

Page 1
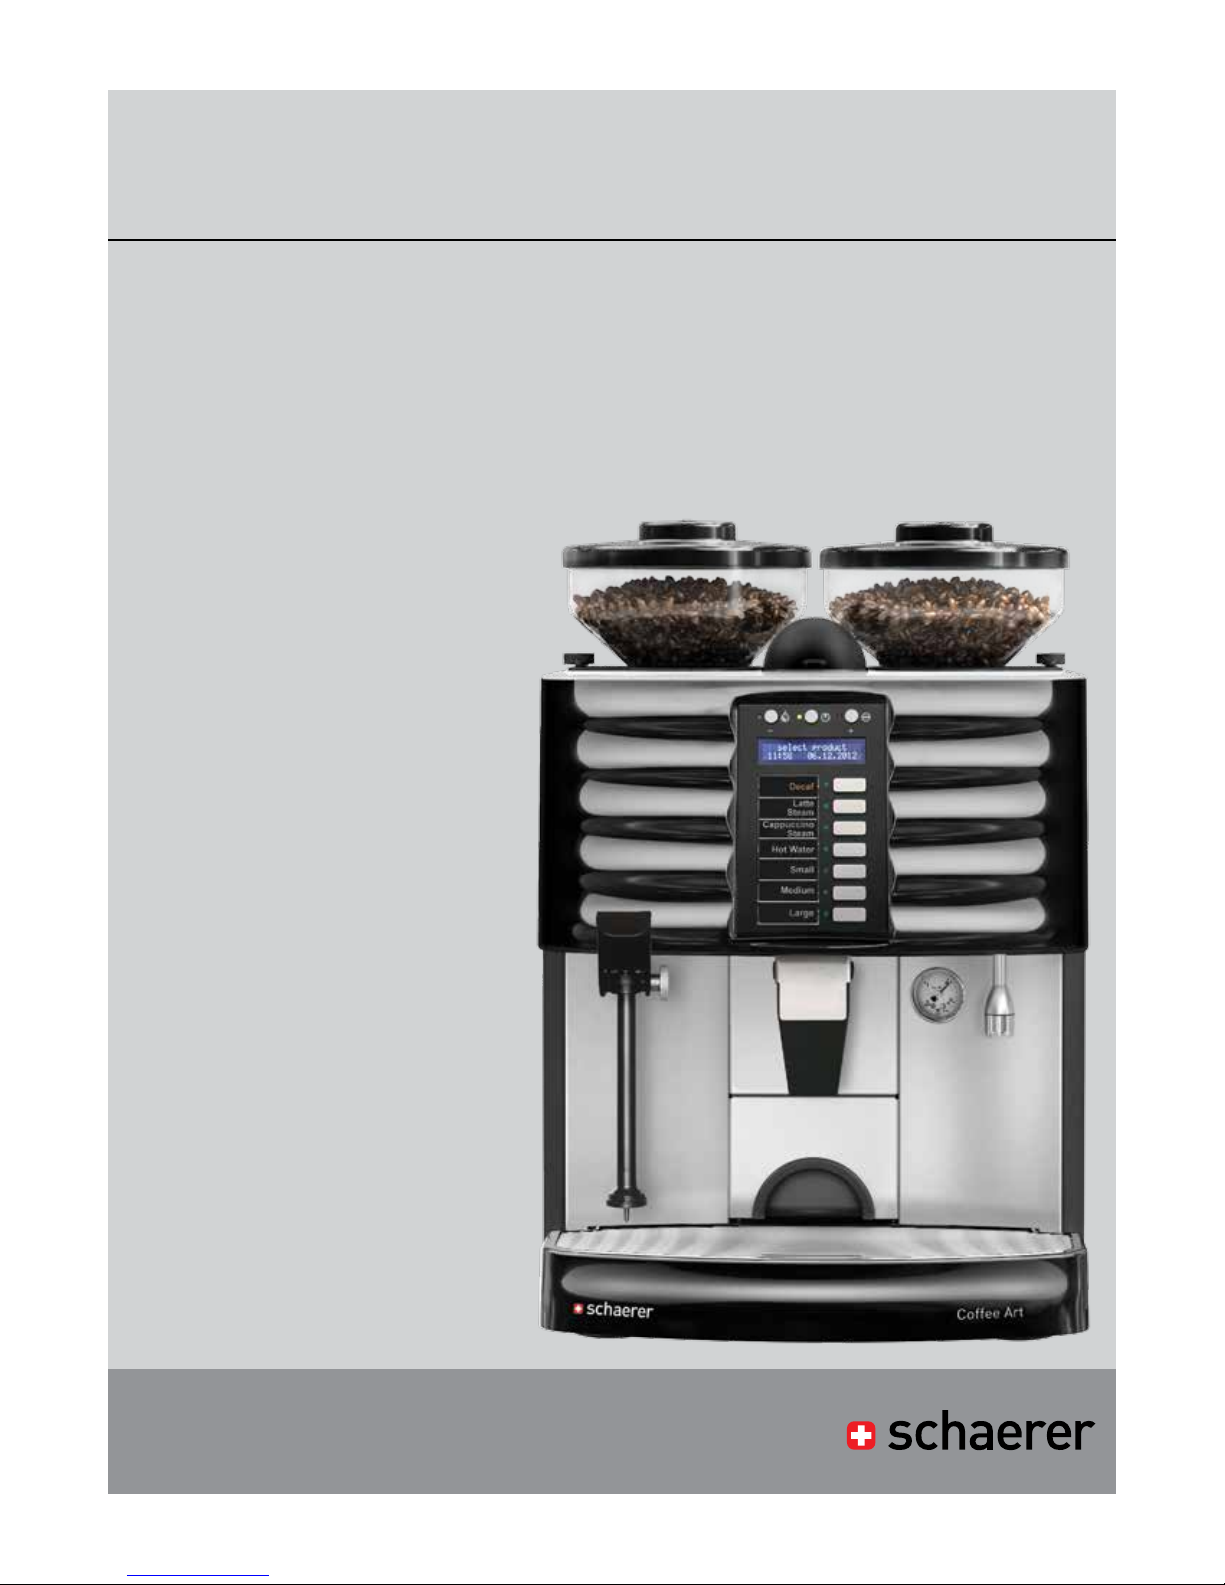
Schaerer Coffee Art 1x7 FS
User Manual | 05.2015 | v01
Page 2

www.schaererusa.com Copyrights
Published by:
Schaerer USA Corporation, Signal Hill California
Version:
Version 01 / May 2015
Software:
v4.37
Designed and edited by:
Schaerer USA Corporation, Signal Hill California
© Copyright:
Schaerer USA Corporation, Signal Hill California
All rights reserved, including translation into other languages. This manual may not be copied, photocopied
or distributed, in whole or in part, by any means, nor transmitted electronically, without the publisher’s written
consent.
All information, illustrations, and specications are based on the latest product information available at the time
of publication approval. Schaerer USA Corporation reserves the right to change the content at any time without
prior notice.
Note that the pictures and display messages shown inside are only examples; your machine and display
messages may vary.
User Manual | 05.2015 | v01
Page 3

www.schaererusa.com Cautions & Warnings
Cautions & Warnings
USE CAUTION WHILE OPERATING AND CLEANING THE COFFEE ART PLUS MACHINE
WARNING:
TO PREVENT ELECTRICAL SHOCK, DO NOT REMOVE SIDE
OR BACK PANELS FROM THIS MACHINE. NO USER SERVICEABLE PARTS INSIDE. REFER SERVICING TO AUTHORIZED
SERVICE PERSONNEL ONLY.
WARNING:
IF WATER OR SMOKE IS COMING FROM INSIDE THE MACHINE, TURN OFF MACHINE IMMEDIATELY. UNPLUG THE
MACHINE, TURN OFF WATER SUPPLY, AND CONTACT AN
AUTHORIZED SERVICE AGENT.
WARNING:
DO NOT MOVE MACHINE WHILE IT IS STILL CONNECTED TO
UTILITIES.
CAUTION:
ALL DISPENSED PRODUCTS ARE EXTREMELY HOT! USE
CAUTION WHILE OPERATING ALL FUNCTIONS. KEEP HANDS
AWAY FROM FOAMER HEAD/COFFEE SPOUT/SPLITTER
WHILE DISPENSING OR CLEANING (EXTREMELY HOT).
CAUTION:
DO NOT PLACE HANDS INSIDE MACHINE WHILE OPERATING,
EXCEPT WHEN FOLLOWING CLEANING PROCEDURES.
CAUTION:
DO NOT TILT MACHINE TO EITHER SIDE (VERY HEAVY).
CAUTION:
DO NOT PLACE LIQUID CONTAINERS (SYRUPS, MILK, ETC.)
ON TOP OF THIS EQUIPMENT.
User Manual | 05.2015 | v01
Page 4

www.schaererusa.com Table of Contents
Table of Contents
Table of Contents
Introduction
Machine Overview
Machine Description
Machine Accessories
Utility Hook-Up Requirements
Operation
General Operation
Beverage Output
Tips During Operation
Maintenance
Daily Cleaning
Cleaning the Steam Wand
Weekly Coffee Spout Cleaning
Weekly Hopper Cleaning
Error Messages
How to Get Help
Warranty Information
Appendix
MSDS Schaerer Cleaning Tablets
MSDS Schaerer Steam Wand Cleaner
User Manual | 05.2015 | v01
Page 5
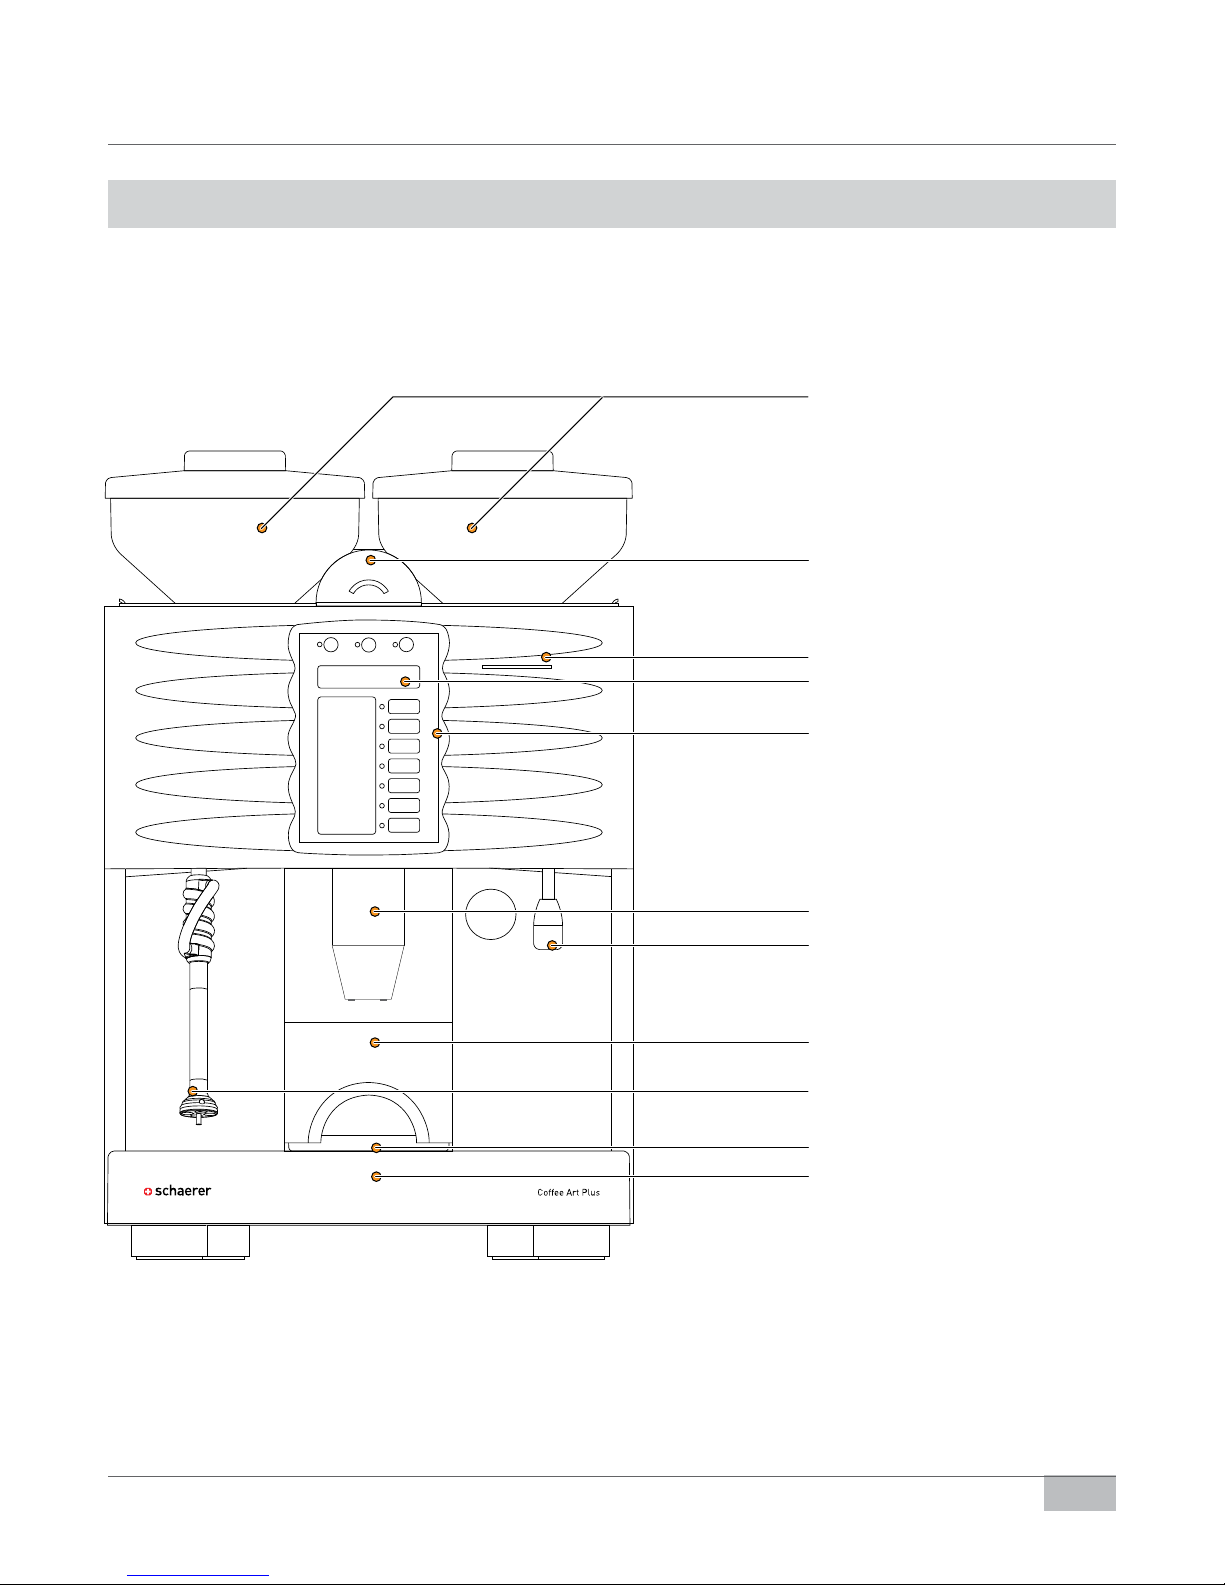
www.schaererusa.com Introduction | Machine Overview
Machine Overview
Dual bean hoppers each hold
up to 1 kg (2.2 lbs.)
Regular (left) and Decaf (right)
Cleaning tablet funnel
Chip card reader
LED display
Button panel
Coffee spout
Hot water spout
Grounds bin
PEEK steam wand with
nesteam
Drip tray grill
Drip tray
®
User Manual | 05.2015 | v01
- 5 -
Page 6

www.schaererusa.com Introduction | Machine Description
Machine Description
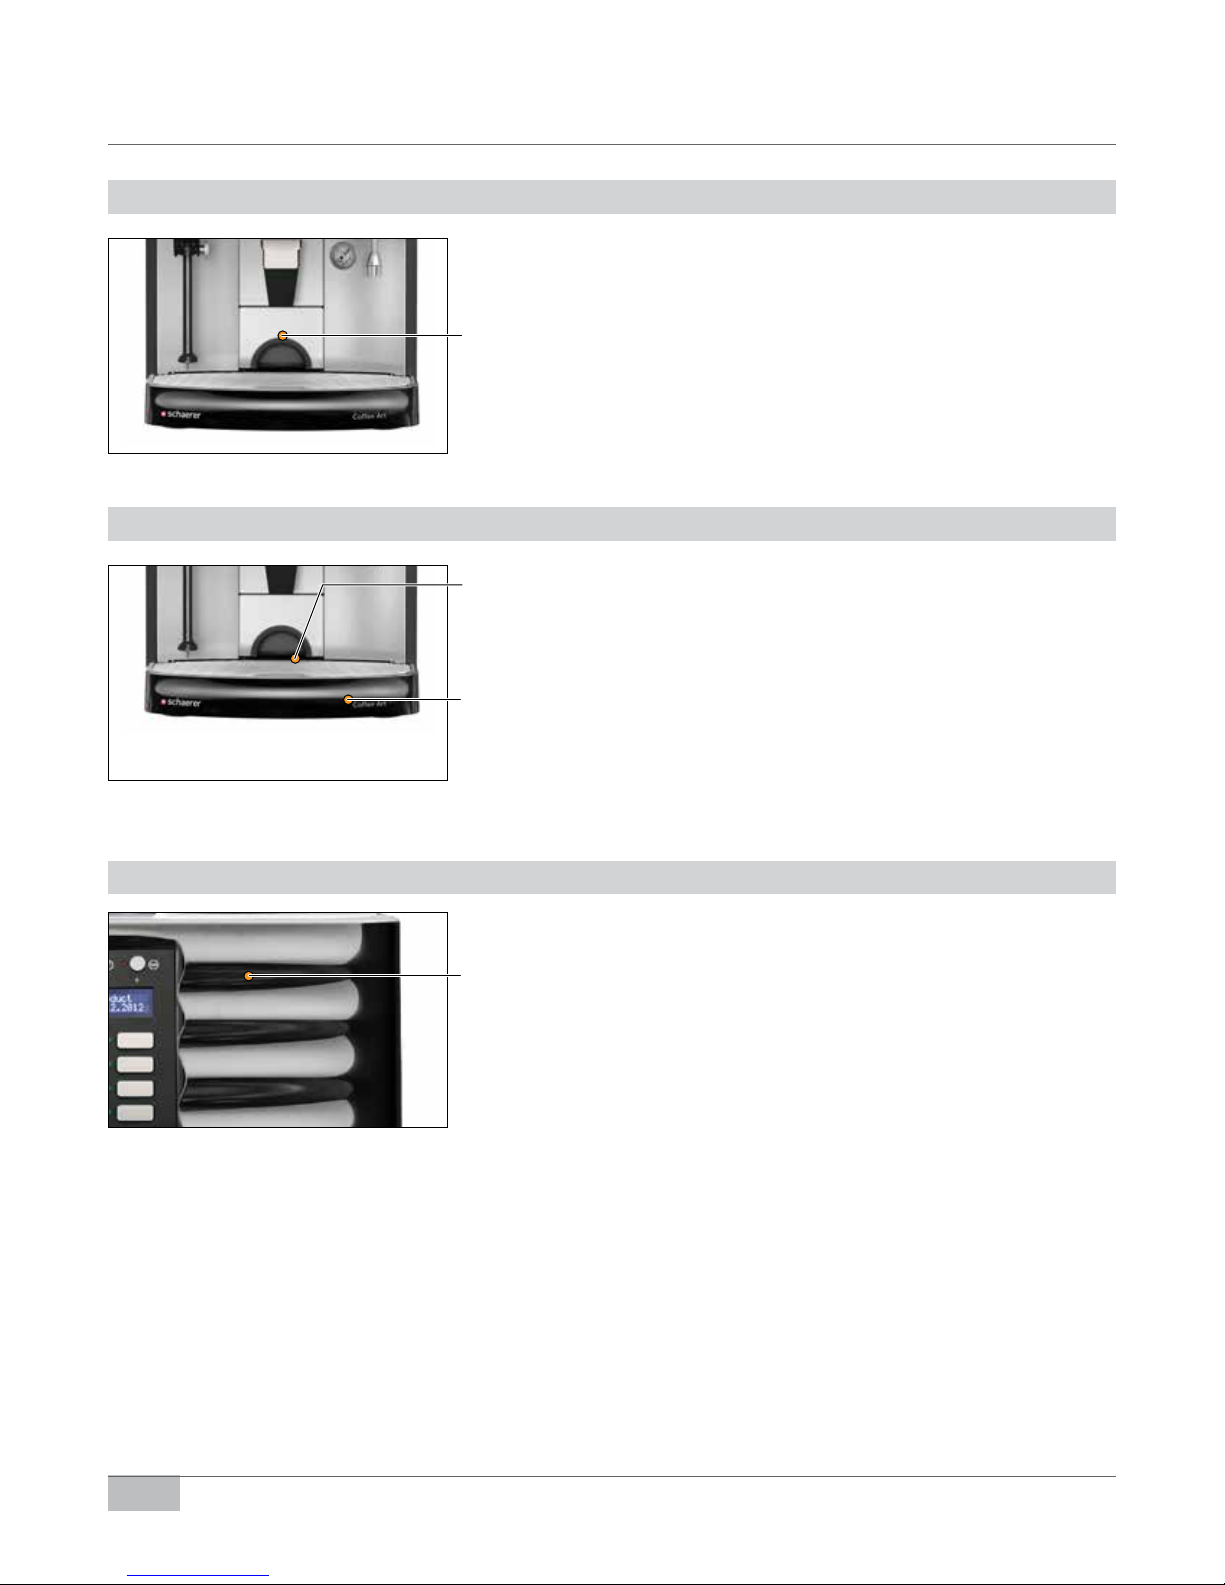
Button Panel
The and “-” button begins the cleaning procedure.
Decaf
Latte
Steam
Cappuccino
Steam
Hot Water
Small
Medium
The
turn the machine off, press and hold the button for 2
seconds. To turn it on, just the press the button.
Press the
Press the Decaf button to shift for decaf beans.
Press the Latte Steam button to steam latte milk.
Press the Cappuccino Steam button to steam cappuccino milk.
Press the Hot Water button to dispense hot water.
Press the Small button for drinks requiring one espresso shot.
Press the Medium button for drinks requiring two espresso shots.
button controls the power to the machine. To
and “+” button to stop or cancel a drink.
Large
Button panel conguration may vary.
- 6 -
Press the Large button for drinks requiring three espresso shots.
Bean Hoppers
Fill the hoppers on top of the machine with whole beans only. The machine grinds the beans freshly for each shot.
The left hopper is intended for regular espresso beans.
The right hopper is intended for decaffeinated espresso beans.
User Manual | 05.2015 | v01
Page 7
www.schaererusa.com Introduction | Machine Description
Bean Hopper Slides
The bean hopper slides are used for locking the hoppers into position.
To release the hoppers for weekly cleaning, push the slides inward and
then lift up. Refer to page 20 for instructions.
Cleaning Tablet Funnel
The cleaning tablet funnel is located between the two bean hoppers.
Only Schaerer Cleaning Tablets should be dropped into this funnel during the daily cleaning procedure. Refer to pages 17-18 for daily cleaning
instructions.
Use only Schaerer Cleaning Tablets (Item # 65221) for the
daily cleaning procedure. Refer to page 19 for reordering
cleaning tablets.
Steam Wand with nesteam
The steam wand is movable and has a hard plastic handle for handling
when it is hot.
The PEEK steam wand material dramatically lowers the wand’s surface temperature. Unlike standard stainless steel wands, milk doesn’t
bake onto the wand. Milk residue easily wipes clean, even later on after
steaming. The PEEK steam wand is also much safer to touch right after steaming. Steam wand with proprietary air injection and auto shut-off
guarantees consistent milk texture and temperature while allowing users
the freedom to multitask.
®
Hot Water Spout and Coffee Spout
The hot water outlet is used for tea water, ceramic cup pre-heating and
quick rinsing of utensils.
User Manual | 05.2015 | v01
The coffee spout can accommodate tall cups.
- 7 -
Page 8
www.schaererusa.com Introduction | Machine Description
Grounds Bin
The grounds bin is located below and behind the coffee spout. It holds
the used grounds which are disposed of after each espresso shot is
brewed. The bin slides straight out from the machine and must be
emptied periodically or when prompted on the display.
Drip Tray Grill and Drip Tray
The drip tray grill is removable for easy cleaning and access to the
inside of the drip tray.
The drip tray is connected to a exible hose which should be connected
to a xed drain line. The purpose of this ‘basin’ is to funnel any spilled
liquids down the drain. To prevent blockage, we recommend that you
avoid ushing large quantities of milk and/or used coffee grounds down
the drain.
Card Reader
For use by manufacturer authorized service agent.
- 8 -
User Manual | 05.2015 | v01
Page 9
www.schaererusa.com Introduction | Machine Accessories
Machine Accessories
User Manual
Steam Wand Cleaner (Item #12-MAB-SU1DN-06)
Daily Cleaning Instructions
Schaerer Cleaning Tablet (Item #65221)
Large Cleaning Brush (Item #67409)
TO ORDER CLEANING SUPPLIES PLEASE CALL
888.989.3004 (PRESS 1, THEN PRESS 4)
User Manual | 05.2015 | v01
Small Cleaning Brush (Item #350352)
- 9 -
Page 10

www.schaererusa.com Utility Hook-Up Requirements
Utility Hook-Up Requirements
25" [635mm] (including rear clearance)
22" [560mm]
4" [102mm]
28" [712mm]
(including top and
bottom clearance)
17" [432mm]
38" [965mm]
(including top
clearance)
30"
[762mm]
3" [80mm]
DIAMETER
ACCESS HOLE
22"
[560mm]
2" [55mm]
POWER, WATER SUPPLY, AND ACCESS REQUIREMENTS
3"
[80mm]
The receptacle (NEMA L6-30R)
and Water Filter can be located
either under the counter or top of
counter behind the machine.
X
G
• Receptacle type: NEMA L6-30R.
• 3 Prong twist-lock.
• Breaker panel: 30 Amp dedicated 220V
single phase circuit.
• Actual maximum load: 24 Amps.
Y
• Access hole with collar (no sharp edges).
The receptacle, water
shut-off valve and drain
pipe must be within 3 feet
(36") of the center of the
location (footprint) of the
machine.
• Located centrally under machine for water
and drain hose.
• Diameter: Minimum 3" (80mm).
• Water shut-off valve with 3/8" (9.5mm)
compression tting.
• Back ow preventer in accordance with
local requirements.
Ideal under counter
space for softener: 30"
(minimum requirement:
26 inches).
• Drain pipe to oor drain.
• Copper or PVC in accordance with local
health codes and regulations.
• Diameter: 1.5" (38mm) or larger.
Notes: Access hole is only required if any of the utility hook-ups are located under the counter. Drain pipe is only necessary if the drain line
from the drain tray is mounted xed. A removable drain tray does not require a drain pipe since it will be emptied by the operator.
- 10 -
User Manual | 05.2015 | v01
Page 11
www.schaererusa.com Operation | General Operation
General Operation
Introduction
This chapter describes the basic functions of the espresso machine.
Read the instructions carefully to ensure smooth routine operation.
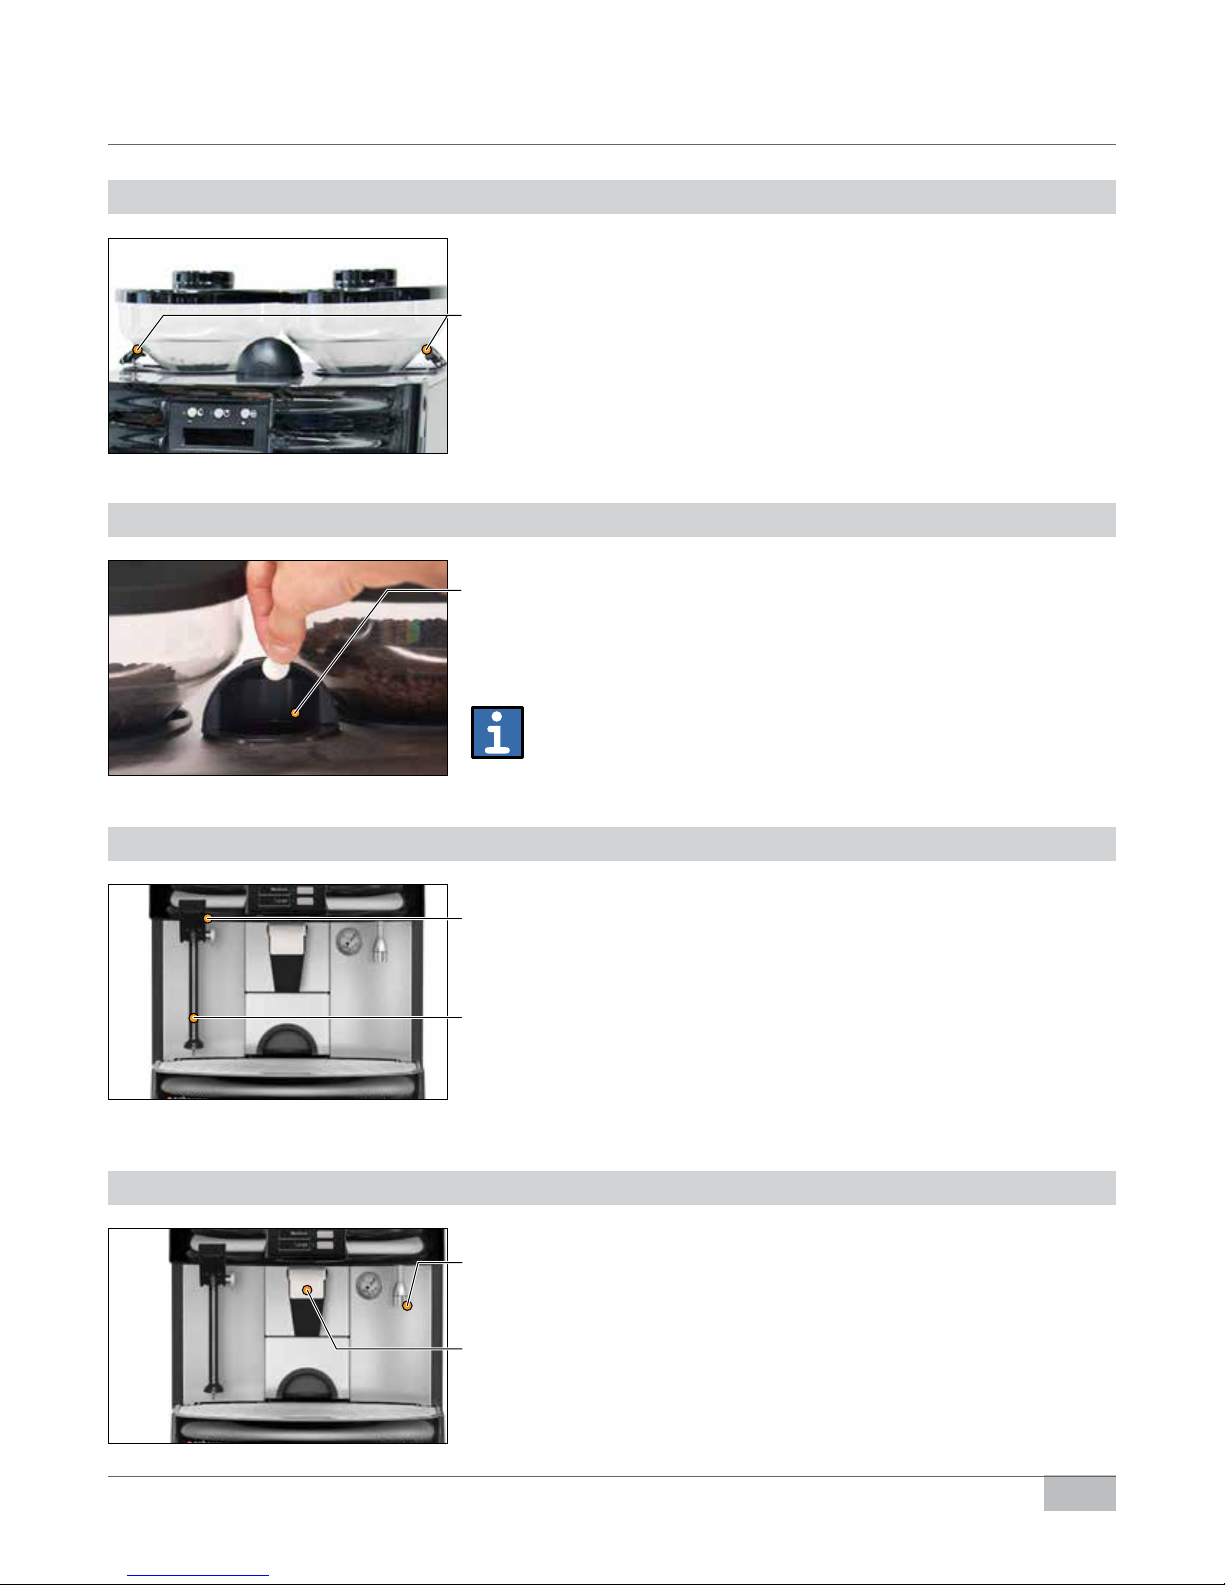
Filling Bean Hoppers
Only use whole beans in the bean hoppers!
Never reach with your hands into the bean hoppers when the
machine is switched on. When relling the bean hoppers, do not
reach into the grinder and do not press any of the product buttons!
1. Remove the lid from the bean hopper.
2. Fill with whole beans maximum 1 kg (2.2 lbs) and close the lid.
A well-closed lid prevents loss of aroma.
Preparing the Machine for Operation
Prior to switching on the machine, check the following:
• The fresh water supply is open.
• The hoppers are lled (see above).
• The grounds bin is empty.
• The machine is connected to the power supply.
• Check whether the bean hopper slides are open.
Switching On the Espresso Machine
Switch on the espresso machine by pressing the button.
If the machine has been switched off for a long period of time, the
message “heating” appears on the display.
select product
12:00 01.10.2008
User Manual | 05.2015 | v01
A product selection can be made when the message “select product”
appears on the display.
- 11 -
Page 12
www.schaererusa.com Operation | General Operation
Switching Off the Espresso Machine
If the espresso machine is not used for longer periods, i.e. overnight, it
can be switched to standby mode. In this mode, the boiler is not heated
and no beverages are available.
<< Standby >>
1. Press the button until the message "<< Standby >>" appears on
the display.
Extended Idle Time
1. Perform the daily cleaning:
(See section "Daily Cleaning" on pages 17-18).
2. Switch the machine to “<< Standby >>” (Press the button).
3. Close the shut-off valve from the fresh water supply.
4. Disconnect the machine from the power supply.
5. Vacuum the coffee beans from the bean hoppers.
6. Store the machine in a dry and clean location. On premises where
temperatures can drop below zero, the boiler has to be emptied. To
empty the boiler, contact a manufacturer-authorized service agent for
assistance.
Removal / Relocation / Disassembly
Contact a manufacturer-authorized customer service agent.
- 12 -
User Manual | 05.2015 | v01
Page 13

www.schaererusa.com Operation | Beverage Output
Beverage Output - Sample
Foamed and Steamed Milk
Steam wand is hot!
Always wipe steam wand with a thick, clean, damp cloth and purge
after each use. Refer to page 19 for details.
Foamed Milk Steamed Milk
1. Portion milk into steaming pitcher. 1. Portion milk into steaming pitcher.
MILK
2. Submerge steam wand into pitcher and make
sure wand points straight down. Press the
Cappuccino Steam button.
Decaf
Latte
Steam
Cappuccino
Steam
Hot Water
Small
2. Submerge steam wand into pitcher and make
sure wand points straight down. Press the
Latte Steam button.
Decaf
Latte
Steam
Cappuccino
Steam
Hot Water
Small
MILK
User Manual | 05.2015 | v01
- 13 -
Page 14

www.schaererusa.com Operation | Beverage Output
Espresso and Decaf Espresso Shot
All beverages dispensed by the machine are extremely hot!
Espresso Shot Decaf Espresso Shot
1. Place cup under coffee spout.
2. Press the Small, Medium or Large button.
Decaf
Latte
Steam
Cappuccino
Steam
Hot Water
Small
Medium
Large
1. Place cup under coffee spout
2. Press the Decaf button.
3. Press the Small, Medium or Large button.
Decaf
Latte
Steam
Cappuccino
Steam
Hot Water
Small
Medium
Large
- 14 -
User Manual | 05.2015 | v01
Page 15

www.schaererusa.com Operation | Beverage Output
Decaf
Decaf
Cappuccino and Latte
Cappuccino Latte
1. Portion milk into steaming pitcher. 1. Portion milk into steaming pitcher.
MILK
2. Submerge steam wand into pitcher and make
sure wand points straight down. Press the
Cappuccino Steam button.
Latte
Steam
Cappuccino
Steam
Hot Water
3. Press the Small, Medium or Large button.
For Decaf
Press the Decaf button rst then the Small,
Medium or Large button.
2. Submerge steam wand into pitcher and make
sure wand points straight down. Press the
Latte Steam button.
Latte
Steam
Cappuccino
Steam
Hot Water
3. Press the Small, Medium or Large button.
For Decaf
Press the Decaf button rst then the Small,
Medium or Large button.
MILK
4. Fill cup to top with foamed milk. 4. Fill cup to top with steamed milk.
User Manual | 05.2015 | v01
- 15 -
Page 16

www.schaererusa.com Operation | Tips During Operation
Tips During Operation
Always run the daily cleaning procedure
when prompted by the machine display.
Refer to pages 17-18 for details.
Empty the grounds bin regularly and when
prompted by the display. Rinsing it nightly
will prevent caked-up grounds from forming.
Always wipe steam wand with a thick, clean,
damp cloth and purge after each use. Refer
to page 19 for details.
Periodically wipe the machine exterior thoroughly with a clean, damp cloth to remove
residue from steamed milk and espresso
shots.
When making two 16oz drinks at a time,
steam 32oz of milk.
- 16 -
When making two drinks at a time, place
cups next to each other with the rims at the
center of the splitter.
User Manual | 05.2015 | v01
Page 17

www.schaererusa.com Maintenance | Daily Cleaning
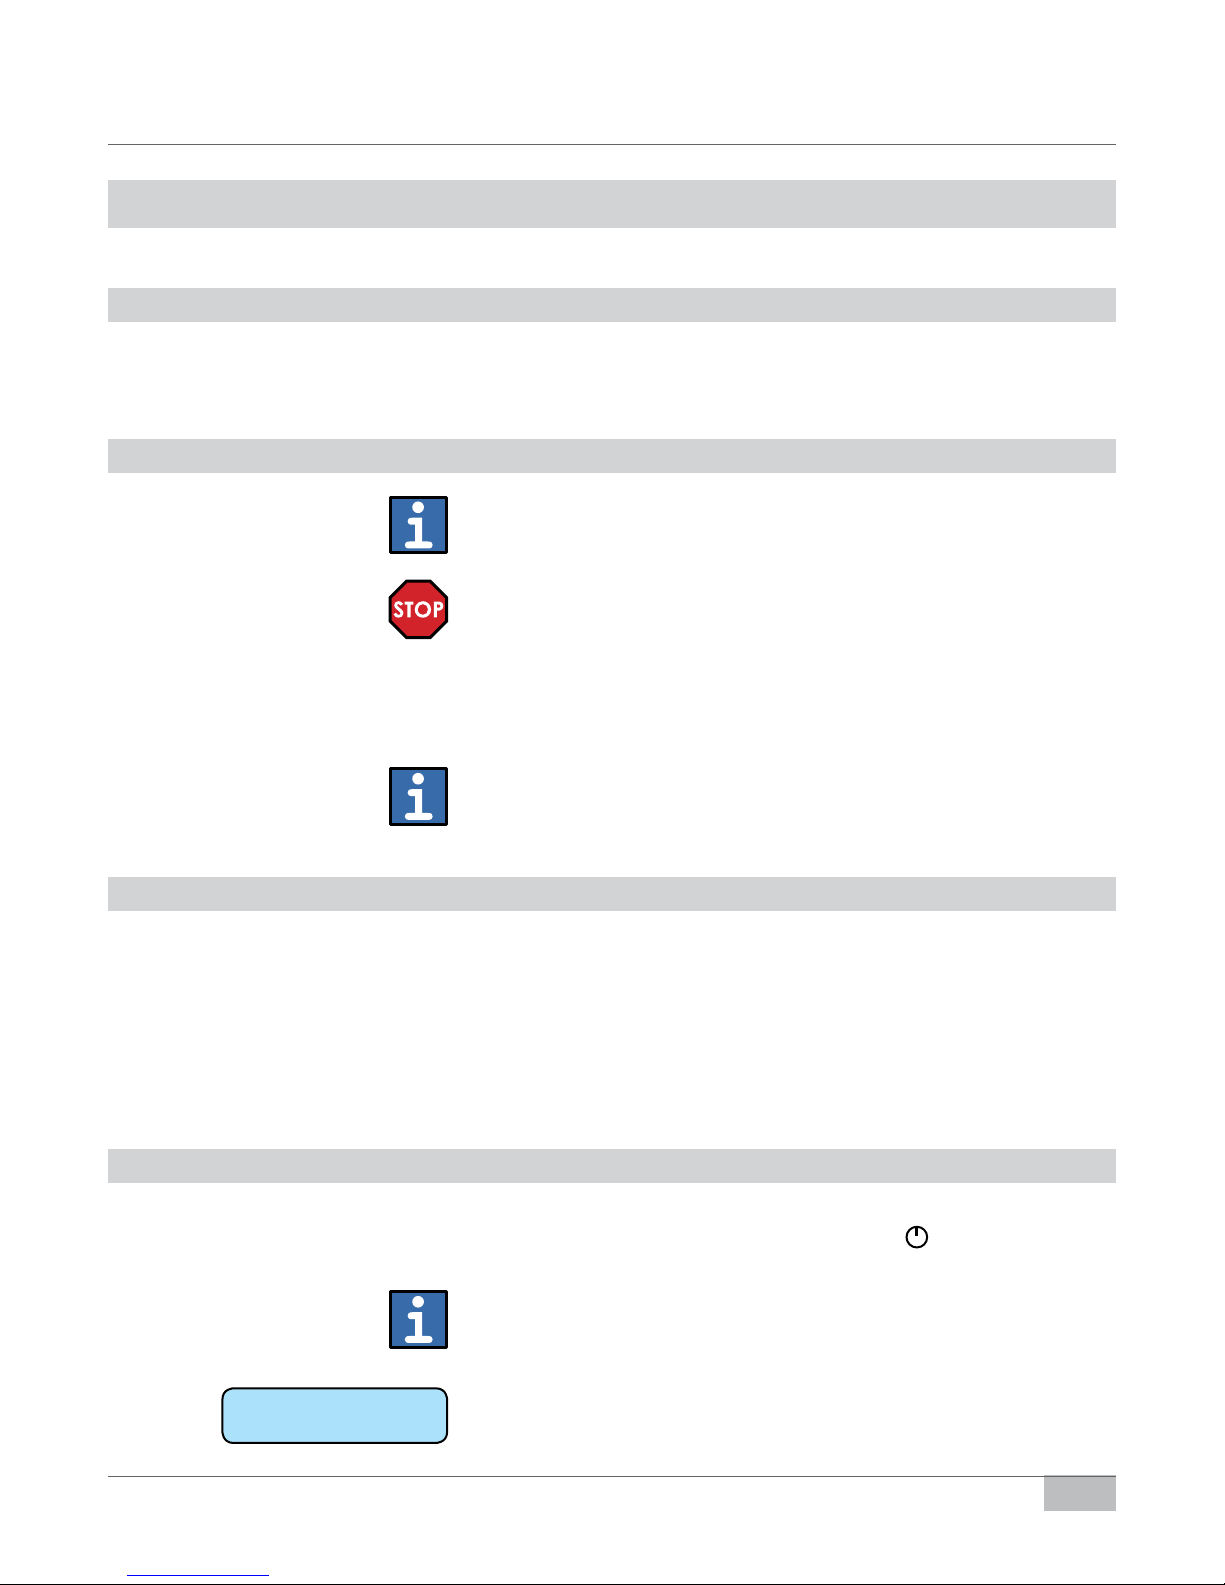
Daily Cleaning
Read and follow the instructions carefully before you begin the daily
cleaning procedure. This procedure should be performed on a daily
basis or when prompted by the machine display.
Never reach into the machine or under the coffee spout during the
automatic cleaning cycle!
The status of the cleaning and some cleaning steps are shown in the
display.
1. ►
Item #350352
Item #12-MAB-SU1DN-06
• Use only Schaerer cleaning supplies for this procedure.
Item #65221
Item #67409
4. ►
2. ►
• Fill large steaming pitcher with
16oz of water and mix in 1oz/30ml
Schaerer Steam Wand Cleaner.
3. ►
• Point steam wand toward drip
tray. Press the Latte Steam button to purge steam wand.
5. ►
• Submerge steam wand into steaming pitcher and press the LATTE
STEAM button to heat solution.
After steam wand shuts off automatically then let it soak for 5
minutes.
While steam wand is soaking, continue to next step.
User Manual | 05.2015 | v01
• While steam wand is soaking, press and hold the
reads “cleaning program empty gr. container.”
• Immediately remove grounds bin within 6 seconds. Empty coffee
grounds into trash can. Wash, rinse, sanitize bin and set aside.
If grounds bin is not removed within 6 seconds, the machine will
return to normal operating mode. If this happens, repeat step 5.
button until display
- 17 -
Page 18

www.schaererusa.com Maintenance | Daily Cleaning
6. ►
• Remove metal shield above
grounds bin and set aside.
9. ►
7. ► 8. ►
• Use large cleaning brush to wipe coffee grounds from brew unit and surrounding areas into drip tray. Do not
touch brew unit or any other parts of
inside area with your hands.
10. ►
• Put back metal shield and slide
coffee grounds bin back into
place.
11. ►
• Wait until display reads “cleaning
program insert tablet.”
• Lift dome lid located between
the two bean hoppers and drop
in one Schaerer cleaning tablet.
Close lid after dropping tablet.
• Using small cleaning brush, brush
the 4 side holes as well as base of
the steam wand tip.
• Press (do not hold) the blinking
button to activate cleaning cycle
(this takes about 4:30 minutes).
All beverage selection buttons
will be locked during this time.
Cleaning runs (4:33 min.)!
13. ►12. ►
• Submerge steam wand into cold
water once to rinse, then discard
water. Wipe steam wand with a
clean, damp cloth.
• After 5 minutes or when automated cleaning cycle is complete,
empty pitcher into drip tray. Wipe
steam wand with a thick, clean,
damp cloth. Be careful, wand
will be very hot!
14. ■
• After wiping off wand, point it
toward drip tray and purge by
pressing the Latte Steam button.
- 18 -
User Manual | 05.2015 | v01
Page 19

www.schaererusa.com Maintenance | Cleaning the Steam Wand
Cleaning the Steam Wand After Each Use
Always use a cloth and/or steam wand handle (grip) when cleaning or
steaming milk. Direct skin contact with wand may result in burns.
1. ►
• Once milk steaming has stopped,
remove pitcher and immediately
wipe steam wand with a thick,
clean, damp cloth. Be careful,
wand will be very hot!
2. ■
• After wiping off wand, point it toward drip tray.
• Press the Latte Steam button to
purge steam wand.
User Manual | 05.2015 | v01
- 19 -
Page 20

www.schaererusa.com Maintenance | Weekly Hopper Cleaning
Weekly Hopper Cleaning
Read and follow the instructions carefully before you begin the weekly
hopper cleaning procedure. This procedure should be performed on a
weekly basis.
Do not clean the bean hoppers in the dishwasher.
When relling the bean hoppers, do not reach into the grinder and do
not press any of the product buttons!
If the oil from the bean remains, use non-abrasive dish washing soap.
1. ►
• Push the bean slide inward to
lock the beans and release the
hopper.
4. ►
2. ►
• Lift the hopper upward to remove
from the machine
5. ►
3. ►
• Empty the beans into another
container. Use warm water to
wash, rinse and sanitize.
6. ■
• Dry the hoppers thoroughly with a
clean, damp cloth.
- 20 -
• Place hopper back on to machine.
• Pull the bean slide outward to
release the beans and lock the
hopper into place. Repeat these
steps for the other hopper.
User Manual | 05.2015 | v01
Page 21

www.schaererusa.com Error Messages
Error Messages
Display Message Cause Remedy
select product
12:00 07.09.2010
selection locked
grounds cont missing
selection locked
empty gr. container
select product
cleaning program
selection locked
grinder L no beans
selection locked
grinder R no beans
selection locked
grinder L overload
selection locked
grinder R overload
selection locked
grinder L blocked
selection locked
grinder R blocked
• Appears when the machine is ready to
operate.
Beverages can be dispensed.
• The grounds container has been pulled out.
(Cleaning program).
• The end switch is defective.
Beverage output is blocked!
• The grounds container is full.
Beverage output is blocked!
• Appears when a programmed number of
beverages has been dispensed without the
machine being cleaned.
• Appears when the bean hopper on the lefthand side is empty or when a coffee bean
has become stuck.
Beverage output is blocked!
• Appears when the bean hopper on the righthand side is empty or when a coffee bean
has become stuck.
Beverage output is blocked!
• Appears when the grinder on the lefthand side is overloaded or if the grinder is
jammed.
Beverage output is blocked!
• Appears when the grinder on the righthand side is overloaded or if the grinder is
jammed.
Beverage output is blocked!
• An object (such as a stone) has become
jammed in the grinder.
Beverage output is blocked!
• An object (such as a stone) has become
jammed in the grinder.
Beverage output is blocked!
► After cleaning the brew chamber, reinsert the
grounds container.
If the message persists, call for service.
► Empty the grounds container and reinsert it.
► The machine must be cleaned.
Refer to page 19-20 for daily cleaning procedures.
► Rell the bean hopper with coffee beans (max.
1000g.) and push the
► If jammed, use the stem of the cleaning brush
to "stir" the coffee beans around and unclog the
grinder. Then press the
► Rell the bean hopper with coffee beans (max.
1000g.) and push the
► If jammed, use the stem of the cleaning brush
to "stir" the coffee beans around and unclog the
grinder. Then press the
► Check the grinder for foreign objects.
Press the
► Check the grinder for foreign objects.
Press the
► Press the
switch off the espresso machine and vacuum out
coffee beans with a vacuum cleaner.
► Check if a foreign object has jammed the grinder.
► Press the
switch off the espresso machine and vacuum out
coffee beans with a vacuum cleaner.
► Check if a foreign object has jammed the grinder.
button.
button.
button. If the message persists,
button. If the message persists,
button.
button.
button.
button.
selection locked
grinder current
selection locked
brew motor current
• PCB or electronics are defective. ► Call for service.
• PCB or electronics are defective. ► Call for service.
User Manual | 05.2015 | v01
- 21 -
Page 22

www.schaererusa.com Error Messages
Display Message Cause Remedy
selection locked
over curr. brewmotor
select product
water ow error
select product
over temp. brewwater
select product
over temp. tea
select product
over temp. steam
selection locked
heating coffee water
selection locked
heating hot water
selection locked
heating steam
select product
timeout coffee heater
select product
timeout HW heater
select product
timeout steam heater
• The brew unit has too much electricity (over
4A).
• Brew unit is jammed.
• No water connection.
• Defective pump (pump pressure < 7.5 bar).
• Brew unit blocked.
• Water system blocked.
• Grinder mixture too ne.
• PCB - owmeter incorrectly connected.
• Electrical problem.
• Electrical problem between the sensor and
the PCB.
• Temperature sensor defective.
• Electrical problem between the sensor and
the PCB.
• Temperature sensor defective.
• Electrical problem between the sensor and
the PCB.
• Temperature sensor defective.
• The temperature is 10 °C below the
programmed temperature.
Beverage output is blocked!
• The temperature is 10 °C below the
programmed temperature.
Beverage output is blocked!
• The temperature is 10 °C below the
programmed temperature.
Beverages cannot be dispensed when the
temperature is below 110 °C.
• The programmed temperature of the coffee
water boiler was not reached within 4 minutes
after the machine was switched on.
Beverage output is blocked!
• The programmed temperature of the hot water
boiler was not reached within 4 minutes after
the machine was switched on.
Hot water beverage output is blocked!
• The programmed temperature of the steam
boiler was not reached within 4 minutes after
the machine was switched on.
Steam output is blocked!
► Call for service.
► Open the shut-off valve and press the beverage
button again.
► Check the brew unit.
► Check the grinder mixture.
If the message persists, call for service.
► Call for service.
► Call for service.
► Call for service.
► Wait until the target temperature has been
reached.
If the message persists, call for service.
► Wait until the target temperature has been
reached.
If the message persists, call for service.
► Wait until the target temperature has been
reached.
If the message persists, call for service.
► Switch the machine off and then back on.
If the message persists, call for service.
► Switch the machine off and then back on.
If the message persists, call for service.
► Switch the machine off and then back on.
If the message persists, call for service.
• Electrical problem between the sensor and
selection locked
coffee sensor def.
the PCB.
• Temperature sensor defective.
Beverage output is blocked!
► Call for service.
• Electrical problem between the sensor and
selection locked
HW sensor def.
the PCB.
• Temperature sensor defective.
► Call for service.
Beverage output is blocked!
- 22 -
User Manual | 05.2015 | v01
Page 23

www.schaererusa.com Error Messages
Display Message Cause Remedy
• Electrical problem between the sensor and
selection locked
steam sensor def.
selection locked
brew unit time out
selection locked
timeout steam suppl.
selection locked
exchange lter
selection locked
service request
selection locked
Initialising
the PCB.
• Temperature sensor defective.
Beverage output is blocked!
• The brew unit motor is not running.
Beverage output is blocked!
• The level in the steam boiler was not reached.
Beverage output is blocked!
• The programmed water volume (liters /
months) has passed through the lter.
Beverage output is blocked!
• The programmed number of beverages
(cups / month) has been reached. Service is
required.
Beverage output is blocked!
• The software and the processor are restarted.
The brewer moves into the "Home" position.
Beverage output is blocked.
► Call for service.
► Call for service.
► Call for service.
► The water lter must be replaced.
► Call for service.
► Call for service.
► Switch the machine off and then back on.
If the message persists, call for service.
User Manual | 05.2015 | v01
- 23 -
Page 24

www.schaererusa.com How to Get Help
How to Get Help
Hours of Business
Normal Hours
During normal business hours, a Schaerer representative will answer your call directly. In case
all lines are busy, please leave a message on our voicemail system according to the instructions
that you hear on the voicemail.
Monday through Friday: 8:00AM to 8:00PM EST
Weekends: 8:00AM to 6:30PM EST
Messages received during business hours will be returned in the order they were received.
Paging Hours
Outside of normal hours, you can use our voicemail system to page an on-duty technician for
emergencies. Our voicemail paging system is active during the following hours:
Monday through Friday: 8:00PM to 11:59PM EST
Weekends: 6:30PM to 11:59PM EST
Messages received during paging business hours will be returned within ½ hour. Please do not
use the voicemail paging system for general questions or other non-emergency requests!
*Messages received outside normal and paging hours will be returned the next day.
How to Contact Us (emergencies, machine is not working)
Call our toll free number at 888-989-3004.
• Press “1” for a list of departments.
• Press “1” to get service on your coffee machine.
• During normal business hours, a Schaerer representative will answer your call
directly.
• Should you reach voicemail, please leave a message containing the following
information:
1. Your phone number, including the local area code.
2. Your name.
3. The store’s contact name and phone number including area code.
4. The store address.
5. The machine’s serial number.
6. A brief description of the problem.
• Leaving a message in the Service Dispatch box will page the on-duty technician
(during paging hours).
Please do not use this procedure for general questions or other non-emergency requests!
Onsite Response Times
If a service request comes in before 12:00NOON EST, all attempts possible will be made for
same day service.
If a service request comes in after 12:00NOON EST, same day service will be attempted,
otherwise, service will be scheduled for the next day.
- 24 -
User Manual | 05.2015 | v01
Page 25

www.schaererusa.com Warranty Information
Warranty Information
General Warranty Program and Policy
Schaerer USA Corporation provides its customers with a one year warranty, including parts and labor, on all new
equipment purchased from Schaerer USA Corporation. This warranty document pertains to the Coffee Art 1 x 7 FS
machine, hereinafter referred to as “the machine.” The terms and conditions are set forth below.
Term
Manufacturer’s warranty covers malfunctioning of major components for the 12 month period commencing on the
date of installation of the machine. A grace period may be granted for a later warranty start date of up to 30 days
from the date of shipment ex-warehouse or the date of installation, whichever occurs rst. After this time period of
one (1) year, all warranty coverage has expired.
General Warranty Coverage
In general, manufacturer’s warranty covers malfunctioning of major components. If, during the warranty period (1
year from installation), a component does not work and needs to be replaced or repaired, Schaerer USA will cover
time & materials for the service call.
Installation and Staff Training
The date of installation shall be the rst day the machine is installed and connected to water, drain and power at
the designated installation site specied in advance and in writing by the customer. Upon installation, the Schaerer
Service Vendor will train the manager(s) and store personnel on how to operate and clean the machine.
Installation and training should take place in one visit. Consequently, it is important that the site is ready for
installation upon arrival of the Service Vendor. Standby time due to the site not being ready or due to other
equipment and/or furniture and xtures that need to be moved will be charged on a time and materials basis. Any
additional installation and/or training visit(s) shall be charged to the customer on a time and material basis.
Conditions
Parts damaged and/or replaced and the resulting labor are included in the contract, provided that:
• Repairs are carried out by Schaerer USA Corporation or an authorized Schaerer Service Vendor.
• The malfunction/damage has not resulted through negligence, misuse, mistreatment, lack of cleaning
and/or operator error, however caused.
• The malfunction/damage has not resulted from water quality issues and/or inadequate voltage supply
(please refer to more explicit descriptions and examples below).
• Daily cleaning should be performed according to the instructions provided with each machine. Tablets
used during the cleaning procedure must be Schaerer Cleaning Tablets. Schaerer USA reserves the right
to rescind warranty coverage in the event that cleaning instructions are not proper followed.
Non-warranty Service Calls
If a component malfunctions due to water quality issues, operator abuse, operator error, lack of cleaning, negligence,
misuse, irregular voltage or voltage that is too high/low supplied to the machine, the repair is NOT covered under
warranty. Water quality supplied to the machine is ultimately the sole responsibility of the owner/operator. Please
note that with a softener/lter installed and maintained, some solids can still reach the machine. Damage caused
by these solids is NOT covered under warranty.
Any damage or malfunction due to irregular voltage, damage caused by lightning strikes or voltage that is too
high (>> 240V) or too low (<< 205V) is not covered under warranty. Blown fuses, damage to computer boards,
transformers, voltage regulators, coils, wiring or other electrical components caused by voltage supply outside of
the 205-240V range are not covered under manufacturer’s warranty. Please be reminded that the machine should
be hooked up to a single phase 220V circuit with a dedicated 30 amp breaker.
Non-warranty service calls will be invoiced on a time and materials basis to the customer by the Schaerer Service
User Manual | 05.2015 | v01
- 25 -
Page 26

www.schaererusa.com Warranty Information
Vendor. The service technician will make an on-site assessment of whether or not a repair is covered under warranty.
If the customer has questions about warranty coverage or disputes the technician’s decision that a service call is
not covered under manufacturer’s warranty, please contact Schaerer USA at 888-989-3004 to discuss warranty
coverage.
Preventative Maintenance Calls
Two preventative maintenance visits shall be included. These visits shall be scheduled in or near the 2nd and 4th
quarter and need to take place during normal business hours. Schaerer USA will coordinate scheduling through
its Service Vendors. In the event that the store or site does not make itself available for a PM visit, Schaerer USA
reserves the right to void its obligation toward this visit and the warranty in general.
Schaerer USA Corporation is entitled to utilize customer-initiated service visits to perform the preventative
maintenance inspection, should one occur during or near the respective PM dates.
Components/Parts Covered Under Warranty
The following major internal components are covered under this contract:
Control Board PC-Board
Pump Head Pump Motor
Flow Meter Brewing Unit (Automat)
Brew Valve Tea Valve
Steam Valve Temperature Probe (internal damage)
Water Boiler Steam Boiler
Grinders Grinder Motors
Brew Group Drive Motor Position switches (internal damage)
Transformer Card Reader
Display (internal damage) Air Pump
Warranty Exceptions
Examples of components NOT covered under this contract, excluding manufacturer defects:
Paneling (Shell) Bean Hopper
Cup Warmer Plate Drip Tray
O-rings Product Buttons (external damage)
Temperature Probe (external damage) Espresso Spout
Steam Wand Hot Water Spout
Grinder Blades (normal wear and tear) Display (external)
Chip Cards
Examples of major component malfunctions NOT covered under manufacturer’s warranty:
• Any valve that is clogged or damaged by calcium or other solids/deposits.
• Any sensor is covered with calcium or other solids/deposits.
• Any boiler lled with solids/deposits that needs to be replaced.
• Any damage due to cartridge residue reaching the machine because it was not ushed properly.
Examples of operator error, misuse, abuse, neglect, lack of cleaning, etc., issues that are NOT covered under
manufacturer’s warranty:
• Clogged brew group/automat due to lack of cleaning.
• Any clogging of the drip tray or cracks in the drip tray.
• Foreign objects (coins, small stones, plastic objects, etc.) in the grinders.
• Position switches, inside the automat/brew group area, bent by the operator.
• Calibration complaints (beverage volume and temperature) based on measurements not following the
correct measuring procedure.
• Main waterline being turned off.
The examples listed above do not represent an exhaustive list of the errors that might be encountered. They are
examples only. Terms and conditions of this contract are subject to change.
- 26 -
User Manual | 05.2015 | v01
Page 27

www.schaererusa.com Appendix | MSDS Schaerer Cleaning Tablets
MSDS Schaerer Cleaning Tablets
Coffeepure Tabs (065221)
Safety Data Sheet
Espresso Cleaning Tablets
Auskunftgebender Bereich:
Schaerer Ltd.
P.O Box Allmendweg 8, 4528 Zuchwil
Switzerland
Tel: +41 (0)32 681 62 00
Fax: +41 (0)32 681 63 26
User Manual | 05.2015 | v01
- 27 -
Page 28

www.schaererusa.com Appendix | MSDS Schaerer Cleaning Tablets
Page 1/8
Safety data sheet
Printing date: 24.03.2014 Revision: 24.03.2014Version No: 8
according to 1907/2006/EC, Article 31
*
SECTION 1: Identification of the substance/mixture and of the company/undertaking
·
1.1 Product identifier
·
Trade name: Coffeepure Tabs
·
1.2 Relevant identified uses of the substance or mixture and uses advised against
No further relevant information available.
·
Application of the substance / the preparation:
·
1.3 Details of the supplier of the safety data sheet
·
Manufacturer/Supplier:
Urnex Brands, Inc. Urnex Brands, Inc.
700 Executive Blvd. 29 Harley Street, London, W1G 9QR
Elmsford, NY 10523 USA United Kingdom
Phone: +1-914-963-2042 Tel: +44 (0)20 7927 6881
Fax: +1-914-963-2145
Email: info@urnex.com
·
Further information obtainable from:
Urnex Brands, Inc.
700 Executive Blvd.
Elmsford, NY 10523 USA
Phone: +1-914-963-2042
Fax: +1-914-963-2145
Email: info@urnex.com
·
1.4 Emergency telephone number:
Tel.: 800-424-9300 (USA)
Tel.: 001-703-527-3887 (INTERNATIONAL COLLECT ACCEPTED)
Espresso cleaning tablets
*
SECTION 2: Hazards identification
·
2.1 Classification of the substance or mixture
·
Classification according to Regulation (EC) No 1272/2008
Skin Irrit. 2 H315 Causes skin irritation.
Eye Irrit. 2 H319 Causes serious eye irritation.
·
Classification according to Directive 67/548/EEC or Directive 1999/45/EC
Xi; Irritant
R36/38: Irritating to eyes and skin.
·
Information concerning particular hazards for human and environment:
The product has to be labelled due to the calculation procedure of the "General Classification guideline for
preparations of the EU" in the latest valid version.
·
Classification system:
The classification is according to the latest editions of the EU-lists, and extended by company and literature
data.
·
2.2 Label elements
·
Labelling according to Regulation (EC) No 1272/2008
The product is classified and labelled according to the CLP regulation.
·
Hazard pictograms
~
GHS07
·
Signal word
Warning
(Contd. on page 2)
GB
- 28 -
User Manual | 05.2015 | v01
Page 29

www.schaererusa.com Appendix | MSDS Schaerer Cleaning Tablets
Page 2/8
Safety data sheet
according to 1907/2006/EC, Article 31
Printing date: 24.03.2014 Revision: 24.03.2014Version No: 8
Trade name: Coffeepure Tabs
·
Hazard statements
(Contd. of page 1)
H315 Causes skin irritation.
H319 Causes serious eye irritation.
·
Precautionary statements
P264 Wash thoroughly after handling.
P305+P351+P338 IF IN EYES: Rinse cautiously with water for several minutes. Remove contact lenses, if
present and easy to do. Continue rinsing.
P332+P313 If skin irritation occurs: Get medical advice/attention.
P337+P313 If eye irritation persists: Get medical advice/attention.
P302+P352 IF ON SKIN: Wash with plenty of water.
P362+P364 Take off contaminated clothing and wash it before reuse.
·
2.3 Other hazards
·
Results of PBT and vPvB assessment
Not determined
·
PBT:
Not determined
·
vPvB:
*
SECTION 3: Composition/information on ingredients
·
3.2 Chemical characterization: Mixtures
·
Dangerous components:
CAS: 497-19-8
EINECS: 207-838-8
Index number: 011-005-00-2
CAS: 15630-89-4
EINECS: 239-707-6
sodium carbonate
Xi R36
?@G?@G
Eye Irrit. 2, H319
~
disodium carbonate, compound with hydrogenperoxide (2:3)
Xn R22;
?@G?@G
Ox. Liq. 2, H272;~ Eye Dam. 1, H318;~ Acute Tox. 4,
~
Xi R41;
?@G?@G
?@E?@E
O R8
< 35%
< 22%
H302
CAS: 5329-14-6
EINECS: 226-218-8
Index number: 016-026-00-0
CAS: 25322-68-3
NLP: 500-038-2
sulphamidic acid
Xi R36/38
?@G?@G
R52/53
Skin Irrit. 2, H315; Eye Irrit. 2, H319; Aquatic Chronic 3, H412
~
Polyethylene glycol
STOT SE 3, H335
~
CAS: 68439-46-3 Alcohols, C9-11, ethoxylated
·
Additional information:
Xn R22;
?@G?@G
Acute Tox. 4, H302; Skin Irrit. 2, H315; Eye Irrit. 2, H319
~
For the wording of the listed risk phrases refer to section 16.
Xi R36/38
?@G?@G
< 20%
< 12%
< 2.5%
*
SECTION 4: First aid measures
·
4.1 Description of first aid measures
·
General information:
Take affected persons out of danger area and lay down.
Immediately remove any clothing soiled by the product.
·
After inhalation:
·
After skin contact:
Supply fresh air; consult doctor in case of complaints.
Immediately rinse with water.
If skin irritation continues, consult a doctor.
·
After eye contact:
Rinse opened eye for several minutes under running water. Then consult a doctor.
Remove contact lenses, if present and easy to do. Continue rinsing.
User Manual | 05.2015 | v01
(Contd. on page 3)
GB
- 29 -
Page 30

www.schaererusa.com Appendix | MSDS Schaerer Cleaning Tablets
Page 3/8
Safety data sheet
according to 1907/2006/EC, Article 31
Printing date: 24.03.2014 Revision: 24.03.2014Version No: 8
Trade name: Coffeepure Tabs
·
After swallowing:
Rinse out mouth and then drink plenty of water.
Seek immediate medical advice.
·
4.2 Most important symptoms and effects, both acute and delayed
·
4.3 Indication of any immediate medical attention and special treatment needed
No further relevant information available.
*
*
SECTION 5: Firefighting measures
·
5.1 Extinguishing media
·
Suitable extinguishing agents:
CO2, powder or water spray. Fight larger fires with water spray or alcohol resistant foam.
Use fire extinguishing methods suitable to surrounding conditions.
·
For safety reasons unsuitable extinguishing agents:
·
5.2 Special hazards arising from the substance or mixture
Formation of toxic gases is possible during heating or in case of fire.
In case of fire, the following can be released:
Carbon monoxide (CO)
·
5.3 Advice for firefighters
·
Protective equipment:
·
Additional information
Cool endangered receptacles with water spray.
Collect contaminated fire fighting water separately. It must not enter the sewage system.
Wear self-contained respiratory protective device.
Water with full jet
SECTION 6: Accidental release measures
·
6.1 Personal precautions, protective equipment and emergency procedures
Ensure adequate ventilation.
Wear protective clothing.
Avoid formation of dust.
·
6.2 Environmental precautions:
Dilute with plenty of water.
Do not allow to enter sewers/ surface or ground water.
·
6.3 Methods and material for containment and cleaning up:
Pick up mechanically.
Ensure adequate ventilation.
Dispose of the material collected according to regulations.
·
6.4 Reference to other sections
See Section 7 for information on safe handling.
See Section 8 for information on personal protection equipment.
See Section 13 for disposal information.
No further relevant information available.
(Contd. of page 2)
*
SECTION 7: Handling and storage
·
7.1 Precautions for safe handling
Ensure good ventilation/exhaustion at the workplace.
Any unavoidable deposit of dust must be regularly removed.
·
Information about fire and explosion protection:
·
7.2 Conditions for safe storage, including any incompatibilities
·
Storage:
·
Requirements to be met by storerooms and receptacles:
·
Information about storage in one common storage facility:
- 30 -
Keep respiratory protective device available.
Store only in the original receptacle.
Store away from oxidizing agents.
(Contd. on page 4)
GB
User Manual | 05.2015 | v01
Page 31

www.schaererusa.com Appendix | MSDS Schaerer Cleaning Tablets
Page 4/8
Safety data sheet
according to 1907/2006/EC, Article 31
Printing date: 24.03.2014 Revision: 24.03.2014Version No: 8
Trade name: Coffeepure Tabs
·
Further information about storage conditions:
Store under lock and key and out of the reach of children.
Protect from humidity and water.
·
7.3 Specific end use(s)
*
SECTION 8: Exposure controls/personal protection
·
8.1 Control parameters
·
Ingredients with limit values that require monitoring at the workplace:
The product does not contain any relevant quantities of materials with critical values that have to be
monitored at the workplace.
·
8.2 Exposure controls
·
Personal protective equipment:
·
General protective and hygienic measures:
Do not inhale dust / smoke / mist.
Avoid contact with the eyes and skin.
The usual precautionary measures are to be adhered to when handling chemicals.
·
Respiratory protection:
·
Protection of hands:
Protective gloves
No further relevant information available.
Not necessary if room is well-ventilated.
(Contd. of page 3)
`S
Avoid direct contact with the chemical/ the product/ the preparation by organizational measures.
To avoid skin problems reduce the wearing of gloves to the required minimum.
Check protective gloves prior to each use for their proper condition.
The glove material has to be impermeable and resistant to the product/ the substance/ the preparation.
·
Material of gloves
The selection of the suitable gloves does not only depend on the material, but also on further marks of quality
and varies from manufacturer to manufacturer. As the product is a preparation of several substances, the
resistance of the glove material can not be calculated in advance and has therefore to be checked prior to the
application.
·
Penetration time of glove material
> 480 min
The exact break through time has to be found out by the manufacturer of the protective gloves and has to be
observed.
·
For the permanent contact gloves made of the following materials are suitable:
·
As protection from splashes gloves made of the following materials are suitable:
·
Eye protection:
·
Body protection:
Safety glasses
Protective work clothing
Nitrile rubber, NBR
Natural rubber, NR
*
SECTION 9: Physical and chemical properties
·
9.1 Information on basic physical and chemical properties
·
General Information
·
Appearance:
Form:
Colour:
·
Odour:
·
Odour threshold:
·
pH-value (10 g/l) at 20 °C:
User Manual | 05.2015 | v01
Solid
White
Characteristic
Not determined.
10.04 - 11.08
(Contd. on page 5)
GB
- 31 -
Page 32

www.schaererusa.com Appendix | MSDS Schaerer Cleaning Tablets
Page 5/8
Safety data sheet
according to 1907/2006/EC, Article 31
Printing date: 24.03.2014 Revision: 24.03.2014Version No: 8
Trade name: Coffeepure Tabs
(Contd. of page 4)
·
Change in condition
Melting point/Melting range:
Boiling point/Boiling range:
·
Flash point:
·
Flammability (solid, gaseous):
·
Ignition temperature:
·
Decomposition temperature:
·
Self-igniting:
·
Danger of explosion:
·
Explosion limits:
Lower:
Upper:
·
Oxidizing properties
·
Vapour pressure:
·
Density:
·
Relative density
·
Vapour density
·
Evaporation rate
·
Solubility in / Miscibility with
water:
·
Partition coefficient (n-octanol/water):
·
Viscosity:
Dynamic:
Kinematic:
·
9.2 Other information
Not determined.
Not determined.
Not determined.
Not determined.
Not determined.
Not determined.
Product is not selfigniting.
Product does not present an explosion hazard.
Not determined.
Not determined.
No
Not applicable.
Not determined.
Not determined.
Not applicable.
Not applicable.
Soluble.
Not determined.
Not applicable.
Not applicable.
No further relevant information available.
*
*
SECTION 10: Stability and reactivity
·
10.1 Reactivity
·
10.2 Chemical stability
·
10.3 Possibility of hazardous reactions
·
10.4 Conditions to avoid
·
10.5 Incompatible materials:
Reacts with strong acids and oxidizing agents.
Reducing agent
·
10.6 Hazardous decomposition products:
No further relevant information available.
SECTION 11: Toxicological information
·
11.1 Information on toxicological effects
·
Acute toxicity:
·
LD/LC50 values relevant for classification:
497-19-8 sodium carbonate
Oral LD50 4090 mg/kg (Rat)
- 32 -
No decomposition if used and stored according to specifications.
No dangerous reactions known.
No further relevant information available.
No dangerous decomposition products known.
(Contd. on page 6)
GB
User Manual | 05.2015 | v01
Page 33

www.schaererusa.com Appendix | MSDS Schaerer Cleaning Tablets
Page 6/8
Safety data sheet
according to 1907/2006/EC, Article 31
Printing date: 24.03.2014 Revision: 24.03.2014Version No: 8
Trade name: Coffeepure Tabs
15630-89-4 disodium carbonate, compound with hydrogenperoxide (2:3)
Oral LD50 1034 mg/kg (Rat)
5329-14-6 sulphamidic acid
Oral LD50 3160 mg/kg (Rat)
25322-68-3 Polyethylene glycol
Oral LD50 >10000 mg/kg (Rat)
Dermal LD50 >20000 mg/kg (Rabbit)
68439-46-3 Alcohols, C9-11, ethoxylated
Oral LD50 >500-5000 mg/kg (Rat)
Dermal LD50 >2000≤20000 mg/kg (Rabbit)
·
Primary irritant effect:
·
on the skin:
·
on the eye:
·
Sensitization:
·
Additional toxicological information:
The product shows the following dangers according to the calculation method of the General EU
Classification Guidelines for Preparations as issued in the latest version:
Irritant
·
Toxicokinetics, metabolism and distribution
·
Acute effects (acute toxicity, irritation and corrosivity)
·
Repeated dose toxicity
·
CMR effects (carcinogenity, mutagenicity and toxicity for reproduction)
No further relevant information available.
*
SECTION 12: Ecological information
Irritant to skin and mucous membranes.
Irritating effect.
No sensitizing effects known.
No further relevant information available.
No further relevant information available.
No further relevant information available.
(Contd. of page 5)
·
12.1 Toxicity
·
Aquatic toxicity:
·
12.2 Persistence and degradability
Anorganic product, is not eliminable from water by means of biological cleaning processes.
The organic portion of the product is biodegradable.
·
12.3 Bioaccumulative potential
·
12.4 Mobility in soil
·
Additional ecological information:
·
General notes:
Water hazard class 1 (German Regulation) (Self-assessment): slightly hazardous for water
Do not allow product to reach ground water, water course or sewage system.
·
12.5 Results of PBT and vPvB assessment
Not determined
·
PBT:
Not determined
·
vPvB:
·
12.6 Other adverse effects
*
SECTION 13: Disposal considerations
·
13.1 Waste treatment methods
·
Recommendation:
User Manual | 05.2015 | v01
No further relevant information available.
No further relevant information available.
No further relevant information available.
No further relevant information available.
Smaller quantities can be disposed of with household waste.
(Contd. on page 7)
GB
- 33 -
Page 34

www.schaererusa.com Appendix | MSDS Schaerer Cleaning Tablets
Page 7/8
Safety data sheet
according to 1907/2006/EC, Article 31
Printing date: 24.03.2014 Revision: 24.03.2014Version No: 8
Trade name: Coffeepure Tabs
(Contd. of page 6)
·
European waste catalogue
20 01 29* detergents containing dangerous substances
·
Uncleaned packaging
·
Recommendation:
·
Recommended cleansing agents:
Disposal must be made according to official regulations.
Water, if necessary together with cleansing agents.
*
*
SECTION 14: Transport information
·
14.1 UN-Number
·
ADR, IMDG, IATA
·
14.2 UN proper shipping name
·
ADR, IMDG, IATA
·
14.3 Transport hazard class(es)
·
ADR, IMDG, IATA
·
Class
·
14.4 Packing group
·
ADR, IMDG, IATA
·
14.5 Environmental hazards:
·
Marine pollutant:
·
14.6 Special precautions for user
·
14.7 Transport in bulk according to Annex II of
MARPOL73/78 and the IBC Code:
·
Transport/Additional information:
·
UN "Model Regulation":
Void
Void
Void
Void
No
Not applicable.
No further relevant information available.
Not dangerous according to the above specifications.
-
SECTION 15: Regulatory information
·
15.1 Safety, health and environmental regulations/legislation specific for the substance or mixture
No further relevant information available.
·
15.2 Chemical safety assessment:
A Chemical Safety Assessment has not been carried out.
*
SECTION 16: Other information
This information is based on our present knowledge. However, this shall not constitute a guarantee for any
specific product features and shall not establish a legally valid contractual relationship.
·
Relevant phrases
H272 May intensify fire; oxidiser.
H302 Harmful if swallowed.
H315 Causes skin irritation.
H318 Causes serious eye damage.
H319 Causes serious eye irritation.
H335 May cause respiratory irritation.
H412 Harmful to aquatic life with long lasting effects.
R22 Harmful if swallowed.
R36 Irritating to eyes.
- 34 -
(Contd. on page 8)
GB
User Manual | 05.2015 | v01
Page 35

www.schaererusa.com Appendix | MSDS Schaerer Cleaning Tablets
Page 8/8
Safety data sheet
according to 1907/2006/EC, Article 31
Printing date: 24.03.2014 Revision: 24.03.2014Version No: 8
Trade name: Coffeepure Tabs
R36/38 Irritating to eyes and skin.
(Contd. of page 7)
R41 Risk of serious damage to eyes.
R52/53 Harmful to aquatic organisms, may cause long-term adverse effects in the aquatic environment.
R8 Contact with combustible material may cause fire.
·
Department issuing SDS:
Chemservice GmbH
Von-Steuben-Str. 13
D-67549 Worms
Tel.: +49 (0)6241-95480-0
Fax: +49 (0)6241-95480-25
Email: sds@chemservice-group.com
·
Abbreviations and acronyms:
REACH: Registration, Evaluation, Authorisation and Restriction of Chemicals
MARPOL: (from Marine Pollutant) International Convention for the Prevention of Marine Pollution from Ships
IBC Code: International Code for the Construction and Equipment of Ships carrying Dangerous Chemicals in Bulk
UN: United Nations (also UNO: United Nations Organization)
PBT: persistent, bioaccumulative and toxic
vPvB: very persistent and very bioaccumulative
NOEC: No Observed Effect Concentration
OECD: Organisation for Economic Co-operation and Development
ASTM: American Society for Testing and Materials
ADR: Accord européen sur le transport des marchandises dangereuses par Route (European Agreement concerning the International
Carriage of Dangerous Goods by Road)
IMDG: International Maritime Code for Dangerous Goods
IATA: International Air Transport Association
GHS: Globally Harmonized System of Classification and Labelling of Chemicals
EINECS: European Inventory of Existing Commercial Chemical Substances
ELINCS: European List of Notified Chemical Substances
CAS: Chemical Abstracts Service (division of the American Chemical Society)
LC50: Lethal concentration, 50 percent
LD50: Lethal dose, 50 percent
Ox. Liq. 2: Oxidising Liquids, Hazard Category 2
Acute Tox. 4: Acute toxicity, Hazard Category 4
Skin Irrit. 2: Skin corrosion/irritation, Hazard Category 2
Eye Dam. 1: Serious eye damage/eye irritation, Hazard Category 1
Eye Irrit. 2: Serious eye damage/eye irritation, Hazard Category 2
STOT SE 3: Specific target organ toxicity - Single exposure, Hazard Category 3
Aquatic Chronic 3: Hazardous to the aquatic environment - Chronic Hazard, Category 3
·
* Data compared to the previous version altered.
GB
User Manual | 05.2015 | v01
- 35 -
Page 36

www.schaererusa.com Appendix | MSDS Schaerer Cleaning Tablets
- 36 -
User Manual | 05.2015 | v01
Page 37

www.schaererusa.com Appendix | MSDS Schaerer Steam Wand Cleaner
MSDS: Schaerer™Milk Steam Wand Cleaner
This MSDS was prepared in accordance to REACH 1907/2006/EC, Article 31
1. Product and Company Identification
MSDS Schaerer Steam Wand Cleaner
Product Name:
General Use: For Cleaning of milk build-up of steam wand.
Product Description: Clear Blue Liquid
Manufacturer: Urnex Brands, Inc. 170 Ludlow Street, Yonkers, NY 10705 USA Tel. 914-963-2042,
Urnex Brands, Inc. 29 Harley Street, London, W1G 9QR, UK Tel. +44 020 7927 6881
Distributor Schaerer USA Corp 2900 Orange AVE. #102, Signal Hill, CA 90755 Tel +1.562.989.3004
Emergency Contact: 800-424-9300 (USA), 001-703-527-3887 (INTERNATIONAL COLLECT ACCEPTED)
Date Prepared November 20, 2009
2. Hazards Identification
This product is classified as an irritant.
Emergency Overview: Product is a non-hazardous blue liquid with surfactant odor.
Effects of Overexposure: May cause skin and eye irritation. If ingested, may cause gastric irritation reaction.
Eye: May cause slight irritation.
Skin: Irritating to the skin.
Ingestion: Irritating to the gastric tract.
Inhalation: No hazard in normal industrial use.
3. Composition/Information on Ingredients
Material CAS# LD-50-LC50 Mixture: LD50 (oral rat)
Sodium Hydroxide* 1310-73-2 1350 mg/kg
Alkyl dimethyl benzyl ammonium
chloride (C
Octyl decyl dimethyl ammonium
chloride
Dioctyl dimethyl ammonium
chloride
Didecyl dimethyl ammonium
chloride
Ethylenediaminetetraacetic acid 64-02-8 2700 mg/kg
Direct blue 86 1330-38-7 >5000 mg/kg
Polyoxyethylene 23 Lauryl Ether 9002-92-0 8600 mg/kg
*Less than 2% as per UN Transport guidelines.
12-16
)
Schaerer ™ Milk Frother Steam Wand Cleaner (an Urnex® Brand product)
email:info@urnex.com
68424-85-1 >500 mg/kg
32426-11-2 >5000 – 15000
5538-94-3 2800 mg/kg
7173-51-5 >50-500 mg/kg
4. First Aid Measures
Eye: In case of contact, flush with water for at least 15 minutes. Seek medical attention if irritation
Skin: Flush thoroughly with water and seek medical attention if irritation persists.
Ingestion: Do not induce vomiting. If ingested, drink large quantities of water and seek medical advice.
Inhalation: Remove to fresh air.
5. Fire Fighting Measures
Flash Point: Non-flammable
LEL: Not determined
UEL: Not determined
Extinguishing Media: Foam, carbon dioxide, powder, and water spray.
Firefighting Instructions: Cool fire exposed containers with spray.
Fire Fighting Equipment Must wear approved self-contained breathing apparatus.
Unusual Fire & Explosive Hazards: None
6. Accidental Release Measures
Land Spill: Sweep material into one area being careful not to allow disposal of the product. Flush remaining
Waste Disposal Methods: Can be disposed in regular washing procedure.
7. Handling and Storage
General Storage: Store in a cool, dry place. Keep container closed. Accidentally spilling water into container may
Storage Temperature: Ambient (between 40 F and 100 F).
Other Precautions: Avoid contact with skin and eyes. Wash thoroughly after handling.
8. Exposure Controls / Personal Protection
General Hygiene: There are no known hazards associated with this material when used as recommended.
Ventilation: Use in a well ventilated area.
Respiratory: Do not inhale. If product becomes airborne wear suitable face protection.
persists.
spill are with large volume of cold water.
cause clumping.
User Manual | 05.2015 | v01
- 37 -
Page 38

www.schaererusa.com Appendix | MSDS Schaerer Steam Wand Cleaner
MSDS: Schaerer™Milk Steam Wand Cleaner
This MSDS was prepared in accordance to REACH 1907/2006/EC, Article 31
Protective Clothing: None required in normal use. When working with large quantities or in technical production
Eye Protection: Avoid contact with eyes. Wear suitable eye protection when working in production applications.
Other Protective: None required.
applications gloves are recommended.
9. Physical and Chemical Properties
Boiling Range: > 212 F
Vapor Density: NA
Evaporation Rate: NA
Solubility in Water: Complete
Melting Point: NA
Odor: Slight surfactant odor
Specific Gravity: 1.068
PH 1% solution 12.00 to 13.00
Appearance: Clear Blue Liquid
Flash Point: Non-Flammable
10. Reactivity
Stability: Stable.
Hazardous Polymerization: Will not occur
Incompatibility: Strong inorganic acids, strong oxidizers and reducing agents.
Conditions to Avoid: MIX WITH WATER ONLY.
Hazardous Decomposition: Incomplete combustion may yield carbon monoxide and soot. Burning can produce carbon
monoxide, carbon dioxide, and oxides of phosphorous. This product and its ingredients are not
considered to be a carcinogen by NTP, IARC, or OSHA.
11. Toxicological Information
Reported Human Effects: No human data are available
Reported Animal Effects: See LD-50/LC-50 Studies on ingredients in section 3.
12. Ecological Information
No data are available on the adverse effects of this material on the environment. The manufacturer will fulfill all requests for any
ecological data that is available on the various components of this product.
13. Disposal Considerations
Dispose of safely in accordance with applicable laws and regulations.
14. Transport Information
Proper Name: Not regulated
Hazardous Materials Identification System Rating (HMIS):
HEALTH 1 Minimal Hazard
FLAMMABILITY 1 Minimal Hazard
REACTIVITY 0 Slight Hazard
PERSONAL PROTECTION B Safety Glasses, Chemical Gloves
15. Regulatory Information
Inventory Status
United States (TSCA) All ingredients are on the inventory or are exempt from listing.
European Union (EINECS) All ingredients are on the inventory or are exempt from listing.
Regulation EC No 648/2004 The surfactants contained in this preparation comply with the biodegradability criteria as laid down
Schaerer ™ Milk Steam Wand Cleaner
in Regulation (EC) No. 648/2004 on detergents. Data to support this assertion are held at the
disposal of the competent authorities of the Member States and will be made available to them, at
their direct request or at the request of a detergent manufacturer.
Labeling
Hazard Symbol: Xi Irritant
Product Contains: Sodium Hydroxide, EDTA, sodium gluconate, nonionic surfactant and quaternary ammonium
compounds.
R-Sentences
R36/38 Irritating to eyes and skin.
- 38 -
User Manual | 05.2015 | v01
Page 39

www.schaererusa.com Appendix | MSDS Schaerer Steam Wand Cleaner
MSDS: Schaerer™Milk Steam Wand Cleaner
This MSDS was prepared in accordance to REACH 1907/2006/EC, Article 31
S-Sentences
16. Other Information
This product is for sale and use by professional personal only.
Keep out of reach of children. It is a violation of federal law to use this product in a manner inconsistent with its label.
Usage Guidelines: Use 30ml (1 oz) of product per 500ml (16oz) cold water. Cycle solution through frothing device.
NOTE: The information in this MSDS is obtained from sources which are believed to be reliable. However, the accuracy or completeness
thereof is not guaranteed. This information is furnished without warranty, expressed or implied. The conditions or methods of handling,
storage, use and disposal of the product are beyond our control and may be beyond our knowledge. For this and other reasons, Urnex
Brands, Inc. assumes no liability for the loss and damage incurred from the proper or improper use of this product.
R22 Harmful if swallowed.
S2 Keep out of the reach of children.
S26 In case of contact with eyes, rinse immediately with plenty of water and seek medical advice.
S46 If swallowed, seek medical advice immediately and show this container or label.
Rinse thoroughly after use.
User Manual | 05.2015 | v01
- 39 -
Page 40

www.schaererusa.com Notes
Notes
- 40 -
User Manual | 05.2015 | v01
 Loading...