

Page 1
2
ST-VC7282
VACUUM CLEANER
ПЫЛЕСОС
ПИЛОСОС
Downloaded From Vacuum-Manual.com Manuals
Page 2

3
4
GB
VACUUM CLEANER
Dear Buyer!
We congratulate you on having bought the device under trade name “Saturn”.
We are sure that our devices will become faithful and reliable assistance in your
housekeeping.
This vacuum cleaner is a highly specialized multifunctional machine with
exceptionally reliable safety assurance. For your convenience of using,
please read these instructions carefully and follow these instructions
before operating this appliance. Given continuous products development,
the company reserves the right to amend products specifications without
notice.
INTRODUCTION OF MAIN FEATURES…………………………........... 4
MAIN PARTS……………………………………………………………… 5
CAUTION………………………………………………………………….. 6-7
ASSEMBLY OF THE MAIN PARTS…………………………………….. 7
BEGIN TO USE……………………………………………………………. 8
Downloaded From Vacuum-Manual.com Manuals
HOW TO USE……………………………………………………………... 8
THE CLEANING AND REPLACEMENT OF THE MAIN PARTS……... 9
TROUBLE SOLUTION…………………………………………………… 10
TECHNICAL DATA………………………………………………………. 11
ELECTRICAL DIAGRAM………………………………………………... 12
MAIN FEATURES INTRODUCTION
1) Streamline type, luxury appearance, which looks elegant.
2) Different suction nozzles fit for different conditions. It can clean wall, ceiling, sofa,
bed and the surface of all kinds of the home use appliances, besides carpet and floor.
3) Strong suction power.
Page 3
5
4) It can be stored erected, convenient for using.
6
5) A neatly and nice drawtube is been used, and the hose can do the 360 rotation.
The above features of this appliance are all for your convenience of using.
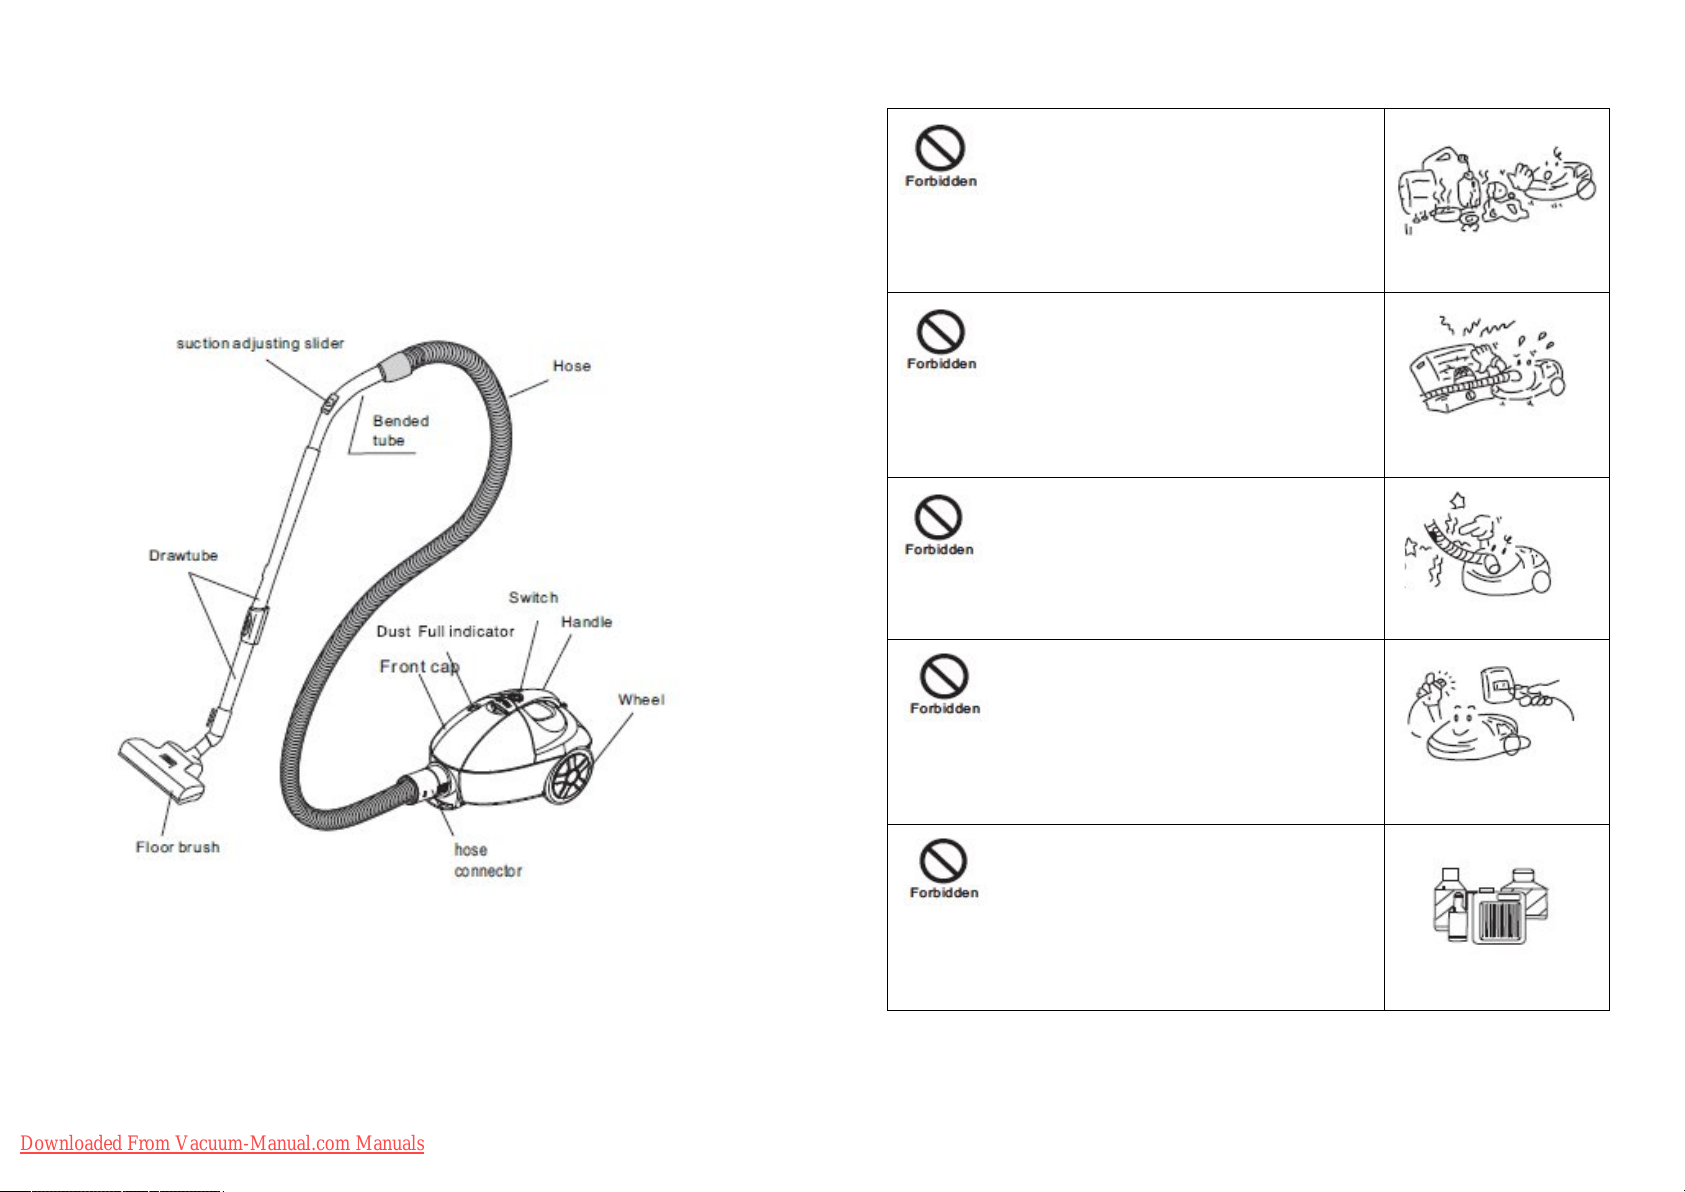
MAIN PARTS
Please assemble the appliance according to the picture.
For home use only.
CAUTION:
1) Don't use this vacuum cleaner to suck scour, kerosene,
gasoline, paint, sewage or other kinds of liquid, or it may
cause damage to the motor inside the appliance.
2) Don't put this vacuum cleaner nearby the heat or other
high temperature objects, or it may lead to the deformation
of the plastic parts.
3) Don't bend, trample or pull the hose. Stop using the
appliance when the hose is broken.
Due to the continuous product development, the real vacuum cleaner which you get on
your hand may differ from this manual. We apologize for any inconvenience thus
caused.
Downloaded From Vacuum-Manual.com Manuals
4) When you need clean, repair or will not use it, please
pull the plug out. When you pull or Insert the plug, don't
pull the cord but to nip the bnc connector plug.
5) When cleaning this vacuum cleaner, please use the rag
with water or neutral detergent instead of gasoline or
banana oil, or it may cause chapping or fading on the case.
Page 4
7
6) Do not use this vacuum cleaner to suck cement, gesso,
8
calcimine or other types of particulate, or it may lead to
block of the dust bag and the filter, and also may cause
damage to the motor. If the above kinds of the particulate
were sucked into the appliance, please clear them up
immediately.
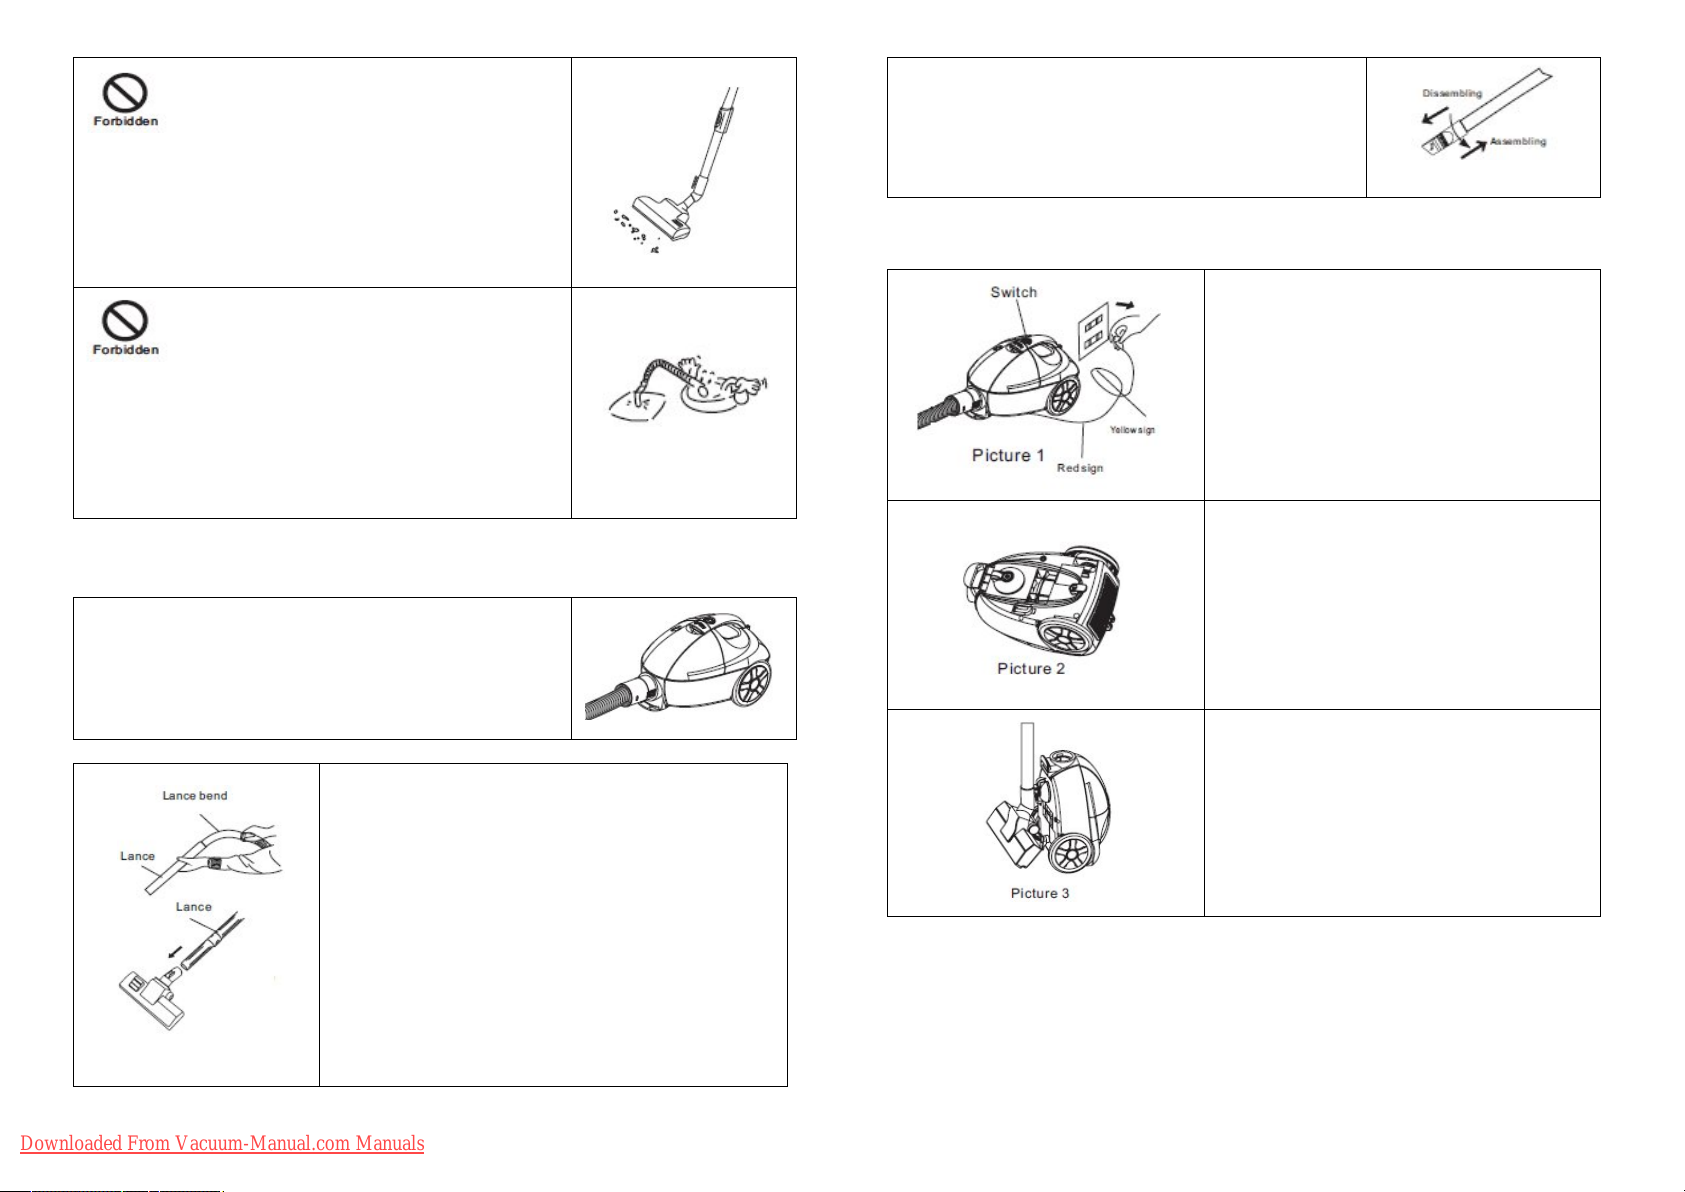
· The connection of draw tube and 2-in-1 brush
connect the drawtube into the 2-in-1 floor brush, then
turn them against each other to lock it firmly. When
dissembling, just turn them in the opposite direction to
the above mentioned.
BEGIN TO USE:
· Plug on
Pull the cord out to the proper length (it is
strictly prohibited to pull the cord over the red
sign), insert the plug into the socket.
7) Do not suck hair, big paper balls or other objects, which
may block suction eye, sucker or the tube, otherwise the
motor may be damaged and the case may deform. If the
block does happen, please stop the machine immediately,
unplugged to do the clearing up.
ASSEMBLY OF THE MAIN PARTS
· Nip the 2 buttons on both sides of the join of the tube,
insert it into the suction hole on the main body and lock it.
· When knock down the appliance, nip the 2 buttons and
pull the tube out.
· The connection between the bended tube and the
flexible drawtube or section tube. Connect the bended
tube to the drawtube (or section tube), then turn them
against each other to l o c k t h e m f i r m l y.
W h e n disassembling, just turn them in the opposite
direction to the above mentioned.
· The connection between the drawtube and the floor
brush Connect the drawtube into the tube of the floor
brush, then turn them against each other to lock it
firmly. When dissembling, just turn them in the
opposite direction to the above mentioned
· Switch
Press this button to start or stop the appliance.
· Curl back the cord
After using it, turn off the power switch,
rewind the power cord like the left picture.
· When stocking
Insert the block on the rod into the trough on
the main body, it can be put straight (see the
left picture).
Attention: Don't move the appliance when the drawtube is in stocking.
.
HOW TO USE:
Downloaded From Vacuum-Manual.com Manuals
Page 5

9
Suction power adjusting button
10
·
For certain material, e.g. curtain, silk, woolen cloth etc.
full power suction may be too strong to use. Then you may
adjust the button on the bended tube to lower down the
suction power. When the hole on the tube seems larger, the
suction power is lower, while contrarily larger.
Use the corner and the places with aperture.
The usage of floor brush
When cleaning floor or any hard surface, push down the
button to the side marked with " "
when cleaning the carpet, push down the button to the side
marked with “ ”.
If something blocks in the tube, pull the tube out and put
the front of the tube bend near the suction hole on the main
body to suck the eyewinker out.
5) Please change the dust bag if it is broken.
Attention: You should fix the dust bag tightly, or the cap cannot be covered.
1) Lift the locking button on the case to
open it.
2) Take the filter patch out from the frame
to clean or change it.
Cleaning the filter patch
1) Rinse the patch under the running
water first.
2) Next flap the patch to remove the water
in it. (Don't knead it.)
3) Finally insolate or air it till it's dry,
don't dry it with heat lest then high
temperature would deform the patch.
THE CLEANING AND CHANGING OF THE MAIN PARTS
When the dust full indicator on the main body turn red, it means that the dust bag is
full, you should clean or change it, it also can indicate that the filter is blocked and
need to be cleaned.
Changing the dust bag
1) Lift the locking button on the case to take it off.
2) Pull out the dust bag out slowly, be careful not to let the dust go out.
3) Reel off the splint on the dust bag and dump the dust out.
4) Fixing the dust bag: insert the dust bag back onto the bracket, put it to its place,
cover the cap, then you can reuse it again.
Downloaded From Vacuum-Manual.com Manuals
TROUBLES SOLUTION
Please check the following points before it's been repaired:
Fault Likely causes Solutions
The motor stops
moving
Check whether the plug is been
placed tightly on the socket.
Check whether there's electricity
from the socket.
Check whether the switch of the
appliance is on.
Check whether the connection of
the tube between the body is firm.
Insert the plug into the socket
again.
Make sure that there's
electricity from the socket.
Switch on.
Insert the joint of the tube
tightly.
Page 6

11
The suction
12
turns weak
The front cap
can’t be covered
The dust full
indicator turns
red
Check whether the floor brush,
tube or the drawtube is been
blocked.
Check whether the dust bag is full
of dust.
Check whether the cap of the dust
stocking room is been covered.
Check whether the filter is been
blocked.
Check whether the dust bag is been
fixed properly.
Check whether the front cap is
deformed.
Check whether the floor brush,
tube or the drawtube is been
blocked.
Check whether the dust bag is full
of dust.
Check whether the filter is been
blocked.
Clear up the stem in time.
Clean or change the dust bag.
Cover the cap of the dust
stocking room.
Wash the filter patch.
Fix the dust bag to its place.
Take it to the repair station.
Clear up the stem in time.
Clean or change the dust bag.
Wash the filter.
ELECTRICAL DIAGRAM
Set
VACUUM CLEANER.……………………….1
INSTRUCTION MANUAL…………………..1
· If the cord is broken, please change it in our repair station and don’t change it by
yourself.
· This appliance is not intended for use by persons (including children) with
reduced physical, sensory or mental capabilities, or lack of experience and knowledge,
unless they have been given supervision or instruction concerning use of the appliance
by a person, responsible for their safety.
· Children should be supervised to ensure that they do not play with the appliance.
· If the supply cord is damaged, it must be replaced by the manufacturer, its service
agent or similarly qualified persons in order to avoid a hazard.
TECHNICAL DATA
· Power supply: 1500 W
· Rated voltage: 220-230 V
· Rated frequency: 50 Hz
· Rated current: 6.8 A
WARRANTY BOOK…………………………1
PACKAGE…………………………………….1
ENVIRONMENT FRIENDLY DISPOSAL
You can help protect the environment!
Please remember to respect the local regulations: hand in the nonworking electrical equipments to an appropriate waste disposal
centre.
The manufacturer reserves the right to change the
specification and design of goods.
Downloaded From Vacuum-Manual.com Manuals
Page 7

13
RU
14
ПЫЛЕСОС
Уважаемый покупатель!
Поздравляем Вас с приобретением изделия торговой марки “Saturn”.
Мы уверены, что наши изделия станут верными и надежными
помощниками в Вашем домашнем хозяйстве.
Данный пылесос является специальным многофункциональным
устройством с исключительно надежной безопасной системой. Чтобы
Вам было удобно пользоваться устройством, пожалуйста,
внимательно ознакомьтесь с данной Инструкцией по Эксплуатации
перед тем, как использовать устройство. Учитывая непрерывное
производство устройств, компания сохраняет за собой право вносить
изменения в технические характеристики устройств без
уведомления.
ОСОБЕННОСТИ УСТРОЙСТВА……...…………………………........... 13
КОМПЛЕКТУЮЩИЕ ДЕТАЛИ………………………………………… 14
МЕРЫ ПРЕДОСТОРОЖНОСТИ….…………………………………….. 15-16
2) Различные всасывающие отверстия подходят для разных условий. Кроме
ковра и пола, пылесос может чистить стены, потолок, диван, постель и любые
виды поверхностей.
3) Большая мощность всасывания.
4) Его можно хранить в собранном виде, и он удобен в использовании.
5) Используется изящная и красивая выдвижная трубка, а гибкий шланг может
поворачиваться на 360 градусов.
Все выше указанные свойства данного устройства разработаны для того, чтобы
Вам удобно было им пользоваться.
КОМПЛЕКТУЮЩИЕ ДЕТАЛИ
Пожалуйста, собирайте устройство в соответствии с рисунком.
Только для применения в быту.
СБОРКА КОМПЛЕКТУЮЩИХ ДЕТАЛЕЙ..………………………….. 16
КАК НАЧАТЬ ПОЛЬЗОВАТЬСЯ УСТРОЙСТВОМ………..…………. 17
КАК ПОЛЬЗОВАТЬСЯ УСТРОЙСТВОМ…………………………….... 17
ОЧИСТКА И ЗАМЕНА КОМПЛЕКТУЮЩИХ ДЕТАЛЕЙ…….……... 18
УСТРАНЕНИЕ НЕИСПРАВНОСТЕЙ..………………………………… 19
ТЕХНИЧЕСКИЕ ХАРАКТЕРИСТИКИ………………………………… 21
ЭЛЕКТРИЧЕСКАЯ СХЕМА...…………………………………………... 21
ОСОБЕННОСТИ УСТРОЙСТВА
1) Устройство имеет обтекаемую форму, красивый и элегантный внешний вид.
Downloaded From Vacuum-Manual.com Manuals
Из-за непрерывного производства устройств, пылесос, который Вы
приобретаете, может отличаться от того, который имеется в данной Инструкции
по Эксплуатации. Мы приносим свои извинения за любое неудобство, связанное
с этим.
Page 8

15
МЕРЫ ПРЕДОСТОРОЖНОСТИ:
16
1) Не применяйте этот пылесос для всасывания
чистящих средств, керосина, бензина, краски, нечистот
или других жидкостей, т.к. это может привести к
повреждению мотора внутри устройства.
2) Не ставьте этот пылесос рядом с источником тепла
или другими нагревательными устройствами, т.к. это
может вызвать деформацию пластиковых деталей.
3) Не сгибайте, не нажимайте и не тяните за гибкий
шланг. Не пользуйтесь устройством, если шланг
поврежден.
4) Пожалуйста, вынимайте штепсельную вилку из
розетки, когда Вам нужно очистить, отремонтировать
устройство или когда им не пользуетесь. Когда Вы
вынимаете штепсельную вилку из розетки или
вставляете ее, тяните не за провод, а за вилку.
5) При очистке этого пылесоса, пожалуйста,
пользуйтесь тканью, смоченной водой или
нейтральным моющим средством вместо бензина или
амилацетата (банановая эссенция), иначе это может
вызвать образование трещин на корпусе или его
обесцвечивание.
6) Не применяйте этот пылесос для всасывания
цемента, гипса, известкового раствора или других
частиц/материалов, иначе они могут заблокировать
пылесборник и фильтр, а также могут вызвать
повреждение мотора. Если в устройство попали
частицы/материалы, пожалуйста, немедленно выньте
их и очистите пылесос.
7) Не собирайте пылесосом волосы, большие клочки
бумаги или все, что может заблокировать
всасывающее отверстие, патрубок или шланг, иначе
мотор может сломаться, а корпус - деформироваться.
Если детали устройства заблокировались, пожалуйста,
немедленно выключите пылесос, отключите его от
розетки, чтобы очистить.
СБОРКА КОМПЛЕКТУЮЩИХ ДЕТАЛЕЙ
· Нажмите на 2 кнопки с обеих сторон соединения
гибкого шланга, вставьте его во всасывающее
отверстие основного корпуса и защелкните его.
· При демонтаже устройства, нажмите на 2 кнопки и
выньте гибкий шланг.
· Соединение изогнутой трубки с выдвижной
трубкой или частью выдвижной трубки. Соедините
изогнутую трубку с выдвижной трубкой (или
частью выдвижной трубки), затем поверните их
друг к другу, чтобы плотно зафиксировать. В о
в ре м я д е м о н т а ж а отсоедините их, выполнив
выше указанную процедуру в обратном порядке.
· Соединение выдвижной трубки с щеткой для
пола. Соедините выдвижную трубку с трубкой
щетки для пола, затем поверните их друг к другу,
чтобы плотно зафиксировать. Во время демонтажа,
отсоедините их, выполнив выше указанную
процедуру в обратном порядке
·
.
Downloaded From Vacuum-Manual.com Manuals
Page 9

17
· Соединение выдвижной трубки и щетки 2-в-1.
18
Соедините выдвижную трубку с щеткой для пола 2в-1, затем поверните их друг к другу, чтобы плотно
зафиксировать. Во время демонтажа отсоедините их,
выполнив выше указанную процедуру в обратном
порядке.
КАК НАЧАТЬ ПОЛЬЗОВАТЬСЯ УСТРОЙСТВОМ:
· Отключите устройство от сети
Выньте провод до необходимой длины
(строго запрещается вынимать провод
дальше красной отметки), теперь вставьте
штепсельную вилку в розетку.
· Кнопка включения/выключения
Нажмите на эту кнопку, чтобы включить
или выключить устройство.
· Смотайте провод
После использования устройства
выключите кнопку включения/
выключения, смотайте провод, как
показано на рисунке слева.
Регулятор воздушного потока
·
Для определенного материала, например, занавески,
шелк, шерстяная ткань и др. большая мощность
всасывания может быть слишком сильной для
использования. Поэтому Вы можете настроить
регулятор на изогнутой трубке, чтобы уменьшить
мощность всасывания. Когда отверстие на трубке
приоткрыто больше, мощность всасывания меньше, и
наоборот.
Используйте для углов и щелей.
Использование щетки для пола
При уборке пола или любой жесткой поверхности,
нажмите на кнопку, расположенную на щетке, вниз до
отметки " ".
При чистке ковра, нажмите на кнопку, расположенную
на щетке, вниз до отметки “ ”.
Если что-то застряло в трубке, выньте трубку и
приложите передний конец изогнутой трубки к
всасывающему отверстию основного корпуса, чтобы
удалить застрявший предмет.
Внимание: Не двигайте устройство, когда выдвижная трубка находится на
хранении.
КАК ПОЛЬЗОВАТЬСЯ УСТРОЙСТВОМ:
Downloaded From Vacuum-Manual.com Manuals
· Хранение
Установите блок на фиксатор для хранения
трубки в углубление основного корпуса,
его можно поставить вертикально (см. на
рисунке слева).
ОЧИСТКА И ЗАМЕНА КОМПЛЕКТУЮЩИХ ДЕТАЛЕЙ
Когда индикатор заполнения пылесборника на основном корпусе горит красным
цветом, это означает, что пылесборник переполнен, Вы должны очистить или
заменить его, это также может указывать на то, что фильтр заблокирован и
требует очистки.
Page 10

19
Замена пылесборника
20
Плотно установите
1) Нажмите на кнопку с фиксацией на крышке, чтобы снять ее.
2) Выньте медленно пылесборник, следите за тем, чтобы не высыпался мусор.
3) Снимите зажим с пылесборника и высыпьте мусор.
4) Фиксация пылесборника: вставьте пылесборник обратно под держатель,
установите его на свое место, накройте крышкой, теперь можно снова
пользоваться устройством.
5) Пожалуйста, замените пылесборник, если он поврежден.
Внимание: Вы должны правильно установить пылесборник, иначе крышка
устройства не закроется.
1) Нажмите на кнопку с фиксацией на
крышке, чтобы открыть ее.
2) Выньте прокладку фильтра из
решетки, чтобы очистить или заменить
ее.
Неисправ-
ность
Мотор не
работает
Слабая
мощность
всасывания
Передняя
крышка не
закрывается
Возможные причины Способ устранения
Проверьте, хорошо ли вставлена
штепсельная вилка в розетку.
Проверьте, есть ли в розетке
электропитание.
Проверьте, включена ли кнопка
включения/выключения
устройства.
Проверьте, плотно ли
установлено соединение трубки
на корпусе.
Проверьте, не заблокированы ли
щетка для пола, шланг или
выдвижная трубка.
Проверьте, возможно,
пылесборник переполнен.
Проверьте, возможно, открыта
крышка отсека пылесборника.
Проверьте, не заблокирован ли
фильтр.
Проверьте, правильно ли
установлен пылесборник.
Проверьте, возможно, передняя
крышка деформирована.
Снова вставьте
штепсельную вилку в
розетку.
Убедитесь, что в розетке
есть электропитание.
Включите кнопку
включения/выключения.
соединение трубки на
корпусе.
Своевременно очищайте
шланг и трубки.
Очистите или замените
пылесборник.
Закройте крышку отсека
пылесборника.
Промойте прокладку
фильтра.
Установите правильно
пылесборник на свое место.
Сдайте ее в ремонт.
Очистка прокладки фильтра
1) Сначала промойте прокладку
фильтра под проточной водой.
2) Далее нажмите на прокладку, чтобы
удалить воду из нее (Не выкручивайте
ее).
3) Наконец, полностью высушите ее на
солнце или на воздухе, не сушите ее на
нагревательном приборе или с его
помощью при высокой температуре,
т.к. это может деформировать
прокладку.
УСТРАНЕНИЕ НЕИСПРАВНОСТЕЙ
Пожалуйста, просмотрите следующие пункты перед тем, как ремонтировать
устройство:
Downloaded From Vacuum-Manual.com Manuals
Индикатор
заполнения
пылесборника
горит красным
цветом
· Если шнур поврежден, пожалуйста, замените его в мастерской по ремонту и
теническому обслуживанию, но не меняйте его самостоятельно.
Данное устройство не предназначено для использования лицами (включая детей)
с ограниченными физическими, сенсорными или умственными способностями, а
также лицами, не имеющими опыта и знаний, если они не находятся под
наблюдением или не получили инструкции по использованию устройства от
лица, ответственного за их безопасность.
· Дети должны находиться под присмотром для уверенности в том, что они не
играют с устройством.
Проверьте, не заблокированы ли
щетка для пола, шланг или
выдвижная трубка.
Проверьте, возможно,
пылесборник переполнен.
Проверьте, не заблокирован ли
фильтр.
Своевременно очищайте
шланг и трубки.
Очистите или замените
пылесборник.
Промойте фильтр.
Page 11

21
· Во избежание опасности, если шнур поврежден, его должен заменить
22
изготовитель, специалист сервисного центра или подобный квалифицированный
специалист.
UА
ПИЛОСОС
ТЕХНИЧЕСКИЕ ХАРАКТЕРИСТИКИ
· Потребляемая мощность: 1500 W
· Номинальное напряжение: 220-230 V
· Номинальная частота: 50 Hz
· Номинальная сила тока: 6.8 A
ЭЛЕКТРИЧЕСКАЯ СХЕМА
КОМПЛЕКТНОСТЬ
ПЫЛЕСОС……………………………….………….1
ИНСТРУКЦИЯ ПО ЭКСПЛУАТАЦИИ………….1
ГАРАНТИЙНЫЙ ТАЛОН…………………………1
УПАКОВКА………………………………………...1
Шановний покупець!
Вітаємо Вас із придбанням виробу торгівельної марки “Saturn”. Ми
впевнені, що наші вироби стануть вірними і надійними помічниками
у Вашому домашньому господарстві.
Даний пилосос є спеціальним багатофункціональним пристроєм з
винятково надійною безпечною системою. Щоб Вам було зручно
користуватися пристроєм, будь ласка, уважно ознайомтеся з даною
Інструкцією з Експлуатації перед тим, як використовувати пристрій.
Враховуючи безперервне виробництво пристроїв, компанія зберігає
за собою право вносити зміни в технічні характеристики пристроїв
без повідомлення.
ОСОБЛИВОСТІ ПРИСТРОЮ……...…………………………................. 22
КОМПЛЕКТУЮЧІ ДЕТАЛІ……………………………………………... 23
ЗАПОБІЖНІ ЗАХОДИ….………………………………………………... 24-25
ЗБІРКА КОМПЛЕКТУЮЧИХ ДЕТАЛЕЙ..…………………………….. 25
ЯК РОЗПОЧАТИ КОРИСТУВАТИСЯ ПРИСТРОЄМ.……..…………. 26
ЯК КОРИСТУВАТИСЯ ПРИСТРОЄМ……………………………......... 26
ОЧИЩЕННЯ ТА ЗАМІНА КОМПЛЕКТУЮЧИХ ДЕТАЛЕЙ…….….. 27
УСУНЕННЯ НЕСПРАВНОСТЕЙ..……………………………………… 28
Безопасное для окружающей среды удаление
Вы можете помочь в охране окружающей среды!
Будьте любезны, соблюдайте местные правила: передавайте
неработающее электрическое оборудование в
соответствующий центр удаления отходов.
Производитель оставляет за собой право вносить
изменения в технические характеристики и дизайн
изделий.
Downloaded From Vacuum-Manual.com Manuals
ТЕХНІЧНІ ХАРАКТЕРИСТИКИ………………………………………... 30
ЕЛЕКТРИЧНА СХЕМА...………………………………………….......... 30
ОСОБЛИВОСТІ ПРИСТРОЮ
1) Пристрій має обтічну форму, гарний і елегантний зовнішній вигляд.
Page 12

23
2) Різні всмоктувальні отвори підходять для різних умов. Крім килима та
24
підлоги, пилосос може чистити стіни, стелю, диван, постіль і будь-які види
поверхонь.
3) Велика потужність всмоктування.
4) Його можна зберігати у зібраному вигляді, і він зручний у використанні.
5) Використовується витончена та гарна висувна трубка, а гнучкий шланг може
повертатися на 360 градусів.
Всі вище зазначені властивості даного пристрою розроблені для того, щоб Вам
було зручно ним користуватися.
КОМПЛЕКТУЮЧІ ДЕТАЛІ
ЗАПОБІЖНІ ЗАХОДИ:
1) Не застосовуйте цей пилосос для всмоктування
чистячи засобів, керосину, бензину, фарби, нечистот
або інших рідин, тому що це може призвести до
пошкодження мотора всередині пристрою.
Будь ласка, збирайте пристрій відповідно до малюнка.
Тільки для застосування в побуті.
Через безперервне виробництво пристроїв, пилосос, який Ви придбали, може
відрізнятися від того, який є в даній Інструкції з Експлуатації. Ми приносимо
свої вибачення за будь-яку незручність, пов'язану із цим.
2) Не ставте цей пилосос поруч із джерелом тепла або
іншими нагрівальними пристроями, тому що це може
викликати деформацію пластикових деталей.
3) Не згинайте, не натискайте й не тягніть за гнучкий
шланг. Не користуйтеся пристроєм, якщо шланг
пошкоджений.
4) Будь ласка, виймайте штепсельну вилку з розетки,
коли Вам потрібно очистити, відремонтувати пристрій
або коли ним не користуєтеся. Коли Ви виймаєте
штепсельну вилку з розетки або вставляєте її, тягніть
не за провід, а за вилку.
5) При очищенні цього пилососа, будь ласка,
користуйтеся тканиною, змоченою водою або
нейтральним мийним засобом замість бензину або
амілацетату (бананова есенція), інакше це може
викликати утворення тріщин на корпусі або його
знебарвлення.
Downloaded From Vacuum-Manual.com Manuals
Page 13

25
6) Не застосовуйте цей пилосос для всмоктування
26
цементу, гіпсу, вапняного розчину або інших
часток/матеріалів, інакше вони можуть заблокувати
пилозбірник і фільтр, а також можуть викликати
пошкодження мотора. Якщо в пристрій потрапили
частки/матеріали, будь ласка, негайно вийміть їх та
очистіть пилосос.
7) Не збирайте пилососом волосся, великі клаптики
паперу або все, що може заблокувати всмоктувальний
отвір, патрубок або шланг, інакше мотор може
зламатися, а корпус - деформуватися. Якщо деталі
пристрою заблокувалися, будь ласка, негайно вимкніть
пилосос, відключіть його від розетки, щоб очистити.
· З'єднання висувної трубки та щітки 2-в-1.
З'єднайте висувну трубку із щіткою для підлоги 2-в1, потім поверніть їх одна до одної, щоб щільно
зафіксувати. Під час демонтажу роз'єднайте їх,
виконавши вище зазначену процедуру у зворотному
порядку.
ЯК ПОЧАТИ КОРИСТУВАТИСЯ ПРИСТРОЄМ:
· Відключіть пристрій від мережі.
Вийміть провід до необхідної довжини
(суворо забороняється виймати провід далі
від червоної позначки), тепер вставте
штепсельну вилку в розетку.
· Кнопка вмикання/вимикання
Натисніть на цю кнопку, щоб увімкнути
або вимкнути пристрій.
ЗБІРКА КОМПЛЕКТУЮЧИХ ДЕТАЛЕЙ
· Натисніть на 2 кнопки по обидва боки з'єднання
гнучкого шланга, вставте його у всмоктувальний отвір
основного корпуса й замкніть його.
· Під час демонтажу пристрою, натисніть на 2 кнопки
та вийміть гнучкий шланг.
· З'єднання вигнутої трубки з висувною трубкою
або частиною висувної трубки. З'єднайте вигнуту
трубку з висувною трубкою (або частиною
висувної трубки), потім поверніть їх одна до одної,
щоб щільно зафіксувати. П і д ча с
д е м он т а ж у р оз ' є д н а й т е ї х ,
в ик о на в ш и в и ще з а з на ч е н у
п р о це д ур у у з в о р о т н о м у п о р я д к у .
· З'єднання висувної трубки із щіткою для
підлоги. З'єднайте висувну трубку із трубкою щітки
для підлоги, потім поверніть їх одна до одної, щоб
щільно зафіксувати. Під час демонтажу,
роз'єднайте їх, виконавши вище зазначену
процедуру у зворотному порядку
· Змотайте провід
Після використання пристрою вимкніть
кнопку вмикання/вимикання, змотайте
провід, як показано на малюнку ліворуч.
· Зберігання
Встановіть блок на фіксатор для зберігання
трубки в поглиблення основного корпуса,
його можна поставити вертикально (див.
на малюнку ліворуч).
Увага: Не рухайте пристрій, коли висувна трубка перебуває на зберіганні.
.
ЯК КОРИСТУВАТИСЯ ПРИСТРОЄМ:
Downloaded From Vacuum-Manual.com Manuals
Page 14

27
Регулятор повітряного потоку
28
Перевірте, чи добре вставлена
штепсельна вилка в розетку.
Перевірте, чи є в розетці
·
Для певного матеріалу, наприклад, фіранки, шовк,
вовняна тканина та ін. велика потужність
всмоктування може бути занадто сильною для
використання. Тому Ви можете настроїти регулятор на
вигнутій трубці, щоб зменшити потужність
всмоктування. Коли отвір на трубці відкритий більше,
потужність всмоктування менша, і навпаки.
Використовуйте для кутів та щілин.
Використання щітки для підлоги
Під час прибирання підлоги або будь-якої жорсткої
поверхні, натисніть на кнопку, розташовану на щітці,
вниз до позначки " ".
При чищенні килима, натисніть на кнопку,
розташовану на щітці, вниз до позначки “ ”.
2) Вийміть повільно пилозбірник, стежте за тим, щоб не висипалося сміття.
3) Зніміть затискач із пилозбірника та висипте сміття.
4) Фіксація пилозбірника: вставте пилозбірник назад під утримувач, встановіть
його на своє місце, накрийте кришкою, тепер можна знову користуватися
пристроєм.
5) Будь ласка, замініть пилозбірник, якщо він пошкоджений.
Увага: Ви повинні правильно встановити пилозбірник, інакше кришка
пристрою не закриється.
1) Натисніть на кнопку з фіксацією на
кришці, щоб відкрити її.
2) Вийміть прокладку фільтра із
решітки, щоб очистити або замінити її.
Якщо щось застрягло в трубці, вийміть трубку й
прикладіть передній кінець вигнутої трубки до
всмоктувального отвору основного корпуса, щоб
видалити застряглий предмет.
ОЧИЩЕННЯ ТА ЗАМІНА КОМПЛЕКТУЮЧИХ ДЕТАЛЕЙ
Коли індикатор заповнення пилозбірника на основному корпусі горить червоним
кольором, це означає, що пилозбірник переповнений, Ви повинні очистити або
замінити його, це також може вказувати на те, що фільтр заблокований і вимагає
очищення.
Заміна пилозбірника
1) Натисніть на кнопку з фіксацією на кришці, щоб зняти її.
Downloaded From Vacuum-Manual.com Manuals
Очищення прокладки фільтра
1) Спочатку промийте прокладку
фільтра під проточною водою.
2) Далі натисніть на прокладку, щоб
видалити воду з неї (Не викручуйте її).
3) Нарешті, повністю висушіть її на
сонці або на повітрі, не сушіть її на
нагрівальному приладі або з його
допомогою при високій температурі,
тому що це може деформувати
прокладку.
УСУНЕННЯ НЕСПРАВНОСТЕЙ
Будь ласка, прогляньте наступні пункти перед тим, як ремонтувати пристрій:
Несправ-
ність
Можливі причини Спосіб усунення
Знову вставте штепсельну
вилку в розетку.
Переконайтеся, що в
Page 15

29
Мотор не
30
працює
Слабка
потужність
всмоктування
Передня
кришка не
закривається
електроживлення.
Перевірте, чи включена кнопка
вмикання/вимикання пристрою.
Перевірте, чи щільно
встановлене з'єднання трубки на
корпусі.
Перевірте, не чи заблоковані
щітка для підлоги, шланг або
висувна трубка.
Перевірте, можливо,
пилозбірник переповнений.
Перевірте, можливо, відкрита
кришка відсіку пилозбірника.
Перевірте, не чи заблокований
фільтр.
Перевірте, чи правильно
встановлений пилозбірник.
Перевірте, можливо, передня
кришка деформована.
розетці є електроживлення.
Увімкніть кнопку
вмикання/вимикання.
Щільно встановіть
з'єднання трубки на
корпусі.
Вчасно очищайте шланг і
трубки.
Очистіть або замініть
пилозбірник.
Закрийте кришку відсіку
пилозбірника.
Промийте прокладку
фільтра.
Встановіть правильно
пилозбірник на своє місце.
Здайте її в ремонт.
ТЕХНІЧНІ ХАРАКТЕРИСТИКИ
· Споживча потужність: 1500 Вт
· Номінальна напруга: 220-230 В
· Номінальна частота: 50 Гц
· Номінальна сила струму: 6.8 A
ЕЛЕКТРИЧНА СХЕМА
Індикатор
заповнення
пилозбірника
горить
червоним
кольором
· Якщо шнур пошкоджений, будь ласка, замініть його в майстерні з ремонту
та технічного обслуговування, але не міняйте його самостійно.
Даний пристрій не призначений для використання особами (включаючи дітей) з
обмеженими фізичними, сенсорними або розумовими здібностями, а також
особами, які не мають досвіду й знань, якщо вони не перебувають під наглядом
або не отримали інструкції з використання пристрою від особи, відповідальної за
їх безпеку.
· Діти повинні перебувати під наглядом для впевненості в тому, що вони не
граються із пристроєм.
· Щоб уникнути небезпеки, якщо шнур пошкоджений, його повинен замінити
виробник, спеціаліст сервісного центру або подібний кваліфікований фахівець.
Перевірте, не чи заблоковані
щітка для підлоги, шланг або
висувна трубка.
Перевірте, можливо,
пилозбірник переповнений.
Перевірте, не чи заблокований
фільтр.
Вчасно очищайте шланг і
трубки.
Очистіть або замініть
пилозбірник.
Промийте фільтр.
КОМПЛЕКТНІСТЬ
ПИЛОСОС……………………………….………….1
ІНСТРУКЦІЯ З ЕКСПЛУАТАЦІЇ………..……….1
ГАРАНТІЙНИЙ ТАЛОН…………………..………1
УПАКОВКА…..……………………………..……...1
Безпечне для навколишнього середовища видалення
Ви можете допомогти в охороні навколишнього середовища!
Будьте люб'язні, дотримуйтесь місцевих правил: передавайте
непрацююче електричне обладнання у відповідний центр
видалення відходів.
Виробник залишає за собою право вносити зміни в технічні
характеристики і дизайн виробів.
Downloaded From Vacuum-Manual.com Manuals
 Loading...