


GL4xxe Series
OPERATOR’S MANUAL

SATO Internatio n a l P te L td
438A Alexandra Road
#05-01/02
Alexandra Technopark
Singapore 119967
Tel: (65) 6271 2122
Fax: (65) 6271 2151
Email: customerservice@sato-int.com
Be sure to ask your dealer about our maintenance contracts
to ensure peace of mind during your usage of SATO products
Version: SI-GL4xxe-01rA-01-12-OM
© Copyright 1994 – 2007
SATO Internatio n a l P te L td
Warning: This equipment compli es with the req uir ement s in Part 15 of FCC rules for a Class
A computing device. Operation of this equipment in a residential area may cause
unacceptable interference to radio and TV reception requiring the operator to take whatever
steps are necessary to correct the inter fer ence.
All rights reserved. No part of this document may be reproduced or issued to third par ti es in
any form whatsoever without the express permissi on of SATO. The materials in this
document are provided for general information and are subj ect to change without notice.
SATO assumes no responsibiliti es for any errors that may appear.

i
TABLE OF CONTENTS
OVERVIEW
1.1 General Spe c if ic a t io n s ............ .. ... .......................................................................1-1
INSTALLATION
Safety Precautions.................................................................................. ...................2-2
2.1 Unpackin g.... ... ......................................................................................................2-4
2.1.1 Included Accessories.......................................................................................2-5
2.1.2 Parts Identification............................................................................................ 2-6
2.2 Loading the Carbon Ribbon (For Thermal Transfer Printing)..........................2-10
(Note: Ribbon is not needed for Direct Thermal printing)......................................2-10
Adjusting the Ribbon Guide .....................................................................................2-11
(Note: Ribbon is not needed for Direct Thermal printing)......................................2-11
2.3 Loading La b els A n d Ta g s ................ ................................................................... 2-1 2
2.3.1 Loading Roll Paper ..................................................................... .. .................2-13
2.3.2 Loading Fanfold Paper from the rear ..............................................................2-15
2.3.3 Loading Fanfold Paper from under the printer ................................................2-16
2.3.4 Adjusti n g th e P a p er Se n s o r ...... .......................................................................2-17
2.4 Replacing the Print Head2-18
2.5 Turning the p rinter ON/OFF ............. ................................................................... 2-19
CONFIGURATION AND OPERATION
3.1 ThE LCD and O PE R A T I O N PA N E L........... .. ........................................................3-1
3.2 The ICON-BA SED MAIN MENU ...........................................................................3-2
3.3 PRINTER OPE R ATION MODES.... .. .....................................................................3-3
ONLINE And OFFLINE Modes...................................................................................3-3
3.3.1 ONLINE Mode ....................... ................................................................. .. .. .. ..3-3
3.3.2 OFFLINE Mode ..............................................................................................3-3
3.4 User Mode............................................................................................................3-4
3.4.1 Setting the Pitch Offset ...................................................................................3-5
3.4.2 Setting Print Speed ........................................................................................3-5
3.4.3 Setting Ver/Hor Print Offsets ..........................................................................3-6
3.4.4 Specifying the Protocol Command Code ....................................................3-6
3.4.5 Specifying the Ver/Hor Base Reference Points ...........................................3-7
3.5 Interface M o d e.... .. ................................................................................................3-8
3.6 Advanced M o d e ... ................................................................................................3-16
3.7 Diagnostics Mode................................................................................................3-21
3.8 Configur ations Mode .... .......................................................................................3-23
3.9 Emulation s S e tu p Mo d e ............ ... .. .....................................................................3-23
3.10 Understanding Continuous Print and Tear Off Operations...........................3-24

ii
CLEANING AND MAINTENANCE
4.1 Introduction .............................. ............................................................................4-1
4.2 Cleaning The P ri n t H e a d, Pl a te n an d R o ll e rs ....................................................4-1
4.3 How To Clean The Printer (Cleaning SET).........................................................4-2
4.4 How To Clean The Printer (Cleaning SHEET)....................................................4-3
4.5 Adjusting P r in t Q u a li ty .. .. .. ..................................................................................4 -4
4.5.1 Adjusti n g P rint Darkness ............... .. ............................................................4-4
4.5.2 Adjusti n g P rint Speed ....... ...........................................................................4-4
TROUBLESHOOTING
5.1 Initial Checklist.....................................................................................................5-1
5.2 Using the Centronics (Parallel) Interface...........................................................5-1
5.3 Using the RS232C (SERIAL) Interface................... .. ...........................................5-3
5.4 Understanding the STATUS INDICATORS.........................................................5-4
5.5 Understanding the LCD Error Messages ...........................................................5-5
5.6 Troubleshooting Guide........................................................................................5-10
OPTIONAL ACCESSORIES
6.1 Introduction .............................. ............................................................................6-1
6.2 Available In t e rface Boards .................. .. ..............................................................6-1
6.3 Label Management Accessories.........................................................................6-2
6.3 PCMCIA Memory Cartridge .................................................................................6-3
6.3.1 Installing the memory card ...........................................................................6-3

Section 1: Introduction
GL Series Operator’s Manual Page 1-1
1
OVERVIEW
Thank you for your investment in this SATO printer product.
This Operator’s Manual contains basic information about the installation, setup,
configuration, operation and maintenance of the printer.
A total of seven topics are covered herein, and they are organized as follows:
Section 1: Overview
Section 2: Installation
Section 3: Configuration and Operation
Section 4: Cleaning and Maintenance
Section 5: Troubleshooting
Section 6: Optional Accessories
It is recommended that you become familiar with each section before installing and maintaining the printer. Refer to the Table Of Contents at the front of this manual to search
for the relevant information needed. All page numbers in this manual consist of a section
number followed by the page number within the stated section.
For specialized pro gr am m i ng , re fer to the separate Programming Ma nu al l ocated on the
utility CD-ROM.
1.1 GENERAL SPECIFICATIONS

Section 1: Introduction
Page 1-2 GL Series Operator’s Manual
The SATO GL4XX “e” series of dual use (Thermal Transfer and Direct Thermal) printers
are complete, high-performance labeling systems designed for printing tags and labels.
The key features of the GL series are:
• Availability in 203 dpi or 305 dpi models
• High print speed of up to 10 inches per second
• User-changeable print head and platen mechanism for faster maintenance
• Supports longer lengths of labels and ribbon for reduced downtime
• Supports core-b ased media
• RFID ready, via optional add-on RFID kit
• Easy operation via large LCD and multi pl e cont rol buttons and status in di cat or s
• ODV option
• Rich emulation of printer languages (IPL, ZPL, DPL, TEC, PGL)
• Supports remote control and troubleshootin g via a network utility
• Built-in support for USB 2.0, IEEE1284 and RS-232C interfaces
• Supports 802.11g Wireless and standard Wired LAN through optional interface cards
• Competitively priced
All printer par ameter s are pr ogra mmabl e usin g the fro nt p anel controls an d via software.
All popular bar codes, including 2-D codes, eight human-readable fonts with two Care
Symbol fonts and a fast and efficient vector font, are resident in memory, providing literally thousands of combinations of type styles and sizes.

Section 1: Introduction
GL Series Operator’s Manual Page 1-3
1.1 GENERAL SPECIFICATIONS (CONT’D)
Specification/
Model Name
GL408e GL412e
Print method Thermal transfer or direct thermal
Head density 8 dots/ mm (203 dpi)
12 dots/ mm (305 dpi)
Print valid range (width) 104 mm x pitch 2514 mm
Not printable for 3 mm from the rear edge
Print speed 2,3,4 (Default),5,6,7,8,9,10 inches/sec
Note:
Maximum speed may be further dependent on the type of print layout, paper,
or carbon ribbon in use.
Paper Thickness 0.060 mm to 0.268 mm supported.
Note:
Be sure to use only printer supplies manufactured or certified by SATO.
Label size
(mounting
and
cardboard
size)
Standard Width: 22 to 128 mm (25 to 131 mm)
Pitch: 6 to 397 mm (9 to 400 mm)
Note:
Supported sizes may
be regulated due to
the quantity of print
jobs or size of paper.
Other usage conditions may restrict the
range of label sizes
supported.
Tear off Width: 22 to 128 mm (25 to 131 mm)
Pitch: 17 to 397 mm (20 to 400 mm)
Peel Width: 22 to 128 mm (25 to 131 mm)
Pitch: 17 to 397 mm (20 to 400 mm)
Cutter Width: 22 to 128 mm (25 to 131 mm)
Pitch: 17 to 397 mm (20 to 400 mm)
Nonseparate
Width: 22 to 128 mm (25 to 131 mm)
Pitch: 17 to 397 mm (20 to 400 mm)
Number of
loadable
sheets
Roll paper Maximum external diameter:
265 mm (Approximately 150 m/roll, 3-inch paper tube used) or 230 mm for 1.5” or 4” cores
Back winding (only front winding for linerless mode)
Fanfold
paper
Maximum folded height: 200 mm
See the section in this manual on Setting Fanfold Paper
Carbon ribbon
Width
Length
Thickness of base material
Color
Winding direction
Be sure to use the specified carbon ribbon manufactured by SATO.
39.5, 45, 59, 76, 84, 92, 102, 111, and 128 mm
Use a carbon ribbon that is wider than the paper used (450 m/roll max)
4.5 µm (for 450mm maximum roll length)
Black (standard), other colors also available
Front winding and back winding
Internal Memory 8MB Flash, 32MB DRAM, with additional 1.426 MB interface buffer
Label dispensing modes Continuous, tear off, peeler, dispenser and non-separate
Dimensions W 271 mm x D 455 mm x H 305 mm x (Standard)
Weight 15 kg (for a standard configuration)
Power supply Input voltage: AC 100 V to 240 V ±10%
Power consumption: Maximum 200 VA 150 W, print rate 30% (89 VA 40 W on standby)
Operating Environment Operational ambient temperature: 0 to 40 ×C
Operational ambient humidity: 10 to 90% (without condensation)
Storing ambient temperature: -5 to 60 ×C
Storing ambient humidity: 10 to 90% (no condensation)
(Paper, and carbon ribbon excluded)
Section 1: Introduction
Page 1-4 GL Series Operator’s Manual
1.1 GENERAL SPECIFICATIONS (CONT’D)
Specification/
Model Name
GL408e GL412e
Interfaces
Standard built-in connections for:
• RS-232C (DB 9-pin female serial)
XON/XOFF
Status 2/3/4/5
• Centronics
• USB 2.0
• IEE1284 (ECP compatible)
• Diagnostic Serial Port (debug port)
Optional interface boards:
¤ LAN (10BASE-T/ 100BASE-TX automatic changeover)
¤ Wireless LAN (IEEE802.11g)
Operation
Panel
Buttons
LINE, FEED, FUNCTION, ENTER, CANCEL
plus 4 navigation buttons (up/down/left/right)
Switch POWER ON/OFF
LCD Green LCD (with backlight), Vertical 64 dots x horizontal 128 dots
LEDs POWER, ONLINE,
STATUS (red for error, green for data buffer status)
LABEL, RIBBON (for ribbon/label end or near-end warning)
Sensors For Print Head:
Print Head unlatched status
For labels:
Reflection type (I-Mark sensor)
Penetration type (Gap sensor)
Label end and near-end
For Ribbons:
Ribbon end and near-end
Optional:
Cutter Open detection
Ribbon Fully Rewound detection
Memory cartridge
32MB optional FLASH ROM
Print Format Transmitted from host (computer) or recalled from print formats stored by user
on memory card (optional)
Stored
Font Types
Standard U, S, M, OA, OB, XB, XL, XU, XS, XM, WB, WL, Raster Font A, Raster Font B, Vector Font
(Outline Font)
Optional
Truetype Fonts
Separate language cartridges are available, preloaded with
Japanese, Chinese, Korean, Thai, English, European language fonts
Character Sets ISO 8859-1 (Latin 1), ISO 8859-2 (Latin 2), ISO 8859-9 (Latin 5), CP 855 (DOS Cyrillic),
CP 864 (DOS Arabic), CP 850 (Multi-Latin 1), CP 737 (DOS Greek), OCR-A, OCR-B
Host
Applications
Sato
Label Gallery
Label Management Software, Firmware Tool, Font/Logo tool
PrintNet Configuration Editor, Flash File Manager, File Download, Operator Panel, Information
Capture, Validation, ODV Quality Wizard, Speed Keys, Job Capture
Advanced
Tool Kit
CST Manager
ODV Data
Manager
Remote Management Verification Tool
EPC Data
Manager
Automated Barcode Quality Control Tool
XML XML Forms Printing
PXML PXML Device Management
Section 1: Introduction
GL Series Operator’s Manual Page 1-5
1.1 GENERAL SPECIFICATIONS (CONT’D)
Specification/
Model Name
GL408e GL412e
Barcode
Onedimensional
code
• UPC-A/E, EAN8/13, JAN8/13
• NW-7
• INTERLEAVED 2 of 5 (ITF)
• INDUSTRIAL 2 of 5
• MATRIX 2 of 5
• CODE39, CODE93, CODE128
• UCC/EAN128
• Customer b arcode
• RSS-14
Twodimensional
code
• QR code model 2, Micro QR (Ver 8.1)
• PDF417 (Ver. 2.4, including micro PDF)
• MAXI code (Ver. 3.0)
• Data matrix ECC200 (Ver. 2.0)
• Synthetic symbol (UPC-A/E, EAN8/13, JAN8/13, CODE39, CODE128 CC-A/B/C
supported with RSS-14)
Magnification
L1 to L12
Vertical 1 to 12 times
Horizontal 1 to 12 times (characters)
Rotation Characters: 0°, 90°, 180°, and 270°
Barcode: parallel 1, serial 1, parallel 2, serial 2
Barcode Ratio 1:2, 1:3, 2:5, user defined
User mode Print Speed, Print Darkness, Pitch Offset, Print Offset, Zero Slash setting, Proportional
Pitch, Kanji Font management (where applicable)
Automatic diagnostics Head check / Head open/ Paper end/ Ribbon end/ Winding full/ Kanji ROM
check/ Test print/Hex Dump
Built-in Functions
• Printer Status Monitoring
• Graphics printing support
• Sequential numbering
• Custom Character Storage (volatile)
• Character Correction function
• Black/White inverted print
• Line and Box graphics primitives
• SATO Barcode Programming
Language (SBPL)/SATO Graphics
Language (STGL) support
• Form Overlay printing
• Hex Dump function
• Format Memory function
• Outline font function
• Label pitch detection overide function
• Zero slash function
• JIS/Shift JIS switching (where applicable)
• JIS/Shift JIS switching (where applicable)
• Emulations for Printronix, Zebra, TEC, Inter
mec and Datamax Graphics Languages
Noise emission
Radiant noise VCCI Class B
Static
electricity
IEC Level 3
AC line noise 1000 Vp-p or more (50 nS to 1 µS pulse)
Optional accessories
• Cutter unit and tray (Guillotine Cutter)
• Dispenser unit with backing paper rewinder
• Internal rewinder
• Simplified dispenser
• Linerless Kit
• RFID Kit
• Online Data Verification System for barcode verification and tracking (TBA)
Section 1: Introduction
Page 1-6 GL Series Operator’s Manual
1.1 General Specifications (Cont’d)
Note:
All the GL printers use th e same command codes . The only differences a r e th e allo wable values representing print positions on the label. These values are specified in “dots” and will vary depending upon
the resolution of the printer and the amount of memory available for imaging the label.
Specification/
Model Name
GL408e GL412e
RFID
Kit
Regulatory
compliance
UHF RFID
• U.S./Canada
• Europe
• Singapore
• China
• Korea
FCC15B/FCC15C
R&TTE (EN300-220-1/EN302-208-1)
IDA
--MIC
RFID
Tag options
UHF RFID
• EPC Class 0+ (TBD)
• EPC Class 1 (TBD)
• UCODE EPC 1.19 (TBD)
• GEN 2

Section 1: Introduction
GL Series Operator’s Manual Page 1-7
1.1 General Specifications (Cont’d)
Specification/
Model Name
GL408e GL412e
Americas •USA: Underwriters Laboratories - UL60950-1, First Edition - Safety of
Information Technology Equipment, Including Electrical Business
Equipment by a Nationally Recognized Test Lab (NRTL).
• Canada
: UL/C-UL 60950-1 First Edition.
•USA
: Federal Communication Commission (FCC) - The Code of Federal
Regulations, Title 47, Part 15, Paragraph 15.3, Class B digital device.
• Canada
: Industry Canada Standard ICES-003, Issue 3.
•Mexico
: NOM certification
• Argentina
: IRAM (S-Mark) certification
European CE Mark • EN 60950 - Safety of Information Technology Equipment, Including
Electrical Business Equipment, with Amendments 1-3.
• EN 55022:1998 +A1 (2003 ) - Limit s and Me thods of M easureme nt of Radio
Disturbance Characteristics of Information Technology Equipment
• EN 55024:1998 - Electromagnetic Immunity Requirements for Information
Technology Equipment
• EN 61000-3-2:1995 + A1 (1998) and A2 (1998) - Electromagnetic
compatibility (EMC) or, alternatively, EN 61000-3-2:2000
• EN 61000-3-3:1995 + A1 (2001) - Voltage fluctuation and flicker
Central European
Countries
• EN55022:1998 + A1 (2000) - Limits and Methods of Measurement of Radio
Disturbance Characteristics of Information Technology Equipment
EN 50082-1 (1992) - Immunity residential, commercial and light industry
Russia EN55022:1998 with Amendment A1:2000, EN 50082-1 (1992), EN 60555-
2:1987, GOST R51317.33-99
Australia/New Zealand C-Tick Mark compliance to AS/NZS 3548:1995 with Amendment 1:1997 and
Amendment 2:1997 and to AS/NZS CISPR 22:2002
China China Compulsory Certification (CCC) mark. CPCS certification to GB 9254-
1998, GB 17625.1-2003, and GB 17625.2-1999 by CNCA (Certification and
Accreditation Administration of the People’s Republic of China)
Taiwan BSMI certification as defined in the publication Official Gazette No. 13438,
Limits and Methods of Measurement of Radio Interference Characteristics of
Information Technology Equipment, (CNS 13438), dated May, 1997.
Korea
MIC certification as defined in MIC Notice No. 2000-79 (October 21,
2000), MIC Notice No. 2000-182 (October 27, 2000), MIC Notice No.
2000-80 (October 21, 2000), and MIC Notice No. 2000-183 (October
28, 2000) plus the immunity requirements outlined in KN 61000-4-2, KN
61000-4-3, KN 61000-4-4, KN 61000-4-5, KN 61000-4-6, KN 61000-48, and KN 61000-4-11 (equivalent to IEC 61000-4-x).
Singapore
IDA certification

Section 1: Introduction
GL Series Operator’s Manual Page 1-8
This page is intentionally left blank

Section 2: Installation
GL Series Operator’s Manual Page 2-1
2
INSTALLATION
This section assists you in unpacking and installing the printer from the shipping container .
You will also be guided through a familiarization tour of the main parts and controls.
The following information is provided:
• Safety Precautions
• Unpacking and Parts Identification
• Loading the Carbon Ribbon
• Loading Labels and Tags
• Adjusting the Sensors
• Replacing the Print Head
• Turning the Printer ON/OFF

SECTION 2: INSTALLATION
Page 2-2 GL Series Operator’s Manual
SAFETY PRECAUTIONS
THE CAUTION SYMBOL
Whenever the triangular Caution logo appears in this manual, pay special attention to the warning(s) cited
below it. Failure to abide by the warnings may result in injury or damage to property.
PRINTER PLACEMENT TIPS
• Place the pri nter on a sol id , st abl e,
horizontal surface that is not subject to strong vibrations from adjacent mechanical devices.
• Avoid shaky or slanting tables, or
platforms that are liable to collapse under a heavy
weight. If the printer is dropped or damaged, immediately turn off the power, pull out the power plug and
contact a service center. In this case, continued use
of the printer may cause a fire or electric shocks.
• Avoid installing the printer in direct sunlight, or in
dusty, very hot or slippery areas. Also avoid placement in damp, unventilated or humid areas. If condensation forms, immediately turn off the power, and
do not use the printer until the condensation disappears. Otherwise the moisture may cause electric
shocks.
• Avoid placing the printer near large high-current
equipment, as such equipment can caus e spike s or
undervoltages in the power supply.
• Do not leave containers of
water or chemicals around the
printer. If any liquid is spilled
onto the printer, immediately
turn off the power, pull out the
power cable from the AC outlet, and contact a
sales outlet, dealer, or service center. In this
case, continued use of the printer may cause
fires or electric shocks.
• Do not move the printer with any paper loaded.
The stack of paper may fall off, causing trips
and accidents.
• When laying the printer down, be careful not to
catch your foot or fingers under it.
• When moving the printer, be sure to pull out the
power cable from the AC outlet, and check that
any other external interface cables have been
disconnected. Otherwise, the connected cables
may be damaged, or may cause trips and falls,
in addition to or a fire or electric shocks.
ELECTRICAL PRECAUTIONS
• Do not damage, break, or process the power cable.
Hanging heavy objects on it, heating or pulling it may
damage the power cable and cause fires or electric
shocks.
• When the power cable is damaged (cable conductors
are exposed or cut, etc.), contact a sales outlet,
dealer, or service center. In this case, continued use
of the printer may cause fires or elec tric shocks.
• Do not process, forcibly bend, twist, or pull the power
cable. Continued use of such a cable may cause
fires or electric shocks.
• If the printer emits any smoke or peculiar odors at
any time, turn it OFF and prevent further usage until
you have contacted a qualified service personnel.
• Do not use any other voltage except the specified
power voltage for the printer that matches your
domestic power supply. Otherwise, it may cause fires
or electric shocks.
• Do not operate the power switch or handle the
power cable with a wet hand.
• Do not insert or drop anything metallic or flammable into the openings of the printer (the cable
outlet or mounting hole of the memory cartridge). Otherwise, immediately turn off the
power, pull out the power cable, and contact a
sales outlet, dealer, or service center. In this
case, continued use of the printer may cause
fires or electric shocks.
• To reduce electrical risks, be
sure to connect the printer to
ground before use. Also, try
not to share the printer’s AC
outlet with other electrical
equipment, especially those that draw high
amounts of current or cause electrical interference.
SAFETY PRECAUTIONS
Please read the following information carefully before
installing and using the printer

Section 2: Installation
GL Series Operator’s Manual Page 2-3
This equipment is a piece of Class B information technology equipment based on the standards of the
Voluntary Control Council for Interference by Information Technology Equipment (VCCI). Although this
equipment is for use in home environment, if it is used close to a radio or television set, it may cause poor
reception. Handle it properly in accordance with the content from the instruction manual.
GENERAL PRECAUTIONS
• The supplied head cleaning liquid is flammable.
Never heat it or throw it into a fire. Keep it out of children’s reach to avoid accidental consumption.
Should this occur, consult a doctor immediately.
• When opening/closing the cover, beware of getting
your fingers caught. Also, hold the opening/closing
cover well so that it will not slip and fall on your hand.
• After printing, the print head remains hot. When
replacing paper or cleaning the printer immediately
after printing, be careful not to burn yourself.
• Touching even the edge of the printer head may
cause injuries. When replacing paper or cleaning the
printer, be careful not to hurt yourself.
• If the printer will not be used for extended periods of
time, disconnect the power cable for safety.
• When releasing and locking down the printer head,
be careful not to catch any other foreign matter in it
except label paper.
• Do not disassemble or perform modifications to
the printer, as this renders the product unsafe.
For maintenance, troubleshooting and repairs,
consult a sales outlet, dealer, or service center
for help, instead of attempting to perform this
yourself. Renewable annual service contracts
are available.
• When maintaining or cleaning the printer,
always disconnect the power cable for safety.
• Do not insert your hand or other objects into the
cutter.
• When loading roll paper, be careful not to catch
your fingers between the paper and the feeder.
• Be careful not to hurt yourself when detaching
the back cover of the fanfold through the hole
and attaching it.
• The simplified cutter (where installed) is structured as a blade. Be careful not to cut yourself.

SECTION 2: INSTALLATION
Page 2-4 GL Series Operator’s Manual
2.1 UNPACKING
When unpacking the printer, take note of the following:
Note
The following illu strations are repr esentative only. Your pri nter may not be packed e xactly as shown, but
the unpacking steps are similar.
The box should stay right-side up.
Lift the printer out of the box carefully.
If the printer was been stored in the
cold, allow it to reach room
temperature before turning it on.
Remove the plastic covering from the
printer.
Set the printer on a so lid, flat surface.
Inspect the shipping container and
printer for any sign of damage that
may have occurred during shipping.
Remove the accessory items from their
protective containers.
1
4
2
5
3

Section 2: Installation
GL Series Operator’s Manual Page 2-5
2.1.1 INCLUDED ACCESSORIES
After unpacking the printer, verify that the following materials are in the accessories or packaging:
Global Warranty
document
Cleaning
Set
Information
leaflet*
Head cleaning sheet
(wrapping sheet)
Power cable*
T w o-pole adaptor*Accessory CD-ROM*Operator’s Manual
and/or Quick Guide*
Items marked with an asterisk may be different fr om what you see here, or may be excluded.
Please fill out the Global Warranty card and submit it
to us in order that we can provide fast and efficient
after-sales service. For malfunctions under normal
use, this product will be repaired free of charge
according to the warranty terms applicable for the
country of use.
Please do not discard the original packaging box and
cushioning material after installing the printer. They
may be needed in future, if the printer needs to be
shipped for repairs.
Important!
Sample paper*

SECTION 2: INSTALLATION
Page 2-6 GL Series Operator’s Manual
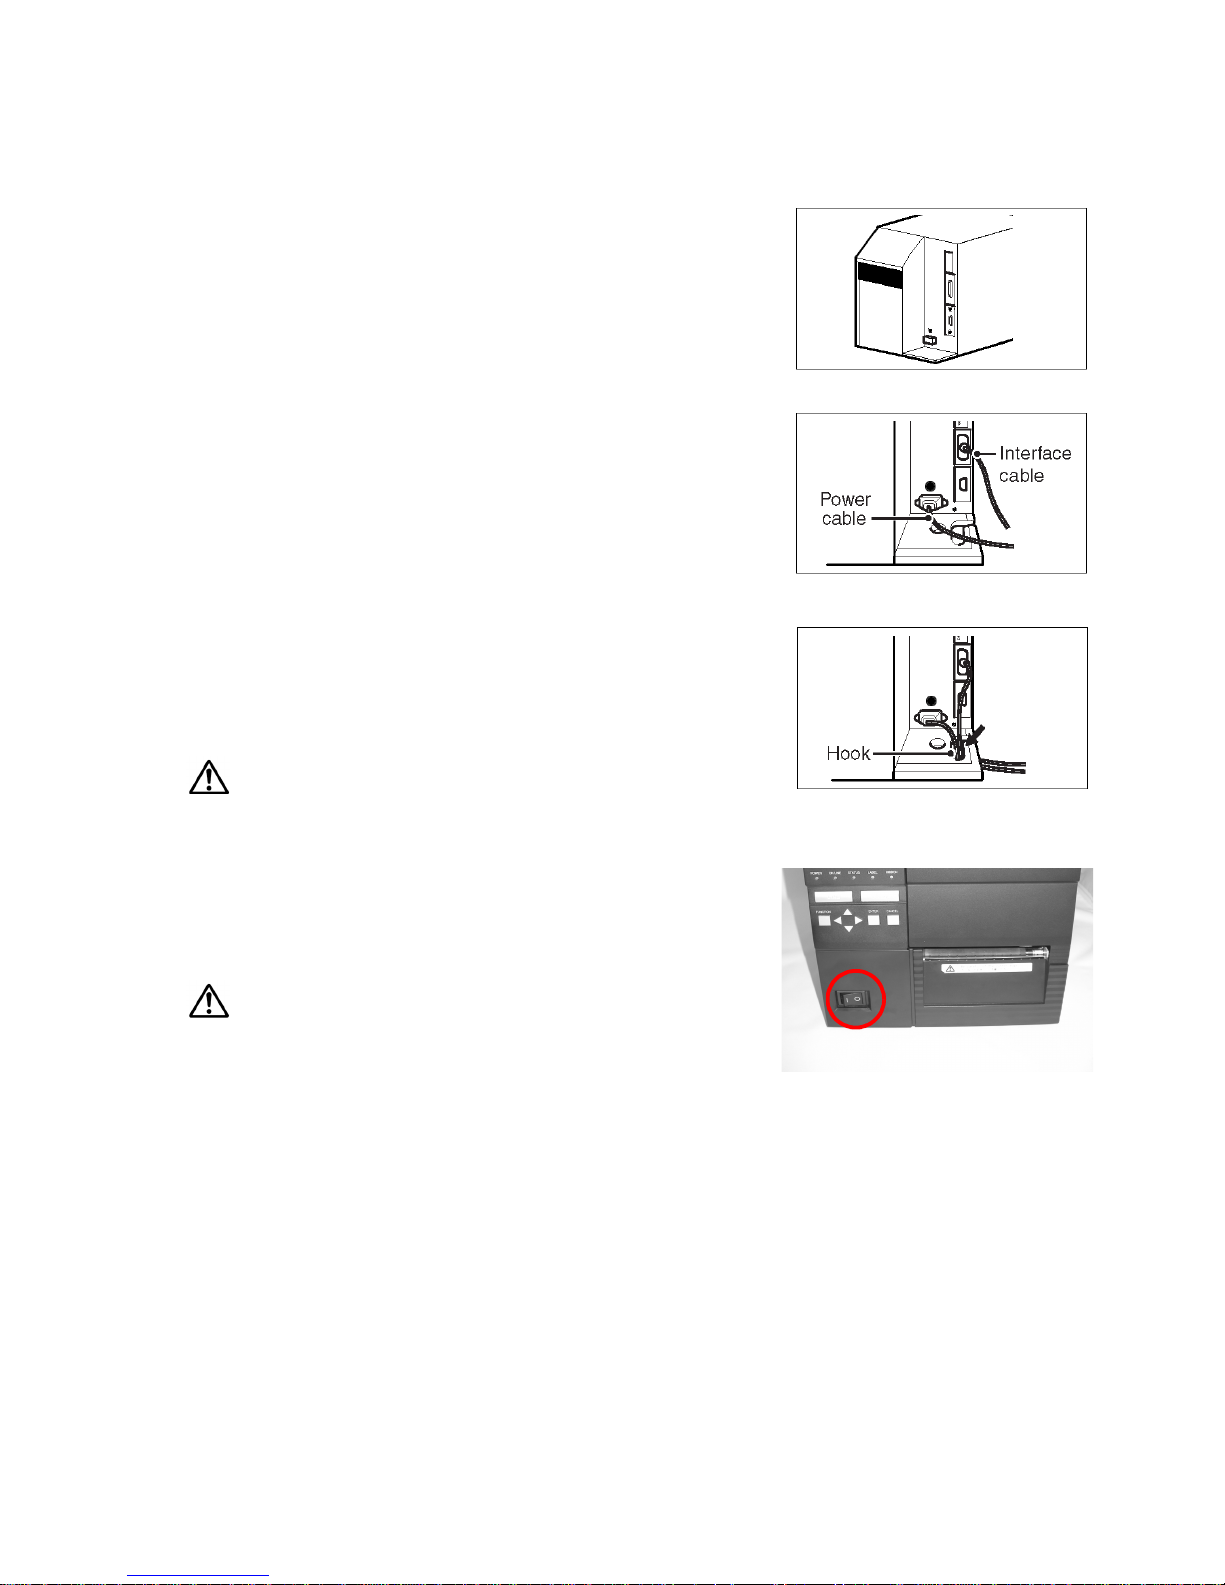
2.1.2 PARTS IDENTIFICATION
IDENTIFYING THE MAIN PRINTER PARTS
Power switch
Pushing the I side turns the
printer ON. Pushing the O side
turns the printer OFF.
Operation Panel
Consists of an liquid crystal display screen, five status indicators and the LINE and FEED
buttons.
Printer Cover
(lifted up)
Ribbon Take-up Spindle
Head pressure
adjustment knob
(visible when print
head is latched)
Ribbon
Supply
Spindle
Label supply arm
Head lock lever
Angled Front View
Front View
Note:
Depending on the region of
manufacture, your unit of the
printer may appear slightly different in some areas from the
model depicted here.
Label Output area
This is where the label feeds
out of the printer after being
printer.
Print Head assembly

Section 2: Installation
GL Series Operator’s Manual Page 2-7
2.1.2 PARTS IDENTIFICATION (CONT’D)
IDENTIFYING THE MAIN PRINTER PARTS
AC power connector
Power cable hook
Slot for optional
EXT connector
Provides a neat and
safe way to hang the
power cable.
Slot for additional
interface card (LAN/
WLAN)
Release screw
Slot for Fanfold Paper
Rear View
9-pin Serial Interface
IEEE1284 and USB
2.0 inter faces

SECTION 2: INSTALLATION
Page 2-8 GL Series Operator’s Manual
IDENTIFYING THE MAIN PRINTER PARTS
Head lock latch
Memory Card
slot cover
AA
B
C
Head pressure knob
B
C
Print head*
* Clean and maintain this part regularly
Platen roller*
Label Guide
Label Guide
position knob
Ribbon take-up spindle
Ribbon suppy spindle
AA
Paper sensor
Label Supply Arm
Angled Front View
Head lock latch
Ribbon Roller
Platen roller
Print Head
Head mounting
spring-latch
Side View
(Media assembly)

Section 2: Installation
GL Series Operator’s Manual Page 2-9
2.1.2 PARTS IDENTIFICATION (CONT’D)
IDENTIFYING THE MAIN PRINTER PARTS
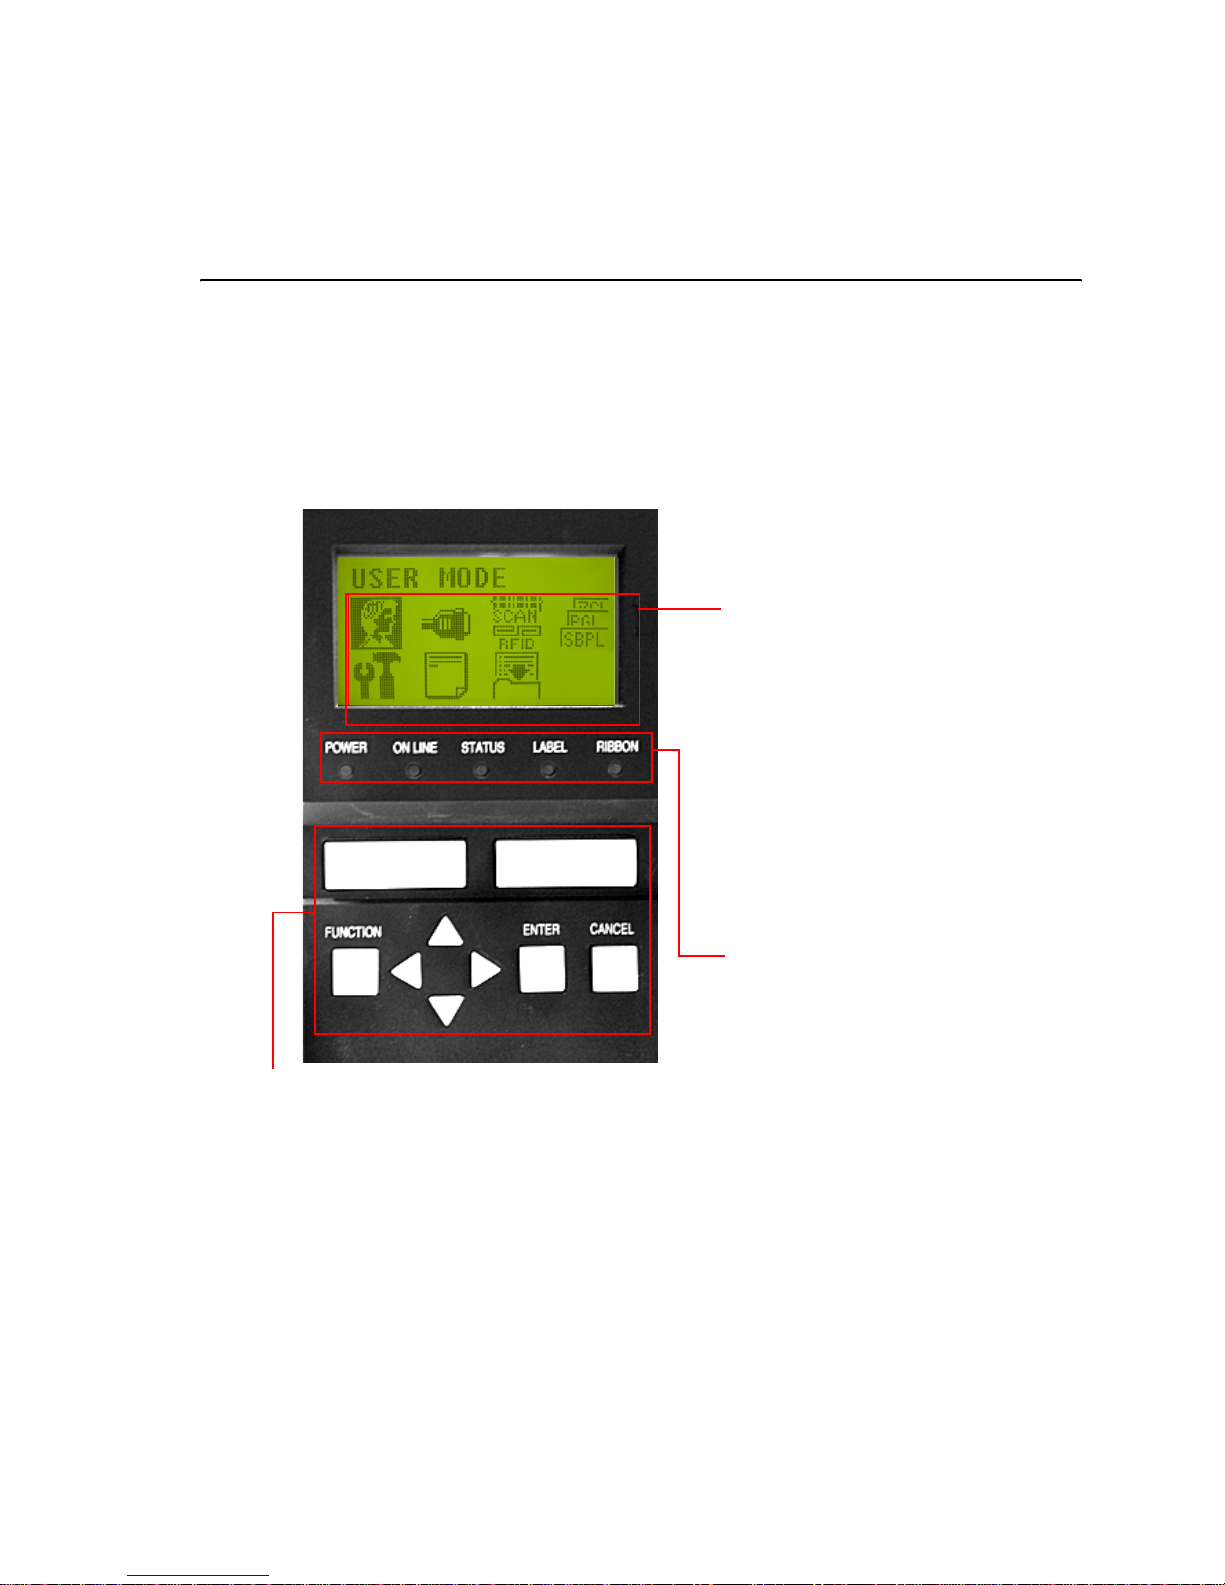
View of Front Panel
Icons, prompts and system messages
are displayed here.
LCD screen
FUNCTION button: Selects the various setting modes.
CURSOR buttons: Each button moves the cursor up,
down, left or right on the LCD screen.
ENTER button: Confirms the choice of a selection or value.
CANCEL button: Cancels printing data. In each setting
mode, the button also returns you to the previous menu or
menu item.
Operation buttons
Feeds the label forward. When it is pressed once,
the equivalent of a sheet of paper or label is ejected.
*There are times when the paper is not aligned properly when power is turned on or when the paper was
set. In this case, always press the FEED button to
align the paper properly.
FEED button
Light Emitting Diodes
POWER LED: Lights up when power is supplied to the
printer.
ONLINE LED: Lights up when communication is available.
Flashes with communication fails.
STATUS LED: Lights up and flashes to indicate exchange of
data.
CANCEL button: Cancels printing data. In each setting
mode, the button also returns you to the previous menu or
menu item.
For details of each indicator’s behavior, see Page 5 -4 of
Section 5, Understanding the STATUS Indicators.
When pressed, it takes the printer ONLINE of
OFFLINE. When certain printer errors occur, the LINE
button can be used to cause the printer to recheck the
error..
The button is also used in conjunction with the cursor
and FEED buttons to navigate menus and confirm the
selection of a menu option.
NOTE: When changing to Online mode, if the operator
has changed menu items, but not saved the changes
in a configuration, the operator will be prompted to
save the changes.
LINE button
LINE FEED
SECTION 2: INSTALLATION
Page 2-10 GL Series Operator’s Manual
2.2 LOADING THE CARBON RIBBON (FOR THERMAL TRANSFER PRINTING)
(Note: Ribbon is not needed for Direct Thermal printing)
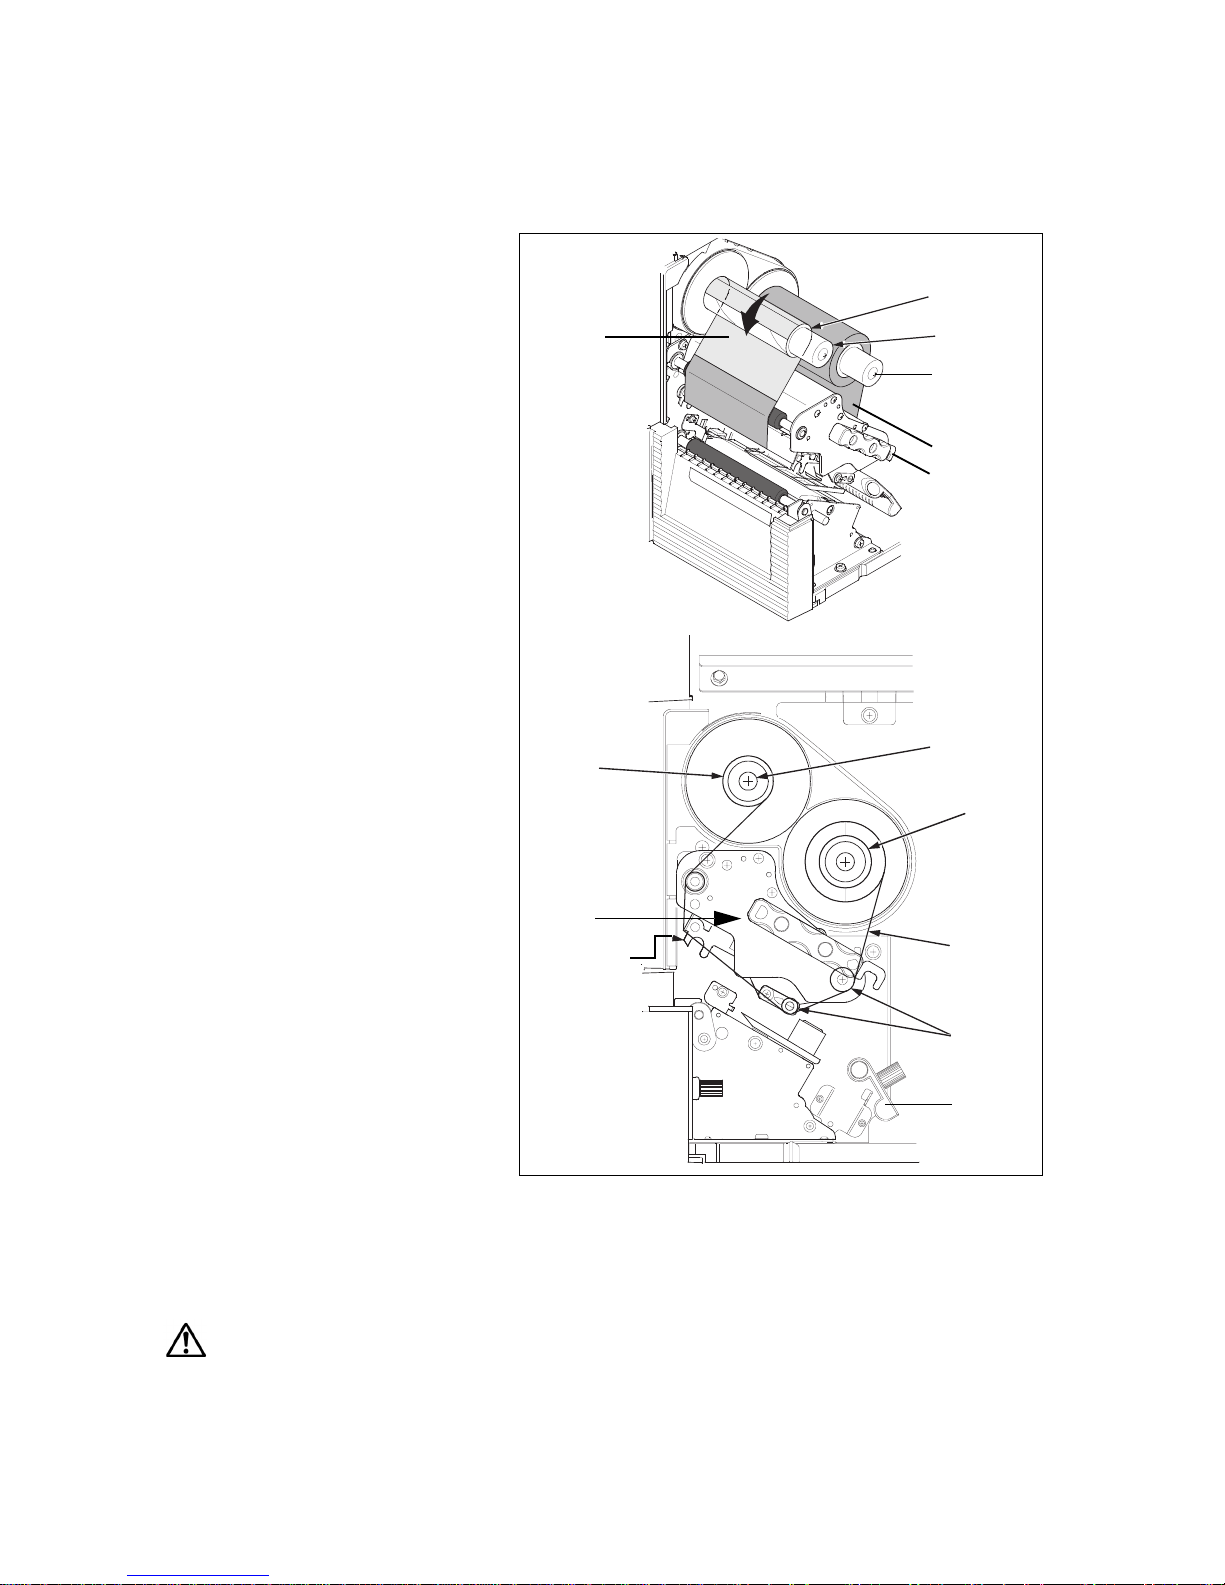
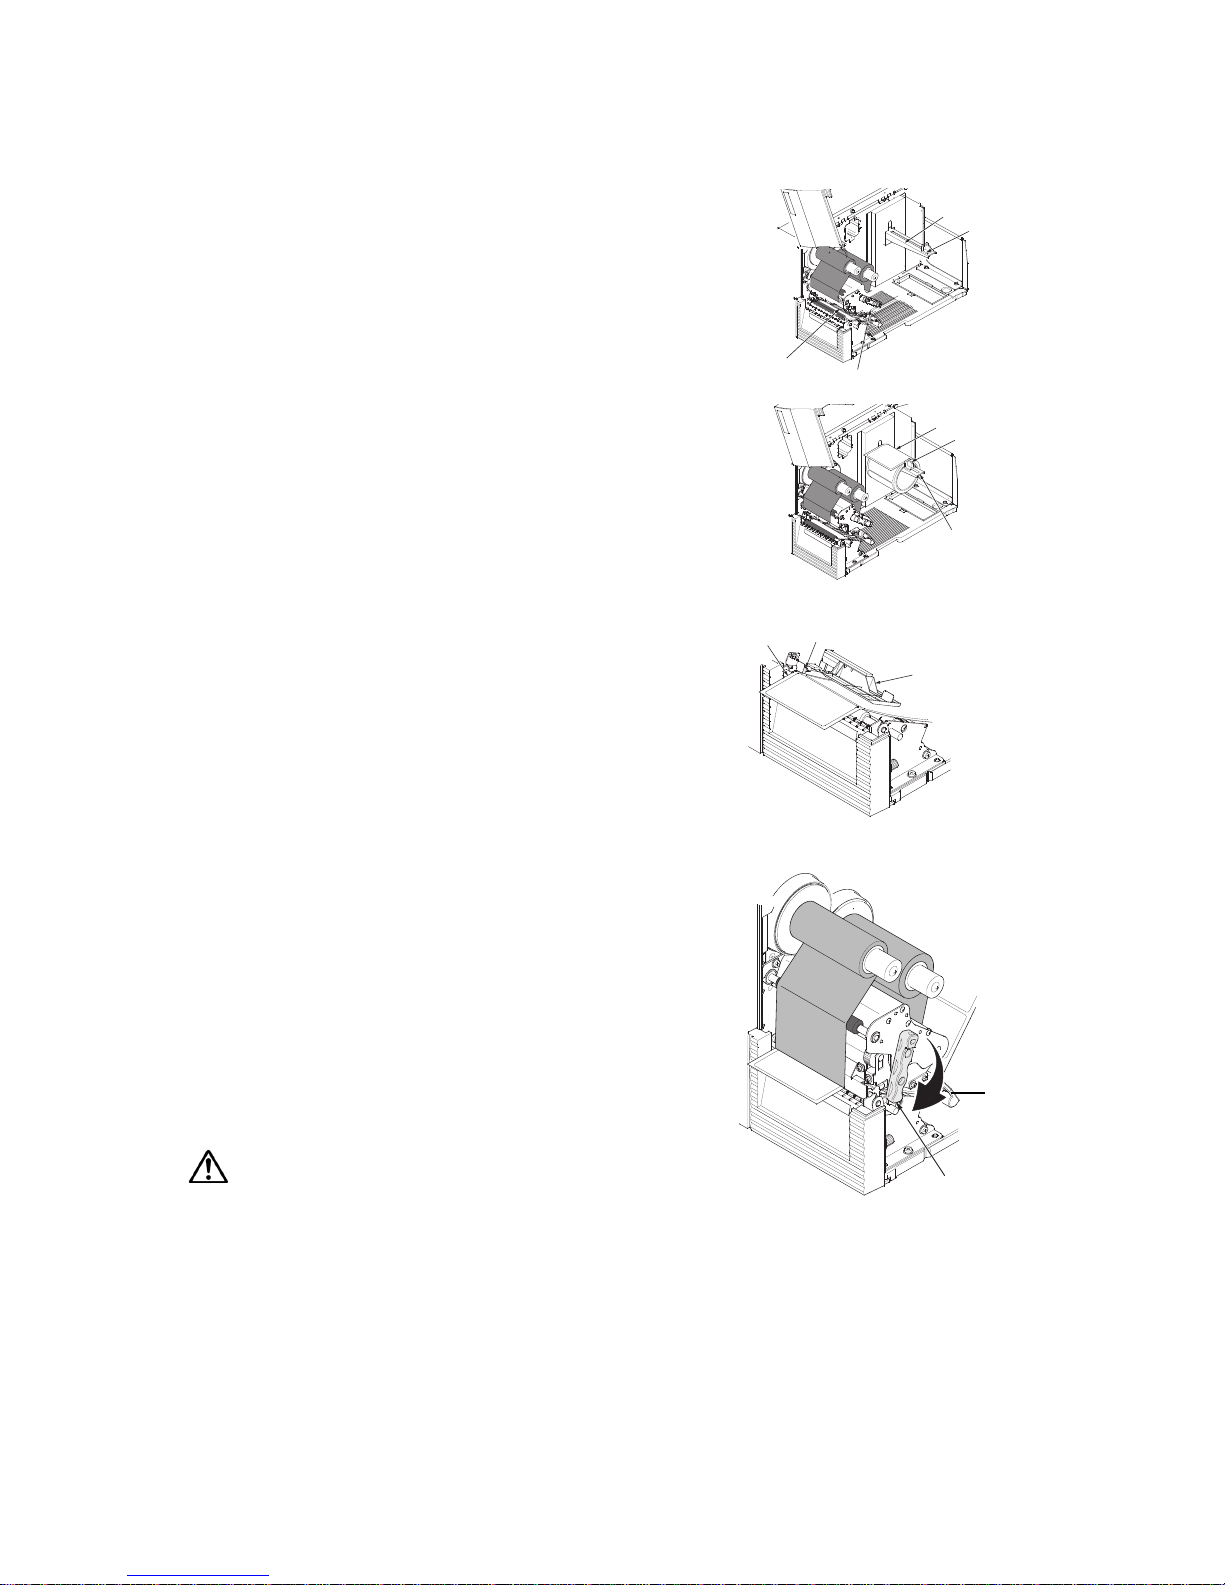
1. Lift up the prin ter c over . Make sure
that the cover rests firmly on the
top of the printer so that it will not
fall forward and injure your hands.
2. Insert an empty ribbon core on the
Ribbon Take-up Spindle.
3. Insert the carbon ribbon in the
Ribbon Supply Spindle.
Push it inwards all the way, with the
ribbon winding in a clockwise
direction around the print head, as
shown. Note: Use only genuine
SATO carbon ribbons for
maximum print quality and
printer durability.
4. Pass the carbon ribbon under the
print head to the ribbon take-up
shaft. Affix the carbon ribbon
directly to the cardboard ribbon
core. Use adhesive tape to affix the
ribbon to the core.
6. Now remount the print head by
pushing down on the head lock
latch. The print head should lock
into place firmly. You can now
proceed to install the label media
as described in the following
sections.
Note:
Do not install a new carbon ribbon
and then wind it over any used
ribbon in the ribbon take-up shaft. That is, always remove all used ribbon from the ri bbon
take-up shaft (using the purple knob to release the used ribbon) before changi ng to a new ribbon.
Caution
• When replacing the carbon ribbon, bear in mind that the pr int head and its surrounding area rem ain hot. Keep your fingers
away from these areas to prevent injury.
• Avoid touching even the edge of th e pr int head with your bare hands.
Ribbon
Take-up
Spindle
Empty
ribbon
core
Ribbon
Supply
Spindle
Ribbon
winds
clockwise
Ribbon
rollers
Head Lock
Latch
Print Head
Empty
ribbon
core
Ribbon Take
-
up Spindle
Ribbon
Supply
Spindle
Head Lock
Latch
Ribbon Roll
Clear
Ribbon
leader
Label
Guide

Section 2: Installation
GL Series Operator’s Manual Page 2-11
ADJUSTING THE RIBBON GUIDE
(Note: Ribbon is not needed for Direct Thermal printing)
If the ribbon is not spread smoothly when it makes contact with the media, print voids will occur.
This could be due to either the ribbon supply spindle, ribbon take-up spindle, printhead or ribbon
guide rollers not being parallel. Thus you may need to perform the following procedures repeatedly
until you reach the desired results.
1. Loosen the screws on each end of the
ribbon guide.
2. Adjust the ribbon guide vertically to
make sure that the ribbon guide axis
is parallel with the entire print head
assembly.
3. Tighten the screws on ea ch end of the
ribbon guide.
4. Print a test label to check for
correctness.
6. Now remount the print head by
pushing down on the head lock latch.
The print head should lock into place
firmly. You can now proceed to install
the label media as described in the
following sections.
Ribbon
Guide
Screw
1 of 2
Screw
2 of 2
Print
Head
assembly

SECTION 2: INSTALLATION
Page 2-12 GL Series Operator’s Manual
2.3 LOADING LABELS AND TAGS
This printer can print on roll paper and fanfold paper.
The method of setting paper is different with roll paper and fanfold paper.
This printer can be set to detect the I-mark on the paper to feed each label correctly.
Note:
For optimal print performance and durabilit y, please use SATO-certified label and ribbon
supplies on this printer. Using suppl ies not tested and approv ed for use by SATO can result in
unnecessary wear and damage to vital parts of the printer, and may void the warranty.
Roll Paper Characteristics
Fanfold Paper Characteristics
Label
Label
Section 2: Installation
GL Series Operator’s Manual Page 2-13
2.3 LOADING LABELS AND TAGS (CONT’D)
2.3.1 Loading Roll Paper
1. Lift up the main cover. Make sure that the cover rests
firmly on the top of the printer so that it will not fall
forward and injure your hands.
2. Release the purple Head Lock Latch by pulling it
upwards counterclockwise. The print head assembly
will be lifted up to allow label loading.
3. Route the label into the print head area, going under
the black plastic label stabilizer and over the platen
roller, as shown here. Make sure the left edge of the
label presses against the label edge guide.
4. Adjust the label guide so that it presses against the
label’s right-side edge.
5. Turn the Head Lock Latch clockwise to latch the
entire print head assembly into place. The label and
ribbon will also be firmly latched into contact. The
illustration on the right shows you how the printer
looks like after all ribbon a nd labels have been loaded
correctly.
6. If desired, close the main cover and do a test print to
check that the label roll has been loaded properly. Be
careful not to get your fingers caught at the bottom
ledge when you are closing the main cover.
Caution
• When replacing paper, bear in mind that the print hea d and its
surrounding area remain hot. Keep your fingers away from these areas
to prevent in j ury.
• Avoid touching even the edge of th e pr int head with your bare hands.
Label Supply Ar
m
Label Stopper
Head Lock Latch
Unlatched
print head
Label Roll
Label Stopper
Label Supply Arm
Label Stabilizer
(with sensor below)
Label edge guide
Paper
edge
(left)
Head Lock Latch
Completed Label and Ribbon Loading
Label
Guide area

SECTION 2: INSTALLATION
Page 2-14 GL Series Operator’s Manual
2.3 LOADING LABELS AND TAGS (CONT’D)
Adjusting for the paper width and print head balance
This printer is adjusted so that quality printing can be obtained without any adjustments.
However, in certain situations, you will need to adjust prin thead pressure becau se of variations i n
media width. The printhead pressure switch (sh own above) has two positions, high and normal.
By following this procedure, you will minimize printhead wear.The head pressure balance knob
adjusts the amount of pressure being ap plied along different se ctions along the lengt h of the print
head.
For suggested settings of the Pressure Switch and Balance Knob (1 to 5), see the table below:
Note:
Adjustments are only necessary if print
quality is not satisfactory. Otherwise, you
do not need to vary the head pressure
balance.
SETTING PRESSURE FOR VARIOUS MEDIA TYPES
Normal 0.08 to 0.20 (Thin paper, normal label, etc.)
High 0.20 to 0.268 (Thick paper, tag stock, etc.)
SETTING BALANCE
A Allow print head
pressure switch setting
1 1.00 to 1.69”
2 1.7 to 2.39”
3 2.4 to 3.09”
4 3.1 to 3.79”
5 3.8 to 4.00”
!
!
Print
Head
Pressure
Switch
(Nigh/
Normal)
Print Head
Balance Knob
Section 2: Installation
GL Series Operator’s Manual Page 2-15
2.3 LOADING LABELS AND TAGS (CONT’D)
2.3.2 Loading Fanfold Paper from the rear
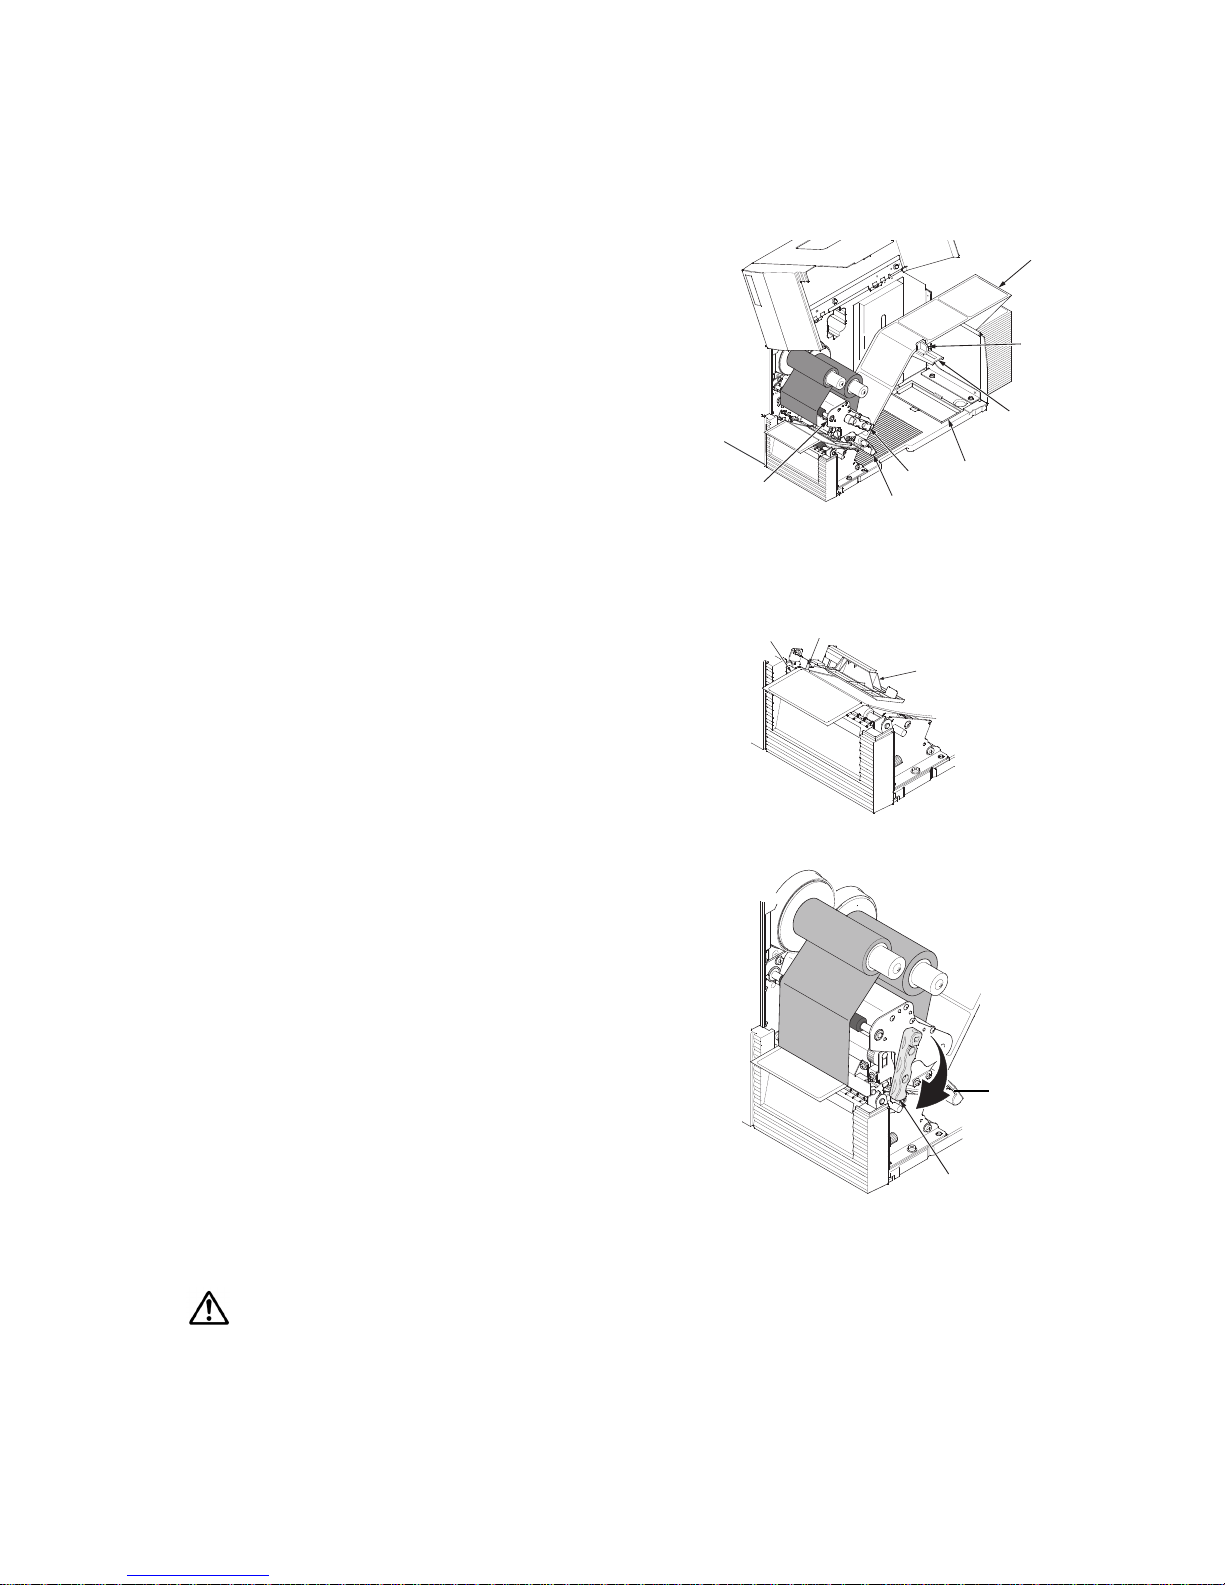
1. Lift up the printer cover. Make sure that the cover
rests firmly on the top of the printer so that it wi ll not
fall forward and injure your hands.
2. Place the stack of fanfold paper at the rear of the
printer. Remove the release screw that hol ds the
cover of the fanfold paper slot. Keep the screw in a
safe place for easy retrieval later.
3. Pull the leader label into the printer, over the Label
Supply Arm, and push the Label Stopper against the
edge of the label so that the label will not meander
during operation.
4. Route the label into the print head area, going under
the black plastic label stabilizer and over the platen
roller, as shown here. Make sure the left edge of the
label presses against the label edge guide.
5. Adjust the label guide so that it presses against the
label’s right-side edge.
6. Turn the Head Lock Latch clockwise to latch the
entire print head assembly into place. The label and
ribbon will also be firmly latched into contact. The
illustration on the right shows you how the printer
looks like after all ribbon a nd labels have been loaded
correctly.
7. If desired, close the main cover and do a test print to
check that the label roll has been loaded properly. Be
careful not to get your fingers caught at the bottom
ledge when you are closing the main cover.
Note:
The procedure described above is recommended for
loading a stack of fanfold paper that is 20 cm to 30cm in
height. Higher stacks should be loaded from below the
printer. (See next section)
Caution
• When replacing paper, bear in mind that the print head and its surrounding area remain hot. Keep your fingers away from these
areas to prevent injury.
• Avoid touching even the edge of th e pr int head with your bare hands.
Fanfold pape
r
Label
Stopper
Label
Supply Ar
m
Bottom
Fanfold
Slot
Head
Lock
Latch
Lable Guide
Print
Head
Assembly
Label Stabilizer
(with sensor below)
Label edge guide
Paper
edge
(left)
Head Lock Latch
Completed Label and Ribbon Loading
Label
Guide area

SECTION 2: INSTALLATION
Page 2-16 GL Series Operator’s Manual
2.3 LOADING LABELS AND TAGS (CONT’D)
2.3.3 Loading Fanfold Paper from under the printer
1. Lift up the main cover. Make sure that the cover
rests firmly on the top of the printer so t hat it will not
fall forward and injure your hands.
2. Release the purple Head Lock Latch by pulling it
upwards counterclockwise. The print head
assembly will be lifted up to allow label loading.
Note:
It is assumed that the printer is supported on stands to al low fanfold paper to be loaded from
beneath the printer.
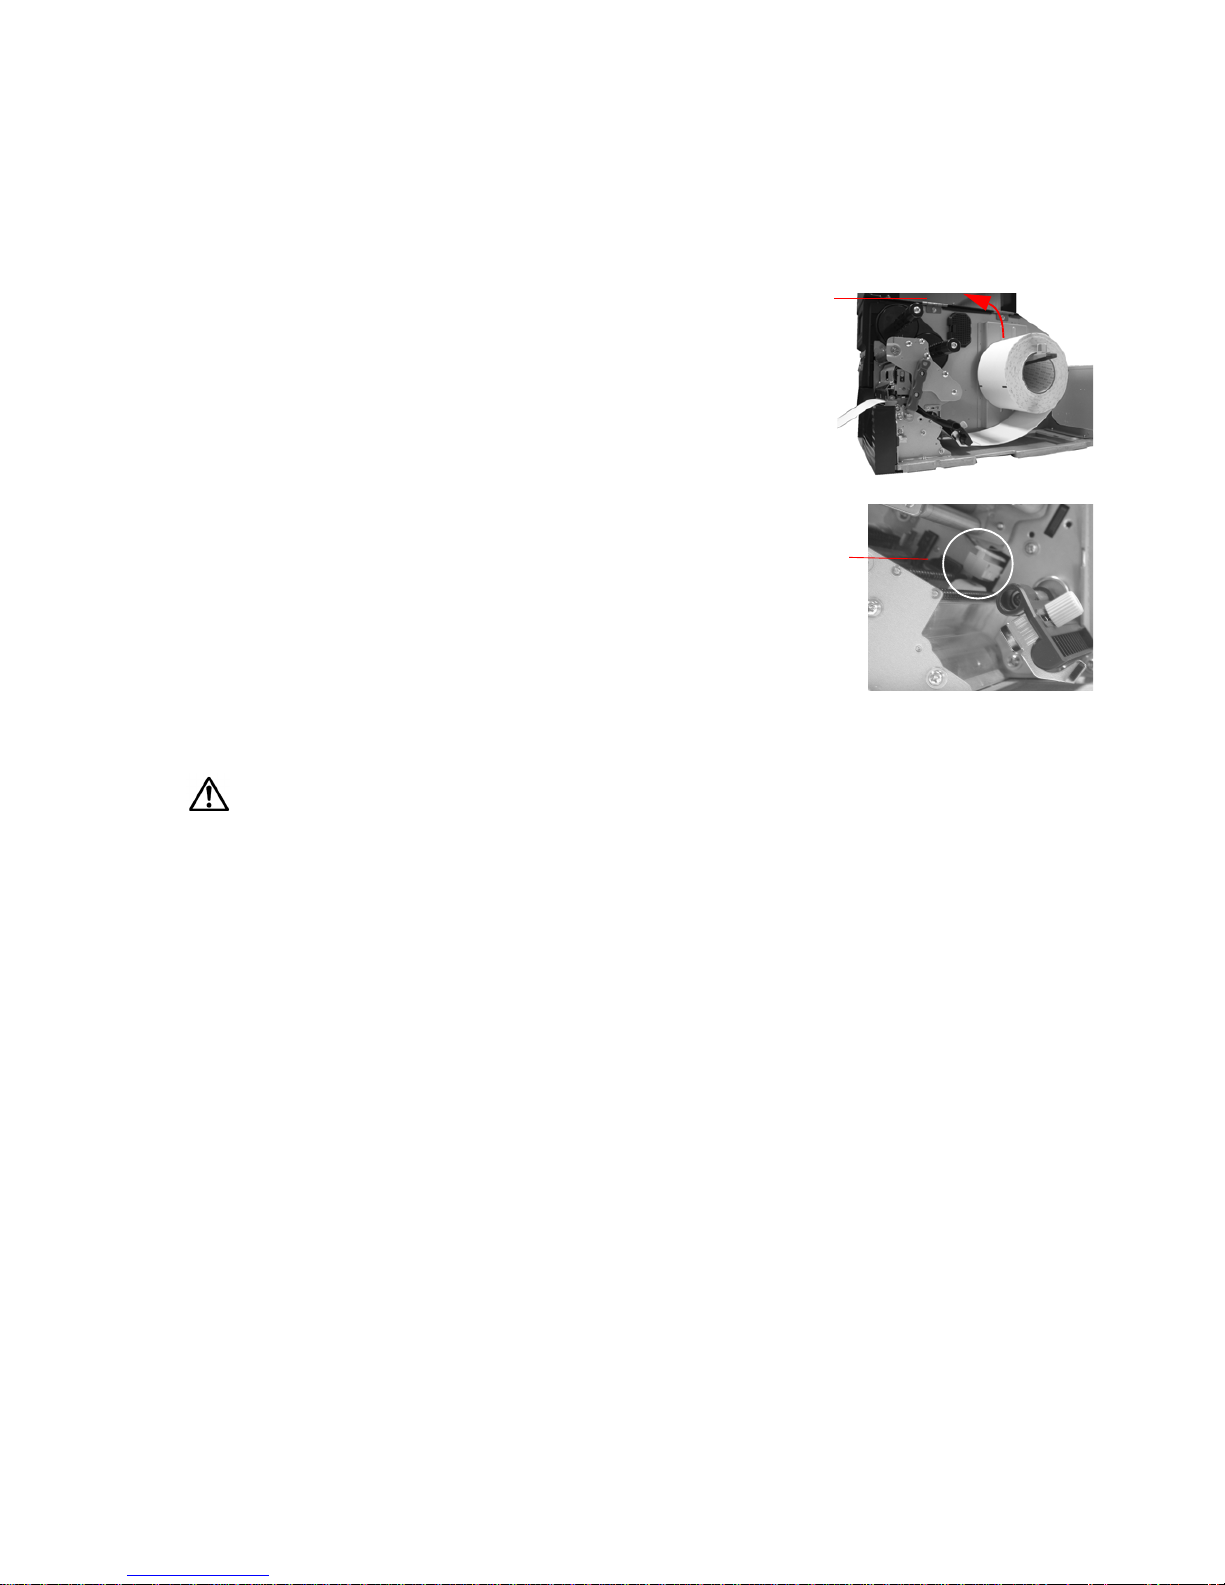
3. Unscrew the fanfold cover at the bottom of the
printer. Keep the cover and the screw in a safe
place for future use.
4. Load the stack of fanfold paper st raight up through
the bottom fanfold loading slot.
5. Pull the label into the chassis and then into the
print head assembly.
6. Proceed to load the label as described in “2.3.1
Loading Roll Paper” on page 2-13.
7. Pass the paper under the label guide and paper
sensor. Loosen the label guide knob, and adjust
the slide guide so that it lightl y touches the edge of
the paper. Now fasten the label guide knob tightly.
8. Remount the print head by pushing down on the head lock lever. The print head should lock
into place firmly.
9. If desired, close the main cover and do a test print to check that the label roll h as been loaded
properly. Be careful not to get your fingers caught at the botto m ledge when you are cl osing
the main cover.
Caution
• When replacing paper, bear in mind that the print head and its surrounding area remain hot. Keep your fingers away from
these areas to prevent injury.
• Avoid touching even the edge of the print head with your bare hands.
Label Supply Ar
m
Label Stopper
Head Lock Latch
Unlatched
print head
Printer
Cover
Printer
Stand
Head
Lock
Latch
Fanfold
Paper
Print
Head
Assembly
Section 2: Installation
GL Series Operator’s Manual Page 2-17
2.3 LOADING LABELS AND TAGS (CONT’D)
2.3.4 Adjusting the Paper Sensor
Adjustment of the paper sensor is usually not necessary, but the procedure is described here.
1. Lift up the cover. Make sure that t he cover rest s firmly
on the top of the printer so that it will not fall forward
and injure your hands.
2. The purple sensor unit is located just above the label
damper assembly. (the black plastic label path
stabilizer has been removed in the picture). Slide the
sensor outwards to adjust its position. Remember to
replace the label path stabilizer after the adjustment.
3. You can continue to load media by following the steps
in previous sections, or close the front cover.
Caution
• When closing the printer cover, be careful not to injure your fingers due to a sudden release of the heav y cover.
Lift
up the
cover
Paper sensor
SECTION 2: INSTALLATION
Page 2-18 GL Series Operator’s Manual
2.4 REPLACING THE PRINT HEAD
Before attempting to replace the print head, it is advisable to contact your local dealer or service
center so that they can assist you in case of problems.
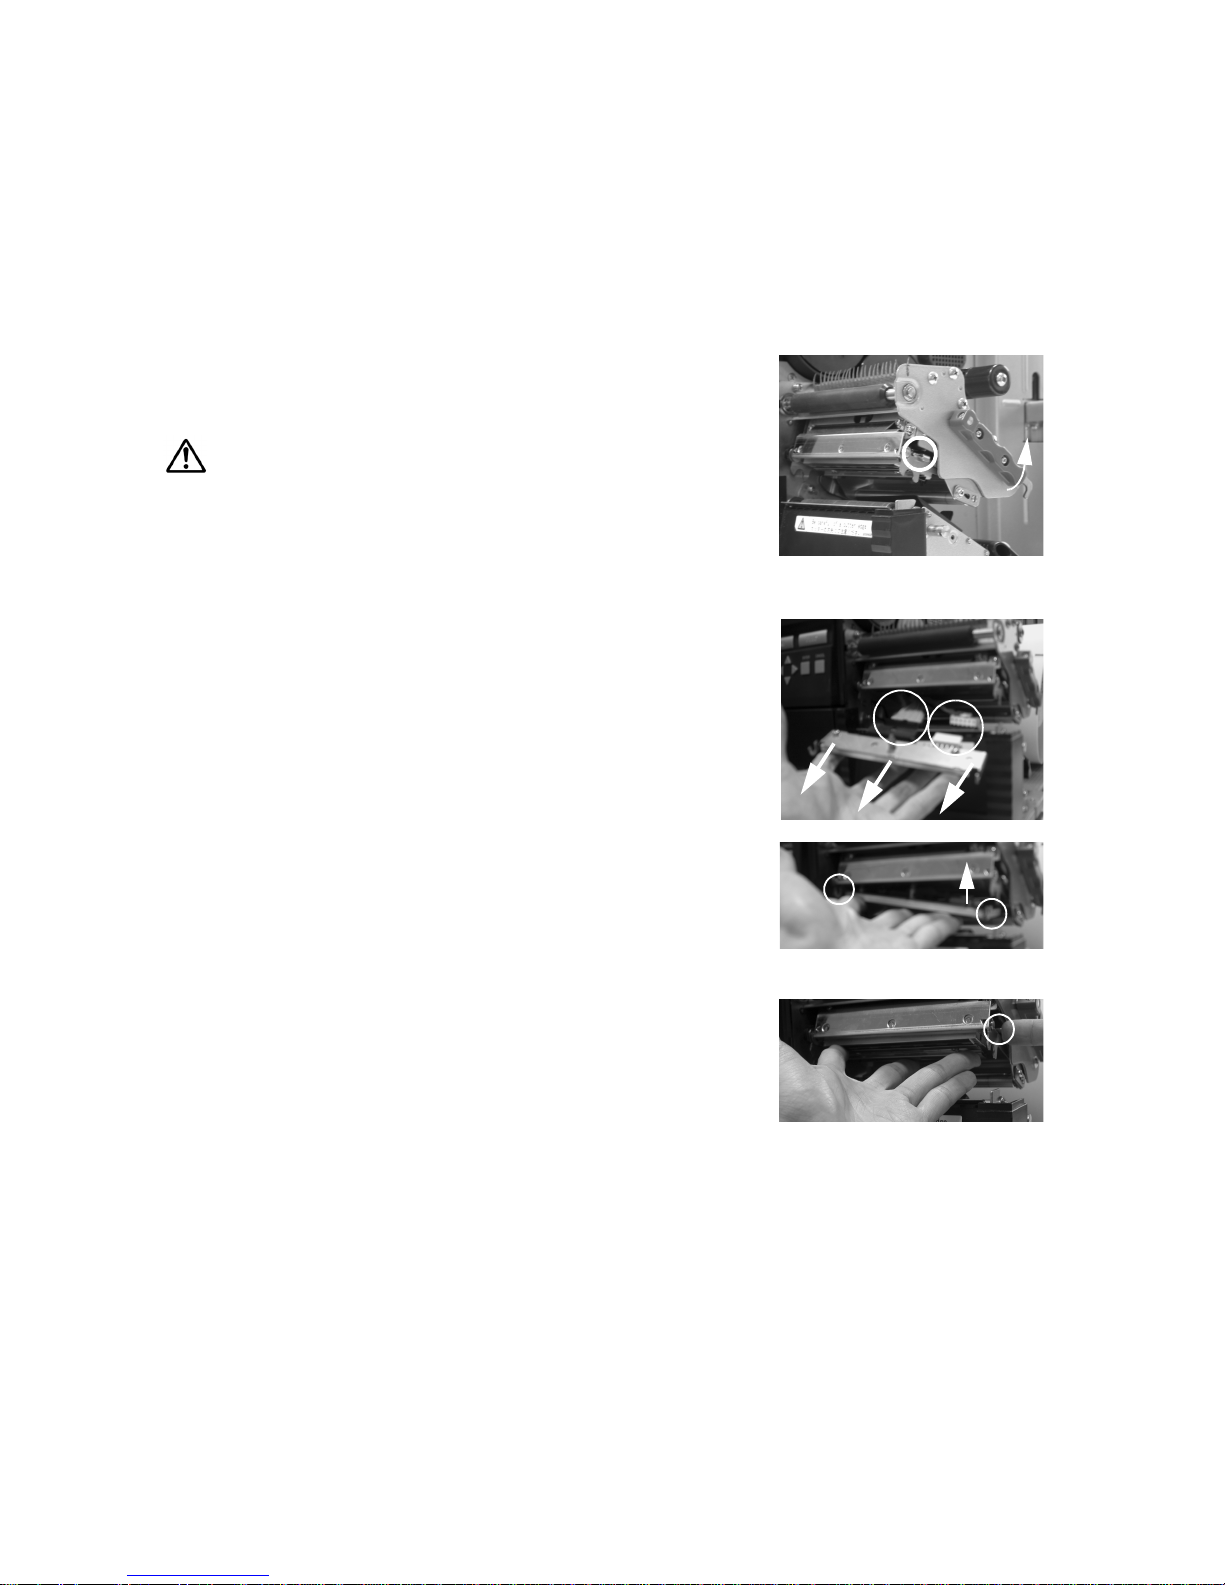
1. Make sure the printer has been turned off for at least 30 minutes so that the pr int head is not
hot. Lift up the main cover.
2. Pull the head lock latch upwards to unlatch the print head
assembly. Pull out the print head’s sprin g latch circl ed in the picture on the right. The print head will be released.
Caution
• Do not touch the print head’s hea tin g el em ents. If you do so inadvertently, use the
cleaning pen (supplied) to cl ean the area thoroughly. For more details, see Section
4, Cleaning and Mainten an ce.
4. Pull the print head out wards and di sco nnect the two c onnect ors
(circled in the picture on the right) attached to it. Note the two
small U-shaped hooks at the front part of the print head. These
will be used for remounting any print head into the printer.
5. Obtain the new print head and attach the two connectors to it.
6. There are two U-shaped hooks (circled in the picture) on the
front part of the print head. Insert the left-side hook into the
printer first.
7. Now mount the right-side hook of the print head into the printer ,
while pushing the spring-latch (circled ). The print head should
snap into place firmly. If not, release the prin t head and tr y
again.
Section 2: Installation
GL Series Operator’s Manual Page 2-19
2.5 TURNING THE PRINTER ON/OFF
1. After removing the cable cover at the rear of the printer, you
can proceed to install the interface and power cables as
shown.
2. To limit movement of the cables, you can optionally channel
the cables through the cable hook area at the base of the
printer.
3. Insert the power cable first to the printer, then connect the
other end to the power outl et. If necessary, u se an adapt er to
match the prongs on the power cable to the sockets in the
AC outlet.
Caution
• Always use a grounded pow er cable to protect against el ectrical leakage and
electrica l shocks.
4. To turn the printer ON, press the power switch to the “I” si de.
When the printer is successfully turned on, the LCD screen
will be activated, and a series of diagnostic messages and
startup information will be displayed.
Caution
• To prevent electric shocks, make sure your hands are dry when you operate the
power switch, or when you pull out or insert power cables and switches.
5. If the printer does not respond, refer to the Troubleshooting section of this manual.
6. Before turning the printer off, perfor m the fol lowing steps:
Take the printer offline by pressing the Line button.
• Press the Feed button to eject any label at the front of the printer.
• Lightly pull the paper diagonally downward to tear off the label.
7. To turn the printer off, press the power switch to the “O” side.

Section 2: Installation
GL Series Operator’s Manual Page 2-20
This page is intentionally left blank
Section 3: Configuration and Operation
GL Series Operator’s Manual Page 3-1
3
CONFIGURATION AND OPERATION
Before using the printer, it is bes t to read this manual thoroughl y first. Otherwi se, you may disturb
default settings around which the instructi onal procedures in this manual are based upon.
3.1 THE LCD AND OPERATION PANEL
The printer can be monitored and controlled and set via the LCD screen and the buttons below.
LINE FEED
Icon/Text display area
Eight icons represent the following
modes from top left to bottom right:
User Mode, Interface Mode, RFID
Mode, Emulation Mode, Printer Setup,
Media Setup, Configuration
Management, and SEMBL Setup.
The same area can also display two
lines of alphanumeric text instead,
providing a total of three lines of text.
Overview of the Operation Panel
Icon/Text display area
Five LEDs and a built-in speaker
provide visual and aural cues
regarding printer status and error s.
POWER LED: Lights up when power is supplied to
the printer.
ONLINE LED: Lights up when communication is
available. Flashes with communication fails.
STATUS LED: Lights up and flashes to indicate
exchange of data.
CANCEL button: Cancels printing data. In each setting mode, the button also returns you to the previous menu or menu item.
For details of each indicator’s behavior, see pg 5-4
of Section 5, Understanding the STATUS Indicators.
Control Buttons
Five buttons and four cursor keys allow fast
setting and checking of the various parameters of
the printer.
FUNCTION button: Selects the various setting modes.
CURSOR buttons: Each button moves the cursor up, down, left or
right on the LCD screen.
ENTER button: Confirms the choice of a selection or value.
CANCEL button: Cancels printing data. In each setting mode, the
button also returns you to the previous menu or menu item.

Section 3: Configuration and Operation
Page 3-2 GL Series Operator’s Manual
3.2 THE ICON-BASED MAIN MENU
LINE FEED
Screen icons and menu options
To exit this iconic menu, press the CANCEL
button repeatedly to return to the main
screen, then press the LINE button to take
the printer ONLINE.
In some menus, a message may inform you
that the ENTER button is LOCKED, to
prevent the operator fro m making inadvertent
changes to a menu item. Press the v cursor
key and then press ENTER again in order to
access the locked menu item.
USER Mode (See pg 3-4)
Settings of Print Speed/Darkness,
Offsets, Label Setup, etc.
INTERFACE Mode (See pg 3-8)
Settings of USB, Parallel, Serial and
other interface options
RFID Mode (Check Service Manual)
Setting of the optional RFID Kit (or
ODV Kit) if installed.
Emulation Mode (See pg 3-23)
Settings of emulation for SBPL, DGL,
PGL, ZGL, TGL and IGL
ADVANCED Mode (See pg 3-16)
Settings of Sensors, media handling,
font handling and advanced features
DIAGNOSTICS Mode (See pg 3-21)
Test prints, printer t ests, Hex Dumps.
Printer usage statistics logs.
CONFIGURATIONS Mode
(See pg 3-23)
Save and Recall various sets of
stored system and user settings
Navigating the Iconic Menu
To access the iconic menu above, press
the FUNCTION button after taking the
printer OFFLINE with the LINE button.
Use the set of four (<, >, ^ and v) cursor
keys to highlight any of the icons shown
on screen.
After highlighting an icon, press the
ENTER button in order to access any sub-
menus related to the mode represented
by the icon.
The ENTER button is also used t o confirm
the selection of any highlighted men u item
in any menu or sub-menu.
The CANCEL button acts as a backspace
or Escape function to return to a previous
sub-menu or menu item.

Section 3: Configuration and Operation
GL Series Operator’s Manual Page 3-3
3.3 PRINTER OPERATION MODES
ONLINE AND OFFLINE MODES
3.3.1 ONLINE Mode
Pressing the LINE button causes the printer to go ONLINE or
OFFLINE a lte rnately.
When the printer is ONLINE, the followi ng activit ies will be possibl e:
• The printer is ready to receive print data from the compute r or
other connected devices
• The printer is ready to start printing
3.3.2 OFFLINE Mode
When the printer is ONLINE, pressing the LINE button once will
cause the printer to go OFFLINE.
When the printer is OFFLINE, the activities for ONLINE mode are
no longer possible, but the following activities will be possible:
• The printer can eject labels when you press the FEED button.
• The printer can be switched to other modes when you press the ENTER button.
• Any printing job can be stopped once the printer is brought OFFLINE
• Any printing job can be cancelled once the CANCEL button is pr essed in OFFLINE mode. The
menu for canceling the print job then appears.
• Received data that is stor ed in the buffer memory can be s aved into a memory cartridge, if t he
LINE button is pressed and held down for at least five seconds in OFFLINE mode. The
following screens will appear.
ONLINE
PARL/SBPL+
OFFLINE

Section 3: Configuration and Operation
Page 3-4 GL Series Operator’s Manual
3.4 USER MODE
The following settings are available i n Use r Mod e:
DISPLAY SUB-MENU RANGE DEFAULT DESCRIPTION
Print Speed 2 to 10 (50.8 - 254.0
mm/sec)
4 ips (101.6 mm/
sec)
Selects the printing speed.
Lower speeds usually yield better print quality. Settings available are dependent on print
head resolution.
Print Darkness -15 to 15 5 Selects the print darkness. Do
not increase print darkn ess to
compensate for poor print head
condition or maintenance.
Pitch Offset -0.50 to 0.20 (-12.7 to
5.1 mm)
0.00 mm See pg 3-5
Vert Print Offset -1.00 to 12.80 (-25.4
to 152.0 mm)
0.00 mm See pg 3-6
Hor Print Offset -1.00 to 1.00 (-25.4 to
25.4 mm)
0.00 mm See pg 3-6
Label Length 00.1 to 99.0 (3 to 2514
mm)
152 mm) Sets the length of each label in
the label roll to be used
Label Width 00.1 to 04.1 (3 to 104
mm)
104 mm) Sets the width of the lab el roll t o
be used
Slash Zero Disable/Enable Disable Selects whether the character
“0” has a diagonal slash across
it, to differentiate it from the letter “O”
Character Pitch Proportional/Fixed Proportional Selects whether the spacing
between every character i s fixed
(Fixed) or variable (Proportional) in accordance to character width.
Protocol C. Code Standard/ Non-
Standard
Standard See pg 3-6
Euro Character 0 to 255 213 Selects the character to repre-
sent the Euro currency
Ver BaseRefPoint -9999 to 9999 0 See pg 3-7
Hor BaseRefPoint -9999 to 9999 0 See pg 3-7
Mem Select (CC1) Card/Memory Card Selects the default storage
memory to be the optional
memory cartridge or standard
printer memory
Orientation Portrait Portrait/Land-
scape
Selects the print orienta tion
Units Inches/Millimeters Millimeters Selects the default unit of mea-
surement in menus

Section 3: Configuration and Operation
GL Series Operator’s Manual Page 3-5
3.4 USER MODE (CONT’D)
3.4.1 Setting the Pitch Offset
This setting adjusts where printing begins verti cally, relative t o the
bottom edge (nearest the print head) of each l abel. The maxi mum
value allowed is 3.75 mm.
Adjusting the OFFSET potentiometer adjusts the tear-off stop
position for use with a cutter, peeler.
Finally, adjusting the Print Darkness potentiometer adjusts the
print darkness.
When all the settings are satisfactory, press the ENTER button to
proceed to set other parameters in the User Mode.
3.4.2 Setting Print Speed
This setting can be used to achieve a high pri nt speed that does not
compromise print quality. Press the ^ and v cursor keys to
change the setting. Press the ENTER button to confirm a setting
and proceed to the next screen.
If quality printing cannot be obtained due to the quality of the paper
or the printing contents, lower the speed accordingly.
Print head
direction of label motion
ref point 0,0
Print offset
Print Speed
4 ips*

Section 3: Configuration and Operation
Page 3-6 GL Series Operator’s Manual
3.4 USER MODE (CONT’D)
3.4.3 Setting Ver/Hor Print Offsets
This setting allows you to set the Print Positi on Offset—which refers
to the vertical and horizont al shifti ng of the ent ire pr int area, r elati ve
to the start position of printing (V=0, H=0), defined by default to be
the bottom right hand corner of the label.
Use the ^ and v cursor keys to select the V or H Offset setting,
and change the highlighted setting as necessary. Press the
ENTER button to confirm a setting and proceed to the next
screen.
The V setting is for the Vertical print offset. A positive (+) offset
means the printing is shifted t owards the print head; a negative (- )
offset means shifting away from the print head. If the Pri nt Pitch
setting has been used to offset the vertical start position, then all
Vertical offset adjustments are made relative to that start position.
The H setting is for the Horizontal print offset. The + or - prefix
determines whether the offset is to the left or to the right of the
reference point.
After setting the Vertical and Horizontal OFFSET, press ENTER
to proceed to the next setting.
3.4.4 Specifying the Protocol Command Code
The ESC sequence in SBPL commands can be defined as
standard (using non-printable code 1BH) or non-standard (some
other user code).
Press the ^ and v cursor keys to select the STANDARD or NON-STANDARD option. The def ault
setting is STANDARD.
Press the ENTER button to confirm the setting and proceed to the next screen.
Printer Valid H and V settings (in dots)
GL408e V: +/- 000 to 1424 dots, H: +/- 000 to 832 dots
GL412e V: +/- 000 to 2136 dots, H: +/- 000 to 1248 dots
Ver Print Offset
0.00 inches
Print head
direction of label motion
ref point 0,0
H+V-H-
V+
Print offset
Protocol C. Code
Standard*
Non-Standard

Section 3: Configuration and Operation
GL Series Operator’s Manual Page 3-7
3.4 USER MODE (CONT’D)
3.4.5 Specifying the Ver/Hor Base Reference Points
The Vertical or Horizontal Base Reference Point defines the origin
0,0 of a label (Reference Point).
Press the ^ and v cursor keys to change the value in Dots, to the
desired quantity. The range of legal values that can be set here is dependent on the print head
resolution of your GL printer, and the width of label used.
Press the ENTER button to confirm the setting and proceed to the next screen.
Ver BaseRefPoint
0 dots*

Section 3: Configuration and Operation
Page 3-8 GL Series Operator’s Manual
3.5 INTERFACE MODE
The following settings are available in Interface Mode:
DISPLAY SUB-MENU RANGE DEFAULT DESCRIPTION
Ignore CR/LF No/Yes No
Item No. Check Disable/Cancel/
Resume
Disable Appears only if Comm. Protocol is set
to Status 5
BCC Check Disable/Cancel/
Resume
Disable Appears only if Comm. Protocol is set
to Status 5
History Buffer Temporary/Permanent Temporary Appears only if Comm. Protocol is set
to Status 5
Comm. Protocol Standard/Status2/
Status3/Status4/
Status5
Status 5
Status Reply ENQ/Cycle ENQ Appears only if Comm. Protocol is set
to Status 4
Host Interface Auto Switching/ Cen-
tronics/ Serial/ IEEE
1284/USB
Auto Switching
ETHERN. Port Timeout 1-15 Secs. Timeout Appears only if LAN interface is
selected
ETHERN. Address IP Address
xxx.xxx.xxx.xxx
Per TCP/IP standard
valid address range
000.000.000.000 Appears only if LAN interface is
selected
Subnet Mask
xxx.xxx.xxx.xxx
Per TCP/IP standard
valid address range
000.000.000.000 Appears only if LAN interface is
selected
Gateway
Address
xxx.xxx.xxx.xxx
Per TCP/IP standard
valid address range
000.000.000.000 Appears only if LAN interface is
selected
MAC Address
xxx.xxx.xxx.xxx
Per TCP/IP standard
valid address range
Read-only,
uniquely assigned
Appears only if LAN interface is
selected
DHCP Disable/Enable Disable Appears only if LAN interface is
selected. Consult your administrator for
the appropriate setting.
ETHERN. Setting NetBIOS Proto-
col
Enable/Disable Enable Appears only if LAN interface is
selected
ASCII Data Prt 1025 to 65535 9100 Appears only if LAN interface is
selected. Sets the port number for
ASCII print jobs, and must match your
host system setting.
Keep Alive
Timer
2 - 10 minutes 3 min Appears only if LAN interface is
selected. With the time on, the TCP
connection will stay connected even
after the print job has terminated.
Ethernet Speed Auto Select/10 Half or
Full/100 Half or Full
Auto Select Appears only if a 10/100-Base-T LAN
card is installed

Section 3: Configuration and Operation
GL Series Operator’s Manual Page 3-9
Job Control Off/Standard/
Enhanced
Standard Appears only if LAN interface is
selected. Standard: NIC waits for entire
job to be received before indicating that
a job is done. Enhanced: Waits for
entire job to be printed before a similar
indication.
Offline Process Disable/Enable Disable Appears only if LAN interface is
selected
WLAN Address IP Address
xxx.xxx.xxx.xxx
Per TCP/IP standard
valid address range
000.000.000.000 Appears only if WLAN interface is
selected
Subnet Mask
xxx.xxx.xxx.xxx
Per TCP/IP standard
valid address range
000.000.000.000 Appears only if WLAN interface is
selected
Gateway
Address
xxx.xxx.xxx.xxx
Per TCP/IP standard
valid address range
000.000.000.000 Appears only if WLAN interface is
selected
MAC Address
xxx.xxx.xxx.xxx
Per TCP/IP standard
valid address range
Read-only,
uniquely assigne d
Appears only if WLAN interface is
selected
DHCP Disable/Enable Disable Appears only if WLAN interface is
selected. Consult your administrator for
the appropriate setting.
WLAN Setting Signal Strength NA NA, read-only Appears only if WLAN interface is
selected
Operation Mode Infrastructure/Pseudo
IBSS/Ad Hoc
Infrastructure Appears only if WLAN interface is
selected. An Access Point is needed
for Infrastructure Mode. Pseudo IBSS
requires two peers specific to the same
manufacturer, running standard Peerto-Peer communication without an
Access Point. Ad Hoc mode achieves
standard Peer-to-Peer communication
without an Access Point and the two
peers can be from different manufacturers.
SSID Name 1 to 32-character,
case sensitive string
including alphanumerics, symbols and
spaces
NA Appears only if WLAN interface is
selected
Reset SSID
Name
NA NA Appears only if WLAN interface is
selected
Min.Xfer Rate Auto-negotiate/1 Mb/
sec./2 Mb/sec./5.5 Mb/
sec./11 Mb/sec.
Auto-negotiate Appears only if WLAN interface is
selected
Channel Default/1-15 Default Appears only if WLAN interface is
selected. Selects the RF channel.
Ant.Diversity Diverse/Primary/Auxil-
iary
Diverse Appears only if WLAN interface is
selected. Select Primary or Secondary
to use the relevant antenna on the
server.
Preamble Default/Short/Long Default Appears only if WLAN interface is
selected
Power Mgmt 0 to 1000 ms 0 ms Appears only if WLAN interface is
selected. Sets the sleep time for power
saving.

Section 3: Configuration and Operation
Page 3-10 GL Series Operator’s Manual
Transmit Power 0 to 100% 100% Appears only if WLAN interface is
selected
Internat.Mode Disable/Enable Disable Appears only if WLAN interface is
selected. When enabled, the printer
adapts to international frequency
requirements in Europe.
Auth.Method Open/Shared Open Appears only if WLAN interface is
selected
Default WEP
Key
Appears only if WLAN interface is
selected. You can set up to four
encryption keys in ASCII of Hex, 40 or
128 bits.
Reset WEP key NA NA Appears only if WLAN interface is
selected
WEP key 1 Individual characters
of encryption key
NA Appears only if WLAN interface is
selected
WEP key 2 Individual characters
of encryption key
NA Appears only if WLAN interface is
selected
WEP key 3 Individual characters
of encryption key
NA Appears only if WLAN interface is
selected
WEP key 4 Individual characters
of encryption key
NA Appears only if WLAN interface is
selected
Section 3: Configuration and Operation
GL Series Operator’s Manual Page 3-11
*Parallel Port
(This option only
appears if this is
the active port to
be used)
Port Type IEEE 1284/Disable/
Centronics
IEEE 1284
Data Bit 8 Enable/Disable Enable
The Enable option (factory default) means
the PI line is not passed directly from host
to printer; all 8 bits are used for data bits,
and characters in the hex 80-FF range can
be accessed. Disable means when the host
PI line is enabled, data bit 8 internally indicates PI line status. T o use the PI line, disable data bit 8, and enable the Host PI
configuration option (under the PI Ignored
option).
Note: Data bit 8 is interpreted as either data
bit 8 or PI signal, but never both. When
enabled as data bit 8, data bit 8 has priority
over the PI signal, and all data above hex
7F is used to access character data and not
to interpret PI line data.
Conversely, when data bit 8 is disabled and
the PI signal is used, data bit 8 of the data is
reserved for use as the PI function, and you
cannot access characters in the hex 80-FF
range. Therefore, to access
characters in the hex 80-FF range, data bit 8
must be enabled.
PI Ignored Enable/Disable Enable
The PI (Paper Instruction) signal is used to
control vertical paper motion. The Enable
option (factory default) ignores the PI signal
and treats the data as characters or control
codes. The Disable option causes the
printer to interpret the eight data lines as
VFU commands when the PI signal is true.
Buffer Size in K 1 to 16 16
Configures the amount of memory allocated
for the Ethernet buffer. The range is 1-16
KB, in 1-KB increments.
Auto Trickle Disable/Enable Disable
This feature is used to prevent a host computer from “timing out” because the parallel
interface is “busy” for too long. The Enable
(factory default) option means, when the
printer’s buffers are almost full, the printer
begins to trickle data in from the host (at the
rate set in the Trickle Time menu) until the
buffers start to empty out.

Section 3: Configuration and Operation
Page 3-12 GL Series Operator’s Manual
Trickle Time 1/4,1/2, 1,2,4,8,16,Off
When the printer is printing
data from a host and a second
print job is received by the
printer from a different host,
Trickle Time
prevents the second host from
timing out while it is waiting for
its data to be printed. In order
to support this feature, the port
has to be able to accept data
from the host and store it for
future use.
1/4 sec
E.g., if the printer is printing a job from the
serial port, and then receives a second print
job from the parallel port, the data from the
parallel port will “trickle” bit by bit into the
printer buffer to prevent a timeout error from
being sent back to the host connected to the
parallel port. The selected value is the time
that the printer waits before getting the next
byte of data from the host. The Trickle Time
value should be less than the host time out
value, but not too much shorter or else the
printer fills up its buffer too fast. This function is not applicable for C/T hotport.
Timeout 1 to 60 10 sec
This is the value used by the printer to time
out from the current port and check the
other selected port types for data to print.
Report Status Disable/Enable Disable
When a fault occurs on the printer, only the
active port reports the fault to the host.
When enabled, this option sets the port to
report any fault even when it is not the current active port.
Prime Signal Disable/Enable Disable
Disable (factory default): The parallel port
will not perform a warm start (reboot) if the
host asserts the Prime Signal. Enable: The
parallel port will perform a warm start
(reboot) if the host asserts the Prime Signal.
Data Polarity Standard/Inverted Stan dar d
The Data Polarity parameter must be set to
match the data polarity of your host computer. Standard (factory default): Does not
expect the host computer to invert the data.
Inverted: Expects the data received on the
data lines from the host computer to be
inverted. Ones become zeros and vice
versa.
Resp.Polarity Standard/Inverted Standard
The Response Polarity parameter must be
set to match the response polarity of your
host computer. The Standard (factory
default) option does not invert the response
signal. Th e Inverted option inverts the
response signal sent to the host computer.
Busy on Strobe Enable/Disable Enable
Enable (factory default): asserts a busy signal after each character is received. Disable: asserts a busy signal only when the
print buffers are full.
Latch Data On Leading/Trailing Leading
Specifies whether the data is read on the
leading or trailing edge of the data strobe
signal.
Offline Process Disable/Enab le Disable
When set to disable, the printer does not
process parallel/network data while offline.
Or else the printer continues to process (but
not print) the current network/parallel job
while the printer is offline until the printer's
buffer is full.

Section 3: Configuration and Operation
GL Series Operator’s Manual Page 3-13
*USB Port
(This option only
appears if this is
the active port to
be used)
Buffer Size in K 1 to 16 16
This option configures the amount of memory allocated for the serial port buffer. The
range is 1-16 KB, in 1-KB increments.
NOTE: If you select a baud rate that is
19200 or greater, you may need to
increase the Buffer Size in K parameter
from the default to 16 KB to improve performance.
Timeout 10 sec 1 to 60
This item allows you to set the time that the
printer, when it has not received data from
its host, will begin to service all other host
ports looking for data to print.
*Serial Port
(This option only
appears if this is
the active port to
be used)
Baud Rate 600,1200,2400,4800,9
600,19200,38400,576
00,115200
19200 BAUD
The Baud Rate, Word Length,
Stop Bits and Parity settings
must match those that are set
on the host computer.
Word Length 7,8 8
Stop Bits 1,2 1
Parity None/Odd None
Data Protocol XON/XOFF,ETX/ ACK/
ACK/NAC/ Series1 1
Char/ Series1 2 Char/
DTR
XON/XOFF
XON / XOFF (factory default). The printer
controls the flow of communication from the
host by turning the transmission on and off.
In some situations, such as when the buffer
is full or the timing of signals is too slow or
too fast, the printer will tell the host to stop
transmission by sending an XOFF chara c-
ter. An XOFF character is sent when the
number of empty bytes in the buffer is less
than or equal to 25 percent of the buffer
size. If the host keeps sending data after an
XOFF is sent, the printer firmware will con-
tinue to send an XOFF for every 16 charac-
ters received. When cleared, the printer will
resume receiving data (XON). The data
does not have any End of Text codes; XON /
XOFF is a non-block protocol.
ETX / ACK. End of Text / Acknowledge. The
host controls the flow of communication to
the printer by sending a block of data and
ending the block with an End of Text (ETX)
signal. When the printer receives the ETX
signal, it will acknowledge the ETX , thereby
acknowledging it has received the entire
block of data.
ACK / NAK. ACK means acknowledge; the
device acknowledges it has accepted a
transmission. NAK means negative
acknowledge; the device did not receive the
transmission.
Buffer Size in K 1 to 16 16
This option configures the amount of mem-
ory allocated for the serial port buffer. The
range is 1-16 KB, in 1-KB increments.

Section 3: Configuration and Operation
Page 3-14 GL Series Operator’s Manual
Trickle Time 1/4,1/2, 1,2,4,8,16,Off 1/4 sec
When the printer is printing data from a host
and a second job is received by the printer
from a different host, Trickle Time prevents
the second host from timing out while it is
waiting for its data to be printed.
In order to support this feature, the port has
to be able to accept data from the host and
store it for future use.
For example, if the printer is printing a job
from the serial port and then receives a second print job from the parallel port, the data
from the parallel port will “trickle” bit by bit
into the printer buffer to prevent a timeout
error from being sent back to the host connected to the parallel port.
The selected value is the time that the
printer waits before getting the next
byte of data from the host. The Trickle Time
value should be less than the host time out
value, but not too much shorter or else the
printer fills up its buffer too fast. This function is not applicable for C/T hotport.
Timeout 1 to 60 10 sec
This is the value used by the printer to time
out from the current port and check the
other selected Port Types for data to print.
When the printer has not received data from
the host after a certain period of time, it
needs to time out in order to service the
other ports.
Data term
Ready
True/On-Line and
BNF/Off-Line or BF/
On-Line/False
TRUE
Data Terminal Ready. This configuration is
part of hardware flow control and determines when the Data Terminal Ready (DTR)
signal is generated. This signal indicates if
the printer is ready to receive data.
• False. Never asserts the DTR signal.
• True (factory default). Continuously
asserts the DTR signal.
• On-Line and BNF (buffer not full). Asserts
the DTR signal when the printer is online
and the internal serial buffer is not full.
• Off-Line or BF (buffer full). Asserts the
DTR signal when the printer is offline or
the internal serial buffer is full.
• On-Line. Asserts the DTR signal when the
printer is online.
Request to
Send
True/On-Line and
BNF/Off-Line or BF/
On-Line/False
On-Line and BNF
This configuration is part of hardware fl ow
control and determines when the Request to
Send (RTS) signal is generated. This
signal indicates whether or not the printer is
ready to receive data.
• False. Never asserts the RTS signal.
• True. Continuously asserts the RTS signal.
• On-Line and BNF (factory default). Asserts
the RTS signal when the printer is online
and the internal serial buffer is not full.
• Off-Line or BF. Asserts the RTS signal
when the printer is offline or the internal
serial buffer is full.
• On-Line. Asserts the RTS signal when the
printer is online.

Section 3: Configuration and Operation
GL Series Operator’s Manual Page 3-15
Poll Character 00 to FF 00 Hex
This option is for the Series1 protocol.
Whenever the printer receives this character, it sends a response to the host indicating the current state of the printer (see
Series1 protocol).
Poll Response 0 to 30 0 ms
This option is for the Series1 protocol. After
receiving a poll character, the printer will
wait the poll response time in milliseconds
before sending the response.
Idle Response Disable/Enab le Disable
This option is for the Series1 protocol.
• Disable (factory default).
• Enable. The printer sends a response
character every two seconds while the
number of valid bytes in the buffer is less
than 75 percent of the buffer size.
One Char
Enquiry
Disable/Enable Disable
The One Char Enquiry mode uses the Poll
Character to detect a request from the host
and sends a response back to the host. .
Printer State Response (hex)
Online and Buffer Not Full 22
Online and Buffer Full 23
Offline and Buffer Not Full 20
Offline and Buffer Full 21
Printer Status Disable, ENQ/STX,
ENQ
Disable
Disable. Printer status ignored.
ENQ/STX:
Bit Printer Status
0 Set when the printer is not online
or the buffer is full
1 Set when the printer is offline.
2 Clear during a paper out or Rib-
bonMinder fault
3 Always set
4 Set during a Head Open fault.
5 Set during a buffer overflow fault
6 Set during a parity or framing
error fault
7 Always clear
ENQ:
Bit Printer Status
0 Set when the label has printed
1 Set when the label is presented
2 Set while the printer is online
3 Always set
4 Set printing in the batch mode
5 Set during a Ribbon fault
6 Set during a Paper Out fault
7 Set during a Head Open fault
Framing Errors Enable/Disable Enable
These are possible errors that can occur
when serial interface settings of the printer
do not match those of the host computer. If
enabled (factory default), a framing error
causes a fault message to display on the
control panel. If disabled no fault message
will be displayed.

Section 3: Configuration and Operation
Page 3-16 GL Series Operator’s Manual
3.6 ADVANCED MODE
Advanced Mode lets you configure the more advanced features of the printer hardware. The
following settings are available in Advanced Mode: (Menus marked with an aster isk * i n front are
only available in Admin User has been enabled in this menu.
DISPLAY SUB-MENU RANGE DEFAULT DESCRIPTION
Media Handling Continuous/Tear-Off/Dis-
penser/Cutter/Rewind
Continuous
*Adv Continuous Standard/Tear-Off/
Tear Strip F ull
Standard
Print Mode Transfer/Direct Transfer
Gap/Mark Sensor Gap/Disable/Mark Gap
The Gap opt ion i s f or u se wit h
media featuring a liner space
between die-cut labels or
when using tag stock with
notches or holes as label
length indicators on white
background media. The Topof-Form position is the leading edge of the die cut label
(trailing edge of the gap,
notch, or hole).
Select when using media that
has horizontal black marks
located on the underside of the
label liner or tag stock. The
Top-of-Form position is the
leading edge of the black mark.
Note: When you select Disable,
the length of each label is
based on the Label Length
value entered in the MEDIA
SETUP menu or the value sent
via host software.
Run Auto Cal
Notes:
Supports label lengths up to
24 inches.
Changes in values take
effect immediately within
the current configuration
menu.
-1.00 to 12.80 (-25.4 to
152.0 mm)
0.00 inches
Note:
Run Auto-Cal is completed
successfully when the
Sensed Distance displayed
correctly matches that of the
installed media.
When Gap is selected, the
Sensed Distance should
match the length from the
trailing edge of one gap to the
trailing edge of the next gap
(one label + one gap).
When Mark is selected, the
Sensed Distance should
match the length from the
leading edge of one black
mark to the leading edge of
the next black mark.
This feature is used to improve
the sensitivity and reliability of
the Media Sensor in detecting
gaps, notches, holes, or black
marks on the installed media,
as well as a paper out condition.
Press the ENTER key with
“Run Auto-Cal” displayed. The
printer will then advance
media the distance needed to
accurately detect the label
length indicators, then stop at
the Top-of-Form position and
momentarily display the
Sensed Distance.
The end result will be a change
to the Gap/Mark Threshold,
Paper Out Threshold, and
Sensed Distance values tha t
the printer will use.
Run Profile -1.00 to 1.00 (-25.4 to
25.4 mm)
0.00 inches
*Power Saver Time 1,5,10,15,30,45,60, 240 15 minutes
(Note:
Pressing any key
removes the power saver
message from the control
panel. Sending a print job to
the printer also turns off
power saver mode.)
The time interval you specify
for this parameter sets the
amount of idle time
before the printer goes into
Power Saver mode.

Section 3: Configuration and Operation
GL Series Operator’s Manual Page 3-17
*Pwr Save Control Enable/Disable Enable
Allows you to enable and disable Power Saver mode. If
enabled, the menu for Power
Saver Time is in effect.
Display Language English/German/ French/
Italian/ Spanish/Portuguese
English
Sets the language used for all
LCD text communication.
*Alarm On/Cont.Beep/Off On
An audible alarm sounds (3
beeps) by def au l t wh en a f a ul t
occurs, such as a paper jam.
*Date 00:00 2005Jan01
This menu allows you to set the
date and time. The date is
expressed in hh:mm
YYYYMMMDD.
MMM = month
DD = day
YYYY = year
hh = hour
mm = minute
Auto Online Enable/Disable Enable
Sets the printer to go to
ONLINE mode upon startup or
error being cleared
*Cancel Key Enable/Disable Enable
When enabled, the key may be
used in offline mode to clear all
data in the print buffer, and
deleted data will not be printed.
*Ret.Status Port Serial/E-NET Stat Port/
USB/IEEE1284/Disable
Serial
This option selects the port for
the Return Status Commands
(i.e., ~STATUS (PGL) and ~HS
(PPI/ZGL)) to send the status
data back to the Host.
*Del Char frm Fls
Delete Character from Flash
*Ld Char From Fls
Load Character from Flash
*Save Char to Fls
Save character to Flash
*Del Char Frm
RAM
Delete Character from RAM
*LD Char at Pwrup Disable/Enable Disable
Load Character at Power Up
*Del Set Frm Flash
Delete Set from Flash
*Ld Set From Flsh
Load Set from Flash
*Save Set to Flsh
Save Set to Flash
*Del Set From
RAM
Delete Set from RAM
*Ld Set at PwrUp Disable/Enable Disable
Load Set at Power Up
*Main FFS Overwrite Files
View Main Files
Delete Files
Flash Avail.0
Bytes
Enable/Disable Enable
Overwrite Files (factory
default): prevents files from
being overwritten
View Main Files: Displays the
list of files in the main file system. Pressing the v cursor key
displays the file size.
Delete Files: lets you delete
files in the main file list. Ask
your administrator for help.
Flash Avail: The amount of
flash available for the user to
save or download files into the
main flash area.

Section 3: Configuration and Operation
Page 3-18 GL Series Operator’s Manual
*Optimize&Reboot
Reclaims flash space from
deleted flash files. After pressing ENTER, wait for the printer
to reboot.
NOTE: The Optimize feature
will optimize both the Main and
Extd file system (if present).
Print File List Disable/Enable Enable
Prints a summary of the files
stored in flash memory and
several statistics on
File System usage.
*Auto Locking Disable/Enable Disable
Disable (factory default): The
ENTER button must be locked
manually. Enable: The printer
automatically locks the ENTER
button five minutes after the
last control panel was used.
*Set Lock Key
(This lets you
choose different
buttons for
locking or unlo ck ing
the printer menu.)
The default lock keys
and the ENTER and
v (down cursor) keys.
Choose any group of keys as
the new lock and unlock keys
that are not already used for
another function.
To set the new lock key: At the
°Select a new lock key”
prompt, press the combinatio n
of keys that you want to assign
as the new lock key. Make sure
you press all keys selected at
the same time.
If the selection is valid, the display will read, ¡°Enter the new
lock key aga in. ” If se t co rre ct ly,
the message °Lock key has
been changed.” appears.
*Max Font Buffer 100 to 1800 100 KB
The maximum amount of
DRAM allocated for downloading fonts (True-Type,
Scalable, or Bit Map).

Section 3: Configuration and Operation
GL Series Operator’s Manual Page 3-19
*Max Cache Memory
(
NOTE:
HS = Horizontal resolution
VS = Vertical resolution
Average Height = Average
character height (inches)
Average Width = Average
character width (inches
NumOfChar = Number of
Characters to be cached)
50 to 2000 900 Kbytes
The Maximum Cache Memory
option specifies the size of the
memory block that can be allocated to the font cache. The
font cache stores bitmaps that
are created on demand from
the font outlines stored on the
printer flash. The cache allows
the printer to print scalable
fonts at optimum speed.
To calculate the memory
requirement, use this equation:
(HS x VS x Average Height x
Average Width x NumOf Char)/
8
*Max Cached Char
(NOTE: HS = Horizontal
resolution
VS = Vertical resolution
Average Height = Average
character height (inches)
Average Width = Average
character width (inches
NumOfChar = Number of
Characters to be cached)
01 to 20 01 Kbytes
Specifies t h e si z e of t h e l ar ges t
character that can be stored in
the font ca che. To calculate t h e
memory
requirement, use this equation:
(HS x VS x Average Height x
Average Width)/
*Standard Chars 0 to 512 340
This menu entry permits you to
adjust the thickness or font
weight of standard text fonts.
*Bold Chars 0 to 512 448
This entry permits you to adjust
the thickness or font weight of
bold text fonts. This menu will
not take effect unless you save
it in a configuration and the
printer is powered up with that
configuration.
*Extra Bold Char 0 to 512 504
This menu entry permits you to
adjust the thickness or font
weight of extra bold text fonts.
*OCR-A Chars 0 to 512 384
Character weight adjustment of
resident OCR-A character s.
*OCR-B Chars 0 to 512 304
Character weight adjustment of
resident OCR-B character s.
*Tall Charcters Disable/Enable Disable
Increases the height of resident
scalable characters. Enab ling
the feature increases the height
by approximately 10 percent.

Section 3: Configuration and Operation
Page 3-20 GL Series Operator’s Manual
*Batch Counter Disable/Enable
Enable (factory default): The #
Pages remaining to be printed will
display on the second line of the
control panel LCD. This feature is
supported in PGL and ZGL only.
The PGL Execute command to support this feature is
~EXECUTE;NAME;(#Pages). The
ZGL Execute command is
^PQ(#Pages).
Disable
Disable: The # Pages remaining to be printed will not display. Instead, the Active
emulation and interface will
display on the second line of
the control panel LCD.
Displays the number of pages
remaining in a print job.
NOTE: If the correct execute
command is absent from the
print file, “0 Pages” will continually display on the control panel
LCD.
Disp. Intensity 0 to 20 10
Sets the Display Intensity values from 0 to 20.
*SENSOR SETUP Sensed Distance
Gap/Mark Thresh
Run Manual Cal
Pwr Up Auto-Cal
Head Auto-Cal
Online Auto-Cal
Gap Windowing
Gap Length
Cal in Peel Mode
Min Calib Delta
Use Label Length
Threshold Range
1 to 9.9 (0.1 to 251.5 mm)
0 to 255
Enable/Disable
Enable/Disable
Disable/Enable
Disable/Enable
0.05 to 1.00 (2 to 25 mm)
Disable/Enable
012 to 050
Disable/Enable
5 to 95%
0 inches (00.0 mm)
140
Enable
Enable
Disable
Disable
0.12 inches (3 mm)
Disable
20
Disable
50%
Admin User Disable/Enable Disable
When enabled, this function
permits access to submenu
items not normally accessible
to a typical user.

Section 3: Configuration and Operation
GL Series Operator’s Manual Page 3-21
3.7 DIAGNOSTICS MODE
The following settings are available in Diagnostics Mode:
DISPLAY SUB-MENU RANGE DEFAULT DESCRIPTION
Priority Setting LCD (Internal) Command
Selects whether software commands can
override printer settings, or whether settings
via the LCD have priority.
Printer Tests Checkerboard
Grey
Grid
Current Config
Left Test
Right Test
Combo Test
Ethernet Test
Barcode Demo
RFID Report
Checkerboard
Checkerboard: This pattern helps identify
marginal print head elements, quality of
edge sharpness, and uneven print quality.
Grey: This pattern helps identify burned out
print head elements and uneven print quality.
Grid: This pattern helps identify edge sharpness and uneven print quality.
Current Config: Prints the cur ren t printe r
configuration and helps identify the text print
quality. Also prints Print head statistics in
the header.
Left Test: Prints a pattern containing a
series of ladder-type bar code symbols,
starting with four and decrementing by one
symbol on each print until a single symbol
prints on the left side. This pattern helps
identify ribbon wrinkle problems.
Right Test: Prints a pattern containing a
series of ladder-type bar code symbols,
starting with four and decrementing by one
symbol on each print until a single symbol
prints on the right side. This pattern helps
identify ribbon wrinkle problems.
Combo Test: Prints a combined left test
and right test.
Ethernet Test. This item appears only if the
Network Interface Card (NIC) adapter is
installed. Prints the NIC statistics stor ed on
the NIC adapter.
Barcode Demo: Prints text and barcodes
with the barcodes positioned at the left and
right margins of the standard label media
supplied with the printer. The test automatically produces output for 4 inch printers at
203dpi and 305 dpi.
RFID Report: This item appears only if the
RFID encoder is installed. Prints a report of
RFID statistics since the printer was turned
on or since the last data reset.
Once you have selected the desired test
pattern, press ENTER to start printing. If
the Test Count option (below) is set to Continuous (factory default), press ENTER
again to stop printing.

Section 3: Configuration and Operation
Page 3-22 GL Series Operator’s Manual
Software Build NA
This is the reference number which includes
the program file part number and
revision number of the software installed in
the printer, e.g., 358186 V1.07G.
Hex Dump Mode Enable/Disable Disable
If enabled, this option prints out data sent
from the host in hexadecimal format.
FLASH Installed NA
Displays the amount of FLASH memory
installed in megabytes.
DRAM Installed NA
Displays the amount of DRAM installed in
megabytes.
Printer Usage NA
Displays the length of media actually printed
since the last Reset Head Data operation.
This value is set to zero at the factory after
burn-in testing.
PrintHead Usage NA
Displays the length of media actually printed
since the last Reset Head Data operation.
This value is set to zero at the factory after
burn-in testing.
Head Type NA
Displays the print head resolution available,
in Dots Per Inch.
Head Voltage NA
Displays the print head voltage being
applied

Section 3: Configuration and Operation
GL Series Operator’s Manual Page 3-23
3.8 CONFIGURATIONS MODE
The following settings are available in Configurations Mode:
3.9 EMULATIONS SETUP MODE
The following settings are available in Emulations Setup:
DISPLAY SUB-MENU RANGE DEFAULT DESCRIPTION
Save Config. 1-8 1
This option allows you to save up to eight
unique configurations to meet different print
job requirements. This eliminates the need
to change the parameter settings for each
new job. The configurations are stored in
memory and will not be lost if you turn off
the printer. If the Protect Configs. parameter
is enabled, the new configuration will not be
saved unless the existing configuration has
been deleted first. The factory default configuration cannot be changed.
Print Config. 1-8 Current con fig.
Prints out the current configuration settings
that are in force
Delete Config. 1-8 1
Deletes the specified user configuration
DISPLAY SUB-MENU RANGE DEFAULT DESCRIPTION
Select SBPL SBPL
Selects SATO Barcode Programming Language as the standard language for host
commands.
DGL
Selects Datamax Printer Language as the
standard language for host comm an ds.
PGL
Selects Printronix Printer Language as the
standard language for host comm an ds.
ZGL
Selects Zebra Printer Language as the standard language for host commands.
TGL
Selects TEC Printer Language as the standard language for host commands.
IGL
Selects Intermec Printer Language as the
standard language for host comm an ds.

Section 3: Configuration and Operation
Page 3-24 GL Series Operator’s Manual
3.10 UNDERSTANDING CONTINUOUS PRINT AND TEAR OFF OPERATIONS
The Continuous Print and Tear Of f o perati ons are ava ilabl e f or u se if the pri nte r i s not c onnect ed
to a cutter or peeler. The difference between the two operations is in the way the label paper is
ejected. Here are the details:
Continuous Print Operation
In this method of operation, whenever a
print job has been completed (or when a
sheet of paper is fed) the paper is ejected
outwards until the second label from the
front is placed just in front of th e print head.
The first label will not be completely
ejected, and cannot be torn off neatly.
Tear Off Operation
In this method of operation, after printing,
the printer feeds the first (out ermost) label
so that its bottom e dge rests at the posi tion
of the cutter blade. This label can then be
torn off easily.*
However, when the front label is torn off,
the label behind it would now have its front
edge moved beyond the print head
position. Since printing has to begin from
the top of a label, the printer theref ore
performs a backfeed to the front-most label
before printing resumes, so that the first
labels’ top edge is repositioned behind the
print head. Printing can then proceed
normally.
*assuming that this tear- o ff position has been properly calibrated as discussed in the User Mode
Section 3.4.2 Setting Print Speed.
Continuous Print Operation
Tear Off Operation

Section 4: Cleaning and Maintenance
GL Series Operator’s Manual Page 4-1
4
CLEANING AND MAINTENANCE
4.1 INTRODUCTION
This section provides information on user maintenance for the GL Serie s pri n ters. The
following information is covered here:
• Cleaning the Print Head, Platen and Rollers
• Adjusting print quality
4.2 CLEANING THE PRINT HEAD, PLATEN AND ROLLERS
The print head not only generates printouts of barcodes, but al so g raphi cs and text. To produce
optimal printing, it must be kept clean in spite of the dirt and adhesive that constantly
accumulates on its print surface. Furthermore, dirt can accumulated along the label path,
affecting parts like sensors and guides, and reducing their performance.
Therefore, it is important to clean these important component s periodically. Depending on the
region in which the GL4xxe series printer was bought, a cleaning set and/or a set of cleaning
sheets may be provided with the unit. I f any of the clean ing items need repla cement, contact your
authorized SATO dealer.
When to clean with the cleaning set
(if supplied)
♦ Printer head, platen roller, paper sensor, and label
guide: clean after using up every other roll of paper,
or each time after printing 150 m.
♦ Other parts: clean after finishing every six rolls of
paper, or every time after printing 900 m.
When to clean with the supplied cleaning sheet
♦ Printer head, platen roller : clean after using every si x
rolls of paper, or every time after printing 900 m.
4.2.1 DETERMINING WHEN THE PRINT HEAD NEEDS REPLACE MENT
♦ Check for vertical st reaking in the same location of every label. If cleaning the print head does
not cause the streaking to be eradicated, then the printhead may be worn. Remove the
printhead and examine it for physical damage or wear.
♦ Load a different roll of labels and ribbon, and then run test prints again. If the vertical streaks
continue to surface, then the printhead needs to be replaced. See Page “2.4 Replacing the
Print Head” on page 2-18.
Sample cleaning kit that may be
supplied with your printer or
purchased separately
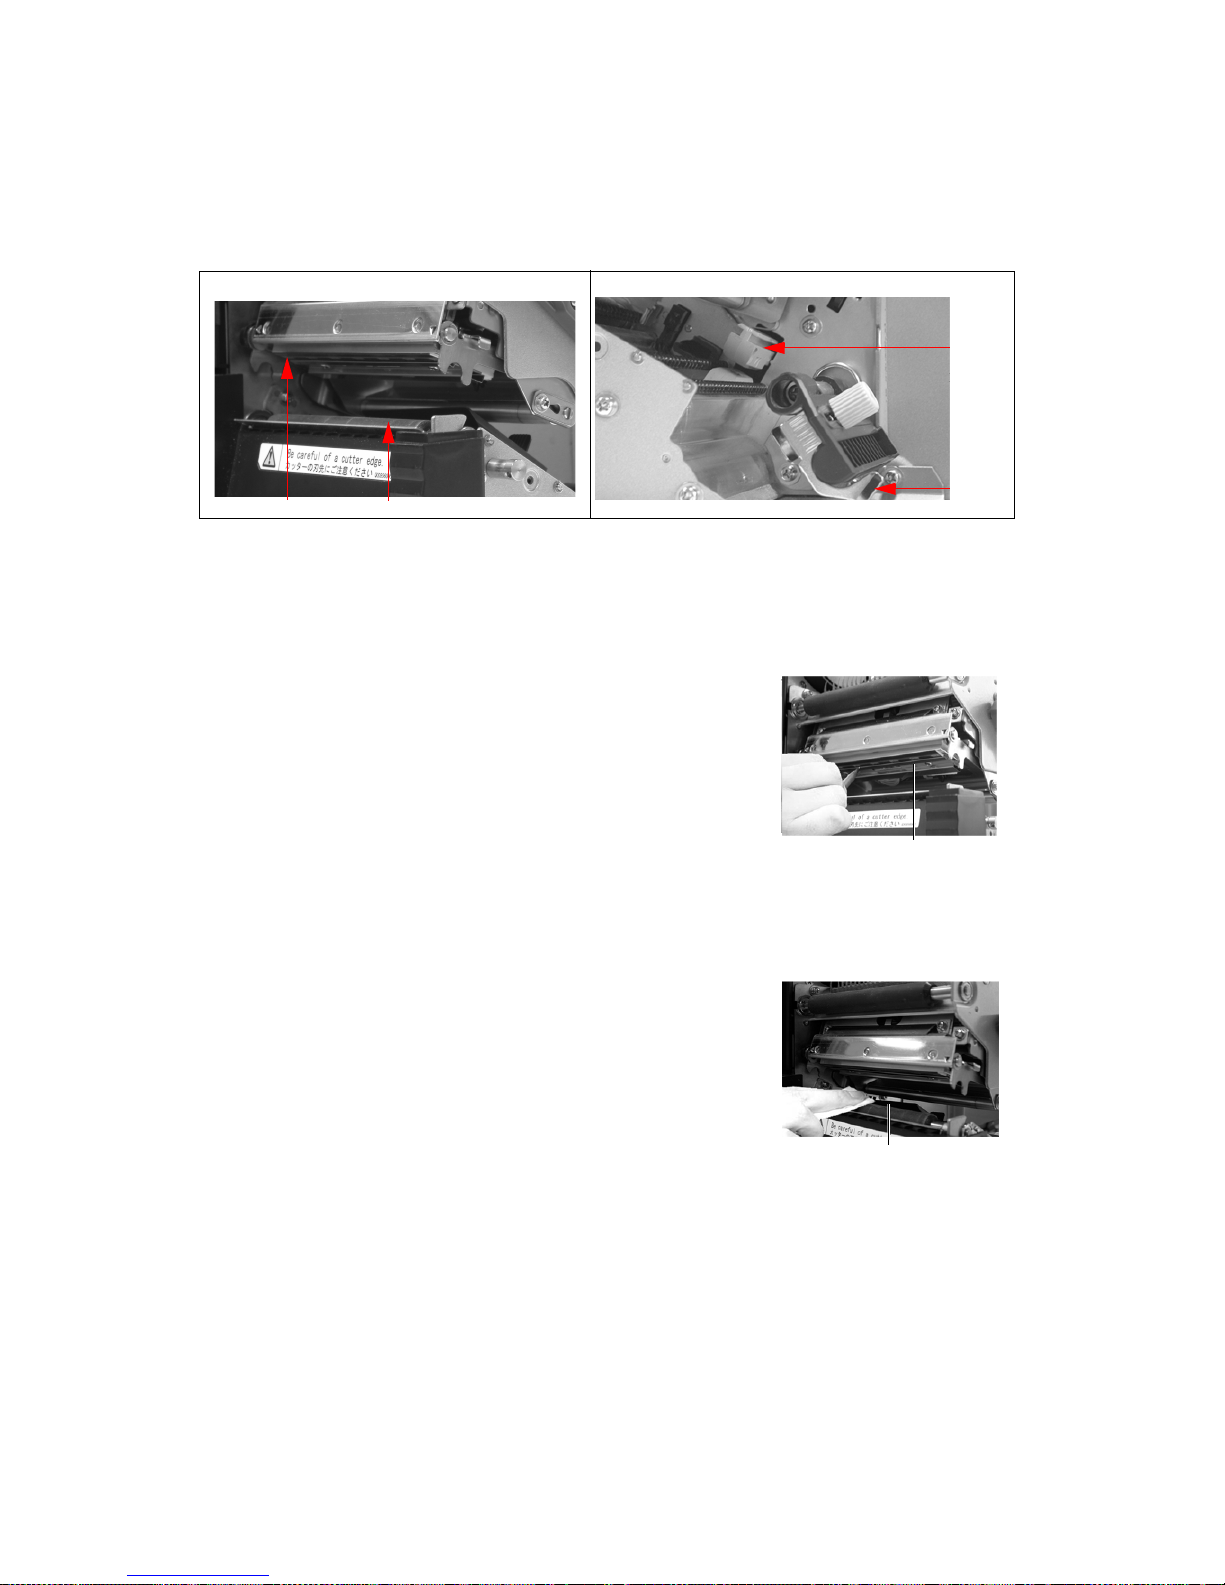
Section 4: Cleaning and Maintenance
Page 4-2 GL Series Operator’s Manual
4.3 HOW TO CLEAN THE PRINTER (CLEANING SET)
If you are using a carbon ribbon, be sure to remove it before cleaning. Foll ow the inst ructions
supplied with the cleaning set. Use the items to clean the following parts.
1. Lift up the main cover.
2. Unlatch the print head unit using the head release lev er.
The print head is now accessib l e.
3. Wipe off the dirt from the printer head and paper
sensor using a cleaning pen. (See figure on the
right)
4. Moisten the cotton cloth with cleaning liquid, and
use the cloth to wipe any dirt or accumulated
adhesive off the platen roller. (See figure on the
right)
5. If you are using linerless labels , also wipe of f the di rt
on the fixed cutter blade with a cleaning pen.
Print head
Paper Sensor and Label Guide
sensor
label
Print head
Cleaning the Print Head
Cleaning t he Platen Roller
Platen Roller
Print head Platen Roller

Section 4: Cleaning and Maintenance
GL Series Operator’s Manual Page 4-3
4.4 HOW TO CLEAN THE PRINTER (CLEANING SHEET)
The cleaning sheet is used for cleaning the print head and platen roller.
1. Lift up the main cover.
2. Unlatch the print head unit using the head release
lever.
The print head is now accessib l e.
3. Remove the label and the ribbon.
4. Put the head cleaning sheet between the print head
and the platen rol ler . The coarse side o f the cleanin g
sheet should face the surface of the print head elements.
5. Fasten the head-releas e lever to mount th e print
head.
6. Using both hands, pull the cleaning sheet outwards, towa rd your body. This will
remove any dirt stuck to the print head.
7. When the cleaning sheet has bee n removed, p erform step s 2 to 6 to re peat the clea n-
ing procedure one or two more times.
8. When no more additional dirt appears on the cleaning sheet after it has been pulled
out, you can stop cleaning with the sheet.
9. Unlatch the print head and use the cleaning pen from the cleaning kit to gently
remove any remaining dirt from the print head.
Caution
• Be sure to turn off the power before cleaning.
• The suggested clean in g s ch edu le here a re ju st gui del in es . If nec essa ry , cl ean as app ro pria te d epe ndi ng
on the degree of contamination.
• Use a cleaning pen or cotton cloth to clean the printer units.
• Use only soft, lint-free m aterials for cl eaning. Avo id using ha rd objects for t he cleaning process, as they
will damage the components.
Using the Cleaning Sheet

Section 4: Cleaning and Maintenance
Page 4-4 GL Series Operator’s Manual
4.5 ADJUSTING PRINT QUALITY
Print quality can be optimized with regular cleaning and maintenance of t he pri nt head and
components along the label path. Additionally , you can fine-tune print quality by adjusting print
darkness and print speed settings.
4.5.1 Adjusting Print Darkness
This adjustment allows the user to control (with in a specified range) t he amount of power applied
to the individual print head heat elements. It is impor tant to find a proper print darkness level
based on your particular label and ribbon combinati on. The printed i mages should not be t oo light
nor should the ink from the ribbon “bleed.” The edges of each image should be crisp and well
defined.
LCD Panel — The Print Darkness can be set using the front panel
LCD panel (User Mode) or by sending the Print Darkness software
command from a computer.
There are five settings, from -15 (lightest) to +15 (darkest). The
default setting is 5. Use the Up and Down cursor buttons to adjust
the cyclical value displayed on the screen.
For instructions on setting Print Darkness, refer to Section 3, Configuration.
4.5.2 Adjusting Print Speed
Besides varying the rate at which labels are printed, thi s adjust ment can be used to reg ulate any
changes in print quality.
LCD Panel — Print Speed can be set using the front panel LCD
panel (User Mode) or by sending the Print Speed software
command from a computer.
On the GL408e and GL412e, there are nine settings, from 2 ip/s
(slowest) to 10 ip/s (fastest). The default setting is 4.
For instructions on setting Print Speed, refer to page 3-5, Operation and Configuration.

Section 5: Troubleshooting
GL Series Operator’s Manual Page 5-1
5
TROUBLESHOOTING
If you are unable to produce printouts on the GL Series printers, use
this section to make sure the basics have been checked, before deciding
you are unable to proceed any further. The section is divided into
seven parts:
• Initial Checklist
• Checklist for the Centronics Parallel Interface
• Checklist for the RS232C Serial Interface
• Understanding STATUS, RIBBON and LABEL indicators
• Understanding the LCD error messages
• Understanding the LCD warning messages
• General Troubleshooting Guide
5.1 INITIAL CHECKLIST
1. Is the printer powered up and ON LINE?
2. Is the ERROR light on the front panel OFF? If this light
is ON, it may mean the print head assembly is open or
another error condition is present.
3. Are the Label Hold-Down and Print Head Assembly in
the latched position?
5.2 USING THE CENTRONICS (PARALLEL) INTERFACE
1. Is the IBM parallel printer cable connected securely to
your parallel port (DB-25S Female) on the PC and to
the Centronics connector on the printer?
2. Is there more than one parallel interface port on your
PC (LPT1, LPT2, etc.)? If so, make sur e you are sending data out the correct port.
3. When you send the print job to the printer, and it does
not respond, do you get an error message on your PC
that says “Device Fault” or something similar?
This may mean that the computer doesn’t know the
printer is there. Verify that:
a. Both ends of the cable are securely inserted into
their respective connectors.
b The printer is ONLINE.
c. The cable is not defective. There are other things
that can cause this error message on your computer, but at this stage, a defective cable may be
one of the reasons.
Observations

Section 5: Troubleshooting
Page 5-2 GL Series Operator’s Manual
5.2 USING THE CENTRONICS (PARALLEL) INTERFACE (CONT’D)
4. When you send the print job to the printer and it
does not respond, and there is no error message
on the PC:
A. Check your data stream for some of the bas ics.
Is your job framed as follows? For SBPL:
<ESC>A—DATA—<ESC>Z
B. Verify that you’ve included all required parame -
ters in the data stream.
C. Verify the following:
• You have not typed a “0” (zero) for an “O”
(letter) or vice-versa.
• You have not missed any <ESC> characters
where they’re needed.
• Make sure all printer command codes are
capital letters .
• Your protocol codes are set for Standard or
Non-St andard and your data stream is consistent with these.
5. If you’ve checked all of the above and the printer still isn’t
printing, you may want to try a Receive Buffer Hex Dump to
determine what (if anything) th e printer is rec eiving fro m your
computer. To print Hex Dumps see page 3-21, Configuration
and Operation.
The Centronics port is now listening for incoming data. Send
your print job. The printer will now print (only once) a Hexadecimal (Hex) Dump of everything it received from the host
computer. Each 2-digit hexadecimal character represents a
character the printer receiv ed. It may be tedious, but now
you can analyze and troubleshoot the data stream.
6. While checking the Hex Dump printout, look out for the
sequence 0D 0A, which is a combination of Carriage Return
and Line Feed characters. The command string should be
continuous, and you should not see CR or LF characters
between the Start Command (<ESC>A) and the Stop Command (<ESC>Z) for SBPL emulation.
If you are using BASIC, it may be adding these characters
automatically as the line wrap s. Adding a “width” statement
to your program can help to suppress these extra 0D 0A
characters by expanding t he line length up to 2 55 characters.
See the beginning of the Programming Reference, under
Command Codes, for details on writing a program in BASIC.
If you are not programming in BASIC, check to see if you
have an equivalent statement in the language you’re using,
to suppress extra carriage returns and lin e feeds from your
data being sent out to the pr inter. The data stream should be
one complete line going to the printer.
Observations

Section 5: Troubleshooting
GL Series Operator’s Manual Page 5-3
5.3 USING THE RS232C (SERIAL) INTERFACE
1. Is the RS232C Serial cable connected securely to
your serial port on the PC (Male connector) and to
the RS232C connector on the printer?
2. Is the cable defective? At the very least, you s hould
be using a “Null Modem Cable,” which crosses pins
in a specific manner . This should enable your printer
to print.
3. Check for obvious errors in the data stream.
Remember that all print jobs for seri al data must be
framed by an STX and ETX.
4. If after sending your j ob to the printer, it only “beeps”
indicating a “framing error” message , you may have
a configuration problem. There may be some inconsistencies with the Baud Rate, Parity, Data Bits, or
Stop Bit s in relati on to your host comp uter . If you are
confused as to what the printer’s current RS232 settings are, you may choose the SATO defaults (all
DIP switches in the OFF position) to achieve 9600
baud, no parity, 8 data bits, and 1 stop bit.
Observations

Section 5: Troubleshooting
Page 5-4 GL Series Operator’s Manual
5.4 UNDERSTANDING THE STATUS INDICATORS
The LED indicators flash to indicate t he curr ent st at us of the pri nter. Another indicator is the builtin buzzer which sounds audible beeps to alert the user.
For information on error messages and icons, proceed to the next section.
Indicator Activity Cause Remedy Illustration
STATUS Flashes
(green)
The receive
buffer is getting low, due
to abundant
incoming data.
You can continue
using the printer.
The flashing should
stop as soon as the
receive buffer
clears more of the
incoming data
RIBBON Flashes ( red)
The ribbon
reel is running low on
ribbon.
You can continue
using the printer.
Replace the ribbon
if the Ribbon End
error message
appears during
printing.
LABEL Flashes (red)
The label reel
is running low
on label.
You can continue
using the printer.
Replace the label
reel if the Label End
error message
appears during
printing.
BUZZER Beeps
There is an
error in an
incoming
printer command or print
area specification setting.
Correct the p rinter
command or print
area settings.
LINE FEED
Five LED indicators are
employed to indicate the
operational status of the
printer. Additionally, a built-in
speaker generates audible
tones to alert the operator.

Section 5: Troubleshooting
GL Series Operator’s Manual Page 5-5
5.5 UNDERSTANDING THE LCD ERROR MESSAGES
LCD Message Description
B10 ERROR:
NO DRAM
DETECTED
Cycle Power
Cause:
Remedy:
DRAM is faulty or otherwise not detected by the system
Turn the printer OFF for 15 seconds, then ON again. If the
problem persists, contact your authorized customer service representative.
B11 ERROR:
RAM TEST FAILED
Cycle Power
Cause:
Remedy:
One or more memory locations failed the RAM test.
Turn the printer OFF for 15 seconds, then ON again. If the
problem persists, contact your authorized customer service representative.
B12 ERROR:
PROGRAM MISS-
ING
Repeat Download
Cause:
Remedy:
The data controller program of the printer was not found,
or has been corrupted.
Turn the printer OFF for 15 seconds, then ON again. If the
problem persists, contact your authorized customer service representative.
B22 ERROR:
DECOMPRESS SIZE
Repeat Download
Cause:
Remedy:
Downloaded data was decompressed but found to have a
different filesize than expected.
Turn the printer OFF for 15 seconds, then ON again. If the
problem persists, repeat the data download.
B23 ERROR:
DECOMPRESS
CKSUM
Repeat Download
Cause:
Remedy:
Downloaded data was decompressed but found to have a
different checksum than expected.
Turn the printer OFF for 15 seconds, then ON again. If the
problem persists, repeat the data download.
CALIBRATION FAIL
See User Manual
Cause:
Remedy:
Preset printer setting in stalled by t he M anual Calibrate
function were not acceptable.
Run the Manual Calibrate function again.
DOWNLOADER
ERROR
BEYOND __ MB EFC
Repeat Download
Cause:
Remedy:
An attempt to access the printer firmware beyond the
allowed area.
Contact your SATO technical service centre for correc tive action.
DOWNLOADER
ERROR
EXTERNAL FLASH
IS FULL
Optimize Files
Cause:
Remedy:
Insufficient memory remaining for the download.
Delete and optimize files.
DOWNLOADER
ERROR
EXTERNAL FLASH
WAS
NOT FOUND
Insert Cartridge
Cause:
Remedy:
No cartridge-based memory area was f ound to store the
data to be downloaded.
Make sure a properly working memory cartridge has
been installed, or specify another storage area.
DOWNLOADER
ERROR
FLASH NOT
ERASED
Repeat Download
Cause:
Remedy:
An error occurred when the f la sh m emory was being
reprogrammed.
Turn the printer OFF for 15 seconds, then ON again. If the
problem persists, contact your authorized customer service representative.

Section 5: Troubleshooting
Page 5-6 GL Series Operator’s Manual
DOWNLOADER
ERROR
FLASH WRITE #__
Repeat Download
Cause:
Remedy:
Writing to the flash memor y r esulted in an error.
Repeat the flash download procedure. If th e er ror per sists, contact a technical support representative.
DOWNLOADER
ERROR
FLASH: W ADDR
BAD
Repeat Download
Cause:
Remedy:
Writing to the flash memor y r esulted in an error in an
area of memory.
Repeat the flash download procedure. If th e er ror per sists, contact a technical support representative.
DOWNLOADER
ERROR
MAIN FLASH IS
FULL
Optimize Files
Cause:
Remedy:
The main flash memory area is full.
Delete files from the memor y and optimize the space.
DOWNLOADER
ERROR
NO EFC DETECTED
Repeat Download
Cause:
Remedy:
No EFC was detected, so the download canno t proce ed .
Contact a technical support representative.
EC
SOFTWARE FAIL
Cycle Powe r
Cause:
Remedy:
The Engine Control software has encountered a failure.
Turn the printer OFF for 15 seconds, then ON again. If the
problem persists, repeat the data download.
ERROR:
INSUFFICIENT
DRAM
Cycle Powe r
Cause:
Remedy:
Not enough available memory for a printer operation
Turn the printer OFF for15 seconds, then turn it ON
again. If the er ror per sists, increase the Glob Mem Adj ust
size in the PRINTER SETUP menu and reboot the printer.
If the error still persists, replace the controller PCBA.
Write down the error message when returni ng t h e defective board.
ERROR:
INSUFFICIENT
FLASH
Cycle Powe r
Cause:
Remedy:
There is not enough available free flash mem ory to run
the downloaded program.
Turn the printer OFF for 15 seconds, then ON again. If the
problem persists, contact your authorize d customer service representative.
ERROR
OCCURRED:
CLEARING
QUEUES
Please Wait
Cause:
Remedy:
The printer is discarding host data it cannot use because
a fault condition exists. While this message displays, a
rotating asterisk (*) appears on th e scr een.
Wait. When the asterisk (*) stops rotating, a different fault
message will appear; troubleshoot the final mes sage.
FILE SYS WRITE
Check Flash
Cause:
Remedy:
There was a problem writing to the flash memory.
Turn the printer OFF for 15 seconds, then ON again. If the
problem persists, contact your authorize d customer service representative.
LCD Message Description

Section 5: Troubleshooting
GL Series Operator’s Manual Page 5-7
GAP NOT
DETECTED
Check Sensor and
Calibrate
Cause:
Remedy:
The printer is set for Gap or I-mark sensing, but the Imark cannot be detected.
1. Check that the setting of the Gap/Mark Sensor in the
SENSOR SETUP menu mat ch es the installed media.
2. Check the position of the medi a sensors.
3. Clean the sensor assemb ly and paper path.
4. Run Auto-Cal to improve the sensor’s ability to detect
the media in use.
5. Run the Media Profile printout in the SENSOR SETUP
menu.
6. Run Manual Calibrate.
7. Manually change the Gap /Mark Thresh and/or Paper
Out Thresh values.
INVALID FILE SYS
Optimize&Reboot
Cause:
Remedy:
The file system was not detected, or the flash memory is
corrupted.
In the PRINTER SETUP menu, use the Optimize & Reboot
option.
LABEL MISSING
Check Media Path
Cause:
Remedy:
The label sensor did not detect any label with the TearOff or Peel-Off handlng mode enabled.
Clear any stuck labels that may be causing the sensor to
function abnormally. Check that the label path is clear,
and select the correct handling mode for the media in
use.
LABEL READY
Remove Label
Cause:
Remedy:
A label was detected at the front of the pr i nte r by the
label sensor in Peel-Off or Tear-Off Media Handling
mode. Or, a label was removed, but the “Remov e Label”
message remains, if the incorrect Media Handling mode
was selected.
Check that all printed labels have been removed. Verify
that a front door assembly is installed on the printer and
that it is properly closed. Ensure that no debris is
obstructing the door mirror or the Label Taken Sensor.
Make sure that the correc t Media Handling mode has
been selected for the type of label in use.
MEDIA OUT
Load Media
Cause:
Remedy:
Tear-Off or Peel-Off Media Handling selection was
attempted with the cutter option still installed. These
modes require that the front door assembly be installed
to use the Label Sensor.
Select a different Media sHandling Mode.
MODE NOT
COMPATIBLE WITH
CUTTER
Check Media Mode
Cause:
Remedy:
Tear-Off or Peel-Off Media Handling selection was
attempted with the cutter option still installed. These
modes require that the front door assembly be installed
to use the Label Sensor.
Select a different Media sHandling Mode.
LCD Message Description

Section 5: Troubleshooting
Page 5-8 GL Series Operator’s Manual
OPTION NOT
INSTALLED
Cause:
Remedy:
If the printer is turned ON with the cutter enabled in the
Media Handling menu, but the cu tter itself is in the dow n
position, or the cutter upper enclosure is removed, the
printer cannot detect the cutter. When using the cutter,
turn the printer ON with the cutter in the up position and
the cutter upper enclosure i nstalled.
1. Check that the cutter option is installed, and connected in the up position and the upper enclosure is
installed, before turning the printer ON.
2. Install the cutter option or change to the correct Media
Handling option in the MEDIA SETUP menu.
3. If the error persists, contact your authorized customer
service representative.
PRINTHEAD HOT
Wait 5 Minutes
Go Online
Cause:
Remedy:
The printhead has become overheate d
Allow the printhead to cool down for five minutes, then
press resume printing. If possible, reduce print intensity.
If problem persists, contact your authorized ser vice representative.
PRINTHEAD
POWER
FAIL
Call For Service
Cause:
Remedy:
There is no power to the print head.
Replace the printhead. If the problem persists, contact an
authorized service representative.
PROGRAM IS NOT
COMPATIBLE WITH
THIS PRINTER
Repeat Download
Cause:
Remedy:
A non-compatible program file cannot be loaded into the
printer.
Make sure the program file is compatible with this
printer, then try downloading again. If problem persists,
contact your authorized service repres entative.
RIBBON OUT
Load Ribbon
Cause:
Remedy:
The ribbon is broken, or some problem in the ribbon path
has occurred.
Check the ribbon path thoroughly and clear any prob lems that have occurred.
RFID TAG MAX
RETRY
Check Media
Cause:
Remedy:
The RFID tag is faulty.
Do a reprint. When the error is cleared, the label with the
failed tag moves forward to the next TOF position.
RFID TAG MAX
RETRY
Check Media
Cause:
Remedy:
Failed tag. Error displays in OVERSTR I KE mode. Each
failed label prints with the OVERSTRIKE patt ern; the form
retries until the label retry count is exhausted.
Clear the error. When the error is cl eared, the label
with the failed tag moves forward such that the next
label is in position.
SERIAL BUFFER
OVERFLOW
Cause:
Remedy:
Host sent d a ta after the printe r b u ffer was fu ll (Serial
Interface).
Make a test printout. Verify that the serial interface
paramet ers for host and pri nter are identical.
SERIAL FRAMING
ERROR
Cause:
Remedy:
A frame error occurred.
Verify that the serial interfac e parame ters for host and
printer are identical.
LCD Message Description

Section 5: Troubleshooting
GL Series Operator’s Manual Page 5-9
SERIAL PARITY
ERROR
Cause:
Remedy:
A parity error occurred.
Verify that the serial interface parameters for ho st and
printer are identical.
SOFTWARE ERROR
Cycle Power
Cause:
Remedy:
An illegal power function was initiated by an application
software. Or there are damaged logic circuits on the
controller PCBA.
Tur n the printer OFF and ON again. If possible, print a
job that had previously worked . 2. If the pr obl em persists, contact your authorized service re pr esentative.
D50 STATU S:
CLEARING FLASH
Please Wait
D51: PROGRAMMING FLASH
LOADING PROGRAM
INTO FLASH
Please Wait
Cause:
Remedy:
Emulation software successfully loaded into printer RAM
and the checksum matched. The old program is now
being deleted from flash memory. No action required.
Wait for completion of the process.
LCD Message Description
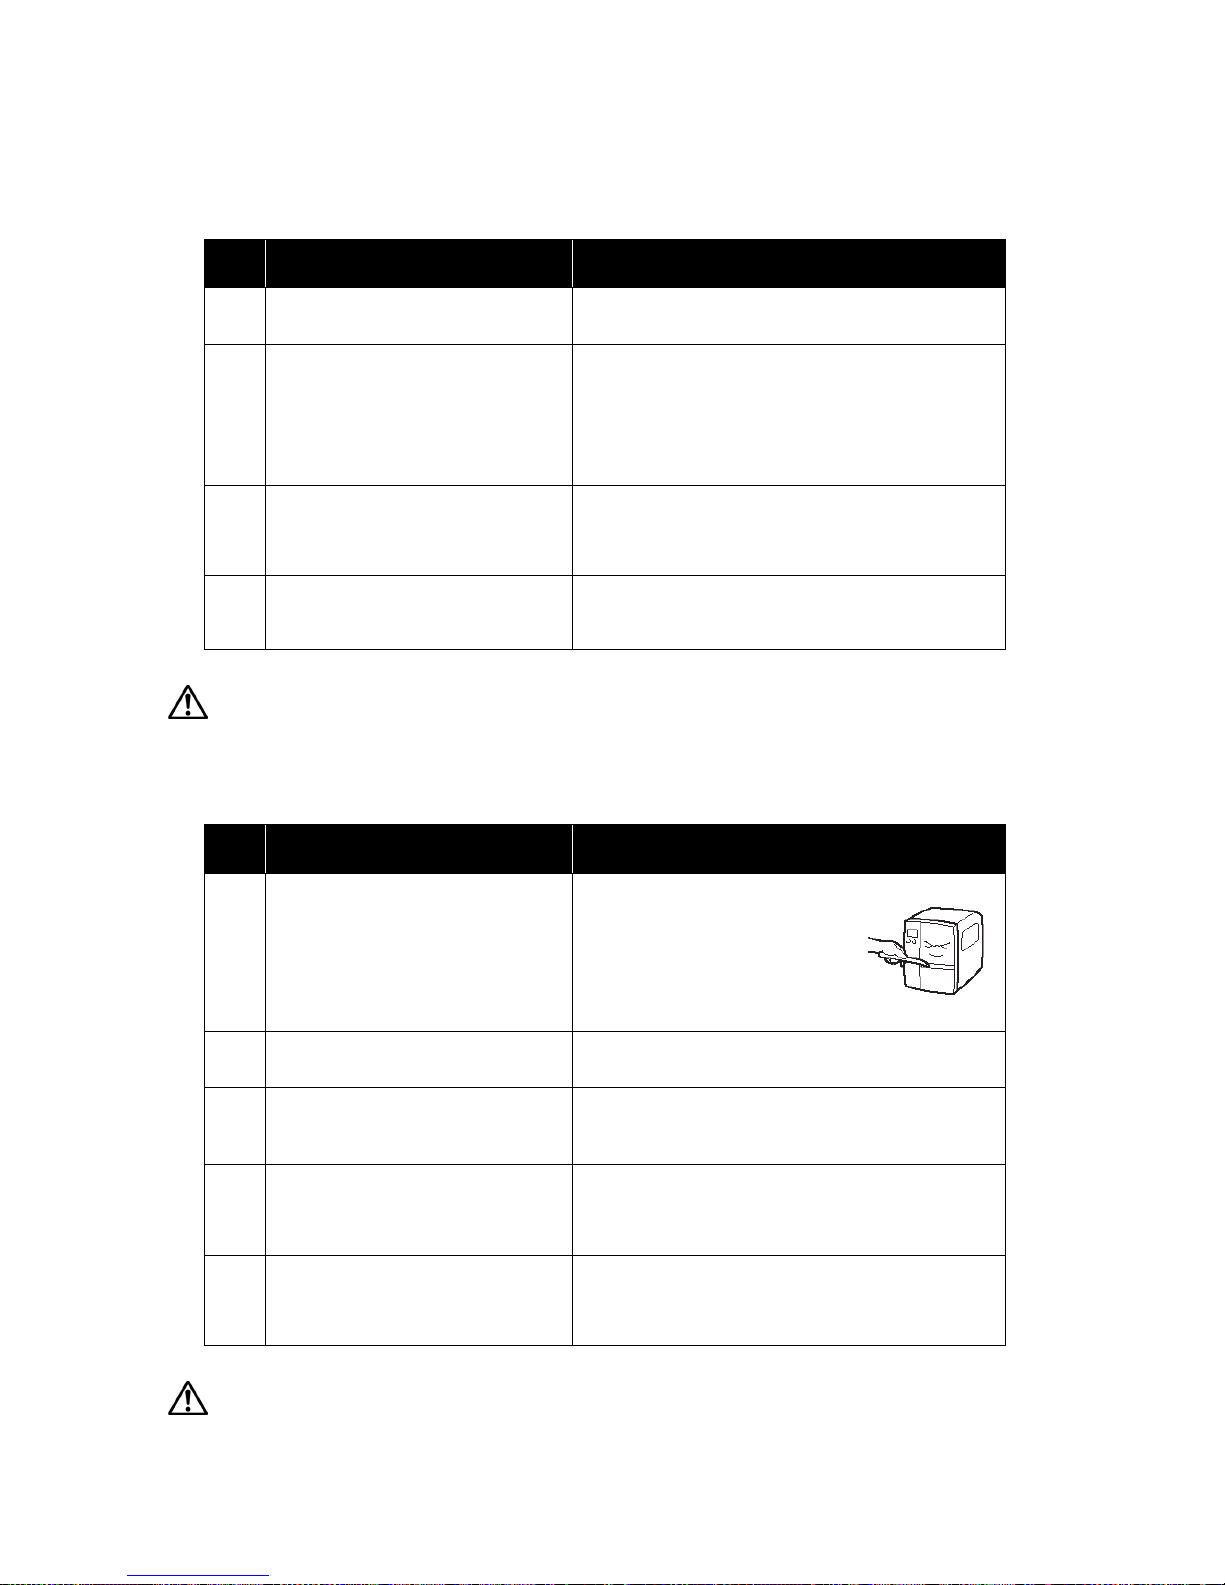
Section 5: Troubleshooting
Page 5-10 GL Series Operator’s Manual
5.6 TROUBLESHOOTING GUIDE
Symptom: The display remains blank when the power switch is pressed.
Caution
Do not operate the power sw i t ch or handle the power cable w i th a w et hand. You may suffer electric shocks as a result.
Symptom: Paper is fed but not printed
Caution
Pull out the power cable befor e cleaning the printer.
No. What to check Remedy
1
Has the power cable been inserted
into the power outlet securely?
Insert the power cable securely into the outlet.
2
Is the power cable damaged? Inspect the power cable for signs of damage.
If possible, try using another printer power cable.
Purchase a new power cable specifically
designed for this printer, from the sales outlet or
dealer where you bought the printer from. Never use
any other power cable but the power cable specifically
designed for this printer.
3
Is electricity comi ng to the power outlet
feeding the printer?
Connect another electric al appliance to the power outlet
to check for power. If there is a problem with the main
power, che ck if elect ricity is coming to the building . Also
check if power failure has occurred.
4
Has the power fuse of the building
blown, or has the ci rcu it brea ke r be en
tripped?
Replace the power fuse and reset the circuit breaker.
No. What to check Remedy
1
Is the printer head dirty, or is there any
label stuck to the printer head?
If the printer head i s dirty , wipe off the
dirt with the supplied cleaning set. If
a label is stuck to the printer head,
take it away. * Do not use metallic
object to remove it (the printer head
may be damaged). If glue of the label
is stuck to the printer head, wip e it off
with the supplied cleaning set.
2
Are you using genuine SATO paper
and carbon ribbons for the printer?
Be sure to use genuine paper and carbon ribbon
specifically designed for the printer.
3
Is the paper sensor dirty? If the paper sensor is dirty, wipe off the dirt with
the supplied cleaning set. See Section 4: Cleaning
and Maintenance.
4
Is the carbon ribbon wound
correctly?
If the knob of the ribbon-winding unit is not set to
its original position, remove the carbon ribbon
already wound, and return the knob to its original
position.
5
Is the data/signal sent from the
computer correct?
Turn on the power switch again.
If the message still appears, check the software
on the computer or the configuration for
connections.
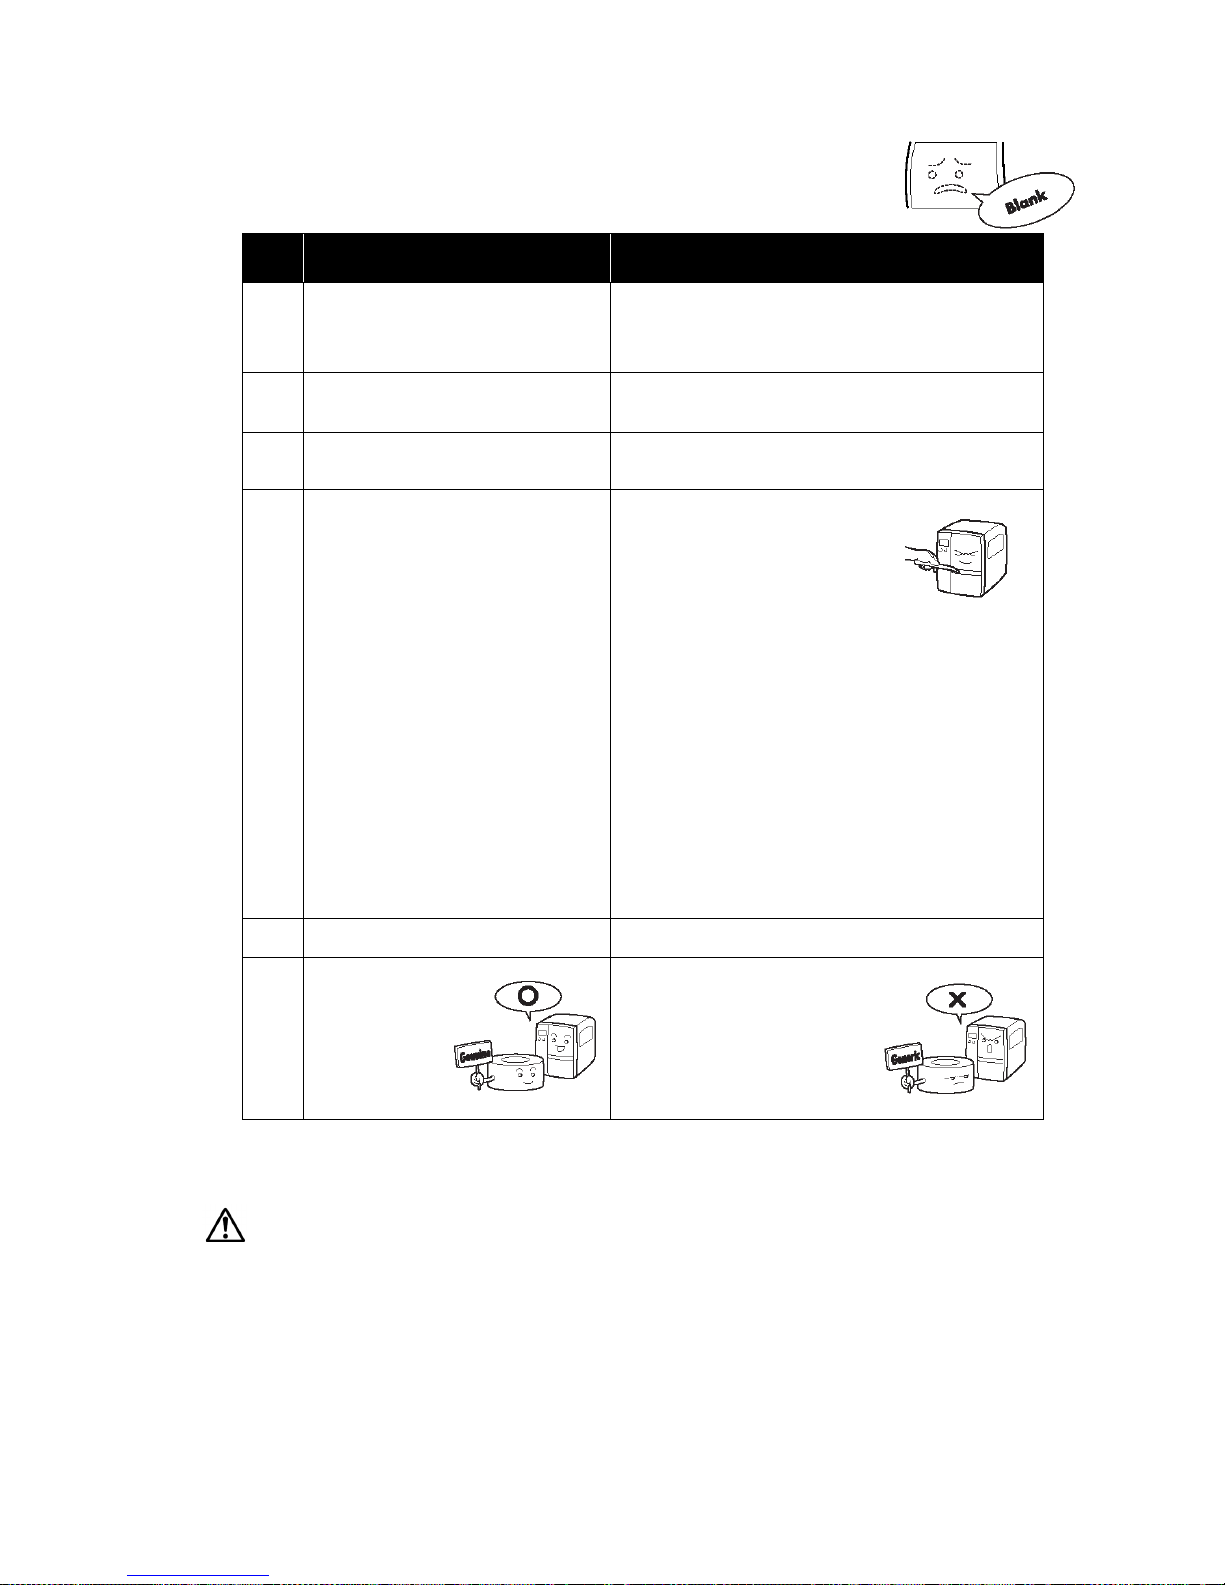
Section 5: Troubleshooting
GL Series Operator’s Manual Page 5-11
5.6 TROUBLESHOOTING GUIDE (CONT’D)
Symptom: Low quality print
Caution
Pull out the power cable before cleaning the printer.
No. What to check Remedy
1
Are the paper and carbon ribbon
set correctly?
Check if the p aper and carbon r ibbon are securely fixed.
Also, lower the head-ope n lever of the printer head unit,
and check if the paper and carbon ribb on are in the
normal position.
2
Are the paper and carbon ribbon
set correctly?
Check the paper and carbon ribbon. Set the print
density again.
3
Is the platen roller dirty? If the platen roller is dirty, wipe off the dirt with the
supplied cleaning set.
4
Is the printer head dirty, or is a
label on the head?
If the print head is dirty, wipe off the
dirt with the attach ed cleaning set. If
a label is on the head, take it away.
* Do not use a metallic object to
remove it (the printer head may be
damaged). If glue of the label is
stuck to the printer head, wipe it off
with the supplied cleaning set.
See Section 4: Cleaning and Maintenance.
Determine if the print head needs replacement:
* Check for vertical streaking in the same location of
every label. If cleaning the print head does not cause
the streaking to be eradicated, then the printhead may
be worn. Remove the printhead and examine it for
physical damage or wear.
* Load a different roll of lab els and ribbon, an d then run
test prints again. If the vertical streaks continue to surface, then the printhead needs to be replaced.
See Section 4: Cleaning and Maintenance.
5
Are you using stained pa per? Use clean paper.
6
Are you using
genuine paper
and carbon
ribbon
specifically
designed for the
printer?
Be sure to use genuine pa per and
carbon ribbon
specifically designed for the
printer.

Section 5: Troubleshooting
Page 5-12 GL Series Operator’s Manual
5.6 TROUBLESHOOTING GUIDE (CONT’D)
Symptom: Print position is misaligned
Caution
Pull out the power cable befor e cleaning the printer.
No. What to check Remedy
1
Are the paper and carbon ribbon
set correctly?
Fix the paper and carbon ribbon securely. Also,
release the head-open lever of the printer head
unit, then set the paper and carbon ribbon to the
normal position again. Finally, latch the print head
back in place.
2
Is the platen roller dirty? If the platen roller is dirty, wipe off the dirt with the
supplied cleaning set.
3
Is the paper/carbon ribbon you are
using deformed?
If the edges of the paper/carbon ribbon are deformed,
the paper cannot be fed normally. Use new paper/
carbon ribbon which are not deformed.
4
Are you using
genuine SATO
paper and
carbon ribbons
specifically
designed for the
printer?
Be sure to use genuine pap er and
carbon ribbon specifically
designed for the printer. Generic
supplies may cost less, but can
result in poor printi ng quality or
shortened equipment l ife, leading
to higher operating costs in the
long run.
5
Is the paper sensor dirty? If the paper sensor is dirty, wipe off the dirt with
the supplied cleaning set. See Section 4: Cleaning
and Maintenance.
6
Is the data/signal sent from the
computer correct?
Turn on the power switch again.
If the error message still appears, check the software
on the computer or the configuration of the
connections.
7
Are the pitch correction (variable potentiometer) or base point correction
(User Mode setting) correct?
Set the pitch correction (vari able potentiometer) or base
point correction (User Mode setting) again.

Section 6: Optional Accessories
GL Series Operator’s Manual Page 6-1
6
OPTIONAL ACCESSORIES
6.1 INTRODUCTION
This section contains details of the optional accessories available for the GL printer series:
• Interface boards
• Peelers
• Cutters
• Winders
• Barcode Verifier
• RFID unit
• Additional memory
6.2 AVAILABLE INTERFACE BOARDS
The printer comes with the I EEE1284 paral lel, s erial and USB i nterfaces as standa rd. One sp ace
slot is available for the addition of an extra interface board to increase connectivity opt ions. By
installing an extra interface board, you can adapt GL printers to fit in a wide range of rel a ted
equipment and usage scenarios.
The following interface boards are available for the GL series:
¤ 10BaseT/100Base-TX LAN interface board (optiona l)
¤ Wireless LAN IEEE802.11b/g interface board (optional)
¤ 14-pin EXT connector (external signal interface) (TBA)
Caution
Before installing or r emoving an inte rf ace boa rd, be s ure t o turn of f
the printer first. Discha rge static electricity from your body bef ore
touching any of the electronic parts. Failure to observe these precautions can result in severe damage to the components.
Empty
Slot for
LAN and
WLAN
interface
IEEE1284
/USB 2.0/
RS-232C
interfaces

Section 6: Optional Accessories
Page 6-2 GL Series Operator’s Manual
6.3 LABEL MANAGEMENT ACCESSORIES
¤ Peel unit with mounting winder (factory option)
Mounts on the printer to automatically peel labels fr om their liner (mounting sheet)
backing sheet. The winder in supplied to roll up the backing sheet neatly f or easy disposal by the operator at a later time.
¤ Simplified Dispenser (factory installed option)
Mounts on the printer to automatically peel labels fr om their liner (mounting sheet)
backing sheet. No winder is supplied to roll the backing sheet neatly.
¤ Cutter Unit and Tray (factory installed option)
Mounts on the printer to automatically cut labels as they are printed.
¤ Cutter Unit for Linerless labels (factory option)
Mounts on the printer to automatically cut linerles s label s—that is , l abels that are sup-
plied without mounting sheets.
¤ Internal winding unit (factory option)
A winder that mounts inside the printer chassis, to roll up label s as they are printed.
¤ Online Data Verification System with mounting stand (TBA*)
An advanced barcode verification syst em that can be p rogrammed to selec tively sca n
any or all printed barcodes f or qua lity an d readabil ity. erifies the readabili ty and quality
of barcodes printed by the machine
¤ RFID unit (factory option)
Enables the printer to read and write to a specified range of RFID tag s an d label s.
Instructions for installing each of the above accessories are supplied with the respective products. An authorized SATO reseller can also arrange to install the products on site.
For more information on any of the accessories available for the GL series printers, please contact an authorized SATO dealer near you.
* Availability pending, To Be Announced later

Section 6: Optional Accessories
GL Series Operator’s Manual Page 6-3
6.3 MEMORY CARTRIDGE
The GL series features a memory cartridge slot for the addition of optional memory cartridges
that are purchased from SATO.
The memory cartridge slot is located behind a protective cover found within the printer’s media
storage area. Memory cartridges of 16 or 32 MB capacity can be installe d for the storage of user
data and graphics.
6.3.1 Installing the memory card
1. Lift up the front cover.
2. Tilt the kn ob of the m emo ry cart ridge
cover inside and remove the memory
cartridge cover.
3. Insert the memory cartridge.
4. Press the knob of the memory cartridge cover and press it firmly into
place.
5. Close the front cover. The additional
memory is now ready for use.
6. To remove the memory cartridge,
reverse the procedure described
here.
Caution
• If a memory access comma nd is sent to the printer that does n ot have a memory c artridge present, an
error will occur. In that case, make sure to install a mem ory cartridge b efore issuing any commands to
access a memory cartridge.
• Before installing or removing a memory card, be sure to turn off the printer first.
• To prevent foreign objects and dust from entering the memory card slot, always make sure the memory
card cover is firmly pressed into place, regardless of whether a memory card is installed or not.
Reinsert the cover

Section 6: Optional Accessories
Page 6-4 GL Series Operator’s Manual
This page is intentionally left blank
 Loading...