

Page 1
Wired Rev A
Introduction
- This document describes the steps for
installing and configuring a SATO Network
interface in a Windows environment. Refer to
the manual contained in the CD-ROM for more
details.
- This Set Up Guide is for Windows users.
- If you intend to use a SATO Network interface
in UNIX/Linux, Netware or Macintosh
environments, please refer to the manual
contained in the CD-ROM.
Initial Installation & Configuration
For Administrators
1.Install the SATO Network interface card into the printer
2.Connect the SATO Network interface to the network
3.Configure the SATO Network interface card
4.Install ST-Print2003(Windows LPR printing only)
5.Setup the printer port
For Clients
1.Install ST-Print2003(Windows LPR printing only)
2.Setup the printer port
Starting User Software
* Referrence Network Environment:
a) DHCP server environment
b) The printer driver is already installed in the PC.
* Explains how to configure SATO Network interface using Quick Setup.
For advanced configuration or to change the configuration, refer to
*
"Chapter 8" of the Users Manual.
* The screen displayed may vary depending on the Windows™ operating
environment.
1. Please insert the CD-ROM User Software into the CD-ROM
drive of your Windows PC.
* If the "Main menu" screen does not appear automatically,
execute "run.exe" in the CD-ROM drive.
Quickset Utility.
2. Press
Package Contents
Please verify that the following are contained in the package.
- SATO EEA
- Setup Guide
- CD-ROM User Software
(Including configuration utility and Users Manual)
- Mounting Hardware
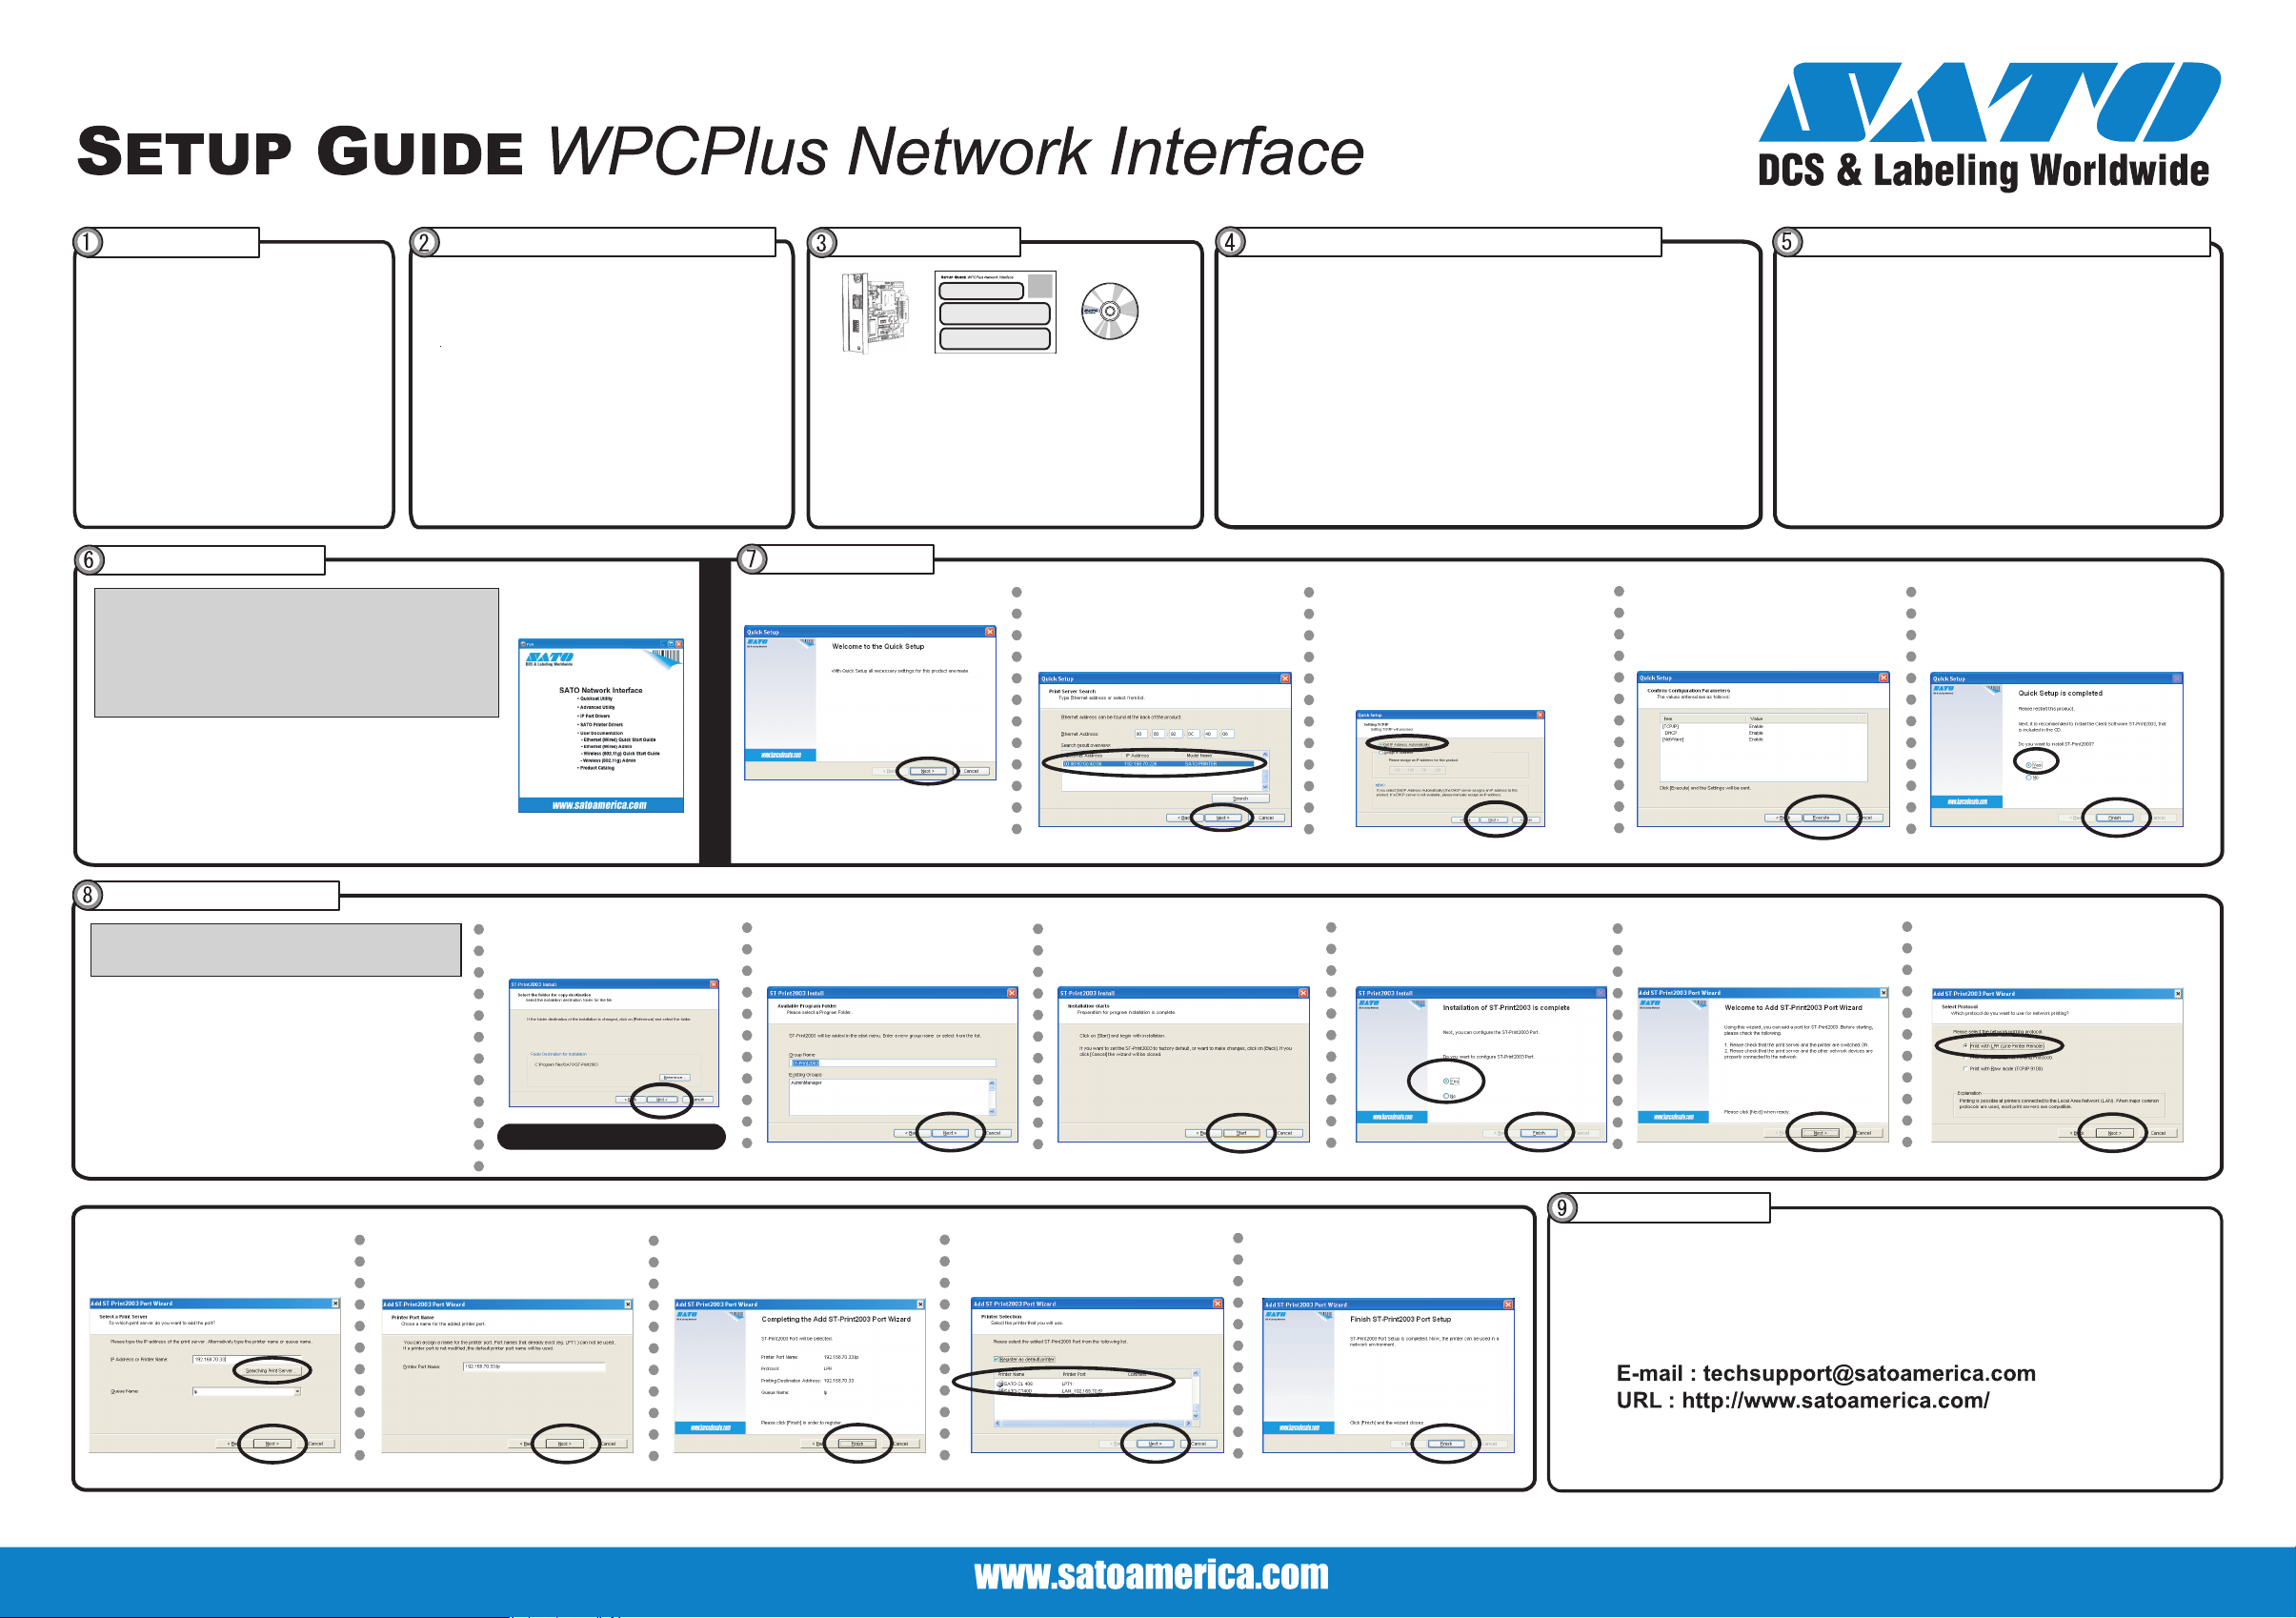
Quick Setup
1. The Quick Setup starts. Press
Next.
2. The Software License Agreement will
appear. Press Yes if you accept the
contents.
Connect SATO Network Interface to the Printer
1. Turn off the printer power and unplug the power cable.
2. Remove the 2 screws securing the existing port to the back of the printer.
3. Remove the existing port by pulling slowly outward.
4. Slide in the SATO Network Interface and secure the port with the 2
thumbscrews attached to the port.
5. Print a self-test page:
a. With the printer's power off, turn DSW3 on the network interface card to the on
position.
b. Power on the printer.
c. The printer should now print a test page.
6. If successful, power the printer off and return DSW3 to the down position. You are
now ready to go to Step 5.
If unsuccessful reset the Network Interface by turning the printer off and than turning
on DSW2 on the adapter, then go back to step 2.
7. If still unsuccessful contact SATO support at 704-644-1660 or by e-mail at:
techsupport@satoamerica.com.
3. Select the SATO Network interface you
want to configure, then press Next.
4. To assign an IP address to the SATO
Network interface automatically, select Get IP
Address Automatically, then press Next.
* If you want to assign an IP address
manually, select Assign IP Address, then
type in the appropriate IP address.
Connect to the network
1. Ensure that the printer’s power is turned off (failure to do so may
result in damage to the Network Interface card) and insert an
Ethernet cable into the Network Interface card.
2. Plug the other end of the Ethernet cable into your network
connection.
Turn the printer on.
3.
5. Verify the configuration parameters,
then click Execute.
6. Configuration is complete.
Select Yes, then press Finish.
ST-Print2003 Installation
The ST-Print2003 installation allows printing using LPR. If you want
to print using a different method, please refer to the SATO Network
interface manual.
1. From the main CD menu, select IP Port
Drivers. The ST-Print2003 installer starts.
Press Next.
2. The Software License Agreement will
appear. Press Yes if you accept the contents.
9. Press Searching Print Server, then
select the appropriate SATO Network
interface and press Next.
10. Assign the Printer Port Name. Press
Next.
3. The Select the folder for copy
destination will appear. Press Next.
ST-Print2003 Installation starts.
11. Press Finish and the port addition is
complete.
4. The Available Program Folder will
appear. Press Next.
12. Select the printer that uses the newly
added port. Press Next.
5. Press Start and the ST-Print2003
installation will begin.
6. Select Yes, then press Finish. 7. The Add ST-Print2003 appears. Press
13. The Port configuration is complete.
Press Finish.
Next.
Next.
User Registration
8. Select Print with LPR, then press
- Please complete the User Registration via our web page after completing the SATO Network interface
setup. User Registration is used by SA
- For any technical questions, © 2009 Sato America, Inc. All rights reserved. P/N: 9001205(A)
TO to improve product support and services.
 Loading...