

Page 1

SATO Users Manual
Enhanced Ethernet Adapter
www.satoamerica.com
Page 2

SATO America, Inc.
10350A Nations Ford Road
Charlotte, NC 28273
Main Phone: (704)644-1650
Tech Support Hotline: (704)644-1660
Tech Support Fax: (707)644-1661
E-Mail: satosales@satoamerica.com
www.satoamerica.com
P/N: 9001204(A)
© Copyright 2004
SATO America, Inc.
All rights reserved. No part of this document may be reproduced or issued to third parties in any
form whatsoever without the express permission of SATO America, Inc. The materials in this
document is provided for general information and is subject to change without notice. SATO
America, Inc. assumes no responsibilities for any errors that may appear.
Page 3

SATO Users Manual
This manual provides complete information on how to setup and use LAN board.
Follow the manual corresponding to your network operation to realize network printing.
Explanation on Online Manual
This manual uses the following symbols to point out specific information. These symbols
provide you with additional tips.
-Information after this mark explains the important points you need to regard when
TIP
NOTE
operating the product. Be sure to read the explanation for safe and proper usage.
-Information after this mark gives you additional information to help you with the setup.
Refer to the explanation when you have difficulties operating the product.
About this Manual
-This manual is copyrighted by silex technology, Inc. with all rights reserved. Under the
copyright laws, this manual may not be reproduced in any form, in whole or in part, without
the prior written consent of silex technology, Inc.
-While every efforts has been made to ensure that the information contained in the manual
is accurate and complete, no liability can be accepted for any errors or omissions.
Specifications described in this manual are subject to change without prior notice.
-SATO America, Inc. makes no warranties for damage resulting from corrupted or lost data
due to a mistaken operation or malfunction of the product.
-If you have any questions about this manual or our products, please contact our customer
support.
-Microsoft, MS-DOS, Windows, Windows NT are either registered trademarks or
trademarks of Microsoft Corporation in the United States and/or other countries.
-NetWare is registered trademark of Novell, Inc.
-Macintosh, EtherTalk, AppleTalk are trademarks of Apple Computer, Inc.
-Adobe, Acrobat, PostScript are trademarks of Adobe System Incorporation.
-Other names and products not mentioned above may be registered trademarks or
trademarks of their respective companies.
Copyrights (C) 2004 SATO Corporation. All rights reserved.
Page 4

SATO Users Manual
Safety Instruction
For safe and proper usage, please read the following information carefully.
The contents include how to handle the product and general issues for user's safety.
IMPORTANT SAFEGUARDS
Users Manual SX
Make sure to read all safety instructions carefully and to fully understand them before using
our products.
This manual contains the safety instructions that must be observed to avoid potential hazards
that could result in personal injuries or damages. The safety instructions have been classified
according to the potential risk involved as follows.
Danger:
"Danger" indicates the existence of a hazard that could result in death or serious bodily injury
if the safety instruction is not observed.
Warning:
"Warning" indicates the existence of a hazard that could result in bodily injury if the safety
instruction is not observed.
Caution:
"Caution" indicates the existence of a hazard that could result in property damage if the
safety instruction is not observed.
Notice:
"Notice" contains general information that relates to the safe operation of the computer.
1. LAN board
Warning:
To avoid the risk of electric shock or possible damage, never remove the cover of LAN board
and never disassemble LAN board. Contact the dealer of silex technology products for
assistance if repair or adjustment is necessary.
Page 5

SATO Users Manual
2. POWER SUPPLY
Danger:
Never attempt to disassemble or repair an power supply, as exposure to electric shock
hazards may result. Always contact the dealer of silex technology products if repair or
replacement is required.
Users Manual SX
Warning:
Always use the power supply provided with LAN board to avoid any risk of fire or other
damage to the computer. Using an unauthorized and incompatible power supply, in violation
of this warning, could result in bodily injury or property damage.
Caution:
Never bend or twist the power cord, and never pull on the power cord in an attempt to
remove the plug from the socket. Never place heavy objects on the power cord, as this
could result in damage to the cord. Always grasp the plug directly when unplugging the
power cord to avoid causing any damage to the cord.
3. NETWORK CABLES
Danger:
Never use damaged or worn network cables. The use of damaged or worn network cables
could result in electric shock, burns or fire.
Page 6

SATO Users Manual
4. PROPER TREATMENT OF THE DEVICE
Warning:
To avoid any risk of short-circuit, fire or other internal damage, never allow any metal
objects such as screws or paper clips to fall into the device. If that should happen,
immediately turn off the power and unplug the power cord. Contact the dealer of silex
Users Manual SX
technology products for appropriate assistance. To avoid damage to LAN board, never
allow any liquids to spill into any part of LAN board, and never expose LAN board
to rain or water. If any of these events should occur, turn off LAN board immediately.
Contact the dealer of silex technology, Inc. products for assistance before attempting to
use LAN board again. To prevent computer malfunction or equipment damage, never
place LAN board on top of (or adjacent to) a heating device, and never expose it in
direct sunlight. Never store LAN board in a locked and unventilated vehicle, (where
excessive internal temperatures may be encountered). Always unplug the power cord
during lightning storms in order to protect the device from possible damage as a result of a
power surge. If LAN board is ever dropped and damaged, or if you ever detect the
emission of an extraordinary odor or excessive heat, unplug the power cord and turn off
the printer and LAN board immediately. Contact the dealer of silex technology, Inc.
products for appropriate assistance.
Notice:
If LAN board has been exposed to cold temperature, allow it to warm to room temperature
before turning on. This will prevent the occurrence of harmful condensation within the device
(this is a particularly important concern when the device is being used in cold climates).
Avoid using LAN board in dusty areas since dust particles can affect the reliability of LAN
board. Contact the dealer of silex technology products if your device has become contaminated
with dust or dirt particles.
Page 7

INDEX
Overview ..........................................................................................1
Users Manual SX
Installation ........................................................................................2
Configuration Utility.......................................................................2
Installation and Configuration (For Administrators).......................3
Configuration (For Clients) ............................................................3
Advanced Configuration for Administrators.....................................4
1. About LAN board...................................................................... 1-1
Features ....................................................................................... 1-1
Operating Environment ................................................................ 1-2
Par ts on LAN board...................................................................... 1-3
Parts and Function.................................................................... 1-3
Dip Switch Operation ................................................................ 1-5
Install Hardware ........................................................................... 1-6
Attach LAN board to the Printer ................................................ 1-6
Connect LAN board to the Network .......................................... 1-7
Page 8

2. About SATO User Software ...................................................... 2-1
Use SATO User Software in Windows Environment..................... 2-1
Configuration............................................................................. 2-2
Users Manual SX
3. Using LAN board in Windows 95/98/Me................................... 3-1
Print Using TCP/IP of Windows 95/98/Me................................. 3-1
Verify the PC Network Configuration......................................... 3-2
Quick Setup............................................................................... 3-3
Install ST-Print2003 ................................................................... 3-7
Adding Printer Port.................................................................. 3-10
Adding ST-Print2003 LPR Port ...........................................................3-11
Adding ST-Print2003 IPP Port.............................................................3-13
Adding ST-Pr int2003 Raw (9100) Port ................................................3-15
Configuring printer driver ....................................................................3-17
Print Using NetBEUI, NetBIOS over TCP/IP of Windows 95/98/Me 3-19
Verify the PC Network Configuration (NetBEUI) ..................... 3-19
Verify the PC Network Configuration (NetBIOS over TCP/IP). 3-20
Print Using NetBEUI, NetBIOS over TCP/IP ........................... 3-21
About NetBEUI, NetBIOS over TCP/IP....................................... 3-22
Structure of NetBEUI, NetBIOS over TCP/IP work group ....... 3-22
Page 9

4. Using LAN board in Windows NT 4.0, Windows 2000 and Windows XP ....... 4-1
Print Using TCP/IP of Windows NT 4.0, Windows 2000 and Windo ws XP. ........4-1
Verify the PC Network Configuration......................................... 4-2
Windows NT 4.0....................................................................................4-2
Windows 2000 ......................................................................................4-4
Windows XP..........................................................................................4-5
Users Manual SX
Quick Setup............................................................................... 4-7
Install ST-Print2003 ................................................................. 4-11
Adding Print Port..................................................................... 4-14
Adding ST-Print2003 LPR Port. ..........................................................4-15
Adding ST-Print2003 IPP Port.............................................................4-17
Adding ST-Pr int2003 Raw (9100) Port ................................................4-19
Configuring Printer Dr iver ...................................................................4-21
Print Using NetBEUI, NetBIOS over TCP/IP of Windows NT 4.0 and
Windows 2000......................................................................... 4-23
Print Using NetBEUI, NetBIOS over TCP/IP of Windo ws NT 4.0 .......4-23
Ver ify the Networ k Configuration (NetBEUI) .......................................4-23
Verify the PC Networ k Configuration (NetBIOS over TCP/IP) ............4-24
Print Using NetBEUI, NetBIOS over TCP/IP.......................................4-25
Print Using NetBEUI, NetBIOS over TCP/IP of Windows 2000........4-26
Ver ify Networ k Configuration ..............................................................4-26
Verify the PC Networ k Configuration (NetBIOS over TCP/IP) ............4-27
Print Using NetBEUI, NetBIOS over TCP/IP.......................................4-28
Print Using NetBIOS over TCP/IP of Windows XP..................... 4-29
Print Using NetBIOS over TCP/IP of Windows XP.................. 4-29
Verify the PC Network Configuration ..................................................4-29
Print Using NetBIOS over TCP/IP.......................................................4-31
About NetBEUI, NetBIOS over TCP/IP....................................... 4-32
Structure of NetBEUI, NetBIOS over TCP/IP work group ....... 4-32
Page 10

Print Using Embedded Pr inting Client Function ......................... 4-34
Print Using LPR Port of Windows NT 4.0................................ 4-34
Print Using Standard TCP/IP P ort of Windows 2000 and Windows XP ....... 4-37
Print Using LPR Port of Windows 2000 and Windows XP ...... 4-42
Print Using IPP Port of Windows 2000 and Wiondows XP..... 4-46
5. Using LAN board in UNIX/Linux Environment .......................... 5-1
Configuring IP Address ................................................................ 5-2
Configuring IP Address by BOOTP........................................... 5-2
Configuring IP Address by RARP ............................................. 5-3
Configuring IP Address by ARP................................................ 5-4
Configuring Host File.................................................................... 5-5
Printing by LPD ............................................................................ 5-6
Using LAN board in Solaris Environment.................................. 5-7
Solaris 2.6/7/8.......................................................................................5-7
Solaris 2.3x-2.5x ...................................................................................5-9
Users Manual SX
Running LAN board in HP-UX 9.x/10.x Environment.............. 5-11
Using setnetlp Tool..............................................................................5-13
Using LAN board in AIX 4.x.x Environment ............................ 5-18
Using LAN board in BSD UNIX Environment.......................... 5-20
Using LAN board in Linux Environment .................................. 5-22
Using Print Queue Creation Tool of Red Hat Linux.............................5-24
Using the Print Queue Creation Tool of Turbo Linux ...........................5-25
Printing Using FTP ..................................................................... 5-26
Printing................................................................................................5-27
Checking the status ............................................................................5-29
Page 11

6. Using LAN board in NetWare ................................................... 6-1
Printing in NetWare Environment ................................................. 6-2
Verifying NetWare Environment ................................................ 6-2
Using Bindery Mode.................................................................. 6-3
Configuration Using Quick Setup..........................................................6-3
Configuring Printer Port ........................................................................6-9
Printing Mode ............................................................................. 6-11
Print Server Mode................................................................... 6-11
Remote Printer Mode.............................................................. 6-12
Users Manual SX
Page 12

7. Functions for Configuration ...................................................... 7-1
Configuration by Using AdminManager........................................ 7-1
Starting AdminManager ............................................................ 7-2
Searching LAN board Using AdminManager ............................ 7-4
Functions of AdminManager ..................................................... 7-5
AdminManager menu structure ............................................................7-5
Printer status.........................................................................................7-6
System status .......................................................................................7-6
Configuration Parameters List...............................................................7-7
Users Manual SX
Configuring LAN board Using AdminManager ............................. 7-8
Configuring Print Server............................................................ 7-8
General Configuration...........................................................................7-9
TCP/IP Configuration..........................................................................7-10
NetWare Configuration........................................................................7-12
NetBEUI/NetBIOS Configuration ........................................................7-15
SNMP Configuration ...........................................................................7-16
SMTP Configuration............................................................................7-17
PrinterPort Configuration ....................................................................7-18
Configuration NetWare............................................................ 7-20
Creating NetWare queue ....................................................................7-20
Using LAN board with bindery connection..........................................7-20
Using LAN board via bindery mode: Configuring print port ................7-24
Page 13

Configuring LAN board via Web browser ................................... 7-26
Display LAN board Webpage .................................................. 7-27
Displaying the webpage from AdminManager ....................................7-27
Displaying the webpage from Web browser........................................7-27
Configuration via the Webpage ............................................... 7-28
Users Manual SX
Configuring LAN board using TELNET ...................................... 7-29
Web browser/TELNET configuration items ................................ 7-30
Print server function................................................................ 7-30
General ...............................................................................................7-30
TCP/IP ................................................................................................7-30
NetWare..............................................................................................7-32
NetBEUI/NetBIOS...............................................................................7-34
SNMP..................................................................................................7-35
PRINTER ............................................................................................7-36
E-Mail (SMTP)......................................................................... 7-37
Page 14

8. Questions & Answers ............................................................... 8-1
Problems while Initial Installation.............................................. 8-1
Problems in Printing.................................................................. 8-5
Problems in TCP/IP................................................................... 8-6
Problems in Windows NetBEUI/NetBIOS over TCP/IP ............. 8-8
Problems in UNIX/Linux............................................................ 8-8
Problems in NetWare ................................................................ 8-9
Other ....................................................................................... 8-11
Software Specification......................................................................1
HP-compatibility ...............................................................................2
Users Manual SX
Page 15

SATO Users Manual
Overview
Thank you for purchasing our product this time. This manual provides complete information
on how to configure and use LAN board.
This manual is edited commonly for several products and there are some parts not applied
for your use.
1Overview
Page 16

SATO Users Manual
Installation
This chapter explains how to install LAN board. Follow the instructions corresponding to the
network environment in use to realize network printing. Refer to the parts you need to install
the LAN board.
-The following instruction may vary depending on your network environment.
TIP
-Make sure to install printer driver to your personal computer before you start using the LAN board.
NOTE
Configuration Utility
-The below contains the explanation for LAN board configuration. Choose an option
NOTE
Conf i gur ati on
Conf i gur ati on
Conf i gur ati onConf i gur ati on
corresponding to your network environment.
Quick Setup In itia l insta llat ion of LAN board (Recommended) Chapter 3,4
Utility
Utility
UtilityUtility
Advanced Setu p Advanced configurat ion for Admin istrat ors Chapter 7
ST-Print2003 Install Printing Software Chapter 3,4
Chapter 3,4
Chapter 3,4Chapter 3,4
Chapter 7
Chapter 7Chapter 7
Chapter 3,4
Chapter 3,4Chapter 3,4
2Overview
Page 17

SATO Users Manual
Installation and Configuration (For Administrators)
This contains explanation for LAN board installation and configuration.
STE P 1
STEP1 Connect LAN board to printer Chapter 1
STE P 1STE P 1
Chapter 1
Chapter 1Chapter 1
STEP2
STEP2
STEP2STEP 2
Use L AN board in Windows 95/98/Me
Use LAN board in Wind o ws NT 4.0, Wi ndo w s 2000, W ind o ws XP
Use LAN board in UNIX/Linux
Use LAN board in Netware
Wi nd o w s 95/ 98/Me Chap t e r 3
Wi nd o ws 95/98/MeWi nd o ws 95/98/Me
Wi nd o w s N T 4.0, W i nd o w s 20 00, W in dow s X P Chap t e r 4
Wind o w s NT 4.0, W ind o ws 2000, Wi ndo w s X P Wind o w s NT 4.0, W ind o ws 2000, Wi ndo w s X P
UNIX/Li nux Chapt e r 5
UNIX/Li nux UNIX/Li nux
Net war e Chapt e r 6
Net war e Net war e
Configuration (For Clients)
This contains explanation for LAN board configuration.
Chapter 3
Chapter 3Chapter 3
Chapter 4
Chapter 4Chapter 4
Chapter 5
Chapter 5Chapter 5
Chapter 6
Chapter 6Chapter 6
STEP1
STEP1
STEP1STEP 1
Co nfigur ati on
Co nfigur ati on
Co nfigur ati onCo nfigur ati on
STEP2
STEP2
STEP2STEP 2
Print
Print
PrintPrint
Use LAN board in Wi nd o w s 95/ 98/ME
Use LAN board in Wind o ws NT 4.0, Wi ndo w s 2000, W ind o ws XP
Use LAN board in NetWare
Test Print (Diagn ostic/Configuration report) and verify the
configuration
Wi nd o w s 95/ 98/ME Chap t e r 3
Wi nd o w s 95/ 98/ME Wi nd o w s 95/ 98/ME
Wi nd o w s N T 4.0, W i nd o w s 20 00, W in dow s X P Chap t e r 4
Wind o w s NT 4.0, W ind o ws 2000, Wi ndo w s X P Wind o w s NT 4.0, W ind o ws 2000, Wi ndo w s X P
Net War e Chapt e r 6
Net War eNet War e
Chapter 3
Chapter 3Chapter 3
Chapter 4
Chapter 4Chapter 4
Chapter 6
Chapter 6Chapter 6
Chaprter 1
Chaprter 1
Chaprter 1Chaprter 1
3Overview
Page 18

SATO Users Manual
Advanced Configuration for Administrators
This contains explanation for LAN board advanced configuration utility, AdminManager.
AdminM anager
AdminM anagerAdminM an ager
Configure LAN board by AdminManager
Configure LAN board by Web browser
Configure LAN board by TELNET
Ad mi n Man age r
Ad mi n Man age rAd mi n Man age r
We b br o ws e r
We b br o ws e r We b br o ws e r
TELNET
TELNET TELNET
Chapter 7
Chapter 7AdminM anager
Chapter 7Chapter 7
4Overview
Page 19

SATO Users Manual
1. About LAN board
This chapter explains LAN board operating environment, outline and how to connect LAN
board to the network.
Features
-Supports 10BASE-T and 100BASE-TX (Auto-detection).
-“Quick Setup” is included in the accessory kit for easy configuration.
-Management utility “AdminManager” is included in the accessory kit.
-Printing software “ST-Print2003” is included in the accessory kit.
-Embedded HTTP enables you to configure LAN board via Web browser.
-Embedded e-mail sending function.
-Supports multi-protocol.
-Enhanced Windows XP compatibility
NetBIOS over TCP/IP is embedded. This allows NetBIOS printing environment to be
configured on the PC running on Windows XP installed as the standard OS, without
additional protocol installation.
-Supports WINS (Windows Internet Name Service) environment
In an environment where WINS server exists, register an IP address solution information
on NetBIOS name to WINS server.
-Embedded DDNS (Dynamic Domain Name System)
Sends LAN board IP address to DNS server having DDNS function. When LAN board is
dynamically given an IP address from DHCP server, it is immediately reflected upon
Domain Name System, avoiding inconsistency from occurring between the domain name
and the IP address.
1-1About LAN board
Page 20

SATO Users Manual
Operating Environment
[Required devices to connect to network]
-Network Cable (category 5 or above in 100BASE-TX environment)
-Printer
[Supported protocol/operating system]
<LAN board>
-Supported protocol: TCP/IP, NetBEUI, IPX/SPX
-Supported OS: Windows 95/98/Me, Windows NT 4.0, Windows 2000, Windows XP
UNIX, Linux
NetWare
1-2About LAN board
Page 21

SATO Users Manual
Parts on LAN board
Parts and Function
(Bottom)
(1) Ethernet Address
LAN board Ethernet Address. The last 6 digits are the product’s serial number.
-Ethernet address 00:80:92:18:0E:1A is noted as 008092180E1A.
NOTE
(2) Dip Switch
The product number (serial number) is 180E1A.
The following list describes the function of each switch.
1 OF F N or mal o per atin g s ettin g
2 OF F N or mal o per atin g s ettin g
O N In i ti al izati on/R es et t o factor y d efaul t up on p ower up
3 OF F N or mal o per atin g s ettin g
ON C onfiguration r eport u pon power up
4 OF F N or mal o per atin g s ettin g
ON P rints D iagnostic r eport upon power up
1-3About LAN board
Page 22

SATO Users Manual
(Back)
(4)10BASE LINK LED (Green)
Lights when a proper 10BASE network connection is established.
100BASE-TX LINK LED (Green)
Lights when a proper 100BASE-TX network connection is established.
(5) STATUS LED (Orange)
Flashes during data transfer
(6) Network Port (10BASE-100BASE-TX Auto-detection)
Connect to the network cable
1-4About LAN board
Page 23

SATO Users Manual
Dip Switch Operation
-Make sure to switch off printer when operating dip switches.
TIP
<Initialization/Reset to factory default>
1. Switch off printer.
2. Switch on the dip switch No. 2.
3. Switch on printer and wait until the printer is ready for printing.
4. Switch off printer.
5. Switch off the dip switch No. 2.
<Configuration report>
1. Switch off printer.
-Diagnostic/configuration report can not be printed depending on your printer.
2. Switch on the dip switch No. 3.
3. Switch on printer and wait until configuration report is printed.
4. Switch off printer.
5. Switch off the dip switch No. 3.
<Diagnostic report>
1. Switch off printer.
2. Switch on the dip switch No. 4.
3. Switch on printer and wait until diagnostic report is printed.
4. Switch off printer.
5. Switch off the dip switch No. 4.
1-5About LAN board
Page 24

SATO Users Manual
Install Hardware
Attach LAN board to the Printer
-Make sure to read the operating instructions of your printer before connecting LAN board to the
TIP
1.
printer for proper use.
-Make sure the power code of the printer is unplugged before attaching LAN board to the printer.
-If you have already used LAN board in another network, make sure to initialize LAN board to factory
default.
Make sure that the printer is switched off
and the printer power code is unplugged.
Attach LAN board to the pritner
enhanced interface.
Make sure that the power supply is not
2.
connected to LAN board.
1-6About LAN board
Page 25

SATO Users Manual
Connect LAN board to the Network
The following items are required to connect LAN board to the network.
-Prepare 100BASE supported Ethernet HUB and network cable (category 5 or above).
TIP
Ethernet HUB
Switch off the printer after you make sure
1.
the power supply is not connected to LAN
board.
2.
Connect the network cable to the network
Network Cable
port of LAN board.
Connect the other end of the network
3.
cable to the Ethernet HUB.
4.
Switch on the printer. Check for the
printer proper function.
1-7About LAN board
Page 26

SATO Users Manual
2. About SATO User Software
This chapter explains about SATO User Software. LAN board configuration utility and Users
Manual are contained in SATO User Software and can be used in Windows environments.
-SATO User Software can not be used in UNIX/Linux and NetWare.
TIP
Use SATO User Software in Windows Environment
The below screen will be executed automatically when installing SATO User Software to
your Windows PC.
-Use SATO User Software in a browser environment with Internet Explorer 4.0 (SP2) or
above.
-If the below screen does not open automatically, open the My Computer. Select the CD
TIP
-User Documentation
This CD contains both a Quick Start Guide and a manual(Admin). The Setup Guide contains
instructions for quickly installing and configuring the SATO network card. The manual contains
detailed information on how to install, configure and use the SATO network card.
ROM drive and execute "autorun.exe".
-Product Catalog
View items available from SATO.
2-1About SATO User Software
Page 27

Configuration
SATO Users Manual
Select the
NOTE
configuration method you want to use from the screen below.
-If initial installation of LAN board has been complete, you can start using LAN board just by
installing ST-Print2003 to your PC.
- Quickset Utility (recommended for initial installation)
The Quick Setup wizard is designed to make the initial configuration easy through simple
interaction with the wizard. The wizard can also start the installation of the ST-Print 2003
printing software. This is the recommended method for initial installation.
- Advanced Utility
Start or install the management utility "AdminManager". AdminManager manages the detailed configuration
and management of the SATO network card.
- IP Port Drivers
This software enables printing directly from a Windows environment using LPR (specific to the SATO
network card), IPP or Port 9100.
- SATO Printer Driver
The drivers for your SATO printer can be easily installed by selecting this option.
-You can not use the optional functions depending on the LAN board you use. Make sure
TIP
the LAN board is supporting the enhanced features.
2-2About SATO User Software
Page 28

SATO Users Manual
3. Using LAN board in Windows 95/98/Me
This chapter explains how to print using TCP/IP, NetBEUI and NetBIOS over TCP/IP protocol
of Windows 95/98/Me.
Print Using TCP/IP of Windows 95/98/Me
Following indicates how to print using TCP/IP protocol.
-Make sure to install printer driver before you start using LAN board.
NOTE
Verify the PC network configuration
In case of initial installation
and printing
Configure IP address using QuickSetup
In case of printing
Install ST-Print2003
Configure printer port
3-1Using LAN board in Windows 95/98/Me
Page 29

SATO Users Manual
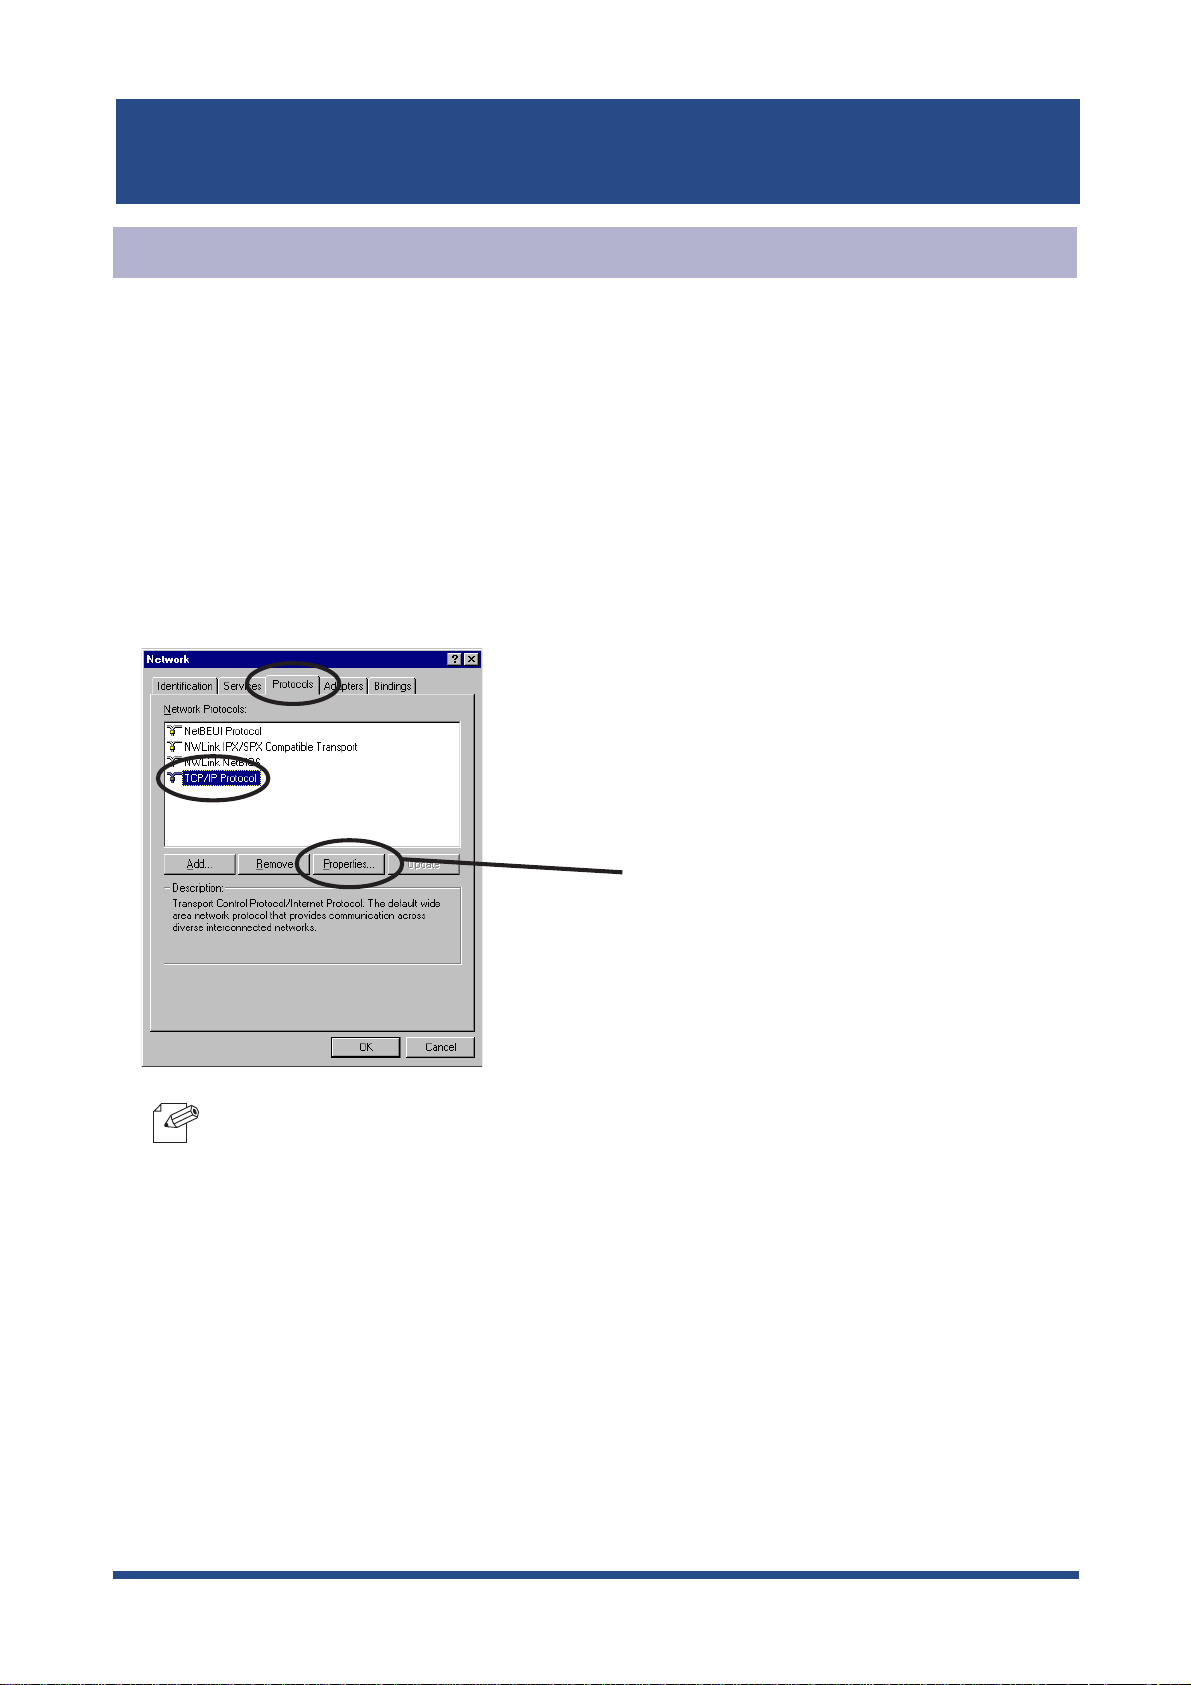
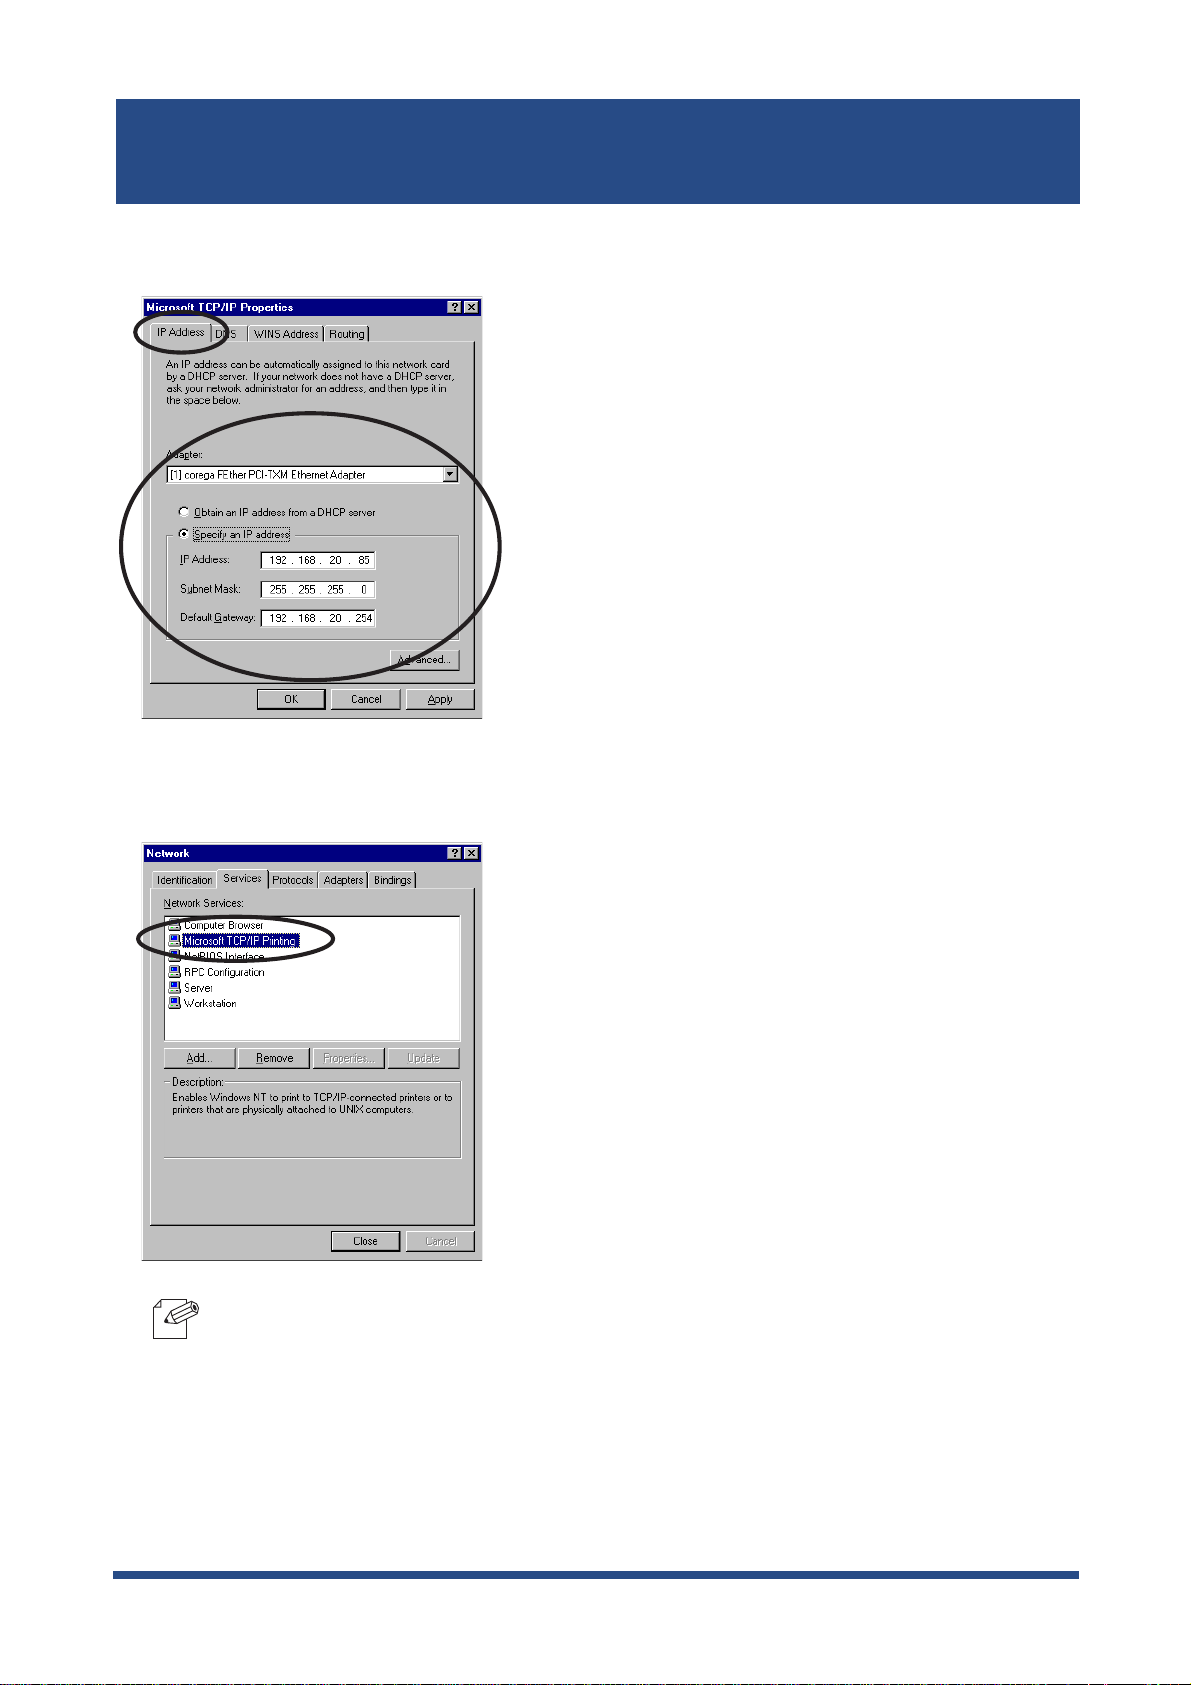
Verify the PC Network Configuration
Make sure that the
Click
Start
1.
Double-click
2.
Verify that
3.
, then
Network
TCP/IP
TCP/IP
Settings
and
, then
.
is included in
Microsoft TCP/IP Printing
Control Panel
.
are added to the
The following network components
Click
Properties.
Services.
are installed.
-If
TCP/IP
NOTE
4.
Verify if the configuration is proper for your environment in
Network component
Protocol is not in
, then
The following network components are installed,
Protocols
, then
Microsoft TCP/IP
to add
TCP/IP
IP Address
click
Add,
then
.
.
3-2Using LAN board in Windows 95/98/Me
Page 30
SATO Users Manual
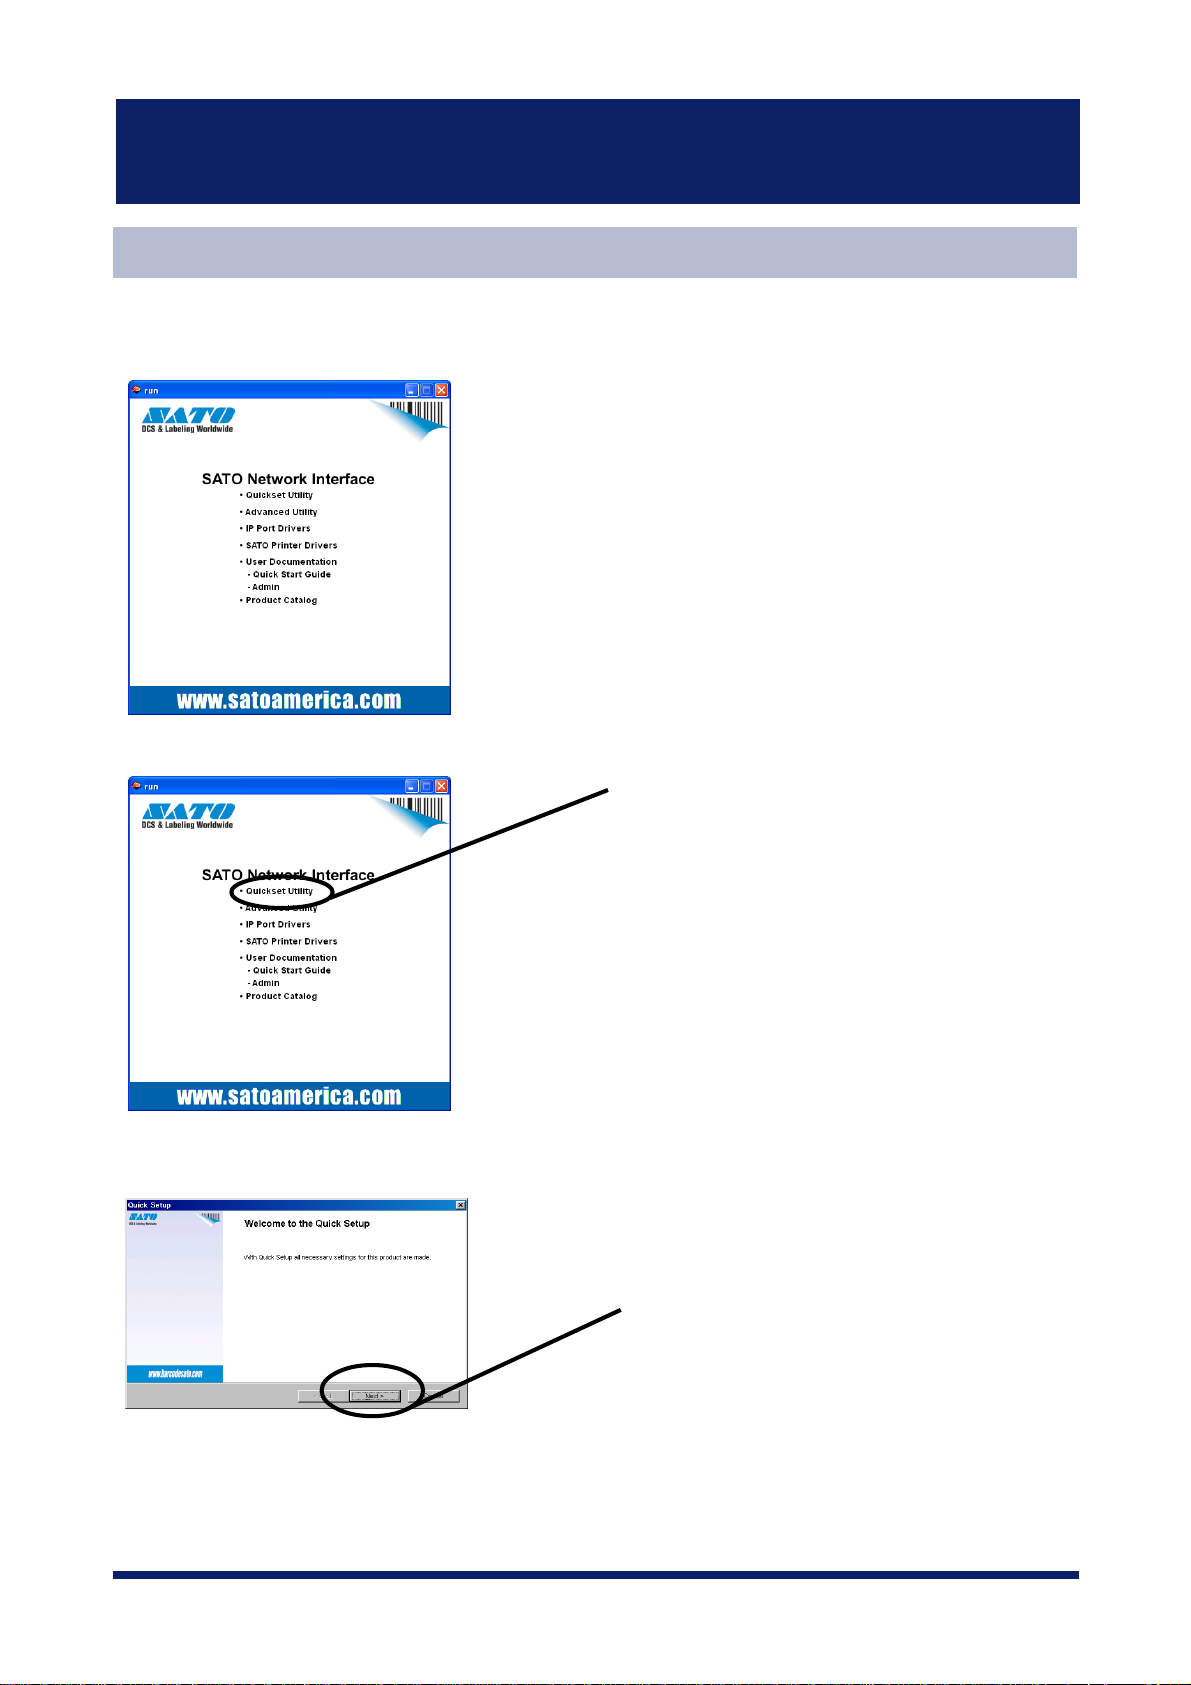
Quick Setup
Insert the SATO User Software in the CD-ROM drive of your Windows PC. The main
1.
menu screen will be displayed.
The below screen will be displayed.
2.
Quick Setup loads.
3.
Click
Quickset Utility.
Click
Next.
3-3Using LAN board in Windows 95/98/Me
Page 31

SATO Users Manual
Confirm the Software License Agreement.
4.
Select LAN board to be configured.
5.
-If the LAN board does not appear in the list, click
NOTE
You can search the LAN board by typing in Ethernet address directly.
Read the agrement and click
if you accept it.
Select LAN board to be configured.
Click
Next.
Search.
Yes
Assign an IP address
6.
When you have DHCP server in your environment.
(A) Obtain an IP address from DHCP server automatically.
Click
•Ÿ‚Ö
Click
-If NetWare Client is installed and LAN board is supporting NetWare (Enable), NetWare
NOTE
configuration screen will appear.
Get IP Address Automatically.
Next
.
3-4Using LAN board in Windows 95/98/Me
Page 32

SATO Users Manual
(B) Assign an IP address manually.
Assign an optional IP address.
Next.
Click
-If NetWare Client is installed and LAN board is supporting NetWare (Enable), NetWare
NOTE
When you do not have DHCP server in your environment.
configuration screen will appear.
-If NetWare Client is installed and LAN board is supporting Netware (Enable), NetWare
NOTE
Verify the configuration parameters.
7.
configuration screen will appear.
Assign the optional IP address.
Click
Next.
Execute.
Click
3-5Using LAN board in Windows 95/98/Me
Page 33

Setup is complete.
8.
-Proceed to install ST-Print2003.
NOTE
ST-Print2003 is a printing software that enables user to execute printing directly
from Windows.
SATO Users Manual
Click
Yes.
Click
Finish.
3-6Using LAN board in Windows 95/98/Me
Page 34

SATO Users Manual
Install ST-Print2003
To print directly from Windows 95/98/Me environment using TCP/IP protocol, use the ST-
Print2003 bundled with LAN board.
ST-Print2003 is a printing software that enables users to use LPR (dedicated to silex products),
IPP and Raw (9100) port.
When installation is complete, the wizard to add printer port to be stared.
-LPR (Line Printer Remote)
NOTE
A widely used protocol that enables users to execute printing to printers on the local area
network (LAN).
-IPP (Internet Printing Protocol)
This protocol enables users to execute printing to network printers remote via Internet.
-Raw (9100) port
This function enables users to execute printing to printers on the local area network (LAN).
Information can be printed at a high speed without spool.
1.
Verifying installing method.
(A) Install ST-Print2003 following Quick Setup.
(B) Install ST-Print2003 .
Click
Yes.
Click
Finish.
Mount the CD-ROM bundled, then
click
IP Port Drivers.
3-7Using LAN board in Windows 95/98/Me
Page 35

SATO Users Manual
2.
ST-Print2003 installation wizard to be started.
Confirm the Software License Agreement.
3.
Click
Next.
4.
Verify the Destination Directory.
-Click
Reference
to specify the destination directory.
Read the agrement and click
if you accept it.
.
Next
Click
.
Yes
NOTE
3-8Using LAN board in Windows 95/98/Me
Page 36
SATO Users Manual
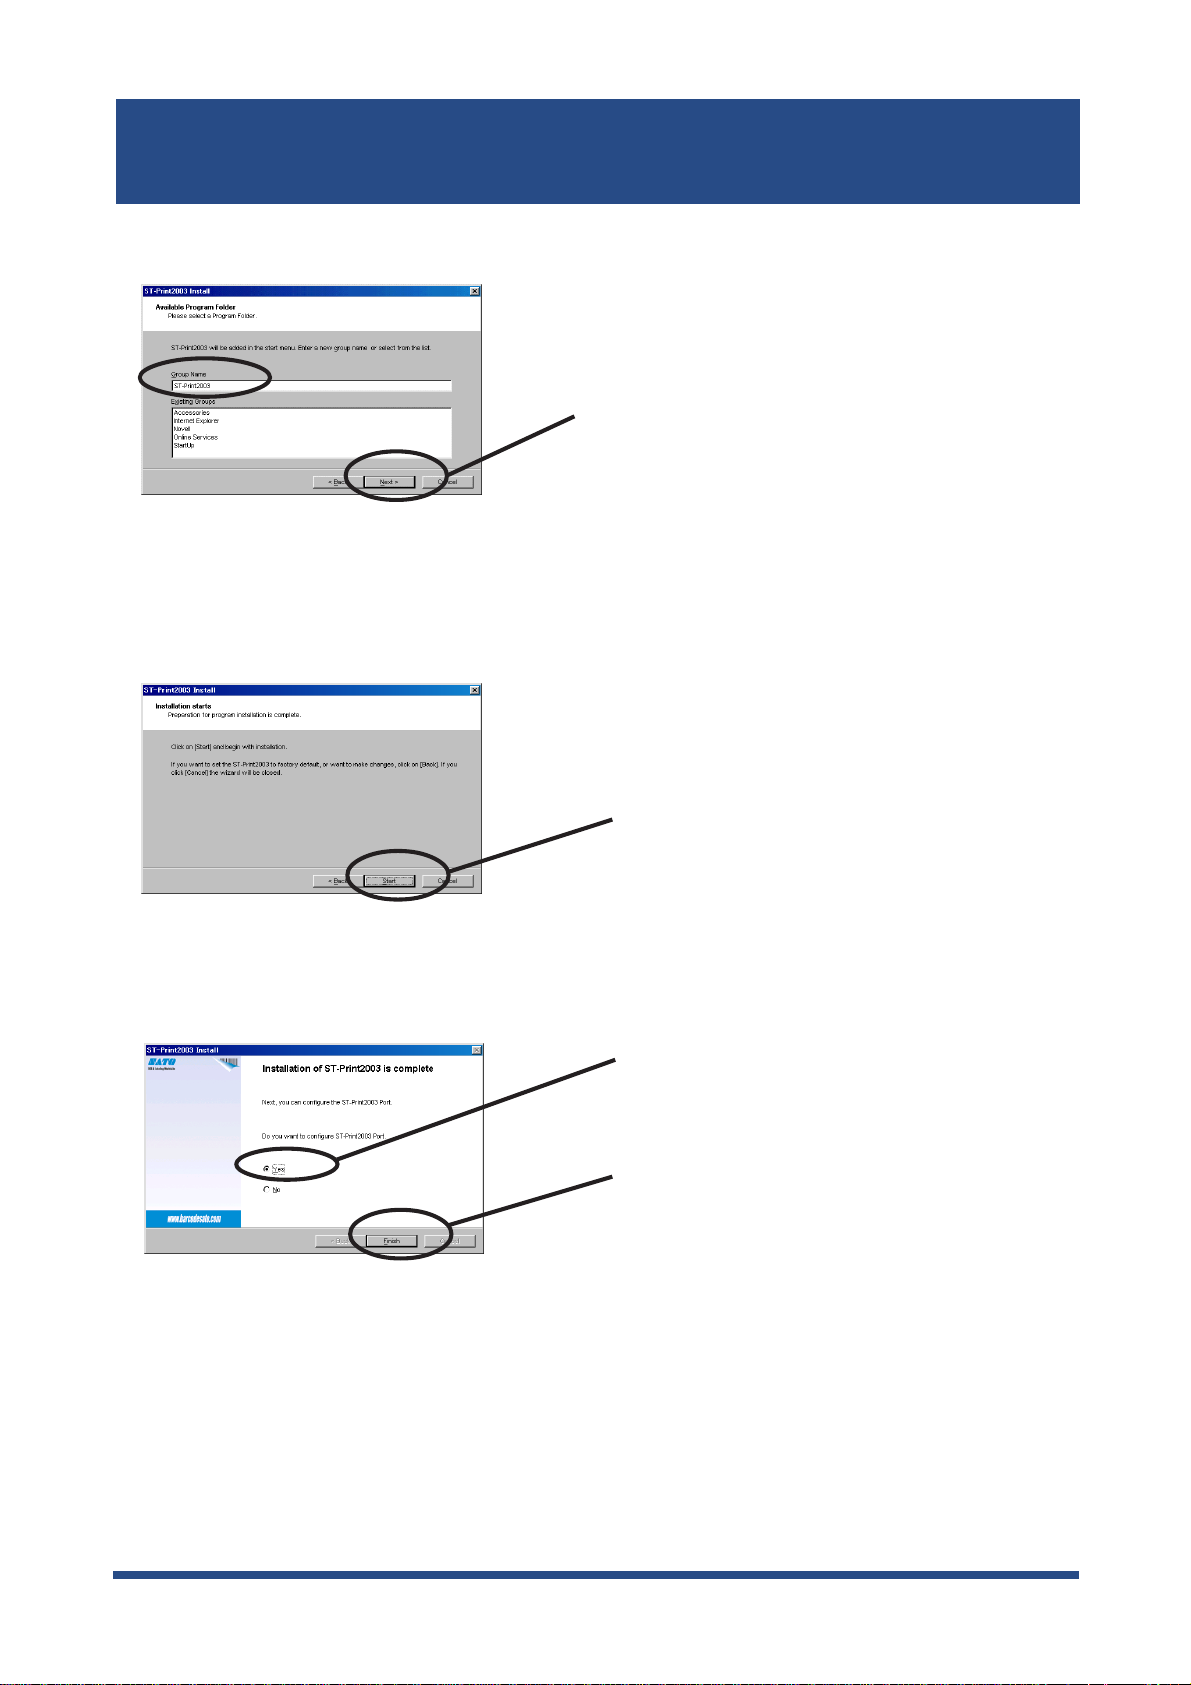
Specify the group name to be registered at the start menu.
5.
Click
Installation to be started.
6.
Next
.
Configuration is complete.
7.
Click
Select
Click
Start.
Yes
..
Finish.
3-9Using LAN board in Windows 95/98/Me
Page 37
SATO Users Manual
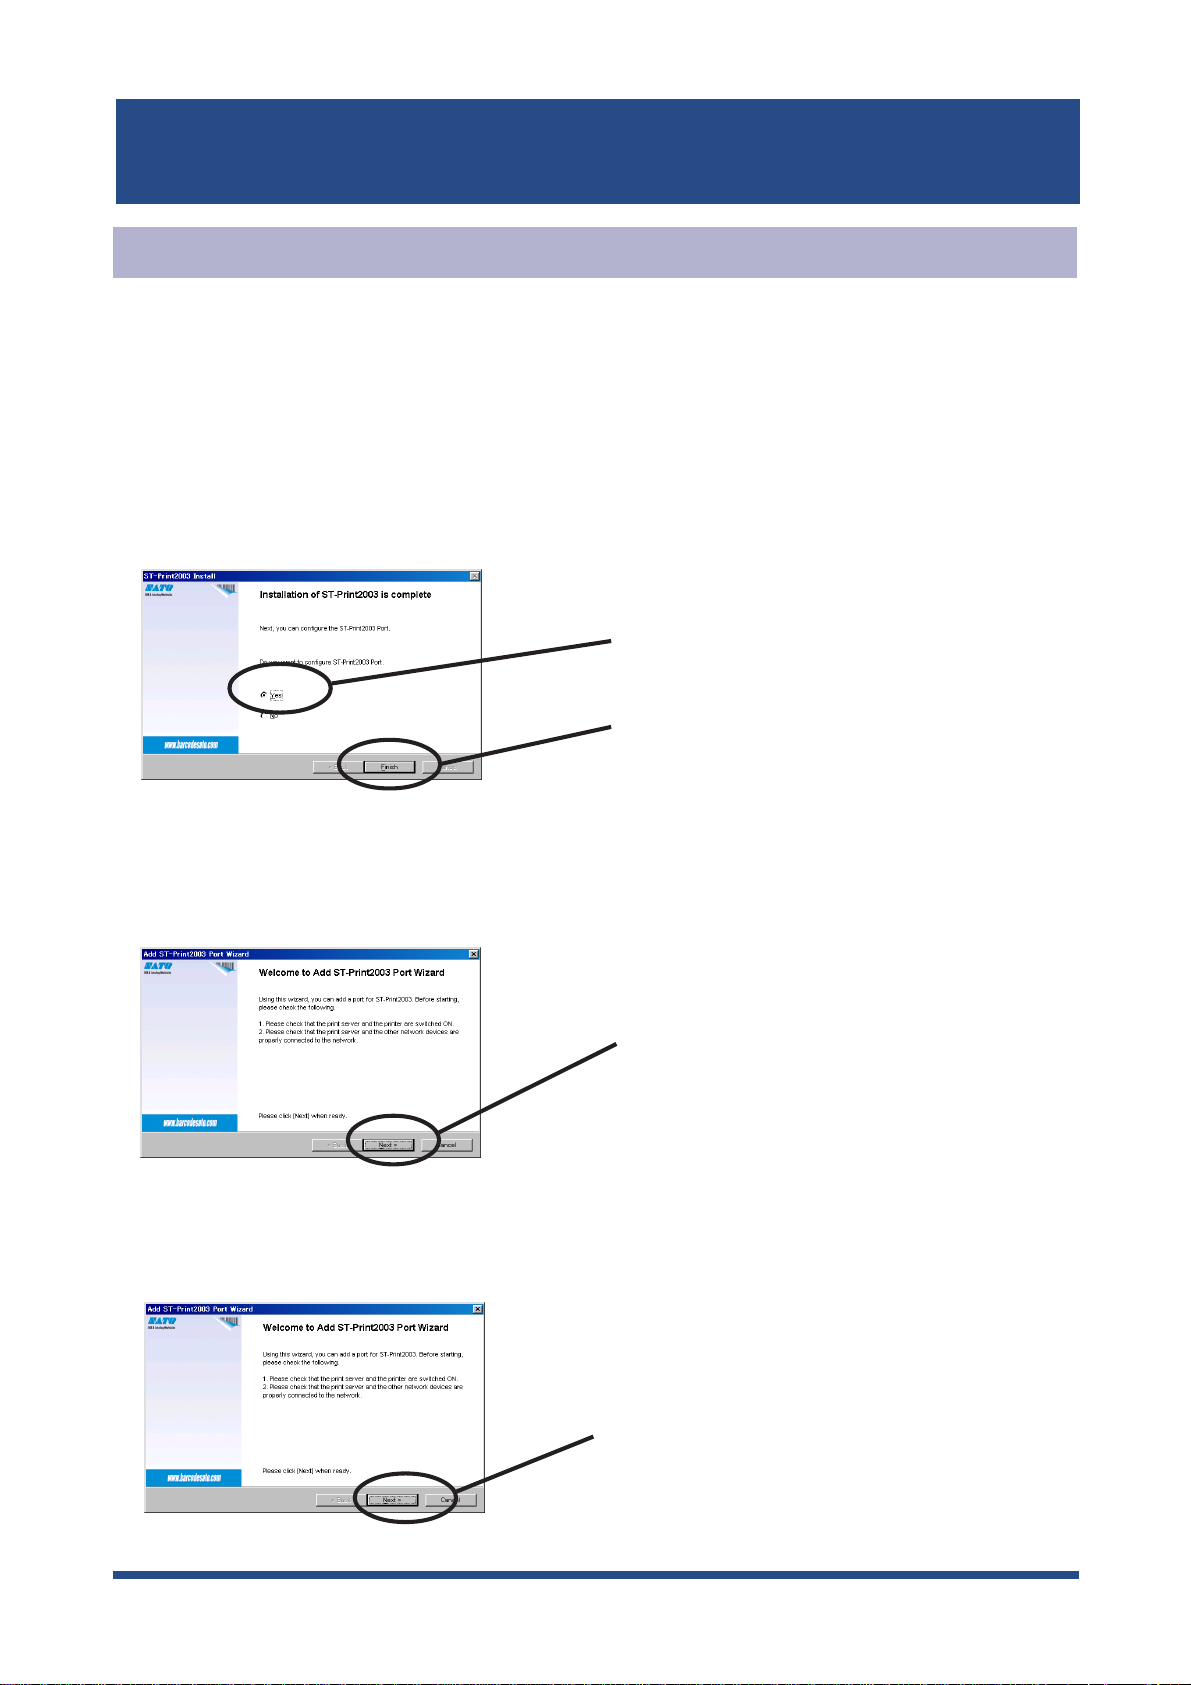
Adding Printer Port
ST-Print2003 has three available options for printing; “
and "
Print using Raw Mode
Select the protocol to be used for printing, then click “
printing option.
(A)
Adding printer port following the ST-Print2003 installation.
1.
2.
ST-Print2003 port adding wizard starts,
".
Print using LPR
Select
Click
Next.
”, “
Print using IPP
Next
” to start using the specified
Yes.
"
(B)
Click
Start
, then
Programs
, then
ST-Print2003
Click
, then
Click
Next.
ST-Print2003 Port adding
Next.
.
3-10Using LAN board in Windows 95/98/Me
Page 38

SATO Users Manual
Adding ST-Print2003 LPR Port
Select
1.
Display the list of print servers on the network by clicking
2.
LAN board you want to configure.
LPR (Line Printer Remote).
Select
Remote).
Click
Click
Print with LPR (Line Printer
Next
.
Searching Print Server
Next
.
. Select
Type in printer port name.
3.
If you do not want to have a specific
name, use the default printer port name.
Click
Next
.
3-11Using LAN board in Windows 95/98/Me
Page 39

SATO Users Manual
Verify the configuration.
4.
Select the printer you want to use with LAN board.
5.
Click
Finish.
Port configuration is complete.
6.
Click
•Ÿ‚Ö
Click
Next.
Finish.
3-12Using LAN board in Windows 95/98/Me
Page 40

SATO Users Manual
Adding ST-Print2003 IPP Port
. Select IPP (Internet Printing Protocol).
1.
Select either
2.
Internet connection
Select
Protocol).
Click
Use Internet Explorer configuration, Deactivate proxy server for
or
Configure proxy server manually.
Click
Print with IPP (Internet Printing
Next.
Next
.
Type in URL assigned to LAN board for
3.
or "/ipp/lp".
-If you click
NOTE
Next,
you can make sure if specified URL exists..
Printer URL
Click
. LAN board IPP printer URL is "/ipp"
Next.
Ex.): When URL is “abc.co.jp”,
http://abc.co.jp/ipp/lp
Ex.) When IP address is
“192.168.90.75”,
http://192.168.90.75/ipp/lp
3-13Using LAN board in Windows 95/98/Me
Page 41

SATO Users Manual
Configure the port name for printing.
4.
Verify the configuration.
5.
If you do not want to have a specific
name, use the default printer port name.
Click
Next.
•Ÿ‚Ö
Select the printer you want to use with LAN board.
6.
Configuration is complete.
7.
Click
Click
Finish.
Next.
Click
Finish.
3-14Using LAN board in Windows 95/98/Me
Page 42
SATO Users Manual
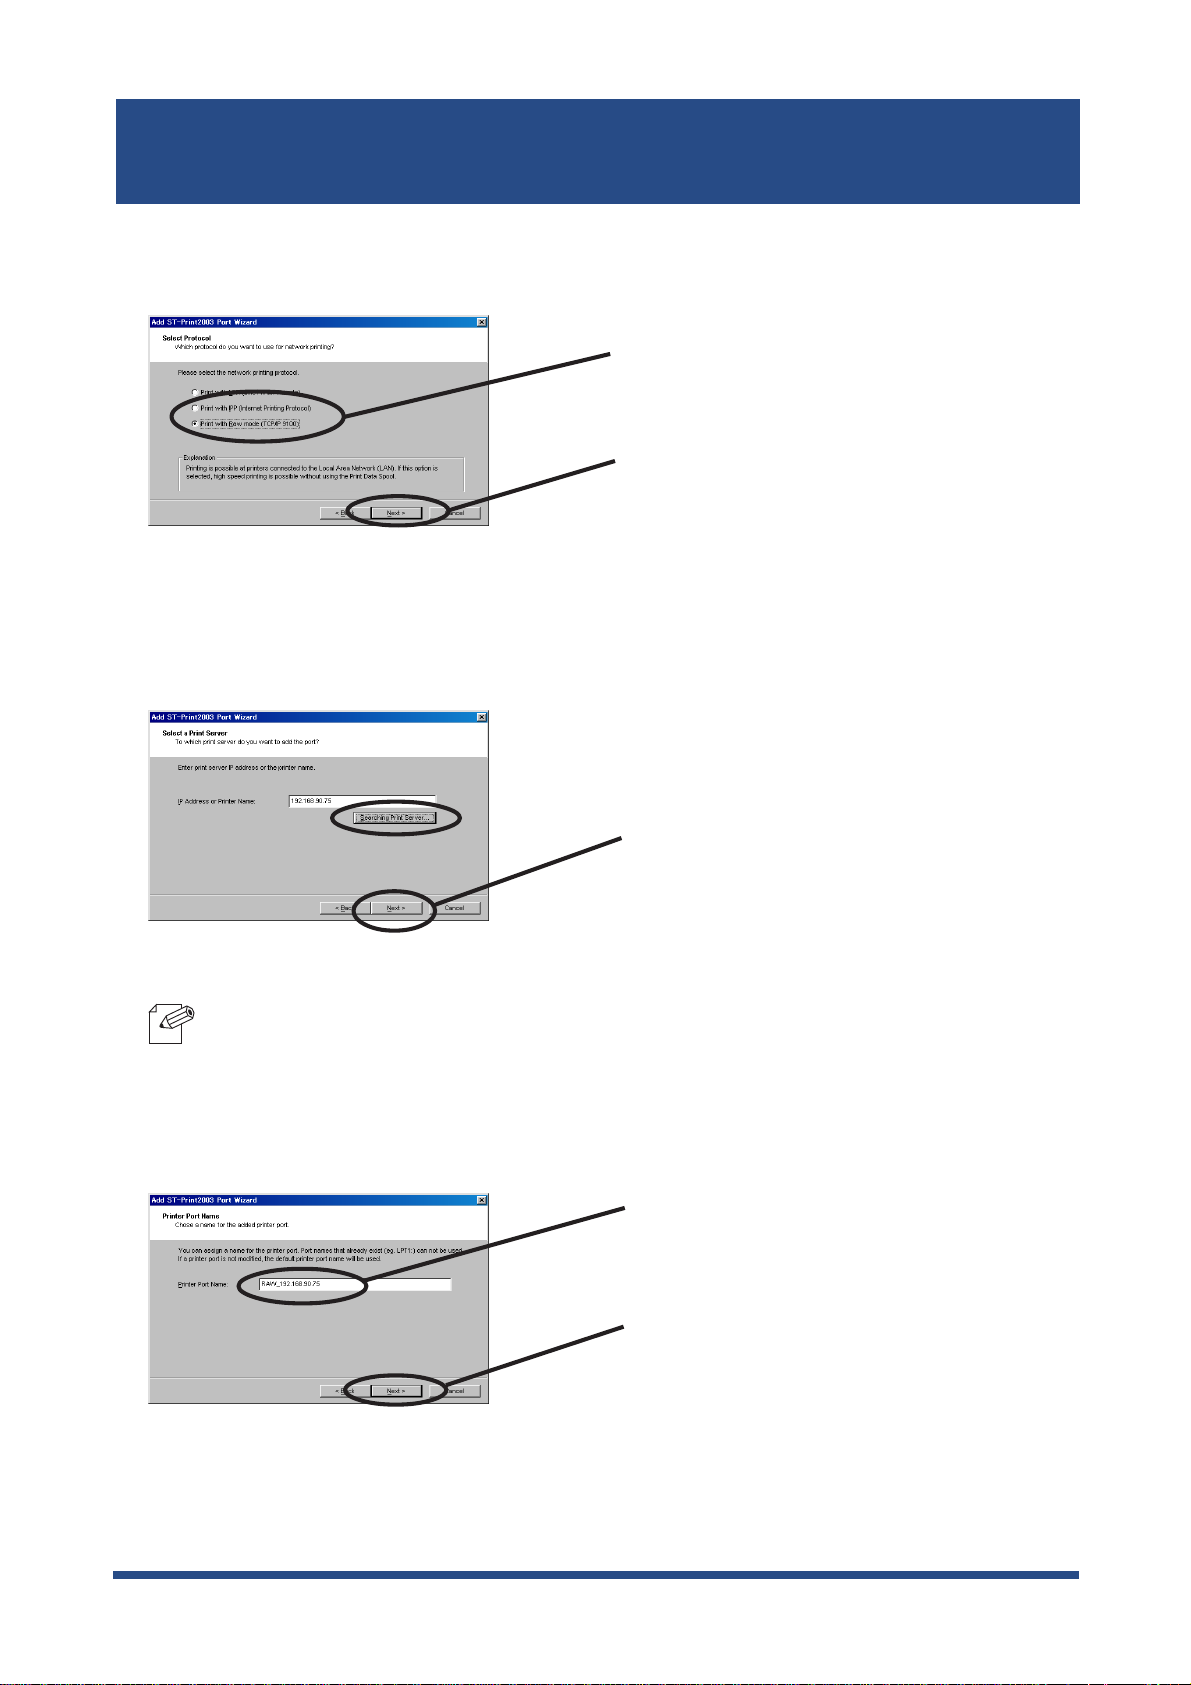
Adding ST-Print2003 Raw (9100) Port
Select Raw mode.
1.
Select
9100).
Click
Display the list of print servers on the network by clicking
2.
LAN board you want to configure.
Click
Print with Raw mode (TCP/IP
Next.
Searching Print Server
Next
.
Select
-To verify if the specified print server can access 9100 port, click
NOTE
Type in print port name.
3.
Next.
If there is no problem, use the default
printer port name (RAW_IP address).
Click
Next.
3-15Using LAN board in Windows 95/98/Me
Page 43

SATO Users Manual
4.
Verify the configuration.
Select the printer you want to use with LAN board.
5.
Click
Finish.
Configuration is complete.
6.
Click
Click
Next.
Finish.
3-16Using LAN board in Windows 95/98/Me
Page 44

SATO Users Manual
Configuring printer driver
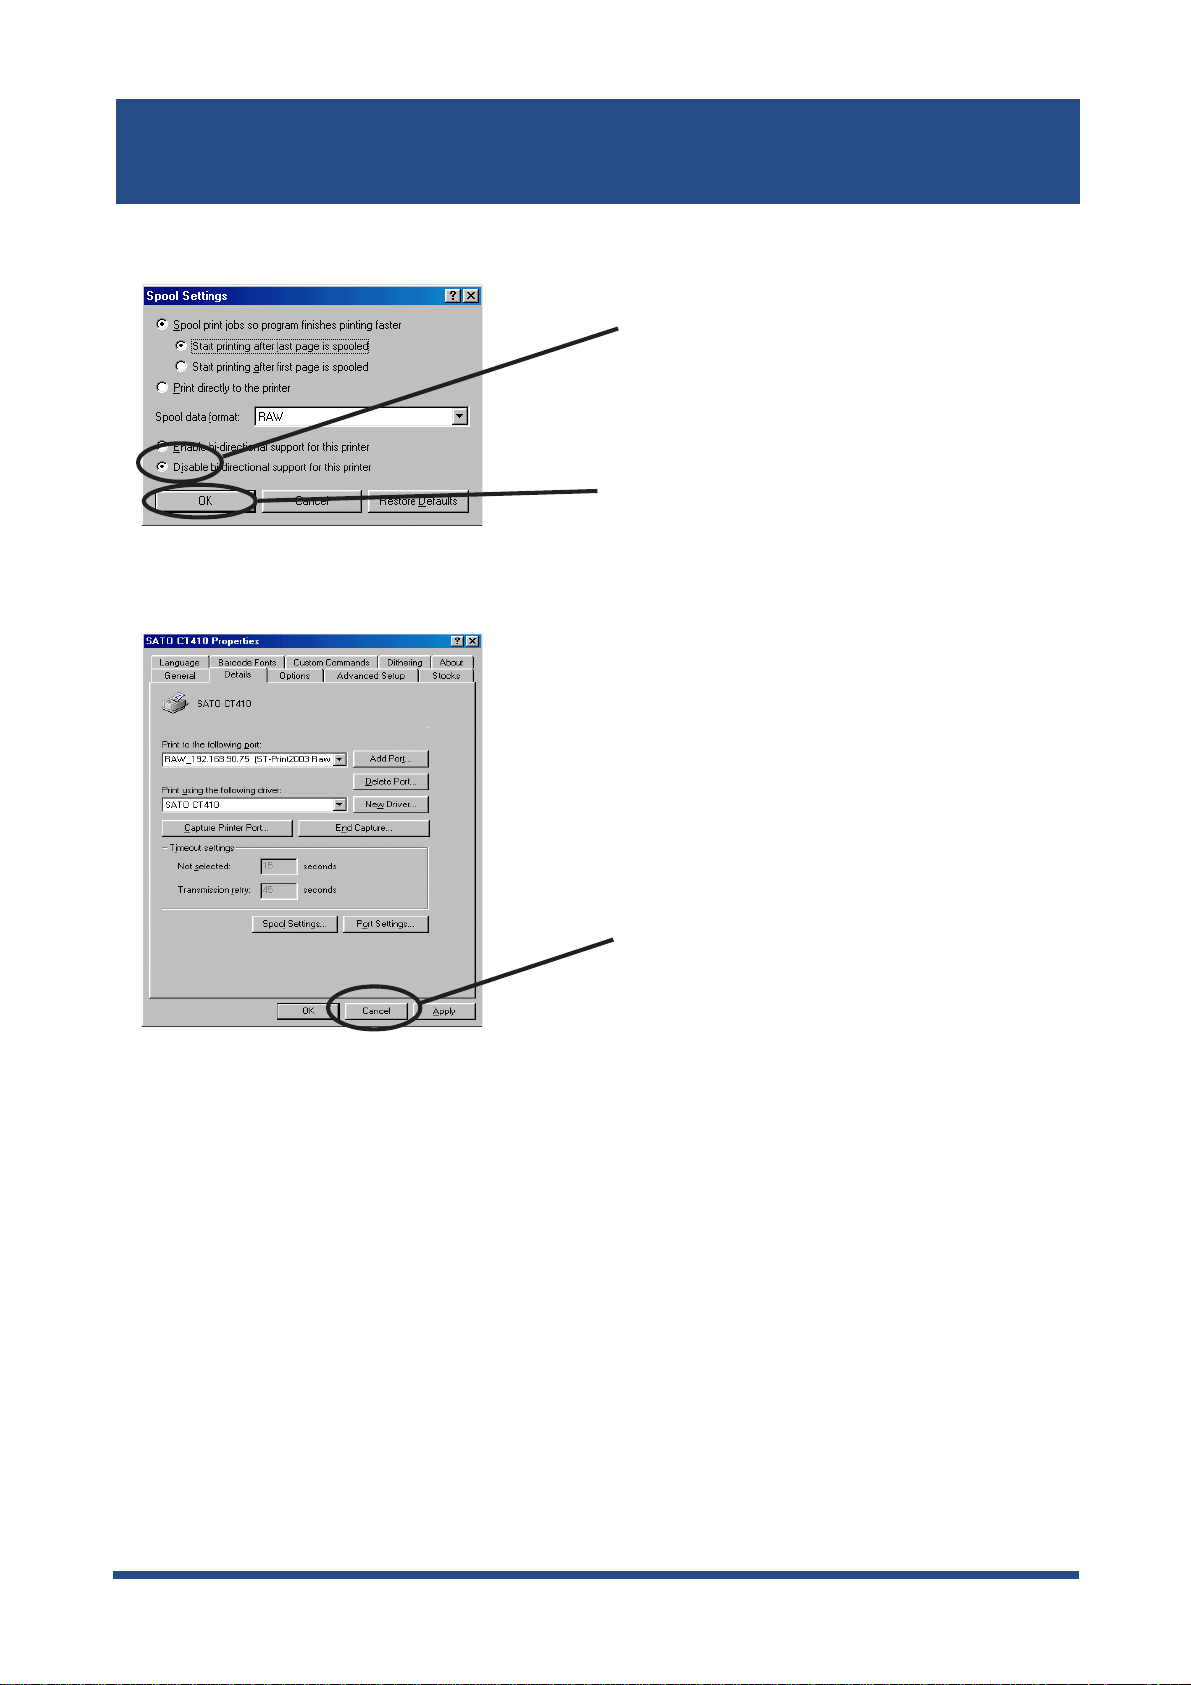
This section explains how to configure printer driver.
-If you do not configure printer driver, the following error dialog may appear.
No
and configure printer driver by following steps.
then
Printer,
then open the printer property.
1.
NOTE
Click
In this case, click
Start
, then
Settings,
2.
Select
Details.
Select
Select
Properties.
Sool Settings.
3-17Using LAN board in Windows 95/98/Me
Page 45
SATO Users Manual
Select
3.
4.
Configuration is complete.
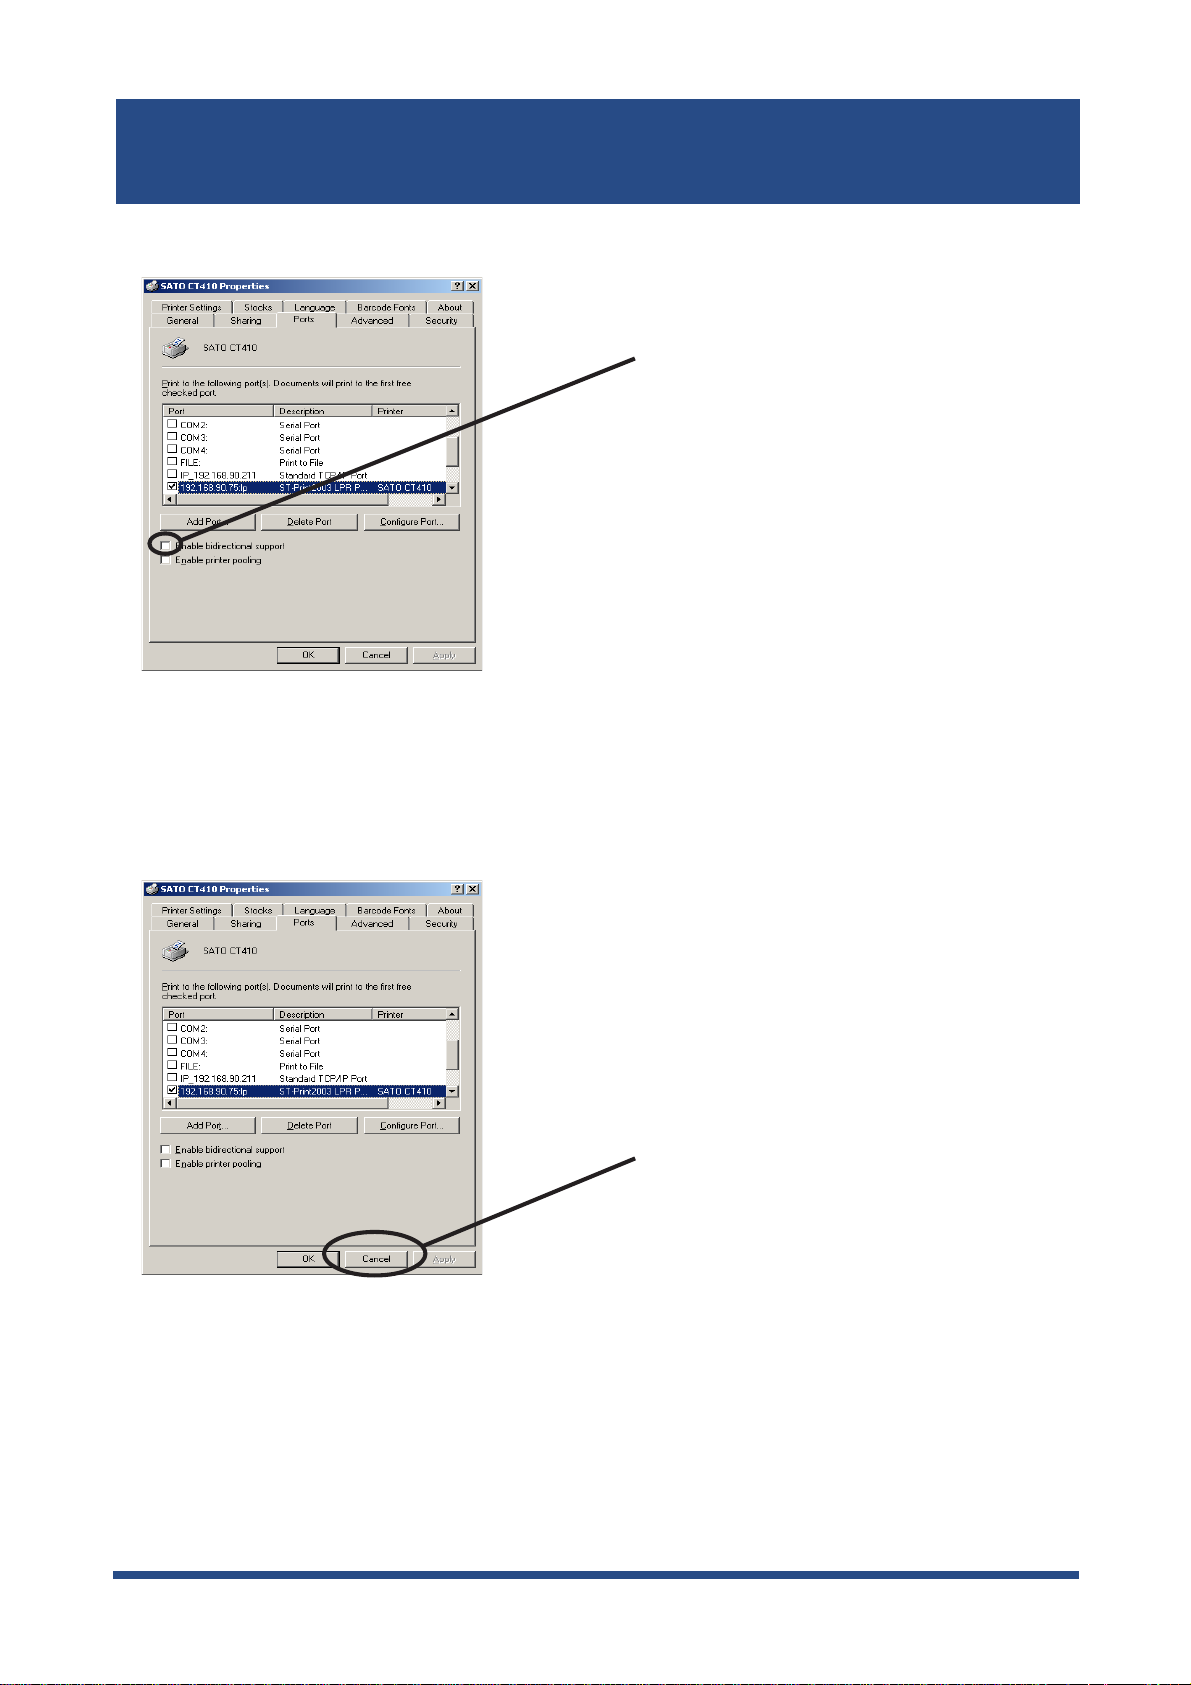
Disable bidirectional support for this printer.
Select
for this printer.
Click
Disable bidirectional support
OK.
Click
Apply.
3-18Using LAN board in Windows 95/98/Me
Page 46
SATO Users Manual
Print Using NetBEUI, NetBIOS over TCP/IP of Win-
dows 95/98/Me
Follow the steps shown below to print from Windows 95/98/Me environment using NetBEUI,
NetBIOS over TCP/IP protocol.
- Make user to install printer driver before you start using LAN board.
NOTE
- For further information on NetBEUI, NetBIOS over TCP/IP configuration, refer to Chapter 7
Functions for Configuration.
Verify the PC network configuration
Build NetBEUI, NetBIOS over TCP/IP printing environment
Verify the PC Network Configuration (NetBEUI)
Make sure that
Windows 95/98/Me.
1.
Click
Double-click
2.
Verify that
3.
the network component list.
NOTE
Start
NetBEUI
, then
Network
NetBEUI
-If NetBEUI protocol is not in the current network component list, click
Microsoft
is not in the current network component list, click
Network
to add File and printer sharing for Microsoft Network.
and
Settings
icon.
and
, then
NetBEUI
Microsoft network shared service
, then
Control Panel
.
File and printer sharing for Microsoft Network
to add
NetBEUI.
If
File and printer sharing for Microsoft Network
Services
are added to
are added to
Add
, then
Protocol
, then
File and printer for Microsoft
Network
, then
of
3-19Using LAN board in Windows 95/98/Me
Page 47

SATO Users Manual
Verify the PC Network Configuration (NetBIOS over TCP/IP)
Make sure that
TCP/IP
and
Microsoft network client
are added to
95/98/Me and verify if NetBIOS over TCP/IP is usable at
Click
Start
1.
Double-click
2.
Verify that
3.
NOTE
, then
TCP/IP
-If
TCP/IP
then
-If Microsoft network client is not in
Services,
Settings
Network
and
is not in
Microsoft,
then
, then
Control Panel
.
.
Microsoft network client
The following network components are installed
then
TCP/IP.
The following network components are installed,
Microsoft network client.
are added to
TCP/IP
Network
properties.
Network
, click
Add,
of Windows
.
then
Protocols,
click
4. Open
is checked.
NOTE
TCP/IP
-In the default, Enable NetBIOS on TCP/IP is generally checked.
properties, then select
NetBEUI
, then verify if
Enable NetBIOS on TCP/IP
3-20Using LAN board in Windows 95/98/Me
Page 48

SATO Users Manual
Print Using NetBEUI, NetBIOS over TCP/IP
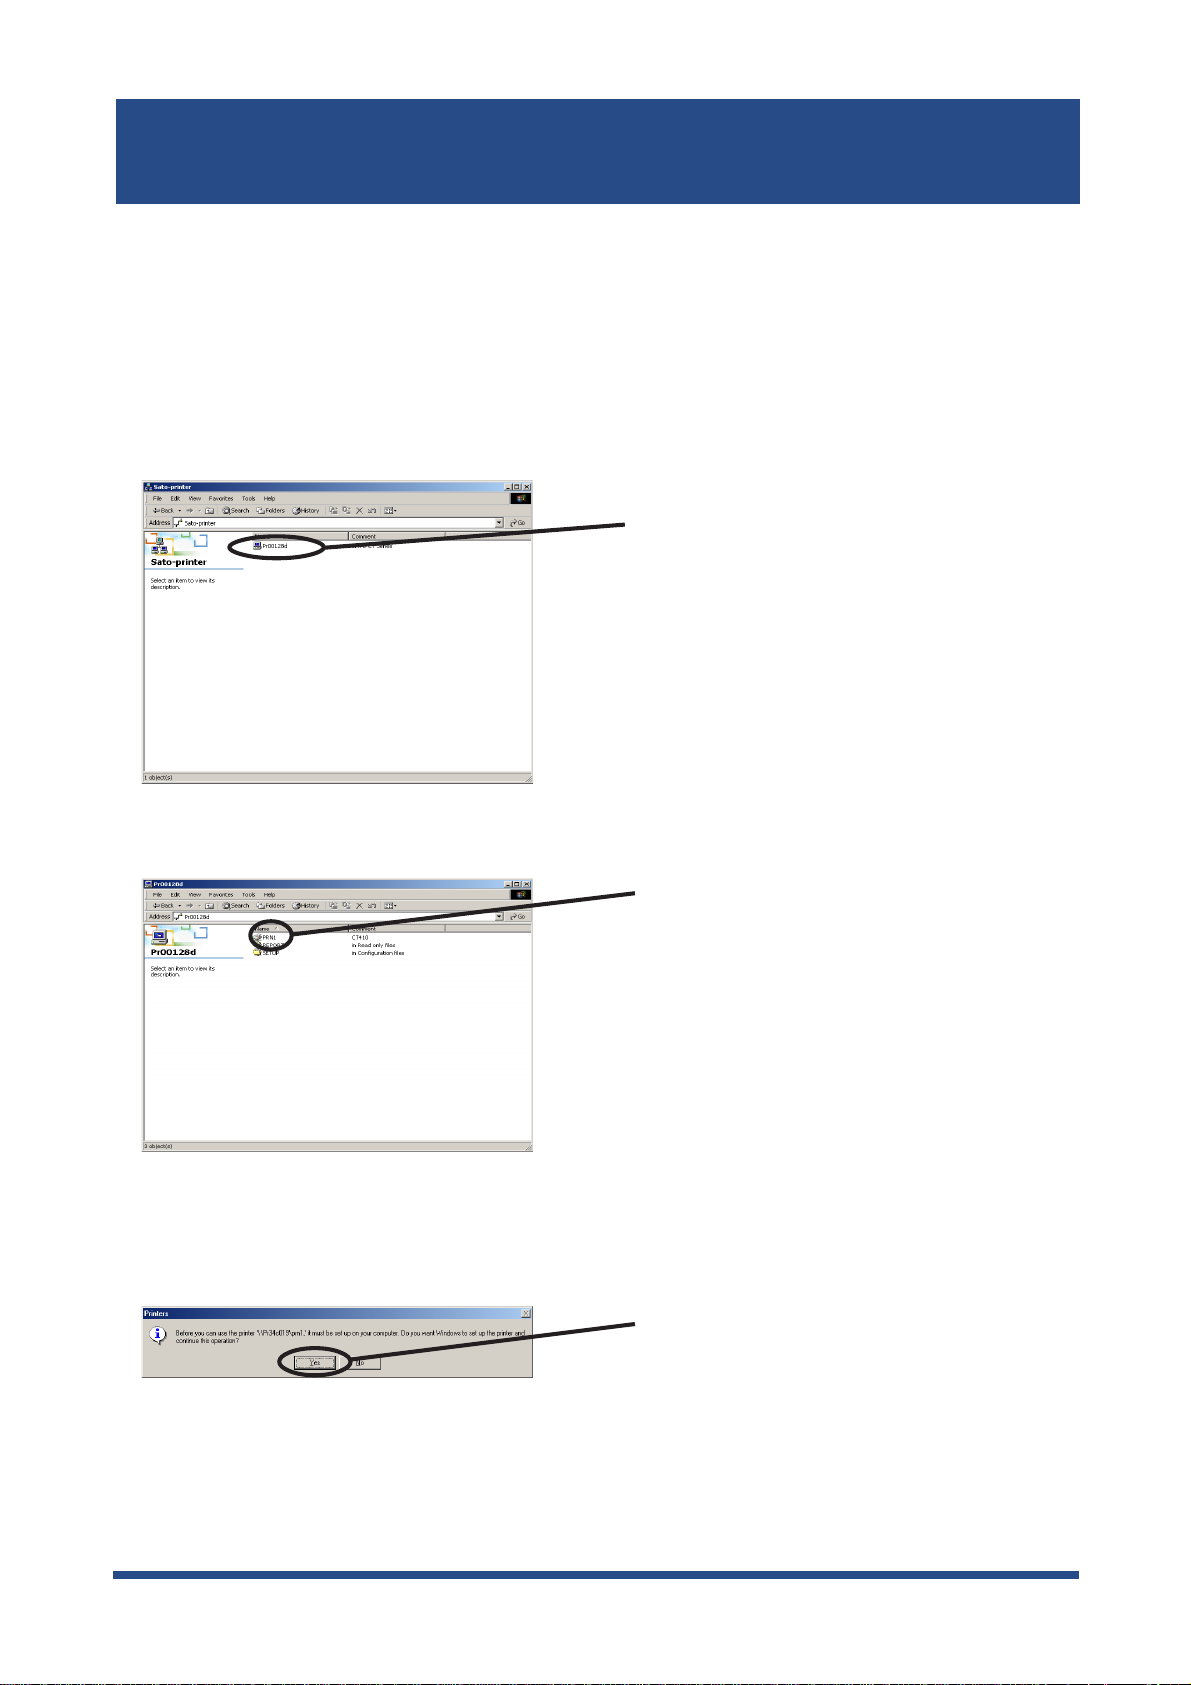
Double-click
1.
the
Whole Network.
2.
3.
Network computer
, then open work group name;
Double-click the computer (LAN board)
Double-click the printer.
[SATO-printer]
in
Display printer configuration screen.
4.
Click
Yes
.
Printer add wizard to be started. Follow the instructions given by the wizard to complete
5.
configuration. If you get the printer test page, adding printer is complete.
3-21Using LAN board in Windows 95/98/Me
Page 49

SATO Users Manual
About NetBEUI, NetBIOS over TCP/IP
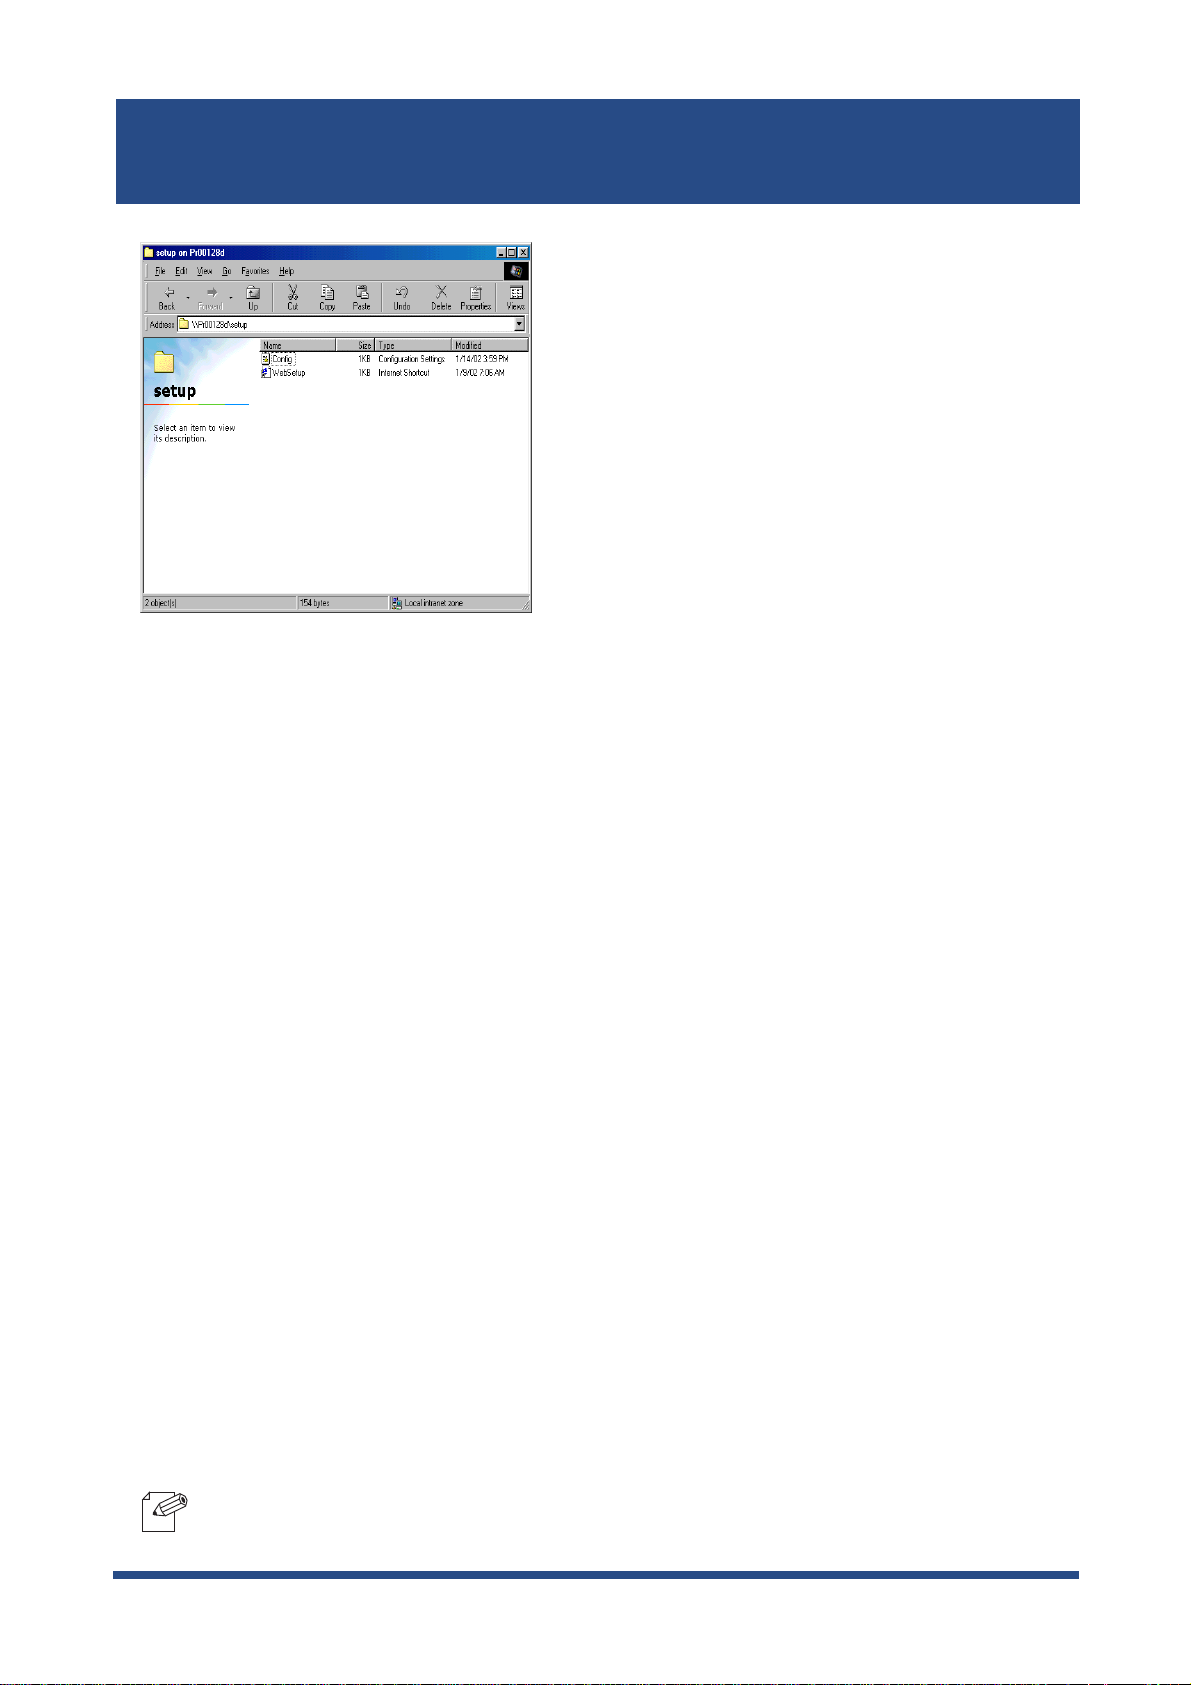
Structure of NetBEUI, NetBIOS over TCP/IP work group
This section explains about the structure of NetBEUI work group installed in LAN board.
Ex.) : LAN board Ethernet address: 00:80:92:00:12:8d
\\Pr00128d: Computer (LAN board)
\\Pr00128d\prn1: Printer
\\Pr00128d\report\ConfigReport.txt:
Settings report (read only)
\\Pr00128d\report\Status.txt:
Diagnostic report (read only)
\\Pr00128d\report\HardReport.txt:
System status report (read only)
\\Pr00128d\setup\Config.ini:
Initial setting file (can be edited)
\\Pr00128d\setup\WebSetup:
Shortcut file (read only)
3-22Using LAN board in Windows 95/98/Me
Page 50

SATO Users Manual
- Configuration report
Outputs the internal information in the LAN board when activated.
- System status report
Outputs the information on LAN board status when activated.
- Initial configuration file
With the initialization file,
like memo pad to edit and save files in the overwrite mode. In a few seconds, LAN board
automatically resets and reboots.
By editing the initialization file and saving the file in the overwrite mode, you can change
work group name and IP address.
Ex.)
Workgroup=UserGroup
IP address=192.168.90.75
Specify work group name that already exist in the whole network. In case IP address is to be
automatically assigned by using DHCP/BOOTP and RARP server, the IP address typed in
[IP address] will be invalid.
- Shortcut file
Once LAN board is given IP address, shortcut (WebSetup) is created. When double-clicking
the shortcut icon, web browser to be activated and LAN board homepage to be displayed.
Work group name
and
IP address
can be described. Use editor
NOTE
-For the Web browser, refer to Chapter 7.
3-23Using LAN board in Windows 95/98/Me
Page 51

SATO Users Manual
4. Using LAN board in Windows NT 4.0, Windows 2000 and Windows XP
This chapter explains how to print using TCP/IP, NetBEUI and NetBIOS over TCP/IP protocol
of Windows NT 4.0, Windows 2000 and Windows XP.
Print Using TCP/IP of Windows NT 4.0, Windows 2000 and Windows XP.
Following indicates how to print using TCP/IP protocol.
-Make sure to install printer driver before you start using LAN board.
NOTE
In case of initial installation
and printing
-For the print using embedded printing client function, refer to "Print Using Embedded Printing
Client Function" in this chapter.
Verify the PC network configuration
Configure IP address using QuickSetup
In case of printing
Install ST-Print2003
Configure printer port
Using LAN board in Windows NT 4.0, Windows 2000 and Windows XP
4-1
Page 52
SATO Users Manual
Verify the PC Network Configuration
Windows NT 4.0
Make sure that the
Click-
Start
1.
Double-click
2.
3.
Verify that
, then
Network
TCP/IP Protocol
TCP/IP
Settings
.
and
Microsoft TCP/IP Printing
, then
Control Panel
is included in
Network Protocols
Click
.
Properties.
are added to the
.
Services.
-If
TCP/IP Protocol
NOTE
Using LAN board in Windows NT 4.0, Windows 2000 and Windows XP
Protocol
to add
is not in
TCP/IP protocol.
Network Protocols
, click
Network Components
, then
TCP/IP
4-2
Page 53
SATO Users Manual
Verify if the configuration is proper for your environment in "
4.
5.
Verify if
Microsoft TCP/IP Printing
is included in
Network Services
IP Address
.
".
-If
TCP/IP Printing
NOTE
Using LAN board in Windows NT 4.0, Windows 2000 and Windows XP
Printing
to add
is not in
Microsoft TCP/IP Printing
Services,
click
Add
.
, then
Network Services
, then
Microsoft TCP/IP
4-3
Page 54
Windows 2000
SATO Users Manual
Verify if
1.
Internet Protocol [TCP/IP]
Click
Connections
Right-click
2.
Verify that
3.
Start,
then
.
Settings
Local Area Connection
Internet Protocol [TCP/IP]
is added.
, then
Control Panel
, then click
is added.
Properties
Click
, then
Network and Dial-up
.
Properties
.
-If
Internet Protocol [TCP/IP]
NOTE
Verify if the configuration is proper for your environment in
4.
Install,
then
Internet Protocol [TCP/IP]
is not in
Components checked are used by this connection
to add
Internet Protocol [TCP/IP]
, click
.
General.
Using LAN board in Windows NT 4.0, Windows 2000 and Windows XP
4-4
Page 55

SATO Users Manual
Windows XP
Verify if Internet Protocol (TCP/IP) is added.
Click
start
1.
, then
Control Panel
, then
Network and Internet Connections.
Right-click
2.
Verify that Internet Protocol (TCP/IP) is added.
3.
Network Connections,
then click
Properties.
Click
Properties.
-If
Internet Protocol (TCP/IP)
then
NOTE
Using LAN board in Windows NT 4.0, Windows 2000 and Windows XP
Internet Protocol (TCP/IP)
is not in
to add
This connection uses the following items
Internet Protocol (TCP/IP).
, click
Install,
4-5
Page 56

SATO Users Manual
Verify if the configuration is proper for your environment in
4.
-When you use TCP/ IP protocol in Windows XP, click
TIP
Properties,
and network by limiting or preventing access to this computer from the Internet.
then
Advanced
, then remove the check from
General.
Local Area Connection
Protect my computer
Using LAN board in Windows NT 4.0, Windows 2000 and Windows XP
4-6
Page 57
SATO Users Manual
Quick Setup
Insert the SATO User Software in the CD-ROM drive of your Windows PC. The main
1.
menu screen will be displayed.
The below screen will be displayed.
2.
Quick Setup loads.
3.
Click
Quickset Utility.
Click
Next.
Using LAN board in Windows NT 4.0, Windows 2000 and Windows XP
4-7
Page 58

SATO Users Manual
Confirm the Software License Agreement.
4.
Select LAN board to be configured.
5.
-If LAN board does not appear in the list, click
NOTE
You can search LAN board by typing in Ethernet address directly.
Read the agrement and click
if you accept it.
Select LAN board to be configured.
Click
Next.
Search.
Yes
Assign an IP address.
6.
When you have DHCP server in your environment.
(A) Obtain an IP address from DHCP server automatically.
Click
Click
-If NetWare Client is installed and LAN board is supporting NetWare (Enable), NetWare configuration
NOTE
Using LAN board in Windows NT 4.0, Windows 2000 and Windows XP
screen will appear.
Get IP Address Automatically.
Next
.
4-8
Page 59

SATO Users Manual
(B) Assign an IP address manually.
Assign an optional IP address.
Next.
Click
-If NetWare Client is installed and LAN board is supporting NetWare (Enable), NetWare configuration
NOTE
When you do not have DHCP server in your environment.
screen will appear.
-If NetWare Client is installed and LAN board is supporting NetWare (Enable), NetWare configuration
NOTE
Verify the configuration parameters.
7.
screen will appear.
Assign an optional IP address.
Click
Next.
Execute.
Click
Using LAN board in Windows NT 4.0, Windows 2000 and Windows XP
4-9
Page 60
8.
Setup is complete.
-Proceed to install ST-Print2003. ST-Print2003 is a printing software that enables you to
NOTE
print directly from WIndows.
-If you want to embedded prinitng client function in WIndows NT 4.0, Windows 2000 or
Windows XP, refer to "Print Using Embedded Printing Function" in this chapter.
SATO Users Manual
Click
Yes.
Click
Finish.
Using LAN board in Windows NT 4.0, Windows 2000 and Windows XP
4-10
Page 61
SATO Users Manual
Install ST-Print2003
To print directly from Windows NT 4.0, Windows 2000 or Windows XP environment using
TCP/IP protocol, use the ST-Print2003 bundled with LAN board. ST-Print2003 is a printing
software that enables users to use LPR (dedicated to silex products), IPP and Raw (9100)
port. When instllation is complete, the wizard to add printer port to be started.
-LPR (Line Printer Remote)
NOTE
A widely used popular protocol that enables users to execute printing to printers on the network.
-IPP (Internet Printing Protocol)
This protocol enables users to execute printing to network printers remote via Internet.
-Raw (9100) port
This function enables users to execute printing to printers on the local area network (LAN).
Information can be printed at a high speed without spool.
Verifying installing method.
1.
(A) Install ST-Print2003 following Quick Setup.
(B) Install ST-Print2003 .
Click
Yes.
Click
Finish.
Mount the CD-ROM bundled, then click
IP Port Drivers
Using LAN board in Windows NT 4.0, Windows 2000 and Windows XP
4-11
Page 62

SATO Users Manual
ST-Print2003 installation wizard to be started.
2.
Confirm the Software License Agreement.
3.
Click
Next.
Verify the Destination Directory.
4.
-Click
Reference
NOTE
to specify the destination directory.
Read the agrement and click
if you accept it.
Click
Next
.
Yes
Using LAN board in Windows NT 4.0, Windows 2000 and Windows XP
4-12
Page 63

SATO Users Manual
Specify the group name to be registered at the start menu.
5.
Click
Installation to be started.
6.
Next
.
Configuration is complete.
7.
Click
Select
Click
Start.
Yes
.
Finish.
Using LAN board in Windows NT 4.0, Windows 2000 and Windows XP
4-13
Page 64

SATO Users Manual
Adding Print Port
ST-Print2003 has three available options for printing.
and
"Print with Raw Mode"
start using the specified printing option.
(A)
Adding printer port following the ST-Print2003 installation.
1.
2.
ST-Print2003 port adding wizard starts.
. Select the protocol to be used for printing, then click Next to
Select
Click
"Print with LPR", "Print with IPP"
Yes.
Finish.
,
(B)Click
Start
, then
Programs
, then
ST-Print2003
Click
, then
Click
Next.
ST-Print2003 Port adding
Next.
.
Using LAN board in Windows NT 4.0, Windows 2000 and Windows XP
4-14
Page 65

SATO Users Manual
Adding ST-Print2003 LPR Port.
1.
Select
LPR (Line Printer Remote).
Display the list of print servers on the network by
2.
board you want to configure.
Select
Remote).
Click
Click
Print with LPR (Line Printer
Next
.
Searching Print Server
Next
.
. Select LAN
Type in printer port name.
3.
If you do not want to have a specific
name, use the default printer port name.
Click
Next
.
Using LAN board in Windows NT 4.0, Windows 2000 and Windows XP
4-15
Page 66

SATO Users Manual
4.
Verify the configuration.
Select the printer you want to use with LAN board.
5.
Click
Finish.
Port configuration is complete.
6.
Click
•Ÿ‚Ö
Click
Next.
Finish.
Using LAN board in Windows NT 4.0, Windows 2000 and Windows XP
4-16
Page 67

SATO Users Manual
Adding ST-Print2003 IPP Port
1.
Select IPP (Internet Printing Protocol).
2.
Select either
server manually.
Select
Protocol).
Click
Deactivate proxy server for Internet connection
Click
Print with IPP (Internet Printing
Next.
Next
.
or
Configure proxy
Type in URL assigned to LAN board for
3.
or "/ipp/lp".
-If you click
NOTE
Using LAN board in Windows NT 4.0, Windows 2000 and Windows XP
Next
, you can make sure if the specified URL exists.
Printer URL
Click
. LAN board IPP printer URL is "/ipp"
Next.
Ex.): When URL is “abc.co.jp”,
http://abc.co.jp/ipp/lp
Ex.):When IP address is
“192.168.90.75”,
http://192.168.90.75/ipp/lp
4-17
Page 68

SATO Users Manual
4.
Configure the port name for printing.
Verify the configuration.
5.
If you do not want to have a specific port
name, use the default printer port name.
Click
Next.
•Ÿ‚Ö
Select the printer you want to use with LAN board.
6.
7.
Configuration is complete.
Click
Click
Finish.
Next.
Click
Finish.
Using LAN board in Windows NT 4.0, Windows 2000 and Windows XP
4-18
Page 69

SATO Users Manual
Adding ST-Print2003 Raw (9100) Port
Select Raw mode.
1.
2.
Display the list of print servers on the network by
board you want to configure.
Select
9100).
Click
Click
Print with Raw mode (TCP/IP
Next.
Searching Print Server
Next
.
. Select LAN
-To verify if the specified print server can access 9100 port, click
NOTE
Type in printer port name.
3.
Reference.
If there is no problem, use the default
printer port name (RAW_IP address).
Click
Next.
Using LAN board in Windows NT 4.0, Windows 2000 and Windows XP
4-19
Page 70

SATO Users Manual
Verify the configuration.
4.
5.
Select the printer you want to use with LAN board.
Click
Finish.
Configuration is complete.
6.
Click
Click
Next.
Finish.
Using LAN board in Windows NT 4.0, Windows 2000 and Windows XP
4-20
Page 71

SATO Users Manual
Configuring Printer Driver
This section explains how to configure printer driver.
Ex.) Windows 2000
1.
NOTE
Click
-If you do not configure printer driver, the following error dialog may appear. In this case, click
and configure printer driver by following steps.
Start
, then
Settings
, then
Printer
, then open the printer property.
Select
Properties.
No
Select
2.
Using LAN board in Windows NT 4.0, Windows 2000 and Windows XP
Ports.
Select
Ports
.
4-21
Page 72
SATO Users Manual
Configure bidirectional.
3.
Configuration is complete.
4.
Check off
Enable bidirectional support
.
Click
Apply.
Using LAN board in Windows NT 4.0, Windows 2000 and Windows XP
4-22
Page 73

SATO Users Manual
Print Using NetBEUI, NetBIOS over TCP/IP of Windows NT 4.0 and Windows 2000
Print Using NetBEUI, NetBIOS over TCP/IP of Windows NT 4.0
Follow the steps shown below to print from Windows NT 4.0, Windows 2000 and Windows
XP environment using NetBEUI, NetBIOS over TCP/IP protocol.
- Make sure to install printer driver before you start using LAN board.
NOTE
- For further information on NetBEUI, NetBIOS over TCP/IP configuration, refer to Chapter 7.
Verify the PC network configuration
Build NetBEUI, NetBIOS over TCP/IP printing environment
Verify the Network Configuration (NetBEUI)
Make sure that
Network
1.
2.
3.
NOTE
of Windows NT 4.0.
Click
Double-click
Verify that
Start
-If
Workstation.
Workstation, NetBIOS interface
, then
Workstation
Workstation
Settings
Network
is not in the
.
, then
and
Control Panel
NetBIOS interface
Network Service
list, click
and
NetBEUI protocol
.
are added to the
Add,
then select
are added to
Services
Workstation
.
to add
Verify
4.
NOTE
Using LAN board in Windows NT 4.0, Windows 2000 and Windows XP
NetBEUI
-If
NetBEUI
is added to
is not in the list, click
Protocol
.
Add
, then select
NetBEUI
from
Network protocol.
4-23
Page 74

SATO Users Manual
Verify the PC Network Configuration (NetBIOS over TCP/IP)
Make sure that
Windows NT 4.0.
Click
1.
Double-click
2.
Verify that
3.
NOTE
Verify
4.
Start
, then
Workstation
-If
Workstation
Workstation.
TCP/IP
-If
TCP/IP
Workstation, TCP/IP
Settings
Network
is not in the
is added to
is not in the list, click
, then
icon.
and
Protocol
Control Panel
NetBIOS interface
Network Service
Add
and
NetBIOS interface
.
are added to the
list, click
.
, then select
TCP/IP
are added to
Add,
then select
from
Network protocol.
Services
Workstation
Network
.
to add
of
NOTE
Using LAN board in Windows NT 4.0, Windows 2000 and Windows XP
4-24
Page 75

SATO Users Manual
Print Using NetBEUI, NetBIOS over TCP/IP
Double-click
1.
Whole Network.
2.
3.
Network computer
, then open group name;
Double-click the computer (LAN board).
Double-click the printer.
[SATO-Printer]
in the
Confirmation message for printer configuration will be displayed.
4.
Click
Yes
.
Printer add wizard to be started. Follow the instruction given by the wizard to complete
5.
configuration. If you get the printer test page, adding printer is complete.
Using LAN board in Windows NT 4.0, Windows 2000 and Windows XP
4-25
Page 76
SATO Users Manual
Print Using NetBEUI, NetBIOS over TCP/IP of Windows 2000
Follow the steps shown below to print from Windows 2000 using NetBEUI, NetBIOS over
TCP/IP protocol.
- Make sure to install printer driver before you start using LAN board.
NOTE
- For further information on NetBEUI, NetBIOS over TCP/IP configuration, refer to Chapter 7.
Verify the PC network configuration
Build NetBEUI, NetBIOS over TCP/IP printing environment
Verify Network Configuration
Make sure that
Network
Click
1.
Open
2.
Verify NetBEUI protocol is added.
3.
NOTE
of the Windows 2000.
Start,
Properties
NetBEUI protocol
then
Settings
of
-If
NetBEUI
is not in the component list, click
, then
Local area connection.
and
Microsoft network shared service
Control Panel,
then
Install
Network and Internet Connection.
, then
Protocol
are added to the
, then
NetBEUI protocol
.
Verify that
4.
NOTE
Using LAN board in Windows NT 4.0, Windows 2000 and Windows XP
Microsoft Network Client
-If
Microsoft Network Client
Network Client.
is added.
is not in component list, click
Install,
then
Client,
then
Microsoft
4-26
Page 77

SATO Users Manual
Verify the PC Network Configuration (NetBIOS over TCP/IP)
Make sure that
added to
Network
Internet Protocol (TCP/IP)
of Windows NT 4.0 and verify if
and
(TCP/IP).
Click
1.
Right-click
2.
Verify Microsoft Network Sharing Services is added.
3.
NOTE
Verify
4.
NOTE
Start
, then
Settings
, then
Control Panel
Local Area Connection
-If
Microsoft Network Sharing Services
Network Sharing Services.
Internet Protocol (TCP/IP)
-If
Internet Protocol (TCP/IP)
click
Install,
then
Internet Protocol (TCP/IP)
is not in
, then click
is not in the list, click
is added.
Components checked are used by this connection,
Microsoft Network Sharing Service
NetBIOS
, then
is configured to
Internet Protocol
Network and Dial-up Connection.
properties.
Install,
to add
Internet Protocol (TCP/IP).
then
Client,
then
Microsoft
are
Verify
5.
then
Using LAN board in Windows NT 4.0, Windows 2000 and Windows XP
Enable NetBIOS over TCP/IP
Properties
, then
Details
, then
is selected by clicking
WINS.
Internet Protocol (TCP/IP)
,
4-27
Page 78
SATO Users Manual
Print Using NetBEUI, NetBIOS over TCP/IP
1.
Double-click
My network
, then
Network
, then
Microsoft Windows Network
and open
work group name,
2.
3.
SATO-Printer.
Double-click the computer (LAN board).
Double-click your computer.
4.
Confirmation message for printer configuration will be displayed.
Click
Yes
.
Printer add wizard to be started. Follow the instruction given by the wizard to complete
5.
configuration. If you get the printer test page, adding printer is complete.
Using LAN board in Windows NT 4.0, Windows 2000 and Windows XP
4-28
Page 79

SATO Users Manual
Print Using NetBIOS over TCP/IP of Windows XP
Print Using NetBIOS over TCP/IP of Windows XP
Follow the steps shown below to print from Windows XP using NetBIOS over TCP/IP protocol.
- Make sure to install printer driver before you start using LAN board.
NOTE
- For further information on NetBIOS over TCP/IP configuration, refer to Chapter 7.
Verify the PC network configuration
Build NetBIOS over TCP/IP printing environment
Verify the PC Network Configuration
Make sure that
Client
1.
2.
is added to
Click
start
then
Network Connection.
Open
NetBIOS
Network.
, then
Properties
is configured in
Settings
of
, then
Local area connection.
Control Panel,
Internet protocol (TCP/IP)
and
Microsoft Network
then
Network and Internet Connection,
Click
Properties.
Using LAN board in Windows NT 4.0, Windows 2000 and Windows XP
4-29
Page 80
3.
SATO Users Manual
Click
Internet protocol (TCP/IP)
Default
or
Enable NetBIOS over TCP/IP
, then
Property
is selected for NetBIOS configuration.
, then
Details
, then
WINS
and verify
Verify that
4.
TIP
Microsoft Network Client
-When you use TCP/ IP protocol in Windows XP, click
Properties,
by limiting or preventing access to this computer from the Internet.
then
Advanced
, then remove the check from
is added.
Local Area Connection
Protect my computer and network
Using LAN board in Windows NT 4.0, Windows 2000 and Windows XP
4-30
Page 81

SATO Users Manual
Print Using NetBIOS over TCP/IP
1.
Double-click
My network,
then
View workgroup computers
, then
Microsoft Windows
Network
2.
3.
and open work group name,
SATO-Printer.
Double-click the computer (LAN board).
Double-click the printer.
4.
Confirmation message for printer configuration will be displayed.
Click
Yes
.
Follow the setting instructions given by the printer add wizard until the printer test page is
5.
output that means the end of printer adding sequence.
Using LAN board in Windows NT 4.0, Windows 2000 and Windows XP
4-31
Page 82

SATO Users Manual
About NetBEUI, NetBIOS over TCP/IP
Structure of NetBEUI, NetBIOS over TCP/IP work group
This section explains about structure of NetBEUI, NetBIOS over TCP/IP work group installed
in LAN board.
Ex.): LAN board Ethernet address: 00:80:92:00:12:8d
\\Pr00128d: Computer (LAN board)
\\Pr00128d\prn1: Printer
\\Pr00128d\report\ConfigReport.txt:
Settings report (read only)
\\Pr00128d\report\Status.txt:
Diagnostic report (read only)
System status report (read only)
\\Pr00128d\report\HardReport.txt:
System status report (read only)
Using LAN board in Windows NT 4.0, Windows 2000 and Windows XP
4-32
Page 83
SATO Users Manual
\\Pr00128d\setup\Config.ini:
Initial setting file (can be edited)
\\Pr00128d\setup\WebSetup:
Shortcut file (read only)
- Configuration report
Outputs the internal information in LAN board when activated.
- System status report
Outputs the information on LAN board status when activated.
- Initial configuration file
With the initialization file,
like memo pad to edit and save files in the overwrite mode. In a few seconds, LAN board
automatically resets and reboots.
By editing the initialization file and saving the file in the overwrite mode, you can change
work group name and IP address.
Ex.)
Workgroup=UserGroup
IP address=192.168.90.75
Specify work group name that already exist in the whole network. In case IP address is to be
automatically assigned by using DHCP/BOOTP and RARP server, the IP address typed in
[IP address] will be invalid.
Work group name
and
IP address
can be described. Use editor
- Shortcut file
Once LAN board is given IP address, shortcut (WebSetup) is created. When double-clicking
the shortcut icon, web browser to be activated and LAN board Web page to be displayed.
-For the Web browser, refer to Chapter 7.
NOTE
Using LAN board in Windows NT 4.0, Windows 2000 and Windows XP
4-33
Page 84

SATO Users Manual
Print Using Embedded Printing Client Function
This section explains how to print using embedded printing client function.
Print Using LPR Port of Windows NT 4.0
TIP
Click
1.
Add Printer
2.
-In order to print using LPR port, LPR port must be added. Click
Panel,
then
OK.
Start
then
Network
Component is installed. Restart the computer.
, then
, then select
Settings,
then
Services
Printers
, then click
, then double-click
Select
Click
Add,
then select
My Computer.
Next
Start
, then
Microsoft TCP/IP Printing
Add Printer
.
Settings
, then
.
Control
,
Click
3.
Select the printer port.
Select
Using LAN board in Windows NT 4.0, Windows 2000 and Windows XP
Add Port
LPR Port
.
and click
New Port
4-34
.
Page 85

SATO Users Manual
Add LPR compatible printer.
4.
Verify the Printer Port.
5.
Type in the IP address configured to LAN
board and type in lp.
Click
OK
.
Verify if the appropriate port is checked.
Click
Next.
6.
Select the printer driver.
Verify the printer driver.
7.
Select the printer driver to be used.
Next.
Click
Select
(recommended)
driver
Click
Keep existing driver
or
Replace existing
.
Next.
-If installed the latest driver, select
NOTE
Using LAN board in Windows NT 4.0, Windows 2000 and Windows XP
Replace existing driver
.
4-35
Page 86
SATO Users Manual
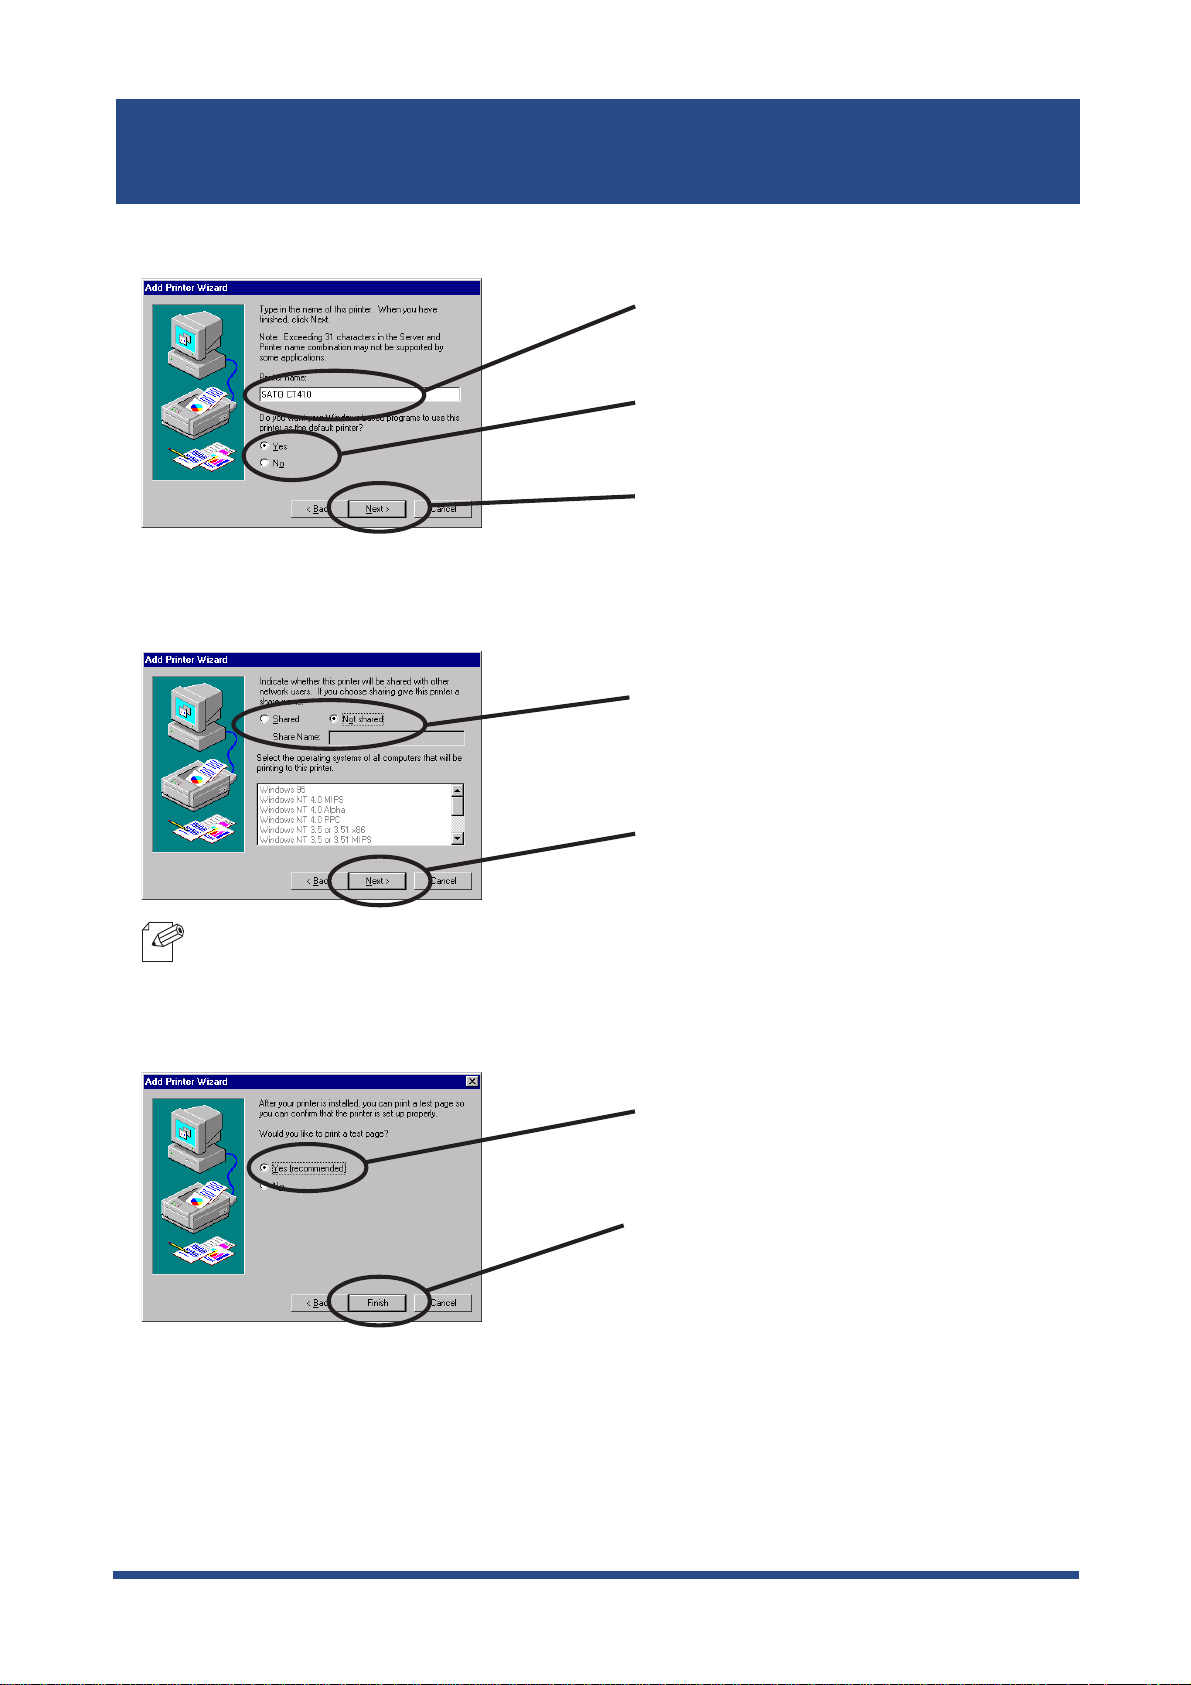
Register the Printer name.
8.
Select if the printer to be shared or not .
9.
Select if use the printer as the default
printer or not.
If you do not specify the printer name,
use the printer name already set.
Click
Next.
-If the printer is shared with other computers in the same network, select
NOTE
Select if you want test print.
10.
Select
Click
Select
Click
Shared
Next.
Yes
Finish.
or
Not shared
Shared.
.
.
If the test page is printed properly, configuration is complete.
11.
Using LAN board in Windows NT 4.0, Windows 2000 and Windows XP
4-36
Page 87

SATO Users Manual
Print Using Standard TCP/IP Port of Windows 2000 and Windows XP
Screens displayed below are for Windows XP. If you use Windows 2000, the screen may
vary.
Click
1.
start
then
Add a printer.
, then
Settings
.
, then
Control Panel
Click
, then
Next.
Printers and Other Hadware,
-If you use Windows 2000, click
NOTE
Select the printer to be configured.
2.
NOTE
3.
Select the printer port.
Add Printer.
-If you use Windows 2000, select
and...
Start
, then
Settings,
Local Printer
then
Control Panel,
Select
Local printer attached to this
computer
and remove the check from
then
Printers,
Aotomatically detect and install....
Click
Next
.
and remove the check from
Automatically detect
then
Check
Create a new port
Standard TCP/IP Port.
Click
Next
.
Using LAN board in Windows NT 4.0, Windows 2000 and Windows XP
and select
4-37
Page 88

SATO Users Manual
Add Standard TCP/IP Printer Port Wizard will be started.
4.
Click
Add TCP/IP Printer Port .
5.
Type in the IP address configured
to LAN board.
Next.
Identify the device type.
6.
If you do not specify the
the established code (IP_xxx.xxx.xxx).
Click
Next.
Check
Click
Custom
Next.
and click
Port Name
Settings
, use
.
Using LAN board in Windows NT 4.0, Windows 2000 and Windows XP
4-38
Page 89

SATO Users Manual
Type in the port information.
7.
(A) Raw Mode
-If you click OK, the screen 6 will be displayed, then click
NOTE
(B) LPR Mode
Select
Type in
Click
Select
Type in lp and check
Enabled
Raw
9100
Next.
Next.
LPR
.
.
.
.
LPR Byte Counting
-If click OK, the screen 6. will be displayed, then click
NOTE
Verify the configuration.
8.
Click
Click
OK.
Next
.
Finish.
Using LAN board in Windows NT 4.0, Windows 2000 and Windows XP
4-39
Page 90

SATO Users Manual
Select the printer driver.
9.
Verify the printer driver.
10.
Select the printer driver to be used.
Click
Next
.
-If installed the latest driver, select
NOTE
Register the Printer name.
11.
Select
(recommended)
driver
Click
Replace existing driver
If you do not specify the printer name,
use the printer name already set.
Select if use the printer as the default
printer or not.
Keep existing printer driver
.
Next.
or
Replace existing
.
Click
Next.
Using LAN board in Windows NT 4.0, Windows 2000 and Windows XP
4-40
Page 91

SATO Users Manual
Select if the printer to be shared or not.
12.
-If the printer is shared with other computers in the same network, select
NOTE
Select if you want test print.
13.
Select
Shared as
Next.
Click
Select
Yes
Do not share this printer
.
Shared.
.
or
Click
Next.
Verify the configuration.
14.
Click
Finish .
15.
If the test page is printed properly, configuration is complete.
Using LAN board in Windows NT 4.0, Windows 2000 and Windows XP
4-41
Page 92
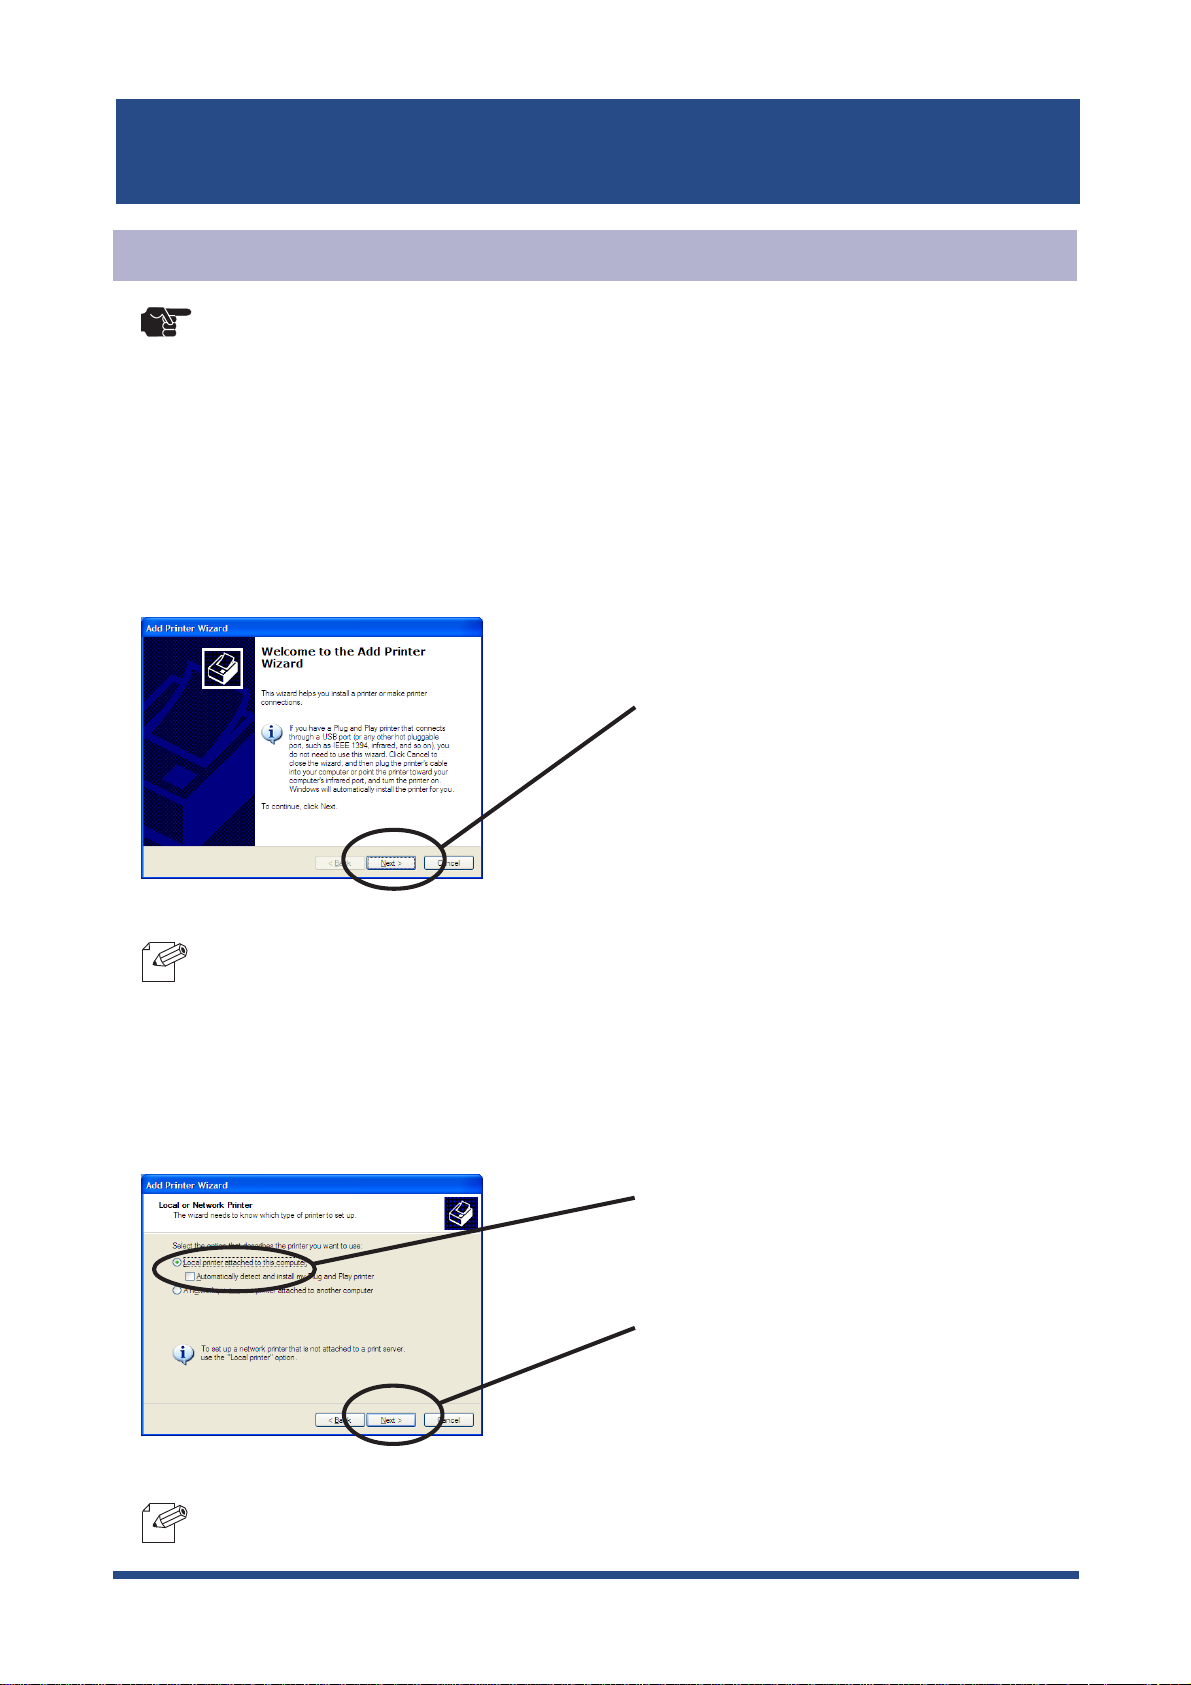
SATO Users Manual
Print Using LPR Port of Windows 2000 and Windows XP
1.
TIP
Click
-In order to print using LPR port, LPR port must be added. Click
Add or Remove Prpgrams
Panel
, then
Add or Remove Programs
Components Wizard
Printing Services
Wizard
-Screens displayed below are for Windows XP. If you use Windows 2000, the screens may
vary.
start
will be displayed. Click
, then
Control Panel
will be displayed, then click
, then
(For Windows 2000, click
), then
Details
, then
Finish
, then
Print Services for Unix
.
Printers and Other Hardware
start
Add/Remove Windows Components. Windows
Components,
Click
Next.
Start,
, then
, then
then
Control Panel,
Settings
then
OK. Windows Components
, then
Control
Other Network File and
, then
Add a printer
then
.
-If you use Windows 2000, click
NOTE
Select the printer to be configured.
2.
-If you use Windows 2000, select
NOTE
detect and .
..
Start,
then
Local printer
Settings
, then
Printers
Select
Local printer attached to this
computer
, then double-click
and remove the check from
Automatically detect and .
Click
Next.
and remove the check from
Add Printer.
..
Automatically
Using LAN board in Windows NT 4.0, Windows 2000 and Windows XP
4-42
Page 93

SATO Users Manual
3. Select the printer port.
Add LPR compatible printer.
4.
Check
Standard TCP/IP Port.
Click
Type in the IP address configured to LAN
board and type in lp.
Click
Create a new port
Next.
OK.
and select
Select the printer driver.
5.
Select the printer driver to be used.
Click
Next.
Using LAN board in Windows NT 4.0, Windows 2000 and Windows XP
4-43
Page 94

SATO Users Manual
Verify the printer driver.
6.
Register the printer name.
7.
Select
(recommended)
driver
Click
If you do not specify the printer name,
use the printer name already set.
Select if use the printer as the default
printer or not.
Click
Keep existing driver
or
Replace existing
.
Next.
Next.
8.
Select if the printer to be shared or not .
-If the printer is shared with other computers in the same network, select
NOTE
Click
Next.
Shared as.
Using LAN board in Windows NT 4.0, Windows 2000 and Windows XP
4-44
Page 95

SATO Users Manual
Select if you want test print.
9.
10.
Verify the configuration.
Click
Next.
Click
Finish.
If the test page is printed properly, configuration is complete.
11.
Using LAN board in Windows NT 4.0, Windows 2000 and Windows XP
4-45
Page 96
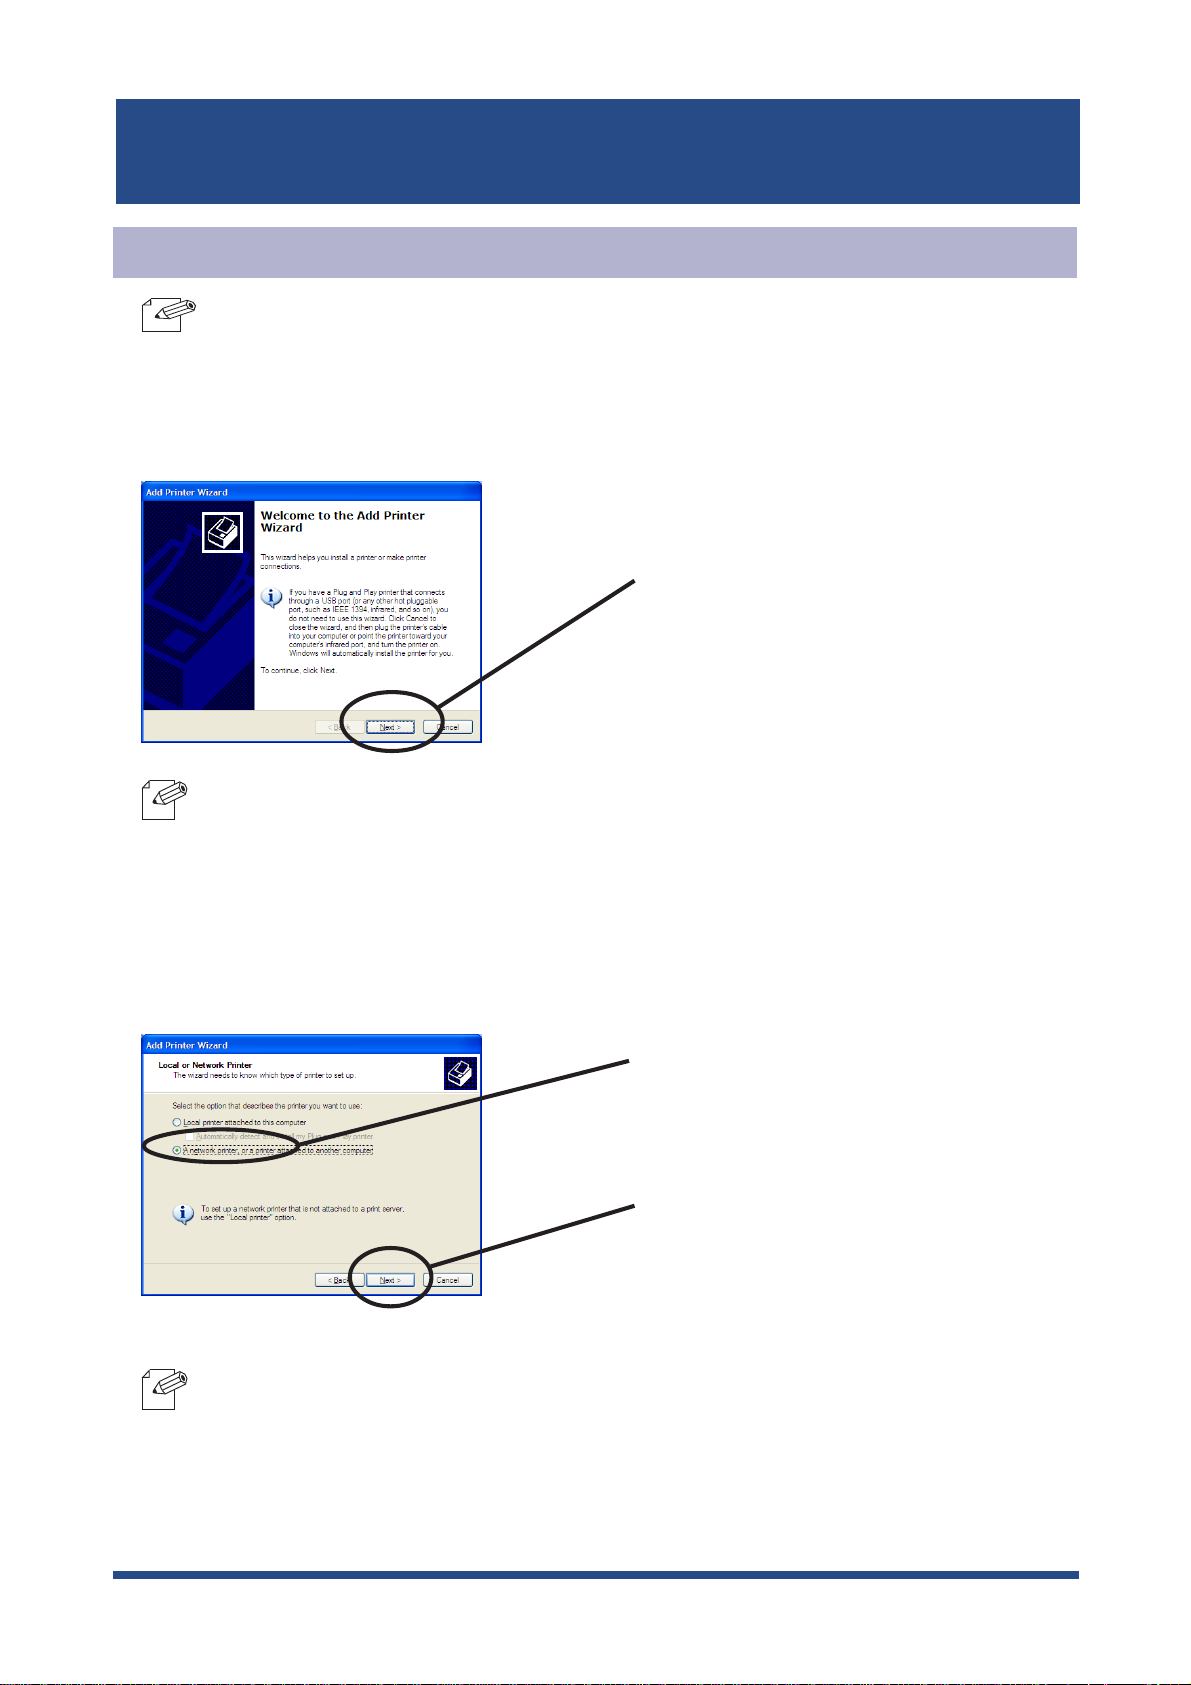
SATO Users Manual
Print Using IPP Port of Windows 2000 and Wiondows XP
-Screens displayed below are for Windows 2000. If you use Windows 2000, the screens may
TIP
vary.
1.
Click
NOTE
start
, then
-If you use Windows 2000, click
Printer
Control Panel,
.
then
Printers and Other Hardware
Start
, then
Click
Settings,
Next.
then
Printers
, then
, then double-click
Add a printer
.
Add
Select the printer to be configured.
2.
-If you use Windows 2000, select
NOTE
Select
attached to another computer.
Click
Network Printer
A network printer or a printer
Next
.
.
Using LAN board in Windows NT 4.0, Windows 2000 and Windows XP
4-46
Page 97
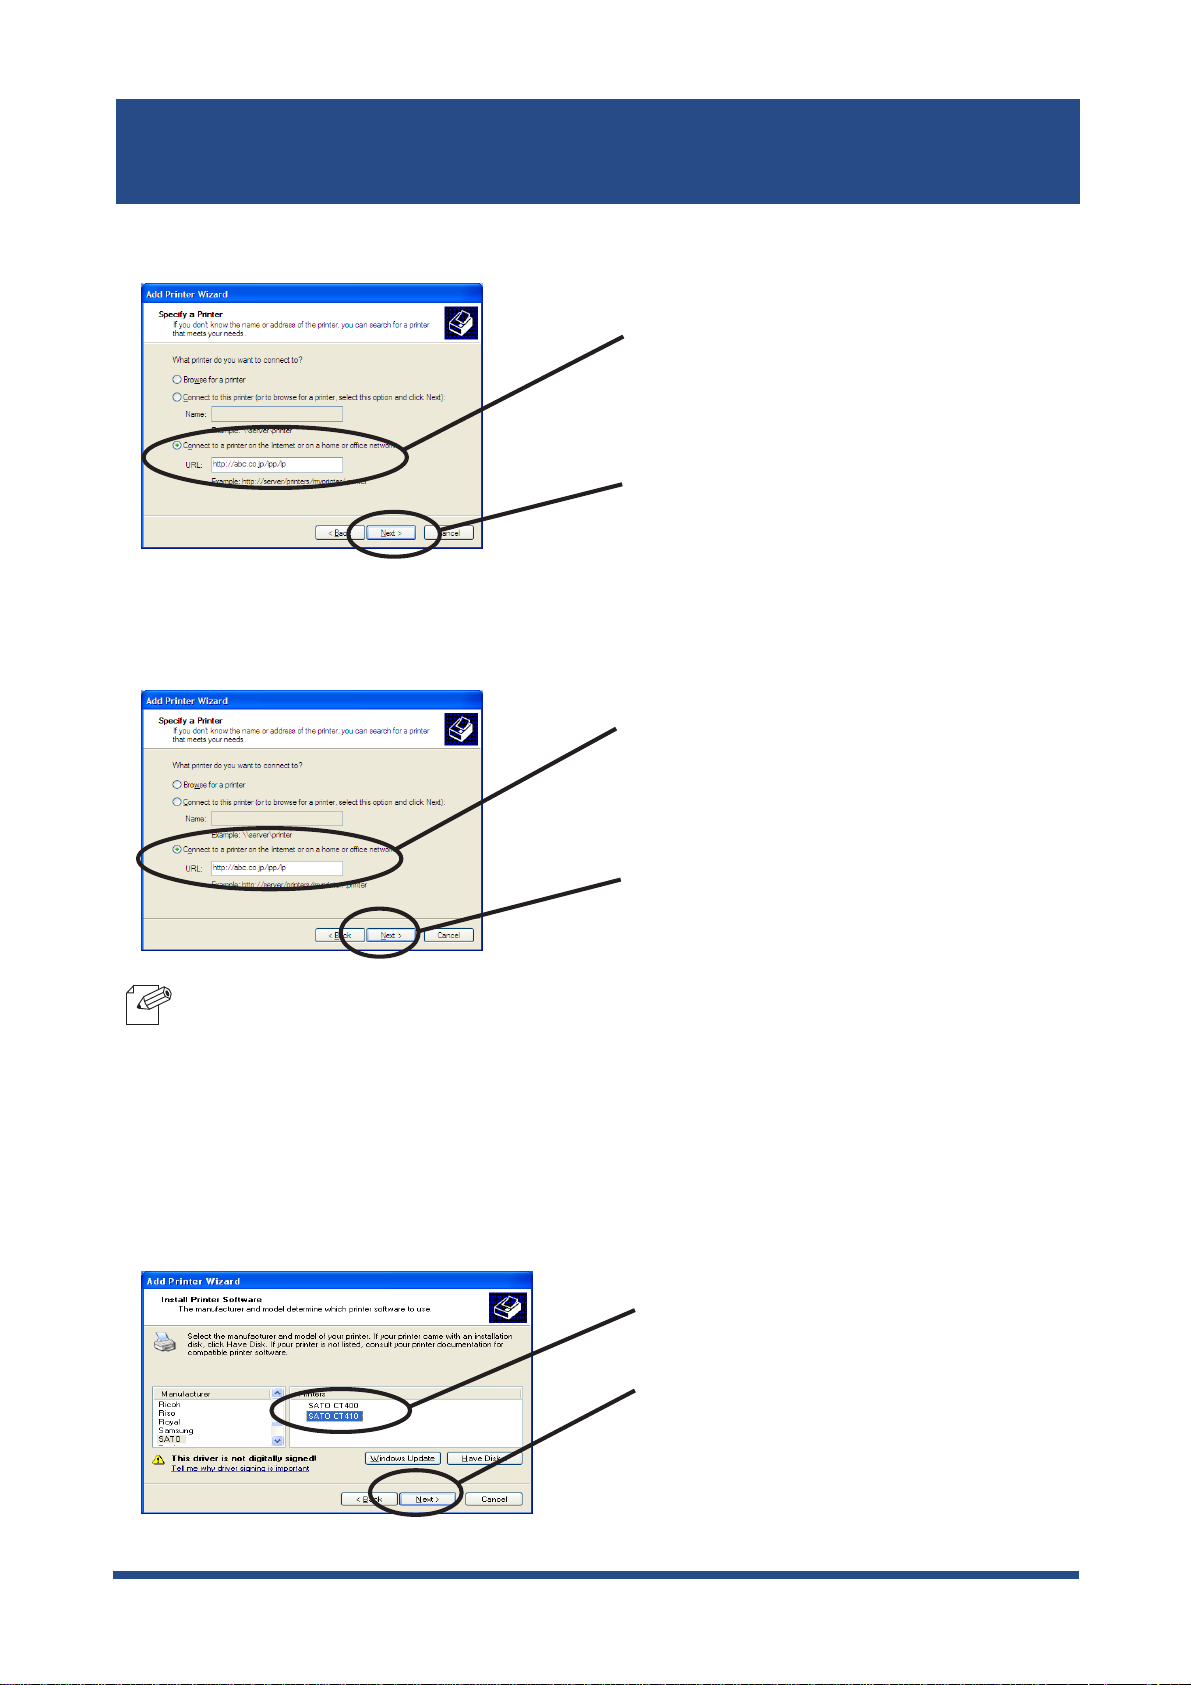
SATO Users Manual
Type in LAN board IP address.
3.
<Windows 2000>
Select
Internet or on the home/office network.
Specify URL or LAN board IP address.
Click
Select Connect to a printer on the
Internet or intranet. Specify URL or
IP address of LAN board.
Click
Connect to a printer on the
Next.
Next.
Ex.): When URL is “abc.co.jp”,
NOTE
Select the printer driver.
4.
http://abc.co.jp/ipp/lp or http://abc.co.jp/ipp
Ex.): When IP address is “192.168.90.75”,
http://192.168.90.75/ipp/lp or http://192.168.90.75/ipp
Select the printer driver to be used.
Click
Next.
Using LAN board in Windows NT 4.0, Windows 2000 and Windows XP
4-47
Page 98
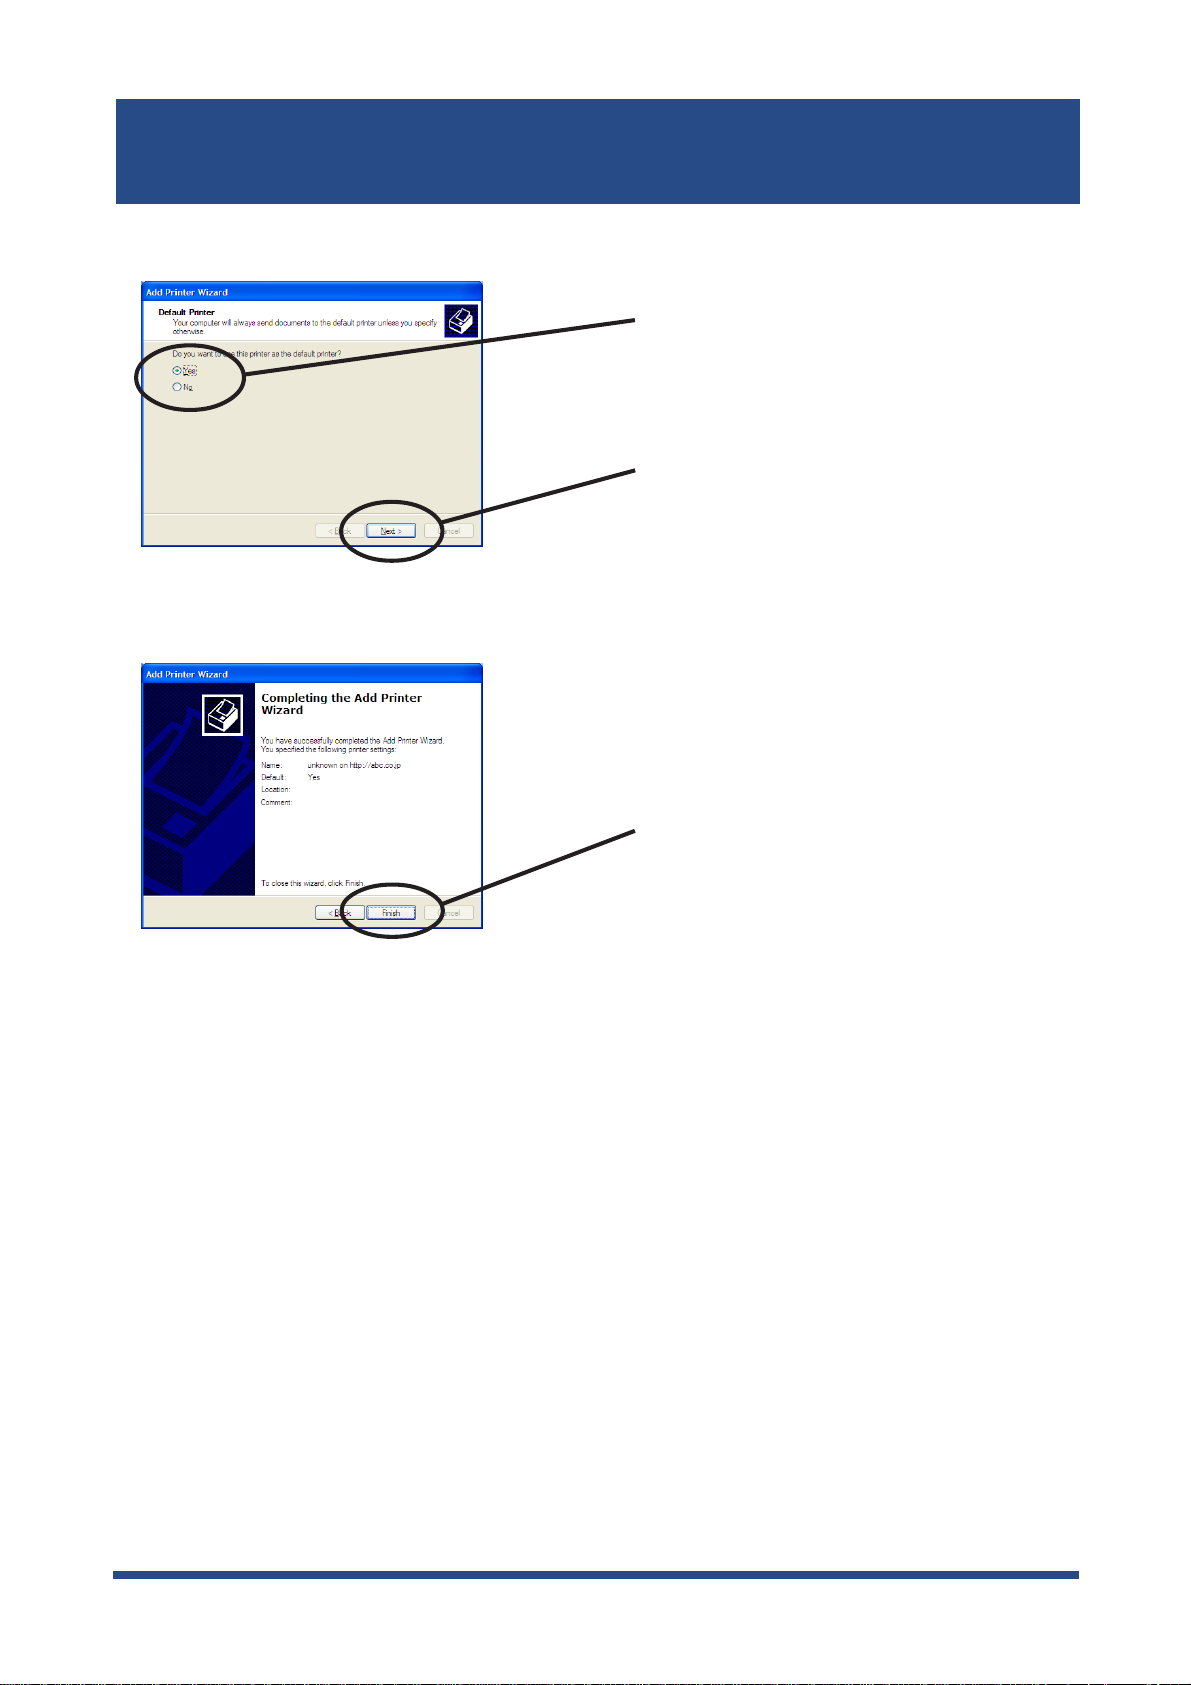
SATO Users Manual
Configure the default printer.
5.
Configuration is complete.
6.
Select if you want to use this printer as a
default printer.
Click
Next
.
Click
Finish.
Using LAN board in Windows NT 4.0, Windows 2000 and Windows XP
4-48
Page 99

SATO Users Manual
5. Using LAN board in UNIX/Linux Environment
This chapter explains how to configure LAN board in UNIX/Linux environment and how to
print using LPD and FTP.
For further information not covered in this manual, refer to the manual of workstation you
use.
<Procedure to execute printing in UNIX/Linux environment.>
In case of initial installation and printing In case of printing
(Administrator) (Client)
Configure IP address
Configure host file
Configure printing
Configure host file
Configure printing
Using LAN board in UNIX/Linux Environment
5-1
Page 100

SATO Users Manual
Configuring IP Address
-After configuring IP address, configure LAN board by TELNET.
NOTE
Register the combination of IP address and Ethernet address that are to be registered on
LAN board to BOOTP server. IP address will be configured to LAN board by turning the
power on.
TIP
For information about TELNET, refer to Chapter 7 Functions for Configuration.
Configuring IP Address by BOOTP
-To configure IP address by BOOTP, you need a workstation that is running BOOTP within the
network.
The below shows an example of IP address configuration by UNIX BOOTP server.
Example: Ethernet address is “00809200100f”, IP address is “192.168.10.100” and host name is “pbox”.
1. Add following configuration to /etc/bootptab.
pbox:\
ht=ether:\ # Target hardware type is ETHERNET
ha=00809200110f:\ # Target hardware address
ip=192.168.10.100:\ # Target IP address
gw=192.168.10.254:\ # Default gateway address (If required)
sm=255.255.255.0: # Target subnet mask (If required)
2. Add following configuration to /etc/inetd.conf.
bootps dgram udp wait root /etc/bootpd bootpd
3. Reboot inetd.
kill -1 1
4. Reset LAN board and printer.
Using LAN board in UNIX/Linux Environment
5-2
 Loading...