


Website: http://www.argox.com
service@argox.com
Version: 1.2
Date: Oct. 7, 2019
OS SERIE PRINTERS
OS-2130D
OS-2130DE
USER’S MANUAL
OS-2130D & OS-2130DE User’s Manual
1

Table of Contents
Introduction ....................................................................... 4
Proprietary Statement ................................................... 4
Product Improvements ................................................. 4
FCC Compliance Statement ......................................... 4
Liability Disclaimer ........................................................ 4
Safety ........................................................................... 5
Getting Started .................................................................. 6
Unpacking Printer ......................................................... 6
Package Contents .................................................... 7
Printer Overview ........................................................... 8
Front View: OS-2130D and OS-2130DE .................. 8
Rear View: OS-2130D .............................................. 9
Rear View: OS-2130DE ......................................... 10
Interior View I ......................................................... 11
Interior View II ........................................................ 12
Attaching Power ......................................................... 13
Loading Media ............................................................ 15
Preparing Media ..................................................... 15
Placing Media Roll ................................................. 15
Printer Operations .......................................................... 21
Printing Media Calibration & Configuration ................. 21
Steps to Start Media Calibration & Configuration ... 21
Sample of Printer Configuration Label ................... 22
Resetting Printer to Factory Defaults .......................... 24
2
OS-2130D & OS-2130DE User’s Manual

Printer Controls and Indicators ................................... 25
Troubleshooting by LED and Buzzer Indicators
Diagnosis .................................................................... 29
Miscellaneous ............................................................. 33
Recovery ..................................................................... 34
Communications ............................................................. 35
Interfaces and Requirements ...................................... 35
USB Interface Requirements .................................. 35
Serial (RS-232) Interface Requirements ................. 36
Ethernet 10/100 Internal Printer Server Option ....... 36
Ethernet Module Status Indicators .......................... 36
Communicating with the Printer .................................. 38
Installing a Plug and Play printer driver (for USB only)
........................................................................... 38
Installing a Printer Driver (for other interfaces except
USB) ................................................................... 44
Caring for Your Printer .................................................... 51
Print Head Maintenance Guide ................................... 51
Cleaning Interval ..................................................... 51
Cleaning Material .................................................... 51
Cleaning Direction .................................................. 52
Product Specification ..................................................... 53
General Specification .................................................. 53
Fonts, Barcodes, and Graphics Specification ............. 57
Printer Programming Language PPLA.................... 57
Printer Programming Language PPLB.................... 58
3
OS-2130D & OS-2130DE User’s Manual

Interface Specification ................................................ 60
Cash Drawer .......................................................... 60
USB Interface ......................................................... 61
Serial Interface ....................................................... 62
Ethernet Interface ................................................... 63
Appendix I-Thermal Print Head Replacement .............. 64
Appendix II-Cutter Installation ....................................... 66
Appendix III-Dispenser kit Installation .......................... 70
4
OS-2130D & OS-2130DE User’s Manual

Introduction
Proprietary Statement
This manual contains proprietary information of Argox Information Co., Ltd. It is
intended solely for the information and use of parties operating and maintaining the
equipment described herein. Such proprietary information may not be used,
reproduced, or disclosed to any other parties for any other purpose without the
expressed written permission of Argox Information Co., Ltd.
Product Improvements
Continuous improvement of products is a policy of Argox Information Co., Ltd. All
specifications and signs are subject to change without notice.
FCC Compliance Statement
This equipment has been tested and found to comply with the limits for a Class A
digital device, pursuant to Part 15 of the FCC Rules. These limits are designed to
provide reasonable protection against harmful interference in a residential installation.
This equipment generates, uses, and can radiate radio frequency energy and, if not
installed and used in accordance with the instructions, may cause harmful
interference to radio communications. However, there is no guarantee that the
interference will not occur in a particular installation. If this equipment does cause
harmful interference to radio or television reception, which can be determined by
turning the equipment off and on, the user is encouraged to try to correct the
interference by the following measures:
Reorient or relocate the receiving antenna.
Increase the separation between the equipment and the receiver.
Connect the equipment into a different outlet on a different circuit.
Consult the dealer or an experience Radio/TV technician for help.
This unit was tested with shielded cables on the peripheral devices. Shielded cables
must be used with the unit to insure compliance. The user is cautioned that any
changes or modifications not expressly approved by Argox Information Co., Ltd.
could void the user’s authority to operate the equipment.
Liability Disclaimer
Argox Information Co., Ltd. takes steps to assure that the company’s published
engineering specifications and manuals are correct; however, errors do occur. Argox
Information Co., Ltd. reserves the right to correct any such errors and disclaims any
resulting liability. In no event shall Argox Information Co., Ltd. or anyone else
involved in the creation, production, or delivery of the accompanying product
(including hardware and software) be liable for any damages whatsoever (including,
without limitation, damages for loss of business profits, business interruption, loss of
business information, or other pecuniary loss) arising out of the use of or the results
4
OS-2130D & OS-2130DE User’s Manual

of use of or inability to use such product, even if Argox Information Co., Ltd. has been
Supplemental Information: This device complies with the requirement
of FCC Part 15 Rules. Operation is subject to the following two
Conditions: (1) This device may not cause harmful interference, and (2)
this device must accept any interference received, including interference
that may cause undesired operation.
Please only use adapters with the following electrical characteristics and
are certified by current legislation. Using other adapters may damage the
device and void the warranty also cause risks to the user.
Features Output: 24VDC, 2.4A
The manufacturer declares under sole responsibility that this product
conforms to the following standards or other normative documents:
EMC: EN 55022:2010 class A
EN55024:2010
Argox Information Co., Ltd certifies that the following products and/or
components are compliant with the current requirements of the European
Union Restriction on the use of Hazardous Substances (RoHS) Directive,
2011/65/EC.
advised of the possibility of such damages.
CAUTION:
Any changes or modifications not expressly approved by the party responsible for
compliance could void the user's authority to operate the equipment.
Safety
INDUSTRY CANADA NOTICE:
This device complies with Industry Canada ICES-003 class A requirements.
Cet equipement est conforme a ICES-003 classe A de la norm Industrielle Canadian.
OS-2130D & OS-2130DE User’s Manual
5

Note: If shipping damage has been discovered, contact your
shipping company immediately to file a claim.
Getting Started
Congratulations on choosing OS-2130D and OS-2130DE printers,
made by Argox Information Co., a leader in the world-wide barcode
industry. OS-2130D and OS-2130DE are ideally designed to easily
bring more efficiency for your business. This manual will help you get
to know your new printer and provide sufficient information needed.
Unpacking Printer
After receiving your printer, please check for possible shipping
damage:
Inspect the outside of both the box and the printer for possible
damage.
1. Open the top cover of the printer to see if all parts are in order.
2. Check whether you have received the following accessories
together with the printer. If there is any item missing, please
contact your local dealer.
6
OS-2130D & OS-2130DE User’s Manual

Quick Installation Guide
Power Cord
Media Hanger & Media Shields
Printer
Power Supply
USB cable
DVD
Package Contents
OS-2130D & OS-2130DE User’s Manual
7

Printer Overview
Top Cover
Cover Lock
Power Switch
Feed Button
Power Indicator
Ready Indicator
Paper Outlet
Front View: OS-2130D and OS-2130DE
8
OS-2130D & OS-2130DE User’s Manual
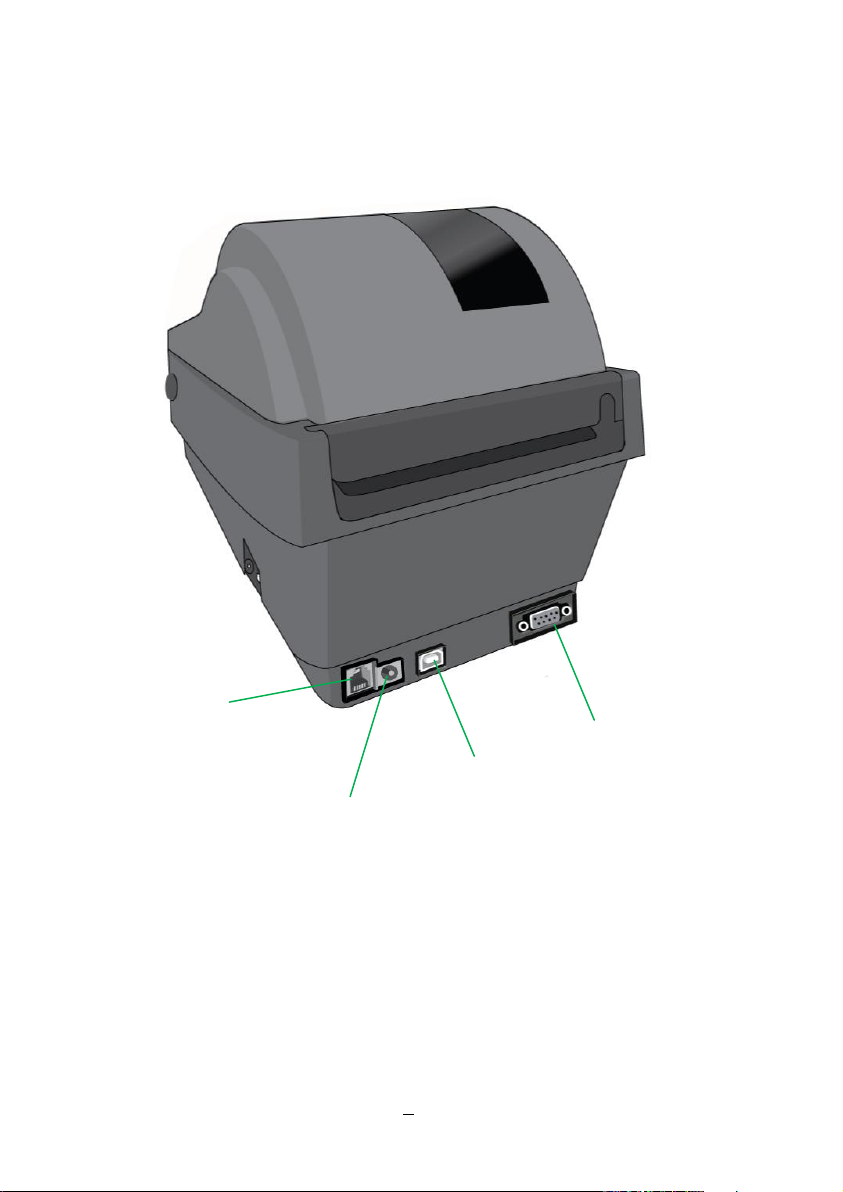
Rear View: OS-2130D
Cash Drawer Port
Power Jack
USB
RS-232 Serial
9
OS-2130D & OS-2130DE User’s Manual

Rear View: OS-2130DE
Cash Drawer Port
Power Jack
USB
RS-232 Serial
Ethernet
10
OS-2130D & OS-2130DE User’s Manual
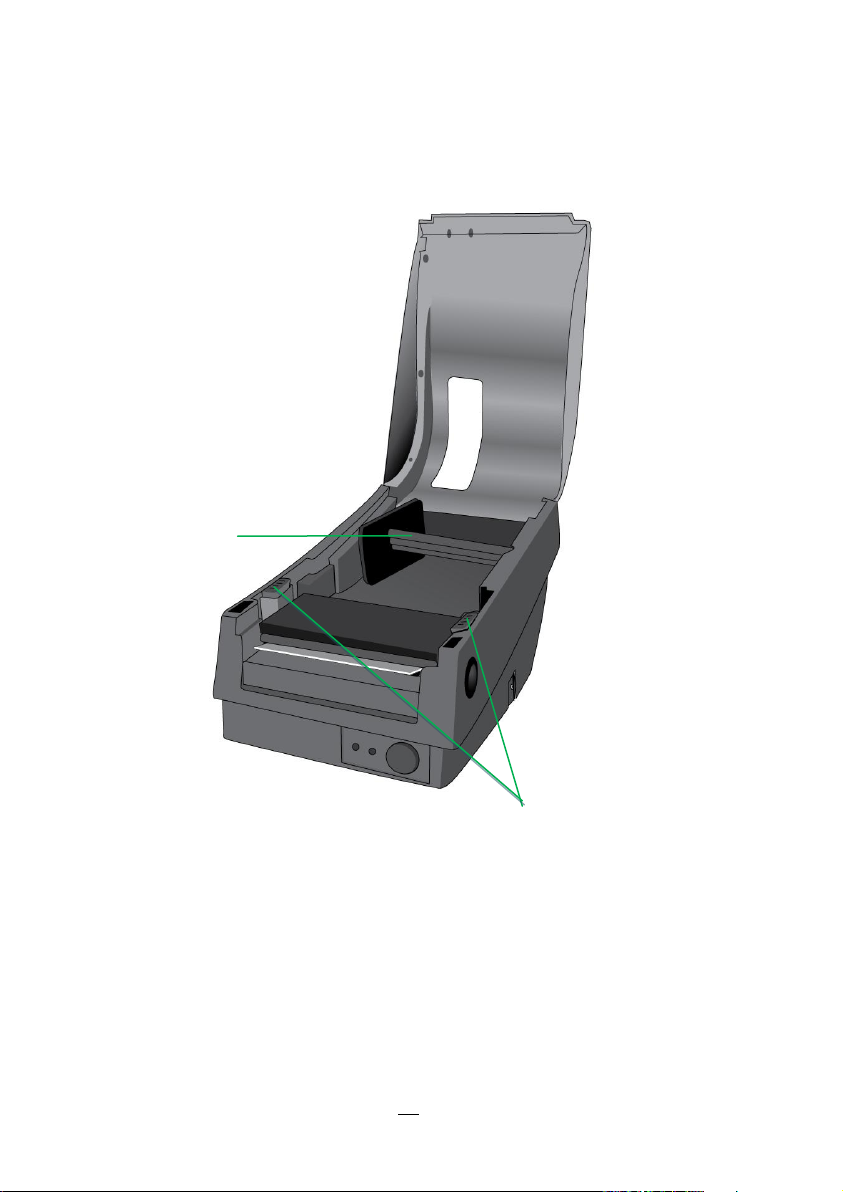
Interior View I
Media Hanger
Release Levers
11
OS-2130D & OS-2130DE User’s Manual
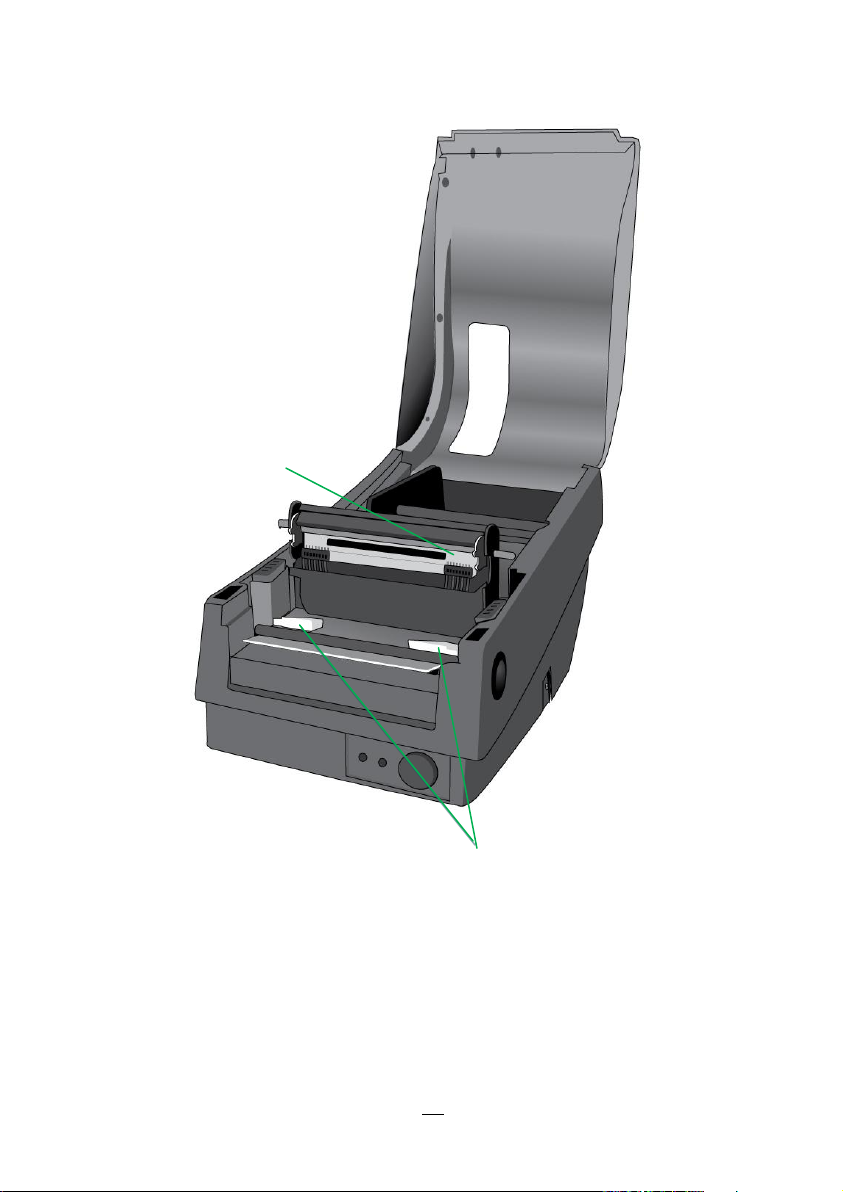
Interior View II
Thermal Print Head
Media Guides
12
OS-2130D & OS-2130DE User’s Manual

Attaching Power
Warning:
Do not operate the printer and power supply in an area where they
might get wet.
1. Make sure the printer’s power switch is in the off position (down)
before conducting following actions.
2. Insert the AC power cord into the power supply.
3. Insert the power supply’s power connector into the printer’s power
jack.
4. Plug the other end of the power cord into an appropriate grounded
AC electrical outlet.
OS-2130D
OS-2130D & OS-2130DE User’s Manual
13

OS-2130DE
14
OS-2130D & OS-2130DE User’s Manual

Loading Media
Preparing Media
In case media roll may become dirty or dusty during shipment,
handling, or storage, firstly remove the outside length of media, which
helps to avoid dragging adhesive or dirty media between the print
head and platen roller. When loading media, it must be placed onto
the media hangers.
Placing Media Roll
1. Open Top Cover of the printer.
15
OS-2130D & OS-2130DE User’s Manual

2. Put the Media Hanger through media supply roll, and then
Media Hanger
Media Roll
centrally align with the two Media Shields to closely lean against
the media supply roll.
16
OS-2130D & OS-2130DE User’s Manual

3. Locate the media supply roll into the Media Compartment of
Media Compartment
Release Levers
printer.
4. Push the Release Levers to open the printer module.
17
OS-2130D & OS-2130DE User’s Manual

5. Pull a short length of media till it reaches the Platen Roll of printer.
Adjust the media guide at right margin, to make media
left-alignment.
18
OS-2130D & OS-2130DE User’s Manual

6. Close the printer module and then press firmly at the both sides to
properly latch until you hear a click.
7. Close the top cover and turn on the printer.
19
OS-2130D & OS-2130DE User’s Manual

8. Press the FEED button to feed labels out of the printer.
20
OS-2130D & OS-2130DE User’s Manual

Printer Operations
Note:
If printer is with Argox PPLB printer language, printer will enter
Dump mode after printing configuration. In Dump mode, all
characters will be printed in 2 columns: the right shows characters
received from your system, and the left are the corresponding
hexadecimal values of the characters. It allows users or engineers
to verify and debug the program.
To return to normal operation mode from Dump mode, press the
FEED button again. Another way is to turn off printer power, and
then restart printer.
Printing Media Calibration & Configuration
Before connecting the printer to your computer, to make sure that
the printer works properly, conduct media calibration and print a
self-test/ configuration label.
Steps to Start Media Calibration & Configuration
1. Make sure the media is properly loaded and the top cover of
the printer is closed.
2. Turn off the printer power.
3. Press and hold the FEED button while turning on the power,
until printer motor is activated.
4. Media Calibration is performed while the printer automatically
feeds the label stock for a certain length; then the printer
motor suspends for one second and then prints out a
configuration profile. Release the FEED button as soon as
printer starts to print.
21
OS-2130D & OS-2130DE User’s Manual

Sample of Printer Configuration Label
Print head test pattern
22
OS-2130D & OS-2130DE User’s Manual
 Loading...