

Page 1
• INSTRUCTION MANUAL
• MODE D’EMPLOI
Inverter-Controlled Split System Air
Conditioner
Climatiseur de type séparé contrôlé par
inverseur
KS0971
KS1271
This air conditioner uses the new refrigerant R410A.
Save These Instructions!
Conserver ce mode d’emploi
COOL/DRY Model
Pub. OI-85264180803000
© SANYO 2005
Page 2

Features
This air conditioner is an inverter type unit that automatically adjusts capacity as appropriate. Details on these functions
are provided below; refer to these descriptions when using the air conditioner.
• Microprocessor Controlled Operation
The interior compartment of the remote control unit
contains several features to facilitate automatic
operation, easy logically displayed for easy use.
• Simple One-touch Wireless Remote Control
The remote control unit has several features to
facilitate automatic operation.
• 24-Hour ON or OFF Timer
This timer can be set to automatically turn the unit
on or off at any time within a 24 hour period.
• 1-Hour OFF Timer
This timer can be set to automatically turn off the
unit at any time after one hour.
• Night Setback
Pressing this button changes the setting of the
room temperature thermostat, allowing you to set
the temperature at whatever level that you find
comfortable.
• Automatic and 3-step Fan Speed
Auto/High/Medium/Low
• Air Sweep Control
This function moves a flap up and down in the air
outlet, directing air in a sweeping motion around the
room and providing comfort in every corner.
• Automatic Restart Function for Power Failure
Even when power failure occurs, preset
programmed operation can be reactivated once
power resumes.
• High Power Operation
The unit operates at maximum output for 30
minutes, regardless of the desired temperature.
The fan speed is 1 step above “High”.
• Quiet Operation
The fan rotates slower than the fan speed setting to
provide a quieter operating sound.
• ION Operation
While it is operating, the unit generates negative
ions that freshen up the air in the room.
• Anti-Mold Filter
This unit is equipped with an anti-mold filter that
inhibits the growth of mold and bacteria.
• Air Clean Filter
An air filter that eliminates unpleasant odors and
cleans the air is available.
Purchase a replacement filter at your local dealer.
(model STK-FDXB)
• Auto. Flap Control
This automatically sets the flap to the optimum
position during cooling and drying operation.
2
OI-803-2-EG
Page 3
Contents
Features............................................................................................................ 2
Product Information........................................................................................... 3
Alert Symbols.................................................................................................... 3
Installation Location .......................................................................................... 4
Electrical Requirements .................................................................................... 4
Safety Instructions............................................................................................. 4
Names of Parts ................................................................................................. 5
Using the Remote Control Unit ....................................................................... 10
Operation with the Remote Control Unit ........................................................ 12
1. Operation ............................................................................................... 12
2. Adjusting the Fan Speed........................................................................ 13
3. Fan Only................................................................................................. 13
4. Night Setback Mode............................................................................... 14
5. QUIET Mode .......................................................................................... 15
6. HIGH POWER Mode ............................................................................. 15
7. ION Mode............................................................................................... 15
Special Remarks ............................................................................................. 16
Setting the Timer............................................................................................. 17
Using the 1-Hour OFF Timer .......................................................................... 19
Tips for Energy Saving.................................................................................... 19
Adjusting the Airflow Direction ........................................................................ 20
Operation without the Remote Control Unit .................................................... 21
Care and Cleaning .......................................................................................... 21
Troubleshooting............................................................................................... 24
Operating Range............................................................................................. 24
Page
Product Information
If you have problems or questions concerning your Air Conditioner, you will need
the following information. Model and serial numbers are on the nameplate on the
bottom of the cabinet.
Model No. ______________________ Serial No. ____________________
Date of purchase ________________________________________________
Dealer’s address ________________________________________________
Phone number ________________
Alert Symbols
The following symbols used in this manual, alert you to potentially
dangerous conditions to users, service personnel or the appliance:
This symbol refers to a hazard or unsafe
practice which can result in severe
personal injury or death.
CAUTION
This symbol refers to a hazard or unsafe
practice which can result in personal injury
or product or property damage.
OI-803-3-EG
3
Page 4
Installation Location
• We recommend that this air conditioner be installed properly by qualified
installation technicians in accordance with the Installation Instructions
provided with the unit.
• Before installation, check that the voltage of the electric supply in your home or
office is the same as the voltage shown on the nameplate.
• Do not install this air conditioner where there are fumes or flammable
gases, or in an extremely humid space such as a greenhouse.
• Do not install the air conditioner where excessively high heat-generating
objects are placed.
Avoid: To protect the air conditioner from heavy corrosion, avoid installing the outdoor
unit where salty sea water can splash directly onto it or in sulphurous air near a
spa.
Electrical Requirements
1. All wiring must conform to the local electrical codes. Consult your dealer or a
qualified electrician for details.
2. Each unit must be properly grounded with a ground (or earth) wire or through
the supply wiring.
3. Wiring must be done by a qualified electrician.
CAUTION
Safety Instructions
• Read this Instruction Manual carefully before using this air conditioner. If
you still have any difficulties or problems, consult your dealer for help.
• This air conditioner is designed to give you comfortable room conditions.
Use this only for its intended purpose as described in this Instruction
Manual.
• Never use or store gasoline or other flammable vapor or liquid near the
air conditioner — it is very dangerous.
• This air conditioner has no ventilator for intaking fresh air from
outdoors. You must open doors or windows frequently when you use
gas or oil heating appliances in the same room, which consume a lot of
oxygen from the air. Otherwise there is a risk of suffocation in an
extreme case.
• Do not turn the air conditioner on and off from the power mains switch.
Use the ON/OFF operation button.
• Do not stick anything into the air outlet of the outdoor unit. This is
dangerous because the fan is rotating at high speed.
• Do not let children play with the air conditioner.
• Do not cool the room too much if babies or invalids are present.
4
OI-803-4-EG
Page 5
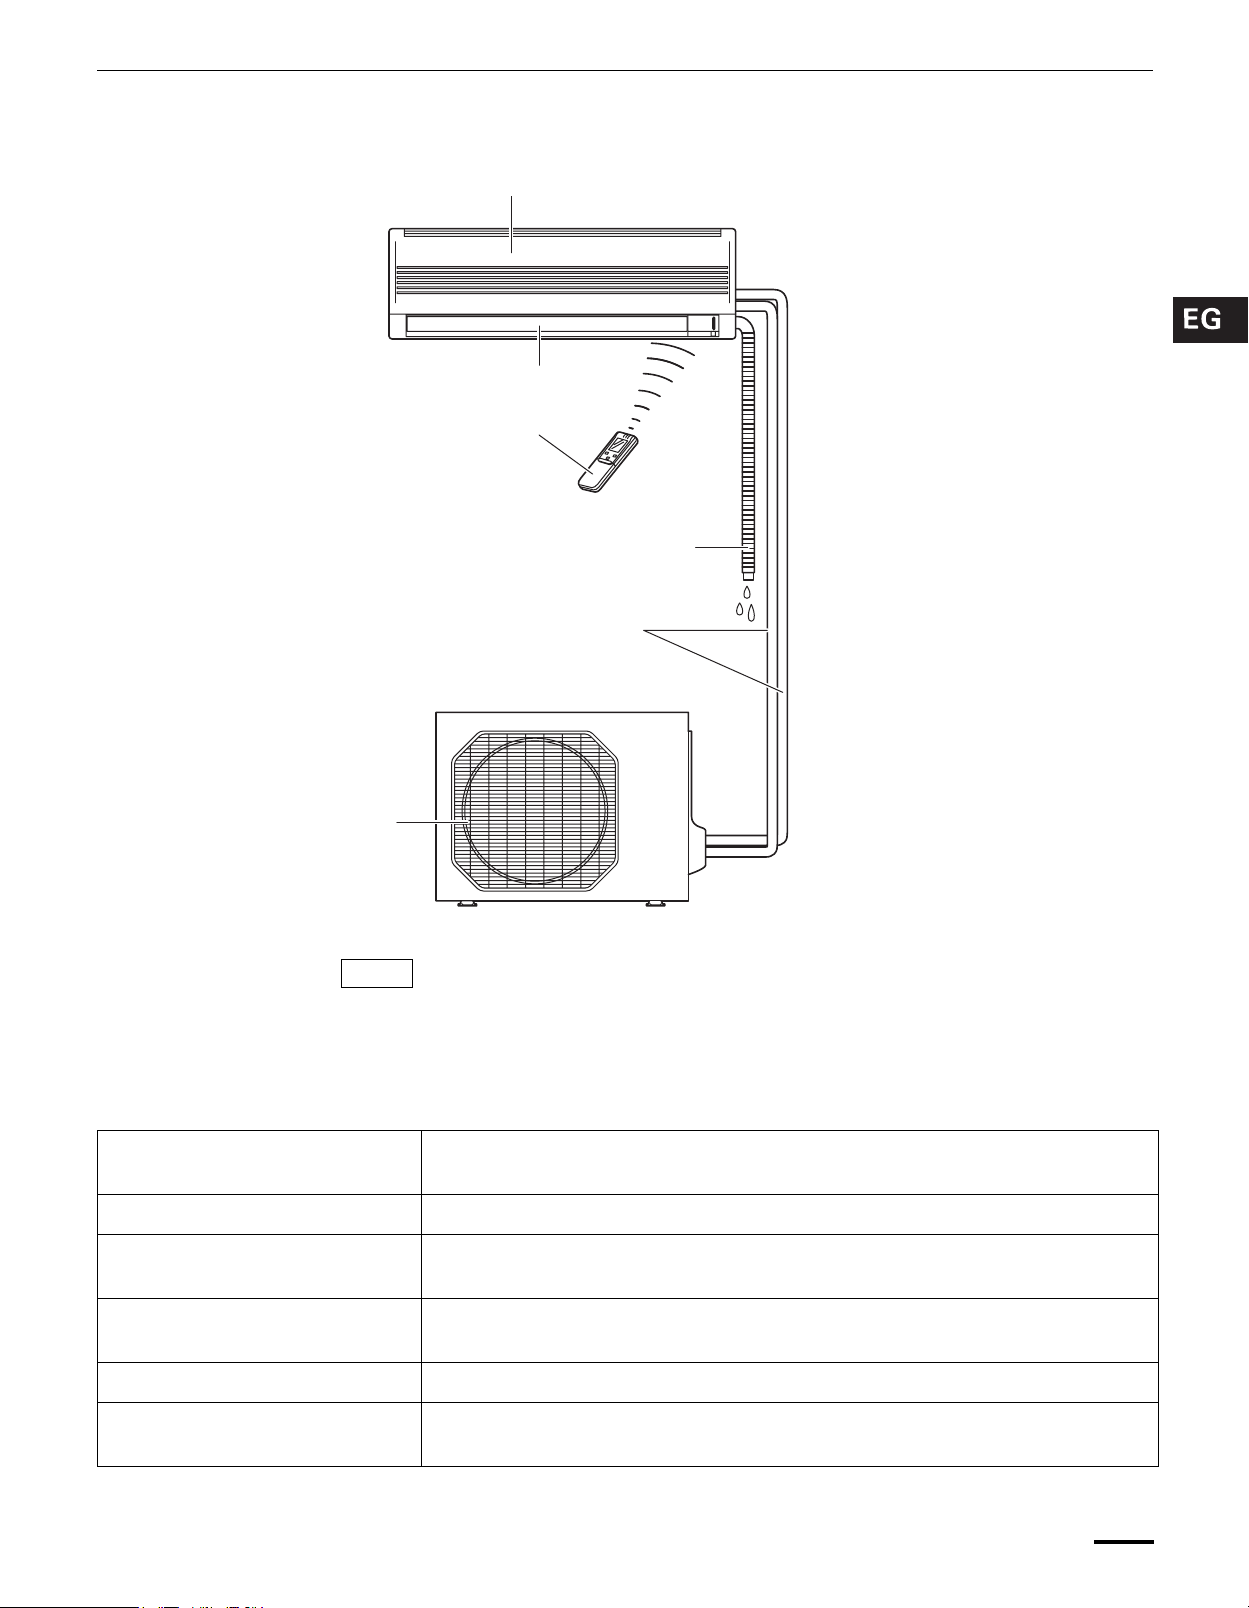
Names of Parts
Air intakes
Air outlet
Remote control unit
Refrigerant tubes
OUTDOOR UNIT
INDOOR UNIT
Drain hose
Air outlet
NOTE
Air Intake Air from the room is drawn into this section and passes through air filters which
Air Outlet Conditioned air is blown out of the air conditioner through the air outlet.
Remote Control Unit The wireless remote control unit controls power ON/OFF, operation mode
Refrigerant Tubes The indoor and outdoor units are connected by copper tubes through which
Drain Hose Moisture in the room condenses and drains off through this hose.
This illustration is based on the external view of a standard model.
Consequently, the shape may differ from that of the air conditioner which you
have selected.
This air conditioner consists of an indoor unit and an outdoor unit. You can control
the air conditioner with the remote control unit.
remove dust.
selection, temperature, fan speed, timer setting, and air sweeping.
refrigerant gas flows.
Outdoor (Condensing) Unit The outdoor unit contains the compressor, fan motor, heat exchanger coil, and
other electrical components.
OI-803-5-EG
5
Page 6

IMPORTANT
Avoid using radio equipment
such as mobile phone near
(within 4 ft.) the remote
control receiver. Some radio
equipment may cause
malfunction of the unit.
If the trouble happens,
disconnect power and restart
the air conditioner after a few
minutes.
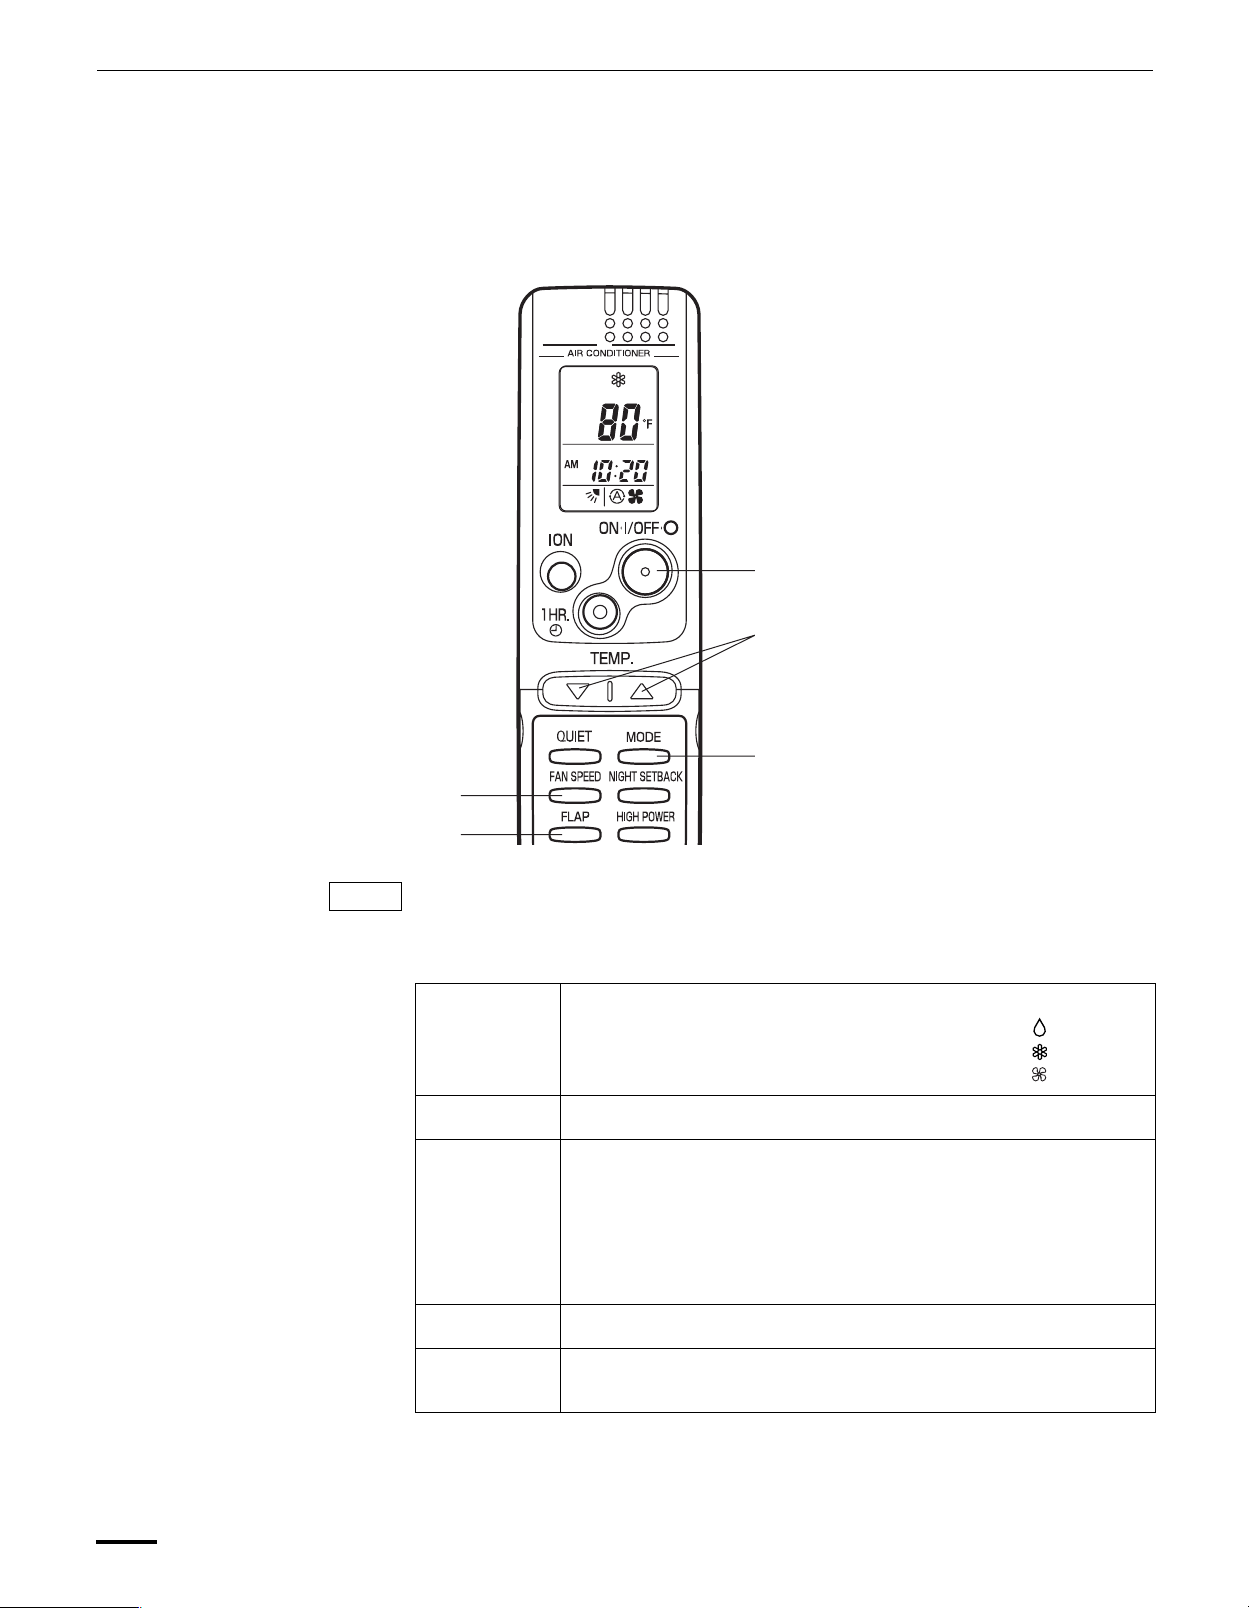
Unit Display and Operation Button
INDOOR UNIT
QUIET
REMOTE CONTROL receiver
OPERATION lamp
TIMER lamp
QUIET lamp
ION lamp
OPERATION button
REMOTE CONTROL receiver This section picks up infrared signals from the remote control unit (transmitter).
OPERATION button When the remote control cannot be used, pressing this button enables cooling
operation.
Each time this button is pressed, the operation mode changes cyclically.
Cooling operation Stop
OPERATION lamp This lamp lights when the system is in the continuous DRY (orange), COOL
(green) and FAN (green) mode.
TIMER lamp This lamp lights when the system is being controlled by the timer.
QUIET lamp This lamp lights during operation in the QUIET mode.
ION lamp This lamp lights during operation in the ION mode while the indoor unit is
operating.
NOTE
The unit’s display lamps are dimmed during operation in the NIGHT SETBACK
mode.
6
OI-803-6-EG
Page 7
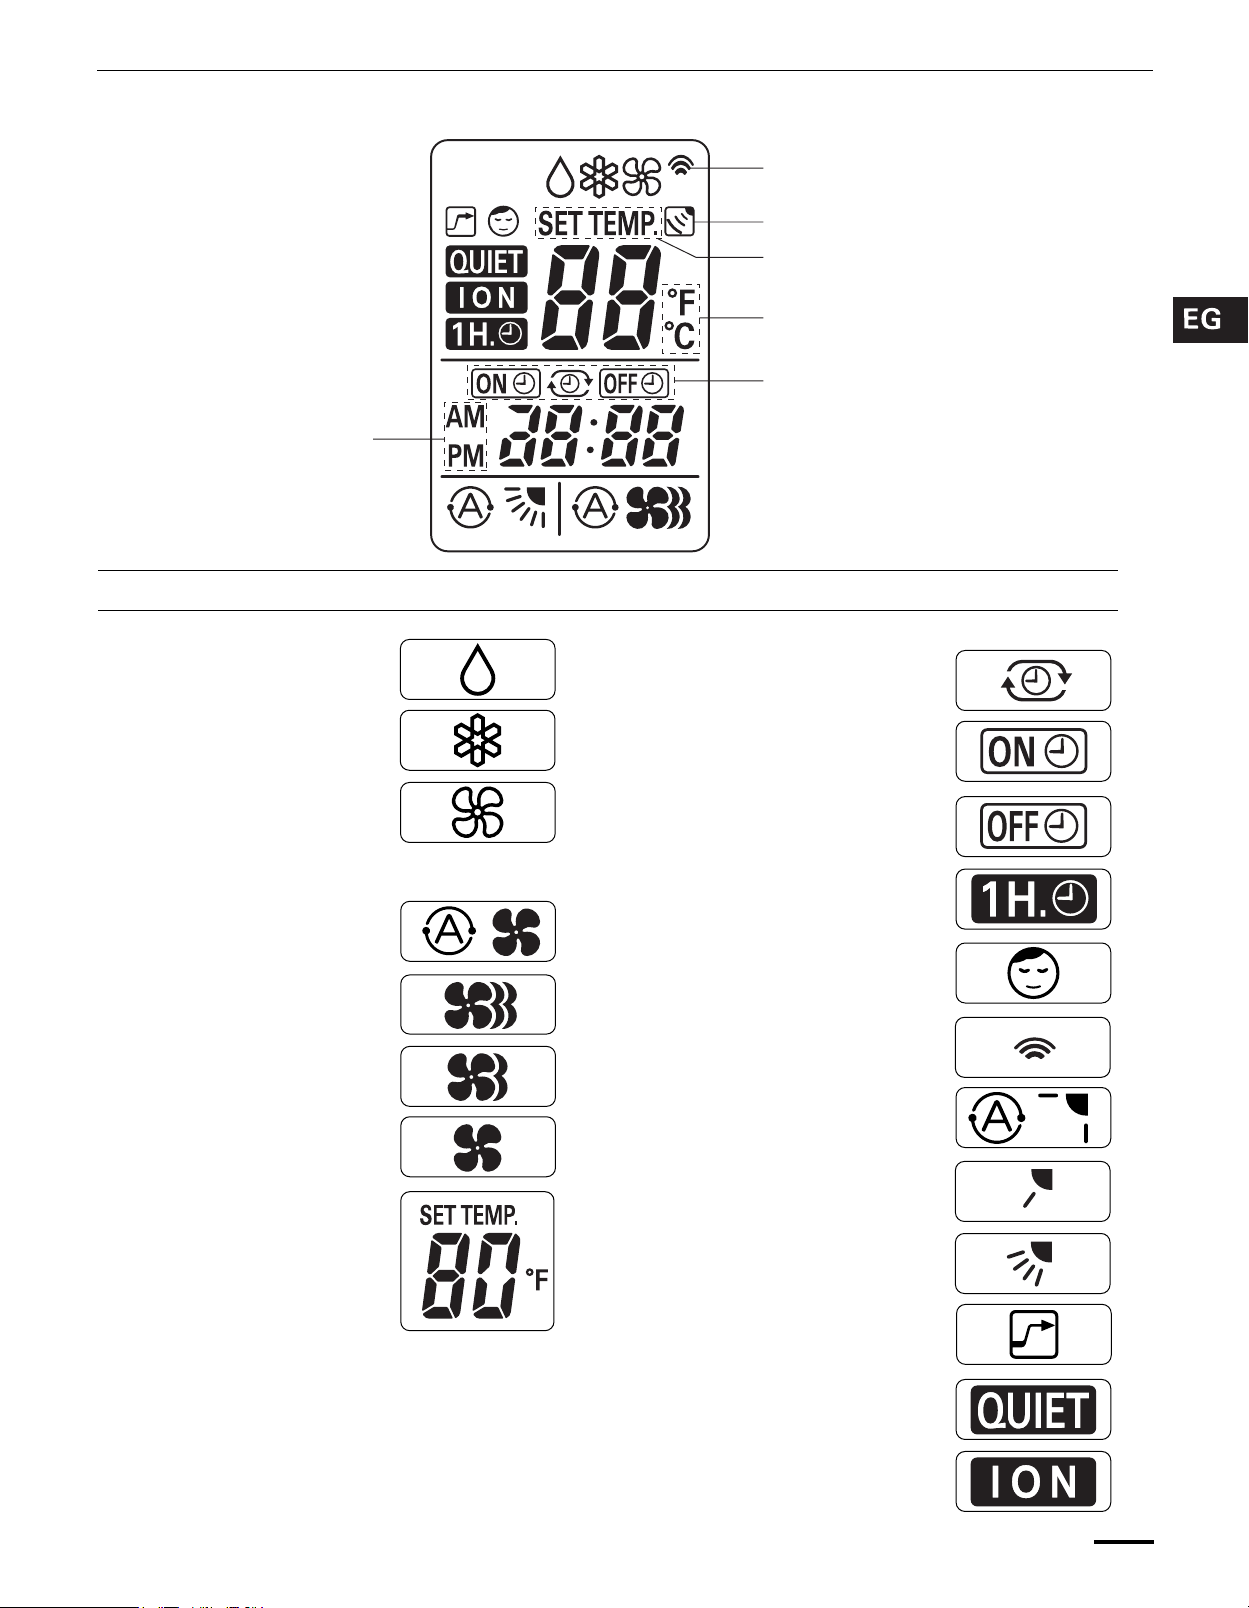
Displayed when the
time display is set to
12-hour time.
Remote Control Unit (Display)
Displayed when transmitting data
Displayed when indoor unit sensor
is in use
Displayed when setting
temperature
Displayed when temperature is
shown
Displayed when setting timer
Symbols
(1) Operation mode
MILD DRY ..............................
COOL.....................................
FAN ........................................
(2) Fan speed
Automatic operation ...............
HIGH .....................................
MEDIUM.................................
LOW .......................................
(3) Temperature setting
60–86°F
When set to 80 °F
temperature indication............
(4) Timer
24-hour clock with ON/OFF
program Timer........................
ON Timer................................
OFF Timer..............................
1-hour OFF Timer...................
(5) NIGHT SETBACK ..................
(6) Confirmation of
transmission ...........................
(7) Auto. fla.dication.....................
Flap angle indication ..............
Sweep indication ....................
OI-803-7-EG
(8) High power operation .............
(9) Quiet operation.......................
(10) ION operation.......................
7
Page 8
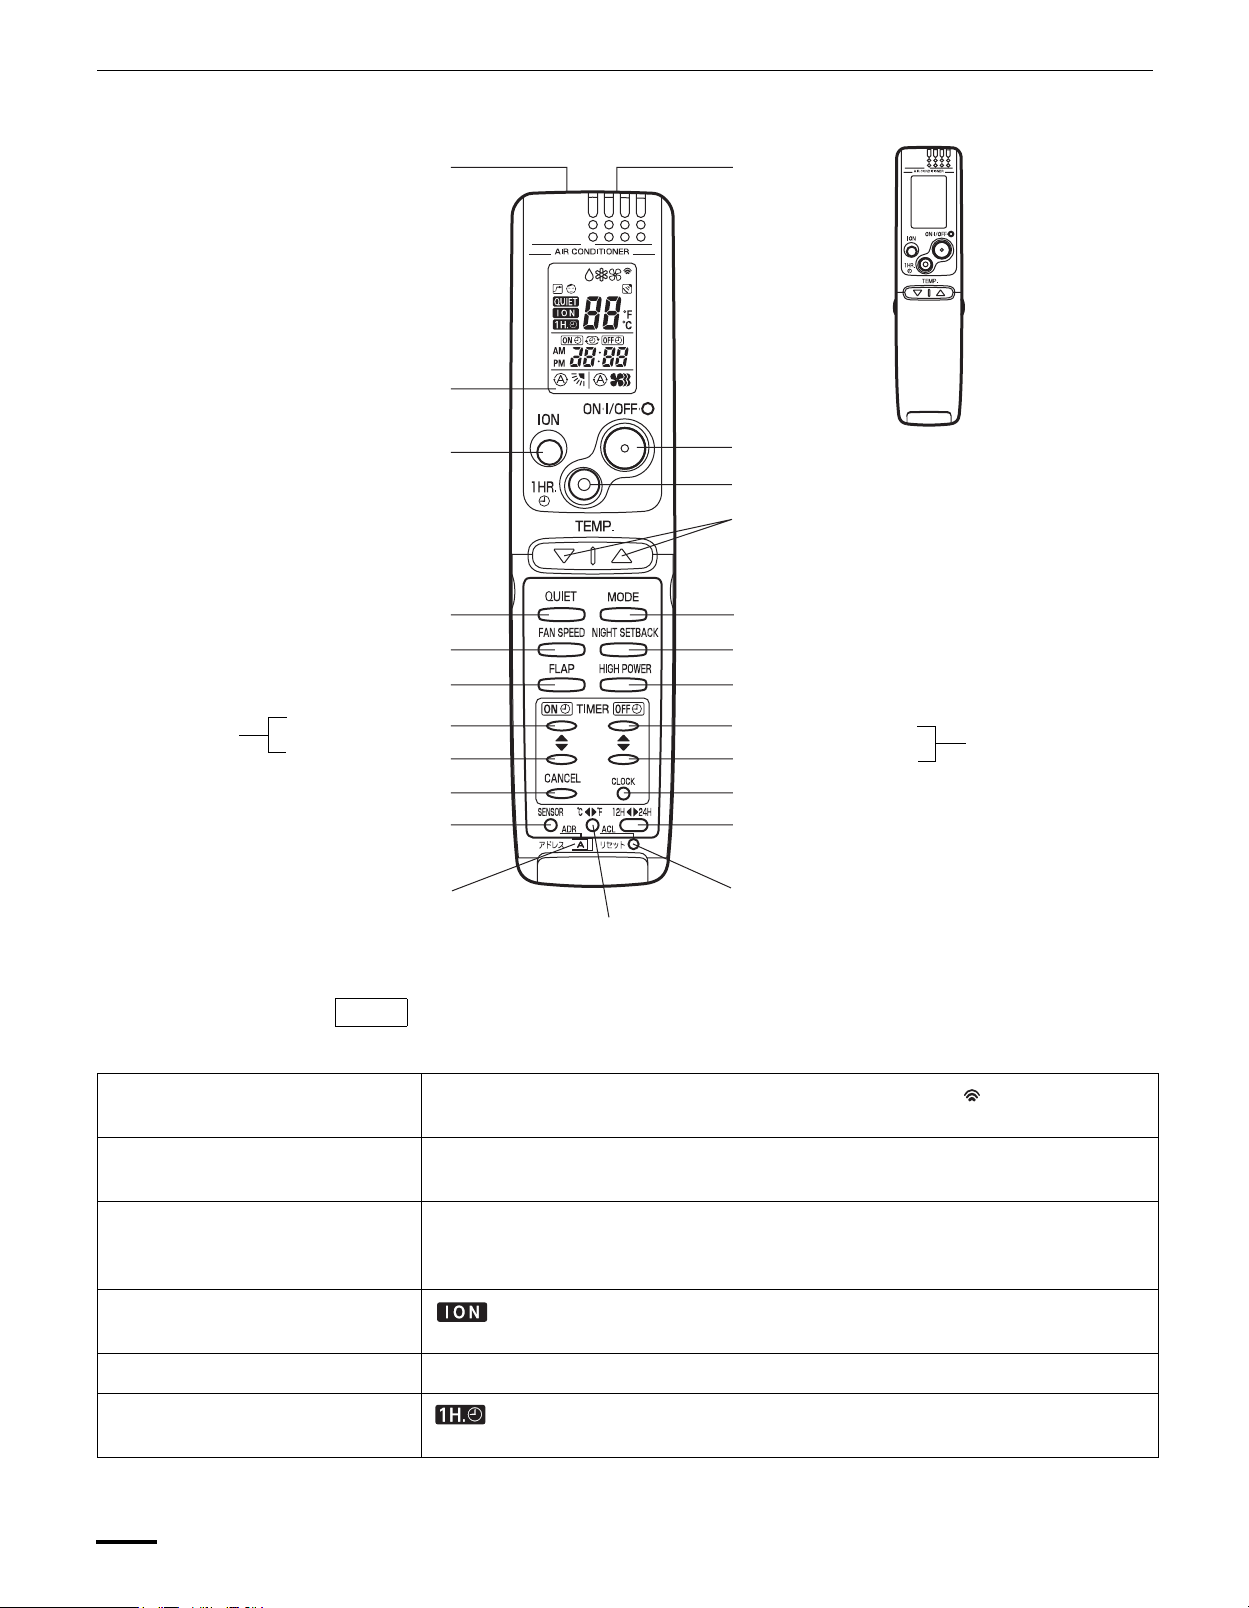
Remote Control Unit
Transmitt e r
ION button
QUIET button
FAN SPEED selector button
FLAP button
ON TIME
setting
buttons
Advance button
Return button
CANCEL button
SENSOR button
Display
Sensor
(Cover closed)
ON/OFF operation button
1 HR. TIMER button
Temperature setting buttons (TEMP.)
MODE selector button
NIGHT SETBACK button
HIGH POWER button
Advance button
Return button
CLOCK button
Time display selector button
OFF TIME
setting
buttons
ADDRESS switch
Temperature display
selector button
NOTE
Transmitt e r When you press the buttons on the remote control unit, the mark appears in
Sensor A temperature sensor inside the remote control unit senses the room
Display Information on the operating conditions is displayed while the remote control unit
ION button : This button is for turning the negative ions generated during operation on
ON/OFF operation button This button is for turning the air conditioner on and off.
1 HR. TIMER button
(1-HOUR OFF TIMER)
The illustration above pictures the remote control unit after the cover has been
opened.
the display to transmit the setting changes to the receiver in the air conditioner.
temperature.
is switched on. If the unit is turned off, FLAP setting and FAN SPEED setting are
not displayed.
and off.
: When you press this button, regardless of whether the unit is operating or
stopping, the unit operates for one hour and then shuts down.
ACL button
8
OI-803-8-EG
Page 9
Remote Control Unit (continued)
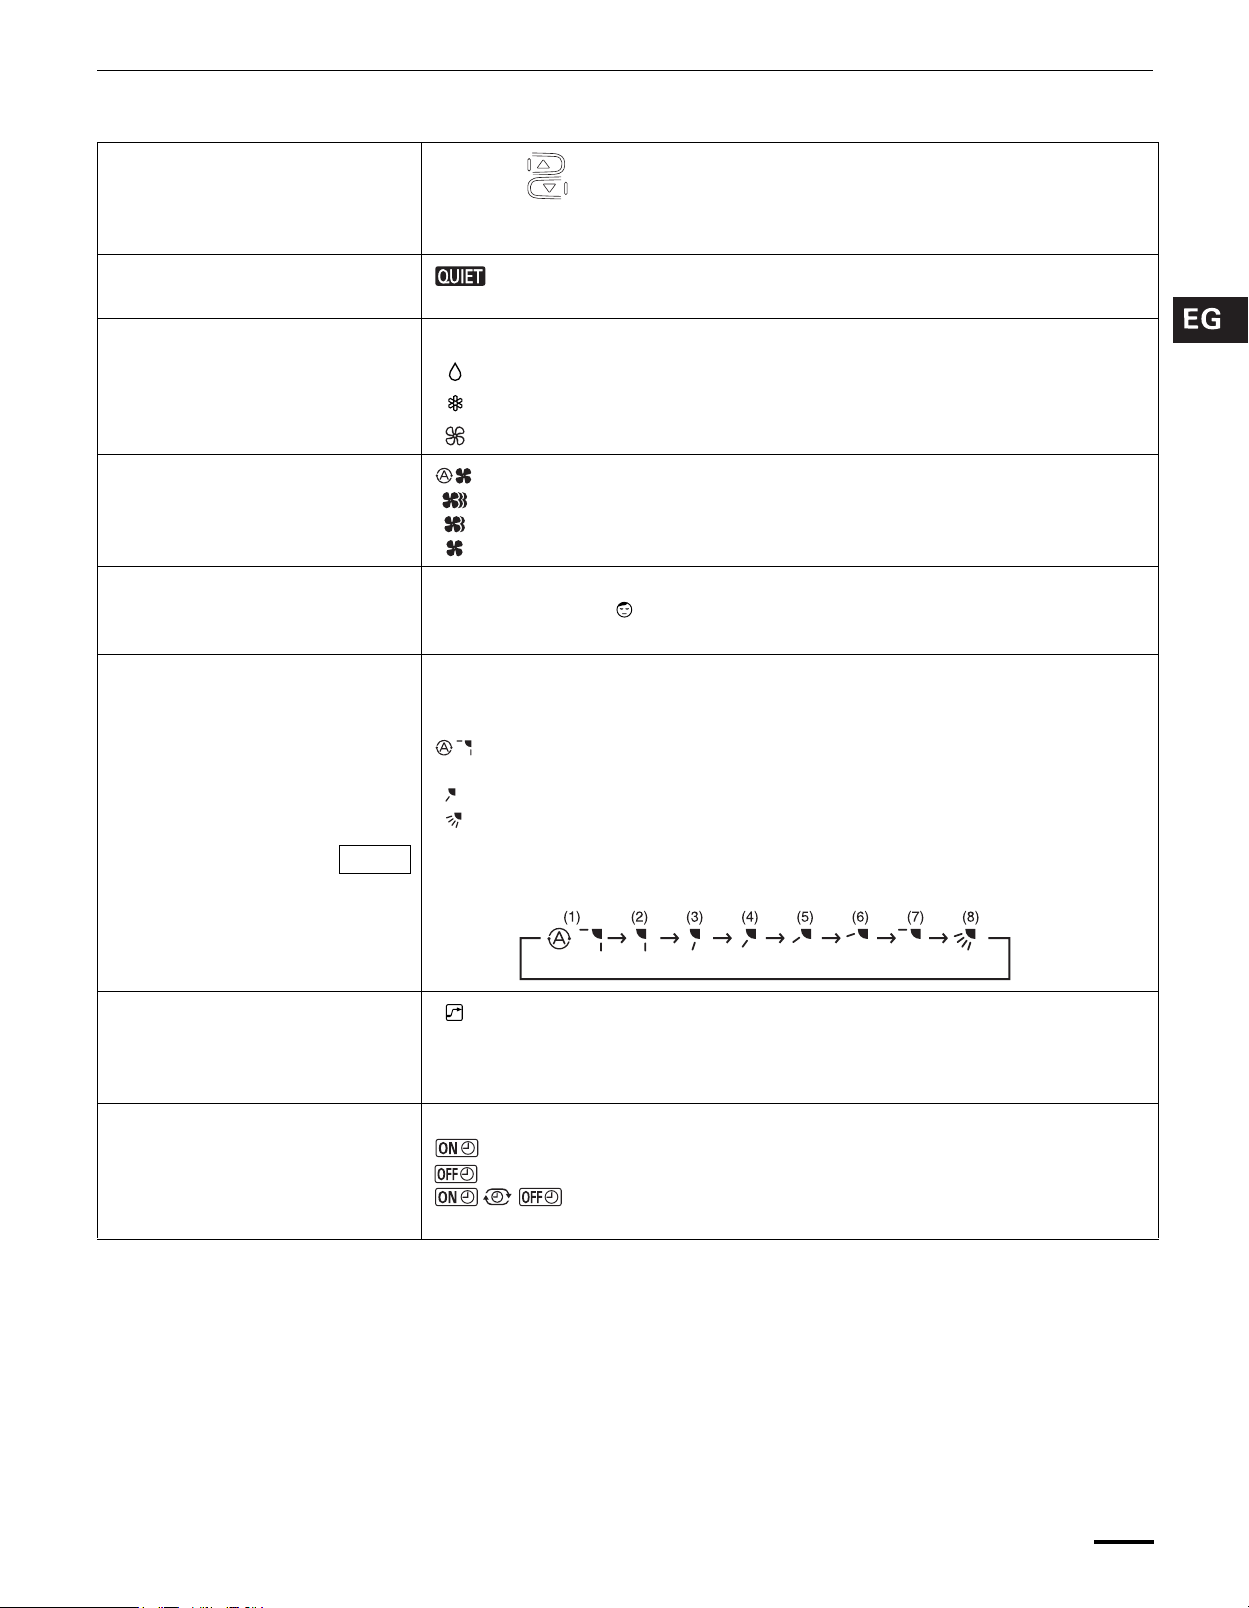
Temperature setting buttons
(TEMP.)
Press the button to increase the set temperature.
Press the button to reduce the set temperature.
The temperature setting changes by 1 °C or 2 °F each time one of the TEMP.
buttons is pressed.
QUIET button : When you press this button, the fan rotates slower than the fan speed
setting to provide a quieter operating sound.
MODE selector button Use this button to select DRY, COOL or FAN mode.
(DRY) : The air conditioner reduces the humidity in the room.
(COOL) : The air conditioner makes the room cooler.
(FAN) : The air conditioner works only as a circulation fan.
FAN SPEED selector button : The air conditioner automatically decides the fan speeds.
: High fan speed
: Medium fan speed
: Low fan speed
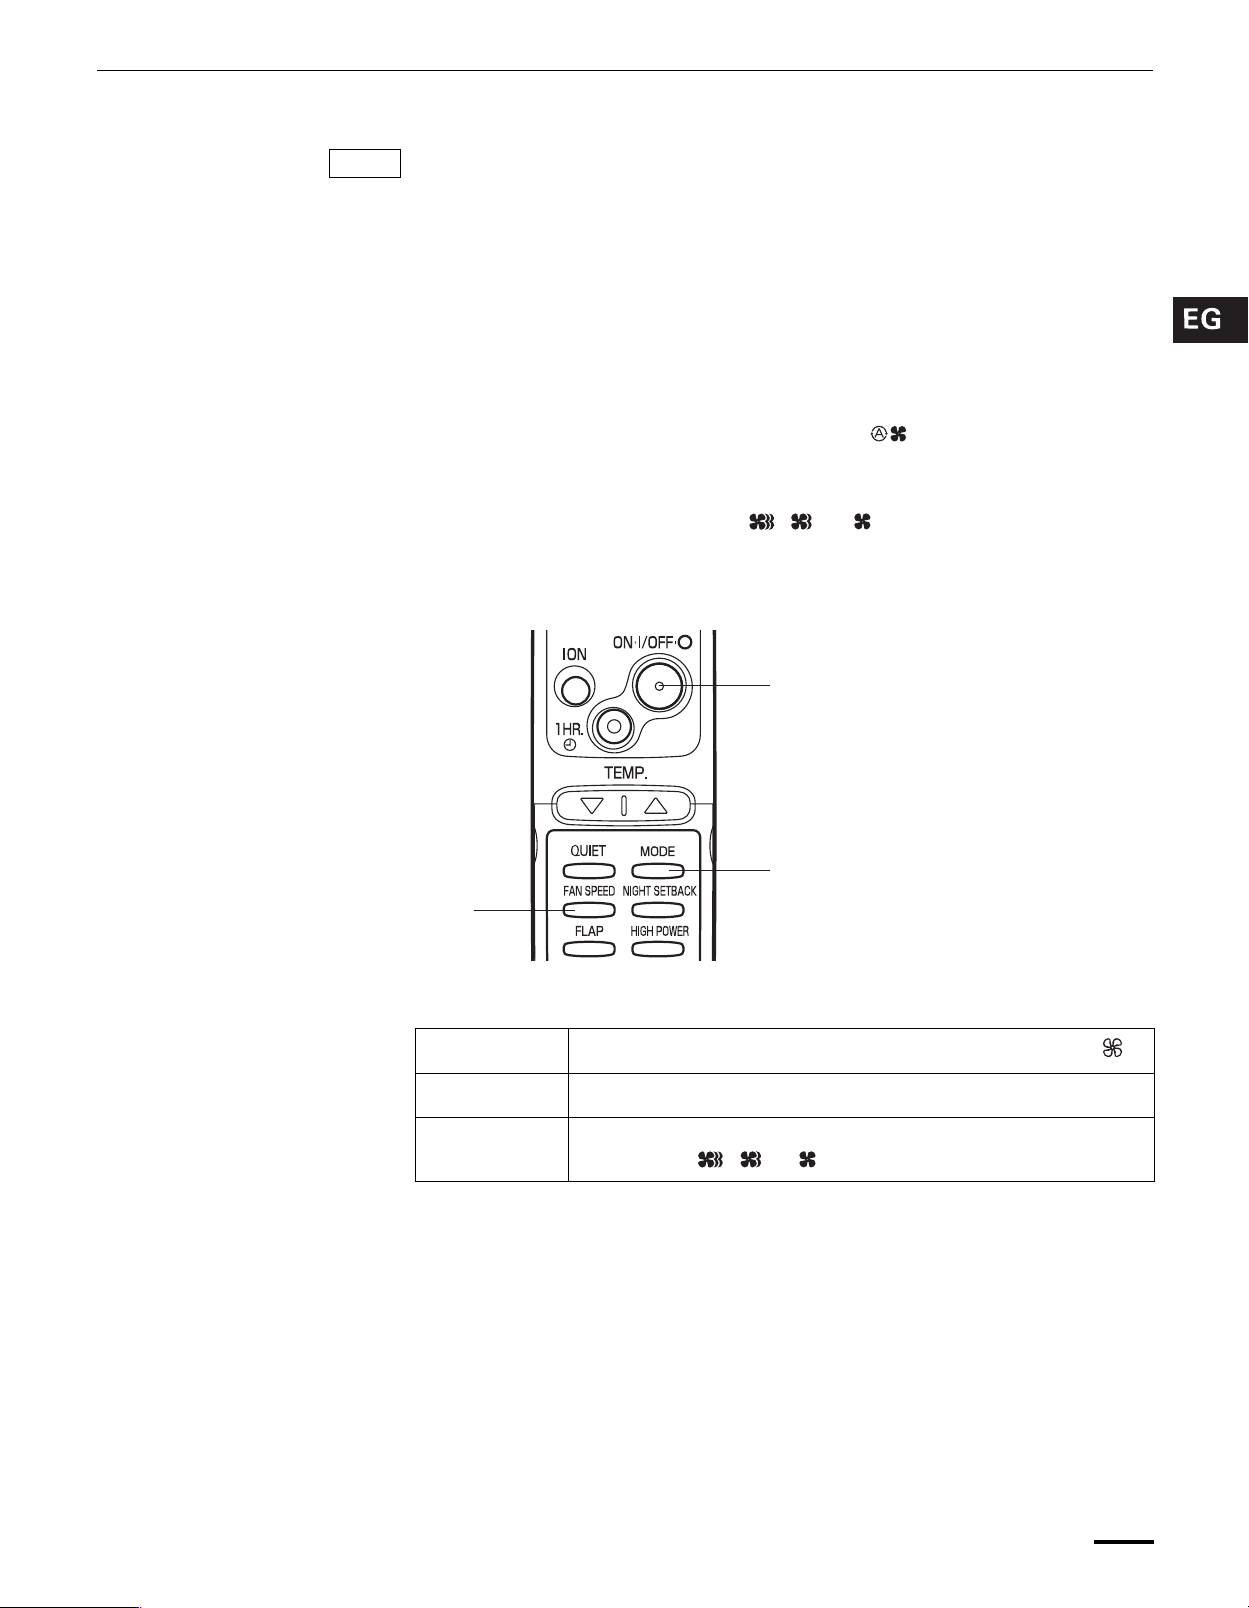
NIGHT SETBACK button For details, see “4. Night Setback Mode”. When you press this button in the DRY
or COOL mode, the mark appears in the display, and the remote control unit
will automatically adjust the set temperature to save energy.
FLAP button Press this button either to select the setting of the airflow direction to the auto.
flap in each mode or one of the six possible positions manually or to select the
sweep function which moves the flap up and down automatically.
: Auto flap setting: If selected in a cooling or dry operation, the flap is set at
position (7) in the following chart.
: The airflow direction can be set manually. (six positions)
: The flap moves up and down automatically.
NOTE
When you press the FLAP button, the air flow direction will be changed one by
one as follows.
SWEEP
HIGH POWER button : If this button is pressed during DRY, COOL or FAN operation, the unit
operates at maximum output for 30 minutes, regardless of the desired
temperature.
The fan speed is 1 step above “High”.
ON TIME/OFF TIME setting
buttons
No display: The timer does not operate.
: The air conditioner starts at the set time.
: The air conditioner stops at the set time.
: The air conditioner stops and starts, or starts and stops, at the
set times every day. For details, see “Setting the Timer”.
OI-803-9-EG
9
Page 10
Remote Control Unit (continued)
SENSOR button When you press this button (use a small-tipped object such as a ballpoint pen),
the mark will appear at the display. And the room temperature is detected by
the sensor which is built into the indoor unit and the air conditioner is controlled
accordingly.
NOTE
Temperature Display Selector button
Time Display Selector button This switches the time display between 24-hour time and 12-hour time.
ACL button (ALL CLEAR) Puts the remote control unit into pre-operation status. Always press this button
ADDRESS switch • The address switch changes to prevent mixing of signals from remote control
NOTE
The remote control unit sends the temperature signal to the air conditioner regularly at five minute
intervals. If the signal from the remote control unit stops for more than 15 minutes due to the loss of the
remote control unit or other trouble, the air conditioner will switch to the temperature sensor which is built
into the indoor unit and control the room temperature. In these cases, the temperature around the remote
control unit may differ from the temperature detected at the air conditioner’s position.
If the remote control is located near a heat source, such as a space heater or in direct
sunlight, press the SENSOR button to switch to the sensor on the indoor unit.
This switches the temperature display between °C and °F.
after replacing the batteries.
units when two air conditioners are installed next to each other. Normally, the
address switch is set to A. For more information, please contact the dealer
where you made the purchase.
• Normally, the tabs on the remote control unit should not be bent.
Using the Remote Control Unit
How to Install Batteries
NOTE
1. Slide the cover in the direction
indicated by the arrow and remove it.
2. Install two AAA alkaline batteries.
Make sure the batteries point in the
direction marked in the battery
compartment.
3. Use a thin object such as the tip of a
pen to press the ACL button.
ACL button
• The batteries last about six months, depending on how much you use
the remote control unit. Replace the batteries when the remote control
unit’s display fails to light, or when the remote control cannot be used to
change the air conditioner’s settings.
• Use two fresh leak-proof type-AAA alkaline batteries.
• In replacing batteries, follow the instructions as mentioned in the subsection “How to Install Batteries”.
• If you do not use the remote control unit more than 1 month, take out the
batteries.
10
OI-803-10-EG
Page 11
Using the Remote Control Unit (continued)
How to Use the Remote
Control Unit
Remote Control Unit
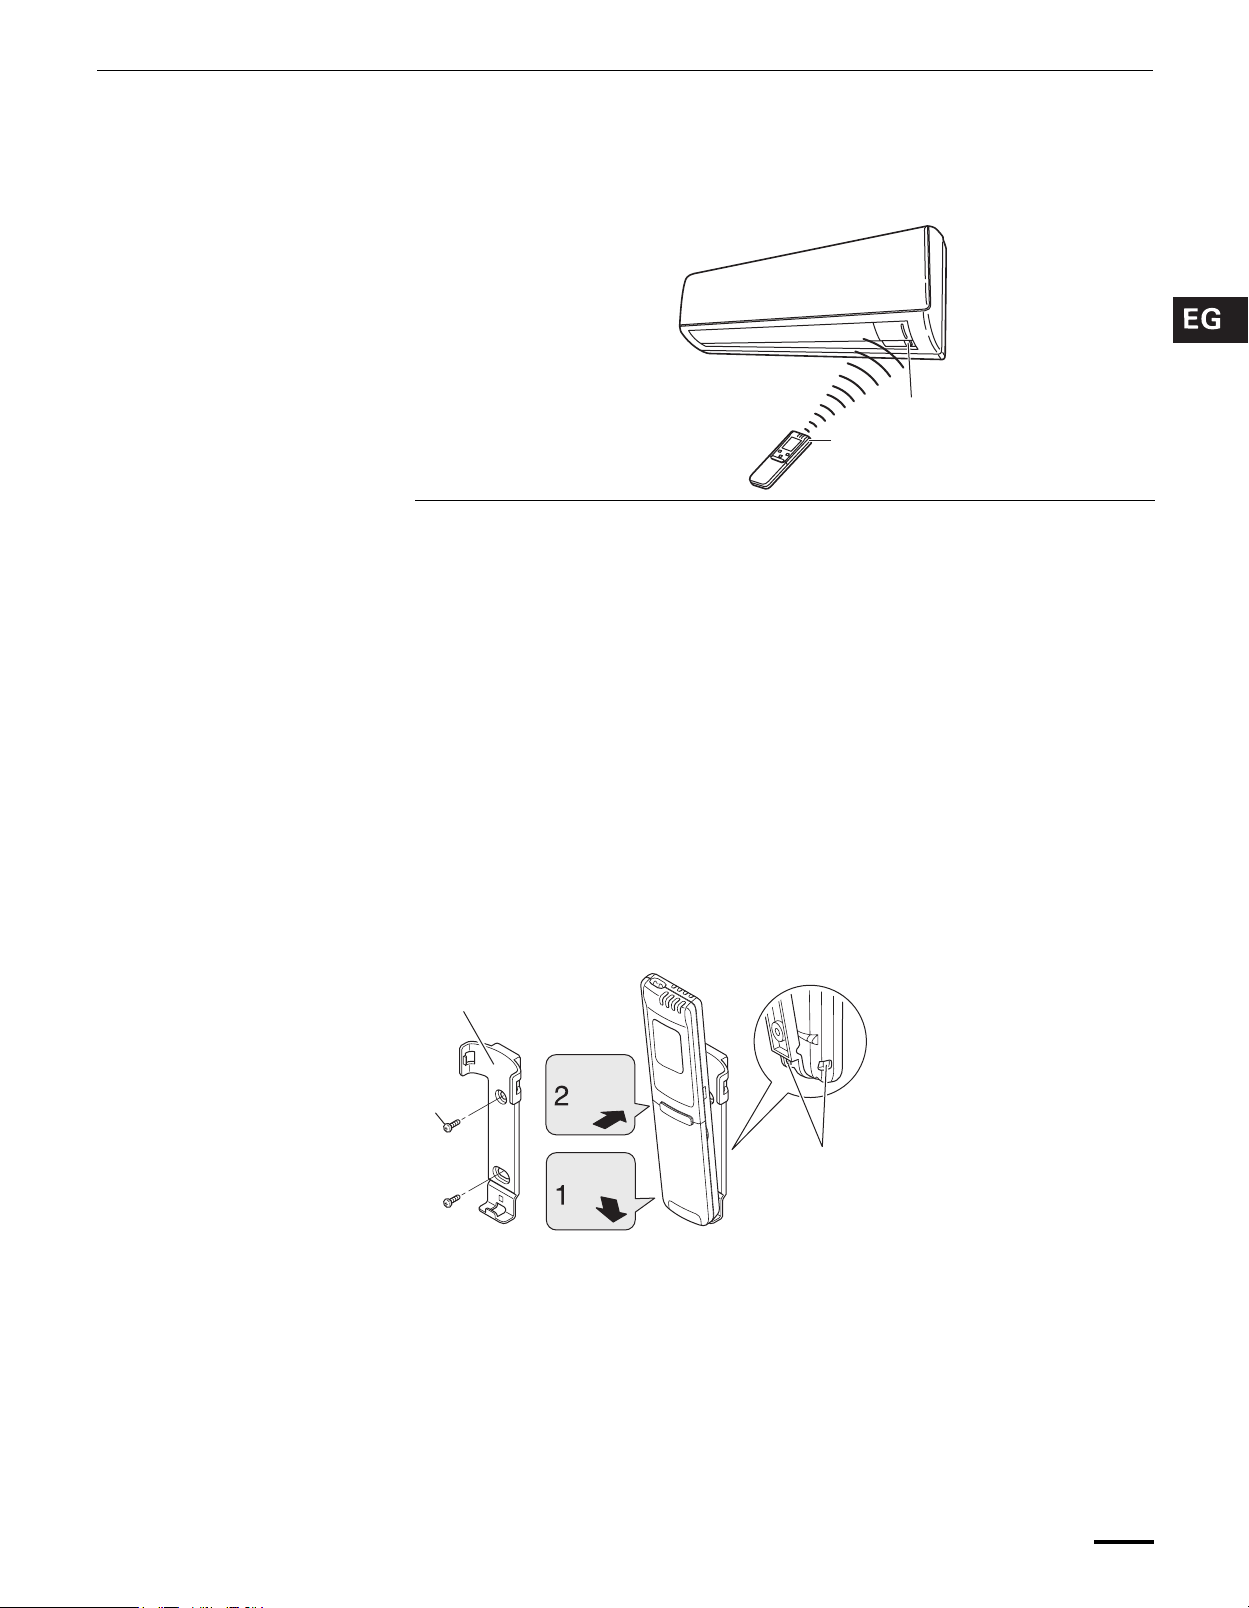
Installation Position
DO NOT • In direct sunlight
When using the remote control unit, always point the unit’s transmitter head
directly at the air conditioner’s receiver.
Air conditioner
(Indoor unit)
Receiver
Remote control
(Transmitter head)
unit
The remote control unit may be operated either from a non-fixed position or from
a wall-mounted position. To ensure that the air conditioner operates correctly, DO
NOT install the remote control unit in the following places:
• Behind a curtain or other places where it is covered
• More than 26 feet (8 m) away from the air conditioner
• In the path of the air conditioner’s airstream
• Where it may become extremely hot or cold
• Where it may be subject to electrical or magnetic noise
• Where there is an obstacle between the remote control unit and air conditioner
(since a check signal is sent from the remote control unit every 5 minutes)
Mounting the Remote Control
Unit
Remote control
unit mount
Mounting screws
5/32 x 5/8" (4 x 16 mm)
(included)
When Holding the Remote
Control Unit
Before mounting the remote control unit, press the ON/OFF operation button at
the mounting location to make sure that the air conditioner operates from that
location. The indoor unit should make a beeping sound to indicate that it has
received the signal.
Rear side
Press
Set in
place
Hole
• To prevent loss of the remote control unit,
you can connect the remote control unit to
the mount by passing a string through the
remote control unit and attachment hole.
To take out the remote control unit, pull it forward.
• When using the remote control unit and during air conditioner operation, the
transmitter on the remote control unit should be pointed toward the receiver on
the indoor unit.
• Make sure that there are no objects between the remote control unit and
receiver which could block the signal.
OI-803-11-EG
11
Page 12
1. Operation
Operation with the Remote Control
Unit
STEP 2
STEP 3
NOTE
STEP 1
STEP 4
STEP 5
Check that the circuit breaker on the power panel is turned on.
Press the setting buttons as described below and change the settings as desired.
STEP 1 Press the MODE selector button and select the desired mode.
For dehumidifying operation →
For cooling operation →
For fan only operation →
STEP 2 To start the air conditioner, press the ON/OFF operation button.
STEP 3 Press the TEMP. setting buttons to change the temperature
setting to the desired temperature.
Adjustable temperature range:
30 °C max.
16 °C min.
STEP 4 Set the FAN SPEED selector button to the setting you want.
or 86 °F max.
60 °F min.
12
STEP 5 Press the FLAP button and set the airflow direction as desired.
(Refer to “Adjusting the Airflow Direction” on page 20.)
To stop the air conditioner, press the ON/OFF operation button again.
OI-803-12-EG
Page 13
Operation with the Remote Control Unit (continued)
NOTE
• Choose the best position in the room for the remote control unit, which also
acts as the sensor for room comfort and transmits the operating instructions.
Once you’ve found this best position, always keep the remote control unit
there.
• This appliance has a built-in 5-minute time delay circuit to ensure reliable
operation. When the operation button is pressed, the compressor will start
running within three minutes. In the event of power failure, the unit will stop.
2. Adjusting the Fan Speed
A. Automatic fan speed Simply set the FAN SPEED selector button to the position.
This automatically sets the best fan speed for the room temperature.
B. Manual fan speed If you want to adjust fan speed manually during operation, just set the FAN
SPEED selector button as desired. [ , , or ]
3. Fan Only
STEP 2
STEP 1
STEP 3
If you want to circulate air without any temperature control, follow these steps:
STEP 1 Press the MODE selector button to switch to the fan mode .
STEP 2 Press the ON/OFF operation button.
STEP 3 Press the FAN SPEED selector button to select the fan speed of
your choice ( , or ).
OI-803-13-EG
13
Page 14
4. Night Setback Mode
Operation with the Remote Control Unit (continued)
Night Setback Mode is used for saving energy.
Press the NIGHT SETBACK button while operation.
The mark appears in the display.
To release the night setback function, press the NIGHT SETBACK button again.
In Cooling and DRY
Mode: ( and )
When the night setback mode is selected, the air conditioner automatically
raises the temperature setting 2 °F when 30 minutes have passed after the
selection was made, and then another 2 °F after another 30 minutes have
passed, regardless of the indoor temperature when night setback was
selected. This enables you to save energy without sacrificing comfort. This
function is convenient when gentle cooling is needed.
Setting
2°F
temperature
Press the NIGHT
2°F
30 min.
30 min.
Time
SETBACK button
14
OI-803-14-EG
Page 15
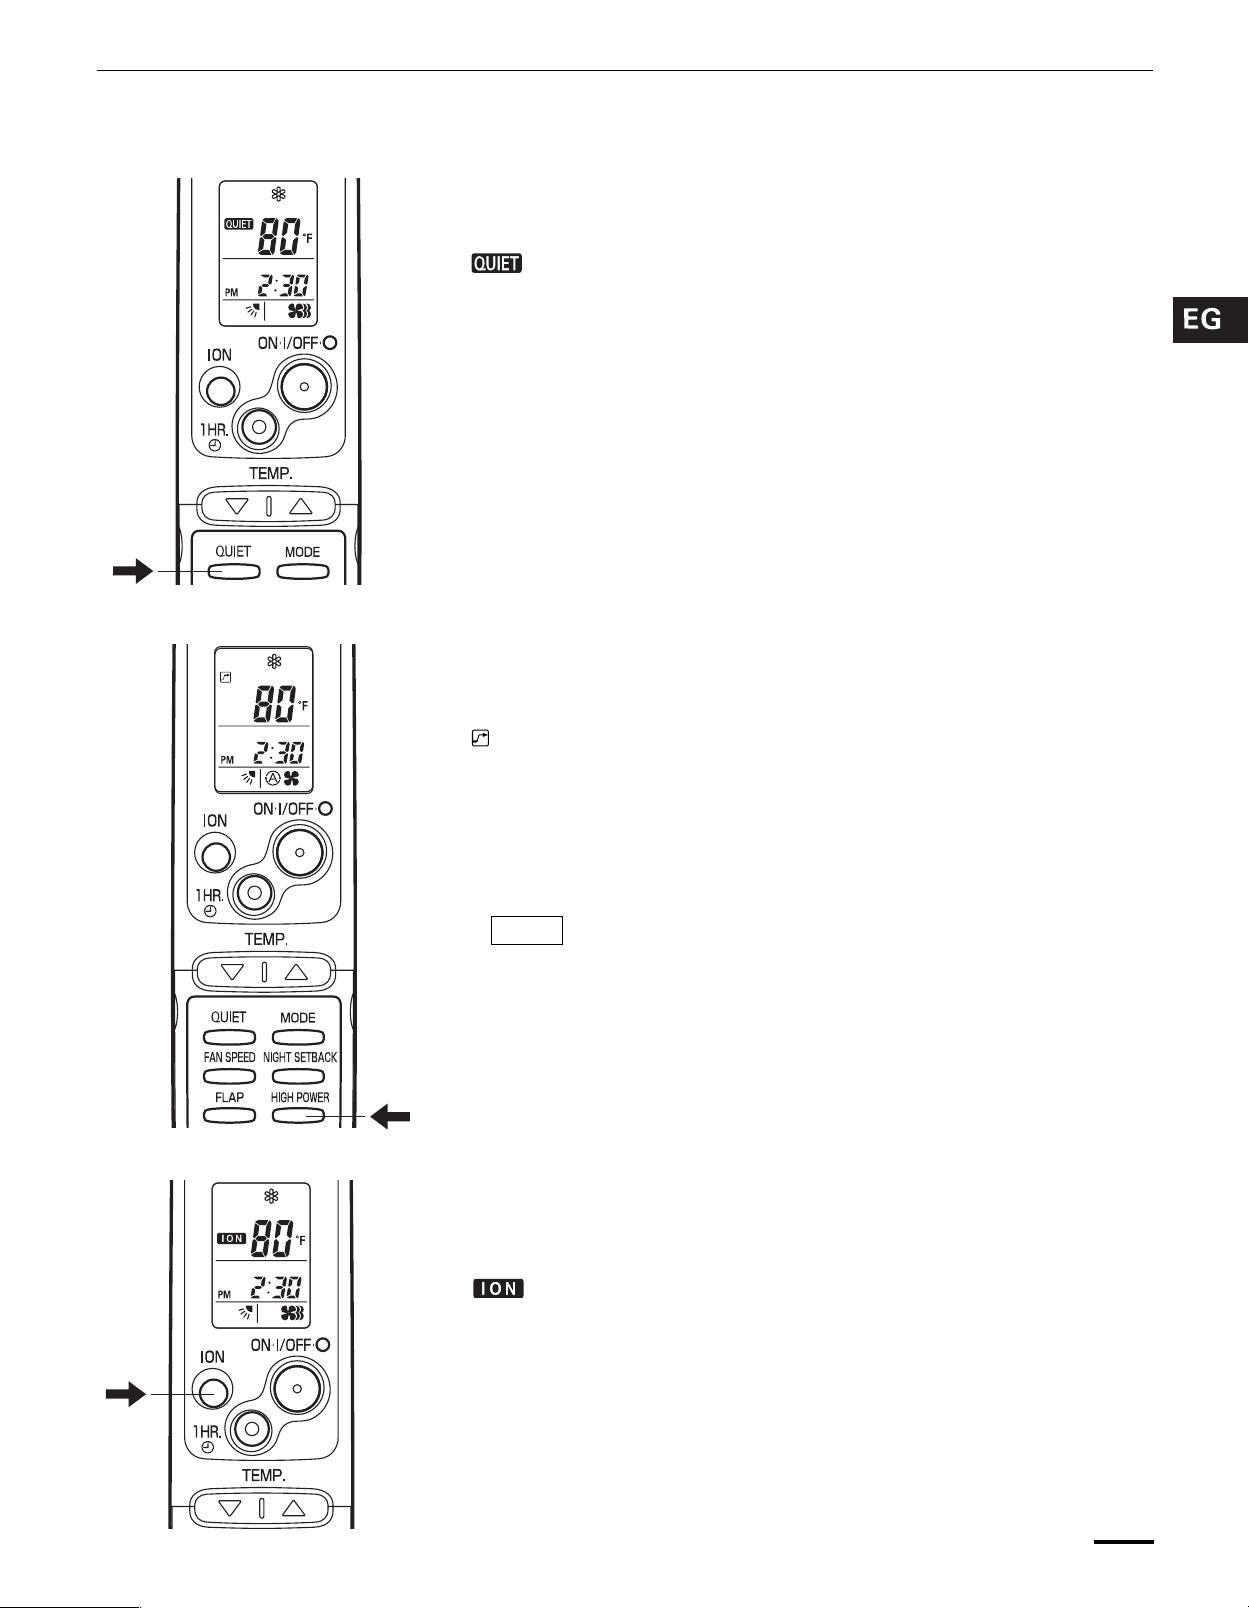
5. QUIET Mode
6. HIGH POWER Mode
Operation with the Remote Control Unit (continued)
QUIET Mode is used to reduce the fan sound of the indoor unit.
Press the QUIET button.
The mark appears in the display.
To cancel, press QUIET button again.
• In QUIET Mode, the fan rotates at a slower speed than the fan speed setting.
• If the unit is already operating with a very low airflow, the fan sound may not
change even if the QUIET button is pressed.
HIGH POWER mode can be used to increase the output of the indoor unit for all
operation modes.
7. ION Mode
Press the HIGH POWER button.
The mark appears in the display.
To cancel, press HIGH POWER button again.
• When the HIGH POWER button is pressed, the unit operates at maximum
output for 30 minutes, regardless of the desired temperature. The fan speed is
1 step above “High”.
• QUIET Mode and HIGH POWER Mode cannot be used at the same time.
NOTE
• Depending on the operating conditions, the fan speed may be
increased by a small amount only.
The ION mode is used during operation to generate negative ions that freshen up
the air in the room.
Press the ION button.
The mark appears in the display.
OI-803-15-EG
To cancel, press ION button again.
• The indoor unit’s ION lamp lights up while negative ions are being generated.
• ION “on” is the remote control unit’s initial setting.
• The negative ions are generated from the negative ion generator.
15
Page 16

‘‘DRY’’ ( ) Operation
How it works? • Once the room temperature reaches the level that was set, the unit’s operation
Special Remarks
frequency is changed automatically.
• During DRY operation, the fan speed automatically runs at lower speed for
providing a comfortable breeze.
• ‘‘DRY’’ operation is not possible if the indoor temperature is 59 °F or less.
Cooling ( ) Operation
Power failure during
operation
Clicking Sound
Clicking sound is heard from
the air conditioner
Remote Control Unit
• Sometimes the indoor unit may not get to the set fan speed such as LOW and
QUIET under cool operation at very low outdoor temperatures due to the
indoor unit being protected from ice or frost when combined with the outdoor
unit for Low Ambient Cooling models.
• In the event of power failure, the unit will stop. When the power is resumed,
the unit will restart automatically within five minutes by the remote control unit.
• In cooling operation, any plastic parts may shrink due to a sudden
temperature change. In this event, a clicking sound may occur. This is normal,
and the sound will soon disappear.
• The remote control unit sends the setting condition to the air conditioner
regularly at five minute intervals.
16
OI-803-16-EG
Page 17

Setting the Timer
NOTE
1. How to set the present
time
2. How to set the OFF time
In the descriptions below, the following settings are used for the temperature and
time indicator selector button on the bottom front section of the remote control.
• Temperature: °F
• Time: AM, PM
(Example) To set to 10:30 pm.
Operation Indication
1. Press the CLOCK button once if
the time indicator is not flashing.
2. Press the Advance, Return ( ,
) button until PM 10:30 is
displayed.
3. Press the CLOCK button again. This completes the setting of the
(Example) To stop the air conditioner at 11:00 am.
1. Press the OFF TIME setting
button once.
The time indication alone flashes.
The time can be set in 1-minute
increments. Holding down the button
advances the time rapidly in 10-minute
increments.
current time.
The timer indication is displayed,
and the present OFF time is shown.
OI-803-17-EG
2. Press the Advance, Return ( ,
) button until AM 11:00 is
displayed.
3. Wait a few seconds, and then the
setting is complete.
The timer indication blinks.
The time can be set in 10-minute
increments. Holding down the button
advances the time rapidly in 10-minute
increments.
The timer indication stops
blinking and the present time is
displayed.
17
Page 18

Setting the Timer (continued)
3. How to set the ON time
4. How to set DAILY ON/OFF
REPEAT timer
(Example) To start operation at 7:10 am.
Operation Indication
1. Press the ON TIME setting
button once.
2. Press the Advance, Return ( ,
) button until AM 7:10 is
displayed.
The timer indication is displayed,
and the present ON time is shown.
The timer indication blinks.
The time can be set in 10-minute
increments. Holding down the button
advances the time rapidly in 10-minute
increments.
3. Wait a few seconds, and then
the setting is complete.
The timer indication stops
blinking and the present time is
displayed.
(Example) To start operation at 7:10 am. and stop the air conditioner at 11:00 am.
10:30 pm.
Present time
7:10 am.
ON
11:00 am.
OFF
1. Set the timer ON/OFF times as
shown in 2-1, 2, 3 and 3-1, 2, 3.
NOTE
• The ON/OFF combination timer uses the current time as the
reference, and it is activated starting from whichever set time
comes first.
• With the ON/OFF combination timer, the settings are repeated
every day.
• You can check the timer ON/OFF times after you have set them
by pressing the ON TIME and OFF TIME setting buttons.
To cancel a timer program • Press the CANCEL button.
• When either an ON or OFF timer is to be canceled, press the button
corresponding to the timer whose program is to be canceled, and then press
the CANCEL button.
NOTE
• The airflow direction, fan speed and temperature setting can be changed after
a timer program has been set even when the unit is stopped. Even when
operation is stopped during an ON timer program, the unit will start operating
when the set time is reached provided that the program is not canceled.
• When the ON timer and OFF timer are set to the same time, the timer
operates as if it is turned off.
The present time 10:30 pm. and
are displayed.
18
OI-803-18-EG
Page 19

Using the 1-Hour OFF Timer
1. 1-Hour OFF Timer This function causes the unit to operate for one hour and then stop,
regardless of whether the unit is on or off when this button is pressed.
The indicator in the display indicates that this function is operating.
Setting procedure:
Regardless of whether the unit is operating or stopped, press the 1 HR. TIMER
button.
appears in the display.
Cancellation procedure:
Press the ON/OFF operation button to turn the unit off, wait for the unit to stop
operating, and then press the ON/OFF operation button again.
The 1-Hour Timer function is now cancelled and the unit operates normally.
NOTE
2. Operation together with the
DAILY ON/OFF REPEAT Timer
Do not • Block the air intake and outlet of the unit. If they are obstructed, the unit
Do • Always try to keep the air filter clean. (Refer to “Care and Cleaning”.) A
• If, while the 1-Hour Timer function is operating, the 1HR. TIMER button is
pressed once to cancel the function and then again, the unit continues to
operate for one hour from that point in time and then stops.
• It is not possible to use the OFF Timer and 1-Hour OFF Timer together.
Whichever function is set last takes precedence. If the 1 HR. TIMER button is
pressed while the TIMER OFF function operates, the OFF Timer is cancelled
and the unit will stop operating one hour later.
The 1-Hour OFF Timer setting is given priority over the DAILY ON/OFF REPEAT
setting.
Tips for Energy Saving
will not work well, and may be damaged.
• Let direct sunlight into the room. Use sunshades, blinds or curtains. If the walls
and ceiling of the room are warmed by the sun, it will take longer to cool the
room.
clogged filter will impair the performance of the unit.
• To prevent conditioned air from escaping, keep windows, doors and any other
openings closed.
OI-803-19-EG
19
Page 20

Adjusting the Airflow Direction
1. Horizontal The horizontal airflow can be adjusted by moving the vertical vanes with your
hands to the left or right.
CAUTION
2. Vertical The vertical airflow can be adjusted by moving the flap with the remote control
A. Sweep function
The flap starts moving up and down to
deliver air over the sweep range.
C. Auto flap function
The flap is set to the recommended
position.
When the humidity is high, the vertical vanes should be in the front
position during the cooling or dehumidifying operation. If the vertical
vanes are positioned all of the way to the right or left, condensation may
begin to form around the air vent and drip down.
unit. Do not move the flap with your hands. Confirm that the remote control unit
has been turned on. Use the FLAP button to set either the sweep function or one
of the six airflow direction settings.
COOL
DRY
FAN
B. Setting the airflow manually
Referring to the above illustration, use the
FLAP button to set the airflow direction
within the range used during the cooling or
dehumidifying operation.
SWEEP
20
NOTE
CAUTION
• The flap automatically closes when the unit is off.
• Use the FLAP button on the remote control to adjust the position of the
flap. If you move the flap by hand, the flap position according to the
remote control and the actual flap position may no longer match. If this
should happen, shut off the unit, wait for the flap to close, and then turn
on the unit again; the flap position will now be normal again.
• Do not have the flap pointed down during cooling operation.
Condensation may begin to form around the air vent and drip down.
OI-803-20-EG
Page 21

Operation without the Remote
Control Unit
INDOOR UNIT If you have lost the remote control unit or it has trouble, follow the steps
below.
When the air conditioner is not running
Each time the OPERATION button is pressed, the operation mode changes
cyclically.
Cooling operation Stop
OPERATION button
NOTE
The temperature is set to the room temperature minus 4 °F during the cooling
operation, and the fan speed and flap are set to Auto.
Care and Cleaning
1. For safety, be sure to turn the air conditioner off and also to disconnect
the power before cleaning.
2. Do not pour water on the indoor unit to clean it. This will damage the
internal components and cause an electric shock hazard.
Casing and Grille (Indoor Unit) Clean the casing and grille of the indoor unit with a vacuum cleaner brush, or
wipe them with a clean, soft cloth.
If these parts are stained, use a clean cloth moistened with a mild liquid
detergent. When cleaning the grille, be careful not to force the vanes out of place.
CAUTION
1. Never use solvents, or harsh chemicals when cleaning the indoor unit.
Do not wipe the plastic casing using very hot water.
2. Some metal edges and the fins are sharp and may cause injury if
handled improperly; be especially careful when you clean these parts.
3. The internal coil and other components of the outdoor unit must be
cleaned every year. Consult your dealer or service center.
OI-803-21-EG
21
Page 22

Care and Cleaning (continued)
Anti-Mold Filter The anti-mold filter behind the air intake grille should be checked and cleaned at
least once every two weeks.
How to remove the anti-mold
filter
Cleaning Use a vacuum cleaner to remove light dust. If there is sticky dust on the filter,
How to replace the anti-mold
filter
1. Grasp both ends of the air
intake grille, and remove it by
opening towards the front and
pulling towards you.
2. Remove the anti-mold filter
attached to the rear of the air
intake grille.
wash the filter in lukewarm, soapy water, rinse it in clean water, and dry it.
1. With the FRONT mark of the
anti-mold filter at the front,
align the two indentions near
the mark with the hooks at the
rear of the air intake grille, and
then mount the anti-mold filter.
Air intake grille
Anti-mold filter
Anti-mold filter
NOTE
FRONT mark
Hook
2. Allow the edge of the air intake
grille to slide into the top of the
indoor unit, and then insert it
all the way inside.
3. Press in the bottom right and
left corners of the air intake
grille to attach the indoor unit.
Attach so that the round pins at the top right and left corners of the air intake grille
are inserted into the grooves at the top right and left of the indoor unit.
Air intake grille
Groove
Pin
Air intake grille
22
OI-803-22-EG
Page 23

Care and Cleaning (continued)
Air Clean Filter The air clean filter removes dust and dirt from the air, and reduces odors and
smoke from tobacco.
This air clean filter cannot remove harmful gases or vapors nor ventilate air in
the room. You must open doors or windows frequently when you use gas or oil
heating appliances. Otherwise there is a risk of suffocation in extreme cases.
How to install the air clean
filter
How to clean the air clean filter • In general, the filter should be sucked to remove dust in low fan speed of a
NOTE
Cleaning the main unit and
remote control unit
Removing and remounting the
air intake grille
The air clean filter needs to be installed behind the air intake grille.
1. Remove the air intake grille.
2. Install the air clean filter in the
position shown in the figure.
3. Remount the air intake grille.
Air clean filter
vacuum cleaner once every three months.
• If there is heavily grime on the filter, soak the filter in lukewarm water with
neutral detergent diluted 1:500 for 1 to 2 minutes then wash it.
• Rinse the filter in clean water, then let it dry on the towel in room temperature.
• Do not bend nor give excessive force onto the air clean filter.
• If the filter surface is heavily blocked with dirt or damaged, replace it with new
one. Purchase a replacement filter at your local dealer. (model STK-FDXB)
• Wipe clean using a soft, dry cloth.
• To remove stubborn dirt, moisten a cloth in warm water no hotter than 104 °F,
wring thoroughly, and then wipe.
• The air intake grille can be removed in order to wash it with water.
Refer to “How to remove the anti-mold filter” and “How to replace the anti-mold
filter” on page 22.
When using a footstool or the like, be careful not to let it tip over.
CAUTION
Washing the grille with water • Clean the grille gently using a soft sponge, or the like. Then wipe away any
remaining moisture.
• Neutral detergent may be used to remove stubborn dirt. Then rinse thoroughly
with water and wipe away any remaining moisture.
Cleaning the negative ion
generator
NOTE
Follow the steps below when the
generator has become dirty.
For safety, be sure to turn the air
conditioner off and also to disconnect
the power before cleaning.
Remove the dust on the negative ion
generator.
• Use a toothbrush, etc. to dust off the end.
• Use a cotton swab, etc., to clean around
the generator inside the plastic case,
taking care not to touch the electrodes.
• During use, the negative ion generator and other metal parts may become
discolored: this is normal and not indicative of malfunctioning.
• If the dirt on and around the negative ion generator is left to build up, a puffing or
sputtering sound will eventually be heard. In this case, clean the generator
immediately.
• Do not apply excessive force while performing maintenance.
Negative ion generator
(metal electrodes inside
plastic case)
OI-803-23-EG
23
Page 24

Troubleshooting
If your air conditioner does not work properly, first check the following points before requesting service. If it still does not
work properly, contact your dealer or service center.
Trouble Possible Cause Remedy
Air conditioner does not run at all. 1. Power failure. 1. Restore power.
2. Leakage circuit breaker tripped.
3. Line voltage is too low. 3. Consult your electrician or dealer.
2. Contact service center.
4. Batteries in remote control unit have
run down.
OPERATION lamp blinks and air
conditioner does not operate.
Compressor runs but soon stops. Obstruction in front of condenser coil. Remove obstruction.
Poor cooling performance. 1. Dirty or clogged air filter. 1. Clean air filter to improve airflow.
Clicking sound is heard from the air
conditioner.
OPERATION lamp lights but outdoor
unit will not run.
Trouble in system. Contact service center.
2. Heat source or many people in room. 2. Eliminate heat source if possible.
3. Doors and/or windows are open. 3. Shut them to keep the heat out.
4. Obstacle near air intake or air
discharge port.
5. Thermostat is set too high for cooling. 5. Set the temperature lower.
In cooling operation, any plastic parts
may shrink due to a sudden
temperature change. In this event, a
clicking sound may occur.
1. The use of cellular phones near the
air conditioner may cause
disturbance to its normal operation.
4. Replace batteries.
4. Remove it to ensure good airflow.
This is normal, and the sound will soon
disappear.
1. Turn off the power then restart the
air conditioner after a while.
2. Consult your dealer.
Operating Range
The air conditioner is operable within the temperature ranges as listed below:
For Cooling Only Models : C0971, C1271
Temperature Indoor air temperature Outdoor air temperature
COOLING Max. 95 °F DB / 71 °F WB 115 °F DB
Min. 67 °F DB / 57 °F WB 67 °F DB
For Low Ambient Cooling Models : CL0971, CL1271
Temperature Indoor air temperature Outdoor air temperature
COOLING Max. 95 °F DB / 71 °F WB 115 °F DB
Min. 67 °F DB / 57 °F WB 0 °F DB
24
OI-803-24-EG
Page 25

25
Page 26

Caractéristiques
Ce climatiseur est un système de type inverseur qui ajuste automatiquement la capacité en fonction des besoins. Des
détails sur ces fonctions sont fournis ci-dessous ; se référer à ces descriptions lors de l’utilisation du climatiseur.
• Fonctionnement contrôlé par microprocesseur
Le logement interne de la télécommande procure
diverses fonctions qui facilitent le fonctionnement
automatique et elles sont clairement affichées pour
simplifier les démarches.
• Simplificité d’une télécommande à infrarouge
Cette télécommande comporte plusieurs atouts qui
facilitent le fonctionnement automatique.
• Marche/arrêt par temporisateur sur 24 heures
Ce temporisateur peut être programmé pour
commander automatiquement la mise en marche et
l’arrêt à tout moment pendant une période de 24
heures.
• Temporisateur 1 heure
Ce temporisateur peut être programmé pour
commander automatiquement la mise à l’arrêt
après une heure de fonctionnement.
• Economie nocturne
Une poussée sur ce bouton change le réglage du
thermostat et permet d’ajuster la température au
niveau jugé le plus confortable.
• Vitesse de ventilation automatique et à 3 paliers
Choix entre Automatique, Vitesse élevée, moyenne
et faible.
• Contrôle du balayage d’air
Cette fonction déplace un volet dans la sortie d’air
vers le haut et le bas afin de diriger l’air dans toute
la pièce selon un mouvement de balayage et
assurer ainsi le confort dans chaque coin.
• Fonction de remise en marche automatique après
une panne de courant
Même après une panne de courant, les
programmations sont remises en service lorsque le
courant est rétabli.
• Fonctionnement à haute puissance
L’unité opère à sortie maximale pendant 30
minutes, indépendamment de la température
désirée.
La vitesse du ventilateur est un palier supérieur à
« Élevée ».
• Fonctionnement silencieux
Le ventilateur tourne plus lentement que la vitesse
sur laquelle est réglé le ventilateur pour fournir un
son de fonctionnement plus doux.
• Fonctionnement d’ionisation
Lorsqu’il est activé, l’appareil génère des ions
négatifs qui rafraîchissent l’air dans la pièce.
• Filtre anti-moisissure
Cet appareil est muni d’un filtre anti-moisissure qui
retarde la croissance de toute moisissure ou
bactérie.
• Filtre de nettoyage d’air
Un filtre à air qui élimine les odeurs désagréables
et purifie l’air est disponible.
Acheter un filtre de remplacement auprès du
dépositaire local. (modèle STK-FDXB)
• Commande de volet automatique
Elle règle automatiquement le volet sur la position
optimum pendant le refroidissement et le séchage.
26
OI-803-2-F
Page 27

Table des matières
Caractéristiques .............................................................................................. 26
Informations sur le produit .............................................................................. 27
Symboles d’avertissement .............................................................................. 27
Emplacement d’installation ............................................................................. 28
Instructions relatives à l’alimentation .............................................................. 28
Conseils de sécurité........................................................................................ 28
Nom des pièces .............................................................................................. 29
Utilisation de la télécommande ....................................................................... 34
Fonctionnement avec télécommande ............................................................. 36
1. Fonctionnement ..................................................................................... 36
2. Réglage de la vitesse du ventilateur ...................................................... 37
3. Ventilateur uniquement .......................................................................... 37
4. Mode économie nocturne ...................................................................... 38
5. Mode de silencieux (QUIET).................................................................. 39
6. Mode de fonctionnement à haute puissance (HIGH POWER) .............. 39
7. Mode d’ionisation (ION) ......................................................................... 39
Remarques spéciales ..................................................................................... 40
Réglage du temporisateur............................................................................... 41
Emploi du temporisateur 1 heure.................................................................... 43
Conseils pour économiser l’énergie................................................................ 43
Réglage du flux d’air ....................................................................................... 44
Fonctionnement sans télécommande ............................................................. 45
Entretien et nettoyage ..................................................................................... 45
Guide de dépannage ...................................................................................... 48
Plage de températures de fonctionnement ..................................................... 48
Page
Informations sur le produit
Pour tout problème ou toute question relatifs au climatiseur, il faudra les
informations ci-dessous. Les numéros de série et de modèle figurent sur la plaque
signalétique placée sur le fond du coffret.
No. de modèle ___________________ No. de série __________________
Date d’achat____________________________________________________
Adresse du concessionnaire _______________________________________
Numéro de téléphone___________
Symboles d’avertissement
Les symboles suivants utilisés dans ce manuel avertissent d’un danger
potentiel pour l’utilisateur, le personnel d’entretien ou l’appareil :
AVERTISSEMENT
ATTENTION
Ce symbole signale un danger ou des
opérations dangereuses qui risquent
d’entraîner des blessures physiques
graves, ou mortelles.
Ce symbole signale un danger ou des
opérations dangereuses qui risquent
d’entraîner des blessures physiques ou des
dommages matériels, notamment de
l’appareil.
OI-803-3-F
27
Page 28

Emplacement d’installation
• Il est recommandé de faire installer l’appareil par un technicien qualifié et
conformément aux instructions fournies avec l’appareil.
• Avant de procéder à l’installation, vérifier que la tension secteur du local
d’utilisation (bureau ou habitation) est la même que celle indiquée sur la plaque
signalétique.
AVERTISSEMENT
À éviter : Pour protéger le climatiseur de toute corrosion, éviter d’installer l’élément
• Ne pas installer le climatiseur dans un endroit où existent des
émanations gazeuses ou des gaz inflammables ou dans un endroit très
humide comme une serre.
• Ne pas installer le climatiseur où se trouvent des objets dégageant une
très forte chaleur.
extérieur dans un endroit qui risque d’être aspergé d’eau de mer ou dans un
environnement sulfureux, par exemple à proximité d’une source thermale.
Instructions relatives à l’alimentation
1. Tous les câbles doivent respecter les codes électriques locaux. Pour les détails,
consulter son magasin ou un électricien qualifié.
2. Chaque élément doit être correctement mis à la terre avec un fil de terre (ou de
masse) ou au moyen d’un câblage d’alimentation.
3. Les raccordements devront être confiés à un électricien qualifié.
Conseils de sécurité
AVERTISSEMENT
ATTENTION
• Lire attentivement ce mode d’emploi avant de faire fonctionner le
climatiseur. Si l’on rencontre des difficultés ou des problèmes, consulter
son concessionnaire.
• Le climatiseur est conçu pour créer un environnement confortable chez
soi. Ne l’utiliser qu’aux fins pour lesquelles il a été prévu, en suivant les
instructions de ce manuel.
• Ne jamais utiliser ni entreposer d’essence ni aucune autre vapeur ou
liquides inflammables près du climatiseur — cela serait extrêmement
dangereux.
• Le climatiseur ne possède pas de ventilateur d’admission d’air frais
extérieur. Il faudra donc ouvrir fréquemment les portes ou les fenêtres
si l’on utilise dans la même pièce des appareils de chauffage à gaz ou
au mazout, qui consomment beaucoup d’oxygène. Sinon, il y aurait
risque d’asphyxie dans les cas extrêmes.
• Ne pas mettre le climatiseur sous et hors tension en le branchant et en
le débranchant. Utiliser le bouton de marche/arrêt de fonctionnement
(ON/OFF).
• Ne rien introduire dans la sortie d’air de l’élément extérieur. Cela est
très dangereux car le ventilateur marche à grande vitesse.
• Ne pas laisser les enfants jouer avec le climatiseur.
• Ne pas trop refroidir une pièce où se trouvent des bébés ou des
malades.
28
OI-803-4-F
Page 29

Nom des pièces
Arrivée d’air
Sortie d’air
Télécommande
Tuyaux de fluide
frigorigène
ÉLÉMENT EXTÉRIEUR
ÉLÉMENT INTÉRIEUR
Tube d e
vidange
Sortie d’air
REMARQUE
Arrivée d’air L’air dans la pièce entre dans cette section et il passe à travers des filtres à air
Sortie d’air L’air climatisé est soufflé du climatiseur par la sortie d’air.
Télécommande La télécommande sans fil commande la mise sous/hors tension (ON/ OFF), la
Tuyaux de fluide frigorigène Les éléments intérieur et extérieur sont reliés par des tuyaux de cuivre par
Le schéma s’appuie sur la vue externe du modèle standard.
En conséquence, la forme risque de différer de celle du climatiseur sur lequel on
a arrêté son choix.
Le climatiseur se compose d’un élément intérieur et d’un élément extérieur. On
pourra le piloter avec la télécommande.
qui éliminent la poussière.
sélection du mode de fonctionnement, la température, la vitesse du ventilateur,
le réglage du temporisateur et le balayage d’air.
lesquels circule le fluide frigorigène.
OI-803-5-F
Tube de vidange L’humidité de la pièce se condense et est éliminée par ce tube.
Élément extérieur
(condensation)
L’élément extérieur se compose d’un compresseur, d’un moteur de ventilateur,
d’une bobine d’échangeur de chaleur et d’autres composants électriques.
29
Page 30

Afficheur de l’appareil et bouton de fonctionnement
ÉLÉMENT INTÉRIEUR
IMPORTANT
Voyant de fonctionnement
(OPERATION)
Voyant de temporisateur
Éviter d’utiliser un
équipement radio tel qu’un
téléphone mobile près (à
moins de 4 pieds) du
récepteur de télécommande.
Cela pourrait causer un
QUIET
(TIMER)
Voyant de
temporisateur
Voyant de silencieux (QUIET)
Voyant d’ionisation (ION)
Bouton de fonctionnement
(OPERATION)
mauvais fonctionnement de
l’appareil.
Récepteur de télécommande
Si une défaillance se produit,
débrancher l’appareil et le
remettre en service après
quelques minutes.
Récepteur de télécommande Cette section capte les signaux infrarouges envoyés par la télécommande
(émetteur).
Bouton de fonctionnement
(OPERATION)
Lorsque la télécommande ne peut pas être utilisée, appuyer sur ce bouton
permet un refroidissement.
Chaque fois que ce bouton est appuyé, le mode de fonctionnement change de
façon cyclique.
Refroidissement Arrêt
Voyant de fonctionnement
(OPERATION)
Ce voyant s’allume lorsque le système est en mode DRY ([SÉCHAGE]
(orange)), COOL ([REFROIDISSEMENT] (vert)) et FAN ([VENTILATEUR]
(vert)).
Voyant de temporisateur
Ce voyant s’allume quand le système fonctionne avec le temporisateur.
(TIMER)
Voyant de silencieux (QUIET) Ce voyant s’allume pendant le fonctionnement en mode QUIET (silencieux).
Voyant d’ionisation (ION) Ce voyant s’allume lorsque l’appareil fonctionne en mode ION et que l’élément
intérieur fonctionne.
REMARQUE
Les voyants d’affichage de l’unité sont atténués pendant le fonctionnement en
mode economie nocturne (NIGHT SETBACK).
30
OI-803-6-F
Page 31

Affiché uniquement
lorsque l’heure est
réglée sur l’horloge de
12 heures.
(1) Mode de fonctionnement
MILD DRY (séchage) .............
Télécommande (Affichage)
Affiché lors de la transmission de
données
Affiché lorsque le capteur de
l’élément intérieur est actif
Affiché lors du réglage de
température
Affiché quand la température est
indiquée
Affiché lors du réglage du
temporisateur
Symboles
Programmation de la
mise en marche (ON).................
COOL (refroidissement) .........
FAN (ventilation).....................
(2) Vitesse de ventilation
Fonctionnement
automatique............................
Vitesse élevée........................
Vitesse moyenne....................
Vitesse faible..........................
(3) Réglage de la température
60–86°F
Indication lors d’un réglage
de température de 80 °F........
Programmation de
l’arrêt (OFF)................................
Temporisateur 1 heure ...............
(5) Mode d’économie nocturne........
(6) Confirmation de transmission .....
(7) Volet automatique ......................
Indication d’angle du volet..........
Indication de balayage d’air........
(8) Mode de fonctionnement
à haute puissance ......................
(4) Temporisateur
Horloge à affichage sur 24
heures avec programmateur
de marche/arrêt......................
OI-803-7-F
(9) Fonctionnement silencieux.........
(10)Fonctionnement
d’ionisation ................................
31
Page 32

Télécommande
Émetteur
Afficheur
Bouton d’ionisation (ION)
Bouton de silencieux (QUIET)
Sélecteur de vitesse du ventilateur
(FAN SPEED)
Boutons de
réglage de
l’heure de
mise en
marche
(ON TIME)
Bouton de volet (FLAP)
Bouton Suivant
Bouton Précédent
Bouton d’annulation
(CANCEL)
Bouton de capteur de
climatiseur (SENSOR)
Capteur
(Couvercle
refermé)
Bouton de
marche/arrêt de fonctionnement (ON/OFF)
Bouton de temporisateur 1 heure
(1 HR. TIMER)
Boutons de réglage de la température
(TEMP.)
Sélecteur de mode (MODE)
Bouton d’économie nocturne
(NIGHT SETBACK)
Bouton de haute puissance
(HIGH POWER)
Bouton Suivant
Bouton Précédent
Bouton de l’horloge (CLOCK)
Bouton de sélection de
l’affichage de l’heure
Boutons de
réglage de
l’heure d’arrêt
(OFF TIME)
Commutateur d’adresse
(ADDRESS)
REMARQUE
Bouton de sélection de l’affichage de la température
L’illustration ci-dessus montre la télécommande lorsque le couvercle est ouvert.
Bouton de réinitialisation (ACL)
Émetteur Quand on appuie sur les boutons de la télécommande, le voyant apparaît sur
l’afficheur pour signaler la transmission des réglages au récepteur du
climatiseur.
Capteur Le capteur de température incorporé à la télécommande détecte la température
de la pièce.
Afficheur Les informations sur le mode de fonctionnement s’affichent lorsque la
télécommande est allumée. Si l’appareil est hors tension, les réglages FLAP
(Volet) et FAN SPEED (Vitesse de ventilateur) ne sont pas affichés.
Bouton d’ionisation (ION) : Ce bouton permet d’activer/désactiver la génération des ions négatifs
pendant le fonctionnement.
Bouton de marche/arrêt de
Ce bouton permet de mettre le climatiseur en marche et de l’arrêter.
fonctionnement (ON/OFF)
Bouton de temporisateur
1 heure (1 HR. TIMER)
: Qu’il soit en service ou non, quand ce bouton est actionné l’appareil
fonctionne pendant une heure puis il s’arrête.
32
OI-803-8-F
Page 33

Télécommande (suite)
Boutons de réglage de la
température (TEMP.)
Appuyer sur le bouton pour augmenter la température réglée.
Appuyer sur le bouton pour réduire la température réglée.
Le réglage de la température change de 1 °C ou 2 °F chaque fois qu’un des
boutons TEMP. est enfoncé.
Bouton de silencieux (QUIET) : Lorsque vous appuyez sur ce bouton, le ventilateur tourne plus
lentement que la vitesse sur laquelle est réglé le ventilateur pour fournir
un son de fonctionnement plus doux.
Sélecteur de mode (MODE) Utiliser ce bouton pour sélectionner le mode DRY (séchage), COOL
(refroidissement) ou FAN (ventilateur).
(DRY) : Le climatiseur réduit l’humidité de la pièce.
(COOL) : Le climatiseur refroidit la pièce.
(FAN) : Le climatiseur fait office de ventilateur.
Sélecteur de vitesse du
ventilateur (FAN SPEED)
: Le climatiseur règle automatiquement la vitesse du ventilateur.
: Vitesse élevée
: Vitesse moyenne
: Vitesse faible
Bouton d’économie nocturne
(NIGHT SETBACK)
Pour les détails, voir « 4. Mode économie nocturne ». Quand on appuie sur ce
bouton en mode DRY (séchage) ou COOL (refroidissement), apparaît sur
l’afficheur, et la télécommande règle automatiquement la température de façon à
économiser l’énergie.
Bouton de volet (FLAP) Appuyer sur ce bouton pour soit régler la direction du flux d’air sur Volet
REMARQUE
Bouton de haute puissance
(HIGH POWER)
Boutons de réglage de l’heure
de mise en marche/arrêt
(ON TIME/OFF TIME)
automatique dans chaque mode ou sur l’une des six positions possibles
manuellement, soit pour sélectionner la fonction de balayage qui fait monter ou
descendre le volet automatiquement.
: Réglage de volet automatique : Si sélectionné durant le refroidissement
ou le séchage, le volet est réglé sur la position (7) dans l’illustration
suivante.
: La direction du flux d’air peut être réglée manuellement. (six positions)
: Le volet se déplace automatiquement vers le haut et vers le bas.
Lorsque vous appuyez sur le bouton de volet (FLAP), la direction du flux d’air est
modifiée comme suit.
Balayage
: Si ce bouton est activé durant le fonctionnement en mode DRY (séchage),
COOL (refroidissement) et FAN (ventilateur), l’unité opère à sortie
maximale pendant 30 minutes, indépendamment de la température
désirée.
La vitesse du ventilateur est un palier supérieur à « Élevée ».
Aucun affichage : Le temporisateur ne fonctionne pas.
: Le climatiseur se met en marche à l’heure programmée.
: Le climatiseur s’arrête à l’heure programmée.
: Le climatiseur s’arrête et se met en marche, ou se met en
marche et s’arrête chaque jour aux mêmes heures. Pour les
détails, voir « Réglage du temporisateur ».
OI-803-9-F
33
Page 34

Télécommande (suite)
Bouton de capteur de
climatiseur (SENSOR)
REMARQUE
Bouton de sélection de
l’affichage de la température
Bouton de sélection de
l’affichage de l’heure
Bouton de réinitialisation (ACL) Elle ramène la télécommande à son état original. Appuyer sur ce bouton après
Commutateur d’adresse
(ADDRESS)
REMARQUE
La télécommande envoie le signal de température au climatiseur toutes les cinq minutes. Si le
climatiseur ne reçoit pas de signal de la télécommande pendant plus de 15 minutes (en raison
d’une défaillance de celle-ci ou pour une autre raison), il utilise le capteur de température intégré à
l’élément intérieur pour régler la température de la pièce. Il se peut alors que la température au
niveau de la télécommande soit différente de la température détectée au niveau du climatiseur.
Lorsqu’on appuie sur ce bouton (utiliser une pointe fine telle que stylo bille), le
pictogramme s’affiche. La température de la pièce est alors détectée par le
capteur intégré à l’élément intérieur et le climatiseur fonctionne selon les
informations fournies par ce capteur.
Si la télécommande se trouve près d’une source de chaleur telle qu’un radiateur
ou en plein soleil, appuyer sur le bouton SENSOR pour que la détection de
température soit effectuée par le capteur de l’élément intérieur.
L’affichage de la température bascule entre °C et °F.
L’affichage de l’heure bascule entre l’horloge de 24 heures et l’horloge de
12 heures.
le remplacement des piles.
• Le commutateur d’adresse change pour empêcher le mélange des signaux
provenant des télécommandes lorsque deux climatiseurs sont installés l’un à
côté de l’autre. En principe, le commutateur d’adresse est réglé sur A. Pour
de plus amples informations, contacter le revendeur où vous avez acheté
l’appareil.
• En principe, les languettes de la télécommande ne sont pas pliées.
Installation des piles
Bouton de
réinitialisation (ACL)
REMARQUE
Utilisation de la télécommande
1. Glisser le couvercle dans le sens
indiqué par la flèche et le retirer.
2. Insérer deux piles alcalines de format
AAA. Bien vérifier que les piles sont
installées suivant les repères inscrits
dans le logement des piles.
3. A l’aide d’un objet comme la pointe
d’un crayon, appuyer sur le bouton de
réinitialisation (ACL).
• Les piles ont une autonomie de six mois environ, en fonction de la
fréquence d’utilisation de la télécommande. Remplacer les piles si le
voyant de l’affichage ne s’allume plus, ou si la télécommande ne permet
plus de modifier les réglages du climatiseur.
• Utiliser deux piles alcalines neuves et étanches de format AAA.
• Pour le remplacement des piles, suivre les instructions du paragraphe
« Installation des piles ».
• Si l’on ne se sert pas de la télécommande pendant plus d’un mois,
retirer les piles.
34
OI-803-10-F
Page 35

Utilisation de la télécommande (suite)
Utilisation de la télécommande Quand on utilise la télécommande, toujours diriger la tête de l’émetteur droit sur
le récepteur du climatiseur.
Climatiseur (élément
intérieur)
Récepteur
Télécommande
(Tête de l’émetteur)
Emplacement d’installation de
la télécommande
NE PAS • En plein soleil
Installation de la
télécommande
télécommande
Vis de montage
5/32 x 5/8
" (4 x 16 mm)
La télécommande pourra être utilisée en position mobile ou en position fixe
(montage mural). Pour garantir un bon fonctionnement du climatiseur, NE PAS
installer la télécommande dans les endroits suivants :
• Derrière un rideau ou tout autre endroit où elle serait cachée
• À plus de 26 pieds (8 mètres) du climatiseur
• Sur le trajet du flux d’air du climatiseur
• Dans un endroit qui risque de devenir extrêmement chaud ou froid
• Dans un endroit soumis à des parasites électriques ou magnétiques
• Là où un obstacle s’interpose entre la télécommande et le climatiseur (en
effet, un signal de vérification est envoyé par la télécommande toutes les
5 minutes)
Avant de monter la télécommande, appuyer sur le bouton de marche/arrêt de
fonctionnement (ON/OFF) à l’endroit du montage pour s’assurer que le
climatiseur pourra fonctionner à partir de cet endroit. L’élément intérieur devrait
émettre un bip sonore pour indiquer qu’elle a reçu le signal.
Boîtier de la
(fournies)
Appuyer
Mis en
place
Partie arrière
Tro u
• Pour empêcher la perte de la
télécommande, vous pouvez
connecter celle-ci au boîtier en
passant une ficelle à travers la
télécommande et à travers le trou
d’attachement.
OI-803-11-F
Manipulation de la
télécommande
Pour retirer la télécommande, tirer vers l’avant.
• Lors de l’utilisation de la télécommande et du climatiseur, l’émetteur de la
télécommande devrait être pointé vers le récepteur de l’élément intérieur.
• S’assurer qu’aucun objet susceptible de bloquer le signal ne se trouve entre le
récepteur et la télécommande.
35
Page 36

1. Fonctionnement
Fonctionnement avec télécommande
ÉTAPE 2
ÉTAPE 3
ÉTAPE 1
ÉTAPE 4
ÉTAPE 5
REMARQUE
Vérifier que le disjoncteur se trouvant sur le panneau de contrôle électrique est
en position de marche.
Appuyer sur les boutons comme expliqué ci-dessous et changer les réglages
selon les besoins.
ÉTAPE 1 Appuyer sur le sélecteur de mode (MODE) et choisir le mode
souhaité.
Pour le séchage →
Pour le refroidissement →
Pour la ventilation seulement →
ÉTAPE 2 Pour mettre le climatiseur en marche, appuyer sur le bouton de
marche/arrêt de fonctionnement (ON/OFF).
ÉTAPE 3 Appuyer sur les boutons de réglage de la température (TEMP.)
pour changer le réglage de la température à la valeur souhaitée.
Plage des températures réglables :
30 °C (max.)
16 °C (min.)
ou
86 °F (max.)
60 °F (min.)
36
ÉTAPE 4 Régler le sélecteur du vitesse de ventilation (FAN SPEED) à la
valeur souhaitée.
ÉTAPE 5 Appuyer sur le bouton de volet (FLAP) et ajuster la direction du
flux d’air selon ses préférences.
(Voir « Réglage du flux d’air » en page 44.)
Pour arrêter le climatiseur, appuyer à nouveau sur le bouton de marche/arrêt de
fonctionnement (ON/OFF).
OI-803-12-F
Page 37

Fonctionnement avec télécommande (suite)
REMARQUE
2. Réglage de la vitesse du
ventilateur
A. Vitesse automatique
du ventilateur
B. Vitesse manuelle du
ventilateur
3. Ventilateur uniquement
• Rechercher le meilleur emplacement possible dans la pièce pour la
télécommande, qui fait également fonction de détecteur de confort et qui
transmet les instructions de fonctionnement. Une fois que l’on a trouvé
l’emplacement idéal, y laisser la télécommande en permanence.
• L’appareil possède un circuit à retardement incorporé de 5 minutes afin de
garantir un fonctionnement en toute sécurité. Quand on appuie sur le bouton
de fonctionnement, le compresseur ne commencera à fonctionner que 3
minutes plus tard. En cas d’une panne de courant, l’appareil s’arrête.
Il suffit de mettre le sélecteur de vitesse du ventilateur (FAN SPEED) sur la
position .
Elle règle automatiquement la meilleure vitesse du ventilateur pour la
température de la pièce.
Pour régler la vitesse du ventilateur manuellement pendant le fonctionnement, il
suffit de mettre le sélecteur de vitesse du ventilateur (FAN SPEED) sur la position
voulue. [ , , ou ]
ÉTAPE 2
ÉTAPE 1
ÉTAPE 3
Pour faire circuler l’air sans modifier la température, suivez la procédure suivante :
ÉTAPE 1 Appuyer sur le bouton de sélection du mode (MODE) pour
passer en mode ventilateur .
ÉTAPE 2 Appuyer sur le bouton de marche/arrêt de fonctionnement
(ON/OFF).
ÉTAPE 3 Appuyer sur le sélecteur de la vitesse du ventilateur (FAN
SPEED) pour sélectionner la vitesse voulue ( , ou ).
OI-803-13-F
37
Page 38

4. Mode économie
nocturne
Fonctionnement avec télécommande (suite)
Ce mode permet de réduire la consommation d’énergie.
Appuyer sur le bouton d’économie nocturne (NIGHT SETBACK) pendant le
fonctionnement.
apparaît sur l’afficheur.
Pour libérer la fonction d’économie nocturne, appuyer à nouveau sur le bouton
d’économie nocturne (NIGHT SETBACK).
En mode de
refroidissement et
séchage : ( et )
Quand le mode d’économie nocturne est sélectionné, le climatiseur élève
automatiquement de 2 °F le réglage de la température quand 30 minutes se
sont écoulées après que la sélection a été faite, puis à nouveau de 2 °F
après 30 minutes, quelle que soit la température intérieure quand le mode
d’économie nocturne a été sélectionné. Ceci permet d’économiser l’énergie
sans sacrifier le confort. Cette fonction est pratique lorsqu’on désire un
refroidissement modéré.
2°F
Température
2°F
réglée
Appuyez sur le bouton
30 minutes
30 minutes
Temps
d’économie nocturne
(NIGHT SETBACK).
38
OI-803-14-F
Page 39

5. Mode de silencieux
(QUIET)
6. Mode de fonctionnement
à haute puissance
(HIGH POWER)
Fonctionnement avec télécommande (suite)
Le mode de silencieux (QUIET) est utilisé pour réduire le son du ventilateur de
l’appareil.
Appuyez sur le bouton de silencieux (QUIET).
apparaît sur l’afficheur.
Pour annuler, appuyez de nouveau sur le bouton de silencieux (QUIET).
• En mode de silencieux, le ventilateur tourne à une vitesse plus faible que celle
sur laquelle est réglé le ventilateur.
• Si l’appareil fonctionne déjà avec un flux d’air très faible, le bruit du ventilateur
peut ne pas changer même si le bouton de silencieux (QUIET) est enfoncé.
Le mode de fonctionnement à haute puissance (HIGH POWER) peut être utilisé
pour augmenter la sortie de l’élément intérieur pour tous les modes de
fonctionnement.
7. Mode d’ionisation (ION)
Appuyez sur le bouton de haute puissance (HIGH POWER).
apparaît sur l’afficheur.
Pour annuler, appuyez de nouveau sur le bouton de haute puissance (HIGH
POWER).
• Lorsque le bouton de haute puissance (HIGH POWER) est activé, l’unité
opère à sortie maximale pendant 30 minutes, indépendamment de la
température désirée. La vitesse du ventilateur est un palier supérieur à
«Élevée».
• Les modes de silencieux (QUIET) et de fonctionnement à haute puissance
(HIGH POWER) ne peuvent pas être utilisés en même temps.
REMARQUE
Le mode d’ionisation (ION) est utilisé pendant le fonctionnement pour générer
des ions négatifs qui rafraîchissent l’air dans la pièce.
Appuyez sur le bouton d’ionisation (ION).
apparaît sur l’afficheur.
Pour annuler, appuyez de nouveau sur le bouton d’ionisation (ION).
• Le voyant d’ionisation (ION) de l’élément intérieur s’allume lorsque des ions
négatifs sont générés.
• Le mode d’ionisation (ION) est activé par défaut sur la l’unité de
telécommande.
• Les ions négatifs sont générés par le générateur d’ions négatifs.
• En fonction des conditions de fonctionnement, la
vitesse du ventilateur peut être légèrement accélérée
uniquement.
OI-803-15-F
39
Page 40

Remarques spéciales
Fonctionnement
séchage ( )
Comment agit-il? • Une fois que la température de la salle atteint le niveau réglé, la vitesse de
fonctionnement de l’unité est modifiée automatiquement.
• Pendant le séchage, la vitesse du ventilateur est réglée automatiquement sur
la vitesse faible afin de fournir une brise confortable.
• Un fonctionnement du séchage (DRY) n’est pas possible si la température
intérieure est de 59 °F ou moins.
Refroidissement ( )
Panne de courant
pendant le
fonctionnement
Cliquetis
Le climatiseur produit un
cliquetis
Télécommande
• Il se peut que parfois l’élément intérieur n’atteigne pas la vitesse de ventilateur
spécifiée, comme par exemple en mode LOW et QUIET, lorsqu’il fonctionne à
froid à température extérieure très basse, car l’élément intérieur est protégé
contre la glace et le gel lorsqu’il est combiné à un modèle d’élément extérieur
conçu pour fonctionner à température ambiante basse.
• En cas d’une panne de courant, l’appareil s’arrête. Lorsque le courant est
rétabli, l’appareil se remet en marche automatiquement en moins de cinq
minutes par la télécommande.
• A la suite d’un changement de température provoqué par refroidissement, les
pièces en plastique de l’appareil se rétrécissent, ce qui provoque un léger
cliquetis. C’est normal et le son disparaîtra après quelques instants.
• La télécommande transmet régulièrement l’état du réglage au climatiseur à
intervalles de cinq minutes.
40
OI-803-16-F
Page 41

Réglage du temporisateur
REMARQUE
1. Réglage à l’heure actuelle
2. Réglage du moment de
mise à l’arrêt (OFF)
Dans les descriptions ci-dessous, les réglages suivants sont utilisés pour le
bouton de sélection de l’affichage de température et d’heure sur la partie avant
inférieure de la télécommande.
• Température : °F
• Heure : AM, PM
(Exemple) pour régler l’horloge à 10:30 p.m.
Démarche Affichage
1. Appuyer sur ce bouton de
l’horloge (CLOCK) si l’indicateur
de l’heure ne clignote pas.
2. Appuyer sur les boutons Suivant
et Précédent ( , ) jusqu’à ce
que PM 10:30 apparaisse.
3. Appuyer à nouveau sur le
bouton de l’horloge (CLOCK).
(Exemple) pour programmer l’arrêt du climatiseur à 11:00 a.m.
Seule l’affichage de l’heure clignote.
L’heure peut être réglée en incréments
de 1 minute. Si vous maintenez le
bouton enfoncé, l’heure change
rapidement en incréments de 10
minutes.
Ceci achève le réglage de l’heure
actuelle.
OI-803-17-F
1. Appuyer sur le bouton de
réglage de l’heure d’arrêt (OFF
TIME).
2. Appuyer sur les boutons Suivant
et Précédent ( , ) jusqu’à ce
que AM 11:00 apparaisse.
3. Patienter quelques secondes
pour que le réglage soit terminé.
L’indicateur du temporisateur
apparaît et l’heure d’arrêt (OFF) actuelle
est affichée.
L’indicateur du temporisateur
clignote.
L’heure peut être réglée en incréments
de 10 minutes. Si vous maintenez le
bouton enfoncé, l’heure change
rapidement en incréments de 10
minutes.
L’indicateur du temporisateur
cesse de clignoter et l’heure actuelle
s’affiche.
41
Page 42

Réglage du temporisateur (suite)
3. Réglage du moment de
mise en marche (ON)
4. Comment programmer
l’heure de mise en
marche/arrêt quotidienne
(DAILY ON/ OFF REPEAT)
(Exemple) pour mettre le climatiseur en marche à 7:10 a.m.
Démarche Affichage
1. Appuyer sur le bouton de
réglage de l’heure de mise en
marche (ON TIME).
2. Appuyer sur les boutons Suivant
et Précédent ( , ) jusqu’à ce
que AM 7:10 apparaisse.
L’indicateur du temporisateur
apparaît et l’heure de mise en marche
(ON) actuelle est affichée.
L’indicateur du temporisateur
clignote. L’heure peut être réglée en
incréments de 10 minutes. Si vous
maintenez le bouton enfoncé, l’heure
change rapidement en incréments de
10 minutes.
3. Patienter quelques secondes
pour que le réglage soit terminé.
L’indicateur du temporisateur
cesse de clignoter et l’heure actuelle
s’affiche.
(Exemple) pour mettre le climatiseur en marche à 7:10 a.m. et l’arrêter à
11:00 a.m.
10:30 p.m.
L’heure actuelle
7:10 a.m.
ON
11:00 a.m.
OFF
Pour annuler une
programmation
REMARQUE
1. Programmer les heures de
marche et d’arrêt (ON/OFF)
L’heure actuelle, 10:30 p.m., et
sont affichés.
comme indiqué sur 2-1, 2, 3 et
3-1, 2, 3.
REMARQUE
• La programmation marche/arrêt combinée utilise l’heure
actuelle comme référence, et elle est activée à l’heure
programmé en premier.
• Avec la programmation marche/arrêt combinée, les
réglages se répètent quotidiennement.
• Vous pouvez vérifier les heures de mise en marche et
d’arrêt (ON/OFF) du temporisateur une fois programmées
en appuyant sur les boutons de réglage de l’heure de mise
en marche/arrêt.
• Appuyez sur le bouton d’annulation (CANCEL).
• Pour annuler une programmation quelconque (mise en marche ou arrêt),
appuyer sur le bouton correspondant au temporisateur dont le programme
doit être annulé, puis appuyez sur le bouton d’annulation (CANCEL).
• Le réglage de la température, la direction du flux d’air et la vitesse de
ventilateur peuvent être changées après une programmation du
temporisateur, même si le climatiseur est arrêté. Même lorsqu’une opération
est interrompue durant une programmation de mise en marche (ON), le
climatiseur démarre lorsque l’heure programmée est atteinte, dans la mesure
où le programme n’a pas été annulé.
• Lorsque la programmation ON (Marche) et la programmation OFF (Arrêt) sont
réglées sur la même heure, la programmation fonctionne comme si elle était
arrêtée.
42
OI-803-18-F
Page 43

Emploi du temporisateur 1 heure
1. Temporisateur 1 heure
(1 HR. TIMER)
REMARQUE
Cette fonction fait en sorte que l’appareil fonctionne pendant une heure,
puis qu’il s’arrête indépendamment qu’il soit en service ou hors service au
moment où le bouton est actionné.
L’indicateur de l’afficheur indique que cette fonction est en service.
Démarches de réglage :
Que l’appareil soit en service ou à l’arrêt, appuyer sur le bouton de temporisateur
1 heure (1 HR. TIMER).
L’indicateur apparaît sur l’afficheur.
Démarche d’annulation :
Appuyer sur le bouton de marche/arrêt de fonctionnement (ON/OFF) pour mettre
l’appareil hors service, attendre qu’il s’arrête et appuyer une nouvelle fois sur le
bouton de marche/arrêt de fonctionnement (ON/ OFF).
La fonction de temporisation 1 heure est alors mise hors service et l’appareil
fonctionne normalement.
• Pendant que fonctionne le temporisateur 1 heure, si on appuie une fois sur le
bouton de temporisateur 1 heure (1 HR. TIMER) afin de l’annuler, puis qu’on y
appuie à nouveau, l’appareil continuera à fonctionner pendant une heure à
partir de cet instant, puis il s’arrêtera.
• Il n’est pas possible d’utiliser ensemble le temporisateur d’arrêt et le
temporisateur 1 heure. La fonction programmée en dernier a priorité. Si l’on
appuie sur le bouton de temporisateur 1 heure (1 HR. TIMER) alors que la
fonction de temporisateur d’arrêt (TIMER OFF) est active, le temporisateur
d’arrêt est désactivé et le climatiseur s’arrête de fonctionner une heure plus
tard.
2. Fonctionnement combiné
avec le temporisateur de mise
en marche/arrêt quotidienne
(DAILY ON/OFF REPEAT)
Choses à ne pas faire • Obstruer les arrivées et les sorties d’air de l’appareil. Si elles sont
Choses à faire • Toujours maintenir le filtre à air propre. (Voir la section « Entretien et
Le réglage du temporisateur 1 heure (1 HR. TIMER) a priorité sur le réglage de
programme quotidien.
Conseils pour économiser l’énergie
bouchées, l’appareil ne fonctionnera pas de façon satisfaisante et il
risque d’être endommagé.
• Laisser le soleil pénétrer à plein dans la pièce. Utiliser des persiennes ou des
rideaux. Si les murs et le plafond de la pièce sont chauds sous l’action du
soleil, il faudra plus longtemps pour refroidir la pièce.
nettoyage ».) Un filtre colmaté amoindrira les performances de l’appareil.
• Pour éviter que l’air réfrigéré ne s’échappe, maintenir toutes les fenêtres,
portes et autres ouvertures fermées.
OI-803-19-F
43
Page 44

Réglage du flux d’air
1. Horizontalement Le flux horizontal de l’air se règle en déplaçant avec les mains les ailettes
verticales vers la gauche ou vers la droite.
ATTENTION
2. Verticalement Le flux vertical de l’air peut se régler en déplaçant le volet à l’aide de la
A. Balayage
Le volet commence à se déplacer de haut
en bas pour fournir l’air dans la plage de
balayage.
C. Fonction de volet automatique
Le volet est réglé sur la position
recommandée.
Lorsque l’humidité est élevée, les ailettes verticales doivent se trouver à la
position avant pendant le refroidissement ou le séchage. Si elles sont
placées à fond vers la gauche ou la droite, une condensation risque de se
produire autour de la sortie d’air et de s’égoutter.
télécommande. Ne pas déplacer ce volet de la main. Vérifier que la
télécommande est allumée et se servir du bouton de volet (FLAP) pour régler le
volet sur la fonction de balayage ou sur une des six positions du flux d’air.
COOL
DRY
FAN
B. Réglage manuel du flux d’air
En observant l’illustration ci-dessus, se
servir du bouton de volet (FLAP) pour
régler la direction du flux d’air dans la
plage utilisée pendant le refroidissement
ou le séchage.
SWEEP
44
REMARQUE
ATTENTION
• Le volet se referme automatiquement quand l’appareil est mis hors tension.
• Utiliser bouton de volet (FLAP) de la télécommande pour ajuster la
position du volet. Si l’on déplace le volet de la main, il y aura un
décalage entre la position réglée par la télécommande et la position
réelle. Dans ce cas, mettre l’appareil hors tension, attendre que le volet
se referme, puis remettre l’appareil sous tension. La position du volet
sera à nouveau normale.
• Ne pas diriger le volet vers le bas pendant le refroidissement car une
condensation risque de se produire autour de la sortie d’air et de
s’égoutter.
OI-803-20-F
Page 45

Fonctionnement sans télécommande
ELÉMENT INTÉRIEUR Si l’on a égaré la télécommande ou qu’elle ne fonctionne pas correctement,
procéder comme suit.
Si le climatiseur ne fonctionne pas
Chaque fois que ce bouton est appuyé, le mode de fonctionnement change de
façon cyclique.
Refroidissement Arrêt
Bouton de fonctionnement
(OPERATION)
REMARQUE
AVERTISSEMENT
Boîtier et grille
(élément intérieur)
ATTENTION
La température est réglée sur 4 °F en dessous de la température ambiante
pendant le refroidissement ; la vitesse et le volet du ventilateur sont réglés sur
Auto.
Entretien et nettoyage
1. Pour toute sécurité, éteindre le climatiseur et le débrancher de la prise
secteur.
2. Ne pas verser d’eau sur l’élément intérieur pour le nettoyer. Cela
pourrait abîmer les composants internes et provoquer des décharges
électriques.
Nettoyer le boîtier et la grille de l’élément intérieur avec la brosse d’un aspirateur
ou les essuyer avec un chiffon propre et doux.
Si ces parties sont sales, les nettoyer avec un chiffon propre humecté d’un
détergent liquide doux. Quand on nettoie la grille, faire attention de ne pas
modifier la place des ailettes en frottant.
1. Ne jamais utiliser de dissolvants ni de produits chimiques puissants. Ne
pas essuyer le boîtier en plastique avec de l’eau très chaude.
2. Certains bords métalliques et les ailettes étant coupants, ils doivent être
manipulés avec précaution lors du nettoyage sous peine de provoquer
des blessures.
3. La bobine interne et les autres composants de l’élément extérieur
doivent être nettoyés tous les ans. Consulter le concessionnaire ou un
service après-vente.
OI-803-21-F
45
Page 46

Entretien et nettoyage (suite)
Filtre anti-moisissure Le filtre anti-moisissure situé derrière la grille d’arrivée d’air doit être vérifié et
Retrait du filtre
anti-moisissure
Nettoyage Se servir d’un aspirateur pour enlever la poussière légère. Si de la poussière
Remplacement du filtre
anti-moisissure
nettoyé au moins une fois toutes les deux semaines.
1. Saisir les deux bords de la
grille d’arrivée d’air et retirer-la
en tirant vers vous.
2. Retirer le filtre anti-moisissure
attaché à l’arrière de la grille
d’arrivée d’air.
adhère au filtre, laver celui-ci dans de l’eau tiède et savonneuse, puis le rincer
dans de l’eau propre et le sécher.
1. Alors que la marque FRONT du
filtre anti-moisissure est située à
l’avant, aligner les deux encoches
près de la marque avec les
crochets à l’arrière de la grille
d’arrivée d’air, puis monter le filtre
anti-moisissure.
Grille d’arrivée d’air
Filtre anti-moisissure
Filtre anti-moisissure
Marque
FRONT
Crochet
46
REMARQUE
2. Laisser le bord de la grille
d’arrivée d’air glisser dans la
partie supérieure de l’appareil,
puis insérer-la à fond à
l’intérieur.
3. Appuyer sur les coins
inférieurs droit et gauche de la
grille d’arrivée d’air pour
l’attacher à l’appareil.
Attacher de sorte que les goupilles rondes des coins supérieurs droit et gauche
de la grille d’arrivée d’air soient insérées dans les rainures sur la partie
supérieure droite et gauche de l’appareil.
Grille d’arrivée d’air
Rainure
Goupille
Grille d’arrivée d’air
OI-803-22-F
Page 47

Entretien et nettoyage (suite)
Filtre de nettoyage d’air Le filtre de nettoyage d’air élimine les poussières et saletés contenues dans l’air
et il réduit les odeurs et la fumée de tabac.
Ce filtre de nettoyage d’air ne permet ni d’éliminer les vapeurs et les gaz
AVERTISSEMENT
nocifs ni de ventiler l’air de la salle. Il faut donc ouvrir fréquemment les
portes ou les fenêtres si l’on utilise des appareils de chauffage au gaz ou
au pétrole. Faute de quoi, on s’exposerait dans les cas extrêmes à un
risque d’asphyxie.
Installation du filtre de
nettoyage d’air
Le filtre d’air doit être installé derrière la grille d’arrivée d’air.
1. Retirer la grille d’arrivée d’air.
2. Installer le filtre de nettoyage
d’air dans la position illustrée
sur la figure.
3. Remonter la grille d’arrivée
d’air.
Filtre de
nettoyage d’air
Nettoyage du filtre de
nettoyage d’air
• En général, il faut utiliser un aspirateur réglé à faible puissance pour nettoyer
le filtre, une fois tous les trois mois.
• Si le filtre est très encrassé, le tremper 1 ou 2 minutes dans une solution
savonneuse tiède (1 partie de détergent pour 500 parties d’eau), puis le laver.
• Rincer le filtre à l’eau claire, puis le laisser sécher à la température de la pièce
en le posant sur une serviette.
REMARQUE
• Ne pas plier le filtre de nettoyage d’air, ni appliquer une force excessive dessus.
• Si la surface du filtre est très encrassée ou endommagée, remplacer le filtre
par un neuf. Acheter un filtre de remplacement auprès du concessionnaire
local. (modèle STK-FDXB)
Nettoyage de l’appareil
principale et de la
télécommande
• Frotter avec un chiffon doux et sec.
• Pour enlever les souillures tenaces, tremper le chiffon dans de l’eau pas plus
chaude que 104 °F, tordre fortement le linge et frotter.
• La grille d’arrivé d’air peut être enlevée pour la nettoyer à l’eau.
Dépose et remise en place de
la grille d’arrivée d’air
Voir la section « Retrait du filtre anti-moisissure » et « Remplacement du filtre
anti-moisissure » en page 46.
A l’emploi d’un tabouret ou d’un escabeau, faire attention à ce qu’il ne se
ATTENTION
renverse pas.
Nettoyage de la grille à l’eau • Nettoyer la grille délicatement avec une éponge douce, par exemple, et
enlever ensuite toute trace d’humidité.
• L’emploi d’un détergent neutre n’est pas interdit pour enlever les souillures
tenaces. Rincer ensuite convenablement avec de l’eau et essuyer toute trace
d’humidité.
Nettoyage du générateur
d’ions négatifs
Si le générateur est sale, suivez la
procédure ci-dessous.
Pour toute sécurité, éteindre le
AVERTISSEMENT
climatiseur et le débrancher de la
prise secteur avant de nettoyer.
Nettoyez la poussière sur le générateur
d’ions négatifs.
• Utilisez une brosse à dents, etc. pour
dépoussiérer l’extrémité.
• Utilisez un cotton-tige pour nettoyer
autour du générateur à l’intérieur du
boîtier en plastique en évitant de
Générateur d’ions négatifs
(électrodes métalliques à
l’intérieur du boîtier en plastique)
toucher les électrodes.
REMARQUE
• Le générateur d’ions négatifs et d’autres pièces métalliques peuvent se
décolorer lorsqu’ils sont utilisés. Cette décoloration est normale et n’indique
pas un mauvais fonctionnement.
• Si la saleté s’accumule sur et dans le générateur d’ions négatifs, un son
ressemblant à un toussotement risque de se faire entendre. Si cela se produit,
nettoyez le générateur sans attendre.
• N’appliquez pas une force excessive lors de l’entretien.
OI-803-23-F
47
Page 48

Guide de dépannage
Si le climatiseur ne fonctionne pas correctement, effectuer les vérifications suivantes avant de faire appel à un
réparateur. Si le problème persiste, prendre contact avec son concessionnaire ou avec un service après-vente.
Panne Cause possible Remède
Le climatiseur ne fonctionne pas du
tout.
Le voyant de fonctionnement
(OPERATION) clignote et le
climatiseur ne fonctionne pas.
Le compresseur se met en marche
mais il s’arrête aussitôt.
Refroidissement insuffisant. 1. Filtre à air sale ou obstrué. 1. Nettoyer le filtre à air afin d’améliorer la
Le climatiseur produit un cliquetis. A la suite d’un changement de
Le voyant de fonctionnement
(OPERATION) s’allume, mais
l’élément extérieur ne fonctionne pas.
1. Coupure de courant. 1. Rétablir l’alimentation.
2. Le disjoncteur a fonctionné. 2. Prendre contact avec un service aprèsvente.
3. Tension de ligne trop basse. 3. Consulter un électricien ou le
concessionnaire.
4. Les piles de la télécommande sont
usées.
Problème dans l’appareil. Prendre contact avec un service après-
Il y a un obstacle devant la bobine du
condensateur.
2. Source de chaleur ou trop de
monde dans la pièce.
3. Portes et/ou fenêtres ouvertes. 3. Les fermer pour empêcher la
4. Obstacle devant l’arrivée ou la
sortie d’air.
5. Le thermostat est réglé sur une
température trop élevée pour le
refroidissement.
température provoqué par
refroidissement, les pièces en
plastique de l’appareil se rétrécissent,
ce qui provoque un léger cliquetis.
1. L’emploi de téléphones cellulaires
près du climatiseur peut perturber
son fonctionnement normal.
4. Remplacer les piles.
vente.
Retirer ce qui fait obstruction.
circulation d’air.
2. Si possible, éliminer la source de
chaleur.
pénétration d’air chaud.
4. Retirer l’obstacle pour assurer une
bonne circulation d’air.
5. Régler la température plus bas.
C’est normal et le son disparaîtra après
quelques instants.
1. Couper l’alimentation puis remettre le
climatiseur en marche après un
moment.
2. Consulter le concessionnaire.
Plage de températures de
fonctionnement
Le climatiseur peut fonctionner dans la plage de températures indiquée ci-dessous :
Modèles à refroidissement uniquement : C0971, C1271
Température Température de l’air intérieur Température de l’air extérieur
REFROIDISSEMENT Max. 95 °F DB / 71 °F WB 115 °F DB
Min. 67 °F DB / 57 °F WB 67 °F DB
Modèles à refroidissement à basse température ambiante : CL0971, CL1271
Température Température de l’air intérieur Température de l’air extérieur
REFROIDISSEMENT Max. 95 °F DB / 71 °F WB 115 °F DB
Min. 67 °F DB / 57 °F WB
48
0 °F DB
OI-803-24-F
Page 49

49
Page 50

SANYO FISHER COMPANY
A DIVISION OF SANYO NORTH AMERICA CORPORATION
21605 Plummer Street
Chatsworth, CA 91311 U.S.A.
In Canada
SANYO Canada Inc.
300 Applewood Crescent, Concord
Ontario, L4K 5C7, Canada
 Loading...