

OPERATING INSTRUCTIONS
DVD RECORDER
DVR-SD450
UK
Problem s with set-up?
Call 0870 240 7475

1
TABLE OF CONTENTS
ABOUT THIS MANUAL...................................................................................................................................................3
WARNING.......................................................................................................................................................................4
IMPORTANT SAFEGUARDS..........................................................................................................................................5
SAFETY INFORMATION.................................................................................................................................................6
WARNING.......................................................................................................................................................................6
SAFETY PRECAUTIONS................................................................................................................................................6
SAFETY PRECAUTIONS................................................................................................................................................7
SAFETY PRECAUTIONS................................................................................................................................................8
PROPER VENTILATION :...............................................................................................................................................8
NOTES ON CD-R/RW, DVD-R/RW AND DVD+R/RW DISCS.........................................................................................9
NOTES ON DISCS........................................................................................................................................................10
GENERAL PROPERTIES.............................................................................................................................................11
CONNECTION..............................................................................................................................................................12
ANTENNA CONNECTION............................................................................................................................................12
VIDEO & AUDIO OUTPUT SOCKETS..........................................................................................................................12
ANALOGUE AUDIO CONNECTION.............................................................................................................................13
DIGITAL AUDIO CONNECTION...................................................................................................................................13
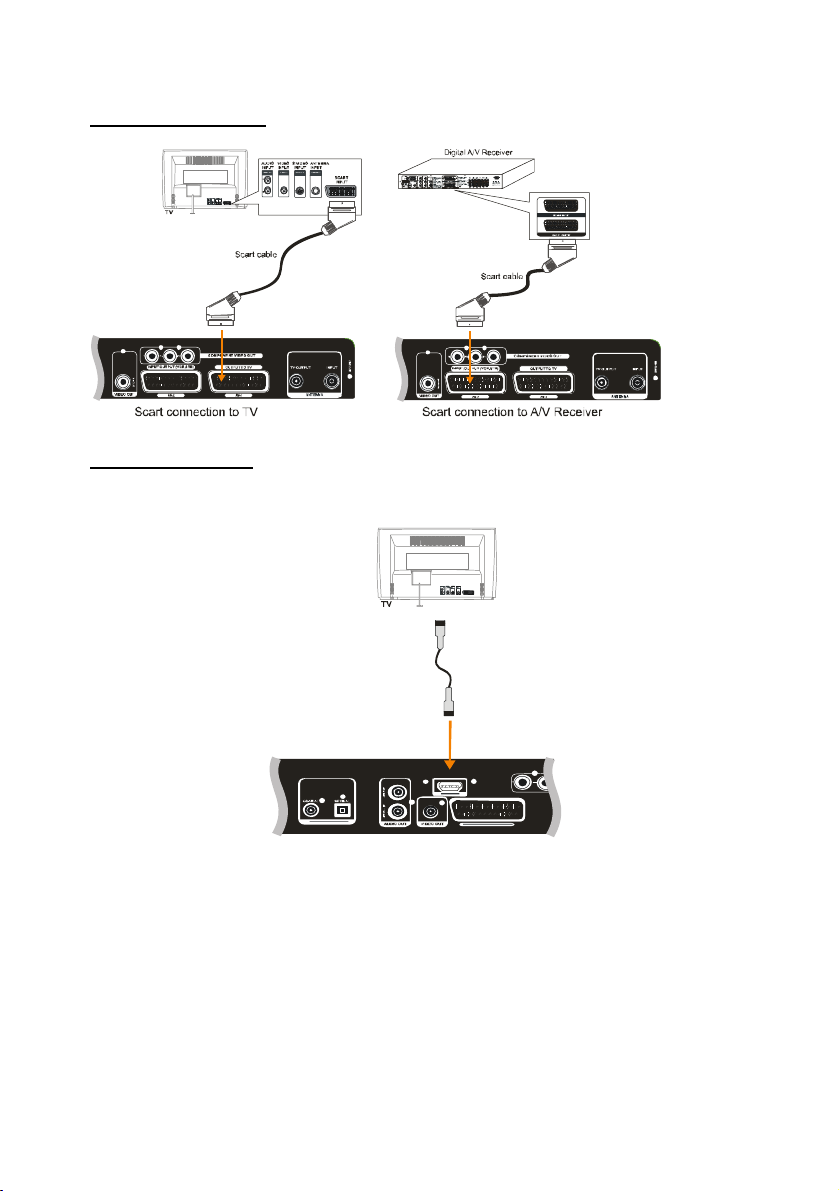
SCART CONNECTION.................................................................................................................................................14
HDMI Output Socket......................................................................................................................................................14
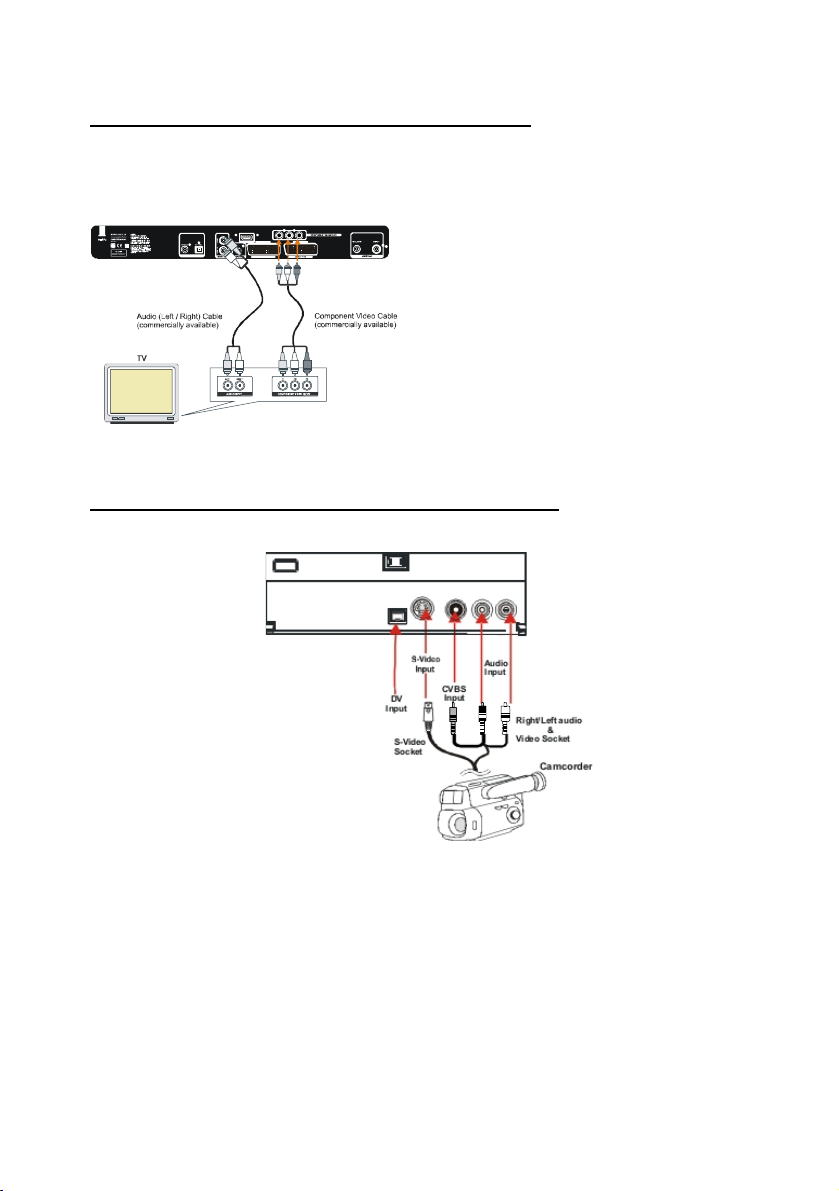
COMPONENT VIDEO & AUDIO OUTPUT CONNECTORS..........................................................................................15
Connect Camcorder to the Front Sockets of DVD Recorder..........................................................................................15
1. INTRODUCTION.......................................................................................................................................................16
1.1 THE REMOTE CONTROL.......................................................................................................................................16
Preparing the Remote Control for Operation.................................................................................................................18
Preparing the Remote Control for Operation.................................................................................................................18
1.2 FRONT PANEL FUNCTIONS..................................................................................................................................19
1.3 FRONT PANEL CONNECTIONS............................................................................................................................20
1.4 REAR PANEL CONNECTIONS...............................................................................................................................20
1.5 VFD ICONS.............................................................................................................................................................21
1.6 SUPPORTED DISCS..............................................................................................................................................22
INSTALLING YOUR DVD RECORDER.........................................................................................................................23
INSTALLATION MENU..................................................................................................................................................23
Initial Setup....................................................................................................................................................................23
2. SETUP MENU...........................................................................................................................................................24
2.1 RECORDING...........................................................................................................................................................24
2.1.1 AUTO CHAPTER MARKER.................................................................................................................................24
2.1.2 RECORD QUALITY..............................................................................................................................................24
2.1.3 APS .....................................................................................................................................................................24
2.1.4 MODIFY CHANNEL..............................................................................................................................................25
2.1.5 PROGRAM TABLE...............................................................................................................................................25
2.1.6 TIMER SETTING MENU.......................................................................................................................................25
2.2 VIDEO.....................................................................................................................................................................26
2.2.1 TV TYPE...............................................................................................................................................................26
2.2.2 TV DISPLAY.........................................................................................................................................................26
2.2.3 VIDEO OUTPUT FORMAT...................................................................................................................................26
2.2.4 HDMI....................................................................................................................................................................27
2.2.5 SCREENSAVER...................................................................................................................................................27
2.3 AUDIO.....................................................................................................................................................................27
2.3.1 DOWNMIX............................................................................................................................................................27
2.3.2 S-PDIF OUTPUT..................................................................................................................................................27
2.3.3 LPCM OUTPUT....................................................................................................................................................27
2.3.4 DYNAMIC RANGE...............................................................................................................................................27
2.4 LANGUAGE.............................................................................................................................................................27
2.4.1 AUDIO LANGUAGE.............................................................................................................................................27
2.4.2 SUBTITLE LANGUAGE........................................................................................................................................28
2.4.3 DISC MENU LANGUAGE.....................................................................................................................................28
2.5 DATE / TIME...........................................................................................................................................................28
2.5.1 DATE-TIME SETTING..........................................................................................................................................28
2.5.2 PROGRAM...........................................................................................................................................................28
2.5.3 DATE (dd / mm/ yyyy)...........................................................................................................................................28
2.5.4 TIME (hh : mm).....................................................................................................................................................28
2.6 PREFERENCES......................................................................................................................................................28
2.6.1 EDIT DISC............................................................................................................................................................28
2.6.2 PARENTAL LEVEL...............................................................................................................................................29
2.6.3 FACTORY DEFAULTS.........................................................................................................................................29
2.6.4 STANDBY TIME...................................................................................................................................................29
2.6.5 POWER SAVING..................................................................................................................................................29
2.6.6 AV-2.....................................................................................................................................................................30
3. FREEVIEW MENU....................................................................................................................................................30
3.1 CHANNEL LIST.......................................................................................................................................................30
3.2 INSTALLATION.......................................................................................................................................................31
3.3 CONFIGURATION...................................................................................................................................................32

2
3.4 LANGUAGE.............................................................................................................................................................33
4. DISPLAY MENUS.....................................................................................................................................................33
5. DISC EDIT MENU.....................................................................................................................................................34
6. TITLE EDIT MENU....................................................................................................................................................35
7. EDITING TITLE.........................................................................................................................................................35
8. PLAYBACK................................................................................................................................................................35
8.1 Preparing For Playback (All Discs)..........................................................................................................................35
8.2 Inserting a Disc in the Tray......................................................................................................................................36
8.3 Basic Playback (DVD, CD-DA, MP3, JPEG, MPEG)...............................................................................................36
8.4 Stopping Playback (DVD, CD-DA, MP3, JPEG, MPEG)..........................................................................................36
8.5 Pausing Playback (ALL DISCS)...............................................................................................................................36
8.6 Removing a Disc (ALL DISCS)................................................................................................................................36
8.7 Repeat Play.............................................................................................................................................................36
8.8 Repeating a Specific Segment A to B (DVD, CD-DA, MP3, JPEG)..........................................................................37
8.9 Displaying a Scene with a Larger and Closer View..................................................................................................37
8.10 Selecting Subtitle Language (DVD) (Displaying / Changing Subtitle Language)....................................................37
8.11 Changing Audio Soundtrack Language (DVD, MPEG)..........................................................................................37
8.12 Changing the Camera Angle (DVD).......................................................................................................................38
8.13 Fast Forward / Backward.......................................................................................................................................38
8.14 Slow Forward Playback (DVD)..............................................................................................................................38
8.15 Skipping Ahead or Back (DVD, CD-DA, MP3, JPEG, MPEG)................................................................................39
8.15.1 Skipping Ahead...................................................................................................................................................39
8.15.2 Skipping Back.....................................................................................................................................................39
8.16 Step Forward (DVD)..............................................................................................................................................39
8.17 Locating a Specific Title or Chapter, Using the MENU or TITLE Button (DVD)......................................................39
8.18 Browsing For a Specific Chapter/Title (DVD).........................................................................................................40
8.19 Moving To a Specific Elapsed Time (DVD)............................................................................................................40
8.20 Browsing For a Specific Track/Time (CD-DA, MP3, MPEG, JPEG).......................................................................40
8.21 Checking Elapsed/Remaining Time (except JPEG)...............................................................................................40
8.22 Playback Modes (CD-DA, MP3, JPEG, MPEG).....................................................................................................41
8.23 Simultaneous Playback (JPEG, MP3)....................................................................................................................41
9. FREEVIEW FEATURES............................................................................................................................................41
9.1 Digital Teletext.........................................................................................................................................................41
9.2 Widescreen..............................................................................................................................................................42
9.3 Subtitle....................................................................................................................................................................42
9.4 Electronic Program Guide (7- Day - EPG)...............................................................................................................42
10. MANUAL RECORDING...........................................................................................................................................43
10.1 General Information...............................................................................................................................................43
10.2 Recording Setup....................................................................................................................................................43
10.3 Selecting Source....................................................................................................................................................43
10.4 How to Initiate and Stop Recording Process..........................................................................................................44
10.5 How to Watch Another Channel at TV During Recording.......................................................................................44
10.6 Inserting Chapter...................................................................................................................................................44
10.7 Pause Recording...................................................................................................................................................44
11. TIMER RECORDING...............................................................................................................................................44
11.1 General Information...............................................................................................................................................44
11.2 To Set a Recorder or Reminder by EPG (Now / Next)...........................................................................................45
11.3 To Set a Record or Reminder by EPG (7 Day)......................................................................................................45
11.4 How to Create Recording Item...............................................................................................................................45
11.5 How to Check, Change or Delete A Programmed Recording (Timer)....................................................................46
12. DV .....................................................................................................................................................................46
12.1 PLAYBACK FROM DV INPUT...............................................................................................................................46
12.2 RECORDING FROM DV INPUT............................................................................................................................46
13. LIMITATIONS AND SOME OTHER FEATURES.....................................................................................................46
14. SPECIFICATIONS (FOR DVD)...............................................................................................................................47
15. SPECIFICATIONS (FOR FreeView)........................................................................................................................48
16. TROUBLESHOOTING GUIDE (FOR DVD).............................................................................................................49
17. TROUBLESHOOTING GUIDE (FOR FreeView)......................................................................................................50
“This product incorporates copyright protection technology that is protected by U.S. patents and other
intellectual property rights. Use of this copyright protection technology must be authorized by Macrovision,
and is intended for home and other limited viewing uses only unless otherwise authorized by Macrovision.
Reverse engineering or disassembly is prohibited.”
Manufactured under license from Dolby Laboratories,
"Dolby" and the double-D symbol are trademarks of Dolby Laboratories.
HDMITM, the HDMITM logo and High-Definition Multimedia Interface are trademarks or
registered trademarks of HDMITM Licensing LLC.

3
ABOUT THIS MANUAL
Instructions on this manual describe the controls of the DVD Recorder. You can also use the remote
controller controls with the same name as those on the unit.
Dear Customers
We would like to thank you for purchasing this DVD Recorder with built-in FreeView Digital Terrestrial
Receiver.
We strongly recommend that you carefully study the operating instructions before attempting to operate the
unit and that you note the listed safety precautions.
4
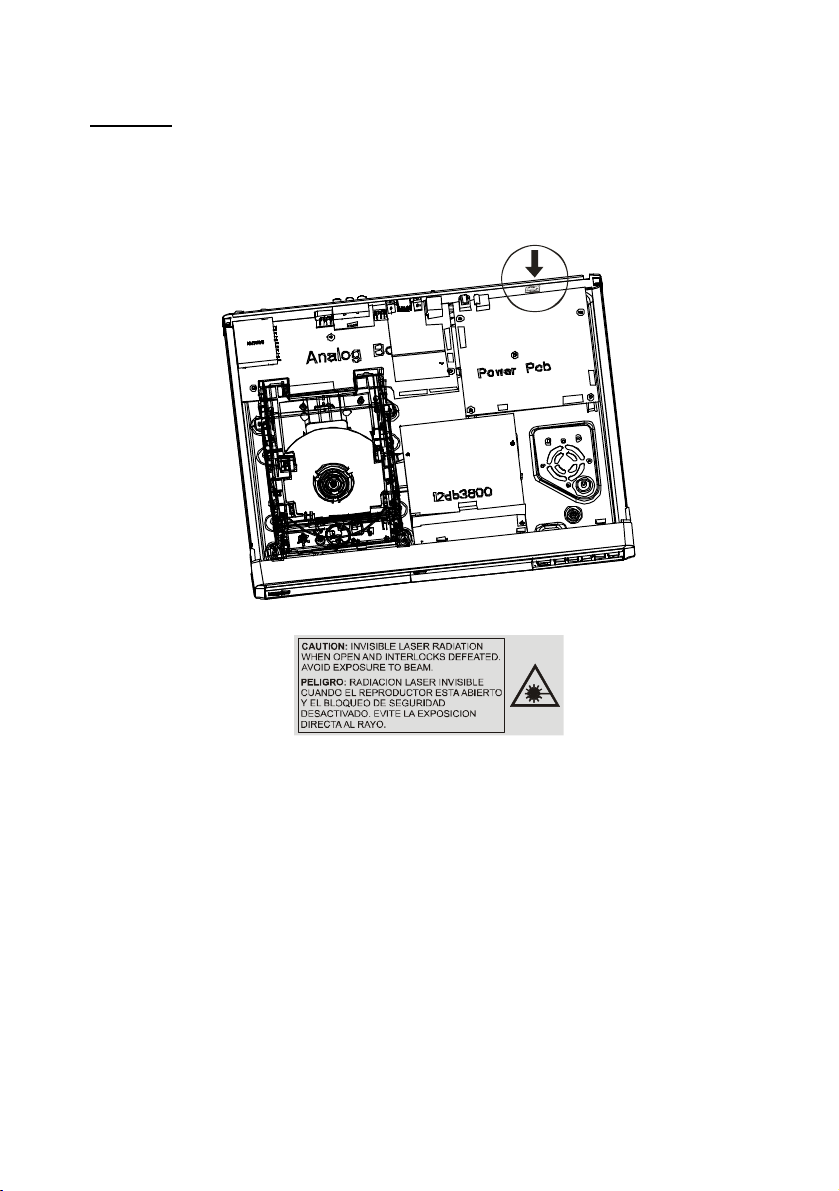
WARNING
A Laser Warning safety label has been placed inside the chasis at the location shown below.
This set complies with the EMC Directive 89/336 and with the LVD Directive 2006/95
5
IMPORTANT SAFEGUARDS
6
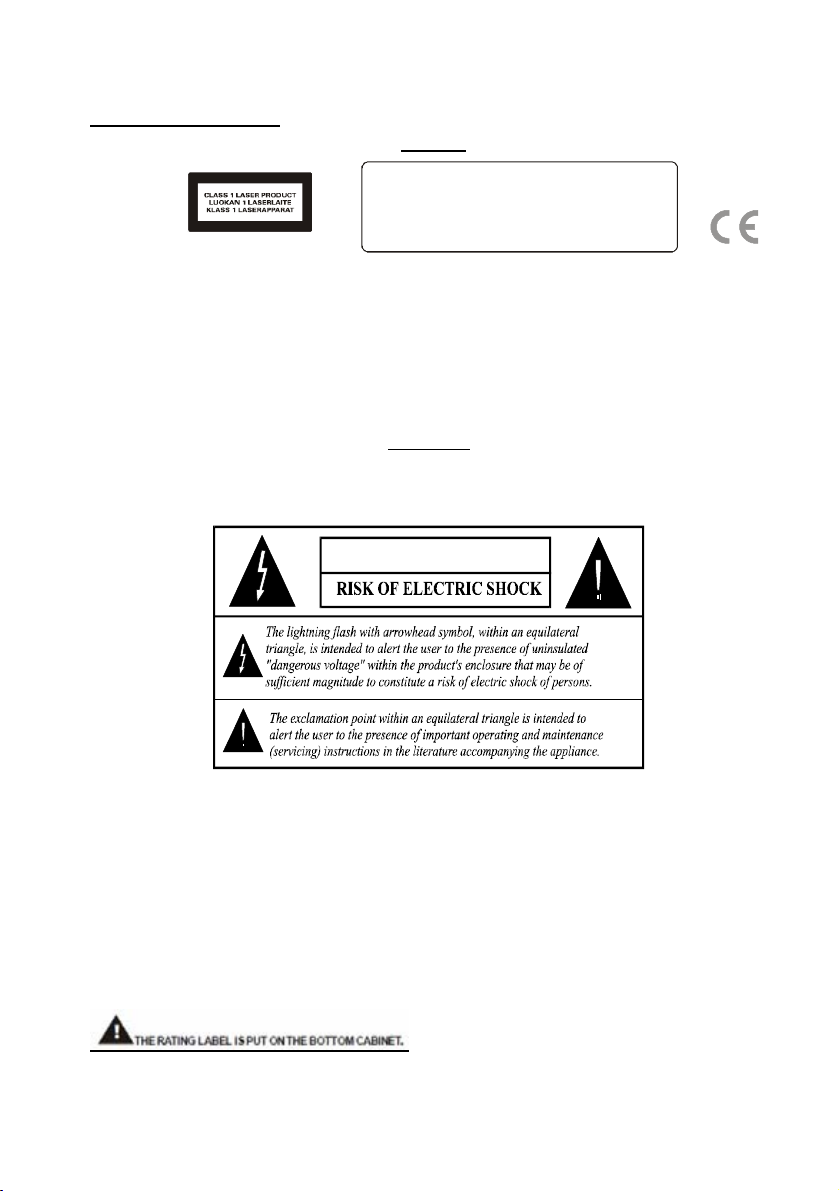
SAFETY INFORMATION
LASER CLASS 1
790 nm (CD)
WARNING
CAUTION
Wave length: 650 nm (DVD)
Maximum output of accessible laser radiation: < 0,39 mW (continuous wave)
Classified according to IEC 60825-1: 1993 + A1: 1997
This unit is a class 1 laser product. However this product uses a visible laser beam which could cause
hazardous radiation exposure.
Be sure to operate the recorder correctly as instructed.
While this recorder is plugged to the wall outlet, do not place your eyes close to the opening of the disc tray
or other openings to look inside the recorder for your own safety.
Use of performance control or adjustment procedures other than those specified may result in hazardous
radiation exposure. Do not open the covers and do not attempt to repair any damaged parts. Please refer to
a service technician or qualified personnel for any necessary repairs.
WARNING
To reduce the risk of fire or electric shock, do not expose this equipment to rain or moisture.
To reduce the risk of fire or electric shock, and any interference, use the recommended accessories only.
The device shall not be exposed to dripping or splashing and no objects filled with liquids, such as
The mains plug or the appliance coupler is used as the disconnect device, the disconnect device
Do not move your device for 20 seconds after removing AC power to ensure that the actuator is completely
locked. This helps prevent the media and the heads from accidental damage due to vibration, moving or
Danger of explosion if battery is incorrectly replaced. Replace only with the same or equivalent type.
vases, shall be placed on the apparatus.
shall remain readily operable.
shipping.
CAUTION

7
SAFETY PRECAUTIONS
Power Source
The unit should be operated only from a 220-240V~ 50 Hz outlet. Please do not open the cover by yourself.
There is high voltage in the set, which will endanger your life. Please contact local service agent for help
and advice. Repairs to be carried out by a qualified technician only.
• The apparatus is not disconnected from the AC power source (mains) as long as it is connected to the
wall outlet, even if the apparatus itself has been turned off.
• If you are not going to use the apparatus for a long time, be sure to disconnect the apparatus from the wall
outlet.
Power Cord
Do not place the unit, a piece of furniture, etc., on the power cord (mains lead), or pinch the cord. Handle
the power cord by the plug. Do not pull out the plug by tugging the cord and never touch the power cord
when your hands are wet as this could cause a short circuit or electric shock. Never make a knot in the cord
or tie it with other cords. The power cords should be routed in such a way that they are not likely to be
stepped on. A damaged power cord can cause fire or give you an electrical shock. Check the power cord
once in a while. When you find it damaged, ask closest service agent for help. When the AC power cord
needs to be changed, it should be done at a qualified service shop only.
Choice of Location
• Please do not place the set in a place subject to direct sun light, excessive dust or mechanical shock or in
a location near heat sources.
• The set should be placed on a solid and safe base. Do not place the apparatus on a soft surface such as
a rug that might block the ventilation holes on the bottom.
• A location should not be selected such as a room with high humidity, as the condensation, arising in the
kitchen for example, may cause malfunction or damage the set.
• Heating or other thermal radiation under the set also may cause malfunction or damage the set.
• The hot air, which arises during the operation, should be ventilated with sufficient air circulation. Please do
not put the set into closed areas and do not cover it.
• Please avoid the contact of the set with water or humidity. Do not put into operation near bath, swimming
pools.
• Take care to provide a good air circulation. Place the apparatus in a location with adequate ventilation to
prevent heat build-up in the apparatus.
• Should any solid object or liquid fall into the cabinet, unplug the apparatus and have it checked by
qualified personnel before operating it any further.
8
SAFETY PRECAUTIONS
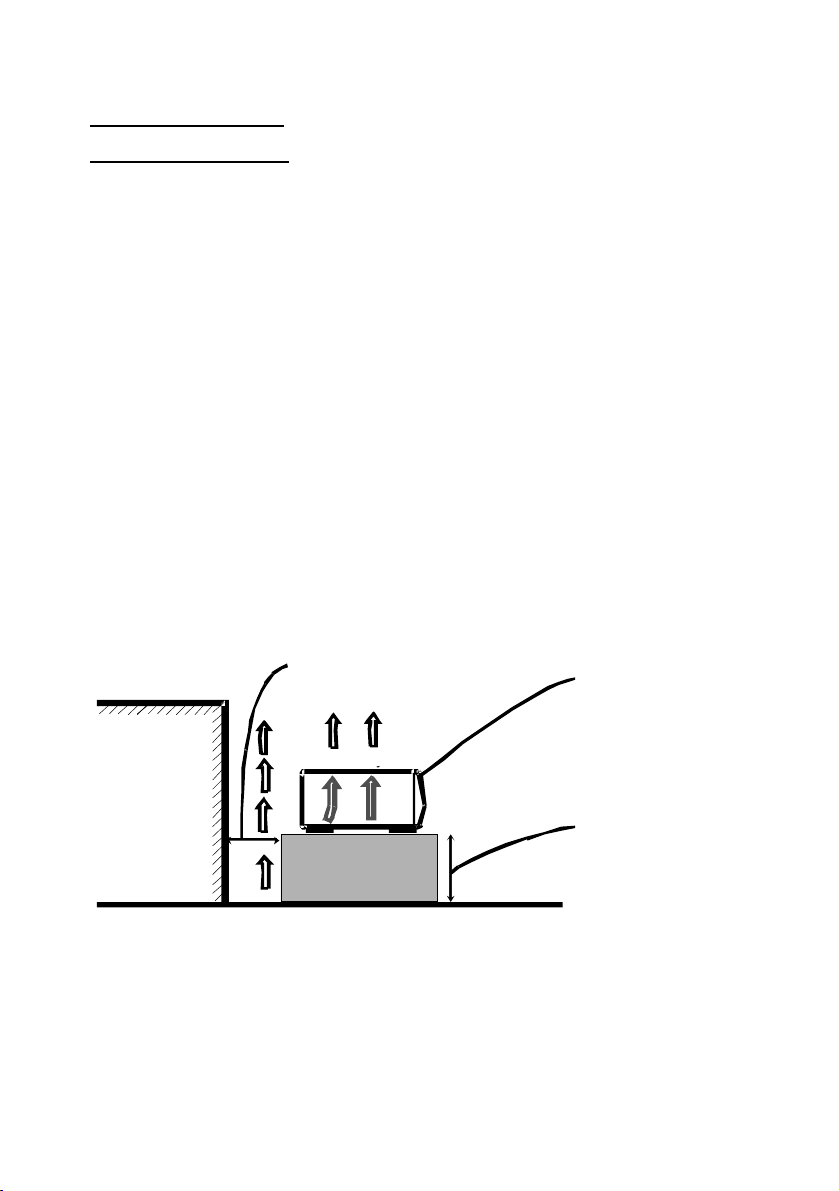
PROPER VENTILATION :
CAUTION
•Do not block the ventilation openings or holes.
(If the ventilation openings or holes are blocked by a newspaper or cloth, etc., the heat may not be able to
get out.)
•Do not place any naked flame sources, such as lighted candles, on the apparatus.
•When discarding batteries, environmental problems must be consid-ered and local rules or laws governing
the disposal of these batteries must be followed strictly.
•Do not expose this apparatus to rain, moisture, dripping or splashing and that no objects filled with liquids,
such as vases, shall be placed on the apparatus.
Caution:
To avoide risk of electric shock and fire and to protect from damage.
Locate the apparatus as follows:
Front: No obstructions and open spacing.
Sides: No obstructions in 3 cm from the sides.
Top: No obstructions in 5 cm from the top.
Back: No obstructions in 15 cm from the back
Bottom: No obstructions, place on the level surface.
Spacing15cmormore
Front
Dvd Recorder
DvdPlayer
Wallor
obstructions
Standheight
5cmormore
Floor

9
NOTES ON CD-R/RW, DVD-R/RW AND DVD+R/RW DISCS
· CD-R, DVD-R, DVD+R (Recordable) and CD-RW, DVD-RW, DVD+RW (Rewritable) discs, recorded
by the users, may only be used after finalization process.
· CD-R/RW, DVD-R/RW and DVD+R/RW discs may not be usable, depending on the disc features,
recording conditions and damage or dirt on disc. The disc configuration and features are determined
by the tool and device used for recording. Therefore, users may face with the following undesired
consequences:
§ Some discs may not be read at all
§ Some discs may cause system crash after laying for a while
§ Some parts of the disc may be skipped or worked abnormally
· Compare with the original discs, the time passed for reading a CD-R/RW, DVD-R/RW and
DVD+R/RW discs may be longer.
· This DVD Recorder may not support some MP3 recordings due to differences in recording formats
or disc type.
· CD-R/CD-RW discs recorded by CD-DA method can be played. Some CD-R/CD-RW disc may be
incompatible due to laser pick-up and disc design.
· DVD-R discs recorded by DVD-Video method can be played. Some DVD-R discs may be
incompatible due to laser pick-up and disc design.
· Some discs may be incompatible with JPEG Viewer function due to different recording format or
condition of the disc.
10
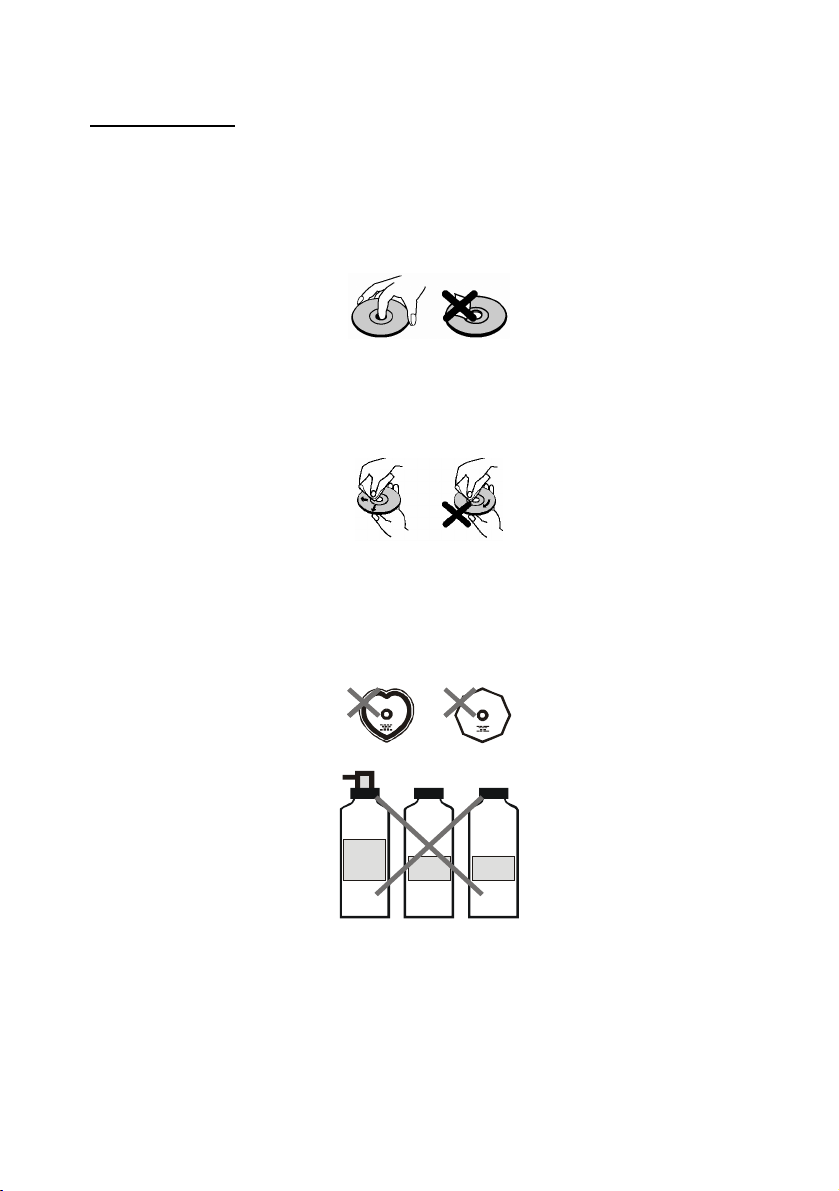
NOTES ON DISCS
BENZENE
Do not expose the disc to direct sunlight or heat sources such as hot air ducts, or leave it in a car parked in
direct sunlight as the temperature can rise quickly and damage the disc.
On handling discs:
• To keep the disc clean, handle the disc by its edge. Do not touch the surface.
• Do not stick paper or tape on the disc.
• If the disc is contaminated with any substance, like glue remove before using it.
On cleaning:
• Before playing, clean the disc with a cleaning cloth. Wipe the disc from the inside to the outside.
• Do not use solvents such as benzine, thinner, commercially available cleaners or anti-static spray intended
for vinyl LPs.
Discs that should not be used:
Only the discs including the marks (see 1.7) can be played.
Note, however, that discs with special shapes (heart-shaped discs, hexagonal discs, etc.) cannot be played.
Do not attempt to play such discs, as they may damage the unit.
NOTE: Do not use record spray or antistatic. Also do not use volatile chemicals such as benzene or thinner.
RECORD
SPREY
THINNER

11
GENERAL PROPERTIES
1. DVD+R/RW, DVD Video, Audio CD, CD-R/RW, MP3, JPEG playback, DVD+R/RW recording
2. Integrated FreeView Digital Terrestrial Receiver
3. Low power standby mode support
4. User-friendly OSD menu control
5. Vacuum Fluorescent Display (VFD)
6. NTSC/PAL playback (according to disc content) and recording
7. Recording in different qualities (HQ, SP, LP, EP, SLP)
8. One Touch Recording
9. Auto title menu with thumbnail index pictures
10. Finalize for DVD+R disc
11. 7 Day Electronic Program Guide (EPG)
12. Adding chapter markers
13. Appending, overwriting, deleting titles
14. Hide/unhide chapters
15. Recording with timer
16. Dolby Digital, LPCM audio via coaxial and optical digital audio outputs
17. Multiple Aspect Ratio support (16:9 Widescreen, 4:3 Letterbox, 4:3 PAN&SCAN)
18. Multi-Audio (up to 8) support (According to disc content) (For DVD)
19. Multi-Subtitle (up to 32) support (According to disc content) (For DVD)
20. Multi-Angle (up to 9) support (According to disc content) (For DVD)
21. 8 level parental control
22. Fast forward and rewind in 5 different speeds (2x, 4x, 8x, 16x, 32x Fast Forward/Backward)
23. For DVD ; frame by frame forward playback
24. For DVD ; slow forward playback (1/2x, 1/4 x, 1/8x Slow Forward)
25. Maximum 5K*5K resolution for baseline, 1280*1024 resolution for progressive JPEG playback
26. 8-320 kbit bit rate for MP3playback
27. Time Search
28. Repeat modes (Disc, Chapter, Title, Track, Folder)
29. Different play modes for Audio CD and MP3(Normal/Random/Intro)
30. Program function for Audio CD, MP3, JPEG and MPEG
31. Simultaneous playback of audio and pictures
32. 20 timer recording events
33. Pause recording
34. A → B repeat
35. FreeView Antenna input / output (loop through)
36. 2 SCART socket
37. Composite Video input/output
38. S-Video input
39. Coaxial & Optical Digital Audio outputs
40. DV INPUT
41. HDMI output
42. Component Video Output
12
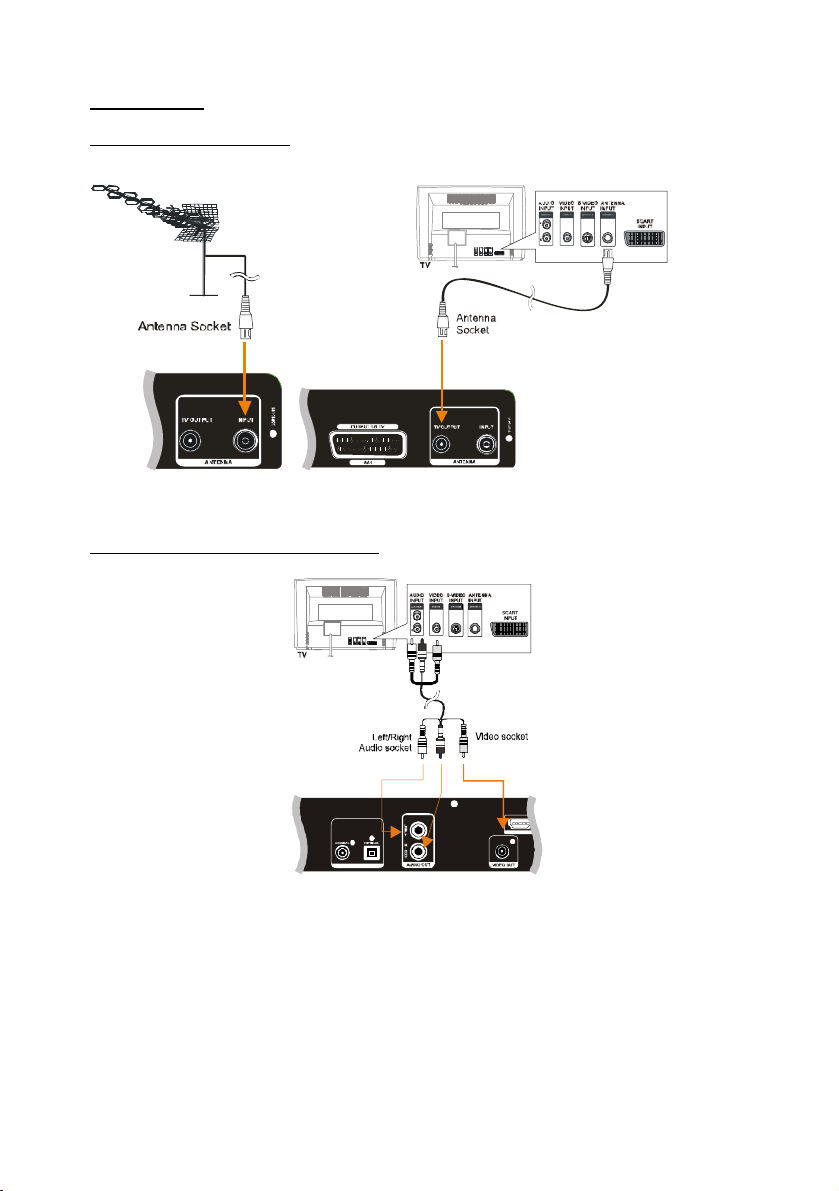
CONNECTION
3501930
5
DIGITAL AUDIO OUT
HDMI OUT
ANTENNA CONNECTION
VIDEO & AUDIO OUTPUT SOCKETS
13
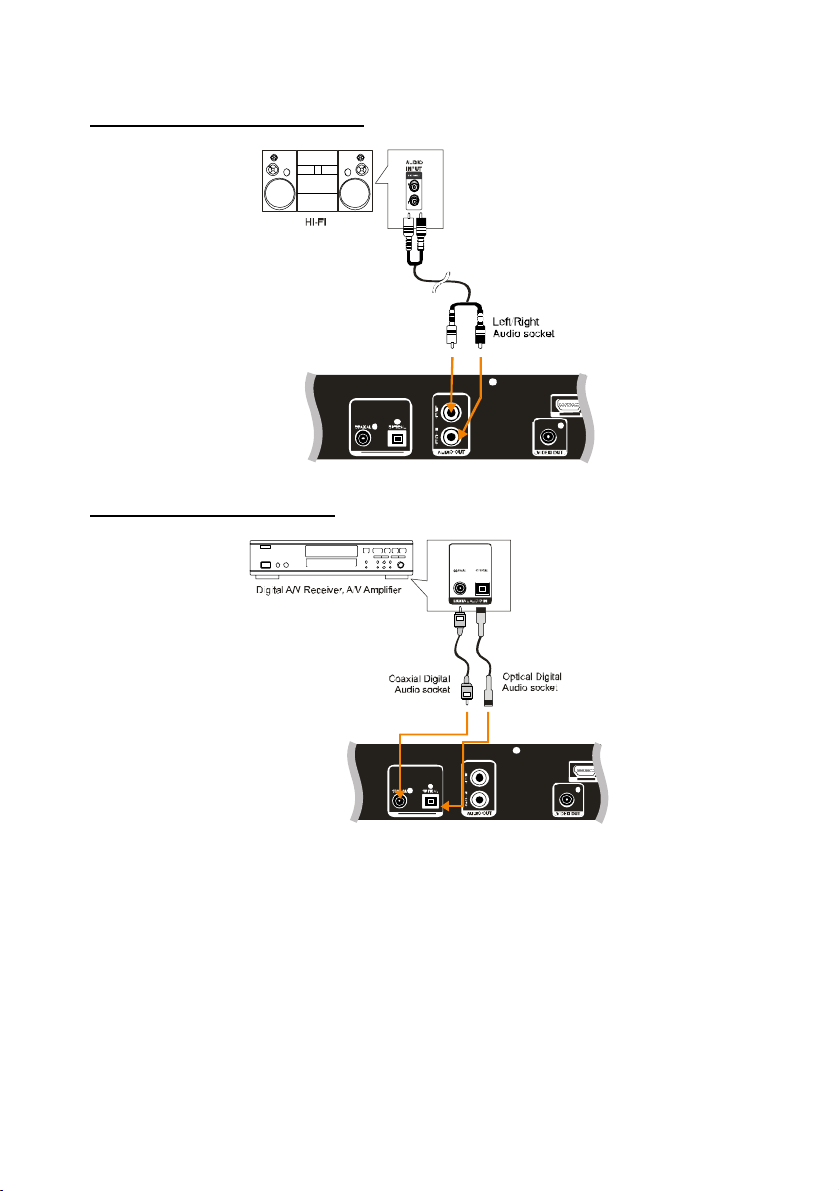
ANALOGUE AUDIO CONNECTION
DIGITAL AUDIO CONNECTION
or
14
SCART CONNECTION
HDMI Output Socket
Video & audio output: HDMI socket can be used to connect the DVD recorder either to your TV set or to your
AV Amplifier via HDMI cables. To make this connection, your TV set or your AV Amplifier must have HDMI
input connector.
HDMI Cable
Putting into operation:
After making the necessary connections stated above, plug the power cord to the mains socket. Unit will be
in standby mode. Press standby to turn on the unit. Open the disc tray with open/close button and insert a
playable disc (DVD/ CD/MP3). Press open/close button again to close the disc tray and to start operating the
player. Player will start playing the disc automatically.
15
COMPONENT VIDEO & AUDIO OUTPUT CONNECTORS
Y
3501853
2
• If you have a high-definition or “digital ready” TV, you may take advantage of the DVD Recorder’s
progressive scan and YPBPR (YUV) output for the highest video resolution possible.
• If your TV does not accept the Progressive Scan or YPBPR (YUV) format, the picture will appear
scrambled when you try Progressive Scan or YPBPR (YUV) output on the DVD Recorder.
Manufacture
d under
license from
DIGITAL AUDIO OUT
HDMI OUT
AV-2 AV-1
INPUT / DECODER (STB, VCR)
PbPr
1. Connect the COMPONENT VIDEO OUT connectors
on the DVD Recorder to the corresponding IN connectors
on the TV, using the component video cable.
2. Connect the Left and Right AUDIO OUT connectors
of the DVD Recorder to the audio Left and Right IN
connectors on the TV using the audio cables.
Connect Camcorder to the Front Sockets of DVD Recorder

16
1. INTRODUCTION
1.1 THE REMOTE CONTROL
ABCDEF
JKLMNOPQR
STU
SEARCH
ADD/ CLEAR
MODE
RETURN/ EXIT
TITLE
TIMER
PLAY MODE
GUIDE
SUBTITLE
GHI
VWXYZ
SETUP
DISPLAY
TEXTFAV
/ INFO
AUDIOANGLE
/ WIDE
VOLUME
TV/ DVD
MENU
RECORD
HDMI
MUTE

17
: To switch the set ON or OFF.
OPEN/CLOSE : To Open/close the disc tray.
NUMERIC KEYS (0- 9) : 0 - 9. Also used for channel rename in FreeView mode.
PROGRAM+ : Tunes to next program while watching TV.
PROGRAM- : Tunes to previous program while watching TV.
VOLUME+ : Increases volume
VOLUME - : Decreases volume
SEARCH MODE : Press to move to any desired title/chapter/track/time within the disc.
ADD/CLEAR : Add files to make playlist in PROGRAM play mode, remove files from playlist. Also erases
RETURN / EXIT : Returns to previous menu on a video CD. Also for CD Menu and Setup menu, it returns to
TV/DVD : Enables/disables the SCART socket output to the TV set. This lets you watch another
ARROW KEYS(3/4 /5/6): To navigate inside menus. Left/right arrow keys are used for volume up/down in
SELECT : Select function/value.
TITLE : If DVD supports, to choose the title menu in DVD discs.
MENU : Displays the DVD menu. In FreeView mode, displays FreeView system menu.
VIDEO SOURCE : Switches the video source in the order of Tuner, SCART Input, Front CVBS, Front S-Video,
SETUP : It opens and closes the system-menu.
WATCH TV : Switches between digital and analog mode.
PLAY/PAUSE (►/;) : Playback a disc. If this key is pressed during playback or recording, operation is paused.
the number you previously entered.
the upper folder. In FreeView mode, exits from EPG menu.
program via TV set while DVD recorder is recording another program or source without
unplugging the SCART cable.
FREEVIEW mode (when digital teletext is not active).
DV and Disc .
Also use this key to switch to disc playback from the beginning in monitor mode. For any DVD
title that has a root menu with still picture, this key functions as “button select” (selects
highlighted item) in the root menu. Otherwise this functioning of “play/pause” key on the root
STOP (■) : Stop playback/recording.
RECORD : Records the selected video source or start dubbing and resumes paused recording.
SKIP (9) : Press this key during playback: Previous chapter/ film or previous file.
SKIP (:) : Press this key during playback: Next chapter/ film or next file. Press this key during pause
SEARCH (►►) (◄◄) : Fast forward and fast backward in x2, x4, x8, x16 and x32. Slow forward in Pause state.
TIMER : To program a recording or to alter/clear pre-programmed recordings.
INSERT CHAPTER : Inserts a chapter manually to recording media during recording or playback of recorded
REC MODE : Select quality and duration of recording.
HDMI : Switches between HDMI output formats SD Progressive, 720p, 1080i and OFF modes while
PLAY MODE / RED : For MP3, CD-DA, JPEG and MPEG tracks switches between play modes. In FreeView,
REPEAT / GREEN : To play titles, chapters and tracks repeatedly. In FreeView mode, scrolls down a page
A-B / YELLOW : Repeat a selection from point A to point B. In FreeView mode, gets information for
ZOOM /BLUE : Enlarge the image. In FreeView mode, gets Information for next days in EPG screen. It is
GUIDE : If DVD supports, to choose the title menu in DVD discs. Display and exit EPG in FreeView
DISPLAY/ INFO : Opens Display menus. Opens Display menu Help in FreeView mode.
TEXT : Start and stop digital text.
FAV : It enables/disables the Favorite Mode.
SUBTITLE : If DVD supports, changes the subtitle language, turns it on or off. Also used to switch DVB
AUDIO : If DVD supports, switches between audio formats during DVD playback. Also used to
ANGLE/WIDE : Selects the angle to view the scene. This only works when multiple angles are provided for a
MUTE : Mutes function.
menu will be prohibited by the disc, and will appear.
Activates One-Touch-Recording while recording is in progress.
mode: Shows next frame at each press.
content at Edit mode.
HDMI option is not OFF.
scrolls up a page through channel list , scrolls up through EPG program details and navigates
page by page in EPG screen within two hours scale in the same day. It is used to select RED
option in digital Teletext.
through channel list , scrolls down through EPG program details, navigates within two hours
scale in the same day page by page in EPG screen. It is used to select GREEN option in
digital Teletext.
previous days in EPG screen. It is used to select YELLOW option in digital Teletext.
used to select BLUE option in digital Teletext.
mode.
subtitles on and off if the channel provider supports.
change DVB audio language if the channel provider supports.
scene. Selects screen format in Freeview mode.

18
Preparing the Remote Control for Operation
The remote control and its batteries are packed separately in the original DVD recorder packaging. You must install the
batteries in the remote control before use.
Ø Take the remote control of the DVD recorder and the enclosed batteries ( 2 x 1.5 V batteries)(R03/AAA)
Ø Open the battery compartment, insert the batteries as shown and then close the compartment.
Ø The remote control range is approximately 5 to 10 meters.
+
-
-
+
+
-
-
+
Within About 5-10m infront of the device

19
1.2 FRONT PANEL FUNCTIONS
8
3
2
45761
9
1 : Switches the set ON or OFF.
2 RECORD : Records the selected video source.
3 OPEN/CLOSE ( ) : Opens/closes the disc tray.
4 PLAY/PAUSE (►/;) : Playback a disc. If this key is pressed during playback or recording,
5 STOP (■) : Stops playback/recording.
6 SKIP FORWARD (:) : Plays next chapter/ title/ track/ file.
7 SKIP BACKWARD (9) : Plays previous chapter/ title/ track/ file.
8 DISC TRAY : Place a disc on the tray.
9 FRONT PANEL DISPLAY (VFD): Indicates the playing time, title, chapter/track etc.
operation is paused. Also use this key to switch to disc playback from the
beginning in monitor mode. For any DVD title that has a root menu with still
picture, this key functions as “button select” (selects highlighted item) in the
root menu. Otherwise this functioning of “play/pause” key on the root menu
will be prohibited by the disc, and will appear.

20
1.3 FRONT PANEL CONNECTIONS
876543219
10
S-Video
DV
Input
Audio
Input
CVBS
Input
Input
DV in: Input jack for DV connection.
S-VIDEO in: S-Video socket: Connection of
S- Video source.
CVBS in : Video input socket: Connection of composite video source (camcorders, video recorders, set
top box).
AUDIO L/R in: Left/Right audio input socket: L/R Audio inputs are used for both S-Video and CVBS.
1.4 REAR PANEL CONNECTIONS
1. ANTENNA INPUT : Connection of the aerial antenna.
2. ANTENNA TV OUTPUT : Connection of the TV set.
3. OUTPUT TO TV : SCART Socket 1(AV1): Connects to the scart-input connector on the TV.
RGB output.
4. INPUT / DECODER (VCR, STB) : SCART Socket 2(AV2): Connection of an external device (satellite
receiver, set-top box, camcorder, etc.)
5. VIDEO OUTPUT : Connection of a TV set with a video output (CVBS, Composite Video).
6. AUDIO connectors (Audio OUT) : Connects to the AV amplifier by using 2 cords (Left, right).
7. DIGITAL AUDIO OUT (OPTICAL) : Connects to an audio component using the optical digital
connection cord.
8. DIGITAL AUDIO OUT (COAXIAL) : Connects to an audio component using the coaxial digital
9. COMPONENT VIDEO OUTPUT : Connect TV with suitable Component Input
connection cord.
10. HDMI CONNECTOR : Connects to the HDMI input connectors on the TV, if the TV has
HDMI connector.

21
1.5 VFD ICONS
TITLE : Displays the selected/played title number (DVD)
TRK : Displays the selected/played track number (CDDA/MP3/JPEG/MPEG)
DVD : Displays the type of inserted DVD disc: DVD/DVD-R/DVD-RW
DVD R : Displays the type of inserted DVD disc: DVD+R
DVD RW : Displays the type of inserted DVD disc: DVD+RW
CD : Indicates that a CD disc is inserted
CHP : Displays the selected/played number of chapter (DVD)
REMAIN : Indicates that remaining time is being displayed
: A Dolby Digital audio signal is available on the digital audio output
DTS : DTS audio signal is available on the digital audio output
PCM : A PCM audio signal is available on the digital audio output
► :Playback in progress
; :Playback/record interrupted (Pause)
REC : Recording in progress
TIMER : A recording (timer) has been programmed
NICAM : The DVD recorder has detected a Nicam audio signal
2 CH : During playback, a HiFi/2 channel tone was detected or a HiFi/2 channel tone was
5.1 CH : During playback, a HiFi/6 channel tone was detected or a HiFi/6 channel tone was
ZOOM : Zoom mode is activated
received.
received.
: A repeat mode is activated
A → B : A → B repeat mode is activated
¸ : Displays multi-angle scenes.
Multi-function display/Text line
- Clock
- Disc/Title playing time
- Display of a program number of TV channel/ position/ channel name/ function
- Display of information, warnings

22
1.6 SUPPORTED DISCS
Playback and Recording
DVD+RW (Digital Versatile Disc+ Rewritable)
DVD+R (Digital Versatile Disc+ Recordable)
Playback only
Disc Types
(Logos)
Recording
Types
Audio
+
Video
Audio
Disc Size
12 cm
8 cm
Playing
Single - sided;
Double - sided;
Single - sided;
Double - sided;
12 cm74 min.
Max.
Characteristics
Time
240 min.
• DVD contains excellent sound and
video due to Dolby Digital and MPEG-
480 min.
80 min.
160 min.
2 System.
• Various screen and audio functions
can be easily selected through the
on-screen menu.
• An LP is recorded as an analogue
signal with more distortion. CD is
recorded as a digital signal with better
audio quality, less distortion and less
deterioration of audio quality over
time. 8 cm20 min.
12 cm
MP3
READABLE
JPEG
READABLE
Audio
(xxxx.mp3)
Video
(still picture)
8 cm
12 cm
8 cm
It depends
on MP3
quality.
It depends
on JPEG
quality.
• MP3 is recorded as a digital signal
with better audio quality, less distortion and less deterioration of audio
quality over time.
• JPEG is recorded as a digital signal
with better picture quality over time.

23
INSTALLING YOUR DVD RECORDER
INSTALLATION MENU
Initial Setup
After exiting standby the system turns on FreeView mode. Since this is
the first time that the receiver has been used, there are no channels
stored in the receiver and the Auto search selection menu is displayed on
the screen. If you do not see the APS (Automatic Programme Search)
search menu on the television screen after a few minutes, refer to the
Troubleshooting.
Using the 3/4 keys on the remote control, make sure that the
YES button is highlighted in yellow, and press the SELECT key to
start the automatic search. The FreeView receiver will
automatically tune to the UHF transmission channels 21 to 68
looking for digital terrestrial TV broadcasts and displaying the
names of channels found. This process may take about a few
minutes.
If no digital terrestrial television broadcasts are found, the receiver
will display a warning message. Check that an aerial is connected
to the aerial input socket of the recorder.
NOTE: Important that you must NOT turn off the recorder within 5 seconds after the automatic search since
the unit is updating the program table and all channels may be lost.
Automatic program search for Analogue channels
Use 5 /6 keys to select the date box and press SELECT to edit date. You can come to the place that you
will change by using 3/4 keys and make the changes by using number keys and 5/6 keys.

24
You can also set system time with the same steps as written above.
Finish the initial setup.
2. SETUP MENU
If you press SETUP key on the remote control, a menu will be displayed. You can use arrow keys for
navigation and SELECT key to change highlighted option.
NOTE: Some setup menu items may not be avaliable according to tuner mode analogue or digital.
2.1 RECORDING
2.1.1 AUTO CHAPTER MARKER
You can select one of the time periods (5min, 10min,
20min, 30min) for automatic chapter insertion or cancel
this function by choosing “Off” option.
2.1.2 RECORD QUALITY
You can choose the quality level for custom recording.
Each quality level offers different recording time period,
listed below:
- HQ : High Quality – 60 min
- SP : Standard Play – 120 min
- LP : Long Play – 180 min
- EP : Extended Play – 240 min
- SLP : Super Long Play – 360 min
NOTE: This menu item will be active only in monitor mode.
2.1.3 APS
Makes automatic scan of all analogue channels preset at the antenna.
Initially, it deletes current channel list. To confirm this, a warning message
appears on the screen. If you choose to continue, it starts scanning
analogue channels.
NOTE: This menu item will be active only in monitor mode.
NOTE: If you do not get audio properly, please see TroubleShooting part.
NOTE: APS operation may take long time.

25
2.1.4 MODIFY CHANNEL
It enables to modify last tuned analogue channel settings. You can select “Search Type” and “Band” or edit
the “Name” field. The “Standard” item will be refreshed according to the tuned channel’s setting. With
“Channel” / “Frequency” field, you can directly enter the channel number / frequency or press arrow keys to
do manual tuning.
When you select “Standard” option from “Band” field, it starts scanning with C-Band and it does not pass to
S-Band after tunning C-Band. If you select “Cable” option, it starts scanning with S-Band and it scans both SBand and C-Band analogue channels.
NOTE: This menu item will be active only in monitor mode.
2.1.5 PROGRAM TABLE
You can view or sort all stored programs by using this menu item.
You can access Modify Channel menu (see 2.2.1.4) by pressing
Select button on Program Table.
NOTE: This menu item will be active only in monitor mode.
2.1.6 TIMER SETTING MENU
You can list all pre-set timer records, edit on stored record list or set
the timer for a new recording by using this menu option. This menu
can also be activated by TIMER key on the remote control.
If you press SELECT on the first blank item an additional menu will
appear on screen. For detailed information, please look at section 6.

26
2.2 VIDEO
2.2.1 TV TYPE
MULTI: Select this option if your TV supports both NTSC and PAL.
PAL: Select this option if your TV supports only PAL.
NTSC: Select this option if your TV supports only NTSC.
2.2.2 TV DISPLAY
TV Display controls the presentation of the picture on the screen.
4:3 PS 4:3 LB 16:9WS
4:3 PS: (Normal/PS Pan & Scan)
Allows the movie to fill the entire screen of your TV, but not the right and left edges.
4:3 LB: (Normal/LB Letterbox (4x3))
Allows you to see movies in their original aspect ratio. You will see the entire frame of the movie, but it will
occupy a smaller portion of the screen.
16:9 WS: (Widescreen (16x9))
Choose this setting if your DVD recorder is connected to a widescreen TV.
NOTE: Depending on the format of the DVD disc, e.g. 2.35:1 the picture may still have black lines above and
below the picture.
2.2.3 VIDEO OUTPUT FORMAT
This menu item enables user to select video output as either “Progressive” or “Interlaced”.
When progressive option is selected, a confirmation message will be displayed. If user does not press
any key to confirm, selection will be discarded after a while.
NOTE: You can only get progressive output with progressive TV set, otherwise you will not get video
properly.
NOTE: Video output Format is disabled and switched to progressive mode in menu when HDMI cable is
plugged.
If your selection and the TV set does not match please use the shortcuts below in monitor mode:
CLEAR, CLEAR, 5: Switch to progressive
CLEAR, CLEAR, 6: Switch to interlaced

27
2.2.4 HDMI
If you are using HDMI output you can select one of SD Progressive, 720P, 1080I options. “Off” option
disables HDMI output.
In order to choose one of HDMI options press HDMI button on the remote control while the HDMI cable is
plugged. Each press of HDMI key will change option.
While HDMI option is ON, only progressive video can be get from SCART output of recorder. Therefore If
your TV does not support progressive mode, scrambled video may be received from SCART output. Please
change SPDIF Output and downmix settings if you do not get a good video or sound.
NOTE : When HDMI cable is unplugged during playback, Power off/on may be needed
NOTE : The video may not be displayed properly in 1080i mode If your TV can not support this mode.
NOTE: The preselected resolution quality will be activated when you replug the HDMI cable.
2.2.5 SCREENSAVER
This menu option allows user to activate screensaver while the unit is not in use for a while.
2.3 AUDIO
2.3.1 DOWNMIX
Downmix means mixing 5.1 channels down to two channels.
Stereo: Two channels stereo. Use this option if you have a
stereo TV or a HI-FI stereo system.
Surround: Surround encoded output.
2.3.2 S-PDIF OUTPUT
This item can be selected as “RAW” or “LPCM”. For 5.1
channels digital output, this item should be selected as
RAW. Set these options to agree with the speakers installed in your home entertainment system.
2.3.3 LPCM OUTPUT
This item can be selected as “LPCM 96K” or “LPCM 48K”.
Choose “LPCM 96K” if your AV amplifier/receiver is compatible with 96K sampling rate audio, otherwise
leave it set to “LPCM 48K”.
2.3.4 DYNAMIC RANGE
Dynamic range adjusts frequency response. This control is useful to turn down the level of loud passages
(explosions, car crashes, and etc.), while at the same time keeping soft passages loud enough to hear them
clearly.
Full: The range between loudest and softest is compressed to the maximum.
Off: There is no compression. You can adjust the level of the dynamic range compression to different levels
between off and full. The other settings are expressed as a fraction of the full dynamic range.
2.4 LANGUAGE
2.4.1 AUDIO LANGUAGE
You can select default audio language by this option. The
selected audio language will be activated, if supported by
the disc played.

28
2.4.2 SUBTITLE LANGUAGE
You can select default subtitle language for DVD discs by this option. The selected subtitle language will be
activated, if supported by the disc played.
2.4.3 DISC MENU LANGUAGE
You can select default DVD disc menu language by this option. The selected DVD disc menu language will
be activated, if supported by the disc played.
2.5 DATE / TIME
2.5.1 DATE-TIME SETTING
You can edit date & time settings if “Manual” option is
selected. Otherwise the date and time settings are set
automatically according to the selected “Program”.
NOTE: Date/ Time info may not be updated
automatically from channels, whose name info can not
be received from broadcast.
2.5.2 PROGRAM
This option is used for selecting the program for
automatic date/time setting. You can select one of the programs that are listed for auto date/time
setting.
2.5.3 DATE (dd / mm/ yyyy)
You can set date by this menu option, if the “Date - Time Setting” option is selected as “Manual”.
The date format will be as “day / month / year”.
2.5.4 TIME (hh : mm)
You can set time by this menu option, if the “Date - Time Setting” option is selected as “Manual”.
2.6 PREFERENCES
2.6.1 EDIT DISC
ERASE DISC
This menu option is used for erasing a recorded DVD+RW
disc.A warning dialogue asking whether you want to erase or not
will be displayed.Select Yes to start erasing disc or select
Cancel to return.
NOTE: This option is enabled if only the disc is not in use. If
you’re playing the disc or viewing title menu (Root), please exit
from DVD mode and select this menu option for erasing the disc.
FINALIZE DISC
This menu option is used for finalizing a recorded DVD+R disc. It is not possible to do any operation on the
disc after this process. A warning dialogue asking whether you want to finalize or not will be displayed.
Select Yes to start finalizing disc, or select No to return to the Setup menu.
EDIT DISC
This menu option is used for viewing Disc Edit Menu of DVD+R/RW discs.
You can perform disc edit operations such as play disc, rename disc or record a new title with this menu.
For the details, please refer to Section 5.

29
2.6.2 PARENTAL LEVEL
Parental Level menu option will not be available if the player is in RESUME (Pre-Stop) mode.
Playing some DVDs can be limited depending on the age of users. The “Parental Control” function allows
playback limitation level to be set by the parent.
PARENTAL LEVEL
Parental level can be adjusted to one of the eight levels or “NO
PARENTAL”. “NO PARENTAL” or level “8 ADULT” adjustments let you
watch all of the DVD titles ignoring that DVD disc’s parental level. You can
watch the DVD discs, which has the same or lower parental level than the
recorder’s level only.
CHANGE PASSWORD
The password for parental level and menu lock can be set and changed
by using this option.
The default password is: 0000.
You have to set a XXXX digital password when it is the first time to select
a parental level.
You have to enter your password every time you want to watch a movie with a higher parental setting or to
change the parental level of the system.
To change the password, you will be prompted to enter your old password. After that, it becomes possible to
enter a new 4-digit password.
Enter password: Enter your current password (four numbers you previously set in here)
Enter new password: Enter your choice for a new password.
Confirm new password: confirm new password by entering again. Select “OK”.
NOTE: Do not forget your password. Otherwise you can use the password at last page, to enter this menu.
2.6.3 FACTORY DEFAULTS
When you choose Factory Defaults option, after resetting all your Setup options back to factory settings, the
device will switch to standby mode automatically. When the standby button is pressed in order to switch the
device on, initial setup starts.
CAUTION: Parental level and parental password do not change. During this operation, there is no message
in device display.
2.6.4 STANDBY TIME
You can set the standby time as 5, 15 or 30 minutes or set it off by choosing “Off” option from the menu. The
unit goes to standby state if one of the time options is selected and no key press occurs for the selected time
duration while in stop mode.
NOTE: In analogue and freeview mode, device will not switch to standby mode.
2.6.5 POWER SAVING
If Power Saving is selected as “On”, the unit goes into LOW POWER state instead of normal STANDBY
state when you press key on remote controller or front panel.
In LOW POWER state, the time is not displayed on VFD and only key works on remote controller or
front panel.
If Power Saving is selected as “Off”, the unit always goes into normal STANDBY state on each press of
STANDBY key.
NOTE: At low power mode the ventilator does not work at stand by.

30
2.6.6 AV-2
This menu option allows you to set AV-2 as “Decoder” or “SCART
CVBS” output.
When “Decoder” option is selected, “SCART” is removed from the
available video sources list and an additional menu item (“Decoder
On/Off”) is added into “Modify Channel” menu.
In the “Modify Channel” menu, if you select Decoder option as “On”,
you can watch scrambled channels with appropriate decoder.
Otherwise, when “SCART CVBS” is selected, AV-2 continues to stay
in available sources list.
3. FREEVIEW MENU
In FreeView Mode, if you press MENU key on remote control, this menu will be
displayed.
3.1 CHANNEL LIST
Here, you can preview any channel stored by the receiver before viewing it full
screen. The complete list of channels is displayed in pages of 10 channels at a
time, with their channel list number. The name and a quarter-screen preview of
the channel last viewed is displayed in the top right of the screen.
that make up a channel name can be highlighted using the3/4 keys and the highlighted character changed
by pressing the 5/6keys to cycle through the alphabet, numbers and other characters available.
CHANNEL LOCK
Some channels broadcast material which you do not want younger members of the family to watch. Any
channel can be 'locked' so that it cannot be selected for viewing without first a four-digit PIN code being
entered. In this way any channel not suitable for younger viewers can be protected.
The channel lock is applied in the Channel List menu. Highlight the channel to be locked using the 5/6
keys. You can move through the list 10 channels in one jump using RED or GREEN. Now select the LOCK
button at the base of the screen with the 3/4 keys and press SELECT.
NOTE: Do not forget your new password. Otherwise you can use the password which is stated at last page,
to enter the locked channel.
A window requesting the PIN code is displayed and the four-digit code should be entered using the number
keys on the remote control, followed by the SELECT key. A lock icon is then displayed alongside the channel
name in the channel list.
You can now leave the Channel List screen and return to normal TV viewing by pressing MENU. Any
attempt to change channel to the locked channel will now display the same window requesting the PIN code
and the channel will only be displayed on entry of the correct code. To remove the lock on a channel, repeat
the same process as to lock the channel.
DELETE
To delete a channel from the list, highlight the channel to be
deleted using 5 /6 keys, then highlight the DELETE button
using 3/4 and press SELECT. The highlighted channel is
deleted from the list after confirmation.
EDIT NAME
The channel names which appear in the channel list and
the information banner are assigned by the broadcasters.
You can edit the names to suit your preferences with the
Edit Name function. Highlight the channel to be renamed,
highlight the EDIT NAME button at the base of the screen
using the 3/4 keys, and press SELECT. The highlighted
channel name appears on the right of the screen with the
first character highlighted by a cursor. Any of the characters

31
FAVOURITES
Any channel can be a favourite channel and the Favourites menu is used to label those channels you want
as favourites.
In channel list highlight “Favourites” by pressing 4 key and then highlight each channel that you desire,
using the 5/6 keys and press SELECT. A channel selected as a favourite appears in the main favourite list
with a favourite icon next to the channel name. The favourite status of a channel can be removed by
repeating this procedure. Leave the Favourites menu by pressing MENU.
Once the desired channels have been marked as favourite channels, the favourite mode can be activated to
allow easy access to them. Press the MENU key to display the Main Menu and highlight Configuration and
press SELECT to open Configuration screen. Highlight the Favourite Mode line and use the 3 /4 keys to
change the status and press SELECT to apply the settings.
When you leave the Configuration menu by pressing MENU the favourite mode is activated. Now, changing
channel using the PROGRAM + /- keys will switch to only those channels marked as favourites in the
channel list. Similarly, the on-screen list in the electronic program guide contains only the favourite channels.
You can still access all the channels in the channel list by keying in their channel list number or by selection
from the Channel List screen.
Alternatively you can switch off the favourite mode from the Favourite Mode line of the Configuration menu
or by pressing FAV button on the remote control .
Hint: The favourite mode can only be activated if one or more channels in the channel list are marked as
favourites. Similarly, if the favourite status is removed from all the channels in the Channel List, the favourite
mode is turned off automatically.
3.2 INSTALLATION
AUTOMATIC SEARCH
Although your FreeView receiver will not loose its settings or
stored channels when switched off, you may wish to reinstall the
receiver because you have moved to a different area with
different broadcast frequencies, you wish to reinstate a channel
previously deleted from the channel list, or you want to watch
new channels which have started broadcasting.
Press the MENU key to display the Main Menu and using the
5/6 keys, highlight the Settings line and press SELECT to
display Settings Menu. Then highlight Installation line and press
SELECT to open the Installation Menu. You can either perform
an automatic search or manual search to add channels.
MANUAL SEARCH
The FreeView receiver can search for channels automatically
(searching all the broadcast frequencies for free-to-air channels)
or manually (searching one specified broadcast frequency only
for any channels to be found there).
This is for searching for digital channels on a single broadcast
frequency. The frequency channel number (21-68) is entered in
the box at the top left of the screen and the received signal level
and signal quality can be observed on the two bar graphs at the
bottom. When SELECT is pressed, the receiver searches that
frequency and display a list of the channels found before
returning to the Installation menu.

32
3.3 CONFIGURATION
Many aspects of your FreeView receiver can be set up to reflect your circumstances and preferences. The
Configuration menu screen is accessed from the Settings Menu. Press the MENU key to display the Main
Menu and use 5 /6 keys to highlight Settings line then press SELECT key to open Settings menu. Again
use 5/6 keys to highlight Configuration line and press SELECT key to open configuration menu screen. By
means of this menu you can configure the unit.
FAVOURITE MODE
This function enables or disables the favourite channel list mode. In this mode you can also choose favourite
channel list.
EPG PREFERENCE
Highlight the line in the configuration Menu and use the 3/4 keys to cycle through the Now & Next and 7-
Day options.
SCAN ENCRYPTED CHANNELS
You can prefer scanning encrypted channels by selecting YES, or prefer skipping them by selecting NO from
this menu.
RECEIVER UPGRADE
This device has stable and convenient software. Nevertheless, in order to improve the performance or for the
sake of adapting to new technologies, a newer software may be released. One of the ways to update your
device with new software is Over Air Download (OAD). This device has BCC compliant OAD feature. When a
new software is available and broadcasted, this device can search , download and update its software either
by your command or automatically, over-night. Every night between 3:00 am and 03:30 am, device searches
for new software. If a newer version is available, it will download and update the system automatically. The
next time you start your device, new software will be activated. Note that if you set a timer from a freeview
channel between that interval, OAD process will be automatically postponed to next day.
You can also search for new software manually, at any time. To search for new software manually, go to
Freeview Menu>Settings>Configuration and select Receiver upgrade. Your device start searching for a new
version and if it finds, it will download and update the system automatically. After update is completed, to
activate new software all you have to is to pull the plug out and then plug in.
PARENTAL SETTINGS
This function controls menu protection. For changing PIN code, please refer to section 2.5.2.
Menu Lock
Simply locking a channel will not deflect a determined would-be viewer. Re-installing the complete channel
list, for example, will bypass the channel lock. However, the menus can be locked out of use too, to prevent
this.
With the Menu Lock line highlighted, use 3/4 to cycle the menu lock setting through Disabled, Main Menu
and Installation. The Main Menu setting will lock out the complete menu system; the Installation Menu setting
locks only the Installation menu and the Disabled setting allows free access to any of the menus.
You must return to normal TV viewing by pressing the MENU key (three times) to activate the lock. Now any
attempt to access the locked menus will display the PIN request window and the menus will only be
displayed on entry of the correct PIN code.
AUDIO LANGUAGE
Change Audio language by using 3/4 key.
SUBTITLE (Only for FreeView)
Digital terrestrial television channels can be broadcasted
with subtitles displayed on-screen for the hard-of-hearing.
This function enables the automatic display of subtitles
whenever subtitle information is broadcast.
Highlight the Subtitle line in the Configuration menu and use
3/4 keys to cycle through the On and Off options. Exit
from this menu by pressing the MENU key.
NOTE: Audio and subtitle settings set in FreeView mode
are not effective in DVD mode.

33
3.4 LANGUAGE
Select LANGUAGE from Main Menu and then highlight one of the audio and/ or subtitle options, supplied by
the current broadcast, using 5/6 keys and press SELECT.
4. DISPLAY MENUS
Display menus are activated by pressing DISPLAY key while disc is in playback.
DISPLAY MENU (DVD)
DISPLAY MENU (CD-DA)
DISPLAY MENU
(JPEG/STILLPICTURE)
DISPLAY MENU (MP3)
NOTE: When there is a recordable disc in disc tray, if you press VIDEO SOURCE button the source of video
changes, by pressing DISPLAY key, display menu appears on the screen.

34
5. DISC EDIT MENU
Disc Edit Menu will be activated by pressing 4 key of the remote control on the disc thumbnail picture. If you
press 5 key while the first title picture is focused, you can view the disc thumbnail picture.
For DVD +RW For DVD +R
Play: You can play the recorded disc from the first title.
Rename Disc: You can change the disc’s name by this option.
Erase Disc: This option allows you to erase the recorded disc if it’s DVD+RW.
Record a New Title: This option allows you to record a new title to the disc.
Overwrite Disc: With this option you can overwrite all titles in the disc.
Lock Disc: You can lock the disc in order to protect from overwriting or continuing to record. Only you can
play the disc.
Unlock Disc: You can unlock the disc and continue to record.
NOTE: You can see “Unlock Disc” option if the disc is locked before.
Make Compatible: When you do chapter operations (add/delete marker, hide/unhide, etc.) on a title, this
menu option will appear on the Disc Menu (available only with DVD+RW).
Since DVD+RW discs do not need to be finalized, if you have performed edit operations on a rewritable disc,
in order to play the disc and see your changes on other recorders, “Make Compatible” operation must be
done.
NOTE: Make Compatible operation may take long time.
Finalize Disc: It finalizes the disc recorded. It is not possible to do any operation on the disc after this
process (available only with DVD+R).
When a DVD+R disc run out of space, disc is automatically finalized after finishing recording. Therefore,
further editing will not be possible.

35
6. TITLE EDIT MENU
Title Menu lists all the actions you can do with the titles recorded on a recordable disc. It will be activated by
pressing 4arrow key of the remote control on the thumbnail picture of the title.
Play Title: You can press SELECT and play the selected title on the disc.
Edit Title: You can edit the titles on the disc. A new menu is displayed on the
screen, and you can insert chapter marker, hide chapter or select index picture
using this menu. (See Editing Title 7)
Rename Title: You can rename the title.
Erase Title: This option allows you to erase the selected title (available only with
DVD+RW).
Overwrite Title: You can overwrite and record another title onto the selected
title. New title cannot be longer than the overwritten title and this feature is
available only for rewritable DVDs. To overwrite a title, select overwrite title
option from menu and press record button after selecting source.
Overwrite Disc: With this option you can overwrite all titles in the disc(available only with DVD+RW).
Append Title: A new recording can be appended to the last title(available only with DVD+RW).
7. EDITING TITLE
Title number: View the number of current title / total title.
Chapter number: View the number of current chapter / total chapter.
Playback operations: Current operation status. It includes PLAY, PAUSE,
STOP, Fast Forward/Backward, Slow Forward…
Chapter marker: When Insert marker is selected by pressing SELECT, a
new chapter marker will be added to the current point.
When Delete marker is selected by pressing SELECT, the marker of the
current chapter will be deleted.
When Delete all markers is selected by pressing SELECT, all of the
chapter markers will be deleted.
Chapter hide or unhide: You can make a chapter invisible by selecting “Hide chapter” option. In this way,
invisible chapters will be skipped during disc playback.
If the current chapter is hidden before, “Unhide chapter” will be displayed; and selecting this will make the
chapter visible again.
Index picture: When you want to set the current frame as the title thumbnail picture of the current title, press
SELECT
Title Elapsed: Display the title elapsed time.
To exit editing mode, press TITLE key.
8. PLAYBACK
8.1 Preparing For Playback (All Discs)
Ø To playback a disc, turn on the TV.
Ø If the DVD Recorder audio outputs are connected to an A/V receiver, turn on the receiver and make the
appropriate selections to play audio from the DVD Recorder. Otherwise connect audio output to TV
input.
Ø Set options in the setup menus that are appropriate for your speaker arrangement and configuration, for
the video standard (PAL or NTSC) of your television monitor, and for the video picture aspect ratio.
Ø For a DVD, check packaging and determine whether the parental control level and local setups are
appropriate for your country. Refer to setup menus for the Country and Parental controls.
Ø DVDs are encoded for six different regions. Check that the region designated on the DVD packaging
conforms to your region. You cannot make any changes in the setup menu that will effect the region
encoding.

36
8.2 Inserting a Disc in the Tray
Insert a disc in the DVD Recorder tray with the shiny side down. Note that some discs shine more than
others. In the case of commercial CD’s, the disc identifying information is printed on the “top” side of a disc.
Do not insert more than one disc in the disc tray at a time.
NOTE: If the disc is placed in upside down (and it is a single sided disc), the VFD display on the DVD
recorder will indicate NO DISC.
8.3 Basic Playback (DVD, CD-DA, MP3, JPEG, MPEG)
Some playback operations and interactivity features of DVD and may be intentionally fixed by the software
producer. Accordingly, some playback features may not be available. You should refer to the instructions
supplied with the DVD. The simplest way to playback a disc is to follow this procedure.
1 Press on the STANDBY key.
2 Press OPEN/CLOSE to open the disc tray.
3 Place a disc onto the tray.
4 Press OPEN/CLOSE.
The disc tray is automatically closed and play commences.
DVD: A menu may appear on the TV screen after a moment or the film may start immediately after the
introduction of the movie company. You can select a specific scene to play if provided in this menu. This
behaviour depends on the disc content and may change.
This statement assumes that parental controls are off or set in such a way to allow the disc to play
unimpeded and also the region of DVD conforms to your region.
CD-DA: CD menu appears, tracks are listed on the screen. It starts playback of the first track automatically.
MP3/ JPEG / MPEG: CD menu is appeared. Max 2500 files or folders can be listed on the screen..
5 If a menu is active on screen, press arrow keys to navigate or press SELECT to select a menu item.
8.4 Stopping Playback (DVD, CD-DA, MP3, JPEG, MPEG)
DVD: Press STOP (■) twice.
· During normal playback press STOP (■). The unit memorizes the point where STOP (■) was pressed
once (RESUME/Pre-Stop function) and a message “Press PLAY to continue” will appear on the screen.
The screen displays a stationary logo or the screensaver is displayed after a timeout interval. Press
PLAY/PAUSE (►/;) again while the screensaver is not active, and play will resume from this point. If
the tray is opened or the STOP (■ ) is pressed again, the RESUME (Pre-Stop) function will be cleared.
CD-DA / MP3/ JPEG / MPEG : In PLAY or PAUSE state, when the STOP (■ ) key is pressed once, playback
is stopped permanently. Press PLAY/PAUSE (►/;) for starting from the beginning.
8.5 Pausing Playback (ALL DISCS)
1. Press the PLAY/PAUSE (► /;) key any time during playback of a disc.
A “freeze frame” is created that stays on the screen until you resume playing the disc. Sound is muted during
still playback.
2. To resume playback, press the PLAY/PAUSE (►/;) key.
8.6 Removing a Disc (ALL DISCS)
Press on the remote control or eject key on the front panel. Remove the disc and press the same key to
close the tray.
8.7 Repeat Play
Repeat play modes are activated by pressing REPEAT during playback and vary with media. Each time this
key is pressed, a different repeat box is displayed on the screen.
In NORMAL mode the repeat mode is disabled.
DVD: CHAPTER REPEAT, TITLE REPEAT, DISC REPEAT, NORMAL
CD-DA: TRACK REPEAT, DISC REPEAT, NORMAL
MP3/ JPEG / MPEG : TRACK REPEAT, FOLDER REPEAT, DISC REPEAT, NORMAL

37
8.8 Repeating a Specific Segment A to B (DVD, CD-DA, MP3, JPEG)
This method of repeating a segment on a disc relies on designating points on the disc to delineate where to
start and end.
1. As the disc plays, press A-B key. “A_” is displayed.
2. At the point you want to end the segment press the A-B key again.
3. “A-B REPEAT” is displayed and the repeat play of the selection between points A and B starts.
4. To end repeat play of the segment you designated, press the A-B key.
8.9 Displaying a Scene with a Larger and Closer View
The zoom in function enables you to take a closer look at the scene you are viewing that is especially a
considerate function when you are watching science fiction or adventure films.
DVD: By pressing ZOOM key consecutively you can get to “Zoom %150”, “Zoom %200” modes.
JPEG: In playback of the JPEG files, first press of the ZOOM key makes it go into the ZOOM ON mode. To
increase magnification press SEARCH (►►) key consecutively. You can get to %12, %25, %50, %100,
%200, %400 and FITSCREEN modes.
Pressing ZOOM again will return to ZOOM OFF mode and the picture is now in its normal size.
To start slide show again, press PLAY/PAUSE (►/;) key.
NOTE: You can move in the picture i.e. change the zoomed location by using the (3/4/5 /6) arrow keys
(DVD and JPEG).
8.10 Selecting Subtitle Language (DVD) (Displaying / Changing Subtitle Language)
DVD: It is possible to change the subtitle language from the one selected at the initial settings to a different
language available on disc or to turn it off, if available. (This operation works only with discs on which
multiple subtitle languages are recorded, and also if it is not prohibited by the disc.)
Press SUBTITLE during playback.
When this key is pressed once, the first subtitle recorded on the disc will be displayed. The rest of the
subtitles recorded will be displayed in sequence at each press of the SUBTITLE key.
NOTES:
· When the preferred language is not selected even after pressing the key several times, it means that
the language is not available on the disc.
· When the recorder is restarted or the disc is changed, the subtitle selection is automatically changed
back to the initial settings.
· Usually a circulation will happen while switching to another language. Thus in order to cancel the
subtitle press this key a number of times until “SUBTITLE OFF” appears on the screen.
8.11 Changing Audio Soundtrack Language (DVD, MPEG)
Your default language choice is determined by the language you set in the Language, Audio Language
menu. Typically a DVD will have a menu that you can make a language selection from, before starting
playback or after the playback begins. Moreover, using the remote control; AUDIO key allows switching
between audio tracks once a DVD has started playing. It is also valid for MPEG videos.
Press AUDIO a number of times until the preferred language is selected.
NOTE:
· When the preferred language is not selected even after pressing the key several times, it means that
the language is not available on the disc.
· When the device is turned on or the disc is removed, the language heard is the one selected at the
initial settings. If the language is not recorded on the disc, only the available language on the disc will
be heard.

38
8.12 Changing the Camera Angle (DVD)
Some DVDs provide multiple shots of a selected scene each from a different camera angle, so you can
choose which angle you are most interested in viewing. A small icon appears on the screen when multiple
angles are available.
Press ANGLE during playback.
The current angle is changed.
Press ANGLE a number of times until the preferred viewing angle is selected.
NOTES:
· This function will only work on discs where different angles have been recorded. The number of
recorded angles differs depending on the disc used.
· If you press ANGLE outside of a multi-angle scene on a multi-angle title, you will see that is
displayed. It means that only one angle is currently available.
8.13 Fast Forward / Backward
Press SEARCH (◄◄) or SEARCH (►►) on the remote control during playback.
The speed of advance or reverse changes at each press of the SEARCH (►►) or SEARCH (◄◄ ) key.
Pressing SEARCH (◄◄) key in Fast Forward state and pressing SEARCH (►►) key in Fast Backward state
decreases the scan speed.
To resume the normal playback press PLAY/PAUSE (►/;) key.
JPEG:
In ZOOM ON mode; SEARCH (►►) key is used to zoom in, SEARCH (◄◄) key is used to zoom out the
picture.
Supported speeds:
DVD: x2, x4, x8, x16, x32
CD-DA: x2, x4, x8, x16
MP3: x2, x4, x8, x16, x32
MPEG: x8, x16, x32
NOTE: The fast forward and backward operations are not circular. The sequence for the fast forward and
backward is as follows:
(FR x32, FR x16, FR x8, FR x4, FR x2, PLAY, FF x2, FF x4, FF x8, FF x16, FF x32)
Audio is muted during fast forwarding or reversing.
8.14 Slow Forward Playback (DVD)
Slow-motion playback is good for searching or just observing a small section of the disc. To begin slowmotion play forward, first press PLAY/PAUSE (►/;) once during playback. The screen suspends.
Then, press SEARCH (►►) on the remote control during playback.
You can increase or decrease the speed of the slow-motion play by pressing SEARCH (►►) or SEARCH
(◄◄). The speed of slow motion is displayed on the screen each time you change it.
Supported speeds:
DVD: x1/2, x1/4, x1/8
NOTE: The sequence for the slow-motion is as follows:
(PAUSE, SF 1/2x, SF 1/4x, SF 1/8x)
Audio is muted during slow-motion playback.

39
8.15 Skipping Ahead or Back (DVD, CD-DA, MP3, JPEG, MPEG)
8.15.1 Skipping Ahead
Press SKIP (:) on the remote control or on the main unit during playback.
DVD:
In any playback state, a chapter or title is skipped forward depending on the information on the disc each
time the key is pressed.
CD-DA, MP3, MPEG:
Next track is played in any playback state.
JPEG: Next picture is displayed.
8.15.2 Skipping Back
Press SKIP (9) on the remote control or on the main unit during playback.
DVD: In any playback state, a chapter or title is skipped backward depending on the information on the disc
each time this key is pressed.
CD-DA, MP3: In any playback state; when the key is pressed once after 5 seconds through a track, play
returns to the start of that track. Otherwise, previous track is played.
MPEG: Previous track is played in any playback state.
JPEG: Previous picture is displayed.
8.16 Step Forward (DVD)
Press PLAY/PAUSE (►/;) once during playback.
The screen suspends.
Press SKIP (:) on the remote control or on the main unit.
The next frame of the movie is displayed and press SKIP (:) for the following frames.
Audio is muted during frame advance.
To return to normal playback press PLAY/PAUSE (►/;) key.
8.17 Locating a Specific Title or Chapter, Using the MENU or TITLE Button (DVD)
Some DVD discs have unique menu structures called DVD menus. For example, DVD’s programmed with
complex content, provide guide menus, and those recorded with various languages, provide menus for audio
and subtitle language. Although the DVD menus’ content and operation differ from disc to disc, the following
explains basic operations when this feature is used.
To play a specific title on a DVD, you can use the MENU or TITLE key to display a menu to make your title
and chapter selection. The procedure described here is general in nature. If the steps do not seem
appropriate for the DVD you are attempting to play, disregard these instructions and follow the instructions
that appear on the screen.
1 During normal playback, press MENU or TITLE.
The screen displays a menu. The menu may not contain all the chapters in the movie title. However,
the disc creators provide additional menus to navigate, which cover all the chapters. Use the arrow
keys to navigate on menus.
2 Position the screen highlight over your selection and press SELECT. Alternatively, you can press the
number of the desired chapter.

40
8.18 Browsing For a Specific Chapter/Title (DVD)
Press SEARCH MODE on the remote control during playback “once” for titles (if more than one title is
available) and “two times” for chapters (if more than one chapter is available).
The chapter/title search box is displayed on the screen. You can see the total numbers of titles/chapters as --/xx.
Enter the number of the title or chapter using number keys.
The selected title or chapter is played just after you enter number and wait for 4-5 seconds.
NOTE:
· If you attempt to enter a number greater than the total number of titles/chapters, it clears the numbers
entered, displays (chapter/title) / xx and continues to play.
· If you wait more than five seconds without pressing any number, the operation is cancelled.
8.19 Moving To a Specific Elapsed Time (DVD)
DVD: You can view the DVD starting from any time point you want.
Press SEARCH MODE on the remote control “three times” during playback.
The title is played beginning from the desired time just after you enter the time and press SELECT key, if not
prohibited by the DVD.
Press SEARCH MODE on the remote control “once” during playback for disc time search. In order to start
from any time within a track, press SEARCH MODE “two times” during playback.
The time search box is displayed on the screen. You can see total runtime of the track or disc as --:--:-/xx:xx:xx
Enter the time using number keys.
The track or disc is played beginning from the desired time just after you enter the time and wait for 4-5
seconds or press SELECT key.
NOTES:
· If you attempt to enter a number greater than the total time, it clears the numbers entered and
continues to play.
· If you wait more than five seconds without pressing any key for selecting scenes by time operation is
cancelled.
8.20 Browsing For a Specific Track/Time (CD-DA, MP3, MPEG, JPEG)
Press SEARCH MODE on the remote control.
Enter the number of the track you want to play by using number keys.
The selected track is played just after you enter number and wait for 4-5 seconds or press SELECT key.
Second press of SEARCH MODE key on the remote control will make you time search of the playing media
(except JPEG). (Only in playback state)
The time search box is displayed on the screen. You can see total runtime of the track as --:--:--/xx:xx:xx.
Enter the time using number keys.
The track is played beginning from the desired time just after you enter the time and wait for 4-5 seconds or
press SELECT key.
8.21 Checking Elapsed/Remaining Time (except JPEG)
To determine how long a file has been playing, you can check the elapsed time by pressing DISPLAY key.
You will see the display menu on the screen and you can select track’s/chapter’s elapsed/remaining time or
disc’s/title’s elapsed/remaining time from the menu option. The chosen time style will also be shown on the
VFD. To close the display menu press DISPLAY again.

41
8.22 Playback Modes (CD-DA, MP3, JPEG, MPEG)
Press PLAY MODE on the remote control.
Display menu will appear on the screen and pressing PLAY MODE consecutively, you can change playing
options of the tracks as below.
CD-DA, MP3:
Program
You can prepare a playlist with this option. The same type of files can be arranged to build a playlist (Only
valid for CD-DA, MP3files).
Select files with 5/ 6 keys and add file with ADD key on remote control to make the playlist. To remove
added files from playlist, come upon to file with 3 key and press CLEAR key on remote control.
Press PLAY MODE key to switch to the program mode. It starts playing the playlist immediately.
All playback operations are available in the playlist you prepared.
Random
When this play mode is selected, the tracks in the current folder will be played once in a random order.
Intro Play
Intro menu is used for introducing the content of the disc. It plays only for first 10 seconds of each track and
then passes to the next track.
Normal
Tracks in the current folder will be played sequentially.
JPEG, MPEG:
Intro mode is not available with JPEG and MPEG files. But other options are the same.
8.23 Simultaneous Playback (JPEG, MP3)
If your disc has both MP3and JPEG files, you can listen MP3audios while viewing JPEG files.
When you start slideshow of the JPEG files, you can select and listen to an MP3file simultaneously.
You can control these two types separately by using their relational display menus. If AUDIO is selected as
TYPE you can control MP3playback options. Similarly, if PICTURE is selected you can control JPEG
playback options.
9. FREEVIEW FEATURES
9.1 Digital Teletext
Many digital terrestrial television channels not only broadcast video
and sound for programs but also pages of information on the
programs, the weather, news and many other topics. This digital
teletext can be displayed by the FreeView receiver.
Some channels are entirely given over to digital teletext and carry no
normal TV program at all. These dedicated digital teletext channels
will not give a quarter-screen display in the Channel List screen.
When such a channel is selected, after a brief pause, they will
usually display the opening page of information automatically.
Other channels have digital teletext pages broadcast alongside the
television program and often include a reduced-size broadcast
picture within digital teletext pages. These usually require the TEXT
button to be pressed to activate the digital teletext pages.
In both cases, moving through the different pages of information is accomplished in a variety of ways,
dependent on the individual broadcasters, but including use of the 5/6/3/4and SELECT keys to select
items from on-screen menus, and the coloured keys to jump directly to particular pages.
You can exit any digital teletext channel by changing channel in any of the normal ways. You can leave the
digital teletext function of a combined digital teletext/program channel, to return to normal television viewing
of that channel, by pressing the TEXT key.
Hint: Calling for the information banner or any menu on-screen stops the receiver from displaying the digital
teletext pages and they are temporarily replaced by a blank picture while the banner or menu is displayed.

42
9.2 Widescreen
TV sets are available with screens of the standard (4:3) format and widescreen (16:9) format. Digital
terrestrial television broadcasts are also made in both standard and widescreen formats.
You can use ANGLE/ WIDE key to change display format (aspect ratio). With a widescreen TV set displaying
a standard format program, the ANGLE/ WIDE key switches between displaying the picture with black bars
down the sides, and enlarging the picture so that it fills the whole width of the screen but the top and bottom
are cropped off.
With a standard format TV displaying a widescreen program, the ANGLE/ WIDE key switches between
displaying the picture with black bars at the top and bottom of the screen, and filling the whole height of the
screen but cropping the sides off according to instructions broadcast with the program (called 'pan and
scan').
The effect of the ANGLE/ WIDE key on the screen display is cancelled by pressing ANGLE/ WIDE again.
(Only for FreeView)
9.3 Subtitle
Subtitle key shows/hides subtitles of channel. When the subtitle key is pressed, subtitle ON/OFF message is
displayed.
NOTE: This feature is available only if the channel provider supports.
9.4 Electronic Program Guide (7- Day - EPG)
In no menu mode, EPG Menu is reached by pressing
GUIDE key and quitted by pressing GUIDE key again. In
EPG Menu all channels are displayed. Current program
is highlighted. Use 5/6 keys to change channels.
Some, but not all, channels send information about the
current and next events. Please note that event
information is updated automatically. If there is no event
information data available in channels, only channel
names with “No Information” banner are displayed. If you
highlight an event, short event description, extended
event description, start and finish times of event are
displayed on the screen. In EPG Menu, you can easily
see the extended help information by pressing
DISPLAY/ INFOkey and by pressing this key again you can close this window.
navigate through the channel and program list. Using RED/GREEN keys you can change schedule time. By
pressing YELLOW/BLUE you can advance the schedule backward/forward of a day. If you press DISPLAY/
INFOkey you can see easily the detailed help information and by pressing DISPLAY/ INFO key again you
can exit Help menu.
NOTE: When info banner is active and SELECT key is pressed, Now & Next EPG appears on the screen. By
means of YELLOW and BLUE buttons you can achieve previous and next time. Only when info banner runs
you can get information with BLUE and YELLOW keys.
If you press SELECT when a next event is highlighted,
an info banner appears asking for setting Reminder or
Record. If you select “Reminder”, a reminder is set for
the highlighted program and a clock appears on the
screen. Program reminders can be set to signal that a
program is about to start when you are watching
another channel. If you set reminder to a program, then
you will be asked for switching to that channel when the
reminder time is reached. When the current program is
highlighted, the current view is switched to the
highlighted channel by pressing OK key.
Press MENU key to view the 7 day EPG. Press 5/6
to navigate in Channels or Programs. Use 3 /4 key to

43
The starting time for EPG is the current time. You can see the event information for the next two hours. By
pressing 5/6 key, you can go to the next/previous hours. If you press SELECT when a next event is
highlighted, a reminder is set for the highlighted program and a clock appears on the screen. Program
reminders can be set to signal that a program is about to start when you are watching another channel. If
you set reminder to a program, then you will be asked for switching to that channel when the reminder time
is reached.
10. MANUAL RECORDING
10.1 General Information
With this DVD recorder, you can record on two types of DVD.
DVD+RW
This disc can be recorded and erased multiple times.
NOTE: If the disc was previously recorded, formatted or erased on any other recorder or PC, please first
erase the disc with this device, before starting record operation. Nevertheless, if you try to record to such a
disc, a warning message will appear. This message explains that the disc is not compatible and it has to be
erased. Select Yes to erase the disc or No to cancel erase and record operations.
DVD+R
This disc can only be recorded until the disc is full or you finalize the disc. After that, it is not possible to
make further recordings on the same disc.
10.2 Recording Setup
From the setup menu, choose Recording to set up the recording quality and auto chaptering periods.
Recording qualities that may be chosen are: HQ (High Quality), SP (Standard Play), LP (Long Play), EP
(Extended Play), SLP (Super Long Play). You can also change record qualities by pressing RECORD MODE
key on the remote control.
Auto chapter durations are: 5, 10, 20, 30 minute, it can be deactivated also by choosing OFF.
10.3 Selecting Source
Video input source modes: Digital Channels, Analogue Channels, SCART, Front CVBS, Front S-Video and
DV . Please checkout your setup before starting a record process and assemble the correct configurations
for starting record process.
Press VIDEO SOURCE on the remote control. The type of source changes for every press of the VIDEO
SOURCE key.
Press Watch TV button switch between analogue and freeview mode.

44
10.4 How to Initiate and Stop Recording Process
After being sure about your device setup and general recording setup, be sure there is a recordable DVD in
tray. Now you are ready to record. Then press RECORD key on your remote control or front panel of device.
Recording process will start. To stop the recording process, press STOP button.
OTR (One Touch Recording)
Every press of RECORD key will increase recording time for 30 minutes after recording has been
started. The timer list is circular so after the maximum recording time, it returns back to the beginning. OTR time
periods are followed as:
HQ: 30 min, 60 min
SP: 30 min, 60 min, 90 min, 120 min
LP : 30 min, 60 min, 90 min, 120 min, 150 min
EP : 30 min, 60 min, 90 min, 120 min, 150 min, 180 min, 210 min, 240 min
SLP : 30 min, 60 min, 90 min, 120 min, 150 min, 180 min, 210 min, 240 min, 270 min, 300 min, 330 min, 360
min
10.5 How to Watch Another Channel at TV During Recording
This feature is valid only for scart connection to TV. Press TV/DVD key on remote control. This will disable
the scart output of the unit. By using program 5/ 6 or numerical keys of your TV remote control and press
SELECT, you can watch other channels. In order to enable the scart output of the DVD recorder, press
TV/DVD key again.
10.6 Inserting Chapter
INSERT CHAPTER key on the remote control divides current chapter into two chapters from the moment
you press this key.
10.7 Pause Recording
In order to pause recording process, press PLAY/PAUSE(►/;) key.
Press RECORD key to resume recording.
NOTE: If you try recording to a pre-recorded DVD+RW disc that is recorded on different platform or PC, a
warning message will be appeared. This message explains that the disc is not compatible and it has to be
erased. Select Yes to erase disc or No to cancel erase and record operation.
11. TIMER RECORDING
11.1 General Information
You can use programmed recording (timer) to automatically start and stop a recording at a later time. The
DVD Recorder will switch to the selected program number and begin recording at the selected time.
To make a programmed recording, your DVD recorder needs to know:
- the input source you want to make recording (FreeView program number, Scart, Composite,S-Video)
- the recording quality (HQ, SP, LP, EP, SLP)
- the mode of the recording (once, daily, weekly)
- the date you want to make the recording
- the start and stop time of the recording
You can also set timer for recording by electronic program guide (EPG) in FreeView mode.
NOTE : At least 1 min is required between two succeeding record settings.
NOTE: If a timer is set at between 03:00 and 03:30 AM, your device would not make OAD and not search for
new SW in the air.

45
11.2 To Set a Recorder or Reminder by EPG (Now / Next)
- During watching any FreeView channel, press GUIDE button to open EPG(Now/Next) page.
- If you want to set a recorder or reminder for next event, press 4 arrow key to highlight and press
SELECT key to activate reminder or press RECORD key to activate timer event
- The display will ask to choose about recording or reminder. If you select Reminder, you can see
clock icon near event name that you want to be reminded. (Reminder option only works while you
are watching TV, it is disabled at standby or any other mode.)
- If you select Record, it asks for quality of recording that you want to set. After selecting one of them,
it puts a red icon near event name and turns back to EPG (Now/Next) page. Also if you want to verify
timer record, you may see event in Timer List by pressing TIMER key.
- To close EPG page and turn back monitor mode, press GUIDE key.
11.3 To Set a Record or Reminder by EPG (7 Day)
- When watching any FreeView channels, press GUIDE key then MENU key to open EPG (7 Day)
page.
- If you want to set a record or reminder for any event, use navigation and coloured keys to highlight
and press SELECT key to activate reminder or press RECORD key to activate timer event. (Use
DISPLAY/ INFO) button for more help.
- The display will request if you want to record this event or set a reminder. If you select Reminder,
you can see clock icon near event name that you want to be reminded. (Reminder option only works
watching TV, it is disabled at standby or any other mode.)
- If you select Record, it asks for quality of recording that you want to set. After selecting one of them,
it puts a red icon near event name and turns back to EPG (7 Day) page. Also if you want to verify
timer record, you may see event in Timer List by pressing TIMER key.
- Other record events may be selected by repeating points 2, 3 and 4 above. In case two record timers
overlap, a warning message will be displayed.
- To complete the record time event ,turn off the recorder by pressing the STANDBY key on the
remote. At the programmed time the recorder will power up and record is selected channel and
power off again once completed.
NOTE: Very important that there is sufficient disc space to cover the recorded time.
11.4 How to Create Recording Item
- Press TIMER key on the remote control or select Timer Setting
Menu from Setup menu
- Press SELECT on the first blank item to program recording
- Set the source of recording
- Set the quality of recording
- Set the mode of recording
- Set the recording time (start and stop time for recording process)
NOTE: When you finish creating an item, the device will ask you
whether you want to put a recordable disc or not, if there is no
recordable disc in loader. If you select “Change Disc” option, you should
place a disc in tray. If you select “Continue” option, you will skip placing
a disc in tray process but timer recoding will be set.

46
11.5 How to Check, Change or Delete A Programmed Recording (Timer)
- Switch on the TV set.
- Press TIMER key on the remote control or select Timer Setting Menu from Setup menu.
- In order change any parameter of the recorded item, choose the related record item, press SELECT
key, a popup menu will appear, you can edit from here in order to change any field.
NOTE: You can program up to 20 timer recording events.
12. DV
12.1 PLAYBACK FROM DV INPUT
You can connect a camcorder or digital camera to DV INPUT of the unit’s front panel. For playback, you
must connect the device to the recorder and press VIDEO SOURCE key until switching to the right source.
First you will see a blank screen. You can do playback operations like play, pause, stop, fast
forward/backward, forward, rewind etc. using your remote control or the device itself. If the DV device is a
camcorder, you can view camera mode with this connection on TV screen.
NOTE: Some DV compliant devices may not be supported.
12.2 RECORDING FROM DV INPUT
Recording from DV INPUT is also available. For this operation you must switch to DV source with the VIDEO
SOURCE key on the remote control. You can record content of the DV device or the camera mode of the DV
device to a DVD disc. Recording operations like record, pause, stop, etc. are the same with steps explained
in Manual recording section.
NOTE: Some DV compliant devices may not be supported.
13. LIMITATIONS AND SOME OTHER FEATURES
Recorder Features And Limitations
1. This DVD recorder cannot record any disc recorded before by another machine unless it is erased
(available only with DVD+RW).
2. In one disc, you can keep 49 titles.
3. There is no time search on a pre-recorded disc, so use auto chaptering as much as possible.
4. You cannot record PAL/NTSC in the same disc.
5. You must finalize DVD+R to play on DVD recorder. If you don’t do it, you may not play it with other
devices.
6. Maximum recording time depends on the record quality option you choose.
7. Timer will be active only when the device is at normal STANDBY state.

47
14. SPECIFICATIONS (FOR DVD)
Power Requirements 220 – 240 Volt ~50Hz (Auto Adjustable)
Power Consumption
Supported
Recording Media
Supported Playback
Media
Video Type
Video Output
Audio Type
Audio Input
Audio Output
TV Broadcasting
Receiving Channels
Number of Preset Channels 100
Copy-Protection Macrovision 7.1
Dimensions 430 (W) x 50 (H) x 325 (D)
Weight (Device) (kg) 3.6
Weight (Device+case) (kg) 4.6
Low Power Standby 3 Watt
Maximum 40 Watt
DVD
DVD
CD
Audio recording Format Stereo Recording
MPEG-2 Video Standard Decoding (MPEG-1 supported)
Full-screen video display of 720x576 (PAL) & 720x480 (NTSC)
50 and 60 Hz frame refresh rates (PAL&NTSC)
Digital bit stream processing rate up to 10.08 Mbits/sec
Line resolution more than 500 lines
Front
Rear
CVBS PAL / NTSC(Negative synchronized), 1Vpp@75 ohm (loaded)
RGB+CVBS Through Full Euroscart Output (Pin-16 control)
YPbPr
HDMI SD Progressive/720p/1080i resolution
Dolby Digital Decoding
MPEG Multichannel (Up to 5.1 channel) Decoding
LPCM (24 bit 96 kHz, 48kHz downsampling)
MP3
Front Cinch Socket Stereo Analog L/R
Rear SCART (Analog L/R)
Digital Audio Outputs
Analog Outputs
2 Vrms (0 dB fs, 1kHz)
PAL
SECAM
B/G
DK
I/I’
L/L’
VHF (Band I/III)
UHF (Band U)
HYPERBAND
Cable TV
DV in (IEEE1394)
Cinch Socket Composite video in
S -Video in (Mini DIN) Video Input
Via SCART
Aerial in
Component YPbPr video output through RCA outputs.Component
YPbPr video is available if Progressive Scan option is enabled.
DVD+R
DVD+RW
DVD-Video
DVD-R (DVD Video or data)
DVD-RW (DVD Video or data)
DVD+R (DVD Video or data)
DVD+RW (DVD Video or data)
CD-Audio
CD-R
CD-RW
Kodak Picture CD
Copy Protected Audio CD
S/PDIF (AC-3 or DTS encoded 5.1 channel digital audio) Optical
and/or Coaxial.
24 Bit / 192 kHz DAC
2 RCA jack outputs (Left / Right)
Left / Right Audio Outputs of Full Euroscart
B/G : S01-S41 / S75-S79
D/K : S01-S41

48
15. SPECIFICATIONS (FOR FreeView)

49
16. TROUBLESHOOTING GUIDE (FOR DVD)
The picture quality is poor(DVD)
· Make sure the DVD disc surface is not damaged(Scratch, fingerprint etc.)
· Clean the DVD disc and try again.
· Ensure that the DVD disc is in the tray with the label uppermost.
· A damp DVD disc or condensation may effect the equipment. Wait for 1 or 2 hours in Stand-by to dry the equipment.
Disc does not play
· No disc in the machine.
Place a disc in the tray.
· Disc incorrectly loaded.
Ensure that the DVD disc is in the tray with the label uppermost.
· Wrong type of disc. The machine cannot play CDROMs etc.
Use disc in supported formats .
· The region code of the DVD must match that of the recorder.
Wrong OSD language
· Select the language in the setup menu.
The language for the sound or subtitles on a DVD cannot be changed
· Multilingual sound and/or subtitles not recorded on the DVD.
· Try to change the sound or subtitles using DVD’s title menu. Some DVD’s do not allow the user to change these settings
without using the disc’s menu.
Some functions(Angle, Zoom etc.) do not work
· These functions are not available on the DVD.
· Angle can only be changed when the angle symbol is displayed.
The picture colors are not OK
· Check the video output mode and select the appropriate mode.
No picture
· Check if the recorder is connected to TV properly and that all connections between the DVD recorder and other attached
equipment are secure.
No sound
· Check the volume is set to an audible level.
· Make sure you have not switched the sound off accidentally.
Distorted sound
· Check that the appropriate listening mode is selected.
No response from remote control
· Make sure the remote control is in the correct mode.
· Check the batteries are fitted correctly.
· Change the batteries.
· If VFD shows “TV”, TV mode is active, press TV/DVD key to return DVD mode.
Record key does not start recording
· Make sure there is a recordable (DVD+RW or DVD+R) disc inside the recorder.
· If you wish to record from RF input, check the program table to see the available channels. You may need to do an APS
(Automatic program search) again to record, if the automatic search after installation has failed to find channels.
· If you wish to record from the SCART, CVBS, S-Video or DV INPUT source, make sure that the record source is active
and sending signals.
· To record from a DVD player the DVD should not be copy protected.
· If there is no space left on the disc you will see the error message “disc is full.” Erase some titles to create space for new
recordings.
Switch to a source, but there is no signal
· Make sure the antenna is connected to Aerial input and there is TV broadcast on some channels.
· If you are using scart, CVBS, S-Video or DV video inputs, make sure the record source is properly connected and switched
on.
Timer recording does not work
· Make sure that the system time and record start time are set correctly.
Time will be displayed when the recorder switches to standby in power saving off mode.
· Make sure that the program number of the scheduled record is on the program list.
You will not be able to record, if the program number found during APS does not contain an active channel.
Edit disc option is disabled
· Make sure that the recorder is in “full stop mode”.
If nothing works
· If you have tried the above solutions and nothing seems to work, try switching your DVD off and on again. If this does not
work, contact your supplier or your initiating service. Never attempt to repair a defective DVD recorder yourself.
NOTE: Please note that you may experience compatibility problems during playback or editing of the discs that are
recorded on other DVD Recorder Brands.

50
17. TROUBLESHOOTING GUIDE (FOR FreeView)
If You Forget The Password:
Cut this information box out and
Then please set your personal password.
Problem Possible Cause What to do
No signal found Aerial is disconnected Check serial lead
Aerial is damaged/misaligned Check aerial
Out of digital signal area Check with dealer
No picture or sound Tuned to digital teletext channel Retune to another channel
No responses to remote control Receiver off Plug in and turn on receiver
Handset not aimed correctly Aim handset at front panel
Front panel obstructed Check for obstructions
Handset batteries exhausted Replace handset batteries
Forgotten channel lock code
Please look at last page
Forgotten menu lock code
The remote will not operate The batteries in your remote control Replace the batteries
FreeView need replacing
There is an obstruction blocking the Check that there is nothing in
signal path between the remote the way of the path between
control and the receiver. the remote control and
receiver.
After moving your Recorder to The aerial feed may be routed via Try using another aerial
to another room/location you a feeder distribution box which will
cannot receive FreeView prevent FreeView reception.
No video at Top Up Tv Top Up Tv channels requires
channels. Conditional Access Module.
This feature is not supported
in this product.
keep in a safe place.
Press 3, 3, 0, 8.

THE GUARANTEE
The seller of this equipment (the vendor) warrants to
the initial retail purchaser that if the equipment
becomes defective, and the defect is shown to be due
to faulty materials or workmanship within a period of
12 Months from the date of sale to the original
purchaser it will be repaired (or at the vendors sole
option) replaced free of charge, always providing that:
The equipment has at all times been used in
accordance with the operating instructions issued by
the manufacturer, and has not been connected to an
electrical supply for which it has not been properly
adjusted.
Unauthorised repairs or modifications, which have not
been expressly approved by the manufacturer, shall
render this guarantee null and void.
This guarantee is not transferable and is only
applicable in the UK.
Nothing in this express warranty affects the statutory
rights available to the purchaser of this equipment
EXCLUSIONS
SANYO shall not be liable for any removal
or installation or re-installation of the equipment.
The warranty does not coverFailure due to fair
wear and tear of any item.
Cosmetic items, remote controls or parts and
consumable items such as lamps, filters,
batteries, tapes, cables or connectors.
Accidental damage or damage caused by
negligence or misuse by the user.
Failure caused by lightning strike, storage or
operation outside the specified environment,
incorrect installation, lack of routine maintenance
outlined in the operating instructions supplied
with the unit, incorrect fitting of lamps, filters,
batteries or other consumables or parts.
Units not originally supplied by SANYO Europe Ltd
through a UK Reseller.
Dear Customer.
Thank you for buying SANYO. This equipment should
give you many years of pleasure and faithful service but
in the event that a fault occurs, the following notes
for you guidance may be helpful:-
1: PLEASE RETAIN YOUR PURCHASE RECEIPT
WHICH WILL BE REQUIRED FOR SERVICE
DURING WARRANTY.
2: If your SANYO equipment proves faulty during the
period of guarantee, take it or send it back to the
dealer who originally supplied it together with this
guarantee and the proof of purchase. We have
made arrangements with our approved dealers
under which they will carry out in guarantee service
repairs on our behalf. In this way, we hope to
reduce to a minimum the amount of time you will be
without your equipment.
3: If for some reason it is impossible to return the
equipment to the original supplier, please contact
our Customer Relations Department at the address
below for further advice.
4: Should the equipment require servicing after the
expiry of the guarantee period, take or send it to
the original supplier or any other Sanyo dealer.
He will be pleased to give you a quotation for the
repair.
Customer Relations Department,
SANYO Europe Ltd.
SANYO House,
18, COLONIAL WAY,
Watford, Hertfordshire, WD 24 4PT.
Tel: 01923 246363
SANYO Electric Co., Ltd.
 Loading...