

Page 1
INSTRUCTION MANUAL
Recordable DVD
Home Theatre System
DVR-HT120
DVD recorder: DVR-S120
Powered subwoofer: ASX-HT120W
Front speakers: SX-HT120F
Centre speaker: SX-HT120C
Rear speakers: SX-HT120R
TIMER CLEAR
RETURN
SELECT
TRIM TEST SOUND
SURROUND
LEVEL
FUNCTION
MUTEVOLTV
CH/INPUT
DISC
SYSTEM
MENU
MENU
OK
EDIT
DISPLAY
REC
REC MODE
PAUSE PREV NEXT
R.SLOW F.SLOW F.REV F.FWD
TV/DVD ZOOM T/C
PLAY MODE
Please read this manual carefully before connecting your DVD Recorder and operating it for the fi rst time.
Keep the manual in a safe place for future reference.
Problems with set up?
Call 0870 240 7475
Calls cost a maximum of 8p per
minute during peak periods,
based on BT rates of April 2004.
Page 2
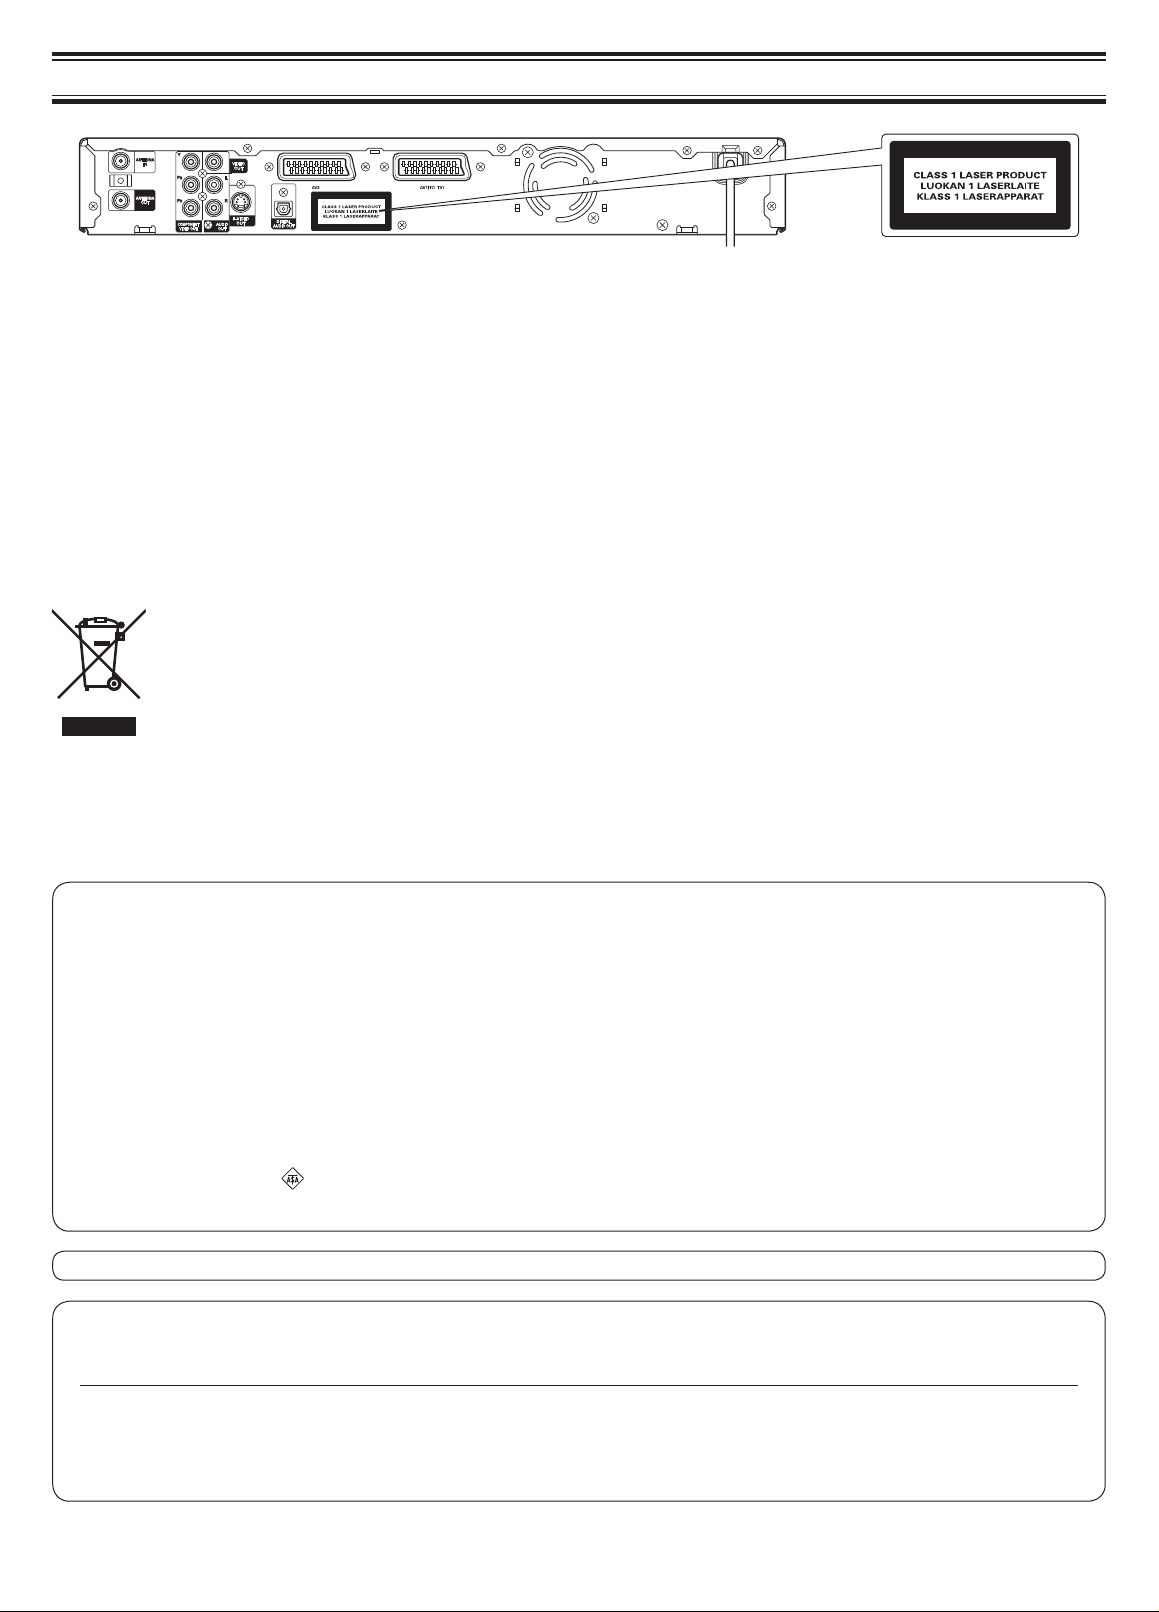
PRECAUTIONS
THIS PRODUCT CONTAINS A LOW POWER LASER DEVICE. TO ENSURE CONTINUED SAFETY DO NOT REMOVE ANY COVERS OR ATTEMPT
TO GAIN ACCESS TO THE INSIDE OF THE PRODUCT. REFER ALL SERVICING TO QUALIFIED PERSONNEL.
- The apparatus shall not be exposed to dripping or splashing.
- No objects fi lled with liquids, such as vases, shall be placed on the apparatus.
- Do not use where there are extremes of temperature (below 5°C or exceeding 35°C) or where direct sunlight may strike it.
- Because of the DVD recorder's extremely low noise and wide dynamic range, there might be a tendency to set the volume on the amplifi er unneces-
sarily high. Doing so may produce an excessively large output from the amplifi er which could damage your speakers.
- Sudden changes in the ambient temperature may cause condensation to form on the optical lens inside the unit. If this happens, take out the disc,
leave the unit for about 2 hours, and then proceed to operate.
- When carrying the unit, be sure to remove a disc which may be inside and turn the power off. Wait at least 10 seconds, then unplug the mains lead
from the AC outlet. Carrying the unit with a disc inside may damage the disc and/or the unit.
- Do not install this equipment in a confi ned space, such as a book case or built-in cabinet.
- The unit must be operated in a horizontal position only.
The unit must be placed in a well ventilated area.
Do not place any object on the top of the unit.
Do not block ventilation holes.
The cabinet of the unit warms up when it is used for a long time, but it is not a malfunction.
Your SANYO product is designed and manufactured with high quality materials and components which can be recycled and reused.
This symbol means that electrical and electronic equipment, at their end-of-life, should be disposed of separately from your household
waste.
Please dispose of this equipment at your local community waste collection/recycling centre.
In the European Union there are separate collection systems for used electrical and electronic products.
Please help us to conserve the environment we live in!
This product incorporates copyright protection technology that is protected by method claims of certain U.S. patents and other intellectual property rights
owned by Macrovision Corporation and other rights owners. Use of this copyright protection technology must be authorized by Macrovision Corporation, and is intended for home and other limited viewing uses only unless otherwise authorized by Macrovision Corporation. Reverse engineering or
disassembly is prohibited.
Recording copyright material without permission of the copyright owners is usually an infringement. If you wish to re-record copyright material, permission
from the copyright owner is necessary. SANYO does not approve of, and cannot be held responsible for, any unlawful use of this machine.
IMPORTANT
If the plug supplied with this equipment is not suitable for the socket
outlets in your home it should be cut off and replaced with the correct
type.
Disposal of Plug
If the non rewireable plug is to be cut off, the removed plug should
be disposed of carefully as there is a shock hazard should the plug
be inserted into a live socket.
Replacing Fuse
The detachable fuse cover must be replaced after changing the fuse.
Only a 3A fuse should be used and should comply with BS1362 and
should carry the ASTA mark
The unit is not disconnected from the mains unless it is unplugged from the AC outlet.
Either the main unit or remote control can be operated. However, for convenience, this instruction manual explains operation using
the remote control.
NOTE:
- This handling description is printed prior to product development.
- When a part of the product specifi cation must be changed to improve operability or other functions, priority is given to the product specifi ca-
tion itself.
- In such instances, the instruction manual may not entirely match all the functions of the actual product.
- Therefore, the actual product and packaging, as well as the name and illustration, may differ from the manual.
.
The wires in the mains lead are coloured in accordance with the
following code;
Blue Neutral
Brown Live
The wires in the mains lead must be connected to the terminals in
the plug as follows;
Wire colour Plug terminal marking
Blue N or Black or Blue
Brown L or Red or Brown
Do not connect either wire to the earth terminal.
If the mains plug contains a fuse this should be 3A, if a plug without a fuse
is used the distribution board fuse should not be greater than 5A.
Disconnect the mains plug from the supply socket when not in use.
Do not remove the back cover with mains connected.
This set complies with the EMC Directive 89/336 and with the LVD Directive 72/23.
1
Page 3

CONTENTS
PRECAUTIONS ............................................................. 1
IMPORTANT ............................................................................... 1
ACCESSORIES .......................................................................... 2
PART NAMES & FUNCTIONS ...................................... 3
Front Panel .......................................................................... 3
Rear Panel ........................................................................... 4
Remote Control ................................................................... 5
Operation Status Display ................................................... 6
Front panel display ...................................................................... 6
Status display on TV screen ........................................................7
Disc Information ........................................................... 7
Recordable Discs ................................................................ 7
Playable Discs ..................................................................... 8
Notes on handling discs ..............................................................8
Cleaning discs for high quality recording .................................... 8
About Titles, Chapters and Tracks ..............................................8
INSTALLATION, CONNECTION & SETTING THE
CHANNEL ...................................................................... 9
Connecting to a TV and Various AV Equipment ............... 9
Connecting to a TV ......................................................................9
Connecting a satellite receiver .................................................. 11
Connecting audio equipment .................................................... 11
Connecting to a video deck and other recording equipment ..... 12
Connecting the Main Lead ............................................... 14
Initial Settings .................................................................... 14
Auto-setting the channel .................................................. 15
Setting the Clock ............................................................... 15
Manually Setting the Reception Channel ........................ 15
Displaying the channel setup screen ........................................ 15
Manually setting the channel ..................................................... 15
Arranging and Deleting Channels .............................................16
RECORDING ................................................................ 17
Recording Programmes during Reception ..................... 17
Timer Recording ................................................................ 18
Timer recording by “Video Plus+ code” ..................................... 18
Timer recording without using “Video Plus+ code” ....................... 20
Checking, Changing and Deleting Reservations ....................... 21
Problem solving for programmed recordings ............................21
Recording Video from Other AV Equipment ................... 22
Inserting New Recordings on a DVD+RW ....................... 22
SAT Record
(Automatic recording from Satellite Receiver) ............... 22
DISC PLAYBACK ........................................................ 23
Basic Operations ....................................................................... 23
LISTENING TO MUSIC ...................................................... 24
Playable Discs ........................................................................... 24
Basic Playback Operations .......................................................24
Repeat Playback, Random Playback, Intro Playback ...............25
Playing Back a Specifi c Track ...................................................25
Playing Back from a Specifi c Point by Time Search ................. 25
Playing Back MP3 Discs ................................................... 25
VIEWING JPEG CD PHOTOS & IMAGES ......................... 26
Playable Discs ........................................................................... 26
Displaying the Thumbnail Screen .............................................. 26
Searching for Photos in the Thumbnail Screen ......................... 26
Displaying Photos in the Slide Show ......................................... 27
EDITING & DISC MANAGEMENT ............................... 28
Editing Chapters ............................................................... 28
Insert Chapter ........................................................................... 28
Hide Chapter ............................................................................. 28
Unhide Chapter .........................................................................28
Delete Chapters(Delete Chapter, Delete All) ............................. 28
Editing Titles ...................................................................... 29
Editing Recording Titles (name) ................................................ 29
Playback Title ........................................................................... 29
Erasing a recording/title ............................................................ 29
Disc settings ...................................................................... 29
Changing the Disc Name ..........................................................29
Erasing DVD+RW Discs ............................................................ 29
Finalising DVD+R Discs ............................................................30
Make DVD Compatible .............................................................. 30
DVD RECORDER SETTINGS ..................................... 31
TV Screen Settings ........................................................... 31
Audio Output Settings ...................................................... 32
Operation and State Display Settings ............................. 32
Setting the Language ........................................................ 33
Recording Settings ........................................................... 34
Parental Level Control ...................................................... 34
Setting parental level control ..................................................... 34
To play back a DVD video set with parental level controls. ....... 35
TROUBLESHOOTING ................................................. 36
MAINTENANCE ........................................................... 38
Cleaning the cabinet ................................................................. 38
SPECIFICATIONS ........................................................ 38
Remote control x 1
R6 (HP 7) battery x 2
Video lead x 1
ACCESSORIES
75-ohm coaxial aerial lead x 1
DVD+RW blank disc x 1
2
Page 4
PART NAMES & FUNCTIONS
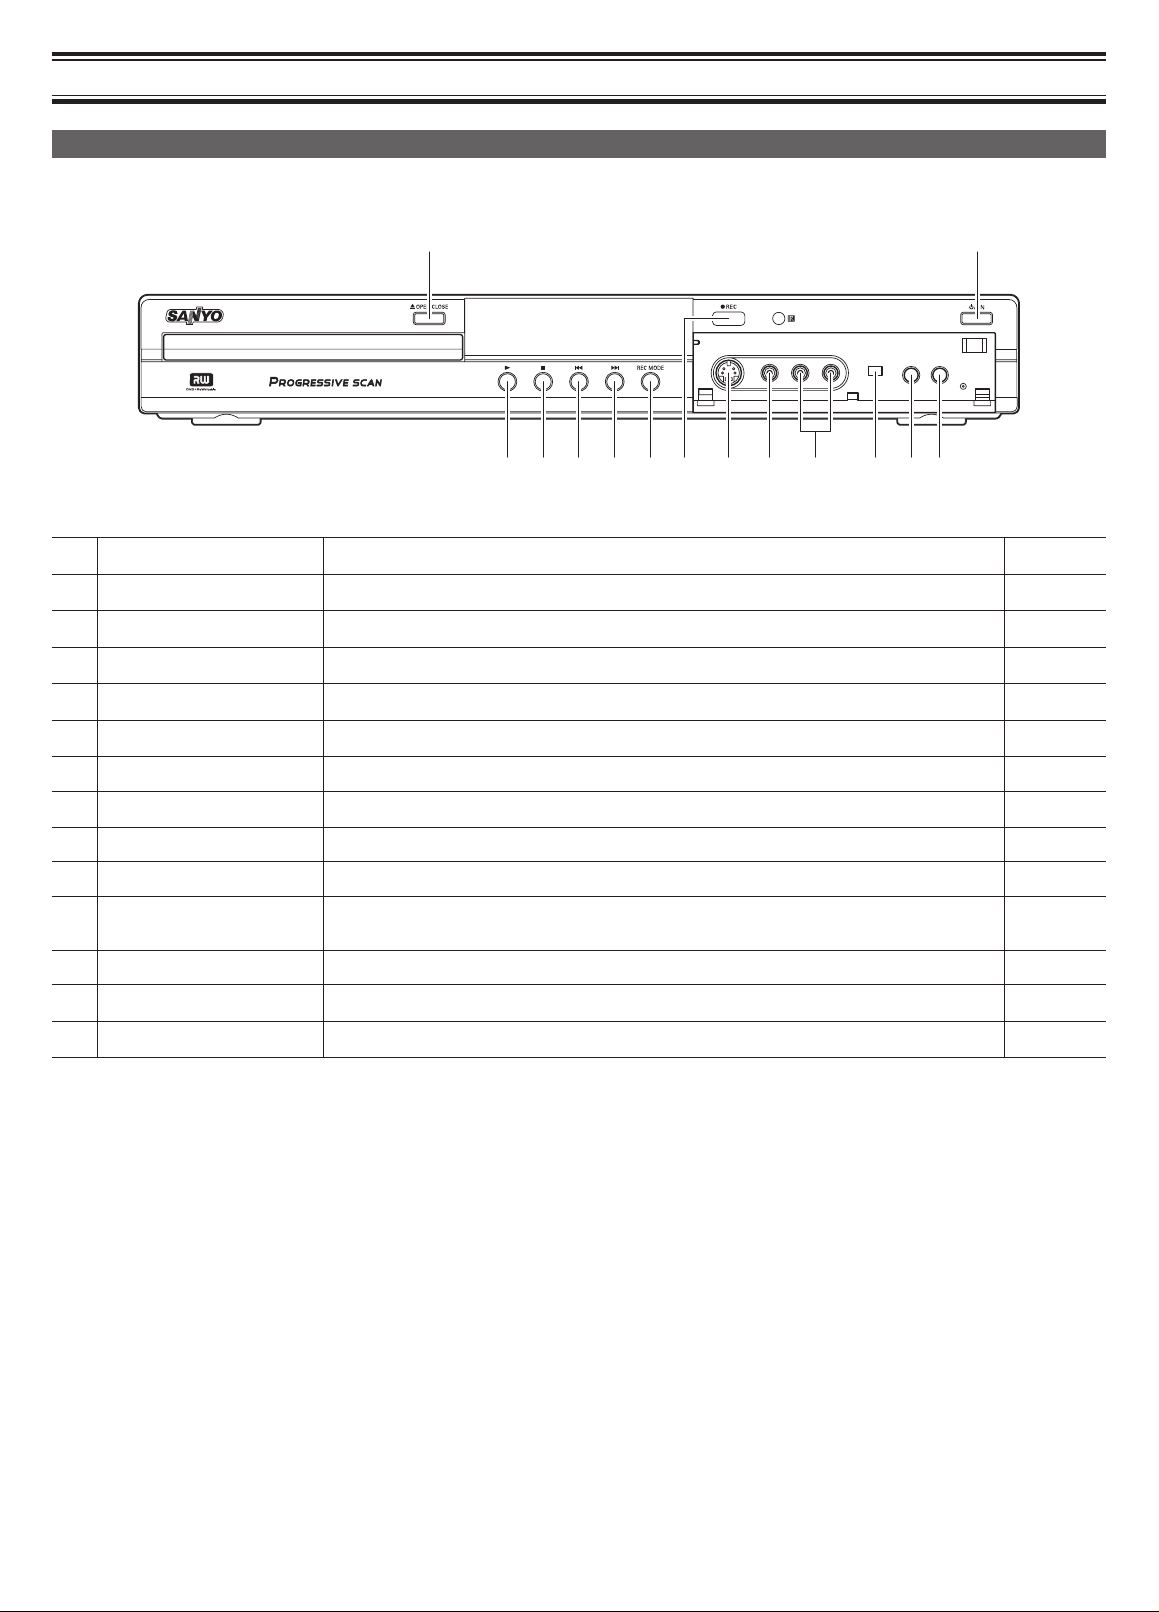
Front Panel
You can operate the DVD recorder using the remote control or the buttons on the front panel of the DVD recorder.
2 1
14131211109876543
1
o
2
rOPEN/CLOSE
3
w
4
e
5
d
6
f
7 REC MODE Record type (quality): To select different qualities of recording (HQ, SP, LP, EP or EP+). p.17
8
qREC
9 S-VIDEO AV3-S IN: Connection of SVHS/Hi8 camcorders or SVHS/Hi8 video recorders. p.13
10 VIDEO AV3 IN: Connection of camcorders or video recorders. p.13
11 L-AUDIO-R AV3/AV3-S IN: Connection of camcorders or video recorders. This is common audio for both
12 DV IN Digital video input: To connect a digital camcorder or other suitable device. p.13
13
CHANNEL-
14
CHANNEL+
To switch on or standby.
Open/close disc tray.
Playback button: To play back a disc.
Stop button: Interrupt playback/recording.
Previous: Select previous chapter or track.
Next: Select next chapter or track.
Record: Record from the preselected input.
S-Video and Video.
To select the previous programme number.
To select the next programme number.
p.14
p.17, 23
p.23
p.17, 23
p.23
p.23
p.17
p.13
p.17
p.17
3
Page 5
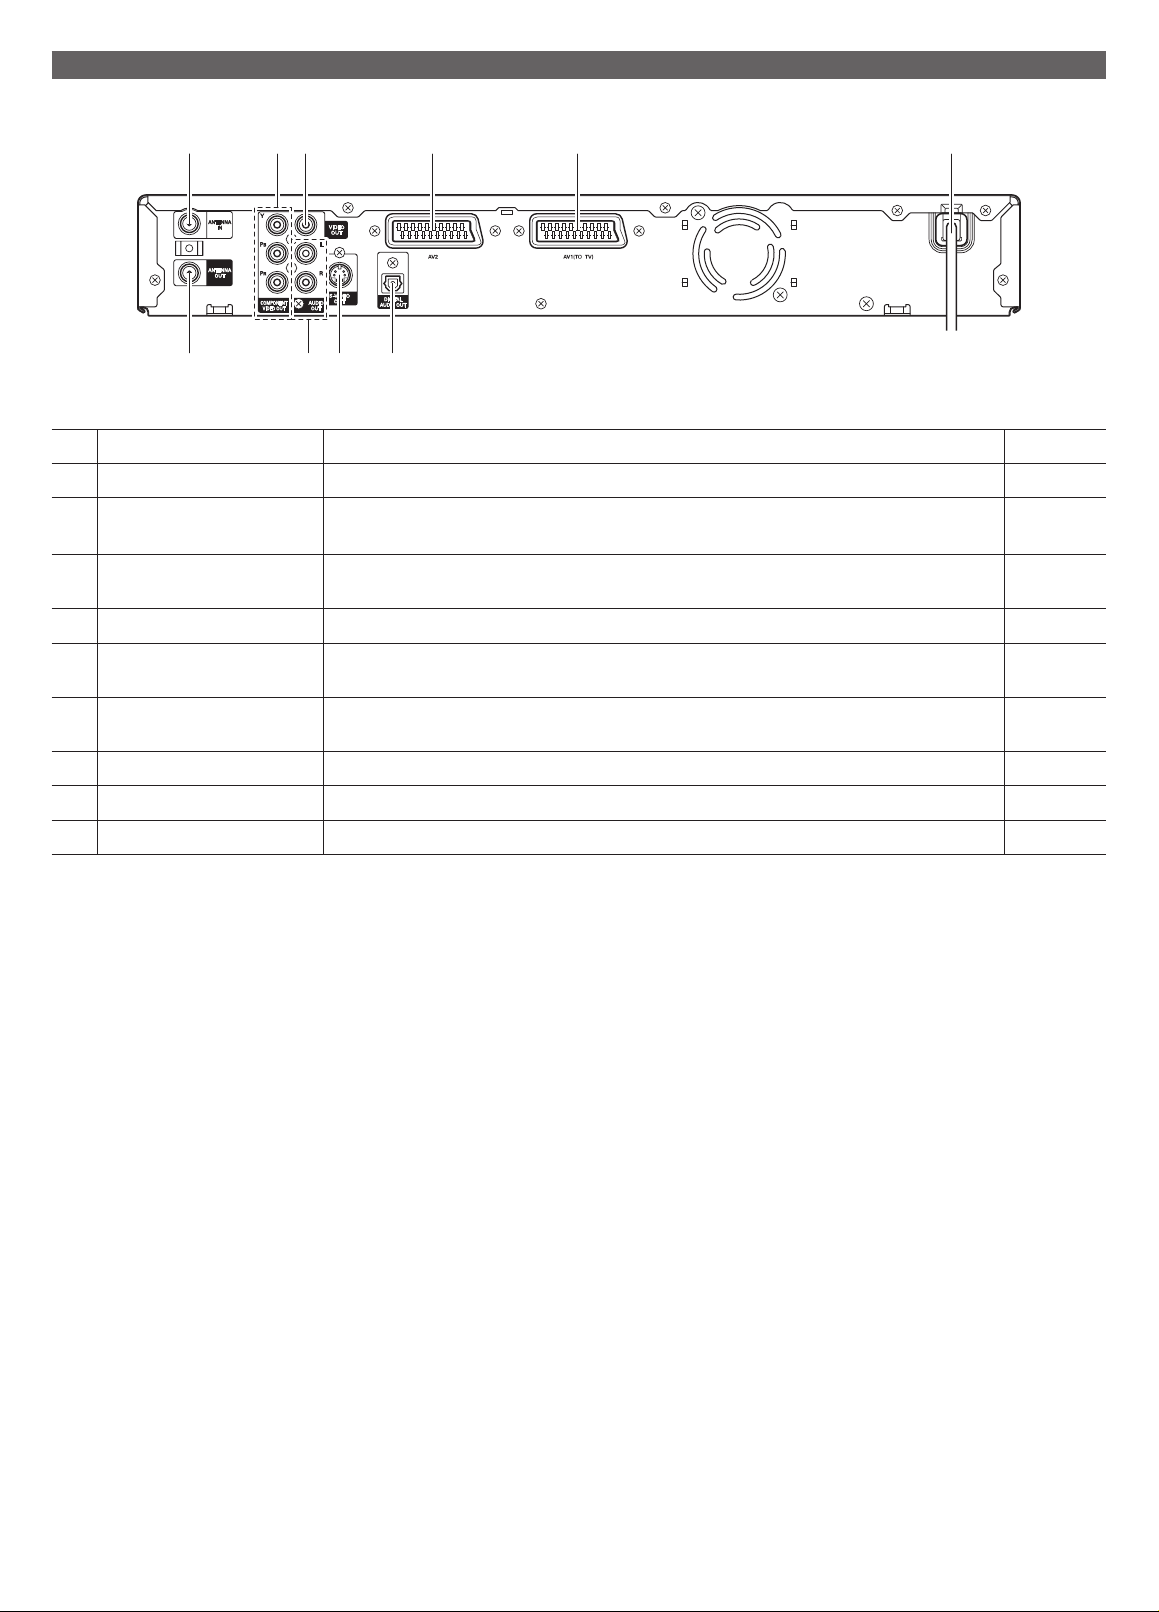
Rear Panel
134 9810
2567
1 ANTENNA IN Aerial input: Socket into which aerial input is connected. p.9
2 ANTENNA OUT Aerial output: Socket from where aerial output is connected to TV set. p.9
3 COMPONENT VIDEO OUT Video output: Socket from where YUV (Component Video) output is connected to YUV Video
compatible input devices (Progressive scan TV, etc).
4 VIDEO OUT Video output: Socket from where Video (Composite Video) output is connected to Video
compatible input devices.
5 AUDIO OUT Analogue audio output: Socket from where audio output is connected to audio input devices. p.10, 12
6 S-VIDEO OUT Video output: Socket from where S-Video output is connected to S-Video compatible input
devices.
7 DIGITAL AUDIO OUT Digital audio output: Socket into which digital audio input devices can be connected (ampli-
fi er/receiver).
8 AV 2 SCART socket 2: Connect to external equipment. p.11
9 AV 1(TO TV) SCART socket 1: Connect to the TV set. p.9
10 Mains lead Plug into the power source. p.14
p.10
p.10
p.13
p.11
4
Page 6
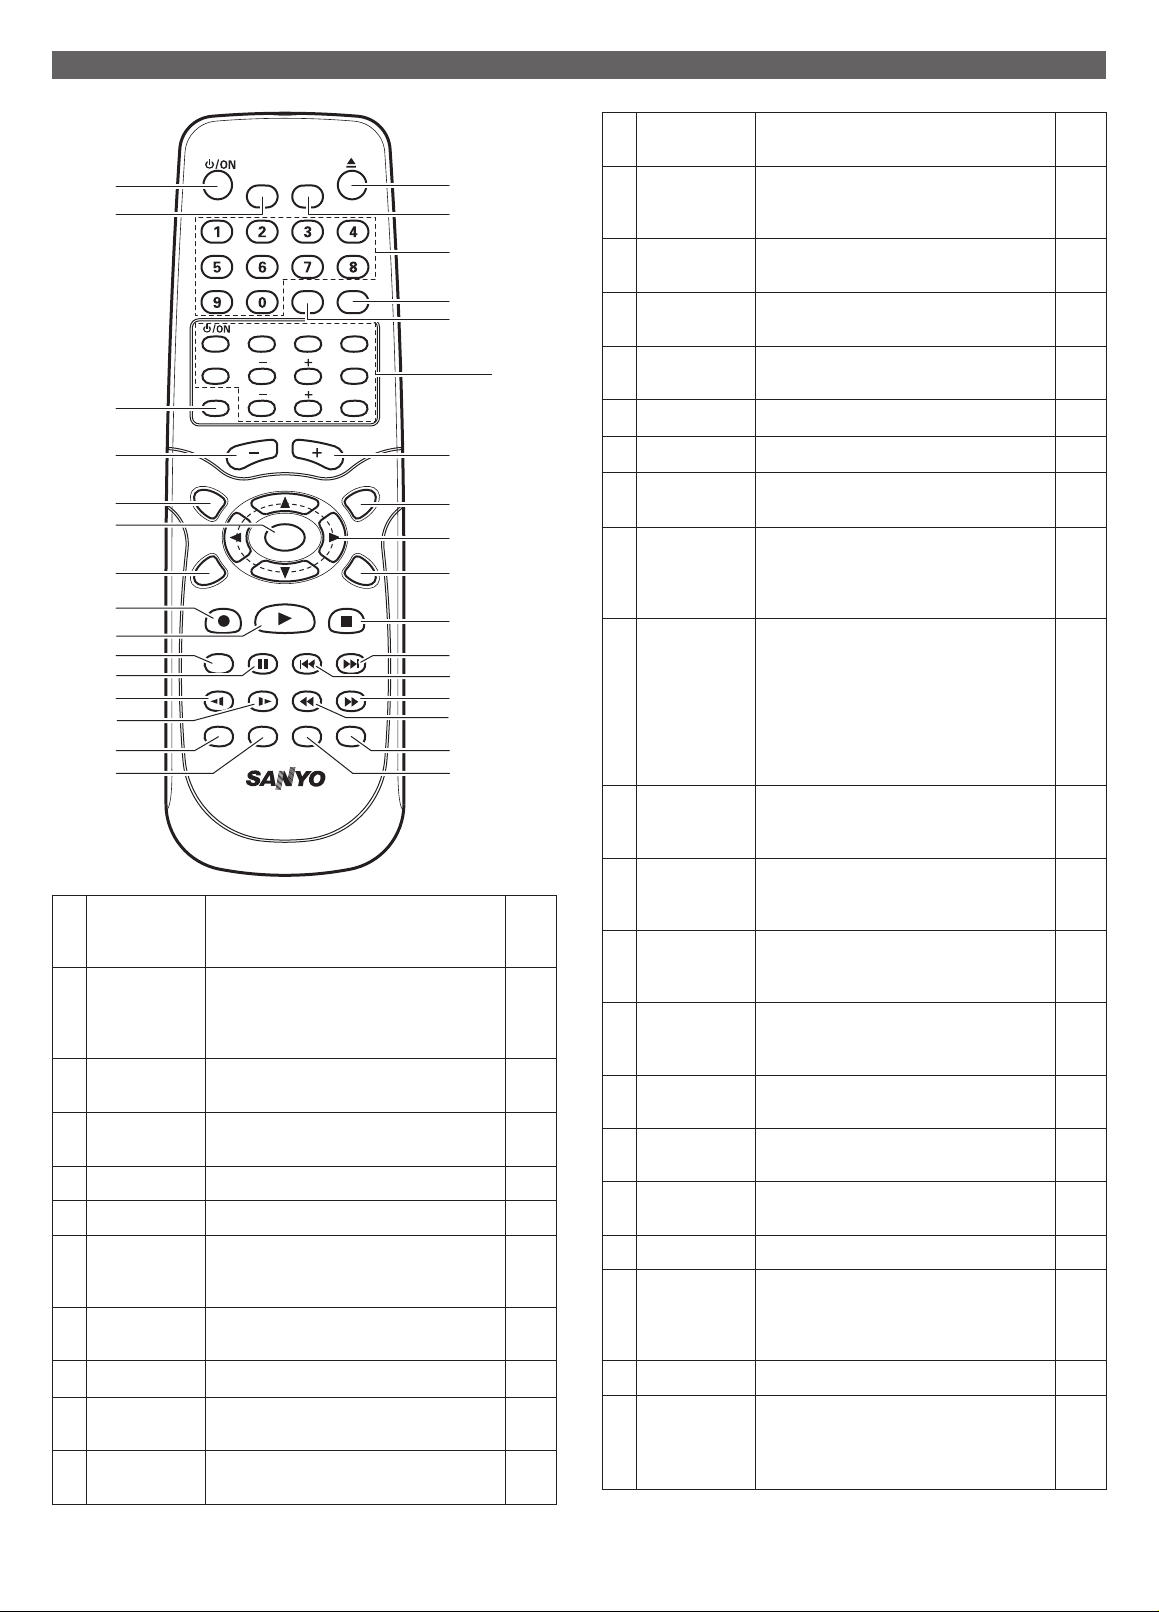
Remote Control
10
11
16
13
17
18
20
21
24
25
28
29
12 DISC
MENU
1
TIMER CLEAR
2
4
3
5
RETURN
SELECT
7
6
32
FUNCTION
TRIM TEST SOUND
SURROUND
LEVEL
MUTEVOLTV
8
CH/INPUT
SYSTEM
MENU
DISC
MENU
9
12
EDIT
OK
DISPLAY
15
13 EDIT Displays the edit menu for DVD+RW
14 DISPLAY To display the status display and the
15
4682
16
k
17
RECq
18
w
19
e
20 REC MODE To select different qualities of recording
14
REC
REC MODE
PAUSE PREV NEXT
R.SLOW F.SLOW F.REV F.FWD
TV/DVD ZOOM
T/C
PLAY MODE
19
23
22
27
26
21
PAUSE
s
31
30
22
PREV d
To show the DVD menu or the disc
menu.
discs, for inserting, deleting and hiding
chapters
channel / clock display
Cursor keys: Left, right, up, down navigation keys.
Applies the details you have selected
or entered.
Record from the preselected input.
To play back a disc.
Stop playback / recording, except with
programmed recordings (TIMER).
(HQ, SP, LP, EP or EP+). Lower the
quality of recording higher than the time
of recording.
Pause: If this button is pressed during
playback, the playback pauses. You
will see a still picture. If this button is
pressed during recording, the recording
pauses.
Each press of this button during a playback pause feeds the video one frame
at a time to display still images.
With single press of the button during
playback, DVD recorder will go back the
p.29
p.28
p.7
p.15
p.16
p.14
p.17
p.23
p.17
p.23
p.17
p.23
p.23
previous chapter or previous track.
1
o
To switch set on or standby, interrupt
menu function, interrupt a programmed
recording (TIMER).
p.14
p.17
2 TIMER To program a recording with the Video
Plus+ system / without the Video Plus+
system or to alter/clear programmed
p.18
recordings.
3 CLEAR To delete last entry or clear programmed
recording (TIMER).
4
r
Open/Close the disc tray. p.17
p.21
p.23
5 0..9 Number buttons: 0 to 9. p.18
6 RETURN Return to previous menu on a VCD. -
7 SELECT When entering text, press this button to
select between uppercase and lowercase
p.30
characters.
8 TV Selects the tuner image built into the
DVD recorder.
9
CH/INPUT +
10
CH/INPUT -
To select the next programme number.
To select the previous programme
number.
11 SYSTEM
Call up/cancel the System Menu.
MENU
p.17
p.17
p.17
p.31
23
NEXT f
With a single press of the button during
playback, the DVD recorder will start
p.23
playing the next chapter or next track.
24
R.SLOW z
Playback the disc backwards at a slower
speed. Each press of the button changes
p.23
the speed.
25
F.SLOW x
Playback the disc forwards at a slower
speed. Each press of the button changes
p.23
the speed.
26
F.REV c
27
F.FWD v
28 TV/DVD Press this button to select between DVD
The disc is fast-reversed. Each press of
the button changes the speed.
The disc is fast-forwarded. Each press of
the button changes the speed.
recorder images and TV set images.
p.23
p.23
p.18
29 ZOOM Enlarge the video image. p.23
30 T/C This button evokes the T/C Tools menu,
which provides titles, chapters, zoom,
angle, slow, search, audio, step, sound
p.24
and subtitles options.
31 PLAY MODE Selects the Play Mode. p.23
32 Amplifi er
(Powered
subwoofer)
Controls amplifer.
*1
controls
*1 Refer to the supplied Subwoofer and speakers instruction manual.
5
Page 7
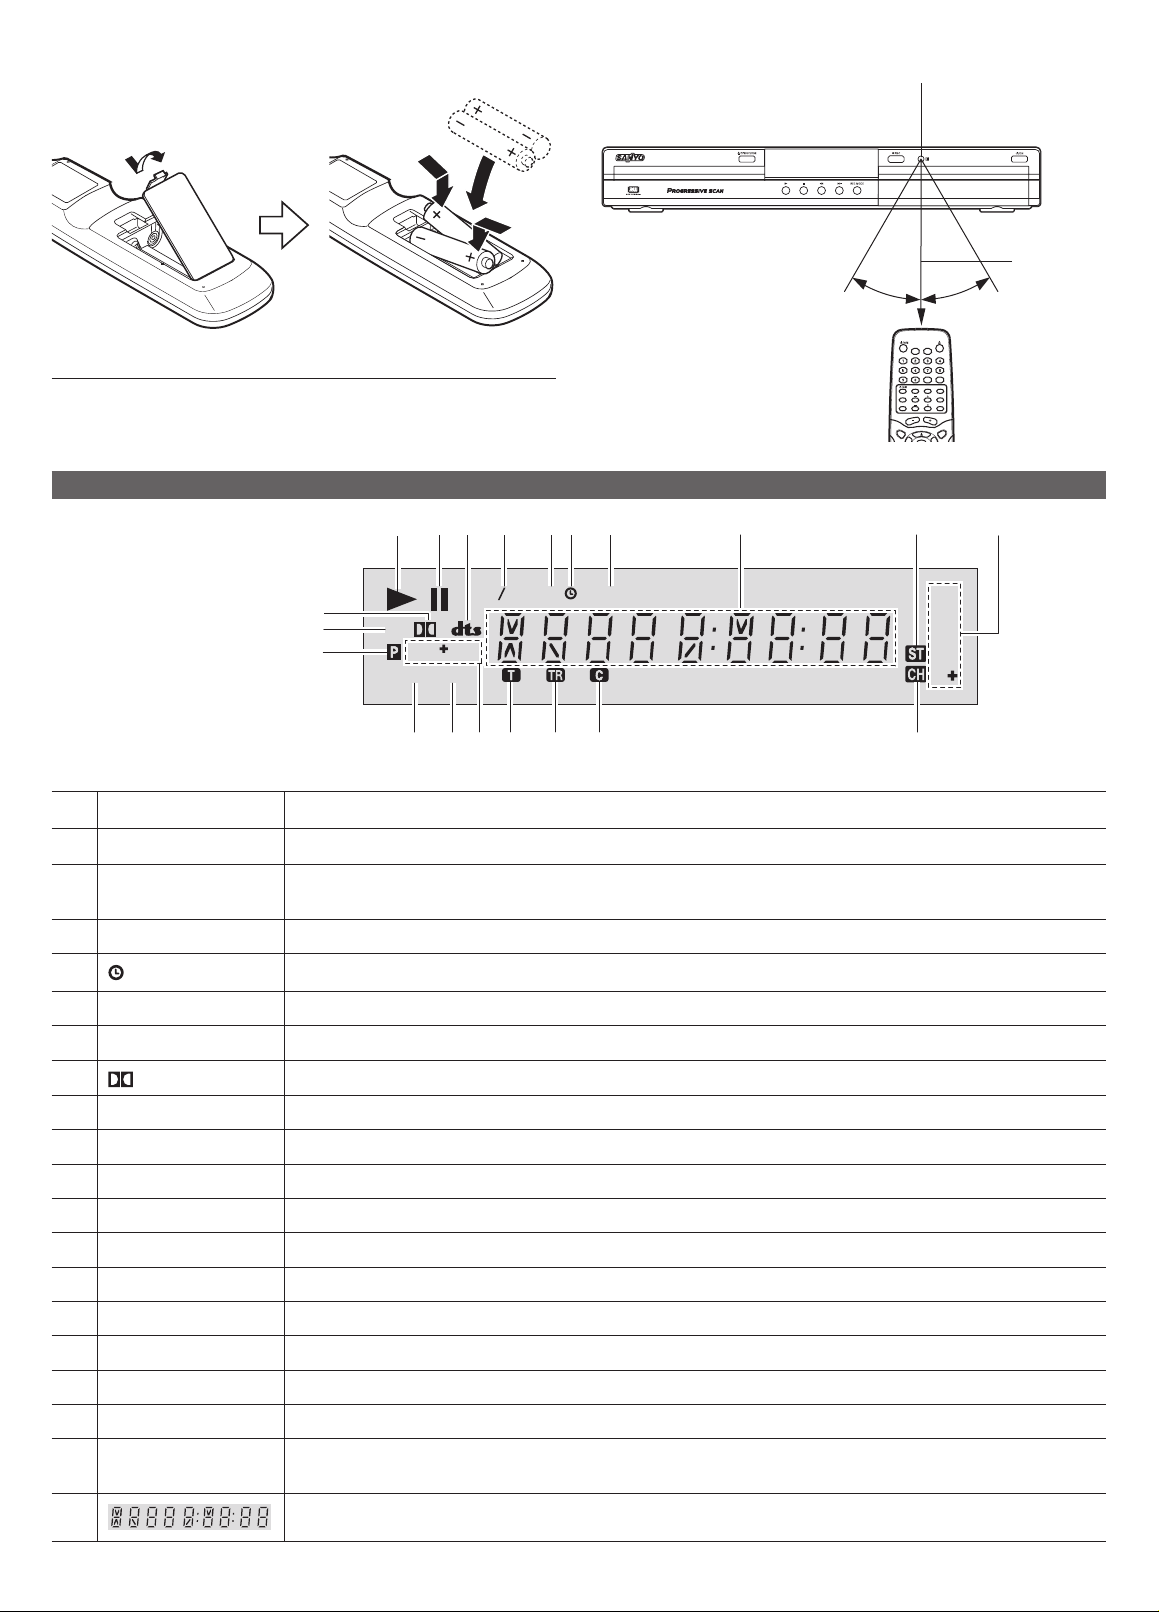
Inserting batteries
Install two “R6 (HP 7)” batteries.
Remote control range
Remote sensor
NOTE:
- Remove the batteries if the remote control is not to be used for a month
or more. Batteries left in the unit may leak and cause damage.
Operation Status Display
Front panel display
8
7
10
These symbols can light up on your DVD recorder display:
1
w
Playback in progress.
1
2 9 3 4 5 6 20 17
PDC
REM
REC
D
DVD
ANGLE
VPS
RW
PBC
12 13 11 14 15 16
NICAM
30°30°
TIMER CLEAR
RETURN
SELECT
TRIM TEST SOUND
SURROUND
LEVEL
FUNCTION
MUTEVOLTV
CH/INPUT
DISC
SYSTEM
MENU
MENU
Within approx.
6 meters
19
HQ
SP
LP
EP
EP
18
2
s
Playback/record interrupted (Pause).
3 VPS/PDC Video Programming System / Programme Delivery Control: A VPS or PDC code will be transmitted for the selected
TV program.
4 REM Displays the Title/Track time remaining
5
A recording (timer) has been programmed.
6 NICAM The DVD recorder has detected a Nicam audio signal.
7 REC Recording in progress.
8
D
Lights when playing a disc recorded with Dolby Digital Audio.
9 dts Lights when playing a disc recorded with DTS.
10 P Lights when progressive video is being output.
11 DVD+RW Displays the type of DVD disc in the recorder: DVD /DVD+R / DVD+RW.
12 ANGLE Displays the angle information of the DVD video disc.
13 PBC Play Back Control.
14 T Displays the current title number (DVD).
15 TR Displays the track selected/played (CD).
16 C Displays the chapter selected/played (DVD).
17 ST During playback a HiFi/2 channel tone was detected or a HiFi/2 channel tone was received.
18 CH Channel/programme number.
19 HQ, SP, LP, EP, EP+ Displays the recording quality selected during recording. Recording qualities HQ, SP, LP, EP or EP+ are shown
on the recorder display.
20
Multi-function display.
6
Page 8
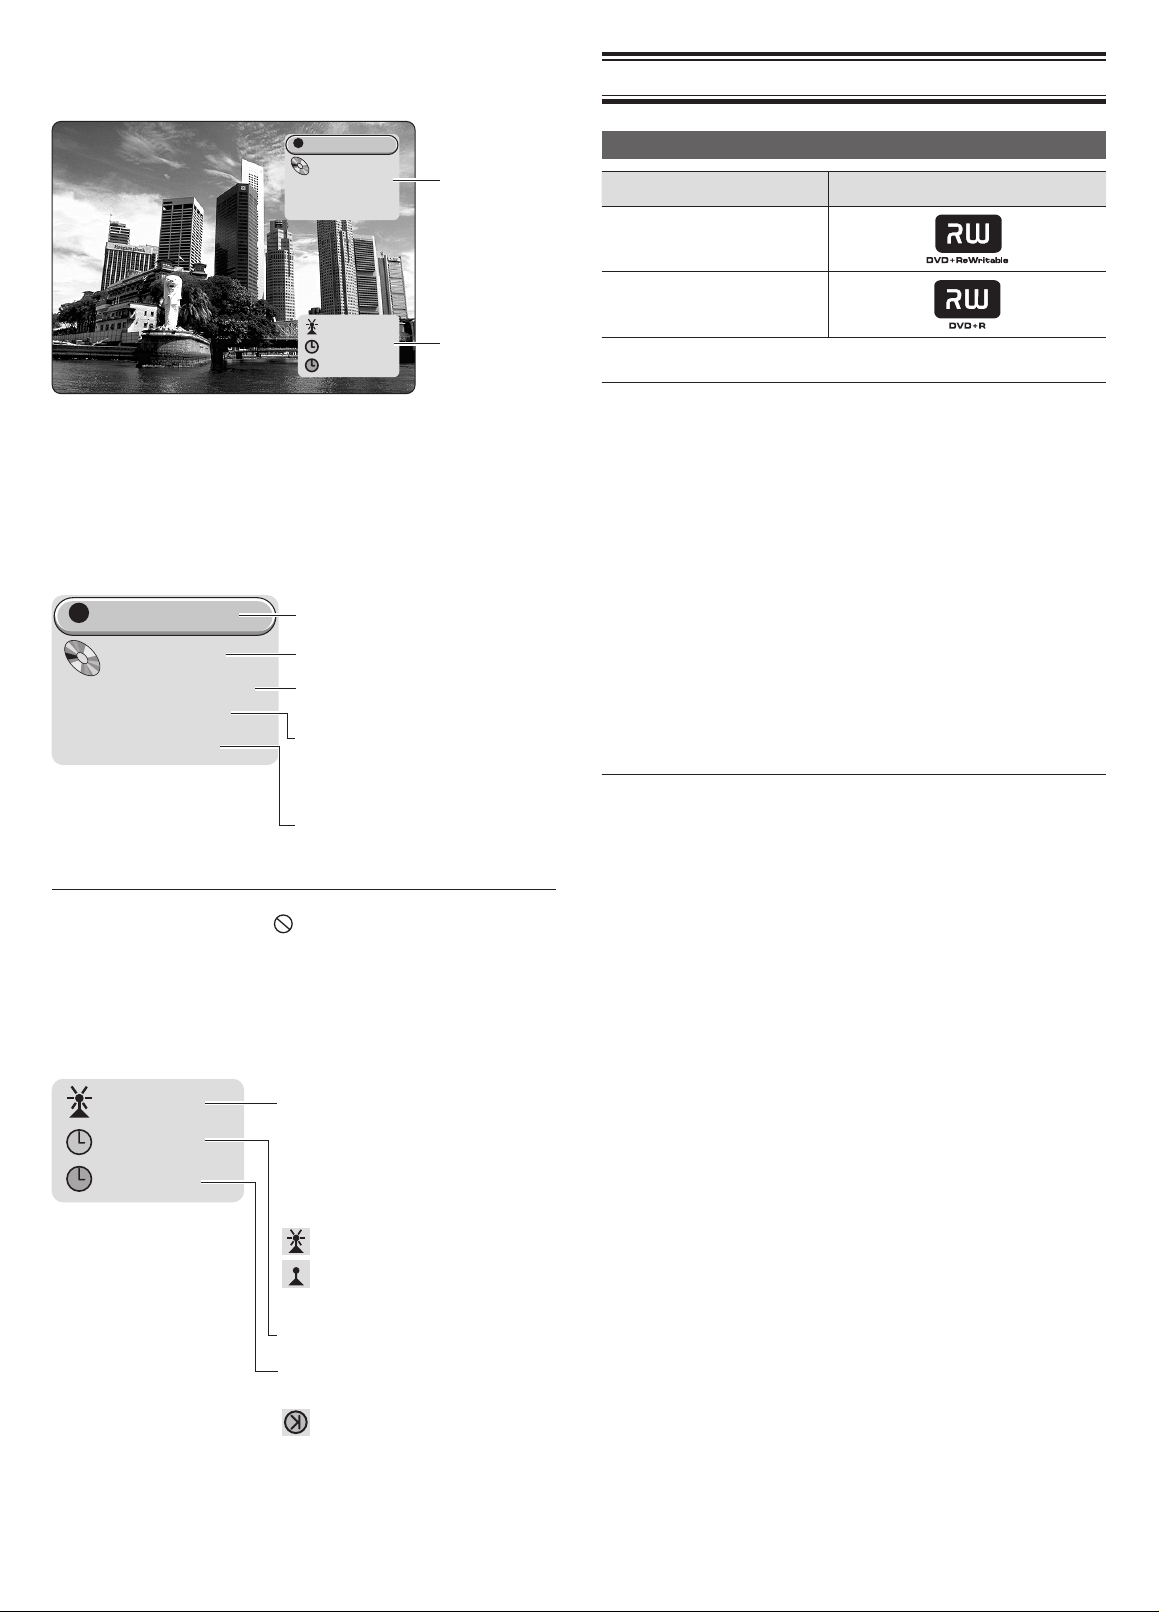
Status display on TV screen
The DVD status is also displayed on the TV screen. The status is displayed
in the Status Display and Channel/Clock Display.
Disc Information
Record
DVD+RW
0:00:13 / 0:29:47
Title 1 : 01/01
OTR 00:30
AV1
23:31
..
..
:
Status Display
When you set “Feature” - “Status Display” at “System Menu” to ON,
the Status Display is displayed for several seconds when the DVD is
operated.
To display the Status Display all the time, press DISPLAY.
Pressing DISPLAY while the Status Display is displayed hides the Status
Display.
The following information is displayed in the Status Display:
Record
DVD+RW
0:00:13 / 0:29:47
Title 1 : 01/01
OTR 00:30
NOTE:
- If an attempt is made to perform an operation that is not supported in
the DVD state at this time, “ ” is displayed to the right of the Status
Display.
Operating mode
Disc type
Time elapsed from start of title/overall
time of title
DVD:Title No.: current chapter No./total number of chapters
CD: Track No.: current track No./total
number of tracks
Play Mode (during playback) or OTR
Status (during recording)
Status Display
Channel/Clock
Display
Recordable Discs
Disc Type Logo Mark
DVD+RW
DVD+R
NOTE:
- Even if the type of the discs is DVD+R/RW, the following discs cannot
be recorded.
Double Layer discs, High Speed discs of 4X speed or faster.
- Only the above types of discs can be recorded on this unit.
DVD-RAM, DVD-RW, DVD-R, CD-R, CD-RW, etc. cannot be
recorded.
- Fingerprints and small scratches on a disc can affect recording and/or
playback performance. Please take proper care of your discs.
- In some cases, you may not be able to add new recordings to DVD+RWs
that contain recordings made on other DVD Recorders or PCs.
Unrecordable pictures
• Pictures with copy protection cannot be recorded on this unit.
• When the unit receives a copy guard signal while recording, the unit
cannot record correctly.
• Only Audio input cannot be recorded without entering a Video signal.
• Video games cannot be recorded.
Important Note:
- SANYO takes no responsibility for recording failure due to power
cuts, defective discs, or damage to the unit, etc.
Channel/Clock Display
The Channel/Clock Display is displayed at the bottom right of the TV
screen. Pressing DISPLAY on the remote control switches between
display/hide of the Channel/Clock Display.
The following information is displayed in the Channel/Clock Display:
AV1
23:31
..
..
:
The channel currently being received
or the currently selected input is
displayed.
When you want to change the input
source from Preset programme to
External input, press ”00”. AV1 will be
selected.
Current channel/selected input.
No signal (TV channel is not
available/additional device is not
connected or is switched off.)
Current time.
Time when the next timer reservation
is begun.
Time when the reservation is closed
during recording.
7
Page 9
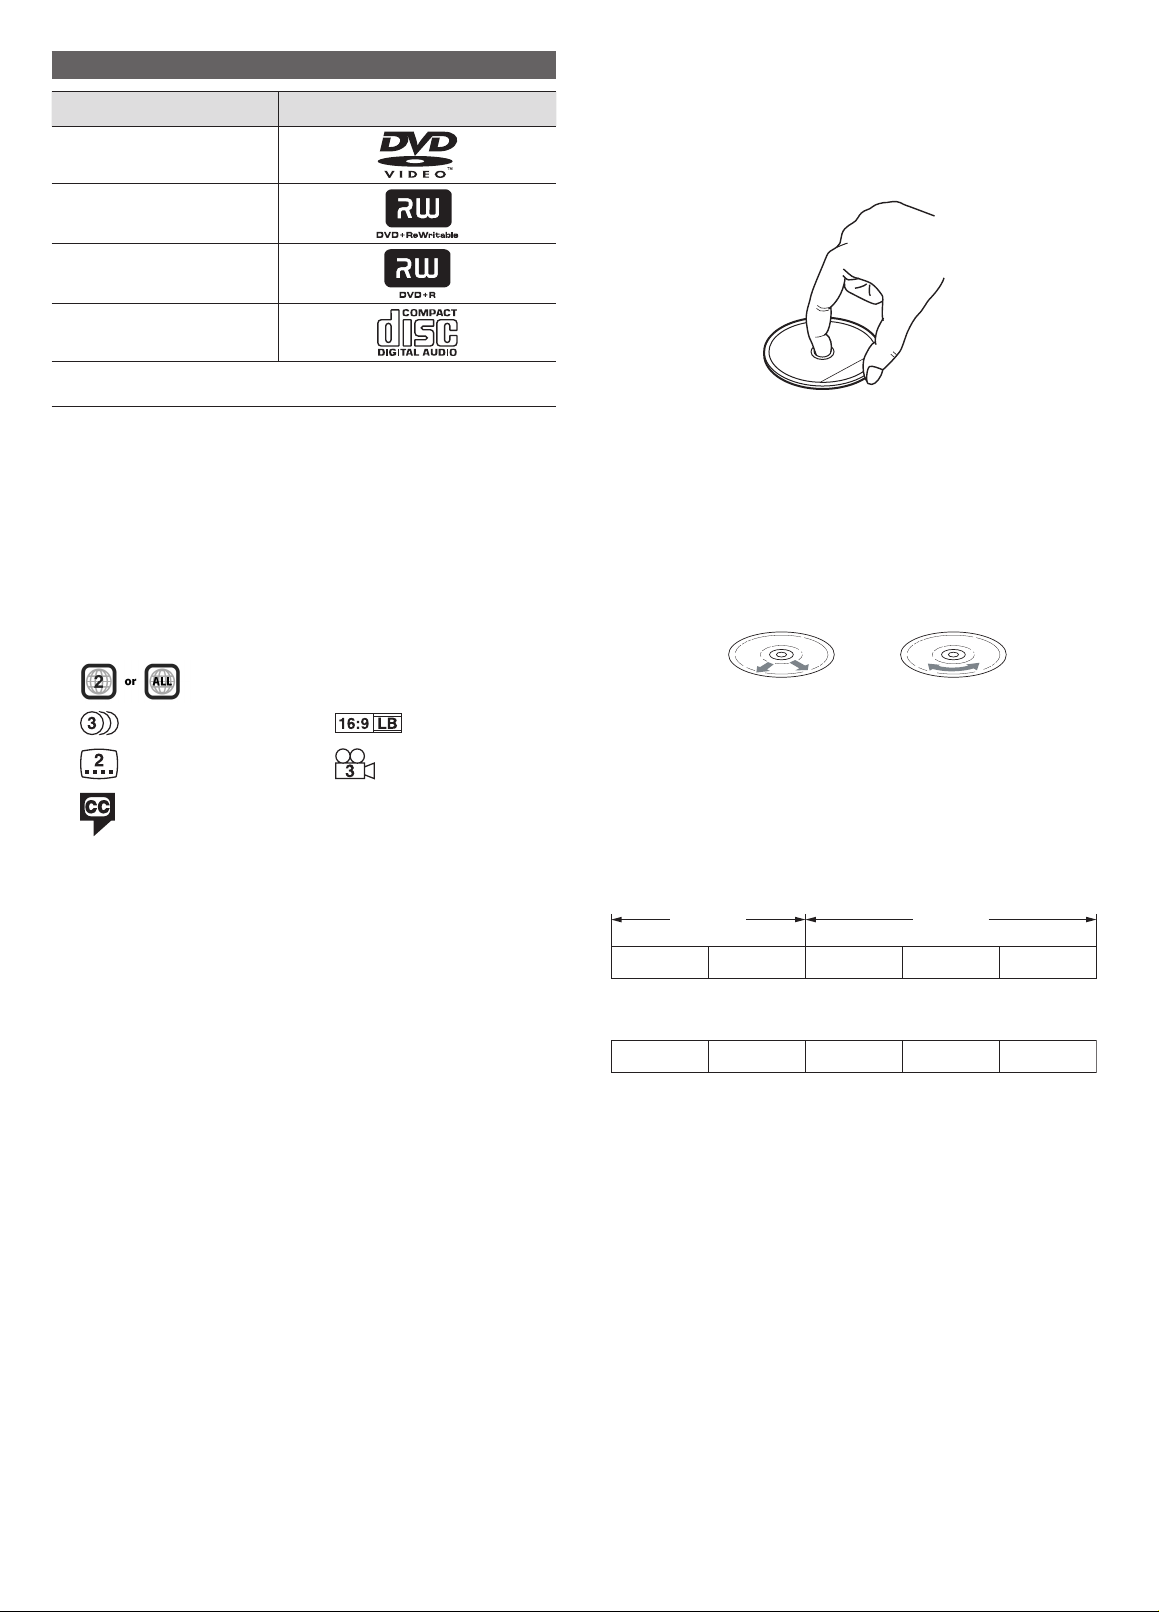
Playable Discs
Y
Disc Type Logo Mark
DVD video
DVD+RW
DVD+R
Audio CD
Notes on handling discs
• Do not expose the disc to direct sunlight, high humidity or high tem-
peratures for extended periods of time.
• Discs should be returned to their cases after use.
• Do not apply paper or write anything on the disc surface.
• Handle the disc by its edge. Do not touch the playing surface (glossy
side).
NOTE:
- Only the above types of discs can be played on this unit.
DVD-Audio, DVD-ROM, DVD-RAM, DVD-RW (VR mode), CD-ROM,
CVD, SACD, etc. cannot be played.
- Region number (Regional restriction code) is built-in to the unit
and DVD discs.There is a region number on the rear of the unit.
DVD video discs having a region code “2” or “ALL” can be played on
this DVD recorder.
- The WMA fi les cannot be played back.
- For MP3. CD, see Page 25.
- For Picture/JPEG CD, see Page 26.
- There are the marks on some DVD disc packages.
Example:
Region number
Multiple languages Multi-aspect
Multi-language subtitles Multi-angle
Closed caption
- Some DVD+R/DVD+RWs cannot be played back depending on the
recording conditions.
- This unit can play back the DVD-R that has recorded movie data as
well. However, some DVD-Rs cannot be played back depending on
the recording conditions.
- The DVD-RW (Video mode) can be played back. However, some DVDRWs cannot be played back depending on the recording conditions.
The DVD-RW (VR mode) cannot be played back.
- This unit is to be used exclusively with the PAL (or NTSC) colour
system discs. SECAM system discs cannot be used with this unit.
• Fingerprints and dust should be carefully wiped off the playing surface
of the disc with a soft cloth.
Wipe in a straight motion from the centre to the outside of the disc.
• Never use chemicals such as record cleaning sprays, antistatic sprays
or fl uids, benzene or thinner to clean discs.
Cleaning discs for high quality recording
Fingerprints and dust should be carefully wiped from the signal surface
of the disc (glossy side) with a soft cloth.
Wipe in a straight motion from the centre to the outside of the disc.
es No
About Titles, Chapters and Tracks
Title
The longest section of a movie or music feature on DVD. Each title is
assigned a title number, enabling you to locate the title you want.
Chapter
Sections of a picture or a music piece on a DVD that are smaller than
titles. A title is composed of several chapters. Each chapter is assigned
a chapter number enabling you to locate the chapter you want.
Title 1
Chapter 1 Chapter 2
Audio CD discs are divided into tracks. Normally, one song is the equivalent
of one track.
Track 1 Track 2 Track 3 Track 4 Track 5
Chapter 1 Chapter 2 Chapter 3
Title 2
This product incorporates copyright protection technology that is protected
by method claims of certain U.S. patents and other intellectual property
rights owned by Macrovision Corporation and other rights owners. Use of
this copyright protection technology must be authorized by Macrovision
Corporation, and is intended for home and other limited viewing uses
only unless otherwise authorized by Macrovision Corporation. Reverse
engineering or disassembly is prohibited.
8
Page 10
INSTALLATION, CONNECTION & SETTING THE CHANNEL
NOTE:
- Do not connect the mains lead to an AC outlet until all connections have been made.
- Please refer to the instruction manuals for the equipments that you are connecting (TV, VCR, Subwoofer and speakers, etc.).
- When you connect the unit to your TV and other equipment, be sure to turn off the power and disconnect all of the equipments from the AC outlet
until all the connections have been made.
Follow the procedure below to prepare to use the DVD recorder.
Connect to a TV and various AV equipment. (See pages 9 to 13.)
L
Start initial setting by connecting the Mains Lead. (See page 14.)
L
Set the language and initial settings. (See page 14.)
L
Automatically set the channel. (See page 15.)
L
Set the clock. (See page 15.)
L
Manually set the channel. (See pages 15 to 16.)
Connecting to a TV and Various AV Equipment
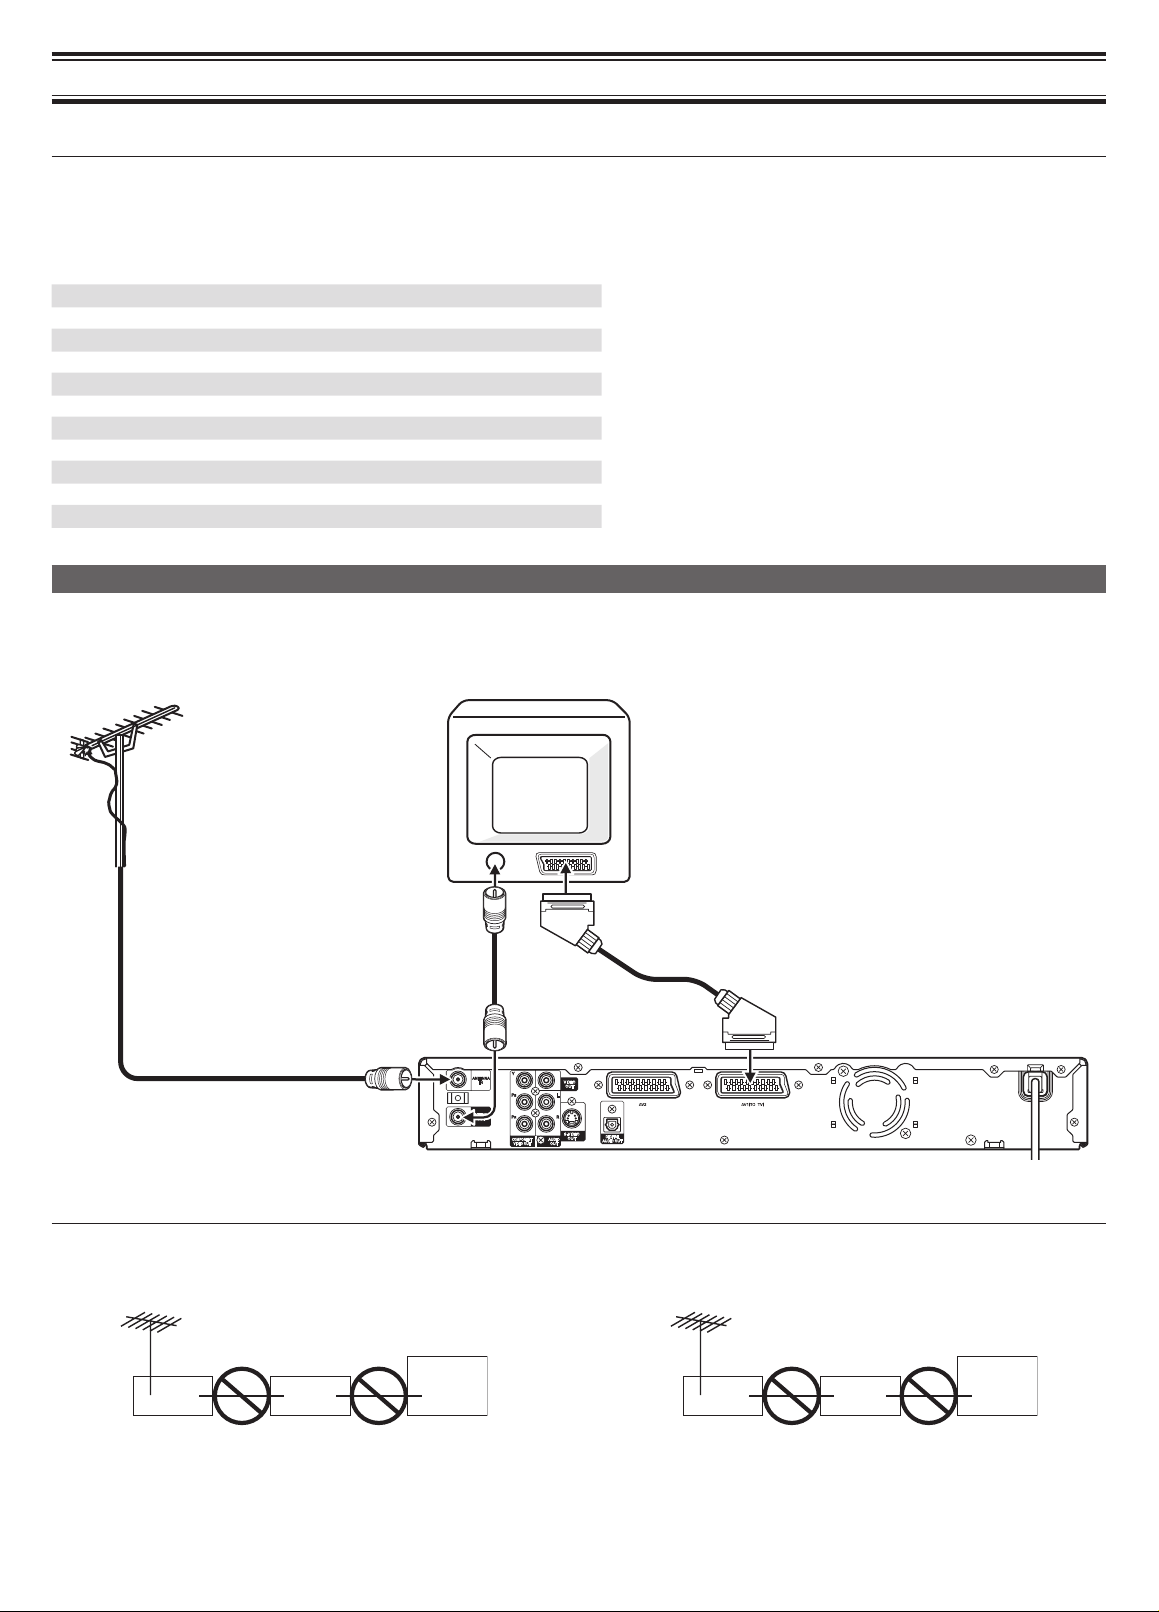
Connecting to a TV
Aerial and TV connections
TV
Aerial
To RF input
Aerial lead
(not supplied)
NOTE:
- When the DVD recorder is connected by the SCART socket connector cable, the VIDEO OUT or S-VIDEO OUT socket connection is not necessary.
- Do not connect the aerial and VCR as shown below.
Aerial lead
To SCART socket
SCART lead
(not supplied)
VCR DVD recorder TV DVD recorder VCR TV
9
Page 11
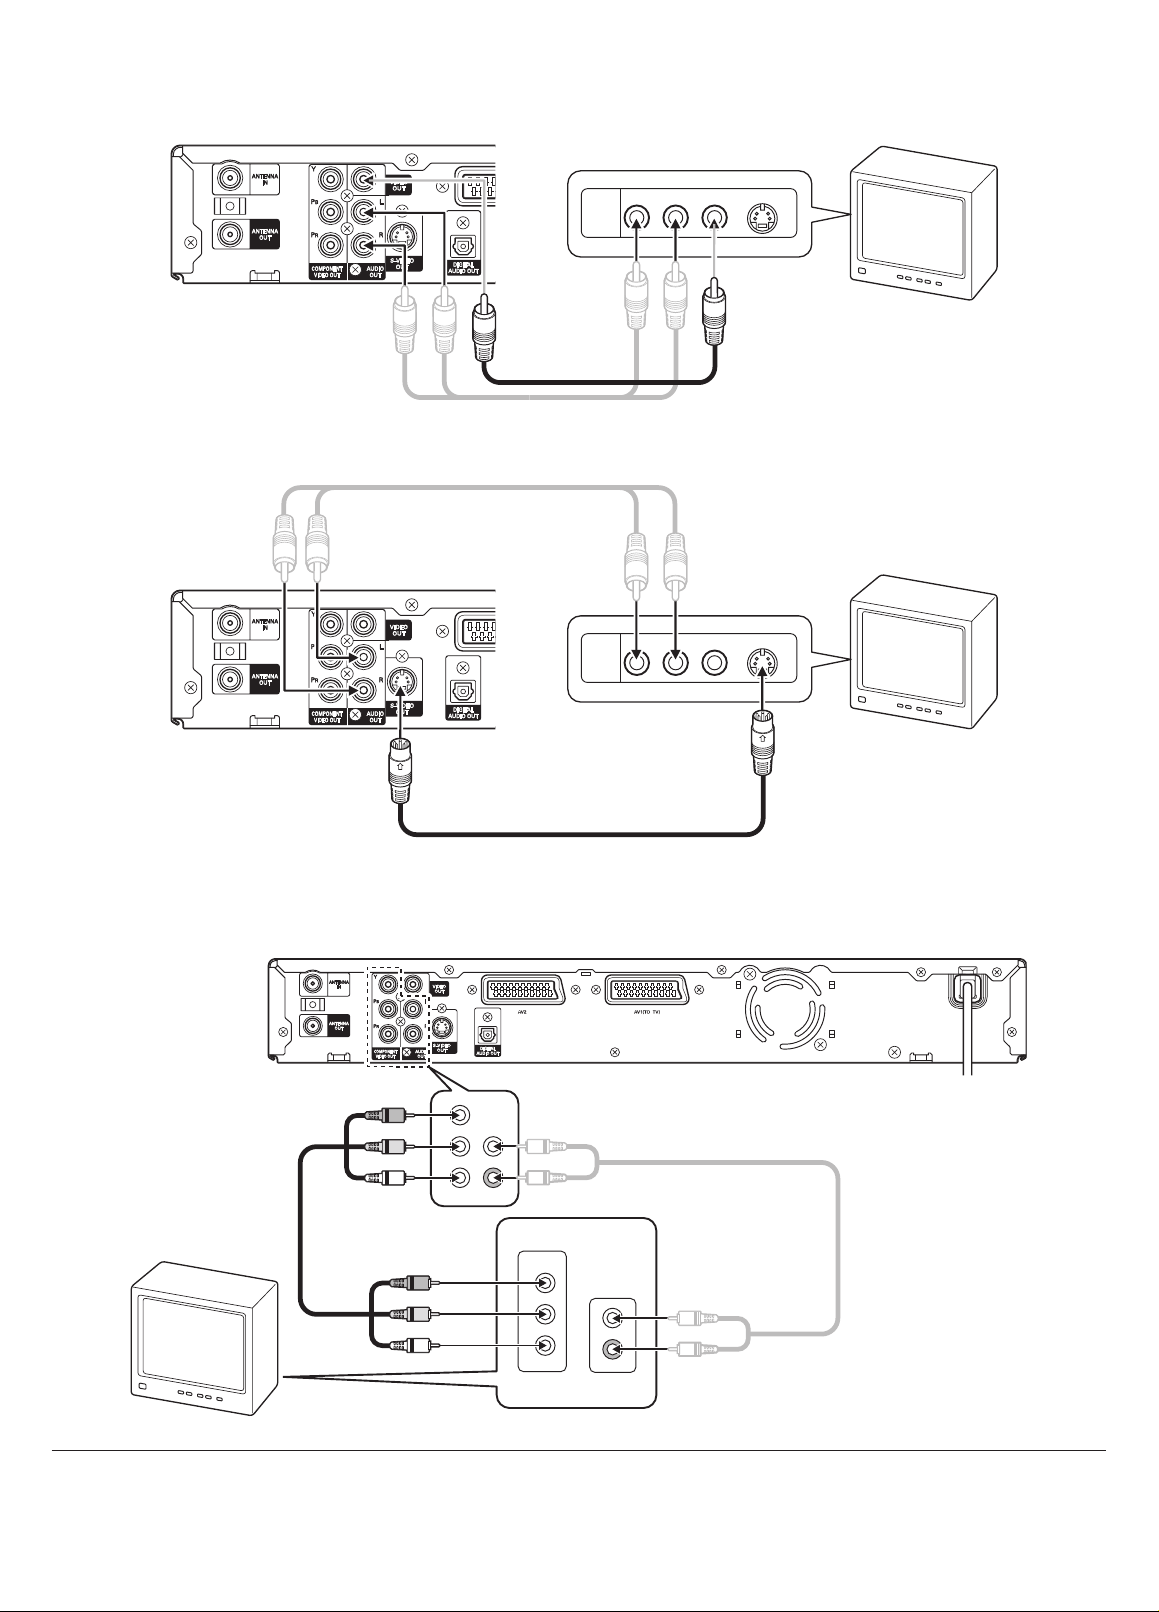
When connecting to a TV without a SCART terminal
Connection without using the SCART socket cable
Connecting to a TV with the audio and video leads.
If your TV has a video input socket, connect the unit as shown.
AUDIO
VIDEO
INPUT
1
R-AUDIO-L VIDEO
S-VIDEO
Video lead
Audio lead (not supplied)
Connecting to a TV with an S-video and audio leads
If your TV has an S-video input socket, connect the unit as shown. You can enjoy clearer picture play. (The VIDEO OUT socket connection is not TV.)
Audio lead (not supplied)
AUDIO
VIDEO
INPUT
1
R-AUDIO-L VIDEO
S-VIDEO
S-video lead (not supplied)
When connecting to a TV with a component video input terminal
If your TV has Component Video inputs, you can enjoy superior picture quality.
Use component cables (not supplied) to connect the COMPONENT output on the unit to the COMPONENT input on the television.
In this confi guration, the Red and White audio connections are required.
Y
L
R
Component video lead
PB
PR
(not supplied)
TV
COMPONENT IN
Y
AUDIO IN
PB
PR
L
R
Audio lead
(not supplied)
NOTE:
- The DVD recorder DVR-S120 can be used connected to a progressive video-compatible TV or display.
In this case, change the YUV Output item from “Interlace” to “Progressive” referring to “TV Screen Settings” at “DVD Recorder Settings”.
(See page 31.)
- Change Video Output in setting items related to Video in the System Menu to “S-video + YUV” or “Video + YUV”. (See page 31.)
- When using component connections, please remove all other video output connections.
10
Page 12
Connecting a satellite receiver
For Digital Cable and Satellite TV users please connect your decoder’s output to this unit’s input.
Use a SCART cable (not supplied) to connect the AV2 (Scart socket) on this unit to the SCART OUT socket on the satellite receiver.
Satellite Receiver
SCART lead
(not supplied)
DVD Recorder
NOTE:
- While viewing the images from the Satellite Receiver on the TV screen, TV images will disappear when DVR-S120 turns on.
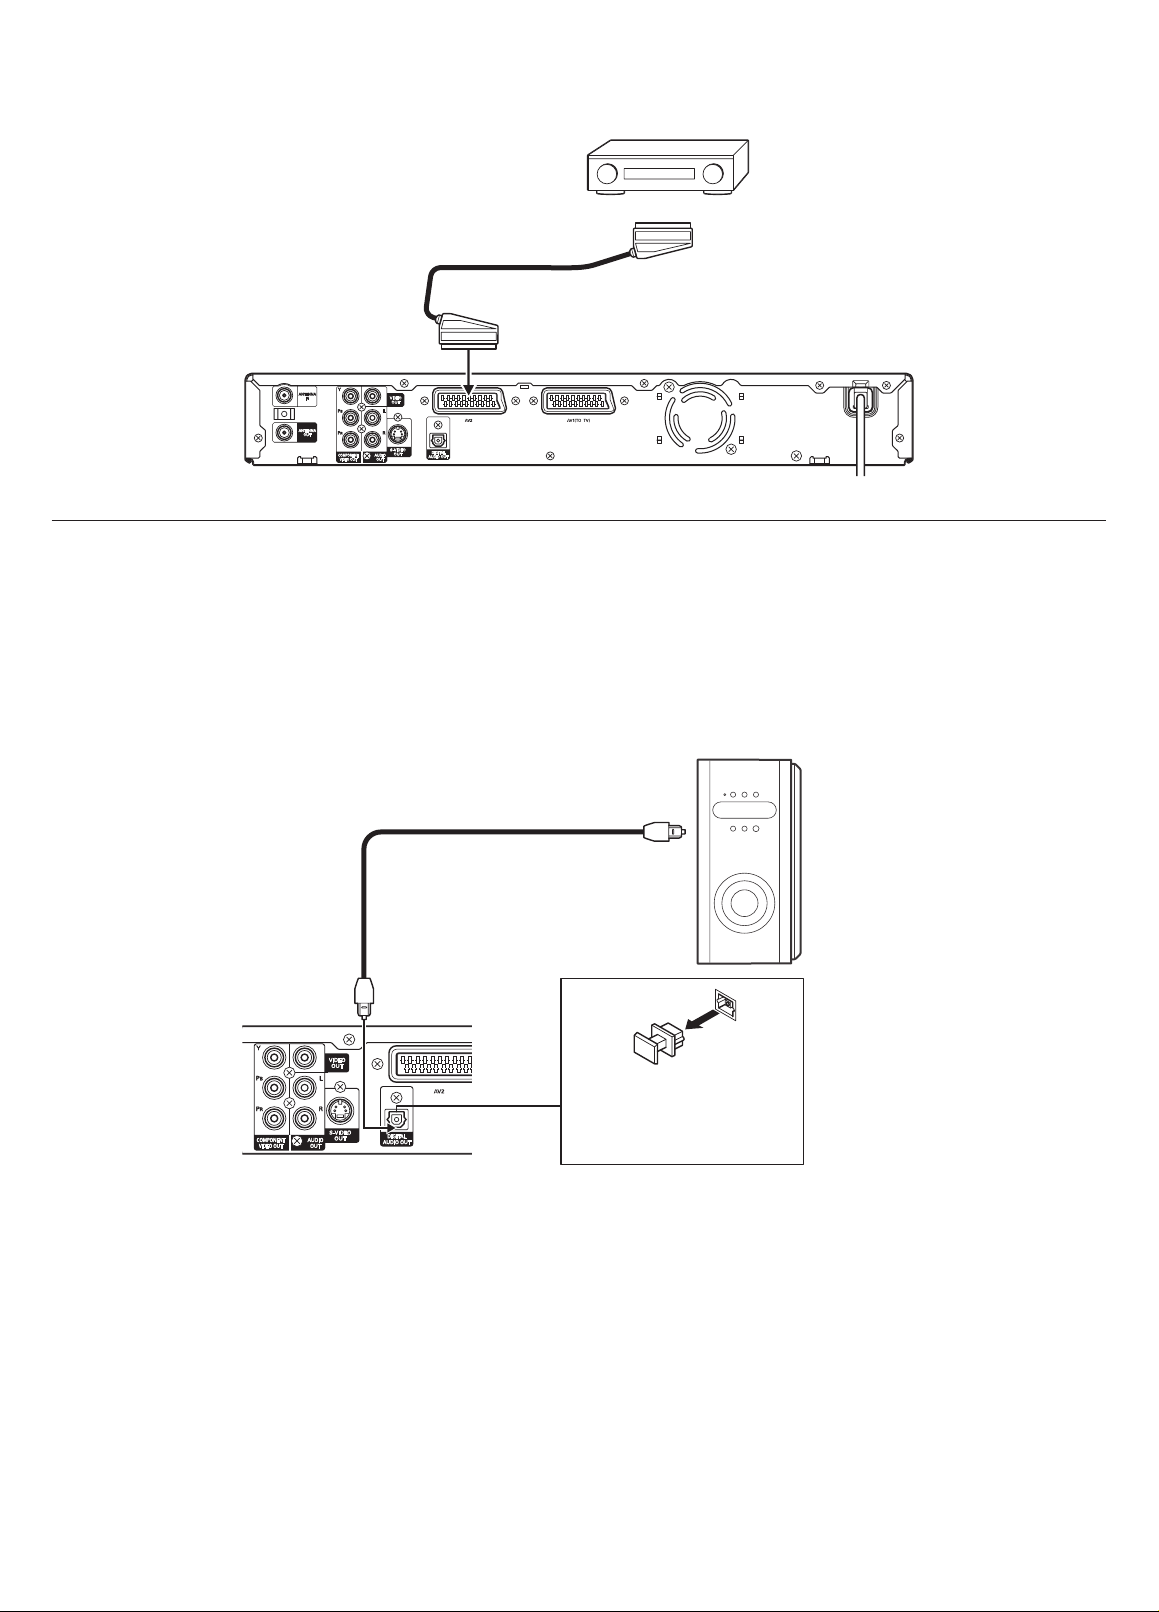
Connecting audio equipment
As an alternative to using the TV’s speakers, the sound can also be played back through a digital or analog amplifi er.
Connecting to a digital audio device
Connect an amplifi er with Dolby Digital and DTS decoders to enjoy surround sound.
Use a fi ber-optic cable (not supplied) to connect the DIGITAL OUT OPTICAL (digital optical output) on the unit to the digital optical input on a stereo
amplifi er or a receiver. Before connecting, remove the protective cap on the optical lead plug.
Powered
To digital audio input
Optical lead
(not supplied)
Before connecting, remove
the protective cap from the
socket. Replace the cover
when the socket is not in use.
Manufactured under license from Dolby Laboratories.
“Dolby” and the double-D symbol are trademarks of Dolby Laboratories.
“DTS” and “DTS Digital Out” are trademarks of Digital Theater Systems, Inc.
subwoofer
ASX-HT120W
11
Page 13

Connecting to a tape deck
p
Use an audio cord to connect the AUDIO OUT on the unit to the audio input on a tape deck.
L
R
Audio lead
(not supplied)
LINE IN
L
R
Ta
e deck
Connecting to a video deck and other recording equipment
Video images from other video equipment can be recorded on the DVD recorder, and video images on the DVD recorder can be recorded on other
video equipment.
Connection for recording video images on the DVD recorder to other video equipment
You can use this unit as a source player or as a recording deck.
Connect a VCR or similar recording equipment to the AV2 (SCART), S-VIDEO OUT, or VIDEO OUT sockets.
NOTE:
- When using the AV2(SCART) as a connecter, you can only record the contents on a disc when playing back on a DVD recorder, to other recording
equipment.
VCR, etc.
SCART lead
(not supplied)
VCR, etc.
AUDIO
VIDEO
INPUT
1
R-AUDIO-L VIDEO
S-VIDEO
Audio/Video lead (not supplied)
12
Page 14

When connecting a VCR, etc. having an S-video terminal, connect by an S-video lead.
Audio lead (not supplied)
VCR, etc.
AUDIO
R-AUDIO-L VIDEO
VIDEO
INPUT
1
S-video lead (not supplied)
Connection for recording video images from other video equipment on the DVD recorder
S-video lead
(not supplied)
A/V
OUTPUT
SOCKETS
S-VIDEO
VIDEO
AUDIO
R
L
DV camcorder,etc.
Audio lead
(not supplied)
S-VIDEO
A/V
OUTPUT
SOCKETS
S-VIDEO
VIDEO
AUDIO
DV camcorder,etc.
R
L
Audio/Video lead (not supplied)
Open the lid.
Connecting to a DV camcorder
You can use this unit to record from a DV camcorder when connected with a 4-pin DV lead (not supplied).
Connect a DV camcorder or similar recording equipment to this unit as shown.
DV camcorder,etc.
DV
OUT
DV lead
(not supplied)
Open the lid.
NOTE:
- When a disc tray is opened, DV-IN can not be selected.
Open the lid.
13
Page 15

Connecting the Main Lead
After all connections have been made, connect the mains lead to an
AC outlet.
When the power supply is connected for the fi rst time, the initial setup
screen will automatically be displayed.
Follow the on-screen instructions to make the initial settings.
NOTE:
- If the initial setup screen is not displayed, turn the power OFF, and
connect the main lead to an AC outlet with the power button o
held down. Hold down the power button o until the setup screen
is displayed.
- At the time, turn the power off the other equipment connected to AV2.
(When the equipment connected to AV2 is on, the above operation
may not work.)
Setting Item Explanation
TV Shape Set the aspect ratio (shape) of your TV’s screen. When
you press the k button, the selection items are
displayed. Select the desired item using 8 or 2, and
press the k button.
4:3 LB: Select this when a standard size TV is
connected. When a wide-screen image
(16:9) is played at this setting, black bands
(letterboxes) appear at the top and bottom
of the screen.
Initial Settings
First, set the language and make the settings on the TV currently connected.
1. Select the item to be changed using 8 or 2, and change the settings.
Press Choose Settings.
Audio
Subtitle
Menu
Country
TV Shape
Setting Item Explanation
Audio Set the DVD audio language. When you press the
k button, the selection items are displayed. Select
the desired item using 8 or 2, and press the k
button.
Subtitle Set the DVD subtitle language. If subtitle language
is not available, the DVD recorder picks the fi rst
available language.
When you press the k button, the selection items
are displayed. Select the desired item using 8 or 2,
and press the k button.
English
Off
English
Austria
4:3 LB
Press SYSTEM to Continue
OK
4:3 PS: Select this when a standard size TV is con-
nected. When a wide-screen image (16:9)
is played at this setting, the left and right
edges of the image are not displayed.
16:9: Select this when a wide-screen TV is con-
2. When you have fi nished the settings, press SYSTEM MENU to
advance to automatic setting of the reception channel.
Cut off Cut off
nected. Also set the TV to wide screen.
Menu Set the menu display language.
When you press the k button, the selection items
are displayed. Select the desired item using 8 or 2,
and press the k button.
Country Choose the country that uses this DVD recorder.
When you press the k button, the selection items
are displayed. Select the desired item using 8 or 2,
and press the k button.
14
Page 16

Auto-setting the channel
1. The following screen is displayed. Check the antenna connection and
press the k button.
Connect Antenna
Please Connect
Your Antenna Now!
Press OK to Continue
2. The automatic TV channel search starts and a progress bar is shown.
This allows the DVD recorder to save all available TV channels. This
procedure may take several minutes.
Auto Install Channels
Please Wait... Searching for Channels.
00 Channels Found
Manually Setting the Reception Channel
In some cases, not all of the available TV channels may have been found
and stored during initial installation. In this case, you will need to search
for and store the missing or coded TV channels manually.
Displaying the channel setup screen
1. Turn the TV on and select input from the DVD recorder. (For details
on operation methods, refer to your TV’s manual.)
2. Press SYSTEM MENU to display the System Menu.
3. Select “Setup” using 8 or 2, and press 6 once. The setting items
at “Setup Options” on the right of the screen can now be selected
using 8 or 2.
Setup Options
Auto Install
Manual Search
Sort TV Channels
Date and Time
Press OK to Select or "Left Arrow" to Exit
In this screen, set the reception channel by the following procedure.
CLEAR to Cancel, STOP to Save
NOTE:
- To cancel automatic setting of the channel, press e. Advance to step
3.
3. When the bar is displayed to the right side, press SYSTEM MENU
to advance to the clock setup.
Auto Install Channels
10 Channels Found
Press SYSTEM to Save and Exit
Setting the Clock
1. Press 4 or 6 to move to the item (Day, Month, Year, Time) to enter,
and press the 8 or 2, or 0 to 9 number buttons to set the time.
Set Date and Time
Day
Date
Time
Press SYSTEM to Save and Exit
Month Year
//
01 01
:
01 01
20
05
Manual Search
L
Sort TV Channels Sorting the TV Channels.
Manual Channel Search, here you can choose
and install channels of interest.
Manually setting the channel
Perform the following operation in the Setup Option screen.
1. Select “Manual Search” using 8 or 2 and press the k button.
Setup Options
Auto Install
Manual Search
Sort TV Channels
Date and Time
Press OK to Select or "Left Arrow" to Exit
2. Specify whether to set the channel by frequency or channel No.
Manual Channel Search (Page 1)
Channel/Freq.
Entry/Search
Program #
Channel Name
Press OK to Select or "Left Arrow" to Exit
NOTE:
- “Freq.”: Select this to set the channel by frequency.
- “Program”: Select this to set the channel by channel No.
- “S-Channel”: Select this to set the channel by special channel when
you are using your TV with cable TV, for example.
Freq.
0.0
OK
1
2. To end setting, press SYSTEM MENU.
Make sure that the time is displayed correctly on the front panel.
NOTE:
- After Clock is set, the power will be turned off(standby) automatically.
15
Page 17

3. The search for channels that can be received begins from the smallest
frequency or channel No. of the channel displayed at “Entry/Search”
and increases upwards to larger values.
When the desired channel is found, changing of the number value
comes to a stop. Press 2 to advance to the “Programme #” item.
4. At the “Programme #” item, specify which channel on the TV the
reception channel specifi ed in step 3 is to be viewed.
Using 4 or 6 in “Programme # “, select the programme number you
want to use for the TV channel, e.g. “01”.
NOTE:
- Programmes cannot be reserved correctly if you do not make the
correct settings.
5. Enter the name of the channel to display on the TV screen. Select the
“Channel Name” item using 8 or 2, and press the k button.
Decide on the position to enter the text using 4 or 6, and enter text
using 8 or 2.
When you have entered the name, press the k button.
6. When you press NEXT f with the “Channel Name” item selected,
the following screen is displayed. Select the item to be changed using
8 or 2, and change the settings.
Manual Channel Search (Page 2)
Decoder
NICAM
Fine Tuning
Off
Off
OK
Arranging and Deleting Channels
After you have performed the automatic channel search, you may not
agree with the sequence in which the individual TV channels have been
allocated to the programme positions (programme numbers). You can use
this function to rearrange the TV channels already stored or to delete TV
channels you do not want or those with poor reception.
NOTE:
- The teletext clock resets automatically.
If you store a TV channel which transmits TXT/PDC on programme
number “P01”, the date and time will automatically be transmitted
and constantly updated. As a result, the changes from summer time
to winter time and back again will be made automatically.
Perform the following operation in the Setup Option screen.
1. Select “Sort TV Channels “ using 8 or 2 and press the k but-
ton.
Setup Options
Auto Install
Manual Search
Sort TV Channels
Date and Time
Press OK to Select or "Left Arrow" to Exit.
2. The following screen will be displayed. In this screen, arrange or
delete channels.
Press PREVIOUS for Page 1 of Options.
Press SYSTEM to Save and Exit.
Decoder Sets whether or not to use a decoder to receive
this channel.
When you press the k button, the selection
item is displayed. Select the desired item using
8 or 2, and press the k button.
NICAM Sets whether or not to select NICAM.
When you press the k button, the selection
item is displayed. Select the desired item using
8 or 2, and press the k button.
Fine Tuning
NOTE:
- When you press PREV d, the screen returns to “Manual Channel
Search (Page 1)”. In this screen, you can change the details you are
currently setting.
7. Press SYSTEM MENU to save the settings, and return to the Setup
Options screen.
8. Repeat steps 1 to 7 of this procedure for all of the channels you want
to set.
After pressing the k button, fi ne-tune the
reception state using 4 or 6 while viewing the
TV screen. When you have fi nished adjusting,
press the k button.
Sort Channel List
P:04
P:05
S.P: 001 BBB
P:06
P:07
P:08
Press OK to Select Channel to Move
Press CLEAR to Delete a Channel
Press SYSTEM to Save and Exit.
Program# Reception channel Channel name
Rearranging the order of channels
First of all, select the channel you want to re-arrange using 8 or 2, and
press the k button.
Next, move to the position where you want to move the channel to using
8 or 2, and press the k button. This re-arranges the order of the
channel.
Deleting TV channels
You can delete channels you do not want to receive. Select the desired
channel using 8 or 2, and press CLEAR.
3. Repeat step 2 for all of the channels you want to change.
4. When you have fi nished changing the settings, press SYSTEM MENU
to save the settings.
16
Page 18

RECORDING
Recording Programmes during Reception
1. Turn the TV on and select input from the DVD recorder. (For details
on operation methods, refer to your TV’s manual.)
2. Press o button. (It takes time to enter the condition the power
supplied.)
3. Press rOPEN/CLOSE to open the disc tray, and place the disc with
the label facing up on the disc tray.
3. Press rOPEN/CLOSE.
The disc tray closes, and "READING" is displayed on the front panel
to indicate that the disc is being checked.
If a disc ready for recording has been loaded, the display on the front
panel or on the TV screen changes as follows.
“NO DATA” on front
panel
Index screen is displayed
on TV and fi nal line be-
comes “Empty Title”
NOTE:
- When the menu contained on the disc is displayed or playback starts,
this means that the disc is not recordable. Reload with a recordable
disc.
- When "No More Titles Available" is displayed, this means that titles
(including empty titles) exceeding 48 have been saved to disc. Either
delete titles, or replace the disc.
This is displayed for a brief fl ash when
an empty new disc is loaded.
You have loaded an already recorded
DVD+RW disc, or an already recorded DVD+R disc that has not been
fi nalised.
6. Repeatedly press REC MODE to specify the recording mode (picture
quality).
HQ High Quality About 60 minutes can be
recorded to disc (4.7GB).
SP Standard Play About 120 minutes can be
recorded to disc (4.7GB).
LP Long Play (S-VHS quality) About 180 minutes can be
recorded to disc (4.7GB).
EP Extended Play (better than
VHS quality)
EP+ Extended Play (VHS picture
quality)
7. Press TV to switch to the DVD recorder tuner.
8. Press CH/INPUT + or - to select the channel to record.
9. Press RECq to start recording.
During recording, the following information is displayed on the front
panel.
Remaining time (hours : minutes : seconds)
Recording in progress display
REM
VPS
PDC
REC
DVD
RW
Type of disc
Cancelling (pausing)/resuming recording
When you press PAUSE s during recording, recording is paused, and
"Pause Rec" is displayed on screen.
Use this feature, for example, to prevent commercials from being
recorded.
To resume recording, press RECq.
Title No.
Chapter No.
About 240 minutes can be
recorded to disc (4.7GB).
About 360 minutes can be
recorded to disc (4.7GB).
Recording mode
SP
Stereo audio
5. When the disc menu is displayed, move to “Empty Title” by 8 or 2,
and make sure that there is enough free space on the disc.
AV1
01.01.05 0:00:25 SP
Empty Title
Free space on disc
(time)
NOTE:
- When a blank disc is inserted, the Disc Menu is not displayed on the
TV screen. The TV screen returns to the screen of the broadcasting
station that was being received or the currently selected external
input.
Proceed to the next step 6 as it is.
- With DVD+RW discs, you can also overwrite titles that have already
been recorded to disc. For details on overwrite recording, see “Inserting
New Recording on a DVD+RW” on page 22.
1:53:03 SP
Marking screens during recording
During recording it is possible to mark scenes that you want to see or
hide later. During recording press EDIT at the relevant location. The
screen displays “Inserting Chapter Marker”. The “CHAPTER” number is
increased by one in the Status Display. Press DISPLAY to display the
Status Display on the screen.
Ending recording
Press e to end recording.
When a recording is made to disc, the following additional information is
also stored at the beginning of the recording:
• Name of the recording. If the TV station does not transmit a name, only
the channel number and time will be stored as the name
• Length of the recording
• Record type (Quality)
• Date of the recording
• Index picture of the recording
When recording is ended, this information is displayed in the index
screen.
Name of the recording
Length of the recording
AV1
01.01.05 0:00:25 SP
Date of the recording
Record type (Quality)
17
Page 19

To One Touch Recording (OTR)
The power can be automatically turned off after recording for the specifi ed
time without setting timer recording. DVD recorder will automatically switch
off after ending recording.
When you press RECq during recording, you can increase the recording
time 30 minutes at a time. The DVD recorder will automatically switch
off after recording ends.
NOTE:
- OTR does not work when there is not 30 minute’s worth of recordable
space.
- To cancel the recording time that you have set repeatedly press
RECq until the time at the bottommost line of the Status Display is
no longer displayed.
- When the disc runs out of free space during recording, the setting
for automatically turning the switch off after recording ends becomes
invalid, and the power cannot be turned off.
- To cancel the recording time that you have set
Press CLEAR while the recording time is displayed.
To watch the TV during recording
To watch TV on the TV tuner while the programme is being recorded,
press the TV/DVD button to switch to the TV tuner so that you can watch
the TV programme.
NOTE:
- The TV switch can be turned off if you are not going to watch TV
during recording.
Timer Recording
This feature allows you to automatically record at a specifi ed date and
time. Up to eight reservations can be made on the DVD recorder.
There are two timer recording modes, timer recording by “Video Plus+
code” and timer recording by entering a programme No. and recording
date and time.
VIDEO Plus+ and PlusCode are registered trademarks of Gemstar
Development Corporation. The VIDEO Plus+ system is manufactured
under license from Gemstar Development Corporation.
NOTE:
- Set the DVD recorder's clock in advance.
Timer recording by “Video Plus+ code”
Most TV programmes can be recorded easily in the recording screen by
the nine-digit Video Plus code assigned to that program. As the information
to be set for timer recording is contained in the Video Plus+ code, there is
no need to enter a date, programme No., and start and end times.
1. Turn the TV on and select input from the DVD recorder. (For details
on operation methods, refer to your TV's manual.)
2. Press TIMER to display the TIMER screen.
3. Select “Video Plus+” using 8 or 2, and press the k button.
Timer
Video Plus+
Timer Setup
Timer List
To Exit Press TIMER
4. Input the recording timer information.
:
SP
None
Video Plus+
:
:
:
Enter Code
:
:
Record Mode
Repeat
VPS/PDC
Confirm Programming
:
:
:
To Exit Press TIMER
Code
Enter the Plus Code with 8 or 2 or with the number
buttons 0 to 9. This number can be found next to the
start time of the TV programme in your TV listings
magazine. e.g.: 5-312-4 or 5 312 4.
Record mode Select the recording mode (picture quality). When you
press the k button, the menu is displayed. Select
the desired recording mode using 8 or 2.
Repeat
When you press the k button, the menu is displayed.
Choose “None” using 8 or 2.
"Mo-Fr": Repeated daily recordings from Monday
to Friday.
"Weekly": Repeated weekly recordings (every week
on the same day).
NOTE:
- When the timer preset with Video+ code, “MoFr” and “Weekly” timer programme can not be
selected.
VPS/PDC Select this setting when using VPS/PDC. Each press
of the k button selects or deselects this setting.
18
Page 20

NOTE:
- What is “VPS/PDC?”
“VPS” (Video Programming System) and “PDC” (Programme Delivery
Control) are mechanisms for controlling start of recording and the
continuation time according to signals that arrive from the TV station. These control mechanisms allows reserved programmes to be
recorded on time even if programmes start earlier or later than the
reserved scheduled times.
The times listed in TV guides are either VPS or PDC times.
To start recording at times different from “VPS/PDC”, turn “VPS/PDC”
off.
- VPS/PDC features are enabled for individual programmes to be
recorded. To continuously record two or more programmes by “VPS/
PDC” on a certain channel, reserve each recording individually.
5. Move to the “Confi rm Programming” item using 8 or 2, and press
the k button.
Enter Code
123456789
Record Mode
Repeat
VPS/PDC
Confirm Programming
To Exit Press TIMER
6. The “Timer Setup” screen is displayed. Move to the “Confi rm program-
ming” item using 4 or 6, and press the k button.
Video Plus+
SP
None
8. Press TIMER to return to the “Timer” screen, and press TIMER
again to end timer recording. The timer programme recording time
is displayed on the Channel/Clock Display.
AV1
10:48
21:00
9. Load a DVD+R/RW (unprotected) ready for recording.
NOTE:
- Load a disc with enough free space for recording the programme.
10. Press o to turn the DVD recorder off.
Recording is automatically started when the timer reaches the recording
time.
NOTE:
- lights on the front panel to indicate that the DVD recorder is set
for timer recording.
- When there is not enough free space for recording the entire programme on the disc, the programme will be recorded to free space,
and recording will end halfway through the programme.
Timer Setup
Program
Time
Record Mode
Repeat
VPS/PDC
7. The “Timer List” screen is displayed. Check the reserved details.
Date
07/04 AV2 SP21:00/23:00
Press OK to Edit Entry,CLEAR to Delete
Insert Recordable Disc and Press /ON to Start Recording
NOTE:
- To change the reserved details, select the line to change using 8
or 2, and press the k button. (When making the 5th reservation
onwards, the second page of the reserved details list is displayed
by repeatedly pressing 2.) The display returns to the "Timer Setup"
screen. Here, set the reserved details again.
- Select a line that has not been entered, and press the k button.
The display returns to the "Timer Setup" screen. Here, you can reserve
a different programme.
- Reservations can also be deleted. For details on operation methods,
see page 21.
50
Start
08 41 09 36
::
Confirm Programming
To Exit Press TIMER
Ch. Mode
Start / End
Total Recording Time: 02:00
To Exit Press TIMER
Date
SP
None
14 04
End
Timer List
VPS/PDC
19
Page 21

Timer recording without using “Video Plus+ code”
1. Turn the TV on and select input from the DVD recorder. (For details
on operation methods, refer to your TV’s manual.)
2. Press TIMER to display the TIMER screen.
NOTE:
- When the clock has not been set, the "Set Date and Time" screen will
be displayed. Move the entry item using 8 or 2, set the clock using
8 or 2, or the 0 to 9 number buttons, and press SYSTEM MENU.
(For details on operation methods, see page 15.)
5. Move to the "Confi rm Programming" item using 8 or 2, and press
the k button.
The "Timer List" screen is displayed. Check the reserved details.
Timer List
Ch. Mode
Date
20/04 AV2 SP21:00/23:00
Sat 02 LP21:00/22:45
Mo-Fr
Start / End
AV-3-S
VPS/PDC
LP06:00/06:30
3. Select “Timer Setup” using 8 or 2, and press the k button.
Timer
Video Plus+
Timer Setup
Timer List
To Exit Press TIMER
4. Move to the item to enter using 4 or 6, and enter the information
for recording.
Timer Setup
Program
Time
Record Mode
Repeat
VPS/PDC
BBC1
Start
21 00 22 00
::
Confirm Programming
Date
SP
None
20 04
End
To Exit Press TIMER
Program
Date
Select the channel or input using 8 or 2.
Enter information with 8 or 2 or with the number buttons
0 to 9.
Start
Time
End Time
Enter information with 8 or 2 or with the number buttons
0 to 9.
Enter information with 8 or 2 or with the number buttons
0 to 9.
Record
Mode
Select the Record Mode. For details on the type of Record
Mode, see page 17.
Repeat Select either of the following to repeatedly record the same
programme. When you press the k button, the menu is
displayed. Select the desired setting using 8 or 2.
“Mo-Fr”: Repeated daily recordings from Monday to
Friday.
“Weekly”: Repeated weekly recordings (every week on
the same day).
VPS/PDC Select this setting when using VPS/PDC. Each press of
k selects or deselects this setting.
Total Recording Time: 04:15
Press OK to Edit Entry,CLEAR to Delete
To Exit Press TIMER
NOTE:
- To change the reserved details, select the line to change using 8
or 2, and press the k button.(When making the 5th reservation
onwards, the second page of the reserved details list is displayed
by repeatedly pressing 2.) The display returns to the "Timer setup"
screen. Here, set the reserved details again.
- Select a line that has not been entered, and press the k button.
The display returns to the "Timer setup" screen. Here, you can reserve
a different programme.
- Reservations can also be deleted. For details on operation methods,
see page 21.)
6. Press TIMER to return to the “Timer” screen, and press TIMER again
to end timer recording.
NOTE:
- lights on the front panel to indicate that the DVD recorder is set
for timer recording.
7. Load a DVD+R/RW (unprotected) ready for recording.
NOTE:
- Load a disc with enough free space for recording the programme.
8. Press o to turn the DVD recorder off.
Recording is automatically started when the timer reaches the recording
time.
NOTE:
- When there is not enough free space for recording the entire programme on the disc, the programme will be recorded to free space,
and recording will end halfway through the programme.
NOTE:
- For details on the “VPS” (Video Programming System) and “PDC”
(Programme Delivery Control),” see page 19.
20
Page 22

Checking, Changing and Deleting Reservations
1. Turn the TV on and select input from the DVD recorder. (For details
on operation methods, refer to your TV’s manual.)
2. Press TIMER to display the TIMER screen.
3. Select “Timer List” using 8 or 2, and press the k button.
Timer
Video Plus+
Timer Setup
Timer List
To Exit Press TIMER
4. The “Timer List” screen is displayed. Check the reservation details.
If necessary, change, delete, or make new reservations.
Timer List
Date
Ch. Mode
Start / End
20/04 AV2 SP21:00/23:00
Sat 02 LP12:51/13:55
Mo-Fr
AV-3-S
Total Recording Time: 04:15
Press OK to Edit Entry,CLEAR to Delete
To Exit Press TIMER
VPS/PDC
LP06:00/06:30
Problem solving for programmed recordings
The following problems/error messages appears on the screen while operating the DVD recorder. Possible solutions are provided in this section:
Error Message Solution
Insert Recordable Disc and
Press o to
Start Recording
Invalid Setup,
please correct
Timer Overlaps
Existing Timer
Warning Solution
Timer Recording!
Press o to
Start Recording.
A write-protected disc has been inserted. Cancel the
protection (See “To cancel disc protection” page 30)
or insert a different disc.
The data for the recording could not be transferred.
Please check the date, start time and end time of
the programmed recording.
The information for two programmed recordings
overlap.
If you ignore this error message the TV programme
with the earlier start time will be recorded fi rst. You
will miss the start of the second programme.
Change the information for one of the recordings or
delete one of the recordings.
The DVD recorder was switched on several minutes
before the start of a programmed recording. Switch
off the DVD recorder with o. A programmed
recording (timer) will only function if the DVD recorder
is switched off (button o).
To change a reservation
Select the line to change using 8 or 2, and press the k button. The
"Timer Setup" screen is displayed. Set the reservation details again. (For
details on operation methods, see page 20.)
To delete a reservation
Select the line to delete using 8 or 2, and press the CLEAR button.
The "Timer Delete" screen is displayed. Select "OK to Delete Timer" and
press the k button.
Timer Delete
OK to Delete Timer
Cancel
To make a new reservation
Select a free line, and press the k button. The display returns to
the "Timer Setup" screen. In this screen, you can reserve a different
programme.
1. Press TIMER to return to the “Timer” screen, and press TIMER again.
This ends checking of reservations.
21
Page 23

Recording Video from Other AV Equipment
Video output from video cameras and other AV equipment can be recorded
on the DVD recorder.
NOTE:
- Prepare other AV equipment in advance, and prepare the equipment
for playback. ("Connecting to a video deck and other recording equipment" page 12)
- Only Audio input cannot be recorded without entering a Video
signal.
- Almost all videos and DVD software on sale have copy-protection.
You cannot record them using this unit.
- Video games cannot be recorded.
1. Turn the TV on and select input from the DVD recorder. (For details
on operation methods, refer to your TV’s manual.)
2. Press rOPEN/CLOSE to open the disc tray, and place the disc with
the label facing up on the disc tray. Press rOPEN/CLOSE to close
the disc tray.
3. When the disc menu is displayed for DVD+RW discs, either move to
"Empty Title" using 8 or 2, or specify a position when overwriting
an already recorded program.
NOTE:
- For details on how to specify the overwrite recording position, "Inserting
New Recording on a DVD+RW" (See page 22).
4. Press REC MODE to specify the recording mode (picture quality).
5. Press CH/INPUT + or - to select the input from the AV equipment
to record.
SAT Record (Automatic recording from
Satellite Receiver)
In the case of equipment (e.g. satellite receiver) connected to the AV2 Scart
terminal on the rear panel on which timer recording is possible, video can
be recorded synchronized with the start of the broadcast without having
to reserve recording on the DVD recorder.
NOTE:
- To use this feature, the "SAT Record" setting item for recording in
System Menu must be set in advance.
- Press SYSTEM MENU to display the System Menu. Make sure that
the "Recording" item is set to "AV2" using 8 or 2.
Video
Sound
Feature
Language
Recording
Setup
If this item is not set, see “Recording Settings” on page 34.
Reserve recording on the AV equipment connected to the AV2 Scart
terminal, and set the satellite tuner ready for recording.
Record Mode
Filter Mode
Auto chaptars
SAT Record
Dual Language
Recording Options
SP
Standard
Off
AV2 OK
Language 1
AV2
Current channel / selected input
08:13
21:00
6. Start playback on the other equipment.
7. Press the TV buttons to display the video from the other equipment
on the TV screen.
8. Press RECq to start recording.
Inserting New Recordings on a DVD+RW
With DVD+RW discs, you can specify a video title already recorded to disc
and overwrite that title. Note, however, that if you overwrite with content
that is longer than the previously recorded content, other following content
will also be overwritten.
1. Select the title on the disc menu.
2. Press the k button to play the title.
3. Find where you want to insert the new recording.
4. Press e at the position where the new recording to go.
5. Press REC MODE to select the record mode. Start recording as usual
by pressing RECq on the remote control.
6. The "Title Overwrite" screen is displayed. Select "OK to Overwrite
Title" and press the k button.
Title Overwrite
OK to Overwrite Title
Cancel
The new recording will be inserted.
7. Stop recording with e.
22
Page 24

DISC PLAYBACK
Basic Operations
1. Turn the TV on and select input from the DVD recorder. (For details
on operation methods, refer to your TV’s manual.)
2. Press o button. (It takes time to enter the condition the power
supplied.)
3. Press rOPEN/CLOSE to open the disc tray.
4. Place the disc with the label facing up on the disc tray.
5. Press rOPEN/CLOSE or w.
The disc tray closes. The disc is then read, and playback automatically
starts.
• While the disc is being read, “READING” is displayed on the front
panel.
• During playback, the elapsed time is displayed on the front
panel.
When playback does not automatically start
Press w to start playback.
When the menu is displayed
Select the desired programme to play back by 4, 6, 8, 2, and press
the k button.
Stopping playback
Press e to stop playback.
When you press w, the disc is played from the position when playback
was stopped.
NOTE:
- When the e button is pressed and held down, “Progressive” as the
TV screen setting will be changed to “Interlace” without System Menu
operation. See “TV Screen Settings” on page 31.
Playing back in slow motion
When you press F.SLOW x, the disc is slow-forwarded. Each press of
F.SLOW x changes the slow-forward speed.
When you press R.SLOW z, the disc is slow-reversed. Each press of
R.SLOW z changes the slow-reverse speed.
To return to normal playback, press w.
Viewing from a desired camera angle
Some DVD-Video discs may contain scenes which have been shot
simultaneously from a number of different camera angles.
The jacket or case of discs that are recorded with angles will be
marked.
Example:
In the case of discs that allow the camera angle to be selected, the angle
selection menu will be displayed for several seconds at the beginning.
The camera angle can be changed by pressing 8 or 2 while this menu
is displayed.
Angle
1/3
After this menu disappears, if you want to change the camera angle again,
see “Various Playback Operations Using T/C Tools” on page 24.
Repeat Playback
Each press of the PLAY MODE button during playback displays the playback
modes. Press the k button to select the desired playback mode.
Playback Mode Explanation
Repeat Chapter Repeats the chapter currently being played.
Repeat Title Repeats all chapters.
Repeat A-B Repeats only a specifi ed section.
Temporarily stopping playback (pause)
Press PAUSE s to pause playback.
To resume playback, press w.
Skipping chapters/returning to the start of chapters
With DVD titles, the content of a single title is divided into several blocks
called “chapters.”
When you press NEXT f during playback or a pause, playback of the
next chapter is started.
When you press PREV d during playback or a pause, the disc returns
to the start of the present chapter, and playback is started.
Fast-forward/fast-reverse
When you press F.FWD v, the disc is fast-forwarded. Each press of
F.FWD v changes the fast-forward speed.
When you press F.REV c, the disc is fast-reversed. Each press of F.REV
c changes the fast-reverse speed.
To return to normal playback, press w.
23
To select a specifi ed section, press the k button
at the repeat start point (A). The display changes
to Repeat B. Press the k button again at the
repeat end point (B).
(None) Select this to cancel the PLAY MODE setting. (The
setting is cancelled even if you do not press the
k button.)
Picture zoom
Press ZOOM during normal/slow playback or still picture. The central
part of the picture is magnifi ed, and “ZOOM X 1” appears on the TV
screen. Each time you press ZOOM, the zoom mode will be changed
as follows:
ZOOM X 1 J ZOOM X 1.3 J ZOOM X 2 J ZOOM X 4 J ZOOM OFF
Press 4, 6, 8 or 2 to change the zoom point.
To return to normal playback, repeatedly press ZOOM until the zoom ratio
display at the bottom of the screen disappears.
NOTE:
- Picture zoom may not work on some discs.
Page 25

Various Playback Operations Using T/C Tools
When you press T/C during playback or while playback is paused, the
“T/C Tools” menu is displayed.
Select the menu item using 8 or 2 and set the desired feature according
to the description in the following table.
T/C Tools
Title 03
Chapter 02
ZoomOK
Angle
Slow
Step
Search
Audio
Subtitles
Sound
OK
1en
1en
Stereo
Menu Item Explanation of Operation
Title
To play back a title, press the number buttons or 4 6
to specify the number of the desired title to playback.
Chapter To play back a chapter, press the number buttons or
4 6 to specify the number of the desired chapter to
playback.
This feature also allows you to play back chapters that
are set to "hide" by the disc management features.
The "hide" setting can be changed to "display" during
playback. (See page 28.)
Zoom
Zooms in on images. Each press of k switches the
zoom ratio.
Angle
Slow
Press 4 6 to switch the camera angle.
Each press of 4 6 switches the slow motion playback
speed.
Step
Displays video one frame at a time. 4 displays the
previous frame, and 6 displays the next frame.
Search Specifi es the time (hours : minutes : seconds) and plays
back from that time.
When you press the k button, the frame for entering the time is displayed. Move to the desired digit by
4 6, and press the number button to specify the
time. Press the k button. Playback starts from the
specifi ed time.
Audio
Press 4 6 to switch the DVD audio language.
Switching the audio language is enabled while the disc
is being played. (Specify the audio language to use at
all times at "System Menu".)
Subtitles
Press 4 6 or number buttons to switch the DVD
subtitle language.
Switching the subtitle language is enabled while the
disc is being played. (Specify the subtitle language to
use at all times at "System Menu".)
Sound
Press 4 6 to switch audio output from the analogue
audio output terminal to Stereo or Surround. When set
to Surround, the sound effect of a multi-channel audio
can be simulated.
Switching the sound is enabled while the disc is being
played. (Specify the subtitle language to use at all times
at "System Menu".)
LISTENING TO MUSIC
Playable Discs
Audio discs can be played on the DVD recorder:
Basic Playback Operations
1. Turn the TV on and select input from the DVD recorder. (For details
on operation methods, refer to your TV’s manual.)
2. Press rOPEN/CLOSE to open the disc tray.
3. Place the disc with the label facing up on the disc tray.
4. Press rOPEN/CLOSE or w.
The disc tray closes. The disc is then read, and playback automatically
begins.
• While the disc is being read, "READING" is displayed on the front
panel.
• During playback, the elapsed time is displayed on the front
panel.
Stopping playback
Press e to stop playback.
When you press w, the disc is played from the beginning.
NOTE:
- The resume playback feature is disabled in the case of audio discs.
Pausing/cancelling a pause
Press PAUSE s to pause playback.
To resume playback, press w.
Skipping a track/returning to the beginning of a track
When you press NEXT f during playback, the next track is started.
When you press PREV d during playback, the disc returns to the start
of the present track, and playback is started.
Fast-forwarding/fast-reversing
When you press F.FWD v, the disc is fast-forwarded. Each press of of
F.FWD v changes the fast-forward speed.
When you press F.REV c, the disc is fast-reversed. Each press of
F.REV c changes the fast-reverse speed.
NOTE:
- Some features are not available depending on the type of disc.
- The menu items of unavailable features are displayed on a grey
background, and cannot be moved between using 8 or 2.
24
Page 26

Repeat Playback, Random Playback, Intro Playback
Each press of the PLAY MODE button during playback displays the play
modes. Press the k button to select the desired play mode.
Playback Mode Explanation of Operation
Repeat Track Repeats the track currently being played.
Repeat Disc Repeats all tracks.
Repeat A-B Repeats only a specifi ed section. To select a
specifi ed section, press the k button at the
repeat start point (A). The display changes to
Repeat B. Press the k button again at the
repeat end point (B).
Shuffl e Selects and plays tracks on the disc at random.
Scan Plays back only the fi rst ten seconds of each
track.
(None) Select this to cancel the PLAY MODE setting.
(The setting is cancelled even if you do not press
the k button.)
Playing Back MP3 Discs
Play back
1. Insert a MP3 disc.
2. “Track, Album and Artist” will be displayed on the screen.
3. MP3 CD will be played automatically.
NOTE:
- When the information for track, album and artist are not recorded,
they will not be displayed.
Playing Back a Specifi c Album or Track
You can specify an allbum or Track to play back by performing the following
operation during playback or while playback is puased.
1. Press T/C to display the “T/C Tolls” menu.
2. Select “Album” or “Track” using 8 or 2.
3. Press the number buttons or 4 6 to specify the number of the
desired album or track to play back.
Stopping playback
Press e to stop playback.
Playing Back a Specifi c Track
You can specify a track to play back by performing the following operation
during playback or while playback is paused.
1. Press T/C to display the "T/C Tools" menu.
2. Select "Track" using 8 or 2.
3. Press the number buttons or 4 6 to specify the number of the
desired track to play back.
• You can advance to the next track by pressing NEXT f.
• You can return to the pervious track by pressing PREV d.
Playing Back from a Specifi c Point by Time Search
You can specify the time (hours : minutes : seconds) and play back from
that time.
The time can be specifi ed only for a track that is currently being played.
Perform the following while the desired track is being played.
1. Press T/C to display the "T/C Tools" menu.
2. Select "Search" using 8 or 2, and press the k button The frame
for entering the time is displayed.
Move to the desired digit by 4 6, and press the number buttons to
specify the time.
3. Press the k button. Playback starts from the specifi ed time.
NOTE:
- When “Playback Mode” is on, “Time Search” is not avairable.
See the table above on “Playback Mode”.
Pausing/cancelling a pause
Press PAUSE s to pause playback.
To resume playback, press w.
Skipping a track/returning to the beginning of a track
Press NEXT f during playback or pause to skip to the next track.
Press PREV d during playback or pause to skip back to the previous
track.
You cannot fast-forward or fast-reverse while playing back MP3 discs.
NOTE:
- The fi le system is ISO9660 Level 1 and Level 2.
- If the CD has both audio CD tracks and MP3 fi les, only audio CD
tracks are played.
- It would take 30 seconds or more for this unit to read MP3 fi les
depending on its structure.
- This unit can recognize up to 999 fi les or folders per disc. A CD with
1000 fi les or folders and over cannot read by this unit.
- MP3 CDs may not be played in the recorded order.
- MP3 fi les must have the extension letters, “.MP3” or “.mp3”.
- Standard, sampling frequency, and the bit rate:
MPEG:1 Audio Layer 3
44.1kHz, 48kHz
56kbps to 256kbps (constant bit rate)
- The recommended recording setting for a high-quality sound is 44.1kHz
of sampling frequency and 128kbps of constant bit rate.
- Limitations on display
Available letters for display are the following: numbers 0 through 9,
and capital or lower-case alphabet characters A through Z.
- Some MP3 CDs cannot be played back depending on the recording
conditions.
- The CD has no music data or non-MP3 fi les cannot be played
back.
- The WMA fi les cannot be played back.
- Customers should also note that permission is required in order
to download MP3 fi les and music from the Internet. SANYO has
no right to grant such permission. Permission should always be
sought from the copyright owner.
- MP3 discs hold about ten times more tracks than audio CDs. Due to
the large number of tracks, tracks are divided and saved in groups.
These groups are called “folders.” Folders are given names that
indicate their content.
Folder1 Folder2
25
Track1 Track2 Track3 Track4 Track1 Track2 Track3
Page 27

VIEWING JPEG CD PHOTOS & IMAGES
Playable Discs
Discs recorded with images saved in JPEG format such as KODAK Picture
CDs can be played on the DVD recorder.
NOTE:
- The fi le system is ISO9660 Level 1 and Level 2.
- When creating discs on a personal computer, image fi les may also
be saved without making a folder for the fi les.
- When images fi les are saved in two or more folders, each folder is
distinguished as a roll. (The uppermost layer is also regarded as a
roll.)
- Even if folders are arranged in a series, they may be hierarchically
organized and other folders may be created within folders.
- The DVD recorder can handle up to 99 folders up to 1000 images per
folder. If the limit of 999 images per folder is exceeded, some images
will not be able to be loaded.
Images up to 2560 x 1920 pixels in size can be read.
Displaying the Thumbnail Screen
1. Turn the TV on and select input from the DVD recorder. (For details
on operation methods, refer to your TV’s manual.)
2. Press rOPEN/CLOSE to open the disc tray.
3. Place the disc with the label facing up on the disc tray.
4. Press rOPEN/CLOSE or w.
The disc tray closes. The disc is then read, and images are displayed
as thumbnails.
• While the disc is being read, "READING" is displayed on the front
panel.
• You can change the order of images in this screen or perform a
slide show.
Photo
Thumbnails
Page
Roll
Play
Reorder
3
1
OK
OK
Searching for Photos in the Thumbnail Screen
The following operations are available in the thumbnail screen.
Select the menu item using 8 or 2, and set the desired feature according
to the description in the following table.
Photo
Thumbnails
Page
Roll
Play
Reorder
Page:
Roll:
Photo:
Date:
Menu Item Explanation of Operation
Page Displays the page number of the thumbnail screen. You
can switch the page by pressing the k button.
Roll When images are saved in two or more folders, each
folder is regarded as a single roll. A number assigned
automatically by the DVD recorder to the currently
displayed folder is displayed to distinguish each folder.
(This number differs according to folder name.)
The roll can be switched by pressing the k button.
Play
When you press the k button, a slide show of the
images in the currently displayed roll is started.
Reorder The display order of images can be changed.
1) Press the k button to start reordering images.
2) Select the image to be reordered by 4, 6, 8, 2,
and press the k button.
3) Specify the move destination position by 4, 6, 8,
2, and press the k button. The order of the images
is changed.
3
1
OK
OK
3/7
1/2
19/55
02/27/2005
NOTE:
Page:
Roll:
Photo:
Date:
3/7
1/2
19/55
02/27/2005
- While viewing the Thumbnail Screen, after you have selected an
image and then pressed the e button, the image will be replaced by
“Hidden Image”.
The “Hidden Image” will be skipped during slide show.
To return to the images, select the “Hidden Image” and press the e
button again.
NOTE:
- Some features are not available depending on the type of disc. The
menu items of unavailable features are displayed on a grey background,
and cannot be moved between using 8 or 2.
26
Page 28

Displaying Photos in the Slide Show
Specify the roll in the thumbnail display, and press the k button to
start the slide show.
Enlarging images
When ZOOM is pressed during the slide show or while the slide show is
paused, the currently displayed image can be enlarged up to two times
its size.
Each press of ZOOM switches the zoom ratio, and the zoom ratio is
displayed at the bottom of the screen.
You can adjust which part of the video image will be displayed in the centre
of the screen by pressing 4, 6, 8, 2 during zoom playback.
To return to regular playback, repeatedly press ZOOM until the zoom ratio
display at the bottom of the screen disappears.
Pausing the slide show
When you press PAUSE s, the slide show is paused, and the “Photo
Slide Show” menu is displayed.
To continue the slide show from the paused position, press w.
Ending the slide show
Press e to end the slide show and return to the thumbnai l screen.
Changing how slide shows are displayed
When you press PAUSE s, the slide show is paused, and the “Photo
Slide Show” menu is displayed. In this menu, set how the slide show is
to be displayed (e.g. image display time).
NOTE:
- If you do not perform any operation, the slide show menu disappears.
To redisplay the “Photo Slide Show” menu, press T/C.
Photo
Slide Show
Photo:
24
OK
OK
x1
Off
24/55
01/01/2005
-
3
Photo
Play
Thumbnails
Zoom
Rotate
Timer
Repeat
Date:
Menu Item Explanation of Operation
Photo When you press the number buttons to enter the number
of an image in the roll that is being displayed in the slide
show, that image is displayed.
You can then enlarge or rotate it.
Play
When you press the k button, the slide show is
resumed with the slide show menu displayed.
Thumbnails
When you press the k button, the screen returns to
the thumbnails screen.
Zoom
When you press the k button, the currently displayed
image is displayed enlarged. Each press of the k
button changes the zoom ratio between X1, X2, X4,
and X8.
Rotate
When you press the k button, the currently displayed
image is rotated. Each press of the k button rotates
the image 90° clockwise.
Timer Sets the time (number of seconds) that each image
is displayed by pressing the k button, 4 6 or the
number buttons up to 99(max).
Repeat Specifi es whether or not to repeat the slide show after
all of the images have been displayed. Each press of the
k button or 4 6 switches between on and off.
27
Page 29

EDITING & DISC MANAGEMENT
Editing Chapters
A marker will be set every few minutes if the "Auto Chapter" function is
activated in the "Recording" menu. This marker is known as a "chapter".
These markers can be changed when the recording has fi nished.
It is also possible to add "chapters" later. This means that scenes you do
not want to see during playback, such as commercials, can be hidden or
skipped. During playback you can watch your recording as a continuous
sequence without the hidden chapters.
NOTE:
Markers can be set on DVD+R discs if they have not been fi nalised.
Insert Chapter
During playback, you can set and delete chapter markers within a title.
Each disc can have a maximum of 100 chapters, and 99 per title. When
one of these values is reached, “Max Chapter Limit Reached” appears
on the screen. Some markers will need to be deleted in order to create
new ones or to make recordings.
1. During playback, press EDIT at the appropriate point. The "Edit
Chapters" menu will appear on the screen.
2. When the image to use as the start position of a new chapter is
displayed, select “Insert Chapter” using 8 or 2 and press the k
button.
Edit Chapters
Insert Chapter
Hide Chapter
Delete Chapter
Delete All
“Inserting Chapter Marker” appears on the TV screen. You can see that
the total number of chapters shown on the Status Display is incremented
by one.
NOTE:
- This operation is possible even in a paused state.
3. To remove the menu, press EDIT.
NOTE:
- If the disc is write-protected or the disc is a fi nalised DVD+R, subsequent
changes cannot be made.
Hide Chapter
By default, all the chapters are visible. You can hide chapters for playback
(e.g. commercial skipping).
1. Press EDIT during playback of the corresponding chapter. The "Edit
Chapters" menu will appear on the screen.
2. When the chapter to return to display is being played back, select
“Hide Chapter” using 8 or 2 and press the k button. The picture
is greyed out.
3. To end, press EDIT.
NOTE:
- During playback this chapter will be skipped.
Unhide Chapter
During regular playback, hidden chapters cannot be viewed as they are
skipped. In the editing mode, hidden chapters are displayed in grey.
You can display hidden chapters by performing the following.
1. Press EDIT the during playback of the corresponding chapter, the
"Edit Chapters" menu will appear on the screen.
2. When the chapter to be displayed is being played back, select “Unhide
Chapter” using 8 or 2 and press the k button.
Edit Chapters
Insert Chapter
Unhide Chapter
Delete Chapter
Delete All
Hidden Chapter
The hidden chapter can be played back normally.
NOTE:
- To view the entire titles includng the hidden chapters, see “Playback
Title” on page 29.
- You can move to chapters to return to display using PREV d or
NEXT f.
3. To end, press EDIT.
Delete Chapters(Delete Chapter, Delete All)
Within a title, you can either delete individual chapter markers or all
markers.
1. Press EDIT during playback of the corresponding chapter. The "Edit
Chapters" menu will appear on the screen.
2. Select either "Delete Chapter " for current chapter or "Delete All " for
all chapters of the selected title using 8 or 2 and press the k
button.
3. Confi rm the deletion of all the chapters by pressing "Press OK to
Delete All Chapters". If you do not want to, press "Press STOP to
Cancel" button.
Edit Chapters
Insert Chapter
Hide Chapter
Delete Chapter
Delete All
NOTE:
- When “Delete Chapter” is selected, “Deleting Chapter Marker” will be
displayed while deleting the chapter.
4. To remove the menu, press EDIT.
Deleting All Chapter Markers
Press OK to Delete All Chapters
Press STOP to Cancel
28
Page 30

Editing Titles
Disc settings
Editing Recording Titles (name)
Some TV stations transmit the title (name) of a programme. In this case,
the name will be included automatically (e.g. “ROCKY”). Otherwise, the
channel number and time of the recording are stored as the name. The
name of the recording can be changed only after the recording has been
completed.
1. Press the e button or during playback press DISC MENU.
2. Using 8 or 2, select the title whose name is to be edited and press
6. The menu for editing names "Title Settings" appears.
3. Select "Name" using 8 or 2 and press the k button.
Title Settings
Name
Play Full Title
Erase Title
Press OK to Select or 'Left Arrow' to Exit
4. Using 4 or 6, select the position where the letter/number/icon is to
be changed/re-entered.
5. Change the character using 8 or 2. You can switch between upper
and lowercase using SELECT. You can delete the character using
CLEAR.
6. Repeat 4 and 5 until you have made the changes you want.
7. Save the new name with k.
8. To end, press 4. "Please Wait" appears on the TV screen for
confi rmation.
AV1
Press OK
Press OK
Playback Title
If you have hidden certain chapters of a title, with this setting you can view
the entire title including the hidden chapters. Proceed as follows:
1. Press the e button or during playback press DISC MENU.
2. Using 8 or 2, select the title that you want to play back and press
6. The menu for editing titles "Title Settings" appears.
3. Select "Play Full Title" using 8 or 2 and press the k button.
4. Playback begins automatically. The full title - including the hidden
chapters - is played back.
Changing the Disc Name
1. Press the e button or during playback press DISC MENU.
2. The disc menu is displayed. Repeatedly press 8 to display the disc
information.
Repeatedly press 8 until the disc appears here.
UNLOCKED
PAL
0:04:32 Used
24.03.05
DVD Playback
Disc
Editing
3. In the Disc Info screen press 6. The "Disc Settings" menu appears
on the TV screen.
Disc Settings
Name
Protected
Erase Disc
Finalise Disc
Make DVD Compatible
Press OK to Select or 'Left Arrow' to Exit
4. Select “Name" using 8 or 2 and press the k button.
5. Using 4 or 6, select the position where the letter/number/icon is to
be changed/re-entered.
6. Change the name using 8 or 2. You can switch between upper
and lowercase using SELECT. You can delete the character using
CLEAR.
7. Repeat 5 and 6 until you have made the changes you want.
8. Save the new title with k.
9. To end, press 4. "Please Wait" appears on the TV screen for
confi rmation.
Erasing a recording/title
You can erase individual recordings from a disc. Follow the instructions
below:
1. Press the e button or during playback press DISC MENU.
2. Using 8 or 2, select the title to be erased and press 6. The menu
for editing titles "Title Settings" appears.
3. Using 8 or 2, select "Erase Title" and press the k button. " OK
to Erase Title" appears on the screen.
4. If you want to erase the title press k.
5. The screen will show "Please Wait".
6. "Empty title" will now appear in this position in the disc menu. A new
recording can now be made at this position. If the deleted title was
very short (shorter than several minutes), no “Empty Title” will be
displayed.
Can titles be deleted from a DVD+R disc?
Titles on DVD+R discs are only marked as deleted. “Deleted Title” will
appear in the display instead of “Empty title”. During playback the “Deleted
Title” is skipped. The space used for this title cannot be used again as the
title has not been physically deleted. Once the disc has been fi nalised no
further changes can be made.
29
Erasing DVD+RW Discs
1. Press the e button or during playback press DISC MENU.
2. The disc menu is displayed. Repeatedly press 8 to display the disc
information.
3. In the Disc Info screen press 6. The "Disc Settings" menu will appear
on the screen.
4. Select "Erase Disc" using 8 or 2. Confi rm with k. The screen
will show "OK to Erase Disc".
5. If you want to erase all titles, press k.
6. The screen will show “Please Wait".
Once the disc has been successfully erased, the disc menu shows
“Empty Title” is displayed.
NOTE:
- With this procedure, all titles will be erased.
Page 31

Finalising DVD+R Discs
This feature is required to play back a DVD+R disc in a DVD player.
Once the disc has been fi nalised no further recordings or changes can
be made.
1. Press the e button or during playback press DISC MENU.
2. The disc menu is displayed. Repeatedly press 8 to display the disc
information.
3. In the Disc Info screen press 6. The “Disc Settings” menu appears
on the TV screen.
“Finalise Disc” can not be selected when either there is no DVD+R
disc inserted or the disc is already fi nalised.
4. Select “Finalise Disc” using 8 or 2 and press the k button.
5. Select “OK to Finalise Disc” using 8 or 2 and press the k
button.
6. The screen will show “Please Wait”.
7. When the operation is executed, “Please Wait” will disappear.
NOTE:
- If the disc has been recorded on another DVD recorder, the menu
may not appear.
Make DVD Compatible
Even if one or more titles have been edited, a DVD player may still show
the original title. You can prepare your disc so that a DVD player will be
able to read the edited title.
1. Press the e button or during playback press DISC MENU.
2. The disc menu is displayed. Repeatedly press 8 to display the disc
information.
3. In the Disc Info screen press 6. The "Disc Settings" menu will appear
on the screen.
4. Select “Make DVD Compatible" using 8 or 2 and press the k
button.
5. Select “Make DVD Compatible” using 8 or 2 and press the k
button.
6. The screen will show “Please Wait”.
7. When the operation is executed, “Please Wait” will disappear.
Protecting Discs and Cancelling Disc Protection
To prevent an important recording from being accidentally erased, you
can protect the entire disc. You can only protect the disc as a whole. It is
not possible to protect an individual recording.
NOTE:
- What happens with DVD+R discs?
As long as these discs are not fi nalised, they can be protected against
accidental erasure in the same way as DVD+RW discs.
Protecting discs
1. Press the e button or during playback press DISC MENU.
2. The disc menu is displayed. Repeatedly press 8 to display the disc
information.
3. In the Disc Info screen press 6. The "Disc Settings" menu will appear
on the screen.
4. Select "Protected" using 8 or 2 and press the k button. The box
is now checked.
5. Exit using 4 and press DISC MENU.
The entire disc is now protected. If you try to record onto this disc
the message “PROTECTED” will appear in the display and “Disc is
Locked” on the screen.
To cancel disc protection
Press the k button at step 4 in "Protecting discs", and deselect the
"Protected" item.
NOTE:
- Each press of k at step 4 in "Protecting discs" selects or deselects
the item.
30
Page 32

DVD RECORDER SETTINGS
When you press SYSTEM MENU, the following menu will be displayed.
In this menu, you can change various settings on the DVD recorder to
suit your particular requirements.
System Menu
Settings for the TV screen
Settings for audio
Settings for features and operation
Settings for audio language, subtitle
language, and menu language
Settings for recording
(e.g. picture quality)
Channel settings and other settings.
The above menu will be displayed by pressing SYSTEM MENU not only
while disc operations are stopped, but also during playback, pause and
standby.
After you change a setting, the new details are stored to memory as
default settings for when you perform various operations.
For example, with the recording mode (picture quality), recordings will be
made in the mode set in this System Menu unless you specify a different
mode during recording. If you press REC MODE before recording to
change the recording mode, the setting you make will be enabled only
until the DVD recorder is turned off.
NOTE:
- During playback or while disc operations are paused, some items
cannot be changed depending on the title that is currently being
played.
- During playback or while disc operations are paused, the "Setup"
feature cannot be changed.
Video
Sound
Feature
Language
Recording
Setup
Setting Item Explanation
TV Shape Set the aspect ratio (shape) of your TV’s screen. When
you press the k button, the selection items are
displayed. Select the desired item using 8 or 2, and
press the k button.
See Page 14.
Black Level
Video Shift Fine-adjust the position of the video on the TV screen
YUV Output Set your TV’s display mode as “Interlace” or “Progres-
Video
Output
NOTE:
- When you press 4, other items in the System Menu can be se-
lected.
Set other items as necessary.
5. To end setting, press SYSTEM MENU.
To use this fuature, press the k button to select it.
Each press of the k button selects or deselects
this setting.
to the left and right.
Press the k button, and then adjust the position
using 4 or 6 and press the k button.
sive.” (When the DVD recorder is shipped from the
factory, the display mode is set to “Interlace.”)
When you press the k button, the selection items
are displayed. Select the display mode of your TV using
8 or 2, and press the k button.
Set whether or not to output video to the S-Video
terminal. When the DVD recorder is connected to a
TV by the SCART cable or other cable, select “SVideo+YUV.”
When you press the k button, the selection items
are displayed. Select video output using 8 or 2, and
press the k button.
TV Screen Settings
1. Turn the TV on and select input from the DVD recorder. (For details
on operation methods, refer to your TV’s manual.)
2. Press SYSTEM MENU to display the System Menu.
3. Select “Video” using 8 or 2, and press 6 once. The setting items
at "Video Options" on the right of the screen can now be selected
using 8 or 2.
4. Select the item to be changed using 8 or 2, and change the settings.
System Menu
Video
Sound
Feature
Language
Recording
Setup
TV Shape
Black Level
Video Shift
YUV Output
Video Output
Video Options
4:3 LB
Interlace
Video+RGB
31
Page 33

Audio Output Settings
1. Turn the TV on and select input from the DVD recorder. (For details
on operation methods, refer to your TV’s manual.)
2. Press SYSTEM MENU to display the System Menu.
3. Select “Sound” using 8 or 2, and press 6 once. The setting items
at "Sound Options" on the right of the screen can now be selected
using 8 or 2.
4. Select the item to be changed using 8 or 2, and change the settings.
Operation and State Display Settings
1. Turn the TV on and select input from the DVD recorder. (For details
on operation methods, refer to your TV’s manual.)
2. Press SYSTEM MENU to display the System Menu.
3. Select “Feature” using 8 or 2, and press 6 once. The setting items
at "Feature Options" on the right of the screen can now be selected
using 8 or 2.
4. Select the item to be changed using 8 or 2, and change the settings.
System Menu
Video
Sound
Feature
Language
Digital Output
Analog Output
Night Mode
Recording
Setup
Setting Item Explanation
Digital
Output
Analog
Output
Night Mode Night mode optimises the sound for playback at low
NOTE:
- When you press 4 , other items in the System Menu can be selected.
Set other items as necessary.
5. To end setting, press SYSTEM MENU.
Set output from the digital audio output terminal.
When you press the k button, the selection items
are displayed. Select digital output using 8 or 2, and
press the k button.
Off Select this when digital audio output is not
used.
PCM Only Dolby Digital and MPEG-2 multi-channel
signals are converted to PCM (Pulse Code
Modulation). This setting is for receivers/amplifi ers without digital multi-channel
sound decoders. DTS is not converted into
PCM. (Sound does not output.)
All Dolby Digital and DTS signals are fed
unaltered to the digital output. MPEG-2
multi-channel signals are converted to
PCM (Pulse Code Modulation). This setting is for receivers/amplifi ers with digital
multi-channel sound decoders.
Set output from the analogue audio output terminal
(L/R AUDIO OUT).
When you press the k button, the selection items
are displayed. Select analogue output using 8 or 2,
and press the k button.
Stereo For devices without DolbySurround or
TruSurround. Use this setting if the DVD
recorder is connected only to a stereo TV
set.
Surround Dolby Digital and MPEG-2 multi-channel
are mixed down to a DOLBY surroundcompatible two-channel output signal. For
devices with Dolby Surround Pro Logic
decoder.
volume. You are therefore less likely to disturb your
neighbours. This only works for Dolby Digital audio on
DVD video discs. This option can be selected if required.
Night Mode works only when analog output.
To use this feature, press the k button to select it.
Each press of k selects or deselects this setting.
Sound Options
All
Stereo
System Menu
Video
Sound
Feature
Language
Recording
Setup
Setting Item Explanation
Access
Control
Status
Display
Resume If playback of a pre-recorded DVD video disc is inter-
Auto
Standby
Clock
Display: Off
NOTE:
- When you press 4, other items in the System Menu can be selected.
Set other items as necessary.
5. To end setting, press SYSTEM MENU.
Parental Level Control
Accessing of DVD discs can be controlled.
For details, see “Parental Level Control” on page 34.
Along with the on-screen menu, the OSD (On Screen
Display) also displays information on the current operating status (counter, playback, recording, TV channel,
etc.) on the TV screen. By default, this would be off, to
see the information about the operating status, check
the “Status Display” box. This appears in every selected
mode for a few seconds and disappears.
To use this feature, press the k button to select it.
Each press of k selects or deselects this setting.
rupted (rOPEN/CLOSE), when the disc is reloaded
(disc is started), playback starts at the precise location
where it stopped. This applies not only to the current
disc but to the last 20 discs played. This feature can
be switched off if not required.
To use this feature, press the k button to select it.
Each press of k selects or deselects this setting.
To set whether or not to set the standby mode when
no operations have been performed for 10 minutes.
When no DVD recorder operation has occured for
10 minutes after e(STOP) button is pressed , this
unit will go to standby mode. This function works CD
media(Audio, MP3 or JPEG) only.
To use this feature, press the k button to select it.
Each press of k selects or deselects this setting.
To save power, you can switch off the clock display on
the DVD recorder. Programmed (TIMER) recordings
will still take place.
If the recorder is switched off (button o), the clock
display is also switched off when checked.
If the recorder is switched off (button o), the
clock display is visible when unchecked.
To use this feature, press the k button to select it.
Each press of k selects or deselects this setting.
Access Control Press OK
Status Display
Resume
Auto Standby
Clock Display: Off
PBC Enable
Feature Options
32
Page 34

Setting Item Explanation
PBC Enable This function lets you activate or deactivate the PBC
menu (Playback Control) for VCD only.
When you press the k button to select this item,
this feature is turned on. Each press of the k button
toggles this feature on and off.
Adapt Disc Format
When you insert a disc (DVD+R : not fi nalised or DVD+RW) recorded
on other DVD recorder, “Adapt Disc Format” will appear under the “PBC
Enable”.
System Menu
Video
Sound
Feature
Language
Recording
Setup
Setting Item Explanation
Adapt Disc
Format
This menu allows you to edit the disc menu on the
disc recorded on other DVD recorder.
Press the k button.
Access Control Press OK
Status Display
Resume
Auto Standby
Clock Display: Off
PBC Enable
Adapt Disc Format
Adapt Disc Menu
This Disc Has a Different Menu
OK to Replace Menu
Cancel
Feature Options
Press OK
Setting the Language
1. Turn the TV on and select input from the DVD recorder. (For details
on operation methods, refer to your TV’s manual.)
2. Press SYSTEM MENU to display the System Menu.
3. Select “Language” using 8 or 2, and press 6 once. The setting
items at "Language Options" on the right of the screen can now be
selected using 8 or 2.
4. Select the item to be changed using 8 or 2, and change the settings.
System Menu
Video
Sound
Feature
Language
Recording
Audio
Subtitle
Menu
Country
Setup
Setting Item Explanation
Audio Set the DVD audio language. When you press the
k button, the selection items are displayed. Select
the desired item using 8 or 2, and press the k
button.
Subtitle Set the DVD subtitle language. If subtitle language is
not available, the DVD recorder picks the fi rst available
language.
When you press the k button, the selection items
are displayed. Select the desired item using 8 or 2,
and press the k button.
Menu Set the menu display language.
When you press the k button, the selection items
are displayed. Select the desired item using 8 or 2,
and press the k button.
Country Set this to call up the specifi c settings for the respec-
tive country.
When you press the k button, the selection items
are displayed. Select the desired item using 8 or 2,
and press the k button.
Language Options
English
Off
English
United Kingdom
33
NOTE:
- When you press 4, other items in the System Menu can be selected.
Set other items as necessary.
5. To end setting, press SYSTEM MENU.
Page 35

Recording Settings
1. Turn the TV on and select input from the DVD recorder. (For details
on operation methods, refer to your TV’s manual.)
2. Press SYSTEM MENU to display the System Menu.
3. Select “Recording” using 8 or 2, and press 6 once. The setting
items at "Recording Options" on the right of the screen can now be
selected using 8 or 2.
4. Select the item to be changed using 8 or 2, and change the settings.
System Menu
Video
Sound
Feature
Language
Recording
Record Mode
Filter Mode
Auto Chapters
SAT Record
Dual Language
Setup
Setting
Item
Record
Mode
Filter
Mode
Auto
Chapters
SAT
Record
Dual
Language
NOTE:
- When you press 4, other items in the System Menu can be selected.
Set other items as necessary.
Set the picture quality during recording. When you
press the k button, the selection items are displayed.
Select the desired item using 8 or 2, and press the
k button.
See Page 17.
The fi lter can be set to “Standard” (Normal) or “Sport”
(for fast movements)
In LP, EP or EP+ recording mode, you can select the Sport
setting in Filter Mode to optimize the video recording
for images that contain fast movements, like sports. The
setting does not infl uence HQ or SP recording mode.
When you press the k button, the selection items are
displayed. Select the desired item using 8 or 2, and
press the k button.
When this feature is turned On, chapters can be automatically marked with chapter markers at several minute
intervals during recording.
When you press the k button, the selection items are
displayed. Select the desired item using 8 or 2, and
press the k button.
When a satellite tuner or other equipment on which timer
recording can be set are connected to the DVD recorder,
video can be recorded synchronized with the start of the
broadcast without having to reserve recording on the
DVD recorder. When using this feature, specify the input
terminal that the equipment is connected to. When this
feature is not used, set to Off.
When you press the k button, the selection items are
displayed. Select the desired item using 8 or 2, and
press the k button.
When recording dual language programmes, set which
language to record. When you press the k button, the
selection items are displayed. Select the desired item
using 8 or 2, and press the k button.
NOTE:
- When recording input from the DV-IN (DV socket on
the front panel), stereo 1 language from DV equipment
is recorded regardless of the setting of this item.
Explanation
Recording Options
SP
Standard
Off
Off
Language 1
Parental Level Control
Films on pre-recorded DVD discs may contain scenes not suitable for
children. Therefore, some discs may contain “Parental Control” rating
(level) information that applies to the entire disc or to certain scenes on
the disc. The appropriate scenes have fi lter values that reach from 1-8.
If such a scene is detected during playback, the fi lter value set on the
DVD recorder is compared to the scene. If the fi lter value is higher than
the setting, an alternative scene will be played (if available).
What do the Rating (Level) mean?
Rating (Level) Off (displayed as “--”) means that parental level control is
not active. Rating (Level) 1 is most restrictive. It means without entering
correct password, child cannot view the scenes that are not suitable for
children, Rating (Level) 8 is least restrictive. Without entering the passcode,
the scenes can be viewed.
What happens if a DVD scene contains a higher level than the rating
set?
If the recorder does not fi nd a suitable alternative, playback will stop and
you must enter the four-digit passcode.
Setting parental level control
Set parental level control as follows.
1. Turn the TV on and select input from the DVD recorder. (For details
on operation methods, refer to your TV's manual.)
2. Press SYSTEM MENU to display the System Menu.
3. Select "Feature" using 8 or 2, and press 6 once. The setting items
at "Feature Options" on the right of the screen can now be selected
using 8 or 2.
4. Select "Access Control", and press the k button.
System Menu
Video
Sound
Feature
Language
Recording
Access Control Press OK
Status Display
Resume
Auto Standby
Clock Display: Off
Setup
5. Select the item to be changed using 8 or 2, and change the settings.
Set Parental Controls
Enter Code
Level:Off
Set Country United Kingdom OK
Press SYSTEM to Save and Exit
[ ] [ ] [ ] [ ]
Feature Options
5. To end setting, press SYSTEM MENU.
34
Page 36

Setting Item Explanation
Enter Code The passcode for setting parental level is required.
(When the DVD recorder is shipped from the factory,
no passcode is set. So, the passcode must fi rst be set.)
Follow the procedure below to set the passcode.
1) "Enter code" will be displayed. Enter a four-digit
code using the number buttons. Entered codes are
indicated by "*".
Set Parental Controls
Enter Code
Level:Off
Set Country United Kingdom OK
Press SYSTEM to Save and Exit.
2) When "Confi rm Code" is displayed, enter the
four-digit code again for confi rmation. When the
code has been set, the display returns to "Press
k".
NOTE:
- When the "Set Parental Controls" screen is displayed from the second operation onwards, "Enter
Code" will be displayed on the 1st line instead of
"Set Code". Parental level control can be set again
by entering the correct passcode.
[*] [*] [*] [ ]
To play back a DVD video set with parental level
controls.
If you attempt to play back a DVD video set with parental level controls,
the following screen will be displayed:
Enter Passcode to Continue
The Disc You are Attempting to View
is Protected with a Passcode.
Enter the Passcode to Continue
Enter Code
Enter the four-digit passcode to start playback.
[ ] [ ] [ ] [ ]
If you have forgotten the passcode, press e four times
to set the entry fi eld to a non-set state. In this state,
set the passcode again.
Parental
Level
Set the level of parental control.
Press the k button, and then press 4 or 6 to
adjust the level. Press the k button again to apply
the level you set.
Set Parental Controls
Set Code
Level:2
Set Country
Press OK
United Kingdom
Press OK to Select
Press SYSTEM to Save and Exit.
Set Country The set fi lter values depend on the respective country.
It is therefore necessary to enter the country to which
these fi lter values apply.
When you press the k button, the country name is
displayed. Select the desired country using 8 or 2,
and press the k button.
NOTE:
- When you press 4, other items in the System Menu can be se-
lected.
Set other items as necessary.
6. To send setting, press SYSTEM MENU.
35
Page 37

TROUBLESHOOTING
Check the following guide for the possible cause of a problem before contacting service.
Symptom Cause Solution
The unit does not work immediately o button is
pressed.
No power.
No picture.
No sound. - The equipment connected with the audio cable is not
“Disc Error” message appears.
Playback picture is poor. - The disc is dirty. - Clean the disc.
DVD Recorder does not start
playback.
- It takes time for power to be supplied after the o
button has been pressed.
- The main lead is disconnected. - Plug the main lead into the wall outlet securely.
- The TV is not set to receive DVD Recorder signal
output.
- The video cable is not connected securely. - Connect the video cable securely.
- The TV is turned off. - Turn on the TV.
set to receive DVD Recorder signal output.
- The audio cables are not connected securely. - Connect the audio cable securely.
- The power of the equipment connected with the audio
cable is turned off.
- The audio connecting cord is damaged. - Replace it with a new one.
- The disc which is not supported is inserted. - Replace a disc.
- No disc is inserted. - Insert a disc. (Check that the disc indicator on the
- No solution. This unit needs time to start operating
because of its structure.
- Select the appropriate video input on the TV so that
the picture from the DVD Recorder appears on the
TV screen.
- Select the correct input mode on the audio receiver
so you can listen to the sound from the DVD Recorder.
- Turn on the equipment connected with the audio
cable.
front panel display is lit.)
- An unplayable disc is inserted. - Insert a playable disc. (Check the disc type, colour
system, and regional code.)
- The disc is placed upside down. - Place the disc with the playback side down.
- The disc is not placed within the guide. - Place the disc on the disc tray correctly inside the
guide.
- The disc is dirty. - Clean the disc.
- The Parental Level Control is set. - Cancel the Parental Level Control function or change
Picture from external input is
distorted
Some channels are skipped
when using CH (+/-)
Picture or sound of broadcasting
channel is weak or missing.
Camcorder image not shown. - Camcorder is off. - Turn camcorder on and operate properly.
Camcorder image via A/V input
or DV IN to DVD Recorder is not
shown on TV screen.
Can’t play disc recorded on
this DVD Recorder on another
DVD player.
- The video signal from the external component is copy-
protected.
- The skipped channels were deleted with the CH. Add/Del
feature.
- Antenna or cables are loose. - Tighten connections or replace cable.
- Wrong Tuning Band is selected in the DVD Recorder
Setup menu.
- DVD Recorder’s source is not set to AV3, AV3-S or DV
IN.
- Some players will not play even a fi nalized disc recorded
in Video mode.
- Discs recorded with copy-once material cannot be played
on other players.
the level.
- You cannot connect via th DVD Recorder. Connect
the component directly to your TV.
- Use the CH. Add/Del feature to restore channels.
See “Arranging and Deleting Channels" on page
16.
- Try all “Auto-Setting the Channel” options; see page
15 for details.
- Use INPUT to select AV input channel AV3, AV3-S
or DV IN.
- No solution
- No solution
36
Page 38

Symptom Cause Solution
Cannot record or did not record
successfully.
Timer Recording not possible. - Clock in the DVD Recorder is not set to correct time. - Set clock to correct time. See “Setting the Clock”
Stereo Audio Record and/or
Playback not present.
- The remaining blank space on the disc is insuffi cient. - Use another disc.
- The source you are trying to record is copy-protected. - You can not record the source.
- When setting the recording channel, the channel is tuned
on the TV’s own tuner.
- When recording to disc, programs that are copy-once
protected cannot be recorded.
- The disc is recorded on NTSC on other equipment. - You can not record on the disc already recorded on
- Timer has been programmed incorrectly. - Reprogram Timer. See “Timer Recording” on page
- TIMER indicator light does not appear after programming
timer.
- TV is not Stereo-compatible. - No solution.
- Broadcast program is not in stereo format. - No solution.
- DVD Recorder A/V Out jacks are not connected to TV
A/V In jacks.
- DVD Recorder Audio/Video Out is not selected for viewing
on the TV.
- DVD Recorder’s TV audio channel is set to MONO. - Set TV audio channel mode to Stereo. See “Audio
- Select the channel on the DVD Recorder’s built-in
TV tuner.
- You can not record the source.
NTSC. Replace a disc.
on page 15.
18.
- Reprogram Timer.
- Make A/V connections. Stereo is available only via
A/V output from DVD Recorder.
- Select AUX or A/V source as TV input.
Output Settings” on page 32.
Remote control does not work
properly.
Playback starts midway after a
DVD video is inserted and the
6 button is pressed.
Moisture Condensation
Moisture condensation can occur: In locations where moisture condensation may occur:
- When the DVD Recorder is moved from a cold place to a warm
place.
- Under extremely humid conditions. - When condensation has occurred, wait a few hours for the DVD Recorder
Reset the DVD Recorder
If you observe any of the following symptoms:
- When the DVD Recorder is plugged in, but the power will not be turned on or off
- When the display window does not work
- When the DVD Recorder does not operate normally
Before resetting, please proceed the following procedure fi rst.
1. Turn the o button off.
2. Disconnect the Power lead.
If these operation does not work, reset the DVD recorder as follows.
- The remote control is not pointed at the remote sensor
of the DVD Recorder.
- The remote control is too far from the DVD Recorder. - Operate the remote control within 6m.
- There is an obstacle in the path of the remote control
and the DVD Recorder.
- The batteries in the remote control are exhausted. - Replace the batteries with new ones.
- If the Resume function is on, playback starts from the
previous position where that disc was stopped for the
next 20 discs.
- Keep the DVD Recorder plugged into an AC power outlet with POWER
on. This will help prevent condensation.
to dry before using it.
- Point the remote control at the remote sensor of
the DVD Recorder.
- Remove the obstacle.
- Turn the Resume function off. See "Operation and
State Display Settings" on page 32.
You can reset the DVD Recorder as follows:
1. Disconnect the DVD Recorder from the power outlet.
2. Press and hold down the o button on the front of the recorder while reconnecting to the power outlet.
3. Release o when “IS TV ON?” appears in the display.
4. Complete the fi rst installation again and reset any items you have adjusted during your use of the recorder.
Warning!!
- The information stored in memory may be reset (cleared).
37
Page 39

MAINTENANCE
Cleaning the cabinet
Use a clean soft cloth moistened with plain lukewarm water and wrung dry. Never use benzol, benzene or other strong chemical cleaners since these
could damage the fi nish of your unit. It is important that no liquid reaches the inside of the unit.
SPECIFICATIONS
DVD recorder(DVR-S120)
Playable discs
DVD-Video
DVD+R
DVD+RW
DVD-RW(Video mode)
DVD-R(Video mode)
Audio-CD(CD-DA)
MP3 CD
JPEG CD
Kodak Picture CD
Recordable discs
DVD+RW
DVD+R
Video recording format
DVD+RW/+R Format
Audio recording format
Dolby Digital (2ch)
Recording time (with 4.7GB disc)
HQ mode: Approx. 60 minutes
SP mode: Approx. 120 minutes
LP mode: Approx. 180 minutes
EP mode: Approx. 240 minutes
EP+ mode: Approx. 360 minutes
Connections
Front panel
Video In : Pin jack (yellow) X1
S-Video In : S terminal X1
Audio L/R In : Pin jack (white/red) X1
DV In : DV (4-pin) terminal X1
Rear panel
Scart 1: AV connector (RGB/S-Video/Video/Audio out)
(Video/Audio in)
Scart 2: AV connector (RGB/S-Video/Video/Audio in)
(Video/Audio out)
Video Out : Pin jack (yellow) X1
S-Video Out : S terminal X1
Component Video Out : Pin jack (Y:green/Pb:Blue/Pr:red) X1
Audio L/R Out : Pin jack (white/red) X1
Digital audio out : Optical X1
Power requirements
230V AC, 50Hz
Power consumption
30Watts
(clock display: off mode: 3 Watts)
Dimensions (W X H X D)
Approx. 430 X 64 X 320mm
Weight
Approx. 3.7kg
TV system
PAL standard system
Tuner
System: PAL-I/I
Time indication
24-hour system
Timer
8-event programmable
The specifi cations and appearance of this product are subject to change
for improvements without notice.
38
Page 40

GUARANTEE TO CUSTOMER
Sanyo Europe Ltd. (the Company) guarantees to the initial retail
purchaser that if this equipment is or becomes defective and that,
in the opinion of the Company, the defect is due to faulty material or
workmanship the Company will, for a period of 12 calendar months
from the date of sale to the original purchaser repair or replace, at
its sole option, free of charge, any such defective component part of
the equipment, always provided that: -
1. The equipment has at all times been used in accordance with the
operating instructions issued by the Company, and has not been
connected to an electrical mains supply for which it has not been
adjusted.
2. Accidental damage, or damage caused by negligence or misuse by
the user, including leakage from exhausted batteries, is specifi cally
excluded.
3. Unauthorised repairs, or any modifi cation to the equipment which
has not been expressly approved by the Company, shall render
this guarantee null and void.
4. Failure due to fair wear and tear of any item, such as batteries,
record playing styli, and tape recording, playback and erase heads
is specifi cally excluded.
This guarantee is not transferable and is only applicable within the
United Kingdom (and the Republic of Ireland). Nothing in this express
guarantee affects the statutory rights available to the purchaser of
this equipment.
NOTE:
This guarantee supersedes any other form of guarantee that may
inadvertently have been enclosed with or attached to the product.
(August 1978).
Thank you for buying Sanyo. This equipment should give you many
years of pleasure and faithful service but in the event that a fault
occurs, the following notes for your guidance may be helpful:-
1. PLEASE RETAIN YOUR PURCHASE RECEIPT WHICH WILL
BE REQUIRED FOR SERVICE DURING GUARANTEE.
2. If your Sanyo equipment proves faulty during the period of guarantee, take it or send it back to the dealer who originally supplied
it together with this guarantee and the proof of purchase. We have
made arrangements with our approved dealers under which they
will carry out in-guarantee service repairs on our behalf. In this
way, we hope to reduce to a minimum the amount of time you
will be without your equipment.
3. If for some reason it is impossible to return the equipment to
the original supplies, please contact our Consumer Relations
Department at the address below for further advice.
4. Should the equipment require servicing after the expiry of the
guarantee period, take or send it to the original supplier or any
other Sanyo dealer. He will be pleased to give you a quotation
for the repair. If you are in any doubt about what to do, write to
us at the address below or telephone:
Consumer Relations Department,
Sanyo Europe Ltd.,
18 Colonial Way,Watford
WD24 4PT
Tel: Watford 246363
R6
(UK) 1AD6P1P2118--
SANYO Electric Co., Ltd.
 Loading...