

Page 1
INSTRUCTION MANUAL
HDD/DVD Recorder
DVR-H200UK
Problems with set-up?
Call 0870 240 7475
Call 0870 240 7475
Calls cost a maximum of 8p per
minute during peak periods,
based on BT rates of April 2004.
Page 2

TABLE OF CONTENTS
GETTING STARTED
Accessories .................................................................. 1
Important safety instructions ................................... 2
Warnings, cautions and others ................................. 3
Disc information ........................................................... 4
CONTROLS AND DISPLAYS
Remote control ............................................................. 5
Front panel connections ............................................. 6
Display window ............................................................. 6
Rear panel connections .............................................. 7
CONNECTIONS
Connecting the antenna cable and television ........ 8
For better video quality............................................... 9
Component out ......................................................... 9
For better audio quality............................................. 10
Connection to a stereo audio amplifier or receiver 10
Connection to a digital audio device ...................... 10
Digital out optical .................................................... 10
Digital out coaxial ................................................... 10
SETTING UP
Setup menu ................................................................. 11
TV CHANNEL SETUP
TV channel search ..................................................... 12
Fine-tuning TV channels manually ......................... 12
Editing TV channels manually.................................. 12
Channel Editor ............................................................. 13
SETTING UP VIDEO PLUS+ SYSTEM
Setting up VIDEO Plus+® System ............................ 14
®
EASY GUIDER
Playback ....................................................................... 15
Record .......................................................................... 16
Timer record ............................................................... 17
Copy .............................................................................. 19
RECORDING
Before recording ........................................................ 20
Recording television programs .............................. 20
Adding new recordings ............................................ 21
Changing chapter intervals...................................... 21
Playing back the last recorded session................ 21
Recording from a VCR or Camcorder .................... 22
One touch record ....................................................... 23
DV recording ............................................................... 23
DV control .................................................................... 24
Recording on a CD-R/CD-RW disc ............................ 25
TIMER RECORDING
Setting the timer ........................................................ 26
Recording TV programs with VIDEO Plus+® System . 27
TIME SHIFT
Pausing Live TV Broadcast ...................................... 29
Record and Play .......................................................... 29
PLAYBACK
Basic playback ........................................................... 30
POWER, OPEN/CLOSE, PLAY, FF, REV ................. 30
NEXT, PREVIOUS ................................................... 30
PAUSE/STEP, STOP, DISPLAY ............................... 30
DISC MENU, PLAYLIST .......................................... 30
Navigation operation ................................................. 31
REPEAT, ZOOM ...................................................... 31
SLOW, SEARCH .................................................... 31
A-B REPEAT,SUBTITLE .......................................... 31
AUDIO, ANGLE ....................................................... 31
INFORMATION ........................................................ 31
Video title playback .................................................. 32
Music file playback ................................................... 33
Picture file playback ................................................. 33
Audio CD playback .................................................... 34
Playback pictures with music ................................ 34
COPY
Copy from DVD to HDD .............................................. 35
Copy from HDD to DVD .............................................. 35
EDIT
DVD menu and Edit menu ........................................ 36
Naming a title ............................................................. 36
Protecting a title ........................................................ 36
Overwriting a title ..................................................... 36
Splitting a title ............................................................ 37
Merging titles ............................................................ 37
Erasing a title ............................................................. 37
Setting a title thumbnail .......................................... 37
Chapter marks relevant setting ............................ 38
DISC TOOLS
Erase ............................................................................. 40
Finalize.......................................................................... 40
Clean up ....................................................................... 41
Defragment.................................................................. 41
GUI OPERATION
FIRMWARE UPDATE
GLOSSARY
SPECIFICATIONS
TROUBLESHOTTING GUIDE
Accessories
Please check and identify the supplied accessories.
1x Remote control
1x Power Cord
1x RF Cable
1x Audio/Video cable
2x Batteries
Used batteries
The batteries in the remote controller of your
HDD/DVD Recorder do not contain mercury.
However, Sanyo recommends that you do not
dispose of used batteries with domestic refuse.
Please, contact your dealer or your local
authorities for information regarding the disposal
of used batteries or take them to your nearest
collection point.
Page 3

IMPORTANT SAFETY INSTRUCTIONS
1) Read inst ruction ss. Read all the safety and operating
instructions before operating the product.
2) Ret ai n instruc ti onss. Keep the safety and operating
instructions for future reference.
3) Heed warningss. Adhere to all warnings on the product and in
the operating instructions.
4) Follow instructi on ss. Follow all operating and use
instructions.
5) Cleaningg-Unplug this product from the wall outlet before
cleaning. Do not use liquid cleaners or aerosol cleaners. Use
a damp cloth for cleaning.
6) Att achmentss-Do not use attachments not recommended by
the product manufacturer as they may cause hazards.
7) Water and Moist uree-Do not use this product near water
for example, near a bathtub, washbowl, kitchen sink, or laundry
tub, in a wet basement, or near a swimming pool.
8) Accessoriess-Do not place this product on an unstable cart,
stand, tripod, bracket, or table. The product may fall, causing
serious injury to a child or adult, and serious damage to the
product. Use only with a cart, stand, tripod, bracket, or table
recommended by the manufacturer or sold with the product.
Any mounting of the product should follow the manufacturer’s
instructions and should use a mounting accessory recommended by the manufacturer.
9) CARTT-A product and cart combination should be moved with
care. Quick stops, excessive force, and uneven surfaces may
cause the product and cart combination to overturn.
10) Ventilationn-Slots and openings in the cabinet provide
ventilation, ensure reliable operation of the product, and protect
it from overheating. Do not block or cover these openings. The
openings should never be blocked by placing the product on a
bed, sofa, rug, or other similar surface. Do not place this
product in a built-in installation such as a bookcase or rack
unless proper ventilation is provided or the manufacturer’s
instructions have been adhered to.
11) Power S ourcess-This product should be operated only from
the type of power source indicated on the marking label. If you
are not sure of the type of power supply to your home, consult
your product dealer or local power company. For products
intended to operate from battery power, or other sources, refer
to the operating instructions.
12) LOCATIONN-The appliance should be installed in a stable
location.
13) NONUSE P
should be unplugged from the outlet when left unused for a
long period of time.
14) Gr oun d ing or Po lar izat ionn-
• If this product is equipped with a polarized alternating current
line plug (a plug having one blade wider than the other), it will fit
into the outlet only one way. This is a safety feature. If you are
unable to insert the plug fully into the outlet, try reversing the
plug. If the plug should still fail to fit, contact your electrician to
replace your obsolete outlet. Do not defeat the safety purpose of
the polarized plug.
• If this product is equipped with a three-wire grounding type plug,
it will only fit into a grounding type power outlet. This is a safety
feature. If you are unable to insert the plug into the outlet,
contact your electrician to replace your obsolete outlet. Do not
defeat the safety purpose of the grounding type plug.
15) Power-Cord Pr ot ec ti onn-Power-supply cords should be
routed so that they are not likely to be walked on or pinched by
items placed upon or against them, paying particular attention
to cords at plugs, convenience receptacles, and the point
where they exit from the product.
16) Outdoor Ant enna Groundingg-If an outside antenna or
ERIODSS-The power cord of the appliance
cable system is connected to the product, be sure the antenna
or cable system is grounded so as to provide some protection
against voltage surges and built-up static charges. Article 810
of the National Electrical Code, ANSI/NFPA 70, provides
information with regard to proper grounding of the mast and
supporting structure, grounding of the lead-in wire to an
antenna discharge unit, size of grounding conductors, location
of antenna-discharge unit, connection to grounding electrodes,
and requirements for the grounding electrode.
Ligh tningg-For added protection of this product during a
17)
lightning storm, or when it is left unattended and unused for
long periods of time, unplug it from the wall outlet and
disconnect the antenna or cable system. This will prevent
damage to the product due to lightning and power-line surges.
18) Power Liness-An outside antenna system should not be
located in the vicinity of overhead power lines or other electric
lights or power circuits, or where it can fall into such power
lines or circuits. When installing an outside antenna system,
take extreme care to keep it from touching power lines or
circuits. Contact with them might be fatal.
19) Overloadingg-Do not overload wall outlets, extension cords,
or integral convenience receptacles. This can result in a risk of
fire or electric shock.
20) ObjectssandLiquids-Do not push objects of any kind into
this product through openings. They may touch dangerous
voltage points or short out parts, resulting in a fire or electric
shock. Liquids of any kind should not be used on or around
this product.
21) Servicingg-Do not attempt to service this product yourself.
Opening or removing covers may expose you to dangerous
voltage or other hazards. Refer all servicing to qualified service
personnel.
22) Dam age Requ iring Servicee-Unplug this product from the
wall outlet and refer servicing to qualified service personnel
under the following conditions:
• When the power supply cord or plug is damaged,
• If liquid has spilled or objects have fallen into the product,
• If the product has been exposed to rain or water,
• If the product does not function properly after following the
operating instructions, contact Customer Service for technical
support.
• If the product has been dropped or damaged in any way,
• When the product exhibits a distinct change in performance.
This indicates a need for service.
23) Repl acement Part ss-When replacement parts are required,
be sure the service technician uses replacement parts
specified by the manufacturer or having the same characteristics as the original part. Unauthorized substitutions may result
in fire, electric shock, or other hazards.
24) Safety Checkk-Upon completion of any service or repairs to
this product, ask the service technician to perform safety
checks to determine that the product is in proper operating
condition.
25) Wall or Ceiling M ountingg-Mount the product to a wall or
ceiling only as recommended by the manufacturer.
26) Heatt- Keep this product away from heat sources, such as
radiators, heat registers, stoves, or amplifiers.
27) Battery Usagee- Battery leakage may result in bodily injury or
damage to the unit. In order to avoid battery problems, please
follow these instructions.
• Install all batteries correctly, with + and - aligned as marked on
the unit.
• Do not mix batteries (old/new, carbon/alkaline, etc.).
• Remove batteries when the unit is not used for a long time.
2
Page 4
WARNINGS,CAUTIONS AND OTHERS
CAUTION!
TO REDUCE THE RISK OF ELECTRIC SHOCK,
DO NOT REMOVE THE COVER OF THIS UNIT.
THERE ARE NO USER SERVICEABLE PARTS INSIDE.
REFER SERVICING TO QUALIFIED SERVICE PERSONNEL.
The lighting flash with arrowhead symbol, within
an equilateral triangle, is intended to alert the
user to the presence of uninsulated “dangerous
voltage” within the product’s enclosure that may
be of sufficient magnitude to constitute a risk of
electric shock to humans.
The exclamation point within an equilateral
triangle is intended to alert the user to the
presence of important operating and maintenance (servicing) instructions in the literature
accompanying the appliance.
CAUTION!
THIS PRODUCT UTILIZES A LASER.
USE OF CONTROLS OR ADJUSTMENTS OR PERFORMANCE
OF PROCEDURES OTHER THAN THOSE SPECIFIED HEREIN
MAY RESULT IN HAZARDOUS RADIATION EXPOSURE. DO NOT
OPEN THE COVER AND DO NOT REPAIR YOURSELF. REFER
SERVICING TO QUALIFIED SERVICE PERSONNEL.
1)CLASS 1 LASER PRODUCT
2)
DANGER: Visible and invisible laser radiation when open and
interlock failed or defeated. Avoid direct exposure to beam.
3)
CAUTION: Do not open the top cover. There are no user
serviceable parts inside the Unit; leave all servicing to qualified
service personnel.
CAUTION!
IMPORTANT FOR LASER PRODUCTS
•
CD-R/RW discs recorded using a personal computer or a CD
Recorder may not play if the disc is damaged or dirty, or if there
is dirt or condensation on the player’s lens.
• Unfinalized CD-R/RW discs can be played, but not all time
information (playing time, etc.) will be displayed.
• Check the copyright laws in your country before recording from
DVD VIDEO, SVCD, Video CD, Audio CD, MP3 and JPEG discs.
Recording of copyrighted material may infringe copyright laws.
Legal Notices Regarding
Macrovision’s Property Rights
“U.S. Patent Nos. 4,631,603; 4,577,216; 4,819,098; 4,907,093;
and 6,516,132.”
“ This product incorporates copyright protection technology that is
protected by U.S. patents and other intellectual property rights.
Use of this copyright protection technology must be authorized by
Macrovision, and is intended for home and other limited viewing
uses only unless otherwise authorized by Macrovision. Reverse
engineering or disassembly is prohibited. “
Manufactured under license from Dolby Laboratories.
“Dolby” and the double-D symbol are trademarks of Dolby
Laboratories.
WARNING:
TO REDUCE THE RISK OF FIRE, ELECTRIC SHOCK OR
PRODUCT DAMAGE, DO NOT EXPOSE THIS APPARATUS
TO MOISTURE AND ENSURE THAT OBJECTS FILLED WITH
LIQUIDS, SUCH AS VASES, SHALL BE PLACED AWAY
FROM THE APPARATUS.
CAUTION! –– STANDBY/ON button
Disconnect the main plug to shut the power off
completely. The
STANDBY/ON button in any position
does not disconnect the main line. Power can be
controlled from the remote.
PRODUCTS WITH 625P PROGRESSIVE SCAN OUTPUTS
NOTICE REQUIREMENTS
“CONSUMERS SHOULD NOTE THAT NOT ALL HIGH DEFINITION TELEVISION SETS ARE FULLY COMPATIBLE WITH THIS
PRODUCT AND MAY CAUSE ARTIFACTS TO BE DISPLAYED IN
THE PICTURE. IN CASE OF 625 PROGRESSIVE SCAN
PICTURE PROBLEMS, IT IS RECOMMENDED THAT THE USER
SWITCH THE CONNECTION TO THE “STANDARD DEFINITION”
OUTPUT. IF THERE ARE QUESTIONS REGARDING OUR TV
SET COMPATIBILITY WITH THIS MODEL 625P DVD PLAYER,
PLEASE CONTACT OUR CUSTOMER SERVICE CENTER.”
“DTS” and “DTS Digital Out” are trademarks of Digital Theater
Systems Inc.
This unit complies with the European Directives 89/336/EEC and
73/23/EEC.
The apparatus shall not be exposed to dripping or splashing.
No objects filled with liquids, such as vases, shall be placed on
the apparatus.
VIDEO Plus+ and PlusCode are registered trademarks of Gemstar
Development Corporation. The VIDEO Plus+ system is manufactured under license from Gemstar Development Corporation.
3
Page 5
DISC INFORMATION
Playable Disc types
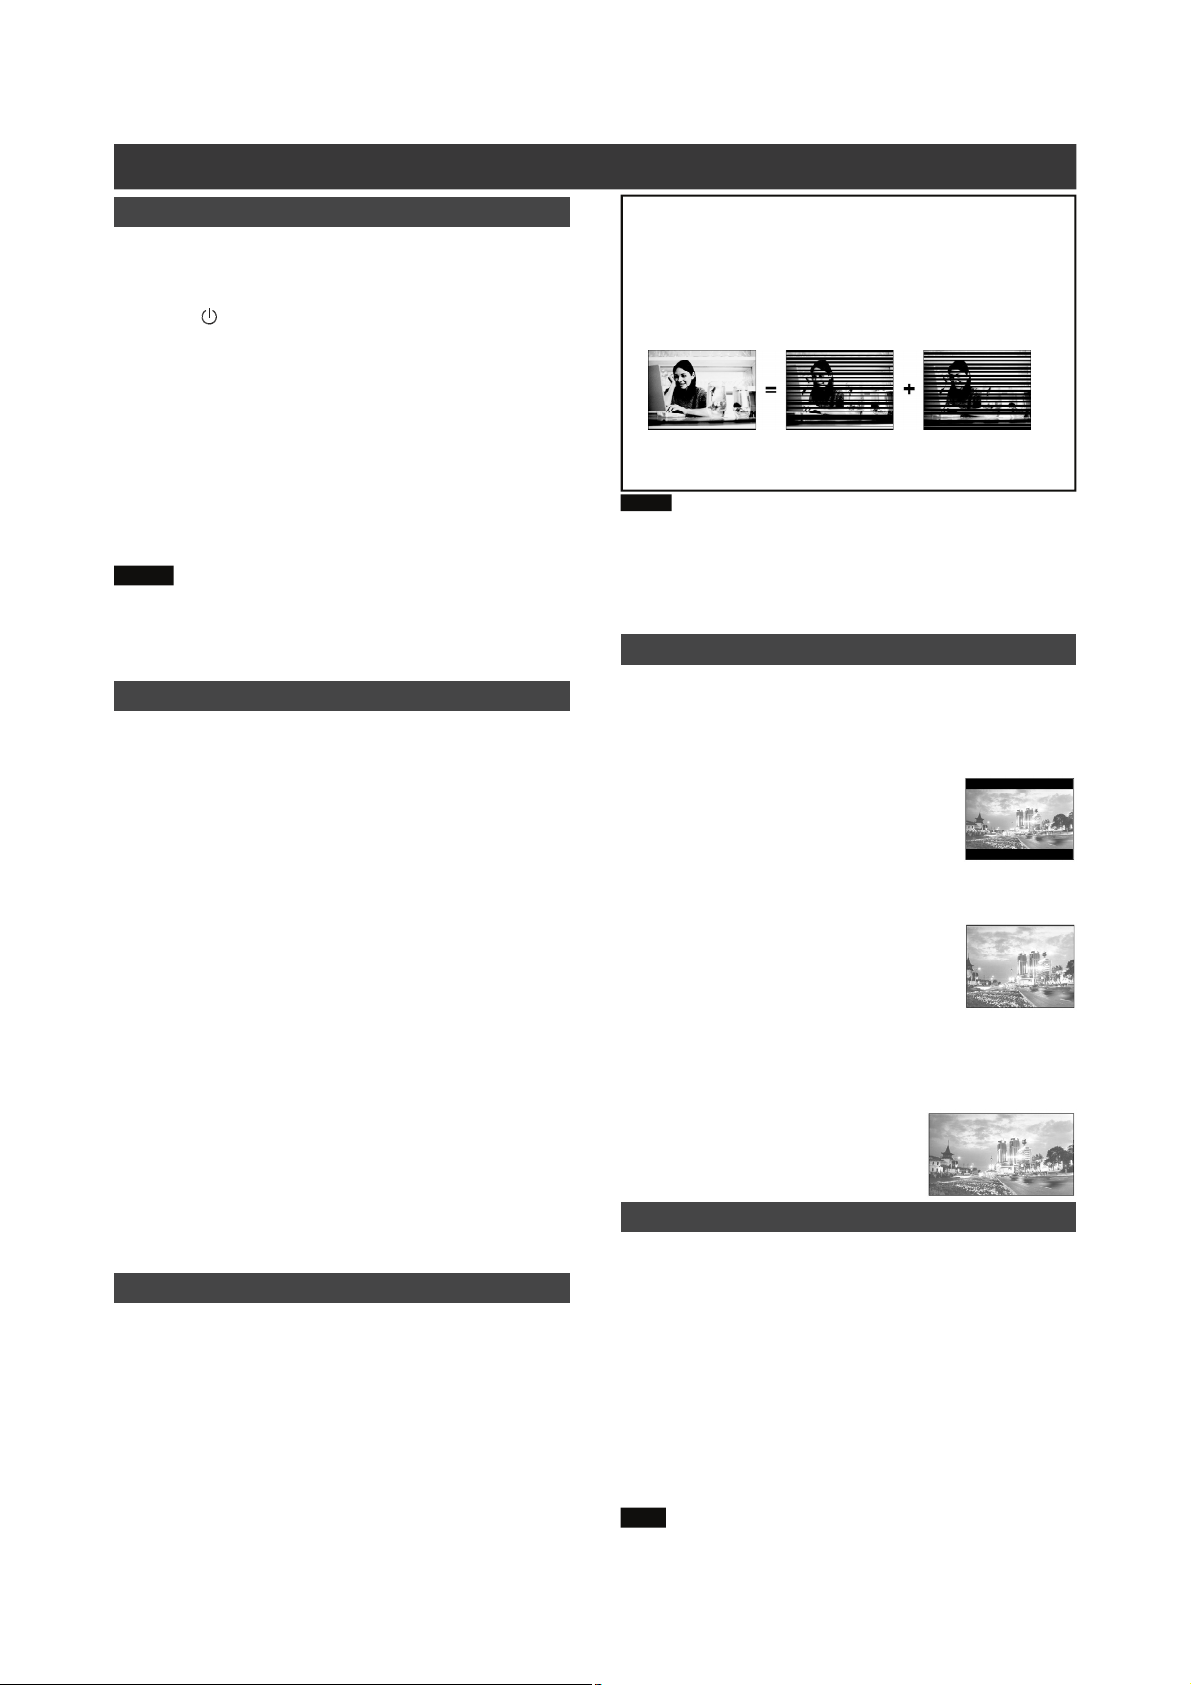
Disc Types Logos Characteristics
DVD-VIDEO
This unit can playback DVD-Video discs and the
region code is printed on the rear of the unit.
DVDЀR/ЀRW
DVDЁR/ЁRW
Video CD (VCD)
Super Video CD (SVCD)
Audio CD
CD-R/RW
(JPEG/BMP/MP3)
DVDЁR, DVDЁRW and DVDЀR, DVDЀRW, discs
written in the DVD-Video format and finalized.
Video with CD sound, VHS quality, MPEG-1 &
MPEG-2 compression technology.
CD is recorded as a Digital Signal with better audio
quality, less distortion and less deterioration of audio
quality over time.
This unit can play CD-R and CD-RW discs recorded
with Audio CD or Video CD format, or with
JPEG/BMP/MP3 files. Close the sessions or finalize
the disc after recording.
Recordable Disc types
Disc Types Logos Characteristics
DVDЀR/ЀRW
CDЁR/ЁRW
Note:
The DVD-Video/DVD+RW/DVD+R/DVD-R/DVD-RW Logos
are trademarks of the respective companies.
For best results, use discs with the above logos. The unit
may not playback other discs correctly. Do not use irregularshaped discs (e.g. heart-shaped), as these can damage the unit.
It may not be possible to play CD-R, CD-RW, DVD-R, DVDRW, DVD+R, DVD+RW in all cases due to the type of disc or
condition of the recording.
Audio System
Video System ( PAL )
DVDЀR disc written in the DVDЀVR format.
DVDЀRW disc written in the DVDЀVR format.
CDЁR/CDЁRW disc written in the MPEG1 or
MPEG2 video format or written in PCM Audio mode.
Dolby Digital Linear PCM
DTS (Digital Theater Systems)
This DVD recorder accepts PAL system.
Unplayable disc types
The unit does not play back disc type listed below. If you
try to play back these discs, excessive noise may cause
damage to your speakers.
1) Unfinalized discs from other DVD/CD recorders.
2) DVD AUDIO, PHOTO CD, SACD, HDCD
(When placing an unplayable disc on the disc tray, the DVD
recorder will display “Unknown Disc” on the display panel after
attempts of trying to loading the disc fail.)
Region code of DVD-Video
This unit can play back DVD-VIDEO discs compatible with
the region code printed on the rear of the unit.
Example of playable DVD-VIDEO discs:
If you try to play any other discs, the message “Invalid
Region Code” will apear on TV screen.s:
Aspect Ratio
4:3 (Letter Box) Standard
4:3 Pan & Scan
16:9 (Wide-Screen)
Others
Audio : Appears at the beginning of a scene recorded
with multiple audio languages.
Subtitle : Appears at the beginning of a scene recorded
with multiple subtitle languages.
Angle : Appears at the beginning of a scene recorded
from multiple angles.
4
Page 6

CONTROLS AND DISPLAYS
Remote Control
The Remote Control
1) Timer button (TIMER)
2) Open / Close button (
3) VIDEO Plus+ button (VIDEO Plus+)
4) Stop button (
Play button (
Pause / Step button (
5) REV/ FF buttons (
Skip buttons (
6) Display button (DISPLAY)
7) Disc Menu button (DISC MENU)
8) Edit button (EDIT)
9) Cursor (), Enter buttons (ENTER)
10) Copy button (COPY)
11) Number buttons (1~9,0)
OPEN / CLOSE)
STOP)
PLAY)
PAUSE / STEP)
REV / FF)
PREV / NEXT)
To install batteries
Open the battery compartment and
insert the batteries. Make sure the
polarities (+ and -) match the marks
indicated inside the remote control.
Do not use rechargeable type
batteries.
Remote sensor
The remote has a range of
approximately 7M and works
best when pointed directly at
the unit horizontally at angles
up to 30° from the front of the
unit.
12) Easy Guider Menu button (GUIDER)
Browser button (BROWSER)
Disc Tools button (TOOLS)
Navigation button (NAVI)
13) Audio button (AUDIO)
Angle button (ANGLE)
Zoom button (ZOOM)
Subtitle button (SUBTITLE)
14) Source button (SOURCE)
15) Power button (
16) HDD/DVD button (HDD/DVD)
17) Record button (
18) Play List Menu button (PLAY LIST MENU)
19) Record Mode button (REC MODE)
20) Time shift button (TIME SHIFT)
STANDBY/ON)
REC)
Do not dispose of the batteries in your domestic or any
other waste bin! Instead, bring them to the nearest
collection site, e.g. at your retail dealer or supermarket:
you will find special collection boxes there for used
batteries. All collected batteries will be recycled.
Please help to conserve our environment. Thank you.
21) CH Up / Down buttons (CH+ / CH-)
22) Setup button (SETUP)
5
Page 7
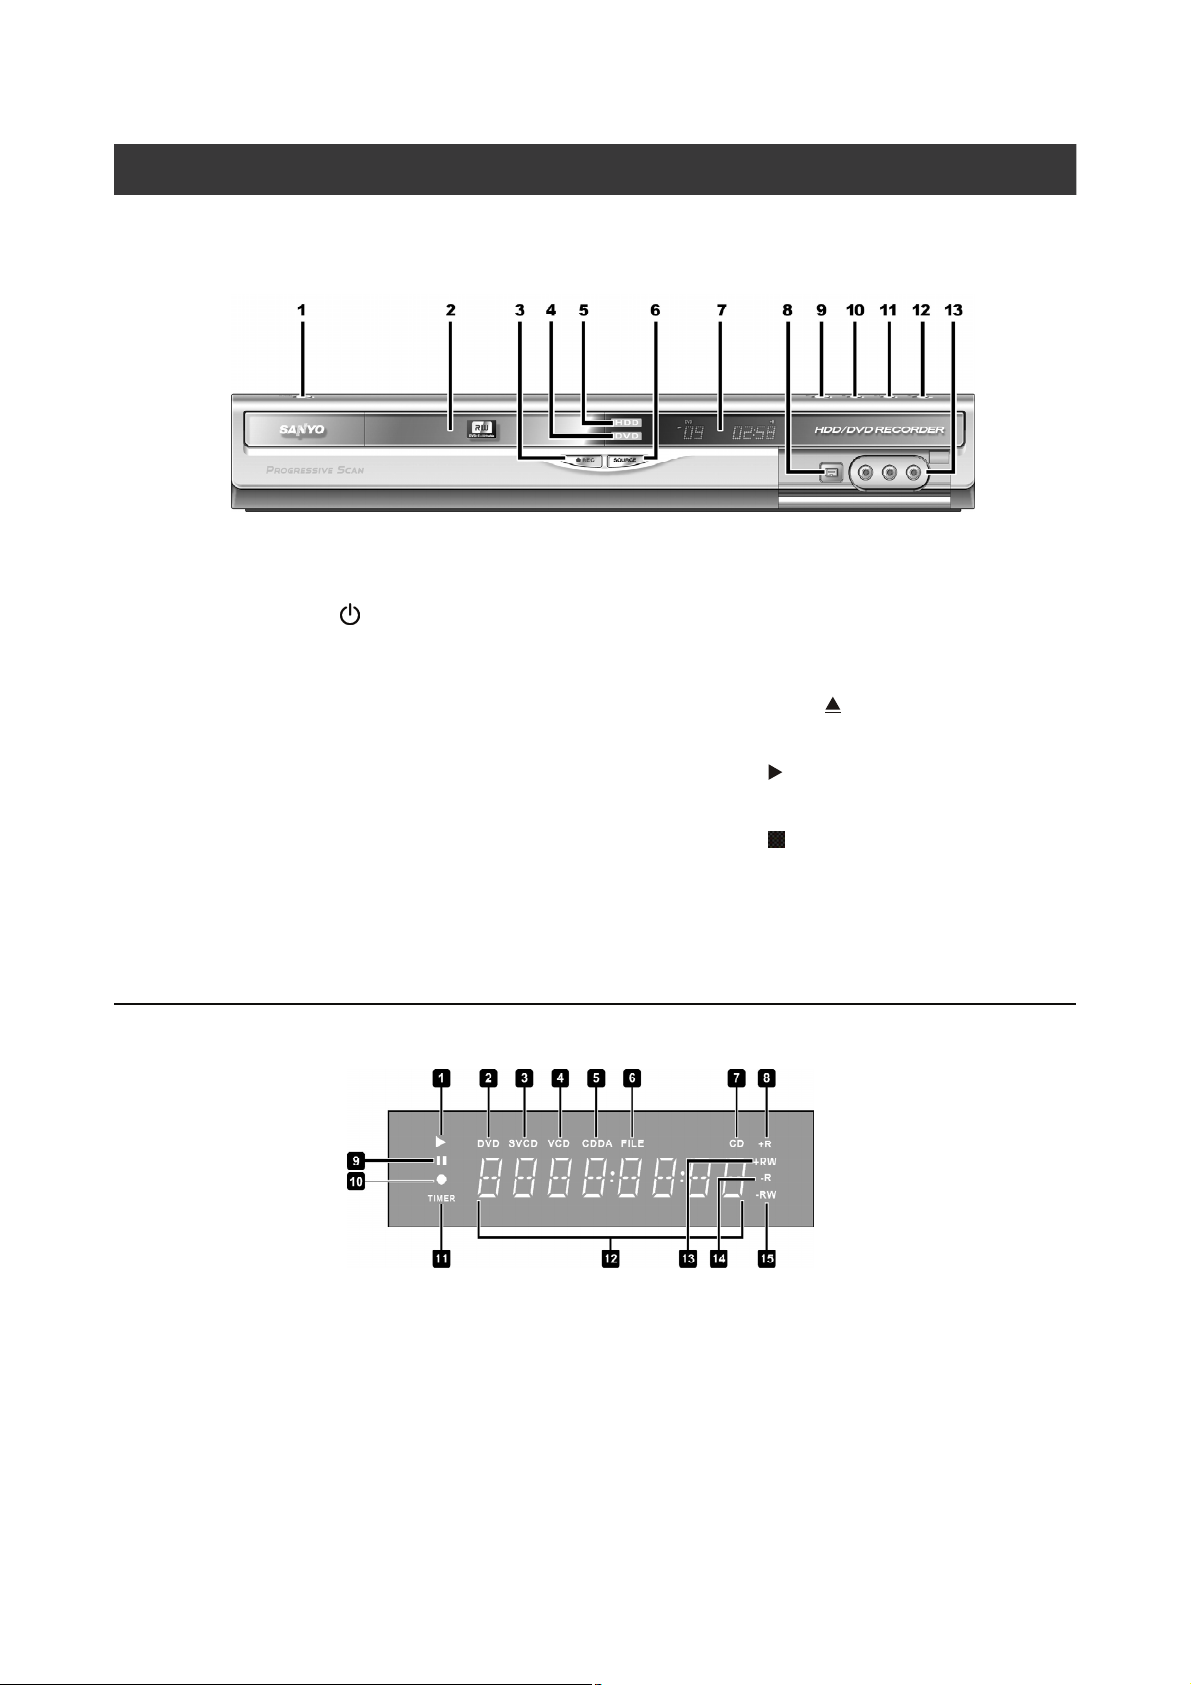
CONTROLS AND DISPLAYS
Front panel connections
Names of parts and controls
1) POWER ON/OFF Button ( /ON)
Turns the recorder on and off.
2) DISC TRAY
Holds discs securely during recording or playback.
3) RECORD Button (
Starts recording.
4) DVD Indicator
Lights up when DVD is set as the playback/record
device.
5) HDD Indicator
Lights up when HDD is set as the playback/record
device.
6) SOURCE Button (SOURCE)
Selects equipment connected to the line inputs.
REC)
Display window
7) DISPLAY Window
Operation indicators are displayed here.
8) DV IN Jack
Connects digital video camcorders to this DVD Recorder.
9) OPEN/CLOSE Button (
Opens or closes the disc tray.
10) PLAY Button (
Plays a disc.
11) STOP Button (
Stops playing or recording a disc.
12) HDD/DVD Button ( HDD/DVD )
Press to switch between HDD and DVD.
13) VIDEO IN/AUDIO IN L/R Jacks
Connect the output of external equipment.
OPEN / CLOSE)
PLAY)
STOP)
1) Play indicator
2) DVD indicator
3) SVCD indicator
4) VCD indicator
5) CDDA indicator
6) FILE indicator
7) CD indicator
8) DVD+R indicator
9) Pause indicator
10) Record indicator
11) Timer record mode
12) Multi-information window
13) DVD+RW indicator
14) CD-R/DVD-R indicator
15) CD-RW/DVD-RW indicator
6
Page 8
CONTROLS AND DISPLAYS
Rear panel connections
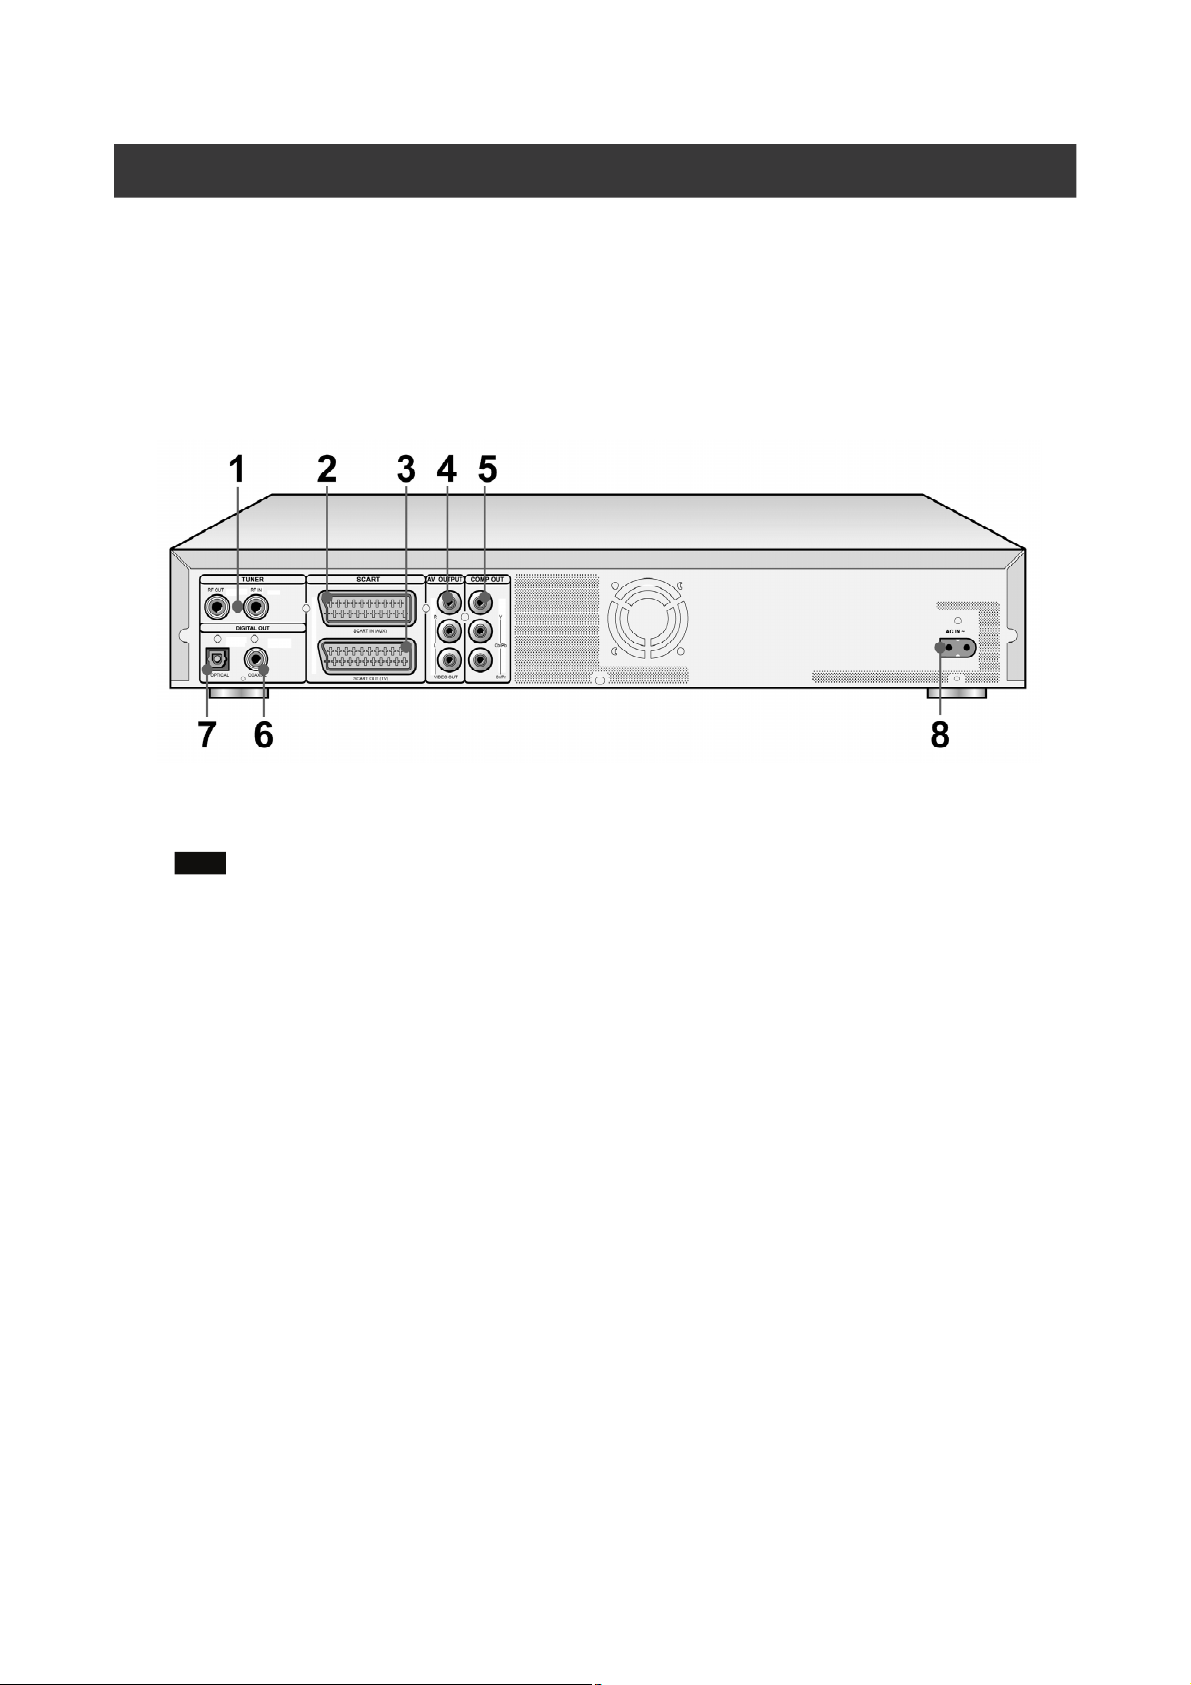
Names of parts
1) TUNER(RF OUT/RF IN) Jacks
Antenna cables input and output.
Note: DVD signals don’t go through here. Make
proper connections before use.
2) SCART IN Jack
Composite/RGB signal input.
3) SCART OUT Jack
Composite/RGB/S-Video signal output.
4) AV OUTPUT Jacks
Composite signal output.
5) COMP OUT Jacks
Component signal output.
6) DIGITAL OUT (COAXIAL) Jack
Connect to an amplifier or a receiver having a
digital input jack.
7) DIGITAL OUT (OPTICAL) Jack
Connect to an amplifier or a receiver having a
digital input jack.
8) AC IN Terminal
Connect the power cord.
7
Page 9
CONNECTIONS
Before making connections
1) Do not plug the AC power cord into the outlet until all other connections are made.
2) Connect VIDEO OUT of the unit directly to the video input of your TV. Connecting VIDEO OUT of the unit to a TV via a VCR may
cause a viewing problem when playing back a copy-protected disc. You may also have a viewing problem when connecting
the unit to an integrated TV/Video system.
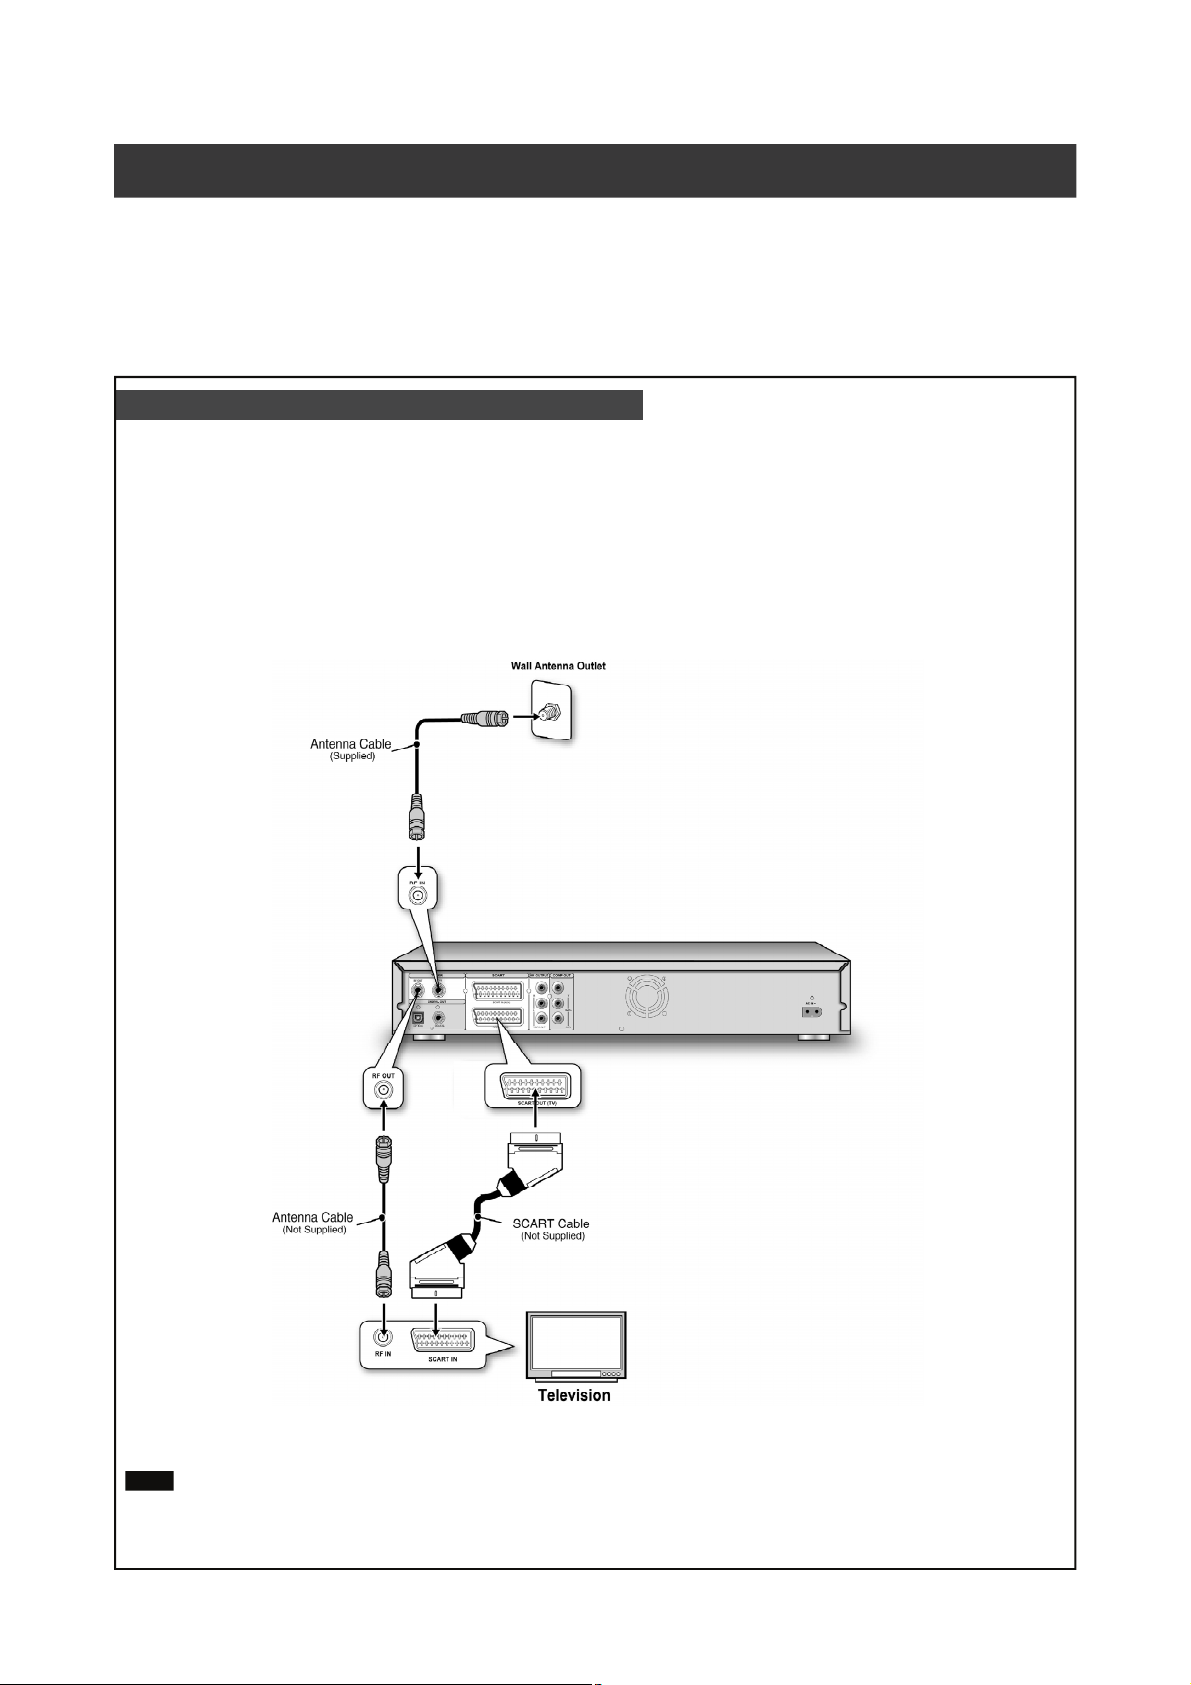
Connecting to the antenna outlet and the television
Before using the unit, follow the steps below to connect the unit to the antenna cable and TV.
Connecting to a TV with SCART jack
Use the antenna cable (supplied) to connect the RF IN on the unit to the antenna outlet.
Use the antenna cable (not supplied) to connect the RF OUT on the unit to the RF input on the television.
Use a SCART cable to connect the SCART OUT jack on the unit to the SCART IN jack on the television.
Notes:
1. Do not place this unit on top of other equipment that may generate heat. Excessive heat may cause this unit to
malfunction.
2. For Digital Cable and Satellite TV users please connect your decoder’s output to this unit’s input.
8
Page 10
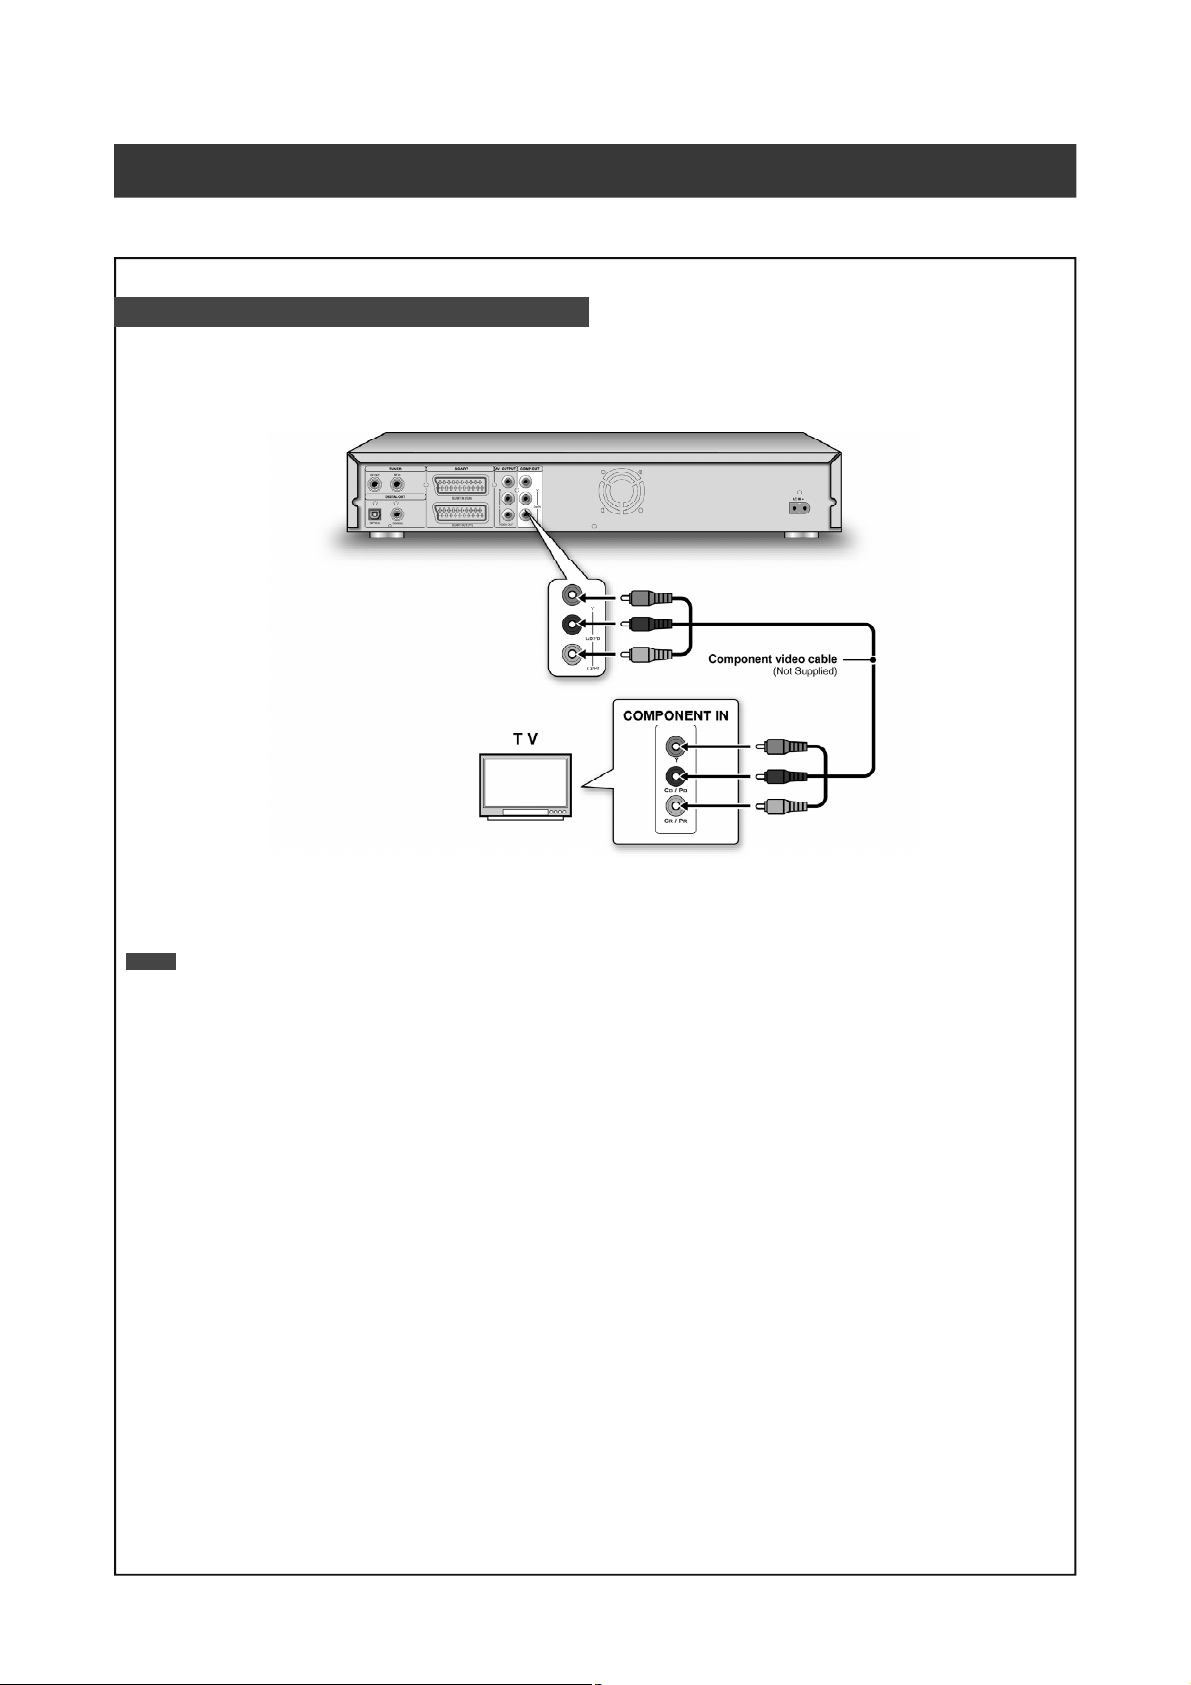
FOR BETTER VIDEO QUALITY
If your TV has Component Video inputs, you can enjoy superior picture quality.
Connecting to a TV via COMPO OUT
Connecting to a TV with component jacks
Use COMPONENT cable (not supplied) to connect the COMPO OUT on the unit to the COMPONENT input on the television.
Notes:
1. Enter system setup to enable COMPO OUT (refer to the section titled “Quick Setup”).
2. When using COMPO OUT connections, please remove all other video output connections.
3. In this configuration, the Red and White audio connections are required.
9
Page 11
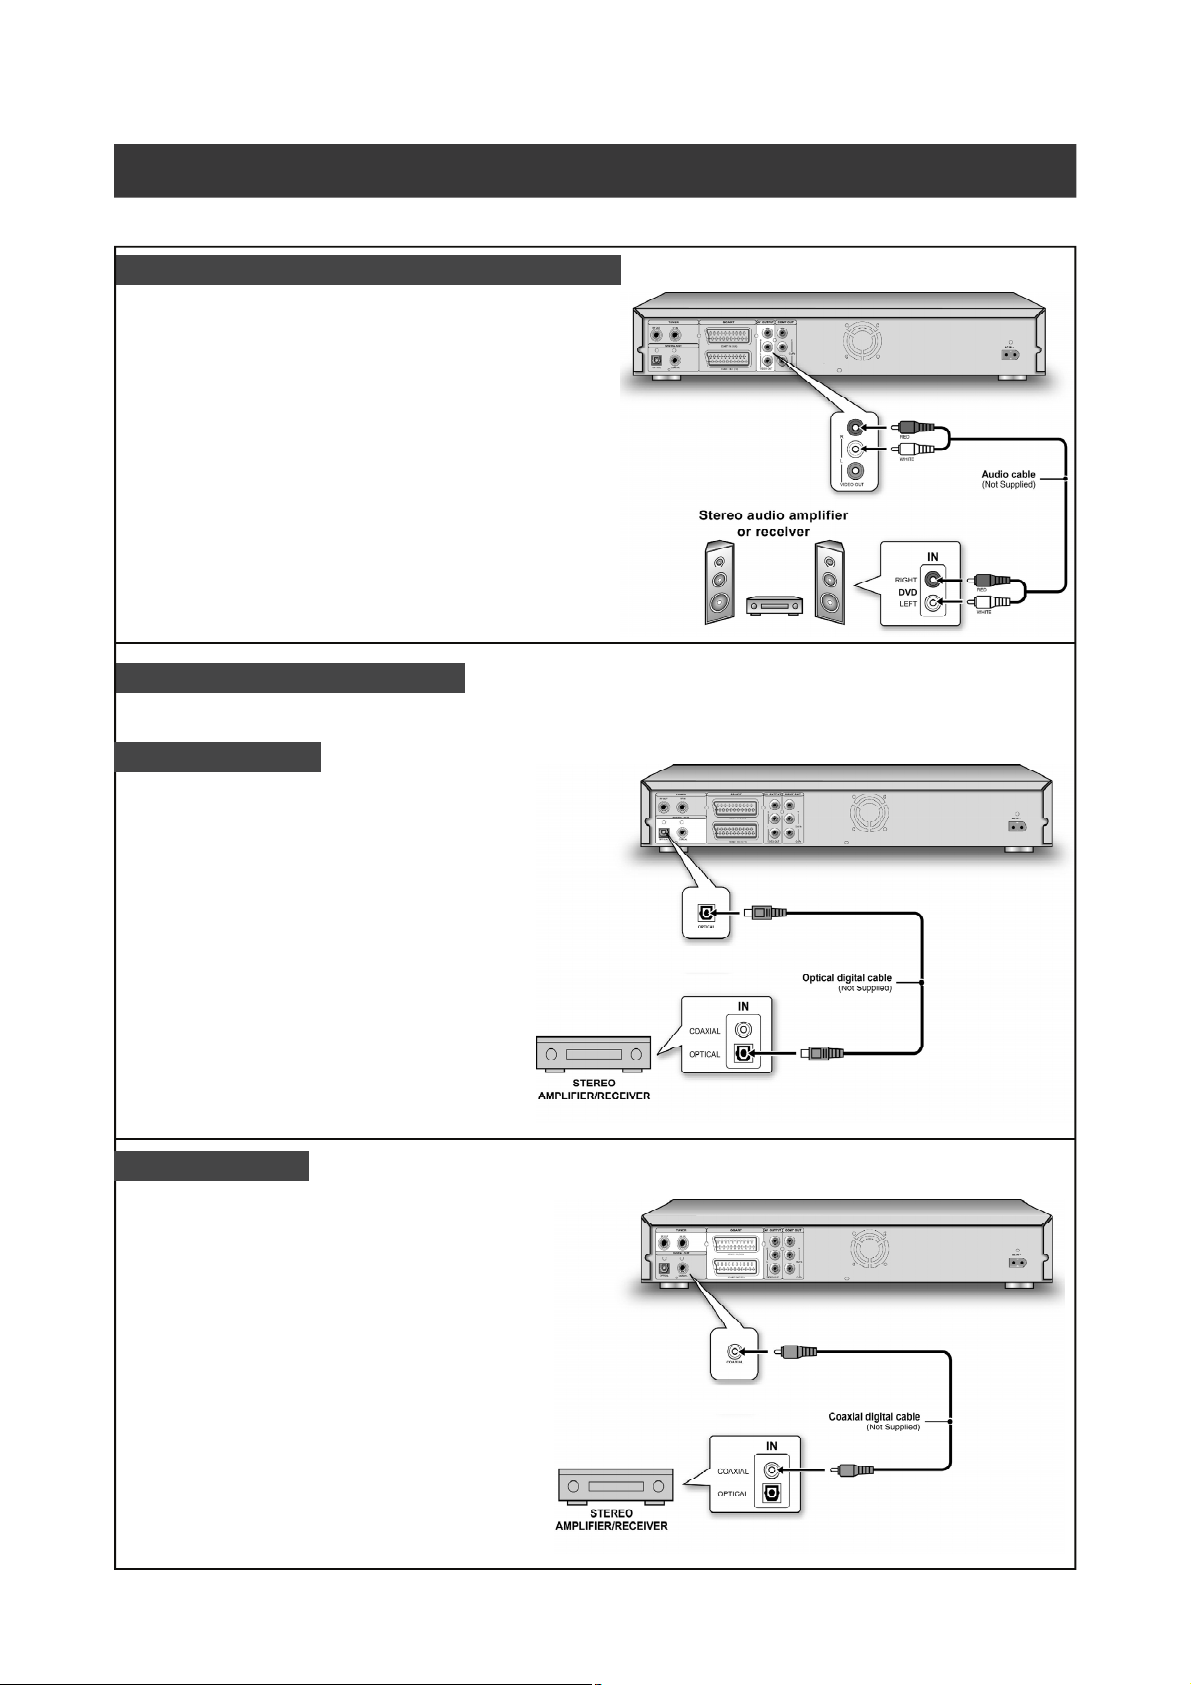
FOR BETTER AUDIO QUALITY
There are two types of audio connections, analog and digital.
Connecting to a stereo audio amplifier or receiver
Use an audio cable to connect the L/R AV OUTPUT on the unit to
the audio inputs on a stereo amplifier or a receiver.
Connecting to a digital audio device
Connect an amplifier with Dolby Digital and DTS decoders to enjoy surround sound.
Digital out optical
Use an optical digital cable (not supplied) to connect
the DIGITAL OUT OPTICAL (digital optical output) on
the unit to the digital optical input on an stereo amplifier
or a receiver.
Digital out coaxial
Use a coaxial digital cable (not supplied) to connect the
DIGITAL OUT COAXIAL (coaxial digital output) on the unit
to the coaxial digital input on an stereo amplifier or a
receiver.
10
Page 12
SETUP MENU
Remote Control & Setup menu
Follow the steps below to reset personal preferences for using
the DVD recorder. Confirm that all connections are secured
properly.
1. Press [
2. Press [SETUP] to display the system menu.
3. Press [] [] to select “System,” “Language,”
“Playback,” “Record,” “Audio,” “TV Tuner” or “Exit”
and press [ ] or [ ] to move to the next or
previous menu.
4. Press [ ][] to select the item you want to
change.
(Refer to the “GUI operation” section for detailed menu)
5. Press [ENTER] to confirm the setting.
6. Press [SETUP] to exit the setup menu or press []
to return to the previous menu.ot
Notes:
1. To record TV programs using the Timer Record feature,
you must set the time accurately.
2. Please see also “ GUI(Graphical User Interface) Operation“
on page 42/43 for further information.
STANDBY/ON] to turn on the unit.
Setting the date and time
Check that the clock is correctly set before initiating the timer
recording function. If the clock is set incorrectly, Timer Record
results may not be accurate.
Set the date
1. Press [SETUP] and the setup menu will
be displayed.
2. Select “System” using [] or [] and press [ENTER].
3. Select “Date” using [] or [] and press [ENTER].
4. Change the day/month/year in the highlighted field using []
or [] or the numbered buttons (0~9) on your remote
control and confirm by pressing [ENTER].
5. When all settings are correct, press [] to return to the
main menu.
6. To exit the setup menu, press [SETUP].
Set the time
1. Press [SETUP]. The setup menu will appear.
2. Select “System” using [] or [] and press [ENTER].
3. Select “Time” using [] or [] and press [ENTER].
4. Change the “hour/minute/second” in the highlighted field
using [] or [] or the numbered buttons (0~9) on your
remote control.
5. When all settings are correct, press [] until returning to
the main menu.
6. To exit the setup menu, press [SETUP].
Notes:
Setting video output
1. Press [SETUP] and the setup menu will be displayed.
2. Select “System” using [] or [] and press [ENTER].
3. Select “Video Output” as “Scart S-Video,” “Scart RGB”
“Component” or “Progressive” using [] or [] and press
[ENTER]. (Refer to “ GUI operation” section for details)
4. When all settings are correct, press [] to return to the
main menu.
5. To exit the setup menu, press [SETUP].
Progressive Scan mode
You can change the video output mode when you press
[SETUP] and select “System-->Video Output-->
Progressive.”
Video output mode:
576i: Interlace video 576p: Progressive video
You must connect the component output on the unit to a
576p compatible television.
Note:
If you accidentally set “Progressive” as the Video Output
when not connecting to a progressive scan-compatible TV,
you may lose the video signal on your TV instantly. To get the
picture back, press [(Cursor Right)] and the numbered
buttons “5,” “0,” “2” and “0” on the remote control and then
[ENTER]. In about 8 seconds, you can re-set the video output.
Setting Aspect ratio
Press [SETUP] and select “Playback”-->”Aspect Ratio.”
Select “4:3” (regular) or “16:9” (widescreen) to suit your
television. If you have a regular 4:3 television, you can also
select how video title on some discs is presented.
4:3 L.Box (4:3 Letter Box)
Select when you connect the unit to a
normal (4:3) TV.
When playing back a DVD-VIDEO disc
recorded in wide picture format, the picture
is shown with black bars at the top and bottom.
4:3 Pan (4:3 Pan & Scan)
Select when you connect the unit to a
normal (4:3) TV.
When playing back a DVD-VIDEO disc
recorded in wide picture format, the picture
is zoomed to fill the screen vertically, and
the left and right sides of the image are chopped off. Note,
however, that the picture will be shown in the 4:3 L.Box (4:
3 Letter Box) mode even if you select the 4:3 Pan (4:3 Pan &
Scan) mode depending on the disc.
16:9 Wide (16:9 Wide Screen)
Select when you connect the unit to
a wide-screen (16:9) TV.
Setting Audio
Press [SETUP] and select “Audio.”
Digital Output
PCM Bit Stream
(Enable digital audio output with PCM or encoded data)
DTS Out
On / Off
Surround
Stereo DOLBY DTS
TV sound Bilingual
Main Sub
MPEG
PCM Bit Stream
Note:
When stereo broadcasting is received, L, R or MONO cannot
be selected for output audio.
11
Page 13
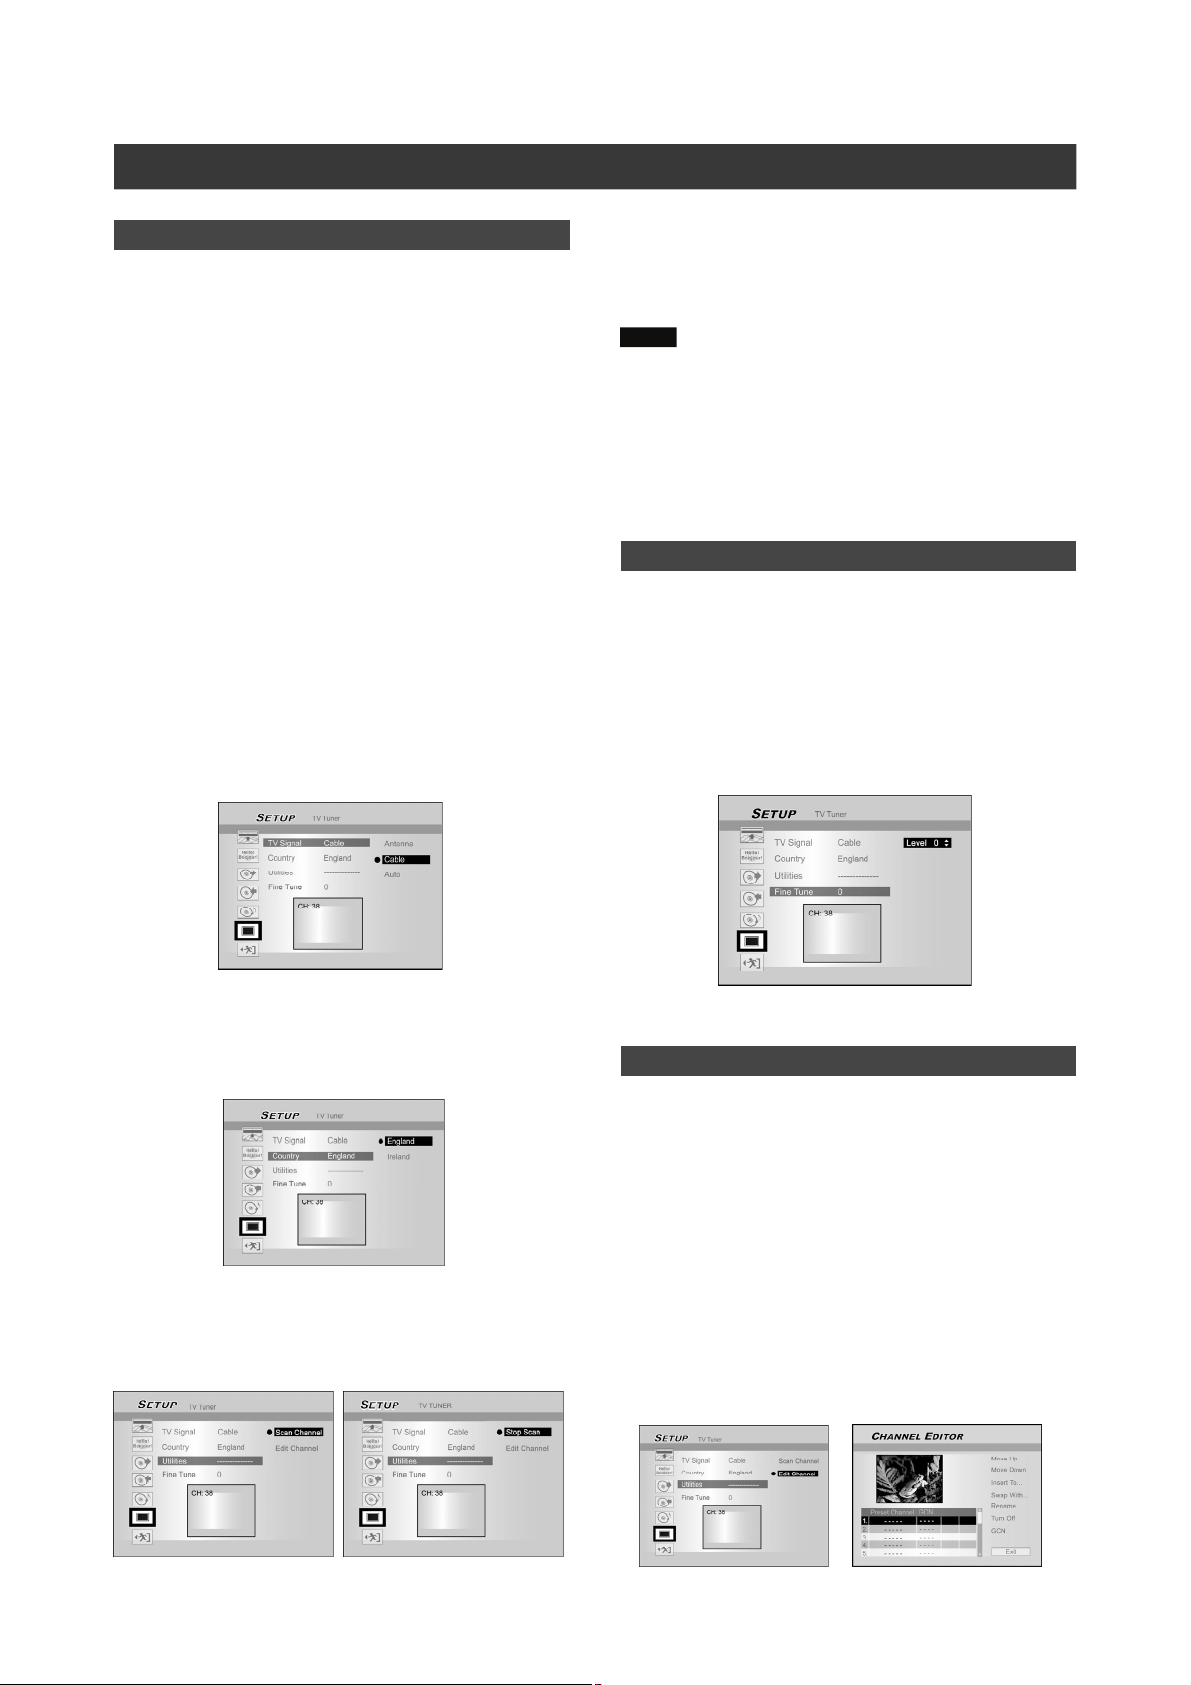
TV CHANNEL SETUP
TV channel scanning
When the “Scan Channel” function is activated, the TV
channels are searched and stored in a specific order. If the
channel assignment of your TV content provider is changed
or if you are reinstalling this DVD recorder, you may need to
start this procedure again.This will replace the TV channel
stored with the new ones.
Before scanning channel, set the “TV Signal” and “Country”
for initiation.
1. Ensure the antennas are securely connected to
the DVD recorder.
2. Switch on the TV set and the DVD recorder.
3. Press [SETUP] to display the setup menu, press
[] or [] to select the “TV Tuner” icon and
press [].
4. Press [] / [] to select “TV Signal” and press
[].
5. Press [] / [] to select “Cable,” “Antenna” or
“Auto” depending on how you receive your
terrestrial TV channels and press [ENTER]. Press
[] to return to the previous menu and save the
setting.
If you select “Auto,” the unit will automatically scan both
channels available at cable and antenna connections, which
might take longer than needed.
9. The channel scanning starts. This process may
take a few minutes.
10.When all the TV channels have been searched
and stored, press [SETUP] to exit.
Notes:
1. If the available channel number in your residence area
exceeds the maximum receivable channel numbers of this
DVD Recorder, the scan will be discontinued. The maxi
mum receivable channel numbers are:
Antenna: 168 (chs)
Cable: 104 (chs)
Auto: 176 (chs)
2. It would take more time for auto channel scanning
depending on the receiving condition of your antenna.
Fine-tuning TV channels manually
After you have performed the channel scanning, you may like
to fine-tune the TV channel signal manually. Follow the steps
below to complete fine tune.
1. Press [SETUP] to display the “Setup”, press
[] or [] to select the “TV Tuner” icon and
press [].
2. Press [] or [] to select “Fine Tune” and
press [].
3. Press [] or [] to fine-tune the channel signal.
6. Press [] / [] to select “Country” and press
[]. Press [] / [] and [ENTER] to select the
country of your residence from the list . Press []
to return to the previous menu and save the
setting.
7. Press [] / [] to select “Utilities” and press [].
8. Press [] / [] to select “Scan Channel” and
press [ENTER] to start channel scanning.
If you wish to stop scanning, move to “Stop Scan” and press
[ENTER]. The scanning process will be discontinued.
4. When complete, press [SETUP] to exit the
setup menu.
Editing TV channels manually
After you have performed channel scanning, you may like to
further edit the TV channels. This function allows manually
adding/deleting channels, swapping channel order, inserting
a channel to a specific order, renaming the channels and so
on.
1. Press [SETUP] to display the “Setup”, press
[] or [] to select the “TV Tuner” icon and
press [].
2. Press [] or [] to select “Utilities” and press
[].
3. Press [] or [] to select “Edit Channel” and
press [ENTER]. The CHANNEL EDITOR menu will be
displayed.
For detailed operation instructions on the “Channel Editor”
menu, refer to the “CHANNEL EDITOR” section.
12
Page 14
CHANNEL EDITOR
To access to the Channel Editor menu, press [SETUP], select
“TV Tuner,” “Utilities,” “Edit Channel” and press [ENTER]. Or,
press [SOURCE] to set “TV” as the input signal source and
press [EDIT]. Either way, the Channel Editor menu will be
displayed.
Moving up or moving down the TV channel
1.Press [] [] to select one of the TV channels
and press [].
2.Press [] [] to select “Move Up” or “Move
Down” and press [ENTER].
The order of the TV channel will be changed.
Each time you press [] or [] and the item changes as
follows:
3. To move the location of other TV channels, repeat
step 1~2 to complete the settings.
4. Press [] [][] [] to select “Exit,” press
[ENTER] to save the setting and exit the
“CHANNEL EDITOR” menu.
Swapping TV channels
This function allows you to manually swap the TV channel
order stored in the unit to match the TV channel order stored
in your TV set.
1. Press [] [] to select a TV Channel and press
[].
2. Press [] [] to select “Swap With” and press
[ENTER].
3. Press [] [][] [] to enter the “Channel
number,” and press [ENTER] to swap. The order
of the channels will be swapped with the channel
number entered.
4. To swap other TV channels, repeat step 1~3 to
complete the settings.
5. Press [] [][] [] to select “Exit,” press
[ENTER] to save the setting and exit the
“CHANNEL EDITOR” menu.
Inserting TV channels
1. Press [] [] to select a TV channels and
press [].
2. Press [] [] to select “Insert To” and press
[ENTER].
3. Press [] [][] [] to enter the “Channel
number,” and press [ENTER]. The channel will be
moved to the desired location.
4. To change the locations of other TV channels,
repeat step 1~3 to complete the settings.
5. Press [] [][] [] to select “Exit,” press
[ENTER] to save the setting and exit the
“CHANNEL EDITOR” menu.
Renaming TV channels
1. Press [] / [] to select a TV channel and press
[].
2. Press [] [] to select “Rename” and press
[ENTER].
The display for
entering a title name
appears.
3. Select the desired
characters from the
keypad. Press
[ENTER] after each
entry.
4. When you finish
entering the title name, press [] [] [] [] to
select “Finish” and press [ENTER].
Notes:
1. You can only enter up to 10 characters for a name.
2. If you wish to enter “space”, select a blank on the keypad
and press [ENTER].
13
Page 15
Setting up VIDEO Plus+®systemCHANNEL EDITOR
Turning on or turning off TV channels manually
After you have performed the channel scanning process, you
may like to add or delete some of the TV channels. This function
allows turning on the channel not found at channel scanning or
turning off the channel found manually.
1. Press [] [] to select a TV Channel not found at
channel scanning and press [].
2. Press [] [] to select “Turn On” and press
[ENTER]. The TV channel selected will be turned
on.
To turn off the TV channel, move to “Turn Off” and press
[ENTER]. The TV channel selected will be turned off.
3. To turn on other TV channels, repeat step 1~2 to
complete the settings.
4. Press [] [][] [] to select “Exit,” press
[ENTER] to save the setting and exit the
“CHANNEL EDITOR” menu.
Thanks to this programming system, you no longer need to
tediously enter the date, programme number, start and end
times. All the information needed by the DVD recorder for
programming is contained in the VIDEO Plus+® programming
number. This 9-digit PlusCode number is found in most TV
listings magazines.
Before setting up, confirm that the all cables are securely
connected.
SettinguptheVIDEOPlus+®system
1. Press [SOURCE] to set TV as the input signal
source.
2. Press [EDIT] to display the “CHANNEL EDITOR”
menu.
3. Press [] [ ] to go to a channel and press
[ENTER].
4. Press [] [] [] [] to go to “GCN” and press
[ENTER].
The menu to enter GCN is displayed.
5. Use the numbered buttons (1~9) to enter the
GCN and press [ENTER] when done.
Press [] [] to go back to advance/return to the previous/
next digit.
6. To set GCN for other channels, repeat step 3~5.
7. When complete, press [] / [] to go to “Exit”
and press [ENTER] to exit the channel editor
menu.
PDC
“PDC” (program delivery control) are used to control
the start and duration of TV channel recordings. If a TV
program starts earlier or ends later than was
scheduled, the DVD recorder will then turn on and off
at the correct time. Refer to “Timer Record using the
VIDEO Plus+ system” section for details about setting.
Notes:
1. You must enter the start time exactly to the minute. If you
want to program a time that is different from the PDC time,
you must switch off PDC.
2. Only on TV program of a TV channel can be controlled
using “PDC” at a time. If you want to record two or more
TV programs on a TV channel using “PDC,” you need to
program these as two separate recordings.
3. Since the DVD recorder requires a certain lead time for
getting the disc up to speed and positioning the laser before
recording can start, it is possible that the recorder will miss
the first few seconds of a TV show recorded with PDC. In
this case, disable PDC and enter a start time one minute
earlier.
14
Page 16

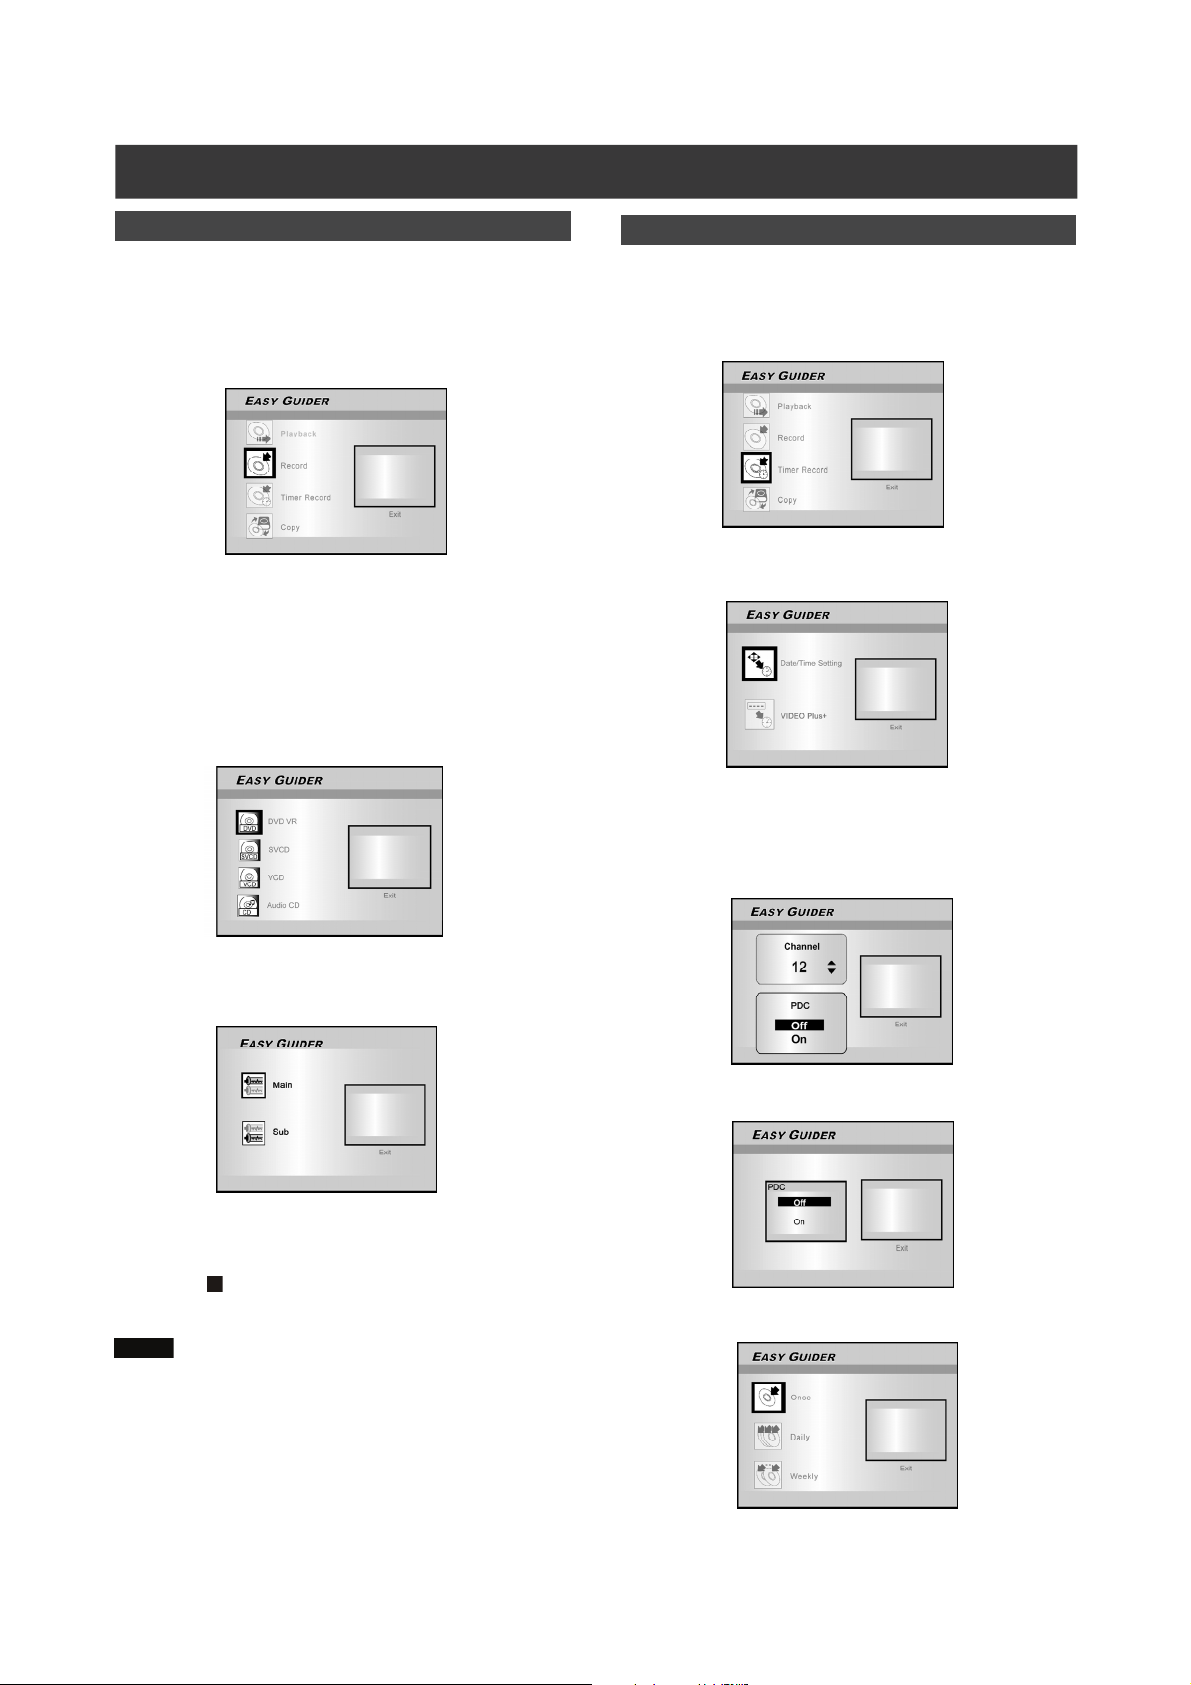
EASY GUIDER
Easy Guider menu is an unique user interface to
guide you through basic functions of this
recorder. By using the Easy Guider menu, it is
less time-consuming to operate this system.
Users no longer need to go through normal
operations that may require far more steps and
different interfaces.
Playback video files
1. Press [GUIDER] to display the Easy Guider
menu.
2. Press [] [] to select “Playback” and then
press [ENTER].
3. Press [] [] to select DVD or HDD and then
press [ENTER].
Playback music files
1. Press [GUIDER] to display the Easy Guider
menu.
2. Press [] [] to select “Playback” and then
press [ENTER].
3. Press [] [] to select DVD or HDD and then
press [ENTER].
4. Press [] [] to select “Music” and press
[ENTER].
5. The selected file screen appears. Press [] []
[] [] to select a music file to start playback
with and press [ENTER].
If you want to go to the next page or to the return previous
page, you can select the [
number icon.
6. Press [PAUSE/STEP] to pause playback.
Press [
Press [
Press [ STOP] twice to bring the playback to a full stop.
PLAY] to resume normal playback.
STOP] to stop playback at a marked stop.
] [ ] icon or the page
4. Press [] [] to select “Video” and press
[ENTER].
5. The selected file screen appears. Press [] []
[] [] to select a video file to start playback
with and press [ENTER].
If you want to go to the next page or return to the previous
page, you can select the [
number icon.
6. Press [ PAUSE/STEP] to pause playback.
Press [
Press [
Press [ STOP] twice to bring the playback to a full stop.
PLAY] to resume normal playback.
STOP] to stop playback at a marked stop.
] [ ] icon or the page
Playback picture files
1. Press [ GUIDER] to display the Easy Guider
menu.
2. Press [] [] to select “Playback” and then
press [ENTER].
3. Press [] [] to select DVD or HDD and then
press [ENTER].
4. Press [] [] to select “Pictures” and press
[ENTER].
5. The selected file screen appears. Press [] []
[] [] to select a picture file to start playback
with and press [ENTER].
If you want to go to the next page or return to the previous
page, you can select the [
number icon.
6. Press [PAUSE/STEP] to pause playback.
Press [
Press [
PLAY] to resume normal playback.
STOP] to stop playback.
] [ ] icon or the page
15
Page 17

EASY GUIDER
Playback pictures with music
1. Press [GUIDER] to display the Easy Guider
menu.
2. Press [] [] to select “Playback” and then
press [ENTER].
3. Press [] [] to select DVD or HDD and then
press [ENTER].
4. Press [] [] to select “Pictures With Music”
and press [ENTER].
The selected file screen appears.Press [
5.
[] [] to select a picture file to start playback
with and press [ENTER].
6. Press [] [][] [] to select a music file to
start playback with and press [ENTER].
Playback will start.
7. Press []/[] to select “Rotate RIGHT” or “Rotate
LEFT” and “Rotate UP” “Rotate down.”
Press [] or [] to skip the picture.
Press [
MP3 file.
8. Press [
Press [
Press [
NEXT ] or [ PREV ] to skip the
PAUSE/STEP] to pause playback.
PLAY] to resume normal playback.
STOP] to stop playback.
] []
Record on the HDD
1. Press [GUIDER] to display the Easy Guider
menu.
2. Press [] [] to select “Record” and then
press [ENTER].
3. Press [] [] to select the Signal- Input ( TV,
AV1-front, AV2-rear, DV-in) and press [ENTER].
If you select “TV,” press [] [] to select the channel you want
to record and press [ENTER]. Press [] [] and [ENTER] to set
the PDC mode off.
4. Press [] [] to select “HDD” and press
[ENTER].
5. Press [] [] to select “Recording mode” and
then press [ENTER].
Playback the last recorded title (on HDD only)
1. Press [GUIDER] to display the Easy Guider
menu.
2. Press [] [] to select “Playback” and then
press [ENTER].
3. Press [] [] to select HDD and press [ENTER].
4. Press [] [] to select “Last Record” and press
[ENTER].
Playback of the title last recorded on your HDD will begin.
5. Press [ PAUSE/STEP] to pause playback.
Press [
Press [
Press [ STOP] twice to bring the playback to a full stop.
PLAY] to resume normal playback.
STOP] to stop playback at a marked stop.
If you select “TV” in step 3, press [] [] to select the desired
TV sound and press [ENTER].
6. Press [ENTER] to start recording.
Press [
Press [
Notes:
1. You can press [GUIDER] to exit the Easy Guider menu.
2. Bilingual TV program which input through AV input terminal
is recorded on DVD disc (HDD) as stereo TV program.
When this title is playbacked, the both Main and Sub sound
can be heard from the speakers.
Please choose the desired sound which you want to enjoy
on the TV side.
3. Stereo broadcasting is recorded by stereo and monaural
one is recorded by mono.
16
STOP] to stop recording.
PAUSE/STEP] to pause recording.
Page 18
EASY GUIDER
Record on DVD
Make sure a recordable disc is inserted before recording.
1. Press [GUIDER] to display the Easy Guider
menu.
2. Press [] [] to select “Record” and then
press [ENTER].
3. Press [] [] to select the Signal-Input (TV,
AV1-front, AV2-rear, DV-in) and press [ENTER].
If you select “TV,” press [] [] to select the channel you want to
record and press [ENTER].
4. Press [] [] to select “DVD” and press
[ENTER].
5. Press [] [] to select a disc format and press
[ENTER].
Timer Record (Date/Time Setting)
1. Press [GUIDER] to display the Easy Guider
menu.
2. Press [] [ ] to select “Timer Record” and
then press [ENTER].
3. Press [][] to select “Date/Time Setting” and
press [ENTER].
4. Press [] [] to select the Signal-Input ( TV,
AV1-front, AV2-rear, DV-in ) and press [ENTER].
If you select “TV,” press [] [] to select the channel you want to
record and press [ENTER]. Press [] [] and [ENTER] to set the
PDC mode on or off.
If you select “TV” in step 3, press [] [] to select the desired
TV sound and press [ENTER].
“Go !” is selected.
6. Press [ENTER] to start recording.
Press [
Press [
Notes:
1. If a new recordable CD-R or a newly erased CD-RW is
used for recording, press [] [] [ ] [] to select a
disc format the disc is to be prepared as and press
[ENTER] : SVCD, VCD, Audio CD or Data CD.
2. Stereo broadcasting is recorded by stereo and monaural
one is recorded by mono.
STOP] to stop recording.
PAUSE/STEP] to pause recording.
If you select “AV1-front or AV2-rear,” press [] [] to set PDC
mode on or off.
5. Press [][] to select “Once,” “Daily,” or “Weekly.”
17
Page 19
EASY GUIDER
6. Press [][] [] [] or the numbered buttons
(0~9) to set the date and press [ENTER] when done.
7. Press [][] [] [] or the numbered buttons
(0~9) to set the time and press [ENTER] when
done.
8. Press [][] to set “Length” and then press [ENTER] .
9. Press [][] to select “HDD” or “DVD” and then
press [ENTER] .
Note:
For Timer Record, there are six recording modes avaialbe: HQ,
SP, LP, EP, SLP and Just Fit. When the recording mode is set
to be “Just Fit,” the recording mode will be automatically
adjusted depending on how much recording space is available
on the disc/HDD.
13. Press [
STANDBY/ON] to turn the recorder
off to activate Timer Record function.
Note:
When you first play a recordable CD-R disc or an empty CD-RW
disc on the disc tray, select a disc format the disc is to be
prepared as: SVCD, VCD, Audio CD or Data CD. The format
selected determines the recording quality.
Timer Record (VIDEO Plus+®Setting)
1. Press [GUIDER] to display the Easy Guider
menu.
2. Press [] [ ] to select “Timer Record” and
then press [ENTER].
3. Press [] [] to select “VIDEO Plus+” and press
[ENTER].
10. Press [][] to select a disc format and press
[ENTER]. (For DVD disc only)
11. Press [] [] to select a recording mode and
press [ENTER].
12. Press [] [] to select the desired TV sound and
press [ENTER].
13. The “Timer Record information” will appear and
press [ENTER] to
exit the timer record settings.
4. Press [] [] to select once, daily or weekly
and press [ENTER].
5. Use the numbered buttons to enter the PlusCode
number and then press [ENTER] . Press [][] to
set the PDC mode on or off and press [ENTER].
18
Page 20

EASY GUIDER
6. After entering the PlusCode number, the “GCN”
and “Present Channel” will be displayed.
Press [ENTER] to preset the channel.
7. Press [][] to select “DVD” or “HDD” and then
press [ENTER] .
8. Press [] [] to select a disc format and then
press [ENTER].
If a CD-R or CD-RW is used for recording, you need to select
SVCD, VCD or Audio CD. If a DVD disc is used for recording,
you need to select “DVD VR” format.
9. Press [] [] to select “Recording mode” and
then press [ENTER].
For CD-R/RW, the format selected determines the recording
quality.
10.Press [] [] to select TV audio and press
[ENTER].
11.The “Timer Record information” will be displayed.
Press [ENTER] to exit the timer record settings for
VIDEO Plus+®.
Press [ STANDBY/ON] to turn the recorder off
12.
to activate Timer Record function.
Note:
When you first play a recordable CD-R disc or an empty CD-RW
disc on the disc tray, select a disc format the disc is to be
prepared as: SVCD, VCD, Audio CD or Data CD. The format
selected determines the recording quality.
3. Press [] [] to select “HDD to DVD” and
press [ENTER].
The disc preparation process will take place in the background.
This process only takes a few moments.
4. Press [] [] to select the type of the file: Video,
Pictures or Music and press [ENTER].
5. The selected file screen appears. Press [] []
[] [] to select the file to copy and press
[ENTER].
6. When complete, go to “Exit” and press [ENTER].
Copy (From DVD to HDD )
Press [ OPEN/CLOSE] to open the disc tray and insert a
disc with recorded contents on it. Press the button again to
close the tray.
1. Press [GUIDER] to display the Easy Guider
menu.
2. Press [] [] to select “Copy” and press
[ENTER].
3. Press [] [] to select “DVD to HDD” and
press [ENTER].
Copy (From HDD to DVD)
Press [ OPEN/CLOSE] to open the disc tray and insert a
recordable DVD disc. Press the button again to close the tray.
1. Press [GUIDER] to display the Easy Guider
menu.
2. Press [] [] to select “Copy” and press
[ENTER].
Note:
You can only copy picture files (in JPEG or BMP formats), audio
files (in MP3 or WAV format) and recorded video titles.
Reference the “Copy” section for the right disc to use.
4. Press [] [] to select the type of the file: Video,
Music, Pictures or All and press [ENTER].
5. Press [] [][] [] to select the file to copy and
press [ENTER].
6. When complete, go to “Exit” and press [ENTER].
Notes:
1. You can only copy picture files (in JPEG or BMP formats),
audio files (in MP3 or WAV format). Sanyo has no right to
grant such permission. Permission should always be
sought from the copyright owner.
2. The title of DVD-Video cannot be copied from DVD to
HDD.
19
Page 21

RECORDING
Before recording
Cautions:
1. This DVD recorder records on DVD+R/+RW,CD-R/RW
discs and the built-in HDD. Please use recommended
recordable discs to ensure the best recording quality.
2. DVD+R and CD-R are write-once discs.
3. DVD+RW and CD-RW are a re-writable discs.
4. You cannot add new recording sessions to DVD+R discs
after the discs are finalized.
5. In some cases, you may not be able to add new recording
(s) to a recordable DVD disc that contains contents written
on other DVD recorders.
6. A disc records 49 video titles maximum. A title recorded
on a DVD disc contains 99 chapter marks maximum. And a
disc contains 254 chapter marks totally maximum.
7. A title recorded on the built-in HDD contains 999 chapter
marks maximum.
Recording television programs
1.Press [ STANDBY/ON] to turn the unit on.
2.Press [HDD/DVD] to set the target device as “HDD”
or “DVD.”
If “DVD” is selected as the target device, press [ OPEN/
CLOSE] to open the disc tray and insert a recordable disc.
Press the button again to close the tray.
When you insert a new recordable DVD disc, the DVD recorder
automatically starts the disc preparation process.
When you insert a new recordable CD-R or CD-RW disc, press
[] [] [] [] to select the disc format the disc is to be
prepared as.
Note:
You can also use the numbered buttons to select a channel.
5.Press [REC ] to start recording.
When recording is completed it may take a few
moments for the session to close.
Recording continues until you stop the recording or when the
disc or the HDD is full.
To stop recording
When you press [ STOP] , it may take a few moments for
recording to stop and the session to close.
To pause recording
Press [PAUSE/STEP] to pause recording, and press [
PAUSE/STEP] again to resume recording.
3.Press [REC MODE] continuously to select the
desired recording quality.
HQSPLPEPSLP
Press [SOURCE] and press [] [] to select “TV”
as the signal-input source.
4.Press [ CH + or - ] or press [] [] to select the
TV channel you want to record.
To change the recording mode before recording:
Press [SETUP] button.
To change the TV Audio setting before recording:
Press [SETUP] button.
Note:
The new setting can't change the current recording mode but
will be activated during the next recording session.
To check the disc status while recording
Press [DISPLAY] , the recording information appears.
20
Page 22

RECORDING
Adding new recordings
Adding new recordings after other recording
sessions.
Press [REC ] to start recording, and press
STOP] at the point you want to stop.
[
Note:
Each new recording session is placed after the previous session
unless a certain recording title is set to be overwritten.
(Reference the “Overwrite” function in the “Editing” section for
additional details.)
Change Chapter Intervals
Creating chapters while recording
The DVD recorder can automatically divide a session into
chapters by inserting chapter marks at 5/10/15/20/25/30-minute
interval during the recording process.
Playback the last recorded title (on HDD only)
Press [PLAY] or
[GUIDER] to start the playback
of the last recorded title .
This function is only available when the desired title resides on
the HDD.
Using [PLAY]
1. Press [PLAY] and the last recorded title will
start playback.
Using [GUIDER]
1. Press [GUIDER] and select the “Playback” icon.
2. Confirm that the playback device is HDD.
3. Press [] [] to go to the “Last Record” icon
and press [ENTER]. The playback will start.
1. Press [SETUP] to display the setup menu.
2. Press [] [] to select “Record” and press
[].
3. Press [] [] to select “Chapter Mark” to set
up the interval time.
4. Press [SETUP] to exit the setup menu.
Notes:
1. During recording, press [EDIT] to add chapter mark(s) in the
recorded session manually.
2. You can also start recording using the “Easy Guider”
Menu. Press [GUIDER], select “Record” and press [ENTER].
Follow the steps to set the recording mode.
3. Before you start, please ensure that the recordable disc or
hard disk has enough available space for the recording
session.
4. You cannot change the channel or recording mode during
recording.
Notes:
1. If a power failure occurs, the program you are recording
may be lost.
2. Before you start, please check that the recordable disc or
hard disk has enough available space for the recording.
3. You can not change the recording mode during recording.
4. Before playing a DVD+R, CD-R, CD-RW disc on another
player, you first need to finalize the disc.
21
Page 23

RECORDING
Recording from a VCR or Camcorder
Before starting to record
This DVD recorder can accept standard CVBS (RCA) analog
audio/video cable or IEEE-1394 cable and record Camcorder
onto DVD in the digital video format of your choice. The unit
functions much like a digital VCR. Examples of use include
archiving videotapes or transferring from a Video Cassette
Recorder or Camcorder to a recordable DVD disc or hard disk
drive. This DVD recorder allows basic DV control with the DVD
Recorder’s remote control when connected via the DV Link.
The front panel and rear panel connection
Connect a Video Cassette Recorder or Camcorder to the unit’s
input terminals.
To start recording
1. Press [HDD/DVD] to set the target device for the
recording.
If “DVD” is set as the target device, press [ OPEN/CLOSE]
to open the disc tray and insert a recordable DVD disc with
the label side facing up.
If a new recordable CD-R or CD-RW is used for recording, press
[] [] [] [] to select the disc format and press [ENTER]
.
2. Press [SOURCE] to select the signal-input (TV,
AV1-front, AV2-rear, DV-in).
Note:
When connected to VCR or other external devices, there will
be no outputting S-Video signal from the DVD recorder, if the
DVD recorder is switched off.
3. Start to play on the VCR or Camcorder.
4. Press [REC ] on the DVD recorder to capture
your video/audio signal from the VCR or
Camcorder onto a recordable DVD disc or hard
disk.
5.Press [
STOP] to stop recording.
To pause recording
Press [PAUSE/STEP] to pause recording. If you want to
restart recording, press [
recording.
PAUSE/STEP] to resume
22
Page 24

RECORDING
One-touch recording
Use “One-touch recording” to start recording immediately in 30minute blocks. Press [REC ] twice to start a 30-minute
recording session. Press [REC ] repeatedly to record longer
timed recordings, up to 6 hours in thirty-minute increments.
Pressing [REC ] when the timed recording exceeds the 6hour constraint automatically sets “one-touch recording” off.
For recording on DVD discs, the length of recording depends
on the current recording mode/speed and the amount of time
available on the disc. For recording on the built-in HDD, the
length of recording is 6 hours maximum.
DV recording
Before you start to record DV contents
This DVD recorder allows basic DV control functions with the
remote control. The DVD recorder is equipped with a camcorder
control (Play, Stop, FF or REV) feature via the DV Link
connection. Simply move the screen cursor to the desired
function on the DV input screen and press [ENTER] on the
remote control.
Use “Easy Guider” Menu to record DV signal
If you are to record DV signals on a disc, press [
CLOSE] to open the disc tray and insert a recordable disc.
If a new recordable CD-R or CD-RW is used for recording, press
[] [] [] [] to select the disc format the disc is to be
prepared as and press [ENTER] .
OPEN/
7. Press [] [] to select “DV” Input, and press
[ENTER] to confirm.
8. Press [] [] to select a recording mode and
press [ENTER]. (For DVD disc or HDD only)
1. Power on your TV and this DVD recorder.
2. Connect the DV cable (IEEE-1394 4-pin to 4-pin
cable) to both the DV Camcorder and the DVDRecorder.
3. Power on the DV Camcorder. Start “Playback
mode” on the DV Camcorder.
4. “Pause” the DV Camcorder at where you want to
record.
5. Press [GUIDER] on the remote control.
This activates the Easy Guider menu.
6. Press [] [] to select the “Record” icon, and
press [ENTER] to start recording.
9. “Go!” is selected. Press [ENTER] to start
recording.
Note:
This DVD-Recorder will stay in “Pause” mode when no DV
input signal is detected.
10.To pause recording.
Press [PAUSE/STEP ] on the remote control to pause
recording. Press [
resume recording.
PAUSE/STEP ] again, if you want to
11.To stop recording.
Press [ STOP]
Note:
Before playing a DVD+R disc on another player, you will first
need to finalize the disc. Reference the “finalize” function in
the “Disc Tools” section for additional information.
23
Page 25
RECORDING
DV Recording -- One-Touch Recording
Before you start to record DV contents
This unit allows basic DV control on screen. The on screen
functions are accessed using the DVD recorder remote control.
1. Power on your TV and this DVD recorder.
2. Press [HDD/DVD] to set the target device for the
recording.
If “DVD” is set as the target device, press [ OPEN/CLOSE]
to open the disc tray and insert a recordable disc with the
label side facing up.
If a new recordable CD-R or CD-RW is used for recording, press
[] [] [ ] [] to select the disc format. The disc is to be
prepared as and press [ENTER] .
3. Connect the DV Cable (IEEE-1394 4-pin to 4-pin
cable) to both the DV Camcorder and this DVD
recorder.
4. Power on the DV Camcorder. Set “Playback
mode” on the DV Camcorder.
5. “Pause” the DV Camcorder at where you want to
record.
6. Press [SOURCE] to change the “Signal-Input
source” and select the “DV-in” input.
DV control
After recording is stopped, a DV control bar will appear on the
screen. This allows basic DV control utilizing this DVD
recorder’s remote control.
1. Press [] [] to select “ ” and press [ENTER] to
start the DV Camcorder playing.
2. Press [] [] to select “
during playback mode to forward search the DV
Camcorder.
3. Press [] [] to select “
during playback mode to backward search the DV
Camcorder.
4. Press [] [] to select “
during playback mode to stop the DV Camcorder
playing.
5. Press [] [] to select “
during playback mode to pause the DV Camcorder
playing.
” and press [ENTER]
” and press [ENTER]
” and press [ENTER]
” and press [ENTER]
7. Resume DV Camcorder playback and press
[REC ] on the DVD Recorder to start
recording.
8. To pause recording.
Press [PAUSE/STEP ] on the remote control to pause
recording. Press [
resume recording.
PAUSE/STEP ] again, if you want to
9. To stop recording.
Press [ STOP ] to stop recording.
Notes:
1. The DV-Link input jack on this unit is for use with DV
compatible camcorders only.
2. Only DV signals can be input to the DV-Link jack on this
DVD recorder.
3. Do not connect a MICRO MV format video camcorder to
this DV-Link (IEEE-1394) jack.
24
Page 26
RECORDING
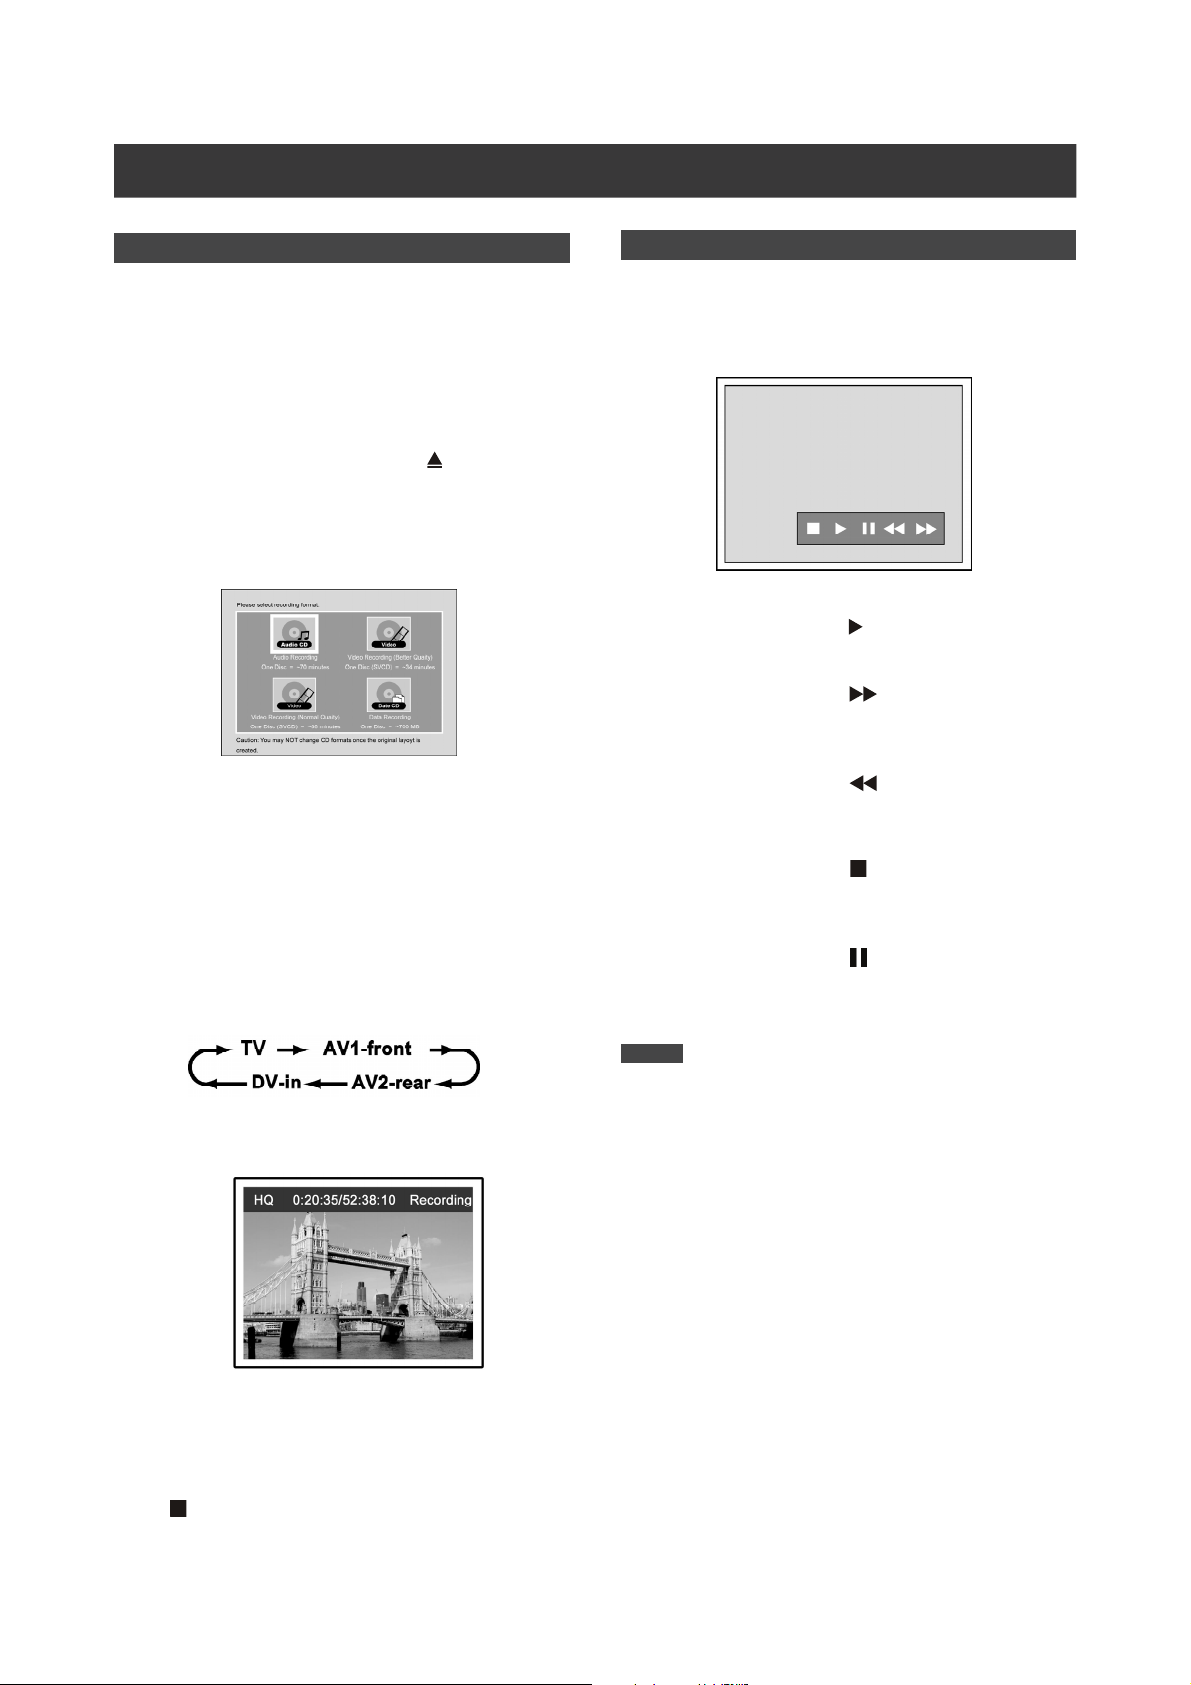
Record on a CD-R/CD-RW disc
Before starting to record
The DVD recorder can also record video in either VCD/
SVCD or Audio CD format on CD-R/RW discs. Before you
start to record, please use qualified recordable disc to
ensure the best recording quality.
Note:
Ensure to prepare the disc in the desired disc format before you
started to record.
Creating a correct disc format
1. Press [ OPEN/CLOSE] to open the disc tray and
insert a recordable CD-R or CD-RW disc with the
label side facing up.
2. Press [] [] [] [] to select the disc format. The
disc is to be prepared as and press [ENTER].
3. The disc preparation process will start. When done,
the disc is ready to be used for recording.
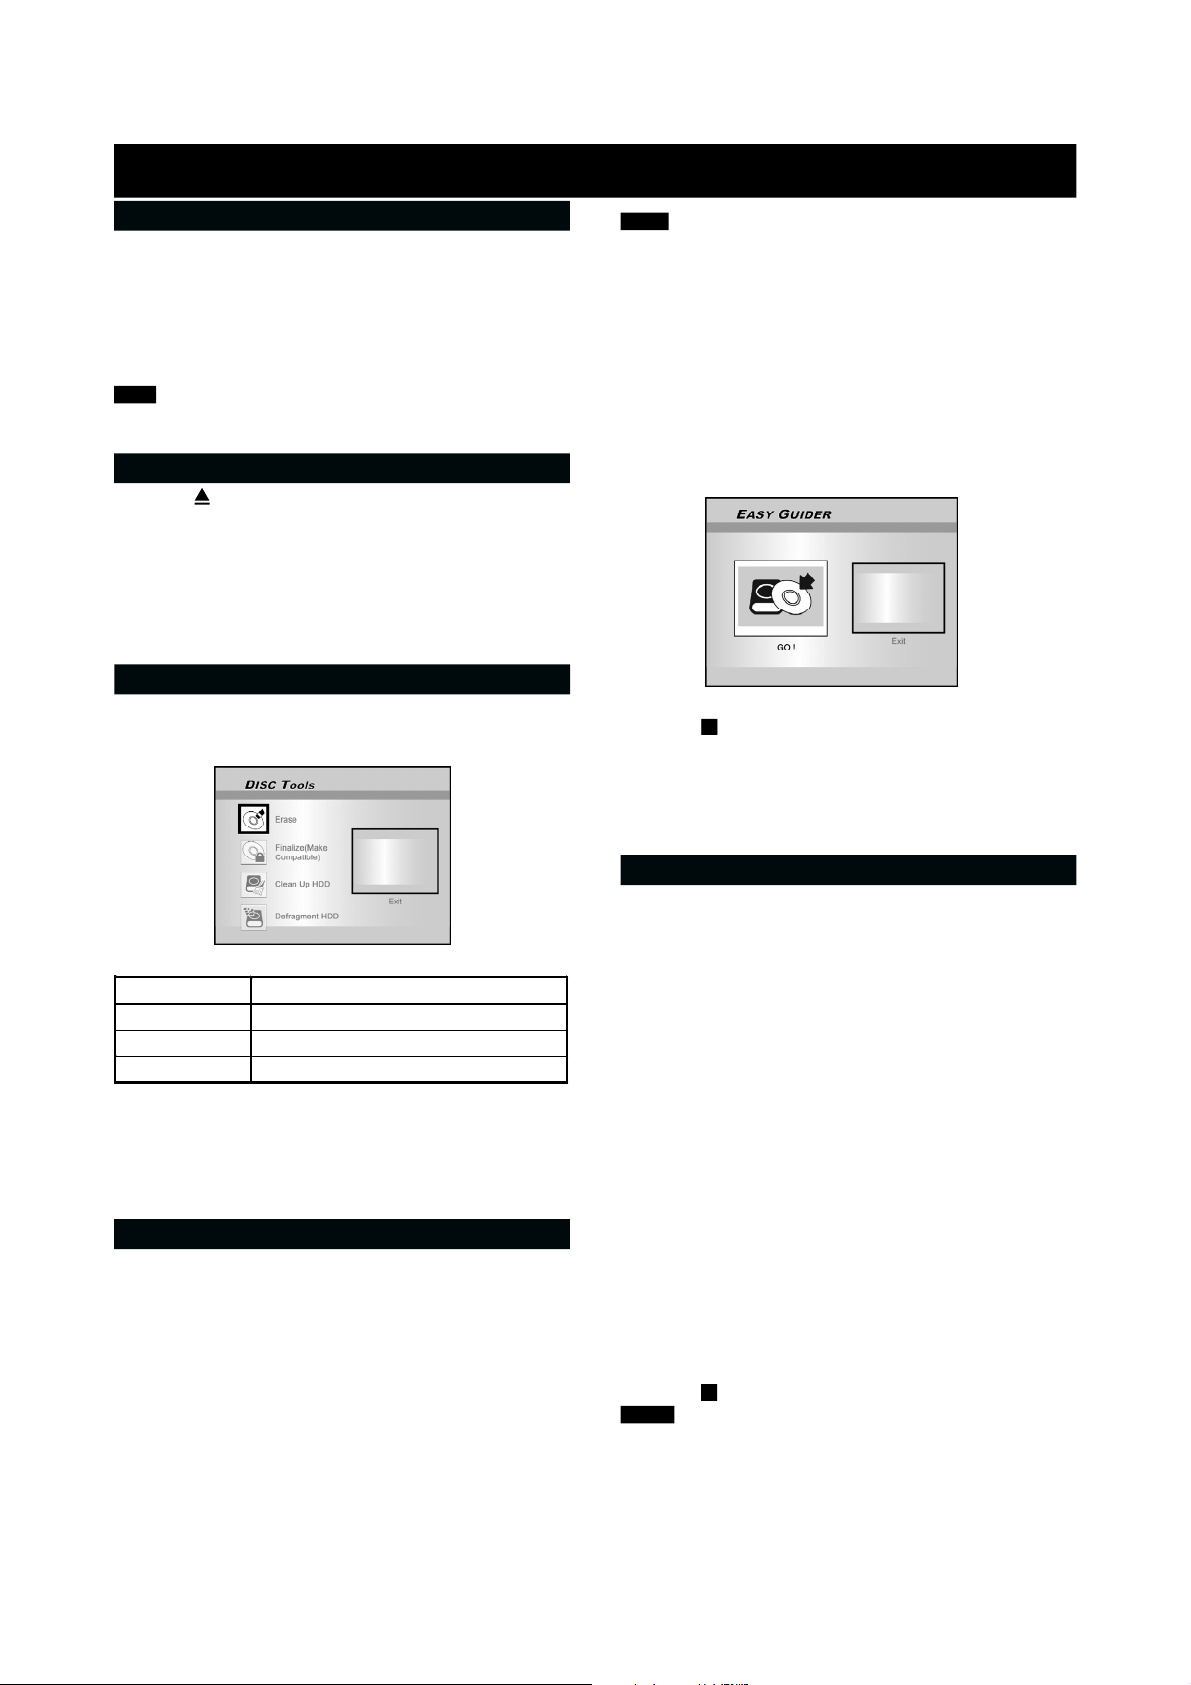
Create the disc format using the Disc Tools menu
1. Press [ TOOLS] to display the “DISC TOOLS” menu,
press [] [] to select the “Erase” icon and then
press [ENTER].
Notes:
1.You can’t perform any record before the CD-R/CD-RW disc is
prepared.
2.Only single format is allowed on a single disc.
3.You can’t change the format of CD-R disc after preparing it.
4.To change the format of the CD-RW disc, you must use the
“Erase” function at the “DISC TOOLS” menu.
5.All contents in the disc will be deleted after erasing it.O
6.You must finalize the disc before you can playback the disc on
other DVD / VCD / SVCD player or DVD-ROM on PC.
6. “Go!” is selected. Press [ENTER] to record your
signal onto the disc.
7. Press [ STOP] to stop recording.
To pause recording
Press [PAUSE/STEP] to pause recording , and if you want to
restart recording, press [PAUSE/STEP] again or [REC].
Recording mode (on an empty 700MB disc)
Recording Mode Recording Time (on empty 700MB disc)
VCD D 68 minutes
SVCD D 34 minutes
Audio CD D 70 minutes
2. Press [] [] to select the desired recording
format. “Go!” is selected and then press [ENTER].
3. When the disc is well-prepared, select the “Exit”
icon and press [ENTER] to exit the erase menu.
VCD/SVCD recording
1. Place a prepared CD-R or CD-RW disc onto the tray
with the disc’s label facing up.
2. Press [GUIDER ] to display the Easy Guider menu,
press [] [] to select “Record” and then press
[ENTER].
3. Press [] [] to select the signal-input ( TV, AV1 front, AV2-rear, DV-in ) and press [ENTER].
4. Press [] [] to select VCD or SVCD as the desired
recording format and then press [ENTER].
5. Press [] [] to select the desired TV Sound and
then press [ENTER].
Audio CD recording
1. Place a well-prepared CD-R / CD-RW disc onto the
tray with the disc’s label face up.
2. Press [ GUIDER ] to display the Easy Guider menu,
press [] [] to select “Record” and then press
[ENTER].
3. Press [] [] to select the audio signal input (TV,
AV1-front, AV2-rear, DV-in) and press [ENTER].
4. Press [] [] to select “Audio CD” as the desired
recording format and then press [ENTER].
5. Press [] [] to select the desired TV Sound and
then press [ENTER].
6. “Go!” is selected. Press [ENTER] to record your audio
signal into a recordable CD disc.
7. Press [EDIT] to create an new audio track into disc
during recording.
8. Press [
Notes:
1.Single press of [EDIT] key will automatically create an new
audio track by 2 sec interval.
2.Audio source input during these 2 sec will be recorded onto
the beginning of the next track.
3.You must finalize the disc before you can playback the disc on
other Audio CD / DVD / VCD / SVCD player or CD / DVD-ROM on
a PC.
STOP] to stop audio recording.
25
Page 27

TIMER RECORD
Prior to timer record
Please ensure that the recordable disc or the HDD has enough
available space for the Timer Record function. Before you start
to record, follow the steps to set the date, time, picture quality
and channel of the program or input source manually. You can
set up 16 individual sessions in the Timer Recording function.
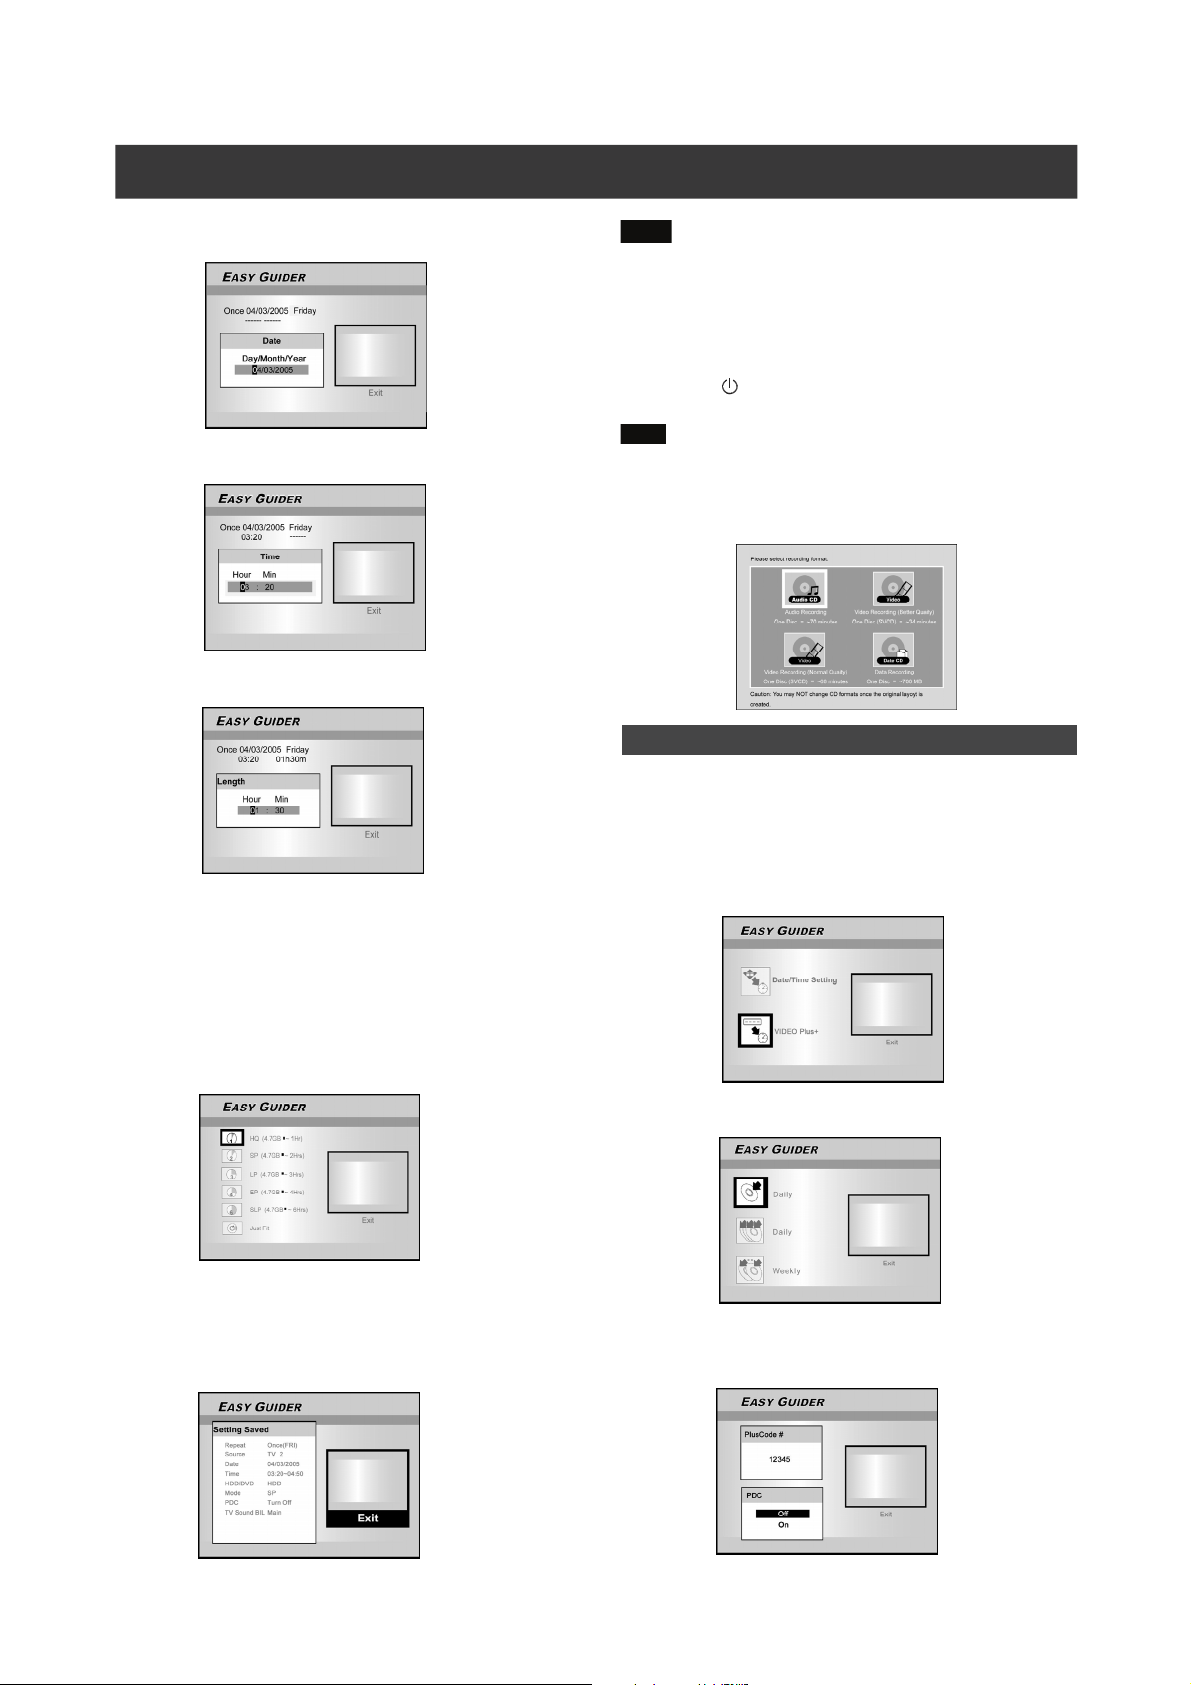
Setting the timer
1. Press [ STANDBY/ON ] to turn the unit on.
2. Press [TIMER] to display the “TIMER RECORD”
menu.
3. Press [][] to select an item from the timer
setting list and press [ENTER] to activate the
system setup menu for the Timer Record function.
8. Press [] [] [][] to select “Repeat
(Once, Daily or Weekly),” and then press [ENTER]
to bring up the list.
If you select “Once,” you need to set the date. Move the cursor
to highlight “date” and press [ENTER]. Use the numbered
buttons (0~9) or [] [] [] [] to enter the date.
If you select “Daily,” you do not need to set the date since the
Timer Record is set for each day until the timer recording item is
cancelled or the media is full.
4. Press [] [] [][] to select “Source
(Signal Source),” and then press [ENTER] to
bring up the list.
Press [] [] and [ENTER] to make your selection.
5. Press [] [] [][] to select “Channel (TV
Channel),” and then press [ENTER] to bring up
the list. This step only applies when the “TV” is
selected as the source.
Press [] [] and [ENTER] to make your selection.
6. Press [] [] [][] to select “HDD/DVD,”
and then press [ENTER] to bring up the list.
Press [] [] and [ENTER] to make your selection.
7. Press [] [] [][] to select “Mode
(Recording Quality),” and then press [ENTER] to
bring up the list.
Press [] [] [] [] and [ENTER] to make your selection.
Recording quality for timer recording on DVD discs and
HDD:
HQ <-> EP <->LP<->SP <-> SLP <-> Just Fit
Recording quality for timer recording on CD discs:
Audio CD <-> VCD <-> SVCD
If you select “Weekly,” a weekly calender will display onscreen for you to select the day. Press [] [] [] [] to
move the cursor to highlight the desired day and press
[ENTER] to make your selection. When completed, move the
cursor to “OK” and press [ENTER] to save the desired setting.
Note:
If the mode is set as “Daily” or “Weekly,” press [] [] []
[] to move the highlighted cursor to the “Advanced” icon
and press [ENTER]. You can choose to apply the setting
“Without Restriction” or “With Restriction.” When “With
Restriction” is selected, enter the “Start” date and “End” date
to set the period of time for a valid setting. Move the highlighted cursor to “OK” and press [ENTER] to confirm the
setting or to “Cancel” and press [ENTER] for resetting.
26
Page 28

TIMER RECORD
9. Press [] [] [][] to select “Start (Start
Time),” and then press [ENTER] .
Use the numbered buttons (0~9) or press [] [] [] [] to
enter the start time.
10. Press [] [] [][] to select “End (End Time),”
and then press [ENTER].
Use the numbered buttons (0~9) or press [] [] [] [] to
enter the end time.
To stop recording during Timer Record
When you press [ STOP ] , it may take a few seconds for
the record to stop.
To check the recording status while Timer Record is
active
Press [DISPLAY] and the Timer Record information appears onscreen.
Notes:
1. When the Timer Record function is active, the “TIMER
LED” on the DVD Recorder front panel will illuminate.
2. The DVD recorder must be turned off to activate the Timer
Record function.
3. Make sure that a recordable DVD disc or a well-prepared
CD-R/RW disc is placed before the scheduled time,
corresponding to the selected recording quality.
Timer Record using the VIDEO Plus+®system
1. Press [ STANDBY/ON] to turn the unit on.
2. Press [TIMER] to display the “TIMER RECORD”
menu.
If you enter a wrong selection
Press [] [] to re-select the item you want to change.
11. Press [] [] [][] to select “Sound (TV
Sound BIL)” and then press [ENTER] to bring up
thelist.
12. Press [] [] [][] to select the “PDC” and
then press [ENTER] to set it on or off.
Press [] [] and [ENTER] to make your selection.
13. Press [][] to select “OK” and press [ENTER]
to save the setting for the timer record item and
go back to the Timer Record list.
Press [] to [Reset] if you want to reset the timer record
item.
14. Press [] [] to go to another item on the list
and press [ENTER] if you want to set up for more
Timer Record programs.
If not, move to the “Exit” icon and press [ENTER] or press
[TIMER] to exit the Timer Record List.
3. Press [][] to select an item from the timer
setting list and press [ENTER] to activate the
setup menu for the Timer Record function.
4. Press [] [] [][] to select “VIDEO Plus+” and
then press [ENTER] to bring up setup menu.
Or press [VIDEO Plus+] to bring up the VIDEO Plus+ menu.
5. Press [] [] [][] to select “Repeat (Once,
Daily or Weekly),” and then press [ENTER] to bring
up the list.
Press [] [] [] [] and [ENTER] to make your selection.
15. Press [ STANDBY/ON] to turn off the unit and
activate the “Timer Record” function.
27
Page 29

TIMER RECORD
6. Press [] [] [][] to select “PlusCode#
(PlusCode number),” and then press [ENTER] to
enter the number.
Use the numbered buttons (0~9) or [] [] [] [] to enter
the PlusCode number.
Note:
If the Preset Channel of this GCN is not set, the following
screen will appear. Use the numbered buttons (0~9) or []
[] [] [] to enter the Preset Channel and press [ENTER] to
comfirm.
7. Press [] [] [][] to select “HDD/DVD,” and
then press [ENTER] to bring up the list.
Press [] [] [] [] and [ENTER] to make your selection.
If “DVD” is set as the target device, press [
open the disc tray and insert a recordable DVD disc.
OPEN/CLOSE] to
13. Press [ STANDBY/ON] to turn off the unit and
activate the “Timer Record” function.
Notes:
1. When the Timer Record function is active, the “TIMER
LED” on the DVD Recorder front panel will illuminate.
2. The DVD recorder must be turned off to activate the Timer
Record function.
3. Make sure that a recordable DVD disc or a well-prepared
CD-R/RW disc is placed before the scheduled time,
corresponding to the selected recording quality.
4. When “Once” timer recording is set, it cannot be changed
to “Weekly” timer recording. Select “Weekly” first in case
of “Weekly” timer recording.
8. Press [] [] [][] to select “Mode
(Recording Quality),” and then press [ENTER] to
bring up the list.
Press [] [] [] [] and [ENTER] to make your selection.
Press [] [] to re-select the item you want to change.
Recording quality for timer recording on DVD discs and the
HDD:
HQ <-> EP <->LP<->SP <-> SLP <-> Just Fit
Recording quality for timer recording on CD discs:
Audio CD <-> VCD <-> SVCD
9. Press [] [] [][] to select “Sound (TV
Sound BIL)” and then press [ENTER] to bring up
the list.
10. Press [] [] [][] to select “PDC”and then
press [ENTER] to set it on or off.
Press [] [] [] [] and [ENTER] to make your selection.
11. Press [][] to select “OK”and [ENTER] to save
the setting or the timer record item and go back
to the Timer Record list.
Press [] to [Reset] if you want to reset the timer record
item.
12. Press [] [] to go to another item on the list
and press [ENTER] if you want to set up for more
Timer Record programs.
If not, move to the “Exit” icon and press [ENTER] to exit the
Timer Record List.
28
Page 30

TIME SHIFT
The “Time Shift” feature allows you to “Pause Live TV” and
resume viewing at the point of interruption, at your leisure.
Note: “Pause Live TV” is constrained within 3 hours.
Record and Play
Follow the steps below to start playback of the recorded program/
Timer Record program before the recording is scheduled to end.
Pausing Live TV Broadcast
1. Press [
2. Switch on your TV and set the video input to this
recorder.
3. Press [ CH + or -] buttons on the recorder’s remote
control to select the desired channel.
Since the TV’s video input is set to be the recorder, channel
selection HAS to be made with the recorder’s remote control.
To turn the audio volume up and down, use the TV’s remote
control.
4. When you choose to leave your TV and must
stop watching, press [TIME SHIFT].
When [TIME SHIFT] is pressed the video broadcast on TV is set in
pause mode. The scene displayed on the TV is the last picture
shown when you press [TIME SHIFT].
STANDY/ON] to turn the unit on.
1. During recording/Timer Record on the HDD, press
[PLAY].
Playback will start from the beginning of the recorded program.
2. Press [ FF] or [ REV ] to perform fastforward or fast rewind scanning.
Press [
[
viewing.
Press [
PAUSE/STEP ] to pause playback. Press
PAUSE/STEP ] again if you want to resume
STOP] to stop playback/viewing.
5. When you are back in front of the TV and ready to
resume viewing, press [PLAY] and the
TV program will begin playing starting from the
interrupted scene.
6. Press [
forward or fast rewind scanning (to the point where
[TIME SHIFT] begins).
Press [
[
PAUSE/STEP] again if you want to resume
viewing.
7. Press [TIME SHIFT] to turn the time shift function off
and switch to viewing live TV broadcast.
FF] or [ REV] to perform fast-
PAUSE/STEP ] to pause viewing. Press
Note:
If you press [ STOP] again, the recording function will be
turned off.
3. If you want to stop recording, press [ STOP] for a
second time.
Note:
Record and Play only functions when the contents are to be
recorded on the HDD.
Note:
Note:
29
Page 31

PLAYBACK
DVD/VCD/SVCD video disc playback
Before you begin to enjoy the digital world of audio and video on DVDs, please ensure that you have made the correct settings in the
Setup menus. These settings should correspond to the capabilities of your home system. Having made the correct settings, you are
now ready to use the DVD recorder to enjoy DVDs, Video CDs, and CDs.
Basic playback
Turn on the television and select the appropriate video input
on the television to suit the connections for the player.
Press [ STANDBY/ON] to turn on the unit.
Press to turn the unit on or off.
Press [ STOP] to stop playback.
At a marked stop, press [ PLAY] to resume playback.
Press [
Press [
disc.
STOP] twice to bring the playback to a full stop.
PLAY] to start playback from the beginning of the
Press [ OPEN/CLOSE ] to open the disc
tray. Place the disc in the tray, label-side up.
Press [ PLAY ] to start playback.
Press [ FF ] to perform fast forward
scanning.
Press repeatedly to play the disc forward at 2x, 4x, 8x,or
16x speeds.
Press [ REV ] to perform fast reverse
scanning.
Press repeatedly to play the disc reverse at 1x, 2x, 4x, 8x,
or 16x speeds.
Press [ NEXT] to advance to the next
chapter/track.
Press repeatedly to skip to the next chapter during playback.
Press [ DISPLAY ] to display disc status
during playback.
Press [ DISC MENU ] to display the thumbnail
icons menu on the TV screen.
Press to return to the DVD’s title or disc root menu for the
current title during playback.
VCD SVCD
Press [0 ,1~9 ] the numbered buttons to select an item of the
title menu.
DVD
Press [] [] [] [] to select an item and press
[ENTER].
Press [ PREV] to reverse to the previous
chapter.
Press repeatedly to return to the beginning of previous
chapters during playback.
Press [PAUSE/STEP] to pause playback.
Press [PAUSE/STEP] again to start “frame
by frame mode.”
Press repeatedly to advance DVDs and Video CDs frame by
frame during playback in pause mode.
Press [
PLAY] to restart normal playback.
Press [BROWSER] to browse the contents
of a DVD disc or the HDD.
Press [HDD/DVD] to select HDD or DVD to
playback the contents saved.
Sample Thumbnail display
Press [ PLAY LIST MENU ] to display the title
menu on the TV screen.
Press [] [] [] [] to select an item and press [ENTER].
Note:
The [PLAY LIST MENU] button only functions while the unit is
in playback mode. Depressing this button during other
operations won’t work on this unit.
30
Page 32

PLAYBACK
Navigation operation
During playback, press [NAVI] to display the “Navigation”
menu.
Repeat Repeat playback. Move the highlighted cursor
to “Repeat” and press [ENTER] repeatedly to
choose a repeat option. Depending on the type of
Disc, you may choose to play the Track, Title,
file or Disc repeatedly.
Note:
For DVD, the repeat options are:
1 TRACK <-> Repeat Off
For VCD and SVCD, the repeat options are:
ALL TRACK <-> Repeat Off
For CDDA (audio CD) and data discs, the repeat options are:
1 TRACK (except for picture files) <-> ALL TRACK
<-> Shuffle Mode <--> Repeat Off
Zoom Press [ZOOM] during playback or still playback
to activate zoom function. Enables zoom in or
out the selected viewing at 1x, 2x, 3x and 4x.
Press [] [][] [] to move the highlighted
cursor to the desired selection on the onscreen panel and press [ENTER].
Slow Motion
Enables the selection of a slow-motion speed.
You can choose to play the Disc at 1/2x and
1/4x.
Search Initiates the search capability for locating a
desired position in the current title or track (time
search).
Press the numeric buttons (0 to 9) to enter the
desired time or title.
Example (for DVD-VIDEO)
To playback from
TITLE:CHAPTER : 001/001
or TIME:0
1 : 2 7 : 3 3 (H:M:S)
Example (for SVCD/VCD)
To playback from
TIME:0
Press [] to correct a mistake.
Press [] repeatedly to move back to the digit
where you entered a wrong number, and reenter
the correct one.
Press [ENTER] to start playback from the
specified time.
1 : 2 7 : 3 3
Note:
Moving the cursor left through each menu takes you to the
previous level. Moving the cursor left at the first menu
selection closes the dialog box.
A-B Repeating a desired part.
Repeat Select “Set Point A” at the beginning of the part
you want to repeat.
Select “Set Point B” at the end of the part you
want to repeat.
The unit locates “A” and starts repeat playback
between “A” and “B.”
Select [Cancel]. The A-B repeat mode turns
off, then normal playback continues.
Subtitle During playback to select a subtitle language
from those available on the current disc. Press
[SUBTITLE] repeatedly during playback to see
the different subtitle languages.
Note:
Some DVDs include subtitles in different languages. If you
want to choose subtitles, follow these steps.
Audio To select a different audio language or
soundtrack during DVD playback. Press
[AUDIO] repeatedly to hear a different audio
languages or audio tracks.
Note:
Multiple languages or soundtracks must be available on the
DVD.
Angle To select a different camera angle during DVD
playback. Press [ANGLE] repeatedly during
playback to select a desired angle.
No
Note:
The Multiple Angles capability must be available on the DVD.
(within the current title) or track for playback.
31
Page 33

PLAYBACK
Information
To enable or disable the DVD/VCD/SVCD disc
information.
TO EXIT NAVIGATION
Press [NAVI] again or repeatedly press [] to
exit the “Navi” menu. Or go to “Exit” and press
[ENTER].
Playing back video title ( By Browser )
This unit can play video titles recorded on the HDD or the
recordable DVD disc.
1. Place a disc with recorded video titles on the tray
or make sure that the video titles are saved on
the HDD.
5. Press [] [][] [] to move the highlight to the
file you want to start playback from and press
[ENTER].
6. Press [
Press [
PAUSE/STEP] to pause playback.
STOP] to stop playback at a market
stop.
Press [ STOP] twice to bring the playback to a full stop.
2. Press [HDD/DVD] to select HDD or DVD.
3. Press [BROWSER] and this will bring up the
browser menu with thumbnails.
If you want to view the text menu, move the cursor to the
“Text View” icon and press [ENTER].
If you want to change the playback device, press [] [] to
move the highlight to the “HDD” icon or “DVD” icon (depending
what the source is set as) and press [ENTER] to change the
setting.
4. Press [] [] to move the highlight to the “Video”
icon and press [ENTER] to view the file menu with
thumbnails.
Note:
The index page numbers shown on the bottom of the browse
menu varies with the number of titles/files saved on the HDD/
DVD disc and do not always follow the numeric order. This is
designed for easier access to each page when there are more
titles/files available.
If you want to view the text menu, move the highlight to the “Text
View” icon and press [ENTER].
32
Page 34

MUSIC FILE P LAYBACK,PICTURE FILE PLAYBACK (BY BROWSER)
The unit can play an Audio CD, JPEG/BMP or MP3/WAV files
on a disc or from the HDD.
Playing back music files
Playing back MP3/WAV files.
1. Place a music disc on the tray or save the music
files to the HDD. Music files residing on the HDD
can be played from the hard disc.
2. Press [HDD/DVD] to select HDD or DVD.
3. Press [BROWSER] on the list and this will bring up
the browser menu with thumbnails.
If you want to change the playback device, press [] [][]
[] to move the highlighted cursor to the “HDD” icon or
“DVD” icon (depending which source your desire) and press
[ENTER] to change the setting.
4. Press [] [] to move the highlighted cursor to
the “Music” icon and press [ENTER] to view the
file menu with thumbnails.
If you want to view the text menu, move the highlighted cursor to
the “Text View” icon and press [ENTER].
10. For JPEG files: The previous files of the selected file
cannot be played back.
Playing back picture files
Playing back JPEG/BMP files.
1.Place a picture disc on the tray or save the
picture files to the HDD. Picture files residing on
the HDD can be played from the hard disk.
2.Press [HDD/DVD] to select HDD or DVD.
3.Press [BROWSER] on the list and this will bring up
the browser menu with thumbnails.
If you want to change the playback device, press [] [] []
[] to move the highlighted cursor to the “HDD” icon or “DVD”
icon (depending what the source is set as) and press [ENTER]
to change the setting.
5. Press [] [][] [] to move the highlighted
cursor to the file you want to start playback from
and press [ENTER].
Or, use the numbered buttoms and [ENTER] to select the music
file to start playback.
6. During playback, press [ NEXT ] or [
PREV] to advance to the next or return to
the previous file.
7. Press [
8. Press [
PAUSE/STEP] to pause playback.
STOP] to stop playback at a market
stop.
Press [ STOP] twice to bring the playback to a full stop.
Notes:
1. If a MP3 file name includes any 2-byte character, the unit
may not display the file name correctly,
2. The unit cannot support ID3 tag.
3. The unit does not support MP3-Pro files.
4. The unit supports discs recorded with multiple sessions.
5. The unit can only playback picture or tracks with the following
file extensions; JPG or jpg, BMP or bmp, MP3 or mp3, WAV or
wav and etc.
6. The time required for reading disc contents may vary for
different discs. This is dependent upon the numbers of groups
(folders) and tracks (files) recorded and etc.
7. You cannot advance or reverse playback by pressing
FF] or [ REV ] during picture file playback.
[
8. This unit supports MP3 file bitrates of: 32Kbps ~ 320Kbps.
9. Customers should also note that permission is required in
order to download MP3 files and music from internet.
Sanyo has no right to grant such permission. Permission
should always be sought from the copyright owner.
4.Press [] [] to move the highlighted cursor to
the “Picture” icon and press [ENTER] to view the
file menu with thumbnails.
If you want to view the text menu, move the highlighted
cursor to the “Text View” icon and press [ENTER].
5.Press [] [][] [] to move the highlighted
cursor to the file you want to start playback from
and press [ENTER].
6.During playback, press [] [] to advance to the
next or return to the previous file.
7.Press [][] to select “Rotate RIGHT” or “Rotate
LEFT” and “Rotate UP” or “Rotate DOWN.”
8.Press [
9.Press [
33
PAUSE/STEP] to pause playback.
STOP] to stop playback.
Page 35

AUDIO CD PLAYBACK,PLAYBACK PICTURES AND MUSIC
Audio CD playback
Playing Audio CDs
1. Place the Audio CD on the tray.
The disc will begin playback automatically.
2. Press [
advance to the next track or reverse to the
previous track.
3. Press [
4. Press [
5. Enter the numbered button (0~9) to select the
desired audio track, and press [ENTER].
Begin playing from a selected track.
NEXT ] or [ PREV] to
PAUSE/STEP] to pause playback.
STOP] to stop playback.
Slide show (Pictures with Music)
Concurrent playing of pictures and music files on the
same disc.
1. Place the disc with the audio and the picture files
on the tray or make sure that the audio and
picture files are saved onto the HDD. The saved
audio and music files can be played from the hard
disk.
8. During playback, press [ NEXT ] or [
PREV] to advance to the next or return to
the previous music file.
9. Press [] [] to go to the next or return to the
previous picture file.
Press [][] to select “Rotate RIGHT” or
“Rotate LEFT” and “Rotate UP” or “Rotate
DOWN.”
10. Press [
Press [
PAUSE/STEP] to pause the playback.
STOP] to stop the playback.
2. Press [GUIDER] for the Easy Guider Menu.
3. Press [] [] to go to the “Playback” icon and
press [ENTER].
4. Press [] [] to select HDD or DVD to play the
files from and press [ENTER].
Note:
Music and picture files can be played concurrently when these
files are saved onto the same device.
5. Press [] [] to go to the “Pictures with music”
icon and press [ENTER].
The browser menu of picture files will be displayed first.
6. Press [] [][] [] to select the picture file to
start playback with and press [ENTER].
The browser menu of audio files will be displayed.
7. Press [] [][] [] to select the music file to
start playback with and press [ENTER].
Playback will start.
34
Page 36

COPY
This DVD recorder is equipped with “One Touch Copy” feature,
which allows you to copy recorded files from the HDD to DVD or
from DVD to HDD. This function is only applicable to JPEG, BMP,
VOB, MP3 and WAV files and recorded video titles(HDD to DVD
only).
Note:
As for the audio CD copied on HDD, there are no relations to the
original track number, the music which played back first may be
indicated with “01”.
When playback musics of audio CD which are copied to HDD;
SHUFFLE playback
Shuffle playback can only be played back after the selected
music.
PREVIEW
The previous musics of the selected music cannot be played
back.
Copying from DVD to HDD
1. Press [
STANDBY/ON] to turn the unit and your TV on.
2. Press [ OPEN/CLOSE ] to open the disc tray and
place the disc with the label side up.
3. Press [HDD/DVD] and select “DVD.”
4. Press [BROWSER] to browse the files.
Copying from HDD to DVD
1. Press [ STANDBY/ON] to turn the unit and your TV on.
2. Press [ OPEN/CLOSE ] to open the disc tray and
place a recordable DVD disc with the label side up.
Make sure to insert a recordable DVD disc.
Press the button again to close the tray.
When you insert a new recordable DVD disc, the DVD recorder
automatically starts the disc preparation process.
3. Press [HDD/DVD] and select “HDD.”
4. Press [BROWSER] to browse the files.
5. Press [] [][] [] to move the highlighted
cursor to the file to be copied and press [COPY].
The file is then copied to the DVD disc.
Note:
5. Press [] [][] [] to move the highlight
cursor to the file to be copied and press [COPY].
The file is then copied to your HDD.
Notes:
1. Contents recorded on a VCD/SVCD disc can not be copied
to the HDD before the disc is finalized.
2. The title of DVD-Video cannot be copied from DVD to HDD.
3. You can’t use the One Touch Copy function to copy a title if
any part of the title is copy-once protected.
4. You may use this product only to reproduce or copy
materials for which you own the copyright or have which
obtained permission to copy from the copyright owner or
for you otherwise have a legal right to reproduce or copy.
Unless you own the copyright or have obtained permission
from the copyright owner or otherwise have a legal right to
reproduce or copy, you may be violating the law, including
copyright law, and may be subject to payment of damages
and other remedies.
Notes:
1. Video files with “DVD-Video” in its file
name and the thumbnail below can only be
copied to an emptied/new DVD+R/+RW
disc.
2. Video files with “VCD-Video” in its file
name and the thumbnail above can only be
copied to a CD-R/RW prepared as a VCD disc.
3. Video files with “SVCD-Video” in its file name and the
thumbnail above can only be copied to a CD-R/RW prepared as
a SVCD disc.
4. Before copying other files to a disc, reference the below:
*1. Recorded titles are t itles with recording quality (HQ, SP, LP , EP,
SLP) infor matio n in the browse r me nu.
*2. CD-R/RW disc p repared i n the Audio CD forma t can only be
used to copy WAV music files. When copying is comp leted, you
need to first "f inalize" the disc b efore you can play the disc on a
com patib le dev ic e.
*3. If yo u copy recor ded titles to a blan k DVD+ R/+RW disc, you can't
use the same disc to copy da ta files. If you copy data file s to a bla nk
DVD+R/+RW disc, yo u c an't use the same disc to copy recor ded
vide o titles.
35
Page 37

EDIT
Before starting to edit
This section explains the basic editing functions on the unit.
Please finish all the editing before finalizing the disc. You cannot
edit the contents on a finalized disc.
You can perform the editing functions on video titles only.
Notes:
1. For DVD+R discs, after performing editing function of
inserting, renaming or hiding chapter marks to a video title,
the setting will NOT be valid when playing the disc(s) on
another DVD player/recorder.
2. Editing functions introduced in this chapter is NOT appli-
cable to video titles recorded on CD-R or CD-RW discs.
Browser menu
1. Press [ STANDBY/ON] and press [HDD/DVD] to
select the “DVD” or “HDD” to browse from.
2. Press [BROWSER] to display the “BROWSER”
menu.
3. Press [] [] [] [] to select the title you want
to edit, and press [EDIT] to go to the edit screen.
Protecting a title (HDD and DVD)
You can protect the title from accidental erasure or editing when
you activate the protect function.
When protection is turned “ON,” the title can’t be edited or
erased.
If you do need to edit it, you must first unlock the file.
1. Press [BROWSER] to display the “Browser” menu.
2. Press [] [] [] [] to select the title you want
to edit and then press [EDIT] to go to the edit
screen.
3. Press [] [] to select “Protection” and then
press [ENTER].
4. Press [ENTER] to select “On” or “Off.
Naming a title (HDD and DVD)
1. Press[ ] [ ] to select “Rename” and then press
[ENTER].
2. The menu for the title naming is displayed.
3. Press [] [] to select the “Clear” icon first and
then press [ENTER] before start entering the new
title. Press [] [] [] [] to select “Back” to
delete characters.
4. Use [] [] [] [] and [ENTER] on the remote
control to select desired characters.
5. When you finish entering the title, press [] []
[] [] to select “Finish” and press [ENTER].
Notes:
1. You only can enter up to 30 characters for a name. You
can not leave the title column blank.
2. If you wish to enter “space”, select a blank on the
keypad and press [ENTER].
5.Press [] [] to select “Exit” and then press
[ENTER].
Note:
You CANNOT protect the recorded title(s) on a DVD+R disc
if the disc is finalized.
Overwriting a title (DVD only)
1. Press [HDD/DVD] to select the “DVD.”
2. Press [BROWSER] to display the “Browse” menu.
3. Press [] [] [] [] to select the title you want
to edit and then press [EDIT] to go to the edit
screen.
4. Press [] [] to go to“Overwrite” and then
press [ENTER] to set it on or off.
The “ Overwrite” mode is set.
5. Press [] [] to select “Exit” and then press
[ENTER].
Note:
The “overwrite” function is not applicable to video titles saved
on the HDD or a DVD+R disc that is finalized.
36
Page 38

EDIT
Splitting a title (HDD or DVD+RW only)
Use this function to divide a title into two distinct sessions. After
splitted, the new title can still be merged again. This function is
only applicable to titles with length longer than 6 seconds.
1. Press [BROWSER] to display the “Browser”
menu.
2. Press [] [] [] [] to select the title you want
to edit and then press [EDIT] to go to the edit
screen.
3. Press [PLAY] to start the title playback first.
Press [ NEXT] or [ PREV] to advance
to the next chapter or the previous chapter.
Press [ FF] or [ REV ] to perform fast
forward or fast rewind scanning.
4. Move the highlighted cursor to “Split” and press
[ENTER] for confirmation.
The title is splitted into two titles at where you press [ENTER]
during playback.
5. When complete, the browser menu will be displayed.
6. To split more titles,
repeat from step 2 to
4. Or press [] [] to
select “Exit” and then
press [ENTER] to exit
the setting.
Notes:
1. For video titles recorded on a DVD+RW disc, you can only
merge the title with its previous/next title and only when the
previous/next title has the same recording quality, TV signal,
audio and video settings. Otherwise, the function will not be
applicable.
2. For video titles recorded on the built-in HDD, you can merge
the title with any of the titles recorded on the HDD with the
same recording quality, TV signal, audio and video setting.
Erasing a title (HDD and DVD only)
Use this function to erase a title.
Note that once erased, the title(s) cannot be retrieved.
1. Press [BROWSER] to display the “Browser” menu.
2. Use [] [] [] [] to select the title you want to
edit and then press [EDIT] to go to the edit screen.
3. Press [] [] to select “Erase”.
4. Press [ENTER] to confirm your setting.
The title selected is erased.
Note:
The split function is only
applicable to video titles
longer than 6 seconds.
Merging two titles into one (HDD or DVD+RW only)
Use this function to merge two titles into one.
After merged, the new title can still be splitted again.
1. Press [BROWSER] to display the “Browser” menu.
2. Press [] [] [] [] to select the title you want
to edit and then press [EDIT] to go to the edit
screen.
3.Press [] [] to select “Merge with...” and then
press [ENTER].
A menu shows all the titles applicable to this function will
display.
4. Press [] [] [] [] to select the title to merge
and then press [ENTER].
5. To erase more titles, repeat from step 2 to 4. Or
press [] [] to select “Exit” and then press
[ENTER] to exit the setting.
Note:
You CANNOT erase recorded title(s) on a DVD+R disc if
the disc is finalized.
Setting a title thumbnail (HDD and DVD only)
Normally the first picture of a recording is used as the index
picture. However, you can choose any picture from the recording
as the index picture.
1. Press [BROWSER] to display the “Browser” menu.
2. Use [] [] [] [] to select the title you want to
edit and then press [EDIT] to go to the edit screen.
3. Press [PLAY] to start the title playback first.
Press [
the next chapter or the previous chapter.
Press [ FF] or [ REV ] to perform fast
forward or fast rewind scanning.
Press repeatedly to play the title forward or reverse.
NEXT] or [ PREV] to advance to
5. To merge more titles, repeat from step 2 to 4. Or
press [] [] to select “Exit” and then press
[ENTER] to exit the setting.
37
Page 39

EDIT
4. Press [] [] to select “Set Thumbnail.”
Notes:
1. You CANNOT insert chapter marks to recorded title(s) on a
DVD+R disc if the disc is finalized.
2. When not in the EDIT menu, press [EDIT] during normal
recording can add chapter marks in the recorded session(s)
manually.
Erasing Chapter Mark (HDD and DVD only)
During playback you can set and erase chapter mark(s) within a
title.
1. Press [BROWSER] to display the “Browser” menu.
5. Press [ENTER] to select the image during playback
and set it as the video title thumbnail.
6. To set thumbnails for more titles, repeat from step
2 to 5. Or press [] [] to select “Exit” and then press
[ENTER] to exit the setting.
Note:
You CANNOT set the thumbnail for the recorded title(s) on
a DVD+R disc if the disc is finalized.
Inserting chapter mark (HDD and DVD only)
During playback you can set and erase chapter mark(s) within a
title.
1. Press [BROWSER] to display the “Browser” menu.
2. Press [] [] [] [] to select the title you want
to edit, and then press [EDIT] to go to the edit
screen.
2. Press [] [] [] [] to select the title you want
to edit, and then press [EDIT] to go to the edit
screen.
3. Press [] [] to select “Remove Chapter Mark”.
4. Press [PLAY] to start the title playback first.
Press [
NEXT] or [ PREV] to advance
to the next chapter or the previous chapter.
Press [
FF] or [ REV ] to perform fast
forward or fast rewind scanning.
Press repeatedly to play the title forward or reverse.
5. During playback you can press [ENTER] to erase
the chapter mark.
6. To erase chapter marks in more titles, repeat from
step 2 to 5. Or press [] [] to select “Exit”
and then press [ENTER] to exit the setting.
3. Press [] [] to select “Insert Chapter Mark”.
4. Press [PLAY] to start the title playback first.
Press [
NEXT] or [ PREV] to advance to
the next chapter or the previous chapter.
Press [ FF] or [ REV ] to perform fast
forward or fast rewind scanning.
Press repeatedly to play the title forward or reverse.
5. Press [ENTER] to insert chapter marks at where
you want to during playback.
6. To insert thumbnails in more titles, repeat from
step 2 to 5. Or press [] [] to select “Exit”
and then press [ENTER] to exit the setting.
Notes:
1. This function is not applicable to files without any chapter
marks.
2. The first chapter mark within a video title can not be erased.
38
Page 40

EDIT
Hiding Chapter (HDD and DVD only)
During playback you can set and hide chapters within a title.
1. Press [BROWSER] to display the “Browser” menu.
2. Press [] [] [] [] to select the title you want
to edit, and then press [EDIT] to go to the edit
screen.
3. Press [] [] to select “Hide Chapter.”
4. Press [PLAY] to start the title playback first.
Press [ NEXT] or [ PREV ] to advance
to the next chapter or the previous chapter.
Press [
forward or fast rewind scanning.
Press repeatedly to play the title forward or reverse.
FF] or [ REV ] to perform fast
Showing Chapter (HDD and DVD only)
During playback you can choose to show chapter(s) currently hidden within a title.
1. During playback, press EDIT to display the Edit
menu.
2. On the Edit menu, press[
to select the hidden chapter you would like to
show again.
Notes:
1. On the Edit menu, a hidden chapter mark is displayed in a
darker color. A message “Hidden” is also displayed at the
left bottom corner of the PIP window.
2. You can press [PAUSE/STEP] to pause playback before
you go on to step 3 and 4 to show the hidden chapter.
NEXT] or [ PREV ]
5. During playback you can press [ENTER] to hide a
chapter.
6. To show (un-hide) the hidden chapter, press []
[] to go to “Show Chapter” and press [ENTER]
during the playback of the hidden chapter.
Press [ NEXT] or [ PREV ] to advance to the next
chapter or the previous chapter.
7. To hide more chapters within the title, repeat from
step 2 to 5. Or press [] [] to select “Exit”
and then press [ENTER] to exit the setting.ote:
Notes:
1. You CANNOT hide chapters within recorded title(s) on
a DVD+R disc if the disc is finalized.
2. This function is not applicable to titles without chapter
marks.
3. After performing this function, the chapter marks within the
title are hidden only during playback.
4. In Edit mode, a hidden chapter mark is displayed in a darker
color. A message “hidden” is also displayed at the left
bottom corner of the PIP.
3. Select the "Show Chapter" by using cursor button
then press [ENTER] for showing chapter again.
4. To show more chapters within the title, repeat
steps 1 to 3. Or press [] [] to select “EXIT”,
then press [ENTER] to exit the setting.
39
Page 41

DISC TOOLS
Erase
Before you begin erasing any contents on a disc or the HDD,
please ensure that all important contents are safely backed-up.
All contents will be permanently erased.
CAUTIONS:
For DVD+RW and CD-RW discs, you can erase the contents
and create a new format with the erase function. You can use
the erase function to empty the HDD as well.
1. Press [TOOLS] to display the “DISC TOOLS”
Menu.
2. Press [] [] to select “Erase” and then press
[ENTER].
3. Press [] [] to select “DVD” or “HDD” and
press [ENTER].
Finalize (make compatible)
CAUTIONS:
For DVD+R/CD-R/CD-RW discs:
Finalizing a disc is a necessary step when you want to share
your digital content with others. Once a DVD+R or a CD-R/RW
disc is finalized, it can be played back on other DVD players
or on PCs.
Note:
For DVD+RW discs, finalizing is NOT required.
1.Press [TOOLS] to display the “DISC TOOLS” Menu.
2.Press [] [] to select the “Finalize” icon and
then press [ENTER].
The finalization process will take place.
4. Press [ENTER] to start erasing.
The erasing process will take place.
5. When complete, go to “Exit” and press [ENTER].
Note:
If a new recordable CD-R or a newly-erased CD-RW is used for
recording, press [] [] [] [] to select a disc format the
disc is to be prepared as and press [ENTER] : SVCD, VCD,
Audio CD or Data CD.
3.When complete, go to “Exit” and press [ENTER].
40
Page 42
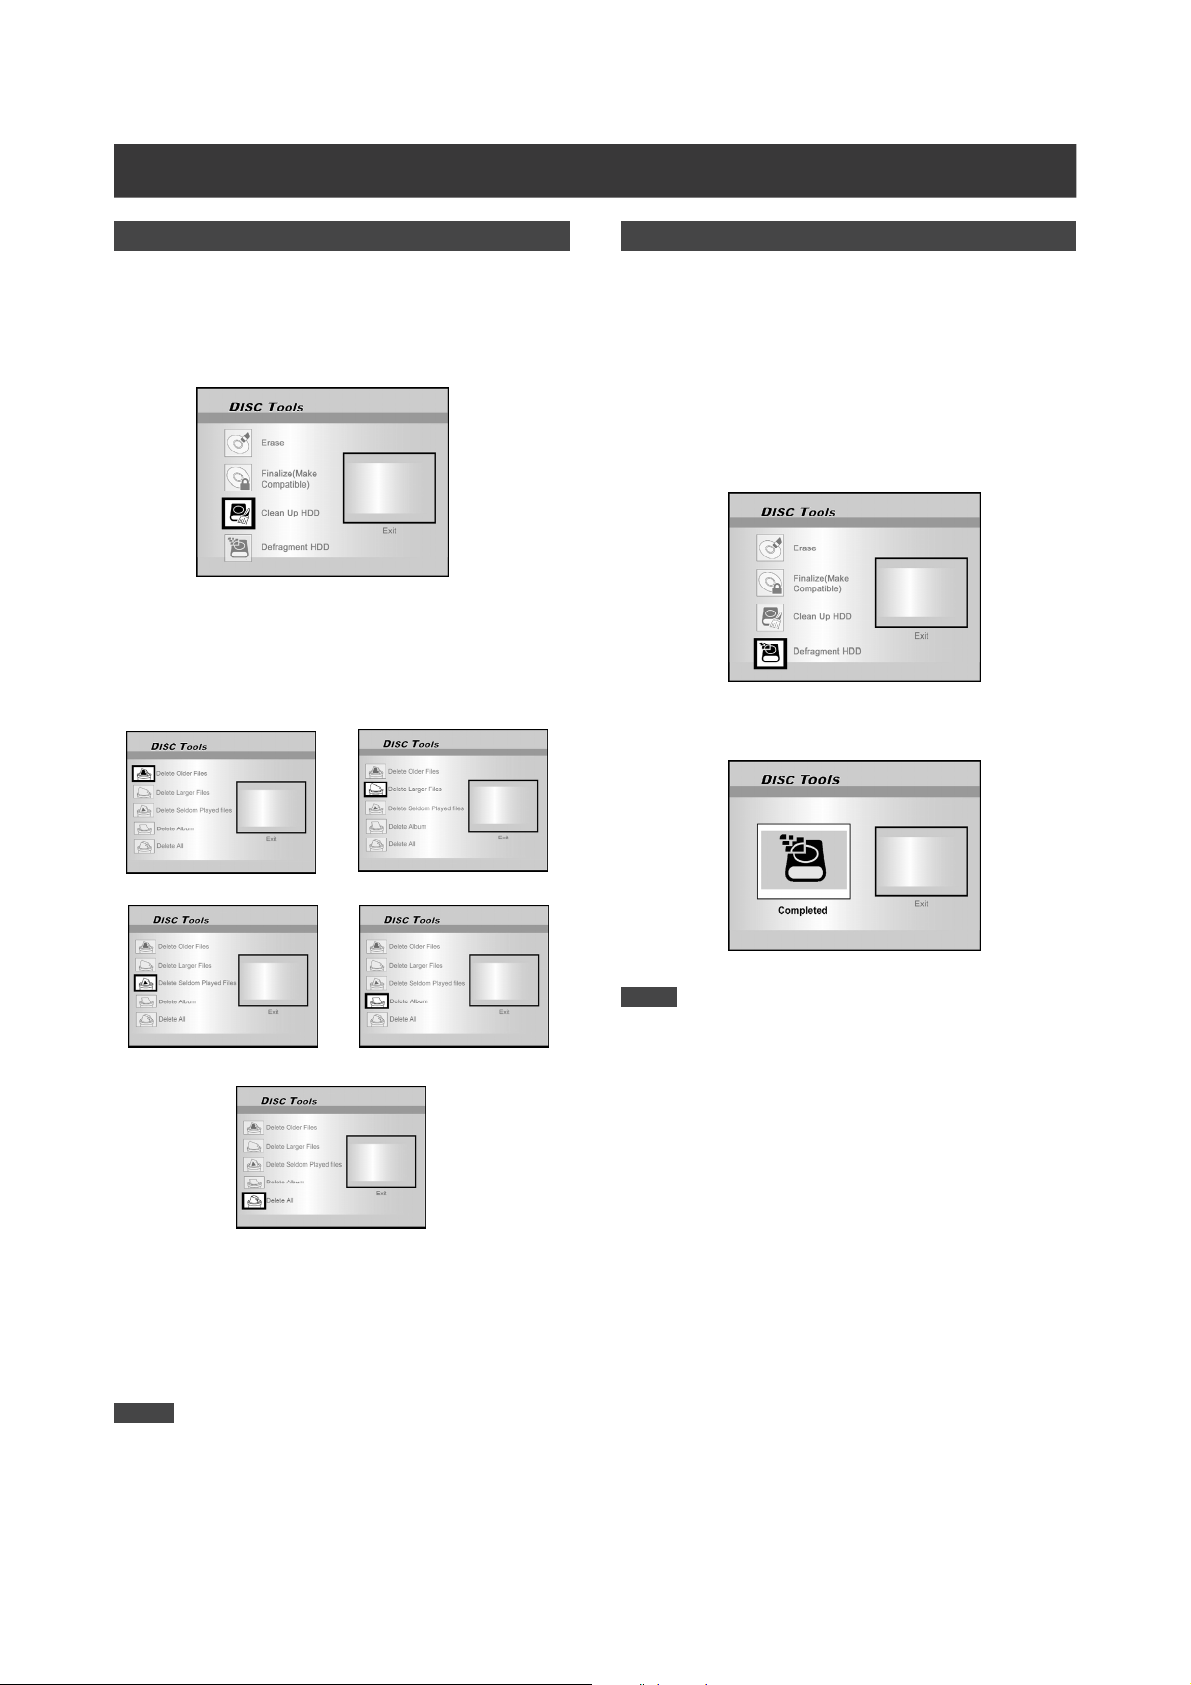
DISC TOOLS
CleanUp Disc (HDD only)
1. Press [TOOLS] to display the “DISC TOOLS”
Menu.
2. Press [] [] to select the “Clean Up HDD,” and
then press [ENTER].
3. Press [] [] to select the “Delete Older Files,”
“Delete Larger Files,” “Delete Seldom Played
Files,” “Delete Album” or “Delete All” and then
press [ENTER].
Defragment (HDD only)
The “Defragment” process reorganizes the contents of the HDD
creating continuous blocks of available space.
1. Press [TOOLS] to display the “DISC TOOLS”
Menu.
2. Press [] [ ] to select “Defragment” and
then press [ENTER]. “Go !” is selected and press
[ENTER].
The defragment operation begins.
3. When the “Defragment” process is completed,
press [ENTER] to exit the “DISC TOOLS” menu.
4. The clean up process will take place.
You will be asked to confirm the operation step by step by
pressing [ENTER] to each question.
5. When complete, move the highlighted cursor to
“Exit” and press [ENTER] to exit.
Notes:
1. The “Cleanup” operation will permanently delete the files
selected.
2. It would take more time for the “Cleanup” operation
depending on the recorded condition.
Notes:
1. Contents of the HDD will not be lost during this process.
2. Frequent “defragment” operations are recommended to
improve performance.
3. During the defragment operation, you can press [TOOLS]
or move to “Exit” and press [ENTER] to exit the defragment
menu.
41
Page 43

GUI(GRAPHICAL USER INTERFACE)OPERATION
System
Video Output
Switch video output signal.
Component
Scart S-Video
Scart RGB(Default)
Progressive
Note: If you are connecting the DVD recorder to the TV via
the SCART OUT jack, set the VIDEO OUTPUT as
either “Scart S-Video” or “Scart-RGB.” If you
are connecting the DVD recorder to the TV via
the COMP OUT jack, set the VIDEO OUTPUT
as “Component.”
Date
Set the date of the system clock.
Time
Set the time of the system clock.
HH:MM:SS
Auto-Sleep
Off/30/60/90/120mins(Default: Off)
Note:
“Auto sleep” sets how long the DVD recorder is switched to
“STANDBY” mode when no operation of the system is
detected (e.g. recording, playback, timer record or editing).
Language
Menu Language
Select a menu operating language. The options are :
English, French, German, Italian, Spanish
Audio Language
Select an audio operating language. The options are :
English, French, German, Italian, Spanish
Subtitle Language
Select a subtitle operating language. The options are :
English, French, German, Italian, Spanish, Off
Restore
---- (Off) Restore
Audio
Digital Out
Settings of digital audio output.
PCM (Enable digital audio output with PCM data)
Bit Stream (Enable digital audio output with encode
data)(Default)
DTS Out
Enable/Disable Digital Theater System output.
ON (Enable Digital Theater System mode)
OFF (Disable Digital Theater System mode) (Default)
Surround
Stereo Dolby(Default) DTS
TV Sound Bilingual
Main(Default) Sub (Second Audio Program)
MPEG
PCM (Default) Bit Stream
Playback
Aspect Ratio
Settings of audio and video parameters when playing back.
16:9 Wide 4:3 Pan 4:3 L.Box (Default)
Parental Lock
Set content control for supported DVD.
Set Level (Off , 1~8 ) (Default: off)
The parental control levels are:
1: Kid Safe 2: G 3: PG
4: PG-13 5: PG-R 6: R
7: NC-17 8: Adult Off (Default)
Password
Set a system protect password. Password is needed for the
changing the setting.
OLD Password (XXXX) NEW Password (XXXX)
Confirm (XXXX) *(Default:0000)
Slide Time
Set the slide show interval while playing JPEG files.
Off 3~99 Seconds (Default: 5)
VCD PBC
Enable/Disable play back control for VCD and SVCD.
ON (Default) OFF
42
Page 44

GUI(GRAPHICAL USER INTERFACE)OPERATION
Record
Mode( Record Quality )
Set the default quality of recording.
HQ SP (Default) LP
EP SLP
Chapter Mark
Set the interval of chapter auto-insertion while recording.
Off 5/10/15/20/25/30 mins (Default: 5mins)
1) Press [SETUP] to display the setupmenu.
2) Press [] [] to select “System,” “Language,”
“Playback,” “Record,” “Audio,” “TV Tuner” or
“Exit” and press [] or press [] to return to previous
layer.
3) Press [] [] to select the item and press [] or
[ENTER].
4) Press [] [] to set the option and press [ENTER].
TV Tuner
TV Signal ---> Antenna or Cable or Auto
(Select the type of antenna input)
Country ---> Select your location
Utilities ---> Scan channel or Edit channel
(Select to start rescanning channel or edit a channel)
Fine Tune --> -24 ~ -1 0 +1 ~ +24
(Select to fine tune the channel frequency manually)
To exit the SETUP menu
Press [SETUP] or press [] until you return to the main menu.
43
Page 45

GLOSSARY
576i/576p
Indicates the number of scanning lines and scanning format of
an image signal.
576i indicates 576 scanning lines with interlace format, and
576p indicates 576 scanning lines with progressive format.
Aspect ratio
Aspect ratio refers to the length to height ratio of TV screens.
The ratio of a standard TV is 4:3, while the ratio of a highdefinition or wide TV is 16:9. The letter box allows you to enjoy
a picture with a wider perspective.
Bitstream
The digital form of multi-channel audio data (e.g., 5.1-channel)
before it is decoded into its various channels.
Chapter / Title
Chapter is the smallest division and title is the largest division
on a DVD VIDEO. A chapter is a division of a title and similar to
a track for Video CD or Audio CD.
Component video
Video signals with three channels of separate information that
makes up the picture. There are some types of component
video, such as R/G/B and Y/Cb(Pb)/Cr(Pr).
Composite video
A single video signal commonly used in most consumer video
products that contains all luminance, color, and synchronization
information.
Dolby Digital®
A six-channel system consisting of left, center, right, left rear,
right rear and LFE (Low-Frequency Effect channel, for use with a
sub-woofer) channels. It requires a Dolby Digital® decoder,
either in the player or in an external receiver to regenerate the
sound. All processing is done in the digital domain.
Not all Dolby Digital discs contain six (5.1) channels of
information.
DTS® (Digital Theater Systems)
DTS® stands for Digital Theater Systems. DTS® is a Digital
Surround audio encoding format configured with six (5.1)
channels, similar to Dolby Digital®. It requires a DTS® decoder,
either in the player or in an external receiver to regenerate the
sound. All processing is done in the digital domain.
Not all DTS discs contain six (5.1) channels of information.
DVD-R
DVD-R is a recordable disc that is the same size as a DVDVideo. Contents can be recorded only once to a DVD-R,and will
have the same format as a DVD-Video.
DVD-RW
DVD-RW is a recordable and rewritable disc that is the same
size as a DVD-Video. DVD-RW has two different modes: VR
mode and Video mode.DVD created in video mode has the
same format as a DVD-Video ,while discs created in VR(Video
Recording)mode allow the contents to be programmed or edited
DVD+RW
DVD+RW is a recordable and rewritable disc. Recording can be
erasd and you can record on the same disc again for the
maximum of 1,000 times. DVD+RW use a recording format that
is comparable to a DVD-Video format.
Interlace output
NTSC, the video signal standard, has 480 interlaced (I) scan
lines, The Interlaced scanning system places lines of the
second half of the picture in-between lines of the first half of the
picture.
JPEG
A popular file format for still image compression and storage.
JPEG stands for “Joint Photographic Experts Group”. There are
two sub-types of the JPEG format as follows.
• Baseline JPEG: used for digital cameras, the web, etc.
• Lossless JPEG: an old type, rarely used now.
Linear PCM audio
PCM stands for “Pulse Code Modulation”. Linear PCM is the
usual method for digitally encoding audio without compression,
and is used for the audio tracks on DVD VIDEO discs, Audio
CDs, etc.
MP3
MP3 (MPEG1 audio layer 3) is a compressed audio file format.
Files are recognized by their file extension “.mp3” or “.MP3”.
MPEG
MPEG stands for “ Motion Picture Experts Group”. This is an
international standard for compression of moving images.
On some DVDs, digital audio has been compressed and
recorded in this format.
NTSC (National Television System Committee)
The initials stand for National Television Standards Committee.
This is the committee that established the standards for
television systems in the United States. The NTSC standard
broadcasts 525 or 480 lines of resolution per second, and 30
frames per second of refresh rate, 60 Hz field frequency. NTSC
TV system is widely used in USA, Canada, Latin America and
Taiwan etc.
PAL (Phase Alternation by Line)
PAL (Phase Alteration Line) is the color television broadcast
standard throughout the Western Europe (except in France,
where SECAM is the standard), Australia, China, Singapore and
Malaysia etc. It has 625 lines of vertical resolution per second
and 25 frames per second refresh rate, 50 Hz field frequency.
PBC
Playback Control. A special feature on a Video CD or Super
VCD that enables interactive use.
S-Video
A video signal which improves picture quality over standard
composite connections. Used on Super VHS, DVD, high end TV
monitors, etc.
DVD+R
DVD+R is a recordable disc that is the same size as a DVDVideo. Contents can be recorded only once to a DVD+R,and will
have the same format as a DVD-Video.
Track
SVCD, VCD, Audio CD discs use tracks to divide up the content
of a disc.
44
Page 46

SPECIFICATIONS
DISC TYPES SUPPORTED (Read Only):
DVD-R/RW, DVD+R/RW, CD-R/RW
CONTENT FORMAT SUPPORTED :
1) DVD-Video
2) DVD+VR (DVD+VR format is compatible with DVD-Video in
most case)
3) Video CD
4) Super VCD
5) Audio CD
6) VOB/MPG/DAT
7) MP3/WAV
Maximum number of files recognizable : 9999 files
Compression rate : between 32 kbps and 320 kbps
8) JPEG/BMP
Maximum number of pictures recognizable : 9999 files
RECORDABLE MEDIA SUPPORTED:
1) Bulit-in HDD (DVD+VR mode)
2) DVD+R/DVD+RW ( DVD+VR Mode )
3) CD-R/CD-RW ( VCD/SVCD mode)
VIDEO RECORDING MODE
Mode DVD 160GB
HDD
HQ 1hr 33hrs
SP 2hrs 66hrs
LP 3hrs 99hrs
EP 4hrs 132hrs
SLP 6hrs 198hrs
Just Fit Variable N/A
Mode CD-R/CD-RW
VCD 68 mins
SVCD 34 mins
Audio CD 66 mins
AUDIO FORMAT SUPPORDED - Playback
Analog output 2channel
Digital output coaxial/optical
Format supported LPCM
Dolby Digital
dts (only digital out)
MPEG
AUDIO PERFORMANCE
DA Converter 24-bit/96KHZ
AD Converter 24-bit/96KHZ
Signal-Noise (1kHz) ≥90dB
Dynamic Range (1kHz) ≥80dB
Cannel Separation (1kHz) ≥110dB
Total Harmonic Distortion (1kHz) ≤-65dB
TUNER
TV format PAL-B/G, PAL-D/K, PAL-I/I
or SECAM-L/L
(This recorder is designed to record and play back using the
PAL coloring system.)
TV sound Main / Sub
CONNECTIONS
FRONT PANEL
Video Input Cinch (yellow) x1
Audio L/R Input Cinch (white/red) x1
DV Input IEEE 1394 4-pin x1
REAR PANEL
Video Output Cinch (yellow) x1
Audio L/R Output Cinch (white/red) x1
Component / Y, P
Progressive Scan Output 576p output
(Green/Blue/Red) x1
b,Pr
SCART 1 CVBS/RGB/S-Video out
SCART 2 CVBS/RGB in
VIDEO RECORDING FORMAT
MPEG2: DVD+VR (HQ/SP/LP/EP mode) , SVCD
MPEG1: DVD+VR (SLP mode) , VCD
AUDIO RECORDING FORMAT
DVD+VR (HQ/SP/LP/EP/SLP mode) : Dolby Digital 2-channel
VCD/SVCD : MPEG1 Layer2
CD-DA : PCM
VIDEO PERFORMANCE
DA Converter 10-bit / 54MHz
Composite Output 1 Vpp 75 Ohm
Components Output Y : 1 Vpp 75 Ohm
: 0.7 Vpp 75 Ohm
P
b
: 0.7 Vpp 75 Ohm
P
r
Digital Audio Output Coaxial x1
Optical x1
GENERAL
Power Supply AC100~240V 50/60Hz
Power Consumption 50W (Operation mode)
Less than 5W (Standby mode)
Operating Temperature +5°C to +40°C
Operating Humidity 5% to 80% RH
Dimensions(W/H/D): 430 x 66 x 316 mm
Net Weight: Approx. 4.5 kg
Note:
The specifications and design of this product are subject to
change without notice.
45
Page 47

TROUBLESHO OTING GUIDE
Picture
The image from this unit does not appear on the
television.
--> Make sure that the TV is connected to the AV OUTPUT,
SCART OUT or COMP OUT terminals on this unit. (refer to
“CONNECTIONS” section)
--> Make sure that the television’s input setting is correct.
--> Make sure that a disc is well-placed on the disc tray and is
compatible to the local TV system ( PAL)
--> Check whether the recorder is set to progressive with an
incompatible TV. Reset by pressing [], “5,” “0,” “2,” and “0”
on the remote control and then press [ENTER].
The image from this unit appears with noises.
--> The disc is distorted or flawed.
--> If the picture output signal from the recorder passes through
your VCR to get to your TV, or if you are connected to a
combination T V/VIDEO player, the copy protection signal
applied to some DVD programs could affect picture quality. If
you still experience this problem even when you connect your
recorder to your TV, try connecting your recorder to your TV’s
S-VIDEO output.
The image from an external input is distorted.
--> If the video signal from the external component is copyprotected, you can not connect via the recorder. Connect the
component directly to your TV.
Sound
There is no sound
--> Check the audio cable connection.
--> Check if the audio cord is damaged.
--> The input source setting on the amplifier is incorrect.
--> There’s no sound when the picture is paused or during
scanning (even forwards at regular playback speed) or slow
motion play. Press [PLAY] to resume regular playback.
--> If the audio signal does not come through the DIGITAL OUT
(OPTICAL or COAXIAL) jacks, check the AUDIO OUT settings.
The sound from this unit is not presented properly or is distorted.
--> Check the audio cable connection.
--> Check if the audio cord is damaged.
--> Make sure that the amplifier/receiver or TV is set to the correct
input and the volume is turned on.
--> If the sound is distorted, try cleaning the cable plugs.
Playback
Can’t playback a disc recorded using this recorder or another player
--> If the disc was recorded in video mode, make sure that it’s
finalized.
--> Some players will not play recordable DVD discs when
recorded in video mode and finalized.
--> Discs recorded with copy-once material cannot be played
on non-CPRM compatible players.
The recorder starts playing the disc
automatically.
--> The DVD VIDEO features an auto playback function.
No playback on DVD recorder.
--> There’s no recording on the disc. Check the disc first.
--> A unplaybackable disc type is inserted. Check the playable
disc type list.
--> The way you inserted the disc is wrong. Insert the disc
with the label side facing up. If there’s no label on the disc,
check the disc retailer.
--> Wrong region code: The region code on the recorder and
the disc must match.
--> Parental control is on: you have to unlock it first. (default
code of the recorder: 0000)
--> Check of the cables are secured between the TV set and
the recorder.
Timer Recording
Timer recording does not work properly
--> The timer program is incorrect. Correct the program.
--> Different timer program times overlap.
--> The clock setting is wrong. Go to setup to set the right time and
date.
--> An already finalized DVD+R has been inserted: change disc.
The timer program remains even after recording
finishes.
--> The timer program remains if set to daily or weekly.
Recording
Can’t record.
--> You haven’t inserted a disc or the disc you inserted cannot be
recorded on. Insert a disc the unit can record onto.
An alternate audio track cannot be recorded.
--> Second Audio Program (SAP) is not available for all programs.
--> The recorder does not feature “Second Audio Program (SAP)”
function.
Recording does not start immediately after you
press [REC].
--> Disc preparation process is taking place and will take a short
while. (applicable to DVD+R/RW discs)
Can’t record on HDD.
--> If there is a power failure or the plug is disconnected from the
household AC outlet while recording or editing, the HDD may
becomeunusable.Youwillhavetogoto“DISCTOOLS”to
“Erase” the contents on the HDD. Data recovery is NOT
guaranteed.
TV channel
TV channels cannot be changed.
--> Switch the input signal source of the recorder to “TV.”
--> Connect the antenna cables correctly.
Others
The disc does not open/close.
--> Contact your local dealer or local authorized service facility.
The unit stops at “HELLO” and does not respond
to any other commands.
--> Turn the unit off and turn it on again. If the unit still does not
respond to any commands, unplug the power cord, reconnect
it and turn it on again. Contact local dealer or authorized
service facility if the unit still does not work.
If you forget the password...
--> Please enter "8008" on password setting mode for password clear.
46
Page 48

P/N: 87819901114--
SANYO Electric Co., Ltd.
 Loading...