

Page 1
Page 2

PRECAUTION
WARNING: TO REDUCE THE RISK OF FIRE OR
ELECTRIC SHOCK, DO NOT EXPOSE THIS
APPLIANCE TO RAIN OR OTHER MOISTURE.
To avoid electrical shock, do not open the cabinet.
Refer servicing to qualified personnel only.
If the power supply cord (AC power cord) of this appliance
is damaged, it must be replaced. Return to a SANYO
Authorised Service Centre for replacement of the cord.
Location
For safe operation and satisfactory performance of your
unit, keep the following in mind when selecting a place for
its installation:
Shield it from direct sunlight and keep it away from sources
of intense heat.
Avoid dusty or humid places.
Avoid places with insufficient ventilation for proper heat
dissipation. Do not block the ventilation holes at the top
and bottom of the unit. Do not place the unit on a carpet
because this will block the ventilation holes.
Install the unit in a horizontal position only.
Avoid locations subject to strong vibrations.
Avoid moving the unit between cold and hot locations.
Do not place the unit directly on top of a monitor TV, as
this may cause playback or recording problems.
Avoiding Electrical Shock and Fire
Do not handle the power cord with wet hands.
Do not pull on the power cord when disconnecting it from
an AC wall outlet. Grasp it by the plug.
If any liquid is spilled on the unit, unplug the power cord
immediately and have the unit inspected at a factoryauthorised service centre.
Do not place anything directly on top of this unit.
SERVICE
This unit is a precision instruments and if treated with care,
will provide years of satisfactory performance. However, in
the event of a problem, the owner is advised not to attempt
to make repairs or open the cabinet. Servicing should
always be referred to your dealer or Sanyo Authorized
Service Centre.
CAUTION
Danger of explosion if battery is incorrectly replaced.
Replace only with the same or equivalent type
recommended by the manufacturer.
Discard used batteries according to the manufacture’s
instructions.
English 1
Page 3
INTRODUCTION
Main features
This digital video recorder can be used to store images
recorded by four monitoring cameras onto its built-in hard
disk.
Large-capacity (120 GB or 240 GB) hard disk.
Eliminates laborious tape replacement, and offers a
long continuous recording time of at least 672 hours
(240 GB; standard image quality). (At least 336 hours
for 120 GB, standard image quality.)
For the 120 GB model, a hard disk upgrade is available
(sold separately) that gives you a total of 240 GB of
memory.
Complete range of recording/playback
functions
z You can play back and record images at the same
time.
z You can record and play back audio.
z The timer record function lets you make recordings
at different times each day. (JP. 15)
z Images from four cameras can be displayed on a
single monitor, in the quad screen.
z The automatic channel switching function
(SEQUENCE) lets you display the images from each
channel on a single screen sequentially, or display
just the desired image on a single screen.
z The motion sensor function automatically records
changes in images caused by movements of
intruders.
Search function – lets you instantly display
the desired image. (JP. 19)
z Searching in order of alarm occurrence
z Searching by date/time
Security lock function – lets you restrict users,
for data and equipment management. (JP. 42)
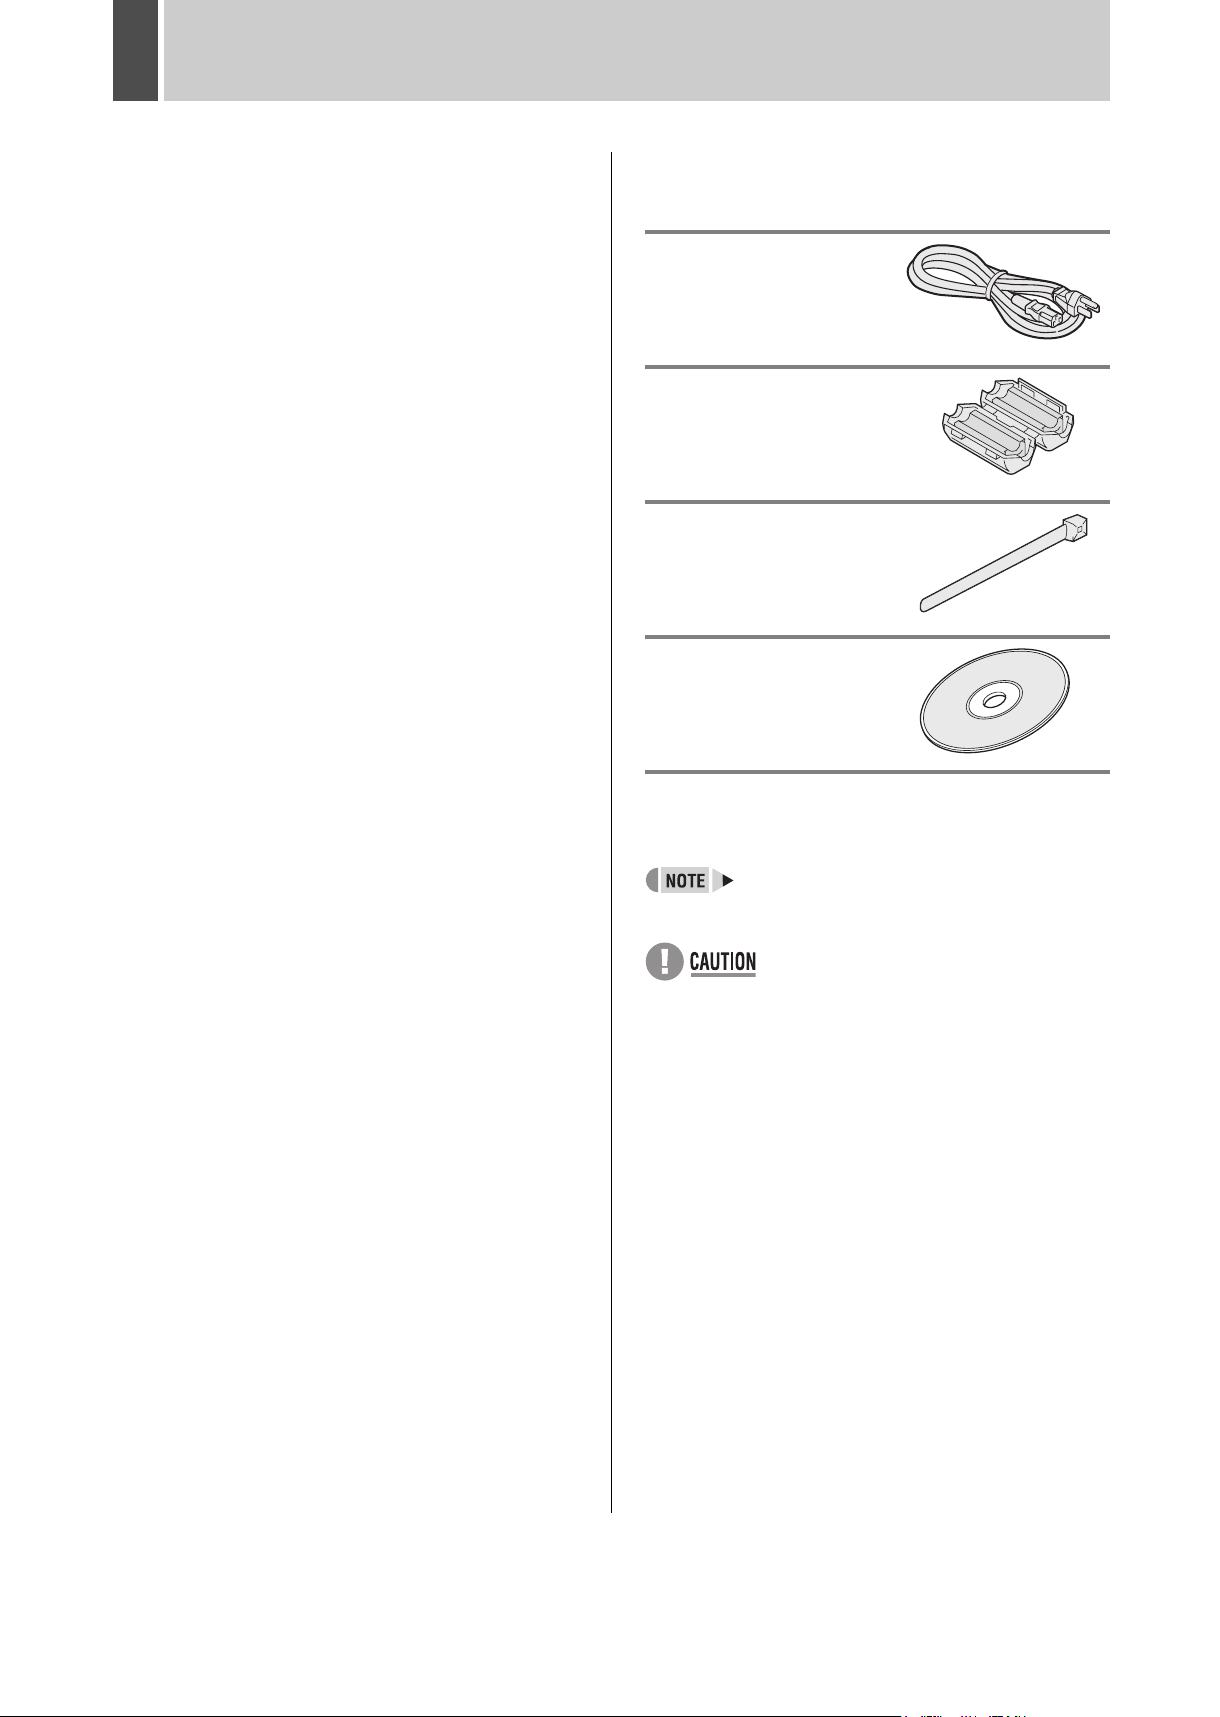
Accessories
Check that you have all the parts below.
Power cord
Ferrite core (3)
For: LAN connection cable
DVR power cord
TV monitor power cord
Power cord tie
Application software
(VA-SW80LITE)
Symbols used in this manual
Information describing operation methods
or how to get the most out of functions
Information describing the correct use of
the digital video recorder
(JP. xx) Indicates manual page to refer to.
Expandability and PC connection
z The Ethernet terminal lets you connect the digital
video recorder to a network, for remote operation/
remote monitoring using a PC.
z Network connection lets you control up to 1,000
DVRs (digital video recorder) using up to 4 PCs.
z Can be connected to a system controller (sold
separately) using the RS-485 terminal.
z A CompactFlash card reader can be connected
using the USB terminal, letting you upload/download
menu data.
Copyright
z This manual and software are copyrighted by Sanyo
Electric Co., Ltd.
z Brand and product names used in this manual are the
trademarks or registered trademarks of their respective
companies.
z Copyright law prohibits the recording of copyrighted
images without the permission of the copyright holder
except for personal use.
2 English
Page 4

CONTENTS
INTRODUCTION
1 BEFORE USE................................................. 5
Notes on handling internal hard disk drive
components .................................................... 5
Conditions to avoid ......................................... 5
The hard disk and cooling fan are expendable
items. .............................................................. 5
Installation conditions...................................... 5
For important recordings................................. 5
Hard disk protection ........................................ 6
Care ................................................................ 6
During extended disuse .................................. 6
Backup battery ................................................ 6
MENU button .................................................. 6
OPERATION
1 SCREEN DISPLAY AND POSITION ........... 11
Operation display area.................................. 11
Changing the position of the operation
display........................................................... 12
To display the quad screen as single
screens ......................................................... 12
To display the image from a specified
channel in a single screen ............................ 12
2 SETTING THE LANGUAGE/CLOCK ........... 13
To change the language ............................... 13
Setting the time ............................................. 14
3 NORMAL RECORDING/TIMER
RECORDING ................................................ 15
Normal recording .......................................... 15
Timer recording............................................. 15
2 NAMES AND FUNCTIONS OF PARTS ......... 7
Front panel ...................................................... 7
Rear panel....................................................... 8
3 INSTALLATION AND CONNECTIONS ......... 9
Basic connections ........................................... 9
System controller connections ........................ 9
Connecting a remote control circuit................. 9
Connecting cables to the control and alarm
terminals........................................................ 10
Connecting to a network ............................... 10
Connecting the power cord ........................... 10
PAL/NTSC switching..................................... 10
5 NORMAL RECORDING/TIMER
RECORDING PLAYBACK ........................... 17
Playback........................................................ 17
Playback while fast-forwarding/rewinding ..... 17
Viewing still images....................................... 18
Frame advance (reverse).............................. 18
To playback audio ......................................... 18
6 SEARCHING FOR RECORDED IMAGES ... 19
Alarm search ................................................. 19
Date/time search ........................................... 20
7 PREVENTING ACCIDENTAL OPERATION
(KEY LOCK FUNCTION).............................. 22
Setting the key lock function ......................... 22
Releasing the key lock function..................... 22
4 ALARM RECORDING .................................. 16
Alarm recording............................................. 16
English 3
Page 5

CONTENTS
SETTINGS
MENU CONFIGURATION AND
OPERATIONS .............................................. 23
Displaying menu screens and setting
screens ......................................................... 23
To restore menu setting items to their
initial values ................................................. 23
Overview of sub-menus ................................ 24
1 LANGUAGE/CLOCK SET............................ 25
<SUMMER TIME> settings........................... 25
<EXT.CLOCK SET> settings ........................ 26
2 SCREEN SET MENU ................................... 28
Screen settings ............................................. 28
MONITOR SET ............................................. 29
Camera title setting ....................................... 29
Setting the motion sensor ............................. 30
3 RECORDER MENU...................................... 32
Setting items ................................................. 32
REC MODE SET........................................... 32
ALARM REC MODE SET ............................. 34
AUDIO REC LEVEL SET.............................. 35
Timer recording settings ............................... 35
Setting holidays............................................. 38
Initializing the hard disk/adding a hard disk .. 38
INTRODUCTION OPERATION SETTINGS OTHER
4 DISPLAY SET............................................... 40
<DISPLAY SET> screen setting items.......... 40
Settings ......................................................... 40
5 BUZZER SET................................................ 41
<BUZZER SET> screen setting items........... 41
Settings ......................................................... 41
6 SECURITY LOCK SET................................. 42
Password setting example ............................ 42
<SECURITY LOCK SET> screen
setting items .................................................. 42
Setting passwords......................................... 42
Setting the user password............................. 43
Setting the authorization for recording and
playback operations ...................................... 44
Setting the security lock ................................ 44
7 RS-485/NETWORK SET .............................. 45
Network connections and settings ................ 45
RS-485 connections and settings ................. 46
8 POWER FAILURE/USED TIME ................... 47
9 MENU UPLOAD/DOWNLOAD..................... 48
Settings ......................................................... 48
OTHER
1 INTERFACE SPECIFICATIONS .................. 50
RS-485 specifications ................................... 50
RS-485 termination switch settings............... 50
DVR/VCR command table ............................ 51
2 SPECIFICATIONS ........................................ 52
Dimensions ................................................... 53
4 English
Page 6

1 BEFORE USE
Notes on handling internal hard disk
drive components
This unit has a built-in hard disk drive (HDD).
Be sure to observe the following points carefully when
operating, setting-up and servicing the unit.
Do not subject the unit to shocks or vibration.
If the unit is subjected to shocks or vibration, it may damage
the HDD or cause corruption of the data stored in the HDD.
z Do not move the unit while the power is turned on.
Always be sure to turn off the power before removing
the unit from or placing it onto the rack.
z When transporting the unit, pack it securely using the
specified packing materials. In addition, use a method
of transportation that minimizes vibration.
z When placing the unit down on a surface such as a
floor, attach the specified feet to the base of the unit
and place it down gently. If the feet are not attached,
place the unit down very carefully so that it does not
make any noise.
Do not move the unit for 30 seconds after
turning off the power.
After the power is turned off, the disk inside the HDD will
continue to spin for a brief period due to inertia, and the
heads will be in an unstable state.
During this time, the unit is even more susceptible to
shocks and vibration than when power is being supplied.
Make sure that the unit is not subjected to even gentle
vibration for at least 30 seconds after turning off the power.
Do not operate the unit when condensation
has formed.
If the unit is operated when condensation has formed, it
may cause operating problems.
If sudden changes in the ambient temperature occur, wait
for the temperature to stablize before operating the unit.
Notes when replacing the HDD
Be sure to follow the correct replacement procedure when
replacing the HDD.
z HDDs that have been removed from their packing may
not operate correctly if they are subjected to any shocks
and vibration. It is recommended that you place HDD
onto a soft, level surface with the printed circuit board
facing upward after unpacking it.
z Be careful not to subject the HDD to shocks or vibration
when removing and tightening screws as part of the
HDD replacement procedure. Make sure that all screws
are tightened securely so that they will not become
loose.
The HDD is sensitive to static electricity, so you should
take proper precautions to prevent static electricity
buildup.
Handling the HDD unit by itself
If transporting or storing the HDD unit by itself, always be
sure to pack it in the specified packing first.
In addition, use a method of transportation that minimizes
the vibration.
If the HDD becomes damaged, handle the unit and the
damaged HDD that has been removed in order for it to be
replaced carefully to prevent the problem from being
aggravated until as the nature of the problem can be
checked and analyzed.
Conditions to avoid
z The hard disk is sensitive to dust, vibrations and
shocks, and should also not be used near magnetic
objects. To prevent loss of recorded data, observe the
following precautions:
z Do not subject the digital video recorder to shocks.
z Do not use the digital video recorder on a vibrating or
unstable surface.
z Do not disconnect the power plug from the wall outlet
during recording or playback.
z Do not use the digital video recorder in areas of
extreme temperature changes (10ºC or more per hour).
z Condensation may occur if the digital video recorder is
moved to an area of extremely different temperature or
high humidity. If the digital video recorder is used with
condensation inside it, operating problems may occur.
z Do not install the digital video recorder in areas of
constant vibration such as motor vehicles or trains.
The hard disk and cooling fan are
expendable items.
Under use in an ambient temperature of 25ºC, the hard
disk should generally be replaced after 2 years, and the
cooling fan after 3 years. These figures are intended as
guidelines only, and are not guarantees of part
performance.
The POWER indicator flashes if a problem occurs in the
hard disk or fan. (JP. 10)
Installation conditions
The digital video recorder has ventilation holes on its left,
rear and bottom panels. Make sure these holes are not
blocked after installation.
Do not use the unit in an area of poor ventilation such as a
bookshelf or box.
When installing the unit in a rack, ensure a gap of at least
5 cm at the top and bottom.
For important recordings
z Always make a test recording beforehand to check that
the digital video recorder's playback is normal.
z Note that no compensation will be provided for losses
due to recording or playback problems arising from
problems with the digital video recorder or its connected
devices during operation.
English 5
Page 7

BEFORE USE1
z To be prepared for malfunctions or accidents, back up
important recordings periodically, or record using
mirroring.
Hard disk protection
The hard disk is checked automatically at power ON. If a
hard disk problem is found, the POWER indicator flashes.
To initialize the disk or save images stored on the disk,
contact a Sanyo service centre.
Care
z To clean the digital video recorder, unplug the power
plug from the wall outlet and wipe the unit lightly with a
soft cloth.
z To remove heavy grime, wipe the digital video recorder
with a well-wrung cloth soaked in a solution of water
and neutral detergent, and then wipe it with a dry cloth.
z Do not clean the unit with benzene or paint thinner.
Doing so may break down the finish or strip the paint.
z When using a chemical cloth, be sure to follow the
precautions provided with it.
z Do not spray insecticide or other volatile chemicals on
the cabinet. Do not allow rubber or vinyl products to
come into contact with the digital video recorder for
extended periods.
Doing so may break down the finish or strip the paint.
MENU button
The [MENU] button is disabled when the unit is connected
to a PC (VA-SW804/VA-SW80LITE). When the [MENU]
button is operative, operations from the PC are disabled.
INTRODUCTION
During extended disuse
Extended disuse may cause problems in functions, so turn
the power on and operate the unit occasionally during
such periods.
Backup battery
The digital video recorder comes with a built-in lithium
battery. When the digital video recorder has been
connected to a wall outlet for at least 48 hours and the
date and time have been set, the clock function will
continue to operate for up to 30 days after the power plug
is disconnected.
When disposing of the digital video recorder, contact a
Sanyo service centre for information on how to dispose of
the lithium battery.
6 English
Page 8
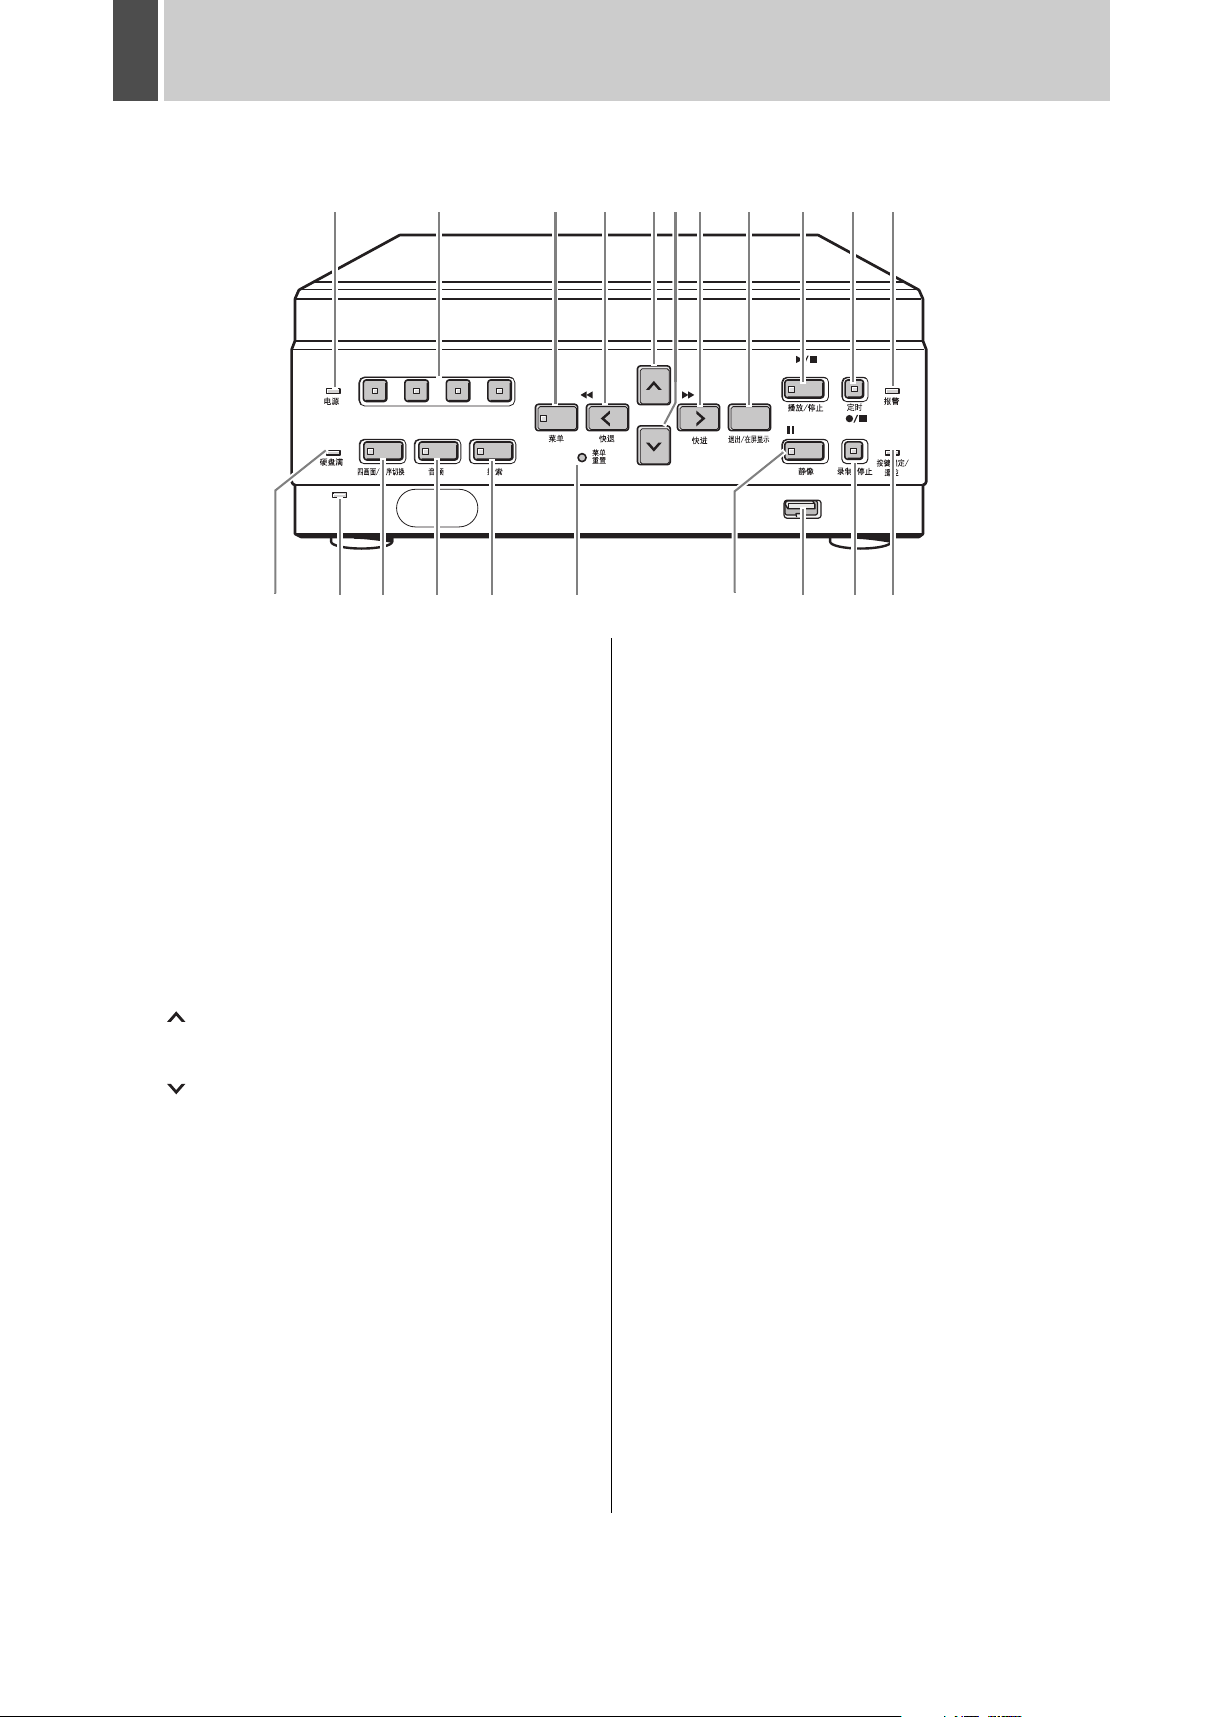
2 NAMES AND FUNCTIONS OF PARTS
Front panel
1110987654321
1234
POWER
QUAD/
FULL
LAN
(LINK/ACT)
SEQUENCE
AUDIO SEARCH
1. POWER indicator (JP. 10)
Lights when the power is ON.
Flashes when there is a problem with the hard disk or
fan.
2. CHANNEL buttons and indicators
Used when switching the image display from the quad
screen to a single screen. Pressing a channel button
lights its indicator and displays the corresponding image
in a single screen.
3. [MENU] button and indicator
Used to display the menu screens. The indicator lights
when a menu screen is displayed.
4. [REVIEW] button
When pressed during playback, lets you rewind the
image while watching it on screen. Also used for menu
screen operations.
5. [ ] button
Used to move the cursor in menu screens up. Also used
to change setting values.
6. [ ] button
Used to move the cursor in menu screens down. Also
used to change setting values.
7. [CUE] button
When pressed during playback, lets you fast-forward
the image while watching it on screen. Also used for
menu screen operations.
8. [EXIT/OSD] button (JP. 23)
Returns the display to the normal screen when the main
menu, a sub-menu, or a setting screen is displayed.
9. [PLAY/STOP] button
Plays back the normal image (indicator lights). When
pressed during playback, stops playback.
10. [TIMER] button and indicator (JP. 15)
When the button is pressed while recording or stopped,
the digital video recorder enters timer record standby,
and the indicator lights. When the set time arrives, the
digital video recorder starts timer recording.
MENU
REVIEW CUE
MENU
RESET
PLAY/STOP
TIMER
EXIT/OSD
USB
1913
ALARM
REC/STOPSTILL
LOCK/
REMOTE
2120181716151412
11. ALARM indicator
Flashes when recording an alarm image.
12. FULL indicator (JP. 33)
Lights when the remaining memory in the hard disk’s
recording area has reached zero and recording has stopped.
13. LAN indicator
Lights when the digital video recorder is connected to a
network. Flashes when data is being sent and received.
14. [QUAD/SEQUENCE] button and indicator (JP. 12)
Switches to the quad screen display, or switches from the quad
screen display to each single-screen display in sequence.
15. [AUDIO] button and indicator
Switches the audio output channel.
16. [SEARCH] button and indicator (JP. 19, P. 20)
When the button is pressed while recording or stopped, the
indicator lights, and the search setting screen is displayed
17. [MENU RESET] button (JP. 23)
Used to initialize the currently displayed menu settings,
and to set the time.
18. [STILL] button
When pressed during playback, freezes the screen
image (the indicator lights). Pressing the button again
resumes playback.
19. USB terminal (JP. 48)
Used to connect a CompactFlash card reader.
20. [REC/STOP] button and indicator
Starts normal recording. Indicator lights during recording.
During recording, pressing the button for at least 3
seconds stops recording and turns off the indicator.
21. LOCK/REMOTE indicator (JP. 22, P. 44)
Lights when operations have been locked by the key
lock or security lock setting.
If an operation button is pressed when the security lock
is set, a buzzer sounds. The key lock cannot be set
during playback.
The indicator flashes at 4Hz when there is a network
connection, and flashes at 1Hz when there is a network
connection while locked.
English 7
Page 9
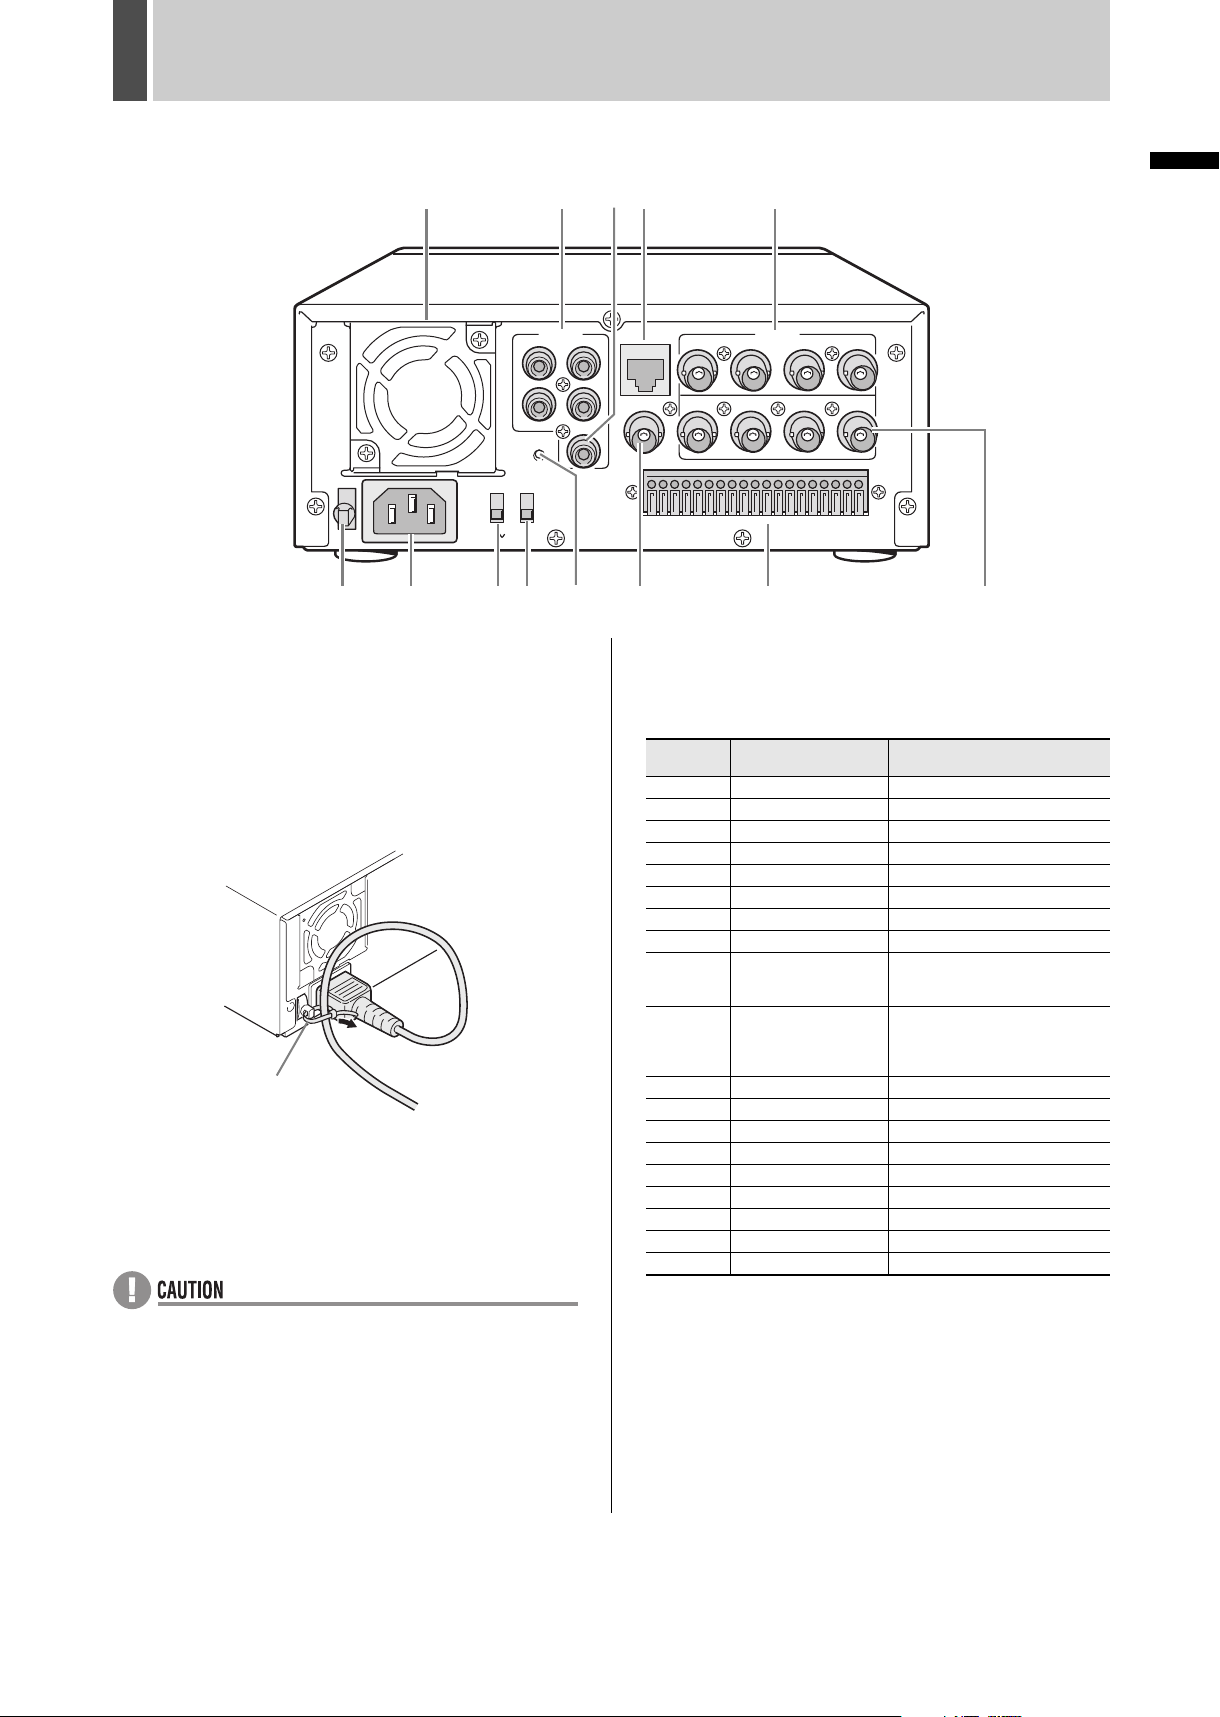
NAMES AND FUNCTIONS OF PARTS2
Rear panel
1 234 5
3
4
RS-485
TERMINATE
TV SYSTEM
NTSC
PAL
AC IN
67 91011 12 138
1. FAN
2. AUDIO IN terminals (4 channels)
3. AUDIO OUT terminal
4. LAN terminal (JP. 45)
5. VIDEO IN terminals (4 channels)
6. Power cord holder
Secure the power cord to the holder using the cord tie
(accessory) as shown in the illustration.
Cord tie
7. AC INLET
AC power input terminal (3-core)
8. TV SYSTEM selector switch
Used to select between NTSC and PAL systems for the
camera input and monitor output connected to the
digital video recorder.
z Turn the power OFF then ON again after selecting
NTSC or PAL.
9. RS-485 TERMINATE switch
Turns RS-485 termination ON/OFF.
10. ALL RESET switch
Resets the clock and backup mode setting. (Menu
settings are maintained)
AUDIO
ALL
RESET
ON
OFF
INTRODUCTION
VIDEO
234
IN
OUT
10 11 12 13 14 15 16 17 18 19
Pin Signal
NON REC OUT/
SERIES REC OUT
To RS-485 terminal signal A *
To RS-485 terminal signal B *
Input terminal used when
recording with multiple digital
video recorders connected.
Output terminal used when
recording with multiple digital
video recorders
connected.
2
*
3
1
1
OUT
1
2
MONITOR OUT
LAN
IN
1
12 34
123456789
11. VIDEO MONITOR OUT terminal
Output terminal that displays quad screen on single
monitor.
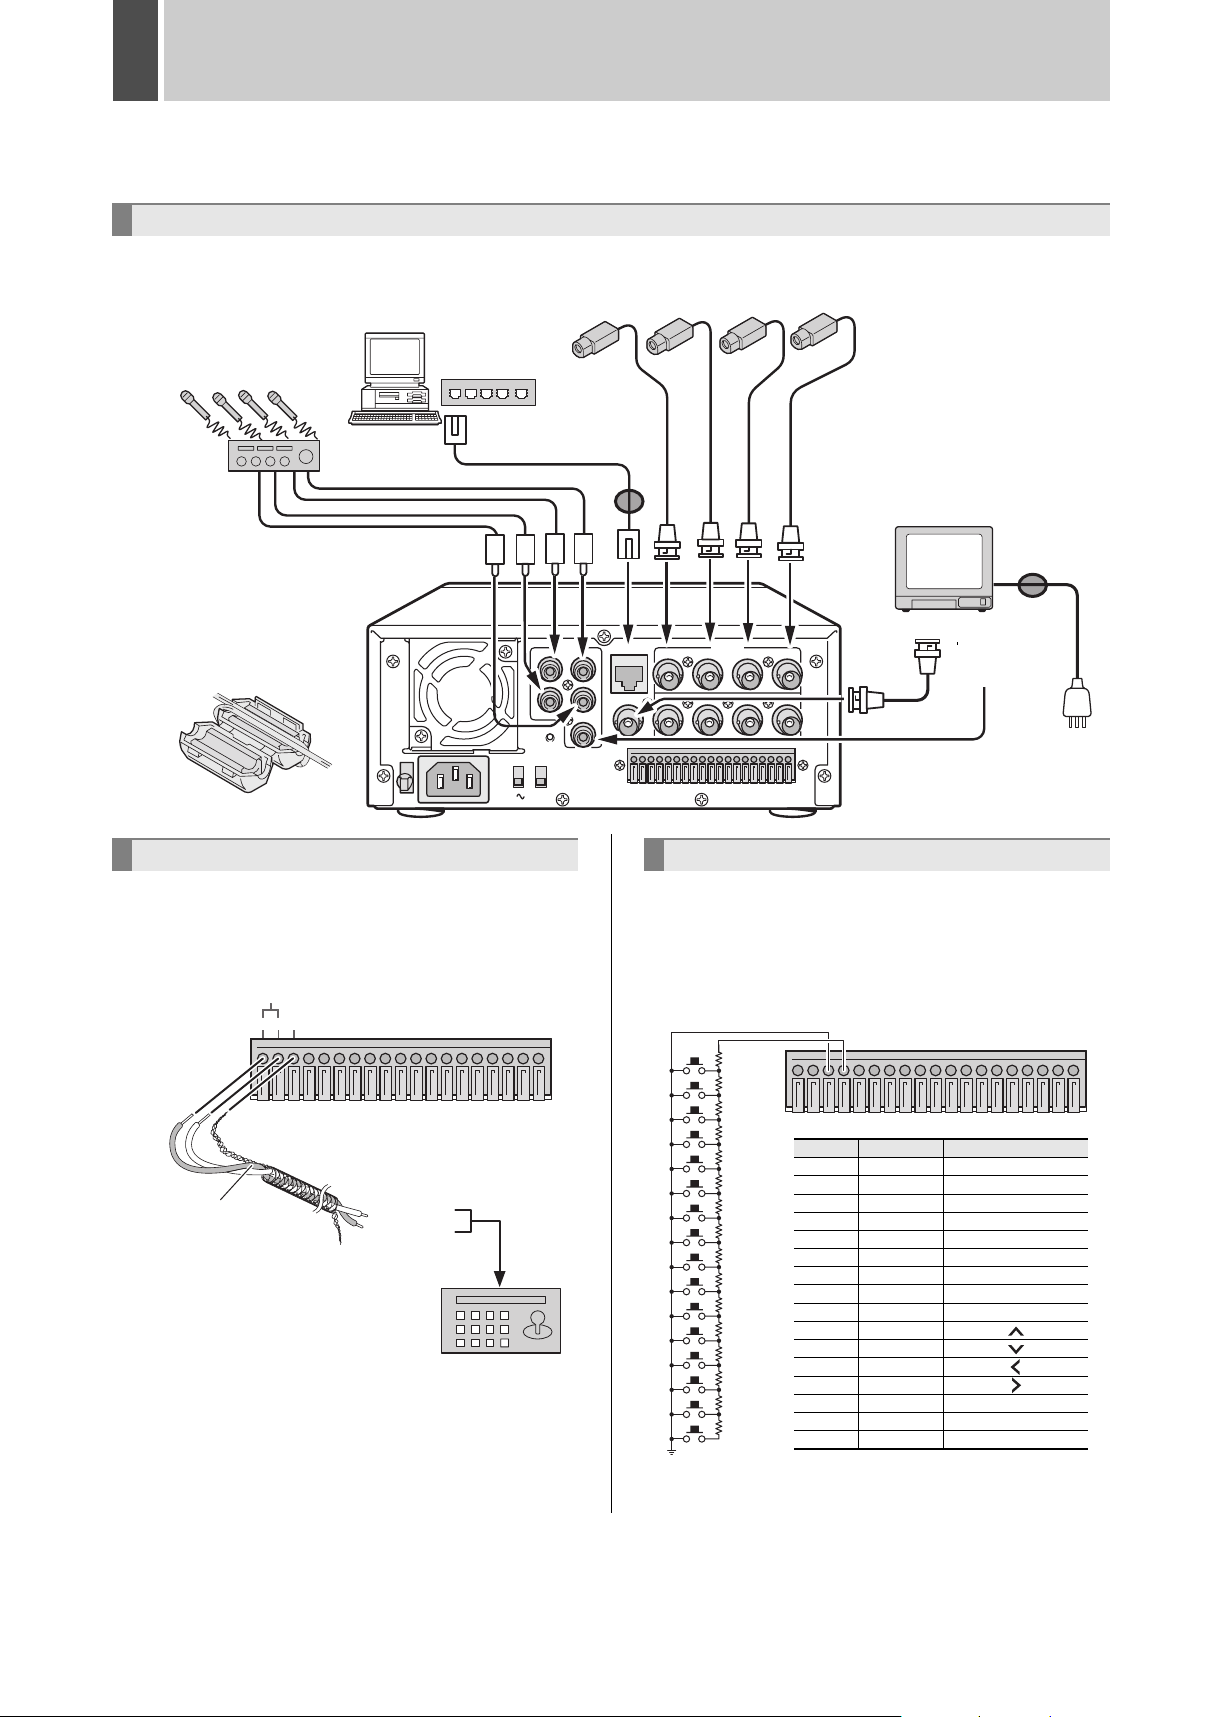
12. Control and alarm terminals
Terminal
No.
1 RS485A
2 RS485B
3 C Common
4 REMOTE Remote Control terminal
5 C Common
6 CLOCK ADJ IN Input for clock setting
7 CLOCK ADJ OUT Output for clock setting
8 C Common
9 SERIES REC IN
10
11 ALARM IN 1 Alarm input for channel 1
12 ALARM IN 2 Alarm input for channel 2
13 ALARM IN 3 Alarm input for channel 3
14 ALARM IN 4 Alarm input for channel 4
15 ALARM RESET Alarm reset input
16 ALARM OUT Alarm output
17 C Common
18 WARNING OUT Warning output *
19 DISK FULL OUT Recording area full warning
*1 Used for twisted-pair cable connection.
*2 SERIES REC outputs NON REC OUT when SERIES REC is
“OFF”.
*3 The following warnings are output:
z Hard disk drive error z Fan error z Recording error
z No input signal when VIDEO LOSS is ON.
13. VIDEO OUTPUT terminals (4 channels)
Terminals for output of individual video channels directly
to the monitor.
8 English
Page 10
3 INSTALLATION AND CONNECTIONS
This section describes how to connect the digital video recorder to the CCTV camera and other devices. Be sure to read the
instruction manuals for each connected device. Make connections carefully. Improper connections can cause smoke or malfunctions.
Basic connections
The connections for cameras (4), TV monitor (1), microphone and PC are shown below.
(sold separately)
Microphone
(sold separately)
switching hub
(sold separately)
Amp (sold
separately)
*1 Use a shielded LAN
connection cable, and
wind it once around the
supplied ferrite core.
System controller connections
PC
or
TV SYSTEM
NTSC
AC IN
CCTV camera (sold separately)
*2 Attach the supplied ferrite
core to the base of the
TV monitor power cable
(coiling not necessary).
*1
TV monitor
(sold separately)
*2
Video input terminal
AUDIO
3
4
ALL
RESET
RS-485
TERMINATE
ON
OFF
PAL
LAN
IN
1
2
OUT
MONITOR OUT
123456789
VIDEO
234
1
IN
12 34
OUT
10 11 12 13 14 15 16 17 18 19
Audio input
terminal
Connecting a remote control circuit
The connections for a system controller are shown below.
Use a twisted-pair cable (sold separately) to connect rear
panel control terminals A, B and C (ground). Connect
signal A to signal A, and signal B to signal B.
RS-485
ABC
123456789
Twisted-pair cable
10 11 12 13 14 15 16 17 18 19
To signal B
To signal A
Ground
RS-485 terminal
System controller
(sold separately)
z Twisted-pair cable
Can reduce interference on the signal caused by noise
generated by other cables.
The connections for a remote control circuit are shown
below. Making the connections shown below lets you
operate the digital video recorder by remote control.
z Create the remote control circuit shown in the
illustration, and connect it to the remote control input
terminals (among the control terminals).
220
SW 1
220
SW 2
300
SW 3
360
470
680
820
1.2k
1.8k
2.2k
3.3k
4.7k
7.5k
13k
27k
68k
123456789
SW 4
SW 5
SW 6
SW 7
SW 8
SW 9
SW 10
SW 11
SW 12
SW 13
SW 14
SW 15
SW 16
SW1
SW2
SW3
SW4
SW5
SW6
SW7
SW8
SW9
SW10
SW11
SW12
SW13
SW14
SW15
SW16
Key
10 11 12 13 14 15 16 17 18 19
Resistance Function
220
440
740
1100
1570
2250
3070
4270
6070
8270
11570
16270
23770
36770
63770
70570
Ω
Ω
Ω
Ω
Ω
Ω
Ω
Ω
Ω
Ω
Ω
Ω
Ω
Ω
Ω
Ω
Camera 1
Camera 2
Camera 3
Camera 4
QUAD/SEQ
AUDIO SELECT
SEARCH
MENU
EXIT/OSD
STILL
PLAY
REC
Use a resistance of 1/10 ohms or more and with a D
ranking (precision 0.5% or finer).
English 9
Page 11
INSTALLATION AND CONNECTIONS3
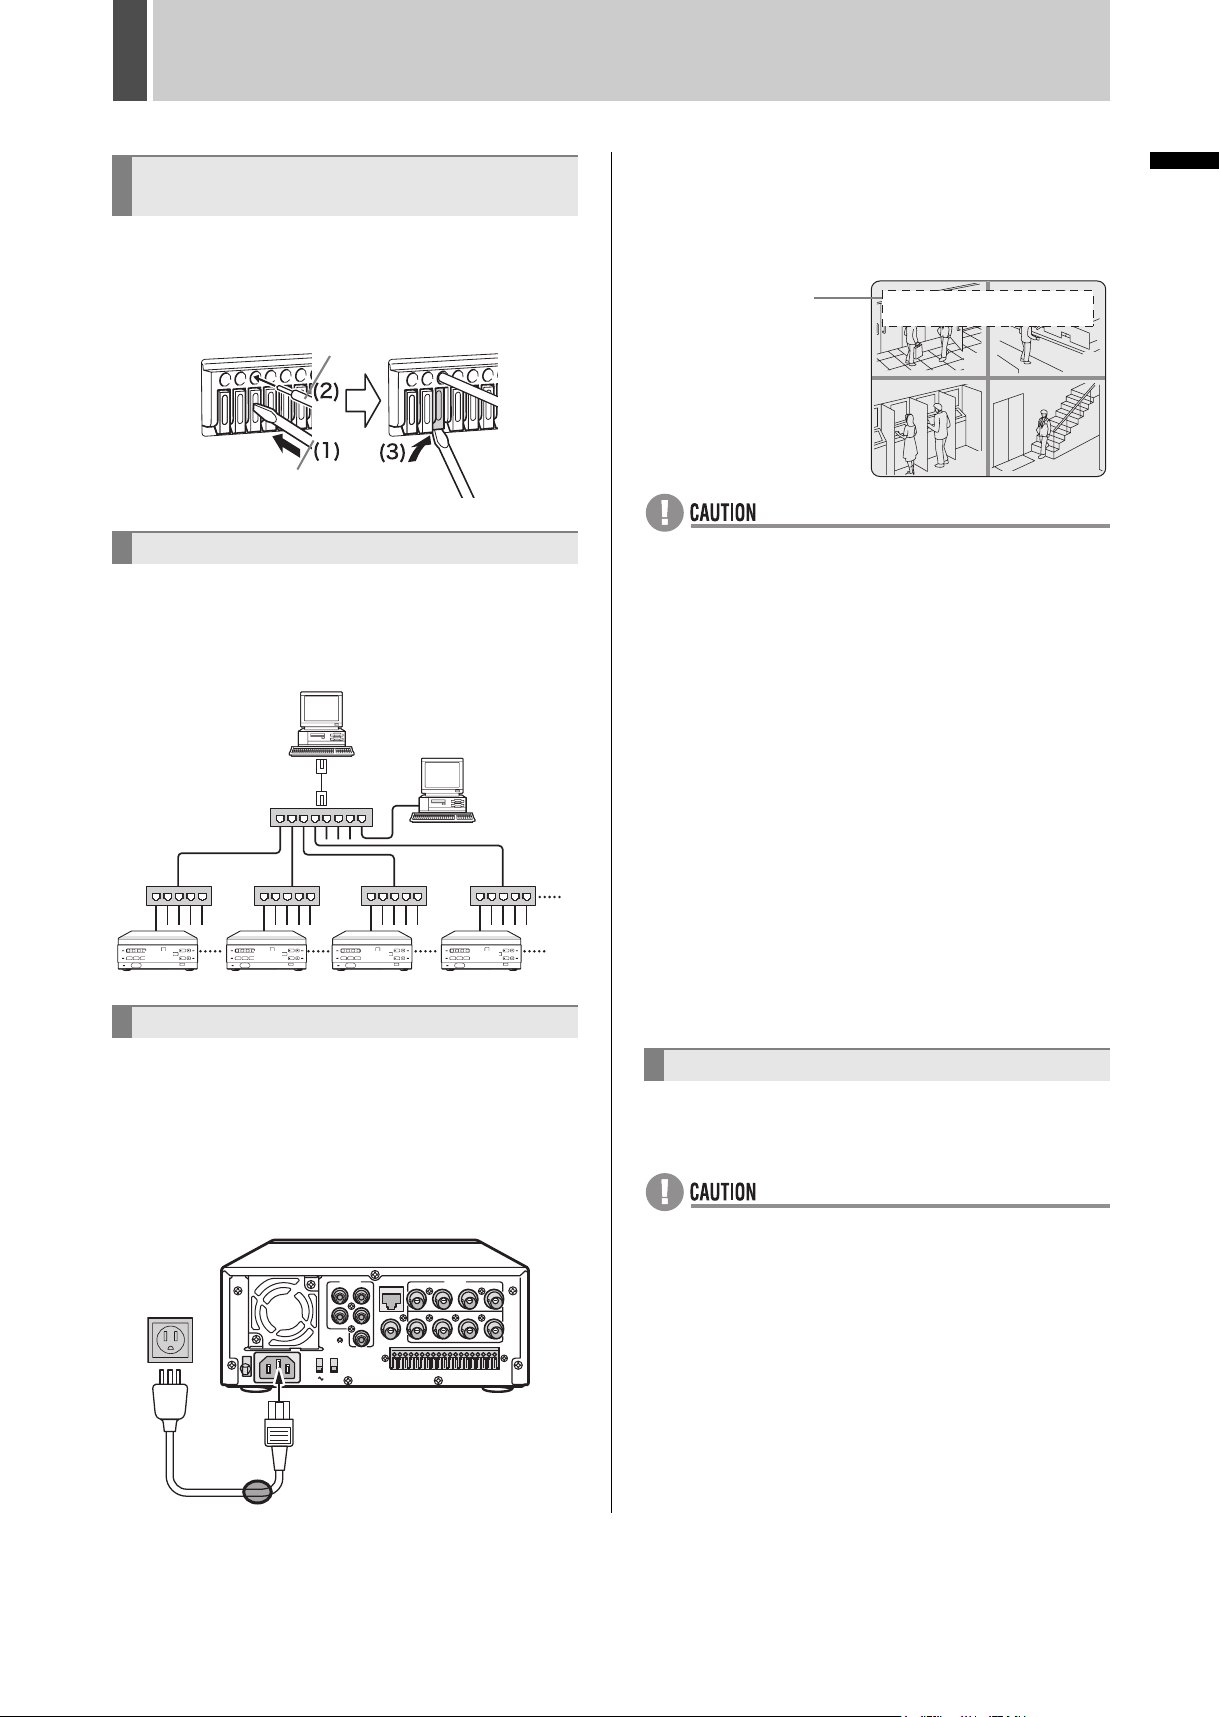
Connecting cables to the control and
alarm terminals
(1) Push in the lock pin with a flat-blade screwdriver.
(2) Insert the cable.
(3) Pull out the lock pin with a flat-blade screwdriver.
The cable is now fixed in place.
Cable
Flat-blade screwdriver
Connecting to a network
The VA-SW804 application software (sold separately) or
the VA-SW80LITE application software (accessory) lets
you control the digital video recorder, and monitor live
images, recorded images and audio through a network.
PC
PC
SWITCHING
HUB
SWITCHING
HUB
DVR DVR DVR DVR
SWITCHING
HUB
SWITCHING
HUB
SWITCHING
HUB
Connecting the power cord
z When turning the power ON for the first time
“PLEASE SET THE CLOCK” is flashed on the monitor
screen. Follow the steps on page 14 to set the clock.
z If the clock is already set
The operation display area is displayed.
Operation
display area
HI A
20 - 05 - 03 08: 30 : 35 AL 00015
1
3
z If the POWER indicator flashes
The digital video recorder has a self-check function that
indicates problems. If there is a problem at power ON or
during operation, the type of problem is indicated by how
rapidly the POWER indicator flashes. Contact a Sanyo
Authorized Service Centre if the POWER indicator flashes.
4 flashes per second:
The disk is checked automatically at power ON. If
a hard disk problem is found, the POWER
indicator flashes, and the hard disk must be
replaced or reformatted. If you need to save
images stored on the disk, contact a Sanyo
Authorized Service Centre.
1 flash per second:
Fan problem
z If you disconnect the power cable
Do not move the recorder or subject it to vibrations for
at least 30 seconds after turning the power OFF.
The disk in the hard disk drive briefly keeps spinning
after power OFF due to inertia, during which time the
head is unstable. At this time, the disk is sensitive to
shocks or vibrations, so avoid even light shocks.
INTRODUCTION
2
4
1 When you have finished making all the
other connections, insert the power
plug into the wall outlet.
There is no power switch. The display indicators flash, and
after a few moments, the monitor screen displays the
camera image.
AUDIO
LAN
IN
341
2
OUT
ALL
RESET
MONITOR OUT
RS-485
TERMINATE
TV SYSTEM
ON
NTSC
OFF
PAL
AC IN
Power cable
* Attach the supplied ferrite core
*
to the base of the power cable
(coiling not necessary).
VIDEO
1
234
1234
123456789
10 11 12 13 14 1516 17 18 19
IN
OUT
PAL/NTSC switching
Set the TV SYSTEM selector switch on the rear panel to
“PAL”. (JP. 8)
z Turn the power OFF then ON again after selecting
NTSC or PAL.
10 English
Page 12
1 SCREEN DISPLAY AND POSITION
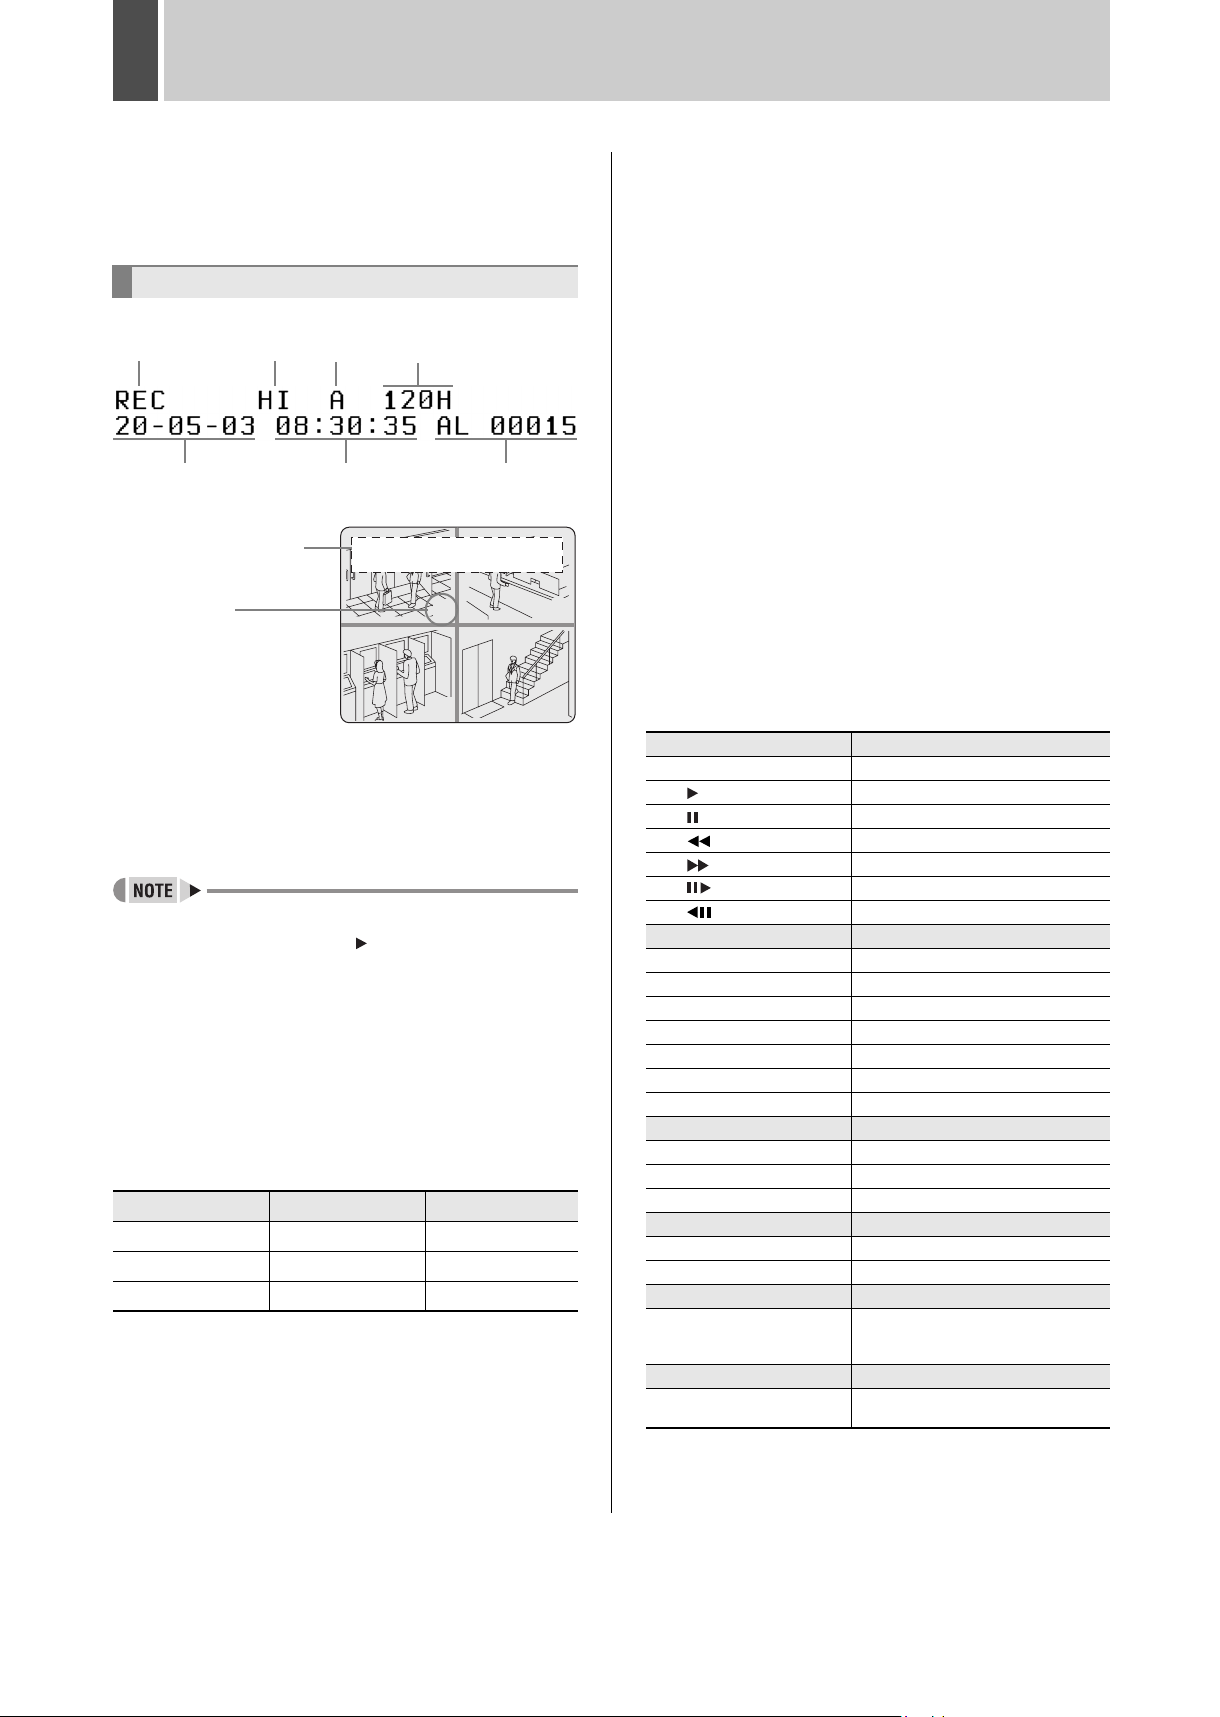
At power ON, the operation display area appears at the top
of the monitor screen.The operation display area shows
the date/time, image quality, remaining time, and other
information needed for operations.
Operation display area
Example: Normal screen
(1) (2)
(5)
(6) (7)
Operation
display area
(8)
(1) Operation symbol display
Displays symbols for recording, playback, playback
speed, etc.
For the meaning of each operation symbol, see
“Displayed symbols” on the right.
z During simultaneous recording and playback, the
display indicates playback ( ).
(2) Image quality display (JP. 33)
Displays the quality of the image that can be recorded
on the hard disk. Set to “HIGH” in the default settings.
(3) Audio recording
Displays “A” when audio recording has been set.
(4) Remaining time display
Unless “OVER WRITE” is set for recording, displays the
remaining amount of recording time, as shown below.
Remaining time
1 hour or more 1 hour increments 1H
Less than 1 hour
Less than 10 minutes
Displayed increment
10 minute increments
1 minute increments 1M
When there is less than 10 minutes, the remaining time
display flashes.
(5) Date display (JP. 14)
Shows the day/month/year.
20-05-03 (day/month/year)
(4)(3)
X180 H I A
20 - 05 - 03 08 : 30 :35 AL 00015
1
3
Example
10M
2
4
(6) Time display (JP. 14)
“00:00:00” is displayed when you turn the power ON
for the first time. The digital video recorder uses the
date and time to manage recording and playback
points.
(7) Alarm display and alarm count display (JP. 16)
When you set an alarm using the <ALARM REC
MODE SET> menu item, the alarm display area
displays the following information. (JP. 34)
z Alarm display
When alarm recording is set, “AL” appears.
During alarm recording, the “AL” display flashes.
z Alarm count display
Displays the total number of alarms that have been
generated.
(8) Camera title and VIDEO LOSS display
The title set for each camera is displayed.
“VIDEO LOSS” is displayed when there is no video
input.
Displayed symbols
The meanings of the symbols shown in the operation
display area during recording or playback are listed below.
(1) Operation symbol display
REC Recording
Playback
Still
Rewind playback
Fast-forward playback
Slow playback
Reverse slow playback
Playback speed display
X7.5
X15
X30
X180
1/8 1/8 the normal playback speed
1/4 1/4 the normal playback speed
1/2 1/2 the normal playback speed
(2) Image quality display
SUP SUPER
HI HIGH
STD STANDARD
(3) Audio recording display
A Audio recording ON
(None) Audio recording OFF
(4) Remaining time display
120H
(7) Alarm count display
AL00000
7.5 times the normal playback speed
15 times the normal playback speed
30 times the normal playback speed
180 times the normal playback speed
Displayed in 1 hour increments
when the remaining time is 1 hour
or more.
Displays the number of generated
alarms.
Description
English 11
Page 13
SCREEN DISPLAY AND POSITION1
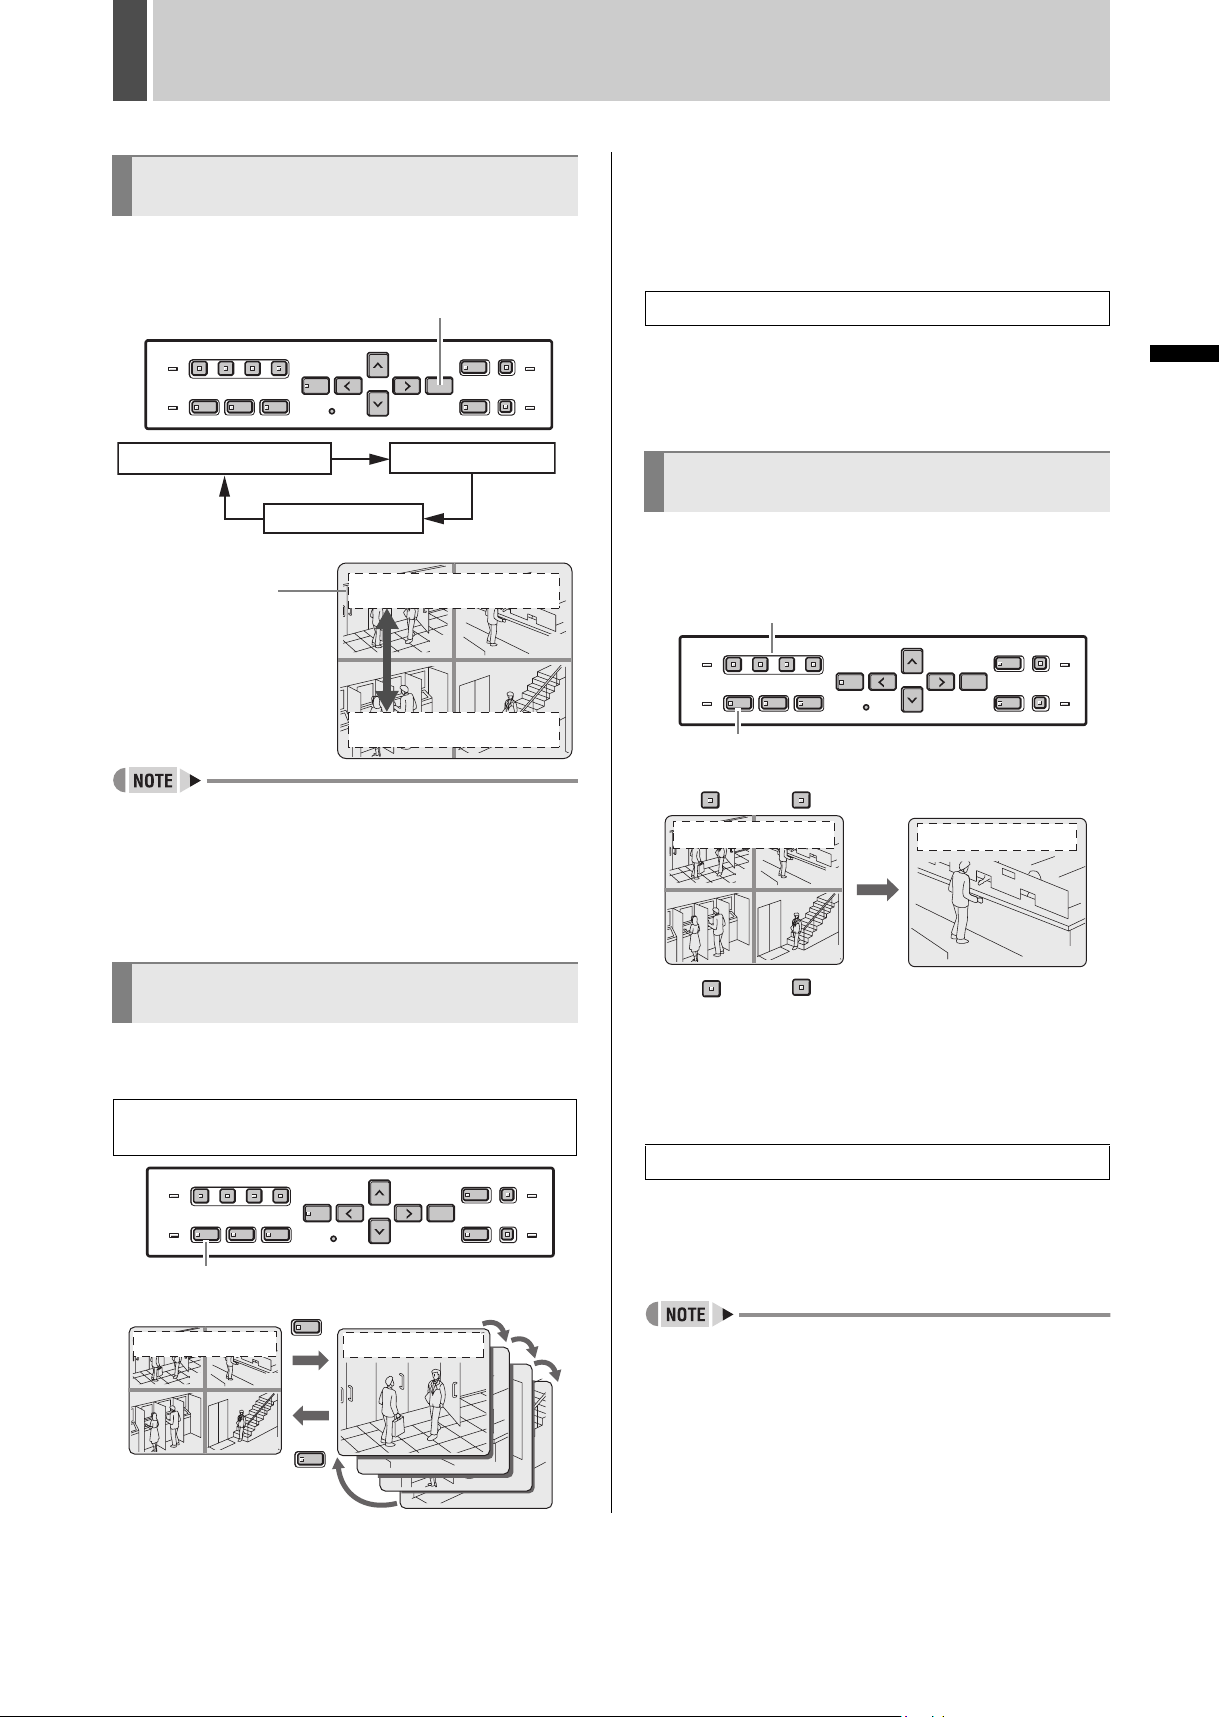
Changing the position of the
operation display
Press the [EXIT/OSD] button repeatedly.
Pressing the [EXIT/OSD] button repeatedly lets you move
or erase the operation display area.
[EXIT/OSD] button
Top of the screen (default)
No display
Example: Normal screen
Operation
display area
Bottom of the screen
X180 HI A
20 - 05 - 03 08 : 30 :35 AL 00015
1
2
1 Press the [QUAD/SEQUENCE] button.
The image from each channel is displayed sequentially in
single screens. Under the default settings, the channel
switches automatically every 1 second.
To return to the quad screen
2 Press the [QUAD/SEQUENCE] button.
The quad screen is displayed.
To display the image from a specified
channel in a single screen
Follow the steps below to display the image from a
specified channel in a single screen.
[CHANNEL] buttons
OPERATION
3
4
z When the operation display is moved to the bottom of
the screen, the camera titles are displayed at the top of
each channel screen. When the operation display is
moved to the top of the screen, the camera titles are
displayed at the bottom of each channel screen.
Camera titles are not displayed when the operation
display is off.
To display the quad screen as single
screens
Images are normally displayed in the quad screen. You
can use the procedure below to display images in single
screens.
To switch screens automatically, displaying
each single screen in sequence
[QUAD/SEQUENCE] button
QUAD/
SEQUENCE
HI A
20- 05 - 03 08: 30 : 35 AL 00015
1
3
2
4
20- 05 - 03 08: 30 : 35 AL 00015
QUAD/
SEQUENCE
HI A
1
2
3
4
[QUAD/SEQUENCE] button
12
HI A
20-05 - 03 08 : 30 : 35 AL 00015
1
3
3
4
2
4
HI A
20 -05 - 03 08 : 30 : 35 AL 00015
2
1 Press the desired [CHANNEL] button.
The indicator on the [CHANNEL] button lights. The image
for the corresponding channel is displayed in the screen.
To return to the quad screen
2 Press the [QUAD/SEQUENCE] button.
The quad screen is displayed.
z While the quad screen is displayed, press the [QUAD/
SEQUENCE] button to toggle through single screens in
sequence.
z The sequence function cannot be used on the playback
screen.
12 English
Page 14
2 SETTING THE LANGUAGE/CLOCK
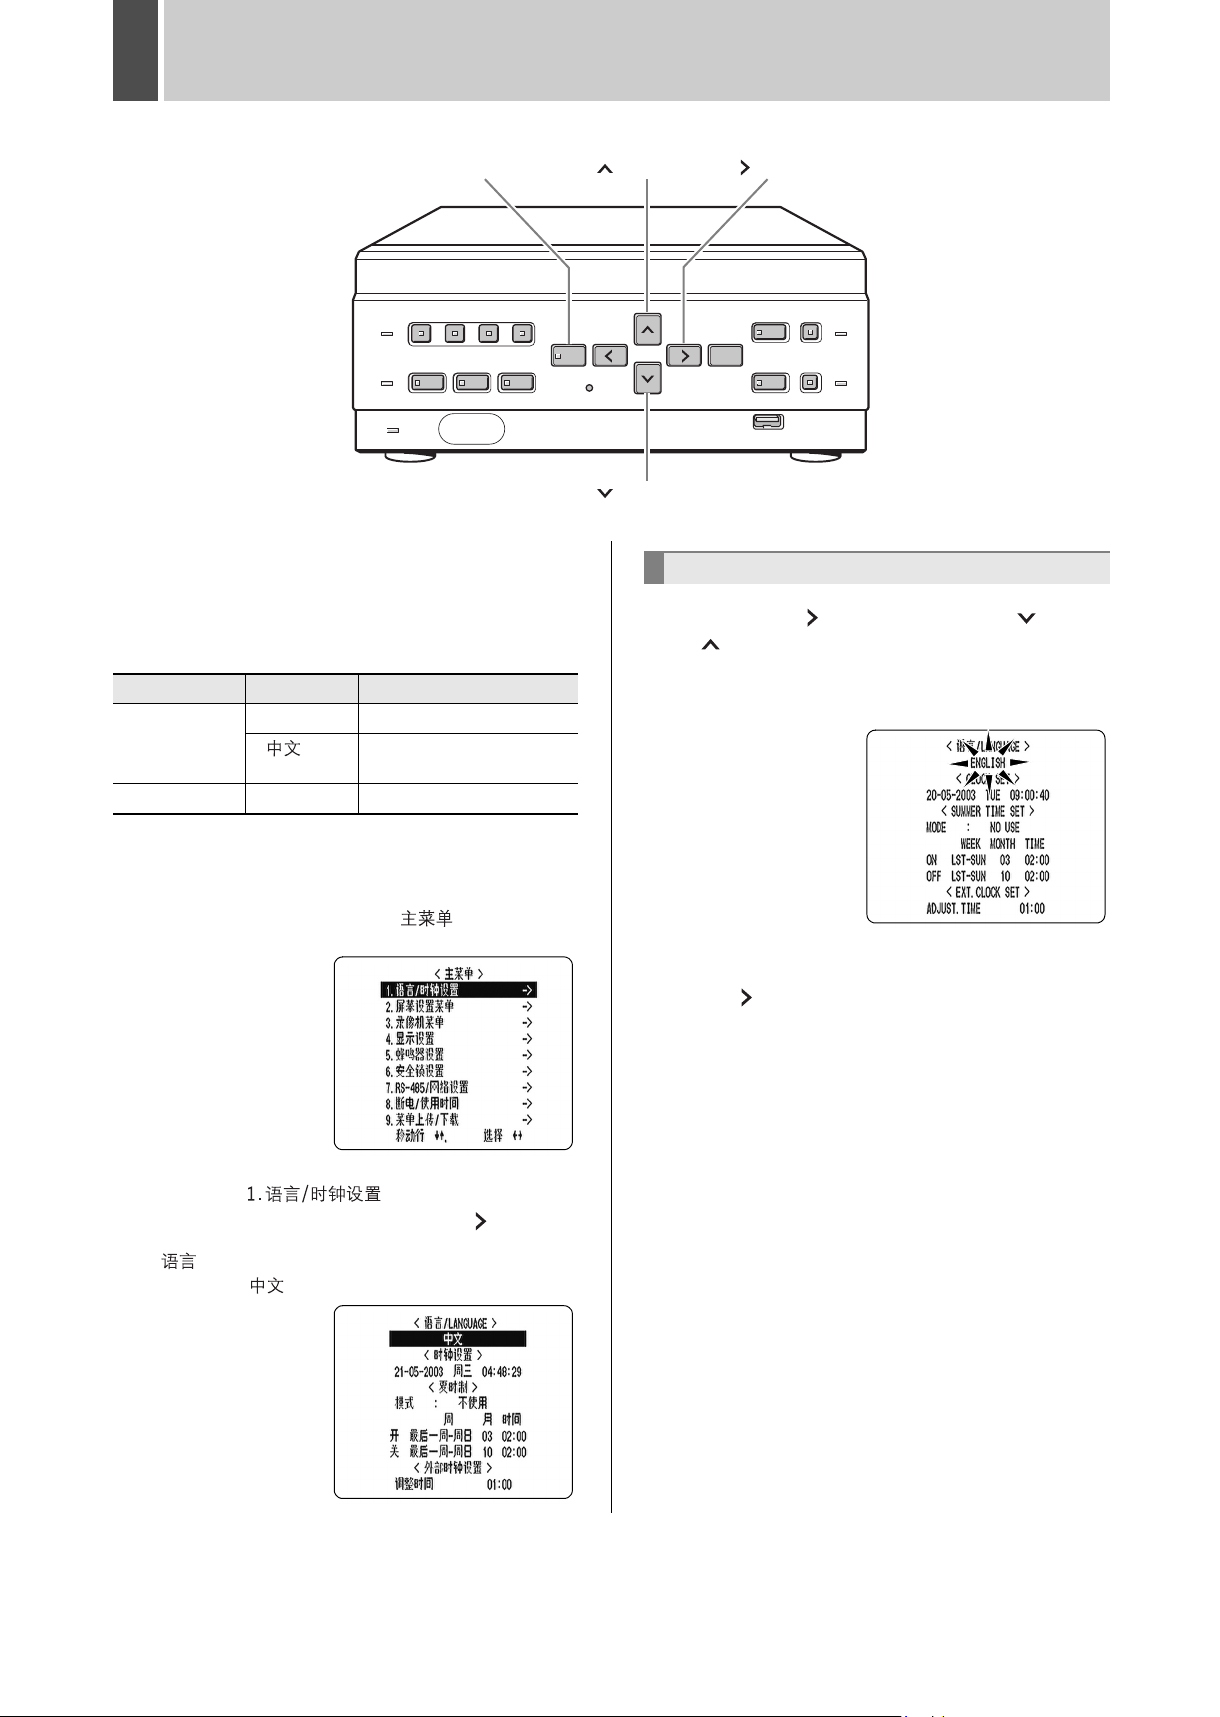
[MENU] button
This section describes how to set the language displayed
on the monitor and how to set the digital video recorder’s
internal clock.
[Settings] ( indicates default setting.)
Item Setting Description
ENGLISH Sets the language to English.
(1) LANGUAGE
(2) CLOCK SET Sets the date and time.
Sets the language to
Chinese.
[ ] button [ ] button
[ ] button
To change the language
3 Press the [ ] button, then the [ ] or
[ ] button to select the desired
language.
The set item flashes.
1 Press the [MENU] button.
The [MENU] button lights, and the < > (MAIN
MENU) screen is displayed
2 Select, “ (LANGUAGE/
CLOCK SET)”, and press the [ ] button.
The < /LANGUAGE> screen is displayed. The cursor
is positioned on “ ”.
4 When you have made a selection, press
the [ ] button.
The cursor moves to the date and time.
The language has now been set.
To return to the normal screen, press the [EXIT/OSD]
button.
English 13
Page 15

SETTING THE LANGUAGE/CLOCK2
Setting the time
(Default setting: 01-01-2003 WED 00:00:00)
Be sure to set the correct date and time. The digital video
recorder stores the times of recordings for use in
operations such as playback and search/playback.
Example: Setting 20 May 2003, 8:30
1 Press the [MENU] button.
The [MENU] button lights, and the <MAIN MENU> screen
is displayed
2 Select, “1. LANGUAGE/CLOCK SET”,
and press the [ ] button.
4 Press the [ ] button.
“01” (indicating the day) flashes.
5 Press the [ ] or [ ] button to select
“20”.
6 Press the [ ] button.
“01” (indicating the month) flashes.
OPERATION
The < /LANGUAGE> screen is displayed. The cursor
is positioned on “English”.
3 Press the [ ] or [ ] button to move
the cursor to the date and time under
<CLOCK SET>.
7 Use the same procedure to set the
month (5 in this example), year (2003),
hour (08) and minute (30).
When you have set the minute, the cursor moves to
“MODE” under <SUMMER TIME>, and the clock starts
from 00 seconds.
z “WEEK” is set automatically.
z The time is stopped during clock setting.
8 Press the [EXIT/OSD] button.
The display returns to the normal screen.
MONTH
DAY
YEAR WEEK TIME
14 English
Page 16
3 NORMAL RECORDING/TIMER RECORDING
[TIMER] button
FULL indicator
Normal recording
Follow the steps below to record the monitored image onto
the hard disk.
z When using the recorder for the first time, check that
the TV SYSTEM selector switch on the rear panel is set
to “PAL” correctly. If this switch is set incorrectly,
recording will not be performed correctly. (JP. 8)
1 Press the [REC/STOP] button.
The REC/STOP indicator lights. “REC” appears on the
screen, and recording starts.
Recording symbol
z When you record for the first time, the default settings
are used. To change the image quality. (JP. 32)
z When the OVER WRITE recording setting is “ON”, the
DVR starts recording from the beginning again. When it
is “OFF” and the remaining space reaches zero,
recording stops and the FULL indicator lights. (JP. 33)
z You can record and play back images at the same time.
(JP. 17)
z You cannot change the menu during recording.
REC H I A
20-05-03 08 :30 : 35
1
3
2
4
Ending normal recording
2 Press the [REC/STOP] button for about
3 seconds.
The REC/STOP indicator turns off and recording stops.
[REC/STOP] button
Timer recording
Follow the steps below to record the monitored image onto
the hard disk at the set time.
1 Press the [TIMER] button.
The TIMER indicator lights, and the digital video recorder
enters timer recording standby mode.
HI A
20 - 05 - 03 08 : 30 : 35
1
3
z
A warning tone sounds if timer recording has not been set.
(1) See P. 35 for how to set timer recording.
(2) When the time specified in the timer settings arrives,
the REC/STOP indicator lights, “REC” appears in the
screen, and recording starts.
(3) When the set end time arrives, the REC/STOP
indicator turns off, and recording stops.
(4) The following restrictions apply to normal recording
and timer recording.
z After making “PICTURE QUALITY” or “AUDIO
RECORDING” menu settings and returning to the
camera screen, recording does not start for a
maximum of 6 seconds (although normal recording
and timer recording operations can be made).
z After recording finishes (the REC/STOP indicator
turns off), recording does not start for a maximum of
10 seconds (although normal recording and timer
recording operations can be made).
z When the remaining memory space for recording
reaches zero, recording stops, and the FULL indicator
lights. You can start recording from the beginning again
by changing the “OVER WRITE” setting. (JP. 33)
z You can record and play back images at the same time.
(JP. 17)
2
4
Stopping during timer recording
2 Press the [TIMER] button.
The TIMER indicator turns off and recording stops.
English 15
Page 17
4 ALARM RECORDING
FULL indicator
ALARM indicator
OPERATION
Alarm recording
Follow the steps below to have the digital video recorder
record an alarm image only when alarm input is detected.
z Check that the cable of the device required for alarms is
connected to the ALARM terminal. (JP. 8)
z When the motion sensor is set, an alarm image is
recorded when a moving subject is detected. (JP. 30)
1 Set alarm recording.
The default settings are shown below. See P. 34 for how to
change these settings.
z ALARM MODE: “OFF”
Alarm recording is disabled.
z ALARM DURATION: “20SEC”
Recording is performed for 20 seconds for each alarm
signal received while the alarm is set.
z “AL” appears in the operation display area.
z When an alarm is generated on a channel that is
already alarm recording, the alarm recording time is
extended counting from that moment. The new alarm is
not counted, and the alarm count remains the same. If
an alarm is generated on a separate channel, the alarm
count increases.
z The latest 19,999 incidents are stored in the alarm
history (recording list). Older incidents are erased.
z The camera title generating the alarm flashes.
z The panel's ALARM indicator flashes.
3 Ending alarm recording.
When the alarm duration time (default setting: 20 seconds)
ends, “AL” disappears from the operation display, the
ALARM indicator stops flashing, and recording stops.
z When the hard disk’s remaining space for recording
reaches zero, the FULL indicator lights and recording
stops. You can start recording from the beginning again
by changing the recording setting. (JP. 33)
z Alarm recording is taken at the set PICTURE QUALITY
(JP. 33)
2 When alarm input is detected.
When an alarm is generated, the display below appears in
the operation display area, and an alarm image is
recorded.
HI A
20 - 05 - 03 08 : 30 : 35 AL 0001
1
3
2
4
Counts number of
alarms.
Camera title
generating alarm
flashes.
z The following restrictions apply to alarm recording.
(1) After recording starts (STOP→REC/STOP indicator
lights).
(2) After making “PICTURE QUALITY” or “AUDIO
RECORDING” menu settings and returning to the
camera screen.
For (1) and (2):
z Alarm input is not recognized for a maximum of 4
seconds. Alarm input after the 4 seconds are
recognized as usual.
z Recording does not start for a maximum of 6
seconds regardless of alarm input.
(3) After recording finishes (the REC/STOP indicator
turns off).
z Alarm input is not recognized for a maximum of 5
seconds. Alarm input after the 5 seconds are
recognized as usual.
z Recording does not start for a maximum of 10
seconds regardless of alarm input.
16 English
Page 18

5
NORMAL RECORDING/TIMER RECORDING PLAYBACK
Follow the steps below to play back images recorded on
the hard disk.
Playback
[PLAY/STOP] button
1 Press the [PLAY/STOP] button.
The [PLAY/STOP] button lights, and appears in the
operation display area. The images recorded on the hard
disk are played back in the quad screen.
HI A
20 - 05 - 03 08 : 30 : 35
1
Playback while fast-forwarding/rewinding
[ ] button
Press the [ ] or [ ] button during playback or
when a still image is displayed.
When you press the [ ] button, appears in the
operation display, and the playback fast-forwards at 7.5
times the normal playback speed.
When you press the [ ] button, appears in the
operation display, and the playback fast-rewinds at 7.5
times the normal playback speed.
2
[ ] button [] button
[ ] button [STILL] button
X7 . 5 H I A
20 - 05 - 03 08 : 30 : 35
1
2
3
z Image playback starts from the point at which recording
started.
z If “OVER WRITE” has been set in the normal recording
settings, playback starts with the oldest recorded image
when the recording is played back for the first time.
z When playback ends, the digital video recorder pauses
automatically. The [STILL] button lights, and ( )
appears in the operation display area.
z After playback is stopped, it will resume from the
stopped point the next time it is started.
z You can display quad screen images in single screens.
(JP. 12)
4
Ending playback
2 Press the [PLAY/STOP] button.
Playback ends.
Playing back an image near the point of
recording
The digital video recorder prioritizes recording
operations, so the playback image may freeze
temporarily.
3
4
To change the fast-forward speed
Press the [ ] button while fast-forwarding.
Press the button once to increase the speed to 15 times the playback speed,
twice to increase the speed to 30 times the playback speed, and 3 times to
increase the speed to 180 times the playback speed.
To change the fast-rewind speed
Press the [ ] button while rewinding.
Press the button once to increase the speed to 15 times the playback speed,
twice to increase the speed to 30 times the playback speed, and 3 times to
increase the speed to 180 times the playback speed.
Ending fast-forward/rewind
Press the [PLAY/STOP] button.
Normal playback starts.
Reverse
direction
Fast-forward
direction
180X
[PLAY/STOP] button
[STILL] button
-7.5X
-15X
-30X
()
Playback
(still image)
[PLAY/STOP] button
()
30X
15X
7.5X
[STILL] button
-180X
English 17
Page 19

NORMAL RECORDING/TIMER RECORDING PLAYBACK5
Viewing still images
[STILL] button
1
During playback, press the [STILL] button.
The image becomes a still image (freezes).
appears in the operation display area.
Still symbol
HI A
20 - 05 - 03 08 : 40 : 58
1
3
To resume playback
2 Press the [STILL] button.
Slow reverse playback
Press the [ ] button for at least 2 seconds while
a still image is displayed.
The playback speed slows to 1/8 the normal speed.
Pressing the [ ] button again switches the playback
speed to 1/4 the normal speed.
Pressing the button twice switches the playback speed to
1/2 the normal speed.
Reverse slow
direction
[STILL] button
Slow
direction
1/2
OPERATION
1/4
Press for at
least 2 seconds
2
-1/8
-1/4
-1/2
4
To playback audio
Follow the steps below to turn the audio ON or OFF, or
switch the audio channels.
CHANNEL indicators
With still image
display
[STILL] button
1/8
Press for at
least 2 seconds
Frame advance (reverse)
[ ] button
[ ] button [STILL] button
Press the [ ] button while a still image is
displayed.
The still image advances by one frame.
Press the [ ] button while a still image is
displayed.
The still image moves back three frames.
Slow playback
Press the [ ] button for at least 2 seconds while
a still image is displayed.
The playback speed slows to 1/8 the normal speed.
Pressing the [ ] button again switches the playback
speed to 1/4 the normal speed.
Pressing the button twice switches the playback speed to
1/2 the normal speed.
[AUDIO] button
1 Press the [AUDIO] button.
The [AUDIO] button flashes during audio settings mode.
Each time you press the button, the audio channels switch
as shown below.
The channel indicator lights when that channel is playing
back.
Normal screen
CH1+CH2 CH3+CH4
Playback screen
CH1+CH2 CH3+CH4
AUTO
z On the playback, you cannot playback audio from one
specific channel.
CH1 CH2
CH3CH4OFFAUTO
OFF
18 English
Page 20

6 SEARCHING FOR RECORDED IMAGES
Images recorded on the hard disk can be searched and
played back. There are two search methods available.
Image to search
1
3
Search in <SEARCH> screen
(1)
(2)
z You can use the button operations to freeze, fast-
forward or perform other operations on retrieved
images being played back.
Alarm search
Lets you search and play back all the alarm images on the
hard disk.
[ ] button [ ] button
2
4
[ ] button[SEARCH] button
1 Press the [SEARCH] button while the
digital video recorder is recording or
stopped.
The <SEARCH> screen is displayed.
(1) ALARM SEARCH
Lets you search and play back alarm images from the
recording list.
(2) TIME/DATE SEARCH (JP. 20)
Lets you search and play back recorded images by
date/time.
2 Check that “ALARM SEARCH” is
selected, and press the [ ] button.
The <SEARCH> screen is displayed.
(2)
(3)
(5)
(1)
(1) NO:
Displays the alarm number.
(2) CH:
Displays the channels of the images that contain
alarms.
(3) DATE/TIME:
Displays the date/time at which the alarm was
received and the image recorded.
(4) TOTAL ALARMS:
Displays the total number of recorded alarm images.
(5) Preview screen:
The selected alarm image is displayed in the quad
screen. (Unselected channels are masked.)
(4)
English 19
Page 21

SEARCHING FOR RECORDED IMAGES6
3 Press the [ ] or [ ] button to select
the image to play back.
The selected alarm image is displayed in the preview
screen. You can display up to 8 alarm images.
z To display the next (previous) image
Press the [ ] or [ ] button.
z To display the items on the next page
Press the [MENU] button. The next 8 items are
displayed chronologically.
z To end search mode
Press the [EXIT/OSD] button.
4 Press the [ ] button.
The image is played back
on the full screen.
Follow the steps below to display an alarm
image by entering the alarm No. directly.
HI A
20 - 0 5 - 03 08 : 30 : 35 AL 00015
3 Press the [SEARCH] button.
The “ALARM NO” input
screen is displayed.
The cursor is positioned in
the input field.
OPERATION
4 Enter the alarm number of the desired
image.
“AVAILABLE NO” indicates the numbers that can be
searched. Enter the approximate number of the desired
image.
Press the [ ] and [ ] buttons to change the number.
Press the [ ] button to move the cursor.
3
5 Press the [ ] button.
The page with the input ALARM No. is displayed.
1 Press the [SEARCH] button while the
digital video recorder is recording or
stopped.
The <SEARCH> screen is displayed.
2 Check that “ALARM SEARCH” is
selected, and press the [ ] button.
The <SEARCH> screen is displayed.
Date/time search
Follow the steps below to play back an image recorded on
the hard disk by specifying its date and time.
[ ] button [ ] button
[ ] button[SEARCH] button
1 Press the [SEARCH] button while the
digital video recorder is recording or
stopped.
The <SEARCH> screen is displayed.
2 Press the [ ] or [ ] button to select
“TIME/DATE SEARCH”.
20 English
Page 22

SEARCHING FOR RECORDED IMAGES6
3 Press the [ ] button.
The <TIME/DATE SEARCH> screen is displayed.
The cursor is positioned on the date and time item.
(1)
(2)
(3)
(4)
(5)
(1) RECORDING TOP:
Displays the date/time of the image recorded first.
(2) RECORDING END:
Displays the date/time of the image recorded last
(latest image).
(3) SEARCH:
Enter the date/time of the image to play back.
(4) PREVIEW:
Select this item to display the preview screen.
(5) VIEW:
Select this item to playback the image on the quad
screen.
4 Press the [ ] button, and set the date/
time to search.
Example: To search for the image from 26
October 2003 20:00
5 Press the [ ] button.
z If no image exists for the specified time
The newest image for the selected time is displayed.
z To end search mode
Press the [EXIT/OSD] button.
6 Press the [ ] button to select “VIEW”,
then press the [ ] button.
The preview screen image is played back in the quad
screen.
HI A
26-10 - 03 20 : 00 : 00
1
3
2
4
(1)
(2) (3) (4) (5)
(1) Press the [ ] or [ ] button to select “26” (the day).
(2) Press the [ ] button, and then the [ ] or [ ] button
to select “10” (the month).
(3) Press the [ ] button, then the [ ] or [ ] button to
select “03” (the year).
(4) Press the [ ] button, and then the [ ] or [ ] button
to select “20” (the hour).
(5) Press the [ ] button to select “00” (the minute), then
press the [ ] button.
The cursor moves to PREVIEW.
z The retrieved image can be displayed in the quad
screen format without displaying the preview screen by
entering the date and time, and selecting “VIEW.”
z You can use the button operations to freeze, fast-
forward or perform other operations on retrieved
images being played back.
z You can display quad screen images in single screens.
(JP. 12)
English 21
Page 23

7
Follow the steps below to set the key lock function,
preventing accidental pressing of the operation buttons.
PREVENTING ACCIDENTAL OPERATION (KEY LOCK FUNCTION)
Setting the key lock function
1 With the digital video recorder
recording or stopped, press the [ ]
button for about 3 seconds.
LOCK/REMOTE indicator
OPERATION
[] button
When the key lock is set, a confirmation tone sounds, and
the LOCK/REMOTE indicator lights.
z The key lock setting is not released at power OFF.
z You cannot set the key lock during playback.
Releasing the key lock function
1 With the key lock function set, press the
[ ] button for about 3 seconds.
When the key lock is released, a confirmation tone
sounds, and the LOCK/REMOTE indicator turns off.
z When the key lock function has been set, the buttons
cannot be used for settings or operations.
z When the security lock is set, you cannot set the key
lock alone.
z If you have already set the security lock, the password
entry screen is displayed. (JP. 44)
22 English
Page 24

MENU CONFIGURATION AND OPERATIONS
This section describes the menu configuration, and which
menu item to select for each operation.
Displaying menu screens and setting
screens
[MENU] button
[ ] button
[] button[EXIT/OSD] button
[ ] button
[ ] button
1 Press the [MENU] button.
The <MAIN MENU> screen is displayed.
To exit a menu screen
4 Press the [EXIT/OSD] button.
The display returns to the normal screen.
z You can display the menu screen during recording, but
not during playback.
z Press the [ ] button to return to the menu screen from
the sub-menu screen.
z You cannot change menu settings while recording.
Changing settings
Use the [ ], [ ], [ ] and [ ] buttons to change settings
in setting screens.
(2)
(3)
(1)
2 Press the [ ] or [ ] button to select
the desired sub-menu or setting screen.
(Example: Selecting “5. BUZZER SET”)
When you move the cursor, the selected item is displayed
in reverse.
3 Press the [ ] button.
The selected sub-menu or setting screen is displayed.
The cursor is positioned on the first setting item.
For some sub-menus, lower-level menus can be selected.
(1) To move the cursor up/down
Press the [ ] or [ ] button.
(2) To move the cursor right or to a setting item
Press the [ ] or [ ] button.
(3) To change a setting value
Press the [ ] or [ ] button.
To restore menu setting items to their
initial values
Follow the steps below to restore the settings in the
displayed setting screen to their initial values. Only the
displayed settings are restored.
1 Display the desired setting screen.
2 Press the [MENU RESET] button.
The displayed settings are restored to their initial values.
English 23
[MENU RESET] button
Page 25

MENU CONFIGURATION AND OPERATIONS
Overview of sub-menus
The screens below are the sub-menu screens or setting
screens displayed by selecting items from the <MAIN
MENU> screen.
Each time you press the [MENU] button, each of the
screens shown on this page is displayed in the order
shown.
1. LANGUAGE/CLOCK SET (JP. 25)
Enables the following
settings:
z
Screen display language
z
Digital video recorder’s
date and time settings
z
Summer time settings
z
Time synchronization
with external devices
2. SCREEN SET MENU (JP. 28)
Lets you make the
following screen-related
settings:
z
Screen display method
z
Camera titles Nos.
z
Motion sensor for
detecting moving
subjects
5. BUZZER SET (JP. 41)
Lets you enable or
disable alarms for
various events.
6. SECURITY LOCK SET (JP. 42)
Lets you set passwords
to prevent unauthorized
users from operating the
digital video recorder.
SETTINGS
7. RS-485/NETWORK SET (JP. 45)
Used to make the
settings needed when
connecting the digital
video recorder to an
external device by
RS-485 interface, or to a
PC via a network (LAN).
3. RECORDER MENU (JP. 32)
Lets you make various
recording settings, and
initialize the hard disk.
4. DISPLAY SET (JP. 40)
Lets you display or hide
items of information in
the operation display
area.
8. POWER FAILURE/USED TIME (JP. 47)
Lets you check the date/
time of power failures
and the amount of hard
disk operation time.
9. MENU UPLOAD/DOWNLOAD (JP. 48)
Lets you save menu
setting values onto a
CompactFlash card. Also
lets you read menu
setting values saved on
CompactFlash cards.
Formats CompactFlash
cards.
24 English
Page 26

1 LANGUAGE/CLOCK SET
<MAIN MENU>
You can perform the following functions:
z Change the language used to display on screen
information.*
z Set the date and time displayed on the normal screen.*
z Set the clock to adjust automatically for summer time.
z Set all the devices to the same time automatically when
multiple devices are connected.
* See P. 13.
<SUMMER TIME> settings
[ ] button[MENU] button [ ] button
3 Press the [ ] or [ ] button to select
“MODE” under <SUMMER TIME>.
4 Press the [ ] button.
“NO USE” flashes.
[] button[EXIT/OSD] button
1 Press the [MENU] button.
The [MENU] button lights, and the <MAIN MENU> screen
is displayed.
2 Select “1. LANGUAGE/CLOCK SET”,
and press the [ ] button.
The < /LANGUAGE> screen is displayed with the
cursor positioned on “ENGLISH”.
5 Press the [ ] or [ ] button to change
the setting.
[Settings] ( indicates default setting.)
Setting Description
USE Time is automatically adjusted to summer time.
NO USE
Time is not automatically adjusted to summer
time.
6 Press the [ ] button.
The cursor moves to the date/time at which to switch from
standard time to summer time.
English 25
Page 27

LANGUAGE/CLOCK SET1
When “USE” is selected for “MODE” under
<SUMMER TIME>.
You can set the date/time at which the time is switched
from standard time to summer time, and the date/time at
which the time is switched back again.
The example below is the default value.
Example:
After the clock display reaches 30 March 2003,
01:59, the next clock display is 03:00, putting the
clock an hour ahead (summer time).
After the clock display reaches 26 October 2003,
01:59, the next clock display is 01:00, putting the
clock an hour behind (back to standard time).
(1) (3) (4)
(5) (7) (8)
(1) Sets the week for switching to summer time.
(2) Sets the day of the week.
(3) Sets the month.
(4) Sets the time.
(5) Sets the week for ending summer time.
(6) Sets the day of the week.
(7) Sets the month.
(8) Sets the time.
(2)
(6)
7 Press the [ ] button.
The cursor moves to “LST“.
<EXT.CLOCK SET> settings
This section describes how to have the time synchronized
automatically when two or more digital video recorders are
connected. If you set the <EXT.CLOCK SET> time to 5:00,
all the connected devices are synchronized to the same
time (to the nearest second) every day at 5:00.
(Default setting: 01:00)
1 Use a cable to connect the CLOCK ADJ
OUT terminal on the rear panel of one
digital video recorder to the CLOCK
ADJ IN terminal on the second digital
video recorder.
To 3rd DVR
j
h
789
10 11 12 13 14 15 16 17 18 19
1st DVR 2nd DVR
Terminal No.
6: CLOCK ADJ IN
7: CLOCK ADJ OUT
8: COMMON
z Do not use a loop connection.
6789
10 11 12 13 14 15 16 17 18 19
2 Press the [ ] and [ ] button to move
the cursor to “ADJUST. TIME”.
SETTINGS
8 Press the [ ] and [ ] buttons to select
the desired week, then press the [ ]
button.
The cursor moves to the day of the week.
9 Press the [ ] and [ ] buttons to select
the desired day of the week, then press
the [ ] button.
The cursor moves to “MONTH”.
10 Press the [ ] and [ ] buttons to select
the desired month, then press the [ ]
button.
The cursor moves to “TIME”.
11 Press the [ ] and [ ] buttons to select
the desired time, then press the [ ]
button.
The cursor moves to the minutes portion of the time.
Set the desired minutes in the same manner.
The <SUMMER TIME> settings are now finished.
3 Press the [ ] button.
“01” flashes.
4 Press the [ ] and [ ] button to select
the desired time, then press the [ ]
button.
Set the time
26 English
Page 28

LANGUAGE/CLOCK SET1
5 Press the [EXIT/OSD] button.
The display returns to the normal screen.
6 Repeat procedures 2 to 5 to set the time
on the second digital video recorder.
When you have finished making the settings, the display
returns to the normal screen.
When the digital video recorder is connected to a PC or
other external device through a network, you can also set
the time from that device. When connected to a PC, see
the instructions for the VA-SW804/VA-SW80LITE
application software.
To network
PC
SWITCHING
HUB
DVR
SWITCHING
HUB
SWITCHING
HUB
DVR DVR
SWITCHING
HUB
DVR
z Subsequent digital video recorders must be
synchronized with the first unit for “ADJUST. TIME.”
z Do not use a loop connection.
SWITCHING
HUB
English 27
Page 29

2 SCREEN SET MENU
<MAIN MENU> <SUB MENU>
Screen settings
MONITOR SET
z “SEQUENCE” is used to set the time interval used for
switching screens when displaying the image from each
channel sequentially.
HI A
20- 05 - 03 08 : 30 : 35 AL 00015
1
2
3
4
z “DISPLAY” setting is used when an alarm is generated.
It sets whether to display the image from the channel
that generated the alarm on a single screen, or whether
to display on the quad screen.
HI A
20-05 - 03 08 : 30 : 35 AL 00015
1
3
2
4
z “ALARM PRIORITY” sets the display method for alarm
recording screens when an alarm is generated on
another channel during alarm recording.
Example 1: Displays screens in order of alarms.
HI A
20-05 - 03 08 : 30 : 35 AL 00015
HI A
20-05 - 03 08 : 30 : 35 AL 00015
HI A
20- 05 -03 08 : 30: 35 AL 00015
1
Example 2: Displays alarm recordings on the single
screen sequentially.
HI A
20-05 - 03 08 : 30 : 35 AL 00015
1
3
2
4
HI A
20- 05 - 03 08 : 30 : 35 AL 00015
2
z “MASK SET” is used to hide the monitor display of
some channel images in the normal screen and
playback screen.
12
TITLE SET
z Lets you set titles for camera Nos.
HI A
20 - 05 - 03 08 : 30 : 35 AL 00015
Set camera title
FLOOR 1 2
MOTION SENSOR SET
z If the motion sensor is set on the monitor, enables
alarm recording when a moving subject is detected.
SETTINGS
3
43
1
2
Example of set
2
3
4
3
motion sensor
28 English
Page 30

SCREEN SET MENU2
MONITOR SET
[ ] button[MENU] button [ ] button
[] button[EXIT/OSD] button
1 Press the [MENU] button.
The [MENU] button lights, and the <MAIN MENU> screen
is displayed.
2 Select “2. SCREEN SET MENU”, and
press the [ ] button.
The <SCREEN SET MENU> screen is displayed.
Item Setting Description
LAST
ALARM
(3)
PRIORITY
MASK SET
(4)
CH1/2/3/4
z “ALARM PRIORITY” settings are active only when the
“DISPLAY” settings are “FULL.”
FIRST
SWITCH
ON Masks image and sound of set channel.
OFF Plays image and sound.
Displays alarm images in order starting
with the most recent when multiple
alarms are generated.
Displays the first alarm image only
when multiple alarms are generated.
Flashes through alarm images in one
second intervals when multiple alarms
are generated.
5 Press the [ ] or [ ] buttons to change
the setting, then press the [ ] button.
3 Select “1. MONITOR SET”, and press
the [ ] button.
The <MONITOR SET> screen is displayed.
4 Press the [ ] or [ ] buttons to select
the desired item, then press the [ ]
button.
(1)
(2)
(3)
(4)
[Settings] ( indicates default setting.)
Item Setting Description
1 to 30
(1) SEQUENCE
(2) DISPLAY
seconds
(1 second
units)
1SEC
FULL
QUAD
Sets time interval used for switching
screens when displaying image from
each channel sequentially.
When alarm occurs, displays image
from channel that generated alarm in
single screen.
When alarm occurs, displays images in
quad screen.
6 Repeat procedures 4 to 5 to set other
items as needed.
7 When you have finished making the
settings, press the [EXIT/OSD] button.
The display returns to the normal screen.
Camera title setting
Camera titles can be up to 10 characters in length.
You can enter the following characters and symbols: 0 to
9, A to Z, - (hyphen), : (colon), . (period), / (slash), *
(asterisk), _ (underbar), (space)
[MENU] button
[ ] button[CHANNEL] buttons [ ] button
[ ] button [EXIT/OSD] button
1 Press the [MENU] button.
The [MENU] button lights, and the <MAIN MENU> screen
is displayed.
English 29
Page 31

SCREEN SET MENU2
2 Select “2. SCREEN SET MENU”, and
Input example: “FLOOR 1”
press the [ ] button.
The <SCREEN SET MENU> screen is displayed.
7 Press the [ ] button.
The characters are entered, and the cursor moves to the
right.
3 Select “2. TITLE SET”, and press the [ ]
button.
The <CAMERA NO.1> screen is displayed.
Camera No.
The default values are shown below.
CAMERA No. Default value
CAMERA NO.1 1
CAMERA NO.2 2
CAMERA NO.3 3
CAMERA NO.4 4
4 Press the desired [CHANNEL] button to
select the desired camera No.
12
34
HI A
20-05- 03 08 : 30: 35 AL 00015
1
No.2No.1
2
8 Repeat procedures 6 to 7 to enter the
second and subsequent charactors.
9 When you have finished making the
settings, press the [EXIT/OSD] button.
The display returns to the normal screen.
The screen displays the set camera title.
Set camera title
Setting the motion sensor
HI A
20 - 05 - 03 08 : 30 : 35 AL 00015
FLOOR 1 2
SETTINGS
No.3 No.4
3
5 Press the [ ] button to make “
4
” flash.
6 Press the [ ] or [ ] button to start
entering the camera title.
You can enter up to 10 characters/symbols.
Each time you press the [ ] or [ ] button, the display
toggles as follows:
AZ
(space)
9
0
/
*
-
:
.
By setting the motion sensor on the monitor, any
movement by the subject will automatically activate alarm
recording.
You can set the following items:
z Motion detection position on screen
z No. of camera for which to set motion sensor
z Motion sensor level (Default setting is OFF.)
[MENU] button
[ ] button[CHANNEL] buttons [ ] button
[ ] button
[ ] button [EXIT/OSD] button
1 Press the [MENU] button.
The [MENU] button lights, and the <MAIN MENU> screen
is displayed.
30 English
Page 32

SCREEN SET MENU2
2 Select “2. SCREEN SET MENU”, and
press the [ ] button.
The <SCREEN SET MENU> screen is displayed.
6 Press the [ ] or [ ] button to select a
sensor operation position, then press
the [ ] or [ ] button to set the
selection (you can set up to 20
positions).
You can set sensor operation positions at any screen position.
z Moving the cursor
3 Select “3. MOTION SENSOR SET”, and
press the [ ] button.
The motion sensor setting screen for camera No. 1
appears.
Displays current
camera number
4 Press the desired [CHANNEL] button to
select the desired camera No.
12
34
No.3 No.4
HI A
20-05- 03 08 : 30: 35 AL 00015
1
3
No.2No.1
2
4
Each time you press the [ ] button, the cursor moves from
left to right in the top row. After the cursor has reached the
end of the row, it moves from left to right in the row below.
You can press the [ ] button to move the cursor in the
opposite direction.
Pressing and holding the [ ] or [ ] button moves the
cursor as follows:
z Setting sensor operation positions
Pressing the [ ] or [ ] button once enables the currently
selected position to set (displays
[ ] button again disables the setting (displays –).
Setting example
Set sensor positionLEVEL
). Pressing the [ ] or
5 Press the [ ] or [ ] button to select
“LEVEL,” then press the [ ] or [ ]
button to set the sensitivity.
The level can be set to a value between 1 and 10. The
lower the value, the higher the sensitivity. (Default setting:
OFF)
z A confirmation tone sounds when making sensor
settings.
z Operation position setting example
If you set an area near the centre of the image, the
sensor operates and recording starts when a moving
subject near the centre of the screen is detected.
7 When you have finished making the
settings, press the [EXIT/OSD] button.
The display returns to the normal screen.
z To activate alarm recording when the motion sensor
detects movement, display the <RECORD MENU>, and
set the “ALARM TRIGGER” in “ALARM REC MODE
SET” to “SENSOR.” (JP. 34)
English 31
Page 33

3 RECORDER MENU
10 11 12 13
10 11 12 13
<MAIN MENU> <SUB MENU>
Setting items
The <RECORDER MENU> screen lets you make the
following recording-related settings:
Item Description
z Changes the recording image quality.
z Turns audio recording ON/OFF.
z Sets whether to stop recording or to
record over previously recorded images,
REC MODE
1
SET
ALARM REC
2
MODE SET
AUDIO REC
3
LEVEL SET
TIMER REC
4
SET
5 HOLIDAY SET Lets you set specific work days as holidays.
6 HDD SET
To record in series when multiple digital video
recorders are connected
when the hard disk becomes full.
z When multiple digital video recorders
are connected, sets recording to
continue automatically on the second
and subsequent hard disks when the
first hard disk becomes full.
z Turns alarm recording ON/OFF.
z Sets the amount of time to record for
when an alarm is generated.
z Sets alarm trigger
z Sets the operation to perform when the
camera image is interrupted.
Sets audio sensitivity level for each
channel. Set high value for high sensitivity.
Sets timer recording.
Initializes the hard disk, or used when
adding a hard disk.
[ ] button [ ] button
[ ] buttonFULL indicator
REC MODE SET
1 Press the [MENU] button.
The [MENU] button lights, and the <MAIN MENU> screen
is displayed.
SETTINGS
2 Select “3. RECORDER MENU”, and
press the [ ] button.
The <RECORDER MENU> screen is displayed, with the
cursor positioned on “1. REC MODE SET”.
3 Press the [ ] button.
THE <REC MODE SET> screen is displayed, with the
cursor positioned on “PICTURE QUALITY”.
4 Press the [ ] or [ ] buttons to select
the desired item, then press the [ ]
button.
(1)
Connect the control terminals by cables as shown below.
1st DVR 2nd DVR
Terminal No.
8: COMMON
9: SERIES REC IN
10: NON REC OUT/SERIES REC OUT
To 3rd
DVR
(2)
(3)
(4)
(5)
(6)
z “REC/PB TIME” changes automatically according to the
“PICTURE QUALITY” set.
32 English
Page 34

RECORDER MENU3
[Settings] ( indicates default setting.)
Item Setting Description
REC/PB
(1)
TIME
PICTURE
(2)
QUALITY
AUDIO
(3)
RECORDING
(4) OVER WRITE
DISK FULL
(5)
RESET
(6) SERIES REC
- Displays the possible recording time.
SUPER
(SUP)
HIGH
(HI)
STANDARD
(STD)
ON Performs audio recording.
OFF Doesn't perform audio recording.
ON
OFF
NO
YES
OFF Doesn't perform series recording.
-1M
-2M
-3M
Highest image quality.
Recording time: At least 84 hours (120
GB), or at least 168 hours (240 GB)
High image quality.
Recording time: At least 168 hours
(120 GB), or at least 336 hours (240
GB)
Standard image quality.
Recording time: At least 336 hours
(120 GB), or at least 672 hours (240
GB)
When the hard disk runs out of space,
recording automatically starts again
from the beginning, recording over
previously recorded images.
When the hard disk runs out of space,
the FULL indicator flashes and
recording stops.
Does not overwrite. The <WARNING>
screen is displayed, and “NO” flashes.
Images can be recorded over
previously recorded images once. The
<WARNING> screen is displayed.
Press the [ ] or [ ] button to select
“YES”.
When multiple digital video recorders
are connected, about 1 minute before
the first recorder's hard disk becomes
full, the second recorder's hard disk
starts recording.
When multiple digital video recorders
are connected, about 2 minutes before
the first recorder's hard disk becomes
full, the second recorder's hard disk
starts recording.
When multiple digital video recorders
are connected, about 3 minutes before
the first recorder's hard disk becomes
full, the second recorder's hard disk
starts recording.
* If the hard disk becomes full when item (4) OVER WRITE
is set to “OFF”, the operation performed is determined by
the setting of item (5) DISK FULL RESET. For how to set
this item, see “Resetting when the FULL indicator lights”
on the right.
* (6) SERIES REC can be set when the OVER WRITE is
set to “OFF”.
6 Repeat procedures 4 to 5 to set other
items as needed.
7 When you have finished making the
settings, press the [EXIT/OSD] button.
The display returns to the normal screen.
Resetting when the FULL indicator lights
When “OVER WRITE” is set to “OFF” and the hard disk
becomes full, the FULL indicator lights and recording
stops. To start recording again, follow the steps below to
overwrite recorded images.
[ ] button [ ] button
[ ] buttonFULL indicator
1 Display the <REC MODE SET> screen.
2 Press the [ ] or [ ] button to select
“DISK FULL RESET”, then press the [ ]
button.
The <WARNING> screen is displayed, with “NO” flashing.
5 Press the [ ] or [ ] button to change
the setting, then press the [ ] button.
English 33
3 Press the [ ] or [ ] button to select
“YES”, then press the [ ] button.
The normal screen is displayed, and the FULL indicator
turns off. The DVR is ready to record again.
Page 35

RECORDER MENU3
ALARM REC MODE SET
[] button[MENU] button [ ] button
[] button[EXIT/OSD] button
1 Press the [MENU] button.
The [MENU] button lights, and the <MAIN MENU> screen
is displayed.
2 Select “3. RECORDER MENU”, and
press the [ ] button.
The <RECORDER MENU> screen is displayed.
3 Press the [ ] or [ ] button to select
“2. ALARM REC MODE SET”, then press
the [ ] button.
The <ALARM REC MODE SET> screen is displayed, with
the cursor positioned on “ALARM MODE”.
(1)
(2)
(3)
(4)
SETTINGS
[Settings] ( indicates default setting.)
Item Setting Description
OFF Doesn't perform alarm recording.
ENABLED Always performs alarm recording, whether or not timer recording is being performed.
(1) ALARM MODE
ALARM
(2)
DURATION
ALARM
(3)
TRIGGER
(4) VIDEO LOSS
*CC: Operates while alarm is active. (Operates for more than 5 seconds per alarm.)
AL-REC ON TIMER Performs alarm recording only during timer recording.
AL-REC OFF TIMER Performs alarm recording only when timer recording is not being performed.
OLY AL-RC ON TMR
Time selections*: CC/5SEC/10SEC/20SEC()/40SEC/1MIN/2MIN/3MIN/4MIN/5MIN/10MIN/15MIN
Sets the amount of time for recording when a single alarm is generated.
Selects how to detect intruders.
ALARM
SENSOR
ALARM OR SENSOR Performs alarm recording when either the external alarm or motion sensor is activated.
ALARM AND SENSOR
ON
OFF Doesn't display “VIDEO LOSS” on the screen when the camera image is interrupted.
Performs alarm recording only for the amount of time set by the timer.
Doesn't return to timer recording standby.
Performs alarm recording when an external alarm is generated (when a switch is attached
to the alarm input terminal on the rear panel, and the switch is activated).
Performs alarm recording when the motion sensor detects movement. See the information
on setting the motion sensor. (JP. 30)
Performs alarm recording when both the external alarm and motion sensor are activated
simultaneously.
Displays “VIDEO LOSS” on the screen when the camera image is interrupted.
Also outputs the WARNING signal to a rear panel terminal.
34 English
Page 36

RECORDER MENU3
4 Press the [ ] or [ ] button to select
the desired item, then press the [ ]
button.
The setting flashes.
5 Press the [ ] or [ ] button to change
the setting, then press the [ ] button.
6 Repeat procedures 4 to 5 to set other
items as needed.
7 When you have finished making the
settings, press the [EXIT/OSD] button.
The display returns to the normal screen.
AUDIO REC LEVEL SET
1 Press the [MENU] button.
5 When you have finished making the
settings, press the [EXIT/OSD] button.
The display returns to the normal screen.
Timer recording settings
[] button[MENU] button [ ] button
[ ] button [EXIT/OSD] button[ ] button
Timer setting items
You can use the timer functions to set recording start/stop
times.
(1) (2) (3) (4)
The [MENU] button lights, and the <MAIN MENU> screen
is displayed.
2 Select “3. RECORDER MENU”, and
press the [ ] button.
The <RECORDER MENU> screen is displayed.
3 Press the [ ] or [ ] button to select
“3. AUDIO REC LEVEL SET”, then press
the [ ] button.
The <AUDIO REC LEVEL SET> screen is displayed.
4 Select the channel and change
sensitivity
Each time you press the [ ] button, the display switches
between possible channels. The sensitivity marks on the
screen flashes for the selected channel.
To increase level: Use the [ ] button.
To decrease level: Use the [ ] button.
(5)
You can set times at which to start and stop recording on
each specified day of the week.
(1) WEEK:
Used to select the days of the week for timer settings.
When each day in the “WEEK” column is flashing, it
can be set to other days. The lines 7 (initially “SAT”)
and 8 (initially “DLY”) are used for timer recording
settings spanning more than 24 hours.
(2) START:
Enter the time at which to start timer recording.
(3) STOP:
Enter the time at which to stop timer recording.
(4) SET:
Setting “ON” enables the entered timer recording
setting.
Setting “OFF” disables the entered timer recording
setting.
(5) SAT, DLY:
Use these lines for timer recording spanning more
than 24 hours.
z Many sensitivity marks indicate high sensitivity.
English 35
Page 37

RECORDER MENU3
Making timer reservations every day at the
same time with the same image quality
Example:
Making a timer recording every day from 8:30 to
18:30 with the same recording speed
1 Press the [MENU] button.
The [MENU] button lights, and the <MAIN MENU> screen
is displayed.
2 Select “3. RECORDER MENU”, and
press the [ ] button.
The <RECORDER MENU> screen is displayed, with the
cursor positioned on “1. REC MODE SET”.
6 Press the [ ] button to move the cursor
to the next item.
Each time you press the [ ] button, the cursor moves to
the following items:
Day J “START” time (hours, minutes) J “STOP” time
(hours, minutes) J “ON”/“OFF”
[ ] button
[ ] button
To change a displayed setting item
Press the [ ] or [ ] button to move the flashing area to
the item you want to change, then press the [ ] or [ ]
button to change the setting.
Timer recording image quality
The image quality is determined by the “PICTURE
QUALITY” setting in the <REC MODE SET> screen.
(JP. 33)
7 When finished making the settings,
press the [EXIT/OSD] button.
SETTINGS
3 Select “4. TIMER REC SET” and press
the [ ] button.
The <TIMER REC SET> screen is displayed.
4 Press the [ ] button once.
“SUN” under “WEEK” flashes.
5 Press the [ ] or [ ] button to change
“SUN” to “DLY”.
The display returns to the normal screen.
To set different recording times on each day of
the week
Set the desired recording times for each day.
If timer reservation days overlap
The timer reservation that starts first will have priority.
To cancel all set timer reservations
1 Press the [MENU] button.
The [MENU] button lights, and the <MAIN MENU> screen
is displayed.
2 Select “3. RECORDER MENU”, and
press the [ ] button.
The <RECORDER MENU> screen is displayed, with the
cursor positioned on “1. REC MODE SET”.
36 English
Page 38

RECORDER MENU3
3 Select “4. TIMER REC SET”, and press
the [ ] button.
The <TIMER REC SET> screen is displayed.
4 With the <TIMER REC SET> screen
displayed, press the [MENU RESET]
button.
All the timer settings are erased.
[MENU RESET] button
2 Set the items in the “WEEK” and
“START” columns.
(1) Press the [ ] or [ ] button to change “SAT” to
“MON”, then press the [ ] button.
(2) Press the [ ] or [ ] button to change “--” to “10”,
then press the [ ] button.
(3) Press the [ ] or [ ] button to change “--” to “30”,
then press the [ ] button.
3 Press the [ ] or [ ] button to change
the “STOP” time from “--:--” to “**:**”,
then press the [ ] button.
Setting timer reservations spanning more than
24 hours
Follow the steps below to set timer recordings spanning
more than 24 hours. These settings are made using lines 7
(initially “SAT”) and 8 (initially “DLY”) of the <TIMER REC
SET> screen.
Example:
Timer recording from 10:30 Monday to 20:30
Wednesday
1 Press the [ ] or [ ] button to move
the cursor to the line 7 (SAT), then press
the [ ] button.
“SAT” in the “WEEK” column flashes.
You can change the setting of the flashing item.
Line 7
The “DLY” item on the line 8 automatically changes to
“TUE” (8 days after “MON” on line 7), and flashes. Items
that don't need to be set are displayed as asterisks (*).
4 Set the end “WEEK” and “STOP” time.
Switch “SET” to “ON”.
(1) (2) (3) (4)
(1) Press the [ ] or [ ] button to change “TUE” to
“WED”, then press the [ ] button.
(2) Press the [ ] or [ ] button to change “--” to “20”,
then press the [ ] button.
(3) Press the [ ] or [ ] button to change “--” to “30”,
then press the [ ] button.
(4) Press the [ ] or [ ] button to change “OFF” to “ON”.
English 37
5 Press the [EXIT/OSD] button.
The display returns to the normal screen.
Page 39

RECORDER MENU3
Setting holidays
You can set specific dates as holidays, to have the timer
recording operation for Sunday used on th\ose days.
Dates such as national holidays and company off days
should be set as holidays when you want those dates to
have the same security as Sundays.
[Setting conditions]
After completing timer settings for Sunday (SUN), make
sure to switch “SET” to “ON”. (JP. 35)
Example: To set 17 November as a holiday
z You can set up to 20 days as holidays.
1 Press the [MENU] button.
The [MENU] button lights, and the <MAIN MENU> screen
is displayed.
2 Select “3. RECORDER MENU”, and
press the [ ] button.
The <RECORDER MENU> screen is displayed, with the
cursor positioned on “1. REC MODE SET”.
4 Set the month and day in item No. 1.
(1) Press the [ ] button to make “--” (the day) flash.
(2) Press the [ ] or [ ] button to set “--” to “17”.
(3) Press the [ ] button to make “--” (the month) flash.
(4) Press the [ ] or [ ] button to set “--” to “11”.
(the month)
(the day)
(No.)
5 After entering the setting, press the [ ]
button.
The cursor moves to “2”.
6 Repeat procedure 4 to set other
holidays as needed.
7 Press the [EXIT/OSD] button.
The display returns to the normal screen.
Initializing the hard disk/adding a hard
disk
This section describes how to initialize the hard disk or add
a hard disk.
[] button[MENU] button [ ] button
SETTINGS
3 Select “5. HOLIDAY SET”, and press the
[ ] button.
The <HOLIDAY SET> screen is displayed, with the cursor
positioned on “1”.
[] button[EXIT/OSD] button
Initializing the hard disk
1 Press the [MENU] button.
The [MENU] button lights, and the <MAIN MENU> screen
is displayed.
2 Select “3. RECORDER MENU”, and
press the [ ] button.
The <RECORDER MENU> screen is displayed, with the
cursor positioned on “1. REC MODE SET”.
38 English
Page 40

RECORDER MENU3
3 Press the [ ] or [ ] button to select
“6. HDD SET”, then press the [ ]
button.
The <HDD SET> screen is displayed, with the cursor
positioned on “DISK INITIALIZE”.
4 Press the [ ] button.
The <WARNING> screen is displayed, with “NO” flashing.
Adding a hard disk (120 GB model only)
To add a hard disk, contact a Sanyo service centre. When
adding a hard disk, use an add-on type hard disk unit (sold
separately).
[Setting conditions]
After adding a hard disk, be sure to initialize it. Note that
both hard disks will be initialized, and any data on the
original hard disk will be erased.
Hard disk setting screen
z MIRRORING: After adding a hard disk, you can
record the same image on both hard
disks by setting “MIRRORING” to “ON”.
If an image write error occurs on one
disk, you will still be able to read the
image from the other disk.
z Playback disk: When mirroring is set, the digital video
recorder automatically sets which of
the two hard disks to read the recorded
image from.
5 Press the [ ] or [ ] button to select
“YES”, then press the [ ] button.
The “HDD INITIALIZING!” screen is displayed, and the
hard disk is initialized.
When the process has finished, the display returns to the
MENU screen.
6 Press the [EXIT/OSD] button.
The display returns to the normal screen.
English 39
Page 41

4 DISPLAY SET
<MAIN MENU>
The <DISPLAY SET> screen lets you turn off the display
of the date, time or other information in the operation
display area of the playback screen. Use this screen to
make settings as needed.
<DISPLAY SET> screen setting items
(1)
(2)
(3)
(4)
Settings
[] button[MENU] button [ ] button
[] button[EXIT/OSD] button
1 Press the [MENU] button.
The [MENU] button lights, and the <MAIN MENU> screen
is displayed.
2 Select “4. DISPLAY SET”, and press the
[ ] button.
The <DISPLAY SET> screen is displayed.
SETTINGS
REC H I A
20 - 05 - 03 08 : 30 :35 AL 00015
(1)
(4)
[Settings] ( indicates default setting.)
Item Setting Description
Turns on display of date/time in
operation display area.
Turns off display of date/time in
OFF
operation display area.
Turns on display of image quality and
“A” for audio recording in operation
display area.
Turns off display of image quality and
OFF
“A” for audio recording in operation
display area.
Turns on display of current alarm
count in operation display area.
Turns off display of current alarm
OFF
count in operation display area.
Turns on display of camera title on
the screen.
Turns off display of camera title on
OFF
the screen.
(1)
(2)
(3)
(4)
DATE/
TIME
QUALITY/
AUDIO
ALARM
COUNT
CAMERA
TITLE
ON
ON
ON
ON
(2) (3)
1
3
2
3 Press the [ ] or [ ] buttons to select
the desired function, then press the [ ]
button.
4
The setting flashes.
4 Press the [ ] or [ ] buttons to change
the setting, then press the [ ] button.
5 Repeat procedures 3 to 4 to set other
functions as needed.
6 When you have finished making the
settings, press the [EXIT/OSD] button.
The display returns to the normal screen.
40 English
Page 42

5 BUZZER SET
<MAIN MENU>
The <BUZZER SET> screen lets you set a warning buzzer
to sound when events occur such as alarms being
generated or the remaining hard disk space reaching zero.
Use this screen to make settings as needed.
<BUZZER SET> screen setting items
(1)
(2)
(3)
(4)
(5)
z Press any button to stop the BUZZER sounding.
Settings
[] button[MENU] button [ ] button
[] button[EXIT/OSD] button
1 Press the [MENU] button.
The [MENU] button lights, and the <MAIN MENU> screen
is displayed.
2 Select “5. BUZZER SET”, and press the
[ ] button.
The <BUZZER SET> screen is displayed.
[Settings] ( indicates default setting.)
Item Setting Description
ON
(1) ALARM ON
ON
(2) DISK FULL
(3) KEY IN
OFF
ON
(4) WARNING
(5) NON REC
OFF
Sounds buzzer when alarm is
generated.
Doesn't sound buzzer when alarm is
OFF
generated.
When “OVER WRITE” is not set,
sounds buzzer when remaining hard
disk space reaches zero.
When “OVER WRITE” is not set,
doesn't sound buzzer when
OFF
remaining hard disk space reaches
zero.
Sounds buzzer when operation
ON
button is pressed.
Doesn't sound buzzer when
operation button is pressed.
Sounds buzzer in following cases:
z Hard disk drive error
z Fan error z Recording error
Doesn't sound buzzer in following
cases:
OFF
z Hard disk drive error
z Fan error z Recording error
Sounds buzzer when recording is
ON
stopped.
Does not sound buzzer when
recording is stopped.
3 Press the [ ] or [ ] buttons to select
the desired function, then press the [ ]
button.
The setting flashes.
4 Press the [ ] or [ ] buttons to change
the setting, then press the [ ] button.
5 Repeat procedures 3 to 4 to set other
functions as needed.
6 When you have finished making the
settings, press the [EXIT/OSD] button.
The display returns to the normal screen.
English 41
Page 43

6 SECURITY LOCK SET
<MAIN MENU>
You can set passwords that restrict use of the digital video
recorder to administrators and designated users,
preventing unauthorized operation. When the security lock
is set, a buzzer sounds when an unauthorized user
presses any of the digital video recorder’s operation
buttons. Be sure to make a note of the set passwords.
Password setting example
Two password types can be set, one for administrators
and one for users. The table below gives example
password setting combinations, and lists how the digital
video recorder operates for each.
Setting example Operation
LEVEL PASSWORD (4-8) USE
ADMIN 123456AB ON
USER AB123456 ON
REC CONTROL : ADMIN
ADMIN 123456AB ON
USER AB123456 ON
REC CONTROL : USER
ADMIN 123456AB ON
USER -------- OFF
REC CONTROL : ADMIN
ADMIN 123456AB ON
USER -------- OFF
REC CONTROL : USER
ADMIN -------- OFF
USER -------- OFF
REC CONTROL : ADMIN
ADMIN -------- OFF
USER -------- OFF
REC CONTROL : USER
All operations are locked until you enter
a password.
Enter the user password to enable
playback operations.
Enter the administrator password to
enable all operations.
All operations are locked until you enter
a password.
Enter the user password to enable
playback and recording operations.
Enter the administrator password to
enable all operations.
Only playback operations enabled
unless password is entered.
Enter the administrator password to
enable all operations.
Only playback and recording
operations enabled unless password is
entered.
Enter the administrator password to
enable all operations.
All operations enabled. Also functions
as key lock. (JP. 22)
All operations enabled. Also functions
as key lock. (JP. 22)
<SECURITY LOCK SET> screen
setting items
<SUB MENU>
(1)
(2)
(3)
[Settings] ( indicates default setting.)
Item Setting Description
Used to set password for administrators. Also
ON
(1) ADMIN
(2) USER
REC
(3)
CONTROL
OFF Disables password setting.
OFF Disables password setting.
ADMIN
enables password setting.
Used to set password for users. Also enables
ON
password setting.
Sets authorization for recording operation to
“ADMIN” (administrators).
Sets authorization for recording operation to
USER
“USER” (users).
Setting passwords
[ ] button[MENU] button [ ] button
[] button[EXIT/OSD] button
Passwords can be between 4 and 8 alphanumeric
characters.
Characters that can be entered in passwords: 0 to 9, A to Z
Example: Setting “123456AB” as a password
1 Press the [MENU] button.
The [MENU] button lights, and the <MAIN MENU> screen
is displayed.
2 Select “6. SECURITY LOCK SET”, and
press the [ ] button.
The <SECURITY LOCK SET> screen is displayed.
The cursor is positioned on “ADMIN”.
SETTINGS
z “LEVEL PASSWORD (4-8) USE” at the top of the
screen is the screen title. You cannot move the cursor
to this item.
42 English
Page 44

SECURITY LOCK SET6
3 Press the [ ] button.
The first password entry bar “-” flashes.
4 Press the [ ] and [ ] buttons to select
the character to enter.
Example:
Selecting “1”
5 Press the [ ] button.
The second password entry bar flashes.
6 Repeat procedures 4 to 5 to enter the
remaining digits (“23456AB” in this
example).
Setting the user password
Example: Setting “AB123456”
Perform Steps 1 and 2 on P. 42
3 Press the [ ] and [ ] buttons to move
the cursor to “USER”.
4 Press the [ ] button.
The first password entry bar “-” flashes.
Example: A
Press the [ ] and [ ] buttons to select “A”.
z To set a 4-digit password
When you have entered four digits, and the fifth
password entry bar is flashing, press the [ ] button.
7 When you have entered the password,
press the [ ] button.
The cursor moves to “OFF” (flashing).
8 Press the [ ] and [ ] buttons to select
“ON”.
z If you select “OFF” for the “ADMIN” setting, you cannot
set the “USER” password.
9 When you have finished making the
setting, press the [ ] button.
The cursor moves to
“USER”.
If you do not want to set
a user password, the
password setting is now
finished.
Press the
button to move the cursor to “REC CONTROL”, to set the
authorization for recording and playback operation. (
[] and []
J
P. 44)
5 Press the [ ] button.
The second password entry bar flashes.
Press the
Use the procedures as “Administrator password” to set
“123456.”
[] and [] buttons to select “B”.
6 When you have finished making the
setting, press the [ ] button.
The cursor moves to “OFF” (which flashes).
7 Press the [ ] and [ ] buttons to select
“ON”, then press the [ ] button.
The cursor moves to “REC CONTROL”.
English 43
Page 45

SECURITY LOCK SET6
Setting the authorization for recording
and playback operations
[ ] button[MENU] button [ ] button
[] button[EXIT/OSD] button
Perform Steps 1 and 2 on P. 42
3 Press the [ ] and [ ] buttons to move
the cursor to “REC CONTROL”.
Setting the security lock
[ ] button[MENU] button [ ] button
LOCK/REMOTE indicator
[ ] button [EXIT/OSD] button
1 With the normal monitoring screen
displayed, press the [ ] button for
about 3 seconds.
A confirmation tone sounds, the LOCK/REMOTE indicator
lights, and the security lock is set.
2 To check the security lock, press any
button.
The password entry screen is displayed for about 5
seconds.
SETTINGS
4 Press the [ ] button.
5 Press thee [ ] and [ ] buttons to
select “ADMIN” or “USER”.
The setting is now finished.
6 Press the [EXIT/OSD] button.
The display returns to the normal screen.
3 While the password entry screen is
displayed, enter the password.
Enter the password using the [ ], [ ] and [ ] buttons.
z Enter the password set for administrators or users
(such as “123456AB”).
4 Press the [ ] button.
The setting is now finished.
The LOCK/REMOTE indicator turns off, and the display
returns to the normal screen.
44 English
Page 46

7 RS-485/NETWORK SET
This section describes how to make the RS-485 terminal
connections/settings needed to connect to an external
device, and how to make the network connections needed
to connect to a PC.
Network connections and settings
You can make digital video recorder menu settings and
monitor images from a PC via a network (LAN). To do so,
connect an Ethernet cable to the LAN terminal on the
digital video recorder’s rear panel.
z To connect a PC directly
(Do not use an Ethernet hub.)
CCTV Camera
Cross-cable
Settings for connecting to a PC or network
How to set the IP address
In the default setting, the IP address is set automatically by
the PC.
To set the IP address manually, follow the procedures
below.
[ ] button[MENU] button [ ] button
[] button[EXIT/OSD] button
1 Press the [MENU] button.
The [MENU] button lights, and the <MAIN MENU> screen
is displayed.
2 Select “7. RS-485/NETWORK SET”, and
press the [ ] button.
The <NETWORK SET> screen is displayed.
z To connect to an intranet
(Use an Ethernet hub.)
CCTV Camera
Straight-cable
SWITCHING HUB
PC
PC
PC
DVR
DVR
DVR
(1)
(3)
[Settings] ( indicates default setting.)
Item Setting Description
AUTO Automatically set by the PC.
IP
(1)
ADDRESS
(2) ADDRESS
DVR NAME
(3)
(Display only)
MANUAL
001 to 250
(250)
You can set the last 3 digits
between 1 and 250 from the
unit.
In “AUTO,” the address set by
the PC is displayed.
In “MANUAL,” set the address
for each recorder connected.
Set at the PC.
(2)
3 Press the [ ] and [ ] buttons to select
the “IP ADDRESS” item, then press the
[ ] button.
“AUTO” flashes.
English 45
Page 47

RS-485/NETWORK SET7
4 Press the [ ] and [ ] buttons to select
“MANUAL,” then press the [ ] button
twice.
The last 3 digits of the address flash.
5 Press the [ ] and [ ] buttons to
change the setting, then press the [ ]
button.
The cursor moves to “DATA SPEED”.
6 When you have finished making the
settings, press the [EXIT/OSD] button.
RS-485 connections and settings
Connect the digital video recorder’s RS-485 (A, B) control
terminals to the system controller, hard disk digital
recorder or similar device.
RS-485A
RS-485B
C
1 Press the [MENU] button.
The [MENU] button lights, and the <MAIN MENU> screen
is displayed.
2 Select “7. RS-485/NETWORK SET”, and
press the [ ] button.
The <RS-485 SET> screen is displayed.
(1)
(2)
(3)
(4)
[Settings] ( indicates default setting.)
Item Setting Description
DATA
(1)
SPEED
STATUS
(2)
INFO
ALARM
(3)
INFO
(4) ADDRESS
2400
4800
9600
19200
ON
OFF Not set
ON
OFF Not set
000 to 127
(001)
Used to select the
communication speed.
(Unit: bps)
Enables status information to be
sent on the RS-485 line.
Enables alarm information to be
sent on the RS-485 line.
When connecting multiple
recorders, different address
numbers are set for each.
SETTINGS
12 34 5 67 8 9
[ ] button[MENU] button [ ] button
[] button[EXIT/OSD] button
10 11 12 13 14 15 16 17 18 19
3 Press the [ ] and [ ] buttons to select
the desired item, then press the [ ]
button.
4 Press the [ ] and [ ] buttons to
change the setting, then press the [ ]
button.
5 Repeat procedures 3 to 4 to set the
other items as needed.
6 When you have finished making the
settings, press the [EXIT/OSD] button.
The display returns to the normal screen.
46 English
Page 48

8 POWER FAILURE/USED TIME
<MAIN MENU>
[ ] button [EXIT/OSD] button
[ ] button[MENU] button [ ] button
You can check the date/time of power failures and the
amount of hard disk operation time.
1 Press the [MENU] button.
The [MENU] button lights, and the <MAIN MENU> screen
is displayed.
2 Select “8. POWER FAILURE/USED
TIME”, and press the [ ] button.
The <POWER FAILURE> screen is displayed.
Use this screen to check the date/time of power failures
and the amount of hard disk operation time.
(1)
(2)
(3)
(4)
(5)
(1) FAILURE:
Displays the date/time at which a power failure
occurred.
The number on the left is the number of power failures
(example: #010). Resets to “000” after exceeding
“999”.
(2) RECOVER:
Displays the time at which the power was restored.
(3) DISK1 USE:
Displays the total amount of disk 1 operation time.
(4) DISK2 USE:
Displays the total amount of disk 2 operation time
(when second disk has been added).
(5) POWER:
Displays the amount of power ON time for the digital
video recorder.
3 Press the [EXIT/OSD] button.
The display returns to the normal screen.
z The most recent power failure and recovery times are
displayed.
English 47
Page 49

9 MENU UPLOAD/DOWNLOAD
[MENU] button [ ] button
<MAIN MENU>
1234
You can save menu setting values onto a CompactFlash
card. Also, you can download menu settings saved on
CompactFlash cards to the DVR.
z Do not turn the power OFF when saving/loading menu
items to/from a CompactFlash card.
z Confirm that the light on the CompactFlash card reader
is lit before using the card reader with the USB terminal.
If used before the light is lit, SAVE and LOAD may not
be recognized.
z After saving menu settings to a CompactFlash card,
you may not be able to repeat the operation. If this
problem occurs, redo the operation after ejecting and
reinserting the CompactFlash card.
z At least 4 KB of available memory space is needed on
the CompactFlash card.
z For the recommended CompactFlash card reader, see
our website at “www.sanyosecurity.com.”
[ ] button
[ ] button [EXIT/OSD] button
[] button
CompactFlash
card reader
CompactFlash
card
The cursor is positioned on “SAVE MENUS TO CF”.
(1)
(2)
(3)
(4)
Item Description
(1) SAVE MENUS TO CF
LOAD MENUS FROM CFReads menu settings saved on
(2)
COPY MIRRORING
(3)
SETTINGS
(4) FORMAT CF Initializes CompactFlash card.
Saves menu settings to
CompactFlash card.
CompactFlash card.
Sets whether to apply
“MIRRORING ON/OFF” setting
saved on CompactFlash card
when “LOAD MENUS FROM CF”
is selected.
SETTINGS
Settings
You will need a CompactFlash card reader and
CompactFlash card (commercially available).
1 Press the [MENU] button.
The [MENU] button lights, and the <MAIN MENU> screen
is displayed.
2 Select “9. MENU UPLOAD/
DOWNLOAD”, and press the [ ] button.
The <MENU UPLOAD/DOWNLOAD> screen is displayed.
z If “COPY MIRRORING SETTINGS” is set to “YES”, the
hard disk may be initialized. If you don't want to initialize
the hard disk, select “NO”.
48 English
Page 50

MENU UPLOAD/DOWNLOAD9
To download menu items
1 Press the [ ] and [ ] buttons to select
“SAVE MENUS TO CF”, then press the
[ ] button.
The <WARNING> screen is displayed.
“NO” flashes.
2 Press the [ ] and [ ] buttons to select
“YES”, then press the [ ] button.
Downloading starts.
2 Press the [ ] and [ ] buttons to select
“YES”, then press the [ ] button.
Uploading starts.
When you have finished saving, the display returns to the
<MENU UPLOAD/DOWNLOAD> screen.
Formatting CompactFlash cards
1 Press the [ ] and [ ] buttons to select
“FORMAT CF”, then press the [ ]
button.
The <WARNING> screen is displayed.
“NO” flashes.
When you have finished loading, the display returns to the
<MENU UPLOAD/DOWNLOAD> screen.
z A file named “M804MENU.txt” is created on the
CompactFlash card.
To upload menu items
1 Press the [ ] and [ ] buttons to select
“LOAD MENUS FROM CF”, then press
the [ ] button.
The <WARNING> screen is displayed.
“NO” flashes.
2 Press the [ ] and [ ] buttons to select
“YES”, then press the [ ] button.
CompactFlash card formatting starts.
When formatting has finished, the display returns to the
<MENU UPLOAD/DOWNLOAD> screen.
z Formatting a CompactFlash card erases all the data
stored on it. To cancel formatting, select “NO”.
To exit
1 Press the [EXIT/OSD] button.
The display returns to the normal screen.
English 49
Page 51

1 INTERFACE SPECIFICATIONS
RS-485 specifications
Data format
Mode Asynchronous
Character length 8 bits
Data transmission
speed
Parity check None
Stop bit 1
Communication protocol
A proprietary Sanyo protocol (SSP: Security Serial
Protocol) is used. Use of a special controller for operation
is recommended. To obtain this controller, contact a Sanyo
service centre.
2400, 4800, 9600, 19200 bps
RS-485 termination switch settings
Termination settings
When connecting multiple devices, you must make
termination settings on both end devices.
z Set the RS-485 termination switch of both end devices
to ON.
z Be sure to set the RS-485 termination switches of all
devices in between (devices other than the first and last
devices) to OFF.
z If you don't make the correct termination settings, data
will be distorted and will affect other data, making the
data transmitted to each device incorrect.
Example
System controller
ON
Termination
switch
OFF
OTHER
Digital video recorder
Time – lapse VCR
RS485
TERMINATE
ON
Termination
switch
OFF
ON
OFF
50 English
Page 52

INTERFACE SPECIFICATIONS1
DVR/VCR command table
The table below shows the commands supported by the digital video recorder.
Left digit
Right digit
0
1
2AUDIO
3 SHIFTI SHIFTJ
4 SHIFTK SHIFTL MENU
5
6
7
8
9
APLAY
B
C GROUP SET
D
E
F STOP STILL
0 1 2 3 4 5 6 7
TIMER
ON/OFF
SHIFT+
/RP UP
SHIFT-
/RP DOWN
SECURITY
LOCK ON
REV PLAY
/SEARCH (DVR)
SECURITY
LOCK OFF
GROUP
CHECK
GROUP
CLEAR
Left digit
Right digit
0 CAMERA1
1 CAMERA2
2 CAMERA3
3 QUAD CAMERA4
4
5
6
7 SEQUENCE
8
9
A REC
BFF
CREW
D
E OSD/EXIT
F
8 9 A B C D E F
The command is only used during RS-485 control.
STATUS
LOG1
CLOCK
ADJUST
MENU RESET
STATUS
SENSE
CLOCK
DOWNLOAD
REC/DUB
REQUEST
REC STOP
English 51
Page 53

2 SPECIFICATIONS
Hard disk capacity 120 GB
Television system NTSC/PAL color signal standard (Switchable)
Picture resolution
Compression
Picture quality 3 levels (Super/High/Standard)
Recording type Frame
Recording speed NTSC: 30 fps or PAL: 25 fps
Screen Single screen/Quad screen
Playback
Recording
Search mode
Menu language English/Chinese (Simplified)
Clock settings Day/Month/Year/Hours/Minutes/Seconds
Miscellaneous functions Motion sensor, Security lock (with password function)
Video input terminal 1V (p-p), 75 Ohm unbalanced, 4 BNC connectors
Video output terminal 1V (p-p), 75 Ohm unbalanced, 4 BNC connectors
Video monitor out terminal 1V (p-p), 75 Ohm unbalanced, 1 BNC connector
Audio input terminal -8 dbs, 47 k Ohm unbalanced (4 RCA pin jacks)
Audio output terminal -8 dbs, 600 Ohm unbalanced (1 RCA pin jack)
LAN terminal 100BASE-TX (RJ-45)
USB terminal For CompactFlash card reader
Control
connector
(Push lock)
Power 120 – 240 V AC, 50/60 Hz
Current consumption 36 W
Dimensions 210 (W) x 96 (H) x 380 (D) mm
Weight 3.7 kg
Video MPEG2
Audio MPEG1 Audio Layer2
Normal recording Records on quad screen
Timer recording Records on quad screen
Alarm recording Records on quad screen
Time/date search
Alarm search Search by alarm event list or alarm thumbnail list
RS-485 terminal 3 terminals (A, B, GND)
Remote control terminal Resistance ladder
Clock adjust input terminal Normal open, Low level active
Clock adjust output terminal Normal 5 V, Low level active
Series rec input terminal Normal open, Low level active
Non rec output/Series rec output
terminal
Alarm input terminal Normal open, Low level active (4 channels)
Alarm reset terminal Normal open, Low level active
Alarm output terminal Normal 5 V, Low level active
Warning output terminal Open collector (500 mA), Low level active
Full out warning terminal Open collector (50 mA), Low level active
NTSC:720 x 480 (Super/High/Standard)
PAL: 720 x 576 (Super/High/Standard)
Playback, Still, Search, Cue, Review, Slow/reverse,
Frame advance/reverse
Search by time and date
Normal 5 V, Low level active
OTHER
Note that product appearance and specifications are subject to change without prior notice.
52 English
Page 54

SPECIFICATIONS2
Dimensions
(mm)
96
210
Front Side
380
English 53
Page 55

 Loading...