

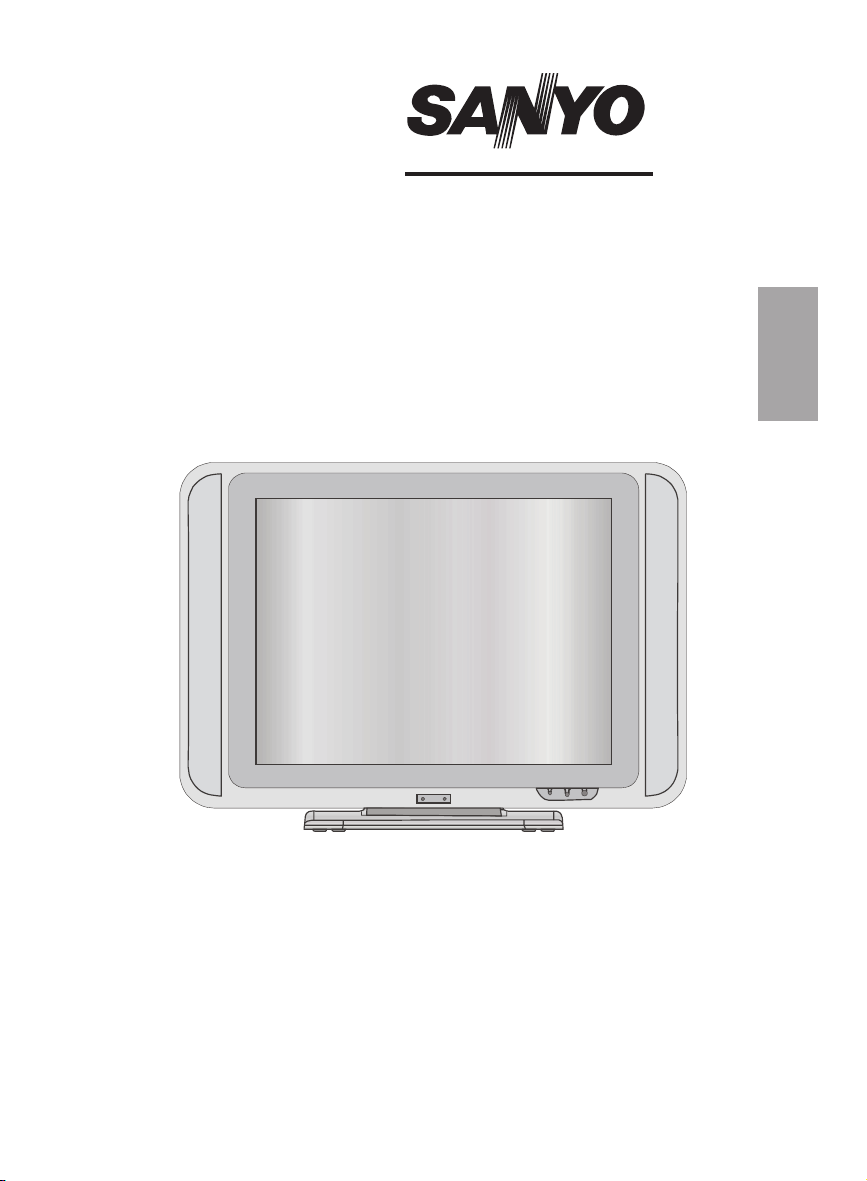
INSTRUCTION MANUAL
CE20WLC25-B
Colour television
1-22
ENGLISH
Please read this Instruction book before using your television.
We wish you many hours of pleasure from your new television.

Contents
Remote Control Buttons ......................... 2
Control Panel Buttons ............................ 3
Preparation ............................................. 5
Features ...............................................5
Safety Precautions .................................5
Before Switching On Your TV................. 7
Power Connection................................7
Connections To The RF Input Socket ..7
How To Connect Other Devices ...........7
Inserting Batteries In The
Remote Control Handset .....................7
Switching The TV ON/OFF....................... 7
To switch the TV on:..............................7
To switch the TV off:..............................8
Operating The TV.................................... 8
InitialA.P.S.
(Automatic Programming System).......8
Operating withthe buttons on the TV set8
Operating With Remote Control ...........8
Menu System .......................................... 9
picture menu ........................................9
audio menu ........................................10
window menu .....................................11
options menu .....................................12
settings menu ....................................12
Other Features...................................... 14
TVStatus.............................................14
Previous Programme .........................15
Sound Indicator ..................................15
Mute Indicator .....................................15
AV Modes ............................................15
Teletext .................................................. 1 5
To Operate Teletext.............................15
To SelectAPage Of Teletext ...............15
To Select Index Page..........................16
To SelectTeletext WithA
TV Programme...................................16
To Select Double Height Text .............16
To Reveal “Concealed” Information ...16
To Stop Automatic Page Change........16
To Select ASubcode Page .................16
To ExitTeletext ....................................16
To Display The Time ..........................16
Fastext................................................17
Connect Peripheral Equipment ............1 7
Via The Euroconnector.......................17
ViaAnt Input ........................................17
Decoder..............................................17
TVAnd Video Recorder.......................18
Playback NTSC ..................................18
Search ForAnd Store The
Test Signal Of The Video Recorder....18
Camera And Camcorder ....................18
Connect The Decoder To The
Video Recorder ..................................18
Connecting Headphones...................18
Antenna Connections ........................... 19
Tips ........................................................20
Care Of The Screen............................20
Poor Picture ........................................20
No Picture...........................................20
Sound .................................................20
Remote Control ..................................20
Specifications .......................................21
Important Instruction ............................22
-1-
= Stand By
= Cursor Up
= Cursor Right
OK =Okay(Store)
= Info
0 - 9 = Direct Programme
-/-- = No function
=Previous Programme
P/CH + = Programme Up
+ = Volume Up
= TV / Quit Menu
= ExternalSource
(AV-1,RGB-1,AV-2,SVHS)
Yellow button
Blue button
= Hold
= Update, = No function
= Index Page
= Reveal, PC =Nofunction
= Expand, = Image size
= Mix, =No function
= Teletext
= Time/ Subcode page
Red button
Green button
= Mute
I-II = Mono/Stereo- Dual I-II
- = VolumeDown
- P/CH = Programme Down
=Color temperature settings
M = Menu
= Cursor Down
= CursorLeft
RemoteControlButtons
-2-

Control PanelButtons
-3-
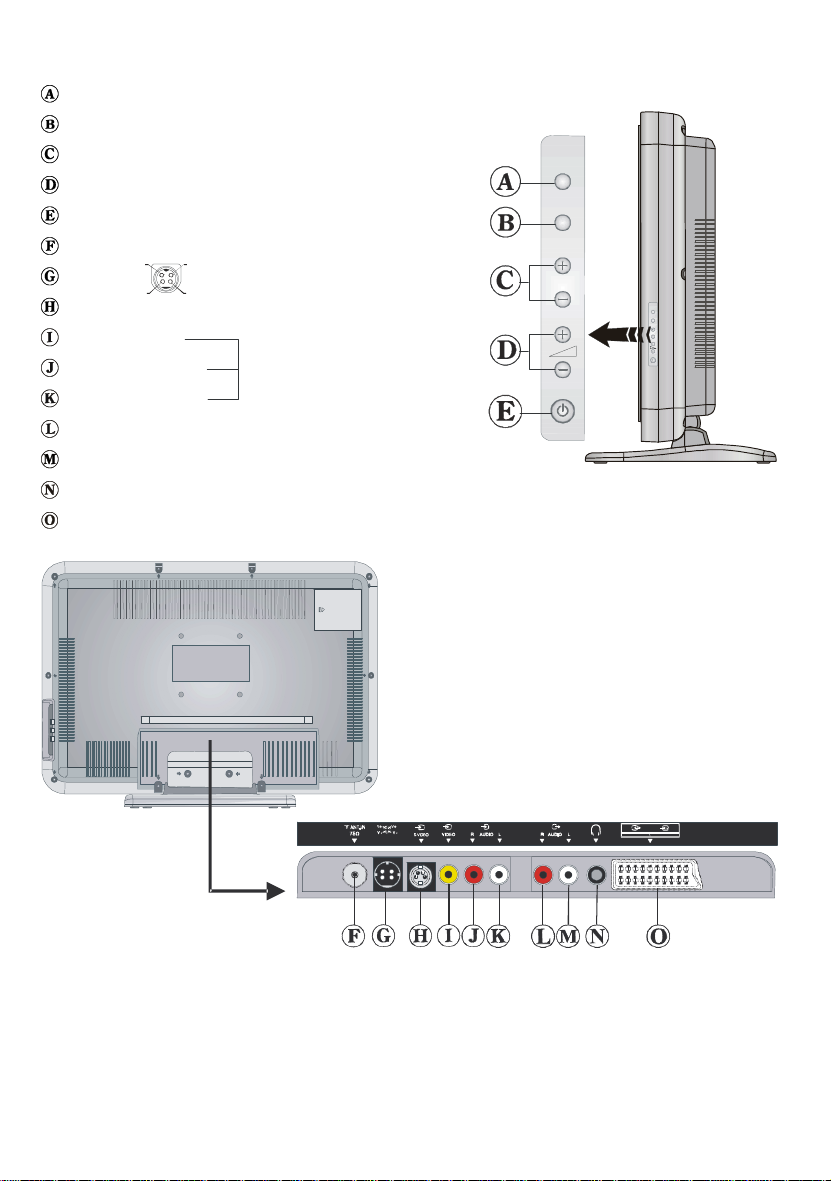
TV/AV button
V-
MENU button
Program Up, Program Down buttons
VolumeUp, Volume Downbuttons
STAND BY button
ANTENNA
V+
DC 24V
S-VIDEOINPUT
VIDEO INPUT
AUDIO INPUT(R)
AV-2
AUDIO INPUT(L)
LINEOUT(R)
LINEOUT(L)
HEADPHONE
SCARTSOCKET(AV-1)
TV/AV
MENU
P/CH
MENU
P/CH
DC 24V
-4-

Preparation
Install Display on solid horizontal surface
such as a table or desk.
For ventilation, leave a space of at least 10
cm free all around the set. To prevent any
fault and unsafe situations, please do not
place any objects on top of the set.
Features
• Remote controlled color television.
• 100 programmes from VHF, UHF bands or
cable channels can be preset.
• It can tune to cable channels.
• Controlling the TV is very easy by its menu
driven system.
• It has an Euroconnector socketfor an external device (such as video, video games, au-
dio set, etc.)
• Stereo sound system (German+Nicam).
• Full function Teletext. Fastext.
• Headphone connection.
• Direct channel access.
•A.P.S. (Automatic Programming System).
• All programmes can be named.
• Programme swapping between the last two
programmes.
• Forward or backward automatic tuning.
• Sleep timer.
• ChildLock
• Automatic sound mute when no transmission.
•Auto, Fill all and Wide picturemodes.
• NTSC Playback.
• BAVin is available.
• SVHS is available.
•AVL (AutomaticVolume Limiting)
• When no valid signal is detected, after 5
minutes the TV switches itself automatically
to stand-by mode.
• PLL (Frequency Search)
SafetyPrecautions
1. Power Source
The TV set is designed to operate on 24V
DC. The adaptor should be operated from a
230V AC, 50 Hz. outlet. Ensure you select
the correct voltage setting for your convenience.
2. Power Cord
The power supply cord should be placed so
that it is not likely to be walked on or pinched
by items placed upon them or against it. Pay
particular attention to cord where it enters
the plug, power outlet, and the point where it
exitsfrom the receiver.
3. Moisture and Water
Do not use this equipment in a humid and
damp place (avoid the bathroom, the sink in
the kitchen, and near the washing machine).
Do not expose this equipment to rain or wa-
ter, as this may be dangerous and do not
place objects filled with liquids on top. Avoid
from dripping or splashing.
4. Cleaning
Before cleaning, unplug the receiver from
the main supply, outlet. Do not use liquid or
aerosol cleaners. Use soft and dry cloth.
5. Ventilation
The slots and openings on the receiver are
intended for ventilation and to ensure reli-
able operation. To prevent overheating,
these openings must not be blocked or covered in anyway.
-5-
6. Lightning
In case of storm and lightning or when going on holiday, disconnect the power cord
from the wall outlet.
7. Replacement Part
When replacement parts are required, be sure
the service technician has used replacement
parts which are specified by the manufacturer
or have the same specifications as the original one. Unauthorised substitutions may result in fire,electrical shock, or otherhazards.
8. Servicing
Please refer all servicing to qualified personnel. Do not remove cover as this may re-
sult in electric shock.
9. Naked Flame Sources
Do not place naked flame sources on the
apparatus.
WARNING: When the device is not in use
for a long time, disconnect from power.
Instructions for waste disposal:
• Packaging and packaging aids are recyclable and should principally be recycled.
Packaging materials, such as foil bag, must
be kept away from children.
• Battery, i ncluding tho se which i s heavy
metal-free, should not be disposed of with
household waste. Please dispose of used
battery in an environmentally sound man-
ner. Find out about the legal regulations
which apply in your area.
“DO NOT LEAVE YOUR TV AT STAND-BY
OR OPERATING WHEN YOU LEAVE YOUR
HOUSE”
"The LCD panel is very high technology
product with about a million thin film tran-
sistors, giving you fine picture details. Occasionally, a few non-active pixels may appear on the screen as a fixed point of blue,
green or red. Please note that this does
not affect the performance of your prod-
uct."
"The mains plug of the power supply is
used as disconnect device and therefore
shall remain readily operable."
“DO use the power cord given/supplied by
the manufacturer for the AC adaptor of the
product”.
-6-

BeforeSwitching OnYour TV
Power Connection
Inserting Batteries In The Remote
Control Handset
• Remove the battery cover located on the
back of the handset by gently pulling up-
wards from the indicated part.
• Insert two AAA (R03) or equivalent type of
batteries inside.
• Replace the battery cover.
AC adapter
To POWER
terminal
IMPORTANT: The TV set is designed to op-
erate on 24V DC. For this, an adaptor is
used which gives 24V DC voltage. Connect
this adaptor to a system that supplies
230V AC, 50 Hz.
•After unpacking,allow the TV set to reach the
ambient room temperature before you con-
nect the set to the mains.
Connections To The RF Input
Socket
VHF/UHF
REAR OF THE TV
CABLE TV
• Connect the aerial or cable TV plug to the
RF input socket located atthe rear of the TV
and connect thecable plug comingout from
the TV out socket located on the devices
(VCR,DVB etc.) tothis socket as well.
How To Connect Other Devices
IMPORTANT: Switch off the TV before con-
nectingany externaldevice.
Sockets for external connections are at the
rear side of the TV. For connection of other
devices via Euroconnector refer to the manuals of the related devices.
NOTE: Remove the batteries from remote
control handset when it is not to be used for
a long period.Otherwise it can be damaged
due to any leakage of batteries.
Switching TheTV ON/OFF
To switch the TV on:
Your TV will switch on in two steps:
1- Connect the power supply cord to the sys-
tem. Press the “ ” button on the right
side of the TV. Then the TV switches itself
to stand-by mode and the led becomes
red locatedon the frontof the TV.
2- To switch on the TV from stand-by mode
either:
Press a digit button on the remote control so
that a programme number is selected,
or,
Press the “-P/CH” or “P/CH+”button on the
right side of the TV or press the “-P/CH” or
“P/CH+” button on the remote control, so that
the last programme switched off is selected.
Either way the TV will switch on and the LED
becomes BLUE.
-7-

To switch the TV off:
country
• Press the“ ” button on the remotecontrol,
so the TV will switch to stand-by mode and
theBLUE LEDwill becomeRED,
or,
• Press the “ ” button located on the right
side of the TV, so the TV will switch off and
theBLUE LED will turnoff.
NOTE: To switch the TV off completely remove the mains plug from the socket.
Operating The TV
You can operate your TV using both the remote control handset and onset buttons.
InitialA.P.S. (Automatic
Programming System)
The following menu will be displayed on the
screen when you turn on your TV for the first
time. A.P.S., searches and sorts all channels and stores them automatically on your
TV, according to the transmission of
programme systems in your area.
A.P.S.
A.P.S.
language
down for A.P.S.
To cancel A.P.S. before starting, press the
“ ” button. First of all choose language
and country by using “ ” / “ ” and “ ” / “ ”
buttons. This, will effect the sort process in
A.P.S. To start aps, select A.P.S. by using
“ ” / “ ” buttons and press the “ ” button.
The following warning is displayed.
If you want to cancel A.P.S. function, press
the “M” button.
If “OK” button is pressed, A.P.S. starts and
the following warning is displayed.
A.P.S. is running
Please Wait
<M> to exit
After A.P.S. is finalized, Program Table will
be displayed on the screen. In the Program
Table you will see the programme numbers
and names assigned to the programmes.
Operating with the buttons on the
TV set
Volume setting and programme selection
can be made by using the buttons at the
control panel on the right side of the TV.
Volume Setting
Press the “- ” button to decrease volume
or the “ +” button to increase volume, so
a volume level scale (slider) will be displayed on the screen.
Programme Selecting
Press the “P/CH +” button to select the next
programme or the “- P/CH” button to select
the previous programme.
Entering Main Menu
Press “MENU” button to enter Main menu. In
the Main menu select submenu using
“- P/CH” or “P/CH +” button and enter the
sub-menu using “- ” or “ +” button.
AV Mode
Press the “TV / AV” button at the control
panel on the right side of the TV to switch
your TV to AVmodes.
Please Check
the Antenna Cable
<M> to cancel <OK> to start
Operating With Remote Control
The remote control handset of your TV is designed to control all the functions of the
model you selected. The functions will be
-8-

described in accordance with the menu systemof yourTV.
Functions of the menu system are described in Menu System section.
Volume Setting
picture menu
By pressing “ ” / “ ” button, select the first
icon. Picture menu appears on the screen.
Press the“ +” button to increase volume.
Press the“- ” button to decrease volume.
A volume level scale (slider) will be displayedon the screen.
12
Programme Selecting
(Previous or next programme)
• Pressthe “- P/CH” buttonto selecttheprevi-
ous programme.
• Press the“P/CH +” button to select thenext
programme.
Programme Selecting (direct access):
Press digit buttons on the remote control
handset to select programmes between 0
and 9. The TV will switch to the selected
programme after a short delay.
• For a two digit program number enter the
second digit after pressing the first digit
within 2 seconds.
MenuSystem
Your TV has been designed with a menu
system to provide easy manipulation of a
multifunction system. Press the “M” (MENU)
button to enter the menu. The “M” button
has two functions; opening or closing the
menu and closing the submenu and then
opening its parent menu.
Press “ ” / “ ” button to select a menu title
and then “ ” / “ ” button to select a menu
item and “ ” / “ ” button to enter the menu
item.To exit a menu press the “M” button.
brightness
contrast
filter
sharpness
color
down for picture settings
brightness
By pressing “ ” / “ ” button, select bright-
ness. Press “ ” button to increase bright-
ness. Press “ ” button to decrease brightness. Brightness level can be adjusted between 0 and 100.
contrast
By pressing “ ” / “ ” button, select con-
trast. Press “ ” button to increase contrast.
Press “ ” button to decrease contrast. Contrast level can be adjusted between 0 and
100.
filter
By pressing “ ” / “ ” button, select filter.
Press “ ” / “ ” buttonto change filter setting
to normal, sharp or sharpest. This function
allows user to choose the level of image
sharpness that changes the details of picture display.
sharpness
By pressing “ ” / “ ” button, select sharp-
ness. Press “ ” button to increase sharp-
ness. Press “ ” button to decrease sharpness. Sharpness level can be adjusted between 0 and 100.
color
By pressing “ ” / “ ” button, select color.
Press “ ” button to increase color. Press
“ ” button to decrease color. Color level can
be adjusted between 0 and 100.
-9-

tint (optional)
61
36
50
43
50
audio
feature
normal
This item is displayed in picture menu when
the TV receives an NTSC signal. By press-
ing “ ” / “ ” button, select tint. Press “ ”
button to increase tint. Press “ ” button to
decrease tint. Tint level can be adjusted between 0 and 100.
brightness
contrast
filter
sharpness
color
tint
down for picture settings
When the TV is in AV mode; picture menu
items (brightness, contrast, sharpness and
color) may require re-adjustment.
audio menu
By pressing “ ” / “ ” button, select the second icon. Audio menu appears on the
screen.
AVL
Automatic Volume Level or AVL normalises
the audio output level. This is required to
compensate variations in sound level during
a transmission (e.g. Commercials are normally louder than the rest of the transmission).
Press “ ” / “ ” button to select AVL. By
pressing“ ” / “ ” button, set AVL on to activateitor off to deactivate it.
extended audio features
By pressing “ ” / “ ” button, select ex-
tended audio features. Press “ ” button to
enter sub-menus. Extended audio features
menu has the following sub-menus:
feature menu
By pressing “ ” / “ ” button, select the first
icon. Feature menu appears on the screen.
effect
sound style
volume
balance
AVL on
extended audio features
down for audio settings
volume
By pressing “ ” / “ ” button, select volume.
Press “ ” button to increase volume level.
Press “ ” button to decrease volume level.
Volume level can be adjusted between 0
and 50.
balance
By pressing “ ” / “ ” button, select balance.
Press “ ” button to increase balance to the
right. Press “ ” button to decrease balance
to the left. Balance level can be adjusted between 0 and 100.
down for feature settings
effect
This feature turns on or off the surround effect.
By pressing “ ” / “ ” button, select effect.
Press “ ” or “ ” button to select Normal or
Extended.
Extended effect mode is used to get deep
sound impression from loudspeakers.
sound style
By pressing “ ” / “ ” button, select sound
style. Press “ ” or “ ” button to change
sound style setting. The available styles are:
Theatre, Music, Voice and User.
A sound style consists of equalizer settings.
- 10-

equalizer menu
normal
By pressing “ ” / “ ” button, select the second icon. Equalizer menu appears on the
screen.
window menu
By pressing “ ” / “ ” button, select the third
icon. Window menu appears on the screen.
equalizer
+12db-
+0db-
-12db100
1K 3K 8K
down for equalizer settings
Press “ ” button to select the first frequency
band. Press “ ” / “ ” button to select the
other frequency bands. Selected band can
be adjusted by pressing “ ” / “ ” button.
Press “ ” button on the first band to exit the
equalizer menu.
headphone menu
By pressing “ ” button, select the third icon.
Headphone menu appears on the screen.
headphone
volume
balance
down for headphone settings
volume
By pressing “ ” / “ ” button, selectvolume.
Press “ ” button to increase volume level.
Press “ ” button to decrease volume level.
Volume level can be adjusted between 0
and 50.
balance
window
image size
color temperature
dynamic skin tone
down for window settings
onoff
image size
Press “ ” / “ ” button to select image size.
By pressing “ ” / “ ” button, you can
change image size to auto, fill all and wide.
You can enter image size directly by press-
ing the“ ” button.
color temperature
You can enter color temperature directly by
pressing "PP" button.
This feature is used to change the color
temperature.
Press “ ” / “ ” button, to select color tem-
perature. By pressing “ ” / “ ” button, you
can select one of these options: Normal,
Warm and Cool.
dynamic skin tone
Dynamic skin tone effect corrects the hue of
colours that matches to skin tones.
Press “ ” / “ ” button to select dynamic
skin tone. By pressing “ ” / “ ” button, turn
skin toneON/OFF.
By pressing “ ” / “ ” button, select balance.
Press “ ” button to increase balance to the
right. Press “ ” button to decrease balance
to the left. Balance level can be adjusted be-
tween 0 and 100.
- 11-

options menu
options
Europe
01
By pressing “ ” / “ ” button, select the
fourth icon. Options menu appears on the
screen.
menu background
language
room lighting
sleep timer
child lock onoff
down for option settings
selected, the TV can only be controlled by
the remote control handset. In this case, the
side panel buttons on the TV (except the On/
Off switch) will not work.
settings menu
By pressing “ ” / “ ” button, select the fifth
icon. Settings menu appears on the screen.
settings
installation
teletext language
teletext region
menu background
By pressing “ ” / “ ” button, select menu
background. You can change menu background to translucent or opaque by press-
ing “ ” /“ ” button.
language
By pressing “ ” / “ ” button, select lan-
guage. Press “ ” / “ ” button to select the
menu language you want.
room lighting
Press “ ” / “ ” button to select room light-
ing. By pressing “ ” / “ ” button, you can
select one of these options: Normal, Bright
and Movie.
sleep timer
By pressing “ ” / “ ” button, select sleep
timer. You can set the sleep time to 0,
5,10,15,...,115 or 120 minutes by pressing
“ ” / “ ” button. The sleep timer is used to
turnthe TV off after a pre-defined period.
child lock
You can use this feature to prevent children
turning the TV on or changing programs or
adjustments etc. without remote control.
By pressing “ ” / “ ” button, select child
lock. The child lock feature can be set to either on or off by pressing “ ” or “ ” button.
When off is selected, there will be no difference in the operation of your TV. When on is
down for various system settings
Installation menu
By pressing “ ” / “ ” button, select installation and press “ ” button. Installation menu
appears on the screen.
programming
programming
program number
program name
manual search
standard
store
frequency . Mhz
fine tuning
progr. skip
down to programming options
25
onoff
program number
By pressing “ ” / “ ” button, select program
number. Press “ ” button to select the first
or the second digit. Then press digit buttons on remote control to enter the
programme number you want. Press “ ”
button to exit.
There are 100 program storage between 0
and 99.
- 12-

program name
down to adjust channel order
- - - - -
- - - - -
- - - - -
- - - - -
- - - - -
- - - - -
- - - - -
- - - - -
- - - - -
- - - - -
- - - - -
- - - - -
- - - - -
- - - - -
- - - - -
- - - - -
- - - - -
- - - - -
- - - - -
- - - - -
- - - - -
- - - - -
- - - - -
- - - - -
By pressing “ ” / “ ” button, select program
name. Program name has a name string
with 5 characters. Press “ ” button to select
a character and “ ” / “ ” button to change it.
After the program name is entered, press
“ ” button to exit.
manual search
By pressing “ ” / “ ” button, select manual
search. Press “ ” or “ ” button to start pro-
gram searching manually. Press “M” button
to cancel manual search process.
Note: When Standard is selected as Auto,
manual search does not find SECAM L/L'
channels. Therefore L/L’ has to be selected
in the Standard menu for SECAM L/L’ channels.
standard
Press “ ” / “ ” button to selectstandard. By
pressing “ ” / “ ” button, you can change
the standard to AUTO, BG, I, DK or L/L'.
When AUTO is selected, the sound standard
is adjusted automatically.
store
Press “ ” / “ ” button to select store. By
pressing “ ” button, you can store the pro-
gram settings.
You can also store a setting by pressing
“OK” button on the selected setting.
“STORED” is displayed on screen when a
program is stored.
frequency
By pressing “ ” / “ ” button, select fre-
quency. Press “ ” button to select the first
digit and digit buttons on remote control to
enter the frequency you want. After the frequency is adjusted, press “ ” button to exit.
fine tuning
By pressing “ ” / “ ” button, select fine tun-
ing. Press “ ” / “ ” button to change thefre-
quencyvalue.
program skip
Use this feature after you run A.P.S. to skip
unwanted programs.
By pressing “ ” / “ ” button, select pro-
gram skip. Press “ ” / “ ”button to select
on or off. When on is selected, current pro-
gram cannot be reached by pressing “-P/
CH” or “P/CH+” button. But digit button can
be usedto reach it.
program table
By pressing “ ” / “ ” button, select the second icon. Program table appears on the
screen.
program table
1
ITV
ZDF
2
3
BBC 1
C 5
4
C 6
5
6
C 8
7
8
C 21
9
10
11
12
- - - - -
- - - - -
- - - - -
- - - - -
13
14
15
16
17
18
19
20
21
25
26
27
Program table shows the programme numbers and the names assigned to the
programmes.
Here you can adjust the channel order by
moving or deleting the channels.
First of all press the “ ” button.
Using the GREEN button you can move a
programme into another programme’s loca-
tion. Press the direction buttons to select a
programme and press the GREEN button.
Then select another programme and press
the GREEN button again. The first selected
programme moves into the location of the
second selected programme.
Using the RED button you can delete any
programme you want.
A.P.S. (Auto Programming System)
By pressing “ ” button, select the third icon.
A.P.S. menu appears on the screen.
- 13-

A.P.S.
country
POLISH
Cyrillic
GERMAN
SLOVENIAN
CZECH
ROMANIAN
GERMAN
RUSSIAN
LATVIAN
ENGLISH
GERMAN
ITALIAN
FRENCH
SLOVENIAN
GREEK
TURKISH
POLISH
GERMAN
ESTONIAN
SERBIAN
CROTIAN
Europe
CZECH REP./SLOVAK
ROMANIAN
GERMAN
ENGLISH
SWEDISH
ITALIAN
SPAIN
TURKISH
PORTUGUESE
DUTCH
P 01
TEXT LANGUAGE TEXT REGION LANGUAGE
A.P.S.
down for A.P.S.
country
By pressing “ ” / “ ” button, select country.
Press “ ” / “ ” button to select the country
where you are.
A.P.S.
By pressing “ ” / “ ” button, select A.P.S.
When “ ” button is pressed, the following
warning is displayed.
all prestored programs
will be deleted
<M> to cancel <OK> to start
If you want to cancel A.P.S. function, press
the “M” button.
If “OK” button is pressed, A.P.S. starts and
the following warning is displayed.
A.P.S. is running
Please Wait
<M> to exit
If you press the “M” button, A.P.S. function
stops and Program table appears on the
screen.
If you wait till A.P.S. is finalized, Program
table is displayed with the programmes
found and located.
teletext language
Cyrillic West
East / WestGreek
East
West
teletext region (optional)
By pressing “ ” / “ ” button in the Settings
menu, select teletext region. There are two
options to select : West and East.
Other Features
TV Status
Programme Number, Programme Name
and Sound Indicator are displayed on
screen after programme change for 3 seconds.
Programme Number
Programme Name (5 characters)
These OSD’s are displayed when a new
programme is entered by digit button, by
pressing the “P<P”, “TV”, “ ” buttons or
the “-P/CH” / “P/CH+” buttons.
By pressing “ ” / “ ” button in the Settings
menu, select teletext language. There are
three options to select : Europe, Cyrillic and
Greek.
- 14-

Previous Programme
• Pressing"P<P" (Previous Programme) button consecutively allows to swap between
the last two programmes.
For example, select programme 8, then se-
lect programme 2. Now, if you press the
“P<P” button, programme 8 will be dis-
played. If you press the same button again,
programme 2 will be displayed and so on.
Sound Indicator
“I-II” button is used to select Mono, Stereo,
Dual I orDual II.
Mono
In Mono broadcast or in forced-mono (for
stereo broadcast).
Stereo
In Stereo broadcast.
If dual broadcast detected. Dual I is selected
in default and also can be selected after
Dual II by Remote Control.
Dual II
If Dual II selected byRemote Control.
Mute Indicator
It is placed in the upper right side of the
screen when enabled.
AV Modes
By pressing the “AV” button, you can switch
your TV to AV modes (except being in Teletext). Pressing this button consecutively will
switch the TV in one of the optional AV
modes: AV1, RGB1, AV2 and SVHS.
RGB1 mode is supported from AV1.
In order to quit the AV mode press the “TV”,
thedigit buttonsor the “-P/CH” or “P/CH+”.
Teletext
Teletext is an information system that displays text on your TV screen. Using the Teletext information system you can view a page
of information on a subject that is available
in the list of contents (index).
On screen display is not available in text
mode.
Contrast, brightness or colour control is not
available, but volume control is available in
text mode.
To Operate Teletext
• Select a TV station where Teletext is being
transmitted.
• Press the “ ” button. Usually the list of
contents (index) are displayed on the
screen.
To Select A Page Of Teletext
To cancel mute, there are two alternatives,
the first one is pressing the “ ” button, thus
the volume is set to the preceding value, and
the second one is increasing the volume
level, thus it starts from minimum level to increase.
• Press the appropriate digit buttons for the
required Teletext page number.
The selected page number is displayed in
the top left corner of the screen. The Teletext
page counter searches until the selected
page number is located, the desired page is
then displayed on the screen.
- 15-

• Press the “P/CH +” button to move the Tele-
text screen forward one page at a time.
• Press the “- P/CH” button to move the Tele-
text screen backward one page at a time.
To Select Index Page
• To select the page number of the index (generally page 100), press the “ ” button.
To Se le c t Tel et ext W it h A T V
Programme
• Press the “ ” button. The text is now superimposed over the programme on the
screen.
• Press the “ ” buttonagain to return to the
Teletext page.
To Select Double Height Text
• Pressthe “ ” button for the top half of the
information page to be displayed in double
height text.
• Press the “ ” button again for the bottom
half of the information page to be displayed
in double height text.
• Press the “ ” button once more for the full
page of normal height text.
To Reveal “Concealed”
Information
• Pressing the “ ” button once will reveal
answers on a quiz or games page.
• Pressing the “ ” button again will conceal
the revealed answers.
To Stop Automatic Page Change
The teletext page you have selected may
contain more information than what is on the
screen; the rest of the information will be
displayed after a period of time.
• Press the “ ” buttonto stop the automatic
page change.
• Pressthe “ ” buttonagaintoallowthenext
page to be displayed.
To Select A Subcode Page
Subcode pages are subsections of long
Teletext pages that can only be displayed on
the screen one section at a time.
• Select the required Teletext page.
• Press the “ ” button.
• Select the required subcode page number
by pressing four digitbuttons (e.g.0001).
• If the selectedsubcode pageis not displayed
in a short time, press the “ ” button. TV
programme will be displayed on the screen.
• Teletext page number will be displayed on
the upper left corner of the screen when the
selected page is found.
• Press the “ ” button to display the selected Teletext page.
To Exit Teletext
• Press the “TV” button. The screen will
switchto TVmode.
To Display The Time
• While watching a TV programme with Teletext transmission press the “ ” button.
The current time information, captured from
Teletext will be displayed on the screen.
• If the programme being watched does not
have Teletext transmission, no information
will be displayed.
• Time informationis displayedon the screen
for10 seconds.If you want to cancel the dis-
play, press the " " button.
- 16-

Fastext
Your TV supports the Fastext Teletext system.
When the page number of any of the pages in
memory is entered, the system will not search
for the requested page; instead it will display
thepage automatically.
• Press the “P/CH+” button to move the Tele-
text screen forward one page at a time.
• Pressthe“-P/CH”button to move theTeletext
screen backward one page at a time.
For Fastext
The subject-heading for the information may
have a particular color.
• Pressan appropriate RED,GREEN,YELLOW
or BLUE button in order to reachthe relevant
page quickly.
For TOP text
TOP text mode of operation will be activated
automatically according to the transmission.
• If TOP text transmission is present, color
coded buttons will appearin status row.
• If TOP text transmission is not present, status rowwill not appear.
The subject-heading for information may be
located incolored box.
In Top mode the “-P/CH” or “P/CH+” commands willrequest the next or previous page
respectively. If TOP text transmission is not
available, in case of operation of these commands, wraparound occurs. For example
page 100 appears to be one greater than
page 199.
ConnectPeripheral
Equipment
There is a wide range of audio and video
equipmentthat can beconnectedto your TV.
The following connection diagrams show
you where the different (Optional) equipment
should be connected at the rear side of the
TV.
Via The Euroconnector
Your TV has one Euroconnector socket. If
you want to connect peripherals (e.g. video,
decoder, etc.) which have Euroconnectors to
theTV, use SCARTinput.
If an external device is connected via the
Euroconnector socket, the TV will be
switched to AV mode automatically. If the external device is connected to SCART input
and the signal is RGB1, select RGB1 by
pressing the “AV” button.
Via Ant Input
If you wantto connect to yourTV, peripherals
like video recorders or decoders, but the device you want to connect does not have
Euroconnector, you should connect it to the
ANTinput of the TV.
If the VCR is connected via antenna input
it is suggested to use Programme 0.
Decoder
Cable TV offers you a wide choice of
programme. Most of them are free, others
are to be paid for by the viewer. This means
that you will need to subscribe to the broad-
casting organisation whose programmes
you wish to receive. This organisation will
supply you a corresponding decoder unit to
allow the programmes to be unscrambled.
For further information ask your dealer. See
also the booklet supplied with your decoder.
Connect a decoder with an aerial socket
to the TV
• Connectthe aerial cable.
- 17-

Connect a decoder without an aerial
socket to the TV
• Connect the decoder to the TV with a
eurocable toSCART input.
TV And Video Recorder
• Connect the aerial cables.
Better picture quality can be obtained if you
also connect a eurocable to SCART socket.
Playback NTSC
To use this option you can;
• Conn ect an NTSC VCR pla yer to
Euroconnector at the rear side of the TV.
or,
• Connectan NTSCVCRplayer to RCAJacks
at the rear sideof the TV.
Then, press the “AV” button to select proper
source.
Search For And Store The Test
Signal Of The Video Recorder
• Unplug the aerial cable from the aerial
socket “ANT”of your video recorder.
• Switch onyour TV and put the video recorder
on the test signal. (See the booklet for your
video recorder.)
• Enter the Installation menu in settings
menu. Enter theProgramming menu inIn-
stallation menu andselect manual search.
• Search for the test signal of your video recorder in the same wayas you searched for
and stored the TV signals. Storethe test signal under programme number 0.
– Replace the aerial cable in the aerial
socket “ANT” of your video recorder once
you have stored the test signal.
To Connect To S-VHS Input
Connect your camera or camcorder S-VHS
input at the rear side of the TV.
• Connect yourequipmenttotheTVviaS-VHS
input and audio inputs of AV-2inputs by using S-VHScables.
Connect The Decoder To The
Video Recorder
Some video recorders have a special
euroconnector for decoder.
• Connecta eurocabletothe euroconnectorof
you r d e c oder and to the spec i a l
euroconnectorof yourvideo recorder.Refer
to the booklet of yourvideo recorder.
• To connect your video recorder to theTV, refer to the TV andVideo Recorder section.
If you want to connect more equipments to
yourTV, consult your dealer.
Connecting Headphones
Use the stereo headphone socket at the
rear side of the TV to connect headphones.
Camera And Camcorder
To Connect To AV-2 Input
Connect your camera or camcorder to AV-2
input at the rear side of the TV.
• Connect your equipment to the TV via VIDEO
(yellow),AUDIO R (red)and AUDIO L (white)
inputs.You must connect the jacksto the input using the same color.
- 18-

AUDIO IN
OUT
AntennaConnections
VHF/UHF
VHF/UHF
Round 75-ohm coaxial cable
Outdoor Antenna Connections
VHF antenna
VHF/UHF antenna
Connect PeripheralEquipment
Rear of TV
Rear of TV
HEADPHONE
ANT.IN
VIDEO
DECODER
AUDIO
VIDEO IN
(R)(L)
IN
FOR SATELLITE RECEIVER
- 19-

Tips
Care Of The Screen
Clean the screen with a slightly damp, soft
cloth. Do not use abrasive solvents as they
may damage the TV screen coating layer.
Poor Picture
Have you selected the correct TV system? Is
your TV set or house aerial located too close
to the loudspeakers, non-earthed audio
equipment or neon lights, etc.?
Mountains or high buildings can cause
double pictures or ghost images. Some-
times you can improve the picture quality by
changing the direction of the aerial.
Is the picture or Teletext unrecognisable?
Check if you have entered the correct fre-
quency.
The picture quality may degrade when two
peripherals are connected to the TV at the
same time. In such a case, disconnect one
of the peripherals.
No Picture
Sound
You can not hear any sound. Did you perhaps interrupt the sound, pressing the “ ”
button? Are external speakers connected to
theTV?
Sound is coming from only one of the
speakers. Is the balance set to one direction
extreme? Seeaudio menu.
Remote Control
Your TV no longer responds to the remote
control. Press the “
mote control once more. Perhaps the batteries are exhausted. If so you can still use the
localbuttonsat the top of theTV.
Have you selected the wrong menu? Press
the “
press the “M” button to return to the previous
menu.
No solution:
Switchyour TV set off and on. If this does not
work, call the service personnel; never attempt to repair it yourself.
” button to return to TV mode or
” button on the re-
Is the aerial connected properly? Are the
plugs connected tightly to the aerial socket?
Is the aerial cable damaged? Are suitable
plugs used to connect the aerial? If you are
in doubt, consult your dealer.
No Picture means that your TV is not receiving any transmission. Have you pressed the
correct buttons on the remote control? Try
once more.
- 20-

Specifications
TVBROADCASTING
PALSECAMB/GD/K K’ I/I’L/L’
RECEIVINGCHANNELS
VHF(BANDI/III)
UHF (BANDU)
HYPERBAND
CABLETV (S1-S20/ S21-S41)
AUDIO
German+Nicam Stereo
AUDIOOUTPUT POWER (W
2 x 3 W
POWERCONSUMPTION (W)
80 W
< 3 W (Stand-by)
) (%10 THD)
RMS.
NUMBER OFPRESETCHANNELS 100
CHANNELINDICATOR
On Screen Display
RFAERIAL INPUT
75 Ohm (unbalanced)
OPERATINGVOLTAGE
230VAC,50Hz.
Your SANYO product is designed and manufactured with high
quality materials and components which can be recycled and re-
used.
This symbol means that electrical and electronic equipment, at
their end-of-life, should be disposed of separately from your
household waste.
PANEL
16/9 display, 20.1” Screen Size
DIMENSIONS (mm)
DIMENSIONS (mm)
D
225
90
L H
588
588
Weight (kg)
429
403 7,2
With foot
8
Please dispose of this equipment at your local community waste
collection/recycling centre.
In the European Union there are separate collection systems for used electrical and
electronic products.
Please help us to conserve the environment we live in!
- 21-

ImportantInstruction
For your own safety read following instruction carefully before attempting to connect this unit
to the mains supply.
MAINS (AC) OPERATION
The wires in the mains lead are coloured in accordance with the following code :
GREEN
&
YELLOW
(Earth)
BLUE
(Neutral)
IMPORTANT
As the colours of the wires in the mains lead of this appliance may not correspond with
the coloured markings identifying the terminals in your plug, proceed as follows:
The wire which is coloured green and yellow must be connected to the terminal which
is marked with the letter E, or by the earth symbol, or coloured green or green and
yellow.
The wire which is coloured blue or black must be connected to the terminal which is
marked with the letter N or coloured Black.
The wire which is coloured brown or red must be connected to the terminal which is
marked with the letter L or coloured Red.
For continued protection against risk of fire, replace only with same type and rating of
fuse(ASTA approved10A 250VACfuse).
(If approved by the qualified TV service personel, 13A fuse may also be used)
If your product is fitted with a moulded plug which requires replacement please cut off
and dispose of safely, then rewire as shown above.
FUSE
BROWN
(Live)
CAUTION
TO PREVENT ELECTRIC SHOCK DISCONNECT FROM THE MAINS BEFORE
REMOVINGCOVER.NO USER SERVICEABLE PARTSINSIDE. REFERSERVICINGTO
QUALIFIEDSERVICE PERSONNEL.
SAFETY PRECAUTION
THISEQUIPMENT MUST BE DISCONNECTEDFROMTHEMAINS WHEN NOT IN USE.
DONOTALLOW THISUNIT TO BE EXPOSED TO RAINORMOISTURE.
- 22-

SANYO España, S.A.U.
Vial Transversal 2, no. 25,
Polígono Industrial Municipal,
31500 Tudela (Navarra)
Espana
Technical Assistance Headquarters
c/ Casal de Sta. Coloma, 6 P. I. Santiga
08210 Barbera Del Valles Barcelona
España
042-02514/1.5
Número de atenci n al cliente en
España
Service Hotline in Spain: 902 222 404
Linha vermelha de serviço en Espanha
Service Hotlin in Spa i : 902 222 404
R
P
%
A
0
P
0
E
1
L
R
O
E
D
C
A
I
L
C
enen
: 902 222 404ó
: 902 222 404
www.sanyo.es
50086662
 Loading...