

OWNER'S MANUAL
IgSANSUl®
26"TFT LCD DIGITAL TV WITH DVD PLAYER
HDLCDVD260
V ID EO DIGITALAUDIOD I G I T A L
I ATTENTION 1
I TV/CABLE MODE SELECTION 1
I_ D["IIDOLBYI
Digital Out
Sooo
oooo
oooo
oooo
oo
%_
If you purchase a universal remote control from your local retailer, please contact the remote
manufacturer for the required programming code.
When shipped from the factory, the TV/CABLE menu option is set to the "CABLE" (Cable Television) mode.
If not using CABLE, set this menu option to the "TV" position.
HDml
IF CONTACT WITH CUSTOMER SERVICE IS REQUIRED
PLEASE HAVE THE MODEL NUMBER READY PRIOR TO THE CALL
CUSTOMER SERVICE - 1-800-289-0980
ORION WEBSITE
FOR INFORMATION ON OUR OTHER PRODUCTS, PLEASE VISIT OUR WEBSITE AT
www.orionsalesinc.com
Before operating the unit, please read this manual thoroughly.
CAUTION
CAUTION: TO REDUCE THE RISK OF ELECTRIC
SHOCK, DO NOT REMOVE COVER
(OR BACK). NO USER-SERVICEABLE
PARTS INSIDE. REFER SERVICING TO
QUALIFIED SERVICE PERSONNEL.
The lightning flash with arrowhead
symbol within an equilateral triangle
is intended to alert the user to the
presence of uninsulated dangerous
voltage within the product's enclosure
that may be of sufficient magnitude to
constitute a risk of electric shock.
The exclamation point within an
equilateral triangle is intended to alert
the user to the presence of important
operating and maintenance (servic-
ing) instructions in the literature
accompanying the appliance.
WARNING: TO PREVENT FIRE OR SHOCK HAZARD, DO NOT EXPOSE THIS APPLIANCE TO
RAIN OR MOISTURE.
CAUTION: TO PREVENT ELECTRIC SHOCK DO NOT USE THIS POLARIZED PLUG WITH AN
EXTENSION CORD, RECEPTACLE OR OTHER OUTLET UNLESS THE BLADES CAN BE
FULLY INSERTED TO PREVENT BLADE EXPOSURE.
WARNING:
CAUTION:
CAUTION:
THIS DIGITAL VIDEO PLAYER EMPLOYS A LASER SYSTEM.
TO ENSURE PROPER USE OF THIS PRODUCT, PLEASE
READ THIS OWNER'S MANUAL CAREFULLY AND RETAIN
FOR FUTURE REFERENCE. SHOULD THE UNIT REQUIRE
MAINTENANCE, CONTACT AN AUTHORIZED SERVICE LO-
CATION-SEE SERVICE PROCEDURE.
USE OF CONTROLS, ADJUSTMENTS OR THE PERFORM-
ANCE OF PROCEDURES OTHER THAN THOSE SPECIFIED
HEREIN MAY RESULT IN HAZARDOUS RADIATION EXPO-
SURE.
TO PREVENT DIRECT EXPOSURE TO THE LASER BEAM,
DO NOT TRY TO OPEN THE ENCLOSURE. RADIATION MANY
BE PRESENT WHEN THE ENCLOSURE IS OPENED. DO NOT
STARE INTO THE BEAM.
I The lamp(s) within this product contain mercury. I
Disposal should be in compliance with local, state or federal laws.
This equipment has been tested and found to comply with the limits for a Class B digital
device, pursuant to Part 15 of the FCC Rules. These limits are designed to provide reasonable
protection against harmful interference in a residential installation. This equipment generates,
uses and can radiate radio frequency energy and, if not installed and used in accordance with
the instructions, may cause harmful interference to radio communications.
However, there is no guarantee that interference will not occur in a particular installation. If this
equipment does cause harmful interference to radio or television reception, which can be
determined by turning the equipment off and on, the user is encouraged to try to correct the
interference by one or more of the following measures:
- Reorient or relocate the receiving antenna.
- Increase the separation between the equipment and receiver.
- Connect the equipment into an outlet on a circuit different from that to which the receiver is connected.
- Consult the dealer or an experienced radio/TV technician for help.
Changes or modifications not expressly approved by the party responsible for compliance with
the FCC Rules could void the user's authority to operate this equipment.
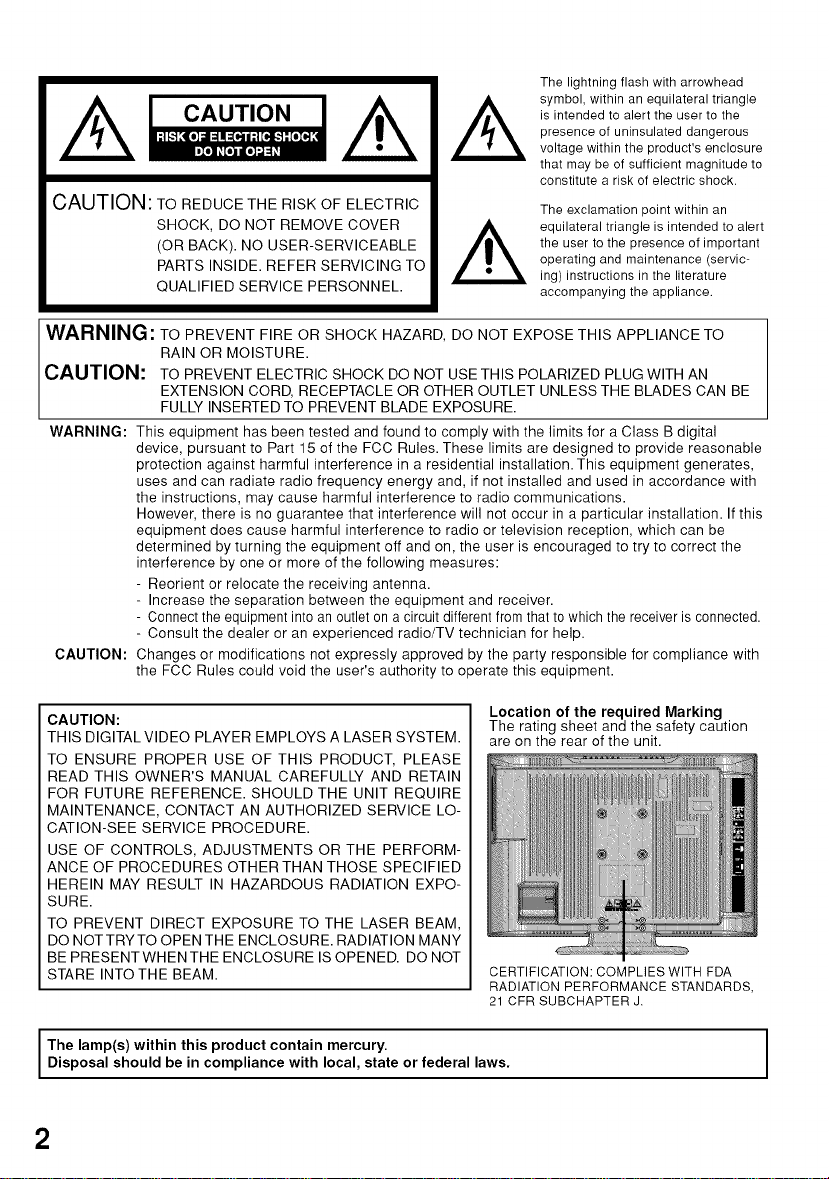
Location of the required Marking
The rating sheet and the safety caution
are on the rear of the unit.
CERTIFICATION: COMPLIES WITH FDA
RADIATION PERFORMANCE STANDARDS,
21 CFR SUBCHAPTER J.
i
I
2
IMPORTANT SAFETY INSTRUCTIONS
1) Read these instructions.
2) Keep these instructions.
3) Heed all warnings.
4) Follow all instructions.
5) Do not use this apparatus near water.
6) Clean only with a clean dry cloth.
7)
Do not block any ventilation openings. Install in accordance with the manufacturer's instructions.
8)
Do not install near any heat sources such as radiators, heat registers, stoves, or other apparatus (including
amplifiers) that produce heat.
e)
Do not defeat the safety purpose of the polarized or grounding-type plug. A polarized plug has two blades
with one wider than the other. A grounding type plug has two blades and a third grounding prong. The wide
blade and the third prong are provided for your safety. If the provided plug does not fit into your outlet,
consult an electrician to replace the obsolete receptacle.
10) Protect the power cord from being walked on or pinched particularly at plug, and the point where it exits
from the apparatus.
11) Only use attachments/accessories specified by the manufacturer.
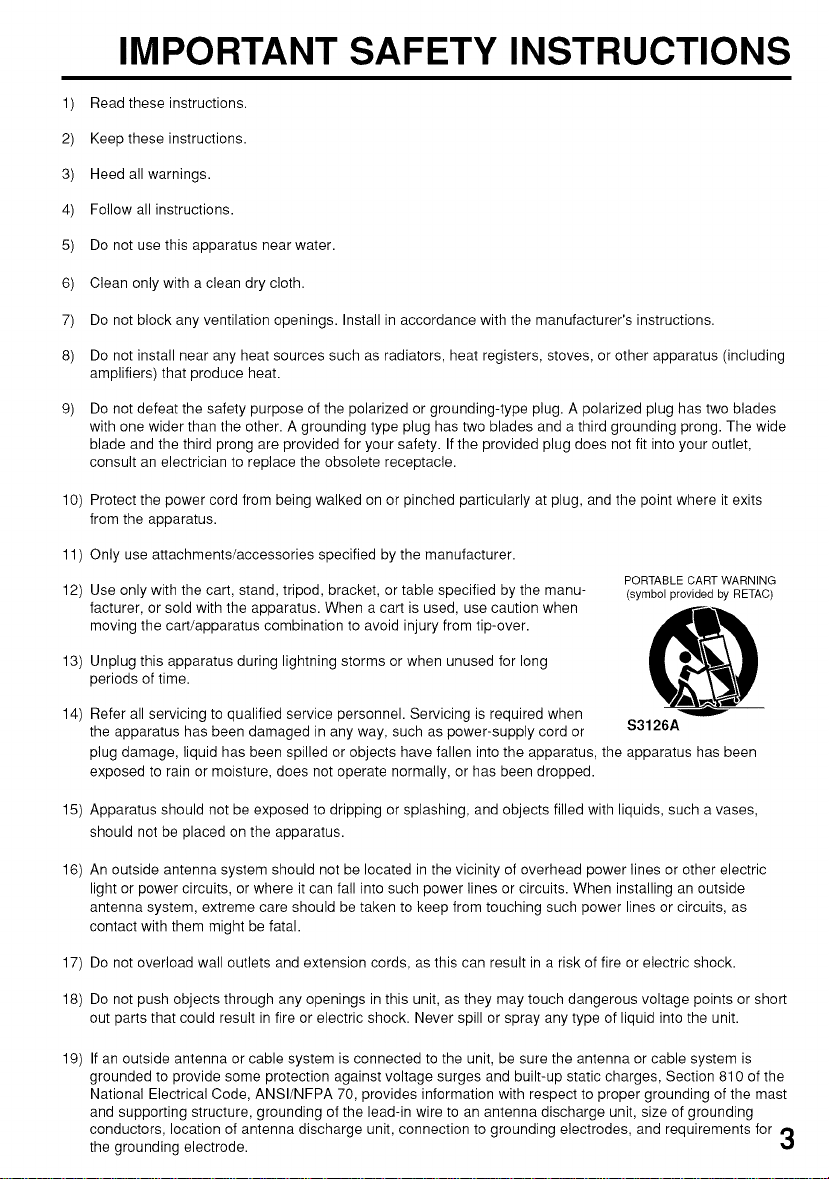
12) Use only with the cart, stand, tripod, bracket, or table specified by the manu-
facturer, or sold with the apparatus. When a cart is used, use caution when
moving the cart/apparatus combination to avoid injury from tip-over.
PORTABLE CART WARNING
(symbol provided by RETAC)
13) Unplug this apparatus during lightning storms or when unused for long
periods of time.
14) Refer all servicing to qualified service personnel. Servicing is required when
the apparatus has been damaged in any way, such as power-supply cord or S3126A
plug damage, liquid has been spilled or objects have fallen into the apparatus, the apparatus has been
exposed to rain or moisture, does not operate normally, or has been dropped.
15) Apparatus should not be exposed to dripping or splashing, and objects filled with liquids, such a vases,
should not be placed on the apparatus.
16) An outside antenna system should not be located in the vicinity of overhead power lines or other electric
light or power circuits, or where it can fall into such power lines or circuits. When installing an outside
antenna system, extreme care should be taken to keep from touching such power lines or circuits, as
contact with them might be fatal.
17) Do not overload wall outlets and extension cords, as this can result in a risk of fire or electric shock.
18) Do not push objects through any openings in this unit, as they may touch dangerous voltage points or short
out parts that could result in fire or electric shock. Never spill or spray any type of liquid into the unit.
19) If an outside antenna or cable system is connected to the unit, be sure the antenna or cable system is
grounded to provide some protection against voltage surges and built-up static charges, Section 810 of the
National Electrical Code, ANSl/NFPA 70, provides information with respect to proper grounding of the mast
and supporting structure, grounding of the lead-in wire to an antenna discharge unit, size of grounding
conductors, location of antenna discharge unit, connection to grounding electrodes, and requirements for rjp
the grounding electrode.
IMPORTANTSAFETYINSTRUCTIONS(continued)
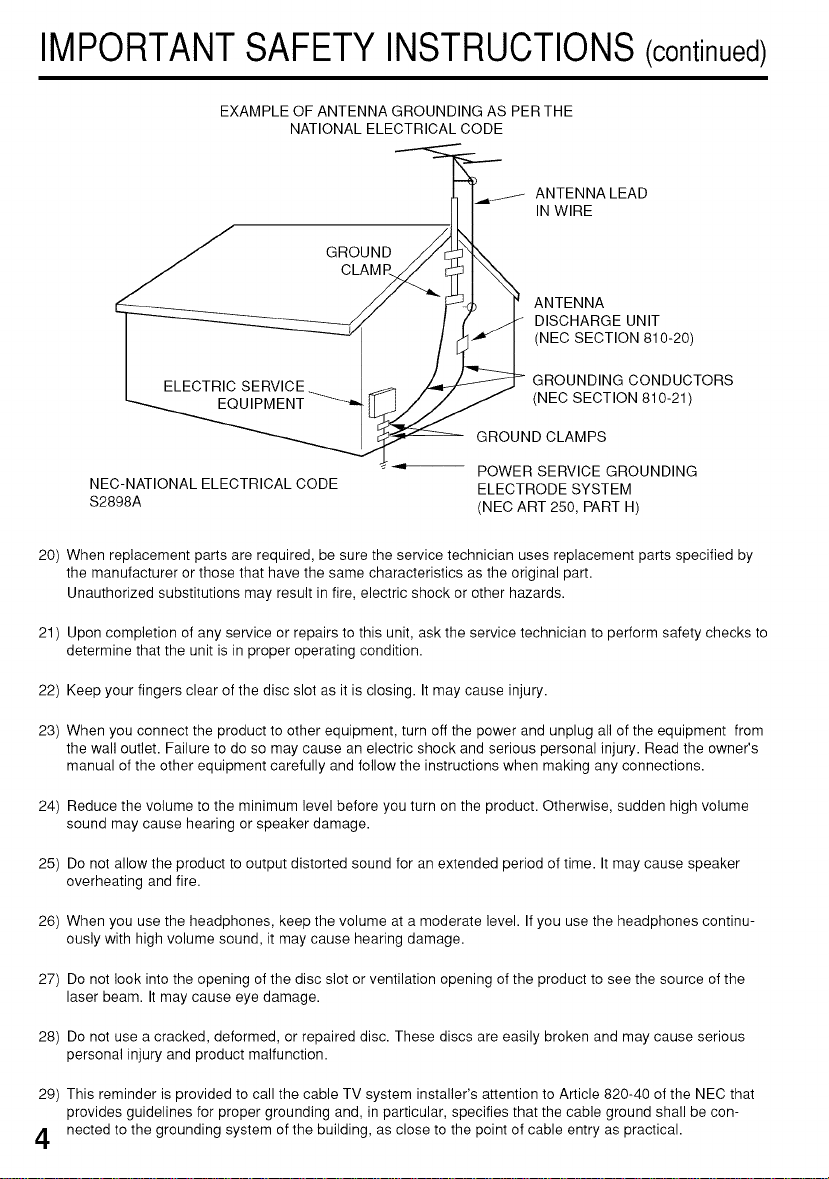
EXAMPLE OF ANTENNA GROUNDING AS PERTHE
NATIONAL ELECTRICAL CODE
ANTENNA LEAD
IN WIRE
CLAMV
ANTENNA
DISCHARGE UNIT
(NEC SECTION 810-20)
GROUNDING CONDUCTORS
(NEC SECTION 810-21)
GROUND CLAMPS
NEC-NATIONAL ELECTRICAL CODE
S2898A
20) When replacement parts are required, be sure the service technician uses replacement parts specified by
the manufacturer or those that have the same characteristics as the original part.
Unauthorized substitutions may result in fire, electric shock or other hazards.
21 ) Upon completion of any service or repairs to this unit, ask the service technician to perform safety checks to
determine that the unit is in proper operating condition.
POWER SERVICE GROUNDING
ELECTRODE SYSTEM
(NEC ART 250, PART H)
22) Keep your fingers clear of the disc slot as it is closing. It may cause injury.
23) When you connect the product to other equipment, turn off the power and unplug all of the equipment from
the wall outlet. Failure to do so may cause an electric shock and serious personal injury. Read the owner's
manual of the other equipment carefully and follow the instructions when making any connections.
24) Reduce the volume to the minimum level before you turn on the product. Otherwise, sudden high volume
sound may cause hearing or speaker damage.
25) Do not allow the product to output distorted sound for an extended period of time. It may cause speaker
overheating and fire.
26) When you use the headphones, keep the volume at a moderate level. If you use the headphones continu-
ously with high volume sound, it may cause hearing damage.
27) Do not look into the opening of the disc slot or ventilation opening of the product to see the source of the
laser beam. It may cause eye damage.
28) Do not use a cracked, deformed, or repaired disc. These discs are easily broken and may cause serious
personal injury and product malfunction.
29) This reminder is provided to call the cable TV system installer's attention to Article 820-40 of the NEC that
provides guidelines for proper grounding and, in particular, specifies that the cable ground shall be con-
/I nected to the grounding system of the building, as close to the point of cable entry as practical.
IMPORTANTSAFETYINSTRUCTIONS(continued)
CONDENSATION
Moisture will form in the operating section of the player if the player is brought from cool surroundings into a
warm room or if the temperature of the room rises suddenly. When this happens, player's performance will
be impaired.
To prevent this, let the player stand in its new surroundings for about an hour before switching it on, or
make sure that the room temperature rises gradually.
Condensation may also form during the summer if the player is exposed to the breeze from an air condi-
tioner. In such cases, change the location of the player.
HOW TO HANDLE THE LCD PANEL
• Do not press hard or jolt the LCD panel. It may cause the LCD panel glass to break and injury may occur.
• If the LCD panel is broken, make absolutely sure that you do not touch the liquid in the panel. This may cause
skin inflammation.
If the liquid gets in your mouth, immediately gargle and consult with your doctor. Also, if the liquid gets in
your eyes or touches your skin, consult with your doctor after rinsing for at least 15 minutes or longer in clean
water.
5
SAFETY PRECAUTIONS
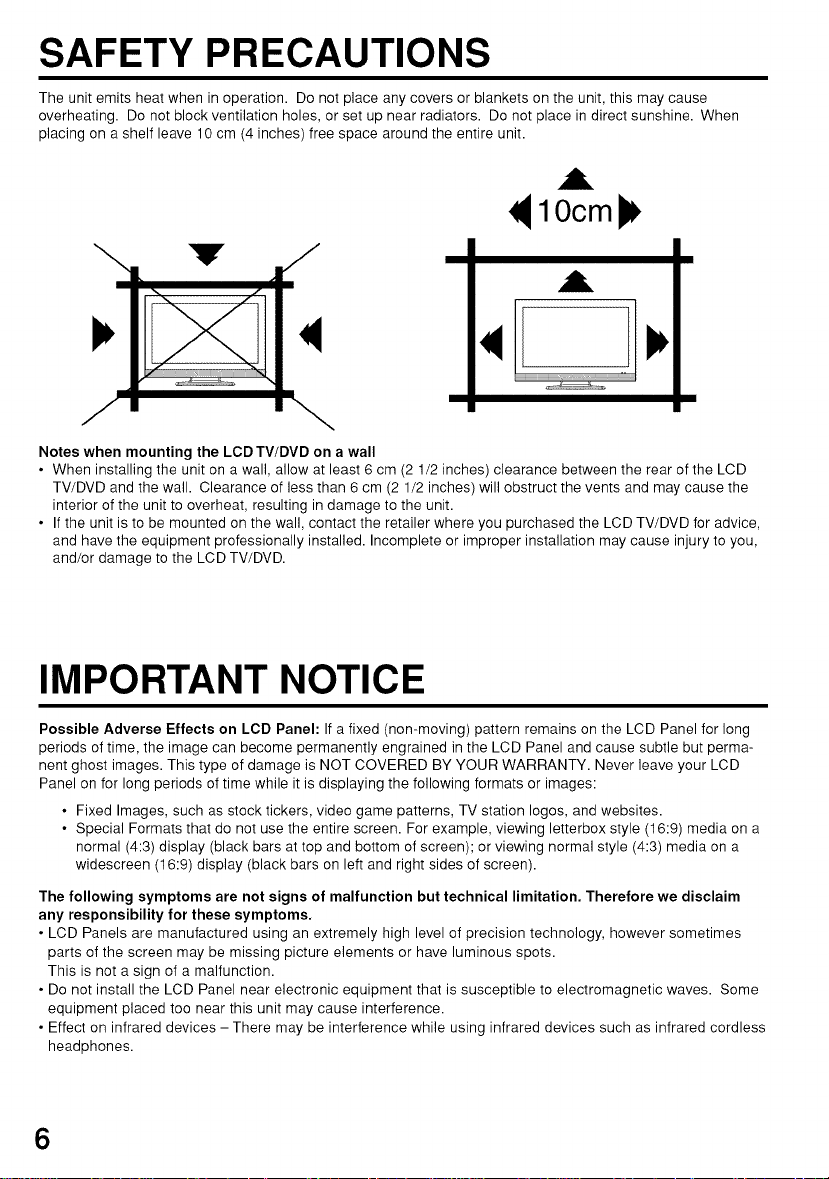
The unit emits heat when in operation. Do not place any covers or blankets on the unit, this may cause
overheating. Do not block ventilation holes, or set up near radiators. Do not place in direct sunshine. When
placing on a shelf leave 10 cm (4 inches) free space around the entire unit.
,i
10cm
A
J \
Notes when mounting the LCDTV/DVD on a wall
• When installing the unit on a wall, allow at least 6 cm (2 1/2 inches) clearance between the rear of the LCD
TV/DVD and the wall. Clearance of less than 6 cm (2 1/2 inches) will obstruct the vents and may cause the
interior of the unit to overheat, resulting in damage to the unit.
• If the unit is to be mounted on the wall, contact the retailer where you purchased the LCD TV/DVD for advice,
and have the equipment professionally installed. Incomplete or improper installation may cause injury to you,
and/or damage to the LCD TV/DVD.
IMPORTANT NOTICE
Possible Adverse Effects on LCD Panel: If a fixed (non-moving) pattern remains on the LCD Panel for long
periods of time, the image can become permanently engrained in the LCD Panel and cause subtle but perma-
nent ghost images. This type of damage is NOT COVERED BY YOUR WARRANTY. Never leave your LCD
Panel on for long periods of time while it is displaying the following formats or images:
• Fixed Images, such as stock tickers, video game patterns, TV station Iogos, and websites.
• Special Formats that do not use the entire screen. For example, viewing letterbox style (16:9) media on a
normal (4:3) display (black bars at top and bottom of screen); or viewing normal style (4:3) media on a
widescreen (16:9) display (black bars on left and right sides of screen).
The following symptoms are not signs of malfunction but technical limitation. Therefore we disclaim
any responsibility for these symptoms.
• LCD Panels are manufactured using an extremely high level of precision technology, however sometimes
parts of the screen may be missing picture elements or have luminous spots.
This is not a sign of a malfunction.
• Do not install the LCD Panel near electronic equipment that is susceptible to electromagnetic waves. Some
equipment placed too near this unit may cause interference.
• Effect on infrared devices - There may be interference while using infrared devices such as infrared cordless
headphones.
6
Features
LCD color TV With DVD/CD player
Unique space saving design combines a 26" LCD color TV and a DVD/CD player.
A DVD disc has much more capacity, but is the same size as an audio CD disc. The Picture/Audio quality of a
DVD exceeds other software. The picture quality is higher than Super VHS video cassettes. The audio quality is
higher than an audio CD. The DVD also has special options; audio language selection, subtitle language selec-
tion, or multi-angle, etc.
The DVD PLAYER can play back both audio CDs and MP3/WMA/JPEG CDs.
Compatible with a wide range of DVD audio outputs
Digital Audio Jack (Coaxial)
• When a component with a built-in Dolby Digital decoder is connected, Dolby Digital sound can produce the
effect of being in a movie theater or a concert hall.
• Surround standard is different from Dolby Digital. This format is already in use in many theaters. By connecting
this unit to a DTS decoder or an AV amplifier with a built-in DTS decoder, the DTS audio of DVD discs recorded
in this format can be enjoyed. However, audio will not be output from the analog audio output jacks.
• By connecting this unit to an AV amplifier with a built-in MPEG decoder, the MPEG audio of DVD discs re-
corded in this format can be enjoyed.
• The Linear PCM sound of a 48 kHz/24 bit through 96 kHz/24 bit exceeds audio CD sound.
Convenience Features
Direct selection of your desired scenes using Title/Chapter/Time/Track - You can play back from the desired
scene.
Recalling Up to 3 Scenes (DVD only) -You can program up to 3 scenes in memory and recall the marked scenes.
Frame Advance - The PAUSE/STILL moves one frame at a time.
Slow Motion - The SLOW moves you back and forth through the program by 4 steps of 1/7-1/2 times.
Repeat Playback -You can repeat chapter, track, title, sides or material between two selected points.
Program Playback (Audio CD/MP3/WMA CD) - You can play back tracks in programmed sequences.
Zoom (DVD only) -You can zoom in the selected subject on the screen during playback.
Note: Make sure that discs are suitable for the following functions.
Multi-Language - Maximum 32 language subtitles and maximum 8 language soundtracks can be played back
for movies or programs.
Multi-Angle - Pictures of Sports or a Live Concert are recorded with many cameras. When you play such a disc,
you can change the angles during playback.
Parental Control - You can limit the play back of scenes or sounds of DVD discs that have a rating level encoded
on the disc.
Video Aspect Ratio - You can change the aspect ratio of the screen for your monitor.
TV Features
Integrated Digital Tuner - You can view digital broadcasts without using a Digital TV Set-Top Box.
Closed Caption Decoder With Full Text Mode - Displays text captions or full screen text on the screen for
hearing impaired viewers.
Picture Adjustments Using The Remote Control - The On-Screen display allows precise remote control ad-
justment of BRIGHTNESS, CONTRAST, COLOR, TINT and SHARPNESS.
Programmable TV Sleep Timer - Operable from the remote control, the TV can be programmed for up to 120
minutes to turn off automatically.
On-Screen 3 Language Display - You can select one of 3 languages, English, Spanish or French for on-
screen programming.
V-Chip - The V-Chip function can read the rating of a TV program or movie content if the program is encoded
with this information. V-chip will allow you to set a restriction level.
* This product incorporates copyright protection technology that is protected by U.S. patents and other intel-
lectual property rights. Use of this copyright protection technology must be authorized by Macrovision, and
is intended for home and other limited viewing uses only unless otherwise authorized by Macrovision.
Reverse engineering or disassembly is prohibited.
* _ is a trademark of DVD Format/Logo Licensing Corporation.
* Manufactured under license from Dolby Laboratories. "Dolby" and the double-D symbol are trademarks of
Dolby Laboratories.
* "DTS" and "DTS Digital Out" are registered trademarks of DTS, Inc.
7
Contents
Before using unit Jyour
IMPORTANT SAFETY INSTRUCTIONS ......... 3
SAFETY PRECAUTIONS ................................ 6
IMPORTANT NOTICE ..................................... 6
Features ........................................................... 7
Contents ........................................................... 8
Disc .................................................................. 9
Location of controls ........................................ 10
Remote control ............................................... 12
Power source ................................................. 13
Antenna connections ...................................... 14
Cable TV connections .................................... 15
Setting the on-screen display language ......... 16
TV operation ................................................... 17
Memorizing channels ..................................... 19
Setting the V-Chip .......................................... 21
Labeling channels .......................................... 24
Selecting the video input source .................... 25
Labeling the video input source ..................... 25
Setting the picture size ................................... 26
Setting the picture scroll ................................. 28
Selecting the cinema mode ............................ 29
Using the aspect feature ................................ 29
Adjusting the picture preference .................... 30
Picture control adjustment .............................. 30
Selecting the color temperature ..................... 31
Adjusting the back lighting feature ................. 31
Resetting your picture adjustments ................ 31
Closed Caption ............................................... 32
CC advanced ................................................. 33
Selecting Stereo/Second Audio Program
(SAP) .............................................................. 34
Sound control adjustment .............................. 34
Selecting the HDMI audio input source .......... 35
Selecting the audio language ......................... 35
Selecting the digital output ............................. 36
Resetting your audio adjustments .................. 36
Checking the Digital-signal strength ............... 37
Setting the auto shut off ................................. 37
Picture/Audio control adjustment in the
PC mode ........................................................ 38
Preparation ..................................................... 40
Status display of disc ..................................... 40
Playback procedure ....................................... 41
Special playback ............................................ 42
MP3/WMA/JPEG and Audio CD playback ..... 43
Setting the JPEG interval ............................... 45
Program playback (CD) .................................. 46
Repeat playback (CD) .................................... 47
Random playback (CD) .................................. 47
Zooming ......................................................... 48
Locating desired scene .................................. 48
Repeat playback ............................................ 49
Marking desired scenes ................................. 50
Changing soundtrack language ..................... 51
Subtitles ......................................................... 51
Changing angles ............................................ 52
Title selection ................................................. 52
DVD menu ...................................................... 52
[Additional information J
Setting the language ...................................... 53
Setting the aspect ratio of TV screen ............. 54
Setting on screen display ............................... 54
Setting the picture mode ................................ 55
Night Mode ..................................................... 56
Digital out ....................................................... 56
Parental control setting .................................. 57
Setting the new password .............................. 58
Temporary disabling of rating level by
DVD disc ........................................................ 59
Language code list ......................................... 60
Connections to other equipment .................... 61
Reception disturbances .................................. 64
Problems and troubleshooting ....................... 65
Specifications ................................................. 67
Limited WARRANTY ........................ Back cover
8
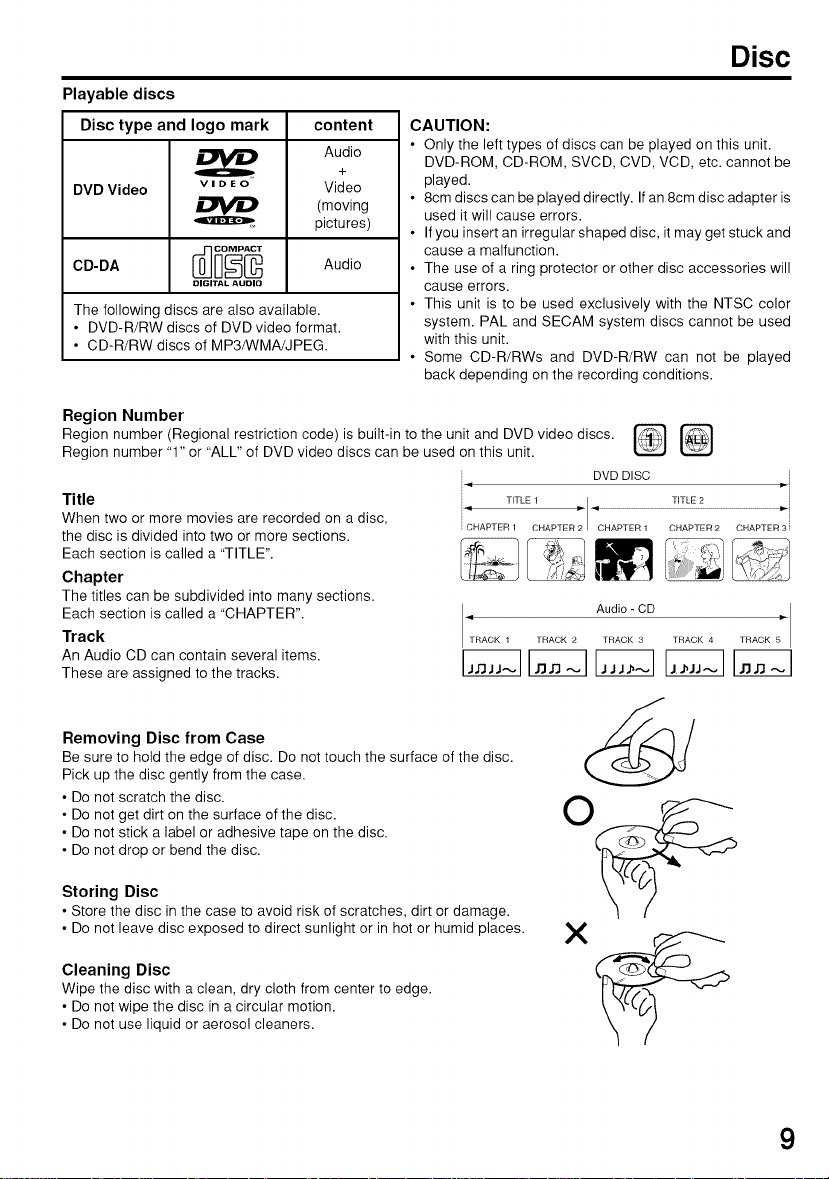
Playable discs
Disc type and logo mark content
Audio
DVD Video v i D E O Video
CD-DA Audio
DIGITAL AUDIO
The following discs are also available.
• DVD-R/RW discs of DVD video format.
• CD-R/RW discs of MP3/WMA/JPEG.
+
(moving
pictures)
CAUTION:
• Only the left types of discs can be played on this unit.
DVD-ROM, CD-ROM, SVCD, CVD, VCD, etc. cannot be
played.
• 8cm discs can be played directly. If an 8cm disc adapter is
used it will cause errors.
• If you insert an irregular shaped disc, it may get stuck and
cause a malfunction.
• The use of a ring protector or other disc accessories will
cause errors.
• This unit is to be used exclusively with the NTSC color
system. PAL and SECAM system discs cannot be used
with this unit.
• Some CD-R/RWs and DVD-R/RW can not be played
back depending on the recording conditions.
Region Number
Region number (Regional restriction code) is built-in to the unit and DVD video discs.
Region number "1" or "ALL" of DVD video discs can be used on this unit.
;; DVD DISC
Title
When two or more movies are recorded on a disc,
the disc is divided into two or more sections.
Each section is called a "TITLE".
Chapter
The titles can be subdivided into many sections.
Each section is called a "CHAPTER".
Track
An Audio CD can contain several items.
These are assigned to the tracks.
i,4
[< TITLE 1 _,
CHAPTER 1 CHAPTER 2 CHAPTER 1
Disc
TITLE 2 ID'-i
CHAPTER 2 CHAPTER 3 i
Audio - CD_RACK 1 TRACK 2 TRACK 3 TRACK 4 TRACK
i
_j
Removing Disc from Case
Be sure to hold the edge of disc. Do not touch the surface of the disc.
Pick up the disc gently from the case.
• Do not scratch the disc.
• Do not get dirt on the surface of the disc.
• Do not stick a label or adhesive tape on the disc.
• Do not drop or bend the disc.
Storing Disc
• Store the disc in the case to avoid risk of scratches, dirt or damage.
• Do not leave disc exposed to direct sunlight or in hot or humid places.
Cleaning Disc
Wipe the disc with a clean, dry cloth from center to edge.
• Do not wipe the disc in a circular motion.
• Do not use liquid or aerosol cleaners.
9
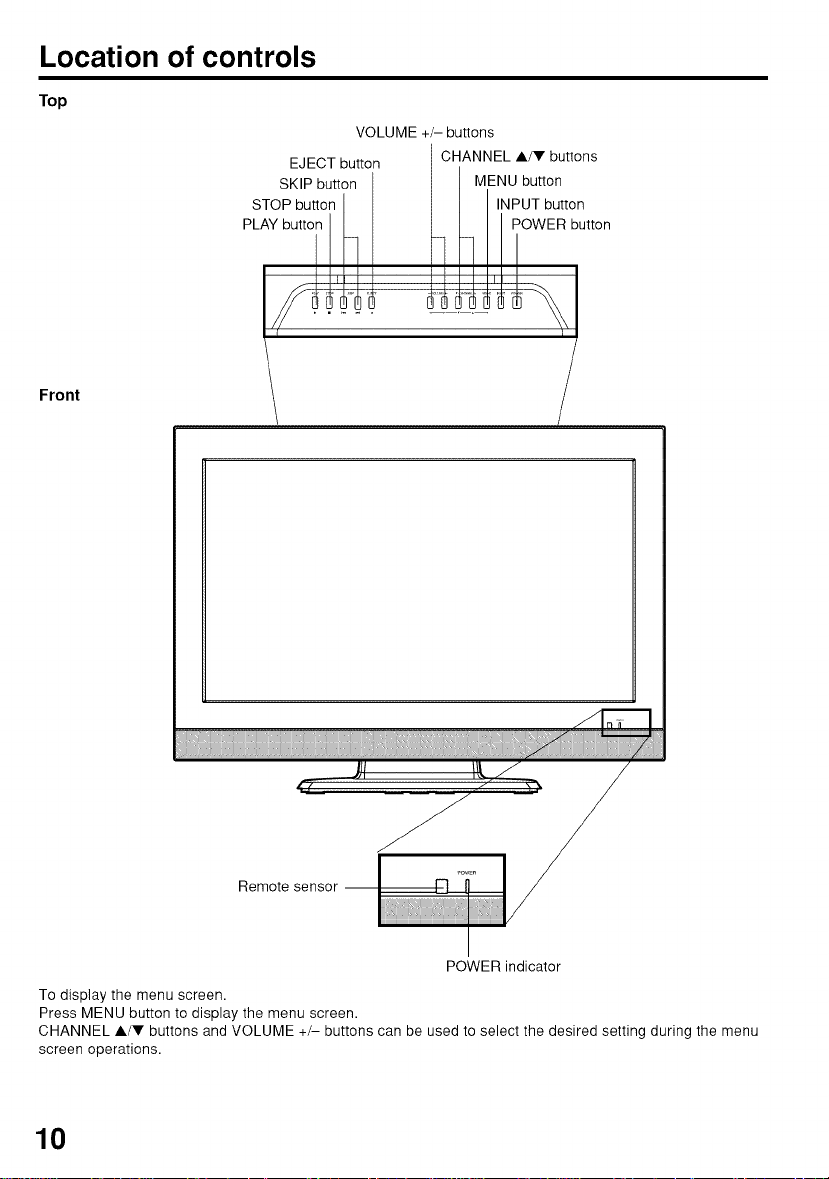
Location of controls
Top
SK P button MENU button
STOPbuttonI I I I,NPUTbutton
PLAYbuttonI,_]!F i 1_1 POweRbutt°n=l_1 _
Front
VOLUME +/- buttons
EJECT button CHANNEL A/V buttons
Remote sensor --
POWER indicator
To display the menu screen.
Press MENU button to display the menu screen.
CHANNEL A/V buttons and VOLUME +/- buttons can be used to select the desired setting during the menu
screen operations.
10
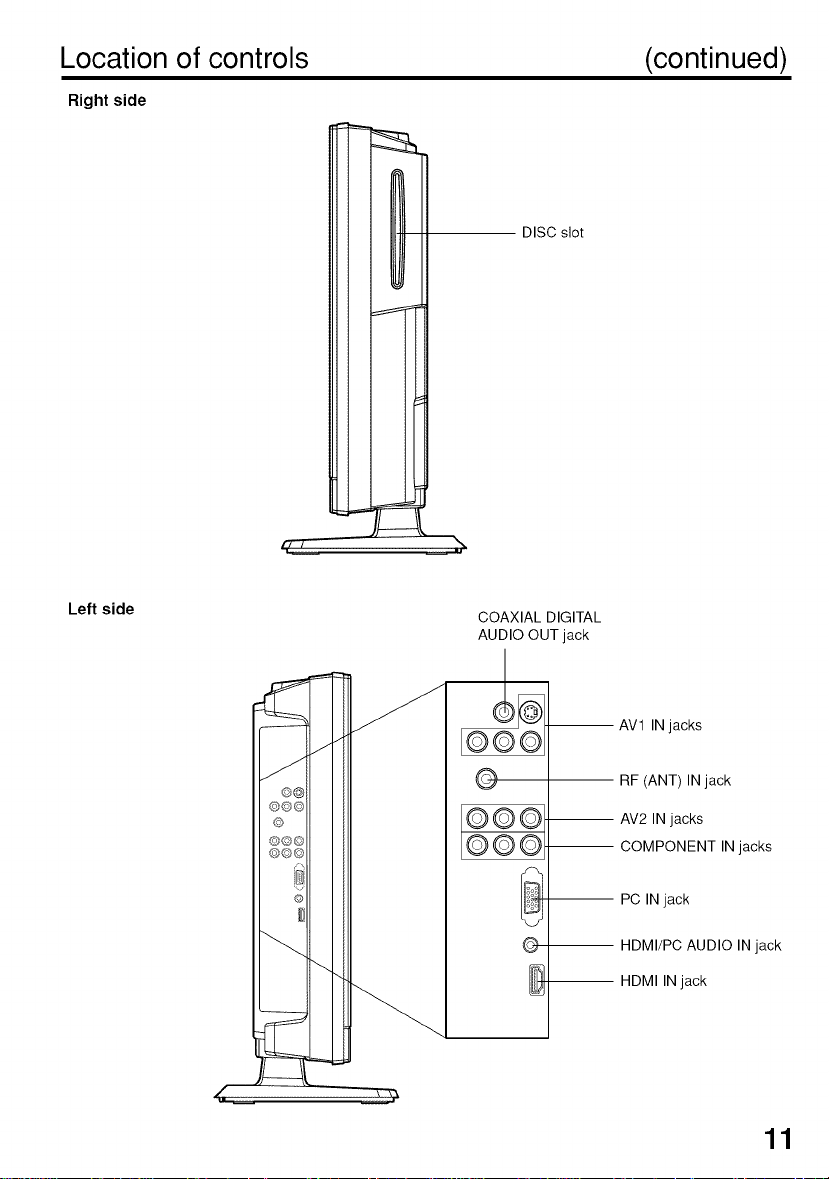
Location of controls (continued)
Right side
DISC slot
17/ ___
Left side
COAXIAL DIGITAL
AUDIO OUT jack
-- AV1 IN jacks
©
_©
-- AV2 IN jacks
©
-- HDMI IN jack
RF (ANT) IN jack
COMPONENT IN jacks
PC IN jack
HDMI/PC AUDIO IN jack
11
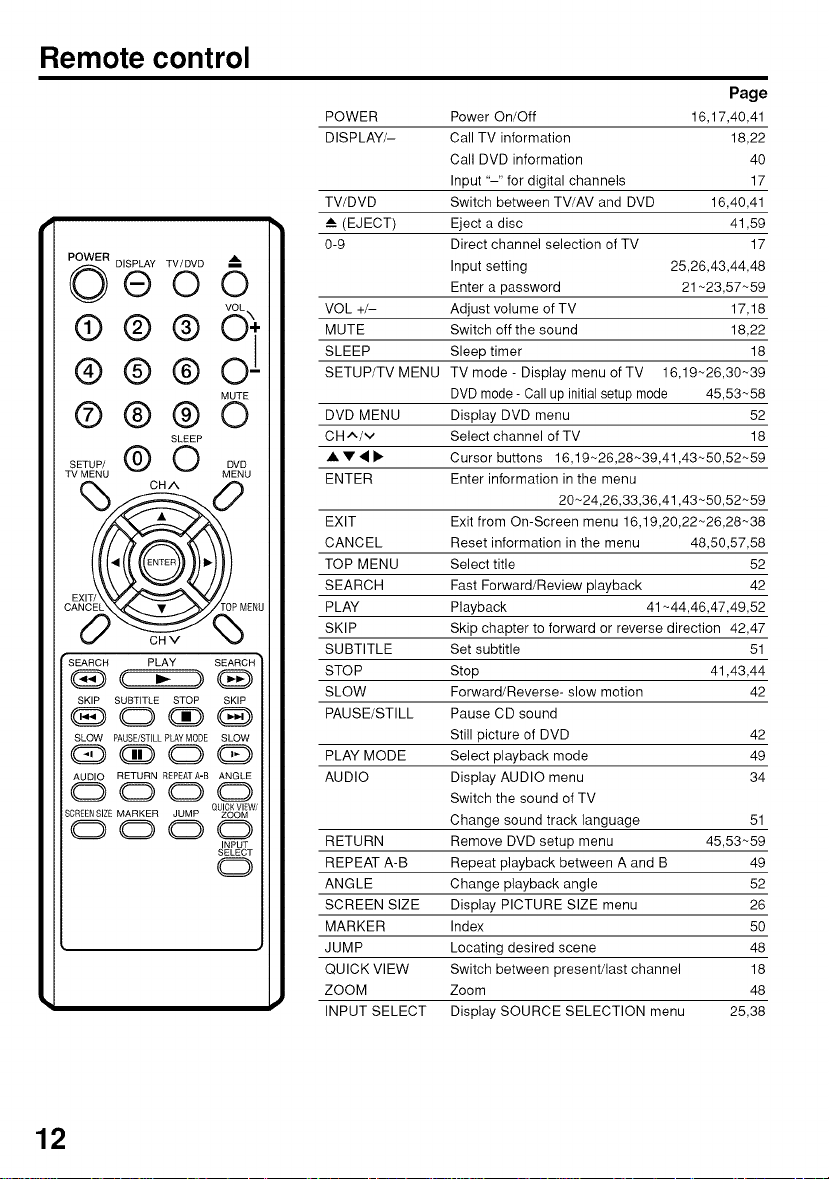
Remote control
DISPLAY TV/DMD®OO
VOL
®@@0*
®®®o !
MUTE
®@@0
SETUP/@OBMo
TV MENU MENU
EXIT_
CANC P MENU
d;:' c,v %
® ®
SKIP SUBTITLE STOP SKIP
SLOW PAUSE/STILL PLAYMODE SLOW
AUDIO RETURN REPEATA-B ANGLE
0000
SCREENSIZE MARKER JUMP ZOOM
0000
SLEEP
CHA 0
PLAY
QUICKVIEW/
INPUT
SELECT
0
Page
POWER Power On/Off 16,17,40,41
DISPLAY/- Call TV information 18,22
Call DVD information 40
Input "-" for digital channels 17
TV/DVD Switch between TV/AV and DVD 16,40,41
(EJECT) Eject a disc 41,59
0-9 Direct channel selection of TV 17
Input setting 25,26,43,44,48
Enter a password 21-23,57~59
VOL +/- Adjust volume of TV 17,18
MUTE Switch off the sound 18,22
SLEEP Sleep timer 18
SETUP/TV MENU TV mode - Display menu of TV 16,19~26,30~39
DVD mode- Call up initial setup mode 45,53~58
DVD MENU Display DVD menu 52
CH ^/v Select channel of TV 18
• • • 1_ Cursor buttons 16,19-26,28~39,41,43~50,52~59
ENTER Enter information in the menu
20-24,26,33,36,41,43-50,52~59
EXIT Exit from On-Screen menu 16,19,20,22-26,28~38
CANCEL Reset information in the menu 48,50,57,58
TOP MENU Select title 52
SEARCH Fast Forward/Review playback 42
PLAY Playback 41-44,46,47,49,52
SKIP Skip chapter to forward or reverse direction 42,47
SUBTITLE Set subtitle 51
STOP Stop 41,43,44
SLOW Forward/Reverse- slow motion 42
PAUSE/STILL Pause CD sound
Still picture of DVD 42
PLAY MODE Select playback mode 49
AUDIO Display AUDIO menu 34
Switch the sound of TV
Change sound track language 51
RETURN Remove DVD setup menu 45,53~59
REPEAT A-B Repeat playback between A and B 49
ANGLE Change playback angle 52
SCREEN SIZE Display PICTURE SIZE menu 26
MARKER Index 50
JUMP Locating desired scene 48
QUICK VIEW Switch between present/last channel 18
ZOOM Zoom 48
INPUT SELECT Display SOURCE SELECTION menu 25,38
12
Remote control (continued)
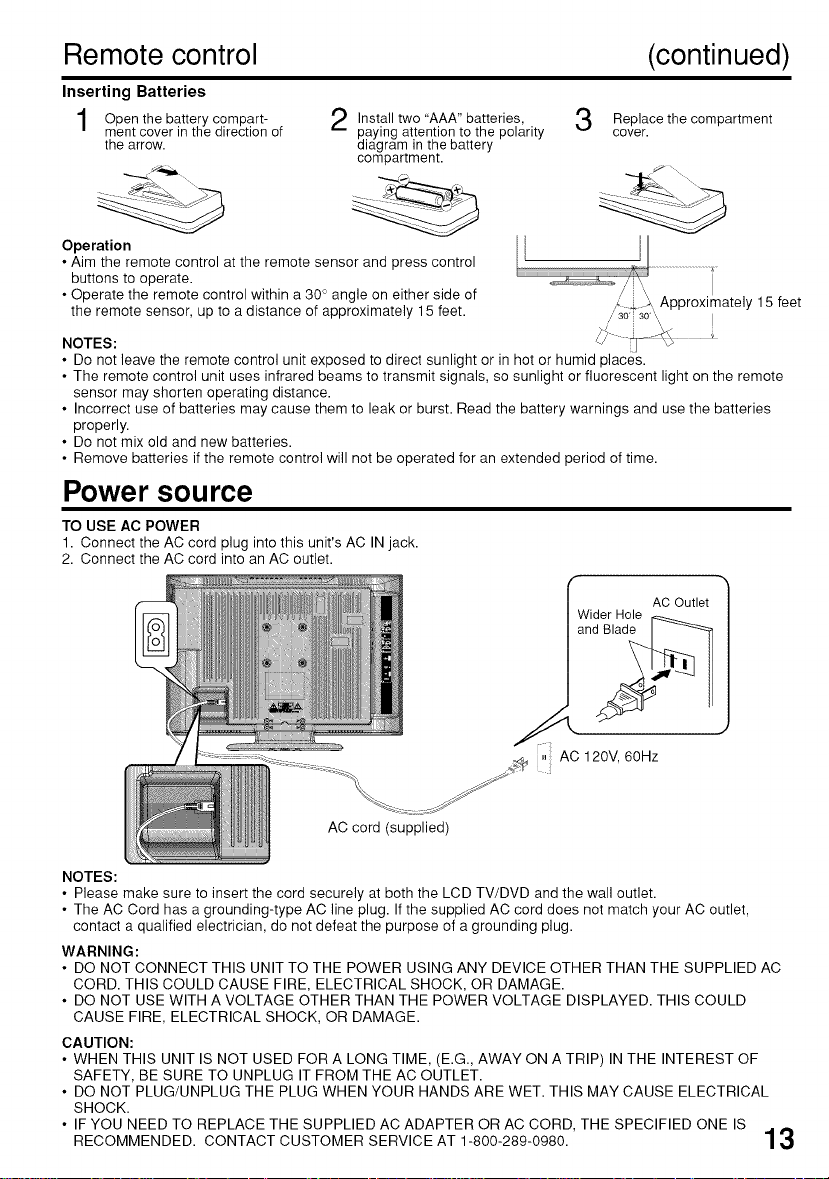
Inserting Batteries
the
Open
ment cover in the direction of
the arrow.
Operation
• Aim the remote control at the remote sensor and press control
buttons to operate.
• Operate the remote control within a 30 ° angle on either side of
the remote sensor, up to a distance of approximately 15 feet.
NOTES:
• Do not leave the remote control unit exposed to direct sunlight or in hot or humid places.
• The remote control unit uses infrared beams to transmit signals, so sunlight or fluorescent light on the remote
sensor may shorten operating distance.
• Incorrect use of batteries may cause them to leak or burst. Read the battery warnings and use the batteries
properly.
• Do not mix old and new batteries.
• Remove batteries if the remote control will not be operated for an extended period of time.
battery compart-
Install two "AAA" batteries,
paying attention to the polarity
diagram in the battery
compartment.
Replace the compartment
cover.
Power sou rce
TO USE AC POWER
1. Connect the AC cord plug into this unit's AC IN jack.
2. Connect the AC cord into an AC outlet.
Wider Hole
15 feet
AC Outlet 1
, AC 120V, 60Hz
AC cord (supplied)
NOTES:
• Please make sure to insert the cord securely at both the LCD TV/DVD and the wall outlet.
• The AC Cord has a grounding-type AC line plug. If the supplied AC cord does not match your AC outlet,
contact a qualified electrician, do not defeat the purpose of a grounding plug.
WARNING:
• DO NOT CONNECT THIS UNIT TO THE POWER USING ANY DEVICE OTHER THAN THE SUPPLIED AC
CORD. THIS COULD CAUSE FIRE, ELECTRICAL SHOCK, OR DAMAGE.
• DO NOT USE WITH A VOLTAGE OTHER THAN THE POWER VOLTAGE DISPLAYED. THIS COULD
CAUSE FIRE, ELECTRICAL SHOCK, OR DAMAGE.
CAUTION:
• WHEN THIS UNIT IS NOT USED FOR A LONG TIME, (E.G., AWAY ON A TRIP) IN THE INTEREST OF
SAFETY, BE SURE TO UNPLUG IT FROM THE AC OUTLET.
• DO NOT PLUG/UNPLUG THE PLUG WHEN YOUR HANDS ARE WET. THIS MAY CAUSE ELECTRICAL
SHOCK.
• IF YOU NEED TO REPLACE THE SUPPLIED AC ADAPTER OR AC CORD, THE SPECIFIED ONE IS
RECOMMENDED. CONTACT CUSTOMER SERVICE AT 1-800-289-0980. ]
Antenna connections
If you are using an indoor or outdoor antenna, follow the instructions below that correspond to your antenna
system. If you are using a Cable TV service, see page 15 for Cable TV connections.
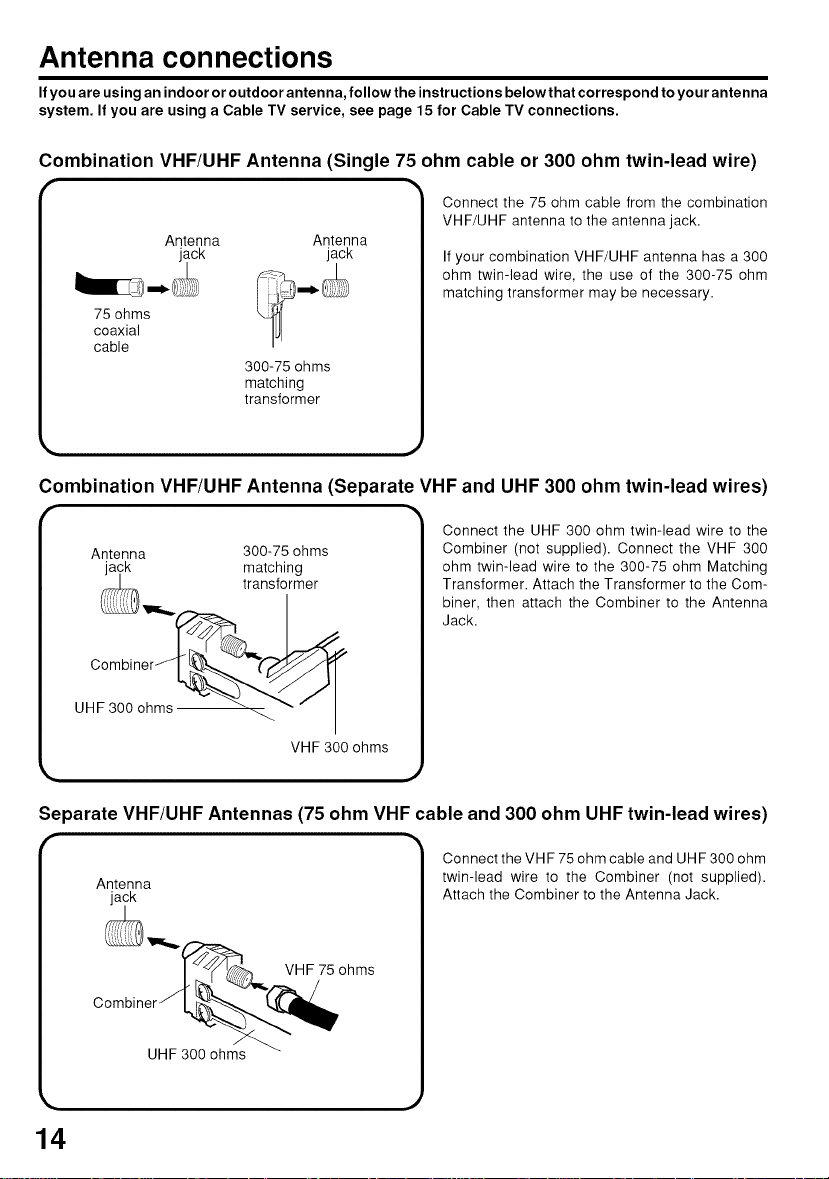
Combination VHF/UHF Antenna (Single 75 ohm cable or 300 ohm twin-lead wire)
Connect the 75 ohm cable from the combination
Antenna Antenna
jack jack
75 ohms
coaxial
cable
300-75 ohms
matching
transformer
Combination VHF/UHF Antenna (Separate VHF and UHF 300 ohm twin-lead wires)
Antenna 300-75 ohms
jack matching
transformer
VHF/UHF antenna to the antenna jack.
If your combination VHF/UHF antenna has a 300
ohm twin-lead wire, the use of the 300-75 ohm
matching transformer may be necessary.
Connect the UHF 300 ohm twin-lead wire to the
Combiner (not supplied). Connect the VHF 300
ohm twin-lead wire to the 300-75 ohm Matching
Transformer. Attach the Transformer to the Com-
biner, then attach the Combiner to the Antenna
Jack.
Combiner
UHF 300 ohms _'" I
VHF 300 ohms
Separate VHF/UHF Antennas (75 ohm VHF cable and 300 ohm UHF twin-lead wires)
Connect the VHF 75 ohm cable and UI-IF 300 ohm
Antenna
jack
Com_biner'_ _ VHF 75 ohms
twin-lead wire to the Combiner (not supplied).
Attach the Combiner to the Antenna Jack.
14
Cable TV connections
This TV/DVD has an extended tuning range and can tune most cable channels without using a Cable
TV Converter box. Some cable companies offer "premium pay channels" where the signal is
scrambled. Descrambling these signals for normal viewing requires the use of a descrambler device
which is generally provided by the Cable TV company.
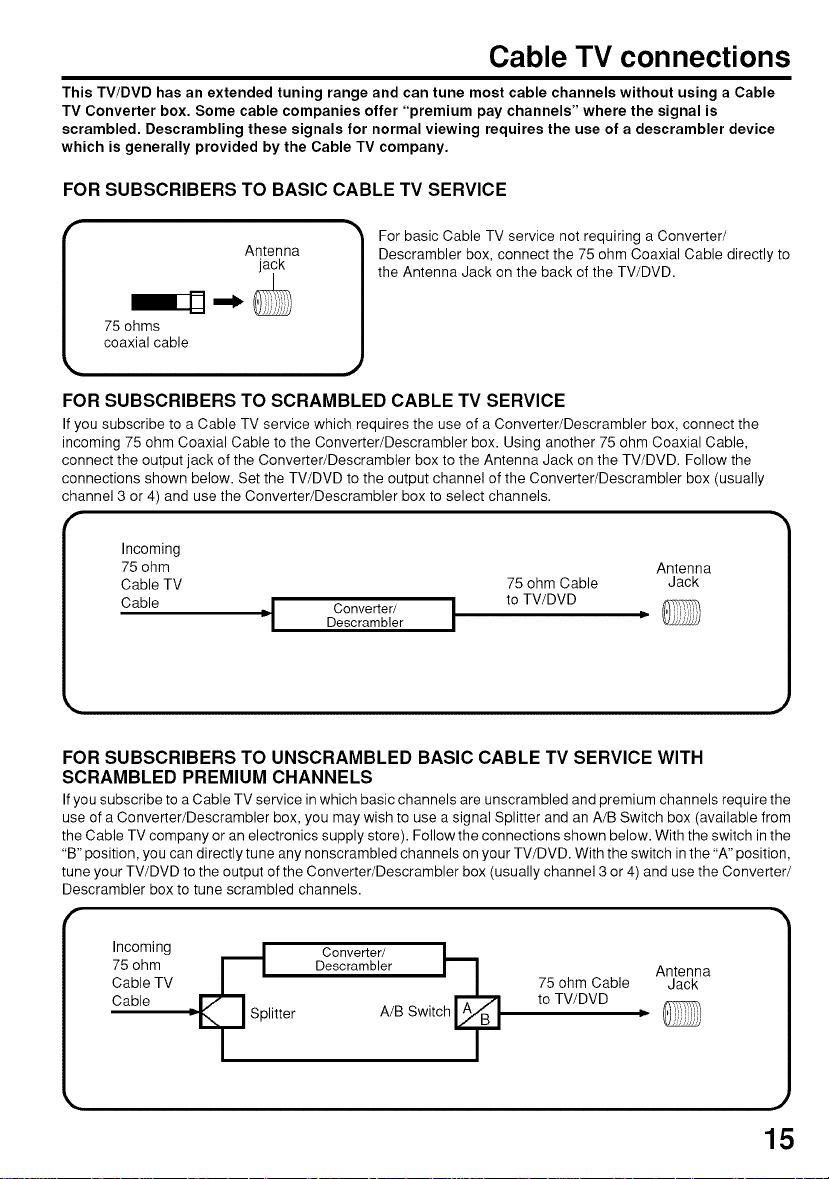
FOR SUBSCRIBERS TO BASIC CABLE TV SERVICE
Antenna
jack
75 ohms
coaxial cable
FOR SUBSCRIBERS TO SCRAMBLED CABLE TV SERVICE
If you subscribe to a Cable TV service which requires the use of a Converter/Descrambler box, connect the
incoming 75 ohm Coaxial Cable to the Converter/Descrambler box. Using another 75 ohm Coaxial Cable,
connect the output jack of the Converter/Descrambler box to the Antenna Jack on the TV/DVD. Follow the
connections shown below. Set the TV/DVD to the output channel of the Converter/Descrambler box (usually
channel 3 or 4) and use the Converter/Descrambler box to select channels.
Incoming
75 ohm Antenna
Cable TV 75 ohm Cable Jack
Cable =1 DescramblerConverter/ I to TV/DVD •
FOR SUBSCRIBERS TO UNSCRAMBLED BASIC CABLE TV SERVICE WITH
SCRAMBLED PREMIUM CHANNELS
If you subscribe to a Cable TV service in which basic channels are unscrambled and premium channels require the
use of a Converter/Descrambler box, you may wish to use a signal Splitter and an A/B Switch box (available from
the Cable TV company or an electronics supply store). Follow the connections shown below. With the switch in the
"B" position, you can directly tune any nonscrambled channels on your TV/DVD. With the switch in the "A" position,
tune your TV/DVD to the output of the Converter/Descrambler box (usually channel 3 or 4) and use the Converter/
Descrambler box to tune scrambled channels.
For basic Cable TV service not requiring a Converter/
Descrambler box, connect the 75 ohm Coaxial Cable directly to
the Antenna Jack on the back of the TV/DVD.
75 ohm Descrambler Antenna
Cable TV 75 ohm Cable Jack
Cable to TV/DVD
:- litter A/B Switc t,
C°verter
15
Setting the on-screen display language
You can choose from three different
languages (English, French and
Spanish) for the on-screen displays.
On-screen language selecion (step 5)
will automatically appear on the
screen when you press SETUP/MENU
initially. Select the language you
prefer first, then proceed with the
other menu options.
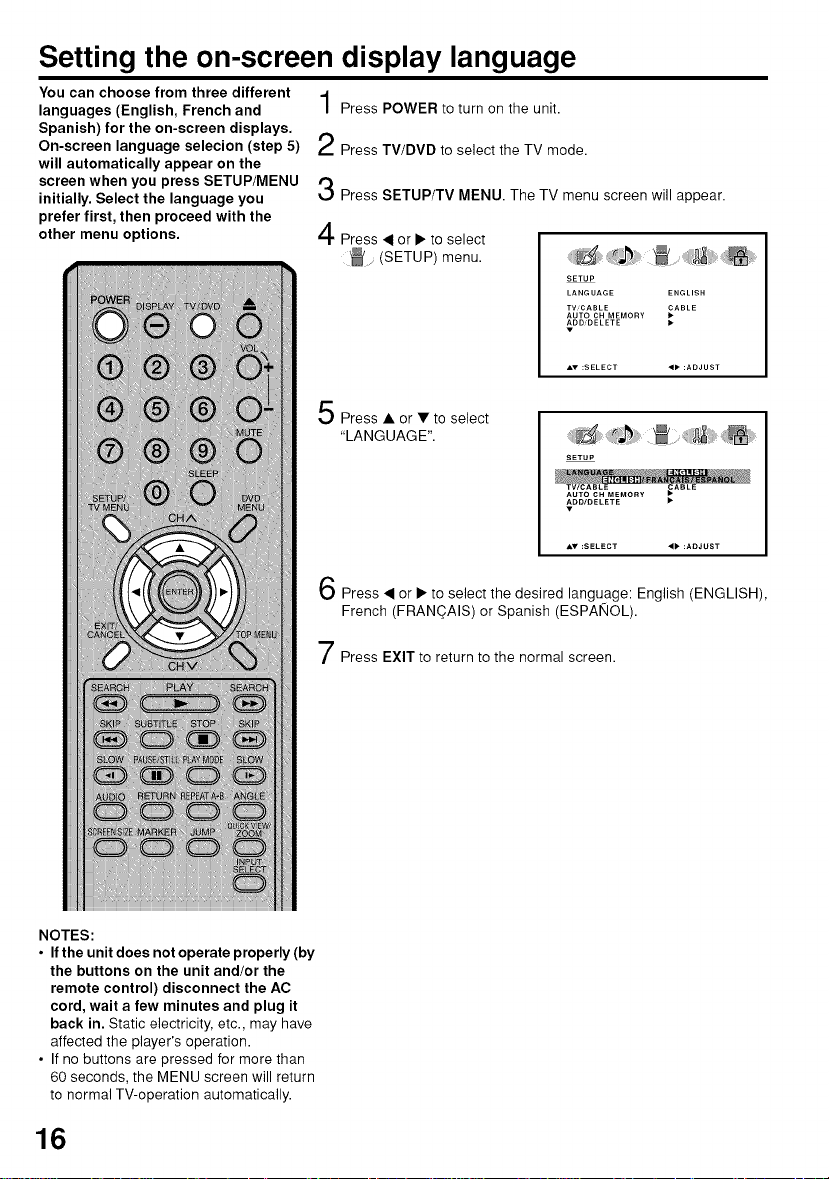
Press POWER to turn on the unit.
Press TV/DVD to select the TV mode.
Press SETUP/TV MENU. The TV menu screen will appear.
Press ,< or • to select
(SETUP) menu.
Press • orVtoselect
"LANGUAGE". irJ_
Press < or • to select the desired language: English (ENGLISH),
French (FRANOAIS) or Spanish (ESPANOL).
SETUP
LANGUAGE ENGLISH
TV,CABLE _ABLE
AUTO CH MEMORY
ADD,DELETE
SETUP
NOTES:
• If the unit does not operate properly (by
the buttons on the unit and/or the
remote control) disconnect the AC
cord, wait a few minutes and plug it
back in. Static electricity, etc., may have
affected the player's operation.
• If no buttons are pressed for more than
60 seconds, the MENU screen will return
to normal TV-operation automatically.
16
Press EXIT to return to the normal screen.
NOTES:
• If a channel with no broadcast is
selected, the sound will automati-
cally be muted.
• It may take a few seconds for a
digital channel picture to appear on
screen after being selected.
TV operation
To turn on the unit, press POWER.
Adjust the volume level by pressing
VOL + or -. The volume level will
be indicated on the screen by white
bars. As the volume level increases,
so do the number of bars. If the
volume decreases, the number of
white bars also decreases.
Set the TV/CABLE menu
option to the appropriate
position (see page 19).
Press the Direct Channel Selection
(0-9,-) buttons to select the channel.
To select analog channels
When the TV/CABLE menu option is
in the TV position, all channels can be
instantly selected by using two
buttons.
(For example, to select channel 2, press "0", then "2". If you press
only "2", channel selection will be delayed for a few seconds.)
For channels 10 and above, press the 2 digits in order.
When the TV/CABLE menu option is in the CABLE position,
channels can be selected as follows:
1-9: Press 0 twice, then 1-9 as needed.
10-12: Press 0, then remaining 2 digits.
13-99: Press the 2 digits in order.
100-125: Press the 3 digits in order.
To select digital channels
Press the channel number in order.
When "-" is contained in the channel number, Press the first 3
digits, then press "-/DISPLAY", followed by the remaining 3 digits.
(Example, to select channel 015-001, press 015- 001 .)
• If a channel is selected with only audio content, "AUDIO ONLY"
• If a channel is selected with a weak digital signal, "DIGITAL
• If a channel is selected to which you have not subscribed, "DIGITAL
VHF/UHF/CABLE CHANNELS
Example, to select channel 2, press 002.
Example, to select channel 12, press 012.
Example, to select channel 36, press 36.
Example, to select channel 120, press 120.
will be displayed on the screen.
CHANNEL SIGNAL STRENGTH IS LOW" will be displayed on
the screen.
If the digital channel has the same analog channel, you may be
able to watch the same channel with analog.
CHANNEL IS ENCRIPTED" will be displayed on the screen.
TV CABLE
VHF VHF
2-13 2-13
UHF STD/HRC/IRC
14-69 14-38 (A) (W)
37-59 (AA) (WW)
60-85 (AAA) (ZZZ)
86-94 (86) (94)
95-99 (A-5) (A-1)
100-125 (100) (125)
01 (5A)
17
TV operation (continued)
CH .,,./v
Press and release CH ,_. or V .The channel
automatically stops at the next channel set
into memory.
For proper operation, before selecting
channels, they should be set into the memory.
See pages 19 and 20 "Memorizing channels".
DISPLAY
Press DISPLAY to display the current information on the screen.
When the TV receives a digital signal, the
digital information will appear.
Channel number
Broadcast program name
Station name • Remaining time
Audio language • Program guide
V-CHIP RATING • V-Chip mark
Sleep time • Picture size
When the TV receives a analog signal, the
analog information will appear.
• Channel number orVlDEO mode
selected
• Channel label (if preset)
• Stereo or SAP (second audio program)
audio status
• Content rating
• Sleep time
• Picture size
Press DISPLAY again to clear the call display.
QUICK VIEW
This button allows you to go back to the last
channel selected by pressing QUICK VIEW.
Press QUICK VIEW again to return to the last
channel you were watching.
CABLE
ANALOG
NOTES:
• The unit is capable of holding a still
video image or On screen display
image on your television screen
indefinitely. If you leave the still video
image or On screen display image
MUTE
Press MUTE to switch off the sound. The unit's
sound will be silenced and "MUTE" will briefly
appear on the screen.The sound can be
switched back on by pressing this button again
or the VOL + or-.
displayed on your unit for an extended
period of time, you risk permanent
damage to your television screen.
• When the TV receives an analog
signal, DISPLAY shows only analog
information.
• After 10 seconds, DISPLAY screen will press of the SLEEP button (OFE 0hl0m .....
return to normal TV-operation auto-
matically, when a Digital signal is
received.
After 4 seconds, DISPLAY screen will
return to normal TV-operation auto-
matically, when a Analog signal is
received.
SLEEP
To set the unit to turn off after a preset amount
of time, press SLEEP on the remote control.
The clock will count up 10 minutes for each
1h50m, 2h00m). After the sleep time is
programmed, the display will appear briefly
every ten minutes to remind you that the sleep
timer is operating. To confirm the sleep timer setting, press SLEEP and the
remaining time will be displayed for a few seconds. To cancel the sleep timer,
press SLEEP repeatedly until the display turns to OFE
18
SLEEPTEMER
2_OOm
Memorizing channels
This TV/DVD is equipped with a channel memory feature which allows channels to skip up or down to
the next channel set into memory, skipping over unwanted channels. Before selecting channels, they
must be programmed into the TV/DVD's memory. To use this TV/DVD with an antenna, set the TV/
CABLE menu option to the TV mode. When shipped from the factory, this menu option is in the CABLE
mode.
TV/CABLE selection
Press SETUP/TV MENU in the TV mode.
The TV menu screen will appear.
Press • or I1_to select
(SETUP) menu.
Press • or •to select
"TV/CABLE".
Press • or 1_to select "TV" or
"CABLE".
SETUP
LANGUAGE ENGLISH
TVCABLE _ABLE
AUTO CH MEMORY
ADD'DELETE
SETUP
LANGUAGE ENGLISH
AUTO CH MEMORY _'_
_DD'DELETE
SETUP
LANGUAGE ENGLISH
AUTO CH MEMORY
ADD'DELETE
NOTE:
It may take a few seconds for a
digital channel picture to appear on
screen after being selected.
Press EXIT to return to the normal screen.
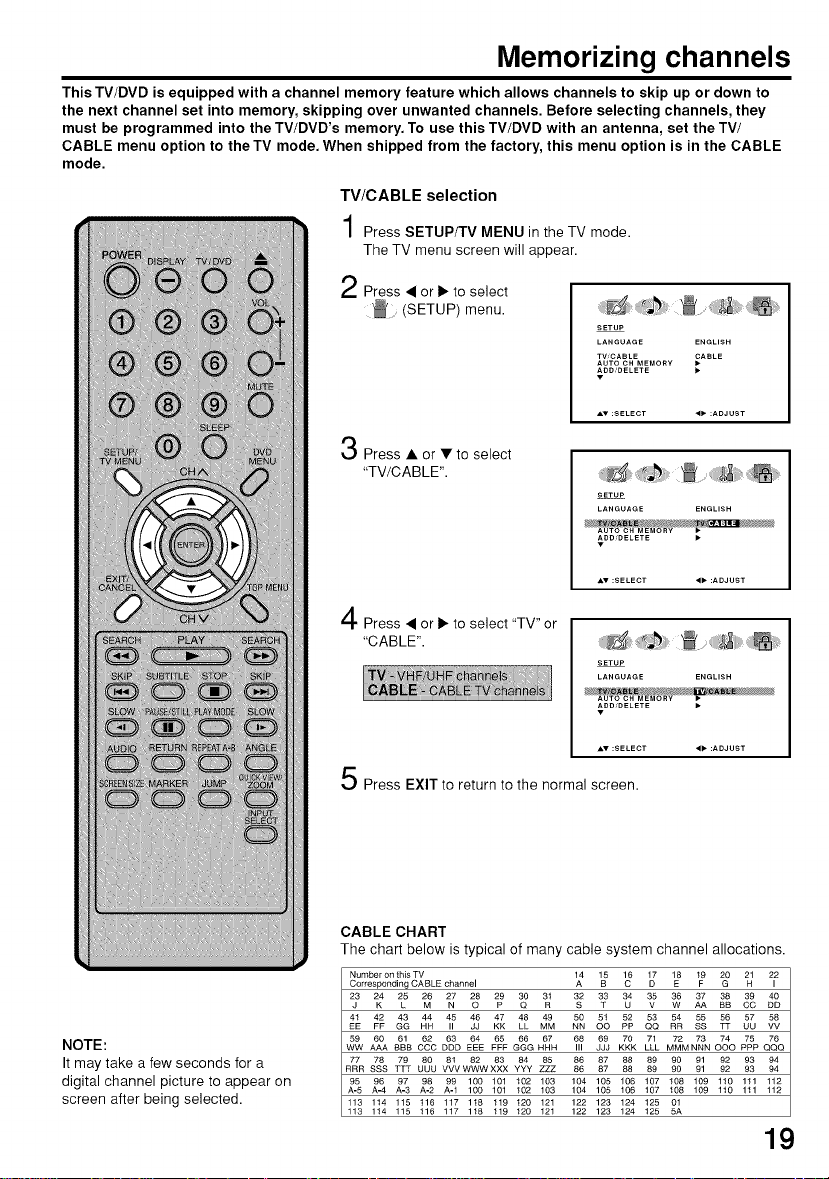
CABLE CHART
The chart below is typical of many cable system channel allocations.
Number on this TV
Corresponding CABLE ...... I 1_ 15 _6 1_ 18 19 _ _ 22
23 2K4 28 _ _ _ 2p9 _ 3R1 32 33 _ 3V5 _ 37 38 39 40
41 42 43 44 45 46 47 48 49 50 5t 52 53 54 55 56 57 58
EE FF GG HN // JJ KK LL MM NN OO PP QQ RR SS TT UU VV
59 A6A0A 61 62 D63D F64 65 86 H67 H 68 6j_ K7OK 71L 72 73 O7(¢O p75p Q7C6Q
WW BBB CCC
77 78 79 80 81 82 8384 85 86 87 88 89 90 91 92 93 94
RRR SSS TTT UUU VVV WWW XXX YYY ZZZ 86 87 88 89 90 91 92 93 94
95 96 97 98 99 100 101 t02 103 104 105 106 t07 108 109 110 111 112
5 A-4 A-3 A-2 A-1 100 101 102 103 104 105 106 t07 t08 109 1t0 1tl 112
113 1t4 115 t16 117 1t8 119 t20 121 122 123 124 125 01
113 114 115 116 117 118 119 120 121 122 123 124 t25 5A
MMM NNNFFF GGG
DDBBAA CC
19
Memorizing channels (continued)
Automatic memory tuning
Press SETUP/TV MENU in the TV mode.
The TV menu screen will appear.
2 Press • or • to select _ .......
(SETUP) menu, then press • or
• to select "AUTO CH MEMORY".
Press • or •. The unit will begin
memorizing all the channels
available in your area.
• It may take from 15 minutes to
30 minutes to complete
memorizing digital cable
channels.
Depending on the reception condition, a BAR display may not
advance for several minutes, please be patient.
To ADD/DELETE channels
Press SETUP/TV MENU.The menu screen will appear.
Press • or • to select
(SETUP) menu, then press • or
• to select "ADD/DELETE".
Press • or •. The ADD/DELETE
menu will appear.
SETUP
LANGUAGE ENgLiSH
TV,CASLE CASLE
ADmDELETE •
A" _SELECT ,_ _ADJUST
AUTOCH _4EMOR¥
\ \ / /
P_O_AMM_NG NOW
PLEASEWA_T
/ / \ \ CASTE
Ex_r : CANCE_
SETUP
LANGUAGE ENGUSH
TW_C_BLE _ABLE
AUTO CHMEMORY
NOTES:
• Memorizing channels is best
accomplished during evening
"PRIMETIME" hours, as more
stations are broadcasting digital
signals. Memorizing channels can
only be accomplished while a
station is broadcasting a digital
signal to set that channel into
memory.
• If you are unsure of the digital
channels available in your area you
may visit www.antennaweb.org
to receive a list based on your
address or zip code. Should you
require further assistance you may
call our toll-free customer service
line at 1-800-289-0980.
• New digital channels may be
added to your area periodically, it
is recommended to perform the
"AUTO CH MEMORY" procedure
regularly.
• To return from ADD/DELETE menu
to SETUP menu, select "RETURN",
then press • or •.
2O
3
Press • or • to select
"ADD/DELETE", then press
•or•.
S ANALO_ AOO
S-001 DiGiTAL AOO
RETURN
4
Select the desired channel to
be memorized or deleted using
•or•.
Press • or • to select "ADD" or
"DELETE", whichever function
you want to perform.
5
Repeat step 4 for other channels you want to add or delete, then
press ENTER.
Press EXIT to return to the normal screen.
To add a digital channel
Select the channel you wish to add.
Press • or • to select "ADDING CHANNEL" as in step 3 above,
then press • or •.
CLEAR ALL
All channels are deleted from the channel memory.
Press • or • to select "CLEAR ALL" in step 3 above,
then press • or •.
AOmDELETE
AOmNG CHANNEL
_Om_O_LETE
*C_ S_GNAL
CL_A_ ALL
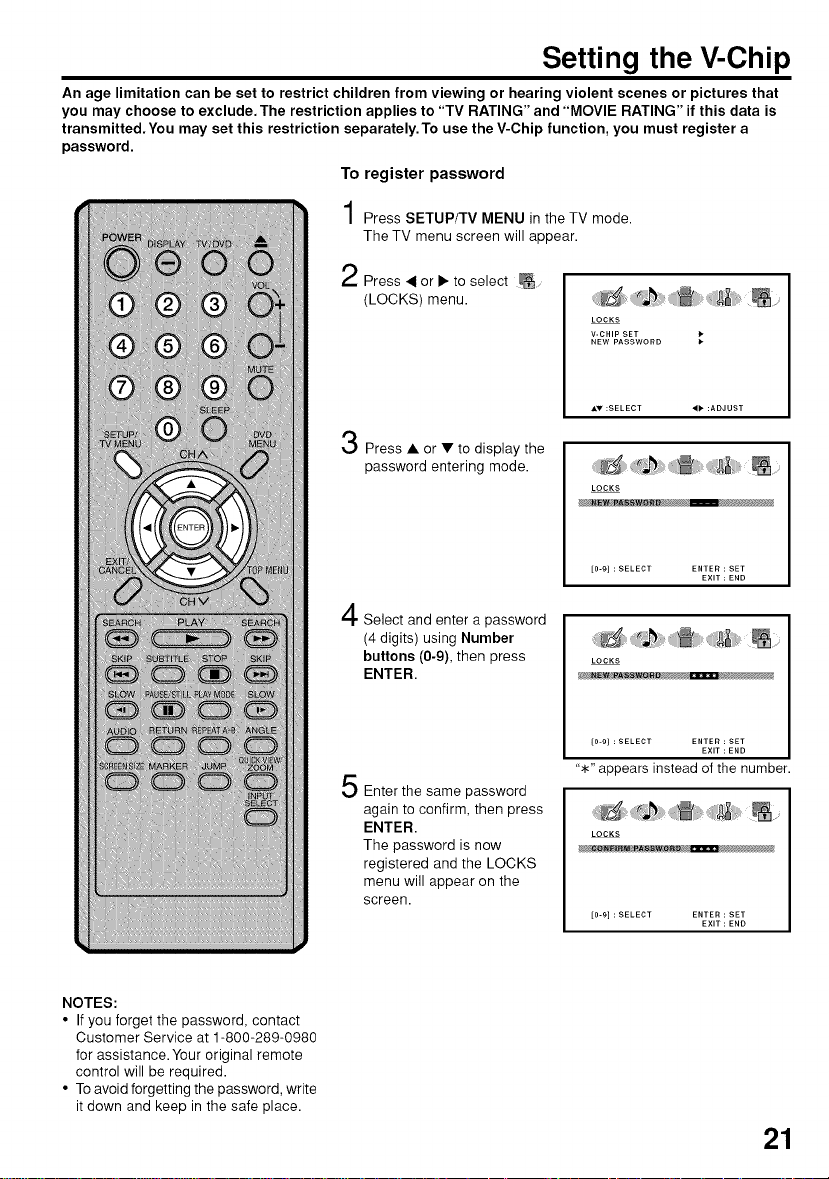
Setting the V-Chip
An age limitation can be set to restrict children from viewing or hearing violent scenes or pictures that
you may choose to exclude. The restriction applies to "TV RATING" and "MOVIE RATING" if this data is
transmitted.You may set this restriction separately.To use the V-Chip function, you must register a
password.
To register password
Press SETUP/TV MENU in the TV mode.
The TV menu screen will appear.
r't
,I Press _ or I_ to select _ ....
(LOCKS) menu.
Press • or • to display the
password entering mode.
LOCKS
V-CHIP SET
NEW PASSWORD
LOCKS
NOTES:
• If you forget the password, contact
Customer Service at 1-800-289-0980
for assistance.Your original remote
control will be required.
• To avoid forgetting the password, write
it down and keep in the safe place.
Select and enter a password
(4 digits) using Number
buttons (0-9), then press
ENTER.
Enter the same password
again to confirm, then press
ENTER.
The password is now
registered and the LOCKS
menu will appear on the
screen.
[0-9] : SELECT ENTER : SET
LOCKS
[0-9] : SELECT ENTER : SET
EXIT : END
EXIT : END
"*" appears instead of the number.
LOCKS
[0-9] : SELECT ENTER : SET
EXIT : END
21
Setting the V-Chip (continued)
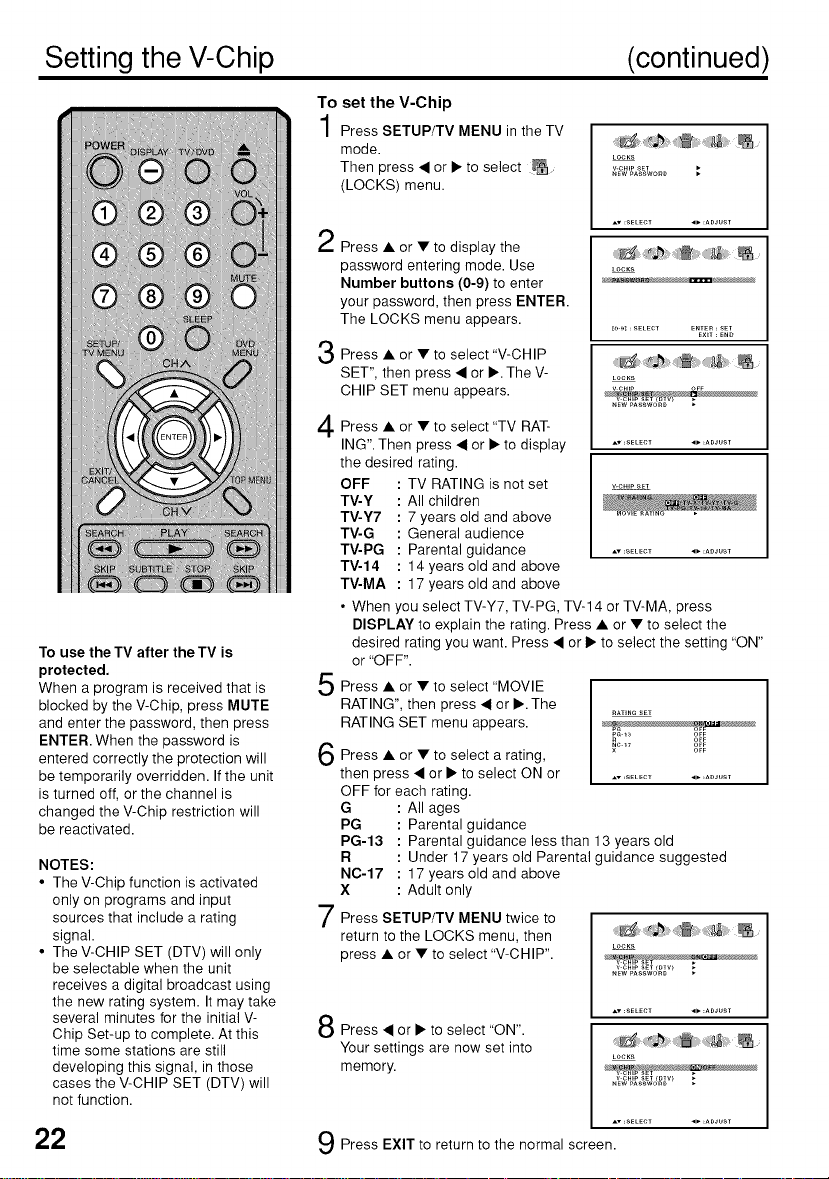
To set the V-Chip
Press SETUP/TV MENU in the TV
mode.
Then press • or • to select _ _°_,K_A%._,O_O;
(LOCKS) menu.
Av :_ELECT ,, :ADJ/IST
Press • or • to display the
password entering mode. Use .....
Number buttons (0-9) to enter
your password, then press ENTER.
To use theTV after theTV is
protected.
When a program is received that is
blocked by the V-Chip, press MUTE
and enter the password, then press
ENTER. When the password is
entered correctly the protection will
be temporarily overridden. If the unit
is turned off, or the channel is
changed the V-Chip restriction will
be reactivated.
NOTES:
• The V-Chip function is activated
only on programs and input
sources that include a rating
signal.
• The V-CHIP SET (DTV) will only
be selectable when the unit
receives a digital broadcast using
the new rating system. It may take
several minutes for the initial V-
Chip Set-up to complete. At this
time some stations are still
developing this signal, in those
cases the V-CHIP SET (DTV) will
not function.
22
The LOCKS menu appears.
or
Press • • to select "V-CHIP
SET", then press • or •. The V- L....
CHIP SET menu appears. _
A or to
Press • select "TV RAT-
ING". Then press • or • to display ..................
the desired rating.
OFF : TV RATING is not set .........
TV-Y : All children
TV-Y7 : 7 years old and above
TV-G : General audience
TV-PG : Parental guidance ...................
TV-14 : 14 years old and above
TV-MA : 17 years old and above
• When you select TV-Y7, TV-PG, TV-14 or TV-MA, press
DISPLAY to explain the rating. Press • or • to select the
desired rating you want. Press • or • to select the setting "ON"
or "OFF".
Press • or • to select "MOVIE
RATING", then press • or •.The
RATING SET menu appears.
6 Press• or• tose eetarating,
then press • or • to select ON or ..................
OFF for each rating.
G : All ages
PG : Parental guidance
PG-13 : Parental guidance less than 13 years old
R : Under 17 years old Parental guidance suggested
NC-17 : 17 years old and above
X : Adult only
Press SETUP/TV MENU twice to
return to the LOCKS menu, then
press • or • to select "V-CHIP".
Press • or • to select "ON".
Your settings are now set into _ ....
memory.
Press EXIT to return to the normal screen.
[o_, SELECT ENTER,SET
RATINGSET
LOCKS
v crop SET{DTV_
NEWPASSWORD
AV,SELECT ,_, :ADJUST
LOCKS
A. =SELECT _, :ADJUST
EXiT: END
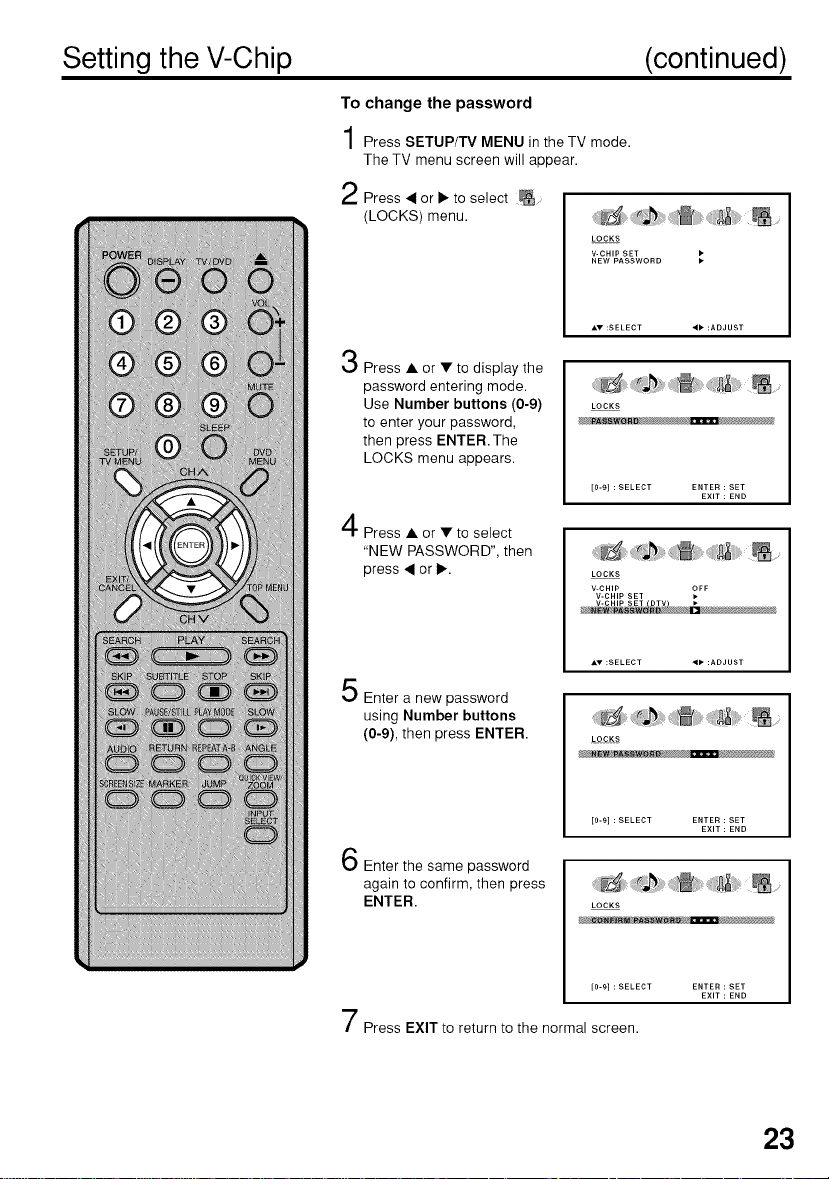
Setting the V-Chip (continued)
To change the password
Press SETUP/TV MENU in the TV mode.
The TV menu screen will appear.
2 Press ._or • to select
(LOCKS) menu.
LOCKS
V-CHIP SET
NEW PASSWORD
Press • or • to display the
password entering mode.
Use Number buttons (0-9)
to enter your password,
then press ENTER. The
LOCKS menu appears.
Press•or•toselect
"NEW PASSWORD", then
press,_or•.
LOCKS
[0-9] : SELECT ENTER : SET
LOCKS
V-CHIP _FF
V-CHIP SET
V-CHIP SET DTV •
EXIT : END
Enter a new password
using Number buttons
(0-9), then press ENTER.
LOCKS
[0-9] : SELECT ENTER : SET
Enter the same password
again to confirm, then press
ENTER.
LOCKS
[0-9] : SELECT ENTER : SET
Press EXIT to return to the normal screen.
EXIT : END
EXIT : END
23
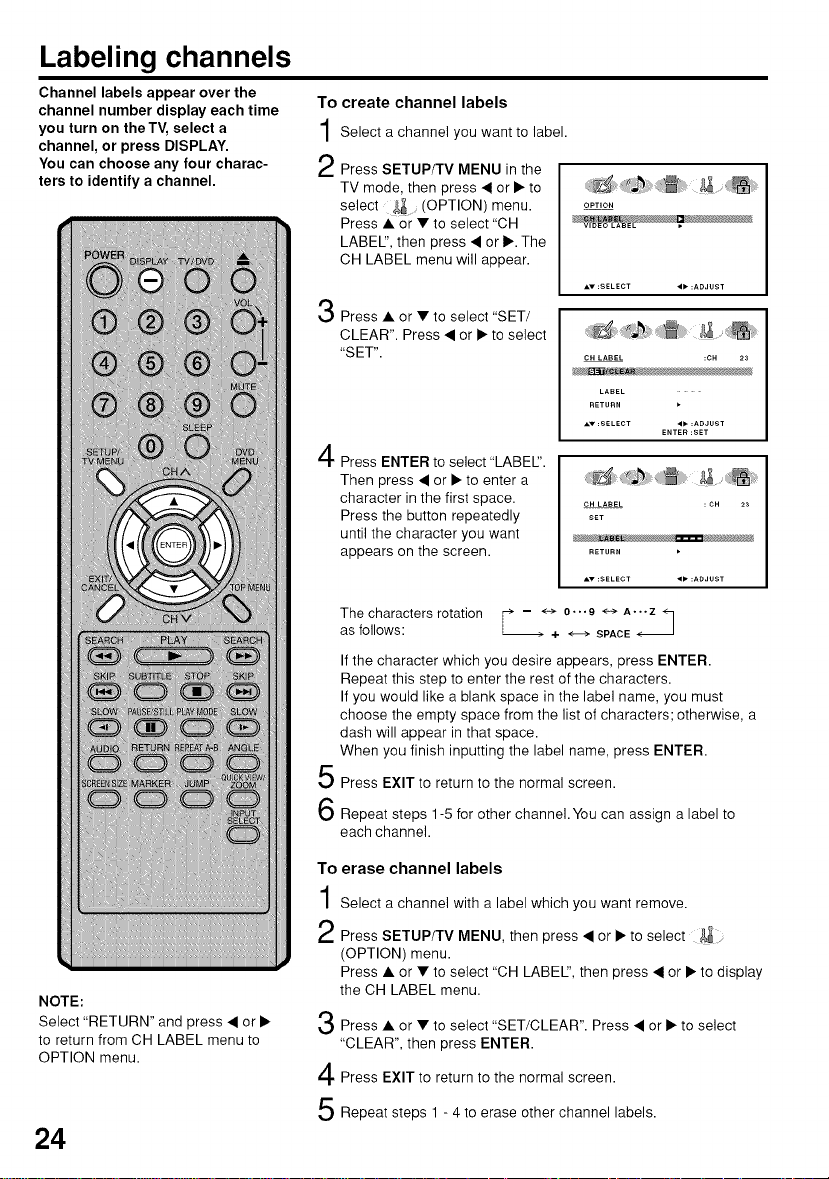
Labeling channels
Channel labels appear over the
channel number display each time
you turn on theTV, select a
channel, or press DISPLAY.
You can choose any four charac-
ters to identify a channel.
To create channel labels
Select a channel you want to label.
Press SETUP/TV MENU in the
TV mode, then press • or • to
select (OPTION) menu.
Press • or • to select "CH
LABEl", then press • or •. The
CH LABEL menu will appear.
OPTION
Press • or • to select "SET/
CLEAR". Press • or • to select
"SET".
Press ENTER to select "LABEl".
Then press • or • to enter a
character in the first space.
Press the button repeatedly
until the character you want
appears on the screen.
The characters rotation - <-_
as follows: + <--->SPACE
If the character which you desire appears, press ENTER.
Repeat this step to enter the rest of the characters.
If you would like a blank space in the label name, you must
choose the empty space from the list of characters; otherwise, a
dash will appear in that space.
When you finish inputting the label name, press ENTER.
5
Press EXIT to return to the normal screen.
6
Repeat steps 1-5 for other channel. You can assign a label to
each channel.
CH LABEL :OH 23
LABEL
RETURN
AY:SELECT <_ :ADJUST
OH LABEL :OH 23
BET
RETURN
&V:SELECT _':ADJUST
0""9 <-> A..._
ENTER:SET
NOTE:
Select "RETURN" and press • or •
to return from CH LABEL menu to
OPTION menu.
24
To
erase channel labels
1
Select a channel with a label which you want remove.
2
Press SETUP/TV MENU, then press • or • to select
(OPTION) menu.
Press • or • to select "CH LABEl", then press • or • to display
the CH LABEL menu.
3
Press • or • to select "SET/CLEAR". Press • or • to select
"CLEAR", then press ENTER.
4
Press EXIT to return to the normal screen.
5
Repeat steps 1 - 4 to erase other channel labels.
Selecting the video input source/
Labeling the video input source
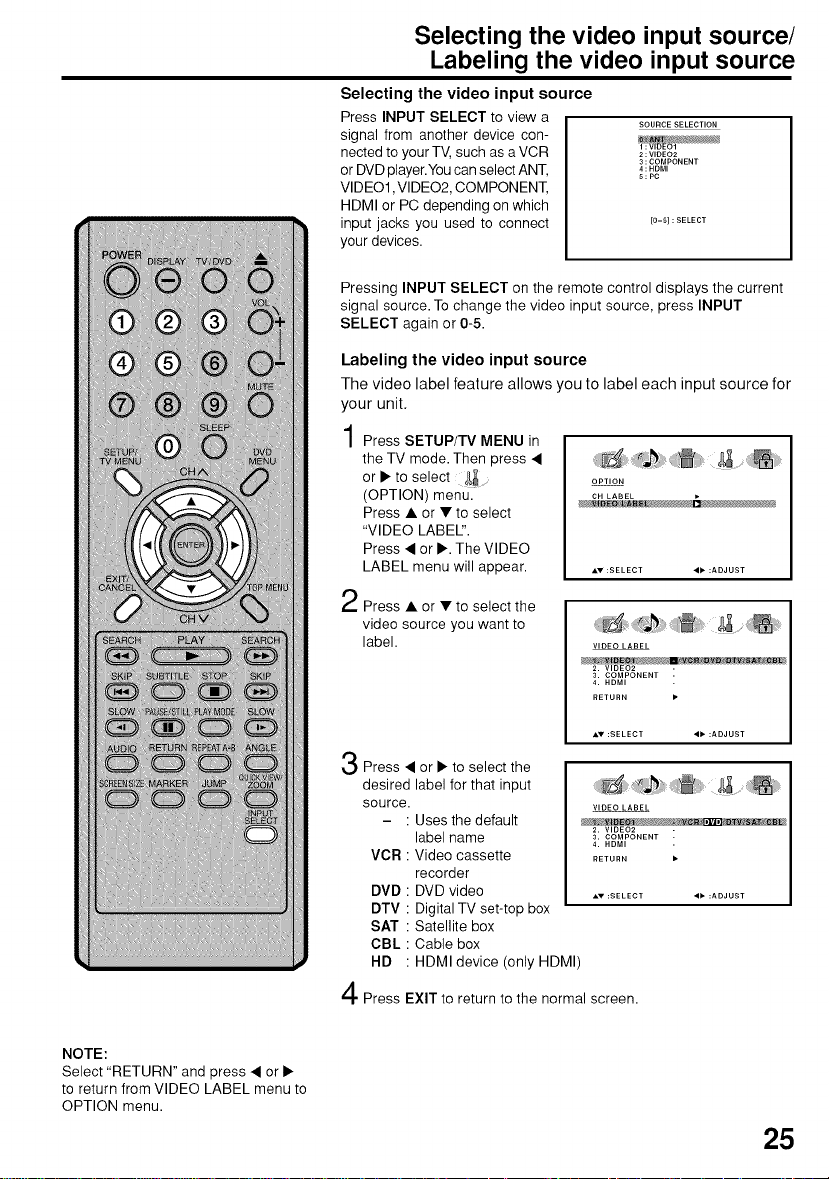
Selecting the video input source
Press INPUT SELECT to view a
signal from another device con-
nected to your TV, such as aVCR
or DVD player.You can select ANT,
VIDEO1, VIDEO2, COMPONENT,
HDMI or PC depending on which
input jacks you used to connect
your devices.
Pressing INPUT SELECT on the remote control displays the current
signal source. To change the video input source, press INPUT
SELECT again or 0-5.
Labeling the video input source
The video label feature allows you to label each input source for
your unit,
Press SETUP/TV MENU in
the TV mode. Then press •
or • to select .... OPT,ON
(OPTION) menu. OH LABEL ,
Press • or • to select
"VIDEO LABEl".
Press • or •. The VIDEO
LABEL menu will appear. ,,,,:SELECT 4_":ADJUST
Press • or •to select the
video source you want to
label.
SOURCE SELECTION
2:VIDEO2
3:COMPONENT
4:HDMI
S:PC
[0-51 : SELECT
VIDEO LABEL
2. VIDEO2
3. COMPONENT -
4. HDMI
RETURN •
NOTE:
Select "RETURN" and press • or •
to return from VIDEO LABEL menu to
OPTION menu.
Press • or • to select the
desired label for that input
source.
- : Usesthe default
label name
VCR : Video cassette
VIDEO LABEL
2. VIDEO2
3. COMPONENT -
4. HDMI
RETURN •
recorder
DVD : DVD video ,_v:SELECT
DTV : Digital TV set-top box
SAT : Satellite box
CBL : Cable box
HD : HDMI device (only HDMI)
Press EXIT to return to the normal screen.
25

Setting the picture size
You can view 480i and 480p format
programs in a variety of picture
sizes--NATURAL, CINEMA
WIDE1, CINEMA WIDE2, CINEMA
WIDE& and FULL.
Selecting the picture size
Press SETUP/TV MENU. Press
• or • to select (SETUP)
menu. Press • or • to select
"PICTURE SIZE".
SETUP
mCTURESCROLL •
C_NEMAMO_E F_LM
ASPIC'; OFF
SIGNALME';ER _O
Press • or •. The PICTURE
2
SIZE menu will appear. Press ,&/
• or a Number button (0-4) to
select the desired picture size, as
described below and on the next
page, then press ENTER.
Press EXIT to return to the normal screen.
NOTE:
You can also display the PICTURE SIZE menu by pressing the
SCREEN SIZE button on the remote control.
NATURAL picture size
In some cases, this image will display the size of standard 4:3
with a black side bar.
PJCTUR_S_ZE
0:NATURAL
1:CINEMAWIDE_
2:CINEMAWl_2
3:CINEMAWIDE3
I
CINEMA WIDE1 picture size (for 4:3 format programs)
To fill the screen, the right and left edges are extended, however;
the center of the picture remains near its former ratio.
The top and bottom edges of the picture may be hidden.
NOTE:
Some High Definition and/or Digital
broadcasts may not allow you to
change the picture size.
26
Setting the picture size (continued)
NOTES:
• In HDMI or COMPONENT mode
with a scanning rate of 720p or
1080i, only the CINEMA WIDE2
and FULL PICTURE SIZE feature
are available.
• The PICTURE SIZE feature is in
the PC mode only for NATURAL or
FULL.
• In CINEMA WIDE2 picture size,
some of the on screen display
items may be positioned off the
visible portion of the screen. You
can use Picture Scroll, as
explained on the right, to view off
screen items.
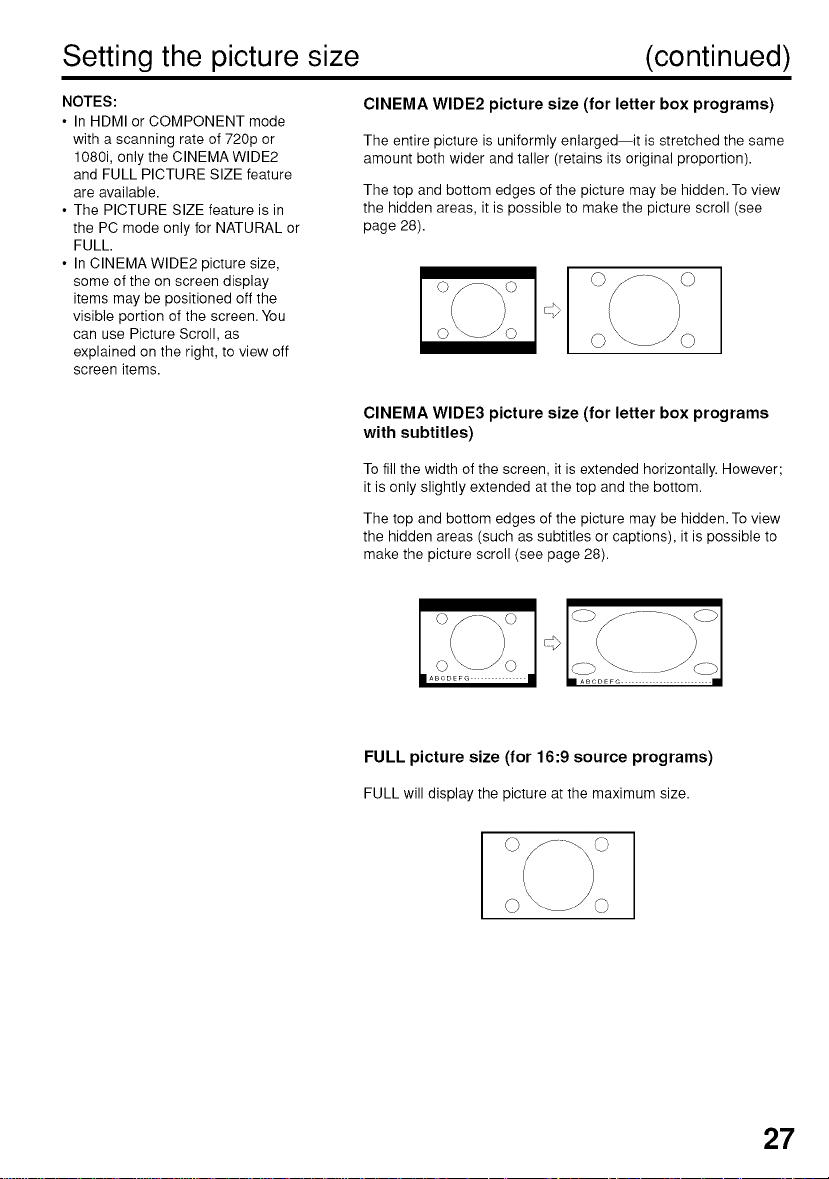
CINEMA WIDE2 picture size (for letter box programs)
The entire picture is uniformly enlarged--it is stretched the same
amount both wider and taller (retains its original proportion).
The top and bottom edges of the picture may be hidden. To view
the hidden areas, it is possible to make the picture scroll (see
page 28).
CINEMA WIDE3 picture size (for letter box programs
with subtitles)
To fill the width of the screen, it is extended horizontally. However;
it is only slightly extended at the top and the bottom.
The top and bottom edges of the picture may be hidden. To view
the hidden areas (such as subtitles or captions), it is possible to
make the picture scroll (see page 28).
|ABCDEFG |
FULL picture size (for 16:9 source programs)
FULL will display the picture atthe maximum size.
27
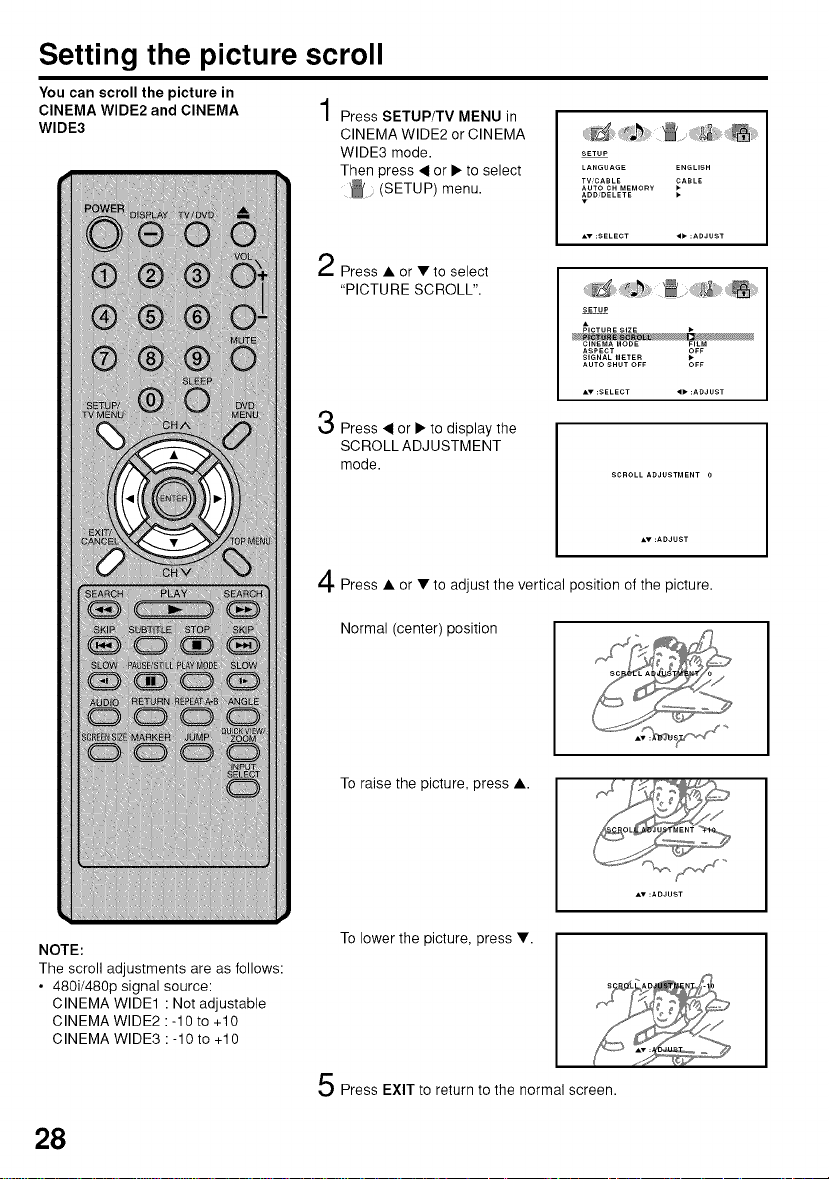
Setting the picture scroll
You can scroll the picture in
CINEMA WIDE2 and CINEMA
WIDE3
Press SETUP/TV MENU in
CINEMA WIDE2 or CINEMA
WIDE3 mode.
Then press _ or • to select
Press • or •to select
"PICTURE SCROLL".
Press ._ or • to display the
SCROLL ADJUSTMENT
mode.
Press • or • to adjust the vertical position of the picture.
Normal (center) position
(SETUP) menu.
SETUP
LANGUAGE ENGLISH
TWCABLE _ABLE
AUTO CH MEMORY
_DD_DELETE •
SETUP
PICTURE SIZE
CINEMA MODE FILM
ASPECT OFF
SIGNAL METER
AUTO SHUT OFF OFF
NOTE:
The scroll adjustments are as follows:
• 480i/480p signal source:
CINEMA WIDE1 : Not adjustable
CINEMA WIDE2 :-10 to +10
CINEMA WIDE3 : -10 to +10
28
To raise the picture, press •.
To lower the picture, press •.
Press EXIT to return to the normal screen.

Selecting the cinema mode/Using the aspect feature
Selecting the cinema mode
A smoother motion may be obtained by setting the Picture Mode to
Film when you view a DVD.
Press SETUP/TV MENU in the
TV mode, then press • or • to
select (SETUP) menu.
Press • or • to select CINEMA
MODE, then press • or • to
select "FILM". _......
Press EXIT to return to the normal screen.
To set the CINEMA MODE to VIDEO :
Press • or • to select "VIDEO" in step 2 above.
Using the aspect feature
When the ASPECT feature is set to ON and the unit receives a 480i
signal, the picture size is automatically selected (as described in the
following table).
Press SETUP/TV MENU in the
TV mode, then press • or • to
select (SETUP) menu.
SETUP
LANGUAGE ENGUSH
TVCABLE _ASLE
AUTOCHMEMORY
ADmDELETE •
PictuRE SCnmL
ASPECt OFF
SIGNALM_:_E_ •
AUtO SHUt O_'_ O_"
AT :S_:__:Cr O :ADJUSt
SETUP
LANGUAGE ENGUSH
TW_CABLE _ABLE
AUTOCH MEMORY
ADmDELETE •
NOTES:
• CINEMA MODE is available only
for 480i mode.
• If the signal does not include
aspect information, the picture
size you selected on page 26 is
displayed.
Press • or • to select
"ASPECT", then press • or • to
select "ON" or "OFF".
SETUP
_,oT....... ;
mCTURESCROLL
C_NEMAMODE F_LM
SIGNALMETE_ •
AUTOSHUTO_ O_
Press EXIT to return to the normal screen.
Automatic aspect size
Aspect ratio of signal source (When ASPECT is ON)
4:3 Normal NATURAL
16:9 Full FULL
4:3 Letter box CINEMA WIDE
Not defined User-set mode
29

Adjusting the picturepreference/Picturecontrol adjustment
You can select four picture
modes--SPORTS, STANDARD,
MOVIE, and MEMORY--as de-
scribed in the following table:
Adjusting the picture preference
Press SETUP/TV MENU in the TV
mode, then press • or • to select
(PICTURE) menu.
Press • or •to select
"PICTURE PREFERENCE".
PICTURE
P_CTUREPREFERENCE_PORTS
AT :SELECT O ,ADJUST
PICTURE
_B
i°i C, Zi
.v :SELECT _ =ADJUST
Press • or • to select the item you
want to adjust.
PICTURE
i !£is [i
.v :SELECT 4_ =ADJUST
Mode Picture Quality
SPORTS Bright and dynamic picture (factory-set)
STANDARD Standard picture quality (factory-set)
MOVIE Movie-like picture setting (factory-set)
MEMORY Your personal preferences (set by you; see "Picture
After your desired setting, press EXIT to return to the normal
screen.
control adjustment" below).
NOTE:
The CONTRAST default setting is
set to maximum at the factory.
30
Picture control adjustment
Press SETUP/TV MENU in the TV
mode, then press • or • to select
_ (PICTURE) menu.
Press • or •to select the item you
want to adjust.
Press • or • to adjust the setting.
BRIGHTNESS decrease brightness increase brightness
CONTRAST decrease contrast increase contrast
COLOR be pale color be brilliant color
TINT be reddish color be greenish color
SHARPNESS makes picture softer makes picture clearer
After your desired setting, press EXIT to return to the normal
screen.
PICTURE
P_CTUREPREFERE_CE_PORTS
SH_R_NESS
:':;C................

Selecting the color temperature/Adjusting the back lighting feature/
Resettingyour picture adjustments
Selecting the color temperature
Change the picture quality by selecting from three preset color
temperatures--COOL MEDIUM, and WARM:
Press SETUP/TV MENU in the TV mode, then press 4 or • to
select (PICTURE) menu.
Press • or • to select "COLOR
TEMPERATURE".
Press • or • to select the mode
you prefer.
Mode Picture Quality
COOL Blueish
MEDIUM Neutral
WARM Reddish
Press EXIT to return to the normal screen.
Adjusting the back lighting feature
If your unit is in a bright room, the screen image may be difficult to
see. You can use the BACK LIGHTING feature to adjust the screen
brightness for improved picture clarity.
Press SETUP/TV MENU in the TV mode, then press • or • to
select (PICTURE) menu.
Press • or • to select "BACK
LIGHTING".
Press • or • to adjust the
screen brightness.
PJC';URE
BACK UGH';_NG 1_
RESE';
PICTURE
_OLO_
TEMPERATUR_ COOL
RESET •
Press EXIT to return to the
normal screen.
Resetting your picture adjustments
The RESET function returns your picture quality adjustments to the
following factory settings:
PICTURE PREFERENCE.... SPORTS TINT .......................... center (0)
BRIGHTNESS ............. center (25) SHARPNESS ......... center (25)
CONTRAST ................... max (50) COLOR TEMPERATURE.... COOL
COLOR ....................... center (25)
Press SETUP/TV MENU in the TV mode, then press • or • to
select _D,,_(PICTURE) menu.
Press • or • to select "RESET",
and then press • or •.
PICTURE
_OLO_
TEMPERATURE COOL
BACK U_HT_NG 16
31

Closed Caption
WHAT IS CLOSED CAPTIONING?
This television has the capability to decode and display Closed Captioned television programs. Closed Captioning
will display text on the screen for hearing impaired viewers or it will translate and display text in another language.
Captions: This Closed Caption Mode will display text on the screen
in English or another language. Generally, Closed Captions in
English are transmitted on C1 and Closed Captions in other
languages are transmitted on C2.
Text: The Text Closed Caption Mode will usually fill 1/2 of the screen
with a programming schedule or other information.
Tune the TV to the desired program.
Press SETUP/TV MENU in the TV mode, then press • or I_ to
display the (SETUP) menu.
Press • or • to select "CLOSED CAPTION".
When an Analog signal is
received, you can choose C1,
C2, T1,T2 and OFR
CO ADVANCED •
.v :SELECT ,_ :ADJUST
When a Digital signal is
received, you can choose
from CSl, CS2, CS3, CS4,
CS5, CS6 and OFR
NOTE:
Depending on the broadcast
signal, some Analog Captions ,,":SELECT
will function with a Digital broadcast signal.
SETUP
_NALOG CAPTION OFF
Press • or I_ to select the desired Closed Caption mode.
NOTE:
To turn the Closed Caption feature off, select "OFF".
NOTES: _ Press EXIT to return to the normal screen.
• If the program or video you selected is not closed-captioned, no captions will display on-screen.
• If text is not available in your viewing area, a black rectangle may appear on-screen. If this happens, set the
Closed Caption feature to "OFF".
• When selecting Closed Captions, the captioning will be delayed approx. 10 seconds.
• If no caption signal is received, no captions will appear, but the television will remain in the Caption Mode.
• Misspellings or unusual characters may occasionally appear during Closed Captioning. This is normal with
Closed Captioning, especially with live programs. This is because during live programs, captions are also
entered live. These transmissions do not allow time for editing.
• When Captions are being displayed, on-screen displays, such as volume and mute may be seen but may
interfere with Closed Captions.
• Some cable systems and copy protection systems may interfere with the Closed Captioned signal.
• If using an indoor antenna or if TV reception is very poor, the Closed Caption Decoder may not appear or may
appear with strange characters or misspelled words. In this case, adjust the antenna for better reception or use
an outdoor antenna.
• After selecting C1/C2 closed captions will be displayed while in the DVD mode. To turn off closed captioning,
select TV mode and set closed caption to OFF.
32

Closed Captions are factory
preset however you can adjust
them individually as follows:
CC advanced
This feature is designed to customize Digital Captions only.
Press SETUP/TV MENU. The menu screen will appear.
2 Press • or • to select _ ....
(SETUP) menu.
Press • or • to select"CC
ADVANCED", then press • or
•.
The CC ADVANCED menu
will appear.
Press • or • to select the
item you want to adjust, then
press • or •.
Press • or • to select
desired setting, then press
ENTER.
SETUP
LANGUAGE ENGLISH
TViCABLE _ABLE
AUTO OH MEMORY
ADD_DELETE •
SETUP
_NALOG CAPTION OFF
DIGITAL CAPTION OFF
CO ADVANCED
BACKGROUND COLOR
TEXT OPACITY
BACKGROUND OPACITY
A.:SELECT 1_ :ADJUST
TEXT SIZE
STANDARD
LARGE
NOTES:
• Do not set the Closed Caption
"TEXT COLOR" and
"BACKGROUND COLOR" as the
same color or you will not be able to
see the text.
• Do not set both the "TEXT
OPACITY" and the "BACKGROUND
OPACITY" to "TRANSPARENT" or
you will not be able to see the text.
You can select from among the following items and parameters.
TEXT SIZE:
TEXT TYPE:
AUTO, SMALL, STANDARD, LARGE
AUTO, DEFAULT, MONO W. SERIF, PROR W.
SERIE MONO W/O SERIE PROR W/O SERIE
CASUAL, CURSIVE, SMALL CAPITALS
TEXT COLOR:
AUTO, BLACK, WHITE, RED, GREEN, BLUE,
YELLOW, MAGENTA, CYAN
TEXT EDGE:
AUTO, NONE, RAISED, DEPRESSED,
UNIFORM, LEFT DROP SHADOW, RIGHT
DROP SHADOW
BACKGROUND COLOR: AUTO, BLACK, WHITE, RED, GREEN,
BLUE, YELLOW, MAGENTA, CYAN
TEXT OPACITY:AUTO, TRANSPARENT, TRANSLUCENT,
SOLID, FLASHING
BACKGROUND OPACITY: AUTO, TRANSPARENT,
TRANSLUCENT, SOLID, FLASHING
6Press EXIT to return to the normal screen, t,_t,_
,l=,#,l=,#
Selecting Stereo/Second Audio Program (SAP)/
Sound control adjustment
The multi-channel TV sound (MTS)
feature provides high-fidelity
stereo sound. MTS also can
transmit a second audio program
(SAP) containing a second
language or other audio informa-
tion.
When theTV receives a stereo or
SAP broadcast, the word
"STEREO" or "SAP" displays on-
screen every time you turn the TV
on, change the channel, or press
DISPLAY.
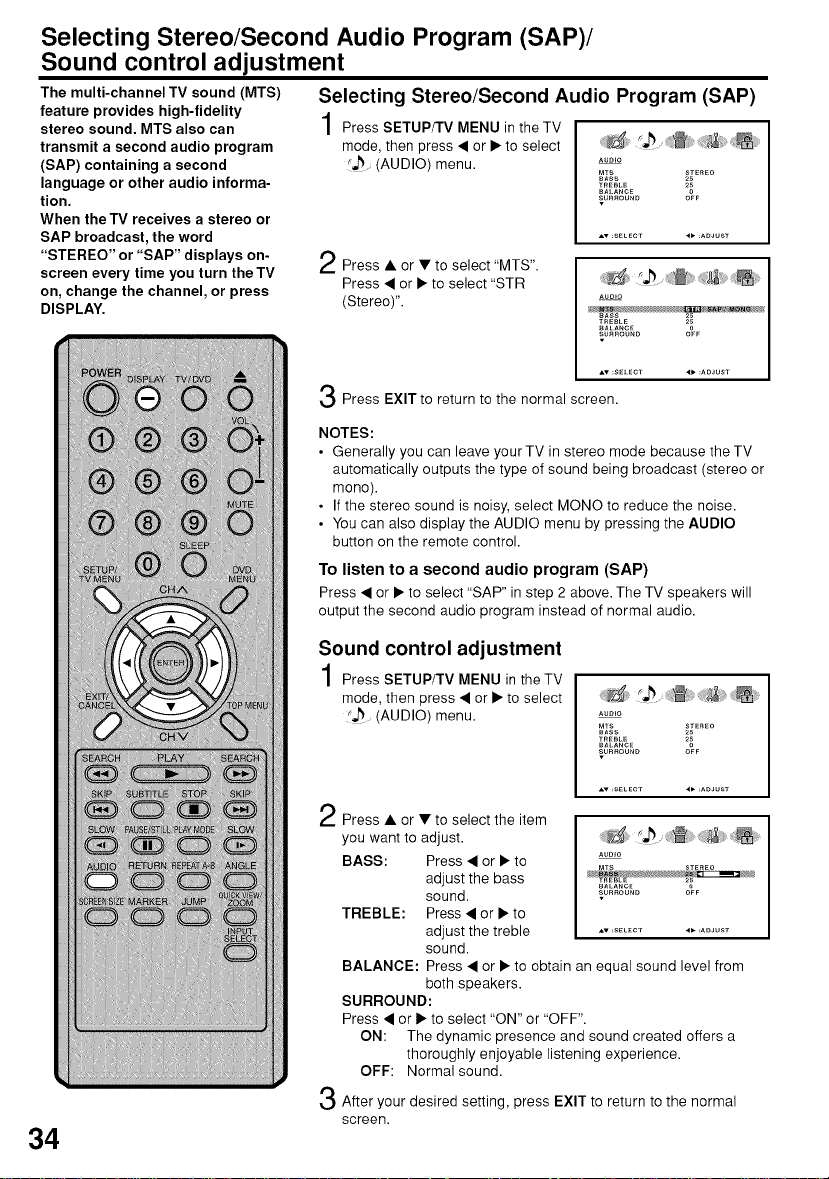
Selecting Stereo/Second Audio Program (SAP)
Press SETUPfFV MENU in the TV
mode, then press • or • to select
r_ (AUDIO) menu.
Press • or • to select "MTS".
Press • or • to select "STR
(Stereo)". o....
Press EXIT to return to the normal screen.
NOTES:
• Generally you can leave your TV in stereo mode because the TV
automatically outputs the type of sound being broadcast (stereo or
mono).
• If the stereo sound is noisy, select MONO to reduce the noise.
• You can also display the AUDIO menu by pressing the AUDIO
button on the remote control.
To listen to a second audio program (SAP)
Press • or • to select "SAP" in step 2 above. The TV speakers will
output the second audio program instead of normal audio.
AUOIO
MTS STEREO
_ASS 2_
T_EBLE 2_
BALANCE O_T
SURROUND
BASS 2S
_R_:BL_: 2S
SALANCE 0
SURROUND O_T
34
Sound control adjustment
Press SETUP/TV MENU in the TV
mode, then press • or • to select
_ (AUDIO) menu.
Press • or • to select the item
you want to adjust.
BASS: Press • or • to
adjust the bass
sound.
TREBLE: Press • or • to
adjust the treble .....................
sound.
BALANCE: Press • or • to obtain an equal sound level from
both speakers.
SURROUND:
Press • or • to select "ON" or "OFF".
ON: The dynamic presence and sound created offers a
thoroughly enjoyable listening experience.
OFF: Normal sound.
After your desired setting, press EXIT to return to the normal
screen.
Auolo
MTS STEREO
BASS 2_
T_EBLE 2_
BALANCE
SURROUND O_
AUOIO
MTS STEREO
_ALANCE
SUnnOUND Oe_

Selecting the HDMI audio input source/
Selecting the audio language
Selecting the HDMI audio input source
When you use HDMI AUDIO IN jacks with HDMI or DVI device, you
must select HDMI audio input source from "HDMI" or "DVI".
Press SETUP/TV MENU in the TV
mode. Then press • or • to select
_ (AUDIO) menu. A....
Press • or • to select "HDMI', .........BALA,OE
then press • or • to select ............
"HDM r' or "DVI'.
HDMh
When you connect the
HDMI device to the TV,
select this setting.
DVI:
When you connect the DVl
device to the TV with
analog
audio cords, select this
setting.
Press EXIT to return to the normal screen.
Selecting the audio language
When two or more audio languages are included in a digital signal,
you can select one of the audio language.
Press SETUP/TV MENU, then
press • or • to select _
(AUDIO) menu.
8Ass 2s
Mrs sl-ER_:o
Aumo
Aumo LANGUAGE
DJmTALOUTPUT PCM
nESET
AV:SELECT
AUDIO
MTS STEREO
BASS 2S
T_EBLE 2_
BALANCE
_URROUND 0_
Press • or • to select "AUDIO
LANGUAGE".
Then press • or • to display the
AUDIO LANGUAGE menu.
Press • or • to select your
desired language, then press
ENTER.
Press EXIT to return to the normal screen.
AUDIO
_OMI HDM_
RESET
AUDIOLANGUAGE
I_ENGLJSH2
2_r_ENCN
_SPANISH
[O-7_:SELECT
ENTEr:SET
35
Selecting the digital output/Resetting your audio adjustments
Selecting the digital output
You can choose the format of the digital audio output signal.
Press SETUP/TV MENU, then
press • or • to select
(AUDIO) menu.
Press • or • to select "DIGITAL
OUTPUT", then press • or • to
select "PCM" or "DOLBY
DIGITAl".
Press EXIT to return to the normal screen.
Resetting your audio adjustments
The RESET function returns the audio adjustments to the following
factory settings:
BASS ................. center (25)
TREBLE ............ center (25)
BALANCE ........... center (0)
Press SETUP/TV MENU in the
TV mode, then press • or • to
select _ (AUDIO) menu.
Aumo
MTS STEREO
BASS 2S
T_EBLE 2_BALANCE
SURROUND O_
AUDIO
AUmOLANGUACE
RESET •
Aumo
MTS STEREO
SASS 2S
TREeLE 2_
BALANCE
SURROUND O_
36
Press • or • to select "RESET",
and then press • or •.
AUmO
AUmO LANCUACE
mGITAL OUTPUT PCM

Checking the Digital-signal strength/Setting the auto shut off
Checking the Digital-signal strength
This unit will allow you to view the digital signal meter for digital
channels.
Press SETUP/TV MENU, then
press • or • to select
(SETUP) menu.
Press • or • to select "SIGNAL
METER".
Press • or • to check the
Digital-signal strength.
Press EXIT to return to the normal screen.
Setting the auto shut off
If the AUTO SHUT OFF feature is ON, and a station being viewed
stops broadcasting, the TV will automatically shut itself off after 15
minutes.
Press SETUP/TV MENU, then
press • or • to select _ ......
(SETUP) menu.
SETUP
LANGUAGE ENGUSH
TW_CASLE _ASLE
AUTOCH ME_O_¥
ADD,OELETE •
SETUP
_CTURE SiZE
mCTURESCROLL
CINEMAMOI,E FILM
AS_'ECT OFF
S_GNALMETER
CHANNEL_mG_TAL_ _3-077
SETUP
LANGUAGE ENGLISH
TVCABLE _ABLE
AUTOCH MEMORY
ADODELETE
100
NOTES:
• Signal meter feature is not
available for analog channels.
• After 240 seconds, SIGNAL
METER screen will return to
normal TV-operation automatically.
Press • or • to select "AUTO
SHUT OFF".
Press • or • to select "ON"
or "OFF".
Press EXIT to return to the normal screen.
SETUP
_'_CTURE SIZE
mCTURESCROLL
CINEMAMO[)E
ASPECT
S_GNALMETER •
SETUP
_'_CTURE SiZE
mCTURESCROLL
CINEMAMO_E _ILM
ASPECT OFF
S_GNALMETER •
37

Picture/Audio control adjustment in the PC mode
PC Monitor Menu
There are a number of picture and audio settings you can adjust to
optimize the performance of the TV in PC mode.
Press INPUT SELECT repeatedly to select PC mode.
Press SETUP/TV MENU. The PC Monitor Menu will appear.
PICTURE Menu AUDIO Menu
NOTES:
• If you wish to change the on-screen
language, follow the steps 1 - 7 on page
16.
• If no buttons are pressed for more than
approx. 60 seconds, the PC Monitor
Menu-screen will return to normal
Monitor-screen automatically.
• The PC Monitor Menu settings are not
effective for normal mode, or external
input mode.
PICTURE
_RI_HTNeS_
_o°_%*,%o.
ve_ PosmoN
=v :_ELECT
Example: Adjust the contrast.
Press SETUP/TV MENU during PC mode, then press < or •
to select (PICTURE) menu.
Press • or • to select CONTRAST.
Press < or • to adjust the setting.
Press EXIT to return to the normal screen.
AVDIO
Picture menu setting: Audio menu setting:
BRIGHTNESS:
CONTRAST:
HOR POSITION:
VER POSITION:
PHASE:
CLOCK:
RED/GREEN/BLUE:
WXGA INPUT:
BACK LIGHTING:
To adjust the brightness of
PC Monitor-screen.
To adjust the contrast of PC
Monitor-screen.
To adjust the horizontal
position of the image on the
PC Monitor-screen.
To adjust the vertical position
of the image on the PC
Monitor-screen.
This must be adjusted after
the frequency of your PC has
been set to 60Hz to optimize
picture quality (page 63).
To minimize any vertical bars
or stripes visible on the
screen background.
To adjust the color temperature
of PC monitor-screen
Set to ON, when you select
the WXGA mode on the PC.
To adjust the screen brightness
for improved picture clarity.
BASS/TREBLE/BALANCE: To adjust the sound
SURROUND: To turn on or off the
38
quality of PC mode.
surround effect in PC
mode.

Picture/Audio control adjustment in the PC mode
Resetting your picture/audio adjustment in the PC mode
The RESET function returns your picture/audio adjustment to the
following factory settings:
PICTURE menu AUDIO menu
BRIGHTNESS ........... center (25) BASS ...................... center (25)
CONTRAST ................. max (50) TREBLE ................. center (25)
RED ........................... center (25) BALANCE .............. center (0)
GREEN ..................... center (25)
BLUE ......................... center (25)
Press SETUP/TV MENU during
PC mode, then press • or I_to
select (PICTURE) or
(AUDIO) menu.
2
Press • or • to select "RESET", then press • or I_.
P_CTURE
_ED 2S
GREEN 2S
BLUE _FWXGAINPUT
RACK L_HTmG _
AT:SELECT 4":AOJUST
39

Preparation/Status display of disc
The following pages describe the
setup/operation in DVD mode.
Preparation
Before DVD/CD operation, please make the following preparations.
Insert the AC cord plug into a standard 120V 60Hz polarized
AC outlet.
• If the AC cord plug is plugged in for the first time, wait for
about 5 seconds before pressing POWER.
NOTE: When connecting to other equipment, unplug the unit
from the AC outlet.
Press POWER on the unit or on the remote control to turn on
2
the unit. The POWER indicator will light.
• Each time you turn the unit ON, the TV/DVD starts from the
TV mode.
• When using an amplifier, switch on the amplifier.
Press TV/DVD to select DVD
mode.
The DVD startup screen will ap-
pear on the screen.
Status display of disc
Press DISPLAY. The status display of the disc will appear on the
screen.
DISC OPERATION TIME TIME
ELAPSED TOTAL
NOTE:
If the unit does not operate properly:
Static electricity, etc., may affect the play-
er's operation. Disconnect the AC power
cord once, then connect it again.
40
TITLE NO.
ANGLE NO. SUBTITLE LANGUAGE
AUDIO LANGUAGE A KIND OF AUDIO
CHAPTER
To make the status display screen disappear, press DISPLAY
again.
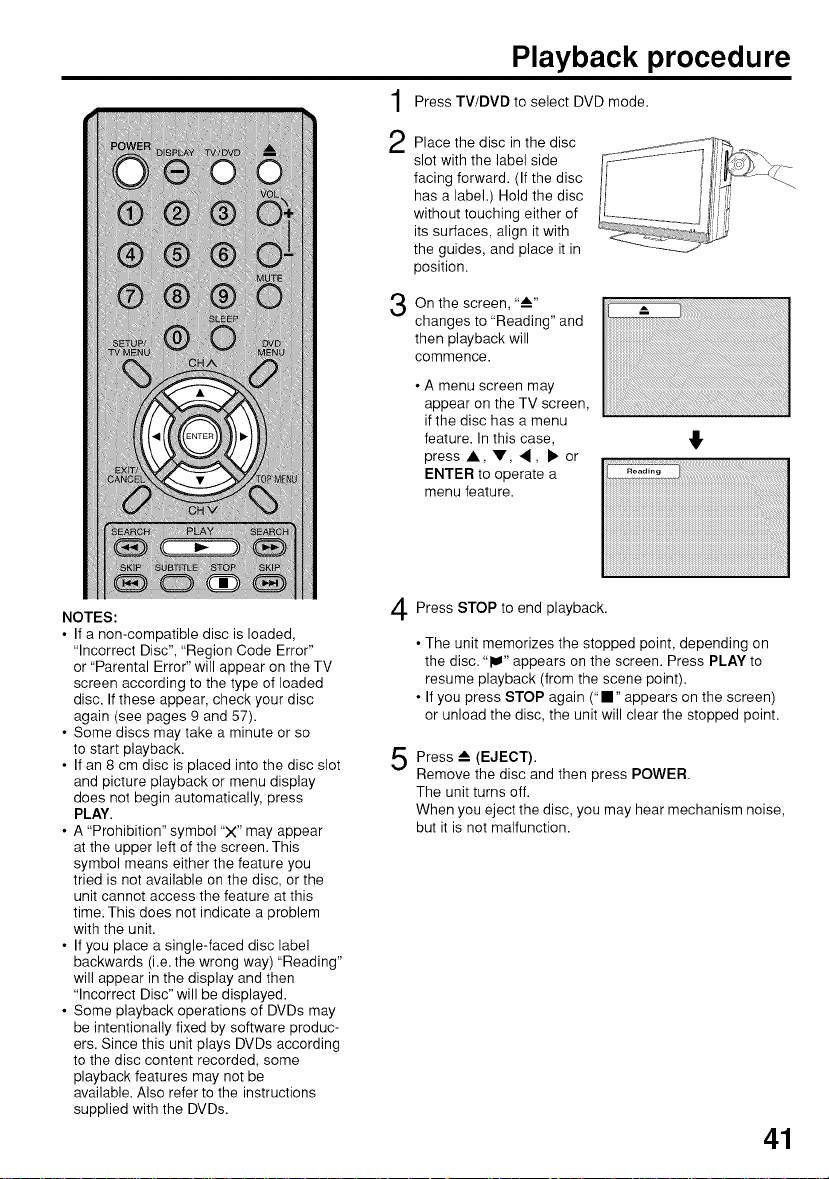
Playback procedure
Press TV/DVD to select DVD mode.
Place the disc in the disc
2
slot with the label side
facing forward. (If the disc
has a label.) Hold the disc
without touching either of
its surfaces, align it with
the guides, and place it in
position.
On the screen, "--"
3
changes to "Reading" and
then playback will
commence.
• A menu screen may
appear on the TV screen,
if the disc has a menu
feature. In this case,
press A, V, ,, • or
ENTER to operate a
menu feature.
NOTES:
• If a non-compatible disc is loaded,
"Incorrect Disc", "Region Code Error"
or "Parental Error" will appear on the TV
screen according to the type of loaded
disc. If these appear, check your disc
again (see pages 9 and 57).
• Some discs may take a minute or so
to start playback.
• If an 8 cm disc is placed into the disc slot
and picture playback or menu display
does not begin automatically, press
PLAY.
• A "Prohibition" symbol "X" may appear
at the upper left of the screen. This
symbol means either the feature you
tried is not available on the disc, or the
unit cannot access the feature at this
time. This does not indicate a problem
with the unit.
• If you place a single-faced disc label
backwards (i.e. the wrong way) "Reading"
will appear in the display and then
"Incorrect Disc" will be displayed.
• Some playback operations of DVDs may
be intentionally fixed by software produc-
ers. Since this unit plays DVDs according
to the disc content recorded, some
playback features may not be
available. Also refer to the instructions
supplied with the DVDs.
Press STOP to end playback.
• The unit memorizes the stopped point, depending on
the disc. "IW" appears on the screen. Press PLAY to
resume playback (from the scene point).
• If you press STOP again ("." appears on the screen)
or unload the disc, the unit will clear the stopped point.
Press --_ (EJECT).
Remove the disc and then press POWER.
The unit turns off.
When you eject the disc, you may hear mechanism noise,
but it is not malfunction.
41

Special playback
NOTE: There may be a slight delay
between when you press the button
and the function activating.
Fast Forward Playback
Press SEARCH !_" during normal playback.
Each press of SEARCH _ will increase the speed of the
search I_" (x 2), _ (x 4), _ (x 8), _ (x 15).
(CD: I_" (x 2), _ (x 4), _ (x 8), _ (x 20))
• To resume normal playback, press PLAY.
Review Playback
Press SEARCH _1_ during normal playback.
Each press of SEARCH _ will increase the speed of the
search _ (x 2), _ (x 4), _ (x 8), _ (x 15).
(CD: _ (x 2), _ (x 4), _ (x 8), _ (x 20))
• To resume normal playback, press PLAY.
Still Playback
Press PAUSE/STILL during
normal playback to pause play-
back.
• To resume normal playback,
press PLAY.
Frame Advance
Press PAUSE/STILL during still playback.
One frame is advanced each time you press PAUSE/STILL
• To resume normal playback, press PLAY.
NOTE:
The unit is capable of holding a still video
image or On screen display image on
your television screen indefinitely. If you
leave the still video image or On screen
display image displayed on your TV for
an extended period of time, you risk
permanent damage to your television
screen.
42
Slow-motion Playback
Press SLOW 41 Reverse or SLOW I_ Forward during
normal playback or still playback.
Each press of SLOW will change the speed of the slow xl/2,
xl/4, xl/6, xl/7.
• To resume normal playback, press PLAY.
• To resume the still playback, press PAUSE/STILL
Locating a chapter or track
Press SKIP I_IHI Forward or SKIP |_1_1 Reverse during
playback to locate a chapter that you want to watch.
Each time you press the button, a chapter or track is
skipped.

MP3/WMA/JPEG and Audio CD playback
This player can play back MP3/WMA/JPEG-
data which has been recorded on CD-R or
CD-RW. To produce MP3/WMA/JPEG-data,
you need aWindows-PCwith CD-ROM drive
and MP3/WMA/JPEG-encoding software
(not supplied).
The Apple-HFS-System cannot be played.
MP3/WMA/JPEG CD information
Limitations on MP3/WMA/JPEG CD
playback
• MP3/WMA/JPEG CD is the disc that is stand-
ardized by ISO9660, its file name must include
3-digit extension letters, "mp3", "wma", "jpg".
• The directory and file names of MP3/WMA/
JPEG CD must correspond to ISO standard-
ized files.
• This unit can read 2000 files per disc. If one
directory has more than 2000 files, it reads
up to 2000 files, the remaining files will be omit-
ted.
• MP3/WMA CDs cannot be used for playback
for the purpose of recording.
• If the CD has both audio tracks and MP3/
WMA/JPEG files, only audio tracks are
played.
• It may take more than one minute for this unit
to read MP3/WMA/JPEG files depending on
its structure.
• Music recorded by "Joliet Recording Specifi-
cation" can be played back.
• The music files recorded by "Hierarchical File
System" (HFS) cannot be played.
• The unit can play back baseline and progres-
sive JPEG files.
Limitations on display
• The maximum number for display is 15
characters. Long file names will be
condensed.
• Available letters for display are the following:
capital or lowercase letters A through Z, num-
bers 0 through 9, and (under score).
• Other letters than those above are replaced
by a hyphen.
Notes on MP3/WMA/JPEG files
To play back MP3/WMA/JPEG CD in the
recorded order,
1. Use MP3/WMA/JPEG software that records
data alphabetically or numerically.
2. Name each file including a two-digit or three-
digit number (e.g. "01" "02" or "001" "002").
3. Refrain from making too many sub-folders.
CAUTION:
• Some MP3/WMA/JPEG CDs cannot be played
back depending on the recording conditions.
• The CD-R/RW that has no music data or non-
MP3/WMA/JPEG files can not be played back.
MP3 CD/WMA and Audio CD playback
Load a MP3/WMA/JPEG CD or an Audio CD in the disc
slot.
"Reading" will appear on the TV screen. Reading time will
depend on the number of files on the disc.
A file browser screen will appear on the TV screen.
Operation status File number Elapsed time Selected file name
File list
i i
Cursor Preview window
Filetype
.j) :IndicatesMusicfile (AudioCD/MP3/WMA)
[] : IndicatesPicturefile (JPEG)
• In case the current directory includes 9 files or more,
press • or • to scroll in the file list.
• To see contents in folder, select the folder and then press
ENTER. To return to the parent directory, select "[! Go
Up ..." then press ENTER.
• In case of a CD containing a mixture of MP3, WMA and
JPEG files, the files are played back by selecting them
from the file browser.
Press • or • to select the
4
desired file.
When PLAY is pressed after
displaying file browser
displayed, or when the disc
tray is closed by pressing
PLAY, playback begins
automatically starting from the first file. In this case, if the
first file is an MP3/WMA file, only MP3/WMA files are
played back in order. If the first file is a JPEG file, the first
JPEG file is played back. If there is no file at a root
directory, playback does not begin automatically.
5
Press ENTER.
The selected file starts playing back.
6
Press STOP to end playback.
• The unit records the stopped point. "lW" appears on the
screen. Press PLAY to resume playback (from the scene
point).
• If you press STOP again or unload the disc, the unit will
clear the stopped point.
NOTES:
• During MP3/WMA/JPEG-Playback, you cannot use
JUMP and A-B Repeat functions.
• You can use Repeat (Track or All), Random functions and
Program playback for MP3/WMA/JPEG and Audio CD
Playback (see pages 46 and 47). An
window
_J
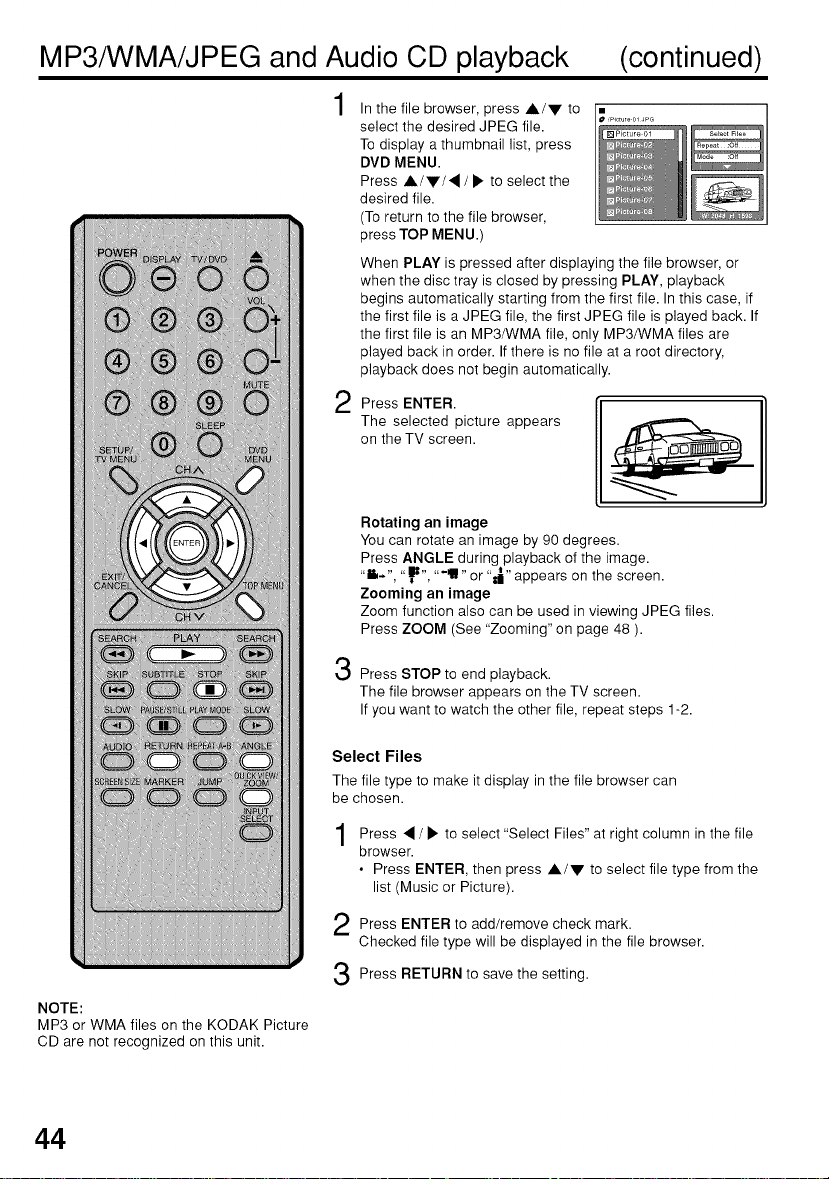
MP3/WMA/JPEG and Audio CD playback (continued)
In the file browser, press A/V to . ..............
select the desired JPEG file.
To display a thumbnail list, press
DVD MENU.
Press AIr/4/• to select the
desired file.
(To return to the file browser,
press TOP MENU.)
When PLAY is pressed after displaying the file browser, or
when the disc tray is closed by pressing PLAY, playback
begins automatically starting from the first file. In this case, if
the first file is a JPEG file, the first JPEG file is played back. If
the first file is an MP3/WMA file, only MP3/WMA files are
played back in order. If there is no file at a root directory,
playback does not begin automatically.
2
Press ENTER.
The selected picture appears
on the TV screen.
Rotating an image
You can rotate an image by 90 degrees.
Press ANGLE during playback of the image.
"1_.", "_", "-ill" or "_" appears on the screen.
Zooming an image
Zoom function also can be used in viewing JPEG files.
Press ZOOM (See "Zooming" on page 48 ).
NOTE:
MP3 or WMA files on the KODAK Picture
CD are not recognized on this unit.
44
3
Press STOP to end playback.
The file browser appears on the TV screen.
If you want to watch the other file, repeat steps 1-2.
Select Files
The file type to make it display in the file browser can
be chosen.
Press • / • to select "Select Files" at right column in the file
browser.
• Press ENTER, then press A/V to select file type from the
list (Music or Picture).
Press ENTER to add/remove check mark.
Checked file type will be displayed in the file browser.
Press RETURN to save the setting.
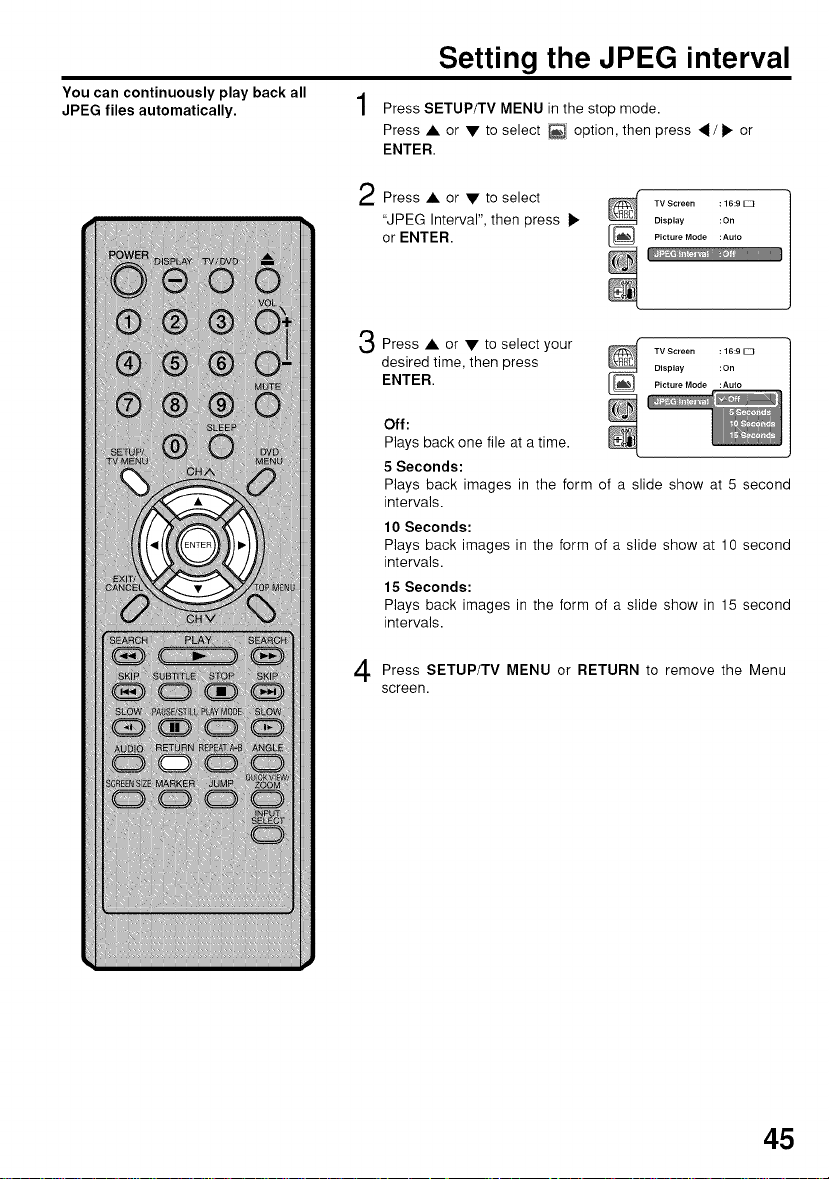
You can continuously play back all
JPEG files automatically.
Setting the JPEG interval
Press SETUP/TV MENU in the stop mode.
Press • or • to select _ option, then press _ / _- or
ENTER.
Press • or • to select
"JPEG Interval", then press _.
or ENTER.
3
Press • or • to select your _ TVScreen :16:9E3
ENTER. P_ctureMode :Auto
Off:
desired time, then press _ Display :On
Plays back one file at a time.
5 Seconds:
Plays back images in the form of a slide show at 5 second
intervals.
10 Seconds:
Plays back images in the form of a slide show at 10 second
intervals.
15 Seconds:
Plays back images in the form of a slide show in 15 second
intervals.
Display :On
Picture Mode :Auto
TV Screen : 16:9 E3
Press SETUP/TV MENU RETURN to the Menu
screen.
or remove
45

Program playback (CD)
You can arrange the order of tracks on
the disc.
In the file browser, A/V/
• / • to select "Edit Mode", then
press ENTER.
When "Edit Mode" is black color,
you can mark the files which you
want to add into Program list.
Press A/V/•/• to select the
file you want to add into the
program list.
Press ENTER. Selected file was
marked.
Repeat this procedure to select the
other files.
Press A/V/• / • to select "Add
3
To Program".
Then press ENTER. All marked
files are added into the program
list.
When you finish storing the files
you want into the Program list,
select "Edit Mode" again and press
ENTER to release edit mode.
Press A/V to select "Program View", then press ENTER.
4
Program View shows only the programed files that you have
added in Step 2.
press
To remove file from program list in
stop mode
In the Edit Mode, switch to Program View.
Select the files you want to remove, then
press ENTER. Select "Clear Program"
and press ENTER. Marked file is
removed from program list.
NOTE:
The program is cancelled when you eject
the disc or turn the power off.
46
Browser View Program View
In the Program View, PLAY. The files start to playback in
programmed order that were added by you.
press
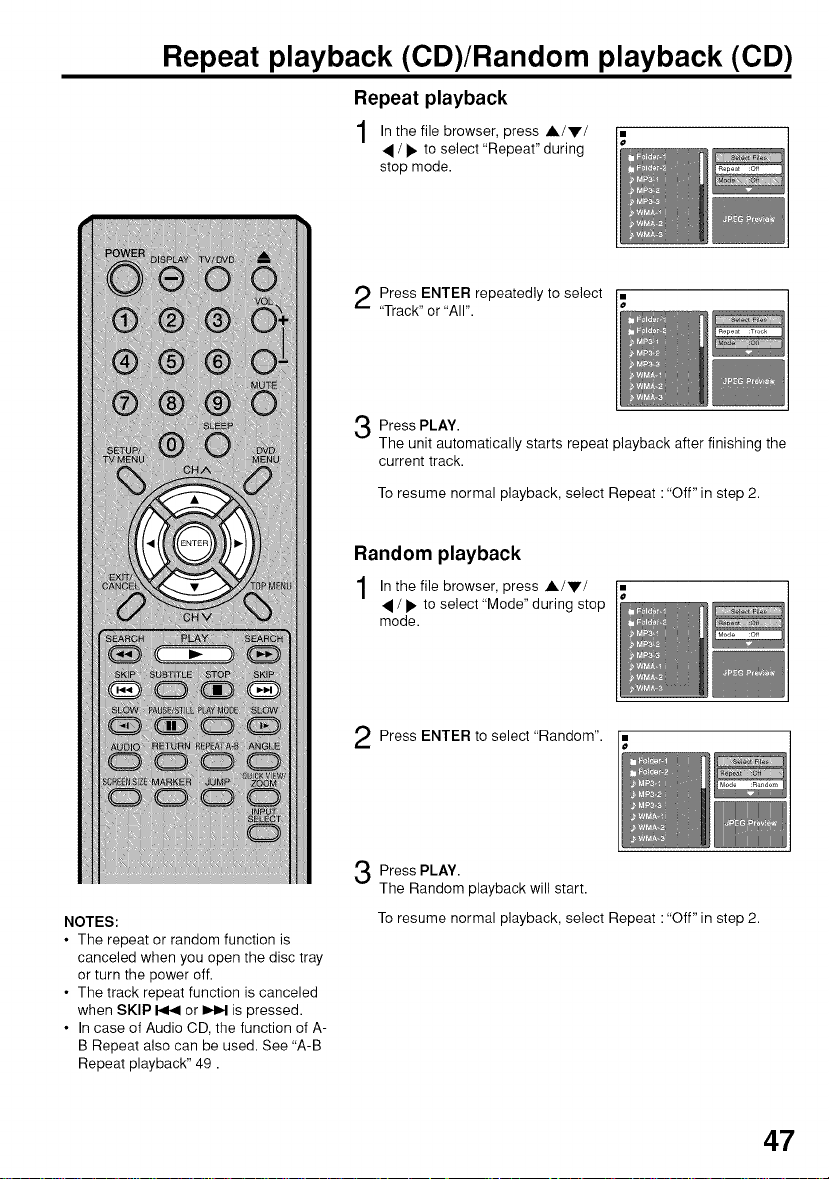
Repeat playback (CD)/Random playback (CD)
Repeat playback
In the file browser, Air/press
• / _, to select "Repeat" during
stop mode.
Press ENTER repeatedly to select
"Track" or "All".
Press PLAY.
The unit automatically starts repeat playback after finishing the
current track.
To resume normal playback, select Repeat "Off" in step 2.
Random playback
In the file browser, A/V/
• / _, to select "Mode" during stop
mode.
press
NOTES:
• The repeat or random function is
canceled when you open the disc tray
or turn the power off.
• The track repeat function is canceled
when SKIP _ or _ is pressed.
• In case of Audio CD, the function of A-
B Repeat also can be used. See "A-B
Repeat playback" 49.
Press ENTER to select "Random".
Press PLAY.
The Random playback will start.
To resume normal playback, select Repeat "Off" in step 2.
47

Zooming/Locating desired scene
Zooming
This unit will allow you to zoom in on the frame image. You
can then make selections by switching the position of the
frame.
Press ZOOM during
playback.
The center part of the
image will be zoomed in.
Each press of ZOOM will
change the ZOOM
magnification O,,1 (x 1.3),
0,,2 (x 1.5) and O_ 3
(x 2.0).
2
Press A/V/, / • to view a different part of the frame.
You may move the frame from the center position UP,
DOWN, LEFT or RIGHT.
3
In the zoom mode press ZOOM repeatedly to return to a
1:1 view (O_ Off).
Locating desired scene
Use the title, chapter and time recorded on the disc to locate the
desired point to play back.
NOTES:
• You can select the Pause, Slow or
Search playback in the zoom mode.
• Some discs may not respond to zoom
feature.
48
or resume stop mode. [ Title --- ]
Press JUMP during playback [ Jump
2
Press • or • to select the "Time", "Title/track" or
"Chapter".
3
Press Number buttons (0-9) to input the number.
• If you input a wrong number, press CANCEL.
• Refer to the package supplied with the disc to check the
numbers.
Press ENTER.
• Playback starts.
• When you change the title, playback starts from
Chapter 1 of the selected title.
• Some discs may not work in the above operation.
Chapter ---
Time --:--:--
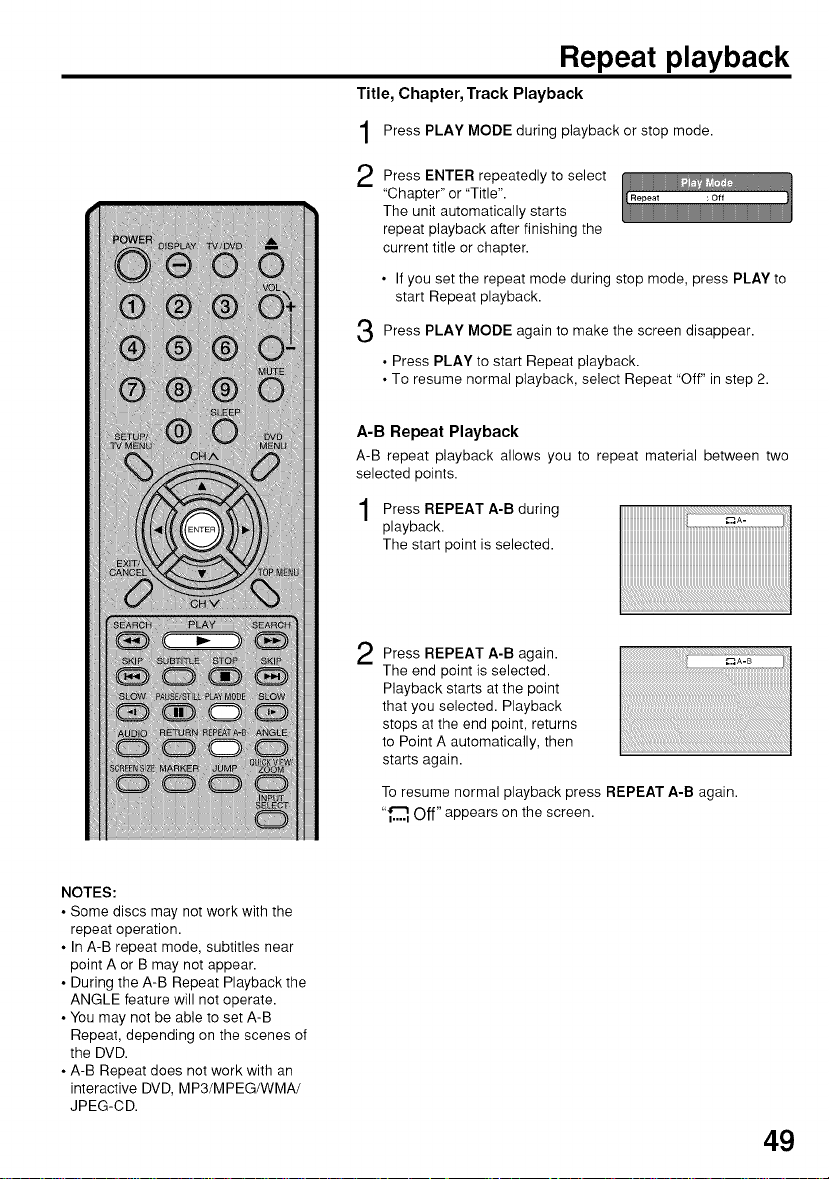
Repeat playback
Title, Chapter, Track Playback
Press PLAY MODE during playback or stop mode.
again
to
screen
disappear.
iii
Press ENTER selectrepeatedly
"Chapter" or "Title".
The unit automatically starts
repeat playback after finishing the
current title or chapter.
• If you set the repeat mode during stop mode, press PLAY to
start Repeat playback.
Press PLAY MODE to make the
• Press PLAY to start Repeat playback.
• To resume normal playback, select Repeat "Off" in step 2.
A-B Repeat Playback
A-B repeat playback allows you to repeat material between two
selected points.
Press REPEAT A-B during
playback.
The start point is selected.
iiiiiiiiiiiiiiiiiiiiiiiiiiiiiiiiiiiiiiiiiiiiiiiiiiiiiiiiiiiiiiiiiiiiiiiiiiiiiiiiiiiiiiiiiiiiiiiiiiiiiiiiiiiiiiiiiii
Press REPEAT A-B again.
The end point is selected.
Playback starts at the point
that you selected. Playback
stops at the end point, returns
to Point A automatically, then
starts again.
To resume normal playback press REPEAT A-B again.
"_.._.._Off" appears on the screen.
NOTES:
• Some discs may not work with the
repeat operation.
• In A-B repeat mode, subtitles near
point A or B may not appear.
• During the A-B Repeat Playback the
ANGLE feature will not operate.
• You may not be able to set A-B
Repeat, depending on the scenes of
the DVD.
• A-B Repeat does not work with an
interactive DVD, MP3/MPEG/WMA/
JPEG-CD.
49

Marking desired scenes
The TV/DVD stores the points that you
want to watch again. You can resume
playback from that scene.
Marking the Scenes
playback. [.Marker1 : : 1
1 Press MARKER during [ ]
using • or V, then (Marker1 00:27:54J
press ENTER at the Marker2 : :
2 Selectthe blank Marker [ ]
desired scene. Marker3 : :
• Up to 3 scenes can be selected.
• Repeat this procedure to set the other 2 scenes.
Press MARKER to remove this display.
Returning to the Scenes
Marker2 : :
Marker3 : :
NOTES:
• The marking is canceled when you eject
the disc or turn the power off.
• Some subtitles recorded around the
marker may fail to appear. [DVD]
playback or stop mode. (Marker1
Press MARKER during [
2 Press • or • to select (
[.Marker2
the Marker 1-3. [ Marker1
Press ENTER.
Playback starts from the marked scene.
To Cancel the Mark
Press MARKER.
Press • or • to select the Marker 1-3.
Press CANCEL.
Press MARKER to remove this display.
Marker2
Marker3
Marker3
oo :27:54[}
01:16:25
02:08:31
oo :27:54
01:16:251
02:08:31
}
50
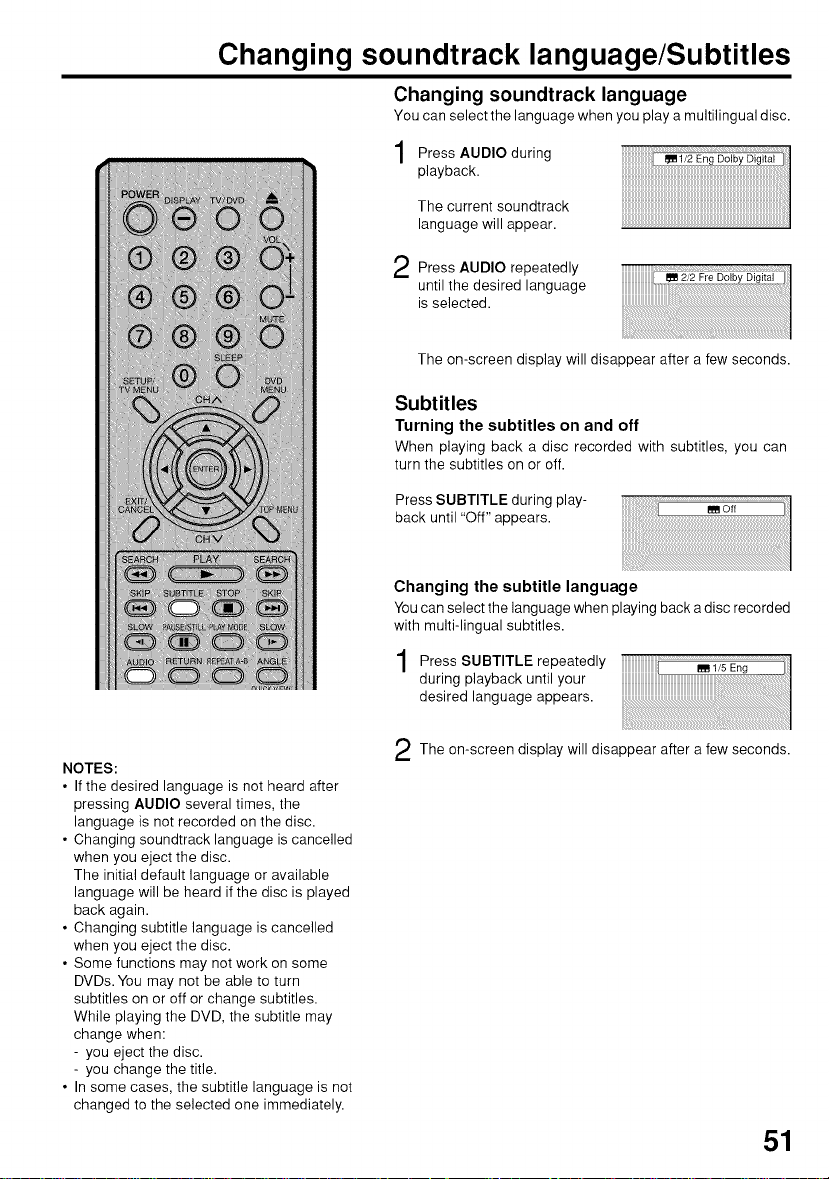
Changing soundtrack language/Subtitles
Changing soundtrack language
You can select the language when you play a multilingual disc.
Press AUDIO during
playback.
The current soundtrack
language will appear.
Press AUDIO repeatedly
until the desired language
is selected.
The on-screen display will disappear after a few seconds.
Subtitles
Turning the subtitles on and off
When playing back a disc recorded with subtitles, you can
turn the subtitles on or off.
Press SUBTITLE during play-
back until "Off" appears.
Changing the subtitle language
You can select the language when playing back a disc recorded
with multi-lingual subtitles.
Press SUBTITLE
during playback until your
desired language appears.
repeatedly
NOTES:
• If the desired language is not heard after
pressing AUDIO several times, the
language is not recorded on the disc.
• Changing soundtrack language is cancelled
when you eject the disc.
The initial default language or available
language will be heard if the disc is played
back again.
• Changing subtitle language is cancelled
when you eject the disc.
• Some functions may not work on some
DVDs. You may not be able to turn
subtitles on or off or change subtitles.
While playing the DVD, the subtitle may
change when:
- you eject the disc.
- you change the title.
• In some cases, the subtitle language is not
changed to the selected one immediately.
The on-screen display will disappear after a few seconds.
51

Changing angles/Title selection/DVD menu
Changing angles
When playing back a disc recorded with multi-angle facility, you
can change the view angle.
Press ANGLE during
playback.
The current angle will
appear.
Press ANGLE repeatedly until the desired angle is
selected.
Title selection
Two or more titles are recorded on some discs.
If the title menu is recorded on the disc, you can select the
desired title.
Press TOP MENU during playback.
Title menu appears on the screen.
Press A/V or •/_. to select the desired title.
Press ENTER or PLAY.
The playback of the selected title will start.
NOTES:
• Depending on the DVD, you may not
be able to change the angles even if
multi-angles are recorded on the DVD.
• Depending on the DVD, you may not
be able to select the title. Depending
on the DVD, a "title menu" may simply
be called a "menu" or "title" in the
instructions supplied with the disc.
52
DVD menu
Some DVDs allow you to select the disc contents using the
menu.
When you play back these DVDs, you can select the subtitle
language and soundtrack language, etc. using the DVD
menu.
Press DVD MENU
The DVD menu appears on the screen.
• Press DVD MENU again to resume playback at the scene
when you pressed DVD MENU.
Press A/Vor • _.to
Press ENTER.
The menu continues to another screen. Repeat steps 2
and 3 to set additional items if any.
during playback.
! select the desired item.

You can select the language of
"Menu", "Subtitle" and "Audio" if
more than one languages are
recorded onto the disc.
Setting the language
Press SETUP/TV MENU in the stop mode.
Press • or • to select _ option, then press • / _ or
ENTER.
Press • to select
desired option, then press 1_ Subtitle :English
or ENTER. Audio :Eng,sh
or
Press • or • to select your
desired language (e.g. English).
English, Francais, Espanol :
The selected language will be heard or seen.
Other:
Other language can be selected (see the "Language code list"
on page 60).
Original (Audio):
The unit will select the first priority language of each disc.
Off (Subtitle):
Subtitles do not appear.
Press SETUP/TV MENU RETURN to the Menu
screen.
or remove
Subtitle
Audio
NOTE:
If the selected language is not recorded on
the disc, the first priority language is
selected.
53

Setting the aspect ratio of TV screen/Setting on screen display
Setting the aspect ratio of TV screen
You can select the aspect ratio of the picture.
Press SETUP/TV MENU in the mode No Disc.stop
Press • or • to select _ option, then press •/• or
ENTER.
or
NOTE:
It is not always possible for the DVD
disc to display the picture as per your
preferred picture setting - for example,
if you select "4:3 Panscan", the disc
may not offer this option. In this case
the picture would display the format the
disc is capable of playing back.
Press • to select "TV
Screen", then press • or
ENTER.
Press or • your
desired screen type, then press
ENTER.
You have the following screen sizes to choose from:
4:3 t"i Letterbox
When playing back a wide screen DVD disc, it displays the
wide picture with black bands at the top and bottom of
screen.
4:3 r-] Panscan
It displays the wide picture on the whole screen with left
and right edges automatically cut off.
16:9 [--] Wide
A wide screen picture is displayed full size.
Press SETUP/TV MENU RETURN to the
Menu screen.
or
to select
or remove
Setting on screen display
On screen display can be switched on or off when you press the
DISPLAY button.
Press SETUP/TV MENU in the mode No Disc.
Press • or • to select _ option, then press •/• or
ENTER.
stop
or
2 Press• or • to select"Display", _ .............. i
picture Mode : Auto
JPEG Interval :Off
then press • or ENTER.. _ - ......
"Off", then press ENTER.
JPEG Interval :Off
3 Press A or • to select "On'or _ "_'-'_'-_- --................
On: On screen displays appear when you press the but-
tons (factory setting).
Off: On screen displays do not appear when you press
any buttons except SUBTITLE, PLAY MODE,
MARKER and DISPLAY.
54
Press SETUP/TV MENU RETURN to
the Menu screen.
or remove

Setting the picture mode
There are two types of source content
in pictures recorded in DVD video
discs: film content (pictures recorded
from films at 24 frames per second)
and video content (video signals
recorded at 30 frames per second).
Make this selection according to the
type of content being viewed.
Setting the picture mode
Press SETUP/TV MENU in the stop mode or No Disc.
Press • or • to select _ option, then press •/• or
ENTER.
Press • or • to select "Picture _ TVScreen :16:9[Z]
ENTER. _., ......
Mode", then press • or _ Display :On
Press • or • to select your _ TVScreen :16:9ECI
press ENTER.
Auto:
desired picture mode, then _ Display :On
Select this position normally.
The DVD player automatically
detects source content, film or
video, of playback source.
Film:
Suitable for playback of film content pictures.
Video:
Suitable for playback of video content pictures.
Press SETUP/TV MENU or RETURN to remove the menu
screen.
JPEG Interval : Off
NOTE:
Depending on the disc, pictures may be
cut off or doubled. In this case, select
"Video".
55

Night Mode/Digital Out
Night Mode
Night Mode enables you to control the dynamic range so as
to achieve a suitable sound for your equipment.
Press SETUP/TV MENU in the mode No Disc.stop
Press • or • to select [(_j'>option, then press • / • or
ENTER.
Press • to select
"Night Mode", then press
or
• or ENTER. D_g_t,_out :PcM
or
Press • to select
"On" or "Off", then press
ENTER.
On :Loud sound such as
Off :It plays back at the recording level on the disk.
Press SETUP/TV MENU RETURN to the Menu
screen.
or
explosion or similar is
toned down slightly
when play back. This
makes it suitable for when it is connected to a
stereo.
or remove
Digital Out
You can select the digital output sound format corresponding
to your system connection.
Press SETUP/TV MENU in the mode No Disc.
Press • or • to select [(_,_ option, then press • / • or
ENTER.
Press • or • to select _ NightMode :Off
or ENTER.
"Digital Out", then press • _ _,_
._ Press • or • to select
then press ENTER.
stop
or
NOTES:
• This function works only during
playback of Dolby Digital recorded
discs.
• The level of Dynamic Range Reduc-
tion may differ depending on DVD
video disc.
• Even if you select "Bitstream", MPEG
audio will be output in PCM format.
56
PCM: Change Dolby
"PCM", "Bitstreem" or "Off", _ " :
Bitstream: Disc audio bitstream data will be output.
Off: There is no sound output from DIGITAL
Press SETUP/TV MENU RETURN to the Menu
screen.
Digital to PCM
for the output.
Select when
connected to a 2 channel digital stereo
amplifier.
AUDIO OUT jack.
or remove

Some discs are specified not suit-
able for children. Such discs can be
limited not to play back with the unit.
Parental control setting
Press SETUP/TV MENU in the stop mode or No Disc.
Press • or • to select _ option. Then press _ / • or
ENTER.
to select
Press • . _
"Parental", then press • or
ENTER.
"Enter Password" screen will
appear.
Press "0000" using Number
buttons (0-9). (Please note,
this pre-setting password of
this unit). Then press ENTER.
The parental level list will
appear.
• Level Off : The parental control setting does not function.
• Level 8 : Virtually all DVD software can be played back.
• Level 1 : DVD software for adults cannot be played back.
• Select from level 1 to level 8. The limitation will be more
• If you input a wrong number, press CANCEL.
Press • or to select the
level 1 to level 8. The
limitation will be more severe
as the level number is lower.
Then press ENTER.
or
Password : Change
severe as the level number decreases.
Password :Change
NOTES:
• If each setup (P.53~58) has been
completed, the unit can always be
operated under the same condi-
tions (especially with DVD discs).
Each setup will be retained in the
memory when you turn the power
off.
• Depending on the discs, the unit
cannot limit playback.
• Some discs may not be encoded with
specific rating level information
though its disc jacket says "adult". For
those discs, the age restriction will
not work.
• After the rating is locked, the setting
cannot be changed unless you enter
the correct password.
Press SETUP/TV MENU or RETURN to remove the Menu
screen.
57

Setting the new password
2 Press • or • to select _ Parental :off
Press SETUP/TV MENU in the stop mode or No Disc.
Press • or • to select _ option. Then press _1 / • or
ENTER.
ENTER.
"Enter Current Password"
screen will appear.
"Password", then press • or _ ......... ,_
to enter the password you _LL,......._ .........
have stored.
• Ifyou input a wrong
Press Number buttons (0-9) _ Parental :off
number, press CANCEL.
Then press ENTER. "Enter
New Password" screen will
appear. Press Number
buttons (0-9) to input the
new password.
Press ENTER.
Now your new password has been set.
Be sure to remember this number!
Parental : Off
NOTE:
Do not forget the password. If you forget
the password, contact Customer Service at
1-800-289-0980. The original remote con-
trol will be required.
58

Temporary disabling of rating level by DVD disc
Depending on the DVD disc, the disc 1 Load a DVD disc (see page 41).
may try to temporarily cancel the
rating level that you have set.
It is up to you to decide whether to
cancel the rating level or not.
If the DVD disc has been designed to temporarily cancel the
Rating level, the screen which follows the "Reading" screen will
change, depending on which disc is played. If you select "YES"
with ENTER key, password input screen will then appear.
Enter the with
Number buttons (0-9).
password
Then press ENTER.
• Ifyou interrupt the entering,
press RETURN.
Playback will commence if the entered password was correct.
NOTE:
This temporary cancellation of the rating
level will be kept until the disc is ejected.
When the disc is ejected, the original rat-
ing level will be set again automatically.
59

Language code list
Enter the appropriate code number for the initial settings "Menu", "Subtitle" and/or "Audio" (see page 53).
_anguage Name Code Language Name Code Language Name Code LanguageName Code
_,bkhazian 1112 Fiji 1620 Lingala 2224 Singhalese 2919
_,far 1111 Finnish 1619 Lithuanian 2230 Slovak 2921
_,frikaans 1116 French 1628 Macedonian 2321 Slovenian 2922
_,lbanian 2927 Frisian 1635 Malagasy 2317 Somali 2925
_,mharic 1123 Galician 1722 Malay 2329 Spanish 1529
_,rabic 1128 Georgian 2111 Malayalam 2322 Sundanese 2931
_,rmenian 1835 German 1415 Maltese 2330 Swahili 2933
_,ssamese 1129 Greek 1522 Maori 2319 Swedish 2932
_,ymara 1135 Greenlandic 2122 Marathi 2328 Tagalog 3022
_,zerbaijani 1136 Guarani 1724 Moldavian 2325 Tajik 3017
3ashkir 1211 Gujarati 1731 Mongolian 2324 Tamil 3011
3asque 1531 Hausa 1811 Nauru 2411 Tatar 3030
3engali; Bangla 1224 Hebrew 1933 Nepali 2415 Telugu 3015
3hutani 1436 Hindi 1819 Norwegian 2425 Thai 3018
3ihari 1218 Hungarian 1831 Oriya 2528 Tibetan 1225
3retort 1228 Icelandic 1929 Panjabi 2611 Tigrinya 3019
3ulgarian 1217 Indonesian 1924 Pashto, Pushto 2629 Tonga 3025
3urmese 2335 Interlingua 1911 Persian 1611 Turkish 3028
3yelorussian 1215 Irish 1711 Polish 2622 Turkmen 3021
3ambodian 2123 Italian 1930 Portuguese 2630 Twi 3033
3atalan 1311 Japanese 2011 Quechua 2731 Ukrainian 3121
3hinese 3618 Javanese 2033 Rhaeto-Romance 2823 Urdu 3128
3orsican 1325 Kannada 2124 Romanian 2825 Uzbek 3136
3roatian 1828 Kashmiri 2129 Russian 2831 Vietnamese 3219
3zech 1329 Kazakh 2121 Samoan 2923 VolapQk 3225
Danish 1411 Kirghiz 2135 Sanskrit 2911 Welsh 1335
Dutch 2422 Korean 2125 Scots Gaelic 1714 Wolof 3325
English 1524 Kurdish 2131 Serbian 2928 Xhosa 3418
Esperanto 1525 Laothian 2225 Serbo-Croatian 2918 Yiddish 2019
Estonian 1530 Latin 2211 Shona 2924 Yoruba 3525
--aroese 1625 Latvian, Lettish 2232 Sindhi 2914 Zulu 3631
60
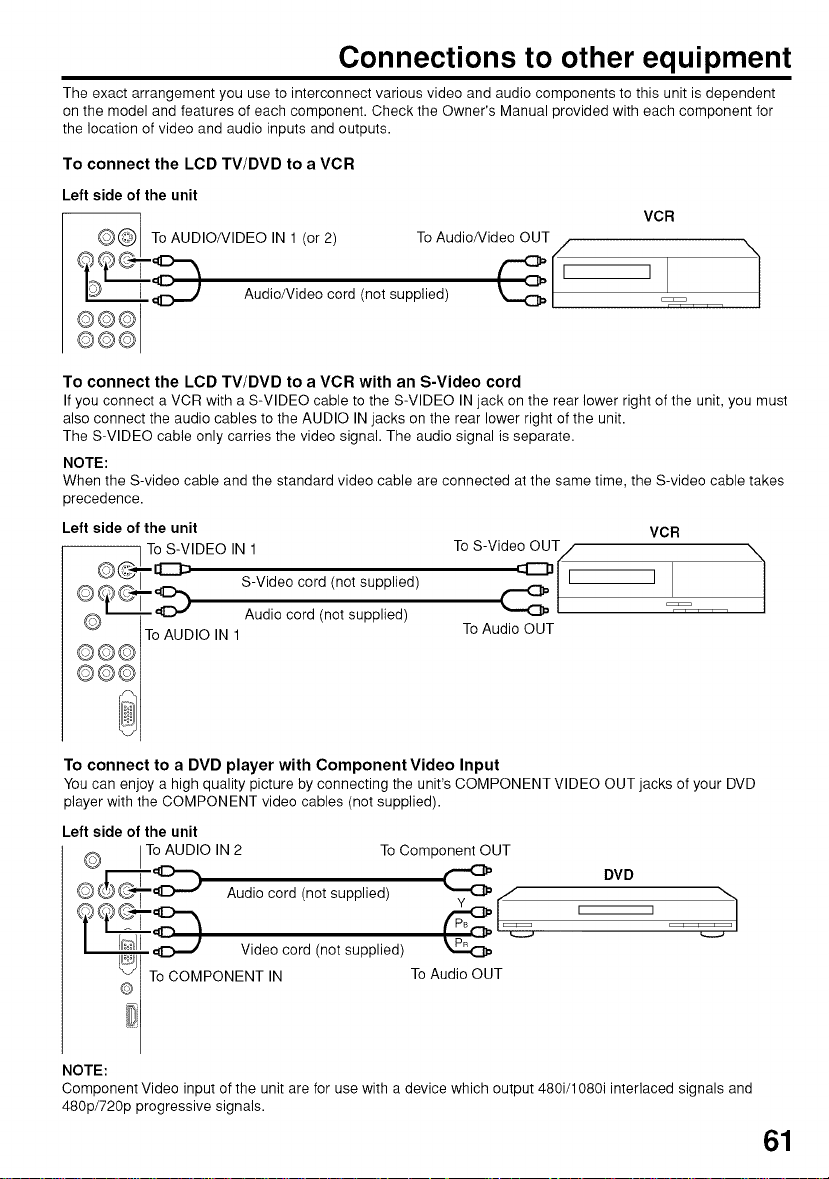
Connections to other equipment
The exact arrangement you use to interconnect various video and audio components to this unit is dependent
on the model and features of each component. Check the Owner's Manual provided with each component for
the location of video and audio inputs and outputs.
To connect the LCD TV/DVD to a VCR
Left side of the unit
VCR
_To AUDIO/VIDEO IN 1 (or 2) To Audio/Video OUT o
/
I Q_I_3___ Audio/Video cord (not supplied)
I©©©1
To connect the LCD TV/DVD to a VCR with an S-Video cord
If you connect a VCR with a S-VIDEO cable to the S-VIDEO IN jack on the rear lower right of the unit, you must
also connect the audio cables to the AUDIO IN jacks on the rear lower right of the unit.
The S-VIDEO cable only carries the video signal. The audio signal is separate.
NOTE:
When the S-video cable and the standard video cable are connected at the same time, the S-video cable takes
precedence.
Left side of the unit
To S-VIDEO IN 1
© ,,_ [1:::::::_
Z S-Video cord (not supplied)
0 L_-- qL..,,'_ Audio cord (not supplied)
Q@@ To AUDIO IN ]
To S-Video OUT / \
To Audio OUT
VCR
1
°°i
To connect to a DVD player with Component Video Input
You can enjoy a high quality picture by connecting the unit's COMPONENT VIDEO OUT jacks of your DVD
player with the COMPONENT video cables (not supplied).
Left side of the unit
Q ITo AUDIO IN 2 To Component OUT
ud,ooo 0 notsu ,ied, OVO
Videocord/notsupp,ied/
_ To COMPONENT IN To Audio OUT
NOTE:
Component Video input of the unit are for use with a device which output 480i/1080i interlaced signals and
480p/720p progressive signals.
61

Connections to other equipment (continued)
To connect a HDMI or a DVI device to the unit
The HDMI input receives digital audio and uncompressed video from a HDMI device or uncompressed digital
video from a DVl device.
When you connect to a DVl device with a HDMI-to-DVl adapter cable, it transfers only video signal. Separate
analog audio cords required.
Left side of the unit
Audio cord (not supplied)
DVl device
HDMI-to-DVladaptercablell Iouvl
(HDMItype Aconnector) I output
(not supplied) or
HDMI cable (type A connector) I
NOTE:
You must choose an appropriate setting for each connection (see page 35. "Selecting the HDMI audio input
source").
Using an AV Amplifier with built-in digital surround
If you are using an Amplifier with built-in digital surround sound, you can enjoy various audio systems including
Dolby Digital Surround audio that sounds just like the movie.
Connect an AV amplifier with built-in Dolby Digital decoder, DTS decoder, or MPEG decoder etc. as
shown below.
Left side of the unit
(not supplied) To HDMI out
I
or
HDMI device
I
Front
] _ Subwoofer ] (SRPg_tk)er
I _@ Audio Out'gut (Left) \\) '_ 4(/_
Coaxi alL_ = _ _ \
(ndoitg_tai_oaiiia _ _,._.. [_ _eaker.._..
DigitalAudiolnput I_ _ 0 _-
I__ | _ S_rer°kUnrd(Left) _ Sprra°t_nd
AV Amplifier with built-in digital surround I t / / (Right)
NOTES:
• This unit will not work in conjunction with DTS audio.There will be no sound output if connected to an AV
• Coaxial digital audio output is active only when receiving digital broadcasting, not when receiving analog
decoder as listed above
amplifier with a built-in DTS decoder.
broadcasting.
_CoaxialD, ,tal Speaker-_L--- /\ (_\ _ /_ / \
Front ,._ TV/DVD /
62

Connections to other equipment (continued)
To connect the TV/DVD to a camcorder, or a TV Game
To playback from a camcorder, connect the camcorder to the unit as shown.
This unit can also be used as a display device for many video games. However, due to the wide variety of
signals generated by these devices and subsequent hook-up variations required, they have not all been
included in the suggested connection diagrams. You'll need to consult each component's Owner's Manual for
additional information.
Left side of the unit
Q@J To AUDIO/VIDEO IN 1 (or 2)
or I TV GAMEI
To Audio/Video OUT _?_)
Audio/Video cord (not supplied)
To connect the TV/DVD to a PC (Personal Computer)
Before you connect this TV/DVD to your PC, change the adjustment of your PC's Resolution and Refresh rate
(60 Hz).
Connect one end of a (male to male) VGA cable to the video card of the computer and the other end to the
VGA connector PC MONITOR on the back of the TV/DVD. Attach the connectors firmly with the screws on the
plug. In case of a Multimedia computer, connect the audio cord to the audio output of your Multimedia
computer and to the AUDIO connector of the PC/HDMI AUDIO IN jacks of the TV/DVD.
Press INPUT SELECT on the remote control to select PC mode.
Switch on the computer. The TV/DVD can operate as the computer monitor.
Left side of the unit
Monitor Display modes
MODE Resolution Refresh rate
VGA 640x480 60Hz
PC
ToPO,N 1 II
VGA cable (not supplied
Audio cord (not supplied)
NOTES:
• The on-screen displays will have a different appearance in PC mode than in TV mode.
• When you select WXGA or WVGA mode, see the WXGA INPUT to ON in the PC PICTURE menu (see page
38).
• If there is no video signal from the PC when the unit is in PC mode, "NO SIGNAl" will appear on the TV-
screen.
VGA 720x400 70Hz
WVGA 848x480 60Hz
SVGA 800x600 60Hz
XGA 1024x768 60Hz
WXGA 1280x768 60Hz
WXGA 1280x720 60Hz
To return to normal mode
Press INPUT SELECT again.
T
63
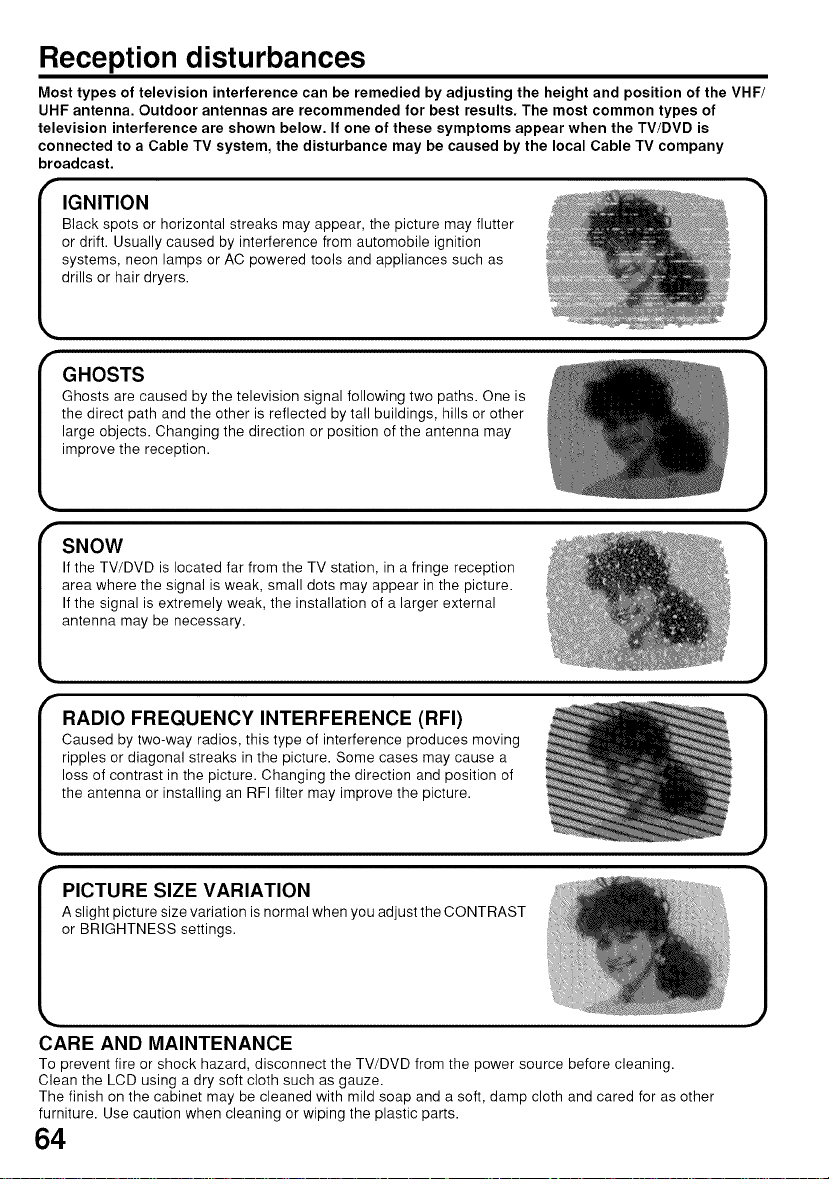
Reception disturbances
Most types of television interference can be remedied by adjusting the height and position of the VHF/
UHF antenna. Outdoor antennas are recommended for best results. The most common types of
television interference are shown below. If one of these symptoms appear when the TV/DVD is
connected to a Cable TV system, the disturbance may be caused by the local Cable TV company
broadcast.
IGNITION
Black spots or horizontal streaks may appear, the picture may flutter
or drift. Usually caused by interference from automobile ignition
systems, neon lamps or AC powered tools and appliances such as
drills or hair dryers.
I
GHOSTS
Ghosts are caused by the television signal following two paths. One is
the direct path and the other is reflected by tall buildings, hills or other
large objects. Changing the direction or position of the antenna may
improve the reception.
SNOW
If the TV/DVD is located far from the TV station, in a fringe reception
area where the signal is weak, small dots may appear in the picture.
If the signal is extremely weak, the installation of a larger external
antenna may be necessary.
RADIO FREQUENCY INTERFERENCE (RFI)
Caused by two-way radios, this type of interference produces moving
ripples or diagonal streaks in the picture. Some cases may cause a
loss of contrast in the picture. Changing the direction and position of
the antenna or installing an RFI filter may improve the picture.
I
PICTURE SIZE VARIATION
A slight picture size variation is normal when you adjust the CONTRAST
or BRIGHTNESS settings.
CARE AND MAINTENANCE
To prevent fire or shock hazard, disconnect the TV/DVD from the power source before cleaning.
Clean the LCD using a dry soft cloth such as gauze.
The finish on the cabinet may be cleaned with mild soap and a soft, damp cloth and cared for as other
furniture. Use caution when cleaning or wiping the plastic parts.
64

Problems and troubleshooting
Use the following check list for troubleshooting when you have problems with your TV/DVD. Consult your local
dealer or service outlet if problems persist.
Be sure all connections are properly made when using with other units.
SYMPTOMS I POSSIBLE SOLUTIONS I PAGE
POWER
TV/DVD does not operate. • Power is off, check fuse or circuit breaker. 13
TV BROADCAST RECEPTION
Poor sound or no sound. • Check Volume adjustments. 17,18
Poor picture or no picture. • Check antenna or Cable TV connections, reorient antenna. 14,15
Poor reception on some channels. • Station signal is weak, reorient antenna to receive stronger station. 14
Poor color or no color. • Check picture control adjustments. 30
Picture wobbles or drifts.
No Cable TV reception. • Set TV/CABLE menu option to the "CABLE" mode. 19
Horizontal or diagonal bars on • Check antenna connections, reorient antenna. 14
screen. • Check for sources of possible interference. 64
No reception above channel 13.
TV shuts off. • Sleep Timer is set. 18
Closed - Caption is not activated. • Check Cable TV connection or VHF/UHF antenna, reposition 14,15
Display is not shown in your
language.
Digital broadcasting screen
_problem. • Check digital signal strength. 37
• Make sure the power cord is plugged in.
• Unplug unit, then plug it back in.
• Station or Cable TV experiencing problems, tune to another station. 17
• Check for sources of possible interference. 64
• Station or Cable TV experiencing problems, tune to another station. 17
• Check for sources of possible interference. 57
• Check picture control adjustments. 30
• Station or Cable TV experiencing problems, tune to another station. 17
• Check for sources of possible interference. 64
• Station or Cable TV experiencing problems, tune to another station. 17
• Make sure channels are set into memory. 20
• Check antenna or Cable TV connections, reorient antenna. 14,15
• Check for sources of possible interference. 64
• Station or Cable TV experiencing problems, tune to another station. 17
• Make sure channels are set into memory. 20
• Cable TV company is scrambling signal.
• Check antenna orientation. 14
• Check all Cable TV connections. 15
• Station or Cable TV system problems, try another station. 17
• Make sure TV/CABLE menu option is in the appropriate mode. 19
• If using antenna, check UHF antenna connections. 14
• No broadcast on station tuned. 17
• Power interrupted.
• TV station experiencing problems or program tuned is not 17
closed captioned. Try another channel.
or rotate antenna.
• Set Closed Caption decoder in the menu. 32
• Select proper language in the menu options. 16
• The LCD panel is a very high technology product, giving you fine picture details. Occasionally, a few non-
active pixels may appear on the screen as a fixed point of blue, green or red. Please note that this does not
affect the performance of your product.
65
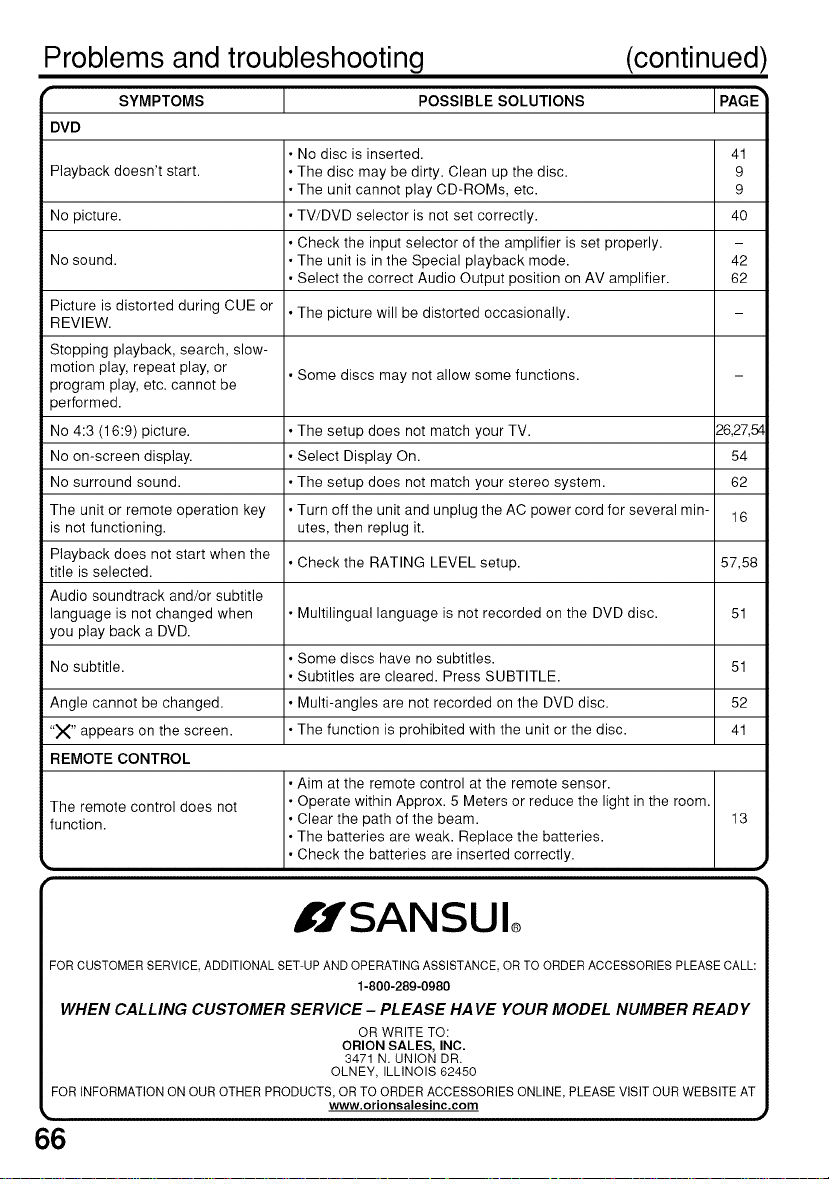
Problems and troubleshooting (continued)
r SYMPTOMS I POSSIBLESOLUTIONS IPAGE
DVD
• No disc is inserted. 41
Playback doesn't start. • The disc may be dirty. Clean up the disc. 9
No picture. • TV/DVD selector is not set correctly. 40
No sound. • The unit is in the Special playback mode. 42
Picture is distorted during CUE or
REVIEW.
Stopping playback, search, slow-
motion play, repeat play, or • Some discs may not allow some functions.
program play, etc. cannot be
performed.
No 4:3 (16:9) picture. • The setup does not match your TV. 26,27,54
No on-screen display. • Select Display On. 54
No surround sound. • The setup does not match your stereo system. 62
The unit or remote operation key • Turn off the unit and unplug the AC power cord for several min- 16
is not functioning, utes, then replug it.
Playback does not start when the
title is selected.
Audio soundtrack and/or subtitle
language is not changed when • Multilingual language is not recorded on the DVD disc. 51
you play back a DVD.
No subtitle. 51
Angle cannot be changed. • Multi-angles are not recorded on the DVD disc. 52
"X" appears on the screen. • The function is prohibited with the unit or the disc. 41
REMOTE CONTROL
The remote control does not • Operate within Approx. 5 Meters or reduce the light in the room.
function. • Clear the path of the beam. 13
!_. • Check the batteries are inserted correctly.
• The unit cannot play CD-ROMs, etc. 9
• Check the input selector of the amplifier is set properly.
• Select the correct Audio Output position on AV amplifier. 62
• The picture will be distorted occasionally.
• Check the RATING LEVEL setup. 57,58
• Some discs have no subtitles.
• Subtitles are cleared. Press SUBTITLE.
• Aim at the remote control at the remote sensor.
• The batteries are weak. Replace the batteries.
I.,fSANSUI
FOR CUSTOMERSERVICE,ADDITIONALSET-UPAND OPERATINGASSISTANCE, OR TOORDER ACCESSORIESPLEASECALL:
1-800-289-0980
WHEN CALLING CUSTOMER SERVICE - PLEASE HA VE YOUR MODEL NUMBER READY
OR WRITE TO:
ORION SALES, INC.
3471 N. UNION DR.
OLNEY, ILLINOIS 62450
FOR INFORMATIONON OUR OTHER PRODUCTS, OR TO ORDER ACCESSORIES ONLINE, PLEASE VISITOUR WEBSITE AT
66
www.orionsalesinc.com

Specifications
GENERAL
Power supply:
Power consumption:
Weight:
Dimensions:
Operating temperature:
Operating humidity:
TELEVISION
Type:
Display method:
Number of Pixels:
Viewing angle:
Tunertype:
Receiving channels:
Input:
Digital audio out:
Component video input:
HDMI input:
PC Monitor input:
Antenna input:
Speaker:
Audio output power:
DVD/CD player
Signal system:
Applicable disc:
Pickup:
ACCESSORIES:
Designs and specifications are subject to change without notice.
AC 120V 60Hz
Operation: 130W
Stand by: lW
12.7 kg (28.0 Ibs)
Width 633 mm (24-15/16 inches)
Height 495 mm (19-1/2 inches)
Depth 211 mm (8-5/16 inches)
5oc _ 40°C
Less than 80%
26.01 inches (660.5 mm diagonal)
Transmission TFT color LCD panel
1366 (H) x 768 (V)
Left/Right: 80/80 degree
Up/Down: 80/80 degree
NTSC standard
ATSC standard (8VSB), QAM
VHF 2-13
UHF 14-69
CATV 14-36 (A)-(W)
37-59 (AA)-(WW)
60-85 (AAA)-(ZZZ)
86-94 (86)-(94)
95-99 (A-5)-(A-1)
100-125 (100)-(125)
01 (5A)
S-Video: Y-Input: 1.0 V (p-p), 75 ohms
Video: (RCA) 1 V p-p/75 ohms
Audio: (RCA) -8 dBm/50K ohms
0.5 Vp-p 75 ohms terminated
(Y) 1 V (p-p), 75 ohms
(PB)/(PR) 0.7 V (p-p), 75 ohms
HDMI compliant (type A connector)
HDCP compliant
E-EDID compliant
Suggested scan rates: 1080i, 480p, 480i, 720p
HDMI Audio: 2-channel PCM
Mini-Dsub 15pin x 1
VHF/UHF In 75 ohms coaxial
41 mm x 122 mm (1-5/8 inches x 4-13/16 inches), 4 ohms x 2
5.0W + 5.0W
NTSC
1. DVD (12 cm, 8 cm)
2. CD (12 cm, 8 cm)
CD: Wavelength: 790 nm
DVD: Wavelength: 655 nm
Remote control
Batteries (UM-4) x 2
AC Cord
C-Input: 0.3 V (p-p), 75 ohms
32/44.1/48 kHz sampling frequency
16/20/24 bits per sample
Maximum output power: 7 mW
Maximum output power: 5 mW
67
IJSANSUI®
fimited
WARRANTY
LCD TV WITH DVD PLAYER
ORION warrants this product to be free from manufacturing defects in material and workmanship under
normal use and conditions for a period of 1 year from date of original purchase in the United States.
Should service be necessary under this warranty for any reason due to a manufacturing defect or malfunc-
tion during the first 12 months from date of original purchase, ORION will provide carry-in service by an ORION
authorized Independent Service Center at no charge. Also, if an original part fails due to manufacturing defect
in material and workmanship within one year from date of original purchase we will replace the defective part,
provided the defect or malfunction is verified along with dated proof of purchase.
There are ORLON authorized Independent Service Centers located throughout the country. For the one
nearest you, DIAL TOLL FREE: 1-800-289-0980 or visit our website at www.orionsalesinc.com. This product is
eligible for CARRY-IN service only. ORLON will not be liable for damages incurred in shipment of the unit. If there
are no ORION authorized Independent Service Centers in your area please call - 1-888-296-7466 for assistance.
Note: This warranty is void if the product is:
(a) Damaged through negligence, misuse, abuse, or accident.
(b) Used in a commercial application or rentals.
(c) Modified or repaired by anyone other than an Independent Service Center authorized by ORION to effect
warranty repairs to the class of product or by the ORION Factory Service Center.
(d) Damaged because it is improperly connected to the equipment of other manufacturers.
This warranty does not cover:
(a) Damage tovideo disc.
(b) Damage to equipment not properly connected to the product.
(c) Costs incurred in the shipping of the product to an ORION authorized Independent Service Center or
ORION Factory Service Center.
(d) Damage or improper operation of unit caused by customer abuse, misuse, negligence, or failure to follow
operating instructions provided with the product.
(e) Ordinary adjustments to the product which can be performed by customer as outlined in the owner's
manual.
(f) Signal reception problems caused by external antenna or cable systems.
THIS WARRANTY IS NON TRANSFERABLE AND APPLIES ONLY TO THE ORIGINAL PURCHASER AND
DOES NOT EXTEND TO SUBSEQUENT OWNERS OFTHE PRODUCT. ANY APPLICABLE IMPLIED WARRAN-
TIES, INCLUDING THE WARRANTY OF MERCHANTABILITY, ARE LIMITED IN DURATION TO A PERIOD OF
THE EXPRESS WARRANTY AS PROVIDED HEREIN BEGINNING WITH THE DATE OF ORIGINAL PURCHASE
AT RETAIL AND NO WARRANTIES, WHETHER EXPRESS OR IMPLIED SHALL APPLY TO THIS PRODUCT
THEREAFTER. ORION MAKES NO WARRANTY AS TO THE FITNESS OF THE PRODUCT FOR ANY PARTIC-
ULAR PURPOSE AND USE.
UNDER NO CIRCUMSTANCES SHALL ORION BE LIABLE FOR ANY LOSS, DIRECT, INDIRECT, INCI-
DENTAL, SPECIAL, OR CONSEQUENTIAL DAMAGE ARISING OUT OF OR IN CONNECTION WITH THE USE
OFTHIS PRODUCT.
THIS WARRANTY IS VALID ONLY IN THE UNITED STATES OF AMERICA. THIS WARRANTY GIVES YOU
SPECIFIC LEGAL RIGHTS, HOWEVER, YOU MAY HAVE OTHER RIGHTS WHICH MAY VARY FROM STATE
TO STATE. SOME STATES DO NOT ALLOW LIMITATION ON IMPLIED WARRANTIES OR EXCLUSION OF
CONSEQUENTIAL DAMAGE, THEREFORE THESE RESTRICTIONS MAY NOT APPLY TO YOU.
ORION SALES, INC.
3471 N. UNION DR.
OLNEY, ILLINOIS 62450
 Loading...