

Page 1
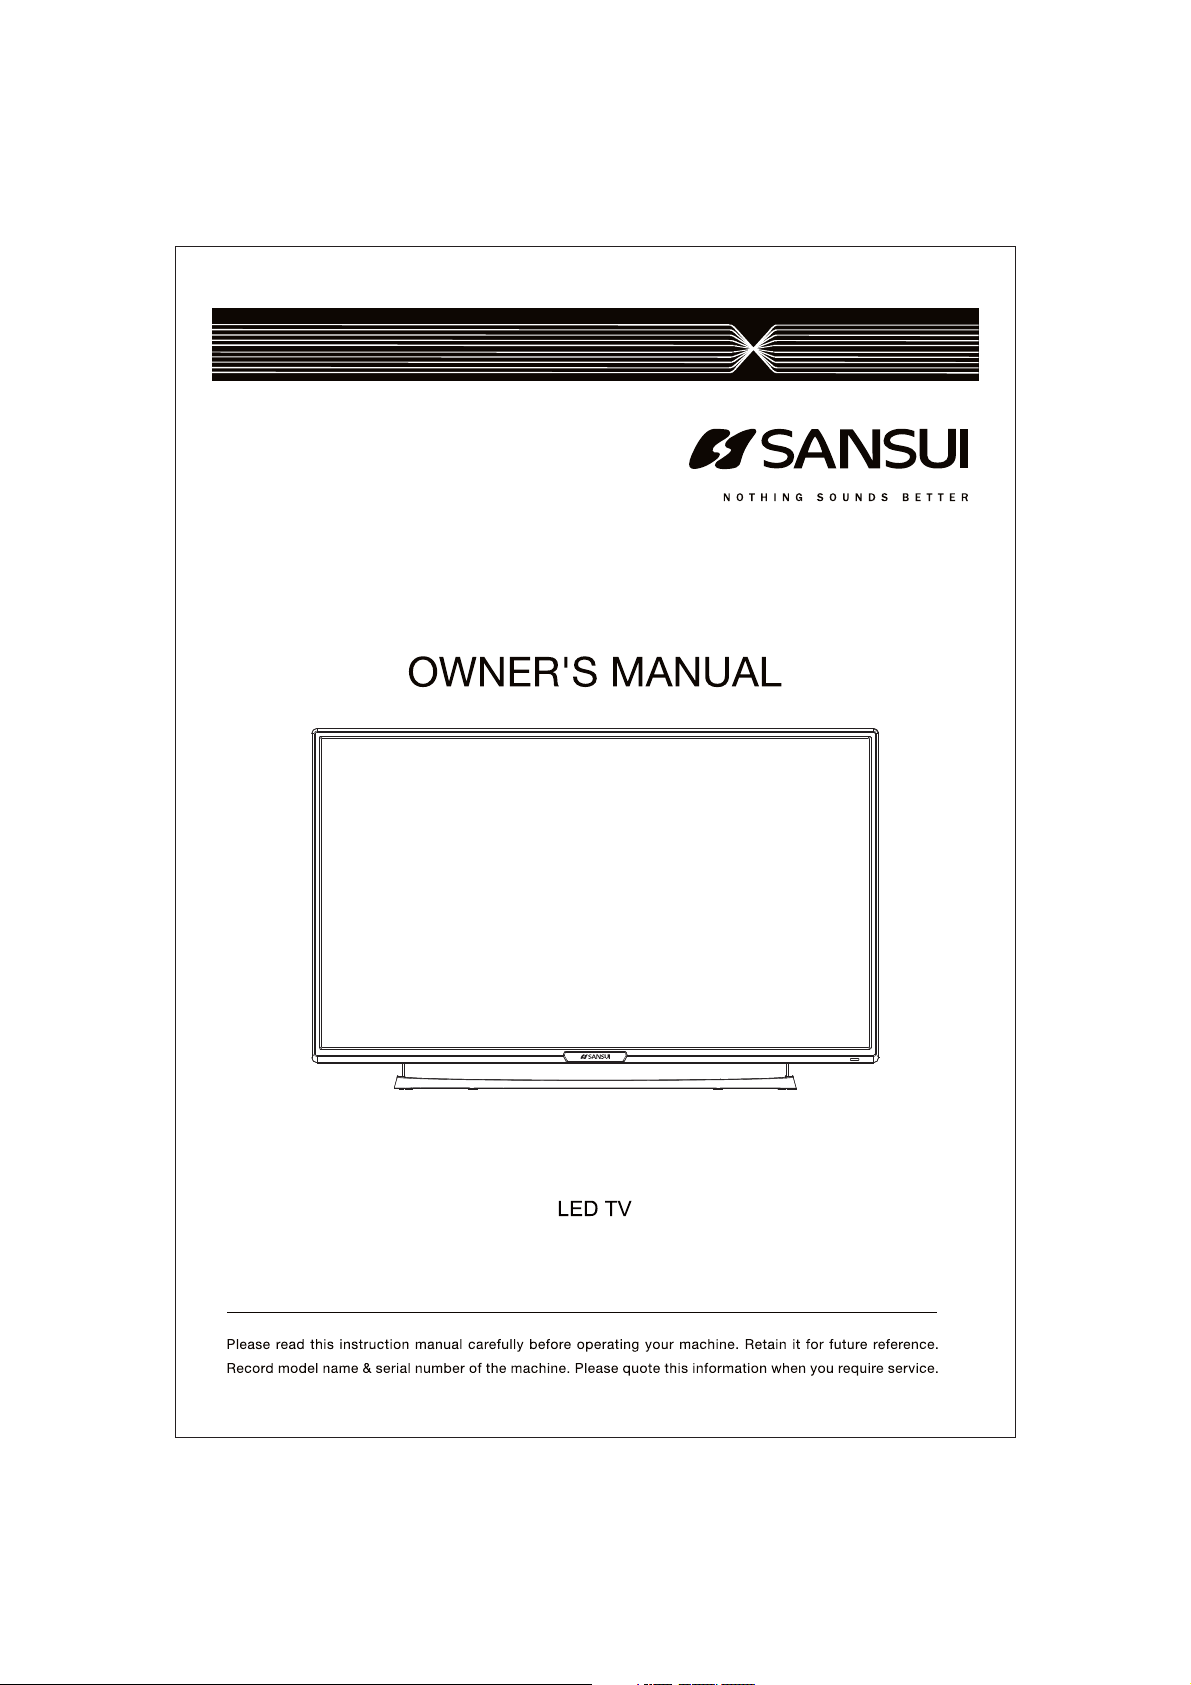
LEDTVSKQ48FH
LEDTVSKQ55FH
Page 2
Page 3
Page 4

-1-
Contents
Safety and warnings..........................................................................................................2 3
Introduction.....................................................................................................................4
Installation...................................................................................................................... 5 9
Remote Controller........................................................................................................... 10
TV Operation..................................................................................................................11 15
Trouble shooting............................................................................................................ 16
Page 5
-2-
SAFETY AND WARNINGS
IMPORTANT SAFETY INSTRUCTION
1) Read these instructions.
2) Keep these instructions.
3) Heed all warnings.
4) Follow all instructions.
5) Do not use this apparatus near water.
6) Clean only with dry cloth.
7) Do not block any ventilation openings, install in
accordance with the instructions.
8) Do not install near any heat sources such as
radiations, heat registers, stoves, or other
apparatus (including amplifiers) that produce heat.
9) Do not defeat the safety purpose of the polarized
plug. If the provided plug does not fit into your
outlet, consult an electrician for replacement of the
obsolete outlet.
10) Protected the power cord from being walked on
or pinched particularly at plugs, convenience
receptacles, and the point where they exit from the
apparatus.
11) Only use attachments/accessories specified by
the manufacturer.
12) Unplug this apparatus during lighting storms or
when unused for long periods of time.
13) Refer all servicing to qualified service
personnel. Servicing is required when the
apparatus has been damaged in any way, such as
power supply cord or plug is damaged, liquid has
been spilled or objects have fallen into the
apparatus, the apparatus has been exposed to rain
or moisture, does not operate normally, or has been
dropped.
14) Mains plug is used as the disconnect device, the
disconnect device shall remain readily operable.
15) The ventilation should not be impeded by
covering the ventilation openings with items, such
as newspapers, table cloth, curtains, etc.
16) No naked flame sources, such as lighted
candles, should be placed on the apparatus.
17) Attention should be drawn to the environmental
aspects of battery disposal.
18) The use of apparatus in moderate climate.
19) The apparatus shall not be exposed to dripping
or splashing and that no objects filled with liquids,
such as vases, shall be placed on the apparatus.
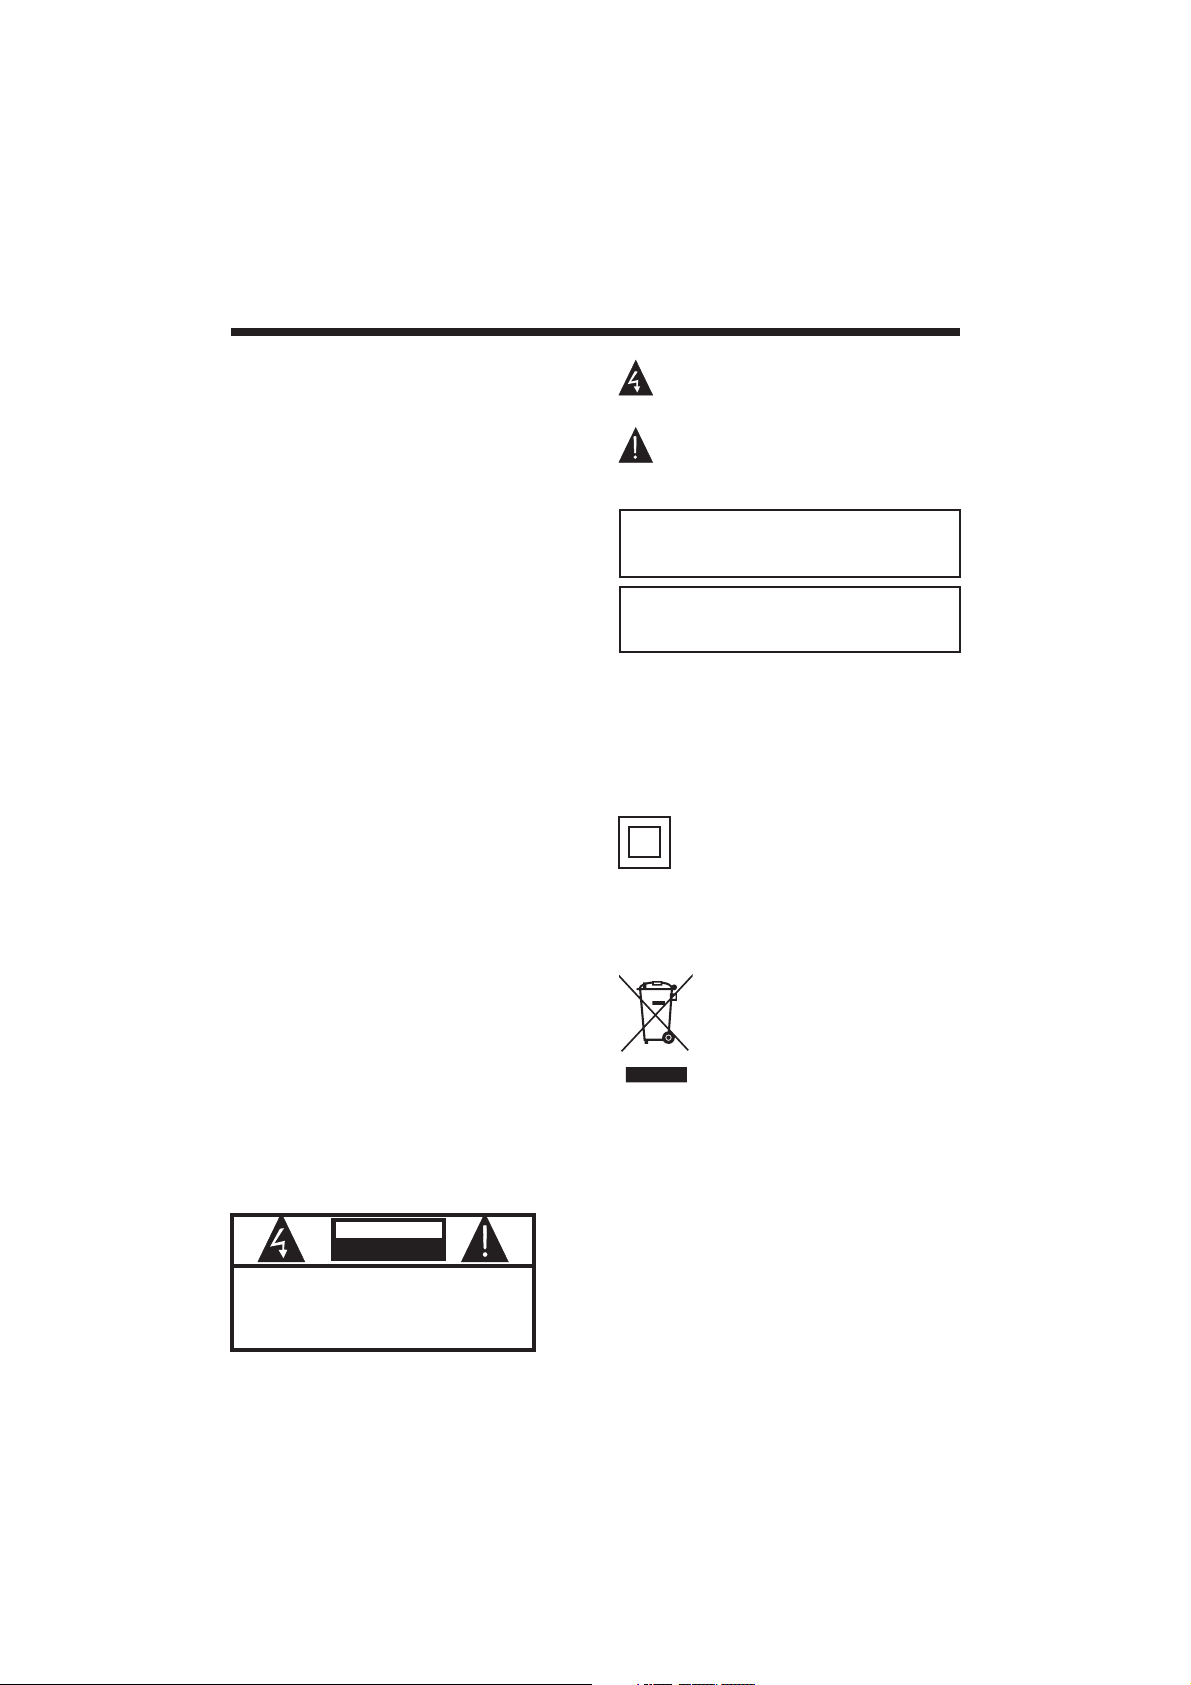
This symbol indicates that this product
incorporates double insulation between
hazardous mains voltage and user accessible
parts. When servicing use only
identical replacement parts.
This marking indicates that this product should
not be disposed with other household wastes
throughout the EU. To prevent possible harm to
the environment or human health from
uncontrolled waste disposal, recycle it
responsibly to promote the sustainable reuse of
material resources. To return your used device,
please use the return and collection systems or
contact the retailer where the product was
purchased. They can take this product for
environmental safe recycling.
TO REDUCE THE RISK OF ELECTRIC SHOCK, DO
NOT REMOVE COVER (OR BACK).NO USER
SERVICEABLE PARTS INSIDE. REFER SERVICING
TO QUALIFIED SERVICE PERSONNEL.
CAUTION
RISK OFELECTRIC SHOCK
DONOT OPEN!
CAUTION
The symbol indicates that dangerous voltages
constituting a risk of electric shock are present
within this unit.
The symbol indicates that there are important
operating and maintenance instructions in the
literaturaccompanying this unit.
To reduce the risk of fire or electric shock, do
not expose this apparatus to rain or moisture.
WARNING:
The batteries shall not be exposed to excessive
heat such as sunshine, fire or the like.
WARNING:
Page 6
-3-
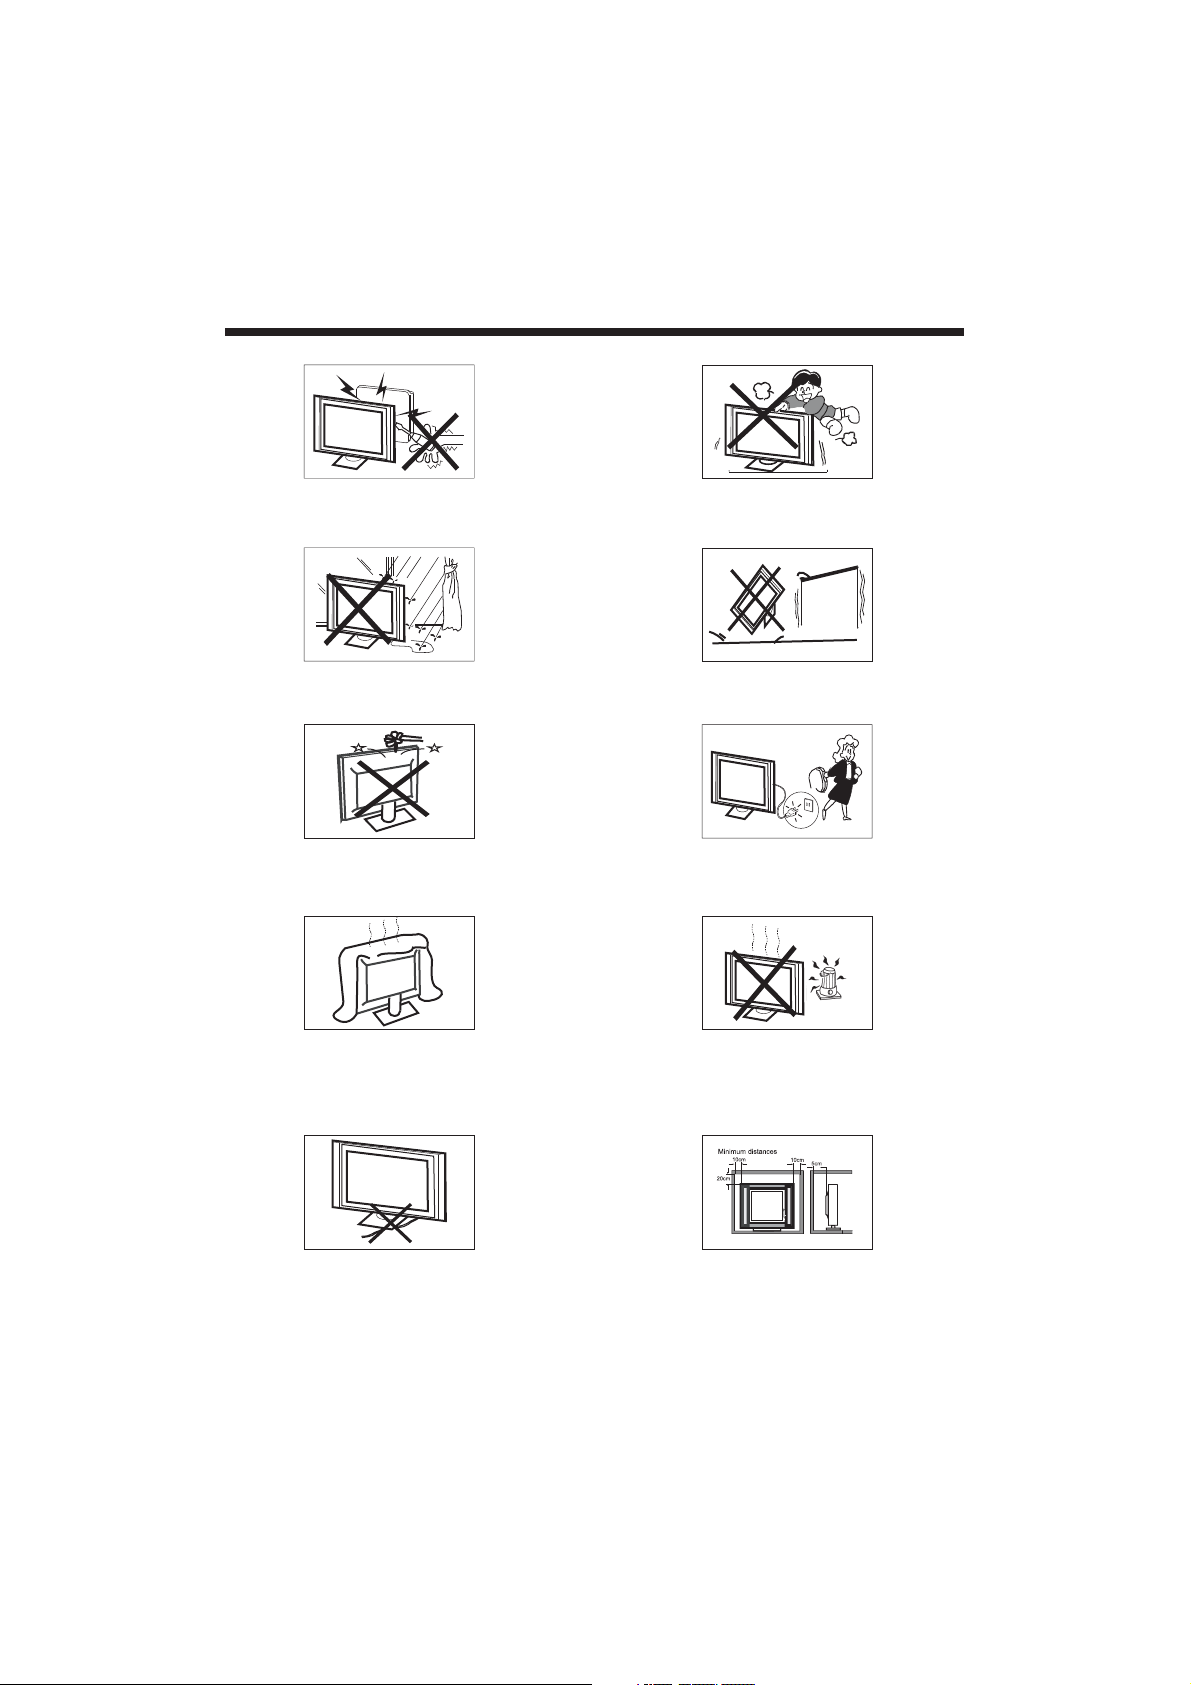
High voltages are used in the operation of this television
receiver
. Do not remove the cabinet back from your set.
Refer servicing to qualified service personnel.
SAFETY AND WARNINGS
T
o prevent fire or electrical shock hazard, do not expose
the television receiver to rain or moisture.
Do not drop or push objects into the television cabinet
slots or openings. Never spill any kind of liquid on the
television receiver
.
Do not block the ventilation holes in the back cover
.
Adequate ventilation is essential to prevent failure of
electrical components.
Do not trap the power supply cord under the television
receiver.
Never stand on, lean on, or suddenly push the television or
its stand.
You should pay special attention to children.
Serious injury may result if it falls.
Do not place your television on an unstable cart, stand,
shelf or table. Serious injury to an individual , and damage
to the television, may result if it falls.
When
the television receiver is not used for an
extended period of t im e, i t is advi sa ble to di sc on nect
the AC pow er c ord fro m th e AC outle t.
A
void exposing the television receiver to direct sunlight
and other sources of heat. Do not stand the television
receiver directly on other products which give off heat,
e.g. video cassette players and audio amplifiers. Do not
place naked flame sources, such as lighted candles on
the television.
If the television is to be built into a compartment or similar
enclosure, the minimum distances must be maintained. Heat
build-up can reduce the service life of your television, and
can also be dangerous.
Page 7
INTRODUCTION
-4-
Main features
Accessories
① Used as Television, display terminal, PC display;
② High luminance, wide viewing angle;
③ Can store 200 TV programs;
④ HDMI interface;
5 Multi-Media player (USB);
Infrared Remote Controller............
1
User’sManual...............................1
Battery(AAA)...............................2
SPECIFICATIONS
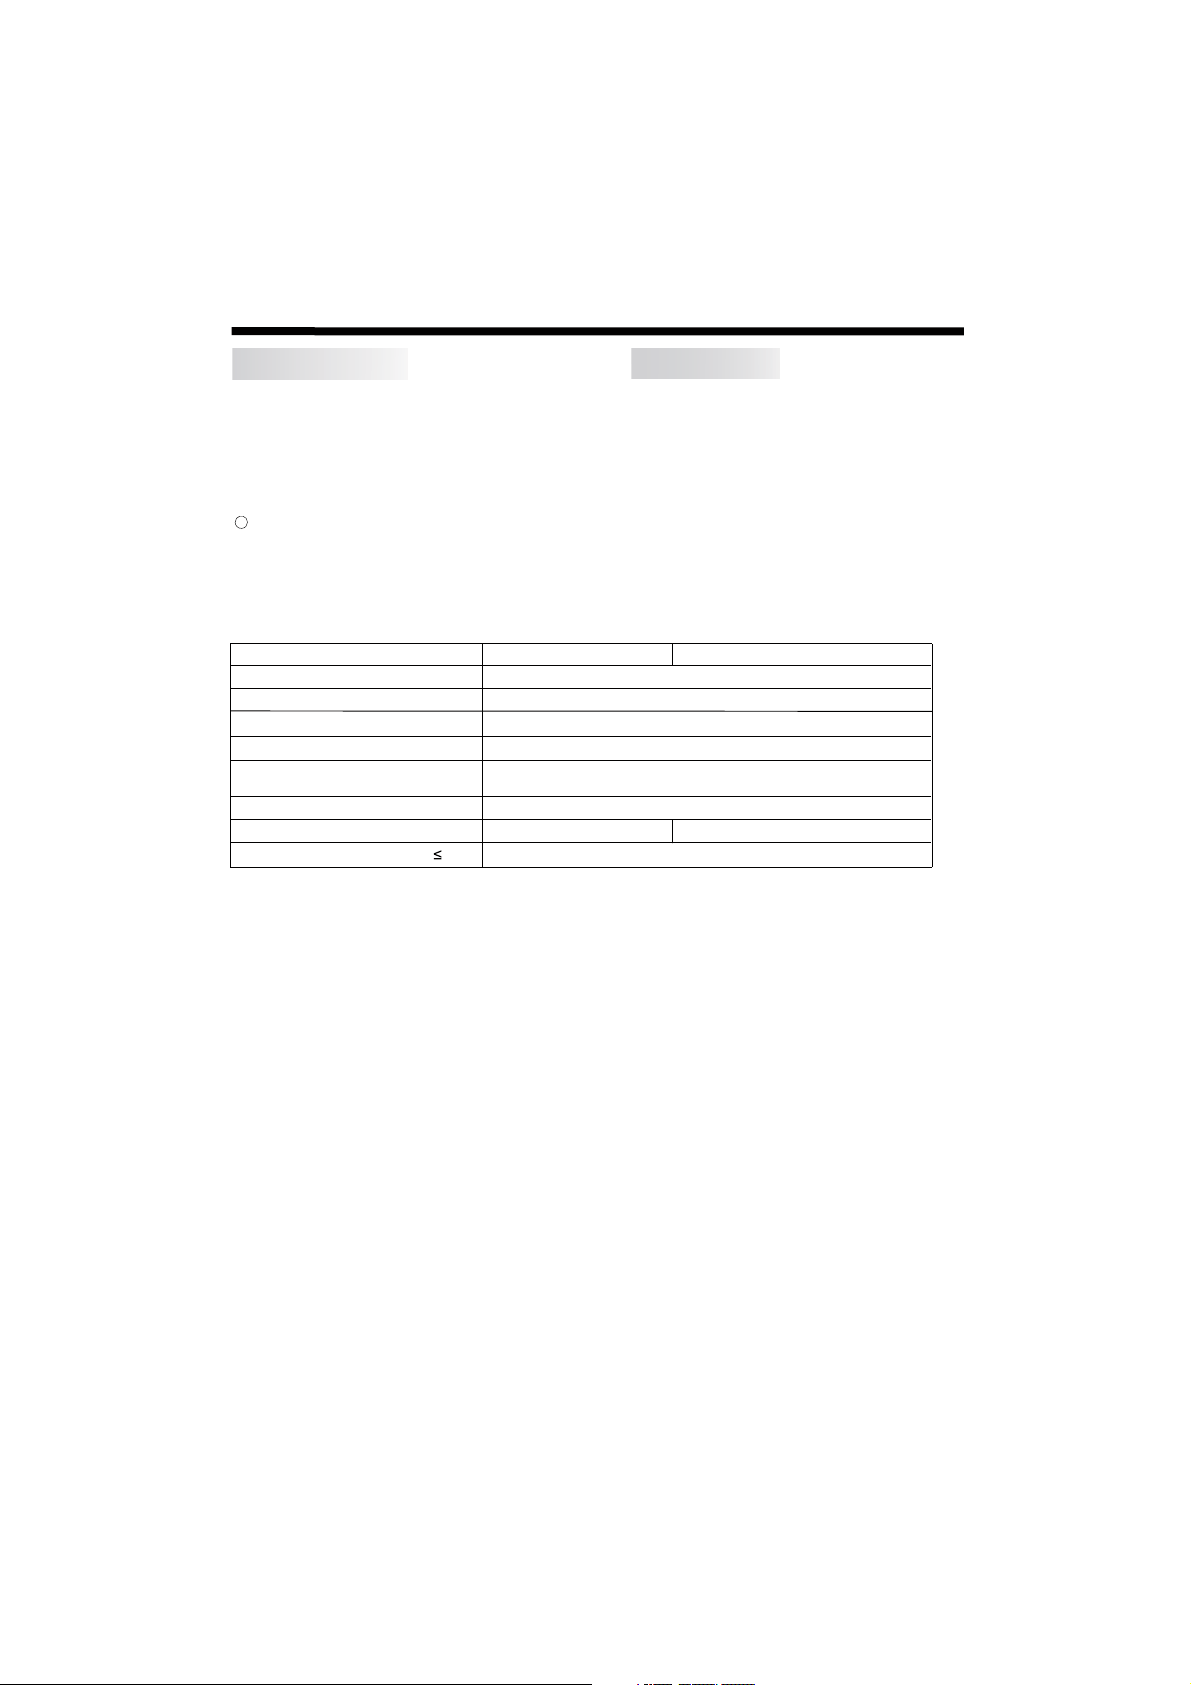
LEDTVSKQ48FH
Viewing Picture Size (Diagonal)
Resolution
Aspect Ratio
TV System
Receiving Channel
Power consumption
Video Signal System
Input Power Voltage
Audio Output Power
1920 x 1080
16 : 9
PAL/BG
PAL/NTSC/SECAM
1 TO 200
(THD 7%)
2x10W
80W
AC 110-240V 50/60Hz
LEDTVSKQ55FH
120W
Page 8
5
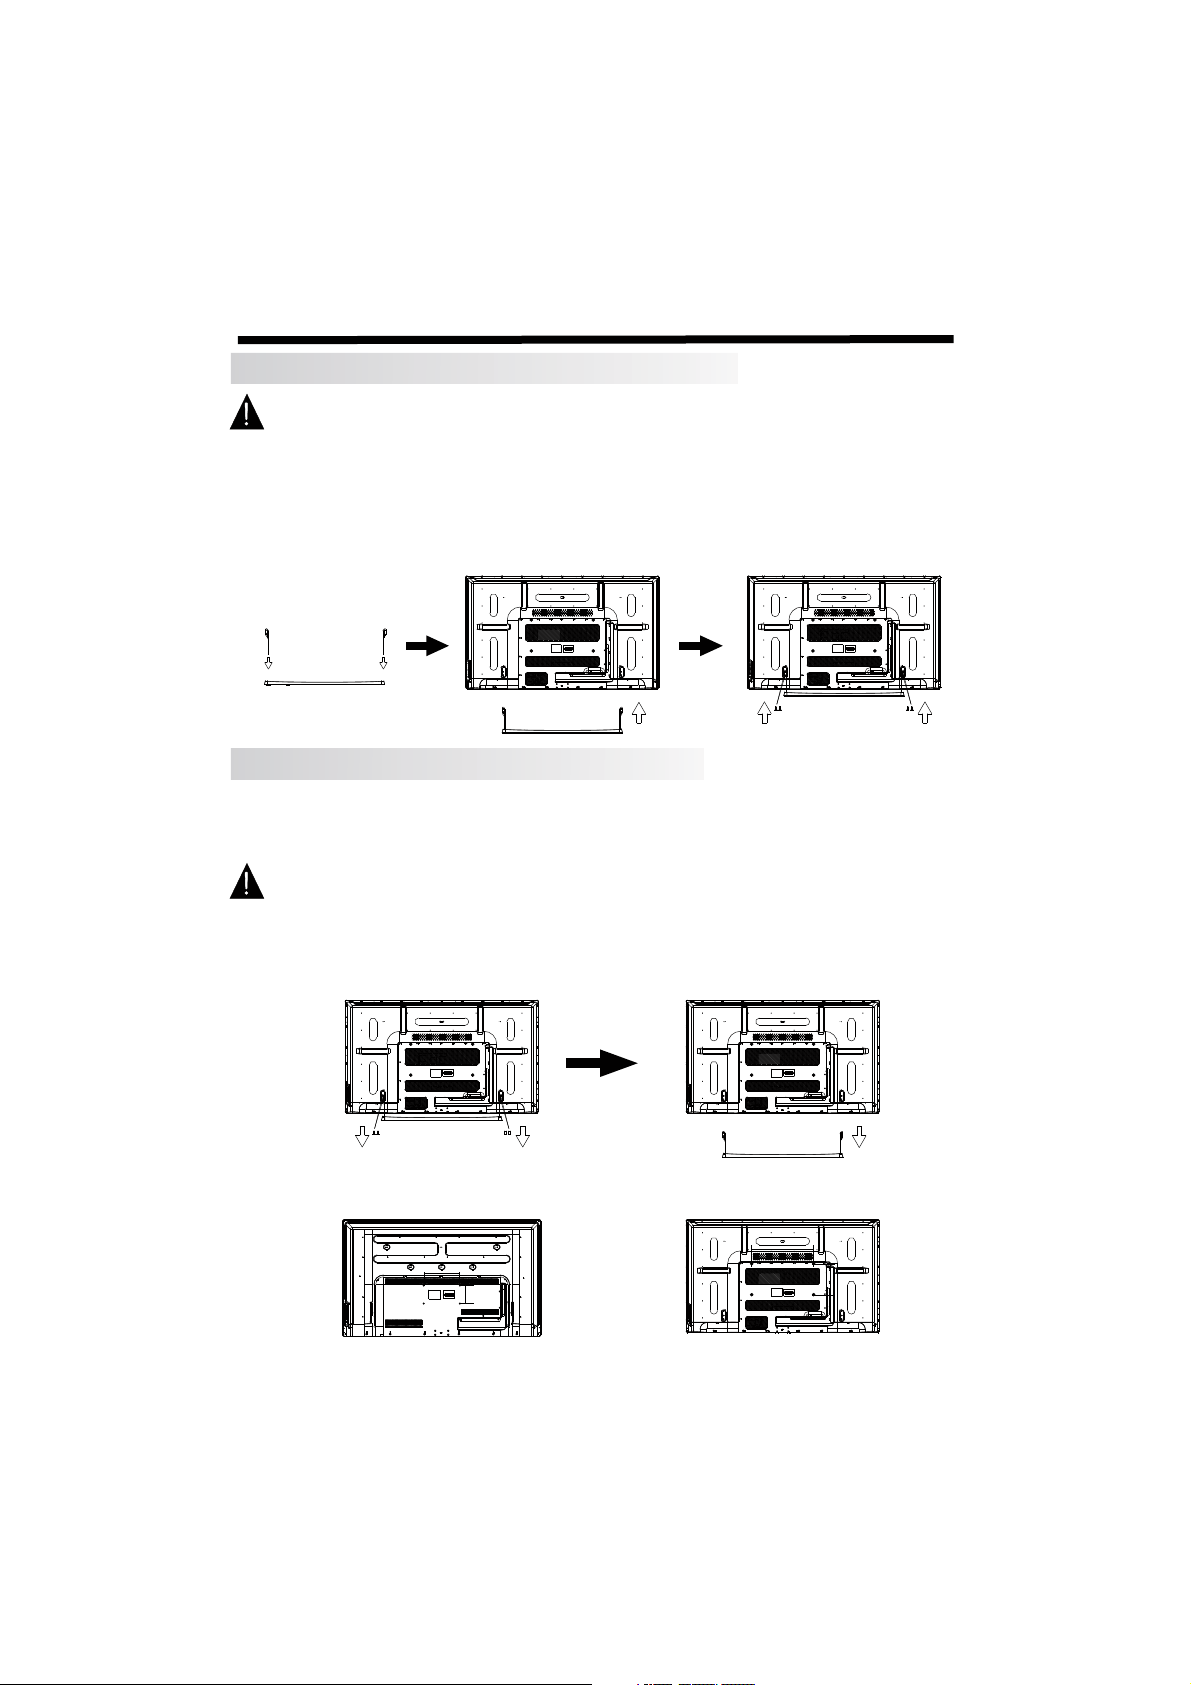
Installation of StandbaseAssembly
Prepare to place the TV with the display side down on a flat surface. Ensure the table or desk you use
provides a flat, totally clean s ur fa ce , an d us e a so ft c lo th b et ween the face of the TV an d th e ta bl e to
protect the TV's screen.
1.Locate the bottom bracket into the gap in the bottom of the TV, and check that it is securely held in
place by its screws.
2.Flat base, the base will be one of the pillars placed in the end seat, make sure the screw holes on the
base and the base of the pillars aligned. Let screws into the base of the hole and tighten the screw.
In the same way to install another base pillars.
3.Install the screw holes on the back of the base and the base pillars aligned television reserved.
4.Let the four screws into the screw holes and tighten the back of the TV.
Installation of WallMount Assembly
For wall mounting with an optional bracket, please read the following instructions in conjunction with the
bracket's instructions. Make sure qualified service personnel perform the operation.
This
television can be wall mounted as follows:
1.Place the LED L CD Television face down onto a solid surface. Please place some soft material over
the front of the screen to protect it from any damage. The LC D panel is a fragile component, and must
be suitably protected when removing the base stand. Be sure that no hard or sharp objects can come
into contact with the screen's surface. Do not exert pressure on the front of the unit at any time, as this
may damage the LCD screen.
2.Remove the 4 screws from the lower part of the television, where the base joins to the TV, and take
away the stand (put the stand and screws somewhere safe for future use).
3.Use the screws provided to fix the TV on to a wall mounting bracket ( no t included) via the
VESA standard holes on the back of the television.
M6
INSTALLATION
400mm
200mm
200
100mm
48" 55"
Page 9
-6-
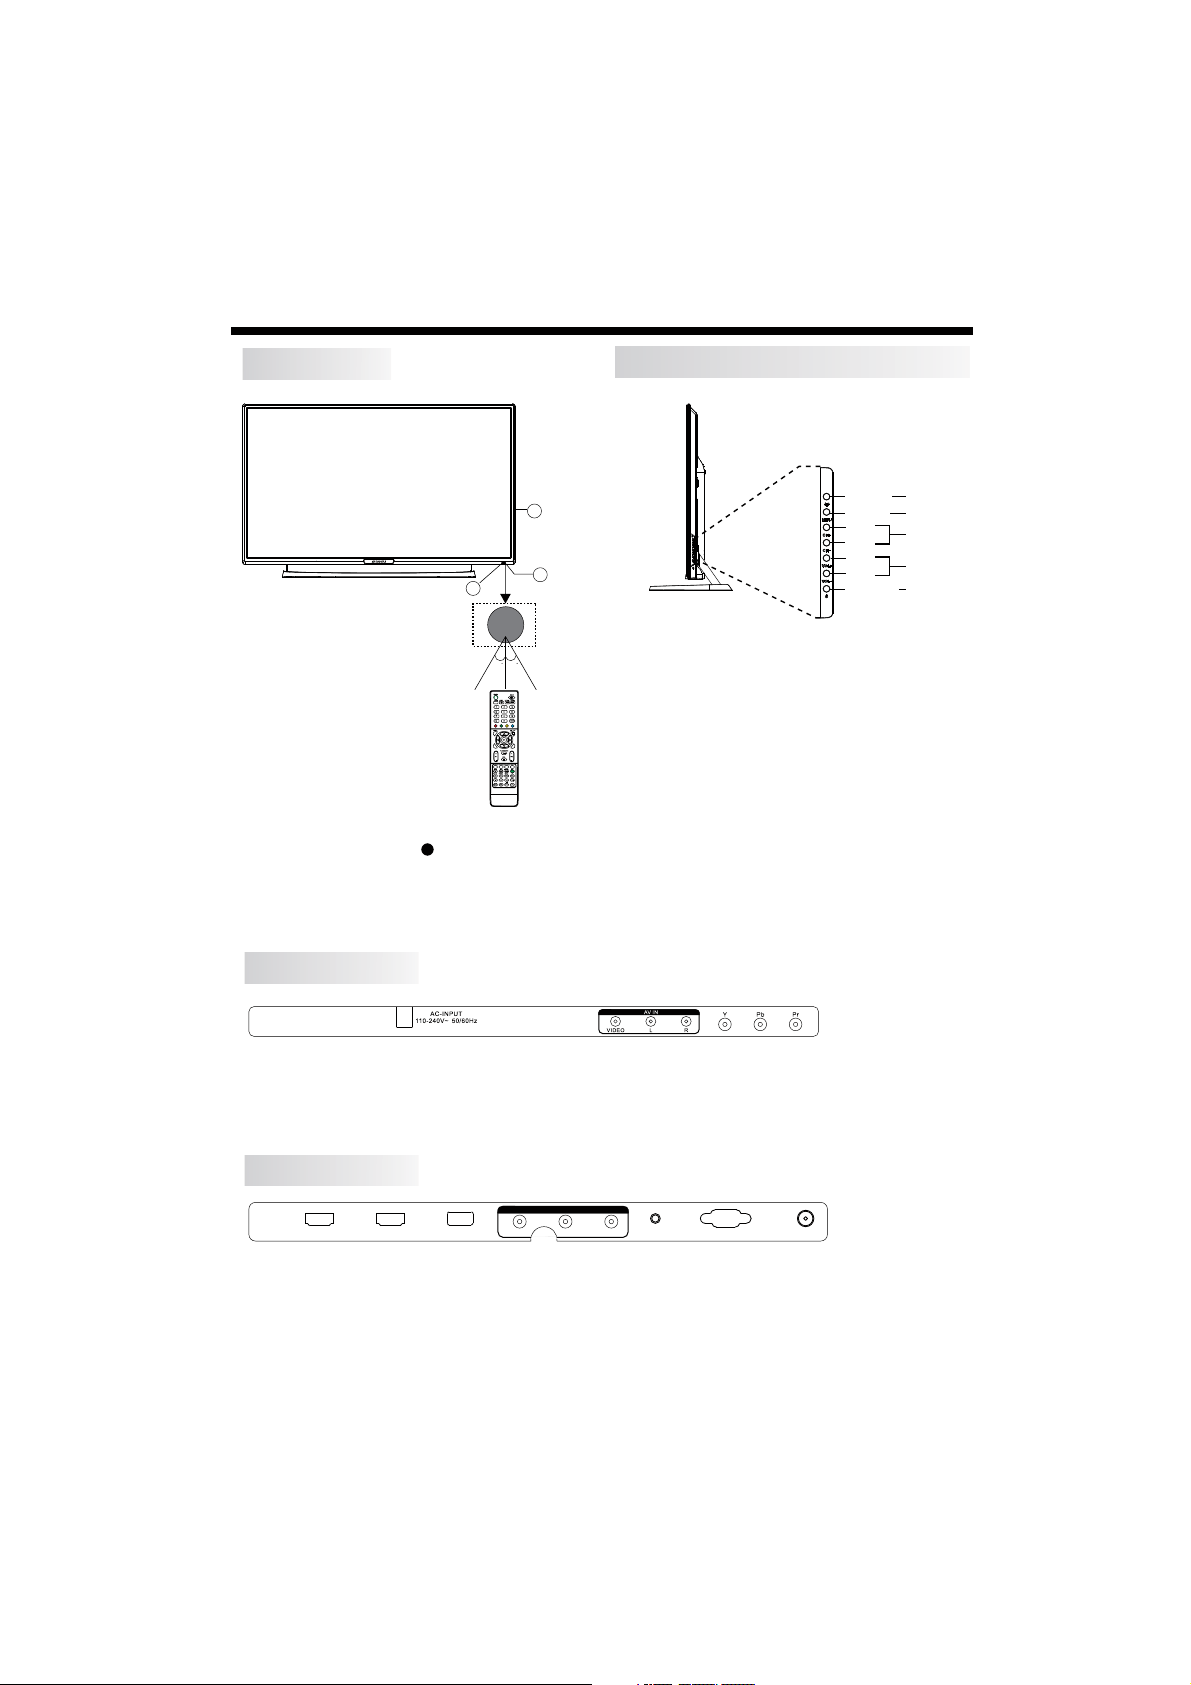
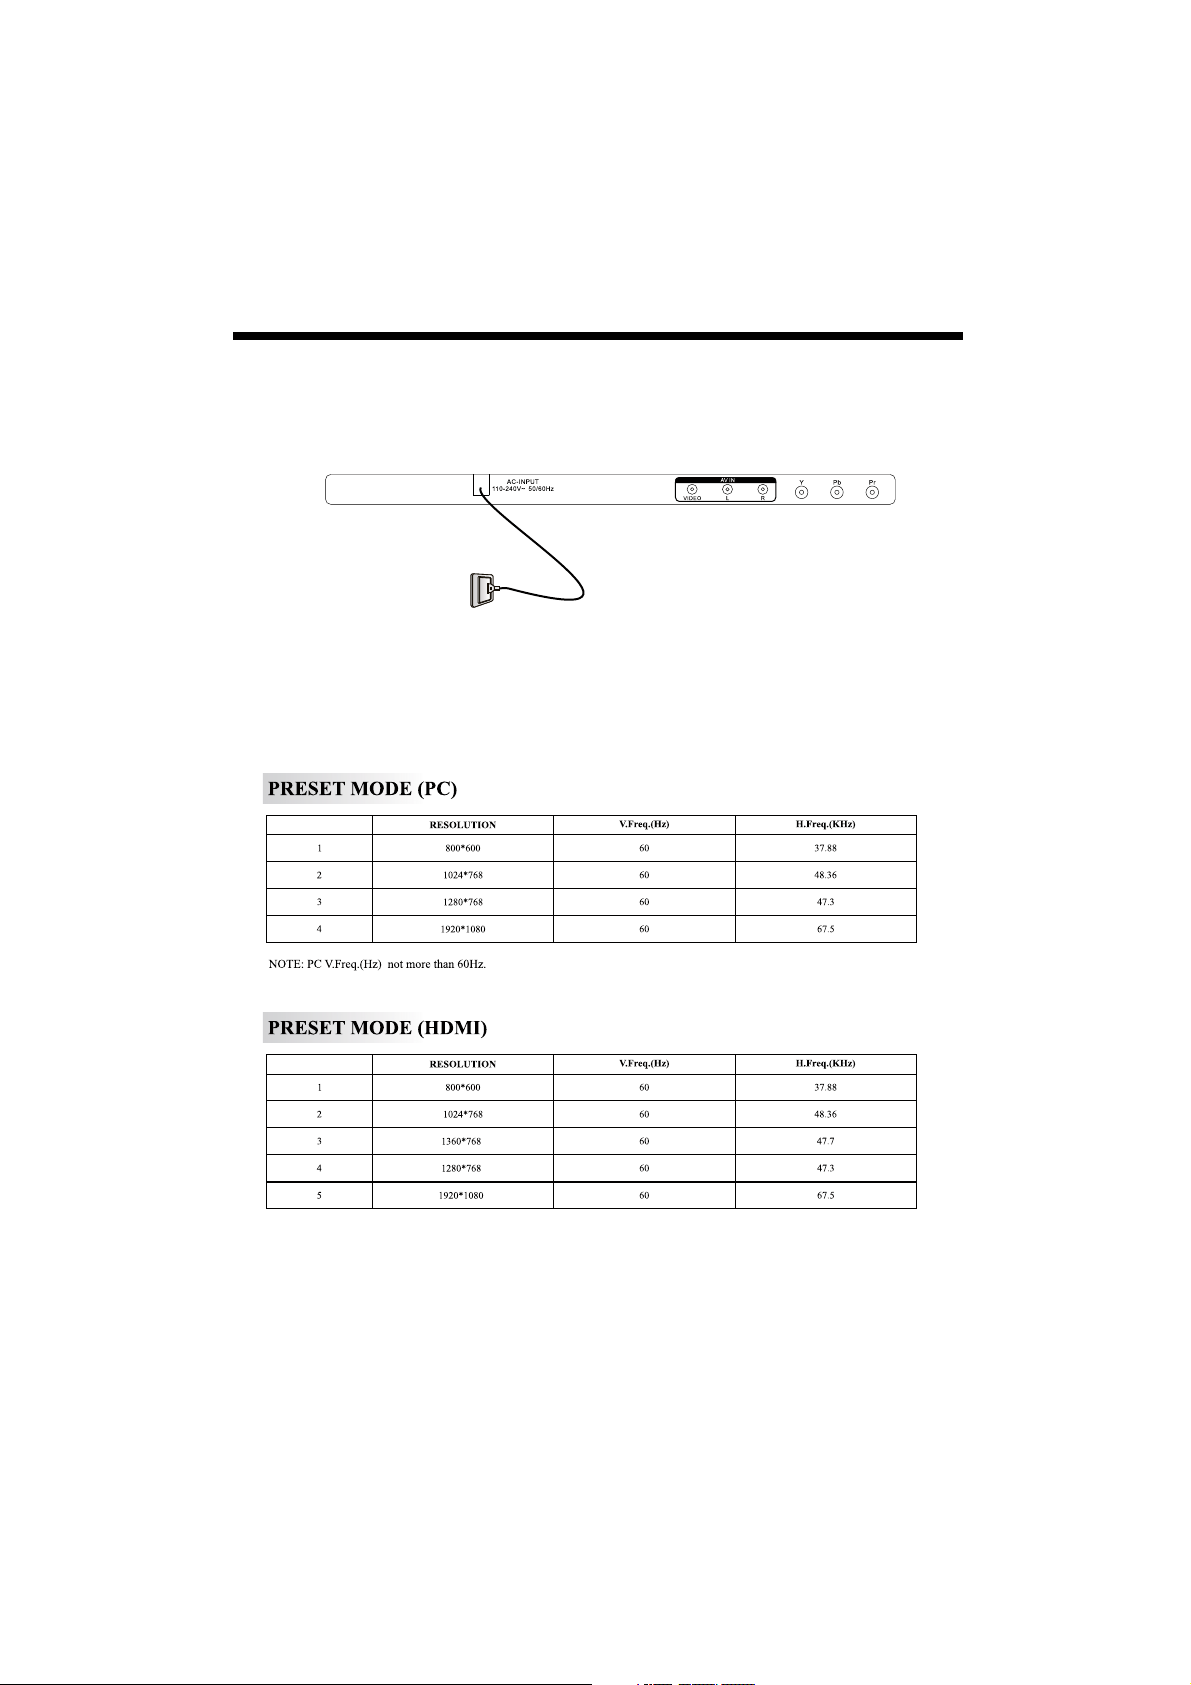
Rear AV Connectivities
All the terminals are(from left to right):
AC POWER SOCKET, VIDEO, AUDIO INPUTS, YPbPr.
Note: VIDEO and YPbPr share one audio channel.
Rear AV side Connectivities
INSTALLATION
Front panel
Key Board Instructions
1: Remotecontrol sensor.
2: IndicatorLED: RED STANDBY.
3: Key board
1.SOURCE:
Display the input source menu.
2.MENU:
Display main MENU.
3.CH+/CH-
In TV mode,press“CH+”or“CH-”to change
the channel up and down.
In MENU mode, press “CH+”or“CH-”to select
items.
4.VOL+/VOL-
Adjust sound level.
In MENU mode, press“VOL+”or“VOL-”to
adjust the item that you selected.
5. STANDBY
Press this button to turn the unit ON from
STANDBY mode.
Press it again to turn the set back to STANDBY.
All the terminals are (from left to right):
HDMI2, HDMI1, USB, AV OUTPUT, PC AUDIO, VGA, RF.
Note: When HDMI port get DVI signal, the audio signal receives from the PC
Audio channel.
30 30
1
2
3
SOURCE
MENU
CH+
CH
VOL+
VOL
STANDBY
HDMI2 HDMI1 USB R FVGAPC AUDIO
VIDEO
L R
AV OUT
①
②
③
④
⑤
Page 10
-7-
INSTALLATION
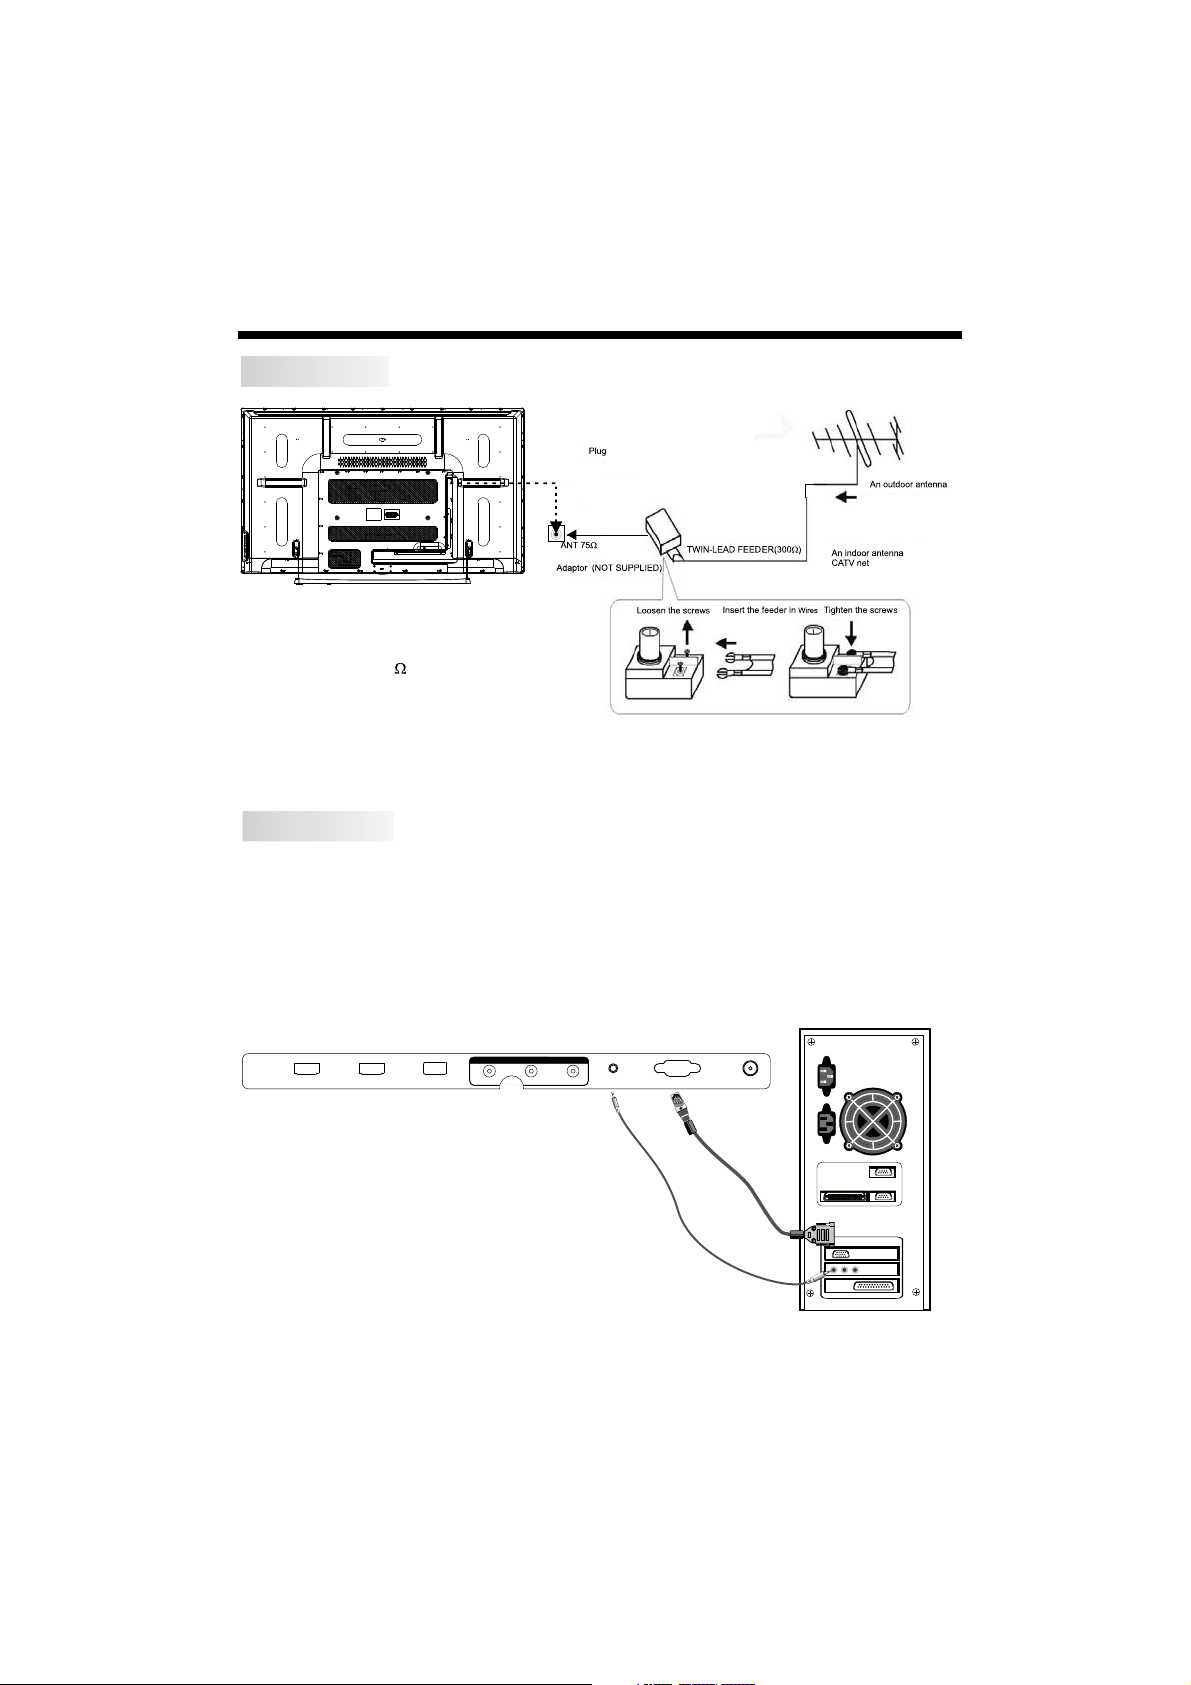
STEPS:
PC Connectivity
Be sur e bo th the TV and co mp uter are se t to Pow er o ff .
1.Connect VGA and aud io c able.
2.Connect the power cord.
3.Power on the TV, swi tc h to P C mo de.
4.Po we r on the PC.
This sequence is very important.
Note:
Aerial connections: IEC(female).
Input impendance: 75 unbalanced.
ANTENNA
HDMI2 HDMI1 USB R FVGAPC AUDIO
V DEO
L R
AV OUT
Page 11
-8-
INSTALLATION
Page 12
INSTALLATION
-9-
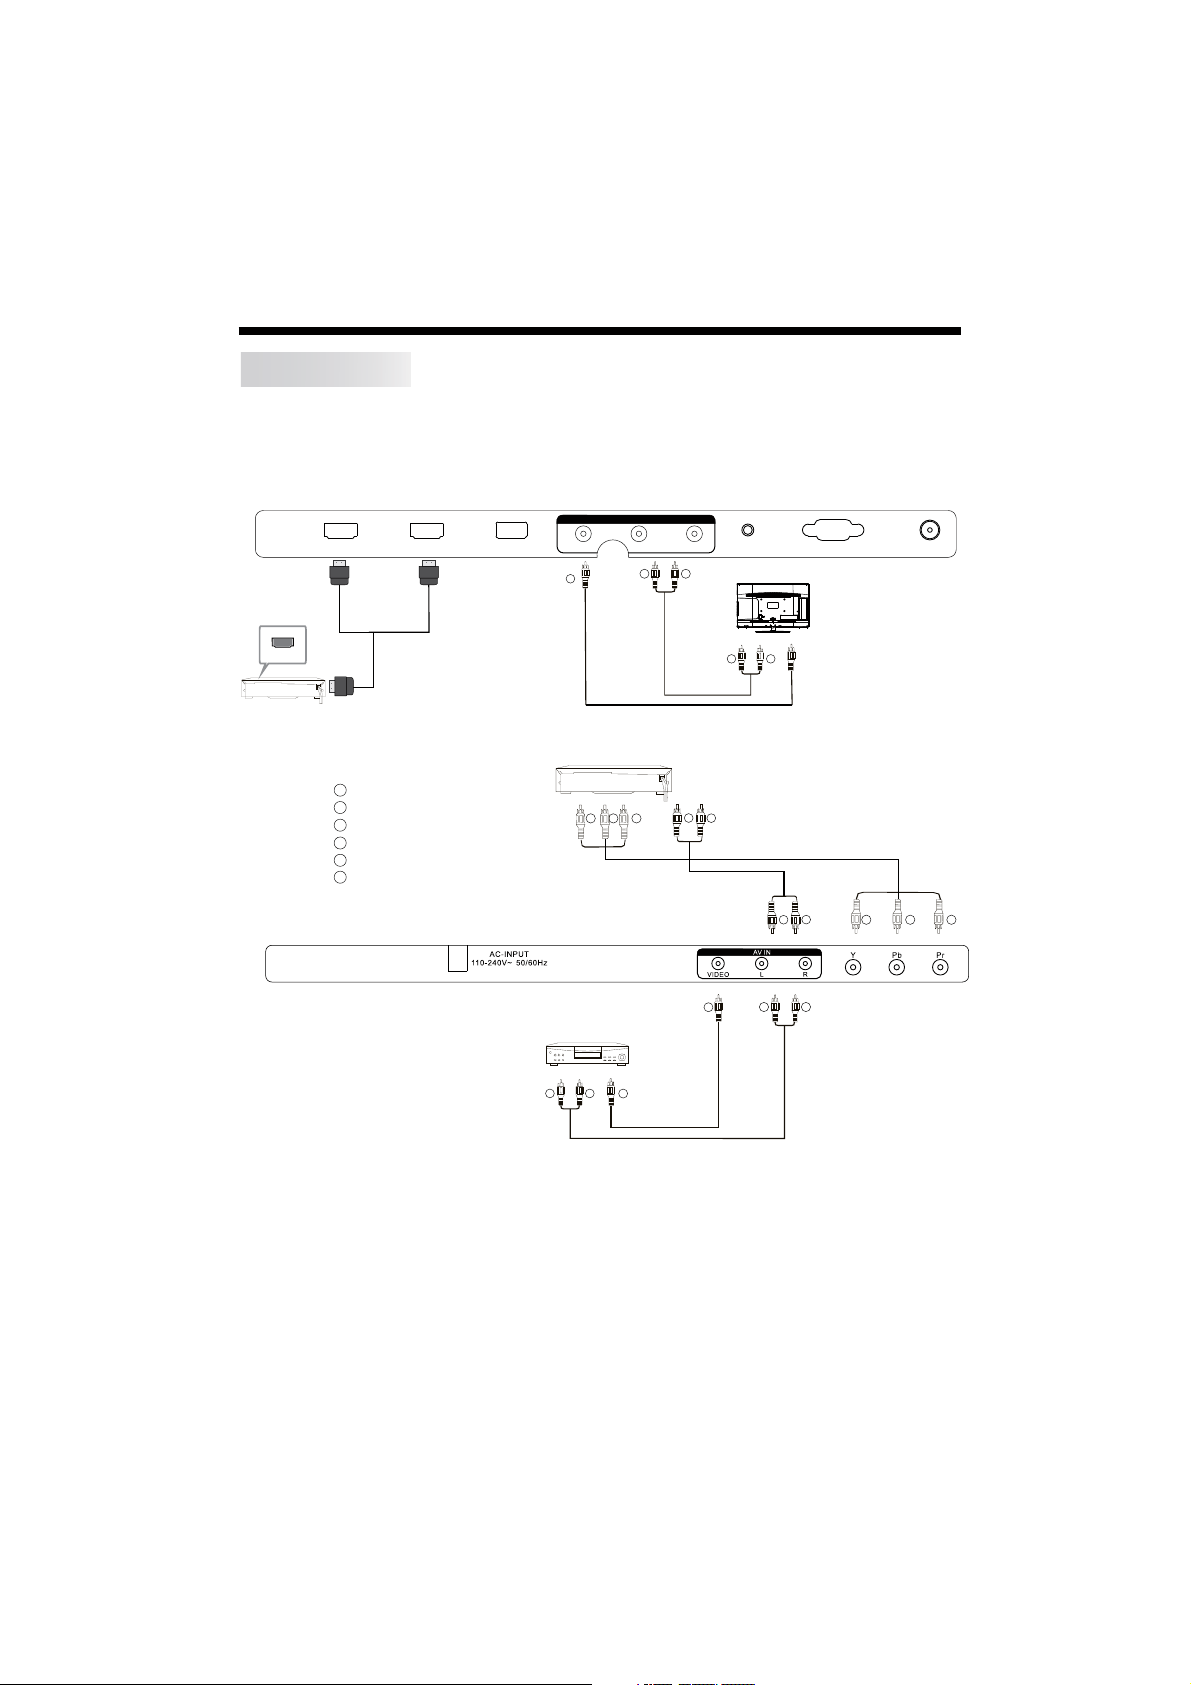
It can be connected to the following appliances: VCR, multi disc player, DVD, camcorder,
video game or stereo system, etc.....
YPbPr can support these video formats:480i,576i,480p,576p,720p,1080i,1080P.
This TV provides one group of AV, one group of YPbPr for convenient connection to VCR, DVD
or other video equipment. Please refer to the owner's manual of the equipment to be connected
as well.
You can use the input terminals on TV set rear as follows.
AV Equipments for
Note:
1.VIDEO and YPb Pr s ha re o ne a udio channel.
2.When HDMI port get DVI si gn al , th e "P C Aud io " ch an ne l is c ha ng ed t o receive the audio for HDMI po rt .
3.Sometimes it wi ll n ot s up po rt i n di fferent device beca us e th e de vi ce s up pl ys n on st an dard signal.
4.When current so ur ce i s TV, AV O UT s ig na l is TV; when current source is AV, AV O UT signal is AV;
other sources hav e no AV O UT signal.
W R
G B R
VIDEO EQUIPMENT with YPbPr
W
R
W R
TO AUDIO OUTPUTS
VIDEO EQUIPMENT
TO VIDEO
OUTPUTS
Y
Y
Red (audio R)
White(audio L)
Red(Pr or Cr)
R
W
R
Blue(Pb or Cb)
Green(Y)
B
G
Yellow (video)
Y
G
B
R
W
R
W
R
W R
TO AUDIO INPUTS
VIDEO EQUIPMENT
TO VIDEO
INPUTS
Y
HDMI
HDMI2 HDMI1 USB R FVGAPC AUDIO
VIDEO
L R
AV OUT
Page 13
REMOTE CONTROLLER
-10-
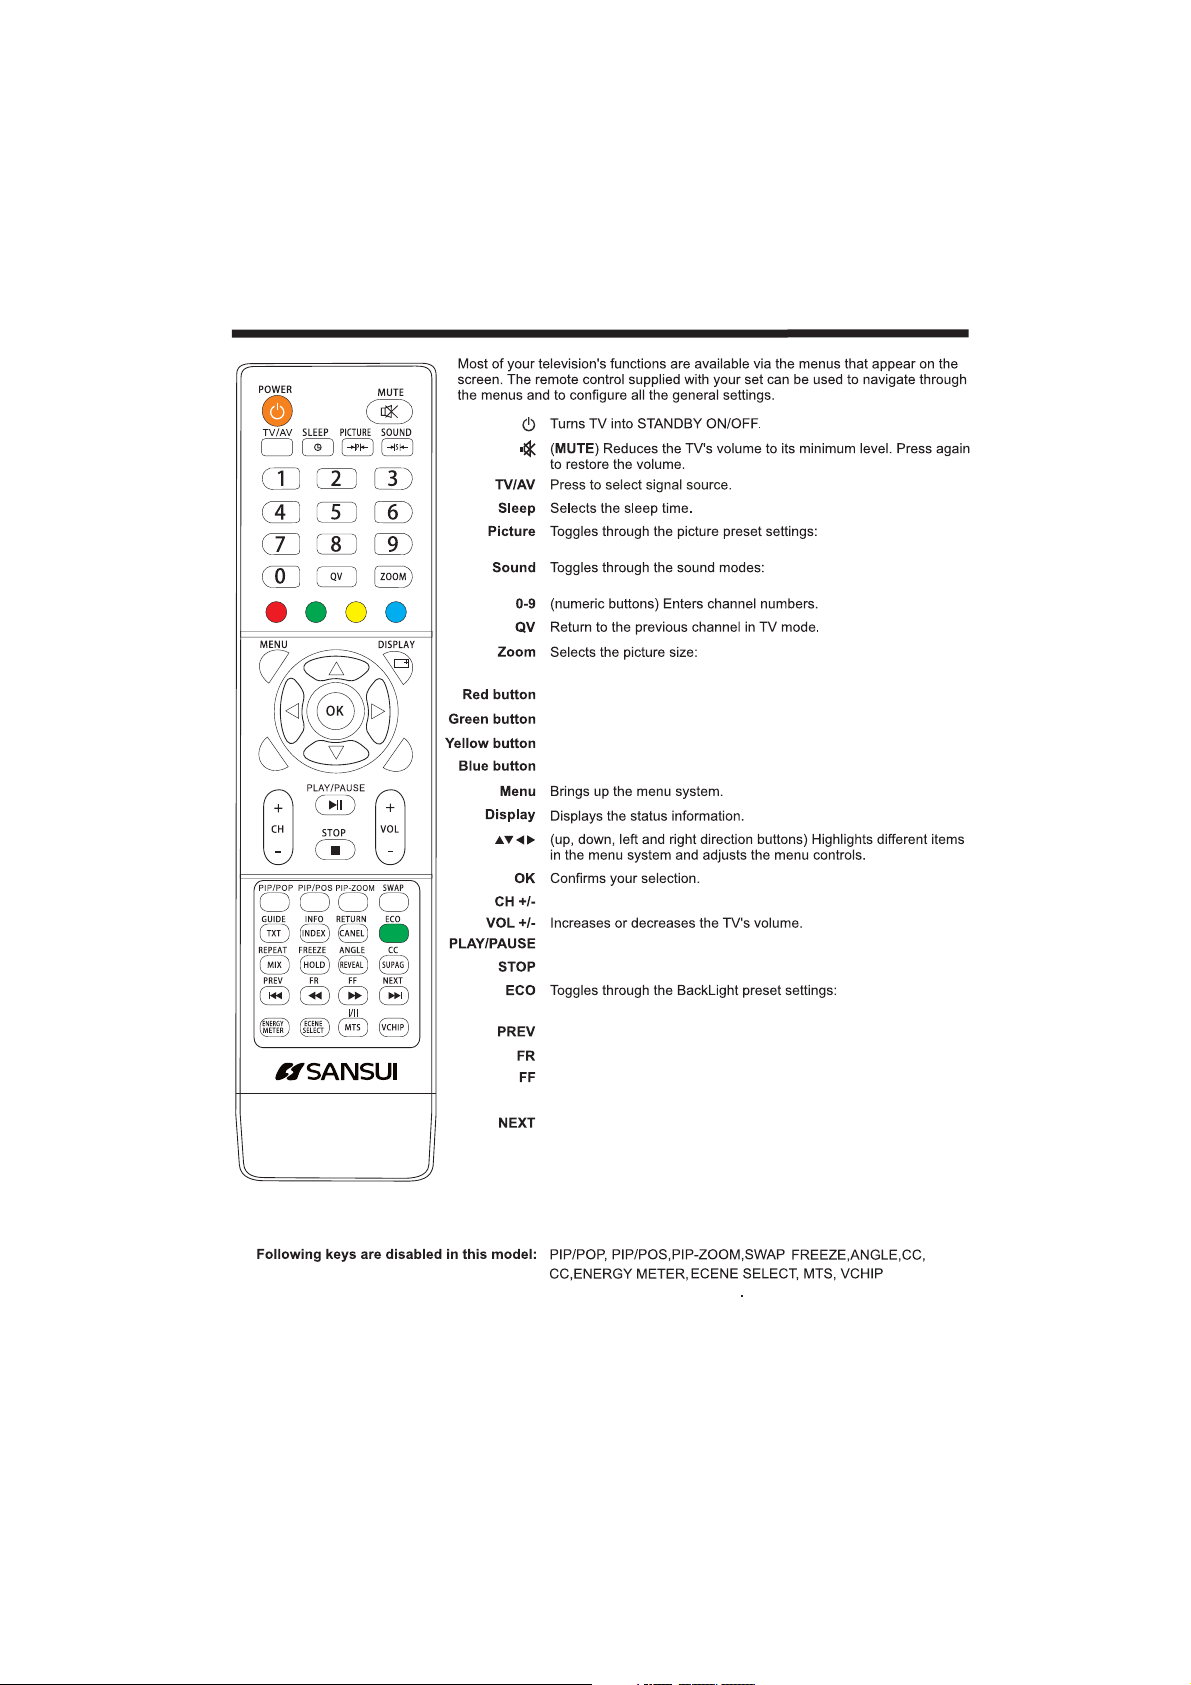
Standard, Mild, User,
Dynamic.
Standare Music Movie, , ,
Sports User.,
Auto, 4:3, 16:9, Zoom, Panorama.
Press CH+ or CH to go to the next or previous channel.
In USB mode, used as Play/Pause key.
In USB mode, used as Stop key.
In USB mode, used as Previous key.
In USB mode, used as reverse key.
In USB mode, used as forword key.
In USB mode, used as Next key.
Favorite program hotkey.
Favorite program hotkey.
Favorite program hotkey.
Favorite program hotkey.
RETURN
REPEAT
Under USB channel, switch to play mode.
Under different channels, optional scaling mode is different.
High, Mid, Low.
OFF, Audio Only,
,
Use this key to return to main multimedia menu while
playing a track/item.
Under HDMI channel, when "HDMI CEC" function set as"open", PLAY/PAUSE
、STOP、PREV、NEXT、
FF、FR will play function accordingly.
GUIDE
When playing the multimedia file, press [GUIDE] key. The task bar
will show for guiding the Multimedia. Under HDMI channel, when
"HDMI CEC" function set as"open", used as "ROOT MENU" key.
S MT22
Page 14
TV OPERATION
-11-
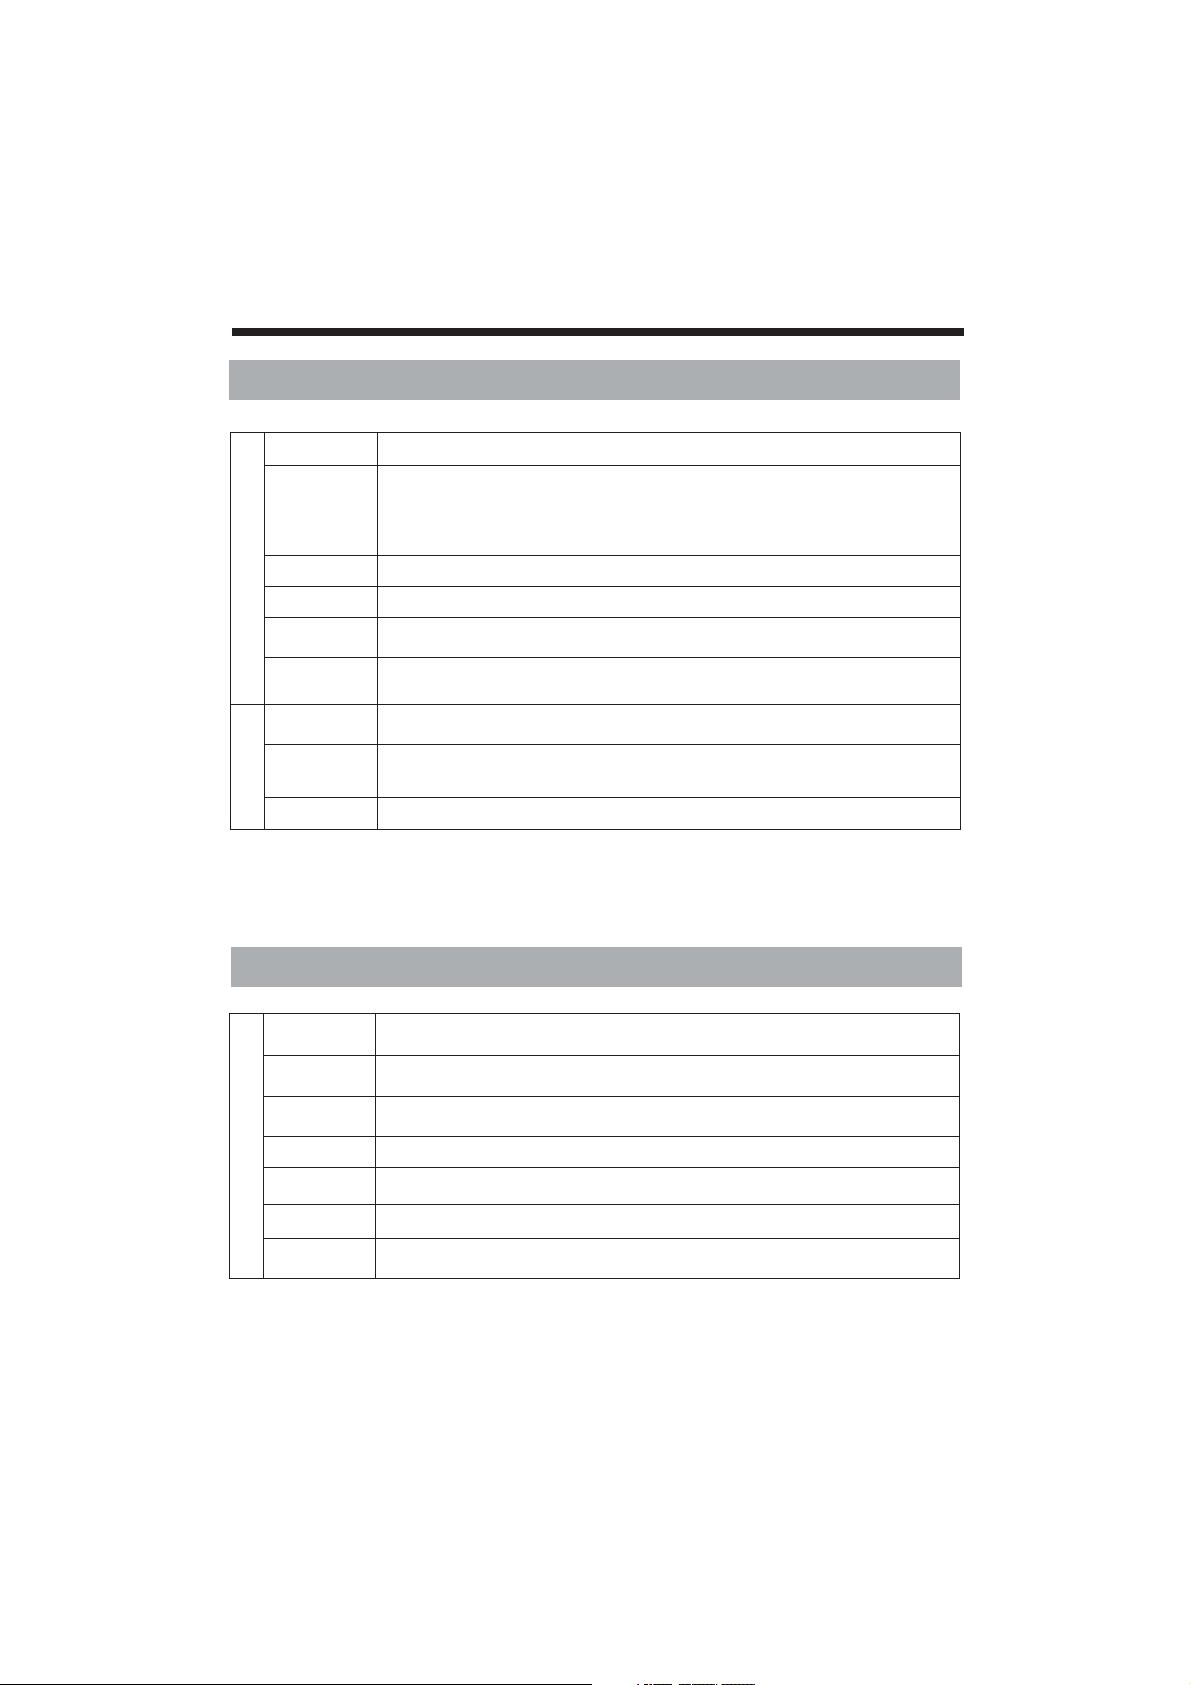
1.PICTURE MENU
PICTURE
Picture Mode This function is used to select the preset picture settings. (Standard/Mild/User/Dynamic)
Contrast
Brightness
Color
Sharpness
Tint
These settings are used to adjust the Contrast (0-100), Brightness (0-100),
Color (0-100), Sharpness (0-100), and Tint (0-100) values for fine a djust me nt s of the pi ct ure.
NOTE: Ti nt i s enabl ed f or NTSC cha nn els onl y.
Color Temp. Use this option to select and change color temperature.
Aspect Ratio
Select the picture size:Auto、4:3、16:9、Zoom、Panorama. Under different channels,
optional scaling mode is different。
Blue Screen This function is used to ON/OFF the blueback in no Signal condition.
Noise
Reduction
The DNR (Off/Low/Middle/High) reduce the noise by applying temporal and spatialnoise
reduction filters to Video data.
Screen
Auto Adjust
Auto se tt ing all ow s th e PC scre en o f TV to s elf adj us t. This a utomatically sets the Horizontal
position、Ve rt ica- po si ti on, Pha se a nd Size .
Horizontal
Pos.Vertical Pos.
If picture is not Ok with auto setting then adjust Horizontal position(0-100) / Verti ca l
position (0-100) manually to adjust the desired picture settings.
Size、Phase Adjust the phase (0-100) and size(0-100) to remove or reduce picture noi se .
Note : 1) T he scre en menu w il l be e nable d fo r PC so urce on ly.
2.SOUND MENU
SOUND
Sound Mode This function is used to select the preset sound modes(User, Standard, Music, Movie,Sports).
EQ
The Equilizer 120Hz, 500Hz, 1.5KHz, 5KHz, 10KHz, (0-100) can be chan ged by othe r us er.
Tre ble The tr eb le f uncti on i s used to v ar y th e trebl e le vel fro m 0 - 10 0.
Balance User can select the left/right speaker intensity by changing bal an ce (-50 - +50).
Volume
The main speaker volume can be adjusted by varying this volume bar (0-100).
Auto Volume
This function is used to for automatic adjustment of volume level(On/Off).
Bass
The bas s fu nctio n is u se d to vary t he b ass lev el f ro m 0 - 100.
Page 15
TV OPERATION
-12-
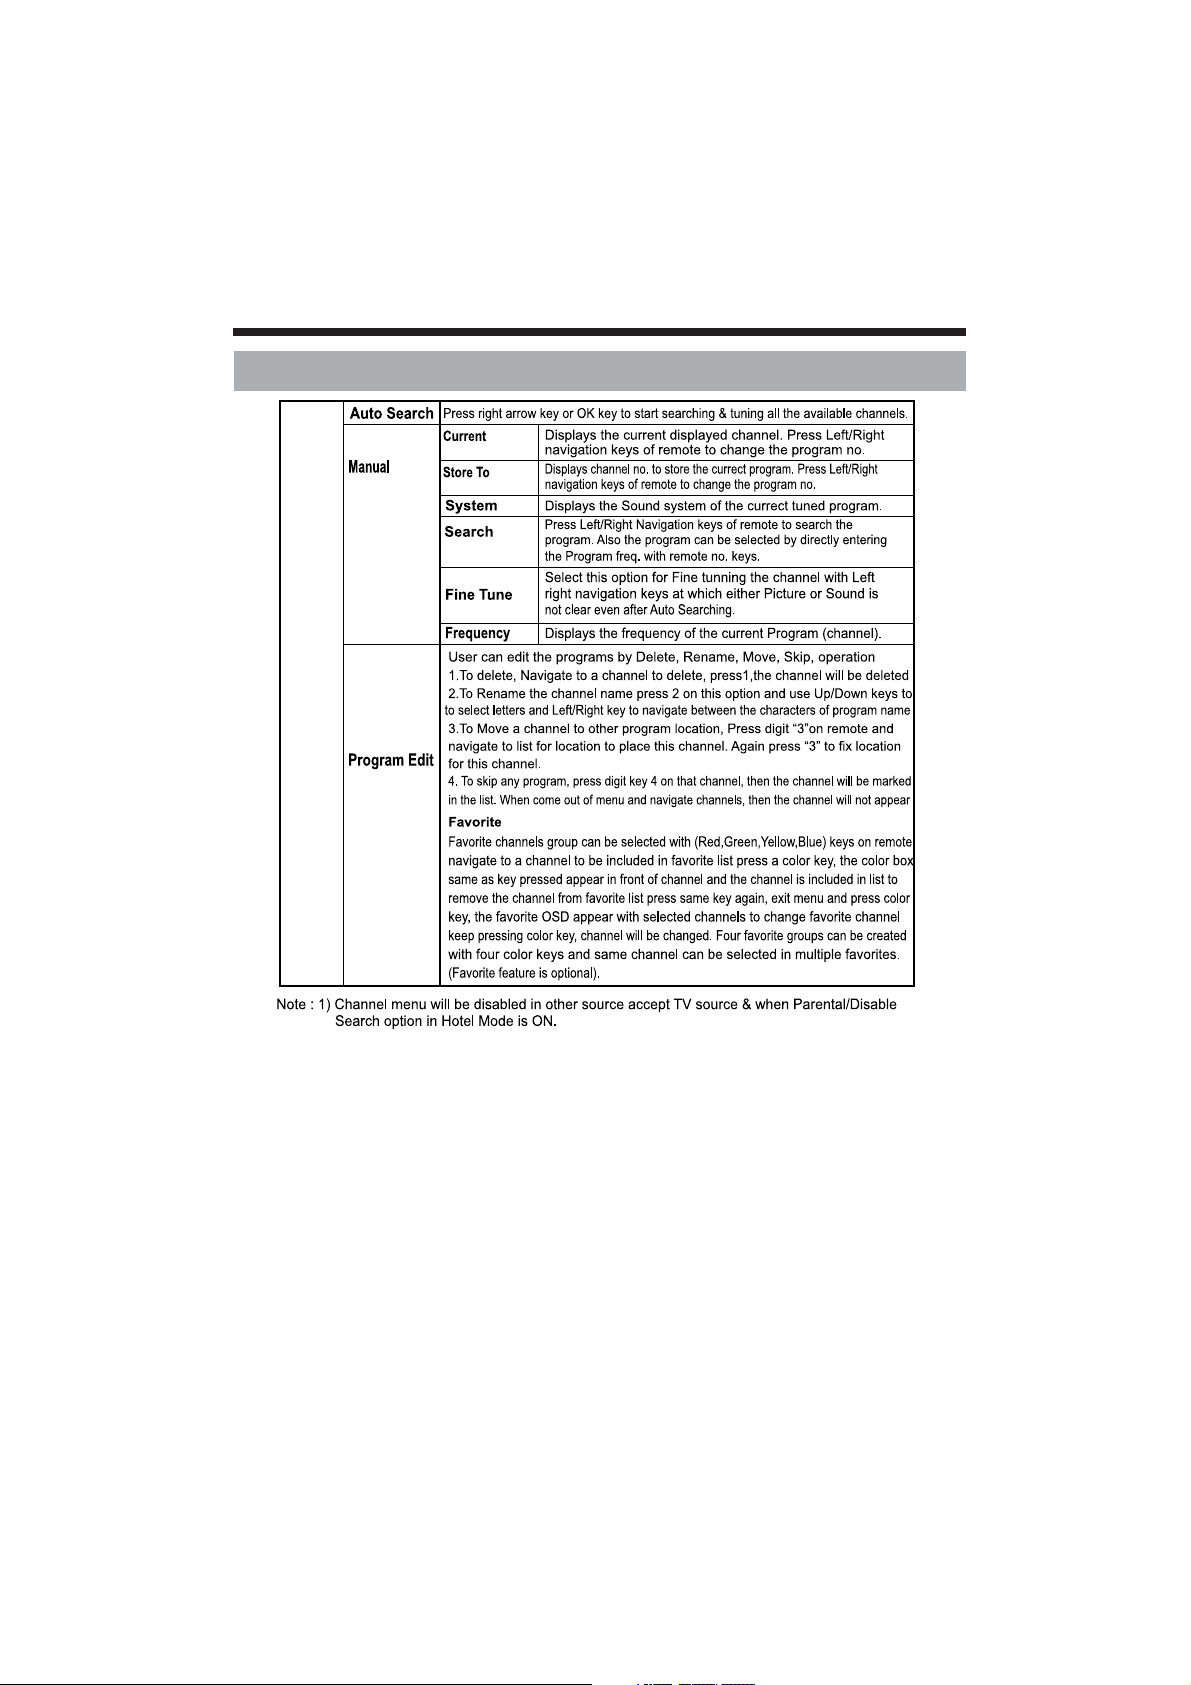
3. CHANNEL MENU
CHANNEL
Tuning
CH
CH
Page 16
4. SETTING MENU
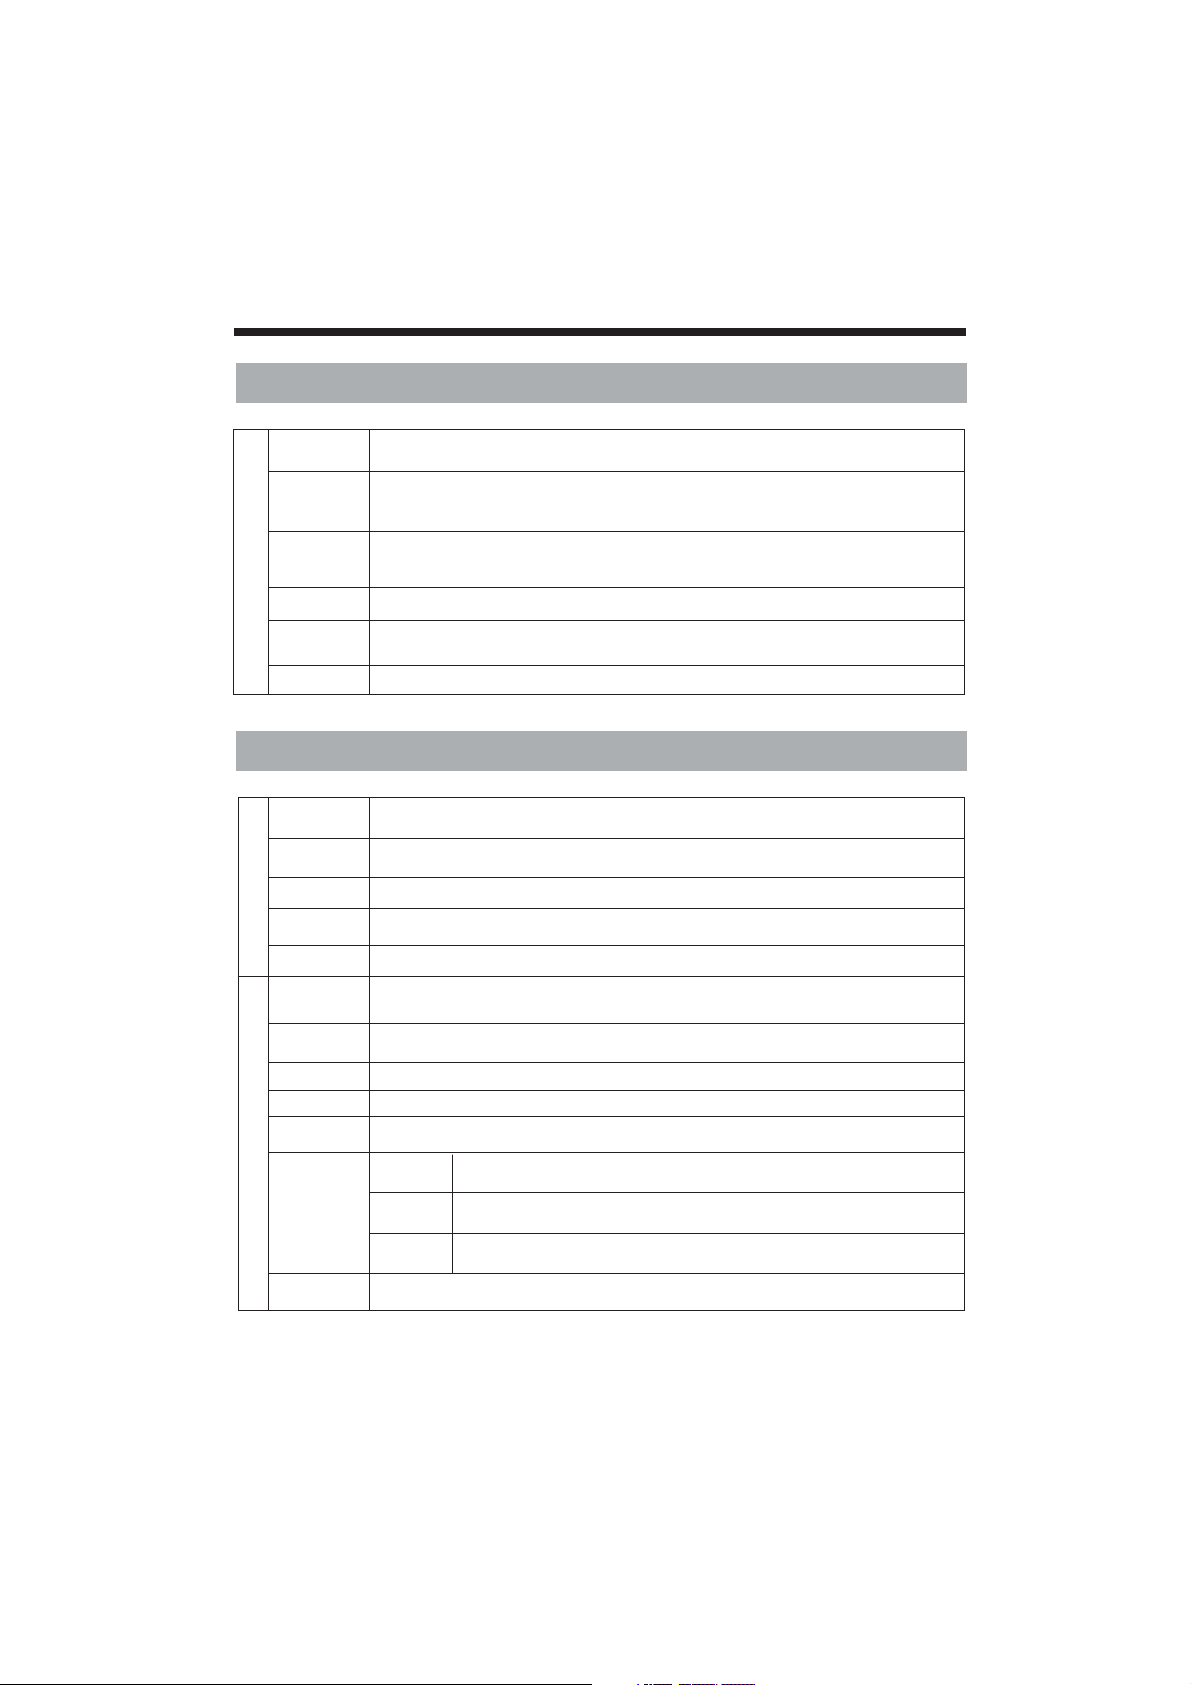
SETTING
Back Light
The backlight value can be varied (0-10) This function is usedto adju st
brigh tn ess lev el o f pa nel .
Ecovision
TV is i n No rmal st at e when this i s on , to save t he p ower cons um ed by TV select power saving
modes P ow er Savi ng O ff/Lo w/ Mid/H ig h/Audio o nl y mode. i n Aud io Only m od e only audi o
is On and P ic ture is o ff.
HDMI CEC
This feature operates only in HDMI source. If a CE C compliant device like Home theater
or DVD player is connected to TV in HDMImode, then the Player con trols c an b e operate d
through TV Remote.
OSD Duration
Adjust display time of menu
Software
Update(USB)
This is for LCD TV Software update. (For Serviceonly)
Reset
Select this option to reset all Feature,Audio, Video parameters to Default value
TV OPERATION
-13-
5. PARENTAL MENU
Parental Control
Parent Lock
Switch
Make this switch On to Activate the Parental Control options selected b y us er . Wh en S witch
is Off the Parental Control, its options will not Operate.
Set P as sw ord
Selec t th is opti on t o ch ange th e pa sswor d (d ef ault - 00 00 ) Enter new
password and confirm the same.
,mast er p asswo rd i s 82 02
Chann el L ock Press D IG IT KE Y 2 key t o Lo ck/Un lo ck t he chan ne ls (1-200).
Source Lock
Press OK key to Lock/Unlock the Sources (TV/AV/YPBPR/HDMI1/HDMI2
PC/USB). Select the sources to be locked with left/right key on a remote.
Clean All
Selec t th is opti on t o re set all P ar ental o pt io ns to def au lt value.
Hotel Mode
Switch
Make this switch On to Activate the Hotel Mode options selected by user .Whe n Sw itch is
Off the Hotel Mode, its options will not Operate.
Hotel Mode Control
Set P as sw ord
Select this option to change the password (default - 00 00 ) Enter n ew
password and confirm the same.
,mast er p asswo rd i s 82 02
Key Loc k
Disable Search
Max Volume
Power O n Se t
Selec t th is opti on O n, p anel ke ys w ill not o pe ra te.
Making this option On, the search options/TV menu will be disabled for user.
The main volume is limited by setting MAX volume (0-100), User cannot
increase the main volume greater than MAX volume selected.
Power O n
Source
Power O n
Channel
Power O n
Vo l
Select the power on source (TV/AV/YPBPR/HDMI1/HDMI2/PC/USB), after
the TV ON, the p ow er on sou rc e wi ll be sam e as s pecif ie d he re
Select the power on channel (1-200), after the TVON, the channel wi ll be same
as specified here.
By setting the power on volume (0-100), this volume will be set afte r set get s ON .
Clear All
Select this option to reset all Hotel Mode options to default.
Page 17
TV OPERATION
-14-
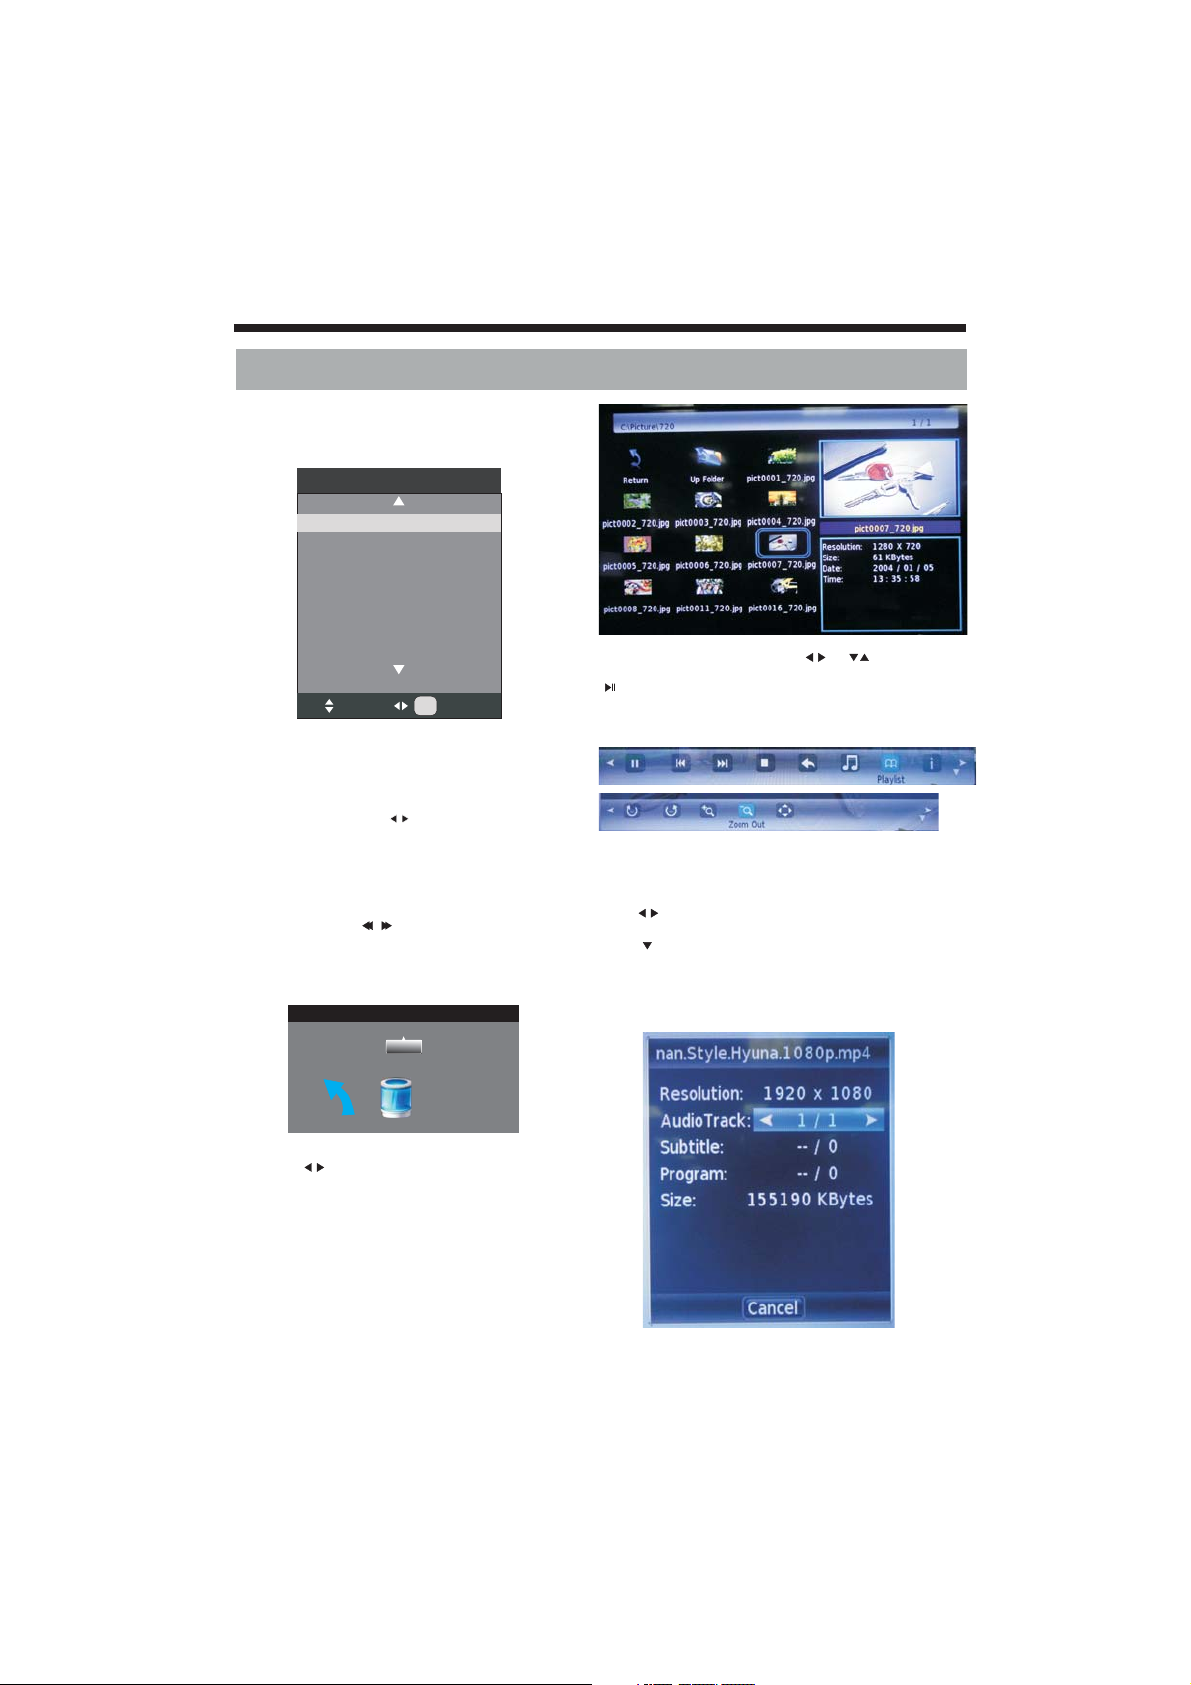
You must enter the Source menu first, then choice the
USB and press OK button, the USB menu will appear.
Please make sure that the USB device have plugged in
the slot. There are four type media item can be selected,
such as photo, music, Movie and text. Select the type
media item by pressing , press OK button to enter
the disk selection menu.
In the movie mode, when you use FB, FF function, The
audio may be pause in several seconds to synchronize
the audio signal and video signal.
In text mode, press to make page up and page down.
NOTE:
When the USB device isn't supported, it may be that the
power of the USB device isn't enough.
6. USB FUNCTION
Input Source
PC
HDMI1
USB
HDMI2
TV
YPBPR
AV
Select
OK
OK
Ret urn (C )
1/1
Press the to select the right disk and press OK to
display media files and folder list or choose Return to
back to the media type selection menu.
Select the media file by pressing or , then
the preview frame will pop up. Press the button
to play the media file in full screen. When the
media file (photo, music, Movie or text type) is
playing, press the GUIDE button
control bar.
Music function need to put music and picture in the
same folder.
can display the
Press to select the function icon, press OK button to
confirm the function.
Press or RETURN button to exit the control bar.
NOTE:
You can adjust the audio track, subtitle, or program in
the Info menu while Playing the video file.
Choose the Info icon and press OK can display the Info
MENU.
Page 18
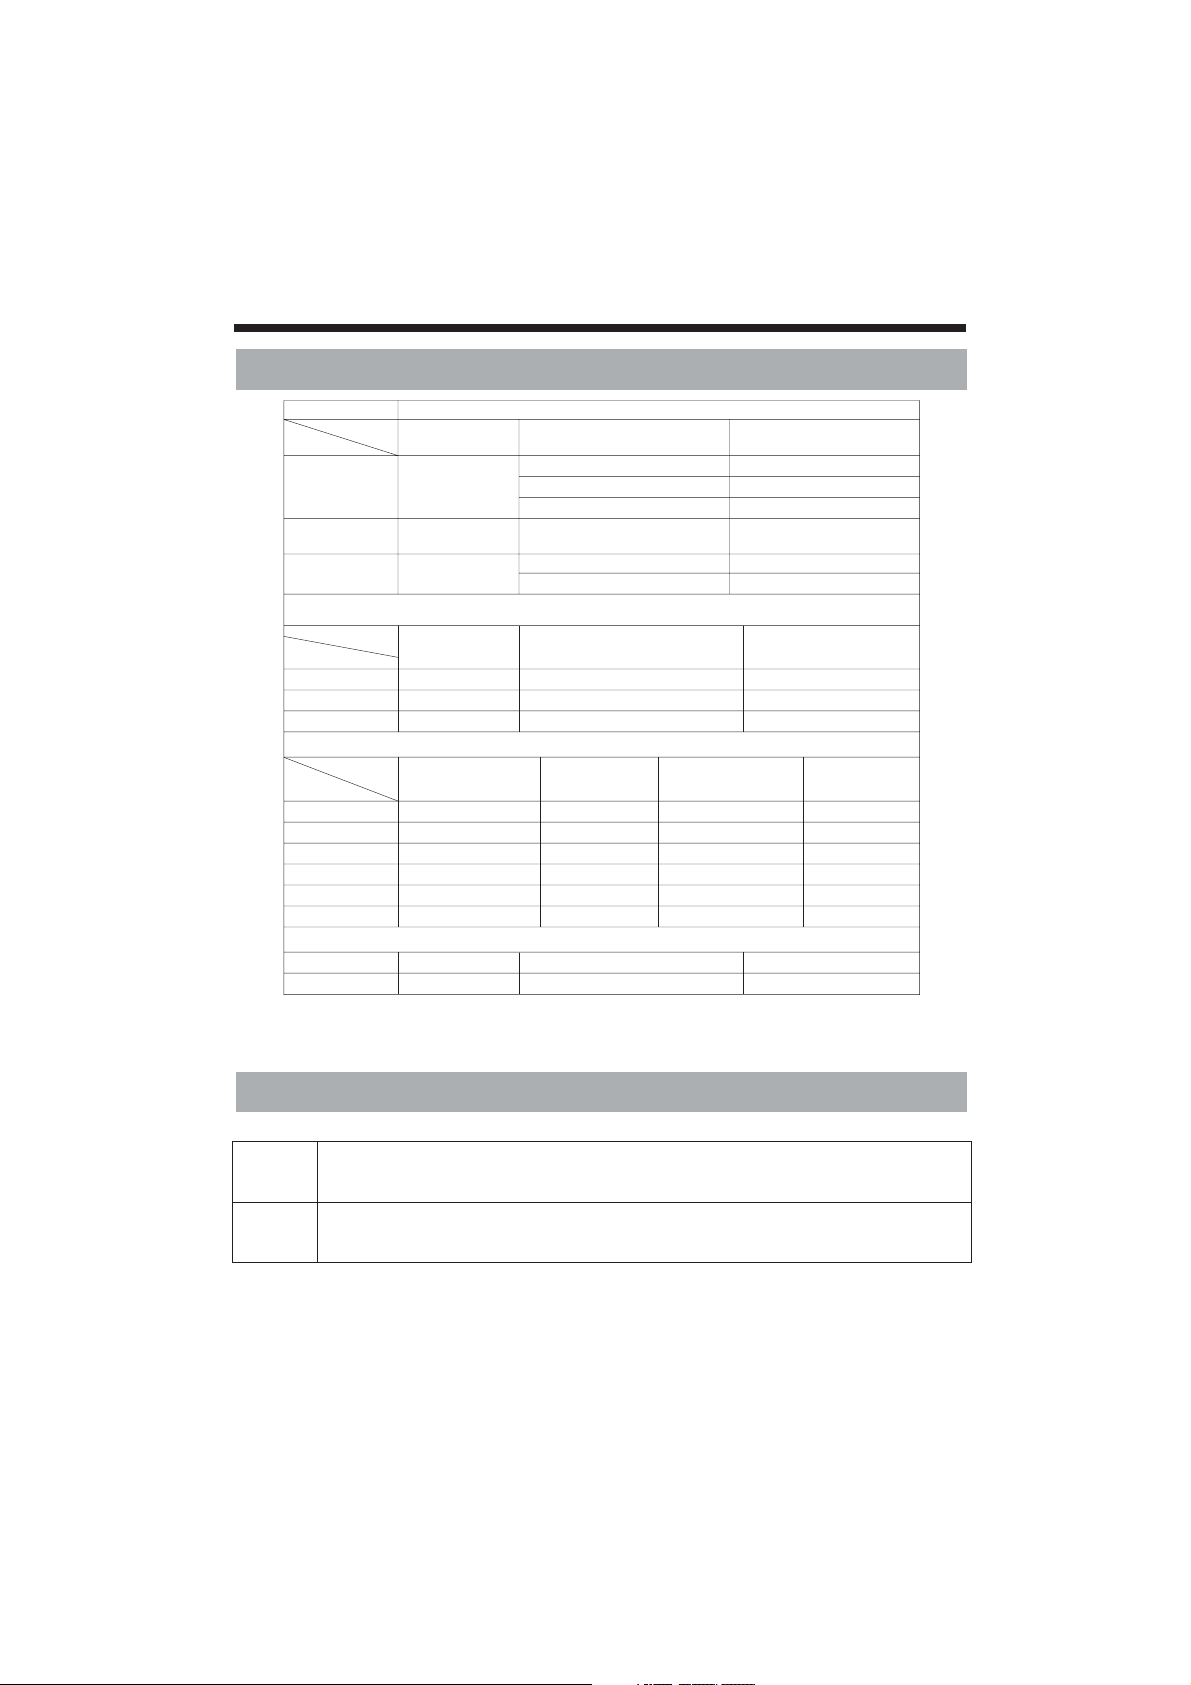
File type
Photo
Resolution Compression Option Support range
Baseline(Standard)
JPEG
15360x8640
Baseline has beenoptimized
Progressive JPEG
Resolution Only Support1024x768
Support
9600x6400BMP
PNG 9600x6400
Monochromatism,16color,256color,
16bit,24bit,32bit
Resolution Only Support 1200x800
Audio
Sampling rate
Baud rate
Channel
MP3
WMA
M4A(AAC)
Video(Support.srt Displaythe .srt. subtitle on the video images)
Internal encoding
MPEG1
.DAT/.MPG/.MPEG
MPEG2
.MPG
MPEG4
.AVI/.MP4
RM/RMVB .RM/.RMVB
MKV
.MKV/.MOV
MJPEG
.AVI
/
/
XVID
RV8,RV9,RV10
MPEG1,2,4
1920X1080 @ 30P
640X480 @ 30P
Top20Mbps
Top20Mbps
Top20Mbps
Top10Mbps
Top20Mbps
Top10Mbps
Text
Parameter Files
File suffixes
Character sets
File Size Supported
Text
.txt
ANSI /UNICODE /GB
Max 3MB
1920X1080 @ 30P
1920X1080 @ 30P
1920X1080 @ 30P
1920X1080 @ 30P
Non-interlaced
Interlace
Support
Support
Support
File type
File type
Associated
parameters
File suffixes
Resolution
Baud rate
Mono, Stereo
Mono
, Stereo
Mono
, Stereo
32K~320Kbps
32K~320Kbps
32K~320Kbps
32K~48KHz
8K~48KHz
8K~48KHz
TV OPERATION
-15-
Multimedia (USB) file support
Resolution Support
YPbPr
mode
HDMI
480i (60Hz), 480p (60Hz), 576i (50Hz), 576p (50Hz), 720p (50Hz, 60Hz),1080i (50Hz, 60Hz)
480i (60Hz), 480p (60Hz)
1080P (50Hz, 60Hz)
, 576i (50Hz), 576p (50Hz), 720p ( 60Hz),1080i (50Hz, 60Hz)
Associated
parameters
Associated
parameters
Page 19
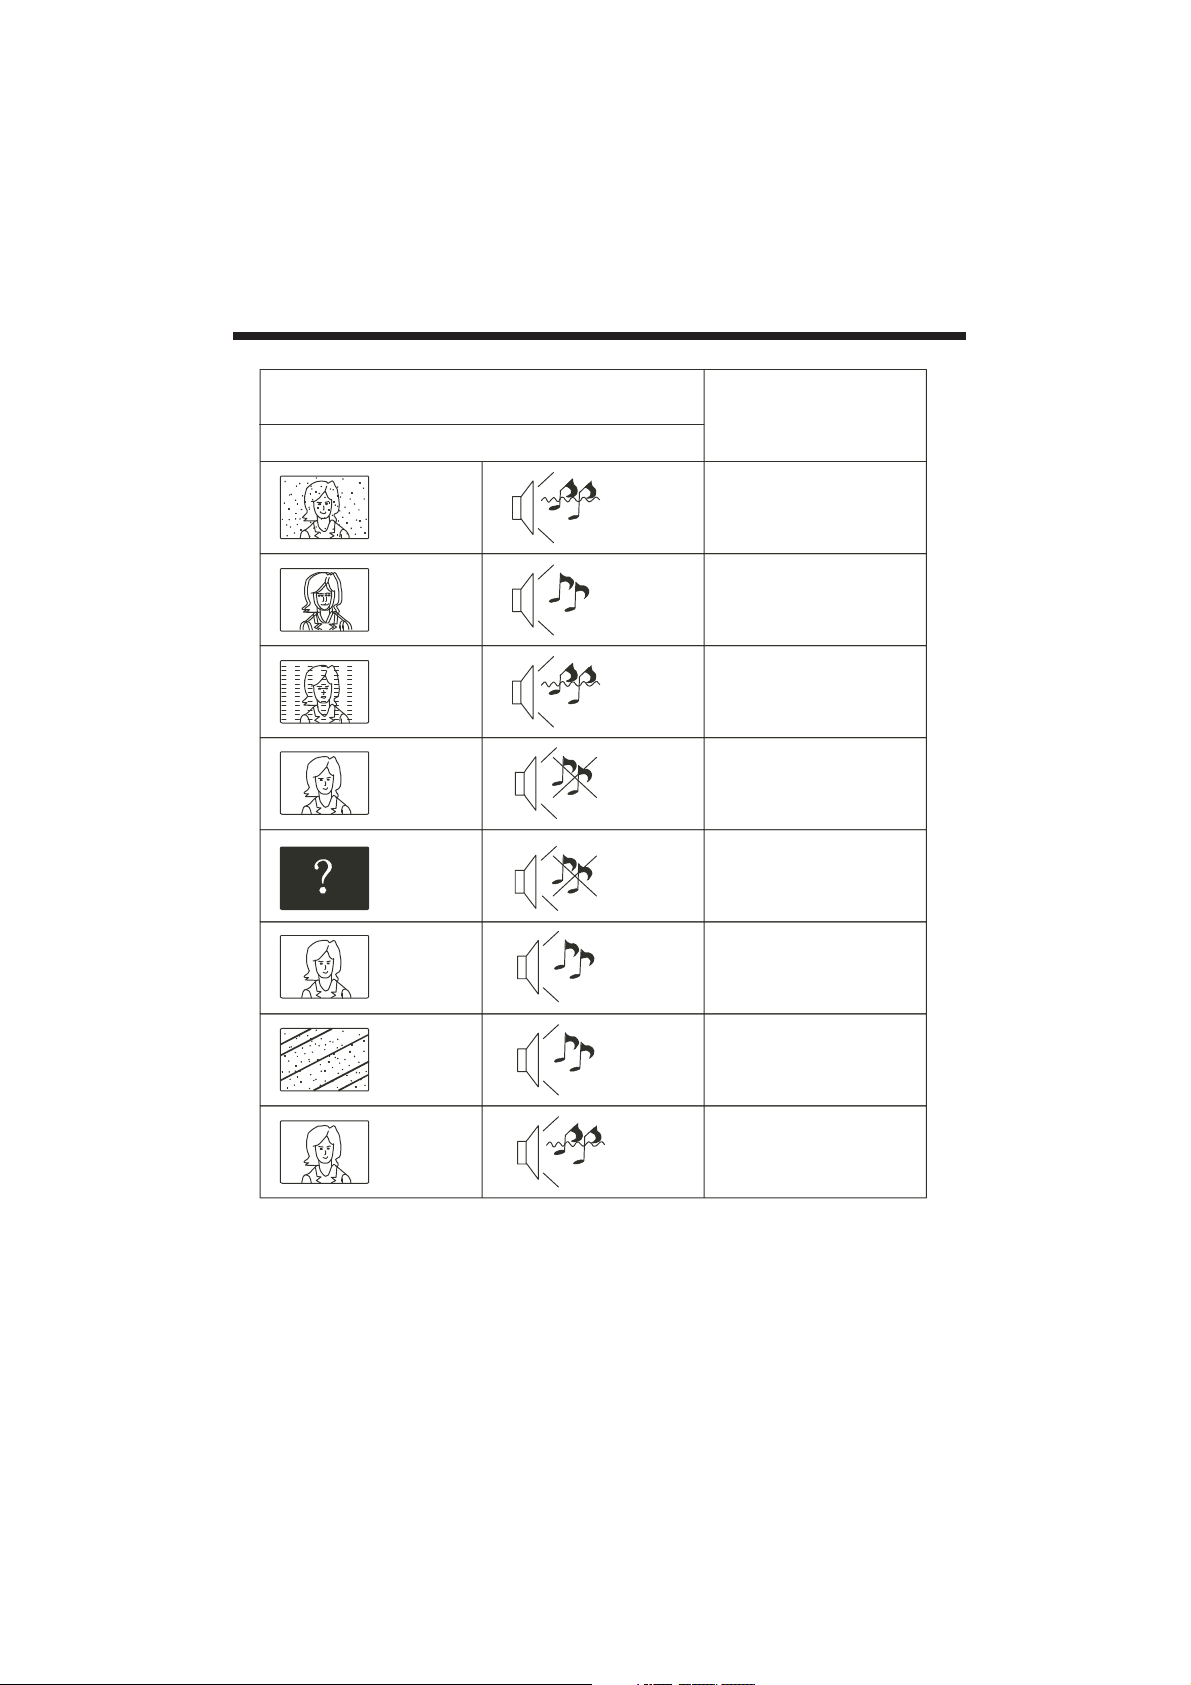
Picture Audio
Snow Noise
antenna position, direction
or connection
Inspection
Interfere
Noise
electronic equipment,car/
motorcycle,fluorescent light
Normal Pict ur e
Mute
Volume(inspect wether the
mute fu nc tion on t he r em ote
contr ol a re star te d , or a udio
system are correct or not)
No picture Mute
Power cord is not inserted
Power switch is not opened
Contrast and brightness/volume
setup
Press s ta ndby ke y on t he r emote
control for inspecting
No color Normal audi o color control
Scramble
Normal audi o
or weak
retune channel
No color
Noise
Audio system
Special Explanation:The accessories such as remote control is not belongs to the guarantee。
Normal audio
antenna position, direction
or connection
Trouble phenomenon
Ghost
-16-
TROUBLE SHOOTING
Page 20
Page 21
Page 22
Page 23
Page 24
Page 25
MTC-V059-SANSUI-SKQ48/55
1100107406
 Loading...