

Page 1
OWNER’S MANUAL
GUIDE D’UTILISATION
22” TFT LCD DIGITAL TV WITH DVD PLAYER
TÉLÉVISEUR NUMÉRIQUE AVEC ÉCRAN TFT À CRISTAUX
LIQUIDES DE 22 PO ET LECTEUR DVD
HDLCDVD225
HDLCDVD225A
FRANÇAIS ENGLISH
ATTENTION
ATTENTION
If you purchase a universal remote control from your local retailer, please contact the remote manufacturer for the
required programming code.
Si vous utilisez avec cet appareil une télécommande universelle (autre que celle vendue avec ce téléviseur),
consultez la documentation accompagnant la télécommande universelle afin de connaître le code numérique correspondant au téléviseur.
AIR/CABLE MODE SELECTION
When shipped from the factory, the Signal Type option is set to the “Cable” (Cable Television) mode.
If not using Cable TV, set this menu option to the “Air” position.
Lorsque l’appareil sort de l’usine, l’option « Signal Type » est en mode « Cable » (câblodistribution). Si vous
n’utilisez pas la câblodistribution, sélectionnez l’option « Air ».
IF CONTACT WITH CUSTOMER SERVICE IS REQUIRED
PLEASE HAVE THE MODEL NUMBER READY PRIOR TO THE CALL
S’IL FAUT CONTACTER LE SERVICE CLIENTÈLE, PRENEZ SOIN D’ÊTRE MUNI
FOR INFORMATION ON OUR OTHER PRODUCTS, PLEASE VISIT OUR WEBSITE AT
POUR OBTENIR DES INFORMATIONS SUR NOS AUTRES PRODUITS, VEUILLEZ VISITER NOTRE SITE WEB:
SÉLECTION DU MODE AIR/CABLE
DU NUMÉRO DE MODÈLE AVANT D’APPELER.
CUSTOMER SERVICE – 1-800-289-0980
SERVICE/SERVICE CLIENTÈLE: 1-800-289-0980
ORION WEBSITE
SITE WEB ORION
www.orionsalesinc.com
Before operating the unit, please read this manual thoroughly.
Avant de faire fonctionner l’appareil, veuillez lire le présent guide attentivement.
Page 2
ENGLISH
The lightning flash with arrowhead
symbol, within an equilateral triangle
is intended to alert the user to the
presence of uninsulated dangerous
voltage within the product's enclosure
that may be of sufficient magnitude to
constitute a risk of electric shock.
CAUTION: TO REDUCE THE RISK OF ELECTRIC
SHOCK, DO NOT REMOVE COVER
(OR BACK). NO USER-SERVICEABLE
PARTS INSIDE. REFER SERVICING TO
QUALIFIED SERVICE PERSONNEL.
The exclamation point within an
equilateral triangle is intended to
alert the user to the presence of
important operating and maintenance
(servicing) instructions in the literature
accompanying the appliance.
WARNING: TO PREVENT FIRE OR SHOCK HAZARD, DO NOT EXPOSE THIS APPLIANCE TO RAIN
OR MOISTURE.
TO PREVENT THE SPREAD OF FIRE, KEEP CANDLES OR OPEN FLAMES AWAY
FROM THIS PRODUCT AT TIMES.
CAUTION: TO PREVENT ELECTRIC SHOCK DO NOT USE THIS POLARIZED PLUG WITH AN EX
TENSION CORD, RECEPTACLE OR OTHER OUTLET UNLESS THE BLADES CAN BE
FULLY INSERTED TO PREVENT BLADE EXPOSURE.
WARNING: This equipment has been tested and found to comply with the limits for a Class B digital device, pursuant
However, there is no guarantee that interference will not occur in a particular installation. If this equipment does
- Reorient or relocate the receiving antenna.
- Increase the separation between the equipment and receiver.
- Connect the equipment into an outlet on a circuit different from that to which the receiver is connected.
- Consult the dealer or an experienced radio/TV technician for help.
CAUTION: Changes or modifications not expressly approved by the partly responsible for compliance with the FCC Rules
to Part 15 of the FCC Rules. These limits are designed to provide reasonable protection against harmful
interference in a residential installation. This equipment generates, uses and can radiate radio frequency
energy and, if not installed and used in accordance with the instructions, may cause harmful interference to
radio communications.
cause harmful interference to radio or television reception, which can be determined by turning the equipment
off and on, the user is encouraged to try to correct the interference by one or more of the following measures:
could void the user’s authority to operate this equipment.
CAUTION:
THIS DIGITAL VIDEO PLAYER EMPLOYS A LASER SYSTEM.
TO ENSURE PROPER USE OF THIS PRODUCT, PLEASE
READ THIS OWNER'S MANUAL CAREFULLY AND RETAIN
FOR FUTURE REFERENCE. SHOULD THE UNIT REQUIRE
MAINTENANCE, CONTACT AN AUTHORIZED SERVICE
LOCATION-SEE SERVICE PROCEDURE.
USE OF CONTROLS, ADJUSTMENTS OR THE
PERFORMANCE OF PROCEDURES OTHER THAN THOSE
SPECIFIED HEREIN MAY RESULT IN HAZARDOUS
Location of the required Marking
The rating sheet and the safety caution are
on the rear of the unit.
CERTIFICATION: COMPLIES WITH FDA
RADIATION PERFORMANCE STANDARDS, 21
CFR SUBCHAPTER J.
RADIATION EXPOSURE.
TO PREVENT DIRECT EXPOSURE TO THE LASER BEAM,
DO NOT TRY TO OPEN THE ENCLOSURE. RADIATION MAY
BE PRESENT WHEN THE ENCLOSURE IS OPENED. DO
NOT STARE INTO THE BEAM.
Complies with FDA performance standards
for laser products except for deviations
pursuant to Laser Notice No. 50, dated
June 24, 2007.
The lamp(s) within this product contain mercury.
Disposal should be in compliance with local, state or federal laws.
Record the model number and serial number.
Model number Serial number
CLASS 1
LASER PRODUCT
Page 3

15) Apparatus should not be exposed to dripping or splashing, and objects filled with liquids, such
NEC NATIONAL
as vases, should not be placed on the apparatus.
16) An outside antenna system should not be located in the vicinity of overhead power lines or
other electric light or power circuits, or where it can fall into such power lines or circuits. When
installing an outside antenna system, extreme care should be taken to keep from touching such
power lines or circuits, as contact with them might be fatal.
17) Do not overload wall outlets and extension cords, as this can result in a risk of fire or electric
shock.
18) Do not push objects through any openings in this unit, as they may touch dangerous voltage
points or short out parts that could result in fire or electric shock. Never spill or spray any type of
liquid into the unit.
19) If an outside antenna or cable system is
connected to the unit, be sure the antenna or
cable system is grounded to provide some
protection against voltage surges and built-up
static charges, Section 810 of the National
Electrical Code, ANSI/NFPA 70, provides
information with respect to proper grounding of
the mast and supporting structure, grounding
of the lead-in wire to an antenna discharge
unit, size of grounding conductors, location
of antenna discharge unit, connection to
ELECTRIC SERVICE
ELECTRICAL CODE
S2898A
EXAMPLE OF ANTENNA GROUNDING AS PER THE
NATIONAL ELECTRICAL CODE
ANTENNA
LEAD IN WIRE
GROUND
CLAMP
EQUIPMENT
ANTENNA
DISCHARGE UNIT
(NEC SECTION 810-20)
GROUNDING CONDUCTORS
(NEC SECTION 810-21)
GROUND CLAMPS
POWER SERVICE GROUNDING
ELECTRODE SYSTEM
(NEC ART 250, PART H)
grounding electrodes, and requirements for the grounding electrode.
20) When replacement parts are required, be sure the service technician uses replacement parts
specified by the manufacturer or those that have the same characteristics as the original part.
Unauthorized substitutions may result in fire, electric shock or other hazards.
21) Upon completion of any service or repairs to this unit, ask the service technician to perform
safety checks to determine that the unit is in proper operating condition.
22) Keep your fingers clear of the disc slot as it is closing. It may cause injury.
ENGLISH
Page 4

IMPORTANT SAFETY INSTRUCTIONS
23) When you connect the product to other equipment, turn off the power and unplug all of the equipment from
the wall outlet. Failure to do so may cause an electric shock and serious personal injury. Read the owner's
manual of the other equipment carefully and follow the instructions when making any connections.
24) Reduce the volume to the minimum level before you turn on the product. Otherwise, sudden high volume
sound may cause hearing or speaker damage.
25) Do not allow the product to output distorted sound for an extended period of time. It may cause speaker
overheating and fire.
26) When you use the headphones, keep the volume at a moderate level. If you use the headphones
continuously with high volume sound, it may cause hearing damage.
27) Do not look into the opening of the disc slot or ventilation opening of the product to see the source of the
laser beam. It may cause eye damage.
28) Do not use a cracked, deformed, or repaired disc. These discs are easily broken and may cause serious
personal injury and product malfunction.
29) This reminder is provided to call the cable TV system installer’s attention to Article 820-40 of the NEC
that provides guidelines for proper grounding and, in particular, specifies that the cable ground shall be
connected to the grounding system of the building, as close to the point of cable entry as practical.
30) The socket-outlet must be installed near the unit and easily accessible.
CONDENSATION
Moisture will form in the operating section of the player if the player is brought from cool surroundings into a warm
room or if the temperature of the room rises suddenly. When this happens, player's performance will be impaired.
To prevent this, let the player stand in its new surroundings for about an hour before switching it on, or make sure
that the room temperature rises gradually.
Condensation may also form during the summer if the player is exposed to the breeze from an air conditioner. In
such cases, change the location of the player.
(continued)
HOW TO HANDLE THE LCD PANEL
Do not press hard or jolt the LCD panel. It may cause the LCD panel glass to break and injury may occur.
•
If the LCD panel is broken, make absolutely sure that you do not touch the liquid in the panel. This may cause
•
skin inflammation.
If the liquid gets in your mouth, immediately gargle and consult with your doctor. Also, if the liquid gets in your
eyes or touches your skin, consult with your doctor after rinsing for at least 15 minutes or longer in clean water.
CHILD SAFETY:
It Makes A Difference How and Where You Use Your Flat Panel Display
Congratulations on your purchase! As you enjoy your new product, please keep these safety tips in mind:
THE ISSUE
The home theater entertainment experience is a growing trend and larger flat panel displays are popular
purchases. However, flat panel displays are not always supported on the proper stands or installed
according to the manufacturer’s recommendations.
Flat panel displays that are inappropriately situated on dressers, bookcases, shelves, desks, speakers,
chests or carts may fall over and cause injury.
THIS MANUFACTURER CARES!
The consumer electronics industry is committed to making home entertainment enjoyable and safe.
TUNE INTO SAFETY
One size does NOT fit all. Follow the manufacturer’s recommendations for the safe installation and use of
your flat panel display.
Carefully read and understand all enclosed instructions for proper use of this product.
Don’t allow children to climb on or play with furniture and television sets.
Don’t place flat panel displays on furniture that can easily be used as steps, such as a chest of drawers.
Remember that children can become excited while watching a program, especially on a “larger than life” flat
panel display. Care should be taken to place or install the display where it cannot be pushed, pulled over, or
knocked down.
Care should be taken to route all cords and cables connected to the flat panel display so that they cannot be
pulled or grabbed by curious children.
WALL MOUNTING: IF YOU DECIDE TO WALL MOUNT YOUR FLAT PANEL DISPLAY, ALWAYS:
Use a mount that has been recommended by the display manufacturer and/or listed by an independent
laboratory (such as UL, CSA, ETL).
Follow all instructions supplied by the display and wall mount manufacturers.
If you have any doubts about your ability to safely install your flat panel display, contact your retailer about
professional installation.
Make sure that the wall where you are mounting the display is appropriate to support the weight of the unit/
product and wall mount. If you are unsure, contact a professional installer.
A minimum of two people are required for installation. Flat panel displays can be heavy.
Page 5
SAFETY PRECAUTIONS
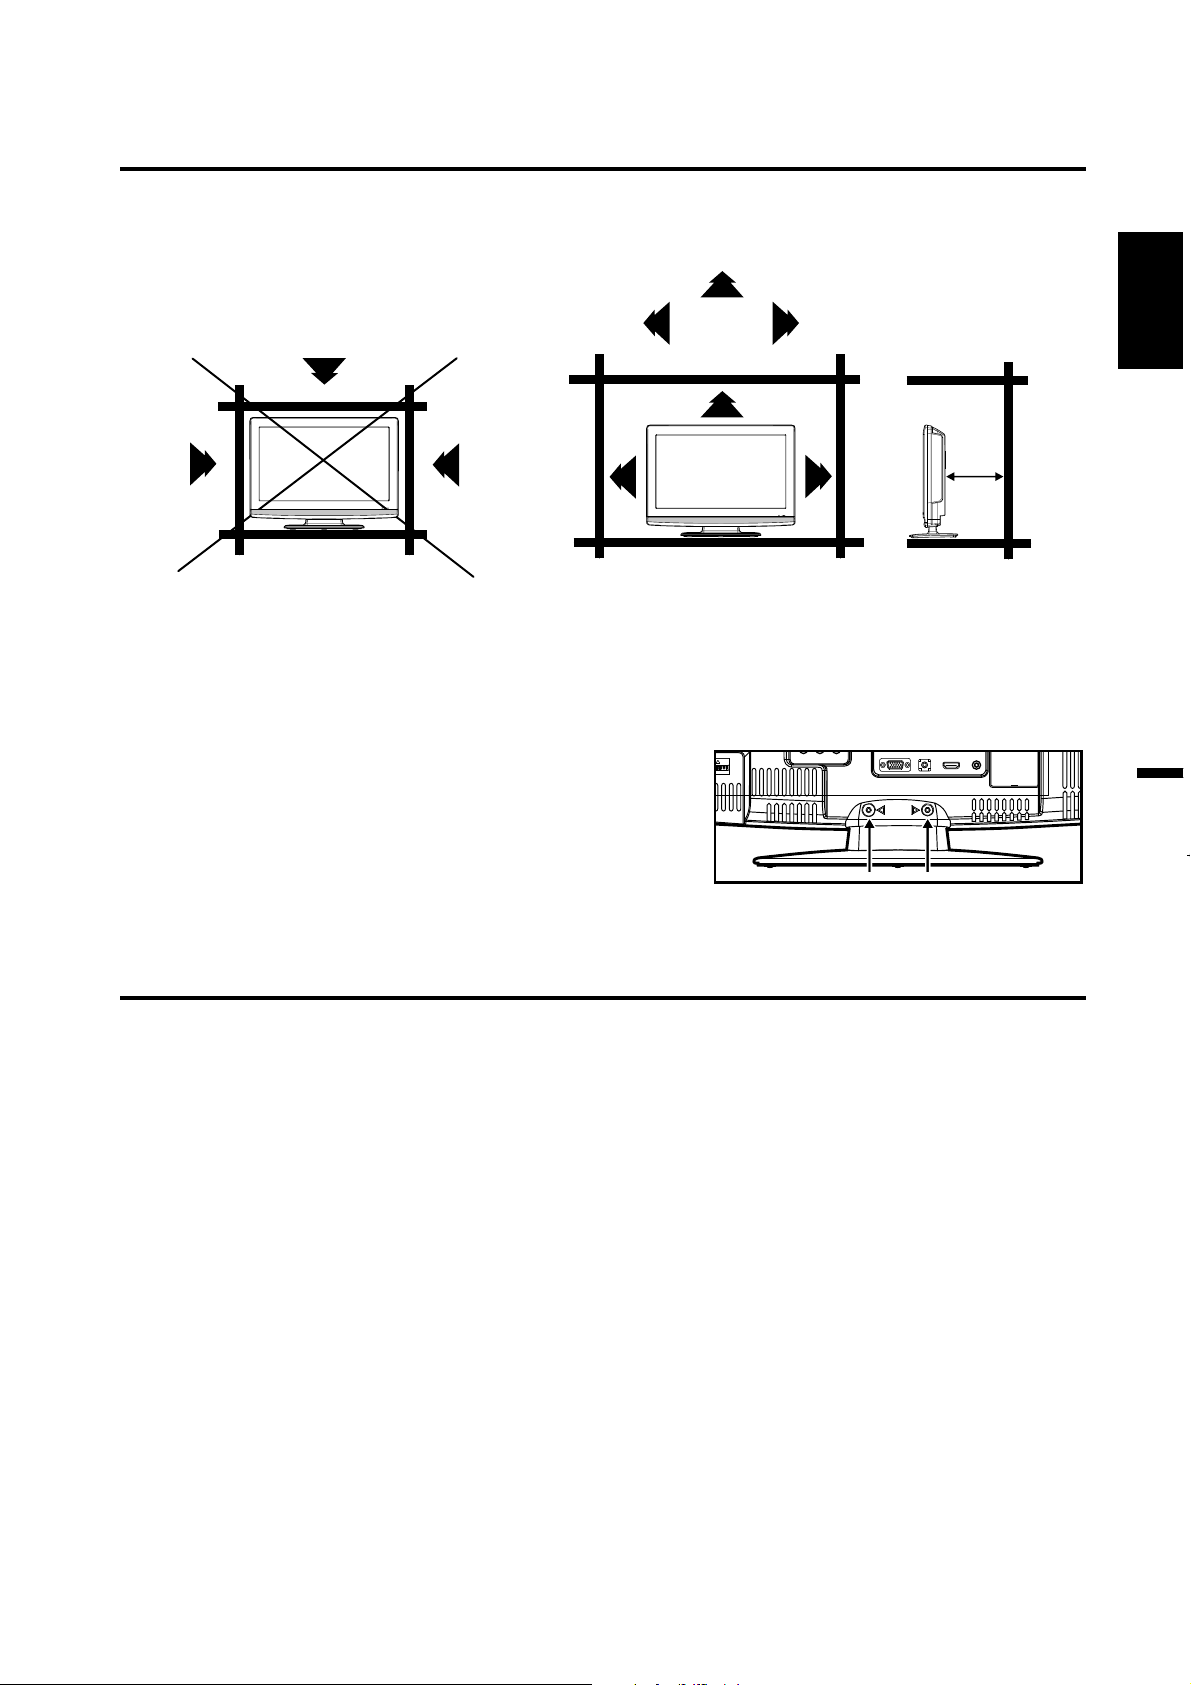
The unit emits heat when in operation. Do not place any covers or blankets on the unit, this may cause
overheating. Do not block ventilation holes, or set up near radiators. Do not place in direct sunshine. When
placing on a shelf leave 10 cm (4 inches) free space around the entire unit.
10cm
10cm
Notes when mounting the LCD TV/DVD on a wall
If the unit is to be mounted on the wall, contact the retailer where you purchased the LCD TV/DVD for advice,
and have the equipment professionally installed. Incomplete or improper installation may cause injury to you,
and/or damage to the LCD TV/DVD.
ENGLISH
To hang the television on a wall, remove these screws and then
remove a stand. Before performing work spread cushioning over
the base area to lay the TV on.
IMPORTANT NOTICE
Possible Adverse Effects on LCD Panel: If a fixed (non-moving) pattern remains on the LCD Panel for
long periods of time, the image can become permanently engrained in the LCD Panel and cause subtle but
permanent ghost images. This type of damage is NOT COVERED BY YOUR WARRANTY. Never leave your
LCD Panel on for long periods of time while it is displaying the following formats or images:
•
Fixed Images, such as stock tickers, video game patterns, TV station logos, and websites.
•
Special Formats that do not use the entire screen. For example, viewing letterbox style (16:9) media on
a normal (4:3) display (black bars at top and bottom of screen); or viewing normal style (4:3) media on a
widescreen (16:9) display (black bars on left and right sides of screen).
The following symptoms are not signs of malfunction but technical limitation. Therefore we disclaim
any responsibility for these symptoms.
•
LCD Panels are manufactured using an extremely high level of precision technology, however sometimes
parts of the screen may be missing picture elements or have luminous spots.
This is not a sign of a malfunction.
•
Do not install the LCD Panel near electronic equipment that is susceptible to electromagnetic waves. Some
equipment placed too near this unit may cause interference.
•
Effect on infrared devices – There may be interference while using infrared devices such as infrared cordless
headphones.
Page 6
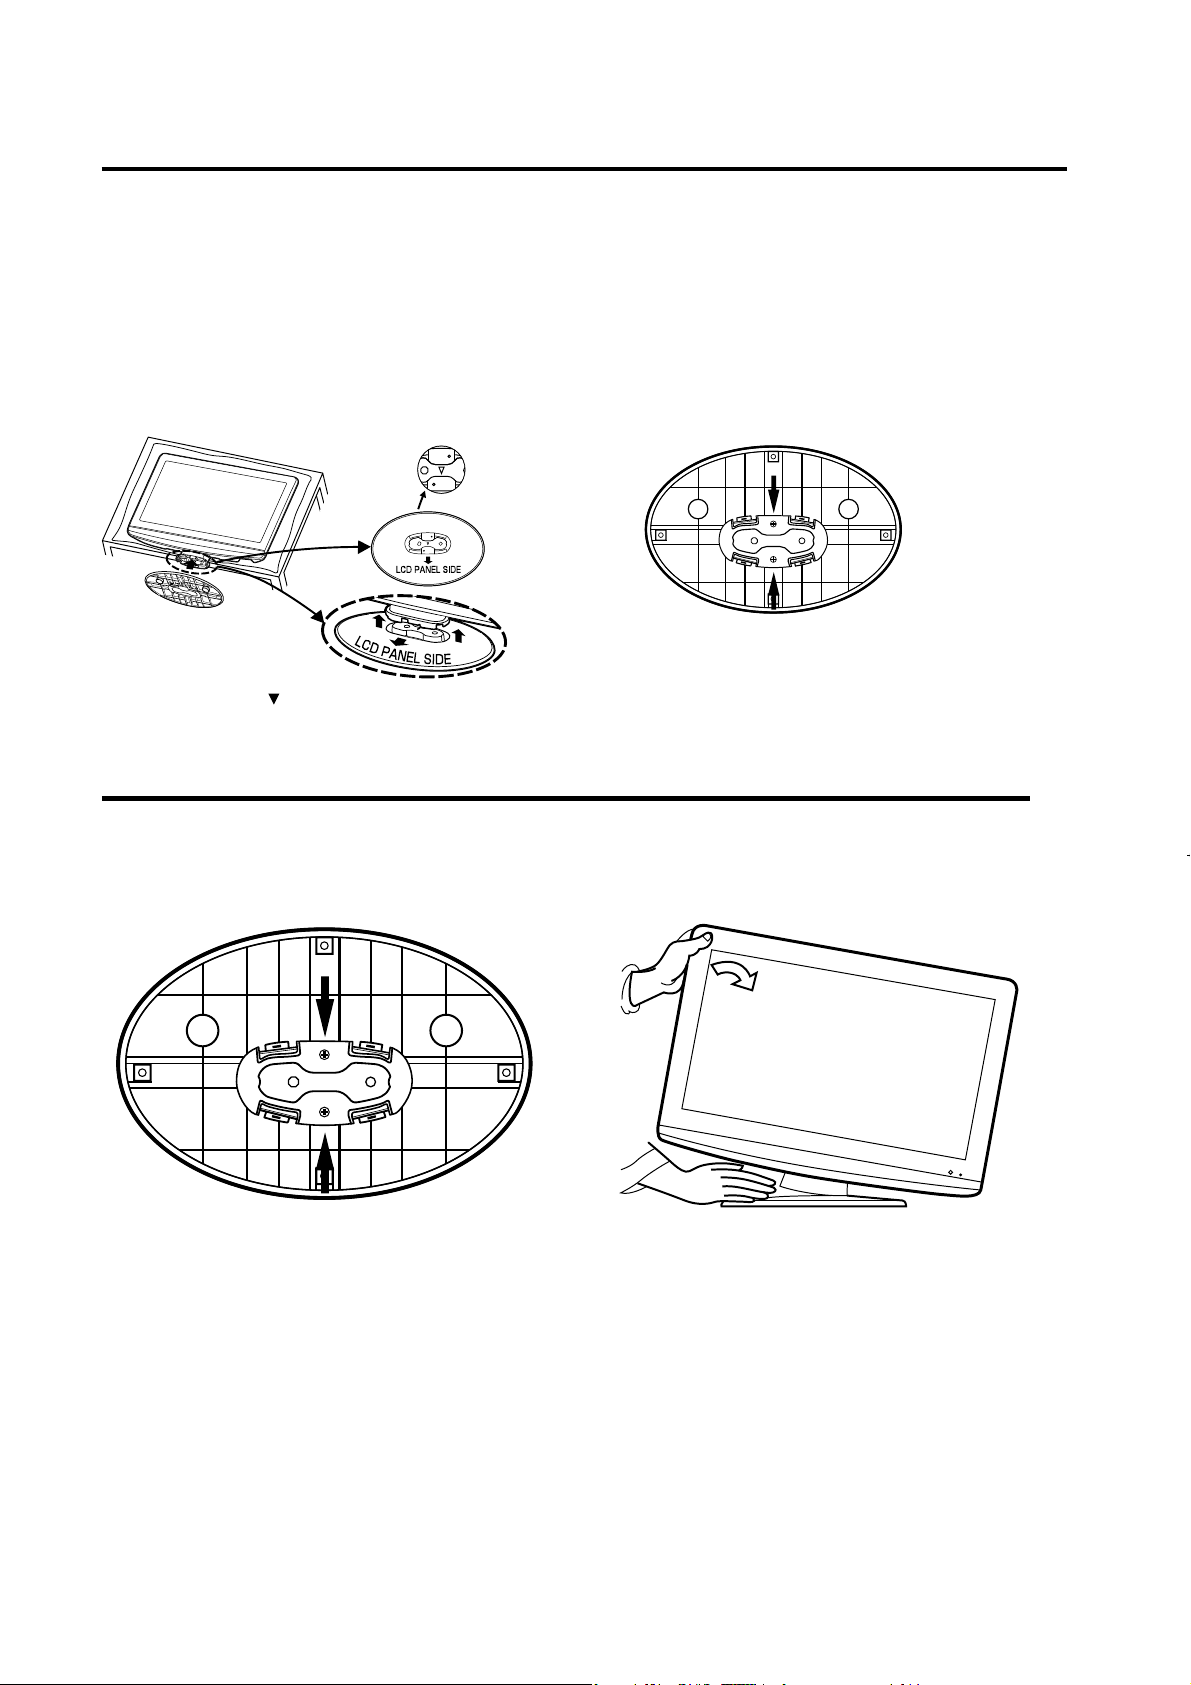
How to attach the stand
NOTE:
• Unplug the AC cord from the AC INPUT terminal.
• Before beginning this process, assure that TV is laid on a clean, safe, and cushioned space to avoid
any damage to the unit.
• Do not touch or press the TV-screen, glass might break under pressure.
Place the TV on its back onto a table.
Align the stand’s bottom-plate (supplied) as seen here.
It will t in only one direction.
Press it in direction of arrow until you hear a ‘click’.
Finally secure the bottom-plate with 2
screws (supplied).
Please assure the “ ” mark on the stand is facing the
LCD panel side.
How to remove the stand
When you transport this product, remove the stand and pack at against the back of the unit in the
carton. To remove the stand, remove the two (2) screws from the bottom (see A), and hold the stand on a
at surface lifting one side of the unit until stand disconnects (see B).
AB
For wall mounting, the base must be removed. To disconnect the base/stand remove the two (2) screws from the
back (see page 5).
Page 7

Features
LCD color TV With DVD/CD player
Unique space saving design combines a 22” LCD color TV and a DVD/CD player.
A DVD disc has much more capacity, but is the same size as an audio CD disc. The Picture/Audio quality of a
DVD exceeds other software. The picture quality is higher than Super VHS video cassettes. The audio quality
is higher than an audio CD. The DVD also has special options; audio language selection, subtitle language
selection, or multi-angle, etc.
The DVD PLAYER can play back both audio CDs and MP3/WMA/JPEG CDs.
Compatible with a wide range of DVD audio outputs
Digital Audio Jack (Coaxial)
•
When a component with a built-in Dolby Digital decoder is connected, Dolby Digital sound can produce the
effect of being in a movie theater or a concert hall.
•
Surround standard is different from Dolby Digital. This format is already in use in many theaters. By connecting
this unit to a DTS decoder or an AV amplifier with a built-in DTS decoder, the DTS audio of DVD discs
recorded in this format can be enjoyed. However, audio will not be output from the analog audio output jacks.
•
By connecting this unit to an AV amplifier with a built-in MPEG decoder, the MPEG audio of DVD discs
recorded in this format can be enjoyed.
The Linear PCM sound of a 48 kHz/24 bit through 96 kHz/24 bit exceeds audio CD sound.
•
Convenience Features
Direct selection of your desired scenes using Title/Chapter/Time/Track You can play back from the
desired scene.
Recalling Up to 3 Scenes
Frame Advance The PAUSE/STILL moves one frame at a time.
Slow Motion The SLOW moves you back and forth through the program by 4 steps of 1/7-1/2 times.
Repeat Playback You can repeat chapter, track, title, sides or material between two selected points.
Program Playback (Audio CD/MP3/WMA/JPEG CD) You can play back tracks in programmed sequences.
Zoom You can zoom in the selected subject on the screen during playback.
You can program up to 3 scenes in memory and recall the marked scenes.
ENGLISH
Note: Make sure that discs are suitable for the following functions.
MultiLanguage Maximum 32 language subtitles and maximum 8 language soundtracks can be played back
for movies or programs.
MultiAngle Pictures of Sports or a Live Concert are recorded with many cameras. When you play such a disc,
you can change the angles during playback.
Parental Control You can limit the play back of scenes or sounds of DVD discs that have a rating level
encoded on the disc.
Video Aspect Ratio You can change the aspect ratio of the screen for your monitor.
TV Features
Integrated Digital Tuner You can view digital broadcasts without using a Digital TV Set-Top Box.
Closed Caption Decoder With Full Text Mode Displays text captions or full screen text on the screen for
hearing impaired viewers.
Picture Adjustments Using The Remote Control The On-Screen display allows precise remote control
adjustment of BRIGHTNESS, CONTRAST, COLOR, TINT and SHARPNESS.
Programmable TV Sleep Timer Operable from the remote control, the TV can be programmed for up to 120
minutes to turn off automatically.
OnScreen 3 Language Display You can select one of 3 languages, English, Spanish or French for onscreen programming.
VChip The V-Chip function can read the rating of a TV program or movie content if the program is encoded
with this information. V-chip will allow you to set a restriction level.
* is a trademark of DVD Format/Logo Licensing Corporation.
* Manufactured under license from Dolby Laboratories. Dolby and the double-D symbol are trademarks of
Dolby Laboratories.
Manufactured under license under U.S. Patent #: 5,451,942 & other U.S. and worldwide patents issued &
*
pending. DTS and DTS Digital Out are registered trademarks and the DTS logos and Symbol are trademarks
of DTS, Inc.© 1996-2008 DTS, Inc. All Rights Reserved.
* HDMI, the HDMI logo and High-Definition Multimedia Interface are trademarks or registered trademarks of
HDMI Licensing LLC.
Page 8

Contents
Before using your unit
IMPORTANT SAFETY INSTRUCTIONS ...........3
SAFETY PRECAUTIONS .................................5
IMPORTANT NOTICE .......................................5
How to attach the stand ....................................6
How to remove the stand ..................................6
Features ............................................................7
Contents ...........................................................8
Disc...................................................................9
Location of controls .........................................10
Remote control ...............................................11
Power source ..................................................12
Antenna connections ......................................13
Cable TV connections .....................................14
TV operation
Starting setup .................................................15
TV operation ...................................................15
Quick guide for menu operation ......................16
Convenience functions ...................................17
Memorizing channels ......................................18
Checking the digital signal strength ................19
Labeling channels ...........................................19
Labeling video inputs ......................................19
Setting the V-Chip ...........................................20
Closed Caption ...............................................21
CC advanced ..................................................21
Setting the picture size ....................................22
DVD operation
Preparation .....................................................23
Status display of disc ......................................23
Playback procedure ........................................23
Special playback .............................................24
MP3/WMA/JPEG and Audio CD playback ......24
Program playback CD ..................................25
Repeat playback CD.....................................26
Random playback (CD) ..................................26
Zooming ..........................................................26
Locating desired scene ...................................26
Repeat playback .............................................27
Marking desired scenes ..................................27
Changing soundtrack language ......................27
Subtitles .......................................................... 28
Changing angles .............................................28
Title selection ..................................................28
DVD menu ......................................................28
Quick guide for DVD menu operation ..............28
Function Setup ................................................29
Parental control ...............................................30
Temporary disabling of rating level
by DVD disc ....................................................30
Additional information
Language code list ..........................................31
Connections to other equipment .....................32
Reception disturbances ..................................35
Problems and troubleshooting ........................36
Specifications ................................................38
limited WARRANTY .......................................39
Page 9
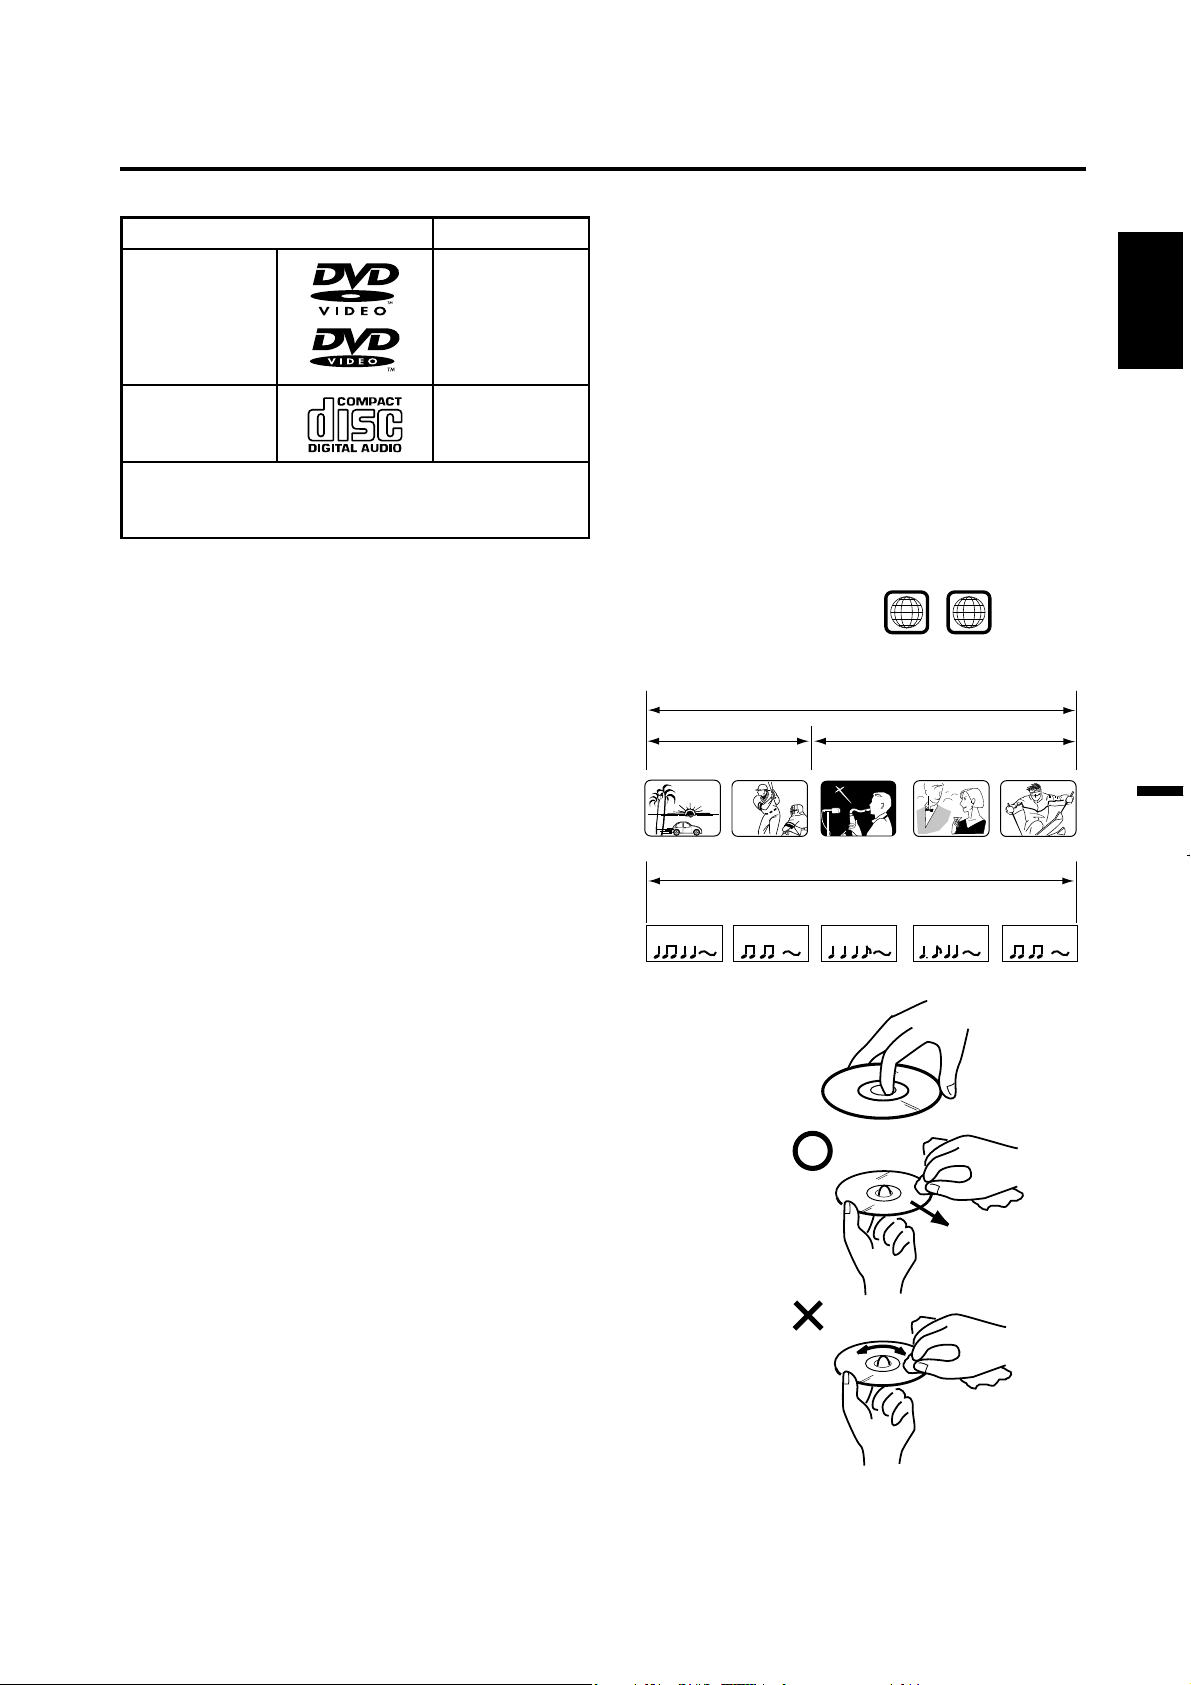
Playable discs
Disc type and logo mark content
DVD Video
CDDA
The following discs are also available.
DVD-R/RW discs of DVD video format.
•
CD-R/RW discs of MP3/WMA/JPEG.
•
Audio
+
Video
(moving
pictures)
Audio
CAUTION:
•
Only the left types of discs can be played on this
unit. DVD-ROM, CD-ROM, SVCD, CVD, VCD, etc.
cannot be played.
•
8cm discs can be played directly. If an 8cm disc
adapter is used it will cause errors.
•
If you insert an irregular shaped disc, it may get
stuck and cause a malfunction.
•
The use of a ring protector or other disc
accessories will cause errors.
•
This unit is to be used exclusively with the NTSC
color system. PAL and SECAM system discs cannot
be used with this unit.
•
Some CD-R/RWs and DVD-R/RW can not be
played back depending on the recording conditions.
Region Number
Region number (Regional restriction code) is built-in to the unit and DVD video discs.
Region number “1” or “ALL” of DVD video discs can be used on this unit.
Title
When two or more movies are recorded on a disc, the disc
is divided into two or more sections. Each section is called
a “TITLE”.
TITLE 1 TITLE 2
CHAPTER 1
CHAPTER 2 CHAPTER 2 CHAPTER 3CHAPTER 1
DVD DISC
Chapter
The titles can be subdivided into many sections.
Each section is called a “CHAPTER”.
Disc
ENGLISH
ALL
1
Track
An Audio CD can contain several items.
These are assigned to the tracks.
TRACK 1 TRACK 2 TRACK 3 TRACK 4 TRACK 5
Removing Disc from Case
Be sure to hold the edge of disc. Do not touch the surface of the disc.
Pick up the disc gently from the case.
•
Do not scratch the disc.
•
Do not get dirt on the surface of the disc.
•
Do not stick a label or adhesive tape on the disc.
•
Do not drop or bend the disc.
Storing Disc
•
Store the disc in the case to avoid risk of scratches, dirt or damage.
•
Do not leave disc exposed to direct sunlight or in hot or humid places.
Cleaning Disc
Wipe the disc with a clean, dry cloth from center to edge.
•
Do not wipe the disc in a circular motion.
•
Do not use liquid or aerosol cleaners.
Audio - CD
Page 10
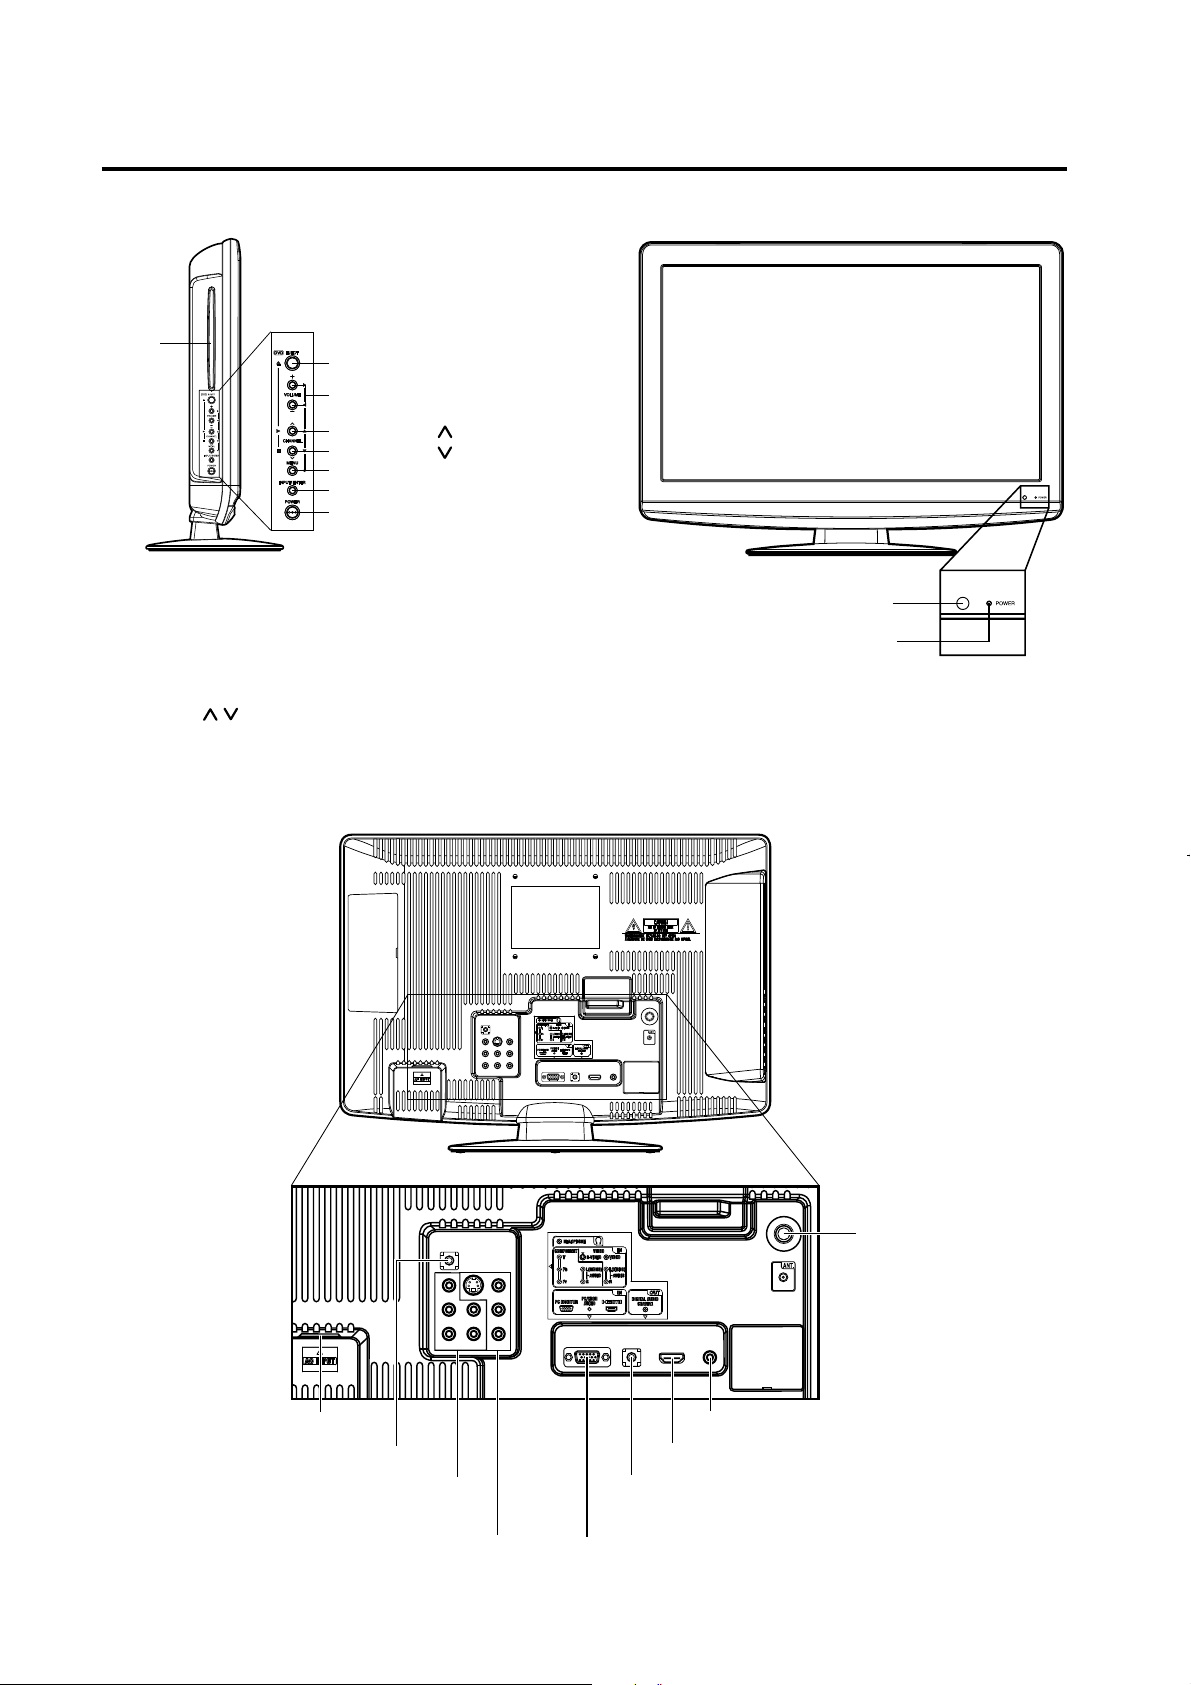
Location of controls
Left side
DISC
slot
To display the menu screen.
Press MENU button to display the menu screen.
CHANNEL
setting during the menu screen operations.
/ buttons, VOLUME +/ buttons and INPUT/ENTER button can be used to select the desired
EJECT button
VOLUME +/– buttons
CHANNEL /1 (PLAY) button
CHANNEL /3 (STOP) button
MENU button
INPUT/ENTER button
POWER button
Front
Remote sensor
POWER indicator
Rear side
RF ANT. IN jack
AC INPUT jack
HEADPHONE IN jack
COMPONENT IN jacks
Y/Pb/Pr/AUDIO (L/R))
VIDEO IN jacks (VIDEO/S-VIDEO/AUDIO L/R
COAXIAL DIGITAL AUDIO IN jack
HDMI IN jack
PC/HDMI AUDIO IN jack
PC MONITOR IN jack
Page 11

Remote control
POWER Power On/Off
DISPLAY/– Call TV information
Call DVD information
Input “–” for digital channels
TV/DVD Switch between TV/AV and DVD
(EJECT) Eject a disc
0-9 Direct channel selection of TV
Input setting
Enter a password
VOL +/– Adjust volume of TV
MUTE Switch off the sound
SLEEP Sleep timer
SETUP/
TV MENU
DVD MENU Display DVD menu
/
CH
Cursor buttons
ENTER Enter information in the menu
EXIT
CANCEL
TOP MENU Select title
SEARCH Fast Forward/Review playback
PLAY Playback
SKIP Skip chapter to forward or reverse direction
SUBTITLE Set subtitle
STOP Stop
SLOW Forward/Reverse- slow motion
PAUSE/STILL Pause CD sound
PLAY MODE Select playback mode
AUDIO Change sound track language
RETURN Remove DVD setup menu
REPEAT A-B Repeat playback between A and B
ANGLE Change playback angle
SCREEN SIZE Display PICTURE SIZE menu
MARKER Index
CCD/
JUMP
RECALL/
ZOOM
INPUT SELECT Display source selection menu
TV mode - Display menu of TV
DVD mode - Call up initial setup mode
Select channel of TV
Exit from On-Screen menu
Reset information in the menu
Still picture of DVD
Closed Caption
Locating desired scene
Switch between present/last channel
Zoom
ENGLISH
ATTENTION
If you purchase a universal remote from a local retailer, please contact the remote manufacturer for the correct
programming code.
Page 12
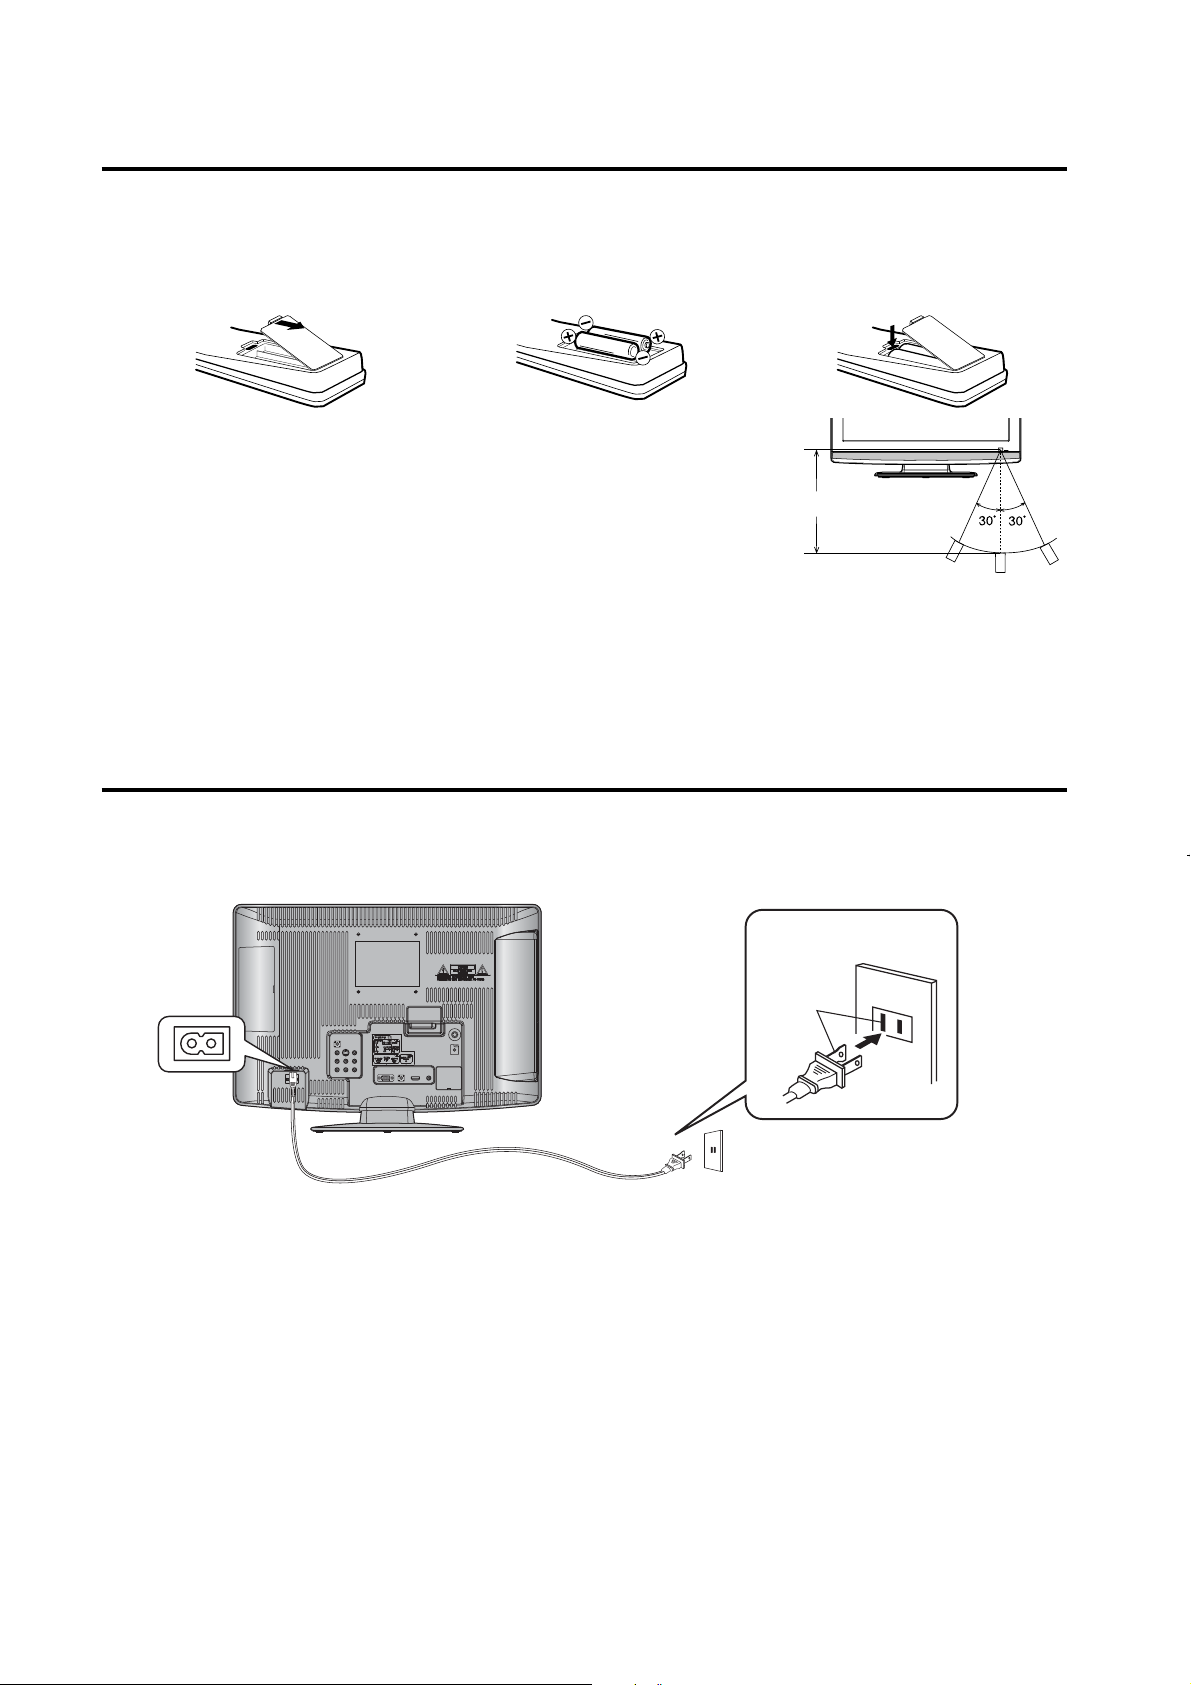
Remote control (continued)
Inserting Batteries
Open the battery compartment
1
cover in the direction of the arrow.
Operation
Aim the remote control at the remote sensor and press control
•
buttons to operate.
Operate the remote control within a 30° angle on either side of
•
the remote sensor, up to a distance of approximately 15 feet.
NOTE:
•
Do not leave the remote control unit exposed to direct sunlight or in hot or humid places.
•
The remote control unit uses infrared beams to transmit signals, so sunlight or fluorescent light on the remote
sensor may shorten operating distance.
•
Incorrect use of batteries may cause them to leak or burst. Read the battery warnings and use the batteries
properly.
Do not mix old and new batteries.
•
Remove batteries if the remote control will not be operated for an extended period of time.
•
Install two “AAA” batteries,
2
paying attention to the
polarity diagram in the battery
compartment.
Replace the compartment cover.
3
Approximately 15 feet
Power source
TO USE AC POWER
Connect the AC cord plug into this unit’s AC IN jack.
1.
Connect the AC cord into an AC outlet.
2.
AC Outlet
Wider Hole
and Blade
AC 120V, 60Hz
AC cord (supplied)
NOTE:
•
Please make sure to insert the cord securely at both the LCD TV/DVD and the wall outlet.
•
The AC Cord has a grounding-type AC line plug. If the supplied AC cord does not match your AC outlet,
contact a qualified electrician, do not defeat the purpose of a grounding plug.
WARNING:
•
DO NOT CONNECT THIS UNIT TO THE POWER USING ANY DEVICE OTHER THAN THE SUPPLIED AC
CORD. THIS COULD CAUSE FIRE, ELECTRICAL SHOCK, OR DAMAGE.
•
DO NOT USE WITH A VOLTAGE OTHER THAN THE POWER VOLTAGE DISPLAYED. THIS COULD CAUSE
FIRE, ELECTRICAL SHOCK, OR DAMAGE.
CAUTION:
•
WHEN THIS UNIT IS NOT USED FOR A LONG TIME, (E.G., AWAY ON A TRIP) IN THE INTEREST OF
SAFETY, BE SURE TO UNPLUG IT FROM THE AC OUTLET.
•
DO NOT PLUG/UNPLUG THE PLUG WHEN YOUR HANDS ARE WET. THIS MAY CAUSE ELECTRICAL
SHOCK.
•
IF YOU NEED TO REPLACE THE SUPPLIED AC ADAPTER OR AC CORD, THE SPECIFIED ONE IS
RECOMMENDED. CONTACT CUSTOMER SERVICE AT 1-800-289-0980.
Page 13
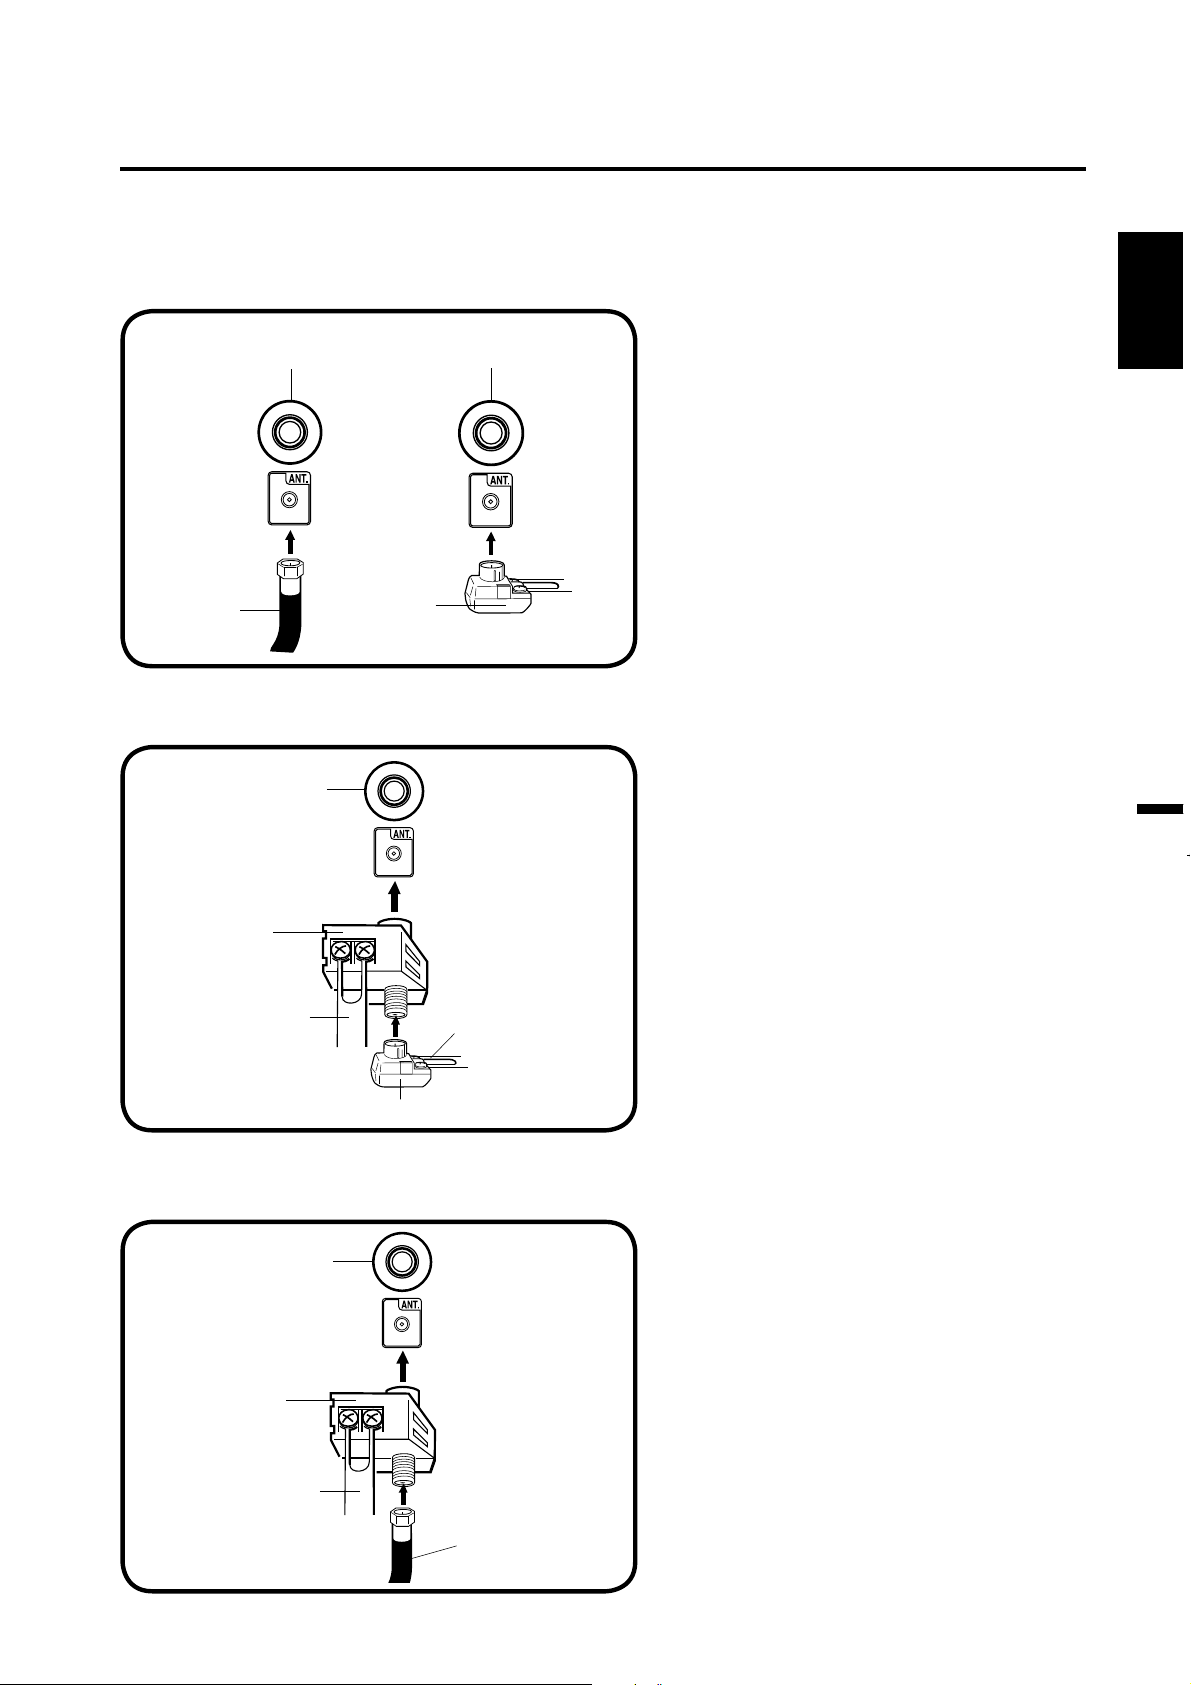
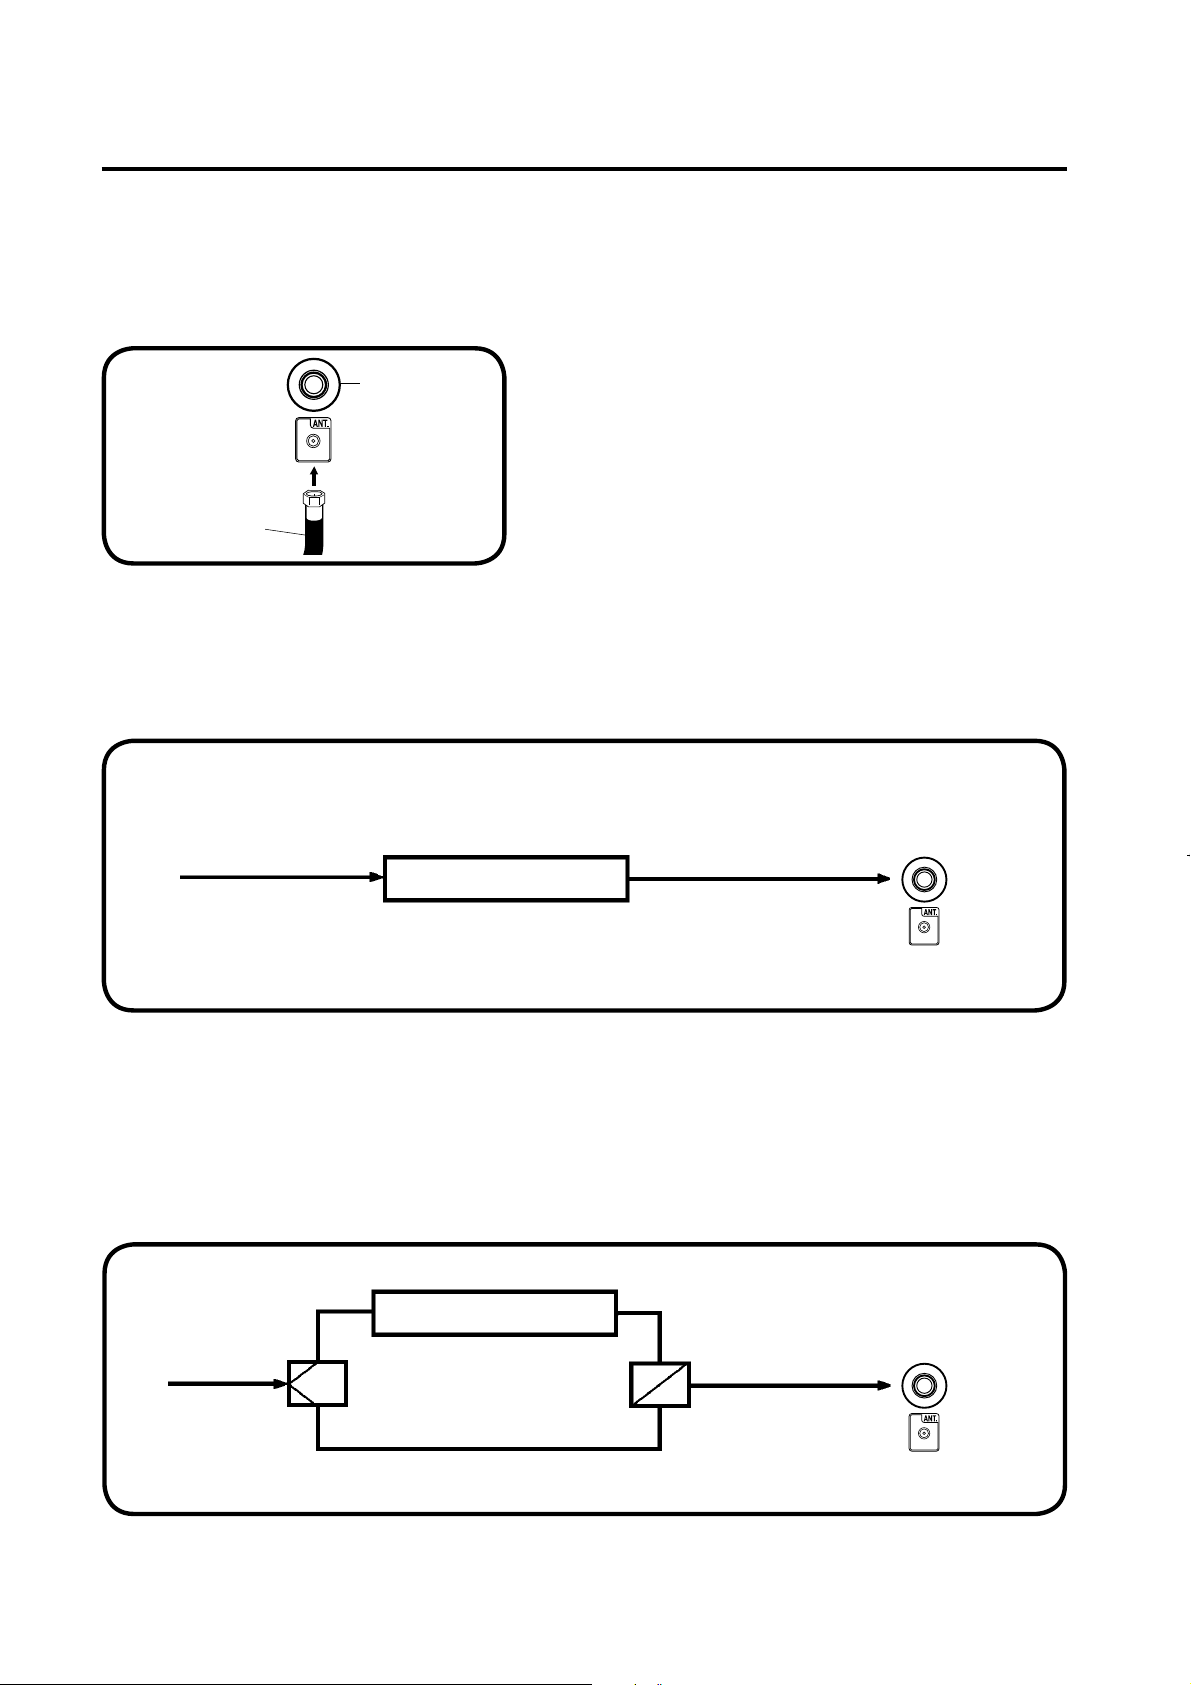
Antenna connections
If you are using an indoor or outdoor antenna, follow the instructions below that correspond to your
antenna system. If you are using a Cable TV service, see page 14 for Cable TV connections.
Combination VHF/UHF Antenna (Single 75 ohm cable or 300 ohm twinlead wire)
Connect the 75 ohm cable from the combination
VHF/UHF antenna to the antenna jack.
If your combination VHF/UHF antenna has a 300
ohm twin-lead wire, the use of the 300-75 ohm
matching transformer may be necessary.
75 ohm
Coaxial
Cable
Antenna
Jack
Antenna
Jack
300-75 ohm
Matching
Transformer
Combination VHF/UHF Antenna (Separate VHF and UHF 300 ohm twinlead wires)
Connect the UHF 300 ohm twin-lead wire to
Antenna
Jack
the Combiner (not supplied). Connect the VHF
300 ohm twin-lead wire to the 300-75 ohm
Matching Transformer. Attach the Transformer to
the Combiner, then attach the Combiner to the
Antenna Jack.
ENGLISH
Combiner
UHF 300 ohm
300-75 ohm Matching Transformer
VHF 300 ohm
Separate VHF/UHF Antennas (75 ohm VHF cable and 300 ohm UHF twinlead wires)
Connect the VHF 75 ohm cable and UHF 300 ohm
Antenna
Jack
Combiner
UHF 300 ohm
twin-lead wire to the Combiner (not supplied). Attach
the Combiner to the Antenna Jack.
VHF 75 ohm
Page 14
Cable TV connections
This TV has an extended tuning range and can tune most cable channels without using a Cable TV
Converter box. Some cable companies offer “premium pay channels” where the signal is scrambled.
Descrambling these signals for normal viewing requires the use of a descrambler device which is
generally provided by the Cable TV company.
For subscribers to basic Cable TV service
For basic Cable TV service not requiring a Converter/
Antenna
Jack
75 ohm
Coaxial Cable
For subscribers to scrambled Cable TV service
If you subscribe to a Cable TV service which requires the use of a Converter/Descrambler box, connect
the incoming 75 ohm Coaxial Cable to the Converter/Descrambler box. Using another 75 ohm Coaxial
Cable, connect the output jack of the Converter/Descrambler box to the Antenna Jack on the TV. Follow the
connections shown below. Set the TV to the output channel of the Converter/Descrambler box (usually channel
3 or 4) and use the Converter/Descrambler box to select channels.
Descrambler box, connect the 75 ohm Coaxial Cable directly
to the Antenna Jack on the back of the TV.
Incoming
75 ohm
Cable TV
Cable
Converter/
Descrambler
75 ohm Cable to TV
Antenna
Jack
For subscribers to unscrambled Cable TV service with scrambled premium
channels
If you subscribe to a Cable TV service in which basic channels are unscrambled and premium channels require
the use of a Converter/Descrambler box, you may wish to use a signal Splitter and an A/B Switch box (available
from the Cable TV company or an electronics supply store). Follow the connections shown below. With the
switch in the “B” position, you can directly tune any nonscrambled channels on your TV. With the switch in the
“A” position, tune your TV to the output of the Converter/Descrambler box (usually channel 3 or 4) and use the
Converter/Descrambler box to tune scrambled channels.
Incoming
75 ohm
Cable TV
Cable
Splitter
Converter/
Descrambler
A/B Switch
75 ohm Cable to TV
A
B
Antenna
Jack
Page 15
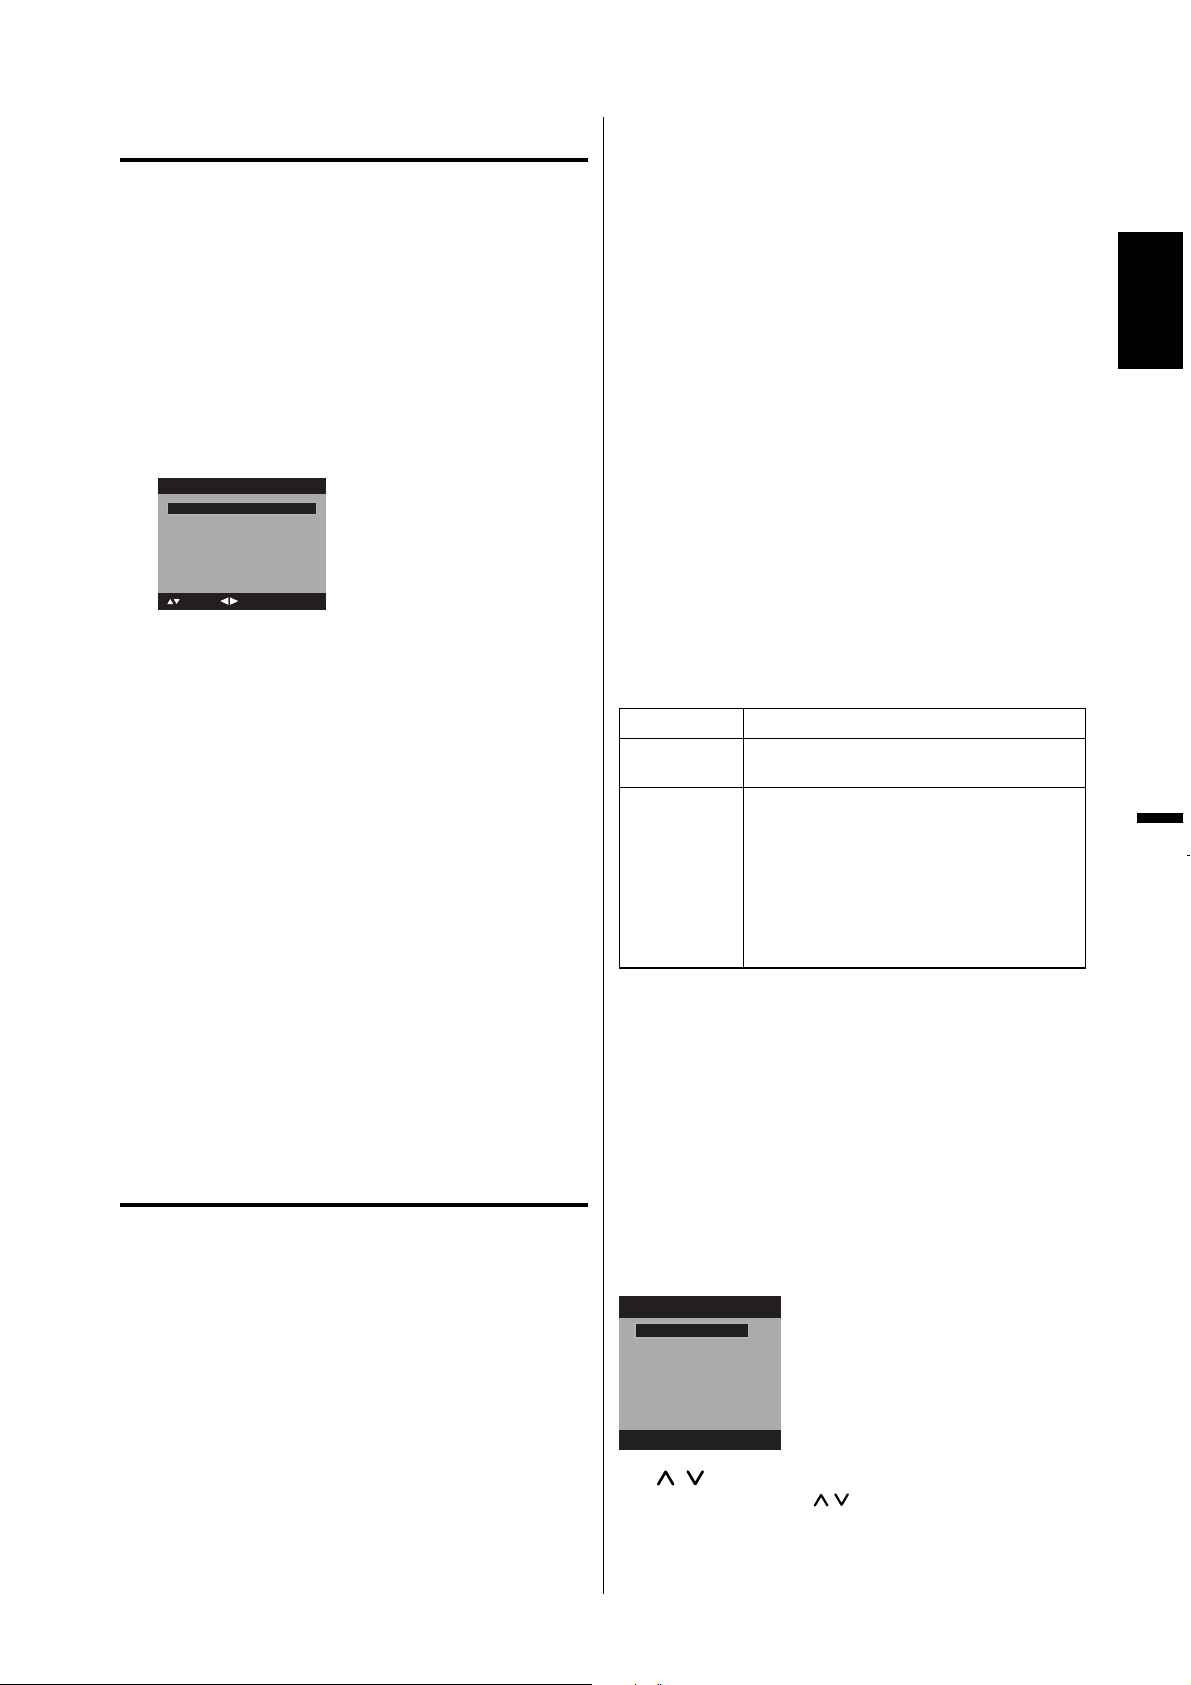
Starting setup
The Starting Setup menu appears the first time
you turn on the TV, and assists you to select the
menu language, specify the Air/Cable setting,
and program your channels automatically.
IMPORTANT: Make sure that the antenna or cable
TV system connection is made!
To turn on the TV, press POWER (POWER
1
indicator on the front of the unit changes green.
It may take approx. 10 seconds for a picture to
appear on screen.). The starting setup function
begins. Press or to select your desired
language.
Auto Setup
Language English
Signal Type Cable
Automatic Search Start
: Adjust
: Select
Press or to select “Signal Type”, then press
2
or to select “Cable” or “Air”.
Press or to select “Automatic Search”, then
3
press ENTER or .
Now the “Auto Setup” starts. After the starting
4
setup is completed, the TV channel appears on
the screen.
•
Depending on the reception condition, it may
take from 15 minutes to 30 minutes to complete
memorizing digital cable channels. Please be
patient.
NOTE:
If you press EXIT/CANCEL in the process of “Auto
•
Setup”, the Starting Setup stops and changes to the
normal screen.
When you make a menu selection, your changes
•
occur immediately. You do not have to press EXIT/
CANCEL to see your changes.
When you are finished programming the menus,
•
press EXIT/CANCEL.
TV operation
To turn on the TV, press POWER.
1
(POWER indicator on the front of the unit
changes green. It may take approx. 10 seconds
for a picture to appear on screen.)
Adjust the volume level by pressing VOL + or .
2
The volume level will be indicated on the screen
by blue bars. As the volume level increases, so do
the number of bars. If the volume decreases, the
number of blue bars also decreases.
Set the Signal Type option to the appropriate
3
position (see “Air/Cable selection” on page 18).
Press the Direct Channel Selection (09, )
4
buttons to select the channel.
(If you press only channel number, channel
selection will be delayed for a few seconds.)
TO SELECT ANALOG CHANNELS
1-9: Press 1-9 as needed. Example, to
select channel 2, press 2, then press
ENTER.
10-99: Press the 2 digits in order. Example,
to select channel 12, press 1, 2, then
press ENTER.
100-135: Press the 3 digits in order. Example, to
select channel 120, press 1, 2, 0, then
press ENTER.
TO SELECT DIGITAL CHANNELS
Press the first 3 digits, then press the button,
followed by the remaining number.
Example, to select channel 015-001, press 0, 1,
5, , 0, 0, 1, then press ENTER.
•
If a channel is selected with only audio content,
“Audio only” will be displayed on the screen.
•
If a channel is selected with a weak digital
signal, “Digital channel signal strength is low”
will be displayed on the screen.
The same program may be available on either
an analog channel or a digital channel. You may
choose to watch either format.
•
If a channel is selected to which you have not
subscribed,
be displayed on the screen.
VHF/UHF/CABLE CHANNELS
Air Cable
VHF
2-13
UHF
14-69
NOTE:
If a channel with no broadcast is selected, the
•
sound will automatically be muted.
•
It may take a few seconds for a digital channel
picture to appear on screen after being selected.
“Digital channel is encrypted” will
VHF
2-13
STD/HRC/IRC
14-36 (A) (W)
37-59 (AA) (WW)
60-85 (AAA) (ZZZ)
86-94 (86) (94)
95-99 (A-5) (A-1)
100-135 (100) (135)
01 (5A)
To select the video input source
To view a signal from another device connected to
your LCD TV, such as a VCR player, press INPUT
SELECT, then press / or corresponding Number
buttons (05), then press ENTER. You can select TV,
Video 1, Component, HDMI, PC or DVD depending
on which input jacks you used to connect your
devices.
Source Selection
0.TV
1.Video
2.Component
3.HDMI
4.PC
5.DVD
[0 5]:Select
CH /
Press and release CH / . The channel automatically
stops at the next channel set into memory.
For proper operation, before selecting channels, they
should be set into the memory. See “Memorizing
channels” on pages 18 and 19.
ENGLISH
Page 16

DISPLAY
Press DISPLAY to display the current information on
the screen.
When the TV receives a digital signal, the digital
information will appear.
62 001 HDTV Moving Picture1
CH 1
Digital Air
No Program Informat on is avaiable
Fu l
1080i
Channel number• Station name•
Channel label (if preset)•
V-Chip rating• Signal type•
Sleep timer• Audio language•
Program guide• Picture size•
Resolution•
When the TV receives a analog signal, the analog
information will appear.
14
Analog Cable
Mono
Fu l
480i
Channel number• Channel label (if preset)•
V-Chip rating• Signal type•
Sleep timer• Picture size•
Audio information
• Resolution•
(Stereo, SAP or Mono)
Sleep Timer
Off
English
Sleep T mer
Off
Broadcast program name
•
Quick guide for menu
operation
Call menu and for example: Select Language.
Press INPUT SELECT to select TV mode.
1
Press SETUP/TV MENU. The TV menu screen
2
will appear.
Main Menu
Picture
Audio
Channel
Lock
Setup
: Select ENTER:Set
Press or to select “Setup”, then press or
3
ENTER.
Press or to select “Language”, then press
4
/ to select the desired language.
…on the following pages the menu can be called
in the same way as here.
Press EXIT to return to the normal screen.
5
NOTE:
If no buttons are pressed for more than about 60
•
seconds, the menu screen will return to normal
operation automatically.
>>
Press DISPLAY again to clear the call display.
NOTE:
•
After a few seconds, DISPLAY screen will return to
normal TV-operation automatically.
RECALL
This button allows you to go back to the last channel
selected by pressing RECALL. Press RECALL again to
return to the last channel you were watching.
MUTE
Press MUTE to switch off the sound. The TV’s sound
will be silenced and “Mute” will appear on the screen.
The sound can be switched back on by pressing this
button again or the VOL + or .
SLEEP
To set the TV to turn off after a preset amount of time,
press SLEEP on the remote control. The clock will
count up 10 minutes for each press of the SLEEP button (Off, 0h 10m, 0h 20m, ..., 2h 0m). After the sleep
time is programmed, the display will appear briefly
every ten minutes to remind you that the sleep timer
is operating. To confirm the sleep timer setting, press
SLEEP and the remaining time will be displayed for a
few seconds. To cancel the sleep timer, press SLEEP
repeatedly until the display turns to Off.
Page 17

Convenience functions
You can change the default settings to convenience use.
Icon Selected Items Setup hint
Picture Picture
Setting
Picture
Preference
Picture Size See page 22.
Film Mode On/Off A smoother motion may be obtained by setting the Film Mode to “On”
PC Setting Hor Position /
DNR On/Off DNR (Digital Noise Reduction) can reduce the roughness of the picture.
Audio Bass / Treble / Balance You can adjust the sound quality to your preference.
MTS Stereo / Mono
Surround On/Off The dynamic presence and sound created offers a thoroughly enjoyable
Audio Language When two or more audio languages are included in a digital signal, you can
HDMI Audio HDMI / DVI When you use PC/HDMI AUDIO IN jack with HDMI or DVI device, you
Channel Add / Delete See page 18.
DTV Signal See page 19.
Auto Ch Memory See page 18.
Ch Label See page 19.
Lock See page 20.
Setup Closed Caption See page 21.
Language You can choose from three different languages (English, French and
Video Label See page 19.
Auto Shut Off*
Reset The Reset function returns your settings to the factory settings.
Brightness
/ Contrast /
Sharpness /
Color / Tint
Color
Temperature
Backlight The Backlight feature adjusts the screen brightness for improved picture
Sports Bright and dynamic picture (factory-set)
Standard Standard picture quality (factory-set)
Movie Movie-like picture setting (factory-set)
Memory Your personal preferences (set by you; see “Picture Setting”).
Ver Position
Clock To minimize any vertical bars or stripes visible on the screen background.
Phase This must be adjusted after the frequency has been set optimize picture
Auto Adjust To adjust the all PC settings automatically.
/ SAP
On/Off If the Auto Shut Off feature is On, a station being viewed stops
You can adjust the picture quality to your preference.
Bluish (Cool) / Neutral (Standard) / Reddish (Warm)
clarity.
when you view a DVD.
To adjust the horizontal / vertical position of the image on the PC Monitor
screen. Each video standard will require a different value for this setting.
quality.
The multi-channel TV sound (MTS) feature provides high-fidelity stereo
sound. MTS also can transmit a second audio program (SAP) containing a
second language or other audio information.
When the TV receives a stereo or SAP broadcast, the word “Stereo” or
“SAP” displays on-screen every time you press DISPLAY.
listening experience.
select one of the audio language. (This function is available only for digital
broadcast.)
must select HDMI audio input source from “HDMI” or “DVI”.
Spanish) for the on-screen displays.
Select the language you prefer first, then proceed with the other menu
options.
broadcasting and the TV is not operated, the TV will automatically shut
itself off after 15 minutes.
“Picture Size”, “MTS”, “Audio Language” and “HDMI Audio” cannot be reset
by this function.
ENGLISH
NOTE:
* If there is no input signal in the HDMI or PC mode, after 1 minute Auto Shut Off will be activated.
Page 18
Memorizing channels
This TV is equipped with a channel memory
feature which allows channels to skip up or down
to the next channel set into memory, skipping
over unwanted channels. Before selecting
channels, they must be programmed into the
TV’s memory. To use this TV with an antenna, set
the Signal Type option to the Air mode. When
shipped from the factory, this menu option is in
the Cable mode.
Air/Cable selection
Select “Channel”, then press or ENTER.
1
Press or to select “Auto Ch Memory”, then
2
press or ENTER.
Press or to select “Signal Type”.
3
Press or to select “Air” or “Cable”.
4
Air - VHF/UHF channels
Cable - CABLE TV channels
Auto Ch Memory
Signal Type Cable
Automatic Search Start
The TV will begin memorizing all the channels
4
available in your area.
It may take from 15 minutes to 30 minutes to
•
complete memorizing digital cable channels.
Depending on the reception condition, a bar
display may not advance for several minutes,
please be patient.
NOTE:
•
Memorizing channels is best accomplished during
evening “PRIMETIME” hours, as more stations are
broadcasting digital signals. Memorizing channels can
only be accomplished while a station is broadcasting
a digital signal to set that channel into memory.
If you are unsure of the digital channels available
•
in your area, you may visit www.antennaweb.org to
receive a list based on your address or zip code.
Should you require further assistance you may call
our toll-free customer service line at 1-800-289-0980.
New digital channels may be added to your area
•
periodically, it is recommended to perform the
“Automatic Search” procedure regularly.
Adding Channel
If you find a new digital channel unregistered, you can
add the new channel into the channel memory.
Tune in the new channel.
1
: Adjust
: Select
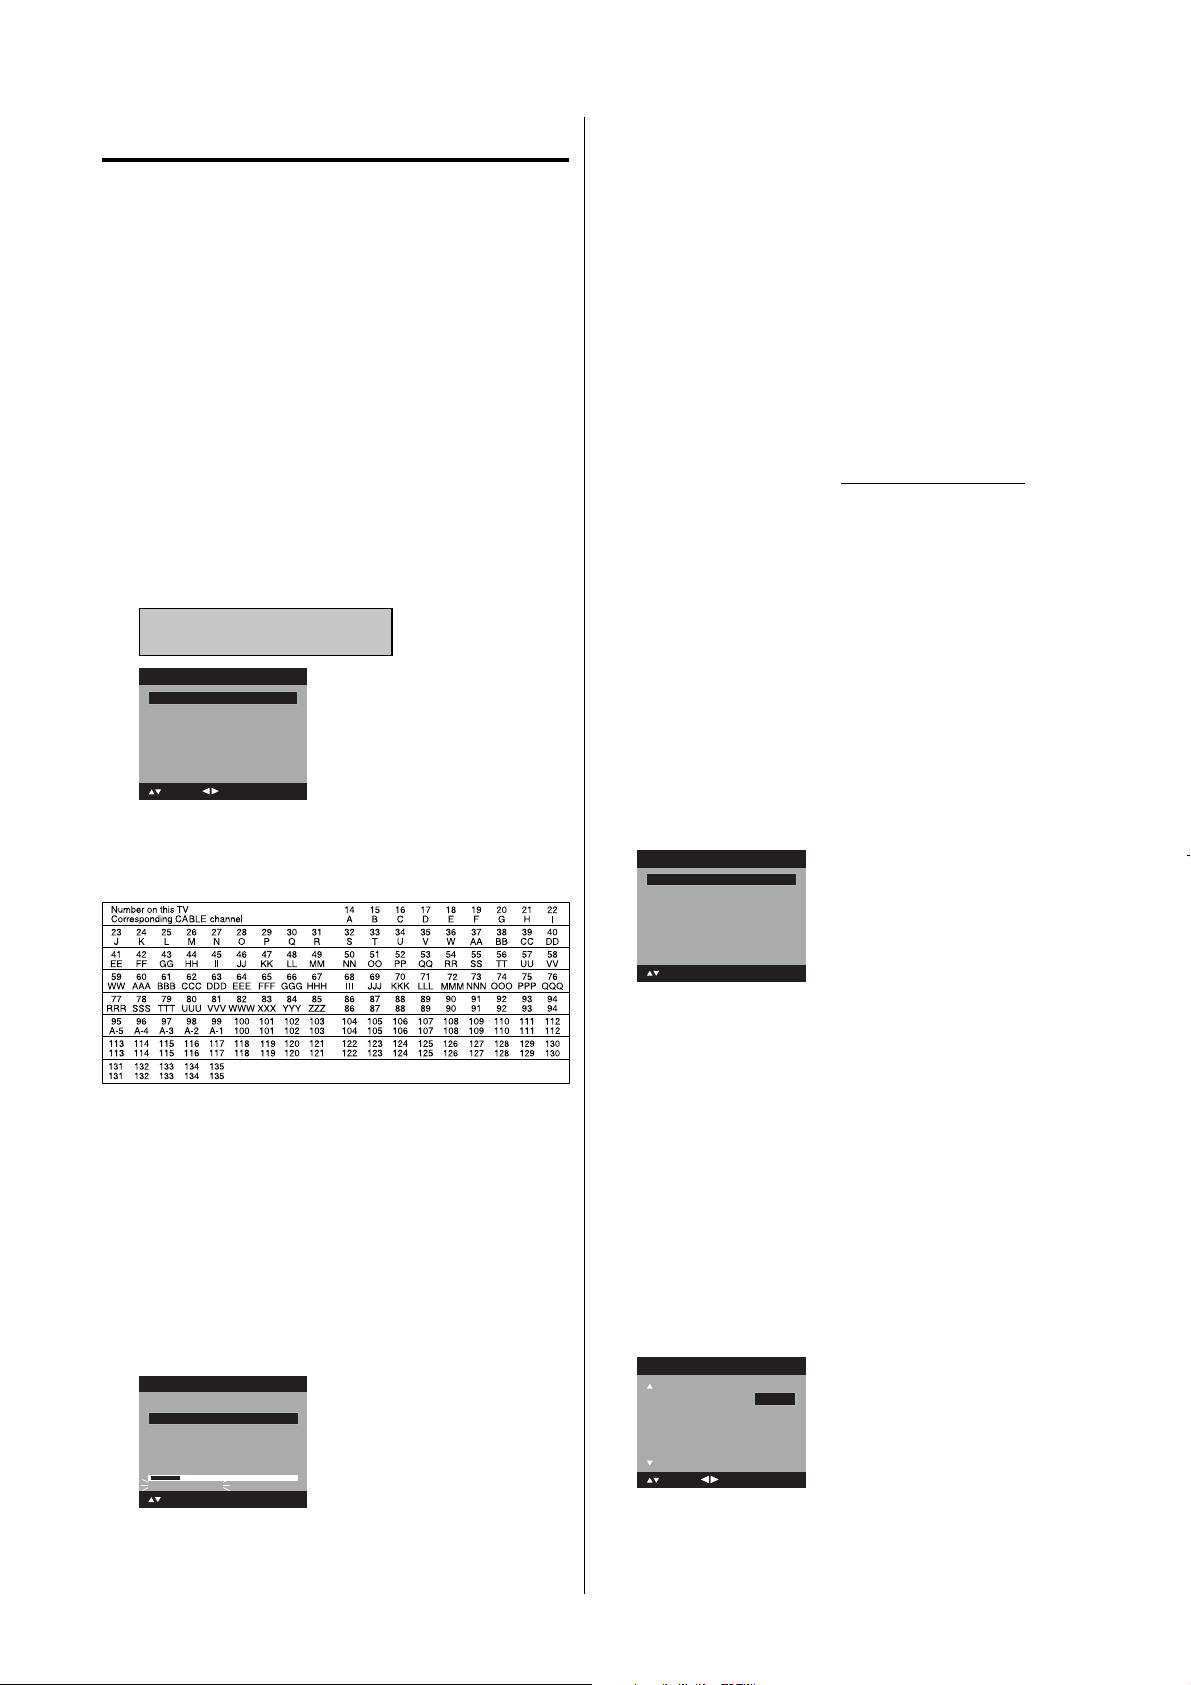
CABLE CHART
The chart below is typical of many cable system
channel allocations.
NOTE:
It may take a few seconds for a digital channel
•
picture to appear on screen after being selected.
Automatic search
Select “Channel”, then press or ENTER.
1
Press or to select
2
press or ENTER.
Press or to select “Automatic Search”, then
3
press or ENTER.
Auto Ch Memory
Signal Type Cable
Automatic Search Stop
Analog Channel Found 7
Dig tal Channel Found 5
Programming Now
: Select
ENTER:Cancel
“Auto Ch Memory”, then
Select “Channel”, then press or ENTER.
2
Press or to select “Add/Delete”, then press
3
or ENTER.
Add/Delete
Adding Channel >>
Add/Delete >>
Clear All >>
: Select ENTER:Set
Press or to select “Adding Channel”, then
4
press or ENTER. The new channel will be
added into the channel memory.
Add/Delete channel
You can select the channel that you want to skip.
Select “Channel”, then press or ENTER.
1
Press or to select “Add/Delete”, then press
2
or ENTER.
Press or to select “Add/Delete”, then press
3
or ENTER.
Press or to select the channel that you want
4
to skip.
Add/Delete
CH Signal
2 Analog
3 Analog Add
3 001 Digital Delete
3 002 Digital Add
4 Analog Delete
: Select
Press or to select “Add” or “Delete”,
5
whichever function you want to perform.
Repeat steps 4 - 5 for other channels you want to
6
add or delete.
Add
: Adjust
Page 19
Clear All
All channels are deleted from the channel memory.
Select “Channel”, then press or ENTER.
1
Press or to select “Add/Delete”, then press
2
or ENTER.
Press or to select “Clear All”, then press or
3
ENTER.
Add/Delete
Add ng Channel >>
Add/Delete >>
Clear A l >>
: Select ENTER:Set
Checking the digital
signal strength
This TV will allow you to view the digital signal
meter for digital channels.
Select “Channel”, then press or ENTER.
1
Press or to select “DTV Signal”.
2
Press or ENTER to check the Digital-signal
3
strength. The Digital-Signal strength screen will
appear. If necessary, adjust the direction of the
antenna to obtain the maximum signal strength.
DTV Signal
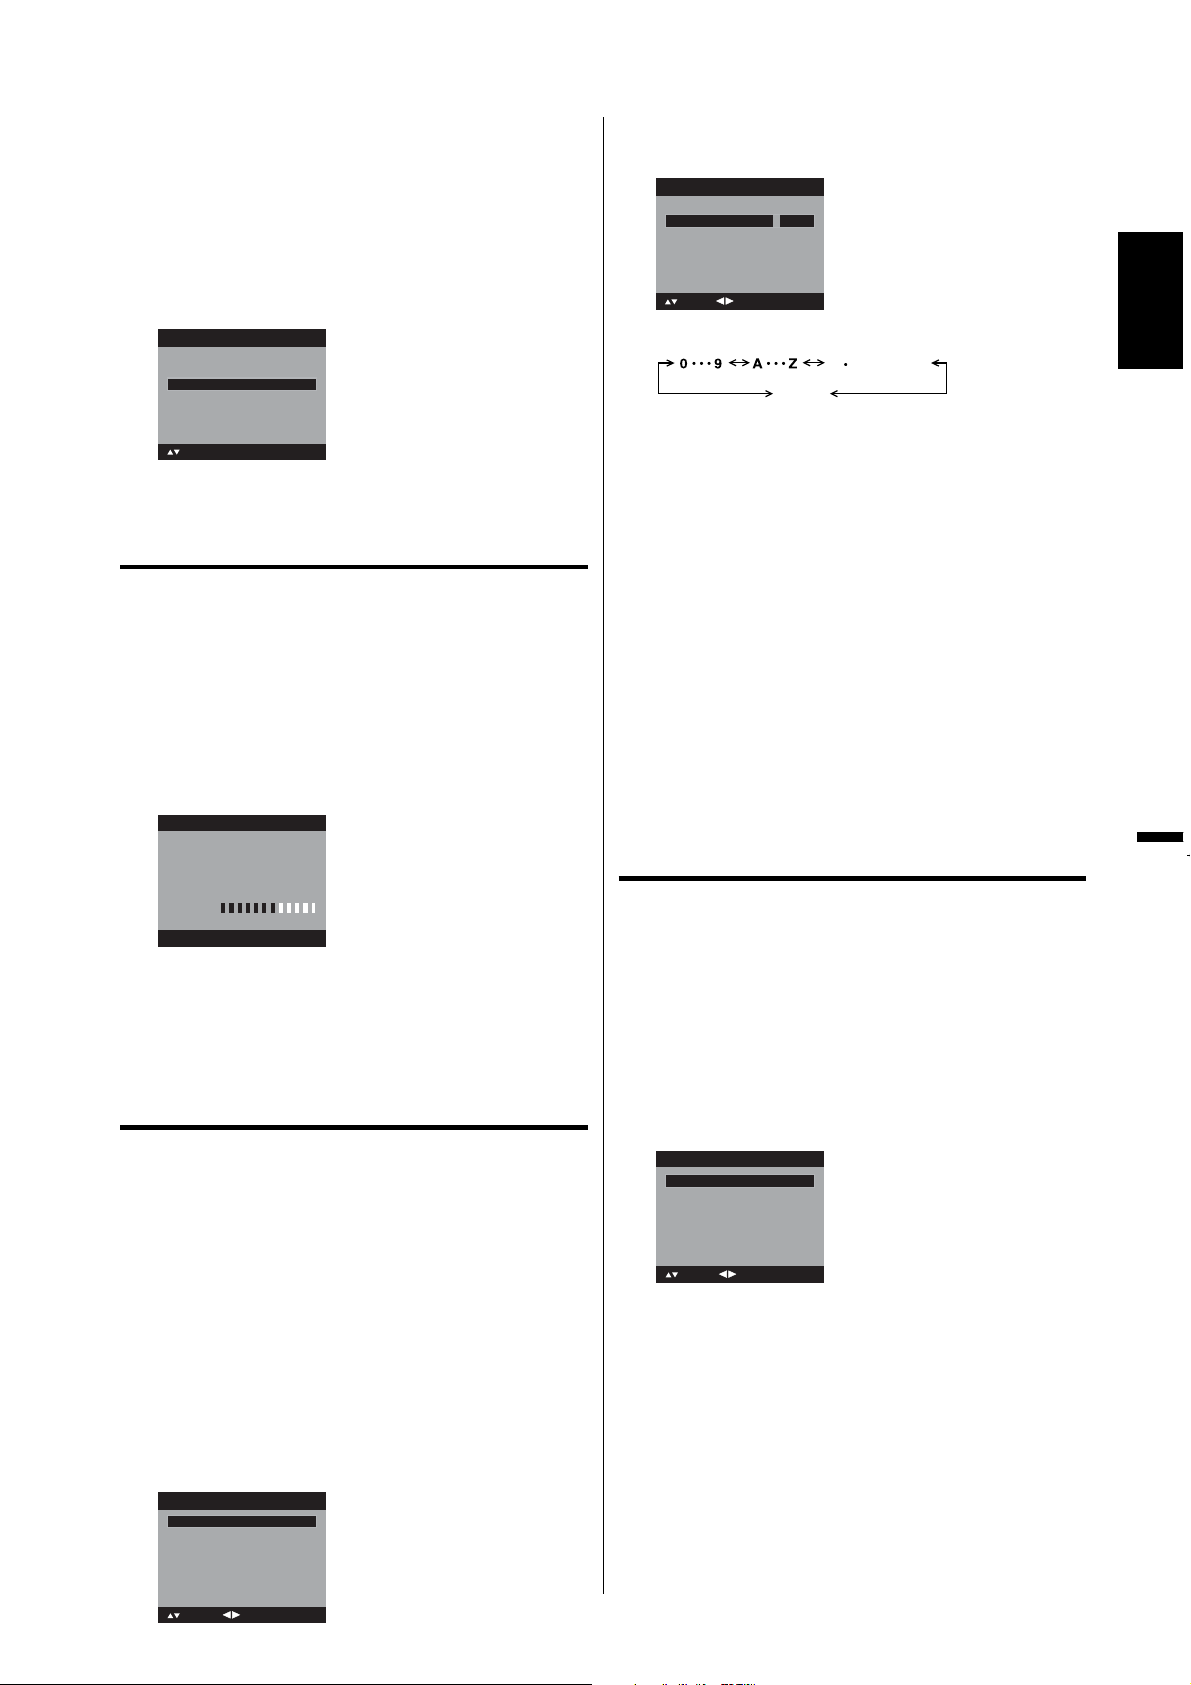
Press or repeatedly until the character you
4
want appears in the first space.
Ch Label
Channel Number 15 1
Ch Label A
Label Clear >>
: Adjust
: Select
The characters rotation as follows:
If the character which you desire appears, press
ENTER.
Repeat this step to enter the rest of the characters.
If you would like a blank space in the label name,
you must choose the empty space from the list of
characters.
When you finish inputting the label name, press
5
EXIT to return to the normal screen.
Repeat steps 3-4 for other channel. You can
6
assign a label to each channel.
ENTER:Set
SPACE
, () @ / + =
To clear a Ch Label
After step 3 above, press or to select “Label
Clear”, then press or ENTER.
NOTE:
•
The channel labels will be reset after “Automatic
Search” on page 18.
ENGLISH
0 50 100
Signal Level
NOTE:
Signal meter feature is not available for analog
•
channels.
After 240 seconds, DTV Signal screen will return to
•
normal TV-operation automatically.
Labeling channels
Channel label appear with the channel number
display each time you turn on the TV, select a
channel, or press DISPLAY.
You can choose any four characters to identify a
channel.
To create channel labels
Select “Channel”, then press or ENTER.
1
Press or to select “Ch Label”, then press
2
or ENTER.
The “Ch Label” menu will appear.
Press or to select a channel you want to
3
label, then press .
Ch Label
Channel Number 15 1
Ch Label
Label Clear >>
Labeling video inputs
The Video Label feature allows you to label each
input source for your TV.
Select “Setup”, then press or ENTER.
1
Press or to select “Video Label”, then press
2
or ENTER.
Press or to select an input which you want to
3
label.
Press or to select the desired label for that
4
input source.
Video Label
Video
Component
HDMI
: Adjust
: Select
– : Uses the default label name
VCR : Video cassette recorder
DVD : DVD video
DTV : Digital TV set-top box
SAT : Satellite box
CBL : Cable box
HD : HDMI device (only for HDMI inputs)
: Select
: Adjust
Page 20
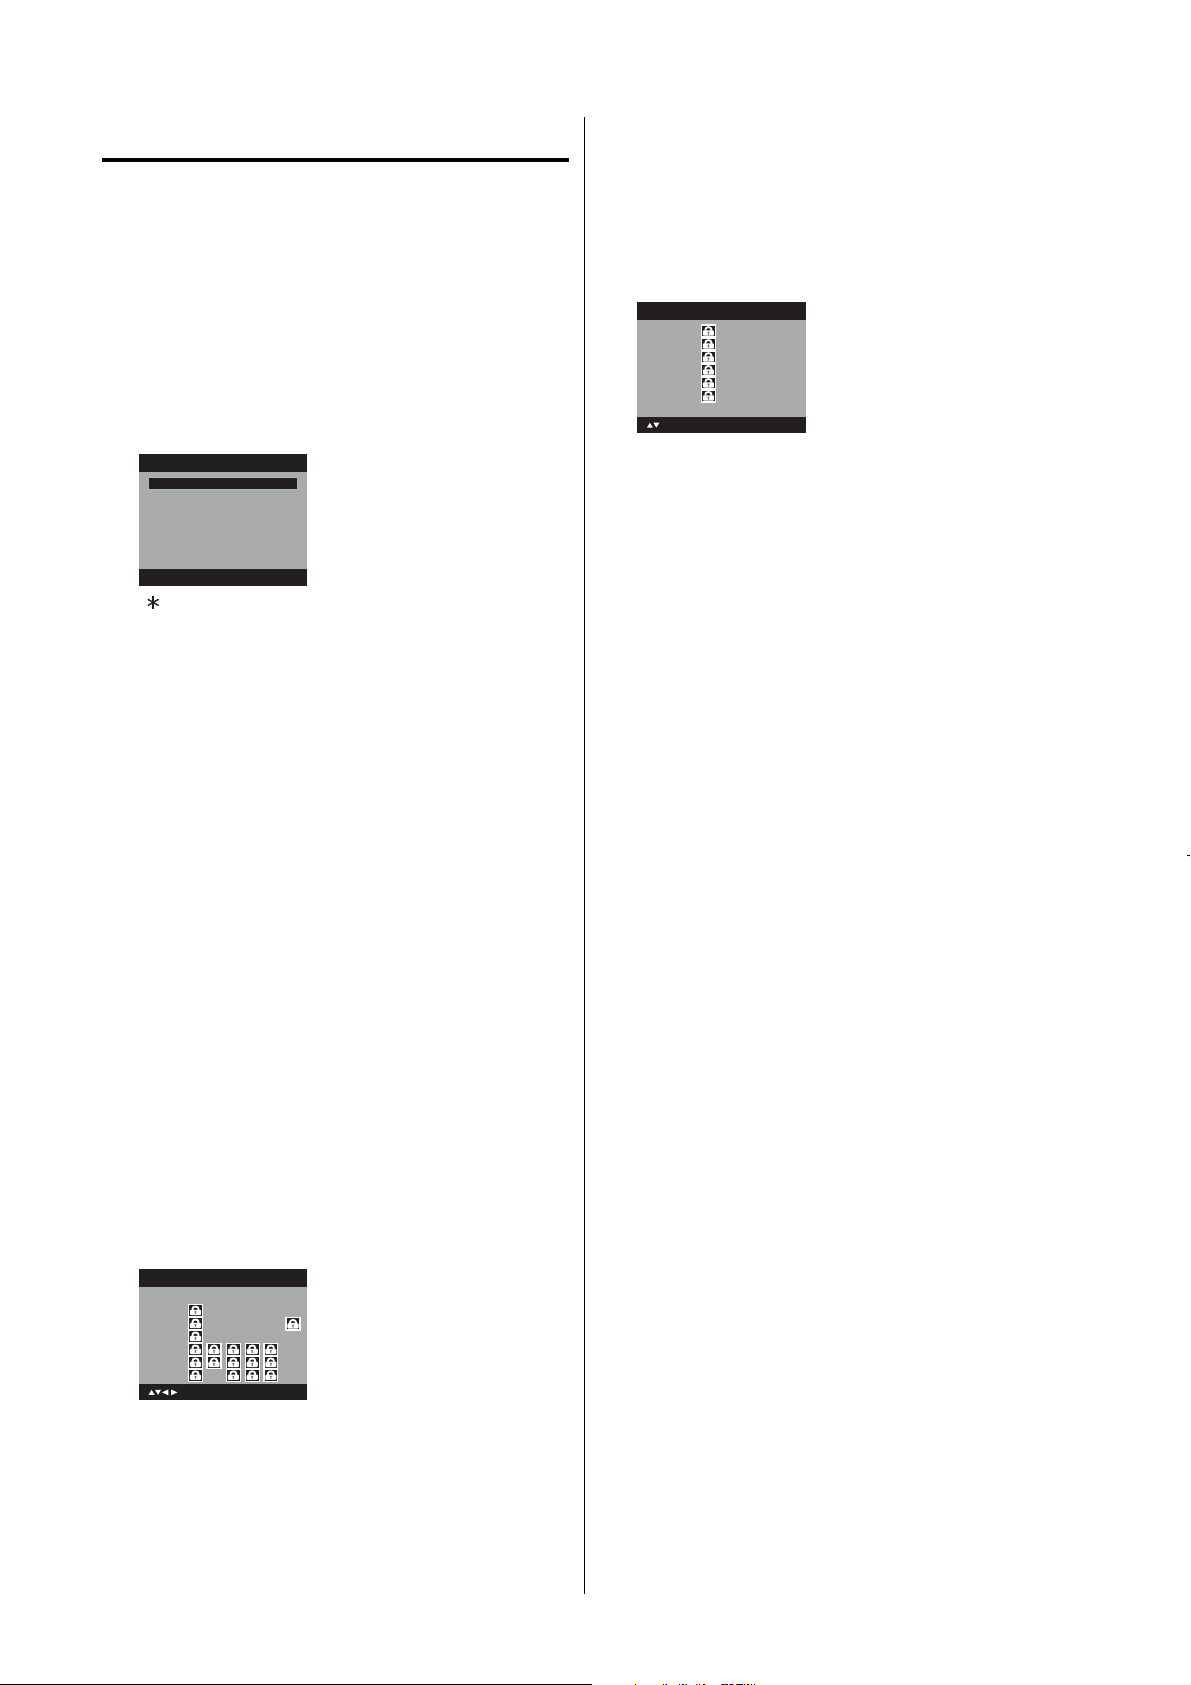
Setting the VChip
An age limitation can be set to restrict children from
viewing or hearing violent scenes or pictures that you
may choose to exclude. The restriction applies to “TV
Rating” and “Movie Rating” if this data is transmitted.
You may set this restriction separately. To use the
VChip function, you must register a password.
To register a password
Select “Lock”, then press or ENTER.
1
Select and enter your password (4 digits) using
2
Number buttons (09), then press ENTER.
Lock
New Password
[0 9]
: Select ENTER:Set
“ ” appears instead of the number.
Enter the same password again to confirm, then
3
press ENTER.
The password is now registered.
NOTE:
If you forget the password, contact Customer
•
Service at 1-800-289-0980 for assistance.
Your original remote control will be required.
To avoid forgetting the password, write it down and
•
keep in a safe place.
To set the VChip
Select “Lock” menu, then press or ENTER.
1
Use Number buttons (09) to enter your
2
password, then press ENTER. Then Lock menu
will appear.
_
* * *
Genre:
ALL : All
D : Dialogue
L : Language
S : Sex
V : Violence
FV : Fantasy Violence
Movie Rating
Movie Rating
G
PG
PG 13
R
NC 17
X
: Select
G : All ages
PG : Parental guidance
PG13 : Parental guidance
R : Under 17 years old parental guidance
NC17 : 17 years old and above
X : Adult only
Press /// to select the desired rating, then
6
press ENTER.
Press EXIT to return to the normal screen.
7
V-Chip function is activated now.
To use the TV after the TV is protected.
When a program is received that is blocked by the VChip, press MUTE, then enter your password.
The protection will be temporarily overridden. If the
TV is turned off or the channel is changed, the V-Chip
restriction will be reactivated.
NOTE:
•
The V-Chip function is activated only on programs
and input sources that include a rating signal.
ENTER:Set
less than 13 years old
suggested
To change the password
Select “Lock”, then press or ENTER.
1
Press or to select “V-Chip”, then press
3
or to select “On” .
Press or to select “V-Chip Set”, then press
4
or ENTER.
The V-Chip Set Menu appears.
Press or to select which rating will be used,
5
then press or ENTER. Each rating below will
appear.
TV Rating
TV Rating
ALL D L S V FV
TVY
TVY7
TV G
TV PG
TV 14
TV MA
: Select
You can set the rating using age level and genre.
Age:
TVY : All children
TVY7 : 7 years old and above
TVG : General audience
TVPG : Parental guidance
TV14 : 14 years old and above
TVMA : 17 years old and above
ENTER:Set
Use Number buttons (09) to enter your password,
2
then press ENTER. The Lock menu will appear.
Press or to select “Change Password”, then
3
press or ENTER.
The Change Password screen will appear.
Enter a new password using Number buttons
4
(09), then press ENTER.
Enter the same password again to confirm, then
5
press ENTER.
The password is now registered.
Downloading the additional VChip rating system
As a supplement to the standard V-Chip rating
system, your television will be able to download an
additional rating system, if such a system becomes
available in the future.
To download the additional VChip rating system
(when available)
Select “Lock”, then press or ENTER.
1
Use Number buttons (09) to enter your password,
2
then press ENTER. The Lock menu will appear.
Page 21

Press or to select “V-Chip”, then press or
3
to set “On”.
Press or to select “V-Chip Set (DTV)”, then
4
press or ENTER.
If the TV is not storing the additional rating
5
system, the TV will begin downloading it, which
may take some time to be completed.
Set your preferred content rating limits for the
6
additional rating system.
You also need “Update” procedure to update
7
rating information.
NOTE:
You can only download the additional V-Chip rating
•
system when your TV is receiving a digital signal.
When you download the additional rating system, it
•
may take some time for the download to occur.
The V-Chip rating information and system are not
•
determined or controlled by the TV.
The standard V-Chip rating system is available
•
whether your TV is receiving a digital signal or not,
and will block both analog and digital programs. To
set the restriction level using the standard V-Chip
rating system, select V-Chip Set in step 4.
The downloadable V-Chip rating system is an
•
evolving technology, and availability, content, and
format may vary.
You cannot select this feature if the TV is not
•
receiving a digital signal for the current station.
To clear the all VChip settings
Select “Lock”, then press or ENTER.
1
Use Number buttons (09) to enter your password,
2
then press ENTER. The Lock menu will appear.
Press or to select “V-Chip Clear”, then press
3
or ENTER.
The Password screen will appear.
Use Number buttons (09) to enter your
4
password, then press ENTER. All your settings
return to the factory settings.
Closed Caption
WHAT IS CLOSED CAPTIONING?
This television has the capability to decode and
display Closed Captioned television programs. Closed
Captioning will display text on the screen for hearing
impaired viewers or it will translate and display text in
another language.
Captions: This Closed Caption Mode will display
text on the screen in English or another language.
Generally, Closed Captions in English are transmitted
on C1 and Closed Captions in other languages are
transmitted on C2.
Text: The Text Closed Caption Mode will usually fill
1/2 of the screen with a programming schedule or
other information.
Select “Setup”, then press or ENTER.
1
Press or to select “Closed Caption”, then
2
press or ENTER.
The Closed Caption menu will appear.
Press or to set “CC Setting” to “On”.
3
On: Captions will be displayed on the screen.
Off: Captions will not be displayed on the screen.
Press or to select “Analog Caption” or “Digital
4
Caption”.
When you select “Analog Caption”, you can
choose C1, C2, C3, C4, T1, T2, T3 and T4.
When you select “Digital Caption”, you can
choose from CS1, CS2, CS3, CS4, CS5 and CS6.
Press or to select the desired Closed
5
Caption mode for both Digital and Analog Caption.
Press or to select “CC Priority”, then press
6
or to select “Digital CC” or “Analog CC”.
NOTE:
Depending on the broadcast signal, some
•
Analog Captions will function with a Digital
broadcast signal. This step prevent that two
kind of captions are overlapping.
NOTE:
•
If the program or video you selected is not closedcaptioned, no captions will display on-screen.
If text is not available in your viewing area, a black rectangle may
•
appear on-screen. If this happens, set the CC Setting to “Off”
•
When selecting Closed Captions, the captioning will
be delayed approx. 10 seconds.
If no caption signal is received, no captions will appear,
•
but the television will remain in the Caption Mode.
Misspellings or unusual characters may
•
occasionally appear during Closed Captioning.
This is normal with Closed Captioning, especially
with live programs. This is because during live
programs, captions are also entered live. These
transmissions do not allow time for editing.
•
When Captions are being displayed, on-screen
displays, such as volume and mute may be seen
but may interfere with Closed Captions.
•
Some cable systems and copy protection systems
may interfere with the Closed Captioned signal.
•
If using an indoor antenna or if TV reception is
very poor, the Closed Caption Decoder may not
appear or may appear with strange characters or
misspelled words. In this case, adjust the antenna
for better reception or use an outdoor antenna.
.
CC advanced
When you have selected Custom as the display
method, you can adjust the various setting listed
below as follows:
This feature is designed to customize Digital Captions
only.
Select “Setup”, then press or ENTER.
1
Press or to select “Closed Caption”, then
2
press or ENTER.
The Closed Caption menu will appear.
Press or to set “CC Setting” to “On”.
3
ENGLISH
Page 22
Press or to select “Digital CC Preset”, then
4
press or to select “Custom”.
Press or to select “CC Advanced”, then
5
press or ENTER.
The CC Advanced menu will appear.
Press or to select the desired item, then
6
press or to change the setting.
CC Advanced
Text Size Auto
Text Type Auto
Text Edge Auto
Text Color Auto
Text Opacity Auto
Background Color Auto
Background Opacity Auto
: Select
: Adjust
You can select from among the following items
and parameters.
Text Size: Auto, Small, Standard, Large
Text Type: Auto, Style1, Style2, Style3, Style4,
Style5, Style6, Style7
Text Edge: Auto, None, Raised, Depressed,
Uniform, Left Shadow, Right
Shadow
Text Color: Auto, Black, White, Red, Green,
Blue, Yellow, Magenta, Cyan
Text Opacity: Auto, Solid, Transparent,
Translucent, Flashing
Background
Color:
Background
Opacity:
Auto, Black, White, Red, Green,
Blue, Yellow, Magenta, Cyan
Auto, Solid, Transparent,
Translucent, Flashing
NOTE:
•
You cannot set both “Text Color” and “Background
Color” as a same color.
•
You cannot set both “Text Opacity” and “Background
Opacity” to “Transparent”.
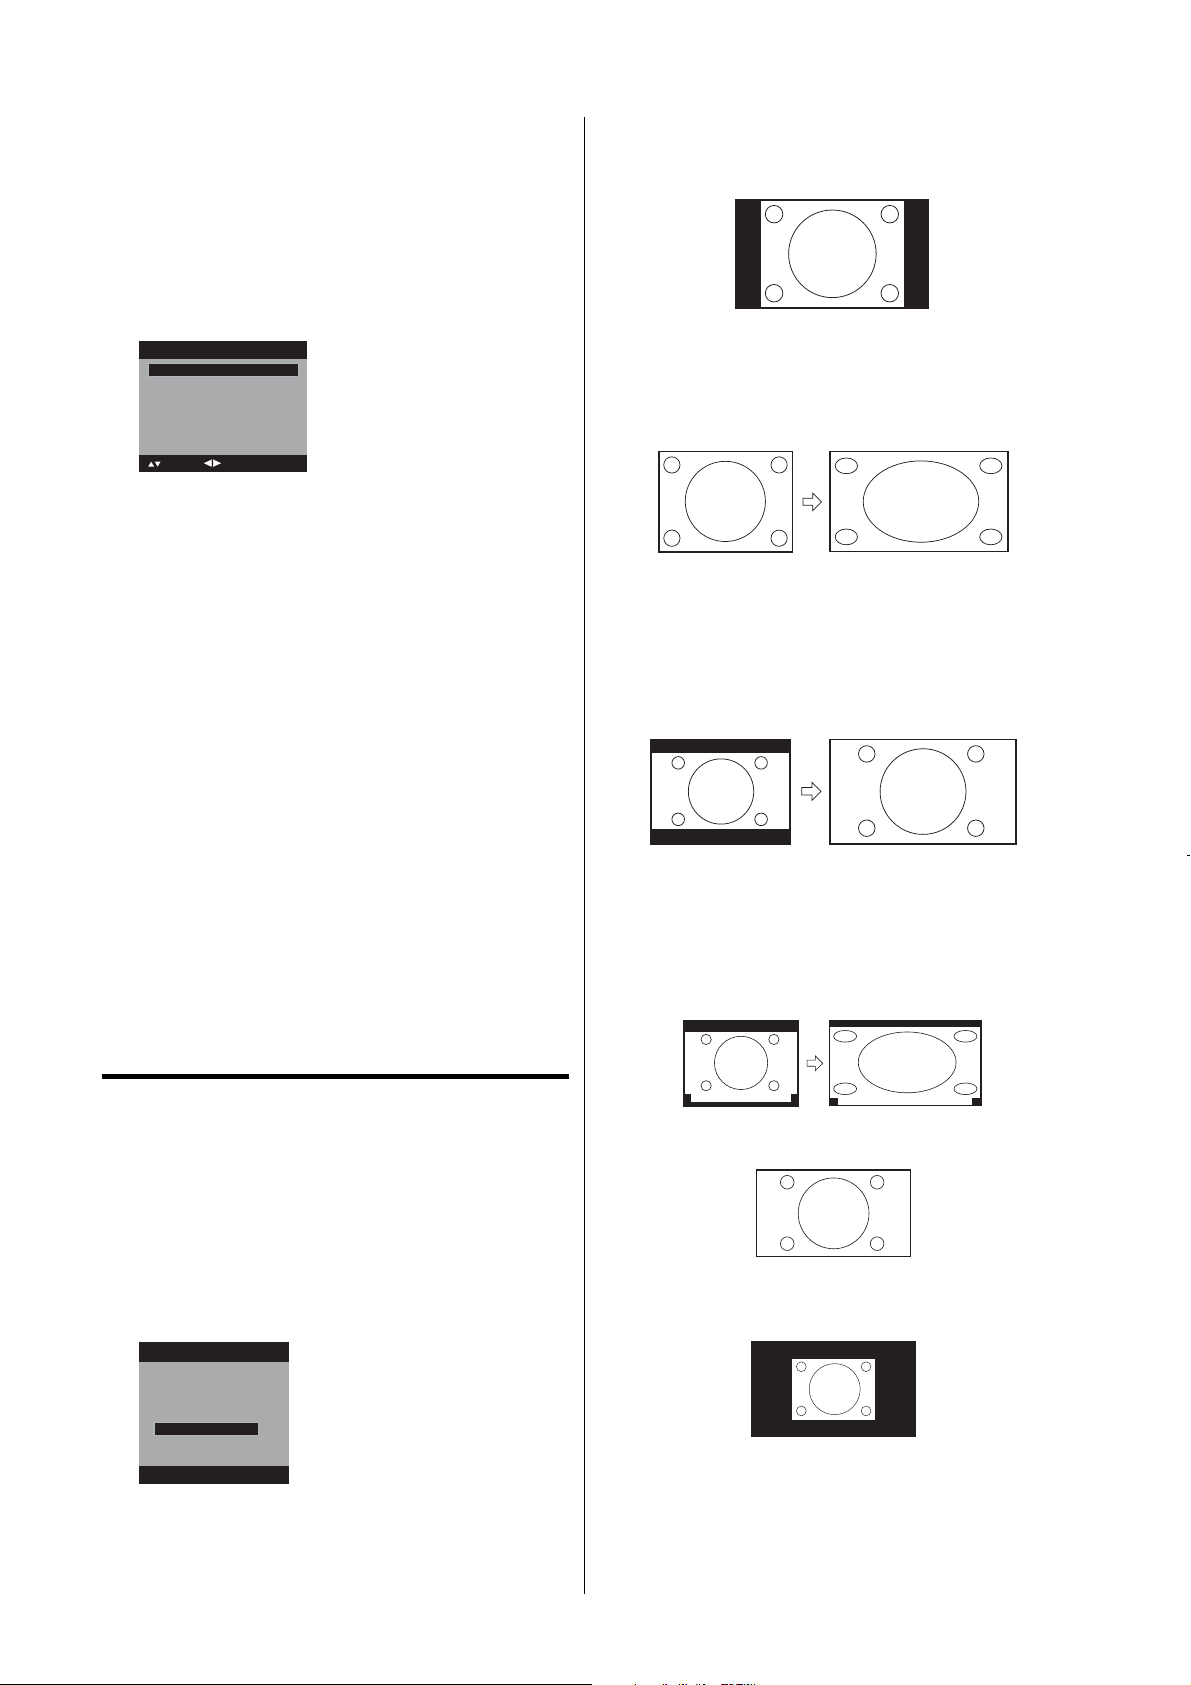
Natural
In some cases, this image will display the size of
standard 4:3 with a black side bar.
Cinema Wide1 (for 4:3 format programs)
To fill the screen, the right and left edges are
extended, however; the center of the picture remains
near its former ratio.
The top and bottom edges of the picture may be hidden.
Cinema Wide2 (for letter box programs with
subtitles)
To fill the width of the screen, it is extended
horizontally. However; it is only slightly extended at the
top and the bottom.
The top and bottom edges of the picture may be hidden.
Cinema Wide3 (for letter box programs with
subtitles)
To fill the width of the screen, it is extended
horizontally. However; it is only slightly extended at the
top and the bottom.
The top and bottom edges of the picture may be hidden.
Setting the picture size
You can view 480i and 480p format programs in a
variety of picture sizes— Natural, Cinema Wide1,
Cinema Wide2, Cinema Wide 3, Full and Native.
Selecting the picture size
Select “Picture”, then press or ENTER.
1
Press or to select “Picture Size”, then press
2
or ENTER to display Picture Size menu. Press
/ or corresponding Number buttons (04)
select the desired picture size, as described below.
Picture Size
0.Natural
1.Cinema Wide1
2.Cinema Wide2
3.Cinema Wide3
4.Full
[0 4]:Select
NOTE:
Selectable picture sizes may vary depending on the
•
input source or broadcast signal.
Picture Size menu also can be displayed by
•
pressing SCREEN SIZE on the remote control.
to
A B C D E F G
A B C D E F G
Full (for 16:9 source programs)
Full will display the picture at the maximum size.
Native (for PC mode only)
Detects the resolution of the signal of the image and it
will be shown on the screen with same amount of pixels.
NOTE:
Some High Definition and/or Digital broadcasts may not
•
allow you to change the picture size.
•
In COMPONENT mode with a scanning rate of 720p
or 1080i, only the Cinema Wide2 and Full picture size
feature is available.
•
In PC Mode, only the Natural, Full and Native picture size
features are available. In PC Mode (WXGA), only the Full
and Native picture size features are available.
Page 23

Preparation
Playback procedure
The following pages describe the setup/
operation in DVD mode.
Preparation
Before DVD/CD operation, please make the following
preparations.
Insert the AC cord plug into a standard 120V
1
60Hz polarized AC outlet.
•
If the AC cord plug is plugged in for the first
time, wait for about 5 seconds before pressing
POWER.
NOTE:
•
When connecting to other equipment, unplug
the unit from the AC outlet.
Press POWER on the unit or on the remote
2
control to turn on the unit. The POWER indicator
will change to green.
Each time you turn the unit ON, the TV/DVD
•
starts from the TV mode.
When using an amplifier, switch on the amplifier.
•
Press TV/DVD to select DVD mode.
3
The DVD startup screen will appear on the screen.
NOTE:
If the unit does not operate properly:
•
Static electricity, etc., may affect the player’s
operation. Disconnect the AC power cord once,
then connect it again.
About inserting disc:
•
If the unit is slanted or moved while inserting disc,
the disc may get damage.
Status display of disc
Press DISPLAY. The status display of the disc will
appear on the screen.
DISC OPERATION
TITLE NO.
ANGLE NO.
To make the status display screen disappear, press
DISPLAY again.
DVD 00:15:25 01:41:39
Title 1/3 Chapter2/24
1/1 Eng Dolby Digital 1/2 Eng
1/1
AUDIO LANGUAGE
ELAPSED TIME TOTAL TIME
SUBTITLE LANGUAGE
A KIND OF AUDIO
CHAPTER
NO.
Press TV/DVD to select DVD mode.
1
Place the disc in the
2
disc slot with the label
side facing forward. (If
the disc has a label.)
Hold the disc without
touching either of its
surfaces, align it with
the guides, and place it
in position.
On the screen, “ ” changes to “Reading” and
3
then playback will commence.
•
A menu screen may appear on the TV screen,
if the disc has a menu feature. In this case,
press , , , or ENTER to operate a menu
feature.
Reading
Press STOP to end playback.
4
•
The unit memorizes the stopped point,
depending on the disc. “
screen. Press PLAY to resume playback (from
the scene point).
•
If you press STOP again (“
screen) or unload the disc, the unit will clear the
stopped point.
Press (EJECT).
5
Remove the disc and then press POWER.
The unit turns off.
When you eject the disc, you may hear
mechanism noise, but it is not malfunction.
NOTE:
•
If a non-compatible disc is loaded, “Incorrect Disc”,
“Region Code Error” or “Parental Error” will appear
on the TV screen according to the type of loaded
disc. If these appear, check your disc again (see
pages 9 and 30).
Some discs may take a minute or so to start
•
playback.
If an 8 cm disc is placed into the disc slot and
•
picture playback or menu display does not begin
automatically, press PLAY.
A “Prohibition” symbol “
•
right of the screen. This symbol means either the
feature you tried is not available on the disc, or the
unit cannot access the feature at this time. This
does not indicate a problem with the unit.
•
If you place a single-faced disc label backwards (i.e.
the wrong way) “Reading” will appear in the display
and then “Incorrect Disc” will be displayed.
Some playback operations of DVDs may be
•
intentionally fixed by software producers. Since
this unit plays DVDs according to the disc content
recorded, some playback features may not be
available. Also refer to the instructions supplied with
the DVDs.
” appears on the
” appears on the
” may appear at the upper
ENGLISH
Page 24

Special playback
MP3/WMA/JPEG and
Fast Forward Playback
Press SEARCH during normal playback.
Each press of SEARCH
search
(CD: (x 2), (x 4), (x 8), (x 20))
•
To resume normal playback, press PLAY.
(x 2), (x 4), (x 8), (x 15).
will increase the speed of the
Review Playback
Press SEARCH during normal playback.
Each press of SEARCH
of the search
(x 15).
(CD:
•
(x 2), (x 4), (x 8), (x 20))
To resume normal playback, press PLAY.
(x 2), (x 4), (x 8),
will increase the speed
Still Playback
Press PAUSE/STILL during normal playback to pause
playback.
To resume normal playback, press PLAY.
•
Frame Advance
Press PAUSE/STILL during still playback.
One frame is advanced each time you press PAUSE/
STILL.
•
To resume normal playback, press PLAY.
Slowmotion Playback
Press SLOW
during
normal playback or still playback.
Each press of
slow x1/2, x1/4, x1/6, x1/7.
To resume normal playback, press PLAY.
•
To resume the still playback, press PAUSE/STILL.
•
Reverse or SLOW
SLOW
will change the speed of the
Forward
Locating a chapter or track
Press SKIP Forward or SKIP Reverse during
playback to locate a chapter that you want to watch.
Each time you press the button, a chapter or track is
skipped.
NOTE:
The unit is capable of holding a still video image or
•
On screen display image on your television screen
indefinitely. If you leave the still video image or On
screen display image displayed on your TV for
an extended period of time, you risk permanent
damage to your television screen.
There may be a slight delay between when you
•
press the button and the function activating.
Audio CD playback
This player can play back MP3/WMA/JPEGdata
which has been recorded on CDR or CDRW.
To produce MP3/WMA/JPEGdata, you need a
WindowsPC with CDROM drive and MP3/WMA/
JPEGencoding software (not supplied).
The AppleHFSSystem cannot be played.
MP3/WMA/JPEG CD information
Limitations on MP3/WMA/JPEG CD playback
MP3/WMA/JPEG CD is the disc that is
•
standardized by ISO9660, its file name must
include 3-digit extension letters, “mp3”, “wma”, “jpg”.
The directory and file names of MP3/WMA/JPEG
•
CD must correspond to ISO standardized files.
This unit can read 2000 files per disc. If one
•
directory has more than 2000 files, it reads up to
2000 files, the remaining files will be omitted.
MP3/WMA CDs cannot be used for playback for the
•
purpose of recording.
It may take more than one minute for this unit
•
to read MP3/WMA/JPEG files depending on its
structure.
Music recorded by “Joliet Recording Specification”
•
can be played back.
The music files recorded by “Hierarchical File
•
System” (HFS) cannot be played.
The unit can play back baseline and progressive
•
JPEG files.
Limitations on display
The maximum number for display is 15 characters.
•
Long file names will be condensed.
Available letters for display are the following:
•
capital or lowercase letters A through Z, numbers 0
through 9, and (underscore).
Other letters than those above are replaced by a
•
hyphen.
Notes on MP3/WMA/JPEG files
To play back MP3/WMA/JPEG CD in the recorded
order,
Use MP3/WMA/JPEG software that records data
1.
alphabetically or numerically.
Name each file including a two-digit or three-digit
2.
number (e.g. “01” “02” or “001” “002”).
Refrain from making too many sub-folders.
3.
CAUTION:
Some MP3/WMA/JPEG CDs cannot be played
•
back depending on the recording conditions.
The CD-R/RW that has no music data or non-MP3/
•
WMA/JPEG files cannot be played back.
MP3/WMA/JPEG CD and Audio CD
playback:
Load a MP3/WMA/JPEG CD or an Audio CD in
1
the disc slot.
“Reading” will appear on the TV screen. Reading
2
time will depend on the number of files on the disc.
A file browser screen will appear on the TV screen.
3
Page 25

Operation status
File number
Elapsed time
Selected file name
JPEG playback:
1/15 00:00:00
/MP3-5.MP3
MP3-5
MP3-6
File list
In case the current directory includes 9 files or
•
WMA-11
WMA-12
Picture-1
Picture-2
Picture-3
Picture-4
File type
: Indicates Music file (Audio CD/MP3/WMA)
: Indicates Picture file (JPEG)
Select Files
Repeat :Off
Mode :Off
Music Playing
Preview windowCursor
more, press or to scroll in the file list.
To see contents in folder, select the folder and
•
then press ENTER. To return to the parent
directory, select “
Go Up ...” then press
ENTER.
In case of a CD containing a mixture of MP3,
•
WMA and JPEG files, the files are played back
by selecting them from the file browser.
Press or to select the desired file.
4
When PLAY is pressed after displaying file
browser displayed, playback begins automatically
starting from the first file.
In this case, if the first file is an MP3/WMA file,
only MP3/WMA files are played back in order. If
the first file is a JPEG file, the first JPEG file is
played back. If there is no file at a root directory,
playback does not begin automatically.
/MP3 2 MP3
Folder-1
Folder-2
MP3-1
MP3-2
MP3-3
WMA-1
WMA-2
WMA-3
Select Files
Repeat Off
Mode Off
JPEG Preview
Tool kit
window
In the file browser, press/ to select the desired
1
JPEG file.
To display a thumbnail list, press DVD MENU.
Press /// to select the desired file.
(To return to the file browser, press TOP MENU.)
/Picture 01 JPG
Picture-01
Picture-02
Picture-03
Picture-04
Picture-05
Picture-06
Picture-07
Picture-08
Press ENTER or PLAY.
2
Select Files
Repeat Off
Mode Off
W 2048 H 1536
The selected picture appears on the TV screen.
Rotating an image
You can rotate an image by 90 degrees.
Press ANGLE during playback of the image.
“
”, “ ”, “ ” or “ ” appears on the screen.
Zooming an image
Zoom function also can be used in viewing JPEG
files.
Press ZOOM (See “Zooming” on page 26).
Press STOP to end playback.
3
The file browser appears on the TV screen.
If you want to watch the other file, repeat steps 1-2.
Select Files
The file type to make it display in the file browser can
be chosen.
Press / to select “Select Files” at right column
1
in the file browser.
Press ENTER, then press / to select file
•
type from the list (Music or Picture).
Press ENTER to add/remove check mark.
2
Checked file type will be displayed in the file browser.
Press RETURN to save the setting.
3
ENGLISH
Press ENTER.
5
The selected file starts playing back.
Press STOP to end playback.
6
The unit records the stopped point. “
•
appears on the screen. Press PLAY to resume
playback (from the scene point).
If you press STOP again or unload the disc, the
•
unit will clear the stopped point.
NOTE:
During MP3/WMA/JPEG-Playback, you cannot
•
use JUMP and A-B Repeat functions.
You can use Program playback, Repeat (Track
•
or All) and Random functions for MP3/WMA/
JPEG and Audio CD Playback (see pages 25
and 26).
Program playback CD
”
You can arrange the order of tracks on the disc.
In the file browser, press /// to select “Edit
1
Mode”, then press ENTER.
When “Edit Mode” is black color, you can mark
the files which you want to add into Program list.
Folder-1
Folder-2
MP3-1
MP3-2
MP3-3
WMA-1
WMA-2
WMA-3
Press /// to select the file you want to add
2
Repeat Off
Mode Off
Edit Mode
JPEG Preview
into the program list.
Press ENTER. Selected file was marked.
Repeat this procedure to select the other files.
Page 26

Press /// to select “Add To Program”.
y
3
Then press ENTER. All marked files are added
into the program list.
When you finish storing the files you want into the
Program list, select “Edit Mode” again and press
ENTER to release edit mode.
Press / to select “Program View”, then
4
press ENTER. Program View shows only the
programmed files that you have added in Step 2.
Folder 1
Folder 2
MP3 1
MP3 2
MP3 3
WMA 1
WMA 2
WMA 3
In the Program View, press PLAY. The files start
5
Edit Mode
Program View
Add To Program
JPEG Preview
MP3 1
MP3 2
MP3 3
WMA 3
Edit Mode
Browser View
Clear Program
JPEG Preview
to playback in programmed order that were
added by you.
To remove file from program list in stop mode
In the Edit Mode, switch to Program View. Select the
files you want to remove, then press ENTER. Select
“Clear Program” and press ENTER. Marked file is
removed from program list.
NOTE:
The program is canceled when you eject the disc or
•
turn the power off.
Repeat playback CD
In the file browser, press /// to select
1
“Repeat”.
Press ENTER repeatedly to select “Track” or “All”.
2
Folder-1
Folder-2
MP3-1
MP3-2
MP3-3
WMA-1
WMA-2
WMA-3
Select Files
Repeat Track
Mode Off
JPEG Preview
Random playback (CD)
In the file browser, press /// to select
1
“Mode”.
Press ENTER to select “Random”.
2
Press PLAY.
3
Folder-1
Folder-2
MP3-1
MP3-2
MP3-3
WMA-1
WMA-2
WMA-3
Select Files
Repeat Off
Mode Random
JPEG Preview
The Random playback will start.
To resume normal playback, select Mode : “Off”
in step 2.
Zooming
This unit will allow you to zoom in on the
frame image. You can then make selections by
switching the position of the frame.
Press ZOOM during playback.
1
The center part of the image will be zoomed in.
Each press of ZOOM will change the ZOOM
magnification
(x 2.0).
Press /// to view a different part of the frame.
2
You may move the frame from the center position
UP, DOWN, LEFT or RIGHT.
In the zoom mode press ZOOM repeatedly to
3
return to a 1:1 view (
NOTE:
•
You can select the Pause, Slow or Search playback
in the zoom mode.
•
Some discs may not respond to zoom feature.
1 (x 1.3), 2 (x 1.5) and 3
Off).
Press PLAY.
3
The unit automatically starts repeat playback
after finishing the current track.
To resume normal playback, select Repeat : “Off”
in step 2.
NOTE:
•
The repeat or random function is canceled when
you eject the disc or turn the power off.
•
The track repeat function is canceled when SKIP
or is pressed.
In case of Audio CD, the function of A-B Repeat
•
also can be used (See “A-B Repeat Playback” on
page 27).
Locating desired scene
Use the title, chapter and time recorded on the
disc to locate the desired point to play back.
Press JUMP during playback or stop mode.
1
Jump
Title
Chapter
Time
Press or to select the “Title”, “Chapter” or “Time”.
2
Press Number buttons (09) to input the
3
number.
If you input a wrong number, press CANCEL.
•
Refer to the package supplied with the disc to
•
check the numbers.
Press ENTER.
4
Playback starts.
•
When you change the title, playback starts from
•
Chapter 1 of the selected title.
Some discs ma
•
not work in the above operation.
Page 27

Repeat playback
Title, Chapter Playback:
Press PLAY MODE during playback or stop
1
mode.
Press ENTER repeatedly to select “Chapter” or
2
“Title”.
The unit automatically starts repeat playback
after finishing the current title or chapter.
If you set the repeat mode during stop mode,
•
press PLAY to start Repeat playback.
Repeat : Off
Play Mode
Marker 1
Marker 2
Marker 3
Up to 3 scenes can be selected.
•
Repeat this procedure to set the other 2
•
scenes.
Press MARKER to remove this display.
3
Returning to the scenes:
Press MARKER during playback or stop mode.
1
Press or to select the Marker 1-3.
2
00 27 54
ENGLISH
Press PLAY MODE again to make the screen
3
disappear.
In stop mode, press PLAY to start Repeat
•
playback.
To resume normal playback, select Repeat
•
“Off” in step 2.
AB Repeat Playback:
A-B repeat playback allows you to repeat material
between two selected points.
Press REPEAT AB during playback.
1
The start point is selected.
A
Press REPEAT AB again.
2
The end point is selected. Playback starts at the
point that you selected. Playback stops at the end
point, returns to Point A automatically, then starts
again.
To resume normal playback press REPEAT AB
3
again.
“
NOTE:
Some discs may not work with the repeat operation.
•
In A-B repeat mode, subtitles near point A or B may
•
not appear.
During the A-B Repeat Playback the ANGLE
•
feature will not operate.
You may not be able to set A-B Repeat, depending
•
on the scenes of the DVD.
A-B Repeat does not work with an interactive DVD,
•
MP3/WMA/JPEG-CD.
” appears on the screen.
Off
Marker 1
Marker 2
Marker 3
Press ENTER.
3
Playback starts from the marked scene.
To cancel the mark:
Press MARKER during playback or stop mode.
1
Press or to select the Marker 1-3.
2
Press CANCEL.
3
Press MARKER to remove this display.
NOTE:
The marking is canceled when you eject the disc or
•
turn the power off.
Some subtitles recorded around the marker may fail
•
to appear. [DVD]
00 27 54
01 16 25
02 08 31
Changing soundtrack language
You can select the language when you play a
multilingual disc.
Press AUDIO during playback.
1
The current soundtrack language will appear.
1/2 Eng Dolby Digital
Marking desired scenes
The TV/DVD stores the points that you want to
watch again. You can resume playback from that
scene.
Marking the scenes:
Press MARKER during playback.
1
Select the blank Marker using or , then press
2
ENTER at the desired scene.
Press AUDIO repeatedly until the desired
2
language is selected.
The on-screen display will disappear after a few
seconds.
NOTE:
If the desired language is not heard after pressing
•
AUDIO several times, the language is not recorded
on the disc.
•
Changing soundtrack language is canceled when
you eject the disc.
The initial default language or available language
will be heard if the disc is played back again.
Page 28

Subtitles
Turning the subtitles on and off
When playing back a disc recorded with subtitles, you
can turn the subtitles on or off.
Press SUBTITLE during playback until “Off” appears.
Off
Press / or / to select the desired title.
2
Press ENTER or PLAY.
3
The playback of the selected title will start.
NOTE:
Depending on the DVD, you may not be able to
•
select the title. Depending on the DVD, a “title
menu” may simply be called a “menu” or “title” in the
instructions supplied with the disc.
DVD menu
Changing the subtitle language
You can select the language when playing back a disc
recorded with multilingual subtitles.
Press SUBTITLE repeatedly during playback
1
until your desired language appears.
1/5 Eng
The on-screen display will disappear after a few
2
seconds.
NOTE:
Changing subtitle language is canceled when you
•
eject the disc.
Some functions may not work on some DVDs. You
•
may not be able to turn subtitles on or off or change
subtitles. While playing the DVD, the subtitle may
change when:
- you eject the disc.
- you change the title.
In some cases, the subtitle language is not changed
•
to the selected one immediately.
Some DVDs allow you to select the disc contents
using the menu.
When you playback these DVDs, you can select
the subtitle language and soundtrack language,
etc. using the DVD menu.
Press DVD MENU during playback.
1
The DVD menu appears on the screen.
Press DVD MENU again to resume playback at
•
the scene when you pressed DVD MENU.
Press / or / to select the desired item.
2
Press ENTER.
3
The menu continues to another screen. Repeat
steps 2 and 3 to set additional items if any.
NOTE:
DVD menu functions may not work on some DVDs.•
Quick guide for DVD
menu operation
example: Setting the language.
Changing angles
When playing back a disc recorded with multi
angle facility, you can change the view angle.
Press ANGLE during playback.
1
The current angle will appear.
Press ANGLE repeatedly until the desired angle
2
is selected.
NOTE:
Depending on the DVD, you may not be able to
•
change the angles even if multi-angles are recorded
on the DVD.
Title selection
Two or more titles are recorded on some discs.
If the title menu is recorded on the disc, you can
select the desired title.
Press TOP MENU during playback.
1
Title menu appears on the screen.
Press SETUP/TV MENU in the stop mode.
1
Press or to select
or ENTER.
Press or to select desired option, then press
2
or ENTER.
Press or to select your desired language
3
(e.g. English), then press ENTER.
Menu
Subtitle
Audio
Press SETUP/TV MENU to remove the menu
4
screen.
English
Francais
Espanol
Other
option, then press /
Page 29

Function Setup
Icon Setting item Description
Language
*1
Picture TV Screen
Audio
Setup
*1
Menu
Subtitle
Audio
*1
*1
English / Francais /
The selected language will be heard or seen.
Espanol
Other Other language can be selected (see the “Language
code list” on page 31).
Off (Subtitle) Subtitles do not appear.
Original (Audio)
*2
4:3 (Letter box)
The unit will select the first priority language of each disc.
When playing back a wide screen-DVD disc, it
displays the wide picture with black bands at the top
and bottom of screen.
4:3
(Pan Scan)
It displays the wide picture on the whole screen with
left and right edges automatically cut off.
16:9
(Wide)
Select this mode when connecting to a wide-screen TV.
A wide screen picture is displayed full size.
Display
*3
Off / On On screen display can be switched on or off when you
press any buttons.
Picture Mode There are two types of source content in pictures recorded in DVD video
discs: film content (pictures recorded from films at 24 frames per second)
and video content (video signals recorded at 30 frames per second). Make
this selection according to the type of content being viewed.
Auto Select this position normally. The DVD player
automatically detects source content, film or video, of
playback source.
Film Suitable for playback of film content pictures.
Video Suitable for playback of video content pictures.
JPEG Interval
*4
You can continuously playback all JPEG files automatically.
Off Plays back one file at a time.
5 / 10 / 15 Seconds Displays images in the form of a slide show.
Every 5 / 10 / 15 seconds the image changes.
Night Mode
*5
Night Mode enables you to control the dynamic range so as to achieve a
suitable sound for your equipment.
Off It plays back at the recording level on the disc.
On Loud sound such as explosion or similar is toned
down slightly when played back. This makes it
suitable for when it is connected to a stereo.
Digital Out
*6
You can select the digital output sound format corresponding to your system
connection.
Off
There is no sound output from DIGITAL AUDIO OUT jack.
PCM Change Dolby Digital to PCM for the output.
Select when connected to a 2 channel digital stereo
amplifier.
Bitstream Disc audio bitstream data will be output.
Parental See page 30.
ENGLISH
Password
NOTE:
*1
If the selected language is not recorded on the disc, the first priority language is selected.
*2
If the DVD disc is not formatted in the pan & scan style, it displays 4:3 style.
*3
If “Display” is not set to “On” on screen displays do not appear when you press any buttons except SUBTITLE,
PLAY MODE, MARKER, JUMP, DISPLAY and AUDIO.
*4
You cannot display DVD SETUP screen when disc is playback
*5
This function works only during playback of Dolby Digital recorded discs.
*6
Even if you select “Bitstream”, MPEG audio will be output in PCM format.
Page 30

Parental control
Some discs are specified not suitable for
children. Such discs can be limited not to play
back with the unit.
Password and setting:
Press SETUP/TV MENU in the stop mode or No
1
Disc.
Press or to select
/ or ENTER.
Press or to select “Parental”, then press or
2
ENTER.
“Enter Password” screen will appear.
Press “0000” using Number buttons (09). (This
3
is pre-setting password of this unit). Then press
ENTER.
If you input a wrong number, press CANCEL.•
Parental : Off
Passw
Enter Password
option, then press
Setting the new password:
Press SETUP/TV MENU in the stop mode or No Disc.
1
Press or to select option, then press /
or ENTER.
Press or to select “Password”, then press
2
or ENTER.
“Enter Current Password” screen will appear.
Press Number buttons (09) to enter the
3
password you have stored.
If you input a wrong number, press CANCEL.•
Then press ENTER. “Enter New Password”
4
screen will appear. Press Number buttons (09)
to input the new password.
Parental : Off
Password : Change
Enter New Password
Press ENTER.
5
Now your new password has been set.
Be sure to remember this number!
The parental level list will appear. Press or to
4
select the level 1 to level 8. The limitation will be
more severe as the level number is lowered. Then
press ENTER.
Parental
Passwo rd
•
Level Off : The parental control setting does
•
Level 8 : Virtually all DVD software can be
•
Level 1 : DVD software for adults cannot be
Press SETUP/TV MENU to remove the menu
5
screen.
NOTE:
•
If each setup (P.28~30) has been completed,
the unit will use these settings during DVD
playback.
Each setup will be retained in memory.
•
Depending on the discs, the unit may not be able to
limit playback.
•
Some discs may not be encoded with specific rating
level information though its disc jacket says “adult”.
For those discs, the age restriction will not work.
After the rating is locked, the setting cannot be
•
changed unless you enter the correct password.
1
2
3
4
5
6
7
8
Off
not function.
played back.
played back.
NOTE:
Do not forget the password. If you forget the
•
password, contact Customer Service at 1-800-289-
0980. The original remote control will be required.
Temporary disabling of
rating level by DVD disc
Some prerecorded DVD discs may attempt to
temporarily cancel the rating level that you have
set. You will be given the option to allow or not
allow the override.
Load a DVD disc (see page 23).
1
If the DVD disc has been designed to temporarily
2
cancel the Rating level, the screen which follows the
“Reading” screen will change, depending on which
disc is played. If you select “YES” with ENTER key,
password input screen will then appear.
Enter the password with Number buttons (09).
3
Then press ENTER.
If you interrupt the entering, press RETURN.•
Enter Password
Playback will commence if the entered password
4
was correct.
NOTE:
This temporary cancellation of the rating level will
•
be kept until the disc is ejected.
When the disc is ejected, the original rating level will
•
be set again automatically.
Page 31

Language code list
Enter the appropriate code number for the initial settings “Menu”, “Subtitle” and/or “Audio” (see page 29).
Language Name Code Language Name Code Language Name Code Language Name Code
Abkhazian 1112 Fiji 1620 Lingala 2224 Singhalese 2919
Afar 1111 Finnish 1619 Lithuanian 2230 Slovak 2921
Afrikaans 1116 French 1628 Macedonian 2321 Slovenian 2922
Albanian 2927 Frisian 1635 Malagasy 2317 Somali 2925
Amharic 1123 Galician 1722 Malay 2329 Spanish 1529
Arabic 1128 Georgian 2111 Malayalam 2322 Sundanese 2931
Armenian 1835 German 1415 Maltese 2330 Swahili 2933
Assamese 1129 Greek 1522 Maori 2319 Swedish 2932
Aymara 1135 Greenlandic 2122 Marathi 2328 Tagalog 3022
Azerbaijani 1136 Guarani 1724 Moldavian 2325 Tajik 3017
Bashkir 1211 Gujarati 1731 Mongolian 2324 Tamil 3011
Basque 1531 Hausa 1811 Nauru 2411 Tatar 3030
Bengali; Bangla 1224 Hebrew 1933 Nepali 2415 Telugu 3015
Bhutani 1436 Hindi 1819 Norwegian 2425 Thai 3018
Bihari 1218 Hungarian 1831 Oriya 2528 Tibetan 1225
Breton 1228 Icelandic 1929 Panjabi 2611 Tigrinya 3019
Bulgarian 1217 Indonesian 1924 Pashto, Pushto 2629 Tonga 3025
Burmese 2335 Interlingua 1911 Persian 1611 Turkish 3028
Byelorussian 1215 Irish 1711 Polish 2622 Turkmen 3021
Cambodian 2123 Italian 1930 Portuguese 2630 Twi 3033
Catalan 1311 Japanese 2011 Quechua 2731 Ukrainian 3121
Chinese 3618 Javanese 2033
Corsican 1325 Kannada 2124 Romanian 2825 Uzbek 3136
Croatian 1828 Kashmiri 2129 Russian 2831 Vietnamese 3219
Czech 1329 Kazakh 2121 Samoan 2923 Volapük 3225
Danish 1411 Kirghiz 2135 Sanskrit 2911 Welsh 1335
Dutch 2422 Korean 2125 Scots Gaelic 1714 Wolof 3325
English 1524 Kurdish 2131 Serbian 2928 Xhosa 3418
Esperanto 1525 Laothian 2225 Serbo-Croatian 2918 Yiddish 2019
Estonian 1530 Latin 2211 Shona 2924 Yoruba 3525
Faroese 1625 Latvian, Lettish 2232 Sindhi 2914 Zulu 3631
Rhaeto-Romance
2823 Urdu 3128
ENGLISH
Page 32

Connections to other equipment
The exact arrangement you use to interconnect various video and audio components to this unit is dependent
on the model and features of each component. Check the Owner’s Manual provided with each component for
the location of video and audio inputs and outputs.
To connect the LCD TV/DVD to a VCR
Rear of the unit
To VIDEO/AUDIO IN
Video/Audio cord (not supplied)
To Video/Audio OUT
VCR
To connect the LCD TV/DVD to a VCR with an SVideo cord
If you connect a VCR with a S-Video cable to the S-VIDEO IN jack on the rear side of the unit, you must also
connect the audio cables to the AUDIO IN jacks on the rear side of the unit.
The S-Video cable only carries the video signal. The audio signal is separate.
NOTE:
•
When the S-Video cable and the standard video cable are connected at the same time, the S-Video cable
takes precedence.
Rear of the unit
To S-VIDEO IN
To AUDIO IN
To S-Video OUT
S-Video cord (not supplied)
Audio cord (not supplied)
To Audio OUT
VCR
To connect to a DVD player with Component Video Input
You can enjoy a high quality picture by connecting the unit’s COMPONENT VIDEO OUT jacks of your DVD
player with the COMPONENT video cables (not supplied).
To Component OUT
Rear of the unit
Component video cord (not supplied)
To COMPONENT
AUDIO IN
Audio cord
To COMPONENT IN
NOTE:
Component Video input of the unit are for use with a device which output 480i/1080i interlaced signals and
•
480p/720p progressive signals.
(not supplied)
Y
P
B
PR
To Audio OUT
DVD
Page 33

Connections to other equipment (continued)
To connect a HDMI or a DVI device to the unit
The HDMI input receives digital audio and uncompressed video from a HDMI device or uncompressed digital
video from a DVI device.
When you connect to a DVI device with a HDMI-to-DVI adapter cable, it transfers only video signal. Separate
analog audio cords required.
Rear of the unit
Audio cord (not supplied)
To PC/HDMI
AUDIO IN
To HDMI IN
HDMI - to - DVI adapter cable
(HDMI type A connector)
(not supplied)
To DVI Audio
output
or
To HDMI out
DVI device
HDMI device
HDMI cable (type A connector)
(not supplied)
NOTE:
•
When using HDMI to connect your HDMI or DVI devices, you must select the corresponding audio
input source (HDMI or DVI) on the menu screen (see page 17). Otherwise you will only see the
image with no sound.
•
If you connect an external component (cable box, satellite receiver, etc.) to this LCD TV using an HDMI cable
or a DVI to HDMI cable, the image will not display if the output resolution of the component is set to 480i. To
receive the picture you must change the output resolution on the external component.
Should you require further instruction, please contact the manufacturer of the external component.
ENGLISH
Using an AV Amplifier with builtin digital surround
If you are using an Amplifier with built-in digital surround sound, you can enjoy various audio systems including
Dolby Digital Surround audio that sounds just like the movie.
Connect an AV amplifier with builtin Dolby Digital decoder, DTS decoder, or MPEG decoder etc. as
shown below.
Rear of the unit
Subwoofer
TV/DVD
Front
Speaker
Coaxial Digital
Audio Output
Coaxial digital cable
(not supplied)
To Coaxial
Digital Audio Input
AV Amplifier with built-in digital surround
decoder as listed above
(Left)
Center Speaker
Surround
Speaker (Left)
NOTE:
When you are viewing digital broadcast, this unit will not work in conjunction with DTS audio or MPEG audio.
•
There will be no sound output if connected to an AV amplifier with a built-in DTS decoder or MPEG decoder.
Front
Speaker
(Right)
Surround
Speaker
(Right)
Page 34

Connections to other equipment (continued)
To connect the TV/DVD to a camcorder, or a TV Game
To playback from a camcorder, connect the camcorder to the unit as shown.
This unit can also be used as a display device for many video games. However, due to the wide variety of
signals generated by these devices and subsequent hook-up variations required, they have not all been
included in the suggested connection diagrams. You’ll need to consult each component’s Owner’s Manual for
additional information.
Rear of the unit
To VIDEO/AUDIO IN
Video/Audio cord
(not supplied)
To Video/Audio OUT
To connect the TV/DVD to a PC (Personal Computer)
Before you connect this TV/DVD to your PC, change the adjustment of your PC’s Resolution and
Refresh rate (60 Hz).
Connect one end of a (male to male) VGA cable to the video card of the computer and the other end to the
or
connector PC MONITOR on the rear of the
case of a Multimedia computer, connect the audio cord to the audio output of your Multimedia computer and to
the AUDIO connector of the PC/HDMI AUDIO IN jack of the TV/DVD. You can also connect the PC with HDMI
cable. If you use HDMI cable, you don’t have to connect the audio cord. If you use DVI-to-HDMI cable, please
connect audio cord as same way as VGA cable.
Press INPUT SELECT on the remote control to select PC mode.
Switch on the computer. The TV/DVD can operate as the computer monitor.
Rear of the unit
VGA cable (not supplied)
To PC MONITOR IN
To PC/HDMI AUDIO IN
To HDMI IN
TV/DVD
. Attach the connectors firmly with the screws on the plug.
Monitor Display modes
MODE Resolution Refresh rate
VGA 640x480 60/ 72/ 75 Hz
VGA 720x400 70Hz
SVGA 800x600 56/ 60/ 72/ 75 Hz
XGA 1024x768 60/ 70/ 75 Hz
WXGA 1280x768 60Hz
WXGA 1280x720 60Hz
WXGA 1360x768 60Hz
To return to normal mode
Press INPUT SELECT again.
VGA
In
HDMI cable (not supplied)
Audio cord (not supplied)
NOTE:
The on-screen displays will have a different appearance in PC mode than in TV mode.
•
If there is no video signal from the PC when the unit is in PC mode, “No signal” will appear on the TV-screen.
•
Page 35

Reception disturbances
Most types of television interference can be remedied by adjusting the height and position of the VHF/
UHF antenna. Outdoor antennas are recommended for best results. The most common types of television
interference are shown below. If one of these symptoms appear when the TV is connected to a Cable TV
system, the disturbance may be caused by the local Cable TV company broadcast.
IGNITION
Black spots or horizontal streaks may appear, the picture may flutter or
drift. Usually caused by interference from automobile ignition systems,
neon lamps or AC powered tools and appliances such as drills or hair
dryers.
GHOSTS
Ghosts are caused by the television signal following two paths. One is the
direct path and the other is reflected by tall buildings, hills or other large
objects. Changing the direction or position of the antenna may improve
the reception.
SNOW
If the TV is located far from the TV station, in a fringe reception area where
the signal is weak, small dots may appear in the picture.
If the signal is extremely weak, the installation of a larger external antenna
may be necessary.
ENGLISH
RADIO FREQUENCY INTERFERENCE (RFI)
Caused by two-way radios, this type of interference produces moving
ripples or diagonal streaks in the picture. Some cases may cause a loss of
contrast in the picture. Changing the direction and position of the antenna
or installing an RFI filter may improve the picture.
PICTURE SIZE VARIATION
A slight picture size variation is normal when you adjust the CONTRAST or
BRIGHTNESS settings.
CARE AND MAINTENANCE
To prevent fire or shock hazard, disconnect the TV from the power source before cleaning.
The finish on the cabinet may be cleaned with mild soap and a soft, damp cloth and cared for as other furniture.
Use caution when cleaning or wiping the plastic parts.
Page 36

Problems and troubleshooting
Use the following check list for troubleshooting when you have problems with your TV/DVD. Consult your local
dealer or service outlet if problems persist.
Be sure all connections are properly made when using with other units.
SYMPTOMS POSSIBLE SOLUTIONS PAGE
POWER
Make sure the power cord is plugged in.
•
TV/DVD does not operate.
TV BROADCAST RECEPTION
Poor sound or no sound.
Poor picture or no picture.
Poor reception on some
channels.
Poor color or no color.
Picture wobbles or drifts.
No Cable TV reception.
Horizontal or diagonal
bars on screen.
No reception above
channel 13.
TV shuts off.
Closed - Caption is not
activated.
Display is not shown in
your language.
Power is off, check fuse or circuit breaker.
•
Unplug unit, then plug it back in.
•
Station or Cable TV experiencing problems, tune to another station.
•
Check Volume adjustments or muting.
•
Check for sources of possible interference.
•
Station or
•
Check antenna or Cable TV connections, reorient antenna.
•
Check for sources of possible interference.
•
Check picture control adjustments.
•
Station or Cable TV experiencing problems, tune to another station.
•
Station signal is weak, reorient antenna to receive stronger station.
•
Check for sources of possible interference.
•
Station or
•
Make sure channels are set into memory.
•
Check picture control adjustments.
•
Check antenna or Cable TV connections, reorient antenna.
•
Check for sources of possible interference.
•
Station or Cable TV experiencing problems, tune to another station.
•
Make sure channels are set into memory.
•
•
Cable TV company is scrambling signal.
•
Check antenna orientation.
Check all Cable TV connections.
•
Set Signal Type option to the “Cable” mode.
•
Station or Cable TV system problems, try another station.
•
Check antenna connections, reorient antenna.
•
Check for sources of possible interference.
•
Make sure Signal Type option is in the appropriate mode.
•
If using antenna, check UHF antenna connections.
•
No broadcast on station tuned.
•
Sleep Timer is set.
•
Power interrupted.
•
•
TV station experiencing problems or program tuned is not closed
captioned. Try another channel.
•
Check Cable TV connection or VHF/UHF antenna, reposition or
rotate antenna.
•
Set Closed caption in the menu.
Select proper language in the menu options.• 17
Cable TV
Cable TV
experiencing problems, tune to another station.
experiencing problems, tune to another station.
12
15
15, 16
35
15
13, 14
35
17
15
13
35
15
18
17
13, 14
35
15
18
–
13
14
18
15
13
35
18
13
15
16
–
15
13, 14
21
The LCD panel is a very high technology product, giving you fine picture details. Occasionally, a few non-
•
active pixels may appear on the screen as a fixed point of blue, green or red. Please note that this does not
affect the performance of your product.
Page 37

Problems and troubleshooting (continued)
SYMPTOMS POSSIBLE SOLUTIONS PAGE
DVD
No disc is inserted.
•
Playback doesn’t start.
No picture. TV/DVD selector is not set correctly.• 23
No sound.
Picture is distorted during
CUE or REVIEW.
Stopping playback,
search, slow-motion play,
repeat play, or program
play, etc. cannot be
performed.
No on-screen display. Select Display On.• 29
No surround sound. The setup does not match your stereo system.• 33
The unit or remote
operation key is not
functioning.
Playback does not start
when the title is selected.
Audio soundtrack and/or
subtitle language is not
changed when you play
back a DVD.
No subtitle.
Angle cannot be changed. Multi-angles are not recorded on the DVD disc.• 28
The disc may be dirty. Clean up the disc.
•
The unit cannot play CD-ROMs, etc.
•
Check the input selector of the amplifier is set properly.
•
The unit is in the Special playback mode.
•
Select the correct Audio Output position on AV amplifier.
•
The picture will be distorted occasionally.• –
Some discs may not allow some functions.• –
Turn off the unit and unplug the AC power cord for several minutes,
•
then replug it.
Check the Parental setup.• 30
Multilingual language is not recorded on the DVD disc.• 28
Some discs have no subtitles.
•
Subtitles are cleared. Press SUBTITLE.
•
23
9
9
–
24
33
12
28
ENGLISH
“
” appears on the
screen.
REMOTE CONTROL
The remote control does
not function.
FOR CUSTOMER SERVICE, ADDITIONAL SET-UP AND OPERATING ASSISTANCE, OR TO ORDER ACCESSORIES PLEASE CALL:
The function is prohibited with the unit or the disc.• 23
•
Aim at the remote control at the remote sensor.
•
Operate within Approx. 15 feet or reduce the light in the room.
•
Clear the path of the beam.
•
The batteries are weak. Replace the batteries.
•
Check the batteries are inserted correctly.
18002890980
12
WHEN CALLING CUSTOMER SERVICE PLEASE HAVE YOUR MODEL NUMBER READY
OR WRITE TO:
ORION SALES, INC.
3471 N. UNION DR.
OLNEY, ILLINOIS 62450
FOR INFORMATION ON OUR OTHER PRODUCTS, OR TO ORDER ACCESSORIES ONLINE, PLEASE VISIT OUR WEBSITE AT
www.orionsalesinc.com
Page 38

Specifications
GENERAL
Power supply: AC 120V 60Hz
Power consumption: Operation: 51W
Stand by: 0.8W
Weight: 4.7 kg (10.4 lbs)
Dimensions: Width: 536.5 mm (21-1/8 inches)
Height: 397 mm (15-5/8 inches)
Depth: 174 mm (6-7/8 inches)
Operating temperature: 5C - 40C
Operating humidity: Less than 80%
TELEVISION
Type: 21.6 inches (547.7 mm diagonal)
Display method: Transmission TFT color LCD panel
Number of Pixels: 1366 (H) x 768 (V)
Tuner type: NTSC standard
ATSC standard (8VSB), QAM
Receiving channels: VHF 2-13
UHF 14-69
CATV 14-36 (A)-(W)
37-59 (AA)-(WW)
60-85 (AAA)-(ZZZ)
86-94 (86)-(94)
95-99 (A-5)-(A-1)
100-135 (100)-(135)
01 (5A)
Inputs: S-Video: Y-Input:1.0 V (p-p), 75 ohms
C-Input:0.3 V (p-p), 75 ohms
Video: (RCA) 1.0 V p-p/75 ohms
Audio: (RCA) –8 dBm/50K ohms
Component video: (Y) 1.0 V (p-p), 75 ohms
(Pb)/(Pr) 0.7 V (p-p), 75 ohms
HDMI: HDMI compliant (type A connector)
HDCP compliant
E-EDID compliant
Suggested scan rates: 480p, 480i, 720p,1080i,1080p
HDMI Audio: 2-channel PCM
32/44.1/48 kHz sampling frequency
16/20/24 bits per sample
PC Monitor: Mini-Dsub 15pin x 1
Antenna: VHF/UHF In 75 ohms coaxial
Outputs: Digital audio out: 0.5 Vp-p 75 ohms terminated
Speaker: 25.4 mm x 68.6 mm (1 inche x 2-11/16 inches), 8 ohms x 2
Audio output power: 1.5W + 1.5W
DVD/CD player
Signal system: NTSC
Applicable disc: 1.DVD (12 cm, 8 cm)
2.CD (12 cm, 8 cm)
Pickup: CD: Wavelength: 790 nm
Maximum output power: 7 mW
DVD: Wavelength: 655 nm
Maximum output power: 5 mW
ACCESSORIES Remote control
Batteries (UM-4) x 2
AC Cord
Screw x 2
Designs and specifications are subject to change without notice.
Page 39

limited
WARRANTY
22” TFT LCD TV WITH DVD PLAYER
ORION warrants this product to be free from manufacturing defects in material and workmanship under
normal use and conditions for a period of 1 year from date of original purchase in the United States.
Should service be necessary under this warranty for any reason due to a manufacturing defect or
malfunction during the first 12 months from date of original purchase, ORION will provide carry-in service
only by an ORION authorized Independent Service Center at no charge. Also, if an original part fails due to
manufacturing defect in material and workmanship within one year from date of original purchase we will replace
the defective part, provided the defect or malfunction is verified along with dated proof of purchase.
There are ORION authorized Independent Service Centers located throughout the country. For the one
nearest you, DIAL TOLL FREE: 1-800-289-0980 or visit our website at www.orionsalesinc.com. ORION will not
be liable for damages incurred in shipment of the unit. If there are no ORION authorized Independent Service
Centers in your area please call - 1-888-296-7466 for assistance.
Note: This warranty is void if the product is:
(a) Damaged through negligence, misuse, abuse, or accident.
(b) Used in a commercial application or rentals.
(c) Modified or repaired by anyone other than an Independent Service Center authorized by ORION to effect
warranty repairs to the class of product or by the ORION Factory Service Center.
(d) Damaged because it is improperly connected to the equipment of other manufacturers.
ENGLISH
This warranty does not cover:
(a) Damage to video disc.
(b) Damage to equipment not properly connected to the product.
(c) Costs incurred in the shipping of the product to an ORION authorized Independent Service Center or
ORION Factory Service Center.
(d) Damage or improper operation of unit caused by customer abuse, misuse, negligence, or failure to follow
operating instructions provided with the product.
(e) Ordinary adjustments to the product which can be performed by customer as outlined in the owner’s
manual.
(f) Signal reception problems caused by external antenna or cable systems.
THIS WARRANTY IS NON TRANSFERABLE AND APPLIES ONLY TO THE ORIGINAL PURCHASER
AND DOES NOT EXTEND TO SUBSEQUENT OWNERS OF THE PRODUCT. ANY APPLICABLE IMPLIED
WARRANTIES, INCLUDING THE WARRANTY OF MERCHANTABILITY, ARE LIMITED IN DURATION TO A
PERIOD OF THE EXPRESS WARRANTY AS PROVIDED HEREIN BEGINNING WITH THE DATE OF ORIGINAL
PURCHASE AT RETAIL AND NO WARRANTIES, WHETHER EXPRESS OR IMPLIED SHALL APPLY TO THIS
PRODUCT THEREAFTER. ORION MAKES NO WARRANTY AS TO THE FITNESS OF THE PRODUCT FOR
ANY PARTICULAR PURPOSE AND USE.
UNDER NO CIRCUMSTANCES SHALL ORION BE LIABLE FOR ANY LOSS, DIRECT, INDIRECT,
INCIDENTAL, SPECIAL, OR CONSEQUENTIAL DAMAGE ARISING OUT OF OR IN CONNECTION WITH THE
USE OF THIS PRODUCT.
THIS WARRANTY IS VALID ONLY IN THE UNITED STATES OF AMERICA. THIS WARRANTY GIVES YOU
SPECIFIC LEGAL RIGHTS, HOWEVER, YOU MAY HAVE OTHER RIGHTS WHICH MAY VARY FROM STATE
TO STATE. SOME STATES DO NOT ALLOW LIMITATION ON IMPLIED WARRANTIES OR EXCLUSION OF
CONSEQUENTIAL DAMAGE, THEREFORE THESE RESTRICTIONS MAY NOT APPLY TO YOU.
ORION SALES, INC.
3471 N. UNION DR.
OLNEY, ILLINOIS 62450
Page 40

FRANÇAIS
Le symbole représentant un éclair
dans un triangle équilatéral a pour
ATTENTION
RISQUE DE CHOC ELECTRIQUE
NE PAS OUVRIR
ATTENTION:
POUR RÉDUIRE LES RISQUES DE CHOC ÉLECTRIQUE, NE RETIREZ PAS LE COUVERCLE (OU LE PANNEAU ARRIÈRE). AUCUNE PIÈCE À L’INTÉRIEUR NE
PEUT ÊTRE RÉPARÉE PAR L’UTILISATEUR. CONFIEZ
L’APPAREIL À UN TECHNICIEN QUALIFIÉ.
AVERTISSEMENT: AFIN D’ÉVITER TOUT RISQUE D’INCENDIE OU D’ÉLECTROCUTION, N’EXPOSEZ
PAS CET APPAREIL À LA PLUIE NI À L’HUMIDITÉ.
POUR ÉVITER QU’UN INCENDIE NE SE PROPAGE, GARDEZ LES CHANDELLES OU
LES FLAMMES NUES À L’ÉCART DE CE PRODUIT EN TOUT TEMPS.
ATTENTION: POUR PRÉVENIR LES CHOCS ÉLECTRIQUES, N’UTILISEZ PAS LA FICHE POLAR
ISÉE DE CET APPAREIL AVEC UNE RALLONGE, UNE PRISE DE COURANT OU UNE
AUTRE SORTIE DE COURANT, SAUF SI LES LAMES PEUVENT ÊTRE INSÉRÉES À
FOND SANS EN LAISSER AUCUNE PARTIE À DÉCOUVERT.
but d’avertir l’utilisateur du danger
présenté par des pièces non
isolées à l’intérieur de l’appareil et
dont la tension est suffisante pour
provoquer des décharges électriques
dangereuses.
Le point d’exclamation dans un
triangle équilatéral a pour but d’avertir
l’utilisateur que des instructions
importantes relatives à l’utilisation et
à l’entretien se trouvent dans le guide
accompagnant l’appareil.
AVERTISSEMENT: Cet appareil a fait l’objet de tests qui ont déterminé qu’il est en conformité avec les limites imposées pour
- Changer l’orientation ou l’installation de l’antenne de réception.
- Eloigner davantage l’appareil du récepteur.
- Brancher le cordon d’alimentation de l’appareil dans une prise ou sur un circuit séparé du récepteur.
- Consulter le distributeur ou un technicien expérimenté en radio/TV pour assistance.
AVERTISSEMENT: Tout changement ou toute modification n’étant pas autorisée de façon explicite par l’organisme responsable
ATTENTION:
LA COMPOSANTE LECTEUR VIDÉONUMÉRIQUE DE CET
APPAREIL FONCTIONNE AU LASER.
POUR UTILISER CORRECTEMENT CET APPAREIL, VEUILLEZ
LIRE ATTENTIVEMENT CE GUIDE D’UTILISATEUR ET
CONSERVEZ-LE POUR POUVOIR VOUS Y REPORTER
ÉVENTUELLEMENT. SI L’APPAREIL DOIT ÊTRE RÉPARÉ,
ADRESSEZ-VOUS À UN CENTRE DE SERVICE AUTORISÉ
— VOIR LE MODE D’ENTRETIEN.
L’UTILISATION DE COMMANDES OU DE RÉGLAGES OU
L’EXÉCUTION DE DÉMARCHES AUTRES QUE CEUX SPÉCIFIÉS
DANS CE DOCUMENT PEUVENT OCCASIONNER UNE
EXPOSITION À DES RADIATIONS DANGEREUSES. POUR
ÉVITER TOUTE EXPOSITION DIRECTE AU RAYON LASER, NE
TENTEZ PAS D’OUVRIR LE BOÎTIER DE CET APPAREIL. UN
RAYONNEMENT RISQUE D’ÊTRE PRÉSENT QUAND LE BOÎTIER
EST OUVERT. NE FIXEZ SURTOUT PAS LE FAISCEAU.
les appareils numériques de la classe B, selon le chapitre 15, sur les règles de la FCC. Ces limites sont
prescrites afin d’offrir une protection raisonnable contre toute interférence préjudiciable dans une installation
résidentielle. Cet appareil produit, emploie et peut être la cause d’un rayonnement radioélectrique et, si
l’installation et l’emploi ne sont pas conformes aux instructions, risque de présenter un brouillage nuisible
aux radiocommunications. Toutefois, il est impossible de garantir qu’aucune interférence ne sera produite par
une installation particulière. Si cet appareil est la source de brouillage nuisible à la réception des émissions
radiophoniques ou télévisuelles, déterminé en allumant et en éteignant plusieurs fois de suite l’appareil,
l’utilisateur pourra tenter de résoudre ce problème de brouillage par une des mesures suivantes:
de la conformité aux règles de la FCC peut entraîner l’interdiction à l’utilisateur de
CLASS 1
LASER PRODUCT
Emplacement des étiquettes obligatoires
La plaque signalétique de l’appareil, ainsi que
les avertissements de sécurité sont apposés à
l’endos de l’appareil.
CERTIFICATION: CONFORME AUX NORMES
« FDA RADIATION PERFORMANCE
STANDARDS, 21 CFR SUBCHAPTER J ».
Conforme aux normes de performance de la
FDA pour les produits laser, exception faite des
écarts en vertu de l’avis sur les produits laser no
50, en date du 24 juin 2007.
La ou les lampes à l’intérieur du présent produit contiennent du mercure.
Vous devez disposer de cet appareil en conformité avec les lois locales, étatiques ou fédérales.
Consignez le numéro de modèle et le numéro de série.
Numéro de modèle Numéro de série:
Page 41

CONSIGNES DE SÉCURITÉ IMPORTANTES
1) Lisez ces consignes.
2) Gardez ces consignes.
3) Conformez-vous à tous les avertissements.
4) Suivez toutes les consignes.
5) N’utilisez pas cet appareil près de l’eau.
6) Nettoyez l’appareil uniquement à l’aide d’un chiffon sec et propre.
7) Ne bloquez aucune prise d’air. Installez l’appareil en conformité avec les instructions du fabricant.
8) N’installez pas l’appareil à proximité de sources de chaleur comme des radiateurs, des bouches de
chauffage, des cuisinières ou d’autres appareils (y compris les amplificateurs) produisant de la chaleur.
9) N’allez pas à l’encontre de l’objectif de sécurité de la fiche polarisée ou avec mise à la terre. Une fiche
polarisée a deux lames, une étant plus large que l’autre. Une fiche avec mise à la terre a deux lames et une
troisième broche de terre. La lame large et la troisième broche sont destinées à vous protéger. Si la fiche
fournie ne s’insère pas dans votre prise, contactez un électricien pour faire remplacer la prise désuète.
10) Assurez-vous que le cordon d’alimentation ne puisse être piétiné ou pincé tout
particulièrement au niveau de la fiche et au point où il sort
Utilisez uniquement les accessoires précisés par le fabricant.
11)
12) N’utilisez cet appareil qu’avec le chariot, le socle, le trépied, la console ou la table spécifié
par le fabricant ou vendu avec l’appareil. Si vous utilisez un chariot, manœuvrez avec
précaution l’ensemble chariot/appareil pour éviter toute blessure résultant d’un basculement.
13) Débranchez cet appareil durant les orages électriques ou lorsqu’il n’est pas utilisé pendant
des périodes prolongées.
14) Faites appel à un technicien qualifié pour tout dépannage. Un dépannage est requis lorsque l’appareil a été
endommagé d’une façon ou d’une autre, comme lorsque le cordon d’alimentation ou la fiche est endommagé,
du liquide a été renversé sur l’appareil ou des objets sont tombés dans l’appareil, l’appareil a été exposé à la
pluie ou à l’humidité, l’appareil ne fonctionne pas normalement ou l’appareil est tombé.
15) L’appareil ne doit pas être exposé à des égouttements ou à des éclaboussures et, de plus, aucun objet rempli
de liquide, tel que des vases, ne doit être placé sur l’appareil.
16) L’antenne extérieure ne doit pas se trouver à proximité de lignes d’alimentation aériennes ou d’autres circuits
d’éclairage ou de distribution électrique. Elle ne doit pas non plus être installée à un endroit d’où elle pourrait
tomber sur ces lignes ou ces circuits. Lors de l’installation d’une antenne extérieure, toutes les précautions
doivent être prises pour ne pas toucher ces lignes ou ces circuits électriques. Tout contact avec eux pourrait
être mortel.
17) Ne surchargez pas les prises électriques murales ni les cordons de rallonge, car cela risque de causer un
incendie ou des chocs électriques.
18) Ne poussez aucun objet dans les orifices de l’appareil, car cela peut toucher des points de tension dangereux
ou causer un court-circuit pour ensuite entraîner un incendie ou des chocs électriques. Ne versez, ni ne
vaporisez jamais aucun liquide sur l’appareil.
19) Si une antenne extérieure ou un système de
transmission par câble est relié à l’appareil, vous
devez vous assurer que l’antenne ou le système de
transmission par câble est mis à la terre de manière
à protéger, dans toute la mesure du possible, contre
les surtensions et les charges d’électricité statique.
La section 810 du code national de l’électricité
(ANSI/NFPA 70) vous renseigne sur les moyens
appropriés de mettre le mât et la structure de support
à la terre, la mise à la terre du fil de descente vers
un élément de décharge de l’antenne, la taille des
conducteurs de mise à la terre, l’emplacement de
l’élément de décharge de l’antenne, le raccordement
aux électrodes de mise à la terre et les exigences
pour l’électrode de mise à la terre.
20) Quand il est nécessaire de remplacer certaines pièces de l’appareil, assurez-vous que le réparateur utilise
des pièces préconisées par le fabricant ou ayant les mêmes caractéristiques que les pièces originales.
Le remplacement par des pièces non autorisées peut causer un incendie, des chocs électriques ou d’autres
dangers.
21) Après tout entretien ou toute réparation, demandez au technicien d’effectuer des vérifications de sécurité
pour s’assurer que l’appareil soit en bon état de fonctionnement.
N’insérez jamais les doigts dans le compartiment à disque quand il se ferme, sinon vous risquez de vous blesser.
22)
23) Lorsque vous raccordez cet appareil à un autre, éteignez d’abord les deux appareils et débranchez-les du
réseau électrique, car autrement, vous risquez de subir un choc électrique ou des blessures graves. Lisez
attentivement les guides d’utilisation des autres appareils et suivez les directives lorsque vous effectuez des
raccordements quelconques.
de l’appareil.
EXEMPLE DE MISE À LA TERRE DE L’ANTENNE SELON LE
CODE NATIONAL DE L’ÉLECTRICITÉ
(NEC) S2898A
CODE NATIONAL DE L’ÉLECTRICITÉ
BRIDE DE MISE
À LA TERRE
ÉQUIPEMENT DU
SERVICE
ÉLECTRIQUE
DESCENTE D’ANTENNE
ÉLÉMENT DE DÉCHARGE DE
L’ANTENNE
(SECTION 810-20 DU NEC)
CONDUCTEURS DE MISE
À LA TERRE
(SECTION 810-21 DU NEC)
BRIDES DE MISE À LA TERRE
SYSTÈME D’ÉLECTRODES DE MISE À
LA TERRE DU COURANT
(ARTICLE 250 PARTIE H DU NEC)
FRANÇAIS
Page 42

CONSIGNES DE SÉCURITÉ IMPORTANTES
24) Réduisez le volume au niveau minimum avant d’allumer l’appareil. Sinon, un volume sonore élevé soudain
risque d’endommager l’ouïe et les haut-parleurs.
25) Ne laissez pas la distorsion sonore durer trop longtemps, car cela risque de faire surchauffer les haut-parleurs
et de provoquer un incendie.
26) Quand vous utilisez un casque d’écoute, maintenez le volume à un niveau modéré. Si vous utilisez les
casques d’écoute continuellement à un volume sonore élevé, l’ouïe peut être affectée.
27) Ne regardez pas à l’intérieur du compartiment à disque ou à travers les orifices d’aération de l’appareil pour
tenter d’apercevoir la source du faisceau laser, car vous risquez ainsi de subir des dommages oculaires.
28) N’utilisez pas de disques fissurés, déformés ou réparés. Ces disques se brisent facilement et peuvent causer
des blessures graves et un mauvais fonctionnement de l’appareil.
29) Nous attirons l’attention de l’installateur de télévision par câble sur l’article 820-40 du code national
de l’électricité (NEC), qui fournit des directives pour l’exécution correcte de la mise à la terre et stipule
notamment que la terre du câble doit être reliée au réseau de mise à la terre de l’édifice, le plus près possible
du point d’entrée du câble.
30) La prise d’alimentation doit être installée près du l’appareil et facile d’accès
CONDENSATION
De la condensation se forme sur les composantes internes du lecteur si ce dernier est déplacé rapidement d’un
environnement froid à un endroit tempéré ou si la température de la pièce augmente subitement. La performance
du lecteur peut alors en être altérée.
Pour éviter que cela survienne, assurez-vous de laisser le lecteur environ une heure dans son nouvel
environnement avant de le mettre en marche ou faites monter la température de la pièce graduellement.
De la condensation peut également se former si le lecteur est exposé à l’air d’un climatiseur pendant une chaude
journée d’été. Dans un tel cas, changez le lecteur de place.
.
(suite)
MANIPULATION DE L’ÉCRAN ACL
Il ne faut pas appuyer fortement sur l’écran ACL ou le secouer, car vous risquez ainsi de briser la paroi de verre
•
de l’ACL et de vous blesser.
En cas de bris de l’écran ACL, veillez surtout à ne pas toucher le liquide que renferme l’écran. Cela pourrait
•
causer une inflammation de la peau. Si le liquide pénètre dans la bouche, il faut immédiatement vous gargariser
et consulter un médecin. Pareillement, si le liquide entre en contact avec les yeux ou la peau, il faut tout d’abord
rincer les parties touchées à l’eau pure pendant au moins 15 minutes, puis consulter un médecin.
SÉCURITÉ DES ENFANTS:
Le lieu et le mode d’utilisation de votre écran plat sont importants
Félicitations pour votre achat! Tandis que vous profitez de votre nouveau produit, n’oubliez pas les conseils de
sécurité suivants:
LE PROBLÈME
L’expérience du cinéma maison se répand, et les gens achètent des écrans plats de plus en plus grands.
Cependant, les écrans plats ne sont pas toujours posés sur des socles adaptés ou installés conformément aux
recommandations du fabricant.
Les écrans plats qui sont mal placés sur une commode, une bibliothèque, une étagère, un bureau, un hautparleur, un coffre ou un chariot risquent de tomber, causant ainsi des blessures.
LE FABRICANT SE PRÉOCCUPE DE SA CLIENTÈLE!
L’industrie de l’électronique grand public s’engage à rendre le cinéma maison agréable et sécuritaire.
LA SÉCURITÉ AVANT TOUT
Tous les supports ne font PAS l’affaire. Observez les recommandations du fabricant pour installer et utiliser votre
écran plat de façon sécuritaire.
Prenez le temps de lire et de comprendre toute les consignes fournies avec ce produit en vue de l’utiliser
adéquatement.
Ne laissez pas les enfants jouer avec les meubles et les téléviseurs ou grimper dessus.
Ne placez pas les écrans plats sur des meubles qui peuvent facilement servir d’escalier, comme une commode.
N’oubliez pas que les enfants peuvent être pris d’enthousiasme en regardant la télévision, surtout sur un écran
plat « géant ». Il convient de placer ou d’installer l’écran là il ne risque pas d’être poussé, tiré ou renversé.
Il importe d’acheminer tous les cordons et les câbles connectés à l’écran plat de façon à éviter que des enfants
curieux ne puissent les saisir ou les tirer.
MONTAGE MURAL: SI VOUS DÉCIDEZ DE MONTER VOTRE ÉCRAN PLAT AU MUR, APPLIQUEZ
TOUJOURS LES RÈGLES SUIVANTES:
Utilisez un support de montage recommandé par le fabricant de l’écran ou homologué par un laboratoire
indépendant (comme l’UL, la CSA, l’ETL).
Suivez toutes les instructions fournies par les fabricants de l’écran et du support mural.
Si vous n’êtes pas certain de pouvoir installer votre écran plat en toute sécurité, contactez votre détaillant pour
requérir une installation professionnelle.
Assurez-vous que le mur sur lequel vous montez l’écran est capable de soutenir le poids de l’appareil/du produit
et du support mural. Si vous n’êtes pas certain, contactez un installateur professionnel.
Il faut au moins deux personnes pour installer. Les écrans plats peuvent être lourds.
Page 43

PRÉCAUTIONS DE SÉCURITÉ
L’appareil dégage de la chaleur en cours de fonctionnement. Ne couvrez pas l’appareil d’un drap ou d’une
couverture afin d’éviter une surchauffe. Il ne faut ni bloquer les orifices de ventilation, ni placer près de
radiateurs. N’exposez pas l’appareil aux rayons directs du soleil. Si vous déposez l’appareil sur une étagère,
veillez à ce qu’il y ait 10 cm (4 po) d’espace libre tout autour.
10cm
10cm
Remarques sur le montage du téléviseur ACL/Iecteur DVD au mur
Si vous désirez fixer l’appareil au mur, contactez le détaillant de qui vous avez acheté le téléviseur ACL/ Iecteur
DVD pour demander conseil et confiez l’installation à des professionnels. Une installation incomplète ou
incorrecte pourrait vous blesser, endommager le téléviseur ACL/Iecteur DVD ou les deux.
FRANÇAIS
Pour suspendre la télévision au mur, retirez ces vis et retirez le
socle.
Avant d’exécuter l’intervention, disposez un amortissement
matelassé sur lequel déposer la télévision.
AVIS IMPORTANT
Effets néfastes possibles pour l’écran ALC: si un motif fixe (immobile) reste longtemps affiché à l’écran,
l’image peut s’imprimer irrémédiablement sur l’écran ALC et causer des images fantôme subtiles mais
permanentes. Ce type de dommage n’est PAS COUVERT PAR VOTRE GARANTIE. Ne gardez jamais votre
écran ACL allumé pour une longue période de temps quand il affiche les formats ou les images suivants:
•
Des images fixes, comme les répertoires boursiers, les motifs de jeux vidéo, les logos de station de TV et
les sites Web.
•
Les formats spéciaux qui n’occupent pas tout l’écran. Par exemple, regarder un document ou une
production de format boîte aux lettres (16:9) sur un écran normal (4:3) (avec des barres noires dans le
haut et le bas de l’écran) ou de format normal (4:3) sur un écran large (16:9) (avec des barres noires à
gauche et à droite de l’écran).
Les phénomènes suivants n’indiquent pas un mauvais fontionnement de l’appareil, mais plutôt des
limitations techniques. Nous déclinons donc toute responsabilité à l’égard de ces phénomènes.
•
Les écrans ACL sont issus d’une technologie de précision très avancée; néanmoins, il peut arriver que des
parties de l’écran manquent des éléments d’image ou présentent des points lumineux. Ce n’est pas le signe
d’une défaillance.
•
N’installez pas l’écran ACL près d’équipement électronique sensible aux ondes électromagnétiques. Il existe
de l’équipement qui, trop proche de l’appareil, peut générer des interférences.
•
Effet sur les dispositifs à infrarouge — Les appareils tels que les casques d’écoute sans fil à infrarouge
peuvent subir des interférences.
Page 44

Comment fixer le socle
REMARQUE:
• Débranchez le cordon d’alimentation de la prise d’alimentation CA.
• Avant de commencer cette procédure, veillez à poser le TV sur une surface propre, sécurisée et matelas-
sée pour éviter toute détérioration de l’écran.
• Ne pas toucher ni appuyer sur l’écran de la télévision, le verre risque de se briser sous la pression.
Déposez la télévision sur le dos, sur une table.
Alignez la plaque inférieure du socle (fournie) comme illustré.
Elle s’adaptera dans un seul sens.
Enfoncez-la dans le sens de la èche jusqu’à l’émission d’un déclic.
TR
Pour terminer, fixez la plaque avec les
TR
Veuillez prendre note que la marque “” fait face
au panneau latéral ACL.
deux vis fournies
.
Comment enlever le socle
Pour transporter ce produit, démontez le socle et posez-le à plat contre l’arrière de l’appareil dans le
carton. Pour démonter le socle, ôtez les deux (2) vis du fond (voir A) et maintenez le socle sur une surface
plane en soulevant un côté de l’appareil jusqu’à ce que le socle se déboîte (voir B).
AB
Le socle doit être démonté pour un montage mural. Pour déboîter la base/le socle, ôtez les deux (2) vis à
l’arrière (voir page 5).
Page 45

Caractéristiques
Téléviseur couleur doté d’un écran à cristaux liquides et d’un lecteur DVD/CD
Modèle unique peu encombrant qui combine à la fois un téléviseur couleur avec écran ACL de 22 po et un
lecteur DVD/CD.
Un DVD a une capacité bien plus grande qu’un CD audio, mais la même taille. La qualité de l’image et du son
obtenue avec les DVD est supérieure à celle des autres supports. La qualité de l’image dépasse celle des
cassettes vidéo Super VHS, et la qualité audio est supérieure à celle d’un CD audio. Les DVD offrent également
plusieurs fonctions spéciales, comme la sélection de la langue de la bande sonore, de celle des sous-titres ou
de l’angle de visionnement, etc. Le lecteur DVD peut lire les CD audio, ainsi que les CD contenant des fichiers
MP3/WMA/JPEG.
Compatibilité avec un vaste éventail de sorties audio de DVD
Prise audio numérique (coaxiale)
Lorsqu’un appareil muni d’un décodeur Dolby numérique (Dolby Digital) intégré est branché, le son Dolby
•
numérique (Dolby Digital) peut imiter l’acoustique d’une salle de cinéma ou de concert.
La reproduction sonore ambiophonique est différente de la reproduction sonore Dolby numérique (Dolby Digital). Ce
•
format est déjà utilisé dans de nombreuses salles de cinéma. En raccordant cet appareil à un décodeur DTS ou à
un amplificateur AV avec décodeur DTS intégré, il est possible d’écouter la bande sonore DTS des DVD enregistrés
dans ce format. Cependant, le signal audio n’émanera pas des prises de sortie audio de type analogique.
Lorsque cet appareil est raccordé à un amplificateur AV avec décodeur MPEG intégré, il est possible
•
d’écouter la bande sonore MPEG des DVD enregistrés dans ce format.
La reproduction sonore de type PCM linéaire de 48 kHz/24 bits à 96 kHz/24 bits est de qualité supérieure à
•
celle obtenue avec un CD audio.
Fonctions pratiques
Sélection directe des scènes désirées à l’aide des paramètres titre (Title), chapitre (Chapter), temps
(Time) et piste (Track): vous pouvez amorcer la lecture à partir de la scène de votre choix.
Rappel de jusqu’à 3 scènes: vous pouvez programmer jusqu’à trois scènes en mémoire et rappeler les
scènes en question.
Avance image par image: la touche de pause/arrêt sur image (PAUSE/STILL) permet l’avance image par image.
Ralenti: la touche de ralenti (SLOW) vous permet de sélectionner l’un de quatre facteurs successifs de ralenti,
soit 1/7 à 1/2 fois la vitesse normale, en marche avant ou arrière.
Lecture répétée: vous pouvez répéter la lecture d’un chapitre, d’une piste, d’un titre ou d’un segment entre
deux points sélectionnés.
Lecture programmée (CD audio ou contenant des fichiers MP3/WMA/JPEG): l’appareil effectue la lecture
des pistes suivant l’ordre dans lequel vous les avez programmées.
Zoom: pendant la lecture, il est possible d’agrandir le sujet sélectionné à l’écran.
Remarque: tous les disques ne sont pas nécessairement dotés des fonctions suivantes.
Langues multiples: un choix maximal de 32 langues pour les sous-titres et de 8 langues pour la bande sonore
vous est offert avec les films ou les émissions.
Multiples angles de visionnement: les émissions de sports ou les concerts sont filmés par bon nombre de
caméras à la fois. Un tel disque vous permet de changer d’angle de visionnement pendant la lecture.
Blocage parental: vous pouvez restreindre la reproduction des scènes ou des sons des DVD qui disposent
d’un niveau de classification encodé.
Rapport de cadre de l’image: vous pouvez changer le rapport de cadre de l’écran pour votre moniteur.
Fonctions du téléviseur
Syntonisateur numérique intégré: vous pouvez regarder des émissions numériques sans utiliser de
décodeur de DTV.
Décodeur de soustitres avec mode de texte intégral: il fait apparaître les sous-titres en légendes ou un
texte sur tout l’écran pour les téléspectateurs malentendants.
Réglage de l’image par télécommande: l’affichage à l’écran permet de régler avec précision, au moyen de la
télécommande, la luminosité, le contraste, la couleur, la teinte et la netteté de l’image.
Minuterie d’arrêt différé programmable: ce téléviseur peut être programmé, par télécommande, pour
s’éteindre automatiquement après une période pouvant aller jusqu’à 120 minutes.
Affichage trilingue à l’écran: vous pouvez choisir l’affichage des étapes de la programmation en trois
langues: français, anglais ou espagnol.
Puce V: la Puce V peut lire la classification attribuée à une émission ou à un film dans la mesure où ils sont
convenablement codés pour cela. La Puce V permet de préciser un certain niveau de restriction.
FRANÇAIS
* est une marque de commerce de DVD Format/Logo Licensing Corporation.
* Fabriqué sous licence de Dolby Laboratories. Le terme Dolby et le sigle double D sont des marques de
commerciales de Dolby Laboratories.
Fabriqué sous licence en vertu du brevet nº 5,451,942 des États-Unis, ainsi que d'autres brevets des États-
*
Unis et de l'étranger, délivrés ou en instance. DTS et DTS Digital Out sont des marques déposées et les logos
et le symbole DTS sont des marques de commerce de DTS inc.© 1996-2008 DTS inc. Tous droits réservés.
* HDMI, le logo HDMI et High-Definition Multimedia Interface sont des marques de commerciales ou des
marques déposées de HDMI Licensing LLC.
Page 46

Table des matières
Avant d’utiliser l’appareil
CONSIGNES DE SÉCURITÉ IMPORTANTES .3
PRÉCAUTIONS DE SÉCURITÉ .......................5
AVIS IMPORTANT ............................................5
Comment fixer le socle .....................................6
Comment enlever le socle .................................6
Caractéristiques ................................................ 7
Table des matières ............................................8
Disque ..............................................................9
Emplacement des commandes ......................10
Télécommande ............................................... 11
Source d’alimentation .....................................12
Raccordement à l’antenne ..............................13
Raccordement au réseau de
câblodistribution .............................................14
Fonctionnement du téléviseur
Starting Setup (Configuration au
démarrage) .....................................................15
Fonctionnement du téléviseur .........................15
Guide rapide pour les opérations menu ..........16
Fonctions personnelles ...................................17
Mise en mémoire des canaux .........................18
Vérification de la force du signal numérique....19
Attribution d’un nom aux différents canaux .....19
Étiquetage des entrées vidéo .........................19
Utilisation de la Puce V ...................................20
Sous-titrage ....................................................21
Sous-titrage avancé ........................................22
Réglage du format d’image .............................22
Fonctionnement du lecteur DVD
Préparation .....................................................24
Affichage d’état du disque ..............................24
Lecture ............................................................24
Modes de lecture ............................................25
Lecture de CD MP3/WMA/JPEG et de
CD audio .........................................................25
Lecture programmée CD ..............................27
Lecture répétée CD ......................................27
Lecture aléatoire CD .....................................27
Zoom ..............................................................28
Repérage d’une scène en particulier ..............28
Lecture répétée ...............................................28
Marquage de scènes désirées ........................29
Sélection de la langue de la bande sonore .....29
Sous-titres ......................................................29
Sélection d’angles ..........................................30
Sélection d’un titre ..........................................30
Menu DVD ......................................................30
Guide rapide pour les opérations menu DVD ..30
Réglage des fonctions ....................................31
Réglage du blocage parental ..........................32
Suspension temporaire du blocage
parental par un DVD .......................................32
Informations complémentaires
Liste des codes de langue ..............................33
Raccordement à un autre appareil ..................34
Problèmes de réception ..................................37
Guide de dépannage ......................................38
Fiche technique ..............................................40
Page 47

Disques compatibles avec l’appareil
Type de disque et logo Contenu
DVD vidéo
CDDA
Les disques suivants sont également disponibles.
DVD-R/RW au format DVD vidéo.
•
•
CD-R/RW contenant des fichiers MP3/WMA/
JPEG.
Audio
et vidéo (films)
Audio
ATTENTION:
•
Seuls les types de disque indiqués à gauche
peuvent être utilisés avec l’appareil. Les disques
DVD-ROM, CD-ROM, SVCD, CVD, VCD, etc. ne
peuvent pas être lus.
•
Les disques de 8 cm peuvent être lus directement.
Si un adaptateur de disque de 8 cm est utilisé, des
erreurs vont se produire.
•
Si vous insérez un disque de forme irrégulière, il
peut se coincer et causer un dysfonctionnement.
•
L’emploi d’un protecteur d’anneau ou d’autres
accessoires de disque engendre des erreurs.
•
Cet appareil fonctionne exclusivement avec le
système de télévision NTSC. Les disques conçus
pour les systèmes de télévision PAL et SECAM ne
peuvent pas être utilisés avec cet appareil.
•
Il se peut que l’appareil ne puisse effectuer la
lecture de certains CD-R/RW et DVD-R/RW en
raison des conditions d’enregistrement.
Numéro de région
Un numéro de région (un code de restriction régionale) est attribué à l’appareil et aux DVD vidéo.
Les DVD vidéo au numéro de région « 1 » ou « ALL » sont utilisables avec cet appareil.
Disque
ALL
1
FRANÇAIS
Titre
Lorsque qu’un DVD contient deux films ou plus, il est
subdivisé en tant de sections. On appelle chacune de ces
sections un « TITRE ».
Chapitre 1
Chapitre
Les titres peuvent être subdivisés en de nombreuses
sections.
Chaque section s’appelle un « CHAPITRE ».
Piste
Les CD audio peuvent contenir plusieurs pièces
musicales.
Celles-ci correspondent aux pistes.
Piste 1 Piste 2 Piste 3 Piste 4 Piste 5
Retrait d’un disque de son étui
Veillez à tenir le disque par les rebords. Ne touchez pas la surface du disque.
Retirez le disque de son étui en procédant avec précaution.
N’égratignez pas le disque.
•
Ne salissez pas la surface du disque.
•
Ne collez aucune étiquette ni ruban adhésif sur le disque.
•
Veillez à ne pas échapper ou plier le disque.
•
Rangement d’un disque
•
Rangez le disque dans son étui afin d’éviter qu’il ne soit égratigné, sali
ou endommagé.
•
Ne laissez pas le disque à la lumière directe du soleil ni dans un lieu
chaud ou humide.
Disque DVD
2ertiT1ertiT
3ertipahC2ertipahC2ertipahC Chapitre 1
CD Audio
Nettoyage d’un disque
Essuyez le disque à l’aide d’un chiffon sec et propre, du centre vers le
rebord.
N’essuyez pas le disque en un mouvement circulaire.
•
N’utilisez pas de nettoyant liquide ni d’aérosol.
•
Page 48

Emplacement des commandes
Vue latérale gauche
Fente
d’insertion
du disque
Pour afficher l’écran de menu.
Appuyez sur la touche MENU pour afficher l’écran de menu.
Les touches CHANNEL
l’intérieur de l’écran de menu.
Touche EJECT
Touches VOLUME +/–
Touche CHANNEL /1 (PLAY)
Touche CHANNEL /3 (STOP)
Touche MENU
Touche INPUT/ENTER
Touche POWER
/ , VOLUME +/ et INPUT/ENTER peuvent servir à sélectionner le réglage désiré à
Vue de l’avant
Capteur de la télécommande
Voyant d’alimentation POWER
Vue arrière
Prise RF ANT. IN
Prise AC INPUT
Prise HEADPHONE
Prises COMPONENT IN
Y/Pb/Pr/AUDIO (L/R))
Prises VIDEO IN (VIDEO/S-VIDEO/AUDIO L/R
Prise COAXIAL DIGITAL AUDIO IN
Prise HDMI IN
Prise PC/HDMI AUDIO IN
Prise PC MONITOR IN
Page 49

Télécommande
POWER Pour allumer et éteindre l’appareil
DISPLAY/– Pour afficher les informations relatives au
téléviseur
Pour afficher les informations relatives au lecteur
DVD
Entrez « – » pour les canaux numériques
TV/DVD Pour commuter entre les modes TV/AV et DVD
(EJECT) Pour éjecter un disque
0-9 Pour sélectionner directement des canaux de
télévision
Pour saisir un réglage
Pour entrer un mot de passe
VOL +/– Pour régler le volume du téléviseur
MUTE Pour couper la reproduction sonore
SLEEP Minuterie d’arrêt différé
SETUP/
TV MENU
DVD MENU Pour afficher le menu DVD
/
CH
Curseurs de déplacement
ENTER Pour entrer de l’information dans le menu
EXIT
CANCEL
TOP MENU Pour sélectionner un titre
SEARCH Lecture rapide/retour rapide
PLAY Lecture
SKIP Pour passer au chapitre suivant ou précédent
SUBTITLE Pour régler les sous-titres
STOP Arrêt
SLOW Lecture au ralenti, en marche avant ou arrière
PAUSE/STILL
PLAY MODE Pour sélectionner un mode de lecture
AUDIO Pour changer la langue de la bande sonore
RETURN Pour faire disparaître le menu de configuration
REPEAT A-B Pour activer la fonction de répétition A-B
ANGLE Pour changer d’angle de visionnement
SCREEN SIZE Pour afficher le menu PICTURE SIZE
MARKER Index
CCD/
JUMP
RECALL/
ZOOM
INPUT SELECT Pour afficher le menu de sélection de source
En mode téléviseur: affiche le menu des fonctions
du téléviseur
En mode lecteur DVD: appelle le mode de
configuration initiale
Pour sélectionner des canaux de télévision
Pour sortir du menu à l’écran
Pour réinitialiser l’information dans le menu
Pour mettre la reproduction sonore du CD en pause
Arrêt sur image en mode DVD
DVD
Sous-titrage
Pour repérer une scène en particulier
Pour commuter entre le canal actuel et le
précédent
Pour effectuer un zoom
FRANÇAIS
ATTENTION
Si vous achetez une télécommande universelle auprès d’un détaillant local, consultez le fabricant de la
télécommande universelle pour connaître le code de programmation requis.
Page 50

Télécommande (suite)
Insertion des piles
Ouvrez le couvercle du
1
compartiment à piles dans la
direction de la flèche.
Fonctionnement
Pointez la télécommande sur le capteur et appuyez sur les
•
touches pour faire fonctionner l’appareil.
Utilisez la télécommande dans un angle de 30° de chaque côté
•
du capteur, jusqu’à une distance d’environ 5 mètres (15 pieds).
REMARQUE:
•
Ne laissez pas la télécommande à la lumière directe du soleil ni dans un lieu chaud ou humide.
•
La télécommande émet des rayons infrarouges pour transmettre les signaux; par conséquent, si la lumière
directe du soleil ou celle provenant d’une lampe fluorescente atteint le capteur, il se peut que la distance
efficace de fonctionnement soit réduite.
Un usage inapproprié des piles risque de les faire couler ou exploser. Lisez les avertissements accompagnant
•
les piles pour les utiliser à bon escient.
N’utilisez pas, simultanément, des piles neuves avec des piles usagées.
•
Si vous ne prévoyez pas utiliser la télécommande pendant un certain temps, retirez-en les piles.
•
Insérez deux piles « AAA »
2
en observant les polarités
indiquées par le diagramme à
l’intérieur du compartiment.
Remettez le couvercle du
3
compartiment en place.
Environ 5 mètres
Source d’alimentation
POUR BRANCHER L’APPAREIL SUR UN RÉSEAU ÉLECTRIQUE DE COURANT ALTERNATIF (CA)
Branchez la fiche du cordon CA dans la prise d’entrée CA de l’appareil.
1.
Connectez le cordon CA à une prise de courant domestique.
2.
Prise de courant
Trou et
lame larges
120 V CA 60 Hz
Cordon d’alimentation CA (fourni)
REMARQUE:
Assurez-vous de bien insérer le cordon dans le téléviseur ACL/lecteur DVD et la prise murale à la fois.
•
Le cordon CA est muni d’une fiche mise à la terre. Si le cordon CA fourni ne correspond pas à la prise de
•
courant, contactez un électricien compétent. N’allez pas à l’encontre de l’objectif d’une fiche avec terre.
AVERTISSEMENT:
•
NE RACCORDEZ L’APPAREIL À SA SOURCE D’ALIMENTATION AVEC RIEN D’AUTRE QUE LE CORDON CA
FOURNI. SINON, IL POURRAIT EN RÉSULTER UN INCENDIE, UNE ÉLECTROCUTION OU DES DOMMAGES.
•
N’UTILISEZ PAS D’AUTRE TENSION QUE LA TENSION D’ALIMENTATION SPÉCIFIÉE. SINON, IL
POURRAIT EN RÉSULTER UN INCENDIE, UNE ÉLECTROCUTION OU DES DOMMAGES.
ATTENTION:
•
EN CAS D’INUTILISATION PROLONGÉE DE CET APPAREIL (P. EX. EN CAS DE VOYAGE), PAR MESURE
DE SÉCURITÉ, ASSUREZ-VOUS DE DÉBRANCHER L’APPAREIL DE LA PRISE DE COURANT.
•
NE BRANCHEZ OU NE DÉBRANCHEZ PAS LE CORDON D’ALIMENTATION AVEC LES MAINS
MOUILLÉES. UNE ÉLECTROCUTION POURRAIT S’ENSUIVRE.
•
SI L’ADAPTATEUR CA OU LE CORDON CA FOURNI A BESOIN D’ÊTRE REMPLACÉ, UTILISEZ LA PIÈCE DE
RECHANGE PRÉCONISÉE. DANS UN TEL CAS, CONTACTEZ LE SERVICE CLIENTÈLE AU 1-800-289-0980.
Page 51

Raccordement à l’antenne
Si vous utilisez une antenne intérieure ou extérieure, suivez les directives cidessous, selon le type
d’antenne que vous employez. Si vous êtes abonné à un service de câblodistribution, voyez les
consignes de raccordement à la page 14.
Antenne VHF/UHF combinée (câble unique de 75 ohms ou câble à conducteurs
jumelés de 300 ohms)
Raccordez le câble de 75 ohms de l’antenne
combinée VHF/UHF à la borne de raccordement
d’antenne.
Si votre antenne VHF/UHF combinée est dotée
d’un câble à conducteurs jumelés de 300 ohms,
il peut être nécessaire d’utiliser un transformateur
d’adaptation 300/75 ohms.
Câble
coaxial de
75 ohms
Borne de
raccordement
d’antenne
Transformateur
d’adaptation
300/75 ohms
Borne de
raccordement
d’antenne
Antenne VHF/UHF combinée (câbles à conducteurs jumelés VHF et UHF distincts
de 300 ohms)
Borne de
raccordement
d’antenne
Raccordez le câble à conducteurs jumelés UHF
de 300 ohms à un multiplexeur (en option).
Raccordez le câble à conducteurs jumelés VHF
de 300 ohms au transformateur d’adaptation
300/75 ohms. Raccordez le transformateur au
multiplexeur, puis branchez le multiplexeur sur la
borne d’antenne.
FRANÇAIS
Multiplexeur
UHF 300 ohms
Transformateur d’adaptation 300/75 ohms
VHF 300 ohms
Antennes VHF/UHF séparées (câble VHF de 75 ohms et câbles à conducteurs
jumelés UHF de 300 ohms)
Borne de
raccordement
d’antenne
Multiplexeur
UHF 300 ohms
Raccordez le câble VHF de 75 ohms et le câble
à conducteurs jumelés UHF de 300 ohms au
multiplexeur (en option) et branchez ce dernier
sur la borne d’antenne.
VHF 75 ohms
Page 52

Raccordement au réseau de câblodistribution
Ce téléviseur/lecteur DVD a une gamme de syntonisation étendue et peut capter la plupart des
canaux câblodistribués sans avoir besoin d’un convertisseur. Certains câblodistributeurs offrent
des « canaux payants », dont le signal est brouillé. Le débrouillage de ces signaux en vue d’un
visionnement normal doit être effectué par un dispositif généralement fourni à cet effet par le
câblodistributeur.
Pour les abonnés aux services de base de câblodistribution
Si vous êtes abonné aux services de base du câble sans
Borne de
raccordement
d’antenne
Câble coaxial
de 75 ohms
Pour les abonnés aux services de câblodistribution comportant des canaux
brouillés
Si vous êtes abonné à des services de câblodistribution exigeant l’utilisation d’un convertisseur/débrouilleur,
branchez le câble coaxial d’entrée de 75 ohms sur le convertisseur/débrouilleur. Au moyen d’un autre câble
coaxial de 75 ohms, branchez la borne de sortie du convertisseur/débrouilleur sur la borne d’antenne du
téléviseur/lecteur DVD. Suivez les raccordements illustrés ci-dessous. Réglez le téléviseur/lecteur DVD sur le
même canal de sortie que le convertisseur/débrouilleur (en général 3 ou 4), puis servez-vous du convertisseur/
débrouilleur pour sélectionner les canaux à visionner.
convertisseur/débrouilleur, branchez directement le câble
coaxial de 75 ohms sur la borne d’antenne se trouvant à
l’endos du téléviseur/lecteur DVD.
Câble de 75
ohms Provenant
du réseau de
câblodistribution
Câble de 75 ohms
à raccorder sur le
téléviseur/lecteur DVD
Convertisseur/débrouilleur
Borne de
raccordement
d’antenne
Pour les abonnés aux services de base de câblodistribution sans brouillage avec
des canaux payants brouillés
Si vous êtes abonné à un service de câblodistribution dont les canaux de base ne sont pas brouillés et
les canaux payants exigent l’utilisation d’un convertisseur/débrouilleur, il est recommandable d’utiliser un
séparateur de signaux et une boîte de commutation A/B (vendus par le câblodistributeur ou dans un magasin
d’électronique). Suivez les raccordements illustrés ci-dessous. Quand le commutateur est réglé à la position
« B », il est possible de syntoniser directement tous canaux non brouillés sur votre téléviseur/lecteur DVD.
Quand le commutateur est réglé à la position « A », syntonisez votre téléviseur/lecteur DVD sur la sortie du
convertisseur/débrouilleur (en général 3 ou 4) et utilisez le convertisseur/débrouilleur pour syntoniser les
canaux brouillés.
Câble de 75
ohms Provenant
DU réseau de
câblodistribution
Convertisseur/débrouilleur
Séparateur
Commutateur A/B
Câble de 75 ohms
à raccorder sur le
A
téléviseur/lecteur DVD
B
Borne de
raccordement
d’antenne
Page 53

Starting Setup (Configuration
3
au démarrage)
4
Le menu Auto Setup s’affiche la première
fois que le téléviseur est mis sous tension ; il
permet de sélectionner la langue du menu, de
spécifier le réglage TV/Câble et de programmer
automatiquement les canaux disponibles.
IMPOTANT: S’assurer que l’antenne ou le
système de TV câblée est bien connecté.
Pour allumer l’appareil, appuyez sur POWER.
1
(Le voyant d’alimentation POWER à l’avant de
l’appareil passe au vert. Une image apparaît
à l’écran au bout d’environ 10 secondes.) La
fonction de configuration au démarrage est
activée. Appuyz sur ou pour sélectionner
langue désirée.
Auto Setup
Language English
Signal Type Cable
Automatic Search Start
: Adjust
: Select
Appuyer sur ou pour sélectionner la « Signal
2
Type » puis appuyz sur ou pour sélectionner
« Cable » ou « Air ».
Appuyer sur ou pour sélectionner
3
« Automatic Search » puis appuyer sur ENTER
ou .
La fonction « Auto Setup » démarre. Une fois que
4
la configuration automatique est terminée, un
canal de TV s’affiche à l’écran.
• La mémorisation complète des canaux de
câblodiffusion numérique peut prendre de 15
à 30 minutes, en fonction des conditions de
réception.
REMARQUE:
Si la touche EXIT/CANCEL est appuyée au cours
•
de la configuration automatique, la configuration au
démarrage s’arrête et l’écran de TV s’affiche.
Les changements sont effectifs immédiatement en
•
cas de sélection d’un élément de menu. Appuyer
sur EXIT/CANCEL pour visionner les changements.
Une fois la programmation des menus terminée,
•
appuyer sur EXIT/CANCEL.
Fonctionnement du téléviseur
Pour allumer l’appareil, appuyez sur POWER.
1
(Le voyant d’alimentation POWER à l’avant de
l’appareil passe au vert. Une image apparaît à
l’écran au bout d’environ 10 secondes.)
Réglez le volume au niveau désiré en appuyant
2
les touches de réglage du VOL + ou . Le niveau
d’intensité de la reproduction sonore sera indiqué
à l’écran par des barres bleues. Au fur et à mesure
que le volume augmente, le nombre de barres
bleues augmente aussi à l’écran, et vice versa.
CANAUX VHF/UHF/CÂBLODISTRIBUÉS
REMARQUE:
Si un canal inactif est sélectionné, la reproduction
•
sonore est automatiquement coupée.
L’image d’un canal numérique peut prendre quelques
•
secondes à apparaître à l’écran après la sélection.
Pour sélectionner la source d’entrée vidéo
Pour afficher un signal provenant d’un autre
appareil raccordé à votre téléviseur ACL, comme
un magnétoscope, appuyez sur INPUT SELECT,
puis sur / ou les touches numériques (05)
correspondantes, puis sur ENTER. Vous pouvez
sélectionner TV, Video, Component, HDMI, PC ou
DVD suivant les prises d’entrée utilisées pour la
connexion de vos appareils.
Réglez l’option de sélection du type de signal (Signal
Type) à la position appropriée (consultez la rubrique
« Sélection du mode Air ou Cable » à la page 18).
Appuyez sur les touches d’accès direct (09, )
pour sélectionner le canal.
(Si vous n’appuyez que sur le numéro de canal,
la sélection du canal est retardée de quelques
secondes.)
POUR SÉLECTIONNER DES CANAUX
ANALOGIQUES
1-9:
10-99: Appuyez sur les 2 chiffres en ordre. Par
100-135: Appuyez sur les 3 chiffres en ordre. Par
POUR SÉLECTIONNER DES CANAUX
NUMÉRIQUES
Appuyez sur les 3 premiers chiffres, puis sur la
touche , suivi du chiffre restant.
Par exemple, pour sélectionner le canal 015-001,
appuyez sur 0, 1, 5, , 0, 0, 1, puis appuyez sur
ENTER.
Le texte « Audio only » s’affiche à l’écran lorsque
•
le canal sélectionné n’offre qu’un contenu audio.
Le texte « Digital channel signal strength
•
is low » s’affiche à l’écran lorsque le signal
numérique du canal sélectionné est faible.
Il se peut qu’un canal analogique et un canal
numérique transmettent la même émission. Vous
pouvez choisir de regarder un format ou l’autre.
Si vous n’êtes pas abonné au canal
•
sélectionné,
encrypted » s’affiche à l’écran.
Air Cable
VHF
2-13
UHF
14-69
Appuyez sur 1-9 selon le besoin. Par
exemple, pour sélectionner le canal 2,
appuyez sur 2, puis appuyez sur ENTER.
exemple, pour sélectionner le canal
12, appuyez sur 1, 2, puis appuyez sur
ENTER.
exemple, pour sélectionner le canal
120, appuyez sur 1, 2, 0, puis appuyez
sur ENTER.
le texte « Digital channel is
VHF
2-13
STD/HRC/IRC
14-36 (A) (W)
37-59 (AA) (WW)
60-85 (AAA) (ZZZ)
86-94 (86) (94)
95-99 (A-5) (A-1)
100-135 (100) (135)
01 (5A)
FRANÇAIS
Page 54

Source Selection
0.TV
1.Video
2.Component
3.HDMI
4.PC
5.DVD
[0 5]:Select
CH /
Pressez et relâchez CH / . L’appareil passe
automatiquement au prochain canal mis en mémoire.
Pour obtenir de bons résultats, avant de choisir les
canaux, ils doivent être mis en mémoire. Consultez la
rubrique « Mise en mémoire des canaux » aux pages
18 et 19.
AFFICHAGE
Appuyez sur DISPLAY pour afficher les données de
fonctionnement courantes à l’écran.
Lorsque le téléviseur reçoit un signal numérique, les
données numériques apparaissent.
62 001 HDTV Moving Picture1
CH 1
Digital Air
No Program Informat on is avaiable
Fu l
1080i
Numéro de canal
•
Nom du canal (si pré-réglage)•Nom du programme diffusé
Classification Puce V
•
Minuterie d’arrêt différé•
Guide des programmes
•
Résolution
•
Lorsque le téléviseur reçoit un signal analogique, les
données analogiques apparaissent.
14
Analog Cable
Mono
Fu l
480i
Numéro de canal
•
Classification Puce V
•
Minuterie d’arrêt différé•
Données sonores
•
(Stereo, SAP ou Mono)
Sleep Timer
Off
English
Sleep T mer
Off
Nom de station
•
•
Type de signal
•
Langue de la bande sonore
•
Format image
•
Nom du canal (si pré-réglage)
•
Type de signal
•
Format image
•
Résolution
•
MINUTERIE D’ARRÊT DIFFÉRÉ
Pour programmer le téléviseur pour qu’il s’éteigne
automatiquement après une période prédéterminée,
appuyez sur SLEEP de la télécommande. La durée de temps augmentera de 10 minutes à chaque
pression de la touche SLEEP (Off, 0h 10m, 0h 20m,
..., 2h 0m). Après la programmation de la durée avant
l’arrêt différé, l’affichage apparaît brièvement toutes
les dix minutes pour vous rappeler que cette fonction
est activée. Pour confirmer le réglage de minuterie
d’arrêt différé, appuyez sur SLEEP et la durée restante s’affichera quelques secondes. Pour désactiver
la minuterie d’arrêt différé, appuyez de façon répétée
sur SLEEP jusqu’à ce que l’affichage indique Off.
Guide rapide pour les
opérations menu
Activer le menu (call Menu) et choisir par ex.
Language.
Appuyez sur INPUT SELECT pour sélectionner
1
le mode TV.
Appuyez sur SETUP/TV MENU. L’écran de menu
2
TV s’affiche.
Main Menu
Picture
Audio
Channel
Lock
Setup
: Select ENTER:Set
Appuyez sur ou pour sélectionner « Setup »,
3
puis sur ou ENTER.
Appuyez sur ou pour sélectionner « Language »,
4
puis sur ou pour sélectionner langue desirée.
... par la suite, le MENU peut être activé de la
même manière.
Appuyez sur EXIT pour retourner à l’écran
5
normal.
REMARQUE:
Si aucune touche n’est pressée pendant plus
•
de 60 secondes environ, l’écran menu retourne
automatiquement au fonctionnement normal.
>>
Appuyez de nouveau sur DISPLAY pour faire
disparaître les informations à l’écran.
REMARQUE:
Au bout de quelques secondes, l’écran DISPLAY
•
rétablit automatiquement le fonctionnement normal
du téléviseur.
RAPPEL DE CANAL
La touche RECALL vous permet de retourner au
dernier canal sélectionné. Appuyez de nouveau sur
RECALL pour retourner au canal que vous regardiez
précédemment.
MISE EN SOURDINE
Appuyez sur MUTE pour couper la reproduction
sonore. Le son est coupé, et le mot « Mute » apparaît
à l’écran. Pour rétablir le son, appuyez de nouveau
sur cette touche ou sur la commande VOL + ou .
Page 55

Fonctions personnelles
Vous pouvez modifier les réglages par défaut selon vos préférences personnelles.
Rubriques sélectionnées Conseil de réglage
Picture Picture
Setting
Picture
Preference
Picture Size Consulter la page 22.
Film Mode On/Off
PC Setting Hor Position /
DNR On/Off La DNR (réduction numérique du bruit) peut atténuer les parasites.
Audio Bass / Treble / Balance Vous pouvez ajuster la qualité du son selon vos préférences.
MTS Stereo / Mono
Surround On/Off La présence dynamique et sonore ainsi créée procure une reproduction
Audio Language Quand deux langues audio ou plus sont incluses dans un signal
HDMI Audio HDMI / DVI Quand vous utilisez les prise PC/HDMI AUDIO IN pour raccorder à
Channel Add / Delete Consulter la page 18.
DTV Signal Consulter la page 19.
Auto Ch Memory Consulter la page 18.
Ch Label Consulter la page 19.
Lock Consulter la page 20.
Setup Closed Caption Consulter la page 21.
Language
Video Label Consulter la page 19.
Auto Shut Off On/Off Si la fonction d’arrêt automatique (Auto Shut Off) est activée, que la station
Reset La fonction de réinitialisation (Reset) rétablit les réglages par défaut du
REMARQUE:
* En mode HDMI ou PC, la fonction d’arrêt automatique (Auto Shut Off) s’active automatiquement au bout d’1
minute en l’absence de signal d’entrée.
Brightness
/ Contrast /
Sharpness /
Color / Tint
Color
Temperature
Backlight La fonction de l’affichage lumineux ajuste la luminosité de l’écran de
Sports Image lumineuse et dynamique (préréglée en usine)
Standard Qualité normale d’image (préréglée en usine)
Movie Réglage ressemblant aux images de cinéma (préréglé en usine)
Memory Vos réglages préférés (choisis par vous-même; consultez la rubrique
Ver Position
Clock Pour minimiser toutes barres verticales ou bandes visibles à l’arrière-plan
Phase Celle-ci doit être ajustée une fois que la fréquence a été réglée pour
Auto Adjust Pour ajuster automatiquement tous les réglages PC.
/ SAP
Vous pouvez ajuster la qualité du image selon vos préférences.
Bleu (Cool) / Neutre (Standard) / Rouge (Warm)
manière à augmenter la clarté de l’image.
« Picture Setting »).
Vous pouvez régulariser les mouvements en réglant le mode Film sur « On »
quand vous visionnez un DVD.
Pour ajuster la position horizontale / verticale de l’image à l’écran du moniteur
de PC. Chaque norme vidéo requiert une valeur différente pour ce réglage.
de l’écran.
optimiser la qualité de l’image.
Utilisez la fonction de son multivoies (MTS) pour écouter un son stéréo
haute fidélité. MTS permet aussi de transmettre un programme secondaire
audio (SAP) contenant une deuxième langue ou d’autres données sonores.
Lorsque le téléviseur reçoit une émission stéréophonique ou en SAP, le mot
« Stereo » ou « SAP » est affiché chaque fois qu’on appuie sur DISPLAY.
sonore des plus agréables.
numérique, vous pouvez choisir l’une des langues audio. (Cette fonction
est uniquement offerte pour les émissions numériques.)
l’appareil un dispositif HDMI ou DVI, vous devez sélectionner « HDMI » ou
« DVI » comme source d’entrée HDMI audio.
Vous pouvez choisir parmi les trois langues suivantes (anglais, français et
espagnol) pour l’affichage à l’écran.Tout d’abord, choisissez la langue que
vous désirez, puis passez aux autres options offertes par le menu.
diffusée cesse d’émettre et que personne ne regarde en fait la télé, le
téléviseur se met hors circuit automatiquement au bout de 15 minutes.
fabricant.
Les réglages « Picture Size », « MTS », « Audio Language» et « HDMI Audio »
ne peuvent pas être réinitialisés par cette fonction.
FRANÇAIS
Page 56

Mise en mémoire des canaux
Ce téléviseur est muni d’une mémoire de canaux,
qui permet de passer au canal mémorisé suivant
ou précédent et de sauter les canaux non
désirés. Avant de syntoniser les canaux, il faut
tout d’abord les programmer dans la mémoire
du téléviseur. Pour utiliser ce téléviseur avec
une antenne, réglez l’option Signal Type sur le
mode Air. Lorsque l’appareil sort de l’usine, cette
option de menu est en mode Cable.
Sélection du mode Air ou Cable
Sélectionner « Channel », puis sur ou ENTER.
1
Appuyez sur ou pour sélectionner « Auto Ch
2
Memory », puis sur ou ENTER.
Appuyez sur ou pour sélectionner « Signal
3
Type ».
Appuyez sur ou pour sélectionner « Air » ou
4
« Cable ».
Air: canaux VHF/UHF
Cable:
canaux du câble
Auto Ch Memory
Signal Type Cable
Automatic Search Start
La mémorisation des canaux câblodistribués
•
numériques peut prendre de 15 à 30 minutes.
Selon la qualité de la réception, un affichage à
barre peut rester immobile pendant plusieurs
minutes; veuillez donc patienter.
REMARQUE:
•
Il est préférable de réaliser la mémorisation des
canaux pendant les heures de grande écoute
de la soirée puisque davantage de stations
diffusent alors des signaux numériques. Pour que
la mémorisation des canaux soit possible, il faut
qu’une station diffuse au même moment un signal
numérique de canal.
•
Si vous n’êtes pas certain quels canaux numériques
sont offerts dans votre région, vous pouvez consulter
www.antennaweb.org pour recevoir une liste
pertinente à votre adresse ou à votre code postal.
Si vous avez besoin d’aide supplémentaire, vous
pouvez composer notre numéro sans frais du service
clientèle: 1-800-289-0980.
•
Il se peut que votre région reçoive périodiquement
de nouveaux canaux numériques; il est donc
recommandé d’exécuter l’opération « Automatic
Search » régulièrement.
Ajout d’un canal
Si vous trouvez un nouveau canal numérique qui n’est pas
enregistré, vous pouvez l’ajouter à la mémoire de canaux.
Syntonisez le nouveau canal.
1
: Adjust
: Select
TABLEAU DES CORRESPONDANCES DES
CANAUX DU CÂBLE
Le tableau ci-dessous illustre les correspondances
usuelles d’attribution des canaux du câble.
REMARQUE:
L’image d’un canal numérique peut prendre quelques
•
secondes à apparaître à l’écran après la sélection.
Recherche automatique
Sélectionner « Channel », puis sur ou ENTER.
1
Appuyez sur ou pour sélectionner « Auto Ch
2
Memory », puis sur ou ENTER.
Appuyez sur ou pour sélectionner
3
« Automatic Search », puis sur ou ENTER.
Auto Ch Memory
Signal Type Cable
Automatic Search Stop
Analog Channel Found 7
Dig tal Channel Found 5
Programming Now
: Select
Le téléviseur commencera à mémoriser tous les
4
canaux offerts dans votre région.
ENTER:Cancel
Sélectionner « Channel », puis sur ou ENTER.
2
Appuyez sur ou pour sélectionner « Add/
3
Delete », puis sur ou ENTER.
Add/Delete
Adding Channel >>
Add/Delete >>
Clear All >>
: Select ENTER:Set
Appuyez sur ou pour sélectionner « Adding
4
Channel », puis sur ou ENTER. Le nouveau
canal sera intégré à la mémoire de canaux.
Ajout/effacement de canaux
Vous pouvez choisir le canal à sauter.
Sélectionner « Channel », puis sur ou ENTER.
1
Appuyez sur ou pour sélectionner « Add/
2
Delete », puis sur ou ENTER.
Appuyez sur ou pour sélectionner « Add/
3
Delete », puis sur ou ENTER.
Appuyez sur ou pour sélectionner le canal à sauter.
4
Add/Delete
CH Signal
2 Analog
3 Analog Add
3 001 Digital Delete
3 002 Digital Add
4 Analog Delete
: Select
Appuyez sur ou pour sélectionner « Add »
5
ou « Delete », selon la fonction à appliquer.
Répétez les procédures décrites aux étapes 4 à 5
6
afin d’ajouter (ou effacer) d’autres canaux dans la
mémoire du syntonisateur.
Add
: Adjust
Page 57

Effacement complet
Tous les canaux sont effacés de la mémoire de canaux.
Sélectionner « Channel », puis sur ou ENTER.
1
Appuyez sur ou pour sélectionner « Add/
2
Delete », puis sur ou ENTER.
Appuyez sur ou pour sélectionner « Clear
3
All », puis sur ou ENTER.
Add/Delete
Add ng Channel >>
Add/Delete >>
Clear A l >>
: Select ENTER:Set
Appuyez sur ou pour sélectionner un canal
3
auquel vous souhaitez attribuer un nom, puis sur
.
Ch Label
Channel Number 15 1
Ch Label
Label Clear >>
: Adjust
: Select
Appuyez de façon répétée sur ou jusqu’à ce
4
que le caractère que vous souhaitez apparaisse
dans le premier espace.
Ch Label
Channel Number 15 1
Ch Label A
Label Clear >>
Vérification de la force
du signal numérique
Vous pouvez visualiser l’indicateur de la
puissance du signal numérique.
Sélectionner « Channel », puis sur ou ENTER.
1
Appuyez sur ou pour sélectionner « DTV
2
Signal ».
Appuyez sur ou ENTER pour vérifier la force
3
du signal numérique.
L’écran de la force du signal numérique s’affiche.
Au besoin, ajustez l’orientation de l’antenne afin
d’obtenir la force de signal maximale.
DTV Signal
0 50 100
Signal Level
REMARQUE:
La fonction de mesure de la force du signal n’est
•
pas offerte pour les canaux analogiques.
Au bout de 240 secondes, l’écran DTV Signal
•
rétablit automatiquement le fonctionnement normal
du téléviseur.
: Adjust
: Select
Le caractère change comme suit:
Si le caractère désiré apparaît, appuyez sur
ENTER.
Répétez cette étape pour entrer le reste des
caractères.
Si vous voulez laisser un blanc dans le nom, vous
devez sélectionner l’espace vide dans la liste des
caractères.
Une fois que vous avez tapé tout le nom, appuyez
5
sur EXIT pour retourner à l’écran normal.
Répétez les étapes 3 à 4 pour les autres canaux.
6
Vous pouvez attribuer un nom à chaque canal.
ENTER:Set
ESPACE
, () @ / + =
Pour effacer un nom de canal
Après l’étape 3 ci-dessus, appuyez sur ou pour
sélectionner « Label Clear », puis sur ou ENTER.
REMARQUE:
•
Les noms de canaux sont réinitialisés après la
fonction « Recherche automatique » décrite à la
page 18.
FRANÇAIS
Attribution d’un nom
aux différents canaux
Le nom des canaux apparaît avec le numéro de
canal chaque fois que vous allumez le téléviseur,
sélectionnez un canal ou appuyez sur DISPLAY.
Vous pouvez sélectionner les quatre caractères
de votre choix pour identifier un canal.
Pour créer des noms de canaux
Sélectionner « Channel », puis sur ou ENTER.
1
Appuyez sur ou pour sélectionner « Ch
2
Label », puis sur ou ENTER.
Le menu « Ch Label » apparaît.
Étiquetage des entrées
vidéo
La fonction d’étiquetage vidéo vous permet
d’étiqueter chaque source d’entrée de votre
téléviseur.
Sélectionner « Setup », puis sur ou ENTER.
1
Appuyez sur ou pour sélectionner « Video
2
Label », puis sur ou ENTER.
Appuyez sur ou pour sélectionner une entrée
3
à étiqueter.
Appuyez sur ou pour sélectionner l’étiquette
4
désirée pour cette source d’entrée.
Page 58

Video Label
Video
Component
HDMI
: Adjust
: Select
– : Utilise le nom d’étiquette par défaut
VCR : Magnétoscope
DVD : Lecteur DVD
DTV : Décodeur de DTV
SAT : Démodulateur/décodeur satellite
CBL : Décodeur de TV câblodistribution
HD : Appareil HDMI (seulement pour les
entrées HDMI)
Utilisation de la Puce V
Vous pouvez régler un âge limite pour empêcher
les enfants de regarder ou d’écouter des scènes
violentes ou des images à exclure. La restriction
s’applique à « TV Rating » et à « Movie Rating » si
ces données sont transmises. Ces restrictions se
règlent séparément. Pour utiliser la fonction Puce V,
vous devez enregistrer un mot de passe.
Pour enregistrer un mot de passe
Sélectionner « Lock », puis sur ou ENTER.
1
Sélectionnez et entrez votre mot de passe (4
2
chiffres) à l’aide des touches numériques (09),
puis appuyez sur ENTER.
Lock
New Password
[0 9]
: Select ENTER:Set
« » apparaît à la place du chiffre.
_
* * *
TV Rating (Classification des émissions
télévisées)
TV Rating
ALL D L S V FV
TVY
TVY7
TV G
TV PG
TV 14
TV MA
: Select
ENTER:Set
Vous pouvez régler la classification en fonction
du niveau d'âge et du genre.
Âge:
TVY : Tous les enfants
TVY7 : Enfants de 7 ans et plus
TVG : Auditoire général
TVPG : Assistance des parents
TV14 : Enfants de 14 ans et plus
TVMA : Enfants de 17 ans et plus
Genre:
ALL : Tous
D : Dialogue
L : Langue
S : Sexe
V : Violence
FV : Fantaisie avec violence
Movie Rating (Classification des films)
Movie Rating
G
PG
PG 13
R
NC 17
X
: Select
ENTER:Set
G : Tous les âges
PG : Assistance des parents
PG13 : Assistance parentale, moins de 13 ans
R : Moins de 17 ans, assistance parentale
conseillée
NC17 : Enfants de 17 ans et plus
X : Adultes seulement
Entrez de nouveau le même mot de passe pour
3
confirmer, puis appuyez sur ENTER.
Le mot de passe est maintenant enregistré.
REMARQUE:
•
Si vous oubliez le mot de passe, contactez le
Service clientèle au 1-800-289-0980 pour l’aide.
Vous aurez besoin de la télécommande originale.
•
Pour ne pas oublier le mot de passe, notez-le et
gardez-le dans un endroit sûr.
Pour régler la Puce V
Sélectionner le menu « Lock », puis sur ou
1
ENTER.
Utilisez les touches numérotées (09) pour
2
entrer votre mot de passe, puis appuyez sur
ENTER. Le menu Lock apparaît.
Appuyez sur ou pour sélectionner « V-
3
Chip », puis sur ou pour sélectionner « On ».
Appuyez sur ou pour sélectionner « V-Chip
4
Set », puis sur ou ENTER.
Le menu V-Chip Set apparaît.
Appuyez sur ou pour sélectionner la
5
classification à utiliser, puis sur ou ENTER.
Chacune des classifications ci-dessous s'affiche.
Appuyez sur /// pour sélectionner la
6
classification désirée, puis sur ENTER.
Appuyez sur EXIT pour retourner à l’écran normal.
7
La fonction puce V est maintenant en service.
Utilisation du téléviseur une fois la fonction de
Puce V activée.
Lorsque le programme auquel s'applique la fonction
Puce V est reçu, appuyez sur MUTE et veuillez saisir
le mot de passe. La protection sera temporairement
annulée. Si le téléviseur est mis hors tension ou que
le canal est changé, la restriction de la Puce V est
rétablie.
REMARQUE:
•
La fonction Puce V est en service uniquement pour
les émissions et les sources d’entrée portant un
signal de restriction.
Pour changer le mot de passe
Sélectionner « Lock », puis sur ou ENTER.
1
Utilisez les touches numérotées (09) pour
2
entrer votre mot de passe, puis appuyez sur
ENTER. Le menu Lock apparaît.
Page 59

Appuyez sur ou pour sélectionner « Change
3
Password », puis sur ou ENTER.
L'écran Change Password apparaît.
Utilisez les touches numériques (09) pour
2
entrer votre mot de passe, puis appuyez sur
ENTER. Le menu Lock apparaît.
Entrez un nouveau mot de passe à l’aide des
4
touches numériques (09), puis appuyez sur
ENTER.
Entrez de nouveau le même mot de passe pour
5
confirmer, puis appuyez sur ENTER.
Le mot de passe est maintenant enregistré.
Téléchargement d'un système de
classification Puce V supplémentaire
En plus du système de classification Puce V standard,
votre téléviseur pourra télécharger un système de
classification supplémentaire, si un tel système vous
est offert dans l'avenir.
Pour télécharger le système de classification
Puce V supplémentaire (s'il en existe un)
Sélectionner « Lock », puis sur ou ENTER.
1
Utilisez les touches numériques (09) pour entrer
2
votre mot de passe, puis appuyez sur ENTER. Le
menu Lock apparaît.
Appuyez sur ou pour sélectionner « V-
3
Chip », puis sur
Appuyez sur ou pour sélectionner « V-Chip
4
Set (DTV) », puis sur ou ENTER.
Si le téléviseur n'a pas le système de
5
classification supplémentaire en mémoire, il
entreprend de le télécharger, ce qui peut prendre
un certain temps.
Réglez les restrictions de contenu que vous
6
préférez pour le système de classification
supplémentaire.
Il faut également accomplir l'opération « Update »
7
pour mettre à jourles données de classification.
REMARQUE:
•
Vous pouvez uniquement télécharger le système
de classification Puce V supplémentaire lorsque le
téléviseur reçoit un signal numérique.
•
Le téléchargement du système de classification
supplémentaire peut prendre un certain temps.
Les données et le système de classification Puce V
•
ne sont pas déterminés ou contrôlés par le téléviseur.
Le système de classification Puce V standard
•
est accessible que le téléviseur reçoive un signal
numérique ou non et bloque aussi bien les
émissions analogiques que les numériques. Pour
régler le niveau de restriction avec le système de
classification Puce V standard, sélectionnez « VChip Set » à l'étape 4.
•
Le système de classification Puce V à télécharger
est une technique en évolution, dont l'accessibilité,
le contenu et le format peuvent varier.
•
Vous ne pouvez pas sélectionner cette fonction si
le téléviseur ne reçoit pas de signal numérique à la
station actuelle.
Pour effacer tous les réglages de la puce V
Sélectionner « Lock », puis sur ou ENTER.
1
ou
pour sélectionner « On ».
Appuyez sur ou pour sélectionner « V-Chip
3
Clear », puis sur ou ENTER.
L'écran Change Password apparaît.
Utilisez les touches numériques (09) pour entrer
4
votre mot de passe, puis appuyez sur ENTER.
Tous les réglages par défaut du fabricant sont
rétablis.
Soustitrage
QUE SIGNIFIE SOUSTITRAGE
Ce téléviseur a la capacité de décoder et d’afficher
les émissions télévisées avec sous-titres. Le
sous-titrage affiche du texte à l’écran pour les
téléspectateurs malentendants ou traduit et affiche du
texte dans une autre langue.
Soustitres: ce mode de sous-titrage fait afficher le
texte à l’écran en anglais ou en une autre langue. En
général, les sous-titres codés en anglais sont transmis
sur C1, et ceux dans d’autres langues sur C2.
Texte: le mode texte des sous-titres remplit
généralement la moitié de l’écran avec un calendrier
de programmation ou d’autres informations.
Sélectionner « Setup », puis sur ou ENTER.
1
Appuyez sur ou pour sélectionner « Closed
2
Caption », puis sur ou ENTER.
Le menu Closed Caption apparaît.
Appuyez sur ou pour réglage « CC Setting »
3
sur « On ».
On: Les sous-titres apparaissent à l’écran.
Off: Les sous-titres n’apparaissent pas à l’écran.
Appuyez sur ou pour sélectionner « Analog
4
Caption » ou « Digital Caption ».
Lorsque vous sélectionnez « Analog Caption »,
vous pouvez choisir entre C1, C2, C3, C4, T1, T2,
T3 et T4.
Lorsque vous sélectionnez « Digital Caption »,
vous pouvez choisir entre CS1, CS2, CS3, CS4,
CS5 et CS6.
Appuyez sur ou pour sélectionner le mode
5
de sous-titrage voulu, à la fois pour les sous-titres
numériques et analogiques.
Appuyez sur ou pour sélectionner « CC
6
Priority », puis sur ou pour sélectionner
« Digital CC » ou « Analog CC ».
REMARQUE:
Selon le signal de radiodiffusion, certains sous-
•
titres analogiques fonctionnent avec un signal
de radiodiffusion numérique. Ceci prévient le
chevauchement de deux types de sous-titres.
REMARQUE:
Si l’émission ou la vidéo sélectionnée n’a pas de
•
sous-titres, aucun sous-titre ne s’affiche à l’écran.
FRANÇAIS
Page 60

Si le texte n’est pas disponible dans votre zone
•
de réception, un rectangle noir peut apparaître à
l’écran. Si cela se produit, mettez le réglage des
sous-titres sur « Off ».
Lorsque la fonction des sous-titres est sélectionnée,
•
les sous-titres apparaissent au bout d’environ 10
secondes.
•
Si aucun signal de sous-titrage n’est reçu, l’écran
n’affiche aucun sous-titre, mais le téléviseur continue
de fonctionner en mode de sous-titrage.
•
Des fautes d’orthographe ou des caractères
bizarres peuvent occasionnellement apparaître
dans les sous-titres. Ceci est normal pour les soustitres, particulièrement lorsqu’il s’agit d’émissions
en direct. La raison en est que les sous-titres sont
saisis également en direct. Ces transmissions ne
donnent pas le temps de procéder à une relecture.
•
Lorsque les sous-titres sont affichés, les affichages
à l’écran, tels que le volume et la sourdine, peuvent
être visibles mais peuvent se superposer aux soustitres.
•
Certains systèmes de câblodistribution et de
protection contre la copie peuvent gêner la
réception des sous-titres.
•
Si vous utilisez une antenne intérieure ou si la
réception télévisée est très médiocre, il est possible
que le décodeur de sous-titres n’apparaisse pas
ou apparaisse avec des caractères bizarres ou
des mots mal orthographiés. Dans ce cas, ajustez
l’antenne pour améliorer la réception ou utilisez une
antenne extérieure.
Soustitrage avancé
Lorsque vous choisissez de personnaliser la
méthode d’affichage, vous pouvez ajuster les
divers réglages cidessous comme suit:
Cette fonction est conçue pour personnaliser les
sous-titres numériques seulement.
Sélectionner « Setup », puis sur ou ENTER.
1
Appuyez sur ou pour sélectionner « Closed
2
Caption », puis sur ou ENTER.
Le menu Closed Caption apparaît.
Taille Sous
Titres
(Text Size):
Type Sous
Titres
(Text Type):
Bordure
SousTitres
(Text Edge):
Couleur
SousTitres
(Text Color):
Opacité de
Texte
(Text Opacity):
Couleur
D’arrièrePlan
(Background
Color):
Opacité de
Fond
(Background
Opacity):
REMARQUE:
•
Il n’est pas possible de définir la même couleur pour
le texte et le fond (« Text Color » et « Background
Color »).
•
Il n’est pas possible de sélectionner « Transparent »
à la fois pour le texte et le fond (« Text Opacity » et
« Background Opacity»).
Auto, Petit (Small), Standard,
Grand (Large)
Auto, Style1, Style2, Style3,
Style4, Style5, Style6, Style7
Auto, Sans (None), En Relief
(Raised), En Retrait (Depressed),
Uniforme (Uniform), Ombre
gauche (Left Shadow), Ombre
droite (Right Shadow)
Auto, Noir (Black), Blanc (White),
Rouge (Red), Vert (Green), Bleu
(Blue), Jaune (Yellow), Magenta,
Cyan
Auto, Solide (Solid), Transparent,
Translucide (Translucent),
Flashing
Auto, Noir (Black), Blanc (White),
Rouge (Red), Vert (Green), Bleu
(Blue), Jaune (Yellow), Magenta,
Cyan
Auto, Solide (Solid), Transparent,
Translucide (Translucent),
Flashing
Réglage du format d’image
Vous pouvez visualiser les émissions de format
480i et 480p dans différents formats d’image:
Natural, Cinema Wide1, Cinema Wide2, Cinema
Wide3, Full et Native.
Sélection du format image
Appuyez sur ou pour réglage « CC Setting »
3
sur « On ».
Appuyez sur ou pour sélectionner « Digital
4
CC Preset », puis sur ou pour sélectionner
« Custom ».
Appuyez sur ou pour sélectionner « CC
5
Advanced », puis sur ou ENTER.
Le menu CC Advanced apparaît.
Appuyez sur ou pour sélectionner l’élément
6
désiré, puis sur ou pour modifier le réglage.
CC Advanced
Text Size Auto
Text Type Auto
Text Edge Auto
Text Color Auto
Text Opacity Auto
Background Color Auto
Background Opacity Auto
: Select
Vous pouvez sélectionner parmi les éléments et
les paramètres suivants.
: Adjust
Sélectionner « Picture », puis sur ou ENTER.
1
Appuyez sur ou pour sélectionner « Picture
2
Size », puis sur ou ENTER pour afficher le
menu Picture Size. Appuyez sur / ou les
touches numérique (04) correspondante pour
sélectionner le format image désiré, comme suit.
Picture Size
0.Natural
1.Cinema Wide1
2.Cinema Wide2
3.Cinema Wide3
4.Full
[0 4]:Select
REMARQUE:
•
Les sélections de format image offertes peuvent
varier selon la source d’entrée ou le signal de
radiodiffusion.
•
Le menu Picture Size peut également être affiché
en appuyant sur la touche SCREEN SIZE de la
télécommande.
Page 61

Natural
Dans certains cas, cette image s’affiche au format
standard 4:3 avec des bandes latérales noir.
Cinema Wide1 (pour émissions de format 4:3)
Pour remplir l’écran, les bords droit et gauche sont
étirés, toutefois, le centre de l’image ne s’écarte pas
beaucoup de ses proportions antérieures.Les bords
supérieur et inférieur de l’image peuvent être cachés.
Cinema Wide2 (pour émissions de format
boîte aux lettres avec soustitres)
Pour remplir la largeur de l’écran, l’image est étirée à
l’horizontale. Cependant, elle est très peu étirée vers
le haut et le bas.
Les bords supérieur et inférieur de l’image peuvent
être cachés.
REMARQUE:
•
Il se peut que certaines émissions numériques,
haute définition ou les deux ne vous permettent pas
de modifier le format d’image.
•
En mode COMPONENT avec taux de balayage
de 720p ou 1080i, seuls le format d’image Cinema
Wide2 et Full sont accessibles.
•
En mode PC, seuls les formats d’image Natural, Full
et Native sont accessibles. En mode (WXGA), seuls
les formats dimage Full ot Native sont accessibles.
FRANÇAIS
Cinema Wide3 (pour émissions de format
boîte aux lettres avec soustitres)
Pour remplir la largeur de l’écran, l’image est étirée à
l’horizontale. Cependant, elle est très peu étirée vers
le haut et le bas.
Les bords supérieur et inférieur de l’image peuvent
être cachés.
A B C D E F G
A B C D E F G
Full (pour émissions de format 16:9)
Full affiche l’image à sa taille maximale.
Native (pour mode PC seulement)
La résolution du signal de l’image est détectée et
affichée à l’écran avec le même nombre de pixels..
Page 62

Préparation
Lecture
Les pages qui suivent décrivent la configuration/
le fonctionnement en mode DVD.
Préparation
Avant l’utilisation d’un DVD/CD, veuillez faire les
préparatifs suivants.
Introduisez la fiche du cordon CA dans une prise
1
CA polarisée standard de 120 V 60 Hz.
Si vous branchez la fiche du cordon CA pour
•
la première fois, veuillez attendre environ 5
secondes avant d’appuyer sur POWER.
REMARQUE:
Lorsque vous raccordez l’appareil à un autre,
•
débranchez-le de la prise de courant.
Appuyez sur la touche POWER de l’appareil ou
2
de la télécommande pour mettre l’appareil en
marche. Le voyant POWER s’allume.
Chaque fois que vous allumez l’appareil, le
•
téléviseur/lecteur DVD démarre en mode TV.
Quand vous utilisez un amplificateur, mettez-le
•
sous tension.
Appuyez sur TV/DVD pour sélectionner le mode DVD.
3
L’écran de démarrage du lecteur DVD apparaît à l’écran.
REMARQUE:
Si l’appareil ne fonctionne pas correctement:
•
L’électricité statique ou un autre facteur nuit peut-être
au fonctionnement du lecteur. Débranchez le cordon
d’alimentation CA une fois, puis rebranchez-le.
Inserción del disco:
•
Si se inclina o mueve la unidad mientras se inserta
el disco, éste puede dañarse.
Affichage d’état du disque
Appuyez sur DISPLAY. L’affichage d’état du disque
apparaît à l’écran.
FONCTION
ACTIVÉE
NUMÉRO
DE TITRE
NUMÉRO DE ANGLE
Pour faire disparaître l’écran d’affichage d’état,
appuyez de nouveau sur DISPLAY.
DVD 00:15:25 01:41:39
Title 1/3 Chapter 2/24
1/1 Eng Dolby Digital 1/2 Eng
1/1
SONORE
TEMPS ÉCOULÉ POUR
LE TITRE EN LECTURE
TYPE DE REPRODUCTION AUDIOLANGUE DE LA BANDE
LANGUE DES SOUS TITRES
DURÉE TOTALE
DU TITRE
NUMÉRO DE
CHAPITRE
Appuyez sur TV/DVD pour sélectionner le mode
1
DVD.
Insérez le disque dans le
2
compartiment à disque
en orientant le côté
imprimé vers l’avant
(si le disque porte une
étiquette).
Tenez le disque sans en toucher les deux faces,
alignez-le sur les guides et mettez-le en place.
Le message « » est remplacé à l’écran par le
3
mot « Reading », et la lecture débute.
Si le disque est doté d’un menu, ce dernier
•
apparaît à l’écran du téléviseur. Pour utiliser un
tel menu, appuyez sur les touches , ,,
ou ENTER.
Reading
Appuyez sur STOP pour arrêter la lecture.
4
•
L’appareil mémorise le point d’arrêt, selon le
disque. Le symbole «
Appuyez sur PLAY pour reprendre la lecture (à
partir de la scène mémorisée).
Si vous appuyez de nouveau sur STOP (le
•
symbole «
retirez le disque du lecteur, le point d’arrêt est
effacé de la mémoire.
Appuyez sur (EJECT).
5
Retirez le disque, puis appuyez sur POWER.
L’appareil s’éteint.
Lorsque de l’éjection du disque, le mécanisme
peut se faire entendre; c’est tout à fait normal.
REMARQUE:
Si un disque non compatible est mis dans l’appareil,
•
le message « Incorrect Disc », « Region Code
Error » ou « Parental Error » apparaît à l’écran du
téléviseur selon le type de disque dont il s’agit. Si
cela se produit, vérifiez si le disque en question est
compatible (voir pages 9 et 32).
Certains disques requièrent environ une minute
•
avant que la lecture démarre.
Lorsqu’un disque de 8 cm est placé dans le
•
compartiment à disque et que l’image à lire ou
l’écran de menu ne s’affiche pas automatiquement,
appuyez sur PLAY.
•
Il se peut que le symbole d’interdiction «
apparaisse dans le coin supérieur droite de l’écran.
Ce symbole signifie, soit que la fonction que vous
tentez d’utiliser n’est pas disponible sur le disque,
soit que l’appareil ne peut pas accéder à cette
fonction à ce moment-là. Il ne s’agit pas d’une
défaillance de l’appareil.
Si vous insérez un disque uniface avec le
•
côté imprimé dans le mauvais sens, les mots
« Reading » puis « Incorrect Disc » s’affichent.
Certaines opérations de lecture DVD peuvent être
•
délibérément fixées par les réalisateurs de logiciels.
Comme cet appareil lit les DVD en fonction du
contenu du disque, certaines fonctions de lecture
risquent de ne pas exister. Consultez également les
instructions fournies avec les DVD.
» apparaît à l’écran) ou si vous
» apparaît à l’écran.
»
Page 63

Modes de lecture
Lecture de CD MP3/WMA/
Lecture rapide
Appuyez sur SEARCH pendant la lecture normale.
Chaque fois que vous appuyez sur SEARCH
vitesse de recherche augmente par
(x4),
(CD:
•
Pour reprendre la lecture normale, appuyez sur
PLAY.
(x8), (x15).
(x 2), (x 4), (x 8), (x 20)).
(x2),
, la
Retour rapide
Appuyez sur SEARCH pendant la lecture normale.
Chaque fois que vous appuyez sur SEARCH
vitesse de recherche augmente par
4),
(CD:
•
Pour reprendre la lecture normale, appuyez sur
PLAY.
(x 8), (x 15).
(x 2), (x 4), (x 8), (x 20)).
(x 2), (x
, la
Arrêt sur image pendant la lecture
Appuyez sur PAUSE/STILL pendant la lecture
normale afin d’interrompre momentanément la
lecture.
•
Pour reprendre la lecture normale, appuyez sur
PLAY.
Avance image par image
Appuyez sur PAUSE/STILL pendant l’arrêt sur image.
L’appareil avance d’une image à chaque pression de
la touche PAUSE/STILL.
•
Pour reprendre la lecture normale, appuyez sur
PLAY.
Lecture au ralenti
Appuyez sur la touche de ralenti en marche arrière
(SLOW
la lecture normale ou l’arrêt sur image.
Chaque fois que vous appuyez sur
de ralenti devient successivement 1/2, 1/4, 1/6, 1/7 de
la vitesse normale.
•
•
) ou en marche avant (SLOW ) pendant
SLOW
Pour reprendre la lecture normale, appuyez sur
PLAY.
Pour reprendre l’arrêt sur image, appuyez sur
PAUSE/STILL.
, la vitesse
Localisation d’un chapitre ou d’une piste
Appuyez sur la touche de saut avant (SKIP ) ou
de saut arrière (SKIP ) pendant la lecture pour
localiser un chapitre que vous souhaitez regarder.
Chaque fois que vous appuyez sur la touche,
l’appareil saute un chapitre ou une piste.
REMARQUE:
L’appareil est capable de maintenir indéfiniment
•
une image vidéo à l’arrêt ou une image affichée
sur votre écran de télévision. Si vous laissez
l’image vidéo à l’arrêt ou l’affichage à l’écran trop
longtemps à l’écran du téléviseur, vous risquez
d’endommager ce dernier de façon permanente.
Il se peut que vous notiez un léger délai entre le
•
moment où une touche est pressée et celui où la
fonction démarre.
JPEG et de CD audio
Ce lecteur peut lire les données MP3/WMA/JPEG
qui ont été enregistrées sur des CDR ou des CD
RW. Pour produire des données MP3/WMA/JPEG,
il vous faut un ordinateur Windows muni d’un
graveur de CDROM et d’un logiciel d’encodage
MP3/WMA/JPEG (non compris).
Le système de gestion hiérarchique des fichiers
(HFS) d’Apple ne peut pas être lu.
Renseignements sur les CD contenant
des fichiers MP3/WMA/JPEG
Restrictions relatives à la lecture de CD MP3/
WMA/JPEG
•
Les CD MP3/WMA/JPEG sont conformes à la
norme ISO9660, et leurs noms de fichier doivent
comprendre une extension de trois caractères
(« mp3 », « wma », « jpg »).
•
Le nom des répertoires et des fichiers du CD
MP3/WMA/JPEG doit respecter les normes ISO
afférentes.
•
Cet appareil peut effectuer la lecture de 2000
fichiers par disque. Si un répertoire contient plus de
2000 fichiers, l’appareil effectue la lecture des 2000
premiers fichiers et ne lit pas les autres.
•
Les CD contenant des fichiers MP3/WMA
ne peuvent servir à la lecture en vue d’un
enregistrement.
•
Il peut s’écouler plus d’une minute avant que
l’appareil ne lise les fichiers MP3/WMA/JPEG selon
leur structure.
•
La musique enregistrée selon la norme
d’enregistrement Joliet peut être lue.
•
Les fichiers de musique enregistrés selon le
système de gestion hiérarchique des fichiers (HFS)
ne peuvent pas être lus.
•
L’appareil peut lire les fichiers JPEG de type
Baseline et Progressive.
Restrictions relatives à l’affichage
•
La longueur maximale d’affichage est de 15 lettres.
Les noms de fichier longs seront abrégés.
•
Les caractères suivants peuvent être affichés: les
lettres majuscules ou minuscules de A à Z, les
chiffres de 0 à 9 et le (trait de soulignement).
•
Les autres caractères sont représentés par un trait
d’union.
Remarques concernant les fichiers MP3/WMA/
JPEG
Pour effectuer la lecture de CD MP3/WMA/JPEG
dans l’ordre d’enregistrement:
1.
Veuillez utiliser le logiciel MP3/WMA/JPEG avec
la fonction qui enregistrent les données en ordre
alphabétique ou numérique.
2.
Nommez chaque fichier en incluant un numéro de
deux ou trois chiffres (p. ex. « 01 » « 02 » ou « 001 »
« 002 »).
3.
Évitez de créer un trop grand nombre de sousdossiers.
FRANÇAIS
Page 64

ATTENTION:
Il se peut que l’appareil ne puisse pas lire certains
•
CD MP3/WMA/JPEG en raison des conditions
d’enregistrement.
Cet appareil ne peut pas effectuer la lecture de
•
CD-R/RW qui ne contiennent aucun fichier musical
ou dont les fichiers ne sont pas de type MP3/WMA/
JPEG.
Lecture de CD MP3/WMA/JPEG et de
CD audio:
Insérez un CD MP3/WMA/JPEG ou un CD audio
1
dans le compartiment à disque.
Sur l’écran du téléviseur, le message « Reading »
2
est affiché. La durée de lecture dépend du
nombre de fichiers sur le disque.
Un écran navigateur de fichiers apparaît à l’écran
3
du téléviseur.
Appuyez sur ENTER.
5
L’appareil entame la lecture du fichier sélectionné.
Appuyez sur STOP pour arrêter la lecture.
6
L’appareil mémorise le point d’arrêt. Le symbole
•
» apparaît à l’écran. Appuyez sur PLAY
«
pour reprendre la lecture (à partir de la scène
mémorisée).
Si vous appuyez de nouveau sur STOP ou si
•
vous retirez le disque du lecteur, le point d’arrêt
est effacé de la mémoire.
REMARQUE:
Lors de la lecture de fichiers MP3/WMA/JPEG,
•
il est impossible d’utiliser les fonctions de
repérage de scène (JUMP) ou de répétition
A-B.
Il est possible d’utiliser les fonctions de
•
répétition de lecture (une piste ou toutes
les pistes), de lecture aléatoire et de lecture
programmée lors de la lecture de CD MP3/
WMA/JPEG et audio (voir page 27).
1/15 00 00 00
/MP3-5 MP3
MP3-5
MP3-6
WMA-11
WMA-12
Picture-1
Picture-2
Picture-3
Picture-4
Le type de fichier
•
Si le répertoire actuel comprend 9 fichiers ou
Select Files
Repeat Off
Mode Off
Music Playing
plus, appuyez sur ou pour faire défiler la
liste de fichiers.
•
Pour voir le contenu d’un dossier, sélectionnezle, puis appuyez sur ENTER. Pour retourner au
répertoire parent, sélectionnez «
Go Up ... »,
puis faites ENTER.
•
Dans le cas où un CD contient un mélange de
fichiers MP3, WMA et JPEG, il faut sélectionner
les fichiers dans le navigateur de fichiers pour
les lire.
Appuyez sur ou pour sélectionner le fichier
4
voulu.
Lorsque la touche PLAY est pressée après
l’affichage du navigateur de fichiers, la lecture
s’amorce automatiquement à partir du premier
fichier.
Dans ce cas, si le premier fichier est au format
MP3/WMA, seuls les fichiers MP3/WMA sont
reproduits dans l’ordre. Si le premier fichier est au
format JPEG, le premier fichier JPEG est reproduit.
Si le répertoire racine ne contient aucun fichier, la
lecture ne commence pas automatiquement.
/MP3 2 MP3
Folder-1
Folder-2
MP3-1
MP3-2
MP3-3
WMA-1
WMA-2
WMA-3
Select Files
Repeat Off
Mode Off
JPEG Preview
Lecture de JPEG:
Dans le navigateur de fichiers, appuyez sur /
1
pour sélectionner le fichier JPEG désiré.
Pour afficher une liste de vignettes, appuyez sur
DVD MENU.
Appuyez sur /// pour sélectionner le fichier
voulu. (Pour retourner au navigateur de fichiers,
appuyez sur TOP MENU.)
/Picture 01 JPG
Picture-01
Picture-02
Picture-03
Picture-04
Picture-05
Picture-06
Picture-07
Picture-08
Appuyez sur ENTER ou PLAY.
2
L’image sélectionnée apparaît à l’écran du
téléviseur.
Rotation d’une image
Vous pouvez faire pivoter une image de 90 degrés.
Appuyez sur ANGLE pendant la lecture de l’image.
«
», « », « » ou « » apparaît à l’écran.
Zoom sur image
La fonction de zoom fonctionne aussi avec les
fichiers JPEG.
Appuyez sur ZOOM (voir « Zoom » à la page 28).
Appuyez sur STOP pour arrêter la lecture.
3
Le navigateur de fichiers apparaît à l’écran du
téléviseur.
Pour regarder un autre fichier, répétez les étapes
1 à 2.
Sélection de fichier
Il est possible de choisir le type de fichier à afficher
dans le navigateur.
Appuyez sur / pour sélectionner « Select
1
Files » dans la colonne de droite du navigateur
de fichiers.
Appuyez sur ENTER, puis sur / pour
•
sélectionner le type de fichiers de la liste
(Music ou Picture).
Select Files
Repeat Off
Mode Off
W 2048 H 1536
Page 65

Appuyez sur ENTER pour ajouter/retirer la coche.
j
2
Le type de fichier coché va s’afficher dans le
navigateur.
Appuyez sur RETURN pour enregistrer le réglage.
3
Lecture programmée CD
Il est possible de définir l’ordre des pistes sur le disque.
Dans le navigateur de fichiers, appuyez sur
1
/// pour sélectionner « Edit Mode », puis
sur ENTER.
Lorsque « Edit Mode » est en noir, vous pouvez
marquer les fichiers à ajouter dans la liste de
programme.
Folder-1
Folder-2
MP3-1
MP3-2
MP3-3
WMA-1
WMA-2
WMA-3
Appuyez sur /// pour sélectionner le fichier
2
à ajouter dans la liste de programme.
Appuyez sur ENTER. Le fichier sélectionné a été
marqué.
Répétez cette démarche pour sélectionner les
autres fichiers.
Appuyez sur /// pour sélectionner « Add To
3
Program ».
Appuyez ensuite sur ENTER. Tous les fichiers
marqués sont ajoutés à la liste de programme.
Une fois que tous les fichiers désirés sont insérés
dans la liste de programme, sélectionnez de
nouveau « Edit Mode » et appuyez sur ENTER
pour sortir de ce mode.
Appuyez sur / pour sélectionner « Program
4
View », puis sur ENTER. Program View ne
montre que les fichiers de programme ajoutés à
l’étape 2.
Folder 1
Folder 2
MP3 1
MP3 2
MP3 3
WMA 1
WMA 2
WMA 3
Depuis l’aperçu du programme, appuyez sur
5
PLAY. La lecture des fichiers est entamée dans
l’ordre de vos ajouts au programme.
Pour retirer un fichier de la liste de programme
en mode d’arrêt
En mode d’édition (Edit Mode), passez à l’aperçu du
programme (Program View). Sélectionnez les fichiers
à retirer, puis appuyez sur ENTER. Sélectionnez
« Clear Program » et appuyez sur ENTER. Le fichier
marqué est supprimé de la liste de programme.
Repeat Off
Mode Off
JPEG Preview
Edit Mode
Program View
Add To Program
JPEG Preview
Edit Mode
MP3 1
MP3 2
MP3 3
WMA 3
Edit Mode
Browser View
Clear Program
JPEG Preview
Lecture répétée CD
Dans le navigateur de fichiers, appuyez sur
1
/// pour sélectionner « Repeat » en mode
d’arrêt.
Appuyez sur ENTER de façon répétée pour
2
sélectionner « Track » ou « All ».
Folder-1
Folder-2
MP3-1
MP3-2
MP3-3
WMA-1
WMA-2
WMA-3
Appuyez sur PLAY.
3
Select Files
Repeat Track
Mode Off
JPEG Preview
L’appareil lance automatiquement la lecture
répétée à la fin de la piste actuelle.
Pour reprendre la lecture normale, sélectionnez le
paramètre « Repeat : Off » à l’étape 2.
REMARQUE:
Les fonctions de lecture répétée ou aléatoire sont
•
annulées lorsque le disque est éjecté ou l’appareil
éteint.
La fonction de répétition de piste est annulée
•
lorsque la touche SKIP
•
Dans le cas d’un CD audio, la fonction de répétition
ou est pressée.
A-B peut également servir. Voyez « Lecture à
répétition A-B » à la page 28.
Lecture aléatoire (CD)
Dans le navigateur de fichiers, appuyez sur
1
/// pour sélectionner « Mode » en mode
d’arrêt.
Appuyez sur ENTER pour sélectionner
2
« Random ».
Folder-1
Folder-2
MP3-1
MP3-2
MP3-3
WMA-1
WMA-2
WMA-3
Appuyez sur PLAY.
3
La lecture aléatoire s’amorce.
Pour reprendre la lecture normale, sélectionnez le
paramètre « Mode : Off » à l’étape 2.
Select Files
Repeat Off
Mode Random
JPEG Preview
FRANÇAIS
REMARQUE:
Le programme est annulé lorsque le disque est
•
é
ecté ou l’appareil éteint.
Page 66

Zoom
Lecture répétée
Cet appareil vous permet de faire un zoom avant
sur l’image. Ensuite, vous pouvez effectuer des
sélections en changeant la position de l’image.
Appuyez sur ZOOM pendant la lecture.
1
La partie centrale de l’image sera agrandie.
Chaque fois que vous appuyez sur ZOOM, le
facteur de ZOOM change:
1,5) et
Appuyez sur /// pour afficher une autre
2
partie de l’image.
Depuis la position centrale, vous pouvez vous
déplacer dans l’image vers le haut (UP), le bas
(DOWN), la gauche (LEFT) ou la droite (RIGHT).
En mode zoom, appuyez à plusieurs reprises
3
sur ZOOM pour retourner à la taille originale de
l’image, soit 1:1 (
REMARQUE:
Vous pouvez sélectionner les fonctions de pause,
•
de ralenti ou de recherche en mode zoom.
Certains disques ne répondent pas à la fonction
•
zoom.
3 (x 2,0).
Off).
1 (x 1,3), 2 (x
Repérage d’une scène
en particulier
Utilisez le titre, le chapitre et l’heure enregistrés
sur le disque pour situer le point de lecture
désiré.
Lecture d’un titre, d’un chapitre:
Appuyez sur PLAY MODE en mode de lecture ou
1
d’arrêt.
Appuyez sur ENTER de façon répétée pour
2
sélectionner « Chapter » ou « Title ».
L’appareil lance automatiquement la lecture
répétée à la fin du titre ou du chapitre actuel.
Si vous réglez le mode de répétition pendant le
•
mode d’arrêt, appuyez sur PLAY pour lancer la
lecture répétée.
Repeat : Off
Appuyez de nouveau sur PLAY MODE pour faire
3
disparaître l’écran.
Pendant le mode d’arrêt, appuyez sur PLAY
•
afin d’entamer la lecture répétée.
Pour reprendre la lecture normale, sélectionnez
•
le paramètre « Repeat : Off » à l’étape 2.
Lecture à répétition AB:
La lecture à répétition A-B vous permet de faire
répéter le contenu du disque entre deux points
sélectionnés.
Appuyez sur REPEAT AB pendant la lecture.
1
Le point de départ est sélectionné.
Play Mode
A
Appuyez sur JUMP pendant le mode de lecture
1
ou d’arrêt.
Jump
Title
Chapter
Time
Appuyez sur ou pour sélectionner « Title »,
2
« Chapter » ou « Time » (titre, chapitre ou temps).
Appuyez sur les touches numériques (09)
3
pour composer le numéro qui convient.
Si vous entrez un numéro incorrect, appuyez
•
sur CANCEL.
Reportez-vous à l’emballage fourni avec le
•
disque pour vérifier les numéros.
Appuyez sur ENTER.
4
La lecture commence.
•
•
Lorsque vous changez de titre, la lecture
commence à partir du chapitre 1 du titre
sélectionné.
•
Il se peut que l’opération ci-dessus ne soit pas
possible avec certains disques.
Appuyez de nouveau sur REPEAT AB.
2
Le point final est sélectionné. La lecture
commence au point que vous avez sélectionné.
La lecture s’arrête au point final, retourne au point
A automatiquement et recommence.
Pour reprendre la lecture normale, appuyez de
3
nouveau sur REPEAT AB.
Le symbole «
REMARQUE:
•
Il se peut que la fonction de lecture répétée ne
puisse être utilisée avec certains disques.
•
En mode de répétition A-B, il se peut que les soustitres près du point A ou B ne s’affichent pas.
•
Pendant la lecture à répétition A-B, la fonction
ANGLE ne peut pas être utilisée.
•
Il se peut que les scènes du DVD ne vous permettent
pas de régler la fonction de répétition A-B.
•
La répétition A-B ne fonctionne pas avec un DVD
interactif ou un CD MP3/WMA/JPEG.
» apparaît à l’écran.
Off
Page 67

Marquage de scènes
Sélection de la langue
désirées
Le téléviseur/lecteur DVD mémorise la position
du contenu que vous voulez revoir. Vous pouvez
reprendre la lecture à partir de cette scène.
Marquage de scènes:
Appuyez sur MARKER pendant la lecture.
1
Sélectionnez une marque d’index vierge avec
2
ou , puis appuyez sur ENTER à la scène
désirée.
Marker 1
Marker 2
Marker 3
Il est possible de sélectionner jusqu’à 3 scènes.
•
Répétez cette démarche pour définir les 2
•
autres scènes.
Appuyez sur MARKER pour faire disparaître cet
3
affichage.
Retour aux scènes:
Appuyez sur MARKER pendant le mode de
1
lecture ou d’arrêt.
Appuyez sur ou pour sélectionner le numéro
2
d’index 1-3.
Marker 1
Marker 2
Marker 3
Appuyez sur ENTER.
3
La lecture s’amorce à partir de la scène marquée.
00 27 54
00 27 54
01 16 25
02 08 31
de la bande sonore
Il est possible de sélectionner la langue lors du
visionnement d’un disque multilingue.
Appuyez sur AUDIO pendant la lecture.
1
La langue actuelle de la bande sonore s’affiche.
1/2 Eng Dolby Digital
Appuyez sur AUDIO à plusieurs reprises jusqu’à
2
ce que la langue désirée soit sélectionnée.
L’affichage à l’écran disparaît après quelques
secondes.
REMARQUE:
•
Si vous n’entendez pas la langue de votre choix
après avoir appuyé à plusieurs reprises sur la
touche AUDIO, la langue n’est pas enregistrée sur
le disque.
La sélection de la langue de la bande sonore est
•
annulée à l’éjection du disque. La langue par défaut
ou la langue disponible se fera entendre si le disque
est lu encore une fois.
Soustitres
Activation et désactivation des soustitres
Lorsque vous visionnez un disque comportant des
sous-titres, vous pouvez activer ou désactiver les
sous-titres.
Appuyez sur SUBTITLE pendant la lecture jusqu’à ce
que « Off » s’affiche.
Off
FRANÇAIS
Pour effacer une marque d’index:
Appuyez sur MARKER pendant le mode de
1
lecture ou d’arrêt.
Appuyez sur ou pour sélectionner le numéro
2
d’index 1-3.
Appuyez sur CANCEL.
3
Appuyez sur MARKER pour faire disparaître cet
affichage.
REMARQUE:
•
Les marques d’index sont annulées lorsque le
disque est éjecté ou l’appareil éteint.
Il se peut que certains sous-titres enregistrés à
•
proximité de la marque d’index ne s’affichent pas.
[DVD]
Sélection de la langue des soustitres
Vous pouvez sélectionner la langue lorsque vous
reproduisez un disque enregistré avec des sous-titres
multilingues.
Appuyez à plusieurs reprises sur SUBTITLE
1
pendant la lecture jusqu’à ce que la langue
désirée apparaisse.
1/5 Eng
L’affichage à l’écran disparaît après quelques
2
secondes.
REMARQUE:
La sélection de la langue des sous-titres est
•
annulée à l’éjection du disque.
Page 68

•
Certaines fonctions ne sont pas utilisables avec
certains DVD. Il se peut que vous ne puissiez pas
activer, désactiver ou changer les sous-titres.
Pendant la lecture d’un DVD, les sous-titres peuvent
changer:
- lors de l’éjection du disque.
- lors d’un changement de titre.
•
Dans certains cas, le changement de la langue des
sous-titres n’est pas immédiat.
Sélection d’angles
Lors de la lecture d’un disque enregistré avec
une fonction multiangles, il vous est possible de
changer d’angle de visionnement.
Appuyez sur ANGLE pendant la lecture.
1
L’angle actuel s’affiche.
Appuyez sur ANGLE à plusieurs reprises jusqu’à
2
ce que l’angle désiré soit sélectionné.
REMARQUE:
Selon le DVD, il peut s’avérer impossible de
•
modifier les angles même si des angles multiples
sont enregistrés sur le DVD.
Sélection d’un titre
Guide rapide pour les
opérations menu DVD
example : Sélectionner la langue
Appuyez sur SETUP/TV MENU dans le mode
1
d’arrêt.
Appuyez sur ou pour sélectionner l’option
, puis sur / ou ENTER.
Appuyez sur ou pour sélectionner l’option
2
désirée, puis sur ou ENTER.
Appuyez sur ou pour sélectionner la langue
3
de votre choix (p. ex. le français), puis sur ENTER.
Menu
Subtitle
Audio
Appuyez sur SETUP/TV MENU pour faire
4
disparaître l’écran de menu.
English
Francais
Espanol
Other
Certains disques contiennent deux titres ou plus.
Si le disque comporte un menu des titres, vous
êtes en mesure de sélectionner le titre désiré.
Appuyez sur TOP MENU pendant la lecture.
1
Le menu des titres apparaît à l’écran.
Appuyez sur / ou / pour sélectionner le
2
titre voulu.
Appuyez sur ENTER ou PLAY.
3
L’appareil entame la lecture du titre sélectionné.
REMARQUE:
Selon le DVD utilisé, il se peut que vous ne puissiez
•
pas sélectionner le titre. Selon le DVD, un « menu
de titres » peut simplement s’appeler « menu » ou
« titre » dans les instructions fournies avec le disque.
Menu DVD
Avec certains DVD, il est possible de sélectionner
un élément contenu sur le disque à l’aide du menu.
Lorsque l’appareil effectue la lecture de l’un de
ces DVD, il est possible de sélectionner la langue
des soustitres, de la bande sonore, etc., à partir
du menu DVD.
Appuyez sur DVD MENU pendant la lecture.
1
Le menu DVD apparaît à l’écran.
Appuyez de nouveau sur DVD MENU pour
•
reprendre la lecture à partir de la scène visionnée
au moment où vous avez pressé DVD MENU.
Appuyez sur / ou / pour sélectionner le
2
paramètre voulu.
Appuyez sur ENTER.
3
Le menu se poursuit sur un autre écran. Répétez
les étapes 2 et 3 pour régler des paramètres
supplémentaires, s’il y a lieu.
REMARQUE:
Menu DVD fonctions ne sont pas utillisables avec
•
Page 69

Réglage des fonctions
Icon Rubriques sélectionnées Conseil de réglage
Language
*1
*1
Menu
Subtitle
Audio
*1
*1
English / Francais /
Espanol
La langue sélectionnée est la langue prioritaire du
menu.
Other Il est possible de sélectionner une autre langue
(consultez la “Liste des codes de langue” à la page 33).
Off (Subtitle) Les sous-titres ne s’affichent pas.
Original (Audio) L’appareil sélectionnera la langue prioritaire de
chaque disque.
Picture
TV Screen
*2
4:3 (Letter box)
Quand vous passez un disque DVD grand écran, il
affiche l’image grand écran avec des bandes noires
en haut et en bas de l’écran.
4:3
(Pan Scan)
Il affiche l’image grand écran sur tout l’écran avec
coupure automatique des bordures gauche et droite.
16:9
(Wide)
Sélectionnez ce mode quand vous branchez sur un
téléviseur à large écran. Une image grand écran s’
affiche dans toute sa taille.
Display
*3
Off / On Vous pouvez activer ou désactiver l’affichage à l’
écran en appuyant sur une touche.
Picture Mode Il y a deux types de contenu source dans les images enregistrées sur
les disques vidéo DVD: contenu film (images enregistrées des films à 24
cadres par seconde) et contenu vidéo (signaux vidéo enregistrés à 30
cadres par seconde). Effectuez la sélection correcte en fonction du type de
contenu visionné.
Auto Normalement, sélectionnez cette position. Le lecteur
DVD détecte automatiquement le contenu source, film
ou vidéo, ou la source de lecture.
Film Indiqué pour la lecture des images type film.
Video Indiqué pour la lecture des images type video.
*4
JPEG Interval
Les images au standard JPEG peuvent être lues en rythme continu.
Off Lire une image à la fois.
5 / 10 / 15 Seconds Affiche les images sous la forme d’un diaporama.
Toutes les 5 / 10 / 15 secondes, l’image change.
Audio
Night Mode
*5
Night Mode enables you to control the dynamic range so as to achieve a
suitable sound for your equipment.
Off La gamme d’amplification dynamique est réduite.
On Pendant la lecture, les sons violents comme les
explosions et autres sont légèrement atténués. Ceci
permet de pouvoir raccorder une chaîne stéréo.
Digital Out
*6
Vous pouvez sélectionner le format sonore de sortie numérique
correspondant au branchement de votre système.
Off Aucun son n’est émis de la prise de sortie DIGITAL
AUDIO.
PCM Commutez la sortie de Dolby Digital à PCM.
Sélectionnez ce réglage lors d’un branchement à un
amplificateur stéréo numérique à 2 canaux.
Bitstream Des données de train de binaire d’un disque audio
sont sorties.
Setup
Parental Consulte la page 32.
FRANÇAIS
Password
REMARQUE:
*1
Si la langue sélectionnée n’est pas enregistrée sur le disque, la langue prioritaire est sélectionnée.
*2
Si le disque DVD n’est pas formaté dans le style pan & scan, il affiche le style 4:3.
*3
Si “OSD” n’est pas réglé sur “Marche”, les affichages à l’écran n’apparaissent pas quand vous appuyez sur
une touche, sauf SUBTITLE, PLAY MODE, MARKER, JUMP, DISPLAY et AUDIO.
*4
Vous ne pouvez pas afficher l’écran DVD SETUP pendant la lecture d’un disque.
*5
La fonction Dynamique audio (contrôle de la gamme d’amplification) ne fonctionne que lorsque vous lisez des
disques enregistrés en Dolby numérique.
*6
Même si vous sélectionnez “Bitstream”, la sortie sonore des fichiers MPEG se fera au format PCM.
Page 70

Réglage du blocage parental
g
Certains disques sont classifiés comme ne
convenant pas aux enfants. Cet appareil est doté
d’une fonction de blocage pour restreindre le
visionnement de ces disques.
Mot de passe et réglage:
Appuyez sur SETUP/TV MENU en mode d’arrêt
1
ou en l’absence de disque.
Appuyez sur ou pour sélectionner l’option
, puis sur / ou ENTER.
Appuyez sur ou pour sélectionner
2
« Parental », puis sur ou ENTER.
L’écran « Enter Password » apparaît.
Entrez « 0000 » à l’aide des touches
3
numériques (09). (Notez qu’il s’agit du mot de
passe de préréglage de cet appareil.) Appuyez
ensuite sur ENTER. La liste de niveau parental
apparaît.
Si vous entrez un numéro incorrect, appuyez
•
sur CANCEL.
Parental : Off
Passw e
Enter Password
Appuyez sur ou pour sélectionner un niveau
4
de 1 à 8. Plus le numéro de niveau est faible, plus
les restrictions sont sévères. Appuyez ensuite sur
ENTER.
Parental
Passwo rd
Level Off : Le réglage de blocage parental
•
Level 8 : Pratiquement tous les DVD
•
Level 1 : Les logiciels DVD destinés aux
•
Appuyez sur SETUP/TV MENU pour faire
5
disparaître l’écran de menu.
REMARQUE:
Si chaque configuration (page 30~32) a été
•
effectuée, l’appareil va utiliser ces réglages
pendant la lecture de DVD.
Chaque configuration est conservée en mémoire.
•
Selon les disques, il se peut que l’appareil ne
puisse pas restreindre la lecture.
Il est possible que certains disques ne soient pas
•
codés avec les informations spécifiques du niveau
de classification bien que la pochette de disque
porte la mention « adulte ». Avec ces disques, les
restrictions d’âge ne fonctionnent pas.
Une fois la classification verrouillée, le réglage ne peut
•
pas être modifié sans entrer le bon mot de passe.
1
2
3
4
5
6
7
8
Off
est désactivé.
peuvent être visionnés.
adultes ne peuvent être visionnés.
Réglage du nouveau mot de passe:
Appuyez sur SETUP/TV MENU en mode d’arrêt
1
ou en l’absence de disque.
Appuyez sur ou pour sélectionner l’option
, puis sur / ou ENTER.
Appuyez sur ou pour sélectionner
2
« Password », puis sur ou ENTER.
L’écran « Enter Current Password » apparaît.
Saisissez, à l’aide des touches numériques (0
3
à 9), le mot de passe que vous avez programmé
en mémoire.
Si vous entrez un numéro incorrect, appuyez
•
sur CANCEL.
Appuyez ensuite sur ENTER. L’écran « Enter
4
New Password » apparaît. Appuyez sur les
touches numériques (09) pour entrer le
nouveau mot de passe.
Parental : Off
Password : Change
Enter New Password
Appuyez sur ENTER.
5
Votre nouveau mot de passe a maintenant été défini.
Veillez à ne pas oublier ce numéro!
REMARQUE:
•
N’oubliez pas le mot de passe. Si vous oubliez le
mot de passe, contactez le Service clientèle au
1-800-289-0980 pour l’aide. Vous aurez besoin de la
télécommande originale.
Suspension temporaire du
blocage parental par un DVD
Certains DVD préenregistrés peuvent tenter
d’annuler temporairement le niveau de blocage
que vous avez réglé. Vous serez prié d’indiquer si
vous autorisez ou non l’annulation.
Insérez un DVD dans l’appareil (voir page 24).
1
Si le disque a été formaté de telle façon qu’il
2
permet la suspension temporaire du blocage
parental, l’écran suivant celui où apparaît le
mot « Reading » change, selon le disque dans
l’appareil. Si vous sélectionnez « YES » avec
la touche ENTER, l’écran de saisie du mot de
passe apparaît alors.
Entrez le mot de passe à l’aide des touches
3
numériques (09).
Appuyez ensuite sur ENTER.
Pour interrompre cette saisie, appuyez sur
•
RETURN.
Enter Password
La lecture débute si le mot de passe entré est
4
exact.
REMARQUE:
•
Cette annulation temporaire du blocage parental
demeure en vigueur jusqu’à l’éjection du disque
•
Lors de l’éjection du disque, le niveau de blocage
inal est rétabli automatiquement.
ori
Page 71

Liste des codes de langue
Entrez les codes numériques appropriés lors du réglage initial des paramètres « Menu », « Sous-titres (Subtitle) »
ou « Bande sonore (Audio) » (voir page 31).
Langue Code Langue Code Langue Code Langue Code
Abkhaze 1112 Fiji 1620 Lingala 2224 Cinghalais 2919
Afar 1111 Finnois 1619 Lithuanien 2230 Slovaque 2921
Afrikaans 1116 Français 1628 Macédonien 2321 Slovène 2922
Albanais 2927 Frison 1635 Malgache 2317 Somalien 2925
Amharique 1123 Galicien 1722 Malaisien 2329 Espagnol 1529
Arabe 1128 Georgien 2111 Malayalam 2322 Soudanais 2931
Arménien 1835 Allemand 1415 Maltais 2330 Swahili 2933
Assamais 1129 Grecque 1522 Maori 2319 Suédois 2932
Aymara 1135 Groenlandais 2122 Marathi 2328 Tagalog 3022
Azerbaïdjanais 1136 Guarani 1724 Moldave 2325 Tadjik 3017
Bashkir 1211 Gujar 1731 Mongol 2324 Tamoul 3011
Basque 1531 Haoussa 1811 Nauru 2411 Tatar 3030
Bengali; Bangla 1224 Hébreu 1933 Népalais 2415 Tégoulou 3015
Bhoutan 1436 Hindi 1819 Norvégien 2425 Thai 3018
Bihari 1218 Hongrois 1831 Oriya 2528 Tibétain 1225
Breton 1228 Islandais 1929 Panjabi 2611 Tigrina 3019
Bulgare 1217 Indonésien 1924 Pashto, Pushto 2629 Tonga 3025
Birman 2335 Interlangue 1911 Perse 1611 Turque 3028
Bélarussien 1215 Irlandais 1711 Polonais 2622 Turkmène 3021
Cambodgien 2123 Italien 1930 Portugais 2630 Twi 3033
Catalan 1311 Japonais 2011 Quechua 2731 Ukrainien 3121
Chinois 3618 Javanais 2033
Corse 1325 Canara 2124 Roumain 2825 Ouzbek 3136
Croate 1828 Cachemirien 2129 Russe 2831 Vietnamien 3219
Tchèque 1329 Kazakh 2121 Samoan 2923 Volapük 3225
Danois 1411 Kirghiz 2135 Sanskrit 2911 Gallois 1335
Néerlandais 2422 Coréen 2125 Gaélique d’Écosse 1714 Wolof 3325
Anglais 1524 Kurde 2131 Serbe 2928 Xhosa 3418
Esperanto 1525 Loatien 2225 Serbo-croate 2918 Yiddish 2019
Estonien 1530 Latin 2211 Shona 2924 Yoruba 3525
Féroïen 1625 Letton 2232 Sindhi 2914 Zoulou 3631
Réto-roman
2823 Urdu 3128
FRANÇAIS
Page 72

Raccordement à un autre appareil
La configuration exacte des liaisons entre les divers appareils audio et vidéo et le présent produit dépend du
modèle et des particularités de chacun. Pour connaître l’emplacement des entrées et des sorties audio et vidéo,
reportez-vous au mode d’emploi accompagnant chaque appareil.
Raccordement du téléviseur ACL/lecteur DVD à un magnétoscope
Arrière de l’appareil
Vers l’entrée VIDEO/AUDIO IN
Câble vidéo/audio
(non compris)
Vers la sortie vidéo/audio
Raccordement du téléviseur ACL/lecteur DVD à un magnétoscope avec un câble Svidéo
Si vous raccordez un magnétoscope en branchant un câble S-vidéo sur la prise S-VIDEO IN se trouvant du côté
arrière de l’appareil, vous devez également raccorder des câbles audio sur les prises AUDIO IN se trouvant du
côté arrière de l’appareil.
Le câble S-vidéo ne transmet que le signal vidéo. Le signal audio est séparé.
REMARQUE:
Si le câble S-vidéo et le câble vidéo standard sont tous les deux raccordés, le signal provenant du câble S-
•
vidéo a préséance sur l’autre.
Magnétoscope
Arrière de l’appareil
Vers l’entrée S-VIDEO
Câble S-vidéo (non compris)
Câble audio (non compris)
Vers l’entrée AUDIO IN
Vers la sortie S-vidéo
Vers la sortie audio
Magnétoscope
Raccordement à un lecteur DVD doté d’une entrée de vidéo en composantes
Vous profiterez d’une image de grande qualité si vous raccordez l’appareil aux prises COMPONENT VIDEO
OUT de votre lecteur DVD à l’aide des câbles de vidéo en COMPOSANTES (non compris).
Arrière de l’appareil
Câble de vidéo en composantes
(non compris)
Vers l’entrée
COMPONENT AUDIO IN
Vers la sortie de vidéo
en composantes
Y
P
B
PR
DVD
Câble audio
Vers l’entrée
COMPONENT IN
REMARQUE:
L’entrée de vidéo en composantes de l’appareil se destine à un dispositif qui émet des signaux entrelacés
•
480i/1080i et des signaux progressifs 480p/720p.
(non compris)
Vers la sortie audio
Page 73

Raccordement à un autre appareil (suite)
Raccordement d’un dispositif HDMI ou DVI à l’appareil
L’entrée HDMI reçoit un signal audio numérique et un signal vidéo non compressé d’un dispositif HDMI ou un
signal vidéo numérique non compressé d’un dispositif DVI.
Si vous branchez un dispositif DVI avec un câble adaptateur HDMI-DVI, seul un signal vidéo est transféré. Des
câbles audio analogiques séparés sont nécessaires.
Arrière de l’appareil
Vers l’entrée
PC/HDMI
AUDIO IN
Câble audio (non compris)
Vers sortie
DVI audio
Dispositif DVI
Vers l’entrée
HDMI IN
Câble adaptateur HDMI-DVI
(connecteur HDMI de type A)
(non compris)
Dispositif HDMI
Vers sortie HDMI
Câble HDMI (connecteur de type A)
(non compris)
REMARQUE:
Lorsque vous employez HDMI pour raccorder vos dispositifs HDMI ou DVI, vous devez sélectionner
•
la source d’entrée audio correspondante (HDMI ou DVI) à l’écran de menu (reportezvous à la page
17). Sinon, vous verrez l’image, mais n’entendrez pas le son.
Si vous raccordez un appareil externe (décodeur de câblodistribution, démodulateur, etc.) au téléviseur ACL
•
au moyen d’un câble HDMI ou DVI-HDMI, l’image ne s’affiche pas si la résolution de sortie de l’appareil est
réglée sur 480i. Pour recevoir l’image, vous devez changer la résolution de sortie sur la composante externe.
Si vous avez besoin d’explications supplémentaires, veuillez contacter le fabricant de la composante externe.
Utilisation d’un amplificateur AV à son ambiophonique numérique intégré
Si vous utilisez un amplificateur à son ambiophonique numérique intégré, vous pouvez profiter de divers
formats audio, notamment le Dolby numérique ambiophonique (Dolby Digital Surround), qui vous donne
exactement le même son qu’au cinéma.
Raccordez un amplificateur AV intégrant un décodeur Dolby numérique (Dolby Digital), DTS ou MPEG,
etc., comme dans l’illustration cidessous.
Arrière de l’appareil
HP avant
(D)
Sortie audio numérique coaxiale
Extrêmes
graves
TV/DVD
HP avant
(G)
FRANÇAIS
Câble coaxial numérique
Vers l’entrée numérique coaxiale
(non compris)
Amplificateur AV à décodeur ambiophonique
numérique intégré (voir ci-dessus)
HP ambiophonique (G)
Enceinte centrale
HP ambiophonique
(D)
REMARQUE:
Lors du visionnement d’émissions numériques, il n’y aura pas de fonctionnement en conjugaison avec le son
•
DTS ou MPEG. Aucun son n’est émis si un amplificateur AV avec décodeur DTS ou MPEG intégré est connecté.
Page 74

Raccordement à un autre appareil (suite)
Raccordement du téléviseur/lecteur DVD à un caméscope ou à un jeu vidéo
Pour accomplir la lecture à partir d’un caméscope, raccordez le caméscope à l’appareil de la manière illustrée.
L’appareil peut aussi servir de périphérique de lecture pour de nombreux jeux vidéo. Toutefois, puisque
ces dispositifs génèrent une grande variété de signaux et que leurs modes de raccordement doit varier en
conséquence, tous les schémas de raccordement possibles n’ont pas été inclus ici. Vous devrez consulter le
guide d’utilisation de chaque appareil pour en savoir davantage.
Arrière de l’appareil
JEU VIDÉO
ou
Câble vidéo/audio (non compris)
Vers l’entrée
VIDEO/AUDIO IN
Vers la sortie vidéo/audio
Raccordement du téléviseur/lecteur DVD à un PC (ordinateur personnel)
Avant de connecter le présent téléviseur/lecteur DVD à votre PC, ajustez la résolution et le taux de
rafraîchissement de votre PC (60 Hz).
Raccordez un bout de câble VGA (mâle-mâle) à la carte vidéo de l’ordinateur et l’autre bout au connecteur
VGA PC MONITOR situé à l’endos du côté arrière de téléviseur/lecteur DVD. Fixez solidement les connecteurs
avec les vis de la fiche. Si vous possédez un ordinateur multimédia, branchez le câble audio à la sortie audio
de votre ordinateur multimédia et au connecteur AUDIO des prise PC/HDMI AUDIO IN sur le téléviseur/lecteur
DVD. Vous pouvez aussi raccorder le PC avec un câble HDMI. Si vous utilisez un câble HDMI, vous n’avez pas à
raccorder le câble audio. Si vous utilisez un câble DVI-HDMI, veuillez brancher le câble audio de la même façon
que le câble VGA.
Appuyez sur INPUT SELECT sur la télécommande pour sélectionner le mode PC.
Allumez l’ordinateur. Le téléviseur/lecteur DVD peut être employé comme moniteur d’ordinateur.
Arrière de l’appareil
Modes d’affichage du moniteur
MODE Résolution Taux de rafraî-
chissement
VGA 640x480 60/72/75Hz
VGA 720x400 70 Hz
SVGA 800x600 56/60/72/75Hz
XGA 1024x768 60/70/75Hz
WXGA 1280x768 60 Hz
WXGA 1280x720 60 Hz
WXGA 1360x768 60 Hz
Pour rétablir le mode normal
Appuyez de nouveau sur INPUT
SELECT.
Vers l’entrée PC
MONITOR IN
Vers prise PC/HDMI
AUDIO IN
Câble VGA (non compris)
Vers prise HDMI IN
Câble HDMI (non compris)
Câble audio (non compris)
REMARQUE:
L’affichage apparaît différemment en mode PC qu’en mode TV.
•
S’il n’y a pas de signal vidéo en provenance du PC lorsque l’appareil est en mode PC, « No signal » s’affiche
•
à l’écran du téléviseur.
Page 75

Problèmes de réception
Il est possible de remédier à la plupart des interférences subies par le téléviseur en réglant la hauteur et en
changeant la position de l’antenne VHF/UHF. Pour obtenir les meilleurs résultats, il est recommandé d’utiliser
une antenne extérieure. Les types les plus courants de brouillage en télévision sont expliqués ci-dessous.
Si l’un de ces symptômes apparaît lorsque le téléviseur est raccordé à un réseau de câblodistribution, les
perturbations peuvent provenir du signal émis par le câblodistributeur local.
ALLUMAGE
Des taches noires ou des rayures horizontales peuvent apparaître ou
l’image peut trembler ou dériver. En général, ces interférences sont
causées par le système d’allumage de véhicules, par des lampes au néon
ou pas des outils et des appareils électriques, comme des perceuses ou
des séchoirs à cheveux.
IMAGES FANTÔMES
Les images fantômes sont causées par un signal télévisé qui suit
deux voies. La première est la voie directe, et l’autre est celle d’un
signal réfléchi par de hauts édifices, des collines ou d’autres obstacles
importants. Il est possible d’améliorer la réception en changeant la
direction ou la position de l’antenne.
FRANÇAIS
IMAGE ENNEIGÉE
Si le téléviseur est employé dans une région limitrophe pour la réception
du signal émis par une station de télévision et que le signal est faible,
l’image peut être criblée de petits points.
Si le signal est extrêmement faible, il peut être nécessaire d’installer une
antenne extérieure de grande taille.
BROUILLAGE RADIOÉLECTRIQUE
Ce genre d’interférence, causé par l’équipement radio à deux voies, produit
des parasites en forme d’ondulations ou de rayures diagonales, et dans
certains cas, une perte de contraste de l’image. Il est possible d’améliorer
l’image en changeant la direction et la position de l’antenne ou en installant
un filtre RFI.
VARIATION DE LA GRANDEUR DE L’IMAGE
Une légère variation de la dimension de l’image à l’écran est normale
lorsque vous ajustez les réglages du contraste et de la luminosité
(BRIGHTNESS).
SOINS ET ENTRETIEN
Pour éviter les risques d’incendie ou de choc électrique, débranchez le téléviseur de la source d’alimentation
avant de le nettoyer.
Comme vous le faites avec les meubles, essuyez le boîtier avec un linge doux humecté d’eau légèrement
savonneuse. Procédez avec précaution en nettoyant ou en essuyant les pièces en plastique.
Page 76

Guide de dépannage
Consultez la liste suivante lorsque le téléviseur/lecteur DVD ne semble pas fonctionner correctement. Si le
problème persiste, communiquez avec votre détaillant ou votre centre de service local.
Vérifiez si tous les raccordements avec d’autres appareils sont bien effectués.
PROBLÈMES SOLUTIONS POSSIBLES PAGE
ALIMENTATION
•
Le téléviseur/lecteur DVD
ne fonctionne pas.
RÉCEPTION D’ÉMISSIONS TÉLÉVISÉES
Mauvais son ou son
inexistant.
Mauvaise image ou image
inexistante.
Mauvaise réception de
certains canaux.
Mauvaise couleur ou
couleur inexistante.
L’image tremble ou dérive.
Pas de réception de la
câblodistribution.
Barres horizontales ou
diagonales à l’écran.
Pas de réception au-delà
du canal 13.
Le téléviseur s’éteint.
Pas de sous-titres.
L’affichage à l’écran n’apparaît
pas dans votre langue.
Vérifiez si le cordon d’alimentation est correctement branché sur la prise
de courant.
•
Il n’y a pas d’alimentation, vérifiez le fusible ou le disjoncteur.
•
Débranchez l’appareil, puis branchez-le de nouveau.
•
Problème à la station ou au réseau de câblodistribution, syntonisez une
autre station.
•
Vérifiez le réglage du son.
•
Recherchez les sources d’interférences possibles.
Problème à la station ou au
•
autre station.
Vérifiez le raccordement à l’antenne ou au réseau de câblodistribution ou
•
changez la position de l’antenne.
Recherchez les sources d’interférences possibles.
•
Vérifiez les ajustements de l’image.
•
Problème à la station ou au réseau de câblodistribution, syntonisez une
•
autre station.
Le signal de la station est faible. Changez la position de l’antenne pour
•
améliorer la réception.
Recherchez les sources d’interférences possibles.
•
Problème à la station ou au
•
autre station.
Assurez-vous que les canaux sont mémorisés.
•
Vérifiez les ajustements de l’image.
•
Vérifiez le raccordement à l’antenne ou au réseau de câblodistribution
•
ou changez la position de l’antenne.
Recherchez les sources d’interférences possibles.
•
Problème à la station ou au réseau de câblodistribution, syntonisez une
•
autre station.
Assurez-vous que les canaux sont mémorisés.
•
Le câblodistributeur brouille les signaux.
•
Vérifiez la position de l’antenne.
•
Vérifiez tous les raccordements au réseau de câblodistribution.
•
Réglez l’option « Signal Type » à « Cable ».
•
Problème à la station ou au réseau de câblodistribution, essayez une
•
autre station.
•
Vérifiez le raccordement à l’antenne ou changez la position de l’antenne.
Recherchez les sources d’interférences possibles.
•
•
La sélection du mode de réception télévisée est erronée. La sélection
s’effectue à partir de l’option « Signal Type » dans le menu de réglage.
Si vous utilisez une antenne, vérifiez les raccordements d’antenne UHF.
•
La station cesse d’émettre.
•
L’arrêt différé est réglé.
•
Il n’y a pas de courant.
•
La station a des problèmes ou l’émission syntonisée n’est pas sous-
•
titrée. Essayez un autre canal.
Vérifiez le raccordement au réseau de câblodistribution ou à l’antenne
•
VHF/UHF, changez la position de l’antenne ou tournez-la.
Réglez sous-titres dans le menu.
•
Choisissez la langue désirée parmi les options de menu.• 17
réseau de câblodistribution
réseau de câblodistribution
, syntonisez une
, syntonisez une
15, 16
13, 14
13, 14
15, 16
13, 14
21, 22
12
15
37
15
37
17
15
13
37
15
18
17
37
15
18
–
13
14
18
15
13
37
18
13
15
16
–
L’écran ACL est un appareil de très haute technologie qui produit une image de grande précision. À
•
l’occasion, il se peut qu’un certain nombre de pixels inactifs apparaissent à l’écran sous forme de points fixes
bleus, verts ou rouges. Ceci ne constitue pas un mauvais fonctionnement de l’appareil.
Page 77

Guide de dépannage (suite)
PROBLÈMES
DVD
•
Aucun disque n’est inséré.
La lecture ne démarre pas.
Pas d’image. Le sélecteur TV/DVD n’est pas réglé correctement.• 24
Pas de son.
L’image présente de la
distorsion pendant l’avance
rapide ou le retour rapide.
Certaines fonctions (arrêt
de lecture, recherche,
ralenti, lecture répétée
ou programmée, etc.) ne
peuvent être utilisées.
Pas d’affichage à l’écran. Activez l’affichage.• 31
Pas de reproduction sonore
ambiophonique.
Les touches de l’appareil
ou de la télécommande ne
fonctionnent pas.
La lecture ne débute
pas lorsque le titre est
sélectionné.
La langue de la bande sonore
ou des sous-titres d’un DVD
n’est pas mod fiable en cours de
lecture.
Pas de sous-titres.
Impossible de changer
d’angle.
•
Le disque est peut-être sale, nettoyez-le.
•
L’appareil ne peut pas lire les CD-ROM, etc.
•
Vér fiez si le sélecteur d’entrée de l’amplificateur est correctement réglé.
•
Un mode particulier de lecteur est activé.
•
Sélectionnez la bonne position de sortie audio sur l’amplificateur AV.
Il se peut que l’image présente de la distorsion à l’occasion.• –
Certains disques ne sont pas munis de certaines fonctions.• –
Les réglages ne conviennent pas à la chaîne stéréo.• 35
Éteignez l’appareil, débranchez-le de la prise de courant pendant plusieurs
•
minutes, puis rebranchez-le.
Vérifiez le niveau auquel est réglée la fonction de blocage parental.• 32
Le DVD ne comporte pas de choix de langue.• 29
•
Certains disques ne comportent pas de sous-titres.
• 29
L’affichage des sous-titres est désactivé. Appuyez sur l’interrupteur des
sous-titres (SUBTITLE).
Le DVD ne comporte pas d’angles multiples.• 30
SOLUTIONS POSSIBLES PAGE
24
25
35
12
9
9
–
FRANÇAIS
Le symbole «
à l’écran.
TÉLÉCOMMANDE
La télécommande ne
fonctionne pas.
POUR CONTACTER LE SERVICE CLIENTÈLE ET OBTENIR DE L’AIDE AVEC LA CONFIGURATION OU L’UTILISATION,
» apparaît
La fonction est interdite par l’appareil ou le disque.• 24
•
Pointez la télécommande sur le capteur.
•
Placez-vous à moins de 15 pieds environ ou atténuez l’éclairage de la
pièce.
•
Assurez-vous qu’aucun obstacle n’obstrue le trajet du faisceau.
•
Les piles sont faibles, remplacez-les.
•
Vérifiez si les piles sont insérées comme il se doit.
VEUILLEZ COMPOSER LE:
18002890980
12
LORSQUE VOUS APPELEZ LE SERVICE CLIENTÈLE, AYEZ VOTRE NUMÉRO DE MODÈLE SOUS LA MAIN
OU CONTACTEZ PAR ÉCRIT:
ORION SALES, INC.
3471 N. UNION DR.
OLNEY, ILLINOIS 62450
POUR OBTENIR DES INFORMATIONS SUR NOS AUTRES PRODUITS, VEUILLEZ VISITER NOTRE SITE WEB:
www.orionsalesinc.com
Page 78

Fiche technique
DONNÉES GÉNÉRALES
Source d’alimentation : 120 V CA 60 Hz
Consommation de courant : En marche: 51 W
En veille: 0,8 W
Poids : 4,7 kg (10,4 lbs)
Dimensions : Largeur: 536,5 mm (21-1/8 po)
Hauteur: 397 mm (15-5/8 po)
Profondeur: 174 mm (6-7/8 po)
Température de fonctionnement :
Humidité de fonctionnement : Moins de 80 %
TÉLÉVISEUR
Type : Écran de 21,6 po (547,7 mm) mesuré en diagonale
Méthode d’affichage : Écran ACL TFT couleur à transmission
Nombre de pixels : 1366 (H) x 768 (V)
Type de syntonisateur : Norme NTSC
Canaux de réception : VHF 2-13
Entrée : S-vidéo: Entrée Y: 1,0 V (p-p), 75 ohms
Sorties : Sortie audio numérique: 0,5 V p-p, terminaison de 75 ohms
Haut-parleur : 25,4 mm x 68,6 mm (1 po x 2-11/16 po), 8 ohms x 2
Puissance de sortie audio : 1,5 W + 1,5 W
5 C à 40 C
Norme ATSC (8VSB), QAM
UHF 14-69
CATV 14-36 (A)-(W)
37-59 (AA)-(WW)
60-85 (AAA)-(ZZZ)
86-94 (86)-(94)
95-99 (A-5)-(A-1)
100-135 (100)-(135)
01 (5A)
Entrée C: 0,3 V (p-p), 75 ohms
Vidéo: (RCA) 1,0 V p-p/75 ohms
Audio: (RCA) –8 dBm/50K ohms
Vidéo en composantes: (Y) 1,0 V (p-p), 75 ohms
(Pb)/(Pr) 0,7 V (p-p), 75 ohms
HDMI: Compatible HDMI (connecteur de type A)
Compatible HDCP
Compatible E-EDID
Taux de balayage préconisés: 480p, 480i, 720p,1080i,1080p
Audio HDMI: PCM 2 voies
Fréquence d’échantillonnage 32/44,1/48 kHz
16/20/24 bits per échantillon
Moniteur de PC: Mini-Dsub 15 broches x 1
Antenne: Entrée VHF/UHF 75 ohms de type coaxiale
Lecteur DVD/CD
Format de signal : NTSC
Disque compatible : 1. DVD (12 cm, 8 cm)
2. CD (12 cm, 8 cm)
Capteur laser : CD: Longueur d’onde: 790 nm
Puissance maximale de sortie: 7 mW
DVD: Longueur d’onde: 655 nm
Puissance maximale de sortie: 5 mW
ACCESSOIRES Télécommande
Piles (UM-4) x 2
Cordon CA
Vis x 2
La conception et les caractéristiques sont sujettes à des modifications sans
préavis.
 Loading...