

Page 1
Revision 1
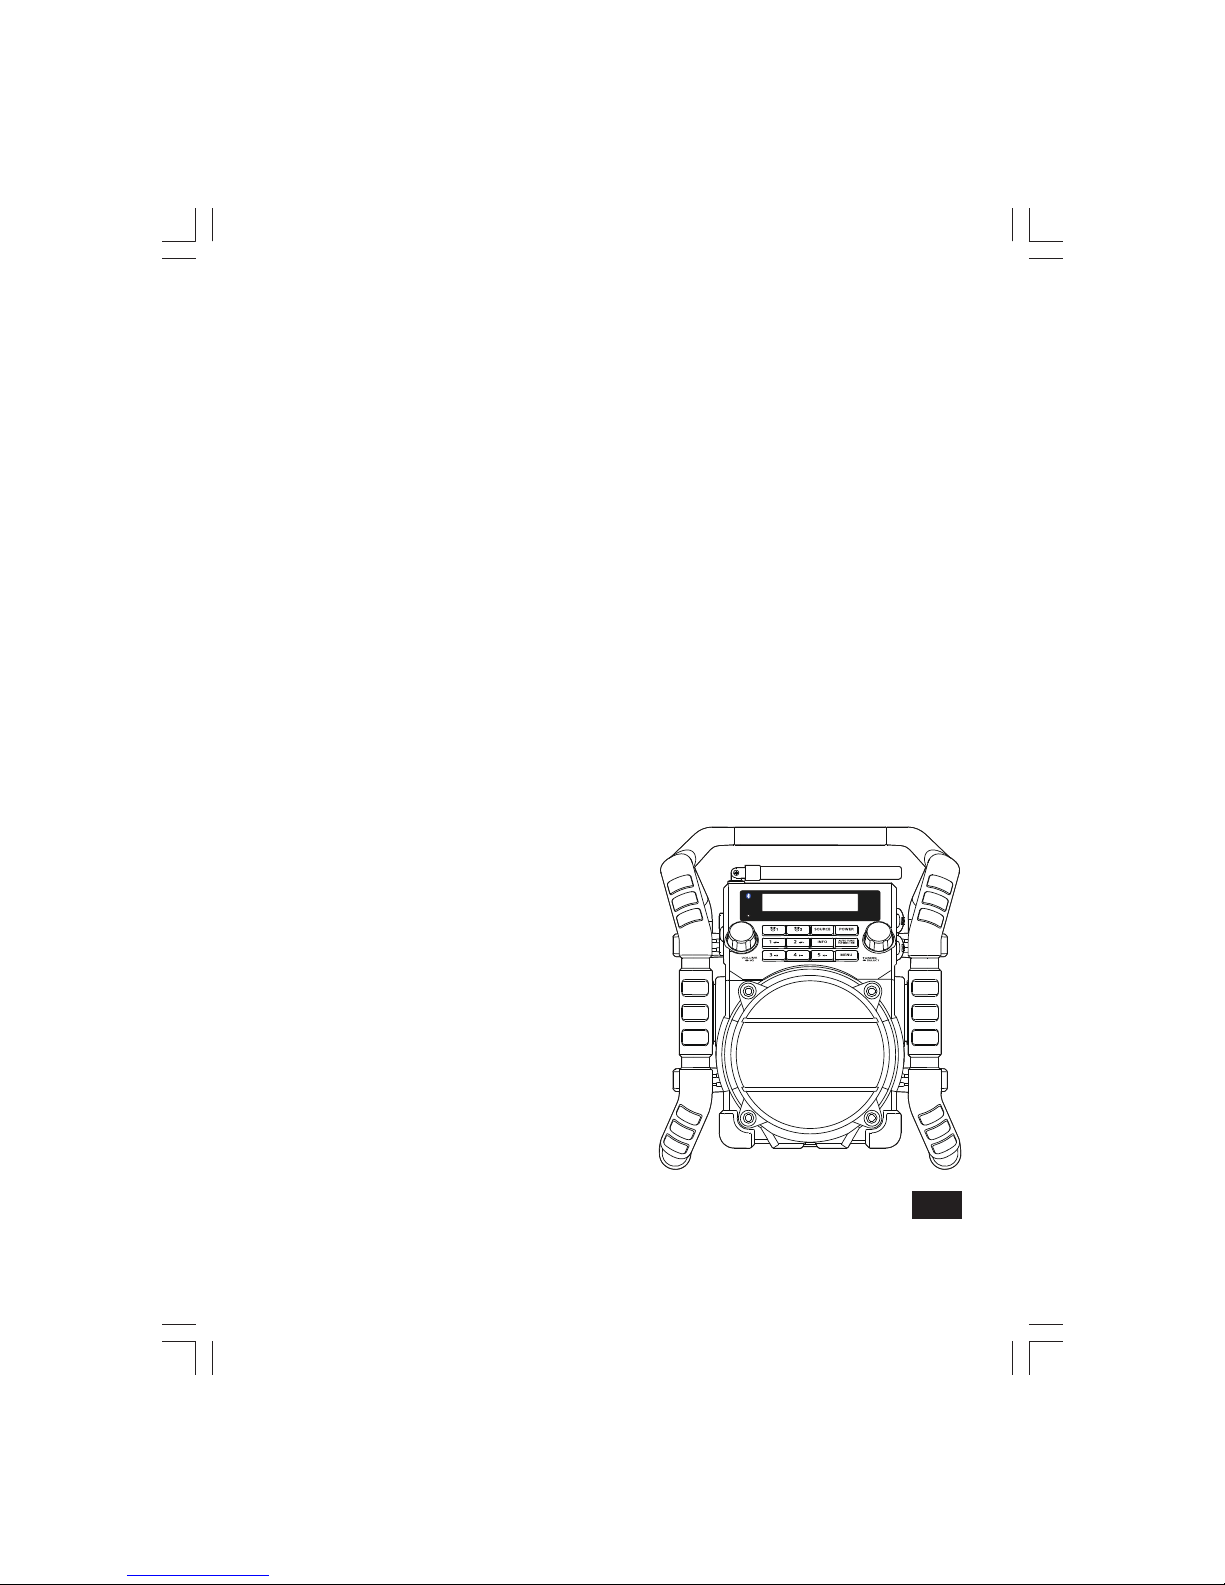
U5 DBT
GB
Page 2

001
The Bluetooth® word mark and logos are registered trademarks owned by Bluetooth SIG, Inc. and any
use of such marks by SANGEAN ELECTRONICS INC. is under license.
Page 3

002
Important Safety Instructions
Read these instructions.
Keep these instructions.
Heed all warnings.
Follow all instructions.
Do not use this apparatus near water.
Clean only with dry cloth.
Do not block any ventilation openings. Install in accordance with the instructions.
Do not install near any heat sources such as radiators, heat registers, stoves or other apparatus
(including ampliers) that produce heat.
Protect the power cord from being walked on or pinched particularly at plug, convenience
receptacles, and the point where they exit from the apparatus.
Only use attachments / accessories specied by the manufacturer.
Use only with the cart, stand, tripod, bracket, or table specied by the manufacturer, or sold with
the apparatus. When a cart is used, use caution when moving the cart / apparatus combination
to avoid injury from tip-over.
Unplug this apparatus during lightning storms or when unused for long periods of time.
Refer all servicing to qualied service personnel. Servicing is required when the apparatus has
been damaged in any way, such as power supply cord or plug is damaged, liquid has been
spilled or objects have fallen into the apparatus, the apparatus has been exposed to rain or
moisture, does not operate normally, or has been dropped.
To reduce the risk of re or electric shock, do not expose this appliance to Rain or Moisture.
For outdoors use, to avoid electric shock, only use batteries power during a raining day or the
weather is wet. This apparatus is provided with protection against splashing water and dust
ingress (IP65).
The Shock Hazard Marking and Associated Graphical Symbol is provided on the back of unit.
11.
10.
12.
13.
14.
15.
1.
2.
3.
4.
5.
6.
7.
8.
9.
Page 4
003
This equipment is a Class II or double insulated electrical appliance. It has been designed
in such a way that it does not require a safety connection to electrical earth.
The ventilation should not be impeded by covering the ventilation openings with items, such as
newspapers ,table-cloths, curtains, etc.
Where the MAINS plug or an appliance coupler is used as the disconnect device, the disconnect
device shall remain readily operable.
A warning that batteries (battery pack or batteries installed) shall not be exposed to excessive
heat such as sunshine, re or the like.
To prevent possible hearing damage, do not listen at high volume levels for long periods.
The changes or modifications not expressly approved by the party responsible for
compliance could void the user’s authority to operate the equipment.
Important Safety Instructions
The lightning ash with arrowhead symbol, within an equilateral triangle, is intended to alert
the user to the presence of uninsulated “dangerous voltage” within the product’s enclosure
that may be of sufcient magnitude as to constitute a risk of electric shock to persons.
16.
The exclamation point within an equilateral triangle is intended to alert the user to the
presence of important operating and maintenance (servicing) instructions in the literature
accompanying the appliance.
17.
18.
19.
20.
21.
22.
23.
NOTICE
Apparatus shall not be exposed to dripping or splashing and no objects lled with liquids, shall
be placed on the apparatus.
The power plug should be close to the radio, and easy to be approached that during the
emergency, to disconnect the power from the radio, just unplug the power plug from the AC
power slot.
Page 5
004
7 8 9 10 11 12 13
14
15
16
17
18
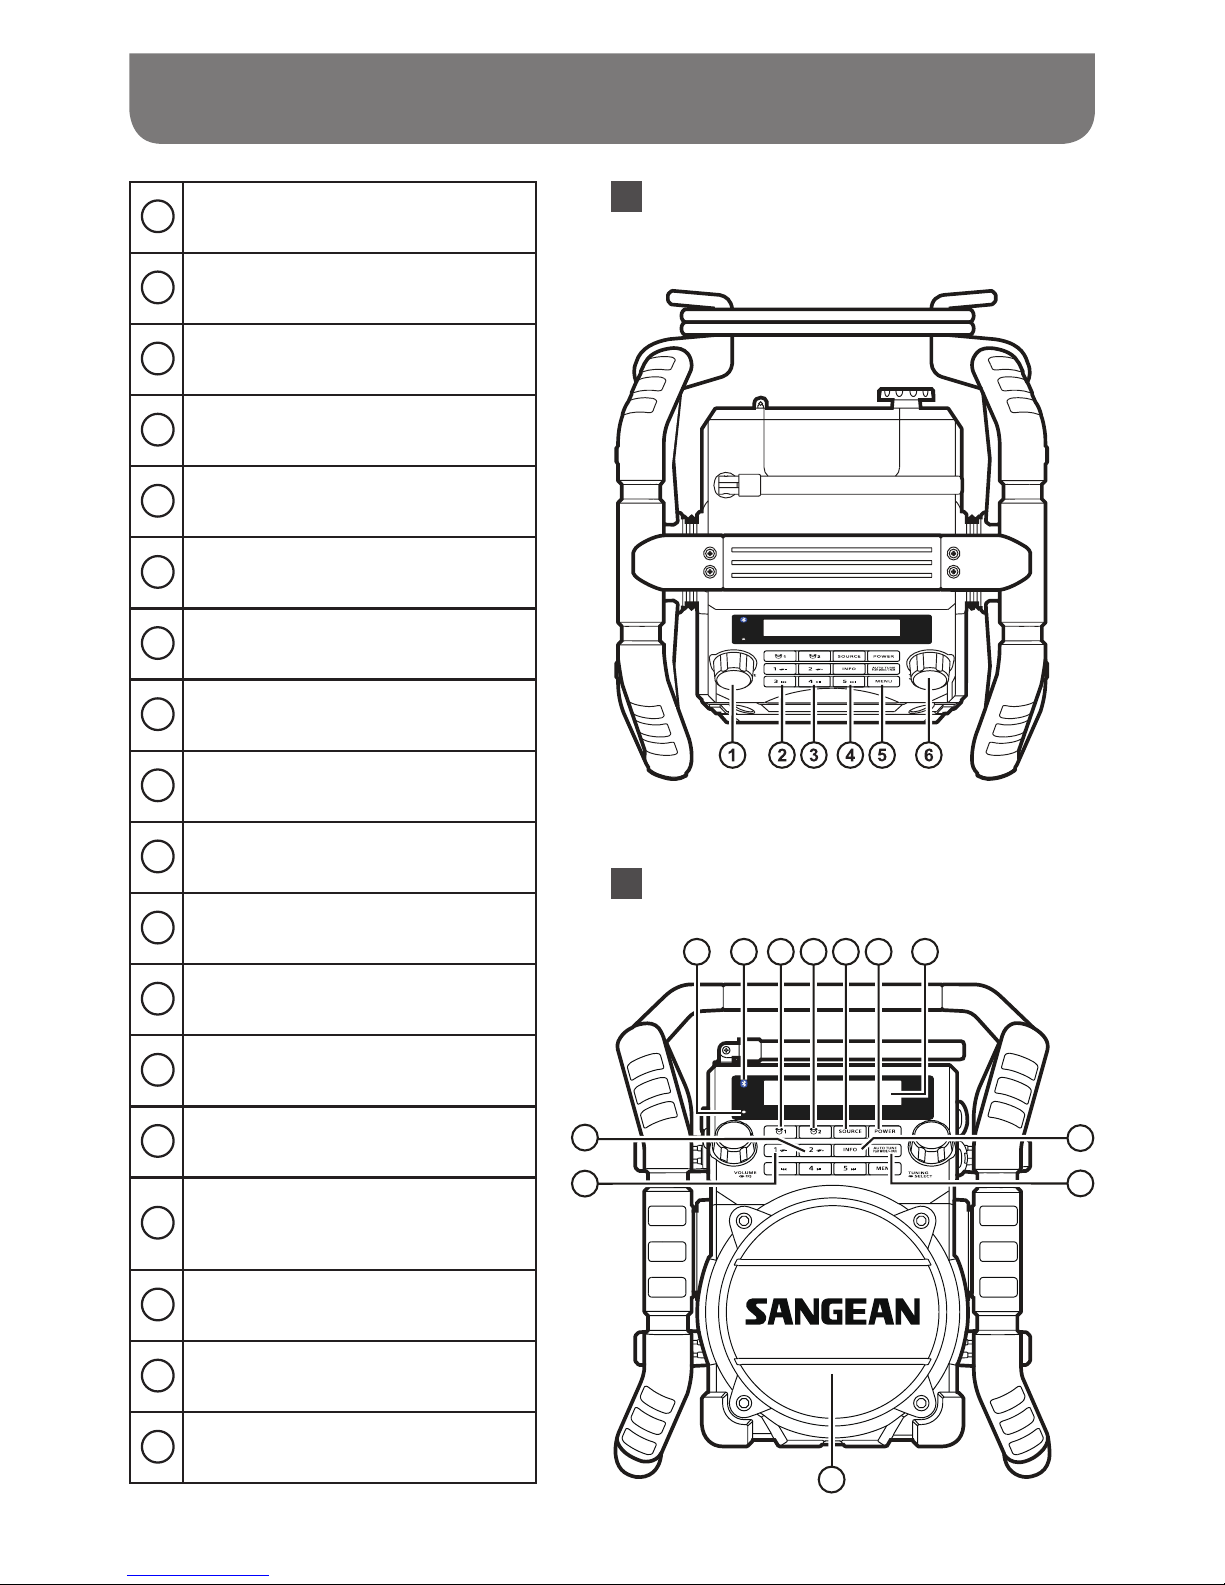
Controls
Top view
1
Volume control / EQ control button
2
Preset 3 / Rewind button
3
Preset 4 / Play / Pause button
4
Preset 5 / Fast-forward button
5
Menu button
6
Tuning control knob / Select button
7
Battery charging indicator
8
Bluetooth status indicator
9
Alarm 1 button
10
Alarm 2 button
11
Source button
12
Power On / Off button
13
LCD display
14
Info button
15
Auto tune / Play mode / Bluetooth
pairing button
16
Speaker
17
Preset 1 / Folder down button
18
Preset 2 / Folder up button
Front view
Page 6
005
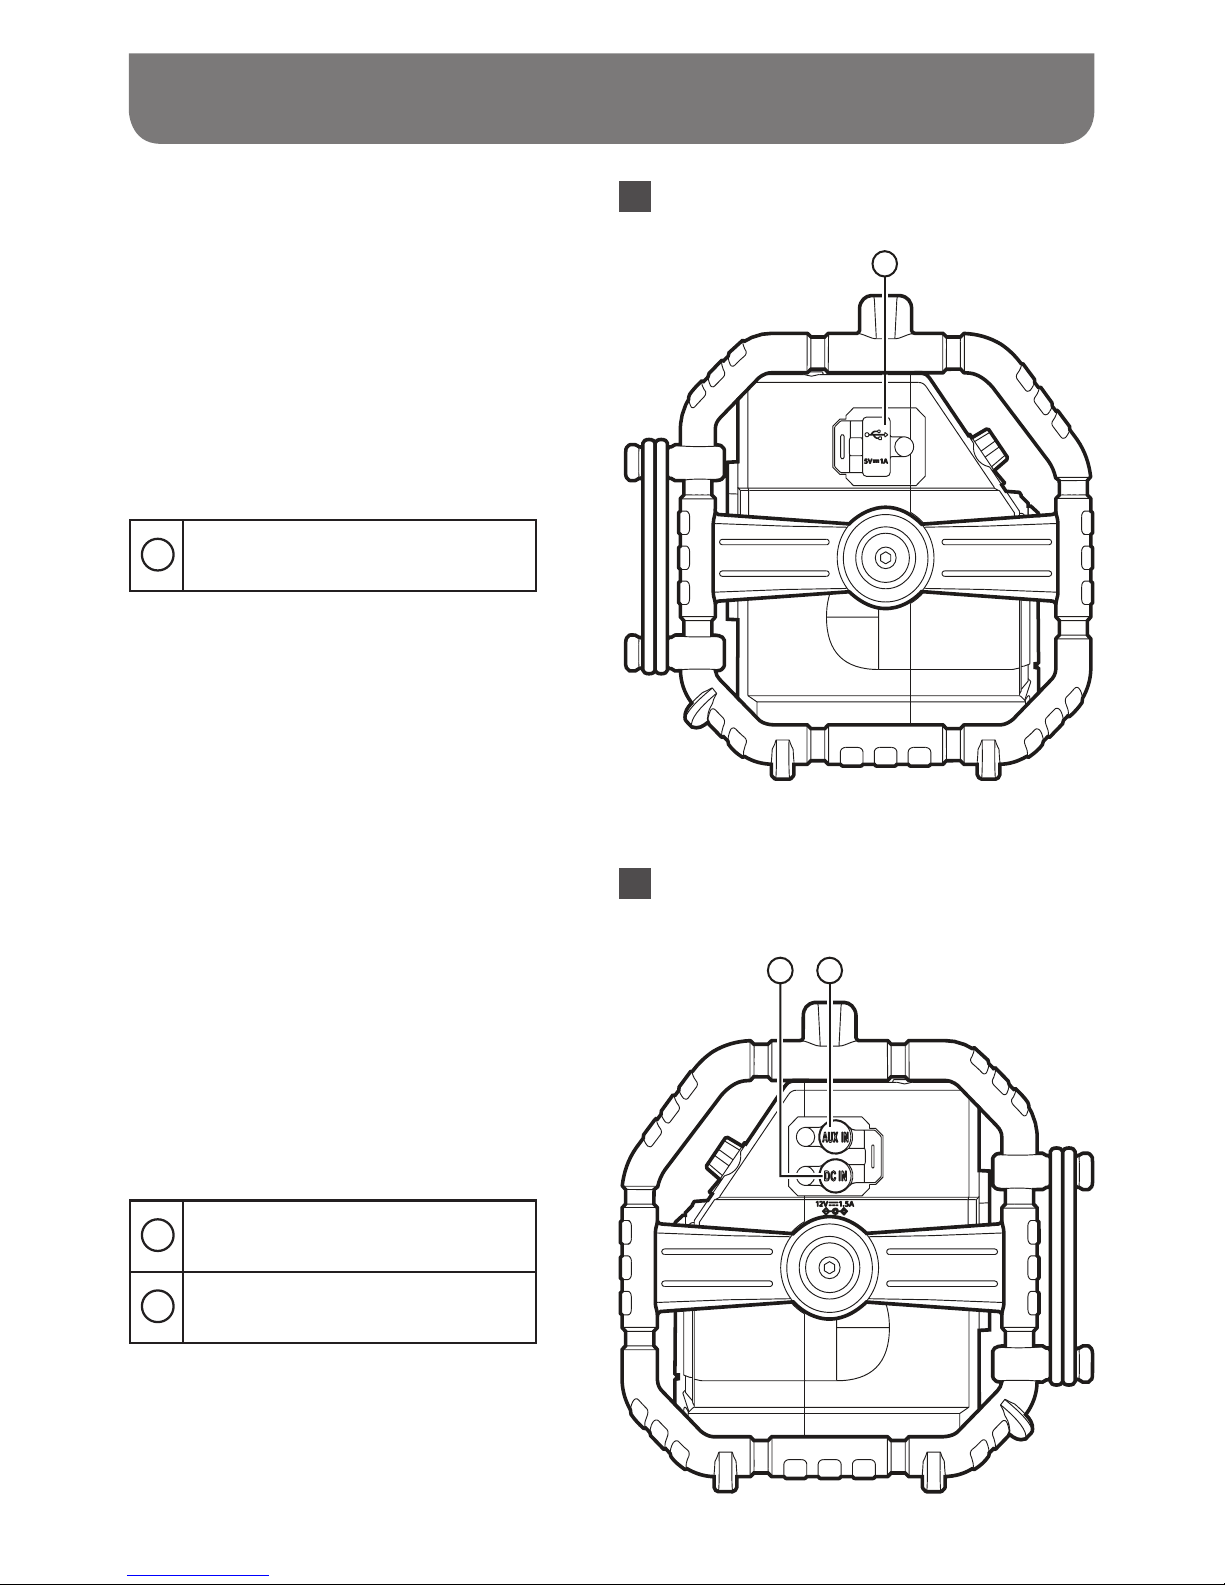
Controls
Left view
Right view
19
USB socket
20
DC In socket
21
Aux In socket
19
20 21
Page 7
006
23
23
24
23
23
22
22
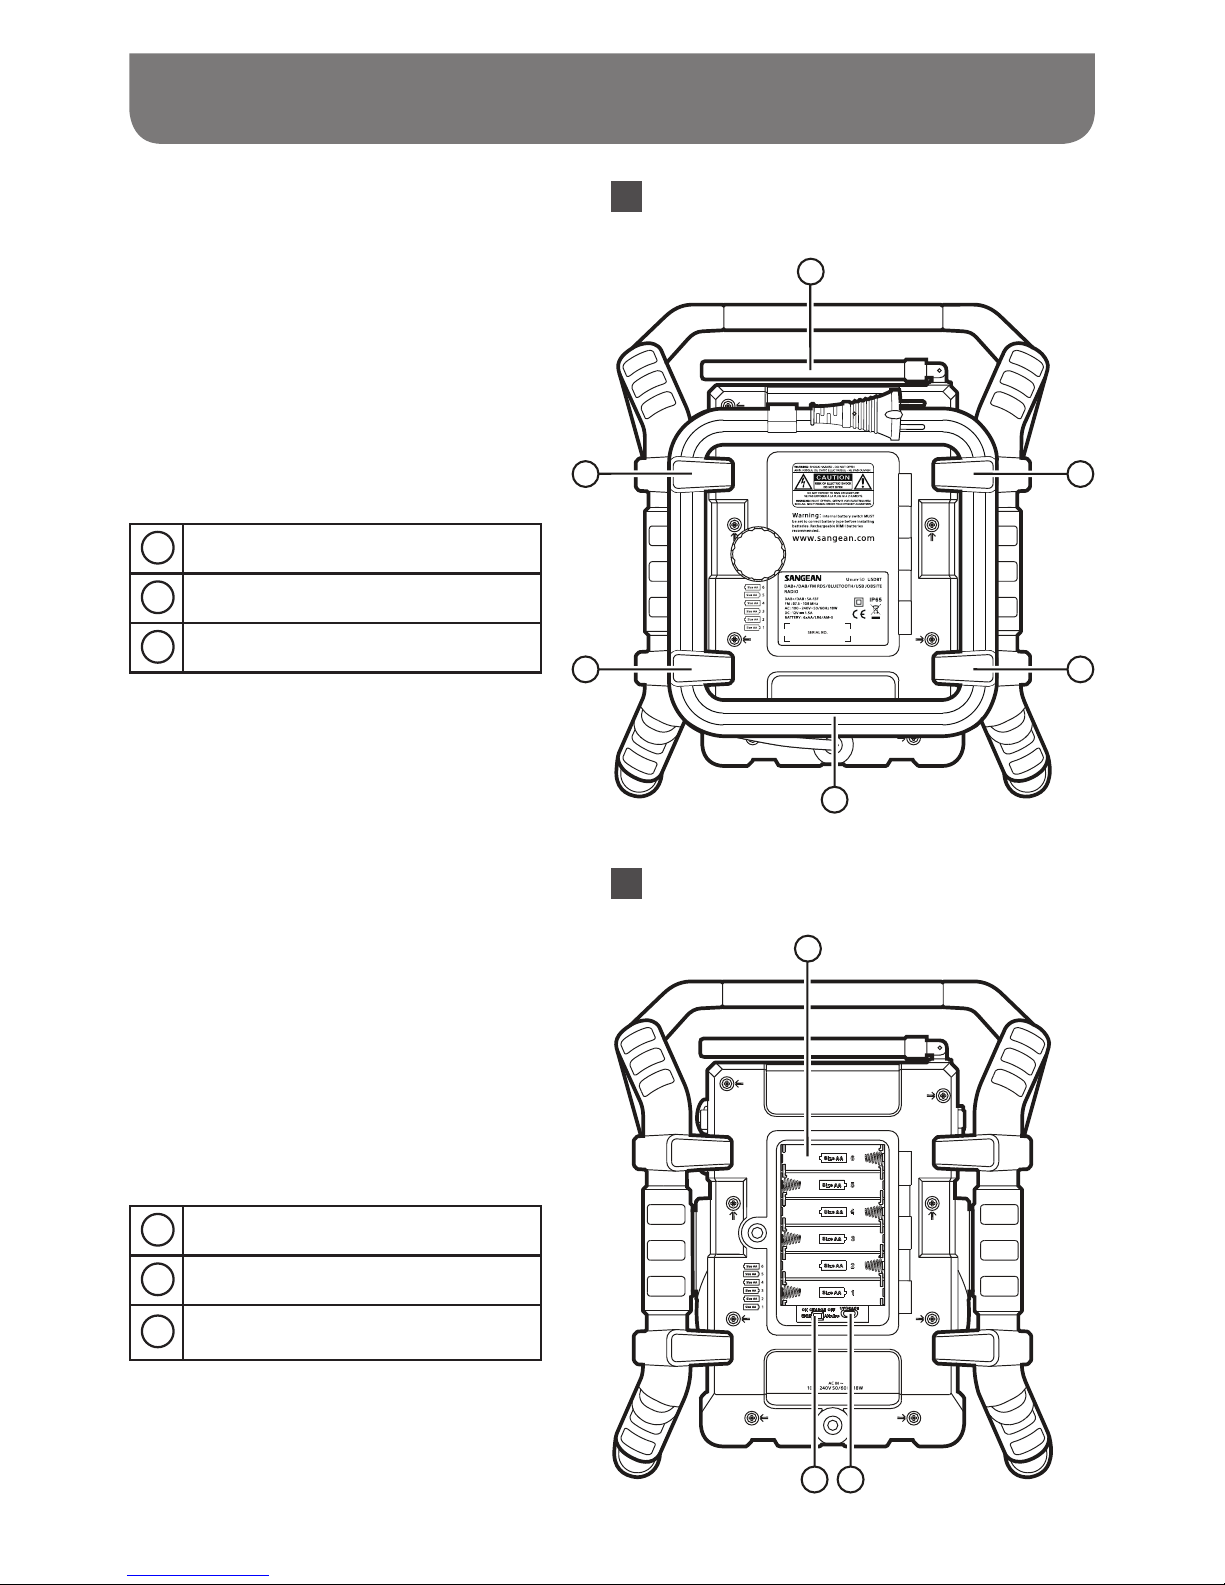
FM / DAB+ antenna
23
Power cord storage
24
AC power cord
Controls
2726
25
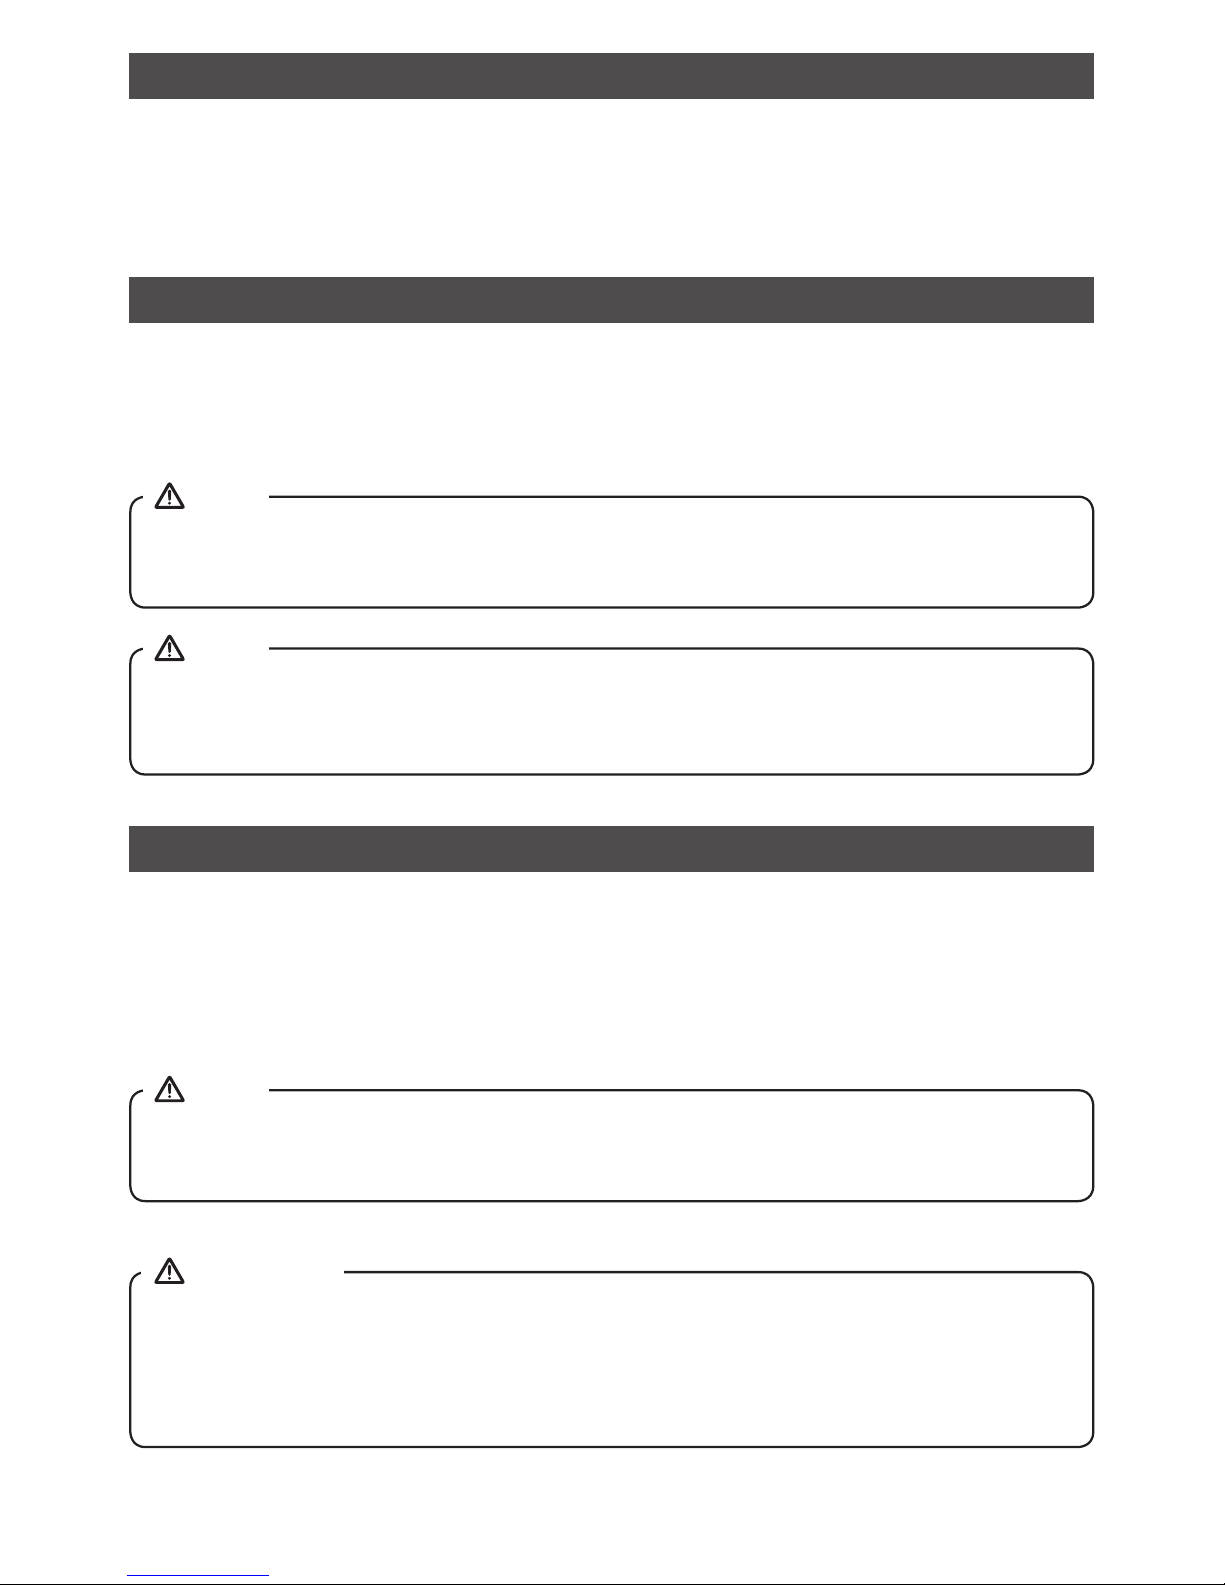
Back view
Back view
25
Battery compartment
26
NiMH / Alkaline batteries switch
27
Socket for software upgrade
Page 8

007
Powering the radio
Battery operation
Installing the batteries, rst turn battery cover xture anti-clockwise
to loosen and open the battery cover.
CLOSE
OPEN
Before you insert the batteries, if you use nonrechargeable
batteries, make sure the NiMH / Alkaline switch which located
inside the battery compartment is switched to Alkaline
position. If you use rechargeable batteries, make sure to
switch NiMH / Alkaline switch to NiMH position.
NOTE
Insert 6 x AA size (AM-3) battery into the compartment.
Ensure the batteries are inserted in accordance with the diagram
shown. Close the battery cover and fasten the fixture by turning
clockwise. If the radio is not to be used for any extended period of
time, it is recommended that the batteries are removed from the
radio. Reduced power, distortion and a stuttering sound or “Battery
Low” showing on the display are all signs that the batteries need
replacing or recharging. (see below information on “charging the
batteries”).
When playing on (rechargeable) batteries the output power is less
compared to the output power when playing on AC mains power.
Because of this the sound can be somewhat distorted at the
highest volume settings.
Page 9
008
AC operation
Before you plug the AC cord into the AC socket, make sure the voltage is correct. If you have batteries
in the radio and use the AC power cord, the batteries will automatically be disconnected.
Power cord storage is designed to store the cord when the radio is not in use.
Powered via DC IN socket
The radio can be also powered via the DC IN socket which can allow 12 Volt DC, which is designed to
be powered by the vehicle or the boat so you can take the radio with you outdoors or on the boat.
An additional cigarette lighter cable is required (not supplied) for this device.
Never use the 12 Volt socket in rainy or moist conditions to prevent moist from entering the radio.
Always keep the rubber cover on the back well closed under these conditions.
If no controls are used and no sound output from the radio for 15 minutes, the radio will be put
into standby mode when using the mains power. When the radio is operated on battery power,
the radio will be switched off completely in order to minimize battery usage.
NOTE
NOTE
Charging the batteries
Make sure the radio is switched off and connected to the AC mains socket.
When the battery charge indicator LED flashes green, this indicates the batteries are charging.
Batteries will be fully charged in around 5-7 hours. The battery charge indicator LED shows steady
green light when the battery charging process is complete.
Duration for charging your batteries fully can vary according to the mAh capacity of the batteries.
Higher mAh batteries require longer charging time.
Under some conditions the charging LED indicator may switch off after flashing briefly. This
may happen if the batteries are already freshly charged, or if the radio detects that you may be
attempting to recharge alkaline batteries or mixed different types or capacity of rechargeable
battery. In these cases the charging will be stopped.
NOTE
IMPORTANT
Page 10

009
Recharge the batteries in any case at least every 2 months.
Make sure the Battery Select switch next the battery compartment is set to the “CHARGE NiMH
ON” position.
Put the batteries in the compartment whilst paying attention to the correct polarity of the
batteries (+ and -).
First use: Charge new batteries in one continuous, uninterrupted, charge until they are full. This
rst charge may take longer than normal. For longer battery life it is advised to always recharge
in one continuous, uninterrupted charge until batteries are full and to not recharge again whilst
the batteries are still full.
New batteries will only reach their full capacity after some time of use (several charge –
discharge cycles).
Leave the complete group of batteries in place inside the radio and do not use these batteries
or a few of them for other purposes. This will result in a mix of (fully) charged and (partly) empty
batteries. This can seriously damage the batteries and radio when recharged.
It is advised to only charge batteries at room temperatures between 5 degrees C – 35 degrees C.
In lower or higher temperatures full charge cannot be achieved.
Depending on the capacity of the batteries, charging from “empty” to “full” can take several
hours, even up to 7 hours or more.
Do not charge batteries when the radio is hot or exposed to heat or heat sources.
It is advised to clean the metal contacts of the batteries and of the charger inside the radio e.g.
with a contact-spray from time to time.
Do not use a mix of old and new rechargeable batteries.
Do not use a mix of rechargeable and non-rechargeable batteries.
Do not use a mix of full and empty rechargeable batteries.
Do not use batteries that have a different mAh capacity.
Important Information On Charging And
Using Rechargeable Batteries
1.
2.
3.
4.
5.
6.
7.
8.
9.
10.
11.
12.
13.
14.
Page 11
010
Important Information On Charging And
Using Rechargeable Batteries
16.
15.
17.
18.
19.
20.
21.
22.
Do not use damaged, deformed or leaking batteries.
Battery level indication is an approximate indication only and can vary with battery type used.
Batteries can become hot during charging.
In cold conditions the capacity of batteries will be much lower than when used at normal room
temperature.
Batteries (even when supplied with the radio), as being consumables, do not fall under the
warranty conditions of the radio.
Batteries should not be disposed of by incineration and with household waste.
Disposable batteries should be taken to a suitable recycling centre if possible.
Danger of explosion if battery is incorrectly replaced. Replace only with the same or equivalent type.
CAUTION
Page 12
011
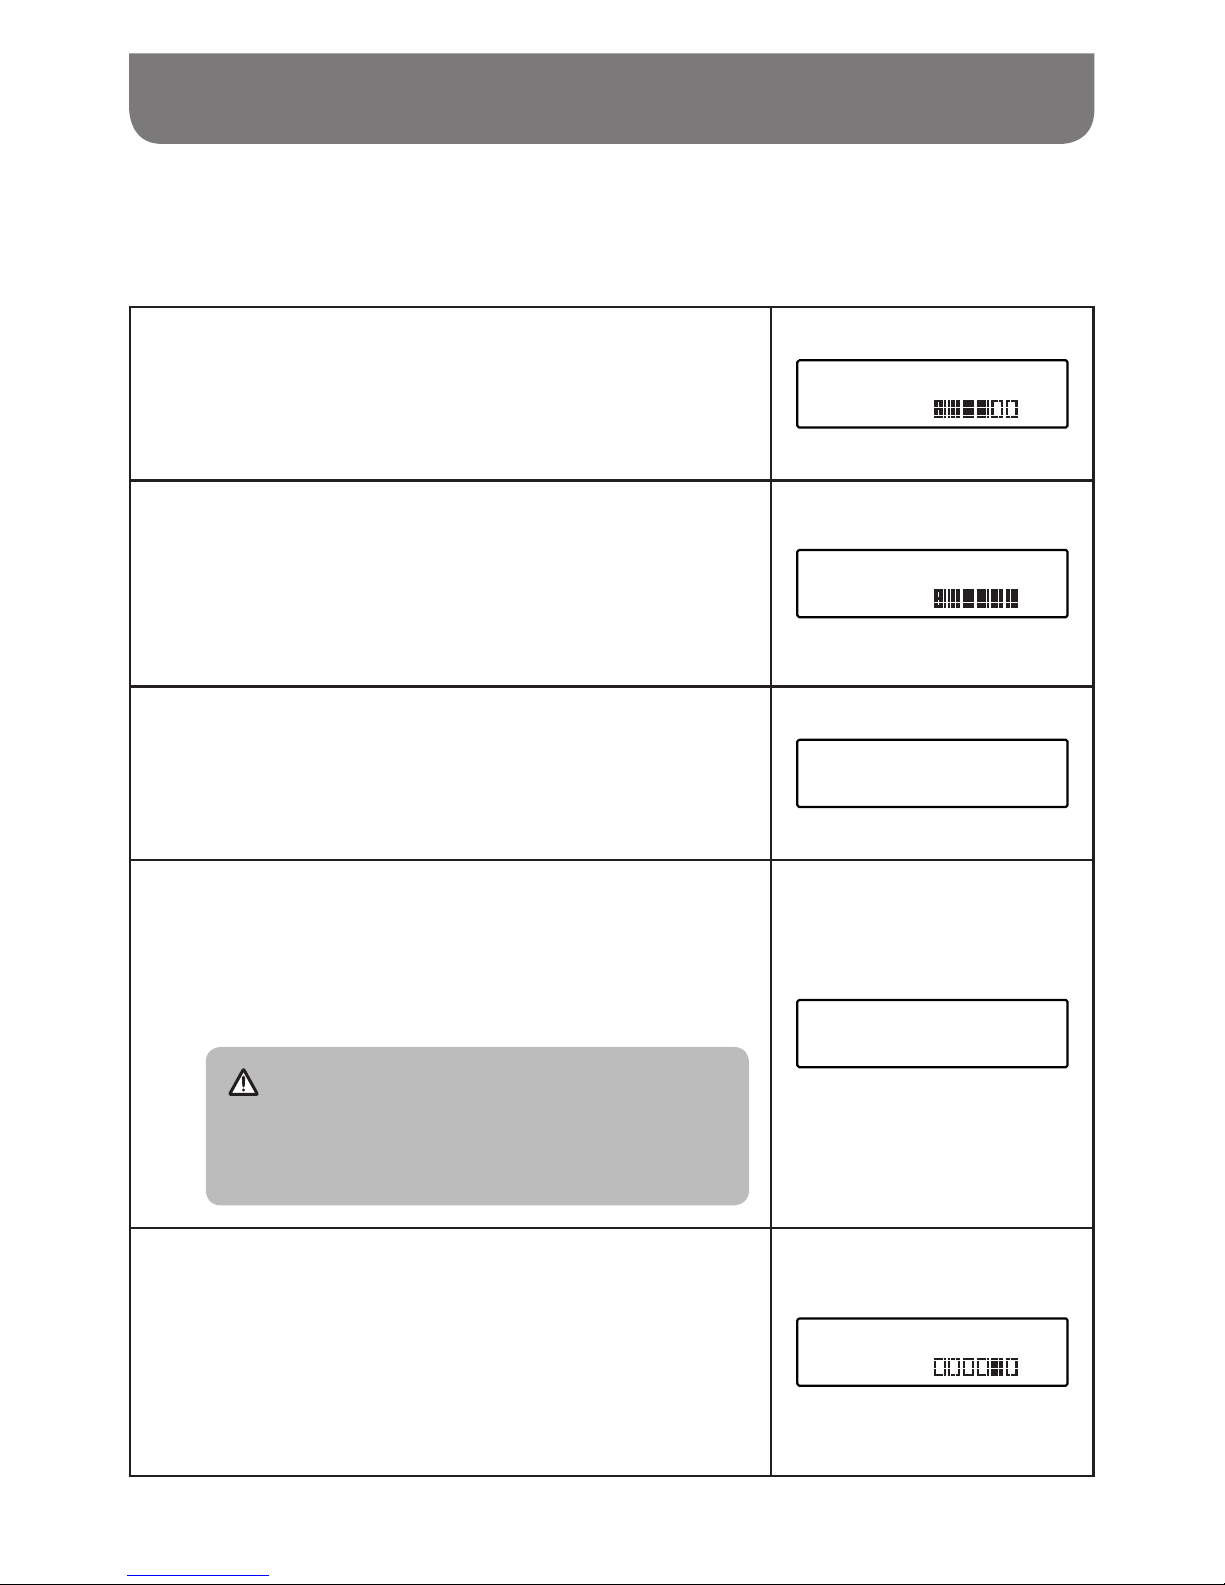
Battery charging indicator
Please note that the battery charging status detection can only be activated when the radio is in
charging mode (i.e. the radio is switched off, the battery switch slides to the NiHM position and it is
connected to the AC mains socket).
When charging is in progress,
display is shown at right
and the charging indicator LED ashes green.
Battery 123456
Charging
When the charging process is completed,
display is
shown at right and the charging indicator LED lights in
steady green.
Battery 123456
Capacity
If batteries are already fully charged,
display is shown
at right and it will switch to standby mode after 5 seconds.
Battery Full
When there is no battery / missing batteries in the
compartment or some of batteries are inserted with
the incorrect polarity,
display is shown at right and it will
enter standby screen after 5 seconds.
NOTE
If a battery is removed while charging, display is
shown at right and the charging indicator LED lights
red.
No cell
During the charging process,
if a battery is detected as
faulty / damaged
, a solid square will be displayed under
the corresponding battery number (see picture right) and
the charging indicator LED ashes red.
Battery 123456
Error
1
2
3
4
5
Page 13

012
Using the radio for the rst time
Place your radio on a at surface.
Straighten up the antenna.
Plug the AC power cord into an AC socket. The display
will show “Welcome to Digital Radio” for a few seconds.
After short time, the current time will appear on the
display.
Welcome to
Digital Radio
If no time is displayed, the screen will show “00:00”.
Press the Power On / Off button to turn on your radio and
it will nd a DAB clock radio stations. It may be necessary
to relocate your radio to a position giving better reception
and carry out a scan to nd stations as described in later
sections.
00:00
Time is not set
IMPORTANT
The mains plug is used as the means of connecting the radio to the mains supply. The mains
socket used for the radio must remain accessible during normal use. In order to disconnect
the radio from the mains completely, the mains plug should be removed from the mains
outlet completely.
1
2
3
4
Operating your radio – DAB
Straighten the antenna properly which is for both DAB and FM reception. Press the Power
On / Off button to switch on your radio.
Press the Source button to select DAB band.
If this is the rst time the radio is used, a quick scan of Band III DAB channels will be carried
out. If the radio has been used before, the last used station will be selected.
1
2
3
Page 14
013
During Autotune, as new stations are detected, the station
counter on the right hand side of the display will increase
and stations will be added to the list.
The display shows a bar graph indicating progress of
autotune.
Scanning... 019
When the Autotune is completed, the rst station (in numeric-alpha order 0…9…A…Z) will
be selected.
If the station list is still empty after the Autotune, your radio will display “No DAB Station”.
If no signals are found, it may be necessary to relocate your radio to a position giving better
reception.
NOTE
That radio station name and frequency displays shown in this user guide may differ from
those that you see on your radio. Broadcasters may change radio station names that are
transmitted, and the frequencies used for DAB and FM radio stations may not be the same
in all parts of the country.
Operating your radio – DAB
Selecting a station – DAB
Press the Power On / Off button to switch on your radio.
Press and release the Source button until the DAB mode
is selected. The display will show the name of the radio
station currently selected.
DAB
Rotate the Tuning control knob to scroll through the list of
available stations.
Station list
<BBC Radio 2 >
1
2
3
4
5
6
7
Page 15

014
Press and release the Tuning control knob to select the
station. The display may show “Connecting…” while your
radio nds the new station.
BBC Radio 2
Connecting...
Adjust the Volume control to the required setting.
NOTE
If after selecting a station, the station is not found it may be necessary to relocate your radio
to a position giving better reception.
4
5
Secondary service – DAB
1.
Certain radio stations have one or more secondary services associated with them. If a station
has a secondary service associated with it, the display will show “>>” next to the station name on
the station list.
The secondary service will then appear immediately after the primary service as you rotate the
Tuning control knob.
2.
Press and release the Tuning control knob to select the station. Most secondary services do not
broadcast continually and if the selected service is not available, the radio will re-tune to the
associated primary service.
Selecting a station – DAB
Page 16

015
Display mode – DAB
Your radio has a range of display options when in DAB mode:
1.
Press and release the Info button to cycle through the various modes.
a.
Scrolling text (DLS)
displays scrolling text messages such
as artist / track name, phone in number,
etc.
sunshine live
electronic music
b.
Signal strength
displays the signal strength of radio
reception. The clear unlled rectangle
indicates minimum signal level required
for satisfactory reception.
sunshine live
c.
Program type
displays type of station being listened
to e.g. Pop, Classic, News etc.
sunshine live
Pop Music
d.
Multiplex name
displays name of multiplex to which
current station belongs.
sunshine live
DR Deutschland
e.
Channel &
frequency
displays current channel and frequency.
sunshine live
12B 225.648MHz
f.
Bit rate / audio
type
displays the digital bit rate and the
audio type for the currently tuned DAB
station.
sunshine live
72kbps / DAB+
g.
Battery level /
Mains power
displays current battery level of using
batteries operation. (If using AC pow-
er cord operation, “Mains Power” is
shown on the screen.)
sunshine live
Bat.level
sunshine live
Mains Power
h.
Time displays the current time.
sunshine live
9:07 AM
i.
Date displays the current date.
sunshine live
8-9-2016
Page 17

016
Finding new stations – DAB
As time passes new stations may become available. To nd new stations proceed as follows:
Manual Tuning – DAB
Manual tuning allows you to tune directly to the various DAB band III channels.
Press the Menu button to access DAB menu.
Rotate the Tuning control knob to nd “Manual tune”.
Press and release the Tuning control knob to enter DAB
channels in the list. Rotate the Tuning control knob to
select required DAB channel. When required DAB channel
is found, press and release the Tuning control knob to
select the required DAB channel.
DAB
<Manual tune >
Manual tune
<5A 174.928MHz >
To carry out a full scan of the entire DAB Band III frequencies press and release the Auto
tune button.
As new stations are found, the station counter on the right
hand side of the display will increase and stations will be
added to the list.
Scanning... 019
1
2
1
2
1
Dynamic Range Control (DRC) setting – DAB
DRC can make quieter sound easier to hear when your radio is used in a noisy environment.
In DAB band, press the Menu button to access DAB menu.
Page 18

017
Rotate the Tuning control knob to find “DRC ”. Press
and release the Tuning control knob to enter adjustment
mode.
DAB
<DRC >
Rotate the Tuning control knob to select required DRC
setting (default is off).
DRC off DRC is switched off, Broadcast DRC will be
ignored.
DRC high DRC is set as sent by broadcaster.
DRC low DRC level is set to 1 / 2 that sent by broadcaster.
<DRC off >
DRC *
DRC
<DRC low >
DRC
<DRC high >
Press and release the Tuning control knob to conrm the setting.
NOTE
Not all DAB broadcasts are able to use the DRC function. If the broadcast does not support
DRC, then the DRC setting in the radio will have no effect.
2
3
4
Dynamic Range Control (DRC) setting – DAB
Station order setup
Your radio has 2 station order settings from which you can choose. The station order settings are
alphanumeric and ensemble.
1
2
The default station order on your radio is alphanumeric.
NOTE
Press the Power On / Off button to switch on your radio.
Press the Source button to select DAB band.
Page 19

018
Press the Menu button to access DAB menu.
Rotate the Tuning control knob until the display shows
“Station order”. Press the Tuning control knob to enter the
station order adjustment mode.
DAB
<Station order >
Rotate the Tuning control knob to choose “Alphanumeric”
or “Ensemble”.
“Alphanumeric” -sorts the station list alpha-numerically
0...9 A...Z.
“Ensemble” – sorts the station list by DAB multiplex.
The current setting is indicated by an asterisk.
Station order *
<Alphanumeric >
Station order
<Ensemble >
Press the Tuning control knob to select the required station order.
Station order setup
Prune stations
If you move to a different part of the country, some of the stations which were listed may no longer be
available.
Also from time to time, some DAB services may stop broadcasting, or may change location or
frequency.
Stations which cannot be found, or which have not been received for a very long time are shown in the
station list with a question mark. The prune stations function will delete the marked DAB stations from
your station list.
Press the Menu button to access DAB menu.
Rotate the Tuning control knob to find “Prune”. Press and
release the Tuning control knob to enter adjustment mode.
Then rotate the Tuning control knob to select “Yes” or “No”.
To activate the Prune function select “Yes”, and press and
release the Tuning control knob to conrm the setting.
DAB
<Prune >
Prune?
<Yes> No
3
4
5
6
1
2
Page 20

019
If you do not wish to prune stations, select “No” and then
press and release the Tuning control knob to conrm the
setting.
Prune?
Yes <No>
NOTE
If you have moved your radio to a different part of the country you should also carry out a
search for new stations (please see the section 'Finding new stations').
Prune stations
Operating your radio – FM
1.
Straighten the antenna properly above the radio. Press the Power On / Off button to switch on
your radio.
2.
Press the Source button to select FM waveband.
3.
To scan up in frequency, rst rotate the Tuning control knob in a clockwise direction and then
press the Auto tune button. Your radio will scan in an upwards direction (low frequency to high
frequency) and stop automatically when it nds a station of sufcient strength. To scan down in
frequency, rst rotate the Tuning control knob in a anti-clockwise direction and then press the
Auto tune button. Your radio will scan in a downwards direction and stop automatically when it
nds a station of sufcient strength. After a few seconds the display will update. The display will
show the frequency of the signal found. If the signal is strong enough and there is RDS data
present then the radio will display the station name.
4.
When the waveband end is reached, your radio will recommence tuning from the opposite
waveband end.
5.
Adjust the Volume control to the required setting.
6.
To switch off your radio, press the Power On / Off button.
Manual tuning – FM
1.
Press the Power On / Off button to switch on your radio.
2.
Press the Source button to select FM waveband.
3.
Rotate the Tuning control knob to tune to a station. The frequency will change in steps of 50 kHz.
When the waveband end is reached, the radio will recommence tuning from the opposite waveband end.
4.
Adjust the Volume control to the required setting. To switch off your radio, press the Power On /
Off button.
3
Page 21

020
Display Modes – FM
On FM the bottom line of the display can be set to any of the following modes:
1.
Press and release the Info button repeatedly to cycle through the various modes.
a.
Radio text
displays scrolling text messages such
as artist / track name, phone in number
etc.
V.H.B.N
[No RadioText]
b.
Program type
displays type of station being listened
to e.g. Pop, Classic, News, etc.
V.H.B.N
News
c.
Frequency
displays the frequency of the station
being listened to.
V.H.B.N
106.50MHz
d.
Signal strength
displays the signal strength for the
station being listened to.
V.H.B.N
SGLV
e.
Battery level /
Mains power
displays current battery level of using
batteries operation. (If using AC power
cord operation, "Mains Power" is
shown on the screen.)
V.H.B.N
Bat.level
V.H.B.N
Mains Power
f.
Time displays the current time.
V.H.B.N
2:18 PM
g.
Date displays the current date.
V.H.B.N
8-9-2016
NOTE
If no RDS information is available, the radio will be unable to display the station name,
scrolling text and program type information.
Page 22

021
Scan sensitivity setting – FM
Your radio includes a local / distant option for the auto-scan function. By setting the radio to the ‘local’
scan option, weaker signals from more distant transmitters can be ignored by the radio, making
stronger signals easier to nd.
Press the Power On / Off button to switch on your radio.
If needed, press and release the Source button until the FM band is selected.
Press the Menu button to access FM menu. Rotate the
Tuning control knob until “FM Scan Zone” shows on the
display. Press and release the Tuning control knob to
enter the scan sensitivity adjustment mode. The current
setting will be marked with an asterisk.
FM
<FM Scan Zone >
Rotate the Tuning control knob to switch between “Local”
(Strong stations only) and “Distant” (All stations) options
on the lower line of the display. The “Distant” option will
allow the radio to nd weaker signals when scanning.
FM Scan Zone *
<Distant >
FM Scan Zone
<Local >
Press and release the Tuning control knob to conrm your selection. The setting is stored in
the radio and remains in force until changed or until a System Reset.
1
2
3
4
5
Page 23

022
Preset stations in DAB and FM modes
There are 5 memory presets for each DAB / FM wavebands.
Press the Power On / Off button to switch on your radio.
Tune to the required station as previously described.
Press and hold the required Preset button until the display
shows e.g. Preset 1 stored. The station will be stored
under the chosen preset button. The corresponding preset
number e.g.“P1” will show on the display. Repeat this
procedure for the remaining presets.
Preset 1
stored
Station stored in the memories may be over written by following the above procedure.
4
3
2
1
Recall a preset in DAB and FM modes
Press the Power On / Off button to turn on the radio.
Press the Source button to select the required waveband.
Momentarily press the required Preset button, the preset
number and station will appear in the display.
87.50MHz P1
[No RadioText]
NOTE
The display will show “Preset Empty” if no station has been stored to that preset.
1
2
3
Page 24

023
Listening to music via Bluetooth streaming
You need to pair your Bluetooth device with your U5 DBT before you can auto-link to play / stream
Bluetooth music through your U5 DBT. Pairing creates a ‘bond’ so the two devices can recognize each
other.
Pairing and playing your Bluetooth device for the rst time
Press the Power On / Off button to switch on your radio and press the Source button to select
Bluetooth function. “Bluetooth Pairing” will show on the display.
The Bluetooth status indicator ( ) on the radio will flash a fast blue to show the radio is
discoverable.
Activate Bluetooth on your device according to the device’s user manual to link to the radio. Locate
the Bluetooth device list and select the device named ‘U5 DBT’ (With some Smartphone’s that are
equipped with earlier versions than BT2.1 Bluetooth device, you may need to input the pass code
“0000”).
Once connected, there will be a confirmation tone sound and the name of your connected
Bluetooth device will show on the display. The Bluetooth status indicator ( ) will turn a solid
blue. You can simply select and play any music from your source device.
The volume control can be adjusted from your source device, or directly from the radio.
Use the controls on your Bluetooth-enabled device or on the radio to play / pause and navigate
tracks.
● If 2 Bluetooth devices are pairing for the rst time, both will search for your radio, it will show
its availability on both devices. However, if one device links with this unit rst, then the other
Bluetooth device will not nd it on the list.
● If you take your source device out of range, the connection will be temporarily disconnected
to your radio. Your radio will automatically reconnect if the source device is brought back in
range. Be aware that during the period of disconnection, no other Bluetooth device can pair or
link with your radio.
● If ‘U5 DBT’ shows in your Bluetooth device list but your device cannot connect with it, please
delete the item from your list and pair the device with the radio again following the steps
described previously.
● The effective operation range between the system and the paired device is approximately 10
meters (30 feet). Any obstacle between the system and the device can reduce the operational
range.
● Bluetooth connectivity performance may vary depending on the connected Bluetooth devices.
Please refer to the Bluetooth capabilities of your device before connecting to your radio. All
features may not be supported on some paired Bluetooth devices.
● With some mobile phones, making / receiving calls, text messages, e-mails or any other
activities unrelated to audio streaming may mute the Bluetooth audio streaming or even
temporarily disconnect from your device. Such behavior is a function of the connected device
and does not indicate a fault with your U5 DBT.
NOTE
1.
2.
3.
4.
Page 25

024
Listening to music via Bluetooth streaming
Display modes – Bluetooth
Your U5 DBT has a range of display options when in Bluetooth mode. Note that the availability of
information depends on the specic media format.
1.
Press and release the Info button to cycle through the different options.
a.
Track status
Displays the current status of the track.
H30-U10
b.
Track name
Displays the track information for the
track currently playing.
H30-U10
Title:Waiting For You
c.
Artist
Displays the artist information for the
track currently playing.
H30-U10
Artist:lsobel Anderson
d.
Album
Displays the album information for the
track currently playing.
H30-U10
Album:In My Garden
e.
Battery level /
Mains power
Displays current battery level of using
batteries operation. (If using AC power
cord operation, “Mains Power” is
shown on the screen.)
H30-U10
Bat.level
H30-U10
Mains Power
f.
Time
Displays the current time.
H30-U10
16:55
g.
Date
Displays the current date.
H30-U10
4-10-2016
Page 26

025
Listening to music via Bluetooth streaming
Playing audio les in Bluetooth mode
When you have successfully connected your radio with the chosen Bluetooth source device you can
start to play your music using the controls on your connected Bluetooth device.
Once playing has started adjust the volume to the required setting using the Volume control on
your radio or on your enabled Bluetooth source device.
Use the controls on your Bluetooth source device to play / pause and navigate tracks. Alternatively,
control the playback using Play / Pause ( ), Next track ( ) , Previous track
buttons ( ) on your radio.
Press and hold the Fast-forward / Rewind button to move through the current track. Release the
button when the desired point is reached.
Not all player applications or devices may respond to all of these controls.
NOTE
1.
2.
3.
Reconnecting a previously – paired Bluetooth source device
The U5 DBT can memorize up to 8 sets of paired Bluetooth source devices, when the memory exceed
this amount, the earliest paring device will be over written from the device.
If your Bluetooth source device already paired with the U5 DBT previously, the unit will memorize your
Bluetooth source device and it attempts to reconnect with a Bluetooth source device in memory which
is last connected. If the last connected Bluetooth source device is not available, the U5 DBT will try to
connect to the second last Bluetooth source device.
Alternatively, you can select to connect to your previously-paired device.
Press the Source button as needed to select Bluetooth mode.
Press Bluetooth pairing button to enter the “Paired List” menu.
Rotate the Tuning control knob to select a previously-paired device you would like to connect and
press the Tuning control knob to conrm the selection.
Disconnecting your Bluetooth device
Press and hold the Bluetooth pairing button for 2-3 seconds to disconnect with your Bluetooth
device or turn off Bluetooth on your Bluetooth source device to disable the connection. There will
be a conrmation tone sound and the “Bluetooth Pairing” will show on the display. The Bluetooth
status indicator ( ) on the radio will ash a fast blue to show the radio is discoverable again for
pairing.
You can also press the Source button to select any mode other than Bluetooth mode to disable the
connection.
1.
1.
2.
2.
3.
Page 27

026
In order to minimize the risk of damage to your radio, your USB Memory, please place the
radio such that the device cannot easily be knocked while it is inserted in the socket.
Remove the USB before carrying the radio or if not using the USB feature for a prolonged
period.
Turn off the radio before removing your USB memory device.
The USB connection is intended only for ash memory devices. The use of hard disk storage
media is not supported.
Playback via USB les stored on MP3 players is not guarantee.
Large le size or high memory USB device takes longer time to read.
Your radio is only designed to work with USB ash memory devices. It is not intended to be
connected to hard disk drives or any other type of USB device.
It is possible to use SD or SDHC cards for media playback when held in a suitable USB
adaptor. However, due to the wide variation of such adaptors, it is not possible to guarantee
that all adaptor / card combinations will work with the radio.
The radio has been tested with a range of USB memory devices of up to 32GB capacity. It
supports USB 2.0 full speed and USB 3.0.
NOTE
when using USB 3.0, please allow the radio to detect the device for a longer period of
time.
USB memory must use the FAT or FAT 32 ling system in order to operate with the radio, it
does not support NTFS.
Audio formats supported for playback are MP3, WMA and AAC. Playback does not support
les encoded using WMA lossless, WMA Voice, WMA 10 professional, nor les of any format
which have DRM protection.
Using USB memory devices
1.
1.
2.
3.
4.
5.
6.
3.
4.
5.
2.
CAUTIONS
IMPORTANT
Page 28

027
To pause playing, press the Play / Pause button ( ). To resume playing, press the Play /
Pause button ( ) again.
● If you turn off the radio, the next time the radio is turned on, it will resume to the last played
track.
● If you switch to other mode when playing from the USB memory device, playback will be
paused. When you switch to the USB mode again, playback will resume from the point where it
was paused.
● It is recommended to store only music les (MP3 / WMA / AAC) in your USB memory device. If
there is one folder contains le(s) other than music les, your radio will skip this le / folder and
the le / folder number shown on the display will not be serial.
Using USB memory devices
Playing les from USB memory devices
Insert the USB memory device into the USB slot which is located on the left hand side of the radio
behind the rubber cover.
Press the Power On / Off button to turn on the radio and Press the Source button to select USB
mode. The “Loading” will appear on the LCD display. Then the radio will start playing from the USB
memory device.
The text coding only supports ASCII.
1.
2.
3.
NOTE
NOTE
Page 29

028
Using USB memory devices
Display modes
Your radio has a range of display mode while in USB playback mode.
Press the Info button to cycle through the different options.
a.
File name
00:30
File:01 Vincent
b.
Folder name
00:47
Folder:USB MUSIC
c.
Genre
01:01
Genre:MP3
d.
Folder and le numbers
01:07
F003 T001
e.
Battery level / Mains power
01:08
Bat.level
01:13
Mains Power
f.
Time
01:18
17:17
g.
Date
01:23
17-5-2018
h.
Song title
01:49
Title:Vincent
i.
Artist name
02:10
Artist:Don McLea
j.
Album name
02:26
Album:
Page 30

029
If your USB contains a folder without les, the device will skip the folder and play the les in the
next folder.
Using USB memory devices
Selecting a le
While the USB memory device is playing, press either the Next track button ( ) or Previous
track button ( ) to change to the desired le. The le number is updated on the display. If
there’s more than one folder, all les in the current folder should have been played and the next
folder will be played.
Press and hold the Next track button ( ) or Previous track button ( ) to fast-forward /
Rewind the current track. Release the button when the desired point in the track is reached.
1.
2.
To skip to another folder
With the USB memory device is in pause or play mode, press and release the Next folder
button ( ) or Previous folder button ( ). The rst le of the next or previous folder will be
played.
NOTE
Play Mode
When playing the les in the USB memory device, press and release Play mode button to select:
Repeat 1 :
repeatedly play the le you are listening to.
Repeat Folder :
repeatedly play the les within the folder you are listening to.
Repeat All :
repeatedly play the folders in the USB.
Random :
it will play les in the USB by in random.
Page 31

030
Charging with USB socket
Your radio has a USB socket which is intended for charging an iPhone, smart phone or similar
devices. Charge time may vary and in some cases may take longer to charge than when using the
manufacturers charging unit supplied with the smart phone. The radio can charge the iPhone, smart
phone or similar devices when using AC power cord and the radio is in power on or standby mode.
● The USB jack can only provide power for the USB memory stick only with 1A 5V maximum and
most of iPhone models. However, it does not support external Hard disk drive and all mobile
phones and electronic device.
● The charger may not supply power to some USB devices.
● Do not connect power source to USB port. Otherwise there is risk of re. The USB port is only
intended for charging lower voltage device.
● Do not insert a nail, wire, etc. into USB power supply port. Otherwise a circuit short may cause
smoke and re.
● Do not connect this USB socket with your PC USB port, as it is highly possible that it may
cause breakdown of the units.
● Never use the USB socket in rainy or moist conditions to prevent moist from entering the radio.
Loudness On / Off
When the radio is switched on, press and hold the EQ control button to get compensation on lower and
higher frequency. The effect will be more audible when the radio is in lower volume level. The display
will show “Loudness on” when Loudness function is applied. To turn off the loudness function, press
and hold the EQ control button again. The display will show “Loudness off”.
Equaliser function
1.
Press the Power On / Off button to switch on your radio.
2.
Press the EQ control button to enter the EQ setting menu.
3.
Rotate the Tuning control knob to select your required mode. Then press the Tuning control knob
to conrm the selection.
IMPORTANT
Page 32

031
Set up My EQ prole
1.
Press the Power On / Off button to switch on your radio.
2.
Press the EQ control button to enter the EQ setting menu.
3.
Rotate the Tuning control knob to select "My EQ…". Then press the Tuning control knob to enter
the setting.
4.
Rotate the Tuning control knob to select “Treble” or “Bass”. Press the Tuning control knob to enter
the setting.
5.
Rotate the Tuning control knob to select your required Treble level or Bass level. Press the Tuning
control knob to conrm the setting.
To prevent possible hearing damage, do not listen at high volume levels for long periods or put
your ears too close to the speaker.
Please use the volume level responsibly with respectable consideration of the situation and other
people or animals in the vicinity.
Clock time setting
SAFETY AND COURTESY NOTE
Setting the time format
Press the Power On / Off button to turn on the radio.
Press the Menu button to access the menu for the current
mode. Rotate the Tuning control knob to select “System”
and press the Tuning control knob to enter the system
settings menu.
FM
<System >
Rotate the Tuning control knob to select “Time” and press
the Tuning control knob to enter the setting.
System
<Time >
Rotate the Tuning control knob to select “Set 12 / 24 hour”
and press the Tuning control knob to enter the setting.
Time
<Set 12/24 hour >
1
2
3
4
Page 33

032
Clock time setting
Rotate the Tuning control knob to select 12 or 24 hour format and press the Tuning control
knob to conrm the setting. The selected format is used in standby mode and on the playing
mode screen. If the 12 hour clock format is chosen, the radio will then use the 12 hour clock
with an AM or PM indicator.
Setting the date format
Press the Power On / Off button to turn on the radio.
Press the Menu button to access the menu for the current
mode. Rotate the Tuning control knob to select “System”
and press the Tuning control knob to enter the system
settings menu.
FM
<System >
Rotate the Tuning control knob to select “Time” and press
the Tuning control knob to enter the setting.
System
<Time >
Rotate the Tuning control knob to select “Set date format”
and press the Tuning control knob to enter the setting.
Time
<Set date format >
Rotate the Tuning control knob to select “DD-MM-YYYY”
or “MM-DD-YYYY” date format and press the Tuning
control knob to conrm the setting.
Set date format*
<DD-MM-YYYY >
Set date format
<MM-DD-YYYY >
5
1
2
3
4
5
Setting the time format
Page 34

033
Clock time setting
Automatically updating the clock
Your radio will normally update the clock automatically using the DAB or FM signal. If no signal is
available, then you need to set the time manually. After a power failure the radio will then set its clock
the next time that you turn on the radio in DAB or FM mode. Alternatively you may specify that the
time is not automatically updated. In this case the clock must always be set manually after a power
interruption.
With your radio switched on, press the Menu button to access the menu for the current
mode.
Rotate the Tuning control knob to select “System” and
press the Tuning control knob to enter the system settings
menu.
FM
<System >
Rotate the Tuning control knob to select “Time”. Press the
Tuning control knob to enter the time setting menu.
System
<Time >
Rotate the Tuning control knob to select “Auto update” and
press the Tuning control knob to enter the setting.
Time
<Auto update >
Rotate the Tuning control knob to choose an update
option from “Update from Any” “Update from DAB” “Update
from FM” or “No update” as required. Press the Tuning
control knob to conrm your choice.
Auto update
<Update from DAB >
Auto update
<Update from FM >
Auto update
<No update >
Auto update *
<Update from Any >
NOTE
If you select “Update from Any”, “Update from DAB”, “Update from FM” the current time
received will be displayed. If no signal is found you should either position the radio or its
aerial so that a signal can be received, or revert to manual clock mode.
5
4
3
2
1
Page 35

034
Clock time setting
Setting the clock manually
With your radio switched on, press the Menu button to access the menu for the current
mode.
Rotate the Tuning control knob to select “System” and
press the Tuning control knob to enter the system settings
menu.
FM
<System >
Rotate the Tuning control knob to select “Time”. Press the
Tuning control knob to enter the time setting menu.
System
<Time >
Rotate the Tuning control knob to select “Set Time / Date”
and press the Tuning control knob to enter the setting.
The hour digits will ash on the display. Rotate the Tuning
control knob to set the desired hour.
Time
<Set Time/Date >
Set Time
2:36 PM
Press the Tuning control knob. The minute digits will ash
on the display. Rotate the Tuning control knob to set the
desired minute.
NOTE
If the radio has been set to use a 12 hour format,
there will be an option here for setting AM or PM for
the clock time. Rotate the Tuning control knob to
select AM or PM.
Press the Tuning control knob to conrm the setting.
If the radio has been set to use a DD-MM-YYYY date
format (for example). The day will ash on the display.
Rotate the Tuning control knob to change the day as
needed.
Set date
21-9-2016
Time
Saved
Press the Tuning control knob. The month will ash on the
display. Rotate the Tuning control knob to set the current
month.
Press the Tuning control knob. The year will ash on the
display. Rotate the Tuning control knob to set the current
year. Then press the Tuning control knob to conrm the
setting. The display will show “Time Saved”.
NOTE
If the radio has been set to use a MM-DD-YYYY date
format, follow the steps above to set the month / day
/ year setting.
1
2
3
4
5
6
7
8
Page 36

035
Setting the alarm clock
Your radio has two separate alarms which can be set to wake you to either the radio or a buzzer alarm.
In the event of a power interruption your radio has built in memory that will retain your alarm settings.
Ensure that the time is set correctly before setting the alarms.
When using batteries only and the radio is switched off, the alarms can’t be set and activated.
If no buttons are pressed for 10 seconds, the radio will exit the alarm setup.
Press and release the Alarm 1 button, for example. “Alarm
1: Setting” will show on the display.
NOTE
If the time is not set before setting the alarms, “Time
is not set” will show on the display. Then Use the
Tuning control knob to set the time and date. When
the setting is complete, proceed to step 2.
Alarm 1:Setting
Off
Press the Tuning control knob to enter the alarm setting.
Alarm status will ash on the display.
Rotate the Tuning control knob to select “On” or “Off”. If
“Off” is selected any current setting for that alarm will be
cancelled. With “On” selected, press the Tuning control
knob to cause the alarm hour digits to ash on the display.
Alarm 1:Setting
On
Rotate the Tuning control knob to choose the desired hour
for the alarm and then press the Tuning control knob to
cause the alarm minute digits to ash on the display.
Alarm 1:Time
10:00
Rotate the Tuning control knob to choose the desired minute
for the alarm and then press the Tuning control knob.
NOTE
If the radio has been set to the 12 hour clock format,
there will also be an option here for setting AM or PM
for t he alarm time. Rotate the Tuning control knob
to select AM or PM. Press the Tuning control knob to
conrm the setting.
Rotate the Tuning control knob to choose the desired
source for the alarm (DAB, FM, Buzzer).
Press the Tuning control knob when the desired source
alarm is highlighted on the display. If setting alarm to
Buzzer proceed to step 6.
Alarm 1:Mode
Buzzer
1
2
3
4
5
NOTE
NOTE
Page 37

036
For which ever radio mode is selected, the radio
alarm may be set to any of the stations which have
been stored as presets or to the station last listened
to. If setting the alarm to a radio option, rotate the
Tuning control knob to choose either last listened or
from presets 1-5.
NOTE
You can only set the alarm to use a preset which
has already been stored.
Press the Tuning control knob to conrm the selection.
The alarm day option will ash on the display.
Alarm 1:Mode
Buzzer
Alarm 1:Mode
FM
Alarm 1:Mode
Last listened
Alarm 1:Mode
1: 87.50MHz
Your alarm can be set to sound once, daily, weekdays
and weekends.
Once - Will sound at one time only.
Daily - Will sound every day.
Weekdays - Will sound only on weekdays.
Weekends - Will sound only on weekends.
Rotate the Tuning control knob to choose the day option
and then press the Tuning control knob to confirm the
setting.
● If setting alarms to daily, weekdays or weekends
proceed to point 10. If selecting the alarm to once
you will need to set the day, month and year options
as described below.
Alarm 1:Day
Once
Rotate the Tuning control knob to select the correct day
and then press the Tuning control knob to conrm the
setting.
Alarm 1:Date
17- 5-2018
Rotate the Tuning control knob to select the correct
month and then press the Tuning control knob to
conrm the setting.
Rotate the Tuning control knob to select the correct
year and then press the Tuning control knob to
conrm the setting.
Rotate the Tuning control knob to choose the desired
volume and press the Tuning control knob to conrm
the setting. Your radio will show “Alarm 1 Saved” and
will exit the alarm setting procedure. Active alarms are
indicated in the display by the alarm “A” symbol.
NOTE
You can also press and hold the Alarm 1 button
or Alarm 2 button to activate or disable the
alarms.
Alarm 1:Volume
6
Alarm 1
Saved
10:06 A
17-5-2018
Setting the alarm clock
6
7
8
9
10
Page 38

037
When the alarm sounds
The alarm will sound at the selected times for up to 60 minutes unless cancelled. The maximum
volume used for the alarm will be specied during the alarm setting procedure. When your radio is
set to wake by the radio alarm, your radio will switch to the selected radio station. If the radio cannot
connect to the specied the radio station, the buzzer will be used instead.
To cancel a sounding alarm, press the Power On / Off button to cancel a sounding alarm.
If the radio is switched on because of a radio alarm you can control basic functions such as the
volume control.
When the alarm activates it will start softly and gradually increase in level. The radio will
automatically switch back to standby mode when the 60 minutes have elapsed.
Snooze timer
NOTE
When the radio alarm sounds, pressing any button other than the Volume control will silence
the alarm for the selected number of minutes. When the buzzer alarm sounds, press any
button. This will silence the alarm for the selected number of minutes. The Snooze time can
be adjusted between 5 and 20 minutes in 5 minute increments. Default setting is 5 minutes.
The snooze duration can only be set while the radio is playing. To adjust the silence time for
the snooze timer, press the Menu button to access the menu for the current mode.
Rotate the Tuning control knob to select “System” and
press the Tuning control knob to enter the system settings
menu.
FM
<System >
Rotate the Tuning control knob until 'Snooze Duration' is
shown on the display. Press the Tuning control knob to
enter the setting.
System
<Snooze Duration >
Rotate the Tuning control knob to choose the desired
snooze time to 5, 10, 15 or 20 minutes. Press the Tuning
control knob to conrm the setting.
Snooze Duration
*
<
5 Minutes
>
In order to cancel the Snooze timer while the alarm is suspended, press the Power On / Off
button.
4
1
2
3
5
6
Page 39

038
Sleep function
Your radio can be set to turn off after a preset time has elapsed. The sleep setting can be adjusted
between 15 and 120 minutes. Ensure your radio is switched on.
To set the desired sleep time, press the Menu button to enter the menu of the current mode.
Rotate the Tuning control knob until “Sleep” is shown on
the display. Press the Tuning control knob to enter the
setting. The sleep settings available are 15, 30, 45, 60, 90
or 120 minutes. Press the Tuning control knob to conrm
the setting. The display will exit the sleep options. The
sleep symbol ‘S’ will show on the display. Your radio will
switch off after the preset sleep time has elapsed.
FM
<Sleep >
Set sleep time
15 minutes
To cancel the sleep timer and switch off your radio before
the chosen sleep time has elapsed, press the Power On /
Off button. To cancel the sleep timer without switching off
your radio, go back to the sleep timer settings (step 1 to 2)
and select the “Sleep off” option in step 2.
Set sleep time
Sleep off
To view the remaining time of an active sleep timer on the display, press the Menu button to
enter the menu of the current mode. Rotate the Tuning control knob until “Sleep” is shown
on the display and then press the Tuning control knob.
4
1
2
3
3
2
1
Brightness control
The brightness of the display can be adjusted for when the radio is in standby and for when it is in
use. If you use the unit in the bedroom, you may prefer a lower standby brightness level than a higher
brightness setting.
Press the Power On / Off button to switch on your radio.
Press the Menu button to access the menu for the current mode.
Rotate the Tuning control knob to select “System” and
press the Tuning control knob to enter the system settings
menu.
FM
<System >
Page 40

039
Rotate the Tuning control knob to select “Backlight” and
press the Tuning control knob to enter the setting menu.
System
<Backlight >
In Backlight menu, there are 3 settings:
Timeout:
to adjust the length of time before the backlight
turns off.
Power On level:
to adjust the brightness when the radio
is in use.
Standby level:
to adjust the brightness when the radio is
in standby.
Rotate the Tuning control knob to select your option and
press the Tuning control knob to conrm your setting.
Backlight
<Timeout >
Backlight
<Power On level >
Backlight
<Standby level >
Brightness control
Language selection
By default your radio will display all menus and messages in English. You can choose your preferred
language.
Press the Power On / Off button to switch on your radio.
Press the Menu button to access the menu for the current mode.
Rotate the Tuning control knob to select “System” and
press the Tuning control knob to enter the system settings
menu.
FM
<System >
Rotate the Tuning control knob to select “Language”
and press the Tuning control knob to enter the language
adjustment menu.
System
<Language >
Rotate the Tuning control knob until your desired language appears on the display. Press the
Tuning control knob to conrm your choice. The display will change to the chosen language.
The chosen language will be marked with an asterisk.
1
4
5
2
4
5
3
Page 41

040
Factory reset
If your radio fails to operate or some digits on the display are missing or incomplete, carry out the
following procedure.
4
2
1
3
5
6
Press the Power On / Off button to switch on your radio.
Press the Menu button to access the menu for the current mode.
Rotate the Tuning control knob to select “System” and
press the Tuning control knob to enter the system settings
menu.
FM
<System >
Rotate the Tuning control knob to select “Factory Reset”
and press the Tuning control knob to enter the setting.
System
<Factory Reset >
Rotate the Tuning control knob to select “Yes” or “No”. If
you do not wish to carry out a system reset, select “No”
and then press the Tuning control knob to confirm the
setting.
Factory Reset?
Yes <No>
With “Yes” selected, press the Tuning control knob. A full
reset will be performed. All presets and station lists will be
erased. All settings will be set to their default values. After
a system reset, the radio will be restarted.
The display will show “Welcome to Digital Radio” and
a scan of the DAB band III will be performed. In case
of malfunction due to electrostatic discharge, reset the
product (reconnection of power source may be required)
to resume normal operation.
Factory Reset?
<Yes> No
Page 42

041
Socket for software upgrade
From time to time, new software features for your radio may be developed. Your radio has therefore
been designed to allow its internal software to be updated using your USB upgrade port. You should
not attempt to update your radio unless it is recommended to you by Sangean Customer Services.
Updating the software may remove all radio station presets and settings from your radio.
Software updates for your radio may be available in the future. As software updates become available
software and information on how to update your radio can be found at:
http://sg.sangean.com.tw/rst/rst.asp
http://www.sangean.eu
www.sangean.com.au
For more information, please contact our Head Ofce by sending an email to info@sangean.com
Using the micro USB cable (not supplied) to connect the USB socket in the battery
compartment and your PC.
With your radio switched on, press the Menu button to access the menu for the current
mode.
Rotate the Tuning control knob to select “System” and
press the Tuning control knob to enter the system settings
menu.
FM
<System >
Rotate the Tuning control knob to select “Software
Upgrade” and press the Tuning control knob to enter the
setting.
System
<Software Upgrade>
Rotate the Tuning control knob to select “Yes” or “No”. If
you do not wish to carry out a software upgrade, select
“No” and press the Tuning control knob to confirm the
setting.
Upgrade?
Yes <No>
With “Yes” selected, press the Tuning control knob. The
display will show “Waiting for PC wizard”.
Upgrade?
<Yes> No
Go to the website above to download the latest software. Follow the on-screen instructions
on your PC provided with the upgrade software to complete the software upgrade.
NOTE
Please use AC power cord as main power when upgrading software. Do not switch off
the power to the radio until the update operation is complete and the radio has restarted,
otherwise the unit may become permanently damaged.
1
2
3
4
5
6
7
Page 43

042
Software version
The software display cannot be altered and is just for your reference.
With your radio switched on, press the Menu button to access the menu for the current
mode.
Rotate the Tuning control knob to select “System” and
press the Tuning control knob to enter the system settings
menu.
FM
<System >
Rotate the Tuning control knob until “SW version” appears
on the display and press the Tuning control knob. The
software version shows on the display.
System
<SW version >
Press and release the Menu button to exit the software version display.
4
3
2
1
Auxiliary input socket
The 3.5mm Aux In socket is to connect audio source like MP3 player or CD walkman and listen the
audio program via radio speaker.
1.
Connect a stereo or mono audio source (like CD walkman or MP3 player) to the Aux In socket,
which is located on the right hand side, behind the rubber cover.
2.
Press the Power On / Off button to switch on your radio.
3.
Press the Source button until “AUX IN” mode is shown on the display.
4.
Play the le in the CD walkman or MP3 player.
5.
Adjust the volume control to the required level.
Make sure the rubber cover of the Aux In socket is closed well after use to prevent moist and dirt
from entering the radio. Never use the Aux In socket in rainy or moist conditions to prevent moist
from entering the radio. Keep the rubber cover always closed under these conditions.
NOTE
Page 44

043
Specications
Power Requirements
AC:
100-240 V ~ 50/60 Hz 18W
Batteries:
6 x AM-3 (AA size, LR6)
Alkaline or Ni-MH battery
Mains via AC adaptor (not supplied):
DC 12V 1.5A Center Pin POSITIVE (+)
Frequency Coverage:
FM 87.50-108 MHz
DAB 174.928-239.200 MHz
Bluetooth
Bluetooth specication Bluetooth® Ver 4.1
Prole Support A2DP 1.2, AVRCP 1.5
Bluetooth Audio CODEC SBC, AAC
Transmitting Power Power Class 2
Line of sight range 10meters / 30feet
The frequency and maximum
transmitted power:
2402MHz ~ 2480MHz: 3.85dBm (Bluetooth EDR)
Electronic features
Speaker:
3inches 8ohm 10W full range, waterproof
Output power:
3Watt 10% T.H.D. @ 100Hz @ DC battery 9V
7Watt 10% T.H.D. @ 100Hz @ AC 230V or 120V
AUX-IN level:
300±70 mVrms (rated level), 1Vrms (max.)
Aux In socket:
3.5mm diameter
Maximum supplying power of
USB socket:
5V, 1A
Operating temperature range:
0°C to +35°C
Page 45

044
The company reserves the right to amend the specications without notice.
If at any time in the future you should need to dispose of this product please note that: Waste
electrical products should not be disposed of with household waste. Please recycle
where facilities exist. Check with your Local Authority or retailer for recycling advice. (Waste
Electrical and Electronic Equipment Directive).
※
The barcode label on the product is dened as below:
Serial number
Production month
Production year
Product code
 Loading...