

Page 1
PR-D17
中文
GB
Revision 1
Page 2

Important safety instructions
1.
Read and understand all safety and operating instructions before the radio is operated.
2.
Retain instructions:
3.
Heed warnings. All warnings on the appliance and operating instructions should be followed.
4.
Follow all operations and use instructions.
5.
Water and moisture:
tub, kitchen sink, wet basement, swimming pool, etc.
6.
Unplug the radio from the AC power outlet before cleaning. Use only a damp cloth for cleaning the exterior of the
radio.
7.
Do not place the radio on an unstable cart, stand, bracket or table. The radio may fall, causing serious personal
injury and damage to the radio.
8.
Ventilation:
ventilation. For example, the radio should not be used on a bed, sofa, rug or other soft surfaces that may block the
ventilation openings. It should not be placed in a built-in situation like a cabinet that may reduce air ow through
the ventilation openings.
9.
Power sources:
If you are not sure of the type of power supply to your home, consult your radio dealer or power company.
10.
Power cords:
Pay particular attention to cords at plugs, convenience receptacles, and the point where they exit from the unit.
Unplug the power cord by gripping the power plug, not the cord. Operate the radio using only the current type of
power source indicated. If you are not sure of the type of power supply to your home, consult your dealer or local
power company.
11.
Do not overload wall outlets or extension cords. This can result in a risk of re or electrical shock. Never insert
objects of any kind into the radio through opening. The objects may touch dangerous voltage points or short out
parts. This could cause a re or electrical shock.
12.
If the radio is left attended and unused for long periods of time, unplug it from the wall outlet. This will prevent
damage caused by lightning or power line surges.
13.
If the radio is left unattended and unused for a long period of time, remove the batteries. The batteries may leak
and damage furniture of your radio.
14.
Do not attempt to service the receiver yourself. Removing the cover may expose you to dangerous voltage, and
will void the warranty. Refer all servicing to authorized service personnel.
15.
Object and Liquid Entry-Never push objects of any kind into the radio through any openings as they may touch
dangerous voltage points or short-out parts that could result in a re or electric shock. Never spill liquid of any kind
on the product.
16.
The appliance should be serviced by qualied service personnel when:
A. The power supply cord or the plug has been damaged.
B. Objects have fallen or liquid had been spilled into the radio.
C. The radio has been exposed to rain or water.
D. The radio does not appear to operate normally or exhibits a change in performance.
E. The radio has been dropped, or the enclosure damaged.
17.
A warning that batteries (battery pack or batteries installed) shall not be exposed to excessive heat such as direct
sunlight, re or the similar.
The safety and operating instructions should be retained for future reference.
The appliance should not be used near water. Do not use near a bathtub, washbowl, laundry
This radio should be situated so that its location or position does not interfere with its proper
The radio should be operated only from the type of power source indicated on the marking label.
The power cord should be positioned so it is not walked on, pinched, or items placed on top of it.
GB
F
E
NL
D
01
Page 3
IMPORTANT
18
19
12
17
16
14
15
13
2 3 11
5
6
781011 9
4
A B C D E F
G
When your radio has any interference in AM band by its adaptor, please move your radio away from its AC power
adaptor over 30cm.
Please note not all AC adapters are alike.
The AC adapter that is included with this radio is designed to be used exclusively with this device. Do not use an AC
adapter that differs from the specications on the AC adapter that is included.
Do not use an AC adapter that does not meet the correct specications.
CAUTION
These servicing instructions are for use by qualied service personnel only. To reduce the risk of the electric shock,
do not perform any servicing other than that contained in the operating instructions unless you are qualied to so.
GB
F
E
NL
D
02
Page 4

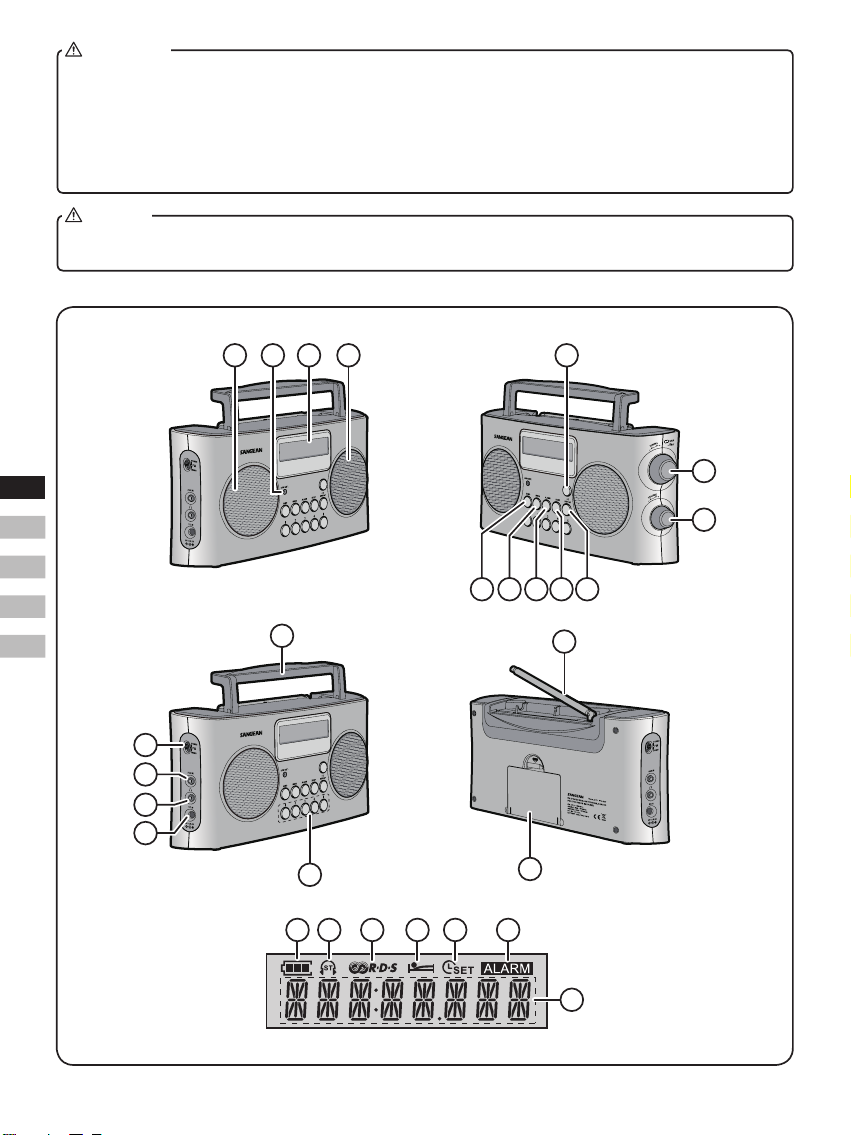
Controls
1
Speaker
2
Low battery indicator
3
LCD display
4
Power button
5
Tuning / Time setting knob / Seek button
6
Volume knob
7
CT (Clock Time) / Display button
8
Sleep button
9
Alarm button
10
Menu button
11
Band button
12
Handle
13
Preset buttons
14
DC IN socket
15
Headphone socket
16
AUX IN socket
17
FM Stereo / Mono switch
18
Telescopic antenna
19
Battery compartment
LCD Display
A
Battery power
B
Stereo display
C
RDS display
D
Sleep display
This radio features helpful voice prompts of all controls that announce functions in multiple languages for
vision impaired users.
It has high contrast large yellow controls and preset buttons with raised symbols to aid in identication along
with large rotary tuning and volume control knobs.
E
Time set
F
Alarm display
G
Frequency / Time display
GB
F
E
NL
D
Battery operation
1.
Open the battery cover on the rear of the unit by pushing the latch downward.
2.
Insert 6 x UM-2 (C size) batteries into the battery compartment. Make sure all batteries are inserted with correct
polarity as shown in the battery compartment. Close the battery cover.
3.
Reduced power, distortion and a stuttering sound or the low battery LED indicator is red are all signs that the
batteries need replacing. If the radio is not to be used for an extended period of time, it is recommended that the
batteries be removed from the radio.
IMPORTANT
Batteries should not be exposed to excessive heat such as direct sunlight, re or the like. After use, disposable
batteries should be taken to a suitable recycling center. On no account should batteries be disposed of by
incineration. Do not leave batteries within reach of young children. They can be a choking hazard.
03
Page 5

Using the AC power adaptor
The AC power adaptor included with this unit is 9 volts DC at 0.7A center pin positive.
Insert the adaptor plug into the DC socket on the left side of the radio. Plug the adaptor into a standard AC outlet.
Whenever the adaptor is used, the batteries are automatically disconnected. The AC adaptor should be disconnected
from the main supply when not in use for long periods of time.
IMPORTANT
The AC adaptor is used as the means of connecting the radio to the power supply. The AC Adapter used for the
radio must remain accessible during normal use in order to disconnect the radio from the power supply completely.
Setting clock time
Upon initial use of the radio after the batteries have been installed or the AC adaptor is plugged in, the voice language
option “English” will ash on the display. Rotate the Tuning knob to select the required voice language and press the
Tuning knob to conrm the setting. The display will show -- --:-- -- . The clock can be set with the radios power on or off.
1.
Press and hold the Time setting knob for more than 2 seconds, the display will ash the time setting symbol
and also the hour digits.
2.
Rotate the Time setting knob to set the required hours.
3.
Press the Time setting knob, the minute digits will ash.
4.
GB
F
E
NL
D
Rotate the Time setting knob to set the required minute.
5.
Press the Time setting knob to complete time setting.
Menu setting
(Voice language Voice volume Time format AM tuning step Software / Voice version)
1.
Press the Menu button, the voice language option “English” (e.g.) will ash on the display. Rotate the Tuning knob to
select the required voice language. Press the Tuning knob to conrm the setting and enter the volume of the voice
setting.
2.
Rotate the Tuning knob to set the volume of the voice. Press the Tuning knob to conrm the setting and enter the
time format setting.
3.
Rotate the Tuning knob to select “12 HOUR” or “24 HOUR”.
4.
Press the Tuning knob to conrm the time format setting and enter the AM tuning step setting.
5.
Rotate the Tuning knob to select “10kHz” or “9kHz”. (10k for America and 9k for most other countries)
6.
Press the Tuning knob to conrm the AM tuning step setting, then the software version will show on the display.
Rotate the Tuning knob to view software version or voice version.
7.
Pressing the Tuning knob will exit the software version or voice version display.
Tuning the radio – FM / AM
1.
Press the Power button to turn on the radio.
2.
Select the required frequency band by pressing the Band button. For the FM band fully extend and rotate telescopic
antenna to get best reception. For the AM band, rotate the radio to get the best signal. (Please note this radio has a
built-in AM antenna.)
3.
Rotate the Tuning knob to the desired frequency, shown in the display.
04
Page 6

4.
Or press the Seek button to seek for the next available station. To seek up in frequency, rotate the Tuning knob in a
clockwise direction, then press the Seek button. Your radio will seek in an upwards direction (low frequency to high
frequency) and stop automatically when it nds a station of sufcient strength.
To seek down in frequency, rotate the Tuning knob in a counter clockwise direction, then press the Seek button. Your
radio will seek in a downwards direction and stop automatically when it nds a station of sufcient strength.
5.
Rotate the Volume knob to get required sound level.
6.
To turn off the radio, press the Power button.
Storing station presets – FM / AM
There are 5 presets each for FM and AM radio. They are used the same way for each operating mode.
1.
With your radio switched on, press the Band button to select the desired frequency band.
2.
Tune to the desired radio station as previously described.
3.
Press and hold the desired preset button for more than 2 seconds. The preset number will appear in the display
(such as: ). The station will be stored under the chosen preset button.
4.
Repeat this procedure for the remaining presets.
5.
Stations stored in preset memories can be overwritten by following the above procedures.
Recalling stations presets – FM / AM
1.
With your radio switched on, press the Band button to select the desired frequency band.
2.
Momentarily press the desired Preset button, the preset number and station frequency will appear in the display.
GB
F
RDS function
This function only applies when an FM station provides the RDS service.
When an FM station provides RDS service, shows on the display and the display will show the station name
and then show the radio text if radio text is provided.
RDS CT (Clock Time) Set
Select an FM radio station which provides RDS CT service, press and hold CT (Clock Time) button for more than 2
seconds, the display will ash . The clock time will be aligned automatically once the CT service is available.
When it shows “No CT” this means there is no CT (Clock Time) service.
To view the time and frequency, press the Display button.
NOTE
Not all stations broadcast the CT (Clock Time) and may not always be accurate. This is the fault of the radio stations
signal not your radio.
AUX IN
1.
Turn on the radio, and press the BAND button until “AUX IN” is displayed.
2.
Connect a stereo or mono audio source using a standard 3.5mm connector (e.g. iPod, MP3 or CD player) to the
Aux in socket on the left side of the radio.
3.
Adjust the Volume control on your iPod, MP3 or CD player and your radio.
05
E
NL
D
Page 7

Setting radio alarm time
Ensure that the time is set correctly before setting the alarms. The alarm can be set when the radio is on or off.
1.
Press the Alarm button, will ash on the display.
2.
Rotate the Tuning knob to select “ALARM OFF” or “ALARM ON”. If “ALARM OFF” is selected any current setting for
that alarm will be cancelled. With “ALARM ON” selected, press the Tuning knob to enter the alarm time setting. The
hour digits will ash on the display.
3.
Rotate the Tuning knob to select the hour then press the Tuning knob to conrm hour setting, and the minute digits
will ash.
4.
Rotate the Tuning knob to select the minute then press the Tuning knob to nish setting.
5.
The radio will play the last played radio station at the chosen alarm time. Use the volume knob to adjust the volume
for the alarm.
6.
While the alarm is sounding, press the Power button or Alarm button to stop it.
NOTE
If it is under AUX band, the alarm will sound by buzzer. When the buzzer alarm activates, the alarm will start softly
and gradually increase in level (Humane Wake System). It will sound for 1 minute and silence for 1 minute in
repetition for 60 minutes unless cancelled.
Sleep function
GB
The sleep timer will automatically switch off the radio after a preset time has elapsed.
1.
F
E
NL
Press the Sleep button, will ash on the display.
2.
Rotate the Tuning knob to select the required sleep time (60-45-30-15-120-90 minutes).
3.
Press the Tuning knob to conrm the setting. will stop ashing on the display.
4.
To cancel the sleep time before the preset time has elapsed and to turn off the radio, press the Power button to turn
the unit off manually.
D
FM Stereo / Mono selection
The FM Stereo / Mono mode switch is on left the side of the radio.
When the FM signal is weak, some hiss may be audible. To reduce the hiss, slide the Stereo / Mono switch to Mono
mode.
Headphone socket
A standard 3.5mm headphone socket located on the left side of your radio is provided for use with headphones.
Inserting earbuds or headphones will automatically mute the internal speaker.
Please be aware that the sensitivity of headphones can vary widely. We therefore recommend setting the volume to a
low level before connecting headphones to the radio.
IMPORTANT
● Excessive sound pressure from Earbuds or Headphones can cause hearing loss.
● To prevent possible hearing damage, do not listen at high volume levels for long periods of time.
06
Page 8

Factory reset
If your radio fails to operate correctly, or some digits on the display are missing / incomplete or you simply just want to
restore the radio to its original factory setting, carry out the following procedure.
By performing a factory reset, all user entered settings will be erased.
Press and hold the Power button and Preset 5 button at the same time, the “DEFAULT” will appear and ash on the
display. Continue holding down these two buttons until all the icons appear on the screen. Now the factory reset is
completed.
Specications
Power Requirements
AC Power adaptor DC 9V 0.7A center pin positive
Batteries 6 X UM-2 (C size)
Battery Life
Frequency Coverage
Approx. 70 hours of listening for 4 hours a day at normal volume using alkaline
batteries
FM 87.5 -108 MHz
AM 522-1710 kHz (9kHz / step)
AM 520-1710 kHz (10kHz / step)
GB
Circuit Feature
Loudspeaker 2.5 inches 8 ohm
Output Power 800+800 mW
Headphone socket 3.5mm diameter
Antenna System
Operating temperature range 0°C to +35°C
The barcode label on the product is dened as below:
※
The company reserves the right to amend the specications without notice.
If at any time in the future you should need to dispose of this product please note that: Waste electrical
products should not be disposed of with household waste. Please recycle where facilities exist. Check with
your Local Authority or retailer for recycling advice. (Waste Electrical and Electronic Equipment Directive).
FM telescopic antenna
AM built-in ferrite antenna
F
E
NL
D
Serial number
Production month
Production year
Product code
07
 Loading...