

Page 1

H201
GB
Version 1
Page 2

Features
1. Built-in AM/FM a ntenna for be st reception
2. 10 presets ( 5 ea ch wave ba nd )
3. Water re sista nt up to JIS7 sta ndard
4. Auto seek station s
5. Large and easy to rea d LCD display
6. Ea sy to fix bra cket a nd ha nger
7. Battery power indicator
8. Clock
9. Adjustable sleep timer
10. Adjusta ble short ti mer
1 1. Emergency LED illumination ( Torch )
12. Emergency Buzzer
13. Water-re sista nt 3 inches spe a ker
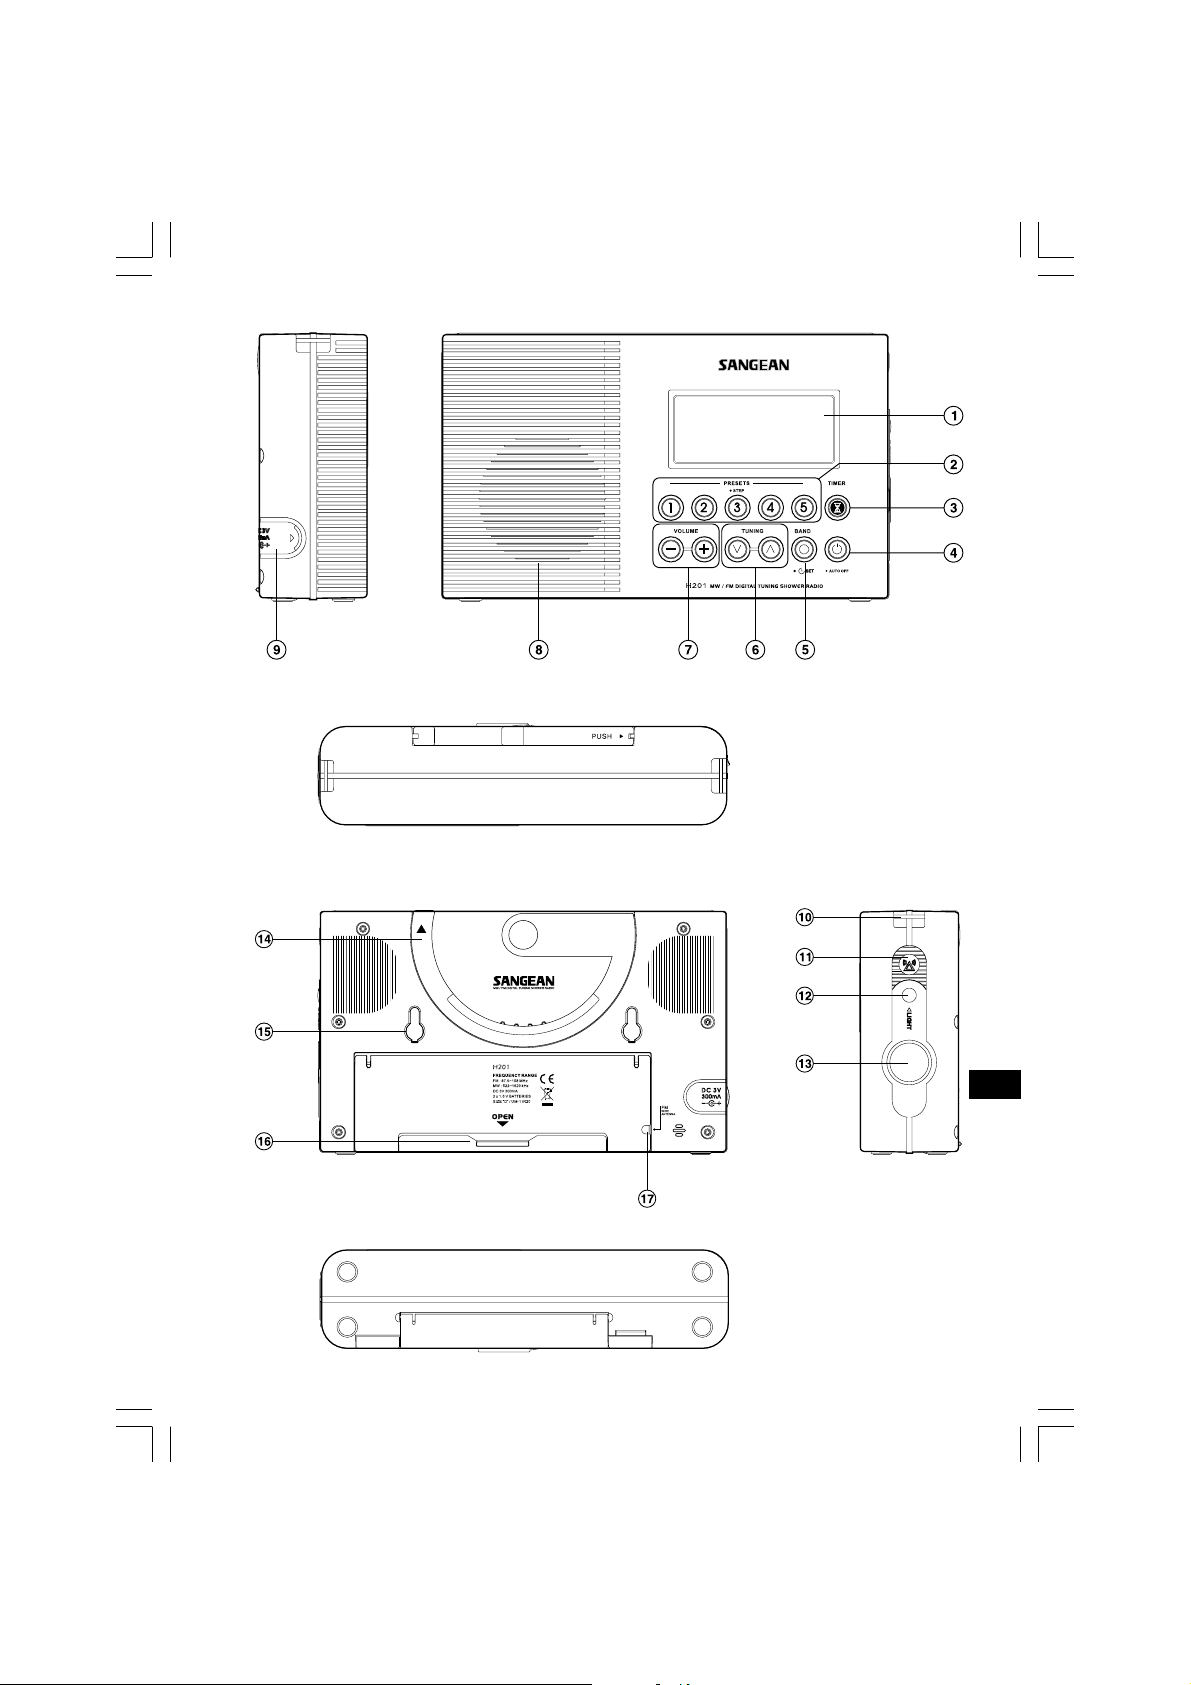
Controls
1
LCD Display
2
Preset stations ( preset 3 also f or tuning step change )
3
Nap timer ( Short timer )
4
Power button
6
Tuning Control
8
Speaker
10
Hanger Ring
12
Torch button
14
Multi Purpose Handle
16
Battery Cover
1
5
Band a nd T ime Set button
7
Volume Control
9
DC IN socket
11
Emergency Buzzer
13
Torch
15
Bracket Holder
17
FM wire antenna compartment
Page 3
GB
2
Page 4
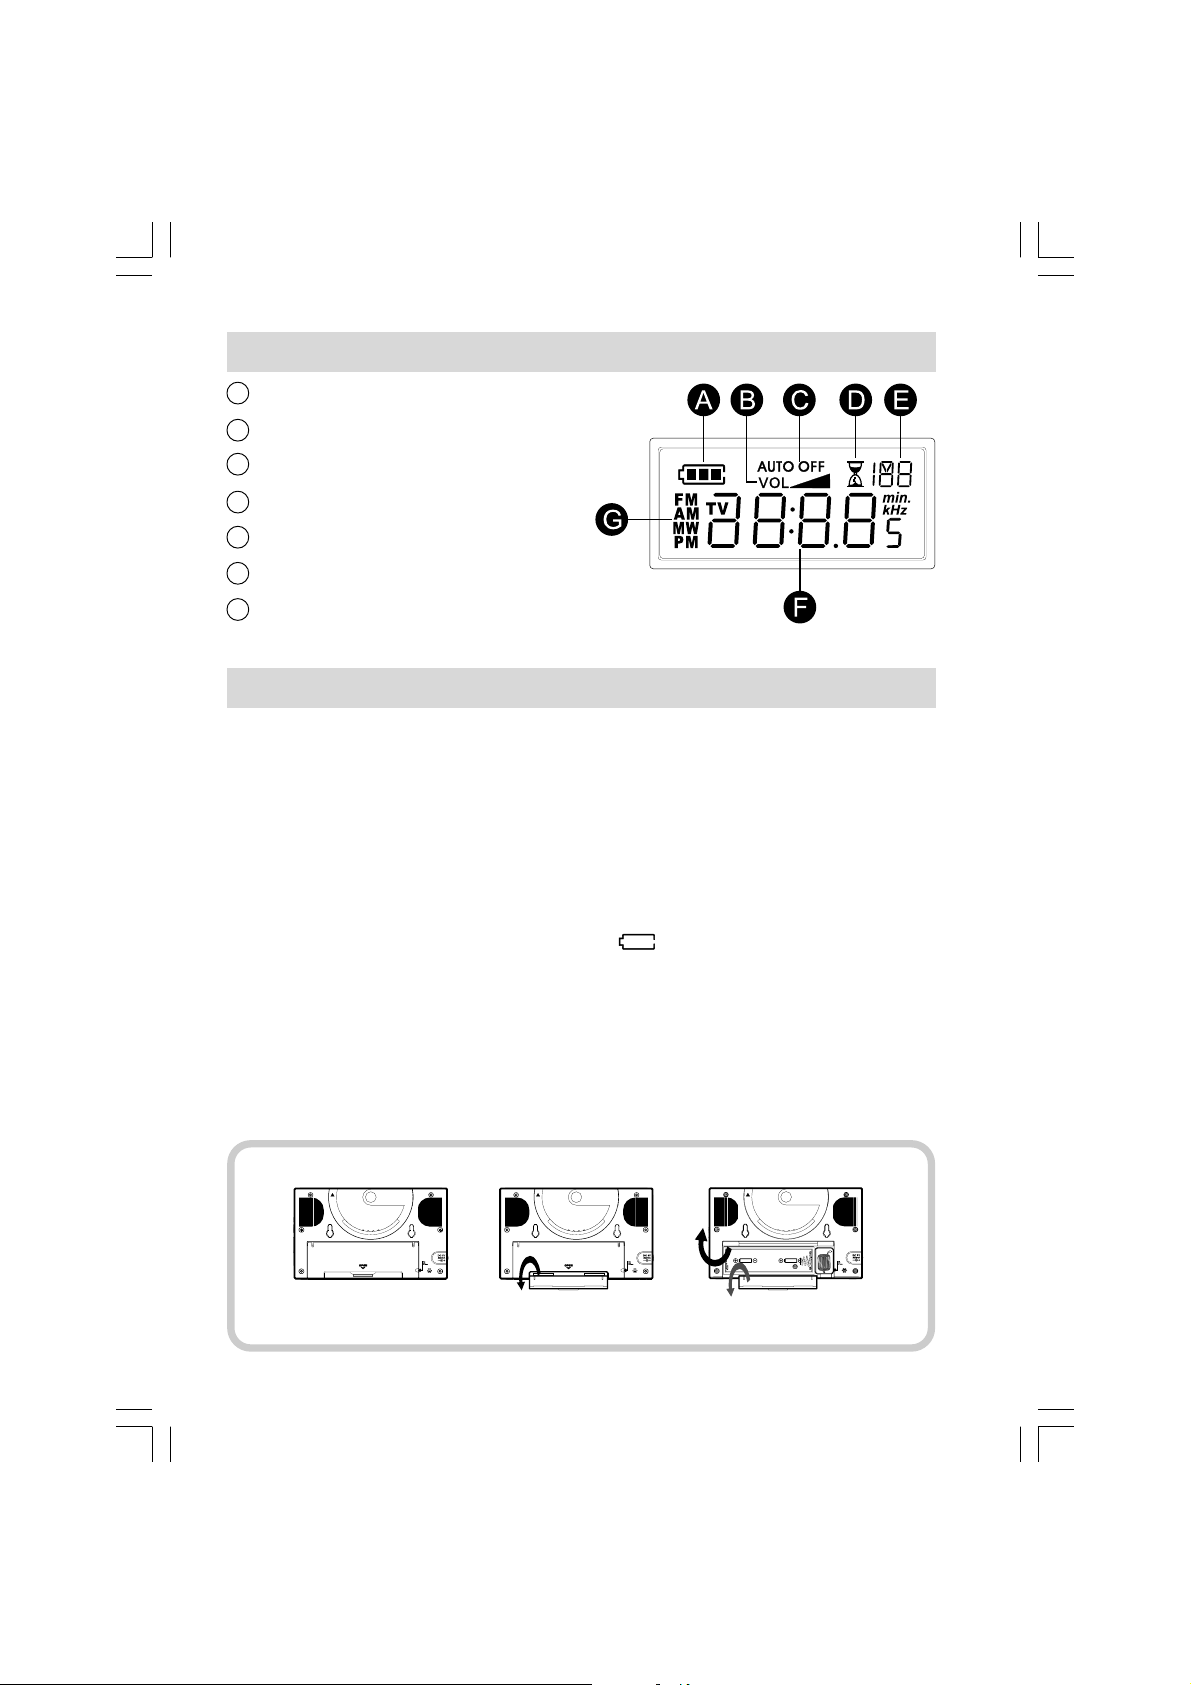
LCD Display
A
Battery Power Status
B
Volume level
C
Auto Off status
D
Short T imer set
E
Memory number a nd seconds
F
Ti me a nd Frequency
G
Band indicator
Installing batterie s
1. Position the radio fa ce down on a soft surfa ce.
2. Remove the catch a s shown a nd lift out the battery cover .
3. Insert 2 x “ D “ size/UM-1/LR20 batterie s.
4. Replace the battery cover a nd catch.
5. Reduced power, distortion, a “ stuttering “ sound are all signs that
the batteries may need repla cing. The batterie s should be
repla ced when the battery indicator flashes and E shows in
the display.
6. If the radio is not to be used for a ny extended period of ti me,
it is recommended that the batteries are removed from the radio.
3
Page 5

Using the AC adaptor ( not supplied )
1. Remove the rubber cover of DC in socket on the left ha nd side
of your radio.
2. Insert the adaptor plug into the DC socket.
3. Plug the ada ptor into mains socket outlet. Whenever the ad a ptor
is used, the batteries are automatically disconnected.
The AC adaptor should be disconnected from the mains supply and
the radio when not in use.
Note:
For safety purpose, DO NOT use AC ada ptor in the shower
room. Use the batteries only.
Setting the clock
1. The clock will start running when the batteries are installed or
when the radio is connected to the mains supply. The display
will show “ - : - - “.
2. The time ca n be set with your ra dio switched off.
3. Press a nd hold down the T i me Set button for approx.
2 seconds until the hours digits fla sh in the display with a beep.
4. Press the T uning Up/Down buttons to set the required hour .
5. Press the T ime Set button, the minute digits will flash in
the display.
6. Press the T uning Up/Down buttons to set the required minute.
7. Press the T i me Set button to complete time setting.
The second will start to count.
GB
4
Page 6

Operating your radio
Y our ra dio is equipped with three tuning methods – Ma nual Tuning,
Search tuning and Me mory preset tuning.
Manual Tuning
1. Press the Power button to turn on the radio.
2. Select the required waveba nd by repeatedly pre ssing the
Band button. For FM waveba nd, pull out a nd extend the
FM wire antenn a located in the battery compartment to
get best reception. For MW ( AM ) waveband, rotate the
radio for best reception.
3. A single pre ss on either T uning up or T uning down buttons will
change the frequency in the following incre ments:
FM: 100 or 200 kHz ( USA version )
50 or 100 kHz ( standard version )
AM ( MW ): 9 or 10 kHz
4. When the waveband end is re a ched, the radio will continue tuning
from the opposite waveband end.
5. Press the V olume Up/Down buttons to the required level.
6. To switch off your radio, press the Power button. The display will
show OFF.
5
Page 7

Search tuning
1. Press the Power button to turn on the radio.
2. Press the Band button to get required waveba nd, then extend a nd
position telescopic aerial ( FM ) or rotate the radio (AM).
3. Press and hold down e ither T uning up or T uning down buttons f or
more than 0.5 seconds to commerce Se arch tuning.
4. The radio will search a nd stop automatically when it f inds a station
of sufficient strength.
5. When the waveband end is re a ched, the radio will continue tuning
from the opposite waveband end .
6. Press the V olume Up/Down buttons to the required level.
7. To switch off your radio, press the Power button. The display will
show OFF.
Memory preset tuning
Storing stations in preset memories
There are 5 presets for ea ch waveband.
1. Press the Power button to turn on the radio.
2. Tune to the required station using one of the methods
previously described.
3. Press and hold down required pre set until the ra dio beeps
( more than 2 seconds ). The preset number will appear with a M
( memory ) a nd the station will be stored under the chosen
preset button.
4. Repeat the procedures for the remaining presets.
5. Stations stored in preset memories may be overwritten by
following the above procedures.
GB
6
Page 8

Recalling preset station s
1. Press the Power button to turn on the radio.
2. Select the required waveband by pre ssing the Band button.
3. Momentarily press the required Preset button, the preset number
and station frequency will appear in the display.
Tuning step change
In Europe and other parts of the world MW( AM ) tuning ste ps are
9 kHz, in America the MW( AM ) tuning step is 10 kHz.
On FM step ca n be set to either 50 or 100 kHz ( sta ndard version )
and 100 or 200 kHz ( USA version ).
To cha nge tuning ste p
1. Ensure that your radio is switched off.
2. Press and hold down the Ste p/Preset button 3 f or 2 sec.,
the display will show current FM tuning step. Continue holding
down the Step/Preset button 3 for 7 seconds. Your radio will beep
and the display will flash FM and current tuning step.
3. Press the T uning Up/Down button to change required
FM tuning step.
4. Press the Step/Preset button 3 to display MW ( AM ) tuning step,
display will show AM and flash current tuning step.
5. Press the T uning Up/Down button to change required MW ( AM )
tuning step.
6. Complete the setting by pressing the Step/Preset button 3.
7
Page 9

Sleep function –Auto Off
The sleep timer will automatically switch off your radio after a preset
time has elapsed.
1. Press and continue to hold down the Power button, the display will
cycle through the available sleep times in the order 50-40-30-20 10-60-50………… Relea se the button when the required
sleep time appears in the display. Display will appear AUTO OFF
and radio will play the last station selected.
2. To cancel the sleep function , pre ss the Power button,
the AUT O OFF will disappear and the radio will switch off.
Nap timer ( short timer )
Y ou can set the Na p ti mer ( short ti mer ) either radio is on or of f.
Press Nap timer button , display will a ppe ar a nd flash last
na p timer ti me. Pre ss T uning up/down button to select required nap
timer time, press Nap ti mer button again to complete setting.
Na p timer will start to count by se cond, display will show a nd
remaining nap timer time ( when radio is off ). The buzzer will sound
for 3 minutes when it rea che s the period of time which you have set.
Press Power button to turn the buzzer off.
To turn off the Nap timer before the time is up, si mply press a nd
relea se the Nap ti mer button. will disappear from display .
Y ou ca n also me mory the nap timer time by long pressing Preset
1-5 button for the timer ti me you require ( same procedures you
store the station ) and recall it whenever you need to set ti mer . e.g.
you can store 10 minutes ti mer in pre set 1 a nd 20 minutes ti mer in
preset 2, so ea ch time after you need to sele ct short ti mer time,
press short timer button then preset 1 to get 10 minutes ti mer a nd
preset 2 to get 20 minutes timer a nd so on.
GB
8
Page 10
Display backlight
The display backlight will be switched on f or approximately
15 seconds when a ny button is pressed.
Emergency buzzer
To activate Emergency buzzer , press a nd release Emergency
buzzer button . Press a nd relea se the button again to switch of f
the buzzer.
Torch
Press to relea se the torch button to turn on the torch.
Note:
The torch won’t turn off automatically . To turn off the torch,
press torch button again.
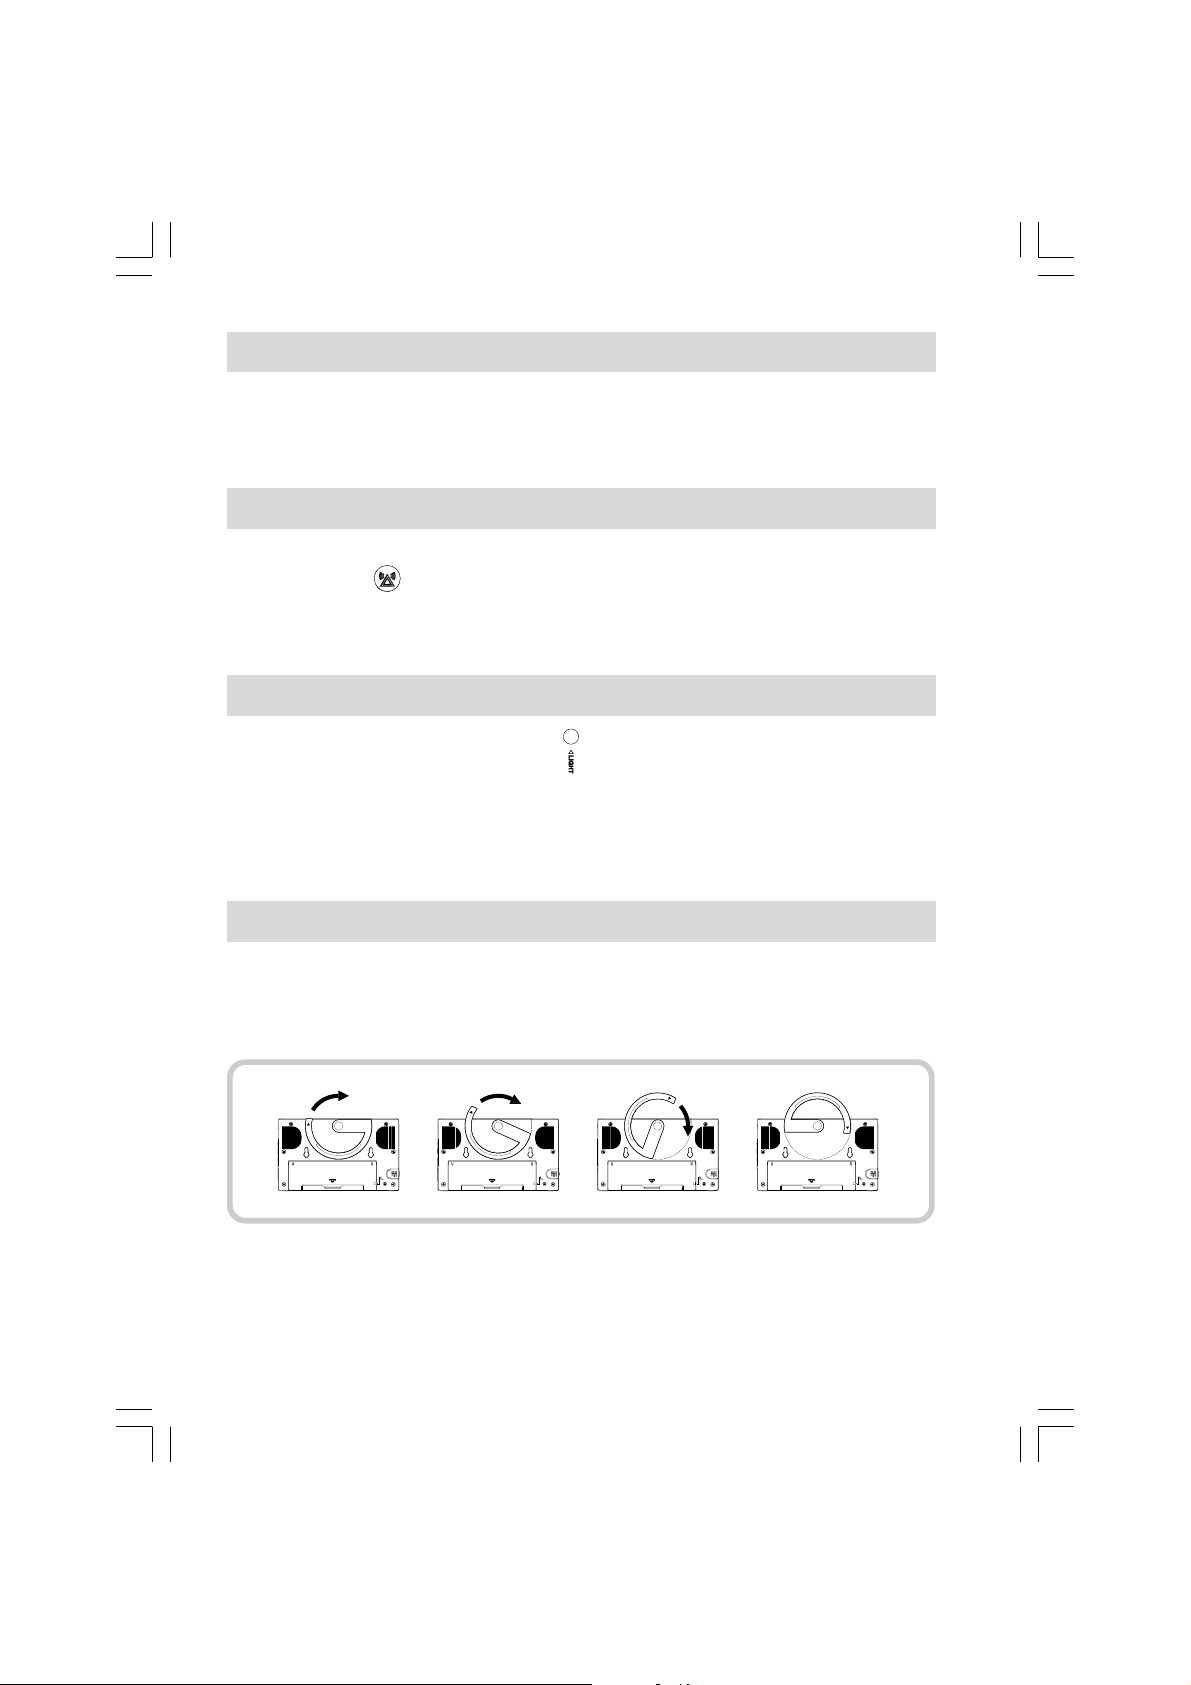
Multi-purpose handle
Using the multi-purpose handle, you may ha ng or carry the radio
when not used in bathroom.
9
Page 11

Bracket
Y ou may install the supplied bra cket on the wall with the help of the
double sides tape back side to hang the ra dio.
GB
10
Page 12

Carrying strap
Using the supplied carrying stra p, you may ha ng or carry the radio
when not used in bathroom.
Specification s
Power requirements
Mains via AC ada ptor ( not supplied )
AC 230 volts, 50 Hz or AC 120 volts, 60 Hz only/DC 3V 300 mA
Batteries: 2 x UM1 ( D size, LR20 )
Battery Life:
Approx. 120 hours of listening for 4 hours a day at normal volume
using alkaline batteries.
Frequency Coverage:
FM 87.50 – 108 MHz
AM (MW) 522 – 1629 kHz or 520 – 1710 kHz
11
Page 13

Circuit feature s
Loudspeaker: 3 inche s, 8 ohm full ra nge, water resista nt
Output Power: 500 mW
Aerial System:
FM Antenna wire
AM ( MW ) Ferrite Rod
GB
12
 Loading...