

Page 1
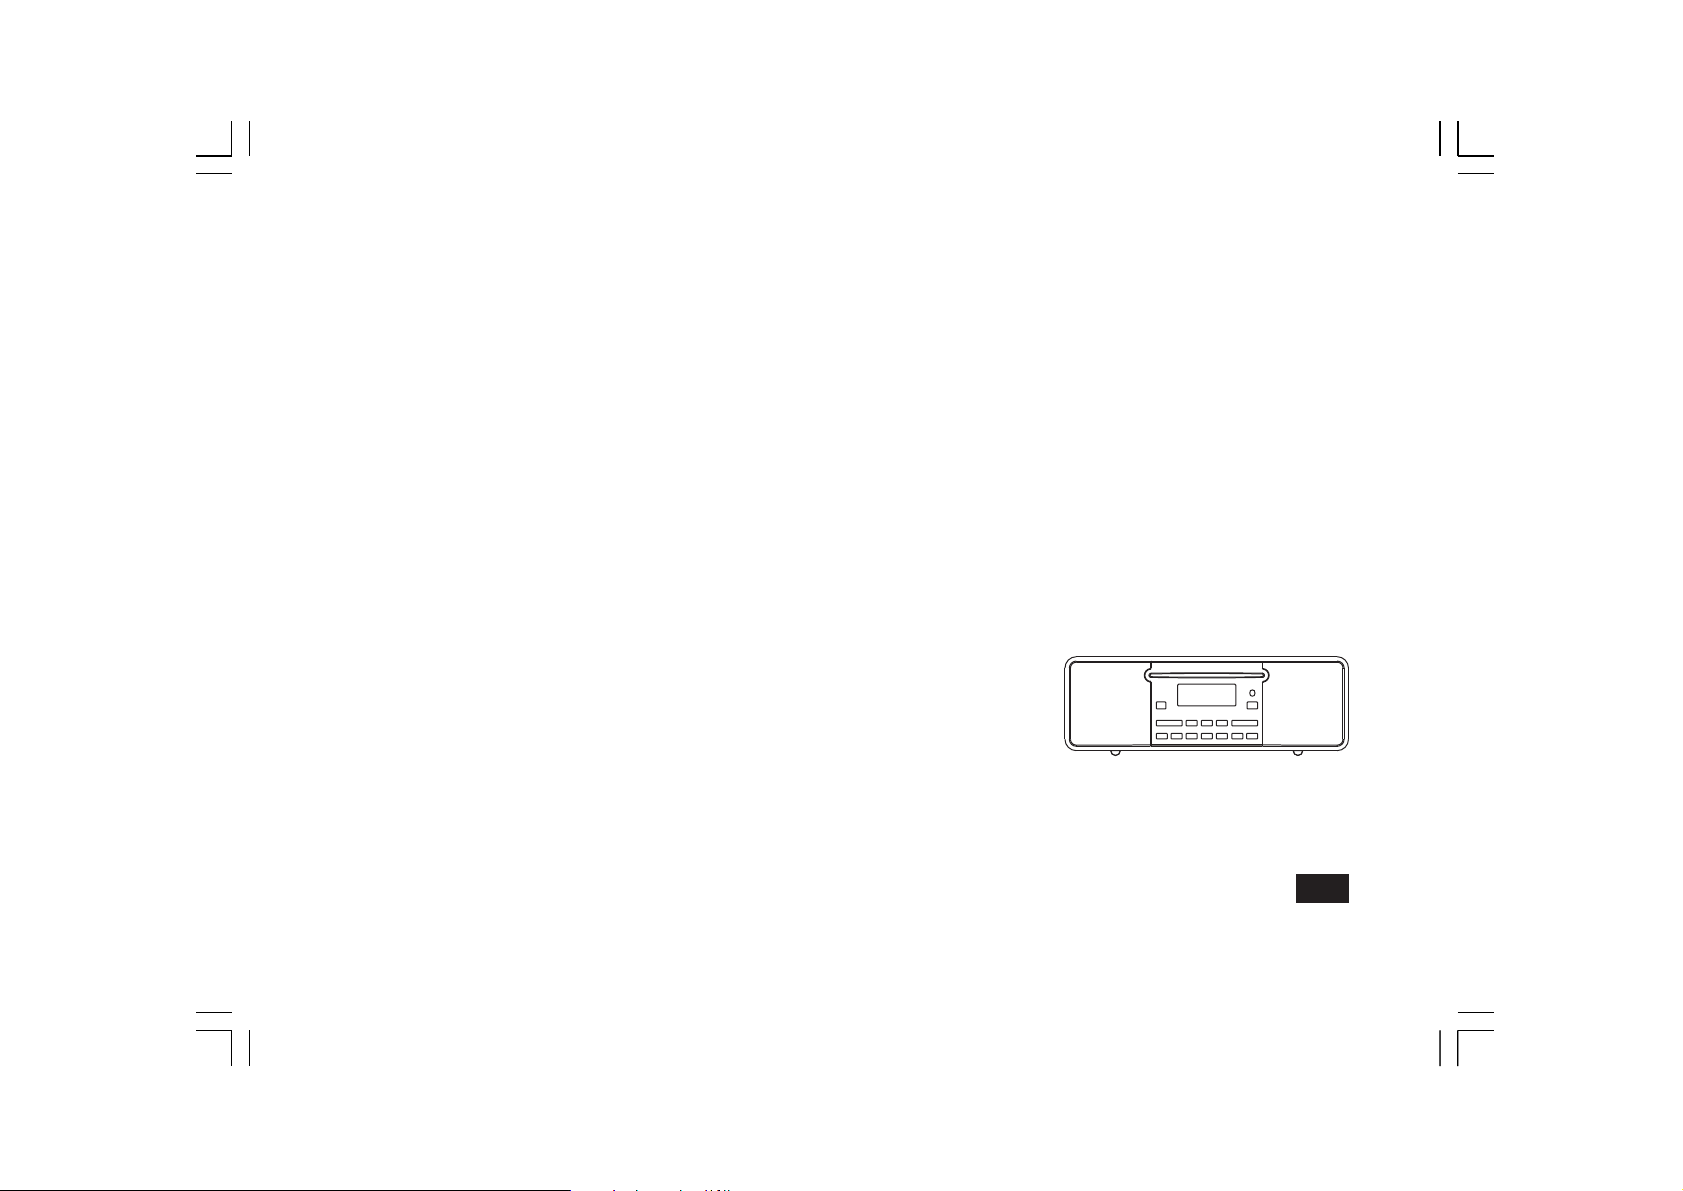
DDR-47BT
中文
GB
Revision 1
Page 2

Contents
Introduction .................................................................... 2-8
Controls and connections .............................................. 2-5
Remote control ................................................................ 6
Display icons .................................................................... 6
Using the touch panel ...................................................... 7
Remote control functions ................................................. 7
Bluetooth remote control options ..................................... 8
Using the sound system for the rst time ......................... 8
DAB radio ..................................................................... 9-15
Operating your sound system - DAB ............................... 9
Selecting a station - DAB ............................................... 10
Secondary services - DAB.............................................. 10
Display modes - DAB ..................................................... 11
Finding new stations - DAB ........................................... 12
Manual tuning – DAB .................................................... 13
Dynamic range control - DAB ........................................ 14
Prune station .................................................................. 15
Software version - DAB ................................................. 15
FM radio ...................................................................... 16-20
Operating your radio - search tuning FM ....................... 16
Manual tuning - FM ........................................................ 17
FM stereo / mono ........................................................... 17
Display modes - FM ....................................................... 18
Presetting stations ......................................................... 19
Recalling a preset station .............................................. 19
Software version ............................................................ 20
CD / MP3 / WMA ......................................................... 21-29
Compact discs .......................................................... 21-22
Playing a CD .................................................................. 23
CD search and repeat .................................................... 24
CD track programming ................................................... 25
GB
MP3 / WMA CD mode .................................................... 26
MP3 / WMA le and folder selection ......................... 27-29
SD / USB playback and recording ............................ 30-36
SD / USB le and folder selection ..............................30-31
Recording to SD / USB ...............................................32-34
Deleting and formatting ..............................................35-36
Listening to Bluetooth music ................................... 37-38
Pairing your Bluetooth device ........................................ 37
Playing Bluetooth music ................................................ 38
Disconnecting your Bluetooth device ............................. 38
Clock and Alarms ....................................................... 39-43
Setting the clock manually……..............................… 39-40
Alarms ....................................................................... 41-42
Cancelling alarms .......................................................... 43
Snooze ........................................................................... 43
Sleep function ................................................................ 43
Display and Auto ........................................................ 44-49
Standby brightness control ............................................ 44
Equalizer function .......................................................... 45
Bass and treble settings ........................................... 45-46
Mute function ................................................................. 46
Auxiliary input socket ..................................................... 47
Line output socket .......................................................... 47
Headphone socket ......................................................... 48
Aerial removal ................................................................ 48
Touch panel sensitivity control ....................................... 49
Information ................................................................. 50-53
System reset .................................................................. 50
Software upgrade .......................................................... 51
Cautions ......................................................................... 52
Specications ................................................................. 53
1
Page 3
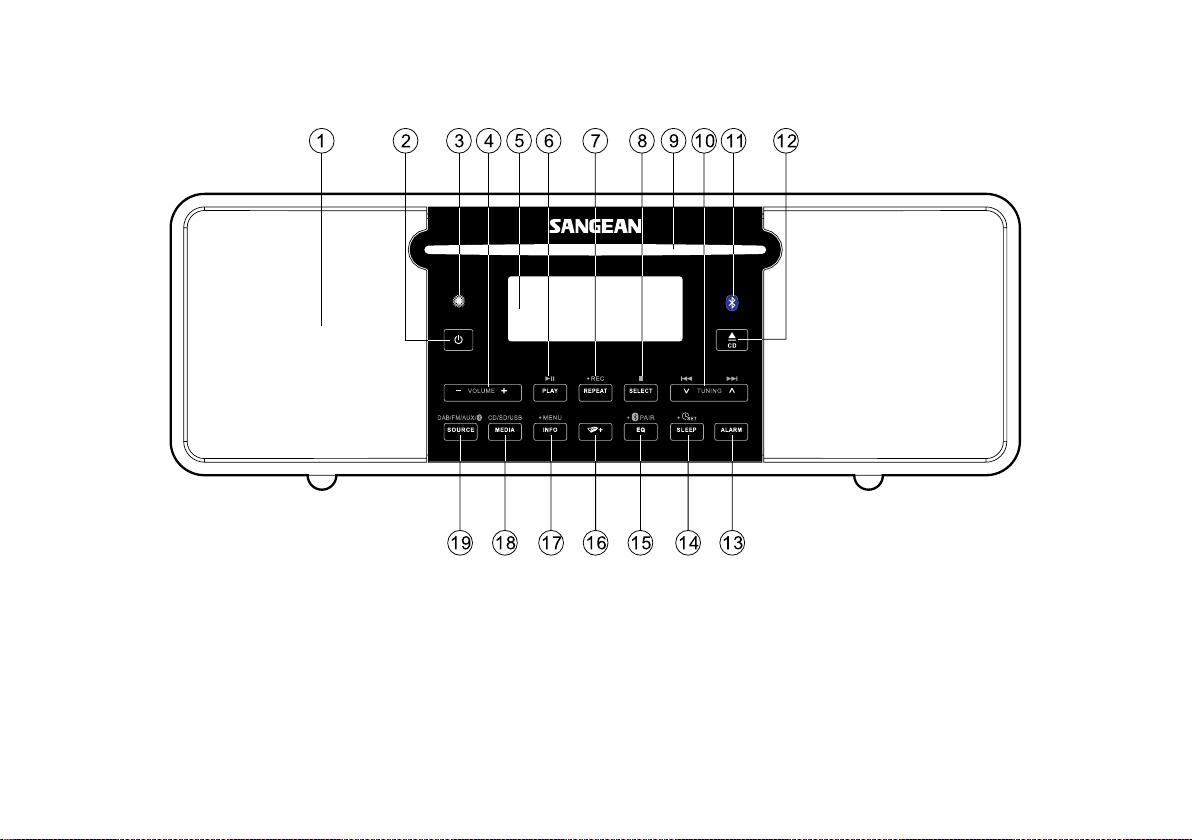
Controls and connections (Front)
1. Speaker
2. On / Standby button
3. Infra-red sensor
4. Volume up / down
5. LCD display
6. Play / Pause button
7. Repeat button / Record button
2
8. Select / stop button
9. CD slot
10. Tuning up / Fast-forward button
Tuning down / Rewind button
11. Bluetooth indicator
12. CD eject button
13. Alarm button
14. Sleep / Clock set button
15. Equalizer / Bluetooth pair button
16. Folder button
17. Info / Menu button
18. Media button (for CD / SD / USB)
19. Source button (for DAB / FM / AUX / Bluetooth)
Page 4
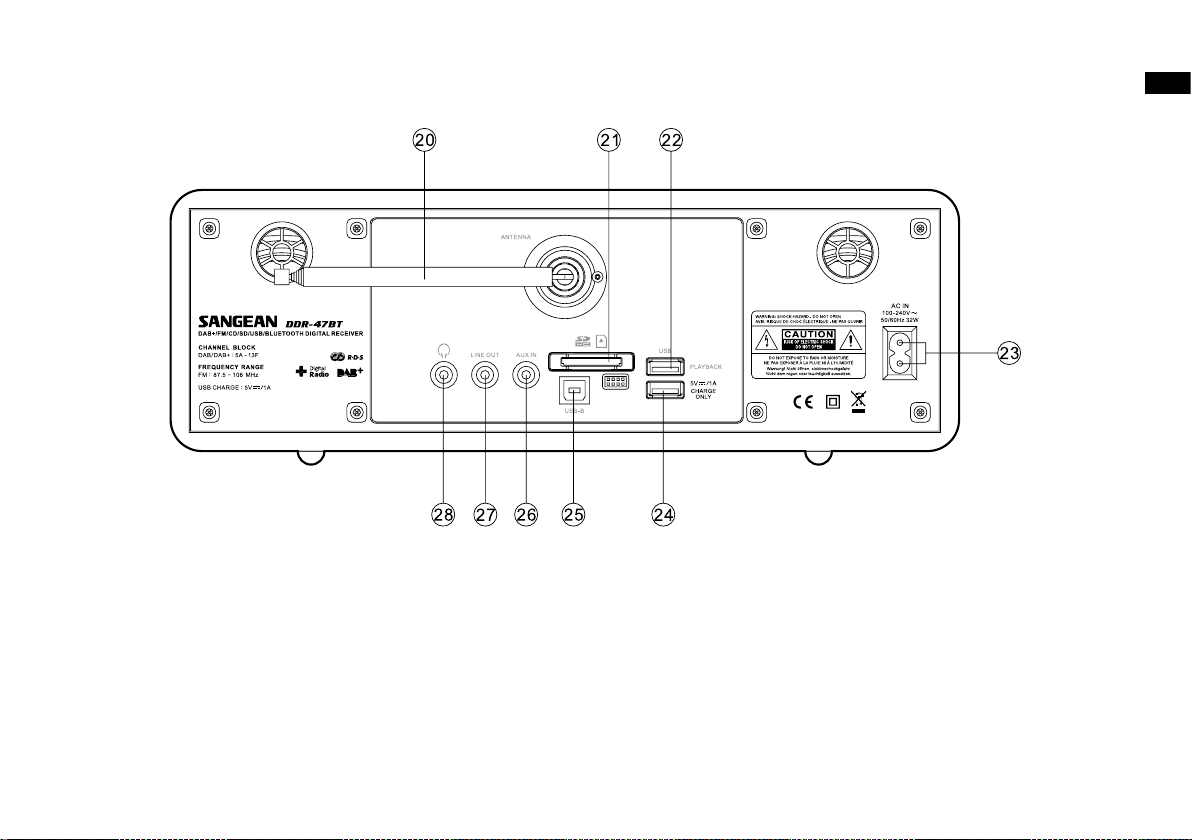
Controls and connections (Rear)
GB
20. Telescopic aerial
21. SD card socket
22. USB playback socket
23. Mains input socket
24. USB charging socket
25. USB socket for software upgrade
26. Auxiliary input socket
27. Line out socket
28. Headphone socket
3
Page 5
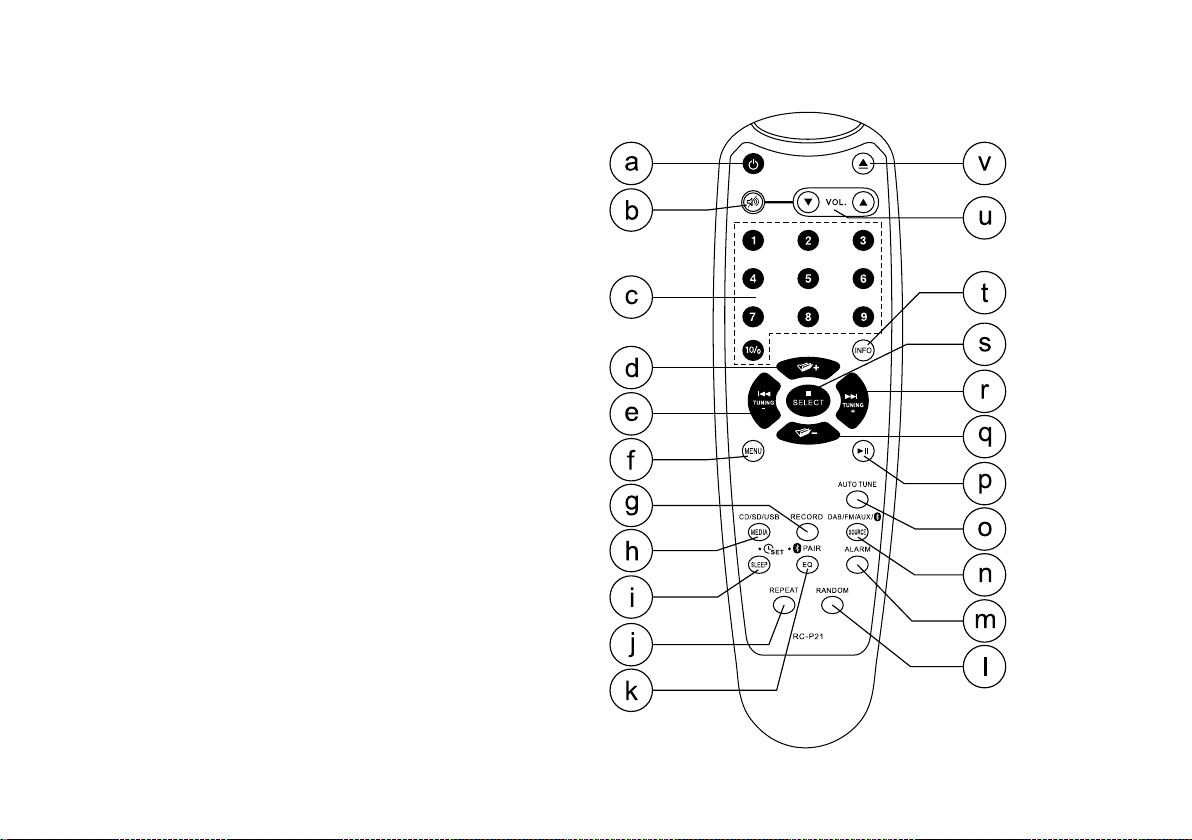
Controls and connections (Rear)
On / Standby button
a.
Mute button
b.
Key pad buttons 1-100
c.
Folder up button
d.
Tuning down / Rewind button
e.
Menu button
f.
Record button
g.
Media button
h.
Sleep / Clock button
i.
Repeat button
j.
EQ / Bluetooth pair button
k.
Random button
l.
Alarm button
m.
Source button
n.
Auto tune button
o.
Play / Pause button
p.
Folder down button
q.
Tuning up / Fast-forward button
r.
Select / stop button
s.
Info button
t.
Volume up / down button
u.
CD eject button
v.
4
Page 6
Controls and connections (Rear)
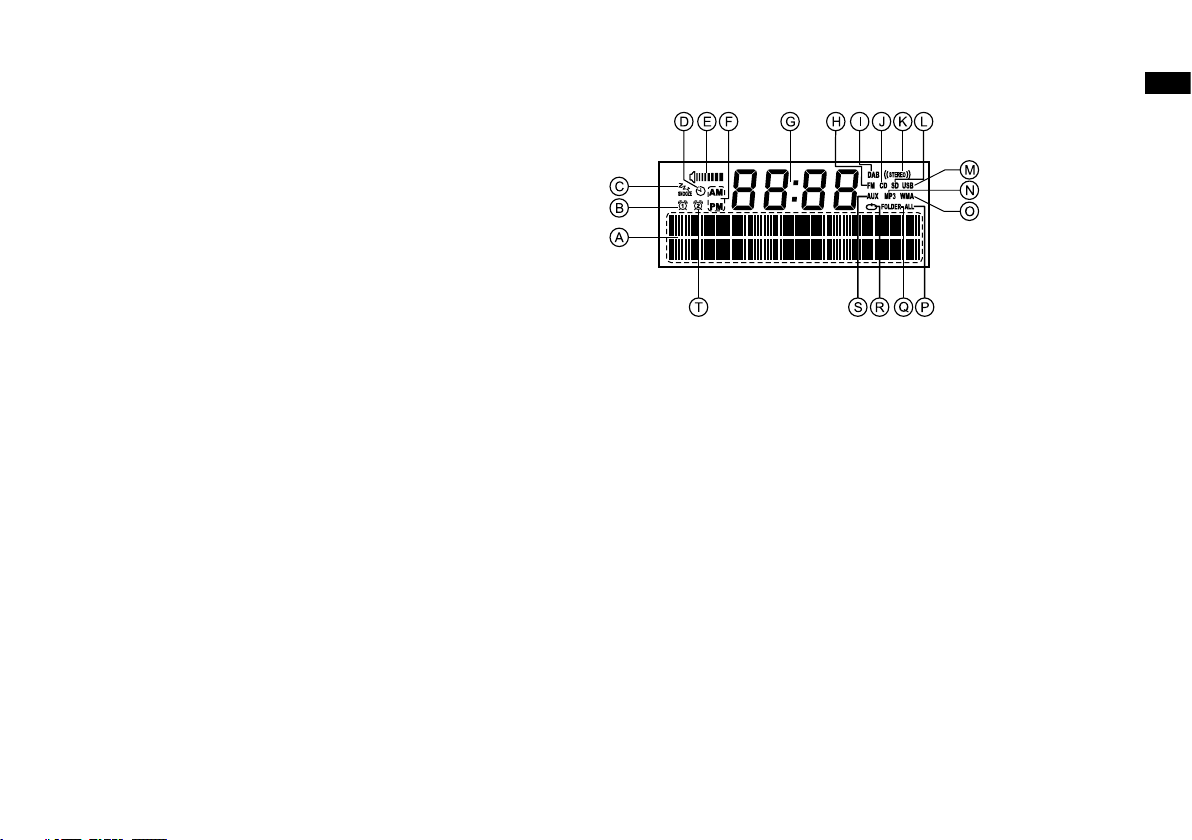
Two line text display
A.
Alarm 1 indicator
B.
Snooze indicator
C.
Sleep indicator
D.
Volume indicator
E.
AM / PM indicator
F.
Clock digits
G.
FM indicator
H.
DAB indicator
I.
CD indicator
J.
Stereo indicator
K.
SD indicator
L.
USB indicator
M.
MP3 indicator
N.
WMA indicator
O.
Repeat all les indicator
P.
Repeat folder indicator
Q.
Repeat single le indicator
R.
Aux input indicator
S.
Alarm 2 indicator
T.
GB
5
Page 7
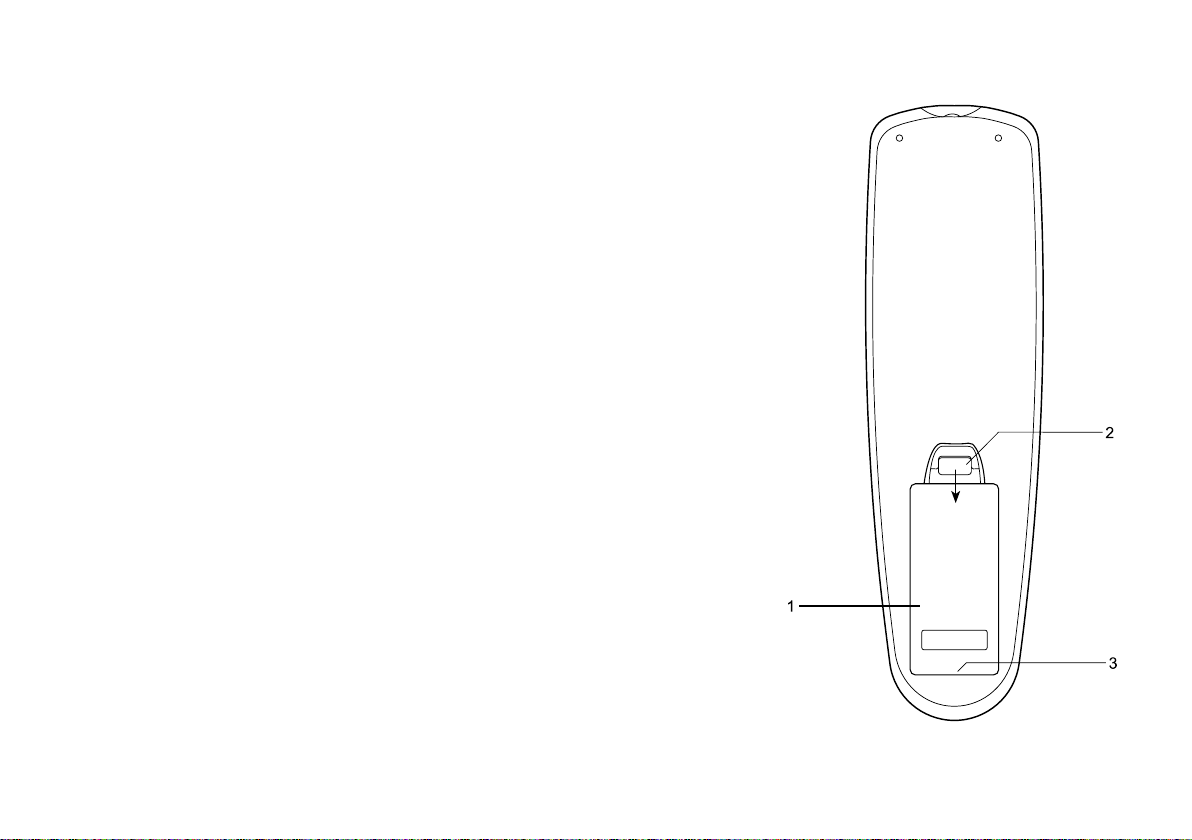
Remote control battery replacement
1. Remove the battery cover on the rear of your remote control by applying pressure to the catch
in the direction shown by the arrow in the diagram, and then lifting the cover.
2. Insert 2 x AAA size batteries into the compartment. Make sure the (+) and the (-) ends of the
batteries are positioned as shown inside the compartment.
3. Close the battery cover by inserting the retaining lugs rst, then apply pressure to the free end
such that the catch latches the cover securely.
4. If the remote is not to be used for an extended period of time it is recommended that the
batteries are removed.
IMPORTANT:
The batteries should not be exposed to excessive heat such as sunshine, re or the like. After
use, disposable batteries should if possible be taken to a suitable recycling centre. On no
account should batteries be disposed of by incineration.
1. Battery compartment
2. Latch
3. Retaining lugs (inside)
6
Page 8

Using the touch panel
The DDR-47BT sound system has a stylish touch panel instead of
conventional buttons.
Remote control functions
Most of the functions of the DDR-47BT sound system can be controlled
using either the touch panel or the remote control.
GB
To operate the buttons simply touch the button area with the tip of
a finger for about half a second. The clock set and system menu
functions marked with a dot (●) are accessed by means of a long touch
(2-3 seconds) on the appropriate button until the display on the sound
system shows that the command has been accepted.
You may find that at first, the sound system does not always detect
that you have touched a button. If so, try touching with a little more
pressure, or for slightly longer. You will soon find the optimum touch
needed to control your sound system. (See also the section of” Touch
Panel Sensitivity Control”)
The panel may be cleaned using a dry cloth. Do not use abrasives,
cleaning uids or solvents.
However, there are a few functions which are only accessible using the
remote control. These are:
DAB / FM radio station presets DAB / FM auto-tune
DAB menu function CD / USB / SD CARD track access
by numbers
CD / USB / SD CARD random
track control
As with the front panel, some operations require a longer operation
of the button (explained in the relevant sections). In this case simply
keep your nger held on the remote control button for 2-3 seconds until
the display on the sound system shows that the command has been
accepted.
Audio mute
7
Page 9

Bluetooth remote control options
Your radio has the option of being controlled by an application installed
on an Apple iPhone, iPod touch or iPod. The Bluetooth facility allows
you to ensure that your radio can only be controlled by your own Apple
device rather than someone else’s.
Details of how to link Bluetooth to you iPhone/ iPod touch are explained
in the later section called “Listening to Bluetooth music”
Using the sound system for the rst time
1. Place your sound system on a at surface.
2. Fully extend the telescopic aerial. The aerial should be fully extended
and positioned vertically for optimum reception.
3. Plug the mains lead into the mains socket located on the back of your
sound system ensuring that the plug is pushed fully into the socket.
4. Plug the other end of the mains lead into the wall socket and switch
on the wall socket.
IMPORTANT:
The mains plug is used as the means of connecting the sound system
to the mains supply. The mains socket used for the sound system must
remain accessible during normal use. In order to disconnect the sound
system from the mains completely, the mains plug should be removed
from the mains socket outlet completely.
5. When your sound system is first switched on the clock display will
show 12:00 and the unit will enter standby mode. It will then scan for
DAB radio stations and when stations have been found the clock and
date should be set automatically. Note that the display will not show
any scanning message for this rst scan.
6. If no stations have been found then the clock will not set. You may
need to relocate your sound system to a position giving better reception.
You should then carry out an auto-tune to nd DAB stations. See the
section of 'DAB operation' and also 'Finding New Stations' in the
following pages. The clock will then be set from a DAB broadcast.
8
Page 10

Operating your sound system - DAB
DAB
DAB
DAB
DAB
1. Fully extend the telescopic aerial. If your sound system is in standby mode, press and release
the On / Standby button to switch it on.
2. Press and release the Source button to select DAB mode. The display will show “DAB” for a
few seconds.
3. If this is the first time the sound system is used a quick scan of the DAB channels may be
carried out (depending on whether scanning was already completed in standby mode). If the
radio has been used before, the last used station will be selected.
4. When rst switched on, the rst station in the list of stations will be shown. Press and release
the Select button to tune to this station or press the Tuning Up or Down buttons to select an
alternative station. See selecting a station on the following page. The display will show the
station name on the upper line of the text display and broadcast information on the lower line.
GB
5. If the station list is still empty after the scan operation or if the selected station cannot be
received your radio will display “Service not available”.
6. If no signals are found it may be necessary to relocate your sound system to a position giving
better reception, and then repeat the scan using the Auto-tune facility (see the section of
“Finding New Stations”).
Note that radio station name and frequency displays shown in this user guide may differ from
those that you see on your radio. Broadcasters may change radio station names that are
transmitted, and the frequencies used for DAB and FM radio stations may not be the same in all
parts of the country.
9
Page 11
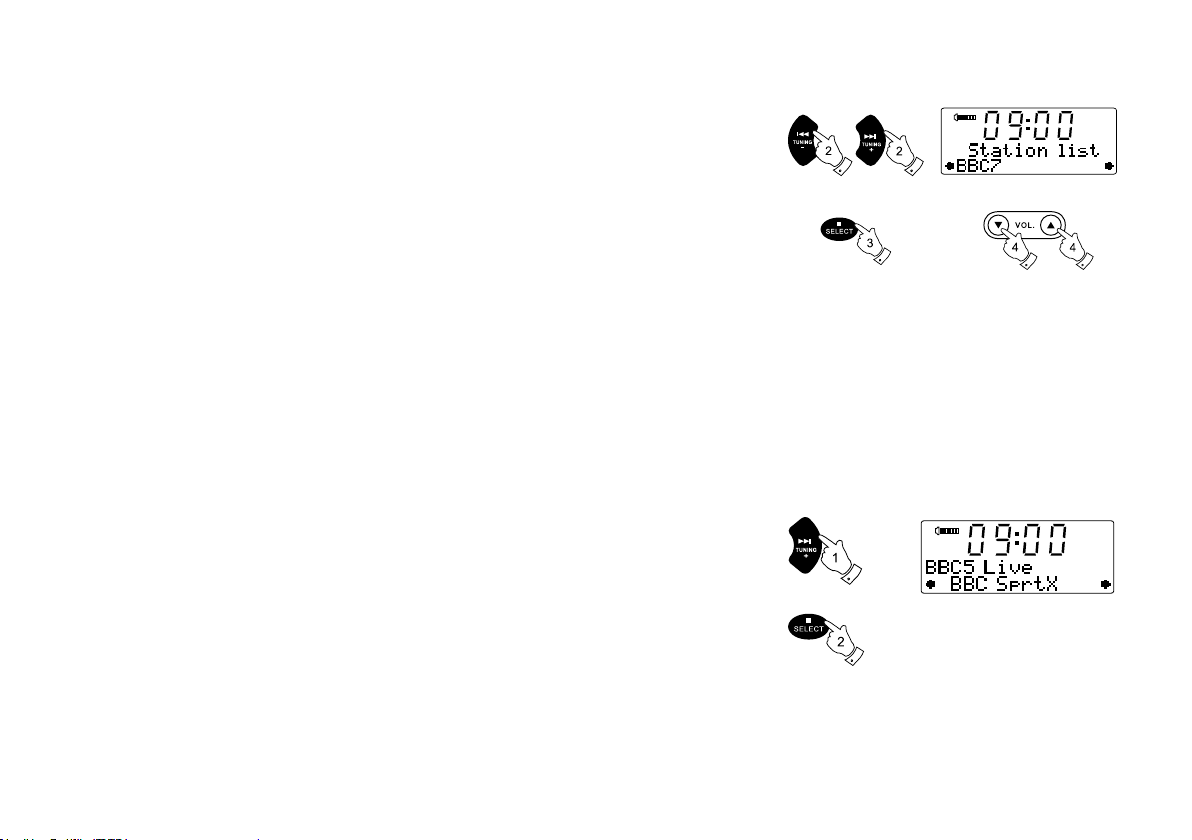
Selecting a station - DAB
DAB
DAB
1. When the unit is in DAB mode the upper line of the text display normally shows the name of
the station currently tuned.
2. Repeatedly press the Tuning Up or Down buttons to scroll through the list of available stations
on the lower line of the text display. Stop pressing the Tuning buttons when you nd the station
that you wish to hear. If you keep pressing one of the tuning buttons then the unit will rapidly
scroll through the list of available stations.
3. Press and release the Select button to cause the radio to tune to the chosen station. The display
may show “Now tuning” while your radio nds the new station. The use of memory presets is
described in the later section.
4. Adjust the Volume to the required setting. If after selecting a station the display shows “Service
not available” it may be necessary to relocate your radio to a position giving better reception.
Secondary services - DAB
1. Certain radio stations may have one or more secondary services associated with them. If a
station has a secondary service associated with it the display will show “>>” next to the station
name on the station list. The secondary service will then appear immediately after the primary
service as you press the Tuning Up button.
2. Press and release the Select button to select the station.
10
Page 12
Display modes - DAB
DAB
DAB
DAB
DAB
DAB
DAB
DAB
DAB
DAB
1
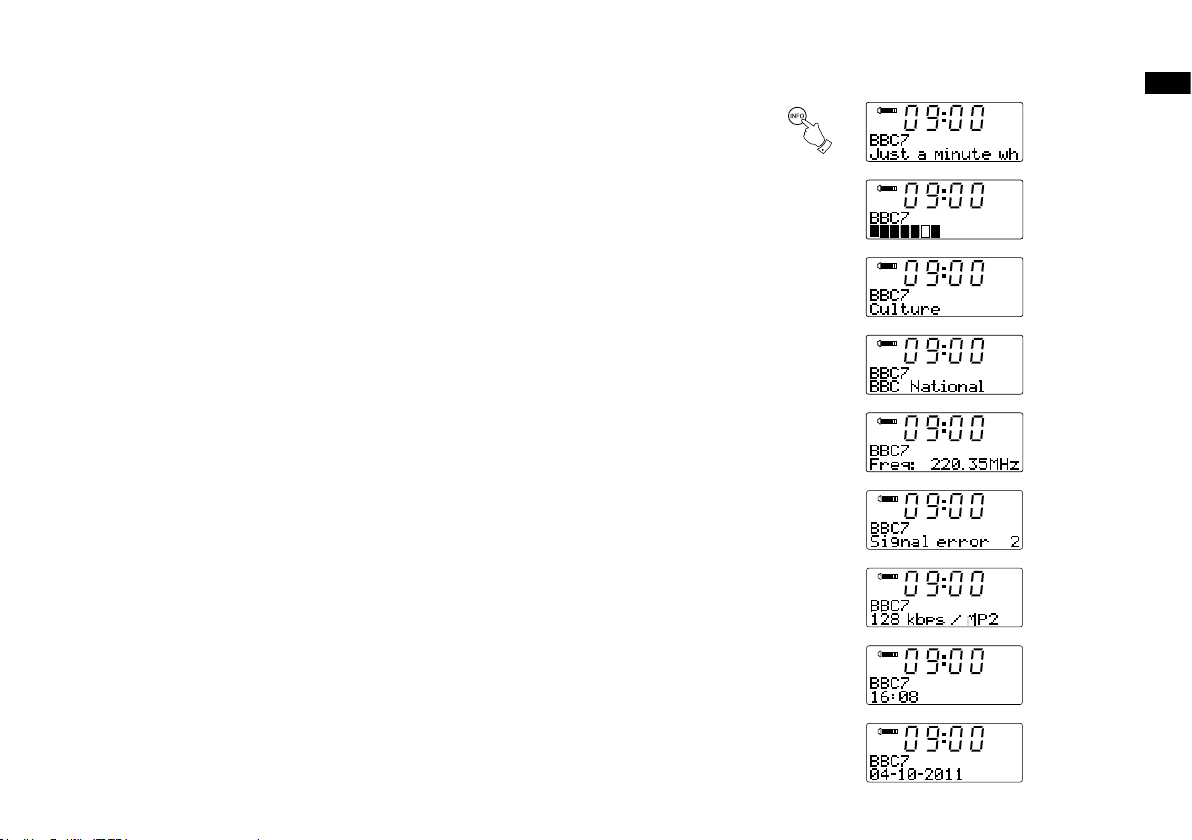
When in DAB mode your radio has a range of display options.
GB
1. Press the Info button to cycle through the various modes.
a. Scrolling text Displays scrolling text messages such as artist / track name, phone in
number, etc.
b. Signal strength Displays signal strength for the station being listened to. The clear
rectangle shows the minimum required signal strength for clear DAB
reception.
c. Programme type Displays the type of station being listened to e.g. Pop, Classic, News,
etc.
d. Multiplex Name Displays the name of the multiplex to which the current station
belongs.
e. Frequency Displays the frequency for the current DAB radio station.
f . Signal error Displays the signal error for the station being listened to. The lower
the number the better the signal received.
g. Bit rate audio type Displays the digital bit rate and audio type for the current DAB radio
station.
h. Time Displays the current time.
i . Date Displays the current date.
11
Page 13
Finding new stations - DAB
3
3
4
DAB
DAB
1
2
As time passes new stations may become available. To nd new stations proceed as follows:
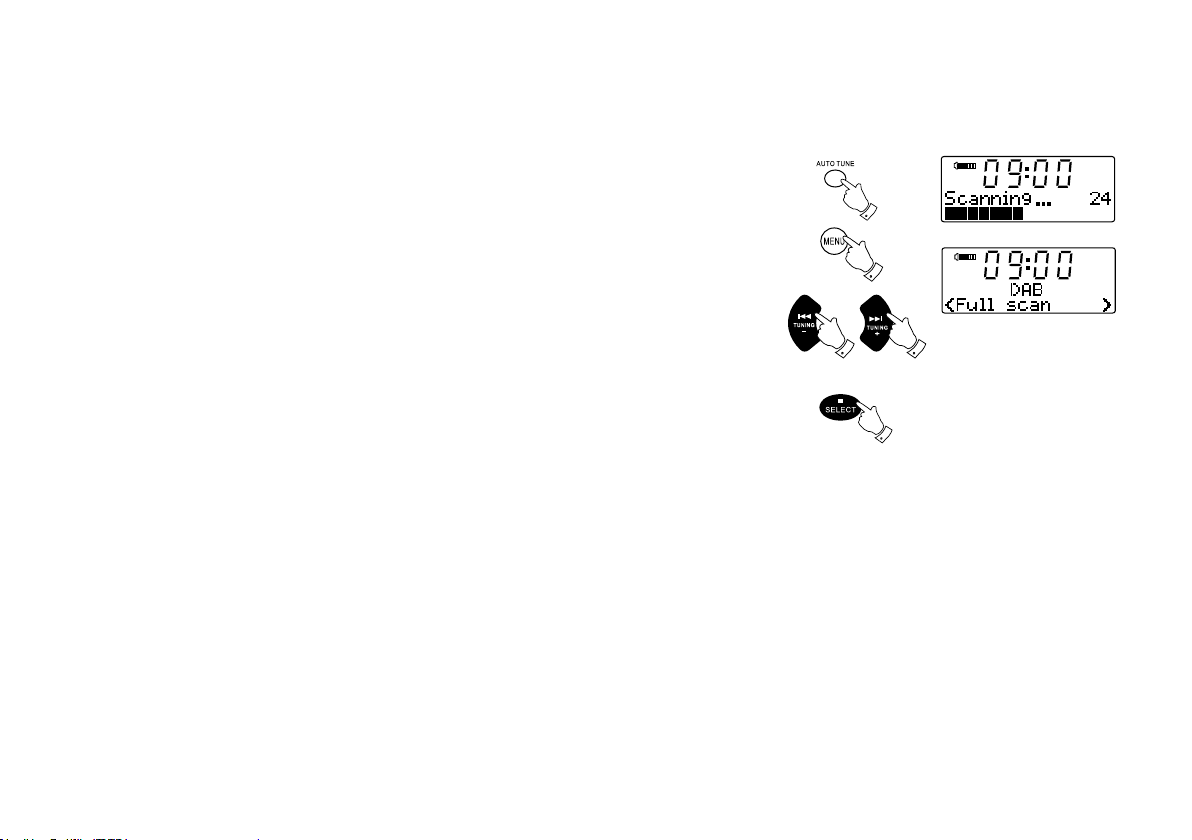
1. With the unit in DAB mode press and release the Auto-tune button. The display will then show
“Scanning”. The radio will perform a scan of the DAB frequencies. As new stations are found
the station counter on the right-hand side of the display will increase and stations will be added
to the list.
2. Alternatively, press and release the Menu button.
3. Press the Tuning up or down button until ‘Full scan’ appears on the display.
4. Press and release the Select button. Your radio will perform a scan of the band III DAB channels.
As new stations are found the station counter on the right-hand side of the display will increase
and stations will be added to the list.
12
Page 14
Manual Tuning - DAB
DAB
DAB
DAB
DAB
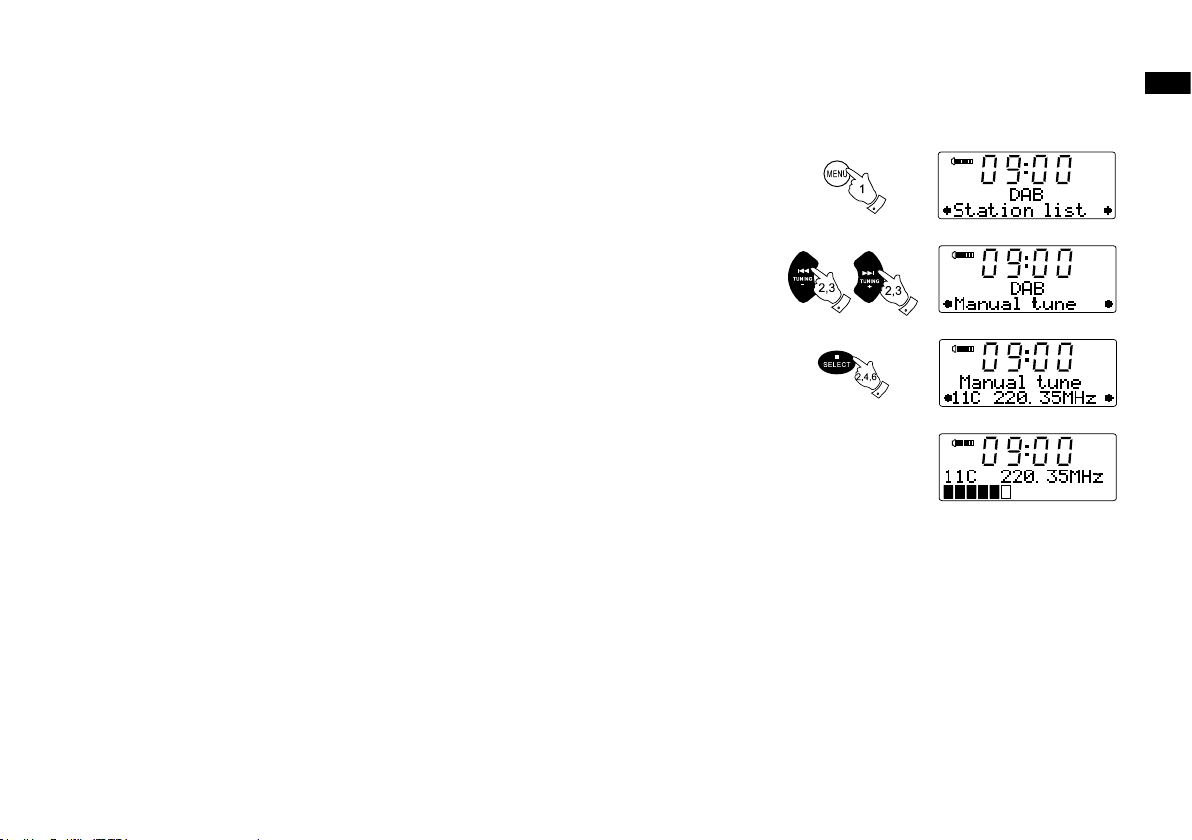
Manual tuning allows you to tune directly to the various DAB channels.
1. Press and release the Menu button so that the display shows “Station list”.
2. Press the Tuning Up or Down buttons until “Manual tune” appears on the display. Press and
release the Select button.
3. Press the Tuning Up or Down buttons to select the required DAB channel.
4. Press and release the Select button to select the channel. A signal strength display will appear.
The clear rectangle shows the minimum required signal strength for clear DAB reception.
5. Any new stations that are found are automatically added to the stored list of stations.
6. Press and release the Select button to return to normal tuning mode.
GB
13
Page 15
Dynamic Range Control (DRC) settings – DAB only
DAB
DAB
DAB
DAB
DRC can make quieter sounds easier to hear when your radio is used in a noisy environment.
This function is only for the DAB waveband.
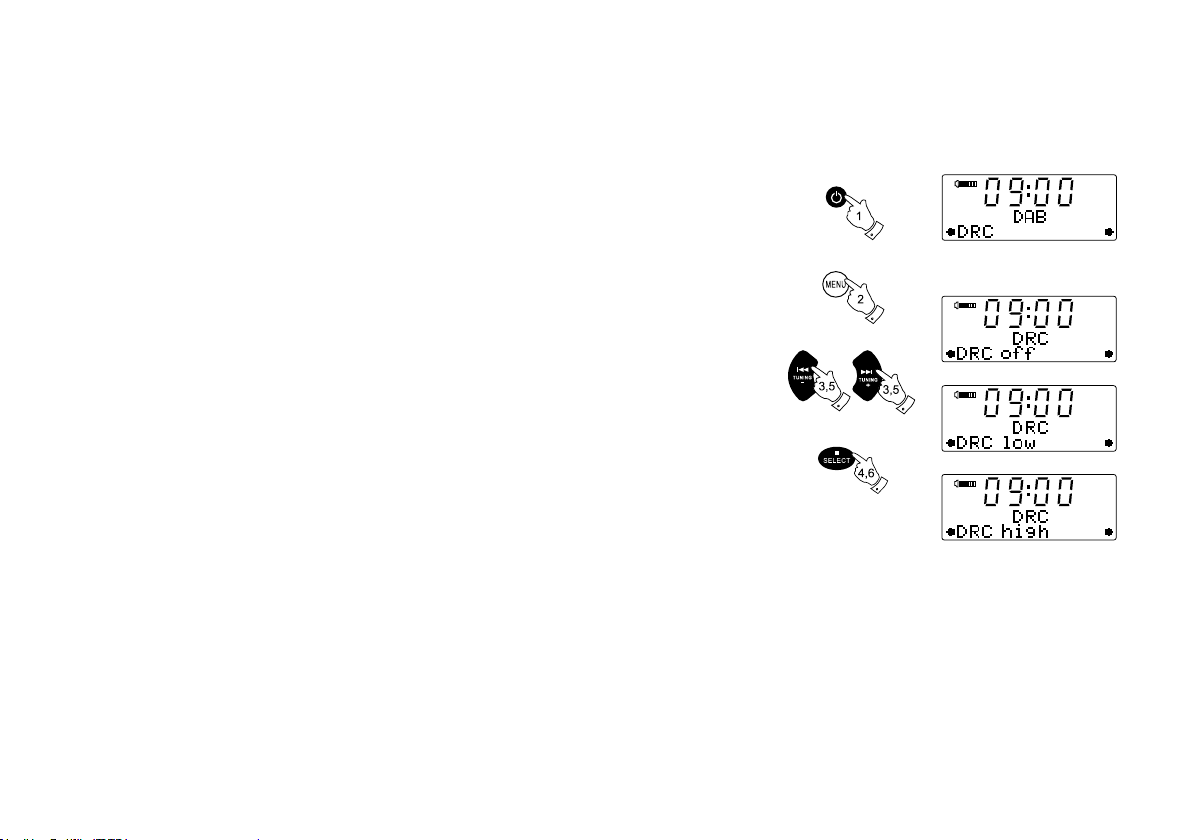
1. Press the On / Standby button to switch on your sound system.
2. Press and release the Menu button so that “Station list” appears on the display.
3. Press and release the Tuning Up or Down buttons until the display shows “DRC”.
4. Press and release the Select button to enter the DRC adjustment mode.
5. Press and release the Tuning Up or Down buttons to select the required DRC setting (the
default is off).
DRC off - DRC is switched off, Broadcast DRC will be ignored.
DRC low - DRC level is set to 1/2 that sent by broadcaster.
DRC high -DRC is set as sent by broadcaster.
6. Press and release the Select button to conrm the setting. The display will then return to the
previous radio display mode.
Note:
Not all DAB broadcasts are able to use the DRC function. If the broadcast does not support
DRC, then the DRC setting in the radio will have no effect.
14
Page 16
DAB
2
2
3
1
Prune station- DAB only
2
2
DAB
1
Over time, some DAB services may stop broadcasting, or you may change location and then not
be able to receive a station. In order to remove such stations from the DAB station list, the Prune
stations function will delete the DAB stations from your station list that can no longer be received.
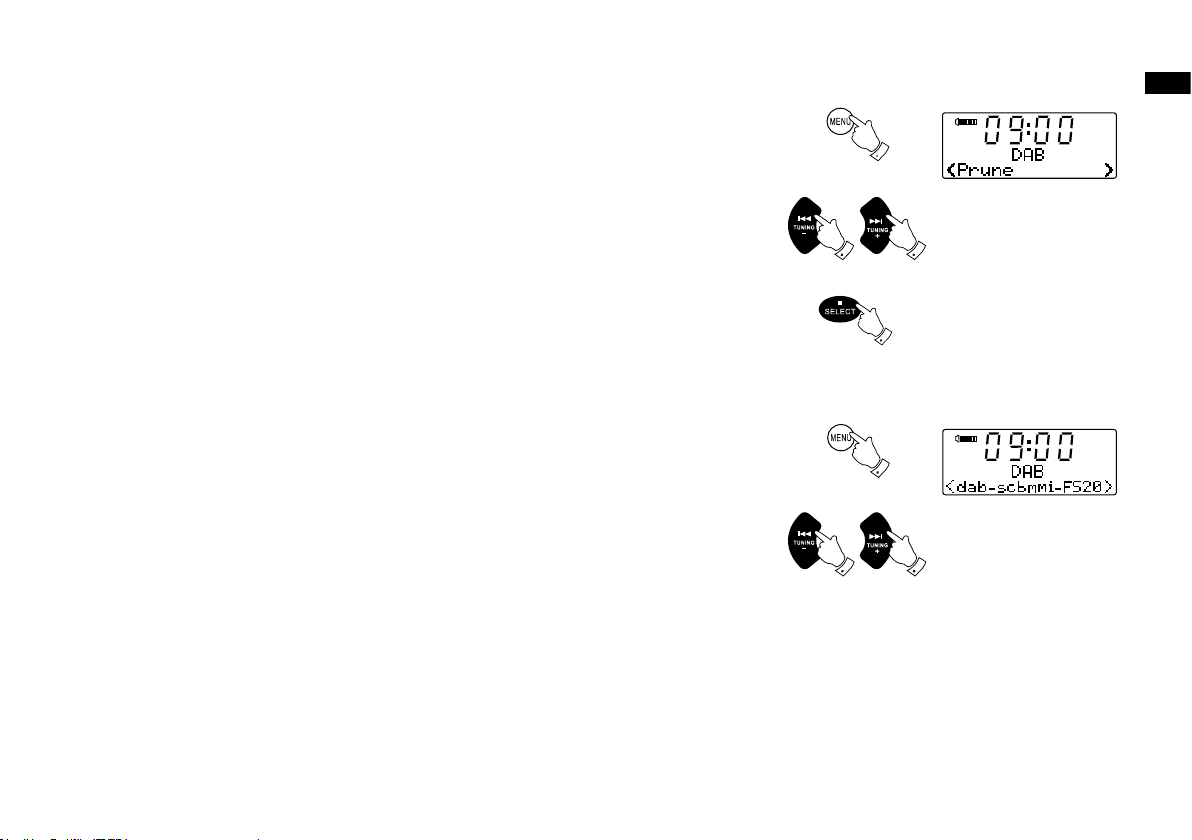
1. Press and release the Menu button so that "Station list" appears on the display.
2. Press the Tuning Up or Down buttons until "Prune " appears on the display.
3. Press and release the Select button to cause the stations list to be pruned, eliminating
unavailable stations.
Software version- DAB only
The software version display cannot be altered and is provided for reference only.
1. To view the DAB software version installed in your radio, press and release the Menu button
so that "Station list" appears on display.
2. Press the Tuning Up or Down buttons until "Software version" appears on the display.
The software version will appear on the display.
GB
15
Page 17
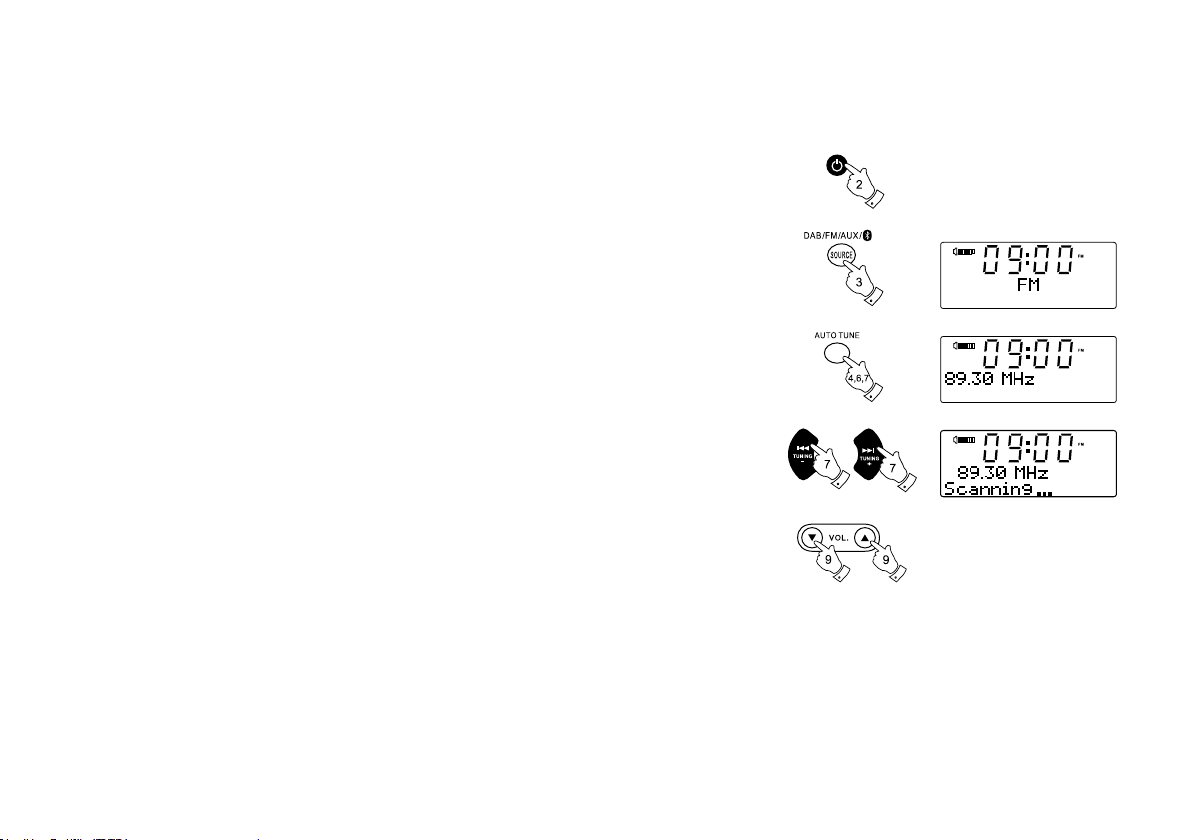
Operating your radio - Search tuning FM
1. Fully extend the telescopic aerial.
2. Press the On / Standby button to switch on your sound system.
3. Press and release the Source button until the FM band is selected.
4. Press and release the Auto-tune button to cause your radio to scan in the direction previously
scanned and stop automatically when it nds a station of sufcient strength.
5. After a few seconds the display will update. The display will show the frequency of the signal
found. If the signal is strong enough and there is RDS data present then the radio will display
the station name.
6. To nd additional stations press and release the Auto-tune button as before.
7. To scan the FM band in a opposite direction press and release either the Up Tuning button (to
scan low frequency to high frequency) or the Down Tuning button (to scan high frequency to
low frequency) and then press the Auto-tune button again.
8. When the end of the waveband is reached your radio will recommence tuning from the opposite
end.
9. Adjust the Volume to the required setting.
10. To switch off your radio press the On / Standby button.
16
Page 18
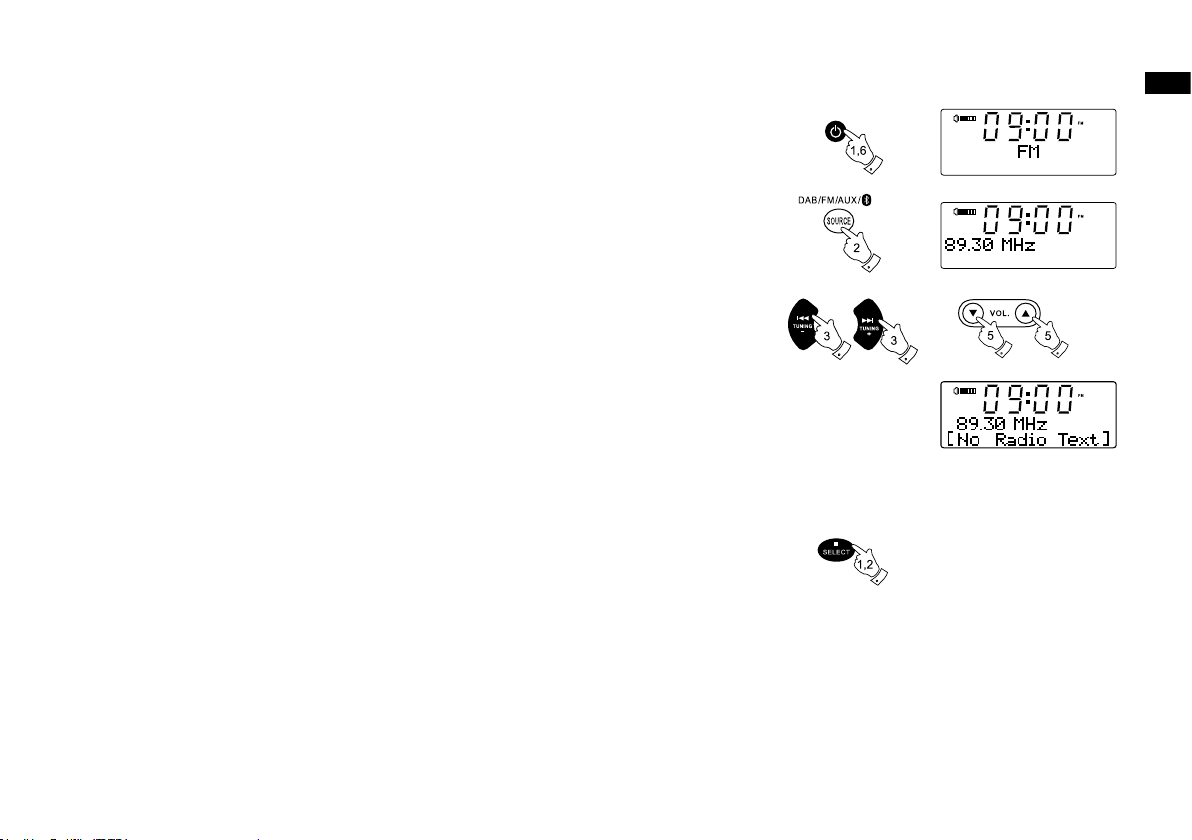
Manual tuning - FM
1. Press the On / Standby button to switch on your sound system.
2. Press and release the Source button to select the FM band and fully extend the Telescopic
aerial for optimal FM reception.
3. Press the Tuning Up or Down buttons to tune to a station. The frequency will change in steps
of 50kHz. Pressing and holding one of the buttons will advance the frequency selection several
times each second.
4. When the end of the waveband is reached the radio will recommence tuning from the opposite
end.
5. Set the Volume to the desired setting.
6. To switch off your sound system press the On / Standby button.
FM stereo / mono
1. If an FM station is received with a weak signal some hiss may be audible. To reduce the hiss
press and release the Select button so that the Stereo indicator on the display is cancelled.
Your radio will switch to mono mode.
2. To return to stereo mode press and release the Select button so that Stereo indicator on the
display is visible. The radio will switch to stereo mode.
GB
17
Page 19

Display modes - FM
Your sound system has four display options for FM radio mode. In addition to the audio content
of the programme, data is broadcast using the Radio Data System (RDS). RDS is a system in
which inaudible digital information is added to the normal FM radio transmission.
In FM mode the lower line of the text display can be set to any of the following options. If RDS
data is received, the upper line of the text display is used to show the radio station name as well
as a stereo and RDS indicator (“St” and “RDS”)
1. Press the Info button to cycle through the various modes.
a. Radio text Displays radio text messages such as news items etc.
b. Programme type Displays the type of station being listened to e.g. Classic, News, etc.
c. Frequency Displays the frequency of the station being listened to.
d. Stereo / Mono Displays the stereo/ Mono mode of the current radio
e. Time Displays the current time
f . Date Displays the current date
Note:
When tuned to the FM band, information display is only available when the radio is able to
receive RDS information from the broadcaster. If there is no RDS data available (or if the signal
is too weak) then the radio will display only the FM frequency.
18
Page 20

Presetting stations
DAB
You may store your preferred DAB and FM radio stations to the preset station memories (1 to
10). The procedure for setting presets and using them to tune stations is the same for FM and
DAB modes, and is described below. Note that the radio stores FM and DAB presets separately
and so there are ten of each. Presets are preserved in the event of a power failure.
1. Press the On / Standby button to switch on your sound system.
2. Tune to the required station as previously described.
3. Press and hold down the required Preset button (1 to 10) until the display shows for example
“Preset 1 stored”. The station will be stored using the chosen preset number. Repeat this
procedure for the remaining presets as you wish.
4. Preset memories which have already been stored may be overwritten by following the above
procedure if required.
Recalling a preset station
1. Press the On / Standby button to switch on your sound system.
2. Select the required waveband by pressing the Source button.
3. Momentarily press the required Preset button (1-10) to cause your radio to tune to the station
stored in preset memory.
GB
Note:
If you have not previously stored a preset station and the preset button is pressed “Empty preset”
will be displayed.
19
Page 21

Software version
2
2
DAB
1
The software version display cannot be altered and is provided for reference only.
1. To view all the software version installed in your system, press and hold he Menu button so
that "Set brightness" appears on display.
2. Press the Tuning Up or Down buttons until "SW version" appears on the display. Press the
Tuning Up or Down buttons to view different items’ software version. The software version will
appear on the display.
Note:
Software version can be viewed when the radio is in Standby mode.
20
Page 22

Compact discs
Use only Digital Audio CDs which have the symbol.
Use only full size CDs (12cm diameter) with the sound system. Mini CDs (8cm diameter) are not
compatible with the player and may jam the CD mechanism.
Never write on a CD or attach any sticker to the CD. Always hold the CD at the edge and store it
in its box after use with the label facing up.
To remove dust and dirt, breathe on the CD and wipe it with a soft, lint free cloth in a straight line
from the centre towards the edge.
Cleaning agents may damage the CD.
Do not expose the CD to rain, moisture, sand or to excessive heat. (e.g. from heating equipment
or in motor cars parked in the sun).
CD-R / CD-RW discs
Your DDR-47BT can playback CD-DA format audio CD-R/CD-RW discs that have been nalized
upon completion of recording.
Your DDR-47BT may fail to play some CD-R/CD-RW discs due to poor recording and wide
variation in quality of the CD-R/CD-RW disc.
GB
* Finalising enables a CD-R/CD-RW disc to playback on audio players such as your DDR-47BT.
A disc which has not been nalised may have information added to it using a computer but may
not always be playable.
21
Page 23

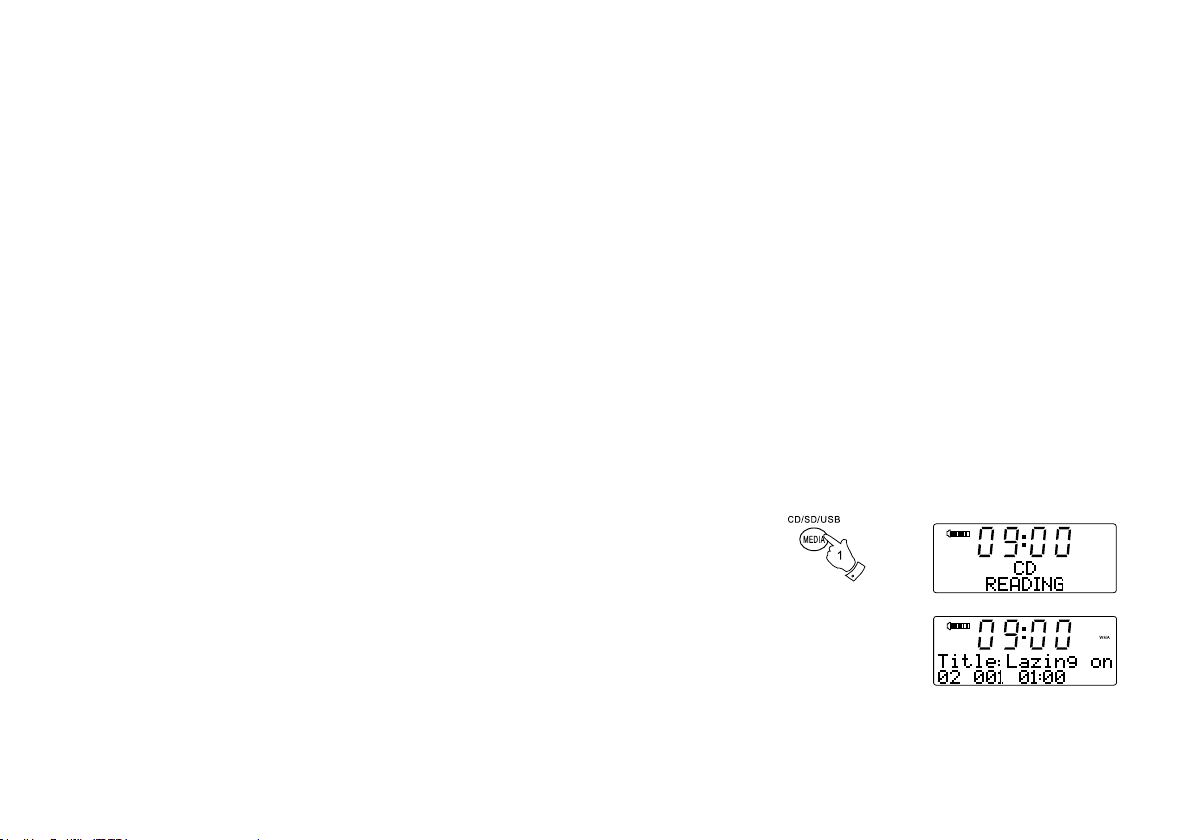
Inserting a CD
Ensure the CD player is empty before inserting a disc. If there is a disc in the player then the
CD indicator will be lit. If you cannot insert a disc, press the CD Eject button to remove the CD
currently in the player.
1. Press the On / Standby button to switch on your sound system.
2. To select the CD mode press the Media button until “CD” shows on the upper line of the display.
3. To eject a CD press and release the CD Eject button. To reload a CD that has just been ejected,
press the Eject button a second time.
4. Insert a disc with printed side facing up into the CD slot. The disc will be loaded automatically.
The unit will check the CD type and load its track list. The display will show “LOADING” and
then “READING” as the information is read.
5. If you load a disc containing MP3 or WMA les your sound system will enter the MP3 / WMA
mode (see the section of MP3 / WMA mode).
Note:
To remove a stuck CD from your radio, press and hold the CD Eject button for 2 seconds to force
ejection.
22
Page 24

Playing a CD
CD
CD
CD
1. Press the Play / Pause button to start playing the disc. The display will show the rst track number.
2. Adjust the Volume to the required setting.
3. To pause playing press the Play / Pause button. To resume press the Play / Pause button again.
4. To stop play, press the Stop button. The total number of CD tracks and the stop symbol ( ) will
be displayed. If you put the unit into standby mode without pressing the Stop button, then the
next time the unit is switched on it will return to the previously played track.
5. To take out the CD, press the CD Eject button. The display will show “EJECT”. In order to
protect the disc if it is not removed, the unit will reload the CD after 10 seconds and then enter
standby mode.
Selecting a track
1. While the CD is playing, press either the Fast-forward or Rewind buttons to change to the
desired track. The updated track number is shown in the display.
2. You can also skip tracks when the player is paused or stopped. Skip to the desired track using
the Fast-forward or Rewind buttons, release the button when the desired track is displayed.
3. Press the Play / Pause button to play the selected track.
GB
23
Page 25

Select a desired track
CD
CD
CD
CD
CD
CD
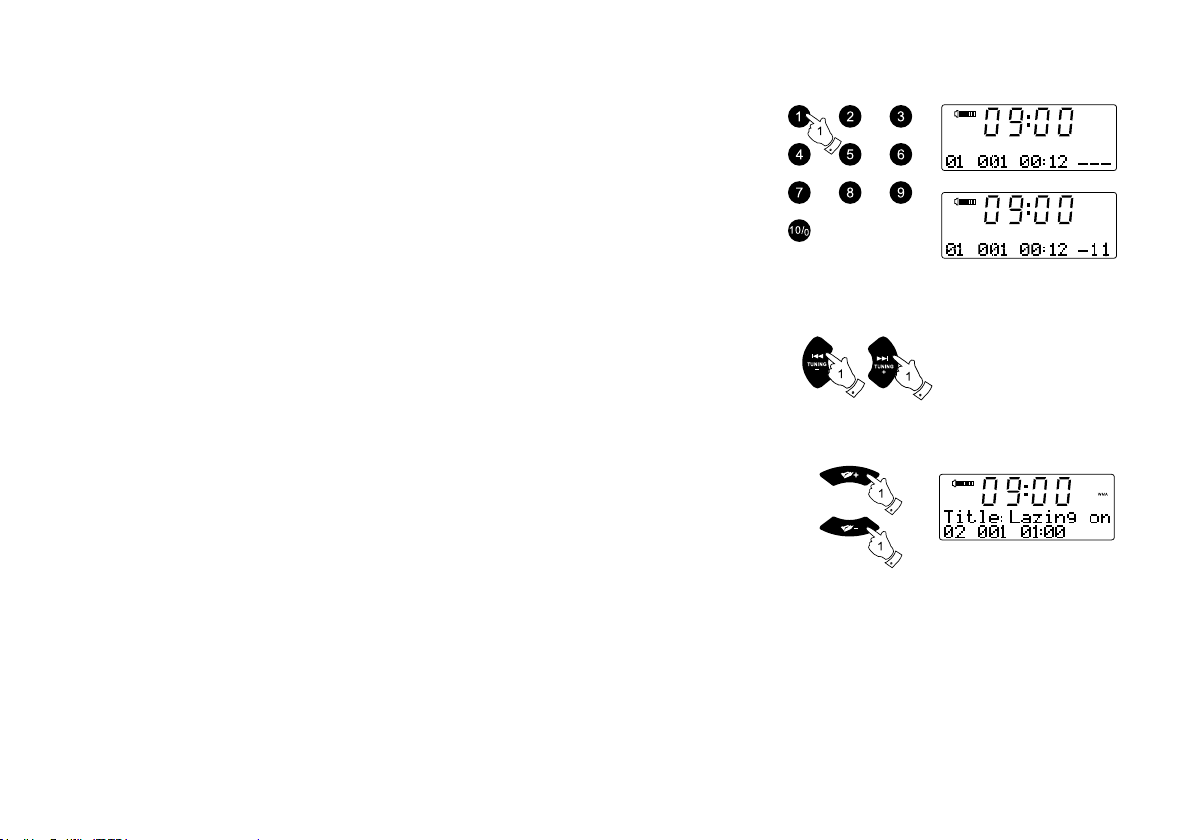
1. For track numbers 1-9 simply press the corresponding digit button. For track numbers ten and
above press the required digits using the 10/0 button to enter the digit zero.
2. If the track number entered exceeds the number of tracks on the CD, then the last track on the
CD will be played.
Search function
1. While the CD is playing, press and hold the Fast-forward or Rewind buttons. Release the button
when the desired part of the track is reached. Repeat a single track
2. While the CD is playing, press the Repeat button until the repeat single track symbol ( )
appears in the display. The current track will be repeated.
Repeat all tracks
3. While the CD is playing, press the Repeat button until the repeat all tracks symbol ( ) appears
in the display. All of the tracks on the CD will be played repeatedly.
Play tracks introduction
4. While the CD is playing, press the Repeat button until the track introduction symbol ( )
appears in the display. The rst
track is reached, press the Repeat button once more to revert to normal play mode.
10 seconds of each track will be played. When the desired
Play tracks in random order
5. While the CD is playing, press the Random button until the random symbol ( ) appears in
the display. The tracks will be played in random order. To cancel the random playback function,
press the Random button a second time.
24
Page 26
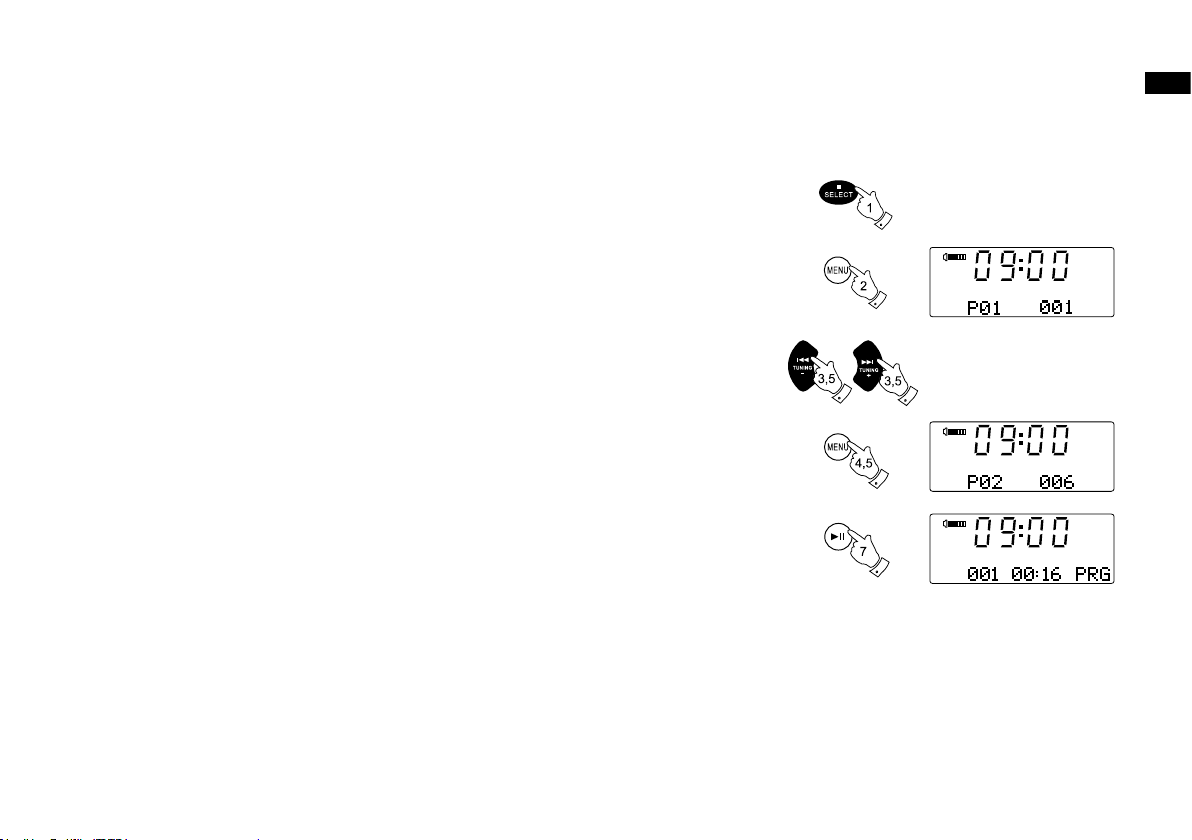
CD track programming
CD
CD
CD
In addition to playing of complete CDs, selected tracks, or a random selection, the CD player allows
you to programme a sequence of up to 20 tracks to be played in whatever order you choose.
1. With the unit in CD mode and with a CD inserted, make sure that the CD is stopped (press the
Stop / Select button).
2. To enter programming mode, press the Menu button.
3. Choose the rst track using the Fast-forward or Rewind buttons.
4. Press the Menu button to enter the selected track into the programme.
5. Choose another track using the Fast-forward or Rewind buttons, and enter it into the programme
using the Menu button (track 6 in example shown).
6. Repeat step 5 to store as many as 20 tracks in the programme.
GB
7. When the programme is complete, press the Play / Pause button to start playing. The tracks
will then be played in the order that you have just programmed.
8. Pressing the Stop / Select button, or switching to another operating mode will erase the programme.
Note:
If you are programming the tracks using a CD with MP3 or WMA les in folders (see the following
pages), you can also use the Up or Down Folder buttons to specify the folder in steps 3 and 5 above.
25
Page 27
MP3 / WMA CD Mode
CD
CD
The DDR-47BT is able to play CD-R and CD-RW discs containing MP3 and WMA files. It is
assumed in this section that a le is equivalent to a CD track.
An MP3 / WMA CD may not contain more than 511 files and not more than 99 folders. MP3
and WMA les should be created with an audio sample rate of 44.1kHz (this is normal for les
created from CD audio content). MP3 and WMA data rates up to 320 kilobits per second are
supported. WMA Lossless les are not supported. The unit will not play les which include digital
rights management (DRM) protection.
When burning CD-R and CD-RW discs with audio les, various problems may arise which could
lead to problems with playback. Typically such problems are caused by poor CD writing or
audio encoding software, or by the hardware settings of the PC’s CD writer, or by the CD being
used. Should such problems arise, contact the customer services of your CD writer or software
manufacturer or look in their product documentation for relevant information. When you are
making audio CDs, take care to observe all legal guidelines and ensure that the copyright of third
parties is not infringed.
1. To select the CD mode press the Media button until “CD” shows on the display, or insert a
suitably prepared CD-R or CD-RW disc.
2. Insert a CD with printed side facing up into the CD slot. The disc will be loaded automatically.
The unit will check the CD type and load its track list. The display will show “loading” and then
“reading” as the information is read. If there are many les or folders on the CD then it may
take some tens of seconds to read all of the le and folder names and to identify those which
are playable (with .mp3 or .wma lename extension).
26
Page 28

Playing an MP3 / WMA CD
CD
CD
1. Press the Play / Pause button to start playing from the CD. The display will show the first
folder and le numbers - “01” and “001”.
2. To pause playing press the Play / Pause button. To resume playing press the Play / Pause
button again.
3. To stop play, press the Stop button. The total number of les on the disc and “STOP” will be
displayed. If you put the unit into standby mode without pressing the Stop button, then the next
time the unit is switched on it will return to the previously played le.
4. To take out the CD, press the CD Eject button. The display will show “EJECT”. In order to
protect the disc if it is not removed, the unit will reload the disc after 10 seconds and then enter
standby mode. To reload a CD that has just been ejected, press the Eject button a second time.
Selecting a le
1. While the CD is playing, press either the Fast-forward or Rewind buttons to change to the
desired le, the le number is updated in the display. If there is more than one folder, when all
les in the current folder have been played the next folder will be played.
2. You can also skip files when the player is in stop mode. Skip to the desired file using the
Fast-forward or Rewind buttons and release the button when the desired le number is displayed.
GB
3. Press the Play / Pause button to play the selected le.
27
Page 29
CD
CD
CD
Select a specic le
1. For file numbers 1-9 simply press the corresponding digit button. For file numbers ten and
above press the required digits using the 10/0 button to enter the digit zero.
2. If the le number entered exceeds the number of playable les on the CD, then the last le will
be played. File numbers up to 511 may be entered. The numbers of les in folders are added
together. So, for example, if the rst two folders each contain 10 les, then entering 15 will play
the fth le in the second folder.
Search function
1. While the MP3 / WMA CD is playing, press and hold the Fast-forward or Rewind buttons.
Release the button when the desired part of the current le is reached.
To skip to another folder
1. With the MP3 / WMA CD in stop or play mode, press and release either the Up or Down Folder
button. The rst le of the next or previous folder will be played.
Repeat, Intro, Random and Programmed play
The DDR-47BT allows you to use the same playback options for files as can be used for
conventional audio CDs (see the previous sections). In addition to Repeat Once and Repeat All
options, there is also a Repeat Folder facility.
28
Page 30
Using SD cards or USB memory devices SD
2
Secure Digital (SD or SDHC) cards or USB memory devices can be used with the DDR-47BTfor
playback of MP3 or WMA les. The DDR-47BT can also record to SD, SDHC or USB media in
MP3 format.
The DDR-47BT has been tested with a range of SD cards and USB memory devices. SD cards
up to 2GB and SDHC cards up to 16GB are supported.
However, there are many different card variants available and not all cards can be guaranteed to
work in the DDR-47BT. Memory must use the FAT or FAT32 ling system in order to operate with
the DDR-47BT.
SD card and USB slots are located behind the panel beneath the volume control. This is opened
by pushing and releasing the right hand top corner of the panel. To close the panel, press the
right-hand side of the panel door until it clicks back into place.
Inserting and removing memory devices
1. To insert an SD card into your radio push the card label side upward and gold contacts rst
into the card slot on the front of your radio until it clicks. To remove the card push the card in
so that it clicks once more. It will then be pushed out slightly allowing removal. USB memory
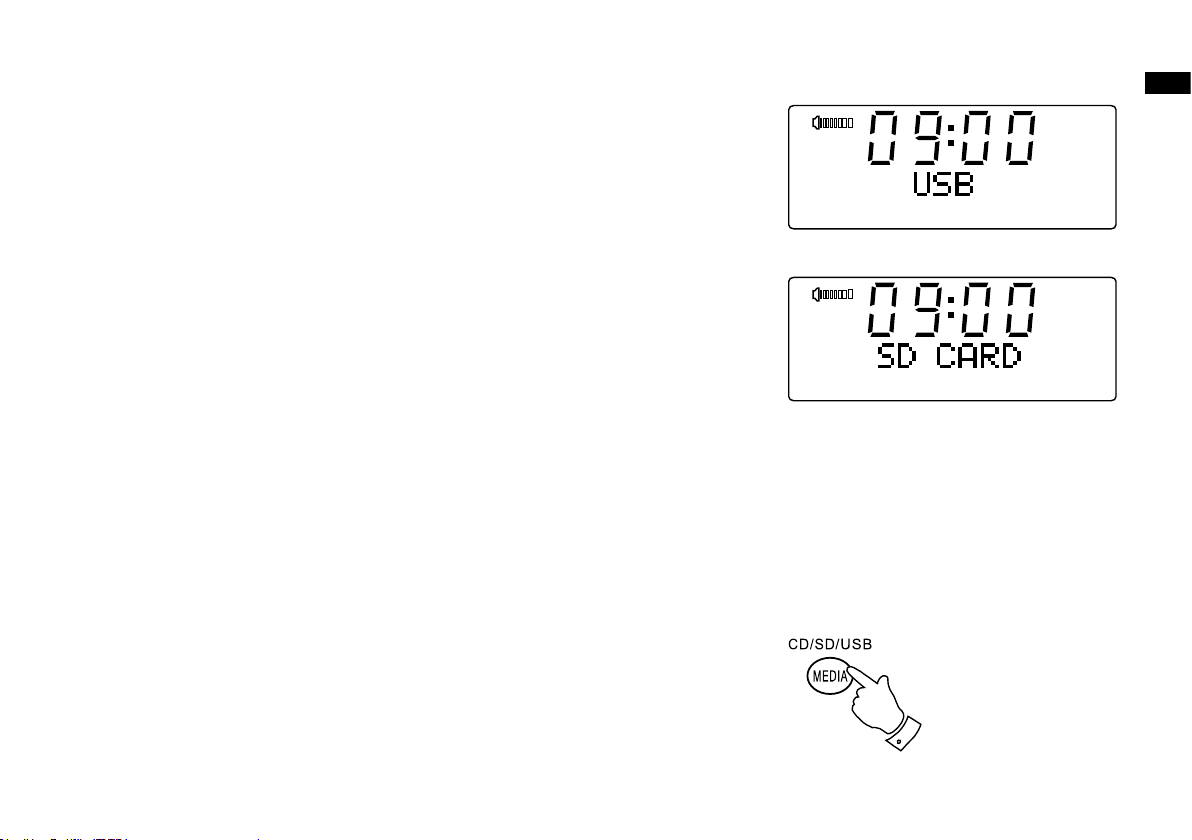
devices plug into the rectangular slot on the rear of the panel.
2. To select either SD card or USB mode press the Media button until the desired mode is shown
on the display.
GB
29
Page 31
1,2
3
3
1,2
1,2
Playing MP3 / WMA les - SD / USB
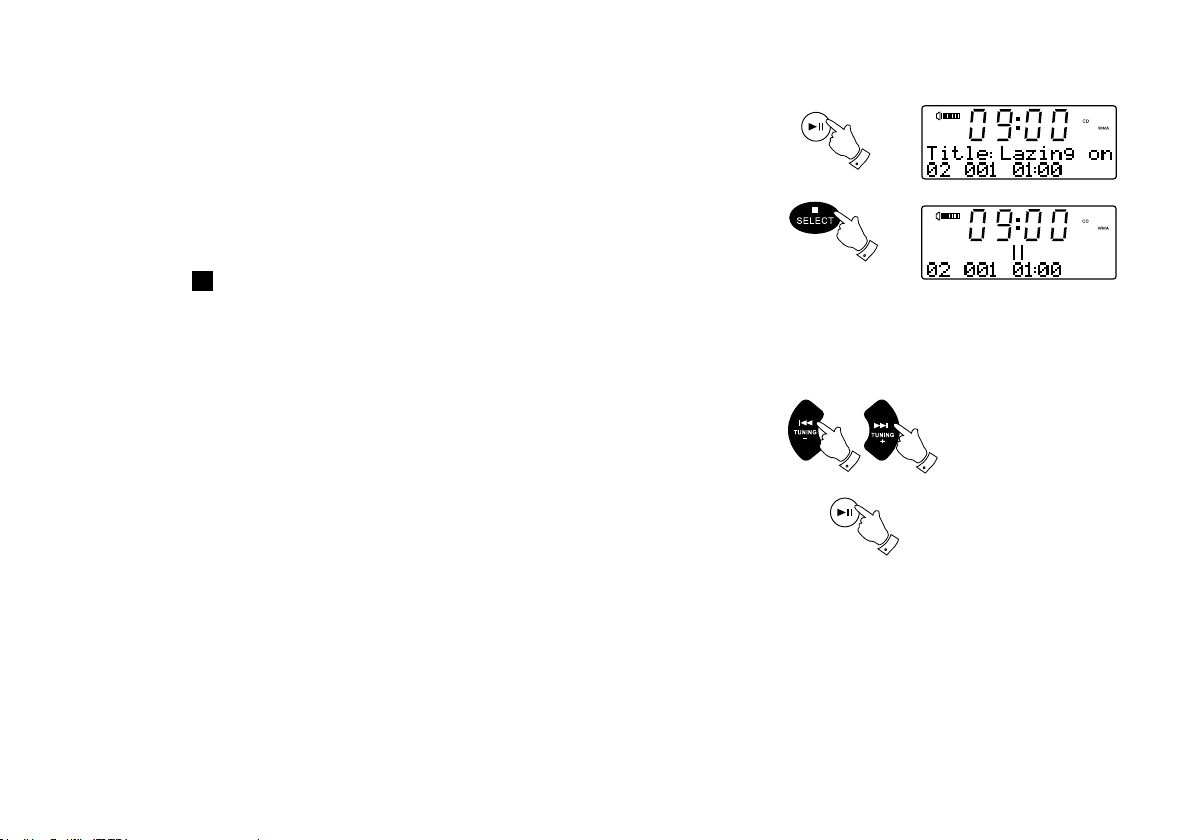
1. Press the Play / Pause button to start playing from the SD card / USB memory device.
The display will show the rst folder and le numbers - "01" and "001".
2. To pause playing press the Play / Pause button. To resume playing press the Play / Pause
button again.
3. To stop play, press the Stop button. The total number of les and folders on the media and the
stop symbol ( ) will be displayed. If you put the unit into standby mode without pressing the
Stop button, then the next time the unit is switched on it will return to the previously played le.
Selecting a le
1. While the SD card / USB memory device is playing, press either the Fast-forward or Rewind
buttons to change to the desired le. The le number is updated in the display. If there is more
than one folder, when all files in the current folder have been played the next folder will be
played.
2. You can also skip files when the player is in stop mode. Skip to the desired file using the
Fast-forward or Rewind buttons and release the button when the desired file number is
displayed.
3. Press the Play / Pause button to play the selected le.
30
Page 32

Select a specic le
1
1
1
1
1
1. For file numbers 1-9 simply press the corresponding digit button. For file numbers ten and
above press the required digits using the 10/0 button to enter the digit zero.
2. If the le number entered exceeds the number of playable les on the SD card / USB memory
device, then the last le will be played. File numbers up to 999 may be entered. The numbers
of les in folders are added together. So, for example, if the rst two folders each contain 10 les,
then entering 15 will play the fth le in the second folder.
Search function
1. While the SD card / USB memory device is playing, press and hold the Fast-forward or Rewind
buttons. Release the button when the desired part of the current le is reached.
To skip to another folder
1. With the SD card / USB memory device in stop or play mode, press and release either the Up
or Down Folder button. The rst le of the next or previous folder will be played.
Repeat, Intro, Random and Programmed play
The DDR-47BT allows you to use the same playback options for files as can be used for
conventional audio CDs (see related pages above). In addition to Repeat Once and Repeat All
options, there is also a Repeat Folder facility.
GB
31
Page 33

2
3
AUX
AUX
AUX
Recording to SD / USB
Your DDR-47BT sound system has been designed to allow you to make recordings to SD /
SDHC cards or to USB connected memory devices.
Recordings are made in MP3 format at 128k bits per second.
SD/SDHC or USB memory media must use the FAT or FAT32 le system in order to operate with
the DDR-47BT. Such media is usually supplied already formatted or can be formatted using a PC
with a suitable card reader (for SD/SDHC cards) or USB connection (for USB memory).
It is possible to record onto media which already contains les written by the radio or using your
computer. The recorded les will be added to those already present on the media.
Making a recording
1. Select the desired source for the recording (DAB, FM, CD, etc.). AUX-IN is shown in the
illustration. Set the volume to the required listening level (the volume of the recording will not
be affected by this).
2. Insert the media on to which the recording is to be made.
3. Press the Record button on the remote control. The display will show "Record init...". If only
one media type is present, then after a short while recording will start. If both SD and USB media
are detected, then a menu is offered to allow you to choose between Card and USB recording.
Select one or the other as needed using the Tuning Up or Down buttons and then press the
Select button. Recording will then start with the recordiduration being shown on the display.
32
Page 34

Making a recording cont.
4
AUX
If recording from a CD, recording will be started from the beginning of the currently playing track.
Each track on the CD will be recorded as a separate le on the media. You may also set up a
programme of tracks before recording if you wish (see the section of 'CD track programming').
4. In order to stop the recording press the Record button once more. Recording will stop and a
le will have been written to the storage media.
Files that have been written to the media are held in a folder called "RECORD". Recordings are
held in sub-folders according to the source used for the recording:
CDIN_xxx for recordings from CD
COP_xxxx for recordings from SD / USB
LINEIN for recordings from DAB, FM, Aux, etc.
The illustration shows the folders as they may appear on a PC running Windows with les in the
LINEIN folder being shown to the right. Other folders on the card were copied there from the PC.
Note:
The SD card / USB memory device should only be removed when recording is stopped.
Removing media while recording is in progress may corrupt data on the card leading to the loss
of les previously written.
The USB connection is primarily intended to be used to allow the DDR-47BT to play MP3 and
WMA les from solid-state ash memory devices. You may be able to play les which have been
stored on a USB hard disc drive (but the drive must have its own power supply). If you wish to
play les from another music player, then we recommend that this is connected to the Auxiliary
input socket - see the section of 'Auxiliary Input Socket'.
GB
33
Page 35

1
2
4
7
Recording MP3 / WMA les from CD / SD / USB
In addition to recording from conventional sources, the DDR-47BT sound system can also record
from MP3 or WMA les that have previously beenthan re-encoded to MP3 in order to avoid a
reduction in quality. You may copy les from CD or SD to USB and from CD or USB to SD.
1. Select the desired source for the recording (SD, USB or CD).
2. Press the Play button to start playing the source media (if it does not automatically start). Set
the volume to the required listening level (the volume of the recording will not be affected by
this).
3. Insert the media that the les will be recorded on to (SD or USB).
4. Press the Record button on the remote control. The display will show "Record init...".
5. If only one media type is present, the audio will stop while the source media is taken back to
the beginning of the current le. Recording will then start.
6. If both SD and USB media are detected, then a menu is offered to allow you to choose between
Card and USB recording. Select one or the other as needed using the Tuning Up or Down
buttons and then press the Select button. The source media will be taken back to the beginning
of the current le and recording will then start.
7. In order to stop the recording press the Record button once more. Recording and playback will
stop and all les that have been played will have been copied to the storage media.
34
Page 36

Deleting and formatting SD
2,3
4
4
4
SD
SD
SD
SD
SD
1
After having recorded les to SD or USB media, you may later wish to delete them in order to
reclaim the space used. The DDR-47BT can be used to delete individual les, or to delete all of
the media les on the card.
Deleting a single le
1. With the sound system in USB or SD mode, and with the media inserted, press and hold the
Menu button. The display will then show "Delete / Format".
2. Press the Select button to enter the Delete / Format menu. The display will show "Delete" as
the default option.
3. In order to delete a single le (the le which is currently displayed), press the Select button
once more. The display will show "Cancel" as the default option.
GB
4. If you do not wish to delete the le, press the Select button with "Cancel" displayed.
Alternatively, to delete the file press one of the Tuning Up or Down buttons to display "OK"
and then press the Select button. The le will be deleted and the details of the next le will be
displayed. If there are no more les left on the media, then the display will show "No File".
Note:
Once a le has been deleted, it is not possible to recover the le.
35
Page 37

1
2
4,5
SD
SD
SD
SD
SD
SD
3,5
3,5
Deleting and formatting cont.
Deleting all les
1. With the sound system in USB or SD mode, and with the media inserted, press and hold the
Menu button. The display will then show "Delete / Format".
2. Press the Select button to enter the Delete / Format menu. The display will show "Delete" as
the default option.
3. Press one of the Tuning Up or Down buttons so that "Format" is displayed.
4. In order to delete all of the les and folders on the media , press the Select button once more.
The display will show "Cancel" as the default option.
5. If you do not wish to delete all of the les on the media, press the Select button with "Cancel"
displayed.
Alternatively, to delete all of the les press one of the Tuning Up or Down buttons to display
"OK" and then press the Select button. The display will show "Formatting..." while all of the
les and folders on the card are deleted. The operation will generally only take a few seconds.
When completed, the display will show "No File”
Note: Although the process of deleting all of the les is described here as formatting, it is not
formatting in the strict sense. Rather it is a “Delete All Media Files” option. Once a device has
been formatted, it is not possible to recover the previous contents.
36
Page 38

Listening to Bluetooth music
1
You need to pair your Bluetooth device with your radio before you can auto-link to play / stream
Bluetooth music through your DDR-47BT. Paring creates a permanent `bond' so two devices can
always recognize each other.
Pairing your Bluetooth device
1. Press the Source button to select Bluetooth function. The Bluetooth icon on the panel will ash
with every 0.4 second interval.
2. Activate Bluetooth on your device according to the device's user manual to allow the paring
procedure. With some mobile, you may need to input the pass code “0000”.
3. Now the Bluetooth icon ( ) will ash with 1 second interval. You can start the search of DDR-47BT
on your Bluetooth device. Once DDR-47BT is appeared on your Bluetooth device, press the
item in your Bluetooth list and it will link with your DDR-47BT.
4. Once connected, the Bluetooth icon will remain illuminated. You can now play the music in
your Bluetooth-enabled device via DDR-47BT.
Note:
a) If there are 2 Bluetooth devices searching for DDR-47BT, it will show its availability on both
devices. However, if one device links with the DDR-47BT rst, then the other Bluetooth device
won't nd the DDR-47BT on its list.
b) If your Bluetooth-enabled device is temporarily disconnected to your DDR-47BT. As long as the
disconnection last within 7 minutes, your device can re-connect with your radio again automatically.
If the disconnection last more than 7 minutes, then you need to manually reconnect your device
again to the radio. Be aware that during the period of disconnection, no other Bluetooth device
can pair or link with your radio.
GB
c) The effective operation range between the docking system and the paired device is approximately
10 meters (30 feet).
d) Any obstacle between the system and the device can reduce the operational range.
37
Page 39

Playing Bluetooth music
2,3
4 4
1. Once your device and the DDR-47 BT are linked you can start to play Bluetooth music via the
DDR-47BT.
2. Press the Play / Pause button on the panel or the native controls on your Bluetooth-enabled
device to start playing the Bluetooth music.
3. To pause playing, press the Play / Pause button. To resume playing, press the Play / Pause
button again.
4. Press Tuning Up/ down button to go to the next or previous track.
Note:
If a phone call is received while a Bluetooth music is playing, the music will go mute automatically.
Disconnecting your Bluetooth device
Press and hold the Paring button to disconnect with your Bluetooth device.
The Bluetooth icon will then start to ash indicating deactivation of Bluetooth.
Note:
If ‘DDR-47BT’ shows in your Bluetooth device list but your device cannot connect to DDR-47BT,
please delete the item from your list and pair the device withDDR-47BT again following the steps
described previously.
38
Page 40

Setting the clock manually
2,3,5
2,3,5
2,4
The DDR-47BT will automatically set its clock when tuned to a DAB radio station or to an FM
station which is broadcasting the time via RDS.
If the clock cannot be set using DAB or FM radio then you will need to set the clock manually
before the alarm function can be used. The clock may be set while the unit is in standby mode or
while playing. The clock display is always in 24 hour format.
If it becomes necessary to set the clock manually, please follow these steps:
1. Press and hold the Clock Set button. The hour digits on the display will ash.
2. Press the Tuning Up or Down button to highlight the 12/ 24 hour time format. Press the Select
button to conrm the setting.
3. Press the Tuning Up or Down buttons to change the hour digits as needed. Keep the button
pressed to cause the digits to change more quickly.
4. Press and release the Select button to confirm the hour setting. The minute digits on the
display will ash.
5. Press the Tuning Up or Down buttons to change the minute digits as needed. Keep the button
pressed to cause the digits to change more quickly.
Note:
When your manual clock setting is completed and provided you are in FM / DAB mode,
sometimes you may nd that the time on top of the LCD and at the bottom of the display are
different. Please note that your manual clock setting time is shown on top of the LCD; whereas
the time at bottom indicates the clock time received from radio-controlled clock signal.
GB
39
Page 41

6. Press and release the Select button to confirm the minutes setting. The year digits on the
7,9,11
6,8,
10,12
7,9,11
display will ash.
7. Press the Tuning Up or Down buttons until the desired year is set. Keep the button pressed to
cause the digits to change more quickly.
8. Press and release the Select button to conrm the year setting. The month will ash on the
display.
9. Press the Tuning Up or Down buttons until the desired month is set. Keep the button pressed
to cause the month to change more quickly.
10. Press and release the Select button to conrm the month setting. The day number will ash
on the display.
11. Press the Tuning Up or Down buttons until the desired day is set. Keep the button pressed to
cause the digits to change more quickly.
12. Press and release the Select button to conrm the day and to complete the clock and date
setting. The display will revert to the display for the previous operating mode.
40
Page 42
Alarms
2,4,
6,7
2,4,
6,7
3,5,
6,7
Your DDR-47BT sound system has two alarms which can each be set to wake you to DAB, FM
radio, CD, USB, SD card or buzzer alarm. The alarms may be set while the unit is in standby
mode or while playing.
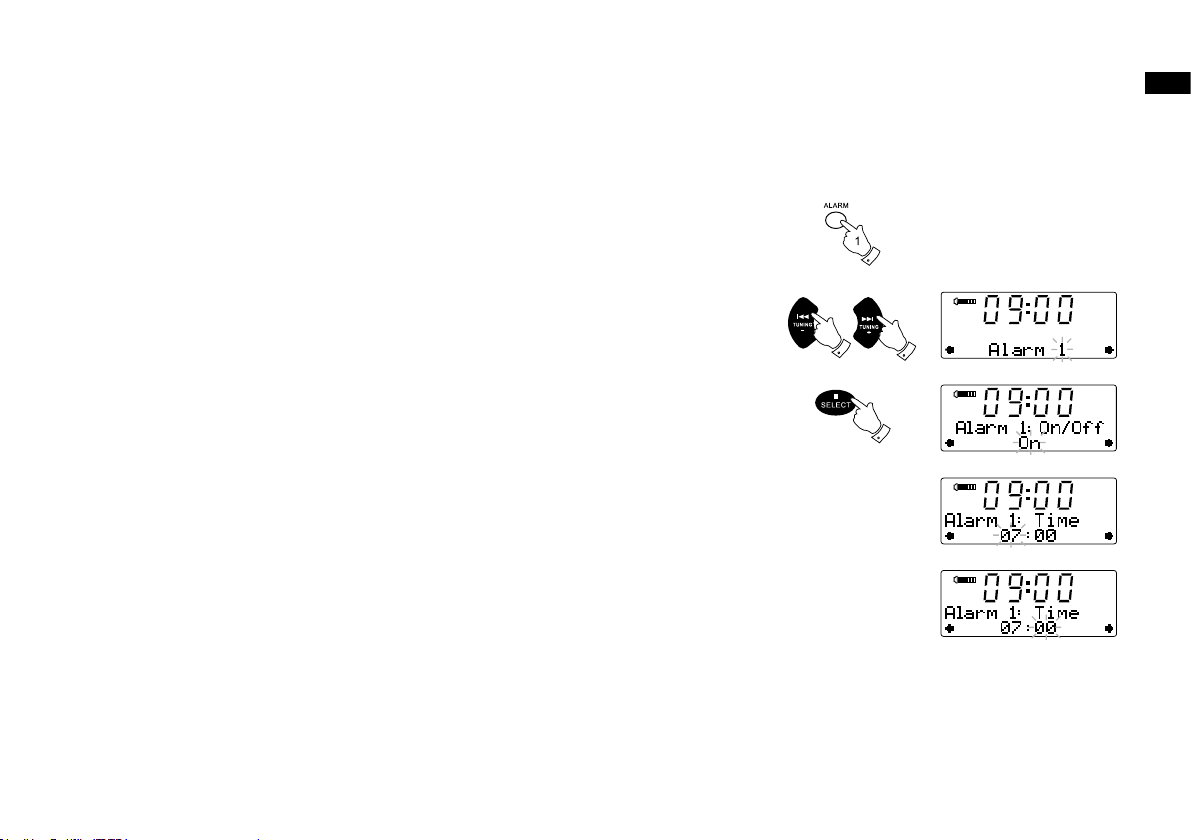
1. Before setting an alarm ensure that the clock time is set (see the section of ‘Setting the clock
manually’). Press and release the Alarm button. “Alarm 1” will show on the display.
2. Press the Tuning Up or Down buttons to select the required alarm, 1 or 2. Press and release
the Select button to cause “Alarm setting” to show on the display.
3. Press and release the Select button to choose alarm setting. “Alarm: On/Off” will show on the
upper line of the text display.
4. Press the Tuning Up or Down buttons to choose whether to set the alarm to On or Off.
5. Press and release the Select button. If the previous selection was to switch on the alarm, then
“Alarm: Time” will show on the upper line of the text display and the Alarm hour digits will ash.
If Off was selected, the unit will exit the alarm menu.
6. Press the Tuning Up or Down buttons to choose the alarm hour and then press and release
the Select button to enter the hour setting. The Alarm minute digits will then ash on the display.
7. Press the Tuning Up or Down buttons to choose the alarm minute and then press and release
the Select button to enter the minute setting. “Alarm: Mode” will show on the upper line of the
text display.
GB
41
Page 43
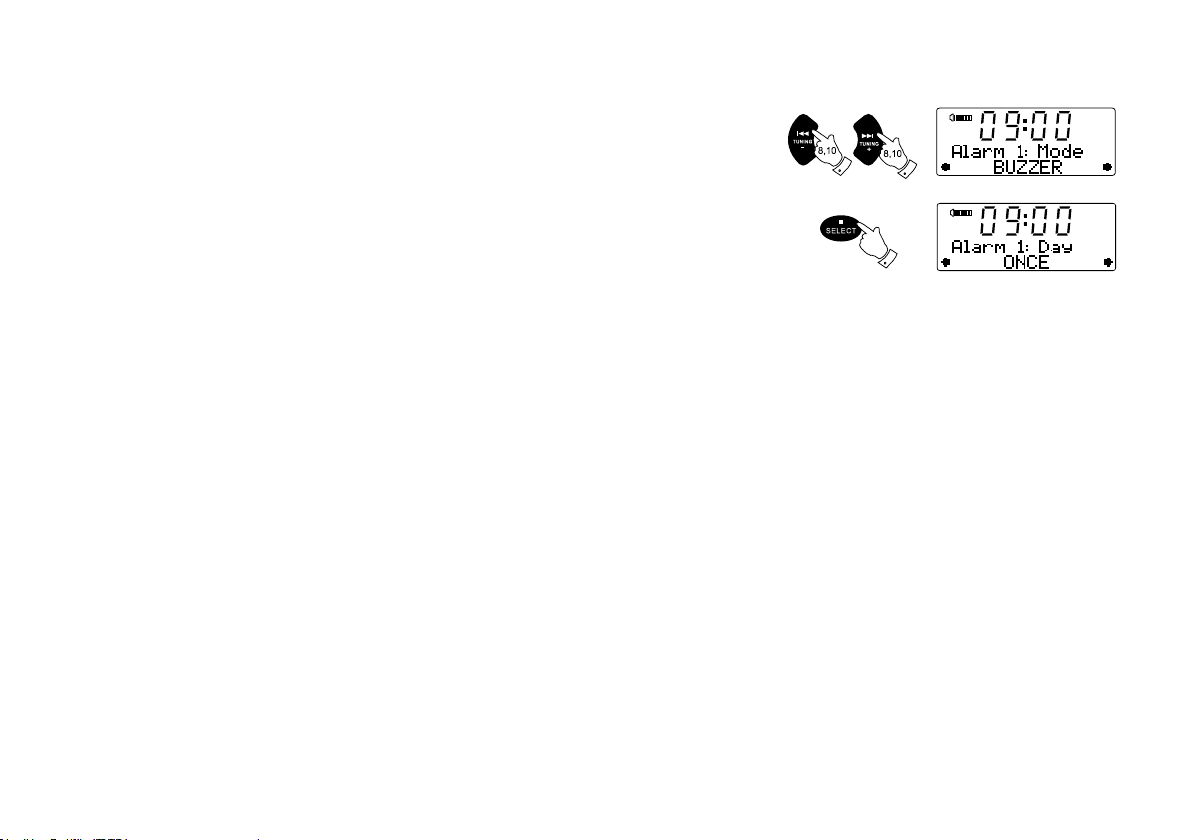
8. Press the Tuning Up or Down buttons to choose the required alarm mode and then press the
8,9,10
Select button to conrm the setting. Each alarm can be set to any of the following modes:
BUZZER - Will wake you with a buzzer alarm
DAB - Will wake you with DAB radio
FM - Will wake you with FM radio
CD - will wake you playing a CD
USB - will wake you playing your USB
SD card - will wake you playing your SD Card
9. Press and release the Select button to select the alarm mode. “Alarm: Day” will show on the
upper line of the text display.
10. Press the Tuning Up or Down buttons to select the required day option and then press the
Select button to conrm the setting.
Your alarm can be set to the following options:
Once - will sound once in the next 24 hours only
Daily - will sound everyday
Weekdays - will sound only on weekdays
Weekends - will sound only on weekends
11. The alarm has now been set and the unit will revert to the previous display. The alarm indicator
(alarm 1 or 2) will show on the display. To view an alarm setting, select “View” instead of
“Setting” at steps 2 and 3. Successive presses of the Select button will display the alarm details.
Note:
When the alarm is set to wake by DAB or FM radio, the last used DAB or FM station will be used
and the alarm volume will be the volume previously listened to. When the buzzer alarm activates,
the alarm will start softly and gradually increase in level. The alarm will sound for 60 minutes
unless cancelled.
42
Page 44

Cancelling alarms
1. While an alarm is sounding it can be cancelled by pressing the On / Standby button.
2. To cancel an alarm at any other time, enter the alarm setup menu and set the alarm On / Off
option to “Off”. See steps 1 - 5 in the previous section.
Snooze
1. When the alarm sounds, pressing any button other than the Standby button will silence the
alarm for ve minutes. The snooze symbol ( ) will appear in the display.
Sleep function
Your sound system can be set to turn off after a preset time has elapsed. The sleep setting can
be adjusted between 0 and 120 minutes in 10 minute increment.
1. To use the sleep timer, press and release the Sleep / Clock set button to enter the sleep setup.
“Sleep off” will appear on the display.
2. Repeatedly press and release the Sleep / Clock set button to select the desired sleep time.
Use the OFF option to cancel the sleep function.
3. Your radio will switch off after the preset sleep time has elapsed.
GB
4. To cancel the sleep function before the preset time has elapsed, either set the sleep timer to
off (step 2) or press the On / Standby button.
43
Page 45

Standby brightness control
CD
CD
The brightness of the display when the unit is in standby mode may be adjusted. If you use the
unit in the bedroom, you may prefer a lower standby brightness level than the standard setting.
1. Press and hold the Menu button so that the display shows “Set Brightness” on the lower line of
the text display
2. Press and release the Select button to show the current setting.
3. Press and release the Tuning Up or Down buttons to change the standby brightness level. The
backlight level will change at the same time so that you can see the effect of the change.
4. Press and release the Select button to save the new setting. The default setting after a system
reset is 5. Possible brightness values range from 1 - 7.
44
Page 46
Equalizer function
The sound of your sound system can be adjusted to suit your personal taste for the material that
you are listening to. The DDR-47BT has six preset equalizer modes. Alternatively, you may set
the treble and bass levels to your own preferences.
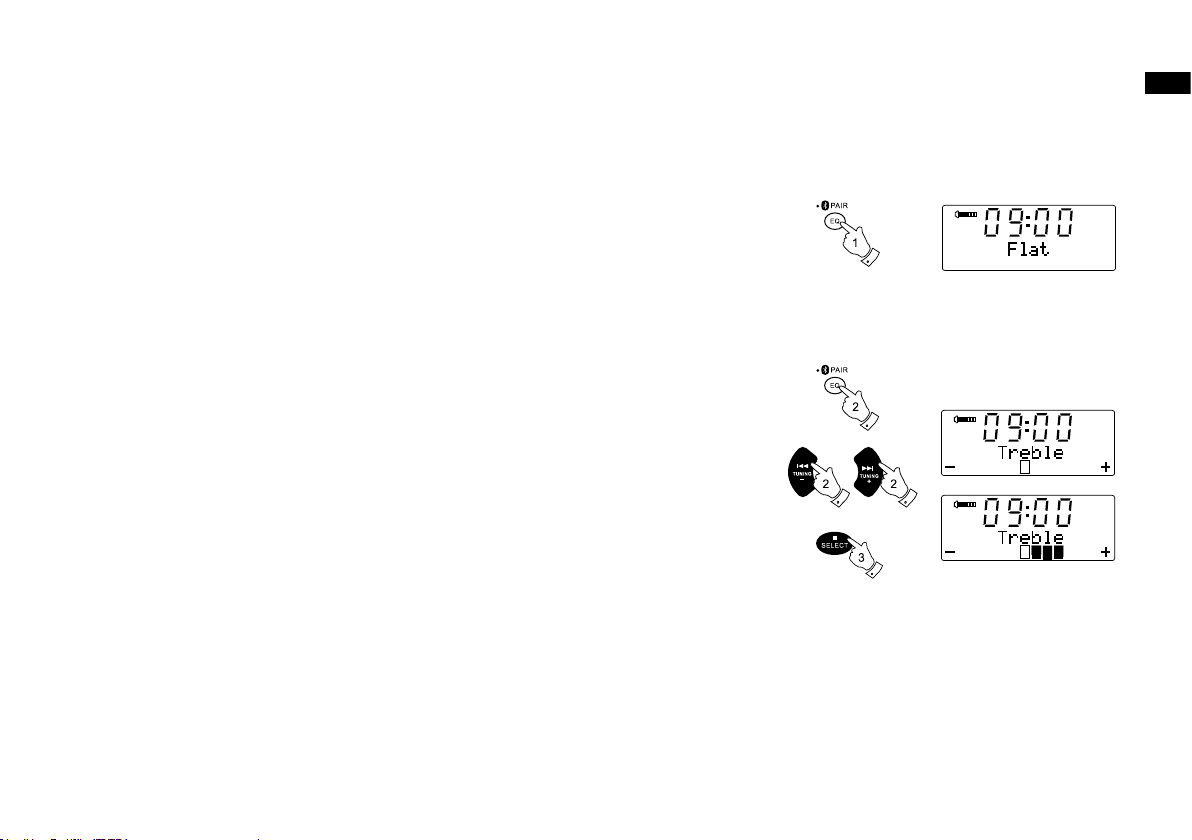
1. Press the Equalizer button to cycle through the various modes.
a. Flat- no tone modication is applied
b. Jazz
c. Rock
d. Classic
e. Pop
f . News
g. Treble - tone setting may be adjusted
h. Bass - tone setting may be adjusted
Treble control
2. Press the Equalizer button to cycle through the modes until “Treble” appears on the upper line
of the text display. The current treble setting will be shown on the lower line.
3. To adjust the treble setting press and release the Tuning Up or Down buttons until the desired
level is displayed.
4. If you wish also to adjust the bass, then press the Equalizer button once more as described in
step 5. Alternatively press the Select button to revert to the play mode display.
GB
45
Page 47
Bass control
DAB
DAB
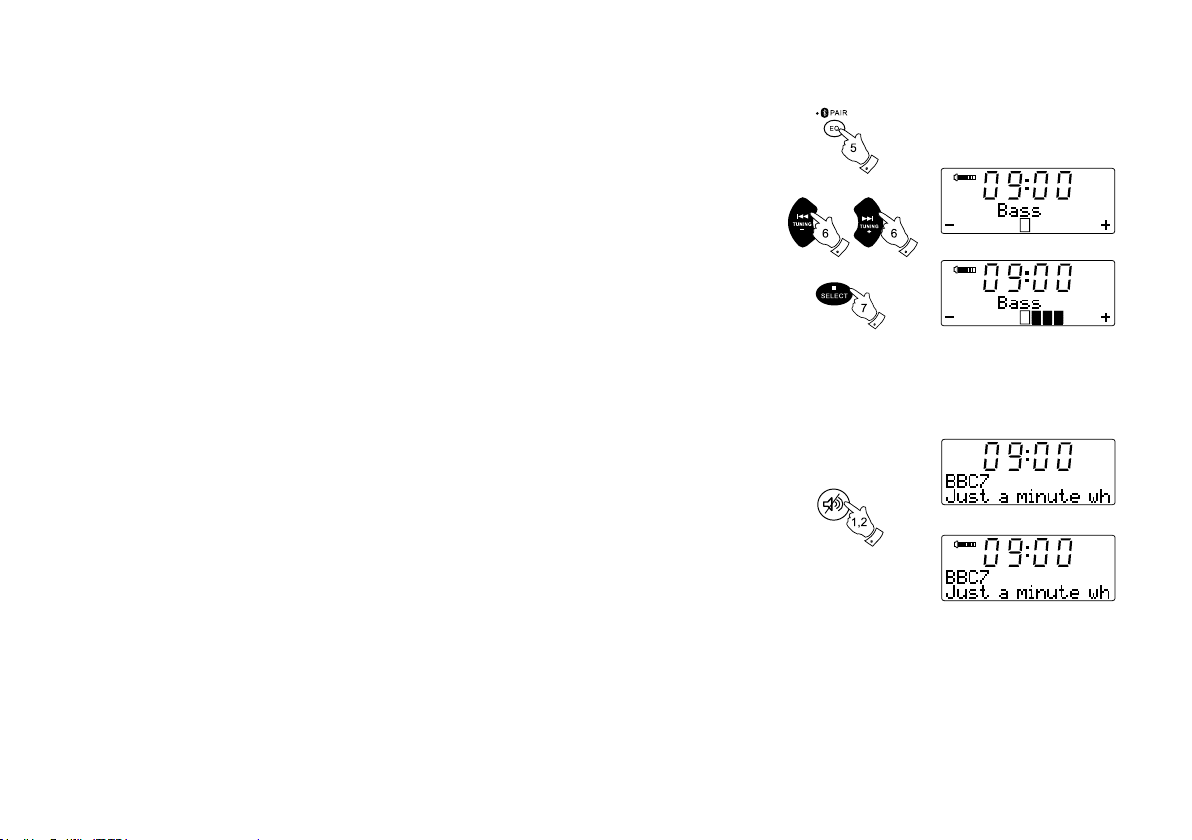
5. Press the Equalizer button to cycle through the modes until “Bass” appears on the upper line
of the text display. The current bass setting will be shown on the lower line.
6. To adjust the bass setting press and release the Tuning Up or Down buttons until the desired
level is displayed.
7. Press the Select button to revert to the play mode display. To quickly cancel the effect of the
treble or bass settings press the Equalizer button until “Flat” appears on the upper line of the
text display. The treble and bass settings will be remembered for the next time that you wish to
adjust them.
Mute function
Pressing the Mute button will mute the output from the loudspeakers.
1. Press the Mute button to mute the sound output. The speaker volume symbol on the display
will disappear.
2. Press the Mute button again or one of the Volume buttons to un-mute the sound output.
46
Page 48

Auxiliary input socket
AUX
A 3.5mm stereo Auxiliary Input socket is provided on the rear of your sound system to permit
an audio signal to be fed into the unit from an external audio device such as iPod, MP3 or CD
player.
1. Repeatedly press and release the Source button until “AUX IN” is displayed.
2. Connect an external audio source (for example, iPod, MP3 or CD 1 player) to the Auxiliary
input socket.
3. Adjust the volume setting on your iPod, MP3 or CD player if necessary to ensure an adequate
signal level, and then use the Volume Up or Down buttons on the sound system as needed for
comfortable listening.
Line Out socket
A 3.5mm stereo Line Out socket is provided on the rear of your sound system to permit the audio
signal to be fed to an external amplier or other audio device.
Inserting an audio cable into this socket will not mute the internal loudspeaker. Set the volume
control to a low level if desired (minimum level = 1). Setting the volume to MIN may cause the
line output to be muted.
GB
47
Page 49

Headphone socket
A 3.5mm stereo Headphone Socket is provided on the rear of your sound system for use with
headphones. Inserting a plug automatically mutes the internal loudspeakers.
IMPORTANT:
Excessive sound pressure from earphones and headphones can cause hearing loss.
Aerial removal
The fitted telescopic aerial is suitable for most applications. In some locations if reception
conditions are poor, an external antenna may be more suitable. For this purpose the telescopic
aerial may be removed to allow connection to an external aerial using a coaxial cable.
First remove the two small screws holding the antenna connector cover in place using a small
cross-head screw driver. Then using a suitable spanner (11mm across the flats), remove the
telescopic aerial by rotating in an anti-clockwise direction when viewed from the rear of the
product.
This will expose an F-type connector to which a coaxial cable may then be connected.
48
Page 50

Touch panel sensitivity control
CD
CD
CD
CD
CD
The sensitivity of the touch panel may be adjusted. The default setting will normally be found
to provide satisfactory operation, however, the touch panel system may respond differently
depending upon the moisture of the skin. The touch panel sensitivity may be reduced or
increased relative to the standard setting.
1. Press and hold the Menu button so that the display shows “Set Brightness” on the lower line of
the text display.
2. Press and release the Tuning Up or Down buttons until the display shows “Touch Pad Set”.
3. Press and release the Select button to show the current setting.
4. Press and release the Tuning Up or Down buttons to change the touch panel sensitivity level.
5. Press and release the Select button to save the new setting.
The default setting after a system reset is High.
GB
49
Page 51

System reset
If your radio fails to operate correctly, or some digits on the display are missing or incomplete
carry out the following procedure.
1. Press and hold the Menu button so that the display shows “Set Brightness” on the lower line of
the text display.
2. Press and release the Tuning Up or Down buttons until the display shows “System reset”.
3. Press and release the Select button. The display will show “Press SELECT to reset”.
4. Press and release the Select button again to conrm the reset operation.
5. After a system reset, all radio station presets will be set to empty.
Alarms will be cancelled, audio equalizer, display brightness and touch panel settings will have
been set to their default values.
The clock will be reset and the unit will behave as when rst switched on.
In case of malfunction due to electrostatic discharge, reset the product using the above
procedure. In some circumstances it may be necessary to disconnect and then reconnect the
mains power in order to resume normal operation.
50
Page 52

Charging with USB socket
● The USB jack can only provide power for the USB memory stick only
with 1A 5V maximum and most of iPhone models. However, it does
not support external Hard disk drive and all of mobile phones and
electronic device.
● The USB jack charging function can only be charged in AUX-IN, USB
or Bluetooth mode.
GB
As software updates become available software and information on
how to update your radio can be found at
http://sg.sangean.com.tw/rst/rst.asp
http://www.sangean.eu/rst/rst.asp
www.sangean.com.au.
For more information, please contact our Head Office by sending an
email to info@sangean.com
● The maximum volume of the output p owe r s pea ker wi ll decrease
when your USB is charging.
Important:
Do not connect this USB socket with your PC USB port, as it highly
possible may cause breakdown of the units.
Software upgrade
From time to time, new software features for your radio may be
developed. Your radio has therefore been designed to allow its internal
software to be updated using your USB upgrade port.
You should not attempt to update your radio unless it is recommended
to you by Sangean Customer Services. Updating the software may
remove all network settings, radio station presets
and alarm settings from your radio.
Software updates for your radio may be available in the future.
1. Plug the USB into the USB socket in the rear of the unit and your PC
USB port.
2. Press the Radio button to switch to the DAB mode.
3. Pr ess the Men u b utton to en ter the set ting men u. Press the
Tuning up / down button until ‘Software Upgrade’ is appeared on the
display. Press the Select button to enter the setting.
4. Go to the website above to download the latest software. Follow the
on-s creen ins tructions p rovided w ith the u pgrade so ftware to
complete the software upgrade.
51
Page 53
Cautions
Do not allow this sound system to be exposed to water, steam or sand.
Do not leave your sound system where excessive heat could cause
damage.
It is recommended that the DAB band is used for radio listening where
possible since this may result in better sound quality and freedom from
interference than will often be obtained on the FM band.
The name plate is located on the rear of your sound system.
● The sound system shall not be exposed to dripping or splashing and
that no objects lled with liquids, such as vases, shall be placed on
the sound system.
● It is recommended to operate the product such that there is a minimum
distance (10cm recommended) to adjacent objects in order to ensure
good ventilation.
● The ventilation of the product should not be restricted by covering it
or its ventilation openings with items such as newspapers, tablecloths,
curtains etc.
● No naked ame sources such as lighted candles should be placed on
the product.
● It is recommended to avoid using or storing the product at extremes
of temperature. Avoid leaving the unit in cars, on window sills, in direct
sunlight etc.
52
Page 54

Specication
Power Requirement
Mains AC 230 volts, 50 Hz ~ only
Battery (Remote control) 2 x AAA
Frequency Coverage
FM 87.5-108 MHz
DAB 174.928-239.200 MHz
Bluetooth 2.4 - 2.485 GHz class-II
Circuit Features
Output power 2x7 watts
Headphone socket 3.5mm dia
Auxiliary in socket 3.5mm dia
Line out socket 3.5mm dia
Aerial System FM Telescopic aerial
DAB Telescopic aerial
The company reserves the right to amend the specication without notice.
GB
If at any time in the future you should need to dispose of this product please note that: Waste electrical products should not be
disposed of with household waste. Please recycle where facilities exist. Check with your Local Authority or retailer for recycling advice. (Waste Electrical and Electronic Equipment Directive)
53
 Loading...