

Page 1
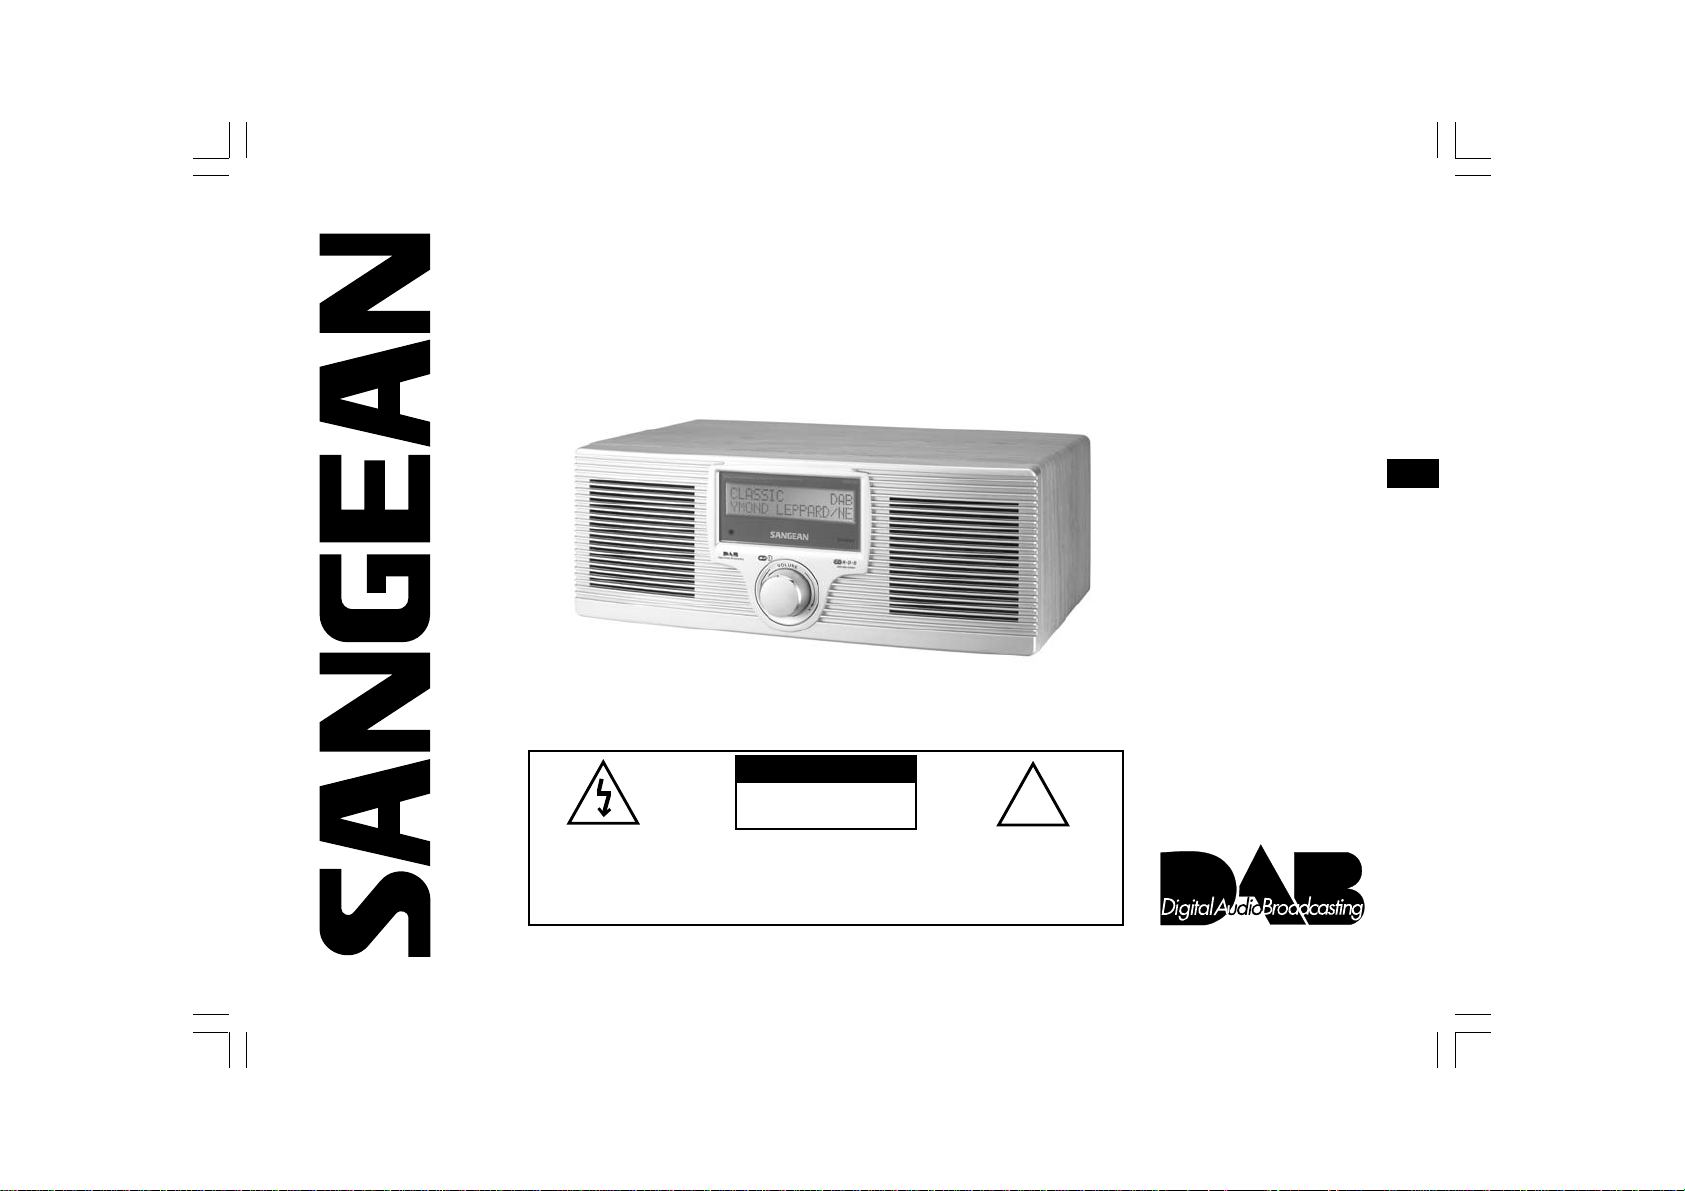
DD R-22
DAB+FM/RDS+MW
DIGITAL STEREO RECEIVER
A WORLD OF LISTENING
DDR-22_381P101_GB.p65 2006/4/14, ¤U¤È 04:421
THE LIGHTNING FLASH AND
ARROW- HEAD WITHIN THE
TRIANGLE IS A WARNING SIGN
ALERTING YOU OF
“DANGEROUS VOLTAGE”
INSIDE THE RADIO.
TO PREVENT FIRE OR ELECTRIC SHOCK HAZARD, DO
NOT EXPOSE THIS PRODUCT TO RAIN OR MOISTURE.
WARNING:
CAUTION
RISK OF ELECTRIC
SHOCK DO NOT OPEN
CAUTION: TO REDUCE THE RISK OF
ELECTRIC SHOCK, DO NOT REMOVE
THE BACK, NO USER SERVICEABLE
PARTS INSIDE. REFER SERVICING TO
QUALIFIED SERVICE PERSONNEL.
THE EXCLAMATION POINT
WITHIN THE TRIANGLE IS A
WARNING SIGN ALERTING
YOU OF IMPORTANT
INSTRUCTIONS ACCOMPANYING
THIS RADIO.
Operating instruction
!
Please read this manual before use
GB
Page 2

Contents
IMPORTANT SAFETY INSTRUCTIONS ........................... 2
Controls .......................................................................... 3-4
Remote control .................................................................. 5
Remote handset battery replacement .............................. 6
Mains operation ................................................................. 6
Time setting ...................................................................... 7
Alarm time setting ............................................................. 8
Alarm off time setting ....................................................... 9
Alarm Source .................................................................... 9
Alarm Volume..................................................................10
Alarm on and off .............................................................. 10
Sleep setting ................................................................... 11
Operation radio ................................................................ 12
Operating your radio – DAB ............................................ 12
Selecting a station – DAB .............................................. 13
Auto tuning ......................................................................14
Secondary services ......................................................... 14
Normal display mode....................................................... 15
Advanced display mode .................................................. 16
Station order – Service list order .................................... 17
Manual Tuning ................................................................. 18
DRC Value Control ..........................................................19
Factory RESET ............................................................... 20
SW version ...................................................................... 20
Operating the radio – FM band ....................................... 21
Display modes – FM RDS .............................................. 22
Search RDS program type .............................................. 23
Operating the radio – MW band ..................................... 24
Presetting stations .......................................................... 24
DAB band Preset station................................................ 25
Recalling DAB preset station ......................................... 26
FM/MW waveband preset station ................................... 27
Recalling FM/MW waveband preset station ................... 27
Preset EQ........................................................................ 28
Operating the radio – Aux In ........................................... 29
Operating the radio – Line Out ....................................... 29
Headphone use ............................................................... 30
Flat/3D sound effect ....................................................... 30
Mute ................................................................................. 30
Specifications.................................................................. 31
1
DDR-22_381P101_GB.p65 2006/3/23, ¤W¤È 09:492
Page 3

IMPORTANT SAFETY INSTRUCTIONS
1. Read these instructions.
11. Only use attachments/accessories specified by the manufacturer.
2. Keep these instructions.
3. Heed all warnings.
4. Follow all instructions.
5. Do not use this apparatus near water.
6. Clean only with dry cloth.
7. Do not block any ventilation openings. Install in accordance with
the manufacturer’s instructions.
8. Do not install near any heat sources such as radiators,
heat registers, stoves, or other apparatus (including amplifiers)
that produce heat.
9. Do not defeat the safety purpose of the polarized or
grounding-type plug. A polarized plug has two blades with one
wider than the other. A grounding type plug has two blades and a
third grounding prong. The wide blade or the third prong are
provided for your safety. If the provided plug does not fit into your
outlet. consult an electrician for replacement of the obsolete outlet.
10. Protect the power cord from being walked on or pinched
particularly at plugs, convenience receptacles, and the point
where they exit from the apparatus.
12. Use only with the cart, stand, tripod, bracket, or table specified by
the manufacturer, or sold with the apparatus. When a cart is
used, use caution when moving the cart/apparatus combination
to avoid injury from tip-over.
13. Unplug this apparatus during lightning storms or when unused for
long periods of time.
14. Refer all servicing to qualified service personnel. Servicing is
required when the apparatus has been damaged in any way,
such as power-supply cord or plug is damaged. liquid has been
spilled or objects have fallen into the apparatus, the apparatus
has been exposed to rain or moisture, does not operate
normally, or has been dropped.
15. To Reduce the Risk of Fire or Electric Shock, Do not Expose
This Appliance To Rain or Moisture.
16. The Shock Hazard Marking and Associated Graphical Symbol is
provided on the bottom panel of unit.
17. Apparatus shall not be exposed to dripping or splashing and no
objects filled with liquids, shall not be placed on the apparatus.
GB
DDR-22_381P101_GB.p65 2006/3/23, ¤W¤È 09:493
2
Page 4
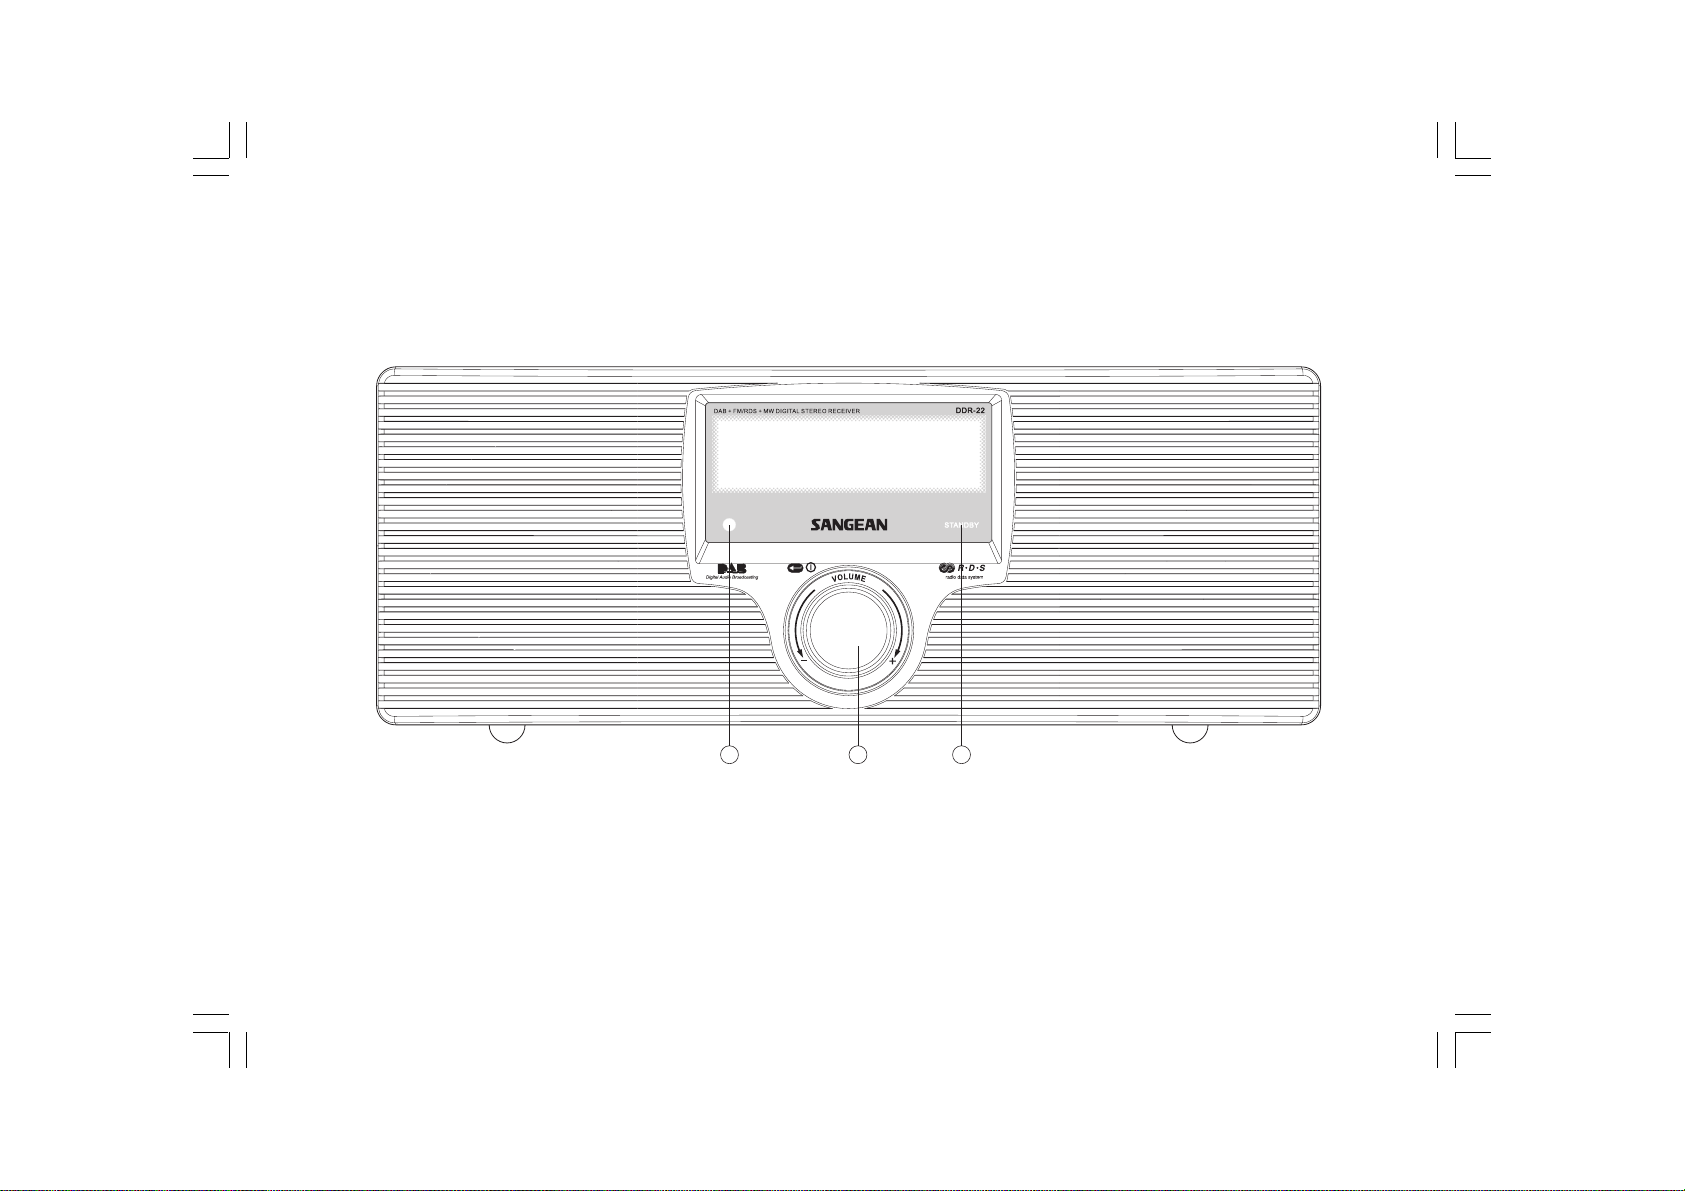
Controls
(Front)
1 2 3
1. Infra red sensor
2. Standby indicator
3. Volume Control/Standby button
3
DDR-22_381P101_GB.p65 2006/3/23, ¤W¤È 09:494
Page 5

Controls
(Rear)
5 6 7 8 9
4. Telescopic aerial
5. AUX IN socket
6. LINE OUT socket
4
GB
7. Headphone socket
8. 3D sound switch
9. Mains input socket
DDR-22_381P101_GB.p65 2006/3/23, ¤W¤È 09:495
4
Page 6
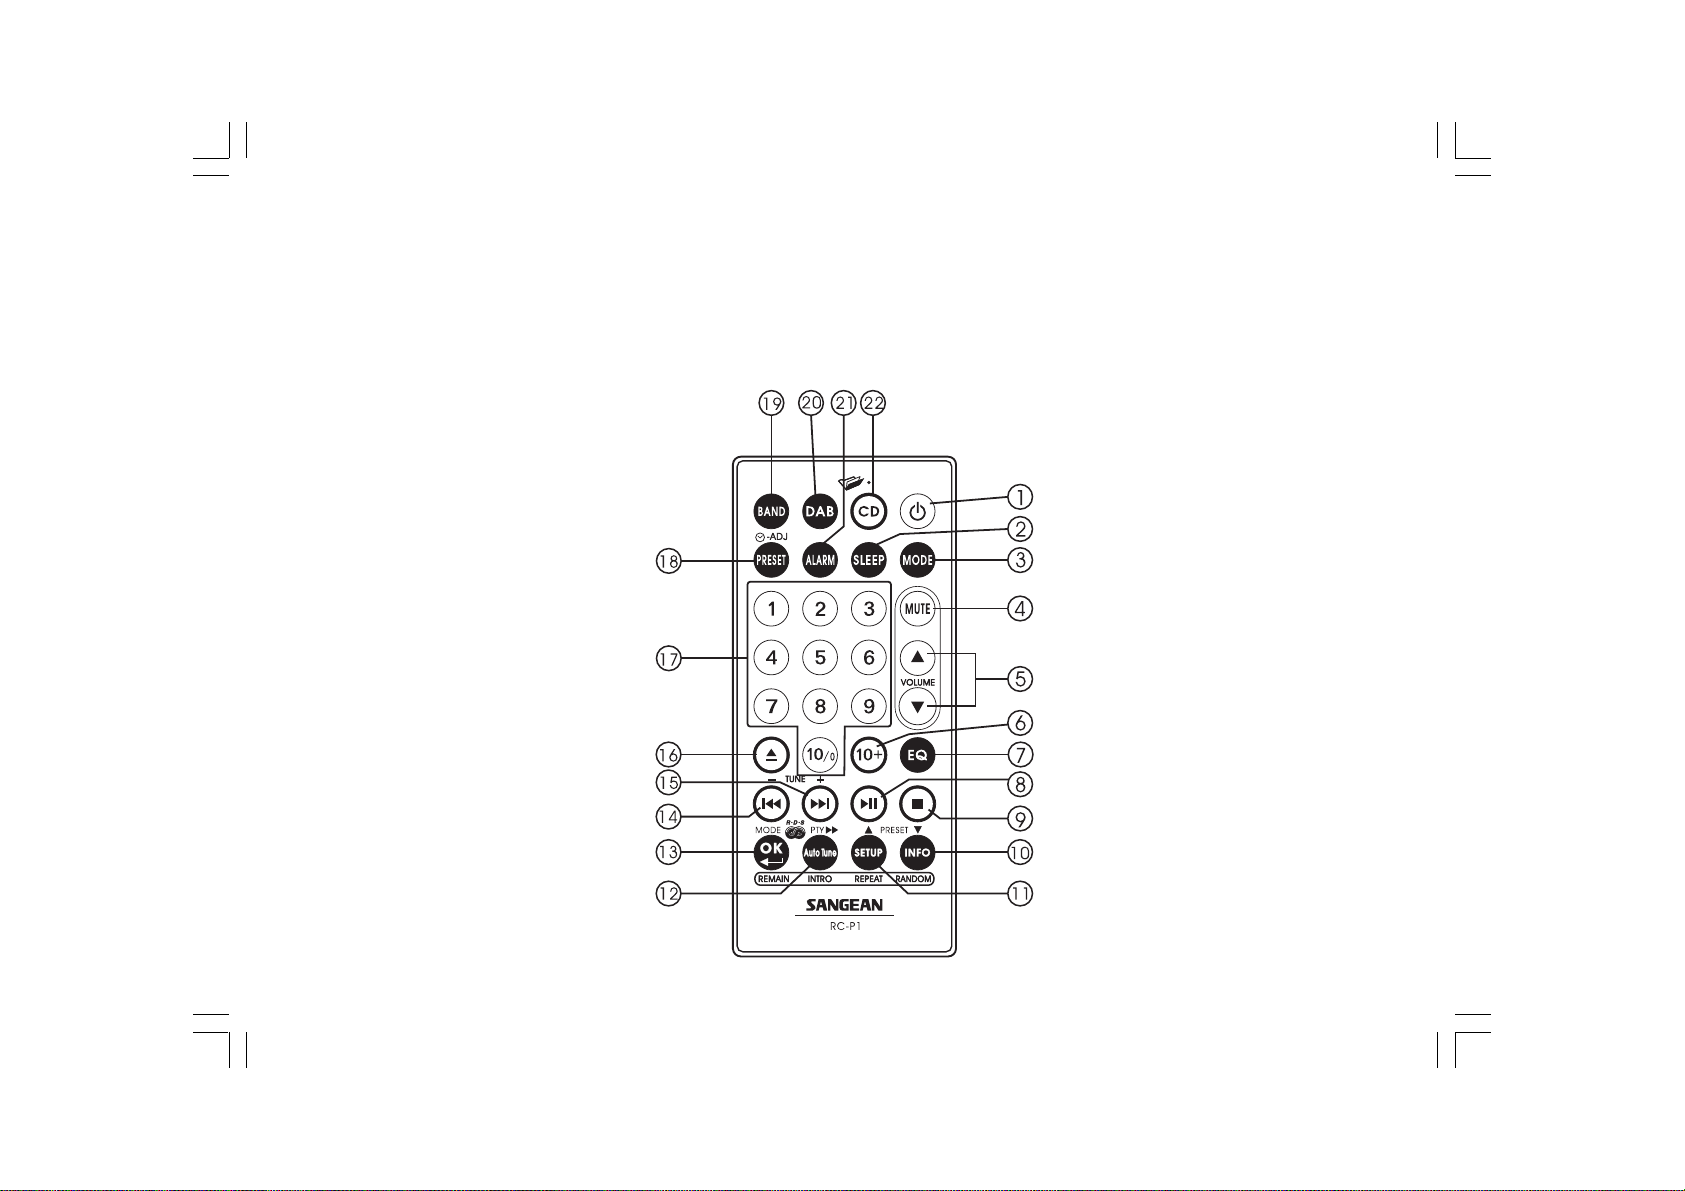
Remote control
Note:
Remote control unit is designed to suit for CD and also non-CD version of radio. Some buttons will be useless for non-CD version.
MP3
1. Standby button
2. Sleep button
3. Mode Selection
4. Audio Mute
5. Volume Control
6. Not applicable for non-CD version
7. Audio Equalizer (EQ)
8. Not applicable for non-CD version
9. Not applicable for non-CD version
10. Information /Preset Down button
11. Set Up button /Preset Up button
5
DDR-22_381P101_GB.p65 2006/3/23, ¤W¤È 09:496
12. Auto Tune button /RDS Pty search
13. OK button/RDS Mode selection
14. Not applicable for non-CD version
15. Not applicable for non-CD version
16. Not applicable for non-CD version
17. Number keys
18. Preset Button
19. AM/FM band /Aux In Selection
20. DAB band button
21. Alarm button
22. Not applicable for non-CD version
Page 7
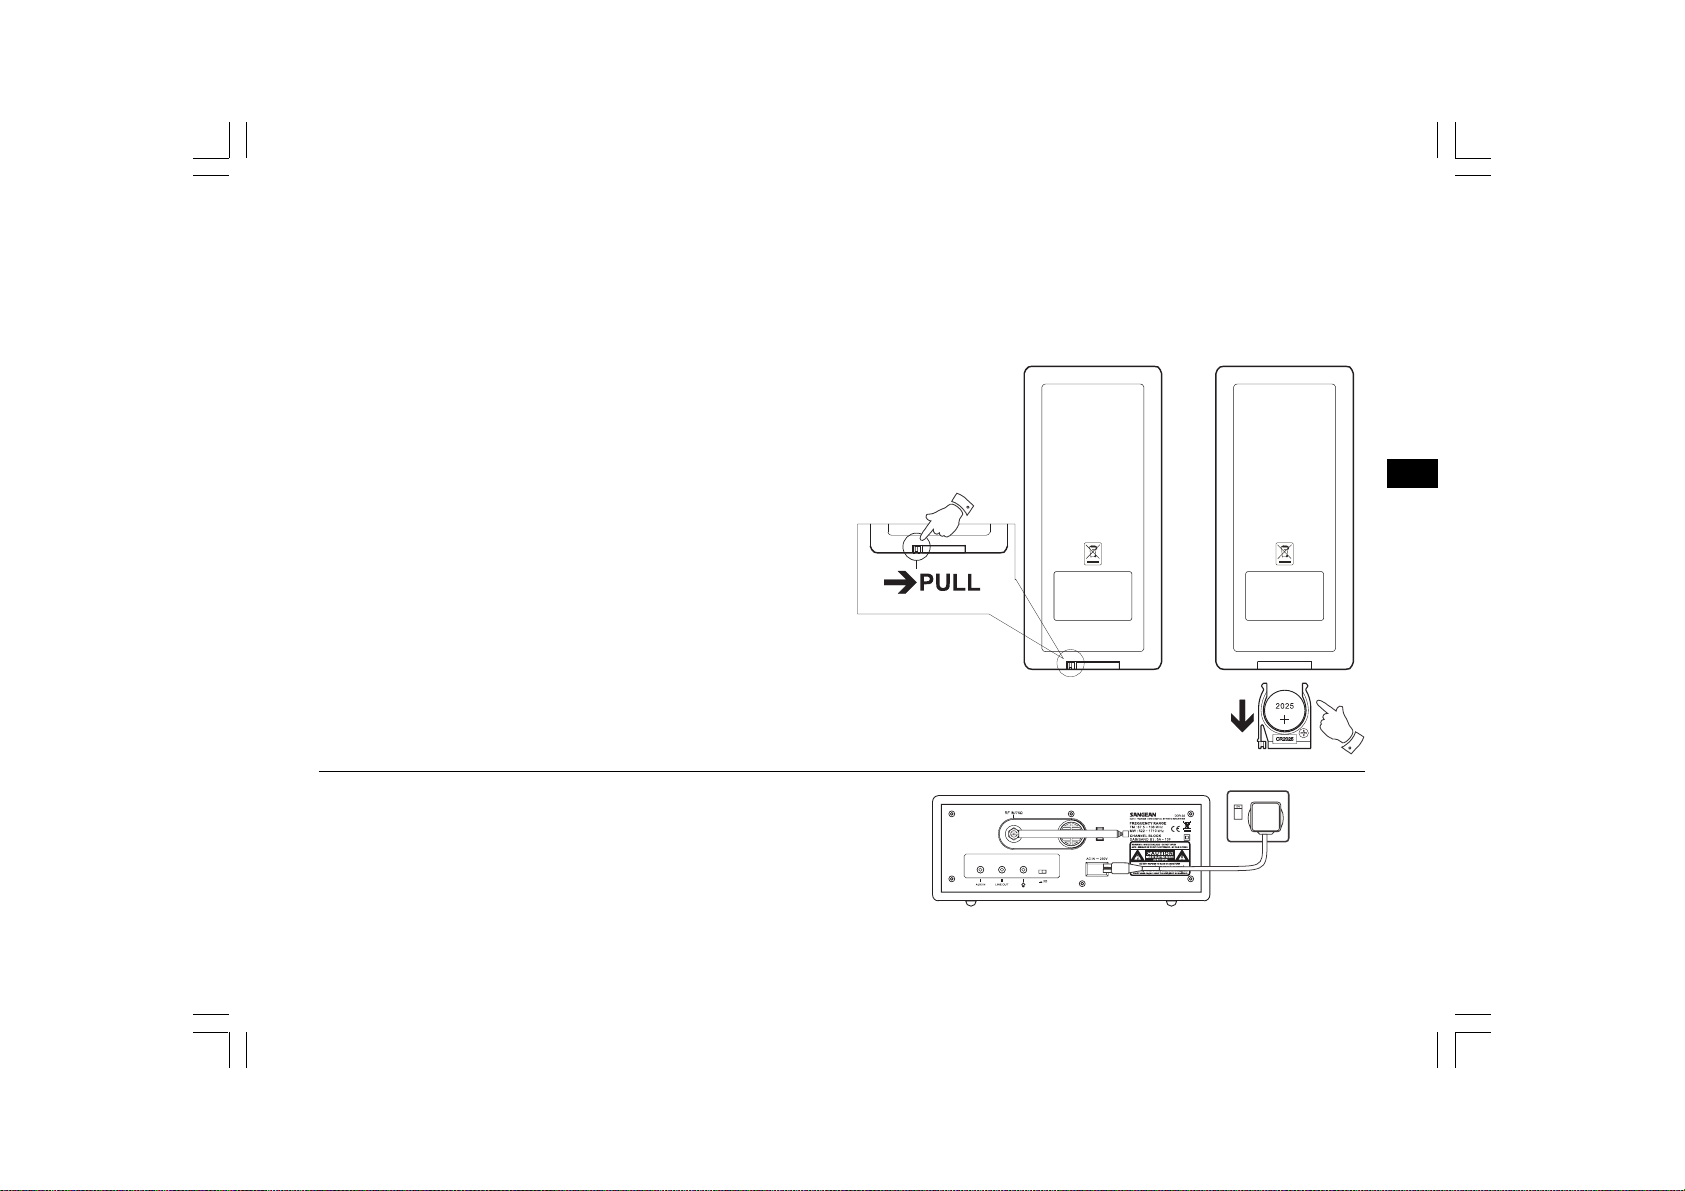
Remote handset battery replacement
1. Release battery holder locker by pressing the holder up.
2. Pull out the battery holder.
3. Replace supplied battery (CR2025 or equivalent) ensuring that
positive side of battery faces you with holder positioned.
4. Replace the battery holder and make sure the holder locker is in
right position.
Mains operation
1. Place your radio on a flat surface.
2. Plug the mains lead into the socket located on the rear of your
radio, ensuring that the plug is pushed fully into the socket.
3. Plug the other end of the mains lead into a wall socket and switch
on the wall socket.
DDR-22_381P101_GB.p65 2006/3/23, ¤W¤È 09:497
GB
6
Page 8
Time setting
1. Turn on the radio by pressing standby button.
2. Press and release MODE button, display will flash 0:00.
3. Press and release Time Set button , display hour digit
will flash.
4. Press Tuning +/- button to select required hour then press Time Set
button again to confirm hour setting. Display minute digit will flash.
5. Press Tuning +/- button to select required minute then press
Time Set button again to finalize time setting.
Note:
The time can be auto adjusted by FM-RDS Auto clock set (CT)
but can’t be auto adjusted by DAB signal.
7
DDR-22_381P101_GB.p65 2006/3/23, ¤W¤È 09:498
Page 9
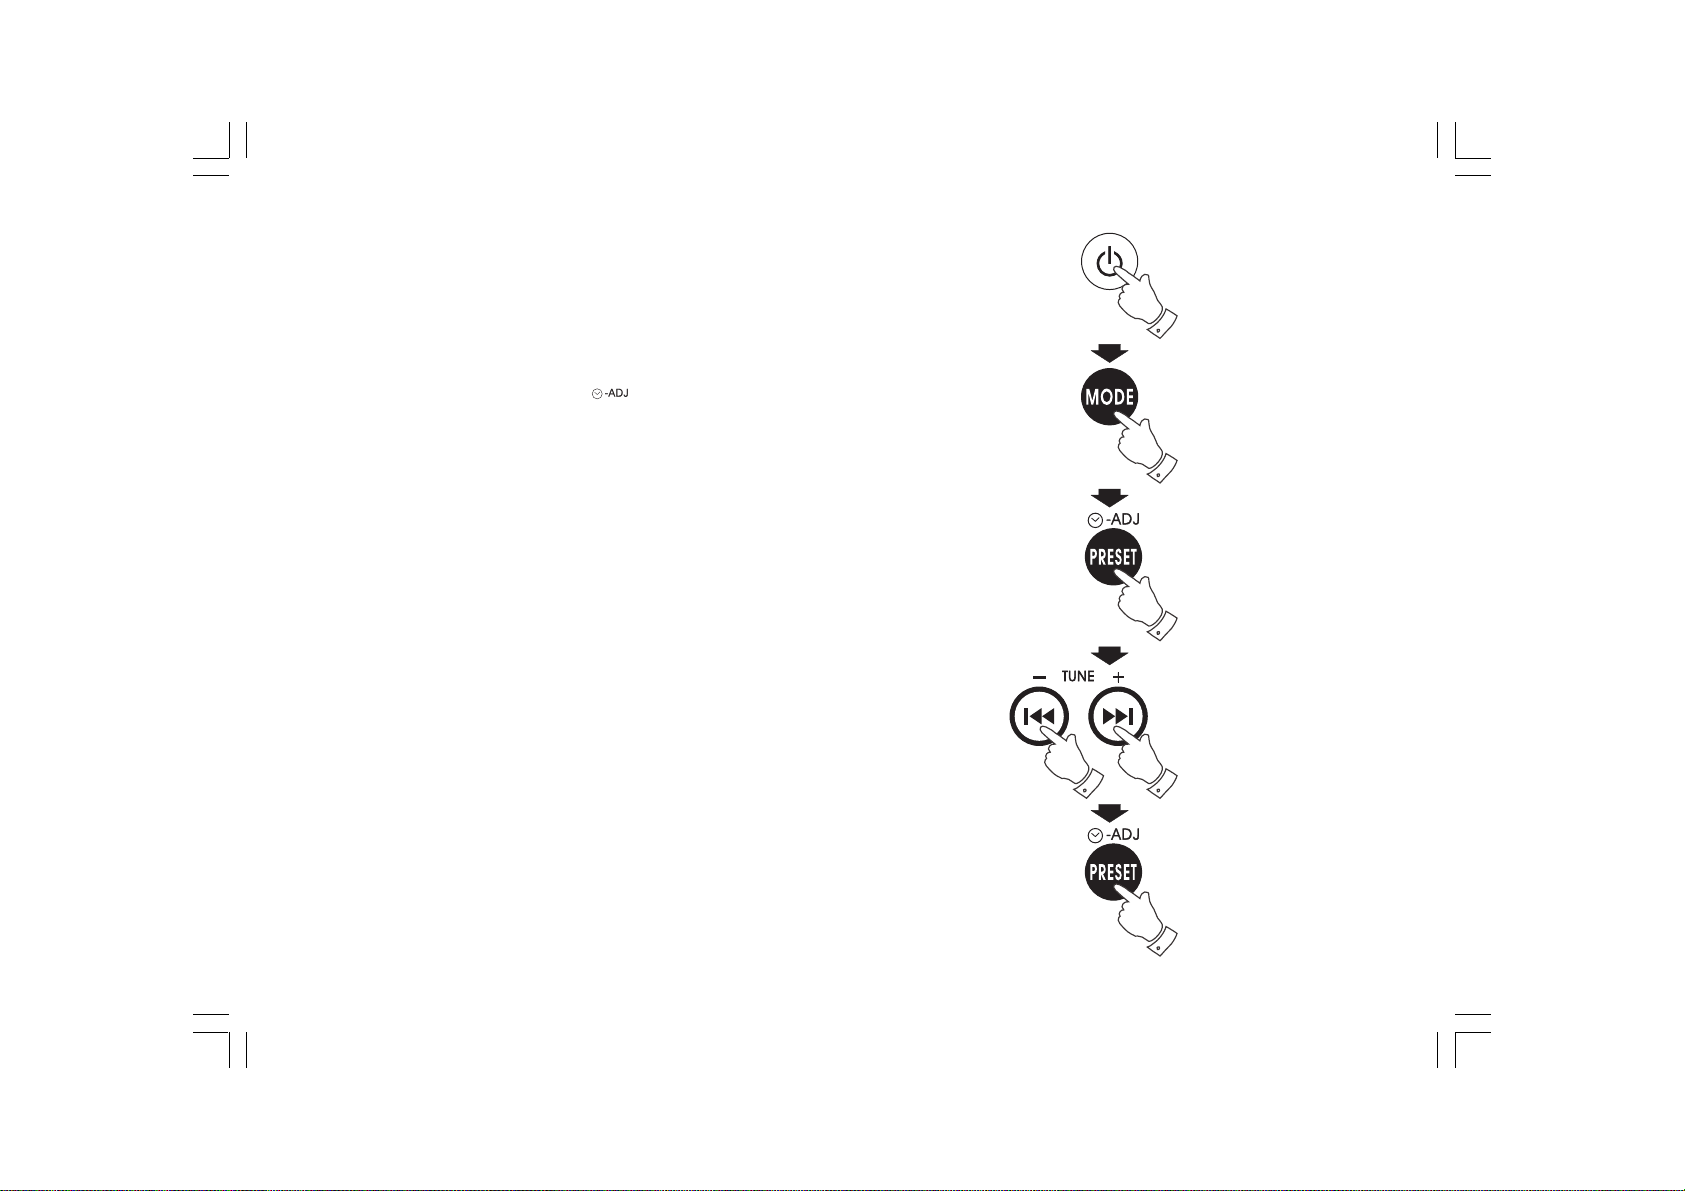
Alarm time setting
1. Press Mode button will cycle through Normal display, clock display,
alarm on display , Alarm off display, Alarm source, Alarm volume,
Sleep and normal display again.
2. During Alarm on display status, press Time Set button ,
display hour digit will flash.
3. Press Tuning +/- button to select required hour then press Time Set
button again to confirm hour setting. Display minute digit will flash.
4. Press Tuning +/- button to select required minute then press
Time Set button again to finalize alarm time setting.
5. The alarm will last for one hour until you switch it off by pressing
Standby button.
DDR-22_381P101_GB.p65 2006/3/23, ¤W¤È 09:499
GB
8
Page 10
Alarm off time setting
Follow above alarm on time setting to set alarm off time.
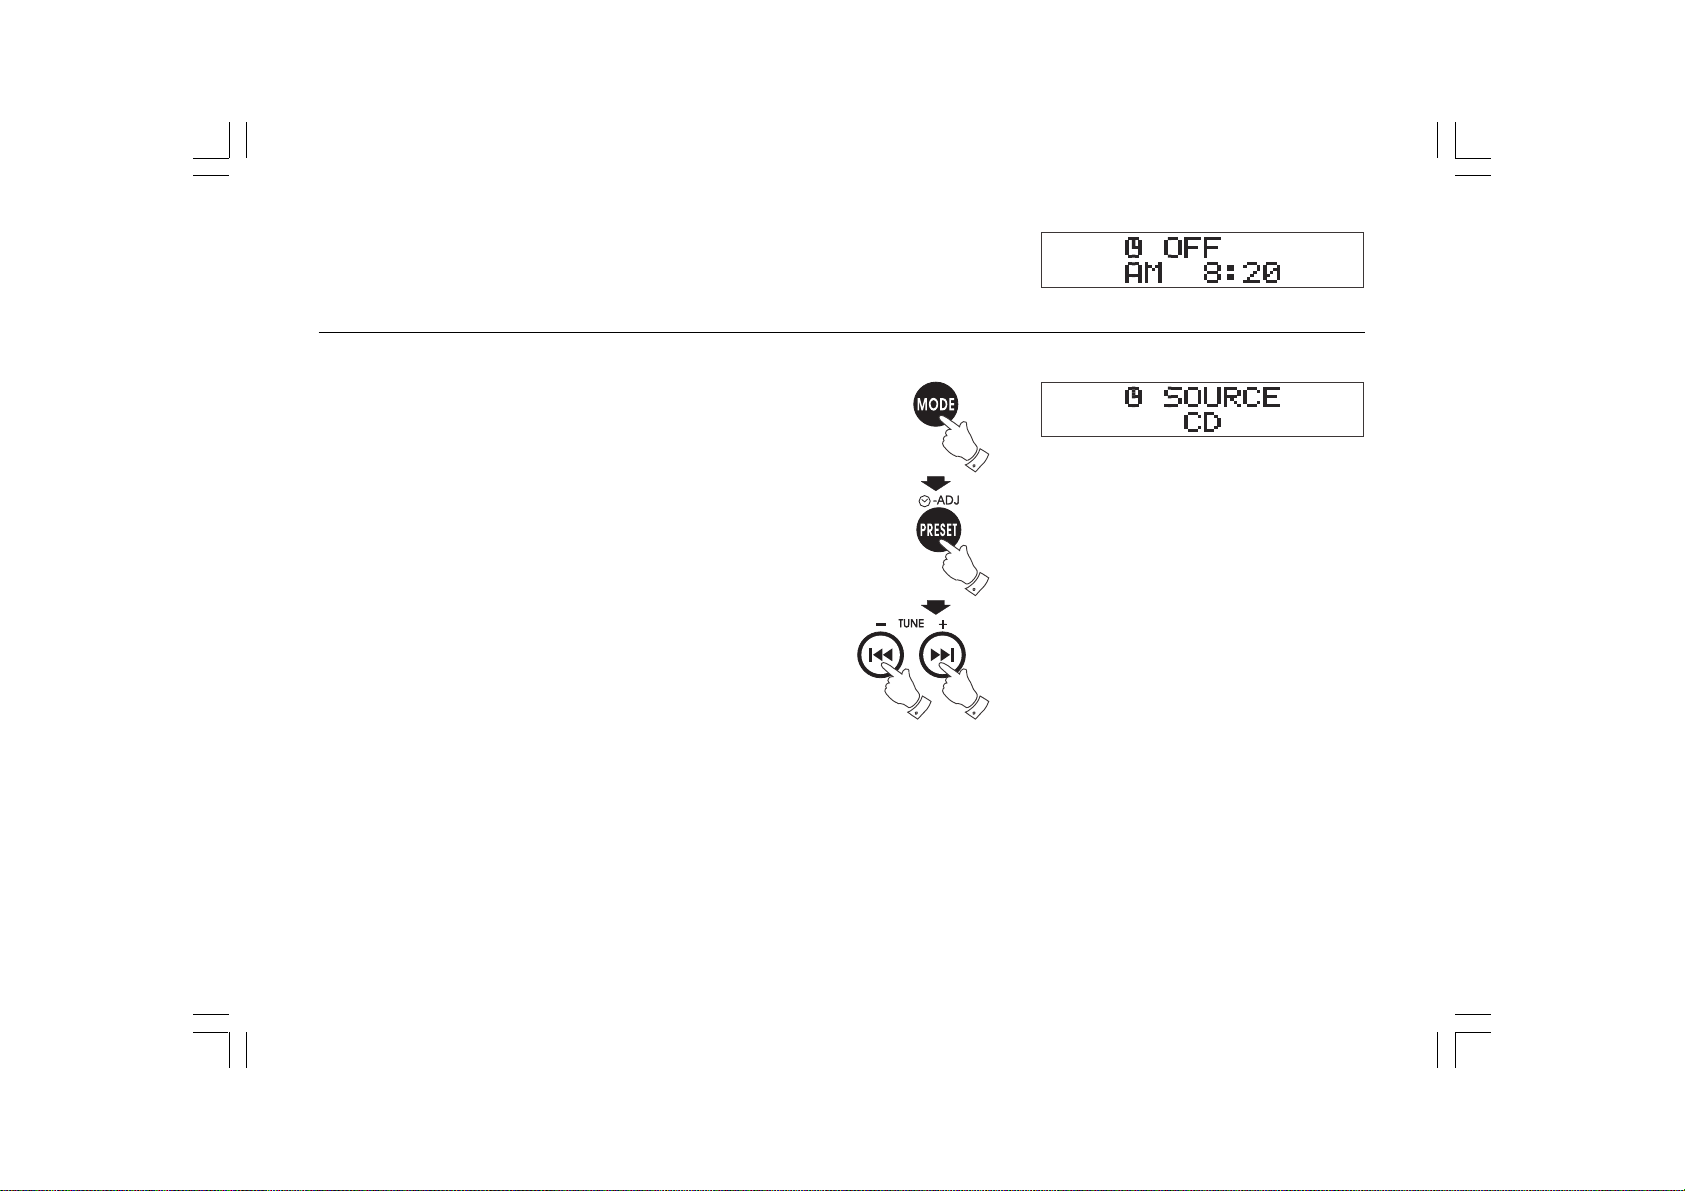
Alarm Source
1. Pressing Mode button to select Alarm Source mode.
2. Press Adj. button, display will flash last alarm source set.
3. Press Tuning + /- button to select required alarm source.
9
DDR-22_381P101_GB.p65 2006/3/23, ¤W¤È 09:4910
Page 11
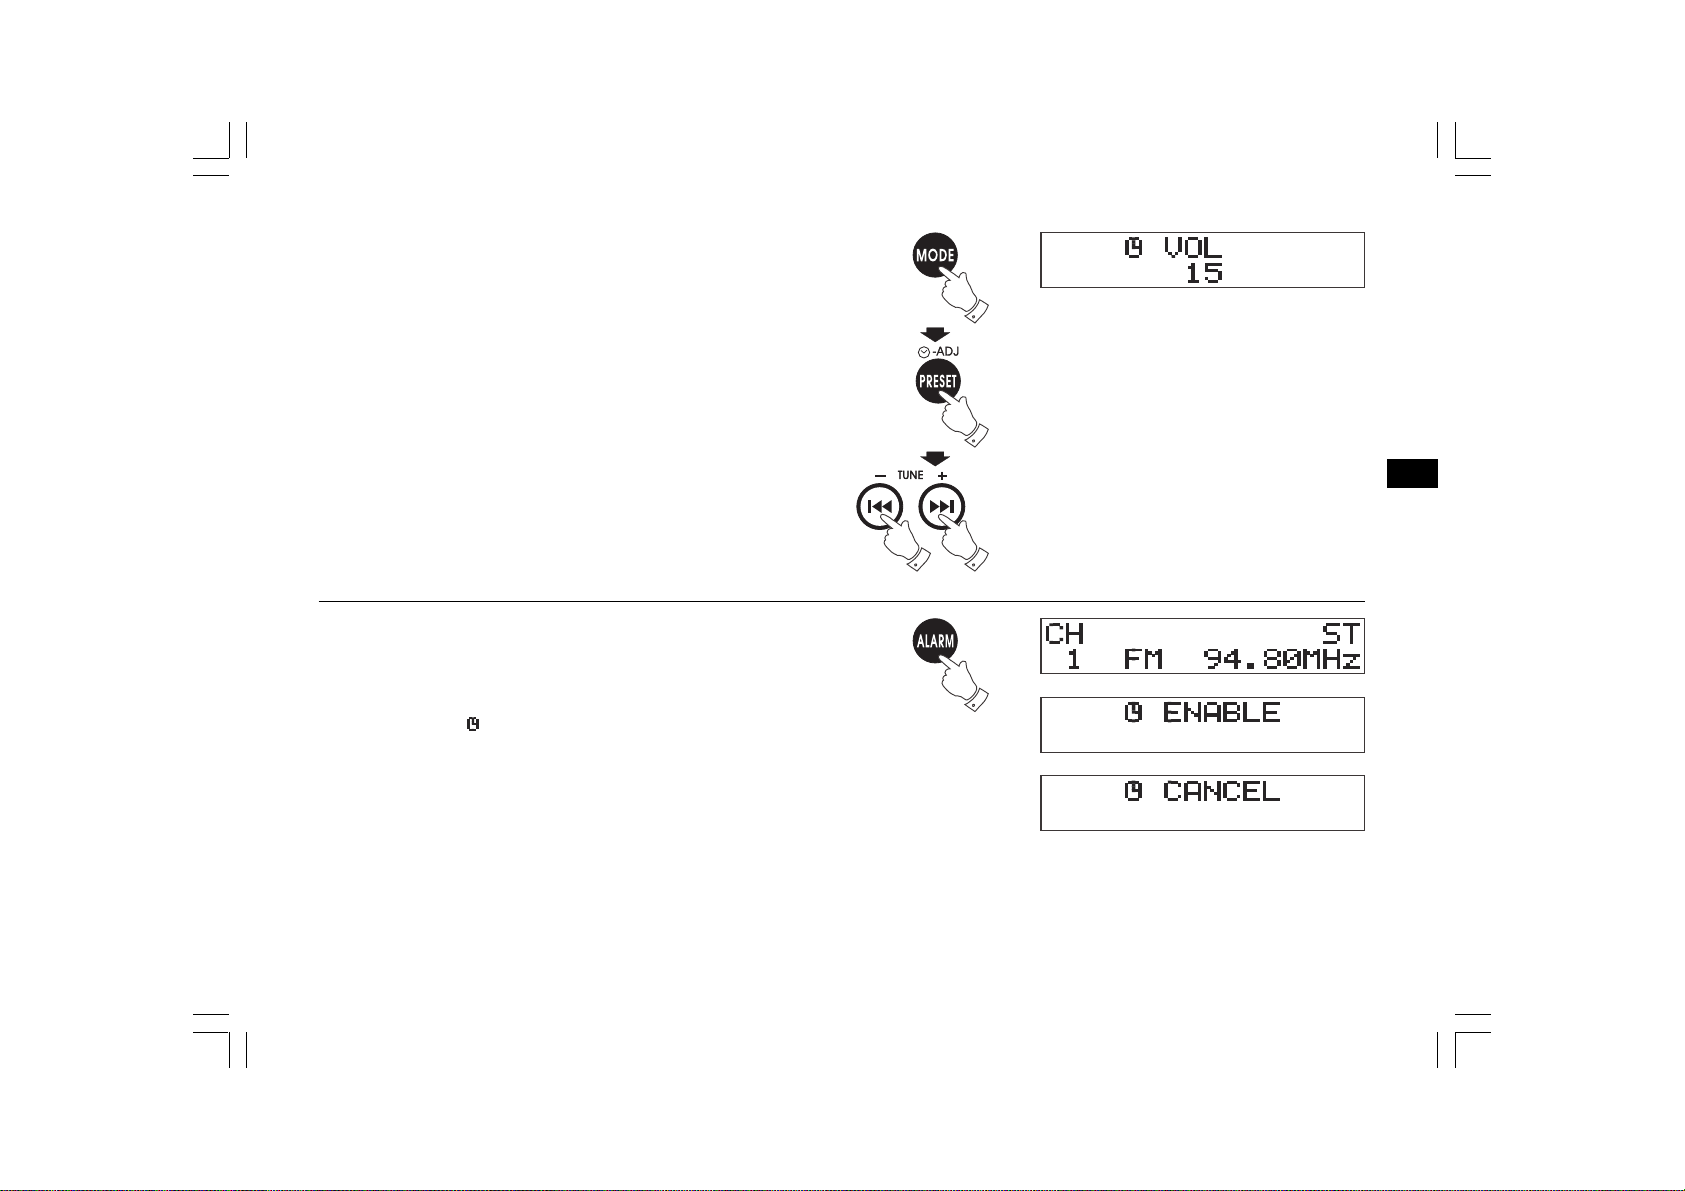
Alarm Volume
1. Pressing Mode button to select Alarm Volume mode.
2. Press Adj. Button, display will flash last alarm volume set.
3. Press Tuning +/- button to select required alarm volume.
Alarm on and off
1. Press ALARM button will toggle the alarm timer enable or disable.
2. Display will show when alarm timer is set after radio is
switched off.
GB
DDR-22_381P101_GB.p65 2006/3/23, ¤W¤È 09:4911
10
Page 12

Sleep setting
1. Press and release Sleep button to select required radio auto
off time.
2. Release Sleep button when required sleep time is reached.
3.To check remaining Sleep timer time. Press and release Mode
button to select Sleep mode.
11
DDR-22_381P101_GB.p65 2006/3/23, ¤W¤È 09:4912
Page 13

Operation radio
Note:
other than the volume control and standby on/off. All the operation of
this receiver is via supplied remote control unit.
Operating your radio – DAB
1. Fully extend the telescopic aerial.
2. Press the Standby button to switch on your radio then press DAB.
Display will show “Welcome to Digital Radio“ for a few seconds.
3. If this is the first time the radio is used, a quick scan of DAB
channels will be carried out. The display will show “scanning“.
If the radio has been used before, the last used station will
be selected.
4. During the scanning, as each group of stations is detected,
the bottom line of the display will show the stations count.
The top line of the display shows a bar graph indicating progress
of the Scanning .
5. When the Scanning is completed, the first station will be selected.
GB
6. If the station list is still empty after Scanning, your radio will display
“Station not available“.
7. If no signals are found, it may be necessary to relocate your radio
to the position giving better reception.
DDR-22_381P101_GB.p65 2006/3/23, ¤W¤È 09:4913
12
Page 14

Selecting a station – DAB
1. The top line of the display shows the name of the station
currently selected.
2. Press the Tuning + or Tuning – button to scroll through the list of
available stations. Stop pressing the Tuning buttons when you find
the station you wish to hear.
3. Press OK to select the station. The display may show
“Now tuning ….” While your radio finds the new station.
4. Adjust the Volume control and 3D sound switch to the
required setting.
Note:
If after selecting a station, the display continues to show
“Station not available“, it may be necessary to relocate your radio
to a position giving better reception.
13
DDR-22_381P101_GB.p65 2006/3/23, ¤W¤È 09:4914
Page 15

Auto tuning
As time passes, new station may become available.
To find new stations, proceed as follows:
a. Press and release Auto Tune button, display will show “Scanning“.
Your radio will perform a scan of the DAB channels. As new
stations are found, the station counter on the right-hand side of the
display will increase and stations will be added to the list.
b. To carry out a full scan of the entire DAB band, press and hold
down the Auto Tune button for more than 2 seconds until display
shows “Scanning“. As new stations are found, the station counter
on the right-hand side of the display will increase and stations will
be added to the list.
Secondary services
Certain radio stations have one or more secondary services
associated with them. If a station has a secondary services
associated with it, the display will show “ “ next to the station
name on the station list. The secondary service will then appear
immediately after the primary service as press and release Tuning +/-.
DDR-22_381P101_GB.p65 2006/3/23, ¤W¤È 09:4915
GB
14
Page 16

Normal display mode
Your radio have several display modes. Press the INFO button to
cycle through the various modes.
a. Scrolling text
b. Program type
c. Multiplex name
d. Time and date
e. channel frequency
f . Audio type and bit rate
g. Signal strength
Displays scrolling text messages,
such as artist/track name,
phone in number, etc.
Displays type of station being listened to
e.g. Pop, Classic, News etc.
Displays names of multiplex to which
current station belongs.
Display signal strength for station being
listened to.
15
DDR-22_381P101_GB.p65 2006/3/23, ¤W¤È 09:4916
Page 17
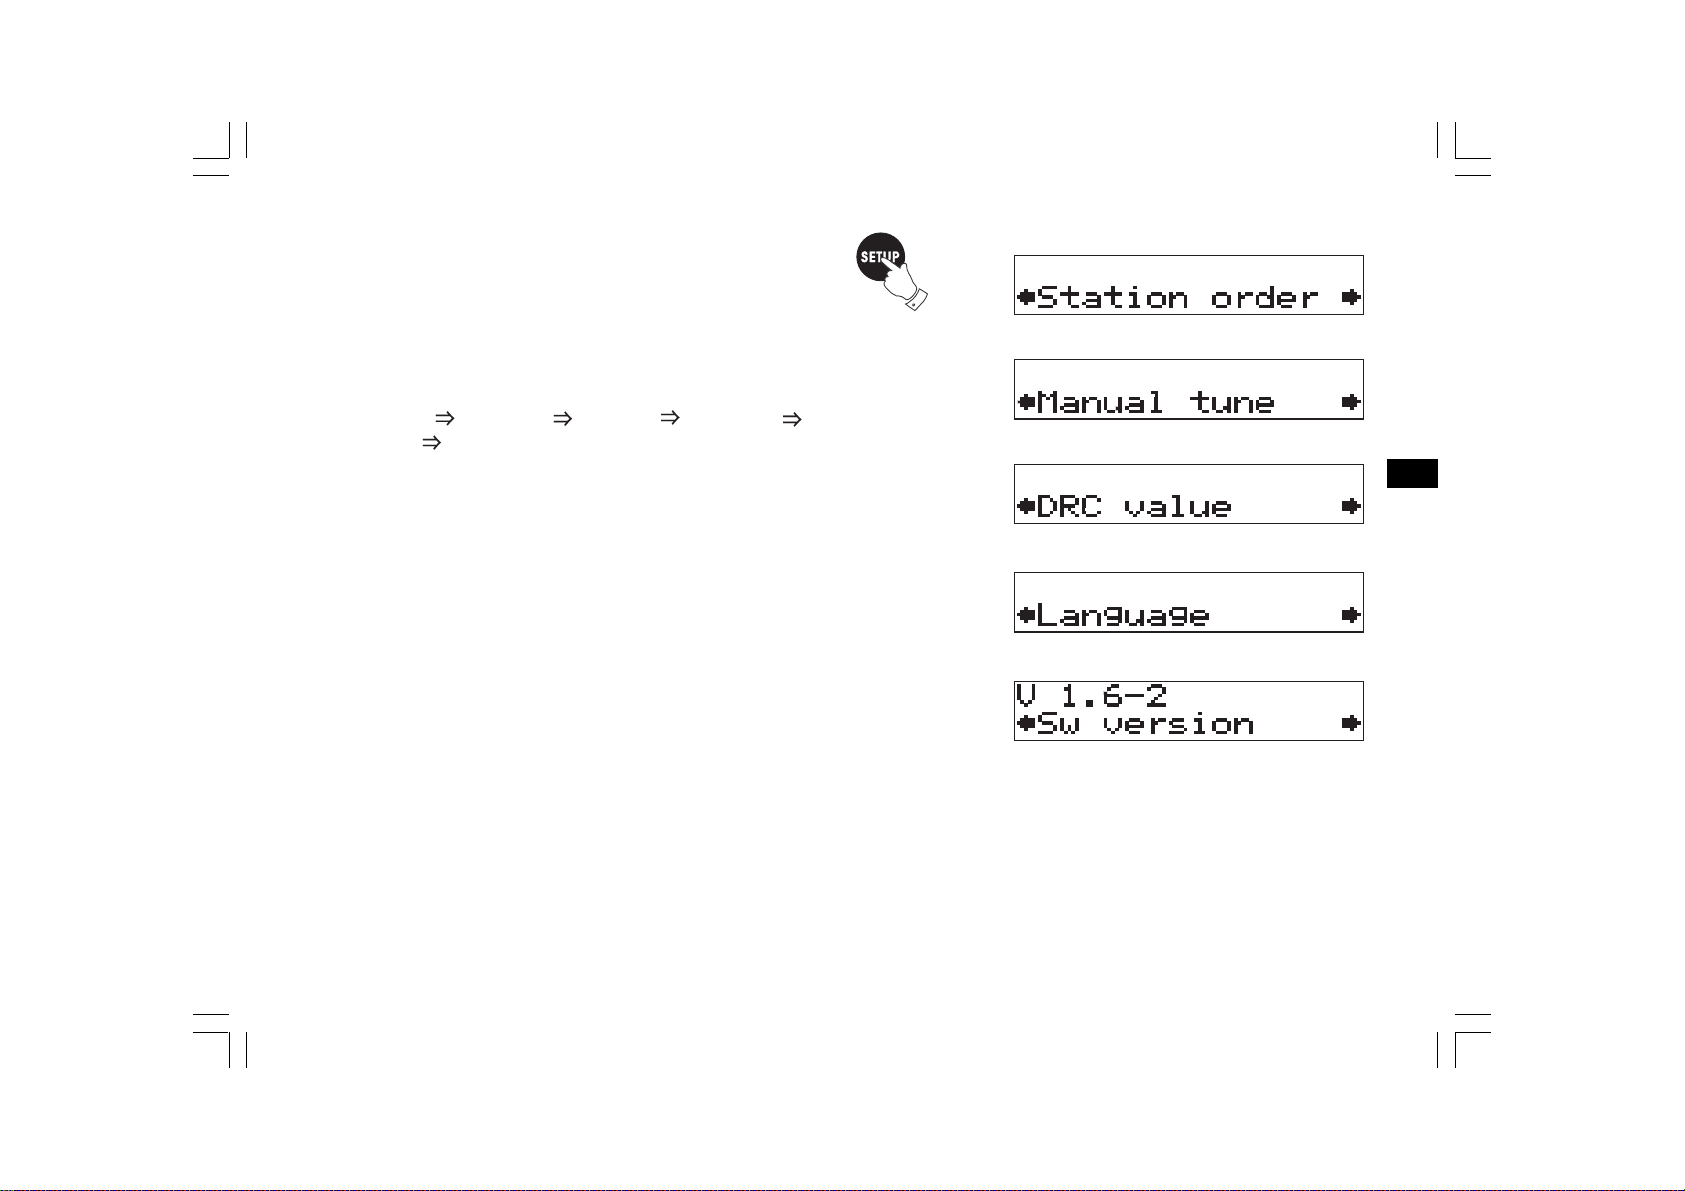
Advanced display mode
a. Press and release SETUP button to view technical information
on the currently selected services and select lower level menu
options to configure the DAB receiver.
b. Press Tune +/- button to scroll through the options:
Station order Manual tune DRC value Factory reset
Sw version Station order ……. .
c. Press OK to confirm the option.
DDR-22_381P101_GB.p65 2006/3/23, ¤W¤È 09:4917
GB
16
Page 18

Station order – Service list order
1. In Station order mode, the user will be presented with a menu.
The top line will contain currently selected service list order.
The bottom line will contain the selected service mode with
scrolling indicators.
2. During Station Order mode, press OK button and press Tuning +/ buttons to scroll through the options:
Favorite Station Alphanumeric Active station
Prune Stations Favorite Station………
3. Press OK button, will see a list of stations. Press OK button to
select required stations.
17
DDR-22_381P101_GB.p65 2006/3/23, ¤W¤È 09:4918
Page 19

Manual Tuning
1. In the Manual Tuning mode, press OK then tuning +/- button to
scroll through the band III options:
5A 174.92 MHz 5B 176.64 MHz 13E 237.48 MHz
13F 239.20 MHz 5A 174.92 MHz.
2. Press OK button to select the stations.
3. The first line to indicate signal strength.
DDR-22_381P101_GB.p65 2006/3/23, ¤W¤È 09:4919
GB
18
Page 20

DRC Value Control
1. In DRC value mode, the user will be presented with a menu.
The top line will contain the currently selected DRC value.
The bottom line will contain the first value in the list,
with scrolling indicators.
2. Press OK then Tuning +/- buttons to scroll through the option
DRC 0 DRC 1/2 DRC1 DRC 0 …….
3. Press OK to confirm the selection.
Note:
DRC ( Dynamic Range Control ) can make quieter sounds easier to
hear when your radio is used in a noisy environment.
DRC 0 DRC is switched off, Broadcast DRC will be ignored.
DRC 1/2 DRC level is set to 1/2 that sent by broadcaster.
DRC 1 DRC is set as sent by broadcaster.
19
DDR-22_381P101_GB.p65 2006/3/23, ¤W¤È 09:4920
Page 21

Factory RESET
If your radio fails to operate correctly or some digits on the display
are missing or incomplete carry out. Carry out following procedures.
1. Press and release SETUP button then tuning +/- button to scroll
through the options until Factory reset shown on the display.
2. Press OK(SELECT) button to select RESET the radio.
3. Radio will carry out to scan all the available stations in your area
and tuning the first available station.
SW version
The software display cannot be altered and is for your reference
only.
DDR-22_381P101_GB.p65 2006/3/23, ¤W¤È 09:4921
GB
20
Page 22

Operating the radio – FM band
1. Fully extend the telescopic aerial.
2. Press Standby button to switch on the radio.
3. Press the Band button to select the FM band.
4. Press and release Tuning control +/- button to tune to required
stations. Display will show ST when a stereo station is tuned.
Long press Tuning +/- button for more than 0.7 seconds,
radio frequency will automatically increase/decrease until next
station of sufficient strength has been found.
5. Adjust the Volume Control to the required setting.
21
DDR-22_381P101_GB.p65 2006/3/23, ¤W¤È 09:4922
Page 23

Display modes – FM RDS
Your radio has four display mode in FM band:
The Radio Data System (RDS) is a system in which inaudible digital
information is transmitted in addition to the normal FM radio program.
RDS offers several useful features. The following are available on
your radio.
1. Press the OK/RDS MODE button to cycle through the
various modes.
a. Frequency–
Displays the frequency of the station being listened to.
b. Station name–
Displays the station name of the station being listened to.
c. Program type–
Displays type of station being listened to e.g. Pop, Classic,
News, etc.
d. Scrolling text–
Displays scrolling test message such as artist/track name,
phone in number, etc.
Note:
RDS features are available on the FM band only. If the station
does not carry RDS information only the station frequency will
be displayed and the display may show “NO PS, NO PTY or
NO TEXT“
GB
DDR-22_381P101_GB.p65 2006/3/23, ¤W¤È 09:4923
22
Page 24

Search RDS program type
Press Auto Tune/RDS PTY to cycle through program type e.g. Pop,
Classic, News, etc. and then press Tuning +/- button to search up/
down the frequency, the search processing will stop once the
station meet demanding program type.
23
DDR-22_381P101_GB.p65 2006/3/23, ¤W¤È 09:4924
Page 25

Operating the radio – MW band
1. Press the Standby button to switch on the radio.
2. Press the band button to select MW band.
3. Press and release Tuning Control +/- button to tune to required
stations. Long press Tuning Control +/- button for more than
0.7 seconds, radio frequency will automatically increase/decrease
until next station of sufficient strength has been found.
4. Rotate the radio for best reception.
5. Adjust the volume control for comfort listening.
Presetting stations
There are 10 memory presets each waveband for this receiver.
GB
DDR-22_381P101_GB.p65 2006/3/23, ¤W¤È 09:4925
24
Page 26

DAB band Preset station
1. Press Standby button to switch on the radio, then press
DAB button to tune required station as previously described.
2. Press and hold down the required Preset button (1-10) until
display show e.g. “Preset 1 saved“. The station will be stored
under the chosen preset station. Repeat this procedure for the
remaining presets.
3. Stations stored in preset memories may be overwritten by
following the above procedures.
25
DDR-22_381P101_GB.p65 2006/3/23, ¤W¤È 09:4926
Page 27

Recalling DAB preset station
1. Press the Standby button to switch on the radio. Press DAB button
to select DAB waveband.
2. Momentarily press the required Preset button, your radio will tune
to the station stored in preset memory.
GB
DDR-22_381P101_GB.p65 2006/3/23, ¤W¤È 09:4927
26
Page 28

FM/MW waveband preset station
1. Press the Standby button to switch on the radio, press Band
button to select FM or MW band and tune to a station as
previously described.
2. Same as DAB preset station described above.
Recalling FM/MW waveband preset station
1. Press the Standby button to switch on the radio, press Band button
to select FM or MW band.
2. Using Preset Up/Down button to cycle through required preset
station or simply press numeric button to recall preset station.
27
DDR-22_381P101_GB.p65 2006/3/23, ¤W¤È 09:4928
Page 29

Preset EQ
Press the EQ button to cycle through the preset equalizer mode of
Flat Jazz Rock Classic Pop Flat …
The initial setting of the equalizer mode is Flat.
GB
DDR-22_381P101_GB.p65 2006/3/23, ¤W¤È 09:4929
28
Page 30

Operating the radio – Aux In
1. Connect a stereo or mono audio source (like CD walkman,
MP3 player) to Aux In socket on the rear side of the radio.
2. Press the band button to select Aux band.
3. Adjust the volume control for comfort listening.
Operating the radio – Line Out
The radio can be used a separate tuner by connecting this input to
Hi-Fi system or using this input to make recording in stereo from
audio system.
29
DDR-22_381P101_GB.p65 2006/3/23, ¤W¤È 09:4930
Page 31

Headphone use
Headphone use with this radio should be fitted with a 3.5 mm
jack plug. Insert the headphones into the socket marked on
the rear side of the radio. When the headphones are plugged in,
the loudspeaker is automatically disconnected.
Flat/3D sound effect
Switch the 3D switch (on the rear side of the radio) to get flat or
3D sound effect.
Mute
GB
Press the MUTE button to mute the audio output.
Display will show MUTE.
Press the MUTE button again or press Volume Control buttons
will release mute.
DDR-22_381P101_GB.p65 2006/3/23, ¤W¤È 09:4931
30
Page 32

Specifications
Power Requirement: AC 230V 50 Hz.
Frequency Coverage:
DAB Band 3 174.928 – 239.200 MHz
FM band 87.50 – 108 MHz
MW band 522 – 1710 kHz
Loudspeaker: 2.5 inches 8 ohm x 2
Output Power: AC power 5 Watt x 2
If at any time in the future you should need to dispose of this product please note that: Waste electrical products should not
be disposed of with household waste. Please recycle where facilities exist. Check with your Local Authority or retailer for
recycling advice. (Waste Electrical and Electronic Equipment Directive)
Headphones socket: 3.5 mm dia.
Aux In socket: 3.5 mm dia.
Line Out: 3.5 mm dia.
Aerial System:
F-Type telescopic aerial for DAB/FM bands
Ferric bar for MW band
31
DDR-22_381P101_GB.p65 2006/3/23, ¤W¤È 09:4932
Page 33

DDR-22_381P101_GB.p65 2006/3/23, ¤W¤È 09:4933
32
Page 34

DDR-22_381P101_D.p65 2006/3/23, ¤W¤È 09:4834
381P101-A
 Loading...