

Page 1

DCR-9+
GB
Version 1
Page 2

Contents
Controls ................................................................................. 2-4
Using the clock radio f or the f irst time ................................... 5
Selecting a station – DAB ...................................................... 5
Display modes – DAB – INFO button ................................... 6
Finding new station – DAB ( Digital Radio ).......................... 6
Manual tuning – DAB ( Digital Radio ) .................................. 6
Dynamic Range Control ( DRC ) setting –
DAB ( Digital Ra dio ) ............................................................... 7
Operating your radio – FM auto-tune .................................... 7
Ma nual tune – FM ................................................................... 8
Display modes – FM .............................................................. 8
Presetting stations ................................................................... 9
Recalling a preset station ...................................................... 9
Scan sen sitivity setting – FM ................................................. 9
Stereo/Mono setting – FM ................................................... 10
Clock display ......................................................................... 10
Display backlight .................................................................. 10
T o view the alarm settings .................................................... 12
Canceling alarms .................................................................. 12
Snooze ................................................................................... 12
Sleep timer ........................................................................... 12
Setting the clock manually.................................................... 13
Auto clock set mode.............................................................. 13
Set date format ...................................................................... 13
Factory reset .......................................................................... 14
Auxiliary Input socket ( Aux In socket )................................ 14
Hea dphone socket ............................................................... 14
Line Out socket ..................................................................... 15
Software version .................................................................... 15
Specifications ........................................................................ 15
Circuit Features ..................................................................... 15
Setting the Nap timer ( short ti mer ) ................................... 10
Setting the alarm timers ....................................................... 1 1
CCancel the alarm setting.................................................... 12
1
Page 3

Controls
GB
1. LCD display
2. On/Standby button
3. Auto-Tune button
4. Band button
5. LCD brightness control
6. Sleep- auto shut off button
7. Nap timer
8. Alarm 2 button
9. Alarm 1 button
2
Page 4
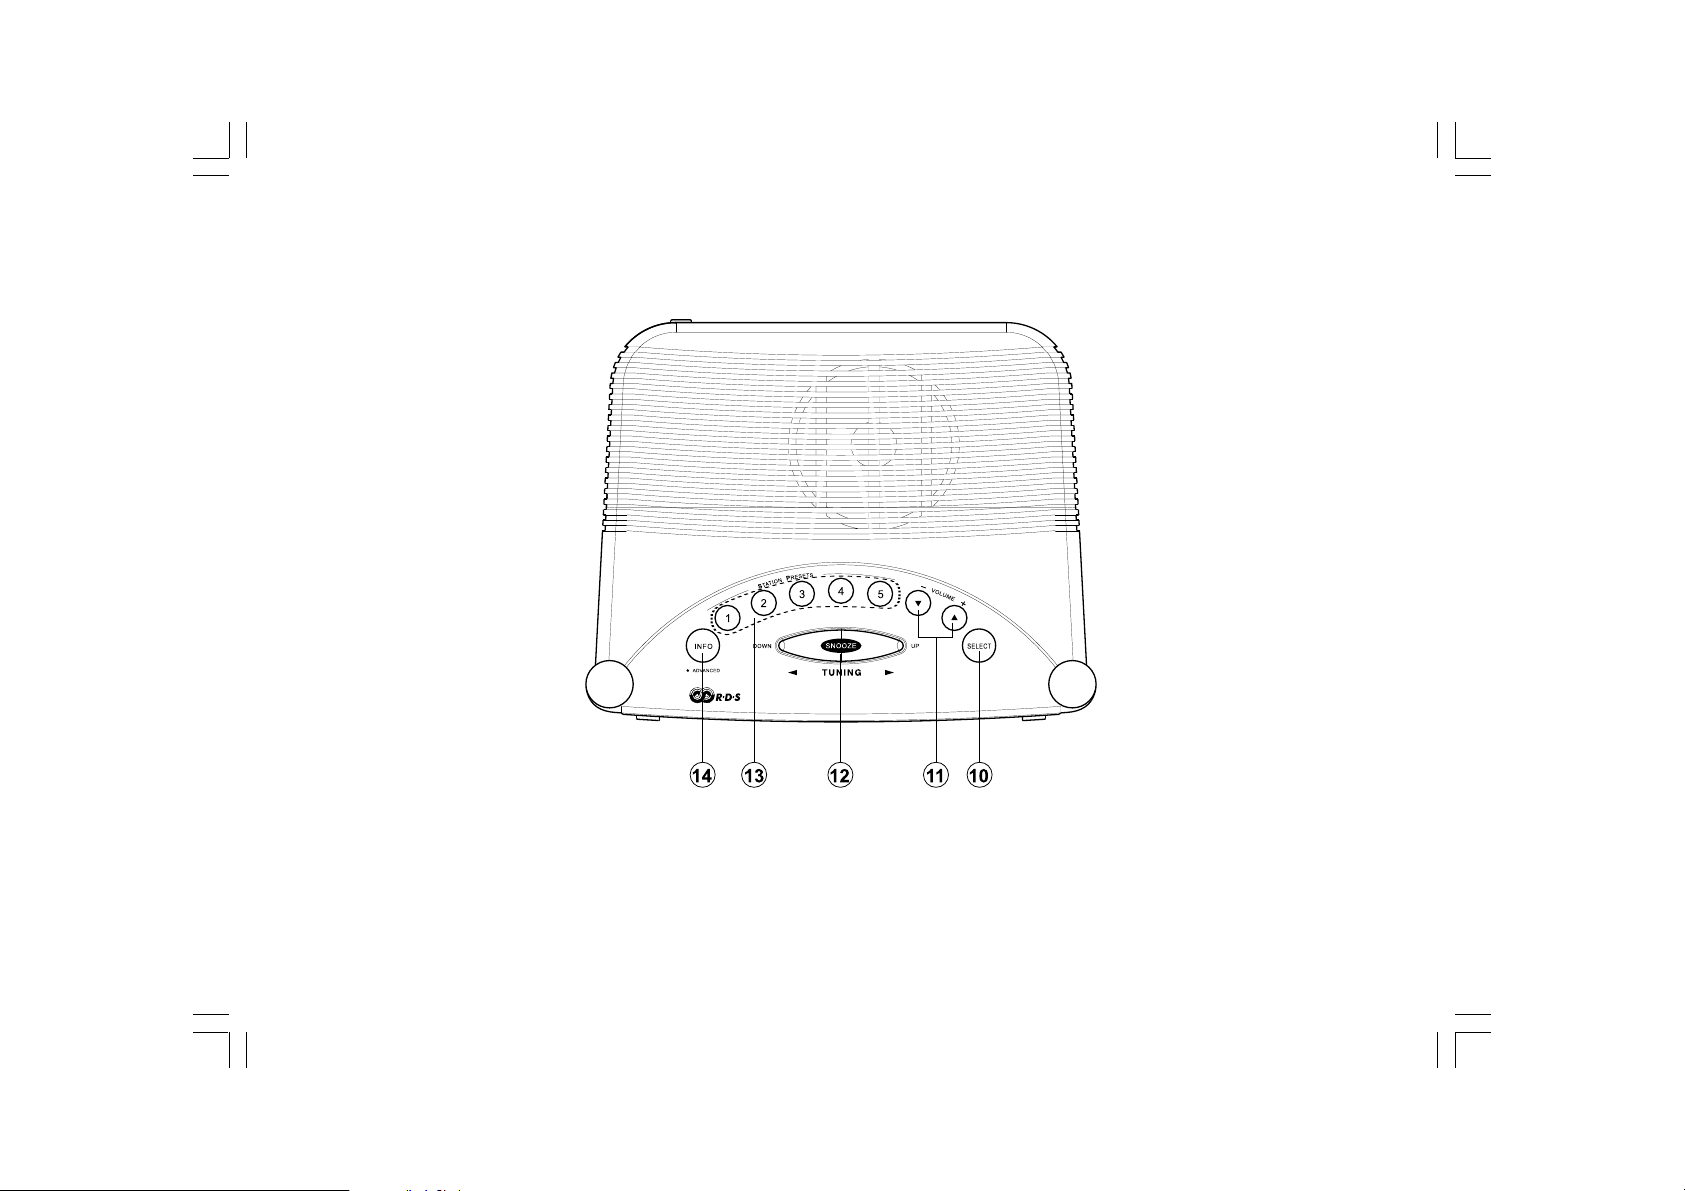
Controls
10. Select button
11 . Volume control
12. Tuning Up/Down/Snooze button
3
13. Station preset buttons
14. Information button
Page 5
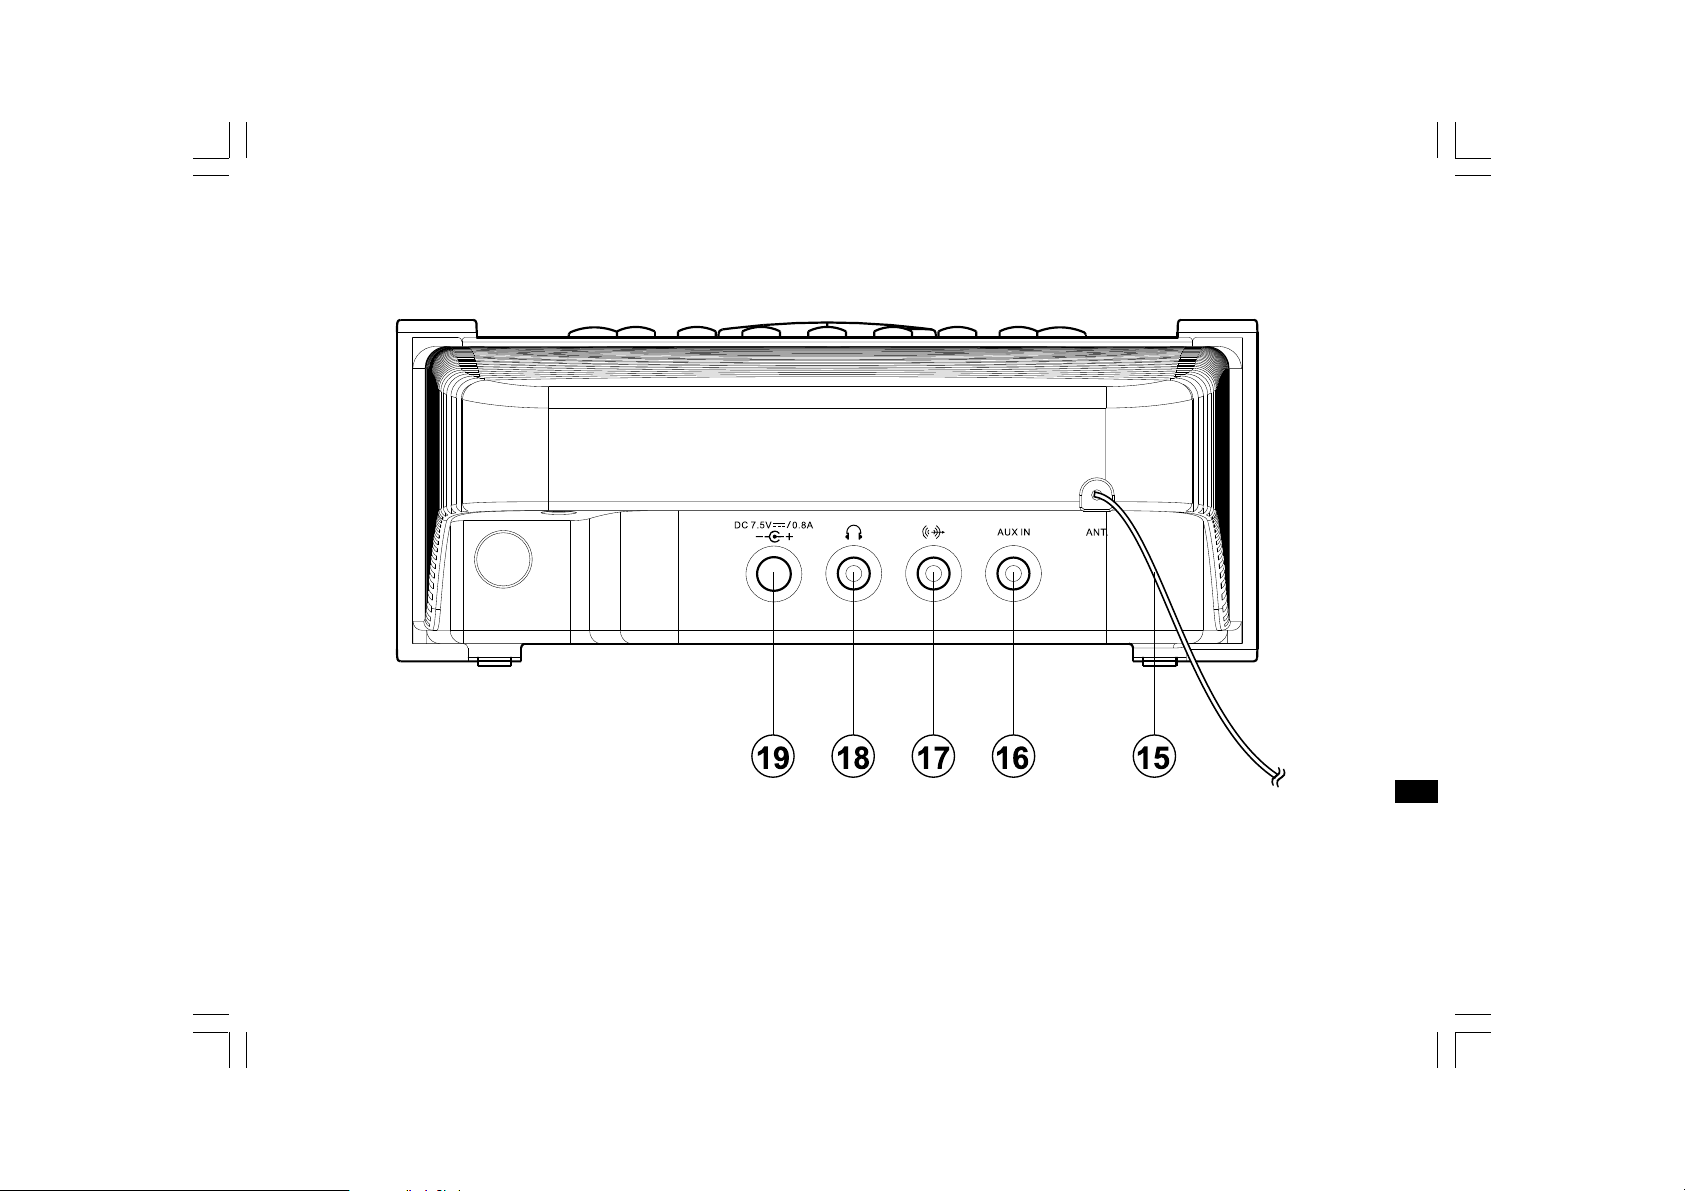
Controls
GB
15. Wire DAB/FM aerial
16. Aux in socket
17. Line out socket
18. Stereo headphone socket
19. DC jack socket
4
Page 6

Using the clock radio for the first time
1. Place your clock radio on a flat surface.
2. Fully extend the wire aerial located on the rear of your clock radio.
Place the wire antenna so that it is as straight as possible extending
either above or below the radio.
3. Insert the ada ptor plug into the DC socket located on the rear of your
clock radio. Plug the adaptor into a standard 13 amp mains
socket outlet.
Selecting a station – DAB
1. Press the On/Standby button to switch on your clock radio,
the display will show last station you tuned to.
2. Press either Tuning Up or Tuning Down button to enter Station List.
3. Press either T uning Up or Tuning Down button again to step through
the list of available stations.
4. When desired station appears on the display, press the Select button
to select the station. The radio will tune to the selected station and
display will show the station na me and information.
5. Adjust the Volume control to the required setting.
4. Press On/Standby button to switch on your clock radio, display will
show “Welcome to Digital Radio“ for a few seconds and start to scan
the DAB+ band and display will show Scanning.
5. The radio will stop and play at first station it finds in the list of
stations during scanning.
6. The clock will be auto adjusted by the DAB station you tune to or you
may refer to “Setting the clock manually“ described later for
clock setting.
Important:
The mains adaptor is used as the mean s of connecting the clock radio
to the mains supply. The mains socket used for the clock radio must
remain accessible during normal use. In order to disconnect the clock
radio from the mains completely , the adaptor should be removed from
the mains socket outlet completely.
Characters appearing on the LCD display indicate that the radio is
connected to and powered from the mains supply.
5
Note:
If after selecting a station, the display shows “not available“, it may be
necessary to relocate your radio to a position giving better reception.
Page 7

Display modes – DAB – INFO button
Y our radio has a range of display options when in DAB mode.
During listening DAB program, press and relea se INFO button will cycle
through the various options.
a. Time –
Displays the current time.
b. Date –
Displays the current date.
Finding new station – DAB ( Digital Radio )
As time passes, new stations may become available or you may have
moved to a different part of the country. In this case you may need to
have your radio to scan f or new stations.
1. With the radio switched on and in DAB mode, press and release Auto
Tune button, “scanning“ will show on the display.
2. Your clock radio will perform a scan of the DAB frequencies. As new
stations are found, the station counter on the right-ha nd side of the
display will increase and station will be added to the list.
c. Station name –
Displays the name of the station being listened to .
d. Signal strength –
Displays the signal strength of the station being listened to.
e. Program type –
Displays type of station being listened to e.g. Pop, Classic, News, etc.
f. Multiplex name –
Displays the na me of the DAB multiplex to which the current
station belongs.
g. Channel and Frequency –
Displays frequency and channel number to the currently tuned
DAB station.
h. Bit rate –
Displays the digital audio bit rate for the currently tuned DAB station.
Ma nual tuning – DAB ( Digital Radio )
Manual tuning allows you to tune your ra dio to a particular
DAB frequency. Any new stations found will be added to the station list.
Note that DAB stations are located in the range of 5A-13F.
1. With the radio switched on and in DAB mode, press and hold the
INFO button for 2 seconds to enter Advanced mode, the display
shows “Manual tune“.
2. Press and rele ase the Select button to enter manual tuning mode.
3. Press the Tuning Up/Down button to select the desired DAB channel.
Press and release the Select button to tune to the chosen frequency.
If a signal is present then the channel number and the first part of
DAB multiplex name will be displayed.
4. Press and release the Select button again to return to the normal
DAB tuning mode.
GB
6
Page 8

Dynamic Range Control ( DRC ) setting –
DAB ( Digital Radio )
The DRC facility can make quieter sound easier to hear when your radio
is used in a noisy environment.
There are three levels of DRC compression,
DRC 0 DRC is switched off, broadcast DRC will be ignored.
DRC high DRC is set as sent by broadcaster.
DRC low DRC level is set to 1/2 that sent by broadcaster.
With the radio switched on and in DAB mode,
1. Press and hold the INFO button until display shows “Manual tuning“.
2. Press and T uning Up/Down button until DRC appe ars on the display.
Then press the Select button. The display will show the current
DRC setting.
3. Press the Tuning Up or Down buttons to allocate required
DRC setting.
4. Press and release the Select button to select the setting. Press and
relea se INFO button to return to the normal ra dio display.
Note:
Not all DAB broadcasts are able to use the D RC function. If the
broadcast does not support DRC, then the DRC setting in the ra dio will
have no effect.
Operating your radio – FM auto-tune
1. Fully extend the wire aerial located on the rear of your clock radio.
Place the wire antenna so that it is an straight as possible,
extending either above or below the radio.
2. With the radio switched on, press Band button to select the
FM band.
3. Press and release the Auto Tune button, display will show scanning
and your radio will scan from low frequency to high frequency (or in
the direction last scanned). It will stop automatically when it finds a
station of sufficient strength.
4. After a few seconds the display will update. The display will show
the frequency of the signal found. If the signal is strong enough
and there is RDS data present then the radio will display the
station name.
5. T o find additional stations, press a nd release the Auto Tune button
as before.
6. To scan the FM band in an opposite direction, press and hold down
either the Tuning Up/Down button and then release, the radio will
scan and stop when it finds station.
7. Adjust the Volume Control to the required setting.
7
Page 9

Manual tune – FM
1. With radio switched on and in FM band, fully extend wire aerial.
2. Press the Tuning Up or Down buttons to tune to a station.
The frequency will change in steps of 50 kHz. Pre ss and hold the
buttons will advance the frequency several times each second. If the
radio is tuned to a station of sufficient signal strength with RDS
information present, then the display may change to show the
station name.
3. When the end of the waveband is reached, the radio will recommence
tuning from the opposite end of the waveband.
4. Set the Volume Control to the de sired setting.
5. To switch off your clock radio, press the On/Sta ndby button.
Display will show Standby.
6. The display will revert to a conventional time display mode after
10 seconds of last operation except when displaying scrolling text.
Display modes – FM
Your radio has a range of display options when in FM mode. Note that
the display will revert to a conventional time display mode after
10 seconds of last operation except when displaying scrolling text.
The Radio Data System (RDS) is a system in which inaudible digital
information is tran smitted in addition to the normal FM ra dio program.
In your radio, RDS offers several useful features listed below.
Press the INFO button to cycle through the various modes
a) Time –
Displays the current time.
b) Date –
Displays the current date.
c) Radio text –
Displays scrolling text messages such as artist/track name,
phone in number, etc.
d) Program type –
Displays type of station being listened to e.g. Pop, Classic, News, etc.
e) Frequency –
Displays the frequency of the station being listened to.
f) Audio type –
Display the audio type to be stereo or mono for the station being
listened to.
GB
8
Page 10

Presetting station s
Y ou may store your preferred DAB+ and FM radio stations to the preset
station memories. There are 10 memory presets in your radio, 5 for
DAB+ and 5 for FM.
The procedures for setting presets a nd using them to tune stations is
the same for FM and DAB+ modes a nd is described as below.
1. With radio switched on, tune to the required station as
previously described.
2. Press and hold down the required preset button until the display
shows e.g. “Preset 1 stored“. The current tuned station will be stored
under the chosen preset button. Repeat this procedure for the
remaining presets a s needed.
3. Stations which have been stored in preset memories may be over
written by following the above procedures.
Recalling a preset station
1. With radio switched on, press the Band button to select the
desired waveband.
2. Momentarily press the required Preset button, your clock radio will
tune to the station stored in the preset memory.
Scan sen sitivity setting – FM
Y our radio will normally scan for FM broadcasts which are strong
enough to give good reception. However, you may wish the Sca n
function to also be able to find weaker signals, possible from more
distant radio transmitters. Y our ra dio includes a local/distant option for
the Scan function in the FM band.
1. Switch on your radio and select FM band by pressing Band button.
2. Press and hold INFO button f or 2 seconds to enter Advanced mode,
display will show FM Scan Zone.
3. Press Select button to enter FM Scan Zone set.
4. Press Tuning Up/Down button to switch between Local a nd
Distant options. The distant option will allow the radio to find weaker
signals when scanning.
5. Press the Select button to confirm your selection. The Local or
Distant setting is stored in the radio and remains in force until
changed or until a System Reset.
Note:
The initial setting causes the radio to ignore weak (distant) signals.
9
Page 11

Stereo/Mono setting – FM
Your radio will play stereo broadcasts in stereo (via headphones) so
long as the received signal is of adequate strength. However, as a
stereo signal becomes weaker, the audio signal will become poorer.
It may be preferable to force the radio to play the station in mono in
order to reduce the level of audio noise.
1. Switch on the radio and tune to the required FM radio station as
previously described.
2. Press and hold the INFO button to enter Advanced mode until display
shows FM Scan Zone.
3. Press Tuning Up/Down button to allocate Mono Override then press
Select button to enter the Mono Override menu. Display will show
“Override Off “ if the radio is in auto stereo mode.
4. Press the Tuning Up/Down button and then Select button to switch
on the mono Override. While this setting is engaged, the radio will
play the current station in mono whether listening via headphones or
the loudspeaker.
Mono Override is a temporary setting and is applied to the currently
tuned station only. It is cancelled automatically by tuning to another
radio station.
5. If you wish to cancel Mono Override while listening to the currently
tuned radio station, press and hold the INFO button then following
above procedures to enter Mono Override menu to allocate
Override On. Press the Tuning UP/Down to allocate Override off.
Press the Select button to switch off the Mono Override. The radio
will then play the current station in stereo through headphones if the
signal is sufficiently strong.
Clock display
When your clock radio is in standby mode, the display normally show
the current time, date, month and year.
Display backlight
Either the radio is in on or sta ndby, repeatedly press the LCD
brightness control button to set display backlight to required brightness.
Setting the Nap timer ( short timer )
If you like to set a short timer , press and hold down Nap timer button
NAP until display minute digit flashes. Press Tuning Up or Down to
select required short timer time then press Select button to confirm the
Nap timer setting. Display will show a “ “ indicating the nap timer
is set. Press and release NAP button to monitor remaining Nap
timer time. Nap timer allows for maximum 60 minutes.
When Nap timer is on, press On/Standby button to turn it off.
To cancel Nap timer set, press On/Standby button.
Display “ “ will disappear.
GB
10
Page 12

Setting the alarm timers
Y our clock radio has two alarms which can be set to wake you either
radio or buzzer alarm. Each alarm can be set to sound once, daily,
on weekdays or at weekends.
Note:
if no buttons are pressed for 10 seconds, your clock radio will exit the
alarm set up.
1. The alarm can be set either the radio is on or standby.
2. Press and hold either alarm 1 or alarm 2 button until display
shows “Alarm 1 or 2 Wizard“ and flashes last alarm hour set time.
3. Press either Tuning Up or Down button to sele ct desired alarm hour
and press Select button, display minute digit will flash.
4. Press either Tuning Up or Down button to sele ct desired alarm
minute and press Select button to choose alarm minute.
5. Display will show alarm duration a nd flash initial setting of
15 minutes.
6. Press either Tuning Up or Down button to cycle through
15-30-45-60-15…. Alarm duration time setting.
7. Press Select to choose alarm duration time. Display will flash
Alarm source.
8. Press either Tuning Up or Down to cycle through alarm
source – buzzer, DAB and FM. Press Select to choose
alarm source.
If alarm buzzer is chosen, press Select button, display will flash
alarm day option. Press Tuning Up or Down button to cycle through
alarm day option.
Daily – will sound everyday.
Once – will sound at one time only.
Weekends – will sound only at weekends.
Weekdays – will sound only on weekdays.
Press Select to choose required alarm day option. Display will flash
alarm sound level setting.
9. If Alarm DAB or FM is chosen, press Select button to choose the
alarm station.
10. Press Tuning Up or Down button to select alarm by last listened
station or from preset station.
Note:
if there is no preset station, display will show only last listened.
11. Press Select to choose alarm source, display will flash alarm
day option.
12. After alarm day option is chosen as described above, display will
flash alarm sound level, press Tuning Up or Down button to select
required alarm sound level. Press Select to choose alarm
sound level.
13. Display will show Alarm Off. Press Tuning Up or Down button to
select On to complete alarm setting. Display will show
“Alarm saved” and will appear alarm symbol indicating the
alarm is set.
14. Pres Tuning Up or Down button to select Off. Display will show
“Alarm saved” but display won’t appear alarm symbol.
Note:
if the above alarm setting procedures are not completed,
display will show “alarm not completed“. You may have to start over
above procedures again.
11
Page 13

Cancel the alarm setting
Following above alarm setting procedures to allocate alarm On or Off,
select OFF by pressing Tuning Up or Down button then press Select
button to cancel the alarm setting. The alarm symbol will disappear
from the display.
To view the alarm settings
You may view the alarm settings when radio is switched on.
1. Press and release either alarm 1 or alarm 2 button.
2. Press the Select button to cycle through each of the settings for the
chosen alarm.
Canceling alarms
1. While an alarm is sounding, it can be cancelled by pressing the
On/Standby button.
Snooze
1. When the radio or buzzer alarm sounds, pressing the Snooze button
will silence the alarm for 5 minutes.
2. The display will show Snooze 5 minutes. The sequence can be
repeated during the set alarm duration time.
3. To cancel the Snooze function, press the On/Standby button.
Sleep timer
Your clock radio can be set to turn off after a preset time has elapsed.
The sleep timer can be adjusted between 15 and 90 minutes in
15 minutes increments. Ensure your clock radio is switched on.
1. Press and release repeatedly the Sleep button until desired sleep
time appears on the display. Release the Sleep button.
2. Display will show a “ “ indicating sleep timer is set.
3. Press and release Sleep button to monitor remaining sleep
timer time.
4. To cancel sleep timer, simply press On/Standby button.
GB
12
Page 14

Setting the clock manually
Normally your clock radio will set its clock automatically via the
DAB+ signal. If no DAB+ signal is available and you need to set the
time manually, please follow the procedures shown below.
Note:
The DAB+ signal will always override any manual time setting.
1. To set the clock time manually, press the On/Standby button to
switch on the clock radio.
2. Press and hold INFO button for 2 seconds to enter Advanced mode.
3. Press and release Tuning Up or Down button to allocate System.
4. Press Select button and then Tuning up or Down button to
allocate Time.
5. Press Select button to enter 12/24 hour format setting.
6. Press Select button and Tuning Up/Down button to select 12 hour or
24 hour format . Press Select button to confirm hour format.
7. Press Tuning Up button to enter Set Time/Date mode. Display will
show Time Set and flashes hour digit.
8. Press either Tuning Up or Down button to set hour and confirm the
hour setting by pressing Select button. Display will flash minute,
following above procedures to set minute and confirm the minute
setting by pressing Select button. Display will show Set Date.
9. Following above procedures to set date, month and year. Confirm the
setting by pressing Select button. Display will show “Time Saved“.
10. Press and release INFO button to return to normal radio mode.
Auto clock set mode
1. When radio is switched on, press and hold INFO button for
2 seconds to enter Advanced mode.
2. Press and release Tuning Up/Down button to allocate Time mode.
3. Press Select button and then Tuning Up/Down button to allocate
“Auto Update”.
4. Press Select button to enter Auto Update mode.
5. Press Tuning Up/Down button to select from Update from DAB,
Update from FM and No update. Confirm the setting by pressing
Select button.
Note:
If you select either Update from DAB or FM, the current time will be
displayed after receiving from DAB + station time signal or FM RDS
time signal. If no DAB or FM time signal is found, display will show
“Time not Set“. You should then either position the radio or its aerial so
that a signal can be received or revert to manual clock mode.
Set date format
1. When radio is switched, press and hold INFO button for 2 seconds
to enter Advanced mode.
2. Press and release Tuning Up/Down button to allocate Time mode.
3. Press Select button and then Tuning Up/Down button to allocate Set
Date format.
4. Press Select button and then Tuning Up/Down button again to select
dd(date) – mm(month) – yyyy(Year) or mm(month) – dd(date) –
yyyy (year).
5. Confirm the setting by pressing Select button.
13
Page 15

Factory reset
If your radio fails to operate correctly or some digits on the display are
missing or incomplete, carry out the following procedures.
1. Switch on your radio.
2. Press and hold down the INFO button to enter Advanced mode.
3. Press Tuning Up/Down button to allocate System, press Select
button to enter System.
4. Press Tuning Up/Down button to allocate Factory Reset,
press Select button to enter Factory Reset.
5. Press Tuning Up/Down button to select YES, then press Select
button to start the Reset, display will appear restarting.
6. A full reset will be performed, the station list and presets will
be erased. Display will show “Welcome to Digital Radio“ and then
flash clock digits and Time is not set. You need to start over the
settings again as the time you used the clock radio for the first time.
In case of malfunction due to electrostatic discharge, reset the
product (reconnection of power source may be required) to resume
normal operation.
Auxiliary Input socket ( Aux In socket )
A 3.5 mm stereo Aux In socket is provided on the rear side of your
clock radio to permit an audio signal to be fed into the unit from an
external audio device such as iPod, MP3 or CD player.
1. Plug in the device into Aux In socket using 3.5 mm audio wire
connecting from headphone socket of the device to the
Aux In socket.
2. Press the Band button to AUX IN.
3. Adjust the volume control on your iPod, MP3 or CD player to a
reasonable high level and then adjust the Volume control on your
clock radio for comfortable listening.
Headphone socket
A 3.5 mm Headphone socket located on the rear side of your clock
radio is provided for use with either headphones or an earpiece.
Inserting a plug automatically mutes the internal loudspeaker.
Important:
Excessive sound pressure from earphones and headphones can cause
hearing loss.
GB
14
Page 16

Line Out socket
A 3.5 mm Line out socket located on the rear side of your clock radio
(marked as ) is provided for connecting the audio signal to an
external amplifier. Inserting a plug into the line output socket will not
mute the internal loudspeaker.
Software version
The software display cannot be altered and is just for your reference.
1. Ensure your clock radio is switched on.
2. Press and hold INFO button for 2 seconds to enter Advanced mode.
3. Press Tuning Up/Down button to allocate System, press Select
button to enter System mode.
4. Press Tuning Up/Down button to allocate SW version, press Select
button to display software version.
5. Press INFO button to return to normal radio mode.
The company reserves the right to amend the specification without notice.
Specifications
Power Requirement
Mains: AC 100 – 240 V 50/60 Hz (switching adaptor)
Frequency Coverage
FM 87.50 – 108 MHz
DAB 174.928 – 239.200 MHz
Circuit Features
Loudspeaker: 1 x 75mm 8 Ohms
Output Power: 0.7 Watt
Headphone socket: 3.5mm dia.
Auxiliary Input socket: 3.5 mm dia.
Line Out socket: 3.5 mm dia.
Aerial System
FM wire aerial
DAB wire aerial
15
If at any time in the future you should need to dispose of this product please note that: Waste electrical products should not
be disposed of with household waste. Please recycle where facilities exist. Check with your Local Authority or retailer for
recycling advice. (Waste Electrical and Electronic Equipment Directive)
 Loading...