

Page 1
DCR-9/DCR-209
FM RDS/DAB digital clock radio
Please read this manual before use
A WORLD OF LISTENING
WARNING:
TO PREVENT FIRE OR ELECTRIC SHOCK HAZARD, DO
NOT EXPOSE THIS PRODUCT TO RAINOR MOISTURE.
THE LIGHTNING FLASH AND
ARROW- HEAD WITH IN THE
TRIANGLE IS A WARNING SIGN
ALERTING YOU OF
“DANGEROUS VOLTAGE”
INSIDE THE RADIO.
CAUTION: TO REDUCE THE RISK OF
ELECTRIC SHOCK, DO NOT REMOVE
THE BACK, NO USER SERVICEABLE
PARTS INSIDE. RE F E R SERVICING TO
QUALIFIED SERVICE PERSONNEL.
THE EXCLAMATIONPOINT
WITHINTHE TRIANGLE ISA
WARNING SIGN ALER TING
YOU OFIMPOR TANT
INSTRUCTIONS ACCOMPANYING
THIS RADIO.
!
CAUTION
RISK OF ELECTRIC
SHOCK DO NOT OPEN
GB
F
E
NL
D
Operating instruction
Mode d’emploi
Instruccions de manejo
Gebruiksaanwijzing
Bedienungsanleitung
Page 2

IMPORTANT SAFETY INSTRUCTIONS ....................... 2
Controls .......................................................................... 3-4
Mains operation ................................................................. 5
Operating your radio - DAB ............................................... 6
Selecting a station - DAB................................................. 7
Secondary services - DAB ............................................... 8
Display modes - DAB ........................................................ 8
Findin g new stations - DAB .............................................. 9
Autoselect - DAB .............................................................. 9
Manual tuning - DAB ....................................................... 10
Signal strength display - DAB ........................................ 10
Operating your radi o - FM ............................................... 11
Manual tuning - FM.......................................................... 12
Display modes - FM ........................................................ 13
FM stereo/mono .............................................................. 13
Presetting stations - F M ................................................. 14
Recalling a preset station - DAB and FM ...................... 14
System reset ................................................................... 15
Select L band channels for Canada (DCR-209 only) .... 15
Setting the alarm time .................................................... 16
Selecting alarm type ....................................................... 17
Cancelling alarms............................................................ 18
Contents
Snooze function .............................................................. 18
Sleep timer ...................................................................... 19
Headphone socket .......................................................... 20
Display backlight ............................................................ 20
Aerials.............................................................................. 21
Specifications .................................................................. 21
Circuit features ................................................................ 21
General ............................................................................ 22
1
Page 3

22
2
IMPORTANT SAFETY INSTRUCTIONS
1. Read these instructions.
2. Keep these instructions.
3. Heed all warnings.
4. Follow all instructions.
5. Do not use this apparatus near water.
6. Clean only with dry cloth.
7. Do not block any ventilation openings. Install in accordance with
the manufacturer’s instructions.
8. Do not install near any heat sources such as radiators,
heat registers, stoves, or other apparatus (including amplifiers)
that produce heat.
9. Do not defeat the safety purpose of the polarized or
grounding-type plug. A polarized plug has two blades with
one wider than the other. A grounding type plug has two blades
and a third grounding prong. The wide blade or the third prong
are provided for your safety. If the provided plug does not fit
into your outlet. consult an electrician for replacement of the
obsolete outlet.
10. Protect the power cord from being walked on or pinched
particularly at plugs, convenience receptacles, and the point
where they exit from the apparatus.
11. Only use attachments/accessories specified by the
manufacturer.
12. Use only with the cart, stand, tripod, bracket, or table specified
by the manufacturer, or sold with the apparatus. When a cart is
used, use caution when moving the cart/apparatus combination
to avoid injury from tip-over.
13. Unplug this apparatus during lightning storms or when unused
for long periods of time.
14. Refer all servicing to qualified service personnel. Servicing is
required when the apparatus has been damaged in any way,
such as power-supply cord or plug is damaged. liquid has been
spilled or objects have fallen into the apparatus, the apparatus
has been exposed to rain or moisture, does not operate
normally, or has been dropped.
15. To Reduce the Risk of Fire or Electric Shock, Do not Expose
This Appliance To Rain or Moisture.
16. The Shock Hazard Marking and Associated Graphical Symbol is
provided on the bottom panel of unit.
17. Apparatus shall not be exposed to dripping or splashing and no
objects filled with liquids, shall not be placed on the apparatus.
GB
Page 4
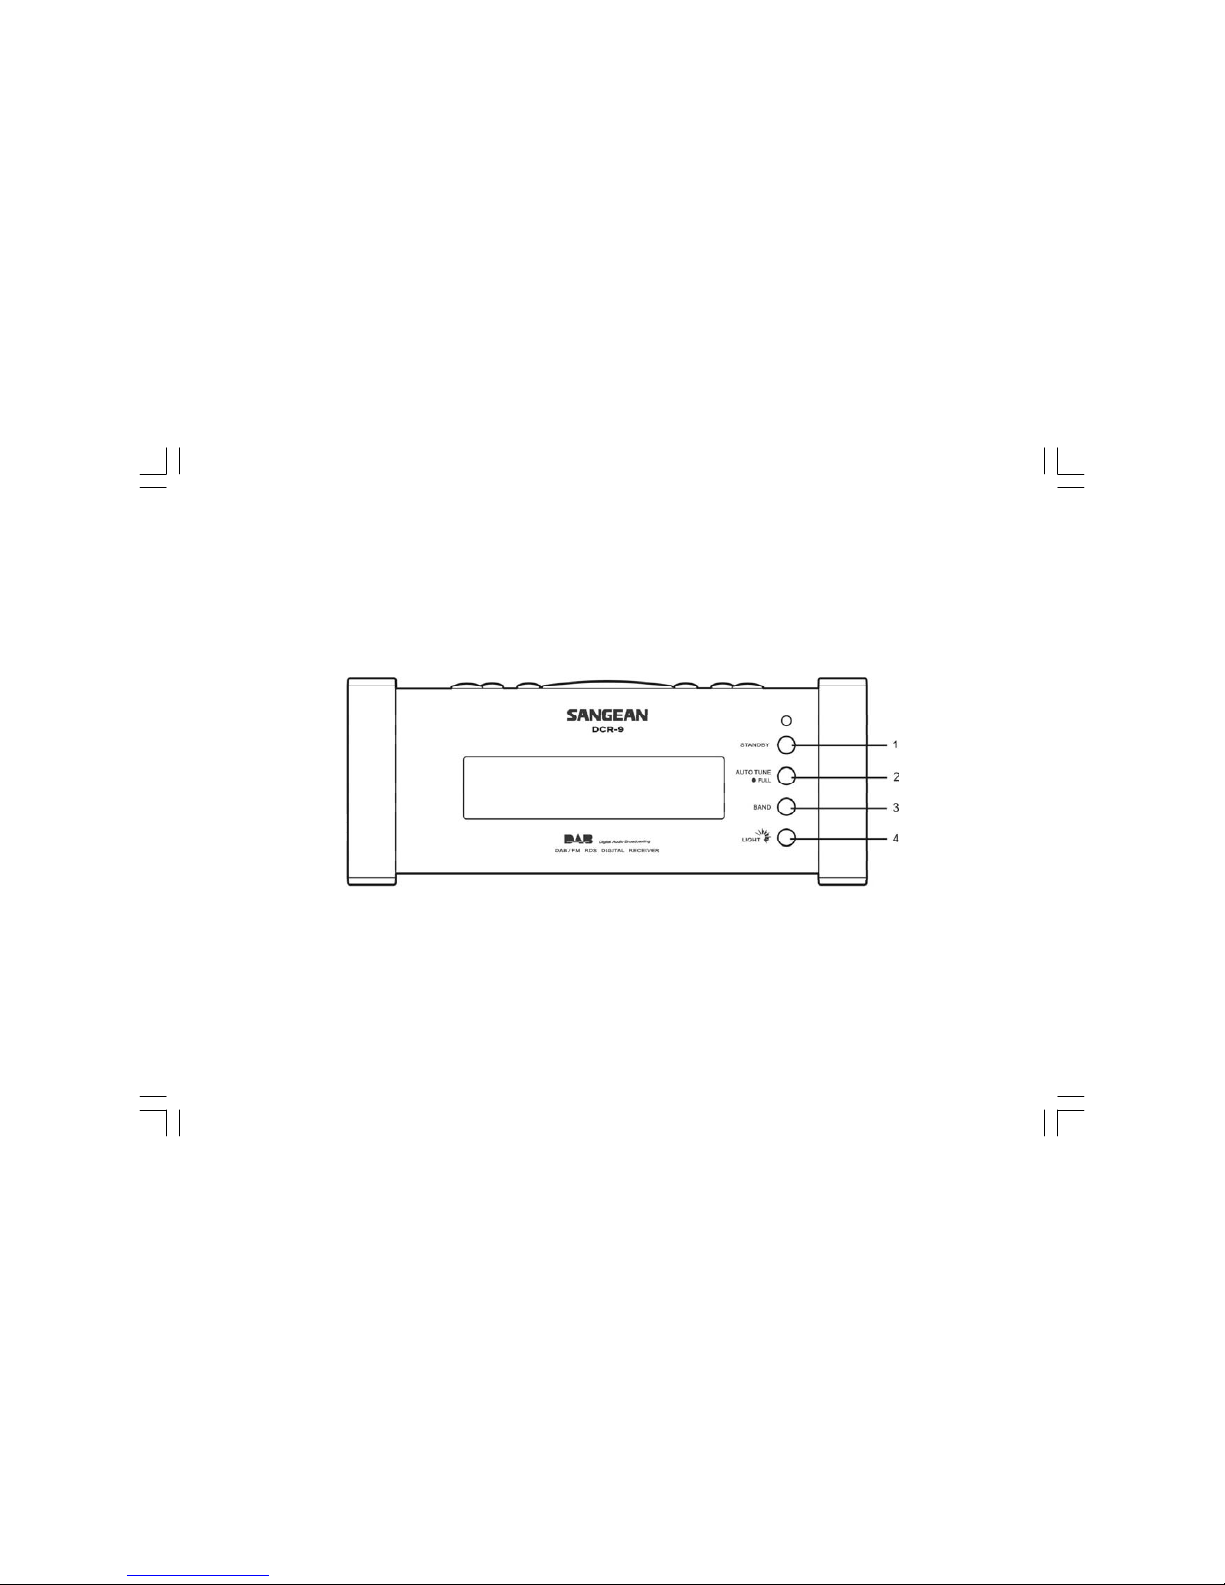
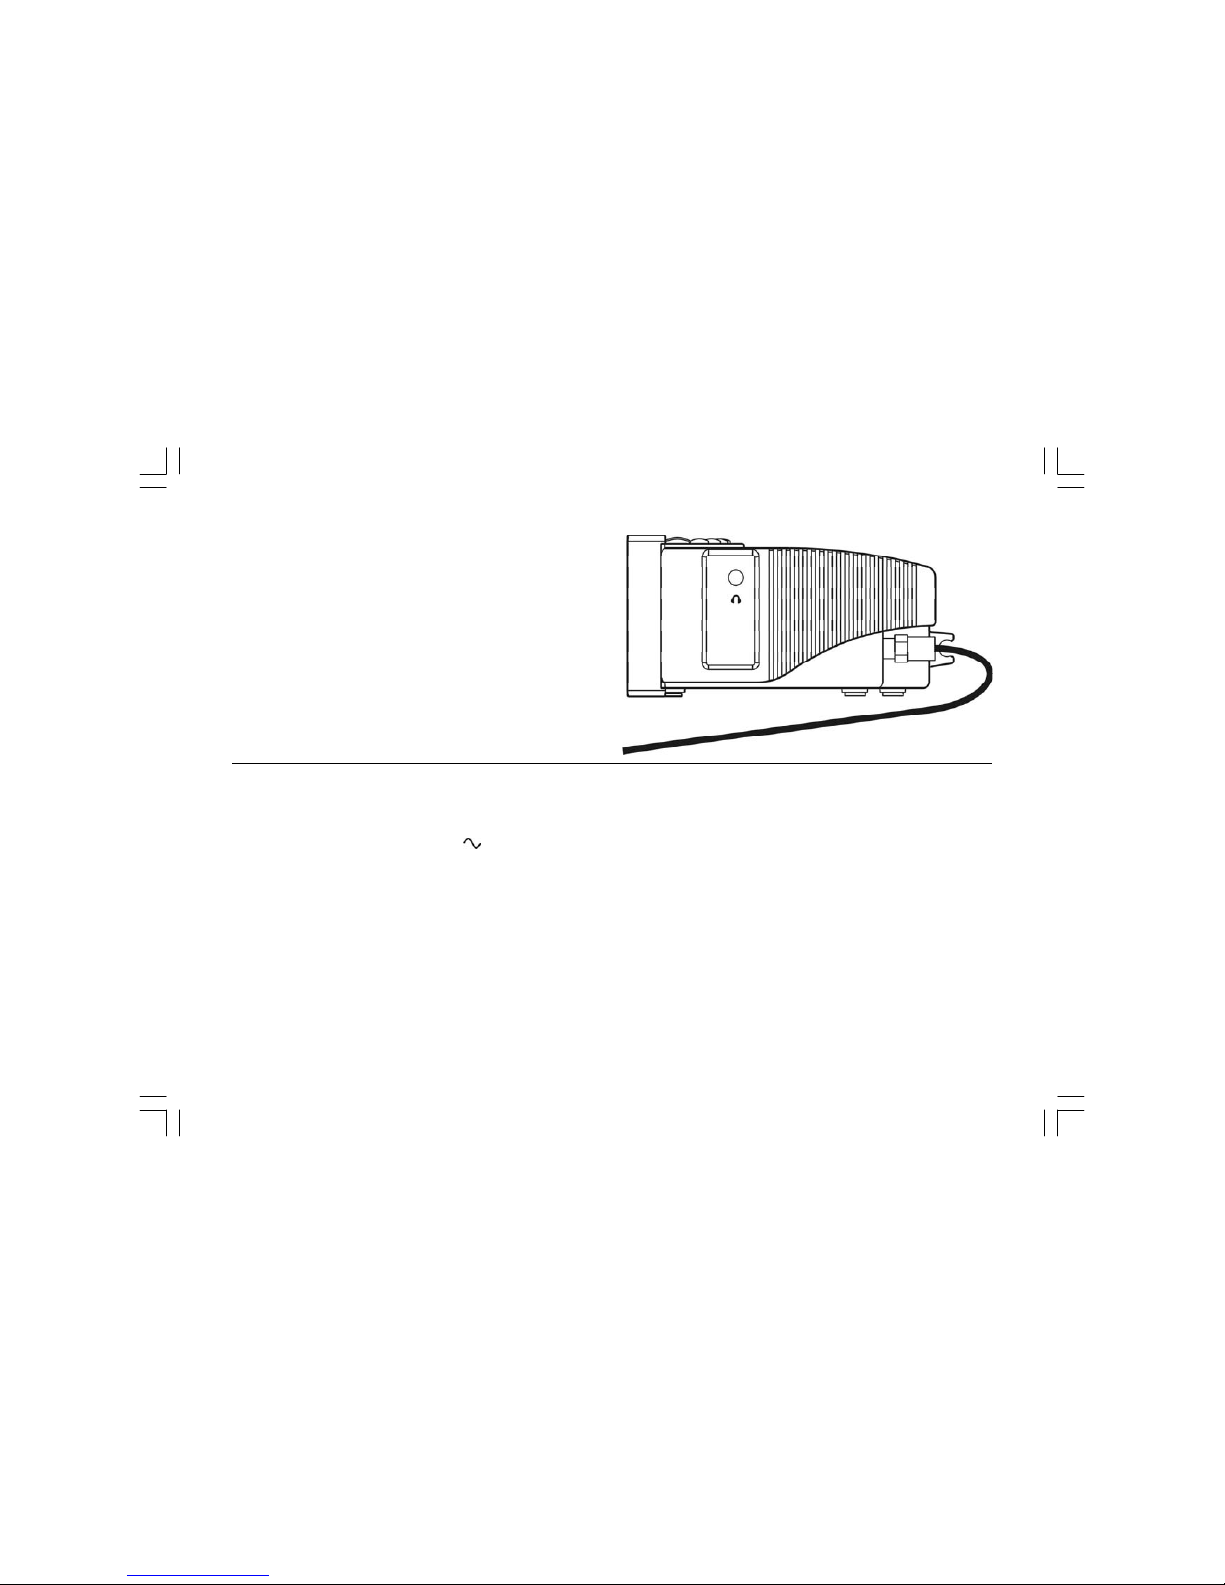
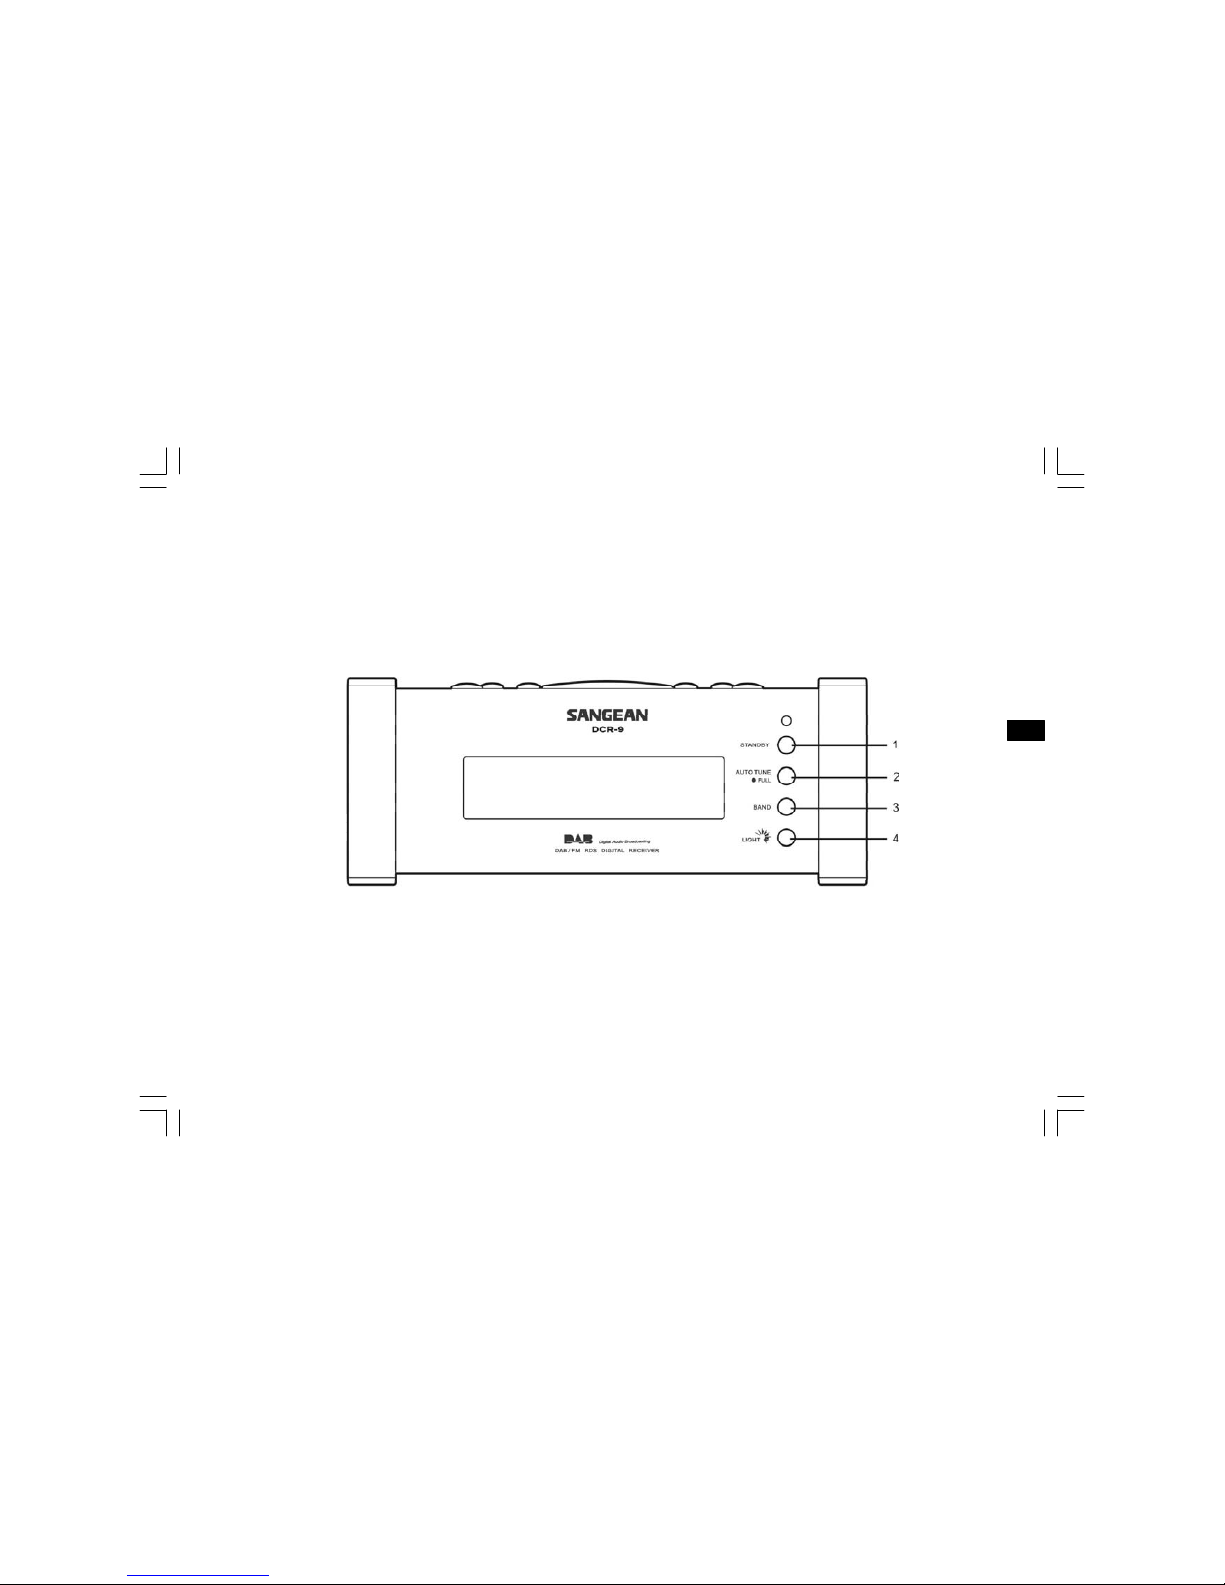
Controls (Front)
1. StandBy button
2. Autotune button
3. Waveband button
4. Light button
3
Page 5
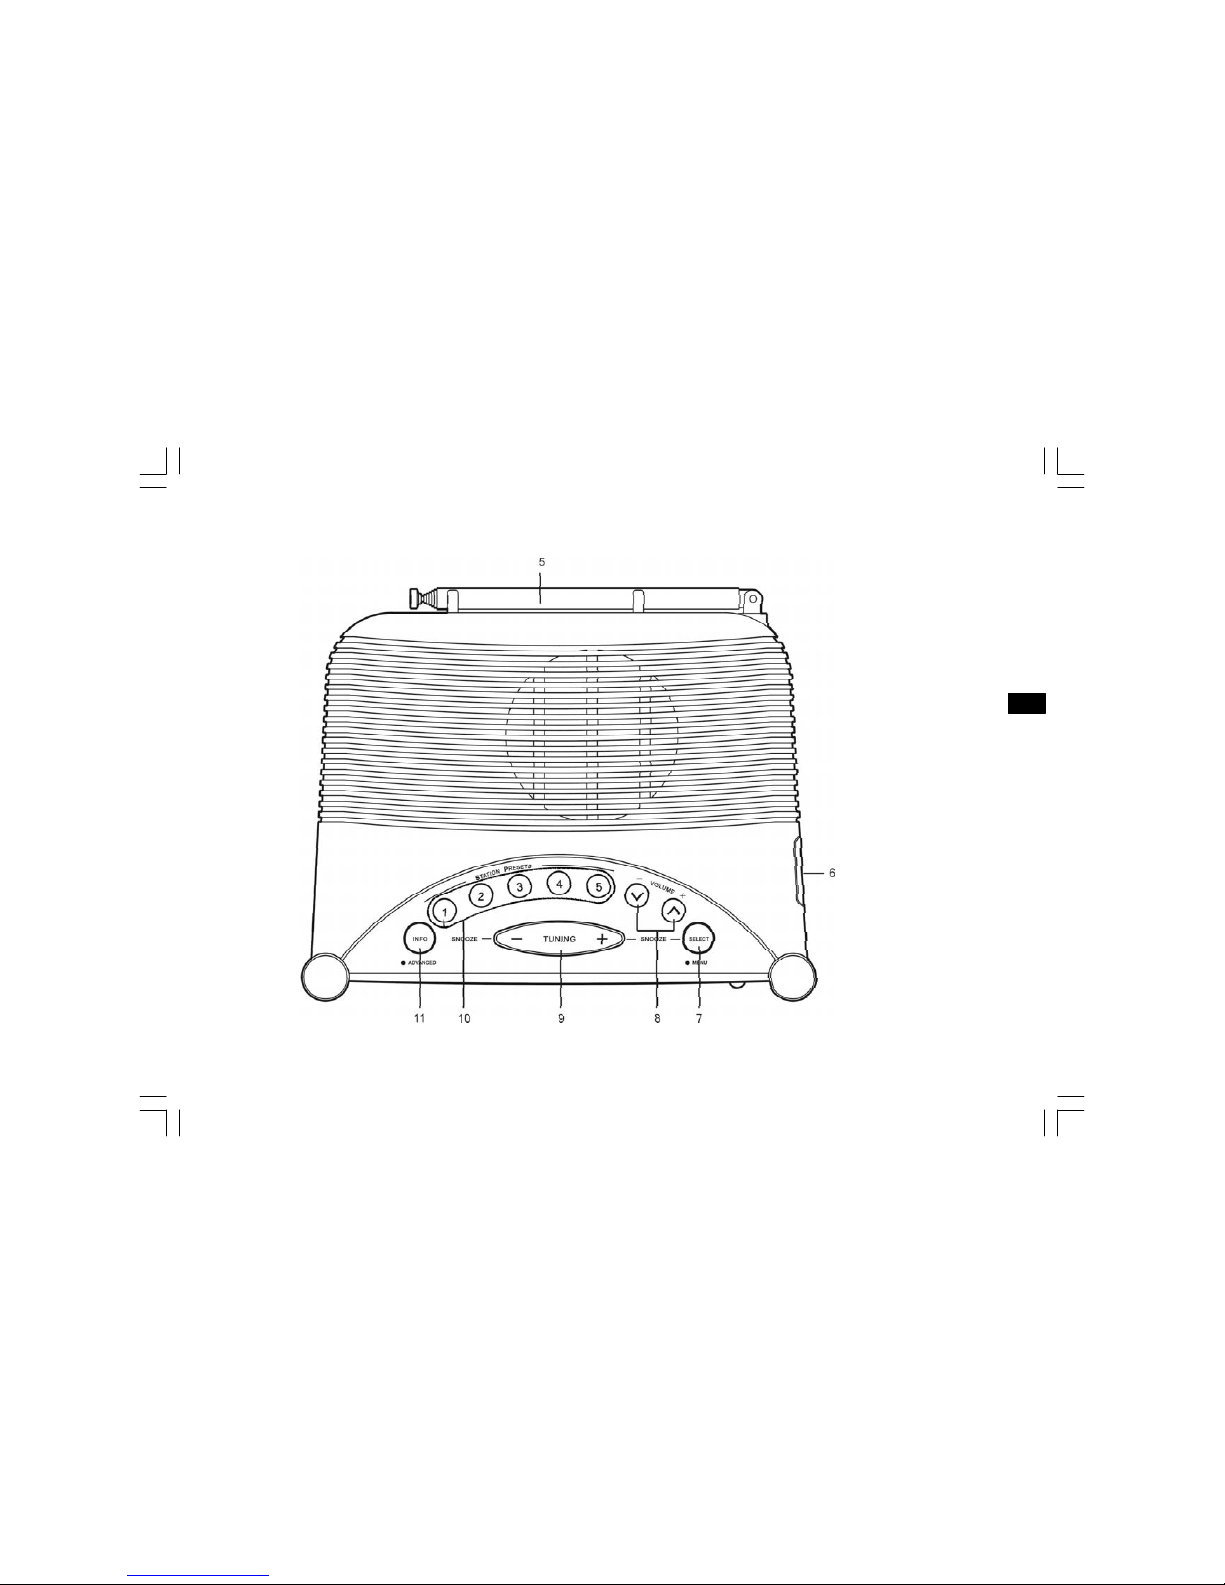
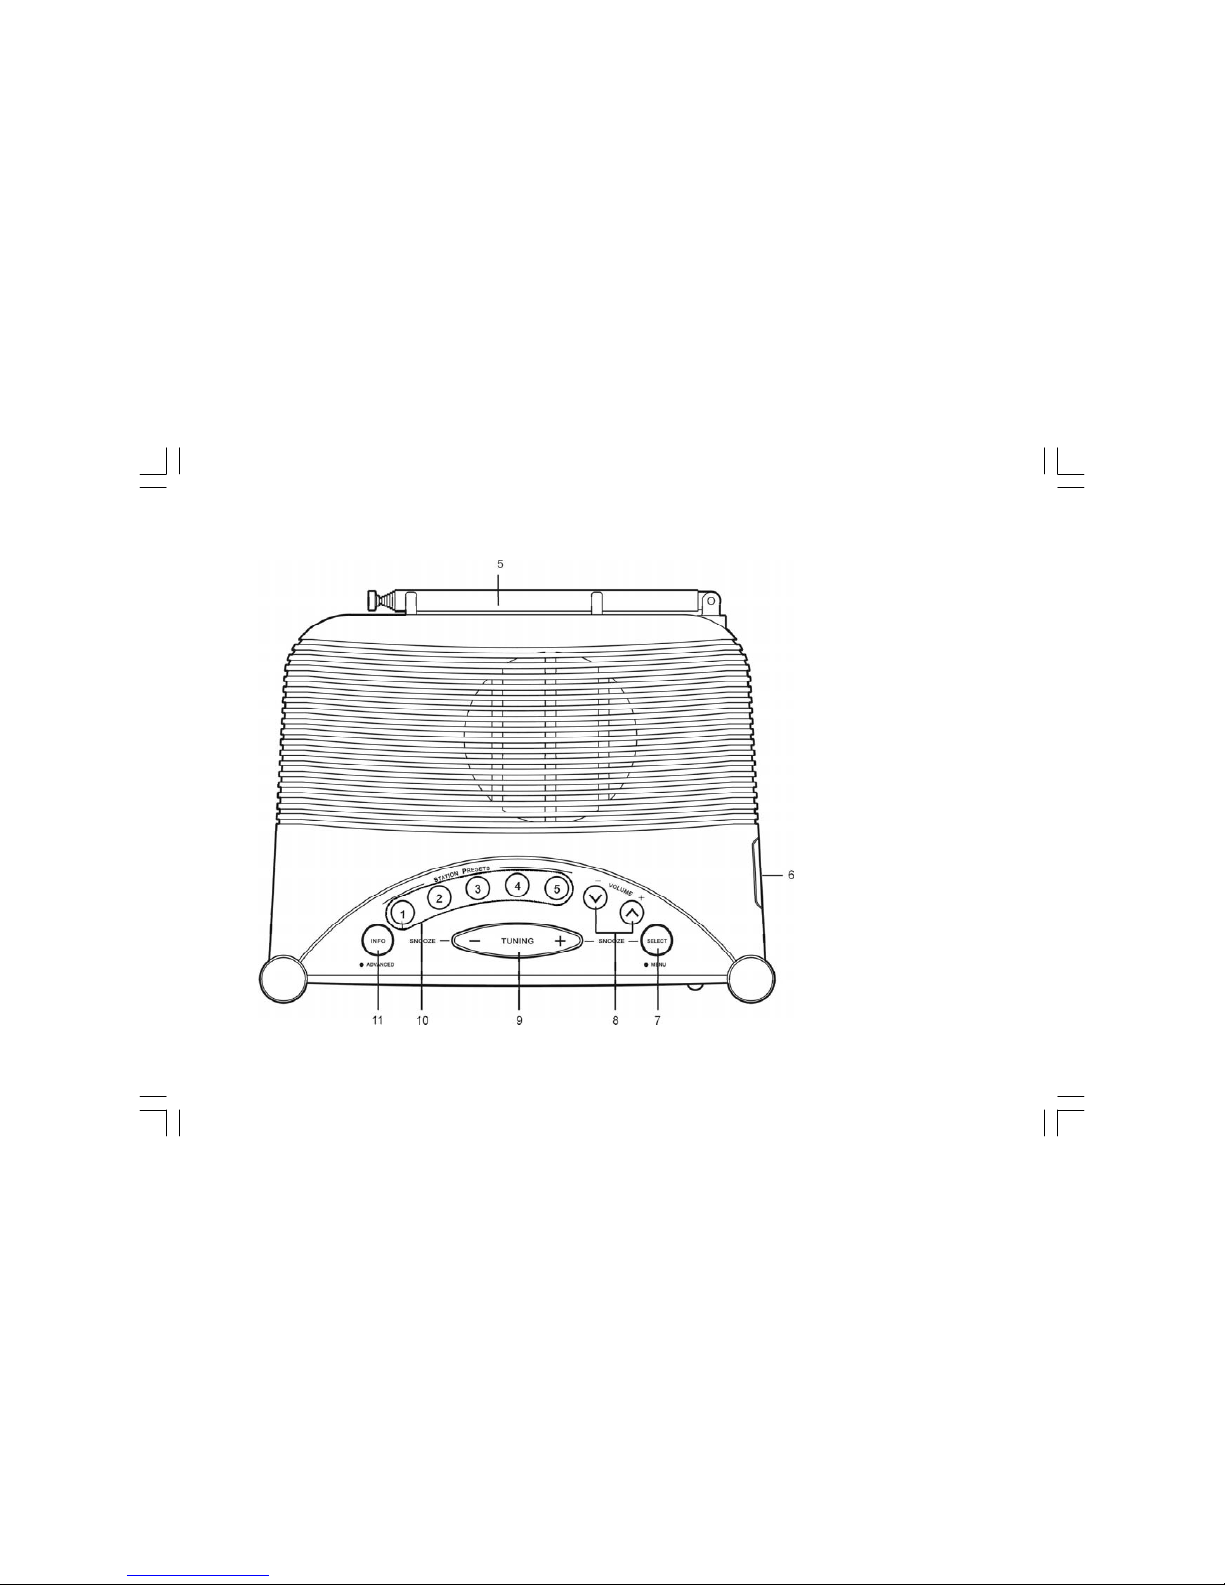
Controls (Top)
5. Telescopic aerial
6. Headphone socket
7. Select button
8. Volume up/down buttons
9. Tuning up/down buttons
10. Preset buttons
11. Info button
4
GB
Page 6
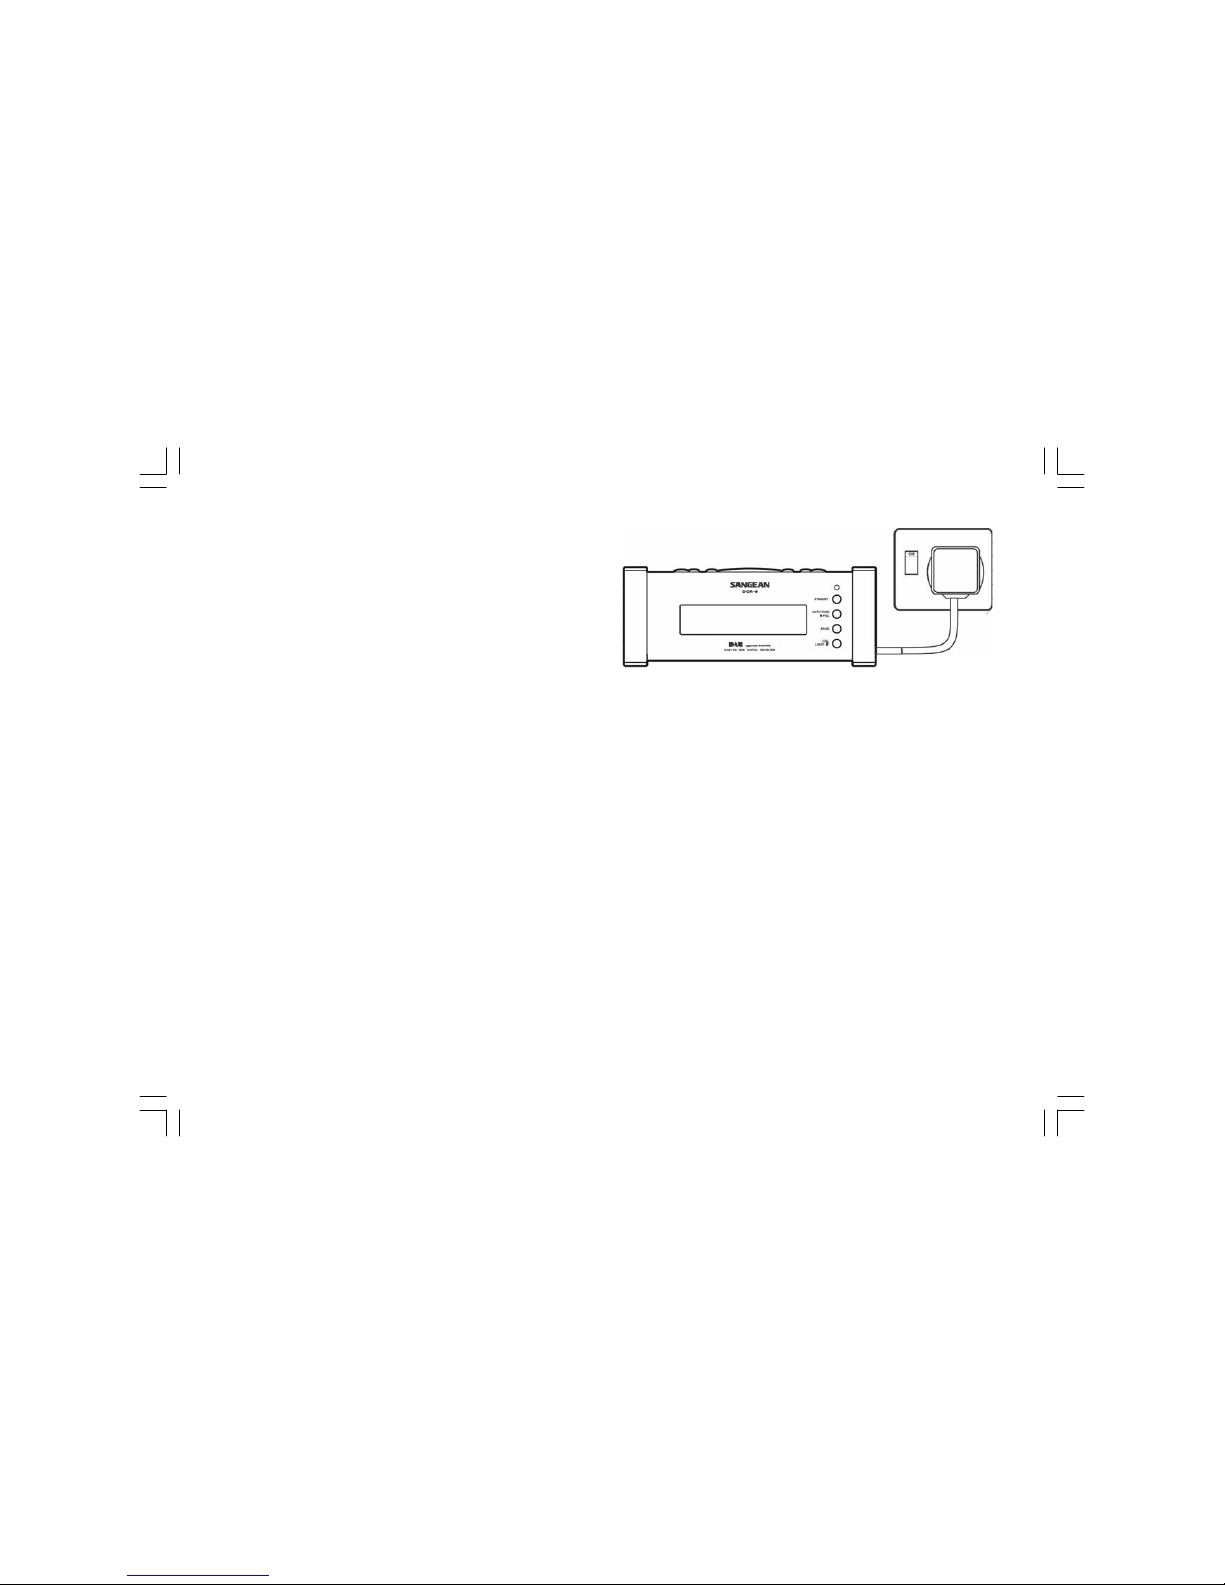
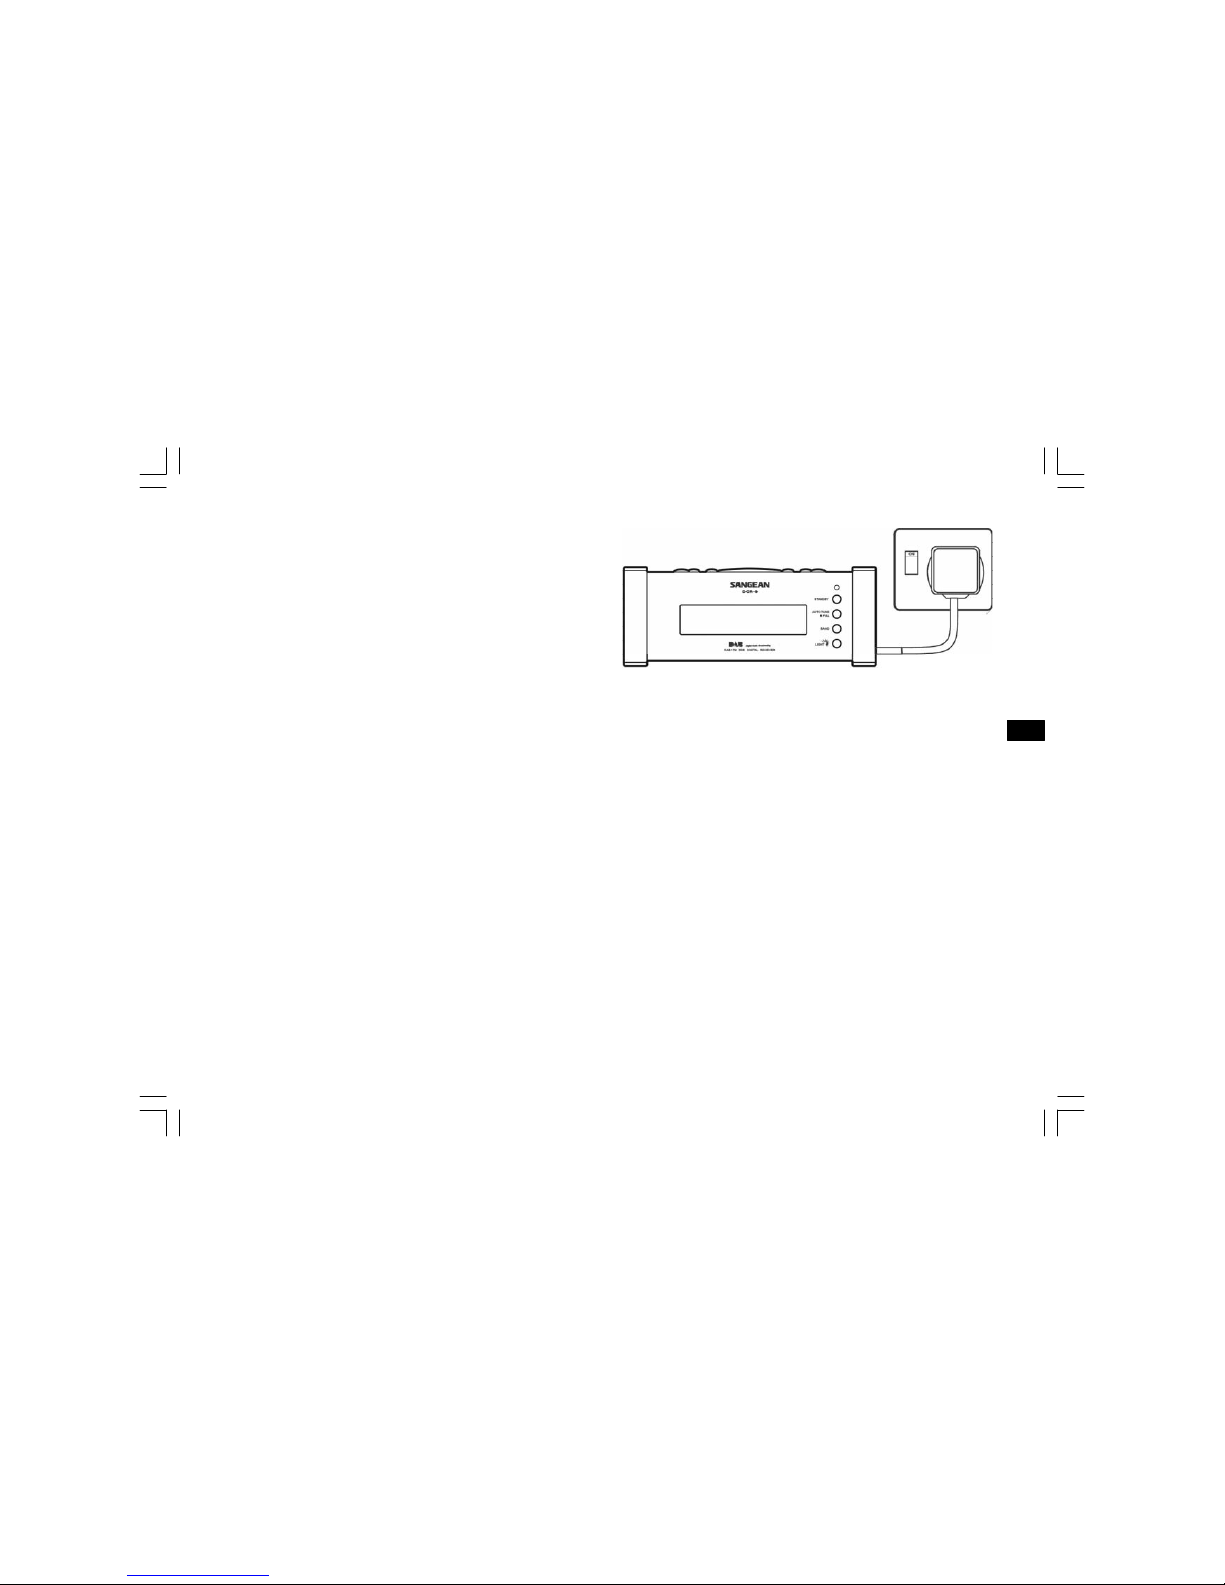
Mains operation
1. Place the unit ona flat surface. Plug the mains lead into awall socket
and switch on the wall socket.
2. The display will show "DAB digital radio" for a few seconds before
returning to clock display.
3. The clock time will be automatically set after your clock radio has
been has been tuned to a DAB station for a few minutes.
5
Page 7
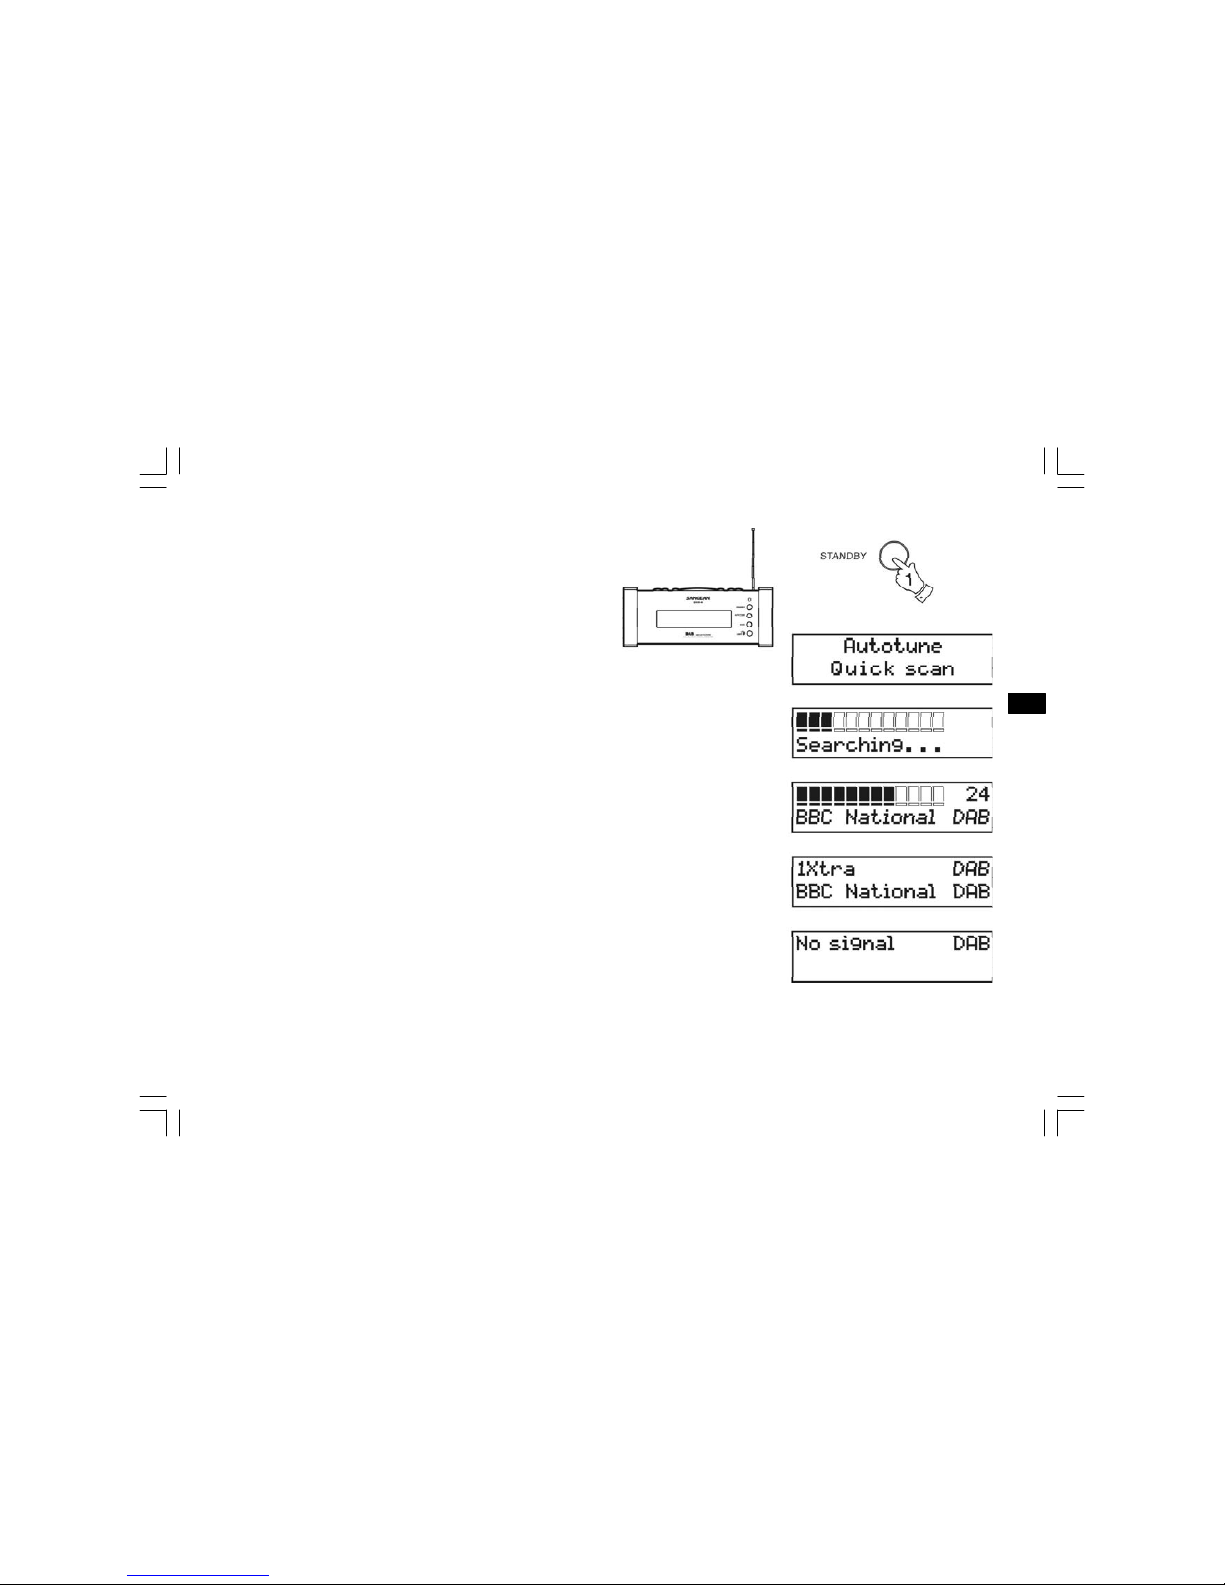
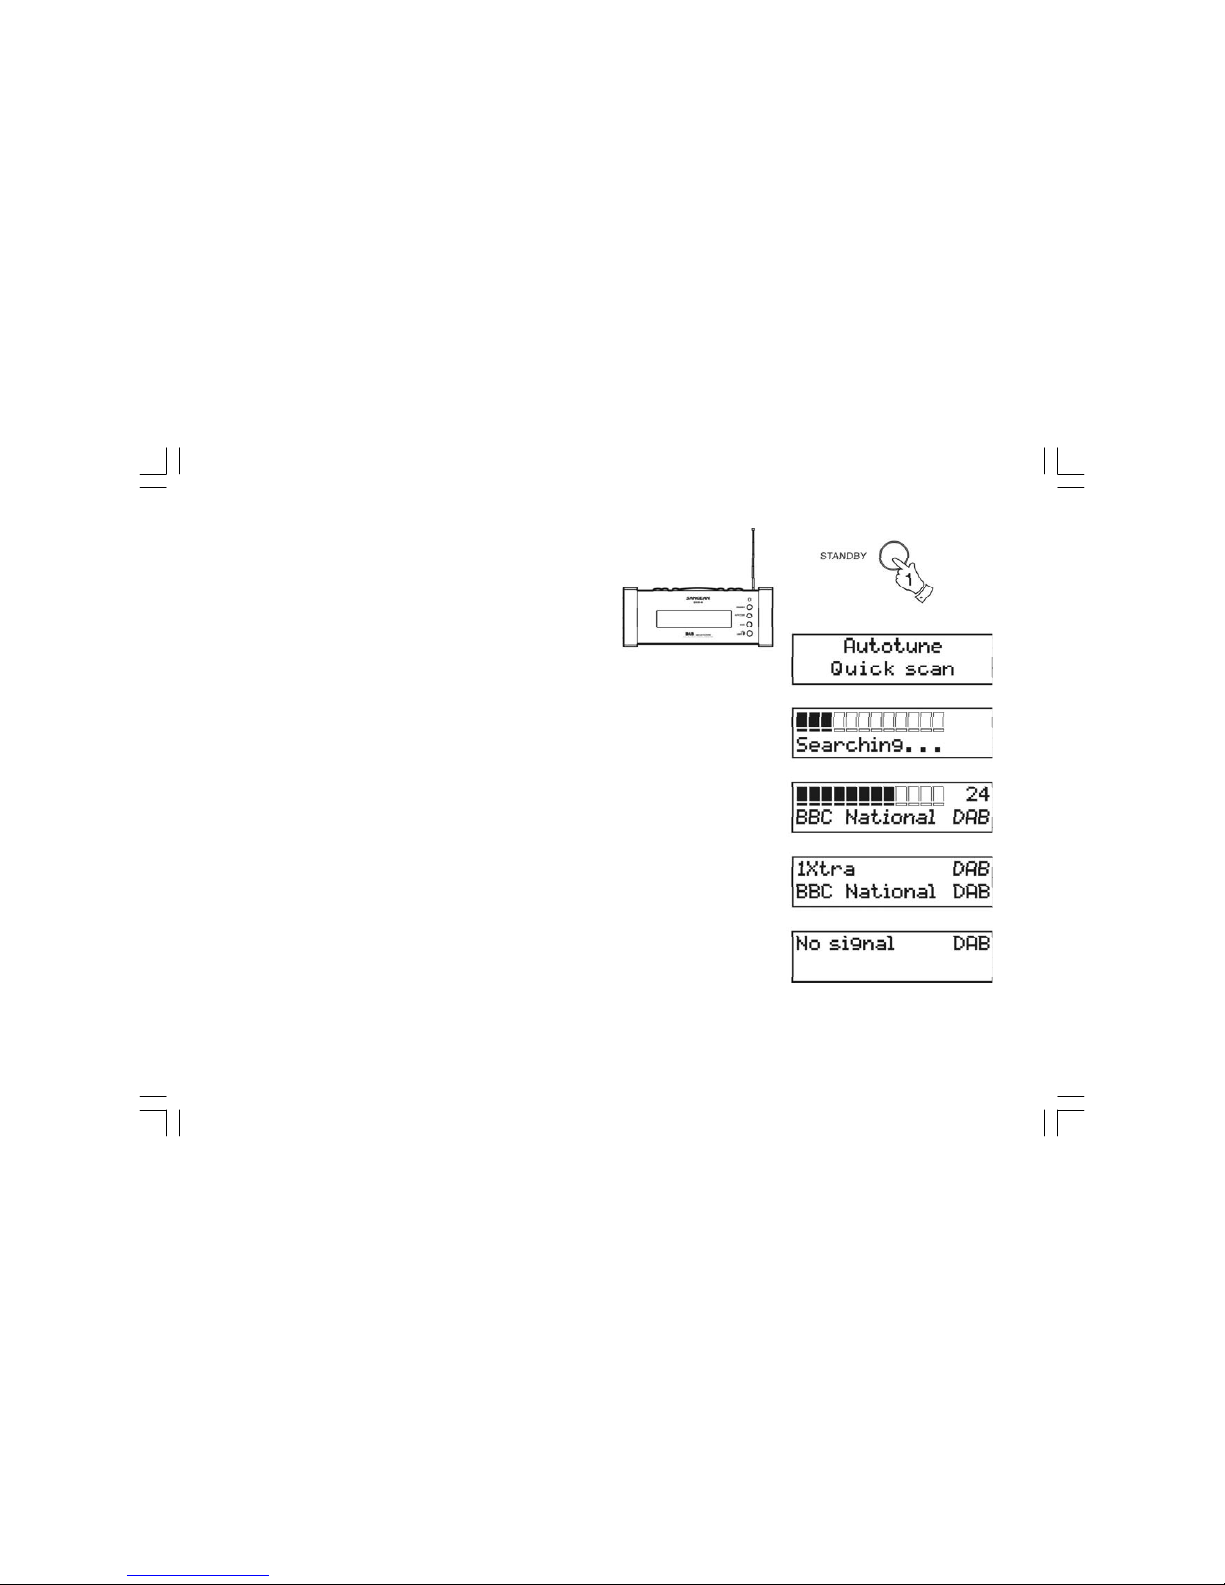
Operating your radio - DAB
1. Fully extend the telescopic aerial.
2. Press the StandBy button to switch on your radio.
3. If this is the first time the radio is used a quick scan DAB channels
will be carried out. The display will show "Autotune Quick scan".
If the radio has been used before the last used station will be
selected.
4. During Autotune as each group of stations is detected the bottom
line of the display will show its name and the station count will be
updated. The top line of the display shows a bargraph indicating
progress of the Autotune.
5. When the Auto tune is complete the first station (in numeric-alpha
order 0...9...A....Z) will be selected.
6. If the station list is still empty after theAutotune your radio will display
"No Signal".
7. If no signals are found it may be necessary to relocate your radio
to as position giving better reception.
6
GB
Page 8
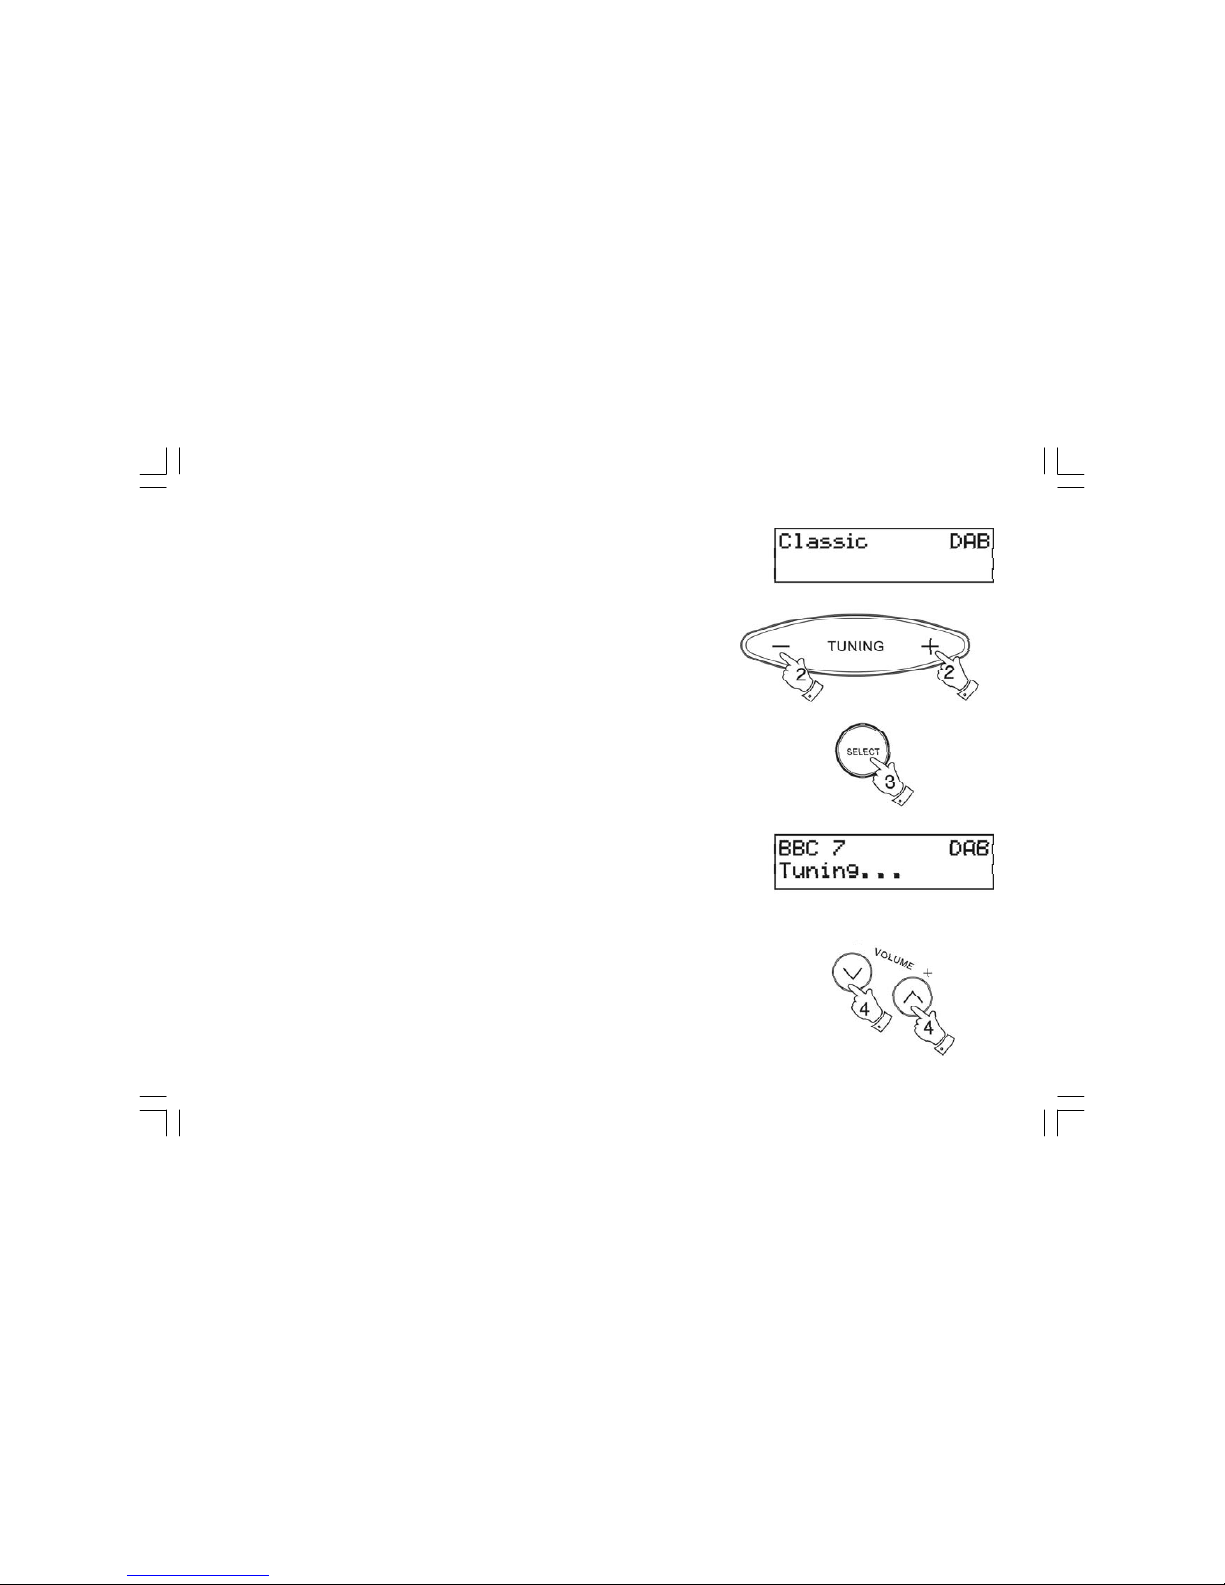
Selecting a station - DAB
1. The top line of the display shows the name of the station currently
selected.
2. Press the Tuning up or down buttons to step through the list of
available stations.
3. Press and release the Select button to select the station. The
display may show "Tuning" while your radio finds the new station.
4. Adjust the Volume control to the required setting.
Note: If after selecting a station the display shows "Not Available"
it may be necessary to relocate your radio to a position giving better
reception.
7
Page 9

Display modes - DAB
Your radio has five display modes:-
1. Press the Info button to cycle through the various modes.
a. Scrolling text Displays scrolling text messages such
as artist/track name, phone in number,
etc.
b. Programme type Displays type of station being listened to
e.g. Pop, Classic, News, etc.
c. MultiplexName Displays name of multiplex to which
curre ntstation belongs.
d. Signal strength Displays signal strength forstation being
listened to.
e. Time and date Displays current time and date.
Secondary services - DAB
1. Certain radio stations have one or more secondary services
associated with them. If astation has asecondaryservice associated
with it thedisplaywillshow" " next to the stationnameon the station
list. The secondary service will then appear immediately after the
primary service as you move through the tuning list.
8
GB
Page 10
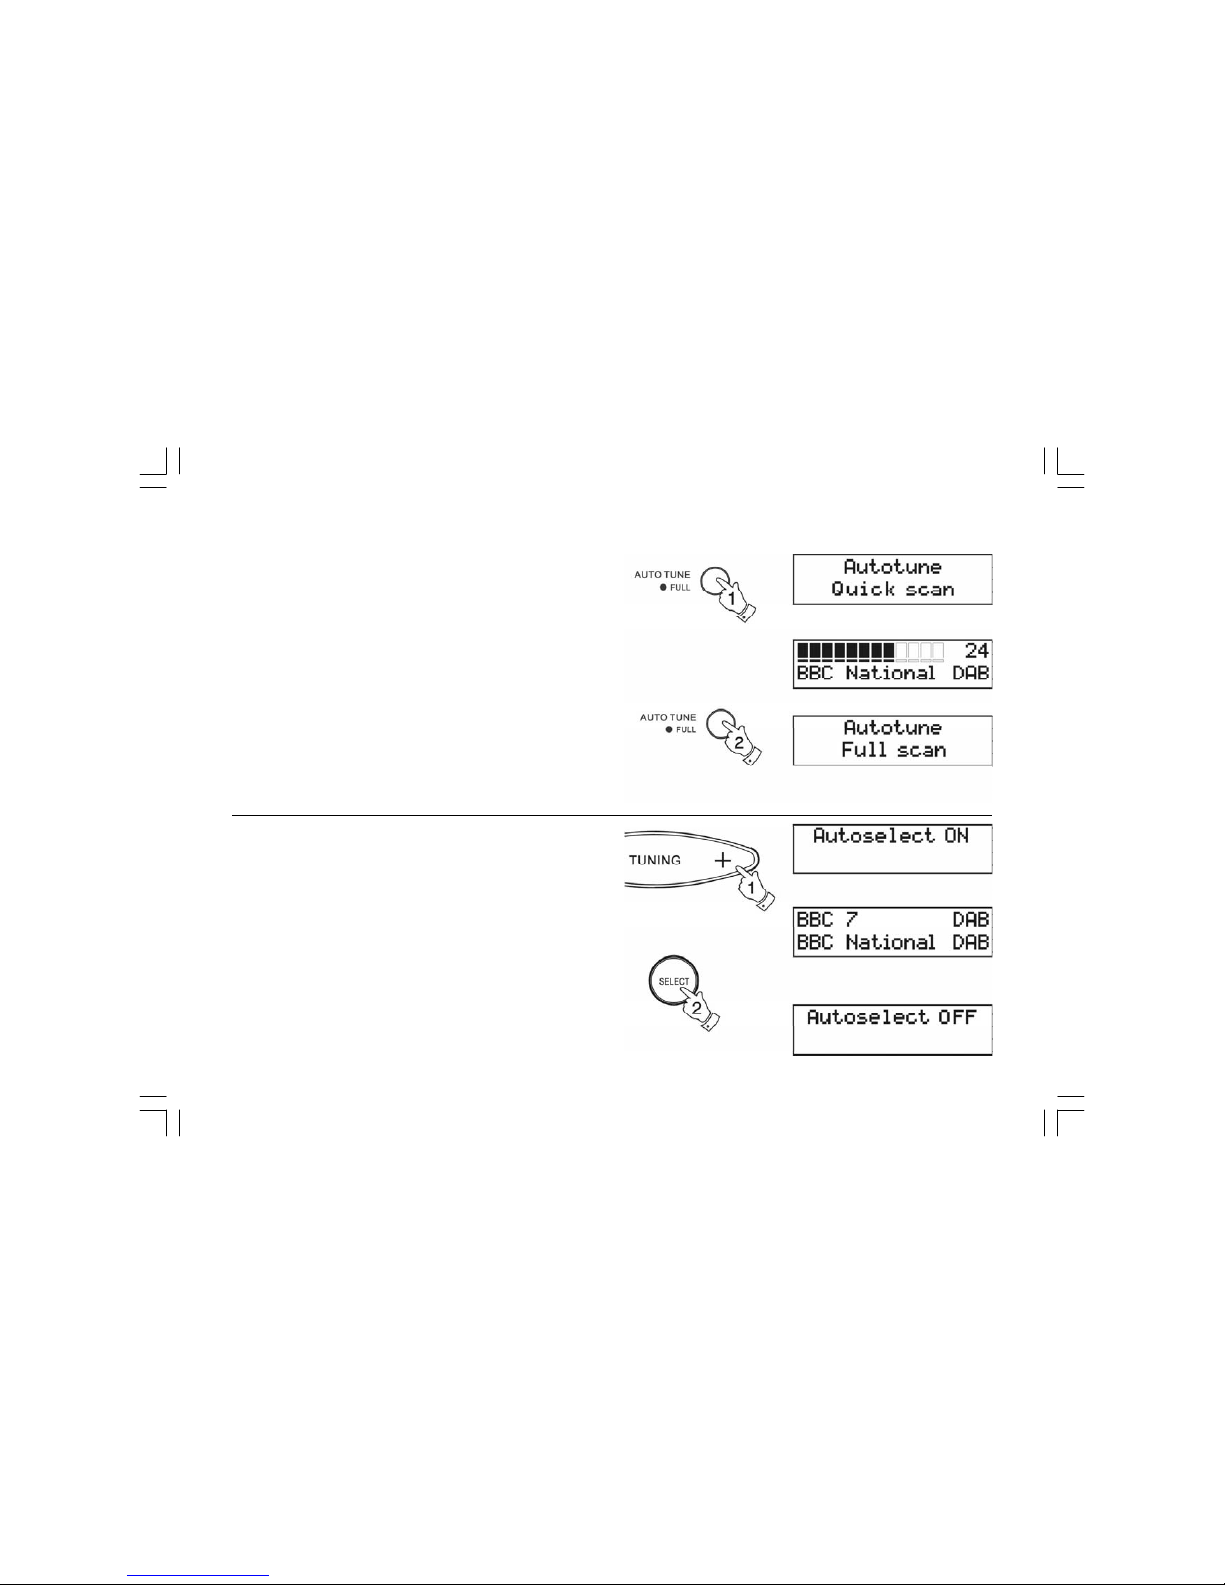
Finding new stations - DAB
As time passes new stations may become available. To find new
stations proceed as follows:-
1. Press and release the AutoTune button, the display will show
"Autotune Quick Scan". Your radio will perform a scan of the DAB
frequencies. As new stations are found the station counter on the
right-hand side of the display will increase and stations will be added
to the list
2. To carry out a full scan of the entire DAB Band III frequencies press
and hold down the AutoTune button formorethan2secondsand
then release. The display will show "Autotune Full scan". As new
stations are found the station counter on the right-hand side of the
display will increase and stations will be added to the list
Autoselect - DAB
As an alternative to pressing the tuning control to select a station your
radio can be set so as to automatically select a station.
1. Press either the Tuning up or down buttons afewtimes,
immediately press and hold in the Select button until the display
shows "Autoselect ON".
2. Scroll through the tuning list using the Tuning up or down buttons
until the station you require is visible on the display, after a few
seconds your radio will automatically select the station shown on
the display.
3. To switch off Autoselect press either the Tu ning up or down
buttons a few times, immediately press and hold in the Select
button until the display shows "Autoselect OFF".
9
Page 11
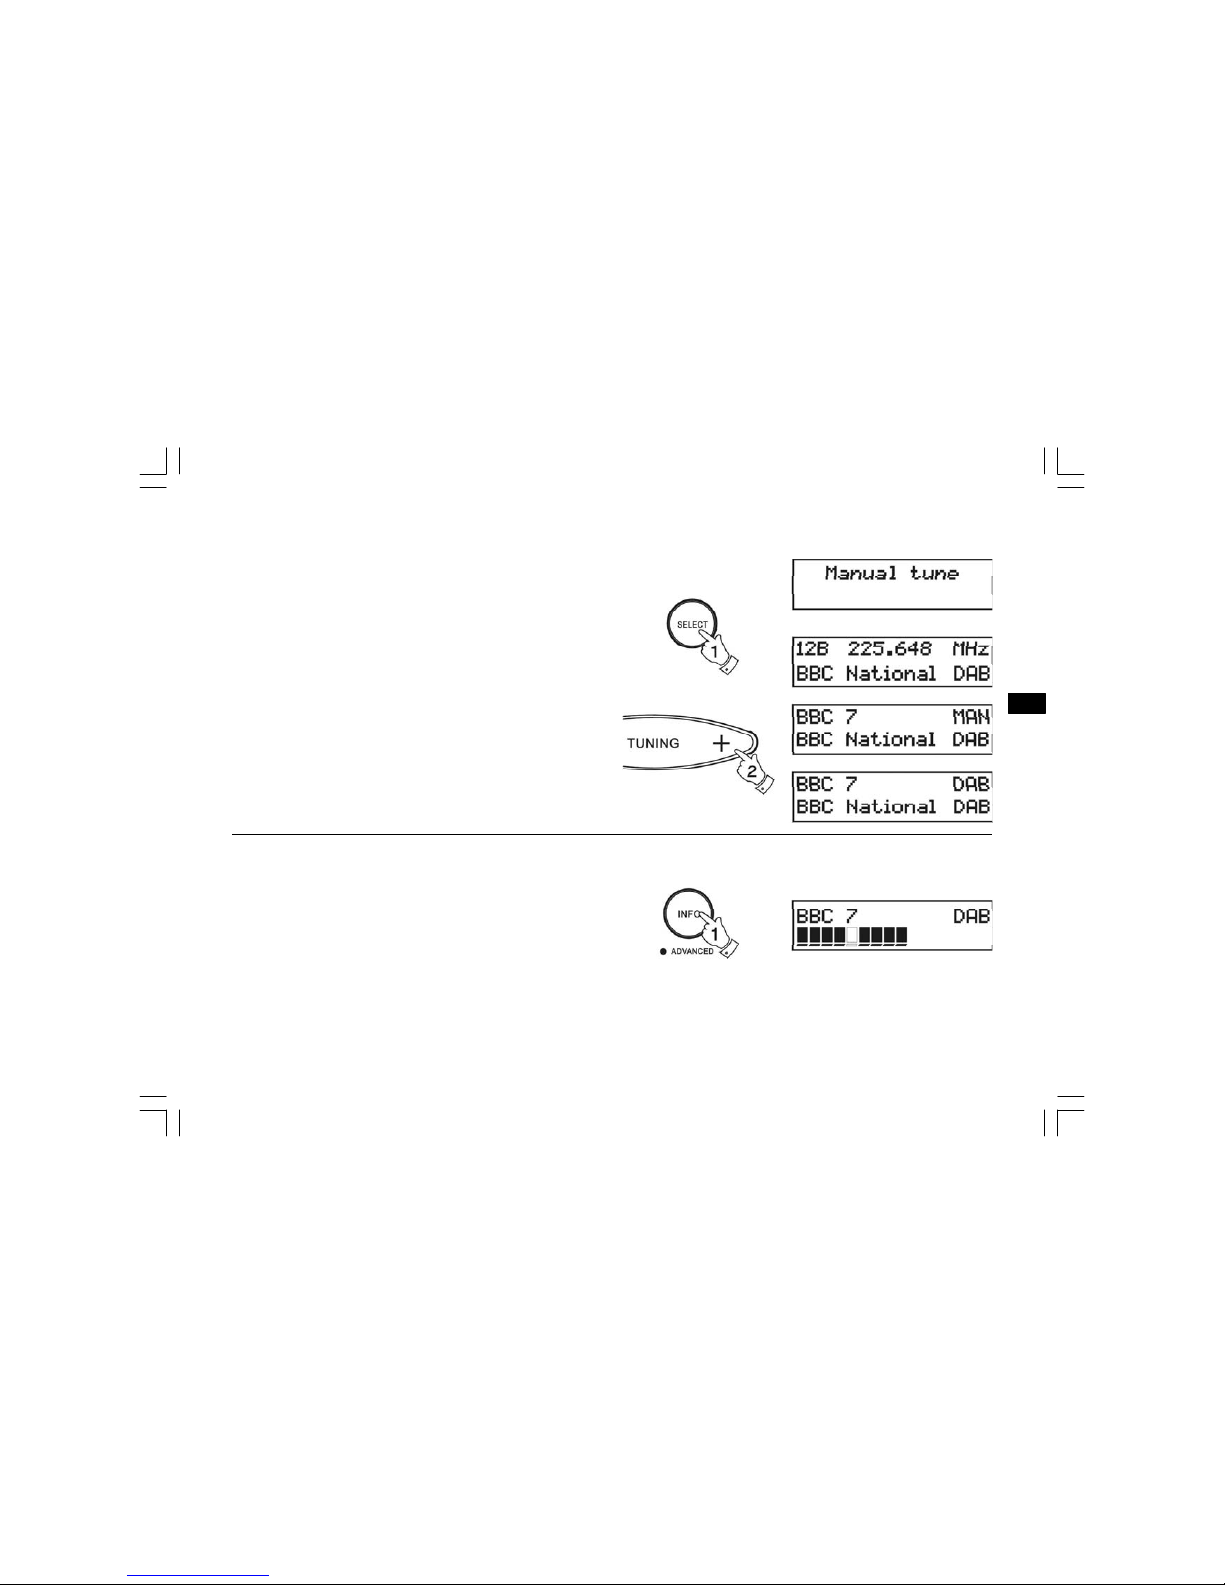
Manual Tuning - DAB
Manual tuning allows you to tune directly to the various DAB Band III
channels.
1. Press and hold in the Select button until the display shows "Manual
tune".
2. Press the Tuning up or down buttons to find the required DAB
channel.
3. Press and release the Select button to select the channel.
4. Press the Tuning up or down buttons to select the stations
contained within the Multiplex for the selected DAB channel.
5. Press and release the Select button to return to normal tuning
mode.
Signal strength display - DAB
1. Repeatedly press and release the Info button until the lower line
of the display shows signal strength.
2. Position your radio and angle the telescopic aerial for best reception
using the signal strength display as a guide. Move your radio around
and position so as to give maximum number of black rectangles on
signal strength display.
3. The clear unfilled rectangle indicates minimum signal level required
for satisfactory reception.
10
GB
Page 12
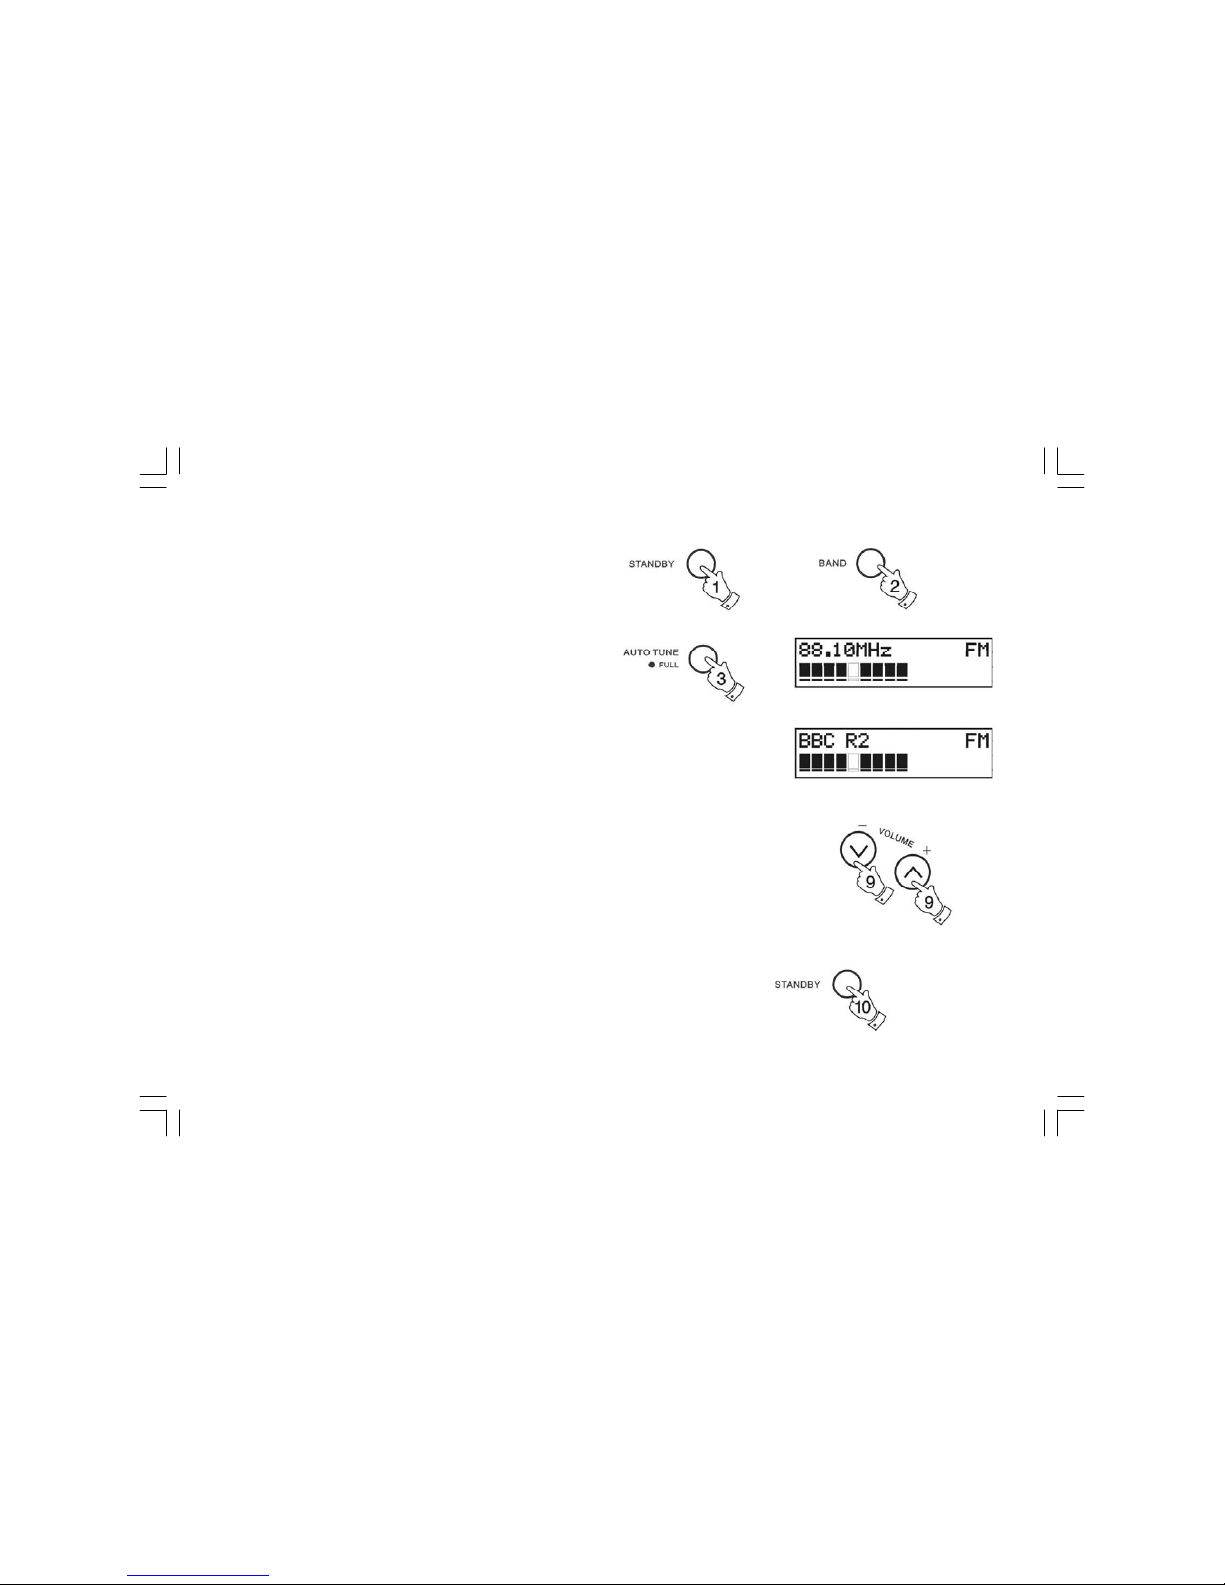
Operating your radio - FM
1. Fully extend the telescopic aerial.
2. Press the StandB y button to switch on your radio. The display will
show "DAB digital radio" for a few seconds.
3. Press the Band button to select the FM band.
4. Press and immediately release the Auto Tune button, your radio
will scan in an upwards direction (low frequency to high frequency)
and stop automatically when it finds a station of sufficient strength.
5. After a few seconds the display will update and show station name.
6. To find other stations press and release the AutoTune button as
before.
7. To scan the FM band in a downwards direction (high frequency to
low frequency) press and hold down the AutoTune button for 0.
5 seconds and then release.
8. When the waveband end is reached your radio will recommence
tuning from the opposite waveband end.
9. Adjust the Volume control to the required settings.
10. To switch off your radio press the StandBy button.
11
Page 13

Manual tuning - FM
1. Press the StandBy button to switch on your radio.
2. Press the FM/DAB button to select the FM band. Fully extend the
Telescopic aerial .
3. Press the Tuning up or do wn buttons to tune to a station. The
frequency will change in steps of 50kHz.
4. When the waveband end is reached the radio will recommence
tuning from the opposite waveband end.
5. Set the Volume control to the desired setting.
6. To switch off your radio press the StandBy button.
12
GB
Page 14
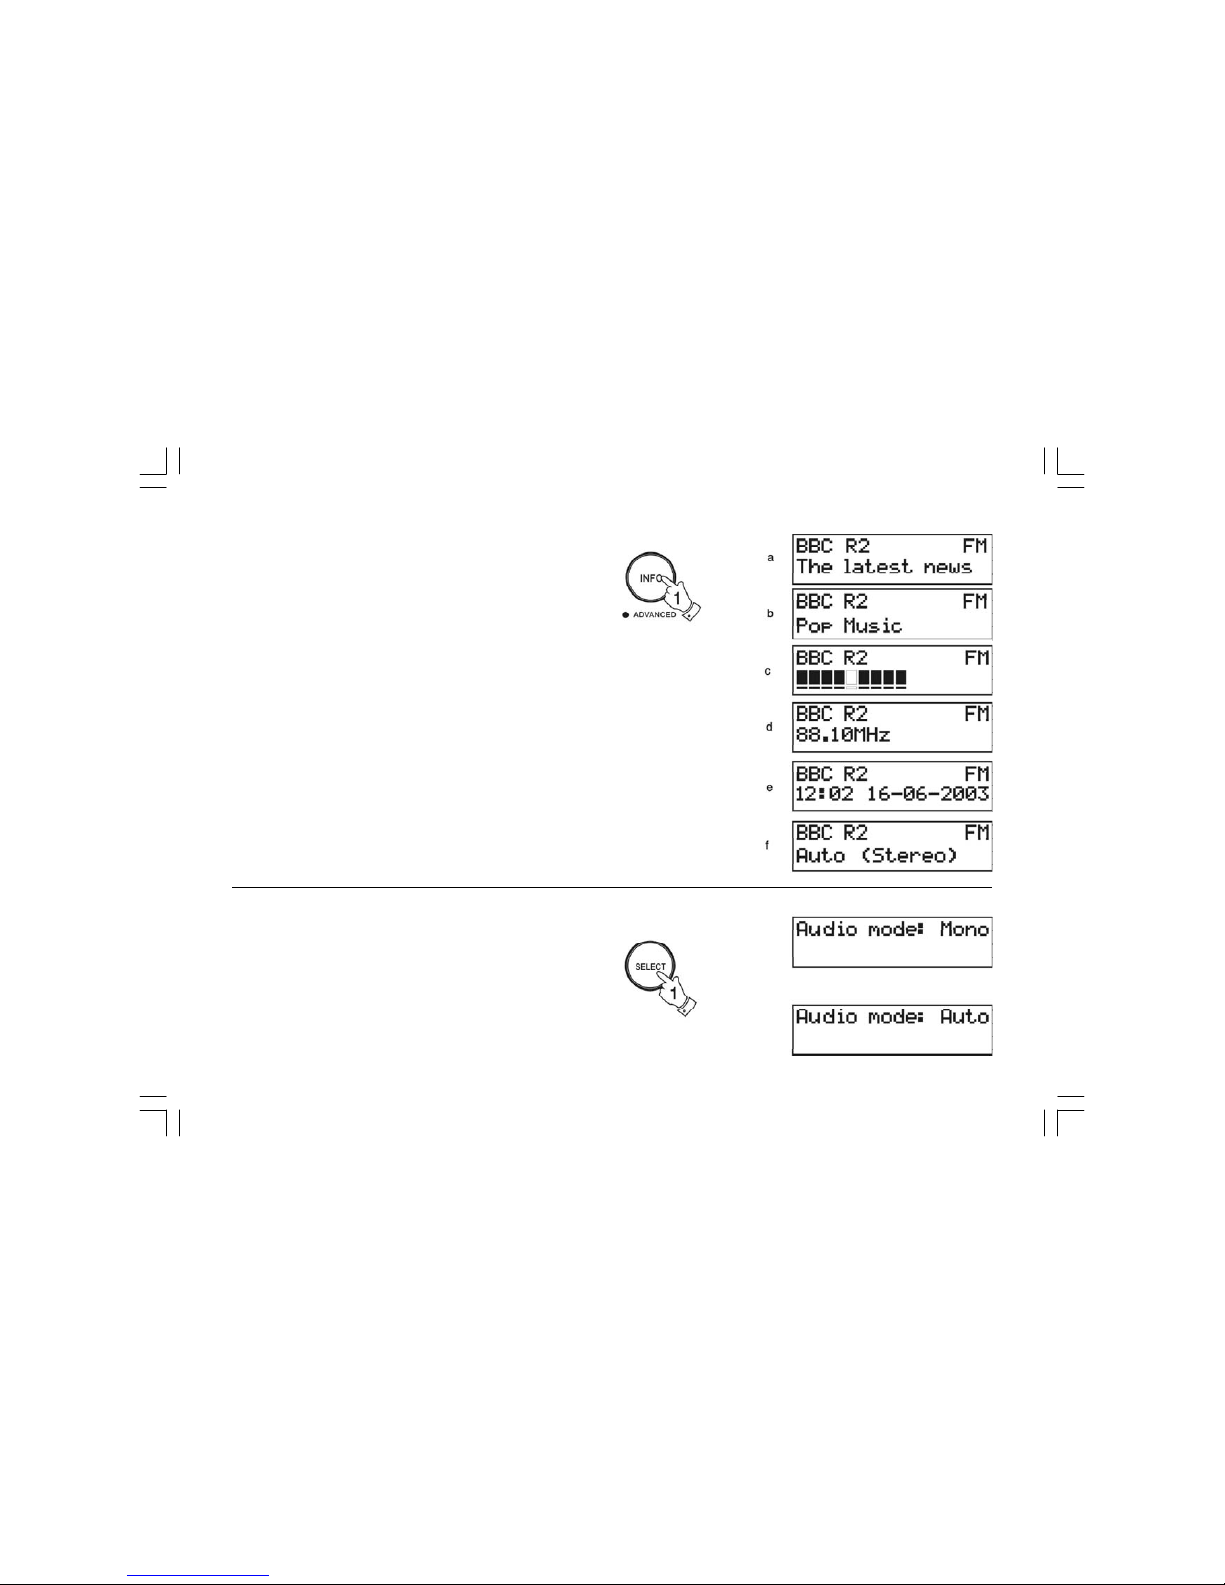
Display modes - FM
On FM the bottom line of the display can be set to any of the following
modes:-
1. Press the Info button to cycle through the various modes.
a. Scrolling text Displays scrolling text messages such
as artist/track name, phone in number
etc.
b. Program Type Displays type of station being listened to
e.g. Pop, Classic, News, etc.
c. Signal strength Displayssignalstrength for station being
listened to.
d. Time and date Displays current time and date.
e. Frequency Displays frequency of the station being
listened to.
f. Audio mode Display shows Auto (stereo) or mono.
FM Stereo/Mono
1. If a station being received is weak some hiss may be audible. To
reduce the hiss press and hold in the Select button until the display
shows "Audio mode : mono" your radio will switch to mono mode.
2. To return to stereo mode press and hold in the Select button until
the display shows "Audio mode :Auto", your radio will switch to
stereo mode.
Note: FM stereo is only available when using earphone/headphones
13
Page 15
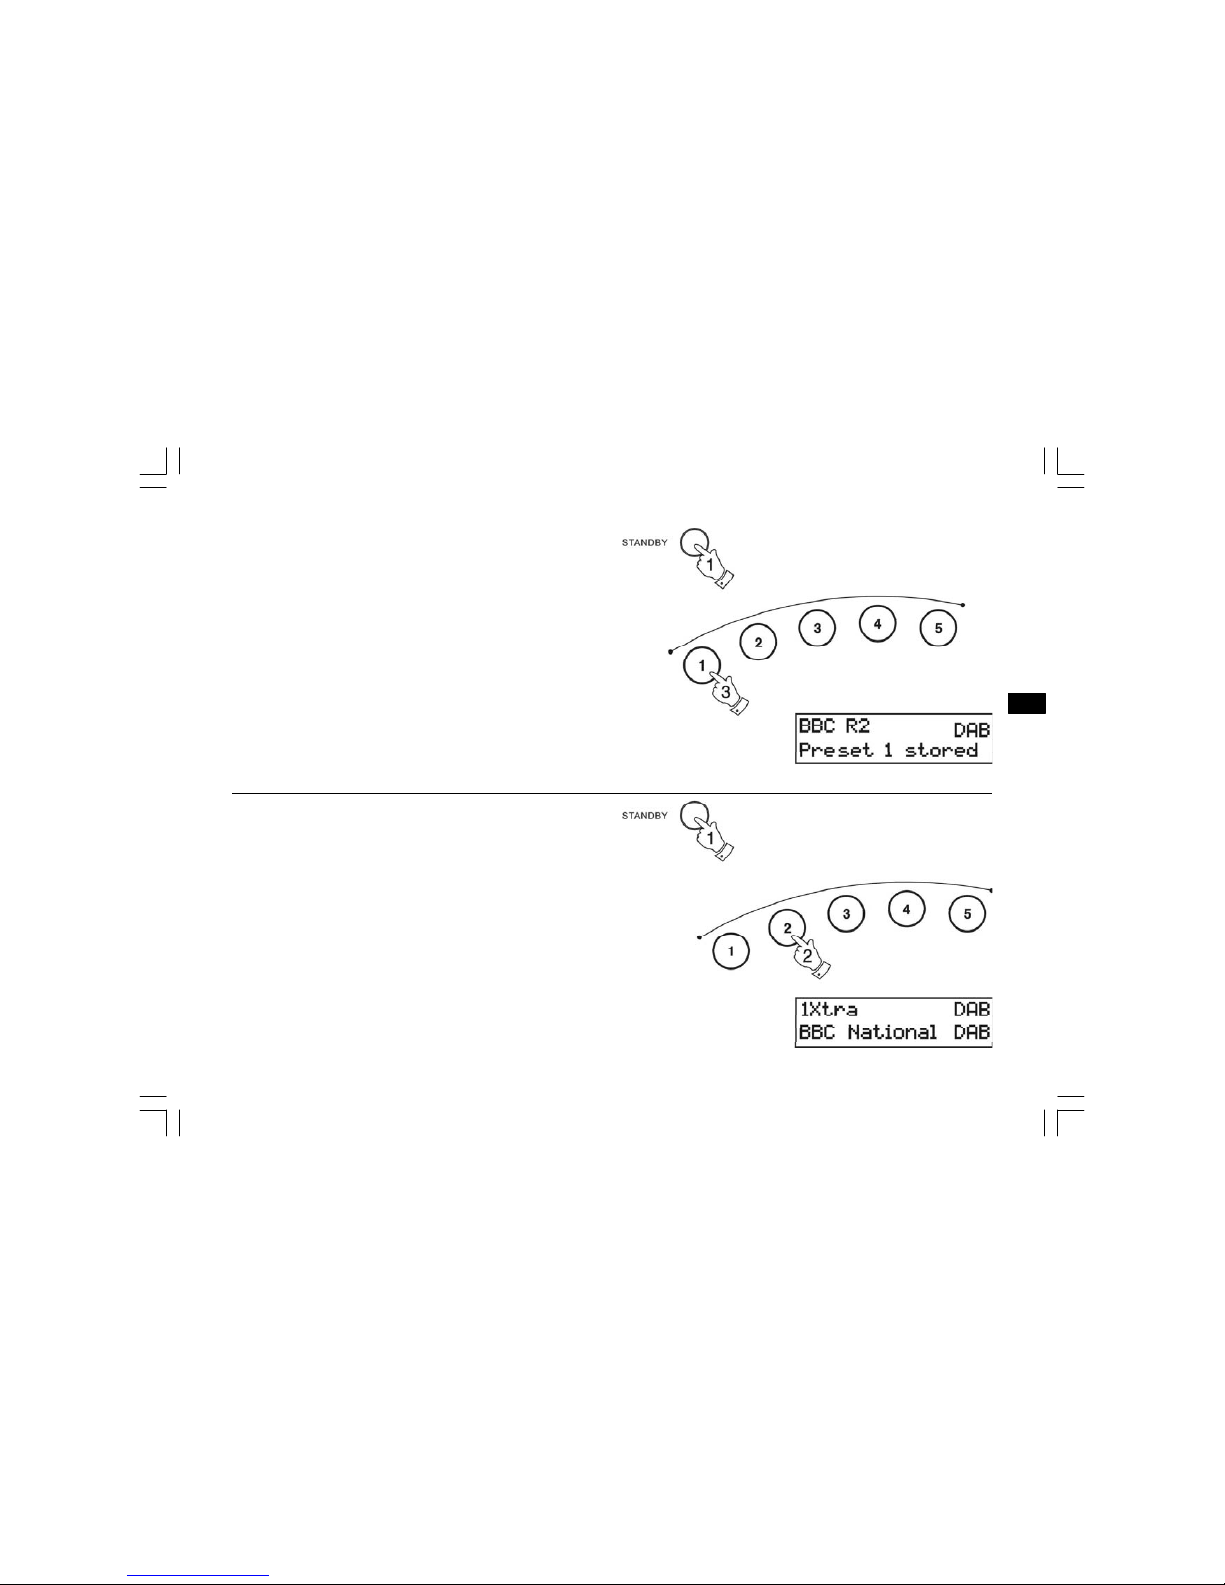
Presetting stations - DAB and FM
There are 5 memory presets for each of the 2 wavebands.
1. Press the StandBy button switch on the radio.
2. Tune to the required station as previously described.
3. Press and hold down the required Preset button until the display
shows e.g. "Preset 1 stored". The station will be stored under the
chosen preset button. Repeat this procedure for the remaining
presets.
4. Stations stored in preset memories may be overwritten by following
the above procedure.
Recalling a preset station - DAB and FM
1. Press the StandBy button to switch on the radio.
2. Select the required waveband by pressing the Band button.
3. Momentarily press the required Preset button, your radio will tune
to the station stored in preset memory.
14
GB
Page 16
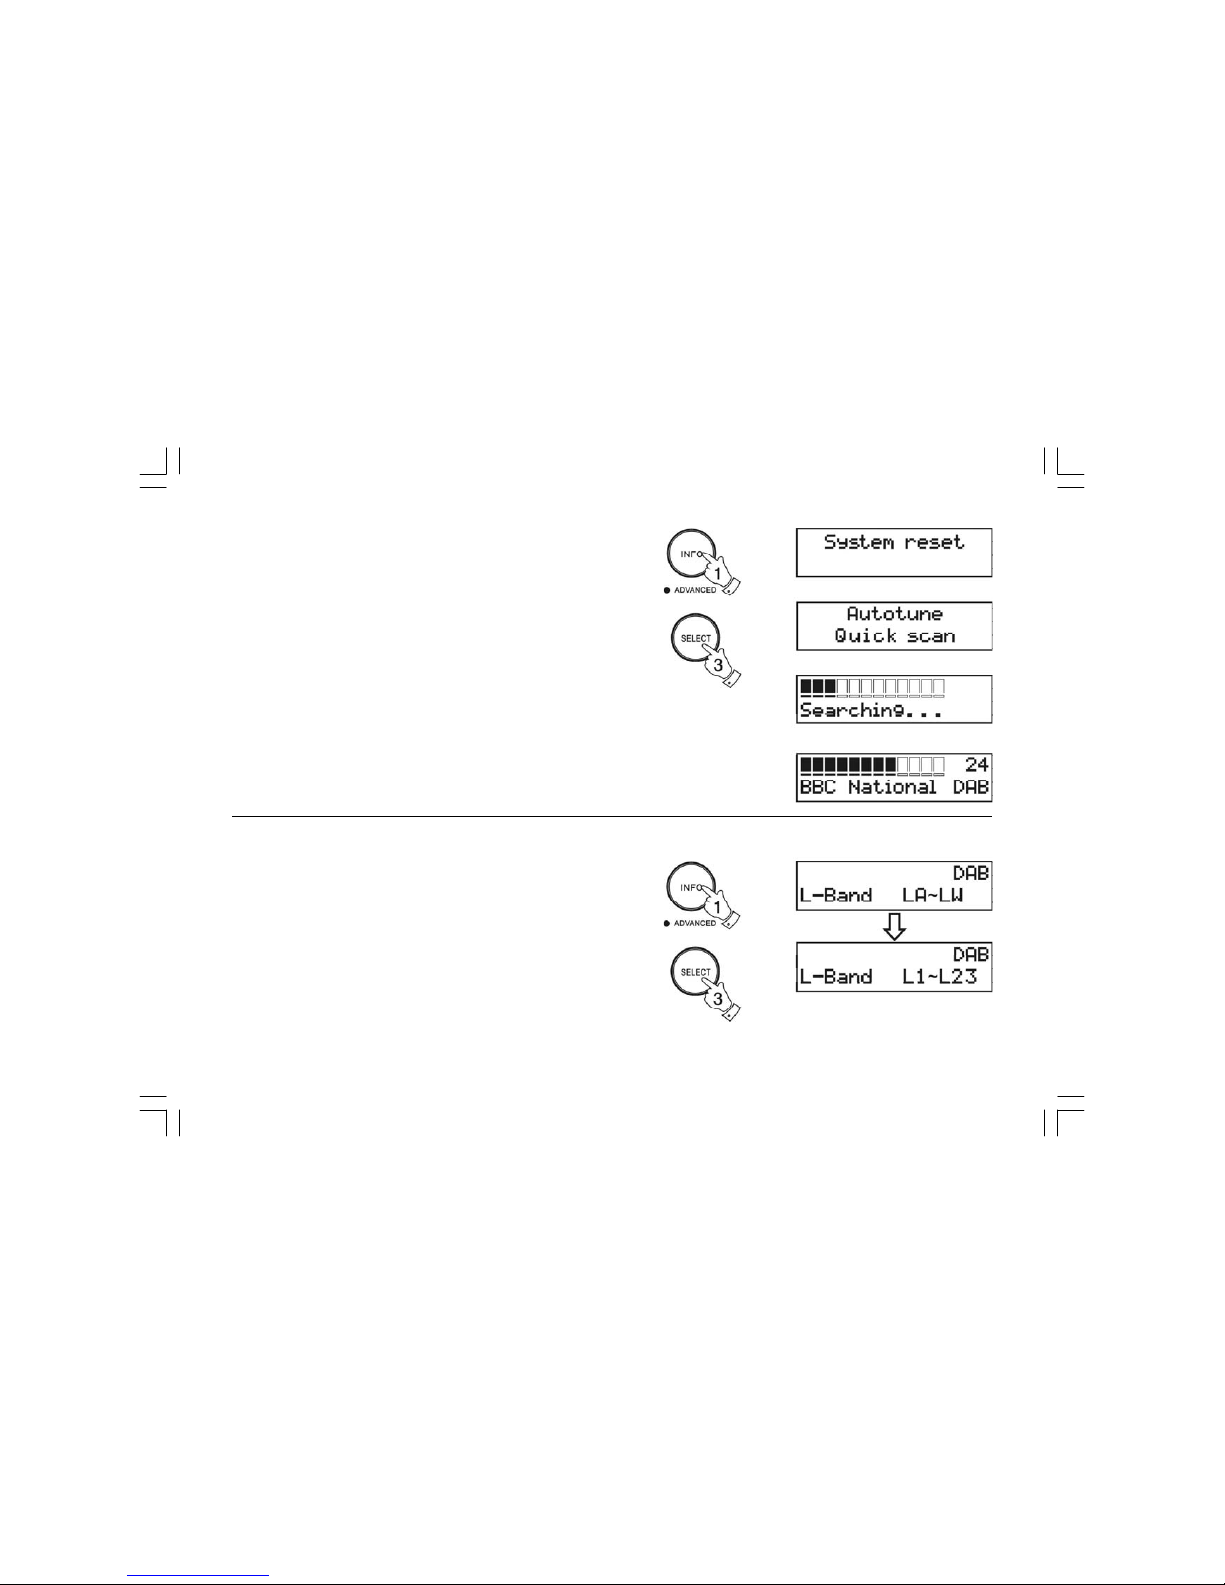
System reset
If your radio fails to operate correctly, or some digits on the display are
missing or incomplete carry out the following procedure.
1. Press and hold in the Info button until the display shows the
software version.
2. Press the Info button twice the display will show System reset.
3. Press in and release the Select button to select System reset.
4. If DAB was used last then a "Quick scan" of the DAB band will be
performed, otherwise a "Quick scan" will be carried out the nexttime
the DAB band is selected.
Select L band channels for Canada (DCR-209 only)
L band channels in Canada and Europe are different. Initial setting for
L band channels of this receiver is for Europe (Quick scan 10A-LK and
Full scan 5A-LW). For Canada, following steps should be taken to select
suitable L band channels in Canada (Quick scan L1-L23 and 5A-L23 full
scan).
1. Press and hold the Info button until display shows software version.
2. Press the Info button twice, the display will show L band.
3. Press Select button to change the L band channels LA-LW (for
Europe) to be L1-L23 (for Canada).
15
Page 17
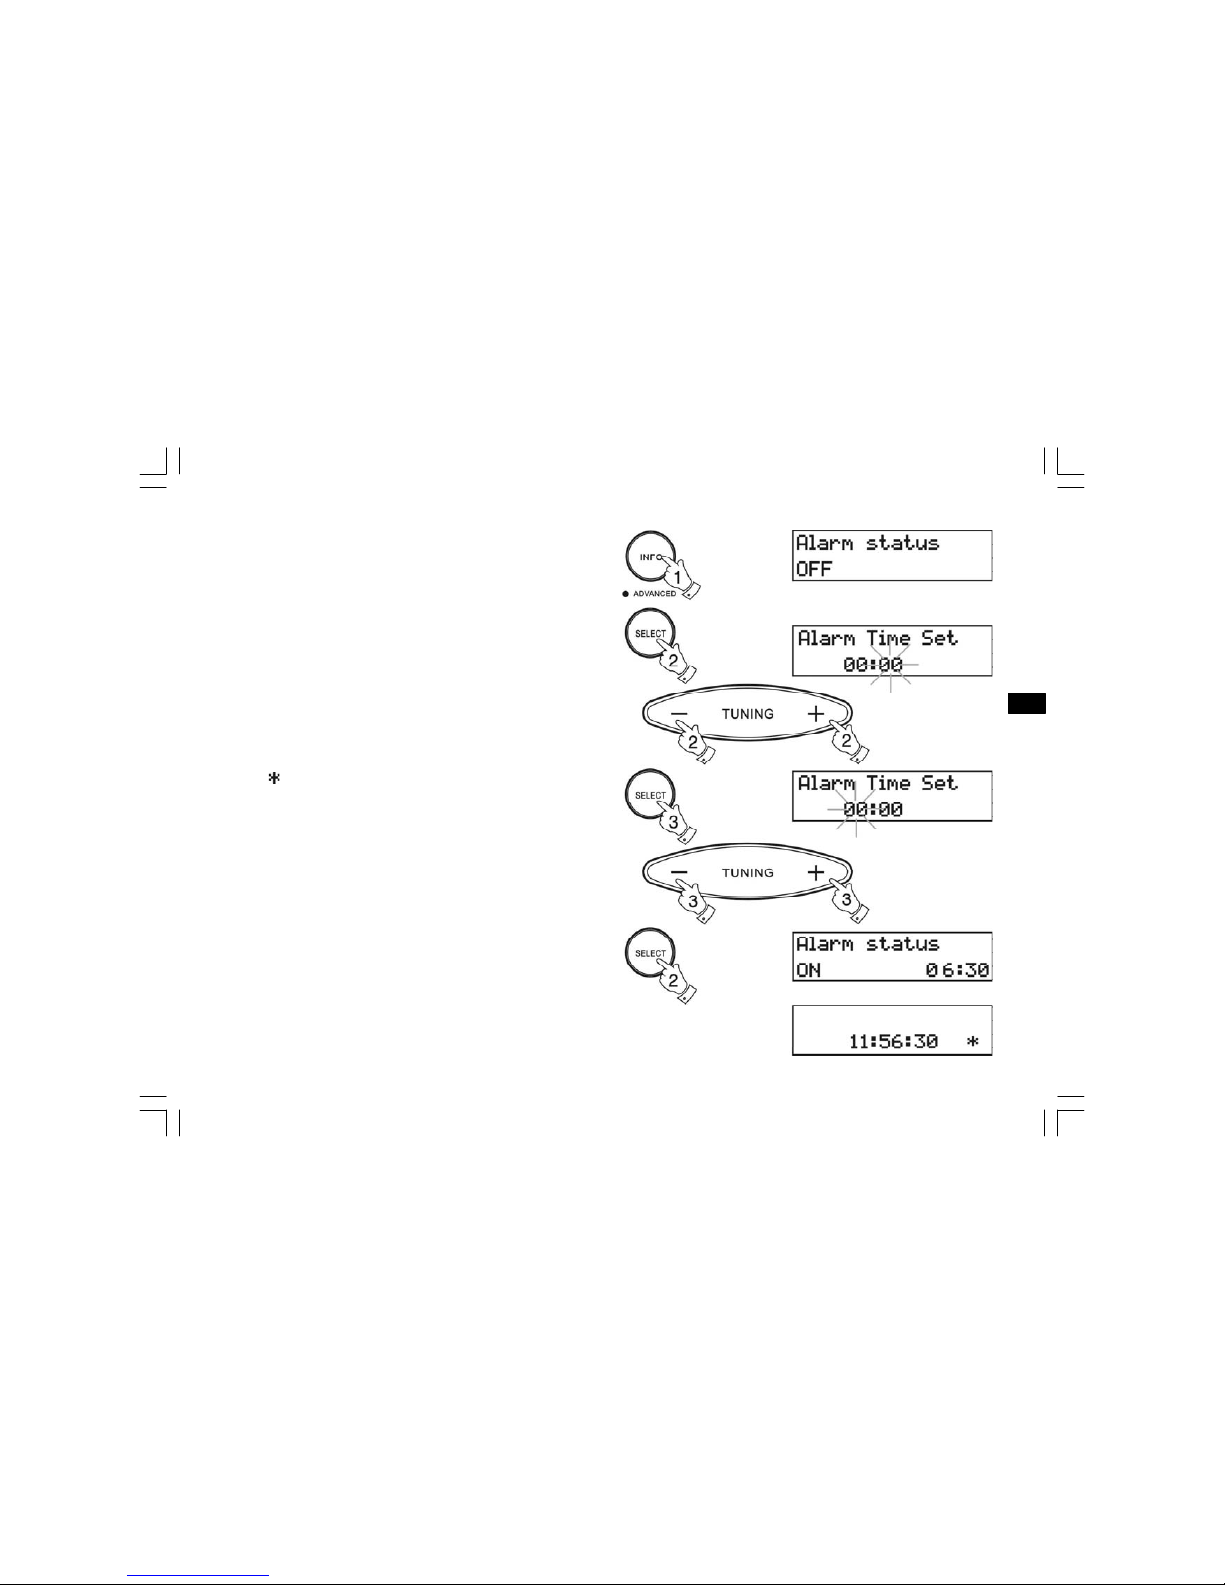
Setting the alarm time
1. Repeatedly press and release the Info button until the display
shows Alarm Status.
2. Press the Select button the display will show Alarm Time Set. The
minutes digits willbegin to flash in the display. Set the required minute
using the Tuning Up/Down buttons.
3. Press the Select button. The hours digits will begin to flash in the
display. Set the required hour using the Tuning Up/Down bu ttons.
4. Press the Select button to confirm the alarm setting. The display
will show Alarm Status On together with the alarm time. After a few
seconds the display will revert to showing real time.
A symbol will appear in the display indicating that the alarm is
active.
Note: Alarm times are set using 24Hr format e.g. 2:30PM is
entered as 14:30
16
GB
Page 18
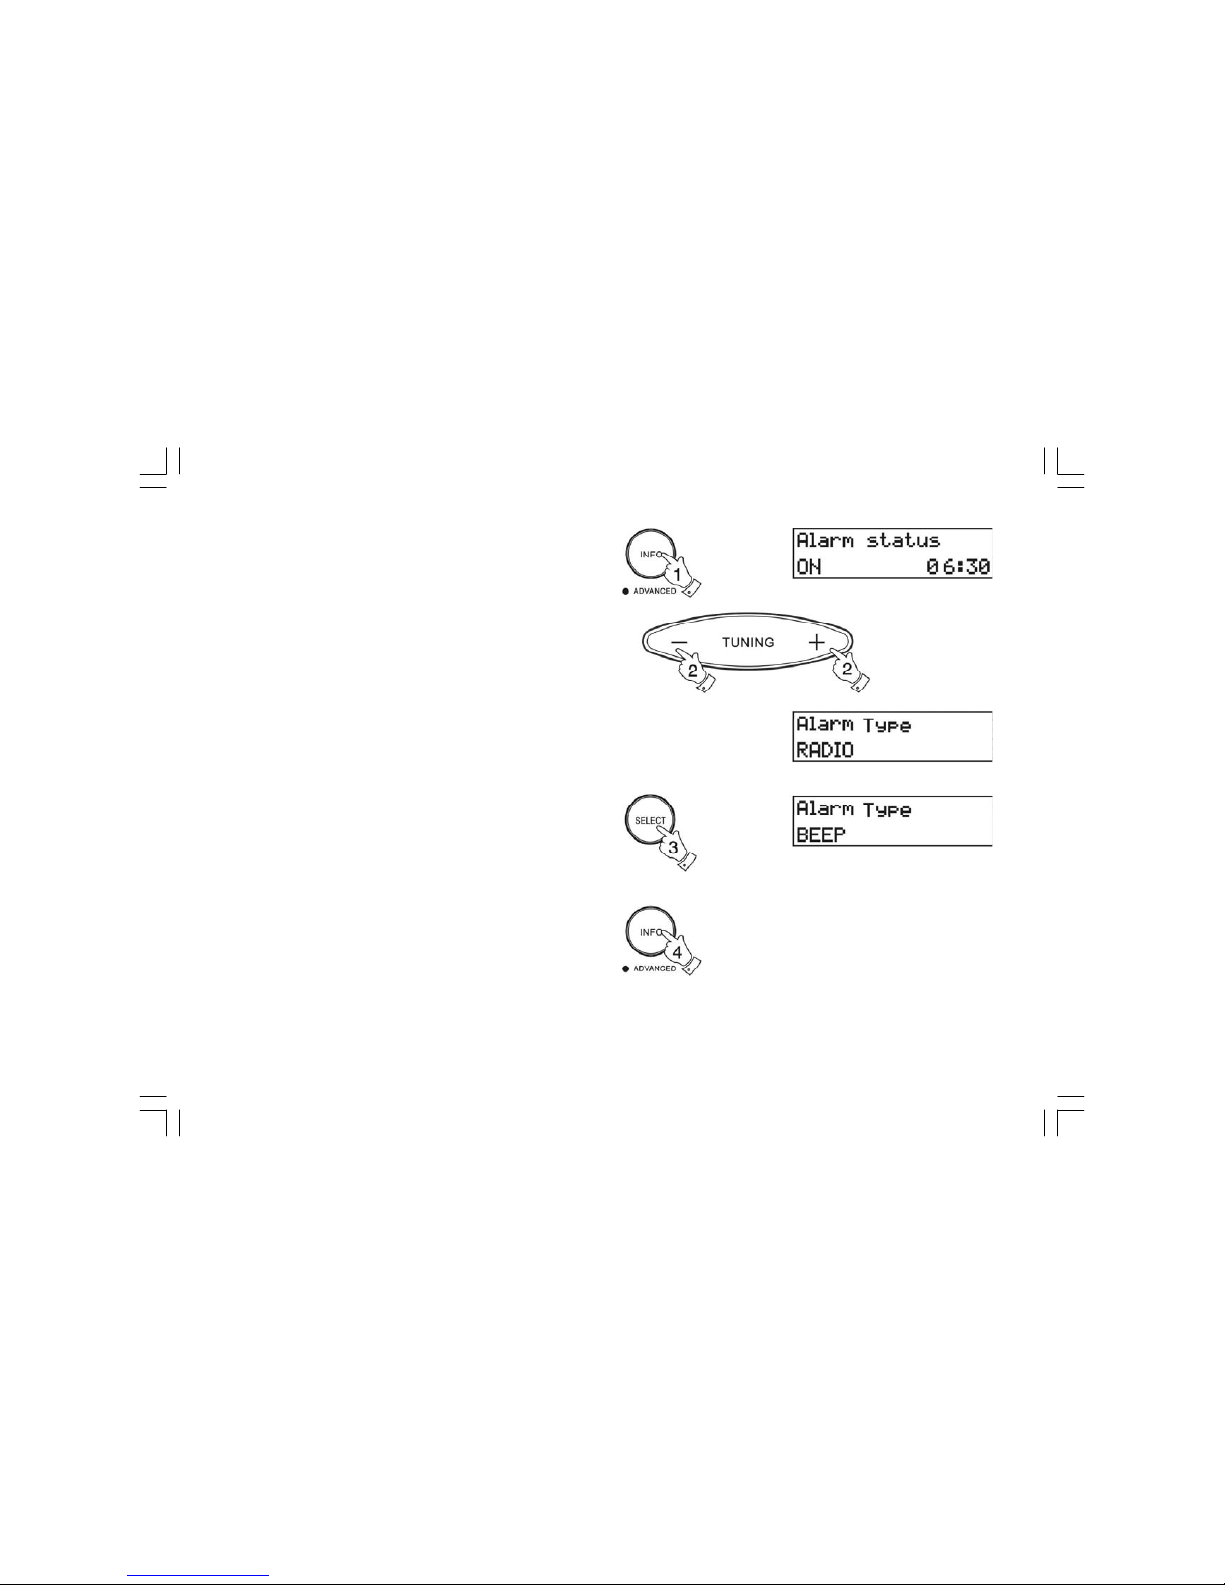
Selecting alarm type
Your clock radio can be set so as to wake you to either radio or beep
type alarm.
1. Repeatedly press and release the Info button until the display
shows Alarm Status.
2. Press either the Tuning Up or Down buttons to enter alarm type
setting.
3. Press the Select button to change between Radio and Beep
alarms.
4. Press the Info button to confirm the selection.
Note: when alarm is set to wak e by radi o your clock radio
switch on to the last used station.
17
Page 19

Cancelling alarms
1. Whilst an alarm is sounding it can be cancelled for 24hours by
pressing the Standby button.
2. To permanently cancel an alarm proceed as follows:-
3. Repeatedly press and release the Info button until the display
shows Alarm Status.
4. Press the Select button to change alarm status to OFF.
Snooze function
1. The radio or beep alarm can be silenced for 5 minutes by pressing
the Tuning Up/Down or Select buttons.
The display will show .
2. This sequence can be repeated during the 1 hour radio or 30 minute
beep alarm period.
18
GB
Page 20
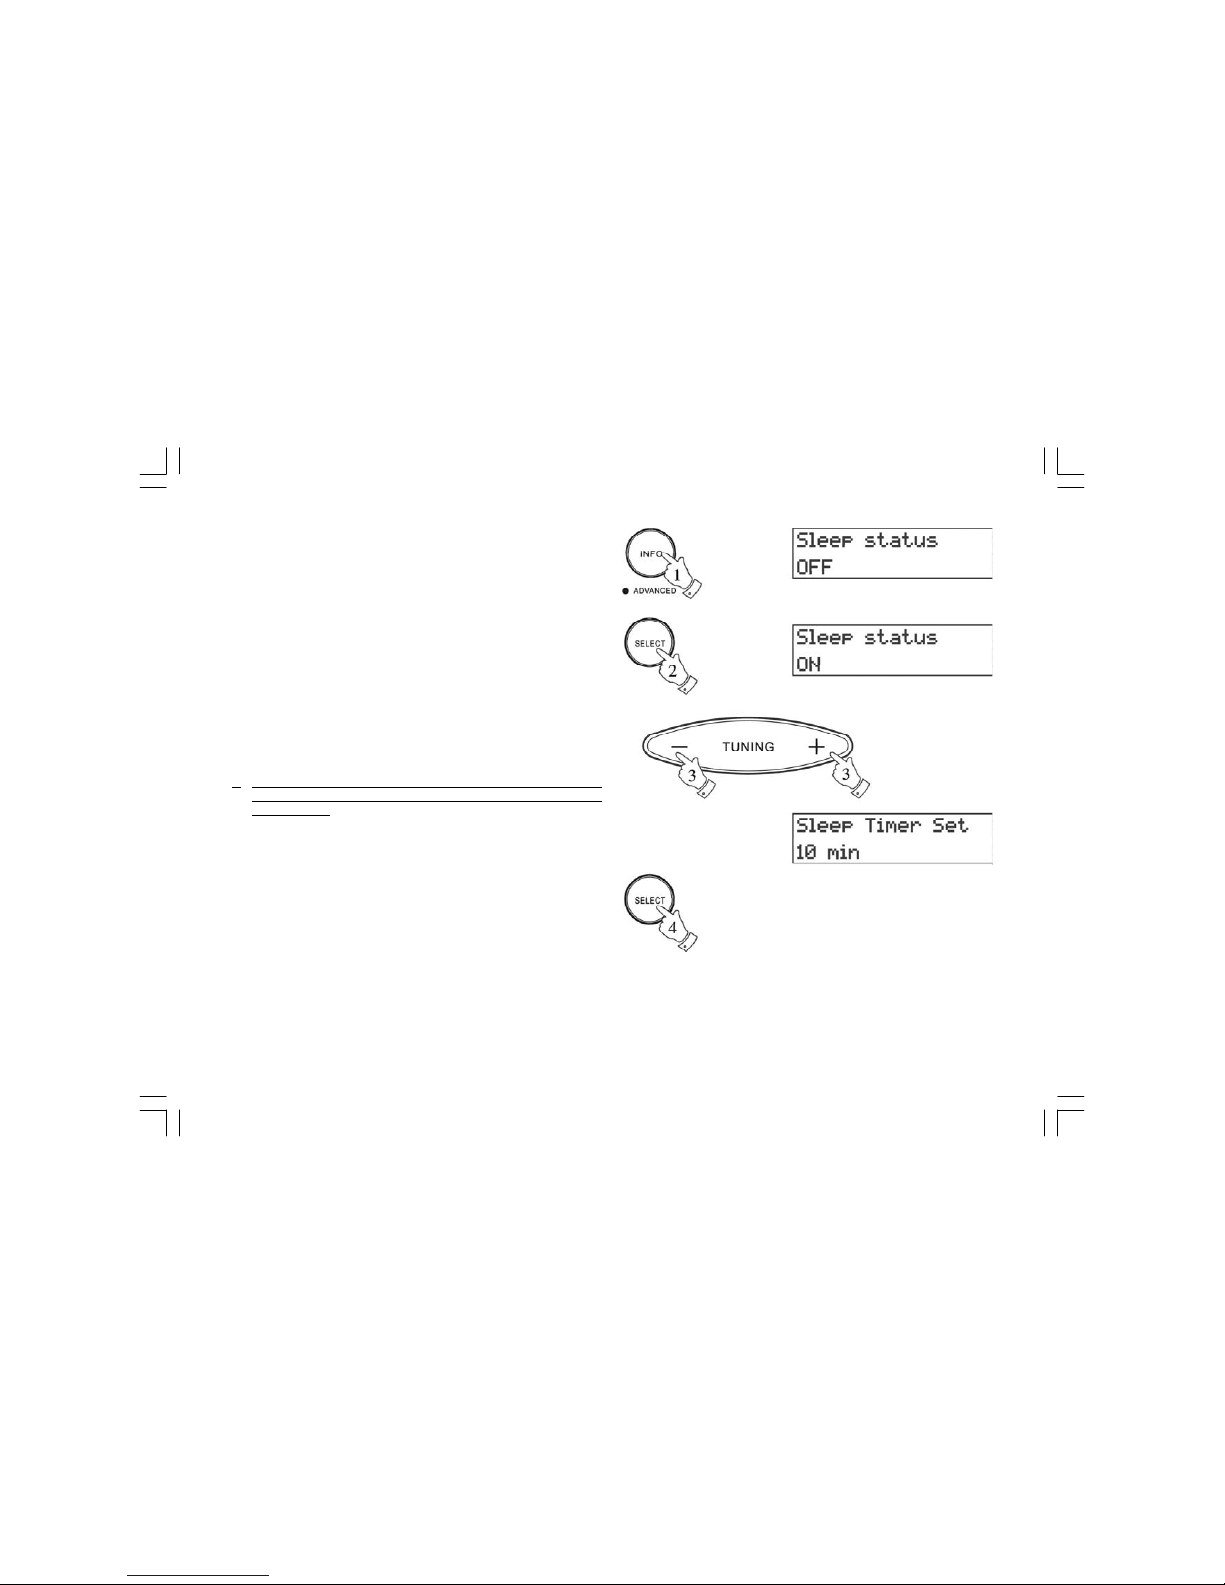
Sleep timer
The sleep timer can only be set when the power (Standby) is on.
1. Repeatedly press and release the Info button until the display
shows Sleep Status.
2. Press the Select button to select Sleep On.
3. Select the required sleep time (1- 99 minutes) using the Tuning Up
or Down buttons.
4. Press the Select button to confirm the sleep timer setting.
5
. The display will show sl eep time before returning to normal
radio d isplay. The radio w ill swi tch off af ter the sleep time
has el apsed.
19
Page 21
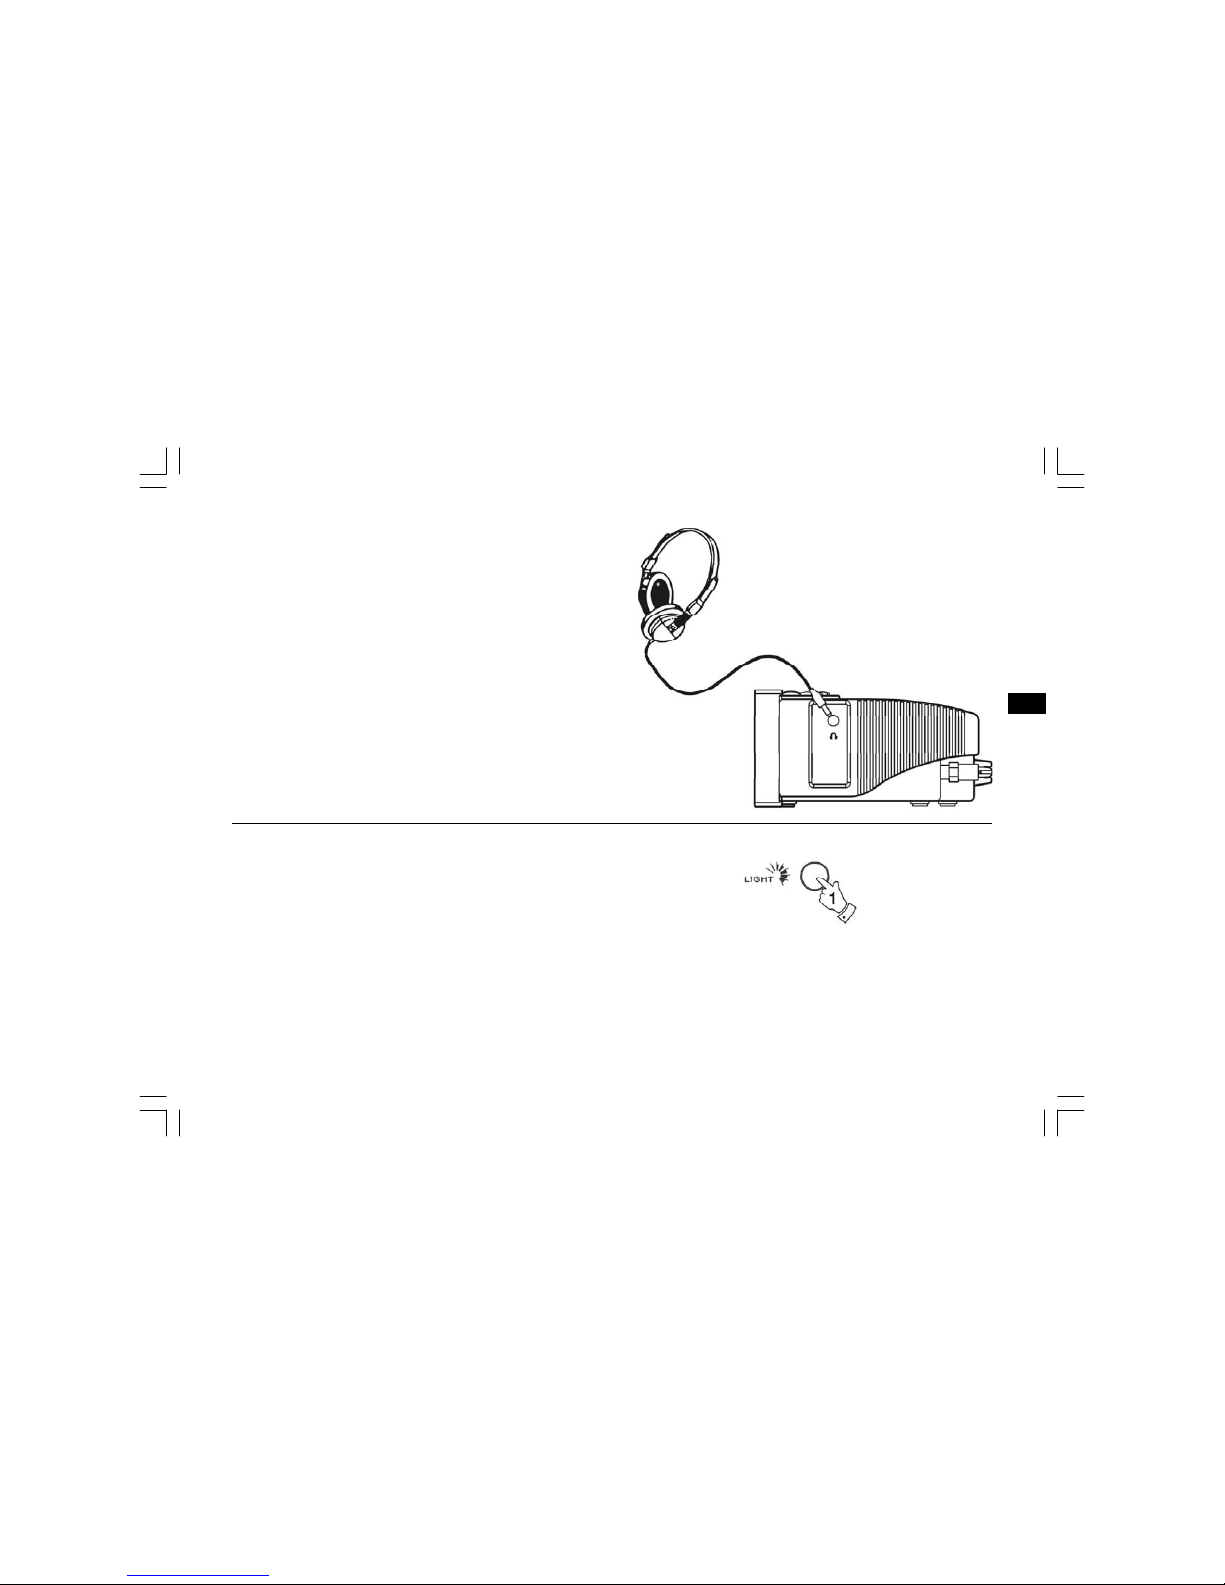
Headphone socket
A3.5mmHeadphone Socket located on the right-hand end of your
radio is provided for use with either headphones or an earpiece.
Inserting a plug automatically mutes the internal loudspeaker.
Display backlight
1. The display backlight has eight levels including off and can be set
by repeatedly pressing and releasing the Light button.
20
GB
Page 22
Specifications
Power Requirements
Mains AC 230 volts, 50Hz only
Frequency Cove rage
FM 87.5 - 108MHz
DAB
Band 3 174.928 - 239.200MHz
L Band 1452 - 1492MHz(DCR-209)only
Circuit Features
Loudspeaker 77mm(3 inches), 8ohms
Output Power 0.9 Watts
Headphone socket 3.5mm dia
Aerial System FM Telescopic aerial or alternative wire aerial
DAB Telescopic aerial or alternative wire aerial
Aerials
As supplied your clock radio is fitted with a telescopic aerial. Should this
prove inconvenient a separate wire aerial can be fitted in place of the
telescopic aerial.
A spanner is provided to allow removal of the telescopic aerial. The wire
aerial can then be plugged in place of the telescopic aerial.
Note : In areas where signals are weak the wire aerial may not
prove to be as effective as the telescopic aerial.
21
Page 23
General
Do not allow this unit to be exposed to moisture (e.g. dripping or
splashing) or to temperatures exceeding 70 degrees centigrade. It is
recommended that the DAB band be used wherever possible as better
results in terms of quality and freedom from interference will usually be
obtained than on the FM band.
22
GB
Page 24

23
Page 25

IMPORTANTES MESURES DE SÉCURITÉ............... 25
Commandes........................................................ 26-27
Fonctionnement sur le réseau électrique..................... 28
Utilisation de votre radio - DAB ................................. 29
Sélection d’une station - DAB ................... ................ 30
Services sec ondai res - DAB ...................... ......... ..... 31
Modes d’affichage - DAB ................ ........ ....... ........ ... 31
Trouver de nouvelles stations - DAB .......................... 32
Sélection automatique - DAB........ ....... ...... ....... ......... 32
Syntonisation manue lle - DAB .................................. 33
Affichage de la force du signal - DAB ........................ 33
Utilisation de votre radio - FM ................................... 34
Syntonisation manuel le - FM ..................................... 35
Modes d’affichage - FM .............................. .......... .... 36
FM stéréo/mono ...................................................... 36
Présélection d e stations - FM ............ ............ ........... 37
Rappel d’une station présélec tion née - DAB e t FM.... ... 37
Réinitialisation du système .............. ........ .......... ....... 38
Sélection des canaux de la bande L pour le C anada
(DCR-209 uni queme nt) ................. ....... ....... ........ ...... 38
Introduction de l’heure de réveil.................................. 39
Sélection du type d’alarme......................................... 40
Annulation des alarmes...... ..... ...... ..... .... ..... .... ..... ..... 41
Table des matières
Fonction de rappel d’alarme........................... ............ 41
Mise en veille programmabl e.............. ............... ........ 42
Prise c asque .......................................................... 43
Rétroéclairage de l’affichage..................................... . 43
Antennes ................................................................ 44
Spécifications ......................................................... 44
Caractéristiques du circuit ....................... ...... ......... .. 44
Généralités.............................................................. 45
24
F
Page 26

25
IMPORTANTES MESURES DE SÉCURITÉ
1. Veuillez lire les présentes instructions.
2. Conservez soigneusem ent les présentes instructions.
3. Tenez compte de toutes les mises en garde.
4. Veuillez suivre toutes les instructions.
5. N’utilisez pas cet appareil près de l’eau.
6. Nettoyez-le uniquement avec un chiffon sec.
7. N’obstruez pas les orifices de ventilation.
Installez l’appareil conformément aux instructions du fabricant.
8. N’installez jamais l’appareil près d’une source de chaleur telle que
radiateurs, registres de chaleur, poêles, ou tout autre appareil
(amplificateurs par exemple) produisant de la chaleur.
9. Ne mettez jamais en péril la mission de sécurité de la prise
polarisée ou prise de terre. Une prise polarisée dispose de deux
lames de contact, une plus large que l’autre. Une prise de terre
dispose de deux lames de contact plus une troisième broche de
mise à la terre. La lame large ou la troisième broche sont prévues
pour votre sécurité. Si la fiche fournie ne s’adapte pas à votre
prise de courant, faites appel à un électricien pour remplacer la
prise obsolète.
10. Évitez qu’on ne marche sur le cordon d’alimentation ou que
celui-ci ne soit écrasé, en particulier au niveau des fiches,
des prises de courant et de l’endroit où il sort de l’appareil.
11. Utilisez uniquem ent les accessoires spécifiés par le fabricant.
12. Utilisez l’appareil uniquement avec le chariot, le stand, le trépied,
le crochet ou la table spécifiés par le fabricant, ou vendus avec
l’appareil. Lorsqu’un chariot est utilisé, veillez à éviter lorsque
vous déplacez l’appareil/chariot tout accident résultant d’un
basculement.
13. Débranchez l’appareil en cas d’orage avec des éclairs ou
lorsqu’il ne va pas être utilisé pour une période assez longue.
14. Pour tout entretien ou toute réparation, faites appel à du
personnel qualifié. Une intervention est nécessaire lorsque
l’appareil a été endommagé d’une façon ou d’une autre,
par exemple lorsque le cordon d’alimentation ou la fiche sont
endommagés, si un liquide s’est répandu ou si des objets sont
tombés sur l’appareil, si l’appareil a été exposé à la pluie ou
l’humidité, s’il ne fonctionne pas normalement, ou encore s’il
est tombé.
15. Pour réduire les risques d’incendie ou de décharges électriques,
conservez l’appareil à l’abri de la pluie et de l’humidité.
16. Le signe indiquant un danger électrique ainsi que le symbole
graphique qui y est associé figurent sur le panneau inférieur
de l’appareil.
17. L’appareil ne doit pas être exposé aux éclaboussures ou
ruissellements et aucun objet contenant des liquides ne doit
être placé sur l’appareil.
Page 27
Commandes (Face a vant)
1. Bouton de veille
2. Bouton Autotune
3. Bouton de gamme d’ondes
4. Bouton d’éclairage
26
F
Page 28
27
Commandes (Face supérieure)
5. Antenne téléscopique
6. Prise pour casque
7. Bouton de sélection
8. Boutons de volume + / -
9. Boutons de syntonisation + / -
10. Boutons de présélection
11. Bouton Info
Page 29
Fonctionnement sur le réseau électrique
1. Placez l’appareil sur une surface plane. Branchez le cordon
électrique dans la prise de courant et allumez celle-ci.
2. L’affichage indiquera “DAB digital radio” pendant quelques
secondes puis repassera à l’affichage de l’heure.
3. L’heure sera automatiquement établie après que votre
réveil-radio ait été réglé pendant quelques minutes sur une
station DAB.
28
F
Page 30

29
Utilisation de votre radio - DAB
1. Déployez entièrement l’antenne téléscopique.
2. Appuyez sur le Bouton de veille pour allumer votre radio.
3. Si c’est la première fois que votre radio est utilisée, un balayage
rapide des canaux DAB sera effectué. L’affichage indiquera
«Autotune Quick scan». Si la radio a déjà été utilisée auparavant,
la dernière station utilisée sera sélectionnée.
4. Durant l’Autotune, lorsqu’un groupe de stations est détecté,
la ligne inférieure de l’affichage indique son nom et le nombre
de stations trouvées est mis à jour. La ligne supérieure de
l’affichage présente un graphique en barres indiquant l’état
d’avancement de l’Autotune.
5. Lorsque l’Auto Tune est terminé, la première station
(en ordre alphanumérique 0...9...A....Z) sera sélectionnée.
6. Si la liste des stations est restée vide après l’Autotune,
votre radio affichera «No Signal».
7. Si aucun signal n’est trouvé, il sera peut-être nécessaire
de déplacer votre radio en un endroit permettant une
meilleure réception.
Page 31

Sélection d’une station - DAB
1. La ligne supérieure de l’affichage indique le nom de la station
actuellement sélectionnée.
2. Appuyez sur les Boutons de syntonisation + ou – pour
parcourir la liste des stations disponibles.
3. Appuyez puis relâchez le Bouton de sélection pour sélectionner
la station. L’affichage peut indiquer “Tuning” pendant que votre
radio recherche la nouvelle station.
4. Réglez la Comma nde de volume sur la valeur voulue.
Remarque: Si après avoir sélectionné une station, l’affichage
indique “Not Available”, il est peut-être nécessaire de déplacer
votre radio en un endroit où la réception est meilleure.
30
F
Page 32

31
Services secondaires - DAB
1. Certaines stations sont également associées à un ou plusieurs
services secondaires. Si une station dispose d’un service
secondaire, l’affichage indiquera “ “ à côté du nom de la station
dans la liste de stations. Le service secondaire apparaîtra alors
immédiatement après le service primaire lorsque vous parcourrez
la liste de syntonisation.
Modes d’affichage - DAB
Votre radio dispose de cinq modes d’affichage :-
1. Appuyez sur le Bouton Info pour vous déplacer entre les
différents modes.
a. Défilement texte
b. Type de programme
c. Nom multiplex
d.Forcedusignal
e. Date et heure
Affiche des messages avec
défilement de texte tels que nom
d’artiste/piste, numéro d’appel, etc.
Affiche le type de station écoutée ex.
Pop, Classique, Infos, etc.
Affiche le nom de multiplex auquel la
station en cours appartient.
Affiche la force du signal pour la
station écoutée à ce moment.
Affiche la date et l’heure à ce moment.
Page 33

Trouver de nouvelles stations - DAB
Au fil du temps, de nouvelles stations peuvent devenir accessibles.
Pour trouver de nouvelles stations, procédez comme suit:-
1. Appuyez puis relâchez le Bouton AutoTune, l’affichage indiquera
“Autotune Quick Scan”. Votre radio effectuera un balayage des
fréquences DAB. Si de nouvelles stations sont trouvées,
le compteur de stations sur le côté droit de l’affichage augmentera
et les stations trouvées seront ajoutées dans la liste
2. Pour effectuer un balayage complet de toutes les fréquences
DAB Band III, appuyez sue le Bouton AutoTune et maintenez
celui-ci enfoncé pendant plus de 2 secondes avant de le relâcher.
L’affichage indiquera “Autotune Full scan”. Si de nouvelles
stations sont trouvées, le compteur de stations sur le côté droit
de l’affichage augmente et les stations trouvées sont ajoutées
dans la liste.
Sélection automatique - DAB
Au lieu d’appuyer sur la commande de syntonisation pour
sélectionner une station, votre radio peut être réglée pour
sélectionner automatiquement une station.
1. Appuyez sur les Boutons de syntonisation + ou – pendant
quelques minutes puis appuyez immédiatement sur le Bouton de
sélection et maintenez celui-ci enfoncé jusqu’à ce que l’affichage
indique “Autoselect ON”.
2. Parcourez la liste de syntonisation en utilisant les boutons de
syntonisation + ou – jusqu’à ce que la station que vous souhaitez
soit visible sur l’affichage, après quelques secondes, votre radio
sélectionnera automatiquement la station indiquée sur l’affichage.
3. Pour désactiver la sélection automatique, appuyez sur les boutons
de Syntonisation + ou – pendant quelques instants puis appuyez
immédiatement sur le bouton de sélection et maintenez celui-ci
enfoncé jusqu’à ce que l’affichage indique “Autoselect OFF”.
32
F
Page 34

33
Syntonisation manuelle - DAB
La syntonisation manuelle vous permet de régler directement
vous-même les différents canaux DAB Bande III.
1. Appuyez sur le Bouton de sélection et maintenez celui-ci enfoncé
jusqu’à ce que l’affichage indique «Manual tune».
2. Appuyez sur les Bouton de syntonisation + ou - pour trouver
le
canal DAB voulu.
3. Appuyez puis relâchez le Bouton de sélection pour
sélectionner le canal.
4. Appuyez sur les Boutons de syntonisation + ou - pour
sélectionner les stations contenues dans le Multiplex pour le
canal DAB sélectionné.
5. Appuyez puis relâchez le Bouton de sélection pour revenir
en mode de syntonisation normal.
Affichage de la force du signal - DAB
1. Appuyez puis relâchez à plusieurs reprises le Bouton Info
jusqu’à ce que la ligne inférieure de l’affichage indique la force
du signal.
2. Placez votre radio et orientez l’antenne téléscopique de manière
à avoir une réception optimale en utilisant l’affichage de la force
du signal pour vous guider. Déplacez votre radio et placez-la de
manière à obtenir un nombre maximal de rectangles noirs sur
l’affichage de la force du signal.
3. Le rectangle clair non rempli indique le niveau de signal minimal
requis pour une réception satisfaisante.
Page 35

Utilisation de votre radio - FM
1. Déployez entièrement l’antenne téléscopique.
2. Appuyez sur le Bouton de veille pour allumer votre radio.
L’affichage indiquera “DAB digital radio” pendant quelques
secondes.
3. Appuyez sur le Bouton de bandes pour sélectionner la
bande FM.
4. Enfoncez puis relâchez immédiatement le Bouton Auto Tune,
votre radio effectuera un balayage dans le sens des fréquences
plus élevées (basse fréquence vers fréquence élevée) et
s’arrêtera automatiquement lorsqu’elle trouvera une station
présentant une force suffisante..
5. Après quelques secondes, l’affichage mettra à jour et affichera
le nom de la station.
6. Pour trouver d’autres stations, appuyez puis relâc hez le Bouton
AutoTune tel que précédemment.
7. Pour balayer la bande FM dans un sens descendant
(fréquence élevée vers basse fréquence), appuyez sur le
Bouton AutoTune et maintenez ce dernier enfoncé pendant
0,5 secondes avant de le relâcher.
8. Lorsque la fin de la gamme d’ondes est atteinte, votre radio
recommencera à syntoniser depuis l’extrémité opposée de
la gamme d’ondes.
9. Ajustez la Comm an de de volume sur la valeur requise.
10. Pour éteindre votre radio, appuyez sur le Bouton de veille.
34
F
Page 36

35
Syntonisation manuelle - FM
1. Appuyez sur le Bouton de veille pour allumer votre radio.
2. Appuyez sur le Bouton FM/DAB pour sélectionner la bande FM.
Déployez entièrement l’antenne téléscopique .
3. Appuyez sur les Boutons de syntonisation + ou – pour
régler une station. La fréquence changera par palliers de 50kHz.
4. Lorsque la fin de la gamme d’ondes est atteinte, la radio
recommencera à l’extrémité opposée de la gamme d’ondes.
5. Réglez la Comma nde du volume sur la valeur voulue.
6. Pour éteindre votre radio appuyez sur le Bouton de veille.
Page 37

Modes d’affichage - FM
En FM, la ligne inférieure de l’affichage peut être réglée sur un des
modes suivants :-
1. Appuyez sur le Bouton Info pour vous déplacer entre les
différents modes.
a. Défilement texte
b. Type de programme
c. Force du signal
d. Date et heure
e. Fréquence
f. Mode audio
FM Stéréo/Mono
1. Si une station captée est faible, un sifflement peut être audible.
Pour réduire ce sifflement, appuyez sur le Bouton de sélection et
maintenez celui-ci enfoncé jusqu’à ce que l’affichage indique
“Audio mode : mono” votre radio passera alors en mode mono.
2. Pour revenir au mode stéréo, appuyez sur le Bouton de sélection
jusqu’à ce que l’affichage indique “Audio mode :Auto”, votre radio
passera en mode stéréo.
Remarque: le mode FM stéréo n’est disponible qu’en utilisant le
casque/les écouteurs.
36
Affiche des messages avec
défilement de texte tels que nom
d’artiste/piste, numéro d’appel, etc.
Affiche le type de station écoutée ex.
Pop, Classique, Infos, etc.
Affiche la force du signal pour la
station écoutée à ce moment.
Affiche la date et l’heure à ce moment.
Affiche la fréquence de la station
écoutée à ce moment.
L’affichage indique Auto (stéréo) ou
mono.
F
Page 38

37
Présélection de stations - DAB et FM
Votre appareil permet 5 présélections mémorisées pour chacune
des 2 gammes d’ondes.
1. Appuyez sur le Bouton de veille pour allumer la radio.
2. Réglez la station voulue tel que précédemment décrit.
3. Appuyez sur le Bouton de présélection voulu et maintenez ce
dernier enfoncé jusqu’à ce que l’affichage indique par ex.
«Preset 1 stored». La station sera enregistrée sous le bouton
de présélection choisi. Répétez cette procédure pour les
présélections restantes.
4. Les stations enregistrées dans les mémoires de présélection
peuvent être remplacées en suivant la procédure ci-dessous.
Rappel d’une station présélectionnée - DAB et FM
1. Appuyez sur le Bouton de veille pour allumer la radio.
2. Sélectionnez la gamme d’ondes voulue en appuyant sur le
bouton Bande.
3. Appuyez un instant sur le Bouton de présélection voulu et
votre radio émettra la station enregistrée dans la mémoire
de présélection concernée.
Page 39

Réinitialisation du système
Si votre radio ne fonctionne pas comme il se doit, ou si certains
chiffres n’apparaissent pas sur l’affichage ou sont incomplets,
procédez comme suit.
1. Appuyez sur le Bouto n Info et maintenez ce dernier enfoncé
jusqu’à ce que l’affichage indique la version du logiciel.
2. Appuyez deux fois sur le Bo uton Inf o et l’affichage indiquera
System reset.
3. Enfoncez puis relâchez le Bouton de sélection pour
sélectionner System reset.
4. Si le DAB a été utilisé en dernier lieu, un “Quick scan” de la bande
DAB sera effectué, dans le cas contraire, un “Quick scan” sera
effectué la prochaine fois que la bande DAB sera à nouveau
sélectionnée.
Sélection des canaux de la bande L pour le Canada
(DCR-209 uniquement)
Les canaux de la bande L au Canada et en Europe sont différents.
Le paramétrage initial pour les canaux de la bande L de ce récepteur
est prévu pour l’Europe (Balayage rapide 10A-LK et Balayage
complet 5A-LW). Pour le Canada, les étapes suivantes doivent être
suivies pour sélectionner les canaux de la bande L (Balayage rapide
L1-L23 et 5A-L23 pour un balayage complet).
1. Appuyez sur le bouton Info et maintenez celui-ci enfoncé
jusqu’à ce que l’affichage indique la version du logiciel.
2. Appuyez deux fois sur le bouton Info, l’affichage indiquera
L band.
3. Appuyez sur le Bouton de sélection pour changer les canaux de
la bande L: LA-LW (pour l’Europe) en L1-L23 (pour le Canada).
38
F
Page 40

39
Introduction de l’heure de réveil
1. Appuyez puis relâchez à plusieurs reprises le Bouton Info
jusqu’à ce l’affichage indique Alarm Status.
2. Appuyez sur le Bouton de sélection et l’affichage indiquera
Alarm Time Set. Les chiffres des minutes commenceront à
clignoter dans l’affichage. Introduisez les minutes voulues en
utilisant les Boutons de réglage + et -.
3. Appuyez sur le Bouton de sélection. Les chiffres des heures
commenceront à clignoter sur l’affichage. Introduisez l’heure
voulue à l’aide des Boutons de réglage + et -.
4. Appuyez sur le Bouton de sélection pour confirmer l’heure de
réveil. L’affichage indiquera Alarm Status On ainsi que l’heure
de réveil. Après quelques secondes, l’affichage indiquera à
nouveau l’heure réelle. Un symbole apparaîtra dans l’affichage
pour indiquer que l’alarme est active.
Remarque: L’heure d’alarme est toujours établie en
utilisant le format 24Heures, par ex. 2:30PM est introduits
sous la forme 14:30.
Page 41

Sélection du type d’alarme
Votre radio-réveil peut être réglé pour vous réveiller avec la radio ou
avec un signal sonore.
1. Appuyez puis relâchez à plusieurs reprises le Bouton Info
jusqu’à ce que l’affichage indique Alarm Status.
2. Appuyez sur un des Boutons de réglage + ou – pour entrer
dans les paramètres du type d’alarme.
3. Appuyez sur le Bouton de sélection pour passer de l’alarme
par radio à l’alarme par signal sonore et vice-versa.
4. Appuyez sur le Bouton Info pour confirmer la sélection.
Remarque: lorsque l’alarme est réglée sur un réveil par
la radio, votre radio-réveil s’allumera sur la dernière
station écoutée.
40
F
Page 42

41
Annulation des alarmes
1. Lorsqu’une alarme retentit, elle peut être annulée pour 24 heures
en appuyant sur le Bouton de veille.
2. Pour annuler définitivement l’alarme, procédez comme suit :-
3. Appuyez puis relâchez à plusieurs reprises le Bouton Info
jusqu’à ce que l’affichage indique Alarm Status.
4. Appuyez sur le Bo uton de sélection pour placer le statut
de l’alarme sur OFF.
Fonction de rappel d’alarme
1. L’alarme par signal sonore ou l’alarme radio peuvent être éteintes
pour 5 minutes en appuyant sur le Bouton de réglage + / - ou le
Bouton de sélection. L’affichage indiquera .
2. Cette séquence peut être répétée pendant une période d’alarme
de 30 minutes en ce qui concerne le signal sonore et d’une
heure pour la radio.
Page 43

42
Mise en veille prog ramma ble
La mise en veille programmable ne peut être activée que lorsque
l’appareil est en marche (Standby).
1. Appuyez puis relâchez à plusieurs reprises le Bouton Info
jusqu’à ce que l’affichage indique Sleep Status.
2. Appuyez sur le Bouton de sélection pour sélectionner
Sleep On.
3. Sélectionnez le délai de mise en veille souhaité (1- 99 minutes)
en utilisant les Boutons de réglage + et -.
4. Appuyez sur le Bouton de sélection pour confirmer les
paramètres de la mise en veille.
5
. L’affichage indiquera le délai de m ise en veille avant
de revenir à l’affichage normal radio. La radio s’éteindra
après que le temps de mis e en veille se soi t écoulé.
F
Page 44

43
Prise casque
Une Prise casque de 3,5mm est située sur l’extrémité droite de
votre radio et peut être utilisée pour un casque ou des écouteurs.
Lorsqu’une fiche est insérée, le haut-parleur interne passe
automatiquement en sourdine.
Rétroéclairage de l’affichage
1. Le rétroéclairage de l’affichage propose huit niveaux, y compris
l’extinction, et peut être réglé en appuyant puis relâchant à
plusieurs reprises le Bouton d’éclairage.
Page 45

Spécifications
Alimentation requise
Réseau électrique
Couverture de fréquences
Caractéristiques du circuit
Haut-parleur
Courant de sortie
Prise casque
Système FM
DAB
Antennes
Tel qu’il vous est fourni, votre réveil-radio est équipé d’une antenne
téléscopique. Si toutefois, cette antenne s’avérait inadaptée, une
antenne filaire séparée peut venir remplacer l’antenne téléscopique.
Une clé pour contre-écrou est fournie pour permettre de retirer
l’antenne téléscopique. L’antenne filaire peut alors être connectée à
la place de l’antenne téléscopique.
Remarque: Dans les zones où les signaux sont faibles,
l’antenne filaire peut s’avérer moins performante que
l’antenne téléscopique.
44
CA 230 volts, 50Hz uniquement
FM 87.5 - 108MHz
DAB
Bande 3 174.928 - 239.200MHz
Bande L 1452 - 1492MHz
(DCR-209)uniquement
77mm(3 pouces), 8ohms
0,9 Watts
3,5mm dia
Antenne téléscopique ou antenne filaire
Antenne téléscopique ou antenne filaire
F
Page 46

45
Généralités
Faites en sorte que cette radio ne soit pas exposée à l’humidité
(ex. éclaboussures ou ruissellement) ou à des températures
supérieures à 70 degrés centigrades. Il est recommandé d’utiliser
la bande DAB à chaque fois que cela s’avère possible car de
meilleurs résultats en termes de qualité et de liberté par rapport
aux interférences seront habituellement obtenus par comparaison
à la bande FM.
Page 47

46
Page 48

INSTRUCCIONES IMPORTANTES DE SEGURIDAD . 48
Controles ........................................................... 49-50
Funcionamiento con la red eléctrica .......................... 51
Funcionamient o de su equipo d e radio - DAB ... .. .... .. .. 52
Selección de una emisora - DAB .............................. 53
Servicios sec undario s - DAB ........................ ........... 54
Modos de v isual ización - DAB .................................. 54
Localización de emisoras nuevas - DAB .................... 55
Selección automática - DAB ............... ...... ...... ..... ..... 55
Sintonía manual - DAB . ...... ...... ...... ...... ...... ......... ..... 56
Visualización de la potencia de la señal - DAB ........... 56
Funcionamient o de su equipo de radio -FM .... .. .. .. .. .. .. 57
Sintonía manual - FM ........ .......... ....... ...... ....... ....... .. 58
Modos de visualización - FM..................................... . 59
FM est éreo/mo nofó ni co ........ ....... .... .... ..... .... ..... .... ... 59
Presintonía de emisoras - FM.................................... 60
Recuperación de una emisora presintonizada –
DAB y FM............................................................... 60
Restaurar el sistema................................................ 61
Selección de canales de la banda L para Canadá
(DCR-209 solamente) .................... ..... ......... ..... ..... .. 61
Configuración del tiempo de alarma............................ 62
Selección del tipo de alarma............... ........... ............ 63
Contenido
Cancelación de al armas ......... ..... ...... ...... ...... ...... ..... 64
Función Dormitar...................................................... 64
Temporizador de dormir ........................... ....... ...... ... 65
Conector de auriculares ............... ....... ....... ........... ... 66
Iluminación posterior de la pantalla ........................... 66
Antenas........................................ ................... ....... 67
Especificaciones ..................................................... 67
Características del circuito .......................... ....... ...... 67
Datos generales ...................................................... 68
47
Page 49

48
INSTRUCCIONES IMPORTANTES DE SEGURIDAD
1. LEAESTASINSTRUCCIONES.
2.CONSERVEESTASINSTRUCCIONES.
3. OBSERVE TODASLAS ADVERTENCIAS.
4. SIGATODAS LASINSTRUCCIONES.
5. No utilice el equipo cerca del agua.
6. LÍMPIELOSOLAMENTECON UN PAÑOSECO.
7. NOOBSTRUYA LASAPERTURAS DEVENTILACIÓN.
Instálelo teniendo en cuenta las instrucciones del fabricante.
8. No lo instale cerca de fuentes de calor tales como radiadores,
estufas u otros dispositivos (incluyendo amplificadores) que
produzcan calor.
9. No desestime el propósito de seguridad del conector polarizado
o el conector con toma de tierra. Un conector polarizado tiene
dos patillas una más ancha que la otra. Un conector con toma
de tierra tiene dos patillas y una tercera para la toma de tierra.
La patilla ancha o la tercera patilla se incluye con fines de
seguridad. Si el conector suministrado no coincide con su toma
de corriente. Consulte con un técnico electricista para sustituir
la toma de corriente obsoleta.
10. Evite que el cable de alimentación sea pisado o doblado,
especialmente en la parte del conector y los puntos donde
salen los cables del equipo.
11. Utilice sólo los accesorios especificados por el fabricante.
12. Utilice solamente un carrito, soporte, trípode, sujeción o mesa
especificada por el fabricante o vendida con el equipo.
Cuando se utilice un carrito debe tener cuidado al transportar
el carrito / equipo para evitar daños producidos por caídas.
13. Desconecte el equipo durante tormentas eléctricas o cuando no
lo utilice durante períodos largos de tiempo.
14. Solicite el servicio al personal técnico cualificado. Se requiere
servicio cuando el equipo haya sufrido daños de cualquier tipo,
por ejemplo si el cable de alimentación o el enchufe estuviesen
dañados si hubiesen caído líquidos u objetos dentro del equipos,
si el equipo hubiese estado expuesto a la lluvia o humedad,
no funciona correctamente o si se ha caído.
15. Para reducir el riesgo de incendio o descargas eléctricas,
no exponga este equipo a la lluvia ni a la humedad.
16. La marca de Peligro de descarga y el símbolo de Associated
Graphical aparecen en el panel inferior del equipo.
17. El equipo no debe exponerse a salpicaduras ni goteo de líquidos
no deben colocarse objetos llenos de líquidos sobre él.
E
Page 50

Controles (Frontal)
49
1. Botón StandBy
2. Botón Auto Tune (Sintonía automática)
3. Botón Band (Bandas)
4. Botón Light (Luz)
Page 51

50
Controles (Parte superior)
5. Antena telescópica
6. Conector de auriculares
7. Botón Select (Seleccionar)
8. Botones Sube/Baja el volumen
9. Botón Sintonía arriba o abajo
10. Botones de presintonía
11. Botón Info
E
Page 52

Funcionamiento con la red eléctrica
1. Coloque el equipo en una superficie plana. Conecte el otro
extremo del cable de la red eléctrica en una toma de corriente
de la pared .
2. La pantalla mostrará el mensaje “DAB digital radio”
(radio digital DAB) antes de volver a la pantalla de reloj.
3. La hora del reloj se ajustará automáticamente unos minutos
después de haber sintonizado la radio en una emisora DAB.
51
Page 53

52
Funcionamiento de su equipo de radio - DAB
1. Extienda totalmente la antena telescópica.
2. Pulse el botón StandBy para encender el equipo de radio.
3. Si ésta es la primera vez que se utiliza el equipo de radio se
llevará a cabo una exploración rápida de los canales DAB.
La pantalla mostrará el mensaje “Autotune Quick scan”
(exploración rápida de sintonía automática). Si el equipo de
radio ya ha sido utilizado antes, se seleccionará la última
emisora seleccionada.
4. Durante el proceso de sintonía automática, al detectarse cada
uno de los grupos de emisoras, la línea inferior de la pantalla
mostrará su nombre y se actualizará la cuenta de emisoras.
La línea superior de la pantalla muestra un gráfico de barras
que indica el progreso de la sintonía automática.
5. Al completarse el proceso de sintonía automática se seleccionará
la primera emisora (en orden alfanumérico: 0...9...A....Z).
6. Si la lista de emisoras sigue vacía una vez finalizado el proceso
de sintonía automática, el equipo de radio mostrará el mensaje
“No Signal” (no hay señal de emisoras).
7. Si no se han encontrado señales de emisoras, podría ser
necesario reubicar el equipo de radio en una posición que mejore
la recepción.
E
Page 54

Selección de una emisora - DAB
1. La línea superior de la pantalla muestra el nombre de la emisora
actualmente seleccionada.
2. Pulse el botón Sintonía arriba o abajo para desplazarse por
la lista de emisoras disponibles.
3. Pulse y suelte el botón Select (Seleccionar) para seleccionar
la emisora. La pantalla puede mostrar el mensaje “Tuning”
(Sintonía) mientras el equipo de radio localiza una emisora nueva.
4. Ajuste el Control de volumen según sus preferencias.
Nota: Si después de seleccionar una emisora, la pantalla
muestra el mensaje “Not Available” (no disponible) podría ser
necesario reubicar el equipo de radio en otra posición que
mejore la recepción.
53
Page 55

54
Servicios secundarios - DAB
1. Ciertas emisoras de radio disponen de uno o más servicios
secundarios asociados. Si una emisora tuviese un servicio
secundario asociado se mostrará el símbolo “ “ junto al nombre
de la emisora en la lista de emisoras. El servicio secundario
aparecerá inmediatamente después del servicio primario al]
moverse por la lista de sintonía.
Modos de visualización - DAB
Este equipo de radio dispone de cinco modos de visualización:
1. Pulse el botón Info para pasar por los distintos modos.
a. Desplazamiento de texto
b. Tipo de programa
c. Nombre del Multiplex
d. Potencia de la señal
e. Hora y fecha
Muestra mensajes de texto
desplazándose, como por ejemplo,
nombre del artista/canción, número de
llamada telefónica, etc.
Muestra el tipo de emisora que se está
escuchando, por ejemplo pop, clásica,
noticias, etc.
Muestra el nombre del Multiplex al que
pertenece la emisora actual.
Muestra la potencia de la señal de la
emisora que se está escuchando.
Muestralahorayfechaactuales
E
Page 56

Localización de emisoras nuevas - DAB
Con el paso del tiempo podrían aparecer emisoras nuevas.
Para localizar emisoras nuevas haga lo siguiente:
1. Pulse y suelte el botón Sinto ní a automá ti ca, la pantalla
mostrará el mensaje “Autotune Quick scan” (exploración rápida
de sintonía automática). El equipo de radio realizará una
exploración de las frecuencias DAB. Al localizarse nuevas
emisoras aumentará el contador de emisoras a la derecha de
la pantalla y se agregarán emisoras a la lista.
2. Para realizar una exploración completa de todas las frecuencias
DAB de la Banda III pulse y m antenga pulsado el botón
Sintonía automática durante más de 2 segundos y luego
suéltelo. La pantalla mostrará el mensaje “Autotune Full scan”
(exploración completa de sintonía automática). Al localizarse
nuevas emisoras aumentará el contador de emisoras a la
derecha de la pantalla y se agregarán emisoras a la lista.
Selección automática - DAB
Como alternativa a pulsar el control de sintonía para seleccionar una
emisora, este equipo de radio puede configurarse para seleccionar
automáticamente una emisora.
1. Pulse el botón Sintonía arriba o abajo unas cuantas veces;
pulse y mantenga pulsado el botón Select hasta que la pantalla
muestre “Autoselect ON” (selección automática activada).
2. Desplácese por la lista de sintonía utilizando el botón
Sintonía arriba o abajo hasta que la emisora que desee quede
visible en pantalla; unos segundos después la radio seleccionará
automáticamente la emisora m ostrada en la pantalla.
3. Para desa ctivar la opción Autoselect pulse el botón
Sintonía varias veces; pulse y mantenga pulsado el botón
Select hasta que la pantalla muestre “Autoselect OFF”
(selección automática desactivada).
55
Page 57

56
Sintonía manual - DAB
La sintonía manual le permite sintonizar directamente los distintos
canales DAB de la Banda III.
1. Pulse y mantenga pulsado el botón Select hasta que la pantalla
muestre el mensaje “manual tune” (sintonía manual).
2. Pulse el botón Sintonía arriba o abajo para encontrar el canal
DAB que desee.
3. Pulse y suelte el botón Select (Seleccionar) para seleccionar
el canal.
4. Pulse el botón Sintonía arriba o /abajo para seleccionar las
emisoras incluidas en el Multiplex correspondiente al canal
DAB seleccionado.
5. Pulse y suelte el botón Select para volver al modo de
sintonía normal.
Visualización de la potencia de la señal - D AB
1. Pulse y suelte varias veces el botón Info hasta que la línea
inferior de la pantalla muestre la potencia de la señal.
2. Coloque el equipo de radio e incline la antena telescópica para
mejorar la recepción utilizando como guía la pantalla de potencia
de la señal. Mueva el equipo de radio y colóquelo para obtener
el máximo número de rectángulos negros en la pantalla de
potencia de la señal.
3. Los rectángulos vacíos indican el nivel mínimo de señal requerido
para una recepción satisfactoria.
E
Page 58

Funcionamiento de su equipo de radio - FM
1. Extienda totalmente la antena telescópica.
2. Pulse el botón StandBy para encender el equipo de radio.
La pantalla mostrará el mensaje “DAB digital radio”
(radio digital DAB) durante unos segundos.
3. Pulse el botón Banda para seleccionar la banda FM.
4. Pulse y suelte de inmediato el bot ón Sinto ní a autom áti ca ;
el equipo de radio realizará una exploración hacia arriba
(de las frecuencias bajas a las altas) y se detendrá
automáticamente al encontrar una emisora con potencia
suficiente.
5. Unos segundos después la pantalla se actualizará y mostrará
el nombre de la emisora.
6. Para localizar otras emisoras pulse y suelte el botón Sintonía
automática como lo hizo antes.
7. Para explorar la banda FM en sentido contrario
(de las frecuencias altas a las bajas) pulse y mantenga
pulsado el botón Sintonía automática durante 0,5 segundos
y suéltelo.
8. Al alcanzar el extremo final de la banda, el equipo de radio
reiniciará la sintonía desde el extremo opuesto.
9. Ajuste el Control de volumen según sus preferencias.
10. Para apagar el equipo de radio pulse el botón Standby.
57
Page 59

58
Sintonía manual - FM
1. Pulse el botón StandBy para encender el equipo de radio.
2. Pulse el botón FM/DAB para seleccionar la banda FM.
Extienda totalmen te la an ten a telesc ópic a.
3. Pulse el botón Sintonía arriba o abajo para sintonizar una
emisora. La frecuencia cambiará en pasos de 50 khz.
4. Al alcanzar el extremo final de la banda, el equipo de radio
reiniciará la sintonía desde el extremo opuesto.
5. Ajuste el Control de volumen según sus preferencias.
6. Para apagar el equipo de radio pulse el botón Standby.
E
Page 60

Modos de visualización - FM
En la línea inferior de la pantalla en FM, podrá ajustar los siguientes
modos:-
1. Pulse el botón Info para pasar por los distintos modos.
a. Desplazamiento de texto
b. Tipo de programa
c. Potencia de la señal
d. Hora y fecha
e. Frecuencia
f. Modo audio
FM estéreo / monofónico
1. Si la recepción de la señal de una emisora es débil, podría oírse
algún zumbido. Para reducirlo pulse y mantenga pulsado el botón
Select hasta que la pantalla muestre “Audio mode”: Mono” el
equipo de radio cambia al modo monofónico.
2. Para volver al modo estereofónico pulse y mantenga pulsado el
botón Select hasta que la pantalla muestre el mensaje
“Audio mode: auto” (modo de audio: automático), el equipo
de radio cambiará al modo estéreo.
Nota: El modo estéreo en FM sólo está disponible al utilizar
auriculares / audífonos.
59
Muestra mensajes de texto
desplazándose, como por ejemplo,
nombre del artista / canción, número
de llamada telefónica, etc.
Muestraeltipodeemisoraquese
está escuchando, por ejemplo pop,
clásica, noticias, etc.
Muestra la potencia de la señal de
la emisora que se está escuchando.
Muestralahorayfechaactuales.
Muestra la frecuencia de la emisora
que está escuchando.
La pantalla muestra Auto
(estereofónico o mono).
Page 61

60
Presintoníadeemisoras–DAByFM
Hay 5 presintonías de memoria para cada una de las 2 bandas.
1. Pulse el botón StandBy del equipo de radio.
2. Sintonice la emisora que desee como se explicó anteriormente.
3. Pulse y mantenga pulsado el botón de presintonía que desee
hasta que la pantalla muestre, por ejemplo: “Preset 1 stored”
(Presintonía 1 almacenada). Se habrá almacenado la emisora en
el botón de presintonía elegido. Repita este procedimiento para
el resto de presintonías.
4. Las emisoras almacenadas en memorias de presintonía pueden
borrarse mediante el procedimiento indicado anteriormente.
Recuperación de una emisora presintonizada –
DAB y FM
1. Pulse el botón StandBy para encender la radio.
2. Seleccione la banda que desee pulsando el botón Banda.
3. Pulse durante unos momentos el botón de presintonía que desee;
el equipo de radio se sintonizará en la emisora almacenada en la
memoria de presintonía correspondiente.
E
Page 62

Restaurar el sistema
Si la radio no funciona correctamente o algunos dígitos de la pantalla
faltan o están incompletos, lleve a cabo el siguiente procedimiento:
1. Pulse y mantenga pulsado el botón Info hasta que la pantalla
muestre la versión de software.
2. Pulse el botón Info dos veces hasta que la pantalla muestre el
mensaje “Reset System” (Restaurar el sistema).
3. Pulse y suelte el botón Select (Seleccionar) para seleccionar
Restaurar el sistema.
4. Si se utilizó la banda DAB la última vez, se realizará una
“exploración rápida” de la banda DAB, de lo contrario se realizará
una “exploración rápida” la próxima vez que se seleccione la
banda DAB.
Selección de canales de la banda L para Canadá
(DCR-209 solamente)
Los canales de la banda L de Canadá y Europa son distintos.
El ajuste inicial de los canales de la banda L de este receptor está
pensado para Europa (Exploración rápida 10A-LK y Exploración
completa 5A-LW). Para Canadá, deben seguirse los siguientes
pasos para seleccionar los canales adecuados de la banda L
(Exploración rápida L1-L23 y Exploración completa 5A-L23).
1. Pulse y mantenga pulsado botón Info hasta que la pantalla
muestre la versión de software.
2. Pulse el botón Info dos veces la pantalla mostrará banda L.
3. Pulse el botón Select para cambiar los canales de la banda L
LA-LW (Europa) para que sean L1-L23 (Canadá).
61
Page 63

62
Configuración del tiempo de alarma
1. Pulse varias veces y suelte el botón Info hasta que la pantalla
muestre Alarm Status (Estado de alarma).
2. Pulse el botón Select la pantalla mostrará Alarm Time Set
(Configuración del tiempo de alarma). Los dígitos de los minutos
empezarán a parpadear en la pantalla. Fije el minuto deseado
utilizando los el botón Sintonía arriba o abajo.
3. Pulse el botón Select (Seleccionar). Los dígitos de las horas
empezarán a parpadear en la pantalla. Fije la hora deseada
utilizando el botón Sintonía arriba o abajo.
4. Pulse el botón Select (Selecci o n ar ) para confirmar la
configuración de la alarma. La pantalla mostrará Alarm Status On
(Estado de alarma activada) conjuntamente con la hora de la
alarma. Unos segundos después la pantalla volverá a mostrar
el tiempo real. Aparecerá un símbolo en la pantalla indicando
que la alarma está activada.
Nota:Lashorasenlaalarmasefijanconelformato
24 horas, por ejemplo para las 2:30 PM se pone 14:30
E
Page 64

Selección del tipo de alarma
Su radio reloj puede fijarse para que le despierte con la alarma con
radio o la alarma con ‘bip’.
1. Pulse varias veces y suelte el botón Info hasta que la pantalla
muestre Alarm Status (Estado de alarma).
2. Pulse el botón Sintonía arriba o abajo para poner el ajuste
del tipo de alarma.
3. Pulse el botón Select (Seleccionar) para cambiar entre alarma
con radio y alarma con ‘bip’.
4. Pulse el botón Info para confirmar la selección.
Nota: cuando se ha configurado la alarm a para despertar
con la radio, su radio reloj se encender á y sinto niz ará la
última emisora escuchada.
63
Page 65

64
Cancelación de alarmas
1. Se puede cancelar una alarma que está sonando durante
24 horas pulsando el botón Standby.
2. Para cancelar una alarma permanentemente haga lo siguiente:
3. Pulse varias veces y suelte el botón Info hasta que la pantalla
muestre Alarm Status (Estado de alarma).
4. Pulse el botón Select para cambiar el estado de la alarma a OFF.
Función Dormitar
1. La alarma con radio o la alarma con ‘ bip’ se puede silenciar por
5 minutos pulsando el botón Sintonía arriba o abajo,
oelbotón Select. La pantalla mostrará .
2. Esta secuencia puede repetirse durante el período de alarma de
1horaderadioo30minutosde‘bip’.
E
Page 66

Temporizador de dormir
El temporizador de dormir sólo puede ajustarse cuando el equipo
está encendido (Standby).
1. Pulse varias veces y suelte el botón Info hasta que la pantalla
muestre Sleep Status (Estado de dormir).
2. Pulse el botón Select para seleccionar Sleep On
(dormir activado).
3. Seleccione el tiempo de dormir que desee (1 a 99 minutos)
utilizando el botón Sintonía arriba o abajo.
4. Pulse el botón Select para confirmar el ajuste del temporizador
de dormir.
5
. La pa ntalla mostrará l a hora de dormir antes de vol ver a la
pantalla normal de radio. La radio se apagará una vez
tran scurri do el tiempo de dormir.
65
Page 67

66
Conector de auriculares
El equipo dispone de un conector de auriculares de 3,5mm
ubicado en el extremo derecho de su radio para ser utilizado
con sus auriculares o audífonos. Al conectarlos se silencia
automáticamente el altavoz interno
Iluminación posterior de la pantalla
1. La iluminación de la pantalla tiene ocho niveles, incluido el
apagado, y puede ajustarse pulsando y soltando varias veces
el botón Light (luz).
E
Page 68

Especificaciones
Requisitos de alimentación
Red eléctrica
Cobertura de frecuencias
Antenas
El equipo de radio reloj se suministra con una antena telescópica.
Si esta opción no fuese la más conveniente, se puede colocar una
antena de cable separada en lugar de la antena telescópica.
Se incluye una llave para quitar la antena telescópica. La antena de
cable puede conectarse en el lugar de la antena telescópica.
Nota: en zonas donde las señales sean débiles, la antena de
cable podría ser men os ef icaz que la antena telescópi ca.
67
230 voltios CA, sólo 50Hz
FM 87.5 - 108MHz
DAB
Banda 3 174.928 - 239.200MHz
Banda L 1452 - 1492MHz
(DCR-209)solam ente
Características del circuito
Altavoces
Potencia de salida:
Conector de auriculares
Tipo de antena FM
DAB
77mm (3 pulgadas), 8 Ohmios
0,9 Watts
3,5mm diámetro
Antena telescópica o antena de cable
Antena telescópica o antena de cable
Page 69

68
Datos generales
No permita que este equipo esté expuesto a la humedad
(por ejemplo, salpicaduras ni goteos) o a temperaturas
superiores a 70 grados centígrados. Se recomienda utilizar
la banda DAB siempre que sea posible, ya que se obtienen mejores
resultados en cuanto a calidad y ausencia de interferencias,
en comparación con la banda FM.
E
Page 70

69
Page 71

BELANGRIJKE VEILIGHEIDSINSTRUC TIES.... ..... .... 71
Besturingen......................................................... 72-73
Netvoeding ……….................................................... 74
Uw radio besturen - DAB …….................................. . 75
Een station selecteren - DAB ................................... 76
Secundaire bereiken - DAB ................... ...... ..... ...... .. 77
Displaymodi - DAB .............. ..... .... .... .... .... .... ...... .... . 77
Nieuwe statio ns zoeken - DAB .................. .......... ..... 78
Autoselect - DAB .................................................... 78
Handmatig afstemmen - DAB.... ...... ..... ...... ........ ..... .. 79
Weergave signaalsterkte - DAB..... ........... ....... ....... ... 79
Uw radio besturen - FM ……...................................... 80
Handmatig afstemmen - FM............ ...... ...... ......... ..... 81
Displaymodi - FM .................................................... 82
FM stereo/mono ...................................................... 82
Vooraf ingestelde stations - FM ................................ 83
Een vooraf ingesteld station oproepen - DAB and FM . . 83
Opnieuw instellen van systeem.................................. 84
L- bandkanalen voor Canada selecteren
(alleen DCR-209)...................................................... 84
De alarmtijd instellen................................................ 85
Alarmtype selecteren................................................ 86
Alarmen annuleren .............. ....... .... ..... .... .... ..... ...... . 87
Inhoud
Slaap/Snooze-functie................................................ 87
Slaaptimer .............................................................. 88
Mof koptelefoon. ..................................................... 89
Weergave achterlicht................................................ 89
Antennes....................................................... .......... 90
Specificaties …….................................................... 90
Circuitkenmerken .................................................... 90
Algemeen ............................................................... 91
70
NL
Page 72

71
BELANGRIJKEVEILIGHEIDSINSTRUCTIES
1. Lees deze instructies.
2. Bewaar deze instructies.
3. Sla acht op alle waarschuwingen
4. Volg alle instructies op.
5. Apparaat niet in de buurt van water gebruiken.
6. Alleen met droge doek reinigen.
7. Geen ventilatieopeningen blokkeren. Installeer volgens de
instructies van de fabrikant.
8. Niet naast warmtebronnen installeren zoals radiatoren,
warmteroosters, ovens, of andere apparaten
(inclusief versterkers) die warmte produceren.
9. Verijdel niet het veiligheidsdoel van de polaire of geaarde plug.
Een polaire plug heeft twee bladen waarbij de een breder is dan
ander. Een geaarde plug heeft twee bladen en een derde geaarde
tand. Het brede blad of de derde tand worden voor uw veiligheid
geleverd. Als de geleverde plug niet in uw stopcontact past,
dient u een elektricien voor vervanging van het onbruikbare
stopcontact raadplegen.
10. Bescherm de stroomkabel tegen vertrapping of afknijping vooral
bij de pluggen, meervoudige contactdozen en het punt waar de
kabel uit het apparaat komt.
11. Gebruik alleen verbinding/hulpstukken die door de fabrikant
worden aangegeven.
12. Gebruik alleen met het karretje, standaard, drievoet, haak,
of tafel die de fabrikant aanraadt, of die met het toestel worden
verkocht. Als u een karretje gebruikt, dient u voorzichtig te zijn
als u de combinatie karretje/toestel verplaatst om verwonding
door struikelen te voorkomen.
13. Trek de stekker van dit toestel uit het stopcontact in geval
van onweer of als u het toestel voor een lange periode
ongebruikt laat.
14. Laat al het onderhoud aan bevoegd onderhoudspersoneel over.
Onderhoud wordt vereist in geval het toestel op de een of
andere manier wordt beschadigd, bijvoorbeeld een beschadigde
stroomkabel of plug. Er is vloeistof verspilt of er zijn voorwerpen
in het toestel gevallen, of het toestel is blootgesteld aan regen of
vocht, het toestel werkt niet zoals normaal of het is gevallen.
15. Om het risico voor brand of elektrische schok te voorkomen,
mag u dit toestel niet aan regen of vocht blootstellen.
16. Het teken voor schokgevaar en het bijbehorende symbool wordt
op het bodempaneel van de eenheid geplaatst.
17. U mag het toestel niet blootstellen aan druppels of spatten en
voorwerpen die met vloeistof zijn gevuld mogen niet op het
toestel worden geplaatst.
Page 73

72
Besturingen(voorkant)
1. Standby-knop
2. Automatisch afstemknop
3. Golfbandknop
4. Lichtknop
NL
Page 74

73
Besturingen (bovenkant)
5. Telescopische antenne
6. Mof koptelefoon
7. Selectieknop
8. Volume op/neer-knoppen
9. Afstem op/neer-knoppen
10. Preset-knoppen
11. Info-knop
Page 75

Netvoeding
1. Plaats de eenheid op een plat oppervlak. Steek de stekker in
een stopcontact en schakel deze aan.
2. De display toont nu gedurende enkele seconden
“DAB digital radio” voordat het naar de klokweergave terugkeert.
3. Nadat uw klokradio voor een paar minuten op een DAB-station
is afgestemd, wordt de kloktijd automatisch ingesteld.
74
NL
Page 76
75
Uw radio besturen - DAB
1. Trek de telescopische antenne helemaal uit.
2. Druk op de knop StandBy om uw radio aan te zetten.
3. Als dit de eerste keer dat u de radio gebruikt, wordt er een snelle
scan naar DAB-kanalen uitgevoerd. De display toont nu
“Autotune Quick scan” (Snelle scan voor automatische
afstemming). Als u de radio al hebt gebruikt, dan wordt het
laatst gebruikte station geselecteerd.
4. Tijdens Autotune, terwijl elke stationgroep wordt afgezocht,
geeft de onderste regel van de display de naam van het station
en wordt de stationteller bijgewerkt. De bovenste regel van de
display toont een staafgrafiek dat de voortgang van de Autotune
(automatische afstemming) weergeeft.
5. Zodra de autotune is voltooid, wordt het eerste station
(in numerieke c-alfa-volgorde 0...9...A....Z) geselecteerd.
6. Als de stationlijst na de Autotune nog leeg is, geeft u radio
“No signal” (geen signaal) weer.
7. Al ser geen signalen zijn gevonden, kan het zijn dat u uw radio
moet verplaatsen naar een plek waar u beter ontvangst hebt.
Page 77

Een station selecteren - DAB
1. In de bovenste regel van de display wordt de naam van het huidig
geselecteerde station weergeven.
2. Druk op de op/neer- kn op pen voor afstemmen om door de
lijst van verschillende stations te gaan.
3. Druk even op de knop Select om het station te selecteren.
De display toont “Tuning” (afstemmen) terwijl uw radio een
nieuw station zoekt.
4. Stel de volumebesturin g op de gewenste instelling af.
Opmerking: Als na het selecteren van een station de display
“Not Available” toont (onbeschikbaar), kan het zijn dat u uw
radio op een andere plaats moet zetten om betere ontvangst
te krijgen.
76
NL
Page 78

77
Secundaire bereiken - DAB
1. Bepaalde radiostations hebben meer dan een secundaire bereiken
ter beschikking. Als een station een secundair bereik ter
beschikking heeft, dan toont de display “ “ naast de
stationsnaam op de stationslijst. Het secundaire bereik
verschijnt dan onmiddellijk na het primaire bereik als u door de
afstemlijst gaat.
Displaymodi - DAB
Votre radio dispose de cinq modes d’affichage :-
1. Druk op de knop Info om door de verschillende cycli te gaan.
a. Roltekst
b. Programmatype
c. Multiplexe naam
d. Signaalsterkte
e. Tijd en datum
Geeft berichten als roltekst weer,
bijvoorbeeld de artiesten/tracknaam,
telefoonnummer, enz.
Geeft het type station weer waar u
naar luistert, bijv. Pop, Classic
(klassiek), News (nieuws), enz.
Geeft naam van multiplex weer
waartoe huidig station behoort.
Geeft de signaalsterkte weer van het
station waar nu naar wordt geluisterd.
Geeft huidige tijd en datum weer.
Page 79

Nieuwe stations zoeken - DAB
Terwijl de tijd passeert komen er nieuwe stations beschikbaar.
Om nieuwe stations te zoeken, gaat u als volgt te werk:-
1. Druk even op de knop AutoTune. De display toont “Autotune Quick
Scan” (Snelle scan autom. Afstemming). Uw radio scand de
DAB-frequenties. Als er nieuwe stations worden gevonden,
dan gaat de stationteller aan de rechterkant van de display
omhoog in telling en worden er stations aan de lijst toegevoegd.
2. Om de gehele DAB-band III-frequenties af te scannen, dient u de
knop AutoTune langer dan 2 seconden ingedrukt houden en deze
dan lost e laten. De display toont “Autotune Full scan”
(Volledige scan autom. Afstemming). Als er nieuwe stations
worden gevonden, dan gaat de stationteller aan de rechterkant
van de display omhoog in telling en worden de stations aan de
lijst toegevoegd.
Autoselect - DAB
Als een alternatief voor het indrukken van de afstemknop om een
station te selecteren, kunt u uw radio instellen dat deze automatisch
een station selecteert.
1. Druk een paar keer op de knoppen Tuning op of neer Houdt
onmiddellijk de knop Select ingedrukt totdat de display
“Autoselect ON” (automatische selectie AAN) toont.
2. Rol met behulp van de Tuning op- en neerknoppen door de
afstemlijs t totdat het door uw gewenste station zichtbaar wordt
op de display. Na een paar seconden selecteert uw radio
automatisch het station dat op de display wordt weergegeven.
3. Om de Autoselect uit te schakelen dient u of een paar keer op de
knoppen Tuning op of neer te drukken. Daarna houdt u onmiddellijk
de knop Select ingedrukt, totdat de display “Autoselect OFF”
(Automatische selectie UIT) weergeeft.
78
NL
Page 80

79
Handmatig afstemmen - DAB
Met handmatig afstemmen kunt u rechtstreeks op verschillende
DAB - Band III-kanalen afstemmen.
1. Houdt de knop Select ingedrukt, totdat de display “Manual tune”
(handmatig afstemmen) weergeeft.
2. Druk op de knoppen Tuning op of neer om het gewenste
DAB-kanaal te zoeken.
3. Druk even op de knop Select om het kanaal te selecteren.
4. Druk op de knoppen Tuning op of neer om de stations binnen
de multiplex te selecteren bij het geselecteerde DAB-kanaal.
5. Druk even op de knop Select om naar de normale afstemmodus
terugtekeren.
Weergave signaalsterkte - DAB
1. Druk onophoudelijk even op de knop Info totdat de lagere regel
op de display de signaalsterkte toont.
2. Plaats uw radio en de hoek van de telescopische antenne zo,
zodat u het beste ontvangt. Gebruik hierbij de weergave van de
signaalsterkte als leidraad. Beweeg uw radio in het rond,
totdat u de plaats vindt waar u het maximum aantal zwarte
rechthoeken op de weergave voor signaalsterkte krijgt.
3. De duidelijk lege rechthoek geeft het minimum signaalniveau aan
dat voor voldoende ontvangst wordt vereist.
Page 81

Uw radio besturen - FM
1. Trek de telescopische antenne volledig uit.
2. Druk op de knop StandBy om uw radio aan te zetten.
De display toont voor een paar seconden “DAB digital radio”.
3. Druk op de knop Band om de FM-band te selecteren.
4. Druk op de knop Auto Tune en laat deze onmiddellijk weer los.
Uw radio scant nu in opwaartse richting (lage frequentie naar
hoge frequentie) en stopt automatisch zodra het een sterk
genoeg station vindt..
5. Na een paar seconden wordt de display bijgewerkt en de
stationsnaam weergegeven.
6. Om andere stations te zoeken, dient u de knop Auto Tune in te
drukken en net als daarvoor los te laten.
7. Om de FM-band in neerwaartse richting (hoge frequentie naar
lage frequentie) af te scannen, dient u de knop AutoTune
gedurende 0. 5 seconde in te drukken en daarna los te laten.
8. Zodra het uiteinde van de golfband wordt bereikt, begint uw radio
van de andere kant van de golfband opnieuw met het scannen.
9. Stel de Volume best uri n g bij op de gewenste instellingen.
10. Om uw radio uit te zetten drukt u op de knop StandBy.
80
NL
Page 82

81
Handmatig afstemmen - FM
1. Druk op de knop StandBy om uw radio aan te zetten.
2. Druk op de knop FM/DAB om de FM-band te selecteren.
Trek de telescopische antenne helemaal uit.
3. Druk op de knoppen Tuning op of neer om op een station af te
stemmen. De frequentie wordt in stappen van 50 kHz veranderd.
4. Zodra het uiteinde van de golfband wordt bereikt, zal de radio
verder gaan met het afstemmen van de tegenovergestelde kant
van de golfband.
5. Stel de Volumebesturing af op de gewenste instelling.
6. Om uw radio uit te schakelen, dient u op de knop StandBy
te drukken.
Page 83

Displaymodi - FM
Bij FM kunt u de onderste regel van de display op een van de
volgende modi instellen:-
1. Druk op de knop Info om door de verschillende modi te gaan.
a. Roltekst
b. Programmatype
c. Signaalsterkte
d. Tijd en datum
e. Frequentie
f. Audio-modus
FM Stereo/Mono
1. Als u een station slecht ontvangt, kan het zijn dat u een ruis hoort.
Om deze ruis te verminderen, druk op de knop Select totdat de
display “Audio mode : mono”. Uw radio gaat nu over in de
monomodus.
2. Om naar de stereomodus terug te keren, houd de knop Select
ingedrukt totdat de display “Audio mode: Auto” toont. Uw radio
gaat nu over in stereomodus.
Opmerking: FM-stereo is alleen beschikbaar als u een
koptelefoon/oorpluggen gebruikt.
82
Geeft roltekstberichten weer zoals
artiesten/track-naam, telefoonnummer,
enz.
Geeft het type station waar u naar
luistert weer, bijv. Pop, Classic
(klassiek), News (nieuws), enz.
Geeft de signaalsterkte weer van het
station waar u naar luistert.
Geeft de huidige tijd en datum weer.
Geeft de frequentie weer van het
station waar u naar luistert.
Display toont Auto (stereo) of mono.
NL
Page 84

83
Vooraf ingestelde stations - DAB en FM
Voor elke 2 golfbanden zijn er 5 geheugen-presets.
1. Druk op de knop StandBy om de radio aan te zetten.
2. Stem op het gewenste station af, zoals hiervoor is beschreven.
3. Houdt de vereiste knop Preset ingedrukt totdat de display bijv.
“Preset 1 stored” (preset 1 opgeslagen” toont. Het station wordt
onder de gekozen preset-knop opgeslagen. Herhaal deze
procedure voor de resterende presets.
4. Stations die in preset-geheugens zijn opgeslagen, kunnen
worden overschreven door de hierboven aangegeven
procedure te herhalen.
Een vooraf ingesteld station opnieuw oproepen DAB en FM
1. Druk op de knop StandBy om de radio aan te zetten.
2. Selecteer de gewenste golfband door op de knop
Band te drukken.
3. Druk nu op de gewenste knop Preset en uw radio wordt op het
station afgestemd dat in het preset-geheugen is opgeslagen.
Page 85

Opnieuw instellen van systeem
Als uw radio niet goed werkt, of op de display worden een paar
cijfers gemist of de display is onvolledig, dan dient u de volgende
procedure uit te voeren.
1. Houd de knop Info ingedrukt totdat de display de
softwareversie toont.
2. Druk tweemaal op de knop Info. De display toont nu
“System reset” (Opnieuw instellen van systeem).
3. Druk even op de knop Select om de nieuwe instelling van
het systeem te selecteren.
4. Als u de laatste keer DAB gebruikte, dan wordt er een
“Quick scan” op de DAB-band uitgevoerd. Anders wordt er
de volgende keer dat u de DAB-band selecteert, een
“Quick scan” uitgevoerd.
L- bandkanalen voor Canada selecteren
(Alleen DCR-209)
L-bandkanalen in Canada en Europa zijn verschillend.
De aanvankelijke instelling voor L-bandkanalen van deze ontvanger
is in Europa (Snelle scan 10A-LK en volledige scan 5A-LW).
Voor Canada dient u de volgende stappen te ondernemen om in
Canada de geschikte L-bandkanalen te selecteren
(Snelle scan L1-L23 en 5A-L23 volledige scan).
1. Houdt de knop In fo totdat de display de softwareversie toont.
2. Druk tweemaal op de knop Info totdat de display L-band toont.
3. Druk op de knop Select om de L-bandkanalen LA-LW
(voor Europa) in L1-L23 (voor Canada) te veranderen.
84
NL
Page 86

85
De alarmtijd instellen
1. Druk onophoudelijk even op de knop Info totdat de display Alarm
Status toont.
2. Druk op de knop Select. De display toont Alarm Time Set
(Alarmtijd ingesteld). De cijfers van de minuten beginnen te
knipperen in de display. Stel de gewenste minuten in door de
knoppen Tuning Op/Neer te gebruiken.
3. Druk op de knop Select. De cijfers van de uren beginnen te
knipperen in de display. Stel het gewenste uur in door de
knoppen Tuning Op/Neer te gebruiken.
4. Druk op de knop Select om de alarminstelling te bevestigen.
De display toont Alarm Status On tezamen met de alarmtijd.
Na een paar seconden toont de display weer de echte tijd.
Een symbool verschijnt in de display. Dit geeft aan dat het
alarm actief is.
Opmerking: Alarmtijde n wor den met gebruik van het
24 uursformaat ingesteld. Bijvoorbeeld 2:30 PM wordt
als 14:30 ingevoerd.
Page 87

Alarmtype selecteren
U kunt uw klokradio zo instellen dat u of met radio-alarm of een
piepalarm wordt wakker gemaakt.
1. Druk onophoudelijk even op de knop Info totdat de display
Alarm Status toont.
2. Druk op een van de Tuning Op of Neer-knoppen om het type
alarm in te stellen.
3. Druk op de knop Select om tussen Radio- en piepalarmen
te schakelen.
4. Druk op de knop Info om de selectie te bevestigen.
Opmerking: Als het alarm op radio-alarm is ingesteld
dan schakelt uw klokradio op het laatst gebruikte
station aan.
86
NL
Page 88

87
Alarmen annuleren
1. Zodra het alarm afgaat kunt u het voor 24 uur annuleren,
door op de knop Standby te drukken.
2. Om een alarm permanent te annuleren, gaat u als volgt te werk:-
3. Druk onophoudelijk even op de knop Info totdat de display
Alarm Status toont.
4. Druk op de knop Select om de alarmstatus naar OFF (uit)
te schakelen.
Snoozefunctie
1. U kunt het radio- of piepalarm voor 5 minuten stilzetten door op
de knoppen Tuning Op/neer of Select te drukken.
De display toont nu .
2. U kunt deze sequentie gedurende een periode van 1 uur voor
het radio-alarm of 30 minuten voor het piepalarm herhalen.
Page 89

88
Slaaptimer
U kunt de slaaptimer alleen instellen als de klokradio aan is
(Standby).
1. Druk onophoudelijk even op de knop Info totdat de display
Sleep Status toont.
2. Druk op de knop Select om Sleep On (slapen aan)
wordt geselecteerd.
3. Selecteer de gewenste slaaptijd (1- 99 minuten) door de
knoppen Tuning Op of Neer te gebruiken.
4. Druk op de knop Select om de instelling van de slaaptimer
te bevestigen.
5
. De display toont d e slaaptijd voordat het naar de
norm ale radi odisplay terugkeert. De radio gaat uit
zodra d e slaaptijd voorbij is.
NL
Page 90

89
Mof koptelefoon
Aan de rechterkant van uw radio zit een koptelefoonmof van
3.5 mm. Deze kunt u voor een koptelefoon of voor oorpluggen
gebruiken. Door er een plug in te steken, wordt de interne
luidspreker automatisch stilgezet.
Weergave achterlicht
1. De weergave van het achterlicht heeft acht niveaus, inclusief uit.
U kunt deze instellen door onophoudelijk even op de knop Light
(licht) te drukken.
Page 91

Specificaties
Power Requirements
Netvoeding
Frequentiedekking
Circuitkenmerken
Luidspreker
Uitvoervermogen
Mof koptelefoon
Antennesysteem
FM
DAB
Antennes
Bij het afleveren is uw radio voorzien van een telescopische
antenne. Als dit ongemakkelijk blijkt te zijn, dan kunt u op de plaats
van de telescopische antenne een aparte draadantenne plaatsen.
Er wordt een steeksleutel geleverd om de telescopische antenne te
verwijderen. De draadantenne kunt op de plaats van de
telescopische antenne steken.
Opmerking: In gebieden waar de signalen zwak zijn, kan een
draadantenne onvoldoende zijn en de telescopisch e ant enne
efficiënter blijke n.
90
AC 230 volt, 50Hz alleen
FM 87.5 - 108MHz
DAB
Band 3 174.928 - 239.200MHz
L Band 1452 - 1492MHz
(DCR-209)alleen
77 mm (3 inches), 8 ohms
0.9 Watt
3.5mm dia
Telescopische antenne of alternatieve
draadantenne
Telescopische antenne of alternatieve
draadantenne
NL
Page 92
91
Algemeen
Stel deze eenheid niet bloot aan vocht (bijv. Druppels of spatten)
of aan temperaturen die de 70 graden centigraad overschrijden.
Het wordt aangeraden de DAB-band te gebruiken wanneer dit
mogelijk is. U krijgt hierdoor betere resultaten op het gebied van
kwaliteit en u blijft vrij van storingen, in tegenstelling tot de FM-band.
Page 93

92
Page 94

WICHTIGE SICHERHEITSHINWEISE ...................... 94
Bedienelemente .……………...............….. ....... ...... 95-96
Netzbetrieb .....................….............….................... 97
Bedienung des Radios - DAB ........................…........ 98
Einen Sender auswählen - DAB.....…......................... 99
Unterprogramme (Seconda ry S erv i c es ) - DAB ...… ... .. 100
Anzeigemodi - DAB ...... ...... ..... .... .... ...… …….... .... .. 100
Neue Sender finden - DAB.....................…………..... 101
Automatische Auswahl – DAB ....... ......... ........ ........ 101
Manuelle Sendereinstellung – DAB .......................... 102
Anzeige der Sig nalstä rke - DAB .............................. 102
Bedienung des Ra dios - FM ..........................…....... 103
Manuelle Sendereinstellung - FM ........….................. 104
Anzeigemodi - FM ........ ....... ........ ….…………… ...... 105
FM-Stereo/Mono ................................….…............. 105
Sender voreinstellen - FM .........…....……................ 106
Einen gespeicherten Sender aufrufen - DAB und FM. 106
System zurücksetzen ........................................…. 107
L-Band-Sender für Kanada wählen (nur DCR-209) ….. 107
Weckzeit einstellen ..........................................….. 108
Art des Weckrufs eins tell en ............. ..... ..... ….... ..... 109
Wecker ausschalten ........………............................ 110
Schlummerfunktio n (Snooze) ... ...... ..... ..…….. ..... .... 110
Inhalt
93
Sleep-Timer .......................................................... 111
Kopfhöreranschluss ...................................…......... 112
Hintergrundbeleuchtun g ................... ...... ..….... ....... 112
Antennen .............................................................. 113
Technische Daten .............. ..... .... ..... .... ..... .... ..... .. 113
Gerätemerkmale .................................................... 113
Allgemeines ........................................................ 114
Page 95

94
WICHTIGE SICHERHEITSHINWEISE
1. Lesen Sie diese Anleitung durch.
2. Bewahren Sie diese Anleitung gut auf.
3. Beachten Sie alle Warnhinweise.
4. Befolgen Sie alle Anweisungen.
5. Verwenden Sie dieses Gerät nicht in der Nähe von Wasser.
6. Reinigen Sie es nur mit einem trockenen Tuch.
7. Blockieren Sie keine Belüftungsöffnungen. Bauen Sie das Gerät
gemäß den Anweisungen des Herstellers ein.
8. Bauen Sie das Gerät nicht in der Nähe von Wärmequellen ein,
wie zum Beispiel Radiatoren, Heizkörpern, Öfen oder anderen
Geräten (einschließlich Verstärkern), die Wärme produzieren.
9. Machen Sie den Sicherheitsmechanismus des gepolten oder
geerdeten Steckers nicht zunichte. Ein gepolter Stecker hat zwei
Stifte, wobei einer davon breiter ist. Ein geerdeter Stecker hat
zwei Stifte und einen dritten Erdungsstift. Der breite bzw.
der dritte Stift dient Ihrer Sicherheit. Wenn der mitgelieferte
Stecker nicht in Ihre Steckdose passt, wenden Sie sich an einen
Elektriker, um die veraltete Steckdose auszutauschen.
10. Sorgen Sie dafür, dass niemand auf das Netzkabel tritt und dass
es nicht gequetscht wird, insbesondere an Steckern,
Steckdosen und an der Stelle, an der es aus dem Gerät kommt.
11. Verwenden Sie nur die vom Hersteller angegebenen
Zusatzgeräte/Zubehörteile.
12. Verwenden Sie das Gerät nur mit dem vom Hersteller
angegebenen oder mit dem Gerät zusammen verkauften Wagen,
Ständer, Stativ, Träger oder Tisch. W enn ein Wagen verwendet
wird, bewegen Sie die Kombination aus Wagen und Gerät
vorsichtig, um Verletzungen durch Umkippen zu vermeiden.
13. Ziehen Sie während Gewitter, oder wenn das Gerät längere
Zeit nicht verwendet wird, den Netzstecker.
14. Überlassen Sie die Reparatur und Wartung qualifizierten
Fachleuten. Reparaturarbeiten sind erforderlich, wenn das
Gerät in irgendeiner Weise beschädigt wurde (zum Beispiel
das Netzkabel oder der Stecker), Flüssigkeit darüber geschüttet
wurde oder Gegenstände in das Gerät gefallen sind, das Gerät
Regen oder Feuchtigkeit ausgesetzt wurde, nicht normal
funktioniert oder heruntergefallen ist.
15. Um das Risiko eines Feuers oder Stromschlags zu reduzieren,
sollten Sie das Gerät nie Regen oder Feuchtigkeit aussetzen.
16. Die Markierung für Stromschlaggefahr und das entsprechende
grafische Symbol finden Sie unten am Gerät.
17. Setzen Sie das Gerät nicht Tropf- und Spritzwasser aus
und stellen Sie keine mit Wasser gefüllten Gegenstände auf
das Gerät.
D
Page 96

Bedienelemente (Vorderseite)
95
1. Standby-Taste
2. Taste für die automatische Sendereinstellung
3. Frequenzbereichstaste
4. Beleuchtungstaste
Page 97

96
Bedienelemente (Oben)
5. Teleskopantenne
6. Kopfhöreranschluss
7. Auswahltaste
8. Lautstärkeregler
9. Sendereinstelltasten
10. Voreinstellungstasten
11. Infotaste
D
Page 98

Netzbetrieb
1. Stellen Sie das Gerät auf eine ebene Fläche. Stecken Sie den
Netzstecker in die Wandsteckdose.
2. Auf dem Display wird für einige Sekunden „DAB digital radio“
angezeigt, bevor es wieder zur Uhranzeige zurückkehrt.
3. Die Uhrzeit wird automatisch einstellt, nachdem ein paar Minuten
lang ein DAB-Sender eingestellt war.
97
Page 99

98
Bedienung des Radios - DAB
1. Ziehen Sie die Teleskopantenne vollständig aus.
2. Drücken Sie die Standby-Taste, um das Radio einzuschalten.
3. Wenn das Radio zum ersten Mal eingeschaltet wird, werden die
DAB-Sender schnell durchsucht. Auf dem Display wird
„Autotune Quick scan“ (Schnellsuche) angezeigt. Wenn das
Radio bereits benutzt wurde, wird der zuletzt verwendete
Sender eingestellt.
4. Während der automatischen Sendereinstellung mit der Erkennung
der Sendergruppen wird in der unteren Zeile des Displays der
Name des Senders und die Anzahl der gefunden Sender
angezeigt. In der oberen Zeile des Displays wird ein
Balkendiagramm angezeigt, das den Fortschritt der automatischen
Sendereinstellung angibt.
5. Wenn die automatische Einstellung beendet ist, wird der erste
Sender (in alphabetischer Reihenfolge 0...9...A...Z) ausgewählt.
6. Wenn die Senderliste nach der automatischen Sendereinstellung
noch immer leer ist, wird auf dem Display „No Signal“ (Kein Signal)
angezeigt.
7. Wenn keine Signale gefunden werden, kann es nötig sein,
das Radio an einen Ort mit besserem Empfang zu stellen.
D
Page 100

Einen Sender auswählen - DAB
1. In der oberen Zeile des Displays wird der Name des gerade
eingestellten Senders angezeigt.
2. Drücken Sie die Sendereinstelltasten, um durch die Liste der
verfügbaren Sender zu blättern.
3. Drücken Sie kurz die Auswahltaste, um den Sender einzustellen.
Auf dem Display wird „Tuning“ (Sender wird eingestellt)
angezeigt, während das Radio den neuen Sender sucht.
4. Stellen Sie den Lautstärkeregler nach Ihren Wünschen ein.
Hinweis: Wenn nach der Auswahl eines Senders auf dem
Display „Not Available“ (Nicht verfügbar) angezeigt wird,
müssen Sie das Radio möglicherweise an eine Stelle mit
besserem Empfang stellen.
99
 Loading...