


Contents
1.Quick Start 1
Features 1
What You Need to Begin 2 Installing the Battery 2 The Basic Controls 3
Play Music 5
Listen to the FM Radio 7 Voice recording 8 Headphone/Earphone 9
2.Playing Music 10
Connecting and Disconnecting 10
Using the Music Controls 10
Listening to Music 11
Transferring Music 12
Adjusting Settings 13
3.Listening to the FM Radio 16
Using the FM Radio Controls 16 Finding a Radio Station 17 Accessing FM Presets 18
Save a Radio Station as a Preset 18 Delete a Preset Radio Station 19 Setting Preset Stations Automatically 19
4.Voice recording 22
Using the Voice Recorder Controls 22
Record voice to file 23
Saving the recorded file 24
Listening to recorded files 24
Deleting to recording file 25
5.Navigating the Software Menus 25
The Basics 25
Diagrams of Top Level Sub Menus 27
6.Tips and Troubleshooting 34
7.Learn More, Service, and Warranty Information 35
Getting Technical Support 35 Learn More 35
Your 1-Year SanDisk Limited Warranty 36
8.Safety Tips and Cleaning Instructions 38
 1
1
This chapter helps you get started quickly playing music and listening to the FM radio with your SanDisk Sansa™ m200 Series MP3 Player.
Quick Start
Congratulations on your purchase of a SanDisk Sansa m200 Series MP3 Player! This chapter will help you to become familiar with your new purchase as quickly as possible.
Features
Your Sansa MP3 Player is a full-featured music device that can be carried with you anywhere.
Plays MP3, WMA, secure WMA and Audible audio file formats.
The backlit graphic LCD display supports numerous local languages around the world and displays artist, album and song title information as well as other important song information.
The digital FM radio allows you to access local radio stations around the world. The radio also allows you to preset up to 20 of your favorite radio stations.
With 5 equalizer types for the FM radio and music player, you can optimize your sound for your favorite style of music, for example, Rock, Jazz, Classical, Pop, and Custom (user-defined).
Sophisticated music library sorting lets you browse the music in your player by artist, album, song title, genre, year, playlist, and other useful criteria.
“AB” feature allows you to select a start point and an end point within an audio file so you can play that segment over and over. This feature can be helpful for learning languages.
Hi-Speed USB 2.0 port for fast and easy transfer of files.
Up to 19 hours of continuous playback using one AAA battery.
Supports voice recording function with built-in microphone.
Supports Microsoft WMDRM 9 and 10.
Fully compatible with subscription music services.
Quick Start ` 1
What You Need to Begin
To add music to the Sansa m200 series MP3 Player, the following are needed:
Intel Pentium PC or equivalent.
Windows XP (Windows Media Player 9 or 10).
CD-ROM drive
USB 2.0 port for High-Speed transfer.
Supports MP3, WMA, secure WMA and Audible audio file formats
Your Sansa Package contains:
Sansa m200 Series MP3 Player
Earphones
Armband and Case
AAA battery
USB 2.0 travel cable
CD with User Manual
Quick Start Guide
Installing the Battery
Follow the steps as shown in Figure 1:
1.Turn your player over, so the backside faces up, and locate the battery door at the back of the player.
2.Gently depress the catch at the bottom of the battery cover and lift up.
3.Push the battery down into the battery area of the player, placing the flat end (--) of the battery against the spring in the battery area. The protruding top (+) of the battery slips down and under. The battery should fit snugly.
4.Replace the battery cover until it snaps closed.
Quick Start ` 2

Figure 1. Installing the AAA Battery
The Basic Controls
Your player has an easy to use set of controls as shown in Figure 2
Left Side |
Front |
Right Side |
(with Hold, Mic) |
|
(Power/Menu, Volume) |
Top (with Headphone Jack, USB)
Figure 2: The Basic Controls
The control names and their functions are described in Table 1 below.
Quick Start ` 3

Table 1: Control Names and Functions
Control Name
Power/Menu Button
Select Button
Play/Pause/Up Button
Repeat/AB/Down
Button
Next/Fast Forward
Button
Previous/Fast Reverse
Button
Hold Button
Volume Button
USB Port
Earphone Port
Function(s)
Located on the right side of the player:
•Press and Hold to turn the player on or off.
•Press once to enter the menu
•Press to exit menu display during menu navigation
•Press to cancel the change in setting menu
Located on the front of the player:
•Select a song or menu
•Press to view secondary information about a song during playback, for example, song format and playback data
Located on the front of the player:
•Press button to Play/Pause during playback.
•Press button to move up one item during menu browsing.
Located on the front of the player:
•Press once to toggle the repeat mode (repeat 1 song, repeat all selection, and no repeat)31
•Press and hold to enable A-B looping
Located on the front of the player:
•Press to skip to next song during playback
•Press and hold to Fast forward during playback
•Press to enter a submenu during menu navigation
Located on the front of the player:
•Press to skip to previous song during playback
•Press and hold to Fast Reverse during playback
•Press to return to a upper level menu during menu navigation
Located on the left side of the player, slide down to lock or hold and up to unlock the player.
Located on the right side of the player:
•Increase or decrease volume during playback.
Located at the top of the player, connect a USB cable from the player to your computer
Located at the top of the player, connect earphones to listen to the player.
Quick Start ` 4
Control |
Name |
Function(s) |
|
Mic |
Located on the left side of the player, speak into the |
|
|
Mic during Recording. |
For more information about the onscreen menus, see the Navigating the Software Menus in the user guide on Page 25.
Play Music
To play music files, you need to transfer music to your player.
Transfer Music
The first step to playing music is to transfer files to your player. Follow these steps:
1.Use the USB connector cable provided with your player to connect the USB port on your player to an open USB port on your computer. The player will appear as a removable drive in Windows File Explorer. (Can’t find the USB port on your player? See The Basic Controls section on page 3.)
2.Drag and drop music files to the player from any location on your hard-drive or use a variety of music software to move music to your Sansa. For more information on how to use specific software, please refer to the help files provided with each program.
NOTE: Because your Sansa Player automatically organizes your music by artist, album, song title, genre, and year, you only need to copy your music to the player. Your Sansa will automatically create a music library which you can later sort with easy-to-use menus.
Play Music Files
After you have transferred music files to your player, disconnect the USB cable from your player and follow these steps:
1.Press the Power/Menu Button once. The SanDisk logo and Sansa logo will briefly appear onscreen then disappear. (Can’t find the Power/Menu Button? See The Basic Controls section on Page 3.)
WARNING: If the onscreen message says “Locked” and then shuts off, you need to locate the Hold Button on the left side of your player. Slide that button up to unlock your device. Then repeat Step 1 above. See The Basic Controls section on Page 3 if you cannot find the Hold Button.
Quick Start ` 5

NOTE: If you do not see music files onscreen, briefly press the Power/Menu Button on the right side of your player. The software Menu will appear. Use the Repeat/AB/Down Button to scroll and highlight Modes. Press the Select Button to select Modes. Press the Play/Pause/Up Button to scroll then highlight the Audio Playback mode. Press the Select Button to enter music mode.
2.Press the Previous/Fast Reverse or Next/Fast Forward Buttons to move backwards or forwards through your music files.
3.Press down once on the Play/Pause/Up Button to play the music files. Once your selected music has played, your player will play each music file, one after another. To pause the music, press the Play/Pause/Up Button, to resume press it again.
4.To change the volume of your music as it plays, push the volume button on the right side of your player.
Once your music starts to play, you can use the player buttons to:
Skip backwards or forwards to the next song by pressing once on the Previous/Fast Reverse Button (backwards) or Next/Fast Forward Button (forwards).
Want to switch to another song while your music plays? Press the Power/Menu Button to display the software menu onscreen. Press the Repeat/AB/Down Button to scroll and highlight your menu choices. Press the Select Button to select options. First, scroll to the Play Music item and select it. Scroll to select from a list of ways to access music, for example, by artist, and then select your choice. Repeat this scroll and select the band, album and song. When your song is highlighted, press the Select Button to play it.
To learn more about how to play music with your player, see the Playing Music chapter that begins on Page 10.
Quick Start ` 6
Listen to the FM Radio
Follow these steps:
1.Press the Power/Menu Button once. The SanDisk logo and Sansa logo will briefly appear onscreen then disappear. (Can’t find the Power/Menu Button on your player? See The Basic Controls section on page 3.)
WARNING: If the onscreen message says "Locked" and then shuts off, you need to locate the Hold Button on the left side of your player. Slide that button left to unlock your device. Then repeat Step 1 above. See The Basic Controls section on page 3 if you cannot find the Hold Button.
NOTE: If you do not see the radio onscreen, briefly press the Power/Menu Button on the right side of your player. The software Menu will appear. Use the Repeat/AB/Down Button to scroll and highlight Modes. Press the Select Button to select Modes. Press the Play/Pause/Up Button to scroll then highlight the FM Radio mode. Press the Select Button to enter FM radio mode.
2.To change stations, press the Next/Fast Forward Button or Previous/Fast Reverse Button to move along the radio spectrum. Press and hold either of these buttons to scan radio stations.
NOTE: You can scan preset radio stations using the Play/Pause/Up Button or the Repeat/AB/Down Button. See Accessing FM Presets on Page 18 to learn how to access the Preset Channel software menus to add, modify, and delete preset channels.
3.To change the volume of your music as it plays, press the Volume Button in the right side of your player.
4.To stop playing the FM radio, you have two choices:
Press and hold down the Power/Menu Button until the “Powering Down” message appears.
Press the Power/Menu Button briefly to navigate the software Menu to switch to Music mode by selecting Play Music with the Select Button and using the Next/Fast Forward Button and Previous/Fast Reverse Button to navigate to the song you want to play. To learn how onscreen menus work, see the Navigating the Software Menus chapter that begins on Page 25.
For more information about how to use the FM radio, see the Listening to the FM Radio chapter that begins on Page 16.
Quick Start ` 7
Voice recording
To record your voice as file to your player. Follow these steps:
1.Press the Power/Menu Button once. The SanDisk logo and Sansa logo will briefly appear onscreen then disappear. (Can’t find the Power/Menu Button on your player? See The Basic Controls section on page 3.)
WARNING: If the onscreen message says "Locked" and then shuts off, you need to locate the Hold Button on the left side of your player. Slide that button left to unlock your device. Then repeat Step 1 above. See The Basic Controls section on page 3 if you cannot find the Hold Button.
NOTE: If you do not see the Recorder onscreen, briefly press the Power/Menu Button on the right side of your player. The software Menu will appear. Use the Repeat/AB/Down Button to scroll and highlight Modes. Press the Select Button to select Modes. Press the Play/Pause/Up Button to scroll then highlight the Recorder mode. Press the Select Button to enter Recorder mode.
2.Press the Power/Menu Button briefly to access the software Menu then use the Modes setting to switch to Recorder.
3.Press the Play/Pause/Up Button to start recording.
4.During the recording, If the Play/Pause/Down Button is pressed, the recording will be paused. If the Play/Pause/Down Button is pressed again, the recording will resume.
5.To stop recording:
Press the Repeat/AB/Down Button.
6.Saving your recording:
Once the recording has been stopped you’ll be presented with a message asking you if you’d like to save the recording. Use the Next/Fast Forward and Previous/Fast Reverse buttons to move the highlight between the X and check boxes. To save the recording, press Select with the check box highlighted. To return to the recorder without saving, press Select with the X box highlighted. You can play back your saved recordings under the Play Music menu.
Quick Start ` 8
Headphones/Earphones
Do not use headphones/earphones while driving, cycling, or operating any motorized vehicle. It may create a traffic hazard and may be illegal in some areas. It can also be dangerous to play your music with headphones/earphones at high volume while walking, or engaged in other activities. You should exercise extreme caution and discontinue use in potentially hazardous situations.
Avoid using headphones/earphones at high volume. Hearing experts advise against continuous loud and extended music play.
Quick Start ` 9
 2
2
This chapter helps you get started playing music on your SanDisk Sansa™ m200 Series MP3 Player.
Playing Music
Your player can play music files stored in MP3, WMA, secure WMA and Audible audio file formats. This chapter shows you how to load and play your music files.
Connecting and Disconnecting
Your player includes a USB connection cable so that you can transfer music files from your computer to your player. The small end fits into the USB port at the top of your player. The larger flat end connects to the USB port on your computer.
To play music, first upload files from your computer to your player. Follow these steps:
1.Use the USB connector cable provided with your player to connect the USB port on the top of your player to an open USB port on your computer. The player will appear as a Sansa m200 series on your computer. (Can’t find the USB port on your player? See The Basic Controls section on Page 3.)
2.Drag and drop music files to the player from any location on your hard-drive or use a variety of music software to move licensed music to your Sansa. For more information on how to use specific software, please refer to the help files provided with each program.
NOTE: Because your Sansa Player automatically organizes your music by artist, album, song title, genre, and year, you only need to copy your music to the player. Your Sansa will automatically create a music library which you can later sort with easy-to-use menus.
Playing Music ` 10
Using the Music Controls
Your player has three modes of operation: Play Music, FM Radio, and Recorder. To play your music files, you need to be in Play Music mode. Follow these steps:
3.Press the Power/Menu Button once. The SanDisk logo and Sansa logo will briefly appear onscreen then disappear. (Can’t find the Power/Menu Button on your player? See The Basic Controls section on page 3.)
WARNING: If the onscreen message says "Locked" and then shuts off, you need to locate the Hold Button on the left side of your player. Slide that button left to unlock your device. Then repeat Step 1 above. See The Basic Controls section on page 3 if you cannot find the Hold Button.
4.If you do not see music files onscreen, briefly press the Power/Menu Button on the right side of your player. The software Menu will appear. Use the Repeat/AB/Down Button to scroll and highlight Modes. Press the Select Button to select Modes.
Press the Play/Pause/Up Button to scroll then highlight the Audio Playback mode. Press the Select Button to enter music mode.
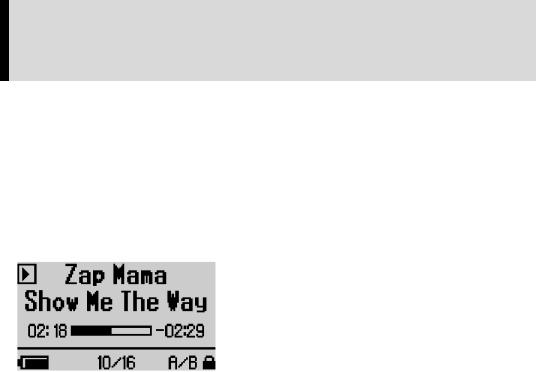
When you are in Music mode, the screen shown in Figure 3 will appear on your player.
Figure 3: The Music LCD screen
The control buttons and ports for your player are described in The Basic Controls section on Page 3. More detailed descriptions on how the controls work is included in the step-by-step instructions throughout this document. In addition, the Navigating the Software Menus chapter on Page 25 describes the onscreen menus that appear when you use these controls.
Listening to Music
Once you are in Music mode, and you have uploaded music files (see Connecting and Disconnecting section on Page 10), you can listen to music. Follow these steps:
1.A music file will display onscreen (see Figure 3). Press down once on the Play/Pause/Up Button to play the file. (Can’t find the Play/Pause/Up Button on your player? See The Basic Controls section on Page 3.)
Playing Music ` 11
 Loading...