

Samsung XE700T1A User Manual
1
2
3
4
5
User Guide
Getting Started
Using the Computer
Settings and Upgrade
Backup / Restore
Appendix
Contents
Start
63
Chapter 2.
Using the computer
A wireless network (Wireless LAN) environment is a network
environment that enables communicating between multiple
computers at home or a small-size o ce through wireless LAN
devices.
The descriptions below are for computer models with •
a Wireless LAN card or device. A Wireless LAN device is
optional.
The pictures in this manual may di er from the actual
product depending on your wireless LAN device model.
If the wireless LAN is turned o , select • Easy Settings >
Wireless Network and set it to ON.
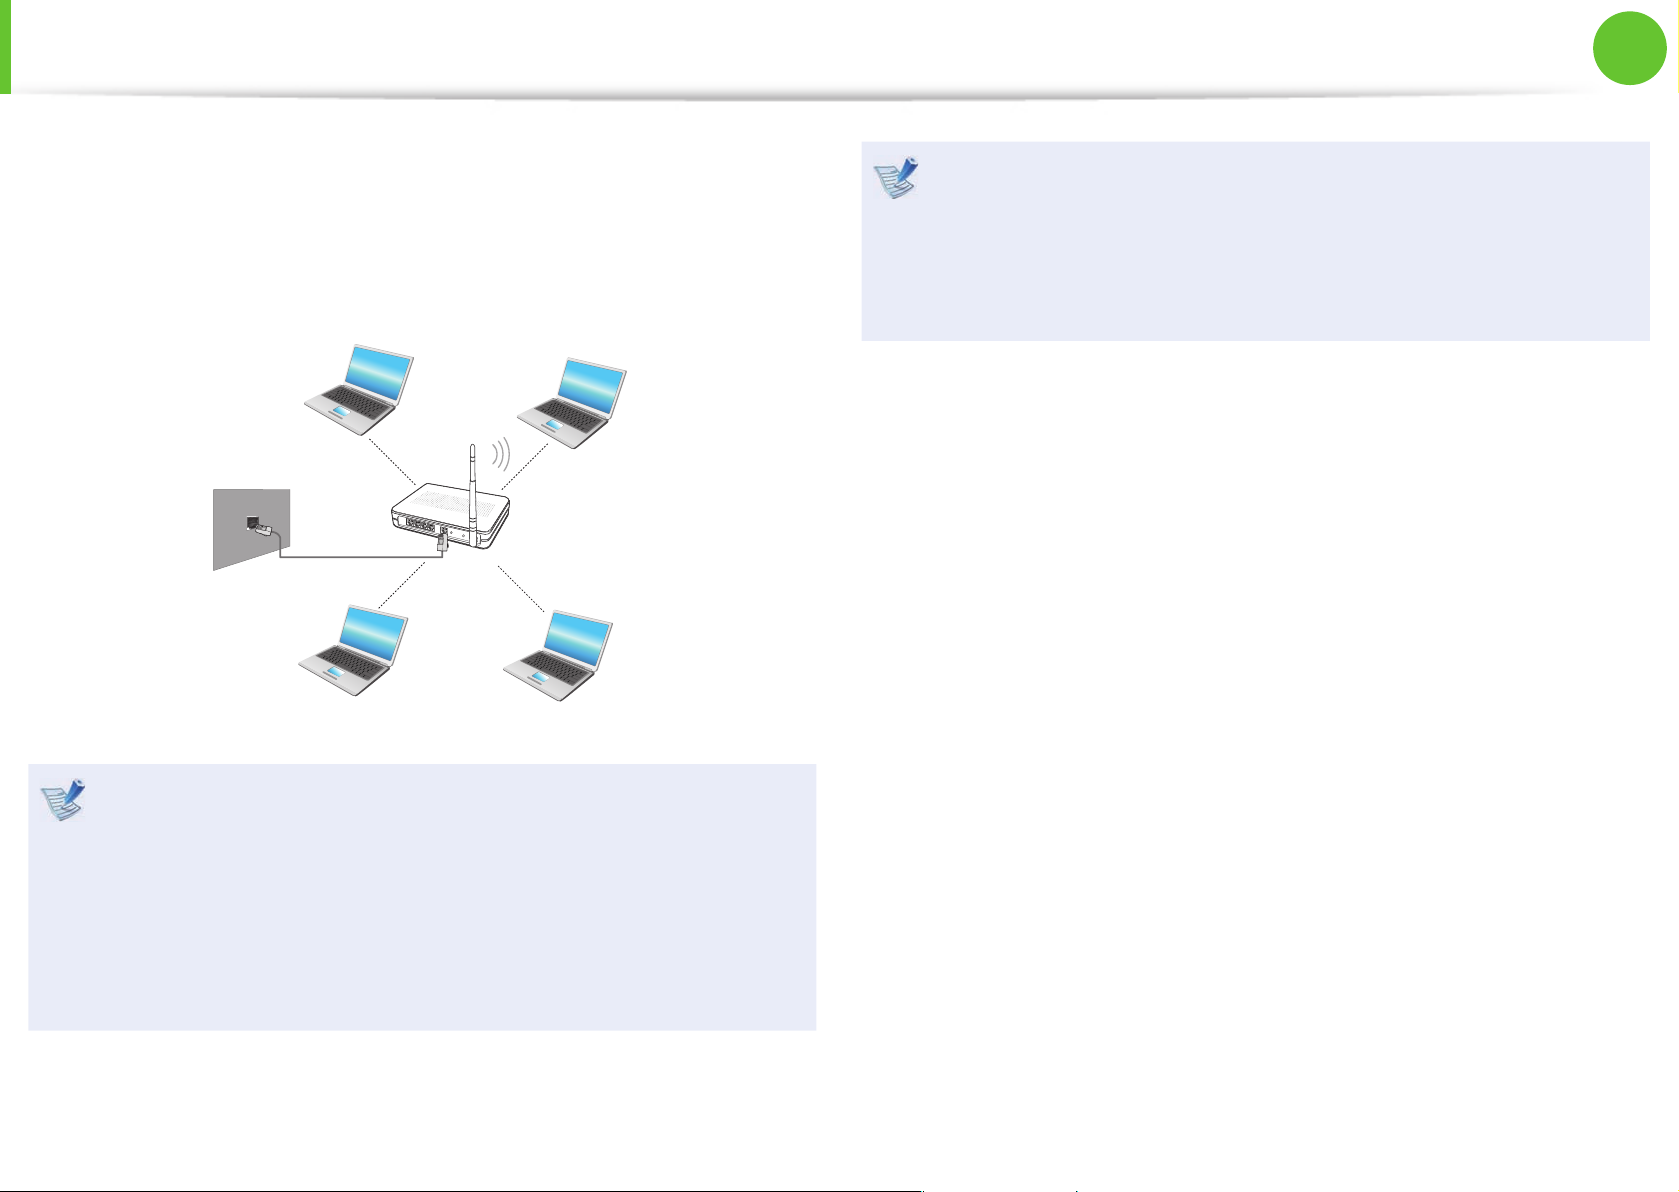
What is an Access Point ( AP)?
An AP is a network device that bridges wired and wireless LANs,
and corresponds to a wireless hub in a wired network. Connect
the computer with the wireless LAN function to the AP to use to
the network connection.
Wireless Network
(Optional)
64
Chapter 2.
Using the computer
Wireless Network
(Optional)
Connecting to a Wireless LAN
If there is an AP, you can connect to the Internet via the AP using
the Wireless LAN connection method provided by Windows.
These descriptions are written based on Windows 7, the latest
operating system. Therefore, some descriptions and gures
may di er from your operating system. But as the usage is
similar to other Windows operating systems, you can use
these descriptions for reference.
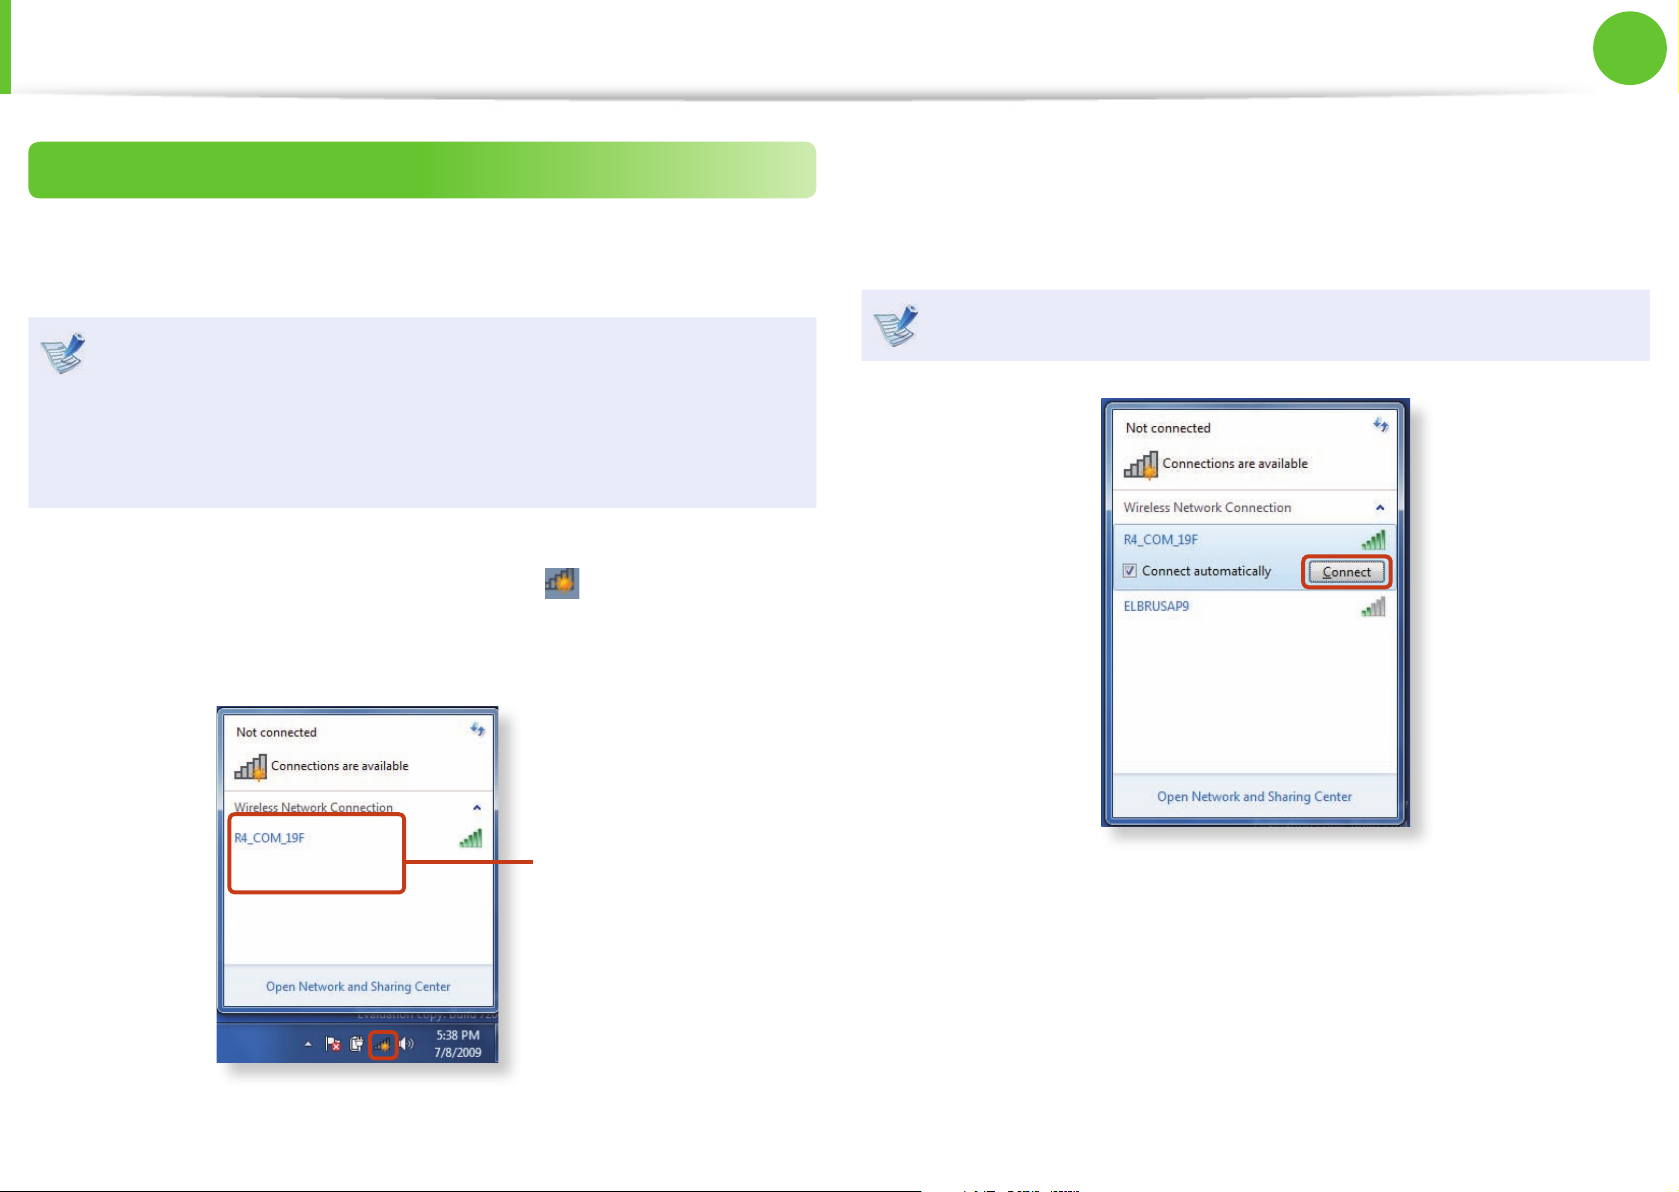
1
If you click the Network Connections icon in the system
tray, a list of available APs appears. If you select an AP to
connect to, the Connect button appears.
AP List
2
Click Connect.
If a network key is set for the AP, enter the network key and
then click Connect.
For the network key, please ask your network administrator.
3
When Connected to the AP is displayed, click the Close
button.
You can access the network.
65
Chapter 2.
Using the computer
Wireless Network
(Optional)
Connecting to a Wireless LAN through Easy
Settings (Optional)
You can access a wireless LAN using Easy Settings.
These descriptions are for Windows 7 and for supported
models only.
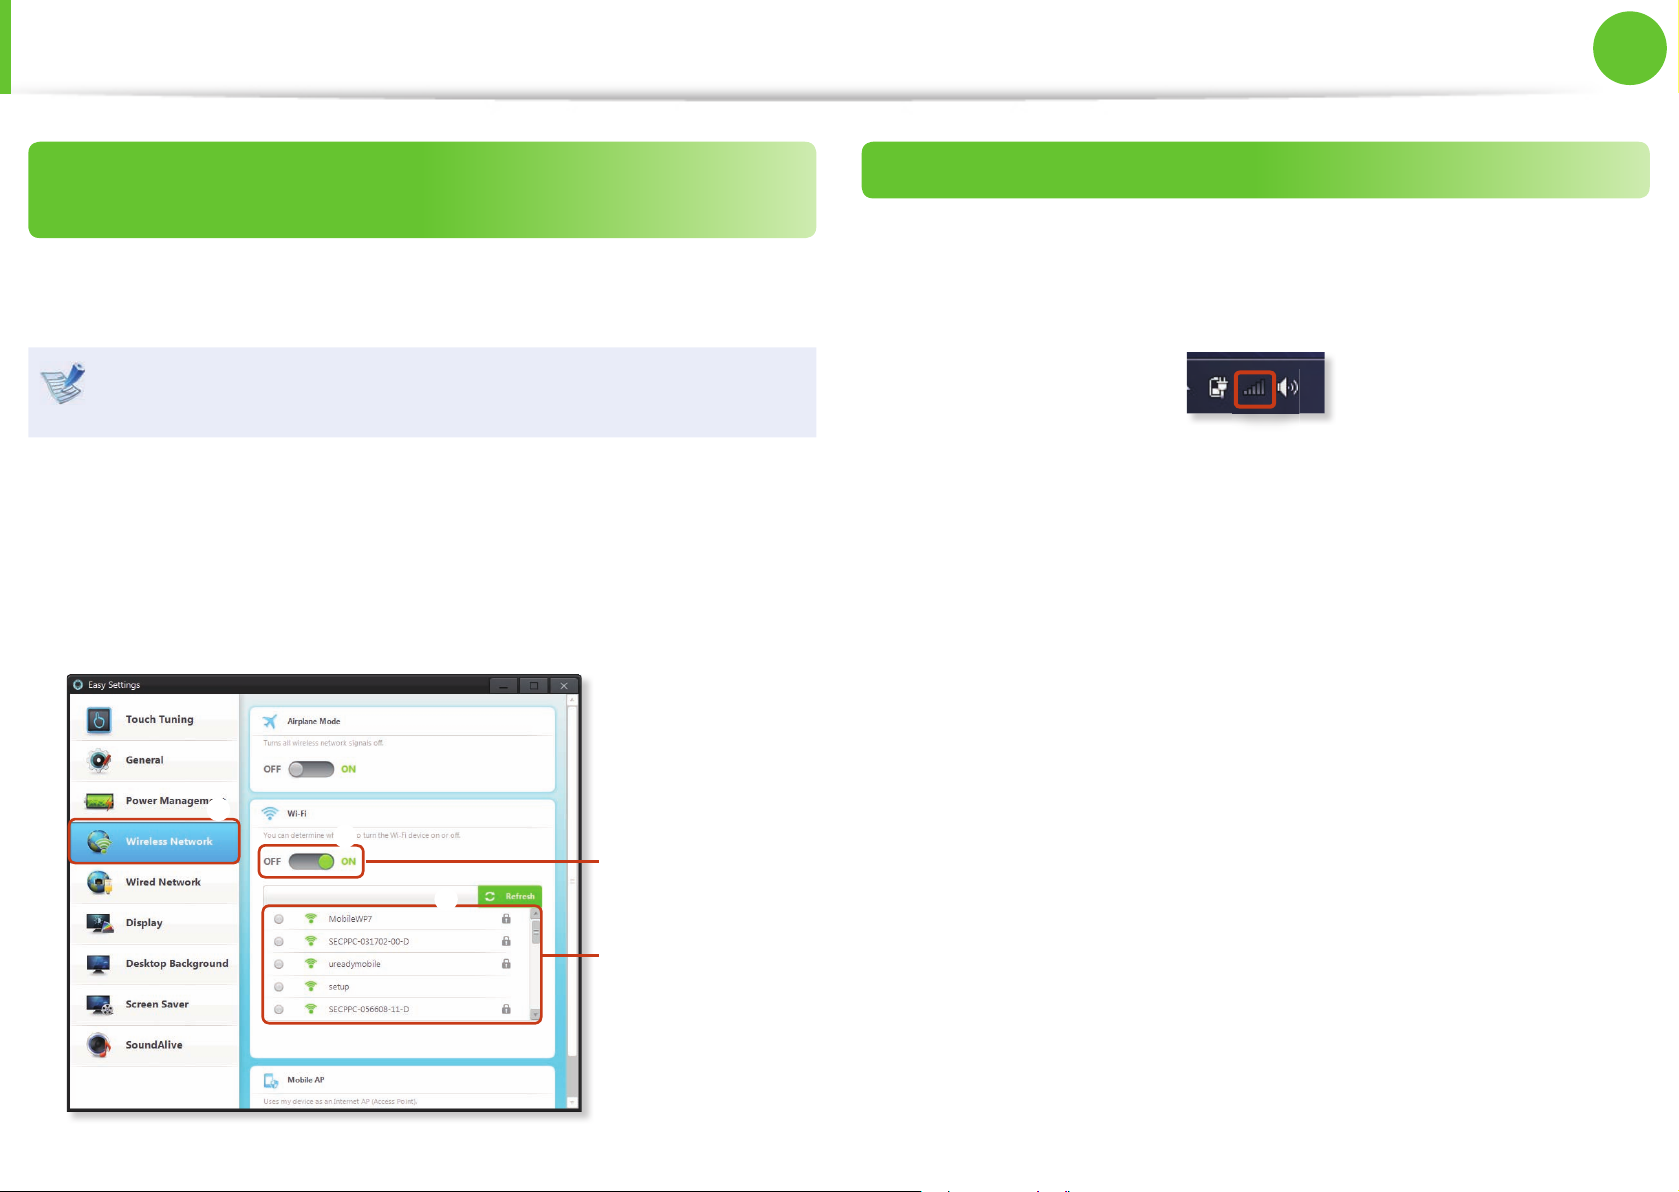
1
Launch the Easy Settings.
2
Con gure the Wireless Network and set the Wi-Fi device to
ON.
If this option is set
to ON, the Wi-Fi
function will run.
AP List
z
x
c
Normal Wireless Network Status
If the wireless LAN icon is displayed in the system tray of the
Taskbar, it indicates that the computer is connected to the Internet
properly (see below).
66
Chapter 2.
Using the computer
Wireless Network
(Optional)
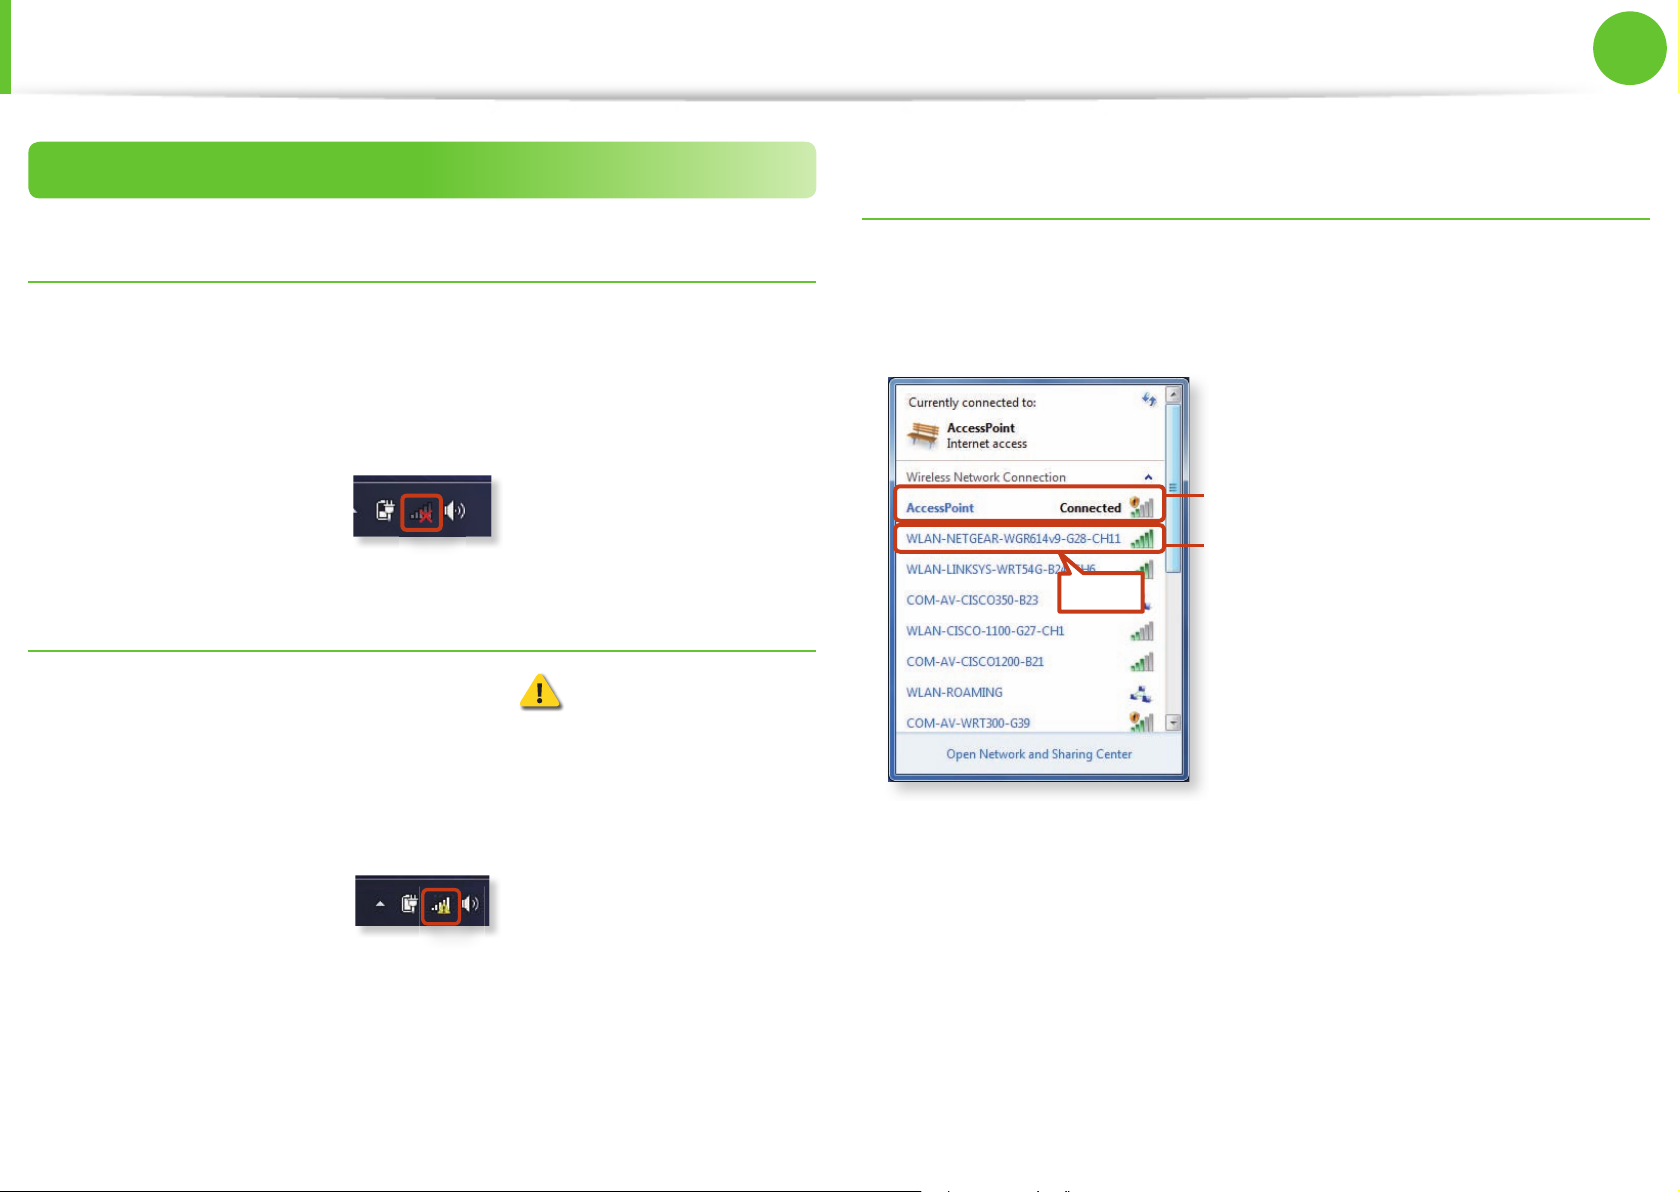
Abnormal Wireless Network Status
When the wireless LAN is not connected
If the wireless LAN icon is displayed with an “X” in the system
tray of the Taskbar, it indicates that the wireless LAN device is
turned o or that there are no available APs. Or the wireless LAN is
disconnected.
When you are not connected to the Internet
This is indicated by the wireless LAN icon in the system tray of
the Taskbar. In this case, you have to check the IP address settings.
Please contact your network administrator and recon gure the IP
address.
When APs are found but your computer is not
connected to the Internet
This is the case when an AP with a weak signal has been set to
a high priority. Connect to an AP with a strong signal by clicking
it.
An AP with a strong signal strength
The currently connected AP.
The signal strength is low.
Click
67
Chapter 2.
Using the computer
Using the Slate PC Dock
(Optional)
The Slate PC Dock supports various notebook computers so that
compatible peripherals can be connected to the computer.
You have to purchase the Slate PC Dock additionally.
►
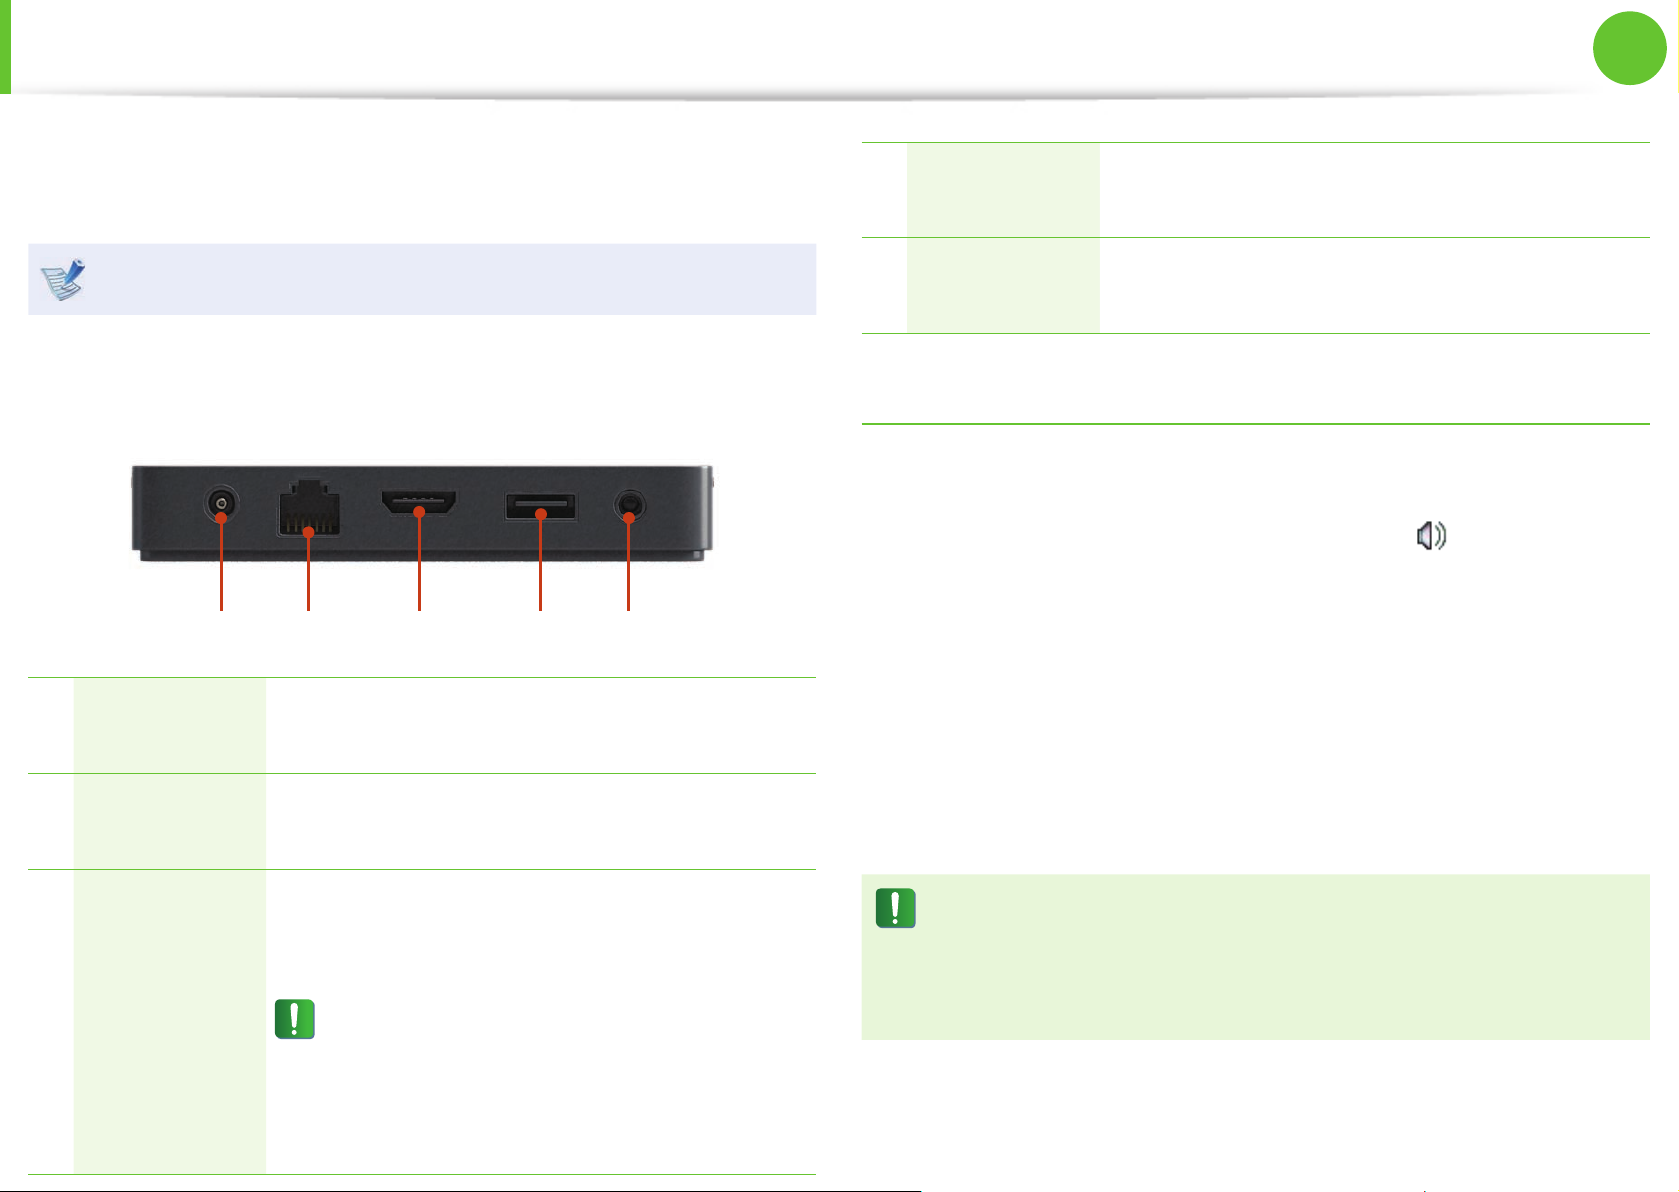
Rear
1 2 3 4 5
1 DC Jack
A jack to connect the AC adapter that supplies
power to the computer.
2
Wired LAN
Port
Connect the Ethernet cable to this port.
3
Digital Video/
Audio Port
(HDMI)
(Optional)
You can connect an HDMI cable to this port.
Using this port, you can enjoy digital video
and audio on the TV.
You cannot use both this port and the
Micro HDMI port on the computer at the
same time.
To use the Micro HDMI port on the
computer, separate the Slate PC Dock.
4 USB Port
You can connect USB devices to the USB port
such as a keyboard/mouse, digital camera, etc.
5
Headphone
Jack
A jack used to connect the headphones.
Connecting and using a Headphone Jack
Using the Headphone jack
1
Right-click over the Volume Control icon in the
noti cation area at the bottom right of the Desktop and
select Playback Devices.
(Alternatively, click the Control Panel > Hardware and
Sound > Sound > Playback tab.)
2
Select the Speakers(USB audio), click Set Default and click
OK.
Restrictions
When the Slate PC Dock is connected to the computer, you
cannot use the microphone (USB audio) or the Line-In (USB
audio) item of the recording device.
68
Chapter 2.
Using the computer
Installing/Removing
Before installing a computer to the docking station, make
sure to disconnect all the cables connected to the computer.
Although you can separate the computer from the Slate
PC Dock regardless of whether the computer is on or o ,
separating it when the computer is o is recommended.
Installing the computer
You can only use the Slate PC Dock with a Samsung computer
that supports this feature.
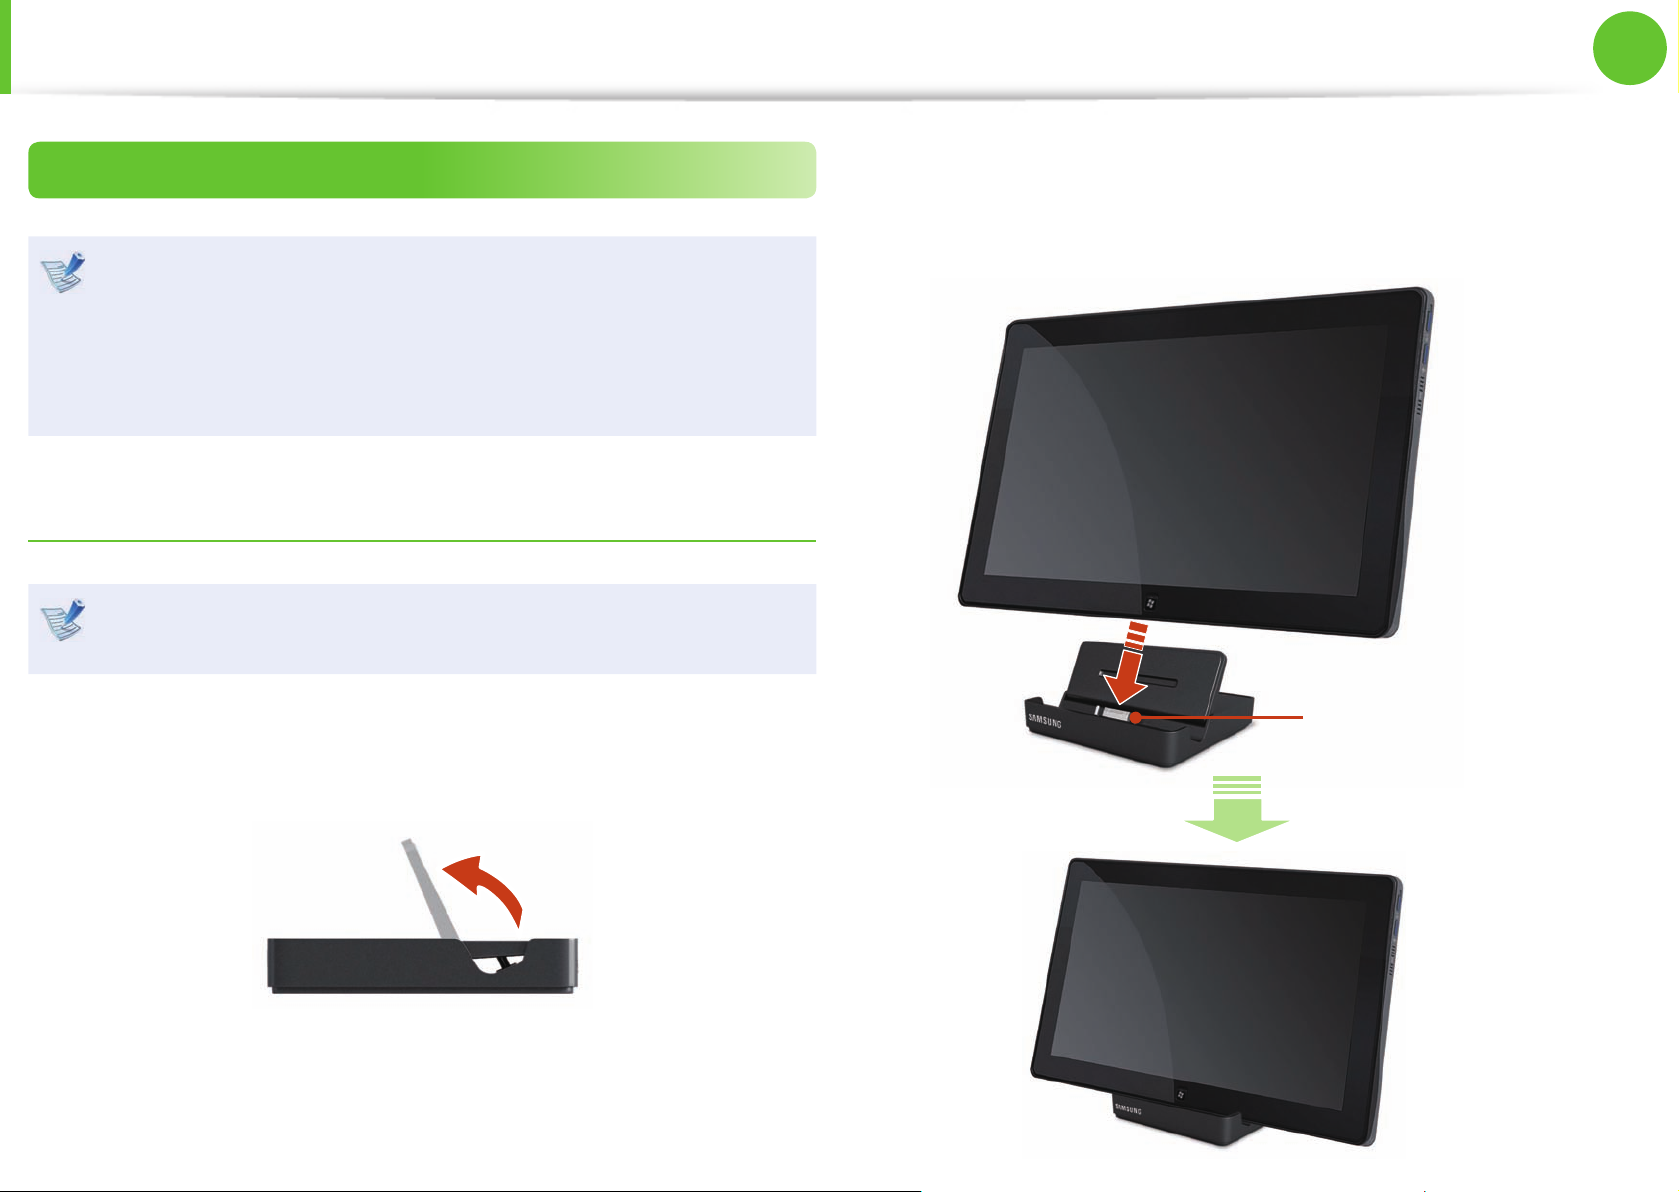
1
Insert your nger into the groove on the side of the Slate PC
Dock to open the top cover of the Slate PC Dock.
2
Align the computer connector of the Slate PC Dock and
the Slate PC Dock port at the bottom of the computer and
connect them.
Computer Connector
Using the Slate PC Dock
(Optional)

69
Chapter 2.
Using the computer
Using the Slate PC Dock
Separating the Computer
Turn the computer o.
(Optional)
1
Pull the computer upward by hand while holding the Slate PC
2
Dock rmly with the other hand.

LCD Brightness Control 71
Easy Settings (Optional) 73
BIOS Setup 74
Changing the Boot Priority 76
Battery 77
Chapter 3.
Settings and Upgrade
71
Chapter 3.
Settings and Upgrade
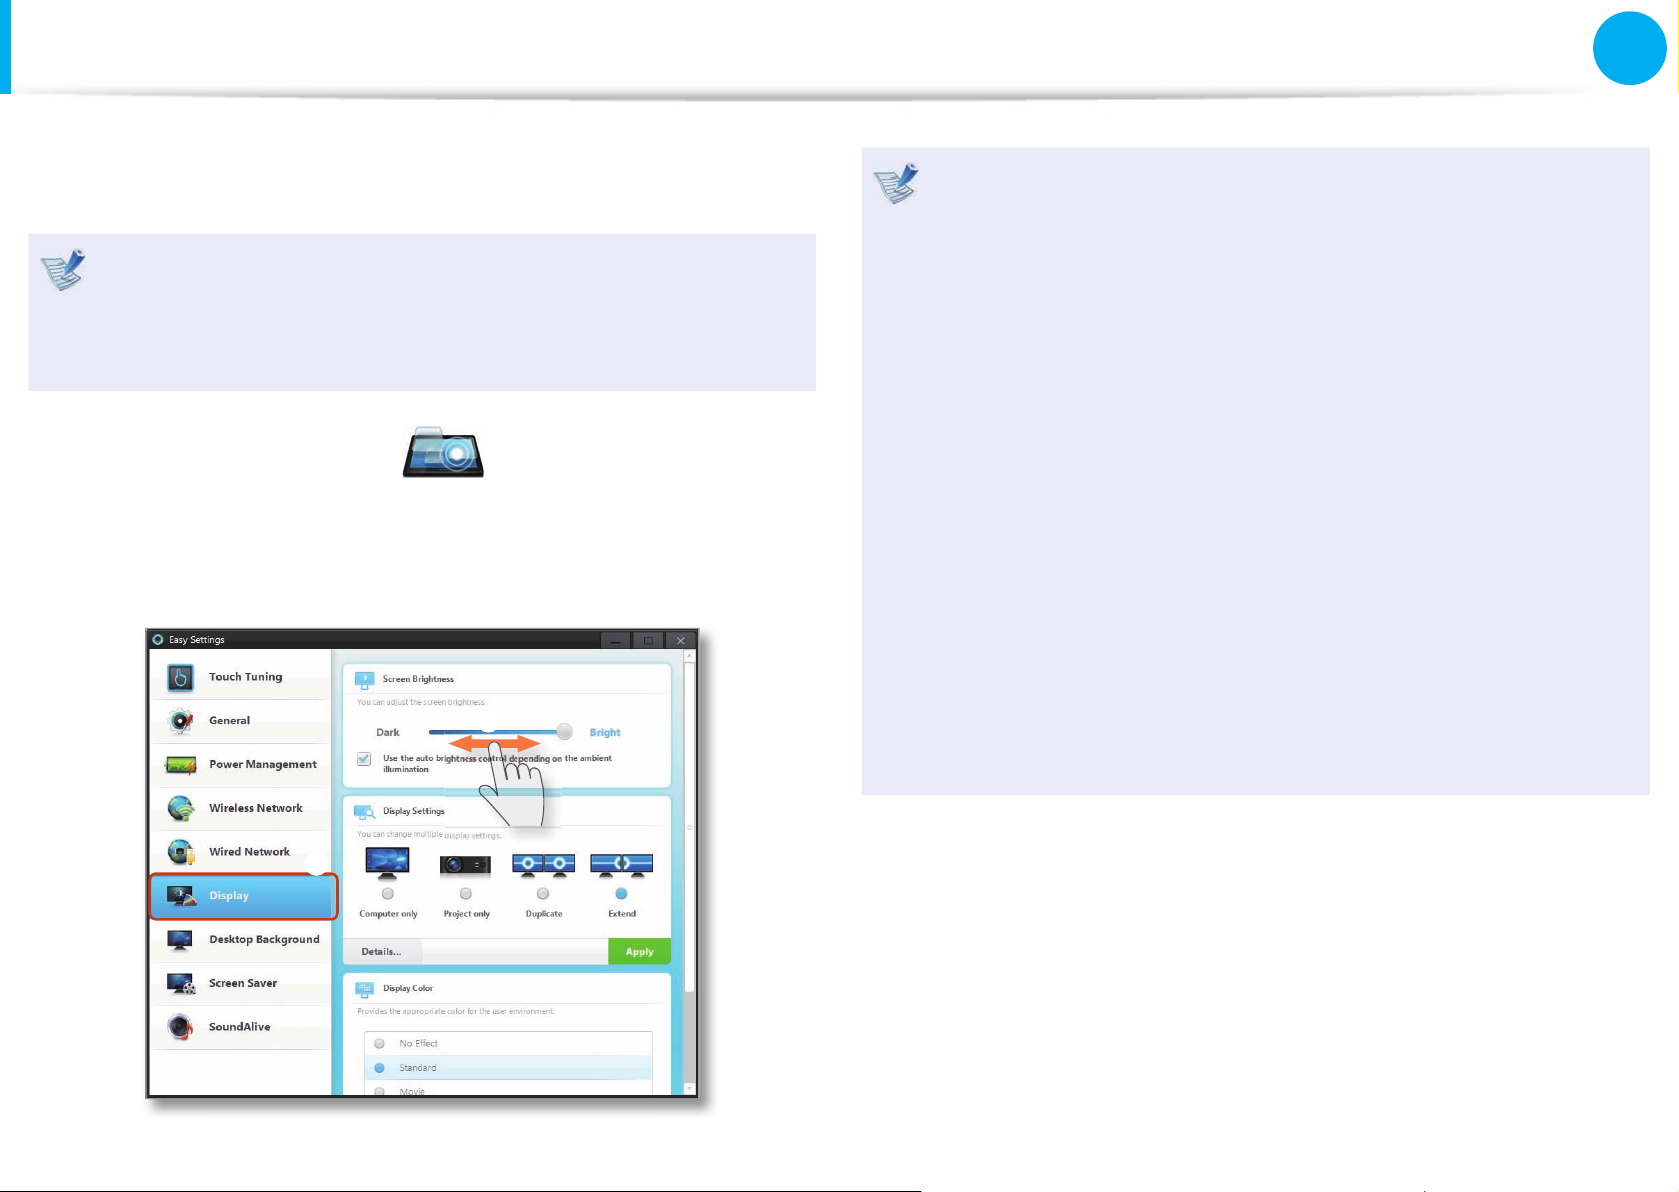
LCD Brightness Control
Using the Easy Settings, you can control the LCD brightness.
The screen brightness is automatically set to the brightest
level when AC power is connected and the brightness is
automatically set dimmer when the computer runs on battery
power to extend the battery use time.
1
Launch the Easy Settings .
2
Click Display > Screen Brightness and set the brightness
level.
z
x
Maintaining the changed LCD brightness even after •
turning the computer on again
To maintain the LCD brightness set by using the brightness
control keys or through the Power Options, follow the
procedures below.
►
For Windows 7
1. Click Control Panel > Hardware and Sound > Power
Options.
2. Click Change the settings of the currently con gured
mode.
3. Adjust the display brightness adjustment menu bar and
click the Save the changes button.
Saving battery power consumption•
Decreases the LCD brightness when the computer
is running on battery power to save battery power
consumption.

72
Chapter 3.
Settings and Upgrade
LCD Brightness Control
LCD bad pixels principle of computer•
Samsung observes the speci cations regarding strict
quality and reliability of LCD. But in spite of that, it is
inevitable that there might be a small number of bad
pixels. A large number of bad pixels can cause problems in
appearance, but a small number of pixels doesn’t a ect the
computer performance.
Therefore Samsung observes and manages the following
dot principles:
- Bright dot : 2 or less
- Black dot : 4 or less
- Combination of Bright and Dark : 4 or less
Instructions for Cleaning the LCD
Clean the LCD panel with a soft cloth lightly moistened with
computer cleansing detergent moving in one direction.
Cleaning the LCD panel with excessive force can damage the
LCD.
73
Chapter 3.
Settings and Upgrade
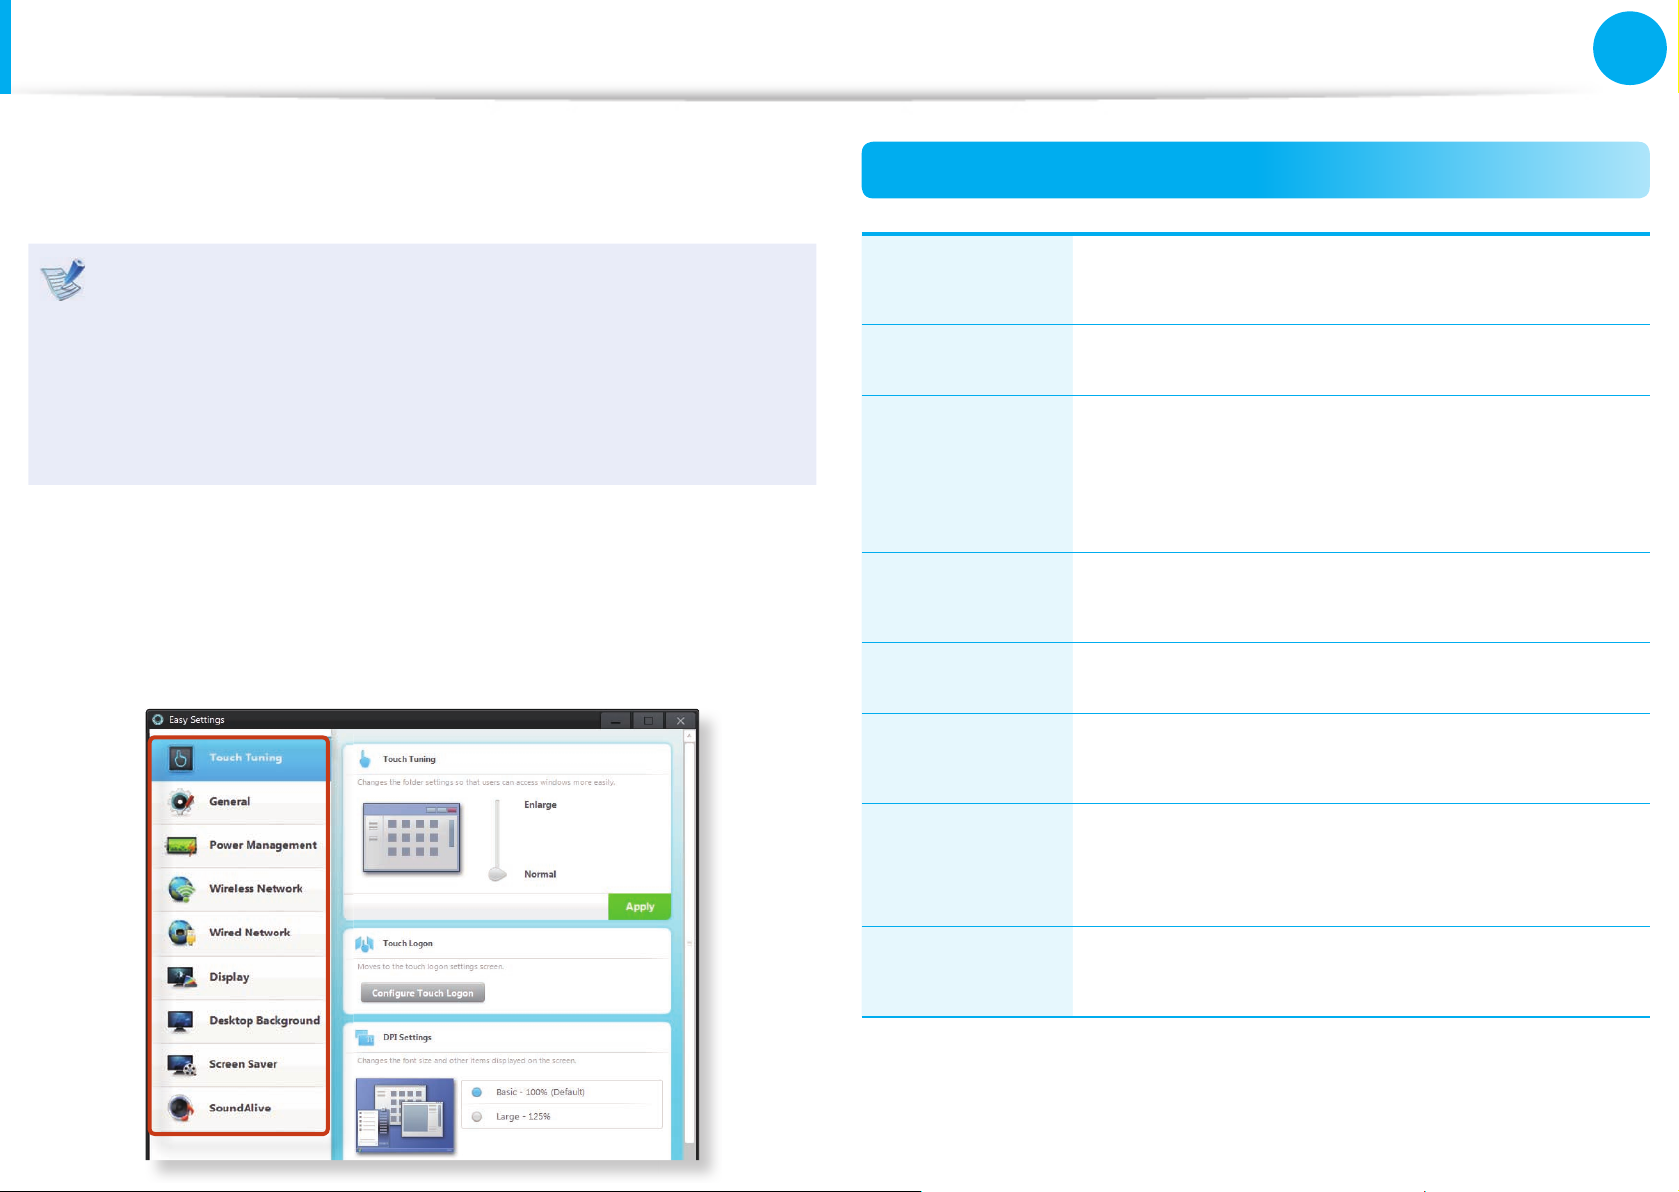
Easy Settings
(Optional)
Easy Settings is the integrated Samsung software control program
that allows you to con gure various settings.
This description is for models that support the function •
and are running on Windows 7.
The screen gures and terms may di er depending on the •
model.
Depending on the program version, some functions may •
not be provided or di erent functions may be provided.
1
Launch the Easy Settings.
2
You can con gure a function by selecting an item in the
System Controller.
Functions
Touch
calibration
The Touch Logon setting and the screen text
font size setting.
General Fast Start setting, silent mode and user account.
Power
Management
You can con gure the Power Plan (highperformance, power-saving, Samsung optimal
mode), the power-saving settings and the
display settings.
Wireless
Network
You can con gure whether to use the Airplane
mode and Wi-Fi options.
Wired Network You can select automatic or xed IP settings.
Display
You can con gure external display devices, and
the screen brightness/color.
Desktop
Background /
Screen Saver
You can con gure the Desktop background and
the screen saver.
SoundAlive
You can con gure the sound mode (Music,
Movie, Speech, Silver Mode etc.).

74
Chapter 3.
Settings and Upgrade
BIOS Setup
The BIOS Setup enables you to con gure your computer hardware
according to your needs.
Use the BIOS setup to de ne a boot password, change the •
booting priority, or add a new device.
Since incorrect settings may cause your system to •
malfunction or crash, take care when con guring the BIOS.
The functions of the BIOS setup are subject to change for •
product function enhancement purposes.
The BIOS Setup menus and items may di er depending on •
your computer model.
Entering the BIOS Setup
1
Turn the computer on and press and hold the Home button
for 4 seconds before the screen is displayed on the touch
screen.
2
After a moment, the BIOS setup screen appears.
The items in the BIOS setup may di er depending on the
product.
75
Chapter 3.
Settings and Upgrade
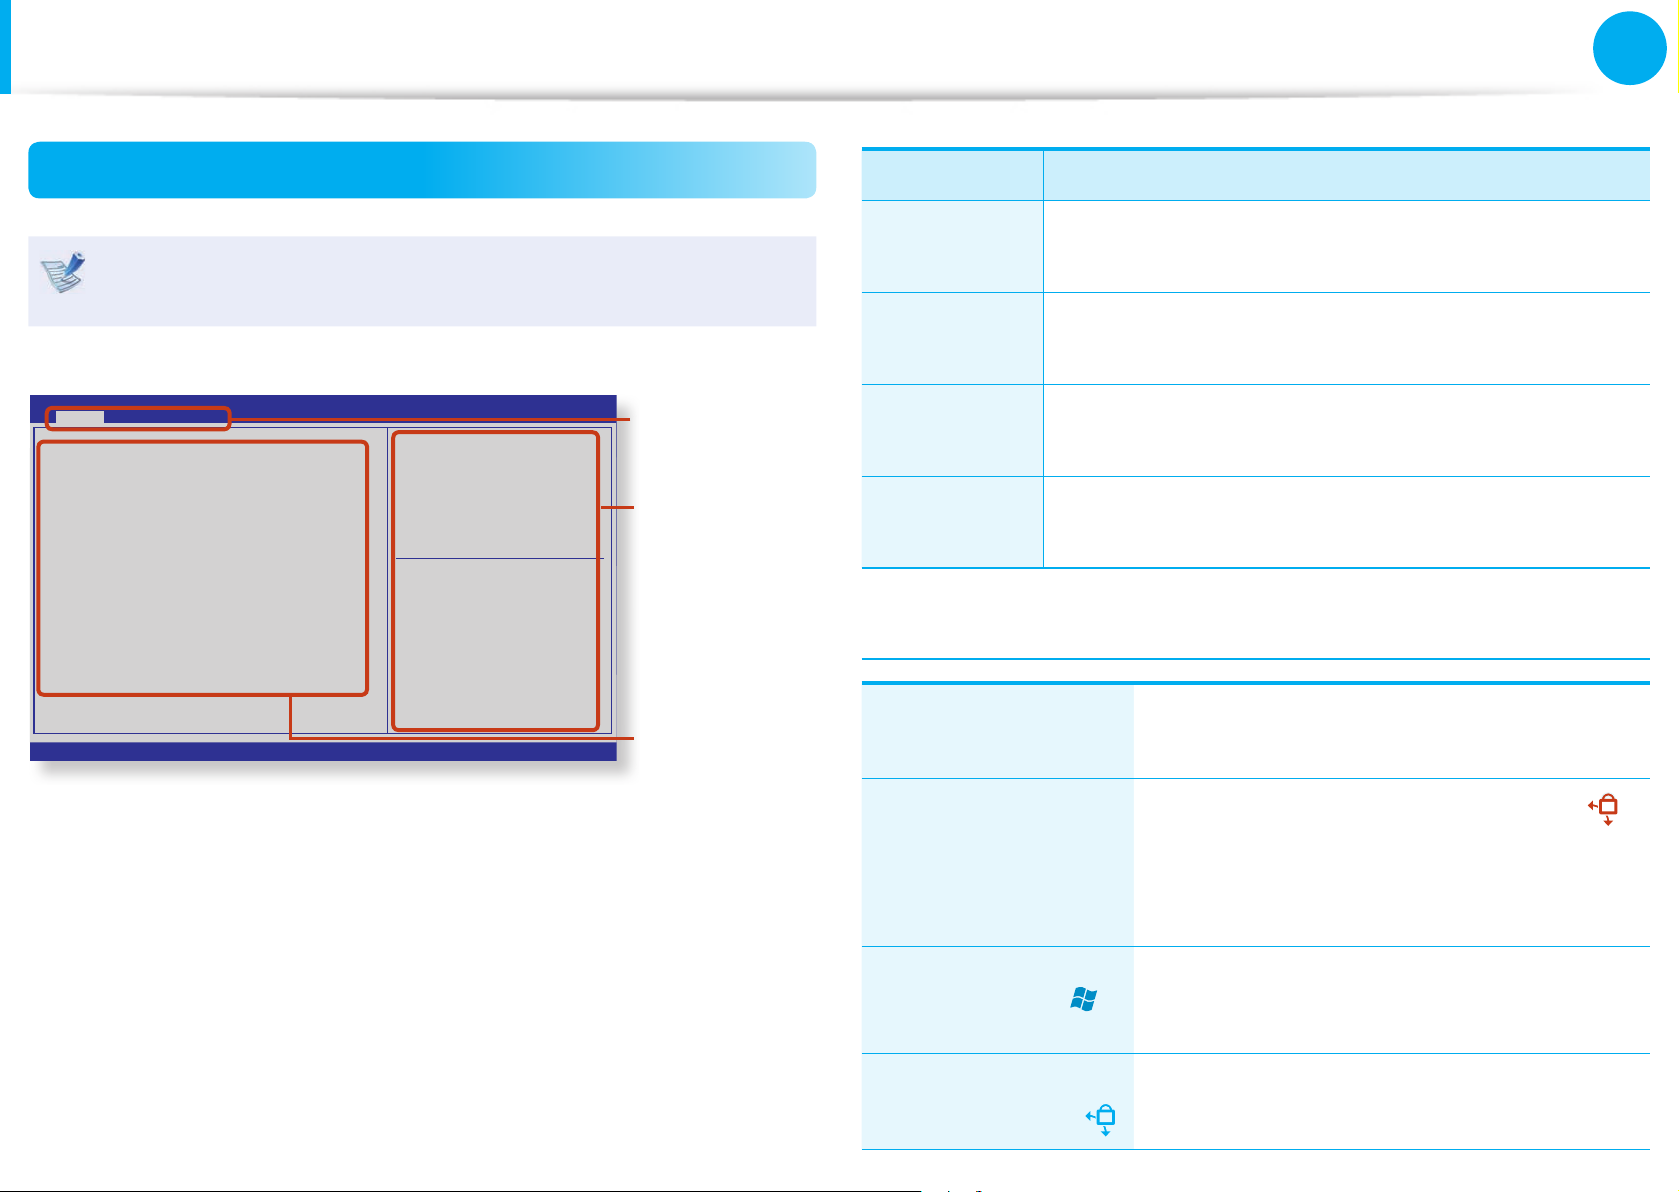
The BIOS Setup Screen
The BIOS Setup menus and items may di er depending on
your computer model.
Aptio Setup Utility - Copyright (C) 201x American Megetrends, Inc.
SAMSUNG Electronics BIOS Team ux.x cx.xx.xxxx
System Time [09:07:06]
System Date [Fri 07/08/2011]
SATA Port 1 SAMSUNG xxxxxxxxxxxx-00000
CUU Vendor Intel(R)
CPU Type Core(TM) ix-xxxxM CPU
CPU Speed x.xx GHz
CPU VT (VT-x) Supported
Total Memory xxxx MB
BIOS Version FWx.Vxxx.xxxxxxxx.SSH
MICOM Version xxFW.Vxxx
Set the Time.
To modify the time, press
'Enter' key. And then use
'Tab' to switch between Time
elements.
,+[R,L&V,D/V,U]: Select Screen
)*[V,U/V,D]: Select Item
Enter [R,L]: Select >> Sub-Menu
F5/F6: Change Help
F1 : General Help
F3 : Previous Values
F9 : Optimized Defaults
F10 : Save and Reset
ESC [Home]: Exit
R,L = Rotation Lock
V,U/D = Volume Up/Down
Home = Home Button
SysInfo Advanced Boot Exit
Setup Menu
Setup Items
Help
Help for the
selected
item appears
automatically.
Setup Menu Description
SysInfo
This is a description about the basic speci cations
of the computer.
Advanced
Using this menu, you can con gure the major
chipsets and additional functions.
Boot
This menu enables you to con gure peripherals and
booting related settings such as the boot priority.
Exit
Used to exit the Setup either saving the changes or
not.
Buttons for BIOS Setup
Volume Control
buttons
Press the Volume Control buttons to move
the focus upward or downward.
Lock Screen
Rotation + Volume
Control button
combination
Press the Lock Screen Rotation button
and the Volume Control button
simultaneously to move the focus to the
left or right.
Home button
Press this button to return to a higher-level
menu or to move to the Exit menu.
Lock Screen
Rotation button
Press this button to select an item or enter
the sub menu.
BIOS Setup
76
Chapter 3.
Settings and Upgrade
Changing the Boot Priority
The computer is con gured so that it boots from the SATA HDD
with priority, by default.
The following describes how to change the boot priority so that
the computer boots from the USB CD drive with priority.
The screen images and terms may di er from actual product
depending on the computer model and driver version.
1
Select the Boot menu in the BIOS Setup.
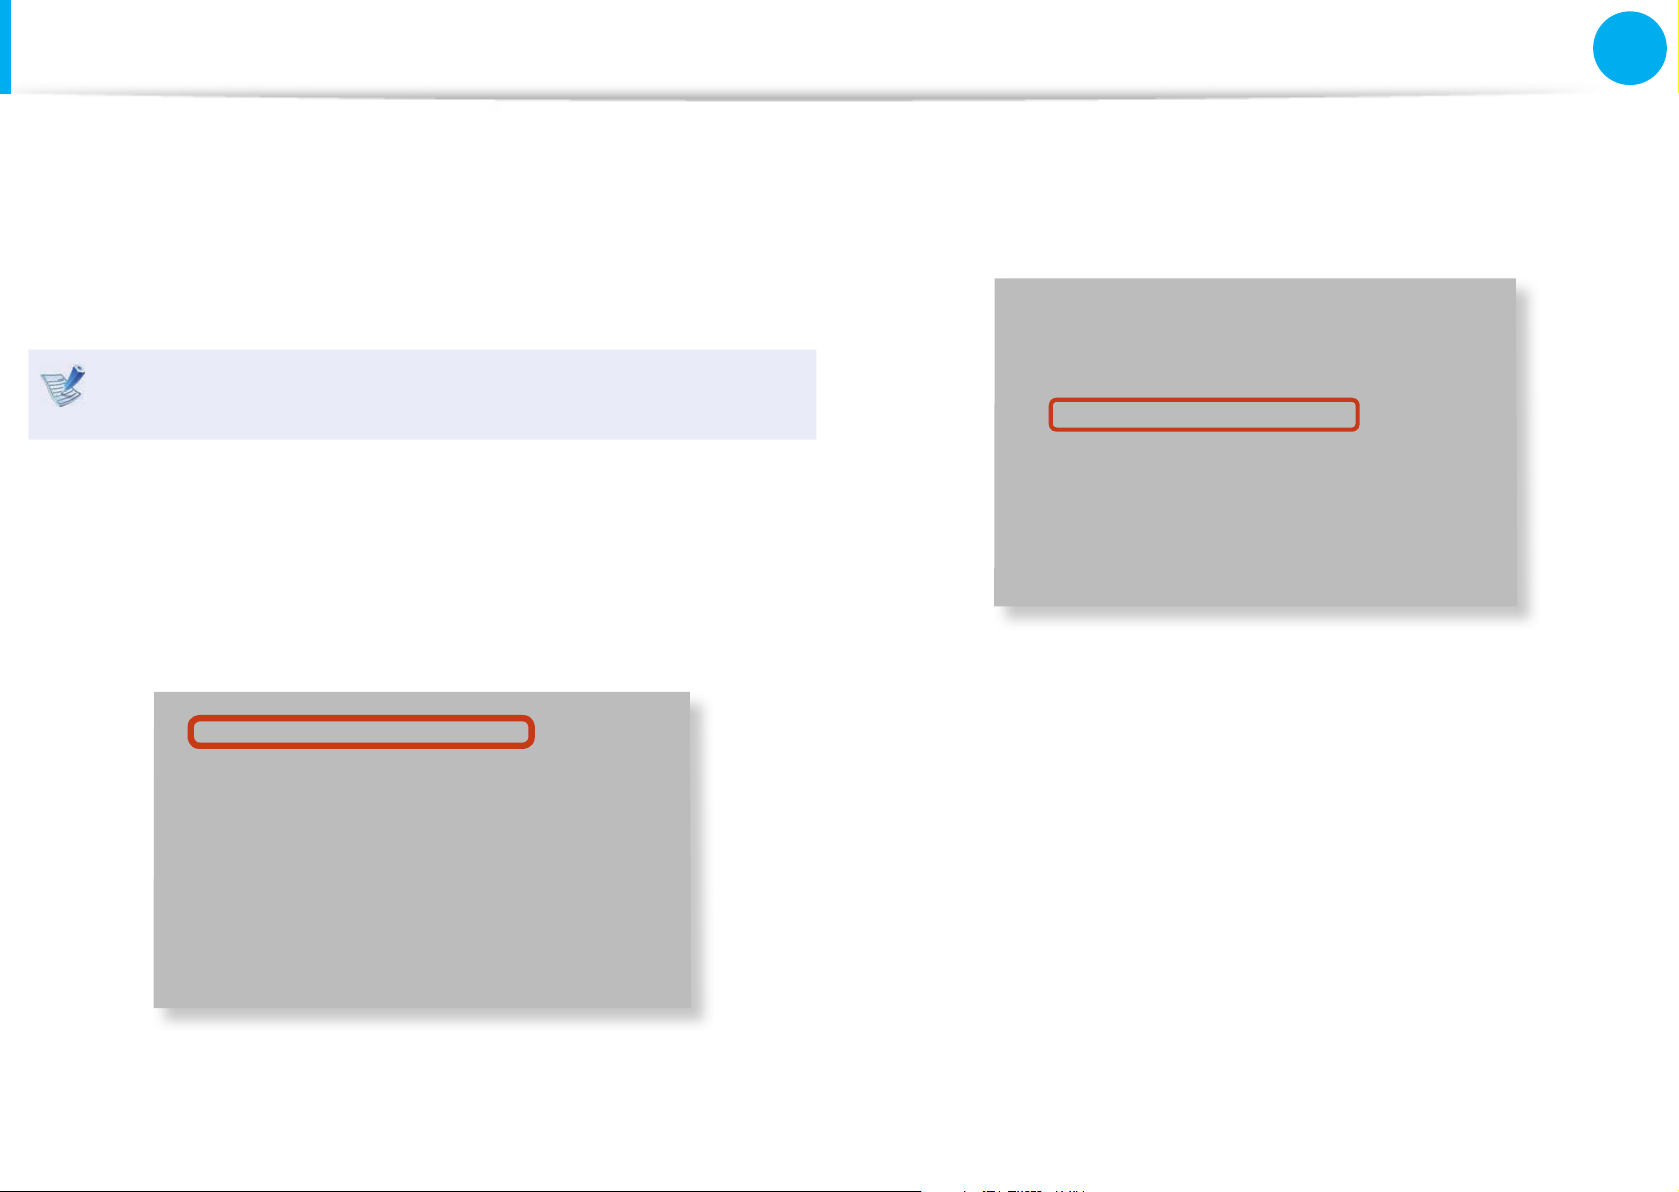
2
In the Boot Device Priority eld, press the Lock Screen
Rotation button.
ඖ
Boot Device Priority
ඖ
TPM Configuration
PXE OPROM [Disabled]
Smart Battery Calibration
3
Press the Volume Control button to move the focus to the
USB CD item and press the Lock Screen Rotation button to
move the USB CD item to the top.
Set Boot Priority
1. SATA HDD : XXXXX
2. USB KEY : N/A
3. USB CD : XXXXXXXX
4. USB FDD : N/A
5. USB HDD : N/A
6. NETWORK : N/A
4
Press the Home button to return to a higher-level menu.
5
Move to the Exit menu and select Save Changes and Reset.
6
The computer will be restarted.
Now, the boot priority has been changed so that the
computer boots from the USB CD drive with priority.
77
Chapter 3.
Settings and Upgrade
Battery
Please refer to the following instructions when running the
computer on battery power without connecting the AC power.
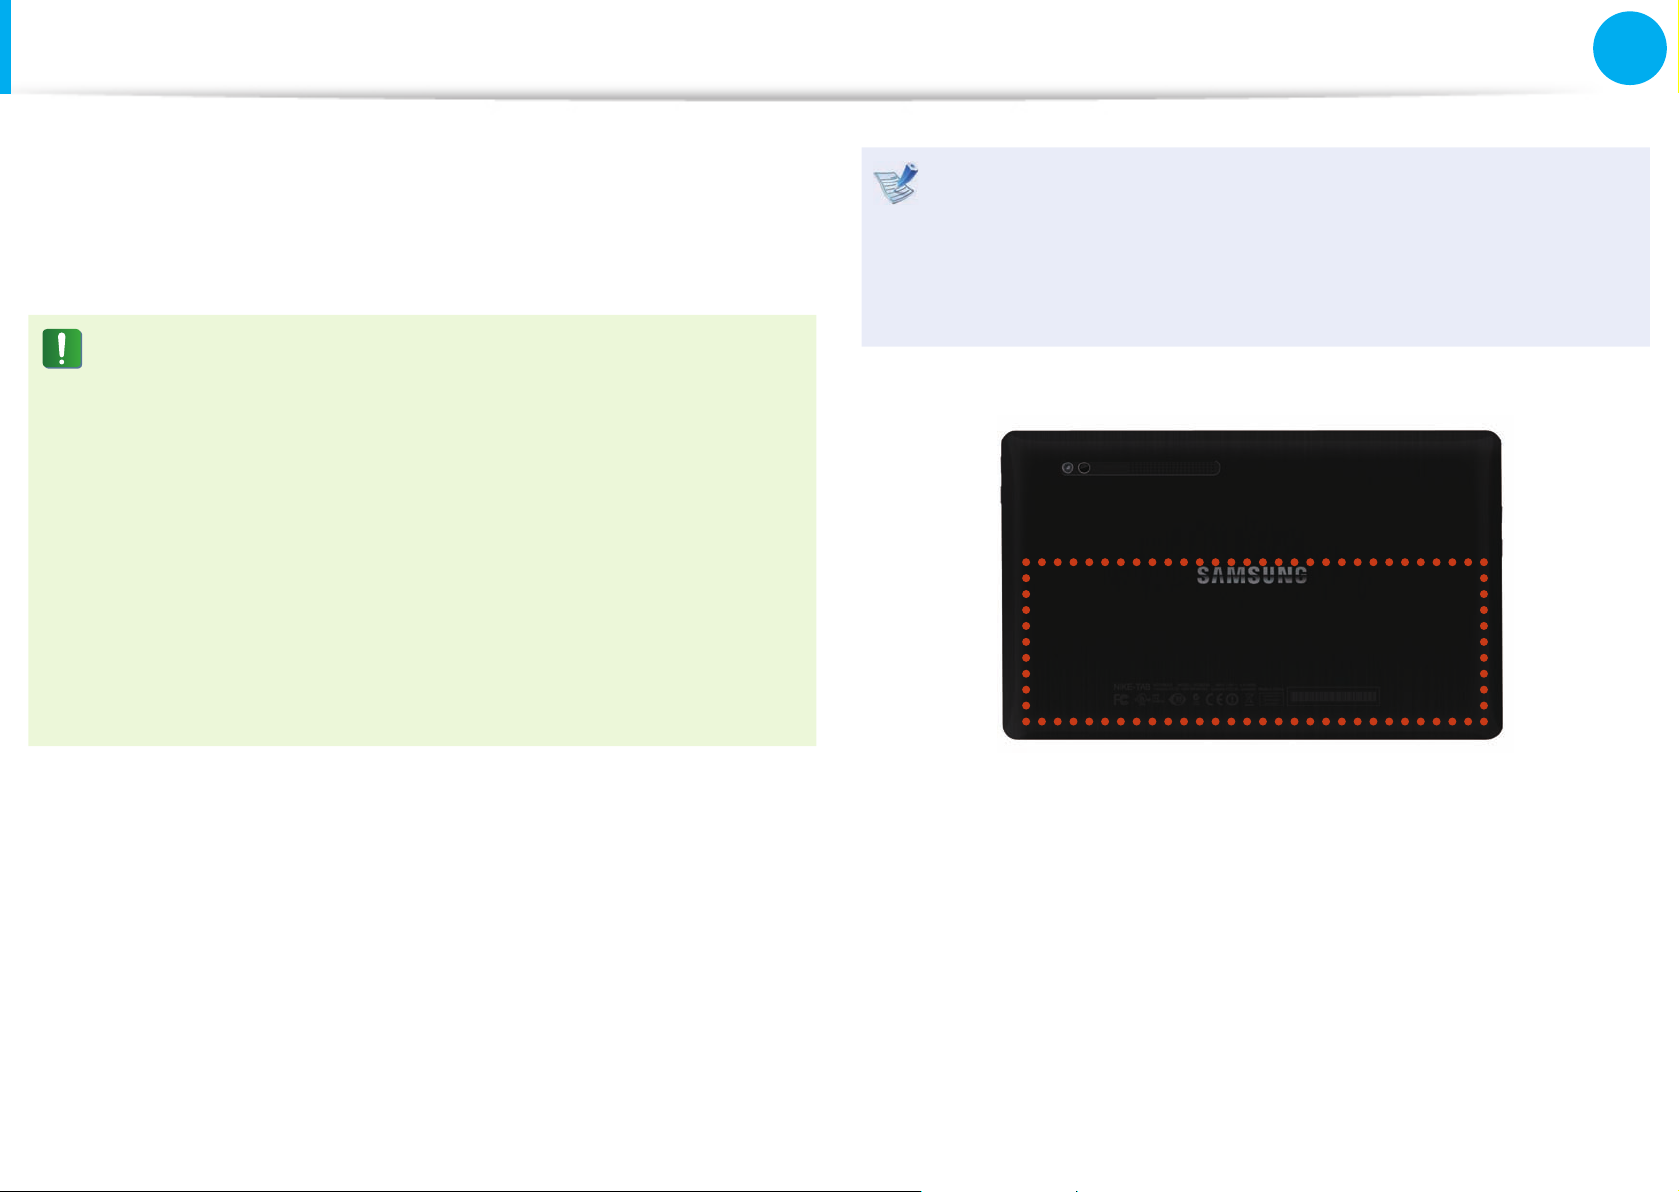
This computer is equipped with an internal battery.
Precautions
Users cannot remove or replace the internal battery. •
To remove or replace the battery, use an authorized •
service center in order to protect the product and
users. You will be charged for this service.
Use only chargers speci ed in the User Manual.•
Never heat the battery pack, put it near or in a re or use at •
a temperature higher than 60°C, as this may cause re.
Please refer to the system operation environment of •
this manual and operate and store the battery at room
temperature.
Before using the computer for the rst time, make sure to •
connect the AC adapter and charge the battery completely.
The images used for the illustration are of a representative •
model, therefore the images may di er from the the actual
product.
The location of the internal battery

78
Chapter 3.
Settings and Upgrade
Battery
Charging the Battery
An internal battery is embedded. Connect the AC adapter to the
power input jack of the computer. The battery will start charging.
Measuring the Remaining Battery Charge
You can view the battery charge status by completing the
following procedures.
Con rming the battery charge in the Taskbar
Disconnect the AC adapter and move the mouse cursor over
the battery icon in the system tray of the Taskbar to con rm the
remaining battery charge.
Battery Usage Time Information
A battery is an expendable supply, so when using it over a long
time, the capacity/battery life is shortened. If the battery life is
reduced to under half of its initial time, we recommend purchasing
a new battery.
When not using the battery for a long time, store the battery after
charging it to 30-40% of its capacity. This extends the battery life
time.
79
Chapter 3.
Settings and Upgrade
Battery
Extending the Battery Usage Time
Decreasing the LCD Brightness
If you dim the screen brightness in the Easy Settings > Display >
Screen Brightness, you can extend the battery use time.
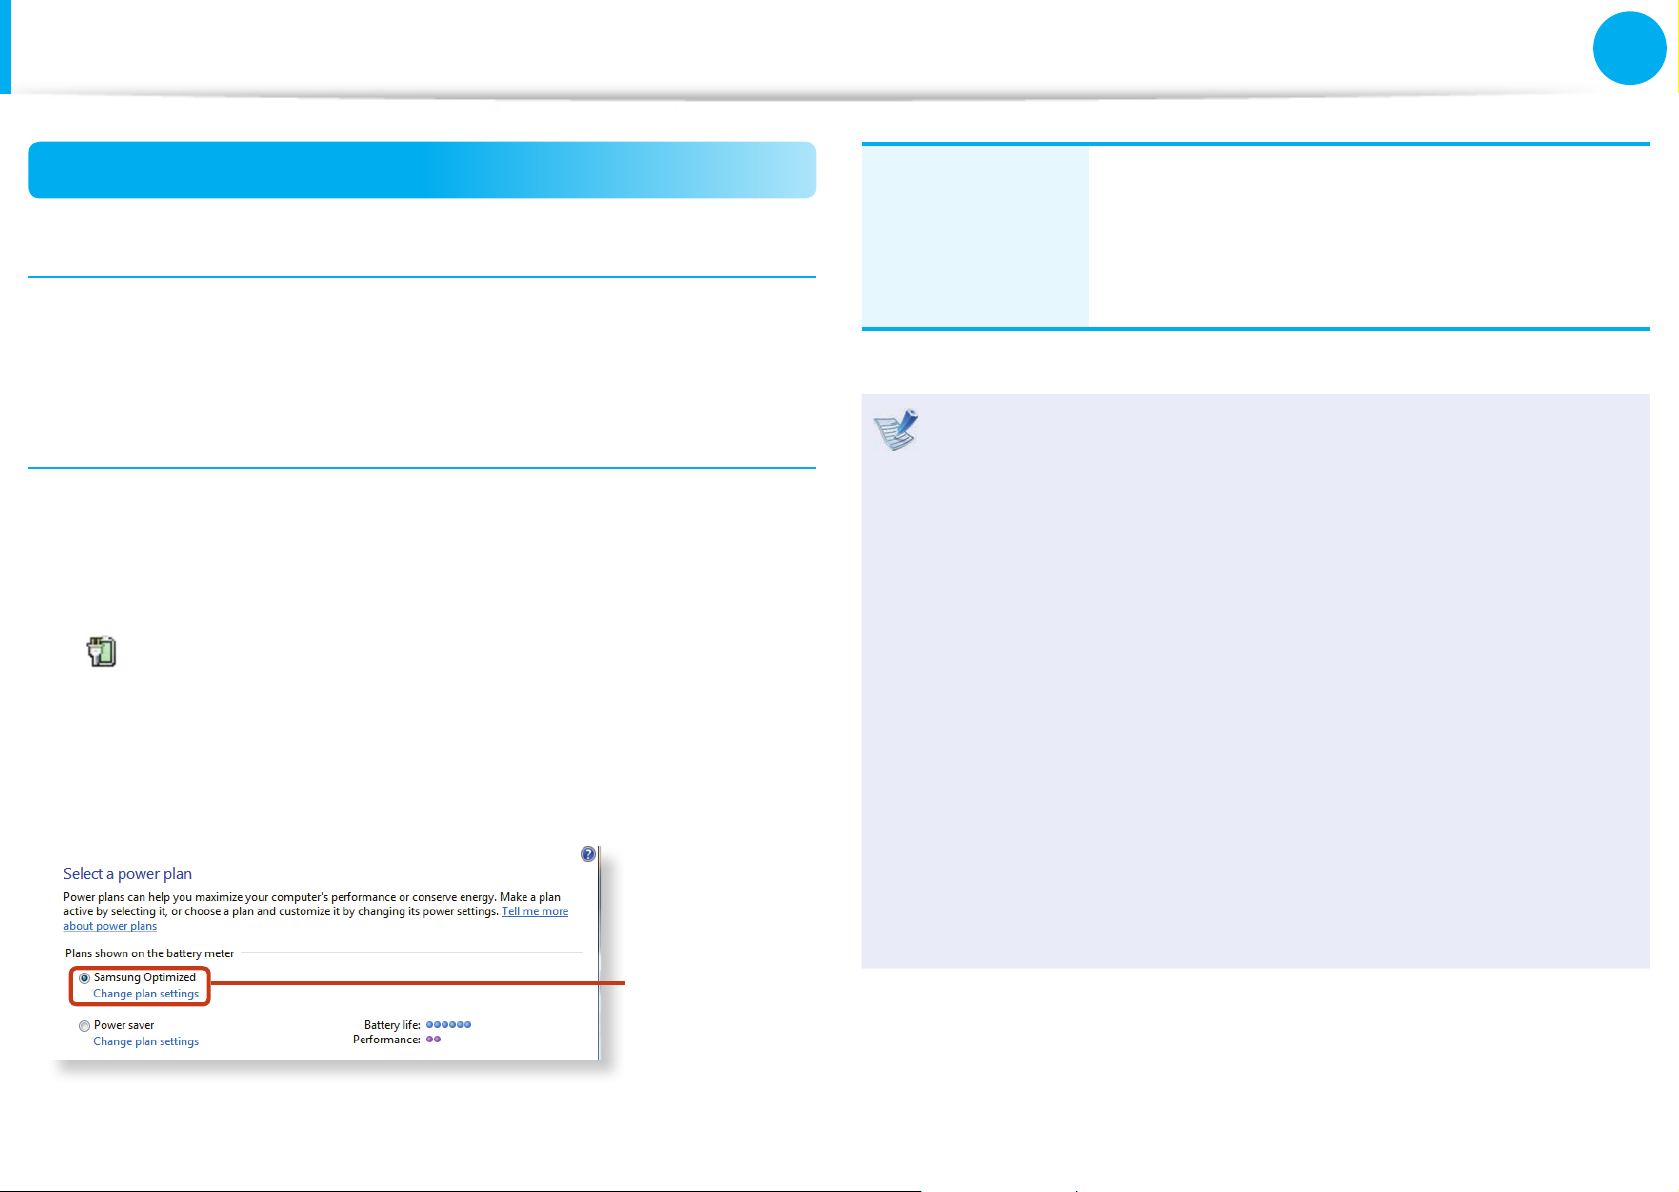
Using the power management program
1
Click Start > Control Panel > Hardware and Sound >
Power Options.
Alternatively, right-click the power measuring device icon
in the noti cation area of the taskbar and select Power
Options.
2
If the following screen appears, select one of the modes.
Samsung
Optimized
Samsung
Optimized
This mode is appropriate for normal conditions.
It maximizes the system performance when
the computer is running on AC power while
maximizing the battery usage time when the
computer is running on battery power.
What is the Power-saving E ect?•
This product displays the battery life in each power mode.
The higher the power saving e ect increases, the longer
the graph bar is displayed.
When Using Games or Multimedia•
The system may not operate properly in maximum battery
mode. It is recommended to connect the AC adapter to the
system or to use the system in general mode.
Usage Mode of Samsung Battery Manager•
- The maximum battery mode optimizes the system
operation speed to increase the battery run time, so the
program execution time may get longer.
- If you change the power settings, the properties in Power
Options window will also be changed.
80
Chapter 3.
Settings and Upgrade
Battery
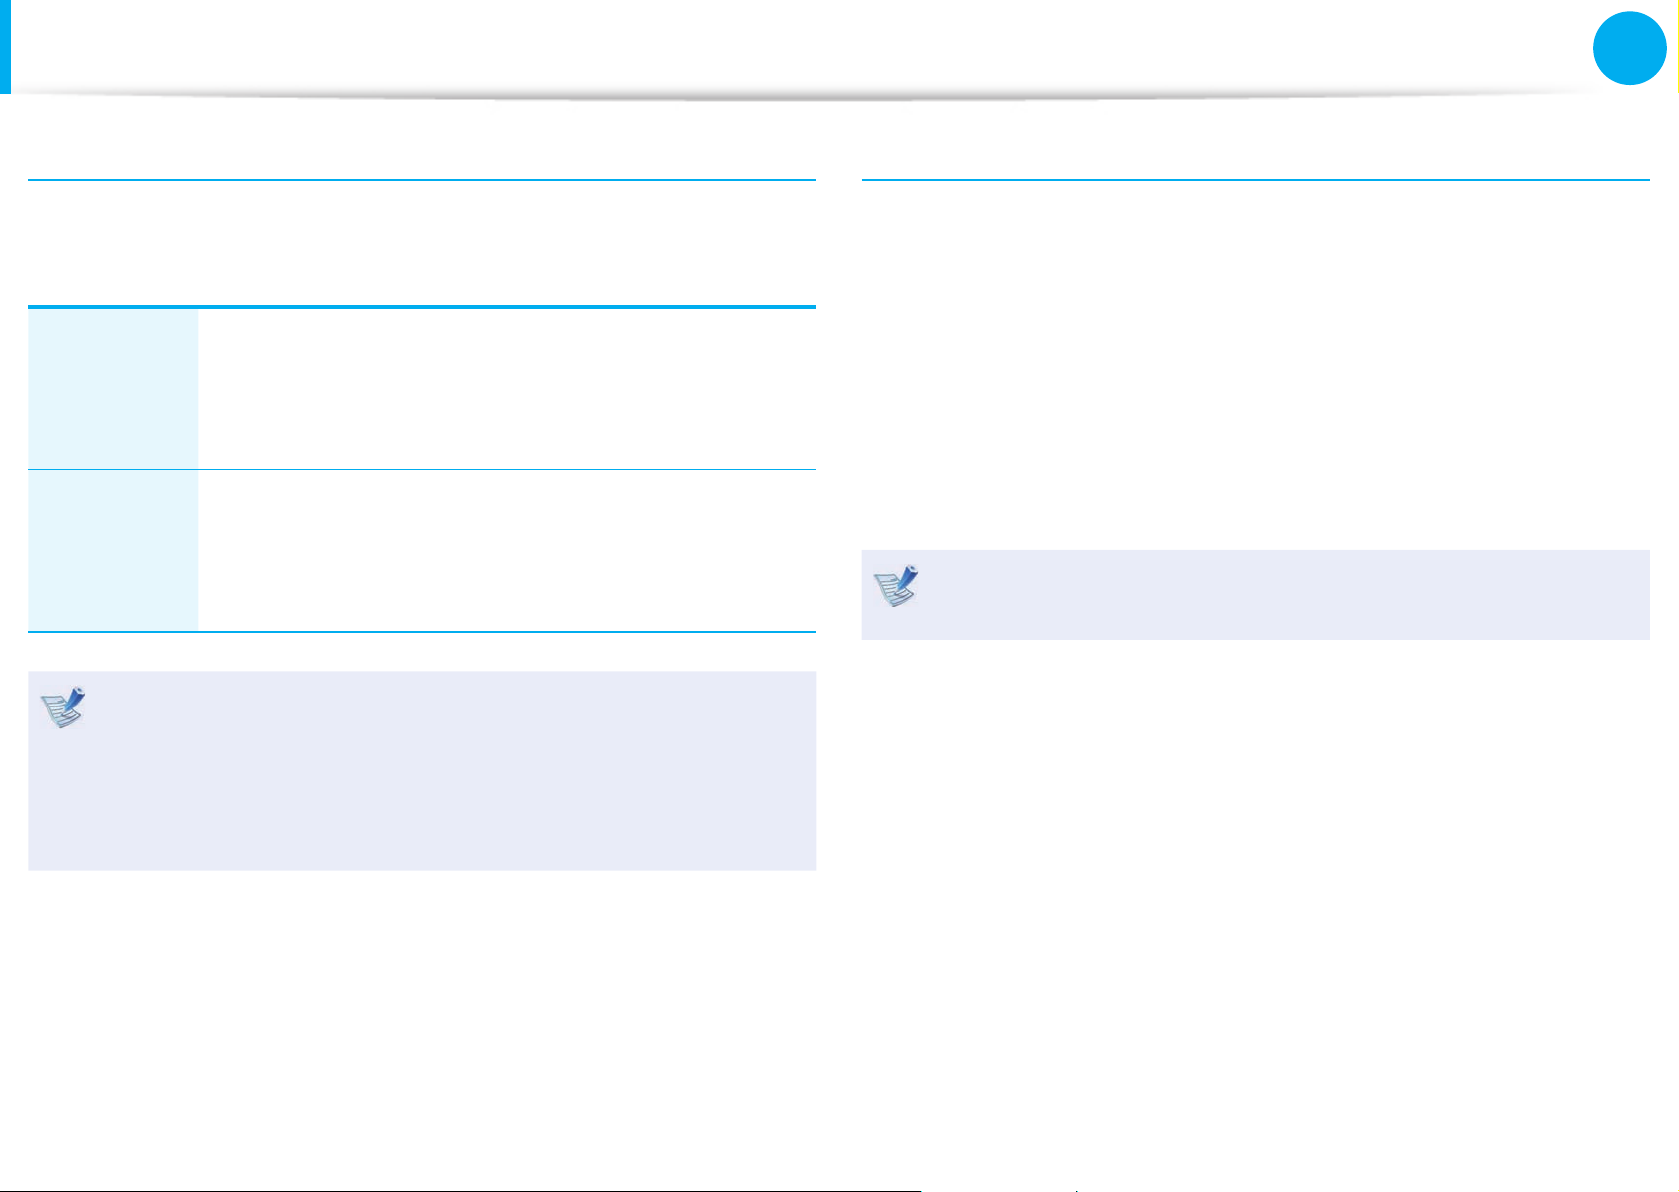
Extending the Battery Life (Optional)
In the Easy Settings program, click System Controller > General
and set the Battery Life Extender to ON or OFF.
OFF
This mode maintains 100% of the battery charge
when using the computer on AC power. In this case,
although the battery use time increases, the battery
life is reduced.
ON
This mode maintains 80% of the battery charge
when using the computer on AC power. In this
case, although the battery use time decreases, the
battery life is extended.
Alternatively, to extend the battery life
Press the F2 key when the Samsung logo appears in the
booting sequence to enter the BIOS Setup, select Advanced
> Battery Life Cycle Extension, and set it to Enable.
Then you can use the battery life cycle extension mode.
Using the Battery Calibration Function
When charging/discharging the battery repeatedly for a short time
only, the battery usage time may be reduced by the di erence
between the actual battery charge and the remaining charge
display.
In this case, the actual battery charge and the remaining charge
display will be the same by discharging the battery completely
using the Battery Calibration function, and then recharging it
again.
The screen images and terms may di er from actual product
depending on the computer model and driver version.
1
Disconnect the AC power adapter after turning o the
computer.
2
Turn the computer on again and press and hold the Home
button for 4 seconds to enter the BIOS Setup.
 Loading...