

Page 1

DVD Camcorder
DVD
VP-DX100(i)
VP-DX100H
VP-DX102
VP-DX103(i)
VP-DX104
VP-DX105(i)
攝錄放影機
user manual
imagine the possibilities
Thank you for purchasing this Samsung product.
To receive more complete service, please register
your product at
www.samsung.com/global/register
使用者手冊
想像可能
感謝您購買
要獲得更為全面的服務,請透過以下網站註冊產品:
www.samsung.com/global/register
Samsung
產品。
Page 2
ii_ English
臺灣
_ii
key features of your DVD
camcorder
DVD
功能
攝錄放影機的主要
3 1/2 inch DVD disc camcorder
DVD-VIDEO recording with 3 1/2 inch (8cm) DVD-RW/+RW/
-R/+R DL (Dual Layer) discs.
2.7” wide (16:9) LCD screen (112K pixels)
The 2.7” wide (16:9) LCD screen provides excellent viewing
clarity with improved resolution. The 112K pixels LCD screen
rotates up to 270 degrees for multiple viewing
angles providing sharp, detailed images for
monitoring or playback, and the widescreen
format makes shooting in 16:9 mode and
composing shots even easier.
Capture visions farther than the eye can
see (34X optical/1200X digital zoom)
Samsung’s powerful optical zoom lenses
bring the world closer without sacrifi cing
image quality. In addition, digital zoom
interpolation means that extreme digital
zooming is clearer, with less distortion than
previous types of digital zooms.
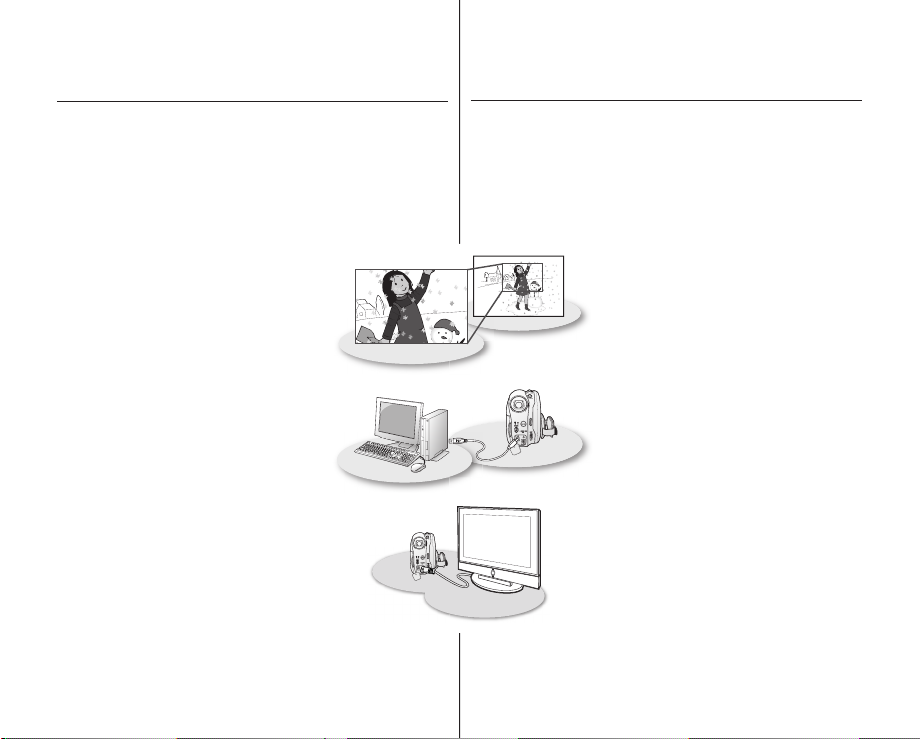
Viewing images on your PC and using
PC CAM
With DV Media PRO, you can view the recorded
images on a PC and use PC cam function by
connecting the DVD camcorder to a PC.
pages 91~98
Voice Plus
You can add your voice to the movie image by
connecting the DVD camcorder to a TV.
page 89
3 1/2 英吋 DVD 光碟攝錄放影機
使用
光碟進行
2.7" 寬 (16:9) LCD 螢幕(112K 像素)
2.7” 寬 (16:9) LCD 螢幕可透過高解析度提供極佳的檢視清晰
度。112K 像素 LCD 螢幕可最多旋轉 270 度以實現多檢視角度,
英吋(8 公分)
3 1/2
DVD-VIDEO
檢視電腦上的影像,並使用電腦相機功能
透過使用 DV Media PRO,您可以檢視電腦上的
已錄制影像,並可透過將 DVD 攝錄放影機連接
至電腦來使用電腦相機功能。第
Voice Plus
透過將 DVD 攝錄放影機連接至電視,您可以將
您的聲音新增至影片影像。第 89 頁
DVD-RW/+RW/-R/+R DL
錄製。
以便在監視或播放時能夠提供清晰、詳細的
影像,而且寬螢幕格式可以按 16:9 模式進
行拍攝,使拍攝內容編寫更容易。
拍攝畫面速度比人眼看得更快
(34 倍光學 /1200 倍數位縮放)
Samsung 功能強大的光學縮放鏡頭會將世界
變得更近,而不會降低影像品質。此外,數
位縮放插補表示極限數位縮放更清晰,比以
前的數位縮放類型失真更少。
(雙層)
91~98
頁
Page 3

iii_ English
臺灣
_iii
safety warnings
What the icons and signs in this user manual mean:
Means that death or serious personal injury
WARNING
CAUTION
CAUTION
These warning signs are here to prevent injury to you and others.
Please follow them explicitly. After reading this section, keep it in a
safe place for future reference.
is a risk.
Means that there is a potential risk for
personal injury or material damage.
To reduce the risk of fire, explosion, electric
shock, or personal injury when using
your camcorder, follow these basic safety
precautions:
Means hints or referential pages that may be
helpful when operating the camcorder.
precautions
• This camcorder should always be connected to an AC outlet
with a protective grounding connection.
• Batteries shall not be exposed to excessive heat such as
sunshine, fire or the like.
Danger of explosion if battery is incorrectly replaced.
Replace only with the same or equivalent type.
To disconnect the apparatus from the mains,
the plug must be pulled out from the mains socket,
therefore the mains plug shall be readily operable.
CLASS 1 LASER PRODUCT
KLASSE 1 LASER PRODUKT
PRODUCTO LASER CLASE 1
Warning!
Caution
LUOKAN 1 LASER LAITE
KLASS 1 LASER APPARAT
安全警告
本使用者手冊中圖示和標誌的含義:
警告
注意
注意
在此提供這些警告圖示可避免對您及他人造成傷害。
請嚴格遵循。在閱讀本部分之後,請將其妥善保管以供日後參考。
表示有造成死亡或嚴重傷害的危險。
表示有潛在的人員傷害或材料損毀之危險。
在使用攝錄放影機時,要降低火災、爆炸、
觸電或人身傷害的危險,請遵循下面這些基
本安全注意事項:
表示可能有助於操作攝錄放影機的提示或參
考頁。
注意事項
此攝錄放影機應總是與帶有保護接地連接的交流電源插座
•
連接。
不應將電池放在太陽底下或火爐旁邊等高熱地方。
•
若沒有正確更換電池,將會有爆炸的危險。
請使用相同類型的電池來更換。
要從本記住電源斷開本設備,必須從住電源插座播下插頭,
因此住電源插頭應該更易于操作。
KLASSE 1 LASER PRODUKT
LUOKAN 1 LASER LAITE
KLASS 1 LASER APPARAT
PRODUCTO LASER CLASE 1
警告!
注意
第一類雷射製品
Page 4

iv_ English
臺灣
_iv
important information on
use
有關使用的重要資訊
BEFORE USING THIS CAMCORDER
• This DVD camcorder records video in MPEG2 format in
the DVD camcorder mode, MPEG4 format in the digital
camera mode and at Standard Resolution (SD-VIDEO).
• Please note that this DVD camcorder is not compatible
with other digital video.
• Before recording important video, make a trial recording.
Play back your trial recording to make sure the video and
audio have been recorded properly.
• The recorded contents cannot be compensated for:
- Samsung cannot compensate for any damage caused
when a recording cannot be played back because of a
defect in the DVD camcorder or memory card. Samsung
cannot be responsible for your recorded video and audio.
- Recorded contents may be lost due to a mistake when
handling this DVD camcorder or memory card, etc.
Samsung shall not be responsible for compensation for
damages due to the loss of recorded contents.
• Make a backup of important recorded data.
Protect your important recorded data by copying the files to
PC. We also recommend you copy it from your PC to other
recording media for storage. Refer to the software installation
and USB connection guide.
• Copyright: Please note that this DVD camcorder is
intended for personal use only.
Data recorded on the card in this DVD camcorder using other
digital/analog media or devices is protected by the copyright
act and cannot be used without permission of the owner
of copyright, except for personal enjoyment. Even if you
record an event such as a show, performance or exhibition
for personal enjoyment, it is strongly recommended that you
obtain permission beforehand.
在使用本攝錄放影機之前
此 DVD 攝錄放影機在 DVD 攝錄放影機模式下會以 MPEG2
•
格式錄製視訊,而在數位相機模式會以 MPEG4 格式和標準
解析度 (SD-VIDEO) 進行錄製。
請注意,本 DVD 攝錄放影機與其他數位視訊不相容。
•
在錄製重要視訊之前,要試錄。
•
播放試錄的內容,以確保視訊和音訊都已正確錄製。
錄製的內容無法因以下原因進行賠償:
•
- Samsung 不會對由於 DVD 攝錄放影機或記憶卡有缺陷而
導致錄製內容無法播放所引起的任何損失承擔任何責任。
Samsung 不會對錄製的視訊和音訊承擔任何責任。
- 錄製內容可能由於處理此 DVD 攝錄放影機或記憶卡等內
容時遺失。Samsung 將不會對由於錄製內容遺失而造成
的損失進行賠償。
備份重要的錄製資料
•
透過將檔案複製到電腦上來保護重要的錄製資料。我們還建
議您將資料複製到電腦或其他錄製媒體進行儲存。請參閱軟
體安裝和 USB 連接指南。
版權:請注意,本 DVD 攝錄放影機僅設計來供個人使用。
•
使用其他數位 / 類比媒體或裝置在此 DVD 攝錄放影機的記
憶卡上錄製的資料受版權法保護,未經版權所有者的允許不
得使用,個人欣賞除外。即使您錄製諸如展覽、表演或展示
等活動進行個人欣賞,也強烈建議您事先獲得允許。
。
Page 5
v_ English
臺灣
_v
ABOUT THIS USER MANUAL
• This user manual covers models VP-DX100(i)/DX100H/DX102/
DX103(i)/DX104/DX105(i). VP-DX103(i)/DX104/DX105(i)
two storage media, Disc and Card. Although the external
appearances of VP-DX100(i)/DX100H/DX102/DX103(i)/DX104
and DX105(i) are different, they operate in the same way.
• Illustrations of model VP-DX105(i) are used in this user manual.
• The displays in this user manual may not be exactly the same
as those you see on the LCD screen.
• Designs and specifications of the camcorder and other
accessories are subject to change without any notice.
( , )
• Some functions of this DVD camcorder are unavailable
MARKS BESIDE HEADINGS
with memory card or disc.
Refer to the marks at right above each function to identify
whether the memory card or disc is compatible with the
function. Refer to these marks and identify the functions and
operation to match the memory card or disc you use.
have
NOTES REGARDING A TRADEMARK
•
All the trade names and registered trademarks mentioned
in this manual or other documentation provided with your
Samsung product are trademarks or registered trademarks of
their respective holders.
Windows® is registered trademark or trademark of Microsoft
•
Corporation, registered in the United States and other countries.
• Macintosh is the trademark of Apple Computer, Inc.
All the other product names mentioned herein may be the
•
trademark or registered trademarks of their respective companies.
• Furthermore, “TM” and “R” are not mentioned in each case in
this manual.
• Manufactured under license from Dolby
Laboratories.
• “Dolby” and the double-D symbol are
trademarks of Dolby Laboratories.
Portions of this software are copyright © 2006 The Free Type
Project. Website: http://www.freetype.org.
All rights reserved.
關於此使用者手冊
本使用者手冊包括型號 VP-DX100(i)/DX100H/DX102/
•
DX103(i)/DX104/DX105(i)
兩個儲存媒體、光碟和卡。儘管 VP-DX100(i)/DX100H/DX102/
DX103(i)/DX104 和 DX105(i) 的外觀有所不同,但它們的操
作方式相同。
在本使用者手冊中使用 VP-DX105(i) 型號的圖示說明。
•
本使用者手冊中的顯示可能不如您在 LCD 螢幕上看到的那樣
•
準確。
攝錄放影機和其他附件的設計和規格若有變更,恕不另行通知。
•
( , )
•
標題旁的標記
此 DVD 攝錄放影機的某些功能對記憶卡或光碟不適用。
請參閱每種功能右上方的標記,以識別記憶卡或光碟是否與此
功能相容。參閱這些標記並識別符合記憶卡或所用光碟的各功
能與操作。
。VP-DX103(i)/DX104/DX105(i) 有
關於商標的注意事項
本手冊或其他
•
稱和註冊商標是其各自所有者的商標或註冊商標。
• Windows®
註冊商標或商標。
• Macintosh是Apple Computer, Inc.
此處提及的所有其他產品名稱可能是其各個公司的商標或註冊
•
商標。
此外,本手冊中的各項範例均未提及「
•
是
Microsoft Corporation
• 經
• 「
產品說明文件中提及的所有產品名
Samsung
在美國或其他國家註冊的
的商標。
Dolby Laboratories
」和雙 D 符號是
Dolby
」和「
TM
」。
R
授權製造。
Dolby Laboratories
的商標。
軟體部分的版權是 copyright 2006 The Free Type Project。
網站:http://www.freetype.org。
版權所有,翻版必究。
Page 6

vi_ English
臺灣
_vi
precautions when using
IMPORTANT NOTE
• Handle the liquid crystal display (LCD) with care:
- The LCD is a very delicate display device: Do not press its surface
with force, hit it or prick it with a sharp object.
- If you push the LCD surface, unevenness in display may occur. If
unevenness does not disappear, turn the camcorder off, wait for a few
moments, then turn it on again.
- Do not place the camcorder with the open LCD screen down.
- Close the LCD monitor when not using the camcorder.
• Liquid crystal display :
- The LCD screen will be slightly dimmer than usual when the
camcorder is at low temperature, as in cold areas, or immediately
after power is turned on. Normal brightness will be restored when
the temperature inside the camcorder rises. This has no effect on the
images in the storage media, so there is no cause for concern.
• Hold the DVD camcorder correctly:
-
Do not hold the DVD camcorder by the LCD monitor when lifting it: the
viewfinder or LCD monitor could detach and the DVD camcorder may fall.
• Do not subject the DVD camcorder to impact:
- This DVD camcorder is a precision machine. Take great care that you
do not strike it against a hard object or let it fall.
- Do not use the DVD camcorder on a tripod in a place where it is
subject to severe vibrations or impact.
• No sand or dust!
Fine sand or dust entering the DVD camcorder or AC power adaptor could
cause malfunctions or defects.
• No water or oil!
Water or oil entering the DVD camcorder or AC power adaptor could cause
electric shock, malfunctions or defects.
• Heat on surface of product:
The surface of the DVD camcorder will be slightly warm when in use, but
this does not indicate a fault.
• Be careful of ambient temperature:
- Using the DVD camcorder in a place where the temperature is over
60°C (140°F) or under 0°C (32°F) will result in abnormal recording/
playback.
- Do not leave the DVD camcorder on a beach or in a closed vehicle
where the temperature is very high for a long time: This could cause a
malfunction.
• Do not point directly at the sun:
- If direct sunlight strikes the lens, the DVD camcorder could malfunction
or a fire could occur.
- Do not leave the DVD camcorder with the LCD screen exposed to
direct sunlight: This could cause a malfunction.
• Do not use the DVD camcorder near TV or radio:
- This could cause noise to appear on the TV screen or in radio broadcasts.
使用時的注意事項
重要注意事項
‧ 細心處理液晶顯示器 (LCD):
- LCD 是非常精密的顯示裝置:切勿用力壓其表面,或使用尖銳的
物件擊打或刺戳。
- 如果您按壓 LCD 表面,可能會在顯示時出現不平現象。如果不平
現象不消失,請關閉攝錄放影機,等待片刻後再次開啟。
- 切勿使開啟的 LCD 螢幕向下放置攝錄放影機。
- 在不使用攝錄放影機時關閉 LCD 顯示器。
‧ 液晶顯示:
- 當攝錄放影機在溫度較低的環境(如在寒冷地區)時,LCD 螢幕
會比正常時稍暗,或在開啟電源後立即變暗。當攝錄放影機內部
的溫度上升時,會恢復到原來的亮度。這對儲存媒體中的影像沒
有什麼影響,因此無需顧慮。
‧ 正確把持 DVD 攝錄放影機:
- 在舉起時,切勿握住 LCD 顯示器旁邊的 DVD 攝錄放影機:取景
器或 LCD 顯示器可能會分離,DVD 攝錄放影機可能會摔落。
‧ 切勿撞擊 DVD 攝錄放影機:
- 此 DVD 攝錄放影機是精密器械。要特別小心,不要讓其撞擊硬物
或摔落。
- 切勿在嚴重振動或撞擊的地方將 DVD 攝錄放影機放在三角架上使
用。
‧ 要避免沙塵!
細沙或灰塵進入 DVD 攝錄放影機或交流電源適配器會引起故障。
‧ 要避免水或油!
水或油進入 DVD 攝錄放影機或交流電源適配器會引起觸電或故障。
‧ 產品表面變熱:
在使用時,DVD 攝錄放影機表面會輕微變熱,便這並不表示有故障。
‧ 注意環境溫度:
- 在溫度高於 60° C (140° F) 或低於 0° C (32° F) 的地方使用 DVD
攝錄放影機,可能會導致錄製 / 播放不正常。
- 切勿將 DVD 攝錄放影機放在沙灘上或溫度長時間會很熱的封閉車
輛中:否則可能會使其發生故障。
‧ 切勿直接對著太陽:
- 如果陽光直射鏡頭,DVD 攝錄放影機可能會出現故障或發生火災。
- 在放置 DVD 攝錄放影機時,切勿讓陽光直射 LCD 螢幕:否則可
能會使其發生故障。
‧ 切勿在電視或收音機旁邊使用 DVD 攝錄放影機:
- 這樣可能會導致在電視螢幕或收音機中出現噪音。
Page 7

vii_ English
臺灣
_vii
• Do not use the DVD camcorder near strong radio waves or
magnetism:
- If the DVD camcorder is used near strong radio waves or
magnetism, such as near a radio transmitter or electric
appliances, noise could enter video and audio that are being
recorded. During playback of normally recorded video and
audio, noise may also be present in picture and sound. At
worst the DVD camcorder could malfunction.
• Do not expose the DVD camcorder to soot or steam:
- Thick soot or steam could damage the DVD camcorder
case or cause a malfunction.
• Do not use the DVD camcorder near corrosive gas:
- If the DVD camcorder is used in a place where there is
dense exhaust gas generated by gasoline or diesel engines,
or corrosive gas such as hydrogen sulphide, the external or
internal terminals could corrode, disabling normal operation,
or the battery connecting terminals could corrode, so that
power will not turn on.
• Do not expose the DVD camcorder to insecticide:
Insecticide entering the DVD camcorder could dirty the lens in
the laser pickup block, and in such a case the DVD camcorder
might not operate normally. Turn the DVD camcorder off and
cover it with vinyl sheet, etc. before using insecticide.
• Do not use an optional 3 1/2 inch(8cm) CD lens cleaner:
- Cleaning the lens is not necessary when using this DVD
camcorder in the usual way.
- Using 3 1/2 inch(8cm) CD lens cleaner could cause this
DVD camcorder to malfunction.
• Do not touch the lens in the laser pickup block.
If you touch the lens in the laser pickup block directly it may
cause a malfunction. The laser pickup block is not warranted
for damage caused by misuse. Therefore, pay much attention
when operating this camcorder.
• Do not wipe the DVD camcorder body with benzene or a
thinner:
- The coating of exterior could peel off or the case surface
could deteriorate.
• Keep the memory card out of reach of children to prevent
swallowing.
•
切勿在靠近強無線電波或強磁力的地方使用 DVD 攝錄放影機:
- 如果在靠近強無線電波或強磁力的地方使用 DVD 攝錄放影
機,如無線電發射機或電器設備,則在錄製的視訊和音訊中
可能會夾雜有噪音。在播放正常錄製的視訊和音訊時,在畫
面和聲音中也可能會出現噪音。在最壞的情況下,DVD 攝錄
放影機可能會出現故障。
•
切勿讓 DVD 攝錄放影機接觸煙灰或蒸汽:
- 濃厚的煙灰或 蒸汽會損壞 DVD 攝錄放影機外殼或導致出現
故障。
•
切勿在腐蝕性氣體旁邊使用 DVD 攝錄放影機:
- 如果在由汽油或柴油機產生的廢氣或腐蝕性氣體(如硫化氫)
很濃的地方使用 DVD 攝錄放影機,外部或內容終端會被腐蝕,
無法進行正常的操作,或電池連接終端會被腐蝕,致使無法
開啟電源。
•
切勿將 DVD 攝錄放影機暴露於殺蟲劑:
進入 DVD 攝錄放影機的殺蟲劑可能弄臟激光拾音器片塊內的鏡
頭,這樣以來就可能造成 DVD 操作不正常。在使用殺蟲劑之前
關閉 DVD 攝錄放影機,並用軟塑膠板將其蓋住。
•
切勿使用選購的 3 1/2 英吋(8 公分) CD 鏡頭清潔器:
- 在正常使用此 DVD 攝錄放影機時無需清潔鏡頭。
- 使用 3 1/2 英吋(8 公分)CD 鏡頭清潔器可能導致此 DVD
攝錄放影機出現故障。
•
切勿觸摸激光拾音器片塊內的鏡頭。
如果您直接觸摸激光拾音器片塊內的鏡頭,則可能使其產生故障。
因誤用而導致激光拾音器片塊損壞的情況不受保固。因此,在操
作此攝錄放影機時要多加注意。
‧ 切勿使用苯或稀釋劑擦拭 DVD 攝錄放影機機體:
- 外層會脫落或外殼表面會被損壞。
‧ 將記憶卡放在兒童接觸不到的地方,以防其吞下
。
Page 8

02_ English
臺灣
_02
contents
目錄
INTRODUCTION TO
BASIC FEATURES
GETTING TO
KNOW YOUR DVD
CAMCORDER
PREPARATION
13
DVD CAMCORDER
MODE: BEFORE
RECORDING
30
06
09 What is included with your
DVD camcorder
10
Front and right view
11
Left side and bottom view
12 Rear and top view
Remote control ((VP-
13
DX102/DX104/DX105(i)
only)
14
Installing the button-type
battery
15
Holding the DVD camcorder
16
Charging the battery pack
21
Basic DVD camcorder
operatio
22
Screen indicators
26
Using the display ( )
Using the joystick
26
27
Using the LCD screen
27
Using the viewfinder
28
Initial setting: OSD language
30
Selecting the storage media
30
Inserting and removing a
32
Recordable time
n
button
& date and time
(VP-DX103(i)/DX104/
DX105(i) only
disc
)
基本功能簡介
了解您的
DVD
模式:
攝錄
DVD
放影機
準備工作
13
攝錄放影機
錄製前
30
06
您的
09
附物件
正視圖和右視圖
10
左視圖和底部視圖
11
後視圖和頂部視圖
12
遙控器(僅適用於 (VP-
13
DX102/DX104/DX105(i))
安裝鈕扣電池
14
握住
15
電池組充電
16
基本的
21
操作
螢幕指示器
22
使用顯示
26
使用搖桿
26
使用
27
使用觀景窗
27
起始設定:
28
期和時間
選擇儲存媒體(僅適用
30
於 VP-DX103(i)/DX104/
DX105(i))
插入和取出光碟
30
可錄製的時間
32
攝錄放影機的隨
DVD
攝錄放影機
DVD
DVD
( )
螢幕
LCD
OSD
攝錄放影機
按鈕
語言與日
Page 9

03_ English
臺灣
_03
DVD CAMCORDER
MODE:
RECORDING/
PLAYBACK
33
DVD CAMCORDER
MODE:
EDITING MOVIE
IMAGE
40
DVD CAMCORDER
MODE:
DISC MANAGE
47
33 Recording movie images
35 Recording with ease for
beginners (EASY.Q mode
36 Capturing still images during
movie image playback
(VP-DX103(i)/DX104/
DX105(i) only
37
Zooming
38
Playing movie images
40
Deleting images
41 Deleting a section of a
movie image (partial delete
42
Playlist
Disc finalise
47
49
Disc unfinalise
50
Disc format
51
Disc information
)
)
模式:錄製 / 播放
模式:編輯影片影像
)
攝錄放影機
DVD
33
攝錄放影機
DVD
40
攝錄放影機
DVD
模式:光碟管理
47
33
35
36
37
38
40
41
42
47
49
50
51
錄製影片影像
初學者可以輕鬆地進行錄製
(EASY.Q 模式)
在影片影像播放時拍攝
靜態影像(僅適用於
DX103(i)/DX104/DX105(i))
縮放
播放影片影像
刪除影像
刪除影片影像部分
(部分刪除)
播放清單
光碟終結
光碟未終結
光碟格式
光碟資訊
VP-
Page 10

04_ English
臺灣
_04
contents
DIGITAL CAMERA
MODE
(VP-DX103(i)/
DX104/DX105(i)
ONLY
52
52 Inserting and ejecting a
)
memory card
55
Recordable time and num-
ber of images
56
Recording movie images
57 Taking photo image
58
Playing movie images
59
Viewing photo images
60 Protection from accidental
erasure
61
Deleting images
目錄
插入和彈出記憶卡
52
52
可錄製的時間和影像張數
55
錄製影片影像
56
拍攝相片影像
57
播放影片影像
58
檢視相片影像
59
保護以防意外刪除
60
刪除影像
61
數位相機模式
(僅適用於
VP-DX103(i)/DX104/
DX105(i))
s
USING THE MENU
ITEMS
62
PRINTING PHOTO
IMAGES
(VP-DX103(i)/
DX104/DX105(i)
ONLY)
83
62 Handling menus
63
Menu items
65
Recording menu items
78
Playback menu item
78 Setting menu items
83 DPOF print setting
84 Direct printing with a
PictBridge
操作選單
62
62
63
65
78
78
DPOF
83
84
選單項目
錄製選單項目
播放選單項目
設定選單項目
列印設定
透過
PictBridge
直接列印
使用選單項目
列印相片影像
(僅適用於
VP-DX103(i)/DX104/
DX105(i))
83
Page 11

05_ English
臺灣
_05
CONNECTING TO
AV DEVICES
86
CONNECTING TO
A PC(VP-DX103(i)/
DX104/DX105(i)
ONLY
91
86 Connecting to a TV
88
Dubbing images on a VCR
or DVD/HDD recorder
89
Using the voice plus
90
Recording (copying) a TV
programme or external
con-tents onto a disc (VPDX100i/DX103i/DX105i
only)
91 System requirements
92 Installing DV Media PRO
94 Connecting the USB cable
95 Viewing the contents of
)
storage media
97 Transferring files from the
DVD camcorder to your PC
98 Using the PC cam function
連接至
AV
裝置
86
連接至電腦
(僅適用於
(VP-DX103(i)/
DX104/DX105(i)
91
)
連接至電視
86
為
VCR 或 DVD/HDD
88
機上的影像配音
使用
89
voice plus
將電視節目或外部目錄錄製
90
(複製)到光碟(僅適用於
VP-DX100i/DX103i/DX105i)
上
系統需求
91
安裝
92
94
95
97
98
DV Media PRO
連接
USB
檢視儲存媒體的內容
將檔案從
傳送到您的電腦
使用電腦相機功能
纜線
DVD
錄製
攝錄放影機
MAINTENANCE &
ADDITIONAL
INFORMATION
TROUBLESHOOTING
SPECIFICATIONS
99 Maintenance
100
Additional information
103 Using your DVD camcorder
abroa
10
4 Troubleshooting
113
d
維護和其他資訊
故障排除
規格
99
100
10
10
113
3
4
維護
其他資訊
在國外使用您的
放影機
故障排除
DVD
攝錄
Page 12
06_ English
臺灣
_06
introduction to basic
features
This chapter introduces the basic features of your DVD
camcorder. See the reference pages below for more information.
基本功能簡介
本節介紹
參閱以下參考頁面。
攝錄放影機的基本功能。要獲得更多資訊,請
DVD
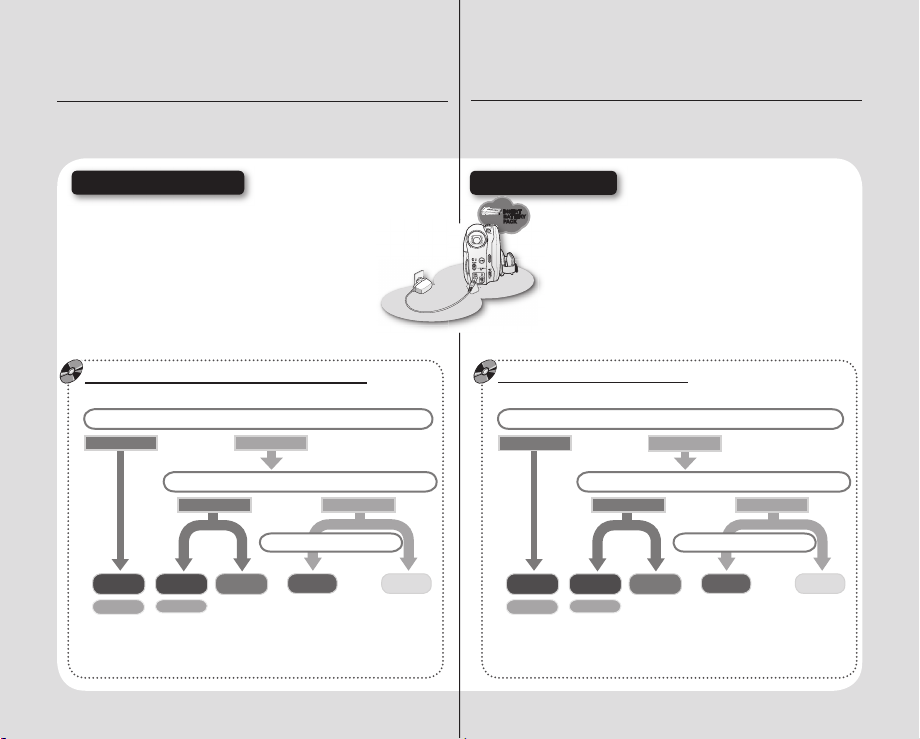
Step 1 : Preparation
Charging the battery pack
•
• Setting OSD language and the date/time
pages 28, 29
• Selecting the storage media (DISC and CARD)
(VP-DX103(i)/DX104/DX105(i) only)
You can record movie and photo images.
- You can take a photo only on the memory
card. DVD discs do not support photo mode.
- Refer to pages 52~54 for the supported
memory cards before purchasing them.
page 18
page 30
When recording movie images on a DVD disc
Select the proper disc for use.
Do you want to delete or edit movie images on the DVD camcorder?
YES
NO
Do you want to reuse the disc after formatting?
DVD +R DL
NO
pages 30-31
YES
When recording for a long time
DVD -RW
VR
• DVD+RW, DVD+R DL and DVD-R do not have Video or VR
mode selection.
• You can delete the movie image only on a DVD-RW disc (VR mode).
• Selecting the desired disc and disc formatting.
DVD -RW
VIDEO
DVD +RW
DVD -R
步驟 1:準備工作
• 電池組充電
INSERT
BATTERY
PACK
• 設定 OSD 語言和日期 / 時間
• 選擇儲存媒體(DISC 和 CARD) ( 僅適用於
VP-DX103(i)/DX104/DX105(i))
您可以錄製影片和相片影像。
- 您僅能在記憶卡上拍攝相片。DVD 光碟不支
援相片模式。
- 在購買之前,請參閱第
援記憶卡相關的資訊。
第 18 頁
52~54
在 DVD 光碟上錄製影片影像時
選擇供使用的正確光碟。
是否想刪除或編輯 DVD 攝錄放影機上的影片影像?
是
想要在格式化後重複使用光碟嗎?
•
•
•
DVD -RW
DVD-RW
VIDEO
VR
DVD+RW、DVD+R DL 和 DVD-R 沒有 Video 或 VR 模式選擇
您只能刪除 DVD-RW 光碟(VR 模式)上的影片影像
選擇需要的光碟和光碟格式。第 30-31
是
DVD +RW
否
在長時間錄製時
DVD +R DL
頁
第 28、29 頁
頁
第
30
頁以獲取與支
否
DVD-R
。
。
Page 13

07_ English
臺灣
_07
Step 2 : Recording
• Recording the movie images
pages 33~37, 56
• Taking the photo images (VP-DX103(i)/
DX104/DX105(i) only)
page 57
步驟 2:錄製
•
•
錄製影片影像
拍攝相片影像(僅適用於
DX103(i)/DX104/DX105(i)
第
57
第
33~37、56
頁
VP-
)
頁
Step 3: Playing back / Editing
• Selecting an image to play back from the
thumbnail index views
• Viewing playback from your DVD camcorder
on your PC (VP-DX103(i)/DX104/DX105(i)
only) or TV
• Editing movie images as your preference
(Editing function is available only in
DVD-RW(VR mode))
pages 86~90, 97
pages 38, 58~59
pages 40~46
Step 4: Viewing on DVD devices
You must fi nalise the disc in advance to view the movie images
recorded on a DVD camcorder on other DVD devices. (Finalise is
the function that allows a disc recorded on the DVD camcorder to
be playable on DVD devices such as DVD players.)
Finalise
continued
步驟 3:播放 / 編輯
從縮略索引視圖中選擇要播放的影像
•
•
•
、
86~90
58~59
、97 頁
頁
第
頁
40~46
第
38
在電腦(僅適用於 VP-DX103(i)/DX104/DX105(i))
或電視上檢視 DVD 攝錄放影機的播放情況
第
根據您的喜好編輯影片影像(僅能在 DVD-RW(VR
模式)下使用編輯功能)
步驟 4:檢視 DVD 裝置
您必須提前終結光碟以檢視透過 DVD 攝錄放影機錄製到 DVD
裝置上的影片影像。( 終結功能可允許透過 DVD 攝錄放影機錄
製的光碟能夠在 DVD 裝置上播放,如 DVD 播放機。)
續
Page 14
introduction to basic
features
基本功能簡介
The function of the finalised disc depends on the disc type.
Finalised
DVD
-R
Finalised
DVD
+R D
L
Finalised
DVD
-RW
Finalised
DVD
+RW
You cannot use the following discs.
•
• We are not responsible for data loss on a disc.
• We do not warranty any damage or loss incurred due to recording
• We take no responsibility and offer no compensation for any
• For stable and perpetual recording and playback, use TDK,
• The time it takes to finalise a disc may vary depending on
• You cannot overwrite, edit, or format a finalised disc. If
• It is not guaranteed that all DVD players/recorders/drives can
• For more information about available discs, see pages 102~103
The finalised DVD disc
can be played on most
DVD devices.
VIDEO
You can play back the disc
only on a DVD player that
supports DVD-RW discs
VR
recorded in VR mode.
You can play back the disc on other DVD devices
without finalising it.
- 5 inch (12cm) CD/DVD discs
- CD/CD-R/CD-RW/DVD-ROM/DVD+R (Single Layer)/DVDRAM/DVD-R (Dual Layer), Floppy Disk, MO, MD, ID, LD
and playback failure caused by disc or card malfunction.
recording failure, loss of recorded or edited material and/or
damage to the recorder arising from the misuse of discs.
MKM, Verbatim discs that have the “
If you do not use them, recording and playback operation
may not work properly or you may not be able to eject the
disc from the camcorder.
the recording time.
needed, unfinalise the disc. (DVD-RW only)
play discs finalised in this DVD camcorder.
For compatibility details, refer to the DVD players/recorders/
drives owner ’s manual.
You cannot make
more recordings,
even if the disc
has enough
space.
You can record
more after
unfinalising
08_ English
page 49
”designation.
page 49
終結光碟的功能取決於光碟類型。
終結
DVD
-R
DVD
+R D
DVD-
.
RW
DVD
+RW
.
終結的 DVD 光碟可
終結
L
•
•
•
•
•
•
•
•
•
在大多數 DVD 裝置
上播放。
終結
VIDEO
您僅可在支援以 VR 模
式錄製的 DVD-RW 光碟
終結
的 DVD 播放機上播放
此光碟。
VR
不能使用以下光碟。
- 5
- CD/CD-R/CD-RW/DVD-ROM/DVD+R
(雙層)、軟碟、
對於光碟上的資料丟失,我們不負任何責任。
對於由於光碟或卡故障導致的錄製或播放故障發生的任何損壞或丟失,
我們不提供任何擔保。
對於光碟使用不當造成的錄製故障、已錄製或已編輯材料的丟失和
/ 或對錄製機宴品的損害,我們不負任何責任,也不提供賠償。
要使錄製和播放效能穩定持久,請使用
光碟(帶有「 」
放操作可能無法正常進行,或者不能從攝錄放影機中彈出光碟。
終結時間可能因光碟的錄製時間而異。
不能改寫、編輯或格式化已終結的光碟。若有需要,請取消終
結光碟。(僅適用於 DVD-RW)
不保證所有 DVD 播放機 / 錄製機 / 磁碟機都能播放在此 DVD 攝錄放
影機中終結的光碟。
有關相容性詳細資料,請參閱 DVD 播放機 / 錄製機 / 磁碟機使
用者手冊。
如需有關可用光碟的更多資訊,請參閱第
無需終結該光碟就可以在其他 DVD 裝置上播放它。
英吋(
公分)
12
光碟
CD/DVD
、MD、ID、
MO
標誌。如果不使用這些光碟,錄製和播
您無法進行更
多的錄製,即
使該光碟具有
足夠的空間。
在取消終結後,
您即可進行更
多的錄製。
(單層)
LD
TDK、MKM、Verbatim
第
頁
49
102~103
第 49 頁
/DVD-RAM/DVD-R
頁
。
臺灣
_08
Page 15
getting to know your DVD
camcorder
了解您的
影機
DVD
攝錄放
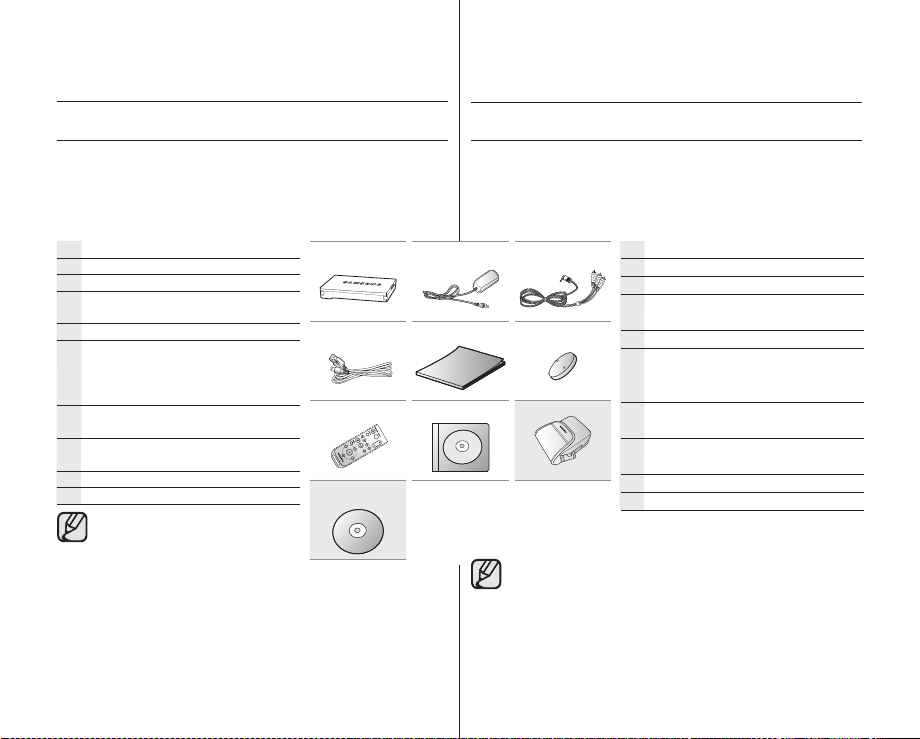
WHAT IS INCLUDED WITH YOUR DVD CAMCORDER
Your new DVD camcorder comes with the following accessories.
If any of these items is missing from your box, call Samsung’s
Customer Care Centre.
✪
The exact appearance of each item may vary by model.
Battery pack
AC power adaptor(AA-E9 type)
AV cable
USB cable
(VP-DX103(i)/DX104/DX105(i) only)
User manual
Button-type battery for internal
clock
(TYPE: CR2025) or remote
control(VP-DX102/DX104/DX105(i)
only)
Remote control(VP-DX102/DX104/
DX105(i) only)
Software CD(DV Media PRO)
(VP-DX103(i)/DX104/DX105(i) only)
Carrying case (Option)
3 1/2 inch(8cm) DVD-RW disc(Option)
The contents may vary depending
on the sales region.
Parts and accessories are available
at your local Samsung dealer.
A memory card is not included.
See pages 52~53 for memory
cards compatible with your DVD
camcorder. (VP-DX103(i)/DX104/
DX105(i) only)
To buy this optional accessory,
contact your nearest Samsung
dealer.
09_ English
您的 DVD 攝錄放影機的隨附物件
您的新 DVD 攝錄放影機隨附了以下配件。如果包裝盒中遺失了
任何這些項目,請聯絡 Samsung 客戶服務中心。
每個項目的實際外形都可能因機型而異。
✪
電池組
交流電源適配器(AA-E9 型)
AV 纜線
內容視銷售地區的不同而有所不同。
部件與配件可從您當地的 Samsung 代理商選購。
不隨附記憶卡。請參閱第 52~53 頁以了解記憶卡與 DVD
攝錄放影機相容的資訊。
(僅適用於 VP-DX103(i)/DX104/DX105(i))
要購買可選購的配件,請與您就近的 Samsung 經銷商
聯絡。
USB 纜線
(僅適用於 VP-DX103(i)/DX104/DX105(i))
使用者手冊
內部時鐘的鈕扣電池(型號:CR2025)
或遙控器(僅適用於VP-DX102/DX104/
DX105(i))
遙控器(僅適用於(VP-DX102/DX104/
DX105(i))
軟體 CD(DV Media PRO)
(僅適用於 VP-DX103(i)/DX104/DX105(i))
攜帶包(選購
3 1/2 英吋(8 公分)DVD-RW 光碟(選購
)
臺灣
_09
)
Page 16

10_ English
臺灣
_10
getting to know your DVD
camcorder
了解您的
影機
DVD
攝錄放
FRONT AND RIGHT VIEW
Lens open/close switch
Lens
Remote sensor (VP-DX102/DX104/DX105(i) only)
Light (VP-DX102/DX105(i) only)
Internal microphone
Grip belt hook
Grip belt
Swivel handle
Disc cover
正視圖和右視圖
CLOSE
OPEN
鏡頭開啟 / 關閉開關
鏡頭
遙控感應窗(僅適用於 VP-DX102/DX104/DX105(i))
燈(僅適用於 VP-DX102/DX105(i))
內置麥克風
手握帶扣
手握帶
旋轉手柄
光碟蓋
Page 17

11_ English
臺灣
_11
LEFT AND BOTTOM VIEW
左視圖和底部視圖
Display ( ) button
EASY Q button
Built-in speaker
FINALIZE button
BATT. (battery release) switch
Storage mode switch (DISC/CARD) (VP-DX103(i)/DX104/
DX105(i) only)
Battery pack
LCD screen
Recording start/stop button
Joystick (up/down/right/left/Select, W/T)
MENU button
Tripod receptacle
Memory card slot (VP-DX103(i)/DX104/DX105(i) only)
顯示器 ( ) 按鈕
EASY Q
按鈕
內置喇叭
FINALIZE
儲存模式開關 (DISC/CARD)(僅適用於 VP-DX103(i)/DX104/
電池組
錄製開啟 / 停止按鈕
搖桿(上 / 下 / 右 / 左 /選擇,W/T)
三腳架
記憶卡插槽(僅適用於 VP-DX103(i)/DX104/DX105(i))
按鈕
BATT.
(電池釋放閂)開關
DX105(i))
LCD
螢幕
MENU
按鈕
Page 18

12_ English
臺灣
_12
getting to know your DVD
camcorder
REAR AND TOP VIEW
了解您的
影機
後視圖和頂部視圖
DVD
攝錄放
Viewfi nder
Zoom (W/T) lever/ Volume control
PHOTO button ((VP-DX103(i)/DX104/DX105(i) only)
Focus adjustment knob
MODE button / Mode indicator (Record ( )/Play ( ) mode)
Recording start/stop button
ACCESS/CHG indicator
OPEN switch
AV jack
USB jack (VP-DX103(i)/DX104/DX105(i) only)
DC IN/ USB / AV jack cover
DC IN jack
POWER switch
取景器
(W/T)
縮放
PHOTO
焦距調整旋鈕
MODE
錄製開始 / 停止按鈕
ACCESS/CHG
OPEN
AV插孔
USB 插孔(
DC IN/ USB
DC IN
POWER 開關
桿 / 音量控制
按鈕(僅適用於 (VP-DX103(i)/DX104/DX105(i))
按鈕 / 模式指示器(錄製 ( )/ 播放 ( ) 模式)
指示器
開關
僅適用於 VP-DX103(i)/DX104/DX105(i))
插孔蓋
/ AV
插孔
Page 19
13_ English
臺灣
_13
preparation
This section provides information on using this DVD camcorder;
such as how to use the provided accessories, how to charge the
battery, how to setup the operation mode and initial setup.
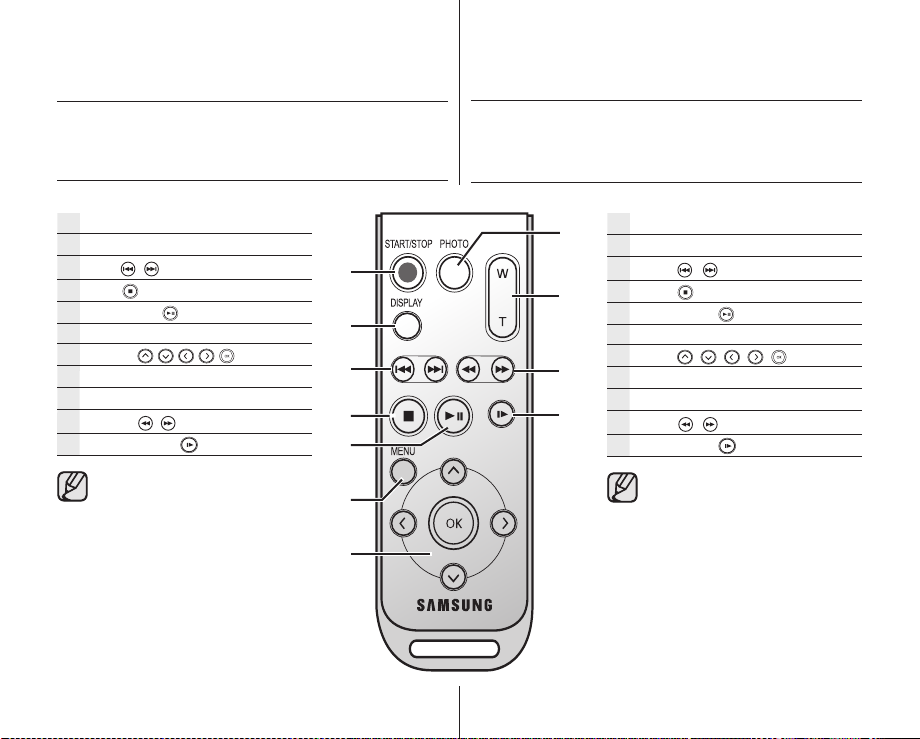
REMOTE CONTROL (VP-DX102/DX104/DX105(i))
準備工作
本節提供關於使用此 DVD 攝錄放影機的資訊,例如:如何使用
提供的配件、如何充電及如何設定操作模式和起始設定。
遙控器(僅適用於 VP-DX102/DX104/DX105(i))
START/STOP button
DISPLAY button
Skip (
/ ) button
Stop (
) button
Play/Pause (
MENU button
Control (
PHOTO button
Zoom (W/T) button
Search ( / ) button
Slow playback (
The buttons on the remote control
function the same as those on DVD
camcorder.
) button
/ / / /
) button
)buttons
START/STOP
DISPLAY
略過 (
停止 (
播放 / 暫停 (
MENU
控制 (
PHOTO
縮放 (
搜尋 (
慢動作播放 (
遙控器上的按鈕與 DVD 攝錄放影機
上的按鈕功能相同。
按鈕
按鈕
/ ) 按鈕
) 按鈕
按鈕
/ / / /
按鈕
) 按鈕
W/T
/ ) 按鈕
) 按鈕
) 按鈕
) 按鈕
Page 20
14_ English
臺灣
_14
preparation
準備工作
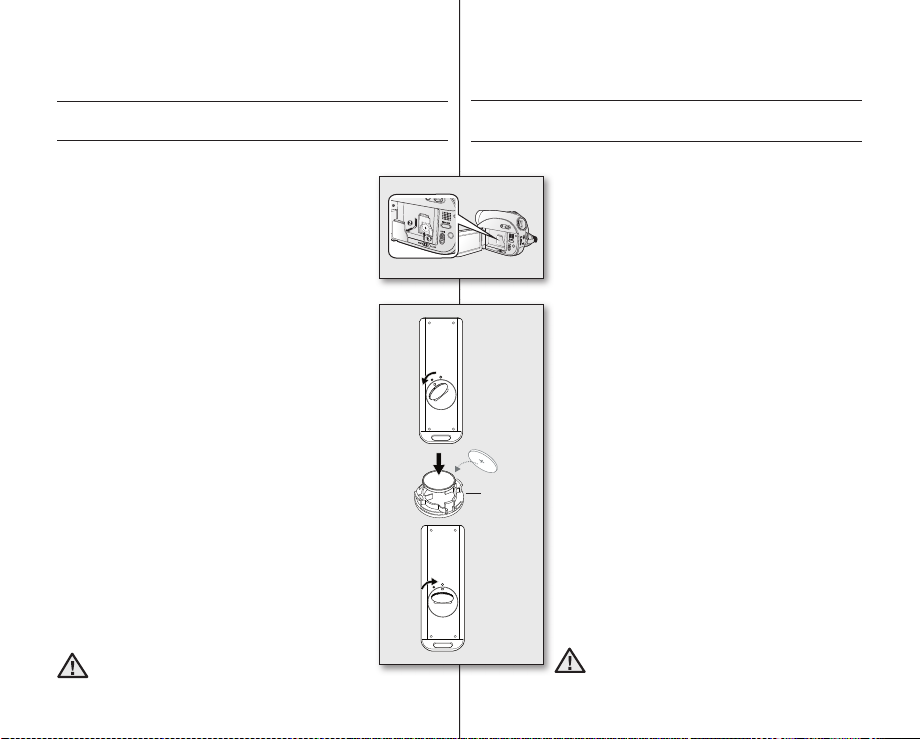
INSTALLING THE BUTTON-TYPE BATTERY
nstallation for the internal clock (battery release) switch
I
1. Open the LCD screen, then slide the BATT. (battery
release) switch in the arrow direction to remove the
battery pack.
2. Remove the battery cover.
3. Replace the button-type battery then place the battery
cover back.
- Position the button type battery with the positive (+)
terminal face out in the button type battery slot.
Battery installation for the internal clock
The button type battery maintains the clock function and
preset contents of the memory: even if the battery pack or
AC power adapter is removed.
The button type battery for the DVD camcorder lasts
about 6 months under normal operation from the time of
installation.
When the button type battery becomes weak or dead, the
date/time indicator will display “01/JAN/2008 00:00” when
you turn the date and time display on.
Installing the button-type battery in the remote control
(VP-DX102/DX104/DX105(i) only)
1. Turn the battery holder counterclockwise (as indicated
2. Insert the battery into the battery holder with the
3. Place the battery holder back in the remote control,
Precautions regarding the button type battery
• There is a danger of explosion if button type battery
• Do not pick up the battery using tweezers or other
• Do not recharge, disassemble, heat or immerse the
WARNING
) mark) using your fi ngernail or a coin to open
with (
it. The battery holder opens.
positive (+) terminal facing down and press it fi rmly
until you hear a locking sound.
matching its (
control, and turn the battery holder clockwise to lock it.
is incorrectly replaced. Replace only with the same or
equivalent type.
metal tools. This will cause a short circuit.
battery in water to avoid the risk of explosion.
Keep the button type battery out of the reach of
the children. Should any battery be swallowed,
seek medical attention immediately.
) mark with the () mark on the remote
安裝鈕扣電池
安裝內部時鐘(電池釋放閂)開關
1
2
Battery
holder
3
打開 LCD 螢幕,然後沿箭頭方向滑動
1.
釋放閂)開關以取出電池組。
取下電池蓋。
2.
更換鈕扣電池,然後再蓋好電池蓋。
3.
- 將鈕扣電池放入鈕扣電池插槽中,正 (+) 極端
向外。
安裝內部時鐘的電池
鈕扣電池可以保持時鐘功能及預設的記憶體內容:即使
拔下了電池組或交流電源適配器。
在正常操作下,DVD 攝錄放影機的鈕扣電池從裝入起可
以使用大約 6 個月。
在您開啟日期和時間顯示時,如果鈕扣電池電量不足
或耗盡,則日期 / 時間指示器將會顯示「
」 。
00:00
向遙控器中裝入鈕扣電池(僅適用於 VP-DX102/DX104/
DX105(i))
使用手指甲或硬幣以逆時針方向旋轉電池座(按照
1.
指定的 () 標記)將其開啟。電池座開啟。
將電池正 (+) 極端向下插入電池座中,並用力按下
2.
它直到聽到鎖定聲為止。
將電池座置於遙控器後部,與遙控器上的 (
3.
() 吻合,然後按順時針方向旋轉電池座將其鎖定。
有關紐扣電池的注意事項
• 如果沒有正確更換鈕扣電池,將會有爆炸的危險。
請使用相同類型的電池來更換。
• 切勿使用鑷子或其他金屬工具取出電池。這樣可能
會引起短路。
• 切勿充電、拆解、加熱或將電池浸泡在水中,以防
爆炸危險。
請勿讓兒童接觸到鈕扣電池。如果吞下電池,請
即刻尋求醫療救助。
警告
(電池
BATT.
01/JAN/2008
) 標記
Page 21

15_ English
臺灣
_15
HOLDING THE DVD CAMCORDER
握往 DVD 攝錄放影機
Attaching a grip belt
Insert your right hand from
the bottom of the DVD
camcorder up to the base
of your thumb.
Put your hand in a position
where you can easily
operate the Recording
start/stop button, PHOTO
button, and the Zoom lever.
Adjust the length of grip belt
so that the DVD camcorder
is stable when you press the Recording start/stop button with
your thumb.
1. Pull and detach the grip belt.
Insert the grip belt into its hook as shown in the fi gure.
2. Insert your hand into the grip belt and adjust its length.
3. Close the grip belt.
Angle Adjustment
Rotate the swivel handle at the most
convenient angle.
You can rotate it downwards upto 140°.
Please be careful not to turn the
swivel handle backward as it
may cause damage.
140
°
安裝手握帶
拉出握帶然後拆下來。
1.
將手握帶插到握帶扣中,如圖所示。
將您的手穿過手握帶然後調整長度。
2.
上手握帶。
3.
角度調整
以最方便的角度旋轉此旋轉手柄。
您最多可以將其向下旋轉 140°。
從 DVD 攝錄放影機底部向
拇指底部插入右手。
將手放在能輕鬆操作
開始 / 停止按鈕
按鈕和縮放桿的位置。
用拇指按下
按鈕時,調整手握帶長度以
固定 DVD 攝錄放影機。
請一定注意不可將旋轉手柄向後
轉動,否則可能使其損壞。
錄製
、
PHOTO
錄製開始 / 停止
Page 22

16_ English
臺灣
_16
preparation
準備工作
CHARGING THE BATTERY PACK
•
There are two types of power source that can be connected to your
DVD camcorder.
• Do not use provided power supply units with other equipment.
- The battery pack: used for outdoor recording.
- The AC power adaptor: used for indoor recording.
To charge the battery pack
Be sure to charge the battery pack before you start
using your DVD camcorder.
Attaching the battery pack to the DVD camcorder
1. Open up the LCD screen 90 degrees with your fi nger.
2. Fit the battery pack to the battery attachment
platform and push the battery pack as shown in
the fi gure until a click is heard.
Removing the battery pack from the DVD camcorder
1. Open up the LCD screen 90 degrees with your fi nger.
2. Slide the BATT. (battery release) switch in the
direction as shown in the fi gure and pull out
the battery pack.
Insert the battery pack in the accurate direction
as shown in the fi gure.
WARNING
When the battery pack is wrongly inserted, it
may cause malfunction of the DVD camcorder
and battery pack.
It is recommended that you purchase one
or more additional battery packs to allow
continuous use of your DVD camcorder.
Additional battery packs are available at
your local Samsung dealer.
If the DVD camcorder will not be in use
for a while, remove the battery from the
DVD camcorder.
Use only Samsung-approved battery packs. Do
not use batteries from other manufacturers.
Otherwise, there is a danger of overheating, fi re or
explosion.
Samsung is not responsible for problems occurring
due to using unapproved batteries.
給電池組充電
• 有兩各電源類型可以連接到 DVD 攝錄放影機。
• 切勿同其他設備一起使用所提供的電源裝置。
- 電池組:用於戶外拍攝。
- 交流電源適配器:用於室內拍攝。
給電池組充電
在使用 DVD 攝錄放影機之前一定要為電池組充電。
在 DVD 攝錄放影機中裝上電池組
用手指開啟 LCD 螢幕呈 90 度。
1.
將電池組固定到電池配件平台上,然後按照
2.
如圖所示方式推動電池組,直到聽到「卡嗒」
聲。
從 DVD 攝錄放影機中取出電池組
用手指開啟 LCD 螢幕呈 90 度。
1.
滑動
2.
所示的方向,然後取出電池組。
警告
請僅使用
其他廠家的電池。
否則,將會導致過熱、火災或爆炸的危險。
由於使用未經批準的電池而導致的問題,
Samsung
.(電池釋放閂)開關,按照如圖
BATT
按照如圖所示的方向插入電池組。
如果電池包插入錯誤,可能會造成 DVD 攝錄
放影機和電池包功能異常。
建議您購買一個或多個額外的電池組,這
樣可連續使用您的 DVD 攝錄放影機。
額外的電池組可從您當地的 Samsung 代理
商選購。
若長時間不會使用 DVD 攝錄放影機,請從
DVD 攝錄放影機中取出電池。
認可的電池組。切勿使用
Samsung
概不負責。
Page 23

17_ English
臺灣
_17
About battery packs
The battery pack should be recharged in an environment that is
•
between 0°C (32°F) and 40°C (104°F).
However, when it is exposed to cold temperatures (below 0°C
(32°F)), its usage time becomes reduced and it may cease to
function. If this happens, place the battery pack in your pocket or other
warm, protected place for a short time, then re-insert it to the DVD
camcorder.
• Do not put the battery pack near any heat source (i.e. fire or a heater).
• Do not disassemble, apply pressure to, or heat the battery pack.
• Do not allow battery pack terminals to be short-circuited. It may cause
leakage, heat generation, induce overheating or fire.
Maintaining the battery pack
•
The recording time is affected by temperature and environmental conditions.
• The recording time shortens dramatically in a cold environment. The
continuous recording times in the user manual are measured using
a fully charged battery pack at 25°C (77°F). As the environmental
temperature and conditions vary, the remaining battery time may
differ from the approximate continuous recording times given in the
instructions.
• We recommend only using the original battery pack that is available
from your Samsung retailer. When the battery reaches the end of its
life, please contact your local dealer. The batteries have to be treated
as chemical waste.
Make sure that the battery pack is fully charged before starting to record.
•
• When fully discharged, a battery pack damages the internal cells. The
battery pack may be prone to leakage when fully discharged.
• Remove the battery from the camcorder when it is not in use. Even
when the power is switched off, the battery pack will still discharge if it
is left attached to the DVD camcorder.
For power saving purpose, the DVD camcorder enters the sleep mode
•
automatically if no operation is for 3 minutes in the STBY mode and
thumbnail index view. If no operation goes on 3 minutes more, it turns
off automatically. If any operation occurs in the sleep mode, the DVD
camcorder comes out of the sleep mode. This function works only if
“Auto Power Off” is set to “6 Min.”
• Make sure that the battery pack fits firmly into place. Do not drop the
battery pack as it may cause damage.
About the battery life
Battery capacity decreases over time and through repeated use.
If decreased usage time between charges becomes significant, it is
probably time to replace it with a new one.
Each battery’s life is affected by storage, operating and environmental
conditions
.
page 80
關於電池組
• 電池組必須在介於 0° C (32° F) 和 40° C (104° F) 的環境溫度下重
新充電。
但是,若將其暴露於低溫(低於 0° C (32° F))中,則其使用時間將
會縮短,並且可能無法使用。如果發生此類情況,請將電池組放入您
的口袋或其他溫暖而安全的地方片刻,然後將其重新裝入 DVD 攝錄放
影機中。
• 切勿將電池組放在靠近熱源的地方(如火或曖器)。
• 勿拆開、擠壓或加熱電池組。
• 切勿讓電池組各端形成短路。這可能會導致電池組漏液、發出熱量,
引起過熱或火災。
維護電池組
• 錄製時間會受溫度和環境條件的影嚮。
• 在寒冷的環境溫度下,錄製時間會急速縮短。使用者手冊中提供的連
續錄製時間是根據在 25° C (77° F) 溫度下使用完全充電的電池組所
測得的結果。由於環境溫度和條件會經常改變,因此剩餘的電池時間
可能會與說明中提供的大約連續錄製時間有所不同。
• 我們建議您僅使用從 Samsung 零售商購買的原始電池組。在電池到達
其使用壽命時,請與當地經銷商聯繫。必須以處理化學廢物的方式處
理該電池。
• 開始錄製之前,請確定電池組已經完全充電。
• 電池組完全放電時,可能會損壞內部元件。完全放電的電池組可能會
導致漏液。
• 在不使用時,要從攝錄放影機中取出電池。若將電池組留在 DVD 攝錄
放影機內,即使關閉電源,電池組將仍然會放電。
• 為節省電源,DVD 攝錄放影機會在
鐘後自動進入睡眠模式。若超過 3 分鐘沒有執行任何操作,則會自動
關閉。如果在睡眠模式下進行操作,則 DVD 攝錄放影機會退出睡眠模
式。此功能僅在「
• 確保電池組已穩固安裝到位。切勿讓電池組掉落,否則可能使其損壞。
關於電池壽命
電池容量 會因超時和重複使用而減小。
如果充電後的使用時間大大減少,則可能要更換新電池組。
每節電池的壽命受存放、操作和環境條件的影響。
Auto Power Off
模式和縮略索引視圖 3 分
STBY
」設定為「
6 Min.
」。
第 80 頁
Page 24

18_ English
臺灣
_18
preparation
Charging the battery pack
• Use IA-BP80W battery pack
only.
• The battery pack may be
charged a little at the time of
purchase.
1. Slide the POWER switch
downwards to turn off the
power.
2. Open the LCD screen and
attach the battery pack to the
DVD camcorder.
3. Open the DC IN/USB/AV
jack cover.
4. Connect the AC power
adaptor to the DC IN jack of
your DVD camcorder.
5. Connect the AC power
adaptor to a wall socket.
• The ACCESS/CHG
(charging) indicator
lights up in orange and charging starts. The ACCESS/CHG (charging)
indicator lights up in green when the battery is fully charged.
6. Once charged, disconnect the AC power adaptor from the DC IN jack on
your DVD camcorder.
Even with the power switched off, the battery pack will still discharge
•
if it is left attached to the DVD camcorder. It is recommended that
you remove the battery pack from the DVD camcorder.
Charging indicator
The colour of the ACCESS/CHG (charging) indicator
indicates the power or charging state.
- If the battery has been fully charged, the
charging indicator is green.
- If you are charging the battery, the colour of the
charging indicator is orange.
- If an error occurs while the battery pack in
charging, the charging indicator blinks orange.
page 16
準備工作
POWER switch
在充電完成後,從 DVD 攝錄放影機上的 DC IN 插孔斷開交流電
6.
源適配器。
• 如果將電池組留在 DVD 攝錄放影機內,即使關閉電源,電池
組將仍然會放電。建議您從 DVD 攝錄放影機中取出電池組。
充電指示器
ACCESS/CHG
或充電狀態。
- 如果電池完全充滿,充電指示器會呈綠色。
- 如果您正在給電池充電,則 充電指示燈的
顏色會呈橙色。
- 如果在電池組充電時發生故障,則充電指示
燈呈橙色閃爍。
電池組充電
• 僅使用 IA-BP80W 電池組。
• 電池組在購買時可能已經有少
量電量。
向下滑動
1.
閉電源。
打開 LCD 螢幕,然後在 DVD
2.
攝錄放影機中裝入電池組。
第 16 頁
打開 DC IN/USB/AV 插孔蓋。
3.
將交流電源適配器連接到 DVD
4.
攝錄放影機的 DC IN 插孔。
將交流電源適配器連接到牆上
5.
插座。
•
ACCESS/CHG
示燈呈橙色亮起,即開
始充電。當電池充滿時,
ACCESS/CHG
示燈會呈綠色亮起。
(充電)指示器的顏色指示電量
POWER
開關以關
(充電)指
(充電)指
Page 25
19_ English
臺灣
_19
Charging, recording and playback times with a fully
charged battery pack (with no zoom operation, etc.)
For your reference, the approximate time with fully charged
battery pack:
Battery Pack
Charging time 1 hr 50 min
Continuous recording time Playback time
LCD
Viewfinder
- The time above is based on Fine mode.
It may differ depending on Super Fine or Normal mode.
- The time is only for reference. Figures shown above are
measured under Samsung’s test environment, and may differ
from your actual use.
- The charging time will vary depending on the remaining
battery level.
Continuous recording time (without zoom)
The times shown in the table reflect the available recording
time when the DVD camcorder is in the recording mode without
using any other functions. In actual recording, the battery pack
may discharge 2-3 times faster than this reference since the
record start/stop and zoom are being operated, and playback is
performed. Assume that the recordable time with a fully charged
battery pack is between 1/2 and 1/3 of the time in the table,
so prepare enough battery packs to allow for the time you are
planning to record on the DVD camcorder.
Note that the battery pack discharges faster in a cold environment.
60min 65min
完全充電電池組的充電、錄製和播放時間
(無縮放操作等)
僅供參考,完全充電電池組的大約時間:
電池組
充電時間 1 小時 50 分鐘
連續錄製時間 播放時間
LCD
取景器
- 上面的時間基於「清晰」模式。
可能會因「高清晰」或「標準」模式而異。
- 時間僅供參考。上表顯示的數字為在 Samsung 測試環境下測
量,並可能會因實際使用情況而異。
- 充電時間將因剩餘電池電量而不同。
連續錄製時間(無縮放)
表格中的時間反映出在 DVD 攝錄放影機處於錄製模式而不使用任
何其他功能時,可錄製的時間。由於使用錄製開始 / 停止和縮放
功能和進行播放,因此在實際錄製時,電池組的放電速度可能是
以上參考時間的 2-3 倍。假設完全充電電池組的可錄製時間為表
內時間的 1/2 至 1/3 之間,則應具有足夠的電池組來滿足您計
劃在 DVD 攝錄放影機上錄製的時間。
請註意,電池組在寒冷環境中的放電速度更快。
60 分鐘 65 分鐘
Page 26
20_ English
臺灣
_20
preparation
準備工作
Using the DVD camcorder with the AC power adaptor
It is recommended that you use the AC power adaptor to power
the DVD camcorder from a household AC outlet when you
perform settings on it, finalise a disc, play back, or edit images, or
use it indoors.
CAUTION
page 18
Be sure to use the provided AC power adaptor to power
the DVD camcorder. Using other AC power adaptors
could cause electric shock or result in fire.
The AC power adaptor can be used around the
world. An AC plug adaptor is required in some foreign
countries. If you need one, purchase it at your local
Samsung dealer.
• Before detaching the power source, make sure that the
DVD camcorder’s power is turned off.
Failure to do so can result in DVD camcorder
malfunction.
• Use a nearby wall outlet when using the AC power
adaptor. Disconnect the AC power adaptor from the
wall outlet immediately if any malfunction occurs while
using your DVD camcorder.
• Do not use the AC power adaptor in a narrow space,
such as between a wall and furniture.
使用帶交流電源適配器的 DVD 攝錄放影機
當您在 DVD 攝錄放影機上進行設定、終結光碟、播放、或編輯
影像或在室內使用時,建議您使用交流電源適配器從室內交流
電插座為其供電。第 18 頁
• 一定要使用指定隨附的交流電源適配器為 DVD 攝錄放
影機供電。使用其他交流電源適配器可能會造成觸電
或火災。
• 交流電源適配器可以在世界各地使用。在某些外國國
家 / 地區,需要交流插頭轉接器。如果需要交流插頭
轉接器,請在您當地的
• 在拔下電源之前,確保關閉 DVD 攝錄放影機的電源。
否則會導致 DVD 攝錄放影機發生故障。
注意
• 在使用交流電源適配器時,可使用鄰近的牆上插座。
如果在使用攝錄放影機時發生任何故障,請立即從牆
上插座拔下交流電源適配器。
• 請勿使用放在狹窄空間(如牆和家俱之間)的交流電
源適配器。
Samsung
經銷商處購買。
Page 27

21_ English
臺灣
_21
BASIC DVD CAMCORDER OPERATION
第一次使用本攝錄放影機時
基本的 DVD 攝錄放影機操作
Turning the DVD camcorder on and off
You can turn the camcorder on or off by sliding the
POWER switch down.
Selecting the operating modes
• Set the operation mode by adjusting the
Storage mode switch (VP-DX103(i)/DX104/
DX105(i) only) and MODE button before
recording or operating any functions.
1. Set the Storage mode switch to DISC or
CARD. (VP-DX103(i)/DX104/DX105(i) only)
- DVD camcorder mode: To record movie on
a DVD disc.
- Digital camera mode: To record movie or
page 33
photo images on memory card.
pages 56~57
2. Press the MODE button to set Record(
) mode. Each press of the MODE button
Play(
toggles between the Record(
) mode.
Play(
When the DVD camcorder is turned on,
the self-diagnosis function operates and a
message may appear. In this case, refer to
warning indicators and messages (on pages
104~106) and take corrective action.
When using this camcorder fi rst time
• When you use your DVD camcorder for the fi rst
time or you reset it, you will see the “Date/Time
Set” screen for the startup display. If you do
not set the date and time, the “Date/Time Set”
screen appears every time you turn on your
camcorder.
) mode and
STBY 0:00:00 [30 min]
<DVD camcorder record mode>
) or
<DVD camcorder play mode>
STBY 0:00:00 [30 min]
Date/Time Set
Day Month Year Hour Min
01 / JAN / 2008 12 : 00
開啟和關閉 DVD 攝錄放影機
您可以透過向下滑動
攝錄放影機。
POWER
選取操作模式
• 在錄製和操作任何功能之前,透過調整
開關(僅適用於 VP-DX103(i)/DX104/
模式
DX105(i))和
1. 將儲存模式
(僅適用於 VP-DX103(i)/DX104/DX105(i))
- DVD 攝錄放影機模式:在 DVD 光碟上錄製
影片。第 33 頁
- 數位相機模式:在記憶卡上錄製影片或相片
影像。第
按下
2.
12/12
( ) 模式。每次按下
錄製 (
開啟 DVD 攝錄放影機後,自診斷功能就會運
行,並可能會顯示訊息。在此情況下,請參
考警告指示器和訊息(在第
然後採取更正措施。
第一次使用本攝錄放影機時
•
當您首次使用 DVD 攝錄放影機或將其重新設定
時,您將會看見
Ok
Cancel
螢幕。如果不設定日期和時間,則每次打開攝
錄放影機都會顯示
MODE
開關設定為
56~57
按鈕以設定錄製 (
MODE
) 模式和播放 ( ) 模式之間切換。
「Date/Time Set」
「Date/Time Set」
開關來開啟或關閉
儲存
按鈕設定操作模式。
DISC
或
CARD
。
頁
) 或播放
按鈕,便會在
MODE
頁上),
104~106
啟動顯示的
畫面。
Page 28
22_ English
臺灣
_22
preparation
準備工作
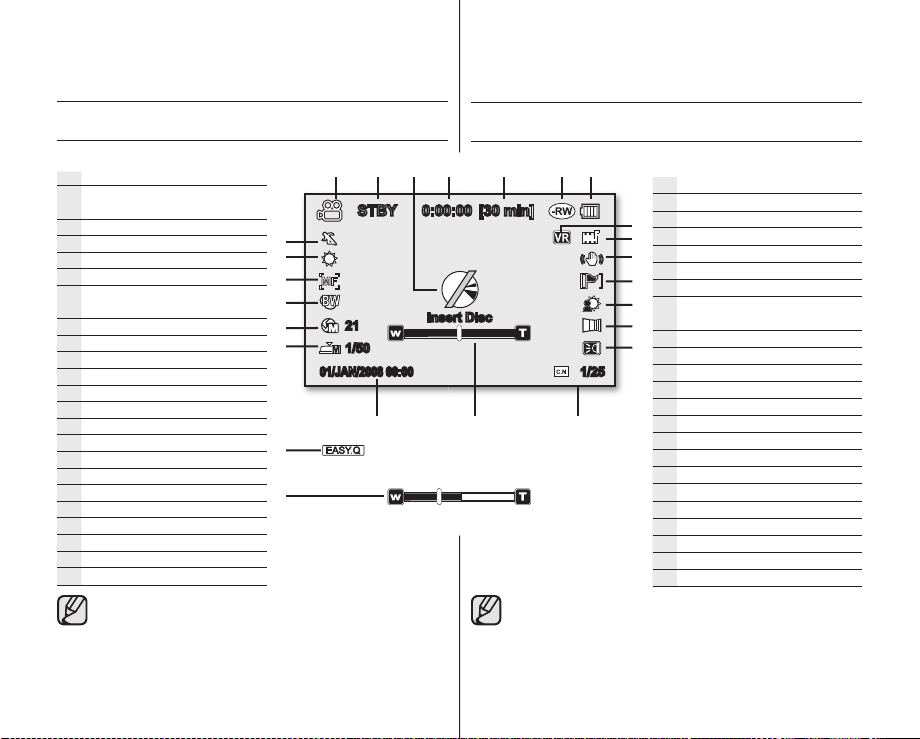
SCREEN INDICATORS
DVD camcorder record mode
Movie record mode
Operating mode (STBY (standby)
(recording))
or
Warning indicators and messages
Time counter (movie recording time)
Remaining time
Storage media (disc)
Battery info.
(remaining battery level)
Disc format type (DVD-RW disc only)
Quality
Anti-Shake (DIS)
Wind Cut
Back Light
Fader*
Light* (VP-DX102/DX105(i) only)
C. Nite*
Zoom/Digital Zoom position*
Date/Time
Manual Shutter*
Manual Exposure*
Digital Effect
Manual Focus*
White Balance
Scene Mode (AE)/ EASY.Q
• This OSD indicators are based on DVD-RW disc.
• The above screen is an example for explanation: It is
different from the actual display.
• Functions marked with * will not be retained when the
DVD camcorder is powered on after turning it off.
• The battery indicator appears 8 seconds after power on.
If the battery is low, it appears right after power on.
21
1/50
01/JAN/2008 00:00
螢幕指示器
STBY 0:00:00 [30 min]
Insert Disc
1/25
• 此 OSD 指示燈基於 DVD-RW 光碟。
• 以上螢幕是用作說明的範例:這與實際顯示有所差異。
• 沒有標上
• 電池指示器在開啟電源後會顯示 8 秒鐘。如果電量太低,便會在
攝錄放影機錄製模式
DVD
影片錄製模式
操作模式(STBY(待機)或
警告指示器和訊息
時間計數器(影片錄製時間)
剩餘時間
儲存媒體(光碟)
電池資訊(剩餘的電池電量)
光碟格式類型
(僅適用於 DVD-RW 光碟)
品質
防震 (DIS)
風聲消減
背光
*
的功能將不會在關閉 DVD 攝錄放影機後重新啟動時
*
調整器
燈光*(僅適用於 VP-DX102/DX105(i)
彩色夜景
縮放 / 數位縮放位置
日期 / 時間
手動快門
手動曝光
數位效果
手動對焦
白平衡
場景模式 (AE)/ 簡易拍攝
保留。
開啟電源後顯示。
(錄製))
)
*
*
*
*
*
Page 29
23_ English
臺灣
_23
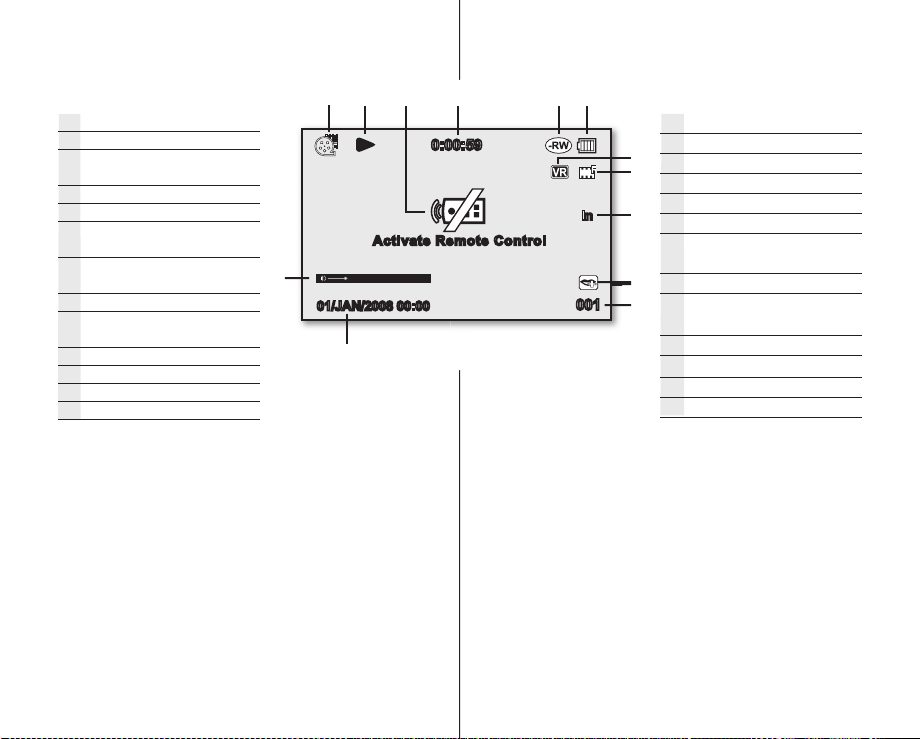
DVD camcorder play mode
Movie play mode
Operating status (Play/Pause)
Warning indicators and
messages
Time code (elapsed time)
Storage media (disc)
Battery info
(remaining battery level)
Disc Format
(-RW Video/VR mode only)
Quality
AV In (VP-DX100i/DX103i/
DX105i only)
Voice plus
Movie No.
Date/Time
Volume control
01/JAN/2008 00:00
0:00:59
Activa te Remote Control
02
001
DVD 攝錄放影機播放模式
影片播放模式
操作狀態(播放 / 暫停)
警告指示器和訊息
時間代碼(經過時間)
儲存媒體(光碟)
In
電池資訊(剩餘的電池電量)
光碟格式(僅適用於 -RW 視
訊 /VR 模式)
品質
输入 ( 僅適用於 VP-DX100i/
DX103i/DX105i)
Voice plus
影片編號
日期 / 時間
音量控制
Page 30

24_ English
臺灣
_24
preparation
準備工作
Digital camera record mode
Record mode
Operating mode (STBY
(standby) or
Warning indicators and messages
Time counter (movie recording
time)
Remaining time
Storage media (memory card)
Battery info (remaining battery
level)
The total number of recordable
photo
Back Light
Zoom position
Date/Time
Manual Exposure*
Manual Focus*
White Balance
The digital camera mode is only for the models (VPDX103(i)/DX104/DX105(i)).
(recording))
●
STBY 0:00:00 [64 min]
Insert Card
29
01/JAN/2008 00:00
4830
數位相機模式僅適用於型號(
).
DX105(i)
數位相機錄製模式
背光
日期 / 時間
錄製模式
操作模式(STBY(待機)
或 ●(錄製))
警告指示器和訊息
時間計數器(影片錄製時間)
剩餘時間
儲存媒體(記憶卡)
電池資訊(剩餘的電池電量)
可錄製相片的總數
縮放位置
*
手動曝光
*
手動對焦
白平衡
VP-DX103(i)/DX104/
Page 31

25_ English
臺灣
_25
Digital camera play mode (Video)
Activa te Remote Control
Activa te Remote Control
02
02
Activa te Remote Control
Activa te Remote Control
Video play mode
Operating status (Play/Pause)
Time code (elapsed time)
Warning indicators and messages
Storage media (memory card)
Battery info
(remaining battery level)
Erase Protection
File Name (folder-fi le name)
Volume control
Date/Time
0:00:03
Activa te Remote Control
Activa te Remote Control
01/ JA N/2 008 00 :00
02
02
100-0002
數位相機播放模式(視訊)
視訊播放模式
操作狀態(播放 / 暫停)
時間代碼(經過時間)
警告指示器和訊息
儲存媒體(記憶卡)
電池資訊(剩餘的電池電量)
刪除保護
檔案名稱 (資料夾 - 檔案名稱)
音量控制
日期 / 時間
Digital camera play mode (Photo)
Photo play mode
Slide Show
Image counter (current image/
total number of recorded images)
Warning indicators and
messages
Storage media (memory card)
Battery info (remaining level)
Erase Protection
File Name (folder-fi le name)
Date/Time
Print Mark(DPOF)
Photo size
The digital camera mode
is only for the models (VPDX103(i)/DX104/DX105(i)).
9/9
1
Activa te Remote Control
Activa te Remote Control
01 /JA N/2008 00:0 0
數位相機播放模式(相片)
相片播放模式
連續放映
影像計數器(目前影像 / 錄製
影像的總數)
警告指示器和訊息
儲存媒體(記憶卡)
電池資訊(剩餘的電池電量)
刪除保護
)
100-0002
檔案名稱(資料夾 - 檔案名稱
日期 / 時間
列印標記 (DPOF)
相片影像解析度
數位相機模式僅適用於型
號(
VP-DX103(i)/DX104/
DX105(i)
).
Page 32

26_ English
臺灣
_26
preparation
準備工作
USING THE Display ( ) BUTTON
Switching the information display mode
You can switch between the on-screen information
display modes:
Slide the POWER switch downwards to turn
on the power, and then press the Display (
button.
Each press of the button toggles the OSD (On
Screen Display) function on and off.
• Full display mode: All information will appear.
• Minimum display mode: Only operating status indicator
will appear.
If the DVD camcorder has warning information, a warning
message will appear.
)
USING THE JOYSTICK
The Joystick is used to make a selection and to
move the cursor left, right, up and down.
Using the Joystick, you can easily make your
selection and navigate the menu.
1. Move to a previous menu item / Adjust the
selected item (to the left).
2. Move to a sub menu item / Adjust the selected
item (to the right).
3. Move to a lower menu item.
4. Move to an upper menu item.
5. Press to select the chosen item
(Select).
1
4
使用顯示 ( ) 按鈕
切換資訊顯示模式
您可以在螢幕上資訊顯示模式之間切換:
將 POWER 開關向下滑動開啟電源,然後按下顯
示 ( ) 按鈕。
每按一次該按鈕就會開啟或關閉 OSD ( 螢幕上顯
示 ) 功能。
•
完全顯示模式
•
最小顯示模式
如果 DVD 攝錄放影機具有警告訊息,則會顯示警告訊息。
使用搖桿
2
5
:將顯示所有資訊。
:僅顯示作業狀態指示符。
可使用搖桿選擇選項,以及將游標向左、右、上下
移動。
您可以使用搖桿輕鬆地選擇選項和導覽選單。
移至上一個選單項目 / 調整選定的項目(往左)。
1.
移至子選單項目 / 調整選定的項目(往右)。
2.
移至下層的選單項目。
3.
3
移至上層的選單項目。
4.
按下以選擇所選的項目(選擇)。
5.
Page 33

27_ English
臺灣
_27
USING THE LCD SCREEN
您可透過觀景窗檢視相片,以在 LCD 螢幕上的相片
效果極差時查看正確的影像。
關閉 LCD 螢幕後,取景器就會開始工作。
調整焦距
Adjusting the LCD screen
1. Open up the LCD screen 90° with
your fi nger.
2. Rotate it to the best angle to record
or play.
Do not lift the DVD camcorder by
holding the LCD screen.
WARNING
• Over-rotation may cause
damage to the inside of the
hinge that connects the LCD
screen to the DVD camcorder.
• See page 79 to adjust
brightness and colour of the
LCD screen.
使用 LCD 螢幕
調整
1.
2.
警告
螢幕
LCD
用手指開啟 LCD 螢幕呈 90°。
將它旋轉至錄製或播放的最佳角度。
切勿透過握住 LCD 螢幕來提起
DVD 攝錄放影機。
• 過度旋轉可能會損壞鉸鏈內
部(將 LCD 螢幕連接到 DVD
攝錄放影機)。
• 要調整 LCD 螢幕的亮度和色
彩,請參閱第 79 頁。
USING THE VIEWFINDER
You can view pictures through the viewfi nder to see
correct images when the picture on the LCD screen
is poor.
The viewfi nder will work when the LCD screen is
closed.
Adjusting the focus
The focus adjustment knob of the viewfi nder enables individuals
with vision problems to see clearer images.
1. Close the LCD screen.
2. Use the focus adjustment knob of the viewfi nder to focus the
picture.
Viewing the sun or any strong light source through the
viewfi nder for a prolonged period may be harmful, or cause
temporary impairment.
使用觀景窗
您可透過觀景窗檢視相片,以在 LCD 螢幕上的相片
效果極差時查看正確的影像。
關閉 LCD 螢幕後,取景器就會開始工作。
調整焦距
觀景窗的焦距調整旋 鈕可以 讓有視 力問題 的人看 到更清 晰的
影像。
關閉 LCD 螢幕。
1.
使用觀景窗的焦距調整旋鈕來對焦影像。
2.
長時間透過觀景窗直視太陽或任何強烈光源可能導致傷害,
或造成暫時的損害。
Page 34

28_ English
臺灣
_28
preparation
準備工作
INITIAL SETTING: OSD LANGUAGE & DATE AND TIME
• Initial setting is available in all operating
modes. page 21
• To read the menus or messages in your
desired language, set the OSD language.
To store the date and time during record, set
the date/time.
• Set the date and time when using this
camcorder for the fi rst time.
And you can set the date and time also using
the setting menu. page 29
page 21
Selecting the OSD language
You can select the desired language to display the
menu screen and the messages.
1. Press the MENU button.
• The menu will appear.
2. Move the Joystick right or left to select
“Setting.”
• The setting menu will appear.
3. Move the Joystick up or down to select
“Language,” then press the Joystick.
4. Move the Joystick up or down to select the
desired language, then press the Joystick.
5. To exit, press the MENU button.
• Even if the battery pack or AC power were removed,
the language setting would still be preserved.
Language” options may be changed without prior
• “
notice.
STBY 0:00:00 [30 min]
STBY 0:00:00 [30 min]
Setting
Date/Time Set
Date/Time
LCD Brightness
LCD Colour
Exit
STBY 0:00:00 [30 min]
Setting
Menu Colour
Transparency
Language
Demo
Exit
起始設定:OSD 語言與日期和時間
起始設定可用於所有操作模式。第 21 頁
‧
要以所需語言讀取選單或訊息,可設定 OSD 語
‧
言。要在錄製時儲存日期和時間,可設定日期
/ 時間。
在首次使用此攝錄放影機時設定日期和時間。
‧
第 21 頁
您也可以使用設定選單來設定日期和時間。
第 29 頁
Select
Select
Off
18
18
Midnight Blue
20%
English
On
5.
要結束,可按下
選擇
OSD
語言
您可以選擇所要的語言來顯示選單畫面和訊息。
按下
1.
‧
向左或向右移動搖桿以選擇
2.
‧
向上或向下移動搖桿以選擇
3.
按鈕。
MENU
將顯示選單
將顯示設定選單。
後按下搖桿。
向上或向下移動搖桿以選擇所需語言,然後按
4.
下搖桿。
按鈕。
MENU
• 即使取出了電池包或拔下了交流電源,仍會保留語言
設定。
•
「Language」
選項可能會變更,而不預先通知。
。
「Setting」。
「Language」
,然
Page 35

29_ English
臺灣
_29
Setting the date and time
Set the date and time when using this DVD camcorder for the fi rst
time.
The recording date/time is recorded on the movie/photo
(VP-DX103(i)/DX104/DX105(i) only) images.
1. Press the MENU button.
• The menu will appear.
2. Move the Joystick right or left to select
“Setting.”
• The setting menu will appear.
3. Move the Joystick up or down to select “Date/
Time Set,” then press the Joystick
• The day will be selected
4.
Move the Joystick right or left to the desired item
(day, month, year, hour, minute) and then move the
Joystick up or down to set values.
5. To save the date and time, move the Joystick
right or left to “Ok,” then press the Joystick.
• To cancel the setting, move the Joystick to
select “Cancel,” then press the Joystick
.
6. To exit, press the MENU button.
• If the button type battery is exhausted,
the date and time will be reset as
“01/JAN/2008 00:00.”
Replace with the button type battery for
internal clock.
• You can set the year up to 2040.
• The date and time do not appear during
recording, but they are automatically
recorded on the storage media, and
can be displayed when you turn the
date and time display on.
page 14
.
STBY 0:00:00 [30 min]
STBY 0:00:00 [30 min]
Setting
Date/Time Set
Date/Time
LCD Brightness
LCD Colour
Exit
Date/Time Set
Day Month Year Hour Min
01 / JAN / 2008 00 : 00
Turning the date and time display on/off
To switch the date and time display on or off, access the menu
and change the date/time mode.
page 79
設定日期和時間
在首次使用此 DVD 攝錄放影機時設定日期和時間。
錄製日期 / 時間會被錄製在影片 / 相片 ( 僅適用於 VP-DX103(i)
/DX104/DX105(i)) 影像上。
1.
按下
MENU
按鈕。
• 將顯示選單。
向左或向右移動搖桿以選擇
2.
「Setting」。
• 將顯示設定選單。
向上或向下移動搖桿以選擇
3.
然後按下
搖桿
。
「Date/Time Set」
• 將會選擇日期。
將搖桿向右或向左移動至所需項目(日,月,年,
4.
小時,分鐘),然後向上或向下移動搖桿以設定
數值。
要儲存日期和時間,可向右或向左移動
5.
Cancel
「Ok」
,然後按下
搖桿。
• 要取消設定,可移動搖桿以選擇
然後按
要結束,可按下
6.
Ok
下搖桿。
按鈕。
MENU
• 如果鈕扣電池耗盡,則日期和時間將會
重新設定為
更換內部時鐘的鈕扣電池。
「01/JAN/2008 00:00」
Select
Off
18
18
• 您最多可以將年份設定為 2040。
• 錄製時不會顯示日期和時間,但是日期
和時間會被自動錄製到儲存媒體上,並
會在開啟日期和時間顯示器時顯示。
開啟 / 關閉日期和時間
要開啟或關閉日期和時間顯示器,可存取選單和變更日期 / 時間
模式。
第 79 頁
至
搖桿
「Cancel」
。
第 14 頁
,
,
Page 36

30_ English
臺灣
_30
DVD camcorder mode:
4.
插入和取出光碟
插入和取出光碟
before recording
SELECTING THE STORAGE MEDIA (VP-DX103(i)/
DX104/DX105(i) only)
You can record movie and photo images on the
desired storage media (a DVD disc or a memory card)
so you should select the desired storage media before
starting recording or playback. Note that photo images
cannot be recorded onto a DVD disc. A DVD disc is
available only in the movie mode.
Selecting the desired storage
• Set the Storage mode switch to DISC or CARD.
(DISC
- DVD camcorder mode: To record movies on a
DVD disc.
Digital camera mode: To record movie or photo
-
images on memory card.
INSERTING AND REMOVING A DISC
When inserting a disc or closing the disc cover,
•
do not apply excessive force. It may cause a
malfunction.
• You cannot open the disc cover while loading.
• You can use a new 3 1/2 inch(8cm) DVD-RW,
DVD+RW, DVD-R or DVD+R DL (Dual Layer)
disc for movie recording. Photos can not be
recorded onto a DVD disc.
A DVD disc is available only in the movie mode.
Inserting a disc
1. Slide the OPEN switch in the direction of the arrow.
• The disc cover will partially open.
2. Gently open the cover the rest of the way by hand.
3. Push the disc into the disc compartment until a
click is heard.
• The recording side of the disc must face the
inside of the DVD camcorder.
• Do not touch the pickup lens.
4. Gently push the disc cover to close it.
• Once inserted, the disc is recognized and the
ACCESS/CHG indicator blinks.
Do not cut off the power supply during this
time. Do not shake nor apply impact.
It may cause a malfunction.
• Set the Storage mode switch to DISC.
(VP-DX103(i)/DX104/DX105(i) only)
CARD
)
page 33
pages 56~57
DVD
攝錄放影機模式:
錄製前
選擇儲存媒體(僅適用於 VP-DX103(i)/DX104/DX105(i))
1
3
4
您可以將影片和照片影像錄製到所需的存儲媒體上
(DVD 光碟或記憶卡),因此,應在開始錄製或播放之
前選擇所需的儲存媒體。請注意,不能將相片影像錄
製到 DVD 光碟上。DVD 光碟僅可在影片模式下使用。
選擇所需的儲存形式
• 將
(
- DVD 攝錄放影機模式:在 DVD 光碟上錄製影
- 數位相機模式:在記憶卡上錄製影片或相片
插入和取出光碟
• 在插入光碟或關上光碟護蓋時,不可過度用力。
否則可能會導致裝置故障。
• 在載入時,不可開啟光碟蓋。
•
您可以使用新型 3 1/2 英吋 (8cm) DVD-RW、
DVD+RW、DVD-R 或 DVD+R DL ( 雙層 ) 光碟來
錄製影片。不能將相片錄製到 DVD 光碟上。
DVD 光碟僅可在影片模式下使用。
儲存模式
DISC
CARD
片。第 33 頁
影像。第
開關設定為
)
56~57
DISC
頁
或
CARD
。
插入光碟
沿著箭頭方向滑動
1.
• 光碟護蓋將會部分開啟。
以手動方式輕輕開啟剩餘光碟護蓋。
2.
將光碟推入光碟槽直至聽到卡嗒聲為止。
3.
• 光碟的錄製面必須朝向 DVD 攝錄放影機的內
部。
• 切勿觸摸拾音器鏡頭。
輕輕推入光碟護蓋以將其關閉。
4.
• 插入之後,光碟會被識別,並且
指示燈會閃爍。
CHG
在此期間,不可切斷電源供應。切勿振動或
撞擊。否則可能會導致裝置故障。
• 將
儲存模式
VP-DX103(i)/DX104/DX105(i)
於
開關。
OPEN
開關設定為
DISC
ACCESS/
。(僅適用
)
Page 37

31_ English
臺灣
_31
• Move the grip belt so it does not interfere with inserting or
ejecting the disc.
• The disc cover can be opened when the device is connected to
an AC power adaptor or the battery pack, even if the power is off.
• 移動手握帶以防影響插入或彈出光碟。
• 即使關閉電源, 也可在將裝置連接到交流電源適配器或電池組時
開啟光碟護蓋 。
Caution
This product utilises a laser. Use of controls or adjustments
or performance of procedures other than those specifi ed
herein may result in hazardous radiation exposure.
Do not open covers and do not look inside the product if
interlock mechanism is damaged.
Warning
Be careful not to damage the interlock mechanism.
When using a new disc: formatting a new disc
Formatting may be required if a new disc is inserted.
Recognition of the disc will start.
For a DVD-R/+R DL disc: Formatting will automatically begin.
For a DVD-RW disc: The Format menu is offered. Select the recording
format, Video mode or VR mode.
Format the disc in the “Disc Manage” menu when you want to format
page 50
again.
Video (Video Mode) : If the disc
has been fi nalised, you will be
able to play the disc on most
Differences
between Video
and VR mode
- Refer to page 8 for fi nalised disc compatibility.
For a DVD+RW disc: The Format menu is offered. Formatting
makes the recorded disc new and reusable by deleting all the data
recorded on the disc.
DVD players/recorders/drives.
VR (VR Mode) : You can edit
the disc on a DVD camcorder,
but playback is possible
only on a DVD recorder that
supports VR mode.
Format the disc in Video mode?
- Can play in DVD devices.
- Cannot edit in camcorder.
If not, Remove the disc.
Video VR
<
When a DVD-RW disc is formatted.
注意
本產品使用雷射。使用本手冊中沒有描述的控制、調整
或執行之步驟可能會導致危險輻射的曝露。
如果聯鎖機構被損壞,切勿開啟護蓋和查看產品內部。
警告
注意不要損壞聯鎖機構。
pickup lens
使用新光碟時:格式化新光碟
如果插入新光碟,可能需要進行格式化。
將開始識別光碟。
對於 DVD-R/+R DL 光碟
對於 DVD-RW 光碟
模式。
當您想再次進行格式化時,請在
第 50 頁
>
對於 DVD+RW 光碟
所有資料,格式化可使錄製的光碟得以更新和重新使用。
:將自動開始格式化。
:提供格式選單。選擇錄製格式、視訊模式或 VR
「Disc Manage」
視訊(視訊模式):如果已終結
光碟,您將能在大多數 DVD 播
放機 / 錄製機 / 磁碟機上播放
視訊和 VR 模式
之間的不同之處
光碟。
VR (VR 模式):您可以在 DVD
攝錄放影機上編輯光碟,但是
僅能在支援 VR 模式的 DVD 錄
製機上播放。
- 請參閱第 8 頁以獲得有關終結的光碟相容性的資訊。
:提供格式選單。透過刪除錄製在光碟上的
選單中格式化光碟。
Page 38

32_ English
臺灣
_32
DVD camcorder mode:
before recording
DVD
攝錄放影機模式:
錄製前
Removing a disc
1. Slide the OPEN switch in the direction of the arrow.
• The disc cover will partially open.
2. Gently open the cover the rest of the way by hand.
3. Remove the disc.
• While pushing down the centre portion of the disc spindle, pick up
the disc by the edges to remove.
4. Gently push the disc cover to close it.
• The Finalise/Format functions are not available at the low battery
level under (
Use the AC power adaptor when finalising/formatting a DVD disc.
• You cannot open the disc cover while loading. Wait until disc
loading is completed.
Do not operate the POWER switch or remove a disc while accessing it.
•
Doing so may damage the disc or the data on it.
• You can not proceed with recording when the disc cover is open.
An icon and message are shown that recording is impossible
with the disc cover open.
• It may take longer to open the cover when using DVD+RW rather
than other type of disc. Especially, more than 5 minutes may be
required if there are a lot of movie images recorded on the disc.
).
RECORDABLE TIME
Recordable time for movie images
Storage DVD+RW/-RW/-R DVD+R DL
Capacity
Movie Quality
Super Fine
Normal Approx. 60min Approx. 106min
Actual formatted capacity may be less as the internal firmware uses a portion of the memory.
Fine Approx. 30min Approx. 53min
• The above figures are measured under Samsung’s standard
recording test conditions and may differ depending on actual use.
• The DVD camcorder provides three quality options for movie
recordings: “Super Fine,” “Fine” and “Normal.”
The higher the quality setting is, the more memory is used.
• The compression rate increases when choosing lower quality
settings. The higher the compression rate is, the longer the
recording time will be. However, the picture quality will be lower.
• Movie image files recorded on other equipment are not playable on
this DVD camcorder.
1.4GB 2.6GB
Approx. 20min Approx. 35min
取出光碟
沿著箭頭方向滑動
1.
• 光碟護蓋將會部分開啟。
以手動方式輕輕開啟剩餘光碟護蓋。
2.
取出光碟。
3.
• 在按下光碟主軸的中央部分時,可握住光碟邊緣以將其取出。
輕輕推入光碟護蓋以將其關閉。
4.
• 終結 / 格式化功能不可用, 當電池電量 低於 ( ) 時。
最終化 / 格式化 DVD 光碟時,請使用交流電源轉接器。
• 在載入時,不可開啟光碟護蓋。等待到裝載完成。
• 切勿在存取時操作
這樣做可能會損壞光碟或其上的資料。
• 打開光碟蓋後不能繼續錄製。將顯示圖示和訊息,說明當光碟
蓋打開時不能進行錄製。
• 使用 DVD+RW 比使用其他類型的光碟打開蓋子所需的時間可能會
稍長。具體說來,如果光碟上錄製了大量影片影像,則可能需
要 5 分鐘以上。
OPEN
開關。
POWER
開關或取出光碟。
可錄製時間
可錄製影片影像的時間
Storage DVD+RW/-RW/-R DVD+R DL
容量
影片品質
Super Fine
Normal
由於內部韌體使用了一部分記憶體,因此實際格式化後的容量可能會小一些。
Fine
在錄製時,以上數字由 Samsung 在標準錄製測量條件下測得,
•
並且可能因實際使用情況而異。
• DVD 攝錄放影機為影片錄製提供三種品質選項:
「Fine」和「Normal」
品質設定越高,使用的記憶體就越多。
• 在選擇較低的品質設定時,壓縮率會增大 。 壓縮率越大,錄製
時間將越長。但是,畫面品質將會降低。
•
透過其他設備錄製的影片影像檔案在此 DVD 攝錄放影機上無法播放
1.4GB 2.6GB
大約 20 分鐘 大約 35 分鐘
大約 30 分鐘 大約 53 分鐘
大約 60 分鐘 大約 106 分鐘
。
「Super Fine」、
。
Page 39

33_ English
臺灣
_33
DVD camcorder mode:
recording/playback
DVD
攝錄放影機模式:
錄製 / 播放
RECORDING MOVIE IMAGES
• You should set the Storage mode switch to
DISC before recording on a disc.(VP-DX103(i)/
DX104/DX105(i) only)
• You can record movie images using the
remote control. (VP-DX102/DX104/DX105(i) )
page 13
• This DVD camcorder provides two Recording
start/stop buttons. One is on the rear side of the
camcorder and the other is on the LCD panel.
Select the Recording start/stop button that
works best for you.
1. Turn the DVD camcorder on.
• Connect a power source to the DVD
camcorder.
(A battery pack or an AC power adaptor)
• Slide the POWER switch downwards to turn
the DVD camcorder on.
• Set the Storage mode switch to DISC. (VP-
DX103(i)/DX104/DX105(i) only)
2. Check the subject on the LCD screen. (Lens
and LCD)
• Set the Lens open/close switch to open
( ). page 10
3. Press the Recording start/stop button.
• The
() recording indicator will display, and
recording will start.
• Press the Recording start/stop button
again to stop recording.
4. When recording is fi nished, turn the DVD camcorder off.
page 30
page 30
錄製影片影像
STBY 0:00:00 [30 min]
0:00:00 [30 min]
• 在光碟上進行錄製之前,您應將
關設定為
DX104/DX105(i))第 30 頁
• 您可以使用遙控器錄製影片影像。(僅適用於
VP-DX102/DX104/DX105(i))第 13 頁
• 此 DVD 攝錄放影機具有兩個
按鈕。其中一個位於攝錄放影機背面,另一
個位於 LCD 面板上。選擇
鈕(具有最佳工作效果)。
開啟 DVD 攝錄放影機。
1.
• 將電源連接到 DVD 攝錄放影機。
(電池組或交流電源適配器)
• 向下滑動
錄放影機。
• 將
於 VP-DX103(i)/DX104/DX105(i))
檢查 LCD 螢幕上的主體。(鏡頭和 LCD)
2.
• 設定
按下
3.
錄製開始 / 停止
• (
會開始。
• 再次按 下
錄製。
在完成錄製時,關閉 DVD 攝錄放影機。
4.
。(僅適用於 VP-DX103(i)/
DISC
錄製開始 / 停止
錄製開始 / 停止
開關以開啟 DVD 攝
POWER
開關設定為
儲存模式
第 30 頁
鏡頭開啟 / 關閉
第 10 頁
) 錄製指示器將會顯示,並且錄製將
錄製開始 / 停止
DISC
開關以開啟 ( )。
按鈕。
按鈕以停止
儲存模式
。(僅適用
開
按
Page 40

34_ English
臺灣
_34
DVD camcorder mode:
recording/playback
• The recorded movie image size is 720X576.
• Eject the battery pack when you have finished recording
to prevent unnecessary battery power consumption.
• For on-screen information display, see page 22.
• For approximate recording time, see page 32.
• Sound is recorded from the internal stereo microphone
at the front of the DVD camcorder. Take care that this
microphone is not blocked.
• Before recording an important movie, make sure to
test the recording function by checking if there is any
problem with the audio and video recording.
• For various functions available when you record movie
images.
• Do not operate the power switch or remove a disc while
accessing it. Doing so may damage the disc or the data
on it.
• If you set the storage media to DVD, up to 253 movie
images can be created on DVD-R/+RW/+R DL/ -RW
(Video mode) discs, and up to 999 on DVD-RW (VR
mode).
• You cannot proceed with recording when the disc cover
is open. An icon and message are shown that recording
is impossible with the disc cover open.
• If you press the Recording start/stop button while
a menu operation is in process, the DVD camcorder
starts to record.
• If you turn the DVD camcorder off while recording,
turn it on again with the storage media inserted
in it: Repair of the storage media will be executed
automatically with a message. Do not turn off
the power or remove storage media while the DVD
camcorder is recovering it. Or it will damage the data or
the storage media itself. The data recovery completes
within a few minutes but sometimes it may take more
time. Use the AC power adaptor when recovering data.
pages 65~77
DVD
攝錄放影機模式:
錄製 / 播放
• 所錄製影片影像的尺寸為 720X576.
• 在完成錄製後取出電池組,以避免不必要的電池耗電。
• 有關螢幕資訊顯示,請參閱第 22 頁。
• 有關大約的錄製時間,請參閱第 32 頁。
• 從 DVD 攝錄放影機前部的內置麥克風錄製聲音。注
意不要堵塞麥克風。
• 在錄製重要影片之前,確保透過檢查音訊和視訊錄製
是否存在問題來測試錄製功能。
• 對於在錄制影片影像時可用的各種功能。
第
• 切勿在存取時操作電源開關或取出光碟。這麼做可能
會損壞光碟或其上的資料。
• 如果您將儲存媒體設定為 DVD,則可在 DVD-R/+RW/
+R DL/-RW(視訊模式)光碟上建立多達 253 張影片
影像,並且可在 DVD-RW(VR 模式)上建立多達 999
個標題場景。
• 在光碟護蓋處於開啟狀態時,您不可繼續錄製。圖示
和訊息顯示,不可在光碟護蓋開啟的情況下進行錄製。
• 如果您在選單操作過程中按下
則 DVD 攝錄放影機會開始錄製。
•
如果在錄製時關閉 DVD 攝錄放影機,則在儲存媒體插
入其中的情況下再次打開它。將自動執行儲存媒體修
復並顯示訊息。
時不要關閉電源或取出儲存媒體。否則會損壞資料或
儲存媒體。資料恢復將在幾分鐘內完成,但有時可能
需要稍長時間。恢複資料時請使用交流電源轉接器。
頁
65~77
錄製開始 / 停止
當 DVD 攝錄放影機正在修復儲存媒體
按鈕,
Page 41

35_ English
臺灣
_35
RECORDING WITH EASE FOR BEGINNERS
(EASY.Q MODE)
• With the EASY.Q function, most of the DVD
camcorder settings are automatically adjusted,
which relieves you of detailed adjustments.
1. Slide the POWER switch downwards to turn on the
power.
• Set the Storage mode switch to DISC. (VP-
DX103(i)/DX104/DX105(i) only)
2. Press the EASY Q button.
• When you press the EASY Q button, most
functions are set to off and the following
functions are set to “Auto.”
- “Scene Mode(AE),” “White Balance,”
“Exposure,” “Anti-Shake(DIS),” “Digital
Effect,” “Focus,” “Shutter,” “Back Light,”
“C. Nite” etc.
• The (
on the screen at the same time.
3. To record movie images, press the Recording start/stop button.
and Anti-Shake(DIS) ( )) indicators appear
page 30
STBY 0:00:00 [30 min]
To cancel EASY.Q mode
Press the EASY Q button once again.
• The (
from the screen.
• Almost all the settings will return to the settings that were set prior
to activating EASY.Q mode.
• You cannot cancel the EASY.Q mode during recording.
and Anti-Shake(DIS) ( )) indicators disappear
• Unavailable buttons during EASY.Q operation.
The following controls are unavailable because the items
are automatically set.
And the corresponding message (“Release the EASY.Q!”)
may appear if unavailable operations are attempted.
-
Menu
button,
Joystick
• Release EASY.Q function, if you want to add any effect or
settings to the images.
• The EASY.Q mode settings is released when the DVD
camcorder is turned off.
.
初學者可輕鬆地進行錄製(EASY.Q 模式)
透過使用 EASY.Q 功能,大多數 DVD 攝錄放影機
•
設定會自動調整,可使您無需詳細調整。
向下滑動
1.
• 將
儲存模式
VP-DX103(i)/DX104/DX105(i))
按下
2.
EASY Q
• 在按下 EASY Q 按鈕時,大多有選舉權功能
會關閉,並且以下功能會設定為「
「Scene Mode(AE)」、「White Balance」、
-
「Exposure」、「Anti-Shake(DIS)」、
「Digital Effect」、「Focus」、「Shutter」、
「Back Light」、「C. Nite」等。
• ( 和防震 (DIS) ( )) 指示器會
同時出現在螢幕上。
要錄製影片影像,可按下
3.
要取消
EASY.Q
再次按下
• (
• 幾乎所有設定都將返回到激活 EASY.Q 模式前所設定的設定。
• 您不能在錄製時取消 EASY.Q 模式。
•
(如果嘗試不可用的操作)。
• 解除 EASY.Q 功能(如果您想將任何效果或設定新增到
• 在關閉 DVD 攝錄放影機時,會解除 EASY.Q 模式設定。
模式
按鈕。
EASY Q
和防震 (DIS) ( )) 指示器會從螢幕上消失。
在進行 EASY.Q 操作時不可用的按鈕。
下列控件不可用,因為它們是自動設定的。
同時還可能會出現相應的訊息(「
-
按鈕,
Menu
影像)。
POWER
搖桿
按鈕。
。
開關以開啟電源。
開關設定為
DISC
錄製開始 / 停止
Release the EASY.Q!
。(僅適用於
第 30 頁
Auto
按鈕
」。
。
」)
Page 42

36_ English
臺灣
_36
DVD camcorder mode:
recording/playback
CAPTURING STILL IMAGES DURING MOVIE IMAGE
PLAYBACK(VP-DX103(i)/DX104/DX105(i) only)
• This function works only in the Play mode.
page 21
• If you press the PHOTO button during playback,
it stops playing and saves one image of the
current movie scene that is paused to the
memory card.
1. Slide the POWER switch downwards to turn on
the power and set the Storage mode switch to
.
DISC
• Press the MODE button to set the Play
• The thumbnail index screen appears.
2. Use the Joystick to select the desired movie
image.
• To change the current thumbnail page, move
3. Press the Joystick
The selected fi le fi lls the screen and is played
automatically.
4. Press the PHOTO button at the desired point.
• A shutter sound is heard. The photo image
page 21
mode.
the Joystick down to highlight the page bar,
then move the Joystick right or left to select
the page.
is recorded on the memory card with the
“Photo capture” message appeared.
• The still images captured from the
movie images to the storage media are
saved in 800x600 format.
.
0:00:59
Photo capture
DVD
攝錄放影機模式:
錄製 / 播放
在影片影像播放期間拍攝靜態影像(僅適用於
VP-DX103(i)/DX104/DX105(i))
• 此功能僅可在播放模式下操作。第 21 頁
• 如果您在播放期間按下
止播放,並會儲存一張目前影片場景(被暫停
到記憶卡)的圖像。
向下滑動
1.
12/12
2.
3.
4.
012
開關設定為
存模式
• 按下
第 21 頁
• 會顯示縮略索引螢幕。
使用
搖桿
• 要變更目前的縮圖頁面,可向下移動
以反白顯示頁面列,然後向右或向左
桿
移動搖桿以選擇頁面。
按下
搖桿
選定檔案顯示在螢幕上並自動播放。
按下
PHOTO
• 會聽到按下快門的聲音。相片影像會
錄製在記憶卡上,並且會出現
capture」
• 從影片影像拍攝到儲存媒體的靜止影像
會以 800x600 格式儲存。
POWER
MODE
選擇所需的影片影像。
。
PHOTO
開關以開啟電源,並將
。
DISC
按鈕以設定播放模式。
按鈕直至所需位置。
訊息。
按鈕,便會停
儲
搖
「Photo
Page 43

37_ English
臺灣
_37
ZOOMING
VOL
Use the zoom function for close-up or wide-angle
recording.
This DVD camcorder allows you to record using
optical 34x power zoom and 1200x digital zoom.
• Zoom lever is on the top of the camcorder.
• You can also use zoom function by moving the
Joystick (W/T) up or down.
To zoom in
Slide the zoom lever towards T (telephoto).
To zoom out
Slide the zoom lever towards W (wide-angle).
• The farther you slide the zoom lever, the quicker
the zoom action.
• Zoom magnifi cation over 34x is done through
digital image processing, and is, therefore,
called digital zoom. Digital zooming is possible
up to 1200x.
Set “Digital Zoom” to the desired value.
page 76
You can set the digital zoom up to 1200x in
movie mode.
• Be sure to keep your fi nger on the Zoom lever. If you
move your fi nger off the zoom lever, the operation
sound of the Zoom lever may be also recorded.
• The minimum possible distance between camcorder
and subject while maintaining sharp focus is about
1 cm (about 0.39 inch) for wide angle and 50 cm (about
19.68 inch) for telephoto.
• The focus changes when zooming after focusing
manually. Focus automatically or seize the desired
sence by zooming before focusing manually.
page 70
• Optical zoom preserves the movie quality, but during
digital zoom the image quality may suffer
W : Wide angle T : Telephoto
STBY 0:00:00 [30 min]
.
縮放
使用縮放功能進行特寫和廣角錄製。
本 DVD 攝錄放影機允許您使用光學 34 倍縮放和
1200 倍數位縮放來進行錄製。
• 縮放杆位於攝錄放影機的頂部。
• 您還可以透過向上或向下移動
搖桿
使用縮放功能。
要放大
將縮放桿滑向
(望遠)。
T
要縮小
將縮放桿滑向
(廣角)。
W
• 縮放桿滑動得越遠,縮放動作就越快。
• 由於放大倍率超過 34 倍的操作是透過數位影
像處理來完成,因此稱為數位縮放。數位縮放
可能高達 1200 倍。
將
「Digital Zoom」
第 76 頁
設定為所需值。
在影 片模 式下 可將 數位 縮放 設定 高達
12 00
倍。
• 務必要按住縮放控制杆。如果松開縮放控制杆,則可
能會把縮放控制杆的操作聲也錄進去。
• 攝錄放影機與物體保持清晰的最短可能距離對於廣角
為 1 公分 ( 約 0.39 英吋 ),對於攝遠鏡頭為 50
公分 ( 約 19.68 英吋 )。
• 手動對焦後進行縮放,對焦便會發生變更。自動對
焦或在進行手動對焦之前透過縮放獲取所需的場景。
第 70 頁
• 光學縮放可保持影片品質,而數位縮放期間影像品質
可能會受損。
(W/T)
來
Page 44

38_ English
臺灣
_38
DVD camcorder mode:
recording/playback
DVD
攝錄放影機模式:
錄製 / 播放
PLAYING MOVIE IMAGES
• This function works only in the Play mode. page 21
You can switch to the Play mode by using the
•
MODE button.
• You can fi nd a desired movie image quickly using
thumbnail index views.
• Use the playback-related buttons on the remote
control. (VP-DX102/DX104/DX105(i) only)
1. Slide the POWER switch downwards to turn on
the power and open the LCD screen.
• Set the
• Adjust brightness or colour of the LCD screen.
2. Press the MODE button to set the Play mode.
• The thumbnail index view appears. The
•
3. Move the Joystick to select the desired movie
image, then press the Joystick.
• The selected fi le fi lls the screen and is played automatically.
• To stop playback, move the Joystick down.
Storage mode switch to DISC. (VP-
DX103(i)/DX104/DX105(i) only) page 30
page 79
thumbnail highlight is on the latest created or
played fi le.
To change the current thumbnail page, move the
Joystick down to highlight the page bar, then
move the Joystick right or left to select the page.
• Press Display ( )button to toggle the OSD (On
Screen Display) function on and off.
• Depending on the amount of data to be played back, it
may take some time for the playback images to appear.
• Movies edited on a PC may not be displayed on this DVD
camcorder.
• Movies recorded on another camcorder may not be
played on this DVD camcorder.
page 13
0:00:59
播放影片影像
此功能僅能在播放模式下操作。 第 21 頁
•
• 您可切換至播放模式(透過使用
• 您可以使用縮略索引視圖快速查找所需的影片影
像。
• 使用遙控器上的播放相關按鈕。(僅適用於
VP-DX102/DX104/DX105(i))
向下滑動
1.
螢幕。
• 將
12/12
2.
3.
012
• 按下顯示 ( ) 按鈕以開啟和關閉 OSD(螢幕顯示)功能。
• 因播放的資料數量不同,可能稍後才會出現播放影像。
• 電腦上編輯的影片可能在此 DVD 攝錄放影機上無法顯示。
• 在另一台攝錄放影機上錄製的影片在此 DVD 攝錄放影機
上可能無法播放。
儲存模式
VP-DX103(i)/DX104/DX105(i))第 30 頁
• 調整 LCD 螢幕的亮度或色彩。
按下
MODE
• 會顯示縮略索引視圖。最近建立或播放的檔
案上會反白顯示縮圖。
• 要變更目前的縮圖頁面,可向下移動
反白顯示頁面列,然後向右或向左移動
以選擇頁面。
移動
搖桿
桿。
• 選定檔案顯示在螢幕上並自動播放。
• 要停止播放同,可向下移動
開關以開啟電源和打開 LCD
POWER
開關設定為
按鈕以設定播放模式。
以選擇所需的影片影像,然後按下
第 13 頁
DISC
MODE
搖桿
按鈕)。
。( 僅適用於
第 79 頁
搖桿
搖桿
搖
。
以
Page 45

39_ English
臺灣
_39
Adjusting the volume
• You can control the volume by using the zoom lever
during playback.
•
You can hear the recorded sound from the built-in speaker.
•
The level can be adjusted anywhere between 0 and 19.
If you close the LCD screen while playing, you will not
hear the sound from the speaker.
Various playback operations
Playback / Pause / Stop
Playback and Pause functions alternate when you
•
press the Joystick.
• Move the
• You can do the same operation by using the remote
Search playback
•
• To resume normal playback, press the Joystick.
• You can do the same operation by using the remote
Skip playback
•
• You can do the same operation by using the remote
Slow playback
• Pause the playback by pressing the Joystick, then
• To resume normal playback, press the
• Slow playback continues for 3 minutes.
•
• When pressing the (
Joystick down to stop playback.
control ( / ). (VP-DX102/DX104/DX105(i) only)
Move the Joystick right or left and hold during
playback.
-
RPS (Reverse Playback Search) rate: x2
-
FPS (Forward Playback Search) rate: x2
x16 x2
x16 x2
control ( / ). (VP-DX102/DX104/DX105(i) only)
Move the Joystick right or left during playback.
- If you move the
after the movie image starts, the previous image
is played back.
- If you move the Joystick left 3 seconds after
the movie image starts, the current image starts
from the beginning.
- If you move the Joystick right, the next image
is played back.
control (
move the Joystick right or left. The movie image
plays forward or reverse at the 1/2x speed.
You can do the same operation by using the remote control
( ). (VP-DX102/DX104/DX105(i) only)
during slow playback, it slowly plays back reversely or forward.
(VP-DX102/DX104/DX105(i) only)
Joystick left within 3 seconds
/ ). (VP-DX102/DX104/DX105(i) only)
Joystick.
) or ( ) buttons on the remote control
調整音量
0:00:59
02
0:00:59
0:00:59
<VP-DX102/DX104
/DX105(i) only>
• 在播放時,您可以透過使用縮放杆來控制音量。
• 您可從內置喇叭中聽到錄製的聲音。
• 可在 0 至 19 等級中隨意調整。
如果在播放時關閉 LCD 螢幕,則您將無法從喇叭
中聽到聲音。
012
不同的播放操作
播放 / 暫停 / 停止
• 會交替顯示播放和暫停功能(當您按下搖桿時)。
• 向下移動
• 透過使用遙控器 (
(僅適用於 VP-DX102/DX104/DX105(i))
搜尋播放
• 向右或向左移動搖桿,並在播放時按下。
012
012
- RPS(倒退播放搜尋)速率:x2
- FPS(向前播放搜尋)速率:x2 x16 x2
• 要恢復正常播放,可按下
• 您可以透過使用遙控器 (
作。(僅適用於 VP-DX102/DX104/DX105(i))
略過播放
• 在播放時,向右或向左移動搖桿。
- 如果您在影片影像開始後 3 秒鐘內向左移動
- 如果您在影片影像開始後 3 秒鐘內向左移動
- 如果您向右移動
• 透過使用遙控器 ( / ),您可執行相同的操作。(僅
適用於 VP-DX102/DX104/DX105(i))
慢動作播放
• 透過按下搖桿暫停播放,然後向右或向左移動搖桿。
影片影像會以 1/2 倍的速度向前或向後播放。
• 要恢復正常播放,可按下
• 慢速播放持續 3 分鐘。
• 您可以透過使用遙控器來執行相同的操作
(僅適用於 VP-DX102/DX104/DX105(i))
• 如果在慢速播放期間按下遙控器上的 (
( ) 按鈕, 則會向後或向前慢速播放。(僅適用於
VP-DX102/DX104/DX105(i))
以停止播放。
搖桿
,則會播放上一幅影像。
桿
,則會從頭開始播放目前影像。
桿
/ ) 您可執行相同的操作。
。
搖桿
/ ) 來執行相同的操
,則會播放下一幅影像。
搖桿
。
搖桿
x16 x2
( )
) 或
。
搖
搖
Page 46

40_ English
臺灣
_40
DVD camcorder mode:
Select
Move
editing movie image
page 30
( ( ))
Select fi le
Select All
Move
Move Select
Move Select
DELETING IMAGES
• This function works only in the Play mode.
• You can delete undesired movie images recorded on
the disc.
• This function works only on a DVD-RW disc
(VR mode).
• An image that has been deleted cannot be recovered.
1. Slide the POWER switch downwards to turn on the
power.
Set the Storage mode switch to DISC.
•
2. Press the MODE button to set the Play mode.
• The thumbnail index view appears.
3. Press the MENU button.
4. Move the Joystick right or left to select “Delete.”
5. Move the Joystick up or down to select the desired
option (“Select fi le” or “Select All”), then press the
.
Joystick
• “Select fi le”: Deletes the individual image.
- To delete the individual image, use the
Joystick to select the image to delete.
) indicator is displayed on the selected
The (
images.
Pressing the Joystick toggles between the
thumbnail image being selected for deletion
) indicator appears on image) or not
(the (
) indicator is removed from image).
(the (
Move the Joystick up to select “Execute,”
then press the Joystick
• “Select All”: Deletes all images.
- Move the Joystick up to select “Execute,”
6. The message according to the selected option will
then press the Joystick
appear. Move the Joystick right or left to select “Yes,”
the press the Joystick
• After completion, the selected images will be
deleted.(Accordingly, the deleted fi les also disappear in playlist.
page 45)
.
.
.
DVD
編輯影片影像
刪除影像
• 此功能僅在播放模式中操作。
Video
Delete
Delete
Back
Select
Delete
Delete selected fi les?
Yes No
攝錄放影機模式:
• 您可以刪除在光碟上錄製的不需要的影片影像。
12/12
• 此功能僅在 DVD-RW 光碟(VR 模式)上操作。
• 所刪除的影像將無法恢復。
Execute
向下滑動
1.
• 將
儲存模式
按下
2.
MODE
• 會顯示縮略索引視圖。
按下
3.
MENU
將
4.
5.
7/12
6.
向左或向右移動以選擇「
搖桿
將
向上或向下移動以選擇所需選項(
搖桿
或
file」
•
「Select file」
- 要刪除單個影像,可使用
(
按下
•
「Select All」
- 將
訊息將視所選項目而出現。將
以選擇
「Yes」
• 完成後,將會刪除所選的影像。(刪除的檔案
也會相應地從播放清單中消失。
開關以開啟電源。
POWER
開關設定為
按鈕以設定播放模式。
按鈕。
「Select All」
行刪除。
間進行切換(( ) 指示器會出現在影像
上)或((
將搖桿向上移動以選擇
按下搖桿。
按下
),然後按下
:刪除單個影像。
) 指示器會顯示在所選擇的影像上。
可在所選擇要刪除的縮略圖影像
搖桿
) 指示器不會從影像中移除)。
:刪除所有影像。
向上移動以選擇
搖桿
搖桿。
,然後按下
搖桿
DISC
Delete
「Execute」
「Execute」
搖桿
。
( ( ))
。
第 30 頁
」。
「Select
搖桿。
選擇影像進
搖桿
,然後
,然後
向右或向左移動,
第 45 頁)
Page 47

41_ English
臺灣
_41
DELETING A SECTION OF A MOVIE IMAGE (PARTIAL
page 21
( ( ))
Partial Delete
.”
.”
011
Partial Delete
Play Frame
001
Partial Delete
Play Frame Delete
Video
Edit
Partial Delete
Back
0:00:59/0:02:00
0:00:59/0:02:00
Partial Delete?
Selected part of a fi le
will be deleted.
Yes Cancel Exit
DELETE)
•
• Set the Storage mode switch to DISC. ((VP-
• A movie image can be partially deleted.
1. Press the MENU button, then move the Joystick
2. Press the Joystick to select “Partial Delete.”
3. Use the Joystick to select the desired movie
4. Move the Joystick right to play the movie image.
5. Press the Joystick at the start point you delete.
6. Move the Joystick right to search the end point
7. Press the Joystick to delete the selected part.
8. Move the Joystick left to select “Yes,” then press
This function works only in the Play mode.
DX103(i)/DX104/DX105(i) only) page 30
right or left to select “Edit.”
image, then press the Joystick.
• The selected fi le fi lls the screen with paused.
• To return, use the
then press the Joystick.
•
The start point of deletion will be marked with “
of deletion. Press the Joystick.
•
The end point of deletion will be marked with “
• The message “
of a fi le will be deleted.” will appear.
the Joystick.
• The selected part of the movie image will be
deleted.
• Do not remove the battery pack or the AC
power adaptor while the partial deletion is
in progress. The fi le can be damaged.
• A deleted part of the movie image can not
be recovered.
• Partial deletion is not available when the
recording is less than 3 seconds.
• Partial deletion is not available when the
section or remaining time is less than 3
seconds.
• When partial deletion is executed, related
movie images in the playlist are partially
deleted.
Joystick to select “Back,”
Partial Delete? Selected part
刪除影片影像部分(部分刪除)
• 此功能僅能在播放模式下操作。 第 21 頁
12/12
• 將
DX103(i)/DX104/DX105(i))
• 影片影像可被部分刪除。
按下
1.
以選擇「
按下搖桿以選擇「
2.
. 使用搖桿選擇所需的影片影像,然後按下搖桿。
3
• 所選擇的檔案會暫時填滿螢幕。
• 要返回,使用
將搖桿向右移動以播放影片影像。
4.
. 在您刪除的起始點位置按下搖桿。
5
• 刪除的起始點將以「
將
6.
11/12
Delete
• 刪除的結束點將以「」標明。
按下搖桿以刪除選取的的部分。
7.
• 將會出現訊息「
將
8.
• 將會刪除選定的影片影像部分。
開關設定為
儲存模式
MENU
Edit
。
搖桿
向右移動以搜尋刪除的結束點。按下
搖桿
part of a file will be deleted.」。
向左移動以選擇「
搖桿
• 在進行部分刪除時不要移除電池組或交流電源
適配器。這樣做可能會損壞檔案。
• 刪除的影片影像部分可能無法恢復。
• 當錄製內容不足 3 秒時,不能進行部分刪除。
• 對於不足 3 秒的影片影像片段和剩餘時間不
足 3 秒片段,不能進行部分刪除。
• 在執行部分刪除時,可刪除部分播放清單中的
相關影片影像。
DISC
第 30 頁
」標明。
( ( ))
。
( 僅適用於 (VP-
」。
,然後按下
搖桿
按鈕,然後將搖桿向右或向左移動
」。
Partial Delete
搖桿選擇「Back」
Partial Delete?Selected
」,然後按下搖桿。
Yes
。
Page 48

42_ English
臺灣
_42
DVD camcorder mode:
editing movie image
DVD
攝錄放影機模式:
編輯影片影像
PLAYLIST ( ( ))
What’s a Playlist?
You can create a playlist on the same disc by gathering your
•
favourite scenes from the recorded movie images. When creating
or deleting a playlist, the original movie image will not be erased.
Adding or deleting movie images from a playlist does not affect the
original movie images.
• This function works only on a DVD-RW disc (VR mode).
You should format the DVD-RW to VR mode before recording.
page 50
Example: You have recorded a few scenes on a DVD disc. You
want to save the original recording, but you also want to create a
digest by putting your favourite scenes together.
In this case, you can create a playlist by selecting your favourite
scenes, leaving the originall recording as it is.
12.JAN.2008 30.JAN.2008
Movie image 1 Movie image 2 Movie image 3 Movie image 4 Movie image 5 Movie image 6 Movie image 7
播放清單
什麼是播放清單?
• 透過從錄製的影片影像中搜集您最愛的場景,您可以在相同的
• 此功能僅在 DVD-RW 光碟(VR 模式)上操作。
在錄製之前,您應將 DVD-RW 格式化為 VR 模式。
例如:
在此情況下,您可以透過選擇您最愛的場景來建立播放清單,
(
光碟上建立播放清單。在建立或刪除播放清單時,將無法刪除
原始的影片影像。從播放清單中新增或刪除影片影像不會影響
原始影片影像。
您已在 DVD 光碟上錄製了幾個場景。您想儲存原始錄製,
但又想透過將您最愛的場景放在一起來建立一個匯集。
而使原始錄製保持原樣。
( ))
第 50 頁
10:00 10:30 11:30 14:00 16:10 18:20 20:00
Playlist
Page 49

43_ English
臺灣
_43
Creating a playlist
• This function works only in Play mode.
• Set the Storage mode switch to DISC. (VP-
DX103(i)/DX104/DX105(i) only)
• You can create a playlist by gathering your
favourites from the recorded movie images.
• You can create only one playlist.
1. Move the Joystick to select the playlist(
the thumbnail index view.
• Thumbnail index view of the playlist appears.
2. Press the MENU button, then move the Joystick
right or left to select “Edit.”
3. Move the Joystick up or down to select “Add,” then
press the Joystick.
4. Use the Joystick to select the movie images to add
to the playlist.
• The (
• Pressing the Joystick toggles between the
• To return, use the Joystick to select “Back,”
5. Use the Joystick to select “Execute,” then press
the Joystick
• The message “Add selected fi les to Playlist?”
6. Move the Joystick right or left to select “Yes,” then
press the Joystick
• The selected fi les are added to the playlist.
• You can play a playlist in the same manner as you play a
) indicator is displayed on the selected
movie images.
movie thumbnail image being selected for
creating a playlist (the (
on image) or not (the (
from image).
then press the Joystick
.
appears.
.
movie image.
• If free space available on the disc is insuffi cient, delete
unnecessary movie images.
• Up to 64 movie images can be included in the playlist.
• When playing back the playlist, the counter refers to total
counter of the playlist.
• To return to the thumbnail index view of movie images, use
the Joystick to select the play(
page 38
page 30
) tab in
) indicator appears
) indicator is removed
.
) tab.
Empty
Move
Playlist
Edit
Add
Arrange
Delete
Partial Delete
Add
Back
Move Select
Add
Add selected fi les to Playlist?
Yes No
Move Select
建立播放清單
• 此功能僅可在播放模式下操作。
• 將
(VP-DX103(i)/DX104/DX105(i))
• 透過從錄製的影片影像中搜集您的最愛,您可以建
立播放清單。
• 您只能建立一份播放清單。
移動搖桿以選擇縮圖索引視圖中的播放清單 ( )
1.
標籤。
• 播放清單的縮圖索引視圖會出現。
按下
2.
擇
向上或向下移動
3.
使用
4.
• (
7/12
Execute
• 按下
• 要返回,可使用
使用
5.
• 將會出現「
向右或向左移動
6.
• 所選擇的檔案會被新增至播放清單中。
• 您可以與播放影片影像相同的方式播放播放
• 如果光碟上的可用空間不足,可刪除不必要的影片影像。
• 播放清單中可包括多達 64 張影片影像。
• 在播放播放清單時,計時器指播放清單的總計時。
• 要返回至影片影像的縮圖索引視圖,可使用搖桿選擇播放
( ) 標籤。
開關設定為
儲存模式
按鈕,然後向右或向左移動搖桿以選
MENU
。
「Edit」
搖桿
選擇影片影像以新增至播放清單。
搖桿
DISC
以選擇
。( 僅適用於
第 30 頁
「Add」,
然後按下搖桿。
) 指示器會顯示在所選的影片影像上。
可在所選擇要建立播放清單的縮略
搖桿
圖影像間進行切換(( ) 指示器會出現在
影像上)或((
) 指示器不會從影像中移
除)。
。
搖桿
搖桿選擇「Execute」
搖桿
選擇「
,然後按下
Back
」,然後按下
搖桿。
Add selected files to Playlist?
訊息。
「Yes」
,然後按下
清單。
第 38 頁
搖桿
以選擇
」
搖桿。
Page 50

44_ English
臺灣
_44
DVD camcorder mode:
editing movie image
DVD
攝錄放影機模式:
編輯影片影像
Arranging the order of movie images within a playlist
• This function works only in Play mode.
• Set the
• You can arrange movie images within a playlist by
1. Move the Joystick to select the playlist(
2. Press the MENU button, then move the Joystick
3. Move the Joystick up or down to select “Arrange,”
4. Use the Joystick to select the movie images to
5. Move the Joystick to select the desired position,
6. To execute, use the Joystick to select “Execute,”
7. Move the Joystick right or left to select “Yes,” then press the
Storage mode switch to DISC.
(VP-DX103(i)/DX104/DX105(i) only) page 30
moving them to desired position.
the thumbnail index view.
• Thumbnail index view of the playlist appears.
right or left to select “Edit.”
then press the Joystick.
arrange.
• The (
• Pressing the
• A bar will also appear next to the selected
then press the Joystick
• The selected fi le is arranged in the desired
• To return, use the
then press the Joystick
• The message “Arrange selected a fi le to this
Joystick
• The selected fi les are arranged to the selected position.
) indicator is displayed on the selected
movie image.
movie thumbnail image being selected for
arrangement within the (the ( ) indicator
appears on image) or not (the ( ) indicator is
removed from image).
movie image.
position.
then press the Joystick.
order?” appears.
Joystick toggles between the
.
Joystick to select “Back,”
.
.
) tab in
Add
Arrange
Delete
Partial Delete
Move Select
Move Select
在播放清單內排定影片影像的順序
Playlist
Edit
Arrange
Back
Arrange
Arrange selected a fi le
to this order?
Yes No
• 此功能僅可在播放模式下操作。
12/12
• 將
VP-DX103(i)/DX104/DX105(i))第 30 頁
• 可在播放清單中將影片影像移至所需位置來排列
這些影片影像。
移動
1.
( ) 標籤。
• 播放清單的縮圖索引視圖會出現。
按下
2.
選擇
向上或向下移動
3.
下搖桿。
使用
4.
• (
• 按下搖桿會在播放清單內選擇排列的影片縮
8/12
Execute
• 還將會在所選擇的影片影像旁邊出現列。
移動
5.
• 選擇的檔案將會在所需的位置進行排列。
• 要返回,可使用搖桿選擇
要執行,可使用
6.
搖桿。
• 將會顯示訊息
向右或向左移動搖桿以選擇
7.
• 選擇的文件會被排列到所需的位置。
搖桿
開關設定為
儲存模式
以選擇縮圖索引視圖中的播放清單
搖桿
按鈕,然後向右或向左移動搖桿以
MENU
。
「Edit」
選擇影片影像以進行排列。
搖桿
) 指示器會顯示在所選的影片影像上。
略圖影像間進行切換(( ) 指示器會出現
在影像上)或(( ) 指示器不會從影像中
移除)。
以選擇所需的位置,然後按下搖桿。
搖桿
下搖桿。
this order?」。
。
DISC
以選擇
搖桿
搖桿選擇「Execute」
「Arrange selected a file to
。( 僅適用於
「Arrange」
「Back」
,然後按下
,然後按下
「Yes」
,然後按
,然後按
Page 51

45_ English
臺灣
_45
Deleting movie images from a playlist
• This function works only in Play mode.
• Set the Storage mode switch to DISC.
(VP-DX103(i)/DX104/DX105(i) only) page 30
• You can delete undesired movie images within a
playlist.
1. Move the Joystick to select the playlist(
in the thumbnail index view.
• Thumbnail index view of the playlist
appears.
2. Press the MENU button, then move the
Joystick right or left to select “Edit.”
3. Move the Joystick up or down to select “Delete,”
then press the Joystick
4. Use the Joystick to select the movie images to
delete.
• The (
) indicator is displayed on the
selected movie image.
.
• Pressing the Joystick toggles between the
movie thumbnail image being selected for
deleting from the playlist (the (
appears on image) or not (the (
is removed from image).
• To return, use the Joystick to select “Back,”
then press the Joystick
5. Use the Joystick to select “Execute,” then
press the Joystick
• The message “Delete fi les from playlist?
.
.
Original fi le not deleted.” appears.
6. Move the Joystick right or left to select “Yes,” then press the
Joystick
.
• The selected fi les are deleted.
) tab
) indicator
) indicator
Playlist
Edit
Add
Arrange
Delete
Partial Delete
Delete
Back
Move Select
Delete
Delete fi les from playlist?
Original fi le not deleted.
Yes No
Move Select
從播放清單中刪除影片影像
12/12
• 此功能僅可在播放模式下操作。
• 將
VP-DX103(i)/DX104/DX105(i))
• 您可以在播放清單內刪除不需要的影片影像。
移動
1.
開關設定為
儲存模式
以選擇縮圖索引視圖中的播放清單
搖桿
( ) 標籤。
• 播放清單的縮圖索引視圖會出現。
按下
2.
以選擇
向上或向下移動
3.
按鈕,然後向右或向左移動
MENU
。
「Edit」
搖桿
以選擇
按下搖桿。
Execute
使用
4.
7/12
使用
5.
6.
選擇要刪除的影片影像。
搖桿
( ) 指示器會顯示在所選的影片影像上。
•
按下搖桿會在選擇從播放清單中刪除的影片
•
縮略圖影像間進行切換(( ) 指示器會出
現在影像上)或(( ) 指示器不會從影像
中移除)。
要返回,可使用搖桿選擇
•
下
搖桿。
選擇「
搖桿
將會出現
•
playlist?Original file not deleted.」
向右或向左移動
。
搖
桿
• 選取的檔案將被刪除。
Execute
「Delete files from
以選擇「
搖
桿
。( 僅適用於
DISC
「Delete」
「Back」
」,然後按下
Yes
第 30 頁
搖桿
,然後
,然後按
搖桿
訊息。
」,然後按下
。
Page 52

46_ English
臺灣
_46
DVD camcorder mode:
editing movie image
Deleting a section of movie image within a playlist
• This function works only in Play mode.
• Set the
• You can delete a section of a movie image within
1. Press the MENU button, then move the Joystick
2. Press the Joystick to select “Partial Delete.”
3. Move the Joystick to select the desired movie
4. Move the Joystick right to play the movie image.
5. Press the Joystick at the start point you delete.
6. Use the Joystick to search the end point of
7. Press the Joystick to delete the selected part.
8. Move the Joystick left to select “Yes,” then press
Storage mode switch to DISC.
(VP-DX103(i)/DX104/DX105(i) only) page 30
a playlist.
right or left to select “Edit.”
image, then press the Joystick.
• The selected fi le fi lls the screen with paused.
•
The start point of deletion will be marked with “
deletion. Press the Joystick.
• The end point of deletion will be marked with “
• The message “
of a fi le will be deleted.” will appear.
the Joystick.
• The selected part of the movie image will be
deleted.
• Do not remove the battery pack or the AC power
adaptor while the partial deletion is in progress.
The fi le can be damaged.
• A deleted part of the movie image can not be
recovered.
• Partial deletion is not available when the recording
time is less than 3 seconds.
• Partial deletion is not available when the section
or remaining time is less than 3 seconds.
Partial Delete? Selected part
Add
Arrange
Delete
Partial Delete
.”
.”
011
Partial Delete
Play Frame Delete
001
Partial Delete
Yes Cancel Exit
Play Frame Delete
Playlist
Edit
Partial Delete
Back
0:00:59/0:02:00
0:00:59
Partial Delete?
Selected part of a fi le
will be deleted.
DVD
攝錄放影機模式:
編輯影片影像
刪除播放清單中的影片影像部分
12/12
• 此功能僅可在播放模式下操作。
• 將
VP-DX103(i)/DX104/DX105(i))第 30 頁
• 您可以刪除播放清單中的影片影像部分。
按下
1.
選擇
按下搖桿以選擇
2.
移動搖桿以選擇所需的影片影像,然後按下搖桿。
3.
• 所選擇的檔案會暫時填滿螢幕。
向右移動搖桿以播放影片影像。
4.
在您想刪除的起始點位置按下搖桿。
5.
• 刪除的起始點將以「
使用搖桿選擇刪除的結束點。按下搖桿。
6.
11/12
• 刪除的結束點將以「
按下搖桿以刪除選取的部分。
7.
• 將會出現訊息
向右或向左移動搖桿以選擇
8.
搖桿
•
開關設定為
儲存模式
按鈕,然後向右或向左移動搖桿以
MENU
。
「Edit」
part of a file will be deleted.」
。
將會刪除選定的影片影像部分。
• 在進行部分刪除時不要移除電池組或交流電
源適配器。這樣做可能會損壞檔案。
• 刪除的影片影像部分可能無法恢復。
• 當錄製內容的時間不足 3 秒時,不能進行
部分刪除。
• 對於不足 3 秒的影片影像片段和剩餘時間
不足 3 秒片段,不能進行部分刪除。
。( 僅適用於
DISC
」標明。
」標明。
。
「Partial Delete」
「Partial Delete?Selected
。
,然後按下
「Yes」
Page 53

47_ English
臺灣
_47
-R
+R DL
DVD camcorder mode:
-R
+R DL
disc manage
DISC FINALISE
• This function works only in the Record mode page 21
• To play the contents of a DVD-RW/-R/+R DL on other DVD players/
recorders/drives, you must fi nalise the disc.When fi nalising, there should be
enough power in the batteries. If the AC power adaptor is to be used, make
sure that the jack is properly connected. A power cut during fi nalising may
disrupt the disc from replaying.
1. Slide the POWER switch downwards to turn on the power. page 21
2. Set the Storage mode switch to DISC.
(VP-DX103(i)/DX104/DX105(i) only) page 30
3. Press the MENU button, then move the Joystick right or
left to select “Disc Manage.”
4. Move the Joystick up or down to select “Disc Finalise,”
then press the Joystick.
• You can simply fi nalise the disc using the
button on the DVD camcorder.
5. The message “DVD needs to fi nalise for other DVD
player or recorder to be played. But no more recording
is allowed after fi nalising.” will appear. Move the Joystick
right or left to select “Next,” then press the Joystick
• Disc information will appear.
6. Move the Joystick right or left to select “Execute,” then
press the Joystick.
• To exit, use the
the Joystick.
7. Move the Joystick right or left to select “Yes,” then press
the Joystick.
• The message showing that the disc is being fi nalised
will appear.
During fi nalising, do not cause impact or vibration
to your DVD camcorder. This could cause a
malfunction.
WARNING
• The fi nalise function is not available at the battery
• Once fi nalised, the movie images or a playlist in the
• Time required for fi nalising may differ by disc type.
• Refer to page 8 for fi nalised disc compatibility.
• Playback is not guaranteed in all DVD players/
• Once the DVD-R/+R DL disc is fi nalised, you cannot
• You may play back DVD+RW discs on other devices
• You cannot make an additional recording on a DVD-
Joystick to select “Exit,” the press
level under (
disc cannot be deleted or edited.
recorders/drives. For compatibility details, refer to
your DVD players/recorders/drives owner’s manual.
re-record it in the DVD camcorder.
without fi nalising them.
RW disc without unfi nalising it after it is fi nalised.
).
FINALIZE
.
( (
STBY 0:00:00 [30 min]
Disc Manage
Disc Finalise
Disc Unfi nalise
Disc Format
Disc Info
Finalise
Back
DVD needs to fi nalise for other DVD
player or recorder to be played.
But no more recording is allowed after
fi nalising.
Finalise
Execute Rename
Disc Name 01/JAN/2008
Disc Type DVD-RW [Unfi nalised]
Disc Format VR Mode
Used 0:10:00
Free 0:20:00 [Fine]
Now Finalising...
Avoid Shock & Vibration
DVD
攝錄放影機模式:
光碟管理
))
光碟終結
• 此功能僅能在錄製模式下操作。 第 21 頁
• 要在其他 DVD 播放機 / 攝錄放影機 / 磁碟機上播放 DVD-RW/-R/+R DL 的內容,
1.
您必須終結此光碟。在終結時,電池應該具有足夠的電源。如果要使用交流電源
適配器,請確保插孔連接正確。在終結時斷開電源可能會中斷光碟的重新播放。
向下滑動
Next
Exit
開關以開啟電源。
POWER
2. 將儲存模式
( 僅適用於 VP-DX103(i)/DX104/DX105(i))
按下
3.
MENU
」。
Manage
向上或向下移動搖桿以選擇「
4.
您僅需使用 DVD 攝錄放影機上的
•
結此光碟。
將會出現訊息「
5.
player or recorder to be played.
is allowed after finalising.」
「
」,然後按
Next
• 將顯示光碟資訊
向右或向左移動搖桿以選擇「
6.
• 要結束,可使用
向右或向左移動
7.
•
表明正在終結光碟的訊息將會出現。
在終結期間,不可撞擊或振動您的 DVD 攝錄放影機。否則可能
會使其發生故障。
警告
• 此結終功能在電池電量低於 ( ) 時不可用。
• 終結後,無法刪除或編輯光碟中的影片影像或播放清單。
• 終結所需的時間可能會因光碟類型而異。
• 請參閱第 8 頁以獲得有關終結光碟相容性的資訊。
• 不能保證在所有 DVD 播放機 / 攝錄放影機 / 磁碟機
中都能播放。有關相容性的詳細資訊,請參閱您的
DVD
• 終結 DVD-R/+R DL 光碟後,您無法在 DVD 攝錄放影機中
重新錄製。
• 無需終結便可在其他裝置上播放 DVD+RW 光碟。
• 終結後,未經取消終結便無法在 DVD-RW 光碟上進行其他
錄製。
第 21 頁
開關設定為
DISC
按鈕,然後向右或向左移動搖桿以選擇「
DVD needs to fi nalise for other DVD
。
搖桿
。
搖桿
以選擇
搖桿
播放機 / 攝錄放影機 / 磁碟機使用者手冊。
( (
。
Disc Finalise
FINALIZE
But no more recording
。向右或向左移動搖桿以選擇
」,然後按下
Execute
選擇
,然後按下
「Exit」
,然後按下
「Yes」
第 30 頁
」,然後按下
按鈕來終
搖桿
搖桿
搖桿
。
Disc
搖桿
。
))
。
。
Page 54

48_ English
臺灣
_48
DVD camcorder mode:
使用
可以透過 DVD 執行媒體(DVD 光碟機)在電腦上播放 DVD。
1.
2.
在
要播放光碟
您可以在 DVD 播放機 / 攝錄放影機上播放終結的 DVD-R/-RW
不能保證在所有 DVD 播放機 / 攝錄放影機中播放。有關相容
性的詳細資訊,請參閱您的 DVD 播放機 / 攝錄放影機使用者
手冊。
大多數 DVD 播放機 / 攝錄放影機都可以播放尚未終結的
DVD+RW 光碟。
請參閱第 8 頁以獲得有關終結光碟相容性的資訊。
1.
2.
可自動開始播放,或按下「播放」按鈕以開始播放。
有關播放 DVD 光碟的更多詳細資訊,請參閱 DVD 播放機
要播放在 VR 模式下錄製的 DVD-RW 光碟:
在 VR 模式下終結的 DVD-RW 可以在支援它的 DVD 攝錄放影
機中播放。
您可以在 DVD 播放機 / 攝錄放影機上播放終結的 DVD-R/-RW
disc manage
DVD
攝錄放影機模式:
光碟管理
Playing back on a PC with a DVD drive
The DVD disc can be played on a PC with a DVD-running
media (DVD drive).
1. Turn on your PC.
2. Insert a fi nalised disc into the DVD drive of the PC.
• DVD playback application software starts and the
disc will play.
• If DVD playback application does not start
automatically, run the application by navigating
through the start menu.
Use a DVD drive compatible with 3 1/2 inch (8cm) disc.
•
• The recorded fi les on DVD may not play in
‘Windows Media Player’.
• Microsoft, Windows and Windows logo are
registered trademarks of Microsoft Corporation
incorporated in the United States and/or other
countries.
• Video and audio may pause or skip when you play
back a DVD disc on your PC. If this occurs, copy
the data into your hard disk drive.
Playing back a fi nalised disc on a DVD player /
recorder
To playback a disc
You can playback fi nalised DVD-R/-RW (Video mode)/+R
DL discs on DVD players/recorders.
Playback is not guaranteed in all DVD players/recorders.
For compatibility details, refer to your DVD player/recorder
owner’s manual.
Most DVD players/recorders can play back a DVD+RW
disc that has not been fi nalised.
• Refer to the page 8 for fi nalised disc compatibility.
1. Turn on the DVD player/recorder.
2. Insert the fi nalised DVD disc into the tray of a DVD
player/recorder.
It may start playing automatically or press the PLAY
button to start.
For further details on playing back DVD discs, refer to
the DVD player/recorder user’s manual.
To playback DVD-RW discs recorded in VR mode:
A fi nalised DVD-RW in VR mode can be played back in a
DVD recorder that supports it.
DVD
DVD
+R DL
-R
➟ ➟
Finalise
PC
DVD
DVD
-R
+R DL
➟ ➟
Finalise
DVD player/recorder
使用
DVD
可以透過 DVD 執行媒體(DVD 光碟機)在電腦上播放 DVD。
-RW
1.
將終結的光碟插入電腦的 DVD 光碟機中。
2.
在
要播放光碟
您可以在 DVD 播放機 / 攝錄放影機上播放終結的 DVD-R/-RW
(視訊模式)/+R DL 光碟。
DVD
不能保證在所有 DVD 播放機 / 攝錄放影機中播放。有關相容
-RW
性的詳細資訊,請參閱您的 DVD 播放機 / 攝錄放影機使用者
手冊。
大多數 DVD 播放機 / 攝錄放影機都可以播放尚未終結的
DVD+RW 光碟。
• 請參閱第 8 頁以獲得有關終結光碟相容性的資訊。
開啟 DVD 播放機 / 錄製機。
1.
將終結的 DVD 光碟插入 DVD 播放機 / 攝錄放影機的托
2.
可自動開始播放,或按下「播放」按鈕以開始播放。
有關播放 DVD 光碟的更多詳細資訊,請參閱 DVD 播放機
光碟機在電腦上播放
DVD
開啟電腦。
• DVD 播放應用程式軟體開啟,同時光碟將會播放。
• 如果 DVD 播放應用程式無法自動開啟,可透過開始
選單執行應用程式。
• 使用與 3 1/2 英吋(8 公分)光碟相容的 DVD
光碟機。
• 在 DVD 上錄製的檔案可能無法在「
Media Player
•
Microsoft、Windows
Corporation
• 在電腦上播放 DVD 光碟時,可能會暫停會跳過
視訊和音訊。如果出現此種情況,可將資訊複製
到您的硬碟機中。
播放機 / 攝錄放影機上播放終結的光碟
DVD
架中。
/ 攝錄放影機使用者手冊。
」中播放。
和
在美國和 / 或其他國家的註冊商標。
Windows
要播放在 VR 模式下錄製的 DVD-RW 光碟:
在 VR 模式下終結的 DVD-RW 可以在支援它的 DVD 攝錄放影
機中播放。
Windows
標誌是
Microsoft
Page 55

49_ English
臺灣
_49
DISC UNFINALISE
Now Unfi nalising...Now Unfi nalising...
Avoid Shock & VibrationAvoid Shock & Vibration
• This function works only in the Record mode.
• If a DVD-RW disc had been fi nalised in the VR mode or Video
mode, you can unfi nalise the disc for further recording. When
unfi nalising, there should be enough power in the batteries. If
the AC power adaptor is to be used, make sure that the jack is
properly connected.
1. Slide the POWER switch downwards to turn on
the power.
2. Set the Storage mode switch to DISC. (VP-
DX103(i)/DX104/DX105(i) only)
3. Press the MENU button, then move the
Joystick right or left to select “Disc Manage.”
4. Move the Joystick up or down to select “Disc
Unfi nalise,” then press the Joystick
• You can simply unfi nalise the disc using the
• Disc information will appear.
5. Move the Joystick to select “Execute,” then
press the Joystick
• To exit, use the Joystick to select “Back,”
6. The message “Make the disc recordable?” will
appear. Move the Joystick right or left to select
“Yes,” then press the Joystick.
• The message showing that the disc is being
• The unfi nalise function is not available at
WARNING
• During unfi nalising, do not cause impact
page 21
page 30
.
FINALIZE button on the DVD camcorder.
.
the press the Joystick
unfi nalised will appear, and the disc will be
unfi nalised.
the battery level under (
or vibration to your DVD camcorder.
This could cause a malfunction.
.
).
( ( ))
page 21
STBY 0:00:00 [30 min]
Disc Manage
Disc Finalise
Disc Unfi nalise
Disc Format
Disc Info
Unfi nalise
Back
Disc Name JAN/01/2008
Disc Type DVD-RW [Finalised]
Disc Format VR Mode
Used 0:10:00
Free 0:20:00 [Fine]
Now Unfi nalising...
Avoid Shock & Vibration
光碟取消終結
(
( ))
• 此功能僅能在錄製模式下操作。 第 21 頁
• 如果已在 VR 模式或視訊模式下終結 DVD-RW 光碟,您可以取
消終結光碟以進一步錄製。在取消終結時,電池中應該具有足
夠的電量。如果要使用交流電源適配器,請確保插孔連接正確。
向下
1.
2.
將
第 21 頁
儲存模式
滑動
開關以開啟電源。
POWER
開關設定為
。(僅適用於 VP-
DISC
DX103(i)/DX104/DX105(i))第 30 頁
Execute
按下
3.
選擇
向上或向下移動
4.
然後按下搖桿。
• 您僅需使用 DVD 攝錄放影機上的
按鈕,然後向右或向左移動搖桿以
MENU
「Disc Manage」
搖桿
。
以選擇
「Disc Unfinalise」
FINALIZE
按鈕來取消終結此光碟。
• 將顯示光碟資訊。
移動
5.
以選擇
搖桿
「Execute」
• 要結束,可使用
,然後按下搖桿。
搖桿選擇「Back」
,然後按
下搖桿。
將顯示訊息
6.
「Make the disc recordable?」
右或向左移動搖桿以選擇
「Yes」
,然後按下
。向
搖桿
• 表明光碟取消終結光碟的訊息將會出現,並
且將會取消終結光碟。
• 取消最終化功能在電池電量低於 ( ) 級別時不可用。
• 在取消終結期間,不可撞擊或振動您的 DVD 攝錄放影機。
警告
否則可能會使其發生故障。
,
。
Page 56

50_ English
臺灣
_50
DVD camcorder mode:
+RW
+RW
disc manage
DVD
攝錄放影機模式:
光碟管理
DISC FORMAT
• This function works only in the Record mode.
• You can format a recorded disc for re-use. By formatting, all
existing data will be deleted.
1. Slide the POWER switch downwards to turn on
the power.
2. Set the Storage mode switch to DISC. (VP-
DX103(i)/DX104/DX105(i) only)
3. Press the MENU button, then move the
Joystick right or left to select “Disc Manage.”
4. Move the Joystick up or down to select “Disc
Format,” then press the Joystick
• When a DVD-RW disc is inserted, move the
• If a DVD+RW disc is inserted, move the
• The Format function is not available at
• Formatting will delete all the recorded
• Do not turn the power off in the middle of
• Be sure to use the AC power adaptor
• See pages 102~103 for more details on
page 21
page 30
.
Joystick right or left to select “Video” or “VR”
according to how you want to use the disc,
then press the Joystick
Joystick to select “Yes,” then press the
Joystick
.
the battery level under (
contents on a disc. Be careful not to
delete data by mistake.
the formatting. The data recorded on a
disc may be damaged.
when formatting a disc so that the DVD
camcorder does not turn off midway.
.
).
the disc format type.
( (
page 21
))
光碟格式
• 此功能僅能在錄製模式下操作。 第 21 頁
• 您可以格式化錄製過的光碟以重新使用。如果格式化,會刪除所
STBY 0:00:00 [30 min]
Disc Manage
Disc Finalise
Disc Unfi nalise
Disc Format
Disc Info
Format the disc?
Select the disc mode.
Video
VR Cancel
<DVD-RW disc>
Format the disc?
All Files will be deleted.
Yes No
<DVD+RW disc>
有的現有資料。
向下滑動
1.
將
2.
按下
3.
向上或向下移動
4.
( (
DX103(i)/DX104/DX105(i))第 30 頁
選擇
後按下搖桿。
• 插入
•
開關設定為
儲存模式
按鈕,然後向右或向左移動搖桿以
MENU
「Disc Manage」
的方式向右或向左移動搖桿以選擇「
或「
如果插入 DVD+RW 光碟,移動搖桿以選擇
「
• 格式化功能在電池電量低於 ( ) 級別時
• 格式化將刪除光碟上的所有錄製內容。注
• 切勿在格式化期間關閉電源。錄製在光碟
• 一定要在格式化光碟時使用交流電源適配
• 請參閱第
搖桿
DVD-RW
」,然後按下
VR
」,然後按下搖桿。
Yes
不可用。
意不要錯誤地刪除資料。
上的資料可能會損壞。
器,以便
DVD
閉的情況。
102~103
式化類型的詳細資訊。
。(僅適用於 VP-
DISC
。
以選擇
「Disc Format」
光碟時,根據您想使用光碟
。
搖桿
攝錄放影機不會出現中途關
頁以獲得關於光碟格
開關以開啟電源。
POWER
第 21 頁
,然
Video
))
」
Page 57

51_ English
臺灣
_51
DISC INFORMATION
+RW-R+R DL
+RW-R+R DL
• This function works only in the DVD camcorder record mode.
page 21
It shows you disc information such as the disc name, disc
•
type, disc format, etc.
NOTICE : Make sure that you insert a disc.
1. Slide the POWER switch downwards to turn on
2. Set the Storage mode switch to DISC.
3. Press the MENU button, then move the
4. Move the Joystick up or down to select “Disc
To rename the disc
1. Move the Joystick right or left to select
2. Use the Joystick to move the cursor to “Delete,”
3. Use the Joystick to select the desired
4. Use the Joystick to select “Done,” then press
page 30
the power.
page 21
(VP-DX103(i)/DX104/DX105(i) only)
Joystick right or left to select “Disc Manage.”
Info,” then press the Joystick.
• “Disc Name,” “Disc Type,” “Disc Format,”
“Used” and “Free” will be displayed.
• To return, move the Joystick right or left to
select “Back,” then press the Joystick
“Rename,” then press the Joystick.
• Disc Name screen will appear.
then press the Joystick to delete the existing
disc name.
characters and items, then press the Joystick
the Joystick
• The “Disc Name” will be changed.
• To return move the Joystick right or left to
.
select “Back,” then press the Joystick
• Disc information may appear depending on the disc
type.
( (
page 30
Disc Finalise
Disc Unfi nalise
Disc Format
Disc Info
Disc Info
Disc Name 01/JAN/2008
Disc Type DVD-RW [Unfi nalised]
Disc Format VR Mode
Used 0:10:00
Free 0:20:00 [Fine]
.
Disc Rename
Disc Name 02/JAN/2008_
A B C D E
F G H I J
K L M N O
P Q R S T
U V W X Y
Z
Disc Info
.
Disc Name 02/JAN/2008
Disc Type DVD-RW [Unfi nalised]
Disc Format VR Mode
Used 0:10:00
Free 0:20:00 [Fine]
.
STBY 0:00:00 [30 min]
Disc Manage
Back
Back
Back
))
光碟資訊
( (
• 此功能僅在 DVD 攝錄放影機錄製模式下操作。第 21 頁
• 它會顯示光碟資訊,如光碟名稱、光碟類型、光碟格式等。
:確保插入光碟。第 30 頁
注意
Delete Space
a b c d e
f g h i j
k l m n o
p q r s t
u v w x y
z
Rename
Done
1 2 3 4 5
6 7 8 9 0
+ - * / ^
! ? ~ , .
: ; ” ( )
@ # $ % &
Rename
向下滑動
1.
第 21 頁
2. 將儲存模式
VP-DX103(i)/DX104/DX105(i))第 30 頁
按下
3.
4.
MENU
以選擇「
桿
向上或向下移動搖桿以選擇「
後按下
搖桿。
• “
Disc Name
Format
• 要返回,可向右或向左移動搖桿以選擇
「
Back
要重新命名此光碟
向右或向左移動搖桿以選擇
1.
後按下搖桿。
將會出現光碟片名稱。
•
使用搖桿將游標移至
2.
以刪除現有的光碟名稱。
桿
使用搖桿選擇所需的字元和項目,然後按下
3.
。
搖桿
使用搖桿選擇
4.
「
•
Disc Name
要返回,可向右或向左移動搖桿以選擇
•
「
Back
開關以開啟電源。
POWER
開關設定為
DISC
按鈕,然後向右或向左移動
Disc Manage
」、「
」,然
」。
」、「
Disc Type
」和「
Used
後按下搖桿。
Free
「Rename」
「Delete」
,然後按下搖桿。
「Done」
」將會變更。
」,然後按下
搖桿
。
• 光碟資訊視類型出現。
。(僅適用於
」,然
Disc Info
」、「
Disc
」將會顯示。
,然
,然後按下
))
搖
搖
Page 58

52_ English
臺灣
_52
digital camera mode
(VP-
DX103(i)/DX104/DX105(i) only)
數位相機模式
(僅適用於
VP-DX103(i)/DX104/DX105(i)
)
INSERTING AND EJECTING A MEMORY CARD
• This DVD camcorder has
multi card-slot for access
to SD (Secure Digital) and
MMC (MultiMediaCard)
cards.
- Some cards are
not compatible
depending on
the memory card
manufacturer and
memory card type.
Inserting a memory card
1. Open the memory card
cover.
Insert the memory card into
2.
the slot until it softly clicks.
•
Make sure that the
label-pasting portion
is facing up and the
camcorder is placed
as shown in the fi gure.
3. Close the memory card
cover.
Ejecting a memory card
1. Open the memory card
cover.
2. Slightly push the memory card inwards to pop it out.
3. Pull the memory card out of the slot and close the memory card cover.
Selecting a suitable memory card
• You can use SD and MMC cards.
- RS MMC or Mini SD should be inserted by using an Adapter (not
supplied).
• On this DVD camcorder, you can use memory cards of the
following capacity: Up to 2GB
• For movie recording, use a memory card that supports faster write
speed (at least 1.25 MB/s).
插入和彈出記憶卡
此 DVD 攝錄放影機具
•
有多個卡插槽,以存取
SD(安全數位)和 MMC
label-pasting portion
輕輕地將記憶卡向內推使其彈出。
2.
從插槽中拿出記憶卡,然後關閉記憶卡蓋。
3.
(
MultiMediaCard
- 某些卡可能因記憶
卡製造商和記憶卡
類型而不相容。
插入記憶卡
打開記憶卡蓋。
1.
將記憶卡插入插槽中,
2.
直到輕輕卡入到位。
確保標籤粘貼部分
•
面朝上,並按如圖
所示方法放置攝錄
放影機。
關閉記憶卡蓋。
3.
退出記憶卡
打開記憶卡蓋。
1.
) 卡。
選擇適當的記憶卡
您可以使用 SD 和 MMC 卡。
•
- RS MMC 或 Mini SD 應通過使用適配器(未提供)來插入。
在此 DVD 攝錄放影機上,您可以使用以下容量的記憶卡:高達 2GB
•
對於影片錄製,可使用支援更快寫入速度(至少 1.25 MB/s)的記憶卡。
•
Page 59

53_ English
臺灣
_53
SD memory card
SD memory card supports a mechanical write-
•
protection switch. Setting the switch prevents
accidental erasure of fi les recorded on the card.
To enable writing, move the switch up to the
direction of terminals. To set write protection,
move the switch down.
MMC(Multi Media Card)
• In the case of MMC, they have no protection tab,
so please use the protect function in the menu.
page 60
Common cautions for memory card
• Damaged data may not be recovered. It is
recommended you back-up important recordings
separately on your PC’s hard disk.
• Turning the power off or removing a memory card during operation
such as formatting, deleting, recording, and playback may cause
the data loss.
• After you modify the name of a fi le or folder stored in the memory
card using your PC, your camcorder may not recognize the
modifi ed fi le
.
<MMC>
<SD memory card>
<Usable memory cards>
Handling a memory card
• It is recommended that you switch off before inserting or removing
the memory card to avoid data loss.
• It is not guaranteed that you can use a memory card formatted
by other devices. Be sure to format your memory card using this
camcorder.
• Memory cards need to be formatted on this camcorder before use.
• If you cannot use a memory card that has been previously used
with another device, format it on your DVD camcorder. Note that
formatting erases all information on the memory card.
• A memory card has a certain life span. If you cannot record new
data, you have to purchase a new memory card.
• Do not bend, drop, or cause a strong impact to your memory card.
• Do not use or store in a place that has a high temperature and
humidity or a dusty environment.
• Do not place foreign substances on the memory card terminals.
Use a soft dry cloth to clean the terminals if required.
• Do not put any additional labels on the memory card.
• Be careful to keep the memory card out of the reach of children
who might swallow it.
SD 記憶卡
SD 記憶卡支援機械寫入保護開關。設定此開關以
•
防止意外刪除儲存在 SD 記憶卡上的資料。若要
寫入,將開關朝終端方向移動。若要設定寫入保護,
Terminals
向下移動開關。
MMC(多媒體卡)
對於 MMC,由於沒有保護標籤,因此請使用此選
•
Protection
tab
在您使用電腦修改儲存在記憶卡中的檔案或資料夾名稱後,攝錄放
•
影機可能無法識別所修改的檔案。
單中的保護功能。
記憶卡的常見注意事項
損毀的資料可能無法恢復。建議在電腦硬碟上單
•
獨備份重要資料。
在操作期間,如格式化、刪除、錄製及播放,關
•
閉電源或取出記憶卡可能會損毀資料。
第 60 頁
處理記憶卡
插入或取出記憶卡之前,建議您關閉以免資料遺失。
•
不保證您可以使用在其他裝置上格式化的記憶卡。一定要使用此攝
•
錄放影機格式化您的記憶卡。
在使用前,需要在此攝錄放影機上格式化記憶卡。
•
如果無法使用已用於其他裝置的記憶卡,可在您的 DVD 攝錄放影機
•
上將其格式化。注意,格式化會刪除記憶卡上的所有資訊。
記憶卡具有特定的使用壽命。如果您無法記錄新資料,則必須購買
•
新記憶卡。
切勿彎曲、掉落或強力衝撞記憶卡。
•
切勿在高溫和濕度高或充滿灰塵的環境中使用或儲存記憶卡。
•
切勿在記憶卡的終端積聚異物。如有必要,可用柔軟的乾布來清
•
潔終端。
切勿將任何其他標籤置於記憶卡上。
•
請勿讓兒童接觸到記憶卡,因為兒童可能會吞食記憶卡。
•
Page 60

54_ English
臺灣
_54
digital camera mode
(VP-
DX103(i)/DX104/DX105(i) only)
Note on use
• Samsung is not responsible for data loss due to misuse.
• We recommend using a memory card case to avoid losing
data from moving and static electricity.
• After a period of use, the memory card may become warm.
This is normal, not a malfunction.
• Photo image files recorded on a memory card by your DVD
camcorder conform to the “DCF (Design rule for Camera
File system)” universal standard established by the JEITA
(Japan Electronics and Information Technology Industries
Association).
• DCF is an integrated image-file format for digital cameras:
image files can be used on all digital devices conforming to
DCF.
The DVD camcorder supports SD and MMC memory
cards for data storage.
The data storage speed may differ, according to the
manufacturer and production system.
- SLC (single-level cell) system: faster write speed is
enabled.
- MLC (multi-level cell) system: only lower write speed is
supported.
For best results, we recommend using a memory card
that supports faster write speed.
Using a lower write speed memory card for recording a
movie may cause difficulties with storing the movie on the
memory card. You may even lose your movie data during the
recording.
In an attempt to preserve any bit of the recorded movie, the
DVD camcorder forcibly stores the movie on the memory
card and displays a warning: “Low speed card.”
數位相機模式
(僅適用於
VP-DX103(i)/DX104/DX105(i)
使用注意事項
Samsung 將不負責由於誤用所造成的資料遺失。
•
我們建議使用記憶卡盒,以免因為移動和靜電而遺失資料。
•
記憶卡在使用一段時間之後可能會變熱。這是正常現象,並非
•
故障。
透過 DVD 攝錄放影機錄製在記憶卡上的相片影像檔案符合
•
JEITA(日本電子資訊技術產業協會)建立的「DCF(相機檔
案系統設計規則)」通用標準。
DCF 是一種數位相機的整合影像檔案格式:影像檔案可用於
•
符合 DCF 的所有數位裝置。
DVD 攝錄放影機支援 SD 和 MMC 記憶卡進行資料儲存。
資料儲存速度可能會因制造廠商和生產系統而異。
- SLC(單級元件)系統:可支援更快的寫入速度。
- MLC(多級元件)系統:僅支援較慢的寫入速度。
為獲取最佳效果,我們建議使用支援更快寫入速度的記憶卡。
使用較慢寫入速度記憶卡來錄製影片可能會在記憶卡上儲存
影片時遇到困難。您還可能會在錄製過程中遺失影片資料。
在嘗試保留存錄製影片的任意細節時,DVD 攝錄放影機會強
制在記憶卡上儲存影片,並顯示
警告:
“
Low speed card
」。
)
Page 61

55_ English
臺灣
_55
RECORDABLE TIME AND NUMBER OF IMAGES
Recordable time for movie images
Storage Memory card
Capacity
Movie
imag
Recordable number of photo images
Photo Quality
Super Fine Approx. 600
Actual formatted capacity may be less as the internal firmware
uses a portion of the memory.
128MB 256MB 512MB 1GB 2GB
Approx.
e
Storage Memory card
Capacity
• The above figures are measured under Samsung’
s standard recording test conditions and may differ
depending on actual use.
• The DVD camcorder provides only super fine for
photo quality.
• The compression rate increases when choosing lower
quality settings. The higher the compression rate is,
the longer the recording time will be. However, the
picture quality will be lower.
• Memory cards of bigger than 2GB in capacity may not
work properly.
• Movie image files recorded on other equipment are
not playable on this DVD camcorder.
Approx.
8 mi
16 min
n
128MB 256MB 512MB 1GB 2GB
Approx.
32 min
Approx. 1200 Approx. 2400 Approx. 4830 Approx. 9740
Approx.
64 min
Approx.
120 min
可錄製的時間和影像張數
可錄製影片影像的時間
Storage
容量
128MB 256MB 512MB 1GB 2GB
影片影像
大約
8 分鐘
大約
16 分鐘
可錄製的相片影像張數
Storage
容量
相片品質
Super Fine
128MB
大約 600 張 大約 1200 張 大約 2400 張 大約 4830 張 大約 9740 張
由於內部韌體使用了一部分記憶體,因此實際格式化後的容量
可能會小一些。
• 在錄製時,以上數字由 Samsung 在標準錄製測量條件下測得,
並且可能因實際使用情況而異。
• DVD 攝錄放影機僅提供超精細的相片品質。
• 在選擇較低的品質設定時,壓縮率會增大 。壓縮率越大,錄
製時間將越長。但是,畫面品質將會降低。
• 容量高於 2GB 的記憶卡可能無法正常操作。
• 透過其他設備錄製的影片影像檔案在此 DVD 攝錄放影機上無
法播放。
記憶卡
大約
32 分鐘
記憶卡
256MB 512MB
大約
64 分鐘
1GB
120 分鐘
大約
2GB
Page 62

56_ English
臺灣
_56
digital camera mode (VP-
DX103(i)/DX104/DX105(i) only)
數位相機模式
(僅適用於
VP-DX103(i)/DX104/DX105(i)
)
RECORDING MOVIE IMAGES
• You should set the Storage mode switch to CARD before
recording on a memory card.
• You can record movie images using the remote
control. (VP-DX104/DX105(i) only)
• This DVD camcorder provides two Recording
start/stop buttons. One is on the rear side of the
camcorder and the other is on the LCD panel.
Select the Recording start/stop button that works
best for you.
1. Turn the DVD camcorder on.
• Connect a power source to the DVD
camcorder.
(A battery pack or an AC power adaptor)
• Slide the POWER switch downwards to turn
the DVD camcorder on.
• Set the Storage mode switch to CARD.
page 30
2. Check the subject on the LCD screen. (Lens
and LCD)
• Set the Lens open/close switch to open ( ).
page 10
3. Press the Recording start/stop button.
• The (
• Press the Recording start/stop button again
4. When recording is fi nished, turn the DVD
camcorder off.
) recording indicator will display, and
●
recording will start.
to stop recording.
• You can use the zoom function while
recording. page 37
• For more details about recording, refer to
the page 63.
• The movie images are recorded in the 4:3
aspect ratio on the memory card.
• The recorded movie image size is
720X576.
page 13
錄製影片影像
• 在光碟上進行錄製之前,您應將
STBY 0:00:00 [64 min]
0:00:00 [30 min]
• 您可以使用遙控器錄製影片影像。(僅適用於
4830
• 此 DVD 攝錄放影機具有兩個
1.
2.
3.
4.
開關設定為
儲存模式
VP-DX104/DX105(i))第 13 頁
鈕。其中一個位於攝錄放影機的後部,另一個位
於 LCD 面板上。選擇
最佳工作效果)。
開啟 DVD 攝錄放影機。
• 將電源連接到 DVD 攝錄放影機。
(電池組或交流電源適配器)
• 向下滑動
放影機。
• 將
檢查 LCD 螢幕上的主體。(鏡頭和 LCD)
• 將
按下
錄製開始 / 停止
• (
開始。
• 再次按下
在完成錄製時,關閉 DVD 攝錄放影機。
• 您可以在錄製時使用縮放功能。
• 有關錄製的詳細資訊,請參閱第 63 頁。
• 以 4:3 畫面比例將影片影像錄製在記憶
• 所錄製影片影像的尺寸為 720X576。
POWER
開關設定為
儲存模式
第 30 頁
鏡頭開啟 / 關閉
第 10 頁
) 錄製指示器將會顯示,並且錄製將會
●
錄製開始 / 停止
第 37 頁
卡上。
錄製開始 / 停止
錄製開始 / 停止
開關以開啟 DVD 攝錄
開關設定為開啟 ( )。
按鈕。
CARD
按鈕(具有
。
CARD
按鈕以停止錄製。
按
。
Page 63

57_ English
臺灣
_57
TAKING PHOTO IMAGES
• You should set the Storage mode switch to
CARD before recording on a memory card.
• You can take photo images using the remote
control.
page 13 (VP-DX104/DX105(i) only)
1. Slide the POWER switch downwards to turn the
2. Check the subject on the LCD screen. (Lens and
3. Press the PHOTO button to take the picture.
DVD camcorder on.
• Set the Storage mode switch to CARD.
page 30
LCD)
• Set the Lens open/close switch to open
( ).
page 10
• A shutter sound is heard. The photo image is
recorded with the “Photo capture” message
appeared.
• While saving the photo image on the memory
card, you cannot proceed with the next
recording.
• You can use the zoom function while
recording.
• The number of photo images that can be
stored depends on the quality and size of
the image.
• The photo image is taken only in the 4:3
aspect ratio on the memory card.
• Audio will not be recorded with the photo
image on the memory card.
• Please check the protection tab setting on
your memory card before recording. You
may not be able to record when it is locked.
• If focusing is diffi cult, use the manual focus
function.
• Do not operate the POWER switch or
remove the memory card while accessing
the storage media. It may damage the
storage media or data.
• Photo images are actually wider than what
appears on the LCD screen.
• The recorded photo image size is 800X600.
page 70
page 37
page 55
拍攝相片影像
STBY 0:00:00 [64 min]
Photo capture
• 在光碟上進行錄製之前,您應將
4830
定為
CARD
。
• 您可以使用遙控器拍攝相片影像。
適用於 (VP-DX104/DX105(i))
向下滑動
1.
• 將
2.
•
3.
•
•
POWER
儲存模式
第 30 頁
檢查 LCD 螢幕上的主體。(鏡頭和 LCD)
將
鏡頭開啟 / 關閉
第 10 頁
按下
會聽到按下快門的聲音。錄製相片影像時,會
在將相片影像儲存到記憶卡上時,您不可繼續
按鈕以拍攝相片。
PHOTO
出現「
Photo capture
進行下一步錄製操作。
• 您可以在錄製時使用縮放功能。
第 37 頁
• 可儲存的相片影像張數取決於影像的品質
和大小。
• 僅能以 4:3 的畫面比例將相片影像拍攝
到記憶卡上。
•
不會透過記憶卡上的相片影像來錄製音訊。
• 請在錄製前檢查設定在您的記憶卡上的保
護標籤。您可能無法在鎖定時進行錄製。
• 如果對焦困難,請使用手動對焦功能。
第 70 頁
• 切勿在存取儲存媒體時操作
關或移除記憶卡。否則,可能會損壞儲存
媒體或資料。
• 實際上,相片影像比在 LCD 螢幕上出現
的要寬。
• 所錄製相片影像的尺寸為 800X600。
開關設
儲存模式
第 13 頁(僅
開關以開啟 DVD 攝錄放影機。
開關設定為
開關設定為開啟 ( )。
第 55 頁
CARD
」訊息。
。
POWER
開
Page 64

58_ English
臺灣
_58
digital camera mode
4.
DX103(i)/DX104/DX105(i) only)
PLAYING MOVIE IMAGES
•
This function works only in the Play mode. page 21
• You can switch to the Play mode by pressing the
MODE button.
• You can fi nd a desired movie image quickly using
thumbnail index views.
• Use the playback-related buttons on the remote
control. page 13 (VP-DX104/DX105(i) only)
1. Slide the POWER switch downwards to turn on the
power and open the LCD screen.
• Set the Storage mode switch to CARD
• Adjust brightness or colour of the LCD screen.
page 79
2. Press the MODE button to set the play mode.
• The thumbnail index view appears. The thumbnail
highlight is on the latest created or played fi le.
• To change the current thumbnail page, move the
Joystick down to highlight the page bar, then move
the Joystick right or left to select the page.
3. Use the Joystick to select the desired movie image,
then press the Joystick.
• The selected fi le fi lls the screen and is played
automatically.
• To stop playback, move the Joystick down.
• Use the Joystick to enjoy various playback operations.
- Press the Joystick to pause or play back.
- Move the Joystick right or left to skip to the
next or previous image.
- Move the Joystick right or left and hold to fast
4. To return to the thumbnail index view, move the Joystick
forward or reverse playback(x2).
down.
• You can control the volume by using the zoom
lever during playback.
• Slow playback is not available in the digital camera
mode.
• Press Display (
Screen Display) function on and off.
• Depending on the amount of data to be played
back, it may take some time for the playback
images to appear.
• Movies edited on a PC may not be displayed on
this DVD camcorder.
• Movies recorded on another camcorder may not
be played on this DVD camcorder.
) button to toggle the OSD (On
page 39
.
(VP-
100-0012
數位相機模式
VP-DX103
播放影片影像
• 此功能僅能在播放模式下操作。
• 您可以透過按
• 您可以使用縮略索引視圖快速查找所需的影片影像。
• 使用遙控器上的播放相關按鈕。
VP-DX104/DX105(i))
向下滑動
1.
• 將
• 調整 LCD 螢幕的亮度或色彩。第 79 頁
按下
2.
• 會顯示縮略索引視圖。最近建立或播放的檔案上會反
• 要變更目前的縮圖頁面,可向下移動
使用搖桿選擇所需的影片影像,然後按下
3.
• 選定檔案顯示在螢幕上並自動播放。
• 要停止播放,可向下移動
• 使用
要返回縮略索引視圖,可向下移動搖桿。
4.
0:00:03
0:00:03
0:00:03
02
12/12
100-0002
100-0002
100-0002
(僅適用於
(i)
/DX104/DX105
第 21 頁
按鈕切換至播放模式。
MODE
第 13 頁(僅適用於
開關以開啟電源和打開 LCD 螢幕。
POWER
開關設定為
儲存模式
按鈕以設定播放模式。
MODE
白顯示縮圖。
頁面列,然後向右或向左移動搖桿以選擇頁面。
以進行各種播放操作。
搖桿
- 按下
- 向右或向左移動搖桿以略過下一幅或上一幅
-
• 播放時,您可以透過使用縮放杆控制音量。
• 在數位相機模式下,不可使用慢速播放。
• 按下顯示 ( ) 按鈕以打開和關閉 OSD(螢幕
• 因播放的資料數量不同,可能稍後才會出現播放
• 電腦上編輯的影片可能在此 DVD 攝錄放影機上無
• 在另一台攝錄放影機上錄製的影片在此 DVD 攝錄
以暫停或播放。
搖桿
影像。
向右或向左移動搖桿以前進或倒退播放 (x2)
第 39 頁
顯示)功能。
影像。
法顯示。
放影機上可能無法播放。
CARD
搖桿
。
。
搖桿
搖桿
(i)
以反白顯示
。
)
。
Page 65

59_ English
臺灣
_59
VIEWING PHOTO IMAGES
設定連續放映以供連續顯示。
1.
3.
2.
4.
設定連續放映以供連續顯示。
1.
2.
設定連續放映以供連續顯示。
• This function works only in the Play mode.
• You can play back and view photo images recorded on
the memory card.
1. Slide the POWER switch downwards to turn on the
power and open the LCD screen.
• Set the Storage mode switch to CARD.
• Adjust brightness or colour of the LCD screen.
page 79
2. Press the MODE button. Use the Joystick to
highlight the photo ( ) tab.
• The thumbnail index view of photo images appears.
• To change the current thumbnail page, move the
Joystick down to highlight the page bar, then move
the Joystick right or left to select the page.
3. Use the Joystick to select the desired photo image,
then press the Joystick
• To view the previous image, move the Joystick left.
• To view the next image, move the Joystick right.
• To search for an image quickly, move the Joystick
right or left and hold. Actually the image number is
changed during search with images not changed.
4. To return to the thumbnail index view, move the
Joystick down.
• All the icons disappear or appear when
you press Display ( ) button on the
camcorder.
• Loading time may vary depending on
the image size.
• Any large-sized image taken with
another device will be displayed as a
thumbnail image.
.
Set the slide show function for continuous display
1. Press the MENU button in the single image display
mode.
2. Move the Joystick right or left to select “Slide Show”
“Start” then press the Joystick.
• The ( ) indicator is displayed. The slide show
will start from the current image.
•
All images will be played back consecutively for 2~3 seconds each.
• To stop the slide show, move the Joystick down or press the
MENU button.
page 21
page 30
.
100-0009
100-0002
Start
Slide Show
1
檢視相片影像
12/12
100-0002
12/12
12/12
100-0002
• 此功能僅能在播放模式下操作。
• 您可以播放和檢視錄製在記憶卡上的相片影像。
12/12
向下滑動
1.
幕。
• 將
儲存模式
• 調整 LCD 螢幕的亮度或色彩。
按下
2.
MODE
( ) 標籤。
• 會顯示相片影像的縮略索引視圖。
開關以開啟電源和打開 LCD 螢
POWER
開關設定為
按鈕。使用搖桿以反白顯示相片
CARD
• 要變更目前的縮圖頁面,可向下移動搖桿以反白
顯示頁面列,然後向右或向左移動搖桿以選擇頁
面。
使用
3.
選擇所需的相片影像,然後按下搖桿。
搖桿
• 要檢視上一個影像,可向左移動搖桿。
• 要檢視下一個影像,可向右移動搖桿。
• 要快速搜尋影像,可向右或向左移動並按住搖桿。
實際上,在搜尋期間,影像數目會變更,而影像
不變。
要返回縮略索引視圖,可向下移動
4.
• 按攝錄放影機上的顯示 ( ) 按鈕時,
所有圖示都會消失或顯示。
• 載入時間將視影像大小而有所不同。
• 任何以其他裝置拍攝的大型影像將顯示
為縮圖影像。
設定連續放映以供連續顯示。
在單一影像顯示模式下按下
1.
向右或向左移動搖桿以選擇
2.
• (
,然後按下搖桿。
「Start」
) 指示器會顯示。連續放映將會從目前影像
開始。
• 所有影像將連續各播放 2
• 要停止連續放映,可向下移動
按鈕。
MENU
「Slide Show」
3 秒鐘。
~
第 21 頁
。
搖桿
按鈕。
搖桿
第 30 頁
第 79 頁
。
或按下
MENU
Page 66

60_ English
臺灣
_60
digital camera mode (VPDX103(i)/DX104/DX105(i) only)
數位相機模式
(i)
VP-DX103
/DX104/DX105
(僅適用於
(i)
)
PROTECTION FROM ACCIDENTAL ERASURE
• This function works only in the Play mode.
• You can protect important images from accidental erasure.
• If you execute formatting, all fi les including protected fi les will
be erased.
1. Slide the POWER switch downwards to turn on
the power.
• Set the Storage mode switch to CARD.
page 30
2. Press the MODE button to set the Play mode.
• The thumbnail index view appears.
• To see the thumbnail index view of photo
images, use the Joystick to select the
) tab.
photo (
3. Use the Joystick to select the image to protect,
press the MENU button.
4. Move the Joystick right or left to select
“Protect.”
5. Move the Joystick up or down to select the
desired option (“Off” or “On”), then press the
.
Joystick
• After completion, the selected images will
be protected.
• The (
) indicator appears on the selected
image.
• This function operates identically in the full image
display mode (single image displayed on the screen).
(Photo images only)
• Protected images will show the (
are displayed.
• If the write-protection tab on the memory card is set to
lock, you cannot set image protection.
page 21
100-0009
Video
Protect
Off
On
100-0009
) indicator when they
page 53
保護以防意外刪除
• 此功能僅可在播放模式下操作。第 21 頁
• 您可以保護重要的影像以防止意外刪除。
• 如果您執行格式化,將會刪除所有檔案,包括受保護的檔案。
12/12
向下滑動
1.
• 將
儲存模式
按下
2.
MODE
會顯示縮略索引視圖。
•
要查看相片影像的縮略索引視圖,可使用搖桿選
•
擇相片 ( ) 標籤。
使用
3.
搖桿
按鈕。
向右或向左移動
4.
向上或向下移動搖桿以選擇所需選項(「
5.
「
」),然後按下
On
完成後,將會保護所選的影像。
12/12
• 在全屏影像顯示模式(顯示在螢幕上的單一影像)下,此
• 在顯示受保護的影像時,它將會顯示 (
• 如果將記憶卡上的寫入保護標簽設定為鎖定,您就不能設
•
• ( ) 指示器會出現在所選的影像上。
功能使用相同的操作方式。(僅適用於相片影像)
定影像保護。第 53 頁
開關以開啟電源。
POWER
開關設定為
按鈕以設定播放模式。
選擇要保護的影像,然後按下
以選擇「
搖桿
。
搖桿
CARD
Protect
。第 30 頁
」。
) 指示器。
MENU
Off
」或
Page 67

61_ English
臺灣
_61
DELETING IMAGES
1.
2.
• This function works only in the Play mode.
• You can delete undesired movie images
recorded on the memory card.
• If you want to delete the protected images, you
must fi rst release the image protection.
• An image that has been deleted cannot be
recovered.
1. Slide the POWER switch downwards to turn on
the power.
•
Set the Storage mode switch to CARD.
page 30
2. Press the MODE button to set the Play mode.
• The thumbnail index view of movie images
appears.
• To see the thumbnail index view of photo
images, use the Joystick to select the photo
( ) tab.
3. Use the Joystick to select the image to delete,
then press the MENU button.
4. Move the Joystick right or left to select “Delete.
5. Move the Joystick up or down to select the
desired option (“This File” or “All Files”), then
press the Joystick
• “This File”: Deletes the selected fi le.
• “All Files”: Deletes all images.
6. The message according to the selected option will appear.
Move the Joystick right or left to select “Yes,” the press the
Joystick
.
•
After completion, the selected images will be deleted.
•
This function operates identically in the full image display
mode (single image displayed on the screen). (Photo
images only)
•
To protect important images from accidental deletion,
activate the image protection.
•
You cannot delete a protected image. You must release
the protect function to delete the image.
.
page 60
”
page 60
100-0009
Video
Delete
This File
All Files
Delete this fi le?
Yes No
刪除影像
12/12
•
•
•
• 此功能僅在播放模式中操作。
• 您可以刪除在記憶卡上錄製的不需要的影片影像。
• 如果您想刪除受保護的影像,必須首先解除影像
保護。
• 所刪除的影像將無法恢復。
向下滑動
1.
• 將
儲存模式
按下
2.
MODE
• 會顯示影片影像的縮略索引視圖。
要查看相片影像的縮略索引視圖,可使用搖桿選
•
擇相片 ( ) 標籤。
使用
3.
搖桿
按鈕。
向右或向左移動
4.
向上或向下移動搖桿以選擇所需的選項(「
5.
」或「
File
「
•
This File
「
•
All Files
訊息將視所選項目而出現。向右或向左移動
6.
以選擇「
完成後,將會刪除所選的影像。
•
在全屏影像顯示模式(顯示在螢幕上的單一影像)下,
此功能會使用相同的操作方式。(僅適用於相片影像)
要防止重要的影像被意外刪除,要啟動影像保護。
第 60 頁
您無法刪除受保護的影像。您必須解除保護功能才能刪
除影像。第 60 頁
開關以開啟電源。
POWER
開關設定為
CARD
。
按鈕以設定播放模式。
選擇要刪除的影像,然後按下
以選擇「
搖桿
」,然後按下
All Files
」:刪除所選的檔案。
」:刪除所有影像。
」,然後按下搖桿。
Yes
Delete
搖桿
」。
。
第 30 頁
MENU
This
搖桿
Page 68

62_ English
臺灣
_62
using the menu items
使用選單項目
HANDLING MENUS
✪
Follow the instruction below to use each of the
menu items listed on this page.
For example: setting the Focus
Using the MENU button
1. Slide the POWER switch downwards to turn on
the power.
• Set the appropriate storage media. (VPDX103(i)/DX104/DX105(i) only)
2. Press the MENU button.
3. Move the Joystick right or left to select “Focus.”
4. Move the Joystick up or down to select the
desired option, then press the Joystick
• Move the Joystick right or left to adjust
focus manually.
5. To exit, press the MENU button.
page 30
.
Using the Joystick
The guide provides easier access to frequently used
menus without using the MENU button.
1. Slide the POWER switch downwards to turn on
the power.
2. Press the Joystick to display the guide
3. Move the Joystick down to select focus(
4. Move the Joystick down to select the desired
option.
• Moving the Joystick down toggles between
“Auto Focus” and “Manual Focus.”
To exit, press the Joystick repeatedly until the
5.
guide disappears.
• Accessible items in menu vary depending
on the operation mode.
).
STBY 0:00:00 [30 min]
Focus
Auto
Manual
STBY 0:00:59/0:01:00
操作選單
請按照以下指示使用在此頁面上所列出的各選單
✪
項目。
例如:設定焦距
使用
向下
1.
• 選擇適當的儲存媒體。(僅適用於 VP-
按下
2.
向右或向左移動
3.
向上或向下移動
4.
• 向右或向左移動
若要結束,可
5.
使用
此指南提供在不使用
便存取經常使用的選單的方法。
向下滑動
1.
按下
2.
向下移動
3.
向下移動
4.
• 向下移動
若要結束,可重複按下搖桿直到此指南消失
5.
按鈕
MENU
滑動
DX103(i)/DX104/DX105(i))第 30 頁
MENU
下搖桿。
POWER
按鈕。
搖桿
搖桿
按下
開關以開啟電源。
以選擇「
Focus
以選擇所需選項,然後按
以手動調整對焦。
搖桿
按鈕。
MENU
搖桿
按鈕的情況下,更方
MENU
開關以開啟電源。
POWER
以顯示此指南。
搖桿
以選擇對焦 ( )。
搖桿
以選擇所需的選項。
搖桿
可在「
「Manual Focus」
為止。
‧
搖桿
選單中可存取的項目因操作模式而有所
不同。
Auto Focus
之間進行切換。
」。
」和
Page 69

63_ English
臺灣
_63
MENU ITEMS
• Accessible items in menu vary depending on the operating
mode.
• For operation details, see the corresponding page.
Recording menu items
Operating mode
Scene Mode(AE)
White Balance
Exposure
Anti-Shake(DIS)
Digital Effect
Focus
Shutter
16:9 Wide
Quality
Wind Cut
Back Light
C. Nite
Light (VP-DX102/
DX105(i) only)
Fader
Guideline
Digital Zoom
File No
Disc Manage
DISC
X
.
• Some items will not appear depending on the storage
media type. (VP-DX103(i)/DX104/DX105(i) only)
• There are some functions you cannot activate
simultaneously in the menu. You cannot select the
gray menu items.
Refer to the troubleshooting for examples of the
inoperable combinations of functions and menu items.
page 112
CARD
(VP-DX103(i)/DX104/
DX105(i) only)
X Auto 65
X
X Off 69
X Auto 71
X On 72
X Fine 72
X Off 73
X Off 74
X Off 74
X Off 75
X Off 76
X - 47~51
Default value Page
: possible, X : not possible
Auto 66
Auto 67
Off
Auto 70
Off 73
Off 75
Series 77
68
選單項目
• 選單中可存取的項目因操作模式而有所不同。
• 有關操作的詳細資訊,請參閱相應的頁面。
錄製選單項目
操作模式 光碟片
Scene Mode(AE)
White Balance
Exposure
Anti-Shake(DIS)
Digital Effect
Focus
Shutter
16:9 Wide
Quality
Wind Cut
Back Ligh
C. Nite
(僅適用
Light
於
VP-DX102/
)
DX105(i)
Fade
r
Guideline
Digital Zoom
File No
.
Disc Manage
(僅適用於 VP-DX103(i)/DX104/
t
X
• 一些項目因儲存媒體不同而不會顯示。(僅適用於 VPDX103(i)/DX104/DX105(i))
• 有些功能無法同時在選單中啟動。您無法選擇呈灰色
顯示的選單項目。
參閱疑難排解以了解不能結合使用的功能和選單項目
的範例。
DX105(i))
第 112 頁
CARD
X Auto 65
X
X
X Auto 71
X On 72
X Fine 72
X Off 73
X Off 74
X Off 74
X Off 75
X Off 76
X - 47~51
預設值 頁碼
:可能,X:不可能
Auto 66
Auto 67
Off
Off
Auto 70
Off 73
Off 75
Series 77
68
69
Page 70

64_ English
臺灣
_64
using the menu items
Playback menu items
CARD
Operating mode DISC
Delete
Edit Partial Delete
Protect
Card Manage
Print Mark(DPOF)
Slide Show (in the
single image display
)
(VP-DX103(i)/DX104/
DX105(i) only
Video Photo
X X - 41,46
X
X
X X
X X
: possible, X : not possible
Setting menu items
Operating mode Default value Page
Date/Time Set 01/JAN/2008 00:00 78
Date/Time Off 79
LCD Brightness 18 79
LCD Colour 18 79
Beep Sound On 80
Shutter Sound
(VP-DX103(i)/DX104/DX105(i) only
Auto Power Off 6 Min 80
(VP-DX102/DX104/DX105(i) only)
TV Display On 81
USB Connect
(VP-DX103(i)/DX104/
DX105(i) only)
AV In/Out (VP-DX100i/DX103i/
DX105i only)
Default Se
Menu Colour Midnight Blue 82
Transparency 20% 82
Language
Remote
DISC PC Cam
CARD Mass Storage
t
Demo On 82
)
On 80
On
Out 81
-
-
Default
)
value
- 40,61
- 60
- 78
- 83
- 59
81
81
82
82
使用選單項目
播放選單項目
Page
操作模式
Delete
Edit Partial Delete
Protect
Card Manage
Print Mark(DPOF)
(在單一影像顯示中)
Slide Show
設定選單項目
操作模式 預設值 頁碼
Date/Time Set 01/JAN/2008 00:00 78
Date/Time Off 79
LCD Brightness
LCD Colour
Beep Sound On 80
Shutter Sound
(僅適用於
僅適用於
(
DX104/DX105(i))
AV In/Out (
(僅適用於
DX103(i)/DX104/DX105(i))
Auto Power Off
Remote Remote
(VP-DX102/DX104/DX105(i)
TV Display On 81
USB Connect
VP-DX103(i)/
僅適用於
DX103i/DX105i )
Default Set
Menu Colour Midnight Blue
Transparency 20%
Language
Demo
VP-
光碟片
CARD
VP-DX100i/
CARD
(僅適用於
光碟
片
X
X
X X
X X
VP-DX103(i)/
DX104/DX105(i)
視訊 相片
X X - 41,46
18
18
On
6 Mi
n
On
)
PC Cam
Mass Storage
Out 81
- 82
- 82
On 82
)
:可能
預設值 頁碼
- 40,61
- 60
- 78
- 83
- 59
不可能
, X :
79
79
80
80
81
81
82
82
Page 71

65_ English
臺灣
_65
RECORDING MENU ITEMS
You can set up the menu items for recording.
Scene Mode(AE)
This DVD camcorder automatically sets the shutter speed and aperture according to
the subject brightness for optimum recording: You can also specify one of six modes
depending on conditions, recording environment or purpose of filming.
Settings Contents
- Auto balance between the subject and
Auto
Sports
Portrait
Spotlight
Beach/
Snow
High Speed
• You can check the selected “Scene Mode(AE)” mode on the
• This function will be set to “
• This function can be set in the DVD camcorder record mode only.
the background.
- To be used in normal conditions.
- The shutter speed is automatically
adjusted depending on the scene.
- For recording people or objects
moving quickly. If the Sports mode
is used under a fluorescent light, the
image may flicker. In this case, use
the Auto mode for recording.
- Creates a shallow depth of field so
that the person or subject appears
against a softened background.
- The portrait mode is most effective
when used outdoors.
- Prevents overexposure of subject’s
face, etc., when strong light strikes the
subject, as in a wedding or on stage.
- Prevents underexposure of subject’
s face, etc., in a place where
reflection of light is intense, such as
at the beach in midsummer or on a
ski slope.
- Reduces blurring when recording
rapidly moving subjects such as in
golf or tennis.
on-screen information display. However, nothing will appear in
“Auto” mode.
Auto” in the EASY.Q mode.
On-screen
display
None
錄製選單項目
您可以設定錄製的選單項目。
Scene Mode(AE)
根據最佳錄製的主體亮度,此 DVD 攝錄放影機會自動設定快門速度和透鏡光圈:
您還可以根據條件、錄製環境或拍攝目的指定六種模式之一。
設定 內容 畫面顯示語言
- 自動平衡主體和背景。
- 在正常情況下使用。
Auto
- 根據場景自動調整快門速度。
- 用於錄製快速移動的人物或物體。
Sports
Portrait
Spotlight
Beach/
Snow
High Speed
•
• 在
• 此功能只能在
如果在螢光燈下使用「體育」模式,
則影像可能會閃爍。在此情況下,
使用「自動」模式進行錄製。
- 建立場景的淺深度以便人物或主
體處於柔和的背景中。
- 人像模式在戶外使用時最有效。
- 防止主體面部曝光過度等(在婚
禮或舞台上強光照射主體時)。
- 防止主體面部等在強烈反光下曝
光面部等在強烈反光下曝光,如
仲夏的海邊或滑雪坡上。
- 在快速錄製移動的主體(如高爾
夫或網球球場)時減少模糊。
您可以在螢幕資訊顯示上檢查所選的「
「
」模式中將無任何顯示。
Auto
模式下,此功能將被設定為「
EASY Q
DVD
Scene Mode(AE)
攝錄放影機錄製模式下設定。
Auto
無
」。但是,在
」。
Page 72

66_ English
臺灣
_66
using the menu items
White Balance
This DVD camcorder automatically adjusts the colour of subject. Change the
white balance setting depending on the recording conditions.
Settings Contents
This option is generally used to control the white
Auto
balance automatically.
This controls the white balance according to the
Daylight
outdoor ambience, especially for close up and when
the subject is of one dominant colour.
This option is used when you make a recording in
Cloudy
cloudy weather.
Fluorescent
Tungsten
Setting white balance manually
1. Move the Joystick up or down to select “Custom
2. Frame a white object such as a piece of white paper
3. Press the Joystick
This option is used when you make a recording under
white fl uorescent lights.
This option is for when there is less than 3200K of
tungsten light being used.
Custom
You can manually adjust white balance to match the
WB
light source or situation.
WB,” then press the Joystick
The “Set White Balance” indicator is displayed.
so that it fi lls the screen.
Use an object that is not transparent.
• If the object that fi lls the screen is not focused,
correct the focus using “Manual Focus.”
page 70
• Press the MENU button to cancel.
The white balance setting will be applied and (
indicator is displayed.
To exit, press the MENU button.
.
.
On-screen
display
None
STBY 0:00:00 [30 min]
)
使用選單項目
White Balance
此 DVD 攝錄放影機會自動調整主體的色彩。變更白平衡設定取決於錄製條
件。
設定 內容
此選項一般用來自動控制白平衡。
Auto
Daylight
Cloudy
Fluorescent
Tungsten
Custom WB
這將根據戶外環境控制白平衡,尤其針對特寫
和在主體顏色突出時。
當您在陰天進行錄製時使用此選項
當您在白色螢光燈下進行錄製時使用此選項
在小於 3200K 的鎢絲燈環境下使用此選項
您可以手動調整白平衡以適應光源或環境情況
手動設定白平衡
向上或向下移動搖桿以選擇「
white thick paper
1.
下搖桿。
會顯示「
將白色物體(如一張白紙)框住以便它填滿螢幕。
2.
使用不透明的物體。
• 如果沒有對焦填充螢幕的物體,請使用「
• 按下
按下搖桿。
3.
將會套用白平衡設定和顯示 (
若要結束,可按下
Set White Balance
」修正對焦。第 70 頁
Focus
MENU
按鈕以取消。
MENU
。
Custom WB
」指示燈。
按鈕。
畫面顯示語
。
。
。
,」,然後按
Manual
) 指示器。
言
無
Page 73

67_ English
臺灣
_67
•
A subject can be shot under various types of lighting conditions
indoors (natural, fl uorescent, candlelight, etc.). Because the
colour temperature is different depending on the light source, the
subject tint will differ depending on the white balance settings.
Use this function for a more natural result.
• It is recommended that you specify “Digital Zoom: Off”
page 76) before setting white balance.
(
• Do not use a coloured object when setting white balance: The
appropriate tint cannot be set.
• This function will be set to “Auto” in the EASY.Q mode.
• Reset the white balance if lighting conditions change.
• During normal outdoor recording, setting to auto may provide
better results
.
Exposure
The DVD camcorder usually adjusts the exposure automatically. You can
also manually adjust the exposure depending on the recording conditions.
Settings Contents
This option automatically adjusts image brightness
Auto
according to the environmental light conditions.
You can adjust the brightness of an image
Manual
manually. Adjust the brightness when the subject
is too bright or too dark.
Setting the exposure manually:
When manually setting the exposure, the default setting
appears as the value is automatically adjusted according
to the environmental light conditions.
1. Move the Joystick right or left to adjust the exposure
while viewing the image on the LCD screen.
- Exposure value can be set between “
2. Press the Joystick.
- The manual exposure setting will be applied and
( xx) indicator is displayed.
3. To exit, press the Joystick repeatedly until the OK guide disappears.
0” and “29.”
On-screen
display
None
xx
STBY 0:00:00 [30 min]
• 在室內的各種光線條件(自然光線、螢光燈、燭光等)下都可
拍攝主體。由於色彩溫度因光源而異,因此主體色調會因白平
衡設定而有所不同。使用此功能獲取更自然的效果。
• 在設定白平衡之前,建議指定「
• 在設定白平衡時切勿使用彩色物體:無法設定適當的色調。
• 在 EASY Q 模式下,此功能將被設定為「
• 在燈光條件變更時重設白平衡。
• 在進行普通戶外錄製期間,設定為自動將可提供更佳效果。
Digital Zoom:Off
Auto
」(
」。
第 76 頁)
Exposure
DVD 攝錄放影機通常會自動調整曝光。根據錄製條件您還可手動調整
曝光。
設定 內容
根據環境光照條件,此選項會自動調整影像亮度。
Auto
您可以手動調整影像亮度。在主體太亮或太暗時調整亮
Manual
度。
手動設定曝光:
在手動設定曝光時,在根據環境光照條件自動調整值時會
出現預設值。
在檢視 LCD 螢幕上的影像時,向右或向左移動
1.
調整曝光度。
23
- 曝光值可設定在「
按下
2.
3.
。
搖桿
- 將會套用手動曝光設定和顯示 (
若要結束,可重複按下
」和「29.」之間。
0
直到 OK 導向器消失。
搖桿
畫面顯示語
) 指示器。
xx
言
無
搖桿
xx
以
Page 74

68_ English
臺灣
_68
using the menu items
Manual exposure is recommended in situations listed below:
• When shooting using reverse lighting or when the background
is too bright.
• When shooting on a reflective natural background such as at
the beach or when skiing.
• When the background is overly dark or the subject is bright.
• If you manually change the exposure value when
“Scene Mode(AE)” function is selected, manual
changes are applied first.
• This function will be set to “Auto” in the EASY.Q mode.
Anti-Shake(DIS)
When you use zoom to record a magnified subject image, it will
correct fuzziness in the recorded image.
Settings Contents
Off Disables the function. None
Compensates for unstable images
On
caused by camcorder-shake, particularly
at high magnification.
• EASY Q mode automatically sets the “Anti-Shake(DIS)”
to “On.”
• When “Anti-Shake(DIS): On” is set, there will be a
slight difference between the actual movement and the
movement on screen.
• Gross camcorder-shake may not be entirely corrected
even if “Anti-Shake(DIS): On” is set.
Firmly hold the DVD camcorder with both hands.
• It is recommended that you specify “Anti-Shake(DIS):
Off” when using the DVD camcorder on a desk or tripod
(not supplied).
• When you record pictures with 34x or more magnification
and the “Anti-Shake(DIS)” is set to “On” in dark locations,
after-images may stand out. In this case, we recommend
using a tripod (not supplied) and turning the “Anti-
Shake(DIS)” to “Off.”
• This function can be set in the DVD camcorder record
mode only.
On-screen
display
使用選單項目
在以下所列情況下建議使用手動曝光:
在使用回光拍攝或背景太暗時。
•
在反射的自然背景如沙灘上拍攝或在滑雪時。
•
在背景過暗或主體太亮時。
•
如果在選擇「
•
值,則會首先套用手動變更。
在
•
Scene Mode(AE)
模式下,此功能將被設定為「
EASY Q
Anti-Shake(DIS)
當您使用縮放錄製放大的影像時,它將會在錄製的影像中修正模糊度。
設定 內容
停用功能。
Off
對攝錄放影機抖動(尤其是在放大率高時)
On
造成的不穩定影像進行補償。
簡易拍攝模式會自動將「
•
在設定「
•
即使已設定「
•
請用雙手握緊 DVD 攝錄放影機。
在桌面或三腳架(未提供)上使用 DVD 攝錄放影機時,
•
在使用 34x 或更高放大倍數錄製畫面及在黑暗位置將
•
此功能只能在 DVD 攝錄放影機錄製模式下設定。
•
Anti-Shake(DIS):On
運動可能會略有不同。
幅度攝錄放影機抖動。
建議指定「
「
Anti-Shake(DIS)
在此情況下,我們建議使用三腳架(未提供),並將「
Shake(DIS)
Anti-Shake(DIS):On
Anti-Shake(DIS):Off
」 設定為「On」時,影像之後可能會突出。
」設定為「
」功能時手動變更曝光
Anti-Shake(DIS)
」時,實際運動和螢幕上的
」,也不能徹底更正大
」
。
」。
Off
」。
Auto
畫面顯示
語言
」設定為「
無
On
Anti-
.」
Page 75

S
N
69_ English
臺灣
_69
Digital Effect
S
N
The digital effect enables you to give a creative look to your recording. Select the appropriate
digital effect for the type of picture that you wish to record and the effect you wish to create.
There are 10 different digital effect options.
Settings
Off
Black &
White
Sepia
Negative
Art
Emboss1
Emboss2
Mosaic
Mirror
Pastel1
Pastel2
• “Mirror” mode is not available in the 16:9
• This function will be set to “Off” while
• The “Emboss2,” “Mosaic,” “Mirror,”
• Digital Zoom is not available in the
• This function can be set in the DVD
Contents
Disables the function.
This mode changes the
images to black and
white.
This mode gives the
images a reddish brown
pigment.
This mode reverses
the colours, creating a
negative image.
This mode gives the
images a coarse effect.
This mode creates a 3D
effect (embossing).
This mode creates a 3D
effect (embossing) on the
surrounding area of an
image.
This mode gives the
images a mosaic effect.
This mode cuts the
picture in half, using a
mirror effect.
This mode applies a pale
pastel drawing effect to
an image.
This mode applies a pale
pastel drawing effect to
the surrounding area of
an image.
Wide mode. Release 16:9 wide first to set
“Mirror.”
EASY.Q is in use.
“Pastel1” and “Pastel2” modes are not
available while “Anti-Shake (DIS)” or
“C. Nite” is in use.
“Emboss2,” “Mosaic,” “Mirror,”
“Pastel1” or “Pastel2” mode.
camcorder record mode only.
On-screen
display
None
1
3
5 6
7 8
99
Digital Effect
數位效果讓您可以在錄製中加入創意元素。為您要錄製的圖片類型以及您要建立的效果選
擇適當的數位效果。共有 10 種不同的數位效果選項。
2
設定
Off
Black &
White
Sepia
4
Negative
Art
Emboss1
Emboss2
Mosaic
Mirror
Pastel1
10
Pastel2
‧ 「Mirror」
‧
‧ 「Emboss2」、「Mosaic」、 「Mirror」、「Pastel1」
‧
‧
內容 畫面顯示語言
停用功能。
此模式將影像變更為
黑白。
此模式可賦予影像紅
褐色的色調。
此模式將顏色倒置,
建立一張底片影像。
此模式可賦予影像粗
糙效果。
此模式將建立 3D 效
果(浮雕)。
此模式在影像周圍區
域建立 3D 效果(浮
雕)。
此模式可賦予影像馬
賽克效果。
此模式使用鏡像效果,
將圖片剪切一半。
此模式將淡淡的蠟筆
繪畫效果套用到影像
上。
此模式將淡淡的蠟筆
繪畫效果套用到影像
的周圍區域上。
模式在 16:9 寬螢幕模式中不可用。
首先解除 16:9 寬螢幕以設定
在使用 EASY.Q 時,此功能將被設定為
模式不可用(在使用
「Pastel2」
或
「C. Nite」時)。
(DIS)」
數位縮放不可在
「Mirror」
此功能只能在 DVD 攝錄放影機錄製模式下
設定。
「Emboss2」、「Mosaic」、
、 「Pastel1」或「Pastel2」
無
「Mirror」。
「Anti-Shake
模式中使用。
「Off」。
和
Page 76

70_ English
臺灣
_70
using the menu items
錄製時手動對焦
此 DVD 攝錄放影機可
但是,根據錄製條件可能無法獲得正確對焦。在此情況下,
使用手動對焦模式。
1.
2.
Focus
The DVD camcorder usually focusses on a subject automatically (auto focus).
When the DVD camcorder is turned on, auto focus will always be set. You can
also manually focus a subject depending on the recording conditions.
Settings Contents
In most situations, it is better to use the automatic
Auto
focus feature, as it enables you to concentrate
on the creative side of your recording.
Manual focusing may be necessary under
Manual
certain conditions that make automatic focusing
diffi cult or unreliable.
Focusing manually during recording
This DVD camcorder automatically focusses a subject from
close-up to infi nity.
However, the correct focus may not be obtained depending on
the recording condition. In this case, use the manual focus mode.
Move the Joystick up or down to select “Manual,” then
1.
press the Joystick.
• The manual focus adjustment indicators appear.
2. Move the Joystick right or left to select the desired indicator
to adjust focus, then press the Joystick
Focusing on a farther subject
To focus on a farther subject, move the Joystick
to the indicator(
Focusing on a nearer subject
To focus on a nearer subject, move the Joystick
to the indicator(
• The nearer or farther icon (
appears between the indicators when focus
adjustment reaches the end. The adjusted
value is applied right after moving the
Joystick right or left to adjust the focus.
•
The manual focus setting will be applied and ( ) indicator is displayed.
3. To exit, press the Joystick repeatedly until the guide disappears.
In the following situations, you may obtain better results by adjusting
the focus manually.
• A picture containing several objects, some close to the DVD camcorder,
others farther away.
• A person enveloped in fog or surrounded by snow.
• Very shiny or glossy surfaces like a car.
• People or objects moving constantly or quickly like an athlete or a crowd.
).
).
.
/ )
使用選單項目
Focus
DVD 攝錄放影機通常針對自動主體對焦(自動對焦)。在開啟 DVD 攝錄放影機時,
On-screen
display
None
STBY 0:00:00 [30 min]
<Nearer subject> <Farther subject>
總會設定自動對焦。您還可根據錄製條件來手動對焦主體。
設定 內容 畫面顯示語言
在大多數情況下,使用自動對焦功能更為恰當,
Auto
因為它允許您專注於創意錄製。
在特定條件下無法進行自動對焦和 / 或自動對焦
Manual
變得不可靠時,可能就需要使用手動對焦。
錄製時手動對焦
此 DVD 攝錄放影機可從特寫到無限遠自動對焦主體。
但是,根據錄製條件可能無法獲得正確對焦。在此情況下,
使用手動對焦模式。
向上或向下移動
1.
向右或 向左移動
2.
將會套用手動對焦設定和顯示 ( ) 指示器。
•
若要結束,可重複按下
3.
在以下情況中,透過手動調整焦距將可讓您獲得更佳效果。
圖片包含數個物體,離 DVD 攝錄放影機的距離各不相同。
•
被霧包圍或雪景中的人物。
•
非常閃亮的表面,如汽車。
•
持續或快速移動的人物或物體,如運動員或人群。
•
以選擇「
手動對焦調整指示器會出現。
•
搖桿
搖桿
然後按下搖桿。
對焦較遠的主體
若要對焦較遠的主體,可將搖桿移至指示器
)。
(
對焦較近的主體
若要對焦較近的主體,可將搖桿移至指示器
)。
(
在完成對焦調整時,較近或較遠的圖示
•
(/) 會出現在指示器之間。在向右或向
左移動搖桿以調整對焦後,使用所調整的值。
直到此指南消失為止。
搖桿
Manual
以選擇所需指示器進行調整對焦,
」,然後按下
無
搖桿
。
Page 77

71_ English
臺灣
_71
• “Focus” function will alternate between manual focus and auto
focus. With auto focus, no indication will appear on the screen.
• If you are inexperienced in the use of DVD camcorders, we
recommend that you use auto focus.
• This function will be set to “Auto” in the EASY.Q mode.
Shutter
The DVD camcorder automatically sets the shutter speed depending on the
subject brightness. You can also manually adjust the shutter speed according
to the scene conditions.
Settings Contents On-screen display
The DVD camcorder automatically
Auto
sets the appropriate aperture value.
Shutter speed can be set to 1/50,
Manual
1/120, 1/250, 1/500, 1/1000, 1/2000,
1/4000, or 1/10000.
Setting the shutter speed manually
You can set the shutter speed manually. A fast shutter speed
can freeze the motion of a fast-moving subject and a slow
shutter speed can blur the subject to give the impression of
motion. The adjusted value is applied right after moving the
Joystick right or left to adjust the shutter speed.
1. Move the Joystick up or down to select “Manual,” then
press the Joystick
• The manual shutter adjustment indicators appear.
2. Move the Joystick right or left to select the desired indicator to adjust
shutter speed, then press the Joystick.
• The adjusted value is applied right after moving the Joystick right
or left to adjust the shutter speed.
• The manual shutter setting will be applied and (
is displayed.
3. To exit, press the Joystick repeatedly until the guide disappears.
Recommended shutter speed when recording
Shutter speed Conditions
1/50
1/120
1/250, 1/500, 1/1000
1/2000, 1/4000, 1/10000
.
The shutter speed is fi xed at 1/50 second. Black
bands that usually appear when shooting a TV
screen become narrower.
The shutter speed is fi xed at 1/120 second for
indoor sports such as basketball.
The fl ickering that occurs when shooting under a
fl orescent light or mercury-vapor lamp is reduced.
Moving cars, trains or other rapidly moving vehicles
such as roller-coasters.
Outdoor sports such as golf and tennis.
None
1/XX
STBY 0:00:00 [30 min]
1/XX) indicator
• 「
• 如果您沒有使用 DVD 攝錄放影機的經驗,我們建議您使用自動
• 在 EASY Q 模式下,此功能將被設定為「
Shutter
DVD 攝錄放影機會根據主體亮度自動設定快門速度。您還可根據場景條件
來手動調整快門速度。
設定 內容 畫面顯示語言
Auto
Manual
手動設定快門速度
1/50
向右或向左移動
2.
• 在向右或向左移動搖桿以調整快門速度後,使用所調整的值。
• 將會套用手動快門設定和顯示 (
若要結束,可重複按下
3.
錄製時建議使用的快門速度
快門速度 條件
1/250, 1/500, 1/1000
1/2000, 1/4000, 1/10000
」功能將在手動對焦和自動對焦之間交替。使用自動對焦,
Focus
螢幕上將不會出現指示說明。
對焦。
DVD 攝錄放影機會自動設定適當的透
鏡光圈值。
快門速度可設定為 1/50、1/120、
1/250、1/500、1/1000、1/2000、
1/4000 或 1/10000。
您可以手動設定快門速度。較快的快門速度可以使快速移動
主體畫面靜止,而較慢的快門速度可模糊主體以讓人感覺
是在移動。在向右或向左移動搖桿以調整快門速度後,使
用所調整的值。
向上或向
1.
• 手動快門調整指示器會出現。
以選擇所需指示器調整快門速度,然後按下搖桿。
搖桿
搖桿
1/50
1/120
快門速度固定為 1/50 秒。在拍攝電視螢幕時,常
常會出現黑色條帶變窄。
對於籃球等室內運動,快門速度固定為 1/120 秒。
在熒光燈或水銀燈下拍攝時,出現閃爍的情況會減
少。
移動的汽車、火車或其他快速移動的車輛,如雲霄
飛車。
高爾夫和網球等戶外運動。
以選擇「
下移動
搖桿
直到此指南消失為止。
」。
Auto
」,然後按下
Manual
1/XX) 指示器。
無
1/XX
搖桿
。
Page 78

72_ English
臺灣
_72
using the menu items
We recommend using a tripod when recording with a slow shutter
•
speed.
• If you manually change the shutter speed value when “Scene
Mode(AE)” function is selected, manual changes are applied with
priority.
• The image may not seem smooth when a high speed is set.
• This function will be set to “Auto” in the EASY.Q mode.
• When recording with a shutter speed of 1/1000 or higher, make
sure the sun is not directly shining into the lens.
• The shutter speed can be set in the DVD camcorder record mode only.
• Fast shutter speed allows a fast-moving subject to be captured one
16:9 Wide
You can record movie image in 16:9 or 4:3 according to the desired aspect
ratio. Set the proper aspect ratio as your TV. The 16:9 Wide function works in
the DVD camcorder record mode only.
Quality
You can select the quality of a movie to be recorded. This DVD camcorder
can film in the SF (Super Fine), F (Fine) and N (Normal) modes. The Fine
mode is set as the factory default.
frame at a time vividly.
Settings
Records images to the full screen on a 4:3 TV screen.
Off
Records images to the full screen on a 16:9(wide)
On
TV screen.
• Mirror mode and Digital Zoom are not available in the 16:9 Wide mode.
• A movie image is played in 16:9 aspect ratio in the DVD camcorder.
When the movie image recorded in 4:3 aspect ratio is played in the
DVD camcorder or 16:9 aspect ratio screen, the displayed picture
may appear wider than the actual size.
Settings Contents
Super
Records movie images at the super-fine image
Fine
quality.
Fine
Records images at the fine image quality.
Records images at the normal image quality
Normal
• Recorded files are encoded with Variable Bit Rate (VBR).
VBR is an encoding system that automatically adjusts the bit rate
according to the recording image.
• The quality can be set in the DVD camcorder record mode only.
Contents
.
On-screen
display
-
-
On-screen
display
使用選單項目
• 透過較慢的快門速度錄製時,我們建議使用三腳架。
• 如果在選擇「
則會首先套用手動變更。
• 在設定很高的速度時,影像可能顯得不柔和。
• 在 EASY Q 模式下,此功能將被設定為「
• 在以
透鏡上。
• 快門速度只能在 DVD 攝錄放影機錄製模式下設定。
• 較快的快門速度可一次清楚拍攝到快速移動的主體。
Scene Mode(AE)
1/1000 或以上的快門速度進行錄製時,請確保陽光不會直射到
16:9 Wide
根據所需的畫面比率,可使用 16:9 或 4:3 錄製影片圖像。請按照電視規格設定
合適的畫面比率。16:9 寬螢幕功能僅能在 DVD 攝錄放影機錄製模式下操作。
設定 內容
將影像以全屏顯示錄製到 4:3 電視機屏幕上。
Off
將影像以全屏顯示錄製到 16:9(寬)電視機屏
On
幕上。
• 鏡像模式和數位縮放在 16:9 寬螢幕模式下不可用。
• 在 DVD 攝錄放影機中影片影像以 16:9 畫面比率播放。在 DVD
攝錄放影機或 16:9 畫面比率的螢幕上播放以 4:3 畫面比率錄
製的影片影像時,顯示的圖片看上去可能會比實際尺寸寬一些。
Quality
您可以選擇要錄製的影片品質。此 DVD 攝錄放影機可在 SF(超精細)、
F(精細)和 N(正常)模式中拍攝。清晰清晰模式設定為出廠預設值。
設定 內容
Super
以超精細影像品質來錄製影片影像。
Fine
以精細影像品質來錄製影像。
Fine
以正常影像品質來錄製影像。
Normal
• 錄製的檔案具有可變位元速率編碼 (VBR)。
VBR 是根據錄製影像自動調整的編碼系統。
• 此品質只能在 DVD 攝錄放影機錄製模式下設定。
」功能時手動變更快門速度值,
」。
Auto
畫面顯示語
言
-
-
畫面顯示語
言
Page 79

73_ English
臺灣
_73
Wind Cut
You can reduce wind noise when recording sound from the built-in
microphone.
If “Wind Cut” is set to “On,” the low-frequency components in the sound
picked up by the microphone will be cut off during recording: this makes it
easier to hear voices and sound during playback.
• Use the Wind Cut when recording in windy places such as a beach.
Settings
Off
Disables the function.
Minimizes wind noise or other noise while
On
recording.
• Make sure the “Wind Cut” is set to “Off” when you want the
microphone to be sensitive as possible.
• The Wind Cut function works only in the DVD camcorder record
mode with the built-in microphone.
Contents
On-screen
display
None
Back Light
When subject is lit from behind, this function will compensate for lighting so
that the subject is not too dark.
Settings
Off
Disables the function.
- Backlight compensation is executed.
On
- Backlight compensation brightens the subject
quickly.
Back lighting influences recording when the subject is darker than the
background:
- The subject is in front of a window.
- The person to be recorded is wearing
white or shiny clothes and is placed
against a bright background; the person’
s face is too dark to distinguish his/her
features.
- The subject is outdoors and the
background is overcast.
- The light sources are too bright.
- The subject is against a snowy
background.
This function will be set to “Off” in the EASY.Q mode.
Contents
On-screen
display
None
<Back Light off>
Wind Cut
在從內置麥克風錄製聲音時,可以減少風聲。
如果將「
有聲低頻元件:這會在播放時更加容易聽到噪音和聲音。
在沙灘等有風吹的地方錄製時,請使用消除風聲功能。
•
設定 內容 畫面顯示語言
Off
On
•
•
」設定為「
Wind Cut
停用功能。
在錄製時最小化風聲或其他噪音。
在希望麥克風的收音能儘量敏感時,確保將「
為「
」。
Off
消除風聲功能僅能與內置麥克風配合在 DVD 攝錄放影機錄製
模式下操作。
」,則會在錄製期間消除以下麥克風中的
On
Wind Cut
無
Back Light
在主體從後面亮起時,此功能將會補償光線以使主體不太暗淡。
設定 內容 畫面顯示語言
停用功能。
Off
- 進行背光補償。
On
- 背光補償可快速加亮主體。
在主體比背景暗時,背光會影響錄製效果:
- 主體位於窗前。
- 將被錄製的人穿著白色或亮色服飾,並
處於明亮的背景中 ﹔ 此人的臉龐將顯得
太暗而無法辨別其五官。
- 主體在戶外,而背景陰暗。
- 光源太亮。
- 主體處於雪景中。
<Back Light on>
在
模式下,此功能將被設定為「
EASY Q
Off
」。
無
」設定
Page 80

74_ English
臺灣
_74
using the menu items
C. Nite
You can make the subject recorded appear to be in slow motion by controlling
the shutter speed, or a brighter image in dark places without a compromise
in colours.
Settings Contents
Off Disables the function.
1/25 Records a brighter image brighter.
1/13 Records a brighter image even in a dark place.
• When using C.Nite, the focus adjusts slowly and white dots may
appear on the screen, this is not a defect.
• C.Nite function is not available with the following functions:
“Scene Mode(AE),” “Shutter,” “Exposure,” “Digital Zoom,”
“Digital Effect” (“Emboss2,” “Mosaic,” “Mirror,“Pastel1”,”and
“Pastel2”).
• If Anti-Shake(DIS) is set, C.Nite mode will be released.
This function will be set to “Off” in the EASY.Q mode.
•
Light (VP-DX102/DX105(i) only)
You can record images brighter in a dark place.
Settings Contents
Off Records a image without using light.
Records a clear image in a dark place without
On
sacrificing colour with the light.
• The LED light can become extremely hot. Do not touch it while in
operation or soon after turning it off, otherwise serious injury may
CAUTION
result.
• Do not place the DVD camcorder into the carrying case
immediately after using the light, since it remains extremely hot
for some time.
• Do not use near flammable or explosive materials.
• The light enables you to record a subject in dark places.
• The light will not turn on or off while you are recording.
• The range of the light is limited. (up to 6.6ft (2m))
• This function can be set only in the DVD camcorder record
mode.
This function will be set to “Off” in the EASY.Q mode.
•
On-screen display
None
1/25
1/13
On-screen display
None
使用選單項目
C. Nite
在不降低色彩的情況下,透過控制快門速度或使暗處的影像變亮,您可以用
慢動作拍攝物體。
設定 內容 畫面顯示語言
停用功能。
Off
錄製較亮的影像。
1/25
還可在暗處錄製較亮的影像。
1/13
• 使用彩色夜景時,焦點調整會很慢,而且畫面上可能會出現白
點,這不是缺陷。
•
彩色夜景功能不能與下列功能配合使用:「
「
」、「
Shutter
(「
Emboss2
• 如果設定了防震 (DIS),將會釋放彩色夜景。
• 在 EASY Q 模式下,此功能將被設定為「
(僅適用於 VP-DX102/DX105(i))
Light
您可在暗處錄製較亮的影像。
設定 內容 畫面顯示語言
在不使用照明時錄製影像。
Off
在不降低照明燈色彩的情況下,在暗處錄
On
製清晰的影像。
• LED 燈光將會過熱。切勿在操作時或熄滅後馬上觸摸它,否則
可能導致嚴重受傷。
注意
• 切勿在使用燈光後立刻將 DVD 攝錄放影機放入攜帶套中,因
為它在此時仍舊過熱。
• 切勿靠近易燃性或爆炸性材料。
• 燈光功能可讓您錄製位於暗處的主體。
• 將無法開啟或關閉燈光功能。
• 燈光功能的範圍相當有限。(最遠 6.6 英呎(2 米))
• 此功能只能在 DVD 攝錄放影機錄製模式下設定。
• 在 EASY Q 模式下,此功能將被設定為「
Exposure
」、「
Mosaic
」、「
Digital Zoom
」、「
Mirror
」、「
Pastel1
無
1/25
1/13
Scene Mode(AE)
」、「
Digital Effect
」和「
Pastel2
」。
Off
無
」。
Off
」、
」
」)
。
Page 81

75_ English
臺灣
_75
Fader
You can give your recording a professional look by using special effects
such as fade in at the beginning of a sequence or fade out at the end of a
sequence.
Settings Contents On-screen display
Off Disables the function.
On Fader is executed.
Fade in
Press the Recording start/stop button when “Fader”
is set to “On.” Recording starts with a dark screen and then the image and
sound are faded in (fade in).
Fade out
When you want to stop recording with fade out, set “Fader” to “On” again
during recording. Then press the Recording start/stop button. Recording
stops as the image and sound are faded out (fade out), image and sound are
faded in (fade in).
•
This function can be set only in the DVD camcorder record mode.
•
This function will be set to “Off” in the EASY.Q mode.
Guideline
Guideline displays a certain pattern on the LCD screen so that you can
•
easily set the image composition when recording movie or photo images.
• The DVD camcorder provides 3 types of guidelines.
Settings Contents
Off
Disables the function.
Enables you to centre the subject for
Cross
proper recording.
Enables you to place the subject in the
Grid
centre square for proper positioning.
Enables you to place the subject within
Safety
a safety zone which prevents it being cut
Zone
when editing in 4:3 for left and right and
2.35:1 for top and bottom.
• Positioning the subject at the cross point of the guideline makes
a balanced composition.
• Guideline cannot be recorded on the images being recorded.
None
Fade in (approx. 3 seconds)
Fade out (approx. 3 seconds)
On-screen
display
None
Fader
透過使用特殊效果,您可使您的錄製看起來更專業,如在錄製順序開始時
時)。錄製以黑螢幕開始,然後淡入影像和聲音。
淡出
在想停止淡出錄製時,可在錄製時再次將「
下
錄製開始 / 停止
聲音(淡入)而停止。
• 此功能只能在 DVD 攝錄放影機錄製模式下設定。
• 在 EASY Q 模式下,此功能將被設定為「
Guideline
• 導向圖在 LCD 螢幕上顯示某種圖案,以便您在錄製影片和相片影像時
能夠輕鬆設計影像構圖。
• DVD 攝錄放影機提供 3 種類型的導向圖。
設定 內容 畫面顯示語言
Off
Cross
Grid
Safety
Zone
• 在導向圖的交叉點定位的主體形成平衡構圖。
• 導向圖無法被錄製到正在錄製的影像上。
使用淡入或在順序結束時使用淡出。
設定 內容 畫面顯示語言
Off
On
停用功能。
執行淡化功能。
無
淡入
按下
錄製開始 / 停止
按鈕。錄製會隨著淡出影像和聲音(淡出)、淡入影像和
停用功能。
將放在中間的主體作為最常見的錄製構圖
進行錄製。
錄製水平或垂直構圖上或使用特寫的主
體。
在以左右比例為 4:3 或上下比例為
2.35:1 進行編輯時防止發生中斷的安全
內區錄製主體。
按鈕(在「
」設定為「
Fader
Fader
Off
」設定為「
On
」。
On
」。然後按
無
」
Page 82

76_ English
臺灣
_76
using the menu items
Digital Zoom
You can select the maximum zoom level in case you want to
zoom to a level greater than 34x (the default setting) during
recording. Zooming more than 34x is achieved digitally, up to
1200x when combined with optical zoom.
使用選單項目
Digital Zoom
如果您想在錄製時放大至高於 34X(預設設定)的級別,可選
擇最大縮放桿。34 倍以上的縮放是以數位形式來完成,在結合
光學縮放時可進行高達 1200 倍的縮放。
This right side of the bar shows the digital zooming factor. The zooming
zone appears when you select the zooming level.
Settings Contents
Up to 34x zoom is performed
Off
optically.
100x, 200x,
Up to 34x zoom is performed
optically, and after that, up to
400x,
100x (200x, 400x, or 1200x) is
1200x
performed digitally.
• The image quality may deteriorate depending on how
much you zoom in on the subject.
• Maximum zooming may result in lower image quality.
• Digital Zoom is not available while “Anti-Shake(DIS),”
“EASY.Q,” “C. Nite,” “Digital Effect” (“Emboss2,”
“Mosaic,” “Mirror,”“Pastel1” and “Pastel2”) is in
use.
• Once “Anti-Shake(DIS),” “C.Nite,” “EASY.Q,”
“Digital Effect” (“Emboss2,” “Mosaic,” “Mirror,”
“Pastel1” and “Pastel2”) is selected, Digital Zoom
mode will be released. (The Digital Zoom mode will
be backed up when they are released. (“C. Nite,”
“EASY Q”
• This function can be set only in the DVD camcorder
record mode.
only))
On-screen
display
None
None
右列顯示數位縮放比。在選擇縮放級別時,會顯示縮放範圍。
設定 內容 畫面顯示語言
可透過光學方式執行高達 34X 的
Off
縮放。
可透過光學方式執行高達 34X 的
縮放,並透過數位方式執行高達
、
100x
400x
、
200x
100x(200x、400x 或 1200x)的
、
1200x
縮放。
• 影像品質可能因為您對主體的放大程度而降低。
• 最大程度的縮放可能會導致較低的影像品質。
• 數位縮放不可用(當使用
「
(「
「
• 在選擇
「
• 此功能只能在 DVD 攝錄放影機錄製模式下設定。
」、「
EASY.Q
Emboss2
Pastel2
Digital Effect
Pastel1
模式。(數位縮放模式在其解除時將被備份。
於
“C. Nite," “EASY Q"
C. Nite
」、「
時)。
」)
「
Anti-Shake(DIS)
」(「
」和「
Mosaic
Emboss2
Pastel2
「
Anti-Shake(DIS)
」、「
Digital Effect
」、「
」)
))
」、「
Mirror
」、「
之後,將會解除數位縮放
C.Nite
」、「
」、「
Mosaic
」、
Pastel1
」、「
無
無
」、
EASY.Q
Mirror
(
僅適用
」
和
」、
」、
Page 83

77_ English
臺灣
_77
File No. (VP-DX103(i)/DX104/DX105(i) only)
• File numbers are assigned to photo images in the order they
were recorded.
Settings Contents
Assigns file numbers in sequence
even if the memory card is
replaced with another one or
Series
after formatting, or after deleting
all files. The file number is reset
when a new folder is created.
Resets the file number to 0001
even after formatting, deleting all
or inserting a new memory card.
Use “Reset” when the folder and
Reset
files cannot be created anymore
because the number of the folders
and files reaches the limit.
• This function can be set only in the digital camera
record mode.
On-screen
display
None
None
(僅適用於 VP-DX103(i)/DX104/DX105(i))
File No.
• 將按照錄製照片影像的順序為它們分配檔案編號。
設定 內容 畫面顯示語言
即使在進行格式化或刪除所有檔
案後更換記憶卡,也要按順序指
Series
定檔案編號。在建立新資料夾時,
會重設檔案編號。
甚至在格式化、刪除所有或插入
新記憶卡後,也要將檔案編號重
設為 0001。在因為資料夾和檔案
Reset
數目達到限度而無法建立資料夾
和檔案時,使用「
• 此功能只能在數位相機錄製模式下設定。
Reset
」。
無
無
Page 84

78_ English
臺灣
_78
using the menu items
PLAYBACK MENU ITEM
使用選單項目
播放選單項目
Card Manage (VP-DX103(i)/DX104/DX105(i) only)
•
You can manage a memory card for recording in the digital camera mode.
Settings Contents On-screen display
Delete all files and options on the
Format
memory card including protected files.
Card Info
Shows the card information such as
used space, free space.
• If you execute the format function, all files will be
deleted completely and the erased files cannot
be recovered.
• Do not turn the power off in the middle of
formatting.
• A memory card with the protection tab set to lock
will not be formatted. page 53
• Card information may appear depending on the
card type.
• This function can be set only in the digital camera
play mode.
None
None
Card Info
SETTING MENU ITEMS
You can set up the date and time, OSD language, video output, and
display settings of the DVD camcorder.
Date/Time Set
Set the current date and time so that they can be recorded correctly.
page 29
Card Manage
您可以管理用於在數位相機播放模式中進行錄製的記憶卡。
•
設定 內容 畫面顯示語言
Format
Card Info
Video
- Used : 56 MB
- Free : 427 MB
(僅適用於 VP-DX103(i)/DX104/DX105(i))
刪除記憶卡上的所有檔案和選項,包
括受保護的檔案。
顯示卡資訊,例如已使用的空間、可
用空間。
如果執行格式化功能,將完全刪除所有檔案,
•
並且無法恢復刪除的檔案。
切勿在格式化期間關閉電源。
•
不能格式化保護標籤設定為鎖定的記憶卡。
•
第 53 頁
Ok
卡資訊視卡類型而出現。
•
此功能只能在數位相機播放模式下設定。
•
設定選單選項
您可以設定日期和時間、OSD 語言以及顯示 DVD 攝錄放影機的設定。
Date/Time Set
設定目前的日期和時間以便對其進行正常錄製。第 29 頁
無
無
Page 85

79_ English
臺灣
_79
Date/Time
You can set the date and time to display on the LCD screen.
• Before you use the “Date/Time
date and time. page 29
Settings Contents
Current date and time
Off
information is not displayed.
Date Displays the current date.
Time Displays the current time.
Date&Time Displays the current date and time.
• The date/time will read “01/JAN/2008 00:00” in
the following conditions.
- If a movie or photo recording was made before
setting the date/time in the DVD camcorder.
- When the button type battery for internal clock
becomes weak or dead.
LCD Brightness
You can adjust the brightness of the LCD screen
to compensate for ambient lighting conditions.
Moving the Joystick right will brighten the screen
whereas moving it left will darken the screen.
• A brighter LCD screen setting
consumes more battery power.
• You can adjust the LCD brightness from
0 to 35 when the ambient lighting is too
bright and the monitor is hard to see.
• LCD Brightness does not affect the
brightness of images to be stored.
LCD Colour
You can adjust the LCD colour from 0 to 35.
When you set colour range, the higher the fi gure is, the brighter
the LCD screen will be.
” function, you must set the
On-screen
display
None
01/JAN/2008
00:00
01/JAN/2008
00:00
STBY 0:00:00 [30 min]
LCD Brightness
MENU
Exit
STBY 0:00:00 [30 min]
LCD Colour
MENU
Exit
Date/Time
您可以設定在 LCD 螢幕上顯示的日期和時間。
在使用「
•
第 29 頁
Date/Time
設定 內容 畫面顯示語言
Off
Date
Time
Date&Time
日期 / 時間計數在以下條件下將顯示為「
•
00:00
- 如果在設定日期 / 時間(在 DVD 攝錄放影機中)
- 在內部時鐘的鈕扣電池電量不足或耗盡時。
Adjust18 Select
Adjust18 Select
您可以在 0 至 35 之間調整 LCD 顏色。
在設定顏色範圍時,設定數字越高,LCD 螢幕就會越亮。
」功能之前,您必須設定日期和時間。
不會顯示目前的日期和時間資訊。
顯示目前日期。
顯示目前時間。
顯示目前的日期和時間。
」。
之前進行影片或相片錄製。
LCD
Brightness
可調整 LCD 螢幕的亮度,以補償周圍環境的光線
條件。
向右移動搖桿將會加亮螢幕,而向左移動則會使螢
幕變暗。
較亮的 LCD 螢幕設定將會消耗較多的電
•
池電量。
週圍環境光線太亮且顯示器難以清楚檢視時,
•
您可以調整 LCD 亮度(範圍從 0 至 35)。
LCD 亮度不會影響要儲存影像的亮度。
•
LCD
Colour
無
01/JAN/2008
00:00
01/JAN/2008
00:00
01/JAN/2008
Page 86

80_ English
臺灣
_80
using the menu items
使用選單項目
Beep Sound
You can turn the beep sound on or off.
Settings Contents On-screen display
Off Cancels the beep sound. None
When on, a beep will sound every time a
On
button is pressed.
• The beep sound is off while recording movies.
• When beep sound is set to off, the power on/off sound is off.
None
Shutter Sound (VP-DX103(i)/DX104/DX105(i) only)
You can turn the shutter sound on or off.
Settings Contents On-screen display
Off Cancels the shutter sound. None
When on, the shutter will sound with
On
each press of the PHOTO button.
Auto Power Off
You can set the DVD camcorder to turn off automatically when there is no
operation for 6 minutes in the STBY mode and thumbnail index view.
Settings Contents On-screen display
- The DVD camcorder does not turn
Off
6 Min
off automatically.
- The DVD camcorder does not enter
the sleep mode even if 3 minutes
go on without any button pressed.
- The DVD camcorder enters the
sleep mode if no operation is for
3 minutes in STBY or thumbnail
index view. If no operation goes
on 3 minutes more, it turns off
automatically. However, if any
operation occurs in the sleep
mode, the DVD camcorder comes
out of the sleep mode.
- The DVD camcorder does not turn
off automatically during recording
and playback.
None
None
None
Beep Sound
您可以開啟或關閉嗶聲。
設定 內容 畫面顯示語言
取消嗶聲。
Off
開啟時,每次按下按鈕時將會響起嗶聲。
On
• 在錄製影片時會關閉嗶聲。
• 將嗶聲設定為關閉時,會關閉開啟 / 關閉嗶聲。
Shutter Sound(
僅適用於 VP-DX103(i)/DX104/DX105(i))
無
無
您可以開啟或關閉快門聲音。
設定 內容 畫面顯示語言
Off
On
取消快門聲音。
開啟時,每次按下
起快門聲音。
PHOTO
按鈕時會響
無
無
Auto Power Off
您可以將 DVD 攝錄放影機設定為在 STBY 模式下和縮略索引視圖中無作業
時間長達 6 分鐘後自動關閉。
設定 內容 畫面顯示語言
- DVD 攝錄放影機不會自動關閉。
- DVD 攝錄放影機在沒有按下任何按
Off
6 Min
鈕時,即使過了 3 分鐘也不會進
入休眠模式。
- DVD 攝錄放影機在待機 (STBY) 或
縮略索引視圖中無作業時間長達 3
分鐘後進入休眠模式。若超過 3
分鐘沒有執行任何操作,則會自動
關閉。但是,如果在睡眠模式下進
行操作,則 DVD 攝錄放影機會退
出睡眠模式。
- 在錄製和播放期間,DVD 攝錄放影
機不會自動關閉。
無
無
Page 87

81_ English
臺灣
_81
Remote (VP-DX102/DX104/DX105(i) only)
This function allows you to enable or disable the remote control for use with
the DVD camcorder.
Settings Contents On-screen display
Disables the function.
Off
- The (
You can control the DVD camcorder with
On
TV Display
The TV Display function works in recording and play modes.
You can select the output path of the OSD (On Screen Display). This
allows you to set the OSD for viewing on the viewfinder, LCD screen or
an external TV.
USB Connect (VP-DX103( i )/DX104/DX105( i ) only)
Using the USB cable, you can connect the DVD camcorder to a PC or a
printer.
You can copy your movie and photo images from the memory card to a
PC and print your photo images in the digital camera mode. You can use
the DVD camcorder as PC cam in the DVD camcorder record mode.
AV In/Out (VP-DX100i/DX103i/DX105i only)
You can record signals from external sources. Also you can send your
videos to external devices to record or playback.
•
the remote control.
Settings Contents On-screen display
The OSD appears in the LCD screen
Off
and viewfinder only.
The OSD appears in the LCD screen,
On
viewfinder and TV.
Settings Contents On-screen display
Mass Storage
PictBridge
PC Cam
Settings Contents On-screen display
In
Our
This function can be set only in the DVD camcorder play mode.
) indicator appears when
you use the remote control.
Connect to a PC to use the DVD
camcorder as mass storage in the
digital camera mode. (VP-DX103(i)
/DX104/DX105(i) only)
Connect to a printer. (VP-DX103(i)
/DX104/DX105(i) only)
Connect to a PC to use the DVD
camcorder as PC cam in the DVD
camcorder record mode.
Records the contents of an external
device to the camcorder.
Copies or plays back the contents
of this camcorder onto the external
device.
None
None
None
None
None
None
None
In
None
(僅適用於 VP-DX102/DX104/DX105(i))
Remote
此功能可讓您允許或禁止用遙控器控制 DVD 攝錄放影機。
設定 內容 畫面顯示語言
停用功能。
Off
-
使用遙控器時將出現 ( ) 指示器。
您可以透過使用遙控器來控制 DVD 攝
On
錄放影機。
無
無
TV Display
電視顯示功能可在錄製和播放模式下操作。
您可以選擇 OSD(螢幕顯示)的輸出路徑。這允許您設置用於在取景器、
LCD 螢幕或外接電視上查看的 OSD。
設定
Off
OSD 僅顯示在 LCD 螢幕和觀景窗中。
On
OSD 會顯示在 LCD 螢幕、觀景窗和電視上。
USB Connect
使用 USB 纜線,您可以將 DVD 攝錄放影機連接至電腦或印表機。
您可以將影片或相片從記憶卡複製到電腦上,並在數位相機模式下列
印您的相片影像。在 DVD 攝錄放影機錄製模式下,您可以將 DVD 攝
錄放影機作為電腦相機使用。
設定 內容 畫面顯示語言
Mass Storage
PictBridge
PC Cam
AV In/Out
您可以錄製來自外部來源的訊號。另外,您可以將視訊傳送到外部裝置以
進行錄製或播放。
Settings Contents On-screen display
Out
此功能只能在 DVD 攝錄放影機播放模式下設定。
•
( 僅適用於 VP-DX103(i)/DX104/DX105(i))
連接至電腦以在數位相機模式下將 DVD
攝錄放影機用作高容量儲存裝置。(僅
限
連接到印表機。(僅限
/DX104/DX105(i)
連接至電腦以在數位相機錄製模式下
將 DVD 攝錄放影機用作電腦相機。
( 僅適用於 VP-DX100i/DX103i/DX105i)
將外部裝置的內容錄製到攝錄放影
In
機。
將此攝錄放影機的內容複製到外部
裝置或在外部裝置上播放。
內容 畫面顯示語言
VP-DX103(i)/DX104/DX105(i)
)
)
VP-DX103(i)
無
無
無
無
無
In
無
Page 88

82_ English
臺灣
_82
using the menu items
Default Set
You can initialise the DVD camcorder settings to the factory defaults.
Initialising the DVD camcorder settings to the factory defaults does not
affect recorded images.
Menu Colour
You can select the desired menu colour to display the menu.
“Midnight Blue” “Lovely Pink” “Mystic Purple” “Sunny Orange”
“Oasis Green”
Transparency
You can select the desired transparency to display the menu.
“0%” “20%” “40%” “60%”
• This function can be set only in the record mode.
使用選單項目
Default Set
您可以將 DVD 攝錄放影機設定初始化為工廠預設。
將 DVD 攝錄放影機設定初始化為工廠預設不會影響錄製的影像。
Menu Colour
您可以選擇要顯示此選單所需的顏色。
「
Midnight Blue
Orange
Transparency
您可以選擇要顯示此選單所需的透明度。
“
”
0%
」
「
Lovely Pink
」 「
Oasis Green
“
“20%”
• 此功能只能在錄製模式下設定。
40%
」
” “
60%
」 「
”
Mystic Purple
」 「
Sunny
Language
You can select a desired language to display the menu and messages.
“English” “
“Dansk”
Demo
Demonstration automatically shows you the major functions that are included
with your DVD camcorder so that you may use them more easily.
Settings Contents On-screen display
한국어
“Português” “Nederlands
“Русский” “中文” “
• “Language” options may be changed without prior notice.
Off Disables the function. None
On
• Demonstration starts in the following cases:
• Demo is dimmed in the setting menu while recording.
• In the digital camera record mode, the demonstration will not take
” “Français” “Deutsch” “Italiano” “Español”
“Polski” “Česky” “Slovensky
Activates demonstration mode and
shows various features.
- Right after “Demo” is set to “On.”
-
With “Auto Power Off”set to “Off,” if there is no operation for about
6 minutes in the STBY mode whether a disc is inserted or not.
- Demonstration stops temporarily by pressing other buttons
(MENU, Joystick, Recording start/stop, etc).
place even if it set to “On.” (VP-DX103(i)/DX104/DX105(i) only)
“Svenska” “Suomi” “Norsk”
”
ไทย
” “Türkçe” “ ” “ ” “IsiZulu”
”“Magyar”
“Украϊнська”
None
Language
您可以選擇所需的語言以顯示選單和訊息。
“English” “
“Dansk” “Polski” “Česky” “Slovensky”“Magyar” “Украϊнська”
Demo
示範畫面將自動顯示 DVD 攝錄放影機中的主要功能,讓您可以更輕鬆地使
用這些功能。
한국어
“Português” “Nederlands” “Svenska” “Suomi” “Norsk”
“Русский” “中文” “
•
設定 內容 畫面顯示語言
Off
On
• 在以下情況下會開啟示範畫面:
• 在錄製時,示範畫面會在設定選單中變暗。
• 在數位相機錄製模式下,將不會出現示範畫面,即使將其設定為「
” “Français” “Deutsch” “Italiano” “Español”
ไทย
” “Türkçe” “ ” “ ” “IsiZulu”
「
Language
停用功能。
啟動示範模式並顯示各種功能。
- 在將「
- 「
- 透過按下其他按鈕 (
適用於 VP-DX103(i)/DX104/DX105(i))
選項可能會變更,而不預先通知。
」
」設定為「On」時。
Demo
Auto Power Off
任何操作,無論光碟插入與否均會顯示。
示範畫面。
」設定為「
」,即如果在待機模式中 6 分鐘後無
Off
、搖桿、
MENU
錄製開始 / 停止等
無
無
)會暫時停止
On
」。(僅
Page 89

83_ English
臺灣
_83
printing photo images
6.
2.
3.
4.
5.
1.
2.
2.
DX103(i)/DX104/DX105(i) only)
You can print photo images by inserting the DPOF setting card to the DPOFcompatible printer or connecting the DVD camcorder to the PictBridge printer.
DPOF PRINT SETTING
This function works only in the Play mode.
•
• This DVD camcorder is compatible with DPOF (Digital
Print Order Format). You can select which images
to be printed and the number of prints with this DVD
camcorder. This feature is useful to print with a DPOFcompatible printer or when bringing storage media to a
photo lab for printing.
1. Slide the POWER switch downwards to turn on the power.
• Set the Storage mode switch to CARD.
2. Press the MODE button, then use the Joystick to
select the photo (
• The thumbnail index view of photo images appears.
3. Press the MENU button.
4. Move the Joystick right or left to select “Print Mark
(DPOF).”
5. Move the Joystick up or down to select the desired
option (“Set All” or “Reset All”), then press the Joystick
• “Set All”: Print-marks all images.
You can print only one copy per one image by
selecting “Set All.”
• “Reset All”: Removes the print mark.
6.
The message according to the selected option will
appear. Move the
then press the Joystick.
You can set the number of prints in the single display
view only. Press the MENU button then move the
Joystick right or left to select “Print Mark (DPOF).”
Move the Joystick up or down to select the number
of printing. Up to 99 copies can be set to print of each
image. To exit, press the MENU button.
• Print marked photo images will show the ( )
indicator when they are displayed.
• The “Reset All” option may take a long time
depending on the number of stored images.
• DPOF (Digital Print Order Format) allows you
to embed printing information on your recording
medium’s MISC folder. Select the pictures to be
printed and how many prints to make.
• This function is not available for movie images.
) tab to set the photo play mode.
Joystick right or left to select “Yes,”
page 21
page 30
.
(VP-
100-0012
Photo
Print Mark(DPOF)
Set All
Reset All
100-0012
100-0002
Print Mark(DPOF)
1
0
列印相片影像
(僅適用於
VP-DX103(i)/DX104/DX105(i))
可透過將 DPOF 設定卡插入到與 DPOF 相容的印表機或將 DVD 攝錄放影機
連接到 PictBridge 印表機來列印照片影像。
列印設定
DPOF
12/12
12/12
1 1 1
1 1 1
12/12
• 此功能僅在播放模式下操作。
• 此 DVD 攝錄放影機與 DPOF(數位列印順序格式)相容。
您可以使用此 DVD 攝錄放影機來選擇要列印的影像和列
印張數。透過使用與 DPOF 相容的印表機列印或將儲存媒
體放到的相片標籤進行列印時,此功能很有用。
向下滑動
1.
• 將
儲存模式
按下
2.
MODE
以設定相片播放模式。
• 會顯示相片影像的縮略索引視圖。
按下
3.
MENU
向右或向左移動搖桿以選擇「
4.
向上或向下移動搖桿以選擇所需的選項(「
5.
「
Reset All
• 「
Set All
如果選擇「
• 「
Reset All
訊息將視所選項目而出現。向右或向左移動搖桿以選擇
6.
「
」,然後按下搖桿。
Yes
您僅能在單一顯示視圖中設定要列印的張數。按下
MENU
Mark (DPOF)
數。每張影像最多可設定為 99 份複製影像。若要結
束,可按下
• 列印有標記的相片影像將會顯示 ( ) 顯示器(顯
• 「
• DPOF(數位列印順序格式)可讓您將列印資訊放入
• 此功能不可用於影片影像。
開關以開啟電源。
POWER
開關設定為
按鈕,然後使用搖桿選擇相片( )標籤
按鈕。
」),然後按下搖桿。
」:對所有影像加上列印標記。
Set All
」:移除列印標記。
按鈕,然後向右或向左移動
」。向上或向下移動
MENU
示時)。
」選項可能會因儲存的影像張數而需要
Reset All
較長時間。
錄製媒體的 MISC 資料夾中。選擇要列印的畫面和
張數。
第 21 頁
。
第 30 頁
CARD
Print Mark (DPOF
」,則每幅影像只能列印一份。
搖桿
以選擇列印份
搖桿
按鈕。
Set All
以選擇「
)」。
」或
Print
Page 90

84_ English
臺灣
_84
printing photo images
((VP-
DX103(i)/DX104/DX105(i) only)
列印相片影像
(僅適用於
(VP-DX103(i)/DX104/DX105(i))
DIRECT PRINTING WITH A PICTBRIDGE
• If your printer is compatible with PictBridge, photo images
can be printed easily by connecting the camcorder to the
printer directly with the USB cable.
DPOF cannot be set while PictBridge in use.
NOTICE: After selecting “PictBridge” in the menu, connect
the USB cable.
1. Move to the photo play mode. page 59
• Set the
• Press the
2. Set the “USB Connect” to “PictBridge.”
• (Press the
3. Connect your DVD camcorder to the printer using
the provided USB cable.
4. Turn your printer power on.
• The PictBridge menu screen appears
• To see the previous or next photo image, press the
• Each press of the
5. Press the MENU button. Move the Joystick right or left
to select “Print,” and then press the Joystick to print.
• The selected photo image will be printed.
• To stop printing after printing starts, press the
Setting the number of copies to print
Press the MENU button.
Move the Joystick right or left to select “Copies,” then
move the Joystick up or down to select the number of
copies.
To exit, press the
• If the image moves to the previous or next, the number of copies is
reset.
Storage mode switch to CARD.
MODE button and use the Joystick
to select the photo ( ) tab to set the photo
play mode.
MENU button Use the Joystick
to select “Setting” “USB Connect”
“PictBridge”)
automatically after a short period.
MENU button and move the Joystick left or right.
PictBridge menu screen on or off.
MENU button.
MENU button toggles the
MENU button.
page 83
page 81
100-0012
12/12
Print
Start
12/12
Copies
1
使用
PICTBRIDGE
12/12
• 如果影像移至上一個影像或下一個影像,則會重設份數。
若要結束,可按下
直接列印
• 如果您的印表機與 PictBridge 不相容,可將有 USB
纜線的攝錄放影機直接連接到印表機以輕鬆列印相片
影像。
在使用 PictBridge 時無法設定 DPOF。 第 83 頁
在選單中選擇「
注意:
移至相片播放模式。
1.
• 將
• 按下
將「
2.
第 81 頁
• (按下
使用隨附的 USB 纜線將 DVD 攝錄放影機連接到印表
3.
機。
開啟印表機電源。
4.
• PictBridge 選單畫面很快將會自動顯示。
• 若要查看上一個或下一個相片影像,按下
• 每次按下
按下
5.
「
Print
• 將會列印所選擇的相片影像。
• 若要在列印開始後停止列印,可按下
設定列印份數
按下
MENU
向右或向左移動搖桿以選擇「
移動搖桿以選擇複製的份數。
開關設定為
儲存模式
按鈕並使用
MODE
籤以設定相片播放模式。
USB Connect
按鈕 使用搖桿選擇「
MENU
「
USB Connect
按鈕並向左或向右移動搖桿。
MENU
單畫面切換為開啟或關閉。
按鈕。向右或向左移動搖桿以選擇
MENU
」,然後按下
搖桿
按鈕。
MENU
」後,連接 USB 纜線。
PictBridge
第 59 頁
」設定為「
」 「
按鈕時,都會將 PictBridge 選
進行列印。
按鈕。
CARD
選擇相片 (
搖桿
PictBridge.
PictBridge
」,然後向上或向下
Copies
。
」
Setting
」)
MENU
) 標
MENU
按鈕
」
。
Page 91

85_ English
臺灣
_85
Setting the date/time imprint option
設定日期 / 時間壓印選項
上或向下移動
可按下
使用
如果印表機與 DPOF 不相容,您可以使用 DPOF 設定。
Move the Joystick right or left to select “Date/Time,”
then move the Joystick up or down to select the
desired option. To exit, press the
To print using the DPOF setting
If the printer is compatible with DPOF, you can use
the DPOF setting. page 83
If the printer is not recognized, or to print again
•
after direct printing with a PictBridge printer,
remove the USB cable, select “PictBridge” in
the menu again, then reconnect the cable.
• If the “USB Connect” menu is set to “Mass
Storage,” you cannot connect a Pictbridge
compatible printer to the camcorder through
USB cable. In some instances, the DVD
camcorder may not connect to the printer,
this will depend on the make of the printer. If
connection fails, disconnect the USB cable and
turn off the printer and back on. Then, connect
the USB cable and set the DVD camcorder to
“PictBridge.”
• The date/time option may not be supported
by all printers. Check with your printer
manufacturer. The “Date/Time
be set up if the printer does not support this
option.
• PictBridge™ is a registered trademark of CIPA
(Camera & Imaging Products Association), an
image transfer standard developed by Canon,
Fuji, HP, Olympus, Seiko Epson, and Sony.
• Use the USB cable provided with the DVD
camcorder.
• Use the AC power adaptor for your DVD
camcorder during PictBridge direct printing.
Turning your DVD camcorder off during printing
might damage data on the storage media.
• Movie images are not available for printing.
• You can set various printing options depending
on the printer. Please refer to the user manual
of the printer for details.
• Do not remove USB cable or memory card
during printing.
• You may not print photo images recorded on
other devices.
MENU button.
” menu cannot
12/12
Date/Time
Off
Date
Time
Date&Time
12/12
1
01/JAN/2008 00:00 100-0012
設定日期 / 時間壓印選項
向右或向左移動搖桿以選擇「
上或向下移動搖桿以選擇所需的選項。若要結束,
可按下
使用
DPOF
如果印表機與 DPOF 不相容,您可以使用 DPOF 設定。
第 83 頁
按鈕。
MENU
設定進行列印
• 如果沒有識別出印表機,或要透過
PictBridge 印表機在直接列印後再次列
印,可拔下 USB 纜線,並在選單中再次選擇
「
PictBridge
• 如果將「
• 可能不是所有的印表機都支援日期 / 時間選
• PictBridge ™ 是 CIPA(相機與影像產品協
• 使用 DVD 攝錄放影機隨附的 USB 纜線。
• 使用
• 不可列印的影片影像。
• 您可以根據印表機設定不同的列印選項。請
• 切勿在列印期間拔下 USB 纜線或記憶卡。
• 您可能無法列印錄製在其他裝置上的相片影像。
USB Connect
」,您無法透過 USB 纜線將與
Storage
Pictbridge 相容的印表機連接到攝錄放影
機。在某些情況下,DVD 攝錄放影機可能無
法連接到列印機,這將視印表機的構造而定。
如果連線失敗,則拔下 USB 線纜,然後關
閉印表機
並將 DVD 攝錄放影機設定為「
項。請洽詢您的印表機製造商。如果印表機
不支援此選項,則無法設定「
選單。
會)的註冊商標,是由 Canon、Fuji、HP、
Olympus、Seiko Epson 和 Sony 開發的影像
傳輸標準。
攝錄放影機的交流電源適配器(在
PictBridge 直接列印期間)。在列印期間關閉
您的 DVD 攝錄放影機可能會損毀儲存媒體上的
資料。
參閱印表機的使用者手冊以獲得詳細資訊。
Date/Time
」,然後重新連接纜線。
再重新開啟。然後,連接 USB 纜線,
」,然後向
」選單設定為「
PictBridge
Date/Time
Mass
」。
」
Page 92

86_ English
臺灣
_86
connecting to AV devices
You can view the recorded movie and photo images (VP-DX103(i)/DX104/
DX105(i) only) on a large screen by connecting the DVD camcorder to a TV.
CONNECTING TO A TV
page 81
DVD camcorder
• To play back your recordings, the television
must be PAL compatible.
• We recommend that you use the AC power
adaptor as the power source for the DVD
camcorder.
Use the provided AV cable to connect the DVD
camcorder to a TV as follows:
1. Connect the end of the AV cable with the single
plug to the AV jack of the DVD camcorder.
2. Connect the other end with video (yellow) and
left(white)/ right(red) audio cables to the TV.
• For more information about the connection, refer to your TV’s user
manual.
• Before connecting, make sure that the volume on TV is turned
down: forgetting this may cause feedback from the TV speakers.
• Carefully connect the input and output cables to the corresponding
connections on the device the DVD camcorder is being used with.
• Make sure to set “AV In/Out” to “Out” before connecting to an
external device.(VP-DX100i/DX103i/DX105i only)
Viewing on TV screen
1. Turn on the TV and set the input selector to the Input connection the
DVD camcorder is connected to.
- This is often referred to as “line.” Refer to the TV instruction
manual for how to switch the TV input.
2. Turn the DVD camcorder on.
- Slide the POWER switch downwards, then open the LCD screen.
- Set the appropriate storage media. (VP-DX103(i)/DX104/DX105(i) only)
page 30
- Press the MODE button to set the Play mode. page 21
- The image from the DVD camcorder will appear on the TV screen.
3. Perform playback.
- You can perform playback, recording or make settings in the
menu while viewing on your TV screen.
page 103
連接至 AV 裝置
您可以透過將 DVD 攝錄放影機連接到電視,以大型螢幕檢視錄製的影片和
相片影像(僅限(VP-DX103(i)/DX104/DX105(i))。
連接至電視機
TV
• 要播放錄製內容,電視機必須具備 PAL 相容性。
第 103 頁
• 我們建議您使用交流電源適配器作為 DVD 攝錄
放影機的電源。
使用提供的
視,如下所示:
將帶有單一插頭的 AV 纜線的終端與 DVD 攝錄
1.
放影機的 AV 插孔連接。
將帶有視訊(黃色)和左(白色)/ 右(紅色)
Signal fl ow
AV cable
• 有關連接的更多資訊,請參閱您的電視機使用者手冊。
• 在連接之前,確保已調低電視音量:忘記調低音量可能會導致
電視的喇叭發出迴聲。
• 將輸入和輸出纜線小心連接到與 DVD 攝錄放影機一起使用裝
置的連接處。
• 在連接到外部裝置之前,確定將「
( 僅適用於
在電視螢幕上檢視
. 開啟電視,然後將輸入選擇器設定為連接 DVD 攝錄放影機的輸入連接
1
處。
- 這通常稱為「線」。參閱電視說明手冊以了解如何切換電視輸入。
開啟 DVD 攝錄放影機。
2.
- 向下滑動
- 設定適當的儲存媒體。(僅適用於
第 30 頁
- 按下
- DVD 攝錄放影機中的影像將會出現在電視機螢幕上。
進行播放。
3.
- 您可以在電視螢幕上檢視時進行播放、錄製或在選單中進行設定。
2.
音訊纜線的另一端與電視機連接。
VP-DX100i/DX103i/DX105i)第 81 頁
POWER
按鈕以設定播放模式。第 21 頁
MODE
纜線將
AV
開關,然後開啟 LCD 螢幕。
攝錄放影機連接至電
DVD
AV In/Out
VP-DX103(i)/DX104/DX105(i))
」設定為「
Out
」。
Page 93

87_ English
臺灣
_87
• Adjust the sound volume on TV.
• The remote control is useful when operating the DVD camcorder
while viewing an image on TV screen. (VP-DX102/DX104/
DX105(i) only)
• If only a mono audio input is available on the connected device
(TV, etc.), use the audio cable with the white jack (Audio L).
• When a copy-protected movie is played back, no image will
appear on TV screen.
• When “TV Display” is set to “Off,” OSD(On-Screen-Display)
does not appear on the TV screen.
• Information that the DVD camcorder is recording will appear
on the TV screen: Press the Display (
display status.
• Howling may occur when the DVD camcorder is too close to the
other devices or the volume is high. Keep the DVD camcorder a
reasonable distance away from the other connected devices.
page 26
page 81
)button to switch the
Image display depending on TV screen ratio
Storage Recording ratio Wide (16:9) TV 4:3 TV
Movie images
recorded in the
16:9 ratio
(16:9 Wide:
On)
DISC
Movie images
recorded in the
4:3 ratio
(16:9 Wide:
Off)
• 調整電視機音量。
• 在操作 DVD 攝錄放影機及檢視電視機螢幕影像時,遙控器
極有幫助。(僅適用於 VP-DX102/DX104/DX105(i))
• 如果連接的裝置(電視等等)上只有單聲道音訊輸入可用,
則使用帶有白色插頭(音訊 L)的音訊電纜線。
• 在播放受複製保護的影片時,在電視螢幕上不會出現影像。
• 在將「
TV Display
不會出現在電視機螢幕上。
• DVD 攝錄放影機錄製的資訊將出現在電視螢幕上:按下
( ) 按鈕以切換顯示狀態。第 26 頁
• 如果 DVD 攝錄放影機太靠近其他裝置或音量很高,則可能
會發出尖銳的長鳴聲。請讓 DVD 攝錄放影機與其他連接的
裝置保持一定的距離。
」設定為「
」時,OSD(畫面顯示語言)
Off
第 81 頁
影像顯示取決於電視螢幕比例
Storage
DISC
錄製比例
以
比例格式
16:9
錄製的影片影像
(16:9 Wide:On)
以
比例格式
4:3
錄製的影片影像
(16:9 Wide:Off)
寬螢幕
(16:9)
電視
顯示
電視機
4:3
CARD
(VP-
only)
• Movie
images
• Photo
images
DX103(i)/
DX104/
DX105(i)
• Refer to page 72 for “16:9 Wide” setting.
CARD
(僅適用
DX103(i)/
DX105(i))
• 參閱第 72 頁以了解有關「
於 VP-
DX104/
• 影片影像
• 相片影像
16:9 Wide
」設定的更多資訊。
Page 94

88_ English
臺灣
_88
connecting to AV devices
如 VCR 或 DVD/HDD 錄製機。使用隨附的
AV 纜線將 DVD 攝錄放影機連接到另一視訊
裝置,如下圖所示:
1.
2.
3.
連接至 AV 裝置
DUBBING IMAGES ON A VCR OR DVD/HDD RECORDER
You can dub images played back on this DVD camcorder onto
other video devices, such as VCRs or DVD/
HDD recorders. Use the provided AV cable
to connect the DVD camcorder to another
video device as shown in the following
fi gure:
1. Slide the POWER switch downwards to
turn the power on, then open the LCD
screen.
page 21
• Set the appropriate storage media.
(VP-DX103(i)/DX104/DX105(i) only)
page 30
2. Press the MODE button to set the Play
mode.
3. Use the Joystick to select the recorded
(dubbed) image in the thumbnail index
view, then press the Joystick
4. Press the record button on the connected device.
• The DVD camcorder will start playback and the recording
device will dub it.
• Refer to “Editing chapter” to create a playlist by
selecting desired scenes from those recorded on this
DVD camcorder.
• Audio is heard from the speaker. If the volume is too
high, noise may enter the dubbed image.
• Be sure to use the AC power adaptor to power the DVD
camcorder to prevent battery power from shutting off
during recording on another video device.
• Make sure to set “AV In/Out” to “Out” before connecting
to an external device.(VP-DX100 i /DX103 i /DX105 i
• Be careful not to disconnect AV cable accidentally by
page 81
only)
sliding the OPEN switch.
.
pages 40~46
DVD camcorder
為
VCR 或 DVD/HDD
您可以將此 DVD 攝錄放影機上播放的影像配音到其他視訊裝置,
VCRs or DVD/HDD recorders
Signal fl ow
AV cable
按下連接裝置上的錄製按鈕。
4.
• DVD 攝錄放影機將開始播放,並且錄製裝置將對其進行
配音。
• 參閱「編輯章節」以透過從錄製在 DVD 上的那些影像
選擇所需的畫面來建立播放清單。第
• 從喇叭中聽到聲音。如果音量太高,噪音可能會進入
配音的影像。
• 務必使用交流電源適配器為 DVD 攝錄放影機提供電
源,以防在其他視訊裝置上錄製時出現電池電源關閉
現象。
• 在連接到外部裝置之前,確定將「
「
Out
第 81 頁
• 注意不要在滑動
錄製機上的影像配音
如 VCR 或 DVD/HDD 錄製機。使用隨附的
AV 纜線將 DVD 攝錄放影機連接到另一視訊
裝置,如下圖所示:
向下滑動
1.
後開啟 LCD 螢幕。第 21 頁
• 選擇適當的儲存媒體。(僅適用於
VP-DX103(i)/DX104/DX105(i))
第 30 頁
按下
2.
MODE
使用
3.
搖桿
(已配音)的影像,然後按下搖桿。
」。( 僅適用於
VP-DX100 i /DX103 i /DX105 i
OPEN
開關以開啟電源,然
POWER
按鈕以設定播放模式。
選擇在縮略圖索引視圖中錄製
40~46
AV In/Out
開關時意外斷開 AV 纜線。
頁
」設定為
)
Page 95

89_ English
臺灣
_89
USING THE VOICE PLUS
1.
2.
3
The Voice Plus function works only in the DVD
•
camcorder play mode. page 38
• This function enables you to narrate over a
pre-recorded disc via the DVD camcorder’s
microphone.
• When you want to copy a DVD onto other AV
devices (DVD recorder, VCR), you can dub
your voice sound incoming from the internal
microphone of your DVD camcorder to an AV
device, instead of copying the audio signals on
a pre-recorded disc.
1. Connect the DVD camcorder to your AV device
with AV cable.
2. Set the Storage mode switch to DISC. (VPDX103(i)/DX104/DX105(i) only) page 30
3. Insert the disc you wish to play back in this DVD
camcorder.
4. Press the MODE button to set the Play mode.
5. Use the Joystick to select the desired image.
6. Press the Recording start/stop button on a point
where you want during the playback.
• Voice Plus icon (
blink for a while.
• Sound signals incoming from the internal
microphone will be dubbed to a connected AV
device, instead of copying the pre-recorded sound on a disc.
7. To cancel, press the Recording start/stop button again.
• Voice Plus is available only when the AV cable is connected.
• If you perform Stop, Play/Pause, REW, or FF while the Voice
• When the Voice Plus function is in progress, the
• The Voice Plus function does not affect the original sound on
• Sound is transferred from the internal microphone on this DVD
• Adjust the sound volume on the connected external device. (TV,
• Feedback may occur if the DVD camcorder is placed near the
• Turn down the volume of the external device and keep the DVD
• Make sure to set “AV In/Out
page 86
) is displayed and “Voice +” will
If a USB cable is connected, the Voice Plus function may not
operate properly. (VP-DX103(i)/DX104/DX105(i) only)
Plus function is being executed, the Voice Plus function will be
deactivated.
or PHOTO button does not work.
the recorded disc.
camcorder to the connected AV device, when using the Voice
Plus function. Make sure the microphone is not covered or
blocked in any way.
audio system etc.)
speaker of an external device.
camcorder a reasonable distance away.
external device. (VP-DX100 i /DX103 i /DX105 i only) page 81
DVD camcorder
0:00:59
MENU button
” to “Out” before connecting to an
使用
VOICE PLUS
Signal fl ow
AV cable
Voice +
012
若要取消,可再次按下
7.
•
• 當正在執行 Voice Plus 功能時如果您執行停止、播放 / 暫停、
• 當正在執行 Voice Plus 功能時,
•
• 使用
• 調整連接外部裝置上的音量。( 電視、音響系統等)
• 如果將 DVD 攝錄放影機放在靠近外接裝置的揚聲器,則可能會
• 調低外接裝置的音量,並使 DVD 攝錄放影機與其保持適當的距
• 在連接到外部裝置之前,確定將「
• Voice Plus 功能僅在 DVD 攝錄放影機播放模式下
TV
操作。
第 38 頁
• 此功能使您能夠通過 DVD 攝錄放影機的麥克風對
預先錄製好的光碟進行解說。
• 如果您想將 DVD 複製到其他 AV 裝置(DVD 錄製
機、VCR)上,則可使用來自 DVD 攝錄放影機的內
建麥克風的傳入語音為 AV 裝置配音,而不是複製
預先複製在光碟上的音訊信號。
使用 AV 纜線將 DVD 攝錄放影機連接至 AV 裝置。
1.
第 86 頁
將
2.
3
.
按下
4.
使用搖桿選擇所需的影像。
5.
在播放時,您可以在想要的 位置按下
6.
按鈕。
•
Voice Plus
會閃爍一小會。
• 將用內建麥克風傳入的語音為所連接的 AV 裝置配
音,而不是複製光碟上預先錄製好的聲音。
錄製開始 / 停止
僅當連接了 AV 纜線後才可用。如果連接 USB 纜線,
Voice Plus
則
/DX104/DX105(i)
倒帶或快進功能,則會取消激活 Voice Plus 功能。
無法操作。
Voie Plus
克風傳輸到連接的 AV 裝置。確定沒有以任何方式遮住或堵塞麥
克風。
產生回聲。
離。
適用於
功能就可能無法正確操作。( 僅限
Voice Plus
功能不會影響錄製的光碟上的原始音效。
Voice Plus
VP-DX100 i /DX103 i /DX105 i
開關設定為
儲存模式
VP-DX103(i)/DX104/DX105(i))
將想要播放的光碟插入此 DVD 攝錄放影機中。
按鈕以設定播放模式。
MODE
圖示 ( ) 會出現,同時「
按鈕。
)
功能時,音效將從 DVD 攝錄放影機上的內部麥
DISC
MENU
AV In/Out
) 第 81 頁
。(僅適用於
錄製開始 / 停止
VP-DX103(i)
按鈕或
」設定為「
第 30 頁
Voice +
PHOTO
Out
按鈕
」。( 僅
」
Page 96

connecting to AV devices
90_ English
臺灣
_90
錄製 ( 複製 ) 到光碟
3.
錄製電視節目
1.
RECORDING (COPYING) A TV PROGRAMME OR EXTERNAL
CONTENTS ONTO A DISC
• The Recording (Copying) function
works only in the DVD camcorder
play mode.
• Connect your DVD camcorder to a
VCR or a TV using the AV jack to
record a TV programme or copy a
video tape to a disc.
• Make sure to set “AV In/Out” to “In”
before connecting to an external
device.
Recording (Copying) onto a Disc
1. Connect the DVD camcorder to your
VCR, DVD/HDD recorders or TV with
AV cable.
• Connect the AV cable to the
• The yellow jack: Video
• The white jack: Audio (L) – Mono
• The red jack: Audio (R)
2. Insert an empty disc in your DVD camcorder.
• Please refer to pages 102~103 for selecting and formatting discs.
To record from a VCR or DVD/HDD recorders
1. Insert the tape to be played in your VCR or DVD/HDD recorders.
• Pause at the starting point of playing.
2. Start copying by pressing the Recording start/stop button
on your DVD camcorder.
3. Press the PLAY button on your VCR or DVD/HDD
recorders to play the tape.
To record from a TV
1. Select a TV channel to be recorded.
2. Start recording by pressing the Recording start/stop
button on your DVD camcorder.
When recording (copying) is complete:
Press the Recording start/stop button on your DVD camcorder to stop
recording(copying).
page 21
page 81
output jack on your VCR, DVD/
HDD recorders or TV.
• If you operate the DVD camcorder connected to another device,
always connect the DVD camcorder to an AC outlet using the AC
power adapter.
• Copy-protected contents such as Macrovision or unstable TV
signals cannot be recorded on this DVD camcorder.
(VP-DX100i/DX103i/DX105i ONLY
DVD camcorder
連接至
將電視節目或外部內容錄製 ( 複製 ) 到光碟
僅適用於
)
STBY 0:01:00
(
VCRs or DVD/HDD recorders
Signal fl ow
AV cable
2.
錄製 VCR 或 DVD/HDD 錄製機播放的內容
1.
錄製 ( 複製 ) 完成時:
按 DVD 攝錄放影機上的
裝置
AV
VP-DX100i/DX103i/DX105i)
TV
將空白光碟插入 DVD 攝錄放影機中。
• 請參閱第 102~103 頁以瞭解如何選取和格式化光碟。
將要播放的錄影帶放入 VCR 或 DVD/HDD 錄製機。
• 在播放的起始點暫停。
• 如果在連接至另一裝置時操作 DVD 攝錄放影機,應始終使用交
• 不能在此 DVD 攝錄放影機上錄製受複製保護的內容 ( 如
按 DVD 攝錄放影機上的
2.
按 VCR 或 DVD/HDD 錄製機上的播放按鈕播放錄影帶。
3.
In
錄製電視節目
選擇要錄製的電視頻道
1.
按 DVD 攝錄放影機上的
2.
流電源適配器將 DVD 攝錄放影機連接到交流插座上。
Macrovision 或不穩定的電視訊號 )。
• 錄製 ( 複製 ) 功能只能在 DVD 攝錄放
影機播放模式下工作。
• 使用 AV 插孔將 DVD 攝錄放影機連接
到 VCR 或電視機上,以將電視節目或
錄影帶分別錄製或複製到光碟中。
• 在連接到外部裝置之前,確定將「
錄製 ( 複製 ) 到光碟
1.
錄製開始 / 停止
」設定為「In」。第 81 頁
In/Out
使用 AV 線纜將 DVD 攝錄放影機連接
到 VCR、DVD/HDD 錄製機。
• 將 AV 線纜連接到 VCR、DVD/HDD
錄製機或電視上的輸出插孔。
• 黃色插孔:視訊
• 白色插孔:Audio (L) ( 聲訊 ( 左 ))
– 單聲道
• 紅色插孔:Audio (R) ( 聲訊 ( 右 ))
錄製開始/ 停止
.
錄製開始 / 停止
按鈕停止錄製 ( 複製 )。
第 21 頁
按鈕以開始複製。
按鈕開始錄製。
.
AV
Page 97

91_ English
臺灣
_91
connecting to a PC
(VP-
DX103(i)/DX104/DX105(i) only
This chapter explains how to connect the camcorder to a PC
using the USB cable for various functions.
✪
When connecting a USB cable to a PC, refer to the software
installation instructions and PC specifications below.
SYSTEM REQUIREMENTS
DV Media PRO
Following requirements must be satisfied to use DV Media PRO.
Windows Vista(32bit, 64bit), XP, or 2000
OS
CPU Intel® Pentium® 4, 2 GHz recommended
RAM 512 MB (2 GB and above recommended)
Connector USB1.1/2.0 connector
Display 1024 x 768, 24-bit colour or higher
Miscellaneous
• USB port must be provided as standard USB 2.0 or
• USB interface is not supported on Macintosh operating
• The above system requirements information is not a
• On a slower PC than recommended, movie playback
• On a slower PC than recommended, movie playback
• Intel® Pentium III™ or Pentium 4™ is a trademark of
• Windows® is a registered trademark of the Microsoft®
• All other brands and names are property of their
*Standard installation is recommended.
Operation may not be assured if the above OS
has been upgrade.
Internet Explorer 5.5 or later
DirectX 9.0 or later
USB 1.1. Hi-speed USB (USB 2.0) is recommended.
systems.
guarantee that the provided software will work on all
personal computers meeting those requirements.
may not be smooth or video editing may take a long
time.
may skip frames or operate unexpectedly.
the Intel Corporation.
Corporation.
respective owners.
連接至電腦
DX103(i)/DX104/
本節說明如何使用 USB 纜線將攝錄放影機連接到電腦以進行各種
操作。
在將 USB 纜線連接到電腦時,請參閱以下軟體安裝和電腦規格
✪
(僅適用於
VP-
DX105(i
)
)
系統需求
DV Media PRO
必須滿足以下需求才能使用 DV Media PRO 電源導向器。
(
位元 ,
(建議
或以上)
或更新版本
位元)、
64
2 GHz
USB
的註冊商標。
)
介面。
XP 或 2000
Windows Vista
作業系統
CPU Intel® Pentium® 4
RAM 512 MB
連接器
顯示器
其他
• 須提供標準 USB 2.0 或 USB 1.1 的 USB 連接埠。建
• 在
• 以上系統需求資訊不保證隨附的軟體將能在滿足那些需
• 在比建議慢的電腦上,影片播放可能不順暢或視訊編輯
• 在比建議慢的電腦上,影片播放可能會跳幀或未能如常
•
•
• 所有其他品牌和名稱是他們各自所有者的財產。
* 建議採用標準安裝。
如果上述作業系統已升級,則可能無法正常操作。
USB1.1/2.0
1024 x 768
Internet Explorer 5.5
DirectX 9.0
議使用高速 USB (USB 2.0)。
Macintosh
求的所有個人電腦上操作。
可能需要較長時間。
操作。
Intel® Pentium III™
的商標。
Windows®是Microsoft® Corporation
32
(建議
2 GB
連接器
、
位元彩色或更高
24
或更新版本
作業系統中不支援
或
Pentium 4™ 是 Intel Corporation
。
Page 98

92_ English
臺灣
_92
connecting to a PC
(VP-
DX103(i)/DX104/DX105(i) only
連接至電腦
DX103(i)/DX104/
(僅適用於
DX105(i
VP-
)
)
INSTALLING DV MEDIA PRO
When you install the DV Media PRO software on your Windows
computer, you can enjoy the following operations by connecting
your DVD camcorder to your computer via a USB cable.
- View Movie Recordings and Photos on PC: DV Driver,
DirectX9.0, Video Codec
- PC cam/USB streaming function: DV Driver, DirectX9.0, Video
Codec
Before your start!
• Turn on your PC. Exit all other running applications.
• Insert the provided CD into the CD-ROM drive.
The setup screen appears automatically soon after the CD is
inserted. If the setup screen does not appear, click on “Start” on
the bottom left corner and select “Run” to display a dialog. Type
“D:\autorun.exe” and then press ENTER, if your CD-ROM drive is
mapped to “D:Drive”.
Installing Driver - DV Driver and DirectX 9.0
• DV Driver is a software driver that is required to support
establishing connection to a PC.
(If it is not installed, some functions will not be supported.)
1. Click on “DV Driver” on the Setup screen.
• Driver software is installed automatically. Following drivers
will be installed:
- PC Camera/USB Streaming driver(Capture Driver)
2. Click on “Confirm” to finish driver installation.
3. If the “DirectX 9.0” is not installed, it is installed automatically
after setting <DV Driver>.
• After installing “DirectX 9.0,” please restart your PC.
If ”DirectX 9.0” is installed already, there is no need to
restart the PC.
Application Installation - Video Codec
• Click on “Video Codec” on the Setup screen.
“Video Codec” is required to play movie files recorded by this
DVD Camcorder on a PC.
安裝
DV MEDIA PRO
如果在 Windows 電腦上安裝了 DV Media PRO 軟體,則可用
USB 電纜線將 DVD 攝錄放影機連線到電腦來享受下列操作。
- 在 PC 上觀看影片錄製內容和照片:DV 驅動程式 DirectX9.0 - 視訊轉碼器
- PC Camera/USB 流化功能:DV 驅動程式 - DirectX9.0 視訊轉碼器
開始使用之前!
開啟電腦。結束所有正在執行的其他應用程式。
•
將隨附的光碟片放入 CD-ROM 光碟機。
•
安裝螢幕會在放入光碟片之後立即自動顯示。若安裝螢幕沒有顯
示,請按一下左下角的「開始」,然後選取「執行」以顯示對話方塊。
若 CD-ROM 光碟機對應到「D:光碟機」,鍵入「D:\\autorun.
exe」並按下 ENTER。
安裝驅動程式
DV Driver 是與電腦建立連接時所需的一個軟體驅動程式。
•
(若未安裝,一些功能將不被支援。)
在「安裝」螢幕上按一下「DV Driver」。
1.
驅動程式軟體將會自動安裝。將安裝以下驅動程式:
•
- PC Camera/USB 流化驅動程式(捕捉驅動程式)
按一下「確認」完成驅動程式安裝。
2.
若尚未安裝「DirectX 9.0」,它將在設定 <DV Driver> 之後
3.
自動安裝。
「DirectX 9.0」安裝完畢後,請重新啟動電腦。
•
如果已安裝 「DirectX 9.0」,則不需要重新啟動電腦。
應用程式安裝
在「安裝」螢幕上,按一下「Video Codec」。
•
需要視訊轉碼器以播放透過電腦上的 DVD 攝錄放影機錄製
的影片檔案。
驅動程式和
- DV
視訊轉碼器
-
DirectX 9.0
Page 99

Application Installation – Quick Time
93_ English
臺灣
_93
1. Click “Quick Time” on the Setup screen.
• QuickTime is Apple’s technology for handling movie,
sound, animation, graphics, text, music, and even
360-degree virtual reality (VR) scenes.
• Please install by using the Software CD that came with
this DVD camcorder. We do not guarantee compatibility
for different CD versions.
• For movie playback on a PC, install software in this
order: DV Driver, DirectX 9.0, Video Codec
• For PC Cam use, install software in this order: DV
Driver, DirectX 9.0, Video Codec
• You have to install DV Driver, DirectX 9.0, Video
Codec to run DV Media Pro properly.
• If a message saying “Digital
Signature not found” or something
similar appears, ignore the message
and continue with the installation.
• During installation, if the Microsoft
LOGO test warning is shown, just
click ‘Continue(C).’
應用程式安裝
在「安裝」螢幕上,按一下「QuickTime」。
1.
• QuickTime 是 Apple 研發的一項技術,用於處理影片、聲
– Quick Time
音、動畫、圖形、文字、音樂,甚至是 360 度虛擬現實 (VR)
場景。
• 請使用此 DVD 攝錄放影機隨附的軟體 CD 進行安裝。我
們不保證與其他不同 CD 版本的相容性。
• 要在電腦上播放影片,請按以下順序安裝軟體:
• 要用作 PC Cam,請安裝此資料夾中的軟體:
• 您必須安裝
、
動程式
DirectX 9.0
DirectX 9.0
能正確執行
• 若顯示「
• 在安裝過程中,如果出現 Microsoft LOGO
、
視訊轉碼器
、
視訊轉碼器
DV
DV Media Pro
不到數位簽章)訊息或其他類似訊息,請
忽略該訊息並繼續進行安裝。
測試警告,按一下「繼續 (C
、
驅動程式
DirectX 9.0
。
Diggital Signature not found
DV
、
視訊轉碼器
)」即可。
驅動程式
DV
驅
、
才
」(找
Page 100

connecting to a PC
94_ English
臺灣
_94
(VP-
DX103(i)/DX104/DX105(i) only
CONNECTING THE USB CABLE
To copy the movie fi les and photo fi les to
your PC, connect your DVD camcorder to
the PC with a USB cable.
1. Set the “USB Connect” to “Mass
Storage.”
2. Connect the DVD camcorder to the
PC with a USB cable.
page 81
• Do not apply excessive
force when inserting or
extracting a USB cable
into/from a USB jack.
• Insert a USB cable after
checking the direction of
its insertion is correct.
• Hi-speed USB (USB 2.0)
recommended.
Disconnecting the USB cable
After completing the data transmission, you must disconnect the
cable in the following way:
1. Click the “Unplug or eject hardware” icon on the task tray.
2. Select “USB Mass Storage Device” or “USB Disk”, then click
“Stop.”
3. Click “OK.
4. Disconnect the USB cable from the DVD camcorder and PC.
”
• We recommend using the AC power adaptor as the power
supply instead of the battery pack.
• When the USB cable is connected, turning the camcorder on
or off may cause the PC to malfunction.
• If you disconnect the USB cable from the PC or the DVD
camcorder while transferring, the data transmission will stop
and the data may be damaged.
• If you connect the USB cable to a PC via a USB HUB or
simultaneously connect the USB cable along with other USB
devices, the DVD camcorder may not work properly. If this
occurs, remove all USB devices from the PC and reconnect
the DVD camcorder.
PC
連接至電腦
DX103(i)/DX104/
連接
纜線
USB
DVD camcorder
(僅適用於
DX105(i
要將影片檔案和相片檔案複製到您的
電腦上,可將您的 DVD 攝錄放影機連
接到有 USB 纜線的電腦。
將「
1.
USB Connect
Storage
將
2.
DVD
USB
• 在向 / 從
• 在檢查以正確方向插入後,插
• 建議使用高速
第 81 頁
」。
攝錄放影機連接到有
纜線的電腦上。
/ 拔出
USB
度用力。
入
纜線插孔。
USB
。
2.0)
VP-
)
」設定為「
插孔中插入
USB
纜線時,不可過
USB (USB
Mass
拔下 USB 纜線
在完成資料傳輸後,您必須透過以下方式拔下纜線:
按一下工作匣上的「拔下或退出硬體」圖示。
1.
選擇「USB 大量儲存裝置」或「USB 光碟」,然後按一下「停止」。
2.
按一下「確定」。
3.
從 DVD 攝錄放影機和電腦上拔下 USB 纜線。
4.
•
我們建議使用交流電源適配器而非電池組作為電源供應。
• 在連接 USB 纜線時,開啟或關閉攝錄放影機可能會導致
電腦發生故障。
• 如果您在傳輸期間從電腦或 DVD 攝錄放影機拔下 USB 纜
線,資料傳輸便會停止,而資料也可能會損壞。
• 如果您透過 USB 集線器將 USB 纜線連接到 PC 或同時與
其他 USB 裝置連接 USB 纜線,DVD 攝錄放影機可能無法
正常操作。如果出現此種情況,可從電腦上卸下所有的
USB 裝置,並重新連接 DVD 攝錄放影機。
)
 Loading...