

ENGLISH/ESP AÑOL

• This camera will not function without a battery.
• Use one 3V lithium battery(CR-123A or DL-123A).
• The lens cap automatically opens when the Power button is turned on.
• Do not open the lens cap with your fingers.
The shutter does not operate in the following circumstances:
• When the camera has no battery or when the battery is almost drained.
• When the Power is turned off.(When the lens cap is closed.)
• When the zoom button is operating or when the film is winding or rewinding.
(Rewinding will stop when the shutter button is pressed during rewinding.)
• When the film remains in the camera after rewinding.
• When the flash is being charged.
This camera is controlled electronically by a built-in microcomputer. Although unlikely, it may fail to operate
under certain circumstances in which there is a strong electromagnetic field (near a TV, microwave etc.). If this
occurs, please remove the lithium battery and replace after 2~3 minutes.
2
NOTE/NOT AS
En

3
• Esta cámara no funciona sin pila.
• Utilice una pila de litio de 3 V. (CR-123A o DL-123A)
• La tapa del objetivo se abrirá automáticamente cuando se conecte la cámara.
• No abra la tapa del objetivo con los dedos.
El disparador no se accionará en las siguientes circunstancias:
• Cuando la cámara no tenga pila o cuando esté casi agotada.
• Cuando la cámara esté desconectada (cuando esté cerrada la tapa del objetivo).
• Cuando el botón del zoom esté en funcionamiento o cuando la pelÌcula esté avanzando o rebobinándose.
(Si presiona el Disparador durante el rebobinado, éste se detendrá).
• Cuando la película permanezca en la cámara después de haber sido rebobinada.
• Cuando se esté cargando el flash.
Esta cámara está controlada electrónicamente por un microordenador incorporado. Aunque es improbable,
puede dejar de funcionar en determinadas circunstancias en las que exista un intenso campo electromagnético
(cerca de un televisor, un microondas, etc.). Si esto ocurriera, por favor extraiga la pila de litio y vuélvala a
colocar transcurridos 2~3 minutos.
Es
4
CONTENTS/ÍNDICE
Part Names
................................................................................
6
LCD panel
...................................................................................
9
Viewfinder and Indicators
.........................................................
11
Attaching the strap
....................................................................
11
Loading the battery
...................................................................
13
Checking the battery
.................................................................
15
Loading the film
.........................................................................
16
Using the camera
.......................................................................
18
Holding the camera
..................................................................
19
Taking pictures
..........................................................................
20
Adjusting the diopter
.................................................................
22
Using the focus lock
..................................................................
23
Rewinding the film
....................................................................
25
Date and caption (Q.D. model only)
.........................................
27
Clock/Calendar function (Non Q.D. model only)
......................
30
Using the Shooting mode
.........................................................
32
Using the Flash mode
...............................................................
33
Using the Self mode
..................................................................
34
Using the focus mode
................................................................
35
Sports shooting
.........................................................................
36
Portrait zoom
.............................................................................
37
Bulb shooting (B Shutter)
.........................................................
38
Step zoom
.................................................................................
39
Continuous shooting
.................................................................
40
Auto Red-eye Reduction
..........................................................
41
Flash off
.....................................................................................
42
Fill-in flash
.................................................................................
43
Fill-in flash and Back-light control
............................................
44
Fill-in flash and Red-eye Reduction
.........................................
45
Self-timer
...................................................................................
46
Double self-timer
.......................................................................
47
2 second delayed shutter release
............................................
48
Interval shooting
........................................................................
49
Spot shooting
............................................................................
50
Snap shooting
...........................................................................
51
Macro photography
...................................................................
52
Panorama photography
............................................................
53
Landscape mode(Infinity)
.........................................................
54
Remote control shooting(Optional)
..........................................
55
Replacing the battery of the remote control (Optional)
...........
56
Care and storage
.......................................................................
57
Trouble shooting
........................................................................
59
PREPARATION
TAKING PHOTOS
IMPORTANT NOTES
SPECIFICATIONS
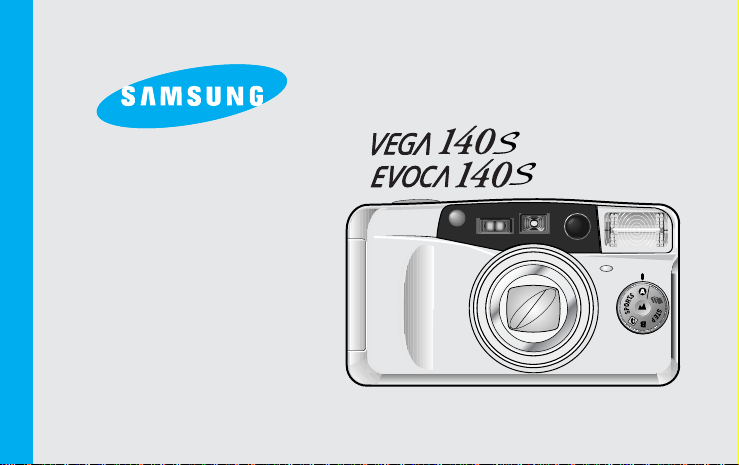
Thank you for purchasing the SAMSUNG camera.
This camera is an exciting 4x zoom camera that will give you excellent performance. Please read this manual before
using your camera.
TABLE OF CONTENTS
En

5
Nomenclatura
..............................................................................
6
Panel informativo LCD
.................................................................
9
Visor e Indicadores
...................................................................
11
Colocación de la correa
.............................................................
11
Colocación de la pila
..................................................................
13
Comprobación de la pila
............................................................
15
Colocación de la película
..........................................................
16
Cómo utilizar la cámara
.............................................................
18
Cómo sujetar la cámara
............................................................
19
Cómo fotografiar
........................................................................
20
Ajuste dióptrico
...........................................................................
22
Utilización del bloqueo del enfoque
.........................................
23
Cómo rebobinar la película
......................................................
25
Fecha y título (sólo modelo Q.D.)
............................................
27
Función reloj/calendario (sólo modelo sin Q.D.)
......................
30
Utilización del modo de exposición
...........................................
32
Utilización de los modos del flash
.............................................
33
Utilización del modo SELF
........................................................
34
Utilización del modo de autofoco
..............................................
35
Utilización del autofoco con haz m˙ltiple
.................................
36
Fotografía deportiva
...................................................................
37
Posición B (exposición larga)
....................................................
38
Modo zoom a diferentes longitudes focales
.............................
39
Fotos en serie
............................................................................
40
Reducción de ojos rojos automática
........................................
41
Flash desconectado
.................................................................
42
Flash de relleno
.........................................................................
43
Flash de relleno y control de contraluz
.....................................
44
Flash de relleno y reducción de ojos rojos
...............................
45
Autodisparador
...........................................................................
46
Autodisparador doble
................................................................
47
Autodisparador con 2 segundos de retardo
............................
48
Fotografía a intervalos
...............................................................
49
Fotografía con enfoque puntual
................................................
50
Instantáneas
..............................................................................
51
Fotomacrografía
.......................................................................
52
Fotografía panorámica
..............................................................
53
Modo paisajes (Infinito)
.............................................................
54
Exposición con mando a distancia (opcional)
.........................
55
Cómo cambiar la pila del mando a distancia (opcional)
..........
56
Cuidados y almacenamiento
................................................
57
Problemas y soluciones
.........................................................
59
PREPARATIVOS
CÓMO TOMAR FOTOGRAFÍAS
NOTAS IMPORTANTES
ESPECIFICACIONES
Gracias por comprar una cámara SAMSUNG.
Ésta es una atractiva cámara con zoom 4x que le proporcionará unos excelentes resultados. Por favor, lea este
manual de instrucciones antes de utilizar su cámara.
Es
ÍNDICE
6
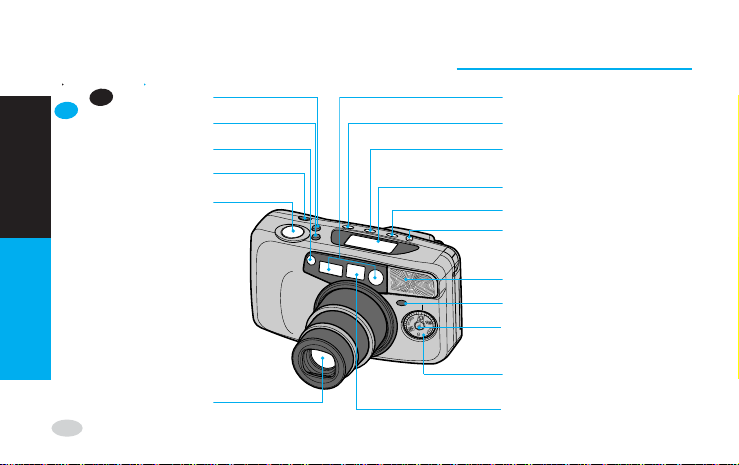
PART NAMES / NOMENCLA TURA
PREPARATION
PREPARATIVOS
Zoom button (WIDE)
Botón del zoom (ANGULAR)
Zoom button (TELE)
Botón del zoom (TELE)
Exposure sensor
Sensor de exposición
Power button
Botón de conexión/desconexión
Shutter button
Disparador
Lens
Objetivo
Autofocus window
Ventanillas del autofoco
Flash button (Flash mode selection button)
Botón del flash (botón de selección del modo de flash)
Self mode button(Self mode and Interval mode selection button)
Botón del modo SELF (botón de selección de los modos de
intervalos y SELF
)
LCD panel
Ecran LCD
Spot/Snap button
Botón de Spot/Snap (instant·neas/enfoque puntual)
DATE or TIME button (Date and Caption selection button)
Botón FECHA y HORA (botón de selección de
fecha y título)
Flash
Flash
Self-timer lamp
L·mpara del autodisparador
Landscape mode button
Botón del modo de paisajes
Shooting mode dial
Dial del modo de exposición
Viewfinder
Visor
Es
En
Front / Top De frente/Parte superior

7
Mid-roll rewind button
Botón de rebobinado a mitad de rollo
Panorama switch
Interruptor de panorámica
Film check window
Ventanilla de comprobación de la
película
Back cover release button
Botón de apertura del respaldo
Autofocus indicator(Green LED)
Indicador del autofoco (diodo verde)
Flash indicator(Red LED)
Indicador del flash (diodo rojo)
Viewfinder
Visor
Diopter adjustment dial
Dial de ajuste dióptrico
Tripod socket
Rosca para el trípode
Strap eyelet
Enganche de la correae
Es
En
Rear / Bottom Parte posterior/inferior
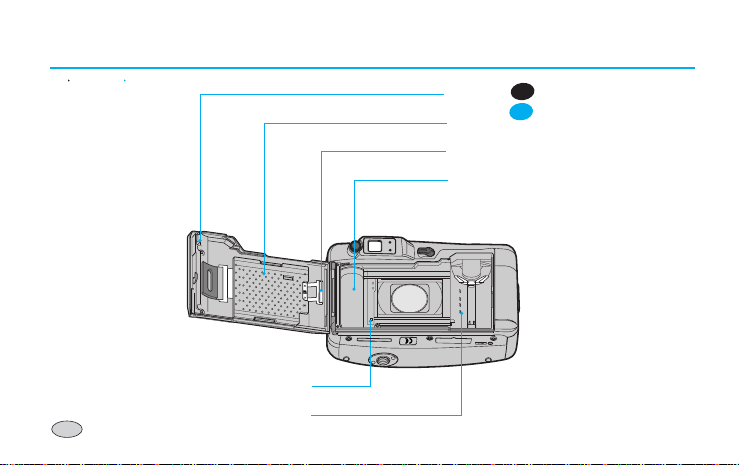
8
Interior Interior
Back cover
Rerpaido
Film pressure plate
Placa de presión de la película
Film pressure roller
Rodillo de presión de la película
Spool
Bobina
Es
En
Film sensor
Sensor de la película
DX contacts
Contactos DX
9
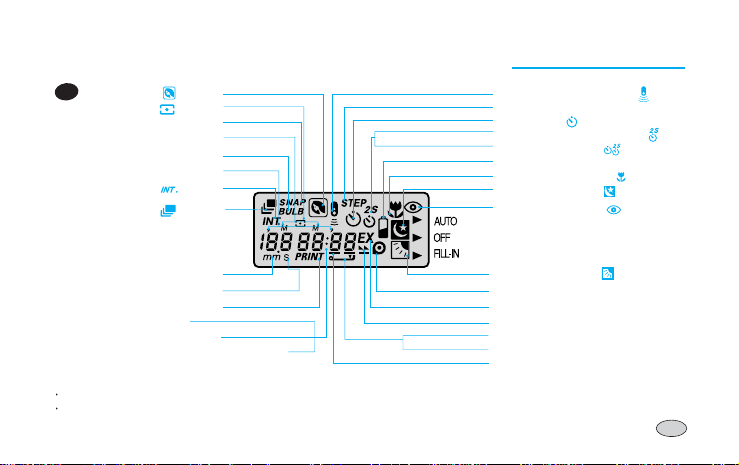
LCD P ANEL/PANEL INFORMATIVO LCD
En
NOTE
For more information regarding the mark, refer to the pages in ( ).
When the back-light control function is selected, the flash will operate regardless of ambient lighting conditions.
Portrait zoom( /P.37).1
Spot shooting( /P.50).2
Snap shooting(
SNAP /P.51).3
Month.4
Bulb shooting(B Shutter)(BULB /P.38).5
Year.6
Interval shooting( /P.49).7
Continuous shooting( /P.40).8
Focal length unit (mm) / Minutes(m)
.9
Seconds(s).10
Date or caption print mark.11
a. Focal length.12
15.Remote control shooting( /P.55)
16.Step zoom(STEP /P.39)
17.Self-timer( /P.46)
18.
2 sec. delayed shutter release
( /P.48)
19.Double self-timer( /P.47)
20.Battery condition indicator(P.15)
21.Macro Photography( /P.52)
22.Slow shutter sync( /P.43)
23.Red-eye reduction( /P.41)
24.Back-light control( /P.44)
25.Film present indicator
26.Exposure unit(EX)
27.Film rewinding indicator
28.Back-cover open indicator
29.
Film loading failure warning indicator(E)
30.Film loading indicator
b. Exposure counter.13
c. Date (Year, Month, Date, Time).14
10
Modo zoom para retratos
Fotografía con enfoque puntual
Instantáneas
Mes
Posición B (exposición larga)
Año
Fotografía a intervalos
Fotografías en serie
Longitud focal (mm) / Minutos(m)
Segundos(s)
Marca de impresión de fecha o título
a. Longitud focal
b. Contador de exposiciones
c. Fecha (año, mes, fecha, hora)
Fotografía con mando a distancia
1
2
3
4
5
6
7
8
9
10
11
12
13
14
15
16
17
18
19
20
21
22
23
24
25
26
27
28
29
30
Modo zoom a diferentes longitudes focales
Autodisparador
Autodisparador con 2 segundos de retardo
Autodisparador doble
Indicador de película cargada
Indicador de la carga de la pila
Fotomacrografía
Sincronización lenta
Reducción de ojos rojos
Control de contraluz
Unidad de exposición (EX)
Indicador de rebobinado de la película
Indicador de apertura del respaldo
Indicador de aviso de fallo en la carga de la película (E)
Indicador de carga de la película
NOTAS
Para más información relativa a la marca, consulte las páginas ( ).
Cuando seleccione la función de control de contraluz, el flash se activará independientemente de las condiciones de
luminosidad del ambiente
Es
11
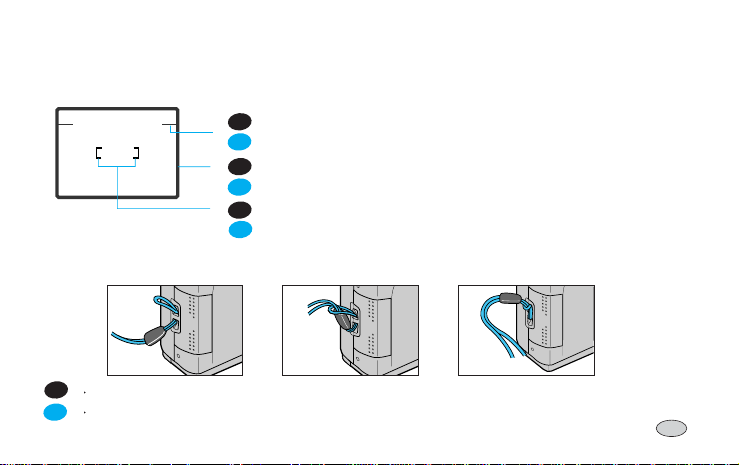
VIEWFINDER AND INDICATORS / VISOR E INDICADORES
Macro picture area
Recuadro para tomas macro
Picture area frame
Recuadro de la imagen
Autofocus frame (Focus on the subject with this frame)
Recuadro del autofoco (enfoque el sujeto con este recuadro)
Viewfinder/Visor
Es
En
Es
En
Es
En
3
2
1
ATTACHING THE STRAP/COLOCACIÓN DE LA CORREA
Refer to the illustrations above.
Consulte las ilustraciones mostradas más arriba.
Es
En

12
AF
1. Autofocus Indicator (Green LED)
When illuminated this confirms that conditions are suitable for picture
taking.
When the subject is too close, (within 0.68m (2.2ft), the LED will blink
rapidly and the shutter will lock.
The Auto Macro mode will be selected when the subject is within the range
(0.68m ~ 1.0m). At this point the LED will blink slowly.
2. Flash Indicator (Red LED)
Illuminates when the flash is fully charged. (In low light conditions)
Blinks rapidly when the flash is being charged. (Shutter will be locked)
Blinks slowly to indicate that the camera requires steady support (preferably
a tripod) to avoid camera shake.
Green/Verde
Red/Rojo
Indicators/Indicadores
En
1. Indicador del autofoco (piloto verde)
Cuando se ilumina confirma que las condiciones son adecuadas para tomar fotografías.
Cuando el sujeto esté a corta distancia (inferior a 0.68 m (2.2 pies)), el diodo parpadeará rápidamente y
se bloqueará el disparador.
Se seleccionará el modo macro automático cuando el sujeto esté dentro de la escala de distancia (0.68
m - 1.0 m). En ese momento, el diodo parpadeará lentamente.
2. Indicador del flash (diodo rojo)
Se ilumina cuando el flash está totalmente cargado (en condiciones de escasa luminosidad).
Parpadea rápidamente cuando se está cargando el flash (se bloqueará el disparador).
Parpadea lentamente para indicar que la cámara debe apoyarse en un soporte firme (preferiblemente
en un trípode) para evitar la trepidación de la misma.
Es
13
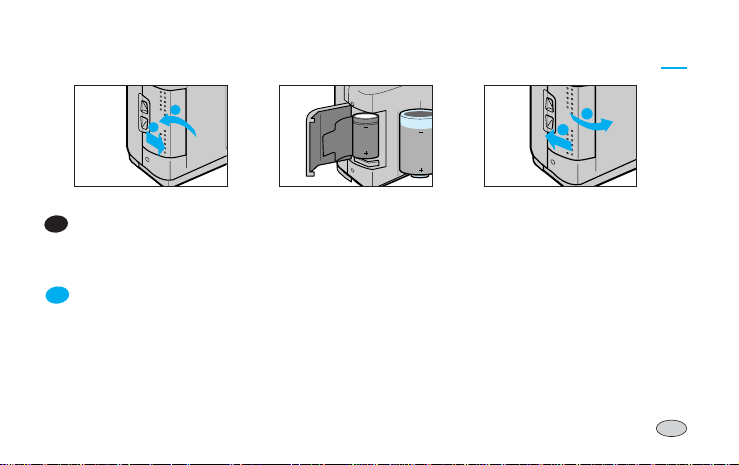
LOADING THE BA TTERY/COLOCACIÓN DE LA PILA
1. Open the chamber cover by sliding the battery chamber cover.
2. Insert a new battery and ensure it is placed in the correct position.
3. Close the chamber cover.
1. Abra el compartimento de la pila deslizando su tapa.
2. Inserte una nueva pila y compruebe que esté colocada en la posición correcta.
3. Cierre la tapa del compartimento de la pila.
2
1
3
2 1
Es
En
1
2

14
NOTE
Use one CR-123A or DL-123A battery.
The camera will automatically turn the power off when not used after 3 minutes.
Remove the battery from the camera when the camera is not used for an extended period.
Be sure to check the date and shooting mode when you load a new battery.
If the date or time is incorrect, please refer to page (27) and adjust accordingly.
NOTAS
Use una pila CR-123A o DL-123A.
La cámara se desconecta automáticamente si no se usa durante 3 minutos. Extraiga la pila de la cámara
cuando no la vaya a usar durante un largo periodo de tiempo.
Compruebe la fecha y el modo de exposición cuando cargue una pila nueva.
Si la fecha o la hora son incorrectas, por favor consulte la página (27) y ajústelas convenientemente.
Es
En
15
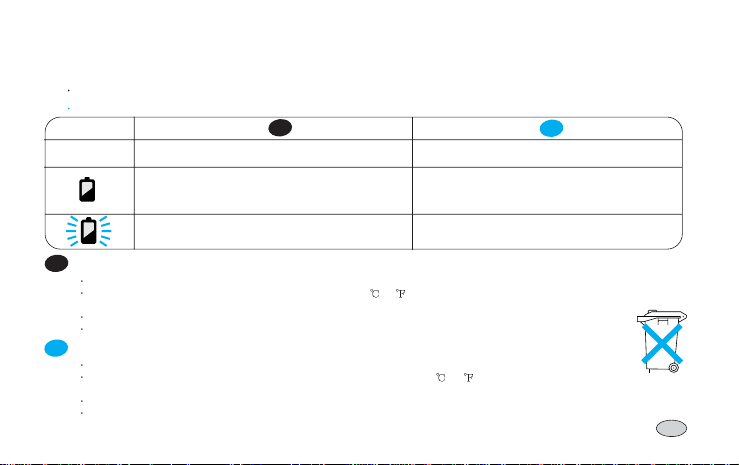
CHECKING THE BA TTERY/COMPROBACIÓN DE LA PILA
You can check the battery life on the LCD panel.
Es posible comprobar la carga de la pila en el panel informativo LCD.
1. Normal operation
- The battery condition indicator does not appear.
2. The indicator appears half way.
- The battery life is low and you should ensure that a
replacement battery is available.
3. The indicator blinks.
- The battery is exhausted. Load a new battery.
1. Funcionamiento normal
- No aparece el indicador de carga de la pila.
2. El indicador aparece por la mitad.
- La carga de la pila está baja y debe comprobar que
dispone de una pila de repuesto.
3. El indicador parpadea.
- La pila está agotada, cargue una pila nueva.
Es
En
NOTE
Do not remove the battery while the camera is operating, because it may cause the camera to malfunction.
Battery performance is reduced in low temperatures (under -10 (14 ));Try to keep the camera warm between shots. (The battery will
operate normally again when the temperature returns to normal).
Please dispose of the exhausted battery with care.
Some local authorities may require batteries to be disposed of separately from other refuse.
NOTAS
No extraiga la pila mientras esté utilizando la cámara, ya que puede provocar un mal funcionamiento.
El rendimiento de la pila se reduce a bajas temperaturas (por debajo de -10 (14 )) ; trate de mantener la cámara a
temperatura normal entre disparos. La pila volverá a funcionar normalmente cuando la temperatura vuelva a estabilizarse.
Por favor, deseche las pilas gastadas con precaución.
En algunas casos la normativa vigente exige desechar las pilas en contenedores dedicados exclusivamente a ellas y separadas de
otros desechos.
Es
En
16
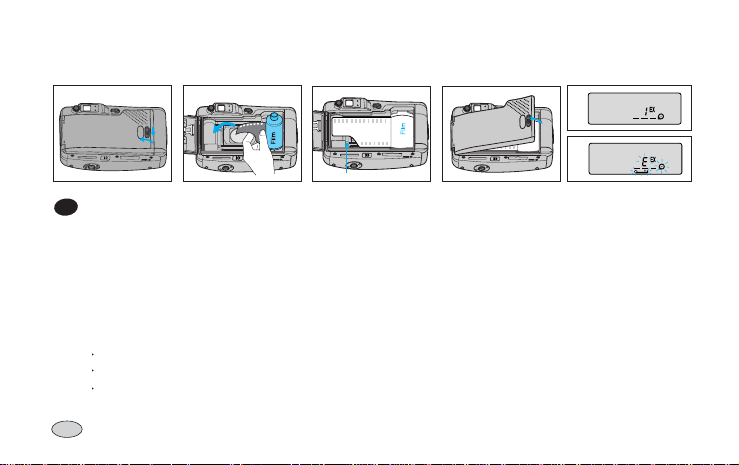
LOADING THE FILM/COLOCACIÓN DE LA PELÍCULA
1. Open the back cover by sliding the release knob as shown above.
2. Insert a roll of film in the chamber. Do not force the film into position.
3. The film should lie flat.
4. Close the back cover. It will close with a “click”.
5. The film will automatically advance until the film counter reads “1”.
6. If a film is loaded incorrectly, the LCD panel will display an “E” warning signal. Reload the film following the steps
shown above.
NOTE
The camera automatically adjusts for ISO 50-3200 DX film.
When you use non-DX film, the camera will set the film speed at ISO 100.
Load the film in subdued lighting.
En
3
2 1
4
6
5
Film sensor

17
1. Deslice la palanca de apertura del respaldo para abrirlo tal y como se muestra en el dibujo sobre estas líneas.
2. Inserte un rollo de película en el compartimento de la película. No fuerce la película al introducirla.
3. La película deberá permanecer plana, tal y como aparece en los dibujos de más abajo.
4. Cierre el respaldo. Se cerrará con un “clic”.
5. La película avanzará automáticamente hasta que aparezca “1” en el contador.
6. Si la película se ha cargado incorrectamente, aparecerá la señal de advertencia “E” en el panel informativo LCD.
Vuelva a cargar la película siguiendo los pasos mostrados anteriormente.
NOTAS
La cámara ajusta automáticamente la sensibilidad de la película en películas con códigos DX entre 50 y 3200 ISO.
Cuando utilice película sin códigos DX, la cámara ajustará automáticamente la sensibilidad de la película a 100 ISO.
Cargue la película en condiciones de luz suave.
Es
18
USING THE CAMERA/CÓMO UTILIZAR LA CÁMARA
Press the Power button to turn the power on. The indicators will appear on the LCD panel.
If the camera is not used for 3 minutes, the power will be turned off automatically.
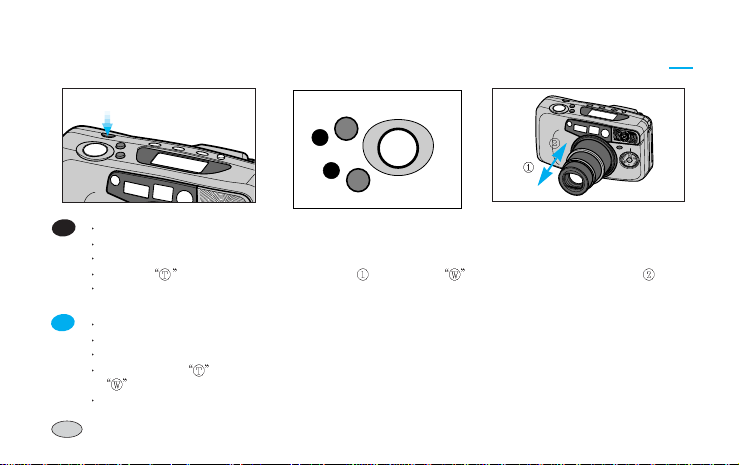
While looking through the viewfinder, aim the camera at the subject and operate the zoom buttons.
Press the (Tele) button to move the lens out and press the (Wide) button to move the lens in .
During this operation, the LCD panel shows the focal lengths in the following sequence : 38, 45, 55, 70, 80, 90,
105, 120, 130, 140 mm.
Pulse el botón de conexión/desconexión para conectar la cámara. Se activará el panel informativo LCD.
Si no utiliza la cámara durante 3 minutos, ésta se desconectará automáticamente.
Mientras mira por el visor, apunte la cámara al sujeto y haga funcionar los botones del zoom.
Pulse el botón (Tele) para aumentar la longitud focal y así acercar los sujetos alejados, o pulse el botón
(Angular) para disminuir la longitud focal y ampliar la cobertura de la imagen.
Durante esta operación, el panel informativo LCD mostrará las longitudes focales en el siguiente orden : 38, 45,
55, 70, 80, 90, 105, 120, 130, 140 mm.
Es
En
T
W

19
HOLDING THE CAMERA/CÓMO SUJET AR LA CÁMARA
In order to avoid camera shake, hold the camera steady, especially when using
longer focal lengths (Tele).
Place the camera strap over your wrist.
Both elbows (horizontal picture) or one elbow (vertical picture) should be held
close to your body.
Keep your eye close to the viewfinder when using the camera. This ensures
correct framing. Ensure you can see all four sides of the viewing frame when
composing your shot.
En
Para evitar la trepidación de la cámara, sujétela firmemente, sobre todo cuando utilice longitudes focales largas (Tele).
Colóquese la correa de la cámara en la muñeca.
Apoye los dos codos (para hacer una fotografía horizontal) o uno solo (para hacer una fotografía vertical) contra su cuerpo.
Mantenga el ojo pegado al visor cuando utilice la cámara. Así se asegurará un encuadre correcto. Asegúrese de poder ver los
cuatro lados del encuadre cuando componga su imagen.
NOTAS
Evite obstruir el objetivo cuando realice una fotografía. Las imágenes pueden estropearse si un dedo, el pelo o la correa de la
cámara cuelgan delante del objetivo, el sensor de exposición o las ventanillas del autofoco.
Cuando realice fotografías en posición vertical y utilice el flash, éste deberá quedar siempre por encima del objetivo.
Es
;;;
NOTE
Avoid obstructing the lens when you take a picture. Pictures can be spoiled when a finger, hair or camera strap falls in front of the Lens,
Exposure Sensor or Auto-focus Windows.
When you take vertical pictures with flash, the flash should be above the lens.
20
Aim the Autofocus frame at a subject.(Refer to page 12)
Press the Shutter button half way down. The lens is focused when the
green lamp turns on.
If a subject is between 0.68m (2.2ft) and 1m (3.28ft), the green lamp
blinks slowly and Macro mode is set automatically. (Refer to page 52)
If a subject is within 0.68m (2.2ft), the green lamp blinks quickly to indicate
that the subject is too close and the shutter is locked. Ensure that the
camera/subject distance is 0.68cm or more.
Press the Shutter button all the way down to take a picture.
The film will automatically advance after shooting and the frame counter will
advance.
Sitúe el recuadro del autofoco sobre el sujeto (consulte la página 12).
Pulse el disparador hasta la mitad. Cuando el motivo se encuentre
correctamente enfocado, la lámpara verde se iluminará.
Si el sujeto se encuentra a una distancia de entre 0.68m (2.2 pies) y 1 m
(3.28 pies), la lámpara verde parpadeará despacio y se ajustará
automáticamente el modo macro (consulte la página 52).
Si el tema se encuentra a una distancia de 0.68 m (2.2 pies) o inferior,
parpadeará la lámpara verde para indicar que el tema está demasiado
cerca y se bloquearé el obturador. Asegúrese de que la distancia de
cámara a tema es de 0.68 cm o superior.
Presione el disparador hasta el fondo para tomar la fotografía.
La película avanzará automáticamente después de realizar la fotografía y
avanzará el contador de exposiciones.
TAKING PICTURES/CÓMO FOTOGRAFIAR
Es
En

21
NOTE
When the flash is being charged, the flash indicator ( AUTO) on the LCD
panel blinks and the shutter will not operate.
When the Red LED blinks, use a tripod or steady support to avoid camera shake.
In order to avoid camera shake, hold the camera steadily and press the Shutter
button gently, particularly when using longer focal lengths.(Tele)
After taking pictures, turn off the camera. This will protect the lens and prevent unintended shots. (If not used for 3
minutes, the camera will turn off automatically).
In such a case, the power will be turn off with zoom lens move into the camera automatically while the Shutter
button is operate. If this occur, please turn the power on and take a picture again.
NOTAS
Cuando se esté cargando el flash, parpadeará el indicador del mismo ( AUTO) en el panel informativo LCD y
no funcionará el obturador.
Cuando el diodo rojo parpadee lentamente, utilice un trípode o sujete la cámara firmemente para evitar la
trepidación de la misma.
Para evitar la trepidación de la cámara, sujétela firmemente y presione el disparador con cuidado, particularmente
cuando utilice longitudes focales largas (Tele).
Después de fotografiar, desconecte la cámara. Esto protegerá el objetivo y evitará realizar disparos involuntarios.
Si no utiliza la cámara durante 3 minutos, ésta se desconectará automáticamente.
En este caso, la cámara se desconectará y el zoom retrocederá hacia la cámara automáticamente mientras el
disparador esté en funcionamiento. Si ello ocurriera, por favor conecte la cámara y vuelva a tomar la fotografía.
Es
En

22
ADJUSTING THE DIOPTER/AJUSTE DIÓPTRICO
Select the maximum zoom setting and turn the diopter adjustment dial
until the viewfinder display becomes clear.
Seleccione la posición máxima del zoom y gire el dial de ajuste dióptrico
hasta ver con total claridad y nitidez la pantalla del visor.
Es
En

23
USING THE FOCUS LOCK/
UTILIZACIÓN DEL BLOQUEO DEL ENFOQUE
If you want to focus on a subject that is not in the centre of your picture, use the Focus Lock
function described below.
1. Aim the camera with the autofocus frame superimposed over the subject.
2. Press the shutter button half way down. (Green LED light)
Be careful not to press the shutter button all the way down to avoid taking an unwanted picture.
3. Keeping the shutter button depressed, recompose your picture as desired.
Hold the camera steadily and gently press the shutter button completely down.
The Focus Lock can be released at any time by lifting your finger from the shutter button.
! ATTENTION
The Autofocus system of this camera may not function in circumstances below :
The subject blends into the background.
The subject is fast moving.
The subject does not reflect enough light back into the autofocus receiver(e.g.very dark objects).
The subject is very narrow, either horizontally or vertically(e.g.a lampost).
There is more than one subject, one near the camera and one some distance away.
Strong light is directed at the camera. (the subject is back lit).
Fireworks and smoke.
Shining or glossy surfaces such as a car body or the surface of water.
In these circumstances, using the Focus Lock feature may help to solve the problem.
En
TAKING PHOTOS
CÓMO TOMAR
FOTOGRAFÍAS

24
Si desea enfocar un sujeto que no se encuentra en el centro de la foto, utilice la función de
bloqueo del enfoque tal y como se describe a continuación.
1. Apunte la cámara con el recuadro del autofoco sobre el sujeto.
2. Pulse el disparador hasta la mitad (diodo verde encendido).
Tenga cuidado de no presionar el disparador hasta el fondo para evitar tomar una fotografía
involuntariamente.
3. Mantenga el disparador pulsado hasta la mitad y vuelva a encuadrar la imagen de la forma
deseada.
Sostenga la cámara firmemente y pulse suavemente el disparador hasta el fondo.
El bloqueo del enfoque podrá anularse en cualquier momento con sólo levantar el dedo del
disparador.
! ATENCIÓN
El sistema de autofoco de esta cámara puede no funcionar en las siguientes circunstancias:
El sujeto se difumina en el fondo de la imagen.
El sujeto está en rápido movimiento.
El tema no refleja suficiente luz en el receptor del autofoco (por ejemplo, temas muy oscuros).
El motivo es muy estrecho, en vertical u horizontal (por ejemplo, una farola).
Hay más de un sujeto, uno cerca de la cámara y otro más alejado.
La cámara recibe una luz fuerte (el sujeto está a contraluz)..
Los fuegos artificiales y el humo.
Superficies brillantes y pulidas, como puede ser la superficie de un coche o la superficie del agua.
En estas circunstancias, usar la función de bloqueo del enfoque puede contribuir a resolver el
problema.
Shining or glossy surfaces such as a car body or the surface of water.
In these circumstances, using the Focus Lock feature may help to solve the problem.
Es

25
REWINDING THE FILM/CÓMO REBOBINAR LA
PELÍCULA
1. Automatic rewinding
After taking all the pictures on a roll of film, the camera will automatically rewind the
film. The motor stops when the rewinding is completed.
When the rewinding is completed, the icon ( ) will blink. After 5 seconds the icon
will no longer be displayed. You may remove the film at this point.
1. Rebobinado automático
Cuando se acabe de exponer la película, la cámara la rebobinará automáticamente.
El motor se detendrá cuando se haya completado la operación de rebobinado.
Cuando se haya completado el rebobinado, parpadeará el indicador ( ).
Transcurridos 5 segundos, el indicador desaparecerá. En ese momento podrá extraer
la película.
En
Es

26
Rewind button/Botón de rebobinado
2. Mid-roll rewinding
To rewind the film in the middle of a roll, press the Mid-roll rewind button.
The film will be completely rewound, ready for processing. You will not be
able to reload the film.
NOTE
If you press the Shutter button during film rewinding, the rewinding is
interrupted until the Shutter button is released.
If the motor stops before the LCD shows “0”, replace the battery. Do not
open the back cover until the battery is replaced.
2. Botó de rebobinado a mitad de rollo
Para rebobinar la película a la mitad, presione el botón de rebobinado a mitad de rollo. La película se rebobinará
totalmente, lista para su revelado. No podrá volver a cargar la película.
NOTAS
Si presiona el botón de conexión/desconexión durante el rebobinado de la película, el rebobinado se interrumpirá
hasta que deje de pulsarlo.
Si el motor se detiene antes de que aparezca “0” en el panel informativo LCD, cambie la pila. No abra el
respaldo de la cámara hasta haber cambiado la pila
En
Es

27
DA TE AND CAPTION (Q.D.MODEL ONLY)/
FECHA Y TÍTULO (SOLO MODELO Q.D.)
1. Changing "Date" format or selecting the caption/
Cómo cambiar el formato de la fecha o seleccionar el título
Press the DATE button to select one of the different formats.(Refer to the left sequences)
The "PRINT" mark on the LCD panel will blink during the print.
Presione el botón DATE para seleccionar uno de los distintos formatos existentes (consulte las
secuencias que aparecen a la izquierda).
El indicador de impresión “PRINT” del panel informativo LCD parpadeará durante la impresión.
<No print/Sin impresión>
<Month-Day-Year/mes-día-año>
<Year-Month-Day/año-mes-día>
<Day-Month-Year/día-mes-año>
<Selecting caption print
/Cómo seleccionar el título>
<Day-Hour-Minute/día/hora/minutos>
Use the DATE button to control "Date" and "Caption"
Utilice el botón DATE para controlar la fecha y el título.
En
Es
2. Date Zone / Área de la fecha
<Normal picture/
Imagen normal>
<Panorama shot/
Imagen panorámica>
NOTE/ NOTAS
Under certain circumstances, the date
will not print on the final frame of a film.
En determinadas circunstancias, la
fecha no se imprimirá en el último
fotograma de la película.
En
Es

28
To change the date or time, press and hold down the DATE button for 2 seconds. The
first sector of the date format will blink.
To select the sector that you want to change, press the DATE button.
Change the date setting by operating Zoom buttons. TELE button to increase, WIDE
button to decrease.
Para cambiar la fecha o la hora, presione y mantenga pulsado el botón DATE durante 2
segundos. Parpadeará la primera parte del formato de la fecha.
Para seleccionar la parte que desea cambiar, pulse el botón DATE (fecha).
Cambie el ajuste de la fecha utilizando los botones del zoom. El botón TELE se utiliza
para ir de menos a más y el ANGULAR para ir de más a menos.
En
Es
3. Changing the date setting / Cómo cambiar el ajuste de la fecha
NOTE/NOTE
This camera will set the date automatically until 2099.
A year mark will be indicated by the last 2 digits on the LCD panel, which will be printed on the picture.
Under these circumstances the camera will operate as normal.
La camera ajustar la automáticamente hasta el ao 2099.
El ao aparecer indicado por ias dos ltimas en el panel informativo LCD, las cuales se imprimirn en la
fotografa.
El estas circunstancias la cámara funcionar de forma normal.
Example/
Ejempio
1999 – > “99”
2000 – >“00”
2001 – >“01”
Es
En

29
When the LCD panel shows "CP-1"(refer to the previous picture ), you can
select one of seven captions as follows :
To change the captions, operate the zoom buttons.("T" or "W")
NOTE
The camera will print either a date or a caption. You cannot select both date
and caption on the same picture. (The caption is printed on the date zone).
Remember to reset the date and time after changing the battery.
Cuando en el panel informativo LCD aparezca “CP-1” (consulte la imagen
anterior), podrá seleccionar uno de los siete títulos siguientes de esta
forma:
Para cambiar el título, utilice los botones del zoom("T" o "W")
NOTAS
La cámara imprimirá la fecha o el título. No podrá imprimir ambos a la vez
en la misma imagen (el título se imprime en la zona de impresión de la
fecha).
Recuerde volver a ajustar la fecha y la hora después de cambiar la pila.
En
Es
MESSAGE CAPTIONS/
TÍTULOS
CP-1 I LOVE YOU!
CP-2 A HAPPY BIRTHDAY
CP-3 THANK YOU
CP-4 CONGRATULATIONS
CP-5 A HAPPY NEW YEAR
CP-6 MERRY X - MAS
CP-7 HELLO!
4. Selecting the caption print/Cómo seleccionar el título

30
1. Clock/Calendar function
With the Non Q.D. version there is a facility to check the time and date via the LCD
panel. Simply press the TIME button to select the display you require.
NOTE
On the Non Q.D model, the date/time will not print on your pictures.
1. Función reloj/calendario
En la versión sin Q.D. existe la posibilidad de comprobar la hora y la fecha
mediante el panel informativo LCD. Sólo tendrá que pulsar el botón TIME (hora)
para seleccionar la información que desee.
NOTAS
En el modelo sin Q.D. la fecha y la hora no se imprimen en las fotografías.
CLOCK/CALENDAR FUNCTION(NON Q.D. MODEL ONLY)/
FUNCIÓN RELOJ/CALENDARIO (SÓLO MODELO SIN Q.D.)
<Year-Month-Day/año-mes-día>
<Month-Day-Year/mes-día-año>
<Day-Month-Year/día-mes-año>
<Day-Hour-Minutes/día-hora-minutos>
En
Es

31
2. Changing the date setting
To change the date or time, press and hold down the TIME button
for 2 seconds. The first sector of the date format will blink.
To select the sector that you want to change, press the TIME button.
Change the date setting by operating zoom buttons.
2. Cómo cambiar el ajuste de la fecha
Para cambiar la fecha o la hora, presione y mantenga pulsado el
botón TIME (hora) durante 2 segundos. Parpadeará la primera parte
del formato de la fecha.
Para seleccionar la parte que desea cambiar, pulse el botón TIME.
Cambie el ajuste de la fecha utilizando los botones del zoom.
En
Es

32
USING THE SHOOTING MODE/UTILIZACIÓN DEL MODO DE EXPOSICIÓN
You can select the shooting mode by turning the dial clockwise or counter-clockwise. Line up the selected icon
with the line at the top of the dial.
Podrá seleccionar el modo de exposición girando el dial en el sentido de las agujas del reloj o en el sentido
contrario. Haga coincidir el símbolo seleccionado con la línea situada en el cuerpo de la cámara.
<Normalphotography>
<Fotografía norma>
<Portrait zoom/P.37>
<Modo zoom para retratos/P.37>
<Sports shooting/P.36>
<Fotografía deportivaP.36>
<Step zoom/P.39>
<Modo zoom a diferentes longitudes focales/P.39>
<Continuous shooting/P.40>
<Fotos en serie/P.40>
<Bulb shooting/P.38>
<Posición B/P.38>
NOTE/NOTAS
After shooting, the shooting mode will remain selected until another mode is chosen.
Después de disparar, el modo de exposición seleccionado permanecerá activado hasta que se elija otro modo.
A
En
Es
En
Es

33
USING THE FLASH MODE/
UTILIZACIÓN DE LOS MODOS DEL FLASH
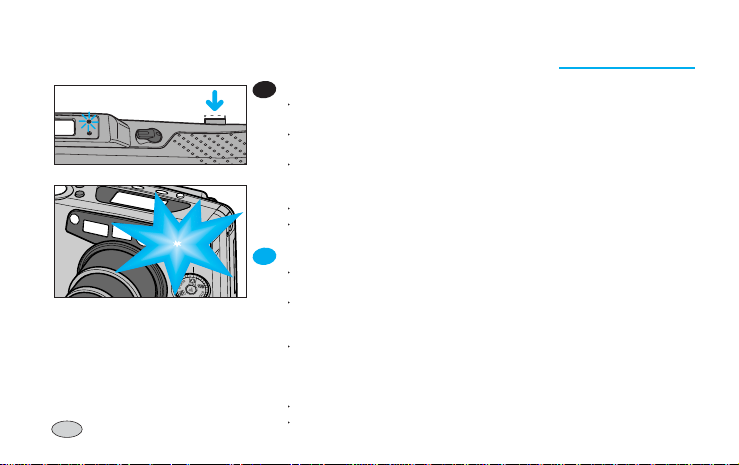
You can select the flash mode by pressing the FLASH button.
Podrá seleccionar el modo del flash que desee presionando el botón FLASH.
Flash button
<Auto flash>
<Flash automático>
<Flash off/P.42>
<Flash desconectado/P.42>
<Fill-in flash/P.43>
<Flash de relleno/P.43>
<Fill-in flash & back-light control/P.44>
<Flash de relleno y control de contraluz/P.44>
<Fill-in flash & red-eye reduction/P.45>
<Flash de relleno y reducción de ojos rojos/p.45>
<Red-eye reduction/P.41>
<Reducción de ojos rojos/P.41>
NOTE / NOTAS
After taking a picture with the "Fill-in & Back-light control" mode, the camera will return to normal mode
automatically.
In case of the "Red-eye Reduction" function, the camera will retain the mode even though the camera is turned
off. When you turn on the camera, check the LCD panel.
Después de tomar una fotografía con el modo de relleno y control de contraluz, la cámara volverá al modo
normal automáticamente.
En caso de utilizar la función de reducción de ojos rojos, la cámara mantendrá dicho modo incluso al
desconectarla. Cuando vuelva a conectar la cámara, compruebe el panel informativo LCD.
En
Es
En
Es

34
USING THE SELF MODE/UTILIZACIÓN DEL MODO SELF
You can select the self mode by pressing the SELF button.
Podrá seleccionar el modo automático presionando el botón SELF (automático)
Self button
<Normal photography>
<Fotografía normal>
<Double self-timer/P.47>
<Autodisparador doble/P.47>
<2 sec. delayed shutter release/P.48>
<Autodisparador con 2 segundos de retardo/P.48>
<Remote control shooting/P.55>
<Exposición con mando a distancia/P.55>
<Interval shooting/P.49>
<Fotografía a intervalos/P.49>
<Self-timer/P.46>
<Autodisparado/P.46>
NOTE / NOTAS
With the "Non Q.D. model", the "Remote control shooting" mode does not appear on the LCD panel.
After using the "2 sec. Delayed Shutter Release" or "Remote Control Shooting" modes, the camera will remain in
that mode, until a new selection is made.
En el modelo sin Q.D., el modo de fotografía con mando a distancia no aparecerá en el panel informativo LCD.
Después de usar los modos de disparador con 2 segundos de retardo o de exposición con mando a distancia, la
cámara permanecerá en dichos modos hasta que se realice una nueva selección.
En
Es
En
Es

35
USING THE FOCUS MODE/
UTILIZACIÓN DEL MODO DE FOCO
You can select the focus mode by pressing the SPOT/SNAP button.
Podrá seleccionar el modo de foco presionando el botón SPOT/SNAP.
<Normal photography>
<Fotografía normal>
<Snap shooting/P.51>
<Instantánea/P.51>
<Spot shooting/P.50>
<Fotografía con enfoque puntual/P.50>
SPOT/SNAP
En
Es

36
AUTO SPORTS SHOOTING/FOTOGRAFÍA DEPORTIVA
The SPORTS mode is ideal for capturing moving subjects with continous
focusing
Select this mode by turning the (SPORTS) icon of the "Shooting Mode Dial" to
the line at the top of the dial.
El modo SPORTS (deporte) està indicado para fotografiar, con disparo continuo,
sujetos en moviniento.
Seleccione este modo girando el símbolo (SPORTS) del dial de modos de
exposición hasta que coincida con la línea del cuerpo de la cámara.
En
Es

37
AUTO
PORTRAIT ZOOM/
MODO ZOOM P ARA RETRATOS
Select this mode by turning the ( ) icon of the "Shooting Mode Dial" to the line at the
top of the dial
.
Use this mode to maintain a constant subject size within the frame, even though the
distance to a subject may vary.
Position your subject in the centre of the viewfinder and press the shutter button halfway. The zoom will operate automatically to attain the optimum shot.
Press the shutter button fully to take a picture.
Seleccione este modo girando el símbolo ( ) del dial de modos de exposición hasta
que coincida con la línea del cuerpo de la cámara.
Utilice este modo para mantener un tamaño constante del encuadre de la fotografía,
aunque varíe la distancia hasta el sujeto.
Coloque el sujeto en el centro del visor y presione el disparador hasta la mitad. El zoom
comenzará a funcionar automáticamente para conseguir la fotografía deseada.
Presione el disparador hasta el fondo para hacer la fotografía.
<Normal mode> <Portrait zoom>
<Modo normal> <Modo zoom para retratos>
En
Es

38
BULB AUTO
BULB SHOOTING(B SHUTTER)/
B POSICIÓN B: EXPOSICIÓN LARGA
Select this mode by turning the B icon of the "Shooting Mode Dial" to the line at the top of
the dial.
Use this mode to shoot subjects that require an extended shutter speed such as fireworks
and night scenes.
The shutter remains open as long as the shutter button is depressed. The time selected is
shown on the LCD panel and the maximum time is 60 seconds.
NOTE
Use this mode only in low light.
To avoid camera shake, use a tripod.
To present of over - exposure from the high brightness, the Bulb Shooting mode will not
operate even though the mode is selected.
Seleccione este modo girando el símbolo B del dial de modos de exposición hasta que
coincida con la línea gris del cuerpo de la cámara.
Utilice este modo para fotografiar motivos que requieran exposiciones largas, tales como
fuegos artificiales o escenas nocturnas.
El obturador permanecerá abierto mientras se mantenga pulsado el disparador. El tiempo
seleccionado se muestra en el panel informativo LCD y podrá utilizarlo un máximo de 60
segundos.
NOTAS
Utilice este modo sólo en condiciones de escasa luminosidad.
Para evitar la trepidación de la cámara, utilice un trípode.
En caso de excesiva luz el modo flash no funcionará, aunque haya sido seleccionado,
evitando así la sobreexposición.
En
Es

39
STEP AUTO
STEP ZOOM/
MODO ZOOM A DIFERENTES LONGITUDES FOCALES
Select this mode by turning the STEP icon of the "Shooting Mode Dial" to the line at the top of the
dial.
Use this mode to take a number of pictures of the same subject using different focal lengths.
The number of photos (up to 3) depends on the focal length chosen. (Refer to chart below) You can
choose the focal length by operating the zoom buttons. ("T" or "W")
NOTE
The first shot is taken after 10 seconds. From the second shot, the interval between shots is 2
seconds.
If flash is required, the time between shots will be increased due to the flash recycling.
Seleccione este modo girando el símbolo STEP del dial de modos de exposición hasta que
coincida con la línea del cuerpo de la cámara.
Utilice este modo para realizar varias fotografías del mismo sujeto utilizando diferentes longitudes
focales.
El número de fotografías (hasta 3) dependerá de la longitud focal escogida (consulte el cuadro
inferior). Podrá elegir la longitud focal utilizando los botones del zoom ("T" o "W").
NOTAS
El obturador de la cámara se accionará después de 10 segundos.
A partir del segundo disparo, el intervalo será de 2 segundos.
Si es necesario utilizar flash, el tiempo de recarga del mismo
aumentará el intervalo entre disparo y disparo.
En
Es
Number of Photo
140mm 130mm 120mm 105mm 90mm 80mm 70mm 55mm 45mm 38mm
3EX
¤ ¤Ł ¤Ø
3EX
¤ ¤Ł ¤Ø
3EX
¤ ¤Ł ¤Ø
3EX
¤ ¤Ł ¤Ø
3EX
¤ ¤Ł ¤Ø
3EX
¤ ¤Ł ¤Ø
3EX
¤ ¤Ł ¤Ø
3EX
¤ ¤Ł ¤Ø
2EX
¤ ¤Ł
1EX
¤

40
AUTO
CONTINUOUS SHOOTING/
FOTOGRAFÍAS EN SERIE
Select this mode by turning the ( ) icon of the "Shooting Mode Dial" to the line at the top of
the dial.
Use this mode to take a sequence of pictures.
As long as you press the shutter button, the camera will continue to take pictures.
NOTE
If flash is required, the time between shots will be increased due to the flash recycling.
The flash does not fire if no film is loaded, (except for "Fill-in Flash" mode).
Seleccione este modo girando el símbolo ( ) del dial de modos de exposición hasta que
coincida con la línea del cuerpo de la cámara.
Utilice este modo para realizar fotografías en serie.
Mientras mantenga pulsado el disparador, la cámara continuará fotografiando.
NOTAS
• Si es necesario utilizar flash, el tiempo de recarga del mismo aumentará el intervalo entre
disparo y disparo.
• El flash no se disparará en caso de que la cámara no tenga película en su interior
(excepto en el modo de flash de relleno).
En
Es

41
AUTO
AUTO RED-EYE REDUCTION/
REDUCCIÓN DE OJOS ROJOS AUTOMÁTICA
Flash button
Select this mode by pressing FLASH button once.
In low light conditions, the flash will automatically fire to obtain a suitable exposure.
You can decrease the red-eye phenomenon automatically when taking a portrait picture in low
light.
NOTE
The red-eye reduction mode dramatically reduce the possible red-eye effect by emitting rapid preflash to shrink the subject
s pupils before the main flash fires. Do not allow the subject to move
until the main flash has fired.
Seleccione este modo pulsando una vez el botón FLASH.
En condiciones de escasa luminosidad, se disparará el flash automáticamente para obtener una
correcta exposición.
Podrá reducir el fenómeno de los ojos rojos automáticamente cuando realice retratos en escasa
luminosidad.
NOTAS
No deje que se mueva el sujeto hasta que se haya disparado el flash principal.
Botón del flash
En
Es
<Auto flash>
<Flash automático>
<With red-eye reduction>
<Con reducción de ojos rojos>

42
OFF FLASH OFF/FLASH DESCONECTADO
Select this mode by pressing the FLASH button twice.
Use this mode when you want to take pictures without flash.
NOTE
When using the Flash Off function, you may need to use a tripod to avoid camera
shake.
Seleccione este modo presionando dos veces el botón FLASH.
Utilice este modo cuando desee realizar fotografías sin flash.
NOTAS
Cuando utilice la función Flash desconectado, es posible que deba usar un
trípode para evitar la trepidación de la cámara.
Flash button
Botón del flash
En
Es

43
FILL-IN FILL-IN FLASH/FLASH DE RELLENO
Select this mode by pressing the FLASH button 3 times.
When the main subject is in shadow and the surrounding light conditions are too
strong for the auto-flash to engage, the fill-in flash allows you to expose the subject
correctly.
NOTE
When using this mode, the flash fires regardless of the brightness of the subject and
background.
Seleccione este modo pulsando 3 veces el botón FLASH.
Cuando el sujeto principal se encuentre en sombra y la luminosidad circundante sea
demasiado fuerte para que funcione el flash automático, el flash de relleno le
permitirá exponer el sujeto correctamente.
NOTAS
Cuando utilice este modo, el flash se disparará sin tener en
cuenta la luminosidad del sujeto y del fondo de la imagen.
Botón del flash
En
Es
Flash button

44
FILL-IN
FILL-IN FLASH AND BACK-LIGHT CONTROL/
FLASH DE RELLENO Y CONTROL DE CONTRALUZ
Select this mode by pressing the FLASH button 4 times.
Use this mode when your subject is strongly back-lit.
NOTE
Be careful to avoid direct sunlight on the lens.
Seleccione este modo pulsando 4 veces el botón FLASH.
Utilice este modo cuando el sujeto esté en contraluz fuerte.
NOTAS
Tenga cuidado de evitar que la luz directa del sol alcance el objetivo.
Flash button
<With back-light control>
< Con control de contraluz>
<Normal photography in back-light condition>
< Fotografía normal en condiciones de contraluz>
En
Es
Botón del flash

45
FILL-IN
FILL-IN FLASH AND RED-EYE REDUCTION/
FLASH DE RELLENO Y REDUCCIÓN DE OJOS ROJOS
Select this mode by pressing the FLASH button 5 times.
Use this mode when you take a picture of a person in low light condition.
NOTE
Use a tripod to avoid camera shake.
Seleccione este modo pulsando 5 veces el botón FLASH.
Utilice este modo cuando tome fotografías de sujetos en condiciones de escasa
luminosidad.
NOTAS
Utilice un trípode para evitar la trepidación de la cámara.
Flash button
En
Es
Botón flash

46
AUTO SELF-TIMER/AUTODISPARADOR
This can be selected by pressing the SELF button once. You can take a picture of
yourself by using this mode.
When pressing the shutter button, the self-timer lamp illuminate for 7 seconds. Then
the lamp blinks rapidly for 3 seconds and the picture is taken.
Podrá seleccionarlo pulsando una vez el botón SELF. Con este modo podrá tomar
una fotografía de sí mismo.
Cuando presione el disparador, se iluminará la lámpara del autodisparador durante 7
segundos. A continuación, la lámpara parpadeará rápidamente durante 3 segundos y
se tomará la fotografía.
Botón Self
En
Es
Self button

47
AUTO
DOUBLE SELF-TIMER/
AUTODISPARADOR DOBLE
You can select this mode by pressing the SELF button twice.
Press the shutter button and a shot will be taken in the same way a self timer shot is
taken. A further shot will be made after 2 seconds.
NOTE
When using the flash, the shooting interval may increase due to the flash recharging
time.
Podrá seleccionar este modo pulsando el botón SELF dos veces.
Pulse el disparador y se tomará la imagen del mismo modo que con el
autodisparador. Transcurridos 2 segundos, se tomará otra fotografía.
NOTAS
Cuando utilice el flash, el tiempo de
recarga del mismo aumentará el
intervalo entre disparo y disparo.
Self button
Botón Self
En
Es
48
AUTO
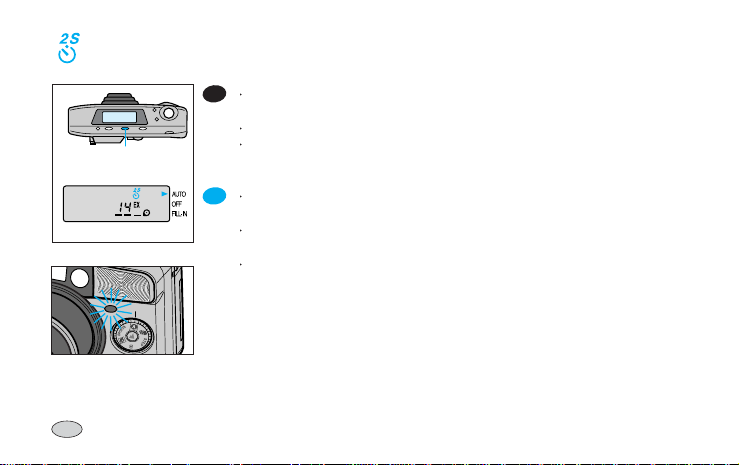
2 SEC. DELAYED SHUTTER RELEASE/
AUTODISPARADOR CON 2 SEGUNDOS DE RET ARDO
Use this mode to avoid camera shake caused by camera movement during hand
held shots.
In this mode, a picture is taken 2 seconds after releasing the shutter button.
To use this mode, place the camera on a steady surface, select by pressing the
SELF button 3 times before taking the picture.
Utilice este modo para evitar la trepidación de la cámara producida al presionar el
disparador.
En este modo, la fotografía se toma 2 segundos después de haber pulsado el
disparador.
Para usar este modo, coloque la cámara en una superficie estable y selecciónelo
presionando el botón SELF tres veces antes de tomar la fotografía.
Self button
Botón Self
En
Es

49
AUTO
INTERVAL SHOOTING/
FOTOGRAFÍA A INTERVALOS
Select this mode by pressing the SELF button 5 times.
(When a camera is Non Q.D. model, press the SELF button 4 times)
Use this mode to take pictures automatically over a chosen period of time.
You can choose the interval time (10~60 seconds) by 10 seconds or (10~60 minutes) by 10 minutes.
To set the interval time, press the zoom buttons ("T"or"W") while keeping the SELF button depressed.
NOTE
Unless you release the INTERVAL Shooting mode, the camera will continue to operate until
the film is used up. The camera will operate a further 5 times before switching off.
Press the Power button or SELF button to release this mode.
Seleccione este modo pulsando el botón SELF 5 veces (si la cámara es un modelo sin Q.D.,
pulse el botón SELF 4 veces).
Utilice este modo para realizar varias fotografías automáticamente separadas entre sí por un
periodo de tiempo elegido previamente.
Podrá elegir el intervalo de tiempo (10~60 segundos en tramos de 10 segundos, o 10~60
minutos en tramos de 10 minutos).
Para ajustar el intervalo de tiempo, presione los botones del zoom
("T"o"W")
mientras
mantiene pulsado el botón SELF.
NOTAS
Si no anula el modo de fotografía a intervalos, la cámara continuará funcionando en ese
modo hasta que se acabe la película. La cámara funcionará 5 veces más antes de
desconectarse.
Pulse el botón de conexión/desconexión o el botón SELF para anular este modo.
Self button
En
Es
Botón Self

50
AUTO
SPOT SHOOTING/
FOTOGRAFÍA CON ENFOQUE PUNTUAL
Use this mode when photographing a specific subject in a situation where the camera may have
difficulty in focusing.
Certain subjects, such as a person in a crowd, can be difficult to photograph.
This mode enables you to have your specific subject clear, even when surrounded by other
subjects in the picture.
Select this mode by pressing the SPOT/SNAP button once and aim the spot shooting focus frame
at the subject you want.
The camera focuses on the subject in the spot shooting focus frame.
Utilice este modo cuando fotografíe un tema concreto en situaciones en que la cámara pueda tener
dificultades para enfocar.
Determinados sujetos, como una persona en una multitud, pueden ser difíciles de fotografiar.
Este modo le permite enfocar con nitidez un sujeto en concreto, aunque esté rodeado de otros
sujetos en la imagen.
Seleccione este modo pulsando el botón SPOT/SNAP una vez y apunte el recuadro de enfoque
puntual al sujeto deseado.
La cámara enfocará el tema en el recuadro de enfoque puntual.
SPOT/SNAP
;
;
;
;
En
Es

51
AUTO SNAP SHOOTING/INSTANTÁNEAS
Select this mode by pressing the SPOT/SNAP button twice
Use this mode when taking a picture of active subjects such as children or pets. (They are difficult to
focus on)
When you select this mode, the camera will set the wide position (38mm) and the focus is fixed.
If you depress the shutter button continuously, the camera will take a sequence of shots.
NOTE
The subject must be within the range 1.3m ~ 6m (4.3ft ~ 19.7ft).
If you press the zoom (T/W)or power button while you operating this mode will be release to normal
photography.
Seleccione este modo presionando dos veces el botón SPOT/SNAP.
Utilice este modo cuando desee fotografIar sujetos muy activos, como por ejemplo niños o animales
(son difíciles de enfocar).
Cuando seleccione este modo, la cámara se colocará en la posición de zoom angular (38 mm) y se
bloqueará el enfoque.
Si mantiene pulsado el disparador, la cámara tomará una serie de varias fotografías.
NOTAS
El sujeto deberá estar situado entre 1.3~6 m (4.3~19.7pies).
Si pulsa el botón de Zoom (T/W) o power mientras está en este modo, la cámara volverá
automáticamente al modo de fotografia normal.
SPOT/SNAP
En
Es

52
AUTO MACRO PHOTOGRAPHY/FOTOMACROGRAFÍA
Use this mode to take close-up photographs.
When a subject is within 1m (3.28ft), the camera will automatically set this mode.
The Macro range is as below:
WIDE : 0.68~1m (2.2~3.28ft)
TELE : 0.87~1m(2.9~3.28ft)
When a subject is within range, the Autofocus Indicator (Green LED) will blink slowly and the Macro
mark ( ) will appear on the LCD panel.
Remember to compose your shot using the macro picture area frame.(Refer to page 11)
NOTE
When a subject is closer than 0.68m (2.2ft), the Green LED will blink quickly and the shutter will lock.
Utilice este modo para realizar primeros planos.
Cuando el sujeto se encuentre a una distancia de 1 m (3.28 pies) o inferior, la cámara se situará en
este modo automáticamente.
La escala de distancias macro es la siguiente:
ANGULAR : 0.68~1 m (2.2~3.28 pies)
TELE : 0.87~1 m (2.9~3.28 pies)
Cuando el sujeto se encuentre dentro de la distancias mencionadas, el indicador de autofoco (diodo
verde ) parpadeará lentamente y aparecerá el símbolo macro ( ) en el panel informativo LCD.
Recuerde componer su imagen usando el recuadro de zona de imagen para macro (consulte la
página 11)
.
NOTAS
Cuando el tema se encuentre a una distancia inferior a 0.68 m (2.2 pies), el diodo verde parpadeará
rápidamente y se bloqueará el obturador.
En
Es

53
Utilice este modo cuando desee realizar una fotografía panorámica.
Cuando ajuste este modo, el visor cambiará para indicar imagen panorámica.
El área de imagen en este modo será más estrecha.
Seleccione este modo usando el interruptor PANORAMA. El modo PANORAMA puede usarse en los fotogramas que seleccione
en la película.
Recuerde informar a su establecimiento de revelado de que
algunas imágenes son panorámicas. Pueden cobrarle una
cantidad extra por este servicio.
NOTAS
Podrá imprimir la fecha con este modo (sólo modelo Q.D.;
consulte la página 27).
PANORAMA PHOTOGRAPHY/FOTOGRAFÍA PANORÁMICA
Use this mode to capture a panoramic view.
When you set this mode, the viewfinder will alter to indicate the panoramic scene.
The picture area with this mode will be narrowed.
Select this mode using the PANORAMA switch. The PANORAMA mode can be used on
selected frames in a film.
Remember to inform your processor that some shots are panoramic. There may be an extra
charge for this service.
NOTE
The date can be imprinted with this mode.(Q.D. model only-Refer to page 27)
<Normal>
<Normal>
<Panorama>
<Panorama>
En
Es
54
Para utilizar este modo, presione el botón LANSCAPE y manténgalo pulsado. Tome la fotografía como de costumbre, pero no
suelte el botón LANSCAPE hasta haber tomado la fotografía. Pulse el disparador (
) y el botón LANSCAPE a la vez ( ).
Utilice este modo para fotografiar sujetos distantes a través de una ventana.
NOTAS
En este modo no se disparará el flash.
Utilice un trípode para evitar la trepidación de la cámara en
condiciones de escasa luminosidad.
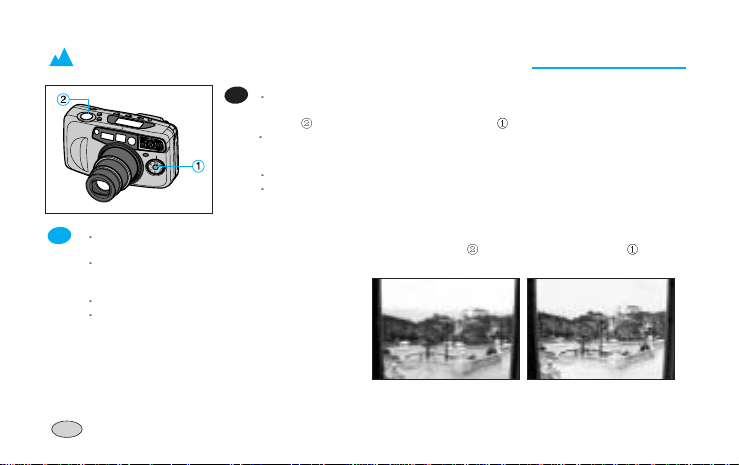
LANDSCAPE MODE/MODO P AISAJES
To use this mode, press the LANDSCAPE button and hold it down. Take a picture as normal,
but do not release the LANDSCAPE button until the shot has been taken. Press the Shutter
button (
) while pressing the LANDSCAPE button( ).
Use this mode to photograph distant subjects through a window.
NOTE
With this mode, the flash does not fire.
Use a tripod to avoid camera shake in low light conditions.
<Without Landscape mode> <With Landscape mode>
<Sin el modo paisajes> <Con el modo paisajes>
En
Es

55
AUTO
REMOTE CONTROL SHOOTING (OPTIONAL)
EXPOSICIÓN CON MANDO A DIST ANCIA (OPCIONAL)
Select this mode by pressing the SELF button 4 times. (You can only use this
function with the Q.D. model camera)
When you select this mode, the self-timer lamp will blink every 2 seconds.
To take a picture remotely, ensure the remote function is selected on the camera.
Point the remote control of the camera and press the button marked shutter. The
camera will take a picture after two seconds.
Seleccione este modo pulsando el botón SELF 4 veces (sólo podrá usar esta función
en las cámaras modelo Q.D.).
Cuando seleccione este modo, la lámpara del autodisparador parpadeará cada 2
segundos.
Para tomar una fotografía a distancia, compruebe que ha seleccionado la función de
mando a distancia en la cámara. Apunte el mando a distancia y pulse el botón
marcado como disparador. La cámara tomará la fotografía transcurridos 2 segundos.
Self button
Names of parts of the Remote Control
Nomenclatura del mando a distancia
Signal lamp/
Lámpara de aviso
Shutter button/
Disparador
Botón Self
En
Es

56
REPLACING THE BA TTERY OF THE REMOTE CONTROL/
CÓMO CAMBIAR LA PILA DEL MANDO A DIST ANCIA
1
3
2
Replacing the battery
Refer to the illustrations above.
NOTE
Use one lithium battery (JIS CR2025)
Be sure to place a battery in the correct position. The positive contact (+) must be facing up.
Cómo cambiar la pila.
Consulte las ilustraciones que aparecen sobre estas líneas.
NOTAS
Utilice una pila de litio (JIS CR2025).
Asegúrese de colocar la pila en la posición correcta. El polo positivo (+) deberá estar mirando hacia arriba.
En
Es

57
CARE AND STORAGE/CUIDADOS Y ALMACENAMIENTO
If your camera needs cleaning, wipe it with a soft, lintless cloth.
The lens should be cleaned only with special lens cleaning tissue and fluid.(Consult your camera retailer.)
Do not allow your camera to come into contact with sand or water.
Keep your camera in a dry, cool place that is free from high humidity and dust.
Never leave your camera in hot places such as a parked car, or direct sunlight.
Avoid sudden shocks or vibration. If you drop your camera, it is a good idea to have it checked before using it.
! Warning
Do not try to disassemble the camera yourself.
Your camera contains high voltage circuitry and may cause injury if interfered with.
The temperature range in which the camera operates is between 50 and -10 (122 ~14 ).
The camera performance may be impaired when used in very cold weather. If you plan to take pictures when
the temperature is below 7
(45 ), take care to keep your camera and battery warm between shots. If your
camera becomes very cold, allow it to return to room temperature slowly by keeping it in its case. Condensation
can spoil pictures and in extreme conditions can damage the electronic components inside the camera.
If you have trouble with your camera, please return it to your retailer for advice.
IMPORTANT NOTES
NOTAS
IMPORTANTES
En

58
Si la cámara necesita limpiarse, hágalo con un paño suave.
El objetivo sólo puede limpiarse con un papel limpiaobjetivos empapado con líquido limpiaobjetivos especiales
(acuda al establecimiento donde adquirió su cámara).
No permita que la cámara entre en contacto con arena o agua.
Guarde la cámara en un lugar seco y fresco, libre de humedades y polvo.
Nunca la deje en lugares donde se alcancen temperaturas muy elevadas, como puede ser un coche aparcado, ni
nunca la deje bajo la acción directa del sol.
Evite las vibraciones o golpes bruscos. Si la cámara cayera al suelo, es recomendable que la lleve a revisar antes
de volver a usarla.
! Atención
No intente desmontar la cámara usted mismo. La cámara contiene circuitos de alto voltaje y puede causar lesiones
si se la manipula.
La escala de temperaturas indicada para que la cámara funcione está entre 50 y -10 (122 ~14 ).
La utilización de la cámara a bajas temperaturas disminuye el rendimiento de la misma. Si planea fotografiar a una
temperatura inferior a 7
(45 ), trate de mantener calientes tanto la cámara como la pila.
Si la cámara se enfría demasiado, llévela a temperatura ambiente lentamente guardándola en la funda. El vapor de
condensación puede estropear las fotografías y en condiciones extremas puede dañar los componentes
electrónicos del interior de la cámara.
Si tuviese algún problema con la cámara, por favor llévela al establecimiento donde la adquirió para que le
asesoren sobre ello.
Es

59
TROUBLE SHOOTING/PROBLEMAS Y SOLUCIONES
Check point / Problema Remedy / Solución Page / Página
Is the lens cover completely open?
Está la tapa deslizante del objetivo completamente abierta?
Press the Power button again.
Vuelva a presionar el botón de conexión/desconexión.
Is the battery loaded correctly?
Está la pila correctamente colocada?
Reinsert correctly.
Vuelva a colocarla correctamente.
Has it been a long time since you used the camera?
Ha pasado mucho tiempo desde que usó la cámara por última vez?
Change the battery.
Cambie la pila.
• If a picture is partially dark or out of focus.
•Si la fotografía está parcialmente oscura o desenfocada.
• If the sutter does not operate after pressing the shutter button.
• Si el obturador no se acciona al apretar el disparador.
18
13
15
Es
En
Es
En
Check point / Problema Remedy / Solución Page / Página
Was the lens or other sensors obstructed by your fingers or hair ?
Bloqueó el objetivo u otros sensores con los dedos o el pelo ?
Be careful not to block the lens or the exposure sensor.
Tenga cuidado de no bloquear el objetivo ni el sensor de exposición.
Did you compose a subject correctly referring to the picture area frame?
Ha colocado el recuadro del autofoco correctamente sobre el sujeto?
Read the “Viewfinder and Indicators”
Lea de nuevo “Visor e indicadores”
Did you set the camera to the panorama mode?
Estaba la cámara situada en el modo panorámico?
Release the panorama mode.
Anule el modo panorámico.
19
11,12
53
60
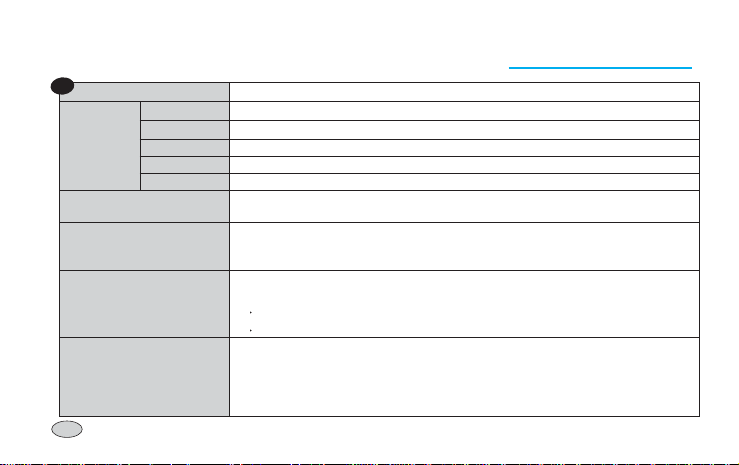
LENS
SHUTTER
EXPOSURE
VIEWFINDER
Format
Speed
Loading
Winding
Rewinding
35mm fully automatic lens shutter camera.
35mm DX-coded film, 24x36mm
Automatic setting with DX-coded film, ISO 50~3200
Automatic advance to the first frame when the back cover is closed.
Automatic advance, Single or Continuous shooting
Automatic rewinding, Mid-roll rewinding
38~140mm Schneider lens, F4.6~12.2
7 elements 10 groups ( 2 groups of Aspherical lens )
Programmed AE electronic focusing
Shutter speed : 1/3 ~ 1/400 sec.
Bulb mode(B shutter) : 0.5 ~ 60 sec.
Programmed auto exposure
AE coupling range (ISO 100 film)
WIDE(38mm) : EV 5.9~17.6
TELE(140mm) : EV 7.8~17.6
Real image type with autofocus frame
Field of view : 83%
Magnification : 0.41~1.32
Picture area frame mark
Connection with Panorama switch
SPECIFICA TIONS/ESPECIFICACIONES
TYPE
FILM
En

61
Built-in electronic flash
WIDE(38mm) : 0.68 ~ 5m(2.2 ~ 16.4ft)
TELE(140mm) : 0.87 ~ 2.2m(2.9 ~ 7.2ft)
Approx. 6 sec.
Portrait zoom Step zoom Bulb shooting (B Shutter)
Sports shooting Continuous shooting
Red-eye reduction(LED lamp) Flash off Fill-in flash
Fill-in flash & Back-light control(+1.5EV) Fill-in flash & Red-eye reduction
Muti-beam autofocus
Spot shooting Snap shooting(between 1.3~6.0m (4.3~19.7ft))
Single/Double self-timer 2 sec. delayed shutter release
Remote control(Option)
Interval shooting
Landscape mode(Infinity)
-WIDE(38mm) : 3.5m~
(11.5ft~ )
-TELE(140mm) : 9.5m~
(31.2ft~ )
Date or Time setting - 5 different formats
(The camera will set the date automatically until 2099.)
Captions imprint - 7 different messages
One 3V lithium battery (CR 123A)
115x65x44mm / 4.53x2.6x1.73in
230g / 8.1oz (without battery)
FLASH
Type
Range
Recycling time
Shooting mode
Flash mode
Autofocus mode
Self mode
SPECIAL
FEATURES
DATE AND CAPTION
(Q.D.model only)
POWER SOURCE
DIMENSIONS(WxHxD)
WEIGHT
Macro mode
Panorama mode (Switchable)

62
OBJETIVO
OBTURADOR
EXPOSICI”N
VISOR
Formato
Sensibilidad
Carga
Avance
Rebobinado
Cámara de 35 mm totalmente automática con obturador central.
película de 35 mm con códigos DX, 24 x 36 mm
ajuste automático con película con códigos DX, 50~3200 ISO.
avance automático de la película hasta el primer fotograma al cerrar el respaldo de la cámara
.
avance automático, disparos foto a foto o en serie.
rebobinado automático, rebobinado a mitad de rollo.
Objetivo zoom Schneider 38~140 mm, F4.6~12.2
con 7 elementos en 10 grupos (2 grupos de objetivo asférico)
Electrónico programado con enfoque y exposición automáticos
Velocidad de obturación: 1/3 ~ 1/400 de segundo.
Posición B : 0.5 ~ 60 segundos.
Exposición automática programada
Gama de exposición automática (AE) (con película 100 ISO)
ANGULAR (38 mm) : EV 5.9~17.6
TELE (140mm) : EV 7.8~17.6
Tipo imagen real con recuadro del autofoco
Campo de visión : 83%
Aumentos: 0.41~1.32
Recuadro de área de imagen
Conexión con interruptor de modo panorámico
TIPO
PELÍCULA
Es

63
flash electrónico incorporado
ANGULAR (38 mm) : 0.68~5.2 m (2.2~17.1 pies)
TELE (140 mm) : 0.87~2.5 m (2.9~8.2 pies)
aproximadamente 6 segundos.
Modo zoom para retratos Modo zoom a diferentes longitudes focales
Posición B (exposición larga) Fotografía deportiva Fotos en serie
Reducción de ojos rojos automática (diodo) Flash desconectado Flash de relleno
Flash de relleno y control de contraluz (+1.5EV) Flash de relleno y reducción de ojos rojos
Autofoco de haz múltiple Fotografía puntual Instantáneas (entre 1.3~6.0 m (4.3~19.7 pies)
Temporizador normal/doble Autodisparador con 2 segundos de retardo
Mando a distancia (opcional)
Modo paisajes (infinito)
-ANGULAR (38 mm): 3.5 m~
(11.5 pies~ )
-TELE (140 mm): 9.5m~
(31.2 pies~ )
Ajuste de la fecha o la hora - 5 formatos diferentes
(La cámara ajustará la fecha automáticamente hasta el año 2099.)
Impresión de títulos - 7 títulos diferentes
Una pila de litio de 3 V (CR 123A)
115 x 65 x 44 mm / 4.53 x 2.6 x 1.73 pulg.
230 g / 8.1 onz. (sin pila)
FLASH
Tipo
Alcance
Tiempo de recarga
Modo de exposición
Modos del flash
Modo de autofoco
Modo Self
CARACTERÍ
STICAS
ESPECIALES
FECHA Y TITULO
(Sólo modelo Q.D.)
FUENTE DE ENERGÍA
DIMENSIONES (ancho x alto x fondo)
PESO
Fotografía a intervalos Modo de fotomacrografía
Modo panorámico (anulable)

6806-0666
Internet address - http : //www.samsungcamera.com/
The CE Mark is a Directive conformity
mark of the European Community (EC)
SAMSUNG AEROSPACE IND., LTD.
OPTO ELECTRONICS DIVISION
PLANT 1, SAMSUNG AEROSPACE IND.,LTD
42, SUNGJU-DONG, CHANGWON-CITY,
KYUNGNAM, KOREA C.P.O BOX 9762
TEL : (82) 551-260-5941, 5945, 5951
FAX : (82) 551-260-5955~7
SAMSUNG OPTO-ELECTRONICS AMERICA, INC.
HEADQUARTERS
40 SEAVIEW DRIVES, SECAUCUS, NJ 07094
TEL : (1) 201-902-0347
FAX : (1) 201-902-9342
WESTERN REGIONAL OFFICE
18600 BROADWICK ST.,
RANCHO DOMINGUEZ, CA 90220
TEL : (1) 310-537-7000
FAX : (1) 310-537-1566
MIAMI OFFICE
2700 NW 87TH AVENUE, MIAMI, FL 33172
TEL : (1) 305-718-9377
FAX : (1) 305-718-9388
SAMSUNG U.K. LTD.
PHOTO PRODUCTS DIV.
SAMSUNG HOUSE, 3 RIVERBANK WAY,
GREAT WEST ROAD, BRENTFORD,
MIDDLESEX,TW8 9RE, U.K.
TEL : (44) 181-232-3280
FAX : (44) 181-569-8385
SAMSUNG DEUTSCHLAND GmbH
SAMSUNG HAUS
AM KRONBERGER HANG 6, 65824
SCHWALBACH, GERMANY
TEL : (49) 61 96-66 53 01
FAX : (49) 61 96-66 53 33
SAMSUNG FRANCE S.A.R.L.
BP. 51 TOUR MAINE-MONTPARNASSE 33,
AV DU MAINE 75755,
PARIS CEDEX 15, FRANCE
TEL : (33) 1-4279-2283
FAX : (33) 1-4320-4510
SAMSUNG OPTO ELÊTRONICA DO BRASIL LTDA
RUA PROFESSOR MANOELITO DE ORNELLAS,
303. 20 ANDAR CHACARA STO. ANTONIO
CEP : 04719-040 SÃO PAULO. SP. BRASIL
TEL : (55) 11-521-0757
FAX : (55) 11-523-0802
SAMSUNG AEROSPACE MOSCOW OFFICE
BOLSHOY GNEZDNIKOVSKY PER., BLD. 1-2,
103009, MOSCOW, RUSSIA
TEL : (7) 095-797-2595
FAX : (7) 095-797-2513
SAMSUNG AUSTRALIA PTY. LTD.
LEVEL 33, NORTHPOINT BLDG, 100 MILLER
STREET, NORTH SYDNEY,
NSW 2060, AUSTRALIA
TEL : (61) 2-9955-3888
FAX : (61) 2-9955-4233
TIANJIN SAMSUNG OPTO-ELECTRONICS
CO.,LTD.
7 PINGCHANG ROAD NANKAI DIST. TIANJIN
P.R CHINA
POST CODE:300190
TEL : (86)22-2761-4599
FAX : (86)22-2761-3314
 Loading...