

Page 1
ENGLISH
Page 2

• This camera will not function without a battery.
• Use one 3V lithium battery(CR-123A or DL-123A).
• The lens cap automatically opens when the Power button is turned on.
• Do not open the lens cap with your fingers.
The shutter does not operate in the following circumstances:
• When the camera has no battery or when the battery is almost drained.
• When the Power is turned off.(When the lens cap is closed.)
• When the zoom button is operating or when the film is winding or rewinding.
(Rewinding will stop when the shutter button is pressed during rewinding.)
• When the film remains in the camera after rewinding.
• When the flash is being charged.
This camera is controlled electronically by a built-in microcomputer. Although unlikely, it may fail to
operate under certain circumstances in which there is a strong electromagnetic field (near a TV,
microwave etc.). If this occurs, please remove the lithium battery and replace after 2~3 minutes.
2
NOTE
Page 3

33
CONTENTS
Part Names
.....................................................................................................
4
LCD panel
........................................................................................................
7
Viewfinder and Indicators
................................................................................
8
Loading the battery
..........................................................................................
9
Checking the battery
......................................................................................
10
Loading the film
..............................................................................................
11
Attaching the strap
.........................................................................................
12
Using the camera
............................................................................................
13
Holding the camera
.......................................................................................
14
Taking pictures
...............................................................................................
15
Adjusting the diopter
......................................................................................
16
Buzzer operation
............................................................................................
17
Using the focus lock
.......................................................................................
18
Rewinding the film
.........................................................................................
19
Date and caption (Q.D. model only)
.............................................................
20
Clock/Calendar function (Non Q.D. model only)
...........................................
22
Using the Shooting mode
..............................................................................
23
Using the Flash mode
....................................................................................
24
Using the Self mode
.......................................................................................
25
Using the focus mode
.....................................................................................
26
Sports shooting
..............................................................................................
27
Portrait zoom
..................................................................................................
27
Bulb shooting (B Shutter)
..............................................................................
28
Step zoom
......................................................................................................
29
Continuous shooting
......................................................................................
30
Auto Red-eye Reduction
...............................................................................
31
Auto Flash
......................................................................................................
32
Flash off
..........................................................................................................
33
Fill-in flash
......................................................................................................
33
Fill-in flash and Back-light control
.................................................................
34
Fill-in flash and Red-eye Reduction
..............................................................
35
Self-timer
........................................................................................................
36
Double self-timer
............................................................................................
37
2 second delayed shutter release
.................................................................
38
Interval shooting
.............................................................................................
38
Spot shooting
.................................................................................................
39
Snap shooting
................................................................................................
40
Macro photography
........................................................................................
41
Panorama photography
.................................................................................
42
Landscape mode(Infinity)
..............................................................................
43
Remote control shooting(Optional)
...............................................................
44
Replacing the battery of the remote control (Optional)
................................
45
Care and storage
............................................................................................
46
Trouble shooting
.............................................................................................
47
Checking the camera
.....................................................................................
50
PREPARATION
TAKING PHOTOS
IMPORTANT NOTES
SPECIFICATIONS
Thank you for purchasing the SAMSUNG camera.
Please read this manual before using your camera.
TABLE OF CONTENTS
Page 4
4
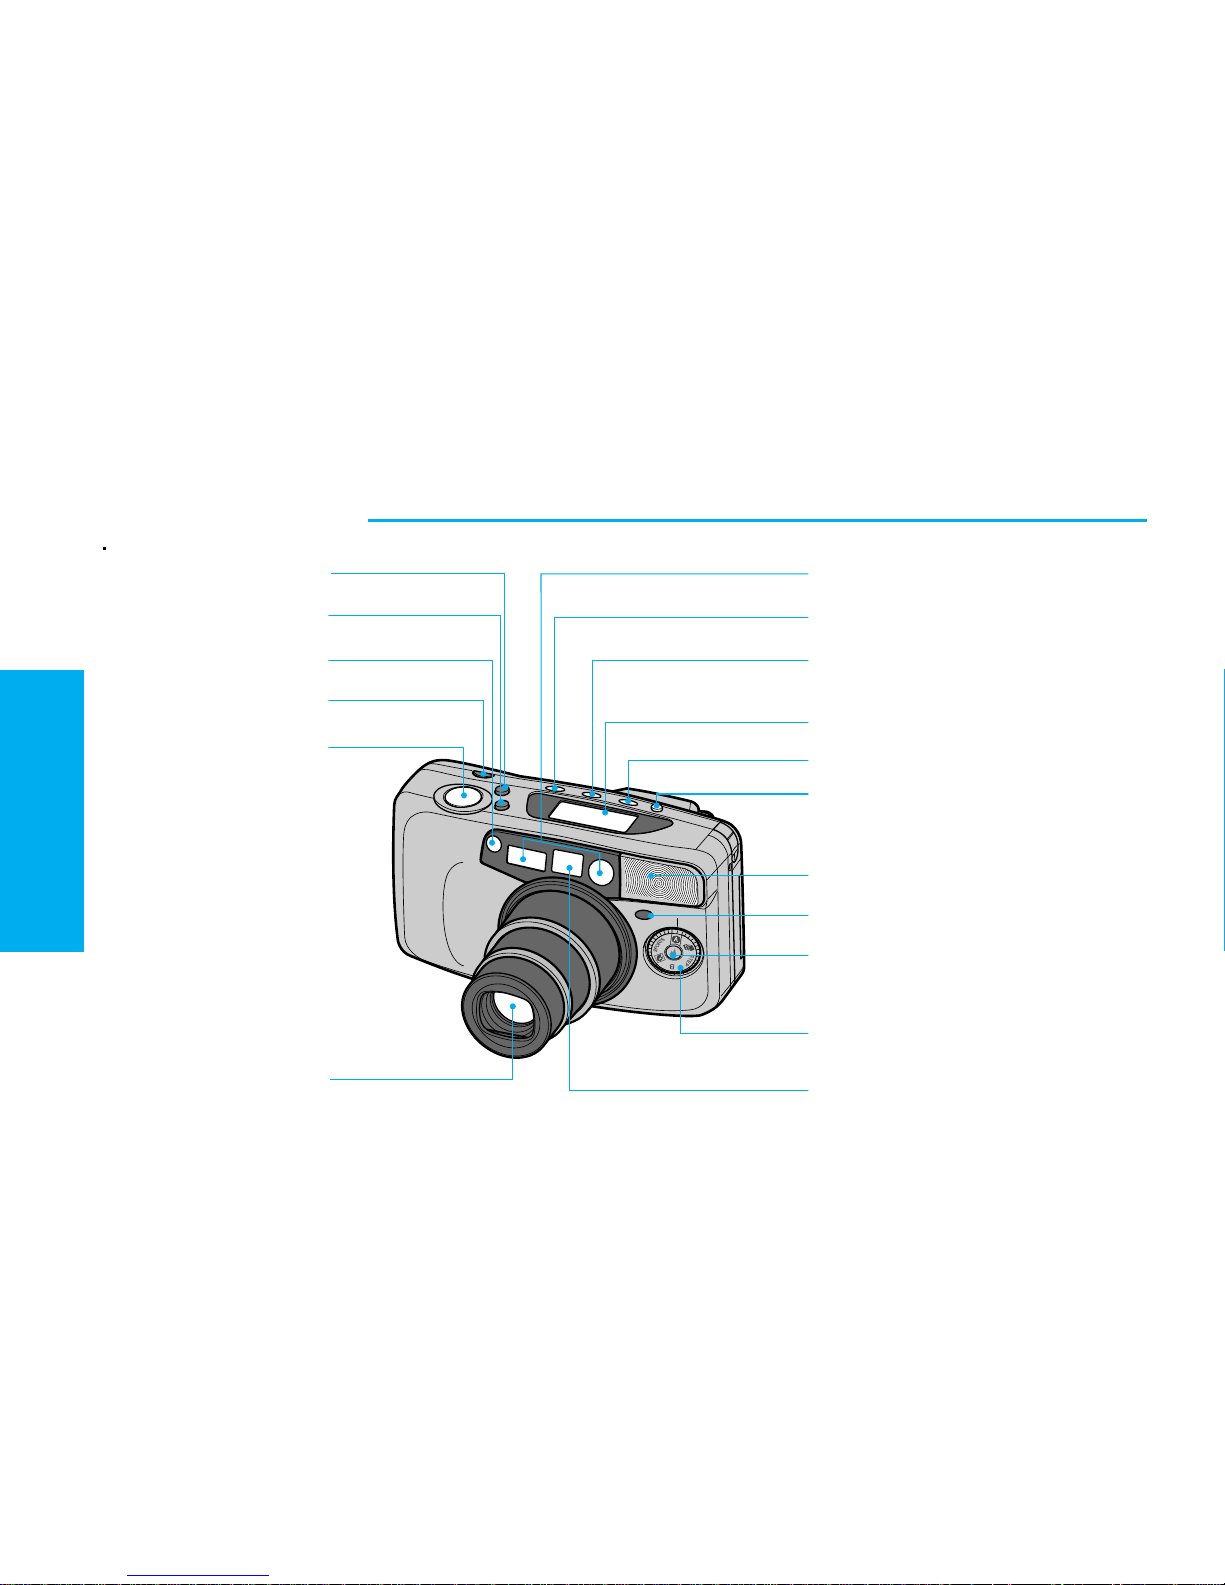
PART NAMES
Front / Top
Zoom button (WIDE)
Zoom button (TELE)
Exposure sensor
Power button
Shutter button
Lens
Autofocus window
Flash button
(Flash mode selection button)
Self mode button(Self mode and
Interval mode selection button)
LCD panel
SPOT/SNAP button
DATE or TIME button
(Date and Caption selection button)
Shooting mode dial
Viewfinder
PREPARATION
Self-timer lamp
Flash
Landscape mode button
Page 5
5
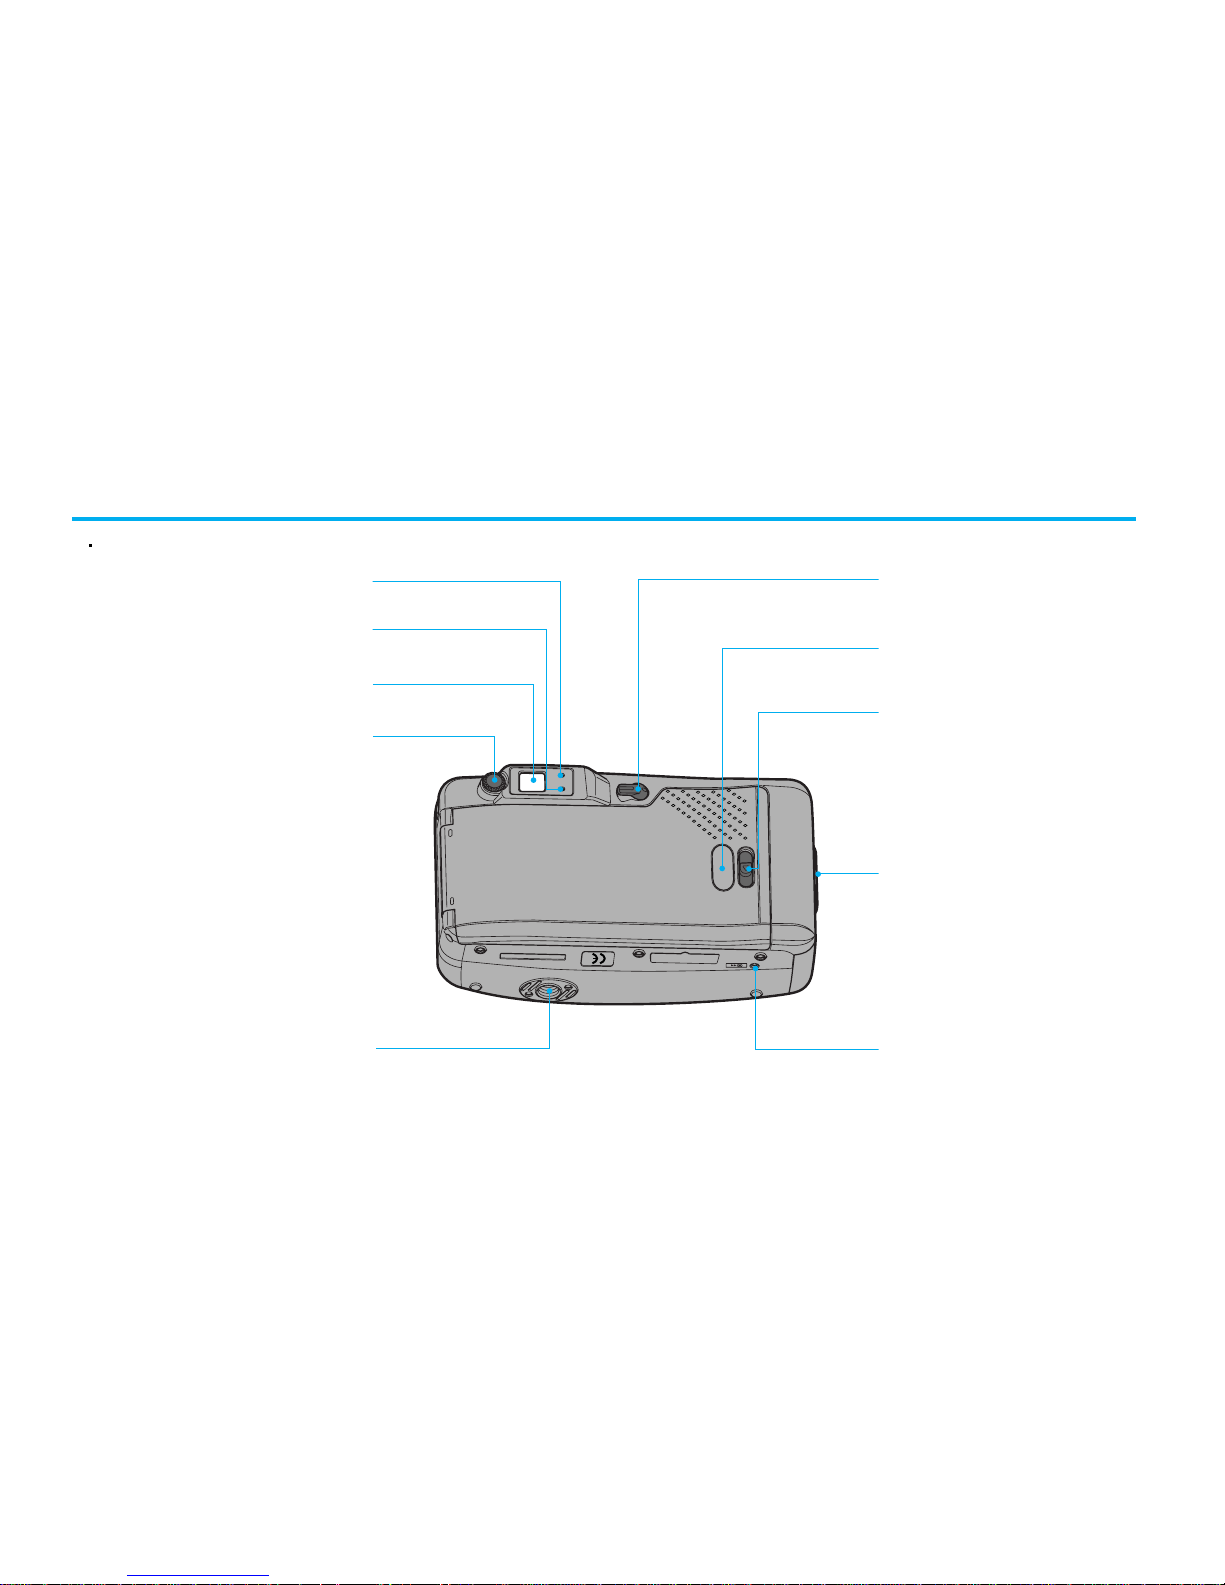
Rear / Bottom
Autofocus indicator(Green LED)
Flash indicator(Red LED)
Viewfinder
Diopter adjustment dial
Tripod socket
Strap eyelet
Mid-roll rewind button
Normal/Panorama switch
Film check window
Back cover release button
Page 6

6
Interior
DX contacts
Film sensor
Back cover
Film pressure plate
Film pressure roller
Spool
Page 7
77
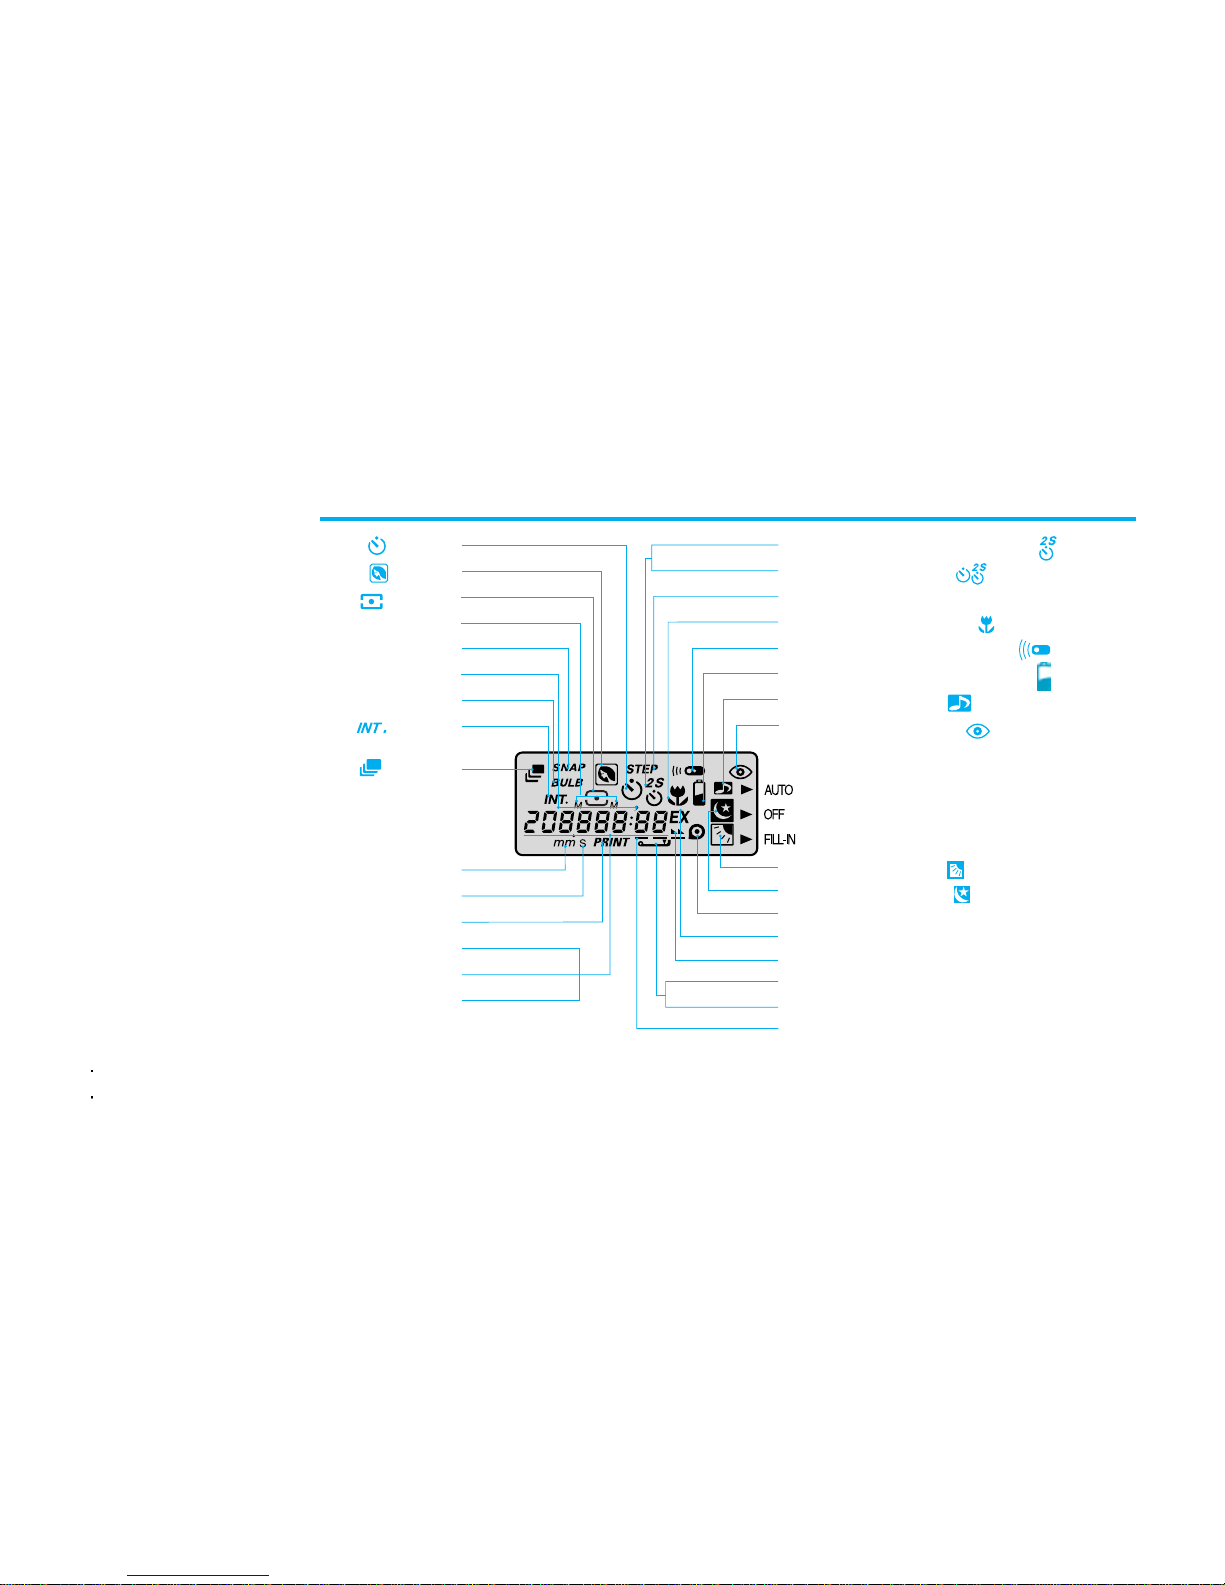
LCD PANEL
Self-timer( /P.36)
Portrait zoom( /P.27)
Spot shooting( /P.39)
Month
Snap shooting(
SNAP /P.40)
Year
Bulb shooting(B Shutter)( BULB /P.28)
Interval shooting( /P.38)
Continuous shooting( /P.30)
Focal length unit (mm) / Minutes(m)
Seconds(s)
Date or caption print mark
a. Focal length
b. Exposure counter
c. Date (Year, Month, Date, Time)
2 sec. delayed shutter release
( /P.38)
Double self-timer( /P.37)
Step zoom(STEP /P.29)
Macro Photography( /P.41)
Remote control shooting( /P.44)
Battery condition indicator( /P.10)
Buzzer indicator( /P.17)
Red-eye reduction( /P.31)
Back-light control( /P.34)
Slow shutter sync( /P.33)
Film present indicator
Exposure unit(EX)
Film rewinding indicator
Back-cover open indicator
Film loading failure warning indicator(E)
Film loading indicator
NOTE
For more information regarding the mark, refer to the pages in ( ).
When the back-light control function is selected, the flash will operate regardless of ambient lighting conditions.
Page 8
8
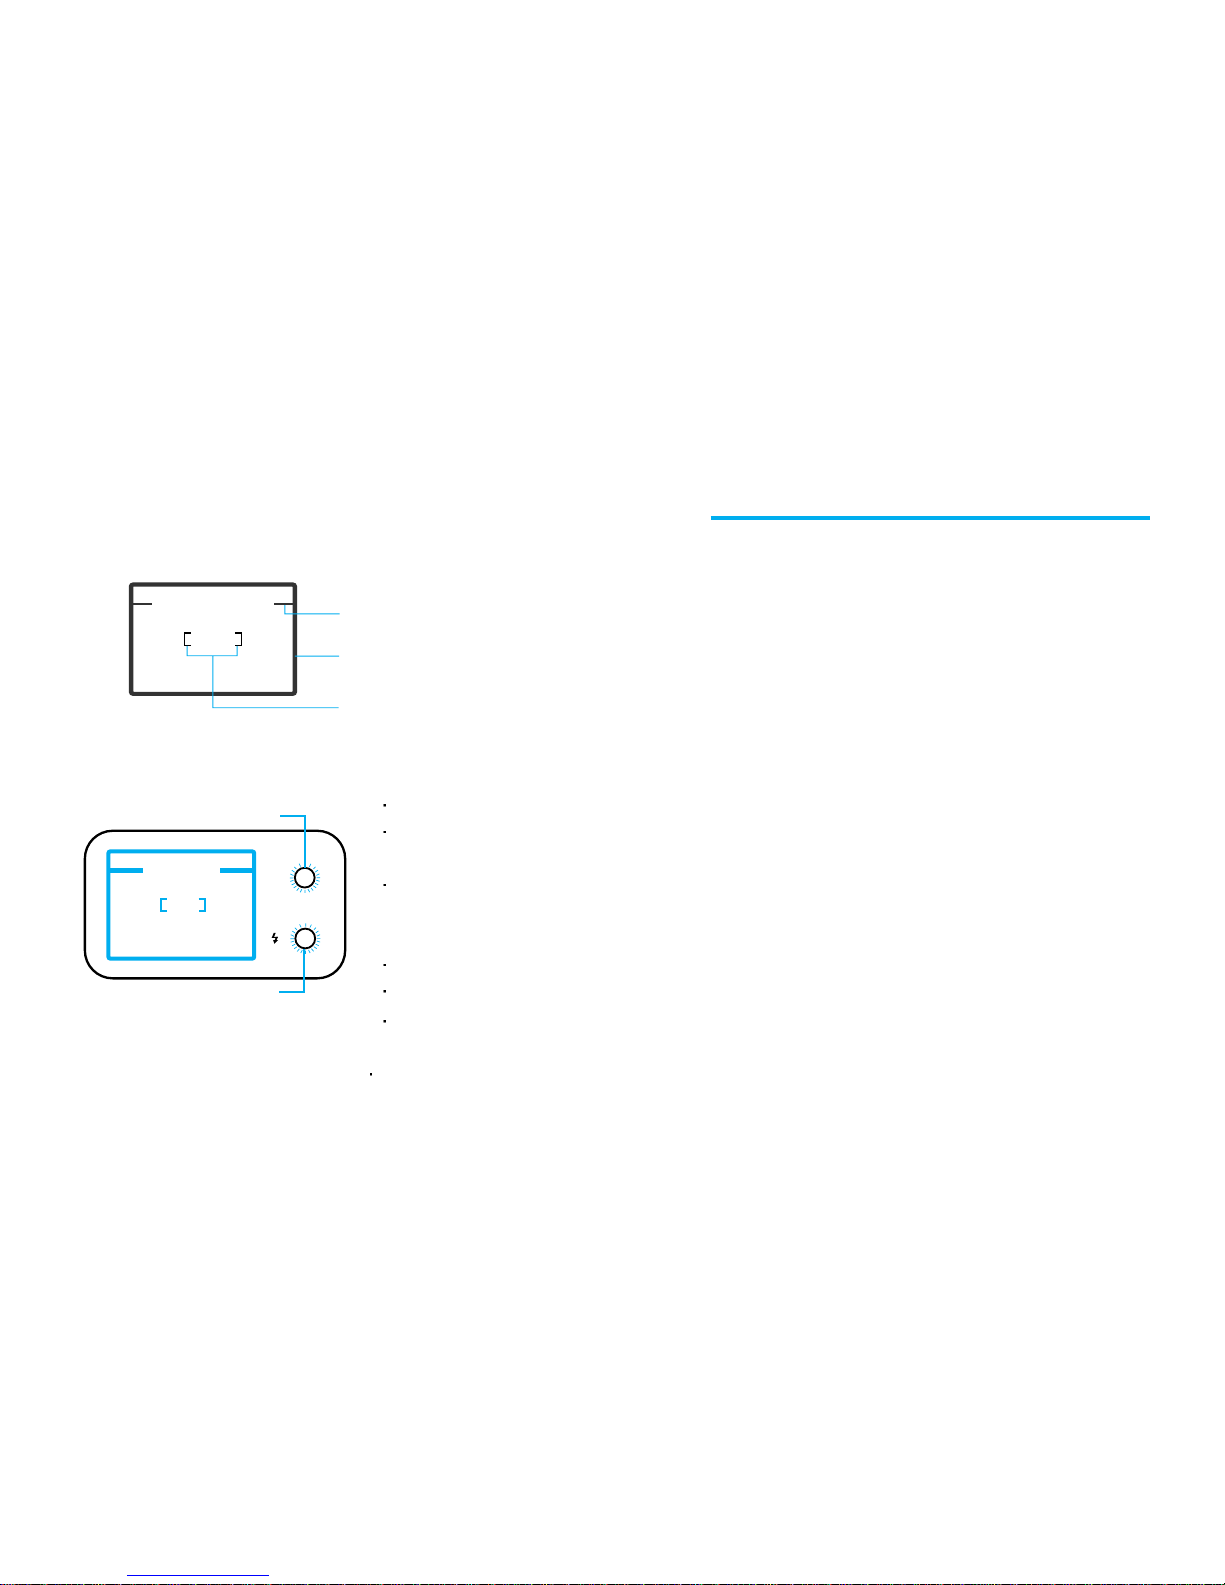
VIEWFINDER AND INDICATORS
AF
Macro picture area
Picture area frame
Autofocus frame (Focus on the subject with this frame)
Indicators
1. Autofocus Indicator (Green LED)
When illuminated this confirms that conditions are suitable for picture taking.
When the subject is too close, (within 0.74m (2.4ft), the LED will blink rapidly
and the shutter will lock. (Refer to page 17 for information of buzzer operation)
The Auto Macro mode will be selected when the subject is within the range
(0.74m ~ 1.0m). At this point the LED will blink slowly.
2. Flash Indicator (Red LED)
Illuminates when the flash is fully charged. (In low light conditions)
Blinks rapidly when the flash is being charged. (Shutter will be locked)
Blinks slowly to indicate that the camera requires steady support (preferably
a tripod) to avoid camera shake.
If a red lamp blinks fast and at the same time a buzzer sounds continually
(beep~), this is a warning sign of flash zoom compensation.
Viewfinder
Green
Red
Page 9
9
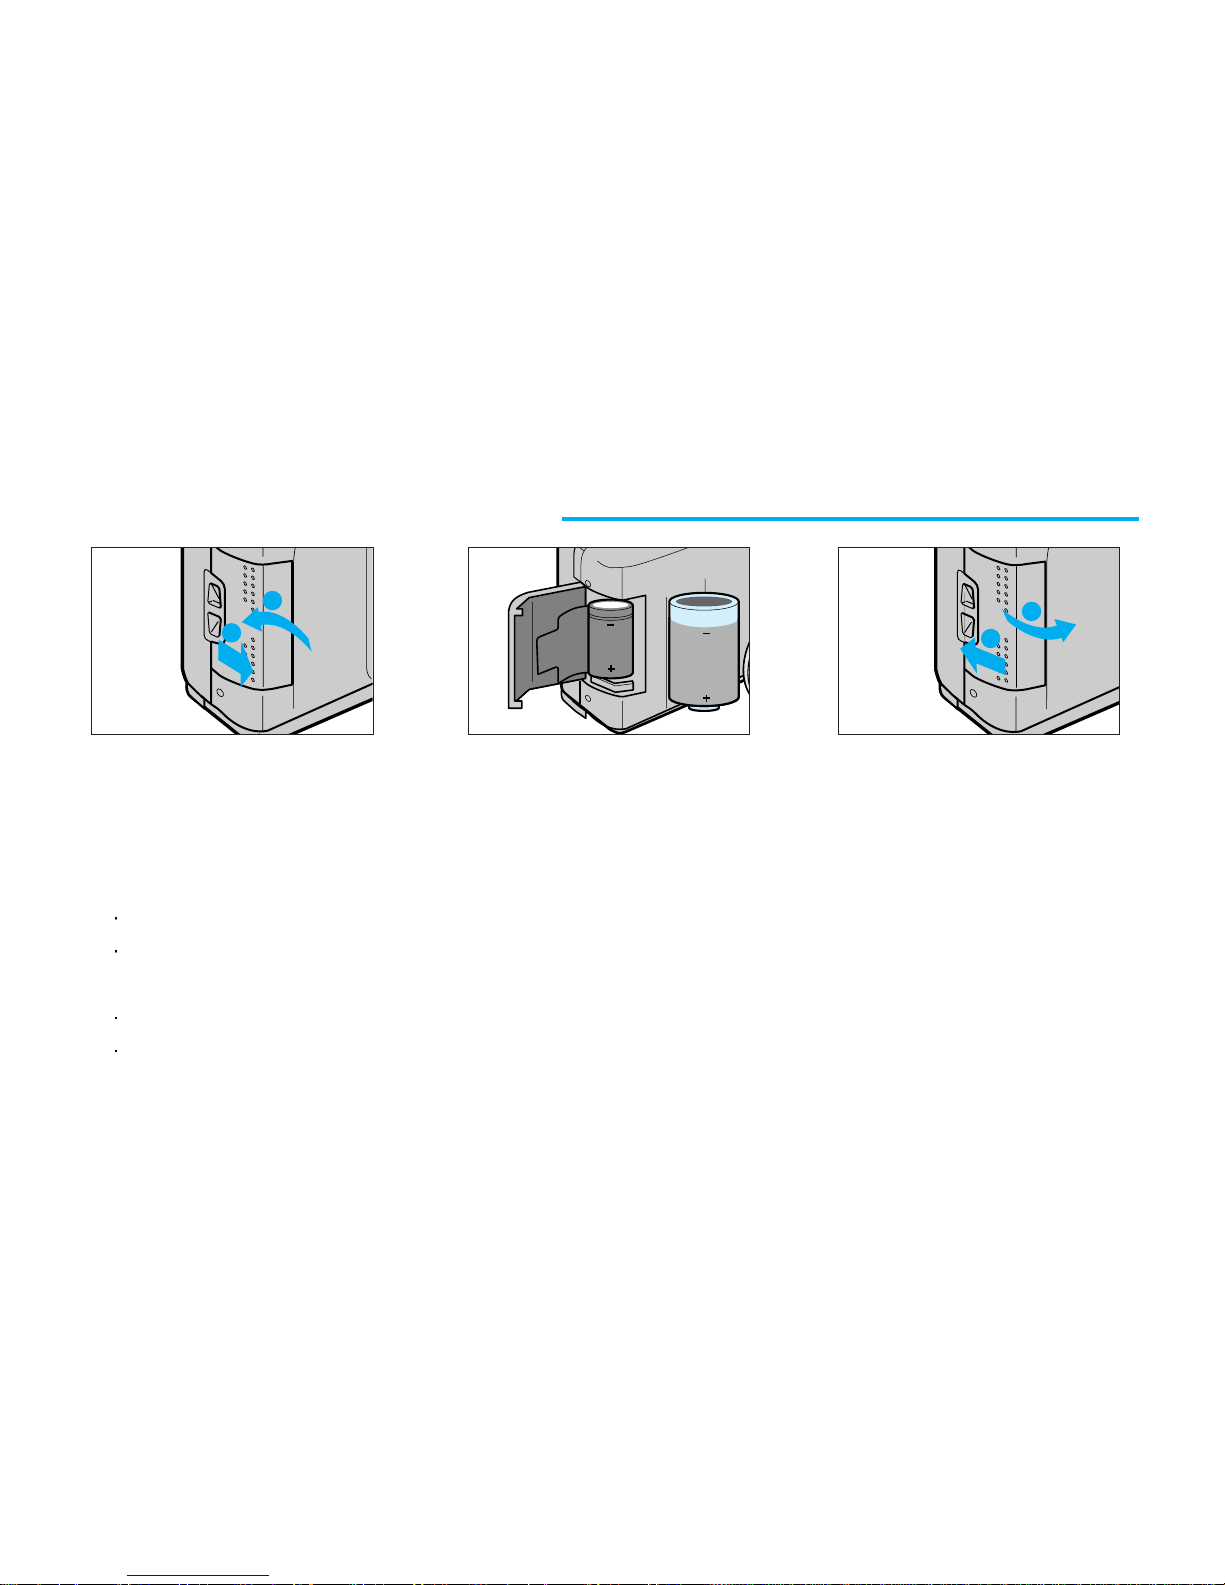
LOADING THE BATTERY
1. Open the chamber cover by sliding the battery chamber cover.
2. Insert a new battery and ensure it is placed in the correct position.
3. Close the chamber cover.
NOTE
Use one CR-123A or DL-123A battery.
The camera will automatically turn the power off when not used after 3 minutes.
Remove the battery from the camera when the camera is not used for an extended period.
Be sure to check the date and shooting mode when you load a new battery.
If the date or time is incorrect, please refer to page 20 and adjust accordingly.
2
1
1
2
3
2 1
Page 10
10
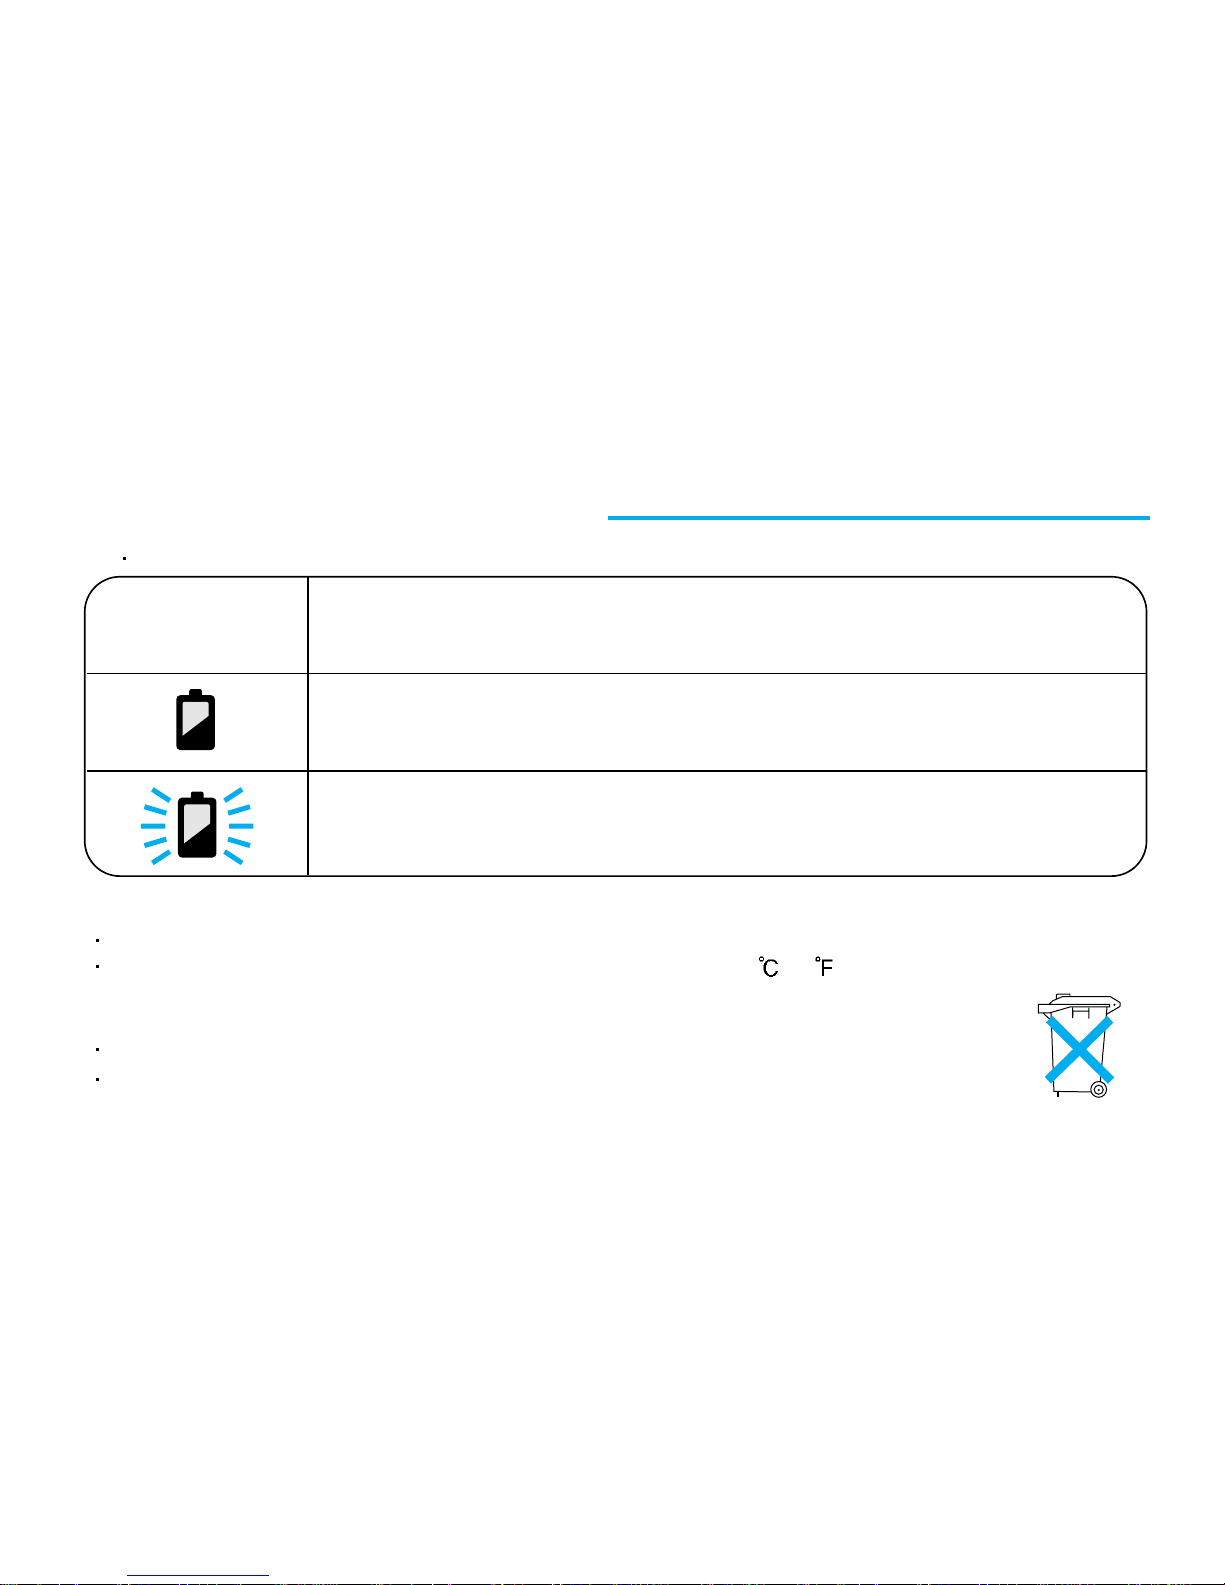
CHECKING THE BATTERY
NOTE
Do not remove the battery while the camera is operating, because it may cause the camera to malfunction.
Battery performance is reduced in low temperatures (under -10 (14 );Try to keep the camera warm
between shots. (The battery will operate normally again when the temperature returns to
normal).
Please dispose of the exhausted battery with care.
Some local authorities may require batteries to be disposed of separately from other refuse.
1. Normal operation
- The battery condition indicator does not appear.
2. The indicator appears half way.
- The battery life is low and you should ensure that a replacement battery is available.
3. The indicator blinks.
- The battery is exhausted. Load a new battery.
You can check the battery life on the LCD panel.
Page 11
11
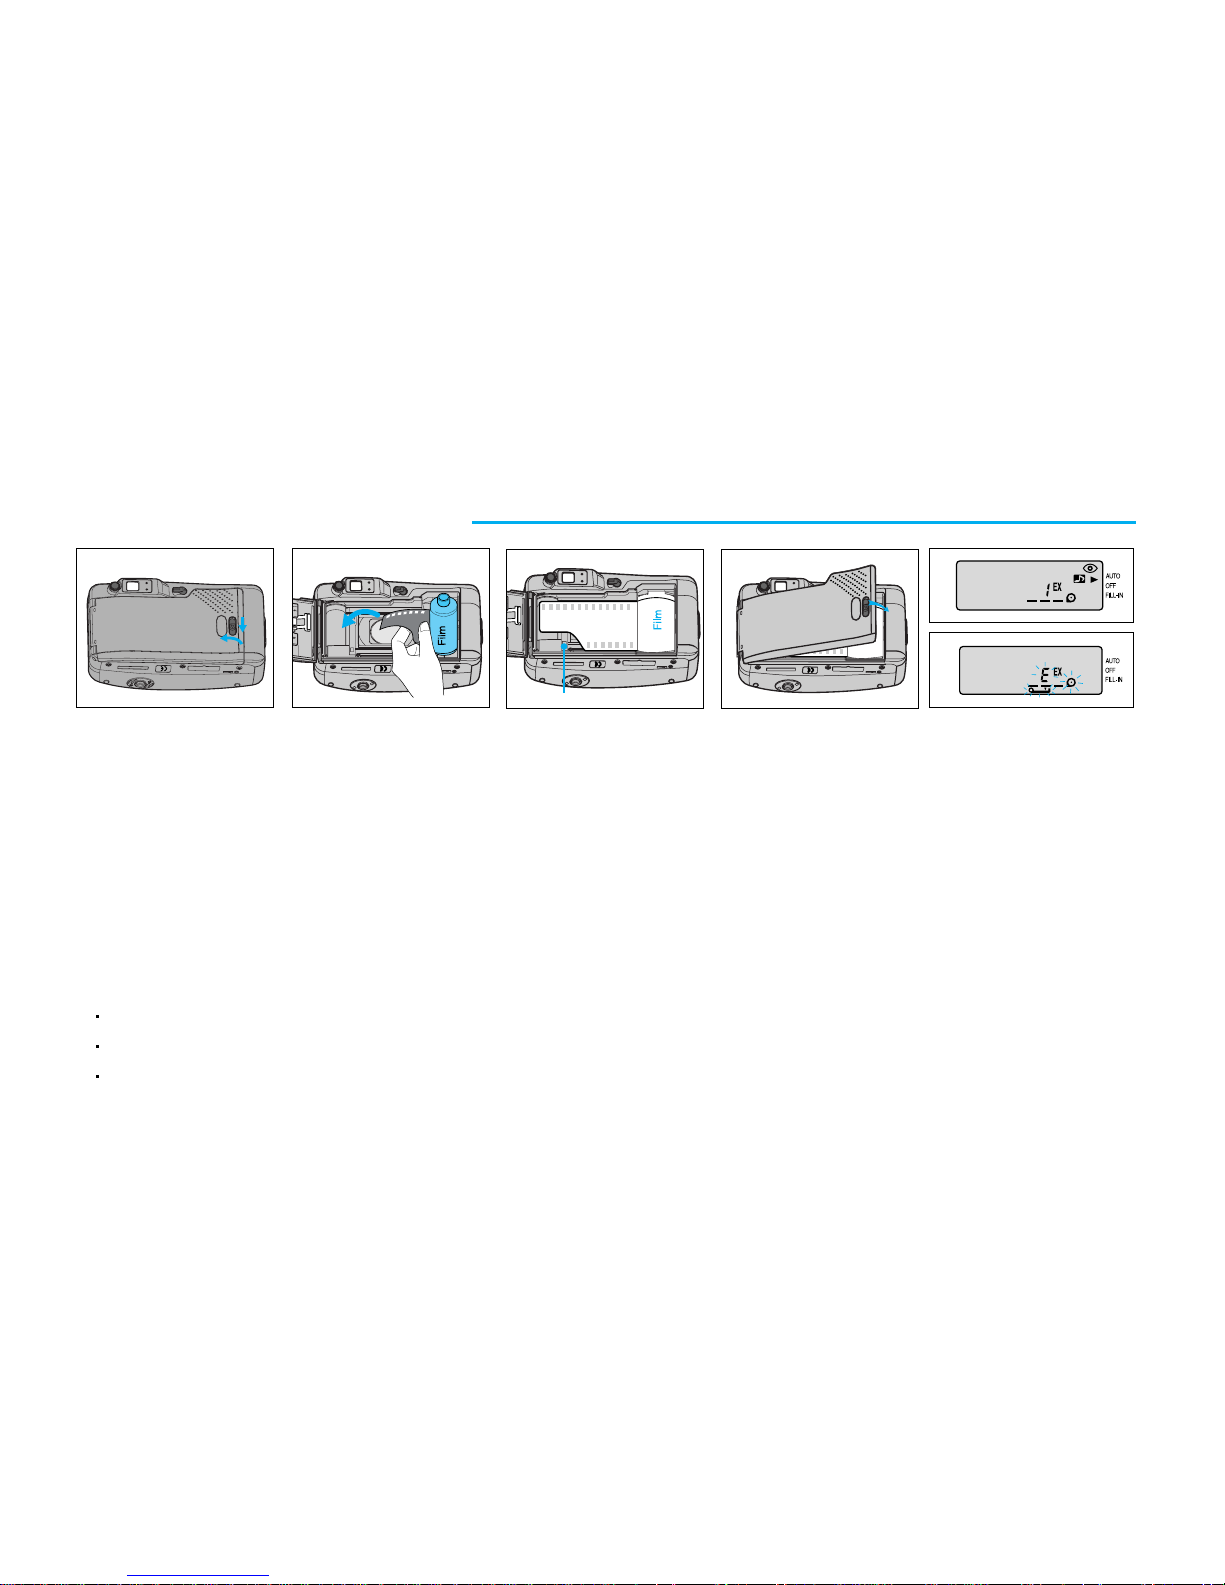
LOADING THE FILM
1. Open the back cover by sliding the release knob as shown above.
2. Insert a roll of film in the chamber. Do not force the film into position.
3. The film should lie flat.
4. Close the back cover. It will close with a “click”.
5. The film will automatically advance until the film counter reads “1”.
6. If a film is loaded incorrectly, the LCD panel will display an “E” warning signal. (Refer to page
17 for information of Buzzer operation) Reload the film following the steps shown above.
NOTE
The camera automatically adjusts for ISO 50-3200 DX film.
When you use non-DX film, the camera will set the film speed at ISO 100.
Load the film in subdued lighting.
3
2 1
4
6
5
Film sensor
Page 12
12
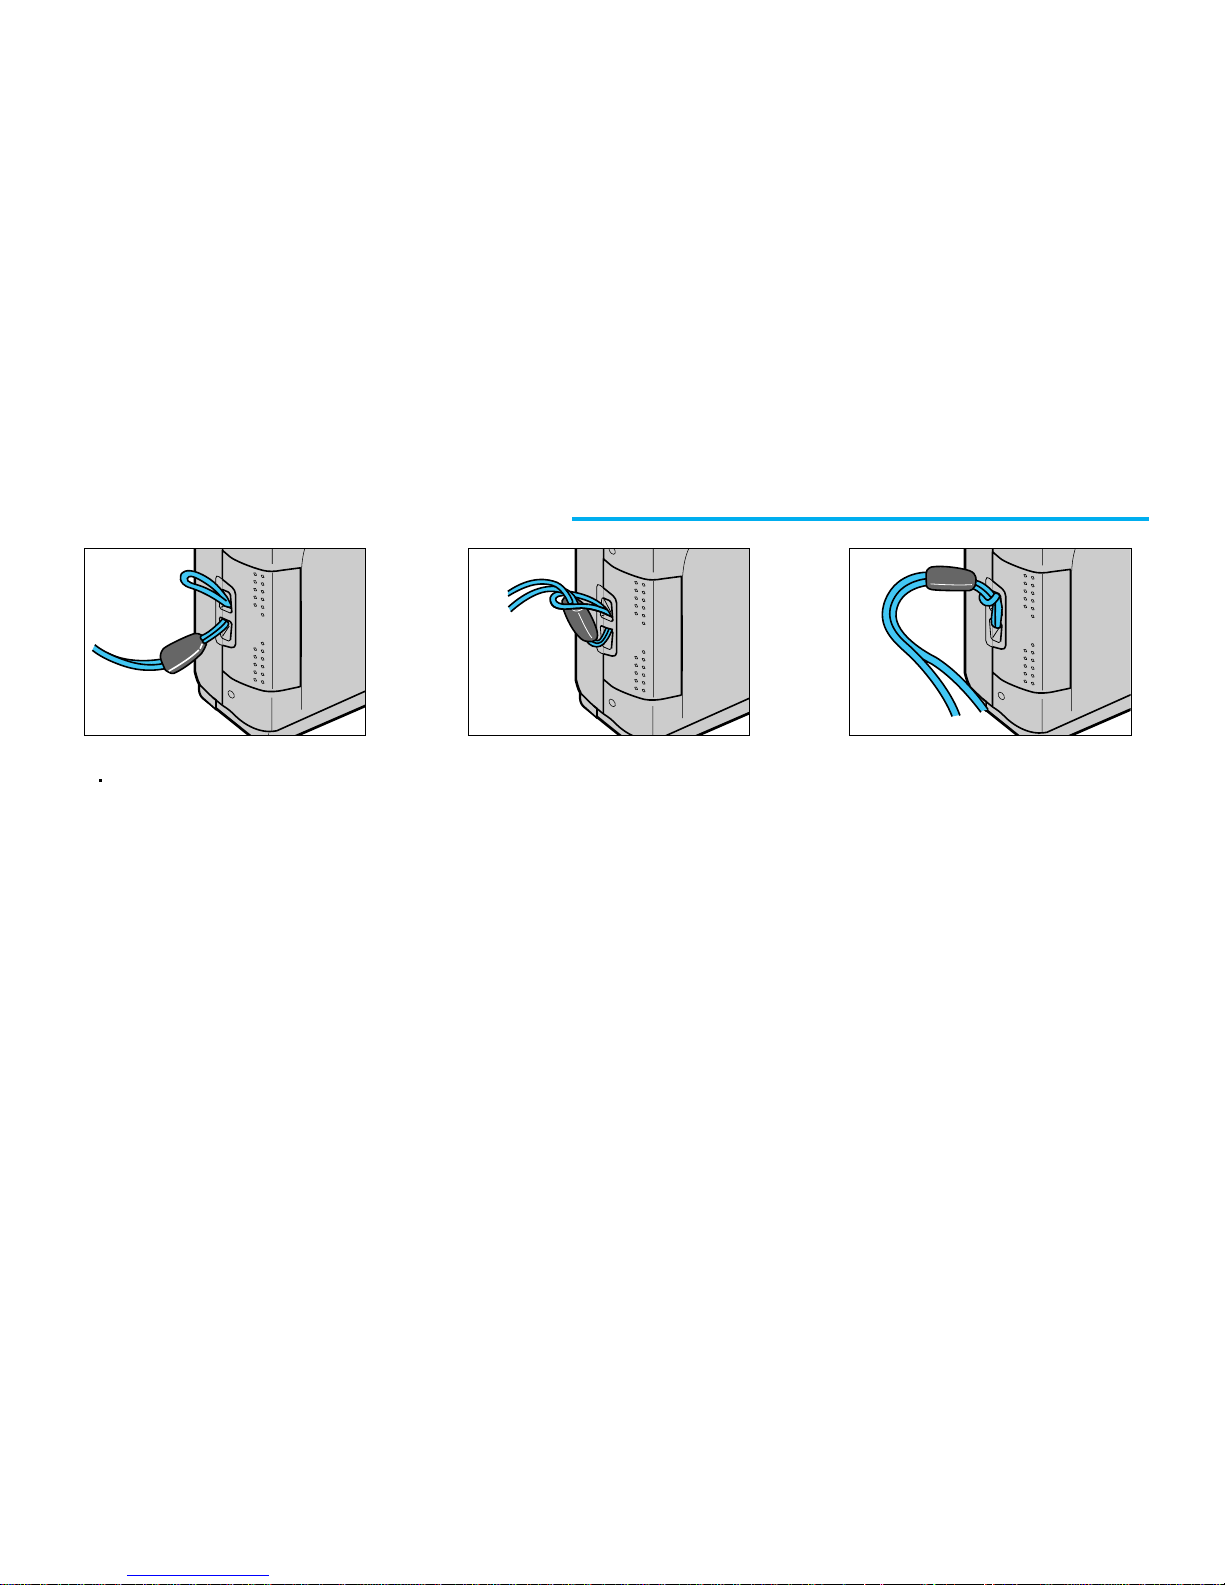
ATTACHING THE STRAP
Refer to the illustrations above.
3
2
1
Page 13
13
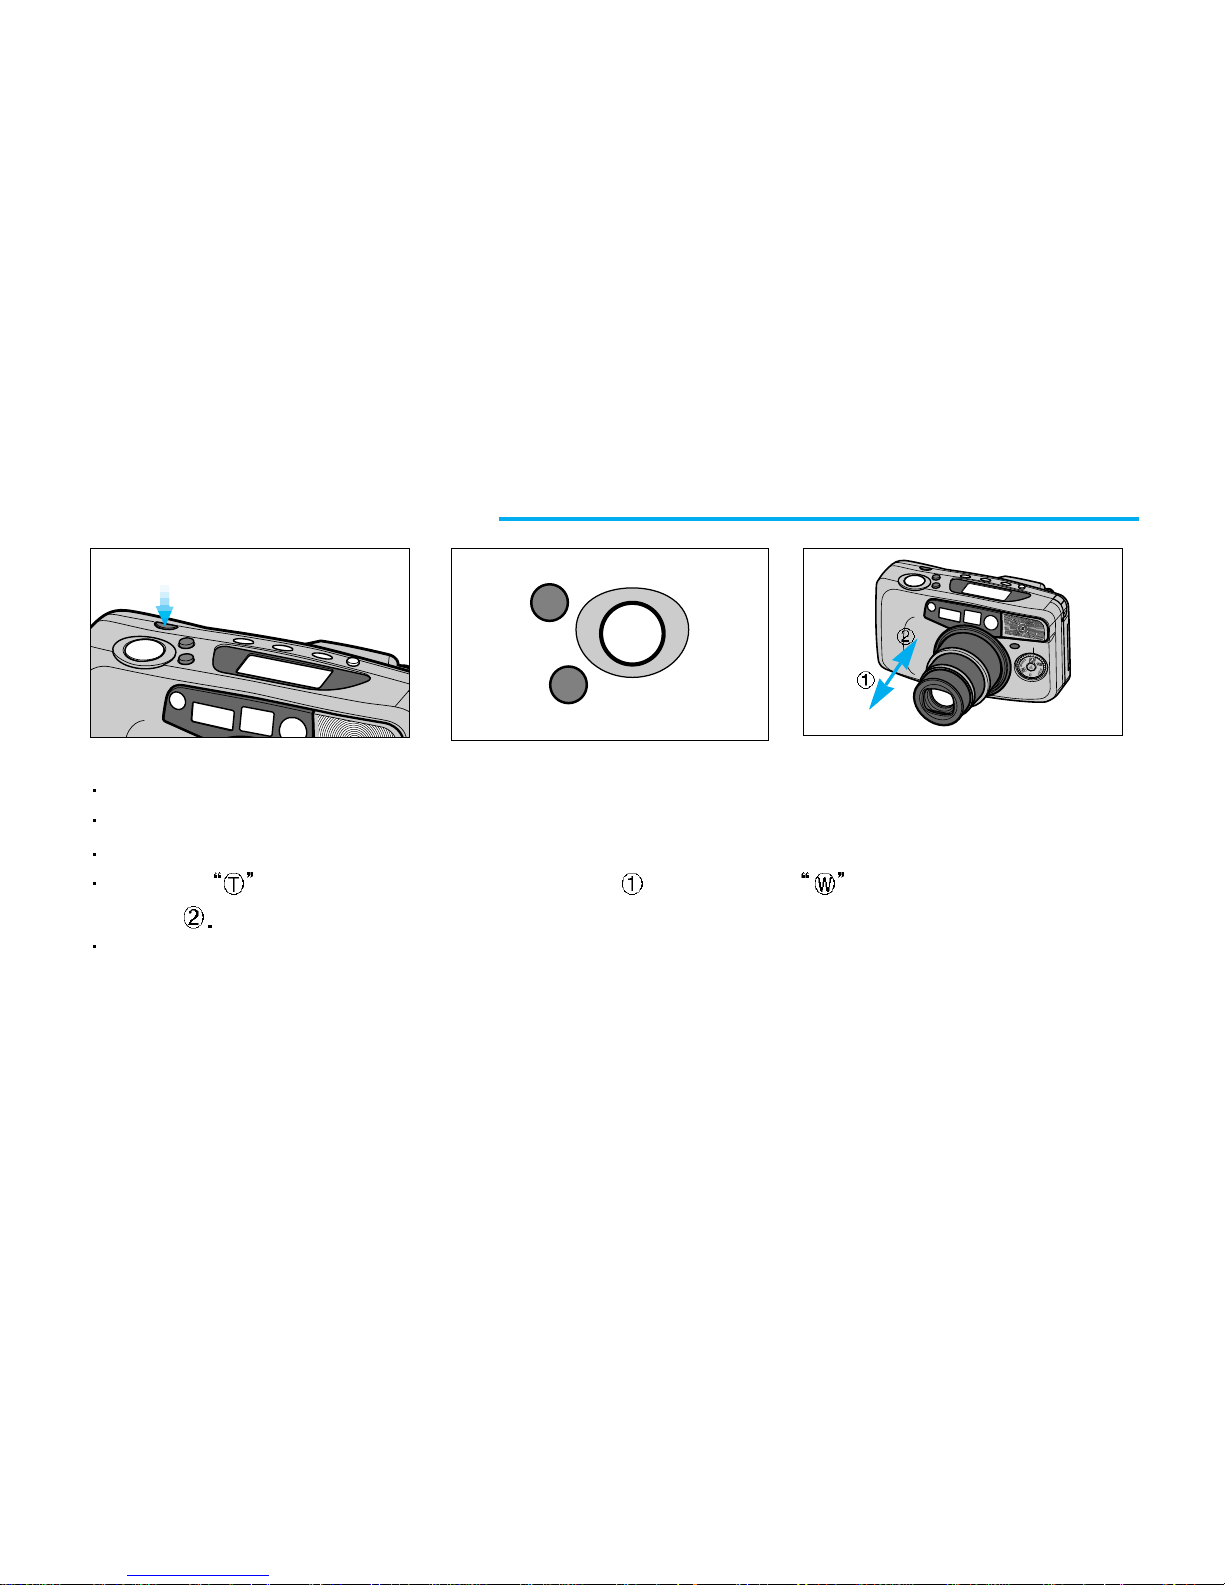
USING THE CAMERA
Press the Power button to turn the power on. The indicators will appear on the LCD panel.
If the camera is not used for 3 minutes, the power will be turned off automatically.
While looking through the viewfinder, aim the camera at the subject and operate the zoom buttons.
Press the (Tele) button to move the lens out and press the (Wide) button to move the
lens in
During this operation, the LCD panel shows the focal lengths in the following sequence : 38, 45, 55,
70, 80, 90, 105, 120, 130, 140 mm.
T
W
Page 14
14
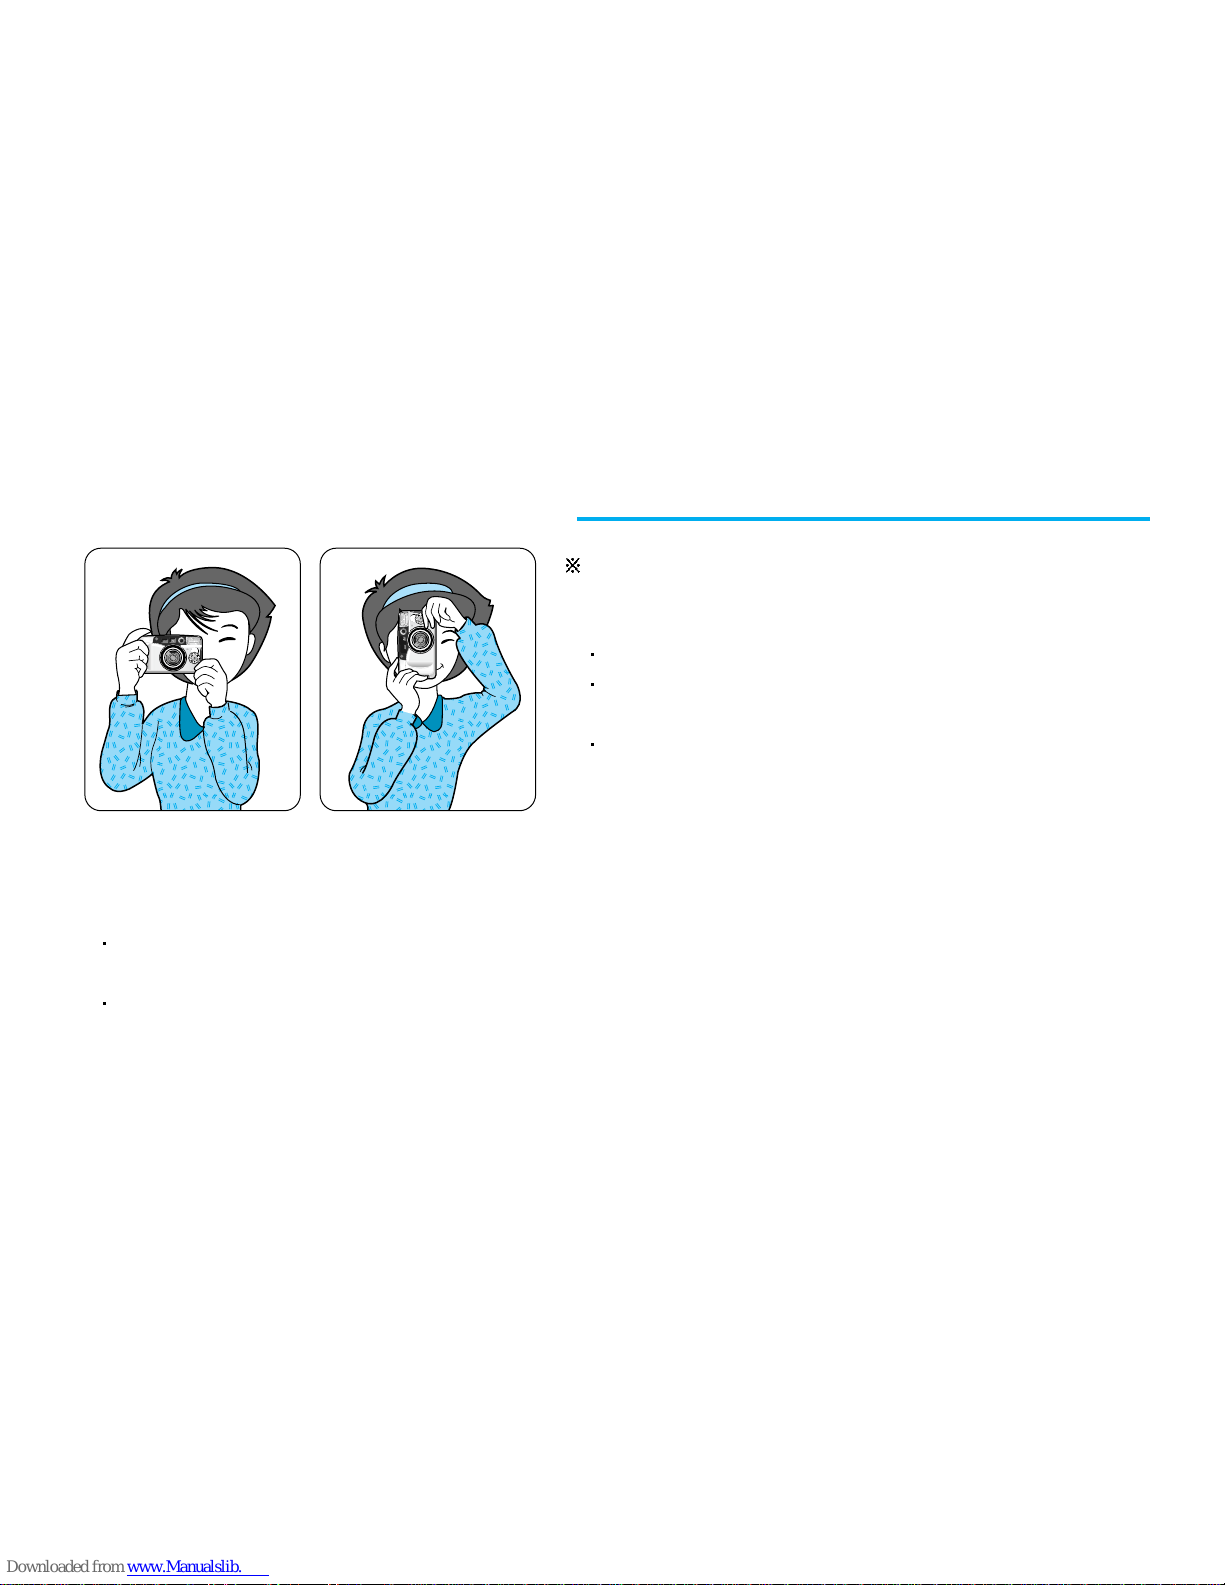
HOLDING THE CAMERA
In order to avoid camera shake, hold the camera
steady, especially when using longer focal lengths
(Tele).
Place the camera strap over your wrist.
Both elbows (horizontal picture) or one elbow (vertical
picture) should be held close to your body.
Keep your eye close to the viewfinder when using the
camera. This ensures correct framing. Ensure you
can see all four sides of the viewing frame when
composing your shot.
NOTE
Avoid obstructing the lens when you take a picture. Pictures can be spoiled when a finger, hair or
camera strap falls in front of the Lens, Exposure Sensor or Auto-focus Windows.
When you take vertical pictures with flash, the flash should be above the lens.
;;;
;;;
Page 15
15
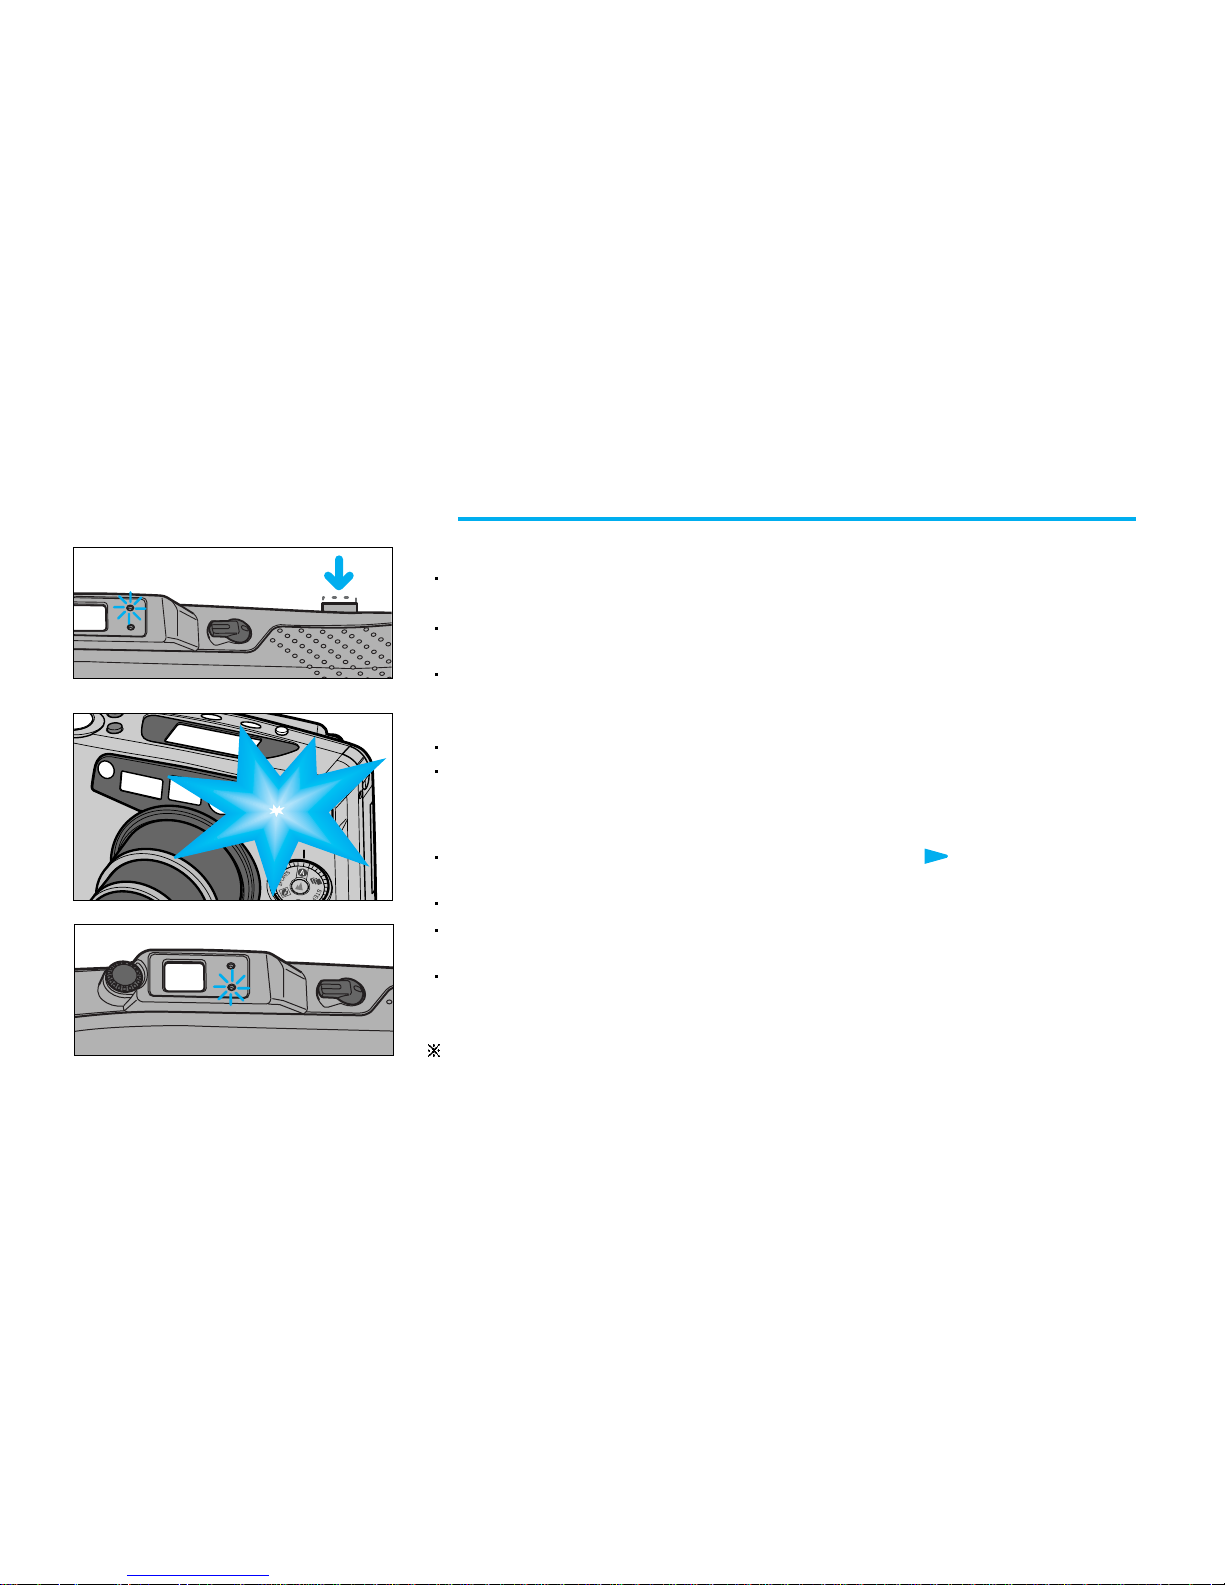
Aim the Autofocus frame at a subject.(Refer to page 8)
Press the Shutter button half way down. The lens is focused when the green
lamp turns on.
If a subject is between 0.74m (2.4ft) and 1m (3.28ft), the green lamp blinks
slowly and Macro mode is set automatically. (Refer to page 41)
If a subject is within 0.74m (2.4ft), the green lamp blinks quickly to indicate that
the subject is too close and the shutter is locked. Ensure that the camera
subject distance is 0.74m or more.
Press the Shutter button all the way down to take a picture.
The film will automatically advance after shooting and the frame counter will
advance.
NOTE
When the flash is being charged, the flash indicator ( AUTO) on the LCD
panel blinks and the shutter will not operate.
When the Red LED blinks, use a tripod or steady support to avoid camera shake.
In order to avoid camera shake, hold the camera steadily and press the Shutter
button gently, particularly when using longer focal lengths.(Tele)
After taking pictures, turn off the camera. This will protect the lens and prevent
unintended shots. (If not used for 3 minutes, the camera will turn off
automatically).
In such a case, the power will be turn off with zoom lens move into the camera
automatically while the Shutter button is operate. If this occur, please turn the
power on and take a picture again.
TAKING PICTURES
Page 16

16
ADJUSTING THE DIOPTER
Select the maximum zoom setting and turn the diopter adjustment
dial until the viewfinder display becomes clear.
Page 17

17
BUZZER OPERATION
In the state of pushing spot/snap button for 2 seconds, if you
push Landscape shooting button, it is possible to select or
cancel. And only when a buzzer mark appears on LCD, the
buzzer works. In this case, a buzzer sound ”beep”
According to the function, the buzzer sound is as follows.
Buzzer Sound Function Application Note
Peek Selection When you press Flash, Self button One time
1 long beep Warning When Mode Dial is changed. One time
When Mode Dial is not selected with
Auto after the power is turned on.
3 short beeps Warning When hand shake is detected. Three times
3 short beeps Warning
The function of Auto flash zoom compensation
Until zooming is finished
3 short beeps
Warning/ Error
When AF Lock(shorter than minimum Three times
shooting range)occurs. When a film is
loaded incorrectly.
3 long beeps
Completion
When the rewinding is completely finished. For 6 seconds / until the
back cover is open
.
3 long beeps Warning When you open / close a lens cap Three times
Page 18

18
USING THE FOCUS LOCK
If you want to focus on a subject that is not in the centre of your picture, use the Focus
Lock function described below.
1. Aim the camera with the autofocus frame superimposed over the subject.
2. Press the shutter button half way down. (Green LED light)
Be careful not to press the shutter button all the way down to avoid taking an unwanted picture.
3. Keeping the shutter button depressed, recompose your picture as desired.
Hold the camera steadily and gently press the shutter button completely down.
The Focus Lock can be released at any time by lifting your finger from the shutter button.
!
ATTENTION
The Autofocus system of this camera may not function in circumstances below :
The subject blends into the background.
The subject is fast moving.
The subject does not reflect enough light back into the autofocus receiver(e.g.very dark
objects).
The subject is very narrow, either horizontally or vertically(e.g.a lamppost).
There is more than one subject, one near the camera and one some distance away.
Strong light is directed at the camera. (the subject is back lit).
Fireworks and smoke.
Shining or glossy surfaces such as a car body or the surface of water.
In these circumstances, using the Focus Lock feature may help to solve the problem.
TAKING PHOTOS
Page 19

19
REWINDING THE FILM
1. Automatic rewinding
After taking all the pictures on a roll of film, the camera will automatically
rewind the film. The motor stops when the rewinding is completed.
When the rewinding is completed, the icon( ) will blink. After
5 seconds the icon will no longer be displayed. You may remove the
film at this point. (Refer to page 17 for information of buzzer operation)
To rewind the film in the middle of a roll, press the Mid-roll rewind button.
The film will be completely rewound, ready for processing. You will not be
able to reload the film.
NOTE
If you press the Shutter button during film rewinding, the rewinding is
interrupted until the Shutter button is released.
If the motor stops before the LCD shows “0”, replace the battery. Do not
open the back cover until the battery is replaced.
2. Mid-roll rewinding
Rewind button
Page 20

20
DATE AND CAPTION (Q.D.MODEL ONLY)
Press the DATE button to select one of the different formats.(Refer to the
left sequences)
The "PRINT" mark on the LCD panel will blink during the print.
1. Changing "Date" format or selecting the caption
2. Date Zone
<No print>
<Month-Day-Year>
<Year-Month-Day>
<Day-Month-Year>
<Selecting caption print>
<Day-Hour-Minute>
Use the DATE button to control "Date" and "Caption".
<Normal picture> <Panorama shot>
NOTE
Under certain circumstances, the date will not print on the final frame of a film.
Page 21

21
3. Changing the date setting
4. Selecting the caption print
MESSAGE CAPTIONS
CP-1 I LOVE YOU!
CP-2 A HAPPY BIRTHDAY
CP-3 THANK YOU
CP-4 CONGRATULATIONS
CP-5 A HAPPY NEW YEAR
CP-6 MERRY X-MAS
CP-7 HELLO!
Example
2000 –> “00”
2001 –> “01”
To change the date or time, press and hold down the DATE button for 2 seconds. The
first sector of the date format will blink.
To select the sector that you want to change, press the DATE button.
Change the date setting by operating zoom buttons. TELE button to increase, WIDE
button to decrease.
NOTE
This camera will set the date automatically until 2099.
A year mark will be indicated by the last 2 digits on the LCD panel.
It will be indicated by 4 digits on the picture.Sometimes the
year is marked by 2 digits.
Under these circumstances the camer
a will operate as normal.
When the LCD panel shows "CP-1"(refer to the previous
picture ), you can se
lect one of seven captio
ns as follows:
To change the captions, operate the zoom buttons.
("T" or "W")
NOTE
The camera will print either a date or a caption. You
cannot select both date and caption on the same picture.
(The caption is printed on the date zone.)
Remember to reset the date and time after changing the battery.
Page 22

22
With the Non Q.D. version there is a facility to check the time and date via the
LCD panel. Simply press the TIME button to select the display you require.
NOTE
On the Non Q.D model, the date/time will not print on your pictures.
2. Changing the date setting
To change the date or time, press and
hold down the TIME button for 2
seconds. The first sector of the date
format will blink.
To select the sector that you want to
change, press the TIME button.
Change the date setting by operating
zoom buttons.
CLOCK/CALENDAR FUNCTION(NON Q.D. MODEL ONLY)
<Year-Month-Day>
<Month-Day-Year>
<Day-Month-Year>
<Day-Hour-Minutes>
1. Clock/Calendar function
Page 23

23
USING THE SHOOTING MODE
You can select the shooting mode by turning the dial clockwise or counterclockwise. Line up the selected icon with the line at the top of the dial.
<Normal photography> <Portrait zoom>
<Step zoom>
<Continuous shooting>
<Sports shooting>
<Bulb shooting>
NOTE
After shooting, the shooting mode will remain selected until another mode is chosen.
A
Page 24

24
USING THE FLASH MODE
You can select the flash mode by pressing the FLASH button.
Flash button
<Red-eye reduction> <Flash off>
<Fill-in flash>
<Fill-in flash & back-light control><Fill-in flash & red-eye reduction>
<Auto flash>
NOTE
After taking a picture with the "Fill-in & Back-light control" mode, the camera will return to normal mode automatically.
In case of the "Auto flash" function, the camera will retain the mode even though the camera is turned off. When you
turn on the camera, check the LCD panel.
In this case, the location of a zoom can be changed from tele into wide, this is to change zoom location automatically
for preventing a picture from becoming dark. (The function of Auto flash zoom compensation)
Page 25

25
USING THE SELF MODE
You can select the self mode by pressing the SELF button.
Self button
<Normal photography> <Double self-timer>
<2 sec. delayed shutter release><Remote control shooting><Interval shooting>
<Self-timer>
NOTE
With the "Non Q.D. model", the "Remote control shooting" mode does not appear on the LCD panel.
After using the "2 sec. Delayed Shutter Release" or "Remote Control Shooting" modes, the camera will
remain in that mode, until a new selection is made.
Page 26

26
USING THE FOCUS MODE
You can select the focus mode by pressing the SPOT/SNAP button.
<Normal photography> <Snap shooting><Spot shooting>
SPOT/SNAP
Page 27

27
AUTO SPORTS SHOOTING
The SPORTS mode is ideal for capturing moving subjects with continous focusing.
Select this mode by turning the (SPORTS ) icon of the "Shooting Mode Dial" to the line at
the top of the dial.
AUTO PORTRAIT ZOOM
<Normal mode> <Portrait zoom>
Select this mode by turning the ( ) icon of the "Shooting Mode Dial" to the line at the top
of the dial.
Use this mode to maintain a constant subject size within the frame, even though the distance
to a subject may vary.
Position your subject in the centre of the viewfinder and press the shutter button half-way. The
zoom will operate automatically to attain the optimum shot.
Press the shutter button fully to take a picture.
Page 28

28
BULB AUTO BULB SHOOTING(B SHUTTER)
Select this mode by turning the B icon of the "Shooting Mode Dial" to the line
at the top of the dial.
Use this mode to shoot subjects that require an extended shutter speed such
as fireworks and night scenes.
The shutter remains open as long as the shutter button is depressed.
The time selected is shown on the LCD panel and the maximum time is 60
seconds.
NOTE
Use this mode only in low light.
To avoid camera shake, use a tripod.
To prevent of over-exposure from the high brightness, the Bulb shooting
mode will not operate even though the mode is selected.
Page 29

29
STEP AUTO STEP ZOOM
Select this mode by turning the STEP icon of the "Shooting Mode Dial"
to the line
at the top of the dial.
Use this mode to take a number of pictures of the same subject using different focal
lengths.
The number of photos (up to 3) depends on the focal length chosen. (Refer to chart
below) You can choose the focal length by operating the zoom buttons. ("T" or "W")
NOTE
The first shot is taken after 10 seconds. From the second shot, the interval between
shots is 2 seconds.
If flash is required, the time between shots will be increased due to the flash
recycling.
Number of Photo
140mm 130mm 120mm 105mm 90mm 80mm 70mm 55mm 45mm 38mm
3EX
¤¤Ł ¤Ø
3EX
¤¤Ł¤Ø
3EX
¤¤Ł ¤Ø
3EX
¤¤Ł¤Ø
3EX
¤¤Ł ¤Ø
3EX
¤¤Ł¤Ø
3EX
¤¤Ł ¤Ø
3EX
¤¤Ł¤Ø
2EX
¤¤Ł
1EX
¤
Page 30

30
AUTO CONTINUOUS SHOOTING
Select this mode by turning the ( ) icon of the "Shooting Mode Dial" to
the line at the top of the dial.
Use this mode to take a sequence of pictures.
As long as you press the shutter button, the camera will continue to take
pictures.
NOTE
If flash is required, the time between shots will be increased due to the flash
recycling.
The flash does not fire if no film is loaded, (except for "Fill-in Flash" mode).
Page 31

31
AUTO AUT O RED-EYE REDUCTION
Flash button
In low light conditions, the flash will automatically fire to obtain a suitable
exposure.
You can decrease the red-eye phenomenon automatically when taking a
portrait picture in low light.
NOTE
The red-eye reduction mode dramatically reduces the possible red-eye effect by emitting rapid pre-flash
to shrink the subject’s pupils before the main flash fires.
Do not allow the subject to move until the main flash has fired.
<Auto flash> <With red-eye reduction>
Page 32

32
AUTO AUT O FLASH
Flash button
Select the Auto Mode by pressing the FLASH button 1 times.
Auto flash mode activates the flash by measuring the brightness of the
object.
Flash will not engage when the shooting object is too bright.
NOTE
Once the Auto Flash Mode is selected, it will remain active even when it is
turned off. (but)When you change the battery, the mode will be set to red-eye
reduction.
Page 33

33
FILL-IN FILL-IN FLASH
Flash button
OFF FLASH OFF
Select this mode by pressing the FLASH button twice.
Use this mode when you want to take pictures without flash.
NOTE
When using the Flash Off function, you may need to use a tripod to avoid camera shake.
Flash button
Select this mode by pressing the FLASH button 3 times.
When the main subject is in shadow and the surrounding light conditions are too strong
for the auto-flash to engage, the fill-in flash allows you to expose the subject correctly.
NOTE
When using this mode, the flash fires regardless of the brightness of the subject and background.
Page 34

34
FILL-IN
FILL-IN FLASH AND BACK-LIGHT CONTROL
Select this mode by pressing the FLASH button 4 times.
Use this mode when your subject is strongly back-lit.
NOTE
Be careful to avoid direct sunlight on the lens.
Flash button
<With back-light control><Normal photography in
back-light condition>
Page 35

35
FILL-IN
FILL-IN FLASH AND RED-EYE REDUCTION
Select this mode by pressing the FLASH button 5 times.
Use this mode when you take a picture of a person in low light condition.
NOTE
Use a tripod to avoid camera shake.
Flash button
Page 36

36
AUTO SELF-TIMER
This can be selected by pressing the SELF button once. You can take a picture
of yourself by using this mode.
When pressing the shutter button, the self-timer lamp illuminate for 7 seconds.
Then the lamp blinks rapidly for 3 seconds and the picture is taken.
Self button
Page 37

37
AUTO DOUBLE SELF-TIMER
You can select this mode by pressing the SELF button twice.
Press the shutter button and a shot will be taken in the same way a self timer
shot is taken. A further shot will be made after 2 seconds.
NOTE
When using the flash, the shooting interval may increase due to the flash
recharging time.
Self button
Page 38

38
AUTO INTERVAL SHOOTING
Self button
AUTO 2 SEC. DELAYED SHUTTER RELEASE
Use this mode to avoid camera shake caused by camera movement during hand held shots.
In this mode, a picture is taken 2 seconds after releasing the shutter button.
To use this mode, place the camera on a steady surface, select by pressing the SELF button
3 times before taking the picture.
Self button
Select this mode by pressing the SELF button 5 times.
(When a camera is Non Q.D. model, press the SELF button 4 times)
Use this mode to take pictures automatically over a chosen period of time.
You can choose the interval time (10~60 seconds) by 10 seconds or (10~60 minutes) by 10 minutes.
To set the interval time, press the flash buttons while keeping the SELF button depressed.
NOTE
Unless you release the INTERVAL Shooting mode, the camera will continue to
operate until the film is used up. If the film is not in the film chamber this mode will be
released after 5 shootings.
Press the Power button or SELF button to release this mode.
Page 39

39
AUTO SPOT SHOOTING
Use this mode when photographing a specific subject in a situation where
the camera may have difficulty in focusing.
Certain subjects, such as a person in a crowd, can be difficult to photograph.
This mode enables you to have your specific subject clear, even when
surrounded by other subjects in the picture.
Select this mode by pressing the SPOT/SNAP button once and aim the spot
shooting focus frame at the subject you want.
The camera focuses on the subject in the spot shooting focus frame.
SPOT/SNAP
Page 40

40
AUTO SNAP SHOOTING
Select this mode by pressing the SPOT/SNAP button twice
Use this mode when taking a picture of active subjects such as children or
pets. (They are difficult to focus on)
When you select this mode, the camera will set the wide position (38mm)
and the focus is fixed.
If you depress the shutter button continuously, the camera will take a
sequence of shots.
NOTE
The subject must be within the range 1.3m ~ 6m (4.3ft ~ 19.7ft).
If you press the zoom(T/W) or power button while you operating this mode
will be release to normal photography.
SPOT/SNAP
Page 41

41
AUTO MACRO PHOTOGRAPHY
Use this mode to take close-up photographs.
When a subject is within 1m (3.28ft), the camera will automatically set this
mode.
The Macro range is as below:
WIDE : 0.74~1m (2.4~3.28ft)
TELE : 0.95~1m(3.1~3.28ft)
When a subject is within range, the Autofocus Indicator (Green LED) will
blink slowly and the Macro mark ( ) will appear on the LCD panel.
Remember to compose your shot using the macro picture area frame.(Refer
to page 8)
NOTE
When a subject is closer than 0.74m (2.4ft), the Green LED will blink quickly
and the shutter will lock. (Refer to page 17 for the information of buzzer
operation)
Page 42

42
PANORAMA PHOTOGRAPHY
Use this mode to capture a panoramic view.
When you set this mode, the viewfinder will alter to indicate the panoramic
scene.
The picture area with this mode will be narrowed.
Select this mode using the PANORAMA switch. The PANORAMA mode can
be used on selected frames in a film.
Remember to inform your processor that some shots are panoramic. There
may be an extra charge for this service.
NOTE
The date can be imprinted with this mode.(Q.D. model only-Refer to page 20)
<Normal> <Panorama>
Page 43

43
LANDSCAPE MODE
To use this mode, press the LANDSCAPE button and hold it down. Take
a picture as normal, but do not release the LANDSCAPE button until the
shot has been taken. Press the Shutter button ( ) while pressing the
LANDSCAPE button( ).
Use this mode to photograph distant subjects through a window.
NOTE
With this mode, the flash does not fire.
Use a tripod to avoid camera shake in low light conditions.
<Without Landscape mode> <With Landscape mode>
Page 44

44
AUTO REMOTE CONTROL SHOOTING (Optional)
Select this mode by pressing the SELF button 4 times. (You can only use
this function with the Q.D. model camera)
When you select this mode, the self-timer lamp will blink every 2 seconds.
To take a picture remotely, ensure the remote function is selected on the
camera. Point the remote control of the camera and press the button marked
shutter. The camera will take a picture after two seconds.
Self button
Names of parts of the Remote Control
Signal lamp
Shutter button
Page 45

45
REPLACING THE BATTERY OF THE REMOTE CONTROL
1
3
2
Replacing the battery
Refer to the illustrations above.
NOTE
Use one lithium battery (JIS CR2025)
Be sure to place a battery in the correct position. The positive contact (+) must be facing up.
Page 46

46
CARE AND STORAGE
If your camera needs cleaning, wipe it with a soft, lintless cloth.
The lens should be cleaned only with special lens cleaning tissue and fluid.(Consult your camera
retailer.)
Do not allow your camera to come into contact with sand or water.
Keep your camera in a dry, cool place that is free from high humidity and dust.
Never leave your camera in hot places such as a parked car, or direct sunlight.
Avoid sudden shocks or vibration. If you drop your camera, it is a good idea to have it checked before
using it.
! Warning
Do not try to disassemble the camera yourself.
Your camera contains high voltage circuitry and may cause injury if interfered with.
The temperature range in which the camera operates is between 50 and -10 (122 ~14 ).
The camera performance may be impaired when used in very cold weather. If you plan to take
pictures when the temperature is below 7 (45 ), take care to keep your camera and battery warm
between shots. If your camera becomes very cold, allow it to return to room temperature slowly by
keeping it in its case. Condensation can spoil pictures and in extreme conditions can damage the
electronic components inside the camera.
If you have trouble with your camera, please return it to your retailer for advice.
IMPORTANT NOTES
Page 47

47
TROUBLE SHOOTING
Check point Remedy Page
Was the lens or other sensors obstructed by
your fingers or hair ?
Be careful not to block the lens or the exposure
sensor.
Did you compose a subject correctly referring
to the picture area frame?
Read the “Viewfinder and Indicators”
Check point Remedy Page
Is the lens cover completely open?
Press the Power button again.
Is the battery loaded correctly? Reinsert correctly.
Has it been a long time since you used the camera?
Change the battery.
Did you set the camera to the panorama mode?
Release the panorama mode.
14
8
42
If a picture is partially dark or out of focus.
If the sutter does not operate after pressing the shutter button.
13
9
10
Page 48

48
LENS
SHUTTER
EXPOSURE
VIEWFINDER
Format
Speed
Loading
Winding
Rewinding
35mm fully automatic lens shutter camera.
35mm DX-coded film, 24x36mm
Automatic setting with DX-coded film, ISO 50~3200
Automatic advance to the first frame when the back cover is closed.
Automatic advance, Single or Continuous shooting
Automatic rewinding, Mid-roll rewinding
38~140mm Schneider lens, F4.6~12.2
10 elements 7 groups ( 2 groups of Aspherical lens )
Programmed AE electronic focusing
Shutter speed : 1/3 ~ 1/400 sec.
Bulb mode(B shutter) : 60 ~ 0.5 sec.
Programmed auto exposure
AE coupling range (ISO 100 film)
WIDE(38mm) : EV 5.9~17.6
TELE(140mm) : EV 7.8~17.6
Real image type with autofocus frame
Field of view : 80%
Magnification : 0.41~1.32
Picture area frame mark
Connection with Panorama switch
SPECIFICATIONS
TYPE
FILM
Page 49

49
FLASH
Type
Range
Recycling time
Shooting mode
Flash mode
Autofocus mode
Self mode
SPECIAL
FEATURES
DATE AND CAPTION
(Q.D.model only)
POWER SOURCE
DIMENSIONS(WxHxD)
WEIGHT
Macro mode
Panorama mode (Switchable)
Built-in electronic flash
WIDE(38mm) : 0.74 ~ 5m(2.4 ~ 16.4ft)
TELE(140mm) : 0.95 ~ 2.2m(3.1 ~ 7.2ft)
Approx. 7 sec.
Portrait zoom Step zoom Bulb shooting (B Shutter)
Sports shooting Continuous shooting
Red-eye reduction Auto flash Flash off Fill-in flash
Fill-in flash & Back-light control (+1.5EV) Fill-in flash & Red-eye reduction
Multi-beam autofocus Spot shooting Snap shooting(between 1.3~6.0m
(
4.3~19.7ft))
Single/Double self-timer 2 sec. delayed shutter release
Remote control(Option)
Interval shooting
Landscape mode(Infinity)
-WIDE(38mm) : 3.5m~
(11.5ft~ )
-TELE(140mm) : 9.5m~
(31.2ft~ )
Date or Time setting - 5 different formats
(The camera will set the date automatically until 2099.)
Captions imprint-7 different messages
One 3V lithium battery (CR 123A)
115 x 65 x 44mm / 4.53 x 2.6 x 1.73in
230g / 8.1oz (without battery)
Page 50

50
CHECKING THE CAMERA
Checking the shutter condition
- You can check the condition of the shutter by pressing it.
The short
click sound will result.
Checking the irises
- After removing the back cover of a camera, it is normal to see
the closed lens opening up when you press the shutter.
- The irises will adjust depending on the light condition.
Dark light will cause them to open wide; bright light will cause the narrowing of the irises.
- If the irises were opened before pressing the shutter or cannot be opened, the irises are not operating properly.
Film transferring device
- It is normal to hear the motor running after you open and close the camera cover.
- It is normal to hear the motor running after you press the Mid-roll rewinding button.
- After examining the Mid-roll rewinding condition, set the camera to the default state and check other functions.
Flash Activation
- Check the Auto Flash Mode indoors.
It is important to check your camera prior to up-coming event to prevent possible psychological and monetary damage
once the camera is not working properly at the day of the event.
<When the irises are opened>
<When the irises are closed>
Page 51

51
Page 52

6806 - 1071(N)
Internet address - http : //www.samsungcamera.com/
The CE Mark is a Directive conformity
mark of the European Community (EC)
SAMSUNG TECHWIN CO., LTD.
OPTICS & DIGITAL IMAGING DIVISION
145-3, SANGDAEWON 1-DONG,
JUNGWON-GU,SUNGNAM-CITY,
KYUNGKI-DO, KOREA 462-121
TEL : (82) 31-740-8086,8088, 8090,
8092, 8099
FAX : (82) 31-740-8398, 8399
SAMSUNG OPTO-ELECTRONICS AMERICA, INC.
HEADQUARTERS
40 SEAVIEW DRIVES, SECAUCUS, NJ07094
TEL : (1) 201-902-0347
FAX : (1) 201-902-9342
WESTERN REGIONAL OFFICE
18600 BROADWICK ST.,
RANCHO DOMINGUEZ, CA 90220
TEL : (1) 310-537-7000
FAX : (1) 310-537-1566
SAMSUNG U.K. LTD.
PHOTO PRODUCTS DIV.
SAMSUNG HOUSE, 3 RIVERBANK WAY,
GREAT WEST ROAD, BRENTFORD,
MIDDLESEX,TW8 9RE, U.K.
TEL : (44) 208-232-3348
FAX : (44) 20-8569-8385
SAMSUNG DEUTSCHLAND GmbH
SAMSUNG HAUS
AM KRONBERGER HANG 6, 65824 SCHWALBACH,
GERMANY
TEL : (49) 61-96-66 53 01
FAX : (49) 61-96-66 53 33
SAMSUNG FRANCE S.A.R.L.
BP. 51 TOUR MAINE-MONTPARNASSE 33,
AV DU MAINE 75755,
PARIS CEDEX 15, FRANCE
TEL : (33) 1-4279-2282
FAX : (33) 1-4320-4510
S.MARKET COM.IMP.EXP.LTDA
RUA ALFERES MAGALHÃES, 92 CONJUNTO 71 SANTANA
SÃO PAULO-SP BRAZIL 02034-000
TEL/FAX : (55) 11-6221-6833
SAMSUNG TECHWIN MOSCOW OFFICE
KOSMODAMIANSKAYA NABEREZNAYA 40/42,
MOSCOW, 113035, RUSSIA
TEL/FAX : (7) 095-937-79-50
SAMSUNG AUSTRALIA PTY. LTD.
LEVEL 33, NORTHPOINT BLDG, 100 MILLER
STREET, NORTH SYDNEY,
NSW 2060, AUSTRALIA
TEL : (61) 2-9955-3888
FAX : (61) 2-9955-4233
TIANJIN SAMSUNG OPTO-ELECTRONICS CO.,LTD.
7 PINGCHANG ROAD NANKAI DIST. TIANJIN
P.R CHINA
POST CODE:300190
TEL : (86)22-2761-4599
FAX : (86)22-2761-3314
 Loading...