

Samsung Galaxy Note, T-Mobile Galaxy Note Start Manual

1
TABLE OF CONTENTS
INTRODUCTION 3
Support 3
Service 4
YOUR DEVICE 5
Front and Back Features 5
Side Features 6
S Pen 7
Battery Installation/Removal 10
Turning Your Device On or Off 18
Locking and Unlocking Your Device 19
Extending Your Battery Life 19
Home Screen 21
DEVICE FUNCTIONS 25
Creating a New Google Account 25
Signing into Your Google Account 26
Voicemail 27
Visual Voicemail 28
Calling Features 30
Contacts 33
TABLE OF CONTENTS

3
INTRODUCTION
TABLE OF CONTENTS
2
Bluetooth 36
Wi-Fi 38
Mobile HotSpot 39
USB Tethering 41
Web Browsing 43
Setting Up Email 45
Messaging 48
Safety Tips 51
Emergency Dialing 52
Accessories 53
Additional Information 55
NOTES 58
INTRODUCTION
SUPPORT
This guide provides you with the information you
need to get started. For more information and
additional support, please visit www.t-mobile.com/
support where you can:
● Register at my.t-mobile.com to check your
minutes, pay your bill, upgrade your phone, and
change your rate plan.
● Review your device’s User Manual and
troubleshooting FAQs.
● View the latest troubleshooting solutions in the
Support Forums or ask a question of your own.
You can also access account and device
information from:
1. From the Home screen, tap
(Applications) g (Access T-Mobile).
2. Choose from an available category such as:
My Account, Billing, Plans & Services, or
Other T-Mobile Links.
10
11
1
5
43
2
6
7891
5
YOUR DEVICE
INTRODUCTION
4
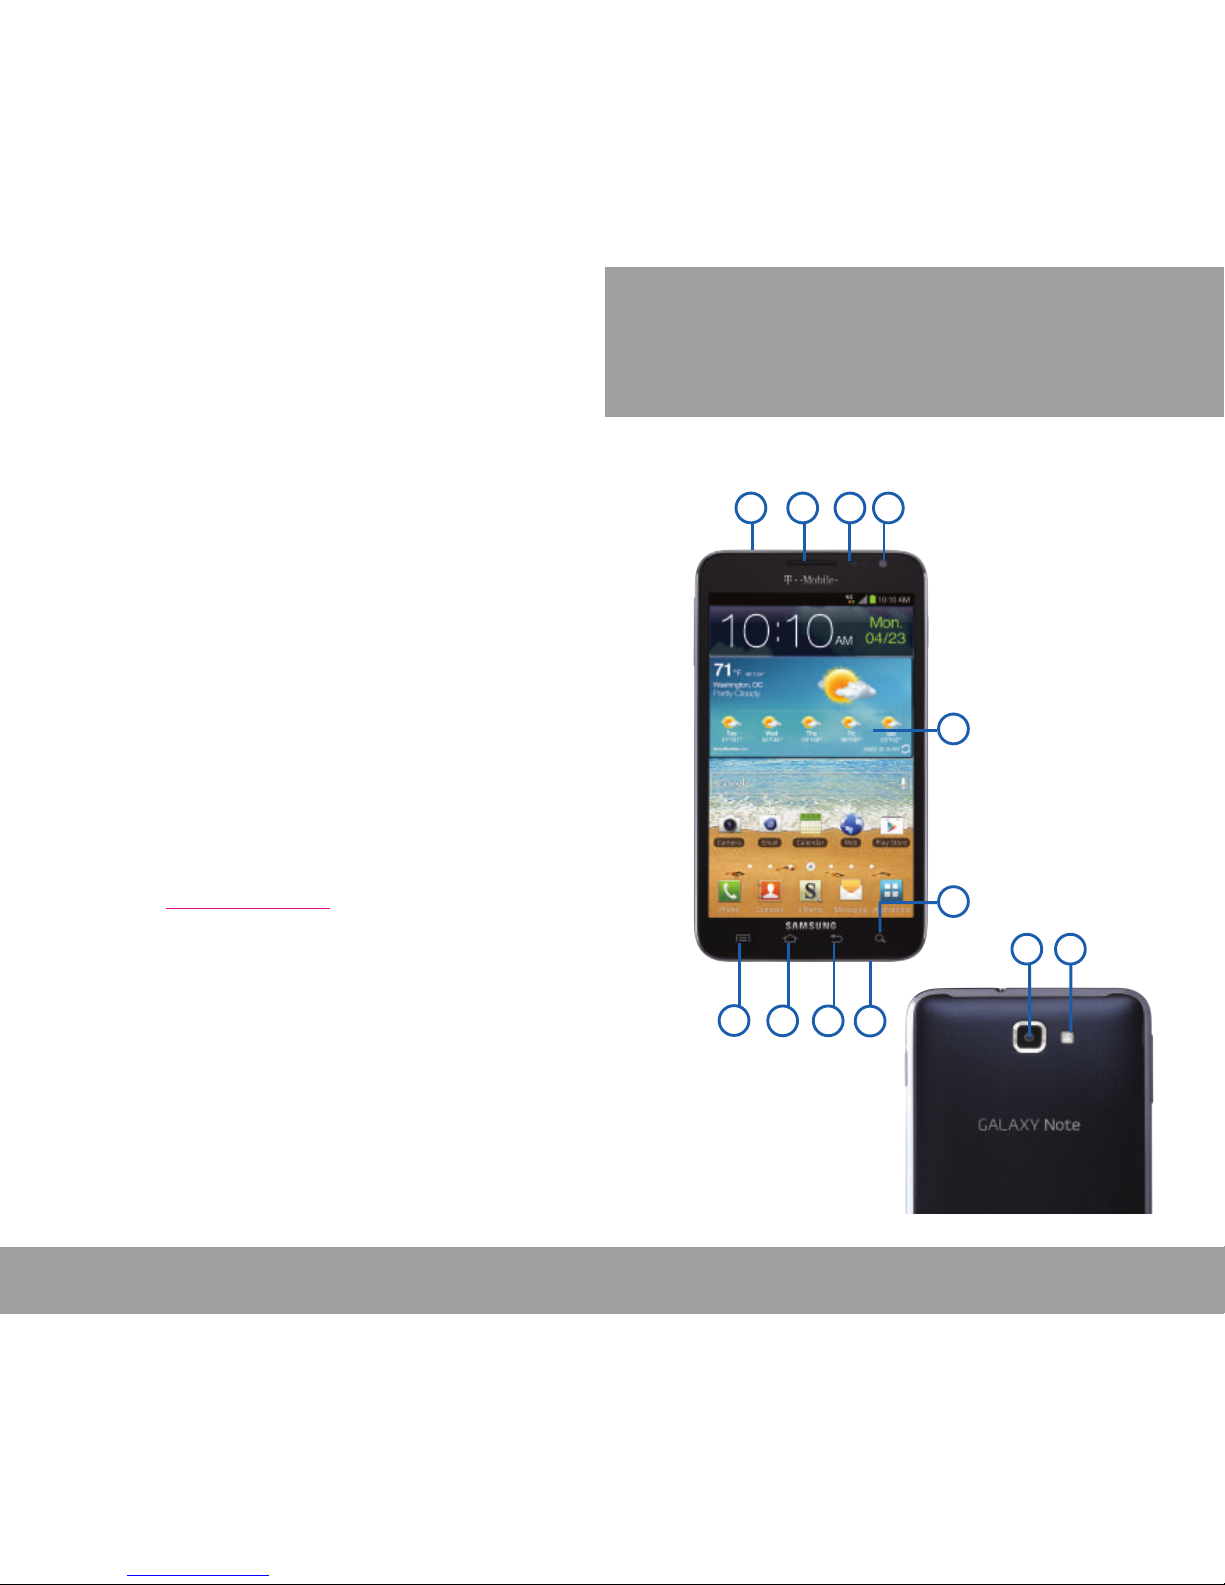
FRONT AND BACK FEATURES
1. MICROPHONE
2. MENU KEY
3. HOME KEY
4. BACK KEY
5. SEARCH KEY
6. DISPLAY
7. FRONT-FACING
CAMERA
8. SENSORS
9. EARPIECE
10. CAMERA LENS
11. FLASH
YOUR DEVICE
SERVICE
If you are a new T-Mobile® customer and your
service has not yet been activated, call Customer
Care at 1-800-937-8997 and a T-Mobile Activations
representative will assist you.
You will need the following information when
activating service:
● Your Service Agreement and the agent code on
your Agreement
● Your name, home address, home phone number,
and billing address
NOTE: For business and government accounts, please provide the
name of the organization, the address, and the tax ID.
● Your Social Security number, current driver’s
license number, and date of birth for credit check
purposes
● Your choice of T-Mobile rate plan and services
(see www.t-mobile.com for the latest plan
information)
● SIM serial number and IMEI number (located on
the box barcode label)
NOTE: By activating service, you acknowledge that you have read,
understand, and agree to be bound by each of T-Mobile’s
Terms and Conditions, and your Service Agreement.
3
6
5
2
1
4
1
2
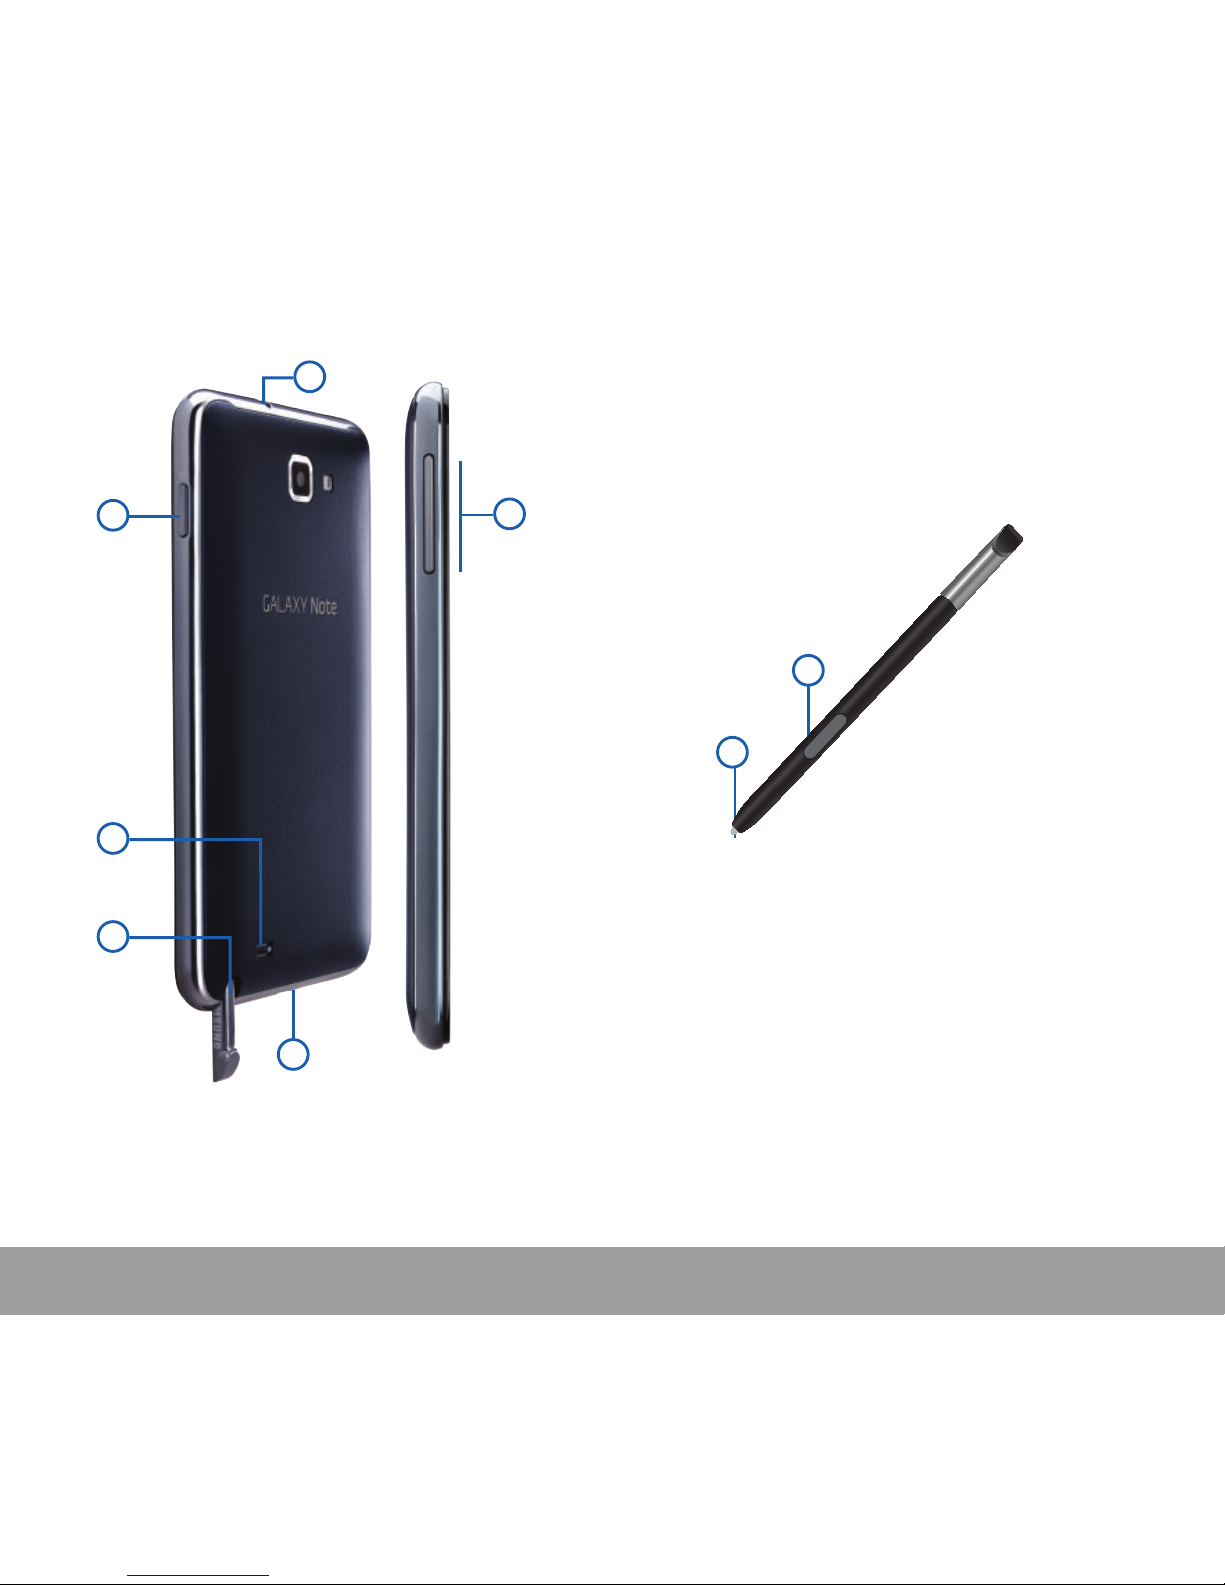
1. PEN BUTTON
2. STYLUS TIP
7
YOUR DEVICE
YOUR DEVICE
6
SIDE FEATURES
1. HEADSET CONNECTOR
2. POWER/LOCK KEY
3. EXTERNAL SPEAKER
4. S-PEN
5. CHARGING PORT
6. VOLUME KEY
S PEN
The S Pen™ is a stylus that assists you in
performing different functions. By using the Pen
button, you can minimize having to switch between
touch and pen input.
9
YOUR DEVICE
YOUR DEVICE
8
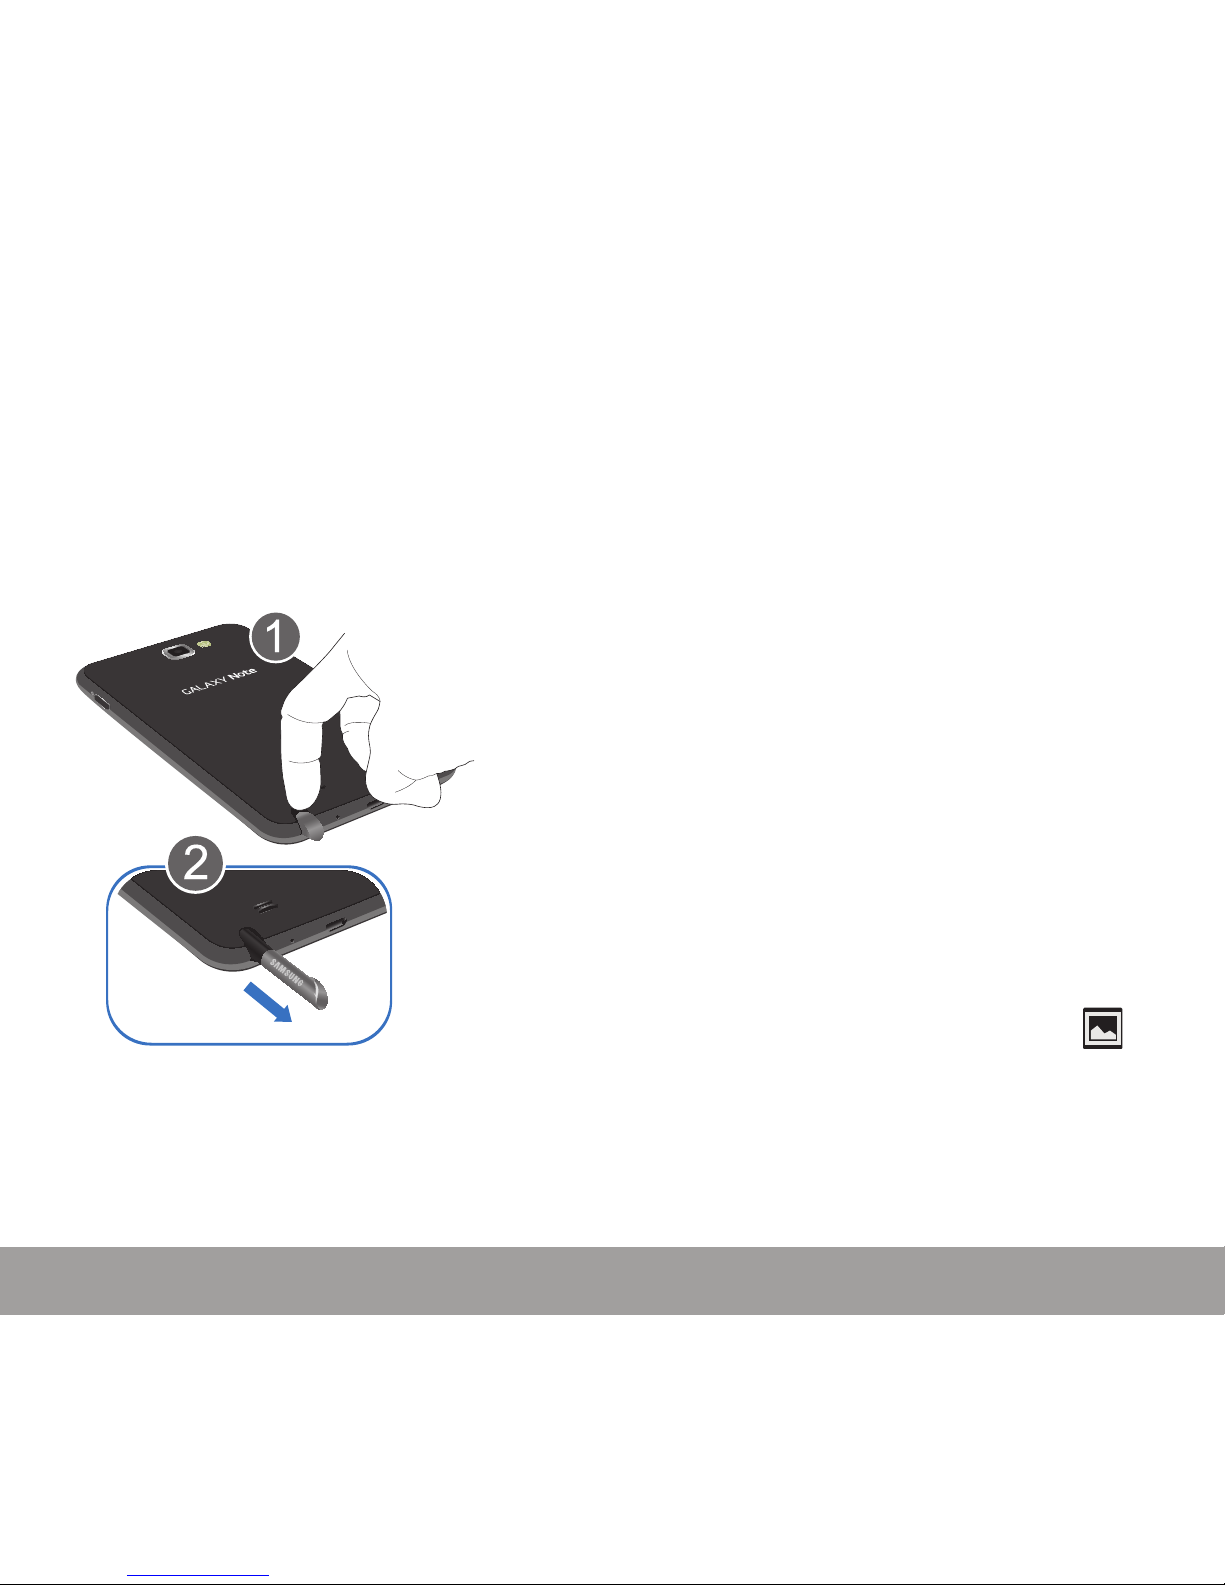
Removing the S Pen from your Phone
The S Pen is stored within your device to make it
easier to keep track of.
To remove the S Pen:
1. Use your fingernail or a sharp object to pull
the end of the S Pen out of the phone (1).
2. Pull the S Pen out from the device (2).
Using the S Pen
There are several different functions you can
perform by using the S Pen.
Back Button Function
To move to a previous screen:
1. Grasp the pen and press the Pen button.
2. In a single motion, touch on the screen for
one second then drag the screen to the left.
The previous screen is displayed. Holding it
for 2 seconds takes a screen shot.
Menu Button Function
To display the menu from any screen:
1. Grasp the pen and press the Pen button.
2. In a single motion, touch on the screen and
then drag the pen upward. The menu is
displayed.
Screen Capture
To take a screen capture of any screen:
1. Grasp the pen and press the Pen button.
2. Touch and hold the S Pen anywhere on the
screen. Files are saved in the My files g
Pictures g Screenshots folder and
(Screen capture) appears in the Notifications
area of the screen to indicate a screen
capture has been taken.

11
YOUR DEVICE
YOUR DEVICE
10
BATTERY INSTALLATION/REMOVAL
Your device is powered by a rechargeable, standard
Li-Ion battery. The battery, SIM card and SD card
are installed under the battery cover.
NOTE: Although the battery comes partially charged, you must fully
charge this battery before using your device for the first time.
WARNING: Use only Samsung-approved charging devices and
batteries. Samsung accessories are designed to
maximize battery life. Using other accessories may
invalidate your warranty and may cause damage.
IMPORTANT: Before removing or replacing the battery, make sure
the device is switched off. To turn the device off, hold
down the key until the Device options
screen displays, then tap Power off.
Removing the Battery Cover
1. Hold the device firmly and locate the cover
release latch.
2. Place your fingernail in the opening and
firmly “pop” the cover off the device (1)
(similar to a soda can).
3. Lift the cover up (2) and away from the
device (3).
4. Slide the battery into the compartment so
that the tabs on the end align with the slots
at the bottom of the phone, making sure the
connectors align.
13
YOUR DEVICE
YOUR DEVICE
12
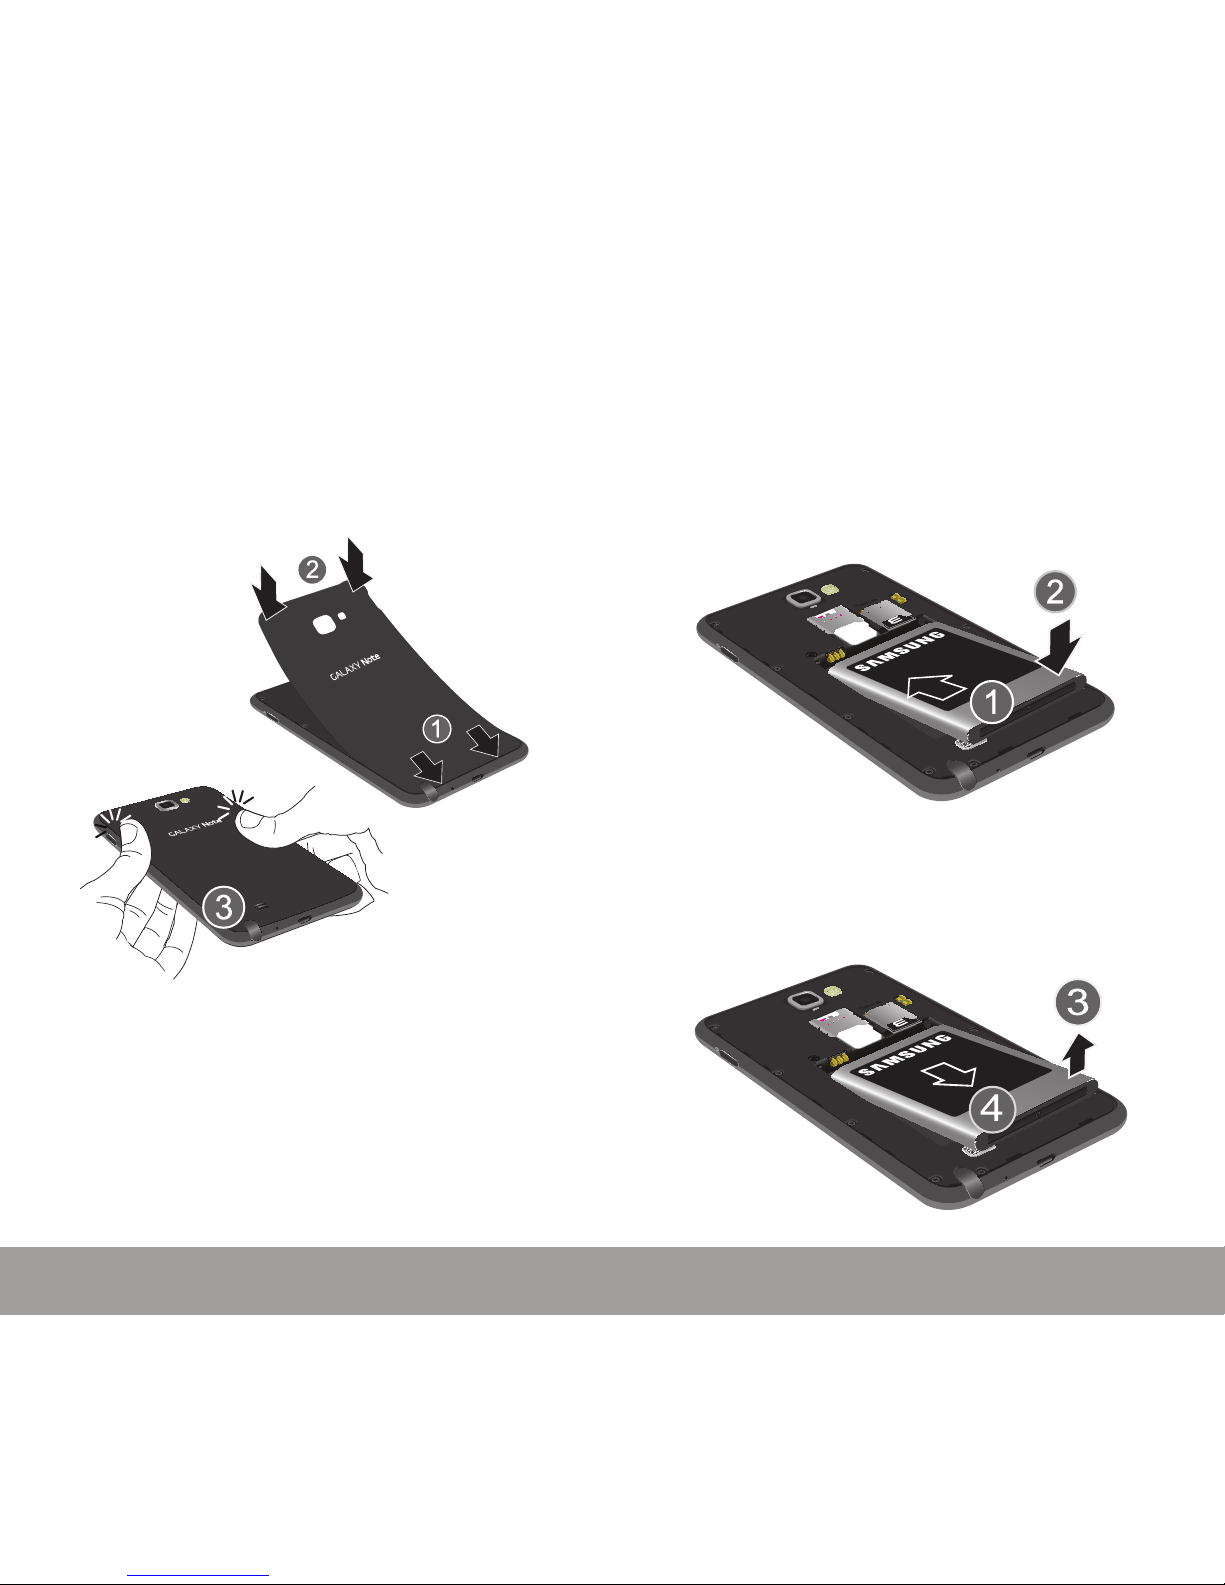
Replacing the Battery Cover:
1. Place the battery cover onto the back bottom
of the phone (1) and press down (2).
2. Press all along the edge of the back cover
until you have a secure seal (3).
Installing the Battery
1. Slide the battery into the compartment (1) so
that the tabs on the end align with the slots
at the bottom of the phone, making sure the
connectors align.
2. Gently press down to secure the battery (2).
Removing the Battery
X Grip the battery at the top end (3) and lift it
up and out of the battery compartment (4).
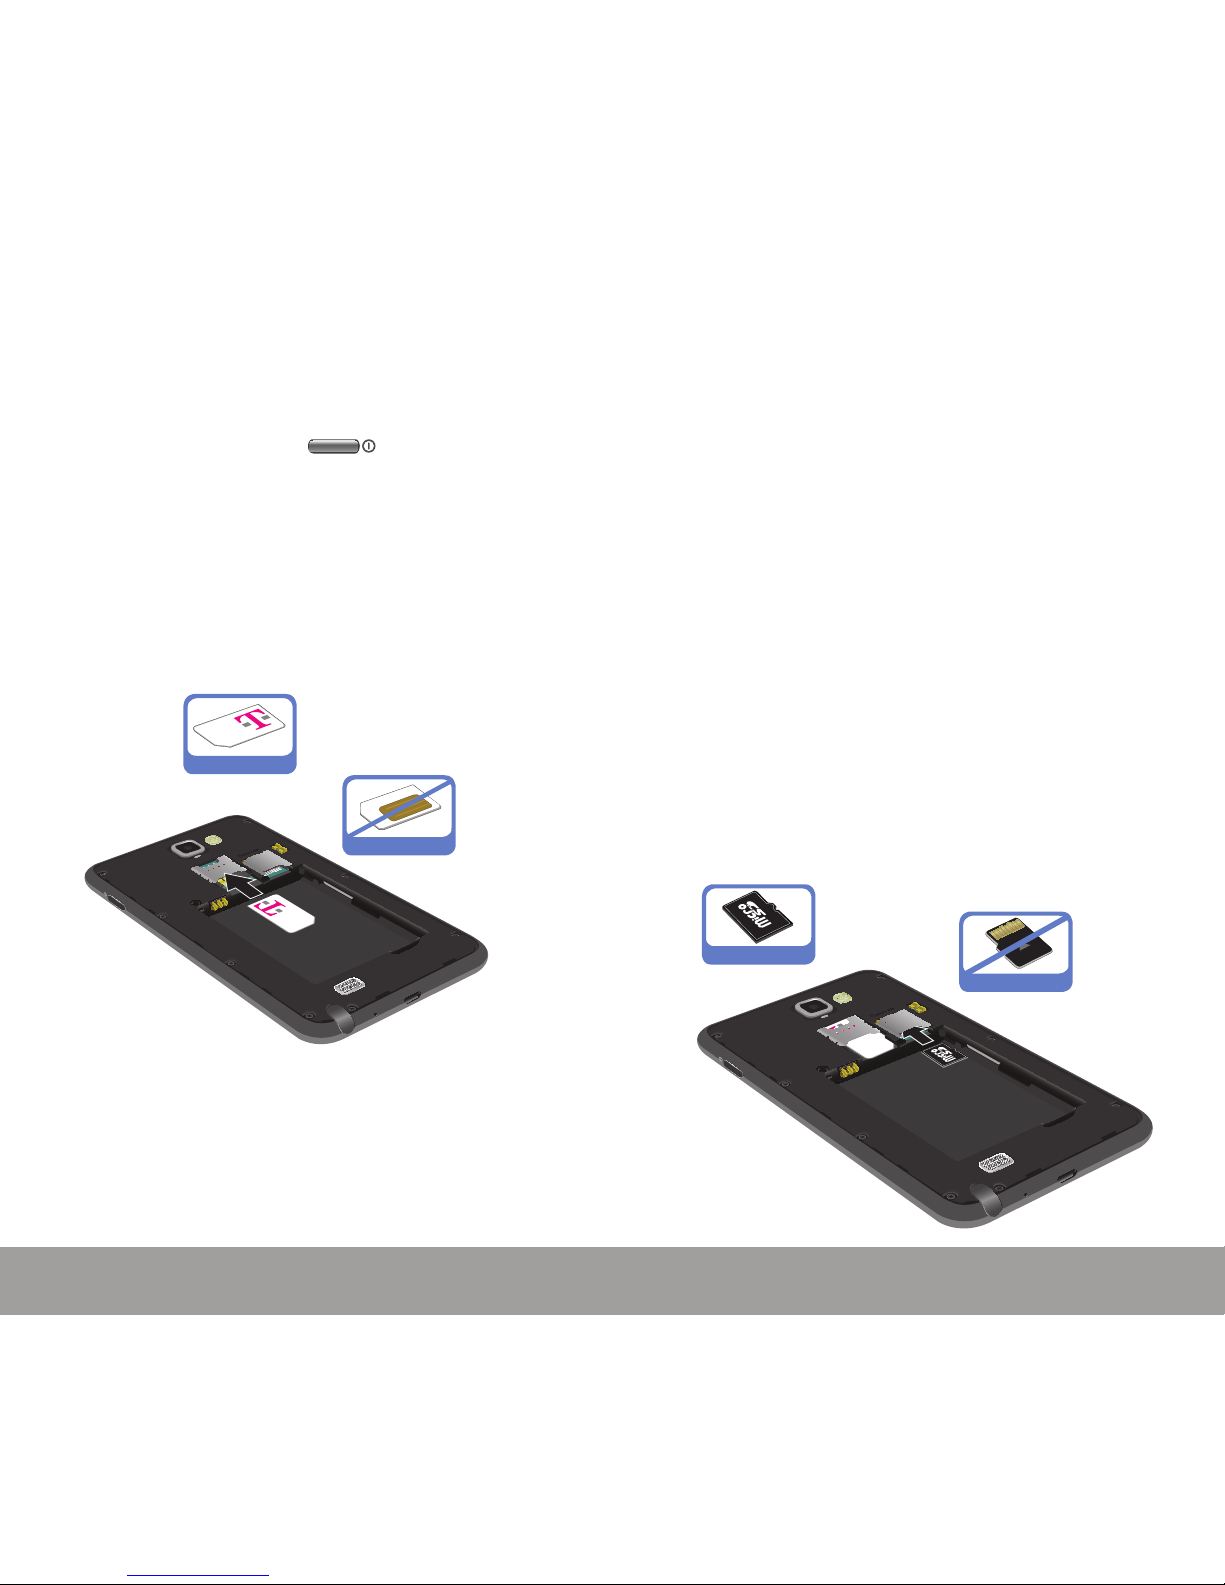
Installing the microSD Memory Card
Your device supports an optional (external)
microSD™ or microSDHC™ memory card for
storage of media such as music, pictures, video
and other files.
NOTE: microSD memory cards include capacities of up to 2GB.
microSDHC™ memory card types can range from 4GB to
up to 32GB.
WARNING: Applications, personal settings and other stored data
may be lost or may not function properly if the memory
card is removed.
1. Remove the battery cover.
2. Locate the microSD card slot on the inside of
the phone.
3. Orient the card with the gold strips facing down.
4. Firmly press the card into the slot and make
sure that it catches with the push-click insert.
Correct
Incorrect
Installing and Removing the SIM Card
IMPORTANT: Before removing or replacing the SIM card, make
sure the device is switched off. To turn the device
off, hold down the key until the Device
options screen displays, then tap Power off.
To install the SIM card:
1. Carefully slide the SIM card into the SIM card
socket until the card clicks into place.
2. Make sure that the card’s gold contacts face
into the device and that the upper-left angled
corner of the card is positioned as shown.
Correct
Incorrect
15
YOUR DEVICE
YOUR DEVICE
14
CHARGING HEAD
17
YOUR DEVICE
YOUR DEVICE
16
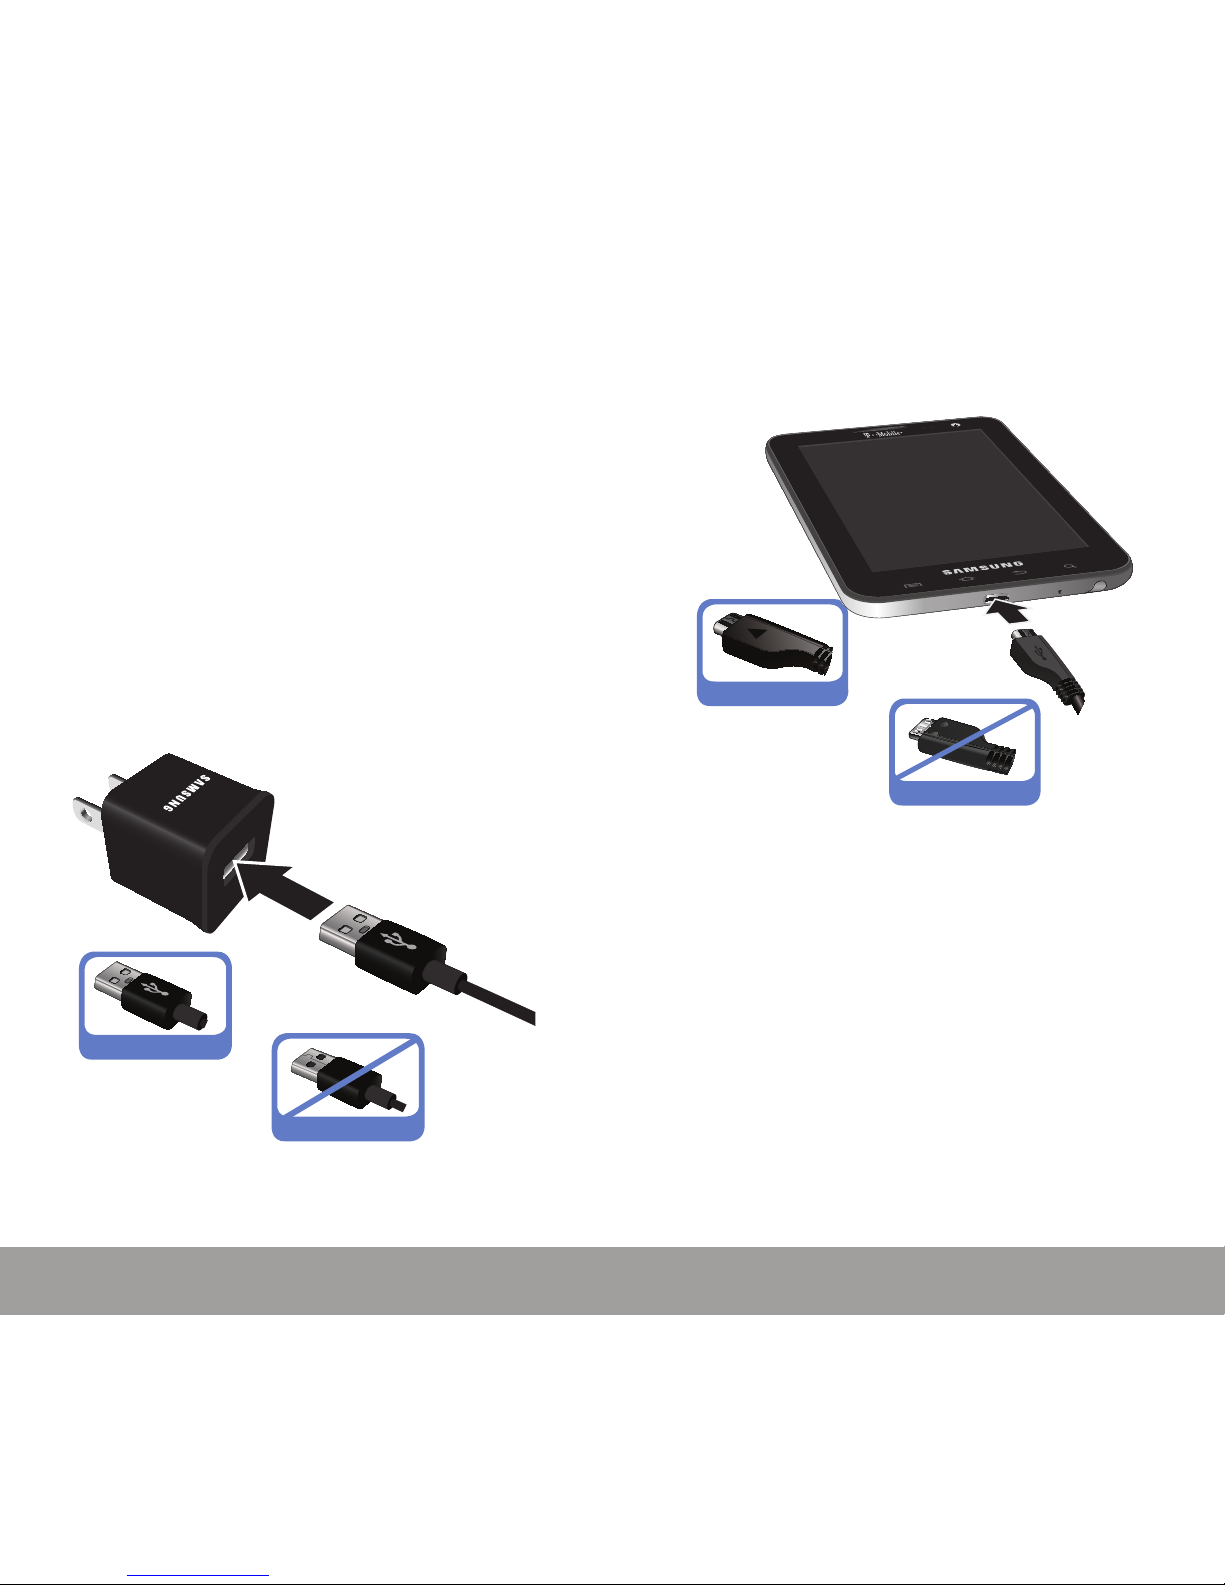
Charging the Battery
Your device comes with a USB cable and charging
head to rapidly charge your phone from any
120/220 VAC outlet.
IMPORTANT: Verify that the battery is installed prior to connecting
the wall charger. If both the wall charger is connected
and the batter y is not installed, the handset will power
cycle continuously and prevent proper operation.
Failure to unplug the wall charger before you
remove the battery, can cause the device to become
damaged.
1. Connect the USB cable to the charging head.
2. Plug the charging head into a standard AC
power outlet.
Correct
Incorrect
3. Insert the USB cable into the device’s
Charger/Accessory jack.
Correct
Incorrect
4. If using a wall charger, plug the charging
head into a standard AC power outlet. If using
a computer, remove the charging head and
plug the USB cable into computer’s USB port.
NOTE: For the most efficient charging, consumers should use the
charger included in the box.
 Loading...