

Samsung T27A550, T24A550, SYNCMASTER T27A550 User Manual

LED TV MONITOR
(MFM TV)
user manual
TA350
TA550
imagine the possibilities
Thank you for purchasing this Samsung product.
To receive more complete service, please register
your product at
www.samsung.com/register

Figures and illustrations in this User Manual are provided for reference only and may differ from actual product appearance.
Product design and specifications may be changed without notice.
Digital TV notice
1. Functionalities related to Digital TV (DVB) are only available in countries/areas where DVB-T (MPEG2 and MPEG4 AVC) digital terrestrial signals are
broadcasted or where you are able to access to a compatible DVB-C (MPEG2 and MPEG4 AAC) cable-TV service. Please check with your local
dealer the possibility to receive DVB-T or DVB-C signal.
2. DVB-T is the DVB European consortium standard for the broadcast transmission of digital terrestrial television and DVB-C is that for the broadcast
transmission of digital TV over cable.
3. Although this TV set meets the latest DVB-T and DVB-C standards, as of [August, 2008], the compatibility with future DVB-T digital terrestrial and
DVB-C digital cable broadcasts cannot be guaranteed.
4. Depending on the countries/areas where this TV set is used some cable-TV providers may charge an additional fee for such a service and you may
be required to agree to terms and conditions of their business.
5. Some Digital TV functions might be unavailable in some countries or regions and DVB-C might not work correctly with some cable service providers.
6. For more information, please contact your local Samsung customer care centre.
The reception quality of TV may be affected due to differences in broadcasting method between the countries. Please check the TV
✎
performance in the local SAMSUNG Authorized Dealer, or the Samsung Call Centre whether it can be improved by reconfiguring TV setting or
not.
Still image warning
Avoid displaying still images (like jpeg picture files) or still image element (like TV programme logo, panorama or 4:3 image format, stock or news bar at
screen bottom etc.) on the screen. Constant displaying of still picture can cause ghosting of screen, which will affect image quality. To reduce risk of this
effect, please follow below recommendations:
• Avoid displaying the same TV channel for long periods.
• Always try do display any image on full screen, use TV set picture format menu for best possible match.
• Reduce brightness and contrast values to minimum required to achieve desired picture quality, exceeded values may speed up the burnout process.
• Frequently use all TV features designed to reduce image retention and screen burnout, refer to proper user manual section for details.
Securing the Installation Space
Keep the required distances between the product and other objects (e.g. walls) to ensure proper ventilation.
Failing to do so may result in fire or a problem with the product due to an increase in the internal temperature of the product.
The actual appearance of the TV may differ from the images in this manual, depending on the model.
✎
Be careful when you touch the TV. Some parts can be somewhat hot.
✎
Installation with a stand. Installation with a wall-mount.
10 cm
10 cm
• An administration fee may be charged if either
– (a) an engineer is called out at your request and there is no defect in the product
(i.e. where you have failed to read this user manual).
– (b) you bring the unit to a repair centre and there is no defect in the product
(i.e. where you have failed to read this user manual).
• The amount of such administration charge will be advised to you before any work or home visit is carried out.
10 cm
10 cm
10 cm
10 cm
10 cm
English
2

Contents
Contents
Getting Started
4
Connections
15
Basic Features
21
Advanced Features
4 Safety Precautions
11 Accessories
12 Installing the Stand
13 Viewing the Control Panel
14 Viewing the Remote Control
15 Connecting to an Antenna
15 Plug & Play (Initial Setup)
16 Connecting to an AV Device
18 Connecting to a COMMON INTERFACE slot
19 Connecting to an Audio Device
20 Connecting to a PC
21 Changing the Input Source
21 How to Navigate Menus
22 Using the INFO button (Now & Next guide)
22 Using the Channel Menu
24 Channel Menu
25 Picture Menu
29 Sound Menu
30 System Menu
34 Support Menu
36 Using the My Downloads
41 Anynet+ (HDMI-CEC)
ENGLISH
Other Information
TOOLS
This function can be used by
pressing the TOOLS button on the
remote control.
36
45
45 Installing the Device Driver
46 Analogue Channel Teletext Feature
47 Attaching a Wall Mount/Desktop Stand
48 Assembling the Cables
48 Anti-theft Kensington Lock
49 Troubleshooting
53 Specifications
54 Index
Check the Symbol!
Note Step by Step Guide
English
3
Getting Started
Getting Started
Icons used for safety precautions
Safety Precautions
WARNING
CAUTION
Do not perform.
Must be followed.
CAUTION
RISK OF ELECTRIC SHOCK DO NOT OPEN
CAUTION: TO REDUCE THE RISK OF ELECTRIC SHOCK, DO NOT REMOVE
COVER (OR BACK). THERE ARE NO USER SERVICEABLE PARTS INSIDE.
REFER ALL SERVICING TO QUALIFIED PERSONNEL.
Failing to follow the precautions marked with this sign may result in a serious injury or
even a fatality.
Failing to follow the precautions marked with this sign may result in a personal injury or
property damage.
This symbol indicates that high voltage is
present inside. It is dangerous to make any kind
of contact with any internal part of this product.
This symbol alerts you that important literature
concerning operation and maintenance has
been included with this product.
Power Related
✎
The following images are for your reference and may differ depending on models and countries.
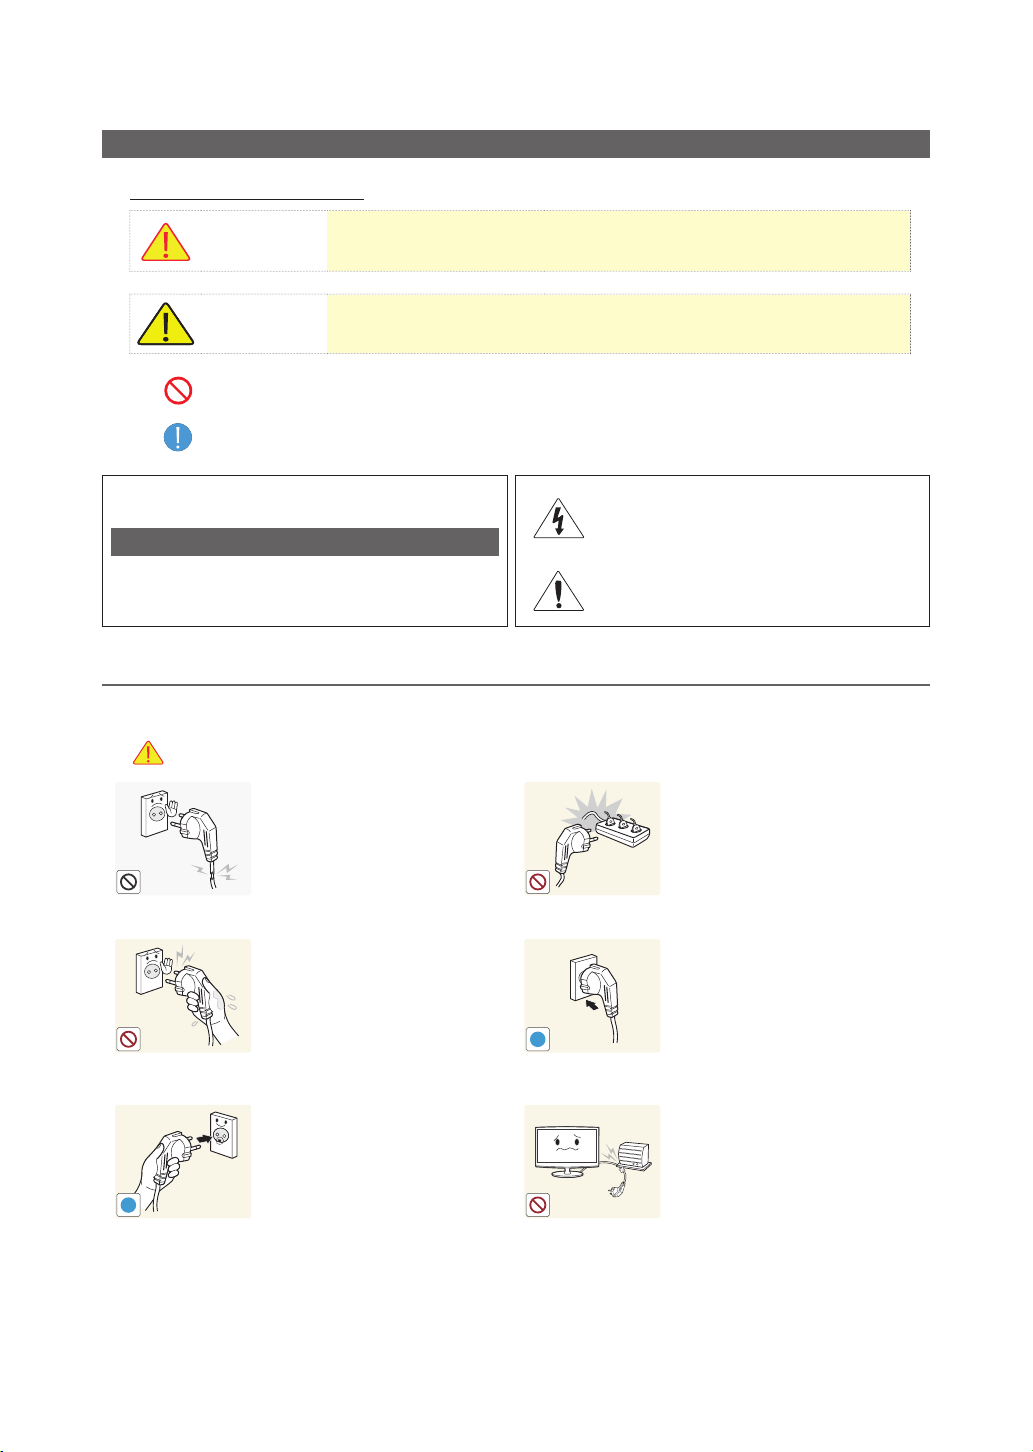
Warning
Avoid using a damaged power
cord or plug or a loose power
outlet.
y Otherwise, it may result in
electric shock or fire.
Avoid connecting multiple electric
appliances to a single wall outlet.
y Otherwise, it may result in fire
due to overheating of the wall
outlet.
Avoid plugging in or unplugging
the power supply with wet hands.
y Otherwise, it may result in
electric shock.
!
Make sure to connect the power
cord to a grounded wall outlet (for
insulation class 1 equipment only).
y Otherwise, it may result in
!
electric shock or injury.
Plug the power plug in firmly.
y Otherwise, it may result in fire.
Avoid bending or twisting the power
cord excessively and avoid placing
heavy objects on the cord.
y Otherwise, it may result in
electric shock or fire due to a
damaged power cord.
English
4

Getting Started
!
!
!
!
!
!
Keep the power cord and the
product away from a heater.
y Otherwise, it may result in
Caution
Avoid unplugging the power plug
while the product is operating.
y Otherwise, it may damage the
When unplugging the power plug
from the wall outlet, make sure to
hold it by the plug and not by the
cord.
y Otherwise, it may result in
Installation Related
electric shock or fire.
product due to electric shock.
electric shock or fire.
If the pins of the power plug or the
wall outlet are covered in dust, clean
it using a dry cloth.
y Otherwise, it may result in fire.
!
Make sure to use only the power
cord supplied by our company. In
addition, do not use the power cord
of another electric appliance.
y Otherwise, it may result in
electric shock or fire.
Connect the power plug to a wall
outlet that can be easily reached.
y When a problem occurs
with the product, you must
unplug the power plug to cut
the power off completely.
You cannot cut the power
off completely using only the
power button on the product.
Warning
Avoid placing burning candles,
mosquitorepellentor cigarettes on
the product.
y Otherwise, it may result in fire.
Avoid installing the product in a
badly-ventilated location such as
inside a bookshelf or closet.
y Otherwise, it may result in fire
due to internal over-heating.
Avoid installing the product in
a location that is unstable or
exposed to excessive vibration
such as on an unstable or slanted
shelf.
y The product may fall and this
may result in damage to the
product or injury.
y If you use the product in a
location exposed to excessive
vibrations, it may result in a
problem with the product or
fire.
Ask an installation engineer or
relevant company to install the
product onto the wall.
y Otherwise, it may result in
injury.
y Make sure to use the specified
wall mount.
Keep the plastic bags used to pack
the product away from children.
y If children place the plastic
bags over their heads, they may
suffocate.
Avoid installing the product in a
location exposed to dust, moisture
(sauna), oil, smoke or water (rain
drops) and installing it within a
vehicle.
y This may result in electric shock
or fire.
English
5
Getting Started
!
!
!
!
SAMSUNG
!
Caution
Avoid installing the product in a
location exposed to direct sunlight
and installing the product near a
heat source such as a fireplace or
heater.
y This may shorten the product
life cycle or cause fire.
Bend the outdoor antenna cable
downwards at the location where
it comes in the house so that
rainwater does not flow in.
y If rainwater enters the product,
it may result in electric shock
or fire.
Do not let the product drop while
moving it.
y This may result in a problem
with the product or injury.
When installing the product on a
console or shelf, make sure that
the front of the product does not
protrude out of the console or
shelf.
y Otherwise, this may cause the
product to fall off and result in
a malfunction or injury.
y Make sure to use a cabinet or
shelf suitable to the size of the
product.
If the product is installed in a
location where the operating
conditions vary considerably,
a serious quality problem may
occur due to the surrounding
environment. In this case, install
the product only after consulting
one of our service engineers about
the matter.
y Places exposed to
microscopic dust, chemicals,
too high or low temperature,
high humidity, airports or
stations where the product is
continuously used.
Avoid installing the product where
children may reach it.
y If a child touches the product,
the product may fall and this
may result in injury.
y Since the front part is heavier,
install the product on a flat and
stable surface.
Install the antenna far away from
any high voltage cables.
y If the antenna touches or falls
onto a high voltage cable, it
may result in electric shock or
fire.
Do not place the product face down
on the floor.
y This may damage the panel of
the product.
When putting the product down,
handle it gently.
y Otherwise, it may result in a
problem with the product or
injury.
English
6
Getting Started
!
!
!
!
!
Cleaning Related
Warning
Before cleaning the product,
unplug the power cord.
y Otherwise, it may result in
electric shock or fire.
Caution
Avoid spraying cleansing agent
directly onto the product.
y This may result in discoloration
or cracking of the exterior
of the product or the panel
coming off.
When cleaning the product, do
not spray water directly over the
product parts.
y Make sure that water does not
enter the product.
y Otherwise, it may result in fire,
electric shock or a problem with
the product.
When cleaning the product,
disconnect the power cord and
clean the product with the supplied
cleaning cloth.
y Avoid using chemicals such as
wax, benzene, alcohol, thinner,
mosquitorepellent, fragrance,
lubrication or cleansing agent
when cleaning the product.
This may result in the exterior
being deformed or the print
being removed.
Usage Related
Warning
If you can't get the product clean
with just the supplied cloth, use a
soft, damp cloth with a "monitorexclusive cleansing agent" and
wipe the product with it.
y If no monitor-exclusive
cleansing agent is available,
dilute a cleansing agent with
water at a ratio of 1:10 before
cleaning the product.
Since a high voltage runs through
the product, never disassemble,
repair or modify the product
yourself.
y Otherwise, it may result in fire
or electric shock.
y If the product needs to be
fixed, contact a service centre.
Since the exterior of the product is
easily scratched, be sure to use the
supplied cleansing cloth.
To move the product, turn the
power off and unplug the power
cord, the antenna cable and any
other wires connected to the
product.
y Otherwise, it may result in
electric shock or fire due to the
damaged power cord.
English
7
Getting Started
!
!
!
!
GAS
!
100
If the product generates a strange
noise, a burning smell, or smoke,
unplug the power plug immediately
and contact a service centre.
y Otherwise, it may result in
electric shock or fire.
If you drop the product or the
case is damaged, turn the power
off and unplug the power cord.
Contact a service centre.
y Otherwise, it may result in fire
or electric shock.
When thunder or lighting occurs,
unplug the power cord and
under no circumstance touch
the antenna cable as this is
dangerous.
y Otherwise, it may result in
electric shock or fire.
Avoid moving the product by
pulling the power cord or antenna
cable.
y Otherwise, it may result
in electric shock, fire or a
problem with the product due
to damage to the cable.
Avoid letting children hang or climb
onto the product.
y Otherwise, it may result in the
product falling and this may
result in injury or death.
Avoid placing objects such as toys
and cookies on top of the product.
y If a child hangs over the
product to grab an object, the
object or the product may fall
and this may result in injury or
even death.
Avoid dropping an object over the
product or cause impact to the
product.
y Otherwise, it may result in
electric shock or fire.
When a gas leak occurs, do not
touch the product or the power plug
and ventilate immediately.
y A spark may result in an
explosion or fire.
y During a thunder or lighting
storm, do not touch the power
cord or antenna cable.
Avoid lifting up or moving the
product by holding only the power
cord or signal cable.
y Otherwise, it may result
in electric shock, fire or a
problem with the product due
to damage to the cable.
Take care not to block the vent by
a table cloth or curtain.
y Otherwise, it may result in fire
due to internal overheating.
Avoid using or placing inflammable
spray or objects near the product.
y This may result in an explosion
or fire.
Avoid inserting metal objects such
as a chopsticks, coins or hairpins,
or inflammable objects into the
product (the vents, ports, etc).
y If water or substances enters
the product, turn the power
off, unplug the power cord and
contact a service centre.
y Otherwise, it may result in a
problem with the product,
electric shock or fire.
English
8
Getting Started
!
-_-
!
!
!
!
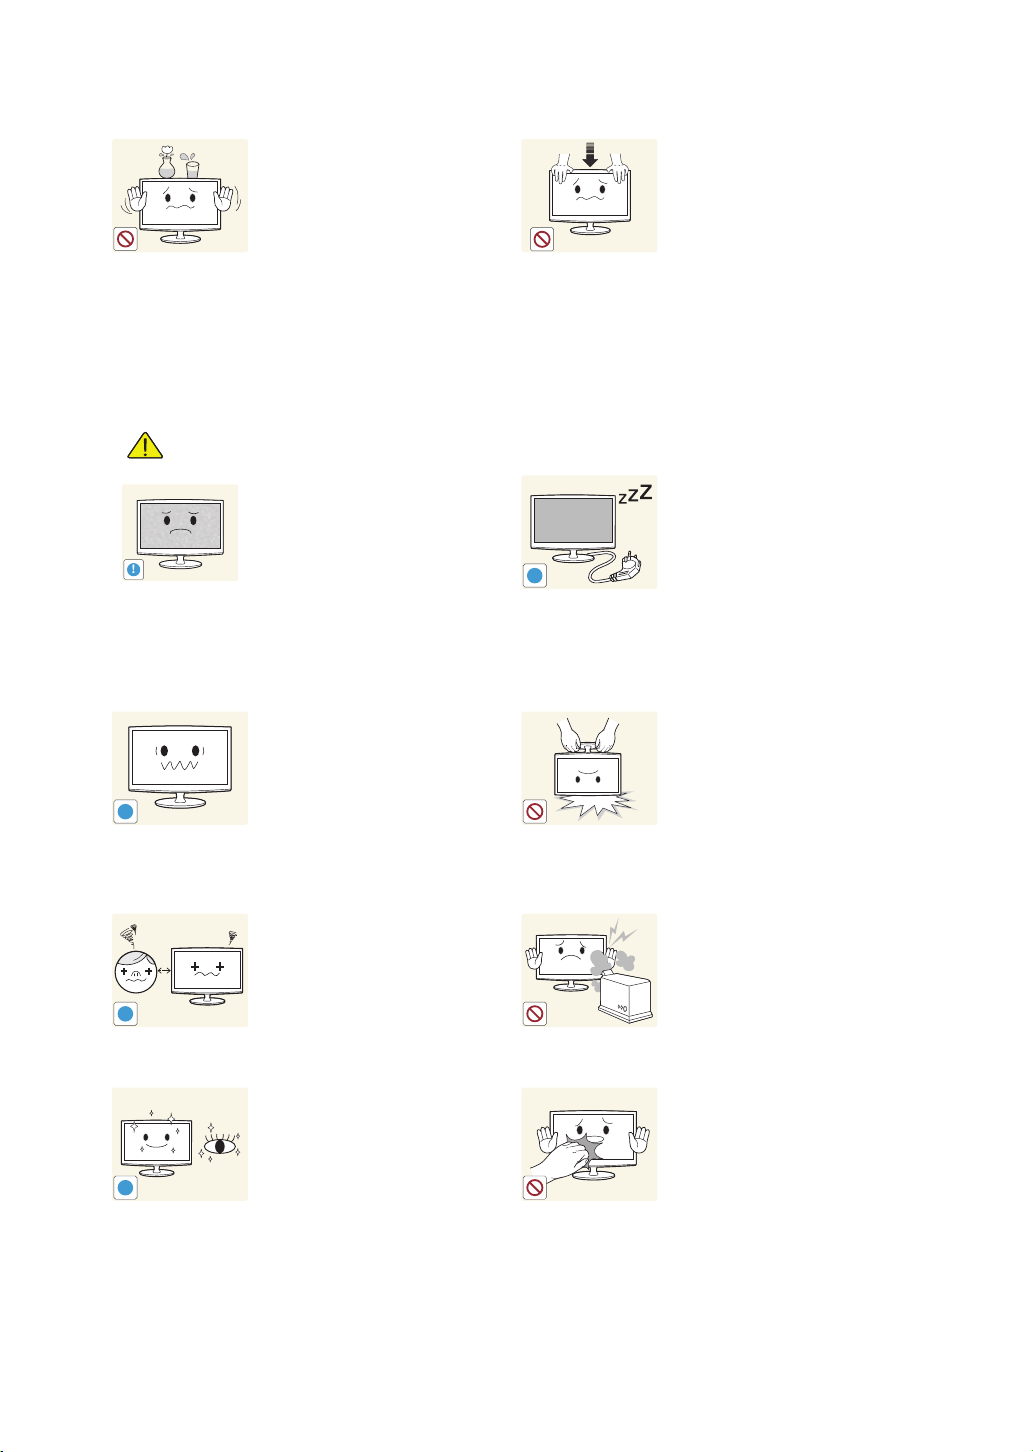
Caution
Avoid placing a liquid container
such as a vase, flowerpot,
beverage, cosmetics or drugs, or a
metal object over the product.
y If water or substances enter
the product, turn the power
off, unplug the power cord
and contact a service centre.
y Otherwise, it may result in a
problem with the product,
electric shock or fire.
Displaying a still image for a long
time may create a persistent image
or stain on the screen.
y If you do not use the product
for a long time, use the
power-saving mode or set the
screensaver to the moving
picture mode.
Set the appropriate resolution and
frequency for the product.
y Otherwise, it may result in eye
strain.
Do not press down hard on the
product. The product may become
deformed or damaged.
When not using the product for
a long time such as leaving your
home, unplug the power cord from
the wall outlet.
y Otherwise, it may cause dust
accumulation and result in fire
caused by overheating or short
circuit or result in an electric
shock.
Avoid turning the product upside
down or move the product holding
only the stand.
y This may cause the product to
fall, resulting in damage to the
product or injury.
Watching the product from too
close a distance continuously may
damage your eyesight.
It is important to give your eyes
some rest (5 minutes every hour)
when viewing the product screen
for long periods of time.
y This will alleviate any eye
strain.
Avoid using a humidifier or cooker
near the product.
y Otherwise, it may result in
electric shock or fire.
Since the display panel is hot after
using it for a long time, do not touch
the product.
English
9

Getting Started
!
!
!
!
Keep the small accessories in
a location out of the reach of
children.
Avoid placing a heavy object over
the product.
y Otherwise, it may result in a
problem with the product or
injury.
Be careful that children do not
place the batteries in their mouths
when removed from the remote
control. Place the battery in a
location that children or infants
cannot reach.
y If children have had the battery
in their mouths, consult your
doctor immediately.
Take care when adjusting the angle
of the product or the height of the
stand.
y If your hand or finger is caught,
you may be injured.
y If the product is tilted
excessively, the product may
fall and this may result in injury.
When using headphones or
earphones, do not turn the volume
too high.
y Having the sound too loud may
damage your hearing.
When replacing the batteries, insert
them with right polarity (+, -).
y Otherwise, the battery may
become damaged or it may
cause fire, personal injury or
damage due to leakage of the
internal liquid.
Use only specified standard
batteries. Do not use new and
used batteries together.
y This may cause a battery to
break or leak and may cause
fire, injury, or contamination
(damage).
The batteries (and rechargeable
batteries) are not ordinary refuse
and must be returned for recycling
purposes. The customer is
responsible for returning the used or
rechargeable batteries for recycling.
y The customer can return used
or rechargeable batteries
to a nearby public recycling
centre or to a store selling the
same type of the battery or
rechargeable battery.
English
10
Getting Started
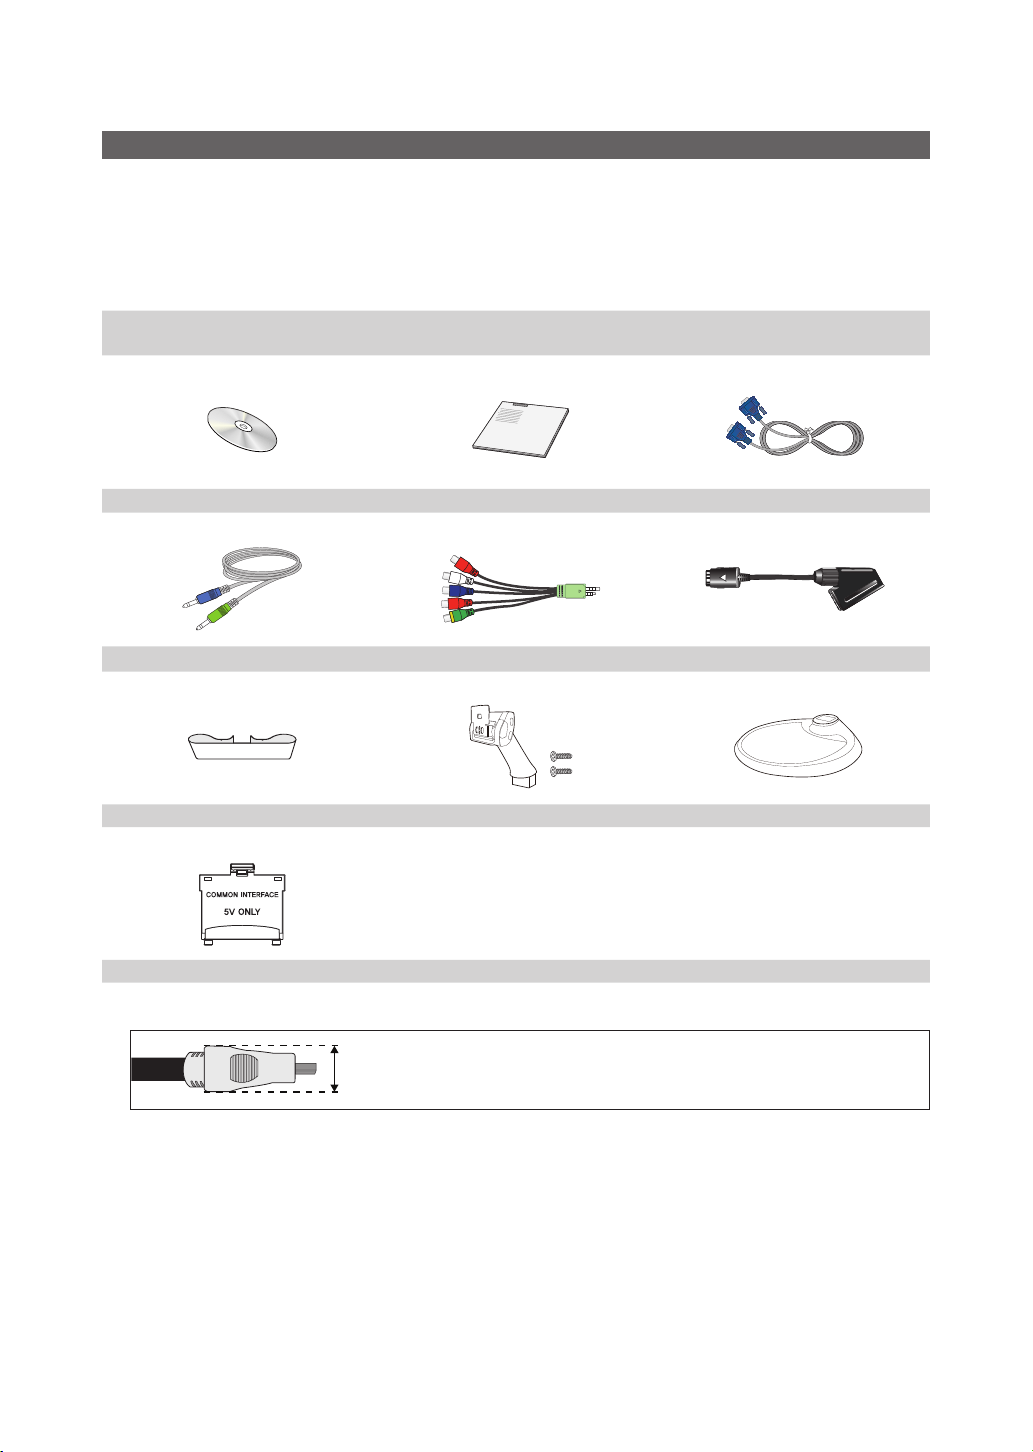
Accessories
✎
Please make sure the following items are included with your T V. If any items are missing, contact your dealer.
✎
The items’ colours and shapes may vary depending on the models.
✎
Cables not included in the package contents can be purchased separately.
✎
Check that there is no accessor y hidden behind packing materials when you open the box.
CAUTION: INSERT SECURELY LEST SHOULD BE DETACHED IN SET
y Remote Control & Batteries (AAA x 2)
y Warranty Card / Safety Guide (Not available in some locations)
y User Manual y Quick Setup Guide y D-sub Cable
y Stereo Cable y AV / Component Adapter y SCART Adapter
y Cable Holder y Stand Connector / Screws (2ea) y Stand Base
y Cleaning Cloth
y Power Cord
y CI Card Adapter
✎
For best cable connection to this product, be sure to use cables with a maximum thickness as below:
y Maximum thickness - 0.55 inches (14mm)
English
11
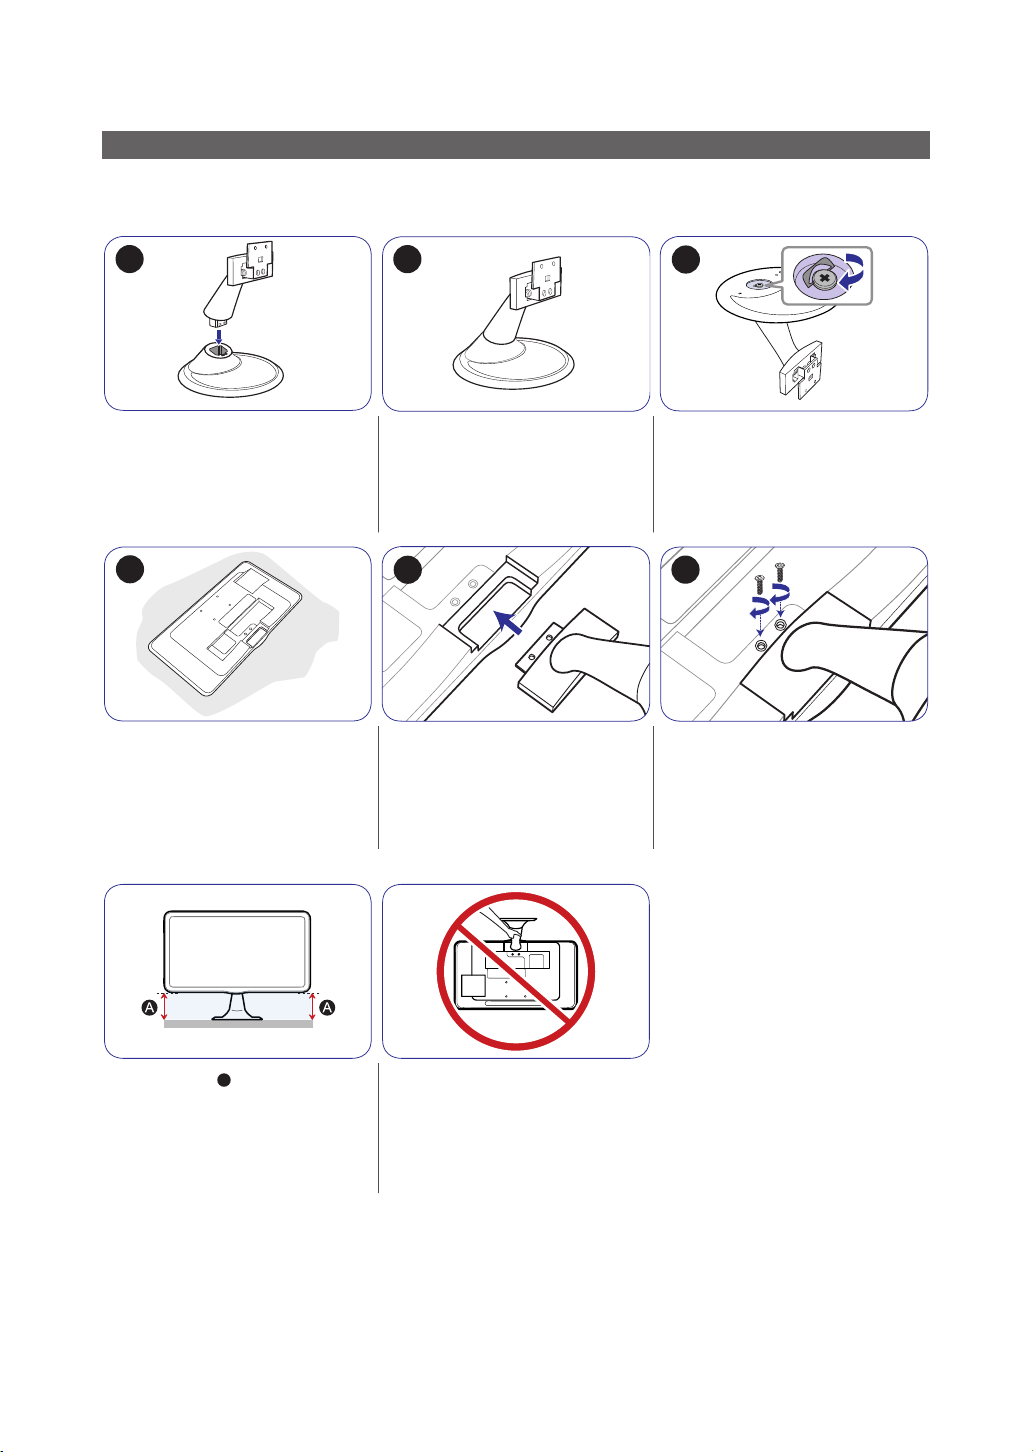
Getting Started
B
Installing the Stand
✎
Before assembling the product, place the product down on a flat and stable surface so that the screen is facing
downwards.
1
Insert the Stand Connector into the
Stand in the direction shown by the
figure.
4
Place a soft cloth over the table to
protect the product and place the
product onto the cloth so that the front
of the product is facing downwards.
2
Check if the Stand Connector is firmly
connected.
5
Push the assembled stand into the
main body in the direction of the arrow
as shown in the figure.
3
Turn the connecting screw at the
bottom of the stand fully so that it is
completely fixed.
6
Firmly fasten the stand using the
screws.
- Caution
A
If the height of "
different from the other side, unfasten
the screws, adjust the heights, and
re-assemble.
✎
The cleaning cloth is supplied with black high-glossy models only.
✎
The colour and the appearance may differ depending on the product, and the specifications are subject to change
without prior notice to improve the performance.
" on one side is
Avoid lifting the product holding only
the stand.
English
12
Getting Started
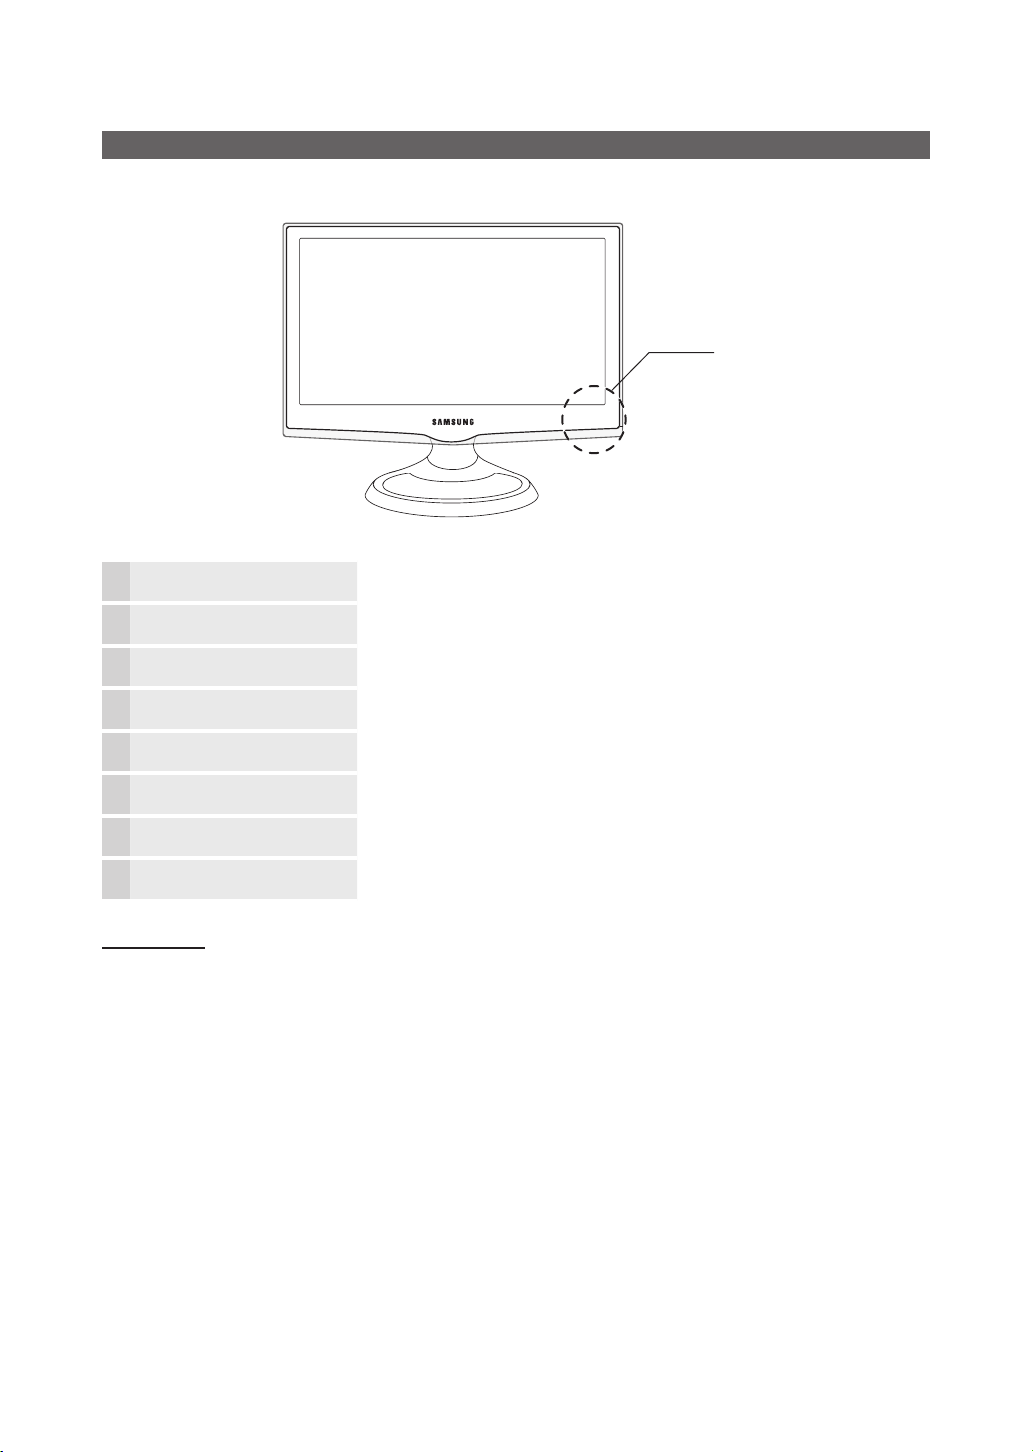
Viewing the Control Panel
✎
The product colour and shape may vary depending on the model.
Control Panel
Power Indicator Blinks and turns off when the power is on and lights up in standby mode.
Remote control sensor Aim the remote control towards this spot on the TV.
SOURCE
MENU Displays an on-screen menu, the OSD (on screen display) of your TV’s features.
(Power)
Toggles between all the available input sources. In the on-screen menu, use this
button as you would use the ENTER
Adjusts the volume. In the OSD, use the
◄ and ► buttons on the remote control.
Changes the channels. In the OSD, use the
▼ and ▲ buttons on the remote control.
Turns the TV on or off.
button on the remote control.
buttons as you would use the
buttons as you would use the
Speakers -
Standby mode
Do not leave your TV in standby mode for long periods of time (when you are away on a holiday, for example). A small amount
of electric power is still consumed even when the power button is turned off. It is best to unplug the power cord.
English
13

Getting Started
Viewing the Remote Control
✎
This is a special remote control for the visually impaired persons and has Braille points on the Power, Channel and
Volume buttons.
Turns the TV on and off.
Selects the HDMI mode directly.
Have direct access to channels.
Alternately select Teletext ON, Double,
Mix or OFF.
Adjusts the volume.
Displays the main on-screen menu.
Displays the Content Home, which
includes Watch TV (p. 22),
My Downloads (p. 36)
and Source (p. 21).
Quickly select frequently used functions.
Move the cursor and select an item.
Confirm the setting.
Returns to the previous menu.
These buttons are for the Channel List,
Channel Manager, My Downloads
menu, etc.
Use these buttons in My Downloads
and Anynet+ (HDMI-CEC) modes
(p. 36, 41).
POWER
TTX/MIX
SOURCE
HDMI
MUTE
CH LIST
MENU
CONTENT
TOOLS
RETURN
A B C D
P.MODE
E-MANUAL
SRS
P.SIZE
GUIDE
DUALf-g
AD/SUBT.
PRE-CH
INFO
EXIT
Displays and selects the available video
sources.
Returns to the previous channel.
Cuts off the sound temporarily.
Changes channels.
Displays channel lists on the screen
(p. 23).
Displays the EPG (Electronic Programme
Guide) (p. 22).
Displays information on the TV screen.
Exits the menu.
P.MODE: Press to select the
Mode (p. 25).
SRS: Selects SRS TruSurround HD
mode(p . 29).
DUAL -: Sound effect selection
(p. 30).
E-MANUAL: Not Available.
P.SIZE: Selects the Picture Size (p . 26).
AD/SUBT.: Turns the audio description
on and off (not available in some
locations) (p . 29). / Displays digital
subtitles (p . 33).
Picture
Installing batteries (Battery size: AAA)
English
14
Connections
Connections
Connecting to an Antenna
When the TV is initially powered on, basic settings proceed automatically.
✎
Preset: Connecting the mains and antenna.
ANT OUT
Plug & Play (Initial Setup)
When the TV is initially powered on, a sequence of on-screen prompts will assist in configuring basic settings. Press the
POWER button. Plug & Play is available only when the Input Source is set to TV.
✎
Before turning on the T V, make sure the antenna cable is connected.
✎
To return to the previous step, press the Red button.
Selecting a language
1
Selecting Store Demo
2
or Home Use
Selecting a country
3
Setting the
4
Clock Mode
Selecting an antenna
5
Selecting a channel
6
Enjoy your TV.
Press the ▲ or ▼ button, then press the ENTER
Select the desired OSD (On Screen Display) language.
Press the ◄ or ► button, then press the ENTER button.
y Select the Home Use mode. Store Demo Mode is for retail
environments.
y To return the unit’s settings from Store Demo to Home Use
(standard): Press the volume button on the TV. When you see the
volume OSD, press and hold MENU for 5 sec.
y Store Demo is only for shop display. If you select it, several
functions are not able to use. Please select Home Use when you
watch at home.
Press the
country.
Set the Clock Mode automatically or manually.
Press the ▲ or ▼ button, then press the ENTER button.
Select the Antenna source to memorise.
Press the ▲ or ▼ button, then press the ENTER
Select the channel source to memorise. When setting the antenna source to Cable, a step
appears allowing you to assign numerical values (channel frequencies) to the channels. For
more information, refer to Channel →
Press the ENTER button.
or button, then press the ENTER button. Select the appropriate
✎
After selecting the country in the Country menu, some models may proceed with an
additional option to setup the pin number. When you input the PIN number, “0-0-0-0”
is not available.
Auto Tuning (p. 24).
button.
button.
POWER
P
7
If You Want to Reset This Feature...
Select System - Plug & Play (Initial Setup). Enter your 4 digit PIN number. The default PIN number is “0-0-0-0”
(France: “1-1-1-1”). If you want to change the PIN number, use the Change PIN function.
You should do Plug & Play (MENU → System) again at home although you did in shop.
✎
If you forget the PIN code, press the remote control buttons in the following sequence in Standby mode, which resets
the PIN to “0-0-0-0”(France: “1-1-1-1”): POWER (off) → MUTE → 8 → 2 → 4 → POWER (on).
English
15
Connections
Connecting to an AV Device
Using an HDMI or an HDMI to DVI cable (up to 1080p)
Available devices: DVD, Blu-ray player, HD cable box, HD STB (Set-Top-Box) satellite receiver, VCR
HDMI OUT
DVI OUT
AUDIO OUT
W
R
WhiteRed
✎
HDMI IN 1(DVI), 2 / PC/DVI AUDIO IN
For better picture and audio quality, connect to a digital device using an HDMI cable.
x
An HDMI cable supports digital video and audio signals, and does not require an audio cable.
x
R
W
R-AUDIO-L
DVD /
Blu-ray player
DVD /
Blu-ray player
– To connect the TV to a digital device that does not support HDMI output, use an HDMI/DVI and audio cables.
The picture may not display normally (if at all) or the audio may not work if an external device that uses an older
x
version of HDMI mode is connected to the TV. If such a problem occurs, ask the manufacturer of the external
device about the HDMI version and, if out of date, request an upgrade.
Be sure to purchase a certified HDMI cable. Otherwise, the picture may not display or a connection error may
x
occur.
A basic high-speed HDMI cable or one with ethernet is recommended. This product does not support the ethernet
x
function via HDMI.
English
16

Connections
Using a Component (up to 1080p) or an Audio/Video (480i only) and a Scart Cable
Available devices: DVD, Blu-ray player, HD cable box, HD STB (Set-Top-Box) satellite receiver, VCR
DVD /
Blu-ray player
AUDIO OUT
COMPONENT OUT
PRPBY
B
G
W
RR
W
R R
VCR / DVD
EXT
✎
In Ext. mode, DTV Out supports MPEG SD Video and Audio only.
✎
When connecting to AV IN, the colour of the AV IN [VIDEO] jack (green) will not match the video cable (yellow).
✎
To obtain the best picture quality, the Component connection is recommended over the A /V connection.
B
G
R
W
W
Y
B
RR
VCR
AUDIO OUT
VIDEO OUT
R-AUDIO-LR-AUDIO-L
Y
W
R
G
W
R
RedRed WhiteWhite YellowRed Blue Green
Y
English
17
 Loading...