

Page 1

LCD-Monitor
Chassis : LS22TDS / LS20TDS
Model :
SERVICE
T220M / T200M
Manual
TFT-LCD Monitor Contens
1. Precautions
2. Product specications
3. Disassembly and Reassemble
4. Troubleshooting
5. Exploded View & Part List
6. Wiring Diagram
7. Schematic Diagram
T220M / T200M
Refer to the service manual in the GSPN (see the rear cover) for the more information.
Page 2

Contents
1. Precautions ..............................................................................................................1-1
1-1. Safety Precautions .........................................................................................................1-1
1-2. Servicing Precautions .....................................................................................................1-2
1-3. Static Electricity Precautions ..........................................................................................1-2
1-4. Installation Precautions ..................................................................................................1-3
2. Product specications ............................................................................................2-1
2-1. Feature & Specications .................................................................................................2-1
2-2. Spec Comparison to the Old Models
2-3. Accessories
....................................................................................................................2-4
3. Disassembly and Assembly ................................................................................... 3-1
3-1. Disassembly ...................................................................................................................3-1
4. Troubleshooting ......................................................................................................4-1
4-1. First Checklist for Troubleshooting ................................................................................4-1
4-2. No Power
4-3. No Video (Analog PC)
4-4. No Video (Digital-HDMI) .................................................................................................4-7
4-5. No Picture (Tuner_CVBS) ............................................................................................4-10
4-6. No Picture (AV) .............................................................................................................4-13
4-7. No Picture (S-VIDEO) ...................................................................................................4-16
4-8. No Picture (Component) ...............................................................................................4-19
4-9. No Sound ......................................................................................................................4-22
4-10. Faults and Corrective Actions .....................................................................................4-25
4-11. Adjustment ..................................................................................................................4-26
4-13. Service Adjustment .....................................................................................................4-27
........................................................................................................................4-2
...................................................................................................4-4
..............................................................................2-3
5. Exploded View & Part List ...................................................................................... 5-1
5-1. Exploded View -20” .........................................................................................................5-1
5-2. Parts List .....................................................................................................................................................5-3
5-3. Exploded View -22” .......................................................................................................5-20
5-4. Parts List ...................................................................................................................................................5-22
6. Wiring Diagram ........................................................................................................6-1
6-1. Wiring Diagram - Main Board .........................................................................................6-1
6-2. Wiring Diagram - IP Board ..............................................................................................6-2
6-3. Connector Functions ......................................................................................................6-3
6-4. Cables ............................................................................................................................6-3
7. Schematic Diagram ................................................................................................. 7-1
7-1. Circuit Descriptions .........................................................................................................7-1
7-2. Block description
7-3. Schematic Diagrams ......................................................................................................7-3
7-3-1. Schematic Diagrams (POWER) ..................................................................................7-3
7-3-2. Schematic Diagrams (SOUND) ..................................................................................7-4
7-3-3. Schematic Diagrams -SIGNAL INPUT (HDMI)
7-3-4. Schematic Diagrams - SIGNAL INPUT (Component)
7-3-5. Schematic Diagrams - Scaler/LVDS Output ................................................................7-7
7-3-6. Schematic Diagrams - Tuner .......................................................................................7-8
7-3-7. Schematic Diagrams - PCMCIA ..................................................................................7-9
7-3-8. Schematic Diagrams - TV PCMCIA
7-3-9. Schematic Diagrams - SIGNAL INPUT (DVI)
............................................................................................................7-2
............................................................7-5
.................................................7-6
...........................................................................7-10
............................................................ 7-11
Page 3
GSPN (Global Service Partner Network)
Area Web Site
North America http://service.samsungportal.com
Latin America http://latin.samsungportal.com
CIS http://cis.samsungportal.com
Europe http://europe.samsungportal.com
China http://china.samsungportal.com
Asia http://asia.samsungportal.com
Mideast & Africa http://mea.samsungportal.com
This Service Manual is a property of Samsung Electronics Co.,Ltd.
Any unauthorized use of Manual can be punished under applicable
International and/or domestic law.
© 2008 Samsung Electronics Co.,Ltd.
All rights reserved.
Printed in Korea
P/N: BN82-00479A-00
Page 4
1. Precautions
1. Precautions
1-1. Safety Precautions
Follow these safety, servicing and ESD precautions to prevent damage and to protect against potential hazards such as
electrical shock.
1-1-1. Warnings
For continued safety, do not attempt to modify the circuit board.
1.
Disconnect the AC power and DC power jack before servicing.
2.
1-1-2. Servicing the LCD Monitor
When servicing the LCD Monitor, Disconnect the AC line cord from the AC outlet.
1.
It is essential that service technicians have an accurate voltage meter available at all times. Check the calibration of
2.
this meter periodically.
1-1-3. Fire and Shock Hazard
Before returning the monitor to the user, perform the following safety checks:
Inspect each lead dress to make certain that the leads are not pinched or that hardware is not lodged between the
1.
chassis and other metal parts in the monitor.
Inspect all protective devices such as nonmetallic control knobs, insulating materials, cabinet backs, adjustment and
2.
compartment covers or shields, isolation resistorcapacitor networks, mechanical insulators, etc.
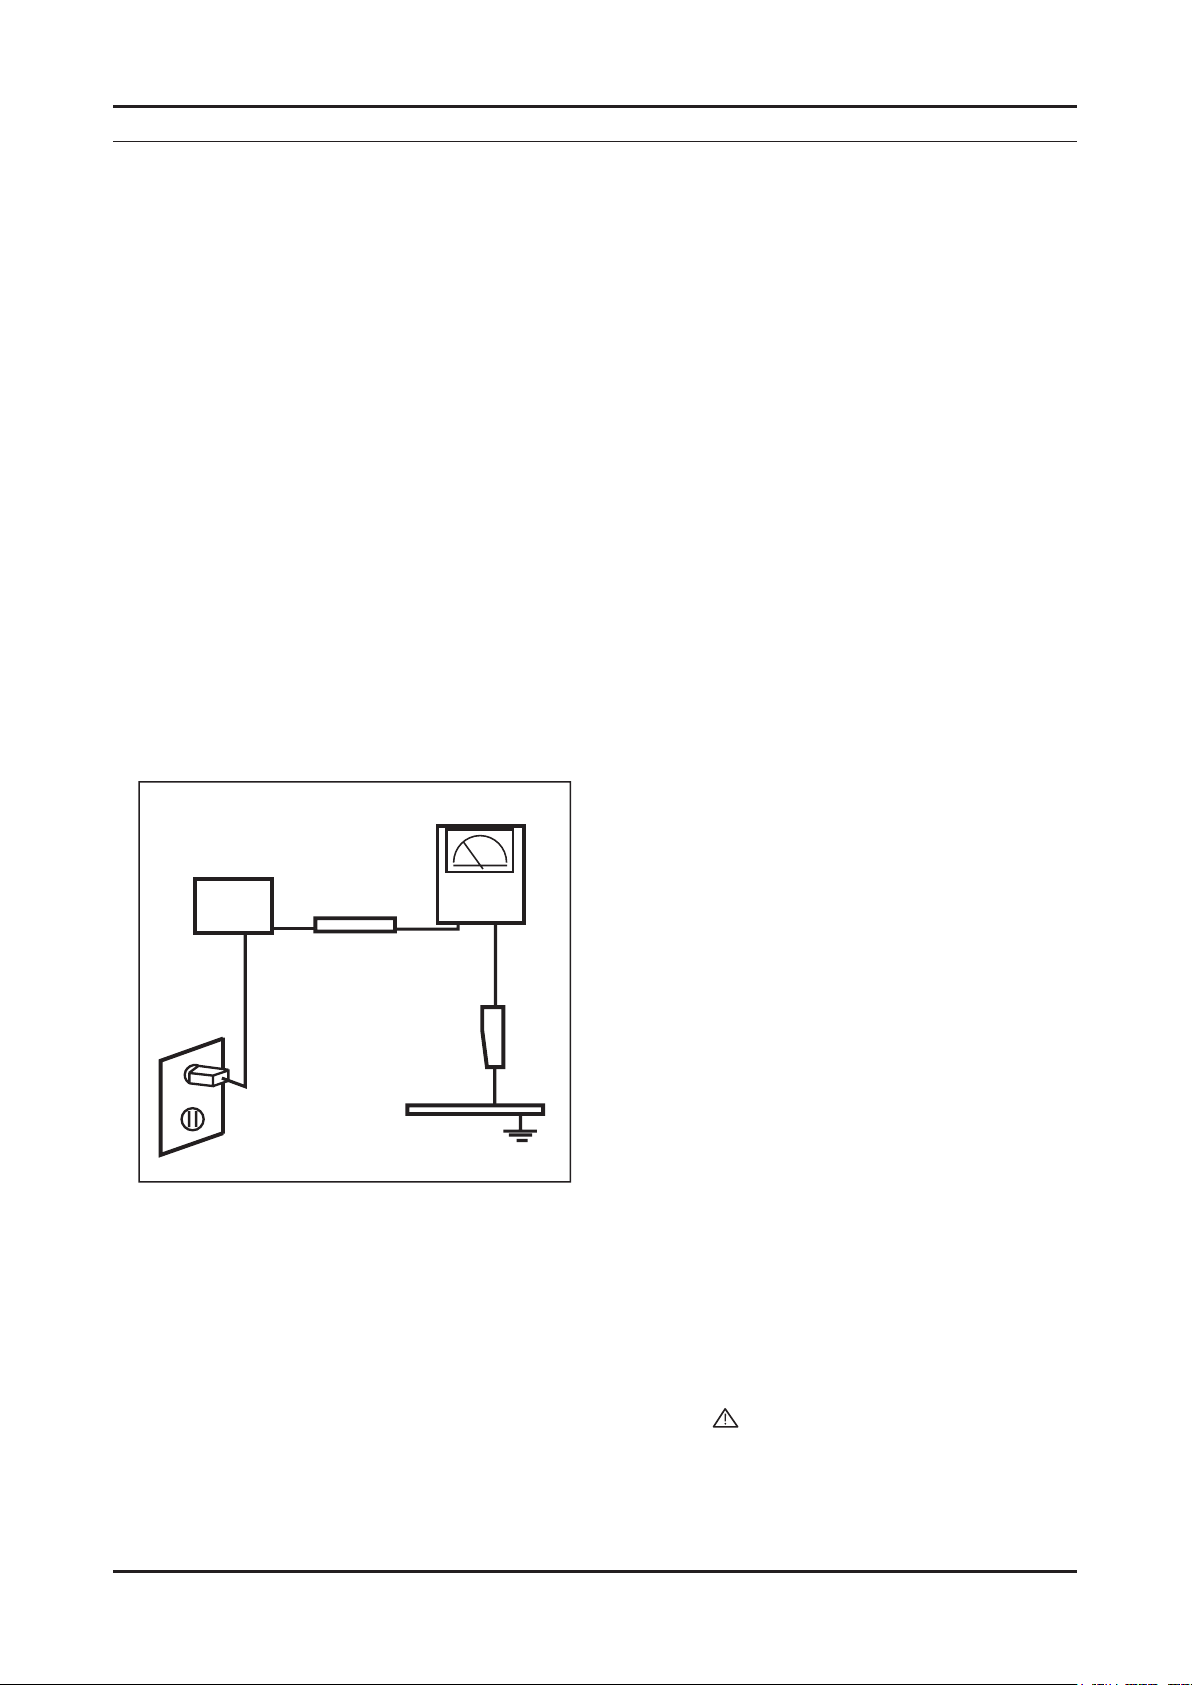
Leakage Current Hot Check (Figure 1-1):
3.
WARNING : Do not use an isolation transformer during this test.
Use a leakage current tester or a metering system that complies with American National Standards Institute (ANSI
C101.1, Leakage Current for Appliances), and Underwriters Laboratories (UL Publication UL1410, 59.7).
(READING SHOULD)
NOT BE ABOVE 0.5mA
DEVICE
UNDER
TEST
TEST ALL
EXPOSED METAL
SURFACES
2-WIRE CORD
*ALSO TEST WITH
PLUG REVERSED
(USING AC ADAPTER
PLUG AS REQUIRED)
With the unit completely reassembled, plug the AC line cord directly into a 120V AC outlet. With the unit’s AC switch
4.
LEAKAGE
CURRENT
TESTER
EARTH
GROUND
Figure 1-1. Leakage Current Test Circuit
rst in the ON position and then OFF, measure the current between a known earth ground (metal water pipe, conduit,
etc.) and all exposed metal parts, including: metal cabinets, screwheads and control shafts.
The current measured should not exceed 0.5 milliamp.
Reverse the power-plug prongs in the AC outlet and repeat the test.
1-1-4. Product Safety Notices
Some electrical and mechanical parts have special safetyrelated characteristics which are often not evident from visual
inspection. The protection they give may not be obtained by replacing them with components rated for higher voltage,
wattage, etc. Parts that have special safety characteristics are identied by on schematics and parts lists. A substitute
replacement that does not have the same safety characteristics as the recommended replacement part might create
shock, re and/or other hazards. Product safety is under review continuously and new instructions are issued whenever
appropriate.
1-1
Page 5

1-2
1. Precautions
1-2. Servicing Precautions
WARNING: An electrolytic capacitor installed with the wrong polarity might explode.
Caution: Before servicing units covered by this service manual, read and follow the Safety Precautions section of
this manual.
Note: If unforeseen circumstances create conict between the following servicing precautions and any of the
safety precautions, always follow the safety precautions.
1-2-1 General Servicing Precautions
Always unplug the unit’s AC power cord from the AC power source and disconnect the DC Power Jack before
1.
attempting to:
(a) remove or reinstall any component or assembly, (b) disconnect PCB plugs or connectors, (c) connect a test
component in parallel with an electrolytic capacitor.
Some components are raised above the printed circuit board for safety. An insulation tube or tape is sometimes
2.
used. The internal wiring is sometimes clamped to prevent contact with thermally hot components. Reinstall all such
elements to their original position.
After servicing, always check that the screws, components and wiring have been correctly reinstalled. Make sure that
3.
the area around the serviced part has not been damaged.
Check the insulation between the blades of the AC plug and accessible conductive parts (examples: metal panels,
4.
input terminals and earphone jacks).
Insulation Checking Procedure: Disconnect the power cord from the AC source and turn the power switch ON.
5.
Connect an insulation resistance meter (500 V) to theblades of the AC plug.
The insulation resistance between each blade of the AC plug and accessible conductive parts (see above) should be
greater than 1 megohm.
Always connect a test instrument’s ground lead to the instrument chassis ground before connecting the positive lead;
6.
always remove the instrument’s ground lead last.
1-3. Static Electricity Precautions
Some semiconductor (solid state) devices can be easily damaged by static electricity. Such components are commonly
called Electrostatically Sensitive Devices (ESD). Examples of typical ESD are integrated circuits and some eld-effect
transistors. The following techniques will reduce the incidence of component damage caused by static electricity.
Immediately before handling any semiconductor components or assemblies, drain the electrostatic charge from your
1.
body by touching a known earth ground. Alternatively, wear a discharging wrist-strap device. To avoid a shock hazard,
be sure to remove the wrist strap before applying power to the monitor.
After removing an ESD-equipped assembly, place it on a conductive surface such as aluminum foil to prevent
2.
accumulation of an electrostatic charge.
Do not use freon-propelled chemicals. These can generate electrical charges sufcient to damage ESDs.
3.
Use only a grounded-tip soldering iron to solder or desolder ESDs.
4.
Use only an anti-static solder removal device. Some solder removal devices not classied as “anti-static” can generate
5.
electrical charges sufcient to damage ESDs.
Do not remove a replacement ESD from its protective package until you are ready to install it. Most replacement ESDs
6.
are packaged with leads that are electrically shorted together by conductive foam, aluminum foil or other conductive
materials.
Immediately before removing the protective material from the leads of a replacement ESD, touch the protective
7.
material to the chassis or circuit assembly into which the device will be installed.
Caution: Be sure no power is applied to the chassis or circuit and observe all other safety precautions.
Minimize body motions when handling unpackaged replacement ESDs. Motions such as brushing clothes together,
8.
or lifting your foot from a carpeted oor can generate enough static electricity to damage an ESD.
Page 6

1. Precautions
1-4. Installation Precautions
For safety reasons, more than two people are required for carrying the product.
1.
Keep the power cord away from any heat emitting devices, as a melted covering may cause re or electric shock.
2.
Do not place the product in areas with poor ventilation such as a bookshelf or closet. The increased internal
3.
temperature may cause re.
Bend the external antenna cable when connecting it to the product. This is a measure to protect it from being exposed
4.
to moisture. Otherwise, it may cause a re or electric shock.
Make sure to turn the power off and unplug the power cord from the outlet before repositioning the product. Also check
5.
the antenna cable or the external connectors if they are fully unplugged. Damage to the cord may cause re or electric
shock.
Keep the antenna far away from any high-voltage cables and install it rmly. Contact with the highvoltage cable or the
6.
antenna falling over may cause re or electric shock.
When installing the product, leave enough space (10cm) between the product and the wall for ventilation purposes.
7.
A rise in temperature within the product may cause re.
1-3
Page 7

1. Precautions
Memo
1-4
Page 8
2. Product specications
2-1. Feature & Specications
Model T220M / T200M
Feature
�
Supreme Digital Interface & Networking
- With a built-in with no particular set-top box and provides simple access with a single remote control.
�
Excellent Picture Quality
- DNIe technology provides life-like clear images.
Dynamic Contrast
�
- Automatically detects the input visual signal and adjusts to create optimum contrast.
Convenience
�
-The TV utilizes the HDMI system to implement perfect digital sound and picture quality.
Specications
2. Product specications
Item
LCD Panel TFT-LCD Panel, RGB Vertical strip,
normaly White, 22-Inch viewable,
0.282(H) X 0.282(V)mm Pixel Pitch
Scanning Frequency Horizontal : 30KHz ~ 81KHz(Automatic)
Vertical: 56Hz ~ 75Hz(Automatic)
Display Colors 16.7 Million colors 16.7Million colors
Maximum resolution
Input Signal Analog 0.7Vp-p±10% positive at
Input Sync Signal Type: separate H/V,composite
Maximum Pixel Clock rate 146.250MHz 146.250MHz
Active Display
(Horizontal/Vertical)
AC power voltage &
Frequency
Horizontal: 1680pixels
Vertical: 1050pixels
75Ω,internally terminated
Level : TTL Level
473.76(H) X 296.1(V) 433.44(H) X 270.9(V)
AC 110 ~ 240V, 50 ~ 60 Hz AC110 ~ 240V, 50 ~ 60Hz
T220M T200M
Description
TFT-LCD Panel, RGB Vertical strip,
normaly White, 20.1-Inch viewable,
0.258(H) X 0.258(V)mm Pixel Pitch
Horizontal :30KHz ~ 81KHz(Automatic)
Vertical:56Hz ~ 75Hz(Automatic)
Horizontal : 1680pixels
Vertical:1050pixels
Analog 0.7Vp-p±10% positive at
75Ω,internally terminated
Type: separate H/V,composite
Level : TTL Level
Power Consumption
Dimensions Set
(W x D x H)
Weight Set
(After installation Stand)
TV System Tuning Frequency Synthesize
Environmental Considerations Operating Temperature: 50˚C ~ 104˚F(10˚C ~ 40˚C)
54W < 2W 50W < 2W
520x215x441.5mm (After installation stand)
520x86.5x373.5mm (Without stand)
6.2kg 6.0kg
System NT3.58, PAL-M, PAL-N
Sound MONO, STEREO
Operating Humidity : 10% ~ 80%
Storage Temperature: -4˚C ~ 113˚C(-20˚C ~ 45˚C)
Storage Humidity: 5% ~ 95%
486x215x417.5mm (After installation stand)
486x86x350mm (Without stand)
2-1
Page 9

2-2
2. Product specications
Specications
Item
Antenna Input 75Ω
Sound Characteristic
-MAX Internal speaker Out : Right : 3W / Left : 3W
-BASS Control Range : -8 dB ~ + 8dB
-TREBLE Control Range : -8 dB ~ +8 dB
-Headphone Out : 10 mW MAX
-Output Frequency : RF : 80 Hz ~ 15 kHz
Description
T220M T200M
A/V : 80 Hz ~ 20 kHz
Page 10

2-2. Spec Comparison to the Old Models
Model T220M / T200M Curie (225MD)
Design
Screen Size 20” / 22” 22”
2. Product specications
Frequency
Horizontal
Vertical
Display Color
PC Resolution
Maximum mode
Input Signal
Sync Signal
Video Signal
Power Consumption
Normal
Power Saving
WSXGA+, 1680 x 1050 @ 60 Hz 1680 x 1050
H/V Separate, TTL, P. or N.
30 ~ 81 kHz
56 ~ 75 Hz
16,777,216 colors
0.7 Vp-p @ 75ohm
22” 54W < 2W
20” 50W < 2W
30 ~ 81 kHz
56 ~ 75 Hz
16,777,216 colors
H/V Separate, TTL, P. or N.
0.7 Vp-p @ 75ohm
58W < 2W
*Color Effect
- Grey scale: Images are displayed in a grey tone on the screen.
- Green: Images are displayed in a green tone on the screen.
- Aqua: Images are displayed in a blue tone on the screen.
- Sepia: Images are displayed in a brown tone on the screen.
Image Size : : If the resolution is not wide resolution, this option allows the screen size to be selected as normal or wide.
2-3
Page 11

2. Product specications
2-3. Accessories
Product Description Ccde. No Remark
Remote Control
&
Batteries (AAA x 2)
Power Cord 3903-000190
Stand Body BN96-07347D
Stand Base BN96-07345A
BN59-00678A
Samsung Electronics
Service center
D-Sub Cable BN39-00244G
User’s Guide,
Monitor Driver,
Natural Color Pro Software
Cleaning Cloth BN63-01798A
BN96-07540A
2-4
Page 12
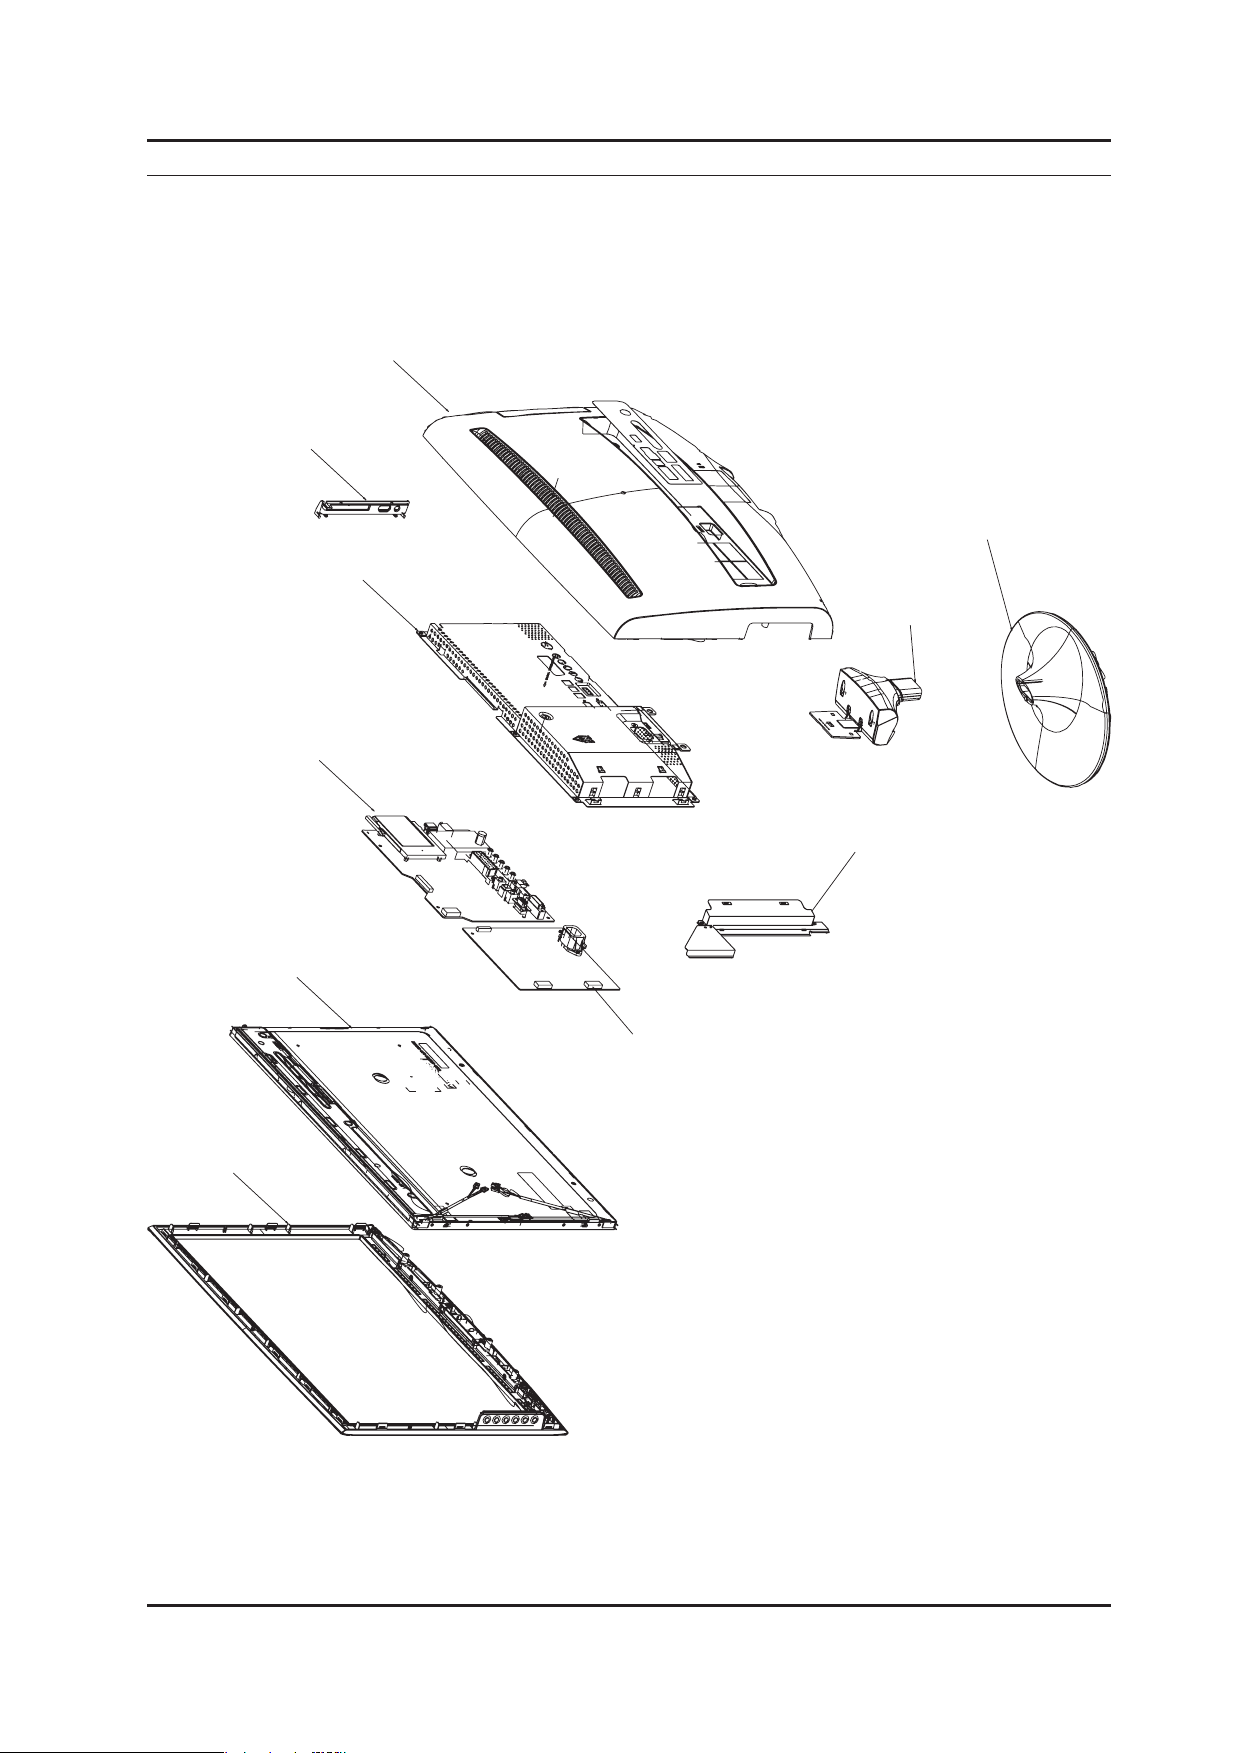
3. Disassembly and Assembly
3. Disassembly and Assembly
This section describes the disassembly and reassembly sequences for this monitor.
Warning: As this monitor has parts that are sensitive to static electricity, be careful when handling them.
3-1. Disassembly
Caution: 1. Turn the monitor off before beginning the disassembly process.
2. When disassembling the monitor, do not use any metal tools except for the provided jig.
3. Remove the signal cable and the power cord before beginning the disassembly.
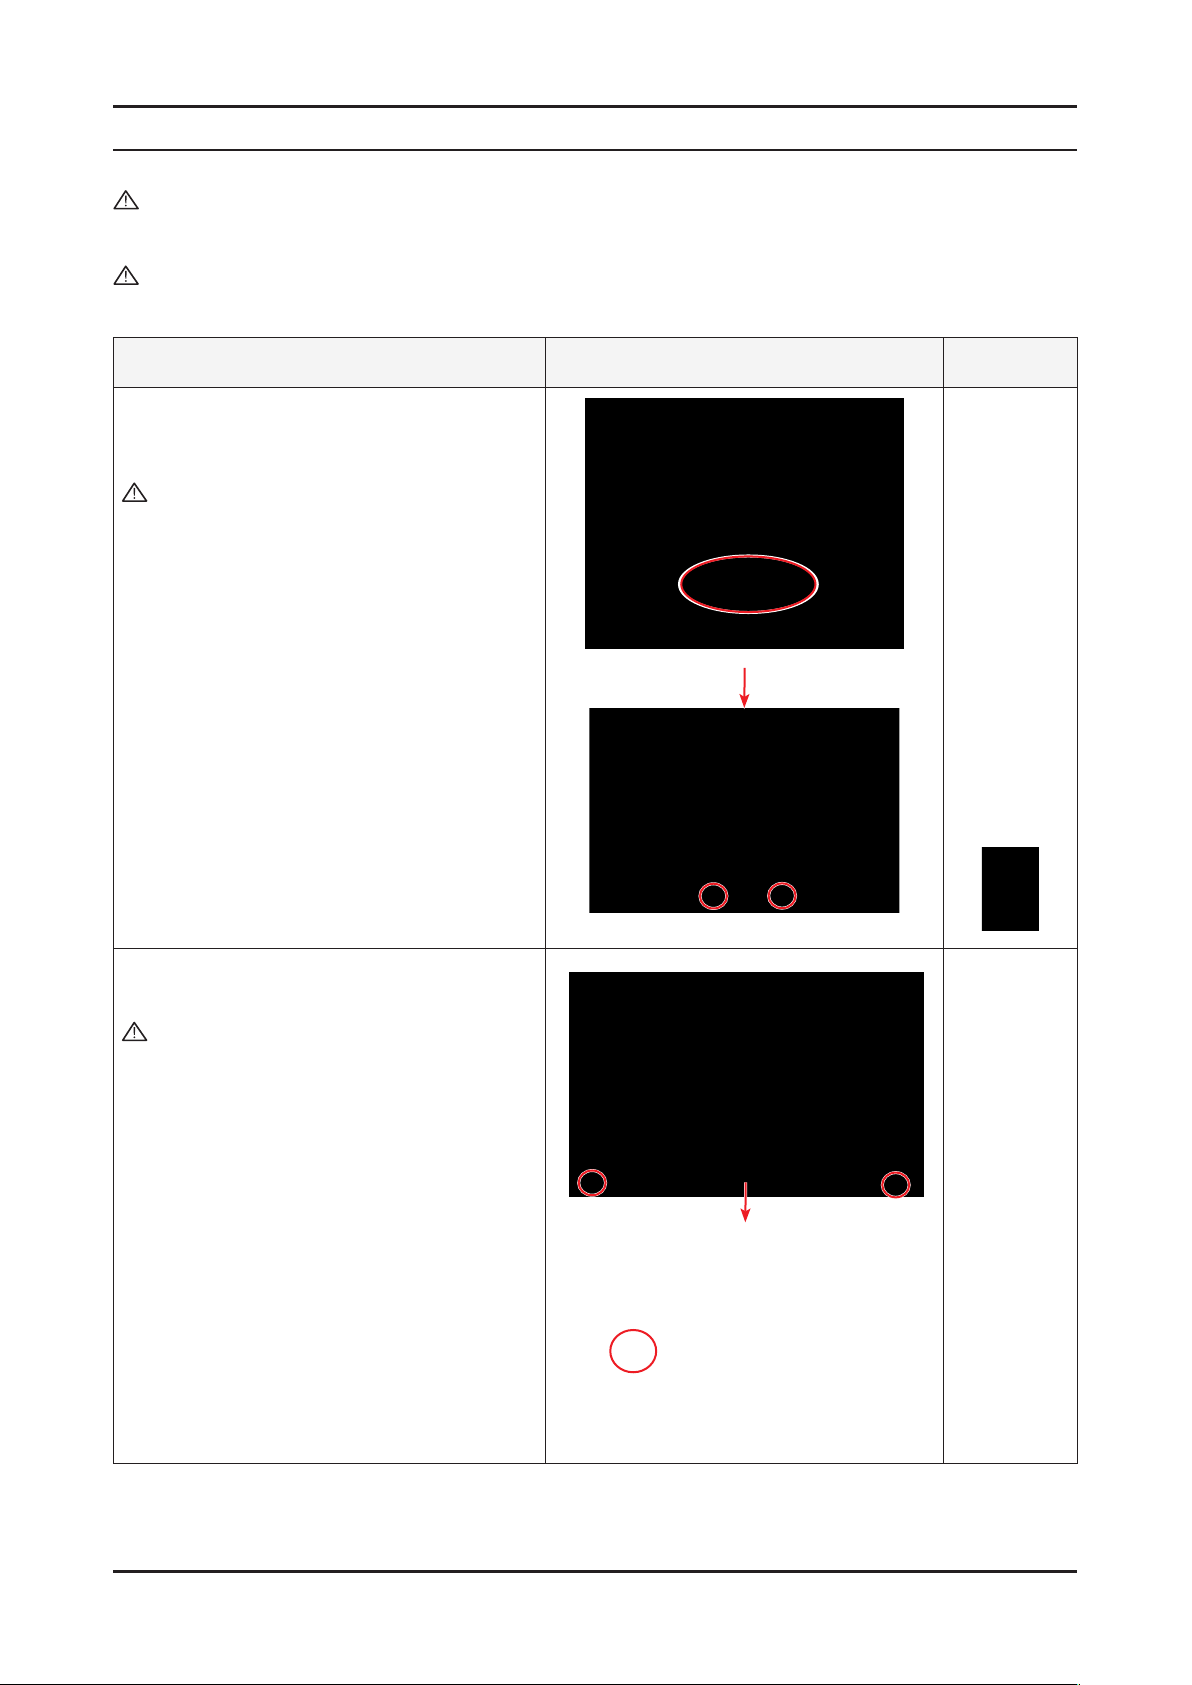
Description Photo Screws
1. Place monitor face down on cushioned table.
Remove Stand, then remove 2 marked screws
from the rear cover.
Caution : If you do not tilt the stand and use too
much force to remove it, the connection
pin may break.
2. Remove the cover and the LCD panel using the
provided jig on both grooves at the bottom.
Caution : Remove the cover and the LCD panel
using the provided jig on both grooves
at the bottom.
3-1
Page 13
3-2
3. Disassembly and Assembly
Description Photo Screws
3. Insertaatscrewdriverintothegrooveandthen
lift up and remove the cover.
4. After remove COVER-REAR, then disconnect
SPEAKER , FUNCTION wire.
5. Disconnect LVDS cable from panel.
Page 14

Description Photo Screws
6. After disconnecting SHIELD-LAMP of left side,
disassemble lamp wire between panel and IP
Board.
3. Disassembly and Assembly
7. Remove 8 marked SCREW of left picture.
Disconnect IP board.
※ Reassembly procedures are in the reverse order
of disassembly procedures.
8. Remove the LCD panel.
3-3
Page 15

3-4
3. Disassembly and Assembly
Description Photo Screws
9. Remove the IR module by tilting the left snap to
the right.
10. Remove the LED module by sliding the snap
designatedintherightgurebackwards.
11. Remove the two (2) screws and then remove the
holders from the four (4) snaps designated in the
rightgureusingtheprovidedjig.
Page 16

Description Photo Screws
12. Remove the two (2) connectors.
Caution : Servicing is not supported for the PCB.
▶Assembly
3. Disassembly and Assembly
13. The assembly is in the reverse order of the
disassembly.
14. Connect the disassembled snap and the LED
module again.
15.Fixtheconnectingwirewithlamenttape
Caution : If the wire is damaged when closing the
cover, an operating error may occur.
Therefore, make sure to close the
coverafterxingitwithlamenttape.
※ The assembly is in the reverse order of disassembly.
lamenttape
3-5
Page 17

3. Disassembly and Assembly
Memo
3-6
Page 18
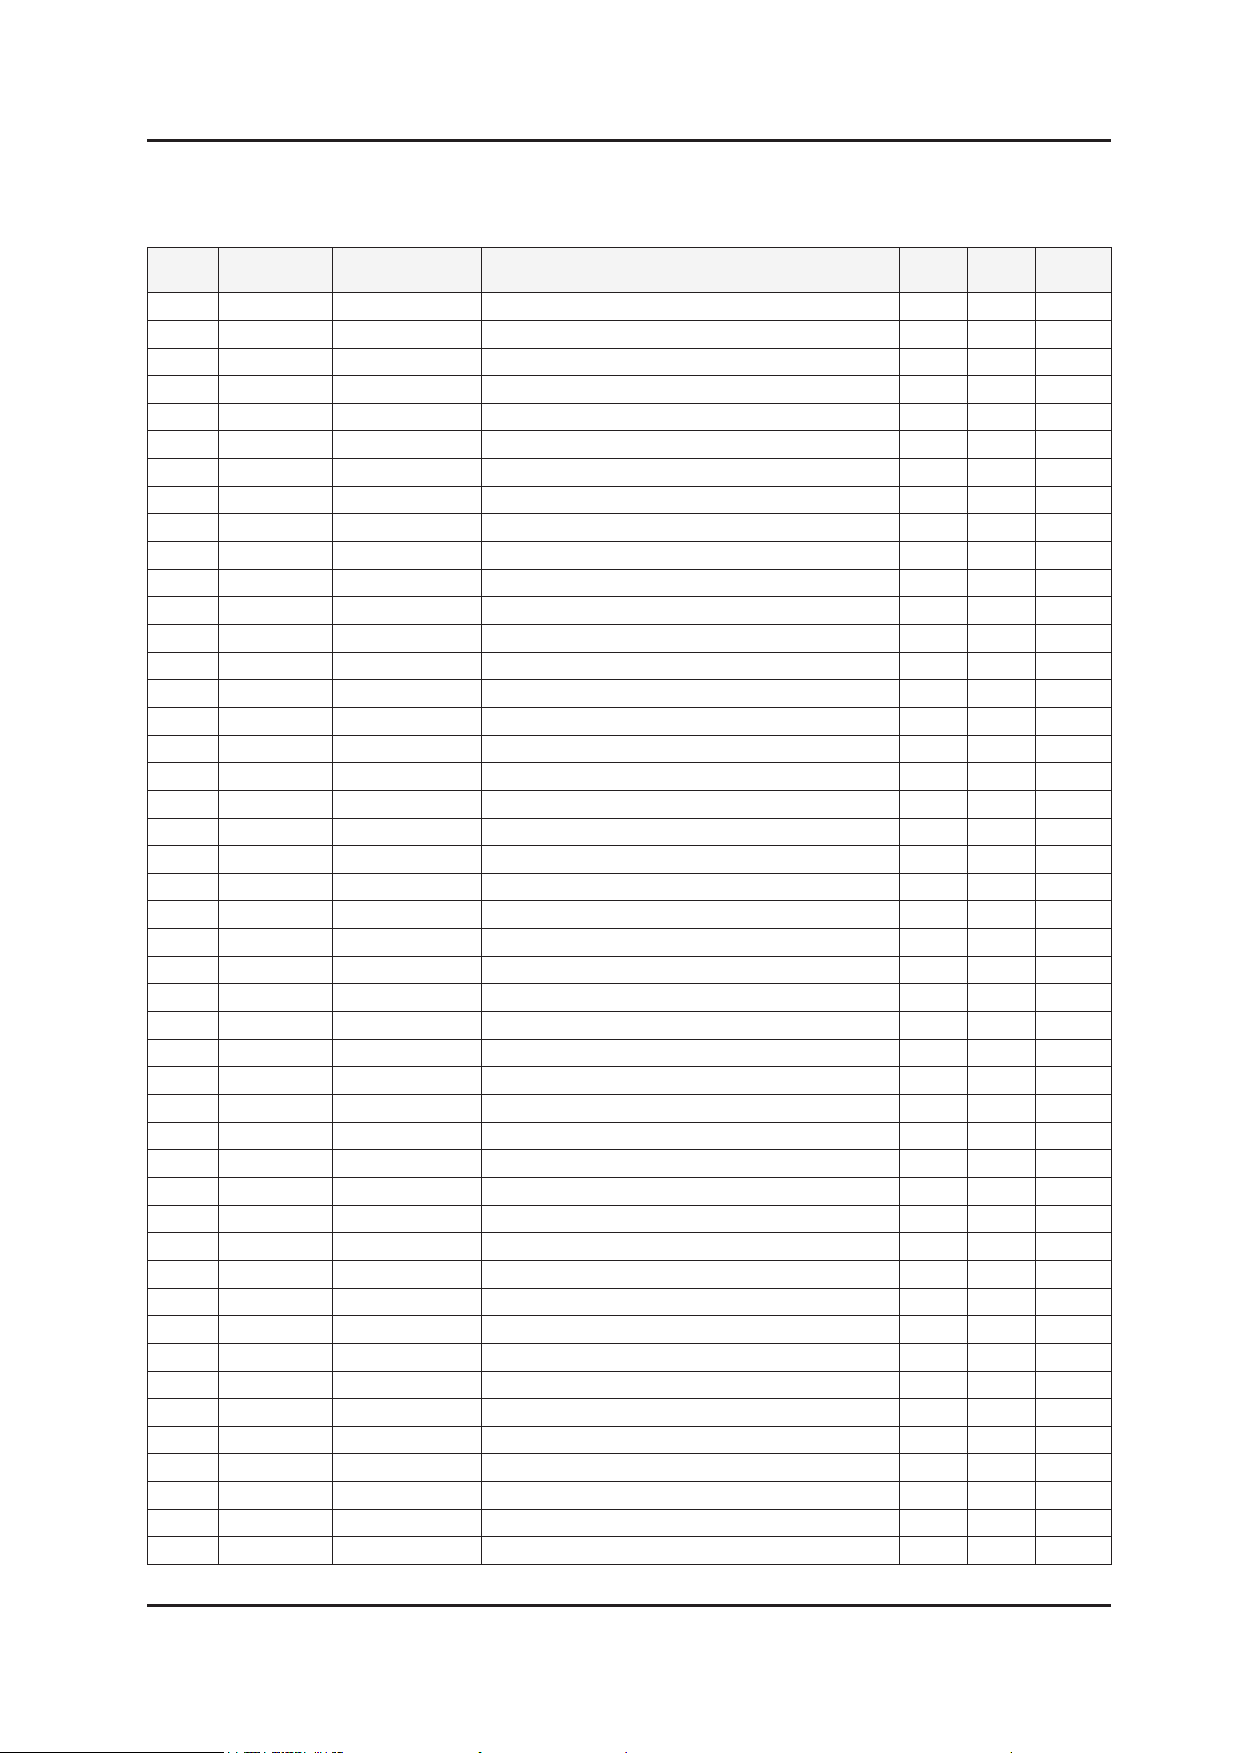
5. Exploded View & Part List
T0003
M0215
M0014
M0006
T0279
M0013
M0090
STD
M0027
M0174
5-1. LS20TDSSUMZD - Exploded View (T220M)
5. Exploded View & Part List
5-1
Page 19

5-2
5. Exploded View & Part List
5-1-1. LS20TDSSUMZD - Parts List (T220M)
Location No. Code No. Description & Specication Q’ty SA/SNA Remark
M0006 BN96-08149G ASSY SHIELD P-COVER;LS20TD(ANALOG),SECC 1 S.N.A
M0013 BN96-07447H ASSY COVER P-REAR;LS20TD(ANALOG),PMMA AB 1 S.A
M0014 BN94-01893R ASSY PCB MAIN;LS20TDSSU/ZB 1 S.A
M0027 BN96-07345B ASSY STAND P-BASE;LS22TW,ABS HB PMMA,RD0 1 S.A
M0090 BN96-08016A ASSY SHIELD P-LAMP;LS20TD(MFM),SPTE,T 0. 1 S.N.A
M0174 BN44-00177D IP BOARD;PWI2204ST(A),T 20” MFM,1.4 ~2.8 1 S.A
M0215 BN07-00374A LCD-PANEL;CLAA201WA04 1 S.A
STD BN96-07347D ASSY STAND P-BODY;LS22TD,PMMA ABS HB, SM 1 S.A
T0003 BN96-07446L ASSY COVER P-FRONT;LS20TD,BRAZIL,PMMA+AB 1 S.A
T0279 BN63-05063A COVER-JACK;T220M ANALOG,ABS + PC,HB,BK26 1 S.N.A
Page 20
5-3
5. Exploded View & Part List
5-2. LS20TDSSUMZD Parts List
Service Bom (SA: SERVICE AVAILABLE, SNA: SERVICE NOT AVAILABLE)
Level Location No. Code No. Description & Specication Q’ty SA/SNA Remark
LS20TDSSUMZD T200M,WST1/S20A4-LTD,20,LCD-MO,BRAZIL
0.1 M0001 BN90-01634H ASSY COVER FRONT;LS20TD_MFM,TOC,ROSE BLA 1 S.N.A
..2 M0081 6006-001096 SCREW-TAPTITE;BH,+,WP,B,M4.0,L12,ZPC(BLK 4 S.N.A
..2 T0175 BN96-06823C ASSY SPEAKER P;16ohm,T-project,MFM,3W,11 1 S.A
...3 BN83-00813A CKD-SPEAKER;Bordeaux New Rubber,pi 15 x 4 S.N.A
...3 BN83-01026A CKD-SPEAKER;L530 32” Fullrange Sleeve-#1 2 S.N.A
...3 BN83-01027A CKD-SPEAKER;L530 32” Fullrange Sleeve-#1 2 S.N.A
...3 BN83-01322A CKD-SPEAKER;T-MFM Speaker Unit,63mm X 35 2 S.N.A
...3 BN83-01323A CKD-SPEAKER;T-MFM Speaker Holder,95mm X 2 S.N.A
...3 BN83-01324A CKD-SPEAKER;T-MFM Speaker Wire Ass’y,4Pi 1 S.N.A
...3 BN83-01325A CKD-SPEAKER;T-MFM Speaker Cushion,52 X23 2 S.N.A
...3 BN83-01326A CKD-SPEAKER;T-MFM Speaker Label,20mmX10m 1 S.N.A
...3 BN83-00781A CKD-SPEAKER;Bordeax26 Screw,pi3 * 6mm 8 S.N.A
..2 T0003 BN96-07446L ASSY COVER P-FRONT;LS20TD,BRAZIL,PMMA+AB 1 S.A
...3 M0081 6003-000282 SCREW-TAPTITE;BH,+,-,B,M3,L8,ZPC(BLK),SW 2 S.N.A
...3 M0960 BN61-03932A HOLDER-BOSS;T200,PMMA+ABS HB,WH15 1 S.N.A
...3 CCM1 BN63-02183D COVER-SHEET;Rhcm,PE Vinyl,T0.05,680mm,20 1 S.N.A
...3 M0112 BN63-04426X COVER-FRONT;LS20TD(ANALOG),PMMA+ABS,ROSE 1 S.N.A
...3 M0145 BN96-07556D ASSY BOARD P-FUNCTION;T220HD,CT5000-5800 1 S.A
....4 BN94-02473F ASSY PCB MAIN-FUNCTION PCB;LS22TDSSUMZD 1 S.N.A
.....5 M2893 BN39-01051B LEAD CONNECTOR;T-MFM24,UL1571#30,UL1571# 1 S.A
.....5 T0174 BN97-02920J ASSY SMD;LS22TDSSUMZD 1 S.N.A
......6 D3 0406-001172 DIODE-TVS;CDS3C30GTH,48/-/50V,SMD 1 S.A
......6 D4 0406-001172
......6 R6 2007-000070 R-CHIP;0ohm,5%,1/10W,TP,1608 1 S.N.A
......6 R7 2007-000076 R-CHIP;330ohm,5%,1/10W,TP,1608 1 S.A
......6 R1 2007-000121 R-CHIP;820ohm,5%,1/10W,TP,1608 1 S.N.A
......6 R4 2007-000121 R-CHIP;820ohm,5%,1/10W,TP,1608 1 S.N.A
......6 R2 2007-000124 R-CHIP;2.2Kohm,5%,1/10W,TP,1608 1 S.N.A
......6 R5 2007-000124 R-CHIP;2.2Kohm,5%,1/10W,TP,1608 1 S.N.A
......6 C3 2203-000189 C-CER,CHIP;100nF,+80-20%,25V,Y5V,1608 1 S.N.A
......6 C4 2203-000189 C-CER,CHIP;100nF,+80-20%,25V,Y5V,1608 1 S.N.A
......6 T0313 3404-001209 SWITCH-TACT;12VDC,50mA,250gf,4.5x4.5x1.5 1 S.A
......6 T0313 3404-001209 SWITCH-TACT;12VDC,50mA,250gf,4.5x4.5x1.5 1 S.A
......6 T0313 3404-001209 SWITCH-TACT;12VDC,50mA,250gf,4.5x4.5x1.5 1 S.A
......6 T0313 3404-001209 SWITCH-TACT;12VDC,50mA,250gf,4.5x4.5x1.5 1 S.A
......6 T0313 3404-001209 SWITCH-TACT;12VDC,50mA,250gf,4.5x4.5x1.5 1 S.A
......6 T0313 3404-001209 SWITCH-TACT;12VDC,50mA,250gf,4.5x4.5x1.5 1 S.A
......6 T0077 BN41-01011A PCB MAIN;T220HD,FR-4,2L,PCB1.0,1.0T 1 S.N.A
....4 BN94-02473K ASSY PCB MAIN-IR PCB;LS22TDSSUMZD 1 S.N.A
.....5 M2893 BN39-01052B LEAD CONNECTOR;T200HD,UL1571#30,UL,5P,20 1 S.A
.....5 M2893 BN39-01053A LEAD CONNECTOR;T220D,UL1571#30,8P,200mm, 1 S.A
.....5 T0174 BN97-02902J ASSY SMD;LS22TDSSUMZD 1 S.N.A
......6 D1 0403-000510 DIODE-ZENER;MTZJ6.2B,5.96-6.27V,500mW,DO 1 S.A
......6 R1 2001-000290 R-CARBON;10Kohm,5%,1/8W,AA,TP,1.8x3.2mm 1 S.N.A
DIODE-TVS;CDS3C30GTH,48/-/50V,SMD 1 S.A
Page 21

5-4
5. Exploded View & Part List
Level Location No. Code No. Description & Specication Q’ty SA/SNA Remark
......6 C 2401-001507 C-AL;47uF,20%,16V,GP,TP,6.3x5,5 1 S.A
......6 T0077 BN41-01013A PCB MAIN;T220D,FR-1,1L,PCB1.0,1.6T 1 S.N.A
.....5 D0254 0609-001204 MODULE REMOCON;HORIZONTAL,6.5mm,TR 1 S.N.A
....4 BN94-02473N ASSY PCB MAIN-POWER PCB;LS22TDSSUMZD 1 S.N.A
.....5 BN81-02334A A/S-DOUBLE SIDE TAPE;T MFM POWER,103*52, 1 S.N.A
.....5 T0174 BN97-02902K ASSY SMD;LS22TDSSUMZD 1 S.N.A
......6 R1 2007-000819 R-CHIP;390Kohm,5%,1/10W,TP,1608 1 S.N.A
......6 C1 2203-000125 C-CER,CHIP;1.2nF,10%,50V,X7R,TP,1608,- 1 S.A
......6 C5 2203-005065 C-CER,CHIP;1000nF,+80-20%,10V,Y5V,1608 1 S.N.A
......6 CN330 3711-002162 HEADER-BOARD TO CABLE;BOX,2P,1R,1.25mm,S 1 S.A
......6 CN330 3711-005935 HEADER-BOARD TO CABLE;BOX,4P,1R,1mm,SMD- 1 S.A
......6 CN906 3711-006471 CONNECTOR-HEADER;BOX,5P,1R,1mm,SMD-A,AU, 1 S.N.A
......6 IC125 BN13-00007A IC ASIC;ADA03,6,2.2 TO 6.5 V,-20 TO +75 1 S.N.A
......6 T0077 BN41-01012A PCB MAIN;T220D,FR-4,2L,PCB1.0,1.6T 1 S.N.A
.....5 M0102 BN96-07569B ASSY BLU P;T220HD,A7-10040180-A0,WHITE,B 1 S.A
...3 BN64-00843A KNOB-GUIDE;T220HD,PMMA ABS,HB,BK23,H/GLO 1 S.N.A
...3 T0022 BN64-00845A KNOB CONTROL;T220HD,PMMA ABS,HB,BK23,H/G 1 S.N.A
0.1 M0002 BN90-01635D ASSY COVER REAR;LS20TD_MFM,ANALOG 1 S.N.A
..2 M0013 BN96-07447H ASSY COVER P-REAR;LS20TD(ANALOG),PMMA AB 1 S.A
...3 M0081 6003-000282 SCREW-TAPTITE;BH,+,-,B,M3,L8,ZPC(BLK),SW 2 S.N.A
...3 BN61-03947A GUIDE-CONTROL;T200D / T220D / T240D / T2 2 S.N.A
...3 CCM1 BN63-02183D COVER-SHEET;Rhcm,PE Vinyl,T0.05,680mm,20 0.5
...3 M0006 BN63-04435A COVER-REAR;T200D,PMMA+ABS,HB,BK23,H/GLOS 1 S.N.A
...3 T0071 BN64-00959A INLAY-TERMINAL;T220N ANALOG,PS SHEET T0. 1 S.N.A
...3 M0126 BN73-00096A RUBBER-PANEL;BI19BS,RUBBER,T1.0,50~60,NT 2 S.N.A
...3 T0151 BN64-00861A DOOR-CONTROL;T( 20W MFM),ABS HB,BK23,H/G 1 S.N.A
..2 M0081 6003-001086 SCREW-TAPTITE;BH,+,-,B,M3,L12,ZPC(BLK),S 4 S.A
0.1 M0135 BN91-01517B ASSY LCD-PTZ;LS20MEW* 1 S.N.A
..2 M0215 BN07-00374A LCD-PANEL;CLAA201WA04 1 S.A
0.1 M0112 BN91-02443C ASSY SHIELD;LS20TD_MFM,TOC,ANALOG 1 S.N.A
..2 T0279 BN63-05063A COVER-JACK;T220M ANALOG,ABS + PC,HB,BK26 1 S.N.A
..2 M0090 BN96-08016A ASSY SHIELD P-LAMP;LS20TD(MFM),SPTE,T 0. 1 S.N.A
...3 BN63-04401A SHIELD-LAMP;T(22W MFM),SPTE,T 0.3 1 S.N.A
...3 M0125 BN63-04772A SHIELD-PANEL;LS20TD,SPTE,0.3 1 S.N.A
0.1 M0017 BN91-02524G ASSY CHASSIS;LS20TDSSU/ZB 1 S.N.A
..2 M0081 6003-000275 SCREW-TAPTITE;BH,+,-,B,M3,L10,ZPC(BLK),S 3 S.N.A
..2 M0081 6003-000275 SCREW-TAPTITE;BH,+,-,B,M3,L10,ZPC(BLK),S 4 S.N.A
..2 M0081 6003-001439 SCREW-TAPTITE;BH,+,-,S,M4,L8,ZPC(WHT),SW 1 S.N.A
..2 T0562 6046-001014 STAND OFF;#4-40,L6,NI PLT,C3601,- 4 S.N.A
..2 M0174 BN44-00177D IP BOARD;PWI2204ST(A),T 20” MFM,1.4 ~2.8 1 S.A
..2 CCMM1 BN73-00143A SILICON/RUBBER;CURIE,SILICON+ALUMINA,W13 1 S.N.A
..2 CCMM1 BN73-00192A SILICON/RUBBER;T-MFM,GAPPAD1500,20X20X8 1 S.N.A
..2 M0014 BN94-01893R ASSY PCB MAIN;LS20TDSSU/ZB 1 S.A
...3 T0245 0202-001608 SOLDER-WIRE FLUX;LFC7-107,D0.8,99.3Sn/0. 0.025 S.N.A
...3 CN3000
...3 CN9001 3701-001386 CONNECTOR-DVI;24P,3R,FEMALE,AU 1 S.A
...3 CN906 3707-001081 CONNECTOR-OPTICAL;STRAIGHT,SPDIF 1 S.A
3701-001385 CONNECTOR-DSUB;15P,3R,FEMALE,STRAIGHT,AU 1 S.A
S.N.A
Page 22

5-5
5. Exploded View & Part List
Level Location No. Code No. Description & Specication Q’ty SA/SNA Remark
...3 CN330 3711-006715 HEADER-BOARD TO CABLE;BOX,4P,1R,2.5mm,AN 1 S.N.A
...3 JA330 3722-002176 JACK-PHONE;7P/4C,SN,L-BLU,STRAIGHT 1 S.A
...3 CN3005 3722-002275 JACK-DIN;4P,SN,BLK,ANGLE 1 S.A
...3 CN2003 3722-002680 JACK-EAR PHONE;6P,NiSn,BLK,ANGLE 1 S.A
...3 JA333 3722-002702 JACK-PIN;3P,Ni,GRN/BLU/RED,STRAIGHT 1 S.A
...3 JA333 3722-002781 JACK-PIN;2P(Shield),Ni,WHT/RED,straight 1 S.A
...3
...3 CIS3 BN40-00113A TUNER;HTM-6M/13F2S,HTM-6M/13F2S,PAL M,18 1 S.A
...3 T0510 BN97-02567B ASSY SMD-MAIN;LS20TDSSU/ZB 1 S.N.A
....4 SUB05 0202-001477 SOLDER-CREAM;LST309-M,-,D20~45um,96.5Sn/ 2.39 S.N.A
....4 D2006 0401-000133 DIODE-SWITCHING;RLS4148,75V,150mA,LL-34, 1 S.A
....4 D2007 0401-000133 DIODE-SWITCHING;RLS4148,75V,150mA,LL-34, 1 S.A
....4 D2008 0401-000133 DIODE-SWITCHING;RLS4148,75V,150mA,LL-34, 1 S.A
....4 D2009 0401-000133 DIODE-SWITCHING;RLS4148,75V,150mA,LL-34, 1 S.A
....4 D2022 0401-000133 DIODE-SWITCHING;RLS4148,75V,150mA,LL-34, 1 S.A
....4 D1003 0401-001056 DIODE-SWITCHING;MMBD4148SE,100V,200mA,SO 1 S.A
....4 D2003 0401-001056 DIODE-SWITCHING;MMBD4148SE,100V,200mA,SO 1 S.A
....4 D3003 0401-001056 DIODE-SWITCHING;MMBD4148SE,100V,200mA,SO 1 S.A
....4 D3004 0401-001056 DIODE-SWITCHING;MMBD4148SE,100V,200mA,SO 1 S.A
....4 D3006 0401-001056 DIODE-SWITCHING;MMBD4148SE,100V,200mA,SO 1 S.A
....4 D3007 0401-001056 DIODE-SWITCHING;MMBD4148SE,100V,200mA,SO 1 S.A
....4 D3008 0401-001056 DIODE-SWITCHING;MMBD4148SE,100V,200mA,SO 1 S.A
....4 D3009 0401-001056 DIODE-SWITCHING;MMBD4148SE,100V,200mA,SO 1 S.A
....4 D3010 0401-001056 DIODE-SWITCHING;MMBD4148SE,100V,200mA,SO 1 S.A
....4 D3011 0401-001056 DIODE-SWITCHING;MMBD4148SE,100V,200mA,SO 1 S.A
....4 D3012 0401-001056 DIODE-SWITCHING;MMBD4148SE,100V,200mA,SO 1 S.A
....4 D3013 0401-001056 DIODE-SWITCHING;MMBD4148SE,100V,200mA,SO 1 S.A
....4 D3014 0401-001056 DIODE-SWITCHING;MMBD4148SE,100V,200mA,SO 1 S.A
....4 D3015 0401-001056 DIODE-SWITCHING;MMBD4148SE,100V,200mA,SO 1 S.A
....4 D3016 0401-001056 DIODE-SWITCHING;MMBD4148SE,100V,200mA,SO 1 S.A
....4 D3230 0401-001056 DIODE-SWITCHING;MMBD4148SE,100V,200mA,SO 1 S.A
....4 D4102 0401-001056 DIODE-SWITCHING;MMBD4148SE,100V,200mA,SO 1 S.A
....4 D4109 0401-001056 DIODE-SWITCHING;MMBD4148SE,100V,200mA,SO 1 S.A
....4 D4110 0401-001056 DIODE-SWITCHING;MMBD4148SE,100V,200mA,SO 1 S.A
....4 D4111 0401-001056 DIODE-SWITCHING;MMBD4148SE,100V,200mA,SO 1 S.A
....4 D9301 0401-001056 DIODE-SWITCHING;MMBD4148SE,100V,200mA,SO 1 S.A
....4 D9302 0401-001056 DIODE-SWITCHING;MMBD4148SE,100V,200mA,SO 1 S.A
....4 D9303 0401-001056 DIODE-SWITCHING;MMBD4148SE,100V,200mA,SO 1 S.A
....4 D9304 0401-001056 DIODE-SWITCHING;MMBD4148SE,100V,200mA,SO 1 S.A
....4 D9305 0401-001056 DIODE-SWITCHING;MMBD4148SE,100V,200mA,SO 1 S.A
....4 D9306 0401-001056 DIODE-SWITCHING;MMBD4148SE,100V,200mA,SO 1 S.A
....4 D9307 0401-001056 DIODE-SWITCHING;MMBD4148SE,100V,200mA,SO 1 S.A
....4 D9308 0401-001056 DIODE-SWITCHING;MMBD4148SE,100V,200mA,SO 1 S.A
....4 D2010
....4 D3244 0401-001099 DIODE-SWITCHING;1N4148WS,75V,150mA,SOD-3 1 S.N.A
....4 D4112 0401-001099 DIODE-SWITCHING;1N4148WS,75V,150mA,SOD-3 1 S.N.A
....4 D4113 0401-001099 DIODE-SWITCHING;1N4148WS,75V,150mA,SOD-3 1 S.N.A
....4 D4114 0401-001099 DIODE-SWITCHING;1N4148WS,75V,150mA,SOD-3 1 S.N.A
....4 D0254 0402-000553 DIODE-SCHOTTKY;SS24/B240,40V,2000mA,DO-2 1 S.A
....4 D2004 0403-000002 DIODE-ZENER;VLZ5V6B,5.45/5.73V,500mW,SOD 1 S.A
TUNER_
GASK
AA63-01388A GASKET-EMI,SPONGE;SP-P300M,Conductive Fa 1 S.A
0401-001099 DIODE-SWITCHING;1N4148WS,75V,150mA,SOD-3 1 S.N.A
Page 23

5-6
5. Exploded View & Part List
Level Location No. Code No. Description & Specication Q’ty SA/SNA Remark
....4 D2023 0403-000002 DIODE-ZENER;VLZ5V6B,5.45/5.73V,500mW,SOD 1 S.A
....4 D3005 0403-000002 DIODE-ZENER;VLZ5V6B,5.45/5.73V,500mW,SOD 1 S.A
....4 D3017 0403-000002 DIODE-ZENER;VLZ5V6B,5.45/5.73V,500mW,SOD 1 S.A
....4 D3018 0403-000002 DIODE-ZENER;VLZ5V6B,5.45/5.73V,500mW,SOD 1 S.A
....4 D3019 0403-000002 DIODE-ZENER;VLZ5V6B,5.45/5.73V,500mW,SOD 1 S.A
....4 D3020 0403-000002 DIODE-ZENER;VLZ5V6B,5.45/5.73V,500mW,SOD 1 S.A
....4 D3021 0403-000002 DIODE-ZENER;VLZ5V6B,5.45/5.73V,500mW,SOD 1 S.A
....4 D5001 0403-000002 DIODE-ZENER;VLZ5V6B,5.45/5.73V,500mW,SOD 1 S.A
....4 D3022 0403-000258 DIODE-ZENER;BZX84C5V6,5.2-6V,225mW,SOT-2 1 S.A
....4 D9300 0403-000579 DIODE-ZENER;BZX84C5V1,4.8-5.4V,200mW,SOT 1 S.A
....4 D9317 0403-000579 DIODE-ZENER;BZX84C5V1,4.8-5.4V,200mW,SOT 1 S.A
....4 D3002 0403-000771 DIODE-ZENER;VLZ6V2B,5.96-6.27V,500mW,SOD 1 S.A
....4 D3001 0403-001052 DIODE-ZENER;RD8.2MB,7.7-8.7V,200mW,SOT-2 1 S.A
....4 D3070 0403-001052 DIODE-ZENER;RD8.2MB,7.7-8.7V,200mW,SOT-2 1 S.A
....4 D1002 0403-001425 DIODE-ZENER;BZX84C33,31-35V,350mW,SOT-23 1 S.A
....4 D9329 0403-001435 DIODE-ZENER;QZX363C5V6,5.32-5.88V,200MW, 1 S.A
....4 D9340 0403-001435 DIODE-ZENER;QZX363C5V6,5.32-5.88V,200MW, 1 S.A
....4 D3029 0407-000123 DIODE-ARRAY;DAN202K,80V,100mA,CA2-3,SOT- 1 S.N.A
....4 D3030 0407-000123 DIODE-ARRAY;DAN202K,80V,100mA,CA2-3,SOT- 1 S.N.A
....4 Q1001 0501-000445 TR-SMALL SIGNAL;KTC3875S-Y,NPN,150mW,SOT 1 S.A
....4 Q1005 0501-000445 TR-SMALL SIGNAL;KTC3875S-Y,NPN,150mW,SOT 1 S.A
....4
....4 Q2005 0501-000445 TR-SMALL SIGNAL;KTC3875S-Y,NPN,150mW,SOT 1 S.A
....4 Q3002 0501-000445 TR-SMALL SIGNAL;KTC3875S-Y,NPN,150mW,SOT 1 S.A
....4 Q3201 0501-000445 TR-SMALL SIGNAL;KTC3875S-Y,NPN,150mW,SOT 1 S.A
....4 Q5005 0501-000445 TR-SMALL SIGNAL;KTC3875S-Y,NPN,150mW,SOT 1 S.A
....4 Q1002 0501-002080 TR-SMALL SIGNAL;2SC2412K,NPN,200mW,SC-59 1 S.A
....4 Q1003 0501-002080 TR-SMALL SIGNAL;2SC2412K,NPN,200mW,SC-59 1 S.A
....4 Q1006 0501-002080 TR-SMALL SIGNAL;2SC2412K,NPN,200mW,SC-59 1 S.A
....4 Q9327 0501-002080 TR-SMALL SIGNAL;2SC2412K,NPN,200mW,SC-59 1 S.A
....4 Q409 0505-000110 FET-SILICON;2N7002,N,60V,115mA,7.5ohm,0. 1 S.A
....4 Q409 0505-000110 FET-SILICON;2N7002,N,60V,115mA,7.5ohm,0. 1 S.A
....4 Q409 0505-000110 FET-SILICON;2N7002,N,60V,115mA,7.5ohm,0. 1 S.A
....4 Q409 0505-000110 FET-SILICON;2N7002,N,60V,115mA,7.5ohm,0. 1 S.A
....4 Q409 0505-000110 FET-SILICON;2N7002,N,60V,115mA,7.5ohm,0. 1 S.A
....4 Q409 0505-001170 FET-SILICON;SI9933ADY-T1,P,-20V,3.4A,0.0 1 S.A
....4 Q409 0505-002169 FET-SILICON;Si4435BDY-T1-E3,P,-30V,-9.1A 1 S.N.A
....4 IC105 0909-001032 IC-REAL TIME CLOCK;PCF8563,SOP,8P,4.9x3. 1 S.A
....4 IC106 1001-001516 IC-VIDEO SWITCH;PI3HDMI201ZFE,3HDMI201 : 1 S.A
....4 IC112 1103-000129 IC-EEPROM;24C02,2Kbit,256x8Bit,SOP,8P,5x 1 S.A
....4 IC112 1103-000129 IC-EEPROM;24C02,2Kbit,256x8Bit,SOP,8P,5x 1 S.A
....4 IC112 1103-000129 IC-EEPROM;24C02,2Kbit,256x8Bit,SOP,8P,5x 1 S.A
....4 IC112 1103-001385 IC-EEPROM;AT24C256,256Kbit,32Kx8,SOP,8P, 1 S.A
....4 IC6001 1105-001838
....4 DU410 1201-000166 IC-OP AMP;LM358,SOP,ST,8P,150MIL,DUAL,10 1 S.A
....4 T0124 1201-002430 IC-POWER AMP;NTP-3000,QFN,56P,8x8mm,DUAL 1 S.A
....4 T0085 1201-002487 IC-AUDIO AMP;MAX9728A,QFN,12P,3x3mm,DUAL 1 S.A
....4 T0087 1203-001815 IC-POSI.FIXED REG.;78M09,TO-252,3P,-,PLA 1 S.A
....4 T0087 1203-002842 IC-POSI.FIXED REG.;AP1117D-33A,TO-252,3P 1 S.A
....4 T0087 1203-002842 IC-POSI.FIXED REG.;AP1117D-33A,TO-252,3P 1 S.A
....4 T0087 1203-002974 IC-POSI.FIXED REG.;AP1117D-25A,TO-252,3P 1 S.A
Q2004 0501-000445 TR-SMALL SIGNAL;KTC3875S-Y,NPN,150mW,SOT 1 S.A
IC-DDR SDRAM;EM6A9160TS0A-5G,DDR SDRAM,1 1 S.A
Page 24

5-7
5. Exploded View & Part List
Level Location No. Code No. Description & Specication Q’ty SA/SNA Remark
....4 T0170 1203-003059 IC-SWITCH VOL. REG.;MP1583,SOIC,8P,4.9x3 1 S.A
....4 T0087 1203-003696 IC-POSI.FIXED REG.;NCP1117DT18T5G,DPAK,3 1 S.A
....4 IC5001 1203-004363 IC-VOL. DETECTOR;RT9818C-29PV,SOT-23,3P, 1 S.A
....4 IC2003 1203-004364 IC-VOL. DETECTOR;RT9818C-42PV,SOT-23,3P, 1 S.A
....4 IC1005 1203-005188 IC-DC/DC CONVERTER;AOZ1021AIL,SOP,8P,4.9 1 S.A
....4 D2001 1405-001233 VARISTOR;30Vdc,5A,1.6x0.8x0.8mm,TP 1 S.A
....4 D2002 1405-001233 VARISTOR;30Vdc,5A,1.6x0.8x0.8mm,TP 1 S.A
....4 D3023 1405-001233 VARISTOR;30Vdc,5A,1.6x0.8x0.8mm,TP 1 S.A
....4 D3024 1405-001233 VARISTOR;30Vdc,5A,1.6x0.8x0.8mm,TP 1 S.A
....4 D3071 1405-001233 VARISTOR;30Vdc,5A,1.6x0.8x0.8mm,TP 1 S.A
....4 D3072 1405-001233 VARISTOR;30Vdc,5A,1.6x0.8x0.8mm,TP 1 S.A
....4 D3231 1405-001233 VARISTOR;30Vdc,5A,1.6x0.8x0.8mm,TP 1 S.A
....4 D3232 1405-001233 VARISTOR;30Vdc,5A,1.6x0.8x0.8mm,TP 1 S.A
....4 D3233 1405-001233 VARISTOR;30Vdc,5A,1.6x0.8x0.8mm,TP 1 S.A
....4 D4115 1405-001233 VARISTOR;30Vdc,5A,1.6x0.8x0.8mm,TP 1 S.A
....4 D4117 1405-001233 VARISTOR;30Vdc,5A,1.6x0.8x0.8mm,TP 1 S.A
....4 R1028 2007-000052 R-CHIP;10Kohm,1%,1/10W,TP,1608 1 S.N.A
....4 R1067 2007-000052 R-CHIP;10Kohm,1%,1/10W,TP,1608 1 S.N.A
....4 R1068 2007-000052 R-CHIP;10Kohm,1%,1/10W,TP,1608 1 S.N.A
....4 R1071 2007-000052 R-CHIP;10Kohm,1%,1/10W,TP,1608 1 S.N.A
....4 R6101 2007-000052 R-CHIP;10Kohm,1%,1/10W,TP,1608 1 S.N.A
....4
....4 R1002 2007-000070 R-CHIP;0ohm,5%,1/10W,TP,1608 1 S.N.A
....4 R1004 2007-000070 R-CHIP;0ohm,5%,1/10W,TP,1608 1 S.N.A
....4 R1063 2007-000070 R-CHIP;0ohm,5%,1/10W,TP,1608 1 S.N.A
....4 R1064 2007-000070 R-CHIP;0ohm,5%,1/10W,TP,1608 1 S.N.A
....4 R1301 2007-000070 R-CHIP;0ohm,5%,1/10W,TP,1608 1 S.N.A
....4 R2013 2007-000070 R-CHIP;0ohm,5%,1/10W,TP,1608 1 S.N.A
....4 R2066 2007-000070 R-CHIP;0ohm,5%,1/10W,TP,1608 1 S.N.A
....4 R3001 2007-000070 R-CHIP;0ohm,5%,1/10W,TP,1608 1 S.N.A
....4 R3002 2007-000070 R-CHIP;0ohm,5%,1/10W,TP,1608 1 S.N.A
....4 R3003 2007-000070 R-CHIP;0ohm,5%,1/10W,TP,1608 1 S.N.A
....4 R3004 2007-000070 R-CHIP;0ohm,5%,1/10W,TP,1608 1 S.N.A
....4 R3005 2007-000070 R-CHIP;0ohm,5%,1/10W,TP,1608 1 S.N.A
....4 R3006 2007-000070 R-CHIP;0ohm,5%,1/10W,TP,1608 1 S.N.A
....4 R3007 2007-000070 R-CHIP;0ohm,5%,1/10W,TP,1608 1 S.N.A
....4 R3008 2007-000070 R-CHIP;0ohm,5%,1/10W,TP,1608 1 S.N.A
....4 R3010 2007-000070 R-CHIP;0ohm,5%,1/10W,TP,1608 1 S.N.A
....4 R3066 2007-000070 R-CHIP;0ohm,5%,1/10W,TP,1608 1 S.N.A
....4 R3259 2007-000070 R-CHIP;0ohm,5%,1/10W,TP,1608 1 S.N.A
....4 R3260 2007-000070 R-CHIP;0ohm,5%,1/10W,TP,1608 1 S.N.A
....4 R3261 2007-000070 R-CHIP;0ohm,5%,1/10W,TP,1608 1 S.N.A
....4 R3264_H 2007-000070 R-CHIP;0ohm,5%,1/10W,TP,1608 1 S.N.A
....4 R3265_H 2007-000070
....4 R4058 2007-000070 R-CHIP;0ohm,5%,1/10W,TP,1608 1 S.N.A
....4 R4101 2007-000070 R-CHIP;0ohm,5%,1/10W,TP,1608 1 S.N.A
....4 R5001 2007-000070 R-CHIP;0ohm,5%,1/10W,TP,1608 1 S.N.A
....4 R5028 2007-000070 R-CHIP;0ohm,5%,1/10W,TP,1608 1 S.N.A
....4 R5036 2007-000070 R-CHIP;0ohm,5%,1/10W,TP,1608 1 S.N.A
....4 R5037 2007-000070 R-CHIP;0ohm,5%,1/10W,TP,1608 1 S.N.A
....4 R5052 2007-000070 R-CHIP;0ohm,5%,1/10W,TP,1608 1 S.N.A
R1029 2007-000067 R-CHIP;15Kohm,1%,1/10W,TP,1608 1 S.N.A
R-CHIP;0ohm,5%,1/10W,TP,1608 1 S.N.A
Page 25

5-8
5. Exploded View & Part List
Level Location No. Code No. Description & Specication Q’ty SA/SNA Remark
....4 R5057 2007-000070 R-CHIP;0ohm,5%,1/10W,TP,1608 1 S.N.A
....4 R5065 2007-000070 R-CHIP;0ohm,5%,1/10W,TP,1608 1 S.N.A
....4 R5999 2007-000070 R-CHIP;0ohm,5%,1/10W,TP,1608 1 S.N.A
....4 R6012 2007-000070 R-CHIP;0ohm,5%,1/10W,TP,1608 1 S.N.A
....4 R6014 2007-000070 R-CHIP;0ohm,5%,1/10W,TP,1608 1 S.N.A
....4 R6066_T 2007-000070 R-CHIP;0ohm,5%,1/10W,TP,1608 1 S.N.A
....4 R6094 2007-000070 R-CHIP;0ohm,5%,1/10W,TP,1608 1 S.N.A
....4 R9348_F3V 2007-000070 R-CHIP;0ohm,5%,1/10W,TP,1608 1 S.N.A
....4 R9356 2007-000070 R-CHIP;0ohm,5%,1/10W,TP,1608 1 S.N.A
....4 R9357 2007-000070 R-CHIP;0ohm,5%,1/10W,TP,1608 1 S.N.A
....4 R3014 2007-000071 R-CHIP;22ohm,5%,1/10W,TP,1608 1 S.N.A
....4 R3015 2007-000071 R-CHIP;22ohm,5%,1/10W,TP,1608 1 S.N.A
....4 R3027 2007-000071 R-CHIP;22ohm,5%,1/10W,TP,1608 1 S.N.A
....4 R3103 2007-000071 R-CHIP;22ohm,5%,1/10W,TP,1608 1 S.N.A
....4 R5019 2007-000071 R-CHIP;22ohm,5%,1/10W,TP,1608 1 S.N.A
....4 R5020 2007-000071 R-CHIP;22ohm,5%,1/10W,TP,1608 1 S.N.A
....4 R5021 2007-000071 R-CHIP;22ohm,5%,1/10W,TP,1608 1 S.N.A
....4 R5024 2007-000071 R-CHIP;22ohm,5%,1/10W,TP,1608 1 S.N.A
....4 R5027 2007-000071 R-CHIP;22ohm,5%,1/10W,TP,1608 1 S.N.A
....4 R5029 2007-000071 R-CHIP;22ohm,5%,1/10W,TP,1608 1 S.N.A
....4 R5083 2007-000071 R-CHIP;22ohm,5%,1/10W,TP,1608 1 S.N.A
....4
....4 R5203 2007-000071 R-CHIP;22ohm,5%,1/10W,TP,1608 1 S.N.A
....4 R5204 2007-000071 R-CHIP;22ohm,5%,1/10W,TP,1608 1 S.N.A
....4 R5205 2007-000071 R-CHIP;22ohm,5%,1/10W,TP,1608 1 S.N.A
....4 R9318 2007-000071 R-CHIP;22ohm,5%,1/10W,TP,1608 1 S.N.A
....4 R9319 2007-000071 R-CHIP;22ohm,5%,1/10W,TP,1608 1 S.N.A
....4 R9320 2007-000071 R-CHIP;22ohm,5%,1/10W,TP,1608 1 S.N.A
....4 R9321 2007-000071 R-CHIP;22ohm,5%,1/10W,TP,1608 1 S.N.A
....4 R9322 2007-000071 R-CHIP;22ohm,5%,1/10W,TP,1608 1 S.N.A
....4 R9323 2007-000071 R-CHIP;22ohm,5%,1/10W,TP,1608 1 S.N.A
....4 R9324 2007-000071 R-CHIP;22ohm,5%,1/10W,TP,1608 1 S.N.A
....4 R9325 2007-000071 R-CHIP;22ohm,5%,1/10W,TP,1608 1 S.N.A
....4 R3016 2007-000072 R-CHIP;47ohm,5%,1/10W,TP,1608 1 S.N.A
....4 R3017 2007-000072 R-CHIP;47ohm,5%,1/10W,TP,1608 1 S.N.A
....4 R3025 2007-000072 R-CHIP;47ohm,5%,1/10W,TP,1608 1 S.N.A
....4 R3026 2007-000072 R-CHIP;47ohm,5%,1/10W,TP,1608 1 S.N.A
....4 R5032 2007-000072 R-CHIP;47ohm,5%,1/10W,TP,1608 1 S.N.A
....4 R5033 2007-000072 R-CHIP;47ohm,5%,1/10W,TP,1608 1 S.N.A
....4 R5035 2007-000072 R-CHIP;47ohm,5%,1/10W,TP,1608 1 S.N.A
....4 R6010 2007-000072 R-CHIP;47ohm,5%,1/10W,TP,1608 1 S.N.A
....4 R6011 2007-000072 R-CHIP;47ohm,5%,1/10W,TP,1608 1 S.N.A
....4 R6050 2007-000072 R-CHIP;47ohm,5%,1/10W,TP,1608 1 S.N.A
....4 R6051 2007-000072
....4 R9336 2007-000072 R-CHIP;47ohm,5%,1/10W,TP,1608 1 S.N.A
....4 R9337 2007-000072 R-CHIP;47ohm,5%,1/10W,TP,1608 1 S.N.A
....4 R2014 2007-000074 R-CHIP;100ohm,5%,1/10W,TP,1608 1 S.A
....4 R2017 2007-000074 R-CHIP;100ohm,5%,1/10W,TP,1608 1 S.A
....4 R3013 2007-000074 R-CHIP;100ohm,5%,1/10W,TP,1608 1 S.A
....4 R3030 2007-000074 R-CHIP;100ohm,5%,1/10W,TP,1608 1 S.A
....4 R3064 2007-000074 R-CHIP;100ohm,5%,1/10W,TP,1608 1 S.A
R5084 2007-000071 R-CHIP;22ohm,5%,1/10W,TP,1608 1 S.N.A
R-CHIP;47ohm,5%,1/10W,TP,1608 1 S.N.A
Page 26

5-9
5. Exploded View & Part List
Level Location No. Code No. Description & Specication Q’ty SA/SNA Remark
....4 R3065 2007-000074 R-CHIP;100ohm,5%,1/10W,TP,1608 1 S.A
....4 R4127 2007-000074 R-CHIP;100ohm,5%,1/10W,TP,1608 1 S.A
....4 R5009 2007-000074 R-CHIP;100ohm,5%,1/10W,TP,1608 1 S.A
....4 R5010 2007-000074 R-CHIP;100ohm,5%,1/10W,TP,1608 1 S.A
....4 R5011 2007-000074 R-CHIP;100ohm,5%,1/10W,TP,1608 1 S.A
....4 R5017 2007-000074 R-CHIP;100ohm,5%,1/10W,TP,1608 1 S.A
....4 R5018 2007-000074 R-CHIP;100ohm,5%,1/10W,TP,1608 1 S.A
....4 R5038 2007-000074 R-CHIP;100ohm,5%,1/10W,TP,1608 1 S.A
....4 R5039 2007-000074 R-CHIP;100ohm,5%,1/10W,TP,1608 1 S.A
....4 R5040 2007-000074 R-CHIP;100ohm,5%,1/10W,TP,1608 1 S.A
....4 R5042 2007-000074 R-CHIP;100ohm,5%,1/10W,TP,1608 1 S.A
....4 R5043 2007-000074 R-CHIP;100ohm,5%,1/10W,TP,1608 1 S.A
....4 R5051 2007-000074 R-CHIP;100ohm,5%,1/10W,TP,1608 1 S.A
....4 R5054 2007-000074 R-CHIP;100ohm,5%,1/10W,TP,1608 1 S.A
....4 R5055 2007-000074 R-CHIP;100ohm,5%,1/10W,TP,1608 1 S.A
....4 R5058 2007-000074 R-CHIP;100ohm,5%,1/10W,TP,1608 1 S.A
....4 R5059 2007-000074 R-CHIP;100ohm,5%,1/10W,TP,1608 1 S.A
....4 R5060 2007-000074 R-CHIP;100ohm,5%,1/10W,TP,1608 1 S.A
....4 R5061 2007-000074 R-CHIP;100ohm,5%,1/10W,TP,1608 1 S.A
....4 R5063 2007-000074 R-CHIP;100ohm,5%,1/10W,TP,1608 1 S.A
....4 R5067 2007-000074 R-CHIP;100ohm,5%,1/10W,TP,1608 1 S.A
....4
....4 R5072 2007-000074 R-CHIP;100ohm,5%,1/10W,TP,1608 1 S.A
....4 R5073 2007-000074 R-CHIP;100ohm,5%,1/10W,TP,1608 1 S.A
....4 R6015 2007-000074 R-CHIP;100ohm,5%,1/10W,TP,1608 1 S.A
....4 R6016 2007-000074 R-CHIP;100ohm,5%,1/10W,TP,1608 1 S.A
....4 R6020 2007-000074 R-CHIP;100ohm,5%,1/10W,TP,1608 1 S.A
....4 R6093 2007-000074 R-CHIP;100ohm,5%,1/10W,TP,1608 1 S.A
....4 R9330 2007-000074 R-CHIP;100ohm,5%,1/10W,TP,1608 1 S.A
....4 R1010 2007-000076 R-CHIP;330ohm,5%,1/10W,TP,1608 1 S.A
....4 R2084 2007-000077 R-CHIP;470ohm,5%,1/10W,TP,1608 1 S.A
....4 R2085 2007-000077 R-CHIP;470ohm,5%,1/10W,TP,1608 1 S.A
....4 R5041 2007-000077 R-CHIP;470ohm,5%,1/10W,TP,1608 1 S.A
....4 R5085 2007-000077 R-CHIP;470ohm,5%,1/10W,TP,1608 1 S.A
....4 R2015 2007-000078 R-CHIP;1Kohm,5%,1/10W,TP,1608 1 S.A
....4 R2021 2007-000078 R-CHIP;1Kohm,5%,1/10W,TP,1608 1 S.A
....4 R2125 2007-000078 R-CHIP;1Kohm,5%,1/10W,TP,1608 1 S.A
....4 R2126 2007-000078 R-CHIP;1Kohm,5%,1/10W,TP,1608 1 S.A
....4 R3009 2007-000078 R-CHIP;1Kohm,5%,1/10W,TP,1608 1 S.A
....4 R3028 2007-000078 R-CHIP;1Kohm,5%,1/10W,TP,1608 1 S.A
....4 R3029 2007-000078 R-CHIP;1Kohm,5%,1/10W,TP,1608 1 S.A
....4 R5002 2007-000078 R-CHIP;1Kohm,5%,1/10W,TP,1608 1 S.A
....4 R6048 2007-000078 R-CHIP;1Kohm,5%,1/10W,TP,1608 1 S.A
....4 R6049 2007-000078
....4 R6052 2007-000078 R-CHIP;1Kohm,5%,1/10W,TP,1608 1 S.A
....4 R6092 2007-000078 R-CHIP;1Kohm,5%,1/10W,TP,1608 1 S.A
....4 R9326 2007-000078 R-CHIP;1Kohm,5%,1/10W,TP,1608 1 S.A
....4 R9328 2007-000078 R-CHIP;1Kohm,5%,1/10W,TP,1608 1 S.A
....4 R9352 2007-000078 R-CHIP;1Kohm,5%,1/10W,TP,1608 1 S.A
....4 R9353 2007-000078 R-CHIP;1Kohm,5%,1/10W,TP,1608 1 S.A
....4 R3036 2007-000081 R-CHIP;2.7Kohm,5%,1/10W,TP,1608 1 S.N.A
R5068 2007-000074 R-CHIP;100ohm,5%,1/10W,TP,1608 1 S.A
R-CHIP;1Kohm,5%,1/10W,TP,1608 1 S.A
Page 27

5-10
5. Exploded View & Part List
Level Location No. Code No. Description & Specication Q’ty SA/SNA Remark
....4 R5070 2007-000082 R-CHIP;3.3Kohm,5%,1/10W,TP,1608 1 S.N.A
....4 R5071 2007-000082 R-CHIP;3.3Kohm,5%,1/10W,TP,1608 1 S.N.A
....4 R1031 2007-000084 R-CHIP;4.7Kohm,5%,1/10W,TP,1608 1 S.A
....4 R1032 2007-000084 R-CHIP;4.7Kohm,5%,1/10W,TP,1608 1 S.A
....4 R2004 2007-000084 R-CHIP;4.7Kohm,5%,1/10W,TP,1608 1 S.A
....4 R2005 2007-000084 R-CHIP;4.7Kohm,5%,1/10W,TP,1608 1 S.A
....4 R2009 2007-000084 R-CHIP;4.7Kohm,5%,1/10W,TP,1608 1 S.A
....4 R2010 2007-000084 R-CHIP;4.7Kohm,5%,1/10W,TP,1608 1 S.A
....4 R2069 2007-000084 R-CHIP;4.7Kohm,5%,1/10W,TP,1608 1 S.A
....4 R2081 2007-000084 R-CHIP;4.7Kohm,5%,1/10W,TP,1608 1 S.A
....4 R2083 2007-000084 R-CHIP;4.7Kohm,5%,1/10W,TP,1608 1 S.A
....4 R2088 2007-000084 R-CHIP;4.7Kohm,5%,1/10W,TP,1608 1 S.A
....4 R3012 2007-000084 R-CHIP;4.7Kohm,5%,1/10W,TP,1608 1 S.A
....4 R3044 2007-000084 R-CHIP;4.7Kohm,5%,1/10W,TP,1608 1 S.A
....4 R3062 2007-000084 R-CHIP;4.7Kohm,5%,1/10W,TP,1608 1 S.A
....4 R3063 2007-000084 R-CHIP;4.7Kohm,5%,1/10W,TP,1608 1 S.A
....4 R3254 2007-000084 R-CHIP;4.7Kohm,5%,1/10W,TP,1608 1 S.A
....4 R5069 2007-000084 R-CHIP;4.7Kohm,5%,1/10W,TP,1608 1 S.A
....4 R6041 2007-000084 R-CHIP;4.7Kohm,5%,1/10W,TP,1608 1 S.A
....4 R6042 2007-000084 R-CHIP;4.7Kohm,5%,1/10W,TP,1608 1 S.A
....4 R1006 2007-000090 R-CHIP;10Kohm,5%,1/10W,TP,1608 1 S.A
....4
....4 R1030 2007-000090 R-CHIP;10Kohm,5%,1/10W,TP,1608 1 S.A
....4 R1043 2007-000090 R-CHIP;10Kohm,5%,1/10W,TP,1608 1 S.A
....4 R1048 2007-000090 R-CHIP;10Kohm,5%,1/10W,TP,1608 1 S.A
....4 R1049 2007-000090 R-CHIP;10Kohm,5%,1/10W,TP,1608 1 S.A
....4 R2028 2007-000090 R-CHIP;10Kohm,5%,1/10W,TP,1608 1 S.A
....4 R2080 2007-000090 R-CHIP;10Kohm,5%,1/10W,TP,1608 1 S.A
....4 R2082 2007-000090 R-CHIP;10Kohm,5%,1/10W,TP,1608 1 S.A
....4 R2089 2007-000090 R-CHIP;10Kohm,5%,1/10W,TP,1608 1 S.A
....4 R2156 2007-000090 R-CHIP;10Kohm,5%,1/10W,TP,1608 1 S.A
....4 R2157 2007-000090 R-CHIP;10Kohm,5%,1/10W,TP,1608 1 S.A
....4 R3018 2007-000090 R-CHIP;10Kohm,5%,1/10W,TP,1608 1 S.A
....4 R3019 2007-000090 R-CHIP;10Kohm,5%,1/10W,TP,1608 1 S.A
....4 R3023 2007-000090 R-CHIP;10Kohm,5%,1/10W,TP,1608 1 S.A
....4 R3024 2007-000090 R-CHIP;10Kohm,5%,1/10W,TP,1608 1 S.A
....4 R3031 2007-000090 R-CHIP;10Kohm,5%,1/10W,TP,1608 1 S.A
....4 R3034 2007-000090 R-CHIP;10Kohm,5%,1/10W,TP,1608 1 S.A
....4 R3035 2007-000090 R-CHIP;10Kohm,5%,1/10W,TP,1608 1 S.A
....4 R3042 2007-000090 R-CHIP;10Kohm,5%,1/10W,TP,1608 1 S.A
....4 R3057 2007-000090 R-CHIP;10Kohm,5%,1/10W,TP,1608 1 S.A
....4 R3058 2007-000090 R-CHIP;10Kohm,5%,1/10W,TP,1608 1 S.A
....4 R3059 2007-000090 R-CHIP;10Kohm,5%,1/10W,TP,1608 1 S.A
....4 R3253 2007-000090
....4 R4119 2007-000090 R-CHIP;10Kohm,5%,1/10W,TP,1608 1 S.A
....4 R4120 2007-000090 R-CHIP;10Kohm,5%,1/10W,TP,1608 1 S.A
....4 R5004 2007-000090 R-CHIP;10Kohm,5%,1/10W,TP,1608 1 S.A
....4 R5007 2007-000090 R-CHIP;10Kohm,5%,1/10W,TP,1608 1 S.A
....4 R5077 2007-000090 R-CHIP;10Kohm,5%,1/10W,TP,1608 1 S.A
....4 R5080 2007-000090 R-CHIP;10Kohm,5%,1/10W,TP,1608 1 S.A
....4 R5117 2007-000090 R-CHIP;10Kohm,5%,1/10W,TP,1608 1 S.A
R1007 2007-000090 R-CHIP;10Kohm,5%,1/10W,TP,1608 1 S.A
R-CHIP;10Kohm,5%,1/10W,TP,1608 1 S.A
Page 28

5-11
5. Exploded View & Part List
Level Location No. Code No. Description & Specication Q’ty SA/SNA Remark
....4 R5119 2007-000090 R-CHIP;10Kohm,5%,1/10W,TP,1608 1 S.A
....4 R9331 2007-000090 R-CHIP;10Kohm,5%,1/10W,TP,1608 1 S.A
....4 R9334 2007-000090 R-CHIP;10Kohm,5%,1/10W,TP,1608 1 S.A
....4 R9335 2007-000090 R-CHIP;10Kohm,5%,1/10W,TP,1608 1 S.A
....4 R4121 2007-000091 R-CHIP;12Kohm,5%,1/10W,TP,1608 1 S.N.A
....4 R4123 2007-000091 R-CHIP;12Kohm,5%,1/10W,TP,1608 1 S.N.A
....4 R9358 2007-000091 R-CHIP;12Kohm,5%,1/10W,TP,1608 1 S.N.A
....4 R9359 2007-000091 R-CHIP;12Kohm,5%,1/10W,TP,1608 1 S.N.A
....4 R1012 2007-000094 R-CHIP;22Kohm,5%,1/10W,TP,1608 1 S.A
....4 R5074 2007-000094 R-CHIP;22Kohm,5%,1/10W,TP,1608 1 S.A
....4 R5076 2007-000094 R-CHIP;22Kohm,5%,1/10W,TP,1608 1 S.A
....4 R5078 2007-000094 R-CHIP;22Kohm,5%,1/10W,TP,1608 1 S.A
....4 R5081 2007-000094 R-CHIP;22Kohm,5%,1/10W,TP,1608 1 S.A
....4 R1015 2007-000097 R-CHIP;47Kohm,5%,1/10W,TP,1608 1 S.A
....4 R1016 2007-000097 R-CHIP;47Kohm,5%,1/10W,TP,1608 1 S.A
....4 R1008 2007-000102 R-CHIP;100Kohm,5%,1/10W,TP,1608 1 S.A
....4 R1011 2007-000102 R-CHIP;100Kohm,5%,1/10W,TP,1608 1 S.A
....4 R1040 2007-000102 R-CHIP;100Kohm,5%,1/10W,TP,1608 1 S.A
....4 R1041 2007-000102 R-CHIP;100Kohm,5%,1/10W,TP,1608 1 S.A
....4 R1042 2007-000102 R-CHIP;100Kohm,5%,1/10W,TP,1608 1 S.A
....4 R1058 2007-000102 R-CHIP;100Kohm,5%,1/10W,TP,1608 1 S.A
....4
....4 R6090 2007-000106 R-CHIP;220Kohm,5%,1/10W,TP,1608 1 S.N.A
....4 R5082 2007-000109 R-CHIP;1Mohm,5%,1/10W,TP,1608 1 S.N.A
....4 R2074 2007-000119 R-CHIP;560ohm,5%,1/10W,TP,1608 1 S.N.A
....4 R5006 2007-000124 R-CHIP;2.2Kohm,5%,1/10W,TP,1608 1 S.N.A
....4 R5506 2007-000124 R-CHIP;2.2Kohm,5%,1/10W,TP,1608 1 S.N.A
....4 R5075 2007-000127 R-CHIP;9.1Kohm,5%,1/10W,TP,1608 1 S.A
....4 R2019 2007-000138 R-CHIP;100ohm,5%,1/16W,TP,1005 1 S.N.A
....4 R3074 2007-000138 R-CHIP;100ohm,5%,1/16W,TP,1005 1 S.N.A
....4 R3283 2007-000138 R-CHIP;100ohm,5%,1/16W,TP,1005 1 S.N.A
....4 R2077 2007-000140 R-CHIP;1Kohm,5%,1/16W,TP,1005 1 S.N.A
....4 R2078 2007-000140 R-CHIP;1Kohm,5%,1/16W,TP,1005 1 S.N.A
....4 R3284 2007-000148 R-CHIP;10Kohm,5%,1/16W,TP,1005 1 S.N.A
....4 R3285 2007-000148 R-CHIP;10Kohm,5%,1/16W,TP,1005 1 S.N.A
....4 R2075 2007-000174 R-CHIP;47ohm,5%,1/16W,TP,1005 1 S.N.A
....4 R2076 2007-000174 R-CHIP;47ohm,5%,1/16W,TP,1005 1 S.N.A
....4 R3011 2007-000309 R-CHIP;10ohm,5%,1/10W,TP,1608 1 S.A
....4 R2086 2007-000570 R-CHIP;220ohm,1%,1/10W,TP,1608 1 S.A
....4 R2087 2007-000570 R-CHIP;220ohm,1%,1/10W,TP,1608 1 S.A
....4 R2016 2007-000683 R-CHIP;3.3Kohm,1%,1/10W,TP,1608 1 S.A
....4 R1070 2007-000726 R-CHIP;300ohm,1%,1/10W,TP,1608 1 S.A
....4 R1057 2007-000839 R-CHIP;39ohm,5%,1/10W,TP,1608 1 S.A
....4 R2001 2007-000882
....4 R2002 2007-000882 R-CHIP;4.7ohm,5%,1/10W,TP,1608 1 S.N.A
....4 R2003 2007-000882 R-CHIP;4.7ohm,5%,1/10W,TP,1608 1 S.N.A
....4 R2006 2007-000882 R-CHIP;4.7ohm,5%,1/10W,TP,1608 1 S.N.A
....4 R2007 2007-000882 R-CHIP;4.7ohm,5%,1/10W,TP,1608 1 S.N.A
....4 R2008 2007-000882 R-CHIP;4.7ohm,5%,1/10W,TP,1608 1 S.N.A
....4 R2011 2007-000882 R-CHIP;4.7ohm,5%,1/10W,TP,1608 1 S.N.A
....4 R2012 2007-000882 R-CHIP;4.7ohm,5%,1/10W,TP,1608 1 S.N.A
R6022 2007-000102 R-CHIP;100Kohm,5%,1/10W,TP,1608 1 S.A
R-CHIP;4.7ohm,5%,1/10W,TP,1608 1 S.N.A
Page 29

5-12
5. Exploded View & Part List
Level Location No. Code No. Description & Specication Q’ty SA/SNA Remark
....4 R1033 2007-000939 R-CHIP;47Kohm,1%,1/10W,TP,1608 1 S.A
....4 R3070 2007-000950 R-CHIP;47ohm,5%,1/4W,TP,3216 1 S.A
....4 R3071 2007-000950 R-CHIP;47ohm,5%,1/4W,TP,3216 1 S.A
....4 R3286 2007-000950 R-CHIP;47ohm,5%,1/4W,TP,3216 1 S.A
....4 R1069 2007-000965 R-CHIP;5.1Kohm,5%,1/10W,TP,1608 1 S.N.A
....4 R6017 2007-001007 R-CHIP;51Kohm,1%,1/10W,TP,1608 1 S.A
....4 R2020 2007-001093 R-CHIP;620ohm,5%,1/10W,TP,1608 1 S.A
....4 R4103 2007-001164 R-CHIP;75ohm,1%,1/10W,TP,1608 1 S.N.A
....4 R4105 2007-001164 R-CHIP;75ohm,1%,1/10W,TP,1608 1 S.N.A
....4 R4107 2007-001164 R-CHIP;75ohm,1%,1/10W,TP,1608 1 S.N.A
....4 R3020 2007-001167 R-CHIP;75ohm,5%,1/10W,TP,1608 1 S.N.A
....4 R3021 2007-001167 R-CHIP;75ohm,5%,1/10W,TP,1608 1 S.N.A
....4 R3022 2007-001167 R-CHIP;75ohm,5%,1/10W,TP,1608 1 S.N.A
....4 R3072 2007-001167 R-CHIP;75ohm,5%,1/10W,TP,1608 1 S.N.A
....4 R3073 2007-001167 R-CHIP;75ohm,5%,1/10W,TP,1608 1 S.N.A
....4 R3287 2007-001167 R-CHIP;75ohm,5%,1/10W,TP,1608 1 S.N.A
....4 R6027 2007-001167 R-CHIP;75ohm,5%,1/10W,TP,1608 1 S.N.A
....4 R1003 2007-002425 R-CHIP;1ohm,5%,1/10W,TP,1608 1 S.N.A
....4 R1022 2007-002425 R-CHIP;1ohm,5%,1/10W,TP,1608 1 S.N.A
....4 R1023 2007-002425 R-CHIP;1ohm,5%,1/10W,TP,1608 1 S.N.A
....4 R1025 2007-002425 R-CHIP;1ohm,5%,1/10W,TP,1608 1 S.N.A
....4
....4 R1027 2007-002425 R-CHIP;1ohm,5%,1/10W,TP,1608 1 S.N.A
....4 R3288 2007-007309 R-CHIP;12Kohm,1%,1/16W,TP,1005 1 S.A
....4 R3289 2007-007309 R-CHIP;12Kohm,1%,1/16W,TP,1005 1 S.A
....4 R6006 2011-000585 R-NETWORK;47ohm,5%,1/16W,L,CHIP,8P,TP,3. 1 S.N.A
....4 R6007 2011-000585 R-NETWORK;47ohm,5%,1/16W,L,CHIP,8P,TP,3. 1 S.N.A
....4 RA5008 2011-000585 R-NETWORK;47ohm,5%,1/16W,L,CHIP,8P,TP,3. 1 S.N.A
....4 RA5009 2011-000585 R-NETWORK;47ohm,5%,1/16W,L,CHIP,8P,TP,3. 1 S.N.A
....4 RA5010 2011-000585 R-NETWORK;47ohm,5%,1/16W,L,CHIP,8P,TP,3. 1 S.N.A
....4 RA5011 2011-000585 R-NETWORK;47ohm,5%,1/16W,L,CHIP,8P,TP,3. 1 S.N.A
....4 RA5012 2011-000585 R-NETWORK;47ohm,5%,1/16W,L,CHIP,8P,TP,3. 1 S.N.A
....4 RA6006 2011-000585 R-NETWORK;47ohm,5%,1/16W,L,CHIP,8P,TP,3. 1 S.N.A
....4 RA6009 2011-000585 R-NETWORK;47ohm,5%,1/16W,L,CHIP,8P,TP,3. 1 S.N.A
....4 RA5024 2011-000881 R-NETWORK;33ohm,5%,1/16W,L,CHIP,8P,TP,3. 1 S.N.A
....4 RA5026 2011-000881 R-NETWORK;33ohm,5%,1/16W,L,CHIP,8P,TP,3. 1 S.N.A
....4 RA5027 2011-000881 R-NETWORK;33ohm,5%,1/16W,L,CHIP,8P,TP,3. 1 S.N.A
....4 RA6010 2011-000881 R-NETWORK;33ohm,5%,1/16W,L,CHIP,8P,TP,3. 1 S.N.A
....4 RA5007 2011-001001 R-NETWORK;0ohm,5%,1/16W,L,CHIP,8P,TP,3.2 1 S.A
....4 RA5001 2011-001011 R-NETWORK;10Kohm,5%,1/16W,L,CHIP,8P,TP,3 1 S.A
....4 RA5004 2011-001011 R-NETWORK;10Kohm,5%,1/16W,L,CHIP,8P,TP,3 1 S.A
....4 RA5017 2011-001011 R-NETWORK;10Kohm,5%,1/16W,L,CHIP,8P,TP,3 1 S.A
....4 RA5018 2011-001011 R-NETWORK;10Kohm,5%,1/16W,L,CHIP,8P,TP,3 1 S.A
....4 RA5032 2011-001011
....4 RA5033 2011-001011 R-NETWORK;10Kohm,5%,1/16W,L,CHIP,8P,TP,3 1 S.A
....4 RA5005 2011-001093 R-NETWORK;100ohm,5%,1/16W,L,CHIP,8P,TP,3 1 S.A
....4 RA5006 2011-001093 R-NETWORK;100ohm,5%,1/16W,L,CHIP,8P,TP,3 1 S.A
....4 RA5015 2011-001093 R-NETWORK;100ohm,5%,1/16W,L,CHIP,8P,TP,3 1 S.A
....4 RA5019 2011-001093 R-NETWORK;100ohm,5%,1/16W,L,CHIP,8P,TP,3 1 S.A
....4 RA5020 2011-001093 R-NETWORK;100ohm,5%,1/16W,L,CHIP,8P,TP,3 1 S.A
....4 RA5021 2011-001093 R-NETWORK;100ohm,5%,1/16W,L,CHIP,8P,TP,3 1 S.A
R1026 2007-002425 R-CHIP;1ohm,5%,1/10W,TP,1608 1 S.N.A
R-NETWORK;10Kohm,5%,1/16W,L,CHIP,8P,TP,3 1 S.A
Page 30

5-13
5. Exploded View & Part List
Level Location No. Code No. Description & Specication Q’ty SA/SNA Remark
....4 RA5023 2011-001093 R-NETWORK;100ohm,5%,1/16W,L,CHIP,8P,TP,3 1 S.A
....4 RA5028 2011-001093 R-NETWORK;100ohm,5%,1/16W,L,CHIP,8P,TP,3 1 S.A
....4 RA5029 2011-001093 R-NETWORK;100ohm,5%,1/16W,L,CHIP,8P,TP,3 1 S.A
....4 RA5030 2011-001093 R-NETWORK;100ohm,5%,1/16W,L,CHIP,8P,TP,3 1 S.A
....4 C1005 2203-000189 C-CER,CHIP;100nF,+80-20%,25V,Y5V,1608 1 S.N.A
....4 C1047 2203-000189 C-CER,CHIP;100nF,+80-20%,25V,Y5V,1608 1 S.N.A
....4 C1060 2203-000189 C-CER,CHIP;100nF,+80-20%,25V,Y5V,1608 1 S.N.A
....4 C1071 2203-000189 C-CER,CHIP;100nF,+80-20%,25V,Y5V,1608 1 S.N.A
....4 C1112 2203-000189 C-CER,CHIP;100nF,+80-20%,25V,Y5V,1608 1 S.N.A
....4 C1120 2203-000189 C-CER,CHIP;100nF,+80-20%,25V,Y5V,1608 1 S.N.A
....4 C2004 2203-000189 C-CER,CHIP;100nF,+80-20%,25V,Y5V,1608 1 S.N.A
....4 C2005 2203-000189 C-CER,CHIP;100nF,+80-20%,25V,Y5V,1608 1 S.N.A
....4 C2013 2203-000189 C-CER,CHIP;100nF,+80-20%,25V,Y5V,1608 1 S.N.A
....4 C2014 2203-000189 C-CER,CHIP;100nF,+80-20%,25V,Y5V,1608 1 S.N.A
....4 C2015 2203-000189 C-CER,CHIP;100nF,+80-20%,25V,Y5V,1608 1 S.N.A
....4 C2036 2203-000189 C-CER,CHIP;100nF,+80-20%,25V,Y5V,1608 1 S.N.A
....4 C2037 2203-000189 C-CER,CHIP;100nF,+80-20%,25V,Y5V,1608 1 S.N.A
....4 C2043 2203-000189 C-CER,CHIP;100nF,+80-20%,25V,Y5V,1608 1 S.N.A
....4 C2082 2203-000189 C-CER,CHIP;100nF,+80-20%,25V,Y5V,1608 1 S.N.A
....4 C3002 2203-000189 C-CER,CHIP;100nF,+80-20%,25V,Y5V,1608 1 S.N.A
....4 C3020 2203-000189 C-CER,CHIP;100nF,+80-20%,25V,Y5V,1608 1 S.N.A
....4
....4 C5002 2203-000189 C-CER,CHIP;100nF,+80-20%,25V,Y5V,1608 1 S.N.A
....4 C5003 2203-000189 C-CER,CHIP;100nF,+80-20%,25V,Y5V,1608 1 S.N.A
....4 C5004 2203-000189 C-CER,CHIP;100nF,+80-20%,25V,Y5V,1608 1 S.N.A
....4 C5005 2203-000189 C-CER,CHIP;100nF,+80-20%,25V,Y5V,1608 1 S.N.A
....4 C5006 2203-000189 C-CER,CHIP;100nF,+80-20%,25V,Y5V,1608 1 S.N.A
....4 C5007 2203-000189 C-CER,CHIP;100nF,+80-20%,25V,Y5V,1608 1 S.N.A
....4 C5008 2203-000189 C-CER,CHIP;100nF,+80-20%,25V,Y5V,1608 1 S.N.A
....4 C5011 2203-000189 C-CER,CHIP;100nF,+80-20%,25V,Y5V,1608 1 S.N.A
....4 C5016 2203-000189 C-CER,CHIP;100nF,+80-20%,25V,Y5V,1608 1 S.N.A
....4 C5018 2203-000189 C-CER,CHIP;100nF,+80-20%,25V,Y5V,1608 1 S.N.A
....4 C5019 2203-000189 C-CER,CHIP;100nF,+80-20%,25V,Y5V,1608 1 S.N.A
....4 C5021 2203-000189 C-CER,CHIP;100nF,+80-20%,25V,Y5V,1608 1 S.N.A
....4 C5022 2203-000189 C-CER,CHIP;100nF,+80-20%,25V,Y5V,1608 1 S.N.A
....4 C5023 2203-000189 C-CER,CHIP;100nF,+80-20%,25V,Y5V,1608 1 S.N.A
....4 C5024 2203-000189 C-CER,CHIP;100nF,+80-20%,25V,Y5V,1608 1 S.N.A
....4 C5026 2203-000189 C-CER,CHIP;100nF,+80-20%,25V,Y5V,1608 1 S.N.A
....4 C5027 2203-000189 C-CER,CHIP;100nF,+80-20%,25V,Y5V,1608 1 S.N.A
....4 C5029 2203-000189 C-CER,CHIP;100nF,+80-20%,25V,Y5V,1608 1 S.N.A
....4 C5032 2203-000189 C-CER,CHIP;100nF,+80-20%,25V,Y5V,1608 1 S.N.A
....4 C5033 2203-000189 C-CER,CHIP;100nF,+80-20%,25V,Y5V,1608 1 S.N.A
....4 C5035 2203-000189 C-CER,CHIP;100nF,+80-20%,25V,Y5V,1608 1 S.N.A
....4 C5036 2203-000189
....4 C5037 2203-000189 C-CER,CHIP;100nF,+80-20%,25V,Y5V,1608 1 S.N.A
....4 C5042 2203-000189 C-CER,CHIP;100nF,+80-20%,25V,Y5V,1608 1 S.N.A
....4 C5044 2203-000189 C-CER,CHIP;100nF,+80-20%,25V,Y5V,1608 1 S.N.A
....4 C5048 2203-000189 C-CER,CHIP;100nF,+80-20%,25V,Y5V,1608 1 S.N.A
....4 C5049 2203-000189 C-CER,CHIP;100nF,+80-20%,25V,Y5V,1608 1 S.N.A
....4 C5050 2203-000189 C-CER,CHIP;100nF,+80-20%,25V,Y5V,1608 1 S.N.A
....4 C5051 2203-000189 C-CER,CHIP;100nF,+80-20%,25V,Y5V,1608 1 S.N.A
C3251 2203-000189 C-CER,CHIP;100nF,+80-20%,25V,Y5V,1608 1 S.N.A
C-CER,CHIP;100nF,+80-20%,25V,Y5V,1608 1 S.N.A
Page 31

5-14
5. Exploded View & Part List
Level Location No. Code No. Description & Specication Q’ty SA/SNA Remark
....4 C5053 2203-000189 C-CER,CHIP;100nF,+80-20%,25V,Y5V,1608 1 S.N.A
....4 C5069 2203-000189 C-CER,CHIP;100nF,+80-20%,25V,Y5V,1608 1 S.N.A
....4 C5071 2203-000189 C-CER,CHIP;100nF,+80-20%,25V,Y5V,1608 1 S.N.A
....4 C5072 2203-000189 C-CER,CHIP;100nF,+80-20%,25V,Y5V,1608 1 S.N.A
....4 C5073 2203-000189 C-CER,CHIP;100nF,+80-20%,25V,Y5V,1608 1 S.N.A
....4 C5074 2203-000189 C-CER,CHIP;100nF,+80-20%,25V,Y5V,1608 1 S.N.A
....4 C5075 2203-000189 C-CER,CHIP;100nF,+80-20%,25V,Y5V,1608 1 S.N.A
....4 C5076 2203-000189 C-CER,CHIP;100nF,+80-20%,25V,Y5V,1608 1 S.N.A
....4 C5081 2203-000189 C-CER,CHIP;100nF,+80-20%,25V,Y5V,1608 1 S.N.A
....4 C5089 2203-000189 C-CER,CHIP;100nF,+80-20%,25V,Y5V,1608 1 S.N.A
....4 C5098 2203-000189 C-CER,CHIP;100nF,+80-20%,25V,Y5V,1608 1 S.N.A
....4 C5111 2203-000189 C-CER,CHIP;100nF,+80-20%,25V,Y5V,1608 1 S.N.A
....4 C5112 2203-000189 C-CER,CHIP;100nF,+80-20%,25V,Y5V,1608 1 S.N.A
....4 C5115 2203-000189 C-CER,CHIP;100nF,+80-20%,25V,Y5V,1608 1 S.N.A
....4 C5200 2203-000189 C-CER,CHIP;100nF,+80-20%,25V,Y5V,1608 1 S.N.A
....4 C5208 2203-000189 C-CER,CHIP;100nF,+80-20%,25V,Y5V,1608 1 S.N.A
....4 C6016 2203-000189 C-CER,CHIP;100nF,+80-20%,25V,Y5V,1608 1 S.N.A
....4 C6024 2203-000189 C-CER,CHIP;100nF,+80-20%,25V,Y5V,1608 1 S.N.A
....4 C6025 2203-000189 C-CER,CHIP;100nF,+80-20%,25V,Y5V,1608 1 S.N.A
....4 C6026 2203-000189 C-CER,CHIP;100nF,+80-20%,25V,Y5V,1608 1 S.N.A
....4 C6027 2203-000189 C-CER,CHIP;100nF,+80-20%,25V,Y5V,1608 1 S.N.A
....4
....4 C6031 2203-000189 C-CER,CHIP;100nF,+80-20%,25V,Y5V,1608 1 S.N.A
....4 C6032 2203-000189 C-CER,CHIP;100nF,+80-20%,25V,Y5V,1608 1 S.N.A
....4 C6033 2203-000189 C-CER,CHIP;100nF,+80-20%,25V,Y5V,1608 1 S.N.A
....4 C6034 2203-000189 C-CER,CHIP;100nF,+80-20%,25V,Y5V,1608 1 S.N.A
....4 C6100 2203-000189 C-CER,CHIP;100nF,+80-20%,25V,Y5V,1608 1 S.N.A
....4 C9309 2203-000189 C-CER,CHIP;100nF,+80-20%,25V,Y5V,1608 1 S.N.A
....4 C9310 2203-000189 C-CER,CHIP;100nF,+80-20%,25V,Y5V,1608 1 S.N.A
....4 C9311 2203-000189 C-CER,CHIP;100nF,+80-20%,25V,Y5V,1608 1 S.N.A
....4 C9312 2203-000189 C-CER,CHIP;100nF,+80-20%,25V,Y5V,1608 1 S.N.A
....4 C9313 2203-000189 C-CER,CHIP;100nF,+80-20%,25V,Y5V,1608 1 S.N.A
....4 C9314 2203-000189 C-CER,CHIP;100nF,+80-20%,25V,Y5V,1608 1 S.N.A
....4 C9315 2203-000189 C-CER,CHIP;100nF,+80-20%,25V,Y5V,1608 1 S.N.A
....4 C9316 2203-000189 C-CER,CHIP;100nF,+80-20%,25V,Y5V,1608 1 S.N.A
....4 C9338 2203-000189 C-CER,CHIP;100nF,+80-20%,25V,Y5V,1608 1 S.N.A
....4 C3236 2203-000233 C-CER,CHIP;0.1nF,5%,50V,C0G,1005 1 S.A
....4 C2012 2203-000236 C-CER,CHIP;0.1nF,5%,50V,C0G,1608 1 S.N.A
....4 C2019 2203-000236 C-CER,CHIP;0.1nF,5%,50V,C0G,1608 1 S.N.A
....4 C3104 2203-000236 C-CER,CHIP;0.1nF,5%,50V,C0G,1608 1 S.N.A
....4 C3105 2203-000236 C-CER,CHIP;0.1nF,5%,50V,C0G,1608 1 S.N.A
....4 C4116 2203-000236 C-CER,CHIP;0.1nF,5%,50V,C0G,1608 1 S.N.A
....4 C4118 2203-000236 C-CER,CHIP;0.1nF,5%,50V,C0G,1608 1 S.N.A
....4 C6050 2203-000236
....4 C6051 2203-000236 C-CER,CHIP;0.1nF,5%,50V,C0G,1608 1 S.N.A
....4 C1012 2203-000257 C-CER,CHIP;10nF,10%,50V,X7R,TP,1608 1 S.A
....4 C1019 2203-000257 C-CER,CHIP;10nF,10%,50V,X7R,TP,1608 1 S.A
....4 C1020 2203-000257 C-CER,CHIP;10nF,10%,50V,X7R,TP,1608 1 S.A
....4 C1037 2203-000257 C-CER,CHIP;10nF,10%,50V,X7R,TP,1608 1 S.A
....4 C1061 2203-000257 C-CER,CHIP;10nF,10%,50V,X7R,TP,1608 1 S.A
....4 C1058 2203-000440 C-CER,CHIP;1nF,10%,50V,X7R,1608 1 S.A
C6029 2203-000189 C-CER,CHIP;100nF,+80-20%,25V,Y5V,1608 1 S.N.A
C-CER,CHIP;0.1nF,5%,50V,C0G,1608 1 S.N.A
Page 32

5-15
5. Exploded View & Part List
Level Location No. Code No. Description & Specication Q’ty SA/SNA Remark
....4 C2001 2203-000440 C-CER,CHIP;1nF,10%,50V,X7R,1608 1 S.A
....4 C2002 2203-000440 C-CER,CHIP;1nF,10%,50V,X7R,1608 1 S.A
....4 C2018 2203-000440 C-CER,CHIP;1nF,10%,50V,X7R,1608 1 S.A
....4 C2025 2203-000440 C-CER,CHIP;1nF,10%,50V,X7R,1608 1 S.A
....4 C2026 2203-000440 C-CER,CHIP;1nF,10%,50V,X7R,1608 1 S.A
....4 C2027 2203-000440 C-CER,CHIP;1nF,10%,50V,X7R,1608 1 S.A
....4 C2028 2203-000440 C-CER,CHIP;1nF,10%,50V,X7R,1608 1 S.A
....4 C2034 2203-000440 C-CER,CHIP;1nF,10%,50V,X7R,1608 1 S.A
....4 C2035 2203-000440 C-CER,CHIP;1nF,10%,50V,X7R,1608 1 S.A
....4 C2039 2203-000440 C-CER,CHIP;1nF,10%,50V,X7R,1608 1 S.A
....4 C2040 2203-000440 C-CER,CHIP;1nF,10%,50V,X7R,1608 1 S.A
....4 C2041 2203-000440 C-CER,CHIP;1nF,10%,50V,X7R,1608 1 S.A
....4 C2079 2203-000440 C-CER,CHIP;1nF,10%,50V,X7R,1608 1 S.A
....4 C3253 2203-000440 C-CER,CHIP;1nF,10%,50V,X7R,1608 1 S.A
....4 C5039 2203-000440 C-CER,CHIP;1nF,10%,50V,X7R,1608 1 S.A
....4 C5055 2203-000440 C-CER,CHIP;1nF,10%,50V,X7R,1608 1 S.A
....4 C5099 2203-000440 C-CER,CHIP;1nF,10%,50V,X7R,1608 1 S.A
....4 C6015 2203-000440 C-CER,CHIP;1nF,10%,50V,X7R,1608 1 S.A
....4 C1017 2203-000491 C-CER,CHIP;2.2nF,10%,50V,X7R,1608 1 S.A
....4 C5091 2203-000491 C-CER,CHIP;2.2nF,10%,50V,X7R,1608 1 S.A
....4 C5094 2203-000491 C-CER,CHIP;2.2nF,10%,50V,X7R,1608 1 S.A
....4
....4 C5101 2203-000491 C-CER,CHIP;2.2nF,10%,50V,X7R,1608 1 S.A
....4 C3106 2203-000626 C-CER,CHIP;0.022nF,5%,50V,C0G,1608 1 S.N.A
....4 C5014 2203-000626 C-CER,CHIP;0.022nF,5%,50V,C0G,1608 1 S.N.A
....4 C5015 2203-000626 C-CER,CHIP;0.022nF,5%,50V,C0G,1608 1 S.N.A
....4 C3007 2203-000783 C-CER,CHIP;0.33nF,5%,50V,C0G,1608 1 S.A
....4 C3008 2203-000783 C-CER,CHIP;0.33nF,5%,50V,C0G,1608 1 S.A
....4 C2081 2203-000815 C-CER,CHIP;0.033nF,5%,50V,C0G,1608 1 S.A
....4 C2083 2203-000815 C-CER,CHIP;0.033nF,5%,50V,C0G,1608 1 S.A
....4 C4104 2203-000815 C-CER,CHIP;0.033nF,5%,50V,C0G,1608 1 S.A
....4 C4106 2203-000815 C-CER,CHIP;0.033nF,5%,50V,C0G,1608 1 S.A
....4 C4108 2203-000815 C-CER,CHIP;0.033nF,5%,50V,C0G,1608 1 S.A
....4 C1018 2203-000888 C-CER,CHIP;4.7nF,10%,50V,X7R,TP,1608 1 S.A
....4 C1056 2203-000888 C-CER,CHIP;4.7nF,10%,50V,X7R,TP,1608 1 S.A
....4 C5038 2203-000888 C-CER,CHIP;4.7nF,10%,50V,X7R,TP,1608 1 S.A
....4 C5040 2203-000888 C-CER,CHIP;4.7nF,10%,50V,X7R,TP,1608 1 S.A
....4 C5041 2203-000888 C-CER,CHIP;4.7nF,10%,50V,X7R,TP,1608 1 S.A
....4 C2033 2203-000925 C-CER,CHIP;470nF,+80-20%,50V,Y5V,2012 1 S.A
....4 C2080 2203-000925 C-CER,CHIP;470nF,+80-20%,50V,Y5V,2012 1 S.A
....4 C5056 2203-000975 C-CER,CHIP;47nF,10%,25V,X7R,TP,1608,- 1 S.N.A
....4 C5057 2203-000975 C-CER,CHIP;47nF,10%,25V,X7R,TP,1608,- 1 S.N.A
....4 C5060 2203-000975 C-CER,CHIP;47nF,10%,25V,X7R,TP,1608,- 1 S.N.A
....4 C5061 2203-000975
....4 C5062 2203-000975 C-CER,CHIP;47nF,10%,25V,X7R,TP,1608,- 1 S.N.A
....4 C5063 2203-000975 C-CER,CHIP;47nF,10%,25V,X7R,TP,1608,- 1 S.N.A
....4 C5065 2203-000975 C-CER,CHIP;47nF,10%,25V,X7R,TP,1608,- 1 S.N.A
....4 C5066 2203-000975 C-CER,CHIP;47nF,10%,25V,X7R,TP,1608,- 1 S.N.A
....4 C5067 2203-000975 C-CER,CHIP;47nF,10%,25V,X7R,TP,1608,- 1 S.N.A
....4 C5113 2203-000975 C-CER,CHIP;47nF,10%,25V,X7R,TP,1608,- 1 S.N.A
....4 C1016 2203-000979 C-CER,CHIP;47nF,10%,50V,X7R,TP,2012 1 S.N.A
C5100 2203-000491 C-CER,CHIP;2.2nF,10%,50V,X7R,1608 1 S.A
C-CER,CHIP;47nF,10%,25V,X7R,TP,1608,- 1 S.N.A
Page 33

5-16
5. Exploded View & Part List
Level Location No. Code No. Description & Specication Q’ty SA/SNA Remark
....4 C6014 2203-000998 C-CER,CHIP;0.047nF,5%,50V,C0G,1608 1 S.N.A
....4 C3009 2203-001052 C-CER,CHIP;0.56nF,10%,50V,X7R,TP,1608 1 S.N.A
....4 C3010 2203-001052 C-CER,CHIP;0.56nF,10%,50V,X7R,TP,1608 1 S.N.A
....4 C4122 2203-001052 C-CER,CHIP;0.56nF,10%,50V,X7R,TP,1608 1 S.N.A
....4 C4124 2203-001052 C-CER,CHIP;0.56nF,10%,50V,X7R,TP,1608 1 S.N.A
....4 C1011 2203-001607 C-CER,CHIP;0.22nF,5%,50V,NP0,1608 1 S.A
....4 C5000 2203-001630 C-CER,CHIP;330nF,+80-20%,16V,Y5V,1608 1 S.N.A
....4 C1063 2203-002398 C-CER,CHIP;22nF,10%,50V,X7R,1608 1 S.N.A
....4 C2006 2203-002398 C-CER,CHIP;22nF,10%,50V,X7R,1608 1 S.N.A
....4 C2008 2203-002398 C-CER,CHIP;22nF,10%,50V,X7R,1608 1 S.N.A
....4 C2010 2203-002398 C-CER,CHIP;22nF,10%,50V,X7R,1608 1 S.N.A
....4 C2024 2203-002398 C-CER,CHIP;22nF,10%,50V,X7R,1608 1 S.N.A
....4 C3239 2203-002525 C-CER,CHIP;0.56nF,10%,50V,X7R,TP,1005 1 S.N.A
....4 C3240 2203-002525 C-CER,CHIP;0.56nF,10%,50V,X7R,TP,1005 1 S.N.A
....4 C2090 2203-005005 C-CER,CHIP;100nF,10%,16V,X7R,1608 1 S.A
....4 C2091_22 2203-005005 C-CER,CHIP;100nF,10%,16V,X7R,1608 1 S.A
....4 C2160 2203-005005 C-CER,CHIP;100nF,10%,16V,X7R,1608 1 S.A
....4 C4009 2203-005005 C-CER,CHIP;100nF,10%,16V,X7R,1608 1 S.A
....4 C5090 2203-005005 C-CER,CHIP;100nF,10%,16V,X7R,1608 1 S.A
....4 C6006 2203-005005 C-CER,CHIP;100nF,10%,16V,X7R,1608 1 S.A
....4 C6019 2203-005005 C-CER,CHIP;100nF,10%,16V,X7R,1608 1 S.A
....4
....4 C1001_22 2203-005065 C-CER,CHIP;1000nF,+80-20%,10V,Y5V,1608 1 S.N.A
....4 C1022 2203-005065 C-CER,CHIP;1000nF,+80-20%,10V,Y5V,1608 1 S.N.A
....4 C1107 2203-005065 C-CER,CHIP;1000nF,+80-20%,10V,Y5V,1608 1 S.N.A
....4 C1114 2203-005065 C-CER,CHIP;1000nF,+80-20%,10V,Y5V,1608 1 S.N.A
....4 C2007 2203-005065 C-CER,CHIP;1000nF,+80-20%,10V,Y5V,1608 1 S.N.A
....4 C2009 2203-005065 C-CER,CHIP;1000nF,+80-20%,10V,Y5V,1608 1 S.N.A
....4 C2011 2203-005065 C-CER,CHIP;1000nF,+80-20%,10V,Y5V,1608 1 S.N.A
....4 C2023 2203-005065 C-CER,CHIP;1000nF,+80-20%,10V,Y5V,1608 1 S.N.A
....4 C2158 2203-005065 C-CER,CHIP;1000nF,+80-20%,10V,Y5V,1608 1 S.N.A
....4 C2159 2203-005065 C-CER,CHIP;1000nF,+80-20%,10V,Y5V,1608 1 S.N.A
....4 C5087 2203-005065 C-CER,CHIP;1000nF,+80-20%,10V,Y5V,1608 1 S.N.A
....4 C9346 2203-005065 C-CER,CHIP;1000nF,+80-20%,10V,Y5V,1608 1 S.N.A
....4 C9347 2203-005065 C-CER,CHIP;1000nF,+80-20%,10V,Y5V,1608 1 S.N.A
....4 C9354 2203-005065 C-CER,CHIP;1000nF,+80-20%,10V,Y5V,1608 1 S.N.A
....4 C9355 2203-005065 C-CER,CHIP;1000nF,+80-20%,10V,Y5V,1608 1 S.N.A
....4 C1002 2203-005249 C-CER,CHIP;100nF,10%,50V,X7R,TP,1608 1 S.N.A
....4 C1064 2203-005249 C-CER,CHIP;100nF,10%,50V,X7R,TP,1608 1 S.N.A
....4 C2029 2203-005249 C-CER,CHIP;100nF,10%,50V,X7R,TP,1608 1 S.N.A
....4 C2030 2203-005249 C-CER,CHIP;100nF,10%,50V,X7R,TP,1608 1 S.N.A
....4 C2031 2203-005249 C-CER,CHIP;100nF,10%,50V,X7R,TP,1608 1 S.N.A
....4 C2032 2203-005249 C-CER,CHIP;100nF,10%,50V,X7R,TP,1608 1 S.N.A
....4 C2075 2203-005249
....4 C2076 2203-005249 C-CER,CHIP;100nF,10%,50V,X7R,TP,1608 1 S.N.A
....4 C2077 2203-005249 C-CER,CHIP;100nF,10%,50V,X7R,TP,1608 1 S.N.A
....4 C2078 2203-005249 C-CER,CHIP;100nF,10%,50V,X7R,TP,1608 1 S.N.A
....4 C1073 2203-005384 C-CER,CHIP;4700nF,+80-20%,10V,Y5V,TP,201 1 S.N.A
....4 C1103 2203-005384 C-CER,CHIP;4700nF,+80-20%,10V,Y5V,TP,201 1 S.N.A
....4 C1123 2203-005384 C-CER,CHIP;4700nF,+80-20%,10V,Y5V,TP,201 1 S.N.A
....4 C1124 2203-005384 C-CER,CHIP;4700nF,+80-20%,10V,Y5V,TP,201 1 S.N.A
C6021 2203-005005 C-CER,CHIP;100nF,10%,16V,X7R,1608 1 S.A
C-CER,CHIP;100nF,10%,50V,X7R,TP,1608 1 S.N.A
Page 34

5-17
5. Exploded View & Part List
Level Location No. Code No. Description & Specication Q’ty SA/SNA Remark
....4 C5077 2203-005384 C-CER,CHIP;4700nF,+80-20%,10V,Y5V,TP,201 1 S.N.A
....4 C5078 2203-005384 C-CER,CHIP;4700nF,+80-20%,10V,Y5V,TP,201 1 S.N.A
....4 C5079 2203-005384 C-CER,CHIP;4700nF,+80-20%,10V,Y5V,TP,201 1 S.N.A
....4 C5080 2203-005384 C-CER,CHIP;4700nF,+80-20%,10V,Y5V,TP,201 1 S.N.A
....4 C5084 2203-005384 C-CER,CHIP;4700nF,+80-20%,10V,Y5V,TP,201 1 S.N.A
....4 C5085 2203-005384 C-CER,CHIP;4700nF,+80-20%,10V,Y5V,TP,201 1 S.N.A
....4 C5086 2203-005384 C-CER,CHIP;4700nF,+80-20%,10V,Y5V,TP,201 1 S.N.A
....4 C2154 2203-005533 C-CER,CHIP;1000nF,20%,6.3V,X7R,TP,1608 1 S.N.A
....4 C2155 2203-005533 C-CER,CHIP;1000nF,20%,6.3V,X7R,TP,1608 1 S.N.A
....4 C2044 2203-005809 C-CER,CHIP;1000nF,10%,16V,X7R,-,2012 1 S.A
....4 C5047 2203-005809 C-CER,CHIP;1000nF,10%,16V,X7R,-,2012 1 S.A
....4 C5207 2203-005809 C-CER,CHIP;1000nF,10%,16V,X7R,-,2012 1 S.A
....4 C1052 2203-005834 C-CER,CHIP;22000nF,+80-20%,10V,Y5V,3216 1 S.A
....4 C1053 2203-005834 C-CER,CHIP;22000nF,+80-20%,10V,Y5V,3216 1 S.A
....4 C1065 2203-005834 C-CER,CHIP;22000nF,+80-20%,10V,Y5V,3216 1 S.A
....4 C1066 2203-005834 C-CER,CHIP;22000nF,+80-20%,10V,Y5V,3216 1 S.A
....4 C2020 2203-006158 C-CER,CHIP;100nF,10%,16V,X7R,1005 1 S.N.A
....4 C2021 2203-006158 C-CER,CHIP;100nF,10%,16V,X7R,1005 1 S.N.A
....4 C1003 2203-006336 C-CER,CHIP;10000nF,10%,25V,X5R,3216 1 S.A
....4 C1007 2203-006336 C-CER,CHIP;10000nF,10%,25V,X5R,3216 1 S.A
....4 C1010 2203-006336 C-CER,CHIP;10000nF,10%,25V,X5R,3216 1 S.A
....4
....4 C1035 2203-006336 C-CER,CHIP;10000nF,10%,25V,X5R,3216 1 S.A
....4 C1036 2203-006336 C-CER,CHIP;10000nF,10%,25V,X5R,3216 1 S.A
....4 C1038 2203-006336 C-CER,CHIP;10000nF,10%,25V,X5R,3216 1 S.A
....4 C1039 2203-006336 C-CER,CHIP;10000nF,10%,25V,X5R,3216 1 S.A
....4 C1046 2203-006336 C-CER,CHIP;10000nF,10%,25V,X5R,3216 1 S.A
....4 C1048 2203-006336 C-CER,CHIP;10000nF,10%,25V,X5R,3216 1 S.A
....4 C1050 2203-006336 C-CER,CHIP;10000nF,10%,25V,X5R,3216 1 S.A
....4 C1051 2203-006336 C-CER,CHIP;10000nF,10%,25V,X5R,3216 1 S.A
....4 C1059 2203-006336 C-CER,CHIP;10000nF,10%,25V,X5R,3216 1 S.A
....4 C1068 2203-006336 C-CER,CHIP;10000nF,10%,25V,X5R,3216 1 S.A
....4 C2092 2203-006336 C-CER,CHIP;10000nF,10%,25V,X5R,3216 1 S.A
....4 C1075 2203-006361 C-CER,CHIP;10000nF,10%,10V,X5R,TP,2012 1 S.A
....4 C1104 2203-006361 C-CER,CHIP;10000nF,10%,10V,X5R,TP,2012 1 S.A
....4 C1109 2203-006361 C-CER,CHIP;10000nF,10%,10V,X5R,TP,2012 1 S.A
....4 C1110 2203-006361 C-CER,CHIP;10000nF,10%,10V,X5R,TP,2012 1 S.A
....4 C2016 2203-006361 C-CER,CHIP;10000nF,10%,10V,X5R,TP,2012 1 S.A
....4 C2017 2203-006361 C-CER,CHIP;10000nF,10%,10V,X5R,TP,2012 1 S.A
....4 C2042 2203-006361 C-CER,CHIP;10000nF,10%,10V,X5R,TP,2012 1 S.A
....4 C2161 2203-006361 C-CER,CHIP;10000nF,10%,10V,X5R,TP,2012 1 S.A
....4 C3001 2203-006361 C-CER,CHIP;10000nF,10%,10V,X5R,TP,2012 1 S.A
....4 C3019 2203-006361 C-CER,CHIP;10000nF,10%,10V,X5R,TP,2012 1 S.A
....4 C3250 2203-006361
....4 C4010 2203-006361 C-CER,CHIP;10000nF,10%,10V,X5R,TP,2012 1 S.A
....4 C5013 2203-006361 C-CER,CHIP;10000nF,10%,10V,X5R,TP,2012 1 S.A
....4 C5088 2203-006361 C-CER,CHIP;10000nF,10%,10V,X5R,TP,2012 1 S.A
....4 C9337 2203-006361 C-CER,CHIP;10000nF,10%,10V,X5R,TP,2012 1 S.A
....4 C1055 2203-006708 C-CER,CHIP;4700nF,+80-20%,10V,Y5V,1608 1 S.A
....4 C1057 2203-006708 C-CER,CHIP;4700nF,+80-20%,10V,Y5V,1608 1 S.A
....4 C1121 2203-006708 C-CER,CHIP;4700nF,+80-20%,10V,Y5V,1608 1 S.A
C1014 2203-006336 C-CER,CHIP;10000nF,10%,25V,X5R,3216 1 S.A
C-CER,CHIP;10000nF,10%,10V,X5R,TP,2012 1 S.A
Page 35

5-18
5. Exploded View & Part List
Level Location No. Code No. Description & Specication Q’ty SA/SNA Remark
....4 C1122 2203-006708 C-CER,CHIP;4700nF,+80-20%,10V,Y5V,1608 1 S.A
....4 C1004 2203-007176 C-CER,CHIP;10000nF,10%,16V,X5R,TP,2012 ( 1 S.N.A
....4 C1006 2203-007176 C-CER,CHIP;10000nF,10%,16V,X5R,TP,2012 ( 1 S.N.A
....4 C1008 2203-007176 C-CER,CHIP;10000nF,10%,16V,X5R,TP,2012 ( 1 S.N.A
....4 C1009 2203-007176 C-CER,CHIP;10000nF,10%,16V,X5R,TP,2012 ( 1 S.N.A
....4 C1013 2203-007176 C-CER,CHIP;10000nF,10%,16V,X5R,TP,2012 ( 1 S.N.A
....4 C1015 2203-007176 C-CER,CHIP;10000nF,10%,16V,X5R,TP,2012 ( 1 S.N.A
....4 C1049 2203-007176 C-CER,CHIP;10000nF,10%,16V,X5R,TP,2012 ( 1 S.N.A
....4 C5201 2203-007176 C-CER,CHIP;10000nF,10%,16V,X5R,TP,2012 ( 1 S.N.A
....4 C5202 2203-007176 C-CER,CHIP;10000nF,10%,16V,X5R,TP,2012 ( 1 S.N.A
....4 C5203 2203-007176 C-CER,CHIP;10000nF,10%,16V,X5R,TP,2012 ( 1 S.N.A
....4 C5204 2203-007176 C-CER,CHIP;10000nF,10%,16V,X5R,TP,2012 ( 1 S.N.A
....4 C5205 2203-007176 C-CER,CHIP;10000nF,10%,16V,X5R,TP,2012 ( 1 S.N.A
....4 C6003 2203-007176 C-CER,CHIP;10000nF,10%,16V,X5R,TP,2012 ( 1 S.N.A
....4 C6028 2203-007176 C-CER,CHIP;10000nF,10%,16V,X5R,TP,2012 ( 1 S.N.A
....4 C6049 2203-007176 C-CER,CHIP;10000nF,10%,16V,X5R,TP,2012 ( 1 S.N.A
....4 C6075 2203-007176 C-CER,CHIP;10000nF,10%,16V,X5R,TP,2012 ( 1 S.N.A
....4 C6001 2402-001216 C-AL,SMD;470uF,20%,16V,WT,TP,10.3x10.3x1 1 S.A
....4 C1021 2402-001238 C-AL,SMD;1uF,20%,50V,HR,TP,4.3x4.3x5.2mm 1 S.N.A
....4 C2003 2402-001273 C-AL,SMD;220uF,20%,35V,WT,REEL,10X10mm 1 S.A
....4 T0052 2703-000398 INDUCTOR-SMD;10uH,10%,3225 1 S.A
....4
....4 T0052 2703-000398 INDUCTOR-SMD;10uH,10%,3225 1 S.A
....4 T0052 2703-000398 INDUCTOR-SMD;10uH,10%,3225 1 S.A
....4 T0052 2703-000398 INDUCTOR-SMD;10uH,10%,3225 1 S.A
....4 T0052 2703-000417 INDUCTOR-SMD;220uH,5%,3225 1 S.A
....4 T0052 2703-001334 INDUCTOR-SMD;1.5uH,10%,2012 1 S.A
....4 T0052 2703-001426 INDUCTOR-SMD;680uH,20%,7070 1 S.A
....4 T0052 2703-001778 INDUCTOR-SMD;3.3uH,20%,3225 1 S.A
....4 T0052 2703-002722 INDUCTOR-SMD;22uH,20%,12x12mm 1 S.A
....4 T0052 2703-002916 INDUCTOR-SMD;10uH,20%,8080 1 S.A
....4 T0052 2703-003362 INDUCTOR-SMD;4.7uH,20%,7070 1 S.A
....4 L2001 2704-000018 INDUCTOR-SMD-ARRAY;15uH,2000mA,2,0.124oh 1 S.N.A
....4 L2002 2704-000018 INDUCTOR-SMD-ARRAY;15uH,2000mA,2,0.124oh 1 S.N.A
....4 X202 2801-003667 CRYSTAL-SMD;14.31818MHz,30ppm,28-AAN,16p 1 S.A
....4 F103 2901-001114 FILTER-EMI SMD;25VDC,2.0ADC,-,100nF,3.2x 1 S.A
....4 T0568 3301-001145 BEAD-SMD;60ohm,4516,TP,70ohm/45MHz,82ohm 1 S.N.A
....4 T0568 3301-001145 BEAD-SMD;60ohm,4516,TP,70ohm/45MHz,82ohm 1 S.N.A
....4 T0568 3301-001145 BEAD-SMD;60ohm,4516,TP,70ohm/45MHz,82ohm 1 S.N.A
....4 T0568 3301-001145 BEAD-SMD;60ohm,4516,TP,70ohm/45MHz,82ohm 1 S.N.A
....4 T0568 3301-001145 BEAD-SMD;60ohm,4516,TP,70ohm/45MHz,82ohm 1 S.N.A
....4 T0568 3301-001145 BEAD-SMD;60ohm,4516,TP,70ohm/45MHz,82ohm 1 S.N.A
....4 T0568 3301-001145 BEAD-SMD;60ohm,4516,TP,70ohm/45MHz,82ohm 1 S.N.A
....4 T0568 3301-001145
....4 T0568 3301-001145 BEAD-SMD;60ohm,4516,TP,70ohm/45MHz,82ohm 1 S.N.A
....4 T0568 3301-001145 BEAD-SMD;60ohm,4516,TP,70ohm/45MHz,82ohm 1 S.N.A
....4 T0568 3301-001145 BEAD-SMD;60ohm,4516,TP,70ohm/45MHz,82ohm 1 S.N.A
....4 T0568 3301-001145 BEAD-SMD;60ohm,4516,TP,70ohm/45MHz,82ohm 1 S.N.A
....4 T0568 3301-001145 BEAD-SMD;60ohm,4516,TP,70ohm/45MHz,82ohm 1 S.N.A
....4 T0568 3301-001145 BEAD-SMD;60ohm,4516,TP,70ohm/45MHz,82ohm 1 S.N.A
....4 T0568 3301-001324 BEAD-SMD;15ohm,2012,600mA,TP,,,0.1ohm 1 S.A
T0052 2703-000398 INDUCTOR-SMD;10uH,10%,3225 1 S.A
BEAD-SMD;60ohm,4516,TP,70ohm/45MHz,82ohm 1 S.N.A
Page 36

5-19
5. Exploded View & Part List
Level Location No. Code No. Description & Specication Q’ty SA/SNA Remark
....4 T0568 3301-001404 BEAD-SMD;30ohm,2012,TP,15.9OHM/30MHz 1 S.A
....4 T0568 3301-001404 BEAD-SMD;30ohm,2012,TP,15.9OHM/30MHz 1 S.A
....4 T0568 3301-001404 BEAD-SMD;30ohm,2012,TP,15.9OHM/30MHz 1 S.A
....4 T0568 3301-001404 BEAD-SMD;30ohm,2012,TP,15.9OHM/30MHz 1 S.A
....4 T0568 3301-001404 BEAD-SMD;30ohm,2012,TP,15.9OHM/30MHz 1 S.A
....4 T0568 3301-001404 BEAD-SMD;30ohm,2012,TP,15.9OHM/30MHz 1 S.A
....4 T0568 3301-001404 BEAD-SMD;30ohm,2012,TP,15.9OHM/30MHz 1 S.A
....4 T0568 3301-001404 BEAD-SMD;30ohm,2012,TP,15.9OHM/30MHz 1 S.A
....4 T0568 3301-001404 BEAD-SMD;30ohm,2012,TP,15.9OHM/30MHz 1 S.A
....4 T0568 3301-001404 BEAD-SMD;30ohm,2012,TP,15.9OHM/30MHz 1 S.A
....4 T0568 3301-001404 BEAD-SMD;30ohm,2012,TP,15.9OHM/30MHz 1 S.A
....4 T0568 3301-001404 BEAD-SMD;30ohm,2012,TP,15.9OHM/30MHz 1 S.A
....4 T0568 3301-001404 BEAD-SMD;30ohm,2012,TP,15.9OHM/30MHz 1 S.A
....4 T0568 3301-001404 BEAD-SMD;30ohm,2012,TP,15.9OHM/30MHz 1 S.A
....4 T0568 3301-001404 BEAD-SMD;30ohm,2012,TP,15.9OHM/30MHz 1 S.A
....4 T0568 3301-001793 BEAD-SMD;18ohm,1608,-,TP,11.8ohm/37.6MHz 1 S.A
....4 T0568 3301-001793 BEAD-SMD;18ohm,1608,-,TP,11.8ohm/37.6MHz 1 S.A
....4 T0568 3301-001793 BEAD-SMD;18ohm,1608,-,TP,11.8ohm/37.6MHz 1 S.A
....4 CN3001 3701-001367 CONNECTOR-HDMI;19P,2R,FEMALE,SMD,AU 1 S.A
....4 M0106 3708-001150 CONNECTOR-FPC/FFC/PIC;30P,1mm,SMD-A,SN,Y 1 S.A
....4 CN330 3711-005499 HEADER-BOARD TO CABLE;BOX,8P,1R,1.25mm,S 1 S.N.A
....4
....4 T0077 BN41-01068B PCB MAIN;T-MFM,FR-4,230*180,22 sound_imp 1 S.N.A
....4
.....5 IC115 1107-001709 IC-FLASH MEMORY;MX25L1605A,16Mbit,2Mx8,S 1 S.N.A
....4 T0087 1203-003060 IC-POSI.FIXED REG.;AP1084,TO-263,3P,9.97 1 S.A
....4 IC109 1205-003308 IC-LCD CONTROLLER;SEMP690-LF,LQFP,256P,2 1 S.A
....4 R2162 2007-000131 R-CHIP;91Kohm,5%,1/10W,TP,1608 1 S.A
....4 R2163 2007-000131 R-CHIP;91Kohm,5%,1/10W,TP,1608 1 S.A
....4 R3251 2007-000239 R-CHIP;1.5Kohm,1%,1/10W,TP,1608 1 S.N.A
....4 R1021 2007-000503 R-CHIP;2.2ohm,5%,1/10W,TP,1608 1 S.A
....4 R5034 2007-000821 R-CHIP;390ohm,1%,1/10W,TP,1608 1 S.N.A
....4 R6013 2007-007651 R-CHIP;9.1Kohm,1%,1/10W,TP,1608 1 S.A
....4 C9345 2203-001071 C-CER,CHIP;0.056nF,5%,50V,C0G,TP,1608 1 S.N.A
....4 X202 2801-000258 CRYSTAL-SMD;0.032768MHz,20ppm,SMD,12.5pF 1 S.N.A
...3 T0066 BP62-00047A HEAT SINK-ES;DLP,A6063S,T2.5,13,13,TAPE 1 S.N.A
...3 JA333 3722-002267 JACK-PIN;3P,AU,RED/WHT/YEL,ANGLE 1 S.A
...3 T0066 BP62-00017A HEAT SINK-ES;SP-50L2HX,A6063S,T2.0,26.2, 1 S.N.A
..2 M0214 BN96-07252B ASSY CABLE P-FLAT;LIME,Flat cable,100mm, 1 S.A
..2 M0006 BN96-08149G ASSY SHIELD P-COVER;LS20TD(ANALOG),SECC 1 S.N.A
...3 T0073 BH63-00008A GASKET-EMI;IB10LO,CONDUCTIVE FABRIC,3MM, 1 S.N.A
...3 M0131 BH63-00104A GASKET;POSEIDON,CONDUCTIVE FABRIC,2MM,10 4 S.N.A
...3 BN61-02429F STUD-PEM;PNB,M2.8,D7,L28,ZPC(SIL),SUM24L 1 S.N.A
...3 M0114 BN61-02500A
...3 BN61-03869A SPRING ETC-STAND;LS22AQ,SUS 304,T0.3,SIM 1 S.N.A
...3 BN61-03936A BRACKET-STAND FRAME;LS20TD,SECC,T 1.6 1 S.N.A
...3 M0107 BN63-04406H SHIELD-COVER;T200M ANALOG,SECC,T 0.8 1 S.N.A
...3 BN61-02429D STUD-PEM;PNB,M2.8,D7,L20,ZPC(SIL),SUM24L 2 S.N.A
..2 BN73-00024C SILICON/RUBBER-BERGQUIST;VENUS 32,40”,SI 1 S.N.A
CN330 3711-005503 HEADER-BOARD TO CABLE;BOX,9P,1R,2mm,SMD- 1 S.N.A
MAIN_
MICOM
BN97-02752A ASSY MICOM-MAIN;LS20TDSSU/ZB 1 S.N.A
HOLDER-WIRE;NYLON6.6,NATURAL 1 S.N.A
Page 37

5-20
5. Exploded View & Part List
Level Location No. Code No. Description & Specication Q’ty SA/SNA Remark
0.1 M0019 BN92-03362A ASSY LABEL;LS22TWHSUV/EN 1 S.N.A
0.1 M0113 BN92-03420B ASSY P/MATERIAL;LS20TDNSUV/ZA 1 S.N.A
..2 T0524 6902-000241 BAG PE;HDPE/NITRON,T0.5/T0.012,W600,L600 1 S.N.A
0.1 BN92-04035B ASSY ACCESSORY-STZ;LS22TDSSUMZD 1 S.N.A
..2 M0114 BN39-00244G CBF SIGNAL;D-sub cable,15P/15P,20276N,15 1 S.A
..2 M0027 BN96-07345B ASSY STAND P-BASE;LS22TW,ABS HB PMMA,RD0 1 S.A
...3 M0081 6003-000115 SCREW-TAPTITE;BH,+,B,M3,L6,ZPC(BLK),SWRC 4 S.N.A
...3 CIS4 BN61-01717A HOLDER-STAND;BIZET,NI PLT,CH,+,M4,L11(5) 1 S.N.A
...3 BN61-03907A BRACKET-STAND BOTTOM;T22W,SECC,T 0.8 1 S.N.A
...3 T0004 BN63-04390A COVER-STAND BASE;T220,PMMA+ABS,HB,RD02,H 1 S.N.A
...3 CCM1 BN63-02183K COVER-SHEET;Rhcm,PE Vinyl,T 0.05,250MM,2 0.3 S.N.A
...3 T0132 BN73-00077A RUBBER FOOT;MATISSE,BUMPON,Ф13.5,T2.0,6 4 S.N.A
..2 STD BN96-07347D ASSY STAND P-BODY;LS22TD,PMMA ABS HB, SM 1 S.A
...3 M0081 6003-000275 SCREW-TAPTITE;BH,+,-,B,M3,L10,ZPC(BLK),S 5 S.N.A
...3 BN63-04404A COVER-STAND FRONT;T200D / T22OD,PMMA+ABS 1 S.N.A
...3 BN63-04407A COVER-STAND REAR;T200D , T220D,PMMA+ABS, 1 S.N.A
...3 T0054 BN96-07341B ASSY HINGE P;LS22TW,SM50 T2.0 1 S.N.A
...3 CCM1 BN63-02183K COVER-SHEET;Rhcm,PE Vinyl,T 0.05,250MM,2 0.25 S.N.A
..2 BN96-09196A ASSY ACCESSORY-STZ;LS22TDSSUMZD 1 S.A
...3 T0524 6902-000110 BAG PE;LDPE,T0.05,W250,L400,TRP,28,2,-,9 1 S.N.A
...3 T0128 BN39-00061C CBF SIGNAL-STEREO;Mckinley,1,male,1.5m,B 1 S.A
...3 BN59-00804A S/W DRIVER-01,IB;T200M,T220M,S.America,S 1 S.N.A
...3
...3 BN68-00844A MANUAL FLYER-01, LEAFLET;LCD/CDT Leaet 1 S.N.A
...3 T0268 3903-000020 CBF-POWER CORD;DT,BR,BP3/YES,I(IEC320 C1 1 S.A
...3 M0114 BN61-03555A HOLDER-WIRE;MCKINLEY,ABS HB,BK26 1 S.N.A
...3 BN98-01071A ASSY K/D-REMOCON;BN59-00678A,CORAL,BRAZI 1 S.N.A
....4 M0014 BN94-01943A ASSY PCB MAIN;BN98-01071A 1 S.N.A
.....5 AA83-00266A CKD-HOLDER WIRE;URETHAN CLARITY 1 S.N.A
.....5 AA83-00321A CKD-RUBBER-KEY PAD;BN59-00678A 1 S.N.A
.....5 AA83-00322A CKD-B/SPRING COMMON;BN59-00678A 1 S.N.A
.....5 AA83-00325A CKD-BAG-PE;BN59-00678A 1 S.N.A
.....5 T0174 BN97-02333A ASSY SMD;BN98-01071A 1 S.N.A
......6 AA83-00256A CKD-IR-LED;Φ5.0 1 S.N.A
......6 AA83-00258A CKD-IC;GC46C501G0 1 S.N.A
......6 AA83-00259A CKD-CHIP-RESISTOR;RC2012J,0R0CS 1 S.N.A
......6 AA83-00260A CKD-CHIP-CAPACITOR;CL 21C 104ZBC NNNC 1 S.N.A
......6 AA83-00261A CKD-RESONATOR;ZTT3.64MG 1 S.N.A
......6 AA83-00262A CKD-ELE-CAPACITOR;SHL 16V 47uF 5.0Φ 1 S.N.A
......6 AA83-00310A CKD-PCB;BN59-00678A 1 S.N.A
......6 AA83-00323A CKD-B/SPRING - (+);BN59-00678A 1 S.N.A
......6 AA83-00324A CKD-B/SPRING - (-);BN59-00678A 1 S.N.A
.....5 T0501 AA63-01682A COVER-TOP;TM95,ABS +PMMA,HB,BLACK 1 S.A
.....5 T0531 AA63-01690A COVER-BOTTOM;TM95,ABS +PMMA,HB,BLACK 1 S.A
.....5 M0006 AA63-01687A COVER-REAR SUB;TM95,ABS +PMMA,HB,BLACK 1 S.N.A
.....5 T0603 AA64-04519A WINDOW-RMC;TM95,PC,HB,VIOLET 1 S.N.A
...3 BN68-01812A MANUAL FLYER-02,QSG;T200M,T220M,SyncMast 1 S.N.A
M9889 BN63-01798B CLOTH-CLEAN;cloth,180,200,sea blue,ToC 1 S.N.A
Page 38

5-21
5. Exploded View & Part List
Level Location No. Code No. Description & Specication Q’ty SA/SNA Remark
0.1 M0003 BN92-04235A ASSY BOX;LS20TDSSUMZD 1 S.N.A
..2 BN69-03094B BOX-SET;T200M,CB,A-01,SW-50,W547,D491,H1 1.02 S.N.A
Page 39

6. Wiring Diagram
PWM
13V
GND
GND
GND
5.1V
5.1V
A-Diming
ON/OFF
CN1001
GND
GND
NC
LED
IR
KEY1
KEY2
VCC
CN9002
SR
SR
SL
SL
CN2001
GND
Y
Y
GND
B
B
GND
R
R
CN4002
GND
SR
SL
SL
SL
SR
SR
JA3003
GND
RX
TX
TX
TX
RX
RX
JA3005
GND
SR
SL
GND
SL
SR
CN4001
SPDIF
Vcc
GND
OP401
Vcc
Vcc
Vcc
NC
NC
NC
GND
LVA3P
LVA3M
LVACKP
LVACKM
LVA2P
LVA2M
GND
LVA1P
LVA1M
GND
LVA0P
LVA0M
LVB3P
LVB3M
LVBCKP
LVBCKM
GND
LVB2P
LVB2M
LVB1P
LVB1M
LVB0P
LVB0M
CN5002
RX2-
RX2+
GND
NC
NC
SCL
SDA
NC
RX1-
RX1+
GND
NC
NC
DDC5V
Check HDMI
HDCP
RX0-
RX0+
GND
NC
NC
NC
RXC+
RXC-
CN9001
RX2+
GND
RX2-
RX1+
GND
RX1-
RX0+
GND
RX0-
RXC+
GND
RXC-
NC
NC
SCL
SDA
GND
DDC5V
Hotplug
CN3001
GND
GND
GND
SVHS_Y
SVHS_C
IDENT
GND
CN3005
GND
AV_SL_IN
AV_SR_IN
GND
AV_SR_IN
AV_SL_IN
GND
IDENT
AV_CVBS
CN3002
RED
GREEN
BLUE
GND
GND
GND
GND
GND
DDC5V
VSYNC
GND
SDA
H SYNC
V SYNC
SCL
CN3000
6-1. Wiring Diagram - Main Board
6. Wiring Diagram
6-1
Page 40

6-2
6. Wiring Diagram
6-2. Wiring Diagram - IP Board
IP board
3711-005503
LVDS Connector
(Connect to Panel)
3708-001150
3722-002275
3722-002267
RGB Connector
(PConnect to PC)
3701-001385
3701-001386
DVI-D Connector
(Connect to PC)
3701-001367
3722-001903
3722-002680
3722-001938
Page 41

6-3. Connector Functions
Connector Functions
6. Wiring Diagram
CN5002
CN3000
CN9001
CN3001
CN1001
CN4002
JA3003
OP4001
CN4001
Transmits LVDS signals from the Main board to the panel
* When a problem occurs: The Blank Screen and No Power errors may occur.
VGA signal input terminal
* When a problem occurs: The No RGB Output error may occur.
DVI signal input terminal
* When a problem occurs: The No DVI Output error may occur.
HDMI signal input terminal
* When a problem occurs: The No HDMI Output error may occur.
Supplies 5V and 13V from the Power board to the Main board. Receives and transmits the
PWM output to the Inverter.
* When a problem occurs: The Blank Screen and No Power errors may occur.
Component input terminal.
* When a problem occurs: The No Component Video Input error may occur.
PC Audio input terminal.
* When a problem occurs: The No PC Sound Output error may occur.
Digital Audio output terminal.
* When a problem occurs: The No Digital Audio Operating error may occur.
Component Audio input terminal.
* When a problem occurs: The No Component Sound Output error may occur.
CN2003 Headphone output terminal.
6-4. Cables
Use LVDS 30P FFC cable
Code 20” : BN96-07252B 22” : BN96-07252D
Photo
6-3
Page 42

6. Wiring Diagram
Memo
6-4
Page 43

4. Troubleshooting
4. Troubleshooting
4-1. First Checklist for Troubleshooting
Check the various cable connections rst.
1.
- Check to see if there is a burnt or damaged cable.
- Check to see if there is a disconnected cable connection or a connection is too loose.
- Check to see if the cables are connected according to the connection diagram.
Check the power input to the Main Board.
2.
Check the following circuits.
3.
• No raster appears: Function PBA, Main PBA, I/P PBA
• 55V develop but no screen: Main PBA
• 5V does not develop: I/P PBA
Check the voltage in and out between the IP↔ Main Board, between the IP↔ Panel, and between the Main LVDS
4.
Boards.
4-1
Page 44

4. Troubleshooting
4-2. No Power
Symptom Though the power swtich on, the LED power off and the screen is blank.-
-
Major
checkpoints
-
-
-
Check Power cable.
Check whether the Lamp connector is connected correctly to the IP.
Check whether the power cable is connected correctly to the MAIN.
Check whether the Function cable is connected correctly to the MAIN.
IC1013
IC1005
Main Board Front
Diagnostics
Caution Make sure to disconnect the power before working on the IP board.
Does Power indicator LED Off ?
Yes
Does proper DC 14.5V appear
at C1002.
Yes
Does proper DC5V appear
at C1004?
Yes
Does proper DC3.3V, 1.2v appear
at 1112, C1052?
Yes
A power is supplied to set?
No
No
No
No
No
Check a connection a
power cable.
Change a Assy PCB Power.
Change a Assy PCB Power.
Check IC1013, IC1005.
Change a main PBA.
Check a other function.(No picture
part) Replace a lcd panel.
4-2
Page 45

4-2-1. Circuit diagrams when the power does not turn on
4. Troubleshooting
4-3
Page 46

4. Troubleshooting
4-3. No Video (Analog PC)
Symptom Though the LED power turns on, the screen is blank when connecting the VGA cable.-
Even though the LED power turns on, the screen is blank when connecting the VGA cable.
-
Check the D-sub cable connections.
Major
checkpoints
-
Check whether the LVDS cable is connected correctly to the panel.
-
Check whether the lamp connector of the panel is connected correctly to the IP board.
-
RA5008~
RA5012
IC5002
Main Board Front
Diagnostics
Caution Make sure to disconnect the power before working on the IP board.
Power Indicator is off.
Lamp on, no video.
Yes
Check a PC source and check
the connection of DSUB cable?
Yes
① Does the sigmal appear at
R3020, R3021,R3022?
Yes
Does the digital data appear at the
output of RA5008~RA5012?
Yes
Check a LVDS cable?
Replace a lcd panel?
No
No
No
No
Please, Call to Samsung Co. LTD.
Input a analog PC signal and
connected cable(DPMS).
PC cable. Change a PC
cable. Change a main PCB ass’y.
Check IC5002.
Change a main PBA.
4-4
Page 47

4. Troubleshooting
4-3-1. Circuit diagrams and waveforms (Analog) when no screen is displayed
on the monitor
4-5
Page 48

4. Troubleshooting
4-3-2. Waveforms when no screen is displayed (Analog PC)
①
R,G,B Output Signal of IC5002
4-6
Page 49

4-4. No Video (Digital-HDMI)
4. Troubleshooting
Symptom
Major
checkpoints
The LED power turns on but the screen is blank when the DVI cable or HDMI cable is connected.
-
Even though the LED power turns on, the screen is blank when connecting the DVI cable or
-
HDMI cable.
Check the DVI cable or HDMI cable connections.
-
Check whether the LVDS cable is connected correctly to the panel.
-
Check whether the lamp connector of the panel is connected correctly to the IP board.
-
IC5002
Main Board Front
Diagnostics
Caution Make sure to disconnect the power before working on the IP board.
Power Indicator is off.
Lamp on, no video.
Yes
Check the connection
of HDMI cable?
Yes
② Does the digital data appear
at D3006~D3013 ( HDMI1)?
Yes
Does the digital data appear at
output of IC5002?
Yes
Check a LVDS cable?
Replace lcd panel?
No
No
No
No
Input a HDMI cable.
Check HDMI cable.
Change the cable.
Check the IC5002.
Change a main PBA.
Please, Call to Samsung Co. LTD.
4-7
Page 50

4. Troubleshooting
4-4-1. Circuit diagrams and waveforms (Digital-HDMI) when no screen is
displayed on the monitor
4-8
Page 51

4-4-2. Waveforms when a blank screen is displayed (Digital-HDMI)
4. Troubleshooting
Digital Output Data of IC3250
②
Signal of HDMI(Data)
③
4-9
Page 52

4. Troubleshooting
4-5. No Picture (Tuner_CVBS)
Symptom The LED power turns on but the screen is blank when the RF cable is connected.-
Even though the LED power turns on, the screen is blank when connecting the RF cable.
-
Check the RF cable connections.
Major
checkpoints
-
Check whether the LVDS cable is connected correctly to the panel.
-
Check whether the lamp connector of the panel is connected correctly to the IP board.
-
IC5002
TU6001
Main Board Front
Diagnostics
Caution Make sure to disconnect the power before working on the IP board.
Power Indicator is off.
Lamp on, no picure.
Yes
④ Does the signal appear at
L6001?
Yes
④ Does the signal appear at #9
of TU6001?
Yes
③ Does the digital data appear
at output of RA5008 ~RA5012?
Yes
Check a LVDS cable?
Replacea lcd panel?
No
No
No
No
No
Connect the RF cable and
check RF signal.
Check the Tuner Vcc 5V.
Change a main PBA.
Change a main PCB ass’y.
Check a IC5002.
Change a main PCB ass’y.
Please, Call to Samsung Co. LTD.
4-10
Page 53

4. Troubleshooting
4-5-1. Circuit diagrams and waveforms (Tuner_CVBS) when no screen is
displayed on the monitor
4-11
Page 54

4. Troubleshooting
4-5-2. Waveforms when a blank screen is displayed (Tuner_CVBS)
CVBS Output Signal
③
Tuner_CVBS Output Signal
④
4-12
Page 55

4-6. No Picture (AV)
Symptom The LED power turns on but the screen is blank when the Antenna Cable is connected.-
Even though the LED power turns on, the screen is blank when connecting the Antenna Cable.
-
Check the Antenna Cable connections.
Major
checkpoints
-
Check whether the LVDS cable is connected correctly to the panel.
-
Check whether the lamp connector of the panel is connected correctly to the IP board.
-
4. Troubleshooting
Diagnostics
Power Indicator is off.
Lamp on, No signal image.
Yes
④ Does the AV signal appear at
#52pin of IC5002?
Yes
Check a LVDS cable?
Replace lcd panel?
Caution Make sure to disconnect the power before working on the IP board.
Main Board Front
No
No
No
check antenna cable
check antenna cable
Change a main PBA
Please, Call to Samsung Co. LTD.
4-13
Page 56

4. Troubleshooting
4-6-1. Circuit diagrams and waveforms (AV) when no screen is displayed on
the monitor
4-14
Page 57

4-6-2. Waveforms when a blank screen is displayed (AV)
CVBS Output Signal
④
4. Troubleshooting
4-15
Page 58

4. Troubleshooting
4-7. No Picture (S-VIDEO)
Symptom The LED power turns on but the screen is blank when the Antenna Cable is connected.-
Even though the LED power turns on, the screen is blank when connecting the Antenna Cable.
-
Check the Antenna Cable connections.
Major
checkpoints
-
Check whether the LVDS cable is connected correctly to the panel.
-
Check whether the lamp connector of the panel is connected correctly to the IP board.
-
Diagnostics
Power Indicator is off.
Lamp on, No signal image.
Yes
④ Does the S-VIDEO signal
appear at #50, 51 pin of IC5002?
Yes
Check a LVDS cable?
Replace lcd panel?
Caution Make sure to disconnect the power before working on the IP board.
Main Board Front
No
No
No
check antenna cable
check antenna cable
Change a main PBA
Please, Call to Samsung Co. LTD.
4-16
Page 59

4. Troubleshooting
4-7-1. Circuit diagrams and waveforms (S-VIDEO) when no screen is displayed
on the monitor
4-17
Page 60

4. Troubleshooting
4-7-2. Waveforms when a blank screen is displayed (S-VIDEO)
CVBS Output Signal
④
4-18
Page 61

4-8. No Picture (Component)
Symptom The LED power turns on but the screen is blank when the Antenna Cable is connected.-
Even though the LED power turns on, the screen is blank when connecting the Antenna Cable.
-
Check the Ant enna Cable connections.
Major
checkpoints
-
Check whether the LVDS cable is connected correctly to the panel.
-
Check whether the lamp connector of the panel is connected correctly to the IP board.
-
4. Troubleshooting
Diagnostics
Power Indicator is off.
Lamp on, No signal image.
Yes
④ Does the Component signal
appear at #44, 46, 47 pin of
IC5002?
Yes
Check a LVDS cable?
Replace lcd panel?
Caution Make sure to disconnect the power before working on the IP board.
Main Board Front
No
No
No
check antenna cable
check antenna cable
Change a main PBA
Please, Call to Samsung Co. LTD.
4-19
Page 62

4. Troubleshooting
4-8-1. Circuit diagrams and waveforms (Component) when no screen is
displayed on the monitor
4-20
Page 63

4-8-2. Waveforms when a blank screen is displayed (Component)
CVBS Output Signal
④
4. Troubleshooting
4-21
Page 64

4. Troubleshooting
4-9. No Sound
Symptom The LED power turns on but the screen is blank when the DVI cable is connected.-
-
Major
checkpoints
-
-
-
Even though the LED power turns on, the screen is blank when connecting the DVI cable.
Check the DVI cable connections.
Check whether the LVDS cable is connected correctly to the panel.
Check whether the lamp connector of the panel is connected correctly to the IP board.
Diagnostics
IC5002
Picture is display, no sound.
Yes
⑥
Does the signal appear at Pin
#71,72,73,74,76,77,78,79 of IC5002?
Yes
Check the 3.3V of #25 IC2005.
Yes
Main Board Front
No
No
No
IC2005
Connect a sound cable.
control a volume.
Check a connection harness.
check IC2003.
Change a main PBA.
⑦
check output signal of
#36,37,31,30,54,53,48,47 of IC2005
Yes
Replace the speaker ass’y?
Caution Make sure to disconnect the power before working on the IP board.
No
4-22
check IC2005.
Page 65

4. Troubleshooting
21
R5009
2
1
R5013_DE
21R5015_DE
2
1
R5014_DE
8
6
4
2
7
5
3
1
RA5030
8
6
4
2
7
531
RA5029
2
1C5077
864
2
753
1
RA5028
2
1
R5067
21R5074
21R5081
2
1
C5084
2
1
C5079
21C5101
2
1
R5068
21C5100
21R5076
2 1
C5088
21
C5083
2
1C5082
21
C5078
8
6
4
2
7
5
3
1
RA5033_DE
8
6
4
2
7
5
3
1
RA5032
21
C508621C5087
2
1C5081
99
98
97
96
95
94
93
92
919089
88
87
86
85
84
83
82
818079
78
77
76
75
74
73
72
717069
68
67
66
65
64
63
62
61
60
59
58
57
119
118
117
116
115
114
113
112
111
110
109
108
107
106
105
104
103
102
101
100
21C5091
2
1
R5065
21C5094
21R5078
21
C5089
2
1C5085
2
1C5080
SW_POWER
IDENT_HP
IDENT_DVI
IDENT_HDMI2
SEL1_HDMI
1/16W
10KOHM
100OHM
100OHM
100OHM
100OHM
100OHM
50V2.2NF
100OHM
100NF 25V
1UF 10V
4.7UF 10V
10KOHM
1/16W
10V4.7UF
4.7UF 10V
10V4.7UF
10V10UF
1/10W
22KOHM
50V2.2NF
100OHM
2.2NF 50V
4.7UF 10V
4.7UF 10V
22KOHM 1/10W
1/10W22KOHM
100OHM
100OHM
4.7UF 10V
A3.3V
A3.3V_AU
FGND
VDDC
A3.3V_VDDP
10V4.7UF
4.7UF 10V
100NF 25V
1/10W22KOHM
A3.3V_ADC
FGND
151413
121110
9
8
7
6
5
4
50V
2.2NF
FGND
A3.3V_SIF
1/10W0OHM
SC_SR_IN
SC_SL_IN
MDATA<4>
SC_SR_OUT2
SC_SL_OUT2
COMP_SR_IN
COMP_SL_IN
DTV_AUDIO_R
DTV_AUDIO_L
PC_SR_IN
MDATA<9>
MDATA<6>
MDATA<5>
MDATA<7>
MDATA<8>
MDATA<10>
MDATA<11>
MDATA<12>
MDATA<13>
MDATA<14>
MDATA<15>
DQS1
PC_SL_IN
MDATA(0:15)
IDENT_PC
IDENT_SIDE_SVHS
IDENT_COMP
IDENT_HDMI1
HP_OUT_L1
HP_OUT_R1
MDATA(0:15)
AVDD_SIF
SIF0P
GND
CVBSOUT0
CVBSOUT1
AVDD_ADC
VCOM0
SIF1P
GND
AUVREADN
AUVRADP
AUVREF
AVDD_AU
AUL0
AUR0
AUL1
AUR1
AUCOM
AUL2
AUR2
AUL3
AUR3
AUMONO
AUOUTL3
AUOUTR3
AUOUTL2
AUOUTR2
AUOUTL1
AUOUTR1
AUOUTL0
AUOUTR0
GPIOF[0]
GPIOF[1]
GPIOF[2]
GPIOF[3]
GPIOF[4]
GPIOF[5]
GPIOF[6]
GPIOF[7]
GPIOF[9]
VDDP
GND
VDDC
DQS[1]
MDATA[15]
MDATA[14]
GND
MDATA[13]
MDATA[12]
VDDM
MDATA[11]
MDATA[10]
MDATA[9]
MDATA[8]
GND
VDDM
MDATA[7]
MDATA[6]
MDATA[5]
MDATA[4]
VDDM
SIFM
GPIOF[8]
CLOSE TO IC
CHASSIS GND
CLOSE TO IC
CLOSE TO IC
SPK_OUT
SPK_R
SPK_L
CHASSIS GND
CLOSE TO IC
CLOSE TO IC
CLOSE TO IC
CLOSE TO IC
1
SPK_R+
1
SPK_R-
1
SPK_L+
1
SPK_L-
4
3
2
1
CN2001
21
BD2006
21
BD2005
2
1
C2042
21
R2015
21
R2014
21
C2018
21
C2019
21
R2016
2
1
C2015
2
1
C2016
2 1
C2014
21
R2017
2
1
C2017
21
C2013
21
C2012
2 1
C2011
2 1
D2006
21
C2008
2 1
C2004
2 1
C2003
21
BD2001
2 1 C2005
2 1
D2007
21
C200221R2003
4
3 2
1
L2001
21
C200121R2002
21
C203921R2006
2 1
C2076
2
1
C2078
2 1
R2005
21
C2041
21
BD2003
21
C2079
2 1
C2080
21
R2001
2 1
C2075
2
1
C2077
2
1
R2004
21
C2040
21
BD2002
21
C2006
21
C2007
2 1
C2009
2
1
C2010
2 1
C2038
2 1
BD2004
2
1
D2008
21
C2036
21
C203521R200821C203421R2007
2 1
C2029
2 1
R2010
2 1
C2031
2 1
C2030
2 1
R2009
21
BD2008
21
C2027
21
C2028
21
BD2007
2 1
C2082
21
C2083
2
1
C2081
21
C2043
21
C2023
2 1
D2009
MGND1
9
8
7
6
56
55
545352
51
50
5
49
4847464544
43
42
41
40
4 39
38
37
36
35
34
33
32
31
30
3
29
282726
25
24
23
22
21
20
2
19
18
171615
14
13
12
11
10
1
IC2005
21
C2024
2 1
R2013
21
C202521R201221C202621R2011
21
C2037
4
3 2
1
L2002
2
1
C2033
2 1
C2032
100NF 50V
50V
470NF
DDA-0808
100NF 25V
4.7OHM 1/10W1NF 50V4.7OHM 1/10W1NF 50V
1/10W0OHM
50V22NF
NTP-3000
75V
LL4148
10V1UF
25V100NF
33PF 50V
33PF 50V
B1.8V_AMP
25V
100NF
BEAD_CHIP
1NF
50V50V1NF
BEAD_CHIP
4.7KOHM
1/10W
100NF 50V
100NF 50V
4.7KOHM
1/10W
100NF 50V
4.7OHM
1/10W
1NF 50V
1/10W
4.7OHM
1NF 50V
25V100NF
75V
LL4148
BEAD_CHIP
220UF
35V
22NF 50V
10V1UF
1UF 10V
22NF 50V
BEAD_CHIP
50V1NF
1/10W
4.7KOHM
50V
100NF
50V100NF
4.7OHM 1/10W
50V470NF
50V1NF
BEAD_CHIP
50V1NF
50V
100NF
100NF 50V
B12VS
1/10W4.7OHM1NF 50V
4.7OHM 1/10W1NF 50V
DDA-0808
1/10W
4.7OHM50V1NF
75V
LL4148
25V
100NF
BEAD_CHIP
B12VS
35V
220UF
100NF 25V
B3.3VD
22NF 50V
75V
LL4148
10V1UF
100PF 50V
25V100NF
100OHM 1/10W
25V100NF
AVDD_PLL
10UF 10V
DVDD_PLL
1/10W3.3KOHM
100PF 50V
1NF 50V
1/10W100OHM
1KOHM 1/10W
B1.8V_AMP
AVDD_PLL
10UF 10V
DVDD_PLL
BEAD_CHIP
BEAD_CHIP
FGND
FGND
FGND
FGND
FGND
FGND
FGND
FGND
FGND
FGND
FGND
FGND
FGND
CN_S_004
AMP_MUTE
AUSD
AUWS
AUSCK
AMP_RESET
AUMCKO
SDA1
SCL1
SPK_R
SPK_R_
SPK_L
SPK_L_
SPK_L
SPK_L_
SPK_R
SPK_R_
4.7KOHM
1/10W
25V
100NF
10UF10V
CLK_
CLK_
VSS_
AD
/RESET
VDR1A
BST1A
PGND1A
PGND1A
OUT1A
OUT1A
PVDD1A
PVDD1A
PVDD1B
PVDD1B
OUT1B
OUT1B
PGND1B
PGND1B
BST1B
VDR1B
NC
VDR2A
BST2A
PGND2A
PGND2A
OUT2A
OUT2A
PVDD2A
PVDD2A
PVDD2B
PVDD2B
OUT2B
OUT2B
PGND2B
PGND2B
BST2B
VDR2B
SOFT_RESET_2
PWM_MASK_2
AUX_PWM3A
AUX_PWM3B
SCL
SDA
BCK
WCK
SDATA
DVDD
DVSS
TEST0
DVDDPLL
AVDDPLL
LFM
AGNDPLL
DGNDPLL
VDD_
4-9-1. Circuit diagrams and waveforms (No Sound) when no screen is
displayed on the monitor
4-23
Page 66

4. Troubleshooting
4-9-1. Waveforms when a blank screen is displayed (No Sound)
The Signal are Inputed to IC5002
⑥
DC 3.3V
⑦
4-24
Page 67

4-10. Faults and Corrective Actions
Fault Photo Symptoms and Corrective Actions Remarks
Symptoms: DVI signals are not recognized.
Causes: This fault occurs when the PC does not
recognize the mode information because
the DVI DDC has not been input to the
monitor.
Corrective Actions: Input the DVI DDC to the monitor.
* Refer to the Training Manual for
information on inputting the DVI DDC.
4. Troubleshooting
Symptoms: When the monitor is turned on,
only a full white pattern is displayed
continually regardless of the signals.
Causes: This fault occurs when only the lamp
power is supplied and no video signals are
input to the panel due to a fault or incorrect
connections of the LVDS cable.
Corrective Actions: Replace or reconnect the LVDS
cable correctly so that video
signals can be supplied to the
panel.
Symptoms: When connecting the DVD, noise
occurs on the screen.
Causes: The HDCP key is not inserted.
Corrective Actions: Enter the HDCP key.
(See page 4-17.)
* A full white pattern is a feature of the
TN panel and is displayed when no
video signals are supplied.
4-25
Page 68

4. Troubleshooting
4-11. Adjustment
4-11-1. Service Instruction
1. Usually, a color TV-VCR needs only slight touch-up adjustment upon installation.
Check the basic characteristics such as height, horizontal and vertical sync.
2. Use the specied test equipment or its equivalent.
3. Correct impedance matching is essential.
4. Avoid overload. Excessive signal from a sweep generator might overload the front-end
of the TV. When inserting signal markers, do not allow the marker generator to distort test result.
5. Connect the TV only to an AC power source with voltage and frequency as specied on the backcover nameplate.
6. Do not attempt to connect or disconnect any wire while the TV is turned on. Make sure that the power cord is
disconnected before replacing any parts.
7. To protect aganist shock hazard, use an isolation transform.
4-12. How to Access Service Mode
4-12-1. Entering Factory Mode
2. To enter “Service Mode” Press the remote -control keys in this sequence :
- If you do not have Factory remote - control
MUTEPower OFF 1 8 Power ON2
- If you have Factory remote - control
PICTURE ON
- The buttons are active in the service mode.
1. Remote - Control Key : Power, Arrow Up, Arrow Down, Arrow Left
Arrow Right, Menu, Enter, Number Key(0~9)
2. Function - Control Key : Power, CH +, CH -, VOL +, VOL -, Menu, TV/VIDEO(Enter)
INFO FACTORY
4-26
Page 69

4-13. Service Adjustment
4-13-1. White Balance - Calibration
If picture color is wrong, do calibration rst.
Equipment : CA210, Patten : chess pattern
Execute calibration in Factory Mode
Source PC : 1024*768/60Hz
(Gray patten)
4. Troubleshooting
4-13-2. White Balance - Adjustment
If picture color is wrong, check White Balance condition.
Equipment : CA210, Patten : Toshiba
Adjust W/B in Factory Mode
Sub brightness and R/G/B Offset controls low light region
Sub contrast and R/G/B Gain controls high light region
Source AV : PAL composite, Component : 1280*720/60Hz
HDMI[DVI] : 1280*720/60Hz
[ Test Pattern : MSPG-945 Series Pattern #16 ]
*Color temperature
1500K +/-500, -6 ~-20 MPCD
*Color coordinate
H/L : 272/278 +/- 2 35.0 Ft +/- 2.0Ft
L/L : 272/278 +/- 3 1.5 Ft +/- 0.2Ft
Toshiba Patten
4-13-3. Conditions for Measurement
1. On the basis of toshiba ABL pattern : High Light level (57 IRE)
- INPUT SIGNAL GENERATOR : MSPG-925LTH
* Mode NO 2 : 744X484@60 Hz
NO 6 : 1280X720@60 Hz
NO 21 : 1024X768@60 Hz
* Pattern NO 36 : 16 Color Pattern
NO 16 : Toshiba ABL Pattern
2. Optical measuring device : CA210 (FL)
Please use the MSPG-925 LTH generator for model LE26M51B/LE32M51B/LE40M51B/LE46M51B.
4-27
Page 70

4. Troubleshooting
4-13-4. Method of Adjustment
1. Adjust the white balance of AV, Component Modes.
(AV→Component)
a) Set the input to the mode in which the adjustment will be made.
(RF→DTV→PC→DVI).
* Input signal - VIDEO Mode : Model #2 (744*484 Mode), Pattern #16
- DTV,DVI Mode : Model #6 (1280*720 Mode), Pattern #16
- HDMI Mode: Model #6(1280*720 Mode), Pattern #16
b) Enter factory color control, conrm the data.
c) Adjust the low light. (Refer to table 1, 2 in adjustment position by mode)
- Adjust sub - Brightness to set the ‘Y’ value.
- Adjust red offset (‘x’) and blue offset (‘y’) to the color coordinates.
Low light
Measurement point
Picture 4-2 Toshiba ABL Pattern
* Do not adjust green offset data.
d) Adjust the high light. (Refer to table 1, 2 in adjustment position by mode)
- Adjust red gain (‘x’) and blue gain (‘y’) to the color coordinates.
* Do not adjust the green gain and sub-contrast (Y) data.
d) Adjust the high light. (Refer to table 1, 2 in adjustment position by mode)
- Adjust red gain (‘x’) and blue gain (‘y’) to the color coordinates.
* Do not adjust the green gain and sub-contrast (Y) data.
Low light
Measurement point
Picture 4-3 Toshiba ABL Pattern
4-28
Page 71

4-14. Software Upgrade
4-14-1. How to Update Flash ROM
1. Install the Flash Downloader
Connector Set(D-SUB) and D-SUB cable to execute Program Update.
4. Troubleshooting
2. Flash Downloader program update
- Turn on the TV Set
- Click “Connect” icon on the MSTAR tool.
- Click “Read”, and Choose a new S/W.
- Click “Auto”, and “Run”
4-29
Page 72

7. Schematic Diagram
7-1. Circuit Descriptions
7. Schematic Diagram
7-1
Page 73

7. Schematic Diagram
DVI
AV
HDMI
S-Video
7-2. Block description
T-MFM consists of three main blocks
1. Main board : Video signal processing
2. IP board : Power supply & Inverter
3. T-con board : LCD Panel control
7-2
Page 74

7-3. Schematic Diagrams
This Document can not be used without Samsungs authorization.
7. Schematic Diagrams
7-3
Page 75

7. Schematic Diagrams
This Document can not be used without Samsungs authorization.
7-4
Page 76

This Document can not be used without Samsungs authorization.
7. Schematic Diagrams
7-5
Page 77

7. Schematic Diagrams
This Document can not be used without Samsungs authorization.
7-6
Page 78

This Document can not be used without Samsungs authorization.
7. Schematic Diagrams
7-7
 Loading...