

Page 1
Install Manual
0
Page 2

Install Manual
`
Introduction
Thank you for purchasing a Samsung SVR series digital video recorder.
This manual is for SVR-3200, SVR-1680C, SVR-1660C, SVR-1645, SVR-960C, SVR-945,
SVR-480. Before product installation and operation, please become thoroughly familiar with this
user manual and other manuals referenced by this manual.
This user manual and the software and hardware described here are protected by copyright law.
With the exception of copying for general use within fair use, copying and reprinting the user
manual, either partially or in entirety, or translating it into another language without the consent
of Samsung Techwin, Inc. is strictly prohibited.
This specification may change without prior notice for improvement of product performance.
Product Warranty and Limits of Responsibility
The manufacturer does not assume any responsibility concerning the sale of this product and
does not delegate any right to any third party to take any responsibility on its behalf. The
product warranty does not cover cases of accidents, negligence, alteration, misuse or abuse.
No warranty is offered for any attachments or parts not supplied by the manufacturer.
The warranty period for this product is for 3 years from the date of purchase. The following
cases are not covered by the warranty and payment is required for repairs.
Malfunctions due to negligence by the user
Deliberate disassembly and replacement by the user
Connection of a power source other than a properly rated power source
Malfunctions caused by natural disasters (fire, flood, tidal wave, etc.)
Replacement of expendable parts (HDD, FAN, etc.)
※ The warranty period for the HDD and Fan is one year after purchase.
Warranty only refers to the warranty covering products that have been paid for.
1
Page 3

Install Manual
After the expiration of the warranty period (3 years), examination and repair will be provided for
a fee. Even during the warranty period, repair and examination of items outside the warranty
scope will require payment.
This product is not for exclusive use of crime prevention but for assistance in cases as
fire or theft. We take no responsibility for damage from any incident.
Experience and technical skills are needed for the installation of this product as an improper
installation may cause fire, electric shocks, or defects. Any installation job should be performed
by the vendor you purchased this product from.
This manual is authored SVR-3200, SVR-1680C, SVR-1660C, SVR-1645, SVR-960C, SVR-945,
SVR-480 according to firmware version 1.8.0
The content of this manual may differ according to Firmware or Software upgrades, and the
standard and appearance of the product is changeable without prior notice to users.
2
Page 4

Install Manual
Contents
Introduction ..................................................................................... 1
Product Warranty and Limits of Responsibility ............................................................ 1
Chapter 1. Safety Precautions ....................................................... 4
1.1 Explaining the Symbols ................................................................................. 4
Chapter 2. Summary ....................................................................... 8
2.1 Features .................................................................................................... 8
2.1 Components ............................................................................................. 12
2.2 Description of product ................................................................................. 13
2.2.1 Front view .......................................................................................... 13
2.2.2 Rear Part ........................................................................................... 23
2.2.3 Remote control ................................................................................... 29
Chapter 3. Installation .................................................................. 31
3.1 Installation & Connection ............................................................................. 31
3.1.1 Basic connection and operation .............................................................. 31
3.2 OSD Menu structure & Operation .................................................................. 33
3.2.2 Remote control setup & basic operation ................................................... 34
3.2.3 Example of installation structure ............................................................. 36
3.2.4 Basic setup ........................................................................................ 37
3.3 Using input/output terminals ......................................................................... 41
3.3.4 External Storage connections ................................................................. 56
3.3.5 Remote monitoring & control .................................................................. 63
Trouble Shooting .......................................................................... 65
Compatible HDD List .................................................................... 67
Compatible Media List .................................................................. 67
Specification ................................................................................. 67
Dimensions ................................................................................... 71
3
Page 5

Install Manual
Chapter 1. Safety Precautions
1.1 Explaining the Symbols
Warning
Refers to information users need to know in order to prevent serious injury or
death.
Before installation
9 Verify the supplied voltage (AC100V~AC240V) before connecting to the power supply.
9 Make sure the power supply is off before installation.
9 Do not install in a very humid environment. Doing so may cause an electric shock or
fire.
9 Make sure ground line is connected to reduce electric shock risk.
During operation
9 Do not open the product cover except by qualified personnel or system installer.
Opening the product cover may cause an electric shock.
9 Do not plug multiple appliances into a single power outlet. Doing so may cause fire.
9 Do not place dishes holding water or heavy objects on the product. Doing so may
cause a malfunction.
9 Do not use in areas where inflammable substances such as propane gas or gasoline
or high amount of dust is present. Doing so may cause an explosion or fire.
9 Do not touch the power line with a wet hand. Doing so may cause an electric shock.
9 Do not insert a hand into the opening of the DVD. Doing so may cause an injury.
9 Make sure conductive materials do not enter the cooling ventilator opening.
9 Do not apply excessive force when pulling on the power cord. Damaging the cord
may cause an electric shock or fire.
9 Improper replacement of the built-in battery by other types of batteries may cause
explosion. The batter must be replaced by the same battery type. Also, expired
batteries may cause pollution and must be disposed of with care.
9 Do not place the battery in fire or in extreme heat. Also, do not dissect or disassemble
the battery.
9 Recharge the batteries for the remote controller.
4
Page 6

Install Manual
Dismantling and cleaning
9 Do not dismantle, repair or modify the product deliberately. Doing so may cause a
damage, an electric shock or an injury.
9 Do not use water, paint thinner or organic solvent for cleaning the product exterior.
Doing so may cause a malfunction or an electric shock. Use a dry cloth to clean the
exterior.
Caution
Provides information users need to know in order to prevent minor
injury or product damage.
During installation
9 To get adequate ventilation, install the product with at least 15cm of space between
the cooling ventilation opening and a wall.
9 To prevent falling, install the product in a flat area . Dropping the product may
cause an injury or a malfunction.
9 Avoid areas exposed to sun light or heat since they may cause deformation or a
malfunction.
9 If a camera is installed while the DVR is recording, image in another channel may
be disrupted. Start the storage after installing the camera is recommended.
During use
9 Make sure the product is not exposed to shocks or shaking when using the product
or during moving.
9 Do not move the product while it is in operation, and apply strong shocks to the
product or throw the product.
9 If hard disk drives other than those recommended are used additionally, abnormal
operation may occur. Inquire at the point of purchase of the product before
installing such a hard disk drive.
9 Product warranty will not cover deliberate additional use of such hard disk drives.
9 This product is a supplementary rather than primary means for preventing fire and
theft. Our company is not responsible for incidence of incident or damage that may
occur.
5
Page 7

Install Manual
Samsung Techwin cares for the environment at all product
manufacturing stages, and is taking a number of steps to provide
customers with more environmentally friendly products. The Eco
mark represents Samsung Techwin’s will to create environmentally
friendly products, and indicates that the product satisfies the EU
RoHS Directive.
FCC Compliance Statement
NOTE : This equipment has been tested and found to comply with the limits for a Class A digital
device, pursuant to part 15 of the FCC Rules. These limits are designed to provide reasonable
protection against harmful interference when the equipment is operated in a commercial
environment. This equipment generates, uses, and can radiate radio frequency energy and, if not
installed and used in accordance with the instruction manual, may cause harmful interference to
radio communications. Operation of this equipment in a residential area is likely to cause harmful
interference in which cause the user will be required to correct the interference at his own expense.
Correct Disposal of This Product
(Waste Electrical & Electronic Equipment)
(Applicable in the European Union and other European countries with separate
collection systems.) This marking shown on the product or its literature, indicates that it
should not be disposed with other household wastes at the end of its working life. To
prevent possible harm to the environment or human health from uncontrolled waste
disposal, please separate this from other types of wastes and recycle it responsibly to promote the
sustainable reuse of material resources. Household users should contact either the retailer where
they purchased this product, or their local government office, for details of where and how they can
take this item for environmentally safe recycling. Business users should contact their supplier and
check the terms and conditions of the purchase contract. This product should not be mixed with
other commercial wastes for disposal.
Correct Disposal of Batteries in this Product
(Applicable in the European Union and other European countries with
separate battery return systems.)
This marking on the battery, manual or packaging indicates that the batteries in this
product should not be disposed of with other household waste at the end of their
working life. Where marked, the chemical symbols Hg, Cd or Pb indicate that the
battery contains mercury, cadmium or lead above the reference levels in EC
6
Page 8

Install Manual
Directive 2006/66. If batteries are not properly disposed of, these substances can cause harm to
human health or the environment. To protect natural resources and to promote material reuse,
please separate batteries from other types of waste and recycle them through your local, free battery
return system. The rechargeable battery incorporated in this product is not user replaceable.
For information on its replacement, please contact your service provider.
7
Page 9

Install Manual
Chapter 2. Summary
This unit is a digital video recording and playback device to record image and video input
from 32/16/9 channels to its built-in hard disk. The buttons on the front of the unit as well
as the mouse and GUI allow easy setup and operation.
The Samsung SVR series of digital video recorders (DVRs) provide additional safety and
security to banks, apartment buildings and complexes, government offices as well as
other public, private and commercial facilities. Recorded high-quality video and images
are stored on hard disk for later retrieval or playback. Real time functionality delivers
users with the ability to simultaneously record multiple channels, playback video, and
copy video. A few of the more advanced user-conveniences include motion detection,
Pan/Tilt/Zoom controls (PTZ), password protection, real time audio recording, event lists,
and log files.
2.1 Features
Monitoring Screen
The monitoring screen supports vivid, high-definition live visual feed from each channel and
provides multiple screens.
Real time MPEG-4 visual output (480 frames)
Multiple split-screen monitoring modes
SVR-3200/1680C/1660C/1645: Single, 4, 9, 10, 16
SVR-960C/945: Single, 4, 9
SVR-480 : Single, 4
Automatic Screen Switching (AUTO)
Supports various monitor output modes
SVR-3200: 4 Composite, 2 VGA
SVR-1680C: 4 Composite, 1 VGA
SVR-1660C/1645/960C/945/480: 2 Composite, 1 VGA
Pan/Tilt, Digital Zoom, PIP (Picture-In-Picture), The PIP function will be available with
a firmware upgrade in the future.
8
Page 10

Install Manual
Audio Recording
SVR series DVRs provide real time audio recording.
Simultaneous recording of 16/9/4 channels of audio in real time
SVR-3200/1680C/1600/1645 : Input - 16 channels (4 RCA in rear, 12 D-SUB),
Output - 1 in rear, SVR-960C/945 : 9 channels (4 RCA in rear, 5 D-SUB),
Output - 1 in rear, SVR-480 : 4 channels (4RCA), Output – 1 in rear
Supports simultaneous recording and playback
Video Recording
The product is capable of storing visual image data as high resolution MPEG-4 video at up
to 480 frames per second, as well as pre-emptively initiating recording sequences up to five
seconds prior to an event. The COVERT feature (concealment of private visual data) helps
to protect privacy.
High quality real time MPEG-4 recording
Three screen-resolution levels for improved control over data sizes
Multi-recording for manual and scheduled events
Simultaneous recording/playback/backup/networking
Easily accessible options for channel-specific resolution and motion detection ranges
Per-second frame rates (up to 30 frames per channel) are user customizable
SVR-3200 Half D1 : NTSC (704x240) 960fps, PAL (704x288) 800fps
SVR-1680C D1 : NTSC (704x480) 480fps, PAL (704x576) 400fps
SVR-1660C/1645 CIF : NTSC (352x240) 480fps, PAL (352x288) 400fps
SVR-960C/945 CIF : NTSC (352x240) 270fps, PAL (352x288) 225fps
SVR-480 D1 : NTSC (704x480) 120fps, PAL (704x576) 100fps
Manual and scheduled recording
Video signal loss detection
Event logs (sensors, D-I/O, video loss, motion detection, text)
9
Page 11

Install Manual
Each channel supports pre-emptive recording sequences up to 5 seconds prior to an
actual event
Search/Playback
Various search and playback options are offered for the user’s convenience.
Playback by time, date and channel
Mouse interface increases data searchability
Forward/backward search while playback is paused
Playback by event log entry (sensor, video loss, motion detection and text)
Remote controller and Jog/Shuttle further improve searching (The SVR-
960C/945/480 models do not support Jog/Shuttle.)
Full-frame playback (Available in SVR-3200/1680C/1660C only)
Data Storage
The hard disk included with the product is for data storage. If desired, recorded data can be
backed up or stored to DVD-R, CD-R or a USB storage device.
The built-in hard disk is provided as primary storage
Multiple portable data storage media are supported: DVD-R, CD-R and USB
※ Refer to the appendix on the back of the manual regarding compatible media types.
Hard disk expansion device (external recording device): SVS-5E (optional) External
hard disk expansion is supported with the SVS-5E (Available for purchase separately)
10
Page 12

Install Manual
Networking
The product supports LAN, xDSL and other networking capabilities. Combined with the PC
interface client, the core features of the device can be easily remotely controlled.
E-mails can be sent via TCP/IP or DHCP upon an event trigger
Remote live visual feed (single or 4 section split-screen)
PC playback, storage, search and DVR control functions via Network Viewer
Remote recording, search and playback scheduling
Supports 10/100Mbps Ethernet/xDSL
Multiple DVR connections
Miscellaneous
User-friendly GUI and mouse interface
Simplified firmware upgrades through USB
Visual data recording and backup to USB
Supports PTZ control (SPEED DOME), Coax, PRESET
Multilingual support: Korean, English, Italian, Spanish, Japanese
Single remote controller to control 16 DVRs
11
Page 13
Install Manual
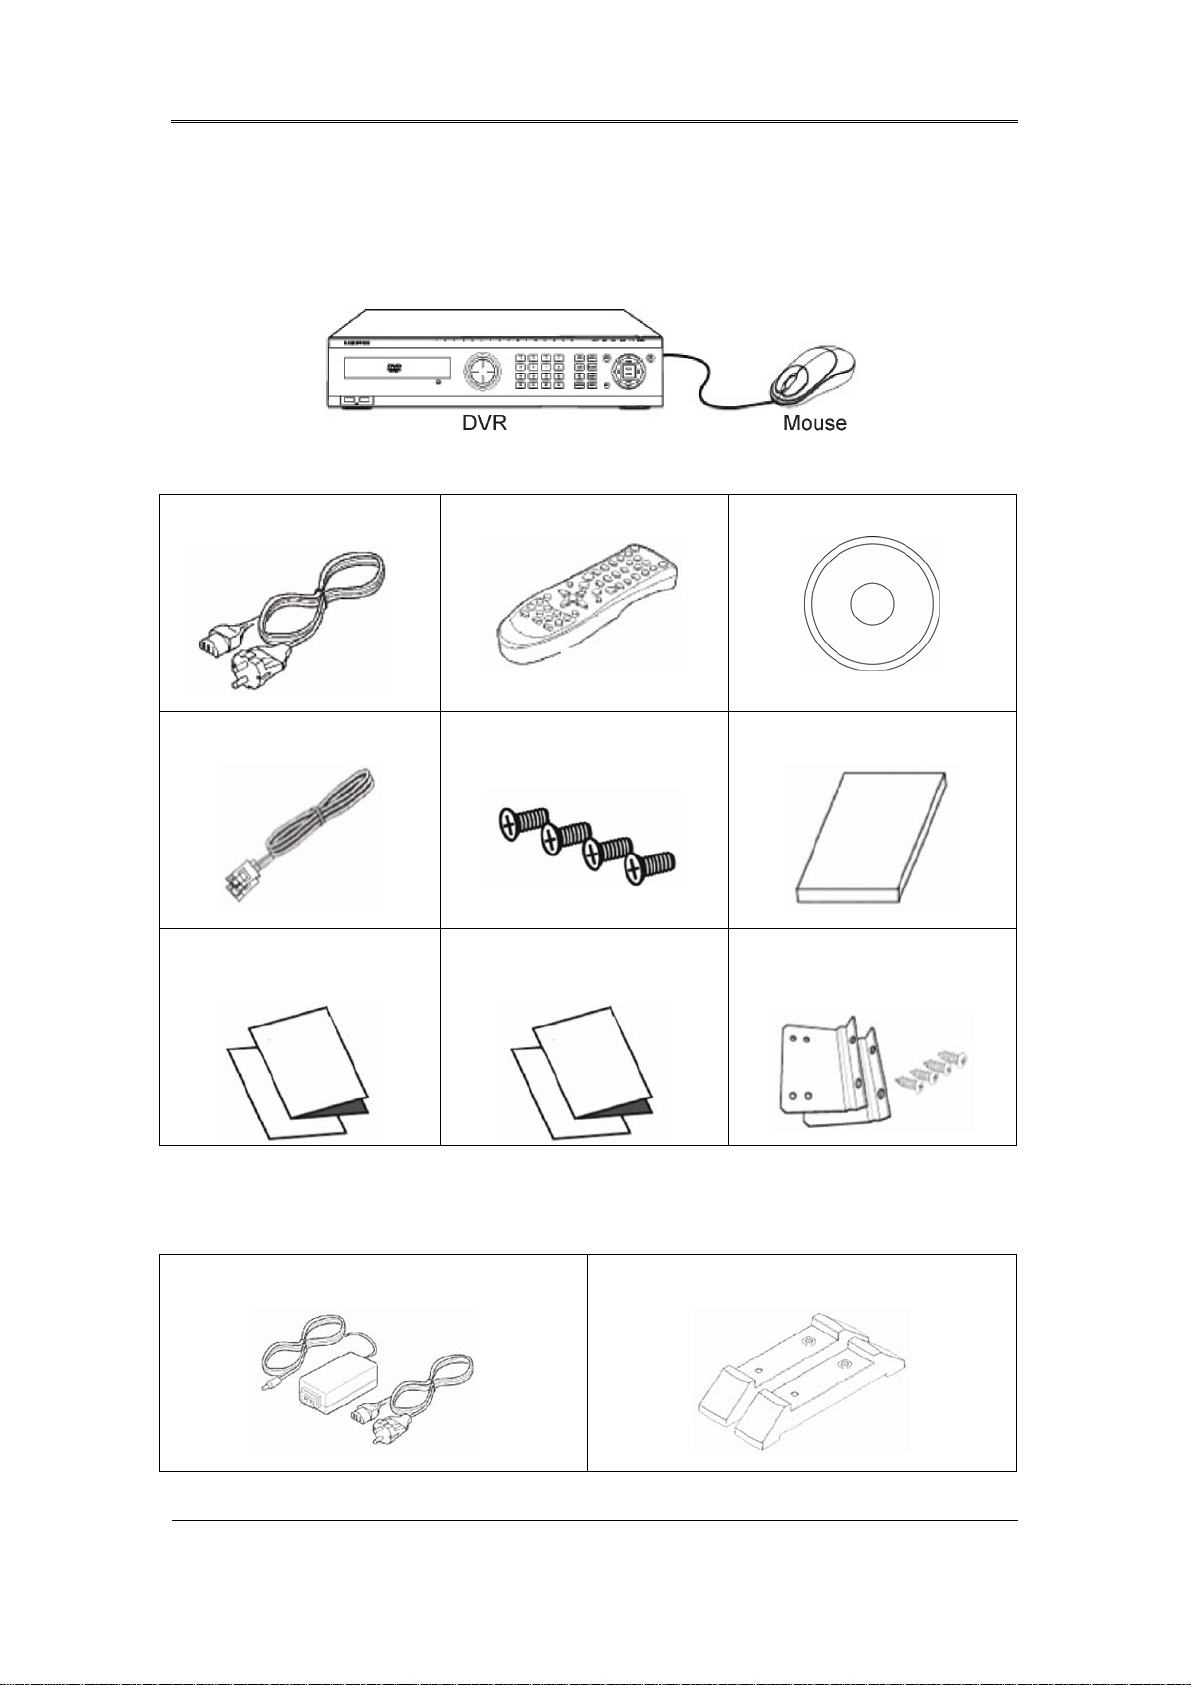
2.1 Components
Please check the included accessories as follows.
AC CORD
SATA Cable
DVR Quickguide
Remote Controller
HDD Mount Screw
SNM-128S Quickguide
Program CD
Install Manual
Rackmount & Screw
For the SVR-945, a switched-mode power supply (SMPS) power cord is included, while a stand
is included instead of the standard rack mount. SVR-480 does not include rack mount & Screw.
AC CORD & SMPS
12
STAND
Page 14
Install Manual
2.2 Description of product
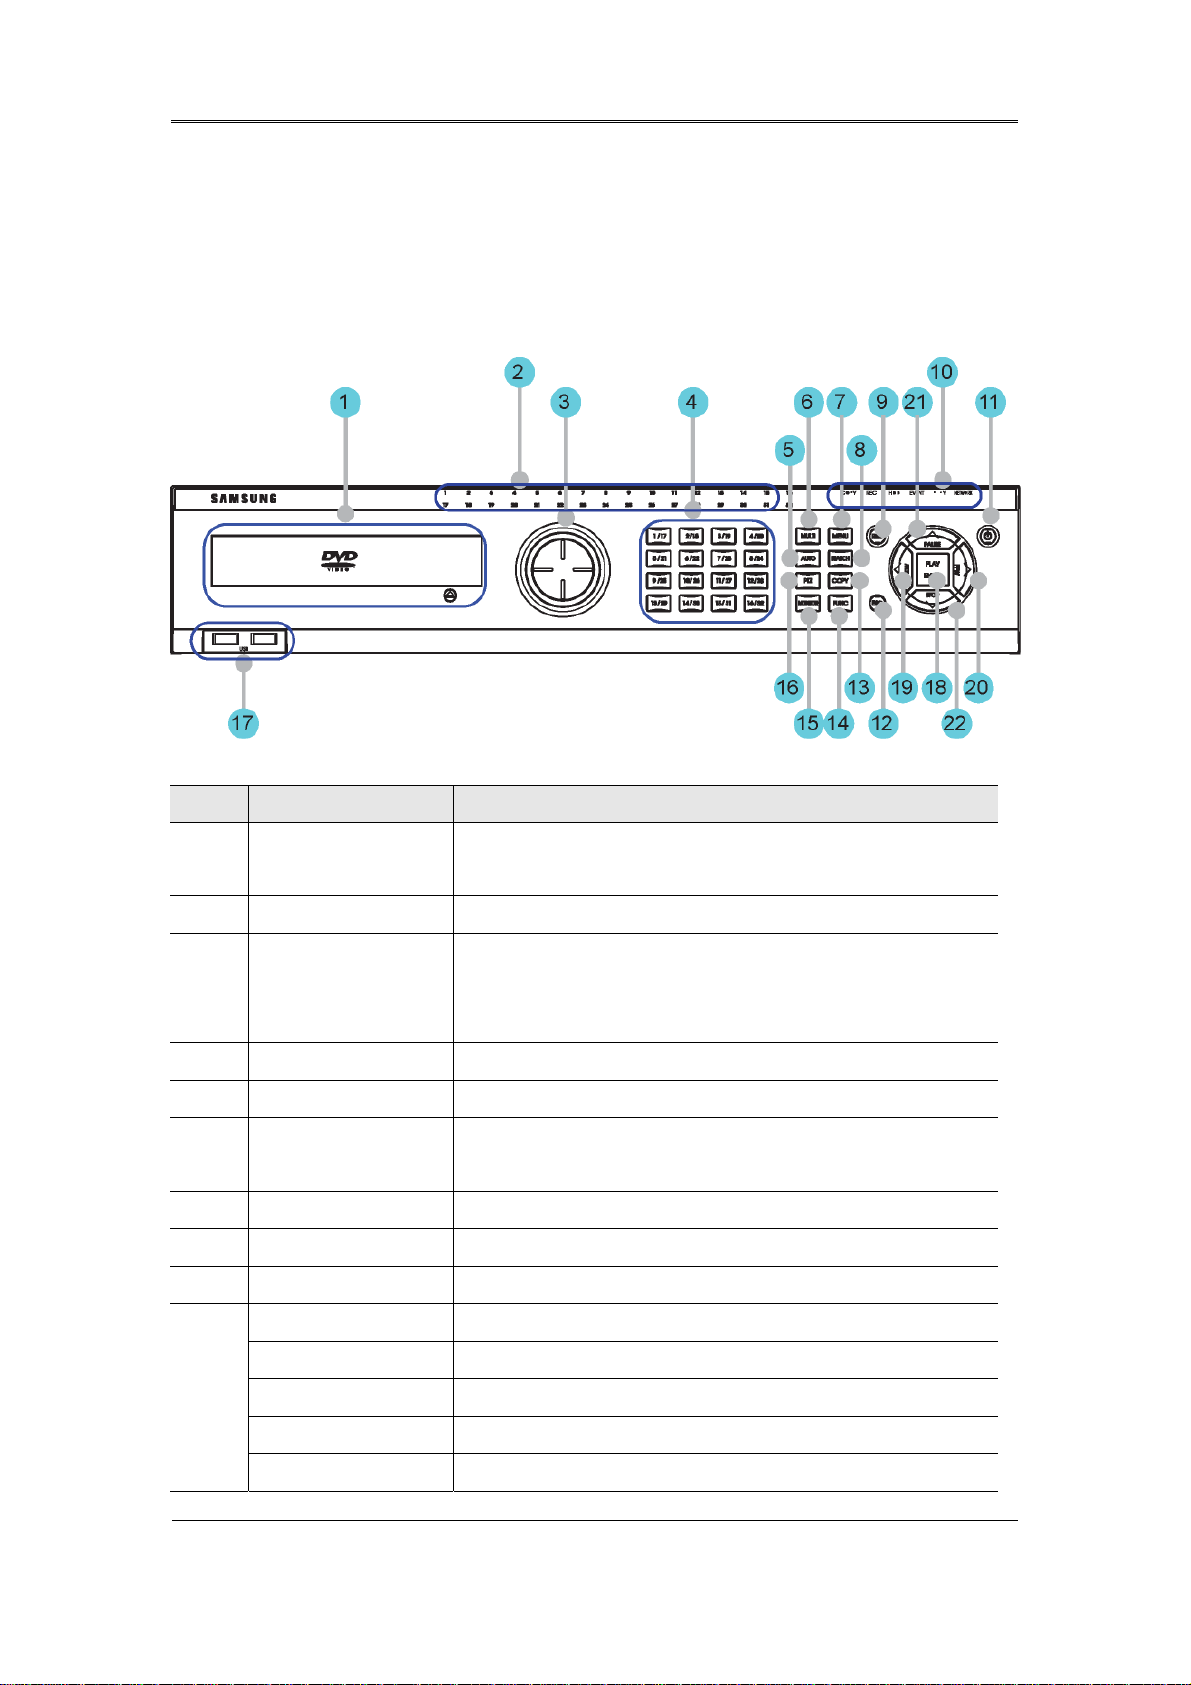
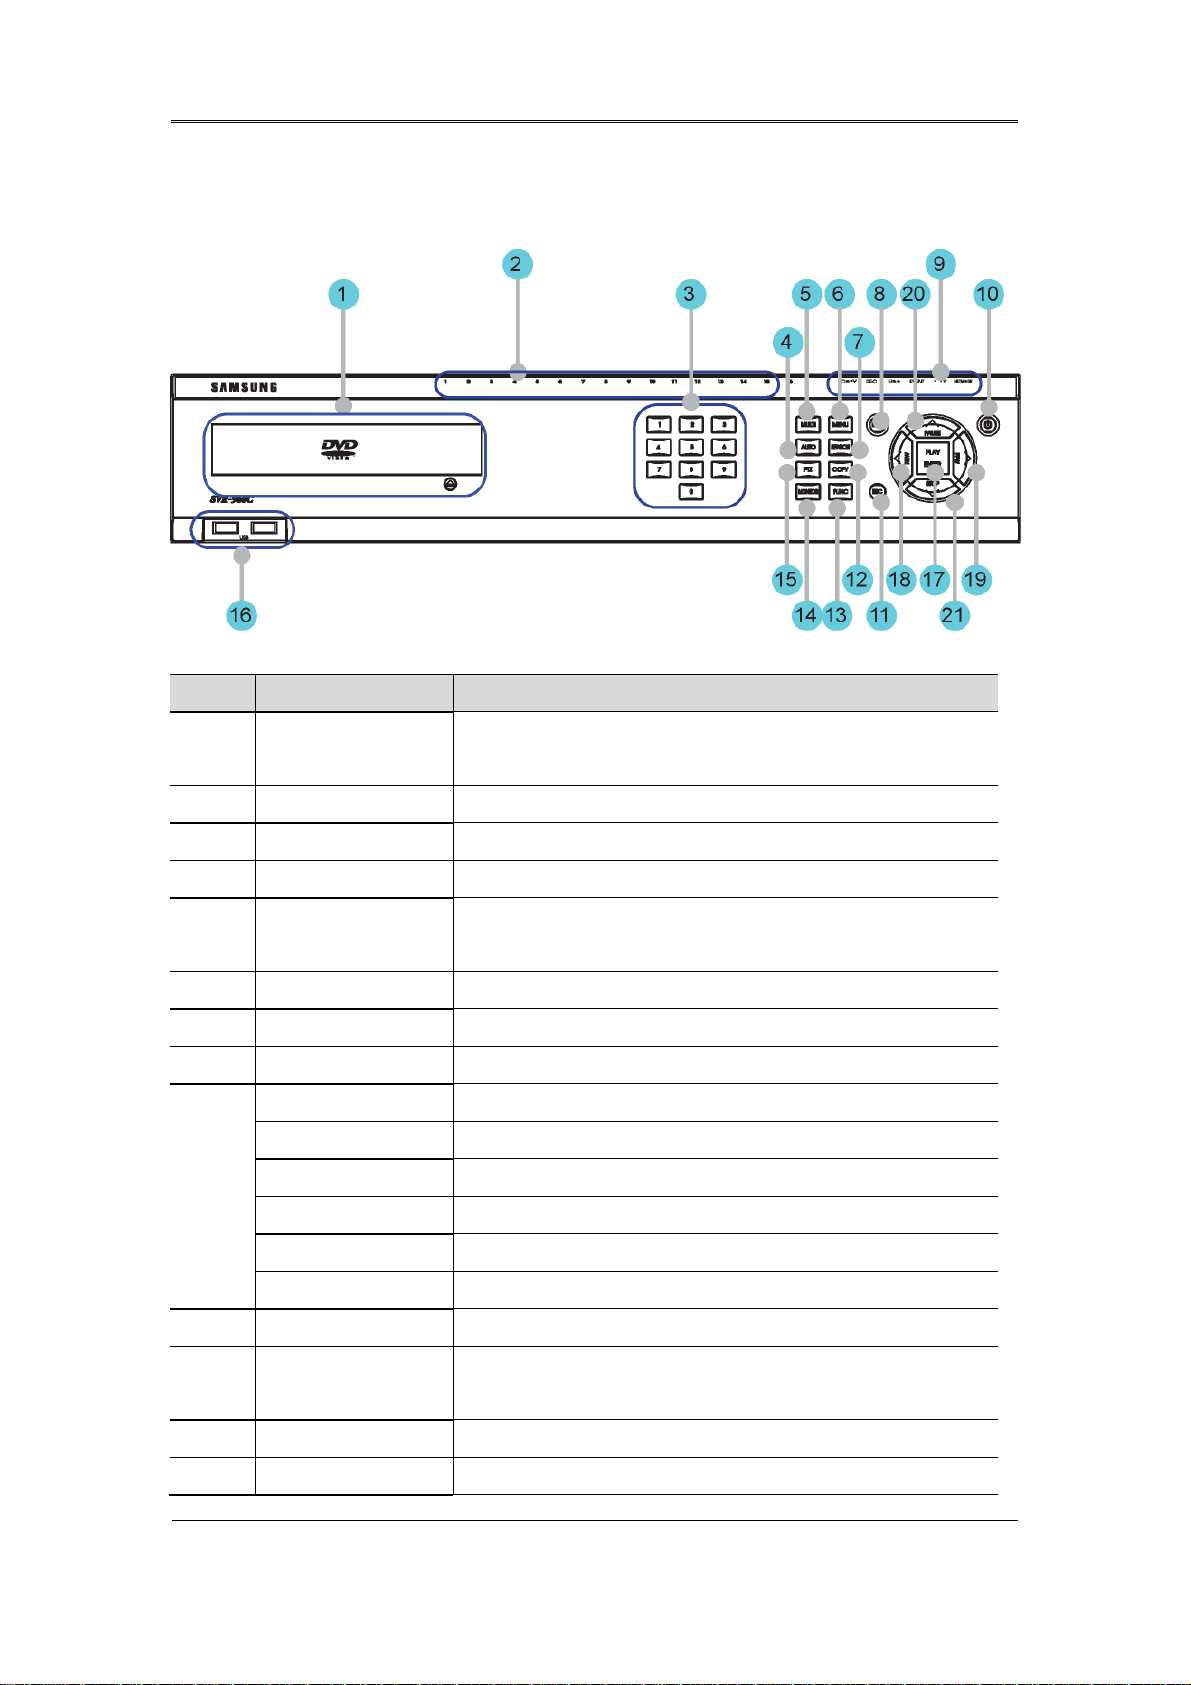
2.2.1 Front view
2.2.1.1 SVR-3200
No. Classification Function
DVD-Multi for
1
copying
2 Channel LED Shows the data input and event operation status
3 JOG/SHUTTLE
4 Channel button Selects channel in live feed or playback
5 AUTO Starts or stops user defined sequences.
6 MULTI Changes split-screen sections for live video feeds or
7 MENU Navigates into the Menu.
8 SEARCH Starts Search mode.
9 REC button Starts or stops manual recording
For copying recorded video and images to DVD/CD
optical media.
Jog can adjust setting values, control the STEP function,
navigate through the menu, and adjust the playback
speed and direction. Shuttle controls PTZ.
playback.
10
REC lamp Lit when recording.
HDD lamp Lit when HDD is working.
NETWORK lamp Lit when network is connected.
EVENT lamp Lit when an event is detected.
COPY lamp Indicates copying operation.
13
Page 15

Install Manual
PLAY lamp Lit when copying.
11 Power button Turns on or off the device.
12 ESC button The Escape button navigates up the menu tree and
closes dialog windows.
13 COPY Starts Copy mode.
14 FUNC Starts Function mode.
15 MONITOR Cycles through from Monitor 1 to 4.
16 PTZ Starts or ends PTZ function.
17
USB ports for external devices (mouse, USB memory
USB1, USB2
stick).
18 PLAY/ENTER Start playback or select an item on the menu.
19
◀/REW
Navigates or selects in the menu, or for playback,
changes the reverse playback speed.
20
▶/FWD
Navigates or selects in the menu, or for playback,
changes the forward playback speed.
31 ▲/PAUSE Navigates or selects in the menu, or for playback,
pauses live or recorded video.
▼/STOP Navigates or selects in the menu, or for playback, stops
22
playback.
14
Page 16
Install Manual
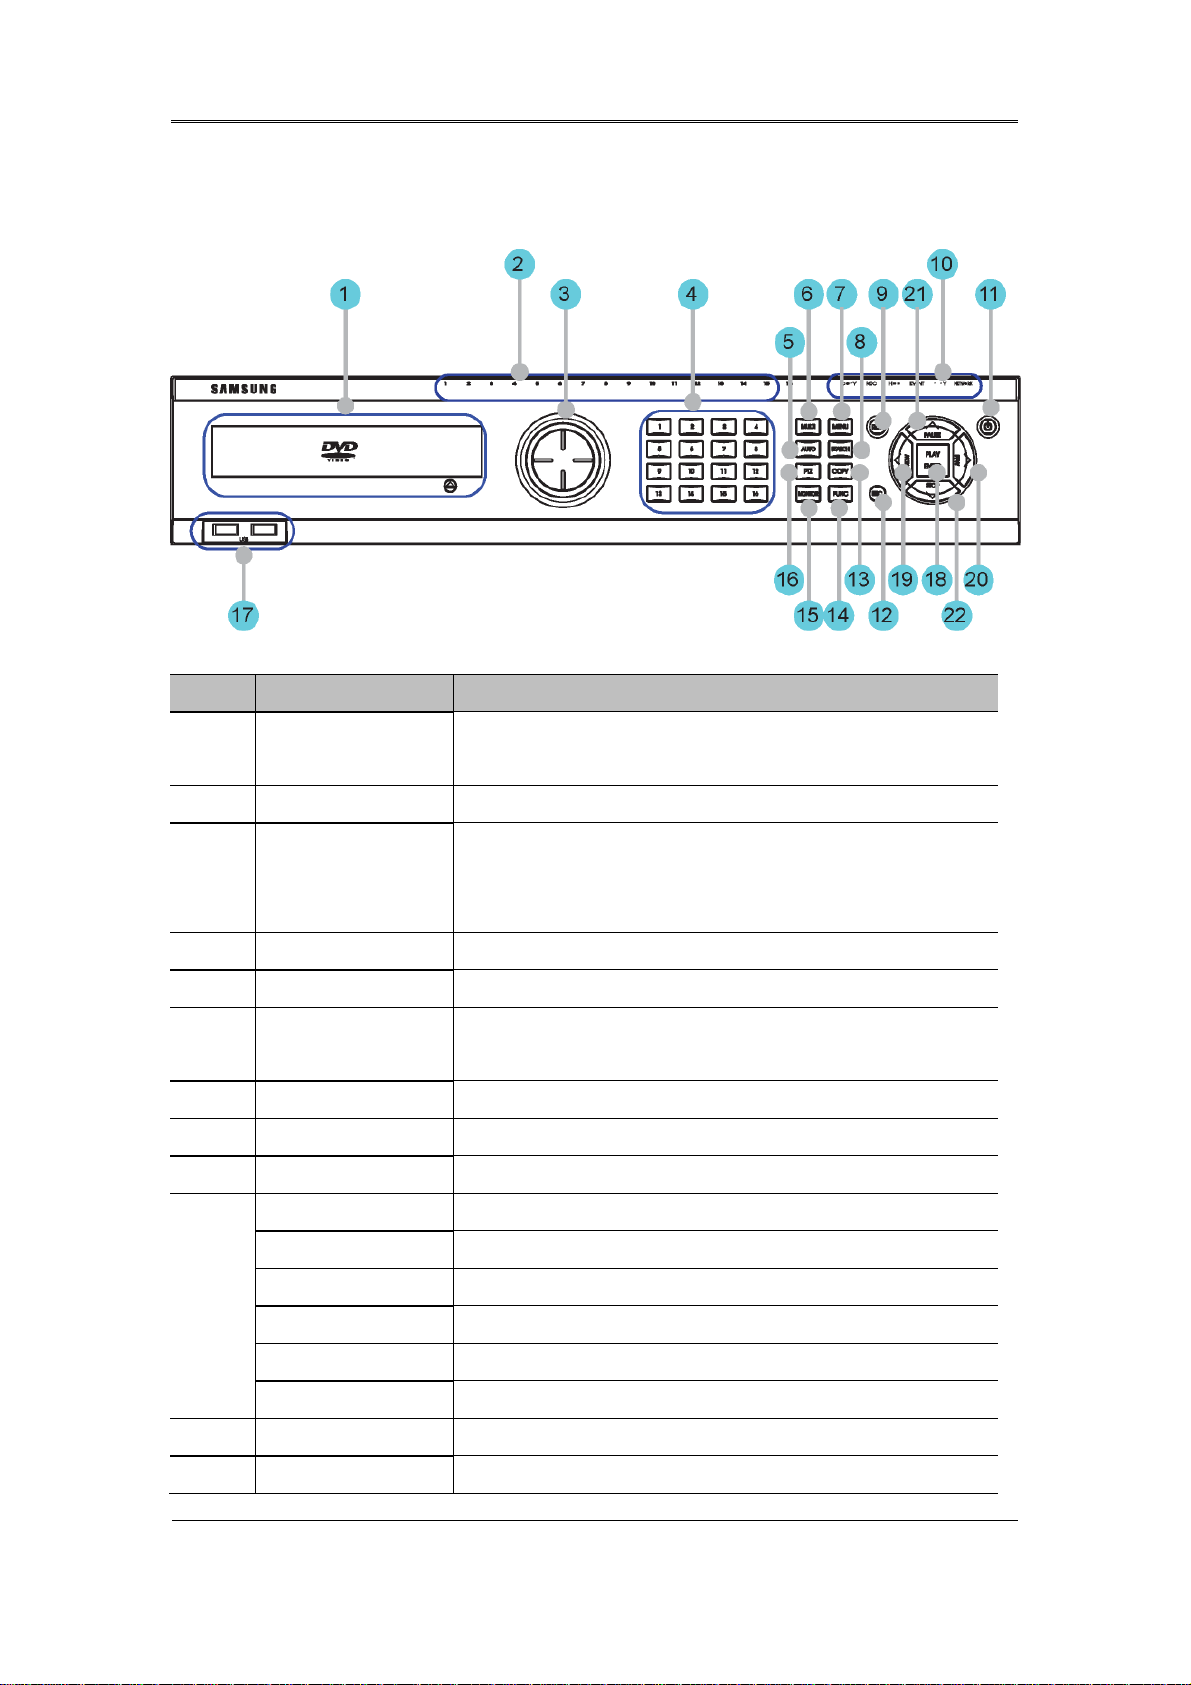
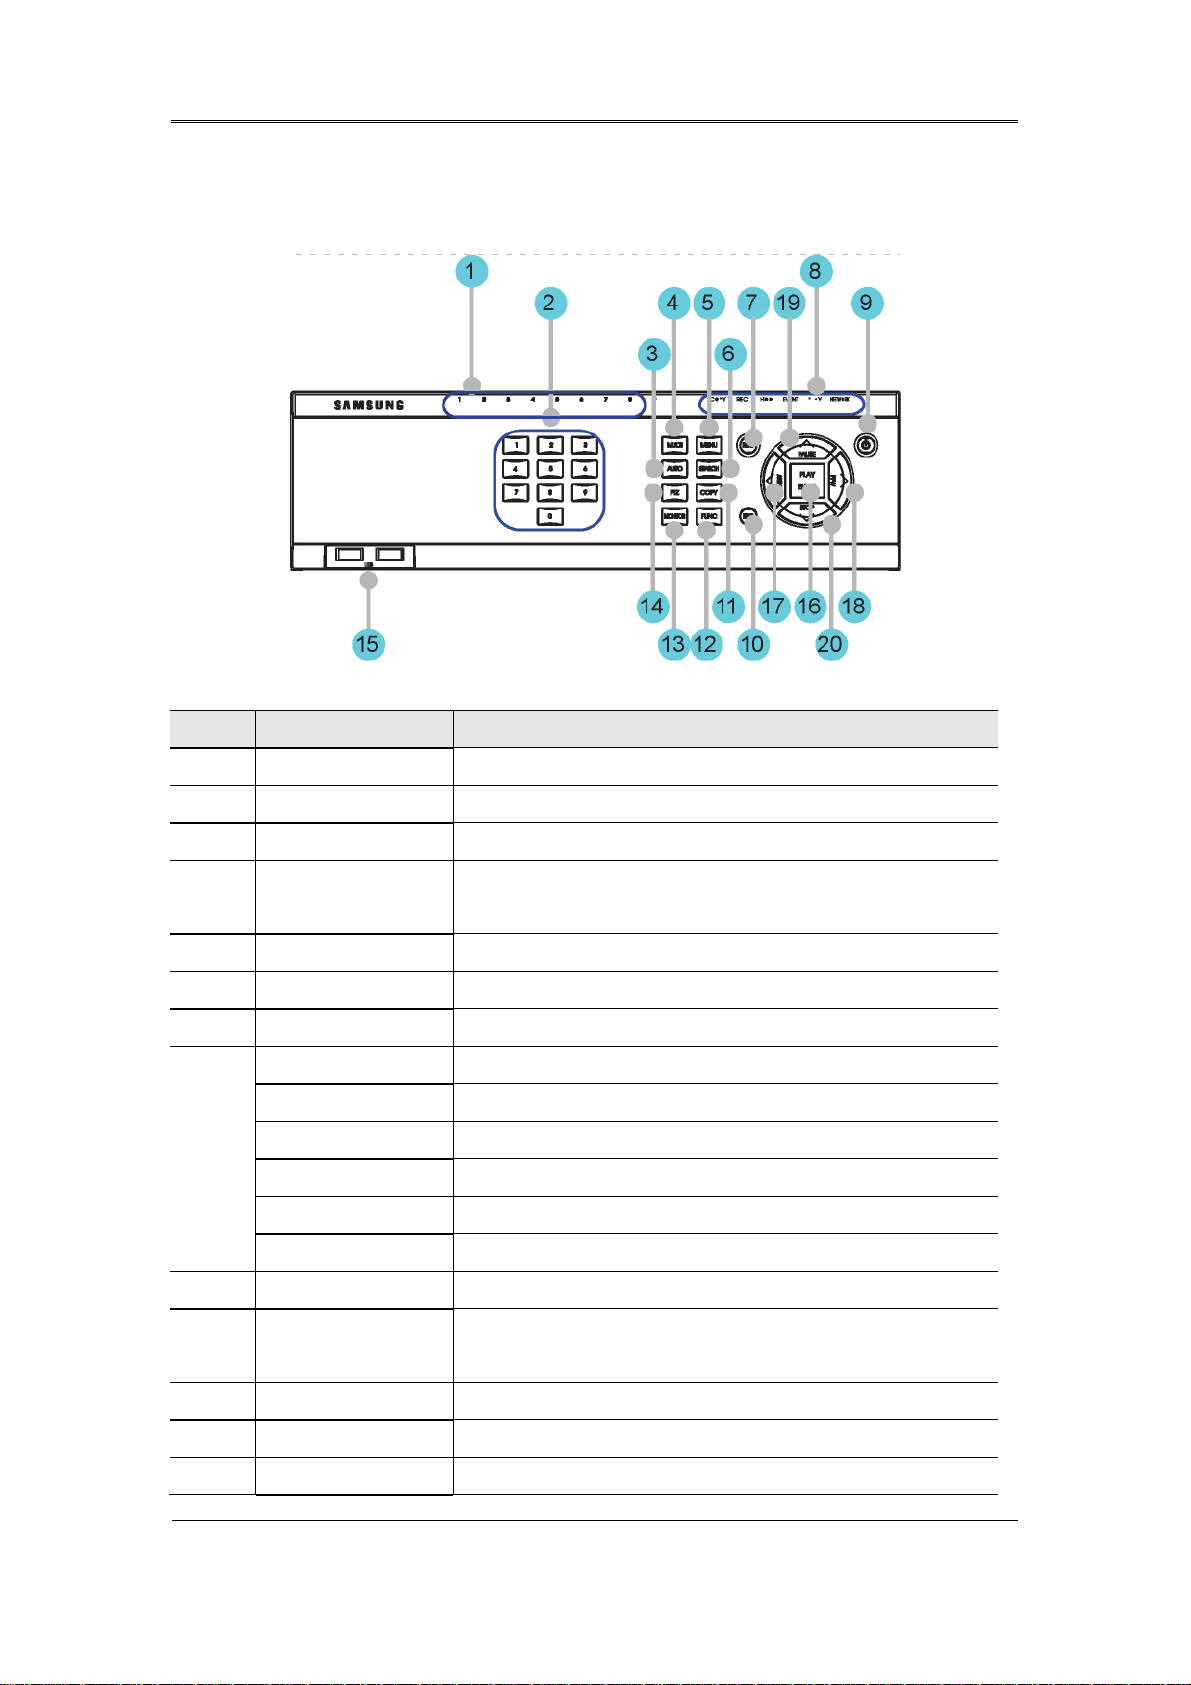
2.2.1.2 SVR-1680C, SVR-1660C, SVR-1645
No. Classification Function
DVD-Multi for
1
copying
2 Channel LED Shows the data input and event operation status
3 JOG/SHUTTLE
4 Channel button Selects channel in live feed or playback
5 AUTO Starts or stops user defined sequences.
6 MULTI Changes split-screen sections for live video feeds or
7 MENU Navigates into the Menu.
8 SEARCH Starts Search mode.
9 REC button Starts or stops manual recording
REC lamp Lit when recording.
HDD lamp Lit when HDD is working.
For copying recorded video and images to DVD/CD
optical media.
Jog can adjust setting values, control the STEP function,
navigate through the menu, and adjust the playback
speed and direction. Shuttle controls PTZ.
playback.
10
NETWORK lamp Lit when network is connected.
EVENT lamp Lit when an event is detected.
COPY lamp Indicates copying operation.
PLAY lamp Lit when copying.
11 Power button Turns on or off the device.
12 ESC button The Escape button navigates up the menu tree and
15
Page 17

Install Manual
closes dialog windows.
13 COPY Starts Copy mode.
14 FUNC Starts Function mode.
15 MONITOR Cycles through from Monitor 1 to 4 : SVR-1680C,
Switches from main and sub monitor : SVR-1660C,
SVR-1645
16 PTZ Starts or ends PTZ function.
17
USB ports for external devices (mouse, USB memory
USB1, USB2
stick).
18 PLAY/ENTER Start playback or select an item on the menu.
19
◀/REW
Navigates or selects in the menu, or for playback,
changes the reverse playback speed.
20
▶/FWD
Navigates or selects in the menu, or for playback,
changes the forward playback speed.
31 ▲/PAUSE Navigates or selects in the menu, or for playback,
pauses live or recorded video.
▼/STOP Navigates or selects in the menu, or for playback, stops
22
playback.
16
Page 18
Install Manual
r
2.2.1.3 SVR-960C
No. Classification Function
DVD-Multi fo
1
copying
2 Channel LED Shows the data input and event operation status
3 Channel button Selects channel in live feed or playback
4 AUTO Starts or stops user defined sequences.
5 MULTI Changes split-screen sections for live video feeds or
6 MENU Navigates into the Menu.
7 SEARCH Starts Search mode.
8 REC button Starts or stops manual recording
REC lamp Lit when recording.
HDD lamp Lit when HDD is working.
NETWORK lamp Lit when network is connected.
9
EVENT lamp Lit when an event is detected.
COPY lamp Indicates copying operation.
For copying recorded video and images to DVD/CD
optical media.
playback.
PLAY lamp Lit when copying.
10 Power button Turns on or off the device.
11 ESC button The Escape button navigates up the menu tree and
closes dialog windows.
12 COPY Starts Copy mode.
13 FUNC Starts Function mode.
17
Page 19

Install Manual
14 MONITOR Switches from main and sub monitor
15 PTZ Starts or ends PTZ function.
16
USB ports for external devices (mouse, USB memory
USB1, USB2
stick).
17 PLAY/ENTER Start playback or select an item on the menu.
18
◀/REW
Navigates or selects in the menu, or for playback,
changes the reverse playback speed.
19
▶/FWD
Navigates or selects in the menu, or for playback,
changes the forward playback speed.
20 ▲/PAUSE Navigates or selects in the menu, or for playback,
pauses live or recorded video.
▼/STOP Navigates or selects in the menu, or for playback, stops
21
playback.
18
Page 20
Install Manual
2.2.1.4 SVR-945
No. Classification Function
1 Channel LED Shows the data input and event operation status
2 Channel button Selects channel in live feed or playback
3 AUTO Starts or stops user defined sequences.
4 MULTI Changes split-screen sections for live video feeds or
playback.
5 MENU Navigates into the Menu.
6 SEARCH Starts Search mode.
7 REC button Starts or stops manual recording
REC lamp Lit when recording.
HDD lamp Lit when HDD is working.
8
NETWORK lamp Lit when network is connected.
EVENT lamp Lit when an event is detected.
COPY lamp Indicates copying operation.
PLAY lamp Lit when copying.
9 Power button Turns on or off the device.
10 ESC button The Escape button navigates up the menu tree and
closes dialog windows.
11 COPY Starts Copy mode.
12 FUNC Starts Function mode.
13 MONITOR Switches from main and sub monitor
19
Page 21

Install Manual
14 PTZ Starts or ends PTZ function.
15
USB ports for external devices (mouse, USB memory
USB1, USB2
stick).
16 PLAY/ENTER Start playback or select an item on the menu.
17
◀/REW
Navigates or selects in the menu, or for playback,
changes the reverse playback speed.
18
▶/FWD
Navigates or selects in the menu, or for playback,
changes the forward playback speed.
19 ▲/PAUSE Navigates or selects in the menu, or for playback,
pauses live or recorded video.
▼/STOP Navigates or selects in the menu, or for playback, stops
20
playback.
20
Page 22
Install Manual
r
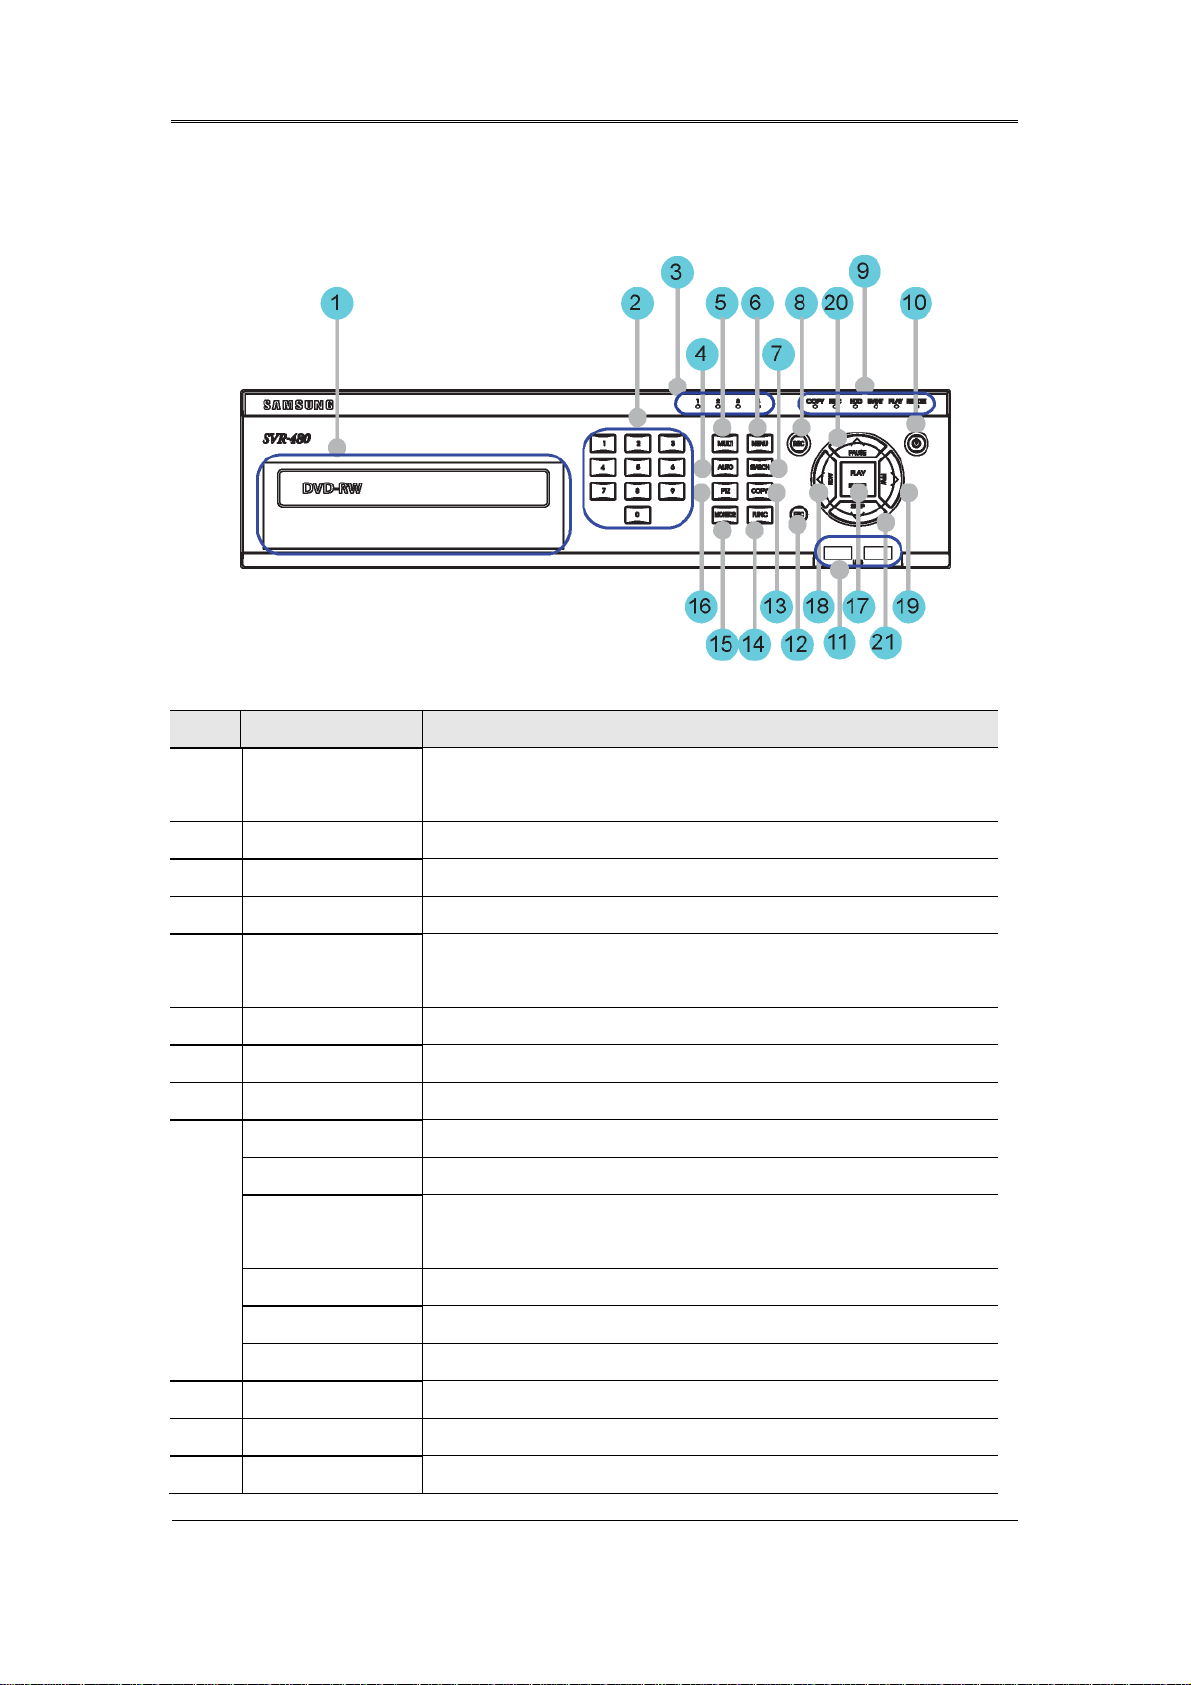
2.2.1.5 SVR-480
No Classification Function
DVD-Multi fo
1
copying
2 Channel button Selects channel in live feed or playback
3 Channel LED Shows the data input and event operation status
4 AUTO Starts or stops user defined sequences.
5 MULTI Changes split-screen sections for live video feeds or
6 MENU Navigates into the Menu.
7 SEARCH Starts Search mode.
8 REC button Starts or stops manual recording
REC lamp Lit when recording.
HDD lamp Lit when HDD is working.
NETWORK
9
lamp
For copying recorded video and images to DVD/CD optical
media.
playback.
Lit when network is connected.
EVENT lamp Lit when an event is detected.
COPY lamp Indicates copying operation.
PLAY lamp Lit when copying.
10 Power button Turns on or off the device.
11 USB1, USB2 USB ports for external devices (mouse, USB memory stick).
12 ESC button The Escape button navigates up the menu tree and closes
21
Page 23

Install Manual
dialog windows.
13 COPY Starts Copy mode.
14 FUNC Starts Function mode.
15 MONITOR Switches from main and sub monitor
16 PTZ Starts or ends PTZ function.
17 PLAY/ENTER Start playback or select an item on the menu.
18
◀/REW
Navigates or selects in the menu, or for playback, changes
the reverse playback speed.
19
▶/FWD
Navigates or selects in the menu, or for playback, changes
the forward playback speed.
20 ▲/PAUSE Navigates or selects in the menu, or for playback, pauses
live or recorded video.
▼/STOP Navigates or selects in the menu, or for playback, stops
21
playback.
22
Page 24
Install Manual
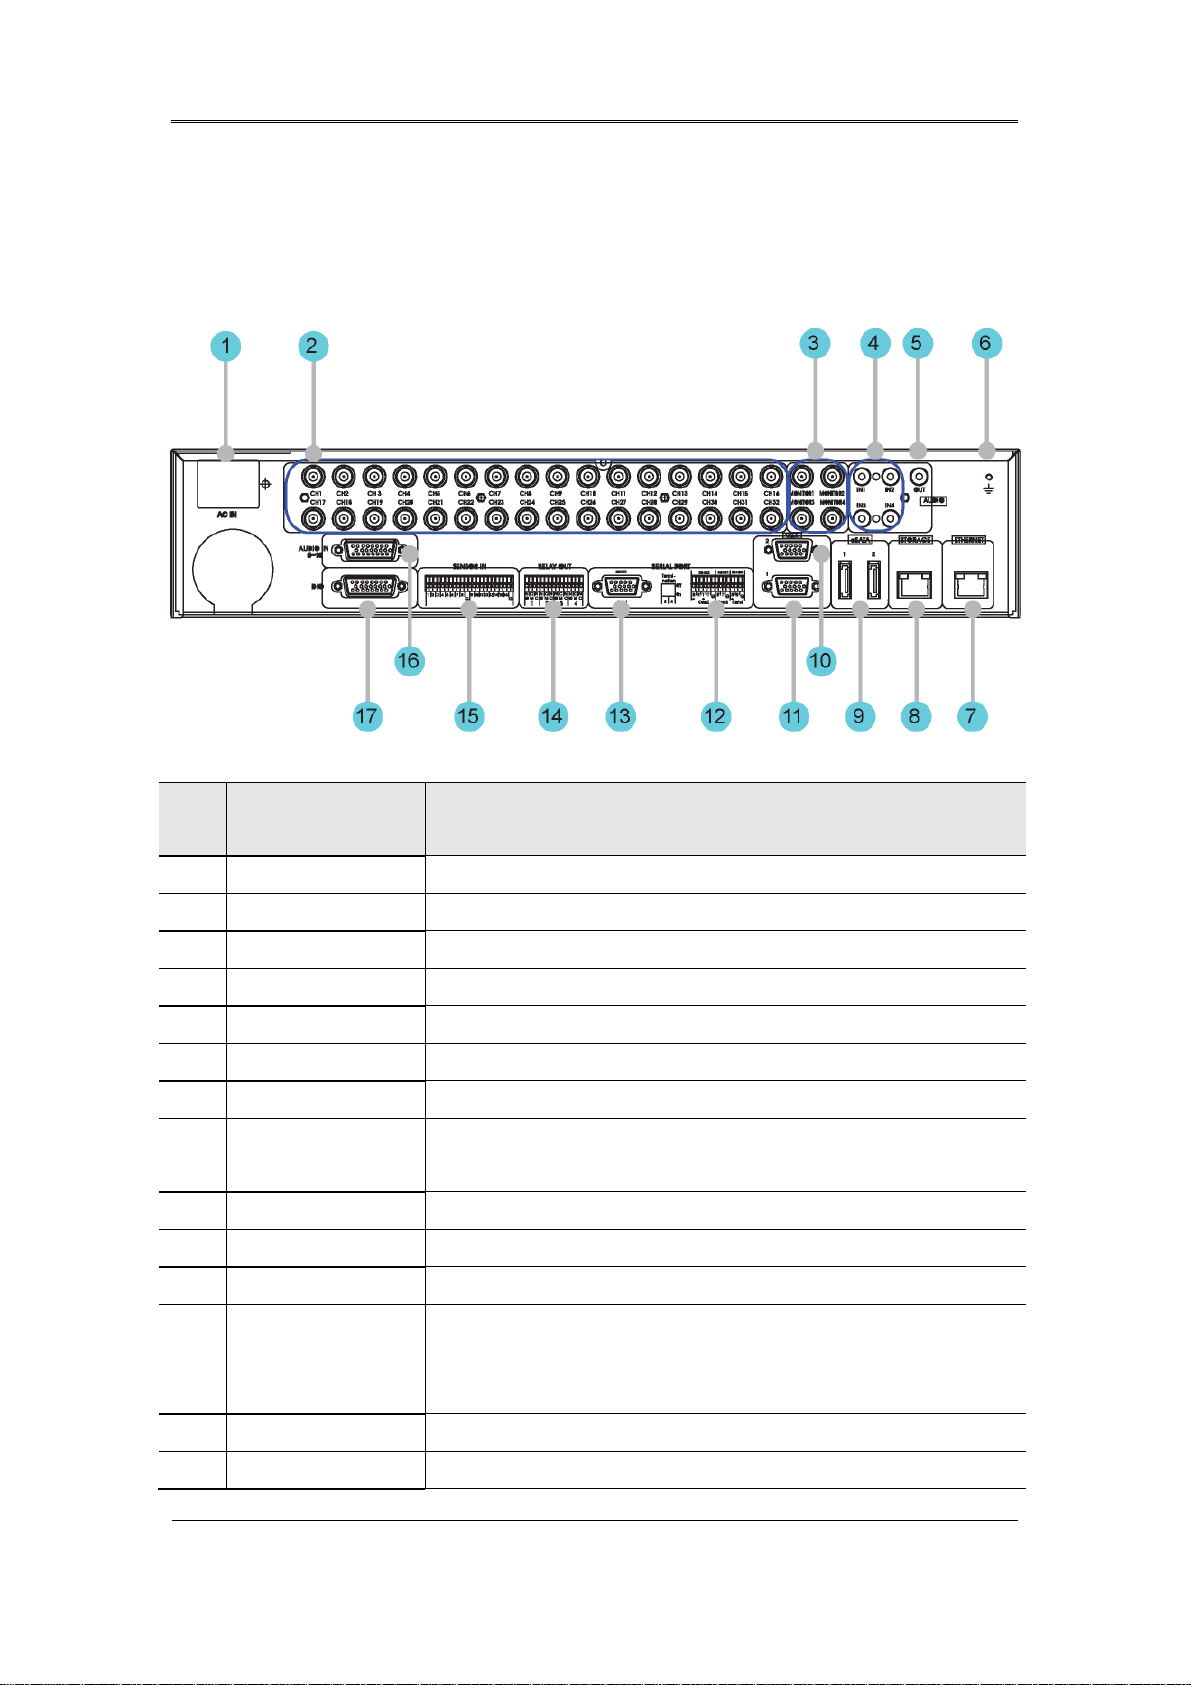
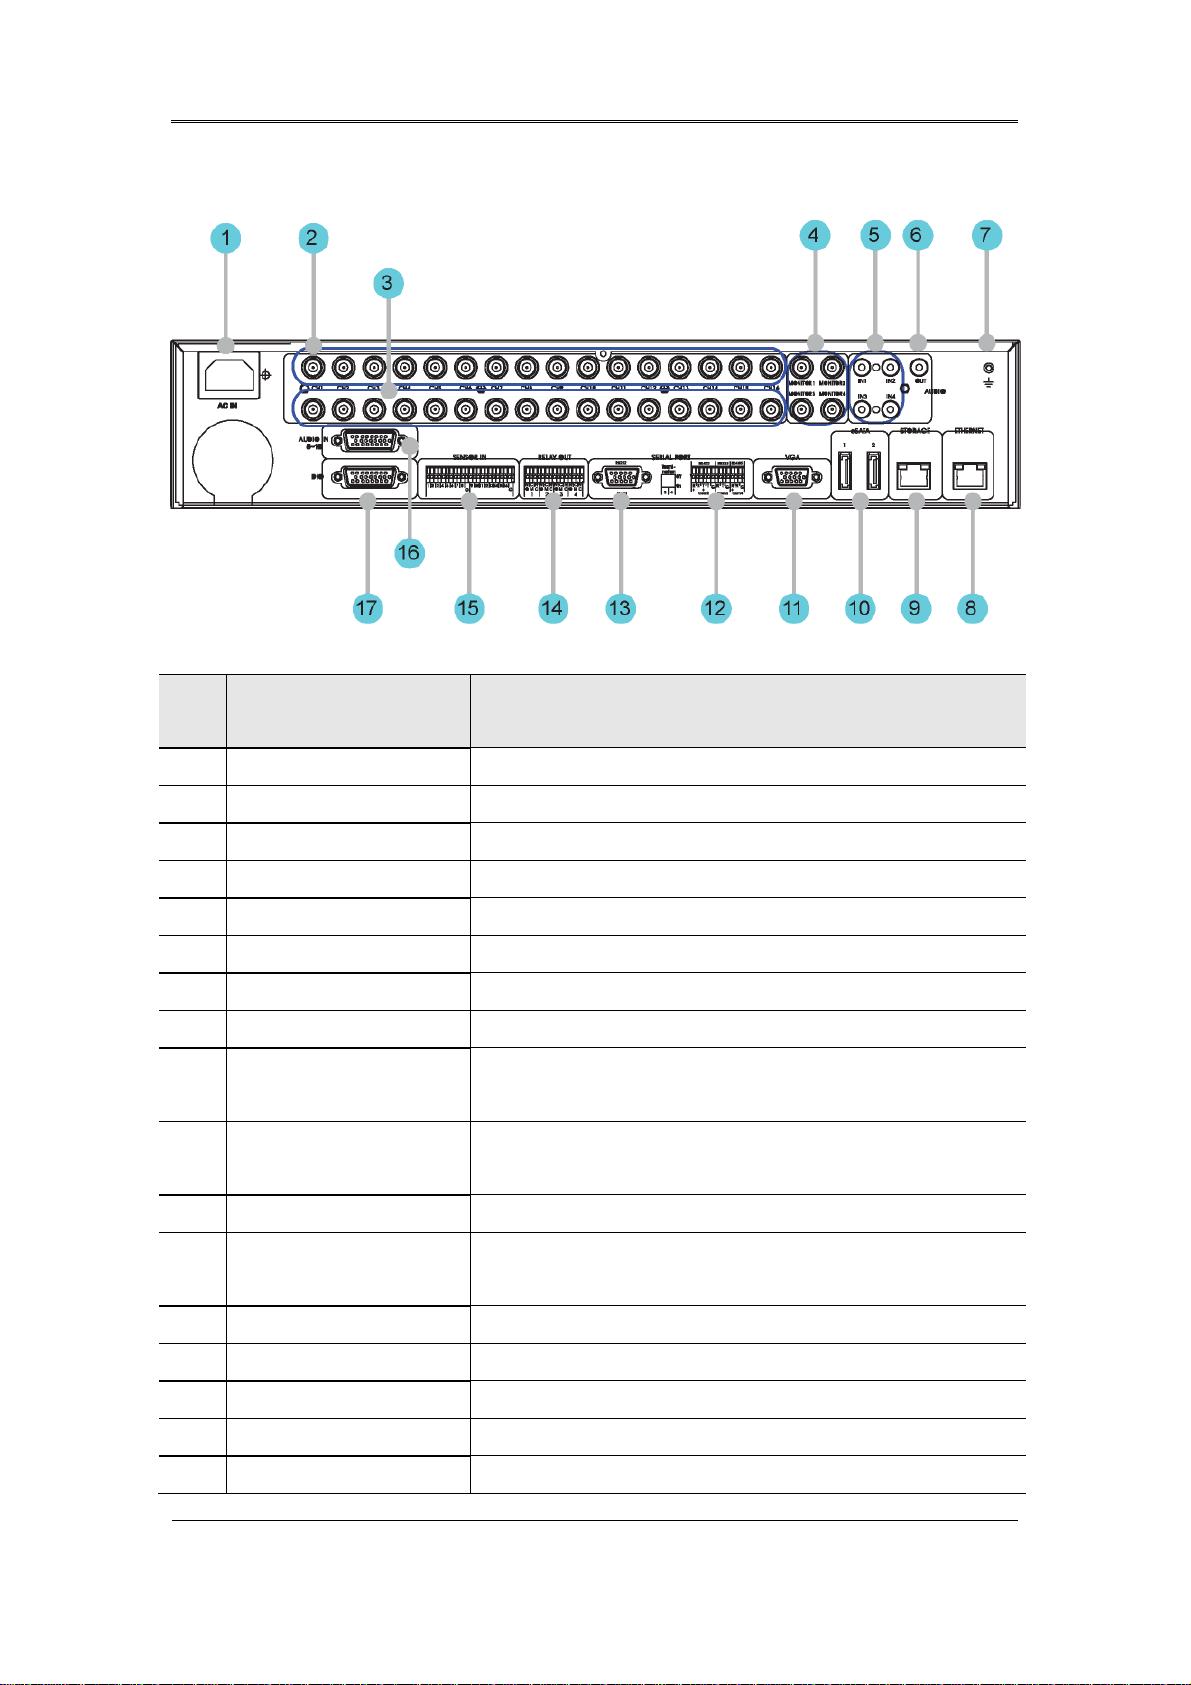
2.2.2 Rear Part
2.2.2.1 SVR-3200
No. Input/Output
terminal name
1 POWER IN Socket for AC 100V ~ AC 240V power cord.
2 CH1 ~ 32 Connection terminal for camera BNC input.
3 MONITOR 1 ~ 4 Connection terminal for monitor BNC output.
4 AUDIO IN(RCA) RCA audio jack for RCA input.
5 AUDIO OUT Audio jack for speaker output.
6 GROUND Ground terminal between DVR and external device.
7 ETHERNET Ethernet port for network connections (RJ-45).
8 STORAGE External storage connection port (Function not supported in the
current version)
9 eSATA Connection terminal for external eSATA HDD or HDD for backups.
10 VGA OUTPUT 2 Output port for PC monitor.
11 VGA OUTPUT 1 Output port for PC monitor.
Function
12 Serial Port (Terminal
Block)
RS-232C/485/422
13 Serial Port (D-Sub) RS-232C D-SUB connector.
14 RELAY OUT Connection terminal for relay output.
Connection terminal for expanded controller, speed dome camera,
etc.
23
Page 25

Install Manual
15 SENSOR IN Connection terminal for sensor input.
16 AUDIO IN(D-SUB) Connection terminal for audio output D-SUB.
17 D-I/O Connection terminal for DIGITAL IN/OUT.
24
Page 26
Install Manual
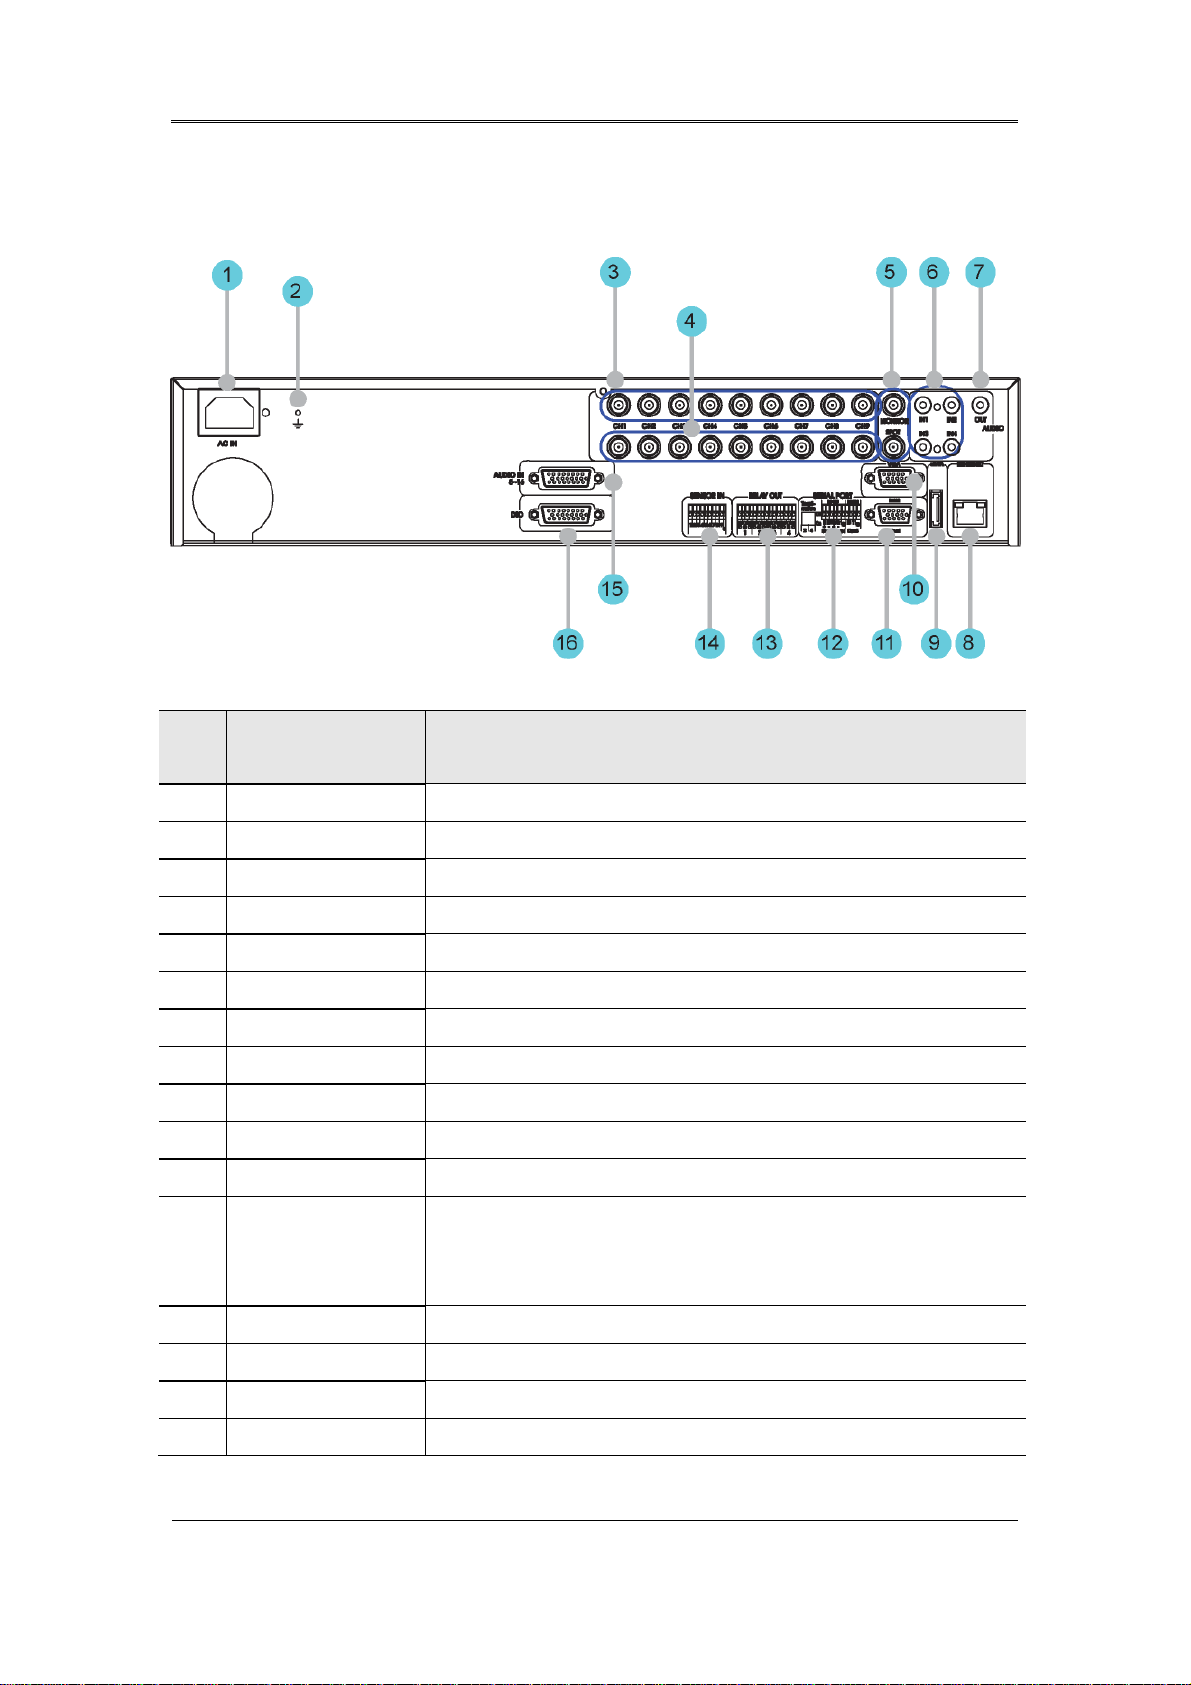
2.2.2.2 SVR-1680C, SVR-1660C, SVR-1645
No. Input/Output
terminal name
1 POWER IN Socket for AC 100V ~ AC 240V power cord.
2 CH1~16 Connection terminal for camera BNC input.
3 LOOP OUT Connection terminal for camera BNC output (loop).
4 MONITOR 1 ~ 2 Connection terminal for monitor BNC output.
5 AUDIO IN(RCA) RCA audio jack for RCA input.
6 AUDIO OUT Audio jack for speaker output.
7 GROUND Ground terminal between DVR and external device.
8 ETHERNET Ethernet port for network connections (RJ-45).
9 STORAGE External storage connection port (Function not supported in
the current version)
10 eSATA Connection terminal for external eSATA HDD or HDD for
backups.
11 VGA OUTPUT Output port for PC monitor.
12 Serial Port (Terminal
Connection terminal for expanded controller, speed dome
Function
Block) RS-232C/485/422
13 Serial Port (D-Sub) RS-232C D-SUB connector.
14 RELAY OUT Connection terminal for relay output.
15 SENSOR IN Connection terminal for sensor input.
16 AUDIO IN(D-SUB) Connection terminal for audio output D-SUB.
17 D-I/O Connection terminal for DIGITAL IN/OUT.
camera, etc.
25
Page 27
Install Manual
2.2.2.3 SVR-960C
No. Input/Output
terminal name
1 POWER IN Socket for AC 100V ~ AC 240V power cord.
2 GROUND Ground terminal between DVR and external device.
3 CH1~9 Connection terminal for camera BNC input.
4 LOOP OUT Connection terminal for camera BNC output (loop).
5 MONITOR 1 ~ 2 Connection terminal for monitor BNC output.
6 AUDIO IN(RCA) RCA audio jack for RCA input.
7 AUDIO OUT Audio jack for speaker output.
8 ETHERNET Ethernet port for network connections (RJ-45).
9 eSATA Connection terminal for external eSATA HDD or HDD for backups.
10 VGA OUTPUT Output port for PC monitor.
11 Serial Port (D-Sub) RS-232C D-SUB connector.
12 Serial Port (Terminal
Block)
Connection terminal for expanded controller, speed dome camera,
etc.
Function
RS-232C/485/422
13 RELAY OUT Connection terminal for relay output.
14 SENSOR IN Connection terminal for sensor input.
15 AUDIO IN(D-SUB) Connection terminal for audio output D-SUB.
16 D-I/O Connection terminal for DIGITAL IN/OUT.
26
Page 28

Install Manual
2.2.2.4 SVR-945
No. Input/Output
terminal name
1 CH1~9 Connection terminal for camera BNC input.
2 LOOP OUT Connection terminal for camera BNC output (loop).
3 MONITOR 1 ~ 2 Connection terminal for monitor BNC output.
4 AUDIO IN(RCA) RCA audio jack for RCA input.
5 AUDIO OUT Audio jack for speaker output.
6 ETHERNET Ethernet port for network connections (RJ-45).
7 eSATA Connection terminal for external eSATA HDD or HDD for
backups.
8 VGA OUTPUT Output port for PC monitor.
9 Serial Port (D-Sub) RS-232C D-SUB connector.
10 Serial Port (Terminal
Block) RS-232C/485/422
11 RELAY OUT Connection terminal for relay output.
12 AUDIO IN(D-SUB) Connection terminal for audio output D-SUB.
Connection terminal for expanded controller, speed dome
camera, etc.
Function
13 SENSOR IN Connection terminal for sensor input.
14 D-I/O Connection terminal for DIGITAL IN/OUT.
15 GROUND Ground terminal between DVR and external device.
16 POWER IN Socket for AC 100V ~ AC 240V power cord.
27
Page 29

Install Manual
o
2.2.2.5 SVR-480
No. Input/Output
terminal name
1 GROUND Ground terminal between DVR and external device.
2 CH1~4 Connection terminal for camera BNC input.
3 LOOP OUT Connection terminal for camera BNC output (loop).
4 MONITOR 1 ~ 2 Connection terminal for monitor BNC output.
5 AUDIO IN(RCA) RCA audio jack for RCA input.
6 AUDIO OUT Audio jack for speaker output.
7 ETHERNET Ethernet port for network connections (RJ-45).
8 eSATA Connection terminal for external eSATA HDD or HDD f
backups.
9 Serial Port (D-Sub) RS-232C D-SUB connector.
10 VGA OUTPUT Output port for PC monitor.
11 Serial Port (Terminal Block)
RS-485/422
12 RELAY OUT Connection terminal for relay output.
Connection terminal for expanded controller, speed
dome camera, etc.
Function
13 SENSOR IN Connection terminal for sensor input.
14 POWER IN Socket for AC 100V ~ AC 240V power cord.
Please refer to the detailed description for installation & use in the “Install Manual”.
28
Page 30

Install Manual
2.2.3 Remote control
All DVR unit features can be controlled with the remote controller; 16 units can be controlled
with a single remote controller. Unit IDs should be set in the DVR Menu > Communication >
Remote > Remocon ID.
No. Classification Function
1 ID Selects ID.
2 FUNC Starts function mode.
3 MULTI Changes split-screen
sections for live video or
playback.
4 STATUS Displays system setup
information.
5 MON Changes screen to spot
monitor.
6 DISP Selects split-screen and
channel options.
7 AUTO Switches to automatic
display.
8 ZOOM Executes digital zoom.
9 PIP Displays picture-in-picture.
10 PTZ Switches to PTZ mode.
11 Channel buttons Changes channels.
12 RECORD ( ) Starts and stops manual
recording.
13 +10 Uses for channels over 9
(e.g. "+10” + “1”)
14 FN1 Spare button 1.
15 FN2 Spare button 2.
16 MENU Switches to menu screen.
17 COPY Displays copy menu and
29
saves recorded video to
external storage device
(USB).
Page 31

Install Manual
No. Classification Function
18
(◀)
Moves cursor left in setup
menu.
19
(▶)
Moves cursor right in
setup menu.
20 (▲) Moves cursor up in setup
menu.
21 (▼) Moves cursor down in
setup menu.
22 ENTER Saves settings and execute.
23 ESC Cancels settings or
navigates up in menu.
24 SEARCH( ) Displays the search menu.
25 FAST
Fast reverses playback.
REWIND(◀◀)
26 REWIND
Reverses playback.
PLAY(◀)
27 FORWARD
Forwards playback.
PLAY(▶)
28 FAST
Fast forwards playback.
FORWARD(▶▶)
29 STOP( ) Stops playback.
30 STEP
REVERSE(◀l)
31 STEP
FORWARD(l▶)
Reverses playback frame by
frame.
Forwards playback frame by
frame.
32 PAUSE(ll) Pauses playback.
33 P/T Controls PAN/TILT.
34 LOAD PRESET Loads presets.
35 AUX ON Turns auxiliary on.
30
Page 32

Install Manual
Chapter 3. Installation
3.1 Installation & Connection
3.1.1 Basic connection and operation
3.1.1.1 Camera connection
Connect the DVR and CCTV cameras using coaxial cable as in the following figure.
- The cameras’ video input type must be one and only of NTSC or PAL. Both types should not
be used together.
- Automatic settings for 75Ω terminal resistance
While terminal resistance is generally 75Ω with only one video input port in use, when the
lower video input port is also connected, the settings automatically separate into 75Ω terminal
resistance while the status is Hi-Z (high impedance).
- The video input type (NTSC/PAL) is automatically recognized when the device is operation.
When multiple cameras are used, the video input type is taken from the first camera detected
starting from channel 1 and progressing sequentially to channel 16.
3.1.1.2 Monitor connection
Monitors connect to the DVR unit using a video cable as shown in the following figure.
31
Page 33

Install Manual
3.1.1.3 Audio connection
Audio equipment connects to the DVR unit using RCA audio cables or D-SUB as shown in the
following figure. SVR-480 does not support D-SUB audio.
Refer to the following figure when connecting D-SUB. The audio inputs are pin numbers 5 ~ 16.
3.1.1.4 Power connection & operation
Connect the power cable as shown in the following figure.
- The DVR unit will boot automatically when the power is connected.
- To turn the DVR unit off, press the power button for 5 seconds, then choose “Yes” when the
power-off dialog appears.
- To turn the power on again, press the power button.
32
Page 34

Install Manual
3.2 OSD Menu structure & Operation
3.2.1 Menu structure
Press the [MENU] button on the front panel to change to setup mode and display the following
dialog.
Main menu
Sub menu
Setup dialog
box
(1) Main menu: The currently selected tab is highlighted in blue with submenus and options
displayed below. Use the cursor [◀/▶] keys to navigate between submenu items then press
[Enter] to activate it.
(2) Sub menu: The currently selected submenu name is displayed in the title bar. Use the
cursor [◀/▶] keys to navigate across submenus and press [Enter] to display it in the dialog box.
Press [ESC] to navigate up to the main menu tabs.
(3) Setup dialog box: The currently selected setting is highlighted in blue. Use the cursor
[◀/▶] keys to move between settings and press [Enter] or [▼] to enter edit mode and change a
setting. All setting values are either numeric or text based. Use the cursor [◀/▶] or [▲/▼] keys
to edit numeric values. Text based values are edited with the character input dialog. To save a
value and resume navigation, press [ESC]. Press [ESC] again to navigate up to the main menu.
33
Page 35

Install Manual
3.2.1.1 Character input dialog box
The characters input dialog lets you input text.
Character input
Use the cursor [▲/▼] and [◀/▶] keys to choose characters then press [Enter] to input it. Use
[Å] to backspace, and [Æ] to insert a space. When finished, press [Enter] to exit the character
input dialog with the newly inputted value.
3.2.2 Remote control setup & basic operation
3.2.2.1 ID setup
When operating multiple units, a single remote controller can be used to control all of them by
assigning each unit a unique ID. Setup each unit's unique ID as follows.
(1) Press [MENU].
(2) Press [▶] to select “Network” then press [Enter] or [▼].
(3) Press [▼] to select “Remote” then press [Enter].
(4) Press [▶] to select “Remote Control ID” then press [Enter].
(5) Adjust the ID value using [◀/▶] then press [ESC].
(6) Press [ESC] several times until you are back in monitor mode.
34
Page 36

Install Manual
Remote Control ID supports a maximum of 16 IDs.
For unused remote controllers, set Remote Control ID to Off.
3.2.2.2 Selecting IDs
All DVR unit features can be controlled with the remote controller; 16 units can be controlled
with a single remote controller. Unit IDs should be set.
1) Check the remote controller ID in DVR Menu.
2) Press the ID button on the remote controller.
3) Press the number button on the remote controller.
If the remote controller ID and the DVR ID are the same, the DVR buzzer beeps
3.2.2.3 Usable range of Remote Controller
3.2.2.4 Inserting and changing batteries in the Remote Controller
The remote controller takes AAA sized batteries.
1. Open the battery cover on
the back.
2. Check the positive(+) and
negative(-) battery poles
and insert or replace the
batteries.
3. Close the battery cover.
35
Page 37

Install Manual
3.2.3 Example of installation structure
3.2.3.1 Basic connection diagram
Connect the cameras, monitors and audio.
3.2.3.2 Extended connection diagram
Connect the cameras, monitors, audio, sensors, relays and other peripherals.
3.2.3.3 External storage and backup connection diagram
Connect a USB memory device or a “Samsung SVS-5E external HDD (eSATA)” unit.
36
Page 38

Install Manual
3.2.3.4 Internet/Intranet connection diagram
3.2.4 Basic setup
3.2.4.1 Video check
The product automatically powers on when the power cord is plugged in. Once it finishes
booting up, the default 16 channel split-screen is displayed.
If a password for the unit has been set, the password input dialog is displayed.
Only the numeric buttons work here and all others are temporarily disabled until
the correct password is entered. (The factory default has no p assword protection.)
3.2.4.2 Date & time setup
- Press [MENU] and select “Quick Setup” when the OSD menu appears.
- After selecting “System Time”, press [Enter].
37
Page 39

Install Manual
Time Zone
(1) Press [◀/▶] or [▲/▼] to select “Time Zone”, and then press [Enter].
(2) Press [◀/▶] to set the correct Time Zone, and then press [ESC].
Daylight Saving
(1) When selecting a Daylight Saving Time zone, Daylight Saving automatically changes to On,
and is Off for other time zones.
(2) To customize the start and end time of DST, use the [◀/▶] buttons and change Daylight
Saving to Custom.
(3) Changing Daylight Saving to Custom displays the Custom DST Setup options.
Upon clicking on Custom DST Setup, two setup methods display.
The first is for selecting a month and date to define the start and end times of DST.
38
Page 40

Install Manual
The second is for selecting a month, week, and day to define the start and end times of DST.
Date Format
(1) Press [◀/▶] or [▲/▼] to select “Date Format”, and then press [Enter]. Press [◀/▶] to
select a date format: YYYY/MM/DD, MM/DD/YYYY, or DD/MM/YYYY.
(2) Press [ESC] to exit edit mode.
Time
(1) Press [◀/▶] or [▲/▼] to select “Time”, and then press [Enter].
(2) Press [◀/▶] to individually select “Date” and “Time”. Press [▲/▼] to set the proper values
for each.
(3) Press [ESC] to exit edit mode.
Apply Date/Time
Setting a new date and/or time has a serious impact on the HDD recording file system. As such,
unlike other settings that are automatically saved, the date and time settings must be manually
saved to avoid the possibility of an inadvertent change. Click the [Apply Date / Time] button to
confirm and save the settings.
39
Page 41

Install Manual
(1) Press [◀/▶] or [▲/▼] to select “Apply Date / Time” and then press [Enter]. A confirmation
dialog is displayed as shown below.
(2) Press [◀/▶] or [▲/▼] to select “YES” and then press [Enter]. Press [ESC] to cancel the
new date/time and return to the original value from before.
3.2.4.3 Record setup
Press [Menu] and select “Quick Setup” when the OSD menu appears.
Program setup
This menu allows user to set resolution, frame rates, and quality for each channel individually.
Please refer to the “Record setup” sections for more information.
40
Page 42

Install Manual
Schedule Setup
Select the “Schedule & Event” option, and set the Day & Time options.
How to check the record status
If the record setup is configured correctly, [REC LED] on the front panel will
light up RED. Also, record status [S] will be displayed on the vi deo screen.
[S] indicates scheduled recording.
3.3 Using input/output terminals
3.3.1 Handling cable ends
The following details how to handle cables for the terminal block. Please note that different
gauges of wire are needed for stranded wire and solid wire.
41
Page 43

Install Manual
- Stranded wire: Strip 8 ~ 10㎜ of insulation off the end of the wire and solder it together. Use
AWG 22 ~ 26 wire.
- Solid wire: Strip 8 ~ 10㎜ of insulation off the end of the wire. Use AWG 20 ~ 26.
3.3.2 Wire insertion/removal
When inserting/removing wires to/from the terminal block, push the driver as shown below and
insert or remove the wire.
3.3.3 Sensor connections & settings
3.3.3.1 Specification
The sensor specifications are as follows.
No. of inputs 16 transistor input
Specification
Electric
capacity
Input types N.C, N.O support
Support Sensor Dry contact sensor
Connection method Insert stripped wire end into terminal block
Pulse width of usable
input
Output power Typical DC 12mA
Minimum 500ms
42
Page 44

Install Manual
Sensor input terminal connection
Connect sensors to S1 ~ S16 as illustrated in the figure below. Please note that the figure
shows connecting sensors with dry contacts. Refer to the section on handling wiring for more
information about connecting or disconnecting sensor wires.
Sensor Settings
(1) Press [Menu] and select “Event” when the OSD menu appears.
(2) Press [Enter] or [▼] to enter the submenu, select “Sensor” and press [Enter].
All
This allows setting all 16 sensors simultaneously to off or Normal Open (N.O.) / Normal Close
(N.C.).
(1) Set the input type after setting "All".
43
Page 45

Install Manual
Individual sensor
This option allows setting each of the 16 sensor input types individually.
(1) Select a sensor then press [Enter].
(2) Set the input type for the selected sensor.
(3) Press [ESC] to exit to the OSD menu when you are finished.
Sensor setup lets you choose whether or not to use sensors and their type, and
Record & Relay setup, while set separately, should be set according to the
sensor type. Please refer to the “Record setup”, the “Event Action” heading in
the “Event setup”, and “Relay out” sections for more information.
3.3.3.2 Relay connections & settings
Specification
The alarm specifications are as follows.
No. of outputs 4 relay outputs
Specification
Rated
current
Output type Dry contact
Connection method Insert stripped wire end into terminal block
DC 30V 1A
AC 125V 0.5A
44
Page 46

Install Manual
Relay out connection
Connect relays to R1 ~ R16 as illustrated in the figure below. The example shows how to
connect a warning light. Refer to the section on handling wiring for more information about
connecting or disconnecting relay wires.
Relay Out Settings
Relays can be triggered by following events; alarm sensor, motion detection, video loss, hard
disk fail, hard disk full, fan fail, password fail, and DDNS registration failure. Relays can also
be triggered remotely over the network using the Samsung Network Video Management
software.
For more information, refer to the user manual.
The user manual can be downloaded from www.samsungcctv.com
provided with the product.
or on the CD
3.3.3.3 D-I/O (Digital Input/Output) connection & settings
The D-I/O has 12 D-I/O ports and can accommodate 12 inputs/outputs. If sensors are working
45
Page 47

Install Manual
as Relay out, the Output can be operated with digital I/O. Also, if Input is operated, the
emergency recording is started. Then the emergency recording starts to record with the Event
Record value.
Specification
The D-I/O specifications are as follows.
No. of inputs/outputs 12
Specification
Rated
current
Output type DC 3V output
Connection method Connect stripped wire end with 15 pin D_SUB.
DC 3.3 ~ 5V
D-I/O Connection
D-I/O inputs/outputs are connected shown in the following figure. Please refer to the section on
handling wiring for information about connecting and disconnecting.
D-I/O Settings
The 12 D-I/O ports are split with 6 for input and 6 for output. They can be configured under the
Event Setup menu tab.
46
Page 48

Install Manual
For more information, refer to the user manual.
The user manual can be downloaded from www.s amsungcctv.com
CD provided with the product.
or on the
3.3.3.4 Serial communication terminal connections & settings
Serial communication terminal connection for Pan/Tilt/Zoom
PTZ cameras for the DVR unit can be connected through the COM port, and supported models
configured through the OSD menu.
The following figures illustrate how to connect PTZ cameras through the RS-422/485 port
(COM2/COM4) and how to connect other devices through the serial port connection terminals.c
Refer to the section on handling wiring for more information about connecting or disconnecting
wires.
[SVR-3200, 1680C, 1660C] [SVR-1645, 960C, 945]
47
Page 49

Install Manual
Serial Comm. Terminal Connection Diagram
COM1 connection diagram(RS-232)
COM2 connection diagram (RS-422/485)
RS-422(SVR-3200, 1680C, 1660C)
RS-485(All SVR series )
48
Page 50

Install Manual
COM3 connection diagram (RS-232)
PTZ, Keyboard Compatible List
Model Manufacturer
SDZ160/330, Samsung SPD
Keyboard SCC3000, Samsung SRX-100B
BOSCH AutoDome, TC8560X-4 BOSCH
PELCO(P), PELCO(D) PELCO
Honeywell 755/655, HRX-2000, ScanDome2 HONEYWELL
Sony EVI-D3x SONY
VT VPT-4x VT
AD SpeedDome AD
SungJin SJ372R1’ SUNGJIN
Samsung SCC641 SAMSUNG ELECTRONICS
Panasonic WV-CS850 PANASONIC
LG GAC-PT2 LG
Keyboard KBD300A, WGI SPD1800/2600 WEBGATE Inc.
Merit-Lilin FastDome MERIT
Elmo PTC200C ELMO
Canon VC-C4 CANON
SAMSUNG TECHWIN
HTC-230S D-MAX
RVision RVISION
Elbex ELBEX
VIDO VIDO
VICON VICON
Hunt HUNT
ORX-1000 SYSMANIA
Fine CRR-1600 LIVEI
49
Page 51

Install Manual
Tokina TOKINA
Kodicom KRE KODICOM
Nuvico NUVICO
Serial Settings
A total of four serial ports are available for the DVR. Two are RS-232C(Com1, Com3) and the
other two are RS-422/485(Com2, Com4).
The Serial Port settings are available under Communication > Remote.
The following options are provided for the Serial Port settings.
PTZ(Serial)
Select PTZ.
To control the PTZ operation via serial port, select PTZ in the Device options, and then set up a
serial port. To control the PTZ operation via coax protocol, you do not need to set up this option.
50
Page 52

Install Manual
Type
Select a serial port.
Protocol
Select a connected PTZ device.
Camera ID
Enter the ID of the selected camera.
Interface
Select one from among Com2 to 4.
To use RS-232, select Com3. For RS-422 or 485, select Com2 or 4.
Baud rate/Parity/Stop Bit/Data Bit
Enter the same settings as the ones for the PTZ device.
Idle Time
Activate or disable PTZ Home, and set up a standby duration for the device before
moving to
PTZ home.
PTZ(Coax)
The Coax Protocol option does not support normal PTZ protocols, but rather supports the Pelco
Standard and Extended Protocols.
The standard protocol supports basic PTZ functions such as PTZ and presets. The extended
protocol supports more expansive features such as menu control and video playback in addition
to the basic PTZ functions.
To use this option, a PTZ device must be embedded with a coax standard or extended protocol.
51
Page 53

Install Manual
Type
Select Coax.
Protocol
Select Pelco or Pelco Extended according to the coax protocol type of Pelco camera.
AD Dome does not support menu control, Presets or AUX when setup with a
coax protocol.
Idle Time
Activate or disable PTZ Home, and setup a standby duration of the device before moving to
PTZ home.
3.3.3.5 External device connection using Serial port
Text Input Device Connection (ATM / POS / Access Control)
Text and video data from POS/ATM terminals can be synchronously recorded through
COM1/RS-232.
As shown in the above figure, COM1/RS-232 (9-pin D-SUB) are used to receive text data that is
configured under the OSD Communication > Event menu.
52
Page 54

Install Manual
Serial Settings (COM1)
(1) In the OSD menu, navigate to Communication > Serial.
(2) Set the “Serial Number” option to COM1 for text.
(3) Set the Baud Rate/Parity/Stop bit/Data bit options identical to the Input device.
Text Settings
(1) On the OSD menu, select Event Setup > Text.
(2) Set text and relations options.
Some external devices may not be recognized. Please consult your product
distributor prior to installation.
3.3.3.6 USB device connections
The USB ports are mainly used to copy video data to supported external USB storage devices
like USB memory sticks (copies data within an hour).
53
Page 55

Install Manual
Supported USB devices conform to the following specifications.
USB Spec. Ver. 2.0
Supported device
types
Output
voltage/current
USB memory stick
Max. 200mA per DC 5V / Port
The storage device should be formatted with the FAT32 file system.
Supported storage devices are automatically recognized when copying. To copy video, set
copying options in the Copy dialog, select the storage device, then copy the data.
[CD/DVD Copy] [RE4 Copy]
Select the channel to copy.
[SVR-960C/945] [SVR-1680C/1660C/1645] [SVR-3200]
54
Page 56

Install Manual
[AVI Copy]
Some USB storage devices may require additional software and drivers. Care
should be taken in these cases as the DVR may not recognize some USB
products like this. If copied files do not playback on another computer, double
check that proper playback software and codecs are installed.
3.3.3.7 Video in/out connections
The DVR video input/output are “Loop through" and detect connection status automatically to
set terminal resistance.
For example, when only video input is connected, terminal resistance is internally set to 75Ω.
However, when video input and output are connected, terminal resistance is set to Hi-Z. As such,
when input and output are connected, the external output device should have its resistance set
to 75Ω.
55
Page 57

Install Manual
3.3.3.8 Audio in/out connections
There are 4 RCA audio in and 12 D-SUB audio in.
All 16 audio sources can be monitored through a single output.
The 12 D-SUB audio inputs use terminals 5 ~ 16 and are connected as shown in the following
figure.
3.3.4 External Storage connections
3.3.4.1 eSATA Port
One eSATA external storage device can be connected through the eSATA port in the back of the
DVR unit for a maximum of 8TB of storage space.
The eSATA port only supports the “SVS-5E” eSATA external HDD from Samsung
Techwin.
3.3.4.2 eSATA device connection
Use the eSATA port in the back of the DVR unit to connect your SVS-5E external HDD. External
storage requires its own power source as the DVR unit does not supply power to it.
Since some external devices may not be recognized if connected with the DVR
unit on, the following procedure should be followed.
56
Page 58

Install Manual
1. Turn DVR power OFF.
2. Connect external device and eSATA interface cable.
3. Turn external device power ON.
4. Turn DVR Power ON.
3.3.4.3 Supported HDD
Refer to the appendix in the back of the manual for information on supported HDDs.
3.3.4.4 Registering & formatting HDDs
When the DVR is first booted after a new HDD is physically installed, the "Disk Manager"
automatically runs as shown in the following figure.
If the “Disk Manager” does not run, check that the HDD is properly installed.
(1) Press [Enter] with “Disk Manager” selected.
(2) Press [▲/▼] to select the new HDD (“No” under the “Enabled” column heading), and then
press [Enter].
(3) If prompted to format the disk, select “YES”.
(4) Close “Disk Manager” by pressing [ESC].
3.3.4.5 Attaching & Detaching HDD
Please follow the instructions below to add or replace an HDD.
Attaching an HDD
Attach the enclosed HDD fixture screws to both sides of the HDD.
With 2 fixture screws to a side, attach 4 screws to the HDD.
The following picture shows an HDD attached with 4 fixture screws.
57
Page 59

Install Manual
Once the HDD is attached with the screws, insert it into an HDD bracket.
For the location of HDDs, IntA is the bottom right, IntB is the upper right, IntC is the bottom left,
and IntD is the upper left.
The following picture shows an HDD being inserted to IntA.
When attaching an HDD, first insert the front part of the HDD to the bracket, and then press
down on the other side with the SATA port.
Once the HDD is inserted, connect the SATA and power cables.
As shown in the picture below, connect the enclosed SATA cable, and then an SMPS power
cable.
The following picture shows the product attached with the maximum 4 HDDs.
58
Page 60

Install Manual
After inserting the HDD, fasten the HDD fixture bracket as shown in the picture below.
Now the HDD is fully attached to the product.
59
Page 61

Install Manual
To enable the newly attached HDD, you must change the availability of the HDD to "Yes" under
the DVR Disk menu.
To access the menu, go to Menu > System Settings > Disk > Disk Manager.
The newly attached HDD will display in the HDD list with No in the Availability pane.
To change the availability, place the cursor on No and then press Enter.
When a dialog window appears, select "Yes." Now the HDD is ready to use.
60
Page 62

Install Manual
Detaching HDD
Detaching an HDD is the same as attaching it, but in reverse order.
Loosen the HDD fixture bracket. Unplug the SATA and power cables.
Detach the HDD.
When detaching an HDD, first lift up the back part of the HDD with the SATA port, and then the
front part. Remove or keep the HDD fixture screws in case you want to attach an HDD later.
61
Page 63

Install Manual
Go to Menu > System Settings > Disk > Disk Manager.
Select the detached HDD, and the press Enter. Select "Yes" in the dialog window and remove
the HDD from the HDD list.
62
Page 64

Install Manual
3.3.5 Remote monitoring & control
Connections can be made through Internet/Intranet by using the remote computer. This
connection can be used to control DVRs and monitor areas same as local spot.
3.3.5.1 Ethernet connection
(1) Shut the DVR power off.
(2) Connect the Ethernet cable to the DVR and hub or router.
(3) Turn the DVR power on.
To prevent damage to the DVR, turn the power on after connecting the Ethernet
cable. The Ethernet cable should be securely connected. After powering on the
DVR, check the connection.
3.3.5.2 Network settings
The following describes settings for Ethernet.
Refer to “User Manual” when using xDSL for detailed setup instructions.
The user manual can be downloaded from www.s amsungcctv.com
the CD provided with the product.
or found on
63
Page 65

Install Manual
When using Ethernet
Set the type to Ethernet and fill in the IP address, Netmask, Gateway, and DNS information
provided by your network administrator. Use Up/Down direction keys or the mouse wheel to
select the items, and then setup with the appropriate values.
When using PPPoE
Change the network configuration type to xDSL then navigate to the xDSL menu.
Change the port from Ethernet. (IMPORTANT: You must remember the port.)
In the xDSL screen, input the login ID and password that you received when you registered for
PPPoE.
When using DDNS
Change the DDNS polling interval to more than 1 minute and enter the login ID and password
for your DDNS server.
64
Page 66

Install Manual
Trouble Shooting
1. DVR does not boot
z Check power
z Check power cord
2. Monitor does not display camera video
z Check monitor power
z Check cable between the monitor and DVR
z Check monitor cable port
z Check that DVR power is on
3. Some channels do not display images
z Check camera power
z Check camera video input
z Check DVR video input port
z Check whether the Screen > Activity option is on/off
z Check the Monitor > Covert option for privacy settings
4. DVR does not record
z Check Disk Manager to see that the HDD is installed
z Check the Record settings
5. DVR does not playback
z Check the Record settings
z Check for button activation
6. Video is overly bright / dark
z Check the camera settings
z Check that video and power cables are properly plugged in
z Check brightness and contrast settings under the “Screen” menu
7. Remote controller does not work
z Check the Remote controller battery
z Check the Remote controller ID
z Check Remote controller usage specifications
65
Page 67

Install Manual
8. Front buttons do not work
z Check DVR power
z Check screen lock status
9. Cannot connect to network
z Check that network cable is properly connected
z Check DVR IP address
z Check PC IP address
z Run a ping test
10. When to contact your reseller
If any of the following happen, immediately turn of the DVR and contact the reseller that
you purchased it from.
z The product exhibits extremely abnormal behavior, e.g. strange noises, odors, or
smoke
z The power jack is damaged
z Rain, water, or other liquids get into the product
z The product does not work as described in the user manual
z The product has fallen and become damaged
z Product performance changes significantly
66
Page 68

Install Manual
Compatible HDD List
Western Digital
Capacity Model
1000GB WD10EVCS
750GB WD7500AVCS
500GB WD5000AVVS
320GB WD3200AVVS
Compatible Media List
DVD-R manufacture CD-R manufacture
Mitsubishi (16X) Mitsubishi (16X)
TDK (16X) TDK (16X)
Imation (16X) Imation (16X)
Sony (16X) Sony (16X)
Specification
Item Description
Display
SVR-3200 : 32 composite video 0.5–2 Vpp, 75 ohm
automatic termination
SVR-1680C/1660C/1645 : 16 composite video 0.5–2
Video
Resolution 704x480 NTSC
Live
Inputs
Frame rate
Vpp, 75 ohm automatic termination
SVR-960C/945 : 9 composite video 0.5–2 Vpp, 75
ohm automatic termination
SVR-480 : 4 composite video 0.5–2 Vpp, 75 ohm
automatic termination
SVR-3200 : NTSC(960Cfps), PAL(800fps)
SVR-1680C/1660C/1645 : NTSC(480fps),
PAL(400fps)
SVR-960C/945 : NTSC(270fps), PAL(225fps)
SVR-480 : NTSC(120fps), PAL(100fps)
Resolution 704x480 NTSC, 704x576 PAL
SVR-3200/1680C/1660C/1645 : 1/4/9/10/16
Multi Screen
67
SVR-960C/945 : 1/4/9
SVR-480 : 1/4
Page 69

Install Manual
Performance
Recording
Compression MPEG-4
SVR-3200 : 480fps@704x480, 960Cfps@704x240,
Record Rate/NTSC
960Cfps@352x240
SVR-1680C : 480fps@704x480, 480fps@704x240,
480fps@352 x 240
SVR-1660C/1645 : 120fps@704x480,
240fps@704x240, 480fps@352x240
SVR-960C/945 : 120fps@704x480,
240fps@704x240, 270fps@352x240
SVR-480 : 120fps@704x480, 120fps@704x240,
120fps@352x240
SVR-3200 : 400fps@704x576, 800fps@704x288,
800fps@352x288
SVR-1680C : 400fps@704x576, 400fps@704x288,
400fps@352x288
Record Rate/PAL
SVR-1660C/1645 : 100fps@704x576,
200fps@704x288, 400fps@352x288
SVR-960C/945 : 100fps@704x576,
200fps@704x288, 225fps@352x288
SVR-480: 100fps@704x576,
100fps@704x288, 100fps@352x288
Mode Manual, Schedule, Event, Emergency
Overwrite modes Continuous
Pre-Event Up to 5 sec.
Post-Event Up to 60 sec.
Search &
Date/time, Event, Calendar, Thumbnail, Bookmark
Search mode
Playback
Text(Exclusive viewer)
Frame rate 480 fps D1 NTSC, 400 fps D1 PAL
REW, FWD, Frame advance (control keys and jog
Playback function
shuttle)
SVR-3200/1680C : 16 Mbps
Network
Transmission speed
SVR-1660C/1645/960C/945/480 : 9 Mbps
Bandwidth control Automatic
Multi Stream MPEG-4(Dual Streams)/JPEG
Remote Users Up to 10 simultaneous users
68
Page 70

Install Manual
Protocol support
Monitoring CMS Software(SNM-128S/P), Built-in web server
Storage
External HDD
DVD Writer (Back-up) DVD-R / CD-R
USB (Back-up) 2 External USB Ports(USB 2.0)
File Format (Back-up)
Security
Data Authentication Watermark
Interface
Maximum Capacity
Internal HDD
Password Protection 10 User Level
TCP/IP, DHCP, DNS, DDNS, HTTP, ARP, ICMP
and NTP
SVR-3200/1680C/1660C : 16 TB
SVR-1645/960C/945/480 : 8 TB
SVR-3200/1680C/1660C : 4 HDD
SVR-1645/960C/945/480 : 2 HDD
SVR-3200/1680C/1660C : External eSATA 2 port
SVR-1645/960C/945/480 : External eSATA 1 port
BMP, AVI, Proprietary format / JPG(Exclusive
viewer)
Monitors
Main Composite BNC, 1 Vp-p, 75 ohm, Multi-screen, Menu, Playback
Sub Composite
Loop Outputs
Audio
Output 1 line, 100k ohm
Compression ADPCM
VGA
Inputs
Analog RGB 800x600, 1024x768, 1280x1024
resolution
Monitor2~4 : SVR-3200/1680C(Menu, Event Pop-
up, Covert, Display Switching)
Sport : SVR-1660C/1645/960C/945/480(event Pop-
up, Display switching), 1 Vp-p, 75 ohm
SVR-3200 : None
SVR-1680C/1660C/1645 : 16 Output, 1 Vpp, 75
ohm
SVR-960C/945 : 9 Output, 1 Vpp, 75 ohm
SVR-480 : 4 Output, 1 Vpp, 75 ohm
SVR-3200/1680C/1660C/1645 : 16 input, 30k ohm
SVR-960C/945 : 9 input
Sampling rate 16 kHz
SVR-3200/1680C/1660C/1645 : 16 Input, NO/NC
Alarm
Inputs
69
SVR-960C/945 : 9 Input
SVR-480 : 4 Input
Page 71

Install Manual
Screw terminal 4 relay outputs, NO/NC
Outputs
(SVR-480 : Screw terminal 2 relay outputs, NO/NC)
Remote notification Notification via e-mail
Connections
Ethernet RJ45 10/100 Base-T
Serial interface RS232
SVR-3200/1680C/1660C : RS485/RS422
PTZ control interface
SVR-1645/960C/945/480 : RS485
Via coax cable (SVR-1680C/1660C/960C)
PTZ Keyboard RS485, max. signal voltage ±12 V
USB 2 USB 2.0 ports
SVR-3200/1680C/1660C : External eSATA 2 port
eSATA
SVR-1645/960C/945/480 : External eSATA 1 port
Application Support ATM/POS, Mouse, Remote Controller
Dome
Samsung Techwin, Pelco D, Pelco P, Pelco
Supported PTZ cameras
Protocols
Coaxitron, Panasonic, Bosch, SEC
General
Electrical
Input Voltage 100 to 240 VAC ±10%; 50/60 Hz, Auto-ranging
Max. 65 W (with 1x HDD)
Power consumption
Max. 88 W (with 2x HDD)
Max. 90 W (with 4x HDD)
Environmental
Operating Temperature +5°C to +40°C (+32°F to +104°F)
Operating Humidity 0% RH to 60% RH
445 x 88 x 388 mm (17.5 x 3.5 x 15.3 in)
SVR-945 : 300 x 88 x 302 mm(118.11 x 34.65 x
Mechanical
Dimensions (W x H x D)
130.7 in)
SVR-480 : 350 x 88 x 401.3 mm(13.77 x 3.46 x
15.79 in)
Approx. 10 kg (22.1 lb), SVR-945 : 5 kg (11 Ib)
Weight (1x hard disks)
SVR-480 : 5.6kg
For mounting one unit in an EIA 19-inch rack
Rack mount kit
(SVR-945 Stand type)
English, Spanish, French, German, Italian, Polish,
Portuguese, Russian, Turkish, Japanese, Czech,
Language
Serbian, Swedish, Rumanian, Danish, Chinese,
Korean, Taiwanese
70
Page 72

Install Manual
Dimensions
SVR-3200, SVR-1680C, SVR-1660C, SVR-1645
71
Page 73

Install Manual
SVR-960C
72
Page 74

Install Manual
SVR-945
73
Page 75

Install Manual
SVR-480
74
Page 76

Install Manual
This product uses some Software programs which are distributed under the GNU GPL(General
Public License)/LGPL license, and the program is licensed as is without warranty of any kind. ,
The program can be obtained from us for a period of three years after our last distribution of this
product by sending email to help.cctv@samsung.com. If you want to obtain the complete
Corresponding Source Code in the physical medium such as CD-ROM by airmail, the cost of
physically performing source distribution might be charged. This offer is valid to anyone in
receipt of this information. For more additional information visit http://samsungcctv.com/gpl
GPL Software : linux kernel, busybox, boa, dhcpcd, iproute2, rp-pppoe, smartsuite.
GNU GENERAL PUBLIC LICENSE
Version 2, June 1991
Copyright (C) 1989, 1991 Free Software Foundation, Inc.
51 Franklin Street, Fifth Floor, Boston, MA 02110-1301, USA
Everyone is permitted to copy and distribute verbatim copies of this license document, but
changing it is not allowed.
Preamble
The licenses for most software are designed to take away your freedom to share and change it.
By contrast, the GNU General Public License is intended to guarantee your freedom to share
and change free software--to make sure the software is free for all its users. This General Public
License applies to most of the Free Software Foundation's software and to any other program
whose authors commit to using it. (Some other Free Software Foundation software is covered
by the GNU Lesser General Public License instead.) You can apply it to your programs, too.
When we speak of free software, we are referring to freedom, not price. Our General Public
Licenses are designed to make sure that you have the freedom to distribute copies of free
software (and charge for this service if you wish), that you receive source code or can get it if
you want it, that you can change the software or use pieces of it in new free programs; and that
you know you can do these things.
To protect your rights, we need to make restrictions that forbid anyone to deny you these rights
or to ask you to surrender the rights. These restrictions translate to certain responsibilities for
you if you distribute copies of the software, or if you modify it.
For example, if you distribute copies of such a program, whether gratis or for a fee, you must
give the recipients all the rights that you have. You must make sure that they, too, receive or can
get the source code. And you must show them these terms so they know their rights.
We protect your rights with two steps: (1) copyright the software, and (2) offer you this license
which gives you legal permission to copy, distribute and/or modify the software.
75
Page 77

Install Manual
Also, for each author's protection and ours, we want to make certain that everyone understands
that there is no warranty for this free software. If the software is modified by someone else and
passed on, we want its recipients to know that what they have is not the original, so that any
problems introduced by others will not reflect on the original authors' reputations.
Finally, any free program is threatened constantly by software patents. We wish to avoid the
danger that redistributors of a free program will individually obtain patent licenses, in effect
making the program proprietary. To prevent this, we have made it clear that any patent must be
licensed for everyone's free use or not licensed at all.
The precise terms and conditions for copying, distribution and modification follow.
TERMS AND CONDITIONS FOR COPYING, DISTRIBUTION AND MODIFICATION
0. This License applies to any program or other work which contains a notice placed by the
copyright holder saying it may be distributed under the terms of this General Public License.
The "Program", below, refers to any such program or work, and a "work based on the
Program" means either the Program or any derivative work under copyright law: that is to say,
a work containing the Program or a portion of it, either verbatim or with modifications and/or
translated into another language. (Hereinafter, translation is included without limitation in the
term "modification".) Each licensee is addressed as "you".
Activities other than copying, distribution and modification are not covered by this License;
they are outside its scope. The act of running the Program is not restricted, and the output
from the Program is covered only if its contents constitute a work based on the Program
(independent of having been made by running the Program). Whether that is true depends
on what the Program does.
1. You may copy and distribute verbatim copies of the Program's source code as you receive it,
in any medium, provided that you conspicuously and appropriately publish on each copy an
appropriate copyright notice and disclaimer of warranty; keep intact all the notices that refer
to this License and to the absence of any warranty; and give any other recipients of the
Program a copy of this License along with the Program.
You may charge a fee for the physical act of transferring a copy, and you may at your option
offer warranty protection in exchange for a fee.
2. You may modify your copy or copies of the Program or any portion of it, thus forming a work
based on the Program, and copy and distribute such modifications or work under the terms
of Section 1 above, provided that you also meet all of these conditions:
a) You must cause the modified files to carry prominent notices stating that you changed
the files and the date of any change.
b) You must cause any work that you distribute or publish, that in whole or in part contains
or is derived from the Program or any part thereof, to be licensed as a whole at no
76
Page 78

Install Manual
charge to all third parties under the terms of this License.
c) If the modified program normally reads commands interactively when run, you must
cause it, when started running for such interactive use in the most ordinary way, to print
or display an announcement including an appropriate copyright notice and a notice that
there is no warranty (or else, saying that you provide a warranty) and that users may
redistribute the program under these conditions, and telling the user how to view a copy
of this License. (Exception: if the Program itself is interactive but does not normally print
such an announcement, your work based on the Program is not required to print an
announcement.)
These requirements apply to the modified work as a whole. If identifiable sections of that
work are not derived from the Program, and can be reasonably considered independent
and separate works in themselves, then this License, and its terms, do not apply to
those sections when you distribute them as separate works. But when you distribute the
same sections as part of a whole which is a work based on the Program, the distribution
of the whole must be on the terms of this License, whose permissions for other
licensees extend to the entire whole, and thus to each and every part regardless of who
wrote it.
Thus, it is not the intent of this section to claim rights or contest your rights to work
written entirely by you; rather, the intent is to exercise the right to control the distribution
of derivative or collective works based on the Program.
In addition, mere aggregation of another work not based on the Program with the
Program (or with a work based on the Program) on a volume of a storage or distribution
medium does not bring the other work under the scope of this License.
3. You may copy and distribute the Program (or a work based on it, under Section 2) in object
code or executable form under the terms of Sections 1 and 2 above provided that you also
do one of the following:
a) Accompany it with the complete corresponding machine-readable source code, which
must be distributed under the terms of Sections 1 and 2 above on a medium
customarily used for software interchange; or,
b) Accompany it with a written offer, valid for at least three years, to give any third party,
for a charge no more than your cost of physically performing source distribution, a
complete machine-readable copy of the corresponding source code, to be distributed
under the terms of Sections 1 and 2 above on a medium customarily used for software
interchange; or,
c) Accompany it with the information you received as to the offer to distribute
corresponding source code. (This alternative is allowed only for noncommercial
distribution and only if you received the program in object code or executable form with
77
Page 79

Install Manual
such an offer, in accord with Subsection b above.)
The source code for a work means the preferred form of the work for making
modifications to it. For an executable work, complete source code means all the source
code for all modules it contains, plus any associated interface definition files, plus the
scripts used to control compilation and installation of the executable. However, as a
special exception, the source code distributed need not include anything that is
normally distributed (in either source or binary form) with the major components
(compiler, kernel, and so on) of the operating system on which the executable runs,
unless that component itself accompanies the executable.
If distribution of executable or object code is made by offering access to copy from a
designated place, then offering equivalent access to copy the source code from the
same place counts as distribution of the source code, even though third parties are not
compelled to copy the source along with the object code.
4. You may not copy, modify, sublicense, or distribute the Program except as expressly
provided under this License. Any attempt otherwise to copy, modify, sublicense or distribute
the Program is void, and will automatically terminate your rights under this License.
However, parties who have received copies, or rights, from you under this License will not
have their licenses terminated so long as such parties remain in full compliance.
5. You are not required to accept this License, since you have not signed it. However, nothing
else grants you permission to modify or distribute the Program or its derivative works. These
actions are prohibited by law if you do not accept this License. Therefore, by modifying or
distributing the Program (or any work based on the Program), you indicate your acceptance
of this License to do so, and all its terms and conditions for copying, distributing or modifying
the Program or works based on it.
6. Each time you redistribute the Program (or any work based on the Program), the recipient
automatically receives a license from the original licensor to copy, distribute or modify the
Program subject to these terms and conditions. You may not impose any further restrictions
on the recipients' exercise of the rights granted herein. You are not responsible for enforcing
compliance by third parties to this License.
7. If, as a consequence of a court judgment or allegation of patent infringement or for any other
reason (not limited to patent issues), conditions are imposed on you (whether by court order,
agreement or otherwise) that contradict the conditions of this License, they do not excuse
you from the conditions of this License. If you cannot distribute so as to satisfy
simultaneously your obligations under this License and any other pertinent obligations, then
as a consequence you may not distribute the Program at all.
For example, if a patent license would not permit royalty-free redistribution of the Program
by all those who receive copies directly or indirectly through you, then the only way you
78
Page 80

Install Manual
could satisfy both it and this License would be to refrain entirely from distribution of the
Program.
If any portion of this section is held invalid or unenforceable under any particular
circumstance, the balance of the section is intended to apply and the section as a whole is
intended to apply in other circumstances.
It is not the purpose of this section to induce you to infringe any patents or other property
right claims or to contest validity of any such claims; this section has the sole purpose of
protecting the integrity of the free software distribution system, which is implemented by
public license practices. Many people have made generous contributions to the wide range
of software distributed through that system in reliance on consistent application of that
system; it is up to the author/donor to decide if he or she is willing to distribute software
through any other system and a licensee cannot impose that choice.
This section is intended to make thoroughly clear what is believed to be a consequence of
the rest of this License.
8. If the distribution and/or use of the Program is restricted in certain countries either by
patents or by copyrighted interfaces, the original copyright holder who places the Program
under this License may add an explicit geographical distribution limitation excluding those
countries, so that distribution is permitted only in or among countries not thus excluded. In
such case, this License incorporates the limitation as if written in the body of this License.
9. The Free Software Foundation may publish revised and/or new versions of the General
Public License from time to time. Such new versions will be similar in spirit to the present
version, but may differ in detail to address new problems or concerns.
Each version is given a distinguishing version number. If the Program specifies a version
number of this License which applies to it and "any later version", you have the option of
following the terms and conditions either of that version or of any later version published by
the Free Software Foundation. If the Program does not specify a version number of this
License, you may choose any version ever published by the Free Software Foundation.
10. If you wish to incorporate parts of the Program into other free programs whose distribution
conditions are different, write to the author to ask for permission. For software which is
copyrighted by the Free Software Foundation, write to the Free Software Foundation; we
sometimes make exceptions for this. Our decision will be guided by the two goals of
preserving the free status of all derivatives of our free software and of promoting the sharing
and reuse of software generally.
NO WARRANTY
11. BECAUSE THE PROGRAM IS LICENSED FREE OF CHARGE, THERE IS NO
WARRANTY FOR THE PROGRAM, TO THE EXTENT PERMITTED BY APPLICABLE LAW.
EXCEPT WHEN OTHERWISE STATED IN WRITING THE COPYRIGHT HOLDERS
79
Page 81

Install Manual
AND/OR OTHER PARTIES PROVIDE THE PROGRAM "AS IS" WITHOUT WARRANTY OF
ANY KIND, EITHER EXPRESSED OR IMPLIED, INCLUDING, BUT NOT LIMITED TO, THE
IMPLIED WARRANTIES OF MERCHANTABILITY AND FITNESS FOR A PARTICULAR
PURPOSE. THE ENTIRE RISK AS TO THE QUALITY AND PERFORMANCE OF THE
PROGRAM IS WITH YOU. SHOULD THE PROGRAM PROVE DEFECTIVE, YOU
ASSUME THE COST OF ALL NECESSARY SERVICING, REPAIR OR CORRECTION.
12. IN NO EVENT UNLESS REQUIRED BY APPLICABLE LAW OR AGREED TO IN WRITING
WILL ANY
COPYRIGHT HOLDER, OR ANY OTHER PARTY WHO MAY MODIFY AND/OR
REDISTRIBUTE THE PROGRAM AS PERMITTED ABOVE, BE LIABLE TO YOU FOR
DAMAGES, INCLUDING ANY GENERAL, SPECIAL, INCIDENTAL OR CONSEQUENTIAL
DAMAGES ARISING OUT OF THE USE OR INABILITY TO USE THE PROGRAM
(INCLUDING BUT NOT LIMITED TO LOSS OF DATA OR DATA BEING RENDERED
INACCURATE OR LOSSES SUSTAINED BY YOU OR THIRD PARTIES OR A FAILURE OF
THE PROGRAM TO OPERATE WITH ANY OTHER PROGRAMS), EVEN IF SUCH
HOLDER OR OTHER PARTY HAS BEEN ADVISED OF THE POSSIBILITY OF SUCH
DAMAGES.
GNU LESSER GENERAL PUBLIC LICENSE
Version 3, 29 June 2007
Copyright (C) 2007 Free Software Foundation, Inc. <http://fsf.org/> Everyone is permitted to
copy and distribute verbatim copies of this license document, but changing it is not allowed.
This version of the GNU Lesser General Public License incorporates the terms and
conditions of version 3 of the GNU General Public License, supplemented by the additional
permissions listed below.
0. Additional Definitions.
As used herein, "this License" refers to version 3 of the GNU Lesser General Public
License, and the "GNU GPL" refers to version 3 of the GNU General Public License.
"The Library" refers to a covered work governed by this License, other than an Application
or a Combined Work as defined below.
80
Page 82

Install Manual
An "Application" is any work that makes use of an interface provided by the Library, but
which is not otherwise based on the Library. Defining a subclass of a class defined by the
Library is deemed a mode of using an interface provided by the Library.
A "Combined Work" is a work produced by combining or linking an Application with the
Library. The particular version of the Library with which the Combined Work was made is
also called the "Linked Version".
The "Minimal Corresponding Source" for a Combined Work means the Corresponding
Source for the Combined Work, excluding any source code for portions of the Combined
Work that, considered in isolation, are based on the Application, and not on the Linked
Version.
The "Corresponding Application Code" for a Combined Work means the object code
and/or source code for the Application, including any data and utility programs needed for
reproducing the Combined Work from the Application, but excluding the System Libraries of
the Combined Work.
1. Exception to Section 3 of the GNU GPL.
You may convey a covered work under sections 3 and 4 of this License without being
bound by section 3 of the GNU GPL.
2. Conveying Modified Versions.
If you modify a copy of the Library, and, in your modifications, a facility refers to a function
or data to be supplied by an Application that uses the facility (other than as an argument
passed when the facility is invoked), then you may convey a copy of the modified
version:
a) under this License, provided that you make a good faith effort to ensure that, in the event
an Application does not supply the function or data, the facility still operates, and performs
whatever part of its purpose remains meaningful, or b) under the GNU GPL, with none of
the additional permissions of this License applicable to that copy.
3. Object Code Incorporating Material from Library Header Files.
81
Page 83

Install Manual
The object code form of an Application may incorporate material from a header file that is
part of the Library. You may convey such object code under terms of your choice, provided
that, if the incorporated material is not limited to numerical parameters, data structure
layouts and accessors, or small macros, inline functions and templates (ten or fewer lines in
length), you do both of the following:
a) Give prominent notice with each copy of the object code that the Library is used in it and
that the Library and its use are covered by this License.
b) Accompany the object code with a copy of the GNU GPL and this license document.
4. Combined Works.
You may convey a Combined Work under terms of your choice that, taken together,
effectively do not restrict modification of the portions of the Library contained in the
Combined Work and reverse engineering for debugging such modifications, if you also do
each of the following:
a) Give prominent notice with each copy of the Combined Work that the Library is used in
and that the Library and its use are covered by this License.
b) Accompany the Combined Work with a copy of the GNU GPL and this license
document.
c) For a Combined Work that displays copyright notices during execution, include the
copyright notice for the Library among these notices, as well as a reference directing the
user
to the copies of the GNU GPL and this license document.
d) Do one of the following:
0) Convey the Minimal Corresponding Source under the terms of this License, and the
Corresponding Application Code in a form suitable for, and under terms that permit,
the user to recombine or relink the Application with a modified version of the Linked
Version to produce a modified Combined Work, in the manner specified by section 6
of the GNU GPL for conveying Corresponding Source.
82
Page 84

Install Manual
1) Use a suitable shared library mechanism for linking with the Library. A suitable
mechanism is one that (a) uses at run time a copy of the Library already present on
the user's computer system, and (b) will operate properly with a modified version
of the Library that is interface-compatible with the Linked Version.
e) Provide Installation Information, but only if you would otherwise be required to provide
such information under section 6 of the GNU GPL, and only to the extent that such
information is necessary to install and execute a modified version of the Combined
Work
produced by recombining or relinking the Application with a modified version of the
Linked
Version. (If you use option 4d0, the Installation Information must accompany the Minimal
Corresponding Source and Corresponding Application Code. If you use option 4d1, you
must provide the Installation Information in the manner specified by section 6 of the
GNU
GPL for conveying Corresponding Source.)
5. Combined Libraries.
You may place library facilities that are a work based on the Library side by side in a single
library together with other library facilities that are not Applications and are not covered by
this License, and convey such a combined library under terms of your choice, if you do both
of the following:
a) Accompany the combined library with a copy of the same work based on the Library,
uncombined with any other library facilities, conveyed under the terms of this License.
b) Give prominent notice with the combined library that part of it is a work based on the
Library, and explaining where to find the accompanying uncombined form of the same work.
6. Revised Versions of the GNU Lesser General Public License.
The Free Software Foundation may publish revised and/or new versions of the GNU
Lesser General Public License from time to time. Such new versions will be similar in spirit
to the present version, but may differ in detail to address new problems or concerns.
83
Page 85

Install Manual
Each version is given a distinguishing version number. If the Library as you received it
specifies that a certain numbered version of the GNU Lesser General Public License "or any
later version"
applies to it, you have the option of following the terms and conditions either of that
published version or of any later version published by the Free Software Foundation. If the
Library as you
received it does not specify a version number of the GNU Lesser General Public License,
you may choose any version of the GNU Lesser General Public License ever published by
the Free Software Foundation.
If the Library as you received it specifies that a proxy can decide whether future versions
of the GNU Lesser General Public License shall apply, that proxy's public statement of
acceptance of any version is permanent authorization for you to choose that version for the
Library.
84
Page 86

Install Manual
85
Page 87

Install Manual
86
 Loading...