

Page 1
VIDEO
CASSETTE RECORDER
SV-665B SV-665X
SV-660B SV-660X
SV-460B SV-460X
SV-265B SV-260X
SV-260B
Instruction Manual
PAL
www.samsungvcr.com
Page 2
3
Contents
◆ FOREWORD
■ Safety Instructions......................................................................................... 5
◆ VCR OVERVIEWS
■ Front View of the VCR................................................................................... 6
■ Rear View of the VCR ................................................................................... 7
■ Infrared Remote Control................................................................................ 8
■ Display Indicator............................................................................................ 9
■ Accessories................................................................................................... 9
◆ CONNECTING YOUR VIDEO CASSETTE RECORDER
■ Deciding How to Connect Your VCR............................................................. 10
■ Connecting Your VCR to the TV using the Coaxial Cable............................. 11
■ Connecting Your VCR to the TV using the RCA Cable................................. 11
■ Connecting Other Equipment to Your VCR................................................... 12
■ Plug & Auto Set Up........................................................................................ 13
■ Tuning your Television for the VCR............................................................... 14
◆ SETTING UP YOUR VIDEO CASSETTE RECORDER
■ Inserting Batteries in the Remote Control...................................................... 15
■ Setting the Date and Time............................................................................. 15
■ Displaying/Hiding On-Screen Information ..................................................... 16
■ Choosing Your Language.............................................................................. 16
■ Setting the VCR Output Channel................................................................... 17
■ Presetting the Stations Automatically............................................................ 18
■ Presetting the Stations Manually................................................................... 19
■ Clearing a Preset Station............................................................................... 20
■ Changing the Preset Station Table................................................................ 21
◆ RECORDING TELEVISION BROADCASTS
■ Selecting the Cassette Type.......................................................................... 22
■ Selecting the Recording Speed..................................................................... 22
■ NICAM (SV-665X/SV-660X Only) ................................................................. 23
■ Protecting a Recorded Cassette.................................................................... 24
■ Recording a Programme Immediately........................................................... 24
■ Recording a Programme with Automatic Stop............................................... 25
■ Using the G-CODE Feature (SV-665B/665X/265B Only).............................. 26
■ Modifying G-CODE Programming (SV-665B/665X/265B Only).................... 27
■ Using the Timer Programming Feature......................................................... 28
■ Checking a Preset Recording........................................................................ 29
■ Cancelling a Preset Recording...................................................................... 29
◆ PLAYING BACK
■ Playing a Cassette......................................................................................... 30
■ Adjusting Picture Alignment Automatically (SV-260B/SV-260X Only)........... 30
■ Adjusting Picture Alignment Manually........................................................... 30
■ Intelligent Picture Control .............................................................................. 31
■ Intelligent Picture Control (SV-260B/SV-260X Only)..................................... 31
■ Selecting the Colour Mode............................................................................ 32
■ Selecting the Audio Output Mode (SV-665B/660B/665X/660X Only) ........... 33
■ Selecting the Audio Mute Mode (SV-460B/265B/260B/460X/260X Only)..... 33
2
About this manual
Thank you for purchasing a Samsung Video Cassette Recorder (VCR).
Your Owner’s Instructions contain much valuable information on setting up and
using your VCR. Please take the time to read them as they will help you take full
advantage of your VCR’s features.
The instructions in this manual are for models, SV-665B, SV-660B, SV-460B,
SV-265B, SV-260B, SV-665X, SV-660X, SV-460X and SV-260X. Before you start
reading this manual please check your model number. It is displayed on the rear
of the VCR.
Features Chart
-
★
(SV-665B): Exceptions only for a certain model, for example SV-665B.
- Gray shaded areas marked with a star indicate instructions that are
only relevant to one model.
Feature
SV-665B SV-660B SV-665X SV-660X
SV-460B
SV-265B
SV-260B
SV-460X SV-260X
IPC (Intelligent Picture Control)
●●●● ●●●
Changing recording speed (SP/LP)
●●●● ●●●
G-CODE recording
●● ●
Connecting an RCA Audio/Video cable
●● ●
Hi-Fi and A2 STEREO
●●●●
NICAM Stereo
●●
Dual VCR/TV remote Control
●●●● ●●
GB
GB
Page 3
54
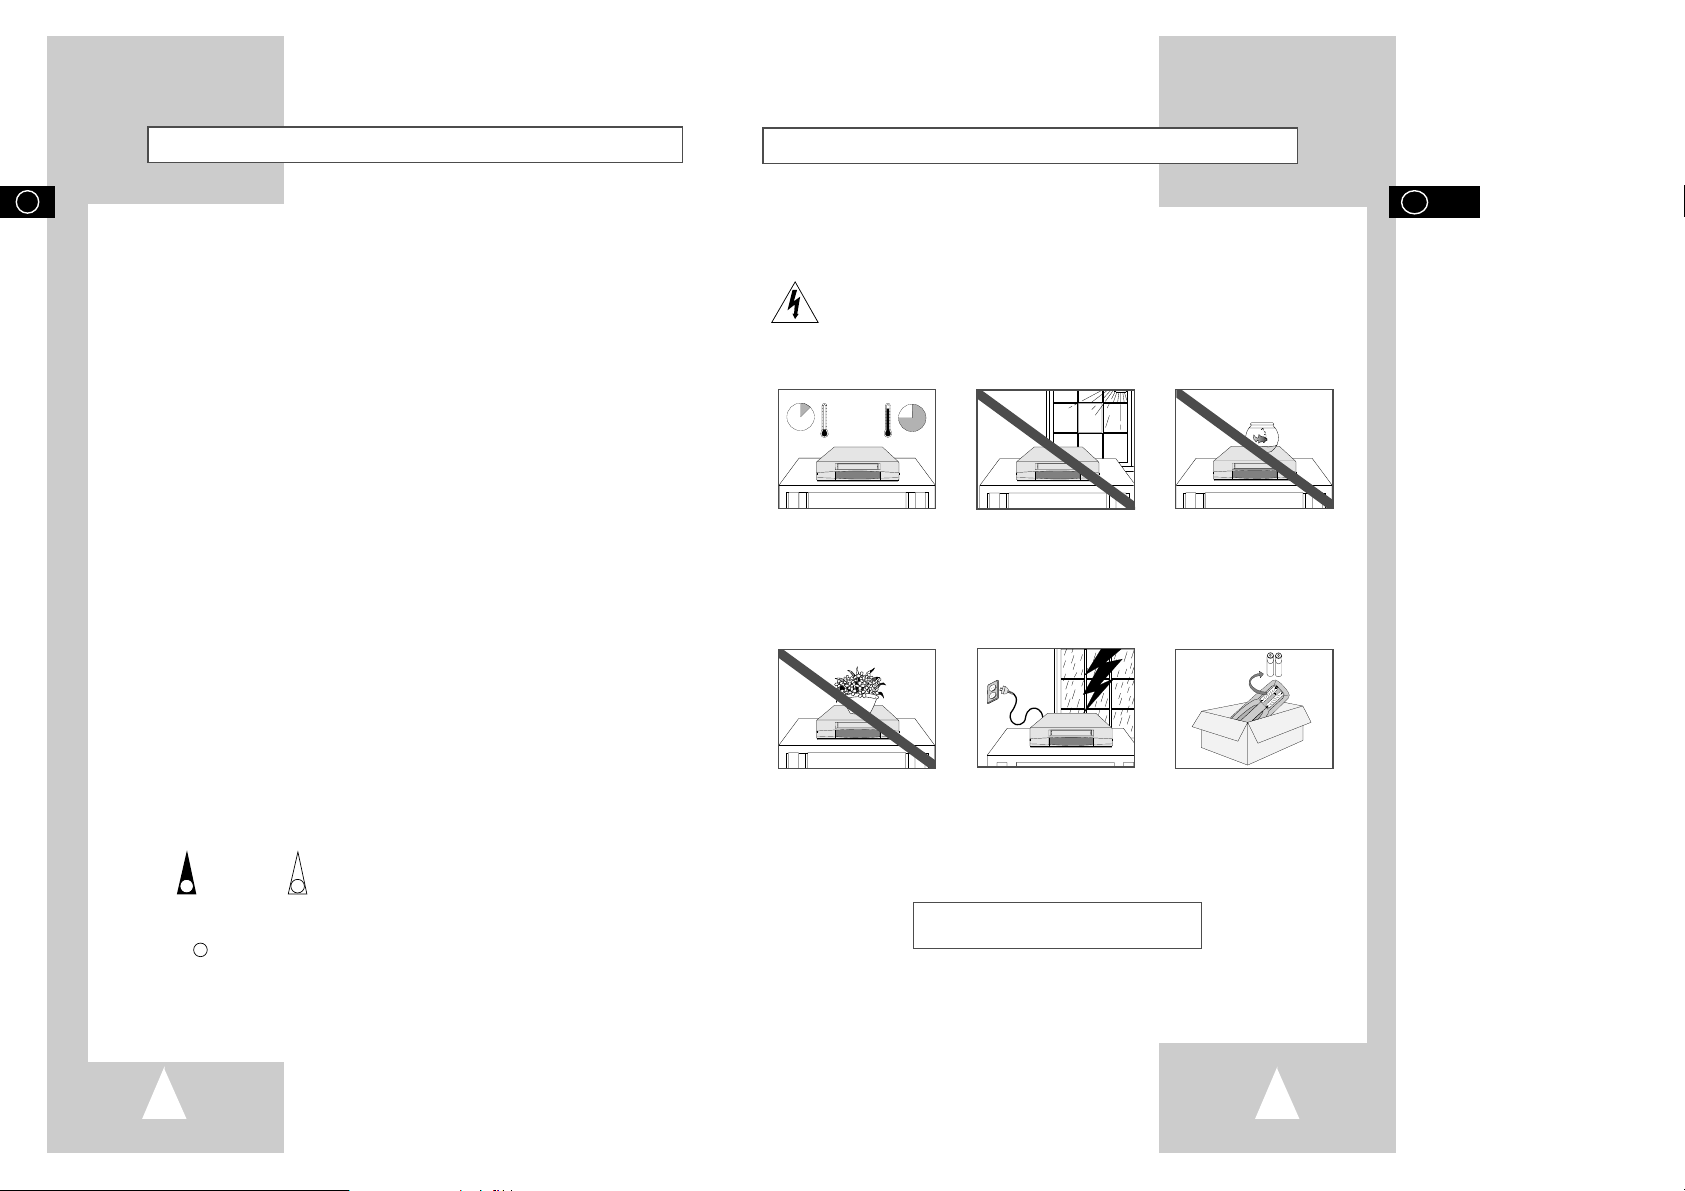
The following illustrations represent precautions.
The lightning bolt is a warning sign alerting you to dangerous voltage inside the product.
DO NOT OPEN THE VCR. Refer to service personnel.
HH
5°C
40°C
10% 75%
THIS DEVICE IS NOT FOR USE IN INDUSTRIAL
ENVIRONMENTS
Safety Instructions
Do NOT expose the VCR to
extreme temperature conditions (below 5°C and above
40°C) or to extreme humidity
conditions (less than 10% and
more than 75%).
Do NOT expose the VCR to
direct sunlight.
Do NOT expose the VCR to
any liquids.
Do NOT place any objects on
the VCR or remote control.
During a storm and/or lightning, unplug the VCR from the
mains socket and aerial.
If the remote control is not
used for a long period of time,
remove the batteries and store
it in a cool, dry place.
Contents (cont.)
◆ SEARCHING FOR A SEQUENCE
■ Playing a Cassette in Slow Motion................................................................ 34
■ Playing a Sequence Frame by Frame........................................................... 34
■ Picture Search, Fast Forward/Rewind........................................................... 35
■ Searching for a Specific Sequence ............................................................... 35
■ Auto Repeat Play........................................................................................... 36
■ Interval Repeat Play...................................................................................... 36
◆ EASY OPERATION
■ Using the Tape Counter ................................................................................ 37
◆ ADVANCED RECORDING FEATURES
■ Connecting RCA Audio/Video Input Cable (SV-665B/665X/265B Only)....... 38
■ Using the Assemble Edit Function................................................................. 39
■ Recording from Another VCR or Camcorder................................................. 39
◆ OTHER FUNCTIONS AND USEFUL RECOMMENDATIONS
■ Using the TV Buttons on the Remote Control (SV-665B/SV-660B/
SV-460B/SV-260B/SV-665X/SV-660X Only) ................................................ 40
■ Auto Power Off.............................................................................................. 41
■ Child door lock system .................................................................................. 41
■ ECO Mode-Reducing Standby power consumption...................................... 41
■ Technical Specifications................................................................................ 42
◆ SOLVING PROBLEMS
■ Problems and Solutions................................................................................. 43
■ TV Frequency Table...................................................................................... 44
☛
➢
NoteImportantHold downPress/push
Symbols
1
1
1
= Step number
★
Option
GB
GB
Page 4
76
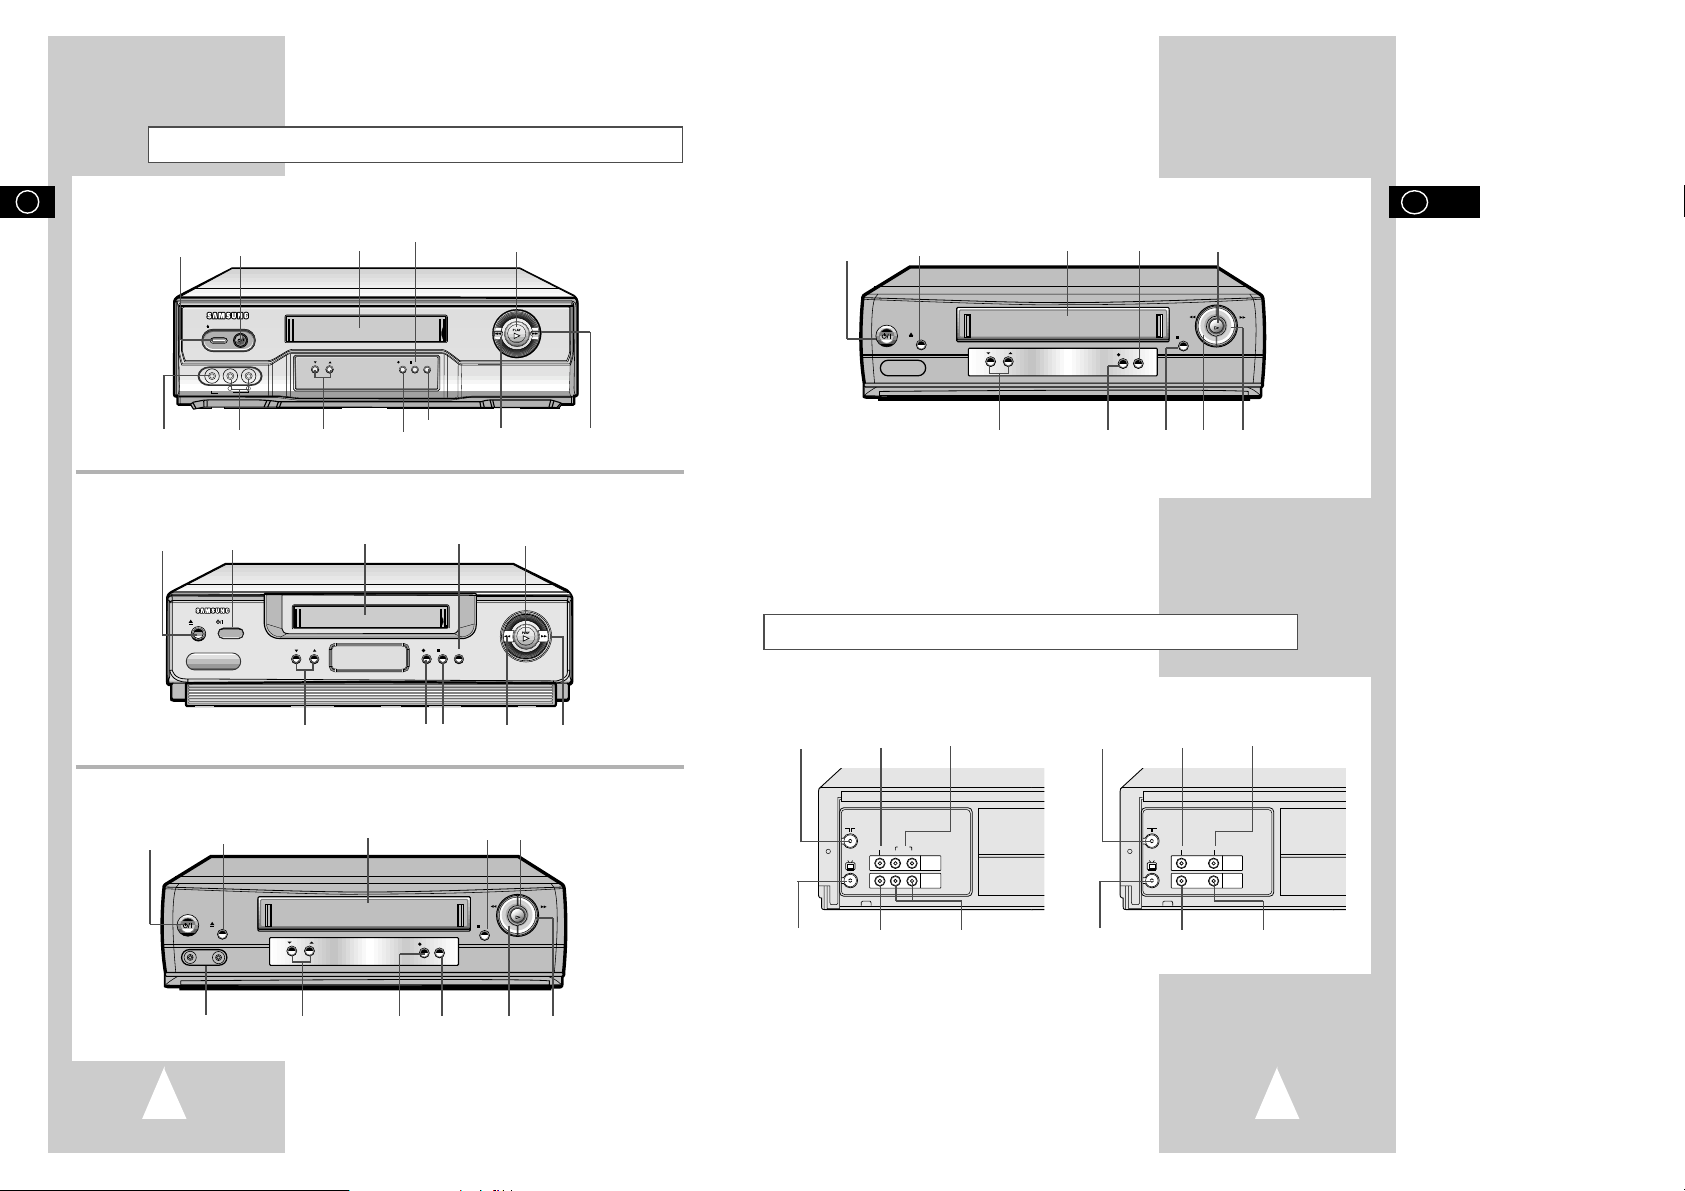
Front View of the VCR
Rear View of the VCR
AERIAL IN
CONNECTOR
AUDIO L, R OUTPUT
SOCKETS
AUDIO L, R INPUT
SOCKETS
VIDEO INPUT
SOCKET
VIDEO OUTPUT
SOCKET
(SV-665B/665X)
(SV-665B/660B/665X/660X)
REC STOP
PROG
I II P/S
EJECT
STANDBY/ON
REW
F.F
VIDEO L AUDIO R
LINE IN
OUT TO TV
CONNECTOR
TV
LINE IN 1
VIDEO AUDIO
LINE OUT
AERIAL IN
CONNECTOR
AUDIO OUTPUT
SOCKET
AUDIO INPUT
SOCKET
VIDEO INPUT
SOCKET
VIDEO OUTPUT
SOCKET
(SV-460B/460X/265B/260B/260X)
OUT TO TV
CONNECTOR
EJECT
BUTTON
VIDEO CASSETTE
COMPARTMENT
STANDBY/ON
BUTTON
REW
BUTTON
STOP
BUTTON
PAUSE/STILL
BUTTON
RECORD
BUTTON
FF
BUTTON
LINE IN VIDEO
INPUT SOCKET
PROGRAMME
SELECTION BUTTONS
LINE IN AUDIO L, R
INPUT SOCKETS
PLAY
BUTTON
(SV-260B/260X)
I I
I I
EJECT
STANDBY/ON
PROG
STOP
REC I I P/S
REW
PLAY
F.F
EJECT
BUTTON
VIDEO CASSETTE
COMPARTMENT
PAUSE/STILL
BUTTON
STANDBY/ON
BUTTON
RECORD
BUTTON
STOP
BUTTON
FF
BUTTON
REW
BUTTON
PROGRAMME
SELECTION BUTTONS
PLAY
BUTTON
(SV-660B/660X/460B/460X)
II
EJECT
STANDBY/ON
PROG
REC STOP
II
I II P/S
REW
F.F
EJECT
BUTTON
VIDEO CASSETTE
COMPARTMENT
PAUSE/STILL
BUTTON
STANDBY/ON
BUTTON
STOP
BUTTON
RECORD
BUTTON
FF
BUTTON
REW
BUTTON
PROGRAMME
SELECTION BUTTONS
PLAY
BUTTON
(SV-265B)
I I
EJECT
STANDBY/ON
PROG
STOP
REC I I P/S
REW
PLAY
F.F
LINE IN 2
VIDEO AUDIO
EJECT
BUTTON
VIDEO CASSETTE
COMPARTMENT
STANDBY/ON
BUTTON
REW
BUTTON
STOP
BUTTON
PAUSE/STILL
BUTTON
RECORD
BUTTON
FF
BUTTON
PROGRAMME
SELECTION BUTTONS
LINE IN 2 VIDEO, AUDIO
INPUT SOCKETS
PLAY
BUTTON
GB
GB
VIDEO AUDIO
TV
R L
LINE IN 1
LINE OUT
Page 5
8
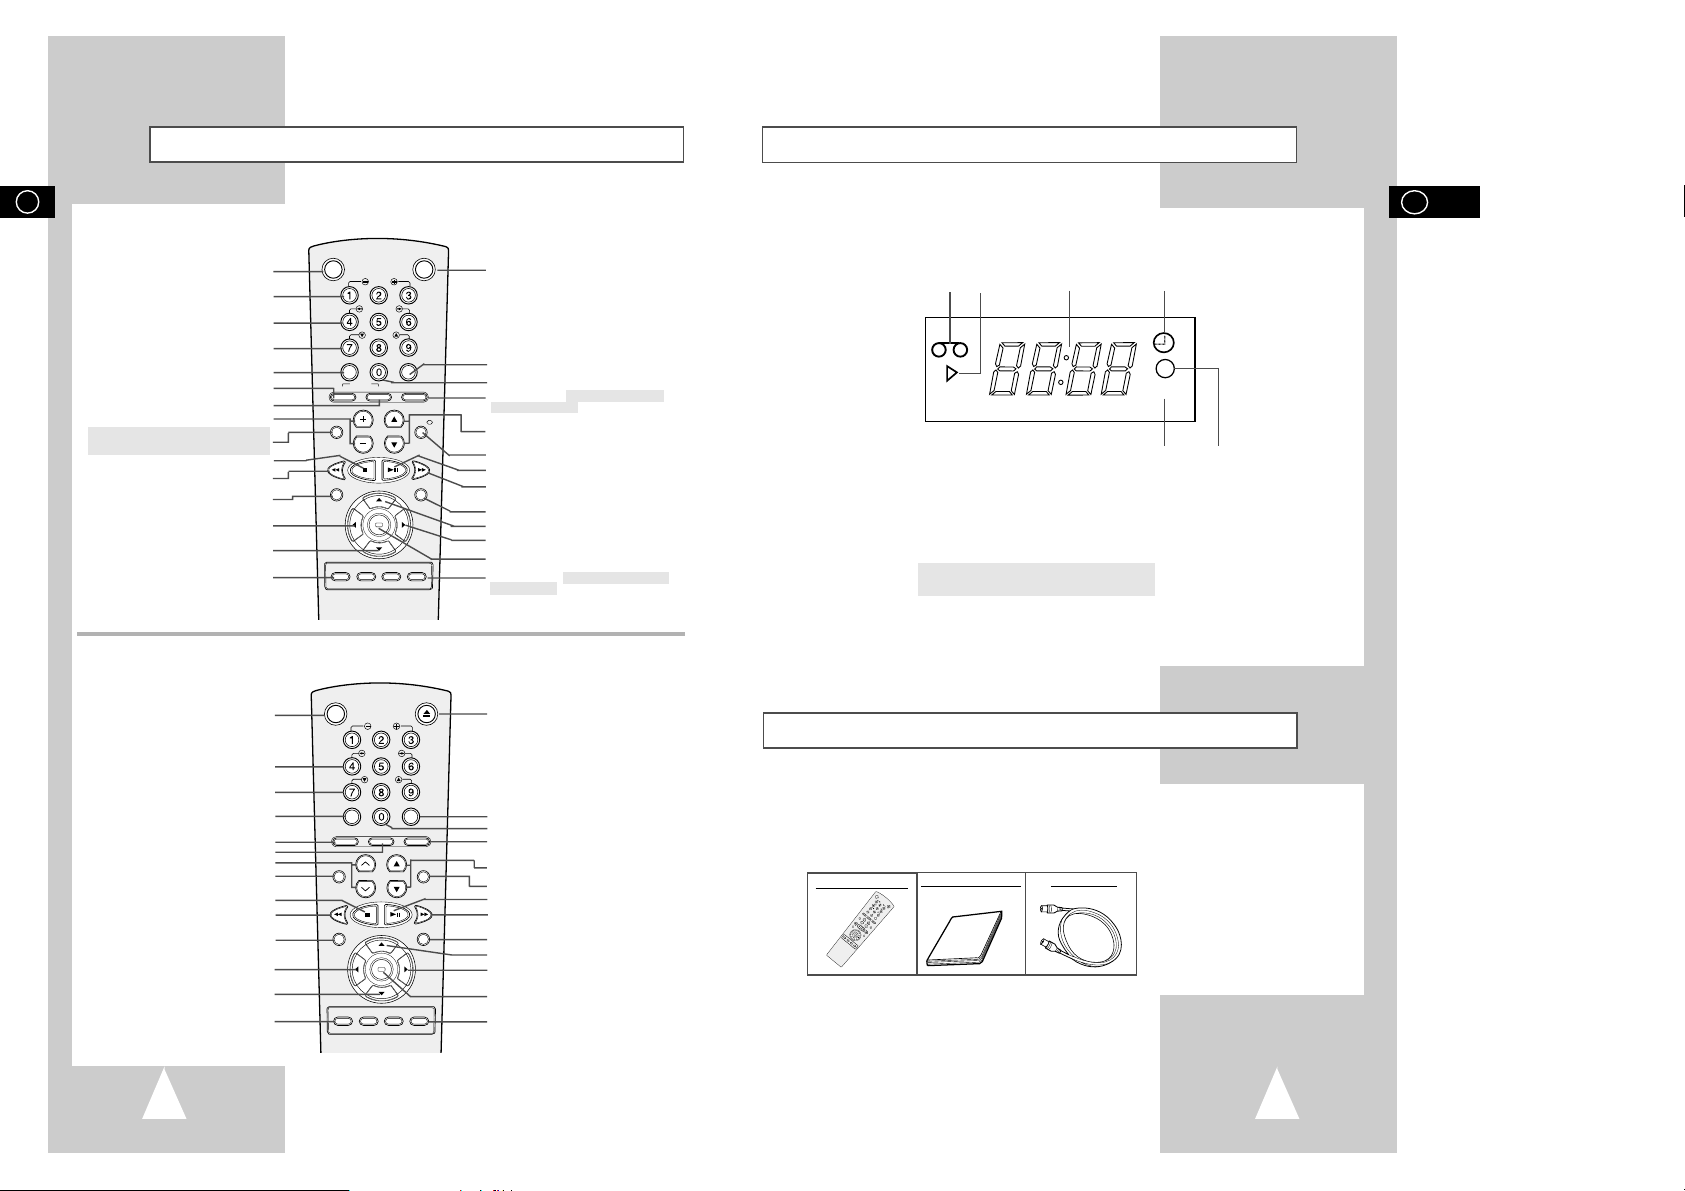
Display Indicator
Accessories
You have just purchased a SAMSUNG Video Cassette Recorder (VCR).
Together with your VCR, you will find the following accessories in the box.
O
K
S
T
A
N
D
B
Y
/
O
N
E
J
E
C
T
S
L
O
W
S
H
U
T
T
L
E
V
L
O
C
K
C
L
R
/
R
S
T
F
.
A
D
V
I
N
D
E
X
A
.
T
R
K
I
P
C
I
N
P
U
T
R
E
P
E
A
T
TRK PROG
AUDIO
REC MENU
S
P
E
E
D
D
U
B
T
V
/
V
C
R
T
I
M
E
R
DISPLAY
REMOTE CONTROL
OWNER’S INSTRUCTIONS
COAXIAL CABLE
9
1 Cassette loaded indicator
2 PLAY indicator
3 Multi-function display
4 Timer indicator
5 STEREO indicator
★
(SV-665B/665X/660B/660X Only)
6 REC indicator
VCR
5 6
12 3 4
STEREO
Infrared Remote Control
EJECT BUTTON
INDEX BUTTON
FRAME ADVANCE BUTTON
TUNER, LINE IN 1SELECTION /
REPEAT SELECTION BUTTON
PROGRAMME SELECTION BUTTON
DISPLAY BUTTON
PLAY/PAUSE/STILL BUTTON
FAST-FORWARD/FORWARD
SEARCH BUTTON
MENU BUTTON
MENU SELECTION UP BUTTON
MENU SELECTION BUTTON
OK BUTTON
TIMER BUTTON
STANDBY/ON BUTTON
SHUTTLE BUTTON
V-LOCK BUTTON
CLEAR AND RESET BUTTON
AUTO TRACKING BUTTON
IPC BUTTON
TRACKING BUTTONS
AUDIO MUTE BUTTON
STOP BUTTON
REWIND/REVERSE PICTURE
SEARCH BUTTON
RECORD BUTTON
MENU SELECTION BUTTON
MENU SELECTION DOWN BUTTON
RECORDING SPEED SELECTION BUTTON
(SV-665B/665X/660B/660X/460B/460X/265B)
(SV-260B/260X)
OK
VCR STANDBY/ON TV STANDBY/ON
SLOW
SHUTTLE
V-LOCK
CLR/RST F.ADV INDEX
TV VCR INPUT
REPEAT
VOL PROG/TRK
AUDIO
REC MENU
SPEED DUB TV/VCR TIMER
DISP./
SELECT
-/--
\
VCR STANDBY/ON BUTTON
SLOW BUTTON
★
SV-665B/665X/660B/660X/460B/460X
SHUTTLE BUTTON
V-LOCK BUTTON
CLEAR AND RESET BUTTON
TV BUTTON
VCR BUTTON
VOLUME BUTTONS
AUDIO MODE SELECTION BUTTON
(SV-665B/665X/660B/660X)
AUDIO MUTE BUTTON (SV-460B/460X/265B)
STOP BUTTON
REWIND/REVERSE PICTURE
SEARCH BUTTON
RECORD BUTTON
MENU SELECTION BUTTON
MENU SELECTION DOWN BUTTON
RECORDING SPEED SELECTION BUTTON
TV STANDBY/ON BUTTON
INDEX BUTTON
FRAME ADVANCE BUTTON
TUNER, LINE IN 1, LINE IN 2 ★(SV-665X/
SV-665B/265B ONLY) SELECTION / REPEAT
SELECTION BUTTON
PROGRAMME SELECTION /
TRACKING BUTTONS
DISPLAY BUTTON
PLAY/PAUSE/STILL BUTTON
FAST-FORWARD/FORWARD
SEARCH BUTTON
MENU BUTTON
MENU SELECTION UP BUTTON
MENU SELECTION BUTTON
OK BUTTON
TIMER BUTTON / G-CODE ★(SV-665B/665X/
SV-265B ONLY) BUTTON
GB
GB
STANDBY/ON EJECT
SLOW
SHUTTLE
V-LOCK
CLR/RST F.ADV INDEX
A.TRK IPC INPUT
AUDIO
REC MENU
SPEED DUB TV/VCR TIMER
TRK PROG
OK
REPEAT
DISPLAY
Page 6
1110
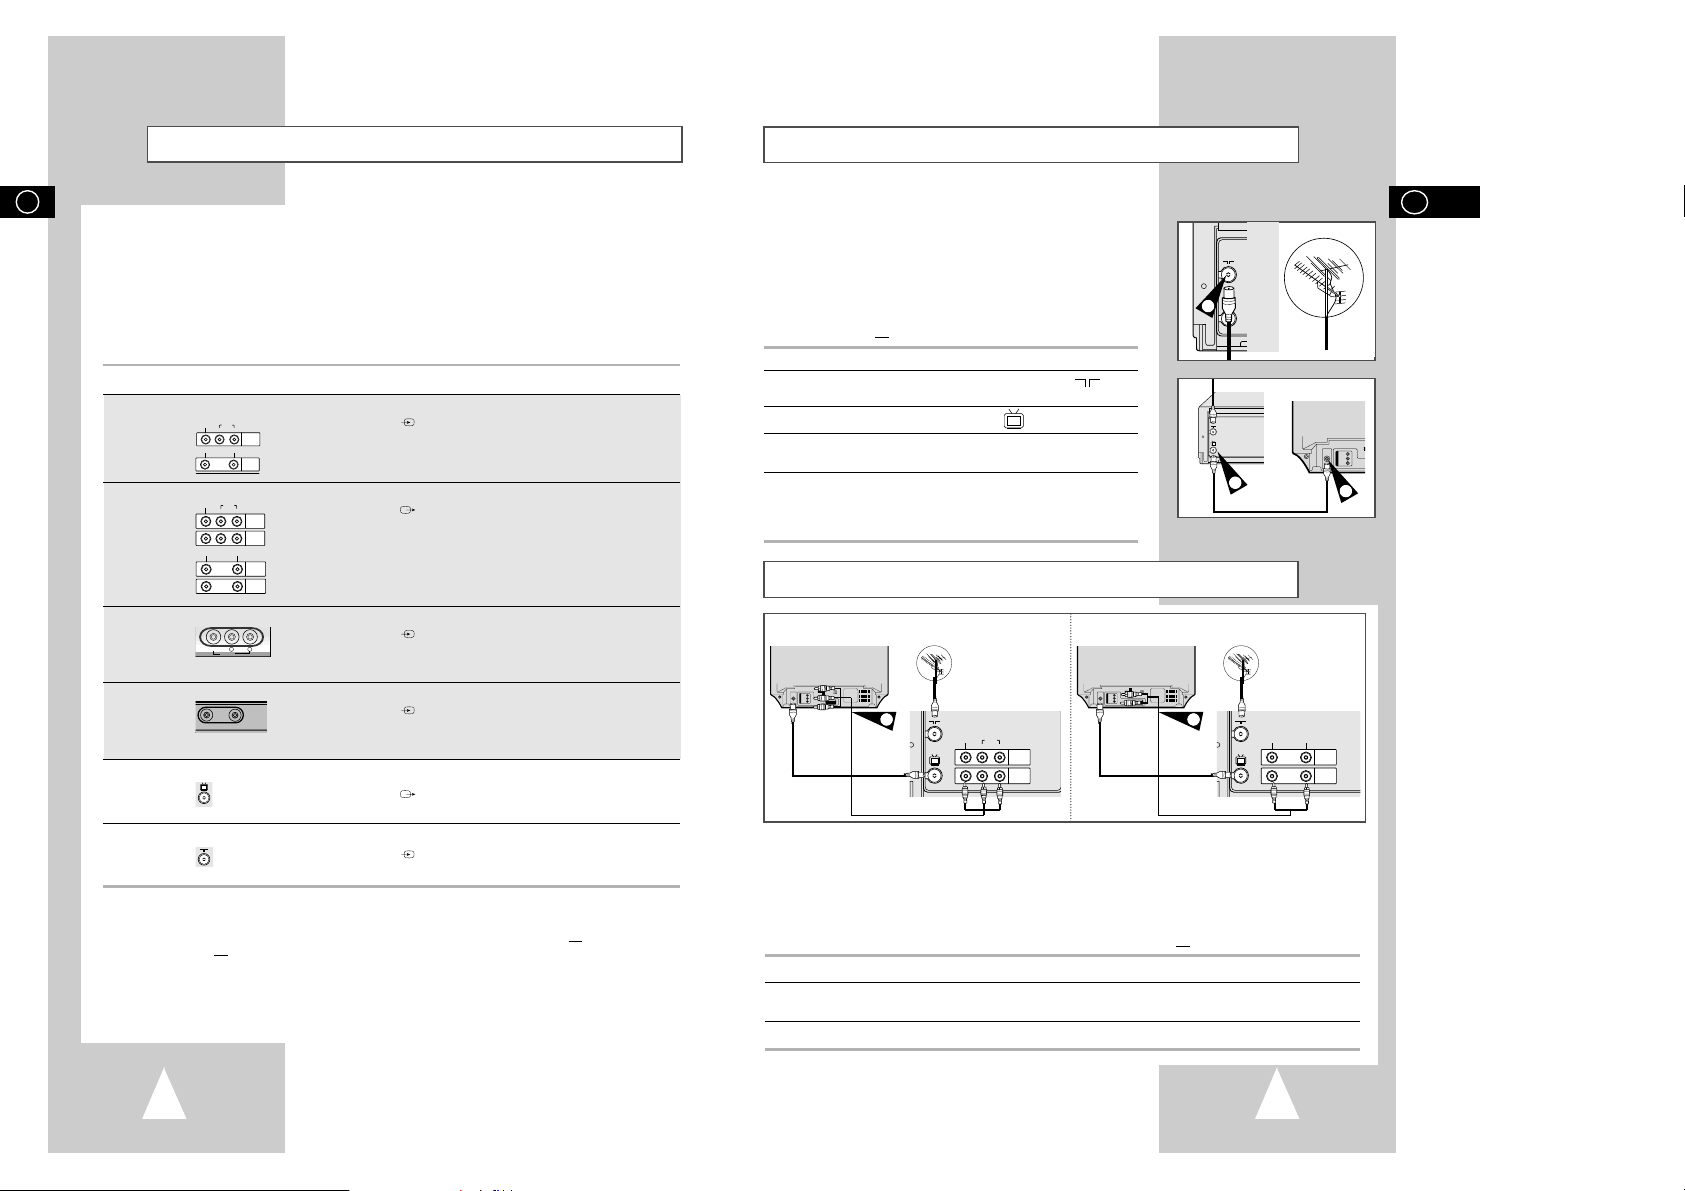
Connecting Your VCR to the TV using the Coaxial Cable
To receive television programmes a signal must be received from
one of the following sources:
◆ An outdoor aerial
◆ An indoor aerial
◆ A cable television network
◆ A satellite receiver
☛ Make sure that both the television and the VCR are
switched off
before connecting the cables.
1 Remove the aerial or network input cable from the television.
2 Connect this cable to the 75Ω coaxial socket marked on the
rear of your VCR.
3 Plug the coaxial cable supplied into the socket on your VCR.
4 Plug the other end of the coaxial cable into the connector
previously used for the aerial on the television.
5 To obtain better quality pictures and sound on your television, you
can also connect your VCR to the television via the RCA cable
(see section below) if your television is equipped with this type of
connection.
TV
Connecting Your VCR to the TV using the RCA Cable
You can connect your VCR to the television using the RCA cable if the appropriate input is available on the
television. You thus:
◆ Obtain better quality sound and pictures
◆ Simplify the setting up procedure of your VCR
☛ ◆ Regardless of the type of connection chosen, you must always connect the coaxial cable
supplied. Otherwise, no picture will be visible on the screen when the VCR is switched off.
◆ Make sure that both the television and the VCR are switched off
before connecting the cables.
1 Connect the coaxial cable as indicated in the above section.
2 Connect one end of the RCA Audio/Video cable to the Video output and Audio output socket on the rear
of the VCR.
3 Plug the other end into the appropriate connector on the television.
Aerial
TV
LINE IN 1
VIDEO AUDIO
LINE OUT
R L
RF
coaxial
cable
TV
2
TV
LINE IN 1
VIDEO AUDIO
LINE OUT
R L
4
2
TV
TV
LINE IN 1
VIDEO AUDIO
LINE OUT
R L
3
SV-665B/665X/660X/660B
Aerial
TV
LINE IN 1
VIDEO AUDIO
LINE OUT
RF
coaxial
cable
TV
2
SV-460B/265B/260B/460X/260X
Deciding How to Connect Your VCR
You must take into account various factors when connecting audio or video systems:
◆ Types of connectors available on your systems
◆ Systems connected permanently to the VCR (satellite receiver for example) or temporarily
(camcorder for example)
Your VCR is equipped with the following connectors.
Connector Location Type Direction Recommended Use
LINE IN 1 Rear Audio/Video RCA In ◆ Camcorder
◆ Satellite receiver
◆ Other VCR
Audio/Video Rear Audio/Video RCA Out ◆ Television
output ◆ Other VCR
◆ Audio Hi-Fi system
LINE IN Front Audio/Video RCA In ◆ Audio Hi-Fi system
◆ Camcorder
★
(SV-665B/665X only)
◆ Other VCR
LINE IN 2 Front Audio/Video RCA In ◆ Audio system
◆ Camcorder
★
(SV-265B only)
◆ Other VCR
OUT TO TV Rear 75 Ω Out ◆ Television
coaxial
IN FROM ANT. Rear 75 Ω In ◆ Aerial
coaxial ◆ Cable television network
◆ Satellite receiver
☛ Whenever you connect an audio or video system to your VCR, ensure that all elements are
switched off
.
Refer to the documentation supplied with your equipment for detailed connection instructions
and associated safety precautions.
TV
I I
I I
LINE IN 2
VIDEO AUDIO
II
VIDEO L AUDIO R
LINE IN
LINE IN 1
VIDEO AUDIO
LINE OUT
GB
GB
VIDEO AUDIO
R L
VIDEO AUDIO
VIDEO AUDIO
R L
LINE IN 1
LINE IN 1
LINE IN 1
LINE OUT
Page 7
1312
Plug & Auto Set Up
Your VCR will automatically set itself up when it is plugged into the
mains for the first time. TV stations will be stored in memory. The
process takes a few minutes. Your VCR will then be ready for use.
1 Connect the coaxial cable as indicated on page 11.
(Connecting Your VCR to the TV Using the Coaxial Cable)
2 Plug the VCR into the mains.
Result
:The LANGUAGE SET menu is displayed.
3 Select the required language by pressing the
or❷
buttons.
4 Press OK to store the language selected.
Result
: A message appears.
5 Press OK to start the auto scanning.
◆ The number of stations automatically stored by the VCR
depends on the number of stations that it has found.
6 On completion, press MENU twice to exit the menu.
7 This will only happen if you have tuned TV to VCR or AV cables
are connected and TV is switched to AV.
TV
TV
LINE IN 1
VIDEO AUDIO
LINE OUT
2
AUTO SET UP
PLEASE WAIT
60%
I
■■■■■■■■■■■■
-------I
END:MENU
WED
12:00 1/JAN/2003
➛❿
❷
END:MENU
➢
◆
Auto preset can be performed by pressing (STOP) on the
VCR continuously for 5 seconds or more with no tape
inserted.
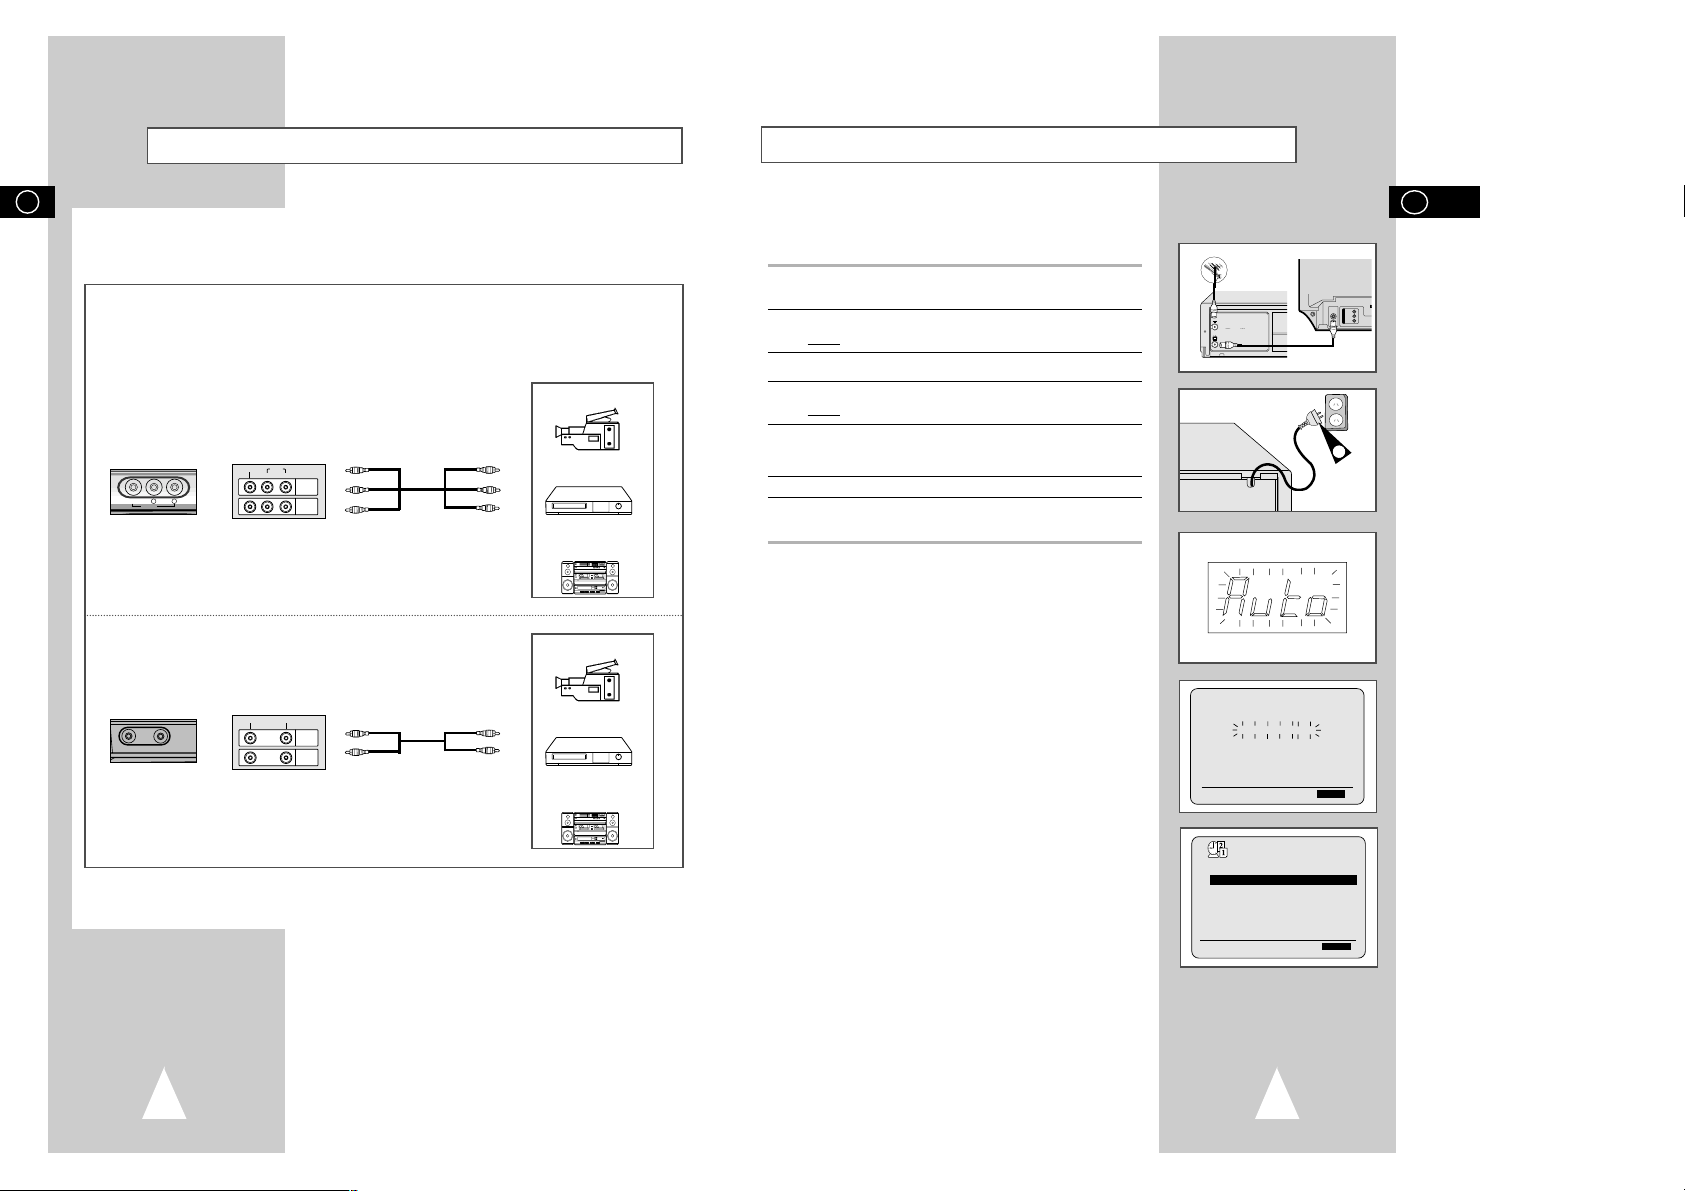
Connecting Other Equipment to Your VCR
You can connect other audio and/or video equipment to your VCR in different ways. The following
illustrations give a few examples of the connection possibilities.
➢ The RCA input/output connectors on the front of the VCR are used
for equipment, such as camcorders, VCRs or sound systems.
II
VIDEO L AUDIO R
LINE IN
FRONT OF THE VCR REAR OF THE VCR
Camcorder
VCR
Sound system
SV-665B/665X
I I
I I
LINE IN 2
VIDEO AUDIO
FRONT OF THE VCR REAR OF THE VCR
(SV-265B Only)
Camcorder
VCR
Sound system
GB
GB
VIDEO AUDIO
R L
LINE IN 1
LINE OUT
VIDEO AUDIO
LINE IN 1
LINE OUT
CLOCK
Page 8
14
Tuning Your Television for the VCR
You must tune your television for the VCR only if you are not using
a RCA cable
➢ To view pictures from your VCR when a RCA cable is
used, the television must be set to the audio/video mode
(AV).
1 Switch on the television.
2 Switch on the VCR by pressing STANDBY/ON on the front of the
VCR or VCR STANDBY/ON (STANDBY/ON) on the remote
control.
3 Select a programme position on the television to be reserved for
use with your VCR.
4 Insert the video cassette in the VCR. Check that the VCR starts
reading the cassette; if not, press
❿
II
button
.
5 Start a scan on your television or set the television to UHF
channel 38.
6 Fine tune the television until the pictures and sound are obtained
clearly.
7 If you cannot find the pictures and sound, or there is interference
from nearby channels, it may be necessary to change the setting
of the VCR output channel (see Setting the VCR Output Channel
on page 17 and Problems and Solutions on page 43).
8 When the picture and sound are perfectly clear, store this channel
at the desired programme position on the television.
Result
:
That programme is now reserved for use with your VCR.
★
(SV-260B/SV-260X)
★
(SV-665B/SV-660B/
★
(SV-460B/SV-265B/
★
(SV-665X/SV-460X/
★
(SV-660X)
4
VCR STANDBY/ON
S
S
2
2
GB
REC MENU
OK
STANDBY/ON
Page 9

15
Setting the Date and Time
You must insert or replace the batteries in the remote control when
you:
◆ Purchase the video cassette recorder
◆ Find that the remote control is no longer working
correctly
1 Push the tab in the direction of the arrow to release the battery
compartment cover on the rear of the remote control.
2 Insert two AA, R6 or equivalent batteries, taking care to respect
the polarities:
◆ + on the battery with + on the remote control
◆ – on the battery with – on the remote control
3 Replace the cover by aligning it with the base of the remote
control and pushing it back into place.
➢ Do not mix different battery types (manganese and
alkaline for example).
Inserting Batteries in the Remote Control
2
2
2
1
3
2
CLOCK SET
PROG OPTIONS INSTALL
CLOCK BONUS LANG
WED
12:00 1/JAN/2003
➛❿
❷
END:MENU
1
❷
➛❿
OK END:MENU
Your VCR contains a 24-hour clock and calendar used to:
◆ Automatically stop programme recording
◆ Preset your VCR to record a programme automatically
You must set the date and time when:
◆ You purchase the video cassette recorder
◆ The power supply remains off for more than 1 hour
★
(SV-665B/660B/665X/660X only)
◆ The power supply remains off for more than 30 sec
★
(SV-460B/265B/260B/460X/260X only)
☛ ◆ Do not forget to reset the time when you change
clocks from winter to summer time and vice versa.
1 Press MENU on the remote control.
Result
: The programming menu is displayed.
2 Press the corresponding
,❷
or ➛, ❿buttons to select the
CLOCK SET option.
3 Press the
OK
button to select this option.
Result
: The CLOCK SET menu is displayed.
4 Press
➛or❿
to select the hour, minutes, day, month and year.
Result
: The option selected flashes.
5 Press the
or❷
buttons to increase or decrease the value.
Result
: The day of the week is displayed automatically.
➢ You can hold the
or❷
buttons down to scroll more
quickly through the values.
6 On completion, press MENU twice to exit the menu.
GB
REC MENU
OK
CLOCK
CLOCK
Page 10

1716
Your VCR output channel may need to be changed if the pictures
suffer from interference or if your TV cannot find the pictures.
Also, you can change the VCR output channel to adjust the
frequency in which information is displayed on the screen.
1 Press MENU on the remote control.
Result
: The programming menu is displayed.
2 Press the corresponding
,❷
or ➛, ❿buttons to select the
INSTALLATION option.
3 Press the OK button to select this option.
Result
: The INSTALLATION menu is displayed.
4 Press the corresponding
or❷
buttons, until the VCR OUTPUT
CH option is selected.
5 Select the required output channel by pressing the
➛
or ❿buttons.
6 On completion, press MENU twice to exit the menu.
Then tune your television again (see page 14).
Setting the VCR Output Channel
INSTALLATION
PROG OPTIONS INSTALL
CLOCK BONUS LANG
❷
➛❿
OK END:MENU
AUTO SET UP
MANUAL SET UP
VCR OUTPUT CH :CH38
❷
❿
END:MENU
★
(SV-665B/660B/460B/265B/260B)
AUTO SET UP
MANUAL SET UP
VCR OUTPUT CH :CH36
❷
❿
END:MENU
★
(SV-665X/660X/460X/260X)
Displaying/Hiding On-Screen Information
Choosing Your Language
You can change the language in which information is displayed on
the screen.
1 Press MENU on the remote control.
Result
: The programming menu is displayed.
2 Press the corresponding
,❷
or ➛, ❿buttons to select the
LANGUAGE SET option.
3 Press the OK button to select this option.
Result
: The LANGUAGE SET menu is displayed.
4 Select the required language by pressing the
or❷
buttons.
5 Press OK to store the language selected.
6 Press MENU to exit the menu.
Result
: From now on, all the on-screen information will be
displayed in the language selected.
Your VCR displays most information both on the VCR and the
television.
You can choose to display or hide this information on the television
screen (except for the Index, Programming MENU and G-CODE
★
(SV-665B/665X/265B only) function, which cannot be hidden).
1 Press MENU on the remote control.
Result
: The programming menu is displayed.
2 Press the corresponding
,❷
or ➛, ❿buttons to select the
USER SET option.
3 Press the OK button to select this option.
Result
: The USER SET menu is displayed.
4 Press the corresponding
or❷
buttons, until the OSD option is
selected.
5 To... Press
➛or❿
, until...
Display on-screen information ON is displayed.
Hide on-screen information OFF is displayed.
6 On completion, press MENU twice to exit the menu.
LANGUAGE SET
PROG OPTIONS INSTALL
CLOCK BONUS LANG
❷
➛❿
OK END:MENU
USER SET
PROG OPTIONS INSTALL
CLOCK BONUS LANG
❷
➛❿
OK END:MENU
OSD :ON
TAPE SELECT :E180
COLOUR SYSTEM :AUTO
ECO. MODE :OFF
IPC :ON
❷
❿
END:MENU
GB
GB
OPTIONS
OPTIONS
LANG
INSTALL
INSTALL
INSTALL
Page 11

1918
Presetting the Stations Manually
INSTALLATION
PROG OPTIONS INSTALL
CLOCK BONUS LANG
❷
➛❿
OK END:MENU
Your VCR contains a built-in tuner used to receive television
broadcasts.
You must preset the stations received through the tuner. This can
be done:
◆ Plug & Auto Set up (see page 13)
◆ Automatically (see page 18)
◆ Manually
You can store up to 80 stations.
☛ You do not need to preset the stations manually if you
have already set them automatically.
1 Press the MENU button on the remote control.
Result
: The programming menu is displayed.
2 Press the corresponding
,❷
or ➛, ❿buttons to select the
INSTALLATION option.
3 Press the OK button to select this option.
Result
: The INSTALLATION menu is displayed.
4 Press the corresponding
or ❷buttons, until the MANUAL SET
UP option is selected.
5 Press the
❿
button to select MANUAL SET UP option.
Result
: The TV STATION TABLE menu is displayed.
6 Press the
or ❷buttons to select a programme number as
required.
7 Press the
❿
button to preset the station.
Result
: The MANUAL TUNING menu is displayed.
8 Press the
➛
or ❿buttons to start scanning.
Result
: The frequency band is scanned and the first station
found is displayed.
If you know the number of the channel you want, press the
numeric buttons on the remote control for example, for channel
06, first press “0” and then press “6”. (see age 44)
9 Press the
or ❷buttons until the NAME is selected.
10 To change the programme’s name, press the
❿
button.
Result
: The first letter of the name flashes.
11 To... Then...
Select a character Press the or ❷button until the
in the name required character is displayed
(letters, numbers or “-” character).
Move to the next or Press the ❿or ➛buttons
previous character respectively.
12 If you... Then...
Wish to store the ◆
Press the correspondingor ❷buttons,
station displayed until the
MFT is selected.
◆ Press the
➛or❿
buttons to adjust the
picture, if necessary.
◆ Press OK to store the station .
Do not wish to ◆
Press the correspondingor ❷buttons,
store the station until the
CH is selected.
displayed
◆ Press the
➛or❿
buttons to go on
scanning the frequency band and display
the next station
◆ Go back to the beginning of Step 12
13 Repeat this procedure from Step 6 onwards, until all the required
stations have been stored.
14
On completion, press the MENU button three times to exit the menu.
**
TV STATION TABLE
**
PR CH NAME
1 002 CAEB
2 --- ---3 --- ---4 --- ---5 --- ----
❷
❿
SWAPPING:OK
DELETE:CLR/RST MENU
**
MANUAL TUNING
**
PR : 1
CH : ---
MFT : NAME : ----
❷
➛❿
MEMORY: OK
END:MENU
AUTO SET UP
MANUAL SET UP
VCR OUTPUT CH :CH38
❷
❿
END:MENU
★
(SV-665B/660B/460B/265B/260B)
AUTO SET UP
MANUAL SET UP
VCR OUTPUT CH :CH36
❷
❿
END:MENU
★
(SV-665X/660X/460X/260X)
Presetting the Stations Automatically
☛ You do not need to preset the stations if you have already
set them automatically (see Plug & Auto Set Up on
page 13).
Your VCR contains a built-in tuner used to receive television
broadcasts.
You must preset the stations received through the tuner. This can
be done:
◆ Plug & Auto Set up (see page 13)
◆ Automatically
◆ Manually (see page 19)
You can store up to 80 stations.
1 Press the MENU button on the remote control.
Result
: The programming menu is displayed.
2 Press the corresponding
,❷
or ➛, ❿buttons to select the
INSTALLATION option.
3 Press the OK button to select this option.
Result
: The INSTALLATION menu is displayed.
4 Press the corresponding
or ❷buttons, until the AUTO SET
UP option is selected.
Press the
❿
button to select this option.
5 Press OK to start the auto scanning.
Result
: ◆ The PLEASE WAIT indication flashes on the
television screen.
◆ The first frequency band is scanned and the first
station found is displayed and stored.
◆ The VCR then searches for the second station and
so on.
◆ When the automatic scanning procedure has
finished, the VCR switches automatically to
programme 1.
➢ The number of stations automatically stored by the VCR
depends on the number of stations that it has found.
6 If you wish to cancel the auto scanning before the end, press the
MENU button three times to exit the menu.
➢ ◆ Once the auto scanning procedure has finished, some
stations may have been stored more than once; select
the stations with the best reception and delete the
ones no longer required (see page 20).
INSTALLATION
PROG OPTIONS INSTALL
CLOCK BONUS LANG
❷
➛❿
OK END:MENU
AUTO SET UP
PLEASE WAIT
2%
I--------------------I
END:MENU
YOUR DATA WILL BE LOST
PRESS OK TO CONTINUE
MENU TO EXIT
AUTO SET UP
MANUAL SET UP
VCR OUTPUT CH :CH38
❷
❿
END:MENU
★
(SV-665B/660B/460B/265B/260B)
AUTO SET UP
MANUAL SET UP
VCR OUTPUT CH :CH36
❷
❿
END:MENU
★
(SV-665X/660X/460X/260X)
GB
GB
INSTALL
INSTALL
INSTALL
INSTALL
INSTALL
INSTALL
Page 12

2120
Changing the Preset Station Table
You can rearrange the preset TV stations according to your own
preferences programme number assigned to the station.
1 Press the MENU button on the remote control.
Result
: The programming menu is displayed.
2 Press the corresponding
,❷
or ➛, ❿buttons to select the
INSTALLATION option.
3 Press the OK button to select this option.
Result
: The INSTALLATION menu is displayed.
4 Press the corresponding
or ❷buttons, until the MANUAL SET
UP option is selected.
And then press the
❿
button to select this option.
Result
: The TV STATION TABLE menu is displayed.
5 Press the corresponding
or ❷buttons, until the required preset
TV programme is selected.
Result
: The selected station is displayed at the same time on
the television screen.
6 To change the programme number assigned to a station press the
OK button on the remote control. (For example, To move a TV
station in programme 1 to programme 3)
7 Press the
or ❷buttons to select required position. And then
press OK again to swap the position.
8 You can modify this station by repeating the same procedure from
Step
5 onwards.
9 On completion, press the MENU button three times to exit the
menu.
INSTALLATION
PROG OPTIONS INSTALL
CLOCK BONUS LANG
❷
➛❿
OK END:MENU
**
TV STATION TABLE
**
PR CH NAME
1 002 CAEB
2 --- ---3 --- ---4 --- ---5 --- ----
❷
SWAPPING:OK
MENU
**
TV STATION TABLE
**
PR CH NAME
1 --- ---2 --- ----
3 002 CAEB
4 --- ---5 --- ----
❷
SWAPPING:OK
MENU
AUTO SET UP
MANUAL SET UP
VCR OUTPUT CH :CH38
❷
❿
END:MENU
★
(SV-665B/660B/460B/265B/260B)
AUTO SET UP
MANUAL SET UP
VCR OUTPUT CH :CH36
❷
❿
END:MENU
★
(SV-665X/660X/460X/260X)
INSTALLATION
PROG OPTIONS INSTALL
CLOCK BONUS LANG
❷
➛❿
OK END:MENU
**
TV STATION TABLE
**
PR CH NAME
1 002 CAEB
2 --- ---3 --- ---4 --- ---5 --- ----
❷
❿
SWAPPING:OK
DELETE:CLR/RST MENU
AUTO SET UP
MANUAL SET UP
VCR OUTPUT CH :CH38
❷
❿
END:MENU
★
(SV-665B/660B/460B/265B/260B)
AUTO SET UP
MANUAL SET UP
VCR OUTPUT CH :CH36
❷
❿
END:MENU
★
(SV-665X/660X/460X/260X)
If you have stored a TV station:
◆ That you do not require
◆ At the wrong programme position
you can cancel it.
1 Press the MENU button on the remote control.
Result
: The programming menu is displayed.
2 Press the corresponding
,❷
or ➛, ❿buttons to select the
INSTALLATION option.
3 Press the OK button to select this option.
Result
: The INSTALLATION menu is displayed.
4 Press the corresponding
or ❷buttons, until the MANUAL SET
UP option is selected.
5 Press the
❿
button to select this option.
Result
: The TV STATION TABLE menu is displayed.
6 Press the corresponding
or ❷buttons, until the required preset
TV station (PR) is selected.
7 Press the CLR/RST button.
8 Repeat the same procedure from Step 6 onwards until all the
required stations have been cleared.
9 On completion, press the MENU button three times to exit the
menu.
Clearing a Preset Station
GB
GB
INSTALL
INSTALL
INSTALL
INSTALL
INSTALL
INSTALL
Page 13

2322
NICAM ★(SV-665X/SV-660X Only)
NICAM programmes are divided into 3 types. NICAM Stereo,
NICAM Mono and Bilingual (transmission in another language).
NICAM programmes are always accompanied by a standard mono
sound broadcast and you can select the desired sound.
Please refer to page 32.
1 Press MENU on the remote control.
Result
: The programming menu is displayed.
2 Press the corresponding
, ❷
or ➛, ❿buttons to select the
USER SET option.
3 Press the OK button to select this option.
Result
: The USER SET menu is displayed.
4 Press the corresponding
or❷
buttons, until the NICAM option
is selected.
5 To... Press
➛or❿
, until...
Mono mode OFF is displayed.
OFF: Only set at this position to record the
standard mono sound during a
NICAM broadcast if the stereo
sound is distorted due to inferior
reception conditions.
NICAM mode ON is displayed.
ON: Normally set at this position.
6 On completion, press MENU twice to exit the menu.
USER SET
PROG OPTIONS INSTALL
CLOCK BONUS LANG
❷
➛❿
OK END:MENU
OSD :ON
TAPE SELECT :E180
COLOUR SYSTEM :AUTO
NICAM :ON
IPC :ON
❷
❿
END:MENU
Selecting the Cassette Type
If you wish to use the tape counter to display the time remaining on
a cassette, you must indicate the type of cassette inserted.
1 Press MENU on the remote control.
Result
: The programming menu is displayed.
2 Press the corresponding
, ❷
or ➛, ❿buttons to select the
USER SET option.
3 Press the OK button to select this option.
4 Press the corresponding
or❷
buttons, until the TAPE
SELECT option is selected.
5 Press the
➛
or ❿buttons as many times as required, until the
correct cassette length is displayed.
E180 E240
E 300 E260
6 Press MENU twice to exit the menu.
OSD :ON
TAPE SELECT :E180
COLOUR SYSTEM :AUTO
ECO. MODE :OFF
IPC :ON
❷
❿
END:MENU
USER SET
PROG OPTIONS INSTALL
CLOCK BONUS LANG
❷
➛❿
OK END:MENU
Selecting the Recording Speed
T
ype Recording Time (in SP)
E-180 180 mins. or 3 hours
E-240 240 mins. or 4 hours
E-260 260 mins. or
4 hours and 20 mins.
E-300 300 mins. or 5 hours
You can record a cassette at two different speeds:
◆ SP (Standard Play)
◆ LP (Long Play)
In Long Play modes:
◆ Each cassette lasts twice as long
To record a cassette... Press the SPEED button on the
remote control, until...
In standard play mode SP is displayed.
In long play mode
LP is displayed.
SPEED DUB TV/VCR TIMER
GB
GB
OPTIONS
OPTIONS
OPTIONS
OPTIONS
Page 14

2524
Recording a Programme with Automatic Stop
This function enables you to record up to nine hours of
programmes. (LP)
Your VCR stops automatically after the requested length of time.
1 Switch on the television.
2 To monitor the programme being recorded, select the television
channel reserved for use with your VCR (or the AV input if used)
3 Insert the cassette on which the programme is to be recorded,
with the window visible and the safety tab intact or the opening
covered with adhesive tape.
Result: The VCR is switched on automatically.
4 Select:
◆
The station to be recorded using the
PROG/TRK (or ❷) /
PROG (
or ❷)
buttons
or
◆ The LINE IN 1 or LINE IN 2
★
(SV-665B/665X/265B only)
source using the INPUT button for a satellite tuner or external
video source
Result
: The channel number is displayed and the programme
can be seen on the television.
5 Select the recording speed by pressing the SPEED button as
many times as required (See pate 22).
6 Hold the REC button down for a while to start recording.
Result
: The record indicator appears on the television screen
and VCR display. An index is recorded on the tape
(see page 36).
7 Press the REC button several times to increase the recording time
in:
◆ 30-minute intervals up to four hours
◆ 1-hour intervals up to nine hours (LP)
Result
: The length is displayed on the television displays. The
selected programme is recorded for the length of time
requested. At the end of that time, the VCR stops
recording automatically.
8 If you wish to cancel the recording before the end, press
VCR STANDBY/ON (STANDBY/ON).
☛ If the end of the tape is reached while recording:
◆ The recording stops
◆ The VCR automatically turns off
3
LENGTH 2:30
SET LENGTH :
PRESS REC
OK
REC MENU
SPEED DUB TV/VCR TIMER
★
5
VCR INPUT
REPEAT
DISP./
CT
A
4
4
4
4
★
(SV-260B/SV-260X)
★
(SV-665B/SV-660B/
★
(SV-460B/SV-265B/
★
(SV-665X/SV-460X/
★
(SV-660X)
Recording a Programme Immediately
Protecting a Recorded Cassette
Video cassettes have a safety tab to prevent accidental erasure.
When this tab has been removed, you cannot
record on the tape.
1 If you wish to protect a cassette, break off the tab using a small
screwdriver.
2 To re-record over a protected cassette (safety tab broken), cover
the hole with adhesive tape.
1
TRK PROG
REC MENU
6
OK
REC MENU
SPEED DUB TV/VCR TIMER
★
5
VCR INPUT
REPEAT
DISP./
CT
A
4
4
4
4
Before recording a programme, you must have preset the corresponding station (unless you are recording via an external video
source). If you have not done so, refer to pages 18 and 19.
1 Switch on the television.
2 To monitor the programme being recorded, select the television
channel reserved for use with your VCR (or the AV input if used).
3 Insert the cassette on which the programme is to be recorded,
with the window visible and the safety tab intact or the opening
covered with adhesive tape.
Result
: The VCR is switched on automatically.
4 Select:
◆
The station to be recorded using the
PROG/TRK (or ❷) /
PROG (
or ❷)
buttons
or
◆ The LINE IN 1 or LINE IN 2
★
(SV-665B/665X/265B only)
source using the INPUT button for a satellite tuner or external
video source
Result
: The station number is displayed and the programme
can be seen on the television.
5 Select the recording speed by pressing the SPEED button as
many times as required (See pate 22).
6 Hold REC down for a while to start recording.
Result
:
The record indicator appears on the television and VCR
display. An index is recorded on the tape (see page 36).
7 To stop recording, press
■
once.
➢ ◆ If the cassette is ejected when you start recording,
check that the safety tab is intact or the opening is
covered with adhesive tape.
◆ If you reach the end of the tape while recording, the
cassette rewinds automatically.
★
(SV-260B/SV-260X)
★
(SV-665B/SV-660B/
★
(SV-460B/SV-265B/
★
(SV-665X/SV-460X/
★
(SV-660X)
GB
GB
DISPL
IPC INPUT
REPEAT
K PROG
IPC INPUT
REPEAT
K PROG
DISPL
Page 15

27
Using the G-CODE Feature ★(SV-665B/665X/265B Only)
SPEED DUB TV/VCR TIMER
1
G-CODE
CODE ---------
CODE:0-9 CORRECT:
➛
END:MENU
**
TIMER METHOD
**
STANDARD
G-CODE
❷
❿
END:MENU
Before presetting your VCR:
◆ Switch on both the television and your VCR
◆ Check that the date and time are correct
◆ Insert the cassette on which the programme is to be
recorded (safety tab intact)
Up to six programmes can be preset.
1 Press the TIMER button.
Result
: The TIMER METHOD is displayed.
2 Press the corresponding
or❷
buttons, until the G-CODE option
is selected.
3 Press the
❿
button to select G-CODE.
Result
: A message is displayed to allow you to enter the
G-CODE code.
☛ If all six programmes have been set, the message TIMER
IS FULL is displayed. Refer to page 29 if you wish to
cancel a preset recording.
4 Press the numeric buttons to enter the code opposite the pro-
gramme that you wish to record in your television magazine.
➢ If you wish to correct the G-CODE code that you are
entering:
◆ Press the
➛
button until the digit to be corrected is
cleared
◆ Enter the correct digit
5 Press the MENU button.
Result
:
The information concerning the programme is displayed.
☛ When using the G-CODE function for the first time with
stored stations, the programme number flashes. This one
time, you must enter the station number manually by
pressing the
or❷
buttons. Refer to the following page if:
◆ The programme number or times flash
◆ You wish to modify the programme
6 If the programme and times are correct, press the MENU button.
7 Press the VCR STANDBY/ON (STANDBY/ON) button to activate
the timer.
Result
: The Timer indicator ( ) is displayed.
☛ If no cassette has been inserted when you press
VCR STANDBY/ON (STANDBY/ON) the Timer indicator
flashes. If the safety tab on the cassette has been broken,
the cassette is ejected. Insert the appropriate cassette.
8 Refer to page 29 if you wish to:
◆ Check that your VCR has been programmed correctly
◆ Cancel a preset recording
☛ The numbers next to each TV programme listing are
G-CODE code numbers, which allow you to programme
your videorecorder instantly with the remote control. Tap
in the G-CODE code for the programme you wish to
record.
™ G-CODE is a trademark of Gemstar Development Corporation. The G-CODE system is
manufactured under licence from Gemstar Development Corporation.
V
IPC
+
PROG
1/JAN MON 21:28
PR DAY START→STOP
L1 MO 1 12:00
→
12:50SP
-- ---- --:--→--:----
-- ---- --:--→--:----
-- ---- --:--→--:----
-- ---- --:--→--:----
-- ---- --:--→--:----
❷
➛❿
DELETE:CLR/RST MENU
26
Modifying G-CODE Programming ★(SV-665B/665X/
SV-265B Only)
If you wish to correct the programme displayed or modify certain elements, such as the recording
speed, you can do so before you press MENU a second time to confirm.
If you wish to... Then...
Select an input source other ◆ Press the ➛or ❿buttons, until the PR selection flashes.
than the tuner
LINE IN 1 or LINE IN 2 input ◆ Press the INPUT button one or more times to change the
input source selection.
➢ The input source must be selected before changing any
other value.
Record a programme every day ◆ Press the ➛or ❿buttons, until the DAY selection flashes.
(Monday to Sunday) at the same time
◆ Press the
or❷
buttons, until the DLY (Daily) value is
displayed.
Record a programme every week ◆ Press the ➛or ❿buttons, until the DAY selection flashes.
on the same day and at the same time
◆ Press the
or❷
buttons, until the W- (Week) value is
displayed, followed by the required day.
Example
: W-SA (Weekly Saturday)
Extend the recording time ◆ Press the ➛or ❿buttons, until the STOP selection flashes.
◆ Press the
or❷
buttons to increase or decrease the stop
time.
Select the recording speed ◆ Press the ➛or ❿buttons, until the recording speed selection
★
(SV-640B only) flashes.
◆ Press the
or❷
buttons until the correct indication is
displayed:
• AUTO (Auto Tape Speed Select) : see page 28
• SP (Standard Play)
• LP (Long Play)
GB
GB
Page 16

2928
Using the Timer Programming Feature
The Timer Programming feature allows you to preset the VCR to
record a programme up to one month before that programme is to
be broadcast. Up to six programmes can be preset.
☛ Before presetting a recording, check that the date and
time are correct.
1 - Insert the cassette. Press the TIMER button.
Press the
or❷
buttons to select the STANDARD option and
then press the
❿
button or,
◆ Press MENU on the remote control.
Result
: The programming menu is displayed.
◆ Press the OK button to select TIMER PROGRAMMING option.
Result
:The TIMER PROGRAMMING menu is displayed.
2 Press
❿
to select the input source.
3 Select the required station by pressing the
,❷
buttons or
INPUT to select the LINE IN 1 or LINE IN 2 ★(SV-665B/SV-665X/
SV-265B only) input sources.
4 Press
❿
to select the recording day.
5 Select the required day by pressing the
or❷
buttons.
6 Press
❿
to select the recording start time.
7 Select the required hour value by pressing the
or❷
buttons.
8 Press
❿
to select the minutes.
9 Select the required minute value by pressing the
or❷
buttons.
10 Press
❿
to select the recording end time.
11 Select the required recording end time by pressing the
or❷
buttons, following the same procedure as when selecting the
recording start time.
12 Press
❿
to select the the recording speed (AUTO/SP/LP).
13 Press the
or ❷buttons to switch between the AUTO, SP
(Standard Play) or LP (Long Play).
14 When you have finished, press the MENU button.
15 Press the VCR STANDBY/ON (STANDBY/ON) button to activate
the timer.
Result: Before starting recording, the VCR compares the timer
duration with the remaining time on the cassette.
☛ Auto Tape Speed Select
The VCR’s “Auto Tape Speed Select” function compares
the duration of the timer recording to the actual recording
time remaining on the tape loaded. If there is insufficient
tape to complete a timer recording in AUTO mode, the
VCR automatically switches to LP mode to record the
whole programme.
E.g. If there is a one hour AUTO mode timer recording
to be started, but only 40 minutes of tape
remaining, the VCR will record in SP for 20
minutes and switch to LP mode for the remaining
40 minutes.
SPEED DUB TV/VCR TIMER
1
**
TIMER METHOD
**
STANDARD
G-CODE
❷
❿
END:MENU
1/JAN MON 21:28
PR DAY START→STOP
L1 MO 1 12:00→12:50SP
-- ---- --:--→--:----
-- ---- --:--→--:----
-- ---- --:--→--:----
-- ---- --:--→--:----
-- ---- --:--→--:----
❷
➛❿
DELETE:CLR/RST MENU
★
(SV-665B/665X/265B)
Checking a Preset Recording
Cancelling a Preset Recording
1/JAN MON 21:28
PR DAY START→STOP
L1 MO 1 12:00→12:50SP
-- ---- --:--→--:----
-- ---- --:--→--:----
-- ---- --:--→--:----
-- ---- --:--→--:----
-- ---- --:--→--:----
❷
SET:
❿
DELETE:CLR/RST MENU
1/JAN MON 21:28
PR DAY START→STOP
L1 MO 1 12:00→12:50SP
-- ---- --:--→--:----
-- ---- --:--→--:----
-- ---- --:--→--:----
-- ---- --:--→--:----
-- ---- --:--→--:----
❷
SET:
❿
DELETE:CLR/RST MENU
You can check your preset recordings:
◆ When you have finished presetting the VCR
◆ If you have forgotten which programmes will be
recorded
1 - Insert the cassette. Press the TIMER button.
Press the
or❷
buttons to select the STANDARD option and
then press the
❿
button or,
◆ Press MENU on the remote control.
Result
: The programming menu is displayed.
◆ Press the OK button to select TIMER PROGRAMMING option.
Result
: The TIMER PROGRAMMING menu is displayed.
2 Press the
or❷
buttons to select the required programme.
3 Press the
➛
or ❿buttons to select and change any values as
required. For more details, refer to the previous page.
4 On completion, press MENU twice.
You can cancel any programmes that are:
◆ Incorrect
◆ No longer required
1 - Insert the cassette. Press the TIMER button.
Press the
or❷
buttons to select the STANDARD option and
then press the
❿
button or,
◆ Press MENU on the remote control.
Result
: The programming menu is displayed.
◆ Press the OK button to select TIMER PROGRAMMING option.
Result
: The TIMER PROGRAMMING menu is displayed.
2 Select the programme to be cancelled by pressing the
or❷
buttons.
3 Press the CLR/RST button to cancel the selected programme.
Result
: All the recording information is deleted and the broad-
cast will not be recorded.
4 On completion, press MENU twice.
GB
GB
PROG
PROG
PROG
Page 17

3130
This function allows you to play back any pre-recorded cassette.
1 Switch on both the television and your VCR.
2 Insert the video cassette to be played. If the safety tab on the
cassette is intact, press
❿ll
.
Otherwise, the cassette is played automatically.
➢ When a cassette is loaded, the tape position is optimized
automatically to reduce disturbance (Digital Auto Tracking).
When playing a cassette, if the end of the tape is reached,
the cassette is rewound automatically.
NTSC tapes can be played back but cannot be recorded
with this VCR.
3 To... Then press...
Stop the playback
■
(STOP).
Eject the cassette (EJECT).
Playing a Cassette
Adjusting Picture Alignment Manually
The Picture Alignment feature allows you to adjust the alignment
manually to obtain the best possible picture.
When noise bars or streaks appear during playback, adjust alignment
manually by pressing the PROG/TRK (
or ❷) / TRK ( or ) buttons
until the picture is clear and stable.
Result
:
◆ The tracking bar appears.
◆ The image is adjusted.
◆ The tracking bar disappears when you release the button.
Adjusting Picture Alignment Automatically
★
(SV-260B/260X Only)
The Picture Alignment feature enables you to optimize the tape
position automatically to obtain the best possible picture.
When noise bars or streaks appear during playback, adjust picture
alignment by pressing the A.TRK button.
Result: ◆ The tracking bar appears.
◆ The picture is automatically adjusted.
◆ The tracking bar disappears when digital auto tracking has
been completed.
OK
TRK PROG
REC MENU
3
2
REPEAT
DISP./
A.TRK
IPC
G
★
(SV-260B/SV-260X)
★
(SV-665B/SV-660B/
★
(SV-460B/SV-265B/
★
(SV-665X/SV-460X/
★
(SV-660X)
OSD :ON
TAPE SELECT :E180
COLOUR SYSTEM :AUTO
ECO. MODE :OFF
IPC :ON
❷
❿
END:MENU
USER SET
PROG OPTIONS INSTALL
CLOCK BONUS LANG
❷
➛❿
OK END:MENU
1
**
PICTURE
**
IPC : OFF
SOFTEN SHARPEN
--------
*
-----
➛❿
ON/OFF:
❷
The Intelligent Picture Control Feature allows you to adjust the
sharpness of the image automatically, according to your own
preferences.
1 During playback, press the MENU button on the remote control.
Result: The programming menu is displayed.
2 Press the corresponding
,❷
or ➛, ❿buttons to select the
USER SET option.
3 Press the OK button to select this option.
Result
: The USER SET menu is displayed.
4 Press the corresponding
or❷
buttons, until the IPC option is
selected.
5 Press the
❿
button to select the IPC (intelligent picture control)
option.
➢ When intelligent picture control mode is ON, the sharpness
of the image is adjusted automatically.
6 To adjust the sharpness manually, press the
❷
button to turn the
IPC mode
OFF
.
7 Press the
➛
or ❿buttons until the picture is displayed according to
your preferences.
➢ If you do not press a button within ten seconds, the
PICTURE menu disappears automatically.
8 On completion, press the MENU button again.
Intelligent Picture Control
The Intelligent Picture Control Feature allows you to adjust the
sharpness of the image automatically, according to your own
preferences.
1 During playback, press the IPC button on the remote control.
2 Press the
❷
button to turn the IPC (intelligent picture control)
option
ON and OFF.
➢ When intelligent picture control mode is ON, the sharpness
of the image is adjusted automatically.
3 To adjust the sharpness manually, select intelligent picture control
mode
OFF.
◆ The horizontal picture adjusting appears.
4 Press the
➛
or ❿buttons until the picture is displayed according to
your preferences.
➢ If you do not press a button within ten seconds, the
PICTURE menu disappears automatically.
5 On completion, press the IPC button again.
Intelligent Picture Control ★(SV-260B/260X Only)
GB
GB
A.TRK IPC INPUT
AUDIO DISPLAY
REPEAT
TRK PROG
DIO
TRK PRO
AUDIO DISPLAY
OPTIONS
OPTIONS
CLR/RST F.ADV INDEX
A.TRK IPC INPUT
TRK PROG
REPEAT
Page 18

3332
Selecting the Colour Mode
Before recording or playing back a cassette, you can select the
required system standard.
➢
◆ When you playback an NTSC-recorded tape on this VCR
make a setting on the colour system according to your TV.
If your TV is a PAL system only TV, set NTPB.
If your TV is Multi System TV (NTSC 4.43 compatible), set
NT4.43 and you can record NT4.43.
1 Press MENU on the remote control.
Result
: The programming menu is displayed.
2 Press the corresponding
,❷
or ➛, ❿buttons to select the
USER SET option.
3 Press the OK button to select this option.
Result
: The USER SET menu is displayed.
4 Press the corresponding
or❷
buttons, until the
COLOUR SYSTEM option is selected.
5 Press the
❿
button to select AUTO
➝
PAL➝ MESECAM➝ B/W.
AUTO When playing back a cassette, the PAL/NTSC system
standard is automatically selected by the VCR.
B/W Black and White
6 On completion, press MENU twice to exit the menu.
OSD :ON
TAPE SELECT :E180
COLOUR SYSTEM :AUTO
ECO. MODE :OFF
IPC :ON
❷
❿
END:MENU
USER SET
PROG OPTIONS INSTALL
CLOCK BONUS LANG
❷
➛❿
OK END:MENU
When monitoring a TV programme or playing back a Hi-Fi
recorded video tape, press the AUDIO button to select a desired
sound output. As the AUDIO button is pressed, the sound output
and the indicator change as below:
Selecting the Audio Output Mode
★
(SV-665B/660B/SV-665X/660X Only)
You can select the mode in which the sound is mute.
To select the audio mute mode on and off, simply press the AUDIO button
on the remote control.
Selecting the Audio Mute Mode
★
(SV-460B/265B/260B/460X/260X Only)
X
REPEAT
VOL PROG/TRK
AUDIO
DISP./
P
★
(SV-260B/260X)
★
(SV-445B/SV-245B)
L R
MIX
MONO
L
R
Heard in stereo.
(left channel and
right channel)
Left channel heard
from both the left
and right
speakers.
Right channel
heard from both
the left and right
speakers.
Heard in
monaural.
Channel
I (MAIN)
heard from the left
speaker, channel
II (SUB) heard
from the right
speaker.
Channel I (MAIN)
heard from both
the left and the
right speakers.
Channel II-(SUB)
heard from both
the left and the
right speakers.
Channel I (MAIN)
heard from both
the left and the
right speakers.
Heard in
monaural.
Heard in
monaural.
Heard in
monaural.
Heard in
monaural.
Sound mixed the left and right channels, and the
normal audio track.
OSD display
Sound type
Stereo sound Bilingual sound
Standard
sound
broadcast
GB
GB
OPTIONS
OPTIONS
AUDIO
REC
VOL
AUDIO
TRK
REC
Page 19

34
Playing a Cassette in Slow Motion
You can play a cassette in slow motion.
➢ No sound is heard when playing back a cassette in slow
motion.
1 Press:
◆
❿
II
to start playing the cassette
◆ SLOW ( ) as many times as required to decrease or
increase the speed respectively
☛
T
o return to the normal speed, press the
❿
II
button twice.
2 When playing back in slow motion, picture interference may occur.
Press the PROG/TRK (
or ❷) / TRK ( or ) buttons to
minimize this effect.
☛ When you have been using the Slow Motion function for
more than about five minutes, the VCR will automatically
play to protect the:
◆ Cassette
◆ Video heads
You can:
◆ Stop the cassette at a given frame (image)
◆ Advance one frame at a time
➢ No sound is heard when playing back frame by frame.
1 Press:
◆
❿
II
to start playing the cassette
◆
❿
II
to stop the tape at a given frame
◆
F.ADV ( )
to advance frame by frame
2 To return to normal playback, press
❿
II
.
☛ When you have been using the Frame-by-Frame function
for more than about five minutes, the VCR will automatically play to protect the cassette and video heads.
➢ Vertical stability: When playing back frame by frame,
interference may be seen on the screen. Press the
V-LOCK ( ) buttons to minimize this effect.
Playing a Sequence Frame by Frame
11
OK
REC MENU
1
VCR INPUT
REPEAT
PROG/TRK
DISP./
A.TRK
IPC
O
2
2
2
2
★
(SV-260B/SV-260X)
★
(SV-665B/SV-660B/
★
(SV-460B/SV-265B/
★
(SV-665X/SV-460X/
★
(SV-660X)
GB
SLOW
SHUTTLE
V-LOCK
UDIO
TRK PR
SLOW
F.ADV
V-LOCK
Page 20

35
Picture Search, Fast Forward/Rewind
Picture Search enables you to Fast Forward or Rewind and look for
a particular part of a tape.
1 Press PLAY, the VCR will enter normal play mode. While in play,
press and release the
❿❿
(or ➛➛) button. The VCR will search at 5
times the normal playback speed.
2 To return to normal playback mode, press the
❿
II
button.
3 If you press and HOLD down the
❿❿
(or ➛➛) button the VCR will
search at 9 times the normal speed. Releasing the
❿❿
button will
return the VCR to search at 5 times the normal speed. To return to
normal playback mode, press the
❿
II
button.
4 Whilst in Picture Search mode, if you press the
❿❿
button again,
the VCR will enter normal Fast Forward mode.
5 Likewise, whilst in Picture Search
➛➛
mode, if you press the
➛➛
button again, the VCR will enter normal Rewind mode.
6 If, when Redwing (
➛➛
) or Fast Forwarding (❿❿), you press the
➛➛
(or ❿❿) button, the VCR will enter the Picture Search mode.
Searching for a Specific Sequence
Each time you record a cassette on this VCR, an “index” is
automatically marked on the tape when recording starts.
The Search function allows you to fast-forward or rewind to a
specific index and start playback from that point. Depending on the
direction selected, the indexes are numbered as follows:
etc.
Prev
Seq.
Seq. being
played
Next
Seq.
etc.
21 12
➞
➢ This VCR uses a standard indexing system (VISS). As a
result, it will recognize any indexes marked by other
VCRs using the same
system and vice versa.
INTRO SCAN
1 To search for a specific index, press INDEX.
2 Press the
➛➛
or ❿❿buttons depending on the direction
where your desired programme is located.
3
When an Index mark is found the VCR will playback the tape for 5
seconds, after which it will continue searching for the next Index mark.
4
If you want to watch the tape from a particular Index, simply press
❿
II
.
Index Skip Search:
This feature will enable you to fast forward/rewind to a specific
point on a tape: E.g. if you have recorded 3 different programmes
on a tape and you have rewound the tape to the beginning, by
using this feature you can go directly to the start of programme 2
simply by pressing the INDEX button.
1 Press the INDEX to start the Index search.
2 Press the
➛➛
or ❿❿buttons twice more. This will take
you directly to the start of the desired programme is located.
3 These Index searches can be made forwards: (press
❿❿
) or
backwards: (press
➛➛
).
4
To cancel an Index search simply press the
❿
II
or ■button.
SHUTTLE
V-LOCK
CLR/RST F.ADV INDEX
INDEX:
➛➛❿❿
INDEX SEARCH:
❿❿
+01
1
GB
Page 21

3736
You can set repeat play to repeat the tape continuously from
beginning to end.
1 Press MENU on the remote control.
Result
: The programming menu is displayed.
2 Press the corresponding
,❷
or ➛, ❿buttons to select the
EASY OPERATION option.
3 Press the OK button to select this option.
Result
: The EASY OPERATION menu is displayed.
4 Press the corresponding
or❷
buttons, until the
REPEAT PLAY option is selected.
5 To... Press
➛or❿
, until...
Repeat play ON is displayed.
Do not wish to repeat play OFF is displayed.
6 On completion, press MENU twice to exit the menu.
You can set interval repeat play to repeat the cassette several times
for special interval.
1 Press MENU on the remote control.
Result
: The programming menu is displayed.
2 Press the corresponding
,❷
or ➛, ❿buttons to select the
EASY OPERATION option.
3 Press the OK button to select this option.
Result
: The EASY OPERATION menu is displayed.
4 Press the corresponding
or❷
buttons, until the
NO. OF INTERVAL REPEAT option is selected.
5 To... Press
❿
, until...
Interval repeat play 5, 10, 15 is displayed.
(choose repeat time 5 times,
10 times, 15 times)
Cancel interval repeat play OFF is displayed.
6 On completion, press MENU twice to exit the menu.
7 To select interval during playback, press the INPUT/REPEAT
button at the desired start point.
Result
:“INTERVAL REPEAT SETTING” is displayed.
Press the INPUT/REPEAT button one more time at the desired
end point.
Result
: The tape is automatically rewound to the start point.
“
INTERVAL REPEAT” is displayed.
Interval Repeat Play
Auto Repeat Play
AUTO POWER OFF :OFF
REPEAT PLAY :OFF
NO. OF
INTERVAL REPEAT : 5
❷
❿
END:MENU
BONUS
AUTO POWER OFF :OFF
REPEAT PLAY :OFF
NO. OF
INTERVAL REPEAT : 5
❷
❿
END:MENU
BONUS
Using the Tape Counter
0:00:00
CLR/RST F.ADV INDEX
TV VCR INPUT
REPEAT
VOL PROG/TRK
REC MENU
DISP./
SELECT
-/--
2
2
2
2
The tape counter:
◆ Indicates the elapsed time in the play and record modes
(hours, minutes and seconds)
◆ Is reset when a cassette is inserted in the VCR
◆ Allows you to find the beginning of a sequence easily
☛ If the remaining time is to be calculated correctly, you
must indicate the type of cassette being used.
1 Insert a cassette in your VCR.
2 To set the tape counter to zero at the beginning of a sequence:
◆ Press DISP./ or DISPLAY twice to display the counter
◆ Press CLR/RST when you want to set the tape counter to
zero
3 When you are ready,
◆ Start playback or Recording.
◆ Press the
■
button.
◆ To fast-froward or rewind to the sequence at which the
counter was set to zero, press
➛➛
or ❿❿.
➢ Some VCR information, such as the counter, can be
displayed on the television screen (unless you have
deactivated the OSD mode; refer to page 16).
Press DISP./ or DISPLAY:
◆ Once to display the current function, programme
number, recording speed, date, time and counter
◆ Twice to display the counter only
◆ Three times to display the time remaining on the
cassette
◆ Four times to clear the display
★
(SV-260B/SV-260X)
★
(SV-665B/SV-660B/
★
(SV-460B/SV-265B/
★
(SV-665X/SV-460X/
★
(SV-660X)
GB
GB
CLR/RST F.ADV INDEX
A.TRK IPC INPUT
DIO
TRK PROG
EC MENU
REPEAT
DISPLAY
Page 22

3938
Connecting an RCA Audio/Video Input Cable
★
(SV-665B/665X/265B
Only)
You can connect other audio/video equipment to your VCR using
audio/video cables if the appropriate outputs are available on the
equipment chosen.
Examples
: ◆ You wish to copy a video cassette with the help of a
second VCR (see page 39).
◆ You wish to play back and/or copy pictures taken
with a camcorder (see page 39).
☛ ◆ Regardless of the type of connection chosen, you
must always connect the coaxial cable supplied.
Otherwise, no picture will be visible on the screen
when the VCR is switched off.
◆ Make sure that both the television and the VCR are
switched off
before connecting the cables.
1 Connect one end of the RCA audio/video cable into the VIDEO
INPUT socket on the front of the VCR.
2 Plug the other end of the audio/video cable into the appropriate
output connector on the other system (VCR or camcorder).
3 Connect one end of the RCA audio cable supplied into the AUDIO
INPUT sockets on the front of the VCR.
➢ Take care to respect the colour coding of the left and right
channels.
4 Plug the other end of the audio cable into the appropriate output
connectors on the other system (VCR, camcorder or Hi-Fi sound
system).
PROG
II
EJECT
STANDBY/ON
VIDEO L AUDIO R
LINE IN
II
1
3
3
★
(SV-665B/SV-665X)
I I
I I
1
3
★
(SV-265B)
This function allows you to start a new recording at a specific
position on the cassette while maintaining a very smooth scene
change.
1 Insert the cassette to be edited in your VCR.
2 Press the
❿ll
button to start playback.
3 When you reach the position from which you wish to start the new
recording, press the
❿ll
button.
4 Press the F.ADV ( ) button again as often as necessary to
advance frame by frame, until the exact recording position is
located.
5 While the VCR is in still mode, hold the REC button down for
a while to activate the Assemble Edit function.
Result: Record symbol flashes in the display.
6 Select the source from which you wish to record by pressing:
◆ The PROG/TRK (
or ❷) / PROG (or ❷) buttons for
television channels
◆ The INPUT button for the LINE IN 1 or LINE IN 2
★
(SV-665B/SV-665X/SV-265B only) input sources
7 Press the
❿ll
button to start recording.
8 When you have finished recording, press
■
.
You can copy a cassette to your VCR from another video source,
such as another VCR or a camcorder.
☛ It is an infringement of copyright laws to copy
prerecorded cassettes or to re-record them in any form
without the permission of the owners of the
corresponding copyright.
1 Connect the VCR, from which the cassette is to be copied, to the
appropriate RCA audio and video input connectors on the rear of
your VCR, as indicated on page 12.
You can also use an RCA audio and video cable to connect the
LINE IN 2 input on the front of your VCR.★(
SV-665B/SV-665X/
SV-265B only)
2 Insert a blank cassette in your VCR.
3 Insert the pre-recorded cassette in the other video source (VCR or
camcorder).
4 Press the INPUT button to select the appropriate input on your
VCR:
◆ LINE IN 1 for the rear input
◆ LINE IN 2 for the front input
★
(
SV-665B/665X/265B only
)
5 Start playing back the cassette to be copied.
6 Hold REC down for a while to start recording on your VCR.
7 When you have finished recording, press
■
on both VCRs.
➢ If you wish to view the cassette being copied:
◆ Your VCR must be connected as usual to the
television (see page 11 for further details)
Using the Assemble Edit Function
Recording from Another VCR or Camcorder
2
6
GB
GB
EJECT
STANDBY/ON
VIDEO L AUDIO R
LINE IN
STANDBY/ON
EJECT
VIDEO AUDIO
PROG
LINE IN 2
PROG
F.ADV
REC MENU
OK
REC MENU
OK
Page 23

4140
Your VCR remote control will work with Samsung televisions and
compatible brands.
To determine whether your television is compatible, follow the instructions
below.
1 Switch your television on.
2 Point the remote control towards the television.
3 Hold down the TV button and enter the two-figure code
corresponding to the brand of your television, by pressing the
appropriate numeric buttons.
Brand Codes Brand Codes
SAMSUNG 01 to 06 PHILIPS 02, 20, 22
AKAI 09, 23 SABA 13, 14, 22 to 24
GRUNDIG 09, 17, 21 SONY 15, 16
LOEWE 02 THOMSON 13, 14, 24
PANASONIC 08, 23 to 27 TOSHIBA 07, 16 to 19, 21
Result:
If your television is compatible with the remote control, it
will switch off. It is now programmed to operate with the
remote control.
➢ If several codes are indicated for your television brand, try
each one in turn until you find one that works.
☛
When you change the batteries in the remote control, you
must reprogramme the code, following the same procedure.
You can then control the television using the following buttons.
Button Function
TV STANDBY/ON➀Used to switch the television on and off.
TV or VCR
➁
Used to switch between the TV and VCR modes.
Only the VOL
(
+ or –
)
and TV STANDBY/ON
buttons are operational in VCR mode.
-/--
➂
Used to enter a two-figure programme number.
Example
: For programme 12, press -/-- followed
by numeric buttons 1 and 2.
INPUT
➃
Used to select an external source.
VOL +or –
➄
Used to adjust the volume of the television.
PROG/TRK
➅
Used to select the required programme.
(
or❷
)
DISP./
➆
Used to switch between an external source and
the television tuner.
➢
The various functions will not necessarily work on all
televisions. If you encounter problems, operate the
television directly.
Using the TV Buttons on the Remote Control
★
(SV-665B/660B/460B/260B/665X/660X Only)
TV
VCR
INPUT
TV
VCR
INPUT
1
2
2
6
6
7
3
5
5
4
The Auto Power Off feature automatically turns off your VCR if no
signal is received and you do not press any button for the selected
time.
1 Press MENU on the remote control.
Result
: The programming menu is displayed.
2 Press the corresponding
,❷
or ➛, ❿buttons to select the
EASY OPERATION option.
3 Press the OK button to select this option.
Result
: The EASY OPERATION menu is displayed.
4 Press the corresponding
or❷
buttons, until the
AUTO POWER OFF option is selected.
5 Press the
❿
button, until you select the time of Auto Power off
interval.
OFF 2HOUR 3HOUR
6 On completion, press MENU twice to exit the menu.
Auto Power Off
Low Power Mode reduces the Standby power consumption of the
VCR when in Standby mode.
Useful, for example, when you are away from the house on holiday.
It saves actually turning the VCR off.
1 Press MENU on the remote control.
Result
: The programming menu is displayed.
2 Press the corresponding
,❷
or ➛, ❿buttons to select the
USER SET option.
3 Press the OK button to select this option.
Result
: The USER SET menu is displayed.
4 Press the corresponding
or❷
buttons, until the ECO. MODE
is selected.
5 Press the
❿
button to turn LOW(3Watts) mode on. Now, when the
VCR is standby mode the front display panel will shut off.
Even the clock disappears. By pressing the VCR STANDBY/ON
(STANDBY/ON) button again the display panel will reappear.
6 On completion, press MENU twice to exit the menu.
ECO Mode-Reducing Standby power consumption
USER SET
PROG OPTIONS INSTALL
CLOCK BONUS LANG
❷
➛❿
OK END:MENU
OSD :ON
TAPE SELECT :E180
COLOUR SYSTEM :AUTO
ECO. MODE :OFF
IPC :ON
❷
❿
END:MENU
AUTO POWER OFF :OFF
REPEAT PLAY :OFF
NO. OF
INTERVAL REPEAT : 5
❷
❿
END:MENU
BONUS
Child Door Lock System
With this mechanism you can prevent children from harming
themselves or the VCR. It stops fingers and small articles from
entering your VCR.
GB
GB
VCR STANDBY/ON TV STANDBY/ON
CLR/RST F.ADV INDEX
TV VCR INPUT
AUDIO DISP./
AUDIO DISP./
AUDIO DISP./
SLOW
SHUTTLE
V-LOCK
CLR/RST F.ADV INDEX
-/--
SELECT
TV VCR INPUT
-/--
SELECT
VOL PROG/TRK
VOL PROG/TRK
VOL PROG/TRK
REPEAT
REPEAT
REPEAT
OPTIONS
OPTIONS
Page 24

4342
Technical Specifications
Design and specifications are subject to change without notice.
Format VHS PAL standard VHS PAL standard
Heads Video: 4 rotary heads Video: 4 rotary heads
(SV-460B/460X)
Video: 2 rotary heads
(SV-265B/260B/260X)
Hi-Fi audio: 2 rotary heads
Audio/Control: 1 stationary head Audio/Control: 1 stationary head
Erase: 1 full track erase head Erase: 1 full track erase head
Receiving channel VHF-I, VHF-III, UHF, lnterband/ VHF-I, VHF-III, UHF, lnterband/
Hyperband Hyperband
Television system STANDARD B/B A2 STANDARD B/B
(SV-665B/660B) (SV-460B/265B/260B)
STANDARD B/G A2/NICAM STANDARD B/G
(SV-665X/660X) (SV-460X/260X)
Luminance FM azimuth recording FM azimuth recording
Colour system PAL/MESECAM/NT4.43: Down PAL/MESECAM/NT4.43: Down
converted subcarrier phase shifted converted subcarrier phase shifted
direct recording direct recording
NTSC PB on PAL TV NTSC PB on PAL TV
Tape speed SP 23.39 mm/sec SP 23.39 mm/sec
LP 11.69 mm/sec LP 11.69 mm/sec
Recording/playback time SP3 hours (E-180 Tape) SP 3 hours (E-180 Tape)
LP 6 hours (E-180 Tape) LP 6 hours (E-180 Tape)
REW time About 60 sec in REW with E-180 About 60 sec in REW with E-180
VIDEO
Input 0.5 to 2.0 Vp-p; 75 ohm unbalanced 0.5 to 2.0 Vp-p; 75 ohm unbalanced
Output 1.0 ± 0.2 Vp-p; 75 ohm unbalanced 1.0 ± 0.2 Vp-p; 75 ohm unbalanced
Signal-to-noise ratio Better than 43 dB (SP) Better than 43 dB (SP)
Horizontal resolution More than 240 lines More than 240 lines
AUDIO
Input -8 dBm, 47 Kohm unbalanced -8 dBm, 47 Kohm unbalanced
Output -8 ± 3 dBm, 1 Kohm unbalanced -8 ±3 dBm, 1 Kohm unbalanced
Wow and flutter (WTD) 0.4% max (SP) 0.4% max (SP)
Signal-to-noise ratio 68 dB min (IHF A filter) 42 dB min (IHF A filter)
Frequency response 20Hz - 20kHz 100Hz - 8kHz
Power requirement 220-240V~, 50Hz 220-240V~, 50Hz
Power consumption Approx. 12 watts Approx. 10 watts
Operation temperature 41°F-104°F (5°C-40°C) 41°F-104°F (5°C-40°C)
Operation humidity 10%-75% 10%-75%
Weight 2.8 Kg (net) 2.8 Kg (net)
Dimensions (WxHxD) 360 x 94 x 240 mm 360 x 94 x 240 mm
MODEL SV-665B/660B/665X/660X SV-460B/265B/260B/460X/260X
Problems and Solutions
Before contacting the Samsung after-sales service, perform the following simple checks.
Problem Explanation/Solution
No power ◆ Check that the power plug is connected to a wall outlet.
◆ Have you pressed the VCR STANDBY/ON (STANDBY/ON)
button?
You cannot insert a video cassette ◆ A video cassette can only be inserted with the window
side up and the safety tab facing you.
The television programme was not recorded ◆ Check the VCR aerial connections.
◆ Is the VCR tuner properly set?
◆ Check if the safety tab is intact on the cassette.
Timer recording was unsuccessful ◆ Was the VCR STANDBY/ON (STANDBY/ON) button pressed
to activate the timer?
◆ Re-check the recording start/stop time settings.
◆ If there was a power failure or interruption during timer
recording, the recording will have been cancelled.
No playback picture or the picture ◆ Check to see if you are using a prerecorded tape.
is distorted
You cannot see normal broadcasts ◆ Check the TUNER/EXTERNAL setting. It should be on
TUNER.
◆ Check the TV/VCR aerial connections.
Noise bars or streaks on playback ◆ Press the PROG/TRK (or ❷)/ TRK (or)
buttons to
minimize this effect.
When the
❿
II
button is pressed ◆ A still picture may have “noise bars”, depending on the
during playback, the still picture
condition of the tape. Press the PROG/TRK (or ❷) / TRK (
has severe “noise bars” streaks
or )
buttons during SLOW motion to minimize this effect.
Video Head Cleaning ◆ If poor pictures appear on a variety of cassettes, the video
heads may need cleaning. This is not a common problem
and unless it appears, the heads should not be cleaned.
When cleaning the video heads, read all instructions
provided with the head cleaning cassette. Incorrect head
cleaning can permanently damage the video heads.
If when tuning in your TV to the VCR test 1. Remove the aerial input plug from the socket marked (aerial
pattern your TV does not find the test pattern symbol) on the rear of the VCR.
or the pattern when found suffers from 2. Carry out the instructions “Tuning Your Television for the VCR”
interference, it may be due to the VCR output (see page 14).
channel clashing with the normal TV 3. Carry out the instructions “Setting the VCR output Channel”
transmissions in your area. To prevent this (see page 17), move the channel number several channels
you will need to change the VCR output down from the original setting. (example: from 38 to 35).
channel in the following way 4. Replace the aerial plug into the socket marked (aerial symbol)
on the rear of the VCR.
5. Re-tune your TV to the VCR again by following instructions
“Tuning Your Television for the VCR” (page 14).
6. If the problem still exists repeat steps 1 to 5 moving several
more channels away from the original setting.
If you are unable to solve the problem after reading the above instructions, note:
◆ The model and serial number on the rear of your VCR
◆ The warranty information
◆ A clear description of the problem
Then contact your nearest SAMSUNG after-sales service.
GB
GB
Page 25

4544
TV Frequency Table ★(SV-665B/660B/460B/265B/260B)
DISP CH Band Fp STD
00 00 V-L 46.25 AUS
01 01 V-L 57.25 AUS
02 02 V-L 64.25 AUS
03 03 V-L 86.25 AUS
04 04 V-L 95.25 AUS
05 05 V-L 102.25 AUS
15 5A V-L 138.25 AUS
06 06 V-H 175.25 AUS
07 07 V-H 182.25 AUS
08 08 V-H 189.25 AUS
09 09 V-H 196.25 AUS
19 9A V-H 203.25 AUS
10 10 V-H 209.25 AUS
11 11 V-H 216.25 AUS
12 12 V-H 224.25 AUS
27 27 UHF 520.25 AUS
28 28 UHF 527.25 AUS
29 29 UHF 534.25 AUS
30 30 UHF 541.25 AUS
31 31 UHF 548.25 AUS
32 32 UHF 555.25 AUS
33 33 UHF 562.25 AUS
34 34 UHF 569.25 AUS
35 35 UHF 576.25 AUS
36 36 UHF 583.25 AUS
37 37 UHF 590.25 AUS
38 38 UHF 597.25 AUS
39 39 UHF 604.25 AUS
40 40 UHF 611.25 AUS
41 41 UHF 618.25 AUS
42 42 UHF 625.25 AUS
43 43 UHF 632.25 AUS
44 44 UHF 639.25 AUS
45 45 UHF 646.25 AUS
46 46 UHF 653.25 AUS
47 47 UHF 660.25 AUS
48 48 UHF 667.25 AUS
49 49 UHF 674.25 AUS
50 50 UHF 681.25 AUS
51 51 UHF 688.25 AUS
52 52 UHF 695.25 AUS
53 53 UHF 702.25 AUS
54 54 UHF 709.25 AUS
55 55 UHF 716.25 AUS
56 56 UHF 723.25 AUS
57 57 UHF 730.25 AUS
58 58 UHF 737.25 AUS
59 59 UHF 744.25 AUS
60 60 UHF 751.25 AUS
61 61 UHF 758.25 AUS
62 62 UHF 765.25 AUS
63 63 UHF 772.25 AUS
64 64 UHF 779.25 AUS
65 65 UHF 786.25 AUS
66 66 UHF 793.25 AUS
67 67 UHF 800.25 AUS
68 68 UHF 807.25 AUS
69 69 UHF 814.25 AUS
TV Frequency Table ★(SV-665X/660X/460X/260X)
002~012 :CCIR STD VHF 244~250 :MOROCCO
013~020 :ITALY 251~255 :BELGUIM
021~069 :CCIR STD UHF
071~075 :CCIR CABLE
201~241 :CCIR STD CABLE
DISP CH Band Fp STD
DISP CH Band Fp STD
DISP CH Band Fp STD
002 E02 V-L 48.25 CCIR
003 E03 V-L 55.25 CCIR
004 E04 V-L 62.25 CCIR
005 E05 V-H 175.25 CCIR
006 E06 V-H 182.25 CCIR
007 E07 V-H 189.25 CCIR
008 E08 V-H 196.25 CCIR
009 E09 V-H 203.25 CCIR
010 E10 V-H 210.25 CCIR
011 E11 V-H 217.25 CCIR
012 E12 V-H 224.25 CCIR
013 A V-L 53.75 Italy
014 B V-L 62.25 Italy
015 C V-L 82.25 Italy
016 D V-H 175.25 Italy
017 E V-H 183.25 Italy
018 F V-H 192.25 Italy
019 G V-H 201.25 Italy
020 H V-H 210.25 Italy
021 E21 UHF 471.25 CCIR
022 E22 UHF 479.25 CCIR
023 E23 UHF 487.25 CCIR
024 E24 UHF 495.25 CCIR
025 E25 UHF 503.25 CCIR
026 E26 UHF 511.25 CCIR
027 E27 UHF 519.25 CCIR
028 E28 UHF 527.25 CCIR
029 E29 UHF 535.25 CCIR
030 E30 UHF 543.25 CCIR
031 E31 UHF 551.25 CCIR
032 E32 UHF 559.25 CCIR
033 E33 UHF 567.25 CCIR
034 E34 UHF 575.25 CCIR
035 E35 UHF 583.25 CCIR
036 E36 UHF 591.25 CCIR
037 E37 UHF 599.25 CCIR
038 E38 UHF 607.25 CCIR
039 E39 UHF 615.25 CCIR
040 E40 UHF 623.25 CCIR
041 E41 UHF 631.25 CCIR
042 E42 UHF 639.25 CCIR
043 E43 UHF 647.25 CCIR
044 E44 UHF 655.25 CCIR
045 E45 UHF 663.25 CCIR
046 E46 UHF 671.25 CCIR
047 E47 UHF 679.25 CCIR
048 E48 UHF 687.25 CCIR
049 E49 UHF 695.25 CCIR
050 E50 UHF 703.25 CCIR
051 E51 UHF 711.25 CCIR
052 E52 UHF 719.25 CCIR
053 E53 UHF 727.25 CCIR
054 E54 UHF 735.25 CCIR
055 E55 UHF 743.25 CCIR
056 E56 UHF 751.25 CCIR
057 E57 UHF 759.25 CCIR
058 E58 UHF 767.25 CCIR
059 E59 UHF 775.25 CCIR
060 E60 UHF 783.25 CCIR
061 E61 UHF 791.25 CCIR
062 E62 UHF 799.25 CCIR
063 E63 UHF 807.25 CCIR
064 E64 UHF 815.25 CCIR
065 E65 UHF 823.25 CCIR
066 E66 UHF 831.25 CCIR
067 E67 UHF 839.25 CCIR
068 E68 UHF 847.25 CCIR
069 E69 UHF 855.25 CCIR
071 X V-L 69.25 CCIR
072 Y V-L 76.25 CCIR
073 Z V-L 83.25 CCIR
074 Z+1 V-L 90.25 CCIR
075 Z+2 V-L 97.25 CCIR
101 S01 V-L 105.25 CCIR
102 S02 V-L 112.25 CCIR
103 S03 V-L 119.25 CCIR
104 S04 V-L 126.25 CCIR
105 S05 V-L 133.25 CCIR
106 S06 V-L 140.25 CCIR
107 S07 V-H 147.25 CCIR
108 S08 V-H 154.25 CCIR
109 S09 V-H 161.25 CCIR
110 S10 V-H 168.25 CCIR
111 S11 V-H 231.25 CCIR
112 S12 V-H 238.25 CCIR
113 S13 V-H 245.25 CCIR
114 S14 V-H 252.25 CCIR
115 S15 V-H 259.25 CCIR
116 S16 V-H 266.25 CCIR
117 S17 V-H 273.25 CCIR
118 S18 V-H 280.25 CCIR
119 S19 V-H 287.25 CCIR
120 S20 V-H 294.25 CCIR
121 S21 V-H 303.25 CCIR
122 S22 V-H 311.25 CCIR
123 S23 V-H 319.25 CCIR
124 S24 V-H 327.25 CCIR
125 S25 V-H 335.25 CCIR
126 S26 V-H 343.25 CCIR
127 S27 V-H 351.25 CCIR
128 S28 V-H 359.25 CCIR
129 S29 V-H 367.25 CCIR
130 S30 V-H 375.25 CCIR
131 S31 V-H 383.25 CCIR
132 S32 V-H 391.25 CCIR
133 S33 V-H 399.25 CCIR
134 S34 V-H 407.25 CCIR
135 S35 V-H 415.25 CCIR
136 S36 V-H 423.25 CCIR
137 S37 UHF 431.25 CCIR
138 S38 UHF 439.25 CCIR
139 S39 UHF 447.25 CCIR
140 S40 UHF 455.25 CCIR
141 S41 UHF 463.25 CCIR
142 1A V-L 42.25 lndoesia
143 01 V-L 45.25 Nez
151 01 V-L 43.25 Angola
152 02 V-L 52.25 Angola
153 03 V-L 60.25 Angola
154 04 V-H 175.25 S/Afri
155 05 V-H 183.25 S/Afri
156 06 V-H 191.25 S/Afri
157 07 V-H 199.25 S/Afri
158 08 V-H 207.25 S/Afri
159 09 V-H 215.25 S/Afri
160 10 V-H 223.25 S/Afri
161 11 V-H 231.25 S/Afri
162 13 V-H 247.45 S/Afri
201 R1 V-L 49.75 OIRT
202 R2 V-L 59.25 OIRT
203 R3 V-L 77.25 OIRT
204 R4 V-L 85.25 OIRT
205 R5 V-L 93.25 OIRT
206 R6 V-H 175.25 OIRT
207 R7 V-H 183.25 OIRT
208 R8 V-H 191.25 OIRT
209 R9 V-H 199.25 OIRT
210 R10 V-H 207.25 OIRT
211 R11 V-H 215.25 OIRT
212 R12 V-H 223.25 OIRT
244 M4 V-H 163.25
Morocco
245 M5 V-H 171.25
Morocco
246 M6 V-H 179.25
Morocco
247 M7 V-H 187.25
Morocco
248 M8 V-H 195.25
Morocco
249 M9 V-H 203.25
Morocco
250 M10 V-H 211.25
Morocco
251 U1 V-H 226.25 Belguim
252 U2 V-H 234.25 Belguim
253 U3 V-H 242.25 Belguim
254 U4 V-H 250.25 Belguim
255 U5 V-H 258.25 Belguim
GB
GB
Page 26

THIS APPLIANCE IS DISTRIBUTED BY
www.samsungvcr.com AC68-01922A
ELECTRONICS
 Loading...