

Samsung SPF-107H, SPF-87H User Manual [tr]

Digital Photo Frame
User Manual
SPF-87H
SPF-107H
imagine the possibilities
Thank you for purchasing this Samsung product.
To receive more complete service, please register your product at
www.samsung.com/register
Model______________Serial No.______________

Language tag in the user manual
03
English
07
Français
11
Türkçe
16
简体中文
21
繁體中文
25
日本語
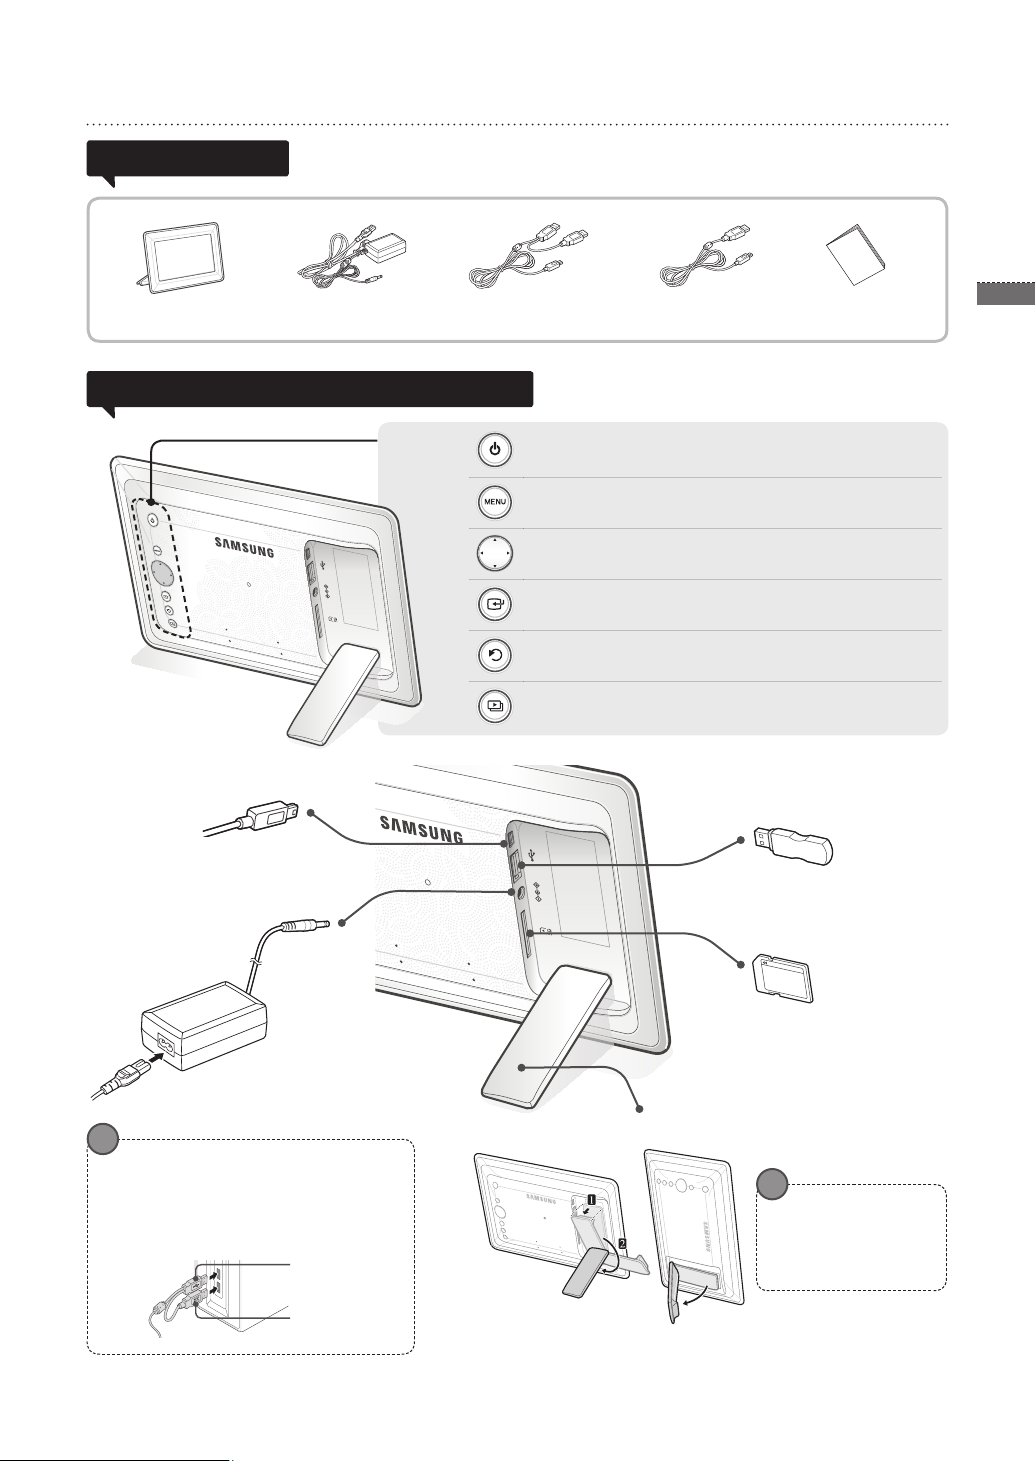
Product and Components
Components
Please check to make sure that all of the following items are included in your delivered
package before using the product.
Power cable/adaptorDigital photo frame USB cable (SPF-87H) USB cable (SPF-107H) User manual
Name and function of each part
3
English
Turns power on and off.
Opens or closes the menu.
Navigates or changes options on the menu.
Selects an option on the menu.
Returns to the previous stage.
(Moves to the main screen if pressed for 2 seconds.)
Starts a slide show.
USB cable connection
(PC connection)
Connect to a PC to copy pictures
to the internal memory or use as
a Mini Monitor.
Power cable connection
Connect the power cable.
!
SPF-87H can be used by connecting to a PC via
the USB cable (along with the auxiliary power
cable).
However, it may not operate properly if the
power supply in your PC is unstable. In this
case, connect the power adapter.
USB Cable
Auxiliary power
cable
Digital photo frame stand
USB memory device
connection
Connect a USB storage device.
SD memory card slot
Insert the SD memory to
view saved pictures.
!
Do not apply excessive
force or turn the stand in
the wrong direction during
setup. This can cause
damage to the stand.

English
4
Using the Digital Frame
1
2
3
4
Viewing pictures
If you press the [MENU] button during a slide show, the <Home>, <Rotate>,
<Zoom>and <Settings> menus will appear.
• To use <Rotate> and <Zoom>, <View Mode> in the <Settings> menu must be set
as <Photo Only> or <Photo & Clock>.
• Only the <Rotate> function is supported when using <Photo & Calendar>.
Press [ ].
Pictures saved in the product’s internal memory or an external memory device can
be viewed in a wide range of options.
Only an SD memory card or USB memory device can be used as an external
memory device.
A wide range of effects can be applied to pictures through the menu. Refer to the
following page for menu options.
Use [▲,▼,◄,►] to
move to the picture you
want and press [ ].
Using as a Mini Monitor
A slide show begins from
the picture you selected.
If you press any button, the button
guide will appear at the right hand
side of the screen.
The available button indication may
differ depending on the situation.
Connect the digital frame to a PC with the USB cable to use as a Mini Monitor.
Connect the digital frame to a PC with the USB cable to use as a Mini Monitor (aux.
monitor). You must install Frame Manager on your PC in order to use the product as
a Mini Monitor.
Log on to http://samsung.com/ to download Frame Manager and for instructions on using
the product as a Mini Monitor.
Only one auxiliary monitor can be used at a time.
Firmware update
!
Preparations for rmware
• Digital photo frame
• Firmware le for update
• USB memory or SD card
update
Download and install the latest rmware from the Samsung Electronics
homepage.
Log on to http://samsung.com/ and enter the model name in the search eld.
(SPF-87H or SPF-107H)
Download and decompress the appropriate rmware.
Copy the decompressed ***.isp le to the SD card or USB memory device and
connect to the digital frame.
Select <Settings> - <Support> - < Upgrade Software> with the buttons on the
back of the product. The rmware is updated.
When the update is nished, turn the digital frame off, remove the external
memory device (SD card/USB memory device), and turn the digital frame on
again.
You can check if the rmware version has been updated in <Settings> -
<Support> - <Product Information>.
!
PC requirements for use as a
• OS: Windows XP SP2, Vista(32bit)
• USB: Extended Host Controller(EHCT)
USB 2.0 supported
• RAM: 256MB or higher
• CPU: 2.4GHz or higher
Mini Monitor
5
English
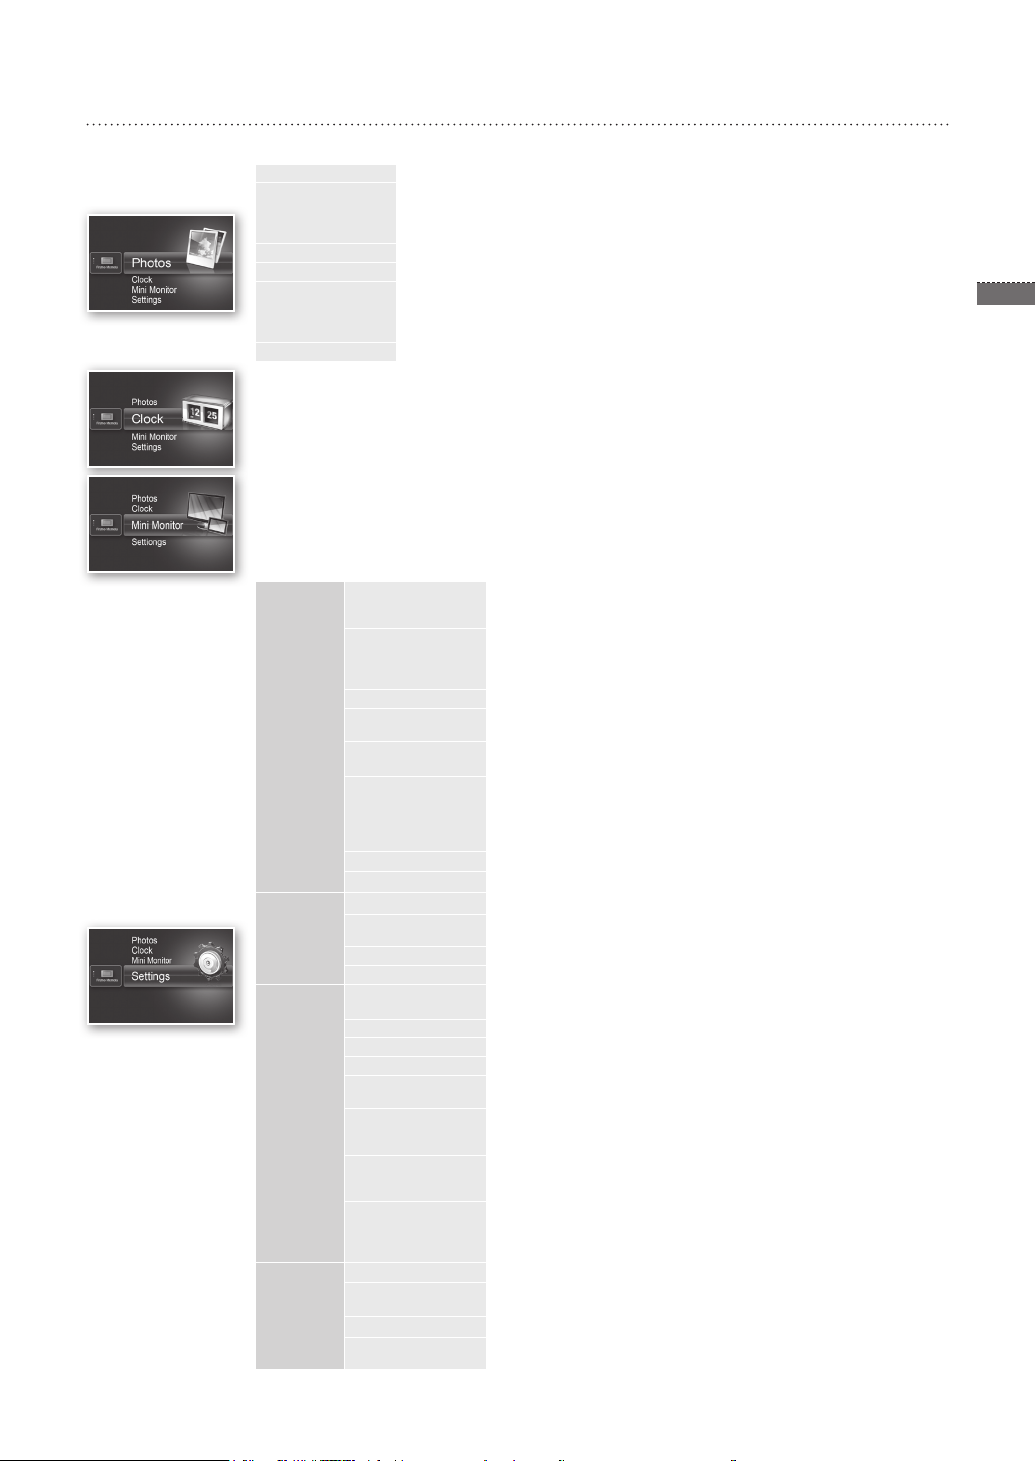
Menu Options
Use the buttons on the back of the product to set various functions to your preferences.
Home Moves to the main screen
Copy If an external memory device (SD memory card/ USB memory device) is connected to the
Delete Deletes pictures in the internal memory or an external memory device
Select Multiple Files Selects multiple les to run functions like slide show, copy, delete, etc.
Select Storage
Device
Settings
The current time congured in <Settings> - <Clock> is displayed. The current time setting can be erased if the
power adaptor is disconnected for a prolonged period of time. Please keep the power adapter connected.
Connect the digital frame to a PC with the USB cable to use as a Mini Monitor.
product,
• Copies pictures in an external memory device to the internal memory
• Copies pictures in the internal memory to an external memory device
If an external memory device (SD memory card/USB memory device) is connected to the
product ,
• Select the internal memory or an external memory device (SD memory card/USB memory
device)
Photos
Clock
General
Support
Slideshow Transition Sets the slide show effects
Slideshow Speed Sets the slide show speed
Slideshow Mode • All Photos / Photos in folder / One photo
Slideshow Order Sets the slide show order
View Mode Sets the slide show display mode
Aspect Ratio • Original Fit: A picture smaller than the screen is displayed in its original size
Portrait Photo Mode Reduces a vertical picture to t the screen
Display Photo Info Displays a picture’s le name and date of creation
Clock Set Sets the current time
Date Format Select the month, year, day display mode
Time Format Selects the time display mode (12 hours, 24 hours)
Clock Type Selects the clock display mode (Clock Only, Clock & Calendar)
Quick Setup Easy settings for frequently used functions
Language Selects the OSD (on-screen display) language
Brightness Adjusts the screen brightness
Auto Picture On/Off Sets the screen to automatically turn on and off at certain times
Startup Mode Selects the screen to be displayed when the digital frame is switched on
Screen Saver If there is no button operation for 10 minutes, the currently congured
Frame Memory Copy • Original Size: Copies an original le as is
Activate USB
Communication
Upgrade Software Updates the rmware
Reset Resets user-customized menu options to default
Product Guide Product functions guide
Product Information Displays product model name, rmware version, internal memory and
• No Effect / Fade / Blinds / Cross Comb / Mosaic / Checkerboard / Dissolve
/ Wipe / Extend / Silk / Corner Transition / Wheel / Ellipse / Random
• Fast / Normal / Slow
Images of large le sizes may not be displayed at the currently congured
slideshow speed.
• Normal / Shufe
• Photo Only / Photo & Clock / Photo & Calendar / Multiview 1 / Multiview 2
and a picture bigger than the screen size is reduced in direct
• Auto Fit: Fits the picture in direct proportion to the screen size
• Fit to Width: Fits the picture to the screen’s horizontal width
(YYYY/MM/DD, MM/DD/YYYY, DD/MM/YYYY)
(View Mode, Slideshow Transition, Clock Set, and Startup Mode)
• Home / Last Mode / Slideshow
screensaver will appear.
• Slideshow / Clock
• Resized: Matches the screen’s optimal resolution by reducing the le size
Selects the recognition mode to be used when the digital frame is connected
to a PC with a USB cable
Use as a removable disk or Mini Monitor
Use as a digital photo frame
(Time setting and screen language setting excluded)
copyrights
proportion to the screen size.
and then copies.
Troubleshooting
Check the below table rst when a malfunction is suspected.
Symptoms and questions Causes and corrections
The power won’t switch on. Ensure that the power cable is correctly connected.
Spots which look like light leaking can be seen on the edges
of the clock screen.
The time setting is wrong.
6
It takes a long time for images to be displayed after the power
has been turned on.
English
It takes a long time to move from one image to the next.
I can’t copy more les even when there is excess capacity to
use in the internal memory.
I’ve connected an external memory device (USB memory
device or SD memory card) but it doesn’t work.
Vertical pictures are displayed horizontally.
JPEG les are not displayed.
Some pictures are not displayed as a slideshow.
The picture size changes when I rotate it.
The picture looks stretched horizontally or vertically.
Previews are too slow. Previews may be slow for large-sized images and multiple images.
Slide show effects are displayed when I have saved only one
picture I want in the memory card or when I pause the slide
show with multiple pictures saved in the memory card.
In what order are the pictures, which are saved in the
memory card, displayed?
The slide show doesn’t start automatically. Ensure that the <Startup Mode> is set to <Slideshow> in <Settings> - <General>.
I have set <Auto Picture On/Off> but the screen doesn’t
switch on automatically.
The pictures I copied from a USB memory or SD card onto
the internal memory have changed in resolution and le size.
The digital frame is not recognized as a removable disk when
I connect it to a PC with the USB cable.
Black LCD panel screens by nature can have this effect, which is not a defect.
The current time setting can be erased if the power adaptor is disconnected for
a prolonged period of time. Keep the power adaptor connected.
It is recommended to reduce the picture resolution.
You may be unable to copy les if the FAT section of the internal memory is
damaged. Try again after formatting the internal memory.
• SPF-87H can be used by connecting the power adapter instead of the USB
cable.
• Ensure that the external memory device has been connected properly or try
formatting it.
• Ensure that JPEG les are saved in the external memory device.
• Abnormal picture les (0 Kbyte, broken JPEG) will not be displayed on the
screen.
• The connected external memory device is not supported. Try another storage
device.
Ensure that the <Portrait Photo Mode> option is set correctly in <Settings> <Photos>.
• Progressively saved JPEG les or JPEG les saved as CMYK color
coordinates will not be displayed.
• Images edited by a JPEG image editor (Photoshop, Paintshop, etc.) may not
be displayed normally. Edit the image on a PC, convert back to JPEG format,
save, and try again.
This product can accommodate a maximum of 4,000 pictures. Any excess
pictures will not be recognized and will not be displayed as a slide show.
The picture size changes automatically depending on the rotation angle (90°,
-90°) in order to display the entire image on the screen.
Press [MENU] on the slide show screen. Go to <Settings> - <Photos> -
<Aspect Ratio> and change the setting to <Original Fit> and check again.
The slide show effects will be displayed automatically in order to protect the
panel. This is not an error.
They are arranged according to the le names. The slide show display order
is determined in the order of number, upper-case letter, and lower-case letter.
Please note that a le name of up to only 25 characters can be recognized.
• Ensure that the current time has been set correctly.
• The screen will not switch on automatically if you have turned the digital
frame off by pressing [ ] when <Auto Picture On/Off> has been set. The
screen switches on automatically only if the power has been switched off
automatically at the Auto Picture Off time.
This product is designed to reduce the le size of high-resolution pictures to t
the screen’s ideal resolution when they are copied onto the internal memory.
If you want to disable the settings, you can change to the original size by
selecting <Settings> - <General> - <Frame Memory Copy>.
The SPF-87H has 2 USB connectors. You must connect the USB connector
[ ] because the digital frame will not be recognized as a removable disk if
only the auxiliary power (DC 5V) connector is connected to a PC.
Product Specications
Classication Details
Model name SPF-87H SPF-107H
Panel Type 8” TFT LCD 10” TFT LCD
Resolution 800 x 480 1024 x 600
Supported format JPEG (Progressive or CMYK type pictures are not supported.)
Internal memory 1 GB
USB Host (USB 2.0) / Device (USB 2.0)
Power
supply
General Size (Width x height x depth) 236.0 x 159.4 x 23.0 mm 280.0 x 188.0 x 23.0 mm
The product design may differ according to the model, and specications are subject to change without prior notice for product performance
enhancement.
This device is a Class B digital apparatus.
Rating External DC power supply device (12 V)
Power consumption General: 5.3 W / Power off: Under 1 W General: 5.9 W / Power off: Under 1 W
Weight 500 g 600 g
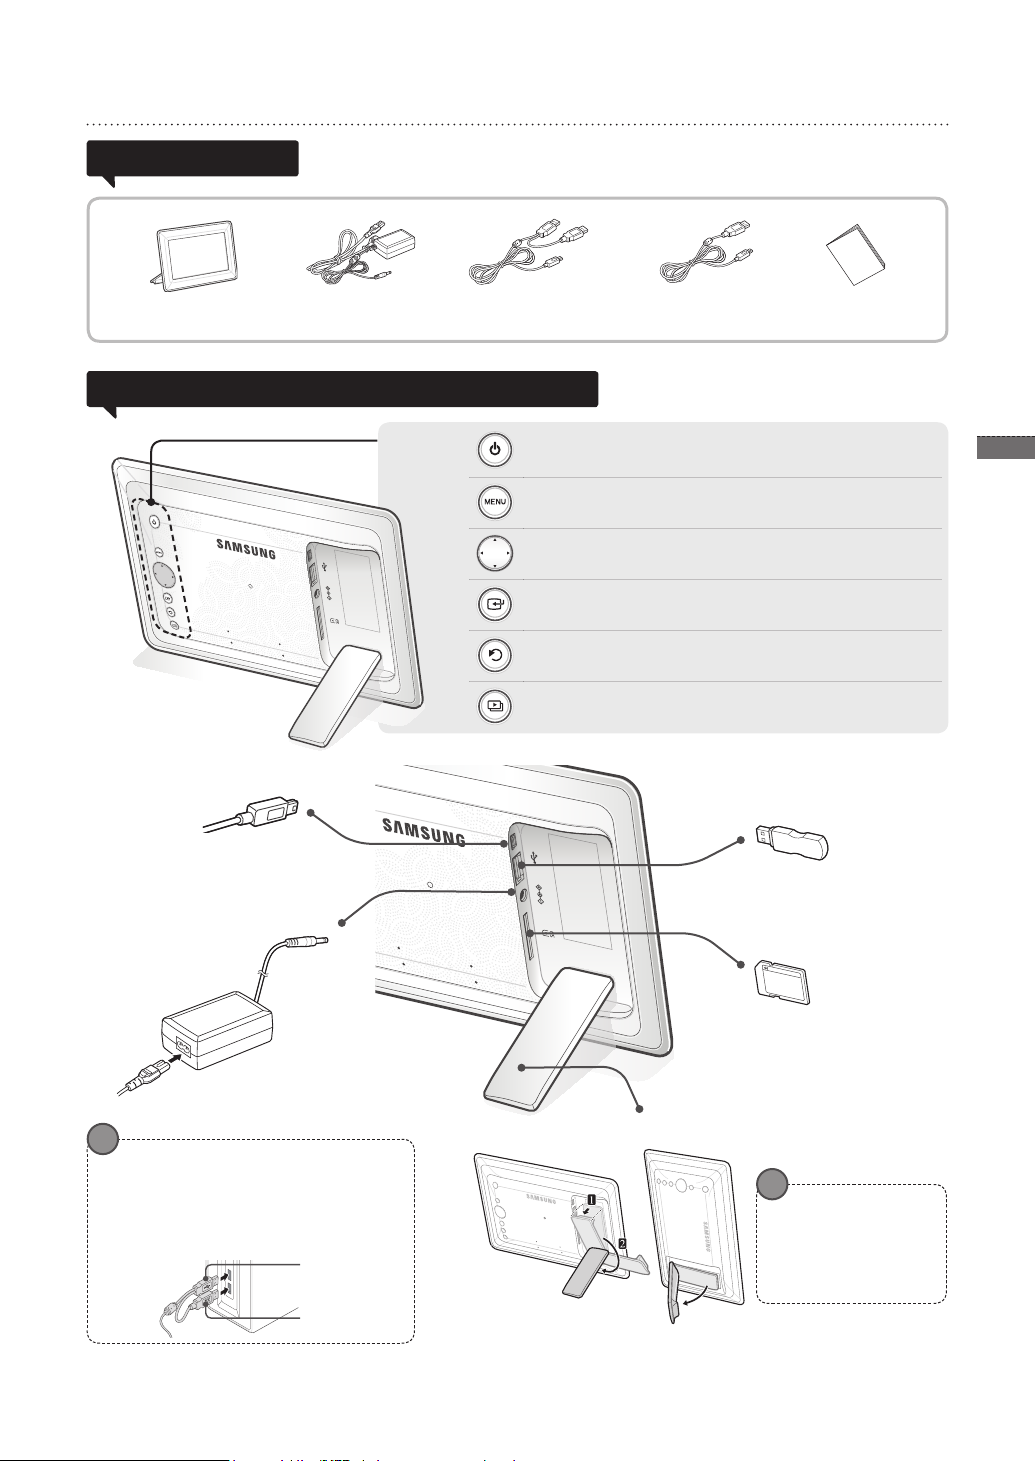
Produit et éléments
Composants
Cadre photo numérique Câble USB (SPF-87H) Câble USB (SPF-107H) Manuel de
Veuillez vous assurer que les composants suivants sont bien inclus dans le carton
d’emballage avant d'utiliser le produit.
Câble d’alimentation/
adaptateur
l'utilisateur
Nom et fonction de chaque élément
Permet d’allumer ou d’éteindre l’appareil.
Permet d'ouvrir ou de fermer le menu.
Permet de naviguer dans le menu ou de modier des options.
Permet de sélectionner une option dans le menu.
Permet de revenir à l'étape précédente.
(Retour à l'écran principal si enfoncé pendant 2 secondes.)
Permet de lancer un diaporama.
7
Français
Raccord du câble USB
(branchement à l'ordinateur)
Effectuez la connexion à un PC pour
copier des images vers la mémoire
interne ou utiliser l’appareil en tant
que Mini monitor.
Raccord du câble
d’alimentation
Connectez le câble d'alimentation.
!
SPF-87H peut être utilisé si on effectue la
connexion à un PC via le câble USB (en plus du
câble d’alimentation secondaire).
Il est cependant susceptible de ne pas
fonctionner correctement si l’alimentation du
PC n’est pas stable. Dans ce cas, connectez
l’adaptateur secteur.
Câble USB
Câble
d'alimentation
auxiliaire
Support du cadre photo numérique
Branchement du
périphérique de stockage
USB
Branchez un périphérique de
stockage USB.
Emplacement pour
carte mémoire SD
Insérez la carte mémoire
SD pour afcher les images
enregistrées.
!
N'exercez pas trop de
force et ne tournez pas le
support dans la mauvaise
direction pendant
l'installation pour éviter
d'endommager le support.

Français
8
Utilisation du cadre numérique
1
2
3
4
Afchage des images
Appuyez sur [ ].
Si vous appuyez sur le bouton [MENU] pendant un diaporama, les menus <Accueil>,
<Rotat.>, <Zoom> et <Paramètres> vont s'afcher.
• Pour utiliser <Rotat.> et <Zoom>, <Mode d’afchage> dans le menu <Paramètres> doit
être réglé sur <Photos uniquement> ou sur <Photo et horloge>.
• Seule la fonction <Rotat.> prise en charge dans l'utilisation de <Photo et calendrier>.
Les images enregistrées dans la mémoire interne du produit ou dans
le périphérique de stockage externe peuvent être afchées dans une
grande série d'options.
Seule une carte mémoire SD ou un périphérique de stockage USB
peuvent servir de périphérique de stockage externe.
Une grande gamme d'effets peuvent être appliqués aux images via le
menu. Reportez-vous à la page suivante pour les options de menu.
Utilisez les touches
[▲,▼,◄,►] pour déplacer
l'image de votre choix et
appuyez sur [ ].
Utilisation en tant que Mini Monitor
Le diaporama commence
à partir de l'image que
vous avez sélectionnée.
Lorsque vous appuyez sur un
bouton, l’indication correspondante
s’afchera sur le côté droit de
l’écran.
L’indication disponible peut varier en
fonction de la situation.
Connectez le cadre photo numérique à un PC à l’aide du câble USB pour
l’utiliser en tant que Mini Monitor.
Connectez le cadre photo numérique à un PC à l’aide du câble USB pour l’utiliser en tant
que Mini monitor (moniteur secondaire). Frame Manager doit être installé sur votre PC
pour que vous puissiez utiliser l’appareil en tant que Mini Monitor.
Rendez-vous sur le site http://samsung.com/ pour télécharger Frame Manager et obtenir
des instructions sur l’utilisation de l’appareil en tant que Mini Monitor
Seul un moniteur auxiliaire peut être utilisé à la fois.
Mise à jour du micrologiciel
!
Préparations de la mise à
jour du micrologiciel
• Cadre photo numérique
• Fichier de mise à jour du
micrologiciel
• Carte mémoire SD ou
périphérique de stockage USB
Connectez-vous à http://samsung.com/ et entrez le nom du modèle dans le
champ de recherche. (SPF-87H ou SPF-107H)
Téléchargez le micrologiciel approprié et décompressez-le.
Copiez le chier décompressé (***.isp) vers la carte mémoire SD ou vers une
clé USB et connectez-vous au cadre numérique.
Sélectionnez <Paramètres> - <Assistance> - <Mise à niveau du logiciel> avec
les boutons au dos du produit. Le micrologiciel est mis à jour.
Une fois la mise à jour terminée, éteignez votre cadre numérique, retirez la
carte mémoire externe (carte SD/clé USB) puis rallumez le cadre numérique.
Vous pouvez vérier si la version du micrologiciel a été mise à jour dans
<Paramètres> - <Assistance> - <Informations sur le produit>.
Téléchargez et installez le dernier micrologiciel sur la page
d'accueil de Samsung Electronics.
!
Exigences PC requises pour une
utilisation en tant que
Mini Monitor
• Système d'exploitation : Windows XP SP2,
Vista (32 bits)
• USB : Extended Host Controller(EHCT)
USB 2.0 pris en charge
• RAM : 256 Mo ou plus
• Processeur : 2,4 GHz ou plus
9
Français
Options du menu
Servez-vous des boutons au dos du produit pour congurer les différentes fonctions selon vos préférences.
Accueil Passe à l'écran principal
Copier Si une carte mémoire externe (carte mémoire SD / clé USB) est connectée au produit,
Supprimer Supprime les images de la mémoire interne ou de la carte mémoire externe
Sélectionner
plusieurs chiers
Sélectionner le
périphérique de
stockage
Paramètres
L'heure actuelle congurée dans <Paramètres> - <Horloge> s'afche. Le réglage de l'heure actuelle peut s'effacer
si l'adaptateur est débranché pendant une longue période. Veillez à ce que l'adaptateur soit toujours branché.
Connectez le cadre photo numérique à un PC à l’aide du câble USB pour l’utiliser en tant que Mini Monitor.
• Copie les images de la carte mémoire externe vers la mémoire interne
• Copie les images de la mémoire interne vers la carte mémoire externe
Sélectionne l'exécution de fonctions sur plusieurs chiers comme le diaporama, la copie, la
suppression, etc.
Si une carte mémoire externe (carte mémoire SD / clé USB) est connectée au produit,
• Sélectionne la mémoire interne ou la carte mémoire externe (carte mémoire SD / clé USB)
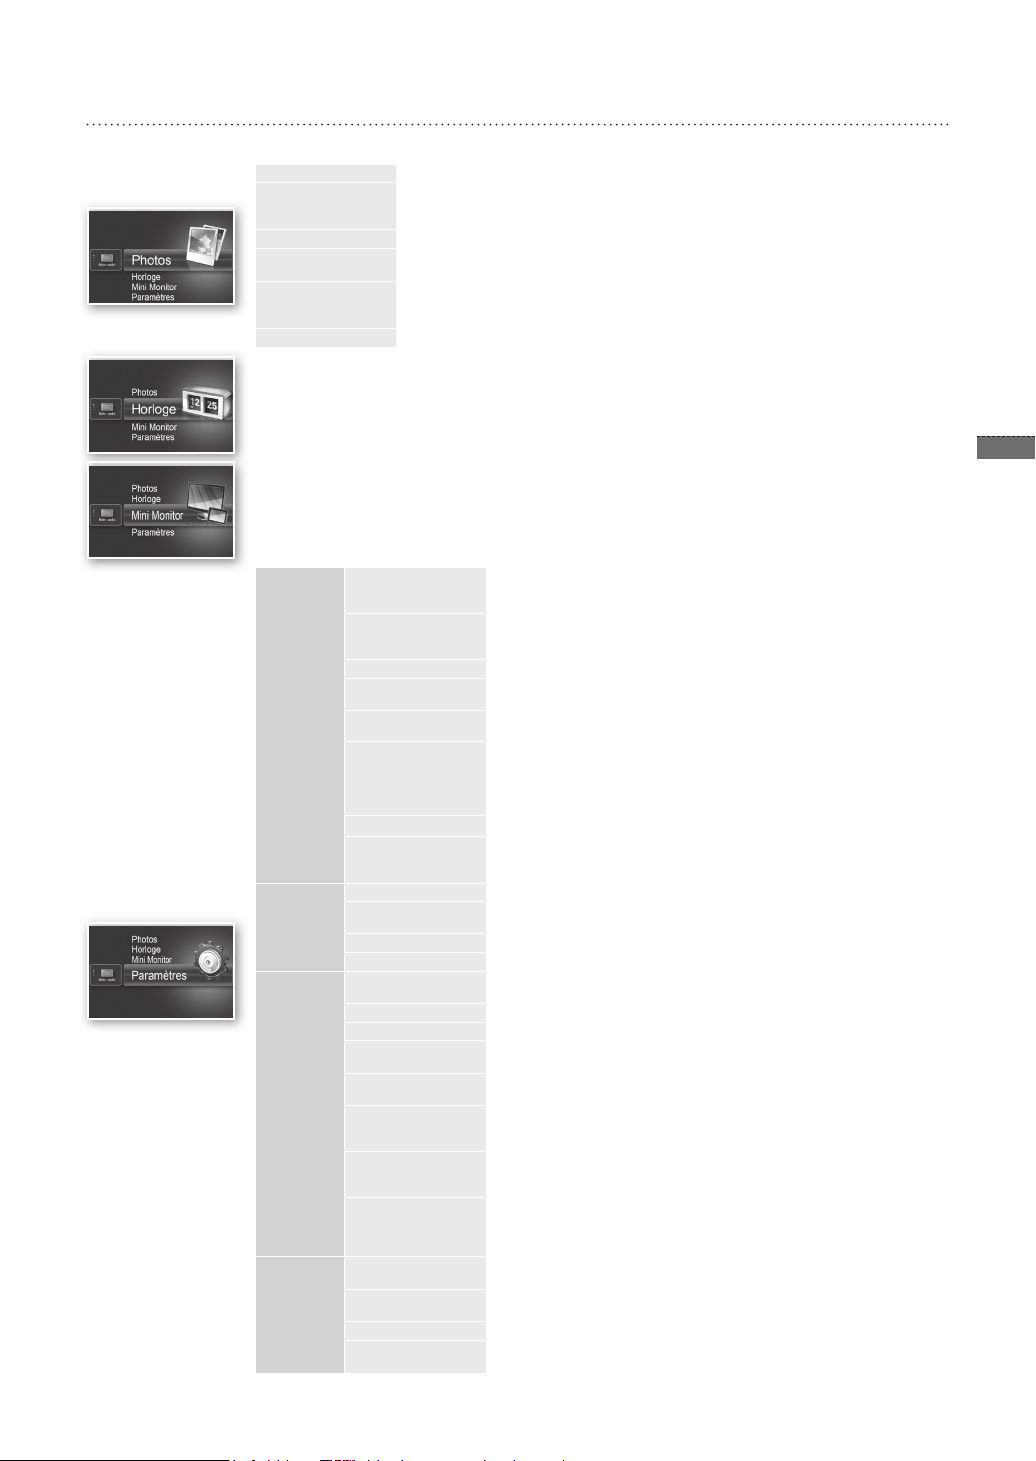
Photos
Horloge
Généralités
Assistance
Transition de
diaporama
Vitesse du diaporama
Mode Diaporama
Ordre du diaporama
Mode d’afchage
Rapport d’aspect
Mode portrait
Afcher les
informations sur la
photo
Dénir l’horloge
Format de date
Format de l’heure
Type d’horloge
Installation rapide
Langue
Luminosité
Mar./Arr. image
autom.
Mode de démarrage
Ecran de veille
Copie mémoire cadre
Activer la
communication USB
Mise à niveau du
logiciel
Réinitialiser
Guide de produits
Informations sur le
produit
Dénit les effets du diaporama
• Aucun effet / Fondu / Stores / Alvéole / Mosaïque / Damier / Dissolution / Effacer /
Etendre / Soie / Transition coin / Roue / Ellipse / Aléatoire
Dénit la vitesse du diaporama
• Rapide / Normal / Lent
Les images trop lourdes peuvent ne pas s’afcher à cette vitesse de diaporama.
• Toutes les photos / Photos du dossier / Une photo
Dénit l'ordre du diaporama
• Normal / Aléatoire
Dénit le mode d'afchage du diaporama
• Photos uniquement / Photo et horloge / Photo et calendrier / Multiview 1 / Multiview 2
• Taille initiale : Si les dimensions de la photo sont inférieures à celles de l'écran, elle
• Ajust. auto : Ajuste l'image proportionnellement à la taille de l'écran
• Aj. largeur : Ajuste l'image à la largeur de l'écran
Réduit une image verticale pour s'adapter à l'écran
Afche le nom du chier de la photo et sa date de création
Règle l’heure actuelle
Sélectionne le mode d'afchage du mois, de l’année, du jour
(YYYY/MM/DD, MM/DD/YYYY, DD/MM/YYYY)
Sélectionne le mode d'afchage de l'heure (12 heures, 24 heures)
Sélectionne le mode d'afchage de l'horloge (Horloge uniquement, Horl. et calend.)
Réglages rapides des fonctions les plus courantes.
(Mode d’afchage, Transition de diaporama, Dénir l’horloge, and Mode de démarrage)
Sélectionne la langue de l'écran (OSD)
Règle la luminosité de l'écran
Règle l'écran pour qu'il s'allume ou s'éteigne automatiquement à certaines heures
Sélectionne l'écran à afcher à l'allumage de l'écran
• Accueil / Dernier mode exécuté / Diaporama
Si aucune touche n’est utilisée pendant 10 minutes, l’économiseur d’écran
actuellement conguré s’afchera.
• Diaporama / Horloge
• Taille initiale : Copie tel quel un chier original
• Redimensionné : Réduit la taille du chier pour qu'il soit à la résolution optimale
Sélectionne le mode de reconnaissance à utiliser lorsque le cadre numérique est
connecté à un ordinateur avec un câble USB
Utilisez-le comme disque amovible ou comme Mini Monitor.
Utilisation comme cadre photo numérique
Met à jour le micrologiciel
Réinitialise les options du menu personnalisées par l'utilisateur sur leur valeur par défaut
(à l'exception des paramètres heure et langue de l'écran)
Guide des fonctions du produit
Afche le nom du modèle du produit, la version du micrologiciel, la mémoire interne
et les copyrights
s'afche à sa taille d'origine et si les dimensions de la photo dépassent
celles de l'écran, elle est ajustée proportionnellement à celles-ci.
puis le copie
 Loading...