

Page 1

Netcam(W)
SNC-L200(W)
User’s manual
Safety instructions and precautions are designed to
protect users and prevent any property damage.
Please read and observe these instructions thoroughly
before using the Netcam.
AB68-000524B(01)
-SNC-L200(130*180)-E 4/21/06 1:17 PM Page 2
NETWORK CAMERA
SNC-L200
Page 2

Netcam(W)_SNC-L200(W)
Important Safety Instructions
Netcam(W)_SNC-L200(W)
Safety Precautions
CAUTION
RISK OF ELECTRIC
SHOCK DO NOT OPEN
CAUTION :
TO REDUCE THE RISK OF ELECTRIC
SHOCK, DO NOT REMOVE COVER (OR
BACK). NO USER SERVICEABLE PARTS
INSIDE. REFER SERVICING TO QUALIFIED
SERVICE PERSONNEL.
This symbol indicates high voltage is
presentinside. It is dangerous to make
any kind ofcontact with any inside part
of this product.
This symbol alerts you that important
literatureconcerning operation and
maintenance has been included with
this product.
To prevent damage which may result in fire or electric shock hazard, do not expose this
appliance to rain or moisture.
This device complies with part 15 of the FCCRules. Operation is subject to the following two
conditions.
1) This device may not cause harmful interference, and
2) This device must accept any interference received, including interference that may cause
undesired operation.
Class B
NOTE :
This equipment has been tested and found to comply with the limits for a Class B digital
device, pursuant to part 15 of the FCC Rules. These limits are designed to provide reasonable
protection against harmful interference in a residential installation.
This equipment generates, uses and can reaiate radio frequency energy and, if not installed
and used in accordance with the instructions, may cause harmful interference to radio
communications. However, there is no guarantee that interference will not occur in a
particular installation. If this equipment does not cause harmful interference radio or
television reception, which can be determined by turning the equipment off and on, the user
is encouraged to try to correct the interference by one or more of the following measures :
- Reorient or relocate the receiving antenna.
- Increase the separation between the equipment and receiver.
- Connect the equipment into an outlet on a circuit defferent from that to which the
receiver is connected.
- Consult the dealer or an experienced radio/TV technician for help.
CAUTION
Danger of explosion if battery is incorrectly replaced.
Replace only with the same or equivalent type recommended by the manufacturer.
Dispose of used batteries according to the manufacturer ’s instructions.
RF Radiation Exposure Statement
This equipment complies with FCC RF Radiation Exposure limits set forth for an
uncontrolled environment. This equipment should be installed and operated with a
minimum distance of 20cm between the radiator and your body. This transmitter must
not be co-located or operating in conjunction with any other antenna or transmitter.
Important Safety Instructions
1. Read these instructions.
2. Keep these instructions.
3. Heed all warnings.
4. Follow all instructions.
5. Do not use this apparatus near water.
6. Clean only with dry cloth.
7. Do not block any ventilation openings.
Install in accordance with the manufacturer ’sinstructions.
8. Do not install near any heat sources such as radiators, heat registers, or other apparatus
(including amplifiers)
that produce heat.
9. Do not defeat the safety purpose of the polarized or grounding-type plug.
A polarized plug has two blades with one wider than the other. A grounding type plug has
two blades and a third grounding prong. The wide blade or the third prong are provided for
your safety. If the provided plug does not fit into your outlet, consult an electrician for
replacement of the obsolete outlet.
10. Protect the power cord from being walked on or pinched particularly at plugs,
convenience receptacles, and the point where they exit from the apparatus.
11. Only use attachments/accessories specified by the manufacturer.
12. Use only with cart, stand, tripod, bracket, or table specified by the
manufacturer,or sold with the apparatus. When a used, caution when moving
the cart/apparatus combination to avoid injury from tip-over.
13. Unplug this apparatus. When a cart is used, use caution when moving the
cart/apparatus combination to avoid injury from tip-over.
14. Refer all servicing to qualified service personnel. Servicing is required when the
apparatus has been damaged in any way, such as power-supply cord or plug is damaged,
liquid has been spilled or objects have fallen into the apparatus, the apparatus has been
exposed to rain or moisture, does not operate normally, or has been dropped.
NOTE :
THE MANUFACTURER IS NOT RESPONSIBLE FOR ANY RADIO OR TV
INTERFERENCE CAUSED BY UNAUTHORIZED MODIFICATIONS TO THIS
EQUIPMENT.? SUCH MODIFICATIONS COULD VOID THE USER'S AUTHORITY TO
OPERATE THE EQUIPMENT.
2 3
Declaration of Conformity to R&TTE Directive 1999/5/EC
This equipment fulfils the R&TTE directive(Council Directive 1999/5/EC).
- European States qualified under wireless approvals:
EU Austria, Belgium, Denmark, Finland, France (with frequency
restrictions), Germany, Greece, Ireland, Italy, Luxembourg, The
Netherlands, Portugal, Spain, Sweden, and the United Kingdom
Accept EU Iceland, Liechtenstein, Norway, and Switzerland
- European States with restrictions on use:
EU In France,the frequency range is restricted to 2446.5-2483.5 MHz for
devices above 10 mW transmitting power such as wireless.
Accept EU No Limitations at this time.
-SNC-L200(130*180)-E 4/21/06 1:17 PM Page 2
Page 3

Netcam(W)_SNC-L200(W) Netcam(W)_SNC-L200(W)
4 5
Features
1/4° 320,000-pixel CMOS
Provides high-quality video of 320,000-pixels (pixel is a number of dots
comprising an image)by adopting high-resolution CMOS.
Pan &Tilt
Moves the lens up and down and left and right, allowing shooting of every
corner in every direction.
Preset
Sets the directions of the lens up to eight spots.
You can return the lens to the stored position easily after movement.
Night Flash
You can monitor the environment at nighttime or in a dark room by using
flash.
Passive Infrared (PIR)Sensor
Automatically detects and shoot any motion from intrusion, and sends it by
E-mail.
You can use this function when you leave the house or return from work.
Support for Communications Protocols
Provides support for TCP/IP, SMTP for E-mail transmission, and FTP
protocols, and provides a variety of Internet-related communications protocols
such as ARP, HTTP, Telnet, DHCP and PPPoE.
Power Pan &Tilt
When you select a desired spot by clicking, the camera lens moves the spot
to the center of the screen.
You can adjust movement over a screen more easily and accurately.
Home Position
The lens returns to the central position after you press the Home Button at
the center of the Pan &Tilt Button, and resets the coordinates of the Pan
&Title.
Pre-Alarm
When motion is detected over the screen, both the detected image and the
image before motion detection is sent to the E-mail address pre-set by the
user (You can set the number of before and after-alarm images sent from
the menu).
Privacy Protection
You can press the Privacy Button of the Netcam(W)if you do not want to
shoot videos. Then the lens rotates to uncovered range, and the screen
turns black. If you press the button again, ‘Privacy Mode’ is displayed on the
black screen.
PRIVACY
The Netcam can be installed in any place you want at domestic, business or
industrial premises, and provides real-time security moving images over the
Internet, allowing remote controlling for security and monitoring.
The Netcam(W)is a wireless network camera adopting wireless network
technology, which allows users to access a security camera without LAN
cable connection.
-SNC-L200(130*180)-E 4/21/06 1:17 PM Page 4
Page 4

Netcam(W)_SNC-L200(W)
7
Before Using This Manual
Netcam(W)_SNC-L200(W)
6
Features
Class A Device (Class A:for business use, Class B:for domestic use)
- Class A Devices (Class A:for business use, Class B : for domestic use)
- Before using this product, please read the safety instructions thoroughly and
carefully.
- Check the trouble shooting procedures when a problem occurs.
- You can refer to the index for better understanding of technical terms.
Currently, SNC-L200 (W) is available in the following areas within Europe:
- UK / France / Germany / Spain/Italy / The Netherlands / Belgium / Norway /
Denmark / Sweden / Russia / Poland / Czech / Hungary
Class A Device (Class A:for business use, Class B:for domestic use)
This camera is a registered radio wave device used for business purposes.
Both retailers and users are required to keep this in mind, and should
exchange products if they were intended for other purposes.
Icons Titles Functions
Warning Functions of this camera may not work or settings can be changed.
Note
Refer to the page containing hints or help on performance of the product.
Icons used in this manual
How to Use the User’ s manual
Web-browser Monitoring
You can view video of the Netcam(W)over an Internet Web browser, so
you can view video not only in the local network environment but also
over an external Internet network.
Auto Local IP Set
Provides easy-to-use installation functions for users who are unfamiliar with
settings of an environment.
Universal Plug and Play (UPnP)
When the Netcam(W)is connected with an IP router or a wireless
router capable of UPnP functions, this camera automatically performs
the port forwarding that enables access from external Internet.
You can easily access the Netcam(W)by using the “Netcam(W)” icon
displayed in “My Computer Environment.”
802.11b Wireless Network (Netcam(W)Only)
You can use this camera over an IEE 802.11b wireless network without
connecting the Netcam(W)to a LAN cable.
Access to Netcam(W) via a cell phone
You can view still images of Netcam(W) by accessing the Internet via a
cell phone.
UPnP
-SNC-L200(130*180)-E 4/21/06 1:17 PM Page 6
Page 5

9
Netcam(W)_SNC-L200(W)Netcam(W)_SNC-L200(W)
8
Contents
Safety Precautions ..............................10
Title of Each Component ....................12
- List of Components ....................................12
- Passive Infrared (PIR)Sensor ....................14
- Flash ..........................................................14
- Privacy........................................................15
- Reset ..........................................................15
Internet Connection ............................17
Power Connection................................18
Opening the Back Cover/Arranging Cable
....19
Installing the Camera ..........................20
- Installing the camera on the wall
(concrete or cemented wall)
................20
-
Installing the camera in Standing position
....21
- Installing the camera on a Tripod
......21
Installing the IP Router of Wireless Router
....23
-
Installing the IP Router of Wireless Router
....23
- Setting the Port Forwarding........................23
Installing the SNC Installer..................24
Searching the Connected Netcam (W)
......26
Setting the Network..............................28
- Auto Setting the Network............................28
- Manually Setting the Network ....................30
- Port Forwarding..........................................34
Access to the Netcam(W)Website ......38
- Access from a Local Network PC ..............38
- Access from External Internet ....................39
Installing the ActiveX Control ............41
- For Windows 2000/Windows XP ................41
- For Windows XP Service Pack 2................42
- Manually Installing the Activex Control ......43
Using the Smart Viewer ......................44
- Power Pan &Tilt… ......................................45
- Preset ........................................................46
- Passive Infrared (PIR) ................................47
- Flash ..........................................................47
- Record Moving Images ..............................48
- Change the Record Route..........................48
Using the Simple Player ......................49
- Play Back Recorded Files ..........................49
- Stop Recorded Files ..................................50
- Capture Playback Images ..........................50
- Print Playback Images................................51
Setting the Smart Viewer ....................53
System Configuration..........................54
Network Configuration ........................59
Utilities ..................................................66
Access to Netcam(W) via a cell phone
..........72
Installing the MultiViewer Program ....75
Registering the Netcam(W) ..................76
- Registering the Netcam(W) ........................76
Connecting the Netcam(W) ..................78
Using the MultiViewer ..........................80
- MultiViewer Screen ....................................80
- View Multi Channel ....................................82
- Sequence View ..........................................84
- Recording Video..........................................85
- Recording Motion ........................................86
- Capturing Video ..........................................88
- Printing Video..............................................88
- Screen Display ............................................89
- Running the SNC Installer ..........................89
Playing Back the MultiViewer ..............90
- Record File Playback ..................................92
- Event Log Information ................................93
Setting the MultiViewer ........................94
- Setting the Viewer Environment..................95
- Setting the Scheduled Recording................96
- Selecting Logo ............................................97
Product Specifications ........................98
Preparations Single Use
Multi Use
Connection
Others
-SNC-L200(130*180)-E 4/21/06 1:17 PM Page 8
Page 6

Netcam(W)_SNC-L200(W)
11
Netcam(W)_SNC-L200(W)
10
Safety Precautions
Strict compliance with the safety instructions is required for protection
and ensured safety of users and prevention of property damage.
Failing to comply with the instructions may result in injury or even fatality.
Warming
Power
Installation
Storage&Maintenance
Do not disassemble,repair
and reassemble this product.
It may result in
malfunctioning, causing a fire,
electric shock or injury.
Do not install the camera in a
wet, dusty or smoky place.
It may cause a fire or electric
shock.
Do not install the camera under
direct sunlight or near a
heat-generating system.
It may cause a fire.
Use the designated power adapter
provided by the manufacturer
(DC8.4V/1A) Using other power
adapters may cause a fire, electric
shock or malfunctioning.
Pull out the power plug during
a lightening or storm.
It may cause a fire.
Insert the power plug firmly to
secure the connection.
Insecure connection may
cause a fire.
Do not use more than one plug
at the same time.
It may generate heat or cause
a fire if the connection is
insecure.
Do not bend power cords and do not
place heavy objects on power cords.
It may cause a fire.
You must not hold the power plug
with wet hands.
It may cause an electric shock.
Failing to comply with the instructions may results in injury or even fatality.
Warning
Storage&Maintenance
Do not place this product near
a vase, a flowerpot, a cup,
cosmetics, medicine or water.
It may cause an electric shock.
Do not use this product when it generates smoke or
smell. Turn off power and pull out the plug
immediately before calling the service center.
If you continue using the product, it may cause a fire
or electric shock.
Do not spray water directly onto parts of
this product when cleaning.
Use a dry towel instead.
It may cause a fire or electric shock.
Do not use chemicals or detergents that
can deteriorate the surface of the product.
Failing to comply with the instructions may results in a loss injury or even fatality.
Warning
Installation
Fix this product firmly so that it
cannot drop. Avoid installing the
product in closed area.
It may cause damage to the product.
Do not install the product in a
hot (35 0 C or higher)or cold
(5 0 C or lower)place.
It may cause an electric shock.
Place this product out of
children ’s reach.
Throwing down the product
may cause injury.
Storage&Maintenance
Do not move the product during
operation.
Turn off power before moving or
reinstalling the product.
Do not drop an object or impose too
much force on the product.
It may cause malfunctioning.
Avoid installation in place with too
much vibration or magnetic force.
It may cause malfunctioning.
-SNC-L200(130*180)-E 4/21/06 1:17 PM Page 10
Page 7

Netcam(W)_SNC-L200(W)
13
Netcam(W)_SNC-L200(W)
12
Title of Each Component
Front
Back
NETWORK CAMERA
SNC-L200
Camera
Lens
Passive Infrared
(PIR)Sensor
Power LED
SNC-L200W :
- LED turns red when power is connected.
- LED turns amber when the system is boosted.
- LED blinks in red and amber in turn when Privacy
functions are turned on.
SNC-L200 :
- It turns on when it is connected to the power source.
Network LED
SNC-L200W :
- LED turns green when the network is connected.
- LED turns amber when the network is being changed.
SNC-L200 :
-
It turns on when it is connected to the networks.
-
It blinks when it receives or transfers data.
Flash
Privacy Button
Power
Connector
LAN
Connector
Reset Button
Bottom Side
Back Cover
Wiring Home
Fix Home
Tripod Fix Home
Fix Home
List of Components
You can download the latest version of software from the Samsung Electronics Web site (http://www.samsung.com).
Netcam(W)
User ’s Manual
(Warranty Included)
Installation CD Screws/Fix labels/
Anchor (16X3)2
Power Adapter (DC
8.4V/1A)(DC8.4V/1A)
Power Cord
EMI Shield Core
-SNC-L200(130*180)-E 4/21/06 1:17 PM Page 12
Page 8

Netcam(W)_SNC-L200(W)
15
Netcam(W)_SNC-L200(W)
14
Title of Each Component
Passive Infrared (PIR)Sensor
Detects and records motion of a human or an animal by using an infrared ray.
- Selects perform or cancel by using the PIR Sensor Button of Smart/Multi Viewer.
- Flash can be turned on in link with the PIR Sensor.
Distance and Range
Distance of Detection : Up to 3m
Range of detection (up and down) : Around 85°
Range of detection (left and right) : Around 40°
Distance and Range
Distance of Light Emitting : Up to 3m
Range of detection (up and down) : Around 67°
Range of detection (left and right) : Around 67°
Flash
You can monitor the environment even in a dark room by using flash.
- Turns on the flash by using the Flash button of the Smart/Multi Viewer.
- Flash can be turned on in link with the PIR Sensor.
- Flash is turned on for 5 seconds and off for 30 seconds.
Even i f you click the Flash Button in 30 seconds, flash is not turned on.
- Flash is also turned on for 5 seconds and off for 30 seconds when using the PIR Sensor.
Range of detection left and right Range of detection up and down
Range of light emitting left and right
Range of light emitting up and down
Privacy
Turns the lens out of the performance range to prevent
shooting for privacy.
Press the Privacy Button.
- Every time you press the button, [the lens moves out of
the performance range ‘Privacy Mode’ is displayed
and video is not transmitted restore to the previous
state ] process is repeated.
Reset
When the product is not in normal conditions, you can
set the values to factory default.
Press the Reset Button on the back for more than 3
seconds.
- Refer to the title of each component for the location of
the Reset Button (page 12).
- All the values are restored to factory default settings,
and the system is rebooted. Use the product after some
2 minutes.
The left and right range of detection may change if motion is fast.
Avoid exposing this product to direct sunlight, air conditioner or heater, high or
cold temperature, humidity, oil, smoke and glass when installing the product.
The Sensor may malfunction.
Warning
Do not use this function unless necessary.
Stored values such as the network settings, registered users,
the title of the Netcam(W), firmware upgrades are all switched to
factory default settings.
Warning
-SNC-L200(130*180)-E 4/21/06 1:17 PM Page 14
Page 9

Netcam(W)_SNC-L200(W)
17
Internet Connection
You can remotely monitor moving images in real time by
connecting the camera to the Internet and setting up the network
environment.
16
Connection
Please read power, network connection and installation instructions carefully
before connecting to the Internet.
Connect the LAN connector of the Netcam ((W)to the LAN connector of the IP
Router (Router or Wireless Router).
Connect the LAN connector of the IP Router to the LAN connector of the PC.
Connect the WAN connector of the IP Router to the Internet..
1
2
3
IP Router
(Router or
Wireless Router)
External PC
Back of Main Body
Direct
Cable
Direct
Cable
It is recommended to use the EMI Shield Core to
prevent the influence of EMI.
Wrap the EMI Shield Core with the LAN cable
three times as shown in the figure.
In similarity, wrap the EMI Shield Core with the
power adapter cord three times.
How to Use the EMI Shield Core
Do not extend the direct cable to more than 100m.
Warning
1
2
3
-SNC-L200(130*180)-E 4/21/06 1:17 PM Page 16
Page 10

Netcam(W)_SNC-L200(W) Netcam(W)_SNC-L200(W)
18 19
Opening the Back Cover/Arranging Cable
Learn how to open the back cover and arrange the cable.
Power Connection
Connect power by using the power adapter and cord provided as
accessories of this product.
”»ˆ… ‚Ø
Connect the power adapter to the power connector of the Netcam(W).
Connect the jack of the power cord to the power adapter.
Insert the power plug to the wall outlet..
- When power is connected,power LED (red)is turned on,and the lens
automatically moves after 2 minutes.
Push the back over with two hands to open it.
Connect the power cable to the power connector and the LAN connector.
Close the cover after aligning the cable with the wiring groove.
Arrange the cable.
- Arrange the cable in direction B when installing the camera on the wall.
- Arrange the cable in direction A when installing the camera in Standing position.
AA
➞➞
Top Cover
BB
Use the power adapter provided by the manufacturer. (DC8.4V/1A)
Note
1
2
3
Power LED
Back of Main Body
Power Adapter
1 1
2
3
4
2
3
➞➞
-SNC-L200(130*180)-E 4/21/06 1:17 PM Page 18
Page 11

Netcam(W)_SNC-L200(W)
21
Netcam(W)_SNC-L200(W)
20
Installing the Camera
You can install the camera on the wall, in standing position or on the
tripod after deciding the place and height of installation.
Installing the camera on the wall (concrete or cemented wall)
Insert two plastic plugs to the holes.
Insert two screws by using a driver.
Arrange the power cable and the
LAN cable in direction A
(see page 17).
Hang the Netcam(W)on the
screws,and push it down to fix.
Attach the fixing label on the wall.
Make two holes by using an electric drill.
- Each hole must be more than 5mm in
diameter and 35mm in depth.
Keep 35mm distance between holes.
Adjust to
this position
Installing the camera in Standing position
Arrange the power cable and
the LAN cable in direction B
(see page 17).
Place the camera on a proper
place such as a cabinet.
Installing the camera on a Tripod
Arrange the power cable and the LAN
cable in direction A (see page 17).
Align the tripod fix groove to the
projecting part of the tripod, and
rotate to insert it.
- Check whether the wall is firm enough to
support the weight of the Netcam(W)when
installing the camera on the wall.
- The camera may fall. Be careful not to be
injured.
- This product is intended for indoor use.
Avoid exposing the product to rain, snow or
moisture.
- When using a separate stand, check
whether it fits the groove of the tripod. They
may be loosely connected and separated.
Follow the step 1,4,5 and 6 when installing the camera on hard
board or on the wooden wall.
Note
Note
1
2
2
3
4
5
6
6
3 4
1
2
1
2
-SNC-L200(130*180)-E 4/21/06 1:17 PM Page 20
35mm
Page 12

Netcam(W)_SNC-L200(W)
23
Setting the Router or Wireless Router
If you want to connect the PC and the Netcam(W)with a single line
of the Internet, you must have an IP router.
You are also required to set the IP router for normal operations.
22
Single Use
- Video transmission may slow down depending on PC performance or network conditions.
- Do not enter the IP address and Mc address used for illustration in this manual.
Recommended System Specifications
- Computer : Pentium 4/1.5GHz or higher
(Pentium 4/1GHz or higher at minimum)
- Operating System : Windows 2000/XP
- Ram : Memory : 256MB or higher
- Video : Memory : 128MB or higher
- Resolution : 1024 X 768 or higher
- Web Browser : Internet Explorer 6.0 or higher
Installing the IP Router of Wireless Router
Read the user ’s manual before installing the IP router.
- Set the IP address on the IP router.
- The IP address is used to set the network of the Netcam (W).Keep a record of the
address for later use.
- The Subnet Mask or the Gateway status of the IP router connection is used to set the
network of the Netcam (W). Keep a record of the status for later use.
- A wireless router is required for wireless communication of the Netcam (W).
- The wireless information (SSID,WEP etc.)of the wireless router settings is used to set the
wireless connection of the Netcam (W). Keep a record of the information for later use.
Setting the Port Forwarding
The port forwarding is automatically set when the IP router
(router or wireless router)of the SNC Installer of the Netcam(W)supports UpnP.
When the router does not support UpnP, you must set the port number allocated
for the Netcam(W)by the IP router. Enter a value between 1 to 65535.
You must not use the following port numbers.
FTP : 21 Telnet : 23 SMTP (E-mail:) : 25
DNS : 53 POP3 : 110 HTTPS : 443
ICQ : 4000 IRC : 6661~6667
*
It is recommended to set the number to higher than 10,000 since you can prevent collision
with port numbers of other Internet service or programs by avoiding commonly used numbers.
IP routers that support UPnP are listed below.
- Netgear WGR614 v5
- Linksys WRT54G
- D-Link DI-624+
-SNC-L200(130*180)-E 4/21/06 1:17 PM Page 22
Page 13

Netcam(W)_SNC-L200(W)
25
Netcam(W)_SNC-L200(W)
24
Installing the SNC Installer
Search and set up the Netcam(W)connected to the hub or the IP
router.
Insert the installation CD into the
CD-ROM driver of the PC.
Click the “Install ”Button.
Double click “SNC Installer.exe.”
Click the “Next ”Button.
Click the “Finish ”Button.
- The “Move to ”Icon is created on
the background screen when the
installation is completed.
Click
Click
Click
➞
SNC
Installer
1
2
3
4
5
-SNC-L200(130*180)-E 4/21/06 1:17 PM Page 24
Page 14

Netcam(W)_SNC-L200(W)
27
Netcam(W)_SNC-L200(W)
26
Searching the Connected Netcam (W)
Used to search an IP router (router or wireless router)connected
with the Netcam(W)or a Netcam(W)directly connected with the PC.
Run the program by double-clicking the SNC Installer icon.
Or you can click [Start ]-[All Programs ]-[SNC Installer ]-[SNC Installer ].
- If a warning screen appears, click the ‘block clear’ button (Windows XP Service Pack2).
Press the ‘OK ’Button.
When the SNC Installer is run, the
following window appears and all the
Netcam(W)over the single network are
searched automatically.
- Press the Cancel Button on the
[Searching ….]
window to cancel the search during process.
1. Server Name: The name of the Netcam(W)set by the manager
2. Model: The model name of the Netcam(W)
3. IP Type: Displays the current status of network among Static,DHCP and PPPoE.
4. IP Address: The IP address of the Netcam(W)
5. HTTP Port: The port number used to access the Netcam(W)connected over a local network.
6. Mac Address: The hardware address of the Netcam(W)shown on the back of the label.
7. Ext Port: The port number that allows access to the Netcam(W)from the external Internet.
8. Status : “Success(W)”appears when the network settings are correct,and “Auto Fail ”appears when the
settings are not authorized during the installation process.
9. Search Button: Searches the Netcam(W)currently connected over the network.
10. Clear Button: Deletes the list of the Netcam(W)s from the SNC Installer List.
11. Manual Set Button: The user enters the network settings of the Netcam(W).
12. Auto Local Set Button: The SNC Installer automatically sets the network settings of the Netcam(W).
13. Internet Set (UPnP)Button: Port-forward to enable access to the Netcam(W)from the external
Internet.
14. Close Button: Closes the SNC Installer window.
15. URL via internet: The URL address used for access from the external Internet.
SNC Installer Screen
The search function of the SNC Installer is enabled when the camera is connected
with the PC via an IP router or directly with the PCover a single network.
Note
Click
1
91011
12
13 14
15
234 5 67
8
1
2
-SNC-L200(130*180)-E 4/21/06 1:17 PM Page 26
Page 15

Netcam(W)_SNC-L200(W)
29
Netcam(W)_SNC-L200(W)
28
Setting the Network
You can set a variety of network settings such as IP address and
UPnP by using the SNC Installer program. You can choose between
<Auto Local Set>and <Manual Set>.
Click the Auto Local Set Button on the
bottom of the SNC Installer screen.
Enter a proper value for each item.
Apply the set values to the Netcam (W),
and save the values by entering the Root
password and clicking the Set Button in
the Save Configuration Option.
- Click the ‘Cancel’ Button to cancel the set
value.
Click the “Yes ”Button.
- The following screen appears for about 2
minutes.
Auto Setting the Network
The SNC Installer searches and automatically allocates available IP and
Subnet Masks over the user network by using the Auto Local Set.
1.
Server Name: Set the name of the Netcam(W).You can enter up to 20 letters
(alphabet and Roman Numerals). You cannot use special characters such as #, ’ , ” and:.
2.
IP Address: Automatically enter the IP available in the user network environment.
3.
Netmask: Automatically enter the Subnet Mask of the IP router (router or wireless router).
4.
Wireless Enable/Wireless Disable(SNC-L200W Only): Choose the “Wireless Enable ”when using wireless
connection of the Netcam(W). Choose the “Wireless Disabled ”when not using wireless connection.
5.
AP Information (SNC-L200W Only)
:ESSID: Enter the (E)SSID used by the wireless router to be connected. Press the “Scan AP ”Button next to
the item, and the list of (E)SSIDs the wireless routers presently available from the Netcam(W)appears.
AUTH MODE: Choose the AUTH Mode of the wireless router to be connected between
the Open System and the Shared Key.
WEP: Select “WEP ”when the wireless router to be connected uses the “WEP ”wireless security settings.
Mode: Select the type of the WEP Key set for the wireless router to be connected.
KEY: Enter the value of the WEP Key set for the wireless router to be connected.
6.
Root password: The password is defaulted to “root”.
Enter a new password if the current one is changed.
1
2
3
4
5
6
Auto Local Set Screen
Click
Click
When the Auto Local Set is completed,
the Internet Set (UPnP)window appears
as follows.
- Click “Yes ”to set up connection over the
Internet (refer to pages 38 to 40 for setup).
- Click “No ”to not set up connection over
the Internet.
“IP collision” may occur between
Netcam(W)and the PC if a firewall
is installed over a single network.
Exclude the IP of the PC with the
firewall if collision occurs.
Note
1
2
3
4
5
-SNC-L200(130*180)-E 4/21/06 1:17 PM Page 28
Page 16

Netcam(W)_SNC-L200(W)
31
Netcam(W)_SNC-L200(W)
30
Setting the Network
Manually Setting the Network
When connecting the Netcam(W)by using the Manual Set, you must enter the
IP and the Subnet Mask since they are allocated automatically.
Press the Manual Set Button on
the bottom of the SNC Installer
screen.
Enter a value for each item.
- If you set the IP Type to DHCP, you must reset the “UPnP” settings again when
power is turned off and later on. It is recommended to set the IP Type to Static.
- If you set the IP Type to DHCP, there may be access control when using the
external Internet. It is recommended to set the IP Type to Static.
- When using wireless connection of the Netcam(W)
(Choosing the ‘Wireless Enable’), you cannot set the IP Type to DHCP.
Note
Apply the settings to the
Netcam(W), and click the Set
Button to store the settings in
the Save Configuration Option.
- Click the Cancel Button to cancel
the settings.
Click the ‘Yes ’Button.
Click
Click
The following screen appears for
about 2 minutes.
When the local network setup is
completed, the Internet Set (UpnP)
setup window appears as follows.
- Click the “Yes” Button to set up the
connection to the Internet
(refer to pages 38 to 40).
- Click the “No” Button to not set up
the connection to the Internet.
1
2
3
4
-SNC-L200(130*180)-E 4/21/06 1:17 PM Page 30
Page 17

Netcam(W)_SNC-L200(W)
33
Netcam(W)_SNC-L200(W)
32
Setting the Network
You can set a variety of network settings such as IP address and
UPnP by using the SNC Installer program.
You can choose between <Auto Local Set>and <Manual Set>.
4. Network
IP Address: Enter the IP available in the user network environment.
Netmask: Enter the Subnet Mask of the IP router (or wireless router).
Default Gateway: Enter the Gateway of the IP router (or wireless router)
DNS1 /DNS2: Enter the DNS of the IP the IP router (or wireless router).
- Use basic values available. (Basic values -168.126.63.1/168.126.63.2)
5. PPPoE
PPPoE User Name: Enter the ID designated or allocated during subscription for
user authentication, when using the IT ADSL.
PPPoE Password: Enter the password designated or allocated during
subscription for user authentication, when using the IT ADSL.
PPPoE Confirm: Enter the password again to confirm the password.
6. Wireless Enable /Wireless Disable (SNC-L200(W)Only): Choose the
“Wireless Enable” when using wireless connection of the Netcam(W).
Choose the “Wireless Disabled” when not using wireless connection.
7. AP information (SNC-L200(W) Only)
ESSID: ESSID: Enter the (E)SSID used by the wireless router to be connected.
Press the “Scan AP” Button next to the item, and the list of (E)SSIDs the wireless
routers presently available from the Netcam(W) appears.
AUTH MODE: Choose the AUTH Mode of the wireless router to be connected
between the Open System and the Shared Key.
WEP: Select “WEP” when the wireless router to be connected uses the “WEP”
wireless security settings.
Mode: Select the type of the WEP Key set for the wireless router to be connected.
KEY: Enter the value of the WEP Key set for the wireless router to be connected.
8. Root password: The password is defaulted to “root”.
Enter a new password if the current one is changed.
9. Save Configuration Option
Save All Configuration: Select when storing all the values.
Save Only Network Configuration: Select when storing the network-related
values only.
Not Saving: Select when not storing the values in flash memory after setting.
1
2
5
3
7
9
8
4
6
Manual Set Screen
1. Server Name: Set the name of the Netcam(W). You can enter up to 20 letters
(alphabet and Arabian numbers). You cannot use special characters such as #,’ , ” and :.
2. HTTP Port: Enter the port value of the Netcam(W)set during the Port Forwarding Setup of
the IP router (router or wireless router)
3. IP Type: Select the type of IP Setup of the Netcam(W)in the IP router
(or wireless router)(Usually select the Static when using an IP router).
-SNC-L200(130*180)-E 4/21/06 1:17 PM Page 32
Page 18

Netcam(W)_SNC-L200(W)
35
Netcam(W)_SNC-L200(W)
34
Setting the Network
Port Forwarding
Port Forwarding assigns port numbers to each network device (including the
Netcam(W)and PC)connected to the local network comprising of IP routers
(or wireless routers), in order to connect the Global IP to the Private IP.
Click the Internet Set ((UPnP)Button on the bottom of the SNC Installer screen.
Enter the user name and password,
and click the “OK” button.
- Enter the new password when you
have changed the user password from
<Smart>to <Admin.Password>.
(Default settings:ID-root,
Password-root)
After user authorization, a page that sets the display of the Netcam(W)
Icon in the Port Forwarding and the “My Network Environment” appears.
Set the proper value for each
item, and click the Apply Button.
The PC environment supporting UPnP functions is available with
Windows XP Service Pack 2 or higher versions.
Note
Click
Click
IP Router
1
2
3
-SNC-L200(130*180)-E 4/21/06 1:17 PM Page 34
Page 19

Netcam(W)_SNC-L200(W)
37
Netcam(W)_SNC-L200(W)
36
Setting the Network
The results of port forwarding
appear in the UPnP Portmapping
Result screen.
- Access the address displayed in the
results to be connected with an
external network.
- Check the URL or the external
access, and click the Close Button.
Search the set values again by
clicking the Search Button on the
bottom of the SNC Installer screen.
- The “Success(W)” is displayed in
the “Status ” if the network is
successfully connected.
- When using wireless Netcam(W),
pull out the LAN cable and close the
cover after settings.
1
2
3
4
5
6
7
UPnP Configuration Screen
1. Port Forwarding: Select the method of allocating port numbers. “Disable” means no
allocating of port numbers.
“Enable” means auto allocating of port numbers. “User Define” means the user ’s entering
port numbers.
2. Display shortcut Icon in My Network Places: Decides whether the Netcam(W)icon will be
displayed in the “My Network Environment.”
3. Status: Displays the status of the UPnP. When succeeding, “Success” is displayed.
When failing, the “Error” is displayed.
4. External Port No.: Displays the allocated port number.
5. Router Global Address: Displays the Global IP address of the router.
6. Camera ‘s address for Local Network Access: Displays the address with which the user
can access the Netcam(W) over the current network.
7. Camera ‘s address for Access via Internet: Displays the address with which the user can
access the Netcam(W) via the Internet.
When accessing a local network, use the address displayed as the
“Camera ’s address for Local Network Access” of the “UPnP
Status.” When accessing an external network, use the address
displayed as “Camera ’s address for Access via Internet.”
Note
1
2
-SNC-L200(130*180)-E 4/21/06 1:17 PM Page 36
Page 20

Netcam(W)_SNC-L200(W) Netcam(W)_SNC-L200(W)
38 39
Access to the Netcam(W)Website
You can check real-time moving images anywhere anytime via the
Smart Viewer by accessing the Netcam(W) Website.
Access from a Local Network PC
You can access the Netcam(W)Website from the connected Netcam(W)via the
IP router (or wireless router).
You can access the Netcam(W)Website by running the SNC Installer program
regardless of using static IP, a cable modem (DHCP)or ADSL (PPPoE).
When Using the SNC Installer Program
Double click the Netcam((W)camera
you want to access from the SNC
Installer.
- Enter the new password if you have
changed the user password from
<Smart>to <Admin. Password>. (Default
settings:ID -root, Password -root)
Enter the user name and password, and click the “OK ”button.
- Enter the new password when you have changed the user password from
<Smart>to <Admin. Password>. (Default settings:ID -root, Password -root)
2 Click
For Static IP Users
Run Internet Explorer.
Enter “http: //Private_IP address:port number” in the URL, and press the
Enter Button on the keyboard.
- The Smart Viewer Screen appears.
- Ex)http: //192.168.0.200:8080
Enter the user name and password, and click the “OK” button.
- Enter the new password when you have changed the user password from
<Smart>to <Admin. Password>. (Default settings:ID -root, Password -root)
Run Internet Explorer.
Enter the domain name of the Netcam(W)in the URL.
- The Smart Viewer Screen appears.
- A domain name contains lowercase letter “w,” the last six letters of the MAC
address of the product and the address of the DDNS server.
You can check the MAC address on the bottom-side label after opening the
backcover of the SNC-L200(W).
(ex) http://wfff32c.websamsung.net:8080
Enter the user name and password, and click the “OK ”button.
- Enter the new password when you have changed the user password from
<Smart>to <Admin.Password>. (Default settings:ID -root, Password -root)
When the port number has the basic value of 80, you do not have
to enter the port number after the address.
Enter the port number after the address when the Internet service
provider blocks the 80 port.
The domain name of the cable modem/ADSL user is automatically
registered when it is connected to the DDNS server of the company.
Tips
Do not use the above examples of IP and Mac addresses when
accessing the camera. They are used as examples.
Note
Access from External Internet
You can access the Netcam(W)Website from an unconnected external PC via the
IP router (or wireless router).
For Cable Modem/ADSL Users
1
22
1
2
3
1
2
3
-SNC-L200(130*180)-E 4/21/06 1:17 PM Page 38
Page 21

Netcam(W)_SNC-L200(W)
41
Installing the ActiveX Control
A security warning window may appear when you access the Netcam(W)Website for the first time.
In this case, you must install the Active Control program to view video from the Smart Viewer.
Netcam(W)_SNC-L200(W)
40
Access to the Netcam(W)Website
For Windows 2000/Windows XP
Click the “Yes” Button when the following security warning window appears.
Click
For Static IP Users
Run Internet Explorer.
Enter “http: //Private_IP address: port number” in the URL, and press
the Enter Button on the keyboard.
- The Smart Viewer Screen appears.
- Ex)http://168.219.13.197:8080
Enter the user name and password, and click the “OK” button.
- Enter the new password when you have changed the user password from
<Smart>to <Admin. Password>. (Default settings:ID -root, Password -root)
1
2
3
-SNC-L200(130*180)-E 4/21/06 1:17 PM Page 40
Page 22

Netcam(W)_SNC-L200(W) Netcam(W)_SNC-L200(W)
42 43
Installing the ActiveX Control
A security warning window may appear when you access the Netcam(W)Website for the first time.
In this case, you must install the Active Control program to view video from the Smart Viewer.
Click the Install Button when a security warning window appears.
Click the Installation Message when the following security warning window appears.
For Windows XP Service Pack 2
Click the ActiveX Control Install.
Click
Click
Click
Manually Installing the Activex Control
Click the Smart Viewer For Network Camera.
Click the Down Load Button.
Click
Click the Execute Button.
Click the Install Button.
Click
The download time for the
ActiveX Control program may
vary depending on the network
environment.
Note
Click
Click
1
2
3
2 3
4
1
-SNC-L200(130*180)-E 4/21/06 1:17 PM Page 42
Page 23

Netcam(W)_SNC-L200(W)
45
Netcam(W)_SNC-L200(W)
44
Using the Smart Viewer
You can use a variety of features such as video monitoring, record,
capture and playback with the Smart Viewer.
2
3
4
1
5
6
7
15
12 13 14
8 9 10 11
Smart Viewer Screen
6. Preset Operation Button: Move when the lens relocates to the Preset direction.
Preset Delete Button: Delete the stored Preset settings.
Preset Store Button: Store the Preset settings.
7. Lens Direction Button (Pan &Tilt): Move the lens freely with 8 direction buttons.
Locate the lens to the center position by clicking the central button.
8. Flash Button: Turn on flash (turned on for 5 seconds and off for 30 seconds)
9. PIR Button: Enable or disenable Passive Infrared (PIR)functions.
10. Storage Route Button: Change the storage route of record files.
11. Capture Button: Capture selected images in JPEG files.
12. Record Button: Record Video.
13. Playback Button: Play back recorded files.
14. Record Stop Button: Stop recording.
15. Screen Size Button: Adjust the image screen to desired size.
1. ActiveX Control Download: Click when installing the ActiveX Control program
manually.
2. Smart Viewer Tab: You can video-monitor.
3. Smart Setting Tab: You can set the network over the Web.
4. Date Indicator: Display the day/month/year/time of monitoring.
5. Preset Number: You can choose a Preset Setting Number between 1 to 8.
Power Pan &Tilt
When you select a desired spot by clicking,the camera lens moves the spot to
the center of the screen.
➞
-SNC-L200(130*180)-E 4/21/06 1:17 PM Page 44
Page 24

Netcam(W)_SNC-L200(W)
47
Netcam(W)_SNC-L200(W)
46
Using the Smart Viewer
Preset
You can store up to 8 lens directions,thereby restoring the lens to the originally
stored position after movement.
Select the Preset Number ( ) to be set.
Move the lens to the desired store position by using the lens direction button.
Click the Preset Store Button ( ).
Repeat steps 1 to 3 if you want to store another number.
Passive Infrared (PIR)
Click the PRI Button.
- PIR is displayed on the screen, and the sensor starts operating.
- When a motion is detected, the flash is turned on automatically to
capture images.
Click the Flash Button.
- The Flash is displayed on the screen. It is turned on for 5 seconds and
off for 30 seconds.
- Flash is not turned on again for 30 seconds, even if you click the Flash
Button during that time.
Detects and records motion of a human or an animal by using an infrared ray and
captured images.
Flash
You can monitor at night or in a dark room by using the Flash.
- You can choose the number of frames to be captured from 1 to 5
in the Alarm Notification Settings.You can also send the captured
images via E-mail.
- PIR may malfunction depending on temperature or surroundings,
since it detects changes in temperature from infrared (heat).
Note
To Set Preset
Select the Preset Number ( ).
Click the Preset Operation Button ( ).
To operate Preset
Select the Preset Number ( )to be deleted.
Click the Preset Delete Button ( ).
To Delete Preset
1
2
1
2
1
2
3
4
-SNC-L200(130*180)-E 4/21/06 1:17 PM Page 46
Page 25

Netcam(W)_SNC-L200(W)
49
Netcam(W)_SNC-L200(W)
48
Using the Smart Viewer Using the Simple Player
Play Back Recorded Files
You can play back, capture and print recorded files.
Click the Playback
Button( ).
- The Open screen
appears.
Record Moving Images
You can record and store images seen in the Smart Viewer.
Click the Record Button.
- ‘Rec’ is displayed on the screen,and recording begins.
Click the Stop Record Button to stop recording.
- Record is stopped.
- Recorded files are stored in the C: WProgram
FilesWSamsungWNetcam_WEBW(Mac address)folder.
Change the Record Route
You can check or change the storage route of recorded files or capture files to the position you want.
Click the Storage Route Button( ).
- The Select the Folder screen appears, and
you can check the storage route.
Change the storage route and click the
Select Button.
- The folder path is changed as you choose.
Click
Select the file you want
to play back, and click
the Open Button.
- The Simple player
screen appears, and
playback starts
automatically.
You can record video up to some 10 minutes.
Tips
Files are stored in the changed folder even when you close the
Smart Viewer and access again.
Tips
Record is stopped when you switch to the Smart Setting mode while recording. Record
may be stopped when you download ActiveX Control program from another PC.
Note
Click
1
2
1
2
-SNC-L200(130*180)-E 4/21/06 1:17 PM Page 48
Page 26

Netcam(W)_SNC-L200(W)
51
Netcam(W)_SNC-L200(W)
50
Using the Simple Player
Click the Print Button when the
image you want to print appears
().
-
The Print screen appears.
Click the Memo Button.
-
Enter information for the print,and
click the OK Button.
Click the Setup Button.
- Click the OK Button after printer
settings, and the image is printed.
- The image is printed after clicking
the Print Button, when you do not
need to set the print.
Print Playback ImagesStop Recorded Files
Click the Stop Button()on the Simple player screen.
When the number of file appears in .fjp, it means it is a moving
image file.When it appears in .jpg, it is a capture file.
Tips
Capture Playback Images
Enter the name of the
file, and click the Store
Button.
- The file is stored in
JPEG.
Click the Pause Button ( ) when the image you want to capture
appears, and click the Snapshot Button ( ).
- The Store File screen appears.
Click
1
2
1
1
2
2
3
-SNC-L200(130*180)-E 4/21/06 1:17 PM Page 50
Page 27

Netcam(W)_SNC-L200(W)
53
Setting the Smart Viewer
You can set a variety of menus such as system, network,
administrator settings and firmware upgrade over the Netcam(W)
Website.
Netcam(W)_SNC-L200(W)
52
Using the Simple Player
Simple Player Screen
1. Open Button: Open files to be played back.
2. Playback Button: Play back files.
Reverse Playback Button: Reverse playback files.
Pause Button: Stop playback for seconds.
Stop Button:
Stop playback. (the screen appears at the beginning of the playback file)
Previous Image Button: View the previous images cut by cut in Pause mode.
Next Image Button: View the following images cut by cut in Pause mode.
Previous File Button: Move to the previous file.
Next File Button: Move to the next file.
3. Playback Speed Button: Set the playback speed faster or slower.
(X0.1,X0.2,X0.5,X1,X2,X4,X8,X10)
4. Enlarge Button:Enlarge images.
Contract Button: Contract images.
Original Size Button: View images in original size.
5. Snapshot Button: Capture playback images in JPEG files.
6. Print Button: Print images.
7. Scroll Bar: Move the playback position by moving the scroll bar with a mouse.
You can move to the image you want in Stop or Pause mode.
1
7
Menu Bar
2 3 4 5 6
Click the Smart Setting Tab in the Smart Viewer Screen.
- The Smart Setting screen appears.
Main Menu
- Click the Main Menu to view the Sub Menu on the left.
Sub Menu
- Click the Sub Menu to
set the sub menu.
Click
-SNC-L200(130*180)-E 4/21/06 1:17 PM Page 52
Page 28
Netcam(W)_SNC-L200(W)
55
Netcam(W)_SNC-L200(W)
54
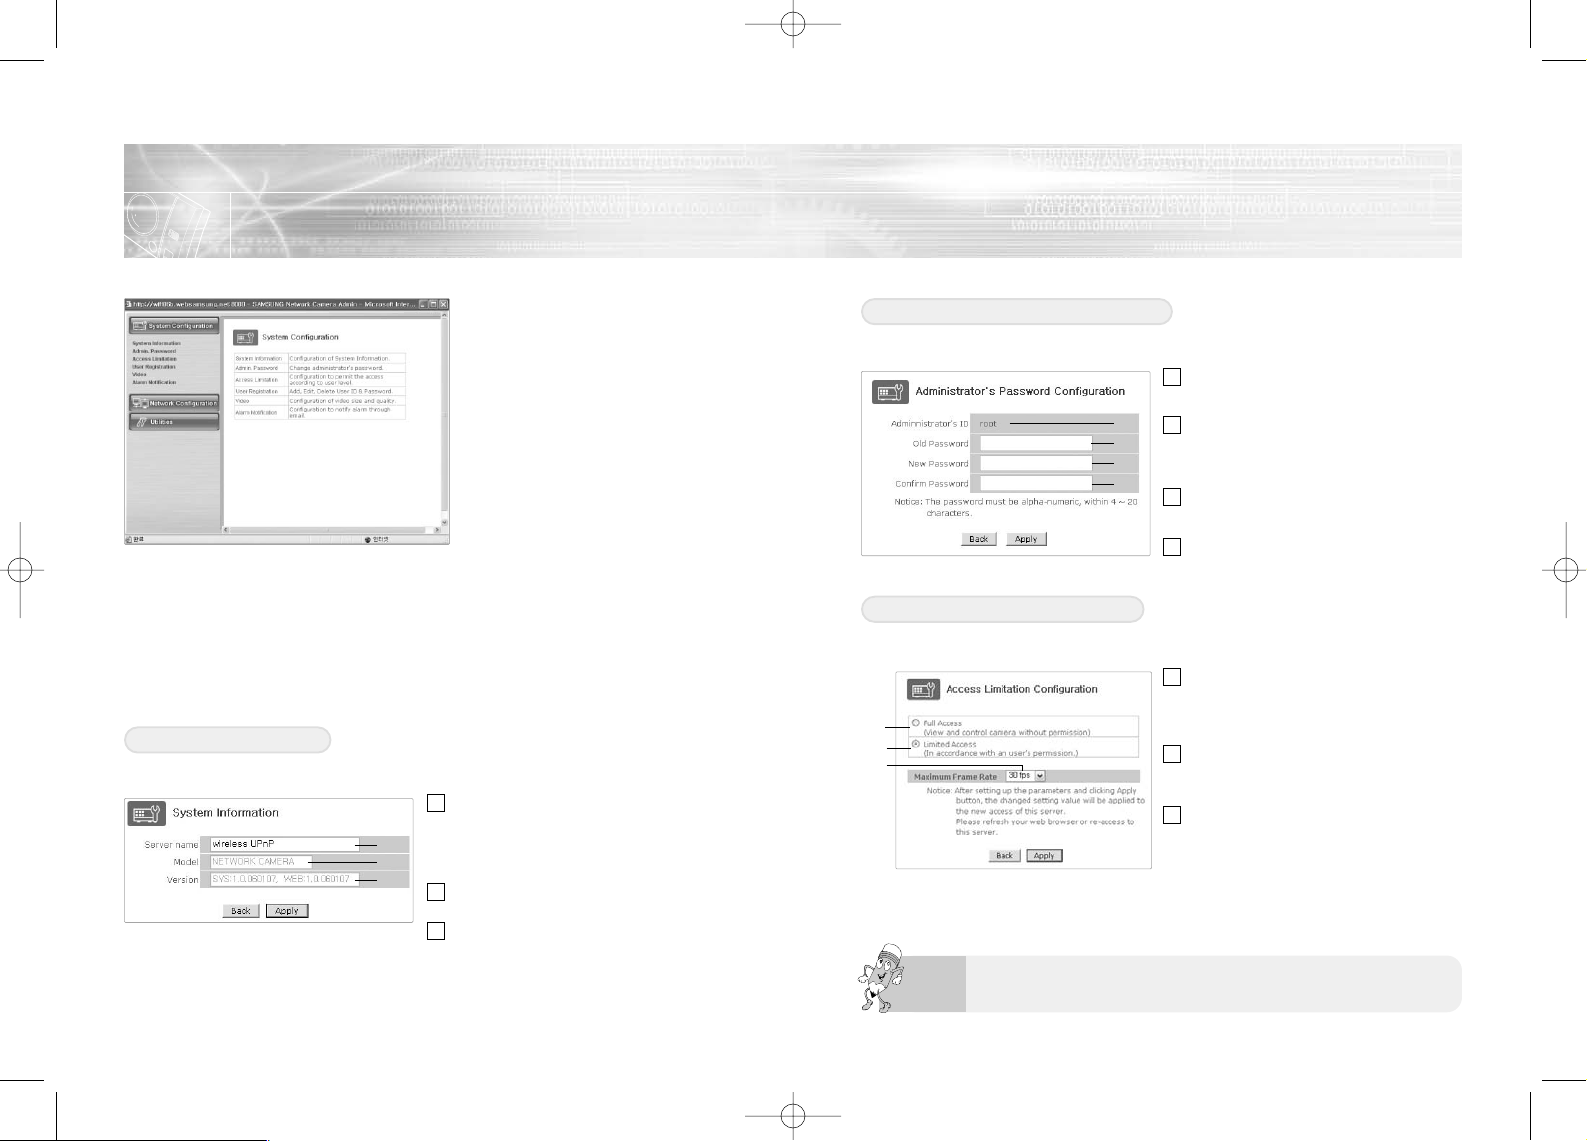
System Configuration
Register and change the name of the Netcam(W)on the server.Check the model and version of the Netcam(W).
System Information
Administrator s Password Configuration
Access Limitation Configuration
< System Setting Sub Menu >
- System Information: Set system information.
- Admin.Password: Change the password of the administrator.
- Access Limitation: Control the access of the user.
- User Registration: Add, modify and delete the ID and password of the user.
- Video: Set the quality and resolution of video images.
- Alarm Notification: Send images via E-mail when alarm is notified.
Server Name: Register the name of
the Netcam(W)on the server. Change
the registered name to a new one.
(English/Number: less than 20 letters.
You cannot use # ” ’ characters.)
Model: Display the model name of the
Netcam(W).
Version: Display the system and Web
version of the Netcam(W).
- You can check information only
when it comes to the model and
version.
1
2
3
Change the log-in password of the administrator.
Administrator ’s ID: Administrator ’s ID
is the root (cannot change)
Old Password: Enter the old password.
It is root when the password is first
changed or switched to default settings.
New Password: Enter the new password
(English/Number, 4 to 20 letters)
Confirm Password: Confirm the new
password.
1
2
3
4
Limit general user ’s access to the Smart Viewer.
Full Access: Everyone can see Smart
Viewer video, without having to enter a
password. But the user cannot use the
function buttons of the Smart Viewer.
Limited Access: General users are
required to enter the password to view
Smart Viewer video.
Maximum Frame Rate: You can set the
per-second image transmission rate
from 1,2,5,10,15,30 (fps). If the size of
the image is 640 by 480, you can set the
rate up to 15 fps. For 320 by 240, you
can set the rate up to 30 fps.
1
2
3
Click the Apply Button to complete settings.Then, close Internet Explorer
and open it again Enter the password on the log-in screen to access again.
Tips
1
2
3
1
1
2
3
2
3
4
-SNC-L200(130*180)-E 4/21/06 1:17 PM Page 54
Page 29

Netcam(W)_SNC-L200(W)
57
Netcam(W)_SNC-L200(W)
56
System Configuration
Register, modify and delete the ID and password of the general user.
< How to Register User ID >
Click the Add by clicking.
Enter the User ID.
Enter a User Password.
Enter the password again for
confirmation.
Enter the User Name.
Click the Apply Button.
< How to Delete User ID >
Click the Delete by clicking.
Select the User ID to be
deleted.
Click the Delete Button.
< How to Change User Password >
Select the Edit by clicking.
Select the User ID to be
changed.
Enter a new password.
Enter the password again for
confirmation.
Enter the User Name.
Click the Apply Button.
Set the size, resolution and brightness of images.
Image Size: Select the size of transmitted images from 160 X 120, 32 0X 240 and
640 X 480.
Image Quality: Set the resolution of transmitted images from High,
Normal and Low.
Hue: Set the hue tone from –10 to 10.
Saturation: Set the saturation from –10 to 10.
Contrast: Set the contrast from –10 to 10.
Brightness: Set the brightness from –10 to 10.
1
2
3
4
5
6
1
2
3
4
5
6
User Registration
Video Configuration
1
2
3
4
5
6
1
2
3
1
1
2
3
4
5
6
2
3
4
5
6
1
2
3
1
2
3
4
5
6
-SNC-L200(130*180)-E 4/21/06 1:17 PM Page 56
Page 30

Netcam(W)_SNC-L200(W)
59
Netcam(W)_SNC-L200(W)
58
System Configuration Network Configuration
Capture images and send them via E-mail when a motion is detected by PIR.
1
2
3
4
5
6
7
8
Service: Set whether to enable this service. Select Enable to use the Alarm Notification.
SMTP server address: Used to send E-mail to the address on SMTP (Simple Mail
Transfer Protocol)Server. Enter the latter part (after @)of the Email address you use.
Authentication Login: Select the Enable to use the log-in screen. It is recommended to
select the Enable.
User ID: Enter the User ID of the sender ’s E-mail address when using the Authentication Login.
Password: Enter the User Password of the sender ’s E-mail address when using the
Authentication Login.
Sender(E-mail): Enter the sender ’s E-mail address.
E-mail address 1~4: Enter up to 4 mail addresses to receive capture images.
Image Count: Set the number of images to be transmitted upon Alarm Notification.
“Pre Alarm” means the number of images to be sent before the Alarm, and
“Post Alarm” is the number of images to be sent after the Alarm. Up to 5
images can be sent in a 0.5-second interval.
Alarm Notification
< Network Configuration Sub Menu >
- Network Configuration: Set the Static IP or the DHCP.
- PPPoE(ADSL): Set the PPPoE(ADSL).
- UPnP Configuration: Set the Port Forwarding and the Display shortcut Icon in My
Network Places.
- Network Ports: Set the HTTP Port.
- View Network Status: Display the network status of the current system.
- Network Status Notification: Send information on allocated IP addresses such as the
DHCP and the PPPoE.
- DDNS Configuration: Set the DDNS.
1
2
3
4
5
6
7
8
-SNC-L200(130*180)-E 4/21/06 1:17 PM Page 58
Page 31

Netcam(W)_SNC-L200(W)
61
Netcam(W)_SNC-L200(W)
60
Network Configuration
Set the Static IP or the network of the cable modem. Talk with the network
administrator, and enter correct values for items.
Network Configuration
Static IP
IP Address: Enter the Static IP address.
Netmask: Enter the Subnet Mask.
(typically 255.255.255.0.)
DNSI/DNS2: Enter the DNS Server
address.
(typically 168.126.63.1/168.126.63.2.)
Default Gateway: Enter the basic
gateway.
DHCP IP –The IP address is
automatically allocated.
DNSI/DNS2: Enter the DNS Server
address. (typically
168.126.63.1/168.126.63.2.)
The cable modem IP address keeps changing with the DHCP IP.
You can either jointly use the DDNS, or access the address
allocated to equipment by using the Network Status Notification
settings.
Tips
1
2
3
1
4
Set the ADSL network.
PPPoE (ADSL)
Service: Click the Enable to use the log-in screen upon accessing the Internet.
User ID: Enter the log-in ID.
User Password: Enter the log-in password.
Confirm Password: Enter the log-in password again.
DNS1/DNS2: The DNS is automatically allocated.
2
1
3
5
4
Talk to the network administrator before entering setting values. With improper
network settings, you cannot set video transmission and the Smart.
Note
The ADSL IP address keeps changing with the DHCP IP. You can
either jointly use the DDNS, or access the address allocated to
equipment by using the Network Status Notification settings.
Tips
1
1
1
2
3
4
5
2
3
4
-SNC-L200(130*180)-E 4/21/06 1:17 PM Page 60
Page 32

Netcam(W)_SNC-L200(W)
63
Netcam(W)_SNC-L200(W)
62
Network Configuration
Set the port number used to access the Netcam(W)over the Internet, and set the
display of the Netcam(W)icon in the “My Network Places.”
UPnP Configuration
Port Forwarding: Select the method of port number allocation. “Auto Enable” is automatic
allocation, and “Disenable” is not allocating the port number. “Manual Enable” is the user
entering the port number.
Display a shortcut Icon in My Network Places: Decide whether to display the
SNC-L200(W) icon of the “My Network Places.”
UPnP Status (It appears by clicking the Apply Button after setting the above items.)
- Status: Display the status of the UPnP.When succeeding, “Success” is displayed. When
failing, “Error” is displayed.
- Port No.: Display the allocated port number.
- Router Global Address: Display the router of the Global IP.
- Camera ‘s address for Local Network Access: Display the address with which the user
can access the Netcam(W) over the network.
- Camera ‘s address for Access via Internet: Display the address with which the user
can access Netcam(W)from external Internet.
1
2
3
For the SNC-L200(W)icon of “My
Network Places,”Windows XP
Service Pack 2 must be installed.
And the “UPnP
Framework ”in the exception tab of
“Controller-Windows Firewall ”must
be checked.
You can access the Netcam(W)by
double clicking the SNC-L200(W)
icon of “My Network Places.”
Tips
Port number used to access the Netcam(W) over the Internet.
Network Port Configuration
Common Status: Display the status
of the Gateway and the DNS.
LAN Status: Display the status of the
IP address, the Netmask and the Mac
address.
PPPoE Status: Display the
connection status of the
ADSL(PPPoE).
Check the current connection status of the network.
View Network Status
1
2
3
The Common Status is information commonly used for all the
interfaces (Ethernet of PPPoE).
Tips
1
2
3
1
2
3
-SNC-L200(130*180)-E 4/21/06 1:17 PM Page 62
Page 33

Netcam(W)_SNC-L200(W)
65
Netcam(W)_SNC-L200(W)
64
Network Configuration
Mail Notification: Decide whether to use this service. When selecting Enable, you can
use the Mail Notification function.
SMTP Server: This address is used to send E-mail to the SMTP(Simple Mail Transfer
Protocol) Server. Enter the latter part (after @)of the E-mail address you use.
Authentication Login: Select Enable to use the log-in screen. It is recommended to
select Enable.
User ID: Enter the User ID of the sender ’s E-mail address when using the Authentication Login.
Password: Enter the User Password of the sender ’s E-mail address when using the
Authentication Login.
Sender: Enter the sender ’s E-mail address.
Recipient ’s Email Address1~3: Enter up to 3 mail addresses to receive the changed IP address.
User-defined Message: Enter the message to be sent with the mail. Up to 50 characters
can be entered per line.
Automatically informs the user of a cable modem or ADSL of a new IP address via mail when
the link IP address changes.
Network Status Notification
8
7
5
6
4
3
2
1
Automatically switch the IP address of the Netcam(W), and access the new
address.
Default setting of the DDNS server is websamsung. net.
The domain name is http: //w(Mac address last 6 numbers). websamsung. net.
If you register the domain name of the link IP of the Netcam(W)on our DDNS
server as with cable modem and ADSL, you can access the Website more
conveniently.
DDNS Configuration
1
2
3
5
4
6
7
8
-SNC-L200(130*180)-E 4/21/06 1:17 PM Page 64
Page 34

Netcam(W)_SNC-L200(W)
67
Netcam(W)_SNC-L200(W)
66
Utilities
< Utility Sub Menu >
- Save Configuration: Store the
settings in flash memory.
- Reboot: Re-boot the system.
- Factory Default: Restore the
settings to factory default.
- System Update: Update the
system.
- To store settings in the memory, click
the Save Button.
Store the settings in the memory of Netcam(W),and save them when power is
turned off or the system is re-booted.
Save Configuration
Reboot the system so that settings are applied to
the Netcam(W). Reboot the system after using the
“Save Configuration” or “System Update.”
Reboot
Press the Reset Button on the back of the Netcam(W)for more than
3 seconds to return to default settings. Then, settings stored in
memory are erased.
Tips
Connection with the
Netcam(W)is cut during
rebooting.
Close Internet Explorer, and
access the Internet again
after 1 minute.
Note
Used to restore settings to factory
default.
Factory Default
Do not use this function
unless necessary. All the
stored settings are
switched to factory default.
Note
You can update firmware in two ways.
- Normal Update: Update to the latest
version of software for improving
performances.
- All Update: Seldom used. It updates
the system to repair a serious defect
such as program bug.
System Update
-SNC-L200(130*180)-E 4/21/06 1:17 PM Page 66
Page 35

Netcam(W)_SNC-L200(W)
69
Netcam(W)_SNC-L200(W)
68
Utilities
Click the OK Button.
Click the Yes Button.
Click the Search Button.
Click
Click
Click
Normal Update
Click the Open Button after
selecting a system file to
update.
Click the Next Button.
Click
Click the Next Button.
Click
Click
1
2
3
4
5
6
-SNC-L200(130*180)-E 4/21/06 1:17 PM Page 68
Page 36

Netcam(W)_SNC-L200(W)
71
Netcam(W)_SNC-L200(W)
70
Utilities
Click the Search Button.
Click
Click the Next Button.
Click
Click the Reboot Button.
Click
Click the OK Button.
Click
Click the Open Button after
selecting a Web file to
update.
Click
Click the Next Button.
Click
Connection with Netcam(W)is cut during rebooting.Close Internet Explorer, and
access the Internet again after 1 minute.
You can download the latest version of software from the Samsung Electronics
Website (http://www.samsung.com).
Note
7
8
9
10
12
11
-SNC-L200(130*180)-E 4/21/06 1:17 PM Page 70
Page 37

Netcam(W)_SNC-L200(W)
73
Netcam(W)_SNC-L200(W)
72
Access to Netcam(W) via a cell phone
You can view still images of Netcam(W) by accessing the Internet via a cell phone.
Enter http: //Global_IP address (or domain name): port number/wap. htm on the
URL page of the cell phone, and press the OK button.
(ex) http://wfffbbb.websamsung.net:8080/wap.htm
- Enter the user name and password when the authorization window appears, and
press the OK button.
< Help Page >
Explains camera operations.
- Button 1: Displays the main page.
- Button 2/4/6/8: Controls the Pan/Tilt.
- Button 5: Refreshes still images.
- Button 7: Turns On/Off the flash.
- Button 9: Turns On/off the PIR sensor.
< View and Control Images >
< Main Page >
- 160x120
- 320x240
- Help
DISPLAY MODE
- You can view images without the authorization process when the
“Access Limitation Configuration” of the Smart Viewer settings is
set to “Full Access.”
- The authorization process does not appear again after an initial
authorization if you store the ID/Password in the cache during
mobile phone settings.
- Communication service providers available are listed below
(as of August, 2005).
*
Cigular
*
Sprint
*
T-Mobile
- Connection to or control over SNC-L200(W)may not work,
depending on the communication service provider, mobile phone’s
model or firmware version, area and/or wireless network operator,
or for other reasons.
Note
-SNC-L200(130*180)-E 4/21/06 1:17 PM Page 72
Page 38

Netcam(W)_SNC-L200(W)
75
Installing the MultiViewer Program
You must first install the multi program of the installation CE to
use more than one Netcam(W).
Multi Use
Recommended System Specifications
- Computer: Pentium 4/2.0 GHz or higher (8 channels)
Pentium 4/2.4GHz or higher (16 channels)
- Operating System: Windows 2000/XP
(Service Pack installation is recommended)
- Ram Memory: 512MB or higher
- Video Memory: 64MB or higher
- Resolution: 1024 X 768
- Web Browse: Internet Explorer 6.0 or higher
Insert the Installation CE into the CD-ROM of the PC.
Double click the NetworkCarmeraMV__Setup. exe of the CD.
Click the Next Button.
Click the Install Button.
Install is process.
To cancel the installation, click the
Abort Button.
Click the OK Button.
Installation is completed, and the
“Move to” icon appears on the
Background Screen.
1
2
3
5
4
6
-SNC-L200(130*180)-E 4/21/06 1:17 PM Page 74
Page 39

Netcam(W)_SNC-L200(W)
77
Netcam(W)_SNC-L200(W)
76
Registering the Netcam(W)
You can register up to Netcam(W)16 units.
Double-click the “Network
Camera MultiViewer”
icon on the Background Screen.
Or Click [Start ] -[All Programs ] [Network Camera MultiViewer ] [Network Camera MultiViewer ]
to start.
Click the MultiViewer Set Button.
- The Registration Screen appears.
Click the New Button.
Enter information on the
Netcam(W).
- Check the ‘StartUp’ item, and
video is automatically connected
when the MultiViewer program
starts.
Click the OK Button.
- Registration is completed, and the
list of registered Netcam(W)is
displayed.
Select the Netcam(W)to be
deleted from the registration list.
Click the Delete Button.
Click the Yes Button.
Registering the Netcam(W)
Deleting the Registered Netcam(W)
Select the Netcam(W)to be
modified from the registration list.
Click the Modify Button.
Enter modified information.
Click the OK Button.
Modifying the Registered Netcam(W)
1
2
2
3
4
5
3
4
5
1
1
2
3
4
2
3
2
3
2
4
-SNC-L200(130*180)-E 4/21/06 1:17 PM Page 76
Page 40

Netcam(W)_SNC-L200(W)
79
Netcam(W)_SNC-L200(W)
78
Connecting the Netcam(W)
You must first connect the registered Netcam(W)to view video from
the MultiViewer.
Double-click the Network Camera MultiViewer icon on the Background
Screen.
Or Click [ Start ]-[ All Programs ]-[ Network Camera MultiViewer ][ Network Camera MultiViewer ] to start.
Select the Netcam(W)to be connected from the Netcam(W)list.
If you want to connect another Netcam(W), repeat the step 2 and 3.
- Videos of the connected Netcam(W)s are shown in sequence.
Click the video you want from the
MultiViewer Screen.
Click the Disconnect Button.
Click the Yes Button when the
message screen appears.
- Video of the selected Netcam(W)is
disconnected,and the following
images are moved up.
Disconnecting the Netcam(W)
2
3
1
2
3
4
1
2
3
1
2
3
-SNC-L200(130*180)-E 4/21/06 1:17 PM Page 78
Page 41

Netcam(W)_SNC-L200(W)
81
Netcam(W)_SNC-L200(W)
80
Using the MultiViewer
You can use multi units of Netcam(W)connected through the
MultiViewer for monitoring, recording, capturing and playback.
23
22
1
2
3
4
5
6
7
8
9
20 19 18 17 13 12 11 1015 141621
MultiViewer Mode Tab: Monitor videos from multi units of the Netcam(W).
Multi Playback Mode Tab: Play back recorded and captured images.
Date Indicator: Indicates the day/month/year/time of the current monitoring.
Netcam(W)List &Connect Button: Display the IP addresses or the domain name list of the
Netcam(W)registered in the “Setup” Select the address to be connected from the list, and click the
Connect Button to view the video of the Netcam(W). Repeat the above process to connect multi units
of the Netcam(W).
Company Logo: Display the company logo.
Preset Number: You can choose a Preset Setting Number between 1 to 8.
Preset Operation Button: Move when the lens relocates to the Preset direction.
Preset Delete Button: Delete the stored Preset settings.
Preset Store Button: Store the Preset settings
1/4/9/16Channel Button: One channel is display in the original size or MultiViewer size, and the rest
4/9/16 channels are displayed on the divided screen.
Full Screen Button: Display video in the monitor screen size.
MultiViewer Set Button: Set the registration, record and capture of the Netcam(W).
SNC Installer Button: Execute the SNC Installer program.
Sequence View Button: Display the video of the connected Netcam(W)in sequence.
Previous/Next Page Button: Move to the previous or next channel video page to view the video.
Flash Button: Turn on flash (turned on for 5 seconds and off for 30 seconds).
PIR Button: Enable or disenable Passive Infrared (PIR)functions.
Lens Direction Button (Pan &Tilt): Move the lens freely with 9 icons.
Motion Button: Split the one-channel video into 16, and monitor and record motion(s).
Record Button: Record Video.
Capture Button: Capture selected images in JPEG files.
Screen Display Button: Display or cancel information on the Netcam(W)server on the screen.
Print Button: Print images.
Disconnect Button: Disconnect the Netcam(W).
Connection Status Button: The icon of the connected Netcam(W)is turned on and displayed.
1
2
3
4
5
6
7
8
9
10
11
12
13
14
15
16
17
18
19
20
21
22
23
MultiViewer Screen
-SNC-L200(130*180)-E 4/21/06 1:17 PM Page 80
Page 42

Netcam(W)_SNC-L200(W)
83
Netcam(W)_SNC-L200(W)
82
Using the MultiViewer
View Multi Channel
Click the 1-Channel Button.
- Video is displayed in original size on a single screen.
- Press the One Channel Button again to display the entire size
of the MultiViewer.
View 1 Channel
Click the 4-Channel Button.
- Four screens including the presently selected channel are displayed at the
same time.
- 1~4 channels/5~8 channels /9~12 channels /13~16 channels are displayed on
a single page, respectively
- Click the Button to move to the previous page.
- Click the Button to move to the next page.
View 4 Channels
Click the 9-Channel Button.
- Nine screens including the presently selected channel are displayed at the
same time.
- 1~9 channels/10~16 channels are displayed on a single page,respectively.
- Click the Button to move to the previous page.
- Click the Button to move to the next page.
View 9 Channels
Click the 16-Channel Button.
- The entire 16 channels are displayed.
View 16Channels
Click the Full Screen Button.
- Video is displayed in the monitor size regardless of original video size.
- Only the screen is displayed without the MultiViewer frame or buttons.
- Press the “Esc” Button on the keyboard to exit the Full Screen Mode.
View Full Screen
-SNC-L200(130*180)-E 4/21/06 1:17 PM Page 82
Page 43

Netcam(W)_SNC-L200(W)
85
Netcam(W)_SNC-L200(W)
84
Using the MultiViewer
Recording Video
You can record video from each channel by using the MultiViewer.
Select video you want to record on the MultiViewer Screen.
Click the Record Button( ).
- The REC-F is displayed on the screen,and recording begins.
Repeat the step 1 and 2 to record another video..
- Record video for 10 minutes,creating a recorded file for each Netcam(W).
Press the Record Button( ).
- Stop recording.
- Recorded files are stored in the C: WProgram FilesWNetwork Camera
MultiviewerWVideo Files.
Stop Record
Record video for up to 10 minutes for each Netcam(W).
Tips
Recording is stopped when the free space on the HDD is less
than 5GB. Check the free space on the HDD if it’s sufficient to
record video continuously.
Note
Sequence View
Video of the connected Netcam(W)is displayed in sequence
automatically. Click the Sequence View Button.
- 1 Channel:Video is displayed by one channel in sequence.
- 4 Channels:Four screens are displayed at the same time,and switched
up to four pages in sequence.
- 9 Channels:Nine screens are displayed at the same time,and switched
up to two pages in sequence.
- 16 Channels:No sequence view is enabled.
To clear the Sequence View,click one of the 1/4/9/16 Channel Buttons.
Channels are displayed in the Setup-Sequence time interval,and one by one in sequence.
Sequence View can be set in 5 to 30-second interval in
MultiViewer Mode.
Tips
1
2
3
-SNC-L200(130*180)-E 4/21/06 1:17 PM Page 84
Page 44

Netcam(W)_SNC-L200(W)
87
Netcam(W)_SNC-L200(W)
86
Using the MultiViewer
Recording Motion
Click the video you want to
motion-record on the MultiViewer
Screen.
Click the Motion Button( ).
-
The Motion Record Screen
appears.
Click the Motion area in the
16-split screen.
- The motion area is displayed in
green color.
- Click the button again to clear the
motion area.
Enter the Sensitivity Value.
- Enter a value between 1 and
10.The level of sensitivity
increases close to 10.
Click the Pretest Button.
- The Sensitivity Setting Value is
temporarily stored.
- When a motion is detected, the
motion area turns red, and
blinks.Testing starts.
Set the motion area in the 16-split video, and automatically record video when a
motion is detected in the set area. This function is applied to only one channel.
The motion area turns red, and blinks. Recording starts automatically.
- The REC-F is displayed on the screen, and video is recorded for up to 10 minutes.
When a motion is detected in the motion area
Set the most appropriate value by
repeating the step 3 to 5.
Click the “Enable Motion Detection” to
display the motion detection.
- The motion detection is selected.
- To clear the motion detection, click the
button again and clear the display.
Click the OK Button.
- Settings are completed.
The Motion Detection detects and records a motion, while the PIR
detects infrared.
Tips
1
3
5
4
2
3
4
5
6
7
7 8
8
-SNC-L200(130*180)-E 4/21/06 1:17 PM Page 86
Page 45

Netcam(W)_SNC-L200(W)
89
Netcam(W)_SNC-L200(W)
88
Using the MultiViewer
Printing Video
Click the video you want on the
MultiViewer Screen.
Click the Capture Button( ).
- The print screen appears.
Click the Memo Button.
- Enter information on print, and click the
OK Button.
Click the Setup Button.
- Click the OK Button after setting the
printer. Printing starts
You can capture the images you want in JPEG file anytime during monitoring.
Capturing Video
Click the video you want on the MultiViewer Screen.
Click the Capture Button( ).
- Video is captured as a JPEG file.
- Captured files are stored in the C:WProgram FilesWNetwork Camera
MultiviewerWVideo Files folder.
You can capture the images you want as JPEG files anytime during monitoring.
Screen Display
Click the Screen Display Button( ).
- To clear the screen display, click the Screen Display Button again.
You can display Information on the Netcam(W)on the MultiViewer Screen.
Running the SNC Installer
Click the SNC Installer Button( ).
- The SNC Installer is executed, and the Netcam(W)Search Screen appears.
- Refer to Page 42 to open the Smart Viewer.
You can open the Smart Viewer by running the SNC Installer during the
MultiViewer.
1
1
3
4
2
3
4
2
-SNC-L200(130*180)-E 4/21/06 1:17 PM Page 88
Page 46

Netcam(W)_SNC-L200(W)
91
Netcam(W)_SNC-L200(W)
90
Playing Back the MultiViewer
MultiViewer Playback Screen
1
2
3
4
Small Screen View Button: Play back images in 160X120 resolution.
Normal Screen View Button: Play back images in 320X240 resolution.
Large Screen View Button: Play back images in 640X480 resolution.
Viewer Screen View Button: Play back images in MultiViewer Screen size.
Full Screen View Button: Play back images in full monitor screen. Press the Esc
Button to cancel the Full Screen View.
Open File Button: Open files to be played back.
Snapshot Button: Capture playback images.
Print Button: Print images.
Event Log Button: Check all the information and status on the MultiViewer.
Reverse Playback Button: Reverse-play back video.
Pause Button: Stop playback for seconds.
Playback Button: Play back video.
Stop Button: Stop playback.
Search Button: Fast-search forward or backward.
Previous Image Button: View the previous/next images cut by cut in
Pause mode.
Previous File Button: Move to the previous/next file.
Scroll Bar: Move the playback position by moving the scroll bar with a
mouse.
You can move to the image you want in Stop/Pause Mode.
1
2
3
4
-SNC-L200(130*180)-E 4/21/06 1:17 PM Page 90
Page 47

Netcam(W)_SNC-L200(W)
93
Netcam(W)_SNC-L200(W)
92
Playing Back the MultiViewer
Event Log Information
Click the Event Log Button
( ) in the MultiViewer
Playback screen.
- The Log Screen appears.
Click the Open Log File
Button.
- Log files appear based on
date.
Select the log file you want,
and click the Open Button.
- Information is displayed on the
log screen.
You can check events (Alarm, Motion, Disconnect, Reconnect etc.)based on
the date and motion status of the Netcam(W)connected to the MultiViewer.
Alarm and Motion events are attached with recorded files.
You can check the recorded video. Play back the files by double clicking on
the name of the file.
Record File Playback
Click the Multi
Playback Mode icon on the
MultiViewer Screen.
- The Multi Playback screen
appears.
Click the Open Button.
- The Open screen appears.
Open the file to be played
back, and click the Open
Button.
- Playback begins.
You can check event log information in the MultiViewer, as well as play back,
capture and print recorded files.
Click the Stop Button
.
Stop Playback
Files with the extension name of .fjp are moving images, and files
with .jpg are capture files.
Note
1
2
3
1
2
2
3
3
-SNC-L200(130*180)-E 4/21/06 1:17 PM Page 92
Page 48

Netcam(W)_SNC-L200(W)
95
Netcam(W)_SNC-L200(W)
94
Setting the MultiViewer
Click the MultiViewer Set
Button on the MultiViewer
Screen.
- The Setup Screen appears.
Click the Viewer Setup Tab.
- The MultiViewer Set Screen
appears.
Click the Close Button when
the settings are completed.
Time: Display the data and time of creating the log file.
Target: Display information on the Netcam(W)server.
IP Address: Display the Netcam(W)IP address.
Mac address: Display the Netcam(W)Mac address.
(Displayed on the label on the top of the main body)
Event Mode: Display log information based on status.
Reconnected, Motion and Forced Alarm and Disconnected
File Folder: Display the location where the recorded file is stored.
Event Log Screen
1 2 3 4 5 6
Setting the Viewer Environment
1
2
3
4
5
6
1
1
2
3
2
3
-SNC-L200(130*180)-E 4/21/06 1:17 PM Page 94
Page 49

Netcam(W)_SNC-L200(W)
97
Netcam(W)_SNC-L200(W)
96
Setting the MultiViewer
Setting the Scheduled Recording
Select the Netcam((W)to
scheduled-record from the
“Schedule” of the “Image
Recording.”
Click the Browser Button.
- The Scheduled Recording Screen
appears.
Select the day of the week you
want.
- When you click the “Select All
”Button, the Netcam(W)is
recorded everyday.
Select the time you want.
- Check on the “Use Time Range,”
and set the time.
Click the “Browser” Button of
the Logo Image File.
Select the company logo file
to be used, and click the
Open Button.
- The company logo on the
MultiViewer Screen changes.
You can record the Netcam(W)on the specific day and at the specific
time you want.
Selecting Logo
You can change the company logo on the right side of the MultiViewer Screen.
- If you set the day of the week only, the Netcam(W)records for
24 hours on that day.
- If you set the time only, the Netcam(W)records at the time
everyday.
Tips
Only .bmp company logo files can be used.
Tips
1
1
2
1
2
3
4
2
3
4
-SNC-L200(130*180)-E 4/21/06 1:17 PM Page 96
Page 50

98
Video WEBcom_SNC-L200
Product Specifications
Communication mode IEEE 802.11b
Frequency Range
2,412MHz ~ 2,462MHz(USA) / 2,412MHz ~ 2,472MHz(EU)
Channel 1 ~ 11(USA) / 1 ~ 13(EU)
Security WEP (HEX/ASCII, 64/128bit)
Modulation Type PLL
System BPSK, QPSK, CCK
Oscillator Form G1D
Image Compression JPEG
Server
Video Compression MJPEG
Video Resolution 640x480 / 320x240 / 160x120
Frame Rate
320x240: Max. 30Fps
640x480: Max. 15Fps
Upgrade Ethernet connection
Remote Pan Angle Maximum Left/Right 50°
Remote Tilt Angle 40° ~ + 10°
Maximum Pan/Tilt Speed
50°/sec
Camera
Image Sensor 1/4° 320,000Pixel CMOS
Focus Fixed 1m - infinity
Flash LED
Range: 3m, Lux Value(1m): 8.0lux
PIR Sensor
Range: 3m, Left/Right 40°, Up/Down 85°
Network Connection Ethernet 10/100Base-T
Interface
Network Service
Static IP, Cable Modem, ADSL, DHCP, Wireless Router
Network Protocol
TCP/IP, UDP, DHCP,
ARP, HTTP, Telnet, PPPoE, SMTP, FTP
Power
Power Adapter: 8.4V DC, 1A
Power Consumption: 5W (8.4V DC, 500mA)
Operating Temperature -10°C ~ 50°C (Ω room temperature)
Dimensions (WxHxD) 105 x 75 x 48mm
Weight 400g
- The video signal transmission rate may be deteriorated due to crowded network traffic
or poor PC performance.
- As the PIR sensor detects the temperature change based on the infrared
rays naturally emitted from a human being or an animal, such factors as the internal
temperature, surroundings and neighboring heating/air-conditioning system may adversely
affect its performance, resulting in an error or narrowed detection range.
- The effective radio transmission distance is about 100-150 feet indoors.
The distance can be reduced in a place with a wall compartment or obstacle in the way.
WirelessNetcam(W)
-SNC-L200(130*180)-E 4/21/06 1:17 PM Page 98
 Loading...