

Samsung SNC-L200N User Manual

Netcam
SNC-L200
User Manual
NETWORK CAMERA
SNC-L200
AB68-00524B
❈ Read the “Safety Cautions” before using the product.
CAUTION
RISK OF ELECTRIC
SHOCK DO NOT OPEN
CAUTION :
TO REDUCE THE RISK OF ELECTRIC
SHOCK, DO NOT REMOVE COVER (OR
BACK). NO USER SERVICEABLE PARTS
INSIDE. REFER SERVICING TO QUALIFIED
SERVICE PERSONNEL.
This symbol indicates high voltage is
presentinside. It is dangerous to make
any kind ofcontact with any inside part
of this product.
This symbol alerts you that important
literatureconcerning operation and
maintenance has been included with
this product.
To prevent damage which may result in fire or
electric shock hazard, do not expose this appliance
to rain or moisture.
This device complies with part 15 of the FCC
Rules. Operation is subject to the following two
conditions.
1) This device may not cause harmful interference,
and
2) This device must accept any interference that
may causeundesired operation.
CAUTION
Danger of explosion if battery is incorrectly
replaced.
Replace only with the same or equivalent type
recommended by the manufacturer.
Dispose of used batteries according to the
manufacturer’s instructions.
Important Safety Instructions
1. Read these instructions.
2. Keep these instructions.
3. Heed all warnings.
4. Follow all instructions.
5. Do not use this apparatus near water.
6. Clean only with dry cloth.
7. Do not block any ventilation openings.
Install in accordance with the manufacturer’s
instructions.
8. Do not install near any heat sources such as
radiators, heat registers, or other apparatus
(including amplifiers) that produce heat.
9. Do not defeat the safety purpose of the
polarized or grounding-type plus.
A polarized plug has two blades with one wider
than the other. A grounding type plug has two
blades and a third grounding prong. The wide
blade or the third prong are provided for your
safety. If the provided plug does not fit into
your outlet, consult an electrician for
replacement of the obsolete outlet.
10. Protect the power cord from being walked on or
pinched particularly at plugs, convenience
receptacles, and the point where they exit from
the apparatus.
11. Only use attachments/accessories specified by
the manufacturer.
12. Use only with cart, stand, tripod, bracket, or
table specified by the manufacturer, or sold with
the apparatus. When a used, caution when
moving the cart/apparatus combination to avoid
injury from tip-over.
13. Unplug this apparatus. When a cart is used, use
caution when moving the cart/apparatus
combination to avoid injury from tip-over.
14. Refer all servicing to qualified service
personnel. Servicing is required when the
apparatus has been damaged in any way, such as
power-supply cord or plug is damaged, liquid
has been spilled or objects have fallen into the
apparatus, the apparatus has been exposed to
rain or moisture, does not operate normally, or
has been dropped.
Table of Contents
1. Product Overview .............................................................................................................................................4
1.1 System Requirements ................................................................................................................................5
1.2 Content Checklist ........................................................................................................................................7
1.3 Product and Accessory Checklist ..............................................................................................................8
2. Connecting .........................................................................................................................................................10
2.1 Connecting ..................................................................................................................................................10
2.2 Installing .......................................................................................................................................................10
2.2.1. To install on a wall surface (concrete and solid wall) ....................................................................11
2.2.2. To install as a tabletop type ............................................................................................................12
2.2.3. To install in other locations .............................................................................................................12
2.3 PRI Sensor and Flash Movement ..............................................................................................................12
3. Netcam Configuration ......................................................................................................................................14
3.1 Before Starting Netcam Configuration .......................................................................................................14
3.1.1 IP Router Configuration ...................................................................................................................14
3.1.2 SNC Installer Installation .................................................................................................................14
3.2 Netcam Configuration .................................................................................................................................16
3.3 Connecting to Netcam ................................................................................................................................20
3.3.1. Connecting from Internet ................................................................................................................20
3.3.2. Connecting from Local Network .....................................................................................................20
4. Using Smart Viewer ..........................................................................................................................................21
4.1 Connecting to Netcam ................................................................................................................................21
4.2 Installing ActiveX Control Program ............................................................................................................21
4.2.1 Windows 2000 Users .......................................................................................................................21
4.2.2 Windows XP SP 2 Users .................................................................................................................22
4.2.3 Local Network Environment not connected to Internet ..................................................................23
4.3 Using Smart Viewer ....................................................................................................................................24
4.3.1 Smart Viewer Function Buttons ......................................................................................................24
4.3.2 Simple Player Program Guide ........................................................................................................26
5. Smart Viewer Administration Menu................................................................................................................30
5.1 System Configuration Menu .......................................................................................................................31
5.1.1 System Information ..........................................................................................................................32
5.1.2 Admin. Password .............................................................................................................................32
5.1.3 Access Configuration .......................................................................................................................33
5.1.4 User Registration .............................................................................................................................33
5.1.5 Video .................................................................................................................................................35
5.1.6 Alarm Notification .............................................................................................................................35
5.2 Network Configuration ................................................................................................................................37
5.2.1 Network Configuration .....................................................................................................................38
5.2.2 PPPoE (ADSL) ................................................................................................................................39
5.2.3 Network Ports Configuration ...........................................................................................................39
5.2.4 View Network Status ........................................................................................................................40
5.2.5 Network Status Notification .............................................................................................................40
5.2.6 DDNS Configuration ........................................................................................................................41
5.3 Utilities .........................................................................................................................................................42
5.3.1 Save Configuration ..........................................................................................................................42
5.3.2 Reboot ..............................................................................................................................................43
5.3.3 Factory Default .................................................................................................................................43
5.3.4 System Update ................................................................................................................................43
6. Netcam MultiViewer ..........................................................................................................................................48
6.1 Key Features ...............................................................................................................................................48
6.2 Requirements ..............................................................................................................................................49
6.3 Installing MultiViewer ..................................................................................................................................50
6.4 Using MultiViewer .......................................................................................................................................52
6.5 Setup ...........................................................................................................................................................55
6.5.1 Registration ......................................................................................................................................55
6.5.2 Viewer Setup ....................................................................................................................................58
6.6 Print ..............................................................................................................................................................59
6.7 Motion ..........................................................................................................................................................61
6.8 Player (Playback) ........................................................................................................................................63
6.8.1. File Open .........................................................................................................................................64
6.8.2. Screen Size Switch .........................................................................................................................64
6.8.3. Various Playback and Search ........................................................................................................64
6.8.4. Snap Shot ........................................................................................................................................64
6.8.5. Print ..................................................................................................................................................65
6.8.6. Status Display .................................................................................................................................66
6.8.7. Log File.............................................................................................................................................66
Video Netcam | SNC-L200
2
Video Netcam | SNC-L200
3

1. Product Overview
Product Overview
About Netcam
SNC-L200 is a network camera that can be monitored from a remote PC through various
networks such as ADSL, Cable Modem. With a compact design, it fits perfectly into your
interior environment.
SNC-L200 videos can be remotely monitored through a Viewer exclusively from Samsung.
The camera Pan/Tilt control is also possible. And the Pre/Post Alarm videos can be saved to
the remote PC when motion is detected.
Key Functions
●
1/4" 3.2 Effective Megapixel CMOS
●
Presets up to 8 spots
●
Pan/Tilt Control
●
Image Monitoring with flash movements
●
Motion Detection
●
Corresponds to Various Communication Protocols
; TCP/IP, UDP, ARP, HTTP, SMTP, FTP, Telnet, DHCP, PPPoE
1.1 System Requirements
Peripheral Requirements
CPU Pentium 4 1GHz or higher
RAM Memory 256MB or higher
Video Memory 128MB or higher
Resolution 1024*768 or higher
OS Windows 2000/XP
Web Browser Internet Explorer 6.0 or higher
CPU Pentium 4 1.5GHz or higher
RAM Memory 256MB or higher
Video Memory 128MB or higher
Resolution 1024*768 or higher
OS Windows 2000/XP
Web Browser Internet Explorer 6.0 or higher
CPU Pentium 4 2.4GHz or higher
RAM Memory 512MB or higher
Video Memory 128MB or higher
Resolution 1024*768 or higher
OS Windows 2000/XP
Web Browser Internet Explorer 6.0 or higher
Single Channel
Viewer
Multi Channel Viewer
Minimum PC
Requirements
Recommended
PC
Requirement
Recommended
PC
Requirements
●
Privacy Protection Function (Privacy button)
Video Netcam | SNC-L200
4
Video Netcam | SNC-L200
5
Product Overview
CABLE
CORE-FERRITE
Product Overview
Netcam Specifications
Image Compression
Video Streaming Format
Server
Camera
Interface
Power
You may download the latest version of Netcam SNC-L200 User Manual from Samsung
Electronics home page at www.sec.co.kr. The Multi Channel View Guide is in the CD
shipped with Netcam.
* Depending on the network environment or PC function, decrease in image transfer speed
may occur.
* PIR Sensor detects temperature changes caused by the infrared ray that naturally emitted
from human or animal. Therefore, a detection error or narrowing down of detection range
may occur due to the effect caused by ambient temperature change and use of A/C or
heater.
Resolution
Frame Rate
Authentication
Upgrade
Remote Pan Angle
Remote Tilt Angle
Maximum Pan/Tilt Speed
Image Sensor
Focus
Flash LED
PIR Sensor
Network Connection
Network Service
Network Protocol
Power Adaptor
Power Consumption
Operating Temperature
Dimension(W*H*D)
Weight
JPEG
MJPEG
640*480 / 320*240 / 160*120
320*240 : Max. 30Fps
640*480 : Max. 15Fps
ID/Password
Ethernet connection
50° left/right max.
40° to +10°
50°/sec
1/4" 320,000 Pixel CMOS
Fixed 1m-infinity
Range : 3m, Lux Value(1m) : 8.0 lux
Range : 3m, Left/Right 30°, Up/Down 85°
Ethernet 10/100Base-T
Fixed IP, Cable Modem, ADSL, DHCP, IP Router
TCP/IP, UDP, DHCP, ARP, HTTP, Telnet, PPPoE,
SMTP, FTP
8.4V DC, 1A
5W (8.4V DC, 500mA)
0°C to +40°C Indoor Only
105mm*75mm*48mm
400g
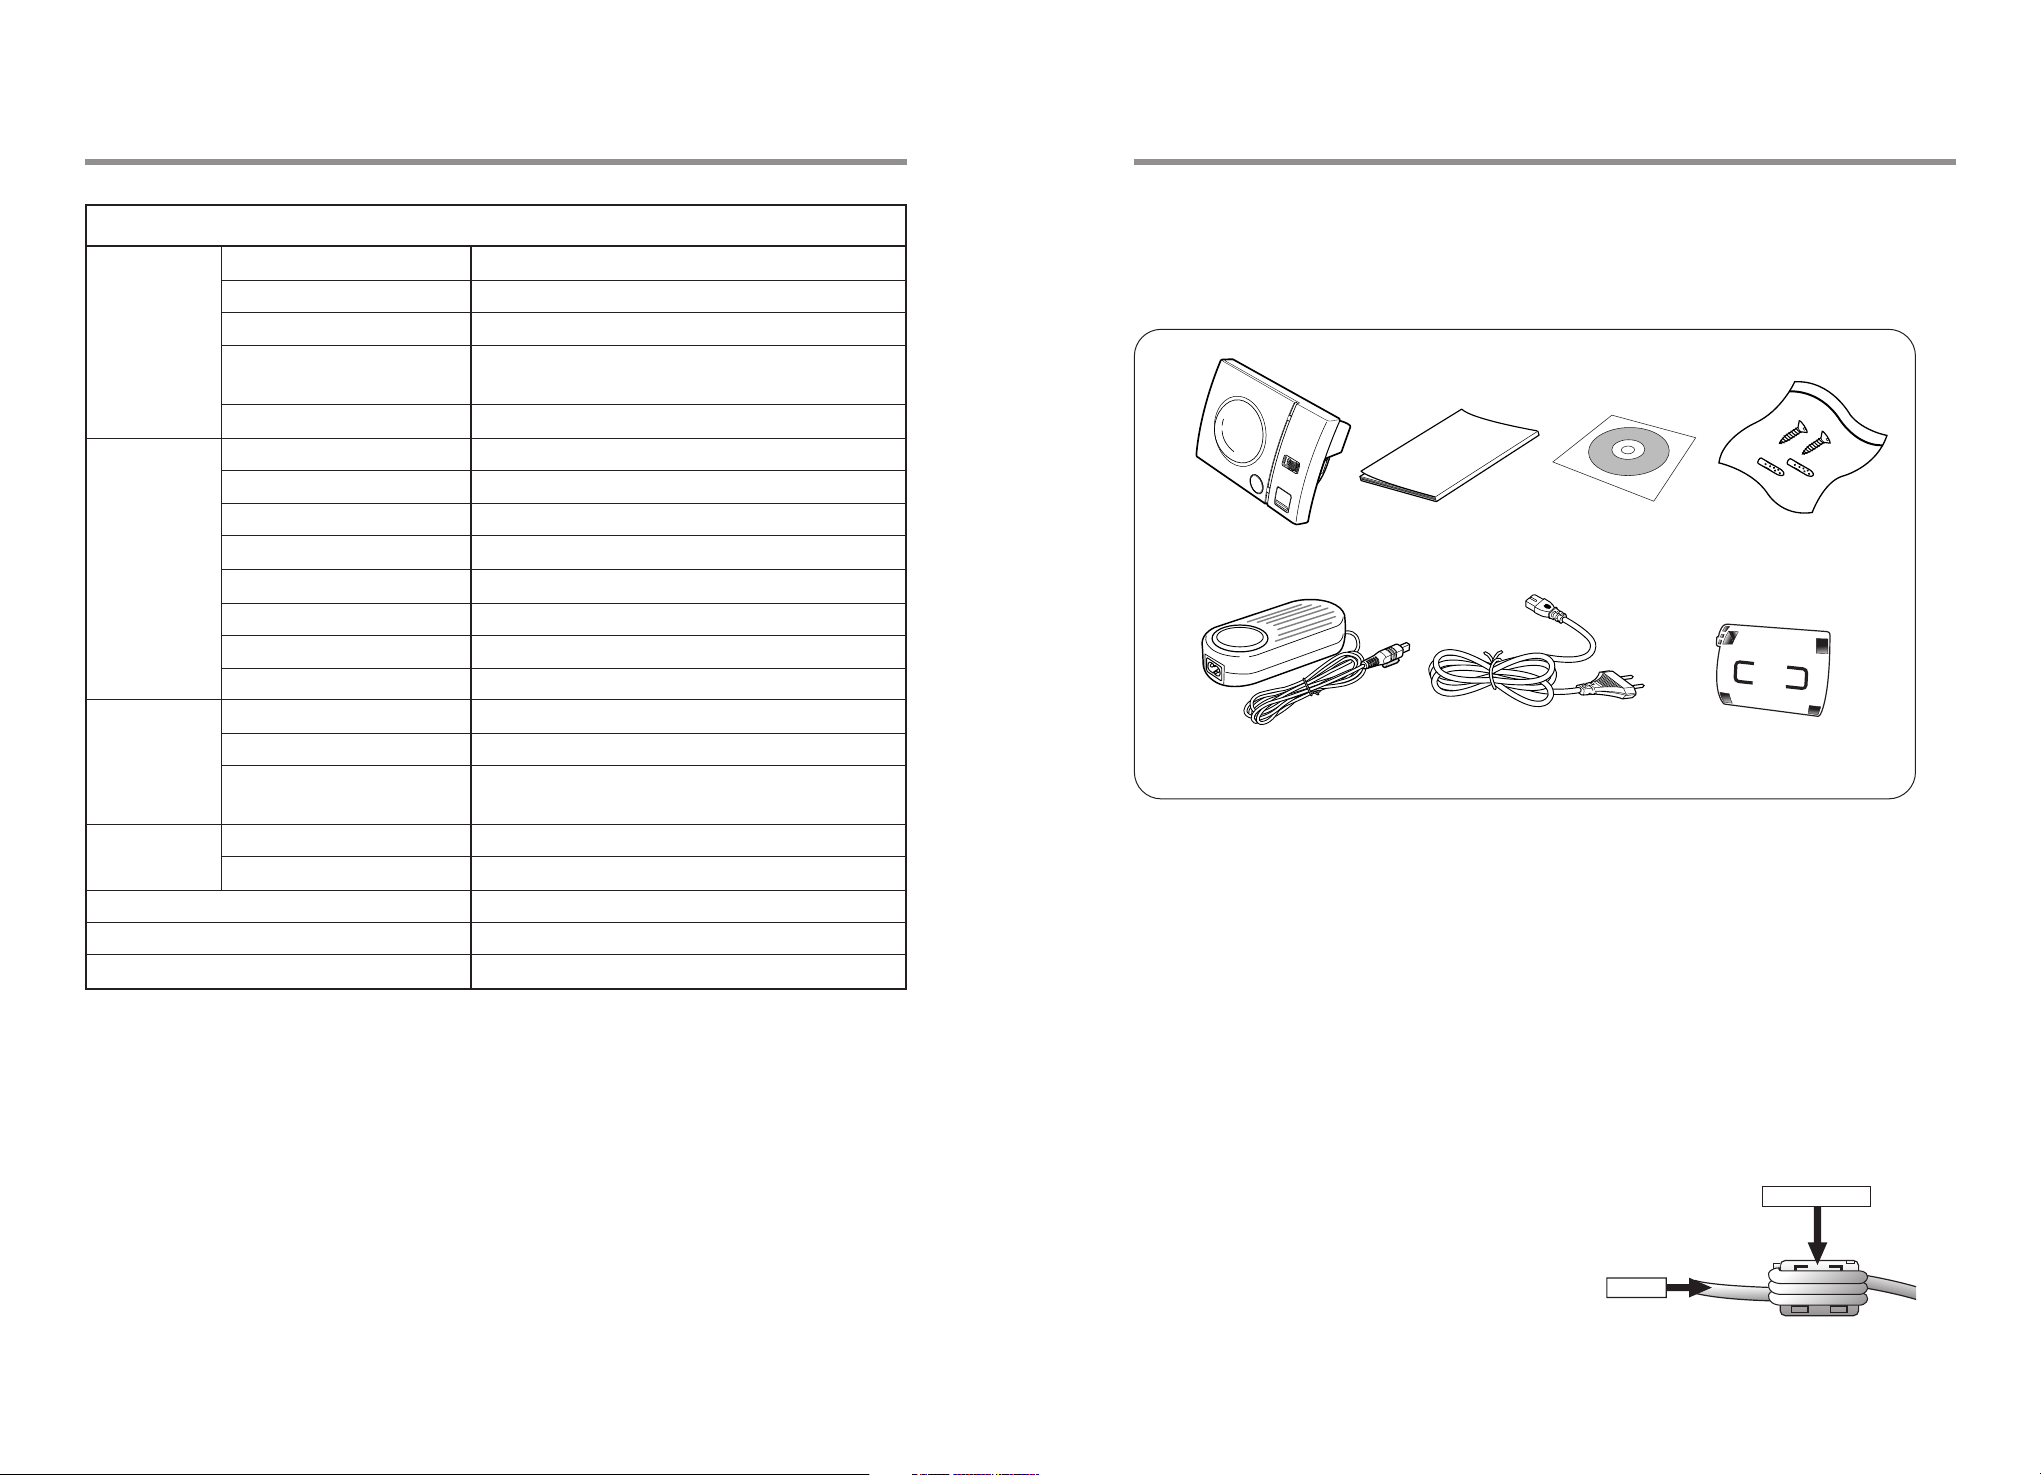
1.2 Content Checklist
Netcam and accessories are safely packed in the box. After purchasing the product,
make sure you have all the following contents.
!
%
!
Netcam : 1 EA
@
User Manual : 1 EA
#
CD : 1 EA
$
Accessory Pouch : 1 EA
■ Anchor-wall 16 x 3 : 2 EA
■ Screw KAL-Black : 2 EA
%
Power Adaptor : 1 EA
^
Power Cable : 1 EA
&
CORE-FERRITE : 1 EA
Check carefully and make sure there are no missing or damaged components.
If any component is missing or damaged, contact the retailer where you purchased the product.
* SNC-L200 can affect EMI(Electro-Magnetic Interface),
so it is recommended to coil the CORE-FERRITE for use.
It is recommended to wind the LAN cable three times before use.
(The CORE-FERRITE is contained in SNC-L200 box).
@
#
^
$
&
Video Netcam | SNC-L200
6
Video Netcam | SNC-L200
7
Product Overview
Product Overview
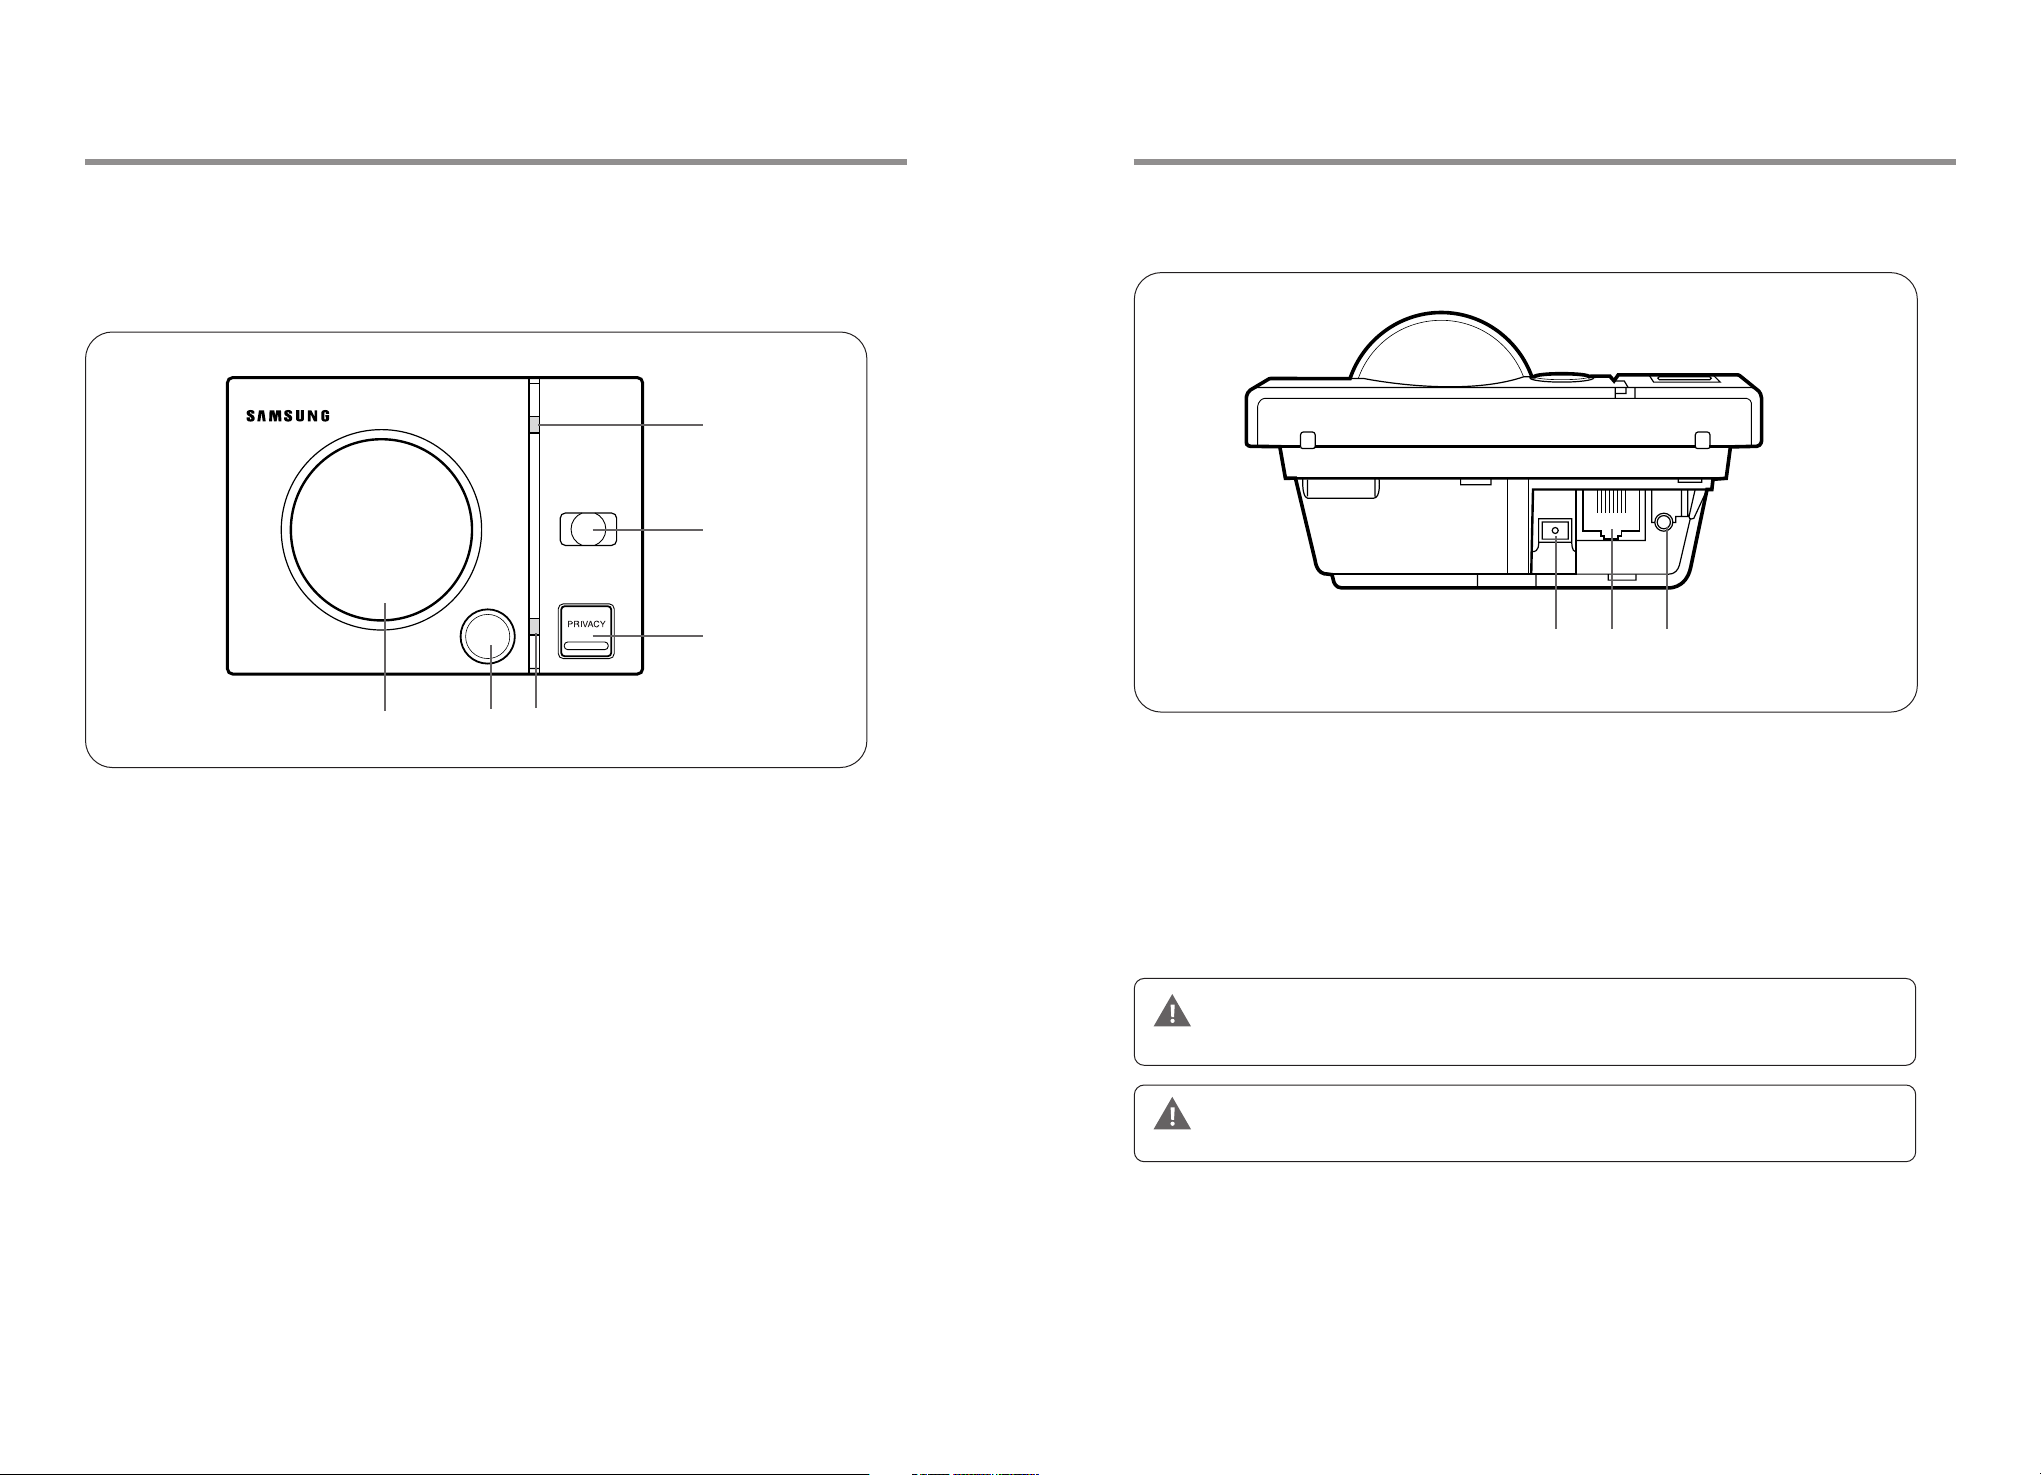
1.3 Product and Accessory Checklist
Front
#
$
%
^
!
! Camera Lens Displays images entered from camera lens through the Viewer.
Pan/Tilt control can be done through the Viewer.
@ PIR Sensor The built-in PIR sensor detects object movements and outputs signals.
# Network LED Indicates Network link status. LED lights up when a proper network
cable is connected to Netcam.
■
ON: Network link complete
■
Blinking : Receiving/Transmitting data
$ Flash
% Privacy Button for the Privacy protection.
Connected with PIR sensor.
It flashes for 5 seconds automatically when there is a movement.
Flash On/Off control can be done through the Viewer.
When the button is pressed first time, the lens moved to outside of the
operation range, so the screen is displayed in black. Press the button
again to cancel the video transfer from the Netcam. Pressing the button
yet again will return to initial status and the normal control will become
available.
@
Back
!@#
! DC Power Adaptor Please connect a DC 8.4V/1A.
@ LAN Please connect a network cable (LAN cable).
# PRESET Set the Netcam setup value to the factory default status.
Press for more than 3 seconds during a normal operation (about
1 minute after power is on), Netcam setup value will change to
the factory default settings. Due to rebooting, it will operate after
1 minute
The existing setup values, such as IP, Administrator log on information, and upgrade
information will be changed to the factory default status. Please reset all the
Caution
information to operate SNC-L200.
Please use authorized DC power adapters only. Using unauthorized devices may
damage the product.
Caution
^ Power LED Indicates Power supply status.
8
Video Netcam | SNC-L200
Video Netcam | SNC-L200
9
2. Connecting
Connecting
2.1 Connecting
➀
Push downward and remove the cover located at the back of Netcam.
➁
Connect one end of the Ethernet cable to the router.
➂
Connect the other end of the Ethernet cable to the back of Netcam.
➃
Connect the power adapter and power cable to the power outlet and then connect
them to the back of Netcam.
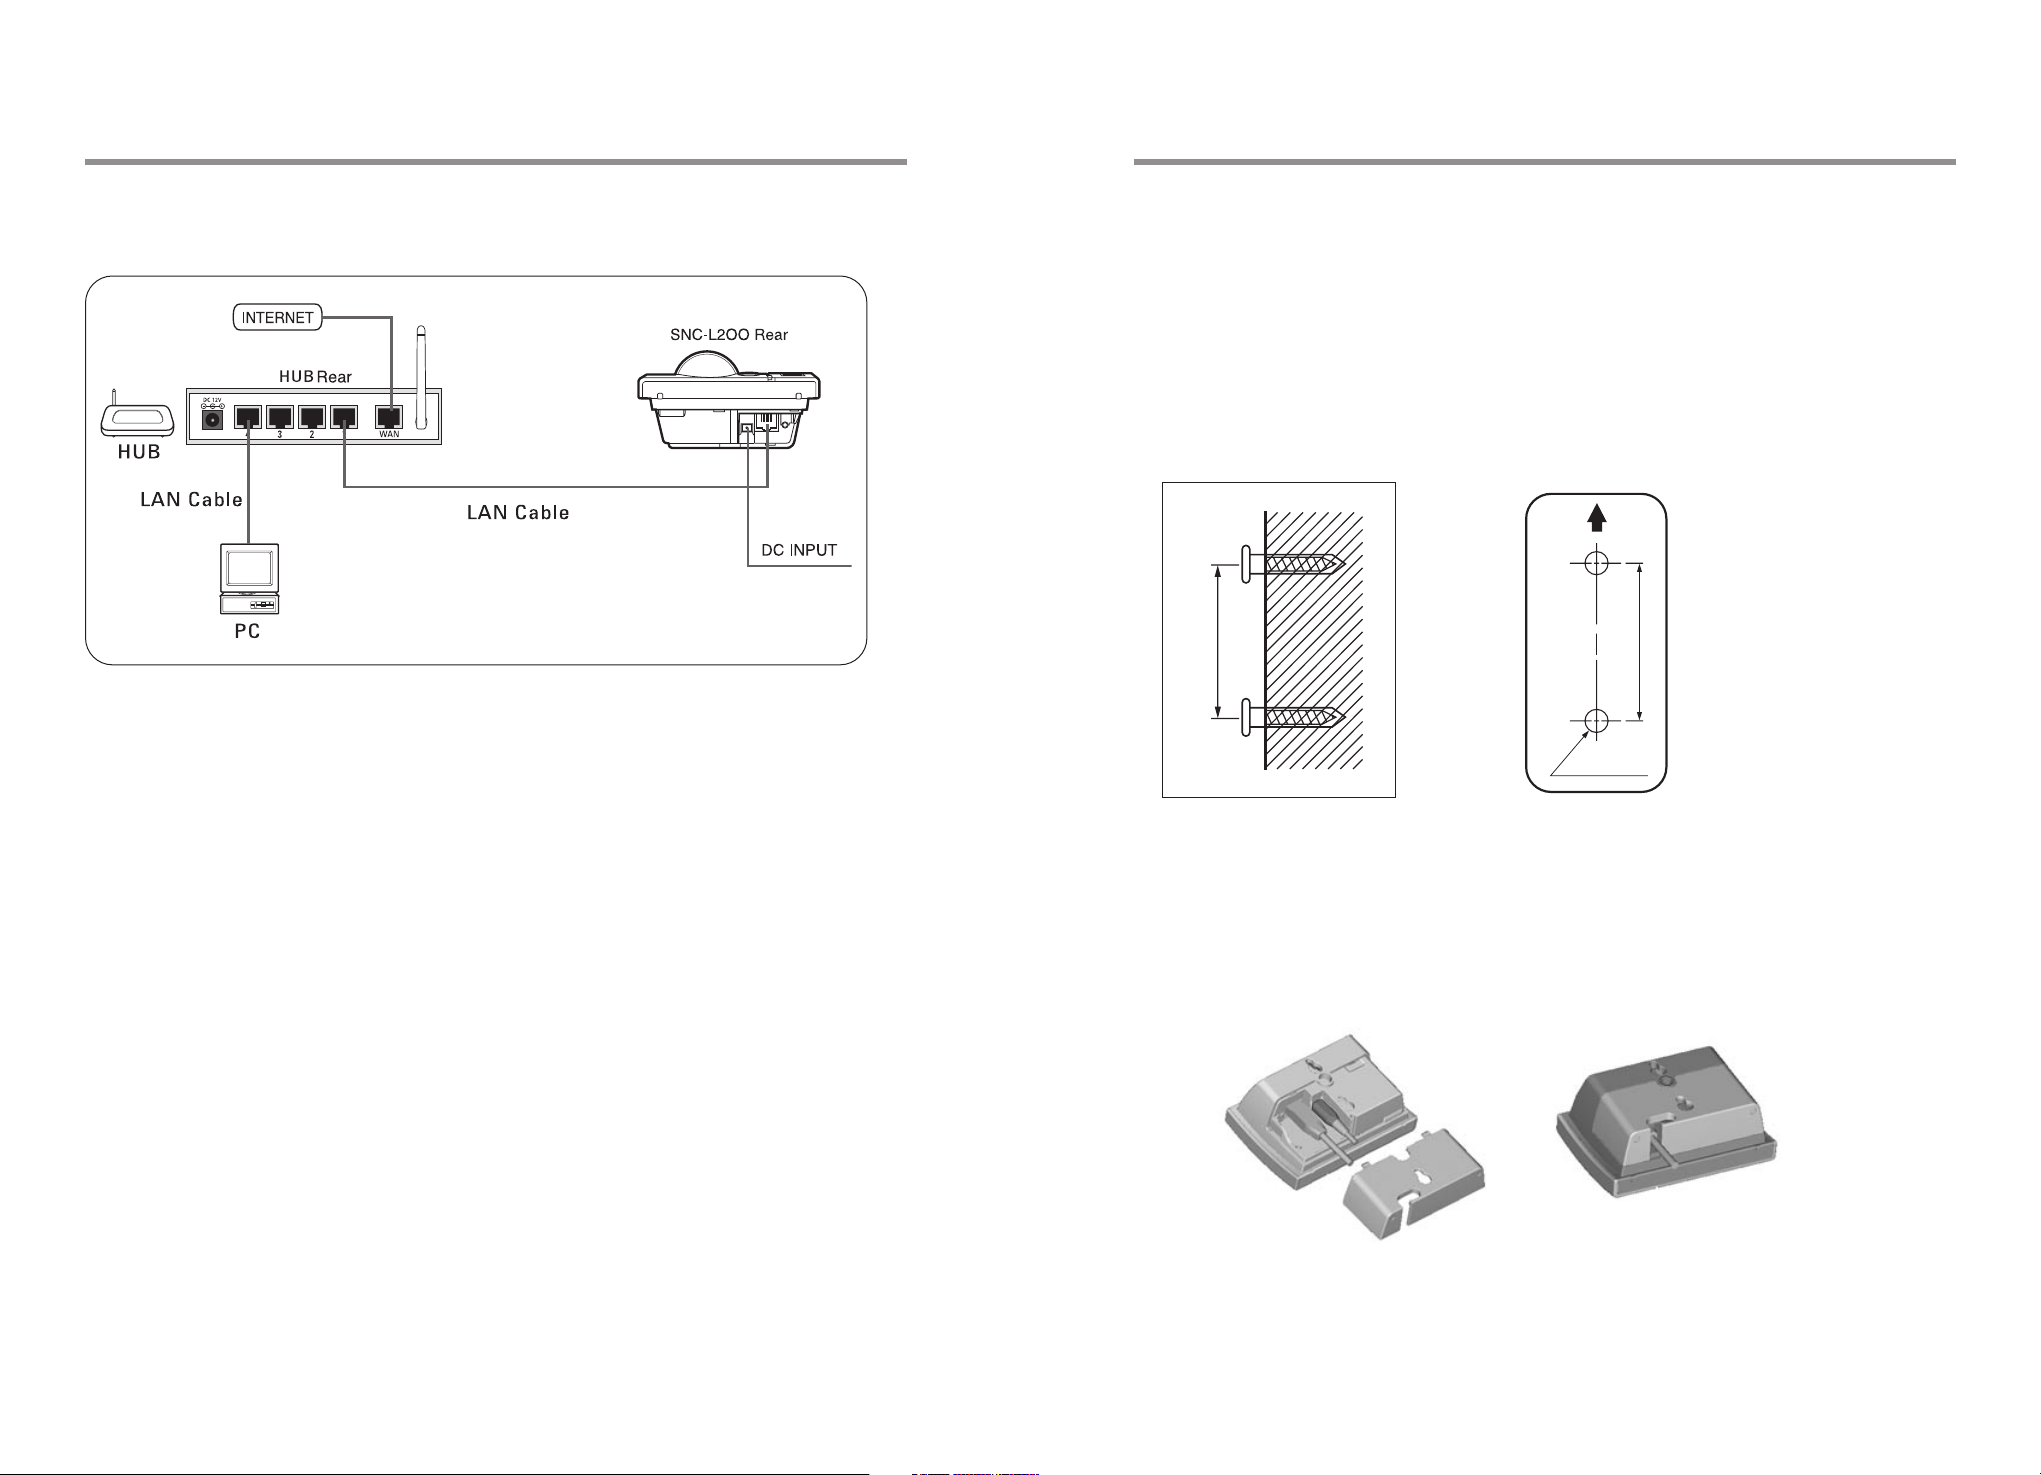
2.2.1. To install on a wall surface (concrete and solid wall)
1. Drill two holes (Diameter: 5 mm, Depth: 35 mm) on the installation location using an
electric driller. Vertical distance between the two holes should be 35 mm.
* It would be convenient for you to stick the enclosed label template on the
installation surface and use it.
2. Insert the enclosed two plastic anchors to the holes (one each) and tighten the
screws with a driver.
35mm
(for Plastic Anchor)
Depth 35mm Minimum
Ø5mm 2 Hole
34mm
➄
After the power is connected for 1 minute, make sure Netcam lens automatically
moves.
➅
Close the cover at the back of Netcam.
2.2 Installing
Install directly on the wall or on let it stand on a flat surface as a tabletop type.
You may install it where you want by using separate stands, such as wall mount.
(However, when using supplementary stands such as a wall mount to install, make sure the
stand can be secured to the nuts on the back of the SET.
*
Precautions while installing Netcam
- When installing on the wall, make sure the location can withstand more than the SET
weight (app. I kg).
- There is a falling hazard after the SET is installed on the wall. Make sure nobody comes
close to it.
- The SET is intended or indoor use. Install it in a place where it cannot be reached by
rain, water, or with less humidity.
- When installing using a fixed type stand and separate structures, make sure to secure
them so they do not become loose from the nuts on the back of the SET.
Video Netcam | SNC-L200
10
* To install on a regular wooden wall, refer to the figure above and tighten two screws
with a driver.
3. Remove the cover from the back of the SET. Plug in LAN-CABLE and POWER
CORD. Align the two to the groove of the cover, and then close the cover as shown
in the figure below.
4. Align two grooves at the back of the SET to the pre-installed screws on the wall
and hang the SET. Pull it slightly downward. The installation is complete.
11
Video Netcam | SNC-L200

ConnectingConnecting
2.2.2. To install as a tabletop type
1. Remove the cover from the back of the SET. Plug in LAN-CABLE and POWER
CORD. Align the two to the groove of the cover, and then close THE cover as
shown in the figure below.
2. Suspend the LAN-CABLE and POWER CORD to the groove of “A” portion. Let the
SET stand.
2.2.3. To install in other locations
Remove the cover from the back of the SET. Plug in LAN-CABLE and POWER
CORD. Align the two to the groove of the cover, and then close the cover. Follow the
other installation methods to secure the CABLE.
* When using after securing the SET on a separate stand, make sure the stand can
be secured to the nuts on the back of the SET.
Detection ranges of PIR SENSOR are as follows:
Horizontal range: Approximately 40 degrees
Vertical range: Approximately 85 degrees
Detection distance: 5m(Max)
(Horizontal detection angle range)
* When the movement is fast, the horizontal detection distance may vary.
* Please avoid installing the set in a place under the direct sunlight, a place expected
considerable temperature change such as near to heater / air conditioning unit, a place
produces high humidity / oil / smoke or stains such as in a cooking room, and a place
having obstructions such as mirrors / glass that might cause erroneous sensor operation.
(Vertical detection angle range)
2.3 PIR Sensor and Flash Movement
FLASH
PIR SENSOR
When installing the set, consider operation / detection range of the PIR Sensor.
When the PIR Sensor works the flash may function.
12
Video Netcam | SNC-L200
When PIR SENSOR moves, the illumination ranges of the FLASH LENS are as follows:
Horizontal range: Approximately 67 degrees
Vertical range: Approximately 67 degrees
Illumination distance: 5m(Max)
(Illumination range)
13
Video Netcam | SNC-L200
3. Netcam Configuration
Netcam Configuration
3.1 Before Starting Netcam Configuration
3.1.1 IP Router Configuration
IP router is needed if you want to use the Internet besides Netcam. You must
configure IP router once so that Netcam can operate properly.
Whether you have an existing IP router or purchased a new one, you must configure
Port Forwarding so that Netcam can operate properly.
Please refer to IP Router User’s Manual.
* IP Address and Port set in the IP router will be needed later when you configure
Netcam. Please do not forget them.
* If you remember the Subnet Mask, Gateway in the IP router connection status
confirmation page, it would be helpful later when you install Netcam.
* Port Forwarding
If you want to use Netcam via IP router, you need to allocate a unique port number
to Netcam.
Numbers from 1 through 65535 can be used as port numbers.
However, do not used the following port numbers.
FTP: 21
Telnet: 23
SMTP: 25
DNS: 53
POP3: 110
HTTPS: 443
ICQ: 4000
IRC: 6661~6667
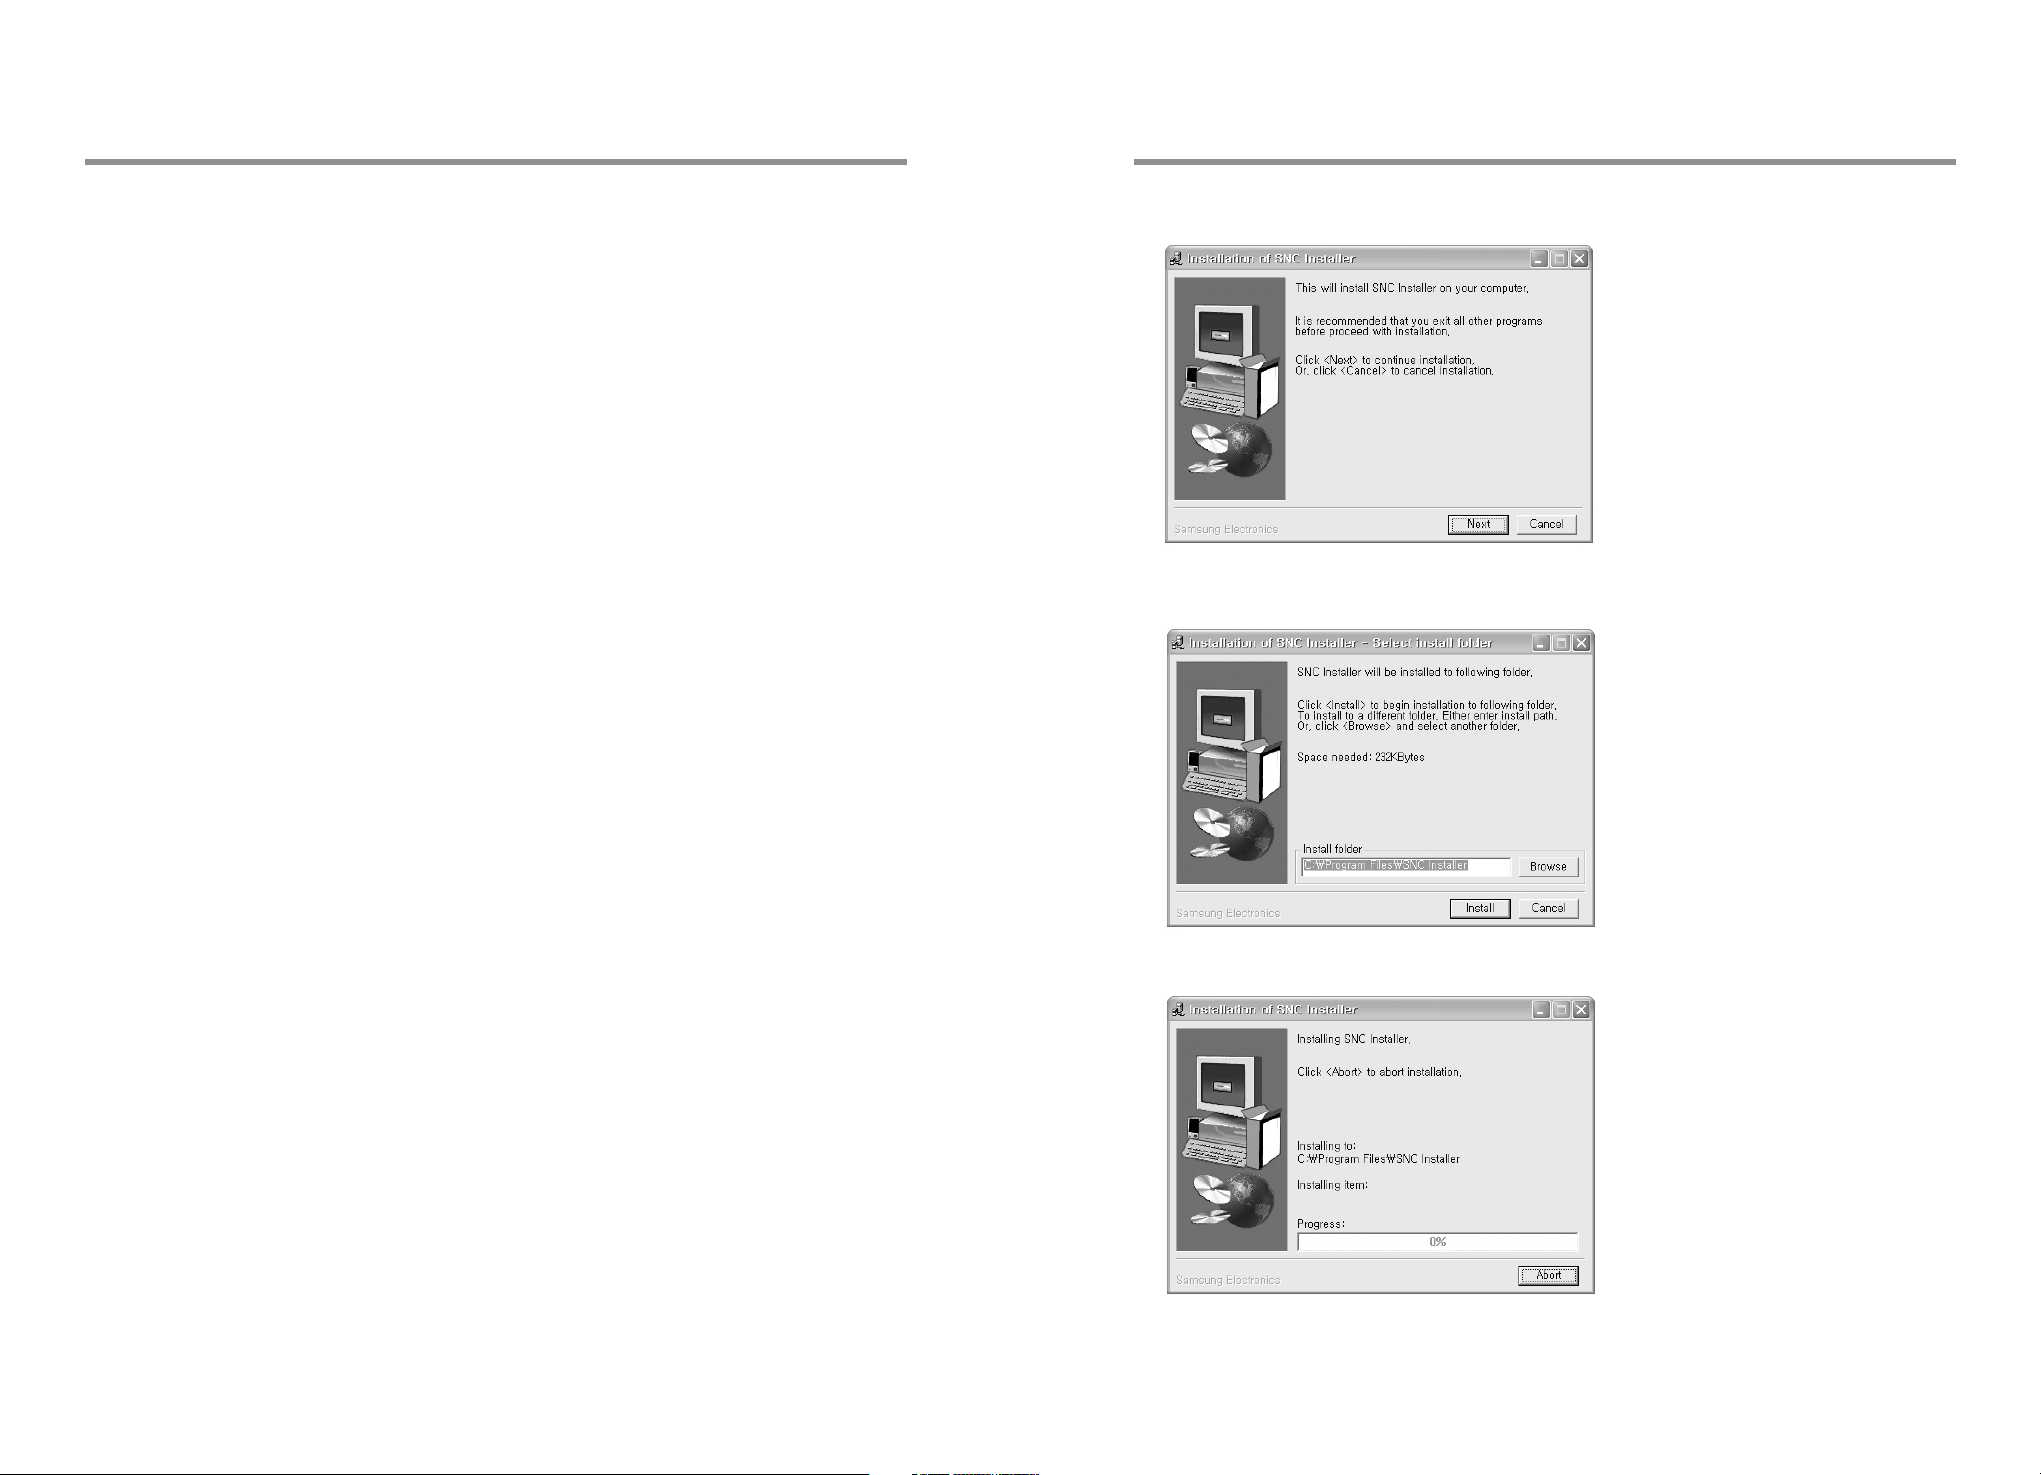
2. Double click and run “SNC Installer.exe” from the CD-ROM.
3. Click “Next.”
To prevent the conflict between the port and other programs from happening, it’s
better to set the port number greater than 10,000.
3.1.2 SNC Installer Installation
You need to install the SNC Installer program from the installation CD shipped with
the product.
SNC Installer searches Netcam on the local network, shows the unique MAC
Address, and configures Netcam.
1. Insert the provided CD to the CD-ROM drive.
14
Video Netcam | SNC-L200
4. Install starts.
15
Video Netcam | SNC-L200
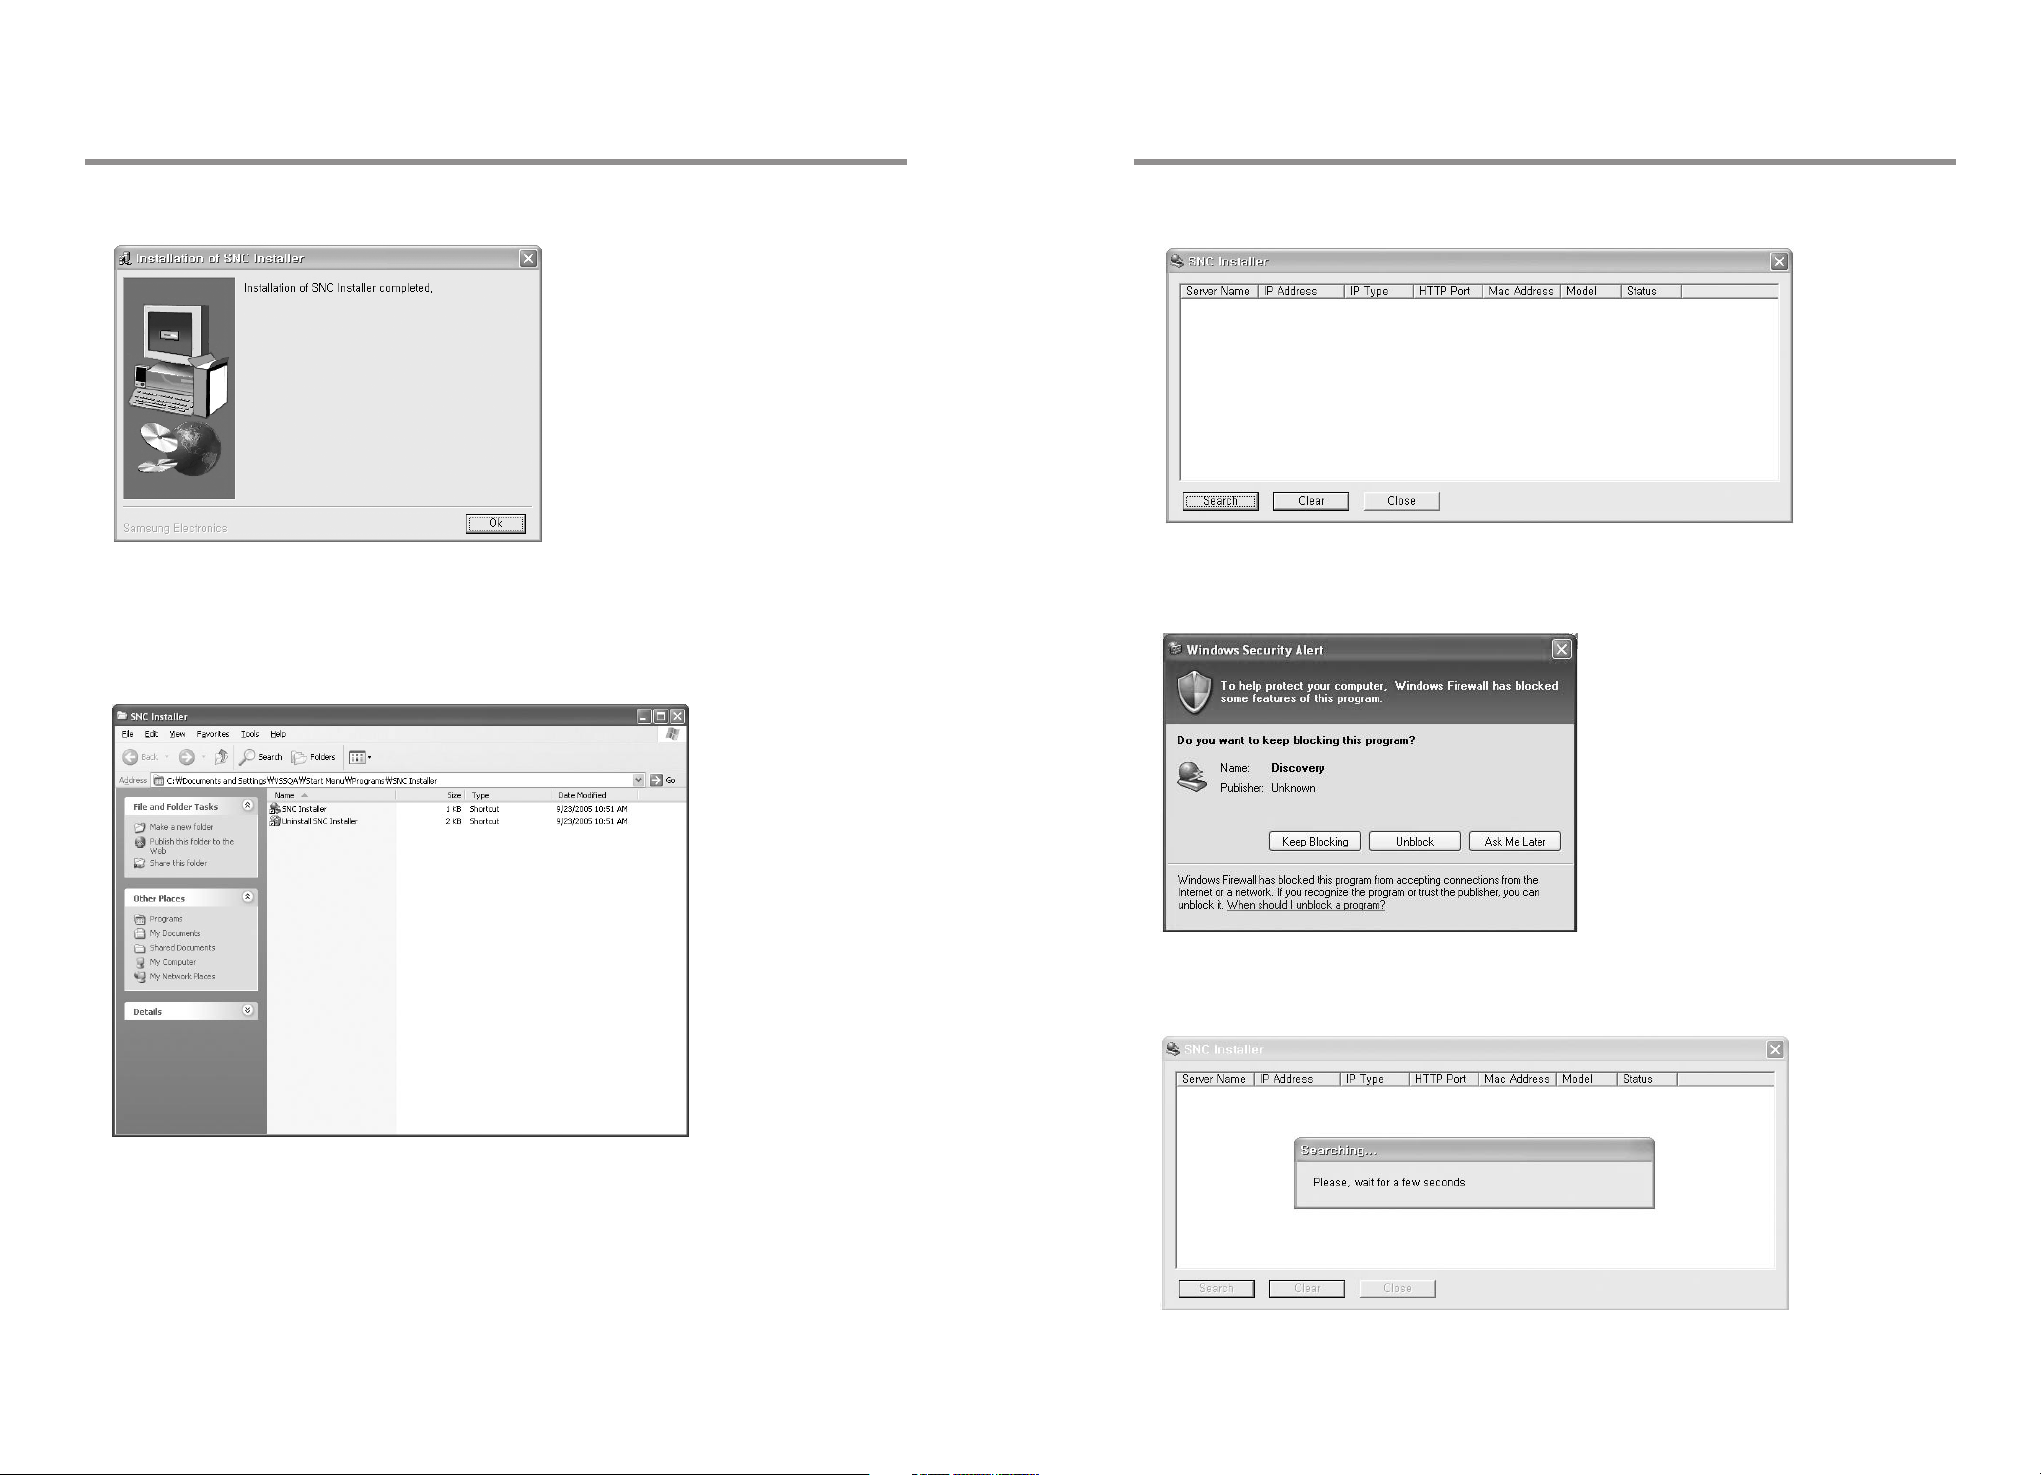
5. Click “OK” when installation is complete. 2. When you run SNC Installer, the following screen appears.
* When the following window appears, click “Cancel Interception” will allow you to use
3.2 Netcam Configuration
1. Double click and run SNC Installer.
it properly.
Netcam ConfigurationNetcam Configuration
Or click Start➔Programs➔ SNC➔Installer➔SNC Installer.
16
Video Netcam | SNC-L200
3. Click “Search.”
The following screen appears for several seconds.
17
Video Netcam | SNC-L200
Netcam ConfigurationNetcam Configuration
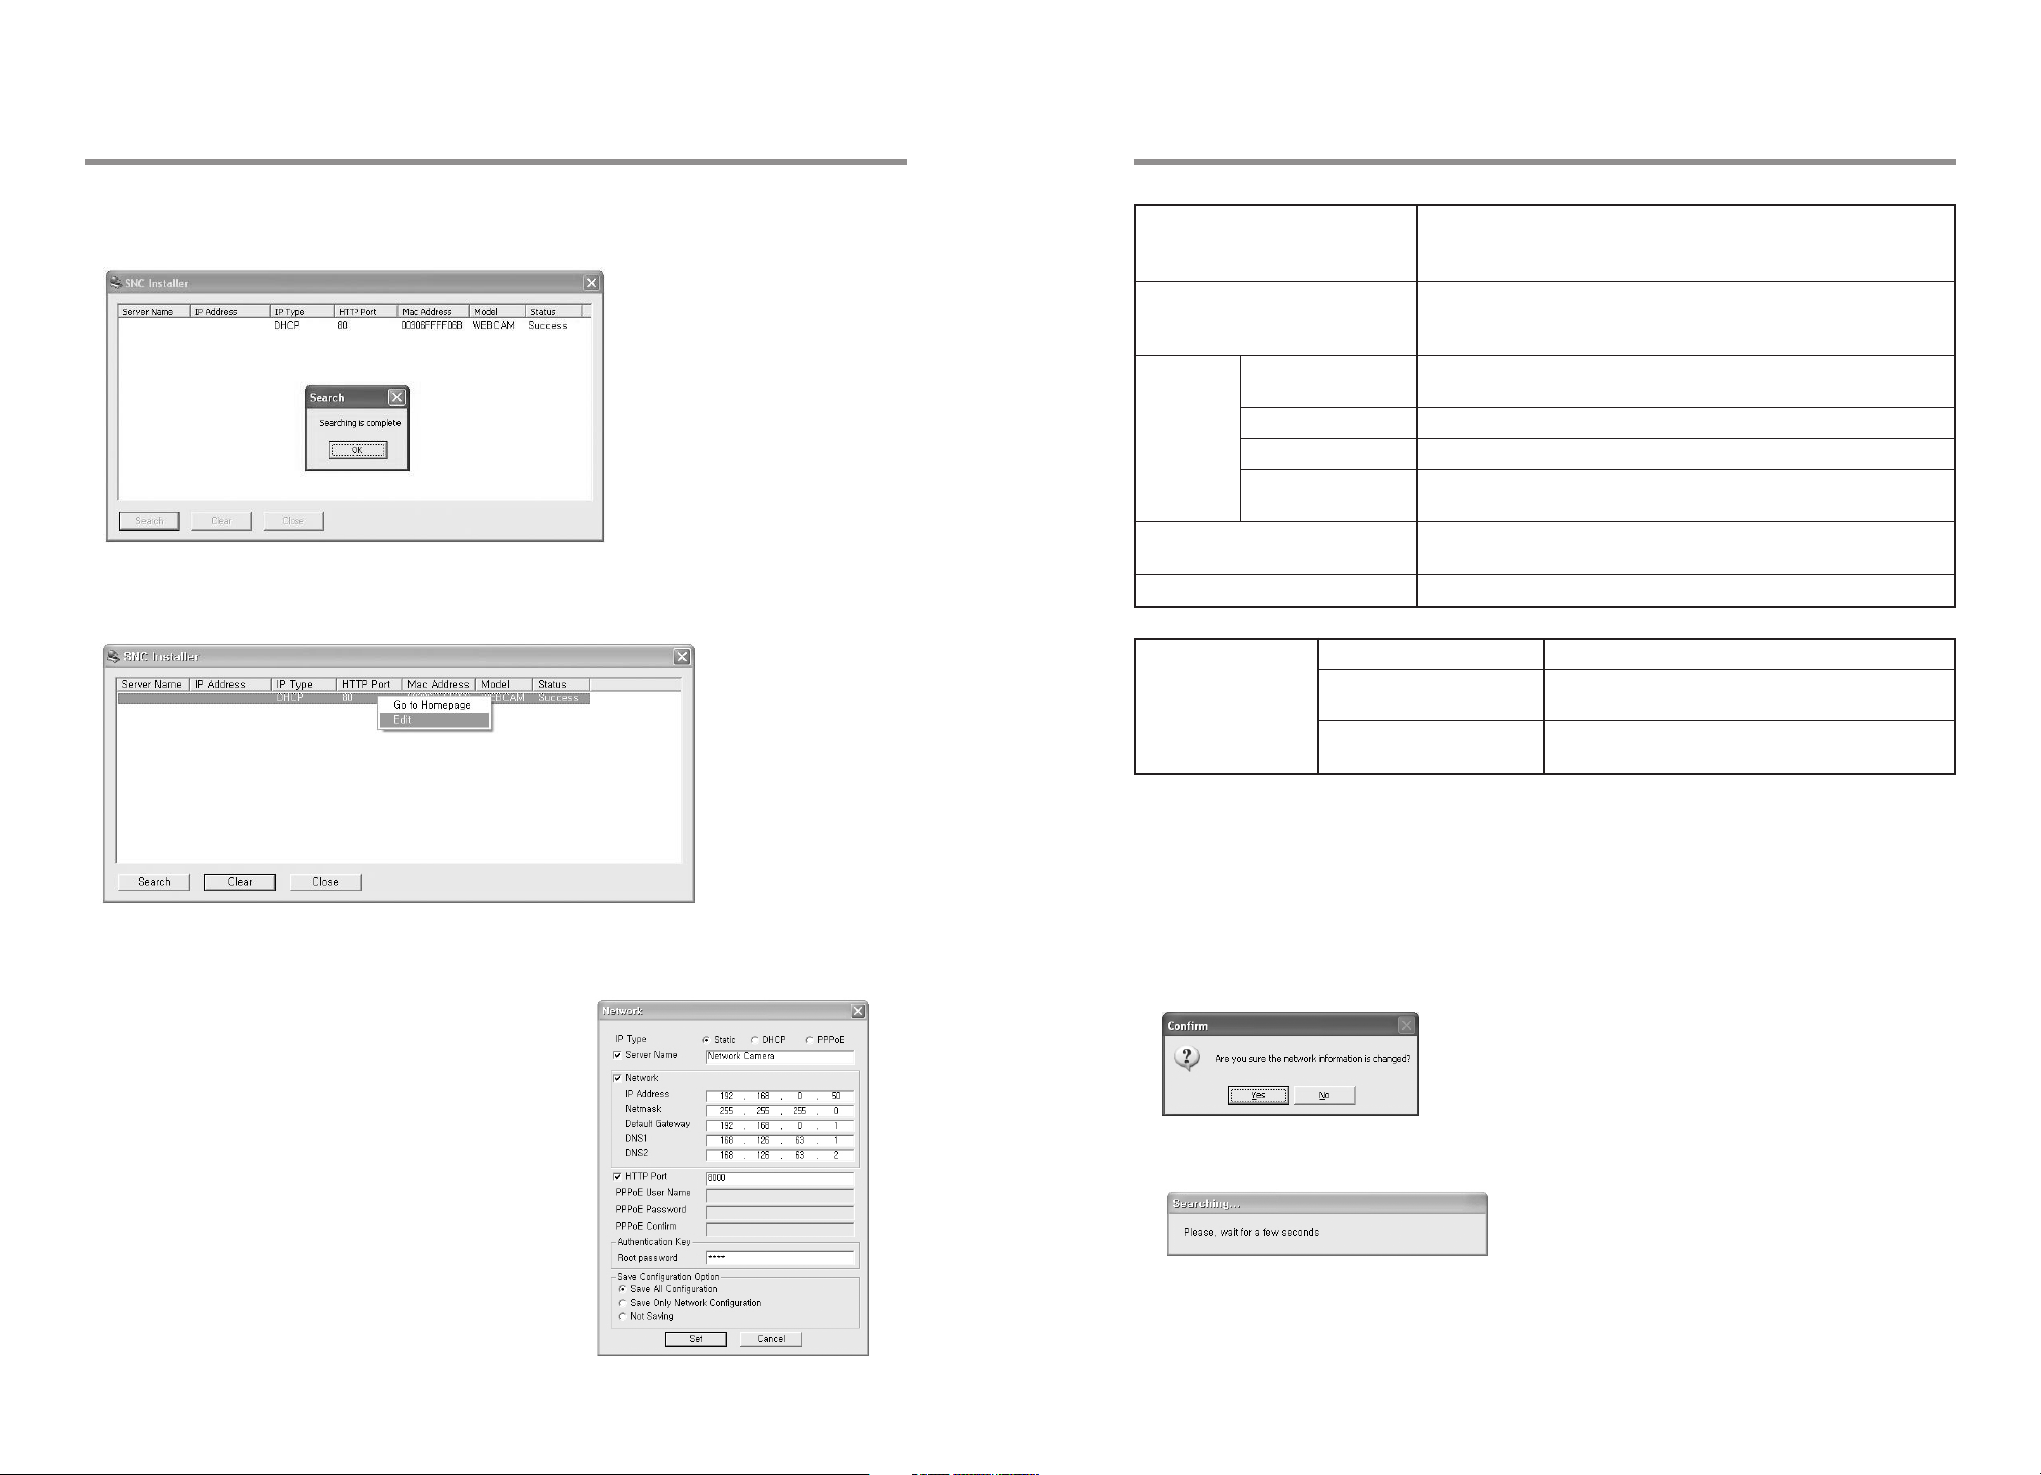
4. When the search for Netcam in the same router is over, the following message
appears on the screen. Click “OK.”
5. Select the Netcam you want from the screen where the search is complete.
Right click “Edit.”
IP Type
Server Name
IP Address
Network
Netmask
Default Gateway
DNS1/DNS2
HTTP Port
Authentication Key
Save
Configuration
Option
Click “Static.”
■ When Netcam is connected to IP router, it is considered
having a static IP internally.
Enter Netcam’s name. The name can be a combination of
numbers and letters up to 20 characters. However,
characters such as #, ', ", : cannot be used.
Enter the allocated IP address of Netcam that has been entered in
the Port Forwarding configuration during IP router configuration.
Enter the Subnet mask of IP router.
Enter the Default Gateway of IP router.
Use default value for DNS server whenever possible.
■ Default value is 168.126.63.1/168.126.63.2.
Enter the Port number of Netcam that has been entered in the
Port Forwarding configuration during IP router configuration.
Enter the Netcam Administrator Password.
Save All Configuration
Save Only Network
Configuration
Not Saving
Select it to save all configuration values.
Select if to save network configuration values only.
Select it to configure only but not saving to
the internal Flash Memory.
6. “Network Option” screen appear.
* Before Staring Network Configuration
If you connect Netcam using IP router, IP and Port
cannot be automatically allocated. You must enter
the numbers yourself using the IP router
configuration program.
For the correct configuration steps, please refer to
IP Router User’s Manual.
Refer to “3.1.1 IP Router Configuration” for details.
Video Netcam | SNC-L200
18
Click “Set” button to apply the configuration to Netcam and save according to the “Save
Configuration Option.” During IP configuration, you cannot connect to Netcam. Please
close Internet Explore window, wait for 1 minute, and then connect to it again.
Click “Cancel” button to cancel the configuration values.
7. Click “Set” button. The following window appears.
Click “Yes.”
8. The following screen appears for several seconds.
19
Video Netcam | SNC-L200
Netcam Configuration
4. Using Smart Viewer
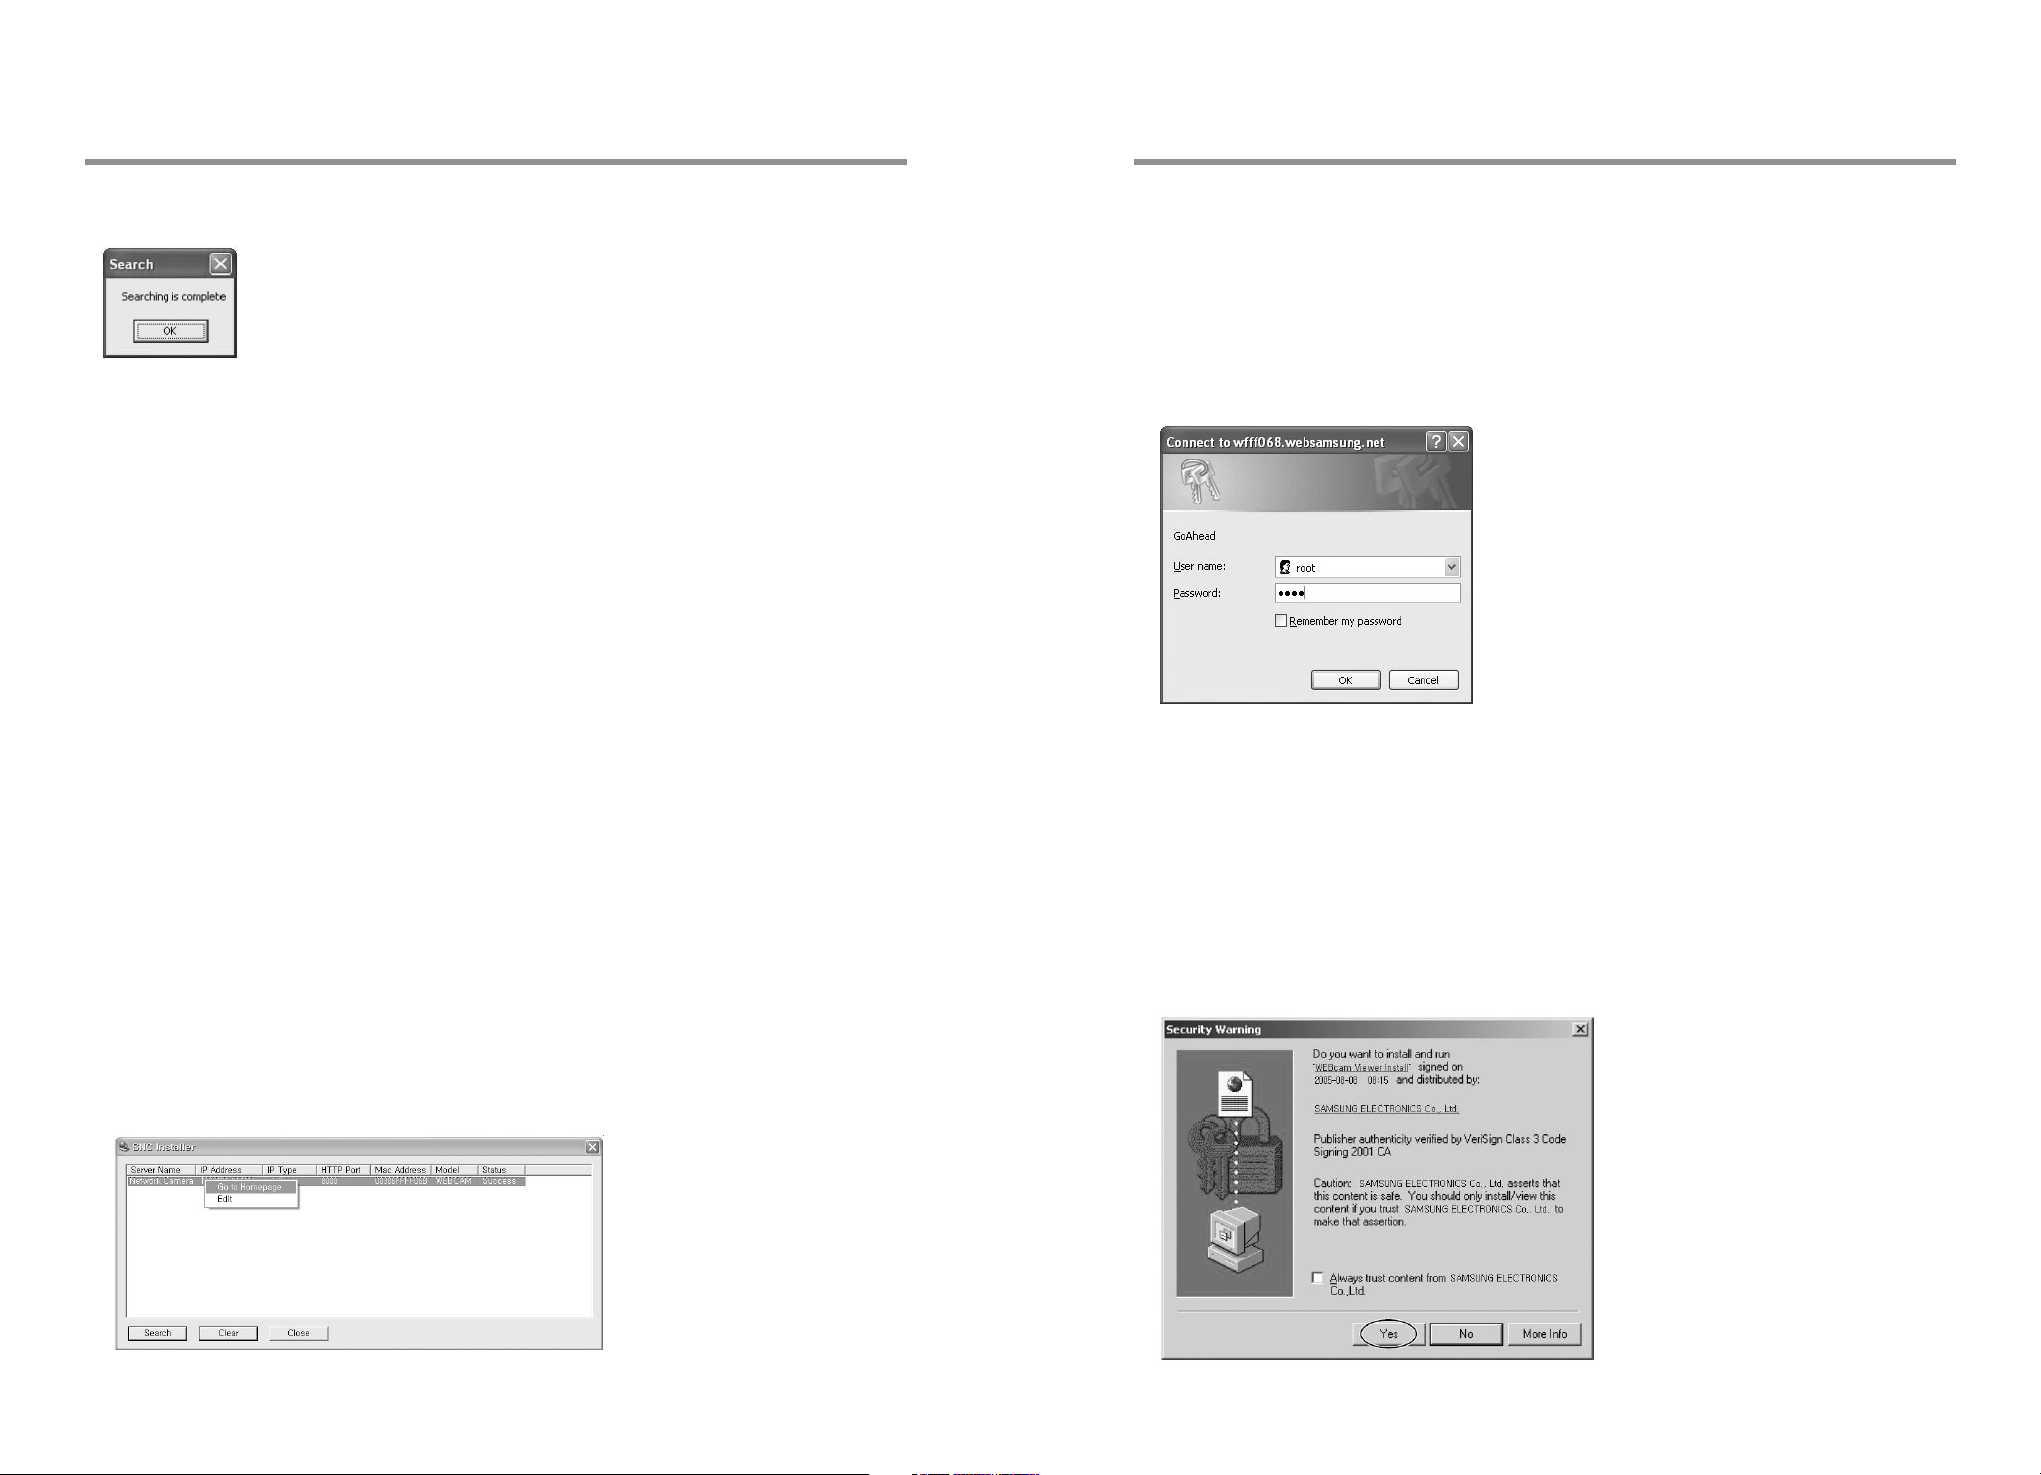
9. Click “OK” button when network configuration is complete.
3.3 Connecting to Netcam
3.3.1. Connecting from Internet
1. Run Internet Explorer from your PC.
2. Enter “http://IP Address (or URL): Port number” in the address field, then press “Enter.”
The URL is composed of lower case “w,” the last six digits of Netcam’s MAC Address, and the
DDNS Server Address.
Example: http://IP Address: Port number
Or http://(Last six digits of MAC Address).websamsung.net: Port number
* MAC Address can be identified from the label at the back of Netcam.
* When the Port number is 80 (default value), you don’t need to enter port number at the end
of the address.
Example: http://168.219.13.250
Or http://wfff06b.websamsung.net
* Internet Service Provider (ISP) may block the port that has the number 80.
You need to enter the port number when it is a number other than 80.
Example: http:// 168.219.13.250:8080
Or http://wfff06b.websamsung.net: 8080
3.3.2. Connecting from Local Network
4.1 Connecting to Netcam
1. Open the Internet Explorer, and enter “http://IP Address (or URL): Port number” in the
address field, then press “Enter” to connect to Netcam.
2. Network password screen appears.
Enter Username (U) and Password (P), then click “OK” button.
The initial Username is “root,” and the password is “root.”
4.2 Installing ActiveX Control Program
When first connected, “Security Alert” window may appear.
If you want to see videos (Motion JPEG), you need to install ActiveX Control program.
* When first connected, the download time for ActiveX may vary based on the network
environment.
4.2.1 Windows 2000 Users
In case of having security warning shown below, click on “Yes”.
1. Run the SNC Installer, select the Netcom you want from the screen where the search is
complete, and then right click it. You may see the Smart Viewer of the Netcam by selecting
“Go to Homepage.”
20
Video Netcam | SNC-L200
Video Netcam | SNC-L200
21
 Loading...