

Samsung SGH-Z308 User Manual

* Depending on the software installed or your service provider or country, some of the
descriptions in this manual may not match your phone exactly.
* Depending on your country, your phone and accessories may appear different from
the illustrations in this manual.
World Wide Web
http://www.samsungmobile.com
Printed in Korea
Code No.:GH68-07926A
10/2005. Rev. 1.2
English.
SGH-Z308
User’s Manual
Important
safety
precautions
Failure to com ply with the following
precautions may be dangerous or illegal.
Use road safety at all times
Do not use a hand-held phone while driving.
Park the vehicle first.
Switch off the phone when refuelling
Do not use the phone at a refuelling point
(service station) or near fuels or chemicals.
Switch off in an aircraft
Wireless phones can cause interference. Using
them in an aircraft is both illegal and
dangerous.
Switch off the phone near all medical
equipment
Hospitals or health care facilities may be using
equipment that could be sensitive to external
radio frequency energy. Follow any regulations
or rules in force.
Interference
All wireless phones may be subject to
interference, which could affect their
performance.
Be aware of special regulations
Meet any special regu lations in force in any are a and
always switch off your phone w henever it is
forbidden to use it, or when it may cause
interference or danger.
Water resistance
Your phone is not water-resistant. Keep it dry.
Sensible use
Use only in the normal position (held to the ear).
Avoid unnecessary contact with the antenna when
the phone is switched on.
Emergency calls
Key in the emergency number for your present
location, then press .
Keep your phone away from small children
Keep the phone and all its parts, including
accessories, out of the reach of small children.
Accessories and batteries
Use only Samsung-approved accessories and
batteries. Use of any unauthorised accessories could
damage your phone and may be dangerous.
• The phone could explode if the battery is
replaced with an incorrect type.
• Dispose of used batteries according to the
manufacturer’s instructions.
Qualified service
Only qualified service personnel may repair your
phone.
For more detailed safety information, see "Health
and safety information" on page 80.
Important safety precautions
1

About this Guide
This User’s Guide provides you with condensed
information about how to use your phone. To quickly
learn the basics for your phone, please refer to “Get
started” and “Step outside the phone.”
In this guide, the following instruction icons appear:
Indicates that you need to pay careful
attention to the subsequent
information regarding safety or phone
features.
→
[
] Indicates a key on the phone. For
< > Indicates a soft key, whose function is
2
Indicates that you can get more
information on the referenced page.
Indicates that you need to press the
Navigation keys to scroll to the
specified option and then select it.
example, [OK
displayed on the phone screen. For
example, <
]
Select
>
•3G
Your phone is capable of operating
in a 3G environment, allowing
much greater data transfer speed,
video streaming, and video
conferencing.
Special
• Camera and camcorder
Use the camera module on your
phone to take a photo or record a
video.
•Media player
Play media files on your phone. You
can enjoy high quality videos and
music.
•IrDA
Send and receive Phonebook and
Organiser data and media files via
an infrared port.
features of your phone
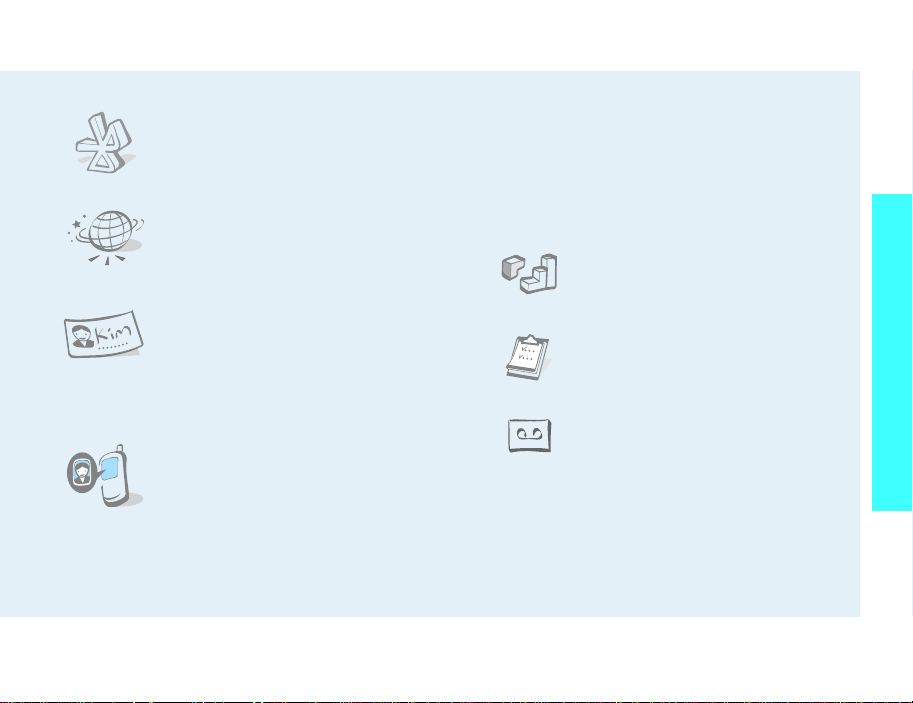
•Bluetooth
Send photos, images, videos, and
other personal data, and connect to
other devices using free, wireless
Bluetooth technology .
•WAP browser
Access the wireless web to get
up-to-the-minute information and
a wide variety of media content.
• Name card
Create name cards with your
number and profile whenever
introducing yourself to others use
this convenient electronic name
card.
• Get personal with photo caller
ID
See who’s calling you with their
very own photo displays.
• Multimedia Message Service (MMS)
Deliver MMS messages with a combination of
text, images, and audio.
•E-mail
Deliver e-mails with images, video, and audio
attachments.
•Java
Enjoy Java™-based embedded
games and download new games.
• Organiser
Keep track of your daily, weekly,
and monthly schedule.
• Voice recorder
Record memos or sounds.
Special features of your phone
3
Contents
Unpack 6
Make sure you have each item
Your phone 6
Buttons, features, and locations
Get started 7
First steps to operating your phone
Install and charge the phone .............................. 7
Power on or off................................................. 8
Keys and display............................................... 9
Access menu functions...................................... 11
Customise your phone ...................................... 12
Make/Answer calls............................................ 14
Step outside the phone 14
Begin with your camera, Media player, games, WAP, and
other special features
Use camera..................................................... 14
Play media files ............................................... 15
Browse the web............................................... 16
Use Contacts................................................... 17
Send messages................................................ 18
View messages................................................ 20
Use Bluetooth wireless...................................... 20
Enter text 22
Pinyin, Stroke, ABC, T9, Number, and Symbol mode
Call functions 25
Advanced calling features
Menu functions 30
All menu options listed
Solve problems 78
Help and personal needs
Health and safety information 80
4

Overview of menu functions
To access Menu mode, press [OK] in Idle mode.
1 Call log
1 Missed calls
2 Dialled calls
3 Received calls
4 Current contacts
5 Delete all
6 Data calls
7 Calls cost
8 Calls time
2 Contacts
1 Search contact
2 New contact
3 Groups
4 Speed dial
5 My name card
6 Copy all
7 Own number
8 Service number*
9 Settings
0 Memory status
3 Applications
1 Medial player
2 Voice memo
3 World clock
4 Calculator
5 Converter
6 SAT*
*
p. 30
p. 30
p. 30
p. 30
p. 30
p. 30
p. 31
p. 31
p. 31
p. 32
p. 32
p. 33
p. 33
p. 34
p. 34
p. 35
p. 35
p. 35
p. 35
p. 35
p. 36
p. 36
p. 37
p. 38
p. 39
p. 39
p. 40
4 Internet
1 Go to homepage
2 Enter URL
3 Favourites
4 History
5 Browser settings
6 Network settings
5 Messages
1 Create new
2 Inbox
3 Drafts
4 Outbox
5 Sent box
6 Email inbox
7 Templates
8 Broadcast
9 Delete all
0 Settings
Memory status
6 File manager
Images
Videos
Music
Sounds
Games & More
Other files
Memory card
**
p. 40
p. 40
p. 41
p. 41
p. 42
p. 42
p. 42
p. 42
p. 42
p. 44
p. 46
p. 47
p. 47
p. 47
p. 48
p. 49
p. 49
p. 49
p. 53
p. 53
p. 53
p. 55
p. 56
p. 57
p. 58
p. 58
p. 59
7 Organiser
1 Alarm
2 Calendar
3 Week view
4 To day’s events
5 Schedule
6 Anniversary
7 T a s k
8 Memo
9 Holiday
0 Missed event alarm
Memory status
8 Camera
9 Settings
1 Profiles
2 Time & date
3 Phone
4 Display
5 Call
6 Connectivity
7 Application settings
8 Security
9 Memory status
0 Reset settings
* Shows only if supported by your USIM/SIM
card.
** Shows only if a memory card is inserted into
the phone.
p. 59
p. 59
p. 60
p. 62
p. 62
p. 62
p. 62
p. 62
p. 62
p. 62
p. 62
p. 62
p. 63
p. 67
p. 67
p. 68
p. 68
p. 69
p. 70
p. 72
p. 76
p. 76
p. 77
p. 78
5
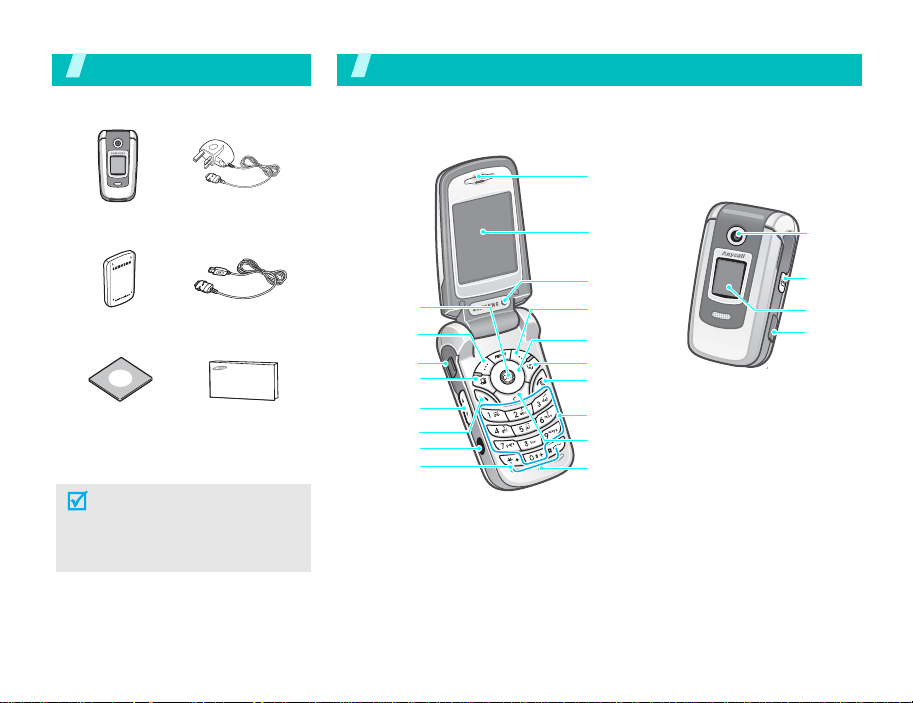
Unpack
Make sure you have each item
You r ph one
Buttons, features, and locations
Earpiece
Phone
Battery PC Data Cable
PC Link CD
Travel Charger
User’s Manual
You can obtain v arious accessories
from your local Samsung dealer.
The items supplied with your
phone and the accessories at
your Samsung dealer may vary,
depending on your country or
service provider.
6
Menu access/
confirm key
Left soft key
Headset jack
Application
switch key
Volume keys
Dial key
Infrared port
Special
function keys
Display
Interior
camera lens
Right soft key
Navigation
keys
Video call key
Power On/Off/
Menu exit key
Alphanumeric keys
Delete key
Microphone
Exterior
camera
lens
Camera
key
External
display
Memory
card slot
Get started
First steps to operating your phone
USIM/SIM card information
When you subscribe to a cellular network, you
receive a plug-in SIM (Subscriber Identity Module)
card loaded with your subscription details, such as
your PIN and available optional services. For 3G
services, you can purchase a USIM (Universal
Subscriber Identity Module) card.
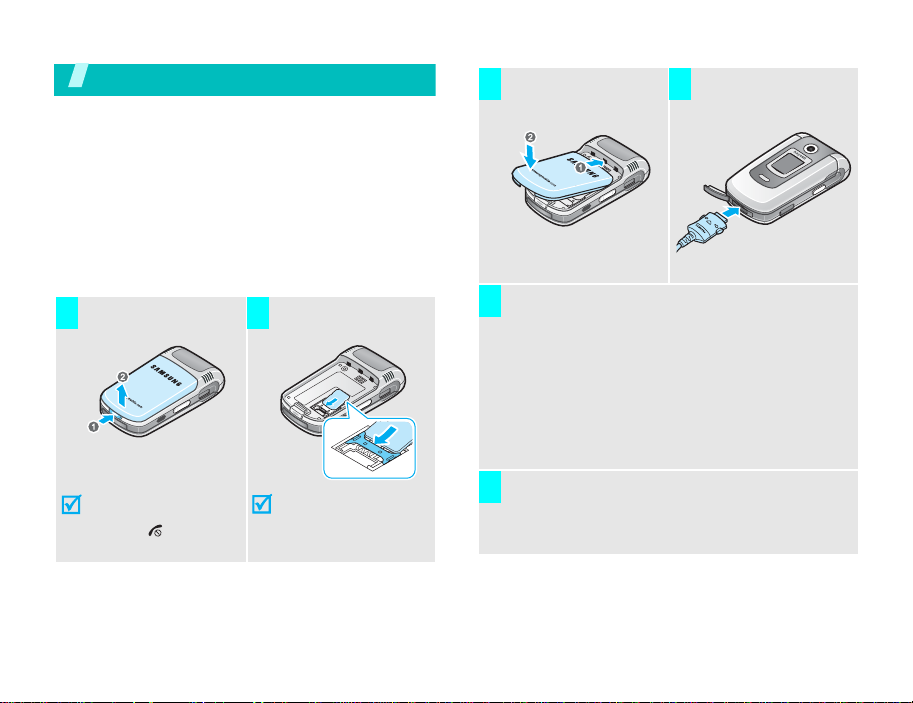
Install and charge the phone
Remove the battery.
1 2
If the
phone is already
on, first turn it off by
holding [ ].
Insert the USIM/SIM
card.
Make sure that the
gold-coloured contacts
on the card face down
into the phone.
Install the battery. Plug the travel
3 4
Plug the charger into a standard AC wall outlet.
5
The LED on the charger indicates the charging
progress.
• Red: the battery is being charged.
• Green: the battery is comp letely charged.
• Orange: the battery is not correctly installed
or is operating at a too high or too low
temperature.
When the phone is completely charged (green
6
charger LED), unplug the charger from the
power outlet.
charger into the
phone.
7
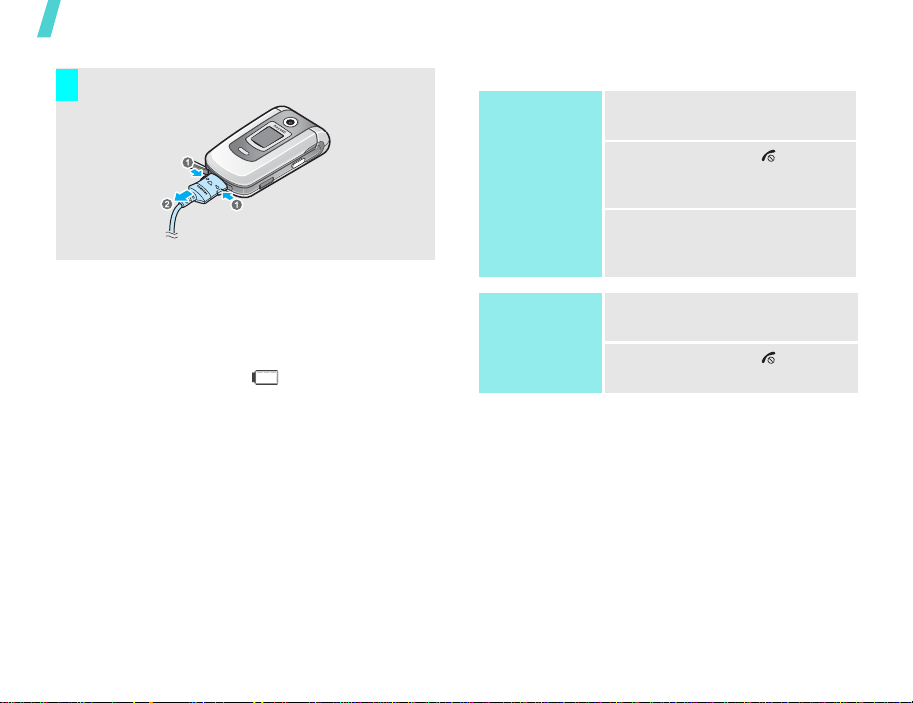
Get started
Remove the charger from the phone.
7
Low battery indicator
When the battery is low:
• a warning tone sounds,
• the battery low message displays, and
• the empty battery icon blinks.
If the battery level becomes too low, the phone
automatically turns off. Recharge your battery.
Power on or off
Power on
Do not turn on the
phone when
mobile phone use
is prohibited.
Power off
1. Open the phone.
2. Press and hold [ ] to turn
3. If necessary, enter the PIN
1. Open the phone.
2. Press and hold [ ].
on the phone.
and press <
Confirm
>.
8
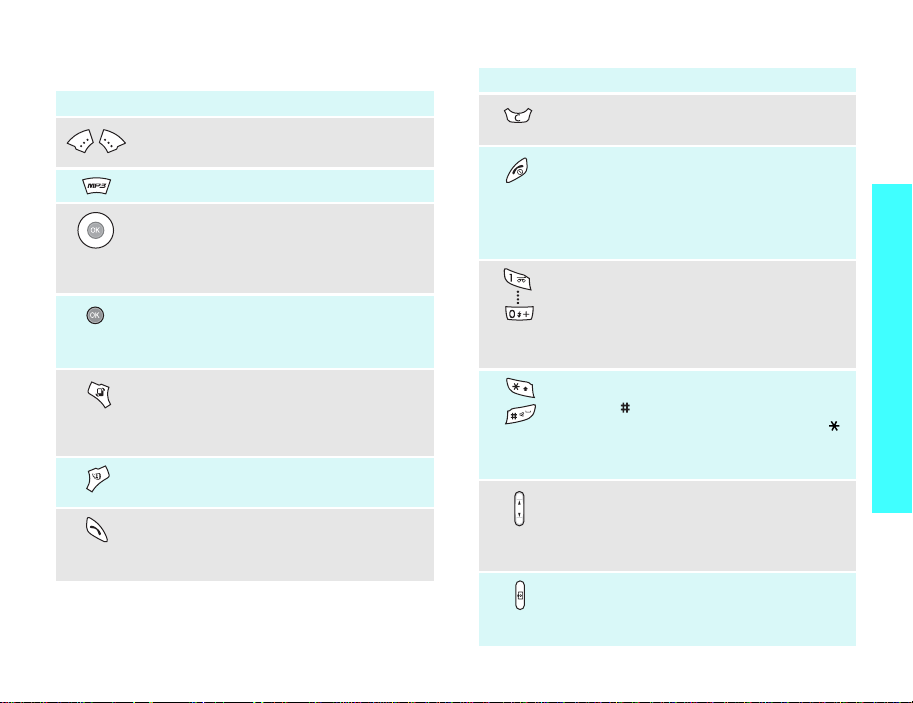
Keys and display
Key(s) Description
Perform the function indicated on the
bottom line of the display.
Opens the Media player.
In Idle mode, access menu options
directly.p. 69
In Menu mode, scroll through the
menu options.
In Idle mode, accesses Menu mode.
In Menu mode, select a highlighted
menu option.
Opens the application switch window
to open
Call, Messages
Internet
application.
Makes a video call.
Makes or answers a call.
In Idle mode, retrieves the recent
number dialled, missed, or received.
without exiting the current
, and
Key(s) Description
Deletes characters from the displ ay or
an item in an application.
Ends a call.
Hold down to switch the phone on and
off.
In Menu mode, cancel input and
return the phone to Idle mode.
Enter numbers, letters, and some
special characters.
In Idle mode, hold [1] down to access
your voicemail. Hold [0] down to enter
an international call prefix.
Enter special characters.
Hold [ ] down to activate or
deactivate the Silent profile. Hold [ ]
down to enter a pause between
numbers.
Adjust the phone volume.
In Idle mode, adjust the keypad tone
(
on the left)
volume. With the phone close d, hold
down to activate the external display.
Hold down to turn on the camera.
(on the right)
In Camera mode, switches the camera
lens.
Get started
9
Get started
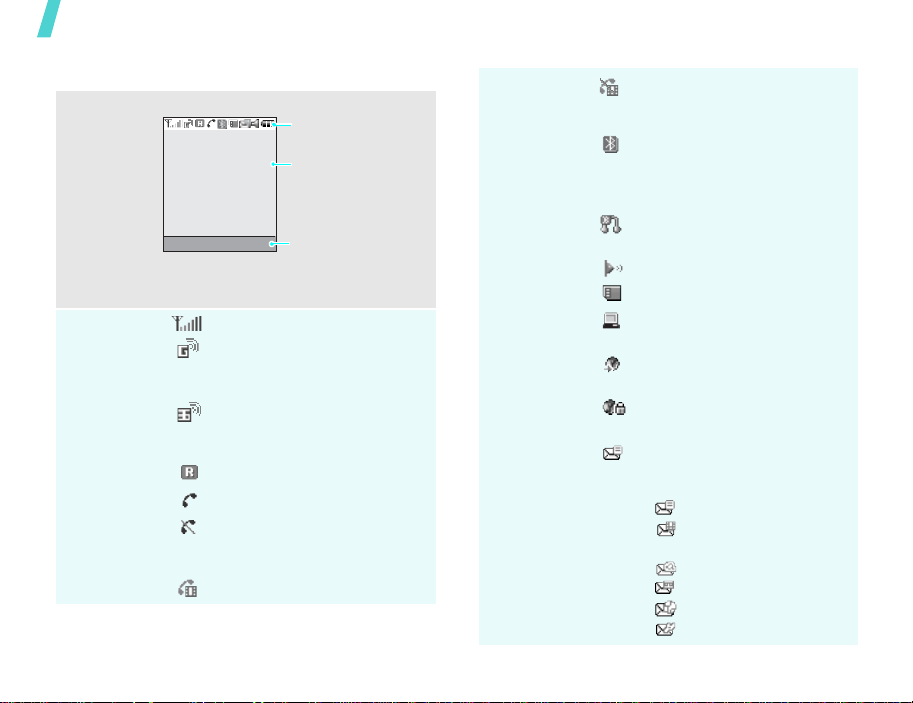
Display
Layout
Icons
10
The display has three areas.
Icons
displays various icons.
Text and graphics
displays messages,
instructions, and
information you enter.
Select Back
Soft key function
indicators
shows the current
functions assigned to
the two soft keys.
Received signal strength
Accessing services in a 2.5G
network; when transferring
data, this icon a nimates
Accessing services in a 3G
network; when transferring
data, this icon a nimates
Active roaming feature
Voice call in pro gr e ss
Out of your service area; you
cannot send or receive voice
calls
Video call in progress
Icons
(continued)
Out of your service area; you
cannot send or receive video
calls
Bluetooth feature is active;
when transferring data, this
icon blinks red and blue
p. 72
Connected with a Bluetooth
headset or hands-free kit
IrDA port is activep. 74
Memory card inserted
Connected with a computer
via a USB port
Browsing the Internet on a PC
using the phone as a modem
Connected to a secured web
page
New message; depending on
the message type, the
following icons may appear.
•: SMS
• : MMS or MMS with
attachments
•: E-mail
•: Voicemail
•: WAP push
• : Configuration message
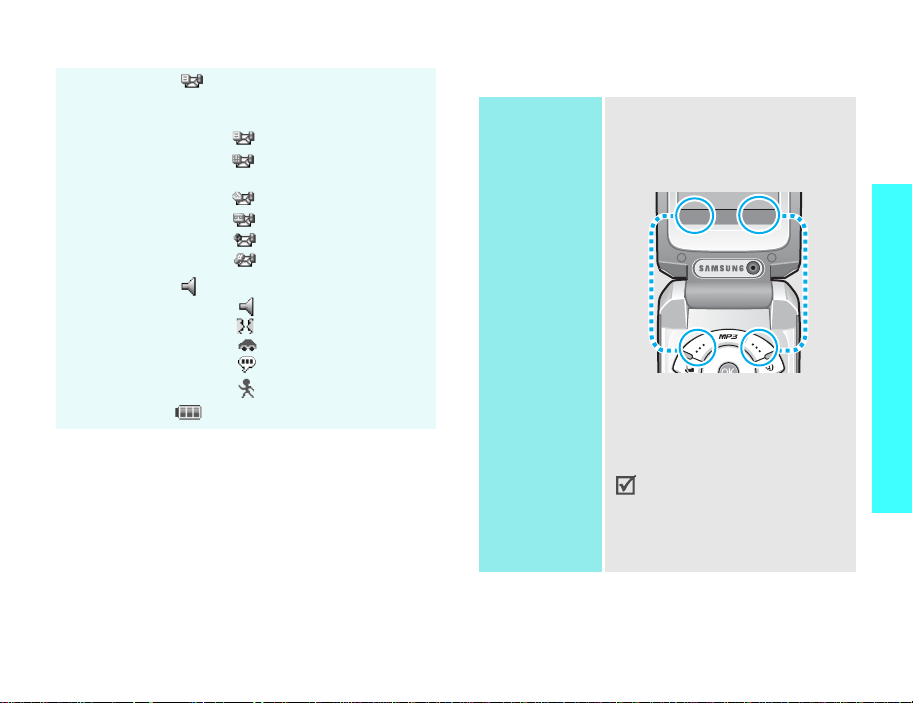
Icons
(continued)
Inbox full; depending on the
message type, the following
icons may appear.
•: SMS
• : MMS or MMS with
attachments
•: E-mail
•: Voicemail
•: WAP push
• : Configuration message
Profile settingp. 68
•: Normal
• : Meeting
•: Car
•: Silent
• : Outdoor
Battery power level
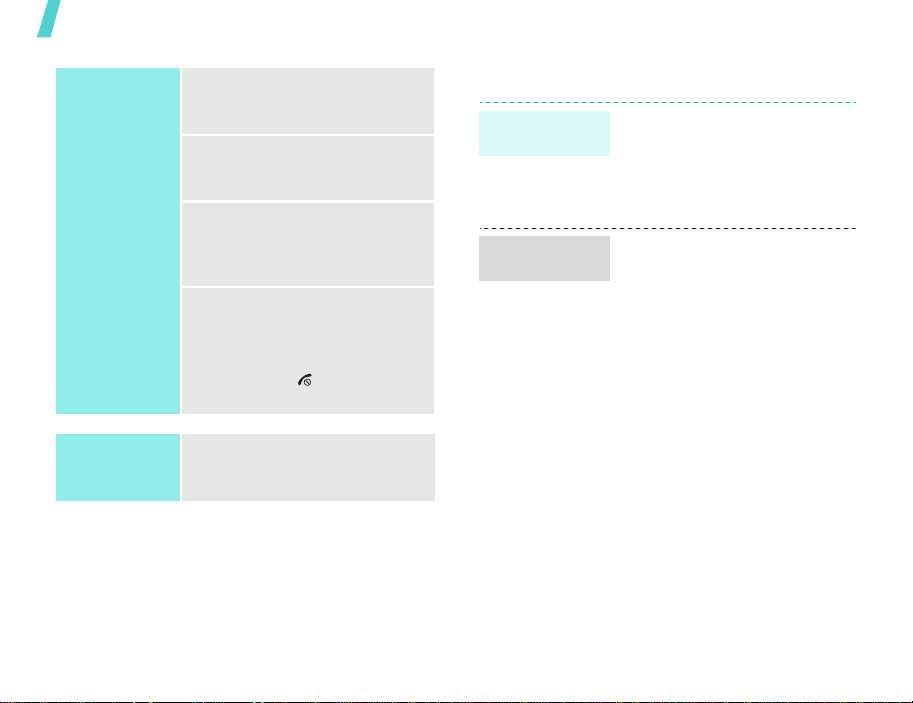
Access menu functions
Use the soft
keys
The roles of the soft keys vary
depending on the function you are
using. The bottom line of the
display indicates their current
role.
Select Back
Press the left soft
key to confirm the
function displayed
or option
highlighted.
In each main menu, one of the
most popular sub menu is
assigned to the left soft key.
This allows you to quickly
access the most popular
menus.
Press the right soft
key to move up
one level.
Get started
11
Get started
Select an
option
Use shortcuts
12
1. Press the appropriate soft
key or [OK] to access Menu
mode.
2. Press the Navigation keys to
move to the next or previous
option.
3. Press <
4. To exit, choose either of the
Press the number key
corresponding to the option you
want.
Select
[OK] to confirm the function
displayed or option
highlighted.
following methods:
• Press <
up one level.
• Press [ ] to return to
Idle mode.
>, <OK>, or
Back
> to move
Customise your phone
Display
language
Call ringer
melody
1. In Idle mode, press [OK] and
select
Settings
Language
2. Select a language.
3. Press <
You can change the call ringer by
changing the properties of the
currently active sound profile.
To change the profile properties:
1. In Idle mode, press [OK] and
select
Settings
2. Scroll the sound profile you
are using.
3. Press <
Edit
.
4. Select
5. Press <
6. Select
7. Press <
8. Press <
Voice call ringtone
and select a ringer for voice
calls.
Select
.
Video call ringtone
and select a ringer for video
calls.
Select
.
Save
.
→
Screen text
Save
>.
Options
Options
Options
Options
→
Phone
→
→
Profiles
> and select
> and Press
> and Press
> and select
.
.

Idle mode
Wallpaper
Silent mode
To change the sound profile:
1. In Idle mode, press [OK] and
select
Settings
2. Select the profile you want.
You can set a wallpaper for the
idle screen.
1. In Idle mode, press [OK] and
select
Settings
Wallpaper
2. Press [Left] or [Right] to
scroll to an image box
3. Select an image and press
<
Set
>.
You can quickly activate the
Silent profile to avoid disturbing
other people.
Press and hold [ ] in Idle mode.
→
Profiles
→
Display
.
.
→
.
Phone lock
You can protect the phone
against unauthorised use with a
phone password. The phone will
require the password on
power-up.
1. In Idle mode, press [OK] and
select
Settings
→
Change phone
password
2. Enter the default password,
00000000
<
Confirm
3. Enter a new 4- to 8-digit
password and press
<
Confirm
4. Enter the new password
again and press <
5. Select
6. Select
7. Enter the password and press
<
Confirm
Phone lock
Enable
→
Security
.
, and press
>.
>.
Confirm
.
.
>.
>.
Get started
13
Step outside the phone
Make/Answer calls
Make a call
Answer a call
Adjust the
volume during
a call
To make a voice call:
1. Enter an area code and
phone number.
2. Press [ ].
3. To end the call, press [ ].
To make a video call:
1. Enter an area code and
phone number.
2. Press [ ], and the other
person appears on the
screen.
1. When the phone is ringing,
press [ ].
2. For a video call, press
<
Show me
other person to see you.
3. To end the call, press [ ].
Press [ / ].
> to allow the
Step outside the phone
Begin with your camera, Media player, games, WAP, and
other special features
Use camera
Take a photo
View a photo
1. In Idle mode, press and hold
[ ] to turn on the camera.
2. Press [ ] to switch between
the interior lens and exterior
lens.
3. Aim the camera lens at the
subject and adjust the image.
4. Press [OK] to take a photo.
The photo is saved
automatically.
5. Press [OK] to take another
photo.
1. In Idle mode, press [OK] and
select
File manager →
Images
2. Select the photo you want.
.
14
Record a video
1. In Idle mode, press and hold
[ ] to turn on the camera.
2. Press [1] to switch to Record
mode.
3. Press [ ] to switch between
the interior lens and exterior
lens.
4. Press [OK] to start recording.
5. Press [OK] to stop recording.
The video is automatically
saved.
6. Press [OK] to record another
video.
Play media files
Copy media
files to the
phone
Use these methods:
• Download from the wireless
• Download from a computer
• Copy files to a memory card
• Receive via IrDA or
webp. 40
using Samsung PC Studio
Samsung PC Studio User’s
Guide
and insert the card into the
phone.
Bluetoothp. 74, p. 72
Step outside the phone
Play a video
1. In Idle mode, press [OK] and
select
File manager
Videos
.
2. Select the video you want.
→
Create a play
list
1. In Idle mode, press [ ].
2. Press <
3. Press <
4. Press [OK] to check the files
5. Press <
6. Press [OK] to start playing
Options
Open play list
Options
Add
→
Folder
you want or scroll to the
folder you want.
Add
the files.
> and select
.
> and select
or
Files
> or <
Select
.
>.
15
Step outside the phone
Play media files
1. From the Media player
screen, press [OK].
2. Press [OK] to start playing.
3. During playback, use the
following keys:
•OK: Pauses or resumes
playback.
• Up: Opens the play list.
• Left: Goes to the previous
file. Moves backward in a
file when held down.
• Right: Skips to the next
file. Skips forward in a file
when held down.
• / : Adjusts the volume.
• Down: Stops playback.
Browse the web
Using a built-in WAP (Wireless Application Protocol)
browser, you can get easy access to the wireless
web to receive a variety of up-to-date information
and services and to enjoy downloads of web
contents.
Launch the
browser
Navigate the
web
In Idle mode, press right soft key
and select
homepage
• T o scroll through browser
• T o select an item, pr ess [OK].
• To return to the previous
• T o use browser options, press
Internet
.
items, press [Up] or [Down].
page, press <
<
Options
>.
→
Back
Go to
>.
16
Use Contacts
Add an entry
To the phone’s memory:
1. In Idle mode, enter a phone
number.
2. Press <
3. Specify the contact
4. Press <
To the USIM/SIM card:
1. In Idle mode, enter a phone
2. Press <
Options
Save to Contacts
→
New
→ a number type.
information: Last name, First
name, Phone number, Work
email, Home email, Group,
Homepage, Birthday, and
More information (Job title,
Department, Company,
Nickname, and Notes).
Options
Save
to save the entry.
number.
Options
Save to Contacts
New
.
> and select
→
Phone
> and select
> and select
→
SIM →
Find an entry
3. Specify the contact
information, depending on
your card type: Name, Email,
Group, and Location number.
4. Press <
1. In Idle mode, press [OK] and
2. Select an entry.
3. Select a number and press
Save
entry.
select
contact
[] to dial, or [OK] to edit
the contact information.
> to save the
Contacts
.
→ Search
Step outside the phone
17

Step outside the phone
Create and
send your
name card
1. In Idle mode, press [OK] and
select
Contacts
card
.
2. Specify your contact
information.
3. Press <
4. To send the name card to
5. Press <
Options
Save
to save the name card.
other people, access the
name card
Options
Send name card
sending method you want.
→
My name
> and select
menu again.
> and select
→ the
My
Send messages
Send a text
message (SMS)
Send a
multimedia
message
(MMS)
1. In Idle mode, press left soft
2. Enter the message text.
3. Press [OK].
4. Enter destination numbers.
5. Press [OK] to send the
1. In Idle mode, press left soft
2. Enter the message subject.
3. Select
4. Enter the message text and
5. Select
6. Add a media file.
7. Press [OK].
8. Enter destination numbers or
9. Press [OK] to send the
key and select
Text message
message.
key and select
Multimedia message
press [OK].
Audio
e-mail addresses.
message.
Create new →
.
Create new →
Text
.
Picture or Video
.
.
or
18

Send flies by
MMS
1. In Idle mode, press left soft
key and select
File messenger
2. Enter the message subject.
3. Move to the
4. Enter the message text.
5. Move to the
6. Press <
Add files, Add name card
or
Add v-calendar
7. Select images, videos,
sounds, name cards,
schedule items, or tasks.
8. Press <
Attach
9. Press [OK].
10.Enter destination numbers or
e-mail addresses.
11.Press [OK] to send the
message.
Message
Attach files
Options
Options
.
Create new →
.
field.
line.
> and select
,
.
> and select
Send an e-mail
1. In Idle mode, press left soft
key and select
Email
2. Enter the e-mail subject.
3. Move to the
4. Enter the e-mail text.
5. Move to the
6. Press <
Add files, Add name card
or
Add v-calendar
7. Select images, videos,
sounds, name cards,
schedule items, or tasks.
8. Press <
Attach
9. Press [OK].
10.Enter e-mail addresses.
11.Press [OK] to send the
e-mail.
.
Options
Options
.
Create new →
Message
Attach files
field.
> and select
.
> and select
line.
Step outside the phone
,
19

Step outside the phone
View messages
View text
message
View a
multimedia
message
When a notification appears:
1. Press <
2. Select the message from the
From the Inbox:
1. In Idle mode, press left soft
2. Select an SMS message
When a notification appears:
1. Press <
2. Press <
3. Select the message from the
From the Inbox:
1. In Idle mode, press left soft
2. Select an MMS message
View
>.
Inbox.
key and select
().
View
>.
Options
Retrieve
Inbox.
key and select
().
.
Inbox
.
> and select
Inbox
.
View an e-mail
1. In Idle mode, press left soft
key and select
2. Press <
Download
3. Select an e-mail or header.
4. If you selected a header,
press <
Retrieve
Options
.
Options
.
Email inbox
> and select
> and select
Use Bluetooth wireless
Your phone is equipped with Bluetooth technology
which enables you to connect the phone wirelessly
to other Bluetooth devices and ex change data with
them, talk hands-free, or control the phone
remotely.
Turn on
Bluetooth
Search for and
pair with a
Bluetooth
device
In Idle mode, press [OK] and
select
Settings
→
Bluetooth
On
.
1. In Idle mode, press [OK] and
select
Connectivity
My devices
device
2. Select a device.
→
→
Activation
Settings
→
.
Connectivity
→
→
Bluetooth →
Search new
→
.
20

3. Enter a Bluetooth PIN code or
the other device’s Bluetooth
PIN code, if it has, and press
<OK>.
When the owner of the other
device enters the same code,
the pairing is complete.
Step outside the phone
Send data
Receive data
1. Access an application,
Contacts, File manager
Organiser
2. Select the item you want to
send.
3. Press <
Send (name card
schedule/task
bluetooth
4. Select a device.
5. If necessary, enter the
Bluetooth PIN and press
<OK>.
To receive data via Bluetooth,
your phone’s Bluetooth feature
must be active.
If necessary, press <
confirm the reception.
.
Options
.
> and select
) →
/
Yes
, or
Via
> to
21

Enter text
Pinyin, Stroke, ABC, T9, Number, and Symbol mode
You can enter text for some features such as
Messages, Phonebook, or Organiser, using Chinese
Pinyin mode, Chinese Stroke modes, ABC mode, T9
mode, Number mode, and Symbol mode.
Changing the text input mode
The text input mode indicator displays when the
cursor is in a text input field.
• Press the right soft key to change the input
mode.
• Press and hold [ ] to switch to Number mode.
• Press and hold [ ] to switch to Symbol mode.
Using Pinyin mode
Pinyin is a system to mark Chinese pronunciation in
Latin alphabets. With the pinyin input method, you
can enter Chinese characters by entering the pinyin
string from the phone keypad.
Entering characters in Pinyin mode
1.
Press the keys corresponding to the phonetic
spelling, using the one key per letter.
Example:
To enter “ ” (li), press [5] and [4].
2.
If necessary, press [Left] or [Right] to select the
pinyin you want.
3.
If necessary, press [Up] or [Down] to scroll
through choices in the character selection field.
4.
Press [1] to activate the charac ter selection field.
A number, 1 to 5, is added to the characters.
5.
Press the number key, [1] to [5], corresponding
to the character you want.
Tips for using Pinyin mode
• Press [ ] to insert a space between characters.
• Press [Left] or [Right] to move the cursor.
• Press [C] to remove strokes to the left. Holding
[C] removes all of entered key strokes or
characters.
Using Chinese Stroke modes
These modes allow you to enter individual Chinese
strokes, in written order, from top to bottom and
from left to right. Y ou r phon e pro v id es Sim pli fied
Stroke mode and Traditional Stroke mode.
The Chinese strokes are classified into five basic
categories; heng, shu, pie, dian and zhe. The basic
strokes are printed on the keypad, on keys [1] to
[5].
22

The following table shows the stroke/key
relationship.
Catetory Keys Strokes represented in each category
Entering strokes and characters in a Stroke
mode
1.
Press the keys corresponding to its comp onent
strokes in the order that you would write the
strokes.
Example: To enter “ ,” press [5] to enter “ ”
and then [3] to enter “
2.
If necessary, press [Up] or [Down] to scroll
through choices in the character selection field.
If you are uncertain of the order of strokes,
press [6] in place of each questionable stroke.
Continue entering strokes until the character
displays or until you finish the character.
3. Press the number key, [7] to [0], corresponding
to the character you wan t.
.”
Tips for using Stroke modes
• Press [ ] to insert a space between characters.
• Press [Left] or [Right] to move the cursor.
• Press [C] to remove strokes to the left. Holding
[C] removes all of entered key strokes or
characters.
Using T9 mode
T9 is a predictive text input mode that allows you to
key in any character using single keystrokes.
Entering a word in T9 mode
1. Press [2] to [9] to start entering a word. Press
each key once for each letter.
For example, press [4], [3], [5], [5], and [6] to
enter Hello in T9 mode.
T9 predicts the word that you are typing, and it
may change with each key that you press.
2. Enter the whole word before editing or deleting
characters.
3. When the word displays correctly, go to step 4.
Otherwise, press [0] to display alternative word
choices for the keys that you have pressed.
For example, Of and Me use [6] and [3].
4. Press [ ] to insert a space and enter the next
word.
Enter text
23
Enter text
Tips for using T9 mode
•Press [1] to enter periods or apostrophes
automatically.
•Press [] to shift case. Lower case (No
indicator), Initial capital ( ), and Capital lock
( ) are available.
• Press the Navigation keys to move the cursor.
•Press [C] to delete characters one by one. Press
and hold [C] to clear the entire display.
Adding a new word to the T9 dictionary
This feature may not be available for some
languages.
1. Enter the word that you want to add.
2. Press [0] to display alternative wor ds for your
key presses. When there are no more alternative
words,
Spell
displays on the bottom line.
3. Press <
4. Enter the word you want using ABC mode and
press <
Spell
Add
>.
>.
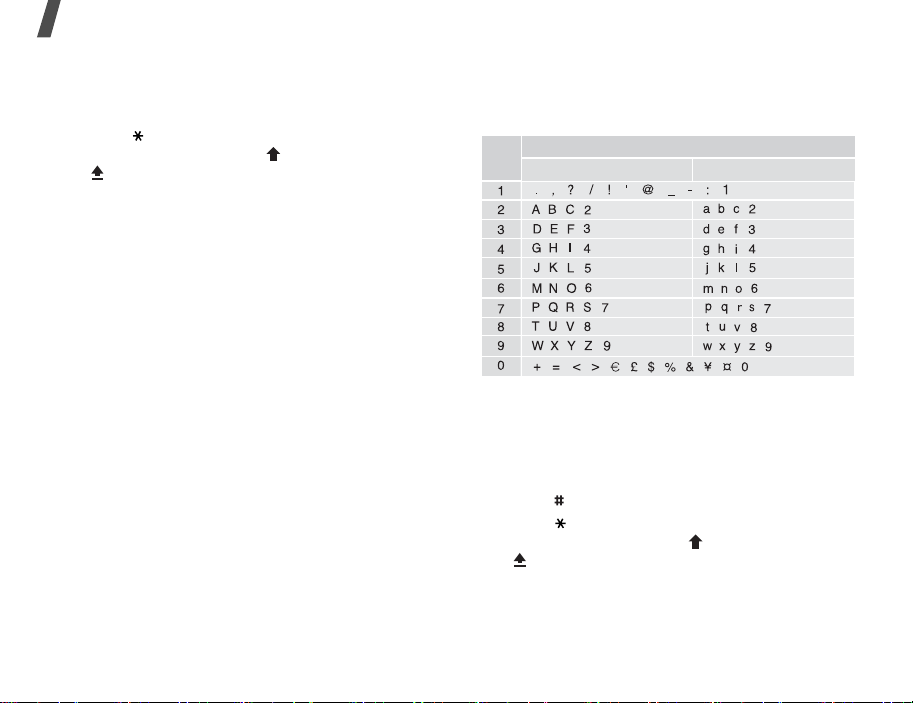
Using ABC mode
Press the appropriate key until the character you
want appears on the screen.
Key
Tips for using ABC mode
• To enter the same letter twice or to enter a
different letter on the sa me key, wait for the
cursor to move to the right automatically or
press [Right]. Then, enter the next letter.
• Press [ ] to insert a space.
•Press [] to shift case. Lower case (No
indicator), Initial capital ( ), and Capital lock
( ) are available.
• Press the Navigation keys to move the cursor.
• Press [C] to delete characters one by one. Press
and hold [C] to clear the entire display.
Characters in order displayed
Upper case Lower case
24
 Loading...