

Samsung SGHI858 Users Manual

* Depending on the software installed or your service provider or country, some of
the descriptions in this guide may not match your phone exactly.
* Depending on your country, your phone and accessories may appear different
from the illustrations in this guide.
World Wide Web
http://www.samsungmobile.com
Printed in Korea
Code No.:GH68-xxxxx
English.11/2005. Rev. 1.0
Draft version
(2005. 10. 28)
SGH-i858 Series
User’s Guide
Please read this guide before operating your phone,
and keep it for future reference.


Table of Contents
Important safety precautions . . . . . . . . . . . . . . . . . . . . . . v
C
HAPTER
1
Getting started
What’s in the box? . . . . . . . . . . . . . . . . . . . . . . . . . . . . . . 7
Getting to know your phone . . . . . . . . . . . . . . . . . . . . . . . 8
Using a stylus pen . . . . . . . . . . . . . . . . . . . . . . . . . . . . . 12
Installing the battery . . . . . . . . . . . . . . . . . . . . . . . . . . . 13
Installing SIM card . . . . . . . . . . . . . . . . . . . . . . . . . . . . 14
Charging your phone . . . . . . . . . . . . . . . . . . . . . . . . . . . 1 5
Switching your phone on . . . . . . . . . . . . . . . . . . . . . . . . 17
Installing an optional memory card . . . . . . . . . . . . . . . . . 17
Installing Sync programs . . . . . . . . . . . . . . . . . . . . . . . . 18
C
HAPTER
2
The basics
Home screen . . . . . . . . . . . . . . . . . . . . . . . . . . . . . . . . 20
Application Launcher . . . . . . . . . . . . . . . . . . . . . . . . . . . 20
Status bar . . . . . . . . . . . . . . . . . . . . . . . . . . . . . . . . . . 21
Basic settings . . . . . . . . . . . . . . . . . . . . . . . . . . . . . . . . 23
Opening an application . . . . . . . . . . . . . . . . . . . . . . . . . . 25
Closing an application . . . . . . . . . . . . . . . . . . . . . . . . . . 25
Using the task window . . . . . . . . . . . . . . . . . . . . . . . . . . 26
Actions common to all applications . . . . . . . . . . . . . . . . . 26
Synchronising information . . . . . . . . . . . . . . . . . . . . . . . 30
Beaming information . . . . . . . . . . . . . . . . . . . . . . . . . . . 32
Viewing the phone display on a TV . . . . . . . . . . . . . . . . . 36
Resetting your phone . . . . . . . . . . . . . . . . . . . . . . . . . . . 37
i

C
HAPTER
C
HAPTER
C
HAPTER
3
Entering text
Using the touch screen . . . . . . . . . . . . . . . . . . . . . . . . . . 38
Using the keypad . . . . . . . . . . . . . . . . . . . . . . . . . . . . . 44
4
Call functions
Turning the phone functions on or off . . . . . . . . . . . . . . . 50
Accessing the Phone screen . . . . . . . . . . . . . . . . . . . . . . 51
Making a call . . . . . . . . . . . . . . . . . . . . . . . . . . . . . . . . . 51
Answering a call . . . . . . . . . . . . . . . . . . . . . . . . . . . . . . 52
Quickly switching to Silent mode . . . . . . . . . . . . . . . . . . . 53
Options during a call . . . . . . . . . . . . . . . . . . . . . . . . . . . 53
Viewing missed calls . . . . . . . . . . . . . . . . . . . . . . . . . . . 55
Advanced calling features . . . . . . . . . . . . . . . . . . . . . . . . 55
Using call logs . . . . . . . . . . . . . . . . . . . . . . . . . . . . . . . . 57
Using the speed dial list . . . . . . . . . . . . . . . . . . . . . . . . . 59
Setting phone options . . . . . . . . . . . . . . . . . . . . . . . . . . 59
5
Messaging and the Internet
Messages . . . . . . . . . . . . . . . . . . . . . . . . . . . . . . . . . . . 63
eMail . . . . . . . . . . . . . . . . . . . . . . . . . . . . . . . . . . . . . . 72
Trace Messenger . . . . . . . . . . . . . . . . . . . . . . . . . . . . . . 78
QQ Messenger . . . . . . . . . . . . . . . . . . . . . . . . . . . . . . . . 81
China Mobile services . . . . . . . . . . . . . . . . . . . . . . . . . . . 84
C
HAPTER
ii
6
Personal information management
Address . . . . . . . . . . . . . . . . . . . . . . . . . . . . . . . . . . . . 88
Schedule . . . . . . . . . . . . . . . . . . . . . . . . . . . . . . . . . . . 93
To Do . . . . . . . . . . . . . . . . . . . . . . . . . . . . . . . . . . . . . . 98
Memo . . . . . . . . . . . . . . . . . . . . . . . . . . . . . . . . . . . . 100
Money . . . . . . . . . . . . . . . . . . . . . . . . . . . . . . . . . . . . 103

C
HAPTER
C
HAPTER
C
HAPTER
7
Entertainment
Camera . . . . . . . . . . . . . . . . . . . . . . . . . . . . . . . . . . . 106
Photo Album . . . . . . . . . . . . . . . . . . . . . . . . . . . . . . . . 111
Media Player . . . . . . . . . . . . . . . . . . . . . . . . . . . . . . . . 115
Fruits Cocktail . . . . . . . . . . . . . . . . . . . . . . . . . . . . . . . 118
MahJong . . . . . . . . . . . . . . . . . . . . . . . . . . . . . . . . . . . 119
8
Tools
Alarm . . . . . . . . . . . . . . . . . . . . . . . . . . . . . . . . . . . . . 120
D-Day . . . . . . . . . . . . . . . . . . . . . . . . . . . . . . . . . . . . 121
Clock . . . . . . . . . . . . . . . . . . . . . . . . . . . . . . . . . . . . . 123
Calculator . . . . . . . . . . . . . . . . . . . . . . . . . . . . . . . . . . 125
Converter . . . . . . . . . . . . . . . . . . . . . . . . . . . . . . . . . . 126
Dictionary . . . . . . . . . . . . . . . . . . . . . . . . . . . . . . . . . . 127
Remote control . . . . . . . . . . . . . . . . . . . . . . . . . . . . . . 128
Recorder . . . . . . . . . . . . . . . . . . . . . . . . . . . . . . . . . . 130
InfASR . . . . . . . . . . . . . . . . . . . . . . . . . . . . . . . . . . . . 132
TSync . . . . . . . . . . . . . . . . . . . . . . . . . . . . . . . . . . . . 134
Java . . . . . . . . . . . . . . . . . . . . . . . . . . . . . . . . . . . . . . 135
File Manager . . . . . . . . . . . . . . . . . . . . . . . . . . . . . . . . 137
9
Documents
Picsel Browser . . . . . . . . . . . . . . . . . . . . . . . . . . . . . . . 140
Text Reader . . . . . . . . . . . . . . . . . . . . . . . . . . . . . . . . 146
C
HAPTER
10
Health and safety information
SAR certification information . . . . . . . . . . . . . . . . . . . . . 148
Precautions when using batteries . . . . . . . . . . . . . . . . . 149
Road safety . . . . . . . . . . . . . . . . . . . . . . . . . . . . . . . . 150
Operating environment . . . . . . . . . . . . . . . . . . . . . . . . 150
Electronic devices . . . . . . . . . . . . . . . . . . . . . . . . . . . . 151
Potentially explosive Environment . . . . . . . . . . . . . . . . . 153
iii

Emergency calls . . . . . . . . . . . . . . . . . . . . . . . . . . . . . 153
Other important safety information . . . . . . . . . . . . . . . . 154
Care and maintenance . . . . . . . . . . . . . . . . . . . . . . . . . 155
iv

Important safety precautions
Read these guidelines before using your wireless phone.
Failure to comply with them may be dangerous or illegal.
Drive safely at all times
Do not use a hand-held phone while driving. Park the
vehicle first.
Switch off the phone when refuelling
Do not use the phone at a refuelling point (service station)
or near fuels or chemicals.
Switch off in an aircraft
Wireless phones can cause interference. Using them in an
aircraft is both illegal and dangerous.
Switch off the phone near all medical equipmen t
Hospitals or health care facilities may be using equipment
that could be sensitive to external radio frequency energy.
Follow any regulations or rules in force.
Interference
All wireless phones may be subject to interference, which
could affect their performance.
Be aware of special regulations
Meet any special regulations in force in any area and always
switch off your phone whenever it is forbidden to use it, or
when it may cause interference or danger.
Water resistance
Your phone is not water-resistant. Keep it dry.
Sensible use
Use only in the normal position (held to the ear). Avoid
unnecessary contact with the antenna when the phone is
switched on.
v

Emergency calls
Key in the emergency number for your present location,
then press .
Keep your phone away from small children
Keep the phone and all its parts, including accessories, out
of the reach of small children.
Accessories and batteries
Use only Samsung-approved accessories and batteries. Use
of any unauthorised accessories could damage your phone
and may be dangerous.
CAUTION:
• The phone could explode if the battery is replaced with an
incorrect type.
• Dispose of used batteries according to the manufacturer’s
instructions.
Use of authorised software
Use only Samsung-authorised software. The use of any
unauthorised software could damage your phone.
Qualified service
Only qualified service personnel may install or repair your
phone. Failure to do so may invalidate the warranty.
For more detailed safety information, see “Health and
safety information” on page 148.
Notes:
• While using your phone, data may be deleted or corrupted due
to system malfunctions or operating mistakes. Back up your
important data using external storage devices.
• Be careful not to press the reset button or remove the battery
while storing data. Doing this may delete or corrupt your data.
• Extremely high or low temperatures may cause errors in the
screen display or a system malfunction. The phone functions
vi
best in a normal temperature range.
1
Getting started
Congratulations on the purchase of your new phone! This
chapter helps you familiarise yourself with the different
components of your phone, set up your phone and charge
the battery.
What’s in the box?
Your package contains the following items:
Headset Travel charger
Leather case PC data able
Software/
Manual CD-ROM
Note
: Use the purchased accessories with only Samsung-
authorised devices. The use of these accessories with other
devices could cause problems and any repair costs would
not be covered by the warranty.
User’s Guide &
Quick Reference Guide
7
Getting started
Getting to know your phone
The following illustrations show the main elements of your
phone:
Front view
IrDA port
Application/
Menu keys
Volume keys
OK key
Voice memo key
Send key
Special
function keys
Receiver
Touch screen
Stereo speaker
Back key
End key
Navigation keys
Alphanumeric keys
Microphone
8
Rear view
Getting started
Memory card slot
Stylus pen holder
Headset jack
Power/Key lock
lever
Camera key
Reset button
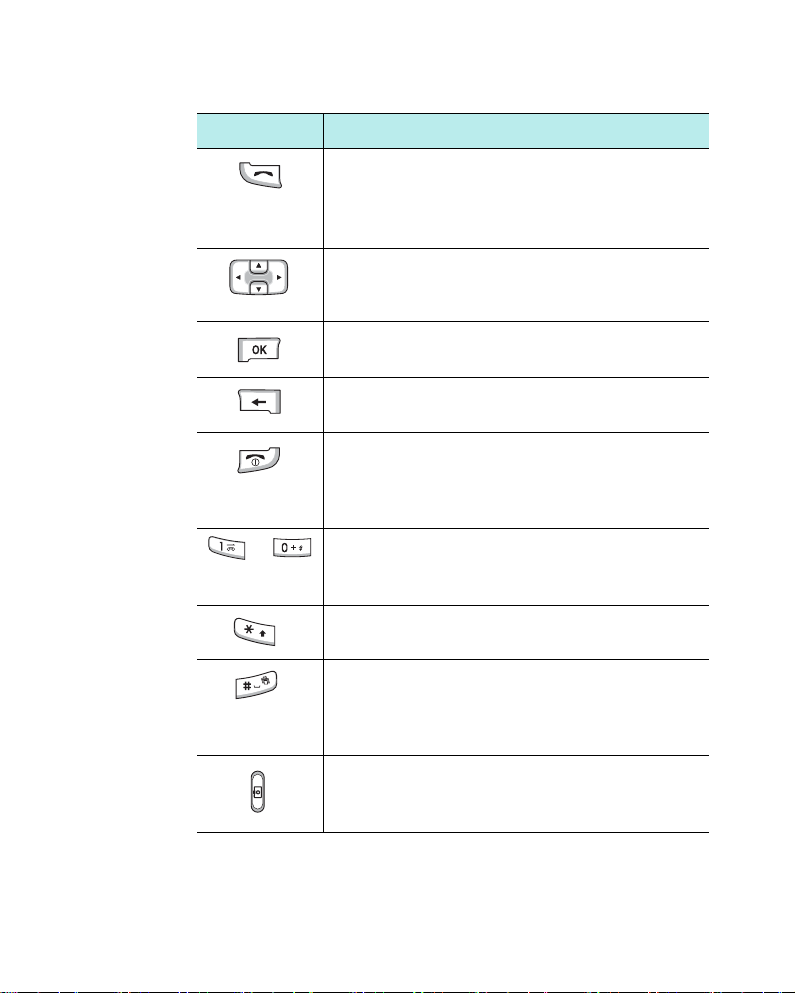
Button(s) Description
Press to open the associated application or
menu.
- : Pop-up menu list
- : Home
- : Address; Press to move through all
the Application Launcher tabs from the
Application Launcher. Press and hold to
open the task window.
- : Monternet
SIM card slot
Card cover lock
Flash
Camera lens
Battery
Battery lock
Charging/
Communication port
of
9
Getting started
Button(s) Description
• Press to access the Phone screen.
• Press to make or answer a call.
Phone screen, it shows the call log.
and hold to dial the last nu mber.
From the
Press
Press to move up or down and left or right
through any of the applications,
records, or
options.
Press to confirm your selection or execute
the selected application.
Press to cancel the operation or return to the
previous status or
application.
• Press to end a call or return to Idle mode
from Phone mode.
• Press and hold to turn the phone functions
off or on.
~ • Press to enter alphanumeric characters.
• Press to select options when they are
numbered.
Press and hold to change case when entering
text using the keypad.
• Press and hold to enter or exit Silent mode
in Phone mode.
• Press to enter a space when entering text
using the keypad.
• Press and hold to turn on the camera.
• Press to take a photo or record a video in
Camera.
10
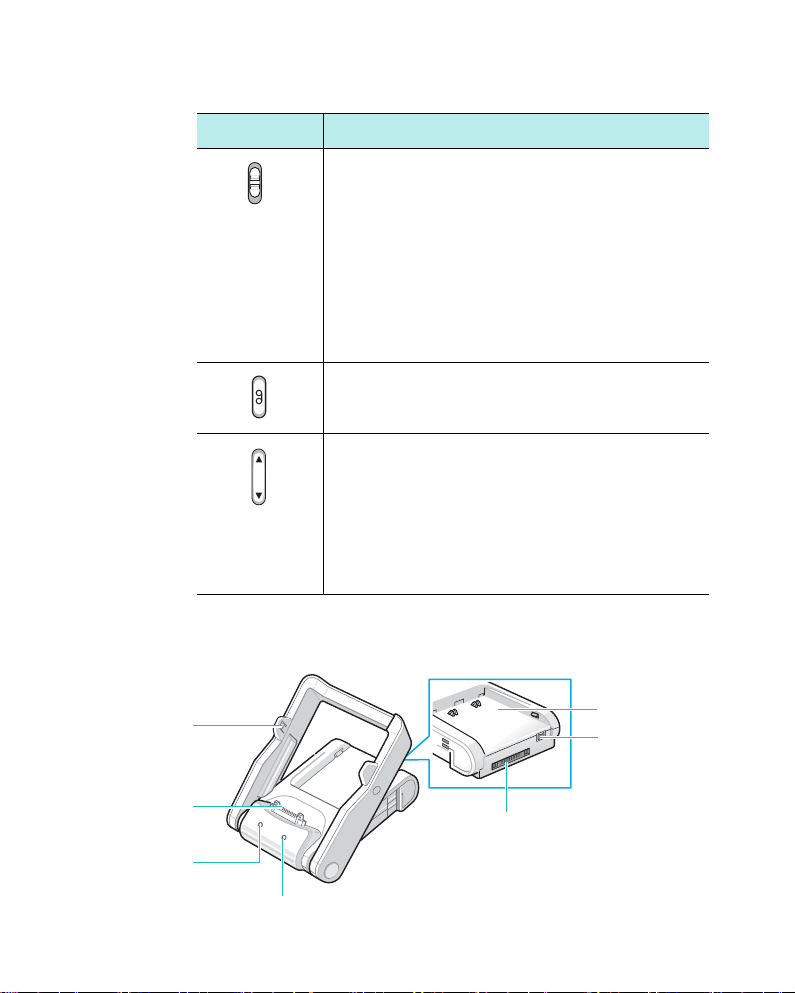
Button(s) Description
• Slide down to turn on the phone.
• Slide down and hold to turn the backlight
on and off, or slide down to switch the
phone to Sleep mode and wake it up when
using the phone.
• Slide up to lock the keys, so that pressing
the exposed keys does not effect your
phone’s functions when the phone is
closed.
to its centre position.
Press to open the Recorder application
allowing you to record a voice memo.
• Press to adjust the voice volume during a
call.
• Press to adjust the media volume in Media
Player.
• Press to adjust the system volume in
Phone mode.
• Press to scroll through records or options.
Desktop charger
Getting started
To unlock the keys, set this lever
Phone
support
Data
connector
Phone
charge LED
Battery
compartment
PC data cable
port
Charging/
Communication port
Battery charge LED
11
Getting started
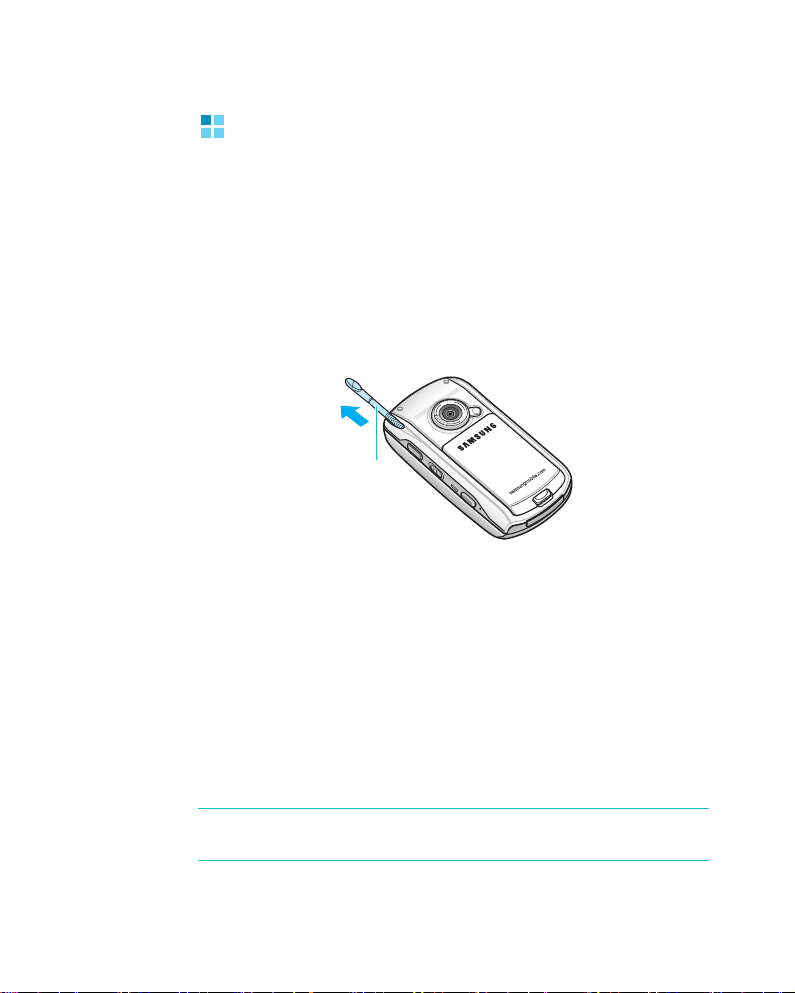
Using a stylus pen
Your phone has many of the same functions as a portable
personal computer, but does not have a keyboard or a
mouse. Instead, use the stylus pen provided with your
phone to access, run, or enter information using the LCD
touch screen.
A stylus pen is stored on the back of the phone so that you
can carry it with the phone. When you aren’t using the
stylus pen, insert it back into the stylus pen holder.
stylus pen
holder
Use the stylus pen to:
Tap
: Softly touch the screen once with the stylus pen to
select or execute a file or command. A tap works like a
mouse click on a computer.
Drag
: Hold the stylus pen on the screen and drag it across
the screen to move text.
Tap-and-hold
see a list of actions available for that item. Tap the action
you want to perform on the pop-up menu that appears.
: Tap and hold the stylus pen on an item to
12
Note
: To prevent scratches, do not use an actual pen, pencil or
other sharp objects to tap or write on the screen.

Getting started
Installing the battery
Your phone is powered by a rechargeable Li-ion battery.
Use only approved batteries and chargers. Ask your local
Samsung dealer for further details.
Inserting the battery
1. Put the battery on the back of the phone, lining it up with
corresponding slots on the phone.
2. Press the battery down until it clicks into place.
Make sure that the battery is securely locked before
switching the phone on.
Removing the battery
T o remo ve the battery, press the battery lock to release the
battery and lift the battery away the phone, as shown.
13

Getting started
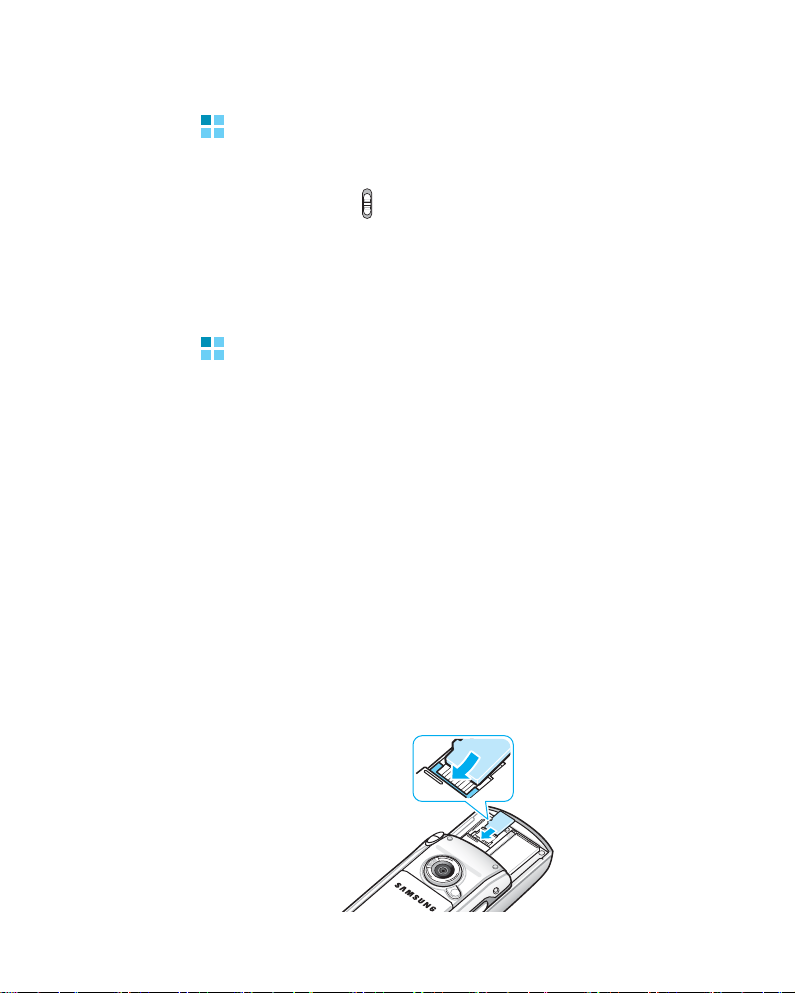
Installing SIM card
When you subscribe to a cellular network, you are provided
with a plug-in SIM card loaded with your subscription
details, such as your PIN, any optional services available
and many others.
• Keep all cards out of the reach of small children.
• The card and its contacts can easily be damaged by
scratches or bending, so be careful when handling, inserting
or removing the card.
Inserting the card
1. Open the phone.
2. Slide the card cover lock to the unlock position ( ) and
slide the card cover of the SIM card slot open.
14
3. Insert and slide the card under the two tabs, ensuring that
the gold-coloured contacts of the card face down into the
phone, as shown.

Getting started
4. Slide the cover closed and relock.
Removing the card
1. Open the phone and the card slot cover, referring to step 1
in “Inserting the card” on page 14.
2. Slide the card out of the holder.
Charging your phone
Before using your phone, charge it with the supplied travel
charger or desktop charger.
Using the travel charger
1. Plug the connector of the travel charger into the bottom of
the phone.
2. Plug the charger into a standard AC wall outlet.
15

Getting started
3. The LED on the charger shows the status of the battery
being charged.
• Red: the battery is charging.
• Green: the battery is fully charged.
• Orange: the travel charger is not plugged in correctly.
4. When charging is finished and the LED changes to green,
unplug the charger from the AC wall outlet and remove it
from the phone by pressing the
connector and pulling the connector out.
PUSH
button on the
Conserving battery power
You can conserve power by the following methods:
• S witch the phone to Sleep mode when you don’t use it. Slide
down to activate Sleep mode.
• Turn off the backlight. Slide down and hold.
• Adjust the Backli ght settings and Power settings. F or details,
see page 24 and page 155.
16
Getting started
Switching your phone on
1. After installing the SIM card and the battery and charging
the phone, slide down to turn the phone on.
2. If you install two SIM cards, select a network and tap
The phone initialises the card and receives signals from the
network. The Home screen appears.
OK
.
Installing an optional memory card
Use a memory card to extend your phone’s capacity. You
can purchase one from your local Samsung dealer or
certain electronics retailers.
A memory card is a ultra small-sized flash memory card
used for extra storage capacity for data, music files, voice
memos, and more. These can be transferred between your
phone and your computer. Use a memory card when it is
inconvenient to perform a PopSync operation.
To insert a memory card:
1. Open the phone, and then the memory card cover by
following step 2 on page 14.
2. Carefully slide the
side face up.
memory
card into the slot with the label
17

Getting started
Guidelines for using a memory card
Follow the instructions that come with the memory card or
contact your memory card manufacturer for more
information.
•Some
• If the battery is very lo w, do not save data to a
• Do not turn your phone off when you are in the middle of
• K eep your
memory
avoid draining the battery completely when using a
card, connect your phone to an AC wall outlet whenever
possible.
card. This may result in the loss of data. First connect to an
AC power outlet.
performing an operation, such as saving data to your
memory
to protect it from dirt and moisture.
cards consume large amounts of power. To
card.
memory
card in a protective case when not in use
memory
memory
Installing Sync programs
Your phone comes with programs which l et you synchronise
and exchange information between your phone and your
computer. Using the supplied CD-ROM, you can install:
•
PopSync
synchronise between your phone and Mobile Desk and/or
Microsoft Outlook on your computer.
•
Mobile Desk
manage Address, Schedule, To Do, Memo, and Money data
and browse the phone’s file directory .
•
USB Sync driver
connect the phone to your computer using a PC data link
cable.
- Sync manager
- Desktop PIMS
- USB driver for PC, which allows you to
program
program
, which allows you to
, which allows you to
18

Getting started
Before installing the Sync programs, make sure that you
have:
• W indow s 2000/XP
• 40 MB of hard disk space
• 256 (minimum) /512 (recommended) MB of RAM memory
• Available USB port
To install the programs:
1. Insert the supplied CD-ROM into the CD-ROM drive of your
computer.
The execution file will automatically run. If it doesn’t,
access
My computer
and double-click your CD-ROM drive.
2. Click the item you want to install.
3. Follow the instructions on the screen to install the
programs
.
After installation is complete, the PopSync and Mobile
Desktop icons appear on your Windows desktop.
Note
: For details about the program, please refer to the Sync
user’s guide on the supplied CD-ROM.
19
2
The basics
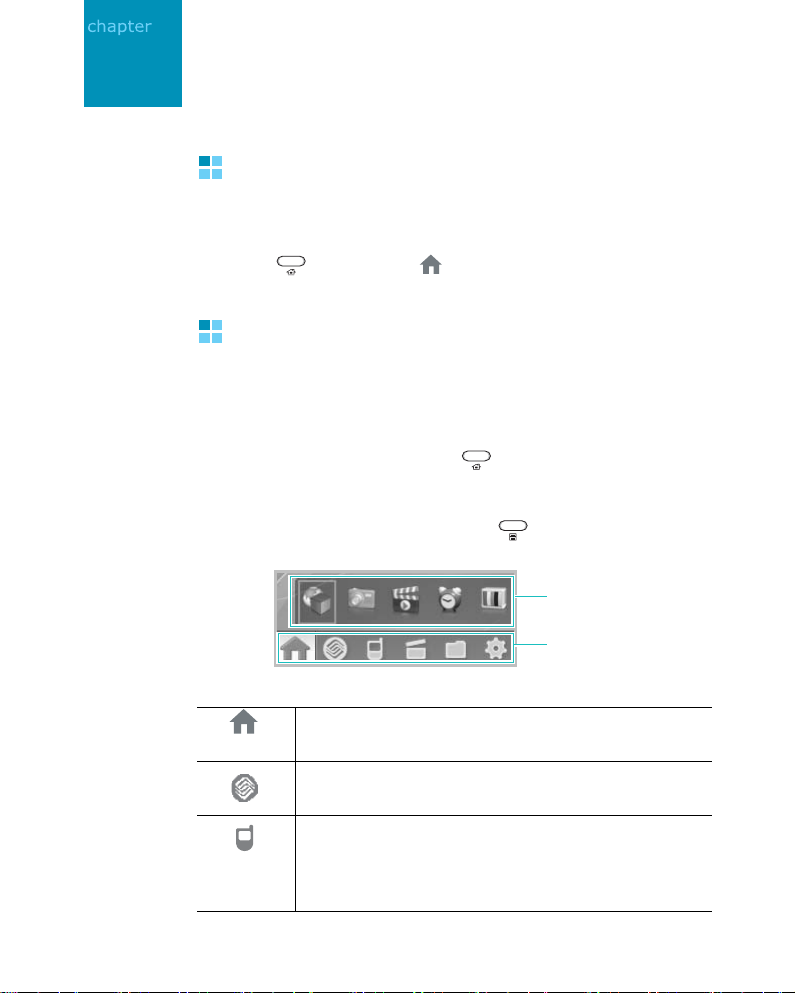
Home screen
When you turn your phone on for the first time each day,
you’ll see the Home screen. You can also display it by
pressing
Application Launcher
Applications on your phone can be accessed from the
Application Launcher.
To access the application screens, tap each icon on the
Application Launcher, or press repeatedly until the
application screen you want opens.
In each screen you can change the view method to either
Icon View or List View by pressing .
or selecting from the launcher.
Quick launcher:
Allows you to access
popular applications.
Application
Launcher icons
20
Tap to open the Home screen. You can see
important information for the day at a glance.
Tap to access the China Mobile-related
applications.
Tap to view the applications are related to
Personal Information Management (PIM) and
communications, such as Phone, Alarm, QQ
Messengers, SMS, and eMail.
The basics
Tap to view the entertainment and tool
applications available, such as Camera,
Control
Tap to access applications you have installed.
Tap to change the various settings of your phone.
, Calculator, and Clock.
Remote
Status bar
On the top line of the screen, the status bar displays icons
to show your phone’s current status. The following icons
may appear:
Icon Description
Shows the received signal strength. The
greater the number of bars, the better the
signal.
Appears when you turn off the phone
functions. Tap to turn on the phone
functions.
Appears when a call is in progress.
Appears when you are out of a service area.
When it appears, you cannot make or
receive a call.
Appears when the phone is connected to a
GPRS network.
Appears when a call restriction option is
active.
21

The basics
Icon Description
Appears when you are out of your home area
and have logged onto a different network,
when travelling in other countries, for
example.
Appears when a new uni-mail is received in
the server.
Appears when a new uni-mail is received in
the phone.
Appears when a new WAP alert is received.
Appears when a new message is received.
Appears when a new voicemail is received.
Appears when you have set an alarm to ring
at a specified time.
Indicates the call ringer setting:
• : Ring
• : Ring silent
• : Ring then vibration
• : Vibration then ring
• : Ring and vibration
• : Vibration
Appears when Silent mode is active.
22
Appears when the Bluetooth feature is
active. When the feature is deactivated, this
icon is greyed.
Appears when a memory card is installed
into your phone.
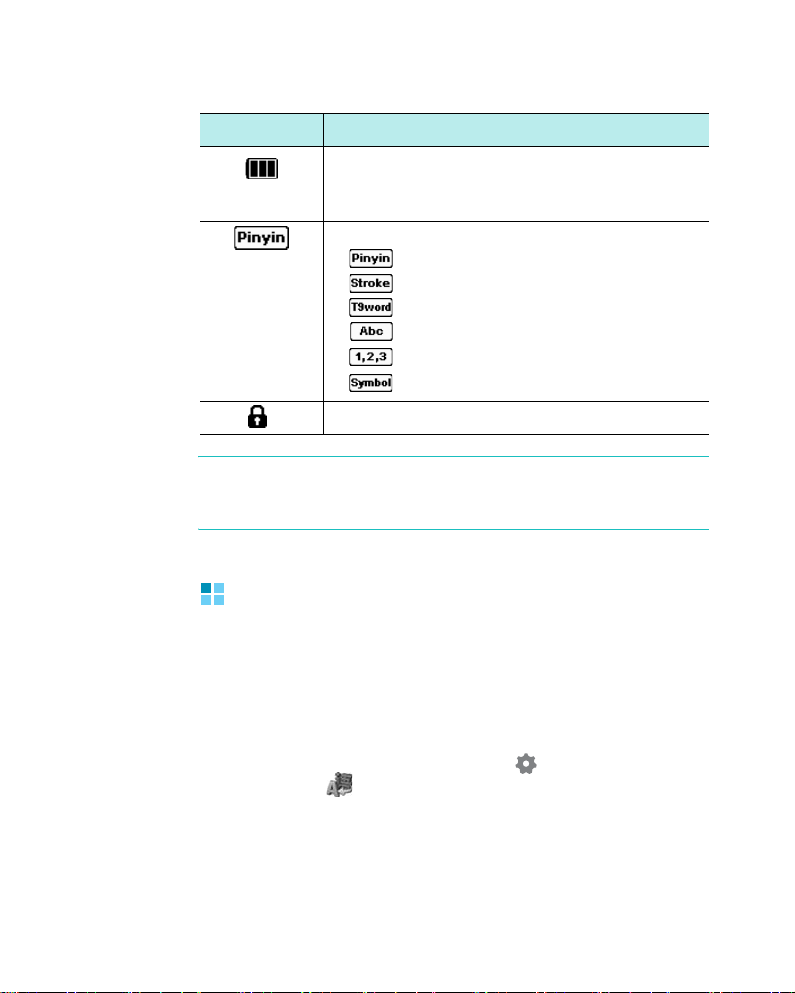
Icon Description
Shows the level of your battery. The more
bars you see, the more power left in the
battery.
Indicates the text input mode:
• : Chinese Pinyin mode
• : Chinese Strok e mode
• : T9word mode
• : ABC mode
• : Number mode
• : Symbolic mode
Appears when the keys are locked.
Note
: T a pping each icon allows you to change the settings for the
corresponding feature or shows you information about the
corresponding feature.
Basic settings
The basics
Before using your phone, personalise the following basic
settings as your preferences and needs.
Changing the display language
1. From the Application Launcher, tap and select
Language
2. Tap the language you want and then
Your phone restarts to apply the language change to the
system.
().
Apply
语言/
.
23

The basics
Calibrating the screen
The LCD screen of your phone is a touch screen which
recognises your touches on the screen and performs the
appropriate commands. T o ensure optimal performance and
to minimise possibility of errors, you should calibrate the
screen when you turn on the phone for the first time.
1. From the Application Launcher, tap and select
Calibration
2. Touch the cross hair object on the screen firmly and
accurately as it moves.
If the screen doesn’t recognise your touches or react
incorrectly to your touches while using the phone, you can
recalibrate the phone by doing this.
().
Customising the display
You can control the screen’ s brightness and the light usage.
The backlight drains the battery, so you can conserve
power by reducing the brightness of the screen.
To adjust the brightness of the screen:
1. From the Application Launcher, tap and select
Brightness
().
24
2. Tap the pick list and select a menu.
3. Adjust the backlight time and the display brightness.
4. Tap
to save the changes and exit screen.
The basics
Adjusting the device volume
You can adjust the v olume level of the system sounds, such
as the keypad tone, screen touch tone, and error alert
tones.
Tap a ringer icon on the top line of the screen, and then or
. You can also press or from the Phone screen.
Opening an application
On the Application Launcher, tap an Application Launcher
icon and then the application icon you want to use.
Your phone has one or more application buttons located on
the front or side of the phone and the quick launcher on the
Home screen to quickly access the applications.
Closing an application
To close the application you are currently using, use the
following methods:
• Tap at the top right corner of the screen. The application
closes and your settings, if any, are saved automatically.
• Select
• Press to close the current application. The Phone screen
opens.
Menu →
Quit
. You can return to the previous screen.
25
The basics
Using the task window
Your phone is a multi-tasking device, which means that it
can run multiple application at the same time. If you switch
to another application without closing the application you
were using, the previous application is inactive but still
running.
When you are using s e veral applications at once, you can
quickly access one of the applications you have already
opened. T a p the application name current ly open on the top
of the screen or press and hold .
The operating application icons display. Tap the application
icon you want to access. The selected application opens.
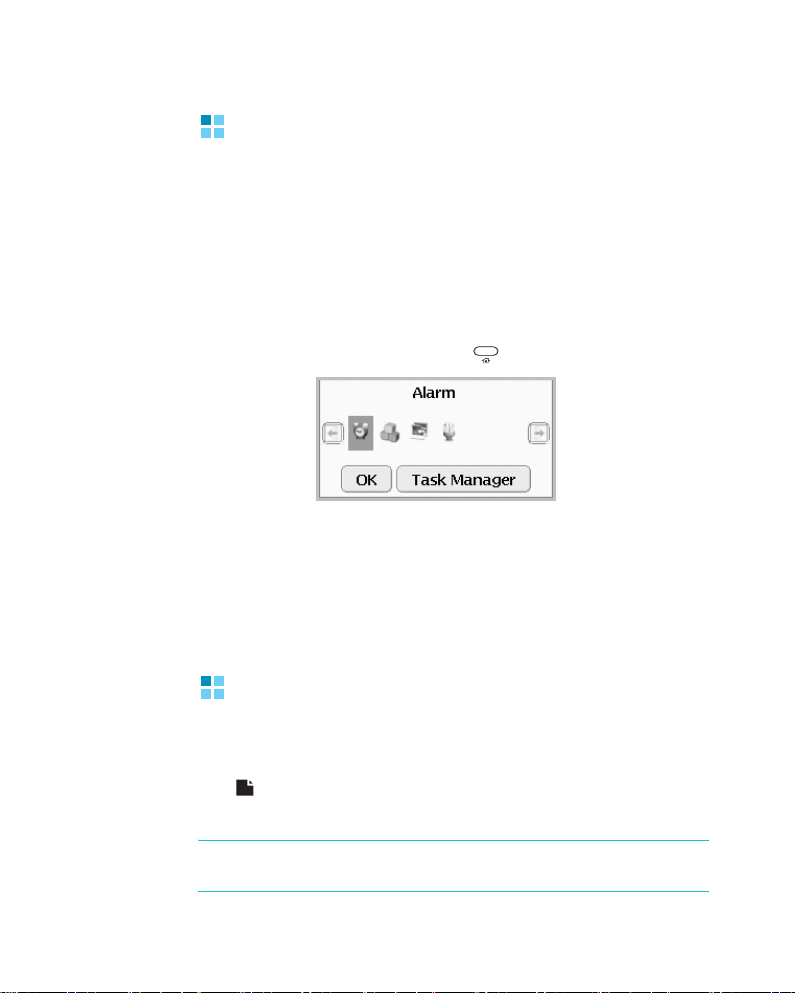
If you want to end one of the applications currently open,
tap
Task Manager
Menu
→
End
, select the application(s), and then tap
. For details, see page 156.
26
Actions common to all applications
Creating a new item in an application
Tap on the command bar at the bottom of the screen or
select
Menu
→
New
.
Tip!
For information on how to enter or change text on your
phone, see “Entering text” on page 38.

The basics
Opening an item for viewing
When you are viewing a list of files or folders, tap an item
to open it. You can also tap and hold an item then select
View
from the pop-up menu.
Editing an item
T o open an item for editing, you us ually need to first open it
for viewing and then tap on the command bar. You can
also tap and hold an item and then select
pop-up menu, or tap
its contents.
You can use the stan dard editing tools, such as
or
Undo
. Highlight the information you want to edit by
dragging the stylus pen over it. Then tap and hold the
highlighted area to display the pop-up menu with the
editing options.
Menu
→
Edit
, if you want to change
Edit
from the
Cut, Paste
Deleting an item
Select the item you want to delete, and then tap or tap
Menu
→
Delete
. You can also tap and hold an item, then
select
Delete
from the pop-up menu.
,
Searching for items
Using Search, you can search for a name, file, folder, or
shortcut. You can also use the Search application in each
application.
1. From the Application Launcher, tap and select
().
2. Enter the keyword in the
If you already have a keyword entered, tap the arrow next
to the
Keyword
field and select the keyword you want.
Keyword
field.
Search
27
 Loading...