

Page 1

SGH-i607
Smartphone
Please read this manual before operating your
phone, and keep it for future reference.
User Guide
UCFJE_WB_i607_110806_d3
Page 2

Intellectual Property
All Intellectual Property, as defined below, owned by or which is otherwise the property
of Samsung or its respective suppliers relating to the SAMSUNG Phone, including but not
limited to, accessories, parts, or software relating there to (the “Phone System”), is
proprietary to Samsung and protected under federal laws, state laws, and international
treaty provisions. Intellectual Property includes, but is not limited to, inventions
(patentable or unpatentable), patents, trade secrets, copyrights, software, computer
programs, and related documentation and other works of authorship. You may not infringe
or otherwise violate the rights secured by the Intellectual Property. Moreover, you agree
that you will not (and will not attempt to) modify, prepare derivative works of, reverse
engineer, decompile, disassemble, or otherwise attempt to create source code from the
software. No title to or ownership in the Intellectual Property is transferred to you. All
applicable rights of the Intellectual Property shall remain with SAMSUNG and its suppliers.
Samsung Telecommunications America (STA), L.P.
Headquarters: Customer Care Center:
1301 E. Lookout Drive 1000 Klein St.
Richardson, TX 75082 Plano, TX 75074
Toll Free Tel: 1.888.987.HELP (4357)
Internet Address: http://www.samsungusa.com
©
2006 Samsung Telecommunications America, L.P. is a registered trademark of
Samsung Electronics America, Inc. and its related entities.
Do you have questions about your Samsung Mobile Phone? For 24
hour information and assistance, we offer a new FAQ/ARS System
(Automated Response System) at:
www.samsungwireless.com/support
Openwave® is a registered Trademark of Openwave, Inc.
RSA® is a registered Trademark RSA Security, Inc.
Disclaimer of Warranties; Exclusion of Liability
EXCEPT AS SET FORTH IN THE EXPRESS WARRANTY CONTAINED ON THE WARRANTY
PAGE ENCLOSED WITH THE PRODUCT, THE PURCHASER TAKES THE PRODUCT "AS IS",
AND SAMSUNG MAKES NO EXPRESS OR IMPLIED WARRANTY OF ANY K IND WHATSOEVER
WITH RESPECT TO THE PRODUCT, INCLUDING BUT NOT LIMITED TO THE
MERCHANTABILITY OF THE PRODUCT OR ITS FITNESS FOR ANY PARTICULAR PURPOSE
Page 3

OR USE; THE DESIGN, CONDITION OR QUALITY OF THE PRODUCT; THE PERFORMANCE OF
THE PRODUCT; THE WORKMANSHIP OF THE PRODUCT OR THE COMPONENTS
CONTAINED THEREIN; OR COMPLIANCE OF THE PRODUCT WITH THE REQUIREMENTS OF
ANY LAW, RULE, SPECIFICATION OR CONTRACT PERTAINING THERETO. NOTHING
CONTAINED IN THE INSTRUCTION MANUAL SHALL BE CONSTRUED TO CREATE AN
EXPRESS OR IMPLIED WARRANTY OF ANY KIND WHATSOEVER WITH RESPECT TO THE
PRODUCT. IN ADDITION, SAMSUNG SHALL NOT BE LIABLE FOR ANY DAMAGES OF ANY
KIND RESULTING FROM THE PURCHASE OR USE OF THE PRODUCT OR ARISING FROM THE
BREACH OF THE EXPRESS WARRANTY, INCLUDING INCIDENTAL, SPECIAL OR
CONSEQUENTIAL DAMAGES, OR LOSS OF ANTICIPATED PROFITS OR BENEFITS.
UCFJE_WB_i607_110806_d3
Page 4

Table of Contents
Section 1: Getting Started .......................................................................................... 7
Activating Your Phone ................................................................................................................ 7
Powering On or Off the Phone .................................................................................................. 14
The Home Screen .................................................................................................................... 14
Section 2: Understanding Your Phone ..................................................................... 17
Basics ..................................................................................................................................... 18
Front View of Your Phone ......................................................................................................... 18
Rear View of Your Phone .......................................................................................................... 21
Internal Display Layout ............................................................................................................ 24
Customizing the Home Screen ................................................................................................. 27
Start menu screen ................................................................................................................... 28
Entering text ............................................................................................................................ 29
Customizing Your Phone .......................................................................................................... 30
Power Settings ........................................................................................................................31
Security Settings ...................................................................................................................... 34
Using an Optional microSD Memory Card ................................................................................. 39
Resetting your Phone ............................................................................................................... 43
Using Online Help .................................................................................................................... 44
Section 3: Synchronization ...................................................................................... 45
Installing Microsoft® ActiveSync®............................................................................................ 46
Customizing Connection Settings ............................................................................................. 47
Connecting Your Phone to a Computer ..................................................................................... 48
Connecting with a PC data cable .............................................................................................. 48
Synchronizing Information .......................................................................................................50
Customizing Synchronization Settings ...................................................................................... 51
Section 4: Call Functions .........................................................................................55
Turning the Phone Functions On and Off .................................................................................. 56
Using the Dialling Screen ......................................................................................................... 56
Making a call ........................................................................................................................... 57
Advanced Calling Features ....................................................................................................... 57
Answering or Ignoring a Call .................................................................................................... 59
Options During a Call ............................................................................................................... 59
Call-related features ................................................................................................................ 61
Customizing Your Phone Functions .......................................................................................... 63
Section 5: Menu Navigation ..................................................................................... 67
Menu Navigation ...................................................................................................................... 68
Using Shortcuts .......................................................................................................................68
Section 6: Cingular Music ........................................................................................ 73
Windows Media Player.............................................................................................................. 74
Shop Music .............................................................................................................................. 80
MusicID ................................................................................................................................... 81
Streaming Music ...................................................................................................................... 83
Music Videos ........................................................................................................................... 83
4
Page 5

The Buzz .................................................................................................................................. 85
Music Community ....................................................................................................................86
Music Apps .............................................................................................................................. 86
Section 7: Cingular Video ......................................................................................... 87
Media Clip Options ................................................................................................................... 88
Using the Video Categories ......................................................................................................91
Customizing Cingular Video ...................................................................................................... 92
My Purchases .......................................................................................................................... 93
Parental Controls ..................................................................................................................... 94
Section 8: Cingular Mall ........................................................................................... 97
Shop Tones .............................................................................................................................. 97
Shop Games ............................................................................................................................ 98
Shop Graphics ......................................................................................................................... 99
Shop Multimedia ...................................................................................................................... 99
Shop Application .................................................................................................................... 100
MEdia Net Home ...................................................................................................................100
Section 9: Messaging, Internet, and Messenger ...................................................103
Messaging .............................................................................................................................104
Working with SMS or MMS Messages .................................................................................... 104
Internet Explorer .................................................................................................................... 116
Section 10: Camera ................................................................................................ 121
Camera ..................................................................................................................................122
Section 11: Organizer ............................................................................................. 129
Alarms ................................................................................................................................... 130
Calculator ..............................................................................................................................131
D-Day ....................................................................................................................................131
NotePad .................................................................................................................................132
Smart Converter ....................................................................................................................133
Stopwatch ............................................................................................................................. 134
Tasks .....................................................................................................................................134
Voice Notes ............................................................................................................................ 135
World Clock ........................................................................................................................... 136
Section 12: Games ..................................................................................................139
Games ...................................................................................................................................140
Section 13: Extra Programs ...................................................................................143
Download Agent ....................................................................................................................144
File Explorer ........................................................................................................................... 144
Java ......................................................................................................................................145
Picsel Viewer ......................................................................................................................... 145
RSS Reader ...........................................................................................................................148
Smart Search ......................................................................................................................... 150
Speed Dial ............................................................................................................................. 151
Task Manager ........................................................................................................................ 151
Table of Contents 5
Page 6

Section 14: Getting Connected ..............................................................................153
Beaming with Bluetooth ......................................................................................................... 153
Connecting to the Internet or your network ............................................................................ 157
Creating a VPN connection ..................................................................................................... 159
Section 15:Troubleshooting ................................................................................... 163
General ..................................................................................................................................164
Call Problems ........................................................................................................................168
Power and Charging Problems ............................................................................................... 170
Program Problems ................................................................................................................. 172
Section 16: Health and Safety Information ...........................................................179
Health and Safety Information ................................................................................................ 179
UL Certified Travel Adaptor .................................................................................................... 181
Consumer Information on Wireless Phones ............................................................................182
Road Safety ........................................................................................................................... 192
Operating Environment .......................................................................................................... 194
Using Your Phone Near Other Electronic Devices .................................................................... 194
Potentially Explosive Environments ........................................................................................196
Emergency Calls .................................................................................................................... 197
FCC Notice and Cautions ........................................................................................................ 198
Other Important Safety Information ........................................................................................ 199
Product Performance ............................................................................................................. 199
Availability of Various Features/Ring Tones ............................................................................ 201
Battery Standby and Talk Time .............................................................................................. 201
Battery Precautions ................................................................................................................ 201
Care and Maintenance ........................................................................................................... 203
Section 17: Warranty Information .........................................................................205
Standard Limited Warranty ....................................................................................................205
Index ....................................................................................................................... 212
6
Page 7

Section 1: Getting Started
Topics Covered
• Activating Your Phone
• Powering On or Off the Phone
• The Home Screen
This section describes how to start using your phone
by activating your phone, inserting your SIM card
and battery, and navigating from the Home screen.
Activating Your Phone
When you subscribe to a cellular network, a plug-in
Subscriber Identity Module (SIM) card is provided
loaded with your subscription details, such as your PIN
and other optional services.
Removing the Battery
1. If necessary, power-off the phone by holding down the
key (located at the top-left of your handset) until the
power-off image displays.
Section 1: Getting Started 7
Page 8

2. Remove the battery cover by pressing the battery lock
down and slide the battery cover away, as shown.
3. Lift the battery from the bottom up and out of the phone.
Installing the SIM Card
Important! The plug-in SIM card and its contacts can be easily damaged
by scratches or bending. Use caution when inserting or removing the card
and keep all SIM cards out of reach of children.
Make sure the gold contacts of the card face into the
phone, then slide the SIM card into the socket.
Section 1: Getting Started 8
Page 9

Removing the SIM Card
To remove the SIM card, slide it away from socket. See
the following illustration.
Installing the Battery
1. Align the battery tabs with the slots at the bottom of the
phone.
2. Press the battery down until it clicks into place. Make
sure that the battery is properly installed before
switching on the phone.
Section 1: Getting Started 9
Page 10

3. With the battery in position on the phone, place the cover
back on the handset and slide it in until it clicks.
Charging a Battery
Your phone is powered by a rechargeable Li-ion battery.
Use the travel adaptor to charge the battery, and use
only Samsung approved batteries and chargers.
Note: You must fully charge the battery before using your phone for the
first time. A discharged battery recharges fully in approximately
200 minutes. You can use the phone while the battery is charging, but this
causes the phone to charge more slowly.
Note: For connection to an electrical supply not located in the U.S., you
must use an adaptor of the proper configuration for the power outlet. Use
of the wrong adaptor could damage your phone and void your warranty.
Section 1: Getting Started 10
Page 11

1. Plug the connector of the travel adaptor into the jack on
the left side of the phone.
Note: The following illustration shows the correct and incorrect method
for connecting the charger. Verify the arrow on the adapter is showing and
pointing to the handset for a correct connection. If it is not, damage to the
accessory port will occur therefore voiding the phones warranty.
Section 1: Getting Started 11
Page 12
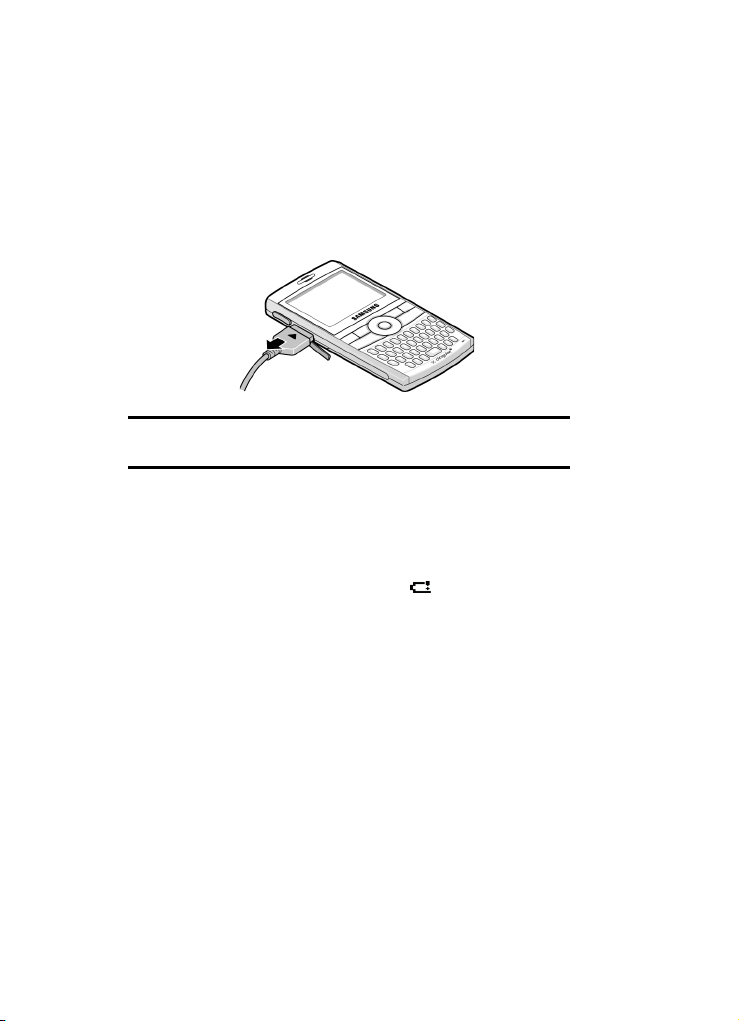
2. Plug the adaptor into a standard AC wall outlet. When
charging is finished, unplug the adaptor from the power
outlet.
Note: You must unplug the adaptor before removing the battery from the
phone during charging to avoid damage.
Low Battery Indicator
When the battery is weak and only a few minutes of
talk time remain, a warning tone sounds and the “Main
Battery very low” message repeats at regular intervals
on the display and the battery icon displays. The
backlight turns off to conserve the remaining battery
power.
When the battery level becomes too low, the phone
automatically turns off.
Section 1: Getting Started 12
Page 13

Using the Battery Charger
Your device comes with a battery charger to charge the
additional battery. The approximate battery charge
time using the battery charger is 200 minutes.
1. Open the battery charger cover and insert the battery as
shown.
2. Plug the power cord into the wall outlet after you have
inserted the battery into the battery charger and closed
the lid.
Section 1: Getting Started 13
Page 14

3. Once the battery has compled charging, unplug the cord
from the wall outlet, open the battery charger, and
remove the charged battery from the charger.
Note: You can also use the battery charger as a carrying case for your extra
battery.
Powering On or Off the Phone
1. Press and hold the key until the phone power-on
screen displays.
The phone is logged into your home network and
receives the signal from the network. You can now make
or answer a call and use programs on the phone.
2. To turn off the phone, press and hold .
The Home Screen
The Home screen displays important information, such
as upcoming appointments, status indicators, the
current date, time, and profile, and icons of programs
that you have recently used. You can open a program
directly by selecting its icon and pressing .
• To access the Home screen from anywhere, press .
• To customize the Home screen display, including the
background, click Start > Settings > Display > Home
Screen and press the key.
Home Screen Options
Use the Up and Down Navigation keys to choose from
the options available in the following fields:
• Home screen layout
• Color scheme
Section 1: Getting Started 14
Page 15

• Background image
• Time out.
Start Menu Style
Use the Left and Right Navigation keys to choose from
the Grid or List display options.
Dialer
Use the Left and Right Navigation keys to choose from
the MS default and Samsung dialer style display
options.
Section 1: Getting Started 15
Page 16

16
Page 17

Section 2: Understanding Your Phone
Topics Covered
•Basics
• Front View of Your Phone
• Rear View of Your Phone
• Internal Display Layout
• Customizing the Home Screen
• Start menu screen
• Entering text
• Customizing Your Phone
• Power Settings
• Inserting the microSD memory card
This section outlines some key features of your
phone. It also displays the screen and the icons that
will are displayed when the phone is in use.
Section 2: Understanding Your Phone 17
Page 18
Basics
This chapter explains basic information about using
your phone, such as customizing your phone and using
online help.
Home Screen
When you turn on your phone, the Home screen, the
phone’s idle screen, appears. You can also access this
screen by pressing from any program.
On the Home screen, you can view important
information for the day or messages at a glance. You
can also quickly switch to the programs you recently
accessed.
Front View of Your Phone
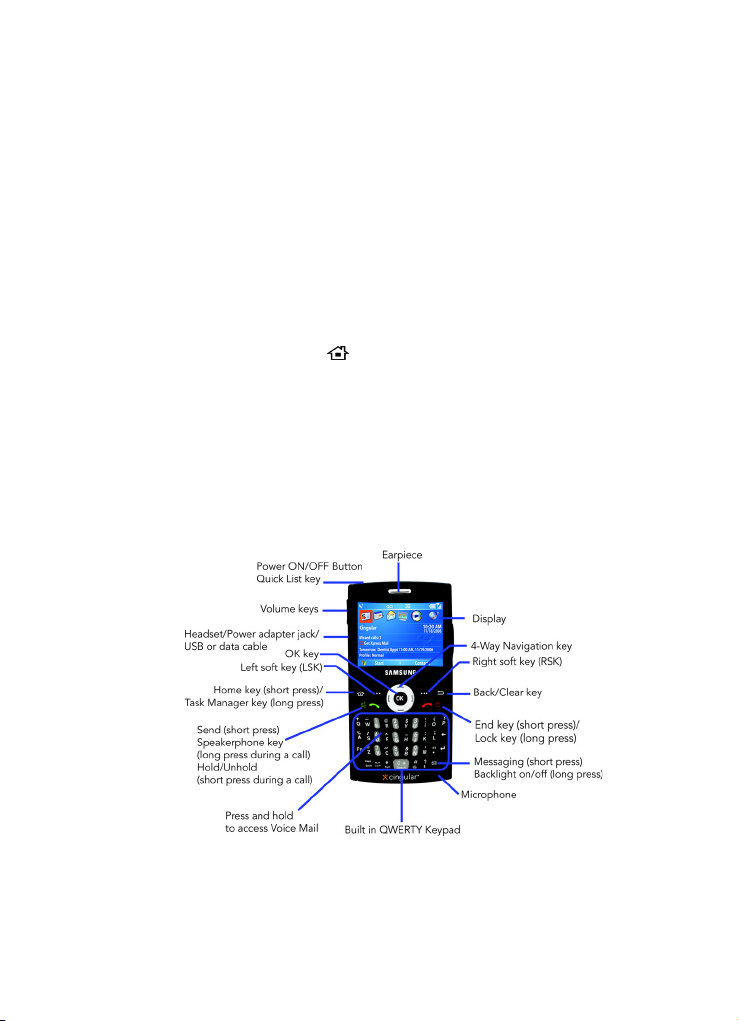
The following illustrations show the main elements of your phone:
18
Page 19

Front View of Your Phone
Keys
The following list correlates to the front view illustration.
1. Power ON/OFF Button: Press and hold to turn the device
on or off. When the device is on, a short press displays
the Quick List screen.
2. Volume keys: Adjusts the earpiece volume or the to
adjust the ringer volume in standby mode or adjust the
voice volume during a call. To mute the ringer during an
incoming call, press the volume key up or down. To
reject an incoming call, press the Ignore soft key or
press and hold the down volume key. This will send the
call to your voicemail.
3. Headset/adapter jack/USB or data cable: Allows you
to plug in the travel adapter (power), PC connection
cable (data transfer), and optional headset for safe,
convenient, hands-free conversations.
4. OK key: Allows you to access the menu screen. It also
allows you to accept choices when navigating through a
menu.
5. Left Soft key (LSK): Allows you to select softkey actions
or menu items corresponding to the bottom left line on
the display screen.
6. Home key: Short press to return to the Home Screen
from any menu, submenu, or application.
7. Send key: Short press to open the dialing screen. Press
to make or answer a call. In standby mode, press the key
once to access the Recent Call log. If you press and hold
the key down, you will initiate the most recent call from
Section 2: Understanding Your Phone 19
Page 20

the Recent Call log. During a call, press and hold will
launch the speakerphone option. During a call, a short
press will place the call on hold or unhold.
8. Voicemail key: Press and hold the key to
automatically dial your voicemail.
9. Built in QWERTY Keypad: allows you to enter numbers,
letters, and characters using a full Qwerty keypad
interface.
10. Microphone: The Microphone allows the other callers to
hear you clearly when you are speaking to them.
11. Messaging: A short press of the Messaging key allows
you to access the SMS/MMS, Microsoft Mobile®
®
Outlook
E-mail or other E-mail accounts you have setup. A long
press of this key will darken the screen to save battery
life-any key pressed will show the screen.
12. End key: Ends a call or exit a program. Press and hold
this key for two seconds to lock they keypad. While in the
main menu, it returns the phone to standby mode and
cancels your input. When you receive an incoming call,
press the Left Soft key Ignore. During a call, you can
reject by pressing the key.
13. Back/Clear key: Press to close the current menu and
return to the previous menu or screen. While in any text
edit screen, you can also press to backspace and clear
text. Press and hold to clear all text in the field.
14. Right Soft key (RSK): allows you to select softkey
actions or menu items corresponding to the bottom right
line on the display screen.
20
Page 21
Rear View of Your Phone
15. Navigation keys: This key allows you to scroll through
phone menu options and provides a shortcut to phone
functions from standby mode.
16. Display: This screen displays all the information needed
to operate your phone.
17. Earpiece: Used to listen to audio from your phone.
Rear View of Your Phone
Keys
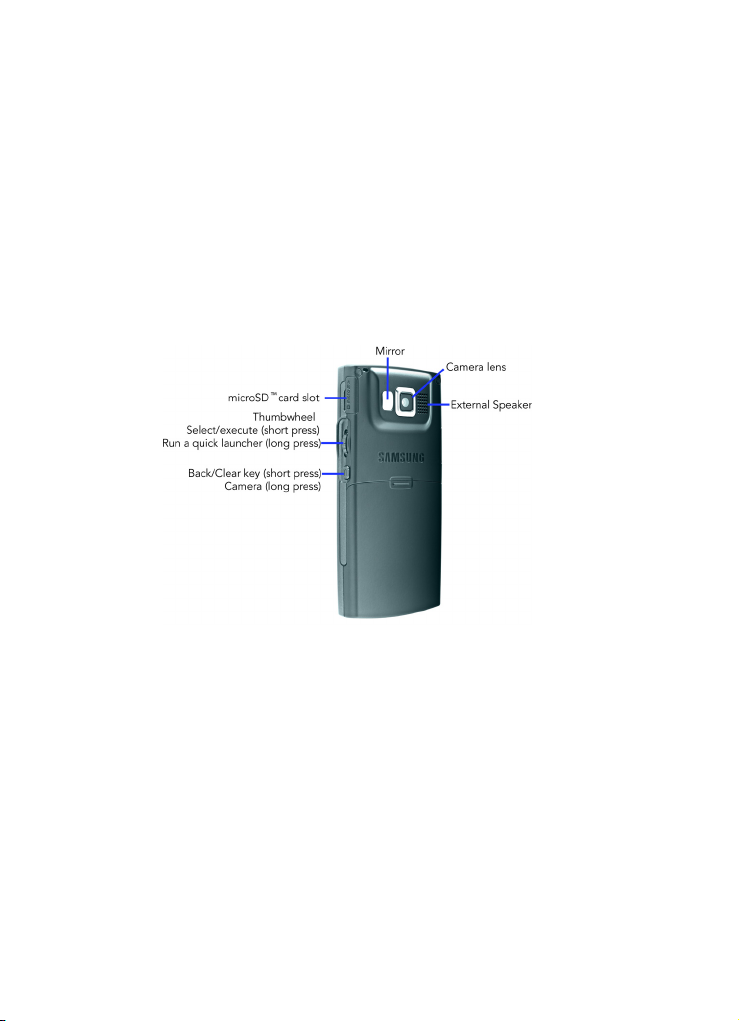
The following list correlates to the rear view illustration.
1. microSD card slot: Your phone has an external memory
port for a microSD card.
2. Thumbwheel dial: used to navigate through menu
options or in your Contacts list. Press to select or execute
the program selected.Press and hold to display the quick
launcher.
Section 2: Understanding Your Phone 21
Page 22

3. Back/Clear key or Camera key: A short press will clear
the entry or take you to the previous menu. A long press
launches the camera to take a photo or to whatever
option you have set for this key.
4. External Speaker: plays the audio during a call using
the speakerphone option and plays music or video files
using the Windows Media Player
®
.
5. Camera lens: the camera lens is used for taking pictures
and videos.
6. Mirror: displays your reflection when taking pictures.
Back Light
A back light illuminates the display and the keypad
when you press any key or open the phone. It turns off
when no keys are pressed within a given period of
time, and/or dims the light, depending on the settings
in the Start > Settings > More > Power Management >
Display Time Out options.
To quickly turn your screen off, press and hold the .
Back Light When Keypad is Locked
When the back light dims and your keypad is locked
you must follow the Unlock the Keypad instructions to
display the screen image.
To Lock the Keypad
To lock your keypad use the following steps.
1. Press and hold the key.
To Unlock the Keypad
To unlock your keypad use the following steps.
22
Page 23
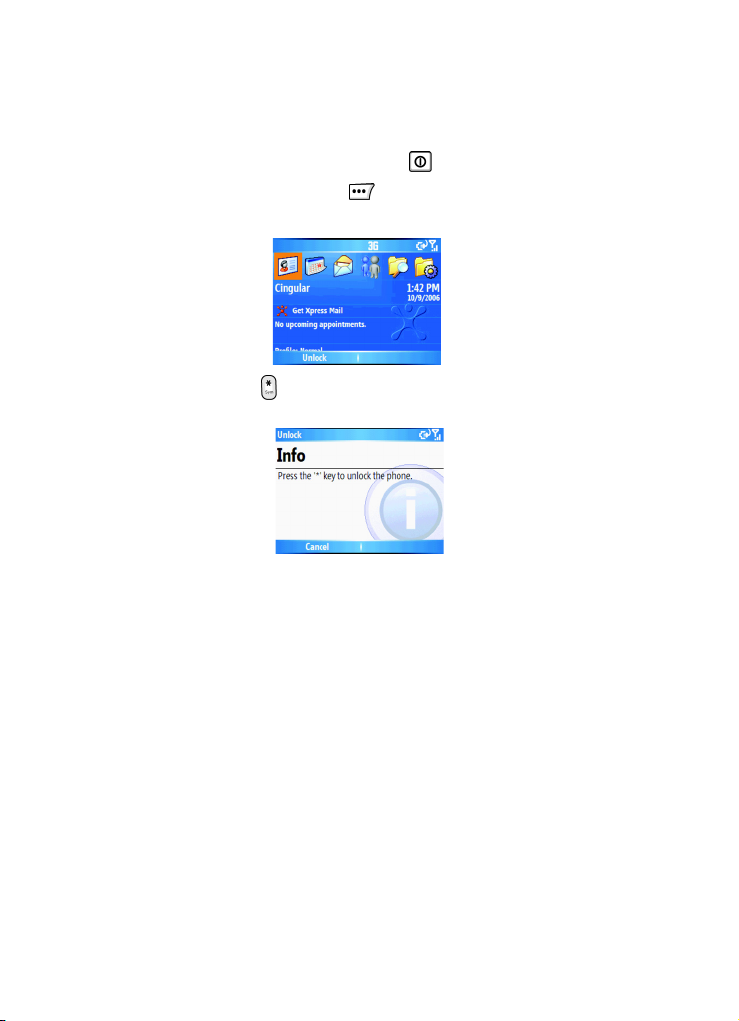
1. Press the Power ON/OFF Button .
2. Press the Left Soft Key (Unlock).
3. Press the key to unlock the keypad.
Rear View of Your Phone
Section 2: Understanding Your Phone 23
Page 24

Internal Display Layout
Status Bar
The display has 3 areas. On the top line of the screen,
the status bar displays icons to show your phone’s
current status. Just below the display area, the Quick
Launcher is displayed. And third is the Soft key
command line.
The following icons can be displayed:
Shows the strength of the signal. You can also
view the following service status:
Shows full wireless coverage using data in the
3G coverage.
24
Page 25

Internal Display Layout
No wireless coverage
Wireless is turned off
Changes the ringtone to vibrate.
Appears when Bluetooth is activated.
Appears when an error occurs during
synchronization.
Appears when an text (SMS) message, Instant
Message or an Email message has been
received.
Appears when a multimedia (MMS) message
has been received.
Section 2: Understanding Your Phone 25
Page 26

Appears when a new voicemail has been
received.
Appears when there is a call you have missed
Appears when you have set incoming calls to
be forwarded to another destination.
Accessing Information from the Home Screen
From the Home screen, you can:
• access your Contact List
• view upcoming appointments
• view unread text (SMS), multimedia (MMS) messages and Email
messages
• access the most recently accessed programs
• change the profile option
1. From the Home screen, scroll to the item you want on the
Quick Launcher by pressing the Navigation keys or
spinning the Thumbwheel Up or Down, and press to
access appointments or messages, or change the profile
setting. For more information on changing these items,
see the appropriate instructions for each task in this
guide.
.
26
Page 27

Customizing the Home Screen
2. Press or to return to the Home screen. To
change information on each item.
Note: To ensure that operations, such as moving or saving files, proceed to
completion, wait at least 50 seconds before removing the battery.
Customizing the Home Screen
You can customize the Home screen according to your
preferences.
Setting the Home Screen Properties
1. On the Home screen, press the Start soft key.
2. Select Settings > Display > Home Screen press
3. Press the Up or Down Navigation key to scroll to an
option.
4. Press the Left or Right key to change the setting.The
following options are available:
䢇 Home screen layout: Select the layout to be used for the
Home screen.
䢇 Color scheme: Select the color scheme to be used for the
Home screen.
䢇 Background image: Select an image to use as a
background image on the Home screen.
䢇 Time out: Specify the length of time the phone waits before
returning the display to the Home screen if the phone is not
used.
5. When you have finished, press the Done soft key.
.
Section 2: Understanding Your Phone 27
Page 28

Changing the Right Soft Key Function
Contacts is assigned by default to the right soft key on
the Home screen. You can change the program
assignment for the key.
1. On the Home screen, press the Start soft key.
2. Select Settings > More... > Key Settings >Home
Screen RSK. Press
3. Use the Left or Right Navigation keys to select the
program you want in the Right Soft key Program field.
4. Use the keypad to enter the name to be displayed on the
Home screen for the program in the Display name field.
5. When you have finished, press the Done soft key.
Note: The Right Soft Key display will show the setting you have set in this
step. If you miss a call, Call History will display. When you receive the SMS
or MMS, Message is appeared.
.
Start menu screen
On the Start menu, you can access all of the programs
in your phone. On the Home screen, press the Start soft
key to open the Start menu screen.
Opening programs or folders
Scroll to a program or a folder by pressing the
Navigation keys and press to open it. If you have
selected the List display option, you can also press the
number key assigned to the program you want.
Switching between programs
Your phone is a multi-tasking device. You can run
multiple programs at the same time and switch from
28
Page 29
Entering text
one program to another. From any program, press
or to switch to the Home screen. Then access
another program from the Quick Launcher or Start
menu.
Note: When you use a GPRS connection, pressing terminates the
connection. If you want the current connection to continue, press , or
as many times as necessary, to switch to the Home screen.
Closing programs
Using Task Manager, you can end the programs which
are currently open.
1. On the Home screen, press the Start soft key and then
the More soft key.
2. Select Applications > Task Manager and press
press and hold the
key.
or
3. Scroll to a program, press the Stop soft key. To close all
of the running programs, press the Menu soft key and
select Stop all.
Entering text
Your phone is equipped with a QWERTY
) keypad to support easy and quick
(
text input. You can enter text as you would when using
a computer’s keyboard.
The keys are labelled with alphabet on the lower half
and numbers and symbols on the upper half. Press the
key corresponding to the character you want to enter.
To switch between using the upper case characters and
lower case characters, press .
Section 2: Understanding Your Phone 29
Page 30

You can move the cursor by pressing the Navigation
keys.
In addition, you can use the following function keys:
Press to delete characters.
Press to start a new line.
Press to change the text input mode to Upper/Lower case mode.
Press to change the text input mode to the symbols above the
letter.
Press to change the text input mode to Numeric input mode.
Press to change the text input mode to Symbols mode.
Customizing Your Phone
You can customize the phone settings to suit the way
you work.
Regional settings
Using Regional Settings, you can change number,
currency, and time and date formats appropriate to the
countries in question.
1. On the Home screen, press the Start soft key.
2. Select Settings > More... > Regional Settings.
30
Page 31

Power Settings
3. Select the option you want in each field.
4. When you have finished, press the Done soft key.
Note: If you changed the Language or Locale option, press the Done soft
key. Then you need to turn the phone off and then back on for your
changes to take effect.
Time and date settings
The Date and Time setting enables you to set the date,
time, and time zone.
1. On the Home screen, press the Start soft key.
2. Select Settings > Date and Time.
3. Select your Time zone and set the current Date and
Time.
4. You can also enable Auto update by using the Left or
Right Navigation key.
5. When you have finished, press the Done soft key.
Power Settings
You can conserve battery power by adjusting the timeout settings for the display and the backlight of the
keypad and display or adjusting the display brightness.
1. On the Home screen, press the Start soft key.
2. Select Settings > More... > Power Management.
3. Select the power settings:
• .Main battery: You can check the remaining battery power.
• Backlight time out on battery: You can select the length of
time the display backlight stays on when you do not use the
phone. Choose from Never, 5 seconds, 10 seconds, 20
seconds, 30 seconds or 1 minute.
Section 2: Understanding Your Phone 31
Page 32

• Backlight time out on AC: You can select the length of time
the display backlight stays on while charging. Choose from
Never, 1 minute, 2 minutes, 5 minutes, or 10 minutes.
• Display time out: You can select the length of time the
display stays on. During standby, the phone goes to Sleep
mode after a specified period of time, so very little power is
being consumed. Choose from Never, 10 seconds, 20
seconds, 30 seconds, 1 minute, 2 minutes, or 5 minutes.
• Display Brightness: You can adjust the brightness for the
display. Choose from Level 1- Level 5.
• Keypad backlight on: You can select when the keypad
backlight is used. Choose from Any time or Custom time. If
you have chosen Customer time, enter the time in the
following fields.
䢇 Start time
䢇 End time
4. When you have finished, press the Done soft key.
Changing the Sound Profile
Using Profiles, you can adjust and customize the phone
tones for different events or environments and then
apply the settings as a group. The currently selected
profile displays on the Home screen.
1. To change profiles: On the Home screen, press the Start
soft key.
2. Select Settings > Profiles. The list of profiles opens.
3. Select the profile you want.
If you select Automatic, the profile will automatically
switch between Normal and Meeting according to your
calendar items.
32
Page 33

Power Settings
Notes: You can quickly change the profile with a short press of the key.
Press and select the profile you want from the Quick List. You can quickly
activate or deactivate the Silent profile by pressing and holding from the
Home screen.
To customize profiles:
1. On the Profiles screen, scroll to the profile you want.
2. Press the Menu soft key and select Edit.
3. Change the settings in each field. Available options may
differ depending on the selected profile.
4. When you have finished, press the Done soft key.
Notes:
To change all profile settings to their factory default,
press the Menu soft key from the profile list and select
Reset to default.
Owner Information
Owner Information identifies the owner or user of the
phone. Set your contact information in case you have
lost the phone.
1. On the Home screen, press the Start soft key.
2. Select Settings > More... > More... > Owner
Information.
3. Fill in each input field.
4. When you have finished, press the Done soft key.
Error Reporting Setting
Your phone has the Error Reporting function which
informs you of errors in a program that can give a crash
Section 2: Understanding Your Phone 33
Page 34

to the phone system. You can enable or disable this
function.
1. On the Home screen, press the Start soft key.
2. Select Settings > More... > More... > Error Reporting.
3. Select Enable or Disable and press the Done soft key.
Security Settings
With options in Security, you can protect your phone
and SIM card from unauthorized use.
Locking the Phone
You can protect your phone using the Device Lock
feature. Once the feature is enabled, your phone is
automatically locked after the specified period of
inactivity.
Note: Even if the phone is locked, you will be able to receive calls.
To lock the phone:
1. On the Home screen, press the Start soft key.
2. Select Settings > More... > Security > Device Lock.
3. Select Prompt if device unused for and select a length
of time the phone waits for before locking itself when it is
not in use. Press the
4. Scroll to the Password type field and select a password
type.
䢇 Simple PIN: Use a numeric password.
䢇 Strong alphanumeric use an alphanumeric password. A
password must be more than 7 characters and contain at least
3 of uppercase and lowercase letters, numbers, or punctuation
marks.
34
key to mark the checkbox.
Page 35

Security Settings
5. Enter a password in the Password field.
6. Re-enter the same password in the Confirm password
field for confirmation.
7. Press the Done soft key.
8. Press the Yes soft key.
To unlock your phone:
1. On the Home screen, press the Unlock soft key.
2. Enter the password and press the Done soft key.
Activating the SIM PIN
When SIM PIN is enabled, you must enter your PIN
supplied with your phone each time you turn the
phone on or insert the current SIM card into another
device.
Consequently, any person who does not have your PIN
cannot use your phone without your approval.
1. On the Home screen, press the Start soft key.
2. Select Settings > More... > Security > Enable SIM
PIN.
3. Enter the PIN and press the Done soft key.
Locking the SIM Card
When SIM Lock is enabled, your phone works only
with the current SIM card. To use another SIM card,
you must enter the SIM lock password.
1. On the Home screen, press the Start soft key.
2. Select Settings > More... > Security > Enable SIM
Lock.
Section 2: Understanding Your Phone 35
Page 36

3. Enter a password for your SIM card and press the Done
soft key.
4. Re-enter the password for confirmation and press the
Done soft key.
Changing PIN2
A PIN 2 is used for certain functions supported by the
SIM card. You can change the PIN2 supplied with your
SIM card to a new one.
1. On the Home screen, press the Start soft key.
2. Select Settings > More... > Security > Change PIN2.
3. Enter the current PIN2 in the Old PIN field, then a new
PIN in the New PIN field, and re-enter the new PIN in the
Confirm new PIN field.
4. Press the Done soft key.
Side Key Setting
You can change the program assigned to the user-defined function key, to
your favorite program.
Note: When you change the side key setting, the long press option is
activated to the new setting. A short press will continue to return to the last
menu that you have accessed.
1. On the Home screen, press the Start soft key.
2. Select Settings > More > Key Settings > Side Key
Settings.
3. Use the Left or Right Navigation keys to select the
program.
4. Press the Done soft key.
36
Page 37

Security Settings
Menu Shortcut Settings
If you have set your Start menu style settings to List,
(for more information on how to change from List or
Grid, see "Start Menu Style" on page 15) then number
keys can be used as shortcut keys to directly access
specific programs that exist in the Start menu.
Note: You can also assign phone numbers, e-mail addresses, or web pages
in Contacts to the number keys as speed dial entries.
Assigning A Shortcut To A Key
1. On the Home screen, press the Start soft key.
2. Scroll to the program you want to assign to a key.
3. Don’t press the key,
press the Right Soft Key Menu
soft key and select 1 Add Speed Dial.
4. Press the
key.
5. If necessary, enter the name you want in the Name field.
6. Select a location in the Keypad assignment field use
the Left or Right Navigation key to select the numeric
assignment and press the Done soft key.
Accessing A Menu Using It’s Shortcut
On the Home screen, use one of the following ways:
• For one-digit shortcut keys, press and hold the number key.
• For two-digit shortcut keys, press the first number key and then
press and hold the last number key.
Searching For Items
Your phone provides a search program, Smart Search,
to allow you to search for data or media files in your
phone with ease and quickly access them.
Section 2: Understanding Your Phone 37
Page 38

Searching For An Item
1. On the Home screen, press the Start soft key and then
the More soft key.
2. Select Applications > Smart Search.
3. Enter the first few letters of the item name in the Find
field and select an item type in the Type field.
4. Select Match case and/or Match whole word to let the
phone to search for the matching items more quickly.
5. Press the Go soft key. The phone searches its file
directory or programs and lists all matching items.
6. Scroll to the one you want and press the Open soft key.
Setting Up The Search Options
You can change the search options for each item type to
provide the phone with more specific information to
narrow the search items.
1. From the SmartSearch screen, press the Menu soft key
and select Options.
2. Select the item type you want and set each option.
Choose from the following options to define your search
options:
䢇 Contact
䢇 Appointment
䢇 Tas k
䢇 Text message
䢇 E-mail
䢇 Phone call
䢇 File Name
3. When you have finished, press the Done soft key.
38
Page 39
Using an Optional microSD Memory Card
Using an Optional microSD Memory Card
Your phone has an expansion slot compatible with
microSD memory cards, which are primarily used to
back up or transfer files and data.
Note: Use only compatible memory cards with your phone. Using
incompatible memory cards, such as Secure Digital (SD) cards, may
damage the card, as well as the phone, and data stored on the card.
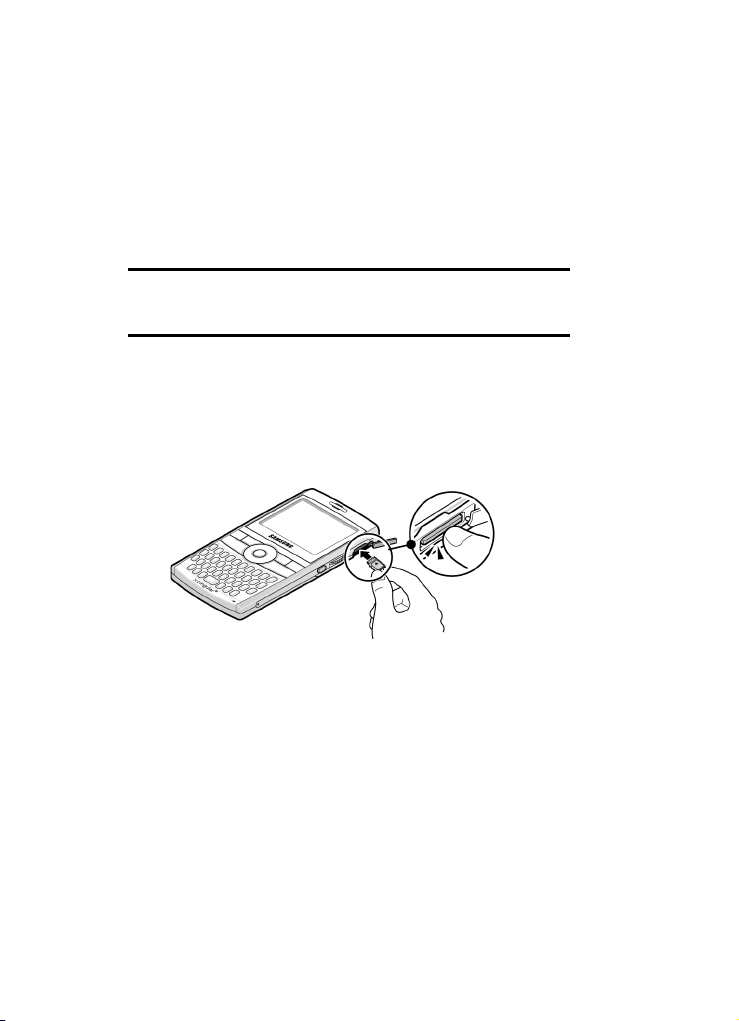
Inserting the microSD memory card
Push the microSD memory card into the slot with the
label side face down until it clicks into place. The card is
secure when it is not protruding from the phone.
Removing the microSD memory card
To remove the microSD memory card, push it in and
release so that it is disengaged from the slot. Then slide
the card out.
Section 2: Understanding Your Phone 39
Page 40

Adding and removing programs
You can install any program created for your phone, as
long as the phone has enough memory. The most
popular place to find software for your phone is on the
Microsoft web site
Adding Programs Using Microsoft ® ActiveSync
You can install programs downloaded from the Internet
or included on the Getting Started CD included with
your Samsung BlackJack
synchronization between your phone and your
computer.
First you need to determine what your phone and
processor type is so that you know which version of the
software to install.
1. On the Home screen, press the Start soft key and select
Settings > More... > More... > About. Check the
version of your phone.
40
(http://www.microsoft.com/mobile/smartphone)
®
TM
by performing
Page 41

Using an Optional microSD Memory Card
2. Download a program to your computer from the Internet
or insert the Getting Started CD that contains the
program into your computer.
Be sure to select the program designed for your phone
and the phone’s processor type.
3. Read any installation instructions, Read Me files, or
documentation that comes with the program.
4. Connect your phone to your computer and make sure
that the Microsoft
®
ActiveSync® is running.
5. Double-click the *.exe file on the computer. If the file is
an installer, the installation wizard will begin. Follow the
instructions on the screen. Once the software has been
installed, the installer will automatically transfer the
software to your phone.
If the file is not an installer, you will see an error
message. You need to move this file to your phone by
using Microsoft
®
ActiveSync® Explore to copy the
program file to the \Windows\Start Menu folder on your
phone. Once installation is completed, you can view and
open the program by accessing the Start menu.
Adding a Program Directly from the Internet
First, you need to determine what your phone and
processor type is so that you know which version of the
software to install.
1. On the Home screen, press the Start soft key and select
Settings > More... > More... > About. Check the
version of your phone.
Section 2: Understanding Your Phone 41
Page 42

2. Download the program to your phone straight from the
Internet using Internet Explorer.
Be sure to select the program designed for your phone
and the phone’s processor type.
3. Read any installation instructions, Read Me files, or
documentation that comes with the program.
4. Select the file, such as a *.zip or *.exe file. The
installation wizard will begin.
5. Follow the directions on the screen.
Once installation is completed, you can view and open
the program by accessing the Start menu.
Removing Programs
1. On the Home screen, press the Start soft key.
2. Select Settings > More... > Remove Programs.
3. Scroll to the program you want to delete.
4. Press the Menu soft key and select Remove.
5. Press the Yes soft key to confirm the deletion.
6. When you have finished, press the Ok soft key.
Managing Certificates
On your phone you can add and delete public key
certificates. You can store the following two types of
certificates on your phone.
1. To access the Certificates options, on the Home screen,
press the Start soft key.
2. Select Settings > More... > Security > Certificates.
䢇 Personal: help to establish your identity, when you log on to a
secured network, such as a corporate network.
42
Page 43

Resetting your Phone
䢇 Root: help to establish the identity of servers with which you
connect. This helps to prevent unauthorized users from
accessing your phone and information.
Deleting a Certificate
1. Scroll to the certificate you want on the list.
2. Press the Menu soft key and select Delete.
3. Press the Yes soft key to confirm the deletion.
Resetting your Phone
You can reset your phone’s settings and clear all added
data from memory.
Resetting the Phone
1. On the Home screen, press the Start soft key
2. Select Settings > More... > Security > More... >
Reset.
3. Enter the reset password and press the Done soft key.
The default password is 0000.
4. Press the Yes soft key to confirm. The phone resets and
reboots itself.
Changing the Reset Password
You can change the reset password to prevent the
phone from being reset by unauthorized people.
1. On the Home screen, press the Start soft key.
2. Select Settings > More... > Security > More... >
Reset.
3. Enter the old password, then a new password, and re-
enter the new one for confirmation.
4. Press the Done soft key.
Section 2: Understanding Your Phone 43
Page 44
Using Online Help
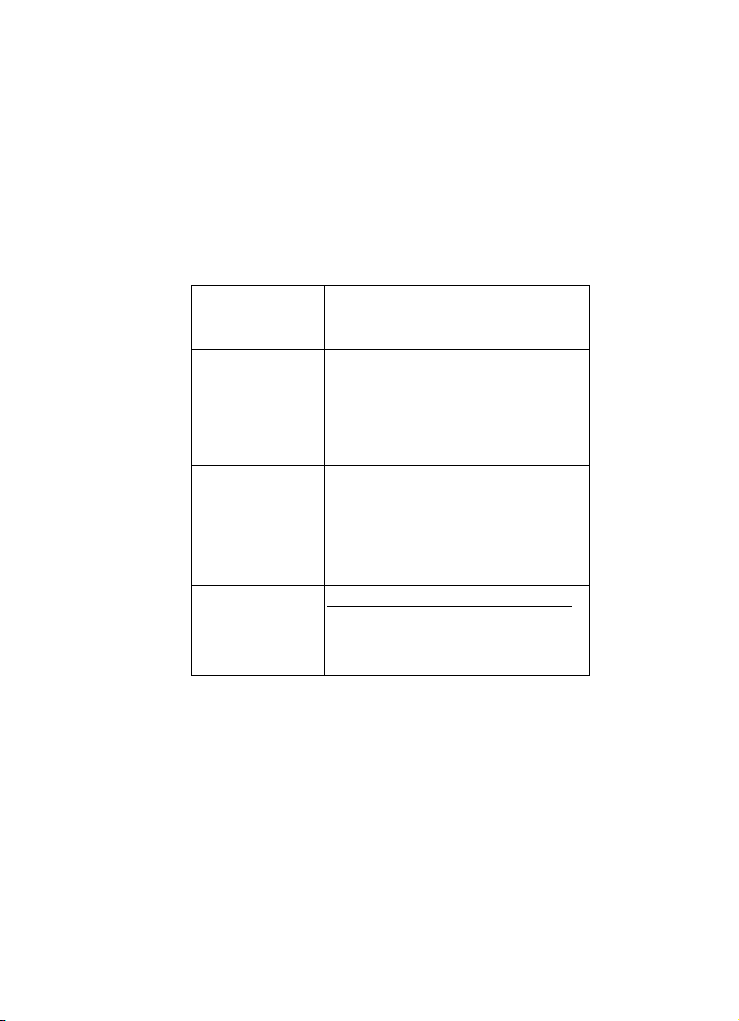
Your phone is supported by additional information
available online, or on the Getting Started CD that came
with your phone.
For
information on:
additional
programs that
can be installed
on your phone
connecting to
and
synchronizing
with a PC
up-to-date
information on
your phone
See:
the supplied Getting Started CD.
®
To view Microsoft
ActiveSync®
help, click the
Microsoft®ActiveSync® icon on
the Windows task bar.
http://www.microsoft.com/ mobile/smartphone
44
Page 45

Section 3: Synchronization
Topics Covered
• Installing Microsoft® ActiveSync
• Customizing Connection Settings
• Connecting Your Phone to a Computer
• Connecting with a PC data cable
• Synchronizing Information
• Customizing Synchronization Settings
®
This section describes Using Microsoft® ActiveSync®,
you can synchronize data on your desktop computer
with the data on your phone. Synchronization
compares the data on your phone with your desktop
computer and updates both your phone and
computer with the latest data.
Section 3: Synchronization 45
Page 46

With ActiveSync, you can:
• Keep Contacts, Calendar, Tasks, or Inbox data up-to-date by
synchronizing your phone with Microsoft
®
Outlook data on your
desktop computer.
• Copy (rather than synchronize) files between your phone and
desktop computer.
• Control the moment when synchronization occurs by selecting a
synchronization mode.
• Select data types to be synchronized and control the amount of
synchronized data.
Wa rn in g
• Microsoft
• If you turn off the phone after copying files to any folders,
Installing Microsoft® ActiveSync
Before beginning synchronization, you must install
Microsoft
using the supplied Getting Started CD. You can also
download the latest version of ActiveSync from the
Microsoft web site.
http://www.microsoft.com
1. Insert the Getting Started CD into the CD-ROM drive
®
ActiveSync® synchronizes two devices using the
latest data.Therefore, if you delete some specific data from
the phone after synchronization, and then perform a
synchronization again, the corresponding data on the
computer will be deleted. Be careful not to lose important
data.
except for the Storage folder, using Microsoft
®
ActiveSync®,
all files in those folders will be deleted. Store important files
in the Storage folder to prevent from being deleted.
®
®
ActiveSync® on your desktop computer
of your desktop computer. Alternatively, double-click the
downloaded Microsoft
®
ActiveSync® installer.
46
Page 47

Customizing Connection Settings
2. Follow the instructions on the screen for installing
Microsoft
®
ActiveSync®.
When installation is completed, the Synchronization
Setup Wizard helps you to connect your phone to your
desktop computer, to set up a partnership.
3. Follow the instructions on the screen.
Note: See page 48 for more information on connecting the phone and a
computer.
Your first synchronization process will automatically
begin when your phone is connected to the computer.
After the first synchronization, take a look at Contacts,
Calendar, and Tasks on your phone. You will notice that
your information has been copied to the phone.
Customizing Connection Settings
To establish a connection between your computer and
the phone, you must enable the connections you want
to use in the ActiveSync
connections are enabled.
1. From the ActiveSync
File > Connection Settings...
2. Change the connection settings.
®
program. By default, all
®
window on your computer, select
Section 3: Synchronization 47
Page 48
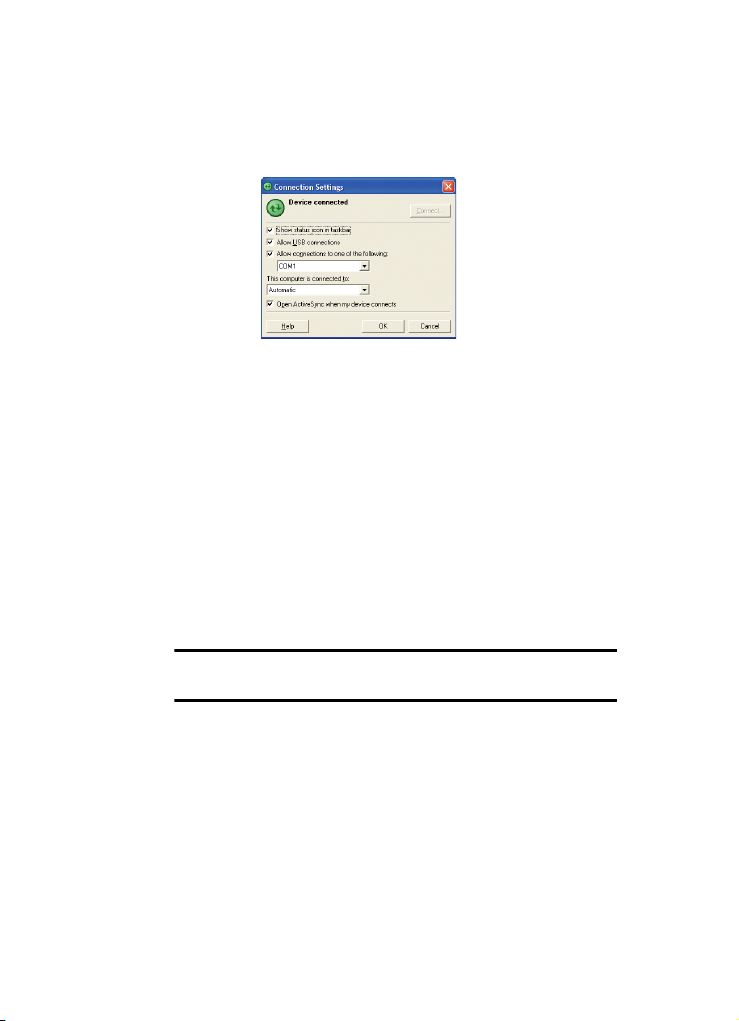
3. Click OK.
Connecting Your Phone to a Computer
To connect the phone to your computer, you can choose
one of the following ways:
• Using a PC data cable
• Using a Bluetooth connection
Connecting with a PC data cable
Connect one end of the PC data cable to the jack on the
left side of the phone and the other end to the USB port
on your computer.
Note: USB mode of your phone must be set for Microsoft® ActiveSync®.
Press the Start > Settings > Connections > USB. Then change the mode.
The connection is established and the Microsoft®
ActiveSync
automatically begins.
48
®
window appears. The synchronization
Page 49

Connecting with a PC data cable
Notes: When an error occurs in a USB connection, activate the DHCP Client
service, or deactivate the firewall or VPN environment.
USB hubs and laptop docking stations have not exhibited consistent
stability with Windows
can connect the device to the PC USB ports if you experience connection
drops or inability to connect through a USB hub or docking station.
®
Mobile 5 powered devices and ActiveSync®. You
Connecting via Bluetooth
1. On the Home screen, press the Start > Settings >
Connections > Bluetooth > Bluetooth. Press the
key.
2. To enable Bluetooth on this device, press the key in
the Turn on Bluetooth field.
3. To Make this device visible to other devices press the
key.
4. Press the Done soft key.
5. To connect a device, click the Menu soft key and select
Devices. Select Add new device... to search for a new
Bluetooth-compatible devices.
6. Select your Bluetooth-compatible computer to pair the
phone with the computer.
7. Enter a Bluetooth password and press the Next soft key.
This password is used just once and you do not need to
memorize it.
When you enter the same password on your computer,
paring is finished.
8. Enter a display name for the computer and press the
Next soft key.
9. Check the services you want to use and press the Done
soft key.
Section 3: Synchronization 49
Page 50
Note: ActiveSync® must be checked on the service list. If Serial is
available, instead, select it and make sure that a correct Bluetooth COM
port is selected from the Connection Settings on the PC ActiveSync®.
10. Press the Done soft key.
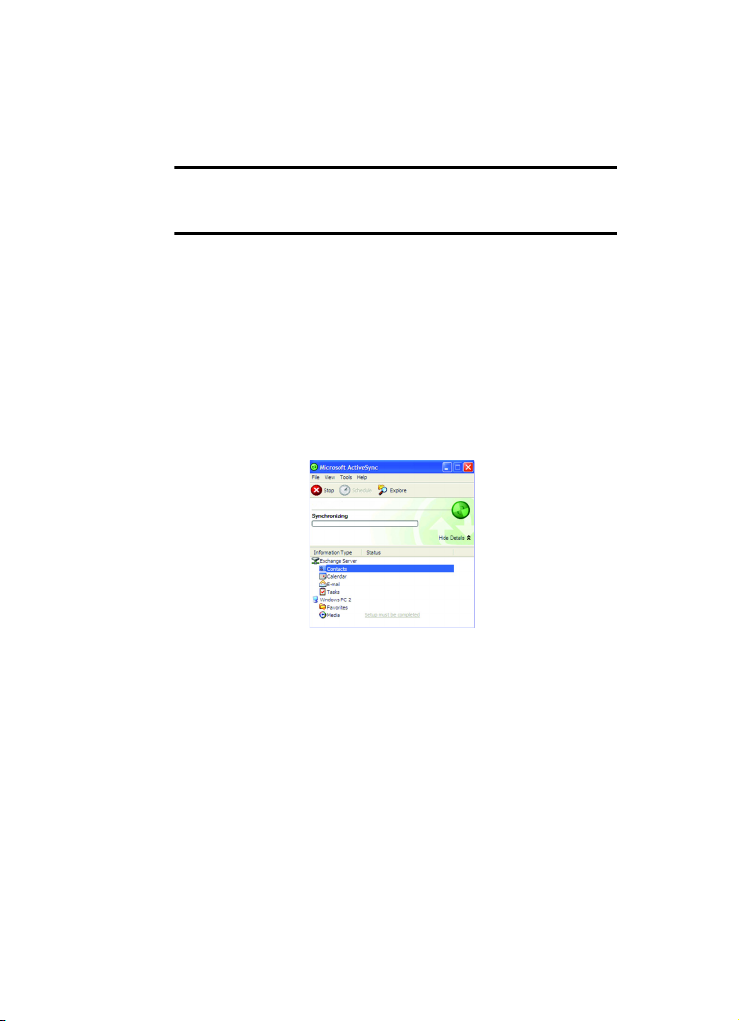
Synchronizing Information
To begin synchronization, connect your phone to your
computer. For more information on connecting the
phone and the computer, see page 48. The Microsoft
ActiveSync® window on your computer automatically
appears and synchronization starts.
Once the synchronization is completed, the phone stays
connected to the computer. If any change is made,
®
Microsoft
ActiveSync® automatically will begin
synchronization. To begin synchronization, press the
Sync soft key in Microsoft® ActiveSync® on your
phone. You can open the phone’s file directory by
®
clicking Explore from the Microsoft
ActiveSync®
window. You can then copy files quickly and easily
from the phone to the computer, or vice versa.
®
50
Page 51

Customizing Synchronization Settings
Note: To synchronize Bluetooth devices with a compatible computer, the
computer must have the Bluetooth stack for Windows XP Service Pack 2.
Customizing Synchronization Settings
You can customize various setting options for
synchronization with a computer and a server, and set
the synchronization schedule.
First, you must terminate the connection between your
phone and computer. Disconnect the PC data cable or
remove the phone from the Bluetooth range.
Changing PC Settings
1. In ActiveSync® on your phone, press the Menu >
Options.
2. Highlight Windows PC.
3. Press the Menu > Settings.
4. Change the computer name, set how to handle a data
conflict between the phone and computer, and set a
event logging type.
5. Enter the selecting in the If there is a conflict and Event
logging fields.
6. Press the Done soft key.
Note: For more information on the conditions that must be met on the
computer and how to change synchronization options, see
Microsoft ®ActiveSync® Help.
Section 3: Synchronization 51
Page 52

Setting Server Synchronization
You can synchronize information automatically as
items arrive only if your company is running Microsoft
®
Exchange Server with Exchange ActiveSync
.
Configuring an Exchange Server connection
1. In ActiveSync on your phone, press the Menu soft key
and select ConfigServer.
2. Enter the server address and select This server
requires an encrypted (SSL) connection to use a SSL
protocol for server access.
3. Press the Next soft key.
4. Enter your Microsoft Exchange user name, password,
and domain name.
To save the password for subsequent accesses, select
Save password.
5. Press the Next soft key.
6. Select data types to be synchronized.
7. When you have finished, press the Finish soft key.
Changing the Synchronization Schedule
You can schedule synchronization with the Microsoft®
Exchange Server on two separate times. Use the peak
time schedule to synchronize during working hours or
other times when you experience higher mail volumes.
Use the off-peak time schedule to synchronize during
times when you experience lower mail volumes.
®
1. In ActiveSync
and select Schedule.
2. Set each option:
on your phone, press the Menu soft key
52
Page 53

Customizing Synchronization Settings
• To synchronize periodically during peak times, select a
frequency of synchronization in the
Choose from the available options.
Peak times field.
• To synchronize periodically during off-peak times, select a
frequency of synchronization in the
Choose from the available options.
䢇 To use the peak time and off-peak time setting while
roaming, select
䢇 To synchronize each time you send an e-mail, select Send
Use above settings when roaming.
outgoing items immediately
䢇 To set the days and hours for peak times, press the Menu
soft key and select
Peak Times.
3. When you have finished, press the Done soft key.
Off-peak times field.
.
Section 3: Synchronization 53
Page 54

54
Page 55

Section 4: Call Functions
Topics Covered
• Turning the Phone Functions On and Off
• Using the Dialling Screen
• Making a call
• Advanced Calling Features
• Customizing Your Phone Functions
This section explains all of the call functions provided
by your phone.
Section 4: Call Functions 55
Page 56
Turning the Phone Functions On and Off
You can choose to turn off the phone functions and just
use the PDA functions at any time and then turn it back
on when you want.
Note: In many countries you may be required by law to turn off the phone
functions while on a flight. To turn off the display of your phone does not
actually turn off the phone functions; you must turn off your wireless
connection to your operator’s network.
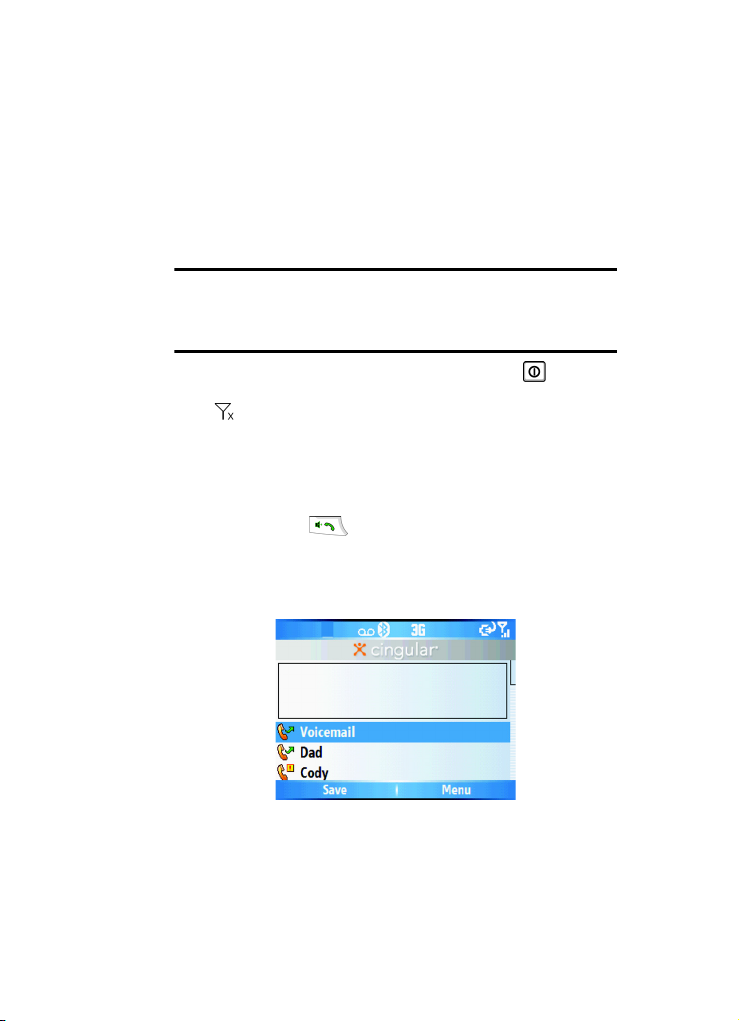
To turn off the phone functions, short press and
select Wireless Manager. Then select Phone to set it to
Off. appears on the top right corner of the screen.
To turn back on the phone functions, select Phone to set
it to On from the Wireless Manager screen.
Using the Dialling Screen
When you press , the Dialling screen opens. You
can view the most recent calls you have dialed,
received, and missed on the screen.
When you enter a digit, the Dialling screen lists all of
the numbers containing the entered digit in Contacts
56
Page 57
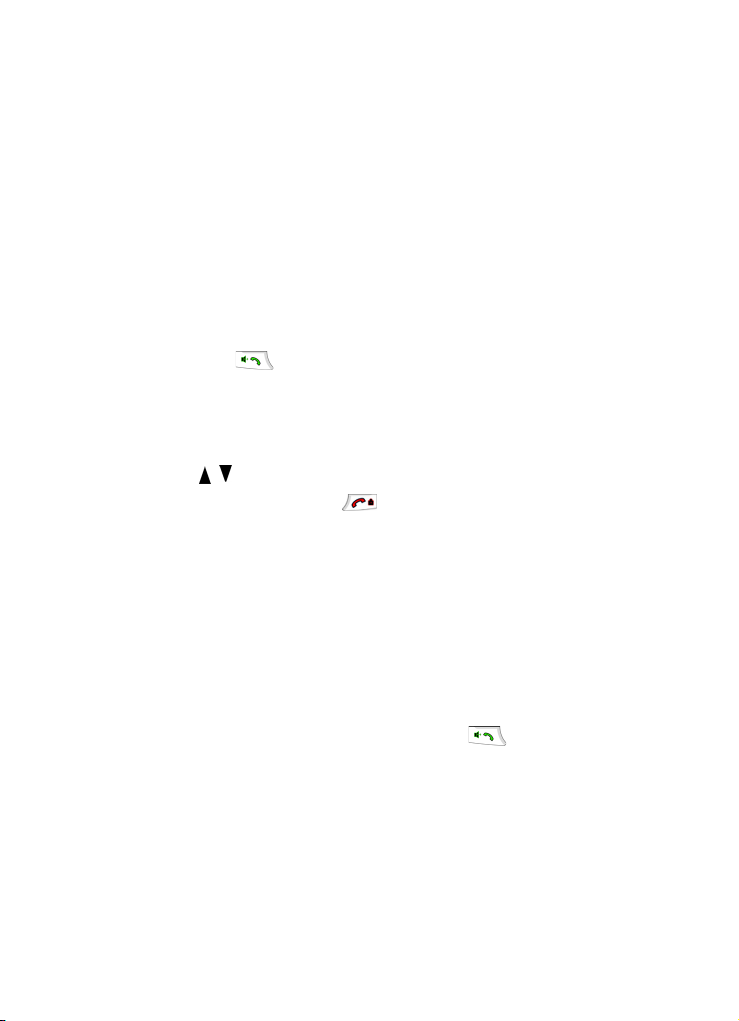
Making a call
and Call History, as well as the phone number assigned
to the corresponding speed dial key.
Making a call
You can make a phone call using the number keypad.
To make a voice call:
1. On the Home screen, enter a number including an area
code.
2. Press to make a call.
When a call is connected, the call duration displays.
During a call, you can use several call options.
To adjust the earpiece volume during a call, press
/ to increase or decrease the volume level.
3. To end the call, press .
Advanced Calling Features
You can make a call from Contacts, Speed Dial, and Call
History.
Making a call from Contacts
1. On the Home screen, press the Contacts soft key. You
can also press the Start soft key and select Contacts.
2. Select a contact card from the contact list.
3. Scroll to the number you want and press for a
voice call.
Making a call from Speed Dial
Speed Dial is a list you can create of often-dialed
numbers.
Section 4: Call Functions 57
Page 58

By memorizing the position on the Speed Dial list, you
can dial the number simply by entering that number of
the Speed Dial key. The phone number assigned to the
key appears on the Dialling screen.
Alternatively, if you do not remember the position of a
number, access the Speed Dial list:
1. On the Home screen, press the Start soft key and then
the More soft key.
2. Select Applications > Speed Dial.
3. Scroll to the number you want and press for a
voice call.
Making A Call From Call History
1. On the Home screen, press the Start soft key.
2. Select Call History. The recent call list appears.
Note: is for incoming calls, is for outgoing calls, and is
for missed calls.
To view the calls categorized by call type, press the
Menu soft key, select Filter, and select a category from
the pop-up list.
3. Scroll to the number you want and press for a
voice call.
Making an International Call
1. Press and hold until the + sign appears. The +
replaces the international access code.
2. Enter the full phone number you want to dial. It includes
the country code, the area code (without the leading
zero), and the phone number.
58
Page 59
Answering or Ignoring a Call
3. Press .
Note: You can set the country or dialling code to be added before the
number when dialling.
Making an Emergency Call
Your phone provides the emergency number 112. This
number can normally be used to make an emergency
call in any country, with or without a SIM card inserted,
if you are within a mobile phone network’s service
area.
Enter the emergency number 112 and press .
Notes: Some service providers may require a SIM card to be inserted, and
in some cases the PIN to be entered as well.
In some cases, other emergency numbers may also be accessed. Your
service provider may save additional local emergency numbers on the SIM
card.
Answering or Ignoring a Call
When a call comes in and the phone rings or vibrates,
depending on the ringer setting:
• Press the Answer soft key or the to answer the call.
• Press the Ignore soft key or press the to reject the call.
You can also press and hold / to reject the call.
Note: If you reject a call, the busy tone is sent out. Depending on your
service provider, the caller may be guided to your voicemail server.
Options During a Call
Your phone provides a number of control functions that
you can use while a call is in progress.
Section 4: Call Functions 59
Page 60

Answering a second call
If a person is trying to call you when you are talking on
the phone, a notification window will pop out.
1. Press the Answer soft key or to answer the
second call and put the first on hold.
2. To switch back and forth between the two callers, press
the Swap soft key.
3. To end the second call and go back to the first, press the
End soft key or press .
Using In-call options
During a call, you can access various options by
pressing the Menu soft key.
For a voice call, the following options are available:
• Hold/Unhold: places the current call on hold or unhold.
• Mute/Unmute: turns off the microphone so that the person
with whom you are speaking cannot hear you, or turns it
back on.
• Speakerphone on/off: turns on/off the speakerphone mode
to talk and listen to the phone a short distance away.
䢇 Turn Hands-free on/Turn Hand-free off: switches the
current call to the connected hands-free car kit or headset, or
switches it back to the phone.
䢇 Conference: joins the two or multiparty call into a conference
call.
• Contacts: opens the contact list.
• Save to Contacts: saves the phone number of the person
with whom you are speaking.
• View Calendar: opens the calendar.
• Call History: opens the call history list.
• In Call options during a multi party call:
60
Page 61

Call-related features
• Swap: switches back and forth between the two callers.
• Mute/Unmute: turns off the microphone so that the person
with whom you are speaking cannot hear you, or turns it
back on.
• Speakerphone on/off: turns on/off the speakerphone mode
to talk and listen to the phone a short distance away.
• Turn Hands-free on/Turn Hands-free off: switches the
current call to the connected hands-free car kit or headset,
or switches it back to the phone.
• Conference: joins the two or multiparty call into a
conference call.
• Contacts: opens the contact list.
• Save to Contacts: saves the phone number of the person
with whom you are speaking.
• View Calendar: opens the calendar.
• Call History: opens the call history list.
Call-related features
Checking your voicemail
The first speed dial location is assigned to your
voicemail box by default. When you insert your SIM
card into the phone, it automatically detects and sets as
default the voicemail center number of your mobile
service provider.
To check your voicemail, press and hold from the
Dialling screen.
Note: You can check and change the voicemail center number.
Managing the Speed Dial list
You can assign frequently-used phone numbers, e-mail
addresses, or web pages in Contacts to the speed dial
Section 4: Call Functions 61
Page 62

location 2 through 99. The location 0 and 1 on the Speed
Dial list are preset for the international call prefix and
the voicemail center number, respectively.
Note: You cannot create a speed dial entry for a phone number stored on
the SIM card.
Managing your Call History
Call History details all incoming, outgoing, and missed
calls, and also provides a summary of total calls. It can
also tell you when a call was initiated and how long it
lasted.
To open Call History
On the Home screen, press the Start soft key and select
Call History. A list of all calls appears.
If necessary, select the category of the call history to be
displayed by pressing the Menu soft key and selecting
Filter.
Calls are categorized as below:
• No Filter: shows all calls made to and from the phone in
chronological order.
• Missed Calls: shows only calls that were not answered.
• Incoming Calls: shows only calls made to the phone.
• Outgoing Calls: shows only calls made from the phone.
Viewing details of calls
•
To save a phone number of a call to Contacts, scroll to the call
you want and press the Save soft key.
• To view contact information, scroll to a contact, press the Menu
soft key, and select Find Contact.
62
Page 63

Customizing Your Phone Functions
• To send an SMS message, press the Menu soft key and select
Send Text Message.
• To send an e-mail message, press the Menu soft key and select
E-mail.
• To delete an individual call, press the Menu soft key and then
select Delete. To delete all calls, select Delete List.
Viewing call timers
In Call History, you can view the duration of your calls.
This option is convenient for estimating your usage.
1. On the Call History screen, press the Menu soft key and
select View Timers.
You can view the following details: Last call, All calls,
Incoming calls, Outgoing calls, Roaming calls, Data calls
Last reset and Lifetime calls.
2. Press the Done soft key.
You can easily erase the call time records at any time,
except for Lifetime calls, by pressing the Menu > View
Timers > Menu > Reset Timers.
Customizing Your Phone Functions
You can personalize the settings of the phone functions,
the services you have, and the network to which you
have connected.
Accessing the Phone setting options
1. On the Home screen, press the Start soft key.
2. Select Settings > Phone.
3. Select a setting menu, and then set each option.
4. When you have finished, press the Done soft key.
Section 4: Call Functions 63
Page 64

Available setting options
All calls
• Call Options: You can customize settings related to call
functions, such as an answering option, voicemail and SMS
access.
• Any key answer: When this option is activated, you can
answer incoming calls by pressing any key, except for
, , / .
• Show SIM contacts: With this option is activated, the
contact cards stored on the SIM card display in Contacts.
• Phone number: Check your phone number.
• Voice mail number: When you insert your SIM card into your
phone, the phone automatically detects and sets your
voicemail number.
• Text messages service center: When you insert your SIM
card into your phone, SMS accesses the number by default.
If not, you can manually enter the numbers obtained from
your service provider.
• Country code: You can enter a country code used will be
automatically added before a phone number when dialling.
• Area Code: You can enter an area code. The code used will
be automatically added before a phone number when
dialling.
• Caller ID: When you place a call, your phone number can be
displayed to or hidden from the person to whom you are calling.
Using this option, you can enable or disable the display of your
caller identification.
• Channels: This option allows you to set the broadcast message
receipt and set up broadcast channels from which you want to
receive broadcast messages.
• Enable channels: Select to enable the receipt of broadcast
messages.
64
Page 65

Customizing Your Phone Functions
• Receive channel list: Select to receive a list of all available
broadcast channels from the network.
• Language: Select your preferred languages to display
broadcast messages. To edit the channel list, press the
Menu soft key and select Edit Channels. Then press the
Menu soft key and select the options for adding, deleting or
editing channels.
• Fixed Dialing: When this option is activated, your phone allows
outgoing calls only to the limited set of phone numbers. You
can call only those numbers that are included in the Fixed
Dialling Number list or which begin with the same digit(s) as a
phone number on the list.
• Networks: You can set the phone to automatically select a
network when you are roaming out of your service area, or find
and select the network you want. Press the Menu soft key to
access the following options:
• Find a New Network: Search for all available networks. You
can start searching when the phone is out of your service
area.
• Cancel: Exit the Networks menu.
Voice Calls
•
Call Waiting: This service allows you to receive another call
while you have a call in progress.
• Call Forwarding: This network service allows you to forward
your incoming calls to another phone number.
• Always: All calls are forwarded.
• Busy: Calls are forwarded when you are on the phone.
• No Reply: Calls are forwarded when you do not answer.
• Unreachable: Calls are forwarded when your phone is
turned off or your phone is out of the service area.
• Data Calls: All data calls are forwarded.
Section 4: Call Functions 65
Page 66

Own Numbers
You can store your phone numbers with descriptive names.
Changes made with this options does not affect the actual
subscriber number of your SIM card.
66
Page 67

Section 5: Menu Navigation
Topics Covered
• Menu Navigation
• Using Shortcuts
This section explains the menu navigation for your
phone. It also includes an outline of all the available
menus associated with your phone.
Section 5: Menu Navigation 67
Page 68
Menu Navigation
Menus and sub-menus can be accessed by scrolling
using the Navigation keys or by using the shortcut
keys.
Accessing a Menu Function by Scrolling
1. On the Home screen, press the Start soft key and then
the More soft key.
2. Scroll using the Navigation keys to reach a main menu
Settings for example. Press the key to enter the
menu.
3. If the menu contains sub-menus, Settings for example,
you can access them by highlight the option and by
pressing the key. If the menu that you have selected
contains further options, repeat this step.
4. To scroll through the menus, press the Up or Down
navigation key. Press the key to make your selection.
5. To return to the previous menu level, press the key.
6. To exit the menu without changing the settings, press the
key.
Using Shortcuts
Numbered menu items, such as menus, sub-menus, and options can be
quickly accessed by using their shortcut numbers.
Note: To Continue to use shortcut keys, change this option to List in the
Display > Start menu style option and press the Done soft key.
Accessing the Start Menu Style Setting menu (in List
not Grid menu option).
1. Press the Start > More > More soft key.
68
Page 69

Using Shortcuts
2. Press the key for Settings.
3. Press the key for Phone
Menu Outline
The following list shows the menu structure and
indicates the number assigned to each option.
1: Messaging
1: SMS/MMS
2: Outlook E-mail
3: New Account...
2: Contacts
3: Calendar
4: ActiveSync
5: Cingular Music
1: 1 Windows Media
2: 2 Shop Music
3: 3 MusicID
4: 4 Streaming Music
5: 5 Music Videos
6: 6 The Buzz
7: 7 Community
8: 8 Music Apps
6: Cingular Video
7: MEdia Net
8: Cingular Mall
1: 1 Shop Tones
2: 2 Shop Games
3: 3 Shop Graphics
4: 4 Shop Multimedia
5: 5 Shop Application
6: 6 MEdia Net Home
9: IM & Email
1: Get IM
2: GetGood
10: Camera
Section 5: Menu Navigation 69
Page 70

11: Call History
12: Organizer
1: Alarms
2: Calculator
3: D-Day
4: Notepad
5: Smart Converter
6: Stopwatch
7: Tasks
8: Voice Notes
9: World Clock
13: My Stuff
1: My Pictures
2: My Videos
3: Notes
4: My Documents
5: My Device
6: Storage Card
14: Games
1: Bubble Breaker
2: Solitare
15: Internet Explorer
16: Applications
1: Download Agent
2: File Explorer
3: Java
4: Picsel Viewer
5: RSS Reader
6: Smart Search
7: Speed Dial
8: Task Manager
17: Settings
1: Phone
1: All Calls
2: Voice Calls
3: Own Numbers
4: SDN
70
Page 71

2: Sounds
1: Ring Tone
2: Other Sounds
3: Display
1: Home Screen
2: Star Menu Style
3: Dialer
4: Profiles
1: Normal
2: Silent
3: Meeting
4: Outdoor
5: Automatic
6: Headset
7: More..
1: Speakerphone
5: Date and Time
6: Connections
1: Wireless Manager
2: Beam
3: Bluetooth
4: USB
5: Dial-up
6: GPRS
7: More...
1: Proxy
2: VPN
7: More...
1: Security
1: Device Lock
2: Enable SIM Lock
3: Enable SIM PIN
4: Change PIN2
5: Certificates
1: Personal
2: Root
6: Change Reset Password
Using Shortcuts
Section 5: Menu Navigation 71
Page 72

7: More..
1: Reset
2: ACL Service
2: Remove Programs
3: Power Management
4: Key Settings
1: Side Key Settings
2: Home Screen RSK
5: Text Input Mode
6: Regional Settings
7: More..
1: Owner Information
2: Accessibility
3: About
4: Version
5: Error Reporting
72
Page 73

Section 6: Cingular Music
Topics Covered
• Windows Media Player
• Shop Music
• MusicID
• Streaming Music
• Music Videos
•The Buzz
• Community
•Music Apps
®
Cingular Music offers several different application in
which you can listen to access and buy, record,
identify and join music communities.
Section 6: Cingular Music 73
Page 74

Windows Media Player
Your phone is equipped with Microsoft® Windows
Media Player
®
10. With Windows Media Player®, you
®
can play Windows Media Audio, Windows Media
Video, and MP3 audio files that are stored on your
phone, on a memory card, or on the Web.
To open Windows Media Player:
1. On the Home screen, press the Start > Cingular Music
> 1 Windows Media.
2. Press .
Preparing media files
You can copy media files from your desktop computer
to the phone using the Windows Media Player or
Microsoft
®
ActiveSync®.You can also copy media files
using a micorSD storage card.
Note: If you have stored too many files in memory, the operation speed of
the system slows down. Using an optional microSD storage card helps you
clear up this problem and lets you enjoy more music files.
About DRM, licences, and protected files
Some digital media files, such as songs downloaded
from online stores, are encrypted to prevent the files
from being unlawfully distributed or shared. Content
providers use a technology called Digital Rights
Management (DRM), to encrypt the files. During the
encryption process, the content provider creates a
licence which specifies how and when the file can be
used.
74
Page 75

Windows Media Player
For example, a content provider could create a licence
that allows you to play a certain file on your computer,
but not on your phone. Or, a licence that allows you to
play a certain file on your phone, but only for a month,
or perhaps only a certain number of times. Files that
have licences associated with them are called protected
files.
Copying media files using ActiveSync
1. Connect your phone to a computer and start
synchronization.
2. Open the file directory on the phone by clicking Explore
from the Microsoft® ActiveSync® window.
3. Drag the media files you want to copy and drop them into
a folder.
Windows Media Player automatically retrieves the
media files from the folder where the files are copied
and you can search them from the Library screen. If the
media files do not appear in Library, update the library
by pressing the Menu soft key and selecting Update
Library.
Copying media files using the Windows Media Player
program on your computer
You can use the desktop Windows® Media Player® to
copy media files. Using the desktop Windows
®
ensures that licences are copied with protected
Player
files.
®
Make sure that you have Windows
Media Player® 10
or later versions on your desktop computer. Depending
®
Media
®
Section 6: Cingular Music 75
Page 76

on the version of your Windows® Media Player®, the
procedure to copy files may vary.
1. Connect your phone to the desktop computer and start
synchronization.
2. Open Windows
®
Media Player® on the computer.
3. Click the Sync tab.
4. Click Edit Playlist.
5. Select the media files you want to synchronize from the
left pane of the window.
6. Click OK.
7. Select the saving location from the right pane.
8. Click to select the quality level you want and click OK.
9. Click Start Sync.
The selected files are converted and copied to the
location you selected in step 7.
Using libraries
A library is a file list provided by Samsung Player to
retrieve media files in the phone’s memory. To access
libraries, press the Menu soft key from the player
screen and select Library.
The library screen contains categories, such as My
Playlists, My Music, and My Videos. From the library
screen, you can sort your content by criteria, such as
artist name, album title, or genre.
On the library screen, you can use the following options
by pressing the Menu soft key:
• Queue Up: adds the selected file to the end of the current play
list.
76
Page 77

Windows Media Player
• Delete from Library: deletes the selected file or all files from
the library.
• Now Playing: opens the current play list.
• Library: Allows you to select the library that you want to view;
for example, the library of files stored on your phone or on the
memory card.
• Update Library: adds new files to the library by searching your
phone or a memory card.
• Open File: allows you to find and play files that are stored on
your phone or a memory card, but those are not in the library.
• Open URL: allows you to specify a URL address for a streaming
service.
• Properties: displays information about the selected file.
• Player: closes the Library screen and displays the player
screen.
Playing music and video files
If you have copied media files to your phone’s memory
or memory card, you can play them from Media Player.
Playing media files from a library
1. On the library screen, if necessary, press the Menu soft
key, select Library, and select the memory from which
you want to retrieve files.
2. Press the Menu soft key and select Update Library.
3. When libraries have been updated, press the Done soft
key.
4. Select a category.
5. Scroll to the library you want to play and press the Play
soft key.
®
Section 6: Cingular Music 77
Page 78

If the file does not appear in a library, on the Library
screen, press the Menu soft key and select Open File.
Then select the file you want to play.
The player screen appears and the selected file plays.
Use the following options during playback:
• To adjust the Windows Media volume, press the Up or Down
key. You can view the volume level on the screen.
• To adjust the earpiece volume, press / .
• To move backward in a file, press and hold the Left key.
• To move forward in a file, press and hold the Right key.
• To access the next file, press the Right key.
• To access the previous file, press the Left key.
• To pause or resume playback, press .
• To play the files in the play list randomly or repeatedly, press the
Menu soft key and select Shuffle/Repeat > an option.
• To view the video on a full screen, press the Menu soft key and
select Full Screen.
• To stop playback, press the Menu soft key and select Stop.
Playing media files on a network
1. On the Library screen, press the Menu soft key and
select Open URL.
2. Enter a URL address in the URL field, or scroll to one of
the URL address that you have used from the History
field.
3. Press the OK soft key.
Note: To play media streaming, you must be connected to a network. For
more information on creating a remote connection between your phone
and a network.
78
Page 79

Windows Media Player
Setting up a play list
You can add media files on the Library screen to a
temporary play list. It lists the currently playing file, as
well as any files that have been queued up to play next.
Creating a play list
1. On the library screen, select the category you want and
scroll to the file you want to play.
If the file does not appear on the list, press the Menu soft
key and select Update Library.
2. Press the Menu soft key and select Queue Up to add the
file to the play list.
3. Repeat steps 1 and 2 to add more files.
4. Press to return to the player screen or Menu >
Player.
5. Press
or to start playing the files.
6. To save the play list, press the Now Playing soft key and
then the Menu soft key, and select Save Playlist.
7. Enter the list name and press the Done soft key. The list
is saved in the My Playlists library.
Opening the play list
On the player screen, press the Now Playing soft key.
You can use various options by pressing the Menu soft
key.
Editing the play list
• To change the play order, press the Menu soft key and select
Move Up or Move Down.
• To delete the selected files, press the Menu soft key and select
Remove from Playlist.
Section 6: Cingular Music 79
®
Page 80

• To clear the play list, press the Menu soft key and select Clear
Now Playing.
Changing the Window Media Player Settings
You can customize the appearance and functionality of
Windows Media Player. On the player screen, press the
Menu soft key and select Options.
You can use the following options:
• Playback: Select the options for playback. You can select the
way time is displayed on the player screen, or whether or not to
pause playback when you launch another program, and
resume playback after a phone call.
• Video: Select the viewing options for playing videos on a full
screen.
Note: If there is a problem while playing MP4 files, deselect the Shrink to
fit window option. The problem occurs because the file has been resized.
• Network: Change the connections speed and protocol for
playing music and streaming video.
• Library: Select whether the player screen or the Library screen
is displayed when you open Windows Media Player.
• Skins: Change the appearance of the player screen by selecting
a new skin.
• Buttons: Assign Windows Media Player functions to the keys on
your phone to quickly control playback without having to use
the menus.
Shop Music
Use the Shop Music feature to browse the internet for
music and Ringtones. Access the MEdia Net menu and
enter a song or ringtone. A popup note displaying that
information entered from this site appears and you
80
Page 81

MusicID
select Yes or No to continue. Use the online screen
instructions to continue.
1. On the Home screen, press the Start > Cingular Music
> 2 Shop Music.
MusicID
MusicID is an application which uses the onboard microphone to analyze a
song sample and then compare it to a remote database of songs. Once the
application completes the analysis of the song sample, it then provides you
with the name of the song, artist and album art as well as opportunities to buy
related content.
1. On the Home screen, press the Start > Cingular Music
> 3 MusicID.
2. Press
3. Highlight MusicID and press the Select soft key or the key. You
are then presented with a list of ID options:
To exit the application at any time, simply press the key.
Using ID song!
1. Highlight ID song! and press the key.
2. Place the handset’s microphone up to the source of the song, which
can be from either a radio, stereo, or headset. The handset then
begins to analyze the audio signal. If a song match is found, the
screen displays the Artist Name, Track Title, and Album cover art.
3. To purchase the song (with ringtone and wallpaper if available),
highlight get:, and press the key.
.
䢇 ID song!: begins the analysis of the song being sampled through the
handset’s microphone.
䢇 manage IDs: provides a list of recently identified song and allows you to
obtain information about the song, delete the song, or send the MusicID as
a link to another phone number.
䢇 help me out: provides you with on screen descriptions of several key
MusicID features.
䢇 exit: allows you to exit the application and return to the main Cingular
Music menu.
Section 6: Cingular Music 81
Page 82

4. To share the song ID with another user, highlight Share ID press the
key. Enter the recipient’s phone number and press the ShareID!
soft key. Within a short time they will receive a message containing
a Music ID link to the song.
5. If the song can not be found, the handset displays a “Sorry, No Match
Try Again!” message. Press the newID! soft key and try analyzing
the song again.
To exit the application at any time, simply press the key.
Using Manage IDs
1. Highlight Manage IDs and press the key. The screen displays a
list of the most recent successful song IDs which were made.
2. Highlight a song and press the Options soft key.
3. Highlight one of the following options and press the key.
䢇 ID Info: displays the Artist Name, Track Title, and Album cover art of the
identified song.
䢇 Delete ID: deletes the selected song from the list of identified songs.
䢇 New ID!: begins the song analysis process again. Hold the microphone to
the song source and wait for analysis.
To exit the application at any time, simply press the key.
Getting Help with MusicID
1. Highlight help me out and press the key to select a topic. The
screen displays a list of helpful topics related to the musicID
application. These topics cover:
䢇 IDing a Song: provides information about the analysis process.
䢇 Recommendations and More!: describes the process following the
successful identification of a song. You can choose to purchase the song
and wallpaper (if available) or send the musicID as a link to another phone
number.
䢇 Subscription: provides details about the general usability and monthly
term information.
䢇 About MusicID: provides information about the Music ID software
version.
Exiting from the MusicID Application
There are two ways to exit from the MusicID application:
1. Highlight exit and press the key to select a topic.
82
Page 83

Streaming Music
2. Exit the application at any time by simply pressing the key.
Streaming Music
This service allows you to stream commercial free music through your
handset.
Note: Since this product uses a large amount of data in its stream process, you should note that you
are responsible for all data charges incurred. It is recommended that you subscribe to a MEdia Max
data bundle so that you are not charged fo r data overages.
Note: XM Radio does not work with Bluetooth. Periodically, the application will ask the customer to
confirm they are still listening to the stream.
1. On the Home screen, press the Start > Cingular Music
> 4 Streaming Music.
2. Press
3. Highlight Streaming Music and press the key. The XM Radio
menu displays. Follow the onscreen instructions to understand
applicable charges and options.
Streaming a Music Channel
1. Press the OK soft key to accept the terms of the trial period. You have
only a few days to use the service before the trial period expires. If at
any time you wish to purchase a subscription to the XM Radio
service, press the Buy soft key and follow the on screen prompts.
2. Use the Up or Down Navigation key to highlight a radio station
category from the guide list and press the key.
3. Use the Up or Down Navigation key to highlight a specific radio
channel and press the key to begin the stream to your phone.
.
Music Videos
The Music Videos homepage is a component of the Cingular Video service.
This page provides you with links to some of the most popular multimedia
content.
1. On the Home screen, press the Start > Cingular Music
Section 6: Cingular Music 83
Page 84

> 5 Music Videos.
2. Press
.
You are then taken to your CV Music homepage. This
homepage provides you with several sections of
accessible content:
䢇 Music: allows you to choose from some recently uploaded video clips
from the Music Choice channel, which can include news, cuts, and
ringtone reports.
䢇 Music Channels: provides some general content categories from which
to begin searching for media: Cingular Sounds Live, Music Choice
Premium, Music Videos, MTV, VH1, CMT, and Hip Hop Official.
䢇 Entertainment: exits from the Music Videos section of the homepage
and launches an entertainment page which provides further streaming
multimedia content.
䢇 Cingular Video: exists from the Music Video application and launches
the Cingular Video homepage.
䢇 MEdia Net: exists from the Music Video application and launches the
MEdia Net homepage.
䢇 Help: provides basic on-line assistance which answers most of the
common issues users come across while using this feature.
3. Highlight the desired media clip or select from one of the available
categories and press the key.
Music Video Options
The options for the Music Video page are identical to those options provided
for within the Cingular Video homepage.
From the main Music Video homepage, press the
Options soft key.
Viewing a Video Clip
1. Use the Up or Down Navigation key to highlight the video clip and
press the Select soft key or the key.
2. After the stream has been buffered into memory, you can choose to
either Pause or play the content. Pressing the key toggles the
Play and Pause functionality.
84
Page 85

The Buzz
The Buzz
This service allows you to navigate through Top 20 chart songs (in a variety of
categories). Other features of this service include streaming entertainment
news about your favorite music artists, access to an artists main page
(containing discographies, ringtones, concert dates, etc.), concert information,
games, and setup options for your own personal billboard notifications.
1. On the Home screen, press the Start > Cingular Music
> 6 The Buzz.
2. Press .
3. Highlight The Buzz and press the key.
4. Press the Trial soft key to accept the terms of the trial period. You
have only a few days to use the service before the trial period
expires. If at any time you wish to purchase a subscription to this
service, press the Buy soft key and follow the on screen prompts.
5. Enter an area code, phone number (without dashes), and Zip code
into the appropriate fields on the Customize screen. Use the Up or
Down Navigation key to switch between fields.
6. Press the Confirm soft key to accept and save your information.
7. Once the phone number has been successfully registered, press the
OK soft key to continue onto the main Billboard mobile menu where
you are given a list of categories to choose from:
䢇 CHARTS: provides you with a top 20 list of popular Ringtones, and tunes
such as R&B/Hip Hop, Rock, Pop, Latin, Country, and Rap.
䢇 NEWS & REVIEWS: provides you with links to some of the latest news
about your favorite artists.
䢇 ARTISTS: features a personalized artist web page for an available artist
which includes a bio, discography info, ringtones, tour dates, etc.
䢇 CONCERTS: allows you to search for a concert by using either the artist
name, venue, type, or city/state/zip information.
䢇 GAMES: allows you to use your keypad to play an entertainment-based
guessing game by entering in names, dates, and places.
䢇 MY BILLBOARD: allows you to refine your Billboard mobile experience by
configuring your text message preferences, personal settings, and alerts.
8. Exit the application at any time by simply pressing the key.
Section 6: Cingular Music 85
Page 86

Music Community
This Community is a place where you can find a listing of various fan sites that
provide sound clips, wallpapers, bios, discographies, and other information
about an artist.
1. On the Home screen, press the Start > Cingular Music
> 7 Community.
2. Press
.
3. Use the Up or Down Navigation key to select a fan site and press the
key. These pages can contain the following information:
䢇 Wallpapers: provides you with color graphic files which can be used as a
wallpaper on your handset. Highlight an entry and press the key.
䢇 Photos: allows you to view some artist-specific photos. Use the Next and
Back buttons to navigate through these pages.
䢇 Bio: provides a biographical description of the artist/band.
䢇 Artist Info: provides more specific group member information.
䢇 Discography: provides a description of the artist’s albums and their
corresponding release dates.
䢇 Tour Dates: provides a listing of the artist’s current tour dates.
To exit the application at any time, simply press the key.
Music Apps
The Music Apps page will remain this way until
Motricity supports downloading .cab & J2ME
applications to the Windows Media platform.
1. On the Home screen, press the Start > Cingular Music
> 8 Music Apps.
2. Press
3. Highlight Music Apps and press the key.
.
86
Page 87

Section 7: Cingular Video
Topics Covered
• Media Clip Options
• Media Clip Options
• Using the Video Categories
• Customizing Cingular Video
•My Purchases
• Parental Controls
Your phone is equipped with a WAP (Wireless
Application Protocol) browser which allows you to
access Internet and then upload media files directly to
your phone. These media files are displayed using the
built-in Media Player. Cingular Video (CV) is a media
service which allows you to not only navigate to your
favorite web sites but stream media content (Weather,
News/Sports highlights, etc.) directly to your phone.
1. On the Home screen, press the Start > Cingular Video.
2. Press
3. You are then taken to your default Cingular Video
homepage.
This homepage provides you with several sections of
accessible content:
.
䢇 Address Bar: allows you to enter a new address
Section 7: Cingular Video 87
Page 88

䢇 Favorites: allows you to choose from some recently
uploaded video clips from among the following media
providers: CNN, ESPN, HBO Mobile Preview, or Access
Hollywood.
䢇 Add to Favorites: allows you to add media websites to the
Favorites list.
䢇 Video Categories: provides some general content
categories from which to begin searching for media: TV to Go,
Entertainment, Sports, News & Weather, HBO Mobile, and
Premium Channel.
䢇 Customize Cingular Video: allows you to access the
Cingular Video Settings menu where you can configure most of
the settings associated with Cingular Video.
䢇 Parental Control: provides you with settings which can be
configured to restrict certain media content from being
displayed on the phone.
䢇 MEdia Net: exits from the Cingular Video application and
launches the MEdia Net homepage.
䢇 Help: provides basic on-line assistance which answers most
of the common issues users come across while using this
feature.
4. Highlight the desired media clip or select from one of the
available categories and press the Select soft key or the
key.
Media Clip Options
With the media currently active on the phone (either
playing or paused), press the Menu soft key to open a
list of the following streaming media options.
88
Page 89

Media Clip Options
Library
This feature launches the Windows Media Library
showing My Music, My Videos, My TV, My Playlists,
and Now Playing.
Play/Pause
This feature allows you to toggle the state of the current
video between being Paused or Resuming playback.
Stop
The feature stops the current media, exits the media
player and returns you to the main Cingular Video
homepage.
Shuffle/Repeat
This feature allows you to toggle between the shuffle or
repeat options for your videos you have played and
saved to your device.
Full Screen
This feature changes the screen content to remove or
include the information regarding the soft key menu
options or to display the video only. Press the
switch between screen options.
Options
The following options are available:
key to
• Playback:
• Show time as: set the show time elapsed or remaining.
• Set the Pause playback while using another program to stop
the video if you launch another program.
Section 7: Cingular Video 89
Page 90

• Resume playback after a phone call to continue the video
after your phone call is ended.
• Video
䢇 Play video in full screen: choose from Never, Only when
oversized, or always.
䢇 Scale to fit window: allows you to fit the picture to the screen.
• Network
䢇 Internet connection speed: choose the internet connection
speed to download the videos.
䢇 Detect connection speed: sets the default speed the data
connection allows.
䢇 Protocol: Select the UDP or TCP protocol, or the Port number.
• Library: allows you to start the player from the library screen
• Skins: allows you to select the screen display (Skin) for your
video clips. Use the Right or Left Navigation key to make your
selection. Press to make your selection.
• Buttons: displays the buttons and their options for the media
clip application.
Properties
Displays a Media Player window which gives file
specific information such as title, and Duration.
Settings
This feature pauses the content and navigates you to
the Player Settings menu where you can configure the
Media Player’s Volume setting.
1. Use the Up or Down Navigation key to increase/decrease
the current volume setting for the player while in Portrait
mode. Use your Left or Right Navigation key to increase/
decrease the current volume setting for the player while
90
Page 91

Using the Video Categories
in Landscape mode.
2. Press the Save soft key to save your changes
- or -
3. Press the Back soft key to resume your media playback
without saving your changes.
Cingular Video Settings
This feature allows you to configure the current server
profile being used by the
on-board WAP.
Using the Video Categories
This grouping of media categories provides access to an
additional listing of streaming media. Where the
previous Favorites list of media stream can be user
edited and updated, this list of categories is defined by
Cingular’s homepage and can not be changed.
Viewing a Video Clip
1. From the Home screen, press the Start soft key. Highlight
Cingular Video and press the key.
2. Use the Up or Down Navigation key to highlight the video
clip from within the Favorites section and press the
Select soft key or the key.
3. After the stream has been buffered into memory, you can
choose to either Pause or play the content. Pressing the
key toggles the Play and Pause functionality.
Section 7: Cingular Video 91
Page 92

Customizing Cingular Video
Updating the Favorites List
The list of media providers which appear in the
Favorites section of the Cingular Video homepage can
be edited and changed by the user.
1. From the Home screen, press the Start soft key. Highlight
Cingular Video and press the key.
2. Use the Up or Down Navigation key to highlight the Edit
button from the upper-right of the homepage (adjacent to
the My Favorites title) and press the key.
3. From the Customize Cingular Video - Options listing,
highlight Edit My Favorites and press the key.
4. Navigate to the Add to Favorites section of the page and
highlight one the additional streaming media channels
which are not currently in your Favorites list (ex: Cartoon
Network).
5. Press the Options soft key. Highlight Add to Favorites
and press the Select soft key or the key.
Adding a Video Alert
When new media is available for upload to your phone
(such as breaking news), you can set your phone to
notify you of the new available content.
1. From the Home screen, press the Start soft key. Highlight
Cingular Video and press the key.
2. Use the Up or Down Navigation key to highlight the
Customize Cingular Video button from the bottom of
the homepage and press the Select soft key or the
key.
92
Page 93

My Purchases
3. From the Customize Cingular Video - Options listing,
highlight My Video Alerts and press the key.
4. Navigate to the Add to My Alerts section of the page
and highlight one the available services (ex: Breaking
News).
5. Press the Options soft key. Highlight Add to Favorites
and press the key.
My Purchases
The Cingular Video homepage can be used to shop for
streaming multimedia content. The My Purchases
section can help keep track of your purchase history
and view any new resale products.
1. From the Home screen, press the Start soft key. Highlight
Cingular Video and press the key.
2. Use the Up or Down Navigation key to highlight the
Customize Cingular Video button from the bottom of
the homepage and press the key.
3. From the Customize Cingular Video - Options listing,
highlight My Purchases and press the key.
4. Highlight Purchase History and press the key. This
provides you with an on screen listing of your “to date”
purchase history for media content.
5. Highlight My Account and press the Select soft key or
the key. This provides you with an on screen
description of your account details.
Section 7: Cingular Video 93
Page 94

Parental Controls
Your phone can be configured to block both purchased
and streamed media content. Before filtering, you must
first establish a pin/password and a contact e-mail
address. Once those have been established, you can the
two available filter options: Content Filter and
Purchase Blocker.
• Content Filtering let you restrict access to inappropriate
content both on and outside of MEdia Net.
• Purchase Blocking lets you restrict the ability to buy ringtones,
downloads, games, etc., from this phone.
Setting up Parental Control
1. From the Home screen, press the Start soft key. Highlight
Cingular Video and press the key.
2. Use the Up or Down Navigation key to highlight the
Customize Cingular Video button from the bottom of
the homepage and press the key.
3. From the Customize Cingular Video - Options listing,
highlight Parental Controls and press the key.
4. Highlight the OK button and press the key to access
the MEdia Net parental setup fields.
5. From the Parental Control Setup screen, use your keypad
to enter information into the following fields: PIN Code,
Re-enter PIN code, contact email address.
6. Use you Navigation keys to highlight the Save button and
press the key. Allow a few minutes for your
information to be received and accepted by MEdia Net.
You can then use this information to activate the parental
filters.
94
Page 95

Configuring the Filters
1. From the Home screen, press the Start soft key. Highlight
Cingular Video and press the key.
2. Use the Up or Down Navigation key to highlight the
Customize Cingular Video button from the bottom of
the homepage and press the key.
3. Highlight the OK button and press the key.
4. When prompted, enter the PIN and e-mail address which
was registered with MEdia Net in the previous section.
5. Highlight Content Filters and press the key.
6. Highlight the On button and press the Select soft key or
the key to toggle the On/Off state.
7. Highlight Purchase Blocker and press the Select soft
key or the key.
8. Highlight the On button and press the Select soft key or
the key to toggle the On/Off state.
9. Press the Back soft key or the key. This activates.
Parental Controls
Section 7: Cingular Video 95
Page 96

96
Page 97

Shop Tones
Section 8: Cingular Mall
Topics Covered
• Shop Tones
• Shop Games
• Shop Graphics
• Shop Multimedia
• Shop Application
• MEdia Net Home
The Cingular Mall topics covered in this section are
shopping for Tones, Games, Graphics, Multimedia, and
Accessing the MEdia Home site.
Note: Prior to purchasing downloadable tones, graphics, games, or other
applications, it is necessary to setup an e-wallet account so that with every
purchase, your account can easily be debited.
Shop Tones
The Shop Tones menu option allows you to shop for
audio tones using the built-in browser. You can
download, record new, and save audio to either your
Audio or Music folder. To access this menu option, use
the following steps:
1. On the Home screen, press the Start > Cingular Mall >
1 Shop Tones.
Section 8: Cingular Mall 97
Page 98

2. Press .
3. Follow the on-screen options. The downloaded files can
be stored into the Main Memory or Storage Card found
within the My Stuff (Phone) location. Music Tone
categories include:
䢇 Featured Artists
䢇 Answer Tones
䢇 Search for a specific audio file by name
4. Select an audio file and press the key.
5. When you are ready to purchase the audio file, press the
Buy Now button to charge your e-wallet account and
complete the transaction.
Shop Games
The Shop Games menu option allows you to shop for
games using the built-in browser. You can download
new games to your Java folder. To access this menu
option, use the following steps:
1. On the Home screen, press the Start > Cingular Mall >
2 Shop Games.
2. Press .
3. Follow the on-screen options. The downloaded files can
be stored in the Java folder found within the Applications
menu. Categories include:
䢇 New Arrivals
䢇 Retro
䢇 3D Games
䢇 Game Clubs
䢇 Search for a specific game by name
98
Page 99

Shop Graphics
4. Select a game entry and press the key.
5. When you are ready to purchase the game, press the
Buy Now button to charge your e-wallet account and
complete the transaction.
Shop Graphics
The Shop Graphics menu option allows you to shop
for graphic images using the built-in browser. You can
download new images to your My Pictures folder. To
access this menu option, use the following steps:
1. On the Home screen, press the Start > Cingular Mall >
3 Shop Graphics
2. Press .
3. Follow the on-screen options. The downloaded files can
be stored in the My Pictures folder found within the My
Stuff (Phone) location. These images can be used as
wallpapers or included into multimedia messages.
4. Select an image entry and press the key.
䢇 When you are ready to purchase the image, press the Buy Now
button to charge your e-wallet account and complete the
transaction.
Shop Multimedia
The Shop Multimedia menu option allows you to shop
for multimedia files (videos) using the built-in browser.
You can download new videos to the My Videos folder.
To access this menu option, use the following steps:
1. On the Home screen, press the Start > Cingular Mall >
4 Shop Multimedia.
2. Press
.
Section 8: Cingular Mall 99
Page 100

3. Follow the on-screen options. The downloaded files can
be stored in the My Videos folder found within the My
Stuff (Phone) location. These files can be included into
multimedia messages.
4. Select an video file entry and press the key.
5. When you are ready to purchase the file, press the Buy
Now button to charge your e-wallet account and
complete the transaction.
Shop Application
The Shop Application menu option allows you to shop
for application files using the built-in browser. You can
download the new applications to your My Stuff
folder. To access this menu option, use the following
steps:
1. On the Home screen, press the Start > Cingular Mall >
5 Shop Multimedia.
2. Press
3. Follow the on-screen options. The downloaded apps. can
be stored in the My Stuff folder found within the My Stuff
(Phone) location. These files can be included into
multimedia messages.
4. When you are ready to purchase the application, press
the Buy Now button to charge your e-wallet account and
complete the transaction.
.
MEdia Net Home
The MEdia Net Home menu option allows you to
quickly access your Cingular
MEdia Net homepage using the built-in browser. This
100
 Loading...