

Page 1

Smartphone
SGH-i310
User’s Guide
Page 2

Table of contents
Important safety precautions . . . . . . . . . . . . . . . . . . . . . 6
CHAPTER 1 Getting started
What’s in the box? . . . . . . . . . . . . . . . . . . . . . . . . . . . . . 8
Getting to know your phone . . . . . . . . . . . . . . . . . . . . . . 9
Installing the SIM card . . . . . . . . . . . . . . . . . . . . . . . . . 12
Installing the battery . . . . . . . . . . . . . . . . . . . . . . . . . . 14
Charging your phone . . . . . . . . . . . . . . . . . . . . . . . . . . 15
Turning your phone on or off . . . . . . . . . . . . . . . . . . . . . 16
CHAPTER 2 The basics
Using the Home screen . . . . . . . . . . . . . . . . . . . . . . . . . 17
Start menu screen . . . . . . . . . . . . . . . . . . . . . . . . . . . . 22
Entering text . . . . . . . . . . . . . . . . . . . . . . . . . . . . . . . . 23
Customising your phone . . . . . . . . . . . . . . . . . . . . . . . . 28
Locking the keys . . . . . . . . . . . . . . . . . . . . . . . . . . . . . 38
Using the Program Launcher . . . . . . . . . . . . . . . . . . . . . 39
Viewing the phone display on a TV . . . . . . . . . . . . . . . . . 40
Using an optional memory card . . . . . . . . . . . . . . . . . . . 41
Adding and removing programs . . . . . . . . . . . . . . . . . . . 43
Managing certificates . . . . . . . . . . . . . . . . . . . . . . . . . . 45
Resetting your phone . . . . . . . . . . . . . . . . . . . . . . . . . . 46
Using online help . . . . . . . . . . . . . . . . . . . . . . . . . . . . . 48
SIM AT (SIM Application Toolkit) . . . . . . . . . . . . . . . . . . 48
2
Page 3

Table of contents
CHAPTER 3 Synchronisation
Installing ActiveSync . . . . . . . . . . . . . . . . . . . . . . . . . . 50
Customising connection settings . . . . . . . . . . . . . . . . . . 51
Connecting your phone to a computer . . . . . . . . . . . . . . 51
Synchronising information . . . . . . . . . . . . . . . . . . . . . . 53
Customising synchronisation settings . . . . . . . . . . . . . . . 54
CHAPTER 4 Call functions
Turning the phone functions on and off . . . . . . . . . . . . . 57
Using the Dialling screen . . . . . . . . . . . . . . . . . . . . . . . 57
Making a call . . . . . . . . . . . . . . . . . . . . . . . . . . . . . . . . 58
Advanced calling features . . . . . . . . . . . . . . . . . . . . . . . 58
Answering or ignoring a call . . . . . . . . . . . . . . . . . . . . . 61
Options during a call . . . . . . . . . . . . . . . . . . . . . . . . . . 62
Call-related features . . . . . . . . . . . . . . . . . . . . . . . . . . 64
Customising your phone functions . . . . . . . . . . . . . . . . . 68
CHAPTER 5 Messaging, Internet, and Messenger
Messaging . . . . . . . . . . . . . . . . . . . . . . . . . . . . . . . . . . 72
Internet Explorer . . . . . . . . . . . . . . . . . . . . . . . . . . . . . 87
WAP Browser . . . . . . . . . . . . . . . . . . . . . . . . . . . . . . . 90
Pocket MSN . . . . . . . . . . . . . . . . . . . . . . . . . . . . . . . . . 94
CHAPTER 6 Organiser
Contacts . . . . . . . . . . . . . . . . . . . . . . . . . . . . . . . . . . . 99
Calendar . . . . . . . . . . . . . . . . . . . . . . . . . . . . . . . . . . 105
D-Day . . . . . . . . . . . . . . . . . . . . . . . . . . . . . . . . . . . 108
Tasks . . . . . . . . . . . . . . . . . . . . . . . . . . . . . . . . . . . . 110
Voice Notes . . . . . . . . . . . . . . . . . . . . . . . . . . . . . . . . 111
Alarms . . . . . . . . . . . . . . . . . . . . . . . . . . . . . . . . . . . 112
WorldClock . . . . . . . . . . . . . . . . . . . . . . . . . . . . . . . . 114
3
Page 4

CHAPTER 7 Multimedia
Camera . . . . . . . . . . . . . . . . . . . . . . . . . . . . . . . . . . 115
Samsung Player . . . . . . . . . . . . . . . . . . . . . . . . . . . . . 121
Windows Media Player . . . . . . . . . . . . . . . . . . . . . . . . 128
My Items . . . . . . . . . . . . . . . . . . . . . . . . . . . . . . . . . 132
CHAPTER 8 Extra programs
Games . . . . . . . . . . . . . . . . . . . . . . . . . . . . . . . . . . . 136
Calculator . . . . . . . . . . . . . . . . . . . . . . . . . . . . . . . . . 137
Smart Converter . . . . . . . . . . . . . . . . . . . . . . . . . . . . 138
StopWatch . . . . . . . . . . . . . . . . . . . . . . . . . . . . . . . . 138
Voice Assist . . . . . . . . . . . . . . . . . . . . . . . . . . . . . . . . 139
Picsel Viewer . . . . . . . . . . . . . . . . . . . . . . . . . . . . . . . 142
Download Agent . . . . . . . . . . . . . . . . . . . . . . . . . . . . 145
File Manager . . . . . . . . . . . . . . . . . . . . . . . . . . . . . . . 146
SIM Manager . . . . . . . . . . . . . . . . . . . . . . . . . . . . . . . 147
Task Manager . . . . . . . . . . . . . . . . . . . . . . . . . . . . . . 150
Format . . . . . . . . . . . . . . . . . . . . . . . . . . . . . . . . . . . 151
CHAPTER 9 Getting connected
Beaming with Bluetooth . . . . . . . . . . . . . . . . . . . . . . . 152
Connecting to a computer via USB . . . . . . . . . . . . . . . . 156
Modem Link . . . . . . . . . . . . . . . . . . . . . . . . . . . . . . . 156
Connecting to the Internet or your network . . . . . . . . . 157
Table of contents
CHAPTER 10 Troubleshooting
General problems . . . . . . . . . . . . . . . . . . . . . . . . . . . 163
Call problems . . . . . . . . . . . . . . . . . . . . . . . . . . . . . . 165
Power and charging problems . . . . . . . . . . . . . . . . . . . 166
Program problems . . . . . . . . . . . . . . . . . . . . . . . . . . . 168
4
Page 5

CHAPTER 11 Regulatory notices
SAR certification information . . . . . . . . . . . . . . . . . . . . 173
European union notice . . . . . . . . . . . . . . . . . . . . . . . . 174
Important safety information . . . . . . . . . . . . . . . . . . . 175
Safety precautions for power supply unit . . . . . . . . . . . 177
Care and maintenance . . . . . . . . . . . . . . . . . . . . . . . . 178
Cautions for using the HDD in the product . . . . . . . . . . 180
Microsoft End User License Agreement . . . . . . . . . . . . . 181
DESCRIPTION OF OTHER RIGHTS AND LIMITATIONS . . . 183
Table of contents
5
Page 6

Important safety precautions
Read these guidelines before using your wireless phone.
Failure to comply with them may be dangerous or illegal.
Drive safely at all times
Do not use a hand-held phone while driving. Park the
vehicle first.
Switch off the phone when refuelling
Do not use the phone at a refuelling point (service station)
or near fuels or chemicals.
Switch off in an aircraft
Wireless phones can cause interference. Using them in an
aircraft is both illegal and dangerous.
Switch off the phone near all medical equipment
Hospitals or health care facilities may be using equipment
that could be sensitive to external radio frequency energy.
Follow any regulations or rules in force.
Interference
All wireless phones may be subject to interference, which
could affect their performance.
Be aware of special regulations
Meet any special regulations in force in any area and
always switch off your phone whenever it is forbidden to
use it, or when it may cause interference or danger.
Water resistance
Your phone is not water-resistant. Keep it dry.
6
Page 7

Sensible use
Use only in the normal position (held to the ear). Avoid
unnecessary contact with the antenna when the phone is
switched on.
Emergency calls
Key in the emergency number for your present location,
then press .
Keep your phone away from small children
Keep the phone and all its parts, including accessories, out
of the reach of small children.
Accessories and batteries
Use only Samsung-approved batteries and accessories,
such as headsets and PC data cables. Use of any
unauthorised accessories could damage you and your
phone and may be dangerous.
CAUTION:
• The phone could explode if the battery is replaced with an
incorrect type.
• Dispose of used batteries according to the manufacturer’s
instructions.
At very high volumes, prolonged listening to a
headset can damage your hearing.
Qualified service
Only qualified service personnel may install or repair your
phone. Failure to do so may invalidate the warranty.
For more detailed safety information, see “Important safety
information” on page 175.
7
Page 8

1
Getting started
Congratulations on the purchase of your new Smartphone!
This chapter helps you set up your phone, charge the
phone’s batteries, and familiarise yourself with the different
components of your phone.
What’s in the box?
Your package contains the following items:
Phone
Travel charger
* One contains Microsoft ActiveSync software, Add-on software and
programs, and the other contains User’s Guide in PDF format.
In addition, you can obtain the following accessories for
your phone from your local Samsung dealer:
• Car charger/adapter • Desktop holder
• Standard/extended battery • Bluetooth hands-free car kit
• Travel charger • Straight headset
• PC data cable • Bluetooth USB dongle kit
• Bluetooth mono &
stereo headset
Note
: The items supplied with your phone and the accessories
available at your Samsung dealer may vary, depending
on your country or service provider.
PC data cable
CD-ROMs
*
Battery
Quick Reference Guide
8
Page 9
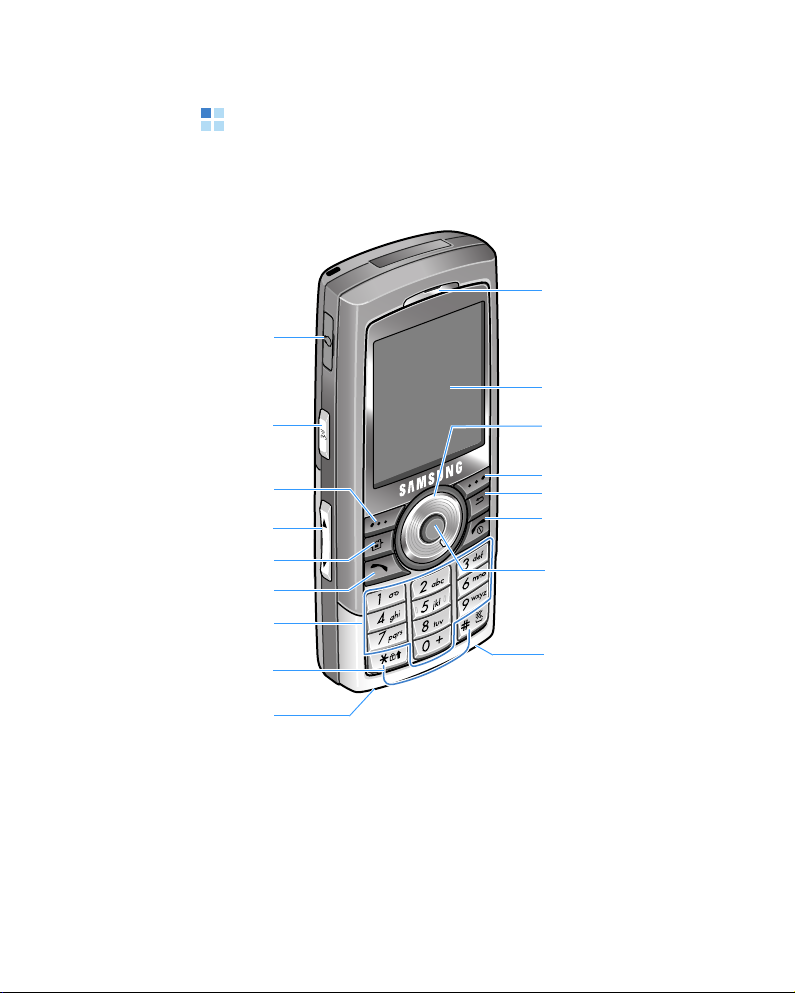
Getting to know your phone
Front view
Headset jack
Voice No tes/
Voice Assist key
Left soft key
Volume keys
Home key
Dialer/Send key
Getting started
Earpiece
Display
Navigation
keys/disc
Right soft key
Back/Clear key
End/Power on or
off key
Confirm key
Alphanumeric
keys
Special
function keys
Reset hole
Microphone
9
Page 10
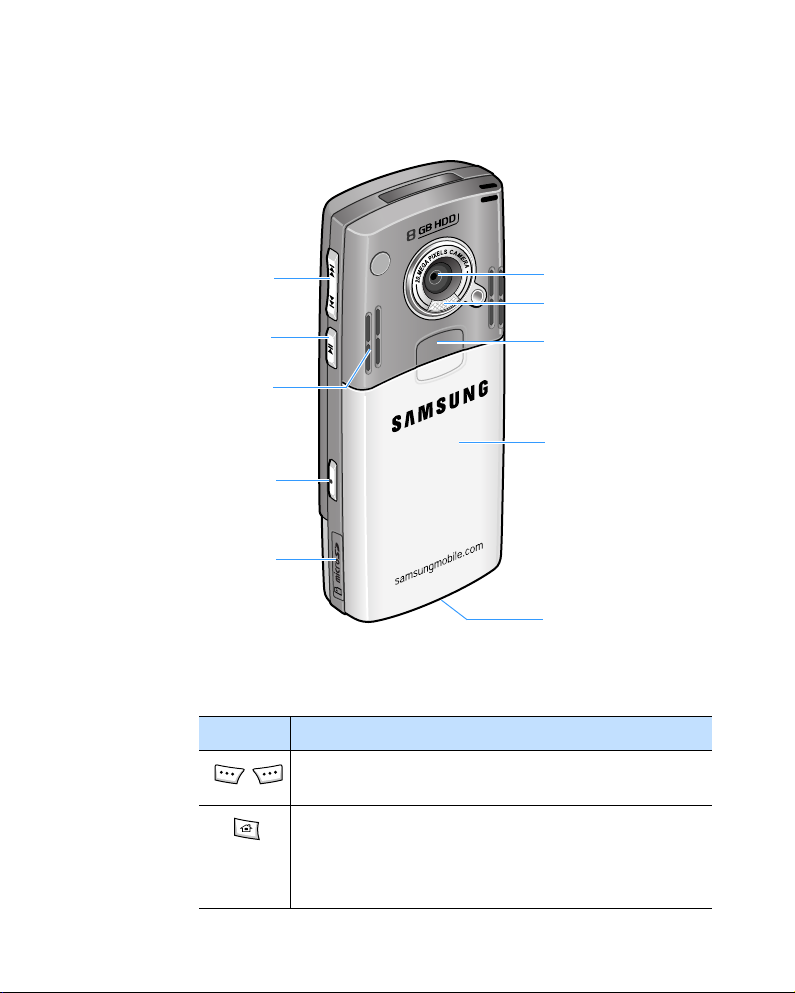
Rear view
Getting started
Backward/
Forward key
Samsung Player
key
Speaker
Camera key
Memory card slot
Keys of your phone
Key Description
Press to perform the command shown on the
screen immediately above the key.
• Press to switch to the Home screen in a
• Press and hold to open the Program
Camera lens
Camera flash
Battery lock
Battery
Charger/data cable
jack
program.
Launcher.
10
Page 11

Key Description
• Press to return to the previous screen.
• Press to delete characters in a text input
field.
Navigation (Left/Right/Up/Down) keys or disc.
• Press to scroll through a list.
• Press to move the cursor in a text input field.
• Press to confirm your selection.
• Press to open the Dialling screen.
• Press to make or answer a call.
• Press and hold to turn the phone on or off.
• Press to end a call.
Press to enter numbers and characters.
• Press to change the letter-case in a text
input field.
• Press and hold to change the text input
mode.
• Press to enter a space in a text input field.
• Press and hold to activate or deactivate the
Silent profile.
Getting started
Press to return to the previous track or skip to
the next track while music playback is in
progress.
Press and hold to open the Samsung Player
program.
11
Page 12

Getting started
Key Description
• Press and hold to open the Camera program.
• Press to take a photo in Camera mode or
record a video in Camcorder mode.
• Press to open the Voice Notes program.
• Press and hold to open the Voice Assist
program.
Press to adjust the earpiece volume.
Installing the SIM card
When you subscribe to a cellular network, you are provided
with a plug-in SIM card loaded with your subscription
details, such as your PIN, any optional services available,
and many other details.
• Keep all miniature SIM cards out of the reach of small
children.
• The SIM card and its contacts can be easily damaged by
scratches or bending, so be careful when handling the
card.
• When installing the SIM card, always make sure that the
phone is switched off before you remove the battery.
12
Page 13
Getting started
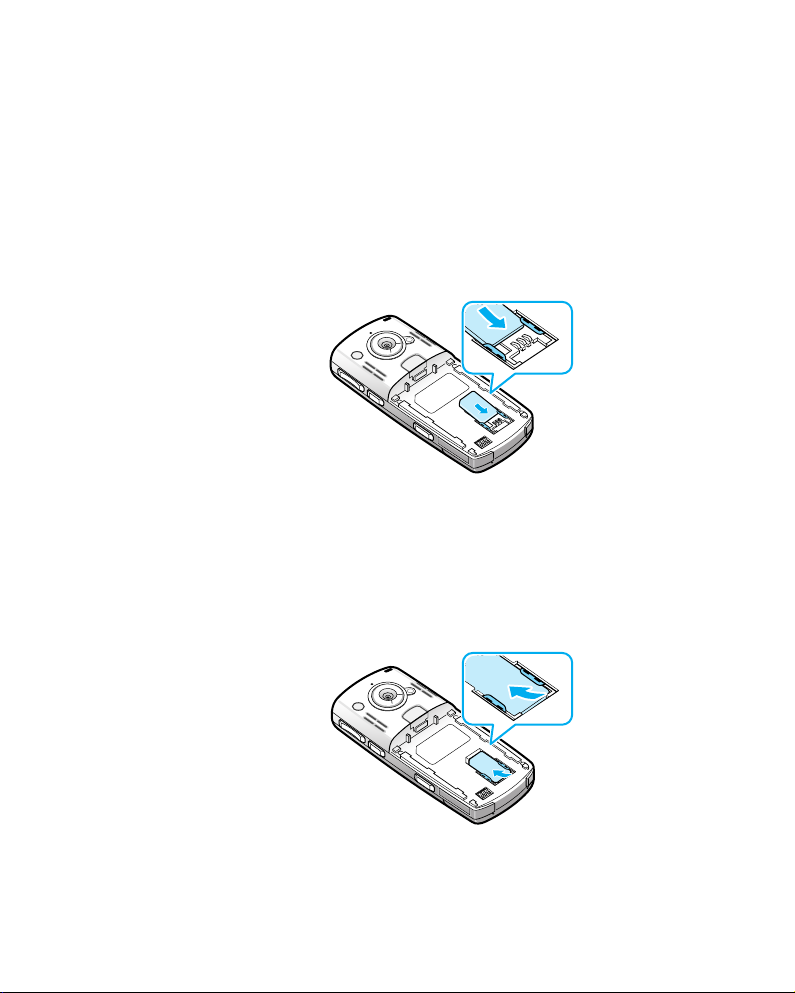
Inserting the SIM card
1. If necessary, remove the battery by referring to page
14.
2. Insert and slide the SIM card under the two tabs, as
shown, ensuring that the gold coloured contacts of the
card are face down into the phone.
Removing the SIM card
To remove the SIM card, slide the card out of the holder, as
shown.
13
Page 14
Getting started
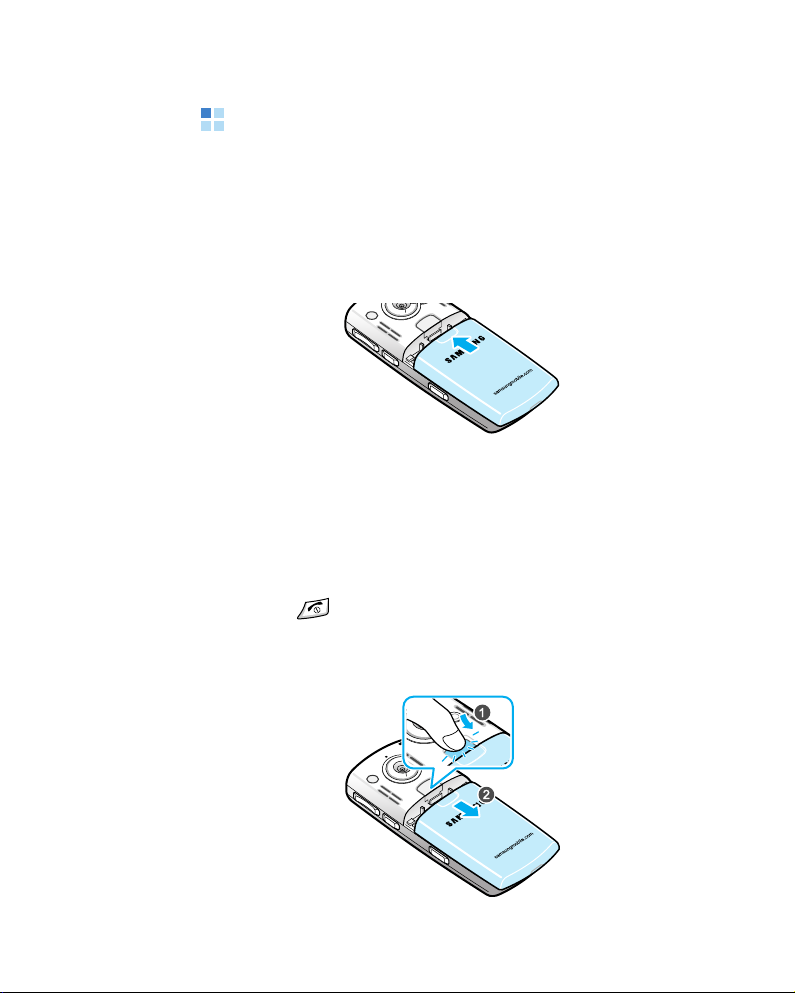
Installing the battery
Installing the battery
1. Place the battery on the back of the phone so that its
tabs align with the corresponding slots on the phone.
2. Slide battery toward the top of the phone.
Make sure that the battery is securely locked before
switching on the phone.
Removing the battery
1. If necessary, switch off the phone by pressing and
holding
until the power-off image displays.
2. While pressing and holding the battery lock, slide the
battery away from the phone, as shown.
14
Page 15
Getting started
Charging your phone
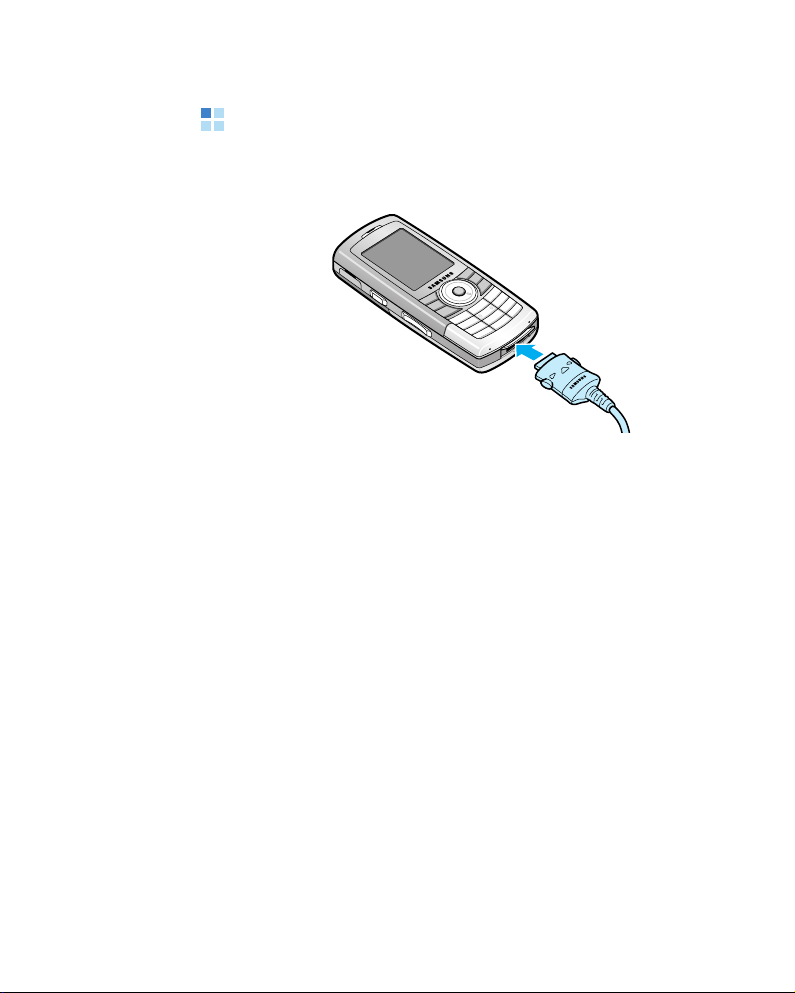
1. Plug the connector of the travel charger into the bottom
of the phone.
2. Plug the travel charger into a standard AC wall outlet.
The LED on the charger will indicate the charging
progress by the following colours:
• Red: The phone is being charged.
• Green: The phone is fully charged.
• Orange: The travel charger is not plugged in correctly.
Check the phone and the charger.
3. When charging is finished, unplug the travel charger
from the wall outlet.
15
Page 16

Getting started
4. Remove the travel charger from the phone by pressing
the buttons on both sides of the connector and pulling
the connector out.
Note
: Do not remove the battery while the phone is connected
to an AC wall outlet. It may cause malfunctions and
may damage the phone.
Low battery warning
Your phone displays the Battery Very Low icon ( ) and a
warning message when the battery gets very low. If this
happens, charge the battery.
Turning your phone on or off
Press and hold
logged into your home network and receives the signal
from the network. You can now make or answer a call
and use programs on the phone.
To turn off the phone, press and hold
to turn on your phone. The phone is
.
16
Page 17
2
The basics
This chapter explains basic information about using your
phone, such as customising your phone and using online
help.
Using the Home screen
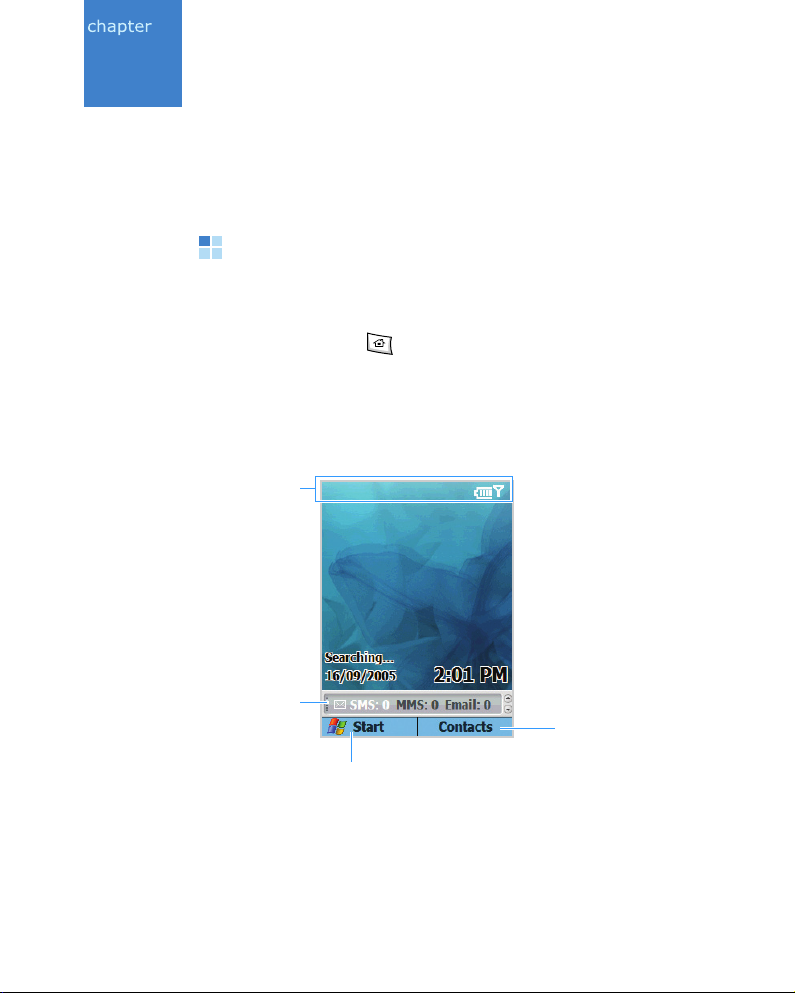
When you turn on your phone, the Home screen, the
phone’s idle screen, appears. You can also access this
screen by pressing from any program.
On the Home screen, you can view important information
for the day or messages at a glance. You can also quickly
switch to the programs you recently accessed.
Status icons indicates
your phone’s current
status. See the next
page.
Quick Launcher: Select to
view appointments or
messages, access recent
programs you used, or
change the profile settings.
Press the left soft key to
open the
switch to a program.
Start
menu and
Press the right soft
key to open
Contacts
.
17
Page 18
The basics
Status bar
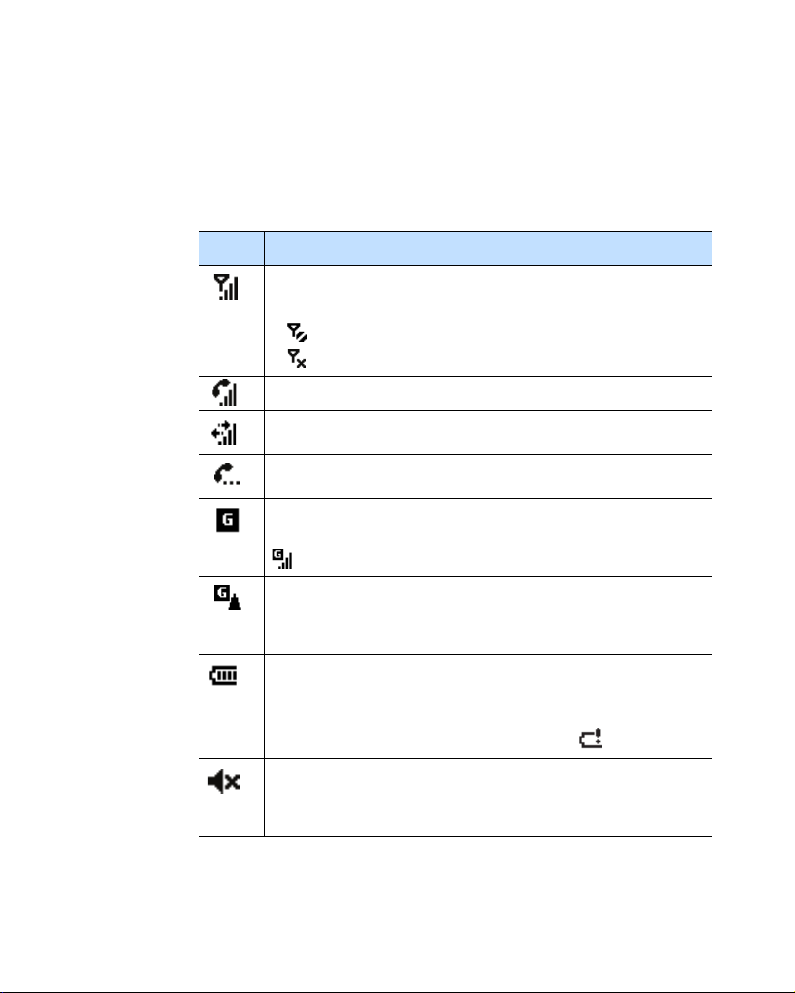
On the top line of the screen, the status bar displays icons
to show your phone’s current status. Followings are some
of the status icons you may see:
Icon Description
Shows the strength of the signal.
You can also view the following service status:
• : You are out of a service area.
• : The phone functions are turned off.
Appears when a call is in progress.
Appears when a data call is in progress.
Appears when the current call is on hold.
Appears when a GPRS connection is available in
the network. When a GPRS connection is active,
appears.
Appears when you are roaming out of your home
service area and logged onto a different GPRS
network.
Shows the level of your battery power. The more
bars you see, the more power you have
remaining.
When the battery level is very low, appears.
Appears when the ring type has been set to
Silent
in the current profile. For details, see page
30.
18
Page 19
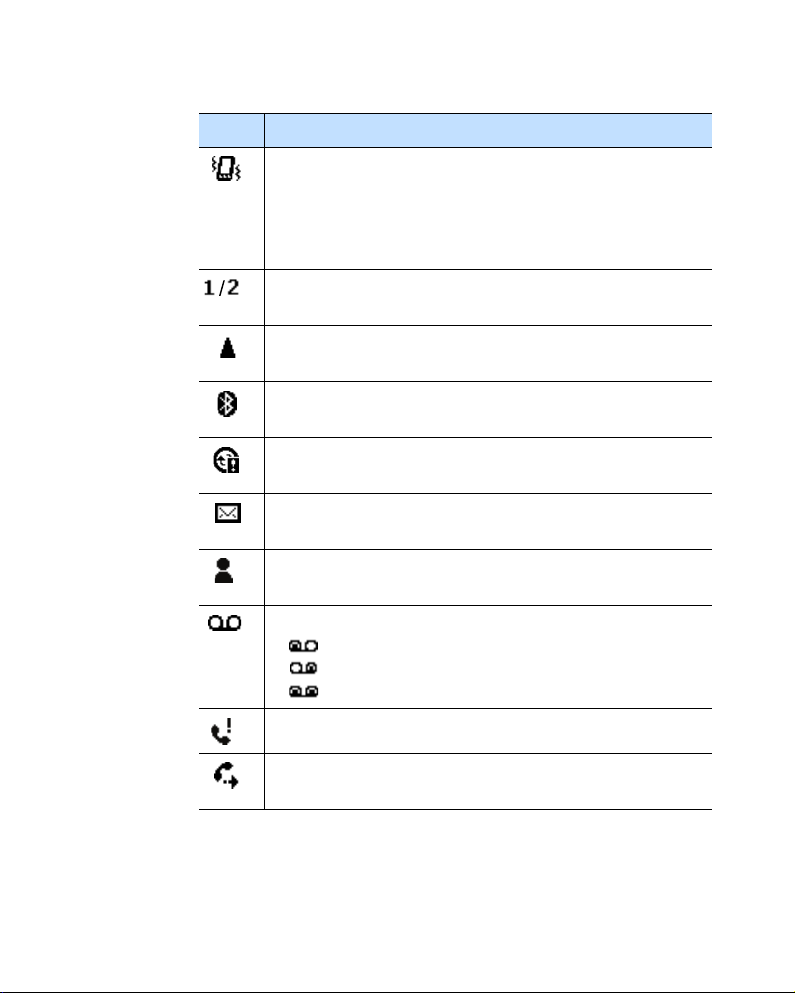
Icon Description
Appears when the ring type has been set to
Vibrate
in the current profile or the ring tone has
been set to
when the Silent profile is activated. For details,
see page 30.
Indicates that you can make calls using phone line
1 or 2 only (network service).
Appears when you are roaming outside of your
home area and logged onto a different network.
Appears when Bluetooth is activated. For details,
see page 152.
Appears when an error occurs during
synchronisation.
Appears when a text (SMS) or multimedia (MMS)
message has been received.
Appears when an instant message has been
received.
Appears when a new voicemail has been received.
• : A new voicemail from line 1.
• : A new voicemail from line 2.
• : A new voicemail from both lines.
Appears when there is a call you have missed.
Vibrate
The basics
in Sounds. Also, appears
Appears when you have set incoming calls to be
diverted to another destination.
19
Page 20

The basics
Accessing information from the Home
screen
From the Home screen, you can:
• access the most recently accessed programs
• view upcoming appointments
• change the profile option
• view unread text (SMS) or multimedia (MMS) messages
To change information on each item:
1. On the
change by pressing the Navigation keys or spinning the
Navigation disc, and press .
2. Access appointments or messages, or change the profile
setting.
For more information on changing these items, see
the appropriate instructions for each task in this
guide.
3. Press or to return to the Home screen.
Note
Home
screen, scroll to the item you want to
: To ensure that operations, such as moving or saving
files, proceed to completion, wait at least 50 seconds
before removing the battery.
Customising the Home screen
You can customise the Home screen according to your
preferences.
Setting the Home screen properties
1. On the
Home screen, press the Start
soft key.
20
Page 21

The basics
2. Select
Settings →
Display →
Home Screen
.
3. Press the Up or Down key or spin the Navigation disc to
scroll to an option, and press the Left or Right key to
change the setting.
The following options are available:
•
Home screen layout
: Select the layout to be used for
the Home screen.
•
Colour scheme
: Select the colour scheme to be used
for the Home screen.
•
Background image
: Select an image to use as a
background image on the Home screen.
•
Time out
: Specify the length of time the phone waits
before returning the display to the Home screen if the
phone is not used.
4. When you have finished, press the
Done
soft key.
Changing the right soft key function
Contacts is assigned by default to the right soft key on the
Home screen. You can change the program assignment for
the key.
1. On the
Home screen, press the Start
soft key.
2. Select
Settings →
More... →
Home screen key
.
3. Select the program you want.
4. Enter the name to be displayed on the Home screen for
the program in the
5. When you have finished, press the
Display Name
field.
Done
soft key.
21
Page 22

The basics
Start menu screen
On the Start menu, you can access all of the programs in
your phone. From the Home screen, press the
key to open the Start menu screen.
You can change the start menu type. Press the
key, and select
Then select the option you want.
Settings →
Display →
Start Menu Style
Opening programs or folders
Scroll to a program or a folder by pressing the Navigation
keys or spinning the Navigation disc and press to open
it. You can also press the number key assigned to the
program you want.
Switching between programs
Your phone is a multi-tasking device. You can run multiple
programs at the same time and switch from one program
to another. From any program, press or to switch
to the Home screen. Then access another program from
the Quick Launcher or Start menu
.
Start
Start
soft
soft
.
Note
: When you use a GPRS connection, pressing
terminates the connection. If you want the current
connection to continue, press , or as many
times as necessary, to switch to the Home screen.
22
Page 23

Closing programs
Using
Task Manager
currently open.
1. On the Home screen, press the
More
the
soft key.
, you can end the programs which are
Start
soft key and then
The basics
2. Select
3. Scroll to a program, press the
Accessories →
of the running programs, press the
select
Stop All
.
Task Manager
Stop
soft key. To close all
Menu
.
soft key and
Entering text
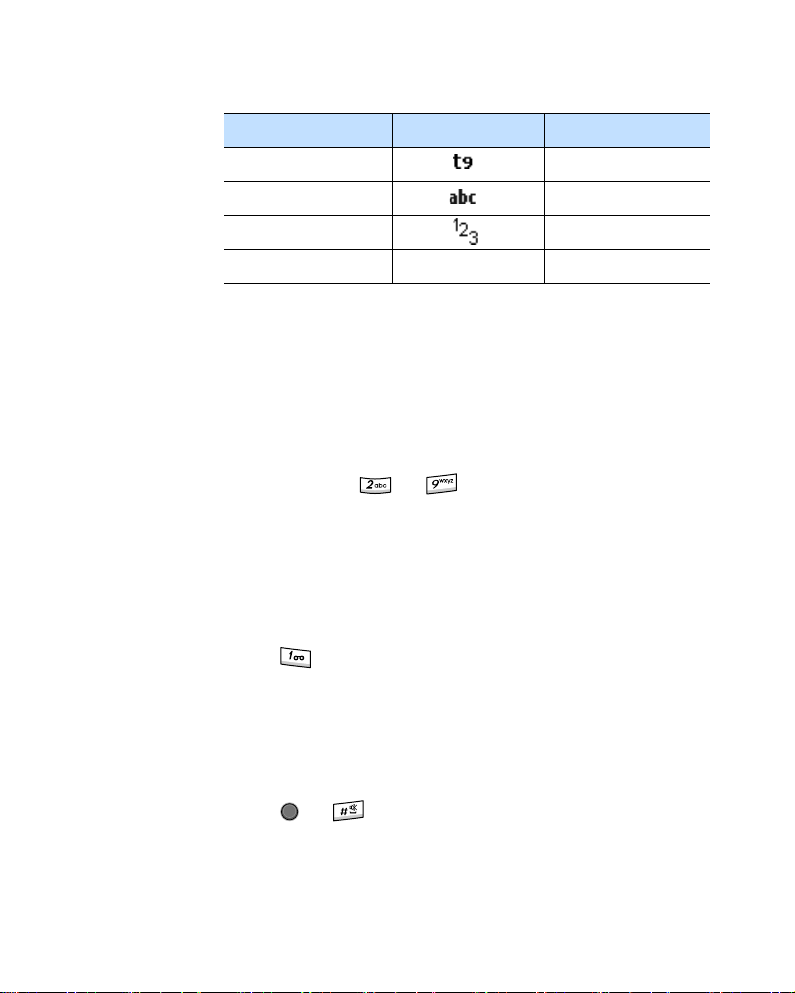
The number keys of your phone are labelled with the
alphabet so that you can enter text easily.
Your phone has the following input modes:
• T9 English mode
• Abc (Multipress) mode
•Symbol mode
• 123 mode
To change the text input mode:
1. On the text input field, press and hold .
2. Select a mode from the pop-up menu list.
The text input mode indicator appears on the top line of
the display.
23
Page 24
The basics
Mode Indicator See
T9 English mode the next section.
Abc mode page 26.
123 mode page 27.
Symbol mode no indicator page 27.
T9 English mode
T9 is a predictive text input mode that allows you to enter
any character with one keypress. This text input mode is
based on a built-in dictionary.
To enter a word in T9 mode:
1. Press the keys to . Press each key only once
for each letter.
The word that you are typing appears on the display. It
may change with each key that you press.
2. Enter the whole word before editing or deleting
characters.
Press to insert a punctuation mark.
3. If the word displays correctly, go to step 4.
If the word does not display correctly, scroll to the word
on the word choice list, which displays alternative word
choices for the keys that you have pressed.
4. Press or to insert a space and start entering the
next word.
24
Page 25

The basics
To change the letter-case:
Press . Three cases are available:
• Capital Lock
•Initial Lock
•Small Lock
To delete letters:
Press . Press and hold to quickly delete the letters.
To include a number:
Press and hold the corresponding number key.
Adding words
Sometimes T9 may not recognise the word you are trying
to enter. If you cannot find the entered word from the
pop-up list, add the word to T9 dictionary so that it will
recognise the word the next time you enter it.
To add a word into the T9 dictionary:
1. Enter a word.
2. Select
Add Word?
from the word choice list.
3. Enter the word you want to add using Abc mode.
4. Press the
Done
soft key.
Changing T9 settings
Press and hold and select
Preferences
Word Candidate List
•
. The following options are available:
: Select an options for the time
T9 Settings →
delay before the phone displays word choices for your
key presses. If you do not want a choice list, select
Off
.
25
Page 26

The basics
•
Word Completion
: Enable or disable word completion
to quickly learn which words users prefer and to prioritise
the words and phrases you enter most often.
Next Word Prediction
•
: Enable or disable word
prediction, with which the phone recognises the language
you are entering and automatically predicts the word in
that language you most likely wants.
Abc mode
Abc mode allows you to enter letters by pressing the key
labelled with the letter you want repeatedly until it
displays.
To enter a word in
Abc mode
:
1. Press the key labelled with the letter you want; once for
the first letter, twice for the second letter, and so on.
2. Enter other letters in the same way.
The cursor moves to the right when you press a
different key. When entering the same letter twice or a
different letter on the same key, just wait for seconds or
press the Right key, and then press the next letter.
Press to insert a punctuation mark.
3. Press to insert a space between words.
To change the letter-case:
Press . Three cases are available:
• Capital Lock
•Initial Lock
•Small Lock
26
Page 27

The basics
To delete letters:
Press . Press and hold quickly delete the letters.
To quickly include a number:
Press and hold the corresponding number key.
Symbol mode
This mode allows you to enter various symbols and
punctuation marks.
On the symbol list, scroll to the symbol you want and press
. To access more symbols, press the
Prev
or
Next
soft
key.
Note
: You can quickly access Symbol mode by pressing and
holding from any input mode.
123 mode
This mode allows you to enter numbers. Press the
corresponding number key.
27
Page 28

The basics
Customising your phone
You can customise the phone settings to suit the way you
work.
Regional settings
Using
Regional Settings
currency, and time and date formats appropriate to the
countries in question.
, you can change number,
On the Home screen, press the
1.
2.
Select
3. Select the option you want in each field.
4. When you have finished, press the
5. If you changed the
the OK soft key.
Then you need to turn the phone off and then back on to
make your changes take effect.
Settings →
More... →
Language
Start
soft key.
Regional Settings
Done
soft key.
or
Locale
option, press
.
Time and date settings
The
Date and Time
time, and time zone.
1. On the Home screen, press the
2. Select
Note
Settings → Clock & Alarm → Date and Time
: By using
set alarms to sound at a specified time.
setting enables you to set the date,
Start
soft key.
Alarm
on the Clock & Alarm screen, you can
.
28
Page 29

The basics
3. Select your time zone and set the current date and time.
4. When you have finished, press the
Note
: You can change the time and date format to be
displayed in
Regional Settings
Done
.
soft key.
Power settings
You can conserve battery power by adjusting the time-out
settings for the display and the backlight of the keypad and
display or adjusting the display brightness.
Home
1. On the
2. Select
screen, press the
Settings → More... →
3. Select the power settings:
•
Main battery
: You can check the remaining battery
power.
•
Backlight time out
: You can select the length of time
the backlight stays on. A backlight illuminates the
display and the keypad. When you press any key, the
backlight turns on and remains on for the backlight
time out period.
Display time out
•
: You can select the length of time
the display stays on. During standby, the phone goes
to Sleep mode after a specified period of time, so very
little power is being consumed.
•
Display Brightness
: You can adjust the brightness
for the display.
Start
soft key.
Power Management
.
4. When you have finished, press the
Done
soft key.
29
Page 30

The basics
Accessibility settings
You can configure the options to increase the accessibility
to your phone’s functions.
Start
1. On the Home screen, press the
soft key.
2. Select
3. Select the options you want.
4. When you have finished, press the
Settings → More... → Accessibility
•
System font size
your screen.
•
Multipress time out
between key presses when entering text.
•
Confirmation time out
an unconfirmed action times out.
•
In-call alert volume
alert tone that sounds when you are on a call.
: You can set the size of the font on
: You can set the length of time
: You can set the delay before
: You can set the volume of the
Done
soft key.
.
Sound settings
You can customise sound settings for various events
happening on the phone.
Setting sounds and notifications
Your phone reminds you in various ways when you have
something to do, receive a message, or press the keys on
the phone.
For example, if you have set up an appointment, you are
notified in any of the following ways:
• A sound, which you can specify, plays,
•The LED indicator flashes, or
• Your phone vibrates.
30
Page 31

The basics
You can change phone sounds by choosing types or sounds
for each event or by choosing a sound theme.
To choose reminder types and sounds:
1. On the Home screen, press the
2. Select
Settings → Sounds Manager → Sounds
Start
soft key.
.
3. Select the event for which to specify a sound.
4. Select the reminder type or ringtone.
5. When you have finished, press the
Notes
:
Done
soft key.
• You can connect to the Internet and then download ringtones
that are in a .wav or .mid format.
• To use an .mp3 or .wma file as your call ringtone, it must be
saved in a HDD, Storage, or Storage Card folder.
• To use downloaded ringtones or your recordings, you must
add them to Sounds by using Ringtone Manager. See the
next section.
To choose the sound theme:
1. On the Home screen, press the
2. Select
Settings → Sounds Theme
3. Scroll to the theme you want and press the
Start
.
soft key.
Done
soft
key.
The selected sound theme affects all of the sound
None
settings. If you selected
, all of the sound settings
are changed to the factory default.
31
Page 32

The basics
Using Ringtone Manager
To use one of the downloaded sound or music files and
voice recordings as your ringtone, you first need to add
them to Sounds.
Start
1. On the Home screen, press the
soft key.
2. Select
Settings → Sounds Manager →
→
Manager
Add Ringtone
Ringtone
.
3. Select the file you want from the Ringtone files list.
4. Press the
Add
soft key.
The file will appear on the ringtone list in Sounds.
Changing the sound profile
Using Profiles, you can adjust and customise the phone
tones for different events or environments and then apply
the settings as a group. The currently selected profile
displays on the Home screen.
To change profiles:
1. On the Home screen, press the
2. Select
Settings → Profiles
Start
soft key.
. The list of profiles opens.
3. Select the profile you want.
If you select
switch between
Automatic
Normal
, the profile will automatically
and
Meeting
according to your
calendar items.
Notes
:
• You can quickly change the profile. Press and hold the
Start
soft key and select the profile you want from the Quick List.
• You can quickly activate or deactivate the Silent profile by
pressing and holding from the Home screen.
32
Page 33

The basics
To customise profiles:
1. On the Profiles screen, scroll to the profile you want.
2. Press the
Menu
soft key and select
Edit
.
3. Change the settings in each field. Available options may
differ depending on the selected profile.
4. When you have finished, press the
Notes
:
Done
soft key.
• To change all profile settings to their factory default, press
Menu
the
default
soft key from the profile list and select
.
• For the Headset profile, when you set the ring type to
or
Vibrate
Auto-answer in
, you must manually answer calls even if the
option is activated.
Reset to
Silent
Customising R2VS settings
R2VS is a suite of 3D sound, bass enhancement, and mono
and stereo speaker technologies designed to improve the
quality of mobile audio, e.g. cellular phone sound quality.
To enjoy music with high audio quality, enable the R2VS
feature.
1. On the Home screen, press the
2. Select
Settings → Sounds Manager → R2VS
Start
soft key.
.
3. Set each option:
•
R2VS Power
•
Play Mode
: Check the sound output mode.
: Enable or Disable the R2VS feature.
33
Page 34

The basics
•
3D Sound Effect
you select
the effect by adjusting the slider.
•
EQ Mode
set each component by adjusting the sliders.
4. When you have finished, press the
Wide
: Select a equaliser mode. You can manually
: Select a 3D sound effect mode. If
or
Dynamic
, you can manually set
Done
soft key.
Owner information
Owner Information identifies the owner or user of the
phone. Set your contact information in case you have lost
the phone.
1. On the Home screen, press the
2. Select
3. Fill in each input field.
4. When you have finished, press the
Settings → More... → Owner Information
To attach notes, enter notes in the
Start
Notes
Done
soft key.
.
field.
soft key.
Error reporting setting
Your phone has the Error Reporting function which informs
you of errors in a program that can give a crash to the
phone system. You can enable or disable this function.
1. On the Home screen, press the
2. Select
3. Select
Settings → More... → Error Reporting
Enable
or
Disable
Start
soft key.
and press the
Done
.
soft key.
34
Page 35

The basics
Security settings
With options in Security, you can protect your phone and
SIM card from unauthorised use.
Locking the phone
You can protect your phone using the Device Lock feature.
Once the feature is enabled, your phone is automatically
locked after the specified period of inactivity.
Note
: Even if the phone is locked, you will be able to receive
calls.
To lock the phone:
1. On the Home screen, press the
2. Select
3. Select
Settings → Security → Device Lock
Prompt if device unused for
Start
soft key.
and select a
.
length of time the phone waits for before locking itself
when it is not in use.
4. Scroll to the
Password type
field and select a password
type.
•
Simple PIN
•
Strong alphanumeric
: Use a numeric password.
: Use an alphanumeric
password. A password must be more than 7 characters
and contain at least 3 of uppercase and lowercase
letters, numbers, or punctuation marks.
5. Enter a password in the
Password
6. Re-enter the same password in the
field.
Confirm password
field for confirmation.
35
Page 36

The basics
7. Press the
8. Press the
To unlock your phone:
1. On the Home screen, press the
2. Enter the password and press the
Done
Yes
soft key.
soft key.
Unlock
Done
soft key.
soft key.
Activating the SIM PIN
When SIM PIN is enabled, you must enter your PIN
supplied with your phone each time you turn the phone on
or insert the current SIM card into another device.
Consequently, any person who does not have your PIN
cannot use your phone without your approval.
Start
1. On the Home screen, press the
2. Select
3. Enter the PIN and press the
Settings →
Security →
Done
soft key.
Enable SIM PIN
soft key.
.
Locking the SIM card
When SIM Lock is enabled, your phone works only with the
current SIM card. To use another SIM card, you must enter
the SIM Lock password.
Start
1. On the Home screen, press the
2. Select
Settings →
Security →
soft key.
Enable SIM Lock
.
3. Enter a password for your SIM card, and re-enter the
password for confirmation.
Done
4. Press the
soft key.
36
Page 37

The basics
Changing PIN2
A PIN 2 is used for certain functions supported by the SIM
card. You can change the PIN2 supplied with your SIM card
to a new one.
Start
1. On the Home screen, press the
soft key.
2. Select
Settings → Security → Change PIN2
.
3. Enter the current PIN2, then a new PIN2, and re-enter
the new one for confirmation.
4. Press the
Done
soft key.
Changing the call barring Password
You can change the default call barring password supplied
by your service provider.
Start
1. On the Home screen, press the
2. Select
Settings → Security → Call Barring Password
soft key.
3. Enter the current password, then a new password, and
re-enter the new one for confirmation.
4. Press the
Done
soft key.
Menu shortcut settings
The number keys can be used as shortcut keys to directly
access specific programs that exist in the Start menu.
Note
: You can also assign phone numbers, e-mail addresses,
or web pages in Contacts to the number keys as speed
dial entries. For details about setting the speed dial list,
see page 64.
.
37
Page 38

Assigning a shortcut to a key
The basics
1. On the Home screen, press the
2. Scroll to the program you want to assign to a key.
3. Press the
4. If necessary, enter the name you want in the
field.
5. Select a location in the
press the
Menu
soft key and select
Done
soft key.
Keypad assignment
Start
soft key.
Add Speed Dial
.
Name
field and
Accessing a menu using its shortcut
On the Home screen, use one of the following ways:
• For one-digit shortcut keys, press and hold the number
key.
• For two-digit shortcut keys, press the first number key
and then press and hold the last number key.
Locking the keys
You can lock the keys on the phone to keep any accidental
key presses from causing a program’s launch or phone
switch on or off.
Start
To lock the keypad, press and hold the
Key lock
select
To unlock the keypad, press the
press .
.
Unlock
soft key and
soft key, and then
38
Page 39

The basics
Using the Program Launcher
Using the Program Launcher, you can view the programs in
the Start menu categorised by type, and quickly access the
program you want.
To open the Program Launcher:
Press and hold on the Home screen. You can also
press the
select
Opening a program
Start
soft key and then the
Accessories → Program Launcher
More
soft key, and
.
1. On the Launcher screen, press the
select the group you want.
2. Select the program you want within the group.
Group
soft key and
Moving a program within a group
1. On the Launcher screen, scroll to the program you want
to move.
Menu
2. Press the
3. When a up/down arrow mark appears next to the
selected program, move it to the position you want by
pressing the Up or Down key.
4. Press the
soft key and select
Done
soft key.
Move
.
39
Page 40
The basics
Managing groups
You can create new groups or delete the groups, or change
the order of the group list.
Menu
1. On the Launcher screen, press the
Edit Group
select
2. Press the
•
New
: allows you to add a new group.
•
Delete
•
Rename
group.
•
Move
: allows you to move the position of the group.
Menu
: allows you to delete the selected group.
: allows you to change the name of the
.
soft key to access the following options:
soft key and
3. When you have finished, press the
Done
soft key.
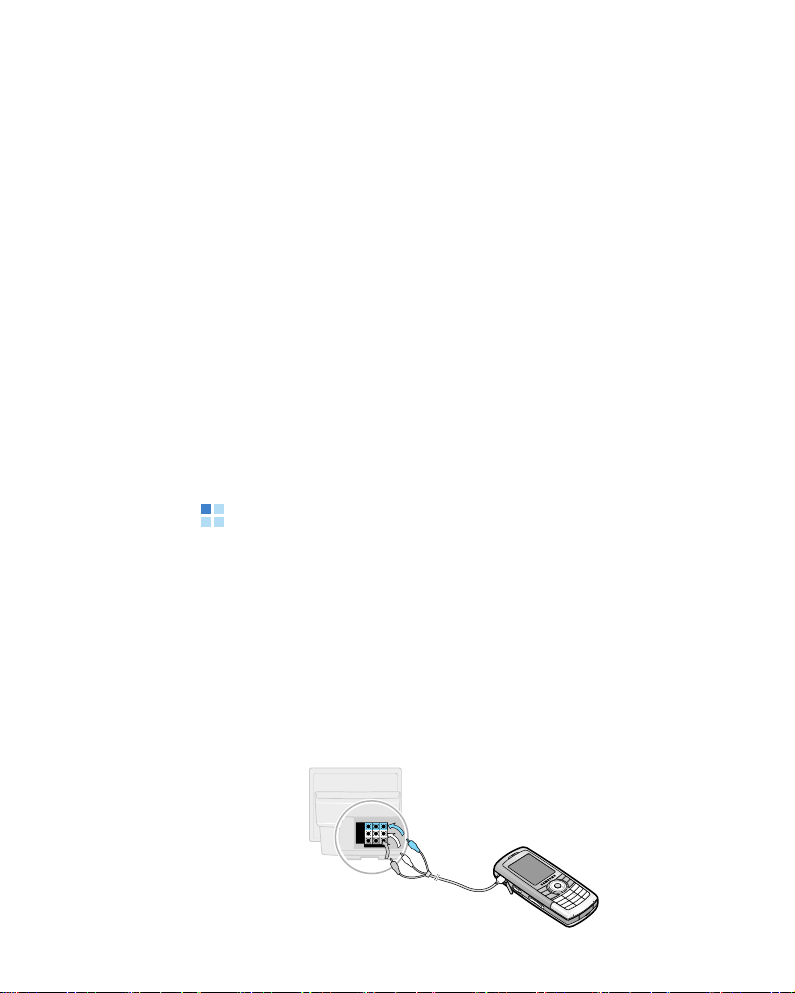
Viewing the phone display on a TV
You can view the display of your phone on a TV screen by
connecting the phone and TV with the supplied TV out
cable.
This enables you to enjoy the photos, videos, music, and
movies stored in the phone’s memory with your family or
friends on a larger screen.
1. Connect the phone to the TV with the TV out cable.
Match cable connector and TV port colors.
40
Page 41

The basics
Notes
:
• Depending on your particular TV model, the location and
shape of the TV ports may vary.
• Do not connect the cable with wet hands.
2. Switch the TV to External Output mode.
The display switches to TV Out mode and the phone’s
screen appears on the TV screen.
3. If necessary, change the TV out mode:
Press the
→ TVOUT Settings
system.
Depending on the particular Video Broadcast Standards,
the image may vibrate or in some other way be less
than optimal.
4. Access the program you want and open files.
Start
soft key and select
from the pick list and then a video
Settings → More...
Using an optional memory card
Your phone has an expansion slot compatible with microSD
memory cards, which are primarily used to back up or
transfer files and data.
Note
: Use only compatible memory cards with your phone.
Using incompatible memory cards, such as Secure
Digital (SD) cards, may damage the card, as well as the
phone, and data stored on the card.
41
Page 42
The basics
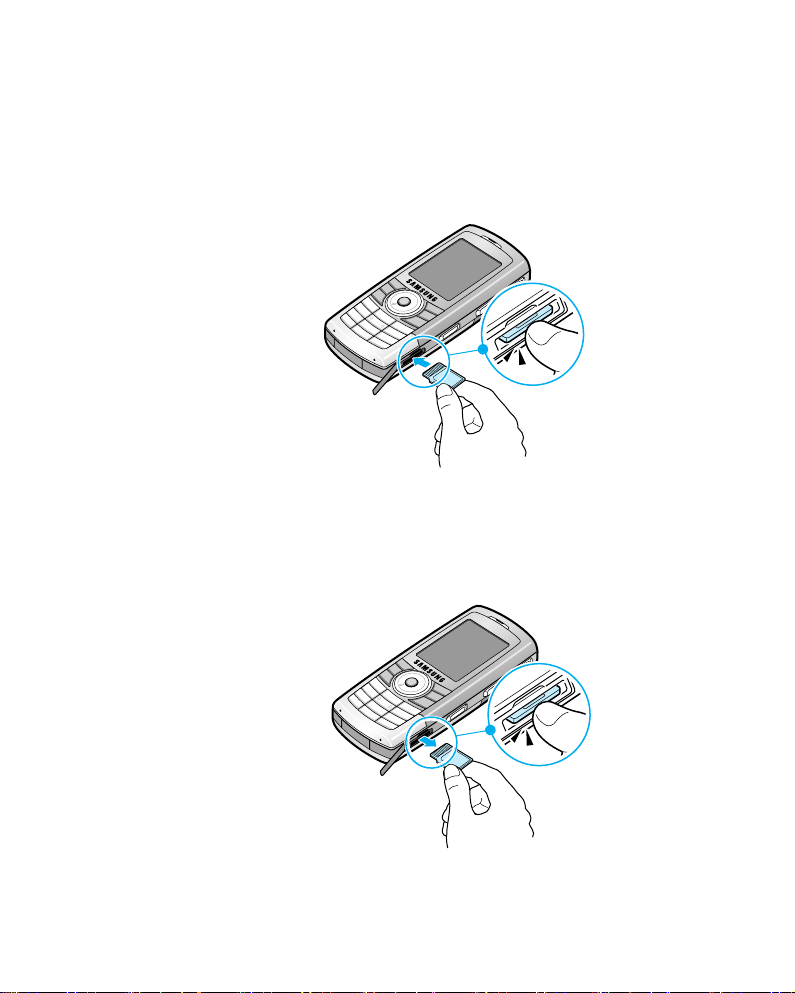
Inserting the memory card
Push the memory card into the slot until it clicks into place.
The card is secure when it is not protruding from the
phone
.
Removing the memory card
Push the memory card in and release so that it is
disengaged from the slot. Then slide the card out.
42
Page 43

The basics
Adding and removing programs
You can install any program created for your phone, as long
as the phone has enough memory. The most popular place
to find software for your phone is on the Microsoft web site
(http://www.microsoft.com/mobile/smartphone).
Adding programs using ActiveSync
You can install programs downloaded from the Internet or
included on the supplied software CD-ROM by performing
synchronisation between your phone and your computer.
First you need to determine what your phone and
processor type is so that you know which version of the
software to install.
Start
1. On the Home screen, press the
Settings → More... → About
phone.
2. Download a program to your computer from the
Internet or insert the CD-ROM that contains the
program into your computer.
. Check the version of your
soft key and select
Be sure to select the program designed for your
and the
3. Read any installation instructions, Read Me files, or
documentation that comes with the program.
4. Connect your phone to your computer and make sure
that the ActiveSync is activated.
For more information on ActiveSync, see page 49.
phone
’s processor type.
phone
43
Page 44

The basics
5. Double-click the *.exe file on the computer.
If the file is an installer, the installation wizard will
begin. Follow the instructions on the screen. Once the
software has been installed, the installer will
automatically transfer the software to your phone.
If the file is not an installer, you will see an error
message. You need to move this file to your phone by
using ActiveSync Explore to copy the program file to the
Start Menu
Once installation is completed, you can view and open the
program by accessing the
folder on your phone.
Start
menu.
Adding a program directly from the
Internet
First, you need to determine what your phone and
processor type is so that you know which version of the
software to install.
1. On the Home screen, press the
Settings → More... → About
phone.
2. Download the program to your phone straight from the
Internet using Internet Explorer.
Be sure to select the program designed for your
and the
3. Read any installation instructions, Read Me files, or
documentation that comes with the program.
4. Select the file, such as a *.xip or *.exe file. The
installation wizard will begin.
phone
’s processor type.
Start
soft key and select
. Check the version of your
phone
44
Page 45

The basics
5. Follow the directions on the screen.
Once installation is completed, you can view and open the
program by accessing the Start menu.
Removing programs
1. On the Home screen, press the
2. Select
3. Scroll to the program you want to delete.
4. Press the
5. Press the
6. When you have finished, press the
Settings → Remove Programs
Menu
soft key and select
Yes
soft key to confirm the deletion.
Start
Ok
soft key.
.
Remove
soft key.
.
Managing certificates
On your phone you can add and delete public key
certificates. You can store the following two types of
certificates on your phone.
Root
•
•
Viewing certificates
1. On the Home screen, press the
: help to establish the identity of servers with which
you connect. This helps to prevent unauthorised users
from accessing your phone and information.
Personal
on to a secured network, such as a corporate network.
: help to establish your identity, when you log
Start
soft key.
2. Select
Settings →
certificate type.
Security → Certificates →
a
45
Page 46
3. To view more details, select the certificate.
Deleting a certificate
1. Scroll to the certificate you want on the list.
The basics
2. Press the
3. Press the
Menu
soft key and then select
Yes
soft key to confirm the deletion.
Delete
.
Resetting your phone
You can reset your phone’s settings and clear all added
data from memory.
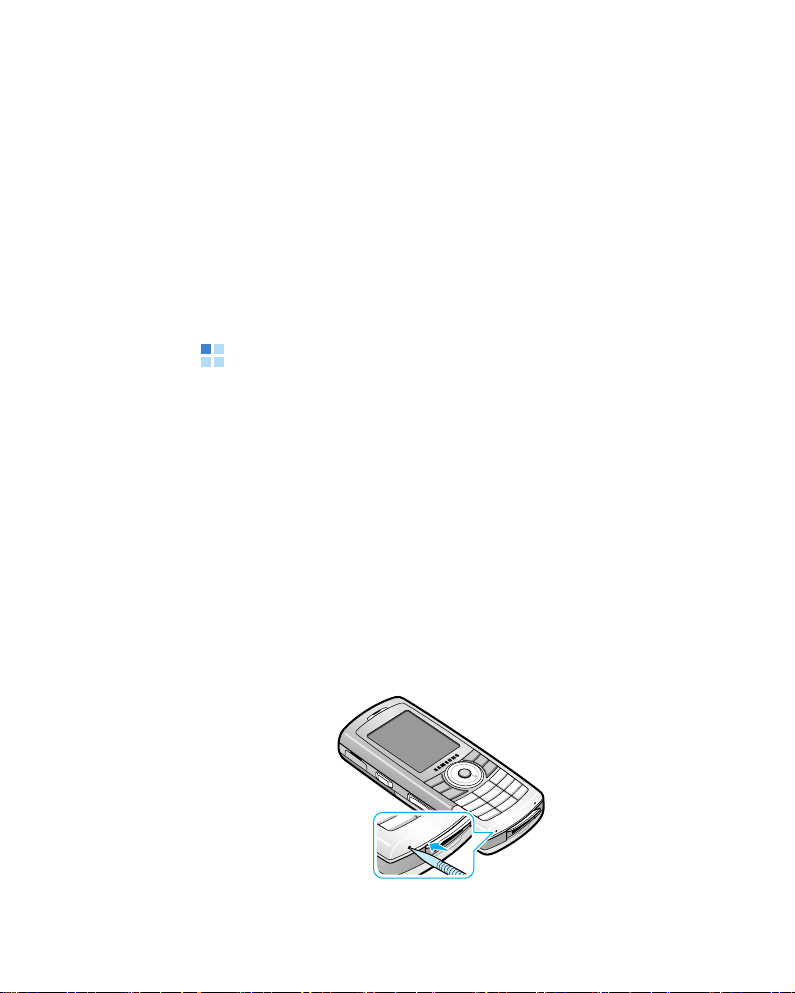
Performing a soft reset
If your phone responds slowly, stops responding, or
freezes, try a soft reset. A reset causes the phone to
restart and re-adjust memory allocation. Unsaved data in
open windows may be lost.
To perform a soft reset use either of the following ways:
• With a pointed tool, press the reset button inside the hole
at the bottom of the phone.
• Remove the battery and then reinstall it.
46
Page 47

The basics
Performing a hard reset
By performing a hard reset, you can return the phone to its
factory status and remove all of the programs and data you
have added.
When the phone is turned on:
1. From the Home screen, press the
select
Settings →
Security →
2. Enter the hard reset password and press the
Start
soft key and
Hard reset
.
Done
soft
key. The password is preset to “1234” at the factory.
Your phone resets the system after about 6 or 7
minutes.
When the phone is turned off:
1. While pressing and holding , press and hold .
2. Enter the hard reset password in the
Enter password
field.
Changing the hard reset password
You can change the hard reset password to prevent the
phone from being reset by unauthorised people.
Start
1. On the Home screen, press the
2. Select
Settings → Security → Hard reset password
3. Enter the old password, then a new password, and
re-enter the new one for confirmation.
4. Press the
Done
soft key.
soft key.
.
47
Page 48

The basics
Using online help
Your phone is supported by additional information available
online, or on the CD-ROM that came with your phone.
For information on: see:
additional programs
that can be installed on
our
phone,
y
connecting to and
synchronising with a
PC,
up-to-date information
on your phone,
the supplied CD-ROM.
Chapter 3 in this User’s Guide
or ActiveSync Help on your PC.
To view the ActiveSync help,
click the ActiveSync icon on the
Windows task bar.
http://www.microsoft.com/
mobile/smartphone.
SIM AT (SIM Application Toolkit)
This is available if you use a SIM AT card that provides the
SIM Application Toolkit menus and additional services, such
as news, weather, sports, entertainment, and location
services. Available services may vary, depending on your
service provider’s plans.
For details, see your SIM card instructions or contact your
service provider.
48
Page 49

3
Synchronisation
Using Microsoft® ActiveSync®, you can synchronise data on
your desktop computer with the data on your phone.
Synchronisation compares the data on your phone with
your desktop computer and updates both your phone and
computer with the latest data.
With ActiveSync, you can:
• Keep Contacts, Calendar, Tasks, or Inbox data up-to-date
by synchronising your phone with Microsoft Outlook data
on your desktop computer.
• Copy (rather than synchronise) files between your phone
and desktop computer.
• Control the moment when synchronisation occurs by
selecting a synchronisation mode.
• Select data types to be synchronised and control the
amount of synchronised data.
WARNING!
• ActiveSync synchronises two devices using the latest data.
Therefore, if you delete some specific data from the phone
after synchronisation, and then perform a synchronisation
again, the corresponding data on the computer will be
deleted. Be careful not to lose important data.
• If you turn off the phone after copying files to any folders,
except for the Storage folder, using ActiveSync, all files in
those folders will be deleted. Store important files in the
Storage folder to prevent from being deleted.
49
Page 50

Synchronisation
Installing ActiveSync
Before beginning synchronisation, you must install
ActiveSync on your desktop computer using the supplied
CD-ROM. You can also download the latest version of
ActiveSync from the Microsoft web site (http://
www.microsoft.com).
1. Insert the CD-ROM into the CD-ROM drive of your
desktop computer. Alternatively, double-click the
downloaded ActiveSync installer.
2. Follow the instructions on the screen for installing
Microsoft ActiveSync.
When installation is completed, the Synchronisation
Setup Wizard helps you to connect your phone to your
desktop computer, to set up a partnership.
3. Follow the instructions on the screen.
Note
: See page 51 for more information on connecting the
phone and a computer.
Your first synchronisation process will automatically begin
when your phone is connected to the computer. After the
first synchronisation, take a look at Contacts, Calendar, and
Tasks on your phone. You will notice that your information
has been copied to the phone.
50
Page 51
Synchronisation
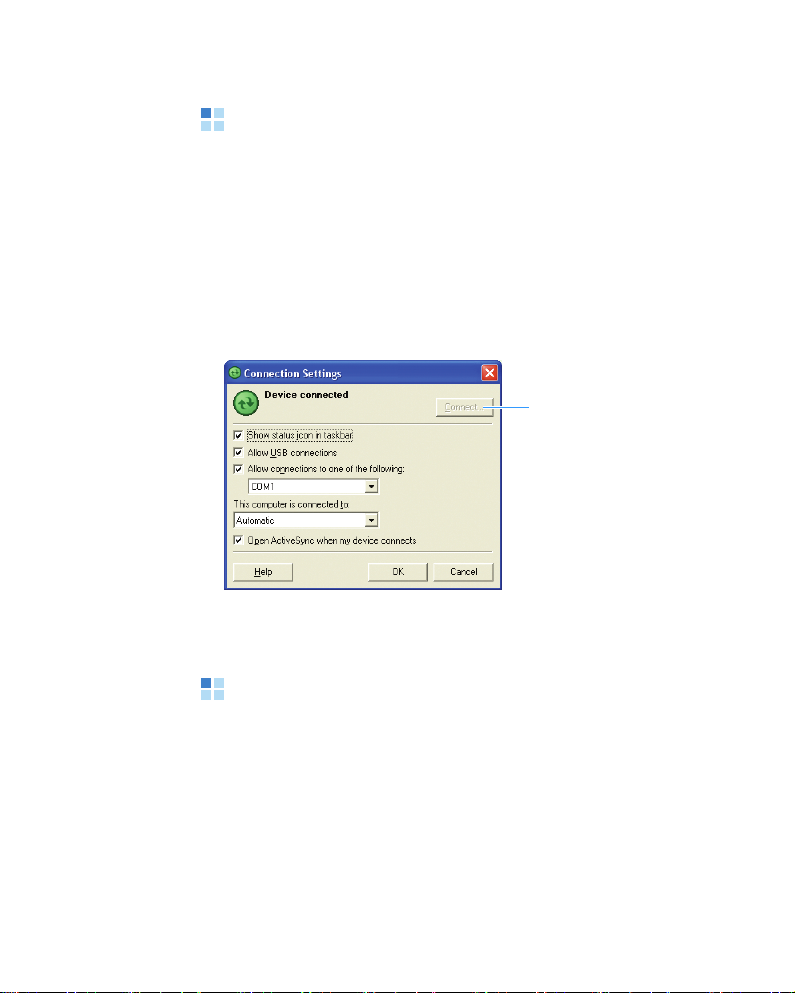
Customising connection settings
To establish a connection between your computer and the
phone, you must enable the connection(s) you want to use
in the ActiveSync program. By default, all connections are
enabled.
1. From the ActiveSync window on your computer, select
File → Connection Settings...
2. Change the connection settings.
If your phone is not
connected to the
computer, click this
button to establish
a connection.
3. Click OK.
Connecting your phone to a
computer
To connect the phone to your computer, you can choose
one of the following ways:
• Using the PC data cable
• Using a Bluetooth connection
51
Page 52

Synchronisation
Connecting with a PC data cable
Connect one end of the PC data cable to the charger/data
cable jack at the bottom of the phone and the other end to
the USB port on your computer.
Note
: USB mode of your phone must be set for ActiveSync.
Press the
Connections → USB
The connection is established and the Microsoft ActiveSync
window appears. The synchronisation automatically begins.
Note
: When an error occurs in a USB connection, activate the
DHCP Client service, or deactivate the firewall or VPN
environment.
Start
soft key and select
. Then change the mode.
Settings →
Connecting via Bluetooth
1. On the Home screen, press the
the
More
soft key, and select
2. Press the
Bluetooth
3. Press the
computer via Bluetooth for the first time.
4. Press the
new Bluetooth-compatible devices.
5. Select your Bluetooth-compatible computer to pair the
phone with the computer.
Menu
soft key and select
.
Yes
soft key, if you are connecting to a
Menu
soft key and select
Start
soft key and then
ActiveSync
Connect via
New
to search for a
.
52
Page 53
Synchronisation
6. Enter a Bluetooth passkey and press the
Next
soft key.
This key is used just once and you do not need to
memorise it.
When you enter the same key on your computer, paring
is finished.
7. Enter a display name for the computer and press the
Next
soft key.
Done
8. Check the available services and press the
soft
key.
Done
9. Press the
soft key.
Synchronising information
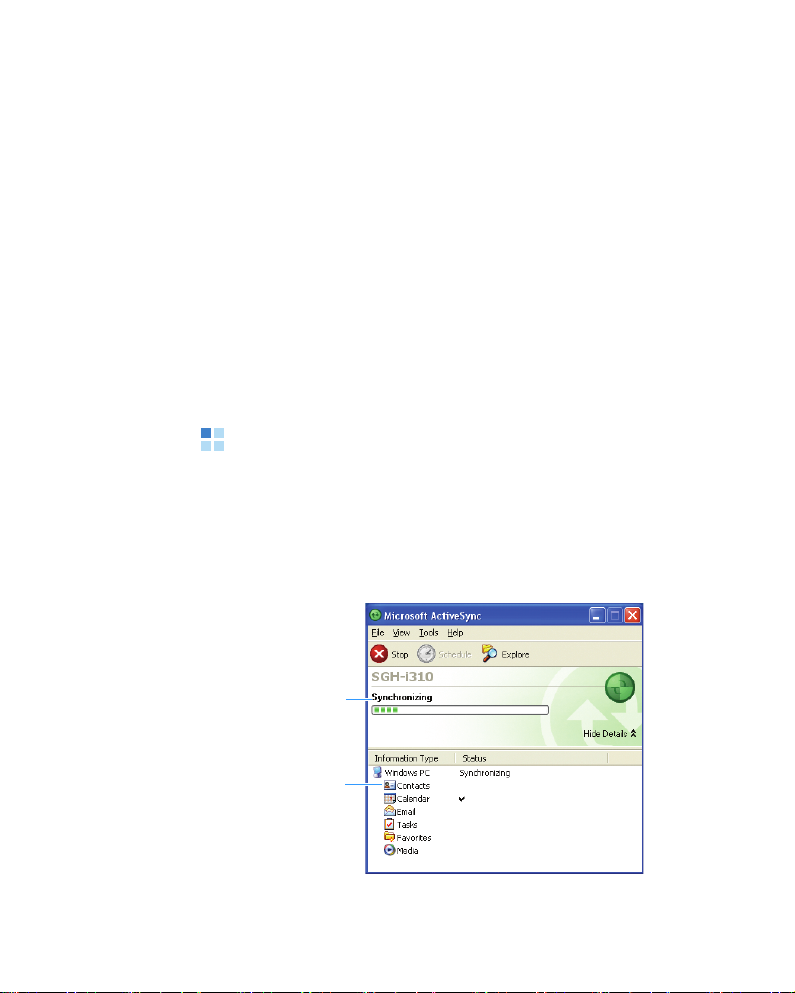
To begin synchronisation, connect your phone to your
computer. For more information on connecting the phone
and the computer, see page 51. The Microsoft ActiveSync
window on your computer automatically appears and
synchronisation starts.
Shows the
synchronisation
status.
Shows types of
information to be
synchronised.
53
Page 54

Synchronisation
Once the synchronisation is completed, the phone stays
connected to the computer. If any change is made,
ActiveSync automatically will begin synchronisation. To
Sync
begin synchronisation, press the
ActiveSync on your phone.
You can open the phone’s file directory by clicking
from the Microsoft ActiveSync window. You can then copy
files quickly and easily from the phone to the computer, or
vice versa.
Note
: To synchronise Bluetooth devices with a compatible
computer, the computer must have the Bluetooth stack
for Windows XP Service Pack 2.
soft key in
Explore
Customising synchronisation
settings
You can customise various setting options for
synchronisation with a computer and a server, and set the
synchronisation schedule.
First, you must break the connection between the phone
and computer. Disconnect the PC data cable or remove the
phone from the Bluetooth range.
Changing PC settings
1. In ActiveSync on your phone, press the
and select Options
2. Highlight
3. Press the
Windows PC
Menu
.
.
soft key and select
Settings
Menu
soft key
.
54
Page 55

Synchronisation
4. Change the computer name, set how to handle a data
conflict between the phone and computer, or set a event
logging type and press the
Done
soft key.
5. Select data types to be synchronised under the selected
profile.
Done
6. Press the
Note
: For more information on the conditions that must be
soft key.
met on the computer and how to change
synchronisation options, see ActiveSync Help.
Setting server synchronisation
You can synchronise information automatically as items
arrive only if your company is running Microsoft Exchange
Server with Exchange ActiveSync.
Configuring an Exchange Server connection
1. In ActiveSync on your phone, press the
and select
Add Server Source
.
2. Enter the server address and select
requires an encrypted (SSL) connection
Menu
soft key
This server
to use a
SSL protocol for server access.
Next
3. Press the
soft key.
4. Enter your Microsoft Exchange user name, password,
and domain name.
To save the password for subsequent accesses, select
Save password
.
55
Page 56

Synchronisation
5. Press the
Next
soft key.
6. Select data types to be synchronised.
7. When you have finished, press the
Finish
soft key.
Changing the synchronisation schedule
You can schedule synchronisation with the Microsoft
Exchange Server on two separate times. Use the peak time
schedule to synchronise during working hours or other
times when you experience higher mail volumes. Use the
off-peak time schedule to synchronise during times when
you experience lower mail volumes.
Menu
1. In ActiveSync on your phone, press the
and select Schedule
.
soft key
2. Set each option:
• To synchronise periodically during peak times, select a
frequency of synchronisation in the
Peak times
field.
• To synchronise periodically during off-peak times,
select a frequency of synchronisation in the
times
field.
Off-peak
• To use the peak time and off-peak time setting while
roaming, select
Use above settings when roaming
• To synchronise each time you send an e-mail, select
Send outgoing items immediately
.
• To set the days and hours for peak times, press the
Menu
soft key and select
Peak Times
.
.
3. When you have finished, press the
Done
soft key.
56
Page 57

4
Call functions
This chapter explains all of the call functions provided by
your phone.
Turning the phone functions on and
off
You can choose to turn off the phone functions and just use
the PDA functions at any time and then turn it back on
when you want.
Note
: In many countries you may be required by law to turn
off the phone functions while on a flight. To turn off the
display of your phone does not actually turn off the
phone functions; you must turn off your wireless
connection to your operator’\s network.
To turn off the phone functions, press and hold the
soft key and select
to set it to
screen.
To turn back on the phone functions, select
to On from the Wireless Manager screen.
Off
Wireless Manager
. appears on the top right corner of the
. Then select
Phone
Start
Phone
to set it
Using the Dialling screen
When you start entering a number or press , the
Dialling screen opens. You can view the most recent calls
you have dialled, received, and missed on the screen.
When you enter a digit, the Dialling screen lists all of the
numbers containing the entered digit in Contacts and Call
History, as well as the phone number assigned to the
corresponding speed dial key.
57
Page 58

Call functions
Making a call
You can make a phone call using the number keypad.
1. From the Home screen, enter a number including an
area code.
2. Press to make a call.
When a call is connected, the call duration displays.
During a call, you can use several call options. For
details, see page 62.
To adjust the earpiece volume during a call, press /
to increase or decrease the volume level.
3. To end the call, press .
Advanced calling features
You can make a call from Contacts, Speed Dial, and Call
History.
Making a call from Contacts
1. On the Home screen, press the
Start
can also press the
2. Select a contact card from the contact list.
3. Scroll to the number you want and press .
soft key and select
Contacts
soft key. You
Contacts
.
58
Page 59

Call functions
Quickly dialling a number on the SIM card
Each contact card on the SIM card has an index number
assigned in order when stored. You can quickly dial a SIM
number by entering its index number.
1. Enter an index number and press .
2. When the phone asks for your confirmation, press the
Yes
soft key.
Making a call from Speed Dial
Speed Dial is a list you can create of often-dialled numbers.
Information on adding a number to Speed Dial is detailed
on page 64.
By memorising the position on the Speed Dial list, you can
dial the number simply by entering that number of the
Speed Dial key. The phone number assigned to the key
appears on the Dialling screen.
Alternatively, if you do not remember the position of a
number, access the Speed Dial list:
Start
1. On the Home screen, press the
the
More
soft key.
soft key and then
2. Select
3. Scroll to the number you want and press
Accessories → Speed Dial
.
.
Making a call using name dialling
You can make a phone call by saying the name that has
been assigned to a contact card in Contacts or on the SIM
card. For details, see page 139.
59
Page 60

Making a call from Call History
Call functions
1. On the Home screen, press the
2. Select
3. Scroll to the number you want and then press
Call History
Note
: is for incoming calls, is for outgoing calls, and
is for missed calls.
To view the calls categorised by call type, press the
Menu
soft key, select
the pop-up list.
. The recent call list appears.
Filter
Start
soft key.
, and select a category from
.
Making an international call
1. Press and hold until the + sign appears. The
replaces the international access code.
2. Enter the full phone number you want to dial. It includes
the country code, the area code (without the leading
zero), and the phone number.
3. Press
Note
: You can set the country or dialling code to be added
before the number when dialling. See page 70.
.
+
Making an emergency call
Your phone provides the emergency number
number can normally be used to make an emergency call in
any country, with or without a SIM card inserted, if you are
within a mobile phone network’s service area.
112
Enter the emergency number
and press .
112
. This
60
Page 61

Call functions
Notes
:
• Some service providers may require a SIM card to be
inserted, and in some cases the PIN to be entered as well.
• In some cases, other emergency numbers may also be
accessed. Your service provider may save additional local
emergency numbers on the SIM card.
Answering or ignoring a call
When a call comes in and the phone rings or vibrates,
depending on the ringer setting:
• Press the
call.
• Press the
You can also press and hold / .
Note
• Press / to mute the ringer.
Answer
Ignore
: If you reject a call, the busy tone is sent out.
Depending on your service provider, the caller may be
guided to your voicemail server.
soft key or press to answer the
soft key or press to reject the call.
61
Page 62

Call functions
Options during a call
Your phone provides a number of control functions that you
can use while a call is in progress.
Answering a second call
If a person is trying to call you when you are talking on the
phone, a notification window will pop out.
1. Press the
call and put the first on hold.
2. To swap back and forth between the two callers, press
the
3. To end the second call and go back to the first, press the
End
Answer
Swap
soft key.
soft key or press .
soft key or to answer the second
Switching to Speakerphone mode
During a call, you can switch to Speakerphone mode so
that you can talk and listen to the phone hands-free.
• To activate Speakerphone mode and switch the call to the
speaker, press and hold .
• To deactivate Speakerphone mode and switch the call to
the earpiece, press and hold the key again.
Using In-call options
During a call, you can access the following options by
Menu
pressing the
Hold
•
: places the current call on hold.
soft key.
62
Page 63

Call functions
•
Mute/Unmute
: turn off the microphone so that the
person with whom you are speaking cannot hear you, or
turn it back on.
Conference
•
: makes a conference call when you have an
active call and a call on hold. You can have a
conversation with up to 5 people at the same time.
Contacts
•
Save to Contacts
•
: opens the contact list.
: saves the phone number of the
person with whom you are speaking.
View Calendar
•
Call History
•
Transfer
•
: opens the calendar.
: opens the call history list.
: transfers the currently active call to a caller on
hold. The two callers can talk to each other, but you are
disconnected from the call.
Send DTMF
•
: allows you to send DTMF (Dual tone multifrequency) tones as a group. The DTMF tones are the
tones used in phones for tone dialling, sounding when
you press the number keys. This option is helpful for
entering a password or an account number when you call
an automated system, like a banking service.
Mute keys
•
: turns the DTMF tones of the keys off or on.
To communicate with answering machines or
computerised telephone systems, you must turn the key
tones on.
63
Page 64

Call functions
Call-related features
Checking your voicemail
The first speed dial location is assigned to your voicemail
box by default. When you insert your SIM card into the
phone, it automatically detects and sets as default the
voicemail centre number of your mobile service provider.
To check your voicemail, press and hold from the
Dialling screen.
Note
: You can check and change the voicemail centre number.
See page 70.
Managing the Speed Dial list
You can assign frequently-used phone numbers, e-mail
addresses, or web pages in Contacts to the speed dial
location 2 through 99. The location 0 and 1 on the Speed
Dial list are preset for the international call prefix and the
voicemail centre number, respectively.
Note
: You cannot create a speed dial entry for a phone
number stored on the SIM card.
Adding a contact to the Speed Dial list
1. On the Home screen, press the
can also press the
2. Select a contact from the list.
3. Scroll to a number, e-mail address, or web page
address.
Start
soft key and select
Contacts
soft key. You
Contacts
.
64
Page 65

Call functions
4. Press the
Menu
soft key and select
Add to Speed Dial
5. If necessary, enter the name you want.
6. In the
7. Press the
Keypad assignment
Done
soft key.
field, select a location.
Deleting Speed Dial assignments
1. On the Home screen, press the
the
More
soft key.
2. Select
Speed Dial
.
Start
soft key and then
3. On the Speed Dial list, select an entry.
4. Press the
5. Press the
Menu
soft key and select
Yes
soft key to confirm the deletion.
Delete
.
Managing your Call History
Call History details all incoming, outgoing, and missed
calls, and also provides a summary of total calls. It can also
tell you when a call was initiated and how long it lasted.
To open the Call History:
On the Home screen, press the
Call History
. A list of all calls appears.
If necessary, select the category of the call history to be
displayed by pressing the
Filter
.
Start
soft key and select
Menu
soft key and selecting
.
65
Page 66

Call functions
Calls are categorised as below:
No Filter
•
: shows all calls made to and from the phone in
chronological order.
Missed Calls
•
Incoming Calls
•
Outgoing Calls
•
: shows only calls that were not answered.
: shows only calls made to the phone.
: shows only calls made from the phone.
Viewing details of calls
• To view the duration of a call and time and date you
received or made it, scroll to the call you want to view
and press .
• To save a phone number in a call to Contacts, scroll to
Save
the call you want and press the
soft key.
• To view contact information, scroll to a contact, press the
Menu
soft key, and select
• To send an SMS message, press the
select
Send SMS
.
• To send an e-mail message, press the
select
Email
.
• To delete an individual call, press the
then select
Delete
. To delete all calls, select
Find Contact
Menu
Menu
Menu
.
soft key and
soft key and
soft key and
Delete List
.
Viewing call timers
In Call History, you can view the duration of your calls. This
option is convenient for estimating your usage.
1. On the Call History screen, press the
select
View Timers
.
Menu
soft key and
You can view the total call time, the last call time, the
time of calls you received or made, and a lifetime
counter. You can also view the time you reset the call
time.
66
Page 67

Call functions
2. Press the
Done
soft key.
You can easily erase the call time records at any time,
except for
and selecting
Lifetime calls
Reset Timers
, by pressing the
.
Menu
soft key
Viewing call cost
This network feature lets you view the cost of calls. Viewing
call cost may not be available, depending on particular SIM
cards. For more information, contact your service provider.
1. On the Call History screen, press the
select
Call Cost
.
Menu
soft key and
2. Select the option you want.
•
Last Call Cost
: shows the cost of the last call you
made.
•
Total Cost
: shows the total cost of all calls made
since the cost counter was last reset. If the total cost
exceeds the maximum cost set in the
Set Max Cost
option, you can no longer make any calls until you
reset the counter.
•
Max Cost
Max Cost
•
Reset Counters
•
Set Max Cost
: shows the maximum cost set in the
option.
: allows you to reset the cost counter.
: allows you to enter the maximum cost
Set
that you authorise for your calls. Calls can be made as
long as the preset max cost is not exceeded.
•
Price/Unit
: allows you to set the cost of one unit.
This price per unit is applied when calculating the cost
of your calls.
3. When you have finished, press the
Done
soft key.
67
Page 68

Call functions
Customising your phone functions
You can personalise the settings of the phone functions, the
services you have, and the network to which you have
connected.
Accessing the Phone setting options
1. On the Home screen, press the
2. Select
3. Select a setting menu, and then set each option.
4. When you have finished, press the
Settings → Phone
Start
soft key.
.
Done
soft key.
Available setting options
•
Call Barring
your incoming or outgoing calls. To set up this service,
you need to enter the call barring password obtained
from your service provider.
For incoming call barring, the following options are
available:
All Calls
When roaming
using your phone outside of your home service area.
Off
: Call barring is deactivated; all calls can be received
normally.
For outgoing call barring, the following options are
available:
All Calls
: This network service allows you to restrict
: No calls can be received.
: Calls cannot be received when you are
: No calls can be made.
68
Page 69

Call functions
Int'l except home
: When abroad, calls can be made
only to number within the current country and to your
home country.
Int'l calls
Off
: Call barring is deactivated; all calls can be made
: International calls cannot be made.
normally.
Call Forwarding
•
: This network service allows you to
forward your incoming calls to another phone number.
Unconditional
No Reply
Busy
: Calls are forwarded when you are on the phone.
Unavailable
: All calls are forwarded.
: Calls are forwarded when you do not answer.
: Calls are forwarded when your phone is
turned off or your phone is out of the service area.
Data Calls
Fax Calls
Call Options
•
: All data calls are forwarded.
: All fax calls are forwarded.
: You can customise settings related to call
functions, such as an answering option, voicemail and
SMS access numbers, and auto dial codes.
Any key answer
: When this option is activated, you can
answer incoming calls by pressing any key, except for
, , , and / .
Show SIM contacts
: With this option is activated, the
contact cards stored on the SIM card display in Contacts.
Phone number
: Check your phone number.
69
Page 70

Call functions
Voice mail number/SMS service centre
: When you
insert your SIM card into your phone, the phone
automatically detects and sets your voicemail and SMS
access numbers by default. If not, you can manually
enter the numbers obtained from your service provider.
Country code/Dialling code
: You can enter a country
code or area code. The code will be automatically added
before a phone number when dialling.
Call Waiting
•
: This service allows you to receive another
call while you have a call in progress.
Caller ID
•
: When you place a call, your phone number
can be displayed to or hidden from the person to whom
you are calling. Using this option, you can enable or
disable the display of your caller identification.
Channels
•
: This option allows you to set the broadcast
message receipt and set up broadcast channels from
which you want to receive broadcast messages.
Enable channels
: Select to enable the receipt of
broadcast messages.
Receive channel list
: Select to receive a list of all
available broadcast channels from the network.
Language
: Select your preferred languages to display
broadcast messages.
Menu
To edit the channel list, press the
Edit Channels
select
. Then press the
soft key and
Menu
soft key and
select the options for adding or editing channels.
70
Page 71

Call functions
•
Fixed Dialling
: When this option is activated, your
phone allows outgoing calls only to the limited set of
phone numbers. You can call only those numbers that are
included in the Fixed Dialling Number list or which begin
with the same digit(s) as a phone number on the list.
Networks
•
: You can set the phone to automatically select
a network when you are roaming out of your service
area, or find and select the network you want.
Menu
Press the
Find a New Network
soft key to access the following options:
: Search for all available networks.
You can start searching when the phone is out of your
service area.
Select a Network
: Select a network from the available
networks.
Preferred Networks
: Set up a list of your preferred
networks. You can set priority of the networks or add
networks manually by selecting them from the preset
network list or entering their service ID codes.
Cancel
Band Selection
•
: Exit the
Networks
menu.
: This option allows you to select the
network band in which your phone will operate. Your
phone can operate in the GSM 900/1800 or PCS 1900
band.
More...
Select
Extra Tones
•
to access the following option:
: You can activate or deactivate the connect
tone which alerts you when your call is connected to the
system, or the minute minder tone which alerts you
every minute during a call.
71
Page 72

5
Messaging, Internet, and
Messenger
Messaging
In Messaging, you can create, send, receive, view, edit, and
organise:
• Text messages (SMS)
• Multimedia message (MMS)
• E-mail messages
To open Messaging:
On the Home screen, press the
Messaging
.
Working with SMS or MMS messages
You can write an SMS message of up to 160 characters.
When you enter more than 160 characters, your phone
handles the message as a multi-part message.
You can also send or receive multimedia messages (MMS).
In addition to the familiar text content of text messages,
multimedia messages can contain images, video clips,
audio clips, and combinations of these things in more than
one page.
Start
soft key and select
MMS also supports e-mail addressing, so that messages
can be sent from phone to e-mail and vice versa.
Creating and sending an SMS message
1. On the Messaging main screen, select
New
2. Press the
soft key and select
SMS/MMS
SMS
.
.
72
Page 73

Messaging, Internet, and Messenger
3. In the To field, enter the recipients’ phone numbers,
separating them with a semicolon.
You can retrieve numbers from the contact list by
pressing the
Recipient
.
soft key and selecting
Add
Menu
4. Press the Down key and compose your message.
To enter preset or frequently used sentences, press the
Menu
soft key and select
My Text → a sentence.
5. When you have finished composing the message,
the
Send
soft key.
Note
: To know if your message is delivered to the recipient(s),
press the
Request message delivery notification
Menu
soft key, select
Message Options →
.
Creating and sending an MMS message
1. On the Messaging main screen, select
New
2. Press the
3. In the
To, Cc
soft key and select
, or
Bcc
field, enter the recipients’
SMS/MMS
MMS
.
numbers or addresses, separating them with a
semicolon.
Note
: The Cc and
Bcc
fields are above the To field.
You can also retrieve numbers or the addresses from the
contact list or the messages you have sent by pressing
Menu
the
soft key and selecting
Add Recipients
press
.
.
73
Page 74

Messaging, Internet, and Messenger
4. Press the Down key to move to the
Subject
field and
enter the message subject.
5. Press the Down key and enter the message text.
Menu
6. Press the
soft key to access the following options
for composing a message:
•
Preview
: shows the multimedia message you
created.
•
Add Recipients
: allows you to add recipients’
addresses.
•
Edit Item
•
Add
: allows you to edit the selected item.
: allows you to add a variety of contents, such as
data, media files, and templates.
•
Attach
: allows you to attach a contact card or
calendar item as a digital file format, or a media file.
•
Edit Page
: allows you to add or delete pages, change
the text style, or set the page order or duration.
•
Save to
: allows you to save the message as a draft or
as an MMS template.
•
Cancel Message
•
MMS Options
: cancels sending the message.
: allows you to change the message
options. See page 78.
7. When you have finished composing the message, press
the
Send
soft key.
74
Page 75

Messaging, Internet, and Messenger
Viewing SMS/MMS messages
When you receive a new SMS or MMS message, the New
Message icon ( ) displays on the top line of the screen
and a new message is stored in Inbox. Press the
Message
soft key to open the message.
You can also view messages you received, sent, composed
but not sent by accessing the message folders.
To open the message folders:
On the SMS/MMS screen, press the
select
Folders
Deleted Items
•
. The following default folders display:
: contains messages that have been
Menu
soft key and
deleted on your phone.
Drafts
•
•
: stores draft messages that have not been sent.
Inbox
: contains received messages. Received push
message and broadcast messages are also stored in this
folder.
Outbox
•
: is a temporary storage place for messages
waiting to be sent.
Sent Items
•
To view all message folder contents, press the
key and select
: stores the messages that have been sent.
Menu
soft
Show All Folders
.
To clear the SMS/MMS messages in a specific folder, scroll
Menu
to the folder you want, press the
Clear SMS/MMS
.
soft key, and select
75
Page 76

Messaging, Internet, and Messenger
To view a received message:
1. On the SMS/MMS screen, open the message folder you
want.
The icons on the message list tells you the message
type.
• : SMS message
• : MMS message
Note
: You can change the default settings for viewing a
message.
Menu
From any message folder
soft key and select
Options → Display
, press the
.
2. Select the message you want to view.
If you open a push message from a WAP server, press
the
Proceed
soft key to access the URL specified in the
message.
3. Press the Left or Right key to view other messages.
To access message options:
While viewing a received or sent message, you can access
Menu
the following options by pressing the
soft key:
Note
: In a received MMS message, the
Menu
soft key is only
available when the message includes both a picture and
a sound clip.
•
Delete
Reply
•
: deletes the message.
(MMS): sends a reply to the sender and/or all
other recipients, or forwards the message to other
people.
76
Page 77

Messaging, Internet, and Messenger
•
Reply All
(SMS): sends a reply to the sender and all
other recipients.
Forward
•
Move
•
Mark as Unread/Mark as Read
•
(SMS): forwards the message to other people.
: allows you to move the message to other folders.
: allows you to mark the
message as unread or read. Unread messages are
boldfaced on the message list.
Save to Contacts
•
: allows you to save the sender’s
number or address.
Save as MMS Template
•
(MMS): saves the message as
an MMS template for reuse.
Attached files
•
(MMS): allows you to save attachments
of the message into the phone’s memory.
MMS options
•
(MMS): allows you to change the MMS
settings.
Viewing messages on the SIM card
Sometimes, text messages may be stored on the SIM card,
depending on their specifications. To view the messages
stored on the SIM card, you need to copy them to a folder
in your phone.
Menu
1. From any message folder, press the
select
Options →
2. Press the
Done
Import SIM Messages
soft key.
soft key and
.
Messages are copied from the SIM card to SMS/MMS
Inbox.
77
Page 78

Messaging, Internet, and Messenger
Configuring MMS settings
You can change the default MMS settings. From composing
or viewing an MMS message, press the
MMS Options
select
Sending Options
•
. The following options are available:
: allows you to change the settings for
Menu
soft key and
sending MMS messages.
Priority
: You can select the priority level of your
messages.
Validity Period
: You can select the length of time your
messages are stored in the message centre after they
are sent.
Delivery Time
: You can select the time delay before
messages are sent.
Creation Mode
: You can set whether or not the phone
allows the MMS creation using unsupported files.
Size
: You can select the maximum message size.
Hide address
: You can set your caller ID to be hidden
from outgoing messages.
Request delivery report
: When this option is activated,
the network informs you whether or not your message
has been delivered.
Request read report
: When this option is activated,
your phone sends a request for a read reply along with
your message to the recipient.
Receiving Options
•
: allows you to change the settings
for receiving MMS messages.
Home Network
: Set how to retrieve new messages
from the server in your home network.
Roaming Network
: Set how to retrieve new messages
from the server while roaming around another network.
78
Page 79

Messaging, Internet, and Messenger
Reject Unknown Sender
: Reject messages from
unknown senders.
Report Allowed
: Send a delivery report from the
network to the sender.
Advertisement Allowed
Information Allowed
MMS Profiles
•
: allows you to set up and activate MMS
: Accept advertisements.
: Accept information messages.
profiles which are sets of MMS parameters required to
send or receive MMS messages. To activate a profile,
select it from the profile list.
To edit a profile, press the
Menu
soft key and select
Change the following options:
Profile Name
MMSC URL
Proxy
: Activate or deactivate the proxy server. When
this option is activated, the
: Enter the profile name.
: Enter the URL address of the MMS centre.
IP Address
and
Port
options
are activated.
IP Address
Port
: Enter the port number of the gateway.
Bearer
Press the
: Enter the IP address of the gateway.
: Check the network bearer type.
Menu
soft key and select
Advanced Settings
to access the additional options:
APN
: Enter the access point name.
Login ID
Password
DNS1/DNS2
: Enter the login name.
: Enter the login password.
: Enter the primary or secondary DNS
address.
About
•
: shows version and copyright information.
Edit
.
79
Page 80

Messaging, Internet, and Messenger
Working with e-mail messages
You can send and receive e-mail messages in one of these
ways:
• Synchronise e-mail messages with Microsoft Exchange or
Microsoft Outlook on your PC.
• Send and receive e-mail messages by connecting directly
to an e-mail server through an Internet Service Provider
(ISP) or a network.
Synchronising e-mail messages
Use the
Outlook Email
account to send and receive e-mail
messages by synchronising e-mail messages with Microsoft
Exchange or Microsoft Outlook on your PC.
E-mail messages can be synchronised as part of the
general synchronisation process. You will need to enable
Inbox synchronisation in ActiveSync.
During synchronisation:
• Messages are copied from the mail folders of Exchange or
Outlook on your PC to the
Outlook Email
folders on your
phone.
• E-mail messages in
Outlook Email
on your phone are
transferred to Exchange or Outlook, and then sent from
those programs.
Connecting directly to an e-mail server
You can send and receive e-mail messages by connecting
to an e-mail server. You’ll need to set up a remote
connection to a network or an ISP, and a connection to your
e-mail server.
80
Page 81

Messaging, Internet, and Messenger
When you connect to the e-mail server, new messages are
downloaded to the phone’s Inbox folder. Also messages in
the phone’s Outbox folder are sent, and messages that
have been deleted on the e-mail server are removed from
the phone’s message folders.
Folder behavior with a direct connection to an e-mail
server
The behavior of the folders you create depends on whether
you are using POP3 or IMAP4.
• If you use POP3 and you move e-mail messages to a
folder you created, the link is broken between the
messages on the phone and their copies on the mail
server. The next time you connect, the mail server will
see that the messages are missing from the phone and
delete them. This prevents you from having duplicate
copies of a message, but it also means that you will no
longer have access to messages that you move to folders
created from anywhere except the phone.
• If you use IMAP4, the folders you created and the e-mail
messages you moved are mirrored on the server.
Therefore, messages are available to you anytime you
connect to your mail server. This synchronisation of
folders occurs whenever you connect to your mail server;
create new folders or rename/delete folders when
connected.
Creating an e-mail account
You need to create a new account to be used for retrieving
and sending e-mail messages.
To make a new account:
1. From any message folder, press the
Options → New Account
select
.
Menu
soft key and
81
Page 82

Messaging, Internet, and Messenger
2. Enter your display name and e-mail address, and press
Next
the
soft key.
If you want to set up your account automatically from
the Internet, select
from the Internet
Attempt to obtain email settings
.
3. Enter your user information, such as user name,
Next
password, and domain name, press the
soft key.
4. Select the e-mail server type, enter an account name,
and select a network type.
Next
5. Press the
soft key.
6. Enter the server names and press the
To set up an outgoing server, select
Settings
.
Next
soft key.
Outgoing Server
7. Set the options for downloading e-mail messages and
press the
Next
soft key.
You can select the number of days for which you receive
e-mail messages and set the maximum data volume of
e-mail messages you want to download.
8. Select how often your phone automatically connects to
the server and checks for incoming e-mails, and press
Next
the
9. Press the
To edit an account:
1. From any message folder, press the
select
soft key.
Finish
soft key.
Options → Account Options
Menu
soft key and
.
2. Select the account you want.
82
Page 83

Messaging, Internet, and Messenger
3. Change the account settings as you would when
creating it.
SMS/MMS
For
, you can set to send a delivery report
request for outgoing messages or to use Unicode
encoding.
Creating and sending an e-mail message
1. On the Messaging main screen, select the e-mail
account with which you want to send.
2. Press the
3. In the
New
To, Cc
soft key.
, or
Bcc
field, enter the recipients’ e-mail
addresses, separating them with a semicolon.
Note
: The Cc and
Bcc
fields are above the To field.
You can retrieve addresses from the contact list by
pressing the
Recipient
4. Press the Down key to move to the
.
Menu
soft key and selecting
Add
Subject
field and
enter the e-mail subject.
5. Compose your e-mail message.
To enter preset or frequently used sentences, press the
Menu
soft key and select
My Text → a sentence.
You can add a picture or voice note as an attachment by
pressing the
soft key and selecting
Insert → an
Menu
item type.
6. Press the
Send
soft key when you have finished
composing the message.
83
Page 84

Messaging, Internet, and Messenger
7. Press the
Menu
soft key and select
Send/Receive
to
connect to the network and send the message.
Viewing e-mail messages
You can also view messages you received, sent, composed
but not sent by accessing the message folders.
To open the message folders:
On the Messaging main screen, access the e-mail account
you want, press the
Menu
soft key, and select
Folders
.
The following default folders display:
Deleted Items
•
: contains messages that have been
deleted on your phone.
Drafts
•
•
•
: stores draft messages that have not been sent.
Inbox
: contains received messages.
Outbox
: is a temporary storage place for messages
waiting to be sent.
Sent Items
•
: stores the messages that have been sent.
To view all message folder contents in the selected
account, press the
Folders
To view an e-mail message:
.
Menu
soft key and select
Show All
1. On the Messaging main screen, select the e-mail account
from which you want to receive e-mail messages.
2. Press the
Menu
soft key and select
Send/Receive
.
The phone connects to your e-mail server and receives
incoming e-mail messages or sends e-mail messages in
Outbox.
3. Select the message you want to view.
84
Page 85

Messaging, Internet, and Messenger
To access message options:
While viewing a received or sent e-mail, you can access the
following options by pressing the
Delete
•
Reply All
•
: deletes the message.
: sends a reply to the senders and all other
Menu
soft key:
recipients.
Forward
•
Languages
•
: forwards the e-mail to other people.
: allows you to select a language to be used
for displaying e-mail.
Move
•
•
: allows you to move the message to other folders.
Mark as Unread/Mark as Read
: allows you to mark the
message as unread or read. Unread messages are
boldfaced on the message list.
Download Message/Do Not Download
•
: allows you to
set the phone to download the complete contents of the
e-mail from the e-mail server, or cancel the download
setting.
Save to Contacts
•
: allows you to save the sender’s
address to Contacts.
Send/Receive
•
: sends or receives the e-mail messages.
Setting downloading options
You can specify your downloading preferences when you
set up the account or select your synchronisation options.
• Change options for Inbox synchronisation using
ActiveSync options. For more information, see
“ActiveSync Help.”
• Change options for direct e-mail server connections in
Menu
Inbox on your phone. Press the
Options →
Account Options
. Select the account you
soft key and select
want and change it.
85
Page 86

Messaging, Internet, and Messenger
Viewing e-mail attachments
To download an attachment, select
and any attachments
Menu
soft key and select
in an open message, or press the
Download Message
Get entire message
. It will be
downloaded the next time you synchonise or connect to
your e-mail server. To view an attachment, select the
attachment in an open message.
Switching between message accounts
While working in an account, you can switch to another
message account any time you need.
Menu
1. From any message folder, press the
Switch Accounts
select
.
soft key and
2. Select the account to which you want to switch.
Inserting signatures into messages
You can specify a signature to be automatically inserted
into SMS, MMS or e-mail messages that you send.
To specify a signature:
1. From any message folder, press the
select
Options →
Signatures
Menu
soft key and
.
2. Select the account for which you want to specify from
the
Select an account
3. Select
Use signature with this account
field.
.
86
Page 87

Messaging, Internet, and Messenger
4. To insert a signature in every messages, including when
you reply or forward the message, select
replying and forwarding
.
Include when
5. Enter a signature to be inserted and press the
key.
Done
soft
Internet Explorer
Use Microsoft® Pocket Internet Explorer to view Web HTML,
cHTML, and WAP pages. You can browse by connecting to
an Internet Service Provider (ISP) or network and browse
the Web. To do this, you’ll need to create the connection
first as described on page 157.
When connected to an ISP or network, you can also
download files and programs from the Internet.
To open Internet Explorer:
On the Home screen, press the
Internet → Internet Explorer
Browsing the Internet
1. To connect and start browsing, do one of the following:
• Press the
Enter the web address you want to visit or select a
page from the history list.
• Scroll to the page you want to view from the
Favourites list.
Menu
soft key and select
Start
soft key and select
.
Address Bar
.
Go
2. Press the
associated web page.
soft key on the browser to open the
87
Page 88
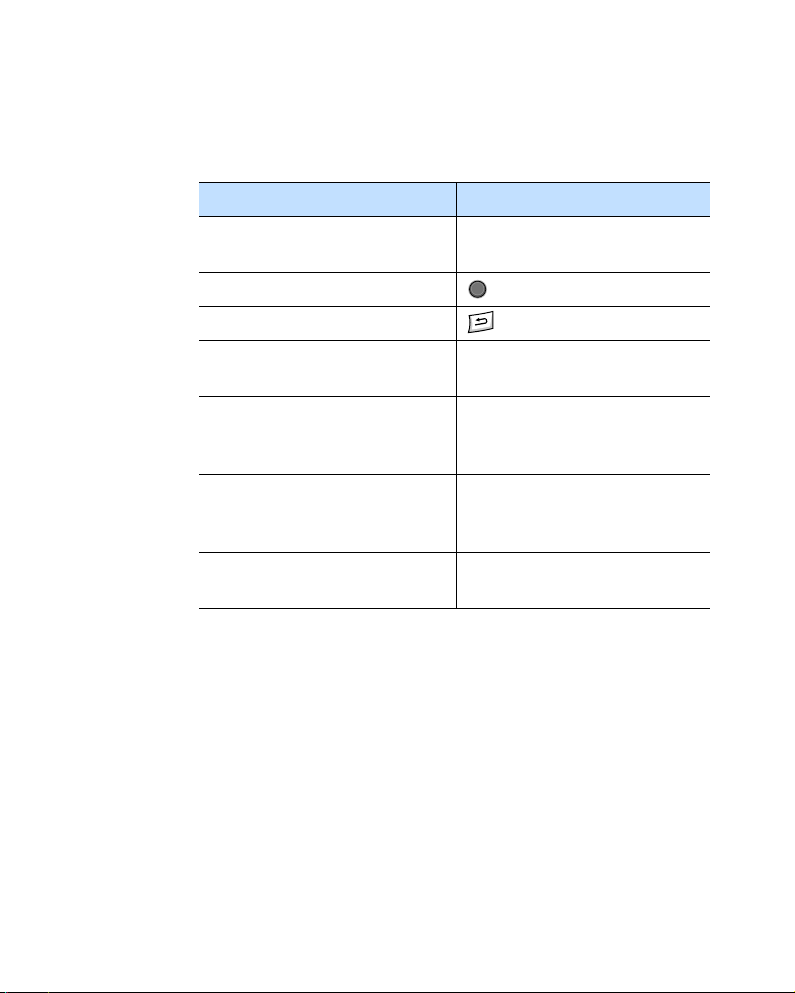
Messaging, Internet, and Messenger
Navigating the Internet Explorer
The following table helps you browse the Internet easily:
To Press
scroll through browser
the Navigation keys.
items
select a browser item .
return to the previous page .
refresh the connection the
To change the display
options
Menu
soft key and
select
Refresh
Menu
the
View
, and select the option
.
soft key, select
you want.
To change the text and
image size
the
Menu
Zoom
, and select the
soft key, select
option you want.
view information on the
web page
the
Menu
soft key and
select
Tools → Properties
.
Using the Favorites list
You can store your favourite links while using the Internet
Browser and then access them easily at a later time.
Categorising them enables you to find them more quickly.
Adding a web page to the Favorites list
1. Go to the page you want to add, press the
key, and select
Add to Favourites
.
2. Change the name for the favourite link, if necessary.
Menu
soft
88
Page 89

Messaging, Internet, and Messenger
3. Select a category under which you want to save the
Folder
favourite link from the
field.
You can also create a new category. See page 93.
4. Press the
Add
soft key.
Opening a link through the Favorites list
1. On the Internet Explorer screen, press the
Favorites
soft key.
2. Scroll to the link you want to access.
If the link you want is in the certain folder, open the
folder and scroll to the link.
3. Press the
Go
soft key.
Managing Favorites categories
You can create a new category for saving favourite web
pages, and rename or delete the created categories.
To add a category:
1. On the Internet Explorer screen, press the
Favorites
soft key.
2. Press the
3. Enter a category name and press the
To edit the categories:
Scroll to the category you want, press the
and select
Menu
Edit
soft key and select
or
Delete
to rename or delete the selected
Add Folder
Add
soft key.
Menu
soft key,
.
category.
89
Page 90

Messaging, Internet, and Messenger
Changing Explorer options
You can customise web browsing options, change the
connection settings, and clear memory. On the Internet
Menu
Explorer screen, press the
→ Options
The following options are available:
•
General: You can select whether or not to play sounds
on web pages, view the warnings when you move
from a secure web page to a non-secure one, or
enable or disable the receiving and sending of cookies.
You can also select the text encoding type to use.
•
Connections
connect to Internet Explorer. If you select
detect settings
network settings from your service provider.
Memory
•
currently being used for the Internet Explorer. To clear
the memory, scroll to a type of memory and press the
Clear
.
: You can change the network setting to
, your phone automatically detects
: You can check the amount of memory
soft key.
soft key and select
Automatically
Tools
WAP Browser
Using
WAP Browser
preset by your service provider and other WAP (Wireless
Application Protocol) sites on your phone.
, you can browse the WAP service
Connecting to a WAP site
1. On the Home screen, press the
2. Select
Internet → WAP Browser
Start
.
soft key.
90
Page 91
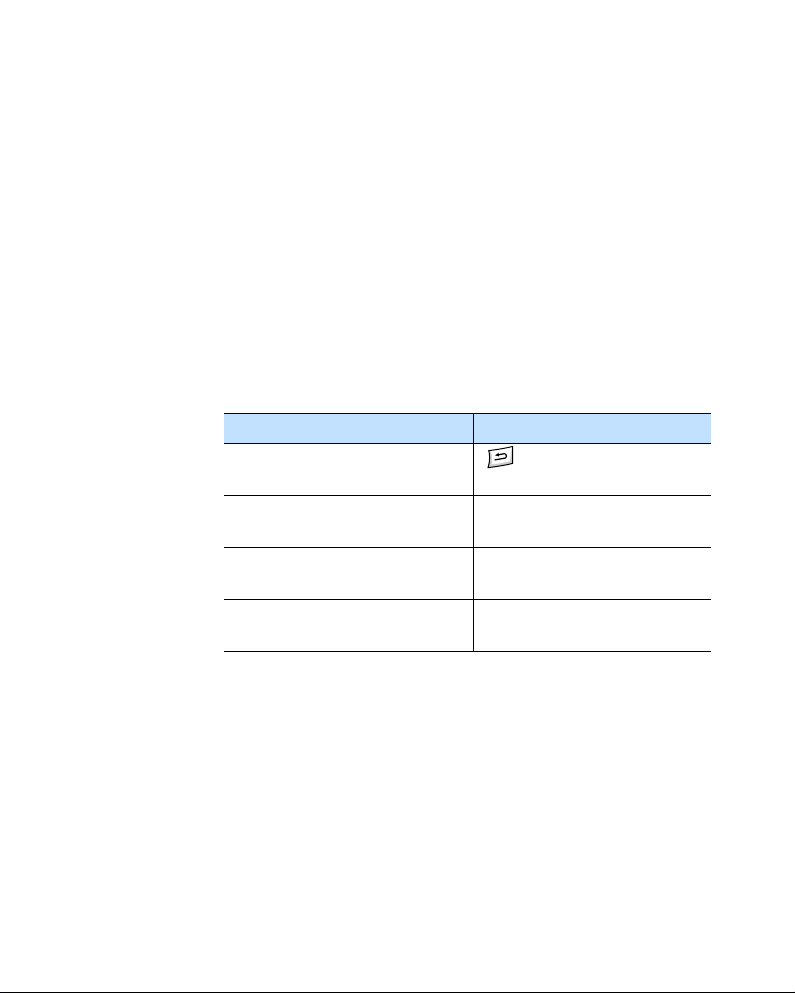
Messaging, Internet, and Messenger
3. To connect and start browsing, do one of the following:
• Press the
Menu
soft key and select
Home
to access
the homepage of your service provider.
• Press the
address of WAP site you want to visit and press the
Menu
soft key and select
Go To
. Enter the
Go
soft key.
• Press the
Favourites
soft key, select the category
which contains the WAP site you want, and then select
the WAP site. For details for storing favourite links, see
the next section.
4. While navigating through WAP pages, you can use the
following options:
To Press
go to the previously visited
.
page
Menu
Home
Menu
Refresh
Menu
History
soft key and
.
soft key and
.
soft key and
.
go to the homepage the
select
refresh the current page the
select
open the list of the WAP
sites you have accessed
the
select
Using the Favourites list
You can store your favourite WAP sites and then access
them easily. Categorising them enables you to find them
more quickly.
Adding a URL address to the Favourites list
1. On the WAP Browser screen, press the
key.
Favourites
soft
91
Page 92

Messaging, Internet, and Messenger
2. Scroll to a category from the list and press the
Open
soft key.
You can also create a new category by pressing the
Menu
soft key and select
3. Press the
Menu
soft key and select
New Category
New
.
to create a
new favourite link.
4. Enter a name for the favourite link and the URL of the
site.
5. Press the
Save
soft key.
You can also add a fetched WAP site as a favourite link.
Menu
1. On the WAP Browser screen, press the
and select
Add to Favorites
.
soft key
2. If there is no category created, enter a name for the
category and press the Save soft key.
3. Enter a name for the favourite link. The URL of the site
is present.
4. Select the category under which you want to save the
favourite site.
5. Press the
Done
soft key.
Opening a page through the Favourites list
1. On the WAP Browser screen, press the
Favourites
key.
2. Scroll to a category from the list and press the
soft key.
3. Scroll to the WAP site you want and press the
key.
Open
Go
soft
soft
92
Page 93

Messaging, Internet, and Messenger
Managing Favourites categories
You can create a new category for saving favourite WAP
pages, and rename or delete the created categories.
To add a category:
1. On the WAP Browser screen, press the
Favourites
soft
key.
2. Press the
soft key and select
New
to create a
Menu
new category.
3. Enter a category name and press the
To edit the categories:
Scroll to the category you want, press the
and select
Rename
or
Delete
to rename or delete the
Save
Menu
soft key.
soft key,
selected category.
Setting the WAP options
You can access options for the WAP browser. Press the
Menu
soft key and select
Settings
•
: Select a connection profile to be used for
accessing the wireless web and set the WAP browser to
load the homepage when launching. You can also create
or edit a profile.
Cache/Cookie
•
: Viewed pages can be cached for faster
downloads and cookies are pieces of information related
to a session. You can select to enable or disable the
cache or cookies.
You can clear information stored in the cache and cookie
by pressing the
or
Cache
Menu
Clear Cookie
Options
.
soft key and selecting
.
Clear
93
Page 94

Messaging, Internet, and Messenger
•
Set as Home Page
: You can change the startup
homepage of the WAP browser. Access the page you want
and select this option.
Pocket MSN
Pocket MSN delivers an always-on experience that enables
you to remain available to other online users and always up
to date with e-mail, instant messaging (IM) and other
online services without maintaining a continuous network
connection to the phone.
The connection will be restored when a new message
arrives or when you needs the service. In addition,
subscribers will receive only updates or changes to their
contacts and Inbox
when they connect to the service.
You will have one-click access to MSN Hotmail
Messenger. In addition, Pocket MSN will allow you to
wirelessly browse online and receive other MSN services,
including MSN Alerts, which include news, sports and
weather updates.
rather than receiving entire lists
®
and MSN
In addition to always-on services, you can access, compose
and answer Hotmail messages offline, maximising their
time when mobile connections are not available.
To access Pocket MSN:
On the Home screen, press the
Internet → Pocket MSN
Start
soft key and select
.
94
Page 95

Messaging, Internet, and Messenger
Signing In
To use the MSN Messenger or Hotmail service, you must
have a Microsoft Passport™ account or Hotmail account, or
a Microsoft Exchange e-mail account. If you have a
Hotmail
Once you have obtained either a Microsoft Passport or a
Microsoft Exchange account, you are ready to set up your
account.
Note
To sign into the MSN service:
®
or MSN account, you already have a Passport.
: Sign up for a Microsoft Passport account at http://
www.passport.com. Get a free Microsoft Hotmail e-mail
address at http://www.hotmail.com.
1. On the Pocket MSN main screen, select
,
Messenger
MSN Hotmail
2. If you selected
MSN Messenger
, or
Compose Hotmail
, press the
MSN
Sign In
.
soft
key.
3. Enter the e-mail address and the password of your
Microsoft Passport and Hotmail account.
4. Press the
Sign In
soft key.
Using MSN Messenger
MSN® Messenger on your phone is an instant messaging
program that lets you:
• see who is online.
• send and receive instant messages.
• have instant message conversations with groups of
contacts.
95
Page 96

Messaging, Internet, and Messenger
Working with contacts
The MSN Messenger screen shows all of your messenger
contacts at a glance, divided into the
Online
categories. From this view, while connected, you
Online
and
Not
can start a chat.
• To see others who are online but not seen on the MSN
Menu
Messenger screen, press the
Chats
.
• To add a contact, press the
Add Contact
.
Menu
• To delete a contact, press the
Delete Contact
.
soft key and select
soft key and select
Menu
soft key and select
• To set the MSN Messenger to automatically update the
contacts’ status when it changes, press the
key and select
Auto update status
.
• To view the properties of a contact, press the
key and select
Properties
.
Menu
Menu
soft
soft
• To block a contact from chatting with you, press the
Menu
soft key and select
Block
.
Chatting with contacts
1. To open a chat window, scroll to the contact with whom
you want to chat.
2. Press the
soft key and select
Send Message
.
Menu
3. Enter your message in the text entry area at the bottom
of the screen, or press the
to enter a preset message.
Text
Send
4. Press the
soft key to send the message.
Menu
soft key and select
My
5. Repeat steps 3 and 4 to chat with the contact.
96
Page 97

Messaging, Internet, and Messenger
During a chat:
• To invite another contact to a multi user chat, press
Menu
the
soft key, select
Invite
, and select the
contact you want to invite.
• To switch back to the main window, press the
soft key and select
My Contacts
your chat window, press the
Chats
, and select the person whom you were chatting
. To revert back to
Menu
soft key, select
Menu
with.
• To view the participants of the current chat, press the
Menu soft key and select
6. To end the chat, press the
End Chat
.
Chat Members
Menu
soft key and select
.
Using the Hotmail service
You can send and read e-mail messages on the phone via
the Microsoft Hotmail service.
Composing and sending an e-mail
1. On the Pocket MSN screen, select
Compose Hotmail
2. Compose an e-mail as you would in the Messaging
program.
Viewing e-mail messages
1. On the Pocket MSN screen, select
Menu
2. Press the
soft key and select
MSN Hotmail
Folders
.
.
3. Select a message folder, and then select the message
you want to view.
.
97
Page 98

Messaging, Internet, and Messenger
Accessing the MSN Mobile Homepage
On the Pocket MSN screen, select
can access various mail, information, entertainment
services provided by Microsoft.
MSN Mobile Home
. You
Changing Pocket MSN setting options
From the Pocket MSN mail screen, press the
keys. The following options are available:
Note
: To change the settings, you may need to sign in to the
MSN service.
•
General
Pocket MSN to be displayed on the Home screen.
Hotmail
•
set Hotmail to automatically download new e-mails to the
phone.
Messenger
•
Messenger or set Messenger to automatically update
your contacts’ presence information.
SMS
•
when a data connection is unavailable.
Switch user
•
the MSN service by another user account.
: You can clear the saved password, if any, or set
: You can set filters to receive or block e-mails or
: You can change your display name in
: You can set Pocket MSN to temporarily use SMS
: You can reset user information to sign in to
Options
soft
98
Page 99

6
Organiser
This chapter explains how to use Personal Information
Management (PIM) programs to keep track of contacts and
appointments and make a list of tasks you need to do.
Contacts
Contacts maintains a list of your friends and colleagues so
that you can easily find the information you are looking for,
whether you are at home or on the road.
To open Contacts:
On the Home screen, press the
Start
also press the
view the list of contact cards that you have created.
soft key and select
Creating a contact card
You can save a new contact card in Contacts or on the SIM
card.
Creating a contact card in the phone’s memory
Contacts
soft key. You can
Contacts
. You can
1. On the contact list,
2. Enter a name and other contact information.
You can add a personal ringtone to a contact card. Scroll
to the
Custom ring tone
melody you want.
Select the
image.
To assign the contact card to a category, scroll to the
Categories
Picture
field and select a category.
press the
field to add an image for the caller ID
New
soft key
field and select the ring
.
99
Page 100

Organiser
3. When you have finished, press the
Done
soft key.
Creating a contact card on the SIM card
1. On the contact list, press the
New SIM Contact
.
Menu
soft key
and select
2. Enter the name of the person you want to add.
3. Scroll to the
Number
field and enter the number you
want to store.
4. Press the
Done
soft key.
Creating a contact card from the Dialling screen
1. On the Home screen, enter the phone number and press
the
Save
soft key.
2. To create a new contact card, select
<New Item>
.
To add the phone number to an existing contact card,
select the contact card.
3. Scroll to the location in which you want to save the
Insert
number and press the
4. Fill in the other fields and press the
soft key.
Done
soft key.
100
 Loading...