

Samsung SGH-I827 User Manual
MOBILE PHONE
User Manual
Please read this manual before operating your
phone, and keep it for future reference.

Intellectual Property
All Intellectual Property, as defined below, owned by or which is otherwise the property of Samsung or its respective suppliers
relating to the SAMSUNG Phone, including but not limited to, accessories, parts, or software relating there to (the “Phone
System”), is proprietary to Samsung and protected under federal laws, state laws, and international treaty provisions. Intellectual
Property includes, but is not limited to, inventions (patentable or unpatentable), patents, trade secrets, copyrights, software,
computer programs, and related documentation and other works of authorship. You may not infringe or otherwise violate the
rights secured by the Intellectual Property. Moreover, you agree that you will not (and will not attempt to) modify, prepare
derivative works of, reverse engineer, decompile, disassemble, or otherwise attempt to create source code from the software. No
title to or ownership in the Intellectual Property is transferred to you. All applicable rights of the Intellectual Property shall remain
with SAMSUNG and its suppliers.
Open Source Software
Some software components of this product incorporate source code covered under GNU General Public License (GPL), GNU Lesser
General Public License (LGPL), OpenSSL License, BSD License and other open source licenses. To obtain the source code covered
under the open source licenses, please visit:
http://opensource.samsung.com
.
Disclaimer of Warranties; Exclusion of Liability
EXCEPT AS SET FORTH IN THE EXPRESS WARRANTY CONTAINED ON THE WARRANTY PAGE ENCLOSED WITH THE PRODUCT, THE
PURCHASER TAKES THE PRODUCT "AS IS", AND SAMSUNG MAKES NO EXPRESS OR IMPLIED WARRANTY OF ANY KIND
WHATSOEVER WITH RESPECT TO THE PRODUCT, INCLUDING BUT NOT LIMITED TO THE MERCHANTABILITY OF THE PRODUCT OR
ITS FITNESS FOR ANY PARTICULAR PURPOSE OR USE; THE DESIGN, CONDITION OR QUALITY OF THE PRODUCT; THE
PERFORMANCE OF THE PRODUCT; THE WORKMANSHIP OF THE PRODUCT OR THE COMPONENTS CONTAINED THEREIN; OR
COMPLIANCE OF THE PRODUCT WITH THE REQUIREMENTS OF ANY LAW, RULE, SPECIFICATION OR CONTRACT PERTAINING
SGH-I827_UM_English_UCLJ2_WC_121712_F7

THERETO. NOTHING CONTAINED IN THE INSTRUCTION MANUAL SHALL BE CONSTRUED TO CREATE AN EXPRESS OR IMPLIED
WARRANTY OF ANY KIND WHATSOEVER WITH RESPECT TO THE PRODUCT. IN ADDITION, SAMSUNG SHALL NOT BE LIABLE FOR
ANY DAMAGES OF ANY KIND RESULTING FROM THE PURCHASE OR USE OF THE PRODUCT OR ARISING FROM THE BREACH OF
THE EXPRESS WARRANTY, INCLUDING INCIDENTAL, SPECIAL OR CONSEQUENTIAL DAMAGES, OR LOSS OF ANTICIPATED PROFITS
OR BENEFITS.
SAMSUNG IS NOT LIABLE FOR PERFORMANCE ISSUES OR INCOMPATIBILITIES CAUSED BY YOUR EDITING OF REGISTRY SETTINGS,
OR YOUR MODIFICATION OF OPERATING SYSTEM SOFTWARE.
USING CUSTOM OPERATING SYSTEM SOFTWARE MAY CAUSE YOUR DEVICE AND APPLICATIONS TO WORK IMPROPERLY.
Samsung Telecommunications America (STA), LLC
Headquarters:
1301 E. Lookout Drive
Richardson, TX 75082
Toll Free Tel: 1.888.987.HELP (4357)
Internet Address:
http://www.samsung.com
©
2012 Samsung Telecommunications America, LLC. Samsung and SoundAlive® are both registered trademarks of Samsung
Electronics Co., Ltd.
Customer Care Center:
1000 Klein Rd.
Plano, TX 75074

Do you have questions about your Samsung Mobile Phone?
TM
For 24 hour information and assistance, we offer a new FAQ/ARS System (Automated Response System) at:
www.samsung.com/us/support.
Nuance®, VSuite™, T9® Text Input, and the Nuance logo are trademarks or registered trademarks of Nuance Communications,
Inc., or its affiliates in the United States and/or other countries.
®
and NetFront™ are trademarks or registered trademarks of ACCESS Co., Ltd. in Japan and other countries.
ACCESS
The Bluetooth
®
word mark, figure mark (stylized “B Design”), and combination mark (Bluetooth word mark and “B Design”) are
registered trademarks and are wholly owned by the Bluetooth SIG.
microSD™ and the microSD logo are Trademarks of the SD Card Association.
Openwave
®
is a registered Trademark of Openwave, Inc.
Google, the Google logo, Android, the Android logo, Android Market, Gmail, Google Mail, Google Maps, Google Music, Google Talk,
Google Play, Picasa, YouTube and other marks are trademarks of Google Inc.
Wi-Fi is a registered trademark of the Wireless Fidelity Alliance, Inc.
©
Swype and the Swype logos are trademarks of Swype, Inc.
2010 Swype, Inc. All rights reserved.
and are trademarks of SRS Labs, Inc. CS Headphone and WOW HD technologies are incorporated under license
from SRS Labs, Inc.
, DivX®, DivX Certified® and associated logos are trademarks of Rovi Corporation or its subsidiaries and are used under
license. DivX Certified® to play DivX® video up to HD 720p, including premium content.
ABOUT DIVX VIDEO: DivX® is a digital video format created by DivX, LLC, a subsidiary of Rovi Corporation. This is an official DivX
divx.com
Certified® device that plays DivX video. Visit
for more information and software tools to convert your files into DivX video.
ABOUT DIVX VIDEO-ON-DEMAND: This DivX Certified® device must be registered in order to play purchased DivX Video-onDemand (VOD) movies. To obtain your registration code, locate the DivX VOD section in your device setup menu. Go to
vod.divx.com
for more information on how to complete your registration.

Devices purchased for use on AT&T's system are designed for use exclusively on AT&T's system. You agree that you won't make
any modifications to the Equipment or programming to enable the Equipment to operate on any other system. A voice plan is
required on all voice-capable devices, unless specifically noted otherwise in the terms governing your agreement. Some devices
or plans may require you to subscribe to a data plan.
Your phone is designed to make it easy for you to access a wide variety of content. For your protection, AT&T wants you to be
aware that some applications that you enable may involve the location of your phone being shared. For applications available
through AT&T, AT&T offers privacy controls that let you decide how an application may use the location of your phone and other
phones on your account. However, AT&T's privacy tools do not apply to applications available outside of AT&T. Please review the
terms and conditions and the associated privacy policy for each location-based service to learn how location information will be
used and protected.
Your phone may be used to access the Internet and to download, and/or purchase goods, applications, and services from AT&T or
elsewhere from third parties. AT&T provides tools for you to control access to the Internet and certain Internet content. These
controls may not be available for certain devices which bypass AT&T controls.
AT&T may collect certain types of information from your device when you use AT&T services to provide customer support and to
improve its services. For more information on AT&T's Privacy Policy, visit
http://www.att.com/privacy
.
Your phone features earSmart™, an intelligent voice processor that delivers a clear voice experience, allowing you to
™ in nearly any environment. earSmart technology uses the science of human hearing to distinguish sounds, identify your
heard
voice and suppress surrounding noise, for clear conversations just about anywhere.
hear and be

How Does It Work?
•
The earSmart voice processor in your phone captures your voice and all the sounds around you.
•
Working like the human ear, it processes and distinguishes these sounds, isolates your voice conversation, and removes background noise -
from both ends of a call.
•
It also automatically equalizes and adjusts voice volume so you can hear and talk naturally, even in the noisiest places.
•
With earSmart technology, you can talk where you want, and have clear conversations for mobile calls, video chats, even speakerphone calls,
without worrying about surrounding noise.

Table of Contents
Section 1: Getting Started .............................6
Setting Up Your Phone . . . . . . . . . . . . . . . . . . . . .6
Charging a Battery . . . . . . . . . . . . . . . . . . . . . . . .9
Configuring your Phone . . . . . . . . . . . . . . . . . . .11
Switching the Phone On or Off . . . . . . . . . . . . . .11
Locking and Unlocking the Touch Screen . . . . . .12
Creating a New Google Account . . . . . . . . . . . . .12
Resetting your Google Account Password . . . . .12
Setting Up Your Voicemail . . . . . . . . . . . . . . . . .12
Section 2: Understanding Your Phone ........14
Features of Your Phone . . . . . . . . . . . . . . . . . . .14
Front View of Your Phone . . . . . . . . . . . . . . . . . .15
Side Views of Your Phone . . . . . . . . . . . . . . . . .16
Front Open View of Your Phone . . . . . . . . . . . . .17
Rear View of Your Phone . . . . . . . . . . . . . . . . . .18
Display Layout . . . . . . . . . . . . . . . . . . . . . . . . . .18
Menu Navigation . . . . . . . . . . . . . . . . . . . . . . . .27
Customizing Your Home Screen . . . . . . . . . . . . .31
Notification Bar . . . . . . . . . . . . . . . . . . . . . . . . .37
Memory Card . . . . . . . . . . . . . . . . . . . . . . . . . . .38
Section 3: Call Functions ............................40
Displaying Your Phone Number . . . . . . . . . . . . 40
Making a Call . . . . . . . . . . . . . . . . . . . . . . . . . . 40
Making a Call Using Speed Dial . . . . . . . . . . . . 41
Making a Call from the Address Book . . . . . . . . 42
Answering a Call . . . . . . . . . . . . . . . . . . . . . . . 42
Dialing Options . . . . . . . . . . . . . . . . . . . . . . . . 43
Call Log . . . . . . . . . . . . . . . . . . . . . . . . . . . . . . 44
Call Duration . . . . . . . . . . . . . . . . . . . . . . . . . . 46
Options During a Call . . . . . . . . . . . . . . . . . . . . 47
Section 4: Entering Text ..............................52
Using the QWERTY Keyboard . . . . . . . . . . . . . . 52
Using the On-screen Keypad . . . . . . . . . . . . . . 55
Entering Text Using the Android Keyboard . . . . 55
Entering Text Using the Samsung Keypad . . . . 58
Entering Text Using Swype . . . . . . . . . . . . . . . 58
Using the Voice to Text Feature . . . . . . . . . . . . 59
Section 5: Contacts and Your Address
Book ..........................................................60
AT&T Address Book Activation . . . . . . . . . . . . . 60
1

Adding a New Contact . . . . . . . . . . . . . . . . . . . . 60
Editing an Existing Contact . . . . . . . . . . . . . . . . 63
Using Contacts . . . . . . . . . . . . . . . . . . . . . . . . . 63
Joining Contacts . . . . . . . . . . . . . . . . . . . . . . . . 65
Synchronizing Accounts . . . . . . . . . . . . . . . . . . 66
Address Book Options . . . . . . . . . . . . . . . . . . . . 67
Groups . . . . . . . . . . . . . . . . . . . . . . . . . . . . . . . 69
Address Book Favorites . . . . . . . . . . . . . . . . . . . 70
Managing Address Book Contacts . . . . . . . . . . . 70
Section 6: Multimedia ................................. 73
Music Player . . . . . . . . . . . . . . . . . . . . . . . . . . . 73
Using Playlists . . . . . . . . . . . . . . . . . . . . . . . . . . 75
Play Music . . . . . . . . . . . . . . . . . . . . . . . . . . . . 76
Movies . . . . . . . . . . . . . . . . . . . . . . . . . . . . . . . 77
Live TV . . . . . . . . . . . . . . . . . . . . . . . . . . . . . . . 77
Videos . . . . . . . . . . . . . . . . . . . . . . . . . . . . . . . . 77
Gallery . . . . . . . . . . . . . . . . . . . . . . . . . . . . . . . 78
Camera . . . . . . . . . . . . . . . . . . . . . . . . . . . . . . . 80
Using the Camera . . . . . . . . . . . . . . . . . . . . . . . 80
Camera Options . . . . . . . . . . . . . . . . . . . . . . . . 82
Using the Camcorder . . . . . . . . . . . . . . . . . . . . 86
Camcorder Options . . . . . . . . . . . . . . . . . . . . . . 87
2
Section 7: Messaging .................................91
Types of Messages . . . . . . . . . . . . . . . . . . . . . . 91
Creating and Sending Messages . . . . . . . . . . . .91
Message Options . . . . . . . . . . . . . . . . . . . . . . . 92
Viewing New Received Messages . . . . . . . . . . . 94
Deleting Messages . . . . . . . . . . . . . . . . . . . . . . 95
Message Search . . . . . . . . . . . . . . . . . . . . . . . . 95
Messaging Settings . . . . . . . . . . . . . . . . . . . . . . 95
Using Email . . . . . . . . . . . . . . . . . . . . . . . . . . . . 97
Using Gmail . . . . . . . . . . . . . . . . . . . . . . . . . . . . 99
Google Talk . . . . . . . . . . . . . . . . . . . . . . . . . . . 100
Google + . . . . . . . . . . . . . . . . . . . . . . . . . . . . . 101
Messenger . . . . . . . . . . . . . . . . . . . . . . . . . . . 101
Section 8: Changing Your Settings ..........103
Wireless and Network . . . . . . . . . . . . . . . . . . .103
Call Settings . . . . . . . . . . . . . . . . . . . . . . . . . . 110
Sound Settings . . . . . . . . . . . . . . . . . . . . . . . . 113
Display Settings . . . . . . . . . . . . . . . . . . . . . . .115
Power Saving Mode . . . . . . . . . . . . . . . . . . . . 115
Location and Security . . . . . . . . . . . . . . . . . . . 116
Applications . . . . . . . . . . . . . . . . . . . . . . . . . .119
Accounts and Synchronization . . . . . . . . . . . . . 122

Privacy . . . . . . . . . . . . . . . . . . . . . . . . . . . . . .122
Storage . . . . . . . . . . . . . . . . . . . . . . . . . . . . . .123
Language and keyboard . . . . . . . . . . . . . . . . .124
Voice Input and Output . . . . . . . . . . . . . . . . . .128
Accessibility Settings . . . . . . . . . . . . . . . . . . . .129
Date and Time . . . . . . . . . . . . . . . . . . . . . . . . .130
About Phone . . . . . . . . . . . . . . . . . . . . . . . . . .130
AT&T Software Update . . . . . . . . . . . . . . . . . . .131
Section 9: Connections .............................133
Browser . . . . . . . . . . . . . . . . . . . . . . . . . . . . . .133
Wi-Fi . . . . . . . . . . . . . . . . . . . . . . . . . . . . . . . .138
Bluetooth . . . . . . . . . . . . . . . . . . . . . . . . . . . . .141
Kies Air . . . . . . . . . . . . . . . . . . . . . . . . . . . . . .145
Section 10: Applications ...........................146
AllShare . . . . . . . . . . . . . . . . . . . . . . . . . . . . . .146
AT&T Navigator . . . . . . . . . . . . . . . . . . . . . . . .147
AT&T Social Net . . . . . . . . . . . . . . . . . . . . . . . .148
Calculator . . . . . . . . . . . . . . . . . . . . . . . . . . . .148
Calendar . . . . . . . . . . . . . . . . . . . . . . . . . . . . .148
Camera . . . . . . . . . . . . . . . . . . . . . . . . . . . . . .150
Clock . . . . . . . . . . . . . . . . . . . . . . . . . . . . . . . .150
Contacts . . . . . . . . . . . . . . . . . . . . . . . . . . . . .153
Downloads . . . . . . . . . . . . . . . . . . . . . . . . . . . 153
Email . . . . . . . . . . . . . . . . . . . . . . . . . . . . . . . 153
Facebook . . . . . . . . . . . . . . . . . . . . . . . . . . . . 153
Gallery . . . . . . . . . . . . . . . . . . . . . . . . . . . . . . 154
Gmail . . . . . . . . . . . . . . . . . . . . . . . . . . . . . . . 154
Google + . . . . . . . . . . . . . . . . . . . . . . . . . . . . 154
Kies air . . . . . . . . . . . . . . . . . . . . . . . . . . . . . 154
Latitude . . . . . . . . . . . . . . . . . . . . . . . . . . . . . 154
Live TV . . . . . . . . . . . . . . . . . . . . . . . . . . . . . 155
Maps . . . . . . . . . . . . . . . . . . . . . . . . . . . . . . . 155
Memo . . . . . . . . . . . . . . . . . . . . . . . . . . . . . . 156
Messenger . . . . . . . . . . . . . . . . . . . . . . . . . . . 157
Movies . . . . . . . . . . . . . . . . . . . . . . . . . . . . . . 157
Music Player . . . . . . . . . . . . . . . . . . . . . . . . . 157
My Files . . . . . . . . . . . . . . . . . . . . . . . . . . . . . 157
Navigation . . . . . . . . . . . . . . . . . . . . . . . . . . . 158
News & Weather . . . . . . . . . . . . . . . . . . . . . . 159
Places . . . . . . . . . . . . . . . . . . . . . . . . . . . . . . 160
Play Books . . . . . . . . . . . . . . . . . . . . . . . . . . . 160
Play Music . . . . . . . . . . . . . . . . . . . . . . . . . . . 160
Play Store . . . . . . . . . . . . . . . . . . . . . . . . . . . 161
Quickoffice . . . . . . . . . . . . . . . . . . . . . . . . . . 161
3

Search . . . . . . . . . . . . . . . . . . . . . . . . . . . . . . 161
Settings . . . . . . . . . . . . . . . . . . . . . . . . . . . . . 162
ShopMusic . . . . . . . . . . . . . . . . . . . . . . . . . . . 162
Social Hub . . . . . . . . . . . . . . . . . . . . . . . . . . . 162
Talk . . . . . . . . . . . . . . . . . . . . . . . . . . . . . . . . 162
Task . . . . . . . . . . . . . . . . . . . . . . . . . . . . . . . . 163
Task Manager . . . . . . . . . . . . . . . . . . . . . . . . . 163
Videos . . . . . . . . . . . . . . . . . . . . . . . . . . . . . . . 164
Vlingo . . . . . . . . . . . . . . . . . . . . . . . . . . . . . . . 164
Voice Recorder . . . . . . . . . . . . . . . . . . . . . . . . 164
Voice Search . . . . . . . . . . . . . . . . . . . . . . . . . . 165
YouTube . . . . . . . . . . . . . . . . . . . . . . . . . . . . . 166
YPmobile . . . . . . . . . . . . . . . . . . . . . . . . . . . . 166
Section 11: Health and Safety
Information ............................................ 168
Exposure to Radio Frequency (RF) Signals . . . . 168
Specific Absorption Rate (SAR) Certification
Information . . . . . . . . . . . . . . . . . . . . . . . . . 173
FCC Part 15 Information to User . . . . . . . . . . . 174
Commercial Mobile Alerting System (CMAS) . . 175
Smart Practices While Driving . . . . . . . . . . . . . 175
Battery Use and Safety . . . . . . . . . . . . . . . . . . 176
4
Samsung Mobile Products and Recycling . . . .178
UL Certified Travel Charger . . . . . . . . . . . . . . . 179
Display / Touch-Screen . . . . . . . . . . . . . . . . . . 180
GPS . . . . . . . . . . . . . . . . . . . . . . . . . . . . . . . . . 180
Emergency Calls . . . . . . . . . . . . . . . . . . . . . . .181
Care and Maintenance . . . . . . . . . . . . . . . . . .182
Responsible Listening . . . . . . . . . . . . . . . . . . .183
Operating Environment . . . . . . . . . . . . . . . . . .185
FCC Hearing Aid Compatibility (HAC)
Regulations for Wireless Devices . . . . . . . . .187
Restricting Children's Access to Your
Mobile Device . . . . . . . . . . . . . . . . . . . . . . .188
FCC Notice and Cautions . . . . . . . . . . . . . . . . .189
Other Important Safety Information . . . . . . . . . 189
Section 12: Warranty Information ............ 191
Standard Limited Warranty . . . . . . . . . . . . . . . 191
End User License Agreement for Software . . . . 196
Social Hub . . . . . . . . . . . . . . . . . . . . . . . . . . . .203
LIMITATION OF LIABILITY . . . . . . . . . . . . . . . . 208
Social Hub Privacy Policy . . . . . . . . . . . . . . . . 211
INFORMATION THAT WE COLLECT . . . . . . . . . . 211
USE OF INFORMATION WE COLLECT . . . . . . . . 212

DISCLOSURE OF INFORMATION TO THIRD
PARTIES . . . . . . . . . . . . . . . . . . . . . . . . . . . .213
CHILDREN . . . . . . . . . . . . . . . . . . . . . . . . . . . .214
SECURITY OF THE INFORMATION WE
COLLECT . . . . . . . . . . . . . . . . . . . . . . . . . . .214
CHAT ROOMS AND OTHER PUBLIC AREAS . . . .214
CONTESTS AND SWEEPSTAKES . . . . . . . . . . . .215
ACCURACY OF THE INFORMATION WE
COLLECT . . . . . . . . . . . . . . . . . . . . . . . . . . .215
CHANGES TO PRIVACY POLICY . . . . . . . . . . . . .216
Social Hub End User License Agreement . . . . .216
Section 13: Samsung Product
Registration ............................................221
Index ...........................................................222
5
Section 1: Getting Started
This section explains how to start using your phone by first
configuring your hardware, activating your service, and then
setting up your Voicemail.
Setting Up Your Phone
Prior to use it is necessary to install both the battery and SIM
into their corresponding internal compartments.
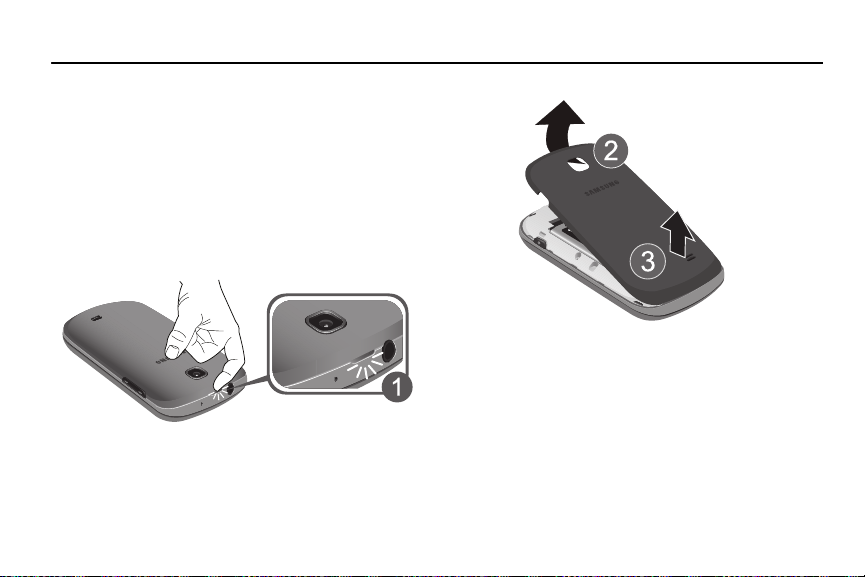
1. Remove the back cover by inserting a fingernail or
pointed object into the slot on the top side of your
phone (1).
6
2. Lift the cover up (2) and away from the phone (3).
Installing the SIM Card
When you subscribe to a cellular network, you are provided
with a plug-in SIM card loaded with your subscription details,
such as your PIN, available optional services, and many
others features.

Important!
Correct
Incorrect
The plug-in SIM card information and its contacts
can be easily damaged by scratching or bending,
so be careful when handling, inserting, or
removing the card. Keep all SIM cards out of reach
of small children.
Carefully slide the SIM card into the SIM card socket
(as shown) until the card locks into place.
•
Make sure that the card’s gold contacts face into the phone
and that the upper-left angled corner of the card is positioned
as shown.
Note:
If the card is not inserted correctly, the phone will not
detect the SIM card. Re-orient the card back into the slot
if the SIM is not detected.
Installing the Battery
1. Insert the battery into the opening on the back of the
phone, making sure the connectors align (1).
2. Gently press down to secure the battery (2).
Getting Started 7
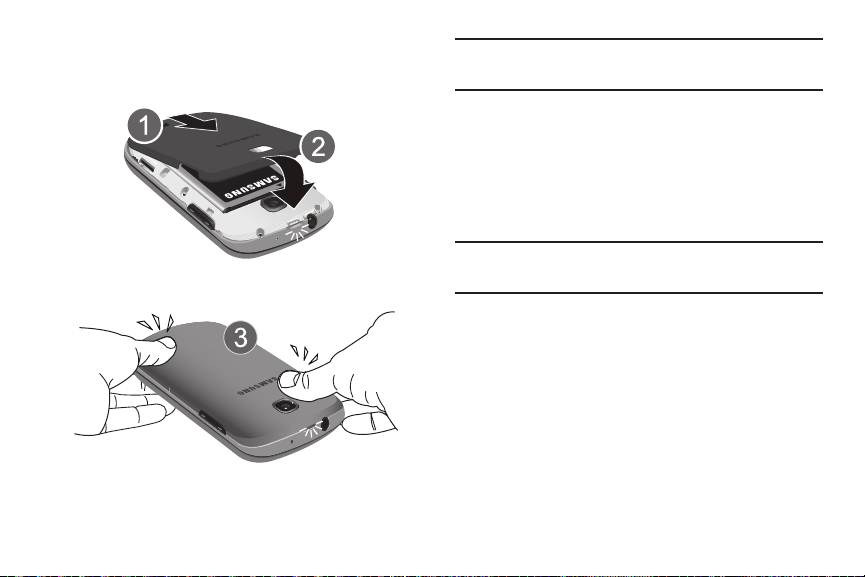
Installing the Back Cover
1. Place the battery cover onto the back of the phone (1)
and press down (2).
2. Press all along the edge of the back cover until you
have a secure seal.
8
Note:
Make sure the battery is properly installed before
switching on the phone.
Installing and Removing the Memory Card
Your device lets you use a microSD (SD) or microSDHC
card to expand available memory space. This secure digital
card enables you to exchange images, music, and data
between SD-compatible devices. This type of memory card
is designed for use with this mobile phone and other devices.
Note:
Your phone has been tested to support up to a 32GB
memory card.
1. Open the back cover and push the microSD card into
the slot until it clicks (as shown).

•
Correct
Incorrect
Make sure the microSD’s gold contact pins face downward and
the card is securely inserted.
2. To remove, push on the memory card until it clicks and
is released. Then grasp the memory card and remove it
from the phone.
For more information on Memory Cards, see “Memory Card”
on page 38.
Charging a Battery
Your device is powered by a rechargeable Li-ion battery. The
Travel Charger that is used to charge the battery, is included
with your device. Use only Samsung-approved batteries and
chargers.
Note:
Long backlight settings, searching for service, vibrate
mode, web browser use, and other variables may
reduce the battery’s talk and standby times.
Although you can use the phone while the battery is
charging, doing so will require additional charging time.
Note:
You must fully charge the battery before using your
phone for the first time. A discharged battery recharges
fully in approximately 4 hours.
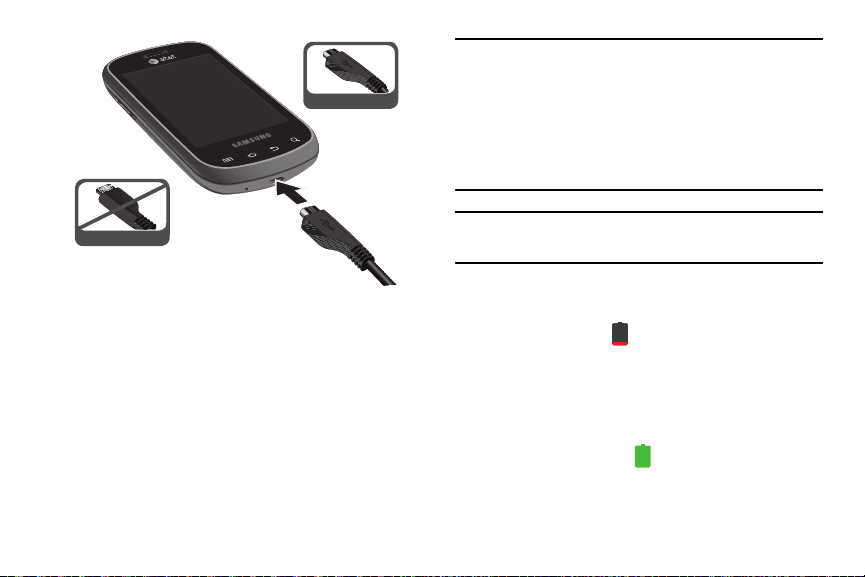
Using the Travel Charger
Important!
Verify that the handset battery is installed prior to
connection. If the battery is not properly installed
and the wall charger is connected, the handset
may power off and on continuously, preventing
proper operation.
Getting Started 9
Incorrect
Correct
Warning!
Please note that a touch screen responds best to a
light touch from the pad of your finger. Using
excessive force or a metallic object when pressing
on the touch screen may damage the tempered
glass surface and void the warranty. For more
information, refer to “Standard Limited Warranty”
on page 191.
Note:
Failure to unplug the wall charger before you remove the
battery, can cause damage to the phone.
1. Plug the flat end of the Travel Charger into the Power/
Accessory Interface connector and the other end into a
standard AC wall outlet.
2. When charging is finished, remove the flat end from
the interface connector jack on the phone.
10
Low Battery Indicator
When the battery is weak and only a few minutes of talk time
remain, the battery icon ( ) blinks and the device sounds a
warning tone at regular intervals. In this condition, your
phone conserves its remaining battery power, not by turning
off the backlight, but by entering the dimming mode. For a
quick check of your battery level, glance at the battery
charge indicator located in the upper-right corner of your
device’s display. Solid color ( ) indicates a full charge.
When the battery level becomes too low, the phone
automatically turns off.

Configuring your Phone
When you first turn on your phone, you will need to set up a
few things.
1. When the Welcome screen displays, touch the green
android to begin.
The
Set up your Google Account
2. If you already have a Google account, tap
otherwise, tap
instructions to create a Google account. You can also
Skip
tap
Note:
In order to utilize your device to the fullest extent, you
will need to create a Google™ Account when you first
use your device. With a Google Account, you will have
access to more Google applications and applications will
always be in sync between your phone and computer.
Create
if you want to create an account later.
screen is displayed.
Sign in
and follow the onscreen
,
4. A green checkmark also appears next to the text that
explains that you allows your location to be used for
Google search results and other Google services. If you
disagree, tap the checkmark to remove it.
5. Ta p
Next
.
The main Home screen is displayed.
Switching the Phone On or Off
1. Press and hold (on the upper right side of the
phone) until the phone switches on.
2. Sweep your finger across the screen to unlock the
phone.
Note:
The display language is preset to English at the factory.
To change the language, use the Language menu. For
more information, refer to “Changing Your Settings” on
page 103.
3. At the
Use Google location
appears next to the text that explains that you allow
Google’s location service to collect anonymous location
data from your phone. If you disagree, tap the
checkmark to remove it.
screen, a green checkmark
3. To switch off the phone, press and hold , until
the
4. Ta p
Phone options
Power off
screen displays.
, then tap OK to switch off the phone.
Getting Started 11
Locking and Unlocking the Touch Screen
1. Press to lock the touch screen.
2. Press again to display the main screen then
sweep your finger across the screen to unlock it.
3. For more information, refer to “Locking and Unlocking
the Phone” on page 28.
Creating a New Google Account
In order to utilize your device to the fullest extent, you will
need to create a Google™ Account when you first use your
device. With a Google Account, Google applications will
always be in sync between your phone and computer.
After you start your phone for the first time, follow these
steps:
1. From the Home screen, tap
Gmail
The
2. Tap
3. Follow the on-screen instructions to create Google
Account.
12
.
Add a Google Account
Next
to continue.
Applications
screen displays.
➔
Note:
If you already have a Google account, you only need to
sign in.
Resetting your Google Account Password
A Google account password is required for Google
applications. If you misplace or forget your Google Account
password, follow these instructions to reset it:
1. From your computer, use an Internet browser to
navigate to
2. Once the URL loads, click on the
account?
3. Click on
4. Enter your Email address and click
5. Follow the on-screen instructions to reset your
password.
http://google.com/accounts
link.
I forgot my password
.
Can’t access your
.
Continue
.
Setting Up Your Voicemail
1. From the Home screen, tap , then tap .
You may be prompted to enter a password.
2. Follow the tutorial to create a password, record a
greeting, and record your name.
Note:
These steps may be different depending on your
network.
Accessing Your Voice Mail
1. From the Home screen, tap , then tap .
2. When connected, follow the voice prompts from the
voice mail center.
Accessing Your Voicemail From Another Phone
1. Dial your wireless phone number.
2. When you hear your voicemail greeting, press the
asterisk key on the phone you are using.
3. Enter your passcode.
Getting Started 13

Section 2: Understanding Your Phone
This section outlines some key features of your phone and
describes the screen and the icons that appear when the phone
is in use. It also shows how to navigate through the phone and
provides information on using a memory card.
Features of Your Phone
Your phone is lightweight, easy-to-use and offers many
useful features. The following list outlines a few of the
features included in your phone.
•
EDGE/UMTS/HSDPA 7.2 network
•
Android Gingerbread platform
•
Touch screen provides quick response to a variety of in-phone
menus and options including applications and seven home
screens
•
Eco-Friendly housing, composed of 80% Post Consumer
Materials
•
Built-in Bluetooth and Wi-Fi technology
14
•
3.2” HVGA (480x320) 262k TFT display
•
3.2 Megapixel camera and camcorder
•
AT&T GPS Navigation functionality provides real-time navigation
•
HSDPA 7.2 Mbps high speed download capability
•
Assisted GPS (TeleNav GPS Navigation)
•
microSD card compatibility with up to 32GB expandable memory
slot
•
Up to 32 GB expandable memory slot
•
Corporate and Personal Email
•
Sync and update social network applications
•
Over 450,000 Apps available to download
•
Full Integration of Google Mobile™ Services (Gmail, YouTube,
Google Maps, Google Voice Search)
•
Multiple Messaging Options: Text/Picture/Video Messaging,
Google+, Google Messenger, and Google Talk
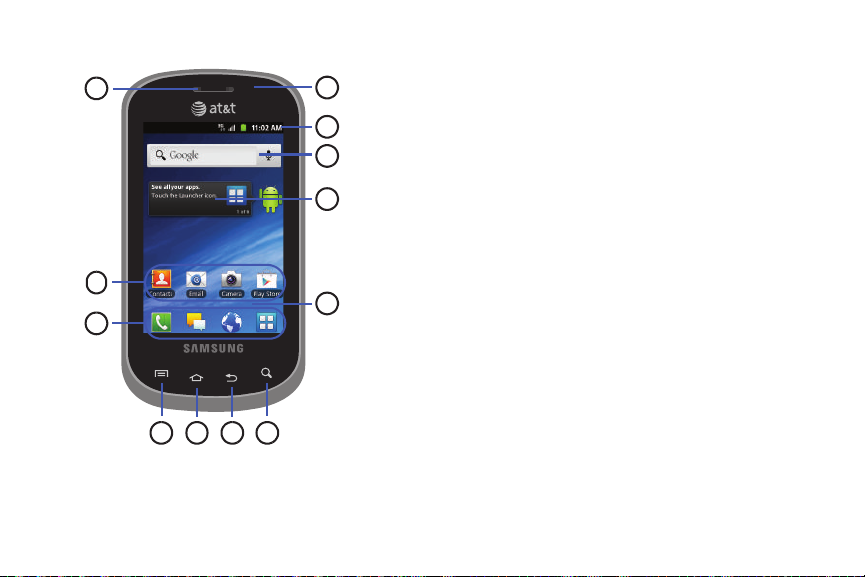
Front View of Your Phone
7
3
2
4
586
1
11
10
12
9
1.
External speaker
: allows you to hear the caller.
2. Application icons: you can place shortcuts to your
favorite applications on the Home screen.
3. Primary shortcuts: allows quick access to important
features such as Phone, Messaging, Web, and
Applications. For more information, refer to “Primary
Shortcuts” on page 18.
4. Menu key: allows you to access sub-menus with
additional options for different features and
applications such as Home screen, Phone, Contacts,
Messaging, and Web.
5. Home key: allows you to return to the main Home
screen from any Home screen or menu. Press and hold
to display your recently used applications and a
shortcut to the Task Manager.
6. Back key: allows you step backwards when navigating
a menu or web page.
7. Search key: allows you to access the Google Search
feature where you can search for items on the internet.
Home screen indicator
8.
: shows which Home screen is
presently displayed. This remains hidden until you
sweep the screen.
Understanding Your Phone 15

9. Home screen tips Widget: displays tips to using your
4
6
1
2
3
5
home screen. Tap the text area to see 6 different tips.
10. Google Quick Search bar: a shortcut to Google Search
that allows you to search for items on the internet.
11. Indicator icons: shows the information needed to
operate your phone, such as the received signal
strength, phone battery level, time, unread Emails,
missed calls, etc.
Proximity sensor
12.
: when holding the phone close to your
ear, the touch screen will turn off.
Side Views of Your Phone
16

1.
Side-View
Display
QWERTY
Keyboard
Microphone
are speaking to them on the speakerphone.
2.
Volume keys
while in standby mode or adjust the voice volume
during a call. When receiving an incoming call, briefly
press down either volume key (
the ring tone.
Microphone
3.
are speaking to them.
4. Power/Accessory Interface connector: allows you to
connect a Travel Charger or other optional accessories
such as a USB/data cable or a hands-free headset for
convenient, hands-free conversations.
5. Power/Lock key: ( ) lets you power your phone
on and off. Also allows you to lock or unlock the touch
screen. For more information on locking your phone,
see “Locking and Unlocking the Phone” on page 28.
3.5mm Headset jack
6.
: allows other callers to hear you when you
: allow you to adjust the ringer volume
) to mute
: allows other callers to hear you when you
: allows you to plug in headphones.
Front Open View of Your Phone
To use the QWERTY keypad, turn your phone to a horizontal
position and slide your phone open as shown below.
For more information on using the QWERTY keypad, For more
information, refer to “Using the QWERTY Keyboard” on page
52.
Understanding Your Phone 17
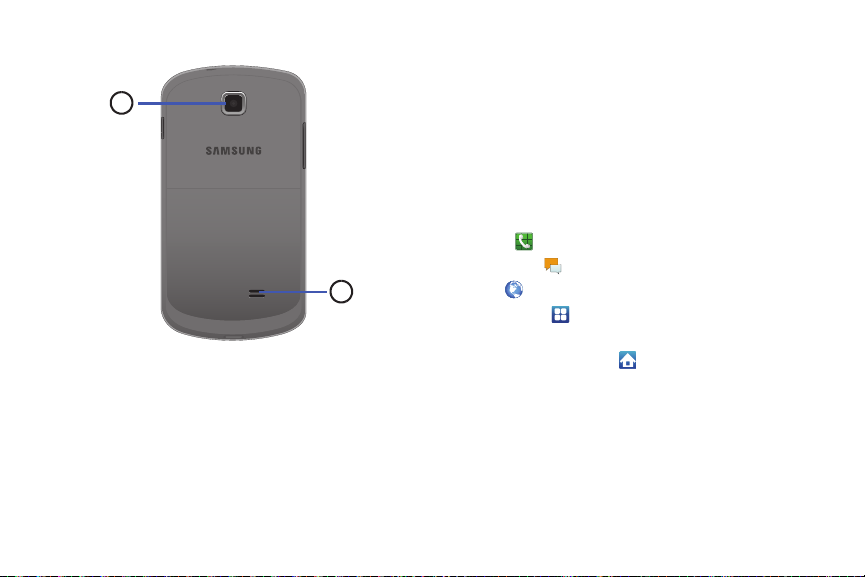
Rear View of Your Phone
1
2
1.
Camera lens
External speaker
2.
Speakerphone is turned on.
: is used to take pictures and shoot videos.
: allows you to hear when the
Display Layout
Your display screen provides a wealth of information about
the phone’s status and options, as well as providing access
to application icons. For more information, refer to “Front
View of Your Phone” on page 15.
Primary Shortcuts
There are four non-movable Application Shortcuts that
appear at the bottom of all Home screens. The default
shortcuts are:
•
Phone
for dialing a number.
•
Messaging
•
Web
•
Applications
While viewing the Applications Menu, the Application
shortcut changes to
screen.
You can change the Phone, Messaging, and Web application
shortcuts to any icon that is displayed in the Applications
menu.
For more information, refer to “Adding and Removing
Primary Shortcuts” on page 32.
for creating and viewing Messages.
for surfing the Internet.
for accessing the applications on your phone.
Home
, which returns you to the Main
18

Indicator Icons
This list identifies the symbols you’ll see on your phone’s
display and Indicator area:
Displays your current signal strength. The greater
the number of bars, the stronger the signal.
Indicates that the Airplane Mode is active. You
cannot send or receive any calls or access online
information.
Displays when there is no SIM card in the phone.
Displays when there is no network available.
Displays when the speakerphone is on.
Displays when a call has been missed.
Displays when a call has been muted.
Displays when Call forwarding is set to Always
forward. For more information, refer to “Call
Settings” on page 110.
Displays when you phone is set to automatically
reject all calls.
Displays when there is a system error or alert.
Displays when a call is in progress.
Displays when a call is in progress using a Bluetooth
device.
Displays when a call is on hold.
Displays your battery charge level. Icon shown is
fully charged.
Displays when your battery is charging. Also
displays battery charge level.
Device Power Critical – Shows your current battery
only has three percent power remaining and will
immediately shutdown.
Understanding Your Phone 19

Displays when your connection to an EDGE network
is active.
Displays when your phone is communicating with
the EDGE network.
Displays when your connection to a 3G network is
active.
Displays when your phone is communicating with
the 3G network.
Displays when your phone is downloading a file.
Displays when a Market download has successfully
been installed.
Displays when updates are available for dow nload.
Displays when the phone is connected to a
computer via a supported USB cable connection.
Displays when the phone is tethered via a
supported USB cable connection.
20
Displays when a new text or multimedia message
is received.
Displays when a new Voicemail is received.
Displays when Email is received.
Displays when a new gmail message is received.
Displays as a reminder to configure your phone
using the AT&T Ready2Go application or to setup
your Google Account.
Displays when the time and date for a Calendar Event
has arrived. For more information, refer to
“Calendar” on page 148.
Displays when you set an alarm to ring at a specified
time. For more information, refer to “Alarm” on page
150.
Displays when the Sound profile is set to Silent
mode.
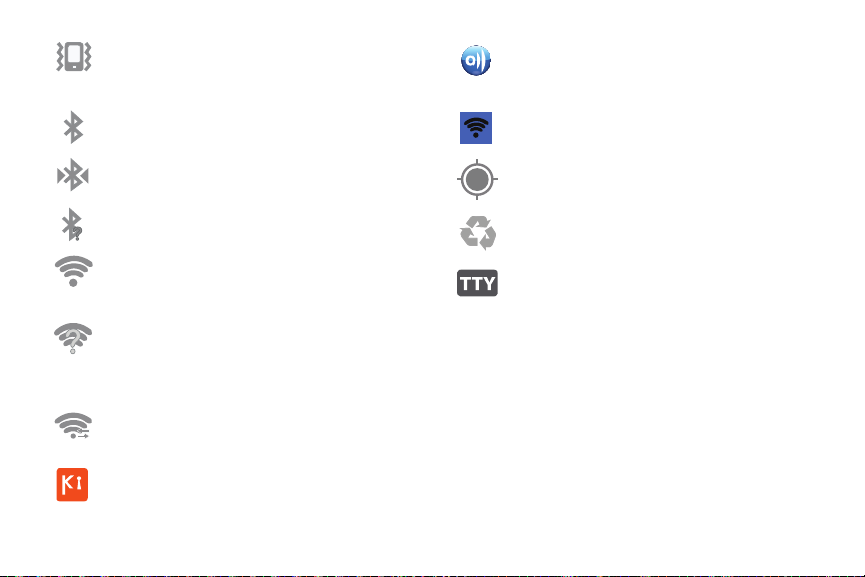
Displays when the Sound profile is set to Silent
mode and Vibrate is set to Always or Only in silent
mode.
Displays when Bluetooth is activated.
Displays when a Bluetooth device has been paired
with the phone.
Displays when Bluetooth is on but is not connected
to a Bluetooth device.
Displays when Wi-Fi is connected, active, and
communicating with a Wireless Access Point
(WAP).
Displays when Wi-Fi is on but there is a
communication issue with the target Wireless
Access Point (WAP) or when Wi-Fi is on but your
device is not connected to a WAP.
Displays when Wi-Fi Direct is active and your phone
is connected to another device.
Displays when your phone is connected to a PC
using Kies air.
Displays when your phone is connected to a Digital
Living Network Alliance (DLNA) certified device
using the AllShare application.
Displays when your phone as been configured as a
portable Wi-Fi hotspot.
Displays when GPS is active and acquiring a signal.
Displays when Power saving mode is enabled.
Displays when TTY device has been inserted.
For more details on configuring your phone’s settings, see
“Changing Your Settings” on page 103.
Understanding Your Phone 21
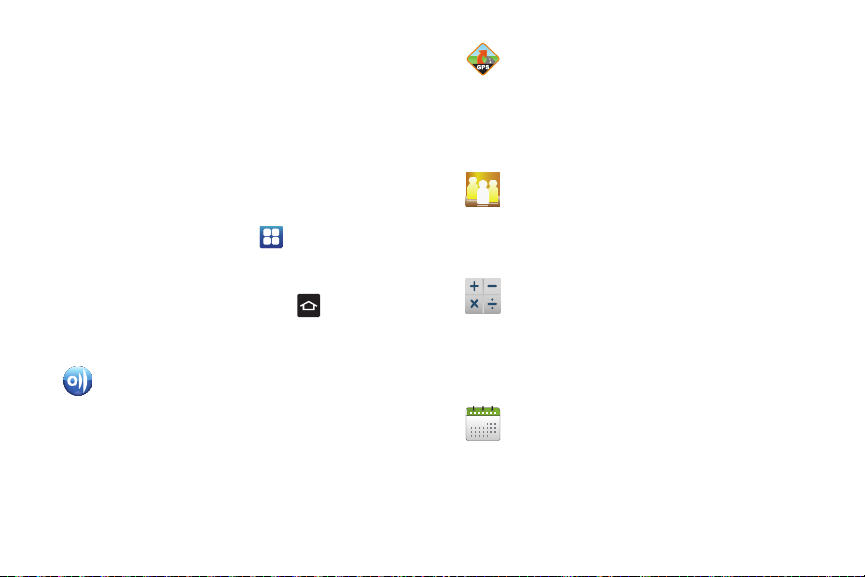
Application Icons
The Application menu provides quick access to the items you
use most frequently.
The following table contains a description of each
application. If the application is already described in another
section of this user manual, then a cross reference to that
particular section is provided.
For information on navigating through the Applications icons,
see “Navigating Through the Application Menus” on page 29.
1. From the Home screen, tap , then tap one of the
application icons.
2. Follow the on-screen instructions.
3. To return to the Home screen, tap
The following applications are available:
AllShare
: AllShare allows your phone to stream photos,
music and videos from its memory to other Digital
Living Network Alliance (DLNA) certified devices. Your
phone can also play digital content streamed from
other DLNA certified devices. For more information,
refer to “AllShare” on page 146.
22
.
AT&T Navigator
: AT&T Navigator provides you with
access to real-time GPS-driven applications. These
programs not only allow you to achieve turn-by-turn
navigation, but also access local searches based on a
variety of category parame ters. For more information,
refer to “AT&T Navigator” on page 147.
AT&T Social Net
: AT&T Social Net is a mobile social
networking application that combines access to
Facebook®, MySpace, Twitter and customizable news
feeds within a single application. For more information,
refer to “AT&T Social Net” on page 148.
Calculator
: Using this feature you can use the phone as
a calculator. The calculator provides the basic
arithmetic functions; addition, subtraction,
multiplication, and division. You can also use this as a
scientific calculator. For more information, refer to
“Calculator” on page 148.
Calendar
: With the Calendar feature, you can consult
the calendar by day, week, or month, create events,
and set an alarm to act as a reminder, if necessary. For
more information, refer to “Calendar” on page 148.
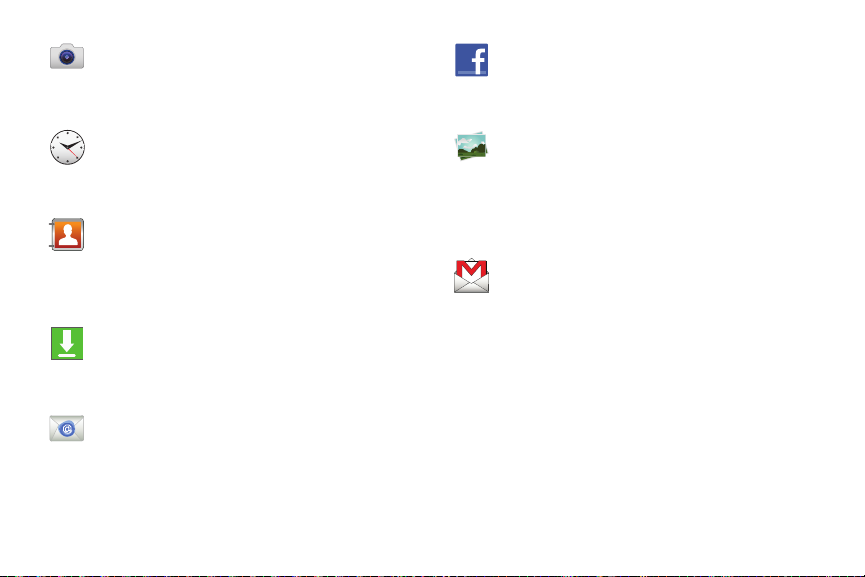
Camera
: Use your 3.2 megapixel camera feature to
produce photos in a JPEG format. It also features a
Camcorder so you can take videos. For more
information, refer to “Camera” on page 80.
Clock
: The Clock application allows you to access
alarms, view the World Clock, set a stopwatch, and use
a timer. For more information, refer to “Clock” on page
150.
Contacts
: You can manage your daily contacts by
storing their name and number in your Address Book.
Address Book entries can be sorted by name, entry, or
group. For more information, refer to “Contacts and
Your Address Book” on page 60.
Downloads
manage all of your downloads from the Market and the
Browser. For more information, refer to “Downloads”
on page 153.
Email
using various email services. For more information,
refer to “Using Email” on page 97.
: The Downloads application allows you to
: Email enables you to review and create email
Facebook
: Facebook enables you to go directly to your
Facebook account without accessing it through your
web browser. For more information, refer to
“Facebook” on page 153.
Gallery
: The Gallery is where you view photos and play
back videos. For photos, you can also perform basic
editing tasks, view a slideshow, set photos as
wallpaper or contact image, and share as a picture
message. For more information, refer to “Gallery” on
page 78.
Gmail
: Gmail is a web-based email service. Gmail is
configured when you first set up your phone.
Depending on your synchronization settings, Gmail
can automatically synchronize with your Gmail
account on the web. For more information, refer to
“Using Gmail” on page 99.
Understanding Your Phone 23
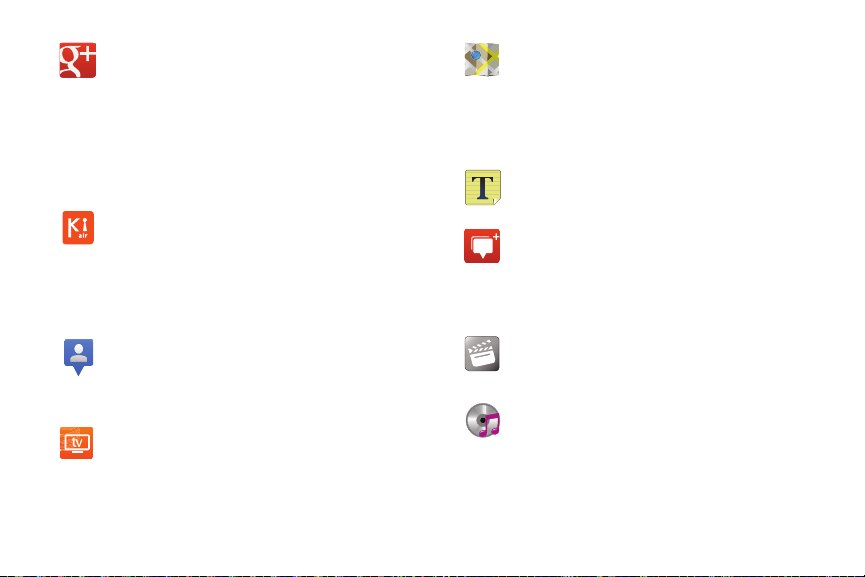
Google +
: Google+ makes messaging and sharing with
your friends a lot easier. You can set up Circles of
friends, visit the Stream to get updates from your
Circles, use Messenger for fast messaging with
everyone in your Circles, or use Instant Upload to
automatically upload videos and photos to your own
private album on Google+. For more information, refer
to “Google +” on page 101.
Kies air
: Kies Air allows you to sync your Windows PC
wirelessly with your phone provided they are both on
the same Wi-Fi network. You can view call logs, videos,
photos, bookmarks, IMs, and even send SMS
messages from your home computer. For more
information, refer to “Kies Air” on page 145.
Latitude
: With Google Latitude, you can see the location
of all of your friends on a map or on a list. You can also
share or hide your location. For more inform ation, refer
to “Latitude” on page 154.
Live TV
: Live TV is a subscription service that allow s you
to watch your favorite TV shows using your handset.
For more information, refer to “Live TV” on page 155.
24
Maps
: Depending on your location, you can view basic,
custom, and satellite maps and local business
information, including locations, contact information,
and driving directions. You can also post public
messages about a location an d track your friends. For
more information, refer to “Maps” on page 155.
Memo
: This feature allows you to create a memo. For
more information, refer to “Memo” on page 156.
Messenger
friends together into a simple group conversation.
When you get a new conversation in Messenger,
Google+ sends an update to your phone. For more
information, refer to “Messenger” on page 101.
Movies
movies to watch on your phone. For more information,
refer to “Movies” on page 77.
Music Player
files that you have stored on your phone and memory
card. You can also create playlists. For more
information, refer to “Music Player” on page 73.
: Messenger allows you to bring groups of
: The Movies application allows you to rent
: Music Player allows you to play music
 Loading...