


InkJet Facsimile
Installation Guide
SF-3100/SF-3100T
Please read this guide before you use this equipment.

Important Precautions and Safety Information
When using this fax machine, these basic safety precautions should always be followed to
reduce risk of fire, electric shock, and injury to persons:
1. Read and understand all instructions.
2. Use common sense whenever operating electrical appliances.
3. Follow all warnings and instructions marked on the product and in the literature
accompanying the product.
4. If an operating instruction appears to conflict with safety information, heed the safety
information. You may have misunderstood the operating instruction. If you cannot resolve
the conflict, contact your sales or service representative for assistance.
5. Unplug the fax machine from the AC wall socket and telephone jack before cleaning. Do
not use liquid or aerosol cleaners. Use only a damp cloth for cleaning.
6. Do not place the fax machine on an unstable cart, stand, or table. It may fall, causing
serious damage.
7. Your fax machine should never be placed on, near, or over a radiator, heater, air
conditioner, or ventilation duct.
8. Do not allow anything to rest on the power, telephone. Do not locate your fax machine
where the cords will be abused by persons walking on them.
9. Do not overload wall outlets and extension cords. This can diminish performance, and
may result in the risk of fire or electric shock.
10. Do not allow pets to chew on the AC power, telephone, or PC interface cords.
11. Never push objects of any kind into the fax machine through case or cabinet openings.
They may touch dangerous voltage points, creating a risk fire or shock. Never spill liquid
of any kind onto or into the fax machine.
12. To reduce the risk of electric shock, do not disassemble the fax machine. Take it to a
qualified service technician when repair work is required. Opening or removing covers
may expose you to dangerous voltages or other risks. Incorrect reassembly could cause
electric shock when the unit is subsequently used.
13. Unplug the machine from the telephone jack, PC, and AC wall outlet, and refer servicing
to qualified service personnel under the following conditions:
¥
When any part of the power cord, plug, or connecting cable is damaged or frayed.
¥
If liquid has been spilled into the product.
¥
If the product has been exposed to rain or water.
¥
If the product does not operate properly after instructions have been followed.
¥
If the product has been dropped, or the cabinet appears damaged.
¥
If the product exhibits a sudden and distinct change in performance.
14. Adjust only those controls covered by the operating instructions. Improper adjustment of
other controls may result in damage, and may require extensive work by a qualified
service technician to restore the product to normal operation.
15. Avoid using this fax machine during a lightning storm. There may be a remote risk of
electric shock from lightning. If possible, unplug the A C po wer , telephone for the duration
of the lightning storm.
16. If your machine is an SF-3100T , ne ver dispose of batteries or battery packs in a fire. There
is a serious risk of explosion and/or the release of highly toxic chemicals.
17. SAVE THESE INSTRUCTIONS.

Table of Contents
Chapter 1. Setup
List of Features ................................................................................................ 1-2
Familiarizing Yourself with Your New Machine................................................ 1-3
Front View.................................................................................................. 1-3
Rear View................................................................................................... 1-3
Setting FAX Number/Name.............................................................................. 1-7
FAX Number/Name (Your Number and Name)......................................... 1-7
How to Enter Letters ..................................................................................1-8
Time/Date Setup........................................................................................ 1-9
Recording TAM Message (SF-3100T only)................................................... 1-10
Chapter 2. Automatic Dialling
One-Touch Dialling.......................................................................................... 2-2
Storing a Number for One-Touch Dialling .................................................2-2
Dialling a One-Touch Number...................................................................2-3
Speed Dialling ................................................................................................. 2-4
Storing a Number for Speed Dialling......................................................... 2-4
Dialling a Speed Number ..........................................................................2-5
Group Dialling (for Multi-Address Transmission)............................................. 2-6
Storing Speed Dial Numbers for Group Dialling ....................................... 2-6
Using Group Dialling (Multi-Address transmission) ..................................2-7
Chapter 3. The Fax Machine
Sending a Fax..................................................................................................3-2
Loading Document.................................................................................... 3-2
Setting Document Resolution and Contrast .............................................. 3-3
Sending a Fax Manually (after Talking)..................................................... 3-4
Sending a Fax Automatically..................................................................... 3-5
Automatic Redial ....................................................................................... 3-5
Receiving a Fax............................................................................................... 3-6
Reception Modes ...................................................................................... 3-6
Receiving in FAX Mode .............................................................................3-7
Receiving in TEL Mode.............................................................................. 3-7
Receiving in AUTO Mode.......................................................................... 3-8
Receiving in TAM Mode (SF-3100)........................................................... 3-8
Receiving in TAM Mode (SF-3100T)......................................................... 3-9
Receiving via an Extension Telephone.................................................... 3-10
Cancelling Reception ..............................................................................3-10
Voice Request................................................................................................ 3-11
Making a Voice Request.......................................................................... 3-11
I

Table of Contents
Answering a Voice Request .................................................................... 3-11
Chapter 4. The Answering Machine
Recordng TAM Message (SF-3100T only) ..................................................... 4-2
Checking Your TAM Greeting Message....................................................4-2
Monitoring an Incoming Call............................................................................4-3
Erasing Old Messages You’ve Heard.............................................................. 4-4
To Erase All Recorded Messages............................................................. 4-4
To Erase a Selected Message................................................................... 4-4
Playing Back Messages .................................................................................. 4-5
Playing Back Newly Received Caller Messages.......................................4-5
Playing Back All Messages .......................................................................4-5
Skipping Backward or Forward................................................................. 4-6
Message Paging..............................................................................................4-7
Using the Answering Machine from a Remote Phone..................................... 4-8
Accessing the Machine............................................................................. 4-8
Using Remote Commands ........................................................................ 4-9
Chapter 5. Advanced Fax
Broadcasting ................................................................................................... 5-2
Delayed FAX.................................................................................................... 5-4
Polling.............................................................................................................. 5-6
Setting Send Polling .................................................................................. 5-6
Setting Receive Polling..............................................................................5-7
To Cancel the Scheduled Job......................................................................... 5-8
Chapter 6. Special Features
REDIAL/PAUSE................................................................................................6-2
To Redial the Last Number Called ............................................................ 6-2
To Redial the Number in Memory..............................................................6-2
To Insert a Pause.......................................................................................6-3
Using Recall .............................................................................................. 6-3
Chain Dialling................................................................................................... 6-4
User Reports....................................................................................................6-5
To Print a report......................................................................................... 6-6
User Options....................................................................................................6-7
Setting SYSTEM/TAM(SF-3100T only) Options ......................................... 6-7
System Setup Options............................................................................... 6-8
TAM Options (SF-3100T only) ................................................................ 6-11
II

Table of Contents
Volume Setup................................................................................................. 6-12
Clearing Memory ........................................................................................... 6-13
Chapter 7. Care and Maintenance
Cleaning the Document Scanner..................................................................... 7-2
Replacing the Print Cartridge.......................................................................... 7-4
Cleaning the Cartridge .................................................................................... 7-6
Wiping the Print Nozzles and Contacts..................................................... 7-6
Cleaning the Cartridge Carrier Contacts and Deflector............................ 7-8
Cleaning the Printhead.................................................................................... 7-9
Ink Level View................................................................................................ 7-10
Adjust Shading .............................................................................................. 7-11
Print Cartridge Maintenance..........................................................................7-12
LCD Error Messages ..................................................................................... 7-13
Fixing Problems............................................................................................. 7-14
Print Quality Problems .............................................................................7-15
Paper Feeding Problems.........................................................................7-15
Clearing Jams................................................................................................7-16
Document Jams During Transmission..................................................... 7-16
Paper Jams During Printing..................................................................... 7-17
Chapter 8. Appendix
Specifications .................................................................................................. 8-2
Paper Type and Sizes (for the ASF) ................................................................ 8-3
Acceptable Documents (for ADF) ................................................................... 8-4
A Sample of ITU 4% Chart (reduced to 60.5%)............................................... 8-5
Replacing the fitted plug ................................................................................. 8-6
Important ................................................................................................... 8-6
Guarantee........................................................................................................ 8-7
Limited Guarantee..................................................................................... 8-7
Exclusions.................................................................................................. 8-7
III

Setup
1
ETUP
S
Chapter 1
1
-1

Setup
List of
Features
Features for both
SF-3100 and
SF-3100T
This machine was designed using the latest technology. It is a
full-featured, high-performance machine that not only meets,
but exceeds industry standards. The following is a list of its
many exciting features:
¥
Inkjet printing on plain paper
¥
14.4Kbps high speed faxing
¥
80 page holding memory
¥
Seven language display and report; English, German, French, Italian, Spanish, Portuguese and
Dutch .
¥
Stand-alone, full-function fax machine
¥
Convenient 99 pages desk-top copier
¥
15 page Anti-Skew Document Feeder
¥
Five One-Touch and 50 Speed-Dialling locations
¥
Group Dialling to eliminate repetitive dialling to the
same multiple destinations
¥
Four reception modes; TEL, FAX, AUTO and TAM
¥
Broadcasting to send the same document to multiple destinations
¥
Delayed FAX to send the document at a later time
¥
Send/Receive Polling
¥
Voice request to signal a request to speak with the
remote machineÕs operator during a transmit or
receive operation
¥
Last three number redial
¥
Report management; sending conÞrmation, Journal
report and Phonebook, etc.
¥
Ink save mode
¥
Standby mode power consumption of 10.1 watts
1
Features for
SF-3100T only
1
-2
¥
Built-in digital TAM
¥
Answering messages for TAM mode
¥
Access from a remote telephone
¥
Message Paging (you can have the machine transfer
a call when the caller leaves a message.)
¥
Call monitor
¥
Charge save
1. If your machine is SF-3100, you need to have an
answering machine attached.

Setup
c
Familiarizing
Yourself with
Your New
Machine
T ake a moment to f amiliarize yourself with your new machine
by looking at the pictures on the next few pages.
Front View
Document Tray
Document Guide
Control Panel
ddf
Document Exit Tray
Paper Tray
ASF
(Automati
Sheet
Feeder)
Chapter 1
Rear View
AC Power
Socket
Connect extension
phone or TAM (Telephone Answering
Machine) here if
applicabe.
Handset
EXT.LINE TEL.LINE HANDSET
Bottom View
0
0
0
0
0
0
0
0
0
0
0
0
0
0
0
0
0
0
0
0
0
0
0
0
0
0
0
0
0
0
0
0
0
0
0
0
0
0
0
0
0
0
0
0
0
0
0
0
0
0
0
Connect telephone line
here.
1
-3

Setup
CCOONNTTRROOLL PPAANNEEL
SF-3100T only
OGM
Use to record or play
outgoing message used in
TAM Mode.
Erase
Use this to erase a message
or all messages.
Play
Play caller messages.
Answer
T oggles the TAM Mode on/
off. It lights when in TAM
Mode, and blinks when a
new message is recorded.
Microphone
Use to record the outgoing
message for TAM Mode.
L
Resolution
Improve the clarity of a
document you are
sending.
Resolution
OGM Erase Play
1
ABC
123
Answer
2
3
4
5
GHI JKL
456
TUVPQRS
789
Symbols
0
OneTouch Dial
Buttons(1-5)
Use to call most
frequently used numbers
with one button.
1
-4

Number keypad
Dial numbers manually as you would usually do with the telephone, or enter
letters while setting up your machine.
❘ÃÃ(1) (SF-3100T only)
Use to skip back to the previous message.
¨¨❘(3) (SF-3100T only)
Use to skip forward to the next message.
Receive Mode/Contrast
This button has two functions:
When no document is loaded, pressing this button
changes the Receive Mode to either TEL, FAX,
AUTO, or TAM.
When a document is loaded, the pressing this
button changes contrast to either NORMAL,
LIGHTEN, DARKEN, or PHOTO.
Rcv.Mode/
Contrast
Scroll/Volume
Advanced
FAX
Report
Help
MNO
WXYZ
Speed
DEF
Recall
Redial/
Pause
OHD/V.Req
Setup
Search/Delete
Setup
Setup
Use to choose special functions
such as system setup, cartridge
change and maintenance, etc.
Advanced FAX
Use for advanced fax features
like broadcasting, delayed fax,
and polling, or to cancel a
scheduled job.
Report/Help
Use to print status reports or to
access HELP files for
information on how to operate
your machine.
Search/Delete
Use to search for a number in
memory. Or use to delete digits
in the edit mode.
Recall
Performs a switch-hook
operation such as Call Waiting.
Redial/Pause
Use to redial the last number
called. You can also use it to add
a pause while storing a number
in memory.
Scroll/Volume à and
Use to display the previous or
next menu item, to adjust the
volume, or to move the cursor to
the digit you want to edit.
¨
Chapter 1
Speed Dial
Use to store and dial the
most frequently used 50
telephone/fax numbers
with two-digit location
number.
(Copy)
Use to copy a document.
(Start/Enter)
Use to start a job or to activate
the selection shown in the
display.
(Stop)
Stops an operation at any time.
OHD (On-Hook Dial)/
V.Req.
Use to dial numbers without
picking up the handset. Also used
to signal a voice request after
sending or receiving documents.
1
-5

Setup
You have learned what features each button covers.
Now, let’s begin setting up your information such as fax
name/number and date/time.
There are two levels of setup:
¥
Basic:
Information such as fax name/number and date/time which must be
entered before using the machine. (See page 1-7.)
¥
Advanced
your living area and preferences such as language and ring to answer, etc. (See
page 6-8.)
We strongly recommend that you do not start the Adv anced setup until you ha v e read through
the User’s Guide to make yourself familiar with the machine.
: The variables you can set up while using the machine depending on
1
-6

Setup
Setting
FAX
Number/
Name
FAX Number/Name (Your Number and
Name)
This is very useful information for the recipient. It allows
them to see who sent a fax and what number they should send
a response to. You can choose from up to five IDs (Multiple
ID), using different IDs for different recipients. To use
Multiple ID, you must first set this option to ON. See “User
Options” on page 6-7.
1
2
3
4
Press Setup.
Press ÃÃÃÃ or
NAMEÕ and press Start/Enter.
Press Start/Enter when display shows ÔFAX
NUMBERÕ.
Enter the fax number to which your machine is
connected.
¥You can enter up to 20 digits, and include special
characters (space, plus sign, etc.)
¥To enter a space, press Redial/Pause or #.
¥To enter plus symbol (+), press *.
¥If you enter a wrong number, use
the number and correct it.
¨¨¨¨
to choose ÔFAX NUMBER/
Ã
or ¨ to move to
Chapter 1
5
6
7
8
Press Start/Enter when Þnished.
Press Start/Enter when display shows ÔFAX
NAMEÕ.
Enter the fax name (up to 40 characters) by using
the number keypad.
You can include special characters (space, plus
sign, etc.).
Press Start/Enter when the name in the display is
correct. When Multiple ID is on and you want
Multiple ID, repeat from step 7 after answering
ÔYÕ to ÔANOTHER ID?Õ.
The machine returns to Standby Mode when you
have Þnished or when Stop has been pressed.
1
-7

Setup
Note
Note these instructions
assume that the display
is asking you to enter a
name.
How to Enter Letters
1
Press the appropriate button for the letter you
want.
The letter appears in the display.
¥To enter an O, for example, press the 6 button three
times. Each time you press the button, the display
shows a different letter: Þrst M, then N, and O, and
Þnally 6.
¥For a list of letters and corresponding buttons, see
"Keypad Character Assignments" below.
2
Select additional letters in the same way.
The blinking cursor moves right and the next
letter appears in the display.
¥If the additional letter is in the middle of or at the end
of the letters assigned to the button you have pressed,
move the cursor by pressing ¨, then press that button.
3
Keypad Character Assignments
Key Assigned numbers, letters, or characters
1 (Space) 1 6 M N O 6
2 A B C 2 7 P Q R S 7
3 D E F 3 8 T U V 8
4 G H I 4 9 W X Y Z 9
5 J K L 5 0 (Symbols) + - , . ’ / * # & 0
Press Start/Enter when youÕre Þnished entering
letters.
1-8

Setup
Time/Date Setup
The current date and time are shown in the display when the
machine is on and ready for use (Standby Mode). The date
and time will be printed on all faxes you send.
1
2
3
4
5
Press Setup.
Press ÃÃÃà or ¨¨¨¨ to choose ÔTIME/DATE SETUPÕ
and press Start/Enter.
Press Start/Enter when the display shows ÔDATE
FORMATÕ.
Press ÃÃÃà or ¨¨¨¨ to select either ÔEUROPEÕ or ÔUSAÕ
and press Start/Enter.
Press Start/Enter when the display shows
ÔTIME/DATEÕ.
¥If you chose USA format, the date will be displayed as
MM-DD-YYYY HH:MM, for example, 03-20-1999
10:20.
¥If you chose EUROPE format, the date will be dis-
played as DD-MM-YYYY HH:MM, for example, 2003-1999 10:20.
Chapter 1
6
Set the date and time. You can move the cursor
by pressing à or ¨.
¥If you enter an invalid number, the machine beeps and
doesnÕt proceed to the next step. If this happens, just
re-enter the correct number.
DD (Day) = 01~31
MM (Month)= 01~12
YYYY (Year) = four digits
HH (Hour) = 00~23
MM (Minute) = 00~59
7
Press Start/Enter when the date and time appear
correctly.
¥The display shows the date and time you have set, then
returns to Standby Mode.
1-9

Setup
Recording
1
TAM
Message
(SF-3100T
only)
The TAM (Telephone Answering Machine) message is an
outgoing message (OGM) which plays whenever a call comes
in and the machine is in TAM Mode. For more information
about reception modes, see “Reception Modes” on page 3-6.
1
2
Press and hold OGM until you hear a beep.
The display starts counting the recording time.
Speak into the microphone when ÔRECORDÕ
appears in the display. Make sure that you are
within a 30cm range.
You can record a message which lasts up to 60
seconds.
¥You are advised to record a message of less than 15 sec-
onds in duration to prevent the fax receive from malfunctioning due to a long message.
¥Press Stop or OGM if you want to stop recording
before the time is up.
¥After the message has been recorded, the machine
brießy displays the date and time when the message
was recorded. Then, it displays the elapsed time as the
message plays back automatically.
Now , you’re ready to use the TAM reception
mode. To learn more about answering
machines, see “The Answering Machine”
on page 4-1.
1. T elephone Answering Machine
1-10

Automatic Dialling
2 AUTOMATIC DIALLING
Chapter 2
2-1

Automatic Dialling
One-Touch
Dialling
One-Touch dialling provides you with quick access to your
most frequently used numbers. Before using One-Touch dial,
you must first store a number into any of five One-Touch
buttons located on the left of the machine’s Control Panel.
Storing a Number for One-Touch Dialling
1
Press and hold a One-Touch button for about
two seconds.
¥If a number is already assigned to the button, the dis-
play brießy shows the number, then asks if you want
to delete.
If you select ÔN (No)Õ and press Start/Enter, the
machine returns to Standby Mode with the old number untouched.
To delete old number, select ÔY (Yes)Õ, press Start/
Enter and start over.
2
Enter the number you want to store (up to 46
digits).
¥If you want a pause between numbers, press Redial/
Pause; a ÔPÕ appears in the display.
¥If you make a mistake while entering a number, use
or ¨ to move the cursor under the digit, then enter
the correct digit.
3
4
Press Start/Enter when the number appears
correctly in the display.
The display asks you to enter a name.
Press Start/Enter to enter name.
Ã
2-2

Automatic Dialling
5
Enter the name by using the keypad.
¥ If you do not want a name, just skip this step.
You can assign up to 20 characters to a name. For
more information, see ÒHow to Enter LettersÓ on page
1-8.
6
Press Start/Enter when youÕre Þnished.
Dialling a One-Touch Number
1
Press the desired One-Touch button. (1 through
5)
¥The display brießy shows the name or number and the
number is then automatically dialled. You hear the
dialling process through the speaker.
¥If there is no number stored, ÔNO. NOT ASSIGNEDÕ
appears with a beep and the machine returns to
Standby Mode.
¥You can refer to each buttonÕs assigned number by
printing Phonebook. To learn how to print Phonebook,
see ÒUser ReportsÓ on page 6-5.
¥To stop One-Touch dialling, press Stop at any time.
¥If you are making a phone call (when no document is
loaded), pick up the handset when the other person
answers.
¥When the remote fax machine answers the phone, the
machine scans the document into memory and begins
to transmit if a document is loaded in the document
tray. If there is no answer, the display will indicate
ÔRETRY REDIAL?Õ. To retry press Start/Enter.
Chapter 2
2-3

Automatic Dialling
Speed
Dialling
Note
You can store up to 50
telephone or fax
numbers in Speed Dial.
Before using Speed
Dial, you have to first
store the number into the
location.
Speed dialling allows you to quick dial your most frequently
used numbers. You can easily access the numbers once you
have stored them into two-digit Speed Dial locations.
Storing a Number for Speed Dialling
1
2
Press and hold Speed for about two seconds.
The display asks you to enter the location you
wish to assign.
Enter the two-digit location number (01 through
50) that you want to assign the telephone or fax
number to and press Start/Enter.
¥If a number is already assigned to the location, the dis-
play brießy shows the number, then asks if you want
to delete.
If you select ÔN (No)Õ and press Start/Enter, the
machine returns to Standby Mode with the old number untouched.
To delete old number, select ÔY (Yes)Õ, press Start/
Enter and try with another location number.
2-4
3
Enter the number you want to store (up to 46
digits).
¥To insert a pause between numbers, press Redial/
Pause; a ÔPÕ appears in the display. If you make a mistake while entering a number, use à or ¨ to move the
cursor under the digit, then enter the correct digit.
4
5
Press Start/Enter when the number appears
correctly in the display.
The display asks you to enter a name.
Enter the name by using the keypad.
¥ If you do not want a name, just skip this step.
You can assign up to 20 characters to a name. For
more information, see ÒHow to Enter LettersÓ on page
1-8.

Automatic Dialling
6
7
Dialling a Speed Number
1
2
3
Press Start/Enter.
To store another Speed Dial location, repeat from
step 2.
Press Stop to exit when youÕre Þnished.
Press Speed.
The display asks you to enter the location
number.
Enter a two-digit speed dial location number.
Press Start/Enter to dial the number. The
number will be automatically dialled. You can
refer to the number assigned to each location by
printing Phonebook. To learn how to print
Phonebook, see ÒUser ReportsÓ on page 6-5.
Chapter 2
¥To stop Speed Dialling, press Stop at any time.
If you are making a phone call (when no document is
loaded), pick up the handset when the other person
answers.
¥When the remote fax machine answers the phone, the
machine scans the document into memory and begins
to transmit if a document is loaded in the document
tray. If there is no answer, the display will indicate
ÔRETRY REDIAL?Õ. To retry press Start/Enter.
2-5

Automatic Dialling
Group
Dialling
(for MultiAddress
Transmissi
on)
Note
Note if the One-Touch
button is used for Group
Dial, you cannot strore
into One-Touch button.
Group Dial uses the One-Touch button for quick access.
Numerous Speed Dial numbers can be stored as a Group. By
using the Group number, you can send a document to multiple
parties through one operation. Your machine will dial the
remote numbers in stored sequence. If the number was busy,
your machine will dial the next stored number. After sending
to all of the stored numbers, the machine will automatically
redial any number(s) which was/were previously b usy. Before
you can use this feature, you must coordinate and store the
group numbers desired.
Storing Speed Dial Numbers for Group
Dialling
1
2
3
Press Setup.
ÃÃÃÃ
¨¨
or
¨¨
to select ÔGROUP DIAL SETUPÕ
Press
and press Start/Enter.
Press a One-Touch button you want to use for
Group Dial.
2-6
¥If the One-Touch button is previously assigned to
Group Dial, the display indicates Ô GROUP xx
USEDÕ and ÕDELETE? Y/NÕ with a beep.
If you select ÔN (No)Õ and press Start/Enter, the
machine returns to Standby Mode with the old one
untouched.
To delete old group, select ÔY (Yes)Õ and press Start/
Enter, then try with another One-Touch button.
4
5
6
Enter a two-digit Speed location Dial number
you wish to include in the group.The display
shows any number stored in the selected twodigit Speed Dial location.
Press Start/Enter.
Repeat steps 4 and 5 to enter more destination
numbers into the Group.

Automatic Dialling
7
8
9
Press Stop when you have entered all the
desired destinations.
The display asks you to enter a name .
Enter a name for the Group. If you donÕt want to
assign a name, skip this step. You can assign up
to 20 characters to a name. For more information,
see ÒHow to Enter LettersÓ on page 1-8.
Press Start/Enter.
Using Group Dialling (Multi-Address
transmission)
Once you have stored the Group, you can use Group Dialling
for Broadcasting and Delayed fax.
Follow the instructions for the desired operation. When you
come to a step in which the display requests the remote fax
number:
Chapter 2
1
Press the One-Touch button under which you
stored the Group number. You can use only one
Group number per operation. Then continue the
procedure to complete the desired operation.
Your machine automatically scans the document
loaded in the document tray into memory, and
will dial each of the numbers included in the
Group.
¥Fore more information on Broadcasting, see ÒBroad-
castingÓ on page 5-2.
¥Fore more information on Delayed fax, see ÒDelayed
FAXÓ on page 5-4.
2-7

Automatic Dialling
2-8

3 THE FAX MACHINE
The Fax Machine
Chapter 3
3-1

The Fax Machine
Sending a
Fax
Sending a fax is very simple if you follow the instructions
starting from here. They will describe how to load the
document, set the resolution/contrast and dial the number.
Loading Document
1
2
Turn the page face down.
Be sure that your document is dry and free of
staples, paper clips, and other foreign objects. For
more information on what kind of paper you can
use for documents, see ÒAcceptable Documents
(for ADF)Ó on page 8-4.
Adjust the document guides to match the width
of the document, and load document consisting
of up to 15 sheets until the Automatic Document
Feeder seizes and pulls it in. The display will
indicate ÔDOCUMENT READYÕ when it senses
that a document has been loaded.
¥If you are sending more than one sheet, make sure the
bottom sheet enters Þrst. Stagger the leading edge of
the sheets slightly, and insert the sheets with a slight
push to ensure smooth feeding.
¥To add pages while faxing, place them over the top
sheet. If youÕre loading pages that are unusually thick
or thin, feed one sheet at a time. If the document
doesnÕt feed correctly, open the Control Panel, remove
the document, and try loading it again.
3-2
3
Choose the proper resolution and contrast by
pressing Rcv. Mode/Contrast and Resolution
respectively.
¥The default resolution is STANDARD and contrast is
NORMAL.
¥For a normal document, it is not necessary to change
them.
Skip over this step. For more information on Resolution and Contrast, see ÒSetting Document Resolution
and ContrastÓ on page 3-3.

The Fax Machine
Setting Document Resolution
and Contrast
Note
SUPER FINE mode is
not used when sending
documents scanned into
memory (i.e., Broadcasting and Delayed Fax)
We recommend you send documents printed using a
typewriter, felt tip pen, black ink, or laserwriter. The paper
should be white or very light, and of normal weight not
cardboard.
Blue lines on a ruled pad don’t fax well. For more
information on what kind of paper you can use for
documents, see ÒAcceptable Documents (for ADF)Ó on
page 8-4.
When you send/copy normal documents, you need not adjust
the resolution and the contrast.
If you send/copy documents with unusual contrast
characteristics, including photographs, you can adjust the
resolution and contrast to send a high-quality transmission of
the documents.
To adjust the resolution and contrast after loading
document(s):
1
¥
¥
¥
Press Resolution as many times as you want to
adjust the sharpness and clarity. There are three
resolution modes: STANDARD, FINE and
SUPER FINE.
STANDARD works well for printed or typewritten originals with normal-sized characters.
FINE is good for documents containing a lot of detail.
SUPER FINE works well for documents containing
extremely Þne detail. SUPER FINE only works if the the
remote machine also has the SUPER FINE feature.
Chapter 3
2
¥
¥
¥
¥
¥
Press Rcv.Mode/Contrast as many times as you
want to adjust the darkness. There are four
contrast modes: NORMAL, LIGHTEN,
DARKEN and PHOTO.
NORMAL works well for normal handwritten, typed,
or printed documents.
LIGHTEN works with very dark print.
DARKEN works with light print or faint pencil mark-
ings.
PHOTO is used when faxing photographs or other
documents containing color or gray shades. When
Photo is chosen, the resolution is automatically set to
FINE.
When sending/copying is executed, resolution/contrast automatically returns to default.
3-3

The Fax Machine
Sending a Fax Manually (after Talking)
1
Pick up the handset.
¥For hands-off operation, press OHD/V.Req. The dis-
play shows ÔPHONE.Õ
¥To adjust the speaker volume, press
to set the proper volume.
2
Enter the number of the remote fax machine by
using the number keypad.
Ã
or ¨ repeatedly
¥If a person answers the telephone, ask him/her to press
Start/Enter for the fax signal so that you can send the
document.
3
Press Start/Enter when you hear the fax tone.
¥If you have set Multiple ID option to ON via User
Option, you will be asked ÔCHANGE ID? Y/NÕ as
soon as you press Start/Enter. If you want to use
another ID instead of default ID (#1), answer ÔYÕ and
select the ID you want by pressing à or ¨.
¥The machine automatically scans the document into
memory and begins to transmit.
3-4
4
Replace the handset.
¥You can check that a fax has been received by pressing
OHD/V.Req. to talk after a transmission.
¥For more information on the Voice Request feature, see
ÒVoice RequestÓ on page 3-11.

The Fax Machine
Sending a Fax
Automatically
To send a fax automatically, you must have already stored
numbers into either One-T ouch button or tw o-digit Speed Dial
locations, or Group Dial. To learn how to register One-Touch
Dial, Speed Dial, or Group Dial, see “Automatic Dialling” on
page 2-1.
1
2
Load your document(s) top down in the
document tray with the printed side facing away
from you (up to 15 pages).
Select the One-Touch button, Speed Dial
location, or Group Dial location which has the
number(s) you want.
¥If a document is loaded when the remote fax machine
answers, the machine scans the document into mem-
ory and begins to transmit. You can check that a fax
has been received by pressing OHD/V.Req to talk after
a transmission.
¥For more information on the Voice Request feature, see
ÒVoice RequestÓ on page 3-11. When the last page of
your document has been sent successfully, the
machine beeps and returns to Standby Mode.
¥If something went wrong during your transmission,
an error message appears in the display, see ÒLCD
Error MessagesÓ on page 7-13. Press Stop to clear the
message and try to send the document again. You can
set your machine to print out a Sending ConÞrm
automatically. For more information, see ÒUser
ReportsÓ on page 6-5.
Chapter 3
Automatic Redial
When you send a fax, if the number you have dialled is busy
or there is no answer, the machine will attempt to redial the
number every three minutes up to two times.
Before redialling, the display shows ‘RETRY REDIAL?’ to
ask if you want to redial the number or not.
If you want to redial the number immediately:
1
2
Press Start/Enter when ÔRETRY REDIAL?Õ
appears in the display.
Press Stop to cancel redialling.
The machine returns to Standby Mode.
3-5

The Fax Machine
Receiving
a Fax
Reception Modes
Note
Note for SF-3100T
users: T o select TAM
Mode, you have to press
the Answer button, not
Rcv.Mode/Contrast.
Reception
Mode
FAX
TEL
AUTO
Your
Model
SF-3100/
SF-3100T
Before you receive a fax, be sure to load one of the supported
paper sizes for receiving faxes. For information on what
paper types you can use, see “Paper Type and Sizes (for the
ASF)” on page 8-3. To learn how to load the papers in the
Paper Tray, refer to Installation Guide.
Your fax machine has various reception modes; FAX, TEL,
AUTO and TAM.
You can change the reception mode by pressing Rcv.Mode/
Contrast when no document is loaded. If you press
Rcv.Mode/Contrast with a document, this button works as
Contrast not Rcv.Mode.
The following chart describes how each reception mode
works:
How It Works
The machine answers an incoming call and
immediately goes into receive mode, expecting a
fax to be received.
The automatic fax reception is turned off. You can
receive a fax only by manually pressing Start/Enter.
Your fax machine will answer faxes automatically
after the number of rings you specify.
If the machine does not pick up a fax signal, it will
give another ringing tone to tell you it is a phone
call. You should lift the handset to answer the call.
If you do not pick up the handset on your fax
machine, it will switch to the automatic reception
mode.
Reference
section
Receiving in
FAX Mode
Receiving in
TEL Mode
Receiving in
AUTO Mode
3-6
TAM
SF-3100T
SF-3100
Your machine plays a greeting message to callers,
and then the caller can leave an incoming message
on your machine as well as a fax.
You have to have an answering machine attached to
the EXT line socket on your fax machine. When the
phone rings, the attached answering machine
answers and stores the caller’s message if they lea ve
one. If your machine senses a fax tone on the line,
the call automatically switches over to fax receive
mode.
Receiving in
TAM Mode
(SF-3100T)
Receiving in
TAM Mode
(SF-3100)
If you rarely use the fax line for voice conversation, set the
machine to receive faxes automatically by selecting either
FAX or AUTO Mode.

The Fax Machine
Receiving in FAX
Mode
Receiving in TEL
Mode
Before receiving in F AX Mode, you ha ve to set the machine to
FAX Mode by pressing Rcv. Mode/Contrast repeatedly until
‘¨FAX MODE’ is displayed.
¥In Standby Mode, FAX appears in the right hand cor-
ner of the display.
¥When you get a call, the machine answers after the
second ring, and receives the fax automatically. When
reception is complete, the machine returns to Standby
Mode.
¥If you want to change the ÔRings to Answer optionÕ,
see ÒSystem Setup OptionsÓ on page 6-8.
Before receiving in TEL Mode, you hav e to set the machine to
TEL Mode by pressing Rcv. Mode/Contrast repeatedly until
‘¨TEL MODE’ is displayed.
In Standby Mode, TEL appears in the right hand corner of the
display.
1
Pick up the handset and answer it when the
telephone rings.
¥If your machine is an SF-3100T, and you do not
answer the call within about 20 rings, the TAM OGM
will be played.
2
Press Start/Enter if you hear a fax tone, or if the
person on the other end asks you to receive a
document.
¥Be sure there is no document loaded, or, the document
will be sent to the callerÕs fax showing ÔTXÕ in the display.
3
Hang up the handset.
¥Your machine starts to receive.
Chapter 3
3-7

The Fax Machine
Receiving in
AUTO Mode
Receiving in T AM
Mode (SF-3100)
Before receiving in AUTO Mode, you have to set the machine
to AUTO Mode by pressing Rcv. Mode/Contrast repeatedly
until ‘¨AUTO MODE’ is displayed.
¥In Standby Mode, AUTO appears in the right hand
corner of the display.
¥When a call comes in, the machine answers it. If a fax
is being received, the machine goes into receive mode.
If the machine does not sense a fax signal, it will continue ringing to tell you it is a phone call. You should
pick up the handset to answer the call, or it will switch
to automatic reception mode, after approximately 25
seconds.
Before receiving in TAM Mode, you have to set the machine
to TAM Mode by pressing Rcv. Mode/Contrast repeatedly
until ‘¨TAM MODE’ is displayed.
¥In Standby Mode, TAM appears in the right hand cor-
ner of the display.
¥When a call comes in, the answering machine answers
and stores the callerÕs message if they leave one. If the
machine detects a fax signal, it goes into receive mode.
¥If you have set your machine to TAM Mode and your
answering machine is switched off, or the answering
machine is not connected to your fax machine, the
machine will automatically go into receive mode after
several rings.
¥If your answering machine has a ÔUser-Selectable
Ring CounterÕ, set the machine to answer an incoming call in less than four rings.
¥If the sound level of the call is too low due to a poor
phone connection, the fax machine or answering
machine may not work properly.
¥When you set the machine to TEL Mode and you have
an answering machine attached, you must make sure
you switch off the answering machine, or, the outgo-
ing message will interrupt your phone conversation.
Not all answering machines will work with your fax
machine.
¥When your answering machine answers an incoming
call, it records a fax tone until it realizes it is a fax
coming through. Due to this, your answering
machine may tell you a voice message has been left,
even when it is actually a fax.
3-8

The Fax Machine
Receiving in T AM
Mode (SF-3100T)
If you are an SF-3100T user, you can turn on/off the TAM
Mode by pressing the Answer button. Once you press
Answer to turn TAM Mode on
the time when the greeting message was recorded and
shows countdown as the message is played back. The
machine returns to Standby Mode after playing the
message back. TAM appears in the right hand corner of
the display and the Answer button lights.
You cannot place the machine in TAM Mode until you have
recorded a greeting message. An error message will be
displayed if you attempt to place the machine in TAM Mode
before a message is recorded. To record TAM message, see
“Recordng TAM Message (SF-3100T only)” on page 4-2.
Before the TAM memory becomes full, you will need to
delete the messages that you have already listened to in order
to make more memory available.
When you get a call, the machine answers the call with the
TAM greeting message. The machine records the caller’s
message. If a fax tone is sensed, the machine goes into receive
mode. Anytime the greeting message is playing, or an
incoming message is being recorded, you can talk to the other
person by picking up the handset. If the memory becomes full
while recording, your machine beeps a warning and
disconnects the line. The machine will not function as an
answering machine unless you erase the recorded messages.
, the display brießy shows
Chapter 3
When you want to talk to a caller with the other telephone on
the same line while recording an incoming message (ICM),
lift its handset and press ‘* (asterisk)’, ‘# (pound)’ and ‘*
(asterisk)’.
If the Message Paging feature is on, and a new message is
recorded, the machine will dial the specified phone number to
alert you that there is a message recorded in memory. For
more information, see “Message Paging” on page 4-7.
Note
If there’s a po wer failure while recording a caller’ s message,
it does not record.
3-9

The Fax Machine
Receiving via an
Extension T elephone
Cancelling
Reception
If you have an extension phone connected to your machine,
you can remote-control your fax machine to start receiving:
1
2
Answer the call on the extension phone.
Press the buttons *9* (remote receive start code)
in sequence when you hear a fax tone.
¥Your fax machine detects the code and starts to receive
the document.
¥The code is preset at the factory. The Þrst and the last
asterisks are Þxed, but you can change the middle
digit to whatever you prefer 0 through 9. For more
information, see ÒSystem Setup OptionsÓ on page 6-
8.
3
Press Stop to cancel reception at any time. Fax reception is
cancelled and the machine returns to Standby Mode.
Hang up the phone if your fax machine starts to
receive.
3-10

The Fax Machine
Voice
Request
If you need to speak to the person after sending or receiving a fax, you can use Voice Request feature to alert the
person at the remote site that you want to talk to him/her.
You can also respond to a Voice Request made at the
remote end.
Making a Voice Request
1
Press OHD/V.Req. while a document is being
sent or received.
¥A Voice Request signal is sent to the remote fax
machine after the document has been sent or received.
If the other person does not answer your request, your
fax machine automatically hangs up and returns to
Standby Mode.
¥If the remote fax machine doesnÕt have the Voice
Request feature, you cannot make a Voice Request.
You can cancel a Voice Request by pressing OHD/
V.Req. again while you are sending or receiving a document.
Answering a
Voice Request
2
3
Remote party can also make a Voice Request to talk to you if
they have a Voice Request feature. If the fax machine rings,
follow this procedure:
1
2
Pick up the handset and answer it when the
phone rings.
Hang up the phone when youÕre Þnished.
Pick up the handset and answer it when the
phone rings after sending or receiving a fax.
If you donÕt answer the Voice Request, the
machine prints out the number, date, and time
when the request was made.
Hang up the phone when youÕre Þnished.
Chapter 3
3-11

The Fax Machine
3-12

The Answering Machine
4 THE ANSWERING MACHINE
In this chapter, you will learn how to check your TAM
greeting message, monitor incoming calls, play/erase
messages, and access your machine from a remote telephone.
This chapter is only for SF-3100T users. If your machine is
SF-3100, please refer to the User’s Guide supplied by the
answering machine manufacturer.
All the instructions in this chapter assume that your fax
machine is set to TAM Mode.
Note
The SF-3100T uses electronic memory as a recording
medium. Recording time is dependent on the content of the
message. The total recording time (TAM OGM + ICM) is
about 12 minutes.
4-1
Chapter 4

The Answering Machine
Recordng
TAM
Message
(SF-3100T
only)
The TAM (Telephone Answering Machine) message is an
outgoing message (OGM) which plays whenever a call comes
in and the machine is in TAM Mode. For more information
about reception modes, see “Reception Modes” on page 3-6.
1
2
Press and hold OGM until you hear a beep.
The display starts counting the recording time.
Speak into the microphone when ÔRECORDÕ
appears in the display. Make sure that you are
within a 30cm range.
You can record a message which lasts up to 60
seconds.
¥You are advised to record a message of less than 15 sec-
onds in duration to prevent the fax receive from malfunctioning due to a long message.
¥Press Stop or OGM if you want to stop recording
before the time is up.
¥After the message has been recorded, the machine
brießy displays the date and time when the message
was recorded. Then, it displays the elapsed time as the
message plays back automatically.
4-2
Checking Your TAM Greeting Message
The TAM greeting message plays back when your machine is
in TAM Mode and someone places a call to you.
1
Press OGM.
The display shows the time when the message
was recorded.
The display then counts down the time as the
message is playing back.
¥If you have not yet recorded a TAM greeting message,
an error appears in the display.

The Answering Machine
Monitoring
an Incoming
Call
Call Monitoring is useful for screening calls in case you do
not want to be disturbed by the person calling.
To use this feature, you have to first set Call Monitoring ON
through the TAM Options. To learn how to set this feature on
or off, see “TAM Options (SF-3100T only)” on page 6-11.
1
2
When the call monitor option is on and an
incoming message is being recorded, you hear
the callerÕs voice through the speaker.
Lift the handset to speak to the caller.
¥ The machine stops recording the callerÕs message and
you can speak directly to the caller.
¥If thereÕs a power failure while recording a callerÕs
message, it does not record.
4-3
Chapter 4

The Answering Machine
Erasing
Old
Messages
YouÕve
Heard
The memory of your machine fills up as messages are
recorded. Make room for new messages by erasing old
messages that you have already listened to. If the memory
becomes full while recording, your machine beeps a warning
and disconnects the line. The machine will not function as an
answering machine unless you erase the recorded messages.
In this case, the message which was being recorded will be
lost from memory. This is why you should erase old
messages.
To Erase All Recorded Messages
1
2
Press Erase.
The display asks if you want to erase ALL
messages.
Press Start/Enter if youÕre sure.
All messages in memory are erased while
displaying ÔERASING...Õ.
4-4
¥If you do not want to erase all messages, press Stop
when asked and the machine returns to Standby
Mode.
To Erase a Selected Message
1
Press Erase while the message is playing.
¥BE CAREFUL! Once you have pressed Erase while a
message is playing, thereÕs no way to cancel or recover
it.
¥The selected message is being erased while displaying
ÔERASING...Õ

The Answering Machine
Playing
Back
Messages
When there are messages waiting to be heard, the Answer
button flashes and the display shows that you have new
messages, for example, ‘NEW: 1 ICM: 3’. (‘NEW: 1’
indicates there’s one new message, and ‘ICM: 3’ says that
there are three incoming messages recorded in total.)
Playing Back Newly Received Caller
Messages
1
Simply press Play.
¥The machine brießy displays recorded time then starts
to play the message. This procedure is repeated for all
NEW messages.
¥When the display reads 50s(01/03), Ô01Õ is the number
of the caller message currently being played and Ô03Õ
is the total number of caller messages in memory.
Ô50sÕ is the play back time for the message currently
playing. This time counts down as the message plays
back.
¥During message playback, you can adjust the speaker
volume by pressing à and ¨.
Playing Back All Messages
1
Press and hold Play until you hear a beep.
¥All the messages are played back. The display brießy
shows recorded time of each message, then plays ALL
the messages recorded.
¥Press Stop or Play to stop before the last message.
While the message is playing back, the display shows a
variety of useful information. For more information,
see "Playing Back Newly Received Caller Messages"
in this section.
Chapter 4
4-5

The Answering Machine
Skipping Backward or Forward
To skip backward
1
Press
❘
ГГГГГГ
ÃÃ
while listening to the message.
¥The machine skips back to the previous message and
plays it.
¥If you press ❘
sage, the machine will re-play the Þrst message.
To skip forward
ÃÃ
ГГГГГГ
while playing back the Þrst mes-
1
Press
¨¨
¨¨¨¨¨¨
❘ while listening to a message.
¥The machine skips forward to the next message and
plays it.
¥If you press
the machine beeps and returns to the Standby Mode.
¨¨
¨¨¨¨¨¨
❘ while playing the last message,
4-6

The Answering Machine
Message
Paging
When you’re out of the office or home and you want to be
notified whenever there’s new message left on your machine,
you need to use the Message Paging feature supplied with
your machine. In TAM Mode, you can set your machine to
transfer incoming calls to another number. In order to use the
Message Paging feature, you must set the Message Paging
option to ON. See “User Options” on page 6-7.
Message Paging operates as follows:
¥ When a call comes in and the caller leaves a mes-
sage, your machine automatically dials the telephone number you have speciÞed when setting
Message Paging.
¥ When someone (maybe you) answers the call, your
machine sends out beeps, for up to 55 seconds, and
waits for the Remote Password to be entered. To
learn about Remote Password, see ÒTAM Options
(SF-3100T only)Ó on page 6-11. If you have entered a
correct password while your machine sends out
beeps, the machine plays the newly recorded messages.
¥ When the playback is complete, you hear a short
beep. You can then enter Remote Command at this
point to perform necessary operation. To learn
about Remote Commands, see ÒUsing Remote CommandsÓ on page 4-9.
If there is no key input or the wrong password is entered while
the machine sends out beeps, and the line will be released.
4-7
Chapter 4

The Answering Machine
Using the
Answering
Machine
from a
Remote
Phone
You don’t need to be at the machine’s Control Panel to operate
the answering machine. If you have access to a Touch-Tone
phone, you can operate many features, such as message
playback, regardless of where you are.
To operate your machine from a remote phone, you need to
enter a five-character: Remote Password. The Remote
Password is preset at the factory to ‘#139#’ and you can
change the password to any number you want, through the
User Options. For more information, see “TAM Options (SF3100T only)” on page 6-11.
Accessing the Machine
1
Place a call to your fax machine from a Touch-
Tone phone.
¥A pulse line works only if you can manually switch
the phone to tone dialling. If you can, switch it to tone
after you dial the fax number but before you enter any
Remote Password or Remote Command.
4-8
2
Enter your Remote Password when the machine
answers with the greeting.
¥When the correct password is recognized by the
machine, you will hear two short beeps (the conÞrmation tone).
¥If the machine doesnÕt immediately respond to a
remote password:
- try to enter the code again.
- If the machine does not accept and you think you
entered the password correctly, press and hold each
key at least for a second
- try to enter the code after TAM message
- If the problem persists, try again from another
phone.

The Answering Machine
3
Enter the Remote Command corresponding to
the operation within ten seconds.
¥When the speciÞed operation is complete, you hear a
short beep. You can then enter another command for
another operation. If you enter a remote code while the
machine is responding to your command, the unit
stops the current operation and performs new operation. For the Remote Commands, "Using Remote
Commands" below.
4
Using Remote
Commands
Code Operation
#0 Exits remote control mode.
#1 Changes the greeting message. After entering the command, speak into the handset. When you finish,
press #. If you run out of recording time, the machine stops and plays back the message.
#2 Plays back all messages. The machine beeps and plays all messages. If there are no messages, the
machine beeps four times and waits for another command to be entered.
#3 Stops the ICM play and waits for remote code when playing ICMs (#2, #5).
#4 Skips a message backward. The machine skips the current message and plays the previous one.
#5 Plays back new messages. The machine beeps and plays all new messages. If there are no new
messages, the machine beeps four times and waits for another command to be entered.
#6 Skips a message forward. The machine skips the current message and plays the next one.
#7 Erases the message currently playing, and plays back the next message.
#8 Turns TAM Mode on/off. The machine plays the greeting message when TAM Mode is turned on.
Each time you press #8 thereafter, TAM mode is turned off, then back on.
#9 Erases all the messages.
#✽1
#✽2 Changes Message Paging destination number and turns on the feature. Press #✽2. When you hear the
#✽3
✽#✽
Turns on Message Paging feature. If you did not set up Message Paging before you lea v e, you cannot
turn it on from a remote phone. You will hear error beeps.
confirm tone (two-short double beeps), enter the new destination number. You cannot include # as a
dial number. Use ✽ to insert a PAUSE between numbers. When you finish entering number, press #.
Turns off Message Paging feature.
Exits the fax machine from answering mode.
This code is used at a phone extension connected to the same line as your fax machine
The chart below describes which Remote Code you have to
enter for remote operation:
Press #0 to Þnish the remote session.
Important: if you donÕt enter Ô#0Õ, your machine
might not hang up for several minutes.
Chapter 4
4-9

The Answering Machine
4-10

5 ADVANCED FAX
Advanced Fax
Chapter 5
In this chapter, you will learn how to use the advanced fax
features of your machine. For example, how to send the same
documents to many different locations (Broadcasting) or how
to set up your machine to send faxes at a preset time (Delayed
fax).
5-1

Advanced Fax
Broadcasting
With Broadcasting you can programme your machine to
automatically scan and send documents to a number of
different recipients. The documents are automatically erased
from memory when Broadcasting is finished.
1
2
3
Turn the document face down and feed it into
the machine.
Press Advanced FAX and select
ÔBROADCASTINGÕ by pressing à or ¨.
Press Start/Enter.
The display asks you to enter the fax number of
the remote machine.
5-2
4
5
Enter the fax number.
You can use any Auto Dial key such as OneTouch, Group Dial, or two-digit Speed Dial
location number.
Press Start/Enter when the correct number
appears in the display.
¥If you have more destinations, select ÔY (Yes)Õ and
press Start/Enter when asked ÔANOTHER? Y/NÕ
and repeat steps from 4.
¥If you have Þnished entering all the numbers, answer
ÔN (No)Õ and press Start/Enter.

Advanced Fax
6
7
Enter the name if you want to name the
transmission.
If not, skip this step.
Press Start/Enter.
The document will be scanned into memory
before transmission.
The display will show each number before
starting each transmission.
¥If the scanned pages Þll up the remaining memory,
your fax machine will display ÔMEMORY FULLÕ and
ask ÔCANCEL JOB? Y/NÕ.
If you select ÔYÕ and press Start/Enter, the scanned
pages will be deleted from memory. You should then
divide your pages into several transmissions, or send
them directly from the feeder not from the memory.
If you select ÔNÕ and press Start/Enter, only the
scanned pages will be sent. You should send the
remaining pages later when the memory is available.
Chapter 5
5-3

Advanced Fax
Delayed
FAX
Note
Your machine can hold
only one Delayed FAX
i.e., if you want to set up
another Delayed FAX
you have to cancel the
previous job. To learn
how to cancel the schedule, see “To Cancel the
Scheduled Job” on page
5-8.
You can set your machine to a send fax at a later time, when
you will not be present. Normally it is cheaper to send a fax at
night because telephone rates are lower than they are during
the day. Therefore you can use Delayed FAX to save money.
1
2
3
Turn the document face down and feed it into
the loading slot.
If needed, choose the desired resolution and
contrast for the document by pressing
Rcv.Mode/Contrast and Resolution respectively.
Press Advanced FAX and select ÔDELAYED
FAXÕ by pressing à or ¨.
Press Start/Enter.
5-4
4
5
Enter the number of the remote machine.
You can use any Auto Dial key such as OneTouch, Group Dial, or two-digit Speed Dial
location number.
Press Start/Enter when the number appears in
the display.
¥If you have more destinations, select ÔY (Yes)Õ and
press Start/Enter when asked ÔANOTHER? Y/NÕ
and repeat steps from 4.
¥If you have Þnished entering all the numbers, answer
ÔN (No)Õ and press Start/Enter.

Advanced Fax
6
7
8
Enter the name if you want to name the
transmission.
If not, skip this step.
Press Start/Enter. The display shows the current
time.
Enter the time in 24-hour format.
¥For example, Enter 2230 for 10:30 P.M.
¥If you set a time earlier than the current time, the doc-
ument will be sent at that time on the following day.
9
Press Start/Enter when the time appears
correctly in the display.
The document will be scanned into memory
before transmission.
The display will show each number before
starting each transmission.
Chapter 5
¥If the scanned pages Þll up the remaining memory,
your fax machine will display ÔMEMORY FULLÕ and
ask ÔCANCEL JOB? Y/NÕ.
If you select ÔYÕ and press Start/Enter, the scanned
pages will be deleted from memory. You should then
divide your pages into several transmissions, or send
them directly from the feeder not from the memory.
If you select ÔNÕ and press Start/Enter, only the
scanned pages will be sent. You should send the
remaining pages later when the memory is available.
The machine returns to Standby Mode and the display
shows a reminder that a Delayed FAX is set.
5-5

Advanced Fax
Polling Polling enables you (or a remote fax machine) to retrieve a
document. This is useful when a person who has a document
to be sent is leaving the office. The person who wants to
receive the document at a later time places a call to the
machine holding the original, and requests that the document
be sent. In other words, it “polls” the machine holding the
original.
Setting Send Polling
You can programme your fax machine to send documents in
your absence when it is polled by a remote fax machine.
1
2
3
Turn the document face down and feed the
document into the loading slot.
Press Advanced FAX and select ÔSEND
POLLINGÕ by pressing à or ¨.
Press Start/Enter.
¥Your machine starts scanning the document(s) into
memory and shows ÔSEND POLLINGÕ in the display.
If set to Send Polling, the machine automatically goes
into FAX Mode waiting to be polled.
¥If somebody places a voice call, the reception mode
changes to AUTO Mode for that call only.
¥When it is polled, the page in memory will be deleted
automatically. To cancel Send Polling, see ÒTo Cancel
the Scheduled JobÓ on page 5-8.
5-6
Note
If the memory becomes full while recording, your machine
beeps a warning and disconnects the line. The machine will
not function as an answering machine unless you erase the
recorded messages.

Setting Receive Polling
Advanced Fax
1
2
3
Lift the handset and enter the number of the
remote machine.
The remote machine must be in Send Polling
state.
Press Advanced FAX when you hear a fax tone
from the remote machine.
The display shows ÔRECEIVE POLLING?Õ.
Press Start/Enter.
Your machine starts to retrieve the document.
Note
You cannot receive a document if the machine you are polling uses a Poll Code.
Not all fax machines have polling capability, and polling
incompatibility sometimes occurs between fax machines
made by different manufacturers. Therefore, polling may
fail in some cases, even when poll code is not used.
Chapter 5
5-7

Advanced Fax
To Cancel
the
Scheduled
Job
All scheduled jobs remain in memory after they have been set.
Cancel unnecessary scheduled jobs to make more memory
available.
1
2
3
Press Advanced FAX and select ÔCANCEL
SCHEDULEÕ by pressing à or ¨.
Press Start/Enter.
The display shows the assigned messages.
Select the reserved transmission you want to
cancel by pressing à or ¨ repeatedly.
4
Press Start/Enter to cancel the selected schedule.
¥If you do not want to cancel, press Stop.
¥The reserved transmission is now cancelled.
5-8

6 SPECIAL FEATURES
Special Features
Chapter 6
6-1

Special Features
REDIAL/
PAUSE
The Redial/Pause button has two functions. You can use it to
redial the number last called or one of the ten unique numbers
recently stored in memory. It can also be used to insert a pause
in a number when you are setting up a One-Touch or Speed
Dial number.
To Redial the Last Number Called
1
2
To Redial the Number in Memory
Press Redial/Pause.
The number is dialled automatically. If a
document is loaded, the machine automatically
begins to send.
Pick up the handset when the person answers.
1
2
3
4
Press and hold Redial/Pause for about two
seconds.
The display shows ÔPRESS Ã , ¨Õ.
Select the number by pressing
Memory can hold ten unique numbers.
Press Start/Enter to start dialling.
The number is dialled automatically.
¥If a document is loaded, the machine automatically
begins to send.
Pick up the handset when the person answers.
ÃÃÃÃ
or
¨¨
¨¨
.
6-2

Special Features
To Insert a Pause
With some private telephone systems, you must dial an access
code (9, for example) and listen for a second dial tone before
dialling an outside number. In such cases, you must insert a
pause in the number when you are registering Auto Dial such
as a One-Touch or Speed Dial number.
If you are asked for the number when setting up Auto Dial,
follow this procedure:
1
Press Redial/Pause to insert a pause while
entering the number.
A ÔPÕ is inserted at the point where you pressed
Redial/Pause. If you need a longer pause, press
Redial/Pause as many times you want.
Using Recall
If you get a call and you want to transfer it to someone else,
press Recall and dial the number of that other person. This
may not work with some phone systems. Refer to your
telephone’s instruction manual for more information. The
recall is of “Time break” type.
1
2
Press Recall when you are on the telephone.
Enter the phone number to transfer it to
someone else.
You may have some problems when you try to
use BT services.
Chapter 6
3
Hang up the handset when the person answers.
Note
If you do not have a special service that uses the switchhook signal, do not press Recall during a call. If you do, you
could disconnect the line.
6-3

Special Features
Chain
Dialling
When using special computer services, such as alternate long
distance carriers, credit card calls, or bank-by-phone, you
must dial the telephone number of the service and wait for the
computer to answer before continuing. The length of time
before the computer answers can vary, so using a preprogrammed pause after a service number is not advised.
However, you can store your ID number, for example, in one
memory location, and the rest of the information, such as your
card number, in another memory location.
Dial the phone number of the special service first. Then, when
the service answers, dial the rest of the information, such as a
long-distance number. We call this procedure Chain Dialling.
1
2
Lift the handset and place a call to the service.
Press a One-Touch button holding the
additional information, when the computer
answers.
¥Speed Dial and Group numbers cannot be used for
Chain Dialling.
6-4

Special Features
User
Reports
Your fax machine can print reports containing useful
information — Scheduled Info, System Data, Help report, etc.
The following reports are available:
Help
This report covers the machine’s basic functions and
commands. It can also be used as a quick reference guide.
Sent Journal and Received Journal
These reports show information concerning the transmission
and reception activities. They can be printed on command or
if the machine is set to do so (see “System Setup Options” on
page 6-8.). They will automatically print after every 40
transmissions or receptions.
Phonebook
This report shows all of the numbers currently stored in the
fax machine’s memory as One-Touch Dial, Speed Dial and
Group Dial.
Chapter 6
Sending Confirm
This report shows the fax number, the number of pages,
elapsed time of the operation, the communication mode, and
the communication results. Set up your machine as described
in “System Setup Options” on page 6-8 to automatically print
Sending Confirm.
Schedule Inform
This report shows the document currently stored for Delayed
FAX and Send Polling along with the operation number,
starting time and type of operation, etc.
System Data
This report shows the status of the User Options (FAX and
TAM). After you ha v e changed any setting, print this report to
check your changes.
6-5

Special Features
Voice Status (SF-3100T only)
This report shows the status of the recorded message
(Outgoing and Incoming messages). You can see when you
have received a message and if you’ve listened to it or not.
Multi-Communication
This report prints automatically if you have faxed documents
to more than one location by using Broadcasting.
Call Back Message
This report is printed automatically when you do not respond
to a remote operator’s Voice Request.
Power Fail Report
If experience a power failure, this report is printed
automatically when power is restored, to notify you that there
was a power failure. This report prints only when there was
any scheduled job such as Delayed FAX or Send Poll.
To Print a report
1
2
3
Press Report.
Choose the report you want by using à or ¨.
Press Start/Enter when the desired report is
displayed.
The selected report will be printed.
6-6

Special Features
User
Options
Your fax machine has various user-selectable features. These
options are preset at the factory, but you may need to change
them.To find out how the options are currently set, print the
System Data List. For more information on printing a report,
see “To Print a report” on page 6-6.
Setting SYSTEM/TAM(SF-3100T only) Options
1
2
3
Press Setup.
Select ÔSYSTEM SETUPÕ or ÔTAM SETUPÕ (SF-
3100T only) by pressing à or ¨.
The System Setup includes settings related to fax
operation, and TAM Setup has settings related to
answering machine operations.
Press Start/Enter to enter speciÞed Setup mode.
Chapter 6
4
5
6
7
Scroll up or down by pressing à or ¨ to select
the option you want to change.
Press Start/Enter when the option you want
appears in the display.
Press ÃÃÃà or ¨¨¨¨ to choose the desired status.
Press Start/Enter for the status you want.
To exit Setup mode at any time, press Stop.
When you press Stop, the machine stores the
options youÕve changed, and returns to the
Standby Mode.
6-7

Special Features
System Setup
Options
The chart below shows the options in the left column and their
suboptions in the right column.
When you have entered System Setup, now you can see one of
the options in the display by selecting à or ¨. The right
column shows the suboptions belonging to the options.
Option Suboption
LANGUAGE There are seven languages you can use for display and report. The
languages are: English, German, French, Italian, Spanish, Portuguese and
Dutch.
SENDING
CONFIRM
FAX PAPER
SIZE
AUTO
REDUCTION
A confirmation report shows whether the transmission was successful or
not, how many pages were sent, etc.
Choose ON to print a confirmation report automatically each time you send
a fax.
Choose OFF not to print whatever the result is.
Choose ERROR to print only when an error occurs, and the transmission
was unsuccessful.
Select the paper size you will use for fax receive and print.
Choose LETTER for letter, A4 for A4 size, or LEGAL to use legal size
paper.
When receiving a document as long as or longer than the paper loaded, the
machine can reduce the data to fit your paper.
If the fax machine cannot fit the data into one page with the feature enabled,
the data is divided and printed in actual size on two or more sheets.
Choose ON if you want Auto Reduction.
Choose OFF if you want actual size as the source is.
DISCARD SIZE If you turn the Automatic Reduction feature off, you can set the fax
machine to discard any excess image at the bottom of the page when
receiving a document as long as or longer than the paper loaded in your
machine.
If the received page is out of the margin you have set, it will be printed on
two sheets of paper.
Enter the desired Discard Size from 0 to 30 in millimeter.
RINGS TO
ANSWER
RCV. START
CODE
You can select the number of rings before answering an incoming call. If
you are using your machine as both a telephone and a fax machine, we
suggest you set the ring count to at least 4 to give you time to answer.
Enter a number from 1 to 7 by using the number keypad.
The RCV. START CODE (Remote Receive Start Code) allows you to start
fax receive from an extension phone plugged into the EXT. LINE socket
(SF-3100 only) or equivalent. If you pick up the extension phone and hear a
fax tone, Press the Rcv. Start Code then the fax will start receiving. The
code is preset to * 9 * at the factory. Enter the desired code from 0 to 9.
6-8

Option Suboption
Special Features
DRPD MODE
(Distinctive Ring
Pattern
Detection)
‘Distinctive Ring’ is a telephone company service which enables a user to
use a single telephone line to answer several different telephone numbers.
The particular number someone uses to call you on is identified by different
ringing patterns, which consist of various combinations of long and short
ringing sounds. This feature is often used by answering services who
answer telephones for many different clients and need to know which
number someone is calling in on to properly answer the phone.
Using the DRPD feature, your fax machine can ‘learn’ the ring pattern you
designate to be answered by the FAX machine. Unless you change it, this
ringing pattern will continue to be recognized and answered as a FAX call,
and all other ringing patterns will be recognized as a normal phone call.
You can easily suspend or change DRPD at any time.
Before using the DRPD option, Distinctive Ring service must be installed
on your telephone line by the telephone company. To set up DRPD, you
will need another telephone line at your location, or someone available to
dial your FAX number from outside.
Choose ‘SET’ to setup the Ring Pattern Detection. The LCD displays
‘WAITING RING’. Call your fax number from another telephone. It is not
necessary to place the call from a fax machine. When your machine begins
to ring, do not answer the call. The machine requires several rings to learn
the pattern.When the machine completes ‘learning’, the LCD displays
‘END DRPD [SETUP]’.
Choose ON to Activate DRPD. With the DRPD feature active, ‘DRPD
MODE’ and the date and time appears in the display and the previously set
reception mode is ignored.
Choose OFF to cancel DRPD if it is currently active. All calls will be
answered normally, depending on Rcv. Mode setting.
Note:
DRPD must be set up again if you re-assign your fax number, or connect
the machine to another telephone line. After DRPD has been set up, call
your fax number again to verify that the machine answers with a fax tone,
then have a call placed to a different number assigned to that same line to be
sure the machine answers the normal phone call.
Chapter 6
ECM MODE
(Error
Correction Mode)
PRINT
QUALITY
INK SAVE You can save ink when making a copy or receiving a fax with this feature.
This mode compensates for poor line quality and ensures accurate, errorfree transmission with any other ECM-equipped facsimile machine. If the
line quality is poor, transmission time may be increased when ECM is
enabled.
Choose ON to turn Error Correction Mode on.
Choose OFF to turn Error Correction Mode off.
You can select desirable print quality.
Choose ‘LQ’ to print high quality but low speed.
Choose ‘DRAFT’ to print low quality but high speed.
Choose OFF to turn off this feature.
Choose MED to use 25% less ink.
Choose MAX to use 50% less ink.
6-9

Special Features
Option Suboption
CALLER ID
(This option may
not work when
connected to a
PABX.)
AUTO
JOURNAL
MULTIPLE ID You can use one of your five IDs you have set in “Setting FAX Number/
You can see the number of the person calling you.
Choose ON to turn on caller ID display.
Choose OFF to disable it.
Note that the RCV. START CODE is disabled when this Caller ID option is
on.
Before using the CALLER ID service, CALLER ID service must be
installed on your telephone line by the telephone company.
A journal report shows the specific information concerning transmission or
reception activities, the time and date of 40 most recent transmissions or
receptions.
Choose ON to print journal automatically after every 40 transmissions or
receptions.
Choose OFF to print journal manually.
Name” on page 1-7 when sending a fax MANUALLY.
Choose ON if you want to be asked which ID you want to use, before
starting to send a fax.
Choose OFF if you want to have your machine use the ID number 1 as
default.
If you selected OFF, you will not be asked when sending a fax.
6-10

Special Features
TAM Options (SF-3100T only)
OPTIONS STATUS
CHARGE SAVE Lets you dial into your machine from a remote phone and check
whether anyone has left a message, without being charged. When
Charge Saver is ON the machine answers your call on the number of
rings you have specified in the ‘Rings to Answer’ option. If there is no
message, the machine answers on the second ring after the number of
‘Rings to Answer’. This gives you time to hang up the phone before
the machine answers and saves the price of the call.
Choose ON to turn on Charge Save.
Choose OFF to turn off Charge Save.
Message Paging This feature allows the fax machine to transfer an incoming message to
the specified place where you are.
Choose ON to turn on the Message Paging feature, and enter the
telephone number to which you want it transferred.
Choose OFF to disable it.
Chapter 6
CALL
MONITOR
RECORDING
TIME
REMOTE
PASSWORD
BATTERY
ALARM
SILENCE
CHECK
HOWLER
CHECK
Enables you to hear callers leave messages on your machine.
Choose ON to turn the feature on.
Choose OFF to turn the feature off.
You can select the maximum time allowed for caller messages. The
display shows you the time limit available: OFF, 30, 60, or 90 seconds.
Choose the desired time.
You can change the three-character password used to access your
machine from a remote phone. The password is preset to “#139#” at
the factory. The first and the last #’s are fixed, but you can change the
three middle numbers. Enter the characters you want to use.
You can turn on the Battery Alarm feature. With this feature on, the
machine displays a low (or no) battery message in the LCD and sounds
beeps to alert you of the low (or no) battery condition.
Choose ON to turn on the Battery Alarm feature.
Choose OFF to turn off the Battery Alarm feature.
In TAM mode, the machine decides the next action when silence is
detected for ten seconds. Available suboptions are:
- Receive: Switches to FAX Receive Mode.
- Recording: Keeps the recording silent.
- Disconnect: Disconnects the line and returns to Standby Mode.
In TAM mode, the machine decides the next action when a howling is
detected for 9 seconds. Available suboptions are:
ON: Disconnect the line and returns to Standby Mode.
OFF: Disregards howling.
6-11

Special Features
Volume
Setup
You can selectively operate alarm and key volume.
1
2
3
4
Press Setup.
Press ÃÃÃà or ¨¨¨¨ button until the display shows
ÔVOLUME SETUPÕ.
Press Start/Enter.
The display shows the type of volume you can
choose.
¥There are two volume types you can choose: ÔALARM
VOLUMEÕ and ÔKEY VOLUMEÕ.
Scroll through the options by pressing à or ¨
button.
6-12
5
6
7
Press Start/Enter when the volume type you
want appears.
Select ON or OFF by pressing à or ¨ button.
Select ON to turn on sound or OFF to turn it off.
Press Start/Enter to conÞrm.

Special Features
Clearing
Memory
Y ou can selecti vely clear information stored in your machine’ s
memory.
1
2
3
4
Press Setup.
ÃÃ
Press ÃÃ
Press Start/Enter.
The display shows the type of information you
can clear from memory.
Select what you want to delete by pressing à or
¨.
The types of information you can clear are:
¨¨
or ¨¨
to choose ÔMEMORY CLEARÕ.
Chapter 6
¥FAX NUMBER/NAME: deletes your system ID.
¥DEFAULT SETUP: restores user-selectable options to
factory default value.
¥DIAL/SCHEDULE: clears the One-Touch, Speed
Dial, or Group Dial numbers stored in memory. In
addition, all the Scheduled Jobs are also cancelled.
¥JOURNAL: clears all records of transmissions and
receptions.
5
Press Start/Enter when you are sure to clear.
Selected information is removed from the
memory.
6-13

Special Features
6-14

Care and Maintenance
7 CARE AND MAINTENANCE
Chapter 7
7-1

Care and Maintenance
Cleaning
the
Document
Scanner
To keep your machine working properly, occasionally clean
the White Roller, ADF Rubber, and the Scanning Glass. If
they are dirty, documents sent to another fax machine won’t
be clear.
Note
If you turn the power off to clean the scanner, documents
stored in memory will be lost.
1
Open the Control Panel.
2
3
4
Disassemble the White Roller. At the right-hand
end of the White Roller there is a bushing that is
secured with a small white tab. Push the tab
slightly inward, then rotate towards you. Then
pull up the right-hand part to take it out.
Wipe the roller surface with a soft cloth
dampened with water.
Clean the ADF Rubber piece at the back of the
Control Panel, too.
7-2

Care and Maintenance
5
6
Carefully wipe the Scanning Glass with a soft,
dry cloth.
If the glass is very dirty, Þrst wipe it with a
slightly dampened cloth, then with a dry one. Be
careful not to scratch the glass surface.
Replace the roller in reverse order, and then
close the Control Panel Þrmly until it clicks into
place.
Chapter 7
7-3

Care and Maintenance
Replacing
the Print
Cartridge
The print cartridge includes the ink supply and the printhead.
Each time you replace the print cartridge, you are replacing
the printhead as well. When you notice that the print becomes
light or ‘INK LOW’ appears in the display, replace the print
cartridge.
1
2
Press Setup.
The display shows ÔCHANGE CARTRIDGEÕ
Press Start/Enter.
The Cartridge Carrier moves to the install
position.
7-4
3
4
5
Open the Control Panel and Cartridge
Compartment cover.
Pull the Cartridge handle toward you while
holding the Cartridge holder until it is released
from the lock, and remove the Cartridge.
Take out a Cartridge from its packaging and
carefully remove the tape covering the
printhead. Hold the Cartridge by the colored top
or black areas only. Do not touch the copper area.

Care and Maintenance
6
7
8
Insert the Cartridge in the Carrier, then push it
Þrmly until it clicks into place. If the Cartridge
moves loosely in the Carrier, it has not clicked
into place. Repeat this step.
Replace the Cartridge Compartment Cover and
Control Panel.
The display shows ÔNEW Õ.
Press Start/Enter after selecting the cartridge
type: OLD or NEW.
Note
When you put in a new cartridge, you must choose ‘NEW’.
When you put in a used cartridge, choose ‘OLD’. This helps
you check the correct amount of ink you have left. If you
mix up several used cartridges, it is not possible to check the
correct amount of remaining ink. Once you have put in a
new Cartridge, use it until it is completely exhausted.
Chapter 7
7-5
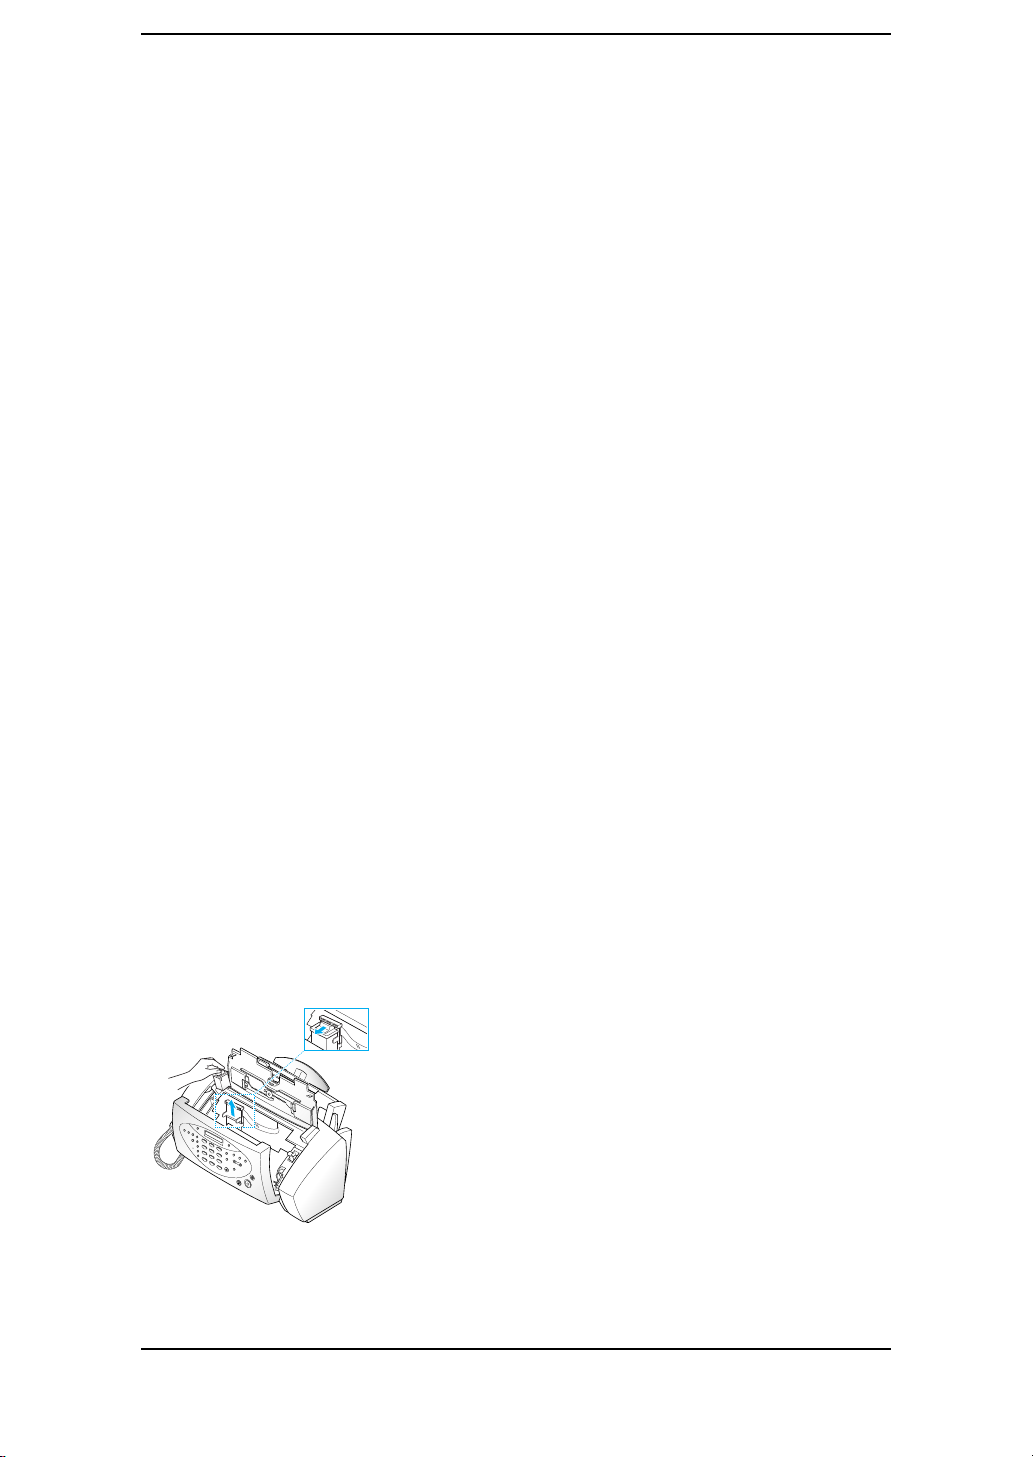
Care and Maintenance
Cleaning
the
Cartridge
To maintain good printing quality, we recommend you
occasionally wipe the Print Nozzles and Contacts as described
below:
Wiping the Print Nozzles and Contacts
When the print is not clear or dots are missing, the problem
may be caused by dried ink on the:
¥ Print Cartridge nozzles
¥ Print Cartridge contacts
¥ Print Cartridge carrier contacts and Deßector
1
Press Setup.
The display shows ÔCHANGE CARTRIDGEÕ.
7-6
2
3
Press Start/Enter.
The Cartridge Carrier moves to the install
position.
Open the Control Panel and Cartridge
Compartment Cover and remove the Cartridge.

Care and Maintenance
4
5
6
Gently blot and wipe the contacts and nozzles
dry.
Use a clean cloth dampened with water only to
gently clean the entire copper-colored area,
including the nozzles and contacts.
To dissolve any dried ink, hold the damp cloth
against the nozzles for about three seconds.
Re-install the Cartridge and close the Cover and
Panel.
The display shows ÔNEW Õ.
Press Start/Enter after selecting the cartridge
type: OLD or NEW by pressing à or ¨.
If the line is still broken, clean the Cartridge
Carrier contacts (see next page).
Chapter 7
7-7

Care and Maintenance
Cleaning the Cartridge Carrier
Contacts and
Deflector
0
0
0
0
0
0
0
0
0
0
WARNING!
Before cleaning these parts, there should be no scheduled job
such as Delayed FAX or Send Polling, etc. Once you have
unplugged the power cord from the machine, all the data will
be lost.
1
2
Remove the Print Cartridge.
Unplug the power cord from the electrical outlet
or the rear of the machine.
Before unplugging, ensure that you have no
scheduled job remaining in memory.
0
0
0
0
0
0
0
0
0
0
0
0
0
0
0
0
0
0
0
0
0
0
0
0
0
0
0
0
0
0
0
0
0
0
0
0
0
0
0
0
3
4
Clean the Cartridge Carrier contacts and
Deßector (metal piece) with clean and dry cloth.
Plug in the power cord and your fax machine
will initialize.
7-8

Care and Maintenance
Cleaning
the
Printhead
If the nozzles seem to be clogged and characters are not
printing completely, clean the printhead as described below:
1
2
3
Press Setup and Þnd ÔMAINTENANCEÕ by
pressing à or ¨.
Press Start/Enter and scroll to ÔCLEAN HEADÕ
by pressing à or ¨.
Press Start/Enter.
The test pattern is printed.
Chapter 7
4
Examine the test pattern.
If print quality does not improve, re-install the
cartridge and repeat CLEAN HEAD. If the line is
still broken, wipe the nozzles and contacts.
For more information on cleaning them, see
ÒWiping the Print Nozzles and ContactsÓ on
page 7-6.
7-9

Care and Maintenance
Ink Level
View
Your machine allows you to check the amount of ink
remaining. The machine displays a fractional number. For
examples, ‘1/8’ means that ink is low and you need to replace
the cartridge.‘8/8’ means that a new cartridge is installed.
To view the current ink level:
1
2
Press Setup and Þnd ÔMAINTENANCEÕ by
pressing à or ¨.
Press Start/Enter and scroll to ÔINK LEVEL
VIEWÕ by pressing à or ¨.
7-10
3
Press Start/Enter.
The display shows the current ink level in
fraction.

Care and Maintenance
Adjust
Shading
The shading is adjusted at the factory. If, however, you drop
and damage your machine while moving, we recommend you
adjust shading for optimized lightness.
To adjust Shading, do as follows:
1
Load a WHITE paper (no writing or graphics)
into the loading slot.
¥BE CAREFUL !
Printing quality may be unexpectedly worse if you do
not use a plain WHITE paper for the adjustment.
2
3
4
Press Setup and Þnd ÔMAINTENANCEÕ by
pressing à or ¨.
Press Start/Enter and scroll to ÔADJUST
SHADINGÕ by pressing à or ¨.
Press Start/Enter.
The machine starts to scan the document to
adjust Shading, and it displays ÔSHADING...Õ. If
thereÕs no document loaded, the display prompts
you ÔLOAD WHITE DOC.Õ with a beep. Insert a
WHITE paper and press Start/Enter to start it.
After feeding the document, it returns to Standby
Mode.
Chapter 7
7-11

Care and Maintenance
Print
Cartridge
Maintenance
The print cartridge life is very sensitive to the content of the
received fax or a copy you made. To increase its life, we
recommend you follow the instructions below:
1
2
3
DO NOT unpack the cartridge until you are
ready to use it.
Store it in the same environment as the printer.
If you have unpacked the cartridge but are not
using it, store it in a storage unit.
If you do not have a storage unit, store the
cartridge in an airtight plastic bag.
7-12
4
5
DO NOT leave it exposed for an extended
period.
DO NOT reÞll the cartridge. The warranty will
not cover damage caused by using reÞlled
cartridges.

Care and Maintenance
LCD Error Messages
Display Meaning
RETRY REDIAL? The machine is waiting to automatically redial another fax
number that was busy or did not answer.
DOCUMENT JAM The document you are sending has jammed in the feeder.
Clear the document jam. see “Clearing Jams” on page 7-16.
INK LOW The Print Cartridge has run out of ink. Install a new Print
Cartridge.see “Ink Level View” on page 7-10.
Although this message is displayed, you can make a copy or
print a report. But, stored data in memory can be printed by
changing the cartridge.
LOAD DOCUMENT! Y ou ha ve tried to send a f ax and there is no document loaded
into the machine.
MEMORY FULL
MEMORY LOW
NO ANSWER The other machine has not answered after all your attempts
LOW BATTERY (SF-3100T Only) The backup battery is weak. Replace the battery.
NO BATTERY (SF-3100T Only) The backup battery is not installed or is completely
NO MESSAGE (SF-3100T Only)
NO NEW MESSAGE (SF-3100T Only) There are no new caller message.
MEMORY FULL[TAM]
(SF-3100T Only)
NO CARTRIDGE Print Cartridge is not installed or properly installed.
NO. NOT ASSIGNED There is no number assigned to the One-Touch button or
CHECK PAPER Printer is out of paper. Load paper and press Start/Enter. If
POLLING ERROR The machine you want to poll is not ready to answer your
RECEIVE ERROR A fax has not been received successfully. Ask the sender to
SEND ERROR Your fax has not gone through successfully. Try again.
Memory has become full or low. Either delete unnecessary
documents stored in memory, or send when memory
becomes available, or split the new document into smaller
parts.
to redial. Or, the other operator does not press START.
discharged. Install/replace the battery.
There is no message to play or erase.
The voice memory is full. No more caller’s messages can be
recorded (Total recording time is about 12 minutes).
two-digit Speed number you choose.
recording paper is jammed during printing. Clear the paper
jam, and press Start/Enter.
poll. The person you are polling should have loaded their fax
machine with a document and be in send poll state.
try again.
Chapter 7
7-13

Care and Maintenance
Fixing
Your problem may be listed in “LCD Error Messages” on
page 7-13. The chart below shows other problems you can
Problems
solve yourself. If not, call the service company shown in the
“Guarantee.” on page 8-6.
Fax Problems
Problem Solution
The machine is not working, there is no
display and the buttons are not working.
No dial tone. Check that the phone is connected properly. Check the phone
The numbers stored in memory do not dial
correctly.
The document does not feed into the
machine.
You cannot receive faxes automatically.
The machine cannot receive faxes manually. Do not hang up the handset before pressing Start/Enter.
The machine does not send anything. Check that the document is loaded face down.‘TX’ should sho w
You cannot poll another machine. The fax machine you are polling may be using a Poll Code.
The fax you receive has got blank bits on it. The machine sending to you may be faulty. A noisy phone line
Spots on or lines missing from the fax you
receive.
You are receiving poor quality copies. The fax machine sending to you may have a dirty scan glass.
Are some of the words on the fax you
receive stretched?
Your machine does not make copies. Make sure your document is loaded face down.
There are lines on copies or documents you
send.
The machine dials a number, but fails to
make a connection with a remote fax
machine.
You cannot store a document in memory. There may not be enough memory available to hold the
Blank areas appear at the bottom of each
page or on continuation pages, with only a
small strip of material printed at the top.
Unplug the power cord and plug it in again. Check that your
socket is live.
socket in the wall by plugging the another phone.
Make sure the numbers are programmed correctly. Print a
Phonebook Report (see “Phonebook” on page 6-5.).
Be sure the document is not wrinkled, and you are putting it in
correctly. Check that the document is the right size, not too
thick or thin.
Check if ‘TEL’ appears on the right side of the display. In TEL
mode, you cannot receive a fax automatically. Be sure the
handset is seated on properly. Is there paper in the machine?
Check if the display shows ‘MEMORY FULL’.
up in the display.You may have hung up the handset before you
pressed Start/Enter. Check if the machine to which you are
sending can receive your fax.
can cause line errors. Check your machine by making a copy.
Check if your phone line is noisy. Check if the print head is
clean by making a copy.
Check for a noisy phone line.
The machine sending to you had a temporary document jam.
Check ink level if the cartridge is out of ink.
Check your scan glass for marks (see “Cleaning the Document
Scanner” on page 7-2.) and clean it.
The remote fax machine may be turned off, out of recording
paper, or unable to answer incoming calls. Speak with the
remote operator and ask for the problem to be rectified.
document you want to store. If the display shows a ‘MEMORY
FULL’ or ‘MEMORY LOW’ message, delete any documents
you no longer need, then retry the document.
You may have selected the wrong paper settings(see “System
Setup Options” on page 6-8.) to select the proper paper size.
7-14

Care and Maintenance
Print Quality Problems
Problem Solution
Light or blurred characters. Check ‘Ink Level V ie w’ as described on page 7-10. If the printer
cartridge has completely run out, ‘INK LOW’ is displayed.
Install a new print cartridge, see “Replacing the Print Cartridge”
on page 7-4. Make sure the Print Cartridge is installed correctly.
Clean the print cartridge, see “Cleaning the Printhead” on page
7-9.
Smudged or dark characters. Make sure the paper is straight and unwrinkled. Let ink dry
before handling the paper. Clean the Print Cartridge. (See
“Cleaning the Printhead” on page 7-9.)
Characters with white lines. If ‘INK LOW’ is displayed, install a new print cartridge. See
“Replacing the Print Cartridge” on page 7-4. Remove and
reinstall the Print Cartridge. Clean the Print Cartridge.( See
“Cleaning the Printhead” on page 7-9. )
Improperly formed or misaligned
characters.
Abnormal black horizontal lines Clean the Carrier Deflector inside the printer. See “Cleaning the
Clean the Print Cartridge. See “Cleaning the Printhead” on page
7-9.
Cartridge Carrier Contacts and Deflector” on page 7-8.
Paper Feeding Problems
Problem Solution
Paper is jammed during printing. Clear paper jam and press Start/Enter.
Paper sticks together. You can load up to 100 sheets in the ASF(Automatic Sheet
Paper fails to feed.
Multiple sheets of paper feed. When loading paper, do not force the paper down into the
Paper skews or buckles in the automatic
sheet feeder.
Feeder). Check if you overloaded. Humid conditions may
cause some paper to stick together.
Remove any obstructions inside the printer.
printer. If multiple sheets have caused a paper jam, clear the
paper jam and press Start/Enter. (See “Paper Jams During
Printing” on page 7-17.)
ASF can hold up to 100 sheets. Make sure the paper guide do
not cause the paper to bow in the bin. When loading paper, do
not force it down into the printer.
Chapter 7
7-15

Care and Maintenance
Clearing
Jams
Document Jams During Transmission
If a document jams during transmission or copying,
‘DOCUMENT JAM’ appears in the display. DO NO T pull the
document out of the slot. Doing so could harm your machine.
To clear document jam:
1
2
Open the Control Panel.
Carefully remove the jammed document.
7-16
3
Close the Control Panel Þrmly until it clicks into
place.

Care and Maintenance
Paper Jams During Printing
If the fax paper jams while you are receiving or printing,
‘CHECK PAPER’ appears in the message. DO NOT pull it
out. Doing so could harm the fax machine.
If the paper is jammed in the Received
Paper Output Area
Remove the jammed paper by pulling it out smoothly in the
direction of the arrow as shown.
If the paper is jammed in the Paper Feed
Area
1
2
3
Remove the jammed paper as shown below.
Chapter 7
Reload new paper with the print side facing
toward you after removing the jammed paper, .
Press Start/Enter when Þnished.
7-17

Care and Maintenance
7-18

8APPENDIX
Appendix
8-1
Chapter 8

Appendix
SpeciÞcations
Type of unit Inkjet Desktop Facsimile Transceiver
Communication System Public Switched Telephone Network (PSTN) and PABX
Compatibility ITU Group3
Compression scheme MH, MR, MMR
Modem speed 14400/12000/9600/7200/4800/2400
Scanning method CIS (Contact Image Sensor)
Input document size 8.5 inches (216 millimeters)
Effective scanning width 8.27 inches (210 millimeters)
Effective recording width 8 inches (203 millimeters)
Power consumption Standby: 10.1 Watts
Sleep Mode: 6.9 Watts
Printing Mode: Maximum 20 Watts/Hour
Temperature range 50 ûF to 95 ûF (10 ûC to 35 ûC)
Humidity range 20 to 80 %RH (non-condensing)
Dimension (WxDxH) 382 x 273 x 192 mm (Without ASF stacker)
382 x 310 x 210 mm (Including ASF stacker)
Weight 3.8 kg (including Handset)
Power source See Rating Label attached on the back of ASF
Scan resolution 200 dpi
ADF 15 sheets (0.075~0.12 mm thick)
2
ASF 100 sheets(70g/m
ECM mode YES
Sending resolution Standard: 3.85 lines/mm
Fine: 7.7 lines/mm
Super Fine: 15.4 lines/mm
Printing resolution 300 x 300 dpi
Gray scale 64 Grayscales
User memory capacity 1 Mbytes (capable of 80 pages at 4% print duty on A4)
Voice Recording time 12 min (SF-3100T only)
Battery 6F22 (FC-1) 9V
Ink Cartridge Life About 1000 sheets (based on ITU 4% chart,
see page 8-5 for a sample of the chart)
~ 90g/m2)
8-2

Appendix
Paper Type and Sizes (for the ASF1)
Satisfactory print and receive quality can be obtained with many types of plain paper. Since
the quality of plain paper varies widely, test the print quality before buying large quantities of
paper. Your machine uses a variety of papers including:
¥Xerographic paper
¥Bond paper
¥Dual-purpose paper
Because all papers vary in physical characteristics, you can receive mixed results from
different packages of paper even though the packages contain the same type of paper. If you
encounter undesirable results, try the other side of the paper, a different type, or another
package of the same kind of paper.
DO NOT use the following types of paper with your machine:
¥Continuous form feed paper
¥Synthetic paper
¥Thermal paper
¥Multi-sheet forms and documents
¥Chemically treated paper
¥Papers with raised, embossed lettering
To load paper with a preferred print side:
¥If youÕre using xerographic paper, load the paper with the preferred print side facing
down.
¥If youÕre using letterhead or bond paper, load the paper with the preferred side facing
up.
The following papers can be used in your machine for fax:
Paper size
Letter 216 x 279 8.5 x 11.0
Legal 216 x 356 8.5 x 14.0
A4 210 x 297 8.3 x 11.7
1. ASF stands for Automatic Sheet Feeder which contains paper for fax receive and
printing. Its capacity is up to 100 sheets.
in
millimeters
in inches Paper W eight
70 g/m2 ~ 90 g/m
(20 ~ 24lb)
2
Chapter 8
8-3

Appendix
Acceptable Documents (for ADF1)
Single Sheet 2 or More Sheets
Document Size Max 8.5 in. (W) x 14 in. (L)
(216 mm x 356 mm)
Min 5.8 in. (W) x 5.0 in. (L)
(148 mm x 128 mm)
Effective Scanning Width 8.26 in. (210 mm)
Number of sheets which can be loaded at
a time
Thickness of document 0.07 mm ~ 0.15 mm 0.075 mm ~ 0.12 mm
Paper Quality Uncoated on both sides
For multiple sheets, all pages of the document must be the same size and paper type.
DO NOT try to send documents that are:
- Up to 15
8.5 in. (W) x 11.7 in. (L)
(216 mm x 297 mm)
¥ wet
¥ covered with wet ink or paste
¥ wrinkled, curled, or folded
¥ too thin (less than 0.07 mm thick-onionskin, airmail paper, etc.)
¥ too thick (more than 0.15 mm thick)
¥ chemically processed (pressure-sensitive paper, carbon-coated paper, etc.)
¥ coated (glossy, etc.)
¥ too small or short (such as a label, voucher, etc.)
¥ made of cloth or metal
To send these documents, use an office copier to make a photocopy first, and then send the
copy.
1. ADF stands for Automatic Document Feeder in which the original document
feeds. It enables you stack of some documents, which will be faxed or copied one
by one.
8-4

Appendix
A Sample of ITU 4% Chart (reduced to 60.5%)
8-5
Chapter 8

Appendix
Replacing the Þtted plug
Important
The mains lead for this machine is fitted with a standard (BS 1363) 13 amp plug and has a 13
amp fuse. When you change or examine the fuse, you must re-fit the correct 13 amp fuse. You
then need to replace the fuse cover. If you have lost the fuse cover, do not use the plug until
you get another fuse cover from the people from whom you bought the machine.
The 13 amp plug is the most widely used type in the UK and should be suitable.
However, some buildings (mainly old ones) do not have normal 13 amp plug sockets. You
need to buy a suitable plug adaptor. Do not remove the moulded plug.
Warning
If you cut off the moulded plug, get rid of it straight away.
You cannot rewire the plug or you may get an electric shock if you put it into a
socket.
Important warning: You must earth this machine
The wires in the mains lead have the following colour code:
¥ Green and Yellow : Earth
¥ Blue : Neutral
¥ Brown : Live
If the wires in the mains lead do not match the colours marked in your plug, do the following:
You must connect the green and yellow wire to the pin marked by the letter ‘E’, or by the
safety ‘Earth symbol’ or coloured green and yellow or green.
You must connect the blue wire to the pin which is marked with the letter ‘N’ or coloured
black.
You must connect the brown wire to the pin which is marked with the letter ‘L’ or coloured
red.
You must have a 13 amp fuse in the plug, adaptor, or at the distribution board.
8-6

Appendix
Guarantee
Limited Guarantee
We guarantee that this product has no faulty parts.
If the machine breaks down during the guarantee period and this is caused by improper
workmanship or a fault, we will repair or replace the machine.
All repairs done under the guarantee must be done by a service centre we have authorized.
You must keep the receipt as proof when you buy the machine. You must give this receipt to
the service centre if they ask for it.
Exclusions
This guarantee does not cover damage caused by:
¥ an accident;
¥ Þre;
¥ ßood;
¥ acts beyond our control;
¥ misusing the machine;
¥using an incorrect line voltage;
¥ not installing it properly;
¥ unauthorized repairs;
¥ using the machine to make a project; and
¥ damage that occurs when the machine is being transported.
The guarantee does not cover the machine’s appearance, lamps and glass.
Any changes to the machine which are explained in the guide to using your Samsung fax are
not covered under the terms of the guarantee. This guarantee will not apply if your machine
does not have a serial number or the serial number is changed. This guarantee only applies to
fax machines bought and used in the United Kingdom.
Chapter 8
In very rare circumstances your phone line or electricity supply may be hit by lightning. If it is
likely that there will be a thunder storm, disconnect your machine from the phone line and
electricity supply.
Samsung Electronics (UK) Ltd.
Stafford Park 12, Telford
Shropshire TF3 3BJ
8-7

ELECTRONICS
P/N : JB68-00107A Rev. 1.00

InkJet Facsimile
Installation Guide
SF-3100/SF-3100T
Please read this guide before you use this equipment.

Important Precautions and Safety Information
When using this fax machine, these basic safety precautions should always be followed to
reduce risk of fire, electric shock, and injury to persons:
1. Read and understand all instructions.
2. Use common sense whenever operating electrical appliances.
3. Follow all warnings and instructions marked on the product and in the literature
accompanying the product.
4. If an operating instruction appears to conflict with safety information, heed the safety
information. You may have misunderstood the operating instruction. If you cannot resolve
the conflict, contact your sales or service representative for assistance.
5. Unplug the fax machine from the AC wall socket and telephone jack before cleaning. Do
not use liquid or aerosol cleaners. Use only a damp cloth for cleaning.
6. Do not place the fax machine on an unstable cart, stand, or table. It may fall, causing
serious damage.
7. Your fax machine should never be placed on, near, or over a radiator, heater, air
conditioner, or ventilation duct.
8. Do not allow anything to rest on the power, telephone. Do not locate your fax machine
where the cords will be abused by persons walking on them.
9. Do not overload wall outlets and extension cords. This can diminish performance, and may
result in the risk of fire or electric shock.
10. Do not allow pets to chew on the AC power, telephone, or PC interface cords.
11. Never push objects of any kind into the fax machine through case or cabinet openings.
They may touch dangerous voltage points, creating a risk fire or shock. Never spill liquid
of any kind onto or into the fax machine.
12. To reduce the risk of electric shock, do not disassemble the fax machine. Take it to a
qualified service technician when repair work is required. Opening or removing covers
may expose you to dangerous voltages or other risks. Incorrect reassembly could cause
electric shock when the unit is subsequently used.
13. Unplug the machine from the telephone jack, PC, and AC wall outlet, and refer servicing
to qualified service personnel under the following conditions:
¥
When any part of the power cord, plug, or connecting cable is damaged or frayed.
¥
If liquid has been spilled into the product.
¥
If the product has been exposed to rain or water.
¥
If the product does not operate properly after instructions have been followed.
¥
If the product has been dropped, or the cabinet appears damaged.
¥
If the product exhibits a sudden and distinct change in performance.
14. Adjust only those controls covered by the operating instructions. Improper adjustment of
other controls may result in damage, and may require extensive work by a qualified
service technician to restore the product to normal operation.
15. Avoid using this fax machine during a lightning storm. There may be a remote risk of
electric shock from lightning. If possible, unplug the A C po wer , telephone for the duration
of the lightning storm.
16. If your machine is an SF-3100T , ne ver dispose of batteries or battery packs in a fire. There
is a serious risk of explosion and/or the release of highly toxic chemicals.
17. SAVE THESE INSTRUCTIONS.


Installation
Make Sure Everything Is in the Box
Once you have unpacked your machine, check to make sure you ha ve all the parts sho wn here.
If any piece is missing or broken, contact your dealer.
Common Parts
b)
c)
d)
e)
a)
Installation
j)
i)
h)
g)
f)
a) Machine
b) Handset
c) Coiled Handset Cord
d) Document Exit Tray
e) Document Tray
f) TAM lead (for SF-3100 only)
g) AC Power Cord
h) Telephone Line Cord
i) Battery (Type: 6F22 (FC-1) 9V,
SF-3100T only)
j) Ink Cartridge
(For replacement cartridge, use
Lexmark P/N 15M0640 or
1380620.)
Note
The shape of Power and Telephone Line Cord plugs may differ, depending on your country.
For correct operation the supplied TAM Lead and Telephone Line Cord should be used.
1

Installation
Familiarizing Yourself with Your New
Machine
Take a moment to familiarize yourself with your new machine by looking at the pictures on
the next few pages.
Front View
d)
c)
b)
e)
a)
a) Document Exit Tray
b) Control Panel
c) Document Guide
2
d) Document Tray
e) Paper Tray

Rear View
EXT.LINE TEL.LINE HANDSET
a)
Installation
Installation
e)
d)
0
0
0
0
0
0
0
0
0
0
0
0
0
0
0
0
0
0
0
0
0
0
0
0
0
0
0
0
0
0
0
0
0
0
0
0
0
0
0
0
0
0
0
0
0
0
0
0
0
0
0
c)
a) AC Power Socket
b) EXT. LINE Socket
(SF-3100 only)
b)
c) TEL. LINE Socket
d) Handset Cradle
e) Handset
3

Installation
Connections
Please review the safety precautions on first page of this manual, then follo w the directions in
this Installation Guide to connect your machine and set it up for use.
Choosing a Location
To help guarantee trouble-free operation of your machine, place it in a spot where:
¥
It is not in direct sunlight or excessive humidity.
¥
It is not too close to heating or air conditioning vents.
¥
Its ventilation openings are not blocked.
¥
It is at least 4 inches away from other objects.
¥
Its cords wonÕt get in the way.
¥
It canÕt be easily knocked off a table or dropped.
¥
It is neither dusty nor dirty.
Connection Diagram
AC power cord
EXT.LINE TEL.LINE HANDSET
0
0
0
0
0
0
0
0
0
0
0
0
0
0
0
0
0
0
0
0
0
0
0
0
0
0
0
0
0
0
0
0
0
0
0
0
0
0
0
0
0
0
0
0
0
0
0
0
0
0
0
Extension phone (option)
(SF-3100 only)
4
 Loading...