

Page 1

SEV04UP
SEV08UP
http://www.samsunghdd.co.kr
BF68-00152B
2002.05. Rev.00
Samsung is not responsible for loss of data.
Please back up data frequently.
Page 2

What is a ?
Contents
HANDY Q is the name of a new high-performance external hard drive
by Samsung. It supports both the high-speed IEEE 1394 interface and
the high-speed USB 2.0 interface. Unlike the existing desktop hard
drives, HANDY Q gives your system large storage space instantly
without the need to open up the computer.
With the formatting and partitioning already done, you can use the
large storage space instantly upon connecting Samsung HANDY Q to
the USB or 1394 port on your computer without rebooting the system.
HANDY Q supports both USB 1.1 and 2.0. The USB 2.0 connection
is up to 40 times faster compared to the USB 1.1 connection.
HANDY Q automatically detects the connected port. When the drive
is connected through the USB port, data is transferred in USB mode,
and when connected through the 1394 port, it is transferred in
1394 mode.
Safety Precautions 1
Identifying the Parts and Checking the Package Kits 2
System Requirements
Windows PC 3
Macintosh 4
Installing the Hardware
For USB-Port Installation 5
For 1394-Port Installation 6
Turning Handy Q Power ON & OFF
Turning Power OFF 7
Turning Power ON 9
Installing the Software
Installing USB 2.0/1.1. Driver
Windows 98 Second Edition (Initial Installation) 11
Windows ME/2000/XP 13
Mac OS 8.x ~ 9.x 14
- Installing the Device Driver 14
Mac OS X 15
Installing the IEEE 1394 Driver
Windows 98SE/2000 Professional/ME/XP 16
Initial Use of HANDY Q in Mac OS X 17
Macintosh 20
- OS 8.6 ~ 9.0 20
- OS 9.1 or higher 20
Troubleshooting Guide 21
Product Specifications 22
Page 3

Safety Precautions
Carefully follow all instructions below to prevent loss of data or
damage to your Handy Q drive.
This product is precision equipment and, the HDD inside
is extremely susceptible to shock and static electricity.
Avoid high-temperature, high-humidity storage.
Make sure you save the data before turning the power off or
pulling the plug out.
The manufacturer does not guarantee the safety of data that
is not saved on the hard disc.
The manufacturer’s guarantee does not apply to problems due
to user’s failure to follow instructions in the User’s Manual.
Frequently check for viruses and take necessary precautions to
prevent infection.
Loss or damage to the parts including the stickers and product
labels can cause immediate malfunction.
Take necessary precautions to keep all the parts intact.
Make sure you back up all important data files.
Do not remove the cable or turn the power off while the
system is running.
Identifying the Parts and
Checking the Package Contents
Front
Power/LED lamp
AC adapter
USB port
1394 port
Power switch
Package Contents
1394 cable Power cord
Back
Power supply slot
USB 1.1/2.0 cable
1
Setup CD User Guide
2
Page 4

System Requirements
The following are the minimum system requirements to install
and run Handy Q.
Windows PC
IEEE 1394
CPU: Pentium or faster
RAM: Minimum 32MB
Windows 98SE, Windows ME, Windows 2000, Windows XP
(Handy Q does not support Windows 95, Windows 98, and Windows NT)
One or more IEEE 1394 ports
Or, an IEEE 1394-compatible PCI card or
PCMCIA card (for notebook computers).
USB 2.0 / 1.1
CPU: Pentium or faster
RAM: Minimum 32MB
Windows 98SE, Windows ME, Windows 2000, Windows XP
(Handy Q does not support Windows 95, Windows 98, and Windows NT)
One or more IEEE 1394 ports
Or, an IEEE 1394-compatible PCI card or
PCMCIA card (for notebook computers).
Note: When connected through the USB 1.1 port,
the computer uses the USB connection.
Macintosh
FireWire (IEEE 1394)
Power PC (iMAC DV, G3, or later) with a FireWire-mounted board
Mac OS 8.6 or higher
RAM: Minimum 32MB
Internet connection
USB 1.1
Macintosh Power PC with a USB-1.1 port
RAM: Minimum 32MB
Internet connection
Note: Apple computers currently do not support USB 2.0.
3
4
Page 5
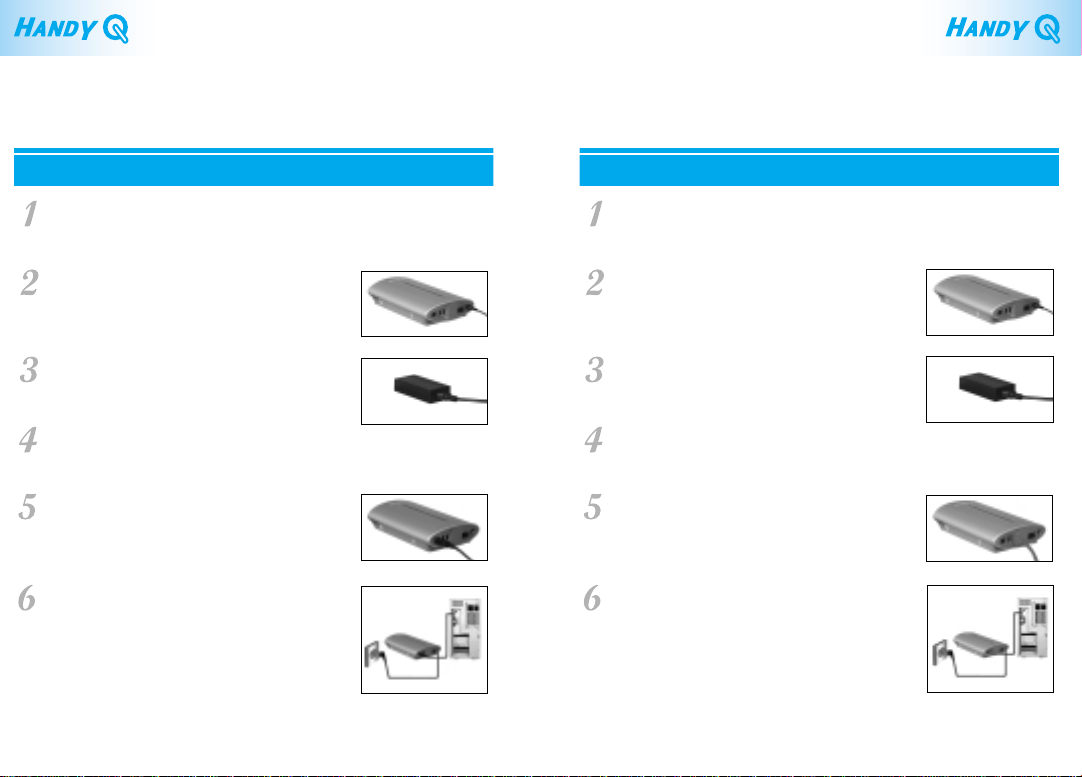
Installing the Hardware
For USB-port Installation For 1394-Port Installation
Make sure your computer meets the system
requirements.
See Pages 3 & 4 for System Requirements.
Connect the AC adaptor to the power supply
slot on the back of Handy Q as shown in the
picture.
Connect the power cord to the ACadaptor
as shown in the picture.
Turn the power on using the power switch
on the back of Handy Q.
Connect the USB data cable to the USB port
on Handy Q as shown in the picture.
Connect the USB data cable to the USB port
of the USB PCI card, which is connected to
the computer.
5
Make sure your computer meets the system
requirements.
See Pages 3 & 4 for System Requirements.
Connect the AC adaptor to the power supply
slot on the back of Handy Q as shown in the
picture.
Connect the power cord to the ACadaptor
as shown in the picture.
Turn the power on using the power switch
on the back of Handy Q.
Connect the 1394 data cable to the 1394 port
on Handy Q as shown in the picture.
Connect the 1394 data cable to the 1394 port
of the 1394 PCI card, which is connected to
the computer.
6
Page 6
Turning Handy Q Power ON & OFF
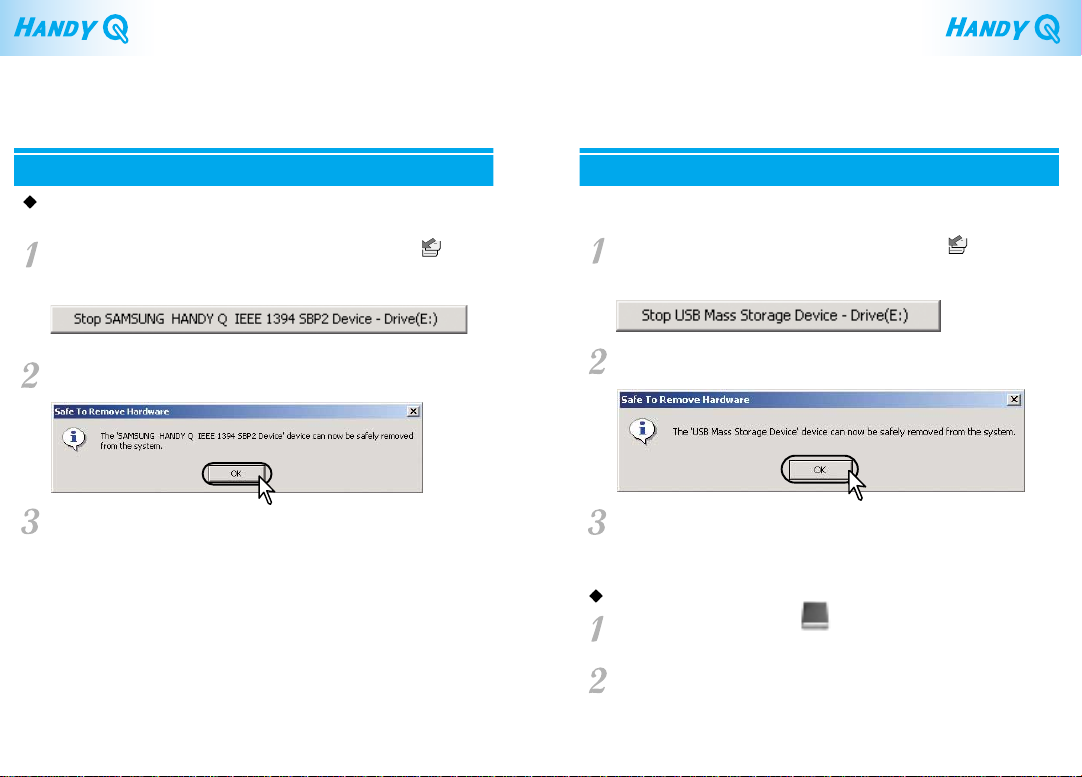
Turning Power OFF
Windows
- For IEEE 1394
Click the Eject Hardware/IEEE 1394 Storage Device icon( )
on the right-hand corner of the taskbar, and the following small
message box appears above the taskbar.
- For USB
Click the Eject Hardware/USB Storage Device icon( )
on the right-hand corner of the taskbar, and the following small
message box appears above the taskbar.
Click the message box to make it disappear and the next dialogue
box to appear.
Click OK, and you can safely remove the device from the system.
7
Click the message box to make it disappear and the next dialogue
box to appear.
Click OK, and you can safely remove the device from the system.
Macintosh
Drag the Handy Q disc icon( )to the trashcan.
You can now safely remove Handy Q from your computer.
HANDY_Q
8
Page 7

Turning Power On
Reconnecting
If the power is off, turn Handy Q on before connecting the
data cable to your computer.
Installing the Software
Before you start using Handy Q, you need to install a USB/1394 driver
compatible with your system.
USB 2.0 / 1.1
-
Windows 98 Second Edition (Initial Installation) Page 11
-
Windows ME/ 2000 / XP Page 13
-
Mac OS 8.x ~ 9.x
-
Mac OS X
IEEE 1394
-
Windows 98SE / 2000 Professional / ME / XP Page 16
-
Initial Use of HANDY Q in Mac OS X
-
Macintosh
Note: Close all programs before installation, and refer to the
Troubleshooting Checklist when you install or encounter
problems.
Page 14
Page 15
Page 17
Page 20
9
10
Page 8
Installing the USB 2.0/1.1 Driver
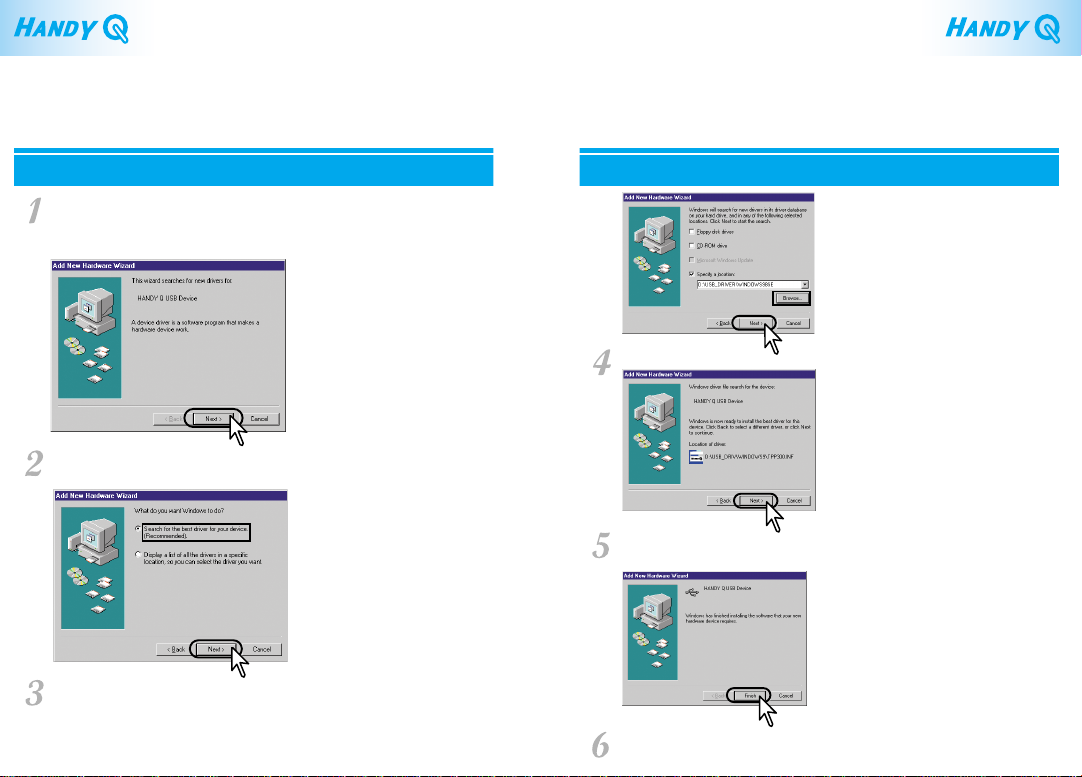
Windows 98 Second Edition (Initial Installation)
Make sure Handy Q is connected to your computer, and turn the
power on. A dialogue box as shown below appears and starts to
look for a driver for the device. Click Next.
A dialogue box appears as shown below.
Select as shown below and click Next.
When you see the dialogue box as shown below, click Next.
A new dialogue box appears as shown below when the
installation is completed. Click Finish.
Choose “Specify a location” option and select the
USB_Driver/Windows98SE folder from the CD-ROM drive
using the Browse button. Click Next.
11 12
Now you are ready to use Handy Q.
Page 9
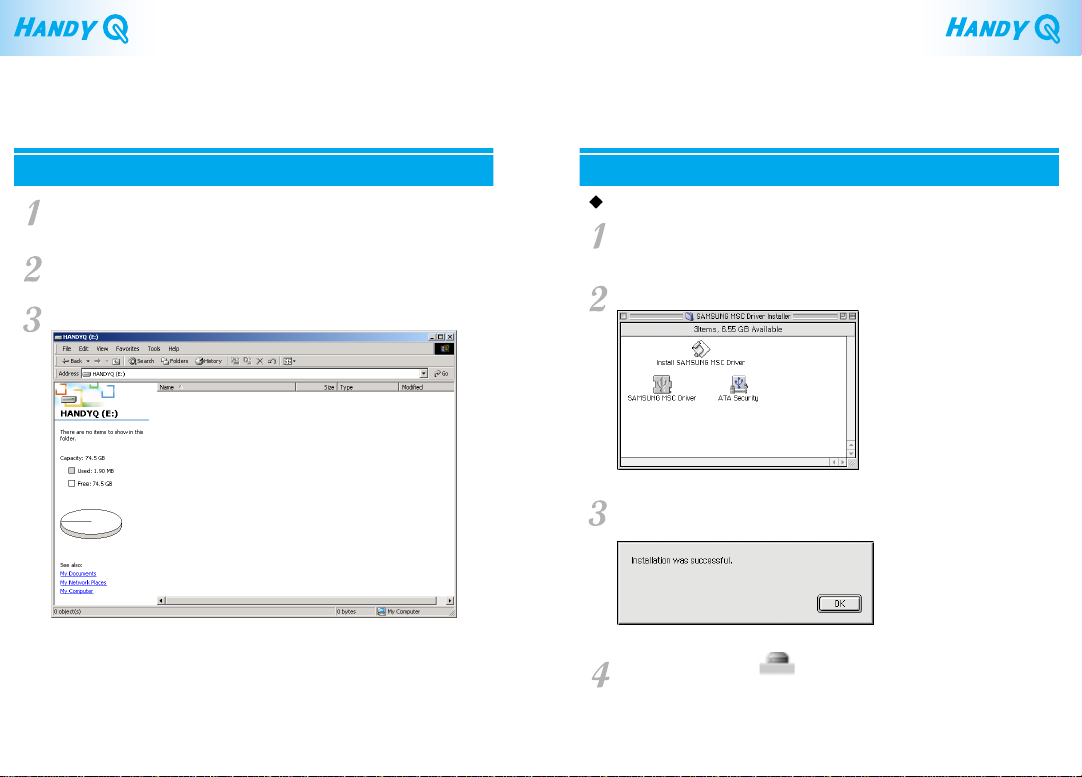
Windows ME/2000/XP
Make sure Handy Q is connected to your computer,
and turn the power on.
A drive named Handy Q appears in your Windows
Explorer window.
You are ready to use Handy Q.
Mac OS 8.x ~ 9.x
Installing the Device Driver
In the setup CD, find a file named HANDYQ.hqx from
the MAC folder in the USB Driver folder.
Decompress HANDYQ.hqx and the files appear as shown below.
Double-click the file named SAMSUNG MSC Driver.
A device driver is installed and the following dialogue box appears.
13
Click OK and an icon( )appears.
You are now ready to use Handy Q.
HANDY_Q
14
Page 10
Installing the IEEE 1394 Driver
Mac OS X
Connect Handy Q to your computer and turn the power on.
An icon( )appears on the screen.
Now you are ready to use Handy Q in Mac OS X using the
USB connection.
Windows 98SE/2000 Professional/ME/XP
Turn your computer on and connect Handy Q to your computer
using the IEEE1394 port.
When ‘Insert Disk’ appears on your screen,
insert the Windows98 SE CD-ROM into your CD-ROM drive,
and click OK. The driver is automatically installed.
Note: Installation may begin immediately without prompting
for disc insertion.
If your computer does not detect Handy Q, or you don’t see the
1394 icon( ) on your Windows taskbar, update your Windows
program as bellow;
Click Start on the left-hand corner of the taskbar.
Click Windows Update.
Click Product Updates.
Download and install the latest version of Windows.
15
16
Page 11
Initial Use of HANDY Q in Mac OS X
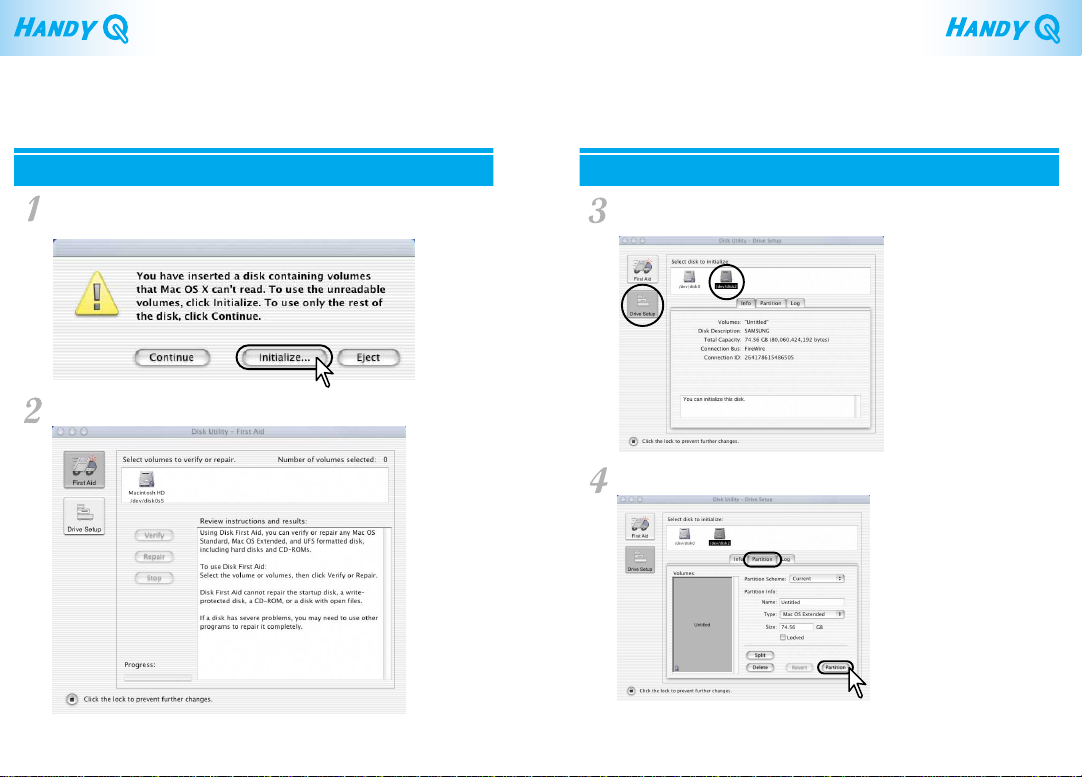
When you first connect Handy Q to your computer,
a dialogue box appears as below. Click Initialize.
The Disk Utility window appears.
Click the Drive Setup button on the left-hand side of the window.
Choose/dev/disk1.
Of the three menu tabs showing, choose “Partition”. Click Initialize.
17
18
Page 12
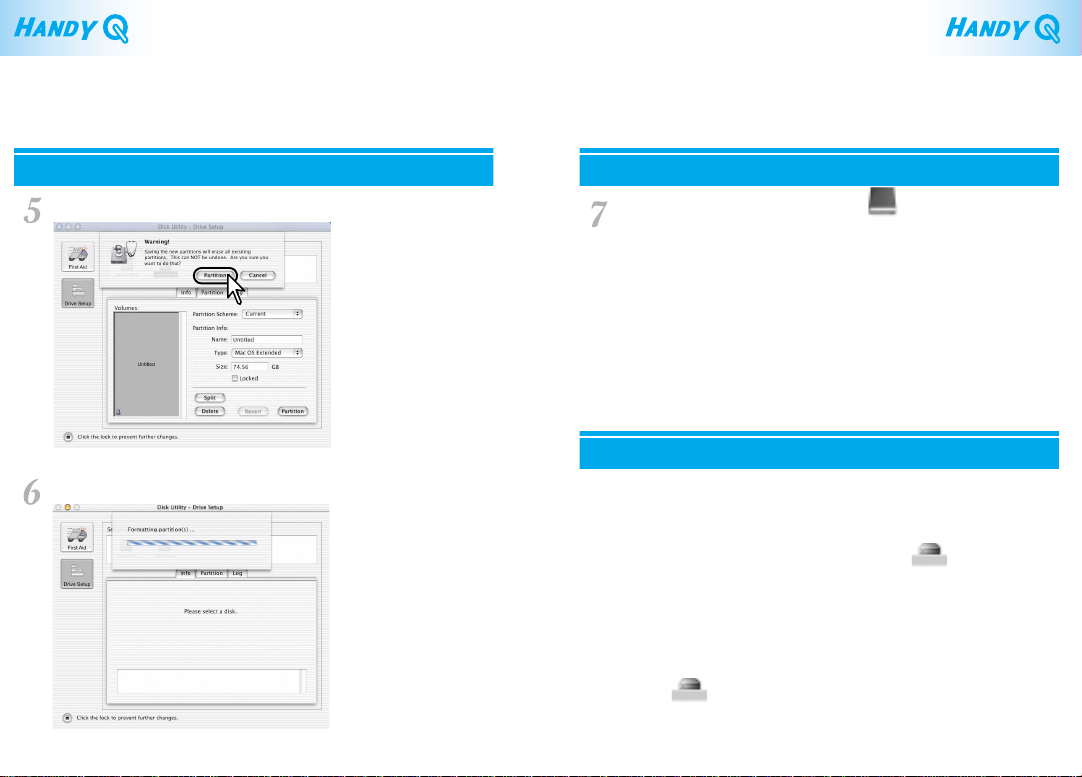
When the following window appears, click Initialize.
The formatting begins as below.
When formatting is completed, an icon( )appears
on the desktop. You are now ready to use Handy Q using the
1394 connection.
Macintosh
- OS 8.6 ~ 9.0
Connect to the Macintosh Homepage to download the FireWire
Enabler and install it on your computer. Reboot your computer
after the installation is completed. A new icon( )appears
on the desktop.
- OS 9.1 or higher
No need for installation.
Connect Handy Q to your computer and turn the power on.
An icon( )appears on the desktop.
HANDY_Q
HANDY_Q
19
20
Page 13
Troubleshooting Guide
When you encounter problems using Handy Q, refer to the followings.
Basic Checklists
Make sure your power cord, USB cable, or the 1394 cable
is connected properly.
Make sure the Handy Q is on before connecting to the computer.
Problems Encountered While Using the USB Connection
Windows NT OS does not support Handy Q’s USB interface.
Make sure your computer supports USB1.1.
Handy Q is not compatible with USB 1.0.
If the connection fails, try connecting to other USB ports.
Make sure you installed the USB driver provided by Samsung.
Note : See “Installing the Software” for driver installation.
Problems Encountered While Using the1394 Connection
Windows 95 and Windows 98 do not support Handy Q’s
1394 interface. (You can use Windows 98SE or later version)
Try connecting to other 1394 ports when the connection is
unsuccessful.
21
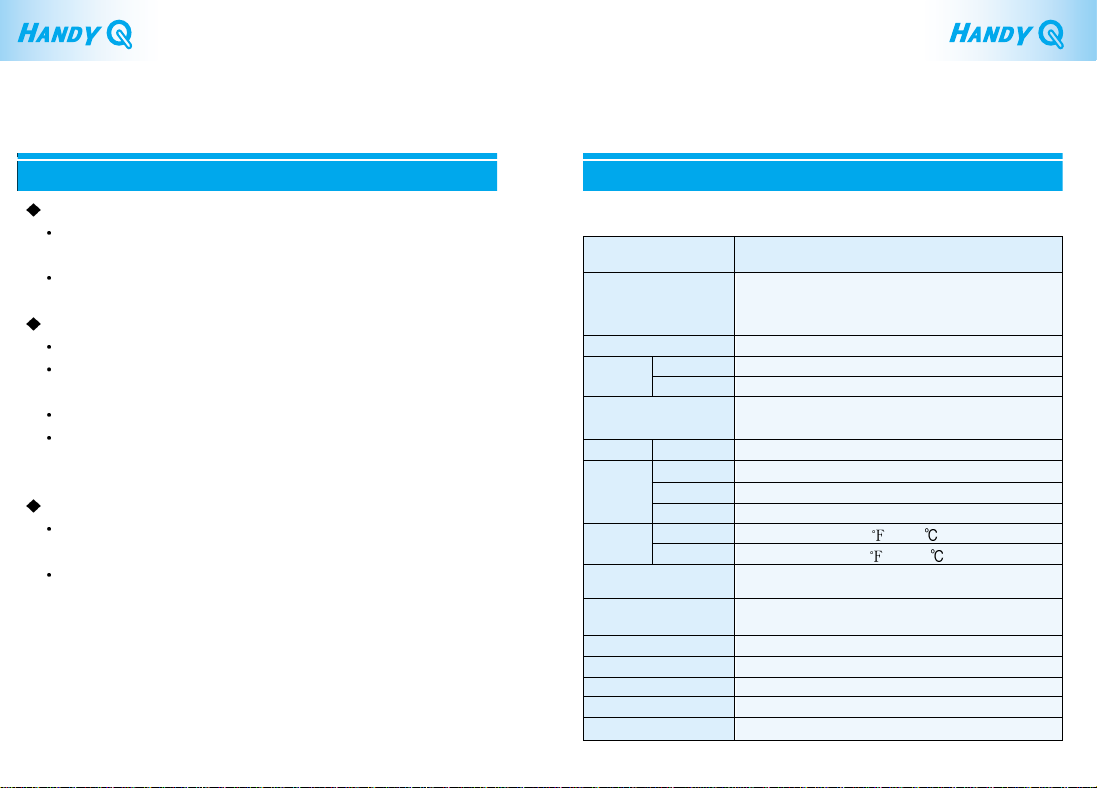
Product Specifications
Category Specifications
OS
Interface
Data
Transfer
Speed
Front
Back
Operating
Environment
Absorption:Operating
Absorption: Storage
Dimensions (W/H/D)
Power Supply – input
Power Supply – output
Power Consumption
USB 2.0
IEEE1394
Memory
LED Lamp (Blue)
Port
Switch
Power jack
Operating
Storage
Maximum Shock
Maximum Shock
Weight
Temperature: 41~104 (5~40 ), Humidity: 30~85%
Temperature: 41~140 (-10~60 ), Humidity:10~90%
Windows 98SE, Windows ME,
Windows 2000, Windows XP,
Mac OS 8.6 or later
For both IEEE 1394, USB 2.0/1.1
MAX 480 Mbps
MAX 400 Mbps
SEV04UP/DOM-40.0GB
SEV08UP/DOM-80.0GB
Power On-Off/Read/Write Mode Indicator
IEEE 1394 port A/port B, USB 2.0/1.1 port
12V/3A adapter power jack
220 x 52.5 x 140.5 mm
AC100~240V, 60Hz, 75~100VA
Operating: 6.3W, Standby: 6.15W
Power switch
63G
250G
1.35Kg
12V DC/3A
22
Page 14

Fcc information to the user
This equipment has been tested and found to comply with the limits
for a Class B digital device, pursuant to Part 15 of the FCC Rules.
These limits are designed to provide reasonable protection against
harmful interference in a residential installation.
This equipment generates, uses and can radiate radio frequency
energy and, it not installed and used in accordance with the
instructions, may cause harmful interference to radio
communications. However, there is no guarantee that interference
will not occur in a particular installation. If this equipment does
cause harmful interference to radio or television reception, which
can be determined by turning the equipment off and on, the user is
encouraged to try to correct the interference by one or more of the
following measures :
- Reorient or relocate the receiving antenna.
- Increase the separation between the equipment and receiver.
- Connect the equipment into an outlet on a circuit different from
that to which the receiver is connected.
- Consult the dealer or experienced radio TV technician for help.
CAUTION
Change or modifications not expressly approved by the
manufacturer responsible for compliance could void the user’s
authority to operate the equipment.
 Loading...