

Samsung scx-4100 series Instruction

U Refill Toner Ltd., 305 Telsen Centre, Thomas Street, Birmingham, B6 4TN, United Kingdom
Telephone UK 0121 448 3561 http://www.urefilltoner.co.uk
Refill your Samsung SCX-4100 series cartridge
Before use, familiarise yourself with the safety data on page 4 & 5.
Take maximum care when using a screwdriver as a lever. Use precautions such as gloves and eye-
protection to guard against injury due to accidental slippage.
Starter cartridge is different
When you buy a new machine, it arrives with a so-called “starter cartridge” that has a lot less toner
than the original cartridge you buy later. It also has a smaller toner compartment, so you can only
refill it with 30g of toner – about half of the amount that will fit into the bought Samsung cartridge.
How to spot the “fade-out point”
There’s no toner low signal from the machine. We were left to deduce that the cartridge was empty
as the image started to fade out vertically down the page, which normally happened from the right
side of the page. Taking the cartridge out and shaking it at the first fade out allows about another 60
pages to be printed before the fade out appears again.
Vertical fade-out that can be cured by shaking the cartridge, but then returns shortly afterwards, is
the tell-tale symptom of there being no toner left. If you want to be clinically precise, the weights of
the cartridges with no toner in are:
Starter cartridge empty weight 621g Original cartridge empty weight 676g
Page 1
U Refill Toner Ltd., 305 Telsen Centre, Thomas Street, Birmingham, B6 4TN, United Kingdom
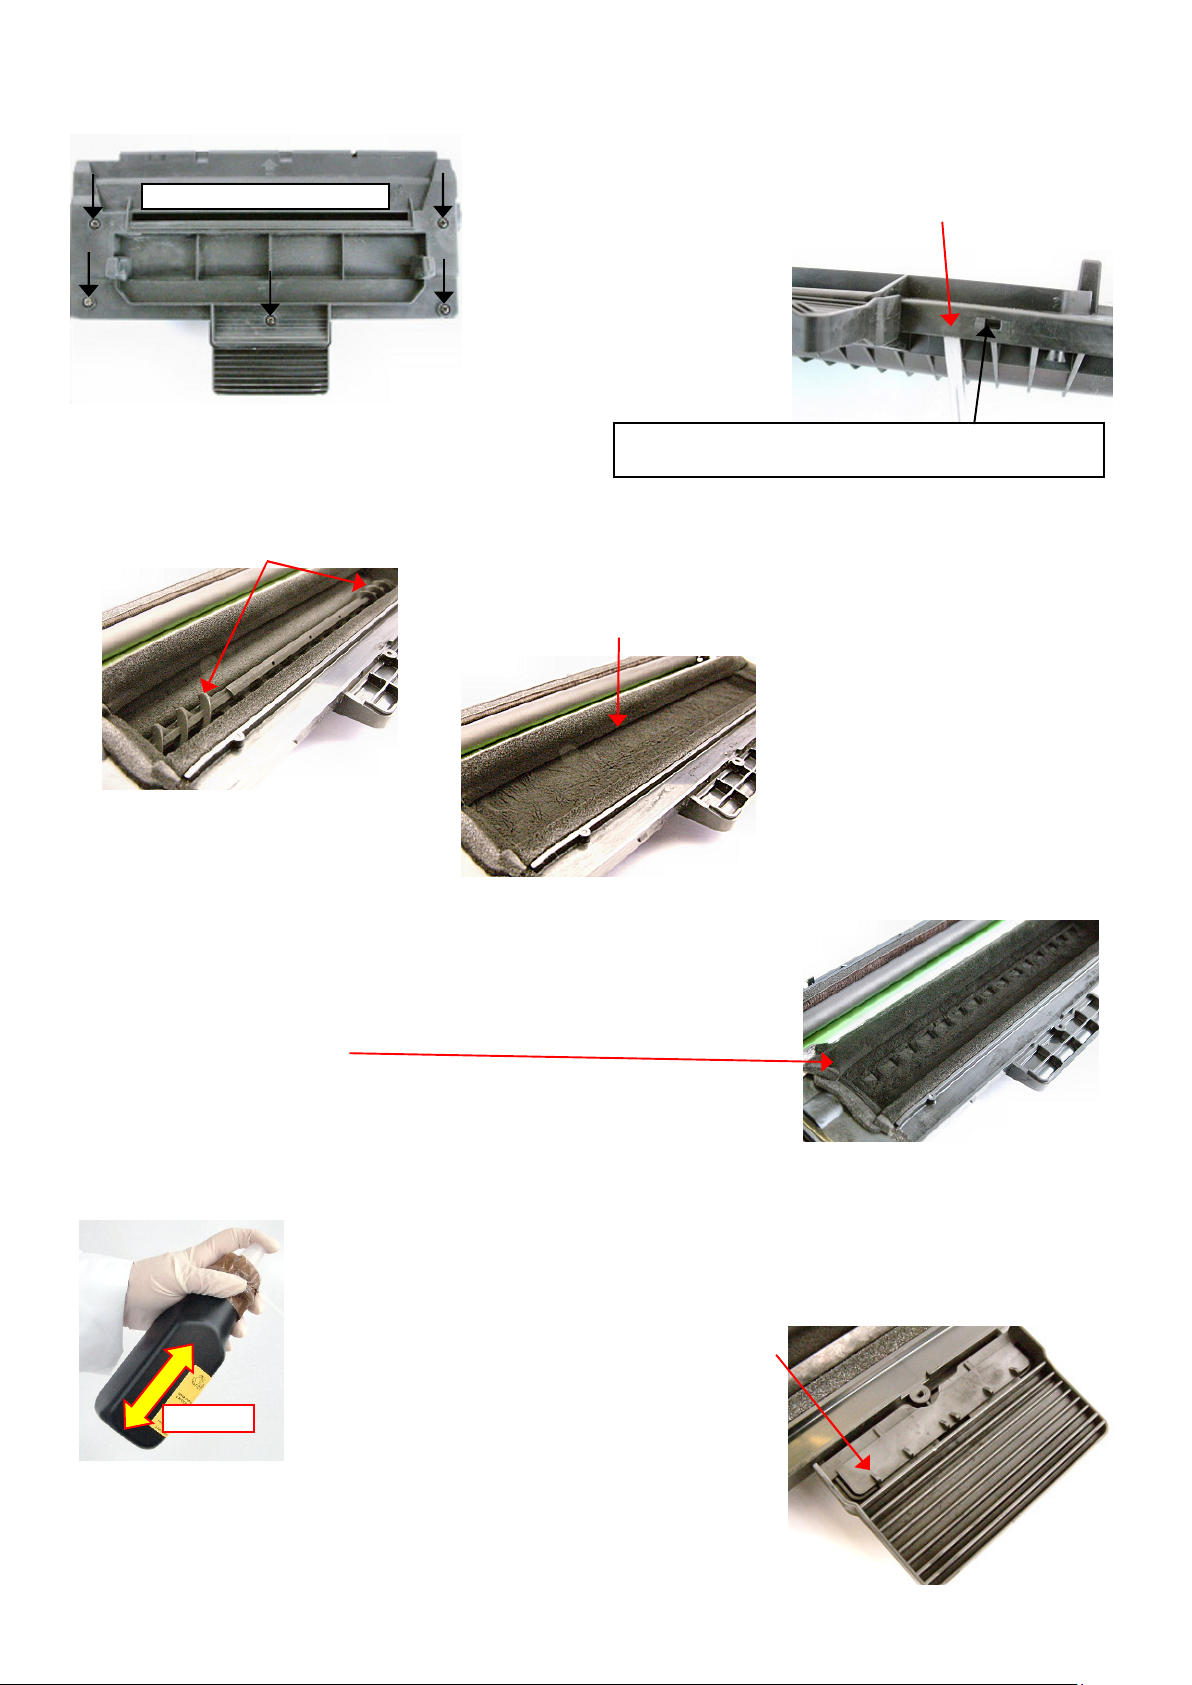
shake
Take out the 5 screws
Lugs to be freed are in these holes. Repeat this
Telephone UK 0121 448 3561 http://www.urefilltoner.co.uk
Starter cartridge refill
1. Make sure cartridge is at fade-out point (see page 1,
paragraph 3)
2. Take out 5 screws.
3. At back, near handle, insert flat blade screwdriver between
urefilltoner.co.uk
Tel. UK 0121 448 3561
5. Screw spout onto bottle and wrap sticky tape around join of spout to ensure no leakage of toner.
6. Note worm gears at each end of a horizontal bar.
urefilltoner.co.uk
UK 0121 448 3561
You might find that the stirrer blade confuses you. It’s a strip with
windows bonded to the same shaft that connects the two worm
gears. Pay no real attention to it. Focus on the worm gears being
just covered and the level being short of the foam gasket as
explained above. With the stirrer blade in play, the correct level
looks something like this.
7. CARE! A full bottle holds 3 times the toner you want to pour
in. Go little by little, stopping to even out the toner by shaking
the cartridge from side to side.
8. Hold finger firmly over end of spout, shake bottle for 10 seconds.
9. Slowly spread a layer of toner along length of compartment.
urefilltoner.co.uk
UK 0121 448 3561
14. Put refilled cartridge back machine and wait a few moments
while it initialises.
10. Stop pouring and shake cartridge from side to side to even out toner.
11. Check the level as described in 6. Stop if there. Carefully put more in if not.
12. Place handle piece in correct position for
re-assembly. Note triangular teeth face
upwards.
13. Snap cover back on and screw down with
5 screws.
two halves of cartridge.
4. Twist blade to free lugs,
lifting top half of cartridge
at same time. Lid of
cartridge will come off,
exposing toner
compartment.
action to left of cartridge handle if necessary.
We’re aiming for a toner level that just covers those worm gears
so we can’t see any of their teeth. Here’s the right fill level:
you’ll see the toner level is just short of a foam gasket.
urefilltoner.co.uk
urefilltoner.co.uk
Tel. UK 0121 448 3561
UK 0121 448 3561
urefilltoner.co.uk
urefilltoner.co.uk
UK 0121 448 3561
Tel. UK 0121 448 3561
urefilltoner.co.uk
Tel. UK 0121 448 3561
Page 2
 Loading...