

Page 1
V
ideo Camcorder
8mm
COLOR LCD
SCL600/L610/L630/L650
Owner’s Instruction Book
Before operating the unit, please read
this instruction book thoroughly, and retain it
for future reference.
Hi
SCL600/L610/L630/L650
Caméscope
8mm
ÉCRAN LCD COULEUR
SCL600/L610/L630/L650
Mode d’emploi
Avant d’utiliser l’appareil, lisez attentivement ce
mode d’emploi et le conservez-le à proximité
pour vous y référer ultérieurement.
Hi
SCL600/L610/L630/L650
ENGLISH FRANÇAIS
AD68-00334C
START/
STOP
SELF
TIMER
ZERO
RETURN
STILL
COUNTER
RESET
WIDE
TELE
DISPLAY
ELECTRONICS
Page 2

FRANÇAISENGLISH
Contents
Sommaire
2
Notices and Safety Instructions
Features...........................................................................................................8
Descriptions
■ Front View/Side View/Rear View................................................9, 10, 11
■ OSD (On Screen Display) ...................................................................12
Accessories Supplied with the Camcorder....................................................14
Remote Control .............................................................................................15
■
Self Timer Recording ............................................................................15
Getting to Know Your Camcorder
Adjusting the Hand Strap and Shoulder Strap..............................................16
Lithium Battery Installation ............................................................................17
Connecting the Power Source.......................................................................18
■
To use the AC Power Adapter..............................................................18
■
To use the Battery Pack .......................................................................19
Using the Battery Pack ..................................................................................20
■
Continuous Recording time table.........................................................20
■
Battery Level Display............................................................................21
Inserting and Ejecting a Cassette ................................................................22
Preparing
Making your First Recording .........................................................................23
Hints for Stable Image Recording ................................................................25
■
Recording with LCD Monitor ................................................................25
■
Recording with Viewfinder....................................................................25
Adjusting the LCD..........................................................................................26
Adjusting Focus of the VIEWFINDER...........................................................27
Playing back a tape on the LCD....................................................................28
■
Controlling a Sound from the Speaker.................................................29
■
Viewing a Still Picture ...........................................................................29
■
Picture Search......................................................................................29
Zooming In and Out.......................................................................................30
Digital Zoom ..................................................................................................31
EASY mode (for beginners)...........................................................................33
CUSTOM-Creating your own customized recording settings........................34
Basic Recording
Advanced Recording
Remarques et consignes de sécurité
Familiarisez-vous avec le caméscope
Fonctionnalités.................................................................................................8
Descriptions
■
Vue avant/Vue latérale/Vue arrière.............................................9, 10, 11
■
Affichage ..............................................................................................12
Accessoires fournis avec votre caméscope..................................................14
Télécommande .............................................................................................15
■
Enregistrement automatique avec la télécommande...........................15
Mise en place de la poignée de soutien et de la bandoulière.......................16
Installation de la pile au lithium .....................................................................17
Connexion d’une alimentation.......................................................................18
■
Utilisation de l’adaptateur secteur et du câble DC...............................18
■
Utilisation du bloc batterie ...................................................................19
Utilisation du bloc batterie .............................................................................20
■
Tableau des durées d'enregistrement ..................................................20
■
Affichage du niveau de la batterie........................................................21
Insertion et éjection d’une cassette ..............................................................22
Votre premier enregistrement........................................................................23
Astuces pour la stabilité de l’image ..............................................................25
■
Utilisation de l’écran LCD.....................................................................25
■
Utilisation du viseur électronique..........................................................25
Réglage de l’écran LCD ................................................................................26
Réglage du viseur..........................................................................................27
Lecture d’une cassette à l’écran LCD...........................................................28
■
Réglage du volume du haut-parleur .....................................................29
■
Arrêt sur image.....................................................................................29
■
Recherche d’une image........................................................................29
Utilisation du zoom avant et arrière...............................................................30
Utilisation du zoom numérique......................................................................31
Mode EASY (enregistrement simplifié)..........................................................33
Mode CUSTOM - Personnalisation des réglages pour l'enregistrement ......34
Réglage du caméscope
Effectuez un enregistrement simple
Perfectionnez vos enregistrements
Page 3

FRANÇAISENGLISH
3
Contents (continued)
DIS (Digital Image Stabilizer, SCL630/L650 only).........................................35
MF/AF (Manual Focus/Auto Focus) ..............................................................36
BLC................................................................................................................37
Program AE (Automatic Exposure) ...............................................................38
DSE (Digital Special Effects) in CAMERA mode...........................................40
Setting and Recording DATE/TIME...............................................................42
Selecting and Recording a Title.....................................................................44
Fade In and Out ............................................................................................46
PIP.................................................................................................................47
Snap Shot ......................................................................................................48
White Balance ...............................................................................................49
Demonstration ...............................................................................................50
Lighting Techniques.......................................................................................51
Playing back a Tape
To watch with LCD ........................................................................................52
To watch with TV monitor..............................................................................52
Various Functions in PLAYER mode.............................................................54
Adjusting the LCD..........................................................................................55
Setting the Speaker ON/OFF ........................................................................55
DSE in PLAYER mode..................................................................................55
Multi Playback (Using a PAL60 System).......................................................56
Cleaning and Taking care of the Camcorder .................................................57
■ Cleaning the Viewfinder .......................................................................57
■ Cleaning the LCD Panel.......................................................................57
■ Cleaning the Video Heads ...................................................................57
■ Storing the Camcorder..........................................................................57
Maintenance
Self Diagnosis Display ..................................................................................59
Moisture Condensation..................................................................................62
Troubleshooting
Specifications...........................................................................63
Index.............................................................................................64
Using Your Camcorder Abroad......................................58
Sommaire (suite)
Utilisation du stabilisateur d’images (SCL630/L650).....................................35
Mise au point manuelle/automatique (MF/AF) ..............................................36
Fonctions BLC...............................................................................................37
Sélection d’un mode d’exposition automatique.............................................38
Effet spéciaux numériques en mode Caméscope.........................................40
Réglage et enregistrement de la date et de l’heure......................................42
Sélection et enregistrement d’un titre............................................................44
Fondu en ouverture ou en fermeture ............................................................46
PIP.................................................................................................................47
Mode photo (Snap Shot) ...............................................................................48
Balance des blancs (White Balance).............................................................49
Mode DEMO ..................................................................................................50
Sources de lumière........................................................................................51
Lecture à l’écran LCD ...................................................................................52
Lecture à l’écran de votre téléviseur .............................................................52
Fonctions du mode magnétoscope ...............................................................54
Réglage de l’écran LCD ................................................................................55
Réglage du haut-parleur................................................................................55
DSE en mode Magnétoscope .......................................................................55
Lecture multiple (avec le système PAL60) ....................................................56
Nettoyage et entretien du caméscope...........................................................57
■ Nettoyage du viseur..............................................................................57
■ Nettoyage de l’écran LCD ....................................................................57
■ Nettoyage des têtes vidéo....................................................................57
■ Rangement du caméscope...................................................................57
Diagnostic à l’écran.......................................................................................59
Condensation d'humidité...............................................................................62
Visionnez une cassette
Conseils d’utilisation
Utilisation du caméscope à l’étranger........................58
Dépannage
Warranty (Canada users only)........................................66
Spécifications techniques..................................................63
Index.............................................................................................64
Garantie pour le Canada...................................................66
Page 4
Notices and Safety Instructions
Notices regarding rotation of LCD screen
ENGLISH
FRANÇAIS
4
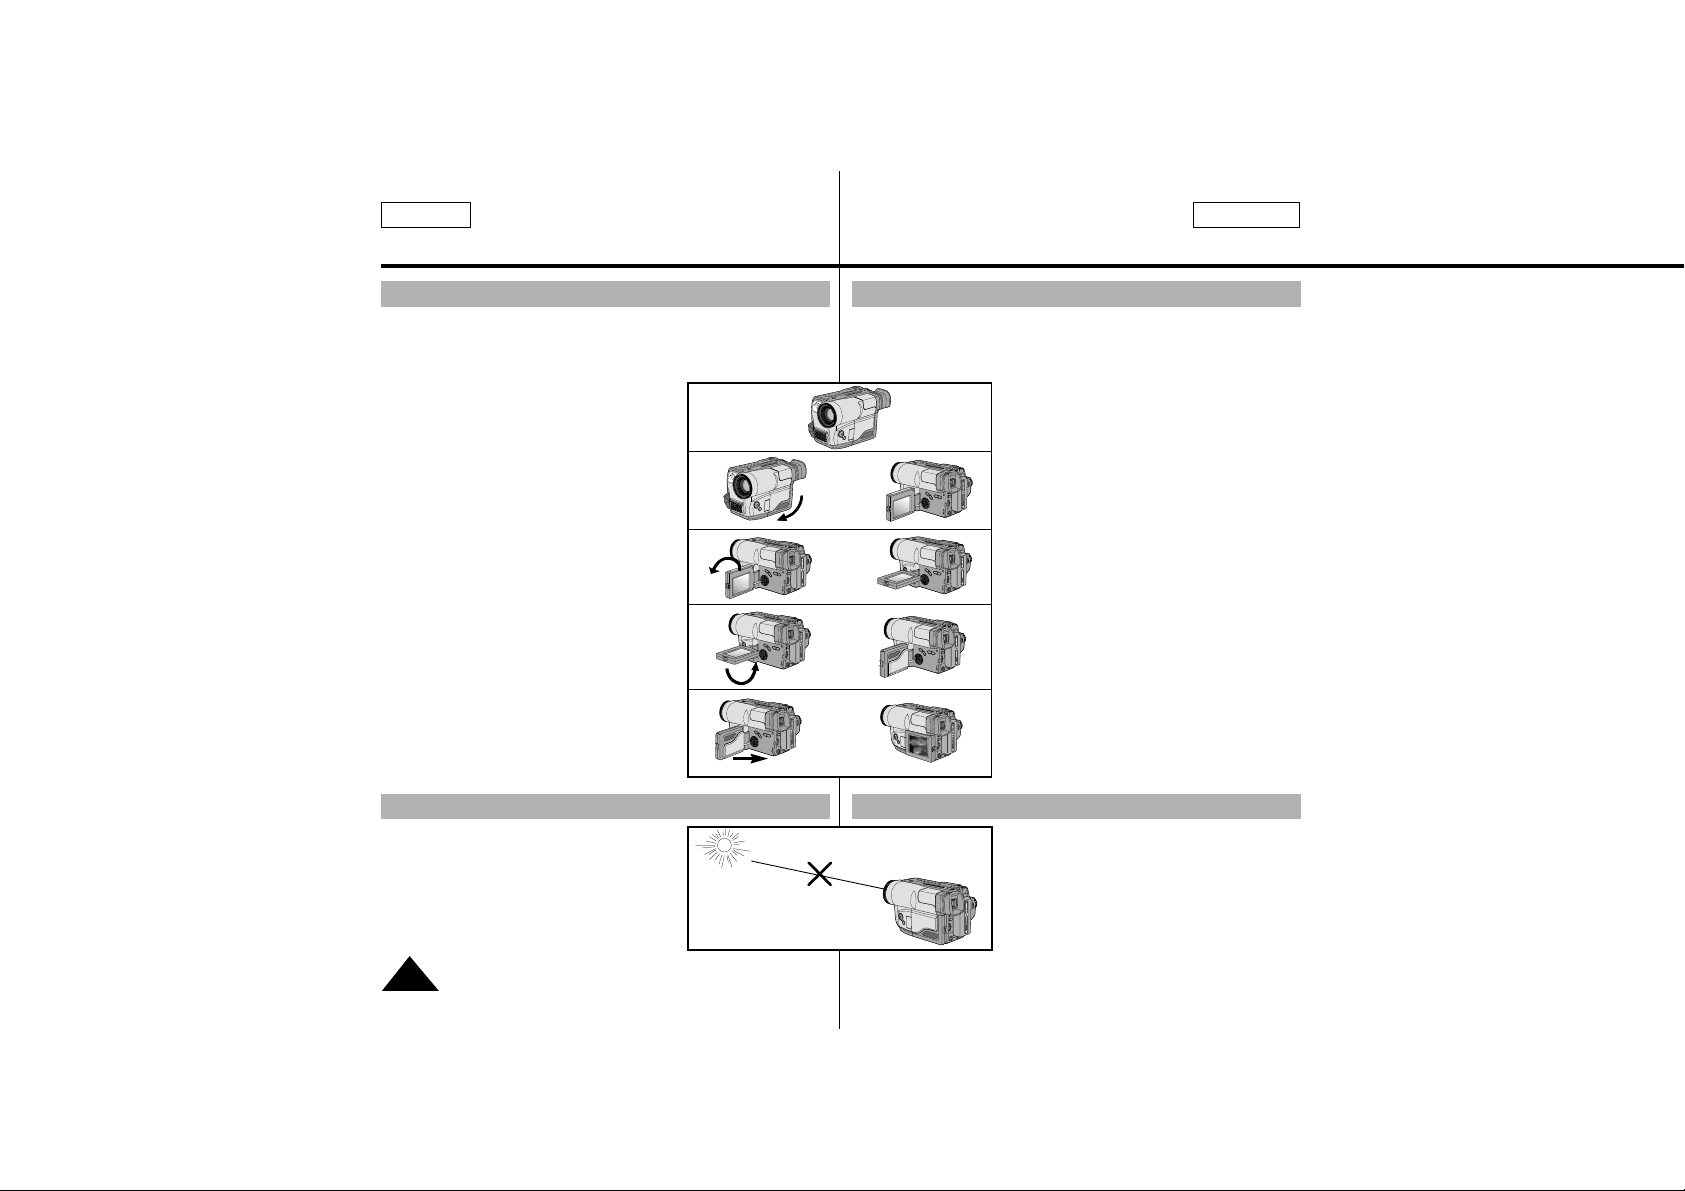
Please rotate the LCD screen carefully as illustrated. Unintended rotation
may cause damage to the inside of the hinge that connects the LCD
screen to the Camcorder.
1) LCD screen closed.
2) Standard recording by using
the LCD screen.
3) Making a recording by looking at
the LCD screen from the top.
4) Making a recording by looking at
the LCD screen from the front.
(In this case, the CVF of only SCL650 isn’t
turned on.)
5) Making a recording with the LCD screen
closed.
(In this case, the CVF of only SCL650 isn’t
turned on.)
✤ Do not let the LENS point toward the sun.
Direct sunlight can damage the CCD
(Charge Coupled Device).
Notices regarding the LENS
Remarques et consignes de sécurité
Rotation de l’écran LCD
Manipulez l’écran doucement lorsque vous le faites tourner. Une rotation
intempestive peut endommager l’intérieur de la charnière qui relie l’écran LCD
au corps de l’appareil.
1) Écran LCD fermé.
2) Enregistrement standard lors de l’utilisation de
l’écran LCD.
3) Enregistrement en regardant l’écran LCD d’en
haut.
4) Enregistrement en regardant l’écran LCD de
devant.
(
Dans ce cas, le viseur couleur du SCL650
n’est pas en marche(en marche = on))
5) Enregistrement avec l’écran LCD fermé.
(
Dans ce cas, le viseur couleur du SCL650
n’est pas en marche(en marche = on))
✤ Veillez à ne pas diriger l’objectif vers le soleil.
La lumière solaire directe peut endommager le
dispositif électronique à transfert de charge
(CCD).
Objectif
90°
➔
➔
➔
➔
➔
➔
➔
➔
90°
90°
1)
2)
3)
4)
5)
90°
Page 5

Notices and Safety Instructions
Notices regarding electronic viewfinder
FRANÇAISENGLISH
5
1) Do not place the camcorder so that
the viewfinder is pointing towards the
sun. Direct sunlight can damage the
inside of the viewfinder. Be careful
when placing the camcorder under
sunlight or by a window.
2) Do not pick up the camcorder by the
viewfinder.
3) Unintended rotation may cause
damage to the viewfinder.
1) A sudden rise in atmospheric temperature may
cause condensation to form inside the
camcorder.
for example:
■ When you take the camcorder from cold temper
ature outside to warm temperature inside during
the winter.
■ When you take the camcorder from cool temper ature inside to hot
temperature outside during the summer.
2) If the “DEW” protection feature is activated,
leave the camcorder in a dry, warm room with
the cassette compartment opened and the battery
removed.
3) If the “DEW” protection feature is activated
unexpectedly, and you want to override it, detach,
then reinstall the battery pack and lithium battery.
Please make sure that the condensation has
disappeared completely. (see page 62)
Notices regarding moisture condensation
Remarques et consignes de sécurité
Viseur électronique
1) N’orientez pas le viseur vers le soleil.
La lumière solaire directe peut
endommager l'intérieur du viseur.
Soyez vigilant lorsque vous placez le
caméscope au soleil ou près d’une
d'une fenêtre.
2) Ne saisissez pas votre caméscope par
le viseur.
3) Évitez les rotations intempestives du
viseur qui risquent de l’endommager .
1) Un accroissement soudain de température peut
entraîner la formation de buée à l’intérieur de
l’appareil.
Ce peut être le cas, lorsque vous passez:
■
d’un extérieur froid à un intérieur chaud
(en hiver, par exemple),
■
d’un intérieur frais à un extérieur chaud
(en été, par exemple).
2) Si la fonction de protection “DEW” se déclenche,
laissez l’appareil dans un endroit sec et à
température ambiante, le compartiment à
cassette ouvert et sans le bloc batterie.
3) Si la fonction de protection “DEW” se déclenche
intempestivement et que vous souhaitiez néanmoins
filmer, retirez le bloc batterie et la pile au lithium,
puis réinstallez-les. Assurez-vous que la
condensation a complètement disparu.
(voir page 62)
Formation de condensation
DEW
1
2
3
Page 6
Notices and Safety Instructions
Notices regarding the battery pack
ENGLISH
FRANÇAIS
6
✤ Make sure that the battery pack is charged before recording out-
doors.
✤ To preserve battery power, keep your camcorder turned off when
you are not operating it.
✤ When your camcorder is in CAMERA mode, if it is left in STANDBY
for more than 5 minutes without operation, it will automatically turn
off to protect against unexpected battery discharge.
✤ It is a good idea to use the viewfinder instead of the LCD when
recording for a long time because the LCD uses more battery
power.
✤ Make sure that the battery pack is fitted firmly into place.
Dropping the battery pack might damage it.
✤ When the battery reaches the end of its life, please contact your
local dealer. The batteries have to be dealt with as chemical waste.
W
arning: Keep the LITHIUM BATTERY out of the reach of children.
Should the battery be swallowed, consult a doctor immediately.
✤ The lithium battery maintains the clock function, TITLE, CUSTOM
function and preset contents memory; even if the battery pack or
AC power adapter is removed.
✤ The lithium battery for the camcorder lasts about 8~10 months
under normal operation from time of installation.
✤ When the lithium battery becomes weak or dead, the date/time indi-
cator flashes about 5 seconds when you set the power switch to
CAMERA. In this case, replace the lithium battery with type
CR2025. (see page 17)
Notices regarding the Lithium battery
* When the lithium battery
becomes weak or dead please
contact your local dealer. The
batteries have to be dealt with
as chemical waste.
WARNING:
LITHIUM BATTERYMUST BE
RECYCLED OR DISPOSED
OF PROPERLY.
Remarques et consignes de sécurité
Bloc batterie
✤ Assurez-vous que le bloc batterie est chargé avant de filmer sans
connexion au secteur.
✤ Pour conserver la charge de la batterie, maintenez votre caméscope
éteint lorsque vous ne l’utilisez pas.
✤ En mode caméscope, si vous laissez votre appareil en mode veille
pendant plus de 5 minutes sans vous en servir, il s’éteint automatiquement pour éviter un déchargement intempestif de la batterie.
✤ Si vous filmez longtemps, nous vous conseillons d’utiliser le viseur
plutôt que l’écran LCD car celui-ci consomme plus d’énergie.
✤ Assurez-vous que le bloc batterie est fermement maintenu en place.
Ne le faites pas tomber car vous risqueriez de l’endommager.
✤ Lorsque la batterie ou la pile ne fonctionne plus, contactez votre
revendeur le plus proche. Les batteries doivent être traitées en tant
que déchets chimiques.
A
vertissement: Maintenez la PILE AU LITHIUM hors de portée des
enfants. Si la pile venait à être avalée, consultez
immédiatement un médecin.
✤ La pile au lithium permet au caméscope de garder en mémoire les
fonctions d'horloge, de titrage, les réglages des modes CUSTOM
ainsi que les réglages prédéfinis, en l'absence du bloc batterie ou
de l'adaptateur secteur.
✤ La longévité de la pile au lithium est de huit à dix mois à partir de
sa mise en place et dans des conditions normales d’utilisation.
✤ Lorsque la pile au lithium s’affaiblit ou est déchargée, l’affichage de
la date et de l’heure clignote pendant cinq secondes environ lorsque
vous passez en mode Caméscope. Dans ce cas, remplacez-la par
une pile de type CR2025. (voir page 17)
Pile au lithium
* Lorsque la pile s’affaiblit ou est
déchargée, contactez votre
revendeur le plus proche. Les
piles doivent être traitées en tant
que déchets chimiques.
AVERTISSEMENT :
LA PILE AU LITHIUM DOIT
ÊTRE RECYCLÉE OU DÉPO-
SÉE DANS UN CENTRE DE
TRAITEMENTAPPROPRIÉ.
Page 7

Notices and Safety Instructions
Notices with Recording or Playback by using LCD
FRANÇAIS
ENGLISH
7
1) The LCD monitor is manufactured by using
high precision technology. However, there may
be some tiny specks (red, blue or green in
color) that appear on the LCD monitor. These
specks are normal and do not affect the recorded picture in any way.
2) When using the LCD monitor outdoors in direct
sunlight, it may be difficult to view. If this
occurs, use the viewfinder.
3) The LCD monitor's OSD is turned off when the
LCD is placed in the forward direction.
✤ To protect against tape and head-drum wear, your camcorder will
automatically turn off if it is left in STANDBY mode without operation
for more than 5 minutes.
5 minutes off timer in STANDBY mode
✤ It is very important to adjust the hand strap for
better recording. (see page 16)
✤ Do not insert your hand in the hand strap
forcibly, the buckle may be damaged.
Notices regarding the hand strap
✤ To ensure normal recording and clear picture, clean the video
heads. When playing back the pictures, if they are noisy or hardly
visible, the video heads may be dirty. If this happens, clean the
video heads with a dry type cassette cleaner.
✤ Do not use a wet type cassette cleaner. It may damage the video
heads. (see page 57)
Notices regarding video head cleaning
Remarques et consignes de sécurité
Enregistrement ou lecture avec l’écran LCD
1) L’écran a été conçu à l’aide d’une technologie
de haute précision. Cependant, de minuscules
points noirs (rouges, bleus ou verts) peuvent
apparaître de façon constante sur l’écran LCD.
Ces points sont normaux et n’affectent
aucunement l’ima-ge enregistrée.
2) Lorsque vous utilisez l’écran LCD directement
sous le soleil, la vision à l’écran peut s’avérer
difficile. Dans ce cas, nous vous
recommandons d’utiliser le viseur.
3) La fonction d’affichage d’informations sur
l’écran LCD est désactivée lorsque celui-ci est
tourné vers l’avant.
✤ Afin de protéger la bande et les têtes vidéo, votre caméscope s’éteint
automatiquement s’il est laissé en mode veille pendant plus de
5 minutes.
Désactivation automatique en mode veille
✤ Pour une meilleure qualité de prise de vue, il est
important de bien ajuster la poignée de soutien.
(voir page 16)
✤ Ne forcez pas pour insérer votre main dans la
poignée car vous risqueriez de l’endommager.
Poignée de soutien
✤ Pour garantir un enregistrement normal et obtenir des images claires,
nettoyez régulièrement les têtes vidéo. L’apparition de parasites sur
l’image ou l’affichage d’un écran vide peut signifier que les têtes vidéo
sont sales. Dans ce cas, nettoyez-les avec une cassette de type sec
prévue à cet effet.
✤ N'utilisez pas de cassette de type humide, car vous risqueriez
d’endommager les têtes vidéo. (voir page 57)
Nettoyage des têtes vidéo
Page 8

Getting to Know Your Camcorder
Familiarisez-vous avec le caméscope
Features
ENGLISH
FRANÇAIS
Fonctionnalités
Votre caméscope dispose de nombreuses fonctionnalités d’enregistrement et
de lecture.
Mode photo (SCL630/L650)
Ce mode permet de filmer un objet immobile pendant un temps limité en mode
Caméscope. (voir page 48)
PIP (SCL630/L650)
Cette fonction indique le centre de l'image lors de l’utilisation du zoom en mode
Caméscope. (voir page 47)
Fonction BLC
■ BLC (Backlight compensation)
Lorsque vous prenez un sujet devant une source lumineurse ou devant un
fond clair, utilisez la fonction BLC. (voir page 37)
DSE (Effets numériques spéciaux)
Cette fonction donne un côté spectaculaire à vos films, grâce aux différents
procédés originaux utilisés. (voir page 40)
Programme AE
Cette fonction permet d’adapter la vitesse d’obturateur et le diaphragme au
type de scène à filmer. (voir page 38)
DIS (SCL630/L650)
Cette fonction compense le léger tremblement qui peut survenir en filmant,
surtout lors de l’utilisation du zoom. (voir page 35)
Zoom longue portée 22x
Le zoom est une technique d’enregistrement qui vous permet de changer la
taille du sujet filmé. Pour des enregistrements plus professionnels, utilisez la
fonction zoom. (voir page 30)
Zoom numérique
Une portée de zoom supérieure à 22x est obtenue numériquement.
(voir page 31)
Macro
Cette fonction permet de filmer le sujet de très près. Pour ce faire, vous devez
régler le zoom sur la position grand angle. (voir page 30)
8
Your camcorder has many features for recording and playing back.
Snap Shot (SCL630/L650 only)
The Snap Shot function lets you record an object at a standstill for a limited
time in Camera mode. (see page 48)
PIP (SCL630/L650 only)
The PIP function shows where the center of the image is while recording in
Digital Zoom of the Camera mode. (see page 47)
BLC
When you record a subject with the light source behind the subject or a
subject with a light background, use the BLC function. (see page 37)
DSE (Digital Special Effects)
The DSE enables you to give a creative look to your films by adding various
special effects.(see page 40)
Program AE (Auto Exposure)
The Program AE enables you to adapt the shutter speed and aperture to the
type of scene to be filmed.
(see page 38)
DIS (SCL630/L650 only)
The DIS compensates for unstable images caused by hand shake,
particularly at high magnification.
(see page 35)
22x High ratio zoom lens
Zooming is a recording technique that lets you change the size of the subject
in the picture.
For more professional recordings, use the zoom function. (see page 30)
Digital Zoom
Zooms more than 22x are performed digitally. (see page 31)
Macro
The macro function allows you to record your subject at close range.
You have to adjust the zoom fully wide for macro recording. (see page 30)
Page 9
Getting to Know Your Camcorder
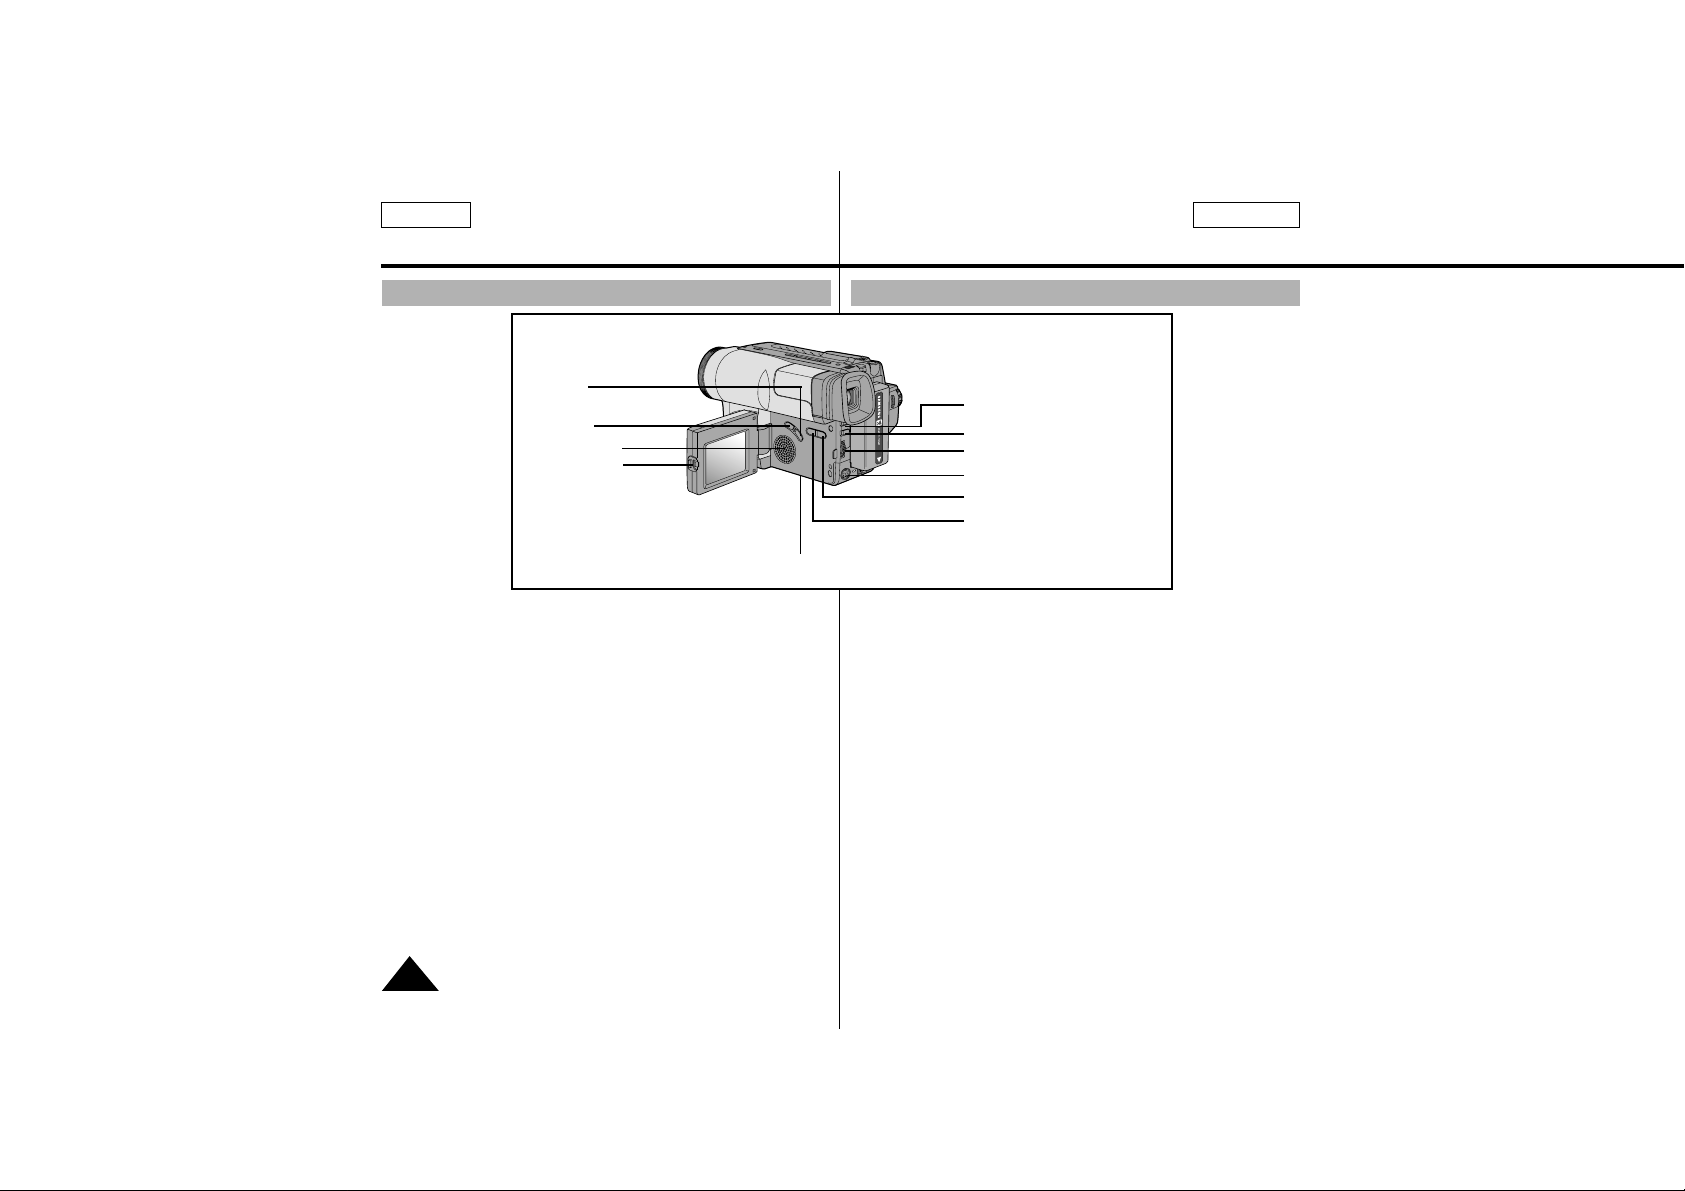
Front View
FRANÇAIS
ENGLISH
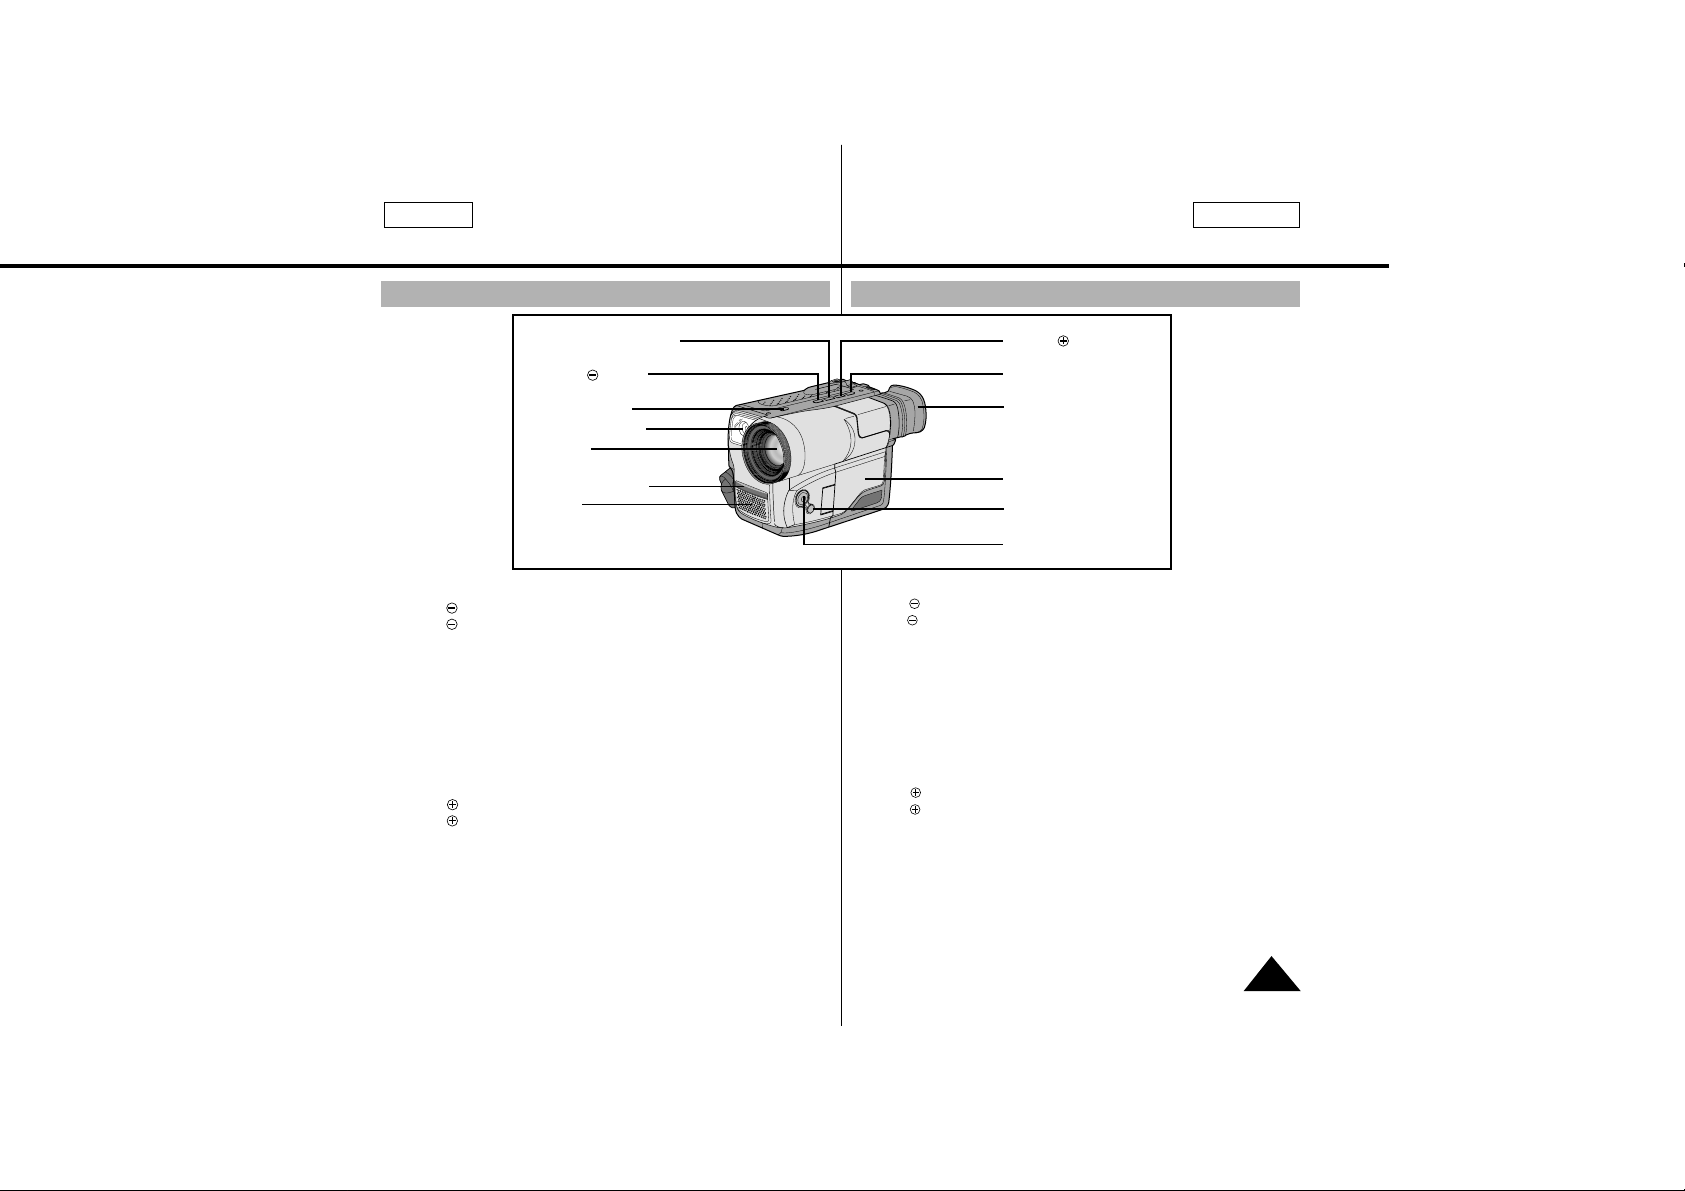
1. Lens (see page 63)
2. EDIT (REW)
EDIT works in STANDBY
mode. (see page 24)
REW works in PLAYER mode.
(see page 54)
3. PLAY/STILL (LIGHT)
(see page 53)
PLAY/STILLworks in PLAYER
mode.
LIGHT works in CAMERA
mode.
4. EDIT (FF)
EDIT works in STANDBY
mode. (see page 24)
FF works in PLAYER mode.
(see page 54)
5. DATE/TIME (STOP)
DATE/TIME works in CAMERA mode. (see page 42)
STOP works in PLAYER
mode. (see page 53)
6. TAPE EJECT (see page 22)
Use when ejecting the tape.
7. EVF (Electronic Viewfinder)
(CVF for SCL650)
8. MIC
MIC works in CAMERA mode.
9. Remote Sensor
(SCL600/L650 only)
10. LCD (see page 26)
11. CUSTOM
CUSTOM works in CAMERA
mode.
12. EASY
EASY works in CAMERA
mode.
13. VIDEO LIGHT
(SCL610/L630/L650 only)
Familiarisez-vous avec le caméscope
Vue avant
1. Lentille (voir page 63)
2. EDIT (REW)
EDIT fonctionne en mode
veille. (voir page 24)
REW fonctionne en mode
Magnétoscope. (voir page 54)
3. PLAY/STILL (LIGHT)
(voir page 53)
Fonctionne en mode
Magnétoscope.
LIGHT fonctionne en mode
Caméscope.
4. EDIT (FF)
EDIT fonctionne en mode
veille. (voir page 24)
FF fonctionne en mode
Magnétoscope. (voir page 54)
5. DATE/TIME (STOP)
DATE/TIME fonctionne en mode
Caméscope. (voir page 42)
STOP fonctionne en mode
Magnétoscope. (voir page 53)
6. TAPE EJECT (voir page 22)
Permet d’éjecter la cassette.
7. Viseur électronique
(CVF: SCL650)
8. MICRO
Fonctionne en mode
Caméscope.
9. Capteur de la télécommande
(SCL600/L650)
10. Écran LCD (voir page 26)
11. CUSTOM
CUSTOM fonctionne en
mode Caméscope.
12. EASY
EASY fonctionne en mode
Caméscope.
13. Torche vidéo
(SCL610/L630/L650)
9
3. PLAY/STILL(LIGHT)
4. EDIT (FF)
5. DATE/TIME (STOP)
7. EVF (CVF for SCL650)
10. LCD
11. CUSTOM
12. EASY
2. EDIT (REW)
6. TAPE EJECT
13. VIDEO LIGHT
1. LENS
9. Remote Sensor
8. MIC
Page 10
FRANÇAISENGLISH
Getting to Know Your Camcorder
Familiarisez-vous avec le caméscope
10
14. MENU ON/OFF (see page 26)
MENU ON/OFF works in
CAMERA and PLAYER mode.
15. ENTER (MF) (see page 26)
ENTER works in MENU mode.
MF works in CAMERA mode.
16. UP/DOWN dial (VOLUME)
UP/DOWN dial works in
MENU mode. (see page 26)
VOLUME works in PLAYER
mode. (see page 55)
17. S-VIDEO out
18. PROGRAM AE (see page 38)
PROGRAM AE (Auto
Exposure) works in
CAMERA mode.
19. DSE (see page 40)
DSE works in CAMERA and
PLAYER mode.
20. SPEAKER (see page 55)
Speaker works in PLAYER
mode.
21. Lithium Battery
(see page 17)
22. LCD open
23. FADE (see page 46)
FADE works in CAMERA
mode.
24. BLC (see page 37)
BLC works in CAMERA mode
14. MENU ON/OFF (voir page 26)
Fonctionne en mode
Caméscope et Magnétoscope.
15. ENTER (MF) (voir page 26)
Fonctionne en mode MENU.
MF fonctionne en mode
Caméscope.
16. Bouton UP/DOWN (VOLUME)
UP/DOWN fonctionne en
mode MENU. (voir page 26)
VOLUME fonctionne en mode
Magnétoscope. (voir page 55)
17. S-VIDEO out (voir page 53)
18. PROGRAM AE (voir page 38)
Fonctionne en mode
Caméscope.
19. DSE (voir page 40)
Fonctionne en mode
Caméscope et Magnétoscope.
20. Haut-parleur (voir page 55)
Fonctionne en mode
Magnétoscope.
21. Pile au lithium (voir page 17)
22. Ouverture de l’écran LCD
23. FADE (voir page 46)
Fonctionne en mode
Caméscope.
24. BLC (voir page 37)
Fonctionne en mode
Caméscope.
Side View Vue latérale
21. Lithium Battery
24. BLC
23. FADE
20. SPEAKER
22. LCD Open
14. MENU ON/OFF
15. ENTER (MF)
16. UP/DOWN Dial (VOLUME)
18. P.AE
19. DSE
17. S-VIDEO out
Page 11
Getting to Know Your Camcorder
Familiarisez-vous avec le caméscope
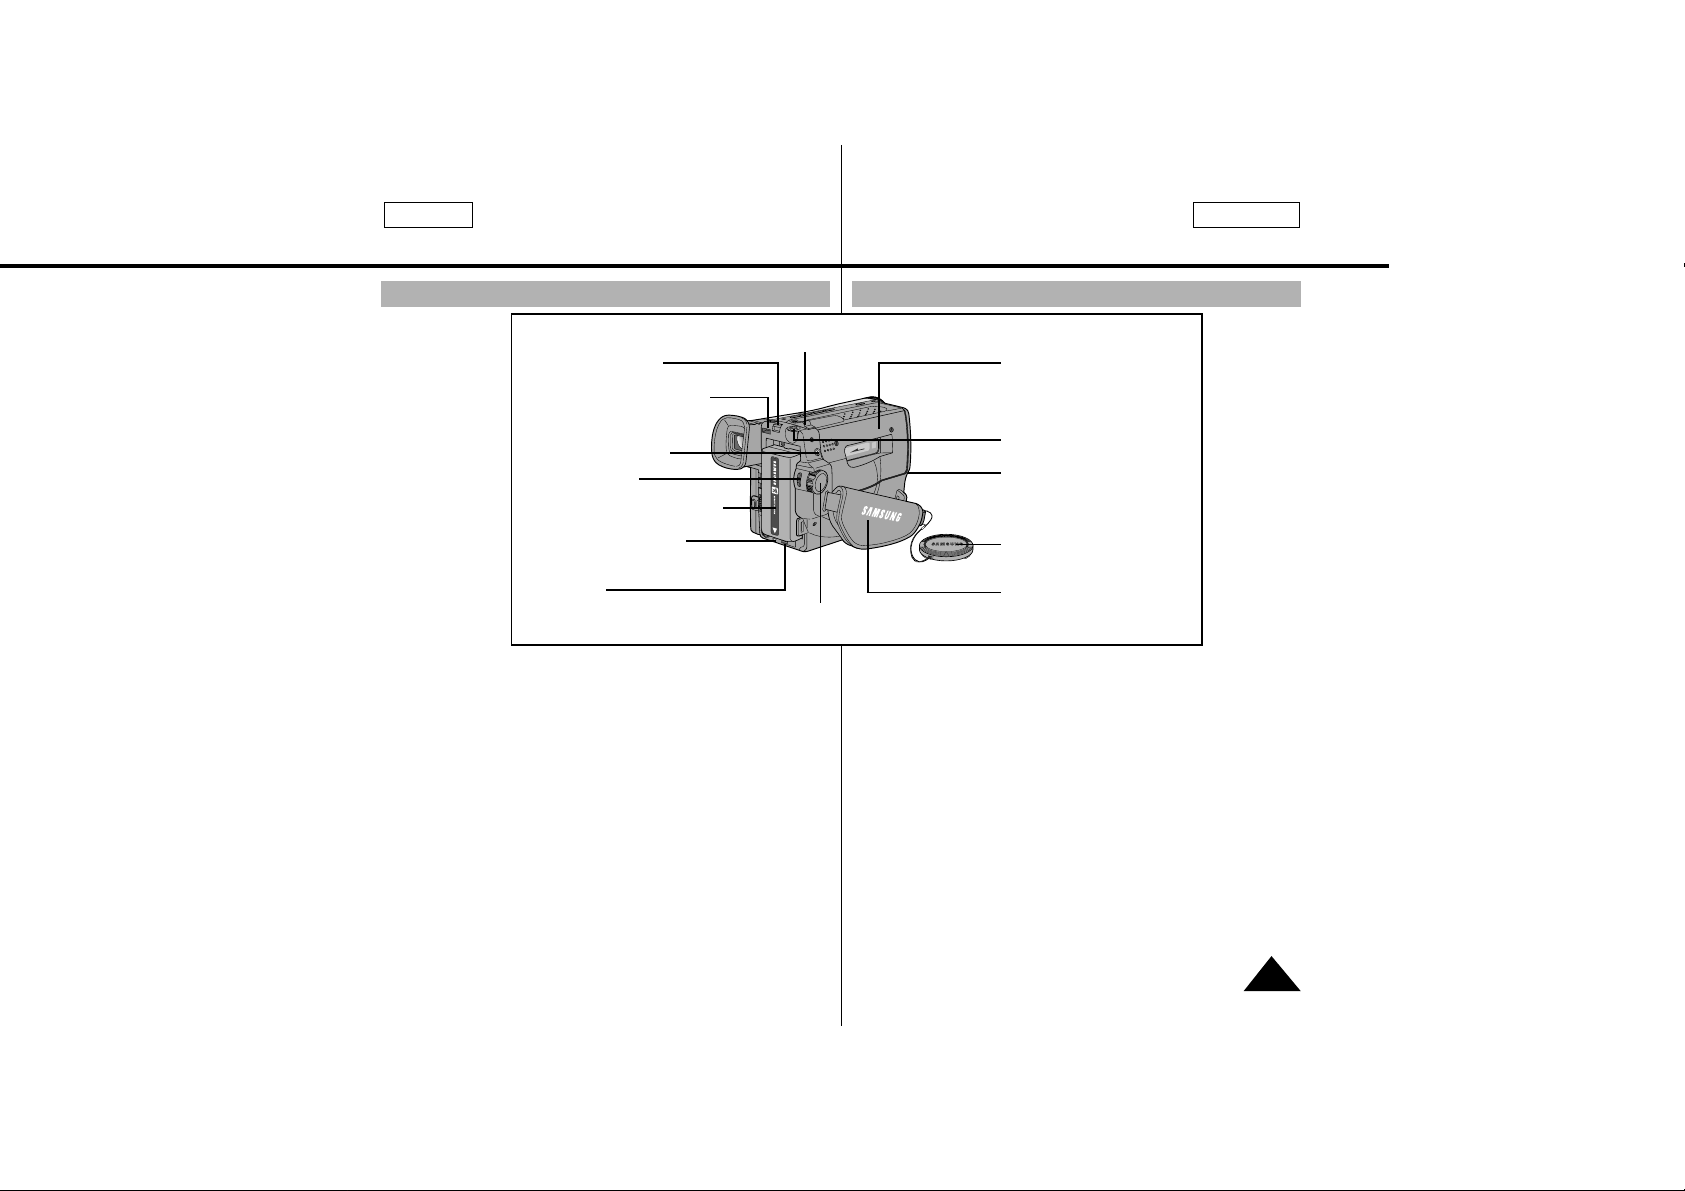
Rear View
FRANÇAIS
ENGLISH
11
25. ZOOM (see page 30)
26. Cassette Compartment
27. Hooks for Shoulder Strap
(see page 17)
28. AUDIO/VIDEO out
(see page 52)
29. LENS Cap
30. Hand Strap (see page 16)
31. POWER Switch (see page 18)
- CAMERA : Select to record.
- OFF : Select to turn off the
camcorder.
- PLAYER :Select to playback.
32. START/STOP (see page 23)
START/STOP works in
CAMERA mode.
33. External MIC (see page 63)
34. DC Jack (see page 18)
35. Battery Pack Compartment
(see page 19)
36. BATTERY EJECT
37. SNAP SHOT/D.ZOOM
SNAP SHOT works in
CAMERA mode.
(SCL630/L650 only,
see page 48)
D.ZOOM works in CAMERA
mode. (SCL600/L610 only,
see page 32)
38. Recharging Indicator
(see page 19)
Vue arrière
25. ZOOM (voir page 30)
26. Compartiment à cassette
27. Anneau pour bandoulière
(voir page 17)
28. Sortie AUDIO/VIDEO
(voir page 52)
29. Cache objectif
30. Poignée de soutien
(voir page 16)
31. Commutateur principal :
trois positions : (voir page 18)
- CAMERA: permet de filmer.
- OFF: l’appareil est éteint.
- PLAYER:mode magnétoscope,
permet la lecture.
32. START/STOP (voir page 23)
Fonctionne en mode Caméscope.
33. Micro externe (voir page 63)
34. Prise DC (voir page 18)
35. Compartiment du bloc batterie
(voir page 19)
36. Éjection du bloc batterie
37. SNAP SHOT/D.ZOOM
SNAP SHOT fonctionne en mode
Caméscope.
(SCL630/L650, voir page 48)
D.ZOOM fonctionne en mode
Caméscope.
(SCL600/L610, voir page 32)
38. Voyant de recharge
(voir page 19)
30. Hand Strap
37. SNAP SHOT/D.ZOOM
26. CASSETTE Compartment
25. ZOOM
33. External MIC
(SCL630/L650)
29. LENS Cap
36. BATTERY EJECT
27. Hooks for shoulder strap
28. AUDIO/VIDEO Out
32. START/STOP
35. Battery Pack Compartment
38. Recharging Indicator
34. DC Jack
31. POWER Switch
Page 12
Getting to Know Your Camcorder
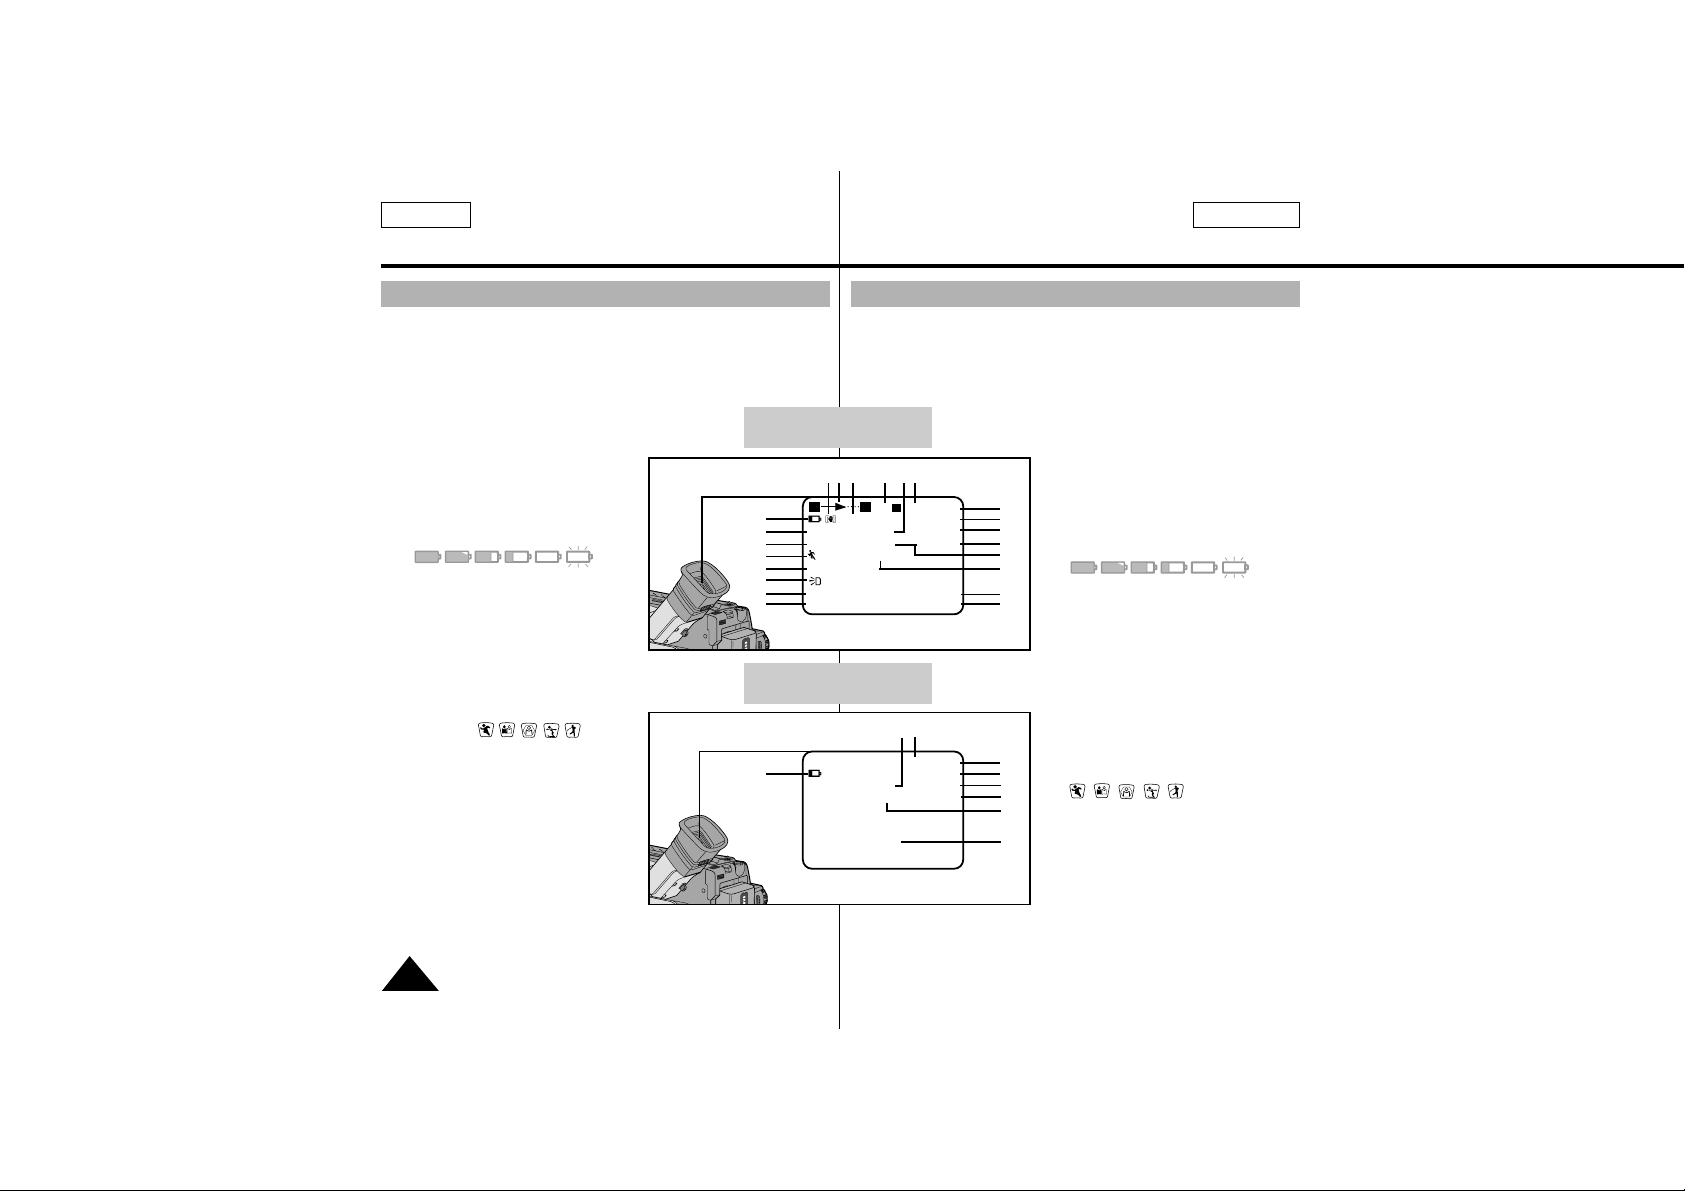
OSD (On Screen Display)
ENGLISH
FRANÇAIS
12
✤ You can turn the OSD on/off by setting the Display menu on/off.
✤ The TITLE, DATE/TIME, EASY and CUSTOM functions can be
operated even after the OSD is turned off.
✤ The OSD is displayed in the viewfinder and the LCD monitor.
OSD in CAMERA mode
OSD in PLAYER mode
a. Zoom position (see page 30)
Indicates zoom position.
b. DIS (SCL630/L650 only)
(see page 35)
Indicates DIS is activated.
c. Battery level (see page 21)
Indicates the power left in the battery.
( )
d. Manual Focus (see page 36)
Indicates manual focus is on.
Auto Focus is not displayed.
e. BLC (see page 37)
Indicates BLC is activated.
f. Program AE (see page 38)
Indicates Program AE mode is
activated. ( , , , , )
g.
Self record waiting timer.
(see page 15)
Indicates 10 second timer.
h. Self record recording timer.
(see page 15)
(30 seconds or END).
i. Date (see page 42)
Indicates the date of the recording.
Familiarisez-vous avec le caméscope
Affichage
✤ Pour activer/désactiver l'affichage dans le viseur et sur l'écran LCD,
utilisez le menu DISPLAY.
✤ Les fonctions titre, date/heure, EASY et CUSTOM sont disponibles,
que l'affichage soit activé ou non.
✤ L’affichage a lieu dans le viseur et sur l'écran LCD.
a. Position du zoom (voir page 30)
Indique la position du zoom.
b. Stabilisateur d’images
(SCL630/L650) (voir page 35)
Indique que la fonction DIS est
activée.
c. Niveau de la batterie (voir page 21)
Indique le niveau du bloc batterie.
( )
d. Mise au point manuelle (voir page 36)
Indique la mise au point manuelle.
Aucune indication n’est affichée
lorsque la mise au point est
automatique.
e. BLC (voir page 37)
Indique que la fonction de compensation
du contre-jour est activée.
f. Exposition automatique (voir page 38)
Indique que le mode d’exposition
automatique est activé.
( , , , , )
g. Minuterie d'attente d'enregistrement
automatique (voir page 15)
Indique 10 secondes d'attente.
h. Minuterie d’enregistrement
automatique (voir page 15)
30 secondes ou END (FIN).
i. Date (voir page 42)
Indique la date à laquelle vous filmez.
c
d
e
f
n
y
g
h
p
o
x
m
l
k
j
i
a s r qb
t
XX
W T 500 Hi8 REC
0:00:00
M.FOCUS DEW
BLC TAPE
PICNIC
INDOOR
WAIT-10S 13:10
SELF-30S AUG. 29, 2001
c
p
o
u
v
l
w
r q
Hi8 PLAY
0:00:25
DEW Z.RTN
TAPE CINEMA
VOLUME
xWT
EASY
CINEMA
Page 13

Getting to Know Your Camcorder
OSD (On Screen Display)
FRANÇAIS
ENGLISH
13
j. Time (see page 42)
Indicates the time you are recording.
k. Title (see page 44)
Indicates the recorded title you have set.
It is superimposed on the scene.
l. Self diagnosis (see page 59)
(TAPE, TAPE END) Checks the operation of the Camcorder.
m. DSE (Digital Special Effect)(see page 40)
Indicates the DSE mode is activated.
The operation modes are GHOST, STROBE, SEPIA, B/W, NEG.,
MIRROR, ART, MOSAIC, WIDE (16:9) and CINEMA.
n. White Balance mode (see page 49)
Indicates the White Balance mode is activated.
The White Balance modes are AUTO, INDOOR and OUTDOOR.
o. Tape counter
Indicates amount of the tape used.
p. Operation mode
Indicates the operation mode is activated.
The operation modes are STBY, REC, STOP, PLAY, FF, REW, EJECT.
q. Hi8 (see page 53)
Indicates you are using Hi8 tape when recording or playing back.
r. DEW condensation (see page 62)
Monitors the moisture condensation.
s. Digital zoom (see page 31)
Indicates digital zoom is activated.
t. Snap Shot (see page 48)
Indicates the time left during Snap Shot Recording.
u. Zero return (see page 54)
Indicates that the zero return is activated.
v. PB DSE (see page 55)
Shows that the PB DSE mode is active.
w. VOLUME (see page 55)
x. EASY & CUSTOM
Shows when the easy or custom mode is active.
y. LIGHT (SCL610/L630/L650)
Shows when the Light is switched on.
Familiarisez-vous avec le caméscope
Affichage
j. Heure (voir page 42)
Indique l'heure à laquelle vous filmez.
k. Titre (voir page 44)
Indique le titre prédéfini choisi pour l’enregistrement.
Il apparaît en surimpression sur scène filmée.
l. Auto-diagnostic (voir page 59)
(TAPE, TAPE END) Contrôle le fonctionnement du caméscope.
m. Effets Numériques Spéciaux (voir page 40)
Indique que ce mode est activé.
Les différents modes sont les suivants : GHOST, STROBE, SEPIA, B/W,
NEG., MIRROR, ART, MOSAIC, WIDE (16:9) et CINEMA.
n. Mode de sélection de l’équilibrage des blancs (voir page 49)
Indique que ce mode est activé.
Les différents modes disponibles sont les suivants: AUTO, INDOOR et
OUTDOOR.
o. Compteur de bande
Indique la quantité de bande utilisée.
p. Mode de fonctionnement
Indique quel mode de fonctionnement est activé. Les différents modes
sont les suivants: STBY, REC, STOP, PLAY, FF, REW et EJECT.
q. Hi8 (voir page 53)
Indique que vous utilisez une cassette Hi 8 en mode d’enregis-trement ou
de lecture.
r. DEW (voir page 62)
Contrôle de la condensation due à l'humidité.
s. Zoom numérique (voir page 31)
Indique que le zoom numérique est activé.
t. Mode Photo (voir page 48)
Indique le temps restant sur la bande pour une prise de vue en mode photo.
u. Remise à zéro (voir page 54)
Indique que la remise à zéro est activée.
v. PB DSE (voir page 55)
Indique que les effets numériques spéciaux sont activés en mode
Magnétoscope.
w. VOLUME (voir page 55)
x. EASY & CUSTOM
Indique que le mode EASY ou CUSTOM est activé.
y. Torche (SCL610/L630/L650)
Indique que la torche vidéo est allumée.
Page 14

Getting to Know Your Camcorder
Accessories Supplied with Camcorder
ENGLISH
FRANÇAIS
14
Make sure that the following basic accessories are supplied with your
camcorder.
Basic Accessories
1. AC Power Adapter. (see page 18)
2. AC cord. (see page 18)
3. Battery Pack. (see page 19)
4. Audio/Video Cable. (see page 52)
5. Shoulder strap. (see page 17)
6. Instruction Book.
7. Remote Control. (see page 15)
(SCL600/L650 only)
8. Lithium Battery for Remote Control.
(see page 15) (SCL600/L650 only)
Lithium Battery for Clock.
(TYPE: CR2025, see page 17)
Optional Accessories
9. S-VIDEO cable. (see page 53)
10. Cassette. (see page 22)
11. Carrying Case.
Note
: Optional accessories may be included with the camcorder,
depending on the country in which it is purchased.
Familiarisez-vous avec le caméscope
Accessoires fournis avec votre caméscope
Assurez-vous que les accessoires de base ci-après ont été livrés avec
votre caméscope.
Accessoires de base
1. Adaptateur secteur. (voir page 18)
2. Câble DC. (voir page 18)
3. Bloc batterie. (voir page 19)
4. Câble AUDIO/VIDEO. (voir page 52)
5. Bandoulière. (voir page 17)
6. Mode d’emploi.
7. Télécommande. (voir page 15)
(SCL600/L650)
8. Pile au lithium pour la télécommande.
(voir page 15) (SCL600/L650)
Pile au lithium pour l’horloge interne.
(type: CR2025, voir page 17)
Accessoires en option
9. Câble S-VIDEO. (voir page 53)
10. Cassette. (voir page 22)
11. Sacoche de transport.
Remarque
: dans certains pays, ces accessoires peuvent être
livrés avec le caméscope.
1. AC Power Adapter
2. AC cord 3. Battery Pack
5. Shoulder Strap
4. AUDIO/VIDEO Cable
6. Instruction Book
7. Remote Control
Video Camcorder
8mm
COLOR
Caméscope
8mm
ÉCRAN LCD COULEUR
8. Lithium Batteries
11. Carrying Case
9. S-VIDEO cable 10. Cassette
START/
STOP
SELF
TIMER
ZERO
RETURN
STILL
COUNTER
RESET
WIDE
TELE
DISPLAY
Page 15
Getting to Know Your Camcorder
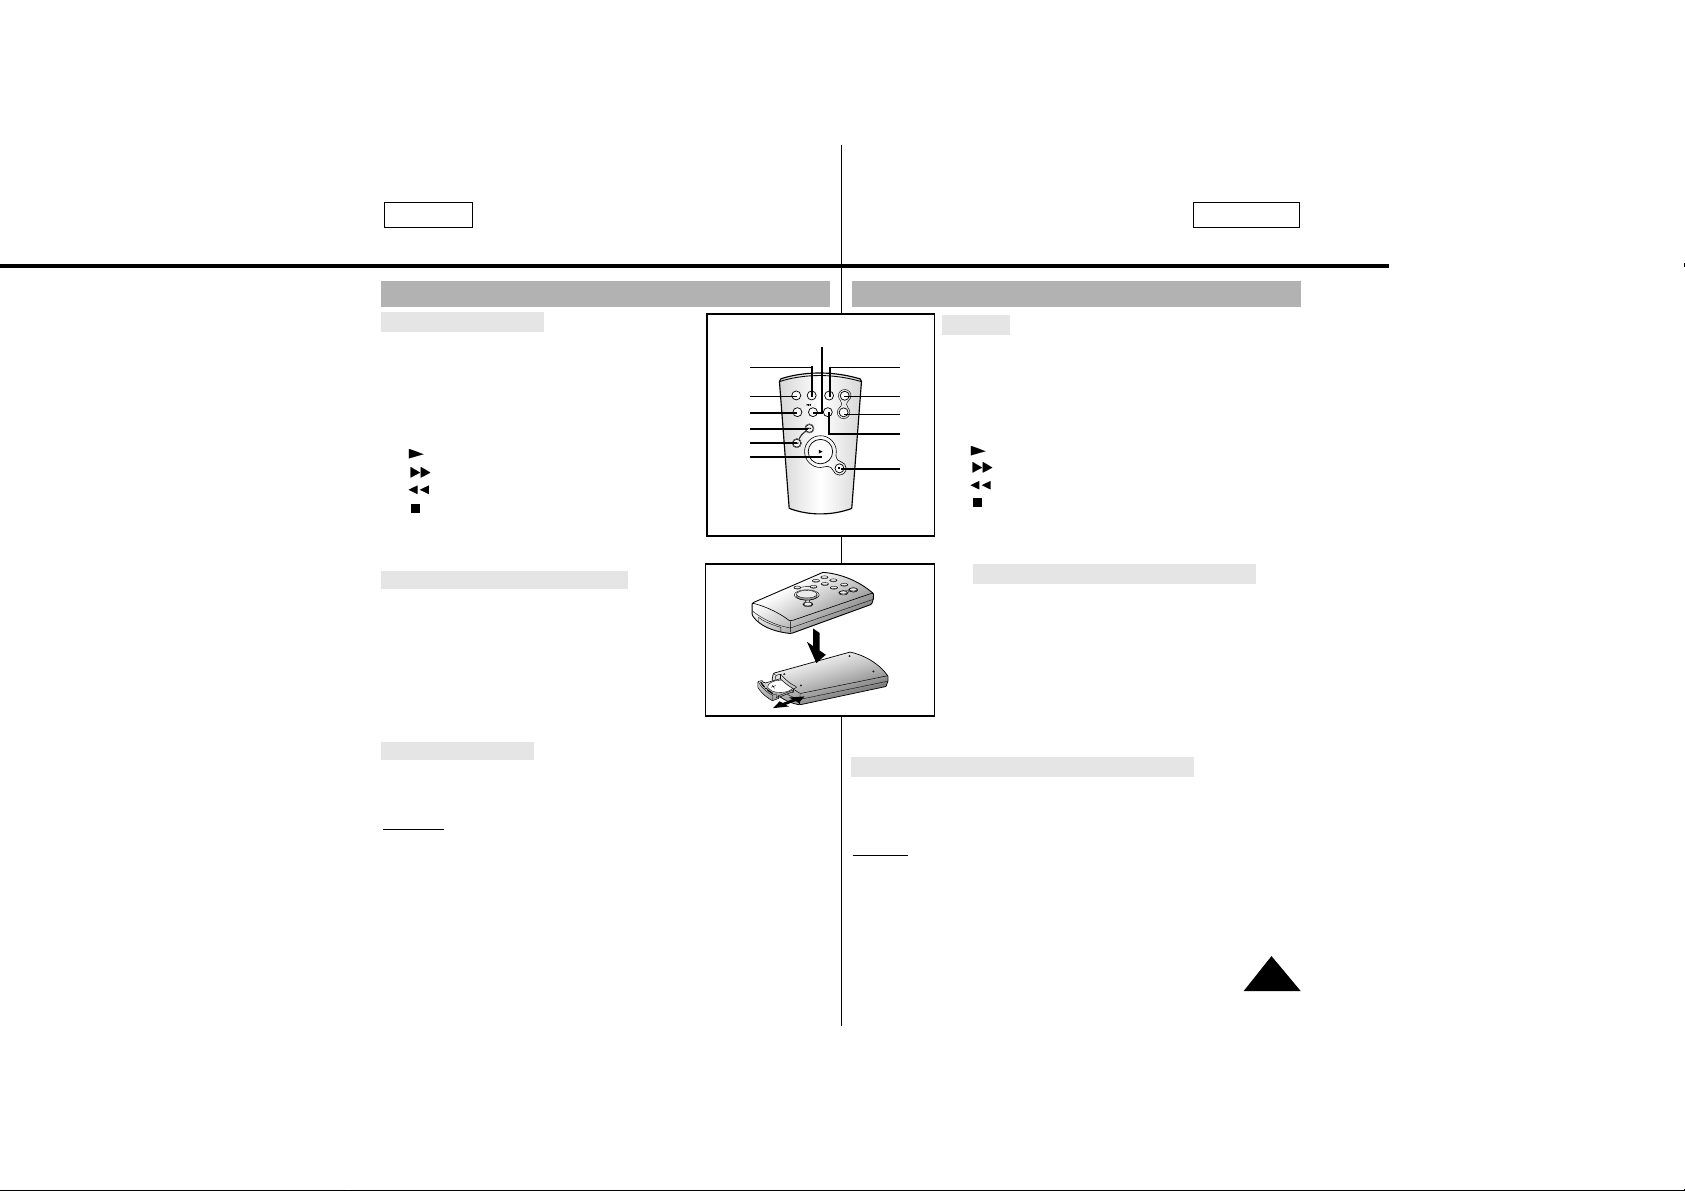
Remote Control (SCL600/L650 only)
FRANÇAIS
ENGLISH
15
Description of Buttons
1. Start/Stop (see page 23)
2. Self Timer
3. Still (see page 54)
4. WIDE (see page 30)
5. TELE (see page 30)
6. Display (see page 12)
7. (Play) (see page 53)
8. (FF) (see page 54)
9. (REW) (see page 54)
10. (Stop) (see page 53)
11. Counter Reset (see page 54)
12. Zero Return (see page 54)
Remote Control Battery Installation
✤ You must insert or replace this battery
when:
- You purchase the camcorder.
- The remote control doesn’t work.
✤ Insert Lithium Battery, following the +
and - markings.
✤ Be careful not to reverse the polarity of the
battery.
Self Timer Recording
✤ The Self Timer function on the remote control allows you to
start and stop recording automatically.
Example:
Recording yourself
✤ Two options are available
- WAIT-10S/SELF-30S: wait 10 seconds, followed by
30 seconds of recording.
- WAIT-10S/SELF-END: wait 10 seconds, followed by
recording until you press the START/STOP button again.
Familiarisez-vous avec le caméscope
Télécommande (SCL600/L650)
Touches
1. Start/Stop (Marche/arrêt, voir page 23)
2. Self Timer (Minuterie automatique)
3. Still (Pause, voir page 54)
4. WIDE (Grand angle, voir page 30)
5. TELE (Téléobjectif, voir page 30)
6. Display (Affichage, voir page 12)
7. (Play) (Lecture, voir page 53)
8. (FF) (Avance rapide, voir page 54)
9. (REW) (Rembobinage, voir page 54)
10. (Stop) (Arrêt, voir page 53)
11 Mise à zéro du compteur (voir page 54)
12. Remise à zéro (voir page 54)
Insertion des piles dans la télécommande
✤ Vous devez insérer ou remplacer les piles:
- à l’achat du caméscope,
- lorsque la télécommande ne fonctionne
plus.
✤ Insérez la pile au lithium en respectant les
signes de polarité + et -.
✤ Veillez à ne pas inverser la polarité de la pile.
Enregistrement automatique avec la télécommande
✤ La fonction de minuterie automatique sur la télécommande vous
permet de démarrer et d’arrêter un enregistrement
automatiquement.
Exemple
: scène regroupant tous les membres de votre famille
✤ Vous avez deux possibilités:
- WAIT-10S/SELF-30S: dix secondes d’attente, suivies de
trente secondes d’enregistrement.
- WAIT-10S/SELF-END: dix secondes d’attente, suivies de
l’enregistrement, jusqu’à ce que vous appuyiez de nouveau
sur la touche START/STOP.
START/
STOP
SELF
TIMER
ZERO
RETURN
STILL
COUNTER
RESET
WIDE
TELE
DISPLAY
6
1
2
8
9
7
11
4
5
12
10
3
Page 16
FRANÇAISENGLISH
Preparing
16
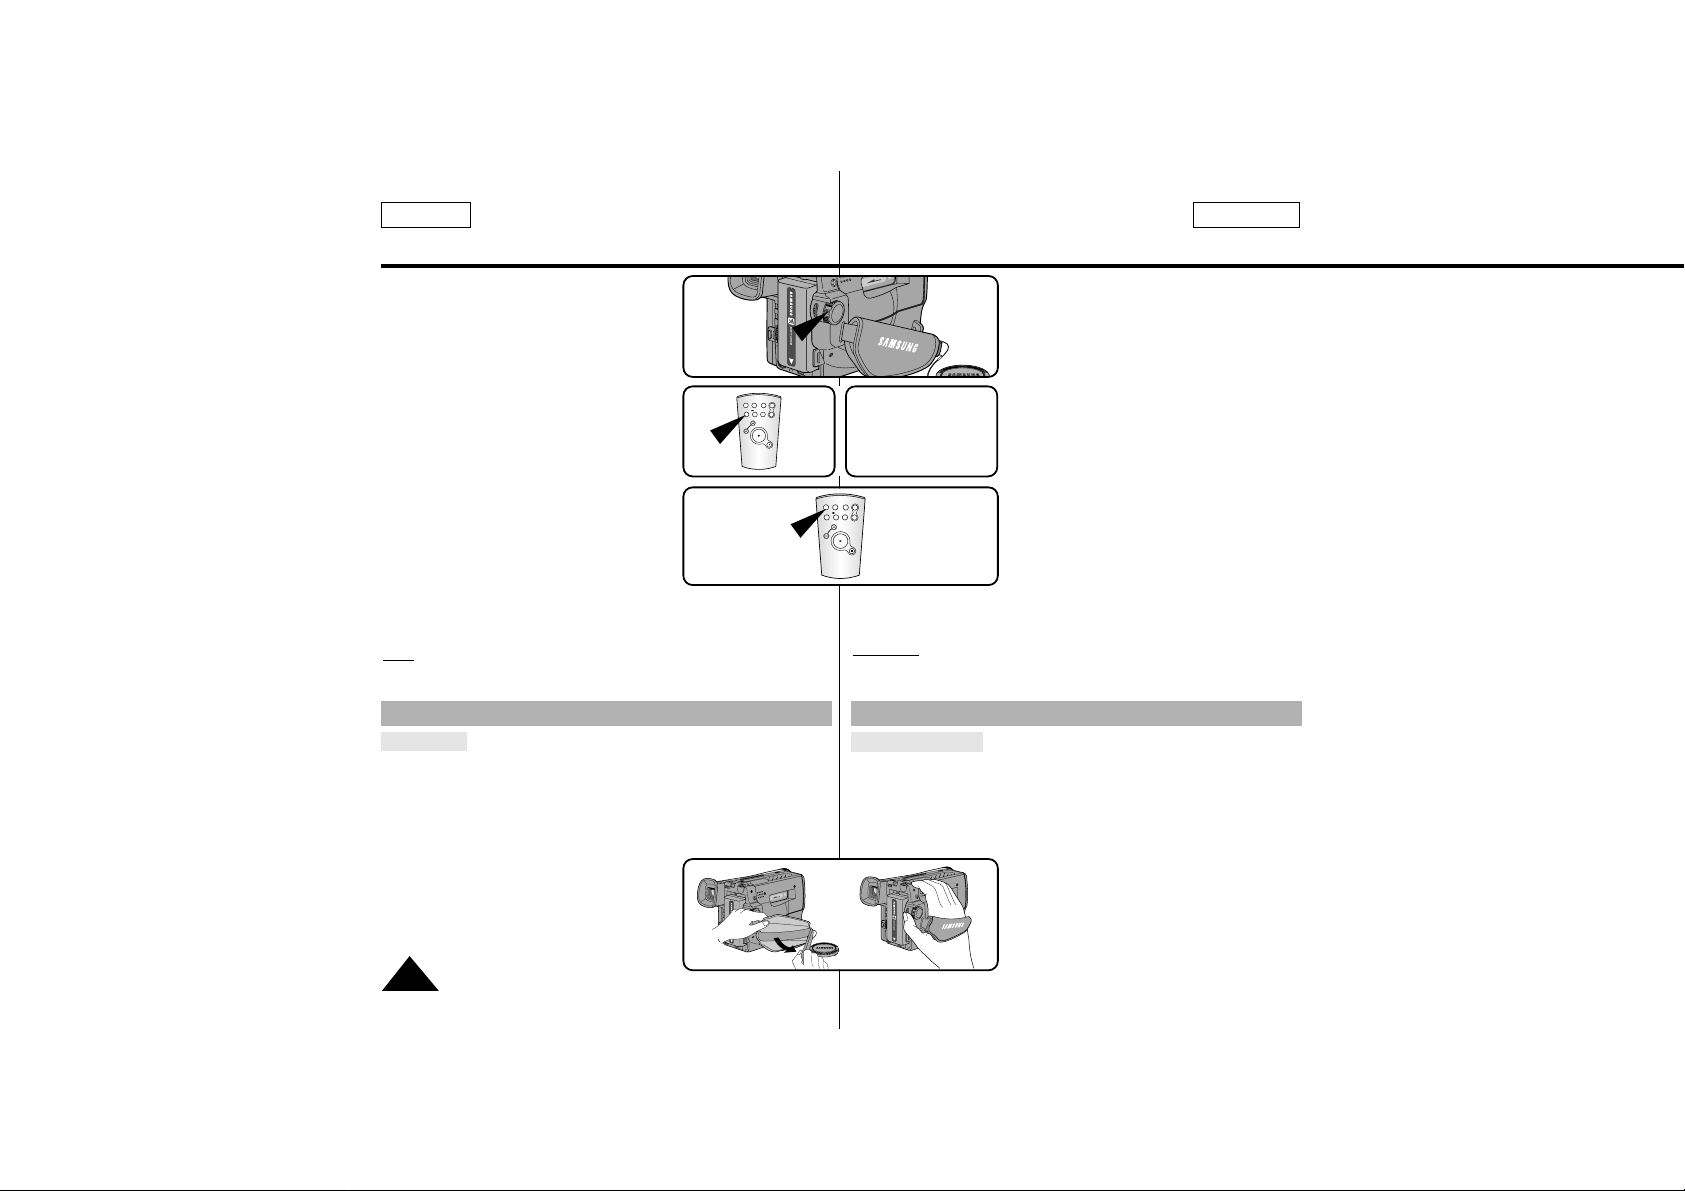
1. Set power switch to CAMERA mode.
2. Press Self Timer button until the
appropriate indicator is displayed on
the LCD:
■ WAIT-10S/SELF-30S
■ WAIT-10S/SELF-END
3. Press START/STOP button to start the
timer.
: After waiting for 10 seconds, recording
starts.
: If you have selected SELF-30S, recording
stops automatically after 30 seconds.
: If you have selected SELF-END, press START/STOP again when
you wish to stop recording.
Note
: When recording with the timer, you can press START/STOP
button again to cancel the function.
Adjusting the Hand Strap and Shoulder Strap
Hand Strap
✤ It is very important to adjust the hand strap for better recording.
✤ The hand strap enables you to:
- Hold the camcorder in a stable, comfortable position.
- Press the Zoom and the red Record button without having to
change the position of your hand.
1. Pull open the Hand Strap cover and
release the Hand Strap, adjust its length
and stick it back onto the Hand Strap cover.
2. Close the Hand Strap cover back up again.
1. Placez le caméscope en mode
Caméscope.
2. Appuyez sur la touche Self Timer, jusqu’à
ce que l’indication souhaitée s’affiche à
l’écran LCD :
■
WAIT -10S/SELF-30S
■
WAIT -10S/SELF-END
3. Appuyez sur la touche START/STOP
pour démarrer la minuterie.
: Après une attente de dix secondes,
l’enregistrement démarre.
: Si vous avez sélectionné SELF-30S,
l’enregistrement s’arrête au bout de
trente secondes.
: Si, au contraire, vous avez sélectionné SELF-END, appuyez de
nouveau sur START/STOP pour arrêter l’enregistrement.
Remarque
: lorsque vous enregistrez avec la minuterie, vous pouvez
appuyer une deuxième fois sur START/STOP pour annuler
la fonction.
Mise en place de la poignée de soutien et de la bandoulière
Poignée de soutien
✤ Il est très important d’ajuster la poignée de soutien afin de filmer
dans les meilleures conditions possibles.
✤ La poignée de soutien vous permet :
-
de maintenir le caméscope dans une position stable et confortable,
-d’appuyer sur le bouton du zoom et sur le bouton rouge
d’enregistrement sans avoir à changer la
position de votre main.
1. Ouvrez le rabat de la poignée en le
décollant. Ajustezla longueur de la poignée,
puis recollez-la.
2. Refermez le rabat.
Réglage du caméscope
1
START/
STOP
SELF
TIMER
ZERO
RETURN
STILL
COUNTER
RESET
WIDE
TELE
DISPLAY
3
START/
STOP
SELF
TIMER
ZERO
RETURN
STILL
COUNTER
RESET
WIDE
TELE
DISPLAY
2
WAIT-10S
SELF-30S
CAMERA
Page 17
FRANÇAISENGLISH
Preparing
17
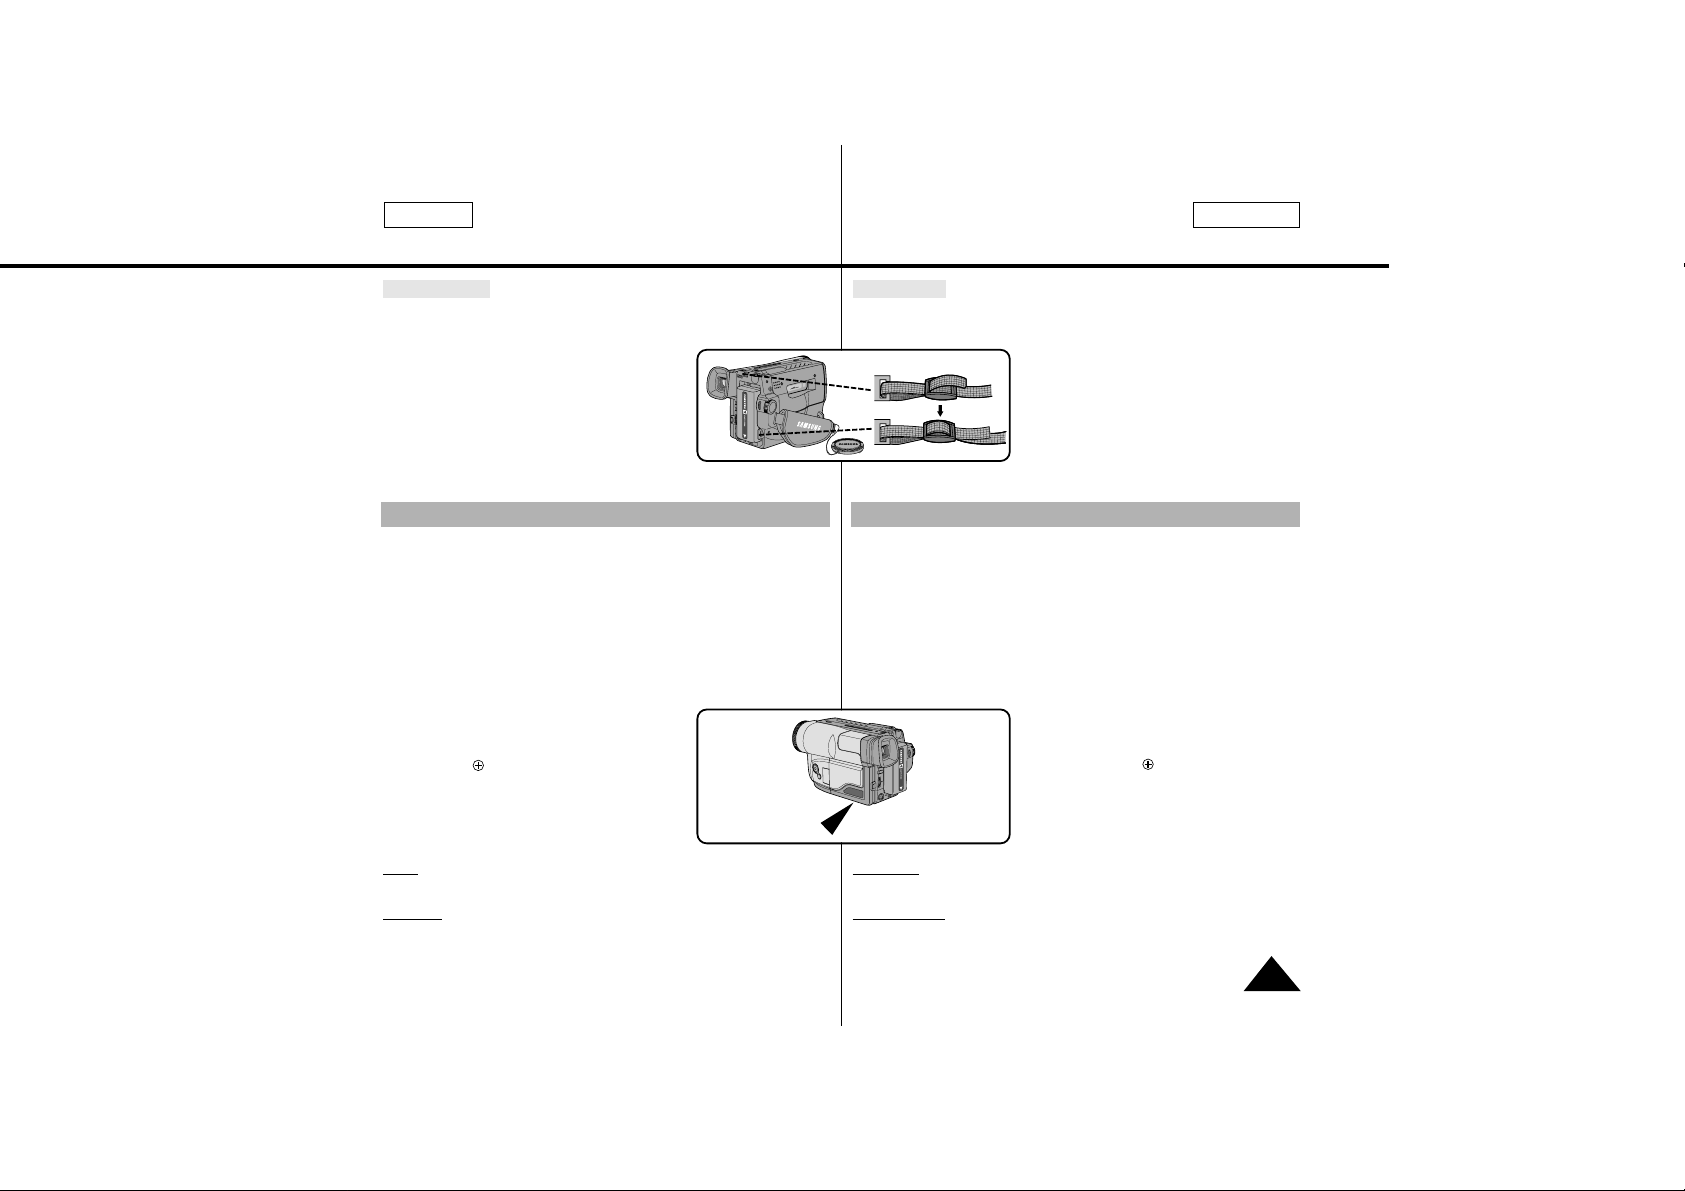
Shoulder Strap
✤ The Shoulder Strap allows you to carry your camcorder with
complete safety.
1. Insert each end of the strap into the hooks
on the camcorder.
2. Put the end of each strap through the buckle,
adjust the length of the strap, then pull it tight
in the buckle .
✤ The lithium battery maintains the clock function, title and preset con-
tents of the memory; even if the battery pack or AC power adapter
is removed.
✤ The lithium battery for the camcorder lasts about 8~10 months
under normal operation from the time of installation.
✤ When the lithium battery becomes weak or dead, the date/time indi-
cator flashes for about 5 seconds when you set the power switch to
CAMERA.
When this occurs, replace the lithium battery with type CR2025.
1. Take out the holder from the lithium battery
compartment.
2. Insert the side of the lithium battery toward
the bottom of the holder.
3. Reinsert the holder into the lithium battery
compartment.
Note:
If the holder is inserted in the wrong direction, it will not fit
correctly.
W
arning: Keep the LITHIUM BATTERY out of the reach of the
children. Should the battery be swallowed,
consult a doctor immediately.
Lithium Battery Installation
Bandoulière
✤ La bandoulière vous permet de porter le caméscope en toute
sécurité.
1. Insérez chaque extrémité de la
bandoulière dans les anneaux de
fixation sur le caméscope.
2. Enfilez ensuite les extrémités dans la
boucle, ajustez la longueur désirée,
puis resserrez la boucle.
✤ La pile au lithium mémorise les fonctions d’horloge et de titrage ainsi
que les réglages prédéfinis, en l’absence du bloc batterie ou de
l’adaptateur secteur.
✤ La longévité de la pile au lithium est de huit à dix mois à partir de
sa mise en place et dans des conditions normales d’utilisation.
✤ Lorsqu’elle s’affaiblit ou est déchargée, l’affichage de la date et de
l’heure clignote pendant cinq secondes environ lorsque vous passez
en mode Caméscope.
Dans ce cas, remplacez-la par une pile de type CR2025.
1. Retirez le cache du compartiment de la
pile au lithium.
2. Placez le côté de la pile au lithium
vers le bas, sur le support.
3. Remettez le cache du compartiment de
la pile au lithium en place.
Remarque
: si le cache est mal emboîté, il ne se mettra pas correctement
en place.
A
vertissement: maintenez la pile au lithium hors de portée des
enfants. Si une pile venait à être avalée,
consultez immédiatement un médecin.
Installation de la pile au lithium
Réglage du caméscope
Page 18
Preparing
Connecting the Power Source
ENGLISH
FRANÇAIS
18
✤ There are two ways to connect power source.
- Using the AC Power Adapter : used for indoor recording.
- Using the Battery Pack: used for outdoor recording.
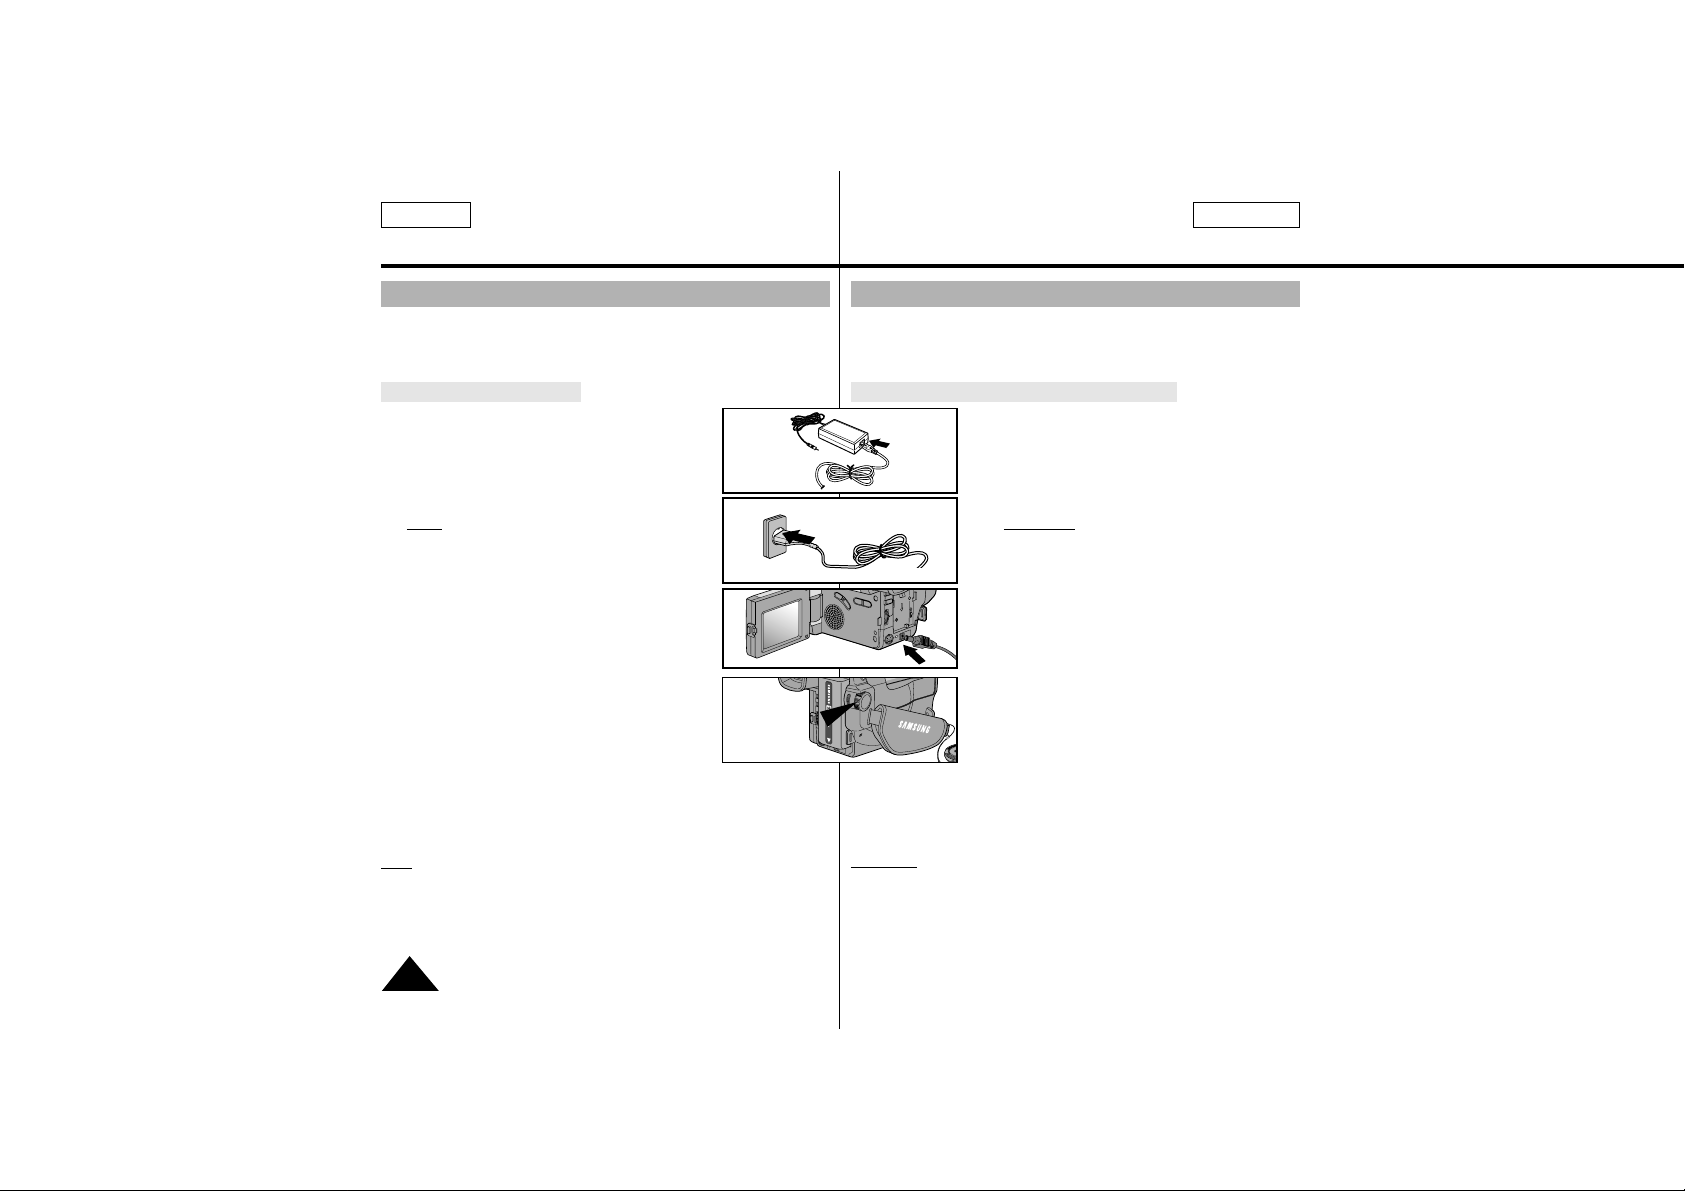
To use the AC Power Adapter
1. Connect the AC Power Adapter to the AC cord.
2. Connect the AC cord to a wall socket.
Note:
The plug and wall socket type may be
different depending on regional conditions.
3. Connect the other end of the DC cable to
DC jack of the camcorder.
4. To set the camcorder to the CAMERAmode.
a. Hold down the tab of the power switch and
push the switch to CAMERA mode.
b. Make sure that the Lens Cap is open.
c. Open the LCD monitor and make sure that
the image appears in the LCD monitor.
- The LCD monitor is turned on automatically when it’s
opened more than 30 degrees.
Note
: If the adapter is used next to a TV or the camcorder, it may
cause the TV or camcorder to emit noise. Move the adapter
away from the TV, camcorder or the antenna cable.
Réglage du caméscope
Connexion d’une alimentation
✤ Deux possibilités d’alimentation s’offrent à vous:
-l’adaptateur secteur et le câble DC: utilisation intérieure,
- le bloc batterie: utilisation extérieure.
Utilisation de l’adaptateur secteur et du câble DC
1. Branchez le câble DC sur l’adaptateur secteur.
2. Connectez l’adaptateur à une prise murale.
Remarque:
le type de fiche et de prise murale
peut différer selon le pays.
3. Connectez l’autre extrémité du câble DC au
caméscope.
4. Placez l’appareil en mode caméscope en suivant
les instructions ci-après.
a. Tout en maintenant appuyé le petit bouton
au milieu du commutateur, placez ce dernier
sur la position CAMERA.
b. Retirez le capuchon de la lentille.
c. Ouvrez l’écran LCD et assurez-vous que
l’image apparaît.
-L’écran LCD s’allume automatiquement
lorsqu’il est ouvert de plus de 30°.
Remarque
: Si vous utilisez l’adaptateur secteur à proximité d’un
téléviseur ou du caméscope, des parasites peuvent
apparaître sur l’écran. Eloignez l’adaptateur du téléviseur,
du caméscope ou du câble de l’antenne.
1
2
3
4-a
CAMERA
Page 19

How long will the battery last for recording?
✤ Depends on how often you are likely to use the zoom feature during
recording.
Recharging the Battery Pack
1. Attach the battery pack to the camcorder.
2. Connect the AC Power Adapter to the AC
cord and connect the AC cord to a wall
socket.
3. Connect the DC cable to the DC jack of
the camcorder.
4. Turn off the camcorder power, and the
recharging indicator will start blinking and
begin recharging.
- Blinking once a second : Indicates less
than 50% has been charged.
- Blinking twice a second : Indicates 50% ~ 75% has been
recharged.
- Blinking three times a second : Indicates 75% ~ 100% has been
recharged.
- Blinking stops and stays on : Recharging has been completed.
- On for a second and off for a second: Indicates there is an error.
Reset the battery pack and DC cable.
5. If recharging is completed, separate the camcorder, AC power
adapter, and battery pack.
■ Even if the power is turned off, battery will be discharged.
Note:
Battery pack may be charged a little at the time of purchase.
Preparing
To use the Battery Pack
FRANÇAIS
ENGLISH
19
Utilisation du bloc batterie
Durée d’enregistrement
✤ De la fréquence d’utilisation du zoom. Par conséquent, disposez
de plusieurs blocs.
Recharge du bloc batterie
1. Installez le bloc batterie sur le caméscope.
2. Connectez l’adaptateur secteur à un câble
d’alimentation et branchez ce câble sur
une prise murale.
3. Branchez le câble DC à la prise DC du
caméscope.
4. Éteignez le caméscope, le voyant de
charge se met alors à clignoter et la
charge commence :
-s’il clignote une fois par seconde,
moins de 50 % de la batterie a été
rechargé;
-s’il clignote deux fois par seconde, 50 % à 75 % de la batterie a
été rechargé;
-s’il clignote trois fois par seconde, 75 % à 100 % de la batterie a
été rechargé ;
- si le voyant reste allumé, la batterie est totalement rechargée;
-s’il s’allume pendant une seconde et s’éteint pendant une
seconde, cela signifie qu’un incident s’est produit. Réinitialisez le
bloc batterie et le câble DC.
5. Si la batterie est entièrement chargée, retirez l’adaptateur secteur et le
bloc batterie du caméscope.
■
La batterie se décharge, même lorsque l’alimentation est coupée.
Remarque
: le bloc batterie peut être déjà en partie chargé à l’achat.
Réglage du caméscope
1
4
2 3
OFF
Page 20

Preparing
ENGLISH FRANÇAIS
20
Using the Battery Pack
Battery
Type
Model
SB-L110A
Approx-
imately
90 minutes
Approx-
imately
130 minutes
Approx-
imately
80 minutes
Approx-
imately
120 minutes
Approx-
imately
80 minutes
Approx-
imately
110 minutes
SB-L160
Approx-
imately
130 minutes
Approx-
imately
190 minutes
Approx-
imately
120 minutes
Approx-
imately
170 minutes
Approx-
imately
110 minutes
Approx-
imately
160 minutes
SB-L320
Approx-
imately
260 minutes
Approx-
imately
390 minutes
Approximately
240 minutes
Approx-
imately
340
minutes
Approx-
imately
230 minutes
Approx-
imately
320 minutes
LCD ON,
EVF OFF
LCD OFF,
EVF ON
LCD ON,
EVF OFF
LCD OFF,
EVF ON
LCD ON,
EVF OFF
LCD OFF,
EVF ON
SCL610
SCL630
SCL650
✤ The continuous recording times given in the table are approximate.
Actual recording time depends on usage.
Notes:
✤ The battery pack should be recharged in a room temperature that is
between 0°C(32°F) and 40°C(104°F). It should never be charged in
a room temperature that is below 0°C(32°F).
✤ The life and capacity of the battery pack will be reduced if it is used
in temperatures below 0°C, even when it is fully recharged.
✤ The life and capacity of the battery pack will be reduced if the bat-
tery pack is left in temperatures above 40°C(104°F) for a long period, even when it is fully recharged.
✤ Do not put the battery pack near any heat source (fire or flames, for
example).
✤ Do not connect +/- of the battery pack.
Réglage du caméscope
Continuous recording time table based on model and
battery type.
Utilisation du bloc batterie
✤ Les durées d'enregistrement indiquées dans le tableau sont
approximatives. Elles varient en fonction de l'utilisation.
Remarques:
✤ Le chargement de la batterie doit être effectué à une température
comprise entre 0°C et 40°C. Il ne doit jamais être effectué dans une
pièce dont la température est inférieure à 0°C.
✤ Même si le bloc batterie est complètement chargé, sa longévité et ses
capacités sont réduites, s’il est utilisé à une température inférieure à
0°C ou s’il est exposé longtemps à une température supérieure à
40°C.
✤ N’exposez pas le bloc batterie à une source de chaleur intense
(feu ou flammes, par exemple).
✤ Ne branchez pas les pôles +/– du bloc batterie.
Tableau des durées d'enregistrement selon le modèle et le
type de batterie
Modèle
SB-L110A
environ
90
minutes
environ
130
minutes
environ
80
minutes
environ
120
minutes
environ
80
minutes
environ
110
minutes
SB-L160
environ
130
minutes
environ
190
minutes
environ
120
minutes
environ
170
minutes
environ
110
minutes
environ
160
minutes
SB-L320
environ
260
minutes
environ
390
minutes
environ
240
minutes
environ
340
minutes
environ
230
minutes
environ
320
minutes
LCD ON,
EVF OFF
LCD OFF,
EVF ON
LCD ON,
EVF OFF
LCD OFF,
EVF ON
LCD ON,
EVF OFF
LCD OFF,
EVF ON
SCL610
SCL630
SCL650
Type
de pile
Page 21

Preparing
FRANÇAIS
ENGLISH
21
Battery Level Display
✤ The battery level display indicates the amount of power remain-
ing in the battery pack.
1. Fully charged
2. 10~40% consumed
3. 40~60% consumed
4. 60~80% consumed
(prepare a charged one)
5. 80~95% consumed
(change the battery)
6. 100% consumed
(camcorder will turn off soon, change the battery
as soon as possible)
✤ Please refer to the table on page 20 for approximate continuous
recording times.
✤ The recording time is affected by environmental temperature
and conditions. The recording time becomes very short in a
cold environment. The continuous recording time in the operating instructions is measured under the condition of using a fully
charged battery pack at 25°C(77°F). As the environmental temperature and conditions may be different when you actually use
the camcorder, the remaining battery time may not be the same
as the approximate continuous recording times given in these
instructions.
Tips for Battery Identification.
A charge mark is provided on the battery pack to help
you remember whether it has been charged or not.
Two colors are provided (red and black)-you may
choose which one indicates charged and which indicates
discharged.
Note
: The charge mark does not affect the battery’s charge status.
1
2
3
4
5
6
Réglage du caméscope
Affichage du niveau de la batterie
✤ Le niveau de la batterie s’affiche pour indiquer la charge restante.
1. Entièrement chargé.
2. Utilisé à 10~40 %.
3. Utilisé à 40~60 %.
4. Utilisé à 60~80 %.
Préparez un bloc batterie chargé.
5. Utilisé à 80~95 %.
Changez le bloc batterie.
6. Utilisé à 100 %.
Le caméscope va bientôt s’éteindre,
changez le bloc batterie dès que possible.
✤ Pour les durées approximatives d'enregistrement, reportez-vous
au tableau de la page 20.
✤ Les durées d'enregistrement en continu sont données pour un
bloc batterie utilisé à 25°C. Les températures et les conditions
ambiantes ont une influence sur la durée d'enregistrement. Dans
un climat froid, celle-ci est raccourcie. Ainsi, si les conditions
dans lesquelles vous utilisez votre caméscope différent de celles
énoncées dans ce mode d’emploi, la durée d’utilisation de votre
bloc batterie peut être différente de celle indiquée dans le tableau
de la page 20.
Astuce pour identifier l’état de la batterie
Un repère figurant sur le bloc batterie vous permet de
savoir s’il a été chargé ou non.
Deux couleurs sont proposées : rouge et noir.
Choisissez-en une pour indiquer que le bloc batterie est
chargé et l’autre qu’il ne l’est plus.
Page 22

ENGLISH FRANÇAIS
22
Preparing
Inserting and Ejecting a Cassette
✤ There are several cassette types, depending on:
- Color system used
- Recording/playback time.
- Hi8
Inserting and Ejecting a Cassette
✤ Check to see if the battery pack is in place or AC adapter is
connected.
1. Press the EJECT button.
- The compartment opens automatically.
- Insert the cassette with the transparent
window facing outward and the
protection tab toward the top.
2. Press the PUSH mark until the
compartment clicks into place.
Note
: When you have recorded a cassette that you
wish to keep, you can protect it from being
accidentally erased.
a. Recording Impossible (Protection):
Push the red tab on the cassette to cover up
the opening.
b. Recording possible:
If you no longer wish to keep the recording on
the cassette, push the red tab back so that it no
longer covers up the opening.
Réglage du caméscope
Insertion et éjection d’une cassette
✤ Plusieurs types de cassettes existent, en fonction :
- du système de couleur utilisé
- de la durée d’enregistrement et de lecture,
- du format Hi8.
Procédure
✤ Vérifiez que le bloc batterie est en place.
1. Appuyez sur le bouton EJECT.
- Le compartiment de la cassette s’ouvre
automatiquement.
- Insérez la cassette en vous assurant
que la fenêtre transparente est tournée
vers l’extérieur et que la languette de
protection de la cassette est vers le haut.
2. Appuyez sur PUSH, jusqu’à ce qu’un déclic
indique que le compartiment est fermé.
Remarque
: lorsque vous avez enregistré une
cassette que vous souhaitez
garder, vous pouvez la protéger
contre un effacement intempestif.
a. Enregistrement impossible (protection):
Faites glisser la languette rouge de la
cassette de façon à ce qu’elle couvre
l'ouverture.
b. Enregistrement possible :
Pour réenregistrer sur une cassette,
repoussez
la languette rouge de façon à ce qu’elle ne
couvre plus l’ouverture.
a.
b.
1
2
TAPE
EJECT
PUSH
Page 23

FRANÇAIS
ENGLISH
23
Basic Shooting
Making Your First Recording
Please make these preparations before recording.
■ Did you connect a power source?
(Battery Pack or AC Power Adapter)
■ Did you set the power switch to CAMERA
position?
■ Did you insert a cassette? (see page 22)
■ Open the LCD monitor and make sure that STANDBY is displayed
in the OSD (if the red tab of the cassette is opened, STANDBY will
not be displayed)
■ Did you open the LENS CAP?
■ Make sure the image you want to record appears in the LCD
monitor.
■ Make sure the battery level indicates that there is enough remaining
power for recording. (see page 21)
■ We recommend that beginners, who are using the camcorder for
the first time, switch the EASY mode on.
a. To start recording, press the red START/STOP
button.
Recording starts and REC should be displayed
on the LCD.
Effectuez un enregistrement simple
Votre premier enregistrement
Vérifiez les points suivants avant de commencer
à filmer.
■
Avez-vous connecté une source d’alimentation
au caméscope (bloc batterie ou câble DC)?
■
Avez-vous placé le commutateur sur la position CAMERA ?
■
Avez-vous inséré une cassette ? (Voir page 22.)
■
Ouvrez l’écran LCD et assurez-vous que l’indication “STBY” est
affichée. (Si la languette rouge de la cassette est ouverte,
cette indication n’apparaît pas.)
■
Avez-vous ouvert le capuchon de la lentille ?
■
Assurez-vous que l’image que vous voulez prendre apparaît à l’écran
LCD.
■
Assurez-vous que le niveau de la batterie indique une charge
suffisante. (Voir page 21.)
■
Il est conseillé aux débutants d'utiliser le mode EASY pour réaliser
leur premier enregistrement.
a. Pour démarrer l’enregistrement, appuyez sur
le bouton rouge START/STOP.
L’enregistrement démarre et l’indication “REC”
s’affiche à l’écran.
REC
X:XX:XX
CAMERA
BATTERY
Page 24

24
ENGLISH FRANÇAIS
Basic Shooting
b. To stop recording, press the red
START/STOP button again.
When Recording stops, STANDBY
should be displayed on the LCD.
When a cassette is loaded and the camcorder is left in STANDBY
mode for over 5 minutes without being used, it will turn off
automatically. To use it again, push the red START/STOP button or
set the power switch to OFF and then back to CAMERA.
This Auto Power Off feature is designed to save battery power and
to protect the Head Drum and tape.
Edit Search
✤ You can view a recorded picture with the
EDIT , function in STANDBY mode.
EDIT allows you to reverse and EDIT
allows you to forward, for as long as you keep
pressing.
✤ If you press the EDIT button briefly in
STANDBY mode, your camcorder will play
back in reverse for 3 seconds and return to
the original position automatically.
Effectuez un enregistrement simple
b. Pour arrêter de filmer, appuyez de
nouveau sur le bouton rouge
START/STOP. L’enregistrement s’arrête et “STBY” s’affiche à l’écran.
Lorsqu’une cassette est insérée et que le caméscope est laissé en
mode veille pendant plus de 5 minutes sans être utilisé, il s’éteint
automatiquement. Pour l’utiliser de nouveau, appuyez sur le bouton
rouge START/STOP ou placez le commutateur principal sur OFF, puis
de nouveau sur CAMERA. Cette fonction a été conçue pour économiser
la durée de la batterie et pour protèger les têtes vides et la cassette.
Recherche de séquences
✤ Vous pouvez visionner une scène précise à
l’aide de la fonction EDIT , en mode
veille. EDIT vous permet de rembobiner et
EDIT d’avancer la bande rapidement, aussi
longtemps que vous appuyez sur ces touches.
✤ Si vous appuyez rapidement sur EDIT en
mode veille, votre caméscope revient en
arrière pendant trois secondes, puis retourne
automatiquement
en lecture à sa position d’origine.
STBY
Y:YY:YY
EDIT
EDIT(Press briefly)
EDIT
Page 25

FRANÇAIS
ENGLISH
25
Basic Shooting
Hints for Stable Image Recording
■ While recording, it is very important to hold the
camcorder correctly.
■ For stable recording, fix the LENS cap firmly by
clipping it on the hand strap. (refer to figure)
Recording with the LCD monitor
1. Hold the camcorder firmly using the hand strap.
(see page 16)
2. Place your right elbow against your side.
3. Place your left hand under or next to the LCD to
support and adjust it. Do not touch the built-in
microphone.
4. Choose a comfortable, stable position for the shots
that you are taking. You can lean against a wall or
on a table for greater stability. Do not forget to
breathe gently.
5. Use the LCD frame as a guide to determine
the horizontal plane.
6. Whenever possible, use a tripod.
Recording with the Viewfinder
1. Hold the camcorder firmly with the hand strap.
(see page 16)
2. Place your right elbow against your side.
3. Place your left hand under the camcorder to
support it.
Do not touch the built-in microphone.
4. Choose a comfortable, stable position for the
shots.
You can lean against a wall or on a table for
greater stability. Do not forget to breathe gently.
5. Put your eye firmly against the eyecap.
6. Use the viewfinder frame as a guide to determine
the horizontal plane.
7. Whenever possible, use a tripod.
Effectuez un enregistrement simple
Astuces pour la stabilité de l’image
■ Lors d’une prise de vue, il est très important de
tenir le caméscope correctement.
■ Pour une prise de vue stable, fixez le capuchon
de la lentille à la poignée de soutien
(reportez-vous à l’illustration).
Utilisation de l’écran LCD
1. Maintenez le caméscope fermement par la
poignée. (voir page 16)
2. Gardez le coude droit le long du corps.
3. Soutenez et ajustez l’écran LCD avec votre main
gauche, en le maintenant par-dessous ou sur le
côté. Ne touchez pas le microphone intégré.
4. Adoptez une position confortable et stable,
adaptée à la vue à prendre ; adossez-vous
éventuellement à un mur ou appuyez-vous sur
une table pour une plus grande stabilité.
N’oubliez pas de respirer doucement.
5. Utilisez l’écran pour déterminer le plan horizontal.
6. Si possible, utilisez un trépied.
Utilisation du viseur électronique
1. Maintenez le caméscope fermement par la
poignée. (voir page 16)
2. Gardez le coude droit le long du corps.
3. Placez votre main gauche sous le caméscope
pour le soutenir. Ne touchez pas le microphone
intégré.
4. Adoptez une position confortable et stable,
adaptée à la vue à prendre; adossez-vous
éventuellement à un mur ou appuyez-vous sur
une table pour une plus grande stabilité.
N’oubliez pas de respirer doucement.
5. Placez votre œil contre l’oculaire du viseur.
6. Utilisez le cadre à l’intérieur du viseur pour vous
aider à déterminer le plan horizontal.
7. Si possible, utilisez un trépied.
Page 26

Basic Shooting
Adjusting the LCD
ENGLISH FRANÇAIS
26
✤ Your camcorder is equipped with a 2.5 inch color Liquid Crystal
Display (LCD) screen, which allows you to view recording or
playback directly.
✤ Depending on the conditions in which you are using the camcorder
(indoors or outdoors for example), you can adjust:
■ Brightness
■ Color
1. Make sure that the battery pack is in place.
2.
Set the power switch to CAMERA mode. (see page 18)
3. Open the LCD monitor, then the LCD will turn on.
4. Press the MENU ON/OFF button,
the MENU list will be displayed.
5. Turn the UP/DOWN dial to LCD ADJUST.
6. Press ENTER.
■ The LCD ADJUST MENU will be displayed.
7. Turn the UP/DOWN dial to adjust
the LCD brightness.
8. Press ENTER.
■ The cursor will move to the next item.
Effectuez un enregistrement simple
Réglage de l’écran LCD
✤ Votre caméscope est équipé d’un écran couleur à cristaux liquides,
de 2,5 pouces, qui vous permet de voir directement ce que vous
enregistrez ou visionnez.
✤ Selon les conditions dans lesquelles vous utilisez le caméscope
(à l’intérieur ou à l’extérieur, par exemple), vous pouvez ajuster:
■ la luminosité,
■ la couleur.
1. Assurez-vous que le bloc batterie est bien en place.
2. Placez le commutateur principal sur la position CAMERA.
(Voir page 18.)
3. Ouvrez l'écran LCD. Celui-ci s'allume.
4. Appuyez sur la touche MENU ON/OFF,
la liste des menus s'affiche.
5. Sélectionnez l’option LCD ADJUST
à l’aide du bouton UP/DOWN.
6. Appuyez sur ENTER.
■ Le menu LCD ADJUST s'affiche.
7. À l’aide du bouton UP/DOWN, sélectionnez
l’option souhaitée : BRIGHT ou COLOUR.
8. Appuyez sur ENTER.
■ L’option suivante est sélectionnée.
LCD ADJUST
CUSTOM SET
CLOCK SET
TITLE SET
TITLE....................OFF
DIS........................OFF
EXIT: MENU
LCD ADJUST
CUSTOM SET
CLOCK SET
TITLE SET
TITLE....................OFF
DIS........................OFF
EXIT: MENU
●
LCD ADJUST
●
BRIGHT 00 17 35
COLOR ..00 17 35
EXIT: MENU
●
LCD ADJUST
●
BRIGHT 00 17 35
COLOR ..00 17 35
EXIT: MENU
●
LCD ADJUST
●
BRIGHT 00 17 35
COLOR ..00 17 35
EXIT: MENU
Page 27

Basic Shooting
Adjusting Focus of the VIEWFINDER
FRANÇAIS
ENGLISH
27
9. Turn the UP/DOWN dial to adjust the LCD color setting.
10. Press ENTER.
■ For further adjustment, repeat steps 7, 8, 9.
11. Press the MENU ON/OFF button to end the setting.
Note:
■ If you do not press a button within 30 seconds, the setting
will disappear.
■ The MENU ON/OFF function will not operate in EASY, REC
or CUSTOM mode.
Focus:
Use the focus adjustment knob of the
VIEWFINDER to focus the picture.
Effectuez un enregistrement simple
9. Tournez le bouton UP/DOWN pour régler l’écran LCD.
10. Appuyez sur ENTER.
■ Pour d'autres réglages, répétez les étapes 7, 8 et 9.
11. Appuyez sur la touche MENU ON/OFF pour quitter le mode de
réglage.
Remarque
: ■ Si au bout de 30 secondes, vous avez appuyé sur
aucune touche, le réglage disparaît.
■ La fonction MENU ON/OFF n'est pas disponible en
mode EASY, REC ou CUSTOM.
Exposition:
Ajustez la mise au point de l’oculaire à l’aide du
levier de réglage du viseur.
Réglage du viseur
Page 28

ENGLISH FRANÇAIS
28
Basic Shooting
Playing back a tape on the LCD
✤ You can monitor the playback picture on the LCD monitor.
✤ Make sure that the battery pack is in place.
1. Hold down the tab of the power switch and
push the switch to PLAYER mode.
2. Insert the tape you have just recorded.
3. Open the LCD monitor and make sure that
STOP is displayed on the OSD.
Adjust the angle of the LCD monitor and set
the brightness or the color if necessary.
4. Press the (REW) button to rewind the tape
to the beginning.
■ To stop REWIND, press the (STOP) button.
■ Camcorder stops automatically after rewinding.
5. Press the (PLAY/STILL) button to start
playback.
■ You can see the video you recorded on the
LCD.
■ To stop the PLAY operation, press the
(STOP) button.
Note:
You can also monitor the picture on a TV screen, after connecting
the camcorder to a TV or VCR. (see page 52)
Effectuez un enregistrement simple
Lecture d’une cassette à l’écran LCD
✤ Vous pouvez visionner les images que vous avez enregistrées sur
l’écran LCD.
✤ Assurez-vous que le bloc batterie est en place.
1. Tout en maintenant appuyé le petit bouton du
commutateur, placez celui-ci sur la position
PLAYER.
2. Insérez une cassette que vous venez
d’enregistrer.
3. Ouvrez l’écran LCD et vérifiez que l’indication
“STOP” est affichée.
Ajustez l’angle de l’écran, sa luminosité et sa
couleur, si nécessaire.
4. Appuyez sur la touche (REW) pour rembobiner la cassette jusqu’à son point de départ.
■ Pour arrêter le rembobinage, appuyez sur la
touche (STOP).
■ Le caméscope s’arrête automatiquement lors-
que la bande a atteint le début de la cassette.
5. Appuyez sur la touche (PLAY/STILL) pour
démarrer la lecture.
■ Vous pouvez visionner à l’écran les images
que vous venez d’enregistrer.
■ Pour arrêter la lecture, appuyez sur la touche
(STOP).
Remarque
: vous pouvez également visionner ces images sur l’écran d’un
téléviseur, après avoir connecté le caméscope au téléviseur
ou à un magnétoscope. (voir page 52)
1
PLAYER
2
PUSH
3
STOP
4
REW STOP
5
PLAY/
STILL
STOP
Page 29

FRANÇAIS
ENGLISH
29
Basic Shooting
Adjusting the LCD during PLAY
The LCD adjustment method in PLAYER mode is identical to step
number 4 of page 26, except the power switch must be set to PLAYER.
Controlling the Sound from the Speaker
✤ When you use the LCD monitor while
playing back, you can hear sound from
the Speaker.
✤ Volume of the Speaker is controlled by
the UP/DOWN dial tab on the camcorder.
✤ If you close the LCD monitor, the LCD moni-
tor and Speaker are turned off.
✤ If the speaker does not work properly, check the following:
■ Is the LCD monitor closed?
■ Is the volume adjusted to a low level?
■ Is the speaker off? (see page 55)
Notes:
■ Lower the volume if vibration from the built-in speaker
causes screen disturbance.
■ Volume display will automatically disappear 2 seconds after
adjusting.
Viewing a Still Picture
■ Press (PLAY/STILL) button during
playback.
■ To resume playback, press the
(PLAY/STILL) button again.
Picture Search
■ Keep pressing (FF) or (REW)
button during playback.
■ To resume normal playback, release
the button.
Effectuez un enregistrement simple
Réglage de l’écran LCD lors de la lecture
Le réglage de l’écran LCD en mode Magnétoscope se fait de la même
manière qu’en mode Caméscope. Cependant le commutateur principal
doit être placé sur la position PLAYER.
Réglage du volume du haut-parleur
✤ Lorsque vous visionnez des images en lecture
sur l’écran LCD, le son sort du haut-parleur.
✤ Le volume du haut-parleur se règle au moyen
de la touche UP/DOWN sur le caméscope.
✤ Si vous fermez l’écran LCD, celui-ci s’éteint et
le haut-parleur du caméscope est coupé.
✤ Si le haut-parleur ne fonctionne pas correctement,
vérifiez les points suivants:
■ L’écran est-il fermé ?
■ Le volume est-il ajusté au niveau le plus faible ?
■ Le haut-parleur a-t-il été désactivé ? (Voir page 55.)
Remarque
: ■ Réduisez le volume si les vibrations du haut-parleur
créent des interférences à l’écran.
■ L’affichage de volume disparait automatiquement
2 secondes après le réglage.
Arrêt sur image
■ Pendant la lecture, appuyez sur
(PLAY/STILL) pour mettre le caméscope
en mode pause.
■ Pour reprendre la lecture, appuyez de
nouveau sur cette touche.
Recherche d’une image
■ Maintenez enfoncée la touche (FF) ou
(REW) pendant la lecture.
■ Pour reprendre la lecture normale, relâchez
la touche.
PLAY/STILL
REW
FF
Page 30

Advanced Recording
Zooming In and Out
ENGLISH FRANÇAIS
30
✤ Zoom works in CAMERA mode only.
✤ Zooming is a recording technique that lets you change the size of
the subject in the picture. For more professional looking recordings,
do not use the zoom function too often.
✤ You can also choose from two zoom speeds to suit different needs :
■ Gradual zoom (9~12 seconds from TELE/WIDE to WIDE/TELE)
■ High-Speed zoom (3~6 seconds from TELE/WIDE to
WIDE/TELE)
✤ Use these features for different shots; please note that overuse of
the zoom feature can lead to unprofessional looking results and a
reduction of battery pack usage time.
1. Move the zoom lever a little for a gradual zoom,
move it further for a high-speed zoom.
Your zooming is monitored on the OSD.
2. T (Telephoto) side:
Subject appears closer.
3. W (Wide angle) side:
Subject appears further away.
Note:
MACRO
If you cannot get a sharp focus in telephoto zoom, move the lever
to the “W” side until the focus is sharp.
You can record a subject that is at least 1 mm away from the lens
surface in the wide angle position.
Perfectionnez vos enregistrements
Utilisation du zoom avant et arrière
✤ Cette fonction n’est disponible qu’en mode Caméscope.
✤ L’utilisation du zoom est une technique d’enregistrement qui vous
permet de changer la taille d’un sujet. Le zoom apporte à vos films
une touche plus professionnelle mais doit être utilisé avec parcimonie.
✤ Deux vitesses de zoom sont disponibles en fonction du type de prise
de vue:
■ zoom progressif (passage du téléobjectif au grand angle et
vice-versa en 9 à 12 secondes),
■ zoom rapide (passage du téléobjectif au grand angle et vice-versa
en 3 à 6 secondes).
✤ Utilisez ces fonctions pour varier vos plans. Notez cependant, qu'une
utilisation trop fréquente risque de donner un aspect amateuriste à
vos films et réduit la durée de vie du bloc batterie.
1. Déplacez doucement le bouton du zoom pour
un zoom progressif et plus vite pour un zoom
rapide. Vous pouvez contrôler l’effet à l’écran.
2. Vers le T (téléobjectif):
Le sujet se rapproche.
3. Vers le W (grand angle):
Le sujet s’éloigne.
Remarque
: MACRO
Si vous n’obtenez pas de mise au point nette en position
téléobjectif maximale, déplacez le levier vers le “W”, jusqu’à
ce que la vue se précise. En position grand angle, vous pouvez filmer un sujet se trouvant au moins à 1 mm de la lentille.
T
W
Page 31

Advanced Recording
Digital Zoom
FRANÇAIS
ENGLISH
31
✤ Digital Zoom works in CAMERA mode only.
✤ Zooms more than 22x are performed digitally.
✤ The picture quality deteriorates as you go towards the “T” side.
✤ We recommend that you use the DIS (SCL630/L650) feature with
the DIGITALzoom for picture stability.
(see page 35)
1. Set the power switch to CAMERA mode. (see page 18)
■ Open the LCD monitor and adjust the LCD monitor so as
to see comfortably.
2. Make sure that the DIGITAL ZOOM feature is on.
(see page 32)
3. When you move the ZOOM lever to the “T” side,
the picture will be enlarged within 22x minimum
to 500x maximum ZOOM.
This is the DIGITALZOOM boundary.
4. If you do not want to use the DIGITAL ZOOM, set the DIGITAL
ZOOM function to OFF in the MENU list. (see page 32)
shows the digital zoom area
shows the optical zoom area
500
▲
x
W T
Perfectionnez vos enregistrements
Utilisation du zoom numérique
✤ Le Zoom numérique ne fonctionne qu’en mode Caméscope.
✤ Un zoom de facteur supérieur à 22 est réalisé numériquement.
✤ La qualité d’image peut se détériorer à mesure que le facteur
d’agrandissement augmente (vers la position “T”).
✤ Pour les modèles SCL630/L650, utilisez de préférence la fonction
EIS pour une plus grande stabilité d’image lors de l’utilisation du zoom
numérique. (voir page 35)
1. Placez le commutateur principal sur la position CAMERA.
(voir page 18)
■ Ouvrez l’écran LCD et ajustez-le de façon à obtenir la
meilleure visualisation possible.
2. Assurez-vous que la fonction Zoom numérique est activée.
(voir page 32)
3. Déplacez de nouveau le réglage du zoom vers
le “T”, le sujet filmé grossit d’un facteur 22 au
facteur 500 qui constitue la limite du zoom
numérique.
4. Si vous ne souhaitez pas utiliser le zoom numérique, désactivez-le en
sélectionnant OFF pour l’option D.ZOOM. (voir page 32)
zone du zoom numérique
zone du zoom optique
500
▲
x
W T
500
x
W
T
W
T
LCD ADJUST
CUSTOM SET
CLOCK SET
.
.
.
D.ZOOM ..............ON
.
.
.
DEMO ..................OFF
3
T
500
x
W
T
Page 32

Advanced Recording
ENGLISH FRANÇAIS
Setting the DIGITAL ZOOM ON/OFF (SCL630/L650)
✤ The DIGITALZOOM feature is explained on page 31.
1. Set the power switch to CAMERA mode. (see page 18)
2. Press the MENU ON/OFF button.
■ The MENU list will appear.
3. Turn the UP/DOWN dial to D. ZOOM.
4. Press ENTER.
■ The DIGITAL ZOOM setting will change.
5. Press the MENU ON/OFF button to end setting.
Setting the DIGITAL ZOOM ON/OFF (SCL600/L610)
1. Set the power switch to CAMERA mode and LOCK/STANDBY
switch to STANDBY mode.
■ Power switch will be changed to CAMERA mode.
2. Press D. ZOOM ON/OFF button.
■ The DIGITAL ZOOM indicators will
be displayed on the screen,
and DIGITALZOOM function will operate.
3. To deactivate the DIGITAL ZOOM function,
press the D.ZOOM button again.
■ The DIGITAL ZOOM indicators disappear
from the screen.
Note:
The D.ZOOM ON/OFF function will not operate in EASY, REC
or CUSTOM mode.
Perfectionnez vos enregistrements
Réglage du zoom numérique (SCL630/L650)
✤ Pour la fonction zoom numérique, reportez-vous à la page 31.
1. Placez le commutateur principal en position CAMERA.
(voir page 18)
2. Appuyez sur la touche MENU ON/OFF.
■ La liste des menus s’affiche.
3. Sélectionnez l’option D. ZOOM à l’aide du
bouton UP/DOWN.
4. Appuyez sur ENTER.
■ Le réglage du ZOOM NUMERIQUE change.
5. Appuyez sur la touche MENU ON/OFF pour
quitter le mode de réglage.
Modèles SCL600/L610
1. Placez le commutateur principal en position CAMERA.
2. Appuyez sur la touche D. Zoom ON/OFF.
■ Le zoom numérique s’affiche sur l'écran et la
fonction Zoom numérique se déclenche.
3. Pour désactiver la fonction Zoom numérique,
appuyez de nouveau sur la touche D.Zoom.
■ Le Zoom numérique disparaît de l'écran.
Remarque
: la fonction D.ZOOM ON/OFF n'est pas disponible en mode
EASY, REC ou CUSTOM.
32
LCD ADJUST
CUSTOM SET
CLOCK SET
.
.
.
D.ZOOM ..............OFF
.
.
.
DEMO ..................OFF
LCD ADJUST
CUSTOM SET
CLOCK SET
.
.
.
D.ZOOM ..............OFF
.
.
.
DEMO ..................OFF
LCD ADJUST
CUSTOM SET
CLOCK SET
.
.
.
D.ZOOM ..............ON
.
.
.
DEMO ..................OFF
D.ZOOM
500
x
W
T
Page 33

FRANÇAIS
ENGLISH
33
EASY Mode (for Beginners)
✤ Even a beginner can easily make a recording using the EASY
mode.
■ The EASY mode only operates in CAMERA mode.
1. Set the power switch to CAMERA mode (see page 18).
2. By pressing the EASY button, all the functions
of the camera will be set to off and the recording
settings will be set to the following basic mode.
■ Battery level, recording mode, counter,
date/time,
DIS ( ) will be displayed as the camcorder
starts to run.
■ The word “EASY” will appear on the LCD at the same time.
However, the Date/Time will only be seen if it has been
previously set.
(DIS ( ) will be displayed on SCL630/L650 only)
3. Press the START/STOP button to start recording.
■ Recording will begin using the basic automatic
environment settings.
4. Pressing the EASY button again turns the EASY mode off.
■ The camera will return to the settings that were set prior
to the EASY mode being switched on.
Notes:
■ In the EASY mode, the MENU, MF, DSE, P.AE, BLC and FADE
functions are not available.
■ If you want to use these functions, you must first switch
the EASY mode off.
■ The EASY mode settings are stored in the camera (provided a
good lithium battery has been installed).
STBY
X:XX:XX
EASY
JAN. 31, 2001
Mode EASY (enregistrement simplifié)
✤ Le mode EASY permet aux débutants de réaliser des prises de
vues de façon très simple.
■ Le mode EASY est uniquement disponible en mode CAMERA.
1. Placez le commutateur principal sur la position CAMERA.
(voir page 18)
2. En mode EASY, toutes les fonctions du
caméscope sont désactivées et les options
d'enregistrement retrouvent leurs réglages
de base.
■ Le niveau de charge de la batterie, le mode
d'enregistrement, le compteur, la date, l'heure
et l'icône DIS ( ) s'affichent au démarrage
de l'enregistrement.
■ L'indication EASY est également affichée sur l'écran LCD.
La date et l'heure apparaissent uniquement si leur affichage a été
activé par avance.
(L'icône DIS ( ) s'affiche uniquement sur les modèles
SCL630/L650.)
3. Appuyez sur la touche START/STOP pour démarrer l'enregistrement.
■ L'enregistrement s'effectue en fonction des réglages automatiques
de base.
4. Appuyez une nouvelle fois sur la touche EASY pour
quitter le mode EASY.
■ Le caméscope retrouve ses réglages antérieurs.
Remarques
:
■ En mode EASY, certaines fonctions telles que MENU, MF, DSE,
P.AE, BLC ou FADE ne sont pas disponibles.
■ Vous devez tout d'abord quitter les mode EASY pour pouvoir
utiliser ces fonctions.
■ Le caméscope garde en mémoire les réglages du mode EASY s'il
dispose d'une pile au lithium suffisamment chargée.
Advanced Recording Perfectionnez vos enregistrements
Page 34

ENGLISH FRANÇAIS
34
Advanced Recording Per fect i onnez vos enregistrements
CUSTOM - Creating your own customized recording settings
✤ You can customize the settings and save them for future use.
■ The CUSTOM function only operates in CAMERA mode.
1. Set the power switch to CAMERA mode.
(see page 18)
2. Press the MENU ON/OFF button, to bring up
the MENU list.
3. Turn the UP/DOWN dial until
CUSTOM..........SET is highlighted.
4. Press the ENTER button, the CUSTOM menu
will appear.
■ Set the status of each item to what you want.
5. To exit the menu, press the MENU ON/OFF
button twice.
6. By pressing the CUSTOM button, the custom
settings will come up.
■ Date/Time and Title will only appear if these
have been set in advance.
■ The word “CUSTOM” will be displayed on
the LCD at the same time.
Example:
When the CUSTOM.........SET is
set as follows;
7. Press the START/STOP button to start recording.
■ Recording will begin using the new CUSTOM settings.
8. To switch Custom off, press the CUSTOM button once.
■ The camera will revert to the settings that were set prior to
the CUSTOM mode being switched on.
Notes:
■ In CUSTOM mode, the MENU, MF, DSE and P.AE functions are
not available.
■ If you want to use these, you must first switch the EASY or
CUSTOM mode off.
■ The CUSTOM settings will be stored in the camera (providing a
good lithium battery has been installed).
Mode CUSTOM - Personnalisation des réglages pour l'enregistrement
✤ Vous pouvez personnaliser et mémoriser les réglages du camés-
cope pour vos enregistrements ultérieurs.
■ La fonction CUSTOM est uniquement disponible en mode
CAMERA.
1. Placez le commutateur principal sur la position
CAMERA. (voir page 18)
2. Appuyez sur la touche MENU ON/OFF pour faire
apparaître le menu.
3. Sélectionnez l'option CUSTOM....SET à l'aide
du bouton UP/DOWN.
4. Appuyez sur la touche ENTER.
Le menu CUSTOM s'affiche.
■ Réglez chaque option à votre convenance.
5. Appuyez deux fois sur la touche MENU ON/OFF
pour quitter le menu.
6. Appuyez sur la touche CUSTOM pour remplacer
les anciens réglages par vos nouveaux réglages.
■ La date, l'heure et le titrage apparaissent
uniquement si leur affichage a été activé par
avance.
■ L'indication CUSTOM s'affiche sur l'écran LCD.
Exemple
: lorsque l'option CUSTOM...SET
est réglée comme suit ;
7. Appuyez sur la touche START/STOP pour démarrer l'enregistrement.
■ L'enregistrement s'effectue selon vos nouveaux réglages.
8. Appuyez sur la touche CUSTOM pour quitter le mode CUSTOM.
■ Le caméscope retrouve ses réglages antérieurs.
Remarques
:
■ En mode CUSTOM, certaines fonctions telles que MENU, MF,
DSE ou P.AE ne sont pas disponibles.
■ Vous devez tout d'abord quitter les modes EASY ou CUSTOM
pour pouvoir utiliser ces fonctions.
■ Le caméscope garde en mémoire les réglages du mode CUSTOM
s'il dispose d'une pile au lithium suffisamment chargée.
Pressing the CUSTOM button,
displays
●
CUSTOM
●
DIS ....................ON
D.ZOOM ............ON
WHT.BAL ..........AUTO
DISPLAY............OFF
D/TIME ..............DATE
TITLE ................AUTO-10S
EXIT: MENU
LCD ADJUST
CUSTOM SET
CLOCK SET
TITLE SET
TITLE....................OFF
DIS........................OFF
EXIT: MENU
LCD ADJUST
CUSTOM SET
CLOCK SET
TITLE SET
TITLE....................OFF
DIS........................OFF
EXIT: MENU
●
CUSTOM
●
DIS ....................ON
D.ZOOM ............OFF
WHT.BAL ..........OUTDOOR
DISPLAY............ON
D/TIME ..............DATE
TITLE ................OFF
EXIT: MENU
STBY
0:00:00
CUSTOM
OUTDOOR
Page 35

FRANÇAIS
ENGLISH
35
Advanced Recording
DIS (Digital Image Stabilizer, SCL630/L650 only)
✤ The DIS function works in CAMERA mode only.
✤ DIS (Digital Image Stabilizer) is a handshake compensation function
that compensates for any shaking or moving of the hand holding the
camcorder (within reasonable limits).
✤ It provides more stable pictures when:
■ Recording in the Zoom In mode
■ Recording a small object close-up
■ Recording and walking at the same
time
■ Recording through the window of a
vehicle
1.
Set the power switch to CAMERA mode. (See page 18)
■ Open the LCD monitor and adjust it to see comfortably.
2. Press the MENU ON/OFF button.
■ The MENU list will appear.
3. Turn the UP/DOWN dial to DIS.
4. Press ENTER.
■ The DIS setting will change.
5. Press the MENU ON/OFF button to end the setting.
■ When the DIS is set, the DIS mark
()
will
displayed on the OSD.
Notes:
1. It is recommended you deactivate
the handshake
compensation function when using a tripod.
2. The DIS function will not operate in the DSE mode.
3. The MENU ON/OFF function will not operate in EASY or
CUSTOM mode.
Stabilisateur d’images (SCL630/L650)
✤ La fonction EIS n’est disponible qu’en mode Caméscope.
✤ La fonction de stabilisation d'images (touche EIS) compense,
dans des limites raisonables, le léger tremblement qui peut survenir
en filmant.
✤ Ainsi, une bonne mise au point est
assurée lors d’un enregistrement:
■ en mode zoom,
■ d’un petit objet de près,
■ en marchant,
■ à travers la fenêtre d’un véhicule.
1. Placez le commutateur principal sur la position CAMERA.
(voir page 18)
■ Ouvrez l’écran LCD et réglez-le de façon à obtenir la meilleure
visualisation possible.
2. Appuyez sur la touche MENU ON/OFF.
■ La liste des menus s’affiche.
3. Sélectionnez l’option DIS à l’aide du bouton
UP/DOWN.
4. Appuyez sur ENTER.
■ Le réglage de l’option DIS change.
5. Appuyez sur la touche MENU ON/OFF pour
quitter le mode de réglage.
■ Lorsque la fonction DIS est activée,
l’indication DIS ( ) s’affiche.
Remarque
: 1. Il est préférable de désactiver la fonction de stabilisation
d’images lorsque vous utilisez un trépied.
2. La fonction DIS ne fonctionne pas en modes DSE.
3. La fonction MENU ON/OFF n'est pas disponible en mode
EASY ou CUSTOM.
Perfectionnez vos enregistrements
➔
➔
LCD ADJUST
CUSTOM SET
CLOCK SET
TITLE SET
TITLE....................OFF
DIS........................OFF
.
.
DEMO ..................OFF
LCD ADJUST
CUSTOM SET
CLOCK SET
TITLE SET
TITLE....................OFF
DIS........................OFF
.
.
DEMO ..................OFF
LCD ADJUST
CUSTOM SET
CLOCK SET
TITLE SET
TITLE....................OFF
DIS........................ON
.
.
DEMO ..................OFF
Page 36

ENGLISH FRANÇAIS
36
Advanced Recording
MF/AF (Manual Focus/Auto Focus)
✤ The MF/AF function works in the CAMERA mode only.
✤ In most situations, it is better to use the Automatic Focus feature, as
it enables you to concentrate on the creative side of your recording.
✤ Manual focusing may be necessary under certain conditions that
make automatic focusing inadequate.
Auto Focusing
✤ The AF (Auto Focus) mode is set automatically when you switch
on the Power switch.
✤ If you are inexperienced with camcorders, we recommend that
you use the Auto Focus mode.
Manual Focusing
✤ In the following situations, you should obtain better results by
adjusting the focus manually.
a. A picture containing several objects, some close to
the camcorder, others further away.
b. A person enveloped in fog or surrounded by snow.
c. Very shiny or glossy surfaces like a car.
d. People or objects moving constantly or quickly like
an athlete or crowd.
1. Set the power switch to CAMERA mode.
(see page 18)
2. Press the MF button.
3. Zoom in the subject to be recorded by pushing
the ZOOM tab to the “T” side.
Perfectionnez vos enregistrements
Mise au point manuelle/automatique (MF/AF)
✤ Cette fonction n’est disponible qu’en mode Caméscope.
✤ Dans la plupart des cas, il est recommandé d’utiliser la mise au point
automatique lors de vos tournages, ce qui vous permet de vous
concentrer sur la composition des images.
✤ Dans certains cas, l’utilisation de la mise au point manuelle peut
s’avérer nécessaire si la mise au point automatique est inadéquate.
Mise au point automatique
✤ Lorsque vous allumez le caméscope, le mode AF (mise au point
automatique) est sélectionné automatiquement.
✤ Il est préférable d’utiliser ce mode si vous n'avez pas l'habitude de
filmer.
Mise au point manuelle
✤ Vous obtiendrez de meilleurs résultats en effectuant une mise au
point manuelle, dans les cas suivants :
a. Image contenant plusieurs objets, certains proches
du caméscope, d’autres éloignés.
b. Sujet dans la neige ou la brume, sujet derrière une
vitre.
c. Surfaces très brillantes (une voiture, par exemple).
d. Contraste important entre les parties droite et
gauche de l’image, sujets ou objets en déplace-
ment rapide ou continu (un sportif ou une foule,
par exemple).
1. Placez le commutateur principal sur la position
CAMERA. (voir page 18)
2. Appuyez sur la touche MF.
3. Poussez le bouton ZOOM vers le “T” pour faire un
plan rapproché du sujet à filmer.
Page 37

FRANÇAIS
ENGLISH
37
Advanced Recording
BLC
BLC works in the CAMERA mode.
Back lighting exists when the subject is darker than the background:
- The subject is placed in front of a window.
-
The person to be recorded is wearing white
or shiny clothes and is placed against a
bright background; the person’s face is too
dark to distinguish their features.
- The subject is outdoors and the
background is overcast.
- The light sources are too bright.
- The subject is against a snowy background.
1.
Set the power switch to CAMERA mode. (see page 18)
2. Press BLC button.
■ Normal - BLC - Normal
■ BLC enhances only the subject.
Note:
BLC function will not operate in P.AE or EASY mode.
* BLC off
4. Turn the UP/DOWN dial up or down until
the object is focused.
5. You will obtain a sharp picture after zooming
out.
6. To return to AF(Auto Focus), press the MF
button again.
Note:
The MF function will not operate in EASY,
CUSTOM or MENU mode.
Perfectionnez vos enregistrements
Fonctions BLC
Les fonctions BLC ne sont disponibles qu’en mode Caméscope. Un contrejour apparaît lorsque le sujet est plus sombre que son environnement:
- le sujet se trouve devant une fenêtre,
- la personne filmée porte des vêtements
clairs ou brillants devant un fond lumineux:
son visage devient trop sombre,
- le sujet est à l’extérieur, sur fond de ciel
couvert,
- il existe des sources lumineuses trop vives,
- le sujet se trouve sur un fond enneigé.
1. Placez le commutateur principal sur la position CAMERA.
(voir page 18)
2. Appuyez sur la touche BLC.
■ Normal - BLC - Normal
■ BLC met en évidence uniquement le sujet.
Remarque
: la fonction BLC n'est pas disponible en mode P.AE ou
EASY.
4. Tournez le bouton UP/DOWN vers le haut ou
vers le bas, jusqu’à ce que le sujet devienne net.
5. Vous obtenez alors une image nette en grand
angle.
6. Pour retourner en mode automatique, appuyez
de nouveau sur la touche MF.
Remarque
: la fonction MF n'est pas disponible en
mode EASY, CUSTOM ou MENU.
* BLC on
Page 38

ENGLISH FRANÇAIS
38
Advanced Recording
PROGRAM AE (Automatic Exposure)
✤ The PROGRAM AE function works in the CAMERA mode only.
✤ The PROGRAM AE modes allow you to adjust shutter speeds and aper-
ture to suit different recording conditions. They give you creative control
over the depth of the field.
✤ There are 6 automatic exposure modes.
1. AUTO mode
■ Auto balance between the subject and the background.
■ To be used in normal conditions.
■ The shutter speed automatically varies from 1/60 to 1/250 second,
depending on the picture.
2. SPORTS mode ( )
■ For recording people or objects moving quickly; you should able to
play back the picture in slow motion on an 8 mm VCR or stop on a
given image with very little blur.
3. PORTRAIT mode ( )
■ For focusing on the background of the subject, the background
being out of focus.
The PORTRAIT mode is most effective when used outdoors.
■ The shutter speed automatically varies from 1/60 to 1/1000 second,
depending on the picture.
4. SPOTLIGHT mode ( )
■ To record correctly when there is only light on the subject and not
the rest of the picture.
■ The shutter speed is 1/60 second.
5. SAND/SNOW mode ( )
■ For recording when the people or objects are darker than the background because of reflected light from sand or snow.
■ The shutter speed automatically varies from 1/60 to 1/250 second,
depending on the picture.
6. HSS (High Speed Shutter) mode
()
■ For recording fast-moving subjects such as the players in golf or
tennis games.
■ You may need to light the recording area.
Perfectionnez vos enregistrements
Sélection d’un mode d’exposition automatique
✤ Cette fonction n’est disponible qu’en mode Caméscope.
✤ Les modes disponibles avec la fonction PROGRAM AE permettent
d’adapter automatiquement la vitesse d'obturateur et la diaphragme
selon la scène à filmer.
✤ Six modes sont disponibles.
1. Mode AUTO
■ Équilibrage automatique entre le sujet et l’arrière-plan.
■ À utiliser dans des conditions normales.
■ La vitesse d’obturateur varie automatiquement de 1/60ème à
1/250ème de seconde, selon la scène.
2. Mode SPORTS ( )
■ Prise d’un personnage ou d’un objet se déplaçant rapidement, pour
permettre de visionner les images sur un magnétoscope au format
8 mm en mode ralenti ou pause sans qu’elles soient floues.
3. Mode PORTRAIT ( )
■ Mise en valeur d’un personnage en avant-plan, l’arrière-plan étant
flou. Le mode PORTRAIT est à utiliser de préférence à l’extérieur.
■ La vitesse d’obturateur varie automatiquement de 1/60ème à
1/1000ème de seconde, selon la scène.
4. Mode SPOTLIGHT ( )
■ Pour filmer correctement lorsque seul le sujet est éclairé et que le
reste de la scène ne l’est pas.
■ La vitesse d’obturateur est de 1/60ème de seconde.
5. Mode SAND/SNOW ( )
■ Pour filmer des sujets plus foncés que l’arrière-plan, du fait de
reflets de lumière sur la mer ou la neige.
■ La vitesse d’obturateur varie automatiquement de 1/60ème à
1/250ème de seconde, selon la scène.
6. Mode HSS (vitesse d’obturateur élevée) ()
■ Prise d’un sujet se déplaçant à très grande vitesse, tel que des
joueurs de golf ou de tennis.
■ Il se peut que la zone à filmer doive être éclairée.
Page 39

FRANÇAIS
ENGLISH
39
Advanced Recording Perfectionnez vos enregistrements
Setting the PROGRAM AE(Automatic Exposure) mode
1. Set the power switch to CAMERA mode. (see page 18)
2. Press the P.AE button, the ( ) symbol will be
displayed.
3. Press the P.AE button until the appropriate
symbol is displayed.
(
➔➔➔➔)
■ No Display : Full Auto mode.
Notes:
■ The screen status that is changed by the P.AE button will be
recorded on the tape.
■ To end the P.AE function, press the P.AE button once or several
times, until the P.AE Icon is no longer displayed.
■ The P.AE function will not operate in EASY or CUSTOM mode.
■ The BLC function will not operate in P.AE mode.
Réglage du mode PROGRAM AE (exposition automatique)
1. Placez le commutateur principal sur la position CAMERA.
(voir page 18)
2. Appuyez sur la touche P.AE.
L'icône ( ) s'affiche.
3. Appuyez sur la touche P.AE jusqu'à ce que
l'icône correspondant au type de prise de vues
souhaité s'affiche.
(
➔➔➔➔)
■ L'absence d'icône indique que le mode
PROGRAM AE est désactivé.
Remarques
:
■ En cas de changement du mode d'exposition durant la prise de
vues, l'icône correspondant au nouveau mode sera enregistrée
sur la bande.
■ Appuyez sur la touche P.AE jusqu'à ce que l'icône P.AE
disparaisse pour désactiver cette fonction.
■ La fonction P.AE n'est pas disponible en mode EASY ou
CUSTOM.
■ La fonction BLC n'est pas disponible en mode P.AE.
STBY
0:00:00
CUSTOM
JAN. 31, 2001
Page 40

ENGLISH FRANÇAIS
40
Advanced Recording
DSE (Digital Special Effects) in CAMERA mode
✤ The digital effects enable you to give a creative look to your record-
ing by adding various special effects.
✤ Select the appropriate digital effect for the type of picture that you
wish to record.
✤ There are several DSE modes.
(SCL600/L610: 8 modes, SCL630/L650: 10 modes)
1. Normal picture.
2. GHOST: This mode gives the image a dragging
effect. (SCL630/L650 only)
3. STROBE: This mode works by inserting a cutting effect on the image. There are 50 fields in
a normal recorded picture. (SCL630/L650 only)
4. SEPIA: This mode gives the image a SEPIA
effect.
5. B/W(Black & White): This mode allows the image
to be recorded in black and white.
6. NEG.(Negative): This mode allows images to be
recorded by reflecting the color of the image.
7. MIRROR: This mode cuts the image in half,
using the mirror effect.
8. ART: Adds a paint-like effect, called solarization,
to the image.
9. MOSAIC: This mode gives the image a checkered design.
10. WIDE(16:9): This mode provides a WIDE(16:9)
television display.
11. CINEMA: This mode covers the upper/lower
portion of the screen to give a movie-like effect.
Notes:
■ DIS, PIP and SNAP SHOT functions
will not operate in DSE mode.
(SCL630/L650 only)
■ DSE function will not operate in EASY or
CUSTOM modes.
Perfectionnez vos enregistrements
Effets numériques spéciaux en mode Caméscope
✤ Les effets numériques spéciaux disponibles (DSE) vous permettent
de donner un caractère original à vos films en ajoutant différents
effets spéciaux.
✤ Sélectionnez l’effet souhaité selon le type de scène et le résultat
à obtenir.
✤ Plusieurs modes DSE sont disponibles :
8 modes pour les modèles SCL600/L610 et
10 modes pour les modèles SCL630/L650.
1. Image normale.
2. GHOST (reflet): ce mode donne du reflet à l’im-
age. (SCL630/L650)
3. STROBE: effet stroboscopique. (SCL630/L650)
4. SEPIA: ce mode donne aux images un effet
sépia.
5. B/W (Noir et blanc): ce mode permet d’obtenir
une image monochrome (noir et blanc).
6. NEG. (Négatif): ce mode permet de filmer en
prenant le reflet de la couleur de l’image.
7. MIRROR (miroir): ce mode coupe l’image en
deux en utilisant l’effet miroir.
8. ART : ce mode donne aux images un effet de
solarisation.
9. MOSAIC (mosaïque): ce mode pixellise les
images.
10. WIDE (16:9): ce mode permet la restitution de
l’image sur un grand écran (type 16:9ème).
11. CINEMA: ce mode ajoute des bandes noires en
haut et en bas de l’image pour donner l’effet
d’une image de film.
Remarque
: ■ les fonctions DIS, PIP et SNAP SHOT ne sont
pas disponibles en mode DSE. (SCL630/L650)
■ La fonction DSE n'est pas disponible en mode
EASY ou CUSTOM.
12
3
7
6
8
10
5
9
4
11
Page 41

FRANÇAIS
ENGLISH
41
Advanced Recording Perfectionnez vos enregistrements
Selecting and recording DSE effects
1. Set the power switch to CAMERA mode.
(see page 18)
2. Press the DSE button, GHOST or SEPIA will
be displayed.
3. Keep pressing the DSE button, until the desired
mode is displayed.
4. Press the START/STOP button to start recording.
5. To exit the DSE functions, press the DSE button
once or several
times until no DSE mode is displayed on the LCD.
Notes: ■ It is recommended that you set the DSE mode in STBY mode.
■ DSE functions will not operate in EASY or CUSTOM modes.
■ DIS, PIP and SNAP SHOT functions will not operate in
DSE mode.
Enregistrement avec effets numériques spéciaux (DSE)
1. Placez le commutateur principal en position
CAMERA. (voir page 18)
2. Appuyez sur la touche DSE. L'indication GHOST
ou SEPIA s'affiche.
3. Appuyez sur la touche DSE jusqu'à ce que le nom
de l'effet désiré s'affiche.
4. Appuyez sur la touche START/STOP pour
démarer l'enregistrement.
5. Pour désactiver la fonction DSE, appuyez sur la
touche DSE jusqu'à disparition de l’indication du
mode DSE.
Remarques
: ■ Il est vivement conseillé de placer le mode DSE en
mode STBY.
■ Les fonctions DSE ne sont pas disponibles en mode
EASY ou CUSTOM.
■ Les fonctions DIS, PIP et SNAP SHOT ne sont pas
disponibles en mode DSE.
STBY
X:XX:XX
GHOST
Page 42

ENGLISH FRANÇAIS
42
Advanced Recording
Setting and Recording the DATE/TIME
✤ Setting and recording the date/time feature works in the CAMERA
mode only.
✤ You can record the date/time on your tapes, so you will know when it
was made. The date and time are recorded whenever they are displayed on the viewfinder or LCD.
Setting a DATE/TIME
✤ Setting the DATE/TIME is possible in STANDBY of CAMERA
mode only.
1.
Make sure that you have installed the LITHIUM BATTERY. (see page 17)
The LITHIUM BATTERY is needed to maintain the clock.
2.
Set the power switch to CAMERA mode.
(see page 18)
3. Press the MENU ON/OFF button,
then the MENU list will appear.
4. Turn the UP/DOWN dial until CLOCK...........SET
is highlighted.
5. Press ENTER.
■ CLOCK SETTING is possible when
the DATE and TIME appear.
■ BLINKING indicates the possible changes
for the setting. The year will be the first
to blink.
6. Turn the UP/DOWN dial to set the desired year.
Perfectionnez vos enregistrements
Réglage et enregistrement de la date et de l’heure
✤ Le réglage et l'enregistrement de la date et de l'heure sont disponibles
uniquement en mode Caméscope.
✤ Vous pouvez incruster la date et l’heure sur les films que vous enreg-
istrez, pour vous souvenir plus tard de leur date de tournage. Dans la
mesure où la date et l’heure apparaissent sur l’écran LCD ou dans le
viseur, elles sont enregistrées sur la bande.
Réglage de la date et de l’heure
✤ Le réglage de la date et de l’heure est possible en mode
Caméscope uniquement.
1. Vérifiez que la PILE AU LITHIUM est installée. (voir page 17)
Cette pile permet de mémoriser l’horloge.
2. Placez le commutateur principal sur la position
CAMERA. (voir page 18)
3. Appuyez sur la touche MENU ON/OFF,
la liste des menus s’affiche.
4. Sélectionnez l'option CLOCK......SET à l'aide du
bouton UP/DOWN.
5. Appuyez sur ENTER.
■ Vous pouvez régler la fonction CLOCK
SETTING lorsque la DATE et l’HEURE
s’affichent.
■ Quand ces données clignotent, cela signifie
que vous pouvez modifier les réglages.
L’année clignote en premier.
6. Sélectionnez l’année souhaitée à l’aide du
bouton UP/DOWN.
●
CLOCK SET
●
0:00
AUG. 29, 2002
●
CLOCK SET
●
0:00
AUG. 29, 2005
LCD ADJUST
CUSTOM SET
CLOCK SET
TITLE SET
TITLE....................OFF
DIS........................OFF
EXIT: MENU
LCD ADJUST
CUSTOM SET
CLOCK SET
TITLE SET
TITLE....................OFF
DIS........................OFF
EXIT: MENU
Page 43

FRANÇAIS
ENGLISH
43
Advanced Recording
7. Press ENTER.
■ The month to be reset will blink.
8. Turn the UP/DOWN dial to set the desired month.
9. Press ENTER.
■ The day to be reset will blink.
10. You can set the day, hour and minute following
the same procedure used for setting the year and
month.
11. Press ENTER after setting the minute and the clock setting screen
will disappear. The selected date and time will then be displayed.
Recording the DATE/TIME
1. Make sure that you have set the DATE/TIME.
2. Set the power switch to CAMERA mode.
(see page 18)
■ Open the LCD monitor and adjust it to see
comfortably.
3. Press the DATE/TIME button the required
number of times.
■ To record the date only, press the DATE/TIME button once.
■ To record the date and time, press the DATE/TIME button twice.
4. Press the START/STOP button to record the DATE/TIME on your
recording.
Note:
■ If your date and time settings are not maintained in the
camcorder, it means the installed LITHIUM BATTERY is
discharged. (see page 17)
■ You cannot conceal the recorded date or time during playback.
■ The DATE/TIME function will not operate in EASY or CUSTOM
mode.
Perfectionnez vos enregistrements
7. Appuyez sur ENTER.
■
Le mois clignote.
8. Sélectionnez le mois souhaité à l’aide du bouton
UP/DOWN.
9. Appuyez sur ENTER.
■
Le jour clignote.
10. Vous pouvez régler l'année, l'heure et les minutes
en suivant la même procédure utilisée pour régler
l'année et le mois.
11. Appuyez sur ENTER une fois les minutes réglées, l'écran de réglage
disparaît. La date et l'heure sélectionnées s'affichent.
Enregistrement de la date et de l’heure
1. Vérifiez que la fonction DATE/HEURE est activée.
2. Placez le commutateur principal sur la position
CAMERA. (voir page 18)
■
Ouvrez l’écran LCD et ajustez-le de façon à
obtenir la meilleure visualisation possible.
3. Appuyez sur la touche DATE/TIME le nombre de
fois requis.
■
Pour enregistrer uniquement la date, appuyez une fois sur la
touche DATE/TIME.
■
Pour enregistrer la date et l’heure, appuyez deux fois sur la
touche DATE/TIME.
4. Appuyez sur le bouton START/STOP pour enregistrer la date et
l’heure sur la scène à filmer.
Remarque
:
■
Si le caméscope ne conserve pas les réglages de l’horloge, cela
signifie que la pile au lithium est déchargée. (Voir page 17.)
■
Si la date et l’heure ont été enregistrées sur la bande, elles ne
peuvent pas être masquées lors de la lecture.
■
La fonction DATE/TIME n'est pas disponible en mode EASYou
CUSTOM.
●
CLOCK SET
●
0:00
AUG. 29, 2005
●
CLOCK SET
●
0:00
AUG. 29, 2005
●
CLOCK SET
●
0:00
AUG. 29, 2005
Page 44

ENGLISH FRANÇAIS
44
Advanced Recording
Selecting and Recording a Title
✤ Selecting and recording a TITLE is possible in the CAMERA mode
only.
✤ The TITLE feature allows you to select a preset title stored in the
camcorder’s memory.
✤ You can also select the language of the titles.
Selecting a Language and Setting a Title
✤ Selecting a language is possible in STANDBY in CAMERAmode
only.
✤ The factory default language is ENGLISH.
You can change the language.
1. Make sure that you have installed the LITHIUM BATTERY or
have the adapter attached. (see page 17)
2. Set the power switch to CAMERA mode. (see page 18)
■ Open the LCD monitor and adjust it to see comfortably.
3. Press the MENU ON/OFF button. The MENU list will appear.
4. Turn the UP/DOWN dial until TITLE...........SET
is highlighted.
5. Press ENTER.
■ A list of available languages will appear.
Perfectionnez vos enregistrements
Sélection et enregistrement d’un titre
✤ La sélection et l’enregistrement d’un titre ne sont possibles qu’en
mode Caméscope.
✤ La fonction TITLE permet de sélectionner un titre prédéfini mémorisé
dans le caméscope.
✤ Vous pouvez également sélectionner la langue des titres.
Sélection d'une langue et d'un titre
✤ La sélection de la langue est possible uniquement en mode
veille (STANDBY) du mode Caméscope.
✤ La langue par défaut est l’ANGLAIS, mais vous pouvez la
changer.
1. Vérifiez que la PILE AU LITHIUM est installée. (voir page 17)
2. Placez le commutateur principal sur la position CAMERA.
(voir page 18)
■ Ouvrez l’écran LCD et ajustez-le de façon à obtenir la meilleure
visualisation possible.
3. Appuyez sur la touche MENU ON/OFF.
La liste des menus s’affiche.
4. Sélectionnez l'option TITLE.....SET à l'aide du
bouton UP/DOWN.
5. Appuyez sur ENTER.
■ La liste des langues disponibles s'affiche.
LCD ADJUST
CUSTOM SET
CLOCK SET
TITLE SET
TITLE....................OFF
DIS........................OFF
EXIT: MENU
LCD ADJUST
CUSTOM SET
CLOCK SET
TITLE SET
TITLE....................OFF
DIS........................OFF
EXIT: MENU
ENGLISH(HAVINGFUN)
FRENCH
GERMAN
ITALIAN
SPANISH
RUSSIAN
EXIT: MENU
Page 45

FRANÇAIS
ENGLISH
45
Advanced Recording Perfectionnez vos enregistrements
6. Turn the UP/DOWN dial to select
the appropriate language.
■ You may select languages from
ENGLISH/FRENCH/GERMAN/
ITALIAN/SPANISH/RUSSIAN.
7. Press ENTER.
■ Then, the title list in the language you chose will appear.
8. Turn UP/DOWN dial to whichever TITLE you
desire.
9. Press ENTER.
■ The selected title will appear on the screen for 2 ~ 3 seconds
and will disappear. At the same, the camcorder will return to
the menu mode.
Recording a Title
Note: ■ Make sure that you have selected
a TITLE.
1. Set power switch to CAMERA mode.
■ Open the LCD monitor and adjust it to
see comfortably.
2. Press MENU.
3. Turn the UP/DOWN dial until TITLE...........OFF is highlighted.
4. Press ENTER to choose between OFF, AUTO-10S, and CONTINUE.
5. Press START/STOP button to record the title with your picture.
■ If you want to change recording time, select title recording time
(OFF, AUTO-10S, CONTINUE) on MENU.
Notes:
■ The title moves horizontally from the right side to
the left side 10 seconds after you turn on the title.
■ MENU ON/OFF function will not operate in EASY or
CUSTOM mode.
6. Sélectionnez la langue à l'aide du bouton
UP/DOWN.
■ Vous pouvez choisir une langue parmi
ANGLAIS/FRANCAIS/ALLEMAND/
ITALIEN/ESPAGNOL/RUSSE.
7. Appuyez sur ENTER.
■ La liste des titres disponibles s'affiche dans la langue
sélectionnée.
8. Sélectionnez un titre à l'aide du bouton
UP/DOWN.
9. Appuyez sur ENTER.
■ Le titre sélectionné s'affiche pendant 2 à 3 sec
ondes.
Le caméscope retourne alors en mode menu.
Enregistrement d'un titre
Remarque: ■ Vérifiez qu'un titre est sélectionné.
1.Placez le commutateur principal sur la position
CAMERA.
■ Ouvrez l'écran LCD et ajustez-le de façon à
obtenir la meilleure visualisation possible.
2. Appuyez sur MENU.
3. Sélectionnez l'option TITLE.....OFF à l'aide du bouton UP/DOWN.
4. Press ENTER to choose between OFF, AUTO-10S, and CONTINUE.
5. Appuyez sur la touche START/STOP pour enregistrer le titre avec
l'image.
■ La durée d'enregistrement du titre (OFF, AUTO-10S, CONTINUE)
peut être modifiée à partir du menu.
Remarques
: ■ Le titre se déplace horizontalement de la droite vers la
gauche 10 secondes après l'activation de la fonction.
■ La fonction MENU ON/OFF n'est pas disponible en
mode EASY ou CUSTOM.
ENGLISH
FRENCH
GERMAN
ITALIAN
SPANISH
RUSSIAN
ANNIVERSARY
CONGRATULATIONS
GRADUATION
HAPPY BIRTHDAY
HAPPY NEW YEAR
HAVING FUN
Page 46

ENGLISH FRANÇAIS
46
✤ The FADE function works in CAMERAmode only.
✤ You can give your films a professional look by using special effects
such as fading in and out at the beginning or end of a sequence.
To Start Recording
1. Before recording, hold down the
FADE button.
The picture and sound gradually
disappear (fade out).
2. Press the START/STOP button and at the
same time release the FADE button.
Recording starts and the picture and sound
gradually appear (fade in).
To Stop Recording (using FADE IN / FADE OUT)
3. When you wish to stop recording, hold down
the FADE button.
The picture and sound gradually disappears
(fade out).
4. When the picture has disappeared,
press the START/STOP button to
stop recording.
a. FADE OUT
(Approx. 4 seconds)
b. FADE IN
(Approx. 4 seconds)
Note:
The FADE function will not operate in EASY mode.
✤ La fonction FADE n’est disponible qu’en mode Caméscope.
✤ Lors du tournage de vos films, vous pouvez utiliser certains effets spé-
ciaux, tels que le fondu en ouverture ou en fermeture, afin de donner
un aspect professionnel à vos séquences.
Début de l’enregistrement
1. Avant de démarrer l’enregistrement,
maintenez appuyée la touche FADE.
L’image et le son disparaissent
progressivement (fondu en fermeture).
2. Appuyez sur le bouton (START/ STOP) tout
en relâchant la touche FADE.
L’enregistrement commence : l’image et le
son apparaissent progressivement (fondu
en ouverture).
Fin de l’enregistrement (avec fondu)
3. À la fin de l’enregistrement, maintenez
appuyée la touche FADE. L’image et le
son disparaissent progressivement
(fondu en fermeture).
4. Lorsque l’image a disparu, appuyez sur
la touche START/STOP pour arrêter
l’enregistrement.
a. FONDU EN FERMETURE
(4 secondes environ)
b. FONDU EN OUVERTURE
(4 secondes environ)
Remarque
: la fonction FADE n'est pas disponible en mode EASY.
Press the FADE button a. FADE OUT Gradual disappearance
Gradual appearance b. FADE IN Release the FADE button
Advanced Recording
Perfectionnez vos enregistrements
Fade In and Out
Fondu en ouverture ou en fermeture
➔
➔
➔
➔
STBY
0:00:00
REC
0:00:15
REC
0:00:15
STBY
0:00:15
➔
➔
➔
➔
Page 47

FRANÇAIS
ENGLISH
47
✤ The PIP(Picture-In-Picture) feature works in combination with the
DIGITALZOOM function by using a small, superimposed screen to
show an image that is wider than the image being recorded. This
should help you to get a more clear idea of what you are recording.
- The PIP function works in CAMERA mode only.
1. Set the power switch to CAMERA mode and
LOCK/STANDBY switch to STANDBY mode.
2. Turn on DIGITALZOOM. (see page 31)
3. Press the MENU ON/OFF button, the MENU
List will be displayed.
4. Turn the UP/DOWN dial until PIP..........OFF
is highlighted.
5. Press ENTER, the PIP ON and a small screen
should appear.
6. Check which part you are recording on the
PIP screen, and turn the Zoom button to “T”
position to activate the DIGITALZOOM mode.
■ Start recording by pressing the
START/STOP button when the portion
you want to record appears.
7. Setting PIP......ON to OFF in the MENU will make the small screen
disappear and switch the PIP mode off.
Note:
■ When you use PIP function while making a recording,
the PIP screen will be recorded on the Tape.
■ The MENU ON/OFF function will not operate in EASY, REC
or CUSTOM mode.
■ PIP function will not operate in DSE mode.
✤ La fonction PIP (Image sur Image) fonctionne avec la fonction ZOOM
NUMÉRIQUE en incrustant un petit écran qui montre une image plus
large que l'image filmée. Ceci doit vous permettre d’avoir une
meilleure idée de ce que vous êtes en train de filmer.
- La fonction PIP est disponible uniquement en mode Caméscope.
1. Placez le commutateur principal sur la position CAMERA et le bouton LOCK/STANDBY
sur le mode veille (STANDBY).
2. Activez la fonction Zoom numérique.
(Voir page 31.)
3. Appuyez sur la touche MENU ON/OFF.
La liste des menus s’affiche.
4. Sélectionnez l'option PIP.....OFF à l'aide du
bouton UP/DOWN.
5. Appuyez sur la touche ENTER.
La fonction PIP est activée (ON) et un petit
écran apparaît.
6. Contrôlez quelle partie vous filmez sur
l’écran PIP et tournez le bouton Zoom sur
la position “T” pour activer le mode Zoom
numérique.
■ Appuyez sur la touche START/STOP
pour commencer à filmer lorsque la partie souhaitée apparaît dans l’écran PIP.
7. Appuyez de nouveau sur la touche ENTER pour désactiver la
fonction PIP (OFF) et faire disparaître l'écran PIP.
Remarque
: ■ l’écran PIP est enregistré sur la bande s’il est affiché
pendant le tournage.
■ La fonction MENU ON/OFF n'est pas disponible en
mode EASY, REC ou CUSTOM.
■ La fonction PIP nést pas disponible en mode DSE.
Advanced Recording
Perfectionnez vos enregistrements
PIP (Picture-In-Picture, SCL630/L650 only) PIP (Image sur Image) (SCL630/L650)
CAMERA
LCD ADJUST
CUSTOM SET
CLOCK SET
TITLE SET
TITLE....................OFF
DIS........................OFF
PIP........................OFF
D.ZOOM ..............OFF
LCD ADJUST
CUSTOM SET
CLOCK SET
TITLE SET
TITLE....................OFF
DIS........................OFF
PIP........................ON
D.ZOOM ..............OFF
➔
➔
ENTER
Page 48

Snap Shot (SCL630/L650 only)
ENGLISH
FRANÇAIS
✤
With the SNAP SHOT feature, your camcorder functions like a regular
film camera, allowing you to take single still pictures.
- The SNAP SHOT function operates in the CAMERA mode.
1. Set the power switch to CAMERA mode.
2. Aim the Camera at the image you want to
record and press the SNAP SHOT button.
■ At this time, be careful not to shake your
camcorder because the image will be
blurred.
3. After the SNAP SHOT button has been
pressed, your camcorder will record the
still image for 6 seconds, then automatically
return to STANDBY mode.
■ You can check the remaining time for
SNAP SHOT recording by looking at the
time displayed on the screen.
■ To stop SNAPSHOTrecording,
press the SNAP SHOT button again.
Notes:
■ The SNAP SHOT is activated during shooting.
■ The still image will be displayed on the display if the SNAP
SHOT button is pressed in CAMERA mode but no tape has
been inserted in your camcorder.
■ The SNAP SHOT function will not operate in EASY, MENU or
CUSTOM mode.
Mode Photo (SCL630/L650)
✤ Avec la fonction SNAP SHOT, vous pouvez prendre une image
similaire à une photo. Elle vous permet d’enregistrer des images fixes.
- La fonction SNAP SHOT n’est utilisable qu’en mode Caméscope.
1. Placez le commutateur principal sur la position CAMERA.
2. Appuyez sur la touche SNAP SHOT.
■
Veillez à ne pas bouger votre caméscope sinon l’image risque d’être floue.
3. Lorsque vous appuyez sur la touche SNAP
SHOT, votre caméscope retourne automatiquement en mode veille après avoir
enregistré l'image fixe pendant 6 secondes.
■
Vous pouvez contrôler le temps restant
pour l’enregistrement de l’image en
regardant le compteur sur l’écran.
■
Pour quitter le mode Photo, appuyez de
nouveau sur la touche SNAP SHOT.
Remarque
:
■
Si vous bougez votre caméscope pendant que vous filmez,
l’image risque d’être de mauvaise qualité.
■
La fonction SNAP SHOT n'est pas disponible en mode EASY,
MENU ou CUSTOM.
48
Advanced Recording
Perfectionnez vos enregistrements
CAMERA
Page 49

FRANÇAIS
ENGLISH
Advanced Recording
White Balance
Équilibrage du blanc
✤ WHITE BALANCE is a recording function that preserves the unique
color of the object in any recording condition.
✤ You may select the appropriate WHITE BALANCE mode to obtain
good quality color of the image.
- AUTO: This mode is generally used to control the WHITE
BALANCE automatically.
- INDOOR: Controls WHITE BALANCE according to the indoor
ambience.
- OUTDOOR: Controls WHITE BALANCE according to the
outdoor ambience.
Setting a White Balance Mode
1. Set the power switch to CAMERA mode.
2. Press the MENU ON/OFF button, the MENU list will be displayed.
3. Turn the UP/DOWN dial until
WHT.BAL........AUTO is highlighted.
4. Press ENTER.
■ You can set it to INDOOR or OUTDOOR
by pressing the ENTER button.
5. Press the MENU ON/OFF button to exit
the WHITE BALANCE setting.
Note:
The MENU ON/OFF function will not operate in EASY, REC or
CUSTOM mode.
✤ Cette fonction permet de préserver la couleur unique de l’objet dans
toutes les conditions de prise de vue.
✤ Vous pouvez sélectionner le mode WHITE BALANCE approprié pour
obtenir une bonne qualité des couleurs de l’image.
- AUTO: ce mode permet un contrôle automatique de l’équilibrage
du blanc.
- INDOOR (intérieur): ajuste les couleurs en fonction de l’éclairage
intérieur.
- OUTDOOR (extérieur): ajuste les couleurs en fonction de la
lumière naturelle extérieure.
Réglage du mode d’équilibrage du blanc
1. Placez le commutateur principal sur la position CAMERA.
2. Appuyez sur la touche MENU ON/OFF, la liste des menus s’affiche.
3. Sélectionnez l’option WHT.BAL........AUTO
à l’aide du bouton UP/DOWN.
4. Appuyez sur ENTER.
■
Appuyez sur ENTER pour régler
l'option WHITE BALANCE sur INDOOR
ou OUTDOOR.
5. Appuyez sur la touche MENU ON/OFF
pour quitter le mode de réglage
WHITE BALANCE.
Remarque
: la fonction MENU ON/OFF n'est pas disponible en mode
EASY, REC ou CUSTOM.
Perfectionnez vos enregistrements
49
LCD ADJUST
CUSTOM SET
CLOCK SET
.
.
.
WHT.BAL..................AUTO
.
.
.
DEMO ......................OFF
LCD ADJUST
CUSTOM SET
CLOCK SET
.
.
.
WHT.BAL..................AUTO
.
.
.
DEMO ......................OFF
LCD ADJUST
CUSTOM SET
CLOCK SET
.
.
.
WHT.BAL..................OUTDOOR
.
.
.
DEMO ......................OFF
Page 50

ENGLISH FRANÇAIS
50
Demonstration
Advanced Recording
Perfectionnez vos enregistrements
✤ Demonstration automatically shows you the major functions that are
included with your camcorder so that you may use them more easily.
✤ The DEMO function is only available in CAMERA mode when you
are not recording.
✤ The Demonstration operates repeatedly until the POWER switch is
set to OFF.
1. Set the power switch to CAMERA mode.
2. Press the MENU ON/OFF button,
then the MENU list will appear.
3. Turn the UP/DOWN dial so that DEMO
is highlighted.
4. Press ENTER to select ON.
■ Demonstration will start.
5. Set the POWER switch to OFF to end
the Demonstration.
Note:
The MENU ON/OFF function will not operate in EASY, REC or
CUSTOM mode.
Démonstration
✤ La démonstration vous montre automatiquement les fonctions les plus
importantes de votre caméscope, vous permettant ainsi de les utiliser
plus facilement.
✤ La fonction DEMO est disponible uniquement en mode Caméscope
lorsque vous ne filmez pas.
✤ Elle fonctionne en boucle tant que vous ne placez pas le commuta-
teur principal sur OFF pour l'arrêter.
1. Placez le commutateur principal sur la position CAMERA.
2. Appuyez sur la touche MENU ON/OFF.
La liste des menus s’affiche.
3. Sélectionnez l’option DEMO à l’aide du
bouton UP/DOWN.
4. Appuyez sur ENTER pour sélectionner ON.
■ La démonstration commence.
5. Placez le commutateur principal sur OFF
pour mettre fin à la démonstration.
Remarque
: la fonction MENU ON/OFF n'est pas disponible en mode
EASY, REC ou CUSTOM.
LCD ADJUST
CUSTOM SET
CLOCK SET
TITLE SET
TITLE....................OFF
.
.
C.RESET..............0:00:00
DEMO ..................OFF
LCD ADJUST
CUSTOM SET
CLOCK SET
TITLE SET
TITLE....................OFF
.
.
C.RESET..............0:00:00
DEMO ..................OFF
DEMO
DIS OFF
■
SAMSUNG
■
Page 51

FRANÇAIS
ENGLISH
51
Advanced Recording
Lighting Techniques
1. Eject the tape that you have recorded. (see page 22)
2. If you want to protect accidental erasure of the tape you have
recorded, push the red tab on the cassette.
3. Set the POWER switch to OFF.
4. Close the LENS cover.
5. Remove the BATTERY PACK from the camcorder.
✤ When you use your camcorder, there are only two possible recording
environments.
- You will be recording outdoors (Normal recording or through an
ND(Neutral Density) filter).
- You will be recording indoors (Video light recommended or
required).
✤ The single greatest influence on picture quality is the level of bright-
ness, measured in lux.
✤ The following table lists a few common situations, the corresponding
level of brightness and any associated recommendations.
Situations
Brightness
Recommendations
(lux)
◆ Snow-covered mountains or fields. 100,000
ND filter recommended.
◆ Sandy beach on a hot summer’s day 100,000
◆ On a sunny day in the middle 35,000
of the afternoon.
◆ On a gloomy day, an hour 2,000
after the sunrise.
◆ Office with fluorescent 1,000 Normal recording.
lighting near to a window.
◆ On a sunny day, an hour 1,000
before the sunset.
◆ Department store counter. 500 to 700
◆ Room lit by two 30W 300 Video light
fluorescent lights. recommended.
◆ Arcade at night. 150 to 200
Video light required.
◆ Candle light. 10 to 15
After Recording
Sources de lumière
1. Éjectez la cassette sur laquelle vous avez filmé. (voir page 22)
2. Si vous voulez protéger cette cassette contre un effacement accidentel,
poussez la languette de protection sur la cassette.
3. Placez le commutateur principal sur la position OFF.
4. Replacez le capuchon de la lentille.
5. Retirez le bloc batterie du caméscope.
✤ Lors de vos tournages, seuls deux environnements s’offrent à vous
pour filmer :
- tournage en extérieur (prises de vue normales ou avec filtre ND
(Densité neutre)).
- tournage en intérieur (torche vidéo recommandée ou indispen-
sable).
✤ La luminosité, mesurée en lux, constitue un facteur déterminant en
matière de qualité de l’image.
✤ Le tableau ci-dessous énumère quelques situations courantes, leur
luminosité approximative et les recommandations associées.
Situation
Luminosité
Recommandations
(lux)
◆ Montagnes ou champs enneigés. 100 000
◆ Plage de sable sous un soleil 100 000 Filtre ND recommandé.
de plomb.
◆ Journée ensoleillée, vers midi. 35 000
◆ Ciel couvert, une heure après le 2 000
lever du soleil.
◆ Bureau sous un éclairage 1 000
Prise de vue normale.
fluorescent, près d’une fenêtre.
◆ Ensoleillement avant le coucher 1 000
du soleil.
◆ Comptoir de grand magasin 500 à 700
◆ Pièce éclairée par deux lampes 300 Torche vidéo
fluorescentes de 30 W. recommandée.
◆ Galerie marchande de nuit 150 à 200 Torche vidéo
◆ Éclairage à la bougie 10 à 15 nécessaire.
Une fois votre enregistrement terminé
Perfectionnez vos enregistrements
Page 52

ENGLISH FRANÇAIS
52
Playing back a Tape
✤ To view a tape that you have recorded.
✤ Playback function works in PLAYER mode only.
✤ There are two ways to see a tape;
■ To watch with LCD: recommended for outdoor use.
■ To watch with TV monitor: recommended for indoor use.
✤ It is practical to view a tape using the LCD monitor in a car or the
outdoors. (see page 28)
✤ It is practical to use a TV monitor to view tapes indoors.
✤ To play a tape back, the TV must feature a compatible color system.
(see page 58)
Connecting to a TV which has an Audio and Video input jack
✤ Use the Audio/Video cable supplied with your
camcorder.
■ The yellow plug: Video
■ The white plug: Audio(L)
✤ You can connect your camcorder to a TV
through a VCR.
■
Set the input selector on the VCR to LINE.
■ The yellow plug: Video
■ The white plug: Audio(L)
Note:
To view the cassette on the television screen, select the channel
reserved for your VCR on the television. (Refer to your VCR or
television instruction book)
To watch with LCD
To watch with TV monitor
Connecting to a TV which has no Audio and Video input jack
✤ Lecture des cassettes que vous avez filmées.
✤ La lecture n’est disponible qu’en mode Magnétoscope.
✤ Vous pouvez visionner une cassette de deux manières différentes :
■ à l’écran LCD (recommandé pour une utilisation extérieure),
■ à l’écran de votre téléviseur (recommandé pour une utilisation
intérieure).
✤ L’écran LCD s’avère très pratique à l’extérieur ou dans une voiture.
(voir page 28)
✤ À l’intérieur, la lecture sur l’écran d’un téléviseur s’avère pratique.
✤ Pour lire une cassette sur un téléviseur, ce dernier doit posséder
un système couleur compatible avec celui du caméscope
(Voir page 58.)
Connexion à un téléviseur avec entrée A/V
✤ Utilisez le câble audio/vidéo fourni avec
votre caméscope, en respectant le codage
des connecteurs :
■ jaune: vidéo,
■ blanc: audio (gauche).
✤ Vous pouvez connecter votre caméscope
à un téléviseur via un magnétoscope.
■ jaune: vidéo,
■ blanc: audio (gauche).
Remarque
: pour visionner la cassette sur l’écran du téléviseur,
sélectionnez le canal réservé à votre magnétoscope
sur le téléviseur. (Reportez-vous au mode d’emploi
du magnétoscope ou du téléviseur.)
Lecture à l’écran LCD
Lecture à l’écran de votre téléviseur
Connexion à un téléviseur via un magnétoscope
Visionnez une cassette
Page 53

FRANÇAIS
ENGLISH
53
Playing back a Tape
Notes:
■ SCL600/L610/L630/L650 feature a monaural audio system.
If your TV or VCR features a stereo audio system, connect the
audio cable to input “L” of your TV or VCR.
■ You can use an S-VIDEO cable to obtain better quality pictures
if you have the S-VIDEO connector on your TV.
■ While playing back on a TV screen, close the LCD panel.
Otherwise, picture distortion may occur.
Playback
1. Use the TV/VIDEO button to select VIDEO on your TV.
2. Connect power source (battery or AC Power
Adapter) to the camcorder.
Set the power switch to PLAYER mode.
3. Insert a tape you want to see.
■ Make sure that STOP is displayed.
4. Press the (PLAY/STILL) button.
■ The picture you recorded appears on the TV
after 2 to 3 seconds.
■ Press
■ (STOP) to stop playing.
■ If the tape reaches its end during playback,
the tape will rewind automatically.
Notes:
■ Vibration from the built-in speaker can cause picture distortion.
■ It is best to turn the built-in speaker off when your camcorder is
connected to the TV.
■ The system (Hi8/8mm) is selected automatically, depending on
the tape format.
■ SCL600/L610/L630/L650 can play back both Hi8 and 8mm
tapes.
■ This camcorder does not support LP recording and playback.
Remarques:
■ Les modèles SCL600/L610/L630/L650 possèdent un système
audio monophonique. Si votre téléviseur/magnétoscope est doté
d’un tel système, connectez le câble audio sur l’entrée “L” du
téléviseur ou du magnétoscope.
■ Vous pouvez brancher le câble S-VIDEO fourni sur votre
téléviseur, afin dóbtenir une meilleure qualité d’image.
■ Lorsque vous visionnez une cassette à l’écran de votre téléviseur,
fermez l’écran LCD pour ne pas provoquer d’interférences.
Lecture
1. Appuyez sur la touche TV/VIDEO pour choisir le mode VIDEO sur le
téléviseur.
2. Connectez une source d’alimentation au
caméscope (bloc batterie ou adaptateur secteur).
Placez le commutateur sur la position PLAYER.
3. Insérez la cassette à visionner.
■ Assurez-vous que “STOP” est affiché à
l’écran.
4. Appuyez sur la touche (PLAY/STILL).
■ Les images enregistrées apparaissent à
l’écran au bout de deux ou trois secondes.
■ Appuyez sur ■ (STOP) pour arrêter la lec-
ture.
■ Si la cassette arrive à la fin de la bande,
celle-ci se rembobine automatiquement.
Remarques:
■ La vibration du haut-parleur peut perturber l’image.
■ Il est préférable de l’éteindre lorsque le caméscope est connecté
au téléviseur.
■ Le système (Hi8/8 mm) sont sélectionnés automatiquement selon
le format de la cassette.
■ Ce caméscope ne dispose pas de fonctions d'enregistrement et
de lecture longue durée (LP).
Visionnez une cassette
PLAYER
PLAY/STILL
Page 54

ENGLISH FRANÇAIS
54
Playing back a Tape
Various Functions in PLAYER mode
To view a STILL picture (Playback pause)
- Press (PLAY/STILL) button during
playback.
- To resume playback, press (PLAY/STILL)
button again.
Note
: Your camcorder will automatically stop if it is
left for more than 5 minutes in STILL mode
without operation in order to prevent tape and head-drum wear.
To locate a scene (picture search)
- Press (FF) or (REW) buttons during
playback. To resume normal playback,
release the buttons.
Zero RETURN (SCL650 only)
✤ The ZERO RETURN function works in STOP of PLAYER mode.
✤ You can Fast Forward or Rewind to 0:00:00 automatically.
1. Set the power switch to PLAYER mode.
■ Make sure that STOP is displayed.
2. Press the ZERO RETURN button.
■ Z.RETURN is displayed.
■ FF or REW works automatically.
Notes:
■ The ZERO RETURN button does not work when
the TAPE COUNTER reads 0:00:00.
■ Set the COUNTER RESET to “C.RESET 0:00:00” in MENU
mode at the start of the cassette or the required sequence.
When you wish to find this point on the tape again, press
Z.RETURN button when playback is stopped.
Fonctions du mode Magnétoscope
Arrêt sur image (mode pause)
- Appuyez sur la touche (PLAY/STILL)
pendant la lecture.
- Pour reprendre la lecture, appuyez de nouveau
sur la touche (PLAY/STILL).
Remarque
: pour éviter l'usure de la cassette et des
têtes vidéo, votre caméscope s'arrête
automatiquement s'il est laissé plus de
5 minutes en mode pause.
Recherche d’une séquence
- Appuyez sur la touche (FF) ou (REW)
pendant la lecture. Pour reprendre la lecture
normale, relâchez la touche enfoncée.
Remise à zéro (SCL650)
✤ Cette fonction peut être utilisée lorsque l’indication “STOP” est
affichée en mode magnétoscope.
✤ Vous pouvez avancer ou rembobiner vers le point 0:00:00
automatiquement.
1. Placez le commutateur sur la position PLAYER.
■ Assurez-vous que “STOP” est affiché.
2. Appuyez sur la touche ZERO RETURN.
■ “Z.RETURN” s’affiche.
■ La bande défile automatiquement vers
l’avant ou vers l’arrière.
Remarque
:
■ La remise à zéro ne fonctionne pas si le compteur indique
déjà 0:00:00.
■ En mode menu, réglez l'option C.RESET sur "0:00:00" au
démarrage de la cassette ou à l'endroit de la séquence
souhaitée.
Si vous voulez revenir à ce point de la bande, appuyez sur la
touche Z. RETURN lorsque la lecture est arrêtée.
Visionnez une cassette
START/
STOP
SELF
TIMER
ZERO
RETURN
STILL
COUNTER
RESET
WIDE
TELE
DISPLAY
REW
FF
PLAY/STILL
Page 55

FRANÇAIS
ENGLISH
55
Playing back a Tape
Adjusting the LCD
✤ The LCD control in PLAYER mode is identical to step 3 of the page
26, except the power switch must be set to PLAYER mode.
✤ The speaker is turned ON/OFF by opening/closing the LCD.
✤ The speaker ON/OFF setting operates when the LCD is opened.
When it is set to OFF, the speaker won’t turn on even after opening
the LCD.
1. Set the power switch to PLAYER mode.
2. Press the MENU ON/OFF button, then the
MENU list will appear.
3. Turn the UP/DOWN dial to SPEAKER.
4. Press ENTER to switch the selection.
5. Press the MENU ON/OFF button again to end
the SPEAKER setting.
✤ Speaker volume can be controlled by turning
the UP/DOWN dial during playback.
Note:
When the MENU list is on, volume will not
be changed.
Setting the Speaker ON/OFF
Réglage de l’écran LCD
✤ La procédure de réglage de l’écran LCD en mode Magnétoscope
est identique à celle en mode Caméscope, sauf que le commutateur
principal doit être placé sur la position PLAYER. (voir page 26)
✤ Le haut-parleur est activé ou désactivé à l’ouverture et à la fermeture
de l’écran LCD.
✤ Le réglage du haut-parleur ON/OFF fonctionne quand l’écran
LCD est ouvert. Si le réglage est sur OFF, autrement dit si le
haut-parleur est désactivé, celui-ci ne fonctionne pas, même après
l’ouverture de l’écran LCD.
1. Placez le commutateur principal sur la position
PLAYER.
2. Appuyez sur la touche MENU ON/OFF.
La liste des menus s’affiche.
3. Sélectionnez l’option SPEAKER à l’aide du
bouton UP/DOWN.
4. Appuyez sur ENTER pour modifier le réglage.
5. Appuyez de nouveau sur la touche MENU
ON/OFF pour quitter l’écran de réglage de
haut-parleur.
✤ Le volume du haut-parleur peut être contrôlé
en tournant le bouton UP/DOWN pendant la
lecture.
Remarque
: lorsque la liste des menus est activée,
le volume ne peut pas être changé.
Réglage du haut-parleur
Contrôle du volumeVolume control
Visionnez une cassette
LCD ADJUST
SPEAKER ..............ON
PALCONV..............ON
DISPLAY ................OFF
C.RESET................0:00:00
LCD ADJUST
SPEAKER ..............OFF
PALCONV..............ON
DISPLAY ................OFF
C.RESET................0:00:00
DSE in PLAYER mode
✤ The procedure for using DSE in PLAYER mode is the same as the
procedure for using DSE in CAMERA mode, except that the power
switch must be set to PLAYER instead of CAMERA. Please refer to
pages 40 and 41.
Note:
The GHOST, STROBE, NEG., MIRROR, MOSAIC, CINEMA and
WIDE(16:9) effects will not operate when your camcorder is in
PLAYER mode.
✤ Pressing the DSE button will scroll through the available settings.
Stop at the one you require.
DSE en mode Magnétoscope
✤ L’utilisation des effets numériques spéciaux en mode Magnétoscope
est identique à la procédure en mode Caméscope, sauf que le
commutateur principal doit être placé sur la position PLAYER.
Reportez-vous aux pages 40 et 41.
Remarque
: les effets GHOST, STROBE, NEG., MIRROR, MOSAIC,
CINEMA et WIDE(16:9) ne sont pas disponibles quand votre
caméscope est en mode Magnétoscope.
✤ Appuyez sur la touche DSE pour sélectionner l'effet désiré.
Page 56

ENGLISH FRANÇAIS
56
Multi Playback (using a PAL60 System)
✤ This Camcorder can convert an NTSC tape recorded in the SP
mode to the “PAL60” format, allowing you to view it on a PAL TV
which has Vertical sync adjustment circuitry for 60Hz.
- “PAL60” is a special output signal format with which a PAL TV
can be used to view a tape recorded by an NTSC recorder.
1. Set POWER switch to PLAYER mode.
2. Insert an NTSC tape you want to see.
3. Press MENU ON/OFF button, then the MENU list will appear.
4. Turn the UP/DOWN dial to “PAL.CONV.OFF”.
5. Press ENTER, then it will change to “PAL CONV.PAL60”.
■ Now you can see the picture by pressing the PLAY button.
6. Press MENU ON/OFF button to end setting.
Notes:
1. This Camcorder can not record using the “PAL60” system.
2. When an NTSC tape is being played back, the picture on
the monitor screen shrinks in the Vertical direction.
3. If the signal recorded on the tape is in bad condition, the
PAL60 playback system may malfunction.
4. A PAL recorded tape can not be normally played back when
“PAL60” is set or displayed.
Lecture multiple (avec le système PAL60)
✤ Ce caméscope peut convertir un enregistrement sur bande NTSC
dans le mode SP en un signal de format PAL60 vous permettant
d’en faire le visionnement sur un téléviseur PALqui possède un
circuit d’ajustement de la synchronisation verticale pour 60Hz.
- PAL60 est un format de signal de sortie spécial qui permet à un
téléviseur PALd’être utilisé pour visionner une bande enregistrée
avec un enregistreur NTSC.
1. Pacer l’interrupteur POWER en mode PLAYER.
2. Insérer la bande NTSC que vous désirez visionner.
3. Appuyer sur la touche ON/OFF du MENU, puis, la liste du MENU
apparaîtra.
4. Utiliser le bouton de commande UP/DOWN pour choisir
“PAL.CONV.OFF”.
5. Appuyer sur la touche ENTER, puis le changement s’effectuera à
“PALCONV.PAL60”.
■ Maintenant vous pouvez visionner l’image en appuyant sur la
touche PLAY.
6. Appuyer sur la touche ON/OFF du MENU pour terminer l’opération.
Notes:
1. Ce caméscope ne peut pas enregistrer en utilisant le
système PAL60.
2. Lors de la lecture d’une bande NTSC, l’image sur l’écran est
réduite de façon verticale.
3. Si le signal enregistré sur la bande est en mauvais état, il est
possible que le système PAL60 ne fonctionne pas de façon
adéquate.
4. Les bandes enregistrées en mode APAL ne peuvent pas
être lues lorsque PAL60 est programmé ou affiché.
Playing back a Tape
Visionnez une cassette
Page 57

FRANÇAIS
ENGLISH
57
Maintenance
Cleaning the Video Heads
✤ To ensure normal recording and clear pictures, clean the video heads.
✤ When the playback pictures are noisy or hardly visible, the video
heads may be dirty.
a. Normal Picture
b,c. Noisy Picture
If this happens, clean the video heads
with a dry type cassette cleaner.
1. Set the power switch to PLAYER mode.
2. Insert the cleaning tape.
3. Press the (PLAY/STILL) button.
4. Press the ■ (STOP) button after about 30 seconds.
Check the quality of the picture using a video cassette. If it is still
bad, repeat the operation. If the problem continues, contact your
local authorized service center.
Storing the Camcorder
1. You must detach the BATTERY PACK from
the camcorder when storing.
2. Keep the camcorder in a ventilated,
dry and warm place.
3. Do not keep the camcorder in a place
where the temperature often changes,
such as in a car.
4. Keep the camcorder in a stable place.
Nettoyage des têtes vidéo
✤ Lorsque les images sont brouillées ou difficilement visibles, il se peut
que les têtes vidéo soient sales.
✤ Pour garantir un enregistrement de bonne qualité et des images nettes,
nettoyez les têtes vidéo.
a. Image normale.
b,c. Image brouillée par des parasites.
Dans ce cas, nettoyez les têtes vidéo avec
une cassette de nettoyage de type sec.
1. Placez le commutateur sur la position PLAYER.
2. Insérez une cassette de nettoyage.
3. Appuyez sur la touche (PLAY/STILL).
4. Appuyez sur la touche ■ (STOP) au bout de 30 secondes environ.
Vérifiez la qualité de l’image à l’aide d’une cassette. Si l’image demeure de
mauvaise qualité, répétez l’opération. Si le problème
persiste, contactez votre revendeur le plus proche.
Rangement du caméscope
1. Lors du rangement du caméscope,
retirez le bloc batterie.
2. Conservez le caméscope à température
ambiante dans un endroit aéré et sec.
3. Ne le laissez pas dans un endroit
soumis à de fréquents changements de
température (une voiture, par exemple).
4. Placez le caméscope dans une position stable.
Conseils d’utilisation
Cleaning the Viewfinder
◆ Releasing the Eyecap
1. Pull the VIEWFINDER up and then turn the
screw counter-clockwise.
2. Pull the EYECAP out.
3. Clean the EYECAP and the VIEWFINDER
screen with a soft cloth and cotton swab or
a blower.
◆ Reattaching the Eyecap
4. Put the EYECAP on the VIEWFINDER.
5. Put the screw back on.
Cleaning the LCD panel
Open the LCD monitor and wipe it gently with a
soft cloth. Be careful not to damage the panel.
Nettoyage du viseur
◆ Retrait de l’oculaire
1. Tirez le viseur, puis tournez la vis dans
le sens inverse des aiguilles d’une montre.
2. Retirez l’oculaire.
3. Nettoyez l’oculaire et l’écran du viseur avec
un chiffon doux et un coton-tige ou un
aérosol à gaz sec.
◆ Remontez l’oculaire
4. Replacez l’oculaire sur le viseur.
5. Remettez la vis en place.
Nettoyage de l’écran LCD
Ouvrez l'écran et essuyez-le avec un chiffon
doux. Veillez à ne pas endommager la surface
de l’écran.
abc
Nettoyage et entretien du caméscopeCleaning and Taking care of the Camcorder
Page 58

ENGLISH FRANÇAIS
58
Using Your Camcorder Abroad
Using Your Camcorder Abroad
✤ Each country or area has its own electric and TV color system.
✤ Before using your camcorder abroad, check the following:
Power sources
■ You can use your camcorder in any country or area that uses
100V to 240V, 50/60 Hz.
■ Use a commercially available AC plug adapter, if necessary,
depending on the power used.
Color system
■ You can view your recording on the LCD or viewfinder.
However, to view a recording on a television or to make a copy to
a video cassette recorder, the television or VCR must be NTSC:
SCL610/L630/L650 - compatible and have the appropriate
audio/video jacks.
✜ PAL-compatible area
Australia, Austria, Belgium, Bulgaria, China, CIS, Czech Republic,
Denmark, Egypt, Finland, France, Germany, Greece, Great Britain,
Holland, Hong Kong, Hungary, India, Iran, Iraq, Kuwait, Libya,
Malaysia, Mauritius, Rumania, Saudi Arabia, Singapore, Slovak
Republic, Spain, Sweden, Switzerland, Syria, Thailand, Tunisia, etc.
✜ NTSC-compatible area
Bahamas, Canada, Central America, Japan, Mexico, Philippines,
Korea, Taiwan, United States, etc.
Note:
You can make recordings with your camcorder anywhere in the
world.
Utilisation du caméscope à l’étranger
✤ Chaque pays possède son propre système électrique et norme
de couleur pour les téléviseurs.
✤ Avant d’utiliser votre caméscope à l’étranger, vérifiez les points ci-
après.
Sources d’alimentation
■ Vous pouvez connecter l’adaptateur de votre caméscope à toute
prise dont la tension est de 100 V à 240 V, 50/60 Hz.
■ Si nécessaire, utilisez un adaptateur de prise de courant adapté
à la forme de la prise de courant utilisée.
Norme de couleur
■ Vous pouvez contrôler l’image sur l’écran LCD ou dans le viseur.
Cependant, pour visionner ou dupliquer vos enregistrements, le
téléviseur ou le magnétoscope utilisé doit être aux normes NTSC
(modèles SCL610/L630/L650) et posséder les connecteurs
audio/vidéo appropriés.
✜ Pays utilisant la norme PAL
Allemagne, Arabie Saoudite, Australie, Autriche, Belgique, Bulgarie,
CEI, Chine, Danemark, Egypte, Espagne, Finlande, France,
Grande-Bretagne, Grèce, Hongkong, Hongrie, Ile Maurice, Inde, Irak,
Iran, Koweït, Libye, Malaisie, Pays-Bas, République slovaque,
République tchèque, Roumanie, Singapour, Suède, Suisse, Syrie,
Thaïlande, Tunisie, etc.
✜ Pays utilisant la norme NTSC
Amérique centrale, Bahamas, Canada, Corée du Sud, Etats-Unis
d’Amérique, Japon, Mexique, Philippines, Taiwan, etc.
Remarque
: vous pouvez filmer partout dans le monde et visionner vos
enregistrements sur votre écran LCD.
Utilisation du caméscope à l’étranger
Page 59

FRANÇAIS
ENGLISH
59
Troubleshooting
Troubleshooting
✤ Before contacting a service center, perform the following simple checks.
They might save you the time and expense of an unnecessary call.
Self Diagnosis Display
Display Blinking Inform that... Action
slow
the battery pack is Change it to a charged
almost discharged one.
fast
the battery pack is Change it to a charged
fully discharged. battery.
TAPE
slow
the tape has almost Prepare a new one.
END reached its end.
TAPE
no
the tape reached Change to a new one.
END its end
TAPE slow
there is no tape in Insert a tape.
the camcorder.
TAPE slow
the tape is protected If you want to record,
from recording. release the protection.
D.EMG slow the camcorder has 1. Eject the tape.
C.EMG some mechanical 2. Set to OFF
R.EMG fault. 3. Detach the battery.
L.EMG 4. Reattach the battery.
* Please contact your
local service center if
the problem continues.
DEW slow
moisture condensation
see page 62.
has formed in the
camcorder.
Dépannage
✤ Avant de contacter le service après-vente, effectuez les simples
vérifications suivantes. Elles peuvent vous épargner un appel inutile.
Diagnostic à l’écran
Dépannage
Affichage Clignotement Signification Action
Lent Le bloc batterie est Remplacez-le par un
presque déchargé. bloc chargé.
Rapide Le bloc batterie est Remplacez-le par un
entièrement déchargé. bloc chargé.
TAPE Lent La cassette arrive bientôtPréparez une
END à la fin de la bande. nouvelle cassette.
TAPE Aucun La cassette est arrivée Remplacez la
END en fin de bande. cassette.
TAPE Lent Aucune cassette n’est Insérez-en une.
insérée dans le
caméscope.
TAPE Lent La cassette est protégée Pour enregistrer,
contre l’enregistrement. retirez la protection.
D.EMG Lent Le caméscope 1. Éjectez la cassette.
C.EMG présente une erreur 2. Éteignez l’appareil.
R.EMG mécanique. 3. Retirez la batterie.
L.EMG 4. Remettez la batterie
en place.
* Si le problème persite,
contactez le SAV.
DEW Lent De la condensation Voir page 62.
s’est formée à l’intérieur
du caméscope.
Page 60

ENGLISH FRANÇAIS
60
Troubleshooting
Checking
✤ If you run into any problem using the camcorder, use the following table to
troubleshoot the problem.
✤ If these instructions do not allow you to solve the problem, take a note of:
■ The model and serial number marked on the bottom of the camcorder.
■ Your warranty, if applicable.
✤ Then contact your nearest authorized service center.
Symptom Explanation/Solution
You cannot switch the ◆ Check the battery pack (see page 19)
camcorder on. or the AC power adapter. (see page 18)
Start/Stop does not ◆ Check the POWER, set it to CAMERA.
operate while shooting. ◆ You have reached the end of the cassette.
◆ Check the record protection tab on the cassette.
(see page 22)
The camcorder goes ◆ You have left the camcorder set to STANDBY
off automatically. for more than 5 minutes without using it.
(see page 24)
◆ The battery pack is fully used up.
(see page 21)
The battery pack is ◆ The atmospheric temperature is too low.
quickly exhausted. (see page 21)
◆ The battery pack has not been charged fully.
(see page 19)
◆ The battery pack is completely dead, and
cannot be recharged. Use another battery pack.
You cannot eject the ◆ The battery pack is fully used up.
cassette from the ◆ A mechanical fault might have occurred.
compartment. (see page 59)
The DATE/TIME indicator ◆ The lithium battery is not installed or is
flashes more than 2 times fully used up. (see page 17)
when you set the
camcorder to CAMERA.
The playback picture ◆ The video heads might be dirty. (see page 57)
is poor.
You cannot operate any ◆ A mechanical fault might have occurred.
functions on the camcorder.
(see page 59)
Vérification
✤ Pour résoudre un problème rencontré lors de l’utilisation de votre camés-
cope, consultez le tableau ci-dessous.
✤ Si ces instructions ne vous permettent pas de résoudre le problème, notez:
■ la référence du modèle et le numéro de série indiqués sous le caméscope,
■ votre numéro de garantie, si elle est toujours valable.
✤ Puis, contactez votre SAV ou le revendeur le plus proche.
Dépannage
Symptôme Explication/Solution
Vous ne pouvez pas ◆ Vérifiez le bloc batterie (voir page 19)
allumer le caméscope. ou l’adaptateur secteur. (voir page 18)
La touche ◆ Vérifiez que le commutateur principal est en
START/STOP ne position CAMERA.
fonctionne pas lors ◆ Vous avez atteint la fin de la cassette.
de l’enregistrement. ◆ Vérifiez la languette de protection
sur la cassette. (voir page 22)
Le caméscope s’éteint ◆ Vous avez laissé le caméscope sur STANDBY
automatiquement. pendant plus de 5 minutes sans l’utiliser.
(voir page 24)
◆ Le bloc batterie est complètement déchargé.
(voir page 21)
Le bloc batterie se ◆ La température ambiante est trop basse.
décharge rapidement. (voir page 21)
◆ Le bloc batterie n’a pas été complètement
rechargé. (voir page 19)
◆ Le bloc batterie n’est plus utilisable et ne peut
plus être rechargé. Utilisez un autre bloc batterie.
Vous ne pouvez pas ◆ Le bloc batterie est complètement déchargé.
éjecter la cassette de ◆ Une erreur mécanique s’est peut-être produite.
son compartiment. (voir page 59)
La date et l’heure ◆ La pile au lithium n’est pas installée ou
clignotent plus de 2 fois est complètement déchargée. (voir page 17)
en mode Camécope.
La lecture de l’image ◆ Les têtes vidéo sont peut-être sales.
n’est pas de bonne (voir page 57)
qualité.
Page 61

FRANÇAIS
ENGLISH
61
Troubleshooting
Symptom
A vertical stripe
appears when you
record a bright subject
against a dark background (candle flame,
for example).
The image quality on
the LCD is poor.
The image in the
viewfinder is blurred.
The tape does not
move when you press
the Play, Fast Forward
or Rewind buttons.
The picture does not
appear in the viewfinder.
There is no sound from
the SPEAKER when
playing back the tape.
The Date/Time or Title
disappeared even
though you had it set.
Explanation/Solution
◆ The contrast between the subject and the
background is too great for the camcorder
to operate normally. Make the background
bright to reduce the contrast or use the
BLC function while you are
recording. (see page 37)
◆ The use of VIEWFINDER is recommended when recording under sunlight.
(see page 7)
◆ Adjust the LCD. (see page 26)
◆ The viewfinder lens has not been adjust-
ed.
Turn the viewfinder focus ring until the
screen comes into sharp focus.
(see page 27)
◆ Set the POWER switch to PLAYER.
◆ You have reached the beginning or end
of the cassette.
◆ The LCD monitor is opened.
◆ Make sure the SPEAKER is ON.
(see page 55)
◆ The lithium battery is not installed or is
fully used up. (see page 17)
Symptôme
Vous ne pouvez rien
faire avec le camés-
cope.
Une bande verticale
apparaît lorsque vous
filmez un sujet lumineux
sur un fond sombre (une
bougie, par exemple).
L’image à l’écran LCD
n’est pas de bonne
qualité.
L’image dans le viseur
est floue.
La bande ne défile pas
lorsque vous appuyez
sur les touches PLAY,
F.F ou REW.
L’image n’apparaît pas
dans le viseur.
Aucun son n’est émis
par le haut-parleur
lors de la lecture de la
cassette.
La date, l’heure et le titre
ont disparu, bien qu’ils
aient été pré-réglés.
Explication/Solution
◆ Une erreur mécanique s'est peut-être
produite. (voir page 59)
◆ Le contraste entre le sujet et le fond est trop
important. Le caméscope ne peut pas filmer
normalement. Éclairez l’arrière-plan pour
réduire le contraste ou utilisez la fonction
BLC pendant que vous filmez.
(voir page 37)
◆ Si vous filmez directement au soleil, utilisez
le viseur. (voir page 7)
◆ Ajustez l’écran LCD. (voir page 26)
◆ La mise au point du viseur n’a pas été
effectuée. Tournez l’anneau de mise au
point du viseur, jusqu’à ce que les indications apparaissant dans le viseur soient
bien nettes. (voir page 27)
◆ Placez le commutateur principal sur la
position PLAYER.
◆ Vérifiez si vous avez atteint le début ou la
fin de la cassette.
◆ L’écran LCD est ouvert.
◆ Assurez-vous que le haut-parleur est activé.
(voir page 55)
◆ La pile au lithium n’est pas installée ou est
complètement déchargée. (voir page 17)
Dépannage
Page 62

ENGLISH FRANÇAIS
62
Troubleshooting
Moisture Condensation
✤ If the camcorder is brought directly from a cold place to a warm place,
moisture may condense inside the camcorder, on the surface of the
tape, or on the lens. In this condition, the tape may stick to the head
drum and be damaged or the unit may not operate correctly.
To prevent possible damage under these circumstances, the
camcorder has a built-in moisture sensor.
✤ If there is moisture inside the camcorder, “DEW”
is displayed.
If this happens, none of the functions except
cassette ejection will work.
Open the cassette compartment and remove the
battery for at least two hours in a warm dry room.
✤ Please follow this procedure when the DEW protection feature is
unexpectedly activated and you want to override it:
(Please make sure that the condensation has disappeared completely.)
1. Take the battery pack out.
2. Take the lithium battery out.
3. Put the lithium battery back.
4. Put the battery pack back.
Condensation d'humidité
✤ Un changement soudain de température peut entraîner la formation de
buée à l’intérieur de l’appareil, sur la surface de la cassette ou sur les
lentilles. Ce peut être le cas, lorsque vous passez d’un extérieur froid à
un intérieur chaud ou d’un intérieur frais à un extérieur chaud. dans ce
cas, la bande peut coller aux têtes vidéo et être endommagée ou l'appareil risque de ne pas fonctionner correctement.
Pour éviter de tels dommages, le caméscope est
doté d’un capteur d'humidité.
✤ S'il y a de l'humidité dans le caméscope, “DEW”
s'affiche. Dans ce cas, aucune des fonctions, sauf
l'éjection de la cassette, ne peut fonctionner.
Ouvrez le compartiment de la cassette et laissez
l’appareil dans un endroit chaud et sec pendant
au moins deux heures.
✤ Effectuez la procédure ci-après lorsque la mention
DEW apparaît intempestivement et que vous
souhaitez néanmoins filmer. Assurez-vous que la
condensation a complètement disparu.
1. Retirez le bloc batterie.
2. Retirez la pile au lithium.
3. Remettez en place la pile au lithium.
4. Remettez en place le bloc batterie.
Dépannage
DEW
Page 63

FRANÇAIS
ENGLISH
63
Specifications
Spécifications techniques
✤ The design and technical specifications may be changed without
notice.
✤ L’apparence extérieure et les spécifications techniques de l’appareil
peuvent être modifiées sans avis préalable.
Système SCL600/L610/L630/L650
Système Vidéo: 2 têtes rotatives à balayage FM hélicoïdal
d’enregistrement Audio: système FM mono
Signal vidéo couleur NTSC, norme EIA
Cassette SCL600/L610/L630/L650: Hi8 ou 8 mm
Vitesse de bande SP : 14,345 mm/sec
Mode de vitesse Enregistrement: SP seulement Lecture: SP
Durée d’enregistrement P6-120: 120 min.
Durée d’avance rapide/ P6-120: 6,5 min. environ
rembobinage
Dispositif d’image CCD
Facteur du zoom optique 22x
Longueur focale: f 3,6 à 79,2 mm
F 1,6
Diamètre du filtre 46 mm
Système de mise au point Interne
Macro Macro grand angle automatique
Luminosité minimale 0,3 lux (visible)
Écran LCD
Taille de l’écran 2,5 pouces/62K
Méthode TFT
Connecteurs
Sortie vidéo Mini-jack, 1 Vp-p, 75 ohms, asymétrique
Sortie audio Mini-jack, 7,7 dBs, Impédance: moins
de 820 ohms
Microphone externe Monophonique ø3,5 (SCL630/L650)
Généralités
Alimentation DC 8,4 V (1,5 A)
Consommation SCL600/L610: 5,4 W, SCL630: 5,9 W,
*Conditions :LCD oui, viseur non SCL650: 5,9 W
Micro interne À condensateur, omnidirectionnel
Haut-parleur interne Dynamique, 0,5 W standard
Température de 0°C à 40°C
fonctionnement
Dimensions (L✕ H ✕ P) 101 ✕ 104 ✕ 174 mm
Poids 750 g
System SCL600/L610/L630/L650
Recording system Video: 2 rotary heads Helical scanning FM
Audio: FM monaural system
Video signal NTSC color, EIA standard
Usable cassette SCL600/L610/L630/L650 : Hi8 or 8mm
Tape speed SP: 14.345 mm/sec
Speed mode Record: SP only Playback: SP only
Recording time P6-120: 120 min.
FF or REW time P6-120: approx. 6.5 min.
Image device CCD (Charge Coupled Device)
Optical zoom ratio 22x
Focal length: f 3.6~79.2 mm
F 1.6
Filter diameter 46 mm
Focus system Inner
Macro Auto wide macro
Min. Illumination 0.3 lux (visible)
LCD monitor
Size/Pic. cell 2.5 inch/62k
Method TFT
Connectors
Video out Mini jack, 1 Vp-p, 75 ohms, Unbalanced
Audio out Mini jack, 7.7 dBs, imp.: less than 820 ohms
External mic Monaural ø3.5 (SCL630/L650)
General
Power requirement DC 8.4 V (1.5 A)
Power consumption SCL600/L610 : 5.4 W, SCL630 : 5.9 W,
*Recording, LCD ON SCL650 : 5.9 W
Built-in mic Condenser mic, omni-directional
Built-in speaker Dynamic, 0.5 W standard
Operating temperature 0°C to 40°C (32°F to 104°F)
Dimension (WxHxD) 101x104x174 mm (3.98x4.09x6.85 inches)
Weight 750 g (1.652 lbs)
Page 64

ENGLISH FRANÇAIS
64
Index
- A -
ABROAD......................................58
AC POWER ADAPTER ..............18
ADJUSTING ................................26
AF................................................36
AUDIO ........................................52
AUTO FOCUSING ......................36
AUTO MODE ..............................38
AUTO POWER OFF ....................24
- B -
BATTERY....................................19
BATTERYLEVEL ........................21
BATTERYPACK..........................19
BLC..............................................37
BRIGHTNESS ............................26
- C -
CAMERA ....................................18
CASSETTE..................................22
CASSETTE HOLDER..................11
CLEANING ..................................57
COLOR ......................................26
CONTENTS ..................................2
COUNTER ..................................54
CUSTOM ....................................34
- D -
DATE............................................42
DATE/TIME..................................42
DC CABLE ..................................18
DEMO ........................................50
DEW ............................................62
DIGITALZOOM ..........................31
DIMENSIONS..............................63
DIS ..............................................35
DISPLAY......................................12
DSE ............................................40
- E -
EASY ..........................................33
EDIT ............................................24
EJECT ........................................22
ENTER ........................................26
EXTERNAL MIC..........................63
- F -
FADE IN ......................................46
FADE OUT ..................................46
FAR..............................................36
FF (FAST FORWARD) ................54
FILTER DIAMETER ....................63
FOCAL LENGTH ........................63
- G -
GHOST........................................40
- H -
HAND STRAP..............................16
Hi8 ..............................................53
- L -
LCD..............................................26
LENS ............................................9
LITHIUM BATTERY ....................17
LOCK ..........................................18
- M -
MIRROR......................................40
MOISTURE..................................62
MOSAIC ......................................40
MULTYPLAYBACK ......................56
- N -
ND FILTER..................................51
NEAR ..........................................36
NEG ............................................40
NTSC ..........................................58
- A -
AL’ETRANGER ............................58
ADAPTATEUR SECTEUR ..........18
AF ..................................................36
AFFICHAGE..................................12
ALIMENTATION ............................63
ARRET SUR IMAGE (STILL) ......54
AUDIO ..........................................52
- B -
BANDOULIERE ............................17
BATTERIE ....................................19
BLC................................................37
BLOC BATTERIE..........................19
BOUTON ROUGE
DU COMMUTATEUR ....................18
- C -
CABLE DC ....................................18
CAMERA ......................................18
CASSETTE....................................22
COMPTEUR..................................54
COMPTEUR DE BANDE..............13
CONSEILS ET CONSIGNES
DE SECURITE................................4
CONSOMMATION........................63
COULEUR ....................................26
CUSTOM ......................................34
- D -
DATE..............................................42
DATE/HEURE................................42
DEMO............................................50
DEW ..............................................62
DIAGNOSTIC A L ’ECRAN ............59
DIAMETRE FILTRE......................63
DIMENSION..................................63
DIS ................................................35
DSE................................................40
- E -
EASY ............................................33
EDIT ..............................................24
EJECT ..........................................22
EJECTION D’UNE CASSETTE....22
ENREGISTREMENT
AUTOMA TIQUE............................15
ENTER ..........................................26
- F -
FF (AVANCE RAPIDE)..................54
FILTRE ND....................................51
FONDU EN FERMETURE............46
FONDU EN OUVERTURE............46
- G -
GHOST..........................................40
- H -
HAUT-PARLEUR ..........................55
HEURE..........................................42
Hi 8 ................................................53
HUMIDITE ....................................62
- L -
LCD................................................26
LENTILLE........................................9
LOCK ............................................18
LOGEMENT CASSETTE..............11
LONGUEUR FOCALE ..................63
LUMINOSITE ................................26
Index
Page 65

FRANÇAIS
ENGLISH
65
Index
- O -
OPERATION MODE....................13
OSD ............................................12
- P -
PIP ..............................................47
PLAY............................................53
PLAYER ......................................53
PORTRAIT MODE ......................38
POWER CONSUMPTION ..........63
POWER REQUIREMENT............63
POWER SWITCH ........................18
PROGRAM AE ............................38
- R -
RECHARGING ............................19
REMOTE CONTROL ..................15
REW (REWIND) ........................54
- S -
SAFETY INSTRUCTIONS ............4
SAND/SNOW MODE ..................38
SELF-30S....................................15
SELF-END ..................................15
SELF DIAGNOSIS ......................59
SELF RECORD ..........................15
SELF TIMER................................15
SEPIA..........................................40
SHOULDER STRAP....................17
SNAP SHOT................................48
SPEAKER....................................55
SPECIFICATIONS ......................63
SPORTS MODE..........................38
SPOTLIGHT MODE ....................38
STANDBY....................................18
START/STOP ..............................23
STILL ..........................................54
STOP ..........................................53
STROBE......................................40
SYSTEM......................................63
S-VIDEO ....................................53
- T -
TAPE COUNTER ........................13
TAPE EJECT ..............................22
TAPE END ..................................59
TIME............................................42
TITLE ..........................................44
TV MONITOR..............................52
- V -
VIDEO..........................................52
VIDEO HEAD ..............................57
VOLUME......................................55
- W -
WAIT-10S....................................15
WEIGHT ......................................63
WHITE BALANCE ......................49
- Z -
ZERO RETURN ..........................54
ZOOM..........................................30
- M -
MICROPHONE EXTERNE ..........63
MIRROR........................................40
MISE AU POINT MANUELLE/
AUTOMATIQUE (MF/AF)..............36
MODE AUTO ................................38
MODE DE FONCTIONNEMENT ..13
MODE PORTRAIT........................38
MODE SAND/SNOW....................38
MODE SPORTS............................38
MODE SPOTLIGHT......................38
MOSAIC ........................................40
LECTURE MULTIPLE ..................56
- N -
NEG ..............................................40
NIVEAU DE LA BATTERIE ..........21
NTSC ............................................58
- O -
OSD ..............................................12
- P -
PAL................................................58
PILE AU LITHIUM ........................17
PIP ................................................47
PLAY..............................................53
PLAYER ........................................53
POIDS............................................63
POIGNEE DE SOUTIEN ..............16
POWER OFF AUTOMATIQUE ....24
PROBLEMES ET SOLUTIONS ....59
PROGRAM AE..............................38
- R -
RECHARGE BLOC BATTERIE....19
REGLAGE ÉCRAN ......................26
REMISE À ZERO..........................54
REW(REMBOBINAGE) ................54
- S -
SELF TIMER ................................15
SELF-30S......................................15
SELF-END ....................................15
SEPIA............................................40
SNAP SHOT..................................48
SOMMAIRE ....................................2
SPECIFICATIONS
TECHNIQUES ..............................63
STANDBY......................................18
START/STOP ................................23
STOP ............................................53
STROBE........................................40
S-VIDEO........................................53
SYSTEME ....................................63
- T -
TAPE END ....................................59
TELECOMMANDE........................15
TETES VIDEO ..............................57
TITRE ............................................44
- V -
VIDEO............................................52
VOLUME........................................55
- W -
WAIT-10S......................................15
WHITE BALANCE ........................49
- Z -
ZOOM ..........................................30
ZOOM NUMERIQUE ....................31
Index
Page 66

ENGLISH FRANÇAIS
66
GARANTIE
SAMSUNG LIMITÉE
La société SAMSUNG Electronics Canada Inc. (SECA) garantit que
ce produit est exempt de tout défaut matériel ou de fabrication.
De plus, SECA s’engage, à sa discrétion, à réparer ou à remplacer
le produit s’il ne fonctionnait pas correctement à cause d’un défaut
matériel ou de fabrication pendant la période de garantie.
Toute réparation effectuée dans le cadre de la garantie doit être
réalisée par un centre de service agréé par SECA. (Le nom et
l’adresse du centre de service agréé le plus proche peuvent être
obtenus en appelant gratuitement le 1-800-SAMSUNG).
Garanti un an pièces et main d’œuvre.
Pour des modèles devant être ramenés par le client au centre de
service agréé, le transport du matériel vers le centre de réparation
et à partir de celui-ci est à la charge du client.
Le ticket de caisse original et daté doit être conservé par le client et
constitue l’unique preuve valide d’achat. Il doit être présenté au
service agréé au moment de la réparation.
EXCEPTIONS (RESPONSABILITÉS NON COUVERTES)
Cette garantie ne couvre pas les dommages provoqués par un
accident, un incendie, une inondation, des cas de force majeure,
une mauvaise utilisation de l’appareil, l’utilisation d’une tension
électrique incorrecte, une installation défectueuse, des réparations
incorrectes ou non autorisées, l’utilisation à des fins commerciales,
ou les dommages survenus lors du transport du matériel.
La garantie ne couvre pas le revêtement de l’appareil, la finition
intérieure, les ampoules, ni les optiques. Les réglages relevant du
client, décrits dans ce mode d’emploi, ne sont pas couverts par les
termes de cette garantie. De même, elle ne s’applique pas si votre
appareil ne porte pas de numéro de série ou si celui-ci est modifié.
Cette garantie s’applique uniquement aux produits achetés et
utilisés au Canada.
SAMSUNG
LIMITED WARRANTY
SAMSUNG Electronics Canada Inc. (SECA), warrants that this
product is free from defective material and workmanship.
SECA further warrants that if this product fails to operate properly
within the specified warranty period and the failure is due to
improper workmanship or defective material, SECA will repair or
replace the product at its option.
All warranty repairs must be performed by a SECA authorized
service center (centre). (The name and address of the location
nearest you can be obtained by calling toll free: 1-800-SAMSUNG)
Labor
1 year carry-in
Parts
1 year
On carry-in models, transportation to and from the service center is
the customer’s responsibility.
The original dated sales receipt must be retained by the customer
and is the only acceptable proof of purchase. It must be presented
to the authorized service center (centre) at the time service is
requested.
EXCLUSIONS (WHAT IS NOT COVERED)
This warranty does not cover damage due to accident, fire, flood
and/or other acts of god, misuse, incorrect line voltage, improper
installation, improper or unauthorized repairs, commercial use, or
damage that occurs in shipping.
Exterior and interior finish, lamps, and glass are not covered under
this warranty. Customer adjustments which are explained in the
instruction manual are not covered under the terms of this warranty,
This warranty will automatically be voided for any unit found with a
missing or altered serial number. This warranty is valid only on
products purchased and used in Canada.
Garantie pour le CanadaWarranty (Canada users only)
Page 67

ENGLISH FRANÇAIS
ELECTRONICS
THIS CAMCORDER IS MANUFACTURED BY:
*
Samsung Electronics’ Internet Home Page
United States
http://www.samsungusa.com
United Kingdom http://www.samsungelectronics.co.uk
France http://www.samsung.fr
Australia http://www.samsung.com.au
Germany http://www.samsung.de
Sweden http://www.samsung.se
Poland http://www.samsung.com.pl
Canada http://www.samsungcanada.com
Panama http://www.samsung-panama.com
Spain http://www.samsung.es
ELECTRONICS
CE CAMESCOPE EST DISTRIBUÉ PAR :
*
Samsung Electronics’ Internet Home Page
United States
http://www.samsungusa.com
United Kingdom http://www.samsungelectronics.co.uk
France http://www.samsung.fr
Australia http://www.samsung.com.au
Germany http://www.samsung.de
Sweden http://www.samsung.se
Poland http://www.samsung.com.pl
Canada http://www.samsungcanada.com
Panama http://www.samsung-panama.com
Spain http://www.samsung.es
 Loading...