

Samsung SCHX799 Users Manual

* Some of the contents in this manu al may differ from your phone,
depending on the software installed or your service provider.
ELECTRONICS
PORTABLE CELLULAR
TELEPHONE
SCH-X799
World Wide Web
http://www.samsungmobile.com
Printed in Korea
Code No. : GH68-0xxxxA
English. 12/2004. Rev.1.0

Table of contents
Important safety precautions.................................8
Unpacking ............................................................10
Your phone...........................................................11
Phone layout........................................................... 11
Display................................................................... 14
Backlight.......................................................... ...... 16
Service light............................................................ 17
Getting started ..................................................... 18
Using a battery........................................................ 18
Switching on or off the phone.................................... 21
Using the soft keys .................................................. 23
Your phone’s modes................................................. 24
Call functions........................................................ 26
Making a call........................................................... 26
Ending a call ........................................................... 27
Emergency dialing ................................................... 27
Using the recent call logs.......................................... 28
Making a call from Phonebook ................................... 28
Prepend dialing ....................................................... 29
Speed dialing.......................................................... 30
Pause dialing........................................................... 31
Adjusting the volume during a call ............................. 33
Answering a call ...................................................... 34
Silencing an incoming call......................................... 34
Rejecting a call........................................................ 35
Viewing missed calls ................................................ 35
Options during a call ................................................ 36
Call forwarding........................................................ 37
Call Waiting ............................................................ 37
Three-way calling .................................................... 38
Entering text ........................................................39
Changing the text input mode ................................... 40
Using Chinese Pinyin mode ....................................... 41
Using Chinese Stroke mode....................................... 45
3

Table of contents
Table of contents
Using 123 mode ...................................................... 48
Using Symbol mode ................................................. 48
Using ABC mode...................................................... 48
Using T9 Word mode................................................ 51
Using the menus...................................................53
Accessing a menu function by scrolling....................... 53
Using shortcuts ....................................................... 54
List of menu functions.............................................. 55
Calls .....................................................................60
Outgoing
Incoming
Missed
Erase History
Air Time
(Menu 1-1)
(Menu 1-2)
(Menu 1-3)
(Menu 1-5)
(Menu 1-5)
................................................. 60
................................................ 60
.................................................... 61
........................................... 62
.................................................. 63
Phone Book ..........................................................64
Find
(Menu 2-1)
Add New Entry
Group Settings
My Phone #
Memory Info
....................................................... 64
(Menu 2-2)
(Menu 2-3)
(Menu 2-4)
(Menu 2-5)
......................................... 68
......................................... 73
............................................. 74
............................................ 74
Messages..............................................................75
New MSG
Voice
Inbox
Sent
Draft
Saved
Web Alerts
Erase MSG
MSG Setting
(Menu 3-1)
(Menu 3-2)
(Menu 3-3)
(Menu 3-4)
(Menu 3-5)
(Menu 3-6)
(Menu 3-7)
(Menu 3-8)
(Menu 3-9)
................................................ 75
...................................................... 76
..................................................... 78
....................................................... 80
...................................................... 81
.................................................... 81
.............................................. 82
.............................................. 82
............................................ 82
Planner.................................................................85
Today
(Menu 4-1)
Scheduler
Task List
Memo Pad
(Menu 4-5)
Alarm
Calculator
World Time
..................................................... 85
(Menu 4-2)
(Menu 4-3)
(Menu 4-4)
............................................... 85
................................................. 88
............................................... 89
..................................................... 90
(Menu 4-6)
(Menu 4-7)
............................................... 90
............................................. 91
4
Countdown
Set Time
(Menu 4-8)
(Menu 4-9)
.............................................. 92
................................................. 93
Voice Tools ........................................................... 94
Voice Memo
Voice Answer
(Menu 5-1)
(Menu 5-2)
............................................ 94
........................................... 96
Sounds .................................................................99
Ringer Volume
Ringer Type
Key tone
(Menu 6-4)
Alerts
Roam Ringer
Tone Length
Power On/Off
(Menu 6-1)
(Menu 6-2)
(Menu 6-3)
......................................... 99
........................................... 100
............................................... 100
................................................... 101
(Menu 6-5)
(Menu 6-6)
(Menu 6-7)
......................................... 101
.......................................... 102
......................................... 102
Dispaly ...............................................................103
Menu Style
Wall Paper
Language/
Backlight
Banner
Dual Clock
Service LED
Contrast
(Menu 7-1)
(Menu 7-2)
(Menu 7-3)
(Menu 7-4)
(Menu 7-5)
(Menu 7-6)
(Menu 7-7)
(Menu 7-8)
............................................ 103
............................................ 103
............................................ 104
.............................................. 104
................................................. 104
............................................ 105
........................................... 105
............................................... 106
Games ................................................................107
Chicken Run
Mobile Cop
(Menu 8-1)
(Menu 8-2)
.......................................... 108
............................................ 108
Set up................................................................. 110
Call Answer
Auto Key Lock
Auto Retry
Select NAM
Set System
Data/Fax
Version
Security
(Menu 9-1)
(Menu 9-2)
(Menu 9-3)
(Menu 9-4)
(Menu 9-5)
(Menu 9-6)
(Menu 9-7)
(Menu 9-8)
........................................... 110
....................................... 110
............................................ 111
........................................... 111
........................................... 112
.............................................. 112
................................................. 114
................................................ 114
VAS..................................................................... 118
Internet Portal
Games & App.
Ringtone
Animation
(Menu -1)
(Menu -2)
(Menu -3)
(Menu -4)
........................................ 118
......................................... 122
................................................ 124
............................................... 124
5

Table of contents
Table of contents
Voice Portal
SMS INFO
GPS
What’s new?
(Menu -6)
(Menu -7)
(Menu -5)
....................................................... 126
(Menu -8)
............................................ 125
............................................... 125
........................................... 127
Health and safety information ............................128
Exposure to radio frequency (RF) signals .................. 128
For body operation................................................. 129
Precautions when using batteries............................. 131
Road safety .......................................................... 132
Operating environment........................................... 133
Electronic devices.................................................. 133
Potentially Explosive Environments .......................... 135
Emergency calls .................................................... 136
Other important safety information .......................... 137
Care and maintenance............................................ 138
Glossary .............................................................140
Index..................................................................143
Quick reference card...........................................145
6
7

Important safety
precautions
Read these guidelines before using your wireless
phone. Failure to comply with them may be
dangerous or illegal.
Important safety precautions
Sensible use
Use only in the normal position (held to the ear).
Avoid unnecessary contact with the antenna when
the phone is switched on, especially when the phone
is in service.
Road safety at all times
Do not use a hand-held phone while driving; park
the vehicle first.
Switching off when refuelling
Do not use the phone at a refuelling point (service
station) or near fuels or chemicals.
Switching off in aircraft
Wireless phones can cause interference. Using them
in aircraft is both illegal and dangerous.
Switching off near all medical equipment
Switch off your phone near the medical equipment.
Hospitals or health care facilities may be using
equipment that could be sensitive to external RF
energy. Follow any regulations or rules in force.
Interference
All wireless phones may be subject to inte rference,
which could affect their performance.
Special regulations
Meet any special regulations in force in any area a nd
always switch off your phone whenev er it is
forbidden to use it, or when it may cause
interference or danger (in a hospital for example).
Water resistance
Your phone is not water-resistant. Keep it dry.
8
Emergency call
Key in the emergency number for your present
location, then press the key. Give all the
necessary information as accurately as possible. Do
not cut off the call until given permission to do so.
Keeping small children away from your phone
Keep the phone and all its parts including
accessories out of the reach of small children.
Accessories and batteries
Use only Samsung-approved accessories. Use of any
unauthorised accessories could damage your phone
and may be dangerous.
Use only Samsung-approved batteries and recharge
your battery only with Samsung-approved chargers.
Qualified service
Only qualified service personnel may install o r repair
your phone.
For more detailed safety information, see “Health
and safety information” on page 128.
CAUTION
RISK OF EXPLOSION IF A BATTERY IS REPLACED
BY AN INCORRECT TYPE.
DISPOSE USED BATTERIES ACCORDING TO THE
INSTRUCTIONS.
9
Unpacking
Your package contains the following items. The
illustrations below may loo k differe nt from your
phone and accessories:
Your phone
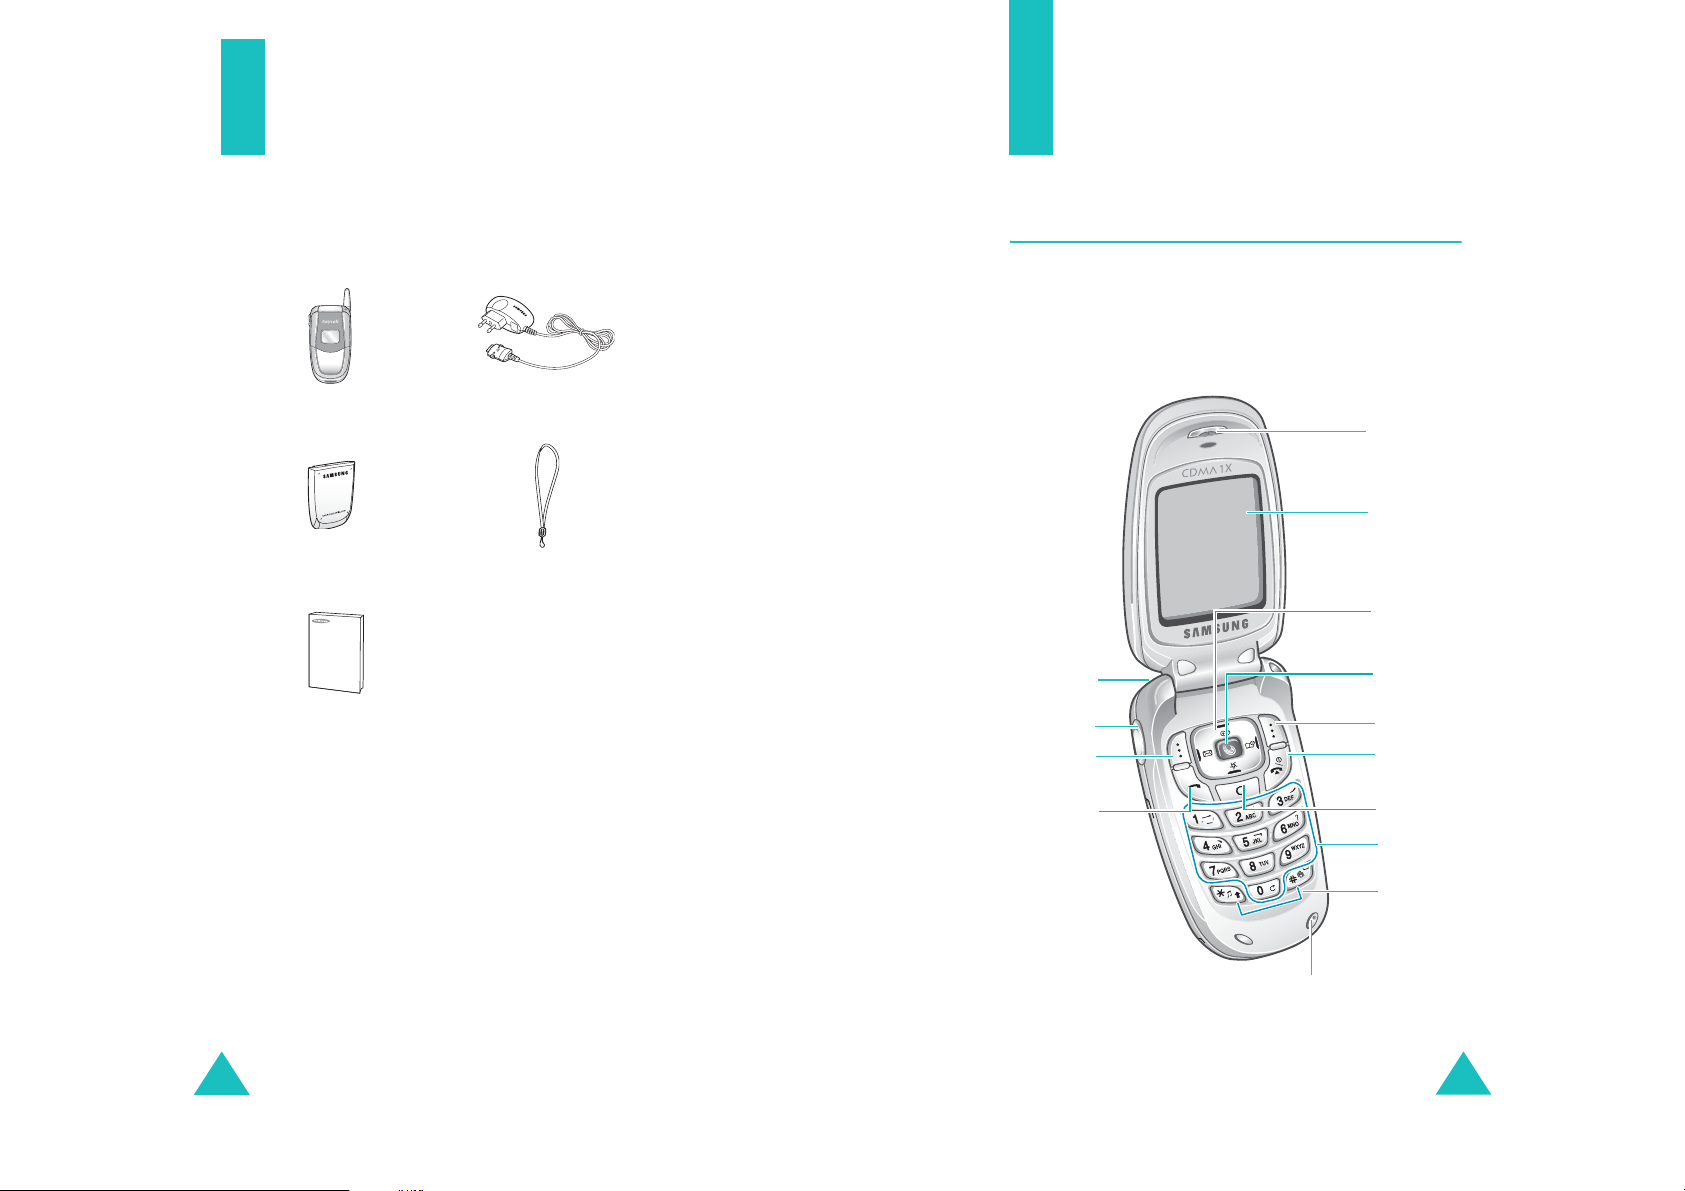
Phone layout
The following il lustrations sh ow the main elements
of your phone:
With the phone open
Handset
Battery
User’s Manual
Travel Adapter
Hand strap
Headset jack
Volume/menu
browse keys
Soft key (left)
Dial key
Earpiece
Display
Navigation (Up/
Down/Left/
Right) keys
WAP browser
key
Soft key (right)
Power On/Off/
menu exit key
Cancel/
correction ley
Alphanumeric
keys
Special
function keys
10
Microphone
11
Your phone
Your phone
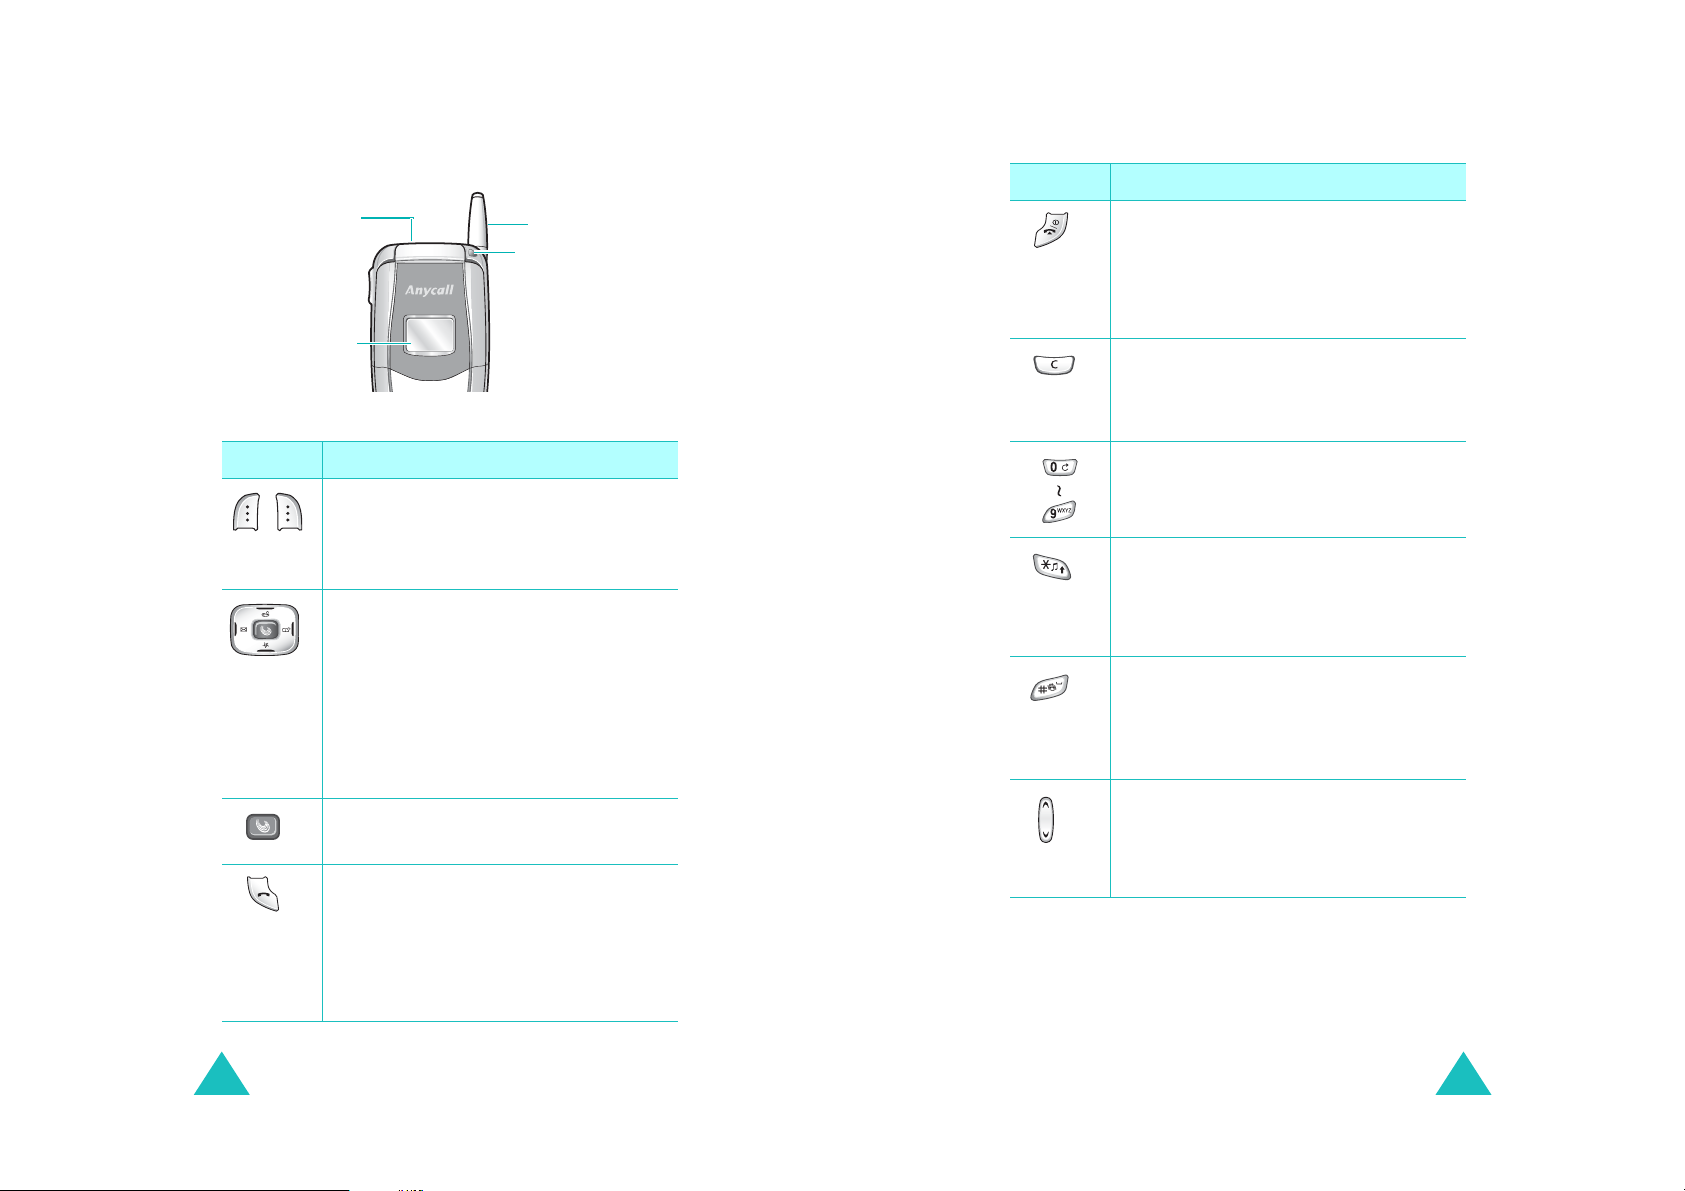
With the phone closed
Headset jack
External display
Key
(s)
Description
Performs the functions indicated by the
screen text above them, on th e bott om
(soft keys)
line of the display.
In Menu mode, scrolls through menu
options.
In Standby mode; quickly enters the
following menu respectively:
Games
• Up:
• Down:
• Left:
• Right:
Enters the
U-Magic
Message
Calendar
U-Max
Makes or answers a call.
In Standby mo de, retrieves the most
recent numbers dialed, received, or
missed. Redials the last number when
pressed and held.
Antenna
Service light
menu.
Key
(s)
Description
(continued)
Ends a call. Also switches the phone on
and off when pressed and held.
In Menu mode, cancels your input and
returns to Standby mode.
Deletes characters from the display.
In Menu mode, returns you to the
previous menu level.
Enters numbers, letters, and some
special characters.
In Standby mode, allows you to change
the call ringer when pressed and held.
In the text entry mode, changes the
case of letters.
In Standby mode, quickly enters or
exits Silent mode when pressed and
held.
In the text entry mode, inserts a space.
(on the left side of the phone)
During a call, adjust the voice volume.
In Standby mode, adjusts the key tone
volume.
12
13
Your phone
Your phone
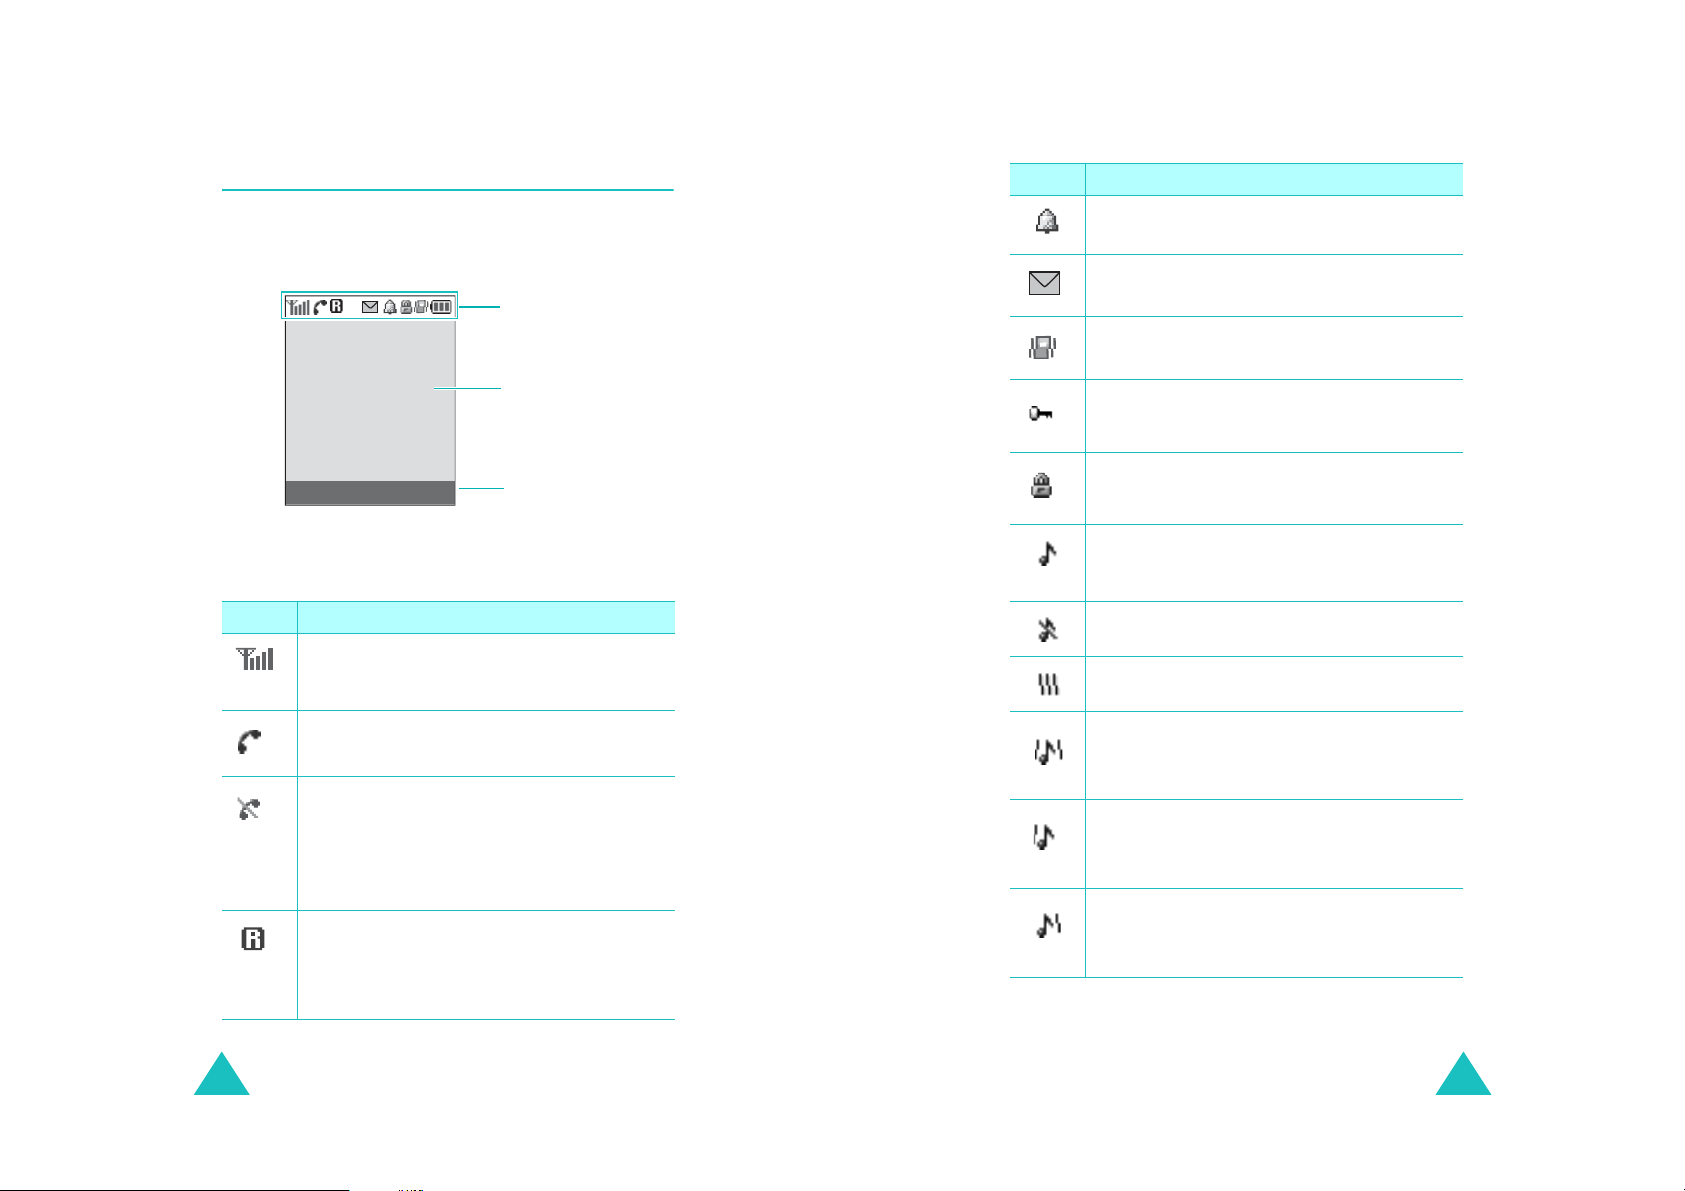
Display
The display has three areas: the top line of icons,
the text and graphic area, and t he bottom line of
soft key indicators.
Icons
Text and
graphics area
Menu Find
Icons
Icon Description
Signal strength
signal strength. The greater the number
of bars, the better the signal.
Service
progress.
No service
outside a service area. When it displays,
you cannot make or receive calls. Wait a
little while for a better signal or move into
an open area to regain service.
Roaming
your home area and have logged onto a
different network; for example, when
traveling in other countries.
: Appears when a call is in
: Appears when you are
: Appears when you are out of
Soft key function
indicators
: Shows the received
Icon Description
Alarm mode
alarm to ring at a specified time.
New message
new message waiting to be checked.
Silent mode
is in the silent mode.
Restriction on
of the Restriction feature is activated.
Lock mode
locked.
Ringer mode
ringer type for calls to
1 Beep
Silent
.
: Appears when you set the ringer
type for calls to
Ringer vibration
ringer type for calls is set to
Vibration & Ringer
set the ringer type for calls to
.
ringer
Vibration then Ringer
you set the ringer type for calls to
then ringer
Ringer then Vibration
you set the ringer type for calls to
then vib
.
(continued)
: Appears when you set an
: Indicates that there is a
: Appears when your phone
: Appears when any option
: Appears when your phone is
: Appears when you set the
Silent
Ringer only
.
and
: Appears when the
Vibration
.
: Appears when you
Vib. &
: Appears when
Vib.
.
: Appears when
Ringer
14
15

Your phone
Your phone
Icon Description
Web alert message
is a new web alert message waiting to be
checked.
Battery status
battery . The more bars y ou see, the more
power you have remaining.
(continued)
: Indicates that there
: Shows the lev el o f y o u r
External display
Your phone has an external display on the phone.
When you close the phone, it turns on and indicates
when you have an incoming call or a message. It
also alerts you at the specified time when you hav e
set an alarm by turning its backlight and showing
the corresponding icon on it.
Backlight
The backlight illuminates the display and keypad.
When you press any key or open the phone, the
backlight illuminates. It turns off if no key is
pressed within a given period of time, depending on
Backlight
the
Display
menu.
menu (
Menu 6-2-3
) set in the
Service light
The service light on the folder flashes to indicate an
incoming call, message, or alarm and flashes for a
few seconds when you turn on or off the p hone. It
lights up while the battery is charging with the
travel adapter; the color of the light tu rns gr een
when the battery is fully charged.
T o specif y the length of time the phone w aits before
the backlight turns off, set the
See page 104 for further details.
16
Backlight
menu.
17
Getting started
Using a battery
Your phone is powered by a rechargeable Li-ion
battery. Use only approved batteries and chargers.
Ask your local Samsung dealer for further details.
Note
: You must fully charge the battery before using
your phone for the first time. A discharged
battery recharges fully in approximately 180
minutes for a standard battery.
Getting started
2. Press the battery until it clicks into place.
Make sure that the battery is properly installed
before switching on the phone.
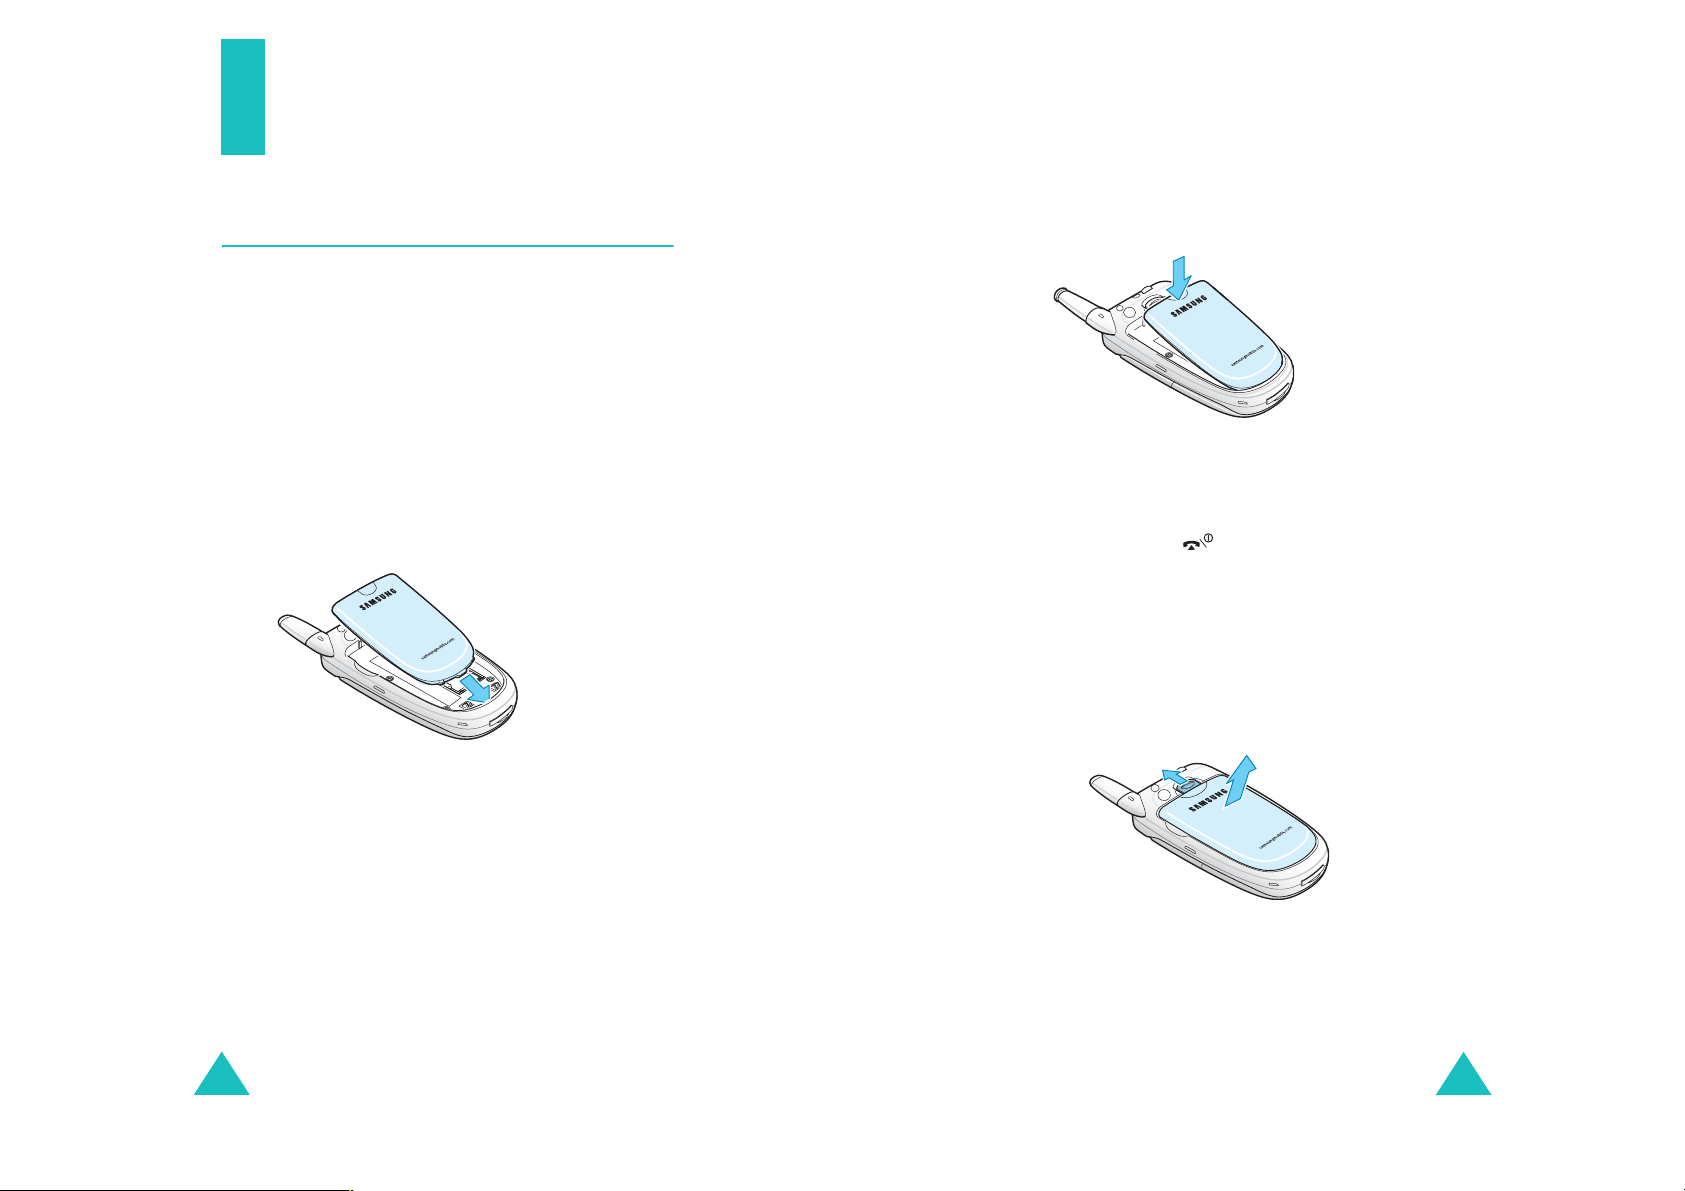
Installing the battery
1. Place the battery so that the tabs on the end
align with the slots at the bottom of the phone.
Removing the battery
1. If necessary, switch off the phone by pressing
and holding the key down until the poweroff image displays.
2. To remove the battery. To do so:
➀
Slide the battery lock towards the top of the
phone.
➁
Lift away the battery, as shown.
➀
➁
18
19
Getting started
Getting started
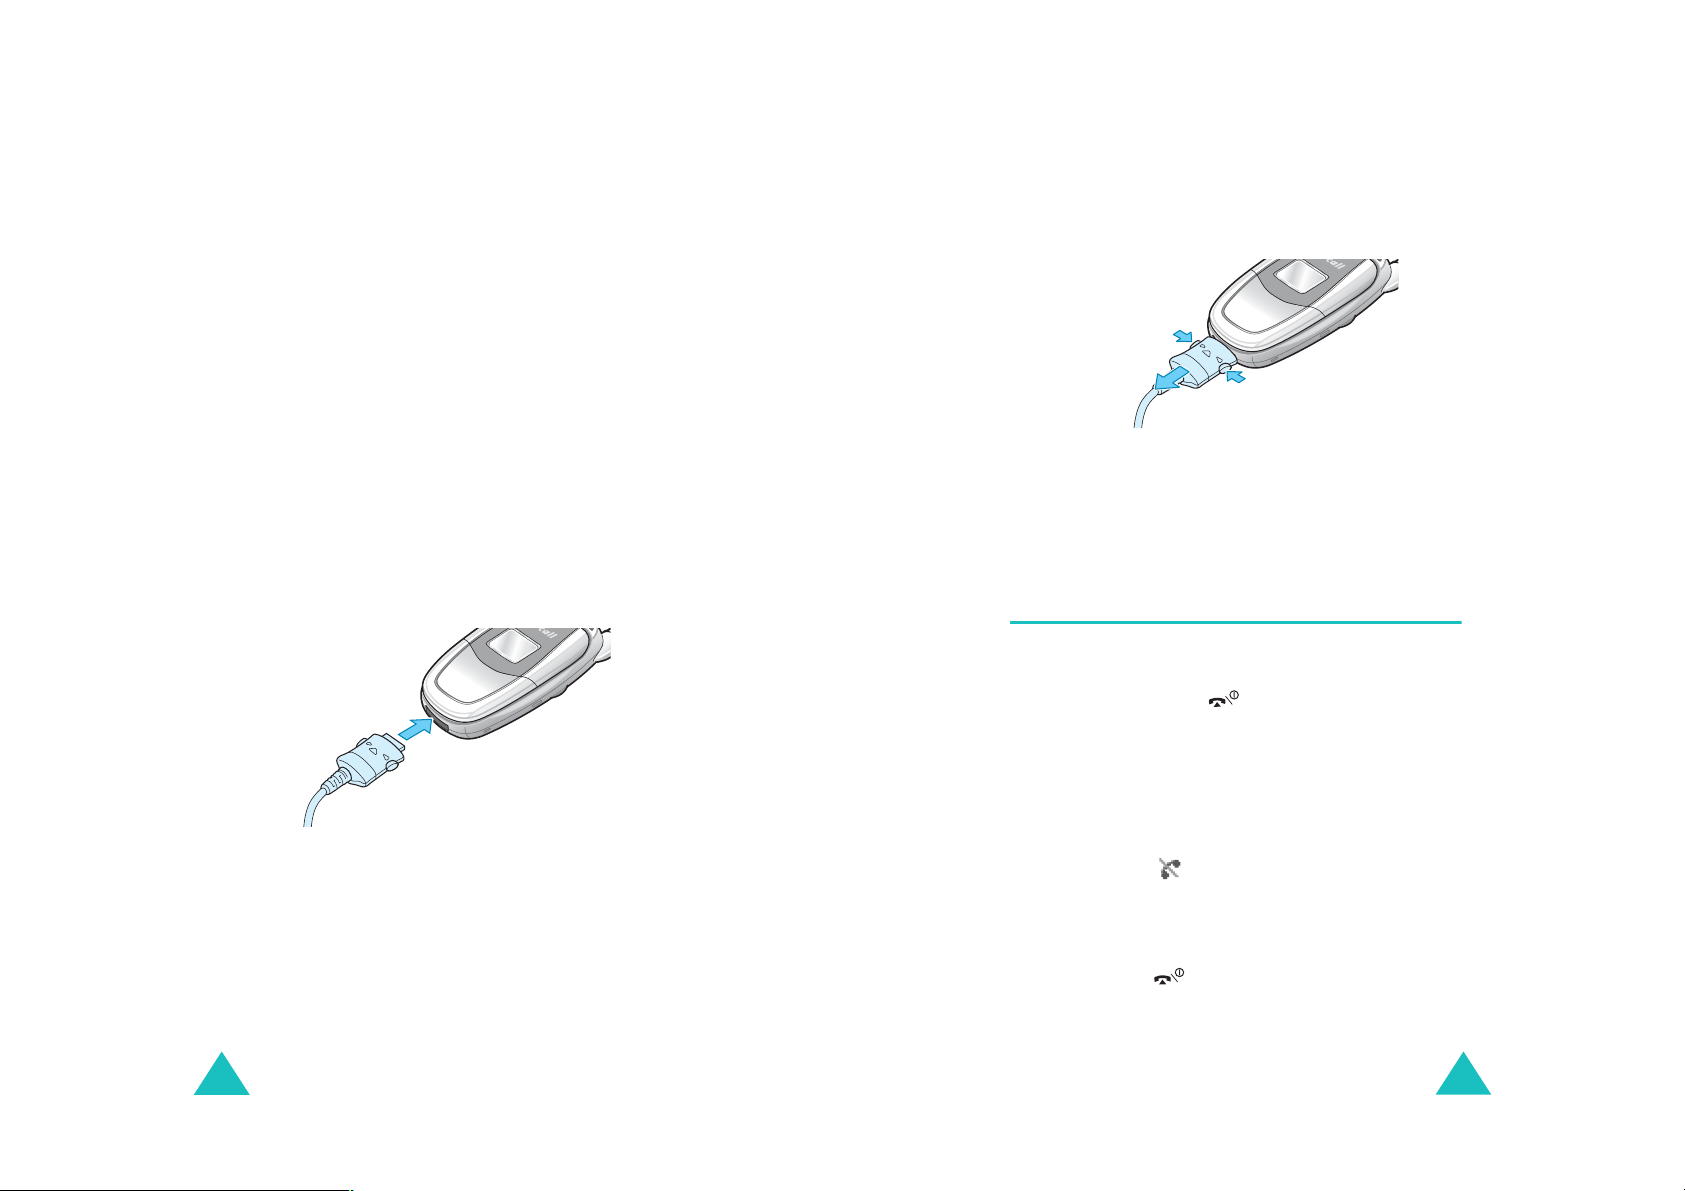
Charging the battery
A travel adapter and a battery charger are provided
for charging your batteries.
Using the travel adapter
The travel adapter allows you to use the phone
while the battery is charging, but this will cause the
battery to charge more slowly.
1. With the battery in position on the phone, plug
the connector of the trave l adapter into the ja ck
at the bottom of the phone.
Make sure that the arrow on the connector is
facing toward the front of the phone.
2. Plug the adapter into a standard AC wall outlet.
The battery strength icon on the display shows
that the battery is charging.
3. When charging is finished, unplug the adapter
from both the power outlet and the phone by
pressing the buttons on both sides of the
connector and pulling the connector out.
➀
➁
Note
: Do not remove the battery from the phone
➀
without unplugging the adapter w hile it is
charging. Otherwise, the phone may be
damaged.
Switching on or off the phone
1. Open the phone.
2. Press and hold the key for m o re th a n on e
second to switch on the phone.
20
3. The service light flashes and then the idle screen
appears on the display when the system locates
services.
If the phone is out of the service area, the No
Service icon ( ) appears on the display. In this
case, you cannot place and receive calls. You
can try again later when service is available.
4. When you wish to switch off the phone, press
and hold the key for more than one seconds
until the power-off image displays.
21
Getting started
Getting started
WARNING!
Do not switch on the phone when mobile phone use
is prohibited or when it may cause interference or
danger.
Note
: Do not touch the antenna on the phone
unnecessarily when the phone is switched on.
Contact with the antenna affects the call quality
and may cause the phone to operate at a
higher power level than otherwise needed.
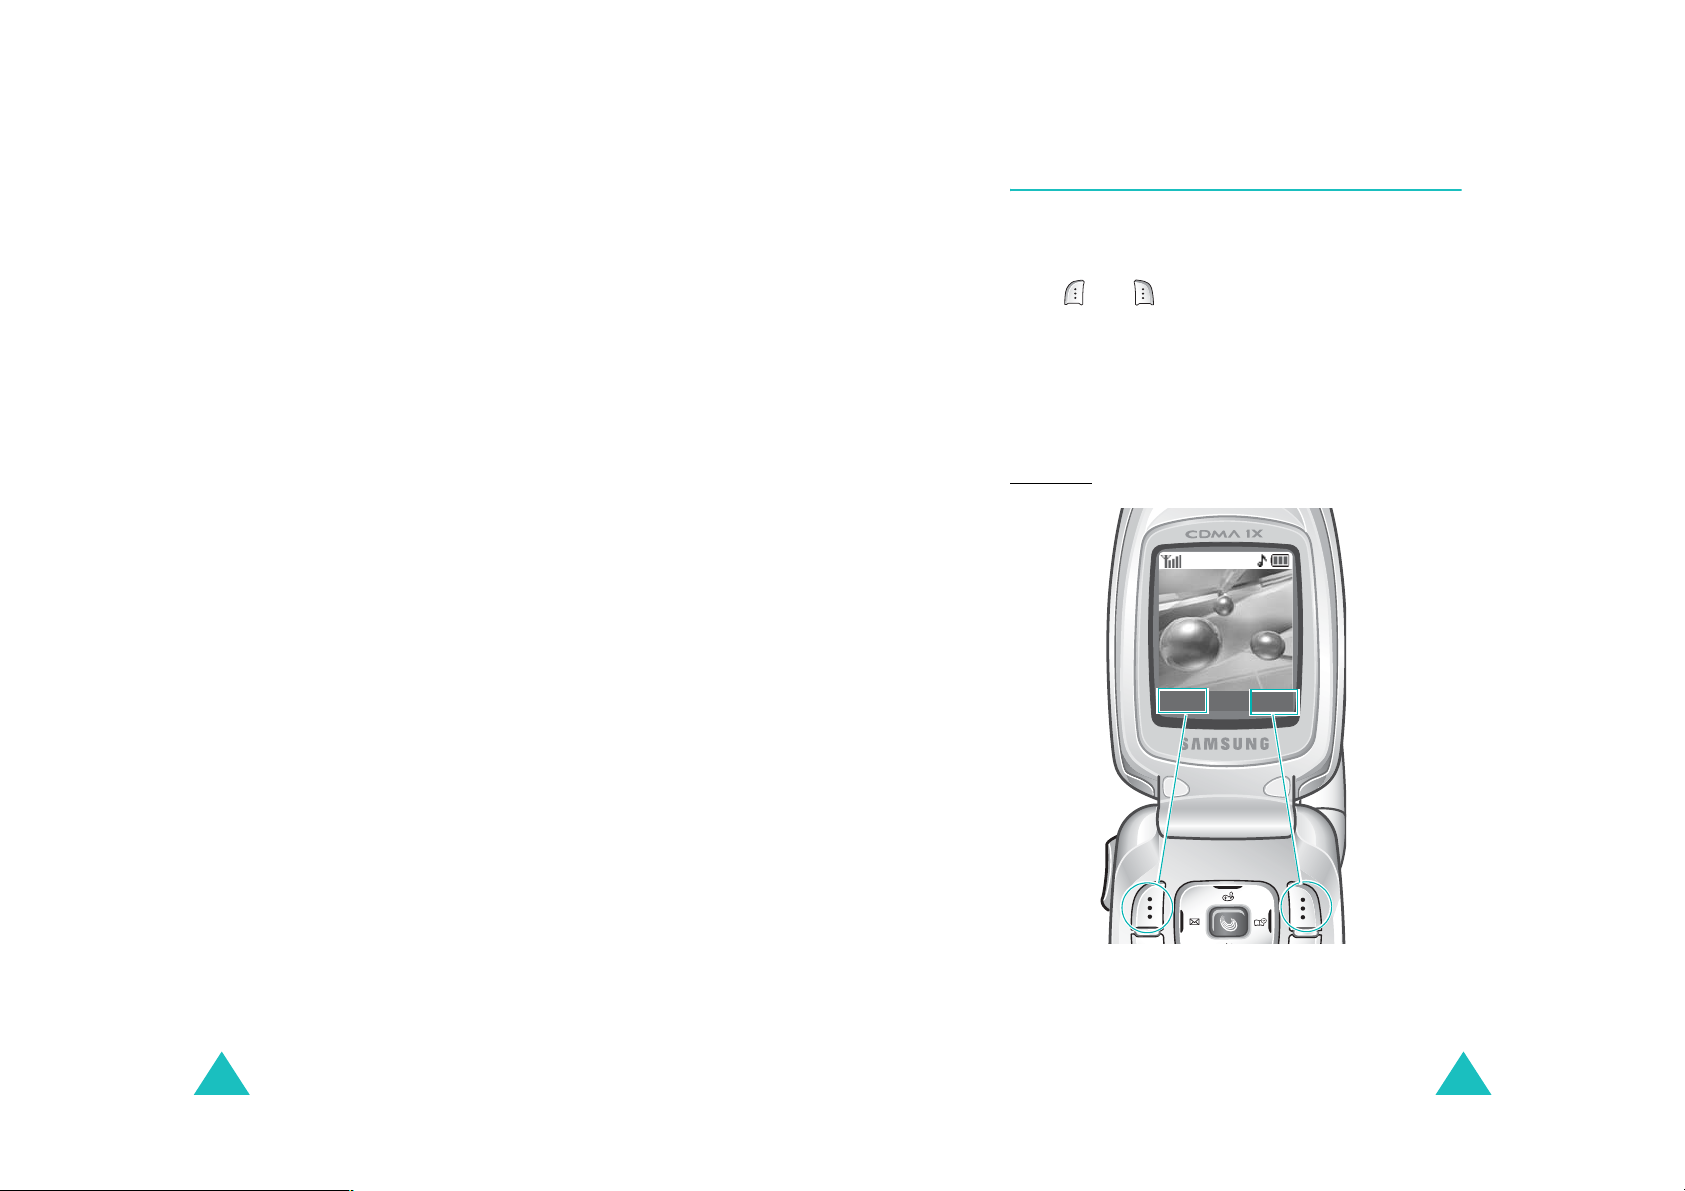
Using the soft keys
You r pho ne of fers a se t of fun ction s that allo ws y ou
to customize it. These functions are arranged in
menus and submenus, accessed using the two soft
keys, and . Each menu and submenu allows
you to view and alter the settings of a particular
function.
The roles of the soft keys vary, depending on the
current function you are using; the labels on the
bottom line of the display j ust above each key
indicate their current role.
Example:
04/12 Mon 14:43
Menu
Find
22
Press the left soft
key to access Menu
mode.
Press the right soft
key to access the
Find
menu in the
Phonebook
menu.
23

Getting started
Getting started
Your phone’s modes
Standby mode
Standby mode is the most basic state of your
phone. The phone goes into Standby mode soon
after you turn it on, or whenever you briefly press
the key. When your phone is in Standby mode,
you will typically see the current time and date. If
you enter a phone number, you can press the
Save
key to dial it, or press the
in the internal Phon ebook.
Press the key at any time to return to Standby
mode. Be careful; if you are on a call when you
press the key, your phone disconnects the call
and returns to Standby mode. Press the
several times or hold it to return to Standby mode
without ending the call.
Talk mode
You can place and answer calls only when your
phone is turned on. During a call, the phone is in
T alk mode. While y ou are in Talk mode, pres sing the
Menu
soft key gives you a list of options. See
page 36 for details on the options.
soft key to save it
C
key
Lock mode
When you lock your phone using the
menu (
and calls, but you cannot place a call until you
unlock the phone.
Menu 6-6-1
), you can receive messages
Phone Lock
Silent mode
Silent mode disables all sounds on the phone. This
feature is best used in situations where the phone
might disturb others, such as in a meeting, a
library, and a theater.
To enter Silent mode, press and hold the key
until “Entering Silent Mode” and the Silent mode
icon ( ) appears.
To exit and reactive the previous sound settings,
press and hold the key until “Exit Silent Mode”
appears. The Silent mode icon no longer displays.
Note
: If you turn off the phone in
silent mode
the phone.
is still activated when you turn on
silent mode
, the
Power Save mode
Your phone comes with a power save feature that
will automatically be activated if your phone is
unable to find a signal after 15 minutes of
searching. While this feature is active, the phone’s
battery charge is conserved. To return to Standby
mode, press any key.
24
25
Call functions
Call functions
Ending a call
Making a call
To make a call:
1. In Standby mode, enter the area code, and
phone number.
While entering a phone number, press the
Pause
soft key to insert a hard pause. For more
information on pause dialing, see page 31.
2. Press the key. The phone places the call to
the entered phone num ber.
Note
: If you have set the time interval for automatic
redialing in the
), the phone will automatically retry to mak e
3
the call when no one answers or the line is
busy.
Correcting the number
To clear Press the
the last digit
displayed
Auto Retry
C
key.
menu (
Menu 6-
When you want to finish your call, press the
key .
The call time, the length of the call, displays along
with the phone number of the called person. If the
number is stored in your Phonebook, the name
displays. If there is no match, you can press the
Save
soft key and store the number in Phonebook.
For further details about storing the number in
Phonebook, see page 68.
Alternatively, simply close the phone to end a call.
Emergency dialing
You can place emergency call from your emergency
number list even if your phone is locked. For further
information on emergency numbers, refer to page
xx.
the whole display
26
C
key for more than one
second.
27

Call functions
Call functions
Using the recent call logs
The phone stores up to 90 of the calls dialed,
received, or missed chronologically. The last call is
saved in the first position.
To recall any of these numbers:
1. If there are any ch aracters on t he display, return
to Standby mode by pressing the key.
2. Press the key. The list of recent calls
displays.
• : Outgoing calls
• : Incoming calls
• : Missed calls
3. Press the Up and Down keys, or the Volume
keys on the left side of the phone to scan
through the list until the number you want
highlights.
4. Press to dial the highlighted num ber.
Prepend dialing
The Prepend option lets you add digits, such as area
codes and network feature activation codes, to a
phone number that is in your call logs before dialing
it.
To prepend the phone numbers stored in the call
logs:
1. Access a call log in the Recent Calls list referring
Calls
to page 28 or in the
2. When the phone number you want to dial
highlights, pres s th e
The display shows the details of the number.
3. Press the
pop-up list.
4. Press the
5. Enter the area code or feature code.
6. Press the key to dial the number.
Menu
soft key to access the Menu
3
key to select the
menu (
Select
Menu 1
soft key.
Prepend
).
option.
Making a call from Phonebook
You can store the phone numbers regularly in the
card and the phone’s memories, which is called
“Phonebook.” You then simply recall the number to
dial. For further details on Phonebook, see page 64.
28
29

Call functions
Call functions
Speed dialing
Once you have stored phone numbers in
Phonebook, you can dial them easily with the few
presses of the keys.
Enter the memory location of a number and press
and hold the final digit to dial.
One-touch dial
009 are special one-touch locations. You can dial
the phone numbers stored in the Phonebook
memory from 001 through 009 simply by pressing
one key.
Press and hold the third digit of the memory
location containing the number to be dialed.
For example
The number (and name) stored displays, then dials.
Two-touch dial
digits.
Press the second digit briefly, then hold down the
third digit of the memory cell.
For example
The number (and name) stored displays, then dials.
Three-touch dial
digits.
: Memory locations 001 thro u g h
: Location no. 009
9
Press the
: For memory loca tion s of tw o
: Location no. 023
Press the
3
the
key and hold.
2
key briefly and hold down
key.
: For memory locations of three
For example: Location no. 123
1
Press the
down the
The number (and name) stored displays, then dials.
and 2 key briefly and hold
3
key.
Pause dialing
When you call an automated system, like a banking
service, you are often required to enter a password
or an account number . Instead of manually entering
the numbers each time, you can store the numbers
in your Phonebook, separated by pauses.
Storing pauses in a Phonebook entry
To store a number in your Phonebook that contains
pauses:
1. Enter the phone number you w ant to store, such
as a bank’s teleservice phone number.
Pause
2. Press the
displays, meaning that a hard pause will occur at
that point in the dialing sequence.
The “P” stops the dialing and waits for the
teleservice to prompt you for a number. The
number following the “P” is your account
number, PIN, etc.
3. Enter the digits that need to follow the pause,
such as your account number.
soft key to insert a pause. A “P”
Press the first two digits briefly, then hold down the
third digit of the memory cell.
30
4. Repeat steps 2 and 3 to add more pauses and
numbers, if necessary.
31
Call functions
Call functions
5. Store the number in your Phonebook as you
Save
normally would by pressing the
soft key
and following from step 4 on page 68.
Pause dialing from a stored Phonebook entry
1. Call the number from Phonebook.
2. Wait for the appropriate promp t from the
number you are calling.
3. When prompted, press the key to send the
DTMF (Dual Tone Multi Frequency) number that
follows your pause.
“SEND DTMF” flashes on the display and the
transmitted tone sounds.
Manual pause dialing
You can enter pauses manually during the dialing
process.
1. Enter the phone number of the service you want
to call, such as a bank’s teleservice phone
number.
Pause
2. Press the
soft key to insert a pause.
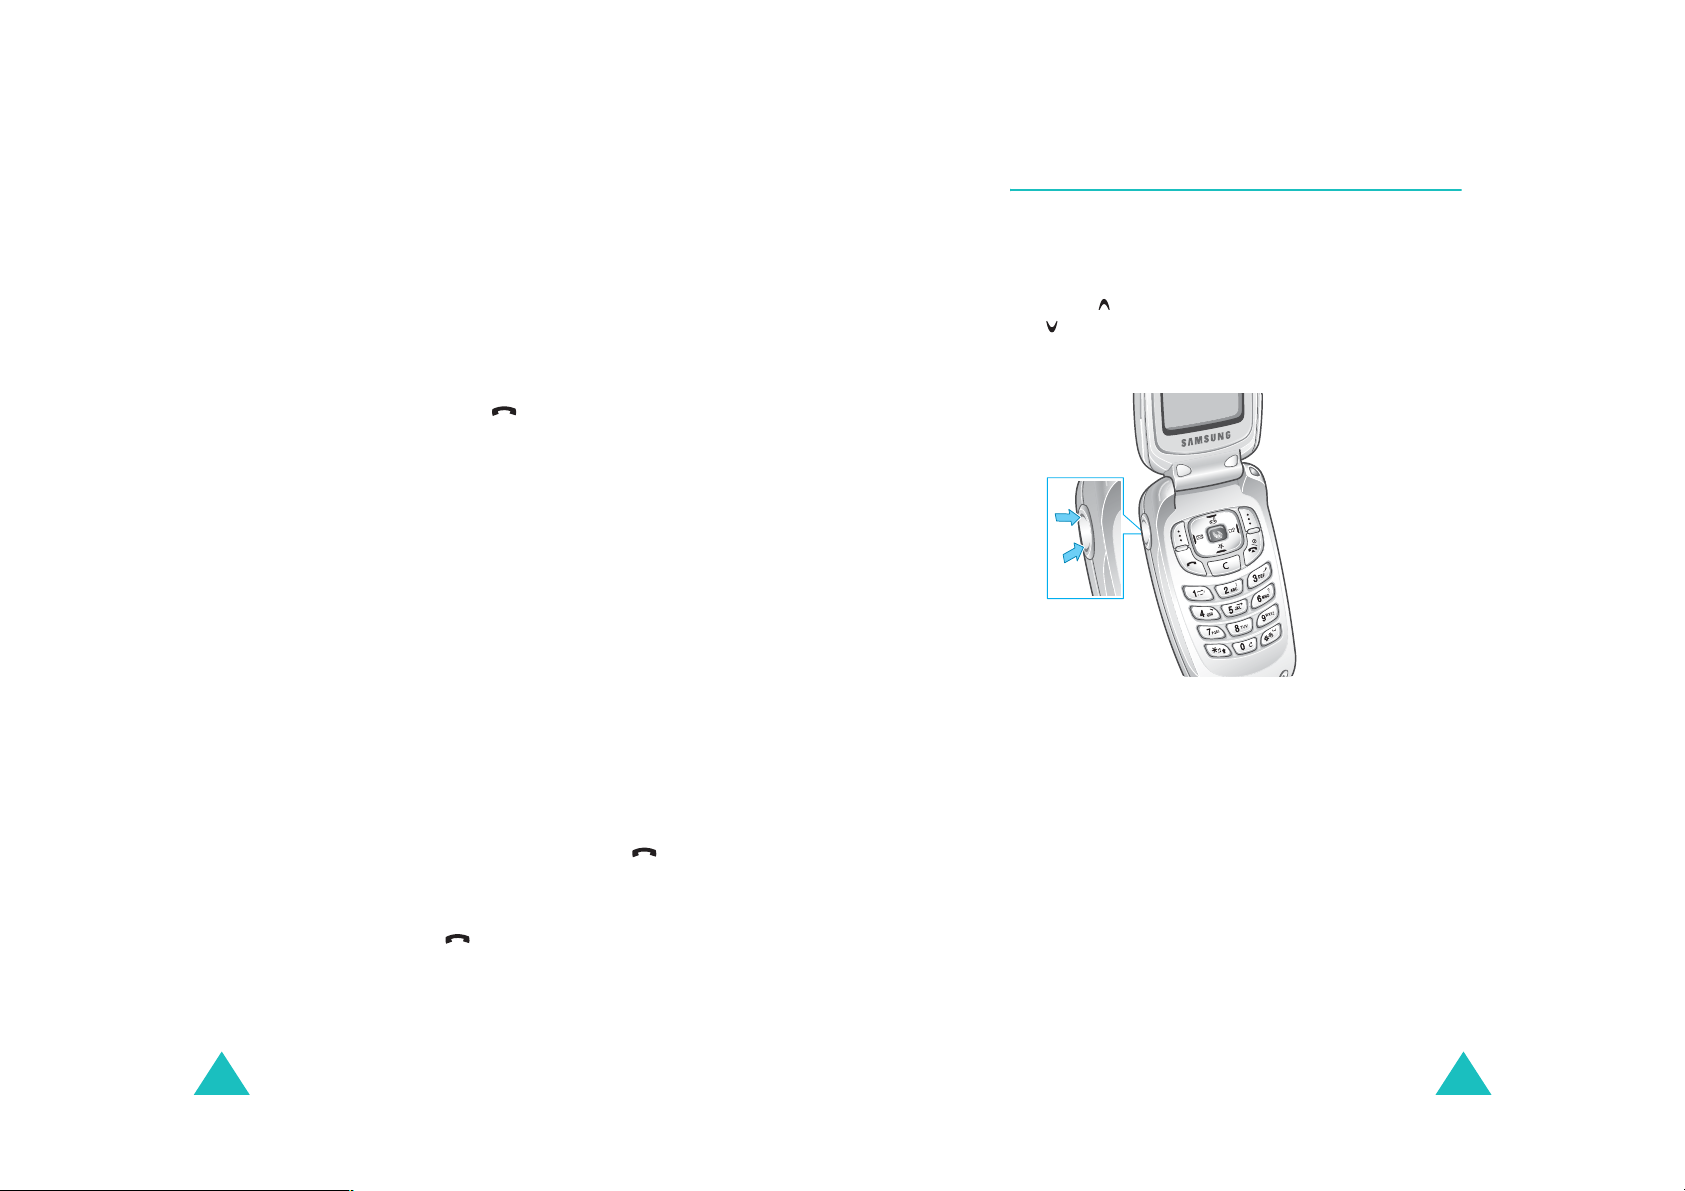
Adjusting the volume during a call
During a call, if you want to adjust the voice
volume, use the Volume k eys on the left side of the
phone.
Press the key to increase the volume level and
the key to decrease the level. The image on the
display shows all five levels; the more bars you see,
the higher the level is.
In Standby mode, you can also adjust the key tone
volume using these keys.
The screen displays a “P” indicating a pause.
3. Enter the number to be sent after the pause by
pressing the digit keys, and then press the
key .
4. After connecting, wait for th e pr om p t from
teleservice. Press the key again after the
prompt to send the additional number.
32
33

Call functions
Call functions
Answering a call
When somebody calls you, the phone alerts you by
ringing and blinking the service light.
If the caller can be identified, the caller’s phone
number or name, if stored in your Phonebook,
displays.
There are many ways to answer a call, depending
on your setting in the
);
6-4
Setting option To answer the call,
By send key press the key.
By folder open open the phone. If it is
By any key open the phone or press any
To end the call, close the phone or press the
key .
Answer Mode
already open, press the
key.
key except the soft keys, the
key or the Volume key.
menu (
Menu
Rejecting a call
To reject an incoming call, press the right soft key
or the key.
Press and hold one of the Volume keys on the left
side of the phone.
Viewing missed calls
If you fail to answer a call for any reason, th e phone
indicates a missed call by displaying a text
notification on the screen. Additionally, if caller
information is available, a Missed entry is created,
and the screen displays the phone number of the
last missed call.
When the display informs you of the missed call,
press the key to call the displayed number, or
the key to clear the message and return to
Standby mode.
T o view the list of the missed calls, refer to “M issed”
on page 60.
Note
: You can answer a call while using Phonebook or
menu features. The current operation stops.
Silencing an incoming call
You can silence the ringer w hen a call comes. Pre ss
one of the Volume keys. If it is open, press the left
soft key.
34
35

Call functions
Call functions
Options during a call
Your phone provides a number of functions that you
can use during a call. As many of these options are
network services, you may not be able to use all of
them at all times.
Menu
Press the
following options:
Mute/Quit
microphone off, so that the other person cannot
hear you.
Example
person in the room, but do not want the other
person to hear you.
Calls
page 60.
Phonebook
menu. See page 64.
Silent/Quit
allows you to press keys without hearing annoying
key tones during a call.
Send my #
calling person or automated services.
DTMF Length
(Dual-Tone Multi-Frequency) tones. You can choose
either
: You wish to say something to another
: allows you to access the
long
soft key during a call to access the
: allows you to switch your phone’s
Calls
menu. See
: allows you to access the
: does not transmit the key tones. It
: sends your phone number to the
: manipulates the audible DTMF
or
normal
.
Phonebook
Call forwarding
When the
enabled, your phone forwards incoming calls to
another phone number, even while your phone
turns off.
Activating Call forwarding does not affect outgoing
calls made from this phone. For further details for
activating Call forwarding.
Call forward
menu (
Menu 1-5
) is
Call Waiting
When the
enabled, you can answer an incoming call while you
have a call in progress;
When a waiting call is detected, the incoming call
alert sounds, depending on your network, and a
text notification displays.
To answer a waiting call:
1. T o answ er the call, press the key. The phone
connects the calling person, and places the
current call on hold.
2. Press the key again to switch between the
two calls.
3. To end the call, press the key or close the
phone. All of the calls are disconnected.
Call Waiting
menu (
Menu 1-6
) is
36
37

Call functions
Three-way calling
This feature enables you to conduct conference calls
with two separate peo p le at the same time. The
phone records both calls in the Outgoing call log.
You are billed airtime for each of the outgoing calls
separately . Contact your service provider to activate
Three-Way Calling.
To make a three-way call:
1. During a conversation, enter the phone number
for the third person and press the key.
2. When the third person answers, press the
key again to begin your three-way ca ll.
During a three-way call, if one of the callers hangs
up, you and the remaining caller will stay
connected. If you initiated the call and you hang up
first, all calls are disconnected.
Entering text
At many times when using your phone, you will
need to enter text; for example, when storing a
name in Phonebook, writing a text message, or
scheduling events in your calendar. You can enter
alphanumeric characters into your phone by using
your phone’s keypad.
Your phone has the following text input modes:
•
Pinyin
: allows you to enter a Chinese character
using its Pinyi n sp e lli n g , w h ic h is a ph o n e ti c
system.
Stroke
•
the individual strokes labeled on the keys.
123
•
Symbol
•
symbols and special characters.
ABC
•
pressing the key labeled with the character you
want until it displays.
: allows you to a Chinese character using
: allows you to enter numbers.
: allows you to enter many different
: allows you to enter English characters by
38
T9 Word
•
with only one keypress per character.
Note
: allows you to enter English characters
: Pinyin, Stroke, and T9 Word modes use the T9
input method. T9 mode automatically compares
your key presses to an internal linguistic
database to determine the correct word.
39
Entering text
Entering text
Changing the text input mode
Example: Writing a text message
In the text entry screen, press the
1. Scroll to the mode you want by pressing the
Navigation keys.
Note
: If you want to exit the Mode list without
changing to a new mode, press the
You can change between
mode to enter English words and choose
or
Stroke
to enter Chinese characters. To
include a symbol or number(s) between
123
and
characters,
Symbol
available.
2. T o select the highlighted m ode, press the
soft key.
You will find the selected text input mode
indicator on the display.
Message 160
Mode
ABC
and
T9 Word
modes are also
soft key.
C
key.
Pinyin
Select
Using Chinese Pinyin mode
Pinyin is a system to write the pronunciation of a
Chinese word using the Latin alphabet. With the
Pinyin input method, you can en ter Ch inese
characters by keying in the Pinyin string using the
phone’s keypad. The phone automatically presents
the matching words.
This mode allows you to enter Pinyin characters
with only one key per letter.
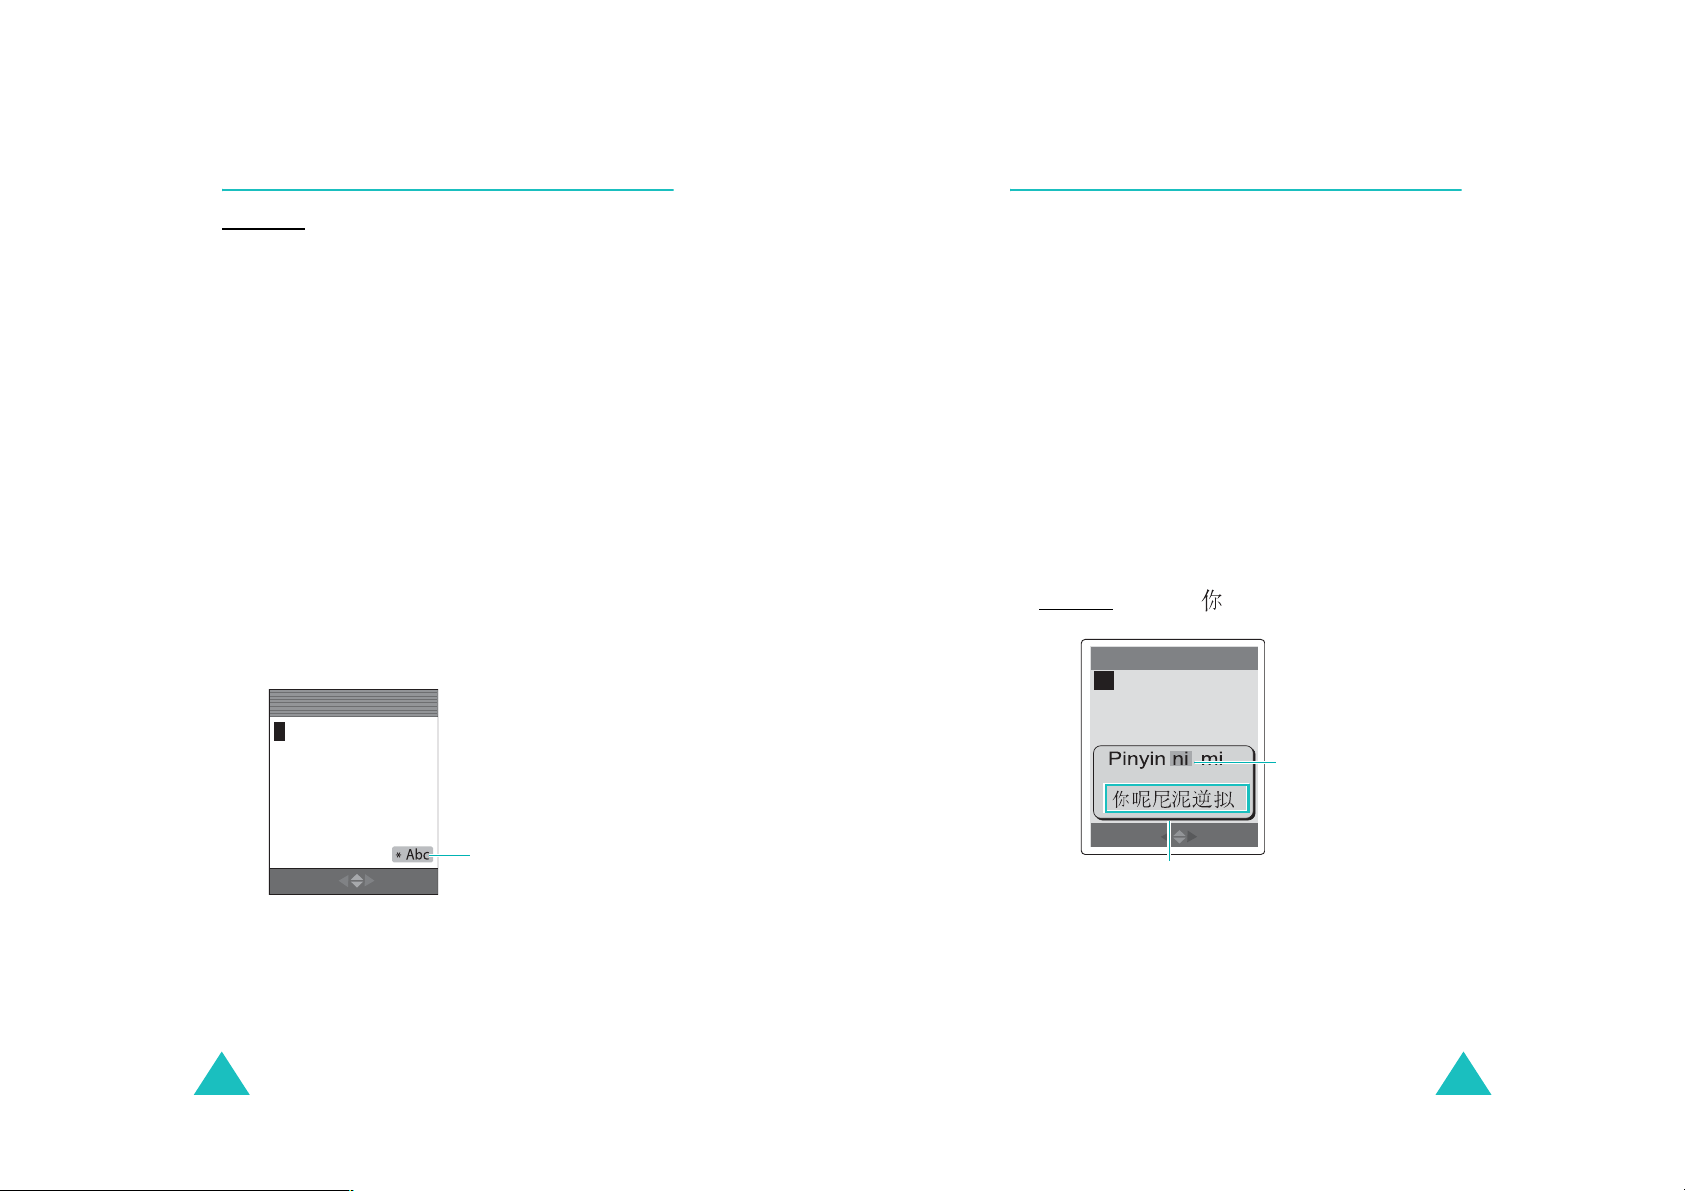
Typing characters in Pinyin mode
1. Press the keys corresponding to the phonetic
spelling, referring to the letters printed on the
keys. Notice that the choices in the Character
Selection Field change.
Example
: Typing “ ” in Pinyin mode
Message 140
Pinyin Input Field
Press the
the 4 key to enter
“ni.”
6
key and
Mode OK
40
Text input
mode indicator
Mode OK
The Character Selection Field
41
Entering text
Entering text
2. If the yellow box is no t placed to the phonetic
word that you want to find, press Left key of
Right key to scroll through the choices. Also, If
you cannot find the desired character from the
display, press Up key or Down key to scroll
through the choices in the Character Selection
Field.
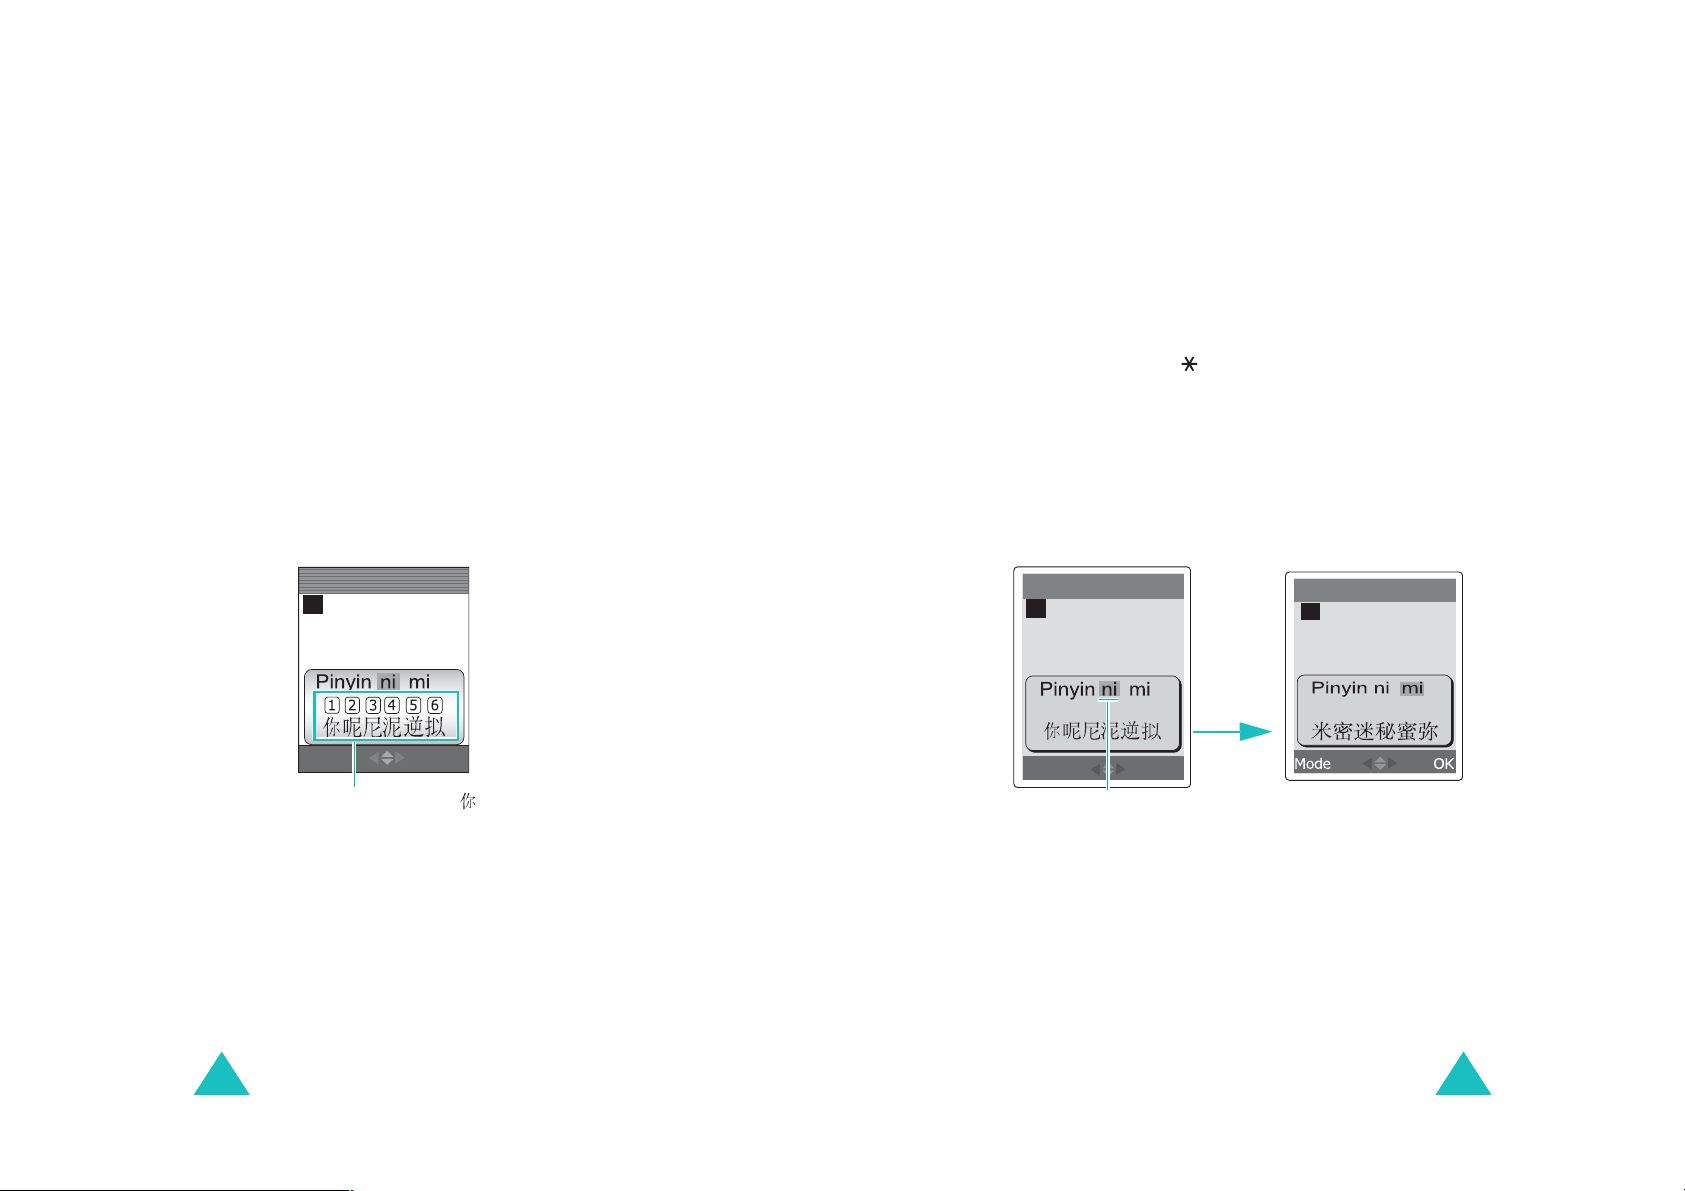
When the character you are typing appears in
the Character Selection Field, you may select it,
without completing t he Pinyin spellng.
1
3. To select a character, press
Character Selection Field. A number from
to activate the
1
to 6
are added to the beginning of a corresponding
character. When the Character Selection Field is
1
activated, a normal press on the
key to 6 keys
selects the corresponding character.
Message 140
Using the alternative pinyins and tones
You can enter another character using alternative
Pinyin for the keys you have pre ssed or assigning a
tone for the selected Pinyin. Entering a tone for a
character is optional, but it is especially useful if the
Pinyin spelling is similar for several characters.
1. Press the keys corresponding to the letter yo u
need. Press the key to display another Pinyin
spellings and the T ones menu.
6
For example, to get “mi”, press the
keys. But the screen shows “ni,” another Pinyin
for your keypress.
Remember there are several Pinyins from the
same key pressing. To get alternative Pinyins,
press the Left key or Right key.
Message 140
Press the
Right key.
Message 140
and the 4
Mode OK
Press the 1 key to select “ .”
Note
: You can de activate the Character Selection
C
Field by pressing the
42
key.
Mode OK
Press the 6 and 4 keys.
2. If you cannot find the desired character from the
display, press Down key to scroll through
choices in the Character Selection Field.
3. If you find the character you want to enter , press
1
a key (
Note
to 6) to corresponding the character.
: You ma y delete a previously entered tone by
C
pressing
.
43
Entering text
Entering text
Rapid character entry
Rapid character entry is easy in any mode, using
the Character Selection Field. As you enter
characters, your phone predicts the next character
you might want and presents choices in the
Character Selection Field.
For example, when you type the word “zhong guo
( )”, enter the first character using the
following keystrokes; the
9, 4, 6, 6, 1
, and 1 keys.
You do not have to complete the Pinyin spelling to
include “guo ( )”. With no extra typing, the letter
displays conveniently in the Character Selection
Field for you to choose.
Scrolling
To move the cursor to the left or right through your
text message, press the Left or Right key when the
Character Selection Field is not activated.
Inserting a space
Insert a space between characters, press the key
in the Text Area.
Using Chinese Stroke mode
This mode allows you to enter individual Chinese
strokes, in written order, from top to bottom, and
from left to right.
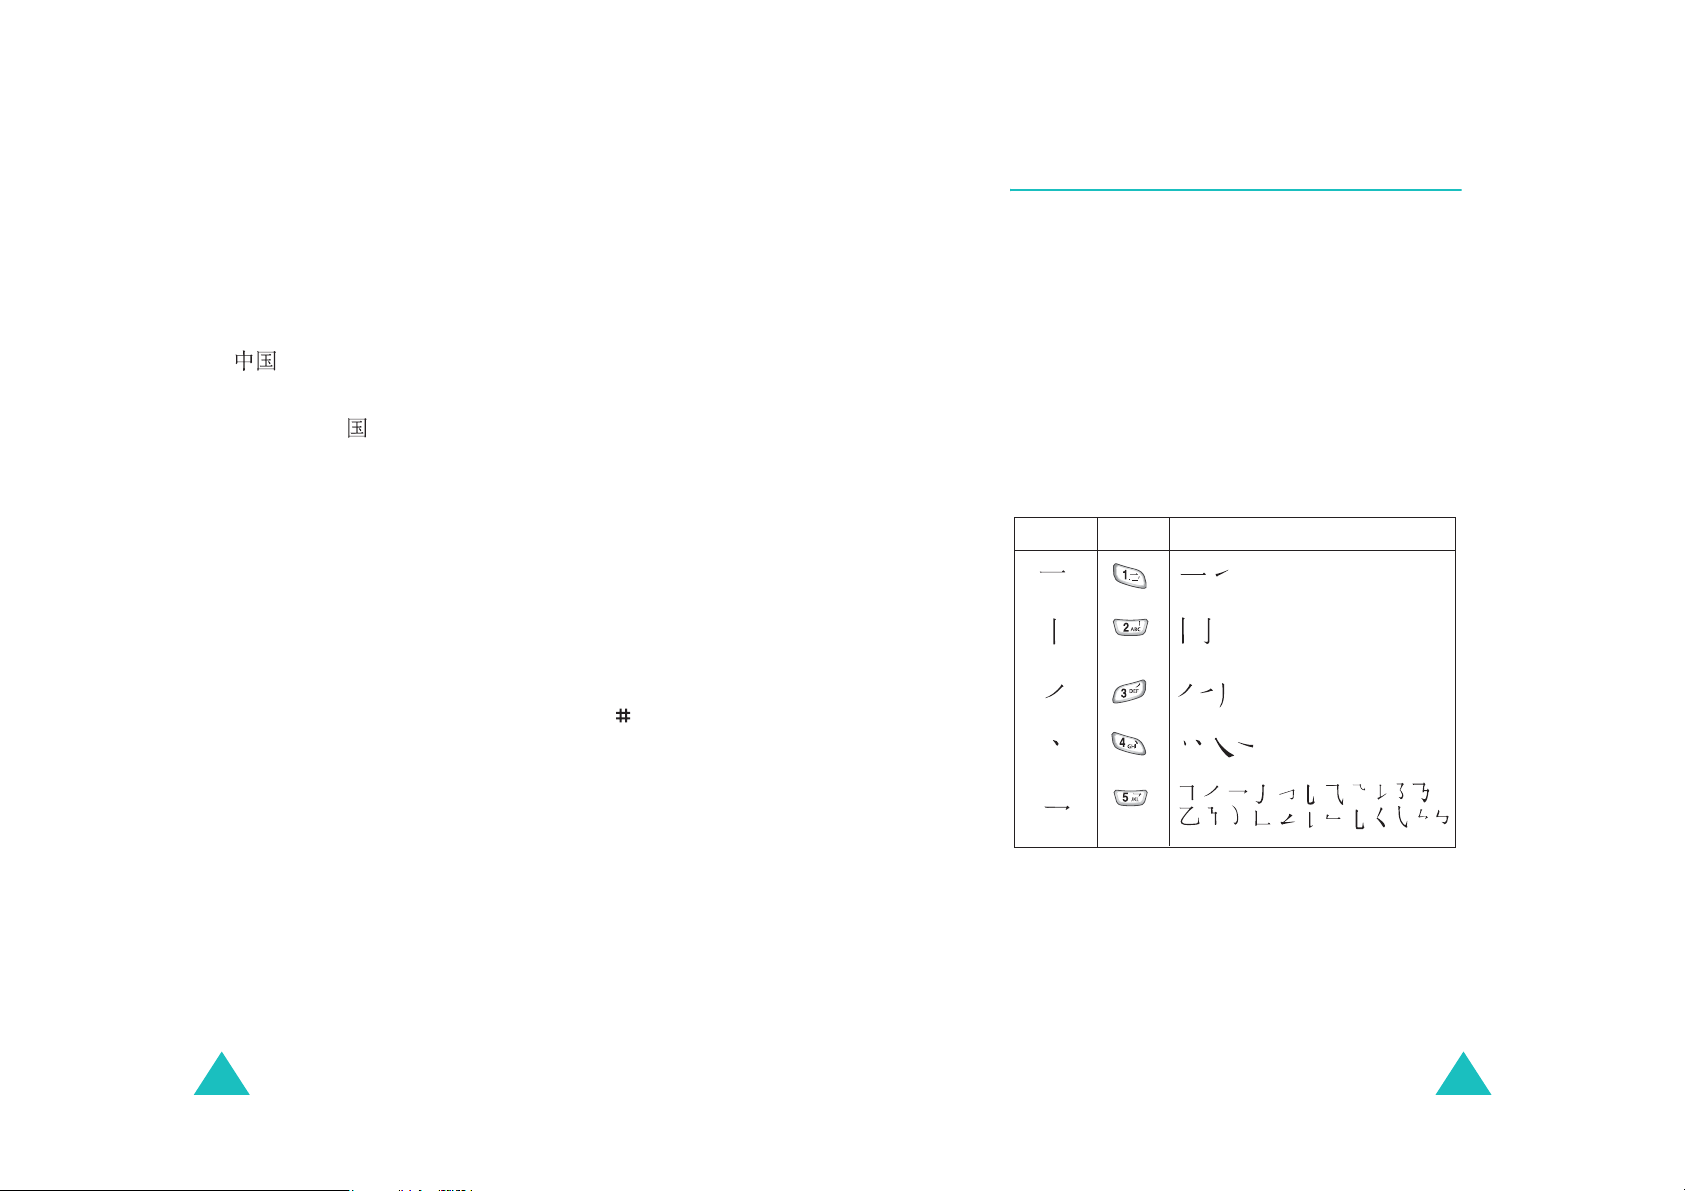
Even though there are many different strokes used
to create Chinese characters, the strokes are
classified into 5 basic categories; heng, shu, pie,
dian, and zhe. The basic strokes are printed on
1
keys, from
To enter a stroke, press the key printed with the
stroke that most closely represents the exact stroke
you want. The table shows the stroke/key
relationship:
Categories Keys
to 5 on the keypad.
Strokes Represented in Each Category
Clearing strokes and characters
Press the C key once or repeatedly to rem ove
strokes one by one to the left. Once the Pinyin input
C
field is empty, pressing the
from the Text Area.
To clear all of the strokes and characters on the
display, press and hold the
44
key removes a letter
C
key.
45

Entering text
Entering text
Typing strokes and characters in Stroke
mode
1. To type a character, press the keys
corresponding to its component strokes. Press
keys in the order that you wo u ld write the
strokes, using one press per stroke.
Example
2. The phone displays your strokes in the Key
Stroke input field and offers character choices in
the Character Selection Field. As you enter
strokes, notice that the choices in the Character
Selection Field change.
To scroll through the choices, press the Up or
Down key.
Note
: Typing “ “ in Stroke mode
Message 140
Key Stroke Input Field
Press the 5 key to enter
“ , ” then th e
enter “ .“
Mode OK
The Character Selection Field.
To select “ ,” press the
7
key.
3
key to
: If you are uncertain of the order of one or more
6
strokes, press the
key in place of eac h
questionable stroke. Continue entering strokes
until the character displays in the Character
Selection Field or until you finish the character.
3. When the character you are typing appears in
the Character Selection Field, you may select it
without finishing the stroke sequence for the
character. Characters displa y ed in th e Cha r ac ter
7
Selection Field correspond to keys,
to on
the keypad. To select a character and add it to
your message, press the corresponding key,
7
from the
to key.
Rapid character entry
Rapid character entry is easy in any mode, using
the Character Selection Field. As you enter
characters, your phone predicts the next character
you might want and presents choices in the
Character Selection Field.
For example, try typing the characters “zhong guo
2, 8
( )” u sing the following keystrok es; the
7
keys. Even though “guo ( )” is the twelve
and
,
stroke character pair, your phone allows you to
enter it in only three key presses.
Scrolling
To move the cursor to the left or right throu gh y o ur
text, press the Left or Right key.
Clearing strokes and characters
Press the C key once or repeatedly to rem ove
strokes one by one to the left. Once the K ey Stroke
C
input field is empty, pressing the
letter from the Text Area.
To clear all of the strokes and characters on the
display, press and hold the
C
key removes a
key.
46
47
 Loading...