

Page 1

*
Depending on the software installed or your service provider or country, some
of the descriptions in this guide may not match your phone exactly.
* Depending on your country, your phone and accessories may appear
different from the illustrations in this guide.
World Wide Web
http://www.samsungmobile.com
Printed in Korea
Code No.:GH68-xxxxxA
English. 06/2007. Rev. 1.0
Page 2

ft
a
r
D
2
1
.
6
0
.
7
0
0
2
SCH-W579+
User’s Guide
Page 3

Important
safety
precautions
Failure to comply with the following
precautions may be dangerous or illegal.
Drive safely at all times
Do not use a hand-held phone while driving. Park
the vehicle first.
Switch off the phone when refuelling
Do not use the phone at a refuelling point (service
station) or near fuels or chemicals.
Switch off in an aircraft
Wireless phones can cause interference. Using them
in an aircraft is both illegal and dangerous.
Switch off the phone near all medical
equipment
Hospitals or health care facilities may be using
equipment that could be sensitive to external radio
frequency energy. Follow any regulations or rules in
force.
Interference
All wireless phones may be subject to interference,
which could affect their performance.
Page 4

Be aware of special regulations
Meet any special regulations in force in any area and
always switch off your phone whenever it is forbidden
to use it, or when it may cause interference or danger.
Water resistance
Your phone is not water-resistant. Keep it dry.
Sensible use
Use only in the normal position (held to the ear). Avoid
unnecessary contact with the antenna when the phone
is switched on.
Emergency call
Key in the emergency number for your present
location, then press .
Keep your phone away from small children
Keep the phone and all its parts, including accessories,
out of the reach of small children.
Accessories and batteries
Use only Samsung-approved batteries and
accessories, such as headsets and PC data cables. Use
of any unauthorised accessories could damage you or
your phone and may be dangerous.
• The phone could explode if the battery is replaced with an
incorrect type.
• Dispose of used batteries according to the manufacturer’s
instructions.
At very high volumes, prolonged listening to a
headset can damage your hearing.
Qualified service
Only qualified service personnel may repair your
phone.
For more detailed safety information, see "Health and
safety information" on page 114.
Important safety precautions
1
Page 5

About this Guide
This User’s Guide provides you with condensed
information about how to use your phone. To quickly
learn the basics for your phone, please refer to “Get
started” and “Step outside the phone.”
In this guide, the following instruction icons appear:
Indicates that you need to pay careful attention
to the subsequent information regarding safety
or phone features.
Indicates that you can get more information on
the referenced page.
Indicates that you need to press the Navigation
→
keys to scroll to the specified option and then
select it.
Indicates a key on the phone. For example,
[ ]
Indicates a soft key, whose function is displayed
< >
on the phone screen. For example, <
2
Menu
[]
>
•GSM and CDMA network
Switch back and forth between
GSM and CDMA networks, anytime
anywhere.
Special
• Touch screen
Your phone has a touch-sensitive display. You can
access a desired function with a touch on the
screen.
features of your phone
• Camera and camcorder
Use the camera module on your
phone to take a photo or record a
video.
Page 6

•MP3 player
Play MP3 music files using your
phone as an MP3 player.
•Bluetooth
Connect to a headset or hands-free
kit using wireless Bluetooth
technology.
• Get personal with photo caller
ID
See who’s calling you when the
phone displays her or his very own
photo.
• Name card
Create name cards with your
number and profile. Whenever
introducing yourself to others, use
this convenient name card.
• Voice recognition
Just say a contact’s name to dial
her/his phone number.
•SOS message
Send SOS messages to your family or friends for
help in an emergency.
• Messenger
Have a conversation with other
people by sending and receiving
instant messages.
• Melody composer
Make your own melodies for your
phone.
•Dictionary
Search for words using your phone.
Special features of your phone
3
Page 7

Contents
Unpack 6
Make sure you have each item
Your phone 6
Keys, features, and locations
Get started 7
First steps to operating your phone
Install and charge the phone ..................................... 7
Power on or off........................................................ 8
Keys and display ..................................................... 9
Access menu functions ............................................ 11
Customise your phone............................................. 13
Switch networks ..................................................... 15
Make/Answer calls .................................................. 15
Step outside the phone 16
Begin with your camera, the MP3 player, the web, and other
special features
Use camera............................................................ 16
4
Play MP3s.............................................................. 17
Use melody composer ............................................. 18
Browse the WAP ..................................................... 18
Use Contacts.......................................................... 19
Send/View messages .............................................. 21
Send SOS messages ............................................... 22
Chat on Messenger ................................................. 22
Use Bluetooth ........................................................ 23
Use My Menu ......................................................... 24
Enter text 25
Pen Stroke, Pinyin, Stroke, 123, Symbol, ABC, and English
Word modes
Call functions 33
Advanced calling features
Menu functions 37
All menu options listed
Solve problems 112
Help and personal needs
Health and safety information 114
Page 8

Overview of menu functions
To access Menu mode, tap or press <
1 Call history
1 Missed
2 Incoming
3 Outgoing
4 Air time
5 GSM call cost
6 Area code
7 Call reject
8 Int’l call prefix
2 Contacts
1 Find
2 Add
3 Group settings
4 Speed dial
5 Name card
6 My phone #
7 Memory info
3 Multimedia
1 Take photo
2 Recognize namecard
3 My album
4 External album
5 Photo studio
6 Settings
p.48
p.48
p.49
p.49
p.49
p.49
p.50
p.50
p.50
p.51
p.51
p.52
p.53
p.53
p.54
p.55
p.55
p.56
p.56
p.60
p.64
p.67
p.67
p.67
Menu
4 Display
1 Screen saver
2 Functional screen
3 Power on/off
4 Dialing font
5 Time setting
6 Backlight
7 Flash light
8 External clock
5 Messages
1 New message
2 Inbox
3 Outbox
4 Drafts
5 Msg. setup
6 SOS message
7 Msg. wallpaper
8 Memory info
6 Sounds
1 Ringer
2 Ringer vol./type
3 Key tone
4 Function alert
5 Hour alert
> in Idle mode. Some menus may not be available, depending on the network you select.
p.68
7 Entertainment
p.68
1 Games
p.68
2 MP3
p.68
3 Melody composer
p.68
4 Karaoke
p.68
5 Fun box
p.69
6 Samsung messenger
p.69
7 VOD
p.69
8 Utilities
p.69
1 Today
p.69
2 Calendar
p.70
3 Task list
p.71
4 Alarm set
p.72
5 User memory
p.73
6 Voice tools
p.74
7 Memo
p.74
8 Calculator
p.74
9 Countdown
0 Clock
p.75
* Dictionary
p.75
# Bluetooth
p.75
p.75
p.75
p.76
p.76
p.76
p.77
p.79
p.82
p.82
p.82
p.85
p.87
p.87
p.87
p.89
p.90
p.91
p.94
p.98
p.99
p.100
p.101
p.101
p.103
Tap or press <
mod
9 Settings
1 CDMA net services
2 GSM net services
3 Security
4 Network selection
5 Answer mode
6 Entry method
7 Stylus adjust
8 语言/Language
9 Domains preset
0 Contents status
e
and then <
uni
1 Mail
2 Magic
3 Map
4 Info
5 Channel
6 Music Street
7 Bookmarks
Menu
Favorites
p.105
p.105
p.106
p.108
p.110
p.111
p.111
p.111
p.111
p.111
p.111
> in Idle
p.39
p.39
p.46
p.47
p.47
p.47
p.47
p.47
>
.
5
Page 9

Unpack
Make sure you have each item
Phone Travel Charger
• The items supplied with your phone
and accessories available at your
Samsung dealer may vary,
depending on your country or service
provider.
• Use the purchased accessories with
only Samsung-authorised devices.
The use of these accessories with
other devices could cause problems
and any repair costs would not be
covered by the warranty.
6
Battery User’s GuideStylus pen
You r p hon e
Keys, features, and locations
Page 10

Get started
First steps to operating your phone
SIM/UIM card information
When you subscribe to a cellular network, you receive
a plug-in SIM (Subscriber Identity Module) or UIM
(User Identity Module) card loaded with your
subscription details, such as your PIN, and available
optional services.
Install and charge the phone
Remove the battery
cover.
If the phone is already
on, first turn it off by
pressing and holding
[].
Install the battery.
Plug the travel charger into the phone.
Insert the card.
Make sure that the goldcoloured contacts on the
card are face down.
Reattach the cover.
Plug the charger into a standard AC wall outlet.
The LED on the charger indicates the charging
progress.
• Red: the battery is being charged.
• Green: the battery is completely charged.
• Orange: the battery is not correctly plugged in
or is operating at a too high or too low.
When the phone is completely charged (green
charger LED), unplug the charger from the power
outlet.
Remove the charger from the phone.
Low battery indicator
When the battery is low:
• a warning tone sounds,
• the battery low message displays, and
• the empty battery icon blinks.
7
Page 11

Get started
If the battery level becomes too low, the phone
automatically turns off. Recharge your battery.
Power on or off
Power on
Do not turn on the
phone when
mobile phone use
is prohibited.
Power off
8
1. Open the phone.
2. Press and hold [ ].
3. Select a GSM or CDMA
network.
4. If necessary, enter the PIN and
tap or press <OK>.
1. Open the phone.
2. Press and hold [ ].
Keypad lock
When you close the phone, the keypad lock feature
locks the exposed keys so that nothing will happen if
the keys are accidentally pressed.
To unlock the keypad, press and hold any key except
for [ ], and tap or press <
Yes
>.
Page 12

Keys and display
Keys
Soft keys Perform the functions indicated on the
Navigation
keys
Uni key In Idle mode, launch the WAP browser.
Send key Make or answer a call.
bottom line of the display.
In Idle mode, access the following menus
directly.
MP3
• [Up]:
•[Down]:
•[Left]:
• [Right]: My Menu
In Menu mode, scroll through menu options.
In Idle mode, retrieve numbers recently
dialled, missed, or received.
Magic
Messages; Mail
p. 24
when held down
C (Clear)
key
End key End a call.
Numeric
keys
Special key Enter special characters.
Volume ke y Adjust the phone volume.
Delete characters from the display.
In Idle mode, initiate the voice recognition
feature. Start voice dialling when held down.
In Menu mode, return to the previous menu
level.
Press and hold to switch the p hone on or of f.
In Menu mode, cancel input and return the
phone to Idle mode.
Enter numbers, letters, and some special
characters.
In Idle mode, press and hold [
or deactivate Silent mode.
In Idle mode, with the phone open, adjust
the keypad tone volume.
]
to activate
Get started
9
Page 13

Get started
Network
key
Camera
key
Display
Layout
10
Switch the network between GSM and
CDMA.
During a call, switch the call between the
phone and a Bluetooth headset.
In Idle mode, access the
menu: press and hold to turn on the
Multimedia
camera.
In Camera mode, take a photo or record a
video.
During a call, press and hold to record your
call conversation.
Icons
display various icon.
Text and graphics
display messages,
instructions, and
information you enter.
Soft key function
Menu Find
indicators
show the current
functions assigned to
the two soft keys.
Icons
*
/ Received signal strength
Roaming
Call in progress
Out of your service area; you cannot
make or receive calls
SOS message feature active
1X mode
Restriction on
Lock mode
Connected to a secured web page
Alarm set
Bluetooth status
•Black: Active
• Blue: Connected to another device.
New e-mail in server
New e-mail in Inbox
New Web alert
New message
Page 14

New voicemail
Urgent message
Messenger invitation
Ringer type setting
•: Ringer only
•: Silent
•: 1 Beep
•: Vibration
•: Vib. & ringer
• : Vib. then ringer
• : Ringer then vib.
p. 96
Silent mode
Answering machine feature
active
Battery power level
* You can select some icons by tapping. Tap an icon to
open a message or change settings.
p. 75
p. 14
Access menu functions
Use the soft
keys
The roles of the soft keys vary
depending on the function you have
selected. The bottom line of the
display indicates their current role.
Press the left soft
key to access
Menu mode.
Press the right
soft key to
access
Find
.
Get started
11
Page 15

Get started
Select an
option
12
By tapping on the touch screen
Your phone’s display is a touch
screen which can recognise when
you touch items displayed on it.
Using the stylus pen,
1. Tap a desired soft key indicator.
2. To scroll up or down, or side to
side:
• Tap the left or right arrow to
scroll left or right.
• Tap and drag the scroll bar
to scroll up or down.
3. Tap a displayed option or
function.
4. To exit, tap on the upper
right of the display.
By pressing the soft keys and
Navigation keys
1. Press a desired soft key.
2. Press the Navigation keys to
move to the next or previous
option.
3. Press <
4. To exit, tap or press either of
By pressing the number keys
Press the number key
corresponding to the option you
want.
Select
>, <
Done
<
Save
> to confirm the function
displayed or option highlighted.
the following methods.
•Press
• Press [ ] to return to Idle
level.
mode.
[C]
to move up one
>, or
Page 16

Use My Menu
You can set up a menu of your own
using your favourite menu items,
which can then be accessed by
specific number keys.p. 24
Customise your phone
Display
language
Call ringer
melody
1. In Idle mode, tap or press
<
Menu
→ 语言 /
2. Select a language.
1. In Idle mode, tap or press
<
Menu
Ringer
2. Press <
ringtone category.
3. Scroll to a ringtone.
4. Tap or press <
a melody.
> and select
Language
> and select
.
Down
> and scroll to a
Play
Settings
.
Sounds →
> to listen to
Idle mode
wallpaper
Menu mode
options
5. When you find the melody you
want, tap or press <
You can set wallpaper for the idle
screen.
1. In Idle mode, tap or press
<
Menu
> and select
Screen saver →
2. Select an image category.
3. Scroll to an image and tap or
press <
Save
You can customise the menu
display in Menu mode.
To set a menu style:
1. In Idle mode, tap or press
<
Menu> → <Options
select
Menu style
2. Scroll to a menu style.
3. Tap or press <
>.
Image
Save
Save
Display →
>, and
.
>.
>.
.
Get started
13
Page 17

Get started
Menu mode
options
(continued)
14
To set a background image:
1. In Idle mode, tap or press
<
Menu> → <Options
select
Background
>, and
.
2. Select an image category.
3. Scroll to an image.
4. Tap or press <
<
Select
>.
Save
> or
To set a menu focus effect:
1. In Idle mode, tap or press
<
Menu> → <Options
select
Focus effect
>, and
.
2. Scroll to an effect type.
3. Tap or press <
You can set a background image or
focus effect only in the
style.
Save
>.
3*3
menu
Idle mode
banner
Silent mode
Phone lock
1. In Idle mode, tap or press
<
Menu
> and select
Screen saver →
2. Select
Enable
Display →
Banner
.
and press [Down].
3. Press and hold [C] to clear the
default banner.
4. Enter your own banner message
and tap or press <
Save
>.
You can switch the phone to Silent
mode to avoid disturbing other
people.
Press and hold [ ] in Idle mode.
You can protect the phone against
unauthorised use with a phone
password.
1. In Idle mode, tap or press
<
Menu
> and select
→ Security
.
Settings
Page 18

2. Enter the default password,
3. Select
4. Enter a new 4- to 8-digit and
5. Enter the new password again
6. Select
7. Select On or
Switch networks
Select a
network
You can easily and quickly switch
back and forth between GSM and
CDMA networks.
1. Press [ ] in Idle mode.
2. Select a network.
00000000
<
Done
tap or press <
and tap or press <
, and tap or press
>.
Change password
Done
Lock mode
Once
>.
Done
.
.
>.
Make/Answer calls
Make a call
.
Answer a call
Adjust the
volume during
a call
1. Enter an area code and phone
number.
2. Press [ ].
3. To end the call, press
1. When the phone rings, press
[].
2. To end the call, press [ ].
Press [ / ].
[]
.
Get started
15
Page 19

Step outside the phone
Begin with your camera, the MP3 player, the web, and
other special features
Use camera
Take a photo
16
1. Open the phone.
2. In Idle mode, press and hold
[ ] to turn on the camera.
3. Press [2] and then [1], or tap
and then to select a
camera mode.
4. Aim the lens at the subject by
rotating the camera lens and
make any desired adjustments.
5. Tap or press <
press [ ] to take a photo.
6. Tap or press <
Capture
Save
>.
>, or
View a photo
Record a video
1. In Idle mode, press [ ] and
select
My album
2. Select
3. Scroll to a photo and tap or
1. In Idle mode, press and hold
2. Press [1] or tap to select
3. Tap or press < >, or press
4. Tap or press < >, or press
5. Tap or press <
Gallery
press <
Expand
[ ] to turn on the camera.
the video cam icon ( ).
[ ] to start recording.
[ ] to stop recording.
.
.
>.
Save
>.
Page 20

Play a video
Play MP3s
Copy MP3 files
to the phone
Create the play
list
1. In Idle mode, press [ ] and
select
My album
2. Select
3. Select a video and tap or press
You can copy MP3 files directly
from a computer.p. 91
1. In Idle mode, press [Up] and
2. Tap or press <
3. Tap or press <
4. Tap or press <
Gallery
<
Play
>.
select
MP3 files
select
Add to play list
the files to be added.
.
.
.
Options
Check
Add
>.
> and
.
> to select
Play MP3 music
5. Tap or press <
music.
1. In Idle mode, press [Up] and
select
MP3 player
2. Press [ ] or tap to play
music.
3. During playback, use the
following functions:
• To pause or resume
playback, press [ ], or tap
or
• To return to the previous
file, press [Left] or tap .
• To skip to the next file,
press [Right] or tap .
• To adjust the volume, press
[/ ] or tap .
For further details, see the
player
Play
> to play
.
.
menu.p. 77
MP3
Step outside the phone
17
Page 21

Step outside the phone
Use melody composer
Create a
melody
18
1. In Idle mode, tap or press
<
Menu
Entertainment → Melody
composer → Composer
melody
2. Move the selection point up or
down.
3. Tap or press <
4. Select a note or rest.
5. Repeat steps 2 to 4 to add
more notes and rests.
6. Tap or press <
7. Enter a melody name and tap
or press <
> and select
.
Input
Save
Save
>.
>.
>.
Play a melody
1. In Idle mode, tap or press
<
Menu> and select
Entertainment → Melody
composer → My melodies
2. Scroll to the melody you want
and tap or press <
Play
>.
Browse the WAP
Using a built-in WAP browser, you can easily access
the wireless web to receive a variety of up-to-theminute information and services and to enjoy
downloads of web contents.
Launch the
browser
In Idle mode, press
[]
.
.
Page 22

Navigate the
web
• To scroll through browser items,
press [Up] or [Down].
• To select an item, tap or press
<OK>, or <✓>.
• To return to the previous page,
press [C].
• To return to the homepage,
press and hold [C].
• To access browser options,
press
[]
.
Use Contacts
Add a contact
To the phone’s memory:
1. In Idle mode, enter a phone
number and tap or press
<
Save
>.
2. Select
3. Enter a name and tap or press
4. Scroll to the left or right to
5. Select a number type.
6. Specify contact information:
7. Tap or press <Save> to save
New entry
<
Save
>.
select the phone memory.
Image, Name, Storage, Mobile,
Home, Office, Pager, Fax,
E-mail1, E-mail2, URL, Group,
Name ringer, and Etc.
the contact.
.
Step outside the phone
19
Page 23

Step outside the phone
Add a contact
(continued)
20
To a c a r d :
1. In Idle mode, enter a phone
number and tap or press
<
Save
>.
2. Select
New entry
.
3. Enter a name and tap or press
<
Save
>.
4. Scroll to the left or right to
select a card.
5. Tap or press <Save> to save
the contact.
Find a contact
Create your
name card
1. In Idle mode, tap or press
<
Find
>.
2. Enter the first few letters of the
name you want.
3. Select a contact.
4. Scroll to a number and press
[ ] to dial, or tap or press
<
Edit
> to edit contact
information.
1. In Idle mode, tap or press
<
Menu
> and select
Name card →
→
My Name Card.vcf
2. Tap or press <
Contacts →
Name card book
.
Edit
>.
3. Specify your contact information.
4. Tap or press <
Save
> to save the
name card.
5. To send the name card, tap or
press <
Send
>.
Page 24

Send/View messages
Send a text
message
View a text
message
1. In Idle mode, press [Left] and
select
New message
2. Enter the message text and tap
or press <
3. Tap or press <Next>.
4. Enter destination numbers.
5. Tap or press <
the message.
When a notification appears:
Tap or press <
message displays.
From the Inbox:
1. In Idle mode, press [Left] and
select
Inbox →
message storage.
2. Select a message.
Next
Send
Select
.
>.
> to send
>. The
Text → a
Access
voicemails
When a notification appears:
1. Press [ ]. The phone dials the
voicemail center.
2. Follow the instructions from the
system.
From the Inbox:
1. In Idle mode, press [Left] and
select
Inbox → Voice mail
2. Follow the instructions from the
system.
.
Step outside the phone
21
Page 25

Step outside the phone
Send SOS messages
Set up the SOS
message
options
22
1. In Idle mode, press [Left] and
2. Select On to activate the SOS
3. Move to the
4. Enter the phone numbers to
5. Move to the
6. Select the number of times the
7. When you have finished, tap or
select
SOS message
message feature.
>.
line.
Save
Recipients
Number of
>.
and tap or press <
which you want to send SOS
messages and tap or press
<
Save
sending
phone will repeat sending SOS
messages.
press <
Add
.
line
>.
Send SOS
message
In Idle mode, with the phone
closed, press [ / ] 4 times.
The phone sends the message.
Chat on Messenger
Create the
buddy list
To add a contact:
1. In Idle mode, tap or press
<
Menu
Entertainment → Samsung
messenger →
2. Select and tap or press
<
Add
3. Tap or press <
Contacts and select a contact.
Alternatively, tap or press
<No> and enter a new name
and number.
4. Tap or press <
> and select
>.
Yes
Save
Messenger
> to open
>.
.
Page 26

Start a
conversation
To add a group:
1. From the Messenger screen, tap
or press <
2. Enter a group name and tap or
press <
To send an invitation:
1. From the Messenger screen,
select a group.
2. Tap or press <
3. Tap or press <
the contacts you want.
4. Tap or press <
5. Enter an invitation message
and tap or press <
6. Repeat step 5 to chat with the
contacts.
Add
Save
>.
>.
Invite
Check
Invite
>.
> to select
>.
Send
>.
To accept an invitation:
1. When you receive an invitation,
tap or press <
2. Enter and send a message.
Join
>.
Use Bluetooth
Your phone is equipped with Bluetooth technology
which enables you to connect the phone wirelessly to
a Bluetooth headset or hands-free kit.
Turn on
Bluetooth
In Idle mode, tap or press
<
Menu
> and select
Bluetooth → Activation → On
Utilities →
.
Step outside the phone
23
Page 27

Step outside the phone
Search for and
connect to a
Bluetooth
device
24
1. In Idle mode, tap or press
<
Menu
> and select
Bluetooth → My Devices
2. Tap or press <
3. Scroll to a device and tap or
press <
Add
>.
4. Enter a Bluetooth PIN or the
other device’s Bluetooth PIN, if
it has one, and tap or press
<OK>.
When the owner of the other
device enters the same code,
paring is complete.
5. Press <
Connect
Your phone enables an Internet
connection when the phone is
connected to a PC via Bluetooth
dongle.
Search
>.
Utilities →
.
>.
Use My Menu
Set up My
Menu item
access
Access My
Menu item
1. In Idle mode, press [Right].
2. Scroll to a location and tap or
press <
Options
3. Select
4. Scroll to the menu you want
5. Scroll to an icon for the item.
6. Tap or press <
1. In Idle mode, press [Right].
2. Tap a desired icon or press the
Assign
and tap or press <
number key corresponding to
the item you want.
>.
.
Save
Assign
>.
>.
Page 28

Enter text
Pen Stroke, Pinyin, Stroke, 123, Symbol, ABC, and English
Word modes
You can enter text in some features such as
messaging, Contacts, or Utilities, using Pinyin, Stroke
modes for Chinese, and English Word and ABC modes
for English. You can also use 123 mode, Symbol mode,
and Pen Stroke mode.
Changing the text input mode
Example
1. In the text entry screen, tap or press <
2. Select the mode you want.
: Writing a text message
Text input mode
indicator
Back Next Mode
Mode
>.
Using Pen Stroke mode
Pen Stroke mode allows you to write letters you want
to enter on the touch screen using the stylus pen as
you would on the paper. You can then tap or press
from the displayed choices corresponding to your pen
stroke. You can enter Chinese and English letters,
symbols, and numbers without having to change the
text input mode.
In this mode, you can also open the alphabetic,
numeric, and symbolic unscrewing keyboards and
enter text simply by tapping the characters on the
keyboard.
You can quickly switch to this mode from any other
mode by tapping on the text area.
Tips for using Pen Stroke mode
• Because of the touch screens sensitivity, choices
displayed may differ each time you write a
character.
• If you cannot find the symbolic characters you
want with Pen Stroke mode, use the Symbol mode
to enter them.
25
Page 29

Enter text
• Write at a normal speed. If you write letters too
slowly or too quickly, the phone may not recognise
your writing.
• Tap, drag, and lift the stylus pen, as precisely as
possible.
Entering characters in Pen Stroke mode
1. Write the character you want on the pen stroke
field.
Tex t f i e l d
Pen St rok e
field
Character
selection field
Back Next Mode
The first choice is automatically inserted into the
Tex t f i el d .
26
Clear the last input.
Enter a Chinese letter.
Enter an English letter.
Enter a number or
symbol.
Open the onscreen
keyboard.
2. If the phone does not recognise your writing, you
can select a character from the character selection
field.
The entered character is replaced with the selected
one.
If the character you want does not display in the
Character Selection field, scroll through the
choices by pressing the Up or Down key, or clear
the entered character and then start over the
writing.
3. Continue writing the next characters.
Sequences of pen strokes
When you write English alphabet, numbers, and
symbols, refer to the following tables to enter strokes
in the correct order.
Page 30

English
Numbers
Symbols
Enter text
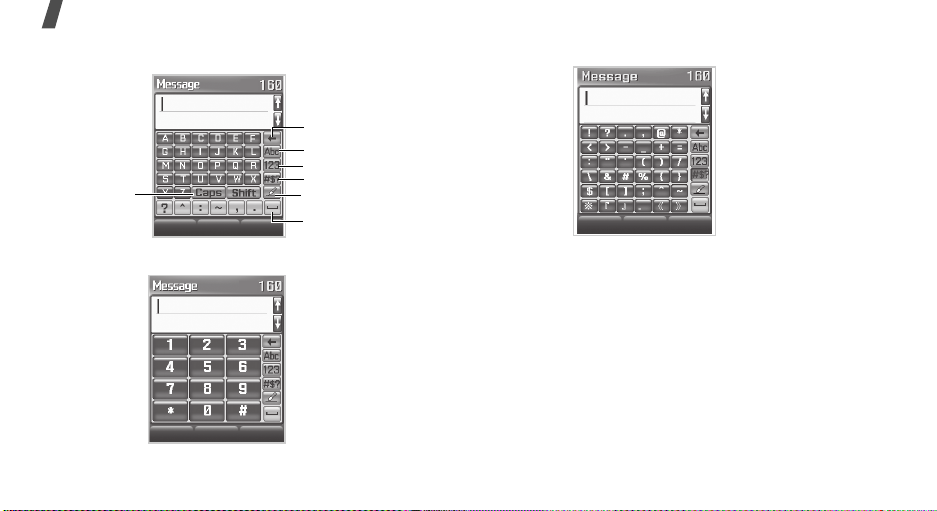
Using the onscreen keyboards
Tapping in Pen Stroke mode opens the onscreen
keyboard. You can select either the alphabetic,
numeric, or symbolic keyboard.
To enter characters using the onscreen keyboard, just
tap the one you want on the keyboard.
27
Page 31
Enter text
•Tap
Caps Lock
•Tap
28
Abc
Switch to
mode.
123
to open the alphabetic keyboard.
Clear the last input.
Enter an alphabet.
Enter a number.
Enter a symbol.
Switch to Pen Stroke
mode.
Back Next Mode
Enter a space.
to open the numeric keyboard.
Back Next Mode
•Tap
#$?
to open the symbolic keyboard.
Back Next Mode
Using Chinese Pinyin mode
Pinyin is a system to enter Chinese words by spelling
them phonetically (how they sound) using the Latin
alphabet. With the Pinyin input method, you can enter
Chinese characters by keying in the Pinyin string using
the phone’s keypad.
Entering characters in Pinyin mode
1. Press the keys corresponding to the phonetic
spelling, referring to the letters printed on the
keys.
Page 32

Example
ni.
2. Press [Left] or [Right] to select alternative pinyins
for the keys you have pressed.
3. If you cannot find the character you want from the
display, press [Up] or [Down] to scroll through the
word choices.
4. Press [1] to activate the character selection field. A
number, from 1 to 6, is added to each character.
5. Press the number key corresponding to the
character you want.
: To enter , press [6] and [4] to enter
Using the tones
You can enter another character by assigning a tone
for the selected pinyin. Entering a tone for a character
is optional, but it is especially useful if the pinyin
spelling is similar for several characters.
1. Press the keys corresponding to the pinyin of the
letter you need.
2. If necessary, press [Left] or [Right] to select the
pinyin.
3. Press
4. If you cannot find the character you want from the
5. Press a key, [1] to [6], corresponding to the
[]
for tones.
display, press [Up] or [Down] to scroll through
word choices.
character.
Rapid character entry
To enter the word zhong guo ( ), enter the first
character using the following keystrokes; [9], [4],
[6], [6], [1], and [1]. You do not have to complete
the Pinyin spelling to include guo (). The character
displays automatically.
Other Pinyin mode operations
• Press [ ] to insert a space between characters.
• Press the Navigation keys to move the cursor.
• Press [C] to delete characters one by one. Press
and hold [C] to clear the characters on the left side
of the cursor.
Enter text
29
Page 33
Enter text
Using Chinese Stroke mode
This mode allows you to enter individual Chinese
strokes, in written order, from top to bottom, and from
left to right.
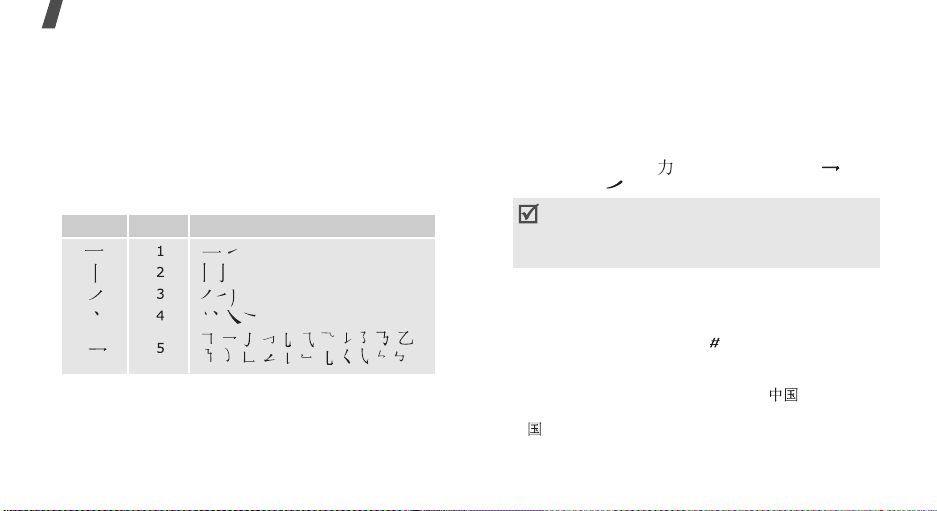
The Chinese strokes are classified into five basic
categories; heng, shu, pie, dian, and zhe. The basic
strokes are printed on keys [1] to [5] on the keypad.
Refer to the following table:
Category Keys Strokes represented in each category
30
Entering strokes and characters in Stroke
mode
1. Press the keys that correspond to a character’s
component strokes. Press keys in the order that
you would write the strokes, using one press per
stroke.
Example
: To enter , press [5] to enter and
[3] to enter .
If you are uncertain of the stroke order, press
6
] in place of each questionable stroke.
[
Continue entering strokes until the character
displays or until you finish the character.
2. Scroll to the up or down to select other choices.
3. To select a character and add it to your message,
tap the number on the screen or press the
corresponding key, [7] to [ ].
Rapid character entry
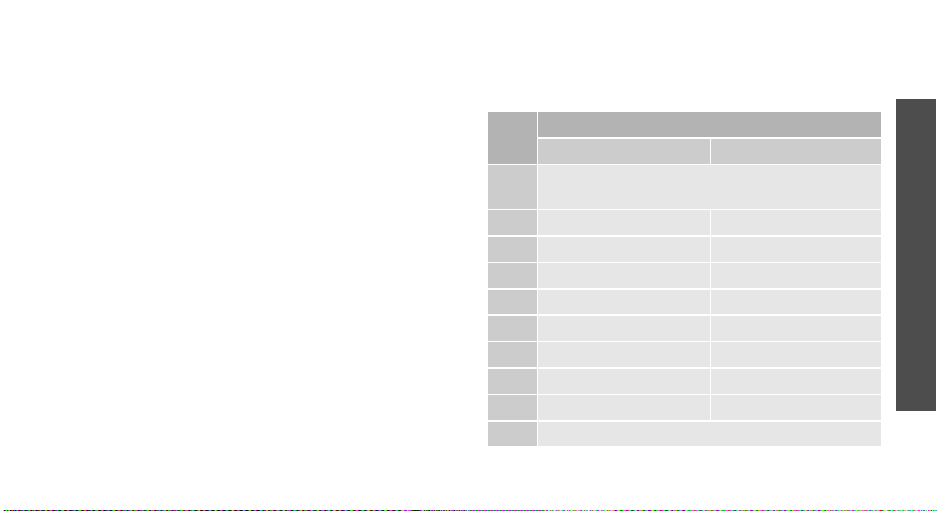
Try entering the characters zhong guo () using the
following keystrokes: [2], [8], and [7]. Even though
guo ( ) is a twelve stroke character, your phone
allows you to enter the complete pair in only three key
presses.
Page 34
Other Stroke mode operations
• Press the Navigation keys to move the cursor.
•Press [C] to delete characters one by one press
and hold [C] to clear the characters on the left side
of the cursor.
Using 123 mode
123 mode enables you to enter numbers. Press the
keys corresponding to the digits you want.
Using Symbol mode
Symbol mode enables you to enter symbols.
1. Scroll to the left or right to display more symbol
sets.
2. Tap the number on the screen or press the key
corresponding to the symbol you want.
Using ABC mode
Press the appropriate key until the character you want
appears on the screen.
Key
1
2
3
4
5
6
7
8
9
0
Characters in order displayed
Upper case Lower case
. @ - _ / : ~ ? , 1 ; ’ ( ) ! #
% & * < > + = ” \ { } $ [ ]
A B C 2 a b c 2
D E F 3 d e f 3
G H I 4 g h i 4
J K L 5 j k l 5
M N O 6 m n o 6
P Q R S 7 p q r s 7
T U V 8 t u v 8
W X Y Z 9 w x y z 9
0
Enter text
31
Page 35

Enter text
Other ABC mode operations
• To enter the same letter twice or to enter a
different letter on the same key, wait for the cursor
to move to the right automatically, or press
[Right]. Then, enter the next letter.
• Press [ ] to insert a space.
•Press
• Press the Navigation keys to move the cursor.
•Press [C] to delete characters one by one. Press
[]
capital (
case (
and hold [C] to clear the characters on the left side
of the cursor.
or tap
Abc
abc
Abc
), Capital lock (
) are available.
to change case. Initial
ABC
), and Lower
Using English Word mode
This mode allows you to enter English by using T9
technology. T9 is a predictive text input mode that
allows you to key in any character using single
keystrokes.
32
Entering a word in English Word mode
1. Press [2] to [9] to start entering a word. Press
each key once for each letter.
Example
enter Hello.
T9 predicts the word that you are typing, and it
may change with each key that you press.
2. Enter the whole word before editing or deleting the
characters.
3. When the word displays correctly, go to step 4.
Otherwise, press [0] to display alternative word
choices for the keys that you have pressed.
For example, Of and Me use [6] and [3].
4. Press
word.
: Press [4], [3], [5], [5], and [6] to
[
]
to insert a space and enter the next
Other English Word operations
• Press [1] to enter periods or apostrophes
automatically.
• Press [ ] to insert a space.
Page 36

•Press
• Press the Navigation keys to move the cursor.
•Press [C] to delete characters one by one. Press
[]
capital (
and Lower case (
and hold [C] to clear the characters on the left side
of the cursor.
or tap
T9 Word
T9 Word
), Capital lock (
T9 word
to change case. Initial
) are available.
T9 WORD
),
Copying and pasting text
You can copy and paste when entering text.
1. While entering text, move the cursor to the desired
location by pressing the Navigation keys.
2. Tap or press <
Manual copy
To copy all of the text, select
3. Press the Navigation keys to highlight the desired
text, and tap or press <
4. Tap or press <
Paste
You can use a copied text while composing other
text by selecting
Mode
> and select
.
Select
Mode
.
> and select
Paste
.
Copy/Paste
Full copy.
>.
Copy/Paste
→
→
Call functions
Advanced calling features
Making a call
1. In Idle mode, enter the area code and phone
number.
• Press [C] to clear the last digit or press and
C
] to clear the whole display.
hold [
• Tap or press <
between numbers or select a font style.
2. Press [ ].
3. When you want to end the call, press [ ].
Making an international call
In GSM network:
1. In Idle mode, press and hold [0]. The + character
appears.
2. Enter the country code, area code, and phone
number, then press [ ].
Options
> to enter a pause
33
Page 37
Call functions
In CDMA network:
1. In Idle mode, press and hold [0].
The country code you have set appears.p. 50
2. Enter the area code and phone number, and press
[].
Redialling recent numbers
1. In Idle mode, press [ ] to display the list of
recent numbers.
2. Scroll to the number you want and press [ ].
Making a call from Contacts
Once you have stored a number in Contacts, you can
dial the number by selecting it from Contacts.p. 51
You can also use the speed dial feature to assign
number keys to your most frequently dialled numbers.
p. 53
Voice dialling
You can dial a number stored in Contacts by speaking
the associated name or the number into the
microphone.
34
Your phone can recognise only Chinese names and it
can’t be recognised Chinese names above six.
To programme the phone to recognise your voice, you
can configure the voice recognition settings in the
Configure
1. In Idle mode, press and hold
2. At a voice prompt, say a name or number into the
3. If you set the phone to display one best result for
4. Say “Yes” when the prompt confirms the name or
menu.p. 95
[C]
.
microphone.
your voice command in the display, skip to step 4.
If you set the phone to display 3 best results, say
“No” until you hear the name or number you want,
following the voice prompt.
number you said. The phone dials the
corresponding number.
Answering a call
When you receive an incoming call, the phone rings
and displays the incoming call image.
Page 38

Press [ ] to answer the call.
Tips for answering a call
• Depending on the setting in the
menu, you can press any key, except for [ ], soft
keys, and [ / ], or just open the phone to answer
a call.p. 111
•Tap or press <
hold [ / ] to reject a call.
• Tap or press <
phone to mute the ringer.
Reject
>, or press [ ] or press and
Silent
>, or press [ / ] or close the
Answer mode
Viewing missed calls
If you have missed calls, the screen displays the
number of the calls and the phone number of the last
call.
• Press [ ] to dial the displayed number.
•Tap or press <
list.
• Tap or press <
the number.
View
> to access the missed call log
SMS
> to send an SMS message to
Using the headset
Use the headset to make or answer calls without
holding the phone.
Connect the headset to the jack on the upper left of
the phone. The button on the headset works as
follows:
To Press
redial the last call the button twice.
answer a call and hold the button.
end a call and hold the button.
Options during a call
You can access a number of functions during a call.
Adjusting the volume during a call
Use [ / ] to adjust the earpiece volume during a call.
Press [ ] to increase the volume and [ ] to decrease
the volume.
Call functions
35
Page 39

Call functions
Answering a second call
If you have subscribed to call waiting, you can answer
another call during a call.
1. Press [ ] to answer a second call. The first caller
is placed on hold and you are connected with the
second caller.
2. Press [ ] again to switch between the calls.
Making a three-way call
If you have activated three-way calling service, you
can have a conversation with two people
simultaneously.
1. During a call, press [ ] and make another call.
The first caller is placed on hold.
2. Press [ ] to begin the three-way call.
36
Using a Bluetooth headset or hands-free
car kit
Use an optional Bluetooth headset or hands-free car
kit to talk on the phone without holding the phone
your ear. To use this feature, you first need to connect
the phone and the headset.p. 103
Press [ ] to switch a call between the phone and the
headset.
Using In-call options
During a call, tap or press <
following options:
•
Voice mute
so that the other person cannot hear you.
•
Key mute
generates each time you press a key.
•
Voice memo
a call. You can also press and hold [ ].
p. 96
: switch off your phone’s microphone,
: mute key tones that the keypad
: record your call conversation during
Options
> to access the
Page 40

•
Noise cancellation
cancellation feature, which removes noise from
your surroundings so that the other person on the
phone can hear you more clearly. You can also
press [Up].
•
Call history
p. 48
•
Contacts:
•
Messages
•
Utilities
access the
: access the
: access the
: activate the noise
: access the
Contacts
Utilities
Call history
Messages
menu.p. 87
menu.
menu.p. 51
menu.p. 69
Menu functions
All menu options listed
Some menus may not be available depending on
network you select.
WAP browser
Your phone comes equipped with a WAP (Wireless
Application Protocol) browser which makes it possible
for you to access the wireless web. Using the web
browser, you can access up-to-date information and a
wide variety of media content, such as wallpapers,
ringtones, and music files.
The touch screen is only activated for soft keys while
using the WAP browser.
Launching the WAP browser
Pressing [ ] in Idle mode launches the web browser
and accesses the homepage of your service provider.
37
Page 41

Menu functions
Navigating websites
To Press
scroll through browser items [Up] or [Down].
scroll page by page [ / ].
select an item or tap <OK>, or
return to the previous screen [C], or tap or press
return to the homepage and hold [C].
<✓>.
<
Cancel
>.
Using browser menu options
While navigating websites, you can use various
options. To access the Browser Menu list, press [ ],
or tap or press <
the following options:
•
Home
homepage.
•
History
the wireless web.
38
Menu
> and select
: return at any time to your startup
: display the records of your connection to
Menu
to access
•
Bookmarks
•
PUSH Message
and display or delete the push messages received
from the server.
•
Reload
updated information.
•
Go to URL
web page.
•
Snapshots
page.
•
Save Items
current web page.
•
Show URL
where you are currently connected.
•
Exit
•
Advanced...
Restart Browser
without exiting it.
Delete Cookies
cookie is a record of a user’s information that is
stored on the phone when you visit a website.
: display the Bookmarks list.
: connect to the message server,
: refresh the current web page with
: manually enter the URL address of a
: take a snapshot for the current web
: save images or sound files of the
: display the URL address of the site
: exit the web browser.
: customise further options.
: restart the web browser
: delete all cookies and files. A
Page 42
Homepage
clear the URL, the default homepage is restored.
Multimedia
the media objects, such as images or background
sound on a web page.
Scroll Mode
scroll speed.
Send Referrer
referrer information to the web server each time
the browser is launched.
Connection Timeout
remains connected to the current web page when
you don’t use the web page for a specified period.
Key Press Timeout
waits after you have pressed a key in the text
entry mode before moving the cursor to the right.
Security
Restore Default Value
settings for the Advanced feature.
•
Send Link
electronic message.
: change the startup homepage. If you
: enable or disable auto download of
: select a scroll mode, and/or set the
: set the browser to send HTTP
: set how long the phone
: set how long the phone
: set up all security information.
: restore the default
: send the URL of the current page in an
•
Clear Memory
History list, the cache, and the Auto Fill form. Also
delete cookies.
•
About
: view information about Openwave and
your version of the web browser.
: clear information stored in the
uni
This menu is supplied by your CDMA service provider.
The contents available in each menu option may be
different, depending on the service provider. For
further details, contact your service provider.
To access this menu, tap or press <
mode and then <
The touch screen is deactivated in some menus.
Favorites
Mail
Use this menu to access the Mail service, which allows
you to send or receive e-mails containing various
media items, such as images, sounds, name cards,
and applications.
>.
Menu
> in Idle
Menu functions
uni
39
Page 43
Menu functions
You can quickly access this menu by pressing and
holding [Left] in Idle mode.
New Mail
Create a new e-mail and send it to one or multiple
destinations.
1. Tap or press <
2. Tap or press <
3. Enter a destination e-mail address and tap or press
<
Save
4. To send your e-mail to more than one person,
repeat steps 2 and 3.
5. On the Recipient List screen, tap or press <
to access the following options:
•
Addr Book
phone number from Contacts.
•
Sent History
phone number from the list of the e-mail
messages you have sent.
•
Addr Group
the e-mail addresses or phone numbers of
members of that group.
40
Edit
> to access the Recipient list.
Edit
>.
>.
: retrieve an e-mail address or a
: retrieve an e-mail address or a
: select a caller group to access
Menu
•
Profiles
automatically.
•
Delete
option is available only when an e-mail address
is selected.
•
Move to To
address to a To address. This option displays
when you have selected a Cc or Bcc address.
•
Move to Cc
address to a Cc address. This option displays
when you have selected a To or Bcc address.
•
Move to Bcc
>
address to a Bcc address. This option displays
when you have selected a To or Cc address.
6. Tap or press <OK> to return to the New Mail
screen.
7. Move to the subject line and tap or press <
8. Enter the subject of your e-mail and tap or press
<
Save
9. Move to the attachment line and tap or press
<
Edit
: enter your e-mail address
: delete the selected recipient. This
: change the selected Cc or Bcc
: change the selected To or Bcc
: change the selected To or Cc
>.
>.
Edit
>.
Page 44
10. Add files using the following options:
•
Select Attach
•
Select SMIL Attach
•
Edit SMIL
: add various types of files.
: add SMIL files.
: create or edit an SMIL file.p. 43
11. Move to the body of your e-mail and tap or press
<
Edit
>.
12. Enter your e-mail text and tap or press <
When you attach an SMIL file, you are unable to
write a message.
13. Tap or press <
You can save the e-mail you have created by
tapping or pressing <
as New
.
Send
> to send the e-mail.
Menu
> and selecting
Save
Save
>.
Inbox
This mail box stores e-mails you have received.
Received e-mails are saved in the
Folder0
folder by
default. If you have set filters (p. 42), a new e-mail
will be saved in the folder containing the filter that
corresponds the sender’s address.
Viewing a received e-mail
1. Select a folder.
2. Scroll to the e-mail you want and tap or press
<
Disp
>.
Items attached to the message will display.
3.
To Tap or press
scroll through the items <
view the body of the
Pre
<OK>.
> or <
Next
message
Using e-mail options
While viewing an e-mail, tap or press <
Menu
> to
access the following options:
•
Reply
: send a reply to the sender.
•
Reply All
: send a reply to the sender and all other
recipients of the e-mail.
•
Forward
: forward the e-mail to other
destinations.
•
Protect
: lock the e-mail to keep it from being
deleted.
Menu functions
>.
uni
41
Page 45

Menu functions
•
Delete
: delete the e-mail.
•
Move to Folder
folder.
•
Show Full Address
sender and all recipients of the e-mail.
•
Copy Mail Body
the text when composing a new e-mail.
Managing e-mail folders
Your phone provides you with the potential for up to
10 e-mail folders to manage your e-mails.
Scroll to the folder you want and tap or press
<
Menu
> to access the following options:
•
Add Filter
e-mails by senders’ addresses. This option is not
available for Folder0.
•
Edit Folder Name
•
Re-Filter
to the filter set for the current folder.
•
Delete All
selected folder.
42
: move the e-mail to another
: display the addresses of the
: copy the e-mail. You can paste
: set a filter, which arranges incoming
: change the folder name.
: rearrange received e-mails, according
: delete all of the e-mails stored in the
•
Reset Folder
selected folder.
: restore the default settings of the
Send Box
This mail box stores e-mails you have sent or tried to
send.
Viewing a sent or saved e-mail
Scroll to the e-mail you want and tap or press <
to open the e-mail.
Using e-mail options
While viewing an e-mail or the e-mail list, tap or press
<
Menu
> to access the following options:
•
Edit
: edit the selected e-mail.
•
Copy To Edit
as a new message. This option displays when you
select the message you have sent.
•
Protect (ON/OFF
from being deleted.
•
Delete
•
Sort
: change the sort order of the e-mail list.
: edit the selected message and save
): prevent the selected e-mail
: delete the selected e-mail.
Disp
>
Page 46

•
Show Full Addr
addresses.
•
Copy Mail Body
paste the text when composing a new e-mail.
•
1-ln/3-ln View
3-line View mode displays the time and date, the
recipient’s e-mail address, and the e-mail subject
on all at once.
1-line View mode displays only one of them. You
can change the item to be displayed on the e-mail
list by tapping or pressing <
: display the recipient’s
: copy the e-mail text. You can
: change the e-mail list mode.
Chg
>.
Check New Mail
Use this menu to check the Mail server for new
incoming e-mails, and then retrieve new e-mails from
the server.
Data Folder
Use this menu to view downloaded and saved content.
Files are stored in separate folders according to data
type, e.g.,
Accessing a file
1. Select a data folder.
Image
for images or
Audio
for sound clips.
2. Scroll to an item and tap or press <
Using data options
While viewing the content list, tap or press <
to access the following options:
•
Auto-Play
selected folder as a slide show.
•
UnSelect All
files in the folder.
•
Delete
•
Delete All
folder.
•
Rename
•
Sort
•
Memory Info
Download and User memory.
: display the items stored in the
: remove all check marks from the
: delete the selected item.
: delete all of the items in the selected
: change the file name.
: change the sort order of the list.
: access memory information for the
Play
>.
Menu
SMIL Editor
Use this menu to create a new SMIL file, which is a
combination of an image, a sound clip, and text.
Creating a new SMIL file
1. Select
New SMIL
.
>
Menu functions
uni
43
Page 47

Menu functions
2. Highlight
<
3. When the image line is selected, tap or press
<
4. Select the source image category you want.
5. Select the image you want.
6. Move to the text line and tap or press <
7. Enter the message and tap or press <
8. Move to the audio line and tap or press <
9. Select the source sound category you want.
10. Select a sound clip.
11. When you have finished, tap or press <OK>.
12. To add more slides, repeat steps 2 to 11.
You can add up to 5 slides for an SMIL file.
13. When you have finished, tap or press <OK> to
save the SMIL file.
Using SMIL slide options
You can access the following options by tapping or
pressing <
a slide:
44
Edit
Edit
>.
>.
Menu
Add New SLIDE
> on the image, text, or audio line on
and tap or press
Edit
Save
>.
Edit
>.
>.
•
Set Start
selected item displays when you open the slide.
•
Set End
selected item will be displayed before the next
item automatically displays.
•
Layout
SMIL slide.
•
Preview
•
Delete Image/Delete Text/Delete Audio
delete the added image, text, or sound.
While viewing a slide list, tap or press <
access the following options:
•
SLIDE During
the message presentation screen. After a specified
time, the display automatically scrolls to the next
slide.
•
SLIDE Move
position you want.
•
SLIDE Delete
Editing SMIL files stored in your phone
1. From the SMIL Editor screen, select
: set the time delay before the currently
: set the length of time the currently
: check and change the layout for your
: display the SMIL file you have created.
Menu
: set how long one slide displays on
: move the selected slide to the
: delete the selected slide.
Open SMIL
:
> to
.
Page 48

2. Select the SMIL file you want to edit.
3. Move to the slide you want and tap or press
<
Edit
>.
4. Change the items on the slide as you would when
creating a slide.
Mail Settings
Use this menu to configure various e-mail settings that
are required when you send or receive e-mails.
•
Receiving & View
control how e-mails are received and viewed.
Auto-Rcving
retrieves new incoming e-mails from your Mail
server without notification.
Rcving Type
want to retrieve, such as the subject, sender’s
address, and body of an e-mail, from the Mail
server when you receive the e-mail.
Receive Atchmnt
phone retrieves an e-mail with attachments from
the Mail server.
: change the settings that
: set whether or not your phone
: select which parts of e-mails you
: select whether or not the
Play Atchmnt
displays attached files in an e-mail and then shows
you the body of the e-mail.
Show Folders
displays e-mail folders.
Font Size
•
Send & New Mail
control how e-mails are created and sent.
Quote Original
includes the original e-mail text in a reply.
Addr Group
Encoding Type
Del Sent History
•
Register Account
to the Mail server or delete your account from the
server.
•
Others
provider to manage your Mail service.
•
View Mail Settings
settings.
: set whether or not the phone first
: set whether or not the phone
: select the font size of e-mails.
: change the settings that
: set whether or not the phone
: manage caller groups.
: select an encoding type.
: delete e-mails you have sent.
: register your e-mail account
: access the website preset by your service
: check the current e-mail
Menu functions
uni
45
Page 49

Menu functions
•
About
: check the software version and copyright
information of your Mail service.
Magic
Use this menu to download and use various Brew
applications.
Downloading an application
1. Select the
•
•
•
2. Select
website preset by your service provider and you
can browse the available applications.
3. Select the application you want and follow the
onscreen instructions to download it.
MobileShop
Catalog
: browse and purchase items.
Search
: search for an application by entering a
keyword.
Help
: get help information for using the
MobileShop
Catalog
. You are sent to the associated
icon.
menu.
Changing the browser settings
1. Select the
46
Settings
icon.
2. Select a setting option.
•
Order Apps
downloaded applications.
•
Move Apps
folder.
•
Manage Apps
used for downloaded applications.
•
Main Menu View
the main menu screen.
•
Screen Savers
application, if downloaded.
•
View Log
browsing.
: change the list order of the
: move an application to another
: check the amount of memory
: change the view mode of
: activate the Screen Saver
: access the records of your
Viewing help information
1. Select the
2. Select a help item.
3. Scroll through help information.
4. Press [ ] to go back to the main help screen.
Help
icon.
Page 50

Map
Use this menu to access a location service based on
GPS positioning technology. With this service, you can
easily find friends, gas stations, restaurants, and other
locations.
For further details, contact your service provider.
Info
This menu is available only when you use a UTK UIM
card that provides additional services. For further
details, see your UTK UIM card instructions.
Channel
This menu allow you to access the VOD server directly.
You can view and download a variety of video files via
the VOD server.
Music Street
Use this menu to access the various audio services
supported by your service provider. For details,
contact your service provider.
•
Send music
message through an ARS service (Automatic
response service).
•
Listen msg
•
Mini music
listened to.
•
Help
street feature.
: send a music file with a short voice
: check messages you have received.
: access the music files you have
: access the help screen for using the Music
Bookmarks
You can add and manage the URLs of the web pages
you access frequently. You can also manage URLs you
have bookmarked while navigating the Internet.
Adding a new bookmark
1. Tap or press <
2. Enter a title for a URL and press [Down].
3. Enter the URL address you want.
4. To save the bookmark to another folder, select
Bookmarks
5. Press [Down] to highlight the
6. To save the bookmark, tap or press < >.
Menu
> and select
, add a new folder and select it.
New Bookmark
Save
line.
Menu functions
uni
.
47
Page 51

Menu functions
7. To return to the bookmark list, tap or press <OK>.
Accessing a bookmarked page
Scroll to a bookmark and tap or press <Go>.
Using bookmark options
From the bookmark list, tap or press <
access the following options:
•
Details
: access the bookmark properties.
•
Delete
: delete the selected bookmark.
•
New Bookmark
•
New Folder
•
Move
: move the selected bookmark to the position
you want.
•
Move to folder
folder.
•
Set As HomePage
start up homepage.
•
Delete all
•
Hotkeys
most frequently accessed bookmarks.
•
Cancel
: exit the
48
: add a new bookmark.
: add a new bookmark folder.
: move the bookmark to another
: set the bookmark as your
: delete all bookmarks.
: assign a hot key (1 to 9) for nine of your
Bookmarks
menu.
Menu
> to
Call history
Use the
Call history
the duration of calls, and set options for call functions.
To access this menu, tap or press <
Call history
Missed
This menu displays the most recent calls you did not
answer.
in Idle mode.
(Menu 1.1)
(Menu 1)
menu to access call logs, view
Menu
> and select
Accessing a call record
1. Select a call.
2. Press [ ] to dial the number, or tap or press
<
Options
> to access the call record options.
Using call record options
While viewing call details, tap or press <
access the following options:
•
SMS
: send an SMS message to the selected
number.
•
Mail
: send an e-mail to the selected number.
Options
> to
Page 52
•
Erase
: erase the call record.
•
Contact
: access contact information, if the caller
is saved in Contacts.
•
Call Reject
Incoming
: add the number to the call reject list.
(Menu 1.2)
This menu displays the most recent calls you have
received.
Outgoing
(Menu 1.3)
This menu displays the most recent calls you have
dialled.
Air time
(Menu 1.4)
This menu displays the time log for voice calls you
have made or received. You can also check the time
log for data calls. Actual time invoiced by your service
provider will vary.
This feature is not intended to be used for billing
purposes.
•
Last call
: check the air time of the last voice or
data call.
•
Total call
: check the total duration of the voice or
data calls.
•
Incoming call
: display the total duration of all
incoming calls.
•
Outgoing call
: display the total duration of all
outgoing calls.
To view the proportion of incoming calls to outgoing
calls, tap or press <
To erase the selected time log, tap or press <
GSM call cost
Graph
(Menu 1.5)
>.
Erase
This GSM network feature lets you view the cost of
calls.
•
Last call cost
: check the cost of the last call you
made.
•
Total cost
: check the total cost of all calls you
have made. If the total cost exceeds the maximum
cost set in
Set max cost
, you can no longer make
any calls until you reset the counter.
Menu functions
Call history
>.
(Menu 1)
49
Page 53

Menu functions
•
Max cost
Max cost
•
Reset counters
•
Set max cost
you authorise for your calls.
•
Price/Unit
unit is applied when calculating the cost of your
calls.
Area code
Use this menu to find and retrieve area and country
codes to quickly and easily dial phone numbers.
1. Select a call type,
2. Enter the first few letters of the city, country, or
province you want, or select the city, country, or
province you want.
3. Tap or press <
4. When the area code of the selected city appears on
the Dialling screen, enter the rest of the phone
number you want.
5. Tap or press <
Contacts, or press [ ] to dial it.
50
: check the maximum cost set in
.
: reset the cost counter.
: enter the maximum cost limit that
: set the cost of one unit; this price per
(Menu 1.6)
Domestic
Dial
> or <
Save
> to save the number to
or
Select
International
>.
Set
Call reject
Use this menu to make a list of the phone numbers
from which you do not want to accept calls.
Int’l call prefix
Use this menu to set international call service
numbers.
(Menu 1.7)
(Menu 1.8)
Adding an international call number
1. Tap or press <
2. Enter a call service number and tap or press
<
Save
.
Selecting a call service number
Select the call service number you want. The selected
number displays when you press and hold [0] in Idle
mode.
From the number list, tap or press <
access the following options:
•
Edit
: edit the call service number.
•
Erase
: erase the call service number.
>.
Add
>.
Options
> to
Page 54

Contacts
You can store phone numbers and their corresponding
names in your card and the phone’s memory. The card
and phone’s memory, although physically separate,
are used as if they were a single entity, called
Contacts.
To access this menu, tap or press <
Contacts
Find
Use this menu to find a contact using a person’s name,
group name, or memory location.
You can quickly access this menu by tapping or
pressing <
(Menu 2)
in Idle mode.
(Menu 2.1)
Find
> in Idle mode.
Menu
> and select
Finding a contact
1. Scroll to a search method.
2. Enter the first few letters of the name you want or
select a caller group or memory.
3. Select a contact.
4. Scroll to a number and press [ ] to dial, or tap or
press <
Edit
> to edit contact information.
Using Contacts options
While viewing contacts details, tap or press
<
Options
•
•
•
•
•
•
•
•
•
> to access the following options:
Mail
: send an e-mail to the selected number or
address.
Release main #
This option is only available for numbers stored in
Contacts.
Set main #
the contact. This option is only available for
numbers stored in Contacts.
Talk
: dial the selected number.
Edit
: change the selected item.
Copy
: copy the selected number to another
memory location.
Move
: move the selected number to another
memory location.
Speed dial
to the currently selected number.
Erase
: erase the contact. If you select a number,
only the number is erased.
: cancel the main number setting.
: set the number as a main number for
: assign a speed dial location number
Menu functions
Contacts
(Menu 2)
51
Page 55

Menu functions
•
To name card
format.
Add
(Menu 2.2)
Use this menu to add a new contact to Contacts.
In the phone’s memory, a name can contain up to 5
numbers in different categories: Mobile, Home, Office,
Pager, and Fax. You can save only one number with a
name in the card’s memory.
Adding a new contact
1. Enter a name and tap or press <
2. Scroll to the left or right to select a memory.
3. Move to the next field(s).
4. If you have selected
number.
If you have selected
or enter more information.
•
Image
the photos you took using the camera or the
default icons as a caller ID image.
52
: save the contact as a name card
Save
>.
Card1/Card2
Phone
: tap or press <
Edit
, enter a phone
, change the settings
> and assign one of
•
Mobile/Home/Office/Pager/Fax
number for each category.
•
E-mail1/E-mail2
enter an e-mail address.
•
URL
: tap or press <
address.
•
Group
: select one of the default relationship
groups, where the contact is to be added.
•
Name ringer
a ringtone for the contact.
•
Etc
: tap or press <
about the contact.
5. When you have finished, tap or press <
save the contact.
: tap or press <
Edit
> and enter an URL
: tap or press <
Edit
> and add a memo
: add a
Edit
Edit
> and select
Save
> and
> to
Adding a number to an existing contact in
Idle mode
1. In Idle mode, enter a phone number and tap or
press <
Save
>.
2. Select
3. Select the contact you want.
Existing entry
.
Page 56

4. If you selected a number stored in the phone’s
memory, select a number category.
If you select a number stored on a card, tap or
press <
Select
>.
5. Tap or press <
Group settings
Use this menu to set up a caller group list.
Adding a new group
1. Scroll to an empty location and tap or press
<
Add
>.
2. Enter a name for the group and tap or press
<
Next
3. Move to the Name ringer line and tap or press
<
Edit
>.
4. Scroll to a ringtone category.
5. Scroll to a ringtone.
6. Tap or press <
ringtone.
7. Tap or press <
>.
Save
> and then <
(Menu 2.3)
Play
> to listen to the selected
Save
>.
Yes
>.
Managing a group
From the group list, tap or press <
the following options:
•
Edit
: change the properties of the selected group.
•
Erase
: erase the selected group or all group
members in the group.
Speed dial
Once you have stored phone numbers in Contacts, you
can set up to 98 (2~99) speed dial entries and then
dial them easily by pressing the associated one or two
number keys.
(Menu 2.4)
Options
> to access
Setting up speed dial numbers
1. Select
2. Enter the location number you want or scroll to the
3. Tap or press <
4. Select a contact from the Contacts list.
All
or
Empty
.
number you want.
Entering a number lists all of the location numbers
containing the entered number.
Assign
>.
Menu functions
Contacts
(Menu 2)
53
Page 57

Menu functions
5. Select a number, if the contact has more than one
number.
Editing speed dial entries
1. Select
2. Enter the location number you want or scroll to the
3. Tap or press <
Viewing a speed dial map
From the Speed dial screen, tap or press <
view a Speed dial map showing occupied and
unoccupied locations.
You can add a new entry or change existing entries.
54
Stored
number.
options:
•
Replace number
to the location.
•
Erase
: clear the speed dial setting for the
location.
.
Options
> to access the following
: assign a different number
Map
> to
Dialling speed dial numbers
• For 1-digit locations, press and hold the
corresponding number key in Idle mode.
• For other locations, press the first number key and
press and hold the last number key in Idle mode.
Name card
Use this menu to create your name card and send it to
other phones using the Mail service. You can also send
a Contacts entry in name card format.
Send a card
You can send a name card from the Name card book,
which stores your name card and the name cards you
have saved, or a contact from Contacts as a name
card.
1. Select
2. Select the name card or contact you want to send.
3. Tap or press <
The phone switches to the New Mail screen,
allowing you to create a new e-mail.
(Menu 2.5)
(Menu 2.5.1)
Name card book
Send
>.
or
Contacts
.
Page 58

4. Follow the procedure in “New Mail.”p. 40
Name card book
Use this menu to create and edit your name card. You
can also access the name cards you have saved and
the last name card you sent.
Creating your name card
1. Select
2. Tap or press <
3. Create your name card as you would store a phone
4. Tap or press <
Viewing a name card
Select the name card you want to view from the Name
card book list.
My Name Card.vcf
number.
(Menu 2.5.2)
.
Edit
>.
Save
> to save your name card.
Using name card options
From the name card list, tap or press <
access the following options:
•
Send
: send the selected name card as part of an
e-mail.
Options
> to
•
Edit
: edit the selected name card.
•
Add
: add a new name card.
•
Add to contacts
Contacts entry.
•
Erase
: erase the name card. This option is not
available for the default name card.
My phone #
Use this menu to view and change your phone
number.
To change the phone number, tap or press <
enter your phone number.
Memory info
Use this menu to check the number of contacts you
have stored in the phone’s memory or on both the
cards.
: save the name card as a
(Menu 2.6)
(Menu 2.7)
Edit
> and
Menu functions
Contacts
(Menu 2)
55
Page 59

Menu functions
Multimedia
Using the camera module built into your phone, you
can take photos of people or events while on the
move. You can also record a video by using your
phone as a camcorder.
To access this menu, tap or press <
Multimedia
mode.
• Do not take photos of people without their
permission.
• Do not take photos in a place where cameras are
not allowed.
• Do not take photos in a place where you may
interfere with another person’s privacy.
Take photo
Use this menu to take a photo in a still image or
multi-shot or record a video. The camera produces
JPEG photos and MP4 video clips.
When you take a photo in direct sunlight or in bright
conditions, shadows may appear on the photo.
56
(Menu 3)
Menu
> and select
in Idle mode, or press [ ] in Idle
(Menu 3.1)
Taking a photo
1. Access the
Take photo
menu or press and hold
[ ] in Idle mode.
The camera turns on and the image to be captured
displays.
2. When you use the camera first time, press [2] or
tap to change the preview screen.
3. Press [1] or tap the corresponding icon to select
the camera mode you want:
• Single ( ): take a photo.
• Series ( ): take series of action stills.
• Divided ( ): take several stills and saves them
in one frame.
• Video ( ): record a video.
• Mail ( ): take a photo for adding to an
e-mail. After taking a photo, tap or press
<
Send
> to send the photo as part of an
e-mail.p. 40
4. Make any desired adjustments.
Page 60
• You can use the following keys to customise the
image settings. You can also tap the icons
corresponding to each function.
Key Function
Flips the image vertically.
Shows the mirror image.
Left/Right Zooms in or out. (unavailable for
1280*960 resolution)
Up/Down Adjusts the brightness.
1
2
Changes the camera mode.
Switch the display between No
icon view ( ), Icons view
( ), Guideline view ( ), and
Actual ratio view ( ).
3
0
Sets the timer.
Accesses Quick view mode.
• You can change settings by tapping or pressing
<
Options
>.
5. Tap or press <
Capture
>, or press [ ] to take
a photo.
When you are taking serial shot images, the
camera takes photos successively.
6.
To Tap
save the photo or press <
photo is saved in the
album
return to Capture
mode
or press <
press [C].
Save
folder.
Cancel
>. The
My
>, or
rotate the image or press [ ].
view the one of
or press <
Expand
>.
serial-shot photos
Reviewing a photo immediately after saving
After saving a photo, you can view the photo by
pressing [0] or tapping in Capture mode. The
captured image displays on the screen:
• To access the file properties, tap or press
<
Options
> and select
Info
.
Menu functions
Multimedia
(Menu 3)
57
Page 61

Menu functions
• To delete the file, tap or press <
select
Delete
.
• To return to Capture mode, press [0] or tap .
Using camera options in Capture mode
In Capture mode, tap or press <
the following options:
•
Mode
: use the following camera modes:
Single shot
Series shot
select the number of photos the camera will take.
Divided shot
one frame. You can select the layout.
Video cam
Mail
part of an e-mail.
•
Size/Quality
quality.
•
White balance
photo. You can make your photo appear warmer or
cooler.
58
: take a photo in normal mode.
: take series of action stills. You can
: take several stills and save them in
: record a video clip.
: take a photo for adding to send the photo as
: select an image size or an image
: adjust the colour balance of the
Options
Options
> and
> to access
•
Self timer
takes a photo.
•
Revision
decorative frame.
•
Preview layout
When you select
the image in actual ratio.
•
Quick view
: set a time delay before the phone
: apply a special effect or use a
: select the default preview mode.
Actual ratio
: switch to Quick view mode.
, the phone shows
Recording a video
1. Access the
2. Press [1] or tap the camera mode icon until the
icon appears.
3. Make any desired adjustments.
• You can use the following keys to customise the
Take photo
image settings. You can also tap the icons
corresponding to each function.
Key Function
menu.
Flips the image vertically.
Shows the mirror image.
Page 62

Key Function
Up/Down Adjusts the image brightness.
Left/Right Zooms in or out.
1
2
Changes the camera mode.
Switch the display between No
icon view ( ), Icons view ( ),
Guideline view ( ), and Actual
ratio view ( ).
3
0
Sets the timer.
Accesses Quick view mode.
• You can change settings by tapping or pressing
<
Options
>.
4. Tap or press < >, or press [ ] to start
recording.
To pause recording, tap or press < > and then
<> to resume.
5. When you have finished, tap or press < >, or
press [ ] to stop recording.
6.
To Tap
save the video clip or press <
video is saved in the
album
return to Camcorder
mode
or press <
press [C].
Save
folder.
Cancel
>. The
My
>, or
review the video clip or press [ ].
Reviewing a video immediately after saving
After saving a video clip, you can view the video clip in
Quick View mode by pressing [0] or tapping in
Camcorder mode. Pressing [ ] initiates playing of the
video clip.
• To access the file properties, tap or press
<
Options
• To delete the file, tap or press <
select
> and select
Delete
.
Info
.
Options
> and
• To return to Camcorder mode, press [0] or tap .
Menu functions
Multimedia
(Menu 3)
59
Page 63

Menu functions
Using camera options in Camcorder mode
In Camcorder mode, tap or press <
access the following options:
•
Mode
: use the following camera modes:
Single shot
Series shot
select the number of photos the camera will take.
Divided shot
one frame. You can select the layout.
Video cam
Mail
•
Size/Quality
quality.
•
White balance
video. You can make your video appear warmer or
cooler.
•
Self timer
records a video.
•
Revision
•
Voice Rec
60
: take a photo in normal mode.
: take series of action stills. You can
: take several stills and save them in
: record a video clip.
: take a photo for adding to an e-mail.
: select an image size or an image
: adjust the colour balance of the
: set a time delay before the phone
: apply a special effect.
: turn on or off the audio.
Options
> to
•
Preview layout
When you select
the image in actual ratio.
•
Quick view
Recognize namecard
My album
Use this menu to review the photos you have taken
and the videos you have recorded.
Photos captured on other devices, such as digital
cameras, may not display correctly.
When you access the
icons may appear on the file list to show the file type:
• No icon: photo
•: video clip
• : slide show file
: select the default preview mode.
Actual ratio
: switch to Quick view mode.
(Menu 3.3)
Gallery
, the phone shows
(Menu 3.2)
folder, the following
Viewing a photo
1. Select
2. Scroll to the photo you want.
3. Tap or press <
Gallery
.
Expand
> to view the photo.
Page 64

If you select a slide show file, the slide show
begins.
4.
To Tap
scroll through photos the left or right arrow, or
switch to Thumbnail
view mode
view the enlarged
image
press [Left] or [Right].
or press <
or press <
zoom in or out, tap +/- or
press [ / ]. Press the
Navigation keys to scroll
through the image.
Multi
>.
Enlarge
>. To
Creating a new folder
1. On the My album screen, tap or press <
2. Enter the name for the folder and tap or press
<
Save
>.
Create
>.
Viewing a slide show
You can view your photos as a slide show, a sequential
presentation of each photo in the current folder.
1. From the folder list, scroll to a folder.
2. Tap or press <
3. Select a slide show effect.
The slide show begins.
4. Press [C] to stop the slide show.
Options
> and select
Slide show
.
Creating your own slide show file
1. On the file list, tap or press <
Slide show
2. Scroll to a location number and tap or press
<
Import
3. Select a photo for the location.
4. To add more photos, select a location. Tap or press
<
Check
added.
5. When you have finished, move to the effect type
field.
6. If you selected
field and select a slide show effect.
If you selected
effect for each photo and tap or press <
.
>.
> and then <
Separate
Common
Options
Done
> to select photos to be
, move to the effect type
, select a slide show
> and select
Save
>.
Menu functions
Multimedia
(Menu 3)
61
Page 65

Menu functions
7. After adding photos, tap or press <
access the following options:
•
Preview
•
Change order
photos.
•
Save
•
Erase
8. When you have finished, tap or press <
9. Select an image folder to store the slide show file.
10. Enter a name for the slide show file and tap or
press <
: view the photos as a slide show.
: change the order of the
: save the photos as a slide show file.
: erase the selected photo.
Save
>.
Using photo options
From the photo list, tap or press <
the following options:
•
Send:
send the file as part of an e-mail.
•
Assign
: set the image as your wallpaper for the
idle screen, or the opening or closing image.
•
Move
: move the file into another folder.
•
Copy
: copy the image into another folder.
•
Photo studio
62
: access the
Photo studio
Menu
Options
> to
Save
> to access
menu.
>.
•
Lock/Unlock
cannot access it without your lock code, or unlock
the file.
•
Grid(4)/Grid(9)
each screen.
•
Sort
: change the sort order of the file list.
•
Slide show
•
Erase
: lock the file so that other people
: view 4 photos or 9 photos on
: create a new slide show file.
: erase the selected files.
Viewing a video clip
1. Select
2. Scroll to the video clip you want and tap or press
3. Tap or press <
During playback, use the following functions:
To Press
pause or resume
playback
Gallery
.
<
Expand
>.
Play
> to play the video clip.
To switch to thumbnail view mode, tap or press
<
Multi
>.
[], or tap or .
Page 66
To Press
change the repeat
mode
[Up] or tap . (No icon:
off, : Once, : All,
: shuffle)
open the play list [Down] or tap
return to the previous
[Left] or tap .
LIST
.
file
move backward in a
file
and hold [Left], or tap and
hold .
skip to the next file [Right] or tap .
skip forward in a file and hold [Right], or tap and
hold .
adjust the volume [ / ] or tap .
change the display size [ ] or tap the screen.
On the video player screen, tap or press <
Options
to access the following options:
•
Set wallpaper
: set the video clip as your
wallpaper for the idle screen.
•
File info
: access the file properties.
>
Using video options
While viewing a still image of a video clip, tap or press
<
Options
•
> to access the following options:
Set wallpaper
: set the video clip as your
wallpaper for the idle screen.
•
Move
: move the file to another folder.
•
Copy
: copy the file to another folder.
•
Rename
•
Lock/Unlock
: change the file name.
Do not use special characters for a file or folder
name, such as /, :, *, ?,
”
, <, >, or \.
: lock the file so that other people
cannot access it without your lock code, or unlock
the file.
•
•
File info
Erase
: access the file properties.
: erase the file.
Using album options
From the My album screen, tap or press <
Options
>
to access the following options:
•
Rename
: change the folder name.
Menu functions
Multimedia
(Menu 3)
63
Page 67

Menu functions
Do not use special characters for a file or folder
name, such as /, :, *, ?,
•
Lock/Unlock
: lock the selected image folder so
that other people cannot access it without your
lock code, or unlock the folder.
•
Create folder
•
Erase folder
•
Slide show
: add a new image folder.
: erase the selected image folder.
: select a sidle show effect and show
the images stored in the selected folder as a slide
show.
External album
Photo studio
(Menu 3.4)
(Menu 3.5)
Photo studio is a great tool for managing photos. Use
this menu to edit photos by applying special effects
and adding comments.
Wizard effect
(Menu 3.5.1)
You can apply a special effect to a photo.
1. Select a photo from the
2. Scroll to an effect.
64
”
, <, >, or \.
My album
folder.
You can compare the changed photo with the
original by tapping or pressing <
Compare
> and
then <OK>.
3. Tap or press <
Save
>.
4. Enter a name for the photo and tap or press
<
Save
>.
Basic effect
(Menu 3.5.2)
You can change the colour tone of a saved photo.
1. Select a photo from the
My album
folder.
2. Scroll to a tone.
You can compare the changed photo with the
original by tapping or pressing <
Compare
> and
then <OK>.
3. Tap or press <
Save
>.
4. Enter a name for the photo and tap or press
<
Save
>.
Decoration
(Menu 3.5.3
)
You can add a decorative frame, clip, or photo cut-out
to a photo. You can also add text to the photo.
1. Select a photo from the
My album
folder.
Page 68

2. Tap or press <
following editing options:
•
Fun frame
•
Clip
position you want by pressing the Navigation
keys.
•
Photo sticker
•
Text
change the font size and colour, and the
brightness of the font colour. You can move text
to the position you want by pressing the
Navigation keys.
3. After adding decorations, tap or press <
4. Enter a name for the photo and tap or press
<
Save
Photo sticker
You can make a photo cut-out using a photo.
1. Select a photo from the
2. Scroll to a photo cut-out type and tap or press
<
Select
Options
: select an image. You can move it to the
p. 65.
: enter text. After entering text, you can
>.
(Menu 3.5.4)
>.
> to access one of the
: select a decorative frame.
: select a photo cut-out.
Save
My album
folder.
>.
3. Adjust the photo cut-out size and tap or press
<
Next
>.
4. Move the photo cut-out to the position you want
and tap or press <
The part of the photo is saved as a photo cut-out.
Video capture
You can save a single video clip frame as a photo.
1. Select a video clip from the
The selected video clip plays.
2. When the part of the video clip you want to capture
appears, tap or press <
The video clip frame displays.
3. Tap or press <
4. Enter a name for the video clip frame and tap or
press <
Save
Composition
You can make a new image by combining two photos.
1. Tap or press <
field highlights.
2. Select a photo from the
Save
(Menu 3.5.5)
Save
>.
>.
(Menu 3.5.6)
Import
>.
My album
Capture
> when the
My album
folder.
>.
Main Image
folder.
Menu functions
Multimedia
(Menu 3)
65
Page 69

Menu functions
3. Move to the
<
Import
4. Select a photo from the
5. Tap or press <
6. Adjust the image brightness and tap or press
<
Save
7. Enter a name for the composition and tap or press
<
Save
Revision
You can change the image properties of a photo, such
as the sharpness, brightness, saturation, or blur.
1. Select a photo from the
2. Tap or press <
options:
•
Sharpness
•
Brightness
image.
•
Saturation
the image colour.
•
Blur
3. After changing the properties, tap or press <OK>.
66
BG Image
>.
Next
>.
>.
(Menu 3.5.7)
Options
: adjust the image sharpness.
: adjust the clarity of the image.
field and tap or press
My album
>.
My album
> to access the following
: adjust the brightness of the
: adjust the degree of the grey of
folder.
folder.
You can compare the changed photo with the
original by tapping or pressing <
then <OK>.
4. Tap or press <
5. Enter a name for the photo and tap or press
<
Save
Resize
(Menu 3.5.8)
You can change the photo size. You cannot resize the
176x144 image.
1. Select a photo from the
2. Tap or press <
you want.
3. Tap or press <
4. Enter a name for the resized photo and tap or
press <
Flip
(Menu 3.5.9)
You can change the orientation of a photo.
1. Select a photo from the
2. Scroll to the left or right to select a direction icon,
, or .
>.
Save
Save
Change
Save
>.
>.
My album
> and select the image size
>.
My album
Compare
folder.
folder.
> and
Page 70
3. Scroll to the up or down to select an orientation for
the photo.
4. Tap or press <
Save
>.
5. Enter a name for the adjusted photo and tap or
press <
Save
>.
Text composition
(Menu 3.5.0)
You can extract text from a photo and add it to
another photo.
It may not be possible to extract text from a
non-mono colour background photo.
1. Tap or press <
Import
> when the
Main Image
field highlights.
2. Select a photo from the
3. Move to the
<
Import
Char Image
>.
4. Select a photo from the
5. Tap or press <
Next
My album
field and tap or press
My album
> and then <
Save
folder.
folder.
>.
6. Enter a name for the photo and tap or press
<
Save
>.
Settings
(Menu 3.6)
Use this menu to change the default settings for the
options when using the camera.
•
Sound
: select a sound to indicate a shutter
release sound, the camera is ready for use, and a
self timer sound.
•
Interruption
: set whether to accept the call,
message, or alarm alert while in Capture mode or
Camcorder mode.
•
Reset
: reset settings to their default status.
•
Auto saving
: set whether the camera saves an
image automatically after taking it.
•
Album lock
: lock the
My album
folder so that
other people cannot access it without your
password.
Menu functions
Multimedia
(Menu 3)
67
Page 71

Menu functions
Display
The
settings for the display and backlight.
To access this menu, tap or press <
Display
Screen saver
Use this menu to set up the idle screen.
•
•
Functional screen
Use this menu to select a function screen, calendar
memo, today, clock, or memo pad, to be displayed in
Idle mode.
Power on/off
You can select an image to be displayed when the
phone is switched on or off.
68
(Menu 4)
Display
menu enables you to change various
Menu
in Idle mode.
(Menu 4.1)
Image
: select a background image.
Banner
: set whether or not to display a greeting
message and enter a greeting message.
(Menu 4.2)
(Menu 4.3)
> and select
Dialing font
Use this menu to select a font style for digits to be
displayed when you enter a phone number for dialling.
Time setting
Use this menu to set the current time and date or set
up the time zones for the Dual Clock wallpaper.
Single clock
You can set the current time and date.
Enter the time in 24-hour format and the date in the
order of year, month, and day.
Dual clock
You can tap or press two time zones to be displayed
when you select
1. Select the time zone for the upper clock and press
[Down].
2. Select the time zone for the lower clock.
3. Tap or press <
(Menu 4.4)
(Menu 4.5)
(Menu 4.5.1)
(Menu 4.5.2)
Dual clock
Save
for the wallpaper image.
>.
Page 72
You can apply the daylight savings time for each
clock. When a clock highlights, tap or press
DST On
<
Backlight
> and then <
(Menu 4.6)
Save
>.
Use this menu to customise settings for the backlight.
•
LCD
: select the length of time the backlight
remains on.
•
LCD brightness
: adjust the brightness of the
display.
•
Keypad
: select the keypad backlight mode.
Save mode
: use the backlight only between 5:00
PM and 8:00 AM. Doing this saves the battery
power.
Normal mode
: flash the backlight when you press
any key.
Flash light
External clock
(Menu 4.7)
(Menu 4.8)
Messages
Use the
(Menu 5)
Messages
menu to send or receive text
messages. You can also use the voicemail and web
alert features.
To access this menu, tap or press <
Messages
New message
in Idle mode, or press [Left] in Idle mode.
(Menu 5.1)
Menu
> and select
Use this menu to create text messages and send them
to multiple mobile phones.
1. Enter the message text and tap or press <
Next
>.
2. Press [Down] to change the following options:
•
Priority
: (in CDMA network) set the priority
level of the message.
•
Ack
: (in CDMA network) activate or deactivate
the delivery acknowledgement feature. When
this feature is activated, the network informs
you whether your message is delivered to the
recipient or not.
•
Reply path
: (in GSM network) allow recipients
to reply to you through your SMS server.
Menu functions
Messages
(Menu 5)
69
Page 73
Menu functions
•
Report
: (in GSM network) set the network to
inform you when your messages have been
delivered.
•
Save
: select one of the following saving
options:
Save&Send
then send the message.
Send only
will be deleted after sending.
Save only
sent later.
3. Tap or press <
4. Enter a phone number.
To send the message to multiple destinations,
enter additional numbers.
5. When you have finished, tap or press <
send or save the message.
Inbox
(Menu 5.2)
Use this menu to access messages you have received.
70
: save a copy of the message and
: send the message. The message
: save the message so that it can be
Next
>.
Send
> to
Viewing a message at the time of its receipt
When the phone receives a text message, the phone
sounds a message alert and displays a text
notification. Tap or press <
Select
> to view the
message immediately.
Viewing a message in Inbox
1. Select
Text
from the
Inbox
menu. A list of
received messages displays.
Icons displayed on the list indicate the message’s
status:
• : Messages received from a GSM network
• : Messages received from a CDMA network
• A red icon with ! means that the message is
urgent.
• and mean that the message is saved on the
cards. means that the message is saved in the
phone’s memory.
2. Scroll to a message storage.
3. Select the message you want.
4. To read the message text audibly, tap or press
<
Read
>.
Page 74
To send a reply to the sender, tap or press
<
Reply
>.
Using message options
While viewing a message, tap or press <
access the following options:
•
Erase
: erase the currently selected message from
your Inbox.
•
Forward
•
Call/Save
number or save the number to Contacts.
•
Lock/Unlock
being deleted, or unlock the message.
•
Copy
memory.
•
Move
memory.
: send the message to other people.
: make a call to the sender’s phone
: lock the message to protect it from
: copy the message to a card or the phone’s
: move the message to a card or the phone’s
Options
> to
Accessing voicemails
When you receive a voicemail, a text notification
displays. Tap or press <
the voicemail centre. Then follow the voice prompts
from the system to listen to the message.
Select
>, and the phone dials
You can also check your voicemails by accessing
mail
in the
Inbox
menu.
In a GSM network, you can press and hold [1] in Idle
mode to access the voicemail centre.
Voice
Accessing Web alerts
When you select
phone accesses your Alert Inbox on the wireless web,
so that you can view a message from your web server.
Outbox
Use this menu to access messages you have sent or
tried to send.
Web alert
(Menu 5.3)
in the
Inbox
menu, the
Viewing sent text messages
When you access the
messages appears.
Icons displayed on the list indicate the messages’
status:
• : Messages that have been successfully
delivered in a CDMA network
• : Messages that have been successfully
delivered in a GSM network
Outbox
menu, a list of sent
Menu functions
Messages
(Menu 5)
71
Page 75
Menu functions
• : Messages that the phone has failed to send in
a CDMA network
• : Messages that the phone has failed to send in
a GSM network
• A red icon with ! means that the message is
urgent.
• and mean that the message is saved on the
cards. means that the message is saved in the
phone’s memory.
1. Scroll to a message storage.
2. Select the message you want.
3. To read the message text audibly, tap or press
<
Read
>.
To forward the message to other people, tap or
press <
Forward
Using message options
While viewing a message, tap or press <
access the following options:
•
Erase
: erase the currently selected message.
•
Resend
: send the message to the recipient again.
72
>.
Options
> to
•
Call/Save
: make a call to the recipient’s numbers
or save the recipient’s numbers in Contacts.
•
Lock/Unlock
: lock the message to protect it from
being deleted, or unlock the message.
•
Copy
: copy the message to a card or phone’s
memory.
•
Move
: move the message to a card or phone’s
memory.
Drafts
(Menu 5.4)
This folder stores messages you have saved to send at
a later time.
1. Scroll to a message storage.
2. Select the message you want.
3. To read the message text audibly, tap or press
<
Read
>.
While viewing a message, tap or press <
Options
> to
access the following options:
•
Erase
: erase the selected message.
•
Forward
: send the message to other people.
Page 76

•
Call/Save
: make a call to the sender’s phone
number or save the number to Contacts.
•
Lock/Unlock
: lock the message to protect it from
being deleted, or unlock the message.
Msg. setup
(Menu 5.5)
Use this menu to customise the settings of various
options for receiving or sending messages.
•
Scroll timer
: set the time interval in which the
phone scrolls to a following screen, 1 through 5
seconds. When this option is set to
Off
, you can
manually scroll to the next screen using [Up] or
[Down].
•
Msg. reminder
: set how often the phone reminds
you of new messages.
•
Alert on call
: set whether or not the phone
informs you when you receive a new message
during a call.
•
Canned msg
: preset sentences to use when
composing a new message.
•
Save
: select the default save option.
•
CDMA settings
: customise the settings for your
outgoing messages in a CDMA network.
Priority
: set the priority level of messages.
Delivery ack
: activate or deactivate the delivery
acknowledgement feature. When this is activated,
the network informs you whether your message is
delivered to the recipient or not.
•
GSM settings
: customise the settings for your
outgoing messages in a GSM network.
Service centre
: set the number of your message
centre.
Validity period
: set the length of time your
messages are stored in the SMS server.
Message type
: set the default message type. The
network can convert the messages into the
selected format.
Reply path
: allow the recipient to reply to you
through your message centre.
Delivery report
: set the network to inform you
when your message has been delivered.
Menu functions
Messages
(Menu 5)
73
Page 77

Menu functions
Voice mail center
voicemail centre. Please contact your service
provider for further details.
•
Msg list info
list.
•
Voice reading
the voice reading feature:
Setting
: set whether your phone reads the
message text audibly while viewing a message.
Voice volume
reading feature.
SOS message
In an emergency, you can send SOS messages to your
family or friends for help. You can also receive SOS
messages from other people who are in an emergency.
Setting up SOS message options
1. Select On to activate the SOS message feature.
2. Press [Down] and specify the following options:
•
Recipients
you want to send SOS messages.
74
: set the number of your
: select the sort type of the message
: set up the following options for
: adjust the volume for the voice
(Menu 5.6)
: specify phone numbers to which
•
Number of sending
the phone repeats sending SOS messages.
You can view the onscreen help by tapping and
pressing <
Help
>.
: set the number of times
Sending the SOS message
When your phone is closed, press [/] 4 times.
The phone switches to Emergency mode and sends
the preset SOS message. To exit Emergency mode,
press [ ].
Msg. wallpaper
Use this menu to select a background image to be
displayed on the message screen so that you can view
messages with the image.
Memory info
Use this menu to check the number of messages you
have stored in the phone’s memory and on the cards.
(Menu 5.7)
(Menu 5.8)
Page 78
Sounds
The
sound settings.
To access this menu, tap or press <
Sounds
Ringer
Use this menu to set the ringer for calls, messages,
alarms, and schedule alarms separately.
Ringer vol./type
Use this menu to adjust the ringer volume for voice
calls, messages, alarms, and schedule alarms. You can
also set the ringer type for voice calls.
•
•
•
•
•
(Menu 6)
Sounds
menu allows you to customise various
in Idle mode.
(Menu 6.1)
(Menu 6.2)
Level 1~5
Ringer only
selected in the
Silent
1 Beep
Vibration
: select one of the volume levels.
: the phone sounds the ringtone
Ringer
menu.
: the phone neither vibrates nor rings.
: the phone sounds a beep.
: the phone vibrates.
Menu
> and select
•
Vib. & ringer
same time.
•
Vib. then ringer
rings.
•
Ringer then vib.
vibrates.
Key tone
Use this menu to select the type of tones that the
phone sounds each time you press a key.
You can adjust the key tone volume using [/] in
Idle mode.
Function alert
Use this menu to set up audible alerts (beeps) at a
specified time to inform you that certain things have
happened.
•
Themes
•
Alert on/off
Select/Saving
when you save your selection or change a menu
function.
: the phone vibrates and rings at the
: the phone vibrates and then
: the phone rings and then
(Menu 6.3)
(Menu 6.4)
: select an alert tone.
: turn each alert on or off.
: set the phone to sound an alert
Menu functions
Sounds
(Menu 6)
75
Page 79

Menu functions
Cancel/Warning
when you cancel your selection or change when a
confirmation message appears.
Slider
: set the phone to sound an alert when you
open the phone.
Connect
when your call is connected to the system.
Disconnect
tone when a call is disconnected by the other
person.
Power on/off
when you turn on or off the phone.
Exit silent mode
when you exit Silent mode.
: set the phone to sound a connect tone
Hour alert
You can set your phone to sound an alert every hour
on the hour.
1. Select On and press [Down].
2. Enter the time period for the phone to sound the
hour alert and press [Down].
76
: set the phone to sound an alert
: set the phone to sound a disconnect
: set the phone to sound an alert
: set the phone to sound an alert
(Menu 6.5)
3. Scroll to an alert type and tap or press <
Entertainment
Using the
using your phone, enjoy karaoke video files, MP3 files,
and VOD files, and chat with your friends or family
using the Samsung messenger. You can also access
media content downloaded from the Internet.
To access this menu, tap or press <
Entertainment
Games
You can enjoy fun games on your phone.
1. Select the game you want.
2. Press any key except for [ ] and [ ].
3. If necessary, select a game mode.
Entertainment
(Menu 7.1)
The phone displays the following options; options
vary depending on the selected game:
•
NEW GAME
(Menu 7)
menu, you can play games
Menu
in Idle mode.
: start a new game.
Save
>.
> and select
Page 80
•
CONTINUE/LOAD GAME
: restart the game
you last played.
•
•
•
RECORD
OPTION
HELP
: check the high score table.
: change the game settings.
: give you the information about how to
play the game.
•
EXIT
: exit the game.
4. Select
NEW GAME
.
For further information about games, refer to the help
option.
MP3
(Menu 7.2)
Use this menu to enjoy music.
MP3 player
(Menu 7.2.1)
You can play MP3 music files. First, you need to save
MP3 files in your phone’s memory.
Downloading MP3 files
You can save music files to your phone’s memory by
connecting the phone to a computer and copying them
to the phone.p. 91
Creating the play list
Before playing MP3 music files, you need to add them
to the play list.
1. Access the
2. Tap or press <
list
3. Tap or press <
4. Tap or press <
5. To play the music files, tap or press <
.
MP3 files
Options
Check
Add
>.
menu.
> and select
Add to play
> to select the files you want.
Play
>.
Playing MP3 music files
To play MP3 music files, press [ ] or tap from the
MP3 player screen.
During playback, use the following functions:
To Press
pause or resume
[], or tap or .
playback
change the repeat
mode
[Up] or tap . (No icon: off,
: All, : Once, :
shuffle)
Menu functions
Entertainment
(Menu 7)
77
Page 81
Menu functions
To Press
open the play list [Down] or tap
return to the previous
file
move backward in a
file
skip to the next file [Right] or tap .
skip forward in a file and hold [Right], or tap and
adjust the volume [ / ] or tap .
repeat a section or tap <
repeat the current
section of the lyrics
Using MP3 player options
During playback, tap or press <
the following options.
78
[Left] or tap . To return to
the beginning of the file, tap
or press within 3 seconds.
and hold [Left], or tap and
hold .
hold .
[]
.
A-B
>.
Options
LIST
.
> to access
•
Go to file list
•
Timer
on. The timer appears to show you the time
remaining.
•
Set to ringer
incoming calls, alarm sets, or scheduler alarms.
•
Visual effect
•
File info
•
Backlight
remains on while playing an MP3 file.
Default
time set in the
Always on
•
Key lock
except for [ / ] so that you can prevent an
accidental key presses from affecting playback. To
unlock the keys, press and hold any key except for
[ ], and tap or press <
MP3 play list
Use this menu to access the play list you have created.
: open the MP3 file list.
: set the length of time the MP3 player stays
: set the music file as a ringtone for
: select an equaliser image.
: access the file properties.
: select the length of time the backlight
: the backlight turns off after the period of
Backlight
: the backlight does not turn off.
: lock the exposed keys on the phone
(Menu 7.2.2)
menu.
Yes
>.
Page 82

Tap or press <
Options
> to access the following
options:
•
Add to play list
•
Remove
•
Visual effect
•
Go to file list
•
File info
MP3 files
(Menu 7.2.3)
: add files to the play list.
: remove files from the play list.
: select an equaliser image.
: access the file list.
: access the file properties.
Use this menu to access the MP3 files stored in the
phone’s memory.
Tap or press <
Options
> to access the following
options:
•
Open files
: display all files stored in the phone’s
memory.
•
Add to play list
•
Move
: move the file to another folder.
•
Copy
: copy the file to another folder.
•
Rename
Do not use special characters, such as /, :, *, ?,
”, <, >, or \.
: add files to the play list.
: change the file name.
•
Sort
: change the sort order of the file list.
•
File info
•
Set to ringer
: access the file properties.
: set the file as a ringtone for
incoming calls, alarm sets, or scheduler alarms.
•
Erase
: erase the selected files.
•
Create folder
MP3 settings
: add a new folder.
(Menu 7.2.4)
Use this menu to change the settings for using the
MP3 player.
•
Skip length
: select the interval by which the
phone skips forward or backward through a music
file.
•
Load default
: restore the default settings for the
MP3 player.
Melody composer
(Menu 7.3)
Melody composer is a great tool that allows you to
compose your own melodies using a variety of musical
components.
Menu functions
Entertainment
(Menu 7)
79
Page 83

Menu functions
Composer melody
When you access this menu, a stave screen displays
with a selection point at the first note position.
Creating a melody
You can compose a melody of up to 10 pages and you
can insert 12 notes or rests onto each page.
1. Move the selection point up or down.
2. When you have placed the selection point to your
satisfaction, tap or press <
3. Select a note or rest.
The note or rest is inserted onto the stave and the
selection point moves to the right on the same
line.
4. Repeat steps 1 to 3 to add more notes and rests.
You can also add a background melody, change
the tempo, or adjust the volume by using
composer options.
5. When you have finished, tap or press <
6. Enter a name for your melody and tap or press
<
Save
>.
80
(Menu 7.3.1)
Input
>.
Save
>.
Using composer options
While composing a melody, tap or press <
Options
to access the following options:
•
New
: open a new composer screen.
•
Open
: open the list of the melodies you have
composed.
•
Play
: play back the current melody.
•
Save
: save the melody.
•
Save as
•
Instrument
: save the melody with a different name.
: change the musical instrument for
the melody.
•
BGM
: use a background melody.
•
Add note
•
Tempo
•
Volume
: add notes to the melody.
: change the tempo.
: adjust the volume level of the main and
background melodies separately.
Editing a melody
While composing a melody or after opening a saved
melody, you can edit it.
>
Page 84

1. Select an entered note or rest by moving the
selection cell.
The colour of the selected item changes to orange
to indicate that it is in Edit mode.
2. Change the position or type of the note or rest the
same as you would when inserting it.
•Press
[]
or [ ], or tap or to move a
note to the next lower or higher position by
semi-tone.
•Tap or press <
Input
> to change the type of
the selected note or rest.
•Tap or press <
Options
> to access the
following options:
Range
: select more than one note or rests.
Copy
: copy the selected notes and/or rests.
Cut
: delete the selected notes and/or rests.
Paste
: paste the copied notes and/or rests to
the position next to the currently selected note
or rest.
Change
: change the type of the currently
selected note or rest.
Delete
: delete the selected notes and/or rests.
Play
: play back the current melody.
3. After editing, move the selection cell to an input
position.
4. Tap or press <
the changes to the melody, or select
Options
> and select
Save
to save
Save as
to
save the melody under a different name.
My melodies
(Menu 7.3.2)
Use this menu to play the melodies you have created.
Playing a melody
Scroll to the melody you want and tap or press
<
Play
>.
Using melody options
From the melody list, tap or press <
Options
> to
access the following options:
•
Set to ringer
: set the melody as a ringtone for
incoming calls, alarm sets, or scheduler alarms.
•
Rename
: change the melody name.
Do not use special characters, such as / or \.
Menu functions
Entertainment
(Menu 7)
81
Page 85
Menu functions
•
Erase
: erase the selected melody.
•
Erase all
•
View details
Karaoke
Use this menu to enjoy karaoke video files you have
downloaded as you would in any karaoke situation.
Scroll to the karaoke file you want and tap or press
<
Play
From the karaoke file list, tap or press <
access the following options:
•
Erase
•
Erase all
Fun box
Use this menu to access Samsung Fun Club, the preset
web site providing Samsung mobile phone users with
attractive download services, such as ringtones and
wallpapers.
82
: erase all melodies.
: access the melody properties.
(Menu 7.4)
>.
Options
: erase the selected karaoke file.
: erase all karaoke files.
(Menu 7.5)
The touch screen is deactivated in this menus.
> to
You can download:
• colour images
• polyphonic melodies
• information and electronic catalogues for Samsung
Electronics products
Samsung messenger
(Menu 7.6)
This feature allows you to have a conversation with
your friends, family, or co-workers by sending and
receiving instant messages.
• You can use Samsung messenger between
Samsung mobile phones equipped with the
feature.
• When you send and receive packet data, you will
be charged by your service provider.
Messenger
(Menu 7.6.1)
Use this menu to start a conversation with a person or
with a group of people.
Before starting a conversation, you need to create a
buddy list of your messenger contacts.
Page 86

Creating the buddy list
You can add contacts to your buddy list by entering a
name and number manually or by retrieving an entry
from Phonebook. You can also group your contacts.
To add a contact to the buddy list:
1. On the Messenger screen, select .
2. Tap or press <
3. Tap or press <
Add
>.
Yes
> to open Contacts and select a
contact.
Alternatively, tap or press <No> and skip to step
5.
4. To enter a new name and number, tap or press
<
Edit
>.
To use the current name and number, skip to step
7.
5. Enter a new name and tap or press <
Done
>.
6. Enter a number.
7. Tap or press <
Save
>.
To add a group to the buddy list:
1. On the Messenger screen, tap or press <
Add
>.
2. Enter a group name and tap or press <
Save
>.
3. When the created group highlights, tap or press
<
Select
>.
4. To add contacts to the group you want, follow from
step 2 of the procedure for adding a contact.
On the Messenger screen, scroll to one of the groups
you have created and tap or press <
Options
> to
access the following options:
•
Edit
: edit the messenger group.
•
Erase
: erase the selected messenger group.
Starting a conversation
Once you have created your buddy list, you can start a
conversation by sending an invitation to the contacts
with whom you want to talk. You can also start a
conversation by accepting an invitation from another
person.
To start a conversation by sending an invitation:
1. On the Messenger screen, select a group.
2. Tap or press <
3. Tap or press <
Invite
>.
Check
> to select buddies you want
to contact.
Menu functions
Entertainment
(Menu 7)
83
Page 87

Menu functions
4. When you have finished, tap or press <
5. Enter an invitation message and tap or press
<
Send
>.
While entering a message, tap or press
<
Options
•
•
•
•
•
•
•
•
•
•
84
> to access the following options:
Invite
: send an invitation to a contact.
Extract
: save the sent or received message in
the history list.
View members
selected.
Add members
buddy list.
View theme
Canned msg.
messages.
Send file
Send theme
Send vibration
other person by vibration.
Start Motion
second, and sends it automatically to a contact
you are messaging.
: show the contacts currently
: add a new contact to the
: display the received themes.
: retrieve one of several canned
: send files to a contact.
: send themes to a contact.
: select this option to alert the
: the phone takes a photo every
Invite
>.
•
Start game
buddy.
6. Write and send a message.
When the other person accepts your message, you
can converse with the person by instant message.
To start a conversation by accepting an invitation:
When another person sends you an invitation, a text
notification displays. Tap or press <
can converse with the person by instant message.
Managing the messenger contacts
On the Messenger screen, select a group. The list of
members of the group displays.
From a contact list, tap or press <
the following options:
•
Edit
: edit contact information.
•
Add
: add a new contact.
•
Erase
: erase the selected contact.
•
Move
: move the member to one of the groups
stored in the buddy list.
: play the online game with your
Join
>. Now, you
Options
> to access
Page 88
•
Reject
: add the contact to so that you can
reject messages from that person.
To receive messages from the person, go to the
contact in and tap or press <
History
(Menu 7.6.2)
Restore
>.
Use this menu to view the records of your
conversations.
Settings
(Menu 7.6.3)
Use this menu to change the setting options for using
the messenger feature.
•
Canned msg.
: add a new canned message to use
when creating an instant message to converse with
other people.
•
Font size
: select the message font size to be
displayed on the messenger screen.
•
My nickname
: enter your nickname to be
displayed on the messenger screen.
VOD
(Menu 7.7)
Use this menu to download video or sound clips from
the wireless web and play them.
VOD files
(Menu 7.7.1)
When you access this menu, the list of downloaded
video or sound clips displays.
Playing media files
Scroll to a file and tap or press <
Play
>.
During playback, use the following functions:
To Press
pause or resume
[], or tap or
playback
change the repeat
mode
[Up] or tap . (No icon:
off, : All, : Once,
: shuffle)
open the play list [Down] or tap
return to the previous
[Left] or tap .
LIST
.
file
move backward in a
file
and hold [Left], or tap and
hold .
skip to the next file [Right] or tap .
Menu functions
Entertainment
(Menu 7)
85
Page 89

Menu functions
To Press
skip forward in a file and hold [Right], or tap and
adjust the volume [ / ] or tap .
change the display size [ ] or tap the screen.
Using media player options
From the media player screen, tap or press
<
Options
•
•
Using file options
While viewing the media file list, tap or press <
to access the following options:
•
•
•
86
> to access the following options:
Set wallpaper
wallpaper for the idle screen.
File info
Open files
Rename
File info
: access the file properties.
: open and play the selected files.
: change the file name.
: access the file properties.
hold .
: set the video clip as your
Menu
•
Set wallpaper
wallpaper for the idle screen.
•
Set to ringer
incoming calls, alarm sets, or scheduler alarm.
•
Visual effects
media player screen. This option is only available
for sound files.
•
Erase
: erase the selected file.
•
Erase all
Connect to server
Selecting this menu loads the website preset by your
service provider for downloading and viewing media
files.
Settings
>
You can set the keypress speed for using [Left] or
[Right] to skip backward or forward in a file while
using the media player.
(Menu 7.7.3)
: set the video clip as your
: set the sound clip as a ringtone for
: select an equaliser image on the
: erase all files.
(Menu 7.7.2)
Page 90

Utilities
The
schedule and tasks, set alarms, or use convenient
features, such as a dictionary, calculator, voice
recorder, and counter. You can also use the Bluetooth
feature.
To access this menu, tap or press <
Utilities
Today
Use this menu to view information of tasks,
countdown timer, and scheduled events for the current
day. The following icons may be shown according to
the types of items:
• : Countdown timer •
• : Business • : Anniversary
•
(Menu 8)
Utilities
menu enables you to keep track of your
Menu
:
Personal
> and select
in Idle mode.
(Menu 8.1)
:
Event
You can create a new item of the selected type by
tapping or pressing <
New
>. p. 88
Viewing an item
1. On the Today view, press [Up] or [Down] to scroll
through the screen. You can move to the next or
previous day view by pressing [Left] or [Right], or
tapping the left or right arrow.
2. Tap or press <
selected item.
View
> to view the details on the
Using Today’s options
On the Today view, tap or press <
the following options:
•
Calendar
•
Jump to date
access.
•
Assign to idle
idle screen.
Calendar
Use this menu to view the current month, as well as
the past or future months in the calendar format. You
can be alerted by the Calendar function before an item
commences.
: go to the calendar.
: specify the date you want to
: set the item to be displayed on the
(Menu 8.2)
Options
> to access
Menu functions
Utilities
(Menu 8)
87
Page 91

Menu functions
Consulting the calendar
When you access this menu, today’s date is
automatically selected and the date in lunar calendar
displays on the bottom.
Below the calendar, the number of items for the
current day appears. The following icons indicate the
types of item:
• : Personal • : Business
• : Anniversary • : Event
Selecting a day
• Press [Left] or [Right], or tap the left or right
arrow to move by day.
• Press [Up] or [Down] to move by week.
• Press [ / ] to move by month.
Using calendar options
On the calendar, tap or press <
the following options:
•
View type
calendar.p. 89
88
: change the view mode of the
Options
> to access
•
Erase events
•
Erase all
•
Lunar calendar
view.
•
View festivals
personal anniversaries and festivals.
•
Jump to date
access.
: erase items for the specific period.
: erase all scheduled items.
: switch to the lunar calendar
: set the list of the national or
: specify the date you want to
Creating an item
You can create up to 9 items for one day and 20 items
total.
1. Scroll to a day from the calendar.
2. Tap or press <
3. Enter information or change the settings:
•
Type
•
Contents
•
Start
item.
•
End
item.
New
>.
: select an item type.
: enter your item contents.
: enter the staring time and date for the
: enter the ending time and date for the
Page 92

•
Contacts
•
Alarm
•
Before
alarm is to alert you.
4. Tap or press <
: enter a contact number.
: set an alarm.
: set how long before the item the
Save
> to save the item.
Viewing your schedule
Days with created items are indicated with squares at
the corners of the date cell.
1. Select one of days with scheduled items. The list of
items for that day displays.
2. Select an item.
While viewing an item, tap or press <
access the following options:
•
Edit
: edit the selected item.
•
Add new
•
Erase
: add a new item.
: erase the selected item.
Options
> to
Viewing items in a different mode
You can change the calendar display to Calendar view,
List view, or Weekly view. Tap or press <
and select
View type →
a view mode.
Options
>
Calendar
You can view the items as a calendar format. Select a
date and select an item.
List view
You can view the items for the selected date as a list
format. Select a date by pressing [Up] or [Down] and
select an item.
Weekly view
You can view items for the current week. Select the
item you want to view.
Task list
Use this menu to enter up a list of tasks you need to
do.
(Menu 8.3)
Creating a task
1. Tap or press <
2. Enter the task content and tap or press <
3. Select
4. Select one of the following options for the deadline
for the item.
High
New
>.
or
Low
priority and press [Down].
Save
>.
Menu functions
Utilities
(Menu 8)
89
Page 93

Menu functions
•
No date
•
Today
•
Custom
need.
5. Tap or press <
Viewing a task
When you access the
displays. A icon next to a task means that the task is
of high priority, and a icon means that the task is in
progress.
Select the task you want to view from the list. To
change the task item, tap or press <
While viewing a task, tap or press <
access the following options:
•
Completed
(Blue).
•
In process
changes to .
•
Forward
(Red).
•
Erase
90
: no deadline is set.
: the deadline is set to today’s date.
: you can manually enter the date you
Save
> to save the task.
Task list
: set the task completed. changes to
: set the task in the process. (Blue)
: set the task forward. changes to
: erase the selected task.
menu, the list of tasks
Edit
>.
Options
> to
•
Erase all:
•
Purge
expired.
Alarm set
Use this menu to set an alarm to sound at a specific
time.
erase all tasks.
: erase the tasks of which the deadlines are
(Menu 8.4)
Setting an alarm
1. Select
2. Select
3. Select the alarm frequency option on the
4. If you choose
5. Move to the
Alarm set
Wake-up call, Alarm 1
•
Once
•
Daily
time.
•
Mon-Fri
Friday.
•
Select
the days you do not want by tapping or pressing
<
Uncheck
.
, or
Alarm 2
: the alarm rings just once.
: the alarm rings every day at the same
: the alarm rings from Monday to
: the alarm rings on the specified days.
Select
, press [Down] and deselect
>.
Time
field.
Set
.
field.
Page 94
6. Enter the alarm time and press [Down].
7. If you select
Wake-up call
in step 1, select the
alarm interval you want and press [Down].
8. Tap or press <
Edit
> to specify an alarm ringer.
9. Scroll to a ringtone category.
10. Select a ringtone.
11. Press [Down] and tap or press <
Uncheck
> if you
do not want the alarm to sound in Silent mode.
12. Tap or press <
Save
> to save the alarm set.
Stopping an alarm
• To stop an alarm when it rings, press any key.
• To use the snooze function, tap or press
<
Snooze
intervals. Tap or press <
>. The alarm repeats at specified
End
> and then <
Yes
> to
stop an alarm.
Setting the alarm to sound when the phone is
off
From the Alarm screen, select
Power off alarm →On.
If the phone is off when it is time for the alarm to
sound, the phone switches on and sounds the alarm.
• If the battery power is too low, an autopower
alarm may not work.
• If the battery is removed after setting the alarm
even when power off, the alarm will nor ring.
Deactivating an alarm
1. From the Alarm screen, select
Alarm set
.
2. Select the alarm you want to deactivate.
3. Select
User memory
Off
from the
Set
(Menu 8.5)
field.
Use this menu to connect the phone to a PC, as you
would use an external memory disk drive, and access
the file folder of your phone’s memory.
Connect PC
(Menu 8.5.1)
Use this menu to connect your phone to a computer.
1. Connect a USB cable to the jack on the right side
of the phone and the USB port of a computer.
2. Access the
3. Enter the password and tap or press <
Connect PC
menu.
Done
>.
Your phone switches to Memory Disk mode.
Menu functions
Utilities
(Menu 8)
91
Page 95
Menu functions
4. Open
5. Copy files from the phone to the computer or vice
6. When you have finished, close the disk.
7. Tap or press <
8. Tap or press <
File manager
Use this menu to manage files stored on the phone’s
memory. You can access the folders of your phone’s
memory and manage media files.
You can also use each file option when you tap or
press <
92
My computer
on your Windows desktop and
double-click the corresponding removable disk to
open the phone’s file folder.
versa.
Disconnect
> to exit Memory Disk
mode.
Yes
> to confirm the exiting.
• When the phone is in Memory Disk mode, all
calls and messages are blocked.
• Use the Safely Remove Hardware programme
from the Windows task bar for removing the
USB cable from the computer; otherwise, the
files may be corrupted and, thus, may not be
played properly.
(Menu 8.5.2)
Options
> with a file highlighted in a folder:
•
Erase
: erase the file.
•
Move
: move the file to another folder.
•
Copy
: copy the file to another folder.
•
Rename
•
Create folder
•
Sort
•
List view
•
File info
•
Set to ringer
: change the file name.
Do not use special characters for a file or folder
name, such as /, :, *, ?,
”
, <, >, or \.
: create a new folder.
: change the sort order of files in a folder.
: change the view mode to List view.
: access the file properties.
: set the MP3 file as a ringtone for
incoming calls, alarm sets, or scheduler alarms.
•
Assign
: set the image as your wallpaper for the
idle screen, or the opening or closing image.
•
Lock/Unlock
: lock the file so that other people
cannot access it without your password, or unlock
the file.
Memory info
(Menu 8.5.3)
Use this menu to view the memory status of each
folder in the phone.
Page 96
Format
Use this menu to format files saved in the
manager
File viewer
(Menu 8.5.4)
File
folder.
(Menu 8.5.5)
Use this menu to view various document files and
images files stored in the
Others
folder in the phone’s
memory.
•
Removable disk
: view the various files imported
from your PC.
•
Downloaded
: view the various files downloaded
from the wireless web.
Viewing a file
The following file formats are available:
• Documents: Microsoft Word, Microsoft Excel,
Microsoft PowerPoint, Adobe PDF, Plain text, HTML
• Images: BMP, GIF, JPEG, PNG, WMF, EMF
1. Select a location from which you want to read files.
2. Select the file you want.
Depending on the file size, you may not be able
to view some files.
1. Use the following keys to view the document. You
can also tap the icons corresponding to each
function.
Key Function
Left/Right/
Pans around the page.
Up/Down
/ Zooms in or out.
1
Returns to the previous page. Moves
to the first page when held down.
2
3
Rotates the page.
Moves to the next page. Moves to the
last page when held down.
4
Changes the view mode to the screen
width.
5
Changes the view mode to the screen
height.
6
7
Displays a map of the current page.
Hides a map of the current page.
Menu functions
Utilities
(Menu 8)
93
Page 97
Menu functions
Key Function
8
You can view the function of the keys you can use by
tapping and pressing <
Using file options
From the file list, tap or press <
the following options:
•
Erase
•
Rename
•
File info
•
Help
Voice tools
Use this menu to configure the voice dial settings and
record voice memos. You can also use the voice
answer feature.
94
Hides or displays the shortcut tool
bar.
Help
>.
Options
> to access
: erase the selected file.
: change the file name.
Do not use special characters for a file or folder
name, such as /, :, *, ?, ”, <, >, or
\
.
: access the file properties.
: view key information you can use.
(Menu 8.6)
Voice command
(Menu 8.6.1)
Your phone provides a set of powerful voice-enabled
features that enhance its hands-free capabilities.
Starting voice recognition
1. Access the
Voice command
menu, or press [C] in
Idle mode to activate voice recognition.
2. Say a command.
•
Name dial
: dial a number by saying a name in
Contacts. You can also directly access this
function by pressing and holding [C] in Idle
mode.p. 34
•
Number search
: search for a number in
Contacts by saying all the digits of the number
you want to find.
•
4-digit number search
: search for a number
in Contacts by saying the last four digits of the
phone number you want.p. 34
•
Memo list
Voice memo
•
Inbox
: access voice memos stored in the
menu.p. 56
: view received messages in the
Inbox
menu.p. 70
Page 98

•
Today
: check items stored for the current
date.p. 87
•
Calendar
: access the
Calendar
menu by
pressing [Left] or [Right].p. 87
3. Follow the corresponding menu procedure or say
the command you want again.
Assigning voice command menus
You can assign the primary menus, such as Camera
and Bluetooth, as voice commands to access one of
them directly, by saying the corresponding command.
1. From the
<
2. Select
3. Tap or press <
Set
>.
Edit functions
Voice command
.
Check
> to select the menu
menu, tap or press
functions you want.
4. Tap or press <
Save
> to save your settings.
Configuring voice recognition settings
You can customise various settings for using the voice
recognition feature.
From the
and select
Voice command
Configure
. The following options are
menu, tap or press <
available:
•
Set active
: set how you want to initiate voice
recognition.
Auto
: the phone automatically starts voice
recognition when you open the phone.
Manual
: you need to press [C] in Idle mode to
start voice recognition.
•
Result display
: set how many entries the phone
displays as a result of the recognition after
searching for the best match for your voice
command.
•
Earmic setup
: set the phone to activate Voice
dialling mode when you press the button on the
headset.
When using the headset, the voice recognition
feature may not work properly in noisy
environments.
•
Message vol
: adjust the volume of voice prompts
guiding you through the procedure for voice
dialling.
Set
>
Menu functions
Utilities
(Menu 8)
95
Page 99

Menu functions
Voice memo
You can record and review voice memos.
Re
cording a voice memo
1. From the Voice memo screen, select
2. Record a memo by speaking into the microphone.
While you are recording, a timer displays to show
you the elapsed time.
Tap or press <
<
Continue
3. Tap or press <
provides you with the following choices:
•
•
•
4. When you are satisfied, select
5. Enter a title for the memo and tap or press
<
Save
96
(Menu 8.6.2)
Pause
> to pause recording, or
> to resume.
Stop
> to end recording. The screen
Save
: save the voice memo.
Re-record
: discard the current memo and
record another one.
Review
: play the voice memo. The screen
displays the length of the memo.
Save
>.
Record
.
Playing a voice memo
1. From the Voice memo screen, select
2. Scroll to a memo and tap or press <
.
From the memo list, tap or press <
access the following options:
•
Send
: send the voice memo as part of an e-mail.
•
File info
•
Rename
•
Erase
Voice answer
: access the file properties.
: change the name of the voice memo.
Do not use special characters for a file or folder
name, such as /, :, *, ?,
”
, <, >, or \.
: erase the selected memos.
(Menu 8.6.3)
Memo List
Play
Options
.
>.
> to
Use this menu to enable your phone to server as an
answering machine. When you are unable to answer
incoming calls, your phone will answer for you and
record the caller’s message.
Activating the answering machine feature
From the Voice answer screen, select
Activate → On
.
Settings →
Page 100

Setting a greeting message
You can record your own greeting messages and select
the greeting to be used.
To record a greeting message:
1. From the Voice answer screen, select
greetings
.
Record
2. Select a recording saving location. The phone
starts recording.
3. Record your greeting message.
4. When you have finished, tap or press <
5. Select
Save
.
Stop>.
6. Enter a name for the greeting and tap or press
<
Save
>.
To select a greeting message:
1. From the Voice answer screen, select
Greet
.
Settings
→
2. Select the greeting message you want.
3. Tap or press <
Save
>.
Checking messages
You can check received messages and delete
messages.
1. From the Voice answer screen, select
Inbox
.
2. Select the number or name you want. The selected
message plays.
From the message list, tap or press <
Options
> to
access the following options:
•
Send
: send the message as part of an e-mail.
•
Erase
: erase the message.
•
File info
: access the message properties.
Customising the answering machine feature
You can change the settings for using the answering
machine feature.
From the Voice answer screen, select
Settings
. The
following options are available:
•
Activate
: turn on or off the answering machine
feature.
•
Time
: set the length of time the phone waits
before answering a call.
Menu functions
Utilities
(Menu 8)
97
 Loading...