

Samsung SCH 620 User Manual

Printed in Korea
Code No. : Test Version
Venezuela. 9/99. Rev.1.0
PORTABLE CELLULAR
TELEPHONE
SCH-620
User’s Manual
ELECTRONICS
World Wide Web
http://www.samsungmobile.com

1
Contents
GETTING STARTED
Unpacking ......................................................................... 7
Phone Layout .................................................................... 8
Display ............................................................................ 10
Installing Battery ..............................................................11
Charging a Battery ........................................................... 13
Switching the Phone On/Off ............................................. 15
GENERAL FUNCTIONS
Making a Call ................................................................... 16
Correcting the Number ................................................. 16
Ending a Call ................................................................ 16
Emergency Dialing ....................................................... 17
Prepend Dialing ........................................................... 17
Making a Call from the Phone Book ............................. 18
Voice Dialing ................................................................ 19
Last Number Redial .......................................................... 20
Answering a Call ............................................................... 21
Viewing Missed Calls ......................................................... 22
In-Call Options .................................................................. 23
Call Waiting ................................................................. 23
Three-Way Calling......................................................... 23
Call Forwarding............................................................. 24
Adjusting the Volume.........................................................24
Quick Switching to Manner Mode ...................................... 25
Recording Voice Memo ...................................................... 25
Table of Contents

2
Contents
3
Contents
USINGTHEMENUS
Using the Scroll Keys .................................................................. 26
Using the Index System .............................................................. 27
Menu Map ................................................................................. 28
CALLS
Outgoing (MENU 1-1) ...................................................... 30
Incoming (MENU 1-2) ...................................................... 31
Erase Logs (MENU 1-3) .................................................... 32
Air Time (MENU 1-4) ........................................................ 32
PHONE BOOK
Find Name (MENU 2-1) .................................................... 33
My Phone Number (MENU 2-2) ........................................ 34
Add Entry (MENU 2-3) ..................................................... 34
Storing Phone Numbers at Call End ......................................... 34
Entering a Name ..................................................................... 35
Find Entry (MENU 2-4) ..................................................... 35
SOUNDS
Ring (MENU 3-1) ............................................................. 36
Ring Volume ........................................................................... 36
Ring Type ...............................................................................36
Ring Tone ...............................................................................37
Key Beep (MENU 3-2) ...................................................... 37
Alert (MENU 3-3) ............................................................. 37
Minute Beep .......................................................................... 37
Service Area .......................................................................... 37
Alarm (MENU 3-4) ........................................................... 37
Differential Ring (MENU 3-5) ........................................... 38
Power On/Off (MENU 3-6) ............................................... 38
DISPLAY
Backlight (MENU 4-1) ...................................................... 39
Greeting (MENU 4-2) ....................................................... 39
Version (MENU 4-3) ......................................................... 39
Language (MENU 4-4) ...................................................... 39
Calculator (MENU 4-5) ..................................................... 40
World Time (MENU 4-6) ................................................... 40
VOICE DIAL
Record (MENU 5-1) .......................................................... 41
Review/Erase (MENU 5-2) ................................................ 42
Erase All (MENU 5-3) ....................................................... 43
Set Active (MENU 5-4) ...................................................... 43
VOICE MEMO
Review (MENU 6-1) .......................................................... 44
Record (MENU 6-2) .......................................................... 45
Erase All (MENU 6-3) ....................................................... 45
SETUP
Auto Retry (MENU 7-1) .................................................... 46
Auto Receive (MENU7-2) .................................................. 46
Auto Hyphen (MENU 7-3) ................................................. 46
Answering (MENU 7-4) ..................................................... 46
Tone Length (MENU 7-5) .................................................. 47
Tone (MENU 7-6) ............................................................. 47
Set Time (MENU 7-7) ....................................................... 47
Analog Call (MENU 7--8)................................................... 48
4
Contents
5
Safety Precautions
Safety Precautions and Important Notices
Read these simple guidelines. Failure to comply with these
guidelines may be dangerous or illegal.
For more detailed safety information, see Safety Information
on page 60.
ROAD SAFETY COMES FIRST
Do not use a hand-held phone while driving; park the vehicle
first.
SWITCH OFF IN AIRCRAFT
Mobile phones can cause interference. Using them on aircraft
is illegal.
SWITCH OFF NEAR BLASTING
Do not use the phone where a blasting operation is in
progress. Observe restrictions, and follow any regulations or
rules in force.
SWITCH OFF WHEN REFUELLING
Do not use the phone at a refuelling point or near fuels or
chemicals.
INTERFERENCE
All mobile phone may be subject to radio interference, which
may affect their performance.
SECURITY
Lock (MENU 0-1) ............................................................. 49
Restrict (MENU 0-2) ......................................................... 50
Lock Code (MENU 0-3) ..................................................... 50
Emergency Number (MENU 0-4) ....................................... 50
Send PIN (MENU 0-5) ...................................................... 51
Clear Memory (MENU 0-6) ............................................... 51
NAM Mode (MENU 0-7) .................................................... 52
Block Own Number (MENU 0-8) ....................................... 52
System Selection (MENU 0-9) ........................................... 53
Reset Phone (MENU 0-0) .................................................. 53
MESSAGES
Reading Message ( 1) ...................................................... 54
Transmitting Message ( 2) ................................................. 56
ACCESSORIES ................................................................... 57
USINGTHEBATTERIES ......................................................58
SAFETY INFORMATION ....................................................... 60
GLOSSARY OF TERMS ........................................................ 64
QUICK REFERENCE CARD.................................................... 67

6
Safety Precautions
7
Getting Started
Unpacking
Your package contains the following items.
Desktop Charger
In addition, you can obtain the
accessories for your phone
from your local SAMSUNG
dealer. For information on the
accessories, see page 57.
Handset
Battery
User’s Manual
Hand Strap
Getting Started
QUALIFIED SERVICE
Only qualified service personnel must install or repair cellular
equipment. Use only approved accessories and batteries.
USE SENSIBLY
Use only in the normal position (to ear).
Avoid unnecessary contact with the antenna when the phone
is switched on.
IMPORTANT!Use only accessories approved by the phone
manufacturer. This apparatus is intended for use when
supplied with power from SAMSUNG approved Travel adapter
and Desktop charger. The use of any other types will invalidate any approval or warranty applying to the phone, and may
be dangerous.
When you disconnect the power cord of any accessory, grasp
and pull the plug, not the cord.
8
Getting Started
9
Getting Started
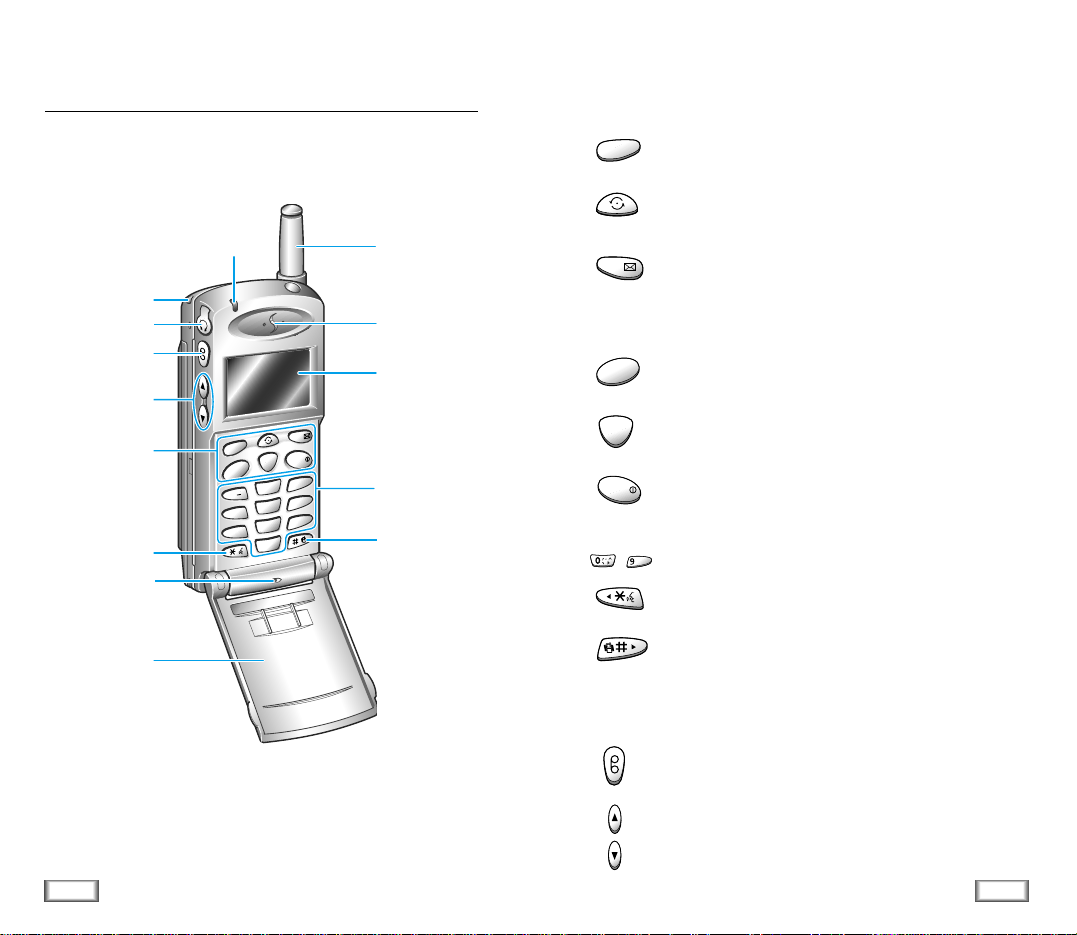
Key Functions
Enters the menu facility. Also, scrolls through the menu
options.
In the menu facility, scrolls through the menu options.
In the idle mode, displays Phone Book names.
In the idle mode, enters message menu.
In the menu facility,selects a menu function or stores
information that you have entered (such as a name in
the phone memory).
Makes or answers call.
In the idle mode, enters Outgoing call log.
Deletes characters from the display. In the menu
facility, returns to the previous menu level.
Ends a call. Also switches the phone on and off when
pressed and held. In the menu facility, returns to the
idle mode and cancels your input.
Enters numbers, letters and some special characters.
In the idle mode , enters Voice Dial mode when pressed
and held. In name input mode, moves cursor to left.
In the idle mode, quickly changes to Vibration mode
when pressed and held. In name input mode, moves
cursor to right.
(On the side of the phone)
Enters Voice Memo menu. Holding down the key starts
recording voice memo.
Adjusts voice volume during conversation and key beep
volume in the idle mode. In the menu facility,scrolls
through the menu options.
2
M
E
N
UO
K
/
ABC
1
S
E
N
D
C
L
R
. ´
3
DEF
5
JKL
4
GHI
6
MNO
8
TUV
0
OPER
7
PQRS
9
WXYZ
E
N
D
/
Antenna
Lamp
Earphone jack
Strap hole
Memo key
Volume keys
Earpiece
Display
Alphanumeric
keys
Vibration mode
key
See the opposite
page
Voice Dial key
Microphone
Flip Cover
MENU
OK/
SEND
CLR
END/
WXYZ
~
Phone Layout
The following illustrations shows the main elements of your
phone.

10
Getting Started
11
Getting Started
Display
The display comprises two areas: an upper line of static icons,
and the lower text and graphic area. The following icons display at power-on:
Icons
Shows the received signal strength. The greater the
number of bars, the better the signal strength.
Indicates that the phone is outside a service area
and cannot send or receive calls.
Appears when you are out of your home area and
have registered with a different network (when
travelling in other countries, for example).
Appears when a new message has been received.
Indicates a Digital mode.
Indicates a Vibrate mode.
Shows the level of your battery. The more bars you
see, the more power you have left.
Icons
Text and
graphic area
Installing Battery
To Install the Battery
1. Hold the battery so that the metal contacts on the bottom
of the battery line up with the metal contacts on the back
of the phone.
2. Place the battery on the back of the phone with the top pf
the battery about a quarter of an inch from the latch.
3. Gently slide the battery toward the top of the phone until
snaps into place.
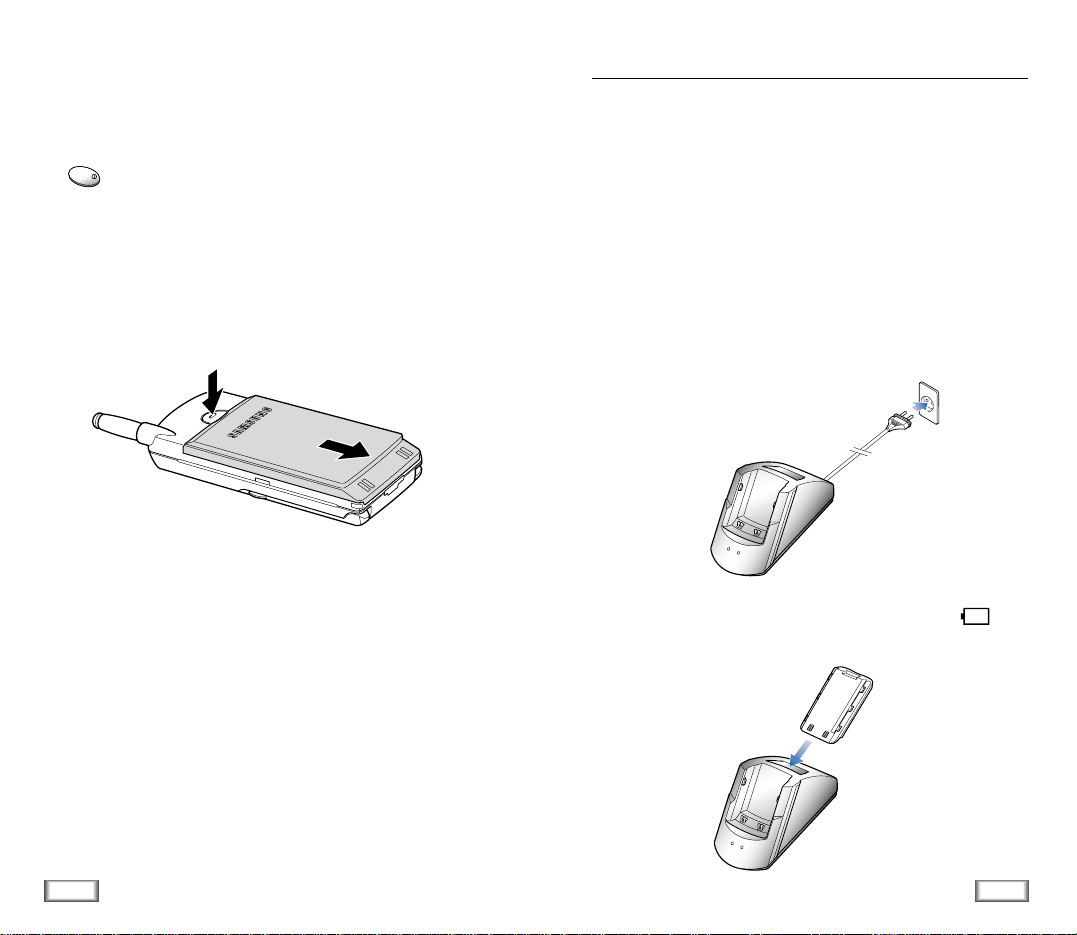
13
Getting Started
12
Getting Started
To Remove the Battery
If you want to remove the battery, do as follows:
1. If necessary, switch off the phone by holding down the
key until power-off message is displayed.
2. Push and hold down the catch above the battery on the
back of the phone, and slide the battery down the phone.
Then lift the battery away.
END/
Your phone is powered by a rechargeable Li-ion battery.
A desk top charger is provided with your phone. Use only
approved batteries and chargers. Ask you local SAMSUNG
dealer for further details.
The phone can be used while the battery is charging.
Note: You must fully charge the battery before using your phone
for the first time. A discharged battery is fully recharged in
approximately 180 minutes.
1. Plug the power cord of the charger into a standard wall
outlet.
2. Remove the battery from the phone and place it in the rear
compartment of the charger. The red lamp marked on
the front of the charger lights up.
Charging a Battery

14
Getting Started
15
Getting Started
3. If you do not wish to use your phone while charging the
battery, you can leave the battery attached to the phone.
Place the phone with the battery attached in the front compartment of charger with the keypad facing forward. The
red lamp marked on the front of the charger lights up.
Low Battery Indicator
When the battery is weak and only a few minutes of talk time
remain, a clear battery icon (no bars displayed) flashes in the
upper right corner of the screen. You will hear a warning tone.
When the battery becomes too weak for the phone to operate,
it switches off automatically.
Switching the Phone On/Off
1. Open the flip cover.
2. Hold down key for more than one second to switch
the phone on.
The red light flashes, an alert sounds:
• When the system locates services, the greeting message
displays along with the date and time. You can now
place and receive calls.
• If the system cannot locate service, the greeting
message displays without the date and time. In this
case, you cannot place and receive calls. Power off the
phone, then try again later when service is available.
• If your phone is locked, ‘-Locked-’ displays. Press
key, and enter the four-digit lock code to unlock
the phone.
3. When you wish to switch the phone off, hold down the
key for more than two seconds.
[WED]
SAMSUNG
10/11 1:45P
END/
MENU
END/

16
General Functions
17
General Functions
Making a Call
When the idle screen is displayed, key in the area code and
phone number and press key.
Note: If you have set Auto Retry option (7-1) to On (see page
46), and the call does not connect, the phone automatically
retries to make the call.
Correcting the Number
To clear... Then
The last digit displayed Press the key.
The whole display Hold down the key for
more than one second.
Ending a Call
When you have finished your call, briefly press the key
or close the flip.
Emergency Dialing
You can place calls to 190 or one of the three emergency
numbers that are in your emergency number list even if your
phone is locked. For further information on
emergency number list, refer to page 50.
Prepend Dialing
The Prepend option enables you to add up to three digits,
such as area codes and network feature activation codes, to a
phone number of up to 10 digits. You can prepend an existing
entry in the Phone Book or Call Logs before dialing.
To prepend existing phone numbers in the Phone Book or Call
Logs:
1. Access the phone number entry.
2. When the desired phone number displays, press key
to access Options.
3. Press key to select Prepend option.
4. Enter the area code or feature code.
5. Press key to dial the number.
General Functions
SEND
END/
CLR
CLR
MENU
DEF
SEND

18
General Functions
19
General Functions
Making a Call from the Phone Book
You can store the phone numbers called regularly in memory,
called the Phone Book. You then simply recall the number to
dial.
For further information on Phone Book, refer to page 33.
FINDING ENTRIES BY NAME, THEN DIAL
1. Press key in the idle mode.
The screen shows the names stored in the Phone Book in
the alphabetical order.
2. Use key to find the desired name. You can also enter
the first letter of the name by pressing the associated
alphanumeric key.
3. Press key to dial the stored number with the name.
ONE-TOUCH DIALING BY MEMORY LOCATION
Memory locations 01 through 09 are special one-touch
locations. You can dial the phone numbers stored in the Phone
Book memory from 01 through 09 simply by pressing one
button.
1. Press and hold the second digit of the memory location
containing the number to be dialed.
For example: Location no. 09
Press and hold.
The number (and name) stored is displayed, then dialed.
Voice Dialing
1. To place the call, press and hold key, or open the
flip, depending on the Set Active (5-4) option
(see page 43).
2. At the voice prompt, say the name into the phone.
• If the phone recognizes the name, the phone attempts a
connection.
• If the phone does not recognize the name, the screen
prompts for the name again.
• If the phone is unable to recognize the name after two
attempts, the message Cannot Recognize Name.
Please check name displays. Try the call again later, or
check the recorded name.
TWO-TOUCH DIALING BY MEMORY LOCATION
Once you have stored phone numbers in the phone book
memory, you can dial them easily whenever you want.
1. Press the first digit briefly, then hold down the second digit
of the memory cell.
For example: Location no. 23
Press briefly and hold down .
The number (and name) stored is displayed, then dialed.
SEND
WXYZ
ABC
DEF

21
General Functions
20
General Functions
Last Number Redial
The phone stores the last 10 numbers dialled. To recall any of
these numbers, proceed as follows.
1. If there are any characters on the display, clear the display
by holding down the key for more than one second.
2. Press key. The list of outgoing calls are displayed.
3. Use the key (or or key on the left side of the
phone) to scroll through the numbers until you select the
required number.
4. Press key to dial the number displayed.
Answering a Call
When somebody calls you, the phone rings and CALL in the
middle of the screen is displayed.
If the caller can be identified, the caller’s phone number (or
name if stored in your Phone Book) is displayed. If the caller
cannot be identified, only the CALL message appears.
1. To answer a call, open the flip cover. If the flip is already
open, press any key except for key.
If the menu option is set to AnyKey Ans., you can answer
a call only by pressing any key except for key.
2. End the call by closing the flip cover or pressing key.
Note: You can answer a call while using the phone book or
menu features. Your setting will be cancelled.
CALL
CLR
SEND
SEND
END/
END/
END/
 Loading...