

Page 1
[ ENGLISH ]
[ ESPAI_OL ]
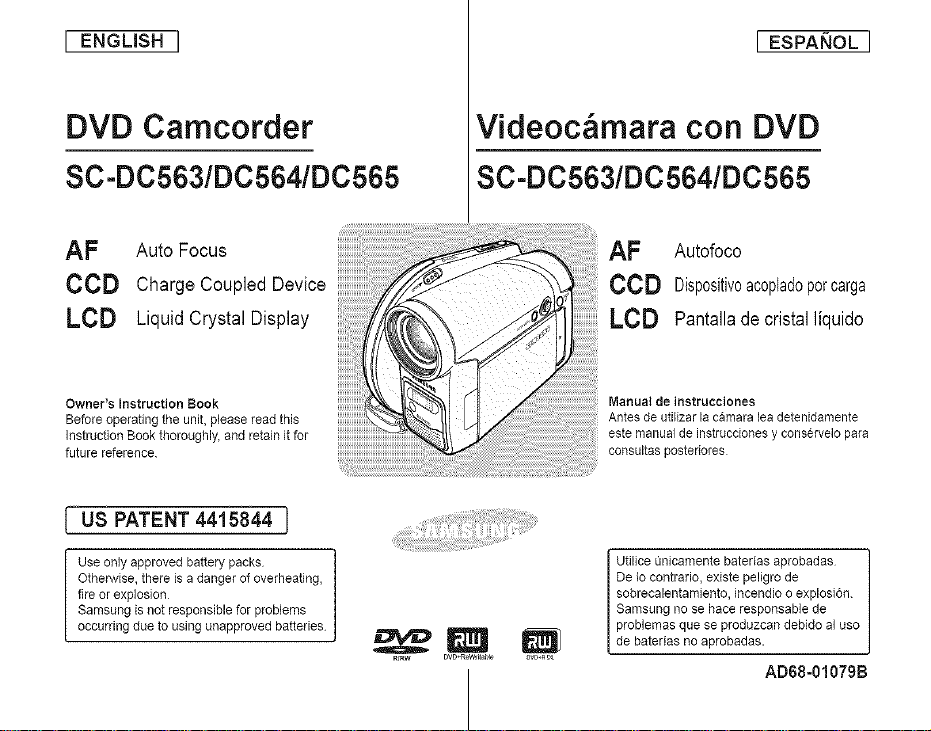
DVD Camcorder
SC-DC563/DC564/DC565
AF Auto Focus
CCD Charge Coupled Device
LCD Liquid Crystal Display
Owner's Instruction Book
Before operating the unit, please read this
instruction Book thoroughly, and retain it for
future reference.
[ US PATENT 4415844 J
Use only approved battery packs
Otherwise, there is a danger of overheating,
fire or explosion
Samsung is not responsible for problems
occurring due to using unapproved batteries.
Videoc mara con DVD
SC-DC563/DC564/DC565
r_w Dvg÷R_W_it_b_e OVD÷rDL
AF Autofoco
CCD Dispositivoacopladoporcarga
LCD Pantallade cristalliquido
Manual de instrucciones
Antes de utilizar la camara leadetenidamente
este manual de instrucdones y conservelo para
consultas posteriores
Utilice Qnicamente baterias aprobadas
De Iocontrario, existe peligro de
sobrecalentamiento, incendio o explosi6n.
Samsung no se hace responsable de
problemas que se produzcan debido al uso
de baterias no aprobadas.
AD68-01079B
Page 2
[ ENGLISH ]
[ ESPANOL ]
Contents
o - _ + - _ • + +
- o + _ + _ + [I | + • +-
Features .............................................................................. 11
Usable Discs ...................................................................... 12
DiscType Description ......................................................... 13
Howto use the DVD Camcorder easily .............................. 14
Accessories Supplied with the DVD Camcorder ................ 15
Front & Left View ................................................................ 16
LeftSide View..................................................................... 17
Right & TopView ................................................................ 18
Rear & Bottom View ........................................................... 19
Remote Control (SC-DC564/DC565 only) .......................... 20
D -o+ + Q
Usingthe Hand Strap & Lens Cover .................................. 21
Lithium Battery Installation ................................................. 22
Usingthe Lithium Ion Battery Pack .................................... 23
Connecting a Power Source ............................................... 27
About the Operating Modes ............................................... 28
Usingthe Joystick .............................................................. 28
Usingthe QUICK MENU .................................................... 29
OSD (On Screen Display) inCamera Mode/Player Mode ..30
OSD (On Screen Display)in MCam Mode/M Player Mode.. 31
Turning the OSD (On Screen Display) On/Off .................... 31
Contents
00 + . . _Q . + + • II I
Caracteristicas .................................................................... 11
Discos utitizables................................................................ 12
Descripci6n det tipode disco .............................................. 13
C6mo utitizar laVideocamara con DVD ............................. 14
Accesorios incluidos con la Videocamara con DVD ........... 15
Vistas frontal y laterat izquierda.......................................... 16
Vista lateral izquierda ......................................................... 17
Vistas superior y lateral derecha ........................................ 18
Vistas posterior e inferior .................................................... 19
Mando a distancia (s61oSC-DC564/DC565) ...................... 20
+++ + +
Utilizaci6n de la empuSadura y la tapa del objetivo ...........21
lnstaiaci6n de la pita de Iitio ............................................... 22
Utiiizaci6n de la bateria de Jonesde litio ............................ 23
Conexi6n a una fuente de atimentaci6n ............................. 27
lnformaci6n sobre los modos de funcionamiento ............... 28
Utilizaci6n del Joystick ....................................................... 28
Uso de QUICK MENU ........................................................ 29
OSD(Presentaci6nenpantalla)enCameraMode/PlayerMode.. 30
OSD(Presentaci6nenpantalla)enM.OamMode/M.PlayerMode..31
Encendido / apagado de OSD (presentaci6n en pantalta). 31
A
Page 3
[ ENGLISH ]
[ ESPANOL ]
Contents
Setting the Clock (Clock Set) ............................................. 32
Setting the Wire{essRemote ControlAcceptance
(Remote) (SC-DC564/DC565 on{y).................................... 33
Setting the Beep Sound (Beep Sound) .............................. 34
Setting the Shutter Sound (Shutter Sound) ........................ 35
Selecting the OSD Language (Language) ......................... 36
Viewing the Demonstration (Demonstration)...................... 37
• - a I o . - - o
Adjusting the LCD Screen (LCD Bright/LCD Color) ........... 38
Displaying the Date/Time (Date/Time)................................ 39
Usingthe Viewfinder ........................................................... 40
Various Recording Techniques ........................................... 41
Inserting and Removing a Disc .......................................... 42
Selecting the Record Mode (Rec Mode) ............................ 44
It II . • e- ._. °- • _ * ................... ,..t
Makingyour First Recording .............................................. 45
Recording with Ease for Beginners (EASY.QMode)..........46
Using External Microphone ................................................ 47
Zooming Inand Out ............................................................ 47
Usingthe Fade Inand Out (FADE) .................................... 48
Using Back LightCompensation Mode (BLC) .................... 49
Usingthe Color Nite ........................................................... 50
Contents
i : - . i - o- - -
Ajuste de{ reloj (Clock Set) ................................................. 32
Ajuste de aceptaci6n de control remoto inalambrico
(Remote) (s61oSC-DC564/DC565) .................................... 33
Ajuste de{ sonido Beep (Beep Sound) ............................... 34
Ajuste de{ sonido del obturador (Shutter Sound) ............... 35
Selecci6n de{idioma de OSD (Language) ......................... 36
Visualizaci6n de la demostraci6n (Demonstration) ............ 37
Ajuste de la pantalla LCD (LCD Bright/LCD Color) ............ 38
Visualizaci6n de la fecha y hera (Date/Time) ..................... 39
Use del Visor ...................................................................... 40
Tecnicas diversas de grabaci6n ......................................... 41
lnserci6n y extracci6n de discos ........................................ 42
Selecci6n detmodo de grabaci6n (Rec Mode) .................. 44
o-o . . . • I I _o. o_ _. .
Primera grabaci6n .............................................................. 45
Grabaci6nconborrado para principiantes(Mode EASYQ)_. 46
Utilizaci6n del micr6fono externo ....................................... 47
Acercamiento y alejamiento de las imagenes .................... 47
Utilizaci6n de aparici6n y desaparici6n gradual (FADE) ....48
Utilizacbndelmododecompensaci6ndelaluzdefondo(BLC)...49
Utilizaci6n de Color Nite ..................................................... 50
A
Page 4
[ ENGLISH ]
[ ESPANOL ]
Contents
| D . o _ _o . -_ D o o e
Cutting Off Wind Noise (WindCut) ..................................... 51
Setting the Shutter Speed & Exposure
(Shutter/Exposure) ............................................................. 52
Auto Focus / Manuat Focus................................................ 53
Programmed Automatic Exposure Modes (Program AE) ... 54
Setting the WhiteBatance (White Balance) ....................... 56
Applying Digital Effects (Digital Effect) ............................... 56
Setting the 16:9Wide mode (16:9 Wide) ........................... 60
Setting the Digital Image Stabilizer (DIS) ........................... 61
Zooming Inand Out with Digital Zoom (Digital Zoom) .......62
| D . • o- o . o- . 0" . _
What is the thumbnail index? ............................................. 63
What's a Playlist? ............................................................... 63
| | . • o- . .................................. _,
Playing title scenes ............................................................. 64
Adjusting the Volume.......................................................... 64
Various Functionswhile in Player Mode ............................. 65
Zooming during Playback (PB ZOOM) ............................... 67
Deleting a title scene (Delete) ............................................ 68
Deleting a Section of a Title Scenes (Partial Delete) .........69
| | . o 0- " . - 0
Creating a New Playiist (New Playlist) ............................... 70
Playing the Playlist ............................................................. 71
Deleting a Playlist (Delete) ................................................. 72
_ Scenesto Playlist (Edit Playlist-Add) ..................... 73
Indice
Corte de ruido de{ viento (Wind Cut) .................................. 51
Ajuste de la exposici6n y la velocidad del obturador
(Shutter/Exposure) ............................................................. 52
Enfoque autom. / Enfoque manual ..................................... 53
Modode exploraci6nautomatica programada(ProgramAE).. 54
Ajuste de balance de btanco (White Balance) .................... 56
Aplicaci6n de efectos digitales (Digital Effect).................... 58
Ajuste del mode 16:9 Wide (16:9 Wide) ............................. 60
Ajuste det Estabitizadordigital de la imagen (DIS)............. 61
AcercamientoyalejamientodelzoomconZoomDigital(DigitalZoom).. 62
o-= , , , _ | | o - o- , . _ _- -g _ Ij •
,Que es el indice de miniaturas?....................................... 63
Descripci6n de lista de reproducci6n ................................. 63
e-o -- . • I I ........................... o,
Reproducci6n de escenas del tituto ................................... 64
Ajuste del volumen ............................................................. 64
Diversas funciones en mode Player................................... 65
Aplicaci6n del zoom durante la reproducci6n (PB ZOOM). 67
Eliminaci6n de un titulo (Delete) ........................................ 68
Eliminaci6n de la secci6n de un titulo (Partial Delete) ...... 69
_ . _ IP . o- -o 00 o S
Creaci6nde una nueva lista dereproducci6n (New Playlist). 70
Reproducci6n de la {ista de reproducci6n .......................... 71
Eliminaci6n de una lista de reproducci6n (Delete) ............. 72
Adici6ndeescenasala listadereproducci6n(EditPlaylist-Add)..73
Page 5
[ ENGLISH ]
[ ESPAI_OL ]
Contents
Changing the Order of Scene Playingwithin a Playlist
(Edit PIaytist-Move) ............................................................ 75
Deleting Scenes from Playlist (Edit Playiist-Delete) ........... 77
Deletinga Sectionof a Playlist(EditPlaylist- PartialDelete)..78
D | _ Q e_ --e- -*J
Disc Information (Disc Info) ................................................ 80
Editing the Disc Name (Disc Info-Rename) ........................ 81
Formatting a Disc (Disc Format)......................................... 82
Finalizing a Disc (Disc Finalize) ......................................... 83
Playing Back on a PC with DVD drive................................ 84
Playing back a finalized discon a DVD Player/Recorder... 84
Unfinalizing a Disc (Disc Unfinatize) .................................. 85
II | . Q o- _ • ..................... _,
Setting theAV In/Out (SC-DC565 only) .............................. 86
Viewing Recordings on TV ................................................. 87
Copying a Disc onto a Tape................................................ 89
Recording(Copying)aTV Programor VideoTapeontoa Disc
(SC-DC565only).................................................................. 90
Do -- - . co-
UsingaMemoryCard (UsableMemoryCard)(not supplied)..91
Memory Card Functions ............................................... 91
Inserting a Memory Card .............................................. 91
Ejecting a Memory Card ............................................... 91
Indice
Cambio del orden de reproducci0n de escenas dentro de
una listade reproducci6n (Edit Playlist-Move) ................... 75
Biminaci6ndeescenasdelalistadereproducci6n(EditPhylist-Delete).. 77
Eliminaci0nde la secci6ndeuna listade reproducci6n
(Edit Playlist-PartialDelete)....................................................78
lnformaci0n de disco (Disc Info)......................................... 80
Edici6n del hombre del disco (Disc Info-Rename) ............. 81
Formate de un disco (Disc Format).................................... 82
Finalizaci6n de un disco (Disc Finalize) ............................. 83
Reproducci6n en un PC con unidad de DVD ..................... 84
Reproducci6n de un discofinalizado en un Reproductor/
Grabadora de DVD............................................................. 84
Anulaci6n de finalizaci6n de un disco (Disc Unfinaiize) _.. 85
Ajuste de AVIn/Out (s6lo SC-DC165) ................................ 86
Visualizaci6n de grabaciones en el TV ............................... 87
Copia de un disco en una cinta .......................................... 89
Grabaci6n(Copia)de un programadeTVo cinta devideoen
undisco (s61o$0-DC565) .................................................... 90
Utilizaci6n de la tarjeta de rnemoria
(Tarjetade memoria utilizable) (no suministrada) .............. 91
Funciones de la tarjeta de memoria ............................. 91
lnserci6n de una tarjeta de memoria ............................ 91
Expulsi6n de una tarjeta de memoria ........................... 91
Page 6
[ ENGLBH ]
[ ESPAI_OL ]
Contents
Structure of Folders and Files on the Memory Card ..........92
Selecting the Photo Quality (Photo Quality) ....................... 93
Selecting the Photo Size (Photo Size) ............................... 94
Setting the File Number (File No.) ...................................... 95
Usingthe Built-In Flash (SC-DC564/DC565 only) ..............96
Taking a Photo Image (JPEG) on a Memory Card ............. 97
Viewing Photo Images (JPEG) ........................................... 98
Protection from accidental Erasure (Protect) ................... 100
Deleting Photo images and Moving images (Delete) ....... 101
Formatting the Memory Card (Format) ............................. 103
Recording Movingimages (MPEG) ona Memory Card 104
PlayingMoving Images(MPEG)on a Memory Card.......... 105
Recording Still images onto a Memory Card during DVD
playback ........................................................................... 106
Marking images for Printing (Print Mark) .......................... 107
Printing Your Pictures-Using the PictBridge TM .................. 109
Connecting To a Printer (USB Connect) ..................... 109
Setting the Number of Prints........................................ 110
Setting the Date/Time ImprintOption...........................110
Printing images ............................................................ 110
Canceling the Printing.................................................. 110
Using USB Interface .......................................................... 111
Selecting the USB Device (USB Connect) ........................113
installing DV Media PRO Program ....................................114
Indice
Estructuradecarpetasy archivosen la tarjeta de memoria .. 92
Selecci6n de la calidad fotografica (Photo Quality) ............ 93
Selecci6n del tamafio de foto con (Photo Size) ................. 94
Ajuste det n0mero de archive (File No.) ............................. 95
Utilizaci6n delflash incorporado (s61oSC-DC564/DC565).. 96
Capturade imagendefete (JPEG) en latarjeta de memoria_ 97
Visualizaci6n de imageries fotograficas (JPEG)................. 98
Protecci6n frente a borrado accidental (Protect) .............. 100
Biminaci6ndeimagenesfotograficasy secuenciasdevideo(Delete)..101
Formato de la tarjeta de memoria (Format) ..................... 103
Grabaci6ndesecuenciasdevideo(MPEG)enlatarjetadememoria.104
Reproducd6ndesecuenciasdevideo(MPEG)enlatarjetadememoda105
Grabaci6n defotografias en una tarjeta de memoria durante
la reproducci6n de DVD ................................................... 106
Marcaci6n de imageries para impresi6n (Print Mark)....... 107
lmpresi6n de imagenes: Use de PictBridgeTM .................. 109
Conexi6n a una impresora (USB Connect) ................ 109
Ajuste del n0mero de copias ....................................... 110
Ajuste de laopci6n Date/Time Imprint ......................... 110
lmpresi6n de imagenes ............................................... 110
Cancelaci6n de laimpresi6n ........................................ 110
Utilizaci6n de la interfaz USB ............................................ 111
Seleaci6n de{dispositivo USB (USB Connect) ..................113
lnstataci6n del programa DV Media PRO ......................... 114
A
Page 7
[ ENGLISH ]
[ ESPAI_OL ]
Contents
Ulead Video Studio............................................................ 115
Connecting to a PC ........................................................... 116
Disconnecting the USB Cable ..................................... 116
Using the PC Camera Function ................................... 117
Using the USB Streaming Function ............................. 118
Using the removable Disk Function ............................. 118
UsingYour DVD Camcorder Abroad ................................. 119
Q - Qo _ ................. J
Troubleshooting ................................................................ 120
Setting menu items........................................................... 125
o- • ®
Indice
Ulead Video Studio............................................................ 335
Conexi6n a un PC ............................................................. 116
Desconexi6n del cabte USB ........................................ 336
Dtilizaci6n de la funci6n PC Camera ...........................137
Utiiizaci6n de la funci6n USB Streaming .....................118
Utilizaci6n de la funci6n de disco extraible ..................118
Utilizaci6n de la Videocamara con DVD en etextranjero_ 119
=-_o • _- Ha - _ ................... 0
ResoIuci6n de probtemas ................................................. 120
Ajuste de opciones de menO............................................ 125
A
Page 8
[ ENGLISH ]
[ ESPANOL ]
Notes and Safety instructions
+ - -_. o o - +o . + • - | --
Please rotate the LCD Screen
carefully as illustrated.
Over-rotation may cause damage
to the inside of the hinge that
connects the LCD Screen to the
DVD Camcorder.
1 Openthe LCD Screen 90
degrees with your finger.
2 Rotate it to the best angle to
record or play.
• If you rotatethe LCD
Screen 180 degrees to the lens side, you canclose the LCD grades hacia elladedela
Screen with it facing out I lente+puedecerrarla pantalla LCD conelfrente hacia afuera.
• This is convenient during playback operations. • Esto resulta practico durante las operaciones de reproduccion
Refer to page 38 to adjust brightness and color of the LCD Screen. Consulte la pagina 38 para ajustar el brillo y elcolor de la pantalla LCD
+ - +_+ o o - J -- - ++ -j + _ --_. . . | -+ o+ - o
1 Directsunlightcandamagethe
LCDScreen,the inside of the
Vlewfinderor the Lens Take
picturesof the sunonly in low
lightconditions,such asat dusk.
2 The LCD Screen has been
manufactured using high
precision technology
However, there may be tiny
dots (red, blue or green in
color) that appear onthe LCD Screen. These dots are normal and
do not affect the recorded picture in any way.
3 Do not pick up the DVD Camcorder by holding the Viewfinder, LCD
Screen or Battery Pack.
4 Applying excessive force to the Viewfinder may damage it.
Notas e instrucciones deeguridad
+ ._ - - - -_ . _ • +- . +. . . |
Gire cuidadosamente la pantalla
LCD como se indica en la figura
Si se gira demasiado se puede
estropear la blsagra interior de
union de la pantalla LCD con la
Videocamara con DVD
1 Abra con eldedo la pantalla
LCD formando 90grados con
la videocamara.
2 Girela ai mejor angulo para
grabar o reproducir
. Si gira la pantalla LCD 180
._/,///'J&// _ 1 La luzdirecta del sol puede
_'r_t_,_ _ | interior.del visor o et objetivo.
f_.. _ Tome _magenesdel sol
-..- ( F'_ + • s61ocon condiciones de luz
_+ ,_ / escasa, como a, anochecer.
_")4_-x__ 2 Para lafabricacion de la
" _'_.-"_,_'z_--_ _ I pantalla LCD seha empleado
._ _._T_ _ I tecnologia de alta precision.
_/f_ i "_ ) Sin embargo, pueden
/t_/('k+ _) aparecer en ella puntitos
,1.___'_/ rojos, azules o verdes. Esta situacion ee normal y no
_--..._"_._[.7 afecta en mode alguno a la grabacion
3.__No agarre la Videocamara con DVD sujetando el visor,
La aplicaciOn de fuerza excesiva en el visor puede da_arlo.
4. lapantalla LCD o la bateria
_ | daOar la pantalta LOD, el
Page 9

[ ENGLISH ]
[ ESPAI_OL ]
Notes and Safety instructions
= Take care not to touch the recording side (therainbow colored side)
ofthe disc with your fingers. Discs contaminated by fingerprints or
foreign substances may not play propedy.
= Use asoft cloth to clean the disc.
Clean lightly from the center of a disc to the
outside edge. Circling or cleaning too hard may
create scratches onthe disc and further cause
the disc to play abnormally.
Do not use benzene, thinner, detergent, alcohol
or anti-static spray when cleaning the disc.
it may cause a malfunction.
=
Press the supporting holder in the center of the
disc case for easy removal of the disc
=
Handle discs by theedges and the center hole to
avoid finger marks on the recording side.
=
Do not bend or apply heat to the disc.
=
Always store discs vertically in their plastic cases
when not in use.
=
Store discs away from direct sunlight, heating
elements, moisture or dust
Notas e instrucciones de seguridad
• Tenga cuidado de no tocar con los dedos e{ lado degrabad6n (el
lade con colores del arco iris)del disco. Los discos marcados con
huellas dactilares o sustancias extraSas pueden impedir que los
discos se reproduzcan correctamente.
Utilice un paso suave para limpiar los discos.
Limpielos levemente desde el centre del disco
hacia el borde exterior. Limpiar en circulo o con
demasiada fuerza puede rayar eldisco e impedir
que sereproduzca con normalidad.
No utilice benceno, disolvente, detergente,
alcohol ni pulverizadores antiestaticos allimpiar
el disco.
Puede hacer que el disco funcione de forma
defectuosa
Presione el soporte de sujecion del centre de la
caja del disco para extraer el disco con facilidad.
Sujete los discos por losbordes y e! orificio
central para evitar marcas de dedos en el lado
de grabacion del disco
No doble niaplique calor al disco
Guarde siempre losdiscos verticalmente en sus
fundas de plastico cuando no se utilicen
Guarde los discos fuera del alcance de la luz
directa de! sol, de generadores de calor,de la
humedad y del polvo
A
Page 10
[ ENGLISH ]
[ ESPAI_OL ]
Notes and Safety instructions
_ - -_. a o | II . • o-
, Do not leave the DVD Camcorder exposed to high temperatures
(above 60 °C or 140 °F).
For example, in aparked car in the sun or exposed to direct
sunlight.
• Do not let the DVD Camcorder get wet. Keep the DVD Camcorder
away from rain, sea water, and any other form of moisture.
The DVD Camcorder may get damaged if it gets wet. Sometimes a
malfunction due to exposure to liquids cannot be repaired
• Asudden rise inatmospherictemperature may cause condensation
toform inside the DVD Camcorder.
- When you move the DVD Camcorder from a cold location to a
warm location (e.g. from outside to inside during the winter.)
- When you move the DVD Camcorder from a cool location to a
hot location (e.g. from inside to outside during the summer.)
• - -o. e _ o_ o | • •
Television programs, video tapes, DVD titles, films, and other program
materials may be copyrighted.
Unauthorized copying of copyrighted materialmay be against the law.
All the trade names and registered trademarks mentioned inthis
manual or other documentation provided with your Samsung product
are trademarks or registered trademarks of their respective holders.
, Do not attempt to service this DVD Camcorder yourself.
• Opening or removing covers may expose you to dangerous voltage
or other hazards.
, Refer all servicing to qualified service personnel.
• When replacement parts arerequired, be sure the service technician
has used replacement parts specified by the manufacturer that have
the same characteristics as theoriginal parts.
• Unauthorized substitutions may result in fire, electric shock or other
hazards
Notas e instrucciones de seguridad
• ._ - - - -_ . . =-_ . . • | |
NOdeje la Videocamara con DVD expueeta aaitas temperaturas
(por encima de 60°C o 140 °F)
Por ejemplo, en un vehiculo aparcado al solo expueeto a la luz
directa del sol
No permita que la Videocamara con DVD se moje. Mantenga la
Videocamara con DVD alejada de la Iluvia, del agua de mary de
caalquier otro tipo de humedad.
Si la Videocamara con DVD se moja puede estropearse. En
algunas ocasionee, losdaSos causados por liquides no pueden
repararse.
Una subida repentina de la temperatura puede producir
condensaci6n en el interior de la Videocamara con DVD
- Cuando traslade la Videocamara con DVDdesde unlugar frio a
uno calido (p. ej. desde el exterior at interior en invierno.)
- Cuando se traslada la Videocamara con DVD de unsitio
temp_ado a uno caliente (por ejemplo, de un espacio irrterior a
uno exterior en verano).
6 _ e .Oe _ e= O t • _ ,
Es probable que los programas de television, las cintas de video, los
DVD, las peliculas y otros materiales audiovisuales tengan registrados
sus derechos de reproduccion.
La copia no autorizada de material protegido por dichos derechos
puede quebrantar la ley.
Todos los nombree de marcas y marcas comerciales registradas
mencionados eneste manual o el resto de documentacion facilitada
con el producto Samsung son marcas comerciales o mamas
registradas de sus respectivos propietarios.
- t 6 - . o- -6 - •
No intente reparar la Videocamara con DVD pot si solo.
La apertura o retirada de cubiertas puede exponerle a sedos
voitajee u ofros peligros.
Confie las reparaciones a personal tecrico califlcado.
Cuando se neceeiten piezas de repueeto, aseg_rese deque el
tecnico utiliza piezas especificadas por el fabricante o que tengan
las mismas caractertsticas que la pieza original.
Los repuestos no autorizados pueden producir incendios,
descargas electricas u otros peligros
Page 11
[ ENGLISH ]
[ ESPANOL ]
Getting to Know Your DVD Camcorder
= DVD Disc Camcorder
DVD-VIDEO Recording with 3 I/2inches (8cm) DVD-RW/+RW/-R/+R DL
(Dual Layer) discs
• High Power Zoom Lens
Offers you 26x High Power Zoom Lens.
• UBB Interface for Digital Image Data Transfer
You can transfer images to a PC using the USB interface without an add-on
card
• Photo Capture
The Photo Capturefunctionlets you capture thescene you want while the disc is
in play, and save as astill image on a MemoryCard
• 12O0x Digital Zoom
Allows you to magnify an image up to 1200 times itsodginal size.
= Color TFT LCD
Ahigh-resolution color TFT LCD gives you clean, sharp images as well as the
ability to review your recordings immediately
• Digital Image Stabilizer (DIS}
The DIS compensates for any handshake, reducing unstable images,
particularly at high magnification.
= Various Digital Bffects
The Digital Effects allow you to give your recordings a special look.
• Back Light Compensation (BLC)
The BLC function compensates for the bright background behind asubject
youre recording
• Program AE
The Program AE enables you to alter the shutter speed and aperture to suit
thetype of scene/action to be recorded
• Digital Still Camera Function
- Using a Memory Card, you can easily record and playback standard photo
images
- You can transfer standard photo images on aMemory Card to your PC
using the USB interface
• Moving Image Recording
Moving image recording makes it possible to record video onto a Memory
Card.
• Multi Memory Card Slot
Multi Memory Card slot that is compatible with Memory Stick (Duo),
Memory Stick PRO, MMC and SD
• Multi OSD Language
You can select the desired OSD language from OSD list
Introduccibn a la Videoc_,mara con DVD
Videoc_mara con disco DVD
Produccion de tituDs DVD-VIDEO con discos DVD-RW/+RW/-R/+R DL
(Doble capa) de 3 1/2puig (8cm).
Objetivo con zoom de gran potencia
Ofrece una ]ente de zoom de gran potencia de 26x
Interfaz USB para transferencia de datos de imageries digitales
Es posib]e transferir imageries al ordenador pot medic de la interfaz USB
sin necesidad de una tarjeta adicionaL
Captura de foto
La funci6n Photo Capture permite capturar la escena que desee mientras
se reproduce el disco y guardaba como una imagen fotografica en la tarjeta
de memoria.
Zoom digital 1200x
Permite ampliar la imagen hasta 1200 veces su tamaSo original
LCD TFT en color
El sistema de color de alta reso]uci6n TFT de la pantalla LCD proporciona
imagenes claras y nitidas a la vez que permite ver Ins grabaciones
inmediatamente
Estabilizador digital de la imagen (DIS)
El DIS compensa los movimientos de la mano reduciendo la inestabilidad
de ins imagenes, especialmente cuando estas Qltimas se graban con una
gran ampliaci6n
Efectos digitales diversos
Los efectos digitales permiten dara la grabaci6n un aspecto especial al
permifir aSadir diversos efectos especiales.
Compensaci6n de luz de fondo (BLC)
La funci6n BLC compensa el bbllo que puede aparecer detras del objeto
que se graba.
Program AE
El programa AE permite modificar ]avelocidad y la apertura del obturador
para que se ajuste a la escena que se vaya a grabar
Funcion de camara fotogr&fica digital
- Con la tarjeta de memoba, puede f&cilmente grabar y reproducir
fotografias estandar
- Puede transferir imagenes fijas est&ndar de su tarjeta de memoria a su
PC utilizando ]a interfaz USB
Grabaci6n de secuencias de video
La grabacion de secuencias de video posibilita la grabacion de video en
una tarjeta de memoria.
Ranura para diversas tarjetas de memoria
Ranura para varias tarjetas de memoria compatible con Memory Stick (Duo),
Memory Stick PRO MMC y SD.
OSD en varios idiomas
Puede seleccionar el idioma de la OSD en la fista de OSD _.
Page 12
[ ENGLISH ]
[ ESPANOL ]
Getting to Know Your DVD Camcorder
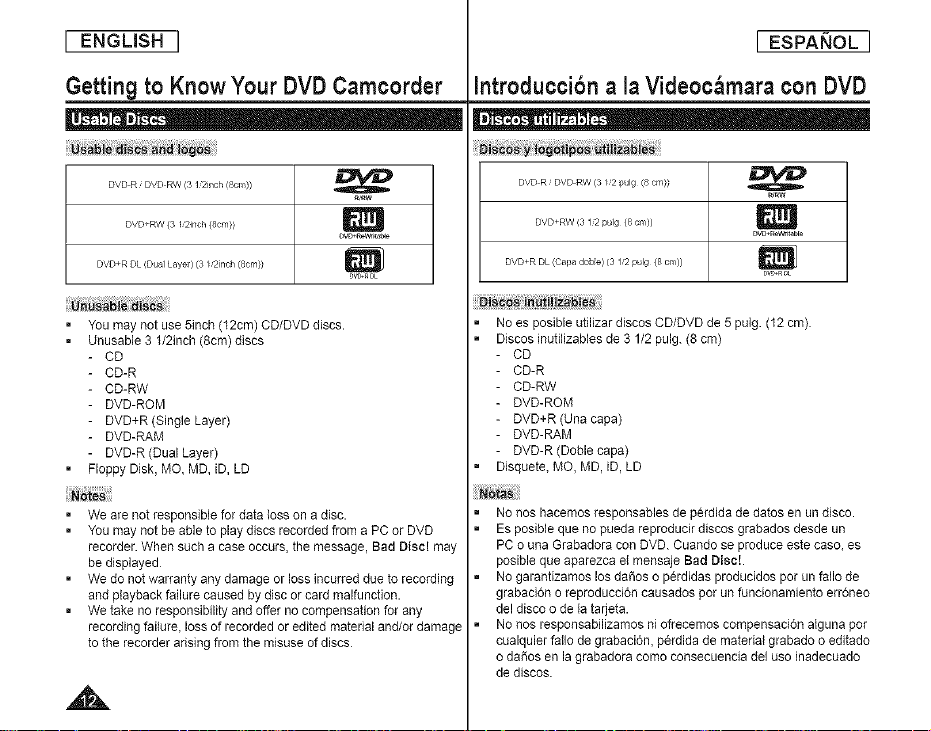
DVD R _DVD RW (3/Qinch (Scll))
D//D+RW (3 E2inch (Scm))
DVD+R DL (Dua] Layel) (3 _2inch (Scm))
You may not use 5inch (12cm) CD/DVD discs.
Unusable 3 1/2inch (8cm) discs
CD
CD-R
CD-RW
DVD-ROM
DVD+R (Single Layer)
DVD-RAM
DVD-R (Dual Layer)
Floppy Disk, MO, MD, iD, LD
• We are not responsible for data loss on a disc.
You may not be able to play discs recorded from a PC or DVD
recorder. When such a case occurs, the message, Bad Disc! may
be displayed
We do not warranty any damage or loss incurred due to recording
and playback failure caused by disc or card malfunction.
We take noresponsibility and offer no compensation for any
recording failure, loss of recorded or edited material and/or damage
tothe recorder arising from the misuse of discs
_w
_vg+r_w_r_'le
D_+r DE
IntroducciSn a la Videoc_,mara con DVD
| • ._ -
DVD R _DVD RW (3 _2 pulg (8 cm))
DVD+RW (31 '2 pullg (8 ca))
DVD+R DL (Calla dobie) (31 '2 pulg (8 cn/))
No es posible utilizar discos CD/DVD de 5 pulg. (12cm)
Discos inutilizables de 31/2 pulg. (8 cm)
CD
CD-R
CD-RW
DVD-ROM
DVD+R (Una capa)
DVD-RAM
DVD-R (Doble capa)
Disquete, MO, MD, iD, LD
No nos hacemos responsables de perdida de datos en un disco.
Es posible que no pueda reproducir discos grabados desde un
PC o una Grabadora con DVD. Cuando se produce este caso, es
posible que aparezca el mensaje Bad Disc!.
No garantizamos los dafios o perdidas producidos porun fallo de
grabaci6n o reproduccion causados por un funcionamiento erroneo
del disco o de la tarjeta.
No nos responsabilizamos ni ofrecemos compensacion alguna por
cualquier fallo de grabacion, perdida de material grabado o editado
o daSos en lagrabadora corno consecuencia del uso inadecuado
de discos.
_rw
Dw_r_w_i_ar,_
DVD+_L
Page 13
[ ENGLBH ]
[ ESPAKIOL ]
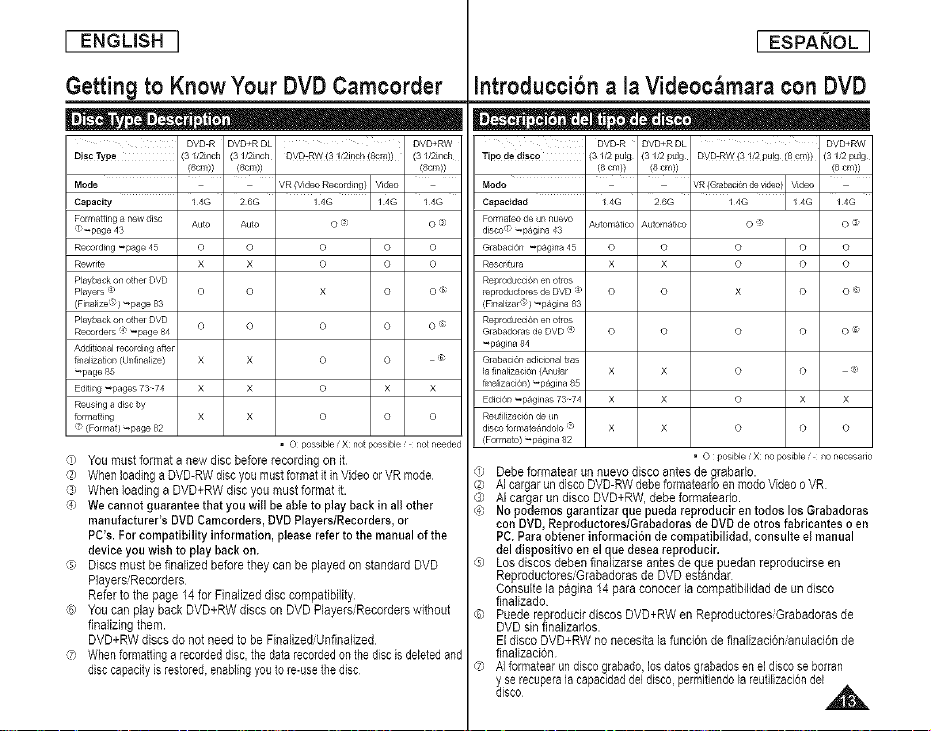
Getting to Know Your DVD Camcorder
II _ _ |- • •
Disc Type (3 1/2inch (3//2inch DVD:RW (3 1/2inch _Scm)) (3//2inch
Mode ' ' I
Capacity I 4G 2 6G / 4G I / ,1G
Formatting a new disc ALrtu Auto O ('
I) _F_age 43
Recording _page 45
Rewr te
Playback on o;her DVD
Players 4 O
(Finalize _!) _page 83
P_ayl_ck on othe_ DVD
Recorders 4 _page 84 O
Addit onal Tecordil7g after
fi_Talization(U_Tfinaiize) X
_page 85
Editing _pages 73 74 X
Reus ng a dsc by
turmaaing X
<: (Format} _page 82
,_) YOU must format a new disc before recording on it
O) WhenloadingaDVD-RWdiscyoumustformatit inVideoorVR mode
@ When loadingaDVD+RWdisc you must format it.
_) We cannot guarantee that you will he able to play back in all other
manufacturer's DVD Camcorders, DVD Players/Recorders, or
PC's. For compatibility information, please refer to the manual of the
device you wish to play back on.
g) Discs must be finalized before they can be played on standard DVD
Players/Recorders
Refer to the page 14 for Finalized disc compatibility
(G) You can play back DVD+RW discs on DVD Players/Recorderswithout
finalizingthem.
DVD+RW discs do not need to be FinalizediUnfinalized
_? When formattinga recorded disc, the data recorded on the disc is deleted and
disccapacityis restored, enablingyou to re-use the disc
DVD R DVD+RDL DVD+RW
(8cm)) (8cm)) (8cm))
VR (Video Recording) Video
o
o o o o o
x x o o o
o x o o®
o o o o _
x o o ®
x o x x
x o o o
, O uoss}ble / X not Possible / not needed
Introducci6n a la Videoc_,mara con DVD
|- _ i o- _o ®- a •
Tipo de disco (3112 pulg {31/2 pulg DVD RW (31/2 Pu!g (8 cln)) (31/2 pulg
Fo_mateo de un nuevo At tomatico Automatico O ; O :_
disco_'_ _pagina 43
G_baci0n _pagina 45 O O O O O
Rescritu_ X X O O O
Reproducci6n en otis
_p_ducto_s de DVD _ O O X O O @
(Finalizar@) _pagina 83
Reproducci6n en otis
G_badoms de DVD ® O O O O O ®
_pagina 84
Gl_baci6rt adicional tras
la finalizaci0n (Anu_r X X O O @
finalizaci0n) _pagina 85
Edici6n _ p_gil7as 73¸-74 X X O X X
Reutilizaci6n de un
disco _rmateandolo @ X X O O O
(Forma_) _pagina 82
@ Debeformatearunnuevodiscoantesdegrabarlo.
@ AIcergarun disco DVD-RWdebeformateadoen modoVideooVR
@ N cergar an discoDVD+RW,debe formatearlo.
@ No podemos garantizar que pueda reproducir en todos los Grabadoras
con DVD, Reproductores/Grabadoras de DVD de otros fabricantes o en
PC. Pare obtener informacion de compatibilidad, consulte el manual
del dispositivo en el que desea reproducir.
@ Los discos deben finalizarse antes de quepuedan reproducirse en
Reproductores,Grabadorasde DVD estandar
Consulte la pagine14 pare canocer le compatibilidadde un disco
finalizado
¢_) Puedereproducirdiscos DVD+RWen ReproductoresGrabadorasde
DVD sin finalizarlos.
El disco DVD+RW no necesita la funcion de finalizeci0nianulaci6n de
finalizeci0n
,z) A] formatear un disco grebade,los datos grabedosen el disco se borran
t serecupera la capacidaddel disco permitiendola reutilizacion del
isco
DVD R DVD+R DL DVD÷RW
(8 cm)) (8 cm)) (8 cm))
, O posible/X no posib_e / no necesano
Page 14
[ ENGUSH ]
[ ESPAI_OL ]
Getting to Know Your DVD Camcorder
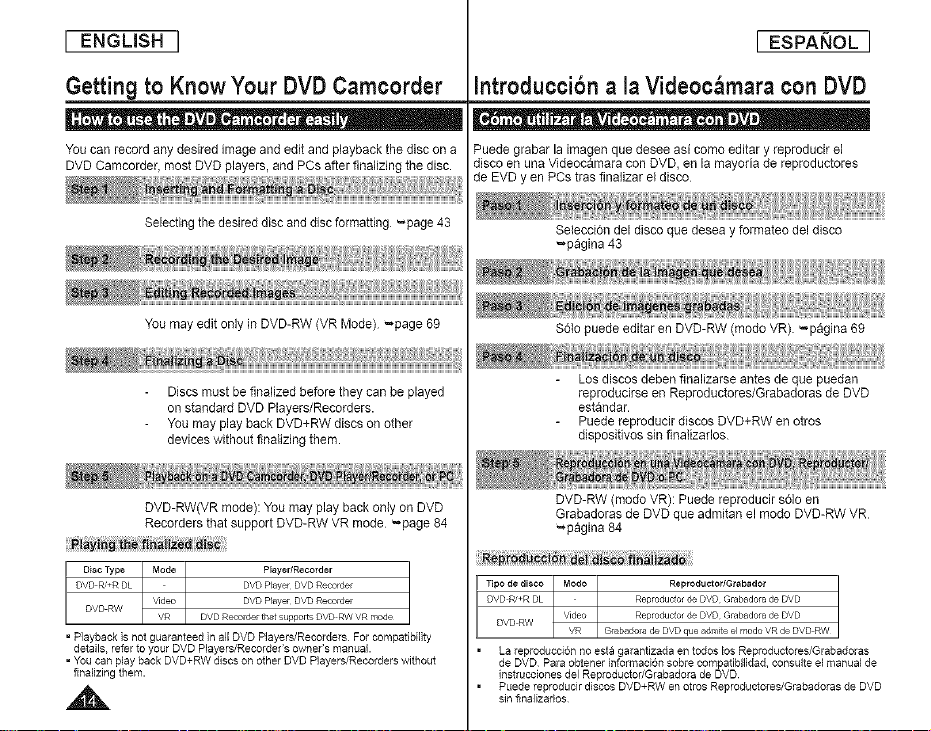
Q • - - i | . • a- -.
YOUcan record any desired image and edit and playback the disc on a
DVD Camcorder most DVD players, and PCs after finalizing the disc.
Selecting the desired disc and discformatting _page 43
You may edit only in DVD-RW (VR Mode) '-,page 69
Discs must be finalized before they can be played
on standard DVD Players/Recorders.
You may play back DVD+RW discs on other
devices without finalizing them.
DVD-RW(VR mode): You may play back only on DVD
Recorders that support DVD-RW VR mode "-page 84
PlayedReeorder
DVD Player DVD Recolder
DVD Prayer DVD Recolder
DVD Recolder that supports DVD RW VR mode
=P]aybackisnotguaranteedin allDVDPlayers/RecordersForcompatibility
details referto yourDVDPlayers/Recorder'sowner'smanual.
=YoucanplaybackDVD+RWdiscsonotherDVDPlayers/Recorderswithout
finalizingthem.
Introducci6n a la Videoc_,mara con DVD
• • . . o-o . . . Q m |
Puede grabar la imagen que desee asi come editar y reproducir el
disco en una Videocamara con DVD, en la mayoria de reproductores
de EVD yen PCs tras finalizar el disco
Selecci6n del disco que desea y formateo del disco
_pagina 43
S61opuede editar en DVD-RW (mode VR). _pagina 69
Los discos deben finalizarse antes de que puedan
reproducirse en Reproductores/Grabadoras de DVD
estandar.
Puede reproducir discos DVD+RW en otros
dispositivos sin finalizarlos.
DVD-RW (modo VR): Puede reproducir s61oen
Grabadoras deDVD que admitan e! modo DVD-RW VR
=pagina 84
Tipo dedisco Modo
DVDR_+RDL //RDVDRW l/l/leo
• La reproducci6n no esta garantizada en todos los Reproductores/Grabadoras
de DVD Para obtener informaci6n sobre compatibilidad, consulte el manual de
instrucciones del Reproductor/Grabadora de DVD
• Puede reproducir discos DVD+RW en otros Reproductores/Grabadoras de DVD
sin finalizarlos
Page 15
[ ENGLBH ]
[ ESPANOL ]
Getting to Know Your DVD Camcorder
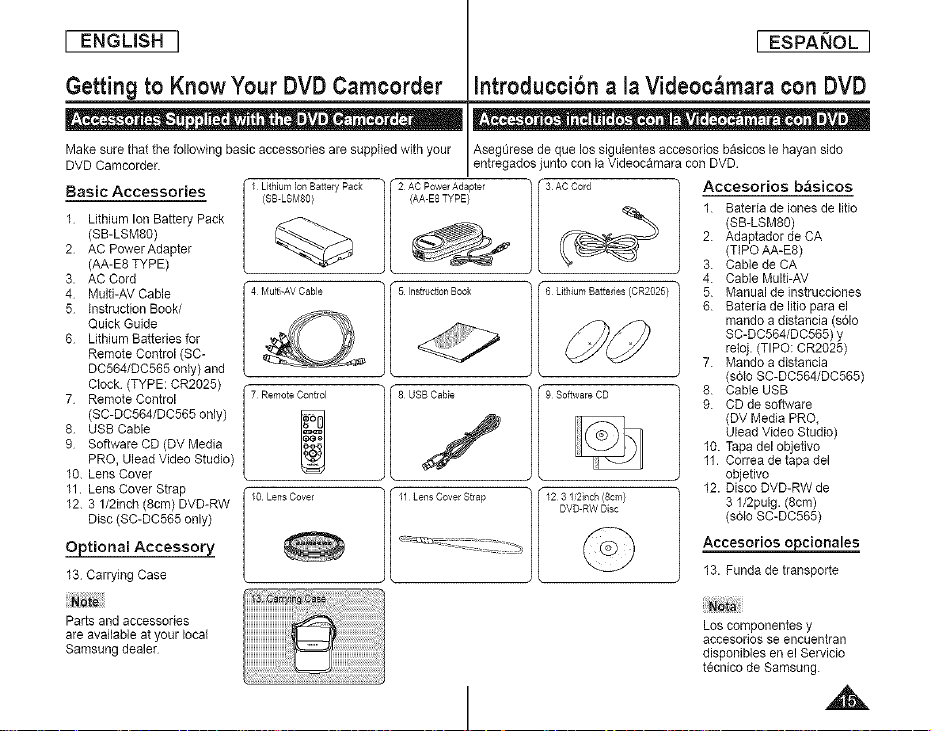
- • - ,_g _ L l - | D . ® a-
Make surethat the following basic accessories are supplied with your
DVD Camcorder.
Basic Accessories (SB-LSM80)
1 Lithium Ion Battery Pack
(SB-LSM80)
2 AC Power Adapter
(AA-E8 TYPE)
3. AC Cord
4 Multi-AV Cable
5 instruction Book/
Quick Guide
6 Lithium Batteries for
Remote Control (SC-
DC564/DC565 only) and
Clock (TYPE: CR2025)
7 Remote Control
(SC-DC564/DC565 only)
8. USB Cable
9 Software CD (DV Media
PRO, Ulead Video Studio)
10. Lens Cover
11. Lens Cover Strap
12. 3 1/2inch (8cm) DVD-RW
Disc (SC-DC565 only)
Optional Accessory
13. Carrying Case
Parts and accessories
are available at your local
Samsung dealer
I I Lithium bn Battery Pack ] 2_ J3AC_
Introducci6n a la Videoc_,mara con DVD
- • • ot • . _-Q . . . • | |
Asegurese de que los siguientes accesorios basicos le hayan side
entregados junto con la Videocamara con DVD
Accesorios b&sicos
1. Bateria deiones de litie
(SB-LSM80)
2. Adaptader de CA
(TIPO AA-E8)
3. Cable de CA
4. Cable Multi-AV
5. Manual de instrucciones
6. Bateria delitie para el
mando a distancia (solo
SC-DC564/DC565) y
reioj. (TIPO: CR2025)
7. Mando a distancia
(sdlo SC-DC564/DC565)
8. Cable USB
9. CD de software
(DV Media PRO,
Ulead Video Studio)
10. Tapa del objetivo
11. Correa de tapa del
objetivo
12. Disco DVD-RW de
3 l/2pulg. (Scrn)
(s61oSC-DC565)
Accesorios ojocionales
13. Funda de transporte
Los componentes y
acceeorios se encuentran
disponibles en e! Servicio
tecnico de Samsung.
Page 16
[ ENGLISH ]
[ ESPAi_OL ]
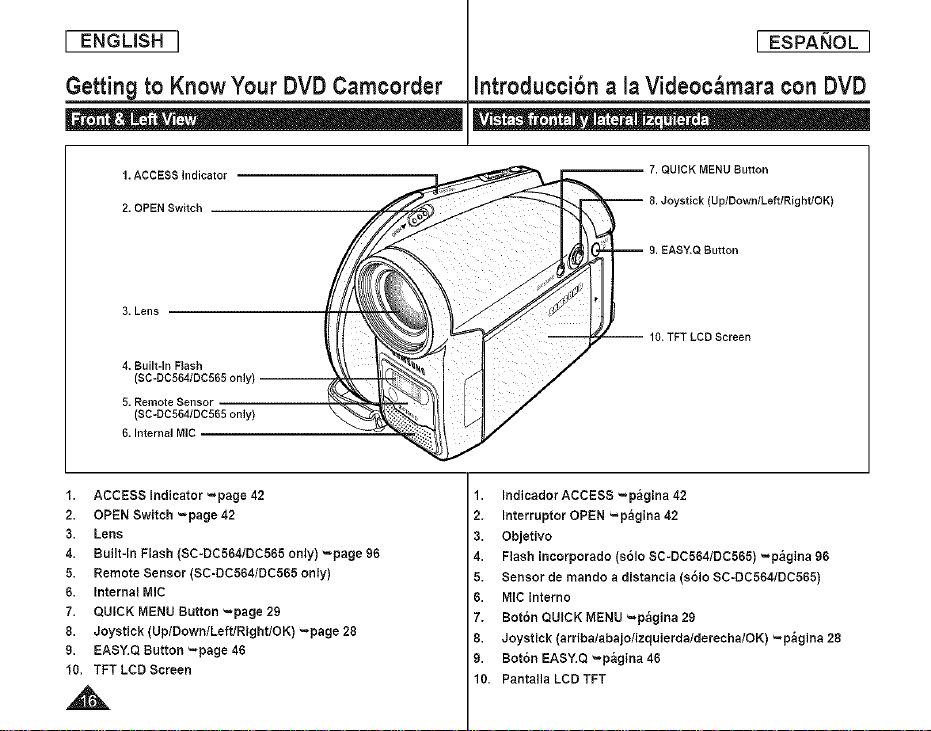
Getting to Know Your DVD Camcorder
1.ACCESS Indicator
2. OPEN Switch
3. Lens
4. Built-In F_ash
(
5. Remote Sensor
(SC-DC5641DC565 only)
6. Internal MIC
1. ACCESS Indicator =page42
2. OPEN Switch =page 42
3. Lens
4. Built-M Flash (SC-DC564/DC565 only) _page 96
5. Remote Sensor (SC-DC564/DC565 only)
6. Internal MIC
7. QUICK MENU Button =page 29
8. Joystick(Up/Down/Left/Right/OK) =page 28
9. EASY,Q Button =page 46
10. TFT LCD Screen
Introduccibn a la Videoc_mara con DVD
- . • . . _ e - 6.
7. QUICK MENU Button
8. Joystick (UplDownlLefllRightlOK)
g. EASY.Q Button
10, TFT LCD Screen
1. MdicadorACCESS =p_gina 42
2. Interruptor OPEN =p_gina 42
3. Objetivo
4. Flash incorporade (s61o SC-DC564/DC565) -,p_gina 96
5. Sensor de mando a distancia (sSIo SC-DC564/DC565}
6. MIC interno
7. BotSn QUICK MENU =p_gina 29
8. Joystick(arriba/abajo/izquierda/dereehalOK) =p_gina 28
9. Bot6n EASY.Q _p_gina 46
10. Pantalia LCD TFT
Page 17
[ ENGLISH ]
[ ESPAI_OL 1
Getting to Know Your DVD Camcorder
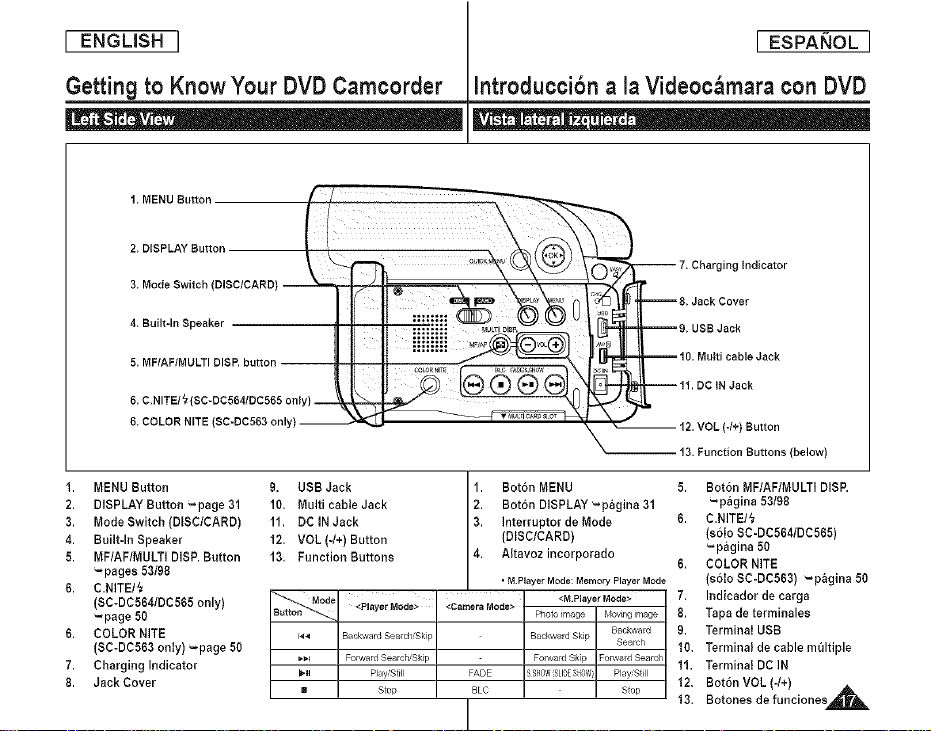
- 0- -
1. MENU Sutton
2. DISPLAY Sutton
3. Mode Switch (DISC/CARD)
4. Built-In Speaker
5. MF/AFIMULTI DISP. button
6. C.NITE/z_ (SC-DC564/DC565 only) _;_
6. COLOR NITE (SC-DC563 only) --
MENU Sutton 9. USB Jack 1. Bot6n MENU 5.
Mode Switch (DISC/BARD) 11. BB iN Jack Interruptor de Mode 6.
DISPLAY Sutton _page 31 10. Multi cabte Jack 12' Bot6n DISPLAY'.=pagina 31
Built-In Speaker 12. VOL (-/+) Sutton (DISC/BARB)
MF/AF/MULT] DISP. Sutton 13. Function Buttons Aitavoz incorporado
_pages 53/98 6.
6. C.NITE/_ • M Player Mode: Memory Player Mode 7,
(SC-DC564/DD565 only) _Mode Mode <PJayerMode> <CameraMode> <M.PlayerMode>
"page 50 B._on _ Photoimage #,bvirlgirr/age 8.
61 COLOR NITE f,_,q BackwardSearchSkip Backw_rrdSkip
(SC-DC563 onZy) _,page 50 Search 10.
7. Charging Indicator _1_i FolwardSearchSkp Fo_,_ardSkp ForwardSearch 11.
8. Jack Cover 12.
B Stop BLC Stop
it;t:::; _UTIDISP.
!!'=![}!!
Play'Sti_l FADE SS_-0WfSLIOES0_, Play'StII
Introduccibn a la Videoc_mara con DVD
-- 7. Charging Indicator
--8. Jack Cover
-- 10. Multi cable Jack
i 11.DO IN Jack
-- g. USB Jack
_13. Function Buttons (below)
Backward 9.
i 13.
12.VOL (-/+) Button
Boton MF/AF/MULTI DISE
_pagina 53/98
C.N]TE/_
(s6io SC-DC564/DC565)
_pagina 50
COLOR NITE
(s6Zo SB-DC563) _pagina 50
Indicador de carga
Tapa de terminales
Terminal USB
Terrninal de cable mt_ltiple
Terminal DC IN
Soton VOL (-/+)
Botones de funciones _
Page 18
[ ENGLISH ]
[ ESPANOL 1
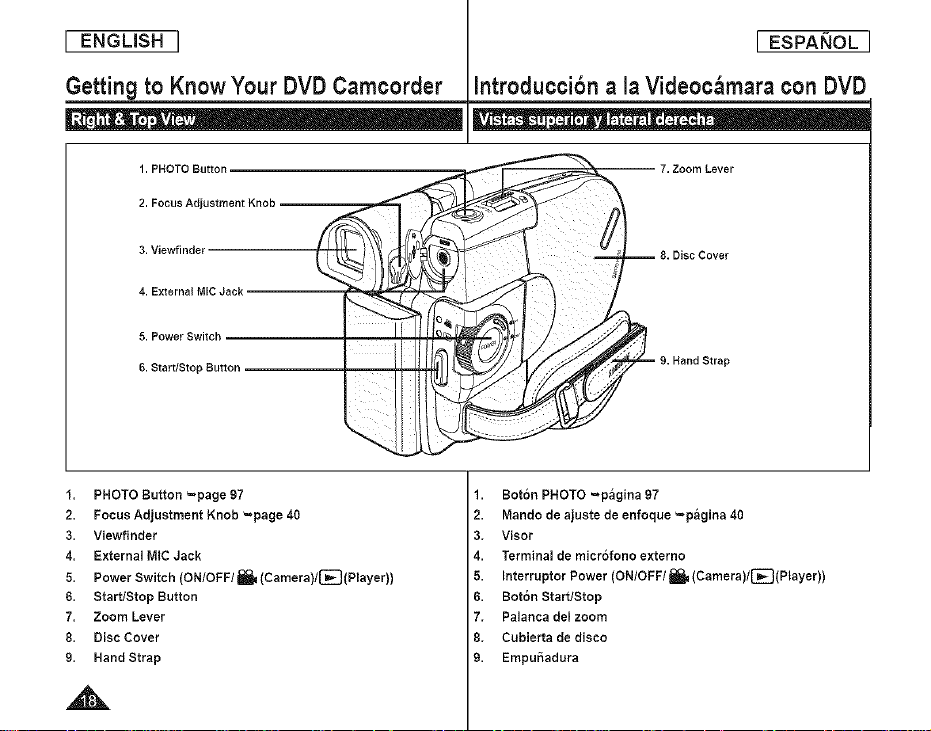
Getting to Know Your DVD Camcorder
1. PHOTO Button,
2. Focus Adjustment Knob
3. Viewfinder
4. External M[C Jack
5. Power Switch
6. Start/Stop Button
1. PHOTO Button =page 97
2. Focus Adjustment Knob =page 40
3. Viewfinder
4. External MID Jack
5. Power Switch (ON/OFF/I_ (Camera)/_(Player))
6. Start/Stop Button
7. Zoom Lever
8. Disc Cover
9. Hand Strap
Introduccibn a la Videoc_,mara con DVD
= 9. Hand Strap
1. Bot6n PHOTO _p_gina 97
2. Mando de ajuste de enfoque _p_gina 40
3. Visor
4. Terminal de micr6fono externo
5. Interrupter Power (ON/OFF/_(Camera)/_(Player))
6. Bot6n StartlStop
7. Palanca delzoom
8. Cubierta de disco
9. Empui_adura
Page 19
[ ENGLISH ]
[ ESPAI_OL ]
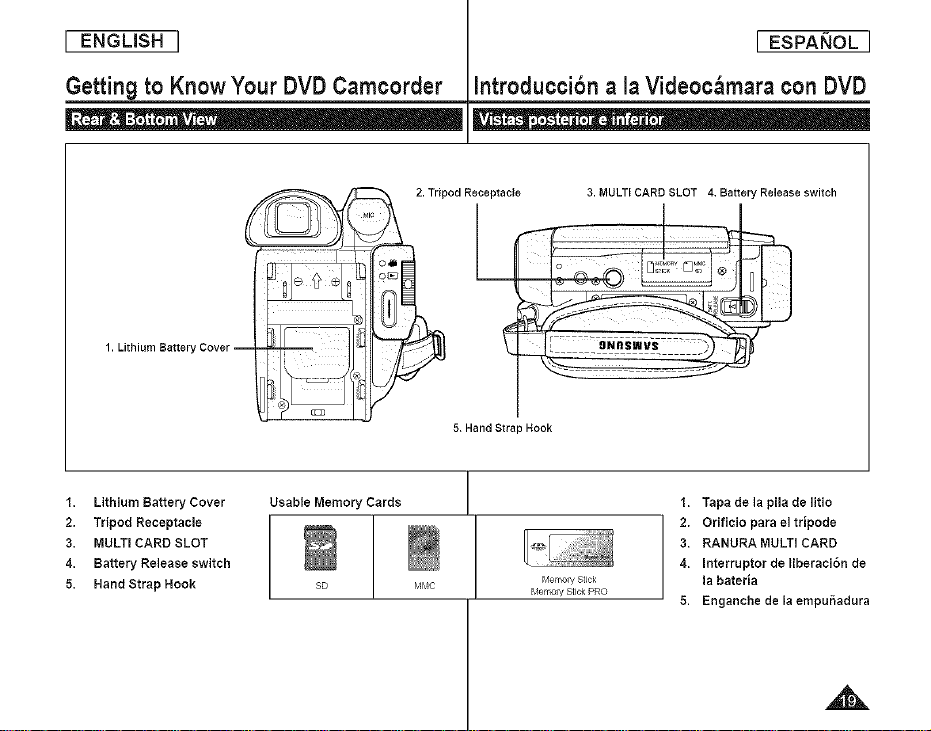
Getting to Know Your DVD Camcorder
°_ ; :Q •
1. Lithium Batter
1. Lithium Battery Cover
2. Tripod Receptacle
3. MULTi CARD SLOT
4. Battery Release switch
5. Hand Strap Hook
Usable Memory Cards
SD r_lr_lc Memo_'J Stick
Introduccibn a la Videoc_mara con DVD
- . g_ - • - - •
2.Tripod Receptacle
3.MULTICARDSLOT 4. Batter r Releaseswitch
L
5.HandStra_Hook
1. Tapa de la pila de litio
2. Orificio para el tripode
3. RANURA MULTi CARD
4. Interruptor de liberaoi6n de
_,lemo_ Stick PRO
la bateria
5. Enganche de la empu5adura
Page 20
[ ENGUSH ]
[ ESPANOL 1
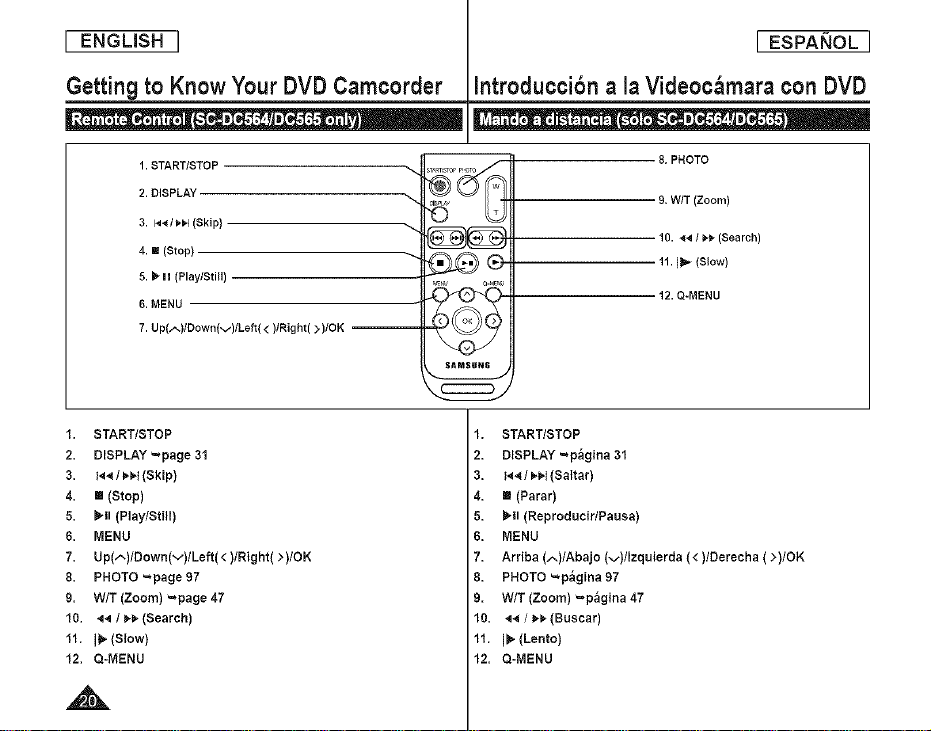
Getting to Know Your DVD Camcorder
_- • - • • | ,, | o •
1. START/STOP
2. DISPLAY
3. i_1_/_1_1(Skip)
4. ! (Stop)
5. _ H (Play/Still)
6. MENU
7. Up(,,--)/Down(v)/Lef_( < )lRight( >)/OK --
1. START/STOP
2. DISPLAY -page 31
3. t_ / _t,t(Skip)
4. m (Stop)
5. I_ll (Play/Still)
6. MENU
7. Up(^)lDown(v)lLeft( < )/Right( >)/OK
8. PHOTO -page 97
9. W/T (Zoom) -page 47
10. ,_.q/ _-I,, (Search)
11. It_(Slow)
12. Q-MENU
Introduccibn a la Videoc_mara con DVD
• oo . o . . _e o II o,_| o
8. PHOTO
9. WIT (Zoom)
10. _l_ / _-1,(Search)
11. I11"(Slow)
12. Q-MENU
SAMSUNG
1. START/STOP
2. DISPLAY -p_gina 31
3. t_ Il_l,,I(Saltar)
4. Ill (Parar)
5. I,II (Reproducir/Pausa)
6. MENU
7. ArNba (^)/Abajo (v)/Izquierda (<)/Derecha ( >)/OK
8. PHOTO -p_gina {)7
9. WIT(Zoom) =p_gina47
10. ,_._/ I,,_(Buscar)
11. I1_(Lento)
12. Q-MENU
Page 21
[ ENGLISH ]
[ ESPAI_OL ]
Preparation
It is very important to ensure that the Hand Strap has been correctly
adjusted before you begin your recording.
The Hand Strap enables you to:
Hold the DVD Camcorder in a stable, comfortable position.
Press the [Zoom] lever and [Start/Stop] button without having to
change the position of your hand.
Hand Strap
1 Pull and open the Hand Strap and
release the Hand Strap
Insert the Hand Strap into the Hand
Strap Hook.
2 Insert your hand into the Hand Strap
and adjust its length.
3 Closethe Hand Strap.
Lens Cover
1 Hook up the Lens Cover with the Lens
Cover Strap as illustrated.
2 Pull and open the Hand Strap and
release the Hand Strap
3 Hook up the Lens Cover Strap to the
Hand Strap and adjust it following the
steps as described for the Hand Strap.
4 Closethe Hand Strap.
_the Lens Cover after
O__[oeration
Press buttons on both sides of the Lens
Cover, then insert itso it covers the DVD
Camcorder Lens.
r '_ _1 Em_u_adura
Preparacibn
• a o- . - e .o . . .=. ®- Qo - •
Es muyimportanteasegurarse de que la empu_adura este
correctamente ajustada antes de empezar la grabacion.
La empuSadura permite:
Mantenga laVideocamara con DVD en una posicidn estable y
comoda.
Presionar lapatanca [Zoom] y el boton [Start/Stop] sin tenet que
cambiar la posicion de la mano.
Inserte la empuSadura en su
_' 2/ 1. Tire y abra la empu_adura y liberela.
I
enganche.
2. Introduzca su mano en la empuSadura
y ajuste taIongitud.
3. Cierre la empu_adura
Ta a de1 o_Yetivo
1. Enganche la tapa del objetivo con
su correa como se muestra en la
ilustraci6n
2. Abra la empuSadura y saque la
t
correa.
3. Enganche ta correa de la tapa del
objetivo yajustela siguiendo los pasos
que se descdben para la empu5adura.
4. Cierre Faempu_adura
Colocaci6n de la ta_
tras utilizar lavideoc_mara
Presione losbotones de ambos lades
de latapa del objetivo para que cubra el
objetivo de la Videocamara con DVD.
A
Page 22
[ ENGLISH ]
[ ESPAI_OL ]
Preparation
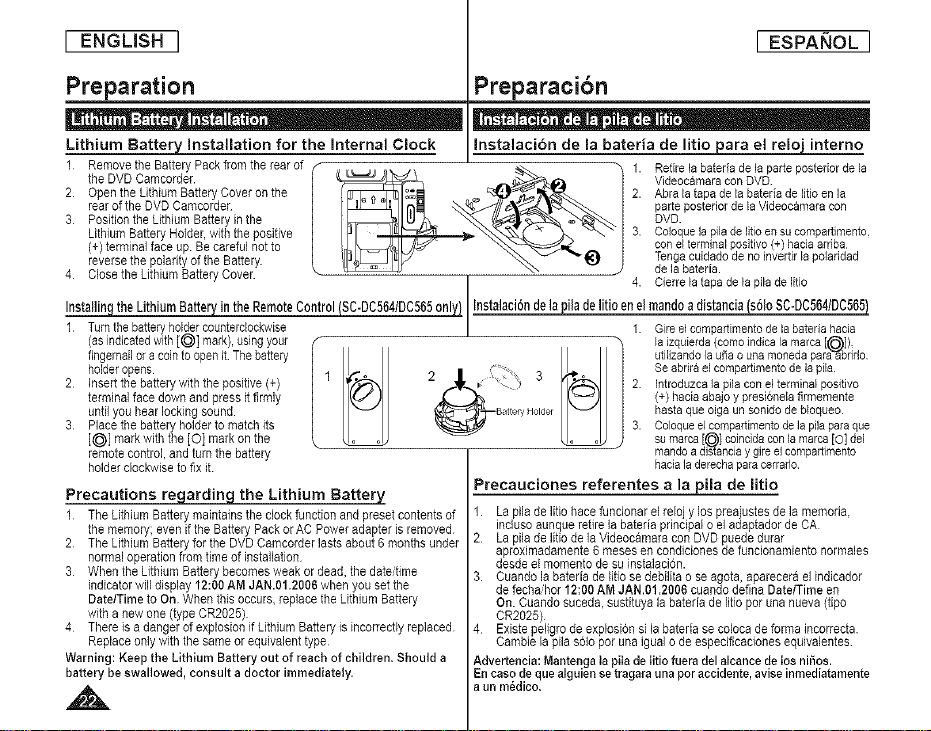
Lithium Battery Installation for the internal Clock
2 Open the Lithium Battery Cover on the 2. Abra la tape de la bateria de litio en la
rear of the DVD Camcorder parte posterior de la Videocamara con
3 Position the Lithium Battery in the DVD.
Lithium Battery Holder, with the positive 3. Coloque la pila de fltio en su cornpartimento,
f theRem°VeDvDthecamcorder.BatteryPack from the rear of ___ \ _ _ 1. VideocamaraRetirela bateriacondeDVDlaparte posterior de la
(+) terminal face up Be careful not to con el terminal posifivo (+) hacia arriba
reverse the poIadty of the Battery. _ x Tenga cuidado de no invertir la poladdad
4 Close the Lithium Battery Cover. de la bateria.
Preparacibn
• . • o- . o . o- •
Instalacion de la bateria de litio joara el relo_ interno
4. Cierre la tape de la pila de litio
InstallingtheLithiumBatteryintheRemoteControl(SC-DC564/DC565only} _ila delitioenelmandoadistancias61oSC-DC564/DC565
f Turn the battery holder counterclockwise 1. Gire el compartirnento de la bateria hacia
(as indicated with [_] mark), using your la izquierda (como indica la marca [_]),
fingernail or a coin to open it The battery utilizando la usa o una moneda pard-_brido
holderopens
2 Insertthe batterywith the positive (+)
terminalface downand press itfirmly
untilyouhearlockingsound.
3 Placethe batteryholder to matchits
[_] markwiththe [O] markon the
remotecontrol, and turnthe battery
holderclockwise to fixit
Precautions regarding the Lithium Battery
f The Lithium Battery maintains the clock function and preset contents of
the memory; even if the Battery Pack or AC Power adapter is removed
2 The Lithium Battery for the DVD Camcorder lasts about 6 months under
normal operation from time of installation
3 When the Lithium Battery becomes weak ordead, the date/time
indicator will display 12:00 AM JAN.01.2006 when you set the
Date/Time to On When this occurs, replace the Lithium Battery
with a new one (type CR2025)
4 There is a danger of explosion if Lithium Battery is incorrectEy replaced
Replace only with the same or equivalent type
Warning: Keep the Lithium Battery out of reach of children, Should a
battery be swallowed, consult a doctor immediately.
f 2. Introduzca la pila con el terminal positivo
I Se abrira el compartimento de la pila
(+) hacia abajo y presionela firmemente
haste qua oiga un sonido de b{oqueo
3. Coloqua el compartimento de la pila pare qua
su marca [_] coincide con la marca [O] del
mando a dis_ancia ygire elcompartimento
hacialaderechapareoerrado
Precauciones referentes a la pile de litio
1 Lapilade litiohacefuncionarelrelojy los preajustesdela memoria.
induso aunquaretirelabateriaprincipalo eladaptadordeCA
2 Lapilade litio de la Videocamerecon DVD puededurer
aproximadamente6 meses en condiciones defuncionemiento normales
desdeel momento de suinstalacion.
3 Cuandolabetariadelitiosedebifltao se egota, eparaceraelindicador
de fecha hor 12:00AM JAN.01.2006 cuando define Date/Timeen
On. Cuandosucede,sustituya la beteria delitio por una nueva (tipo
CR2025)
4 Existepeligro de explosicnsi la bateria se colocade forma incorrecta
Cambie la pilesolo pot une iguel o de espacificeciones equivelentes
Advertencia: Mantengata piIa de Iitio fuera del alcance de Ios nii_os.
Encaso de que alguiensetragaraunapor accidente,arise inmediatamente
aun m_dico,
Page 23
[ ENGLISH ]
[ ESPAI_OL ]
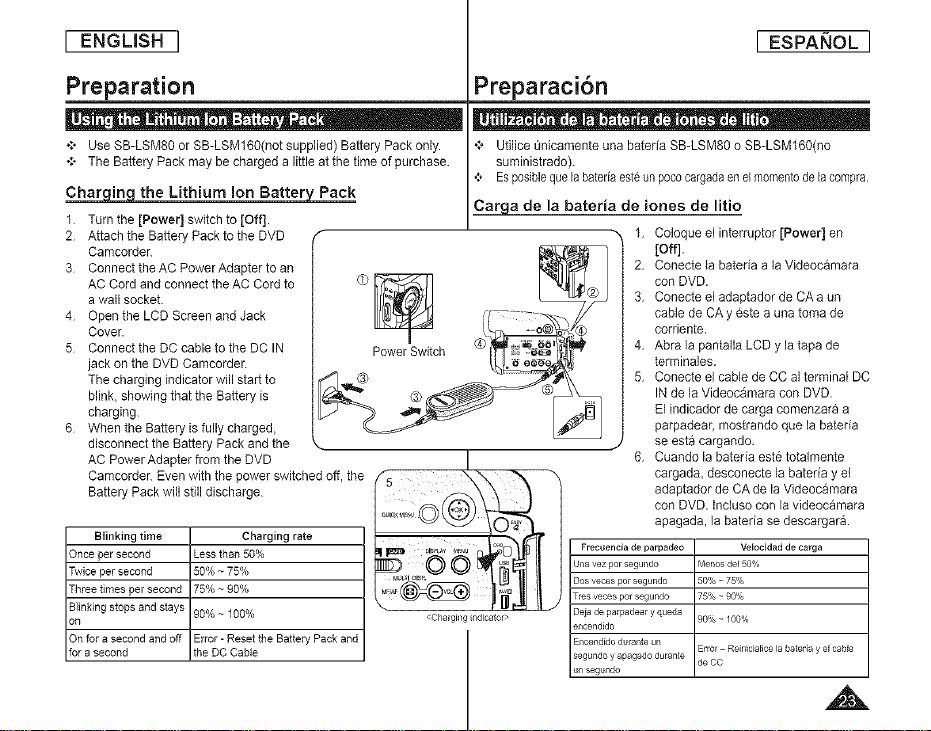
Preparation
÷;o Use SB-LSM80 or SB-LSM160(not supplied) Battery Pack only.
+ The Battery Pack may be charged a littleat the time of purchase.
Char in the Lithium ion Batter Pack
1 Turn the [Power] switch to [Off].
2 Attach the Battery Pack to the DVD
CamcordeL
3 Connect the AC Power Adapter to an
AC Cord and connect the AC Cordto
f
Preparaci6n
•;, Uti]ice _nicamente una bateria SB-LSM80 o SB-LSM160(no
suministrado).
,;, Esposiblequeb baterbesteun pococargadaenelmomentode b compra,
Carga de la bateria de iones de litio
a wall socket.
4 Open the LCD Screen and Jack
Cover.
5 Connect the DC cable to the DC IN
jack onthe DVD Camcorder.
The charging indicator will start to
blink showing that the Battery is
charging.
6 When the Battery is fully charged,
disconnect the Battery Pack and the k
AC PowerAdapter from the DVD I
Camcorder. Even with the power switched off, the _._ _'_-\ _ "_
Battery Pack will still discharge, oi0__
Oncepersecond Lessthan50%
Twicepersecond 50% ~75%
Threetimes persecond 75% ~90%
Blinkingstopsandstays 90%~ 100% <Chagi_/gndicator>
on
Onfora secondandoff Error-ResettheBatteryPackand
ora second theDOCable
• e e" , e_ = , _= e = e = e
1, Coloque el interruptor [Power] en
[Off].
2, Conecte ia bateria a la Videocamara
con DVD,
3, Conecte el adaptador de CAa un
cable de CA y este a una toma de
corriente.
4, Abra la pantalla LCD y la _apade
_erminales.
5, Conecte el cable de CC al terminal DC
INde la Videocamara con DVD.
El indicador de carga comenzara a
parpadear, mostrando que la bateBa
se esta cargando,
J
6, Cuando la bateBa este totalmente
cargada, desconecte la bateria y el
adaptador de CA de la Videocamara
con DVD. Incluso con la videocamara
apagada, la bateria se descargar&
Una vez por segundo Menos de150%
Dos veces po_ segundo 50% _ 75%
Tres veces pc1 segundo 75% _ 90%
Deia de palpadear y queda 90% _ 100%
e_lcendido
Frecuencia de parpadeo de CC VeJocidad de carga
u_lsegundo
Encendido du_a_te un Error - Reinicialice la batefia y el cable
segundo y apagado durante
Page 24
[ ENGLISH ]
[ ESPANOL ]
Preparation
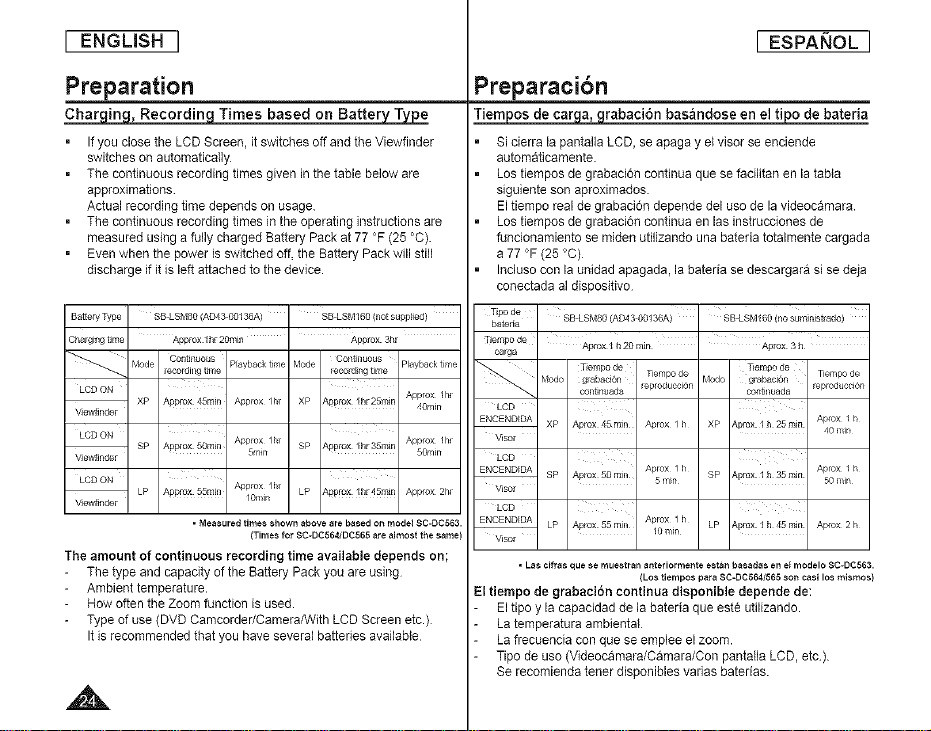
Charging, Recording Times based on Battery Type
Ifyou close the LCD Screen, it switches off and the Viewfinder
switches on automatically
=
The continuous recording times given in the table below are
approximations
Actual recording time depends on usage.
=
The continuous recording times in the operating instructions are
measured using a fully charged Battery Pack at 77 °F (25 °C).
Even when the power is switched off, the Battery Pack will still
discharge if it isleft attached to the device.
Ba_e_,Type SB LSMS0 (AD43 00136A)
Charging time Approx I hr 20rain
Mode O,,nti_uous
LCD ON
ViewfJnder
LCD ON
ViewfJnder 5min
LCD ON
Vie_nder /0n/in
recording t_me
XP Appro× 45rain A_prox /hr
SP Applo× 50min A_prox lhr
LP Approx 55mil/ Approx lhr
Playback time
• Measured times shown above are based on model SC-D0563.
(Times for SC-DC564/DC565 are almost the same)
The amount of continuous recording time available depends on;
The type and capacity of the Battery Pack you are using
Ambient temperature.
How often the Zoom function isused.
Type of use (DVD Camcorder/Camera/With LCD Screen etc.)
Itis recommended that you have several batteries available
SB LSMI6O (not supplied)
Approx 3hr
Mode Playback time
XP Appro× Ihr25min
SP Appro× Ihr35mJn
LP Approx Ihr45min Approx 2h_
Preparacibn
Tiempos de carga, grabaci6n bas_ndose en el tipo de bateda
Si cierra lapantalla LCD, se apaga y elvisor se enciende
automaticamente.
Los tiempos de grabaci,Sn continua que se facilitan en la tabta
siguiente son aproximados.
El tiempo real de grabaddn depende del uso de lavideocamara.
Los tiempos de grabacion continua en las instruccionesde
funcionamiento se miden utilizando una bateria totalmente cargada
a 77 °F (25 °C)
Induso con la unidad apagada, la bateda se descargara si se deja
conectada aldispositivo
_pode
bateda
_empo de
ca_a
LeD
ENCENDIDA
Visor
LeD
ENCENDIDA
Visor
LeD
ENCENDIDA
Visor
= Las cifras que se rnuestran anteriorme_tte est,_tt basadas en el modelo 8C-DC563.
El tiempo de grabaci6n continua disponible depende de:
- El tipo y la capacidad de la bateria que este utilizando.
La temperatura ambienta{
ha frecuencia conque se emplee el zoom.
Tipo de uso (Videocamara/Camara/Con pantalla LCD, etc).
Se recomienda tener disponibles varias batedas.
Apro× 1 h 20 mn
Tiempo de Tiempo de
[_lodo glabaci0n Fempo de Modo grabact0n Tiempo de
cont_t_uada _eproducci0n contin_ada _eproduccl0n
XP Aplo× 45 mln Aprox / h XP Aprox _ h 25 rain Aprox / h
SP Aplo× 50 mln 5 rain SP Aprox _h 35 rain 50 rain
LP Aptox 55 mill LP Aprox :l h 45 mJn Aprox 2h
Aprox 1h Aprox / h
(Los tiempos para SC-DC564/565 sot_ casi los mismos)
40 rain
Page 25
[ ENGLISH ]
[ ESPANOL ]
Preparation
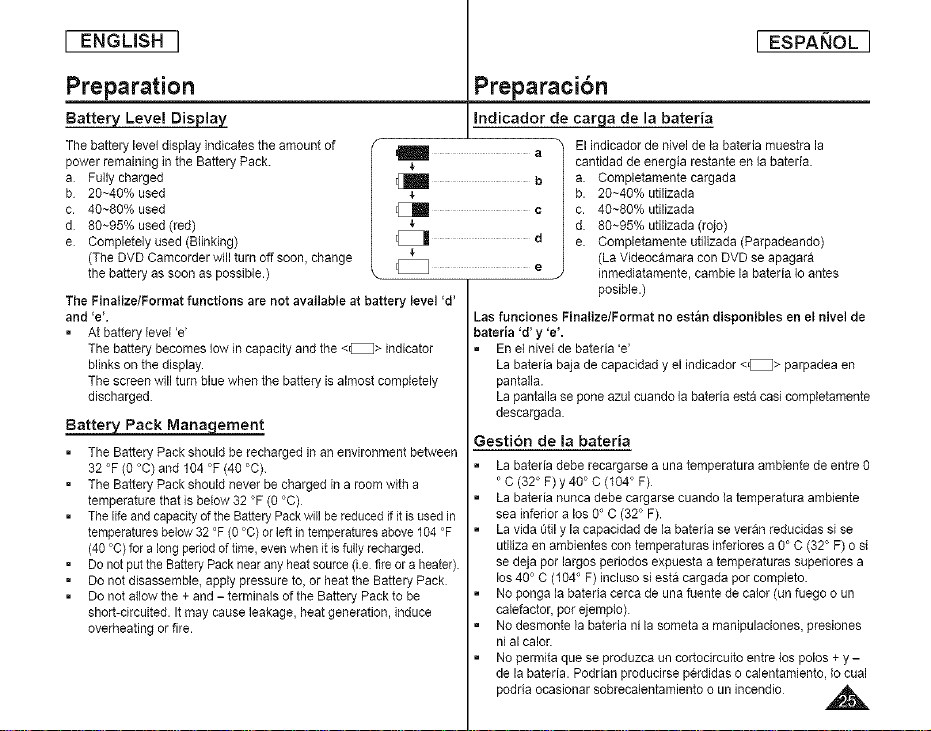
Battery Level Display
The battery level display indicates the amount of
power remaining in the Battery Pack.
a Fully charged
b 20~40% used
c. 40~80% used
d 80~95% used(red)
e Completely used (Blinking)
(The DVD Camcorder will turn off soon, change
the battery as soon as possible.)
The Finalize/Format functions are not available at battery level 'd'
and _e_,
• At battery level 'e'
The battery becomes lowin capacity and the <_> indicator
blinks on the display.
The screen will turn blue when the battery is almost completely
discharged.
Batter_ernent
= The Battery Pack should be recharged in anenvironment between
32 °F (0 °C) and 104 °F (40 °C).
= The Battery Pack should never be charged ina room with a
temperature that is below 32 °F (0 °C)
= The life andcapacity of the BatteryPack will be reduced if it isused in
temperaturesbelow 32 °F (0°C) or leftin temperaturesabove 104°F
(40 °C) for a long period oftime, even when it is fully recharged.
= Donot put the BatteryPack near any heat source (i.s fire ora heater).
= Do notdisassemble, apply pressure to,or heatthe Battery Pack
= Do notallow the + and - terminals of the Battery Pack to be
short-circuited. It may cause leakage, heat generation, induce
overheating or fire.
I a
$
Preparacibn
Indicador de carqa de la bateria
El indicador de nivel de la bateria muestra la
cantidad de energia restante en la bateda.
a. Completamente cargada
b
b. 20~40% utilizada
c. 40~80% utilizada
d. 80~95% utilizada (rojo)
e. Completamente utilizada (Parpadeando)
(La Videocamara con DVD se apagara
inmediatamente, cambie la baterta Io antes
posible.)
Las funciones Finalize/Format no est_n disponibles en el nivel de
bateria 'd' y 'e',
En el nivet de bateria 'e'
La bateria baja de capaddad y el indicador<_> parpadea en
pantalla.
La pantalla se pone azul cuando la baterta esta casi comptetamente
descargada
Gestibn de la bateria
La bateria debe recargarse a una temperatura ambiente de entre 0
' C (32°F)y 40 ° C (104°F)
La bateria nunca debe cargarse cuando la temperatura ambiente
sea inferior a los 0° C (32° F).
La vida t3tily lacapacidad de la bateria se veran reducidas si se
utitiza enambientes con temperaturas inferiores a 0° C (32° F) o si
se deja por largos periodos expuesta a temperaturas superiores a
los 40 ° C (104 ° F) incluso si esta cargada per compieto.
No ponga labateria cerca de una fuente de calor (un fuego o un
catefactor, pot ejempto).
No desmonte la bateria ni lasometa a manipulaciones, presiones
ni al calor.
No permita que se produzca un cortocircuito entre los polos + y -
de labateria. Podrtan producirse pcrdidas o calentamiento, Io cual
podria ocasionar sobrecalentamiento o un incendio A_
Page 26
[ ENGLISH ]
[ ESPAI_OL ]
Preparation
Maintaining the Battery Pack
, Please refer to the Table on page 24 for approximate continuous
recording time.
, The recording time is affected by temperature and environmental
conditions.
. The recording time shortens dramatically in a cold environment.
The continuous recording times in the operating instructions are
measured using a fully charged Battery Pack at 77 °F (25 ' C)
The remaining battery time may differ from the approximate
continuous recording times given in the instructions.
• When replacing the battery pack, only use the same type as is
supplied with this camcorder and is available from your SAk4SUNG
retailer When the Battery reaches the end of its life, please contact
your local dealer.
The batteries have to be dealt with as chemical waste.
• Make sure that the Battery Pack is fully charged before starting to
record.
• Abrand new Battery Pack is not charged. Before using the Battery
Pack, you need to charge it completely.
• Fully discharging a Lithium ion Battery damages the internal cells.
The Battery Pack may be prone to leakage when fully discharged.
• Topreserve battery power, keep your DVD Camcorder turned off
when you are not operating it.
• if your DVD Camcorder is in Camera Mode, and it is left in STBY
mode without being operated for more than 5 minutes with a
disc inserted, itwill automatically turn itself offto protect against
unnecessary battery discharge.
, Make sure that the Battery Pack is fitted firmly into place
Do not drop the Battery Pack. Dropping the Battery Pack may
damage it,
Preparacibn
MantenimJento de la bateria
Consulte latabla de la pagina 24 para obtener informaci6n sobre
el tiempo aproximado degrabacion continua.
El tiempo degrabaci6n seve afectado por lascondiciones
ambientales y la temperatura
El tiempo degrabaci6n se acorta enormemente en un ambiente
frio. Los tiempos de grabacion continuada que sedan en este
manual de instrucciones estan medidos empleando una bateria
completamente cargada a 25°C (77° F)
El tiempo de labaterta restante puede difedr de lostiempos de
grabaci6n continuos facilitados en lasinstrucciones.
AI sustituir labateria, utilice unicamente el mismo tipo que se
suministra con esta videocamara, disponible en los distribuidores
de SAMSUNG Cuando se termine la vida util de la bateria,
pongase en contacto con su proveedor habitual
Para desechar lasbaterias gastadas, estas deben tratarse como
residuos quimicos.
Aseg_:lresede que la baterta este completamente cargada antes
de empezar a grabar.
Las baterias nuevas no vienen cargadas. Antes de utilizar la
bateria es necesado cargarla por completo.
Descargar completamente la bateda de polimero de litio da_a las
c¢tulas internas
La bateria puede ser mas propensa a fugas cuando se deja
totalmente descargada.
Para ahorrar energia de la bateda mantenga la Videocamara con
DVD apagada cuando nose este usando
Si la Videocamara con DVD esta en la Camera Mode con undisco
cotocado y se deja en el modo STBY sin haceda funcionar durante
mas de cinco minutos, se apagara automaticamente para ahorrar
energia de la baterta.
AsegOresede que la baterta este colocada correctamente en su
sitio.
No deje caer la bateria. Si se Ilegara acaer, podria estropearse.
Page 27

[ ENGLISH ]
[ ESPANOL ]
Preparation
*-*oThere are two types of power source that can be connected to your
DVD Camcorder.
- The AC Power adapter and AC Cord: used for indoor recording.
- The Battery Pack: used for outdoor recording.
Using a Household Power Source
Connectto ahousehold
power source to use the DVD
Camcorder without having to
worry about the battery power
You can keep the Battery Pack
attached; the battery power will
not be consurned.
1 ConnecttheAC Power
adapter (AA-E8 Type] to
the AC Cord.
2 Connect the AC Cord to a
wall socket.
The plug and wan socket type may differ according to your resident
country.
3 Open the LCD Screen and Jack Cover.
4 Connect the DC cable to the DC INjack of the DVD Camcorder.
5 Set the DVDCamcorder to each mode by holding down the Green
Tabon the [Power] switch and turning it to [On] or [Off].
Preparacibn
• - • . . - - o- . - . •
+ Hay dos tJposdefuentes de alimentacion alas que se puede
conectar la VJdeocamara con DVD
- El adaptador deCA yel cable de CA: se emplean para
grabaciones en interiores
- La bateria: se emplea para grabaciones en exterJores.
UtJlizaci6n de una fuente de alimentacJ6n domestJca
Conecte unafuente de
alimentaci6n casera para utHizar
la Videocamara con DVD sin
preocuparse sobre laenergia
de la bated& Puede mantener
la bateda conectada; la energia
de la bateria no se consumir&
1. Conecte el adaptador deCA
(Tipo AA-E8) al cable de CA.
2. Conecte el cable de CA a
Es posible que la clavija y latoma de cordente sean de distinto
tipo, dependiendo desu lugar de residencia.
3. Abra la pantaila LCD y la tapa de terminales
4. Conecte el cable de CC al terminal DC IN dela Videocamara con
DVD
5. Ajuste la videocamara en cada modo manteniendo presionada la
pestaSa verde del interruptor [Power] y girandoio a [On] o [Off].
una tomade cordente.
A
Page 28
[ ENGLISH ]
[ ESPAI_IOL ]
Preparation
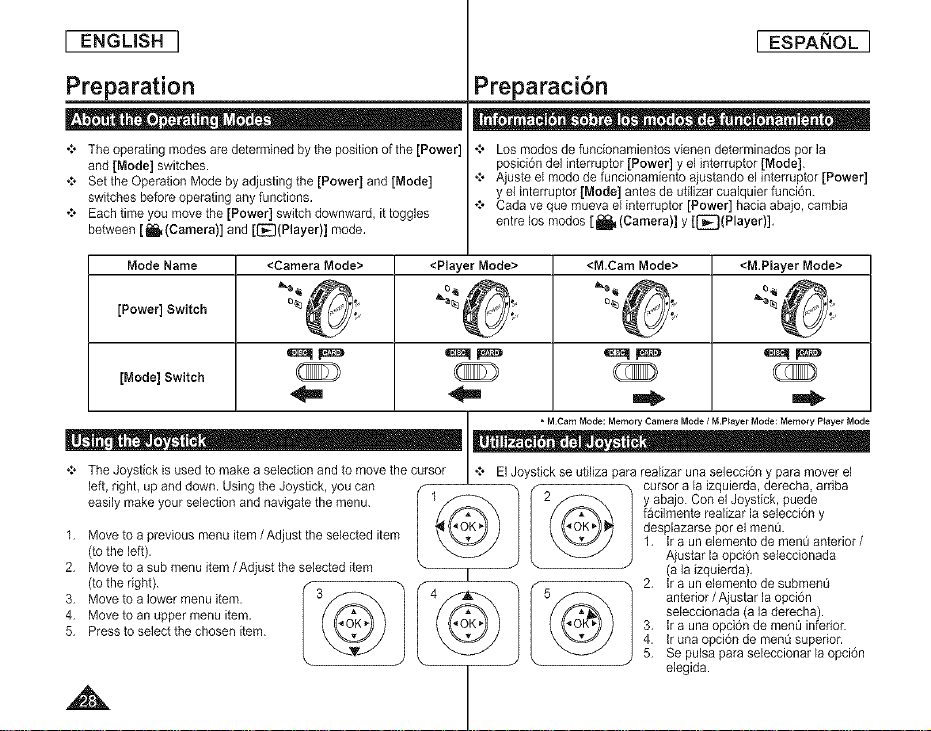
+ The operating modes are determined by the position of the [Power]
and [Mode] switches.
+ Set the Operation Mode by adjusting the [Power] and [Mode]
switches before operating any functions.
+ Each time you movethe [Power] switch downward, ittoggles
between [l_(Camera)] and [[_(Player}] mode,
Mode Name <Camera Mode> <Player Mode> <M,Cam Mode> <M.Player Mode>
Switch
[Power]
[Mode] Switch
+ The Joystick is used to make a selection and to move the cursor
left, right, up and down. Using the Joystick, you can
easily make your selection and navigate the menu.
1. Move to aprevious menu item / Adjust the selected item
(tothe left).
2, Move to a sub menu item / Adjust the selected item
(tothe right).
3. Move to a lower menu item.
4. Move to an upper menu item.
5. Press to select the chosen item.
,A
Preparaci6n
e , = e_ = o Qe_ 0- e , - o
+ Los modos de funcionamientos vienen determinados per la
posici6n del interruptor [Power] y el interruptor [Mode].
+ Ajuste el modo de funcionamiento ajustando el interruptor [Power]
y el intermptor [Mode] antes de utilizar cualquier funci6n.
+ Cada ve que mueva el interruptor [Power] hacia abajo, cambia
entre los modes [ _ (Camera)] y [l_(Player)].
t,
=MCam Mode: Memory Camera Mode / M.Pteyer Mode: Memory Prayer Mode
+ El Joystick se utiliza para realizar una selecci6n y para mover el
facilmente realizar la selecci6n y
2_ y abajo. Con el Joystick, puede
5_ anterior / Ajastar la opci6n
desplazarse por el men&
1, tra unelemento de menOanterior /
i cursor a la izquierda,derecha, arriba
Ajustar la opcion seleccionada
(a la izqaierda).
seleccionada (a laderecha).
3, tra una opci6n de menQ inferior.
i 2, tr a un elemento de subment_
4. tr una opci6n de menO superior.
5. Se pulsa para seleccionar la opci6n
elegida.
Page 29
[ ENGLBH ]
[ ESPAI_IOL ]
Preparation
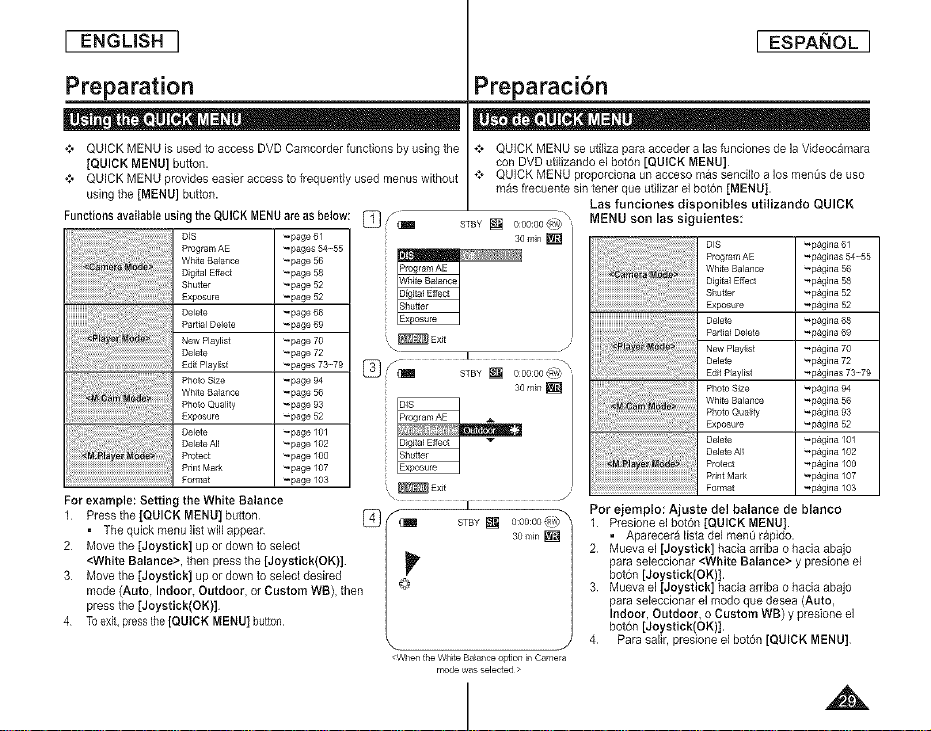
+ QUICK MENU is used to access DVD Camcorder functions by using the
[QUICK MENU] button.
+ QUICK MENU provides easier access to frequently used menus without
using the [MENU] button.
Functions available using the QUICK MENU are as below:
i
For example: Setting the White Balance
1.
Press the ]QUICK MENU] button FT_/-
• The quick menu list will appear LZJ r|_!1
2
Move the [Joystick] up or down to select |
<White Balance>, then press the [Joystick(OK)] |
3 Move the [Joystick] up or down to select desired |
mode (Auto, Indoor, Outdoor, or Custom WB), then |Q
press the [Joystick(OK)] |
4 To exit, press the [QUICK MENU] button |
D_S
Program AE
White Balance
Digital Effect
Shutter
Ex£osure
Delete
Part_al Delete
New Playlist
Delete
Edit Playlist
Photo Size
WNte Ba]ance
Photo Quality
Exposure
Delete
Delete A,
Protect
Pnnt Mark
Fomlat
_page61 mm [] I
_pases 54-55
page56
_pase 58 ProgramAE
_page 52
_page 68
_page 52
_page 69
_page 70
_Paee72 I
_pages 73-79 @ /" ,_
-page 94 30rain [] I
_page 56
_Pase52
_Paee93
_paee01
-page 00
-p_geg2 | _
_Paee 07
_page 103 _ Ext
' E! STBY [] 0:O0:O0(,/v_ i
' _ STBY [] 00ooo(_e,
x /
v
\ J
<WhentheWhte BalanceoptioninCamera
Preparaci6n
÷t* QUICK MENU se utilize pare acceder alas funciones de la Videoc&mara
con DVD utilizando el boton [QUICK MENU]
÷to QUICK MENU proporciona un acceso mas sencillo a los menQs de uso
m_s frecuente sin tener que utilizar el bo{dn [MENU].
Las funciones disponibles utilizando QUICK
MENU son las siguientes:
I
.................... Exposure
D,sProgramAE
W_ite3al_,_o_
Dgtal Effect
Shutter
Po,,ia,DeleteOeeto
New Pie)4 st
Delete
EditPayist
Wh, eOaP ° °s, e.....
::P o oOua,N
E_p......
Oe,e,o
DeleteAll
P,oteot
PrintMark
Format
STBY [] 0:00:00(RI_)"_
30Ilir []
modewasselected>
Por ejemplo: Ajuate del balance de
1 Presione el botdn [QUICK MENU].
• Aparecer_ lista del men0 rapido.
2 Mueva el [Joystick] hacia arriba o hacia abajo
para seleccionar <White Balance> y presione el
boton [Joystick(OK)].
3 Mueva el [Joystick] hacia ardba o hacia abajo
para seleccionar el modo que desea (Auto,
Indoor, Outdoor, o Custom WB) y presione el
boton [Joystick(OK)].
4 Para salir, presione el botdn [QUICK MENU]
_pAgina 61
_p&ginas 54_-55
_pAgina 56
_p&gina 58
_pAgina 52
_p_gina 52
_p&gina 68
_p_gina 69
_p_gina 70
_p&gina 72
_p_gmas 73-79
_p&gina g4
_p_gina 56
_p_eina 93
_p&gina 52
_p_gina I01
_p&glna 102
_p_gina 100
_p&gma 107
_p_gma 103
blanco
Page 30
[ ENGLISH ] [ ESPANOL]
Preparation Preparaci6n
O | _ -- | _ . . _ oo _ . - co- O | " - - = 0 - ,-- . - . _ e,- " . - o,-
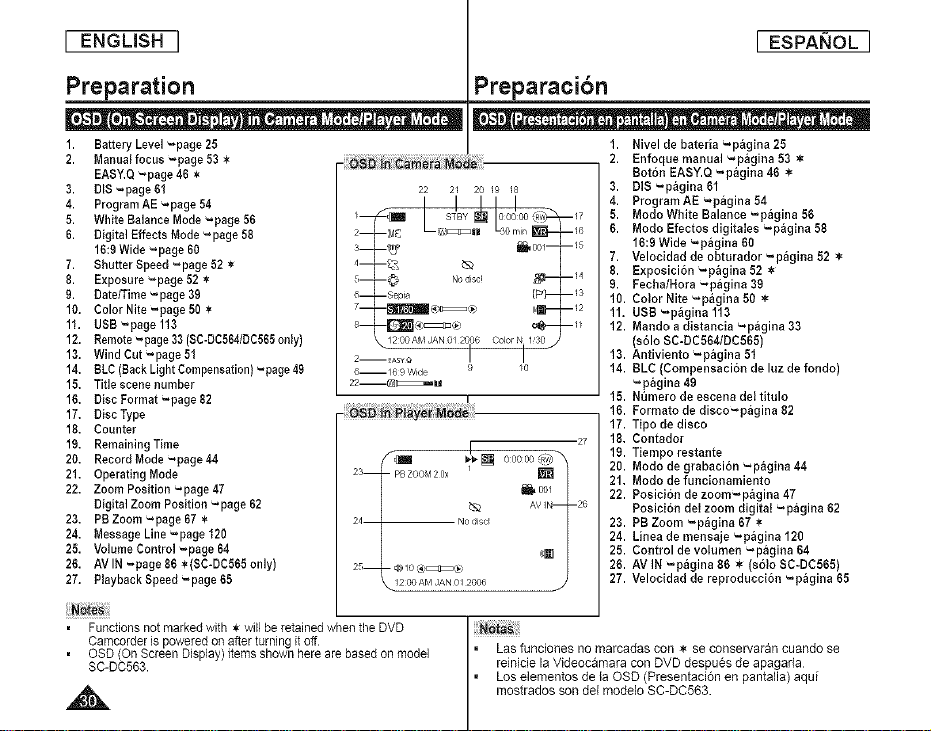
1. Battery Level _page 25 1. Nivel de bateria _p&gina 25
2. Manua{ focus _page 53
EASY.Q _page 46
3. DIS _page 61
4. Program AE -page 54
5. White Balance Mode -page 56
6. Digital Effects Mode -page 58
16:9 Wide _page 66
7. Shutter Speed _page 52
8. Exposure _page 52
9. DatelTime _page 36
10. Color Nite _page 50
11. USB _page 113
12. Remote _page 33 (SC-DC564/DC565 onty)
13. Wind Cut _page 51
14. SLC (Back Light Compensation) _page 49
15. Title scene number
16. Disc Format _page 82
17. Disc Type
18. Counter
16. Remaining Time
20. Record Mode _page44
21. Operating Mode
22. Zoom Position-page 47
Digital Zoom Position -page 62
23. PB Zoom _page 67 ,_
24. Message Line _page 120
25. Volume Control-page 64
26. AVlN _page86 _(SC-DC565only)
27. Playback Speed _page 65
6 Sepia [ /3
6--/69 Wide 9 _0
22--_=::::::::::::]g_
25 4_10_;_i 2006
22 2/ 20 19 18
_ 12 00A[/IJAN 0/ 2006 Color N 1'30_
2. Enfoque manual -p_gina 53
Bot6n EASY.Q _p_gina 46
3. DIS -p_gina 61
4. ProgramAE _pagina 54
5. Mode White Balance _pagina 56
6. Mode Efectos digitaZes _pagina 58
16:9 Wide -pagina 60
7. Velocidad de obturador _pagina 52
8. Exposici6n _pagina 52
9. Fecha/Hora _pagina 39
10. Color Nite -p_gina 50
11. USB -pagina 113
12. Mando a distancia _pagina 33
(s61o SC-DCBB4/DCSBS)
13. Antiviento _pagina 51
14. BLC (Compensaci6n de luz de fondo)
_pagina 46
15. NQmero de escena de! titulo
16. Forrnato de disco_pagina 62
17. Tipo de disco
18. Contador
19. Tiempo restante
20. Mode de grabaci6n _pagina 44
21, Mode de funcionarniento
22. Position de zoom-p_gina 47
Posicion deI zoom digitat _pagina 62
23. PB Zoom _p_gina 67
24. Linea de mensaje _p_gina 120
25. Control de volumen _pagina 64
26. AM IN _pagina 86 _ (s6lo SC-DC565)
27. Velocidad de reproducci6n _pagina 65
" Functions not marked with * will be retained when tile DVD
Camcorder is powered on after turning it off.
. OSD/On Screen Display) items shown here are based on model
SC-DC563.
,,&
• Las funciones nomarcadas con * se conservaran cuando ee
reiricie laVideocamara con DVD deepucs de apagada
• Los elementos de la OSD (Presentacion en pantalla) aqui
rues rados son de modeo SC-DC563.
Page 31

[ ENGUSH ]
[ ESPANOL ]
Preparation
0 | 0 -- m _ - I U -I_ U o_- L " . - o0-
1.
Photo Quality
=page 93
2.
Photo Size
=page 94
3.
Flash Mode
=page 96
(SC-DC564/
DC565 only)
4,
CARD (Memory
Card) Indicator
5.
Image Counter
/ " No memory cardF
@ 20
0AI_,IdAN 0/ 2006
(Total number of
resordable photo images)
6,
Slide Show =page 99
7.
Erase Protection Indicator '-'page 100
8.
Print Mark _page 107
9.
Folder Number-File Number _page 92
File number of the moving image
10. ImageCounter (Current Image/Total number of recorded images)
_ - e | e -- I = . 0 e
Turning OSD On/Off
Press the [DISPLAY) button onthe leftside control panel.
= Each press of the button toggles the OSD function on and off.
Turning the Date/Time On/Off
To turnthe Date/Time on or off, access the menu and change the
Date/Time mode. '-page 39
600
_i_ 8rain
z/Am
Preparacibn
1. Ca]idad de foto
o _p_gina g3
F-
6 Slide
7 @
S _ 5 I_
_ 1200AM JAN 01 2006 1O00005
(Nt_merototal de imageries fotogr_ficas grabables)
6. Presentaci6n _'p_gina 99
7. Indicador de protecciTn contra borrado _p_gina 100
8. Marca de impresiTn "-p_gina 107
9. NSmero de carpeta-NSmero de archivo -p_gina g2
N_mero de arcMvo de ]a seeueneia de imageries
10. Contador de im_genes (Imagen actuallN_mero total de
im_genes grabadas)
- o o6 .I.0.oe o- e D o - - _ - ®. . .
Encendidolapafjado de OSD
Presione el boton [DISPLAY) en elpanel de control det lado izquierdo
AI pulsar repetidas veces el boton, lafuncion OSD cambiara
a_ternativamente entre activada y desactivada (On/Off).
ActivadTn/desactivaciTn de la fecha y hora
Para activar o desactivar la fecha/hora, acceda al menu y cambie e!
modo Date/Time. _pagina 39
NO memo_/card!
_ 5/0 q[3
SMO\/00 _AVI --9
2. Tama5o de foto
-p_gina 94
3. Modo Flash
_p_gina 96
(s61oSC-DC564/
DC565)
4. Indicador CARD
(Tarjstadememoria)
5. Contador de
imageries
Page 32

[ ENGUSH ]
[ ESPANOL ]
Initial Setting • System Menu Setting
*:o Clock setup works in Camera Mode/Player Mode/M.Cam Mode/
M.Player Mode. -page 2B
*:o The date/time is automatically recorded onto a
disc. Before recording, please set the date/time.
1 Bet the [Mode] switch to [DISC] or [CARD].
2 Setthe[Power]switchto[_(Camera)]or
[[_(Player)].
3 Pressthe [MENU] button.
. The menu list will appear.
4 Move the [Joystick] up or down to select
<System>, then press the [Joystick(OK)].
5 Move the [Joystick] up or down to select
<Clock Set>, then press the [Joystick[OK)].
. The month will behighlighted first.
B Move the [Joystick] upor down to set current
month, then press the [Joystick(OK}].
. The daywill be highlighted.
. To adjust the clock, select the Year Month,
Day, Hour, Min, or AM/PM by pressing the
[Joystick(OK)l, then move the [Joystick]
up or down to set respective values.
7 You can set the day, year, hour, minute, and
AM/PM following the same procedure after
setting the month
8 Press the [Joystick(OK)] after setting AM/PM.
= A message <Complete!> is displayed
9. Toexit, press the [MENU] button.
= After theLithium Battery loses its charge (after
about 6 months), the date/time appears on the
screen as 12:00 AM JAN.01.2006.
= Youcan set the year up to 2040.
= Ifthe LithiumBatteryisnotinstalled,data inputtedwill notbebackedup
_A@_st _Select _Exit
_Move _Select _E×i_
Ajuste inicial: Ajuste del men_ System
i = - _- - • ® -
*:* Laconfiguracfondel reloj esta operativaen losCamera Mode/Player
Mode/M.Cam Mode/M.Player Mode. '-,pagina 28
I
. Puede fijar ela_iohasta 2040
. Si noesta instalada la bateria de litio,no serealizara ninguna copia
de seguridad de los dabs de entrada.
+ La fecha yhera se graba automaticamente en
un disco. Antes de grabar, ajuste la fecha y la hora.
1. Coloque el interrupter [Mode] en [DISC] o
[CARD]
2. Coloquee]interruptor[Power] en [ _ (Camera)]
o [[_(Player)]
3. Presione el bot6n [MENU]
, Aparece la listadel men{_.
4. Mueva el [Joystick] hacia arriba o hacia abajo
para seleccionar <System> y presione el
botdn [Joystick{OK)].
5. Mueva el [Joystick] hacia arriba o hacia abajo
para seleccionar <Clock Set> ypresione el
bot6n [Joystick(OK)].
, Primero se resalta el rues.
6. Mueva el [Joystick] hacia arriba o hacia abajo
para fijar el rues actual y presione el botdn
[JoysUck[OK)].
, Se resalta el dia.
. Para ajustar el reloj, seleccione Year,
/
Month, Day, Hour,MinoAM/PM pulsando el
bot6n [Joystick(OK)] y muevael ]Joystick]
hacia arriba o hacia abajo para ajustar los
respectivos valores.
7. Fije el rnes,dia, aSo, hora,minutos y AM/PM
siguiendo el mismo procedimientotras ajustar
el rues
B. Presione el bot6n [Joystick(OK)] tras ajustar
AM/PM
, Aparece el mensaje <Complete!>
9. Para salir, presione el bot6n [MENU].
. Una vez que la bateria de litio pierda su carga
(despues de 6 meses aproximadamente), la
fecha y hera aparecen en pantalla coreD12:00
AM JAN.01.2006.
Page 33

[ ENGLISH ]
[ ESPANOL ]
Initial Setting • System Menu Setting
+ The Remote function works in Camera Mode/Player Model
M.Cam Mode/M.Player Mode. _page 28
*:o The Remote function allows you to enable or disable the remote
control for use with the DVD Camcorder.
1 Set the [Mode] switch to [DISC] or [CARD].
2 Set the [Power] switch to [_ (Camera)] or
[[_(Player)].
3 Pressthe [MENU] button.
• The menu list will appear.
4 Move the [Joystick] up or down to select
<System>, then press the [Joystick(OK)]
5 Move the [Joystick] up or down to select
<Remote>, then press the [Joystick(OK)].
6 Move the [Joystick] up or down to select <On>
or <Off>, then press the [Joystick(OK)].
7 Toexit, pressthe [MENU] button.
If you setthe Remote to Off in the menu and tryto use it, the remote
control icon ((/(_) will blJnkfor 3 seconds on the LCD Screen and then
disappear.
Camera Mode
, _Move _Select _Ext
_ Camera MOde
* Beep Sound
Del_onstration
Ill
_Move _Select _Exit
Ajuste iniciah Ajuste del men5 System
+ Lafuncion Remote esta operativa en los Camera Mode/Player
Mode/M.Cam Mode/M.Player Mode. _pagina 28
+ Lafund6n Remote permite activar o desactivar el control remote
para utilizar la Videocamara con DVD.
1. Coloque elinterrupter [Mode] en [DISC] o
[CARD].
2 Coloquselintenuptor[Power]en[_(Camera)]
_On
_ English
_On
Si define Remote en Off en el menu e intenta utilizarlo, el icono de
control remoto (({{i"_)parpadeara por 3 segundos en lapantalla LCD y
desaparecer&
o [[]_(Player)].
3. Presione el boron [MENU]
• Aparece la lista de! menQ
4. Mueva el [Joystick] hacia ardba o hacia abajo
para seleccionar <System> y presione el
boron [Joystick[OK)]
5. Mueva el [Joystick] hada ardba o hacia abajo
para seleccionar <Remote> y presione el
boton [Joystick[OK)]
6. Mueva el [Joystick] hacia ardba o hacia abajo
para seleccionar <On> u <Off> y presione el
boron [Joystick[OK)]
7. Para salir, presione e! boron [MENU]
/
Page 34

[ ENGLISH ]
[ ESPANOL ]
Initial Setting • System Menu Setting
+ + + _-++ • o ._+++ + o
*:o The Beep Sound function works in Camera Mode/Player Model
M.Cam Mode/M.Player Mode. -page 28
*:o You can turn the Beep Sound on or off, when on, each press of a
button sounds a beep.
1 Set the [Mode] switch to [DISC] or [CARD].
2 Set the [Power] switch to [1_1 (Camera)] or
[[]_(Player)].
3 Pressthe [MENU] button.
• The menu list will appear.
4 Move the [Joystick] up or down to select
<System>, then press the [Joystick(OK)]
5 Move the [Joystick] up or down to
select <Beep Sound>, then press the
[Joystick]OK)].
6 Move the [Joystick] up or down to select
<On> or <Off>, then press the [Joystick(OK)]
7 Toexit, pressthe [MENU] button.
_Move _Selec: _Exii 4.
f ............................ I.......................................
%
ml
Ajuste iniciah Ajuste del men_ System
+ _ - ++ • oe _++o _-++ • u
+ Lafunci6n Beep Sound esta operativa en los Camera Model
Player Mode/M.Cam Mode/M.Player Mode _pagina 28
*:o Puede activar o desactivar Beep Sound, cuando esta encendido,
cada pulsaci6n deboton emits un pitido.
1. Coloque el+nterruptor[Mode] en [DISC] o
[CARD].
2.
Coloque el +nterruptor[Power] en [ I_1 (Camera)]
_English
_On
_On
o [[_(Player)].
3.
Presione el boron [MENU]
• Aparece la lista de! menO
Mueva el [Joystick] hacia arriba o hacia abajo
/
para sebccionar <System> y presione el
boton [Joystick(OK)]
5.
Mueva el [Joystick[ hacia arriba o hacia abajo
para sebccionar <Beep Sound> y presione el
boton [Joystick[OK)[
6.
Mueva el [Joystick] hacia arriba o hacia abajo
para seleccionar <On> u <Off> y presione et
boton [Joystick(OK)[
7. Para salir, presione e! boron [MENU]
Page 35

[ ENGLISH ]
[ ESPAI_OL ]
initial Setting • System Menu Setting
*:- The Shutter Sound function works only in M.Cam Mode
_page 28
*:. You can tum the Shutter Sound on or off, when on, with each
press of the [PHOTO] button the Shutter will sound.
1 Set the [Mode] switch to [CARD].
2 Set the [Power] switch to [l_l (Camera)].
3 Pressthe [MENU] button.
• The menu listwill appear.
4 Move the [Joystick] up or down to select
<System>, then press the [Joystick(OK)]
5 Move the [Joystick] up or down to
select <Shutter Sound>, then press the
[Joystick(OK)].
6 Move the [Joystick] up or down to select
<On> or <Off>, then press the [Joystick(OK)]
7 Toexit, pressthe [MENU] button.
If Beep Sound is set to Off, you will not hear the
shutter sound even if it is set to On
[_} _ x, 1. Coloque elinterruptor [Mode] en [CARD].
F 2. Coloque elinterrupter [Power] en
_Move _SeJect _Exit / [Joystick(OK)].
[_ /- 5. Mueva el [Joystick] hacia arriba o hacia abajo
_:_ Language boton [Joystick(OK)]
'\
_Move _Se,ect _Exit /
.....................................................................................J
Ajuste inicial: Ajuste del men_ System
i _ - o- • ee a- oe .oe - Q o
*:- La funci6n Shutter Sound solo esta operativa en el M.Cam Mode.
=pagina 28
*:- Puede activar o desactivar Shutter Sound, cuando esta activado
con cada pulsaci6n del bot6n [PHOTO] sonata el obturador
[ _ (Camera)].
_-o_ 3. Presione el boron [MENU]
_-or, • Aparece la {ista del men&
_*Engh h
j 4. Mueva el [Joystick] hacia arriba o hacia abajo
para seleccionar <System> y presione el boton
el boton [Joystick[OK]].
6. Mueva el [Joystick] hacia arriba o hacia abajo
J para seleccionar <On> u <Off> y presione el
" para seleccionar <Shutter Sound> y presione
7. Para saD, presione e! boron [MENU]
J
Si Beep Sound se define en Off, oira el sonido del
obturador aunque este definido en On
Page 36

[ ENGLISH ]
[ ESPANOL ]
Initial Setting • System Menu Setting
*:o The Language function works in Camera Mode/Player Mode/
M.Cam Mode/M.Player Mode. =page 28
*:o YoucanselectthedesiredJanguagetodispiaythemenuscreen
and the messages
1 Set the [Mode] switch to [DISC] or [CARD].
2 Set the [Power] switch to [1_1 (Camera)] or
[[]_(Player)].
3 Pressthe [MENU] button.
• The menu list will appear.
4 Move the [Joystick] up or down to select
<System>, then press the [Joystick(OK)]
5 Move the [Joystick] up or down to select <Language>, then press
the [Joystick[OK)].
• The available language options are listed.
6 Move the [Joystick] up or down to select the desired OSD
language, then press the [Joystick(OK)].
• The OSD language is refreshed in the selected language.
7 Toexit, pressthe [MENU] button.
The word Language inthe menu is always indicated in English.
f .......................................................................................
%
Ajuste inicial: Ajuste del men_ System
*:o La funcion Language esta operativa en los Camera Mode/Player
Mode/M.Cam Mode/M.Piayer Mode. -pagina 28
*:o Puede seleccionar el idioma en el que desea que aparezca ta
pantalla det menu y los mensajes.
1 Coloque el interrupter [Mode] en [DISC] o
[CARD].
2 Coloq.u_elinterrupter[Power] en[l_(Camera)]
o [L__J(Player)].
3 Presione el boton [MENU]
= Aparece la lista de!menO.
4 Mueva el [Joystick] hacia arriba o hacia abajo
para seleccionar <System> y presione el
boton [Joystick[OK)]
5. Mueva el [Joystick] hacia arriba o hacia abajo para seleccionar
<Language> y presione el boton [Joystick(OK}].
= Aparece una Iista con lasopciones de idioma disponib+es.
6. Mueva el [Joystick] hacia ardba o hacia abajo para seleccionar e!
lenguaje OSD que desea y presione el boton [Joystick(OK)].
= La OSD se actuatiza en el ldioma seleccionado.
7. Para salir, presione el boton [MENU].
La palabra Language del menu siempre se Jndicaen ingles.
Page 37

[ ENGLISH ]
[ ESPANOL ]
initial Setting • System Menu Setting
- = - |- = . • |- • - . Q
÷:" The Demonstration function may only be used in the Camera
Mode with no disc inserted inthe unit. =page 28
÷:. Before you begin: Make sure that there is nodisc inserted inthe
DVD Camcorder. -page 42
÷:. Demonstration automatically shows you the major functions that
are included with your DVD Camcorder so that
you may use them more easily.
+ The Demonstration operates repeatedly until it
is switched off.
1 Set the [Mode] switch to [DISC].
2 Set the [Power] switch to [l_qCamera)].
3 Pressthe [MENU] button.
= The menu list will appear.
4 Move the [Joystick] up or down to select
<System>, then press the [Joystick(OK)]
5 Move the [Joystick] up or down to select
<Demonstration>, then press the
[Joystick(OK)].
6 Move the [Joystick] up or down to select
<On>, then press the [Joystick(OK)].
7 Pressthe [MENU] button.
, The Demonstration will begin.
8 Toquit the Demonstration, press the [MENU]
button
When you press FADE, BLC, EASY.Q, MF/AF, or
COLOR NITE button during the Demonstration
operation, the Demonstration function will be
deactivated and the function of the button pressed
will be activated.
_Move _Sebct _Ex}t
............................. j........................................
m
_Move _Select _Ext
L_
Ajuste iniciah Ajuste del men_ System
. . e e- . o- • . • |- • . •
+ Lafunci6n Demonstration s61opuede utilizarse en el Camera
Mode sin ning0n disco insertado en la videocamara.
_pagina 28
+ Antes deempezar: asegC_resede que no hay ninguna cinta dentro
de laVideocamara con DVD. _pagina 42
+ Esta funcion muestra de manera automatica
las funciones mas importantes de la
Videocamara con DVD.
+ Lademostracion se realiza repetidamente
hasta que se desactive el modo de
demostracion
1 Coloque el interruptor [Mode] en [DISC].
2 Ooloque elinterrupter [Power] en
[ I_ (Camera)].
3 Presione el bot6n [MENU]
/
• Aparece la lista de! menQ
4 Mueva el [Joystick] hacia arriba o hacia abajo
para sebccionar <System> y presione el
boron [Joystick(OK)]
5 Mueva el [Joystick] hacia arriba o hacia abajo
para seleccionar <Demonstration> y presione
el boton [Joystick(OK)].
6 Mueva el [Joystick] hacia arriba o hacia abajo
para seleccionar <On>, y presione el boton
[Joystick(OK)].
7 Presione el boron[MENU]
• Comenzaralademostraci6n.
8 Parasalir de la demostracion, presione el
bot6n [MENU].
Cuando presione el boton FADE, BLC, EASY.Q,
MF/AF, o COLOR NITE durante la operacion de
demostracion, dicha funcion se desactivara y la
funci6n del bot6n se activar&
Page 38

[ ENGLISH ]
[ ESPAi_OL ]
initial Setting • DispJayMenu Setting
• o _ - i -- I ,_ = | • •
*:° Adjusting the LCD Screen works in Camera Mode/Player Mode/
M.Cam Mode/M.Player Mode. =page 28
*:o Your DVD Camcorder isequippedwith a 25 inches(SC-DC563 only)
/ 27 inches(3C-DC564/DC565 only) wide color LiquidCrystal Display
(LCD)Screen, whichenables you to viewwhat youare recording or
playing backdirectly.
_* DependingontheconditionsunderwhichyouareusingtheDVD
Camcorder (indoors or outdoors for example), you can adjust;
LCD Bright
LCD Color
1 Set the [Mode] switch to [DISC] or [CARD].
2 Set the [Power] switch to [_ (Camera)] or
[[]_(Player)].
3 Pressthe [MENU] button.
• The menu list will appear.
4 Move the [Joystick] up or down to select
<Display>, then press the [Joystick(OK)]
5 Move the [Joystick] up or down to select the
item you want to adjust (LCD Bright or LCD
Color), then press the [Joystick(OK)]
6 Move the [Joystick] left or right to adjust the
value of the selected item (LCD Bright or LCD
Color), then press the [Joystick(OK)].
• You can set values for <LCD Bright> and
<LCD Color> between <00> ~ <35>
7 Toexit, press the [MENU] button. 7. Para salir, presione el bot,Sn[MENU].
• Adjusting the LCD Screen does not affect the brightness and • El ajuste de la pantalla LCD no afecta al britlo ni alcolor de la
@
Ajuste iniciah Ajuste del men_ Display
= _ - 6- _. . . I | _ _ I • •
+ El ajuste de la pantalla LCD esta operative en los Camera Model
Player Mode/M.Cam Mode/M.Player Mode _pagina 28
+ Lavideocamara esta equipada con una pantalla decdstal liquido
(LCD) en color de 2,5 pulg. (SC-DC563) / 2,7 pulg (SC-DC564/
DC565), que permite vet directamente Io que esta grabando o
reproduciendo.
_* SegOn las condiciones de grabaci6n (pot ejemplo exteriores o
intebores) es posible ajustar:
- LCD Bright
- LCD Color
_,off
_Niove _Se]ect _Ext
Camera Mode
J
LCD Color
_#,love _Se]ect _Ext
1. Co]oque el interruptor [Mode] en [DISC] o
[CARD].
2. Colo.£_q_eelinterrupter[Power] en[_(Camera)]
o [L_J(Player)]
3. Presione el boron [MENU]
• Aparece ]a lista de! menQ
4. Mueva el [Joystick] hacia arrJbao hacia abajo
para seleccionar <Display> y presJoneel
bot6n [Joystick(OK)]
5. Mueva el [Joystick] hacia arrJbao hacia abajo
para seJeccionar la opci6n que desea ajustar
(LCD Bright o LCD Color) y presJoneel bot6n
[Joystick(OK)].
6. Mueva e] [Joystick] a la izquierda o la derecha
para ajustar el valor de la opci6n seleccionada
(LCD Bright o LCD Color) y presione el bot6n
[Joystick(OK)].
• Puede fijar valores para <LCD Bright> y
<LCD Color> entre <00> y <35>.
,,_ color of the image to be recorded, magen que se grabe
Page 39

[ ENGLISH ]
[ ESPANOL ]
initial Setting • Display Menu Setting
*:o The Date/Time function works in Camera Mode/Player Model
M.Cam Mode/M.Player Mode. _page 28
+ The date and time are automatically recorded on a special data
area ofthe disc.
1 Set the [Mode] switch to [DISC] or [CARD].
2 Set the [Power] switch to [l_ (Camera)] or
[IJ_(Player)].
3 Pressthe [MENU] button.
• The menu list will appear.
4 Move the [Joystick] up or down to select
<Display>, then press the [Joystick(OK)]
5 Move the [Joystick] up or down to select
<Date/Time>, then press the [Joystick(OK)].
6 Move the [Joystick] up or down to select the
display type of the Date/Time, then press the
[Joystick(OK)].
• Display type of the Date/Time: <Off>,
<Date>, <Time>, <Date&Time>.
7 Toexit, pressthe [MENU] button.
= The Date/Time will read 12:00 AM JAN.01.2006 in the following
conditions.
During playback of a blank section of a disc.
If the disc was recorded before setting the Date/Time in the
DVD Camcorder
- When the Lithium Battery becomes weak or dead.
= Before you use the Date/Time function, you must set the clock.
-page 32
Camera Ivlo_le
_Move _Select _Exit
Ajuste inicial: Ajuste del men_ Display
+ Lafund6n Date/Time esta operativa en los Camera Mode/Player
Mode/M.Cam Mode/M.Player Mode. _pagina 28
+ Lafecha y la hora se graban automaticamente en una zona
especial del disco.
=
Aparecera 12:00 AM JAN.01.2006 enDate/Time en las siguientes
condiciones.
- Durante la reproducci6n de una parte de! disco que no este
grabada.
- Si el disco fue grabado antes de ajustar Date/Time en la
Videocamara con DVD.
- Cuando la bateria de litio se debilita o se agota.
Antes de utilizar la fanci6n Date/Time, debe ajustar e! reloj.
_pagina 32
1.
Coloque el interruptor [Mode] en [DISC] o
[CARD].
2
Colo_ el intenuptor [Power] en[1_ (Camera]]
o [L_J(Player)].
Presione el boron [MENU]
• Aparece la {ista de! menQ
Mueva el [Joystick] hacia ardba o hacia abajo
para seleccionar <Display> y presione el
boton [Joystick(OK)]
Mueva el [Joystick] hacia ardba o hacia abajo
para seleccionar <DatetTime> y presione el
boton [Joystick(OK)]
Mueva el [Joystick] hacia arriba o hacia abajo
para seleccionar el tipo de visualizacion de la
fecha/hora y presione el boton [Joystick(OK)].
= Tipo devisualizacion de lafecha y hora:
<Off>, <Date>, <Time>, <Date&Time>.
7.
Para salir, presione e! boron [MENU]
Page 40

[ ENGLISH ]
[ ESPAI_OL ]
DVD Camcorder: Before Recording
- = - _ +-
_+ lnthe [t_j_ (Camera)] or [_(Player)] mode+the Viewfinder wlll
work when the LCD Screen is closed.
Ad'ustin the Focus
The focus adjustment knob of theViewfinder enables
individuals with vision problems to see clearer images.
1 Close the LCD Screen and pull out the Viewfinder.
2 Use the Focus Adjustment Knob of the Viewfinder
tofocus the picture
Viewing the sunor any strong light source through the Viewfinder for a
prolonged period may be harmful, or cause temporary impairment.
Videoc mara conDVD:Antes degrabar
• ++ m
o,*+En el modo [_ (Camera)] o [_(Player)], et visor funcionara
cuando se cierre lapantalla LCD.
1. Cierre la pantalla LCD ysaque el visor.
2. Utilice el boton de ajuste de enfoque del visor
para enfocar la imagen.
La luzdel sol o cualquier fuente de luz intensa a traves del visor
durante tiempo protongado puede ser perjudicial o causar problemas
de visi6n temporales
Page 41

[ ENGLISH ]
[ ESPAI_OL ]
DVD Camcorder: Before Recording
• • _- Q = o - e -
•:o In some situations, different recording techniques may be required
for more dramatic results.
1. General recording,
2. Downward recording.
Making a recording with a
top view of the LCD Screen.
3. Upward recording.
Making a recording viewing
the LCD Screen from below.
4. Self recording=
Making a recording viewing
the LCD Screen from the
front
5. Recording with the
Viewfinder.
in circumstances where it
isdifficult to use the LCD
Screen, the Viewfinder can
be used as a convenient
alternative.
Please rotate the LCD Screen
carefully as excessive rotation
may cause damage to the inside
of the hinge that connects the
LCD Screen to the DVD
Camcorder.
Videoc mara conDVD:Antes degrabar
- +_ _ • ++ + +++ +
+ En algunos casos son necesarias distintas tecnicas degrabaci6n
para obtener mejores resultados.
1. Grabaci6n en general.
2. Grabaci6n hacia abajo,
Grabacbn mirando {a
pantalla LCD desde arriba
3. Grabaci6n haeia arriba.
Grabacbn mirando {a
pantalla LCD desde abajo.
4. Grabaci6n propia.
Grabacion mirando la
pantalla LCD desde e!
frente.
5. Grabaci6n empleando el
visor,
Er+casos en los que sea
dificil emplear la pantalla
LCD, elvisor puede resultar
una altemativa de gran
utilidad.
Gire la pantalla LCD con cuidado,
ya que si la gira demasiado se
puede daMarel interior de la
bisagra que une la pantalla LCD
a la Videocamara con DVD.
Page 42

[ ENGLBH ]
[ ESPANOL ]
DVD Camcorder: Before Recording
,**o When inserting a disc or dosing the disc cover, do not
apply excessive force It may cause a malfunction
,**o You cannot open the disc cover while loading.
,**° Set the [Mode] switch to [DISC] and the [Power]
switch to [l_(Camera)] to view menus and
messages displayed on the LCD Screen
f Push the [OPEN] switch in the direction of the arrow
• The disc cover will partially open
2. Gently open the cover the rest of the way by hand
3 Push the disc into the disc compartment until a dick is
heard
• The recording side of the disc must face the inside
of the DVD camcorder
• Do not touch the pickup lens.
4 Gently push the section marked [PUSH CLOSE] on the
disc cover to dose it
• Once inserted, the disc is recognized and the
[ACCESS] indicator blinks Do not cut off the power
supply during this time Do not shake nor apply impact.
}t may cause a malfunction.
Move the Hand Strap so it does not interfere with
inserting or ejecting the disc.
- The disc cover can be opened when the device is
connected to an AC power adapter or the battery
pock, even if the power is off.
Caution
This product utilizes a laser Use of controls or
adjustments or performance of procedures other than
those specified herein may result in hazardous radiation
exposure, Do not open covers and do not look inside the
product if interlock mechanism is damaged
Warning
Be careful not to damage the interlock mechanism,
Videoc_mara con DVD: Antes de grabar
+ AI inserter un disco o cerrar la cubierta de] disco, no
aplique excesiva fuerza Podda hacer que la
videocamara no funcionara bien.
°:, No puede abdr la cubierta del disco al cargar,
+ Co]oque el interruptor [Mode] en [DISC] yel interruptor
Power en I_(Camera para vet menOs y mensa es
en a panta aLCD.
1 Presione el interruptor [OPEN] en la dkecci6n de la
fiecha.
. La cubierta del disco se abdr_ parcialmente
2 Abra suavemente la cubierta con la mano el espacio
restante.
3 Introduzca el disco en el compartimento basra que se
oiga un clic.
• El lado de grabacidn de disco debe situarse hacia el
interior de la camara con DVD.
• No toque la lente de captaci6n
4 Empu e suavemente la secci6n marcada como
[PUSH CLOSE en la cuberta del d sco pare cerrafla.
• Una vez insertado el disco se reconoce con el
indicador [ACCESS] parpadeando. Durante este
proceso no corte el suministro electrico No la agite
ni la go{pee. Podda hacer que la videoc&mara no
funcionara bien
Mueva la empudadura para que no interfiera al insertar
o expuBar el disco
La tape del disco puede abdrse cuando el dispositivo
este conectado a un adaptador de CA oa la bateria,
incluso aunque este apagado
Precaucidn
Este producto utiliza un laser El uso de contro_es oajustes o
]a ejecucidn de procedimientos distintos a los especificados
en este documento pueden dar como resufiado la
exposicidn peligrosa a radiaciones, No abra ]as tapes ni
mire en el interior dela unidad sise daita el mecanismo de
pickup lens
interbloqueo
Tenga cuidado de no daitar el mecanismo de interNoqueo
Advertencia
Page 43

[ ENGLISH ]
[ ESPAI_OL ]
DVD Camcorder: Before Recording
Formatting may be required if a new disc is inserted.
Recognition of the disc will start
For a DVD-R/-,'-R DL disc: Formatting will automatically begin
For a DVD-RW disc: You are prompted with the <Disc is not formatted.
Format?> message.
Differences between be able oplay the disc onmost DVD Players/Ree0rders
ideo and VR mode VR (VR Mode) : You can edit the disc on a DVD
_/ Video Video Mode : if thedisc has been finalized, you wil
Move the [Joystick] left or right to select <Video> or <VR>I then press
[Joystick(OK)]
Please refer to page 13 for disc type descriptions and usage.
Upon completion, the <Complete!> messagewill appear
Ifyou select <Cancel> the <Not formatted!>
warning messagewill appear Formatting a new
disc is requiredto record on it To format later, use
the <Disc Manager> menu _page 82
For aDVD+RW disc: You are prompted with the
<Disc format? All files will be deleted!> message.
Move the [Joystick] left or rightto select <Yes>,then
press [Joystick(OK)]
Upon completion the <Complete!> messagewill
appear.
Ifyou select <No>, the <Not formatted!> warnfng
message will appear Formatting a new disc is
required to record onit Toformat later, usethe <Disc Manager>
menu. '-page 82
1. Push the [OPEN] switch inthe direction ofthe arrow
• The disc cover will partially open
2. Gently open the cover the rest oftheway byhand.
3. Remove the disc
• Whilepushing down the center portion of the dfscspindb, pickup
the disc by theedges to remove.
4. Gently push the section marked [PUSH CLOSE] on the disc cover
to close it.
N_te
The Finalize/Format functions are not available at battery level
and _.
Camcorder. but playback is onl possible ona DVD
Recorder that supports VR mo_e.
= Refer to page 14 for Finalized disc compatibility
<When a DVD-RW disc is formatted.>
Videoc mara conDVD:Antes de grabar
Ser& necesado formatear un disco nuevo al introducido.
Se iniciara el reconocimiento del disco
Para un disco DVD-RI+R DL: Se iniciara autornaticamente elformateo.
Para un disco DVD-RW: A _arecerael mensaje <Disc is not formatted. Format?>
Diferencias entre elmodo Grabadoras de DVD
Video y VR VR (Modo VR): Puede editar el discoen una
• Consulte la pagina 14para conocer la compatibilidad de un disco finalizado
Mueva el [Joystick] a laizquierda o a la derecha para seleecionar <Video> o
<VR> y presione el bot6n [Joystick(OK)]
I. Presione el interruptor [OPEN] en la direccirtn de la flecha
• La cubierta del disco se abdra parciaimente.
2. Abra suavemente la cubierta con la mano el espacio restante
3. Retire el disco
• Mientras presiona la parte central de M pletina, sujete el disco por los
bordes para retirado.
4. Empuje suavemente M secci6n marcada corno [PUSH CLOSE] en la
cubJerta del disco para cerrada
La funci6n Format/Finalize (Formato/Finalizar) no esta rtisponible en el nivet
de bateria _ o _. ,_.
reproducir el disco en lamayorta de los Reproductores/
Video (Modo Video): Si el disco se hafinalizado, podra
Videocamara conDVD, pero la reproducci6n s61oes
osible en un Grabador de DVD que admita el modo VR
= Consulte la pagina 13 para las apHcaciones pot modo
= AI finalizar aparecer& el mensaje <Complete!>.
= SJselecciona <Cancel>, aparecer& el mensaje <Not
formatted!> Formatear un nuevo disco es necesado
para grabar enel. Para formateado posteriormente.
utJliceelmenQ <Disc Manager>. -p&gJna 82
Para un disco DVD+RW: Aparecer& el mensaje
<Disc format? All files will be deleted!>
Mueva el [Joystick] a la izquierda o a la derecha para
seleccionar <Yes> y presione [Joystick(OK)]
= AI finalizar aparecer& el mensaje <Complete!>.
= Si selecciona <No>, aparecera elmensaje <Not formatted!>
Formatear un nuevo disco es necesado para grabar
en el Para formatearlo postebormente, uti]ice el menQ
<Disc Manager>. _p&gina 82
Page 44

[ ENGLISH ]
[ ESPAI_OL ]
DVD Camcorder: Before Recording
_ _ _ _ m • o oo _` oo-
•:o The Record Mode function works in both Camera Mode and
Player Mode _page 26
•:o This DVDCamcerder can film inthe XP (extra play), the SP
(standard pray) and the LP (long play) modes.
The SP mode is set as the factory default
1 Set the [Mode] switch to [DISC].
2 Set the [Power] switch to [l_(Camera)] or
[[]_(Player)].
3 Pressthe [MENU] button.
• The menu list will appear.
4 Move the [Joystick] up or down to select
<Record>+ then press the [Joystick(OK)].
5 Move the [Joystick] up or down to select
<Ree Mode>, then press the [Joystick(OK)].
6 Move the [Joystick] up or down to select the
desired record mode (XP, SP or LP), then
press the [Joystick(OK)].
7 Toexit, pressthe [MENU] button.
• The icon of the selected mode is displayed.
DVD-RW/+RW/-R DVD+R DL
XP Approx. 2Omin Approx. 35rain
•SP Approx. 3Omin Approx. 53min
•LP Approx. 6Omin Approx.1O6min
* Recordedfilesareencodedwith VariableBitRate(VBR)
, The recording times shown above are
approximate and depend on the recording
environment (i.e lighting conditions).
, VBR is an encoding system that automatically
adjusts the bit rate according to the recording
image.
(14G) (2.6G)
(_ _- _ 1 Coloque el interrupter[Mode] en [DISC].
_,love _Select _Ext
_ STB¥ 0_00_00 (_ _
Videoc mara conDVD:Antes degrabar
+ + + +- ++Q e + ++ +++ + o- e=+
+ La funcidn de! modo de grabacion esta operativa en los Camera
Mode y Player Mode _pagina 28
o:÷ Esta Videocamara con DVD puede filmar en los modos
XP (reproduccion extra), SP (reproduccion estandar) y LP
(reproduccion larga). El modo SP se define come el valor
predeterminado de fabdca.
2 Coloque el interruptor[Power] en
[l_(Camera)] o [[_J(Player)]
3 Presione el boton [MENU]
= Aparece laIista del men&
4 Mueva el [Joystick] hacia arriba o hacia
abajo para seleccionar <Record> y pulse el
boron [Joystick(OK)]
5 Mueva el [Joystick] hacia arriba o hacia
abajo para seleccionar <Rec Mode> y pulse
e] boton [Joystick(OK)]
6 Mueva el [Joystick] hacia arriba o hacia
abajo para seleccionar el medo de grabacion
que desee (XP, SP o LP) y pulse el boton
[Joystick(OK)].
7. Para salir, presione el boron [MENU]
• Aparece el icono del mode seleccienado.
I
_ DVD-RW/+RW/-R DVD+R DL
XP Aprox 20 raM. Aprox 35 rain.
•SP Aprox 30 rain. Aprox 53 rain.
•LP Aprox 60 raM. Aprox 106 rain.
• Los archivos grabados se codifican con VBR
(Ve!ocidad variable de bits)
• Los tiempos de grabacion que se muestran
son aproximados y dependen de+entomo de
grabacion (p ej.: condiciones de luz).
• VBR es unsistema de codificacion que
ajusta automaticamente la velocidad en bits
de acuerdo con la imagen de grabacion.
(1,4 G) (2,6 G)
Page 45

I ENGLISH 1
[ ESPAI_OL ]
DVD Camcorder: Basic Recording
• 6 • m • o
1 Connect a power source to the DVD _S_7_
Camcorder. _pages 23.27
= (A Battery Pack or a AC Power
adapter) i. I_l_:'_
2 Remove the Lens Cover
= Insert a disc-page 42 _ _
Open the LCD Screen _'
3 = Set the [Mode] switch to [DISC]
= Set the [Power] switch to [_(C ...... )] __"_. [;_Zr_
Mak..... that <STBY> isdisplayed. ] I '_(
= Mak..... the image y..... tto f_ _,r 7qe"-_ I I !Ji_
or Viewftnder _"-_-f_ I] I I F b
= Make sure the Battery Level I _J_'_)__'t =-
indicates that there is enough I llP_'_J"_ _J'_"
remaining power for your expected
recording time
4 To start recording, press the [Start/Stop[ button
<RECO> is displayed on the LCD Screen
The record mode recording time, the disc type, the
format mode and the title scene number are displayed
on the LCD Screen
5 To stop recording, press the [Start/Stop] button again.
<STBY> is displayed on the LCD screen after blinking
If you press the [StartlStop[ button to record again, a
new title scene will be created
The scene number vdfl not appear in the STBY mode
but in the REC mode
= Playing title scenes _page 64
= Up to 253 title scenes can be created on DVD-R/+RW/+R DL/-RW (_Jldeo
Mode) discs, and up to 999 on DVD-RW (VR Mode)
Detach the Battery Pack when you have finished recording to prevent
unnecessary battery power consumption
if the power cable/batteries are disconnected, or recording is disabled during
recording an error message v4fl appear and the system is switched to thedata
recovery mode. While data is being recovered,no other function is enabled After
data recovery, the systemwill be switched to theSTBY mode.
Videoc_mara con DVD: Grabaci6n b_sica
1 Coneete la Videocamara con DVD a
una fuente de afimentacidn
J-_ 0
4. Pulse el botdn [StartlStop] para empezar agrabar.
REC• [] OO020(*'_
30rain []
I_100/
* Reproduccidn de escenas deltitulo _p&gina 64
. Pueden crearse hasta 99 escenas de titulo en discos DVD-RW/-R y hasta 49
en discos DVD+RW/+R DL
. Desconecte la bateria al terminar de grabar para evitar un eonsumo
innecesado de la bated&
. Si estan desconectados elcable de afimentacidn y las batedas, o la grabaci6n
esta desactivada durante lagrabacidn,aparecera un mensajede error y el
sistema cambiara a] modo de recuperacidn de datos. Mientras se recuperan los
datos, ninguna otra funei6n permanece habilitada Tras la recuperaci6n de
datos el sistema cambiara al modo STBY _.
= <RECO> aparece en ]a pantal[a LCD.
El modo de grabaeidn e] tiempo de grabaeidn, e]
tipo de disco, el modo de formato y el nQmero del
Btu[o aparecen en la pantal]a LCD.
5. Para detener la grabacJdn, pulse de nuevo el botbn
[StartlStop[.
= Aparece <STBY> en ]a pantal[a LCD
Si pulsa e] botdn [Start/Stop] para grabar de nuevo
se creara una nueva lista de tftulos
J
El nt_mero de lista de titu]os no aparecera en el
rnodo STBY pero si en eImodo REC
_paginas 23, 27
• (Una bateda o un adaptador de CA.)
• InseRe un disco _p&gina42
2 Retire ]atapa del objetivo
3 Abra la pantalla LCD
• Coloque elinterruptor [Mode] en
[DnSC]
• Coloque elinterruptor [Power] en
[t_ [Camera)]. Asegdrese de que
aparece <STBY>.
• AsegQrese de que la imagen que
desea grabar aparezca en la
pantafla LCD o en el visor
• AsegOrese de que el hive] de la
bateda indique que tiene suficiente
energia para grabar durante el
tiempo deseado
Page 46

[ ENGLISH ]
[ ESPANOL ]
DVD Camcorder: Basic Recording
+ The EASY.Qfunction works only in Camera Mode. "_page 28
*,,t* TheEASY.Q functionallowsa beginner to easily make good recordings.
1, Set the [Mode] switch to [DISC].
2. Set the [Power] switch to [i_ (Camera)].
3, By pressing the [EASY.Q] button, all functions
on the DVD Camcorder will be set to off and the
recording settings will be set to thefollowing
basic modes (DIS, AF(Auto Focus) AWB(Auto
White Balance), AE(Auto Exposure)) ON:
• The word <EASY.Q> and DtS (_) appear
on the display at the same time.
4, Press the [Start/Stop] button to start recording. [_
• Recording will begin using the basic
automatic settings,
5, Press the [EASY.Q] button again in the STBY
mode to turn the EASY.Q mode off,
• The EASY,Q function will not turn offwMle
you are recording,
. The DVD Camcorder will return to the
settings that were set pdor to activating
EASY.Q mode.
ores
• tn EASY,Q mode, certain functions are not
available, such as Menu, BLC, Manual focus,
Color Nite. Ifyou want to use these functions,
you must first turn the EASY.Q mode off,
• The EASY.Q mode settings are released when
the Battery Pack is removed from the DVD
Camcorder and must be reset when the Battery
Pack is replaced.
• 16:9 Wide is not available in the EASY.Q mode, (SC-DC563 only)
• Digital Effect and Digital Zoom is not available in the EASY,Qmode.
Videoc_mara con DVD: Grabaci6n b_sica
*,:* La funci6n EASY.Q s61oestaoperativa en el Camera Mode.
_pagina 28
,,:* La funci6n EASY.Q permite a los principiantes obtener buenas
I
• 16:9 Wide no esta disponibte en el Modo EASY.Q,(s6toSC-DC563)
• Digital Effect y Digital Zoomnoestandisponiblesenelmodo EASY Q.
grabaciones con facilidad.
1. Coloque el interruptor [Mode] en [DISC].
2. Coloque el interruptor [Power] en
[ I_ (Camera)].
3. AI presionar el bot6n [EASY.Q] para que
se desactiven todas las funciones de la
videocamara, Los ajustes de grabaci6n se
acomodaran a los siguientes modos basicos
(DIS, AF (Enfoque automatico), AWB (Balance
de blanco automatico), AE (Exposici6n
automatica)) ON:
• Apareceran en pantalla las palabras
<EASY.Q> y DIS ('_) al mismo tiempo,
4. Pulse el botdn [StartlStop] para iniciar la
grabaci6n,
• La grabaci6n empieza con los ajustes
automaticos basicos.
5. Pulse de nuevo el botdn [EASY.Q] en e modo
STBY y se desactivara el modo EASY.Q.
• La funci6n EASY,Q sedesactivara cuando
este grabando.
• La Videocamara con DVD volvera a los
ajustes hechos antes de activar el modo
EASY,Q,
• En et modo EASY_Q,algunas fi._ncionesno estan
disponibles, comoMenu, BLCy enfoque manual,
Color Nite. Sidesea usar estas fi._nciones
pdmero debera desactivar el modo EASYQ,
• Los ajustes del modo EASY.Q se liberaran
cuando se quite la bateria de la Videocamara
con DVD y deberan ajustarse de nuevo al
volver a colocada,
Page 47

[ ENGLBH ]
[ ESPAKIOL ]
DVD Camcorder: Basic Recording
= _ oo • -
Connect external microphone (not supplied) to the
external microphone jack of this DVD Camcorder.
Clearer sound cart be recorded.
+ The Zoom function works in both Camera Mode and M.Cam
Mode. -page 28
*.*o Zooming is a recording technique that lets you change the size of
the subject ina scene.
+ Youcan zoom using variable zoom speeds.
*.*o Use these features for different shots. Please note that over-use of
the Zoom feature can lead to unprofessional looking results and a
reduction of battery usage time.
1 Move the [Zoom] lever slightly
for agradual zoom, move it
further for a high-speed zoom.
• Your zooming is monitored
on the QSD
2 [T] (Telephoto) side: Subject
appears closer.
3 [W] (Wide angle) side: Subject
appears farther away
• You can record a subject that isabout 10ram (about 0.5 inch)
away from the lens surface in the Wide position
Videoc rnara conDVD:Grabaci6nb sica
• I o- • • • - - •
Conecte el micrdeno exteme (no se suministra) al
terminal del microfene exteme de estaVideecamara
con DVD. Pedra grabarse un sonide mas claro
+ La funcion Zoom esta operativa en los Camera Mode y M.Cam
Mode =pagina 28
+ El usodel zoom es una tecnica de grabacion que permite
modificar el tama5o det encuadre de ]as escenas.
+ El zoom se puede emplear con velocidades variables.
+ Utilice el zoom para obtener imageriesvariadas. Si abusa del
zoom el resultado sera imageries poco profesienales. Ademas, e!
tiempo de use de la bateria se reduce
TELE
WIDE
3. [W] (Gran angular): el objeto se ve mas iejos
= Puede grabar un objeto que se encuentre a unos 1gram (unas
0,5 pulgadas) de la superficie del objetivo en la posici6n W.
1 Mueva la palanca det [Zoom]
lentamente para obtener
un efecto de zoom gradual.
Mu6valo mas rapido si desea
un efecto rapido
• El efecto del zoom se
puede seguir por la
pantalla OSD.
2 [T] (Teleebjetivo): elobjeto se
ve mas cerca.
Page 48

[ ENGLISH ]
[ ESPANOL ]
DVD Camcorder: Basic Recording
+ The Fadefunction works only in
Camera Mode. _page 28
4- Youcan give your recording a
professional look by using special
effects such as fade in at the
beginning of a sequence or fade out
atthe end of a sequence
To Start Recording {_
1 Set the [Mode] switch to [DISC].
2 Setthe [Power]switchto[l_(Camera)]
3 Before recording, hold down the
[FADE] button
• The picture and sound gradually
disappear (fade out).
4 Pressthe [Start/Stop} buttonandatthe
sametime releasethe[FADE[button
• Recording starts and the picture and
sound graduallyappear(fadein)
To Sto Recordin 6L_J
5 When you wish to stop recording,
hold down the [FADE]button.
• The picture and sound gradually
disappear (fade out).
6 When the picture hasdisappeared,
press the [Start/Stop] button to stop
recording.
Hold down the [FADE] button a, Fade Out
a. Fade Out
(Approx 4seconds)
b. Fade In
(Approx 4seconds)
VideocbmaraconDVD:Grabacibnbbsica
¢. Lafunci6nde aparicibngraduals61o
est&operativeenelCameraMode
pagina28
+ Puededara susgrabacionesun
aspeetoprofesionalempleandoefecfos
espeeialescomblaaparicibngradual
dela imagen(fade-in)al pdncipio
deuna secuenciaosudesaparlci6n
gradual(fade-out)al finalde la
secuencia
Comienzo de la grabacibn
1 Coloqueelinterruptor[Mode]en
[D_SC].
2 CoJoqueelinterruptor[Power]en
[_(Camera)]
3 Antesdegrabar,mantengapulsadoel
bot6n[FADE]
= Lah'nageny elsonidodesaparecen
gradualmente(fadeout)
4 Pulseel bot6n[Start/Stop]y al mismo
tiemposuelteel bot6n[FADE]
= EmpJezalagrabacibnylaimagen
y elsonidoaparecengradualmente
(fade-in)
Pare detener la grabaci6n
5 Cuandoquieradetenerlagrabad6n,
mentenge pulsedoel bot6n[FADE]
. Leimageny elsonidodeseperecen
graduelmente[fade out).
6 Cuandoleimegenhaye
desepereddo, pulse el botbn [Start/
Gradualdisappearance
B a FadeOut
Stop]pare detaner lagrabecion
(Aprox 4 segundos)
b FadeIn
(Aprox 4 segundos)
G_radua]appearance b, Fade In
Release the [FADE[ button
Page 49

[ ENGLISH ]
[ ESPANOL ]
DVD Camcorder: Basic Recording
÷***BLC works in both Camera Mode
and M,Cam Mode. "*page 28
¢ Back lighting exists when the subject
is darker than the background:
- The subject is in front of a window.
- The person to be recorded is
wearing white or shiny clothes
and is placed against a bright
background; the person's face <BLCOff>
is too dark to distinguish his/her
features.
- The subject is outdoors and the background is overcast,
- The light sources are too bright,
- The subject is against a snowy background,
1, Set the [Mode] switch to [DISC] or [CARD].
2, Set the [Power] switch to [_ (Camera)].
3, Press the [BLC] button,
• BLC icon (_}) is displayed,
4, Toexit BLC mode, press the [BLC] button
again.
. Each press of the [BLC] button toggles:
Normal _ BLC _ Normal.
The BLC function will not operate in EASY.Q mode.
Videoc_mara con DVD: Grabaci6n b_sica
& BLC est& operativa en los Camera Mode
y M,Cam Mode _p_gina 28
+ Existe luz de fondo cuando el objeto que
se va a grabar es mas oscuro que el
fondo:
- Cuando e] objeto est& deiante de una
ventana
= Cuando se va a grabar a una persona
que lieva ropa blanca o briliante y
<BLC On> iluminado En este caso su cara
Cuando el objeto se encuentra en el exterior y el rondo esta
nublado
Cuando la fuente de luz es muy intensa
Cuando el objeto se encuentra delante de un fondo nevado
1. Coloque el interruptor [Mode] en [DISC] o
[CARD].
2. Cologue e] interruptor [Power] en
[ _ (Camera)].
g. Pulse el bot6n [BLC].
• Aparece el ieono de BLC (_,_).
4. Para salir del modo BLC, pulse de nuevo el
I
bot6n [BLC].
• Cada puBacidn del botdn [BLC] cambia:
La funci6n BLC no esta operativa en ]a modalidad
EASY.Q.
se encuentra frente a un fondo muy
estara demasiado oscura para que
se distingan sus facciones.
Normal _ BLC _ Normal.
Page 50

[ ENGLISH ]
[ ESPANOL ]
DVD Camcorder: Basic Recording
o - _ e =
+ Color Nitefunction works only inCamera Mode. _page 28
4. You can make the subject recorded appear to be inslow motion by
controlling the shutter speed, or a brighter image
in dark places without acompromise in colors.
*:* Please disable 16:9 Wide mode to use the Color
Nite function. _page 60
1, Set the [Mode] switch to [DISC].
2, Set the [Power] switch to [l_q (Camera)].
3, Press the [COLOR NITE] (SC-DC563 only) or
[C.NITE/$] (SC-DC564/DC565 only) button.
4, Each time you press the [COLOR NITE]
(SC-DC563only) or [C.NITE/'_] (SC-DC564/
DC565 only) button,shutter speed is changed to;
<Color N. 1/30>, <Color N. 1/15> and off.
• When using Color Nite, the image takes on a
slow motion like effect.
• When using Color Nite, thefocus adjusts slowly
and white dots may appear on the screen, this [_ SIm
is not a defect.
• Program AE, Digital Zoom, Shutter, Exposure,
Mosaic, Mirror, Emboss2. Pastel2 or 16:9
Wide is net ava@ble in the Color Nite mode,
if DIS or EASY,Q isset. Color Nite mode will be
released.
<SC-DC564/DC565only>
Videoc_mara con DVD: Grabaci6n b_sica
@ La funci6n Color Nite solo esta operativa en el Camera Mode.
'- pagina 28
<SC-DC563only>
i'!"::!
*.:* Puede disparar sobre un objeto a camara
lento controlando la velocidad del obturador o
una imagen mas brillante en lugares oscuros
sin que afecte a los colores.
_,:* Desactiveelmodo 16:9 Wide para utilizar la
funciOnColor Nite. _pagina 60
1. Coloque el interruptor [Mode] en [DISC],
2. Coloque el interruptor [Power] en
[ llt (Camera)].
3 Pulse el boron [COLOR NITE] (s0to SC-
DC563) o [C.NITE/_] (s61oSC-DC564/DC565),
4. Cada pulsaci6n del bot6n [COLOR NITE]
(s61oSC-DC563) o [C,NITE/'_] (s01oSC-
DC564/DC565), se cambia la velocidad del
obturador; <Color N.1/30>, <Color N.1/15> y
desactivada.
. AI utilizar Color Nite, la imogen toma un efecto
como de camara lento.
. AI utilizar Color Nite, el enfoque se ajusta
lentamente y es posible que aparezcan
puntos blancos en la pantalia; esto no es
ningOndefecto.
Program AE, Digital Zoom, Shutter,
Exposure, Mosaic, Mirror, Emboss2,
Pastel2 o 16:9 Wide no estan disponibles en
el modo Color Nite.
Si se define DIS o EASY.Q, se liberara el
mode Color Nite.
Page 51

[ ENGLISH ]
[ ESPAI_OL ]
DVD Camcorder: Advanced Recording
+ The Wind Cut function works only in Camera Mode, _,,page 28
+ Use theWind Cut when recording in windy places such as the
beach or near buildings,
+ The Wind Cut function minimizes wind noise or other noise while
recording.
- When the Wind Cut is on, some low pitched tones are
e_iminated along with the sound of the wind, (_ F- a,
2, Set the [Power] switch to [1i_ (Camera)]. P,off
1. Set the [Mode] switch to [DISC]. __sp
3, Pressthe [MENU] button.
4. Move the [Joystick] upor down to select
<Record>, then press the [Joystick(OK)]. _TUove _Select _Exit
5. Move the [Joystick] upor down to select
<Wind Cut>, then press the [Joystick(OK)].
6, Toactivate the Wind Cut function, move the
[Joystick] up or downto select <On>,
then press the [Joystick(OK)].
7. To exit, press the [MENU] button.
• Wind Cut icon ([p]) is displayed.
Make sureWind Cut isset to Off when you want
the microphone to beas sensitive as possible.
Videoc&maracon DVD:Grabaci6navanzada
+ La funci6n Wind Cut s61oestaoperativa en el Camera Mode.
_pagina 28
+ Use la funci6n Wind Cutcuando grabe en lugares donde sople el
viento, como en lapJayao cerca de edificios,
+ La funcion Wind Cut minimiza e] ruido del viento y otros ruidos
durante ia grabaci6n.
STBY [] 0:00:00(R,¢"_
- e A ee _i - _ #
- Cuando la funci6n Wind Cut esta activada,
se eliminan algunos sonidos graves junto
con losdel viento.
1. Coloque el interruptor [Mode] en [DISC],
2. Coloque el interrupter [Power] en
[ _ (Camera)].
3. Presione el bot6n [MENU],
4. Mueva el [Joystick] hacia arfiba o hacia
abajo para seleccionar <Record> y pulse el
bot6n [Joystick(OK)],
5. Mueva el [Joystick] hacia arriba o hacia
abajo pars seleccionar <Wind Cut> y pulse el
bot6n [Joystick(OK)I,
6. Para activar ]a funci6n Wind Cut, mueva el
[Joystick] arriba o abajo para se]eccionar
<On> y pulse el bot6n [Joystick(OK)].
7. Para salir, presione el boton [MENU].
. Aparece elicono Wind Cut ([}::_]).
Off cuando quiera que el micr6fono sea Io mas
sensible posible,
30rain_ Aseg0rese de que la funci6n Wind Cut este
Page 52

[ ENGLISH ]
[ ESPAI_OL ]
DVDCamcorder: Advanced Recording
¢o The Shutter Speed function works only in Camera Mode _page 28
*:o The Exposure function works in both Camera Mode and M.Cam Mode
'-page 28
*:o The Shutter Speed and Exposure functions can be set in the QUICK
MENU
1 Set the Mode] switch to [DISC] or [CARD]
2 Se the Power sw chto _, Camera
3 Pressthe [QUICK MENU] button.
• QUICK MENU fist will appear
4 Move the [Joystick] up or down to select <Shutter>
or <Exposure>, then press the [Joystick(OK)]
5 Move the [Joystick] up or down to select
<Manual>, thenvessthe Joystick(OK)]
6 Move the Joystick eft or r ght to se ect the des red
shutter speed or exposure value, then press the
[Joystick(OK)]
• Shutter speed can be set to <1/60>, <1/100>.
<1/250>, <11500>, <111000>. <112000>. [5_
<114000> or <1/10000>
= Exposure value can be set between <go> and<29>
7 To exit, press the [QUICK MENU] button
• Selected settings are displayed
RecommendedShutterSpeedsWhenRecordinq
•:* Outdoor sports such as golf or tennis: 112000 or 114000
•:* Moving cars or trainsor other rapidly movingvehicles such
asroller coasters: b100O 1/500or 1'250
•:* Indoor sports such as basketball: 1100
Adjusting theExposureWhenRecording
•:* [fyousetExposuretoManualthedefaultseftingabpears [_
asthe value adjusted automatically for changes according
tothe environmental light conditions Youcan also adjust
thebrightness using theJoystick
_ote_:
• if you manually change tile Shutter Speed and the
Exposure value when Program AE option is selected,
manual changes are applied first
• The image may not seem as smooth when ahigh
Shutter Speed is set
• The DVD Camcorder returns to the auto shutter and auto exposure
settings when you change to the EASY.Q mode
• When recording with a Shutter Speed of 1,1000 orhigher, make sure the
sun is not shining into the lens.
%
/_lm STBY [] 00000(R'i._
L_
\ _ Ext ./.
Videec&rnaraconDVD:Grabacibn avanzada
' - J- , - Jo J , - _ _,0 I- =0 ,_ - a= -
•;* La func[dnShutter Speed s61oesta operativaen e] Camera Mode =pagina 28
+ La funci6n Exposureesta operativa enlos Camera Mode y M.Cam Mode
-pagina 28
÷ Las funciones Shutter Speed y Exposure pueden definirse con QUICK MENU
Co]oque el interrupter [Mode] en [DISC] o [CARD]
Coloque el interrupter [Power] en [_ (Camera)]
3 Presione el botdn [QUICK MENU]
= Aparecelalista QUICK MENU
4 Mueva el [Joystick] hac[a arriba ohaciaabajo para
seleecionar <Shutter> o <Exposure> y pulse el boron
[Joystick(OK)]
30 mill[]
[ ] -
30ilir'
• La Videocamara con DVD vue]ve a los ajustes de obturador y exposiciSn
automatieos cuando se define elcambio al mode EASY.Q
= AI grabar con una velocidad de obturador de 1/100Oo superior aseg0rese
de que el sol no se refleja sobre el objetivo
5 Mueva el [Joystick] hac[a arriba ohaciaabajo para
seleecionar <Manual> y pulse el botdn [Joystick(OK)]
6 Mueva el [Joystick] a la izquierda o a la derecha para
seleecionar la velocidad de obturador oel valor de
exposicidn que desea y pulse el botdn [Joystick(OK]]
= La velocidad del obturador puede definirse en
<1160>,<11100> <11250>,<11500>, <i/100O>,
<1/2000>, <114000>o <1110000>
• Elvalordeex_os}ci6nsepuededefinirentre<00>y<29>
7 Para sa]ir=pulse e]botdn [QUICK MENU]
• Aparecen los ajustesseleccionados
Velocidadesdelobturadorrecomendadasalraqrabar
+ Deportesa[aire I[brecomegolf o tenis:1_2000o 114000
+ Cocheso ttenes en movirnientou otros veMculosde
movimientorapido comeunarnontaSarusa: 1i1000,1_500
o 1,250
+ Deportes enpista cubierta come baloncesto: 1/100
Ajuste de la exposicidn al grabar
¢ Si fija Exposure (Exposicidn) en Manual (Manual), e]
ajuste predeterrNnado apareee come el valor ajustado
automaticamente para realizar los cambios de acuerdo
conlas condJciones de luz ambientales Tambien puede
ajustar elbrillo uti]izando el Joystick
• Si modificamanualmentelos valoresdeShutterSpeedy
ExposurecuandoestaseleecJonadala opcidn Program AE,
se aetivaran primero loscambiosmanuales.
Es posible que ]aimagen no se yea tan uniforme cuando
se defina la vMocidad del obturador
Page 53

[ ENGLISH ]
[ ESPA_IOL ]
DVDCamcorder:Advanced Recording
= = ,l , o
+ The Auto Focus/Manual Focus function
works in both Camera Mode and
M,Cam Mode, _page 28
@ tn most situations, it is better to use the
automatic focus feature, as it enables
you to concentrate on thecreative side
of your recording,
@ Manual focusing may be necessa_j
under certain conditions that make
automatic focusing difficult or unreliable.
Auto Focus
*:, tf you are inexperienced inthe use of
DVD Camcorders, we recommend that
you useAuto Focus.
Manual Focus
+ tnthe following situations, you may obtain better
results by adjusting the focus manually.
a. A picture containingseveral objects,someclose
to theDVDCamcorder,others further away
b. A personenvelopedin fogorsurroundedbysnow,
c. Very shiny orglossy surfaces like a car.
d. People or objects moving constantly or
quickly like an athlete or a crowd.
1, Set the [Mode] switch to [DISC] or [CARD].
2. Set the [Power] switch to [ tl_ (Camera)].
3, Pressthe [MF/AF] button,
• The manual focus icon (_R) will blink.
4, Focus with the [VOL-] and [VOL+] buttons,
• Pressing the [VOL-] button will focus on the
foreground image while pressing the [VOL+]
button will focus on the background image.
5, Toexit, press the [MF/AF] button,
Videoc&maracon DVD:Grabaci6navanzada
_1 - . . e I Jl - j , __
•:, La funci6n Enfoque automatico/Enfoque
manual esta operativa en los Camera Mode
y M,Cam Mode _pagina 28
•:, En la mayoria de casos, es mejor usar e[ enfoque
automatico, ya que pemlite concentrarse en el
aspecto crea_Jvode ia grabad6n.
•:, El enfoque manual puede ser necesano bajo
ciertas condiciones que hacen que el enfoque
autom_tico resulte diflcil o poco fiable
Enfoque automatico
•:, Si no posee experiencia en el uso de
Videocamaras con DVD, le recomendamos
que use el enfoque autom_tico.
Enfoque manual
+ En las siguientes situaciones se pueden
- obtener mejores resultados ajustando el
enfoque manualmente
a. Cuando una imagen contiene ratios objetos, algunos
situados cerca de la Videocamara con DVD y otros
lejos de ella
b. Cuando hay una persona entre la niebla o
rodeada de nieve,
c Cuando se graban supedicies muy bli]lantes,
como un coche.
d. Cuando hay gente u objetos que se mueven
constantemente o con rapidez, como una multitud
o un atleta
Co_oque el interluptor [Mode] en [DISC] o [CARD]
Coloque el interruptor Power] en [l_4(Camera}].
Pu se el bot6n MF AF
= ParpadearA el icono de enfoque manual (M_)
Enfoque con los botones [VOL-] y [VOL+].
• Si se presiona el bot6n [VOL-] se enfecar&
la imagen de primer piano mientras que si se
presiona el bot6n [VOL+] se enfocarA ]a imagen
del fondo
5 Para salir, pulse el bot6n [MF/AF]
Manual Focus is not available in the EASY.Q mode.
El Enfoque manual no esta disponible en el modo EASYQ
Page 54

[ ENGLISH ]
[ ESPAI_IOL ]
DVD Camcorder: Advanced Recording
+ The Program AE function works only inCamera Mode. '-page 28
**** The Program AE mode allows you to adjust shutter speeds and
apertures to suit different recording conditions.
**** They give you creative control over the depth of field.
<Auto ( [] )> mode _:"
- Auto balance between the subject and the backc
- To beused in normal conditions.
- The shutter speed automatically varies from
1/60 to 1/250 persecond, depending on the
scene.
<Sports ( _ )> mode
For recording people or objects moving quickly,
<Portrait (_)> mode
For focusing on the background of the
subject, when the background is out of focus,
- The Portrait mode is most effective when used outdoors.
- The shutter speed automatically varies from 1/60 to 1/1000 per
second.
<Spotlight (_)> mode
For recording correctly when there is only light on the subject and
not the rest of the picture.
<Sand/Snow (_)> mode
For recording when people or objects are darker than the
background because of reflected light from sand or snow.
<High Speed (_)> (High Shutter Speed) mode
For recording fast-moving subjects such as players in golf or tennis
games,
round.
Videoc_maracon DVD:Grabaci6n avanzada
La funci6n Program AE s61oesta operativa en el Camera Mode.
-pagina 28
El modo Program AE permite ajustar las velocidades de
obturaci6n y aperturas para adaptarse a distintas condiciones de
grabaci6n,
Con ella se puede controlar de manera creativa la profundidad de
campo.
• Modo <Portrait(_ >
- Enfoca e rondo de objeto cuando esta desenfocado,
- Este modo es mas eficaz cuando se emplea en exteriores,
- La velocidad del obturador se ajusta automaticamente entre
1/60 y 1/t000 de segundo.
• Modo <Spotlight ( (_))>
Este modo se emplea para grabar correctamente cuando s61o
esta iluminado el objeto y el restode la imagen no Io esta.
• Modo <Sand/Snow ( 4_ )>
Este modo se emplea para grabar cuando las personas o los
objetos estan menos iluminados que el fondo debido a la luz
reflejada en la arena o en la nieve.
• Modo <High Speed (_ )> (Velocidad de obturador alta)
Este modo se emplea para grabar escenas en que el movimiento
es de gran velocidad, por ejemplo, jugadores de tenis o de golf,
• Modo <Auto [_)>
- Ba ance automat co entre el objeto yel
fondo.
- Se utiliza en condiciones normales.
- La velocidad de1obturador se ajusta
automaticamente entre 1/60 y 1/250 de
segundo, segOnla escena que se este
grabando.
• Modo <Sports ( _ )>
Se utiliza para grabar a personas u objetos que
se mueven rapidamente.
,,&
Page 55

[ ENGLISH ]
[ ESPAI_IOL ]
DVD Camcorder: Advanced Recording
Setting the Program AE
1. Set the [Mode] switch to [DISC].
2. Set the [Power] switch to [_ (Camera)].
3, Press the [MENU] button,
• The menu list will appear.
4, Move the [Joystick] upor down to select
<Camera>, then press the [Joystick(OK)].
5, Move the [Joystick] upor down to
select <Program AE>, then press the
[Joystick(OK)].
• The available options are listed.
6, Move the [Joystick] upor down to select the
desired program AE option, then press the
[Joystick(OK)].
7, Toexit, press the [MENU] button.
• The icon of the selected mode is displayed.
• When the <Auto> mode isselected, no
icon is displayed.
• You can directly access the Program AE
function by using the [QUICK MENU] button.
-page 29
• The Program AE function will not operate in
EASY.Q mode
{_ _- 1. Coloque el interruptor [Mode] en [DISC],
........................... {..........................................
Videocamaracon DVD:Grabaci6n avanzada
Ajustes de Program AE
_Move _Select _Exit
J........................................ \
_l,,Iove _Select _Exit /
2. Coloque el interruptor [Power] en
[ _ [Camera)].
3. Presione el bot6n [MENU].
• Aparece la lista del ment_.
4. Mueva el [Joystick] hacia arriba o hacia
abajo para seleccionar <Camera> y pulse el
boton [Joystick(OK)].
/
5. Mueva el [Joystick] hacia arriba o hacia
abajo para seleccionar <Program AE> y
pulse el bot6n [Joystick(OK)].
• Aparece una lista con las opciones
disponibles.
6. Mueva el [Joystick] hacia arriba o hacia
abajo para seleccionar la opci6n de
program AE que desea y puJse el bot6n
[Joystick(OK)I,
7. Para safir,presione el bot6n [MENU].
• Aparece el icono del modo seleccionado.
• Cuando se sefecciona el modo <Auto>,
no aparecera nlngun icono,
• EFacceso directo a lafunci6n Program AE
esta disponible simp]emente utilizando el
bot6n [QUICK MENU]. _pagina 29
• La funci6n Program AE no estara operativa
en el modo EASY.Q.
Page 56

[ ENGLISH ]
[ ESPAI_IOL ]
DVD Camcorder: Advanced Recording
= e " " t,+ < " = t,. . "
÷t+ The White Balance function works in both Camera Mode and
M.Cam Mode. _page 28
÷t+ The White Balance is a recording function that preserves the
unique image color of the subject in any recording condition.
+ Youmay select the appropriate White Balance mode to obtain
good quality image color.
• Auto (h_J):This mode is generally used to
control the White Balance automaticafly.
• Indoor (_): This controls the White
Balance according to indoor ambience.
Under halogen or studio/video fighting
- Subject is of one dominant color
- Close up
• Outdoor (_): This controls the White
Balance according to the outdoor ambience.
In daylight, especiafly for close up and
where the subject is of one dominant color.
• Custom WB (_): This controls the
White Balance according to the recording
environment.
1. Set the [Mode] switch to [DBC] or [CARD].
2. Setthe Power] switch to [_(Camera)].
3. Press the MENU button.
= The menu listwifl appear.
4. Move the [Jeystick] up or down to select
<Camera>, then press the [Joystick(OK)J,
5. Move the [Joystick] up or down to
select <White Balance>, then press the
[Joystick(OK)].
6. Move the [Joystick] up or down to select
desired mode (Auto, indoor, Outdoor or
Custom WB), then press the [Joystick(OK)].
• Refer to page 57 for details on setting
Custom WB,
7. To exit, press the [MENU] button.
• The icon of the selected mode is displayed.
• When the <Auto> mode is selected, no
icon is displayed.
f _ . Auto ( [] ): 6ste es el rnodo gue se utiliza
%
_P, love _Select _Exit
Videoc&maracon DVD:Grabaci6navanzada
= e" g+ , = += e + Q " _,+ + =
+ La funci6n White Balance esta operativa en los Camera Mode y
M.Cam Mode. _pagina 28
+ White Balance es una funci6n de grabaci6n que conserva los
colores Qnicos de la irnagen de los objetos independientemente de
Ins condiciones de grabaci6n
¢ Se debe seleccionar la modalidad correcta de balance de blanco para
obtener ima anes con una buena calidad de color de imagen,
por Io general para controlar de manera
automatica el balance de blanco
. Indoor ( @ ): contro+a el balance de blanco
segQn el ambiente interior.
- Con habgeno o i]uminaci6n de estud o o video:
- El objeto tiene un color dominante;
- Cercano.
. Outdoor _ : controla el equiiibrio del
Move _ Select _ Exit
ProgramAE
blanco segQn el arab en e exterior
- Durante el dia, especialmente de cerca y
en casos en que el objeto tiene un color
dominante
. Custom WB _ :controla el equilibrio del
blanco segQn eq'en orno de grabaci6n
1 Cobque el interruptor [Mode] en [DISC[ o [CARD]
_: Coloque el interru_tor [Power] on [ _ (Camera)]
Pres one el bot6n [MENU]
• Aparece la flsta del men0_
4 Mueva el [Joystick] hacia arriba o hacia abajo
para seleccionar <Camera> y pulse el bot6n
[Joystick(OK)]
5 Mueva el [Joystick] hacia ardba o hacia aba/o
para seleccionar <White Balance> y pulse el bot6n
[Joystick(OK)]
6 Mueva el [Joystick] haca arriba ohacia aba/o para
sMeccionar e]modo que desea [Auto, Indoor, Outdoor
o Custom WB) y pulse elbotdn [Joystick[OK)].
. Consulte la p_gina 57 para obtener detalMs sobre
el ajuste de balance de blanco personal
7 Para salt, presione elbotdn [MENU]
• Aparece e+icono del modo seleccbnado
• Cuando se se+eccona el modo <Auto>, no
aparece ning_Enicono
Page 57

[ ENGLISH ]
[ ESPAI_IOL ]
DVDCamcorder: Advanced Recording
Settin 9 the Custom White Balance
*1. You can adjust the white balance as youwish based on the
recording environment.
1, Set the [Mode] switch to [DISC] or [CARD].
2, Set the [Power] switch to [1_ (Camera)].
3, Press the [MENU] button.
• The menu list will appear.
4. Move the [Joystick] upor down to select
<Camera>, then press the [Joystick(OK)].
5. Move the [Joystick] upor down to
select <White Balance>, then press the
[Joystick[OK)].
6, Move the [Joystick] upor down to
select <Custom WB>, then press the
[Joystick(OK)].
• The <Set White Balance> will blink,
7, Place the subject under the desired lighting,
then press the [Joystick(OK)] button.
• The <Set White Balance> will disappear
and the white balance setting will
commence.
8, Toexit, press the [MENU] button.
• Custom WB icon(_z_) is displayed,
• You can directly access the White Balance
function by using the [QUICK MENU] button.
-page 29
• The White Balance function will not operate in
EASY.Q mode.
• Turn the Digital Zoom off (if necessary) to set
a more accurate white balance,
Reset the white balance if lighting conditions change,
During normal outdoor recording, setting to Auto may provide
better results.
I" 17
Videocamaracon DVD:GrabaciSnavanzada
Ajuste del balance de blanco personal
_:. Puede ajustar el balance de blancos como desee basandose en el
entomo de grabaci6n.
1. Coloque el interraptor [Mode] en [DISC] o
[CARD].
2. Coloqueelinterruptor[Power]en I_ Camera ,
3. Preslone el bo on [MENU].
• Aparece la lista dei ment_.
4. Mueva el [Joystick] hacia ardba o hacia
abajo para seleccionar <Camera> y pulse el
bot6n [Joystick[OK)].
5. Mueva el [Joystick] hacia arriba o hacia
abajo para seleccionar <White Balance> y
pulse el bot6n [Joystick[OK)].
6.
Mueva el [Joystick] hacia arriba o hacia
abajo para seleccionar <Custom WB> y
presione el [Joystick(OK)],
• <Set White Balance> parpadeara.
SetWhiteBalance
Seect _ Exit
I 8,
STBY [] 0:00:00 _,_
30 min []
Si el equilibrio del blanco se ajusta en Auto en lasgrabaciones
normales enexteriores, se pueden obtener mejores resultados.
Coloque el objeto blanco bajo una
luz apropiada y presione el bot6n
[Joystick(OK)],
• <Set White Balance> desaparecera
y comenzara el ajuste de balance de
blancos.
Para sa_ir,pulse el boton [MENU],
. Aparece el icono de Custom WB (_).
Puede acceder directamente a la funcion
White Balance uWizandoel bot6n
[QUICK MENU], "_pagina 29
• La funci6n White Balance noesta operativa
en el modo EASY.Q.
• Sies necesario,desactive el Digital Zoom para
obtenerun balance de blanco mas preciso,
J
• Reinicie el balance de blanco si las
condiciones de iluminaci6n cambian.
Page 58

[ ENGLISH ]
[ ESPAI_OL ]
DVDCamcorder: Advanced Recording
+ The Digital Effect function works only inCamera Mode -page 28
+ The Digital Effects enabbeyouto give acreativelook to yourrecording.
*:o SetecttheappropriateDigitalEffectforthetypeofpicturethatyou
wish to record and the effect you wish to create
+ There are 10 Digital Effect modes.
1. <Art> mode
This mode givestheimages a coarse effect.
2. <Mosaic> mode
This mode givesthe imagesa mosaic effect.
3. <Sepia> mode
This mode gives the images a reddish-
brown pigment.
4. <Negative> mode
This mode reverses the colors, creating a
negative image.
5. <Mirror> mode
This mode cuts the picture in half, using a
mirror effect.
6. <BLK & WHT> mode
This mode changes the images to black
and white.
7. <Emboss1> mode
This mode creates a 3Deffect
(embossing).
8. <Emboss2> mode
This mode creates a 3Deffect
(embossing) on the surrounding area of
an image.
9. <Pastel1> mode
This mode applies a pale pastel drawing
effect to an image.
10. <Pastel2> mode
This mode applies a pale pastel drawing
effect to surrounding area of an image.
Videec&maraconDVD:Grabacibnavanzada
i_ . • o-- - • oe .- |_ . -
+ La funcionDigital Effect s01oesta operativa en elCamera Mode.
_pagina 28
+ Los efectos digitales permiten dar un aspecto mas creative alas
grabaciones
4* Seleccione elefecto digital que necesite para el tipo de imagen
que desee grabar y el efecto que desee crear
+ Existen 10 modes de efectos digitales
1. Mode <Art>
Este mode le da a la imagen un aspecto
de grano grueso.
2. Mode <Mosaic>
Este mode le da a la imagen un aspecto
de mosaico
3. Mode <Sepia>
Este mode le da a la imagen un color
marten rojizo.
4. Mode <Negative>
Este mode invierte los colores, creando
una imagen en negative.
5. Mode <Mirror>
Este mode divide la imagen en dos,
empleando un efecto de espejo.
6. Mode <BLK & WHT>
Este mode cambia la imagena blanco y
negro.
7. Mode <Emboss1>
Este mode crea un efecto 3D (relieve).
8. Mode <Emboss2>
Este mode crea un efecto 3D (relieve) en
el area alrededor dela imagen
9. Mode <Pastel1>
Este mode aplica un efecto pastel palido a
la imagen
10. Mode <Pastel2>
Este mode aplica un efecto pastel palido al
area alrededor de la imagen.
Page 59

ENGLISH ]
[ ESPANOL ]
DVDCamcorder: Advanced Recording
SeJecting the Digital Effects
1 Set the [Mode] switch to [DISC]. (_ ,F
2 Set the [Power] switch to [lt_ (Camera)].
3 Pressthe [MENU] button.
• The menu listwill appear.
<Camera>, then press the [Joystick(OK)]. ProgramAE '
4 Move the [Joystick] up or down to select
5 Move the [Joystick] up or down to select I......................................
<Digital Effect>, then press the [Joystick(OK)]. [_ if ............................
6 Move the [Joystick] up or down to select the
desired Digital Effect option, then press the PEogramAE
[Joystick[OK)].
" The display mode is set tothe selected mode.
7. Toexit, press the [MENU] button.
Youcan directlyaccessthe Digital Effect function r_q/-
by usingthe [QUICKMENU[button _page 29 LU _,11
The Mosaic, Mirror, Emboss2, or Pastel2 modeis |
not availablewhile DIS or Color Nite is inuse |
Digital Effect modesare notavailable while EASY.Q _ .=i
is in use. |
Once DIS, EASY.Q,Color Nite is set, Mosaic, |At,
Mirror, Emboss2, or Pastel2 mode will bereleased. |
Digital Zoom is not availablein the Mosaic, Mirror,
Emboss2, or Pastel2 mode
Mirror modeisnot availabb in the 16:9 Wide mode
(SC-DC564/DC565only)
Digital Effect modesotherthan Emboss2, PasteJ2, Mirror, or Mosaic
modeis availabb while DISis in use
_Move _Select _Ext
\ _Move _Seiect _Exit
\
Videec&maraconDVD:Grabacibnavanzada
Selecci6n del efecto digital
(@_ Puede accederdirectamente a la funci6n Digital
oo00o
STBY
[]
so_r E_I Effect utilizando el bot6n [QUICK MENU].
j Una vezquesedefine DISo EASY.Q,Color
• Digital Zoom no esta disponible en los modes Mosaic, Mirror,
Emboss2 o Pastel2
. El mode Mirror no esta disponible en el mode16:9 Wide
(s61oSC-DC564/DC565)
. Los modes de Digital Effect que noseaEmboss2, Pastel2, Mirror o
Mosaic esta disponible mientras DISesta en use
1. Coloque el interrupter[Mode] en [DISC].
2. Coloque el interrupter[Power] en
[_ (Camera)]
3. Presione el boton [MENU]
• Aparece la {ista de! men&
4. Mueva el [Joystick] hacia arriba o hacia
abajo para seleccionar <Camera> y pulse el
boton [Joystick(OK]]
5. Mueva el [Joystick] hacia arriba o hacia
abajo para seleccionar <Digital Effect> y
pulse el boron [Joystick(OK)].
6. Mueva el [Joystick] hacia arriba o hacia
abajo para seleccionar el efecto digital que
desea y pulse elboton [Joystick(OK)].
• El mode de pantalla se ajusta en elmode
seleccionado
7. Para salir, presione e! boron [MENU]
'=pagina 29
Los modes Mosaic, Mirror, Emboss2, o
Pastel2 no estan disponibles mientras se
ufiliza DIS o Dolor Nite
Los modes Digital Effect no estan disponibles
mientras se encuentre en use EASY.Q.
Nite, se liberara el mode Mirror, Mosaic,
Emboss2 o Pastel2.
Page 60

[ ENGLISH ]
[ ESPANOL ]
DVDCamcorder: Advanced Recording
- o - , ' *- _- • ' =-
÷:. The 16:9 Wide function works only in Camera Mode. _page 28
÷:. Select to record a picture to be played back on a 16:9 Wide TV.
¢ 16:9 Wide is the default setting for models SC-DC564/DC565
1 Set the [Mode( switch to [DISC(.
2 Set the [Power] switch to [1_ (Camera)].
3 Pressthe [MENU] button.
• The menu listwill appear.
4 Move the [Joystick( up or down to select
<Camera>, then press the [Joystick(OK)].
5 Move the [Joystick] up or down to select
<16:9 Wide>, then press the [Joystick(OK)]
6 Toactivate the 16:9 Wide function, move the
[Joystick( up or down to select <On>, then
press the [Joystick(OK)(.
• If you do not want to usethe 16:9 Wide
function, set the <16:9 Wide> menu to
<Off>
7 Toexit, pressthe [MENU] button.
• The display mode is set to the selected
mode.
= The 16:9 Wide mode is not available while DIS, EASY,Q or Digital
Effect is in use. (SC-DC563 only)
• Once Color Nite is set, 16:9 Wide mode will be released
(SC-DC563 only)
= Digital Zoom isnot available in the 16:9 Wide mode
f
Program AE
1_ WNte Ba_Jhce
_Move _Select _Exit
Videoc&maraconDVD:Grabacibnavanzada
i _ - 6- o_ • ' a- o ' e-
÷ La funci6n 16:9 Wide s61oesta operativa en e! Camera Mode.
_pagina 28
¢ Se selecciona para grabar una imagen que se va a reproducir en
un TV panoramico 16:9.
+ 16:9 Wide es el ajuste predeterminado en los modelos SC-DC564/
DC565.
1. Coloque el interruptor [Mode] en [DISC]
2. Coloque e! interruptor [Power] en
[ I_ (Camera)].
3. Presione el boron [MENU].
• Aparece la lista de{ men&
4. Mueva el [Joystick] hacia arriba o hacia
abajo para seteccionar <Camera> y pulse e!
boton [Joystick(OK)]
5 Mueva el [Joystick] hacia arriba o hacia
abajo para seleccionar <16:9 Wide>, y pulse
el boton [Joystick(OK)]
6. Para activar la funcion 16:9 Wide, mueva el
[Joystick] arnba o abajo para seleccionar
<On> y pulse et boton [Joystick(OK}].
• Si no quiere utilizar la funci6n 16:9 Wide,
defina el ment_<16:9 Wide> en <Off>.
7. Para saiir, presione el boton [MENU].
• El modo de visualizaci6n se ajusta en el
rnodo seleccionado.
• El modo 16:9 Wide no esta disponible mientras DIS, EAS¥,Q o
Digital Effect seencuentra en uso. (s61oSC-DC563)
• Una vez definido Color Nite, seliberara el modo 16:9 Wide.
(S01oSC-DC563)
• Digital Zoom no esta disponible en el modo 16:9 Wide.
Page 61

[ ENGLISH ]
[ ESPANOL ]
DVDCamcorder: Advanced Recording
*t, The DiSfunctionworks onlyin Camera Mode _page 28
@ DIS(DigitaltmageStabilizer)is a function that
compensatesfor any shakingor hand movement
while holdingthe DVDCamcorder(within
reasonablelimits)
+ It providesmore stable pictureswhen:
Recordingwith the zoomdfthe DISis set.
Digital Zoom modewill be released )
Recordinga small object dose-up
Recordingand walkingatthesametime
- Recordingthroughthe windowofavehicle
1 Setthe [Mode] switch to (DISC].
2 Set the [Power] switch to [1_ (Camera)].
3 Pressthe (MENU] button.
• The menu list will appear.
4 Move the [Joystick] up or down to select
<Camera>, then press the [Joyatick(OK)].
5 Move the [Joystick] up or down to select
<DIS>, then press the [Joystick(OK)].
6 Toactivate the DIS function, move the
[Joystick] up or downto select <On>, then
press the [Joystick(OK)].
• If you do not want to usethe DIS function,
set the <DIS> menu to <Off>
7 Toexit, pressthe [MENU] button.
. DIS icon ('_) is displayed.
YoucandkectlyaccesstheDISfunctionbyusingthe
[QUICKMENU]button _page 29
DigitalZoom, Color Nite,Mosaic, Mirror Emboss2
orPastel2is notavailableintheDISmode.
Itis recommendedthatyoudeactivatethe DISfunction
whenusinga tripod
IfyouusetheDISfunction,thepicturequalitymaydeteriorate
EASY.QmodeautomaticallysetstheDISto On.
16:9Widemodeis notavailableintheDISmode ($0-D0563only)
DISfunctionin 16:9Widemodemayproducebwer qualitythanin normal
mode(SC-DC564/DC565only)
r_ ,r + DIS(Estabilizndordigitat de la imagen)as
L2J unafandon que compensa 1assncudidnso
_r, love _Select _Exit
@
_Move _Select _Exit
f .............................I.......................................... x
Videec&maraconDVD:Grabacibnavanzada
+ Lafundon DISsolo estaoperativaenelCameraMode _paginn 28
los movimientosde la manealsostenarla
videocamara,dentro de unos limites razonables.
+ Proporcionnimageries masestablesnh
- Grnbacionconel zoom sise define DIS. se
beratee modeDg ta Zoom
- Se grabaun objato pequeSomaydecarca;
Se grabamiantrassecnminn;
- Segrebentrnvosdelaventnnilladeunvahiculo.
1 Coloqueelinterruptor [Mode] en [DISC].
2 Coloqueelinterruptor [Power] en
Camera Moqe
. Si LdilizalafancionDIS,puedequelacelidaddelaimagense veaafectada
. EASY.Q establece nutomaticnmenteDISen On.
. 16:9 Wide no esta disponibleen el Mode DIS (s61o$0-DC563)
La fancion DIS en mode 16:9Wide puedeproducirunacalidad menor
queen modenormal (sOloSC-DC564iDC565)
[1_ (Camera)]
3 Presioneelboton [MENU]
. Aparece lalistndelmeno
4 Muevael[Joystick] hacia arribao hada abajo
ijnra seleccionar<Camera> y pulseel boton
oystick(OK)]
5 Muevael Joystick] hecia arribaobade
abeo pareseecc onnr<D S>y pu see beOn
[Joystick(OK)]
6 Para activnrla fancion DIS, mueva el Joystick
errbaoabnopnrn seecconar <On>y pase e
bot6n Joystick[OK)]
. S no dasea u zar nfunc 6n D S, aus e n
en el menL3<DIS>en <Off>
7 Pare salir,presione el bot6n[MENU]
.......• Aparecael iconode DIS('_)
• Puedeaccederdirectamenteala funci6n DIS
utilizandoel bot6n [QUICK MENU] '-pagina 29
DigitalZoom,ColorNite,Mosaic,Mirror,Embosa2,
oPastet2noesf_ndisponiblesen elmodeDIS
• Serecomiendndesactivarestafancion cunndo
se empieeun tripode
Page 62

[ ENGLISH ]
[ ESPANOL ]
DVD Camcorder: Advanced Recording
•,t, The Digital Zoom works only M Camera Mode. -page 28
•,t, Zoomingmorethan26xis acMeveddigitally,upto 1200xwhen
combinedwithopticMzoom.
•,.t, The picture quality may deteriorate dependMg on how much you
zoom inon the subject.
Selecting the Digital Zoom
1, Set the [Mode] switch to [DISC].
2, Set the [Power] switch to [1_ (Camera)].
3, Press the [MENU] button,
• The menu list will appear,
4, Move the [Joystick] upor down to select
<Camera>, then press the [Joystick(OK)].
5, Move the [Joystick] upor down to
select <Digital Zoom>, then press the
[Joystick(OK)].
6, Move the [Joystick] upor down to select the
_Move _Se/ect _Exit
z- -\
%
desired zoom value (Off, 100x, 200x, 400x or
1200x), then press the [Joystick(OK)].
7, Toexit, press the [MENU] button,
• When using the zoom lever,andigital zoom
indicator appears on thescreen,
• Maximum zoomMg may result in lower picture
quality,
• Digital Zoom is not available while DB,
EASY,Q, Color Nite. 16:9 Wide Mosaic,
_Move _Select _Ext
Mirror, Emboss2, or Pastel2 is inuse.
• Once Color Nite, EASY.Q, 16:9 Wide, Mosaic,
Mirror, Emboss2, or Pastel2 is selected.
Digital Zoom mode will be re;eased,
(The Digital Zoom mode will bebacked up.)
• Once DIS is selected. Digital Zoom mode will
be released.
z&
Videoc_maracon DVD:Grabaci6n avanzada
+ La funci6n Digital Zoom s61o est_ operativa en el Camera Mode
_p_gina 28
+ E} zoom por encima de 26x se Iogra digitalmente hasta 1200x
cuando se combina con zoom 6ptico.
I
I
÷:* La calidad de la imagen puede deteriorarse
dependiendo dei nivel de acercamiento sobre
et objeto.
Selecci6n del zoom digital
1 Coloque el interruptor [Mode] on[DiSC].
2. Csloque el Mterruptor [Power] en [IW_ (Camera)].
3 Presione el bot6n [MENU],
• Aparece la Iista dM memO.
4 Mueva el [Joystick] hacia arriba o hacia abajo
para seleccionar <Camera> y pulse el bot6n
[Joystick[OK)[.
_/
5 Mueva el [Joystick[ hacia arriba o hacia abajo
para seleccionar <Digital Zoom> y pulse el
bot6n [Joystick[OK)].
6 Mueva el [Joystick] hacM arriba o hacia abajo
para seleccionar el valor de zoom gue desea
(Off, 100x, 200x, 400x o 1200x) y pulse el
bot6n [Joystick(OK)].
7 Para sMir, presione el bot6n [MENU]
• AI utilizar et Mterruptor dot zoom digital,
aparece en pantalla el indicador de] zoom
digital
• El zoom m_ximo puede dar como resultado
una calidad de imagen m_s pobre,
• Digital Zoom no est_ disponible mientrss DIS,
EASY.Q, Color Nde, 16:9 Wide, Mosaic, Mirror,
Emboss2, o Pastel2 se encuentran en uso
• Una vez definido Color Nite, EASY, Q, 16:9
Wide, Mosaic, Mirror, Emboss2, o Pastel2,
Digital Zoom se liberara (So hara una copM
de seguridad de los datos del modo Digital
Zoom.)
• Una vez defiMdo DIS o Digital Zoom se _iberar&
Page 63

[ ENGLBH ]
[ ESPAI_IOL ]
DVDCamcorder:Thumbnailindexand Playlist
+ The thumbnail index displays multiple title
scenes that have been recorded.
**** A title scene is created between the points
where you start and step a recording.
Once deleted, you cannot recover the title
scene again.
Current title scene/Total title scenes
+ You can create a Playlist on the same disc by
gathering your favorite scenes from the recorded
title scene
You can edit the Playlist without changing the
origina} recordings.
o_* Even if the Playlist is deleted, the original title
scenes remain undeleted.
+ Up to 999 title scenes (chapters) can be registered
on a Playlist
Example: You have recorded a few scenes on a
DVD-RW in VR mode You want to save the original
recording, but you also want to create a playlist by putting
your favorite scenes together,
In this case, you can create a Playlist by selecting your favorite scenes,
leaving the original recording as it is
JAN/2 2006_
A title scene is created between ,_, _ ,_
the points where you start and stop
a recording ®_
Once deleted you cannot recover 1000AM 1030AM //30AM
the title scene again
_Tite sterne/ Tiresterne2 Tiresterne3
Current playlist/Total playlists tambien desea crear un compendio colocando juntas las
..... _ _'" __ _.- _-
Videoc_maraconDVD:indicedeminiaturasylistadereproducci6n
+ El indice de miniaturas muestra vadas escenas
del titulo grabadas
+ Un titulo se crea entre los puntos en los que se
inicia y se detiene una grabacion
Una vez eliminado, no puede recuperar de nuevo
e] titulo
+ Puede crear una lista de reproducd6n en el mismo
disco recopilando la escena favodta de los titulos
grabados (listas de titulos).
Puede editar la lists de reproducci6n sin cambiar las
grabaciones originales
+ Incluso aunque se elimine la lista de reproducci6n las
listas de titulos originales permanecen sin eliminarse
+ En una lista de reproducci6n pueden registrarse hasta
999 escenas de titulos (capitulos)
Ejemplo: Ha grabado algunas escenas en un DVD-RW
en modo VR Desea guardar la grabaci6n original, pero
escenas favoritas En este caso, puede crest una lista
de reproducci6n seleccionando Onicamente las escenas
favodtas, dejando la grabacion original tal y como est&
Tit_escene4 Tit_escene5 Tit_escene6 Tit_escene7
0200PM 02/0 PM 0220PM 0230PM recuperar el titulo de nuevo
JAN302006_
_ _ L Un titulo se crea entre los
r,m
'_ puntos de inicio y parada de
la grabaci6n
Una vez eliminado no podra
Page 64

[ ENGLISH ]
[ ESPANOL ]
DVD Camcorder
= . o - - - DY_RW +RW.R +RDL
The recordedtitle scenesaredisplayedas a thumbnail (_ F
index(multiple images)on the LCD Screen
You can findthe desired scene quickly using this
convenient index Ifthe TFT LCD screen is closed.
you can view the recording through the viewfinder.
Use the Playback related buttons on the DVD
Camcorder or on the remote control. -page 65
1 insert the discyou want to view
2 Openthe LCD Screen.
3. Set the [Mode] switch to [DISC).
4 Setthe [Power] switch to [[]_(Player)].
• The thumbnail index screen appears.
• Use the [MENU] button to adjust brightness
or color of the LCD Screen. "=page 38
5 Use the [Joystick] to select a title scenes to
be played, then press the [Joystick[OK)] or
[1_-II] button.
• Tostop playback, press the [il(Stop)] button.
During playback, a displayed image may be paused for a while until
the next image to be shown.
+ When you use the LCD Screen for playback,
you canhear recorded sound from the built-in
speaker.
+ When you hear sound once the disc is in play,
use the [VOL -,+] buttons to adjust thevolume
• A volume level display will appear onthe LCD
Screen
• Levels may be adjusted from anywhere
between 00to 19.
= If you close the LCD Screen white playing,
,_you will not hear sound from the speaker.
%
Videoc mara con DVD
=-_ Qa • .- - - . o- • DYD-RW+RW-R+RD_
Las escenasde los titulos grabados aparecencomo
un indice de miniatures (redes imagenes)en le
pantallaLCD
PuedeIoce][zarrapidamente la escenaque desea
uti][zandoeste practico indice Si la pantellaLCDesta
cerrada,puedevetla grabecione travesdel visor.
Utilicelosbotonesre]acionadoscon la reproducci(m
en la Videocamaracon DVDoenelmando a
distancia _pagine 65
1 Inserteel disco quedesee vet
2 Abrala pantalleLCD.
3 Co]oqueel interruptor[Mode] en[DISC]
4 Coloqueelinterruptor [Power] en[[_(Player)]
, Aparece lapante]ladei indicedemniaturas
, Utiliceel bot6n[MENU] pare ajustar el bdllo o
el colordelapante]laLCD _pagine 38
5 Utiliceel [Joystick] pare seleccionar]a escene
de le lista de titulos que vaa reproduciry pulse el
bot(_n[Joystick[OK)] o [_-H ]
= Paredetenerlareproducci0n,presioneelbot6n
[lll(Stop)]
Durante la reproducci6n, es posible que la imagen en pantalta permanezca
congelada durante un tiempo haste que aparezca ]a siguiente imagen.
, - o - • - DYD-R_I+n_U-R +IIDL
,1. Cuando se usa ]apantalla LCDpara la
reproduccion, se puede oir el sonido a travcs
del altavoz incorporados
*1, AI oir los sonidosuna vez que la cinta este
en march& utilice losbotones [VOL -,+] para
ajustar el volumen
LA_arecerael nivel de volumen en la pantalia
D.
, Losniveles se pueden ajustar de 00 a 19.
Sicierra la pantaHaLCD mientras
reproduce, es posib]e que no escuche
ning0nsonido en el aitavoz.
Page 65

[ ENGLISH ]
[ ESPANOL ]
DVD Camcorder
+ These functions work only in Player Mode, '_page 28
+ Play, Still, Stop, Fast Forward, Rewind, Forward Skip, and Reverse
Skip functions are accessible using the remote control.
(SC-DC564/DC565 only)
Slow function is accessible only using the
remote control, (SC-DC564/DC565 only)
'layback/Still
Press the [_- | J] button to pause daring p_ayback.
To resume playback, press the [)11] button.
'icture Search (Forward/Reverse)
Pressing the [144 ]/[ _,_-I] button once while
a disc is playing back will increase the play
speed to approximately X2, and pressing
twice plays at approx x16.
When the number 1 appears on the OSD, it means
X2 speed, Number 2 = X16.
To resume normal playback, press the [1_|1] button.
Same as [ 44 ]/[ _._ ] buttons on the remote control
;kip Playback (Forward/Reverse)
Press and hold the [ 14_ ]/[ _vl] buttons during
playback,
When playing a disc, if you press and hold the
[ I_11 hldfr_n if mn//_ fr_ fhA n_tf _¢'_rt_
if you press and hold the [t44 ] button, it moves
to the beginning of the scene. One more press and hold makes it
move to the beginning of the previous scene. If you press and hold
the [ 144 ] button at a portion 3 seconds from the start of scene, it
moves to the beginning of the previous scene.
Potion being #ayed back
....... E
t'2
® i.@,Q.@.@.i0
®O
O
..... ......
Videoc mara con DVD
J " _ o== = * " r,_YD.R_+RW.R+RDL
÷:- Estas funciones s6to estan operativas en el Player Mode _pagina 28
+ Las funciones Reproducir, Pausa, Parar, Avarice r_pido, Rebobinar,
Salto adelante y Saito atr_s estan accesibles con el mando a distancia
(s61o SC-DC564/DC565)
_J kJ_ + La funci6n Slow sdlo esta accesible utilizando el
bot6n [ _,_-I], va a la siguiente escena Si mantiene pulsado el boton[ 14_ ],
se va al pdncipio de la eecena Otra pulsaci6n continua provocara que se
vaya al principio de la escena anterior Si mantiene presionado el bot6n
[ 14.,_] durante 3 eegundoe desde el inicio de la escena, va al principio de la
escena anterior
mando a distancia (s61o SC-DC564/DC565)
Reproducir/Pausa
• Presione el bot6n [_ II ] para hacer una pausa durante la
reproduccidn
• Para reanudar la reproducci6n, pulse el botdn [i_- II ].
Busqueda de imageries (Adelante/Atr_s)
• Si se preeiona una vez el botdn [ 14.,_]/[ _._1]
mientras se reproduce un disco, aumentara la
velocidad de reproducci6n a aproximadamente
X2 y eise presiona dos veces ee reproduce a
aproximadamente x16.
• Cuando aparece el n0mero t en ]a OSD, representa
una velocidad X2 N0mero 2 = X16.
• Para reanudar la reproduccidn normal, pulse el
botdn [_ II ]
= Igual que los botones [ 4._ ]/[ _._.] del mando a
distancia
Saltar reproducci6n (adelante/atras)
= Mantenga pulsados los botones [ 14._]/[ p_-I]
durante la reproducci6n
• AI reproducir un disco, si mantiene pulsado el
Patte que se va a reg_oducir
Page 66

[ ENGLISH ]
[ ESPAI_OL ]
DVD Camcorder
Slow Playback (ForwardlReverse)
(SC-DCS64/DC565 only)
= Press the [lit_] button on the remote control
during playback.
- To resume normal playback, press the [i,ql]
button.
Videoc_mara con DVD
Reproducci6n lenta (Adelante/Atr&s}
(s61o SC-DC564/DC565)
_6 • Pulse elbotdn [],] del mando a distancia
el boton [_ Ill.
normal, pulse
-- _ dur_nte_areprod_eo_6n.
®®®
S/IMSItN6
Page 67

[ ENGLISH ]
[ ESPA_IOL ]
DVD Camcorder
_ e o _ " _ _YD-_UJ+RWMR+RDL
+ ThePBZOOMfunctionworksonlyinPlayerMode._page28
+ The PB ZOOM function enables you to magnify the playback
scene.
1, Set the[Mode] switch to [DISC].
2, Set the [Power] switch to [_(Player)].
• The thumbnail index screen appears.
3. Use the [Joystick] to select a titlescene to be
played, thee press the [Joystick(OK)] or [_ |l ]
button,
4, Move the [Zoom] lever toward [T(Tele)] to
activate the PB Zoomduring playback,
• The image is magnified starting from the
center of image.
5. You can zoom in from 2.0x to 8.0x by moving
the [Zoom] lever.
• It zooms 2,0x .4,0x .8,0xprogressively,
• Zoom ratio is displayed.
6. Use the [Joystick] to move the screen up.
down, right or left.
7, Tocancel the PB Zoom function, move the
[Zoom] lever toward [W(Wide)].
• You cannot apply the PB ZOOM function to pictures which are
being input from an external video source.
• The PB ZOOM images cannot be exported to aPC.
Videoc mara con DVD
_:* La funci6n PB ZOOM s61oesta operafiva en el Player Mode,
_pagina 28
+ La funcion PB ZOOM permite ampiiar Is reproduccion.
1. Coloque el interruptor [Mode] en [DISC].
2. Coloque el interruptor [Power] en
[()_(Player)].
• Aparece la pantalla del indice de miniaturas.
3. UtNiceel [Joystick] para seleccionar la escena
de lalista de titulos que va a reproducir y
presione el botdn [Joystick[OK)] o [_" II].
4. Mueva lapalanca [Zoom] hacia [T(Teie)]
para activa PB Zoom durante la reproducci6n.
• La imagen se amplia desde el centro de la
imagen,
5. Puede acercar elzoom desde 2,0x a 8.0x
moviendo la palanca [Zoom].
• Aplica el zoom 2.0x -, 4.0x -, 8.0x
progresivamente,
= Aparece el indice dezoom.
6. Utilice el [Joystick] para mover la pantalla
arfiba, abajo, a la derecha o a la izquierda.
7. Para cancelar la funcion PB Zoom, mueva la
palanca [Zoom] hacia [W(Wide)].
• No puede apiicar lafunci6n PB ZOOM en imagenes introducidas
desde una fuente de video externa,
• Las imagenes de PB ZOOM no se pueden exportar a una PC.
Page 68

[ ENGLISH ]
[ ESPAI_OL ]
DVD Camcorder
D- - a . - - - | -- - DYD-RgJ+RW
+ Delete function works only in Player Mode --page 28
+ Individual or all title scenes can be deleted.
1 Set the [Mode] switch to [DISC].
2 Setthe (Power] switch to [[_(Player)].
• The thumbnail indexscreen appears.
4 Move the (Joystick] up or down to select
<Delete>, then press the (Joystick(OK)].
5 Move the [Joystick] up or down to select
<Select> or<Select All>, then press the
[Joystick(OK)].
• Select: Deletes individual title scenes.
To delete individual title scenes, use the L_J
[Joystick] to select title scenes to delete,
then press the [Joystick(OK)]
The selected title scenes will be marked <'_>.
• Select All: Deletes all titM scenes.
To delete alltitle scenes, simply press the
[Joystick(OK[] after <Select All> is selected.
All title scenes will be markedwith <'_>
6 Move the [Joystick] up to select <Execute>,
then press the [Joystick(OK)]. [_ fDeJete
• The <Delete?> message will appear.
7 Move the [Joystick) left or right to select <Yes>,
then press the [Joystick(OK)].
• All selected titles will be deleted.
• Related scenes in Playlist will be deleted.
(DVD-RW(VR mode only))
A deleted title scenes can not be recovered
(_ /- " 1. Coloque el interruptor [Mode] en [DISC].
z&
Videoc rnara con DVD
• a * - * m- - - DYD .Rig +RW
+ Lafunci6n Delete s61oestaoperativa en el Player Mode =pagina 28
+ Es posible suprimJrescenas individuales o todas las escenas del
titulo.
2. Coloque el interrupter [Power] en
[_(Player)].
= Aparece a pan a a de ndce de miniaturas3 Pressthe (QUICK MENU[ button.
3. Pulse el boton [QUICK MENU]
4. Mueva el [Joystick] hacia arriba o hacia abajo
para seleccionar <Delete> y pulse el boron
[Joystick(OK)].
5. Mueva el [Joystick] hacia arriba o hacia abajo
para seleccionar <Select> o <Select All> y
presione [Joystick(OK)].
= Select: Suprime archivos individuales
Para suprimir archivos individualmente,
utilice el [Joystick] para seleccionar los
archivos que va a suprimir y presione el
[Joystick(OK)].
Se marcaranlosarchivesseleccionados <_>.
Select All: Suprime todos los archivos
Para suprimir todos los archivos, presione
simplemente el [Joystick(OK)] tras
seleccionar <Select AJI>.
Se marcaran todos los archivos con <_>.
6. Mueva el [Joystick] hacia arriba para
seteccionar <Execute> y presJone el
[Joystick(OK)].
• Aparecera el mensaje <Delete?>.
7. Mueva el [Joystick] a la izquierda o a la
derecha para seleccionar <Yes>y presione el
[Joystick(OK)].
Se suprimiran todos lostitulos seleccionados.
. SeelJminaranlosarchivesrelacionadosde la
listade reproducci6n (DVD-RW(s01omodeVR))
Un titulo borrado no podra recuperarse.
Page 69

*to Partial Delete function worksonly in Player Mode @
_page 28
+ ATitlescenecanbepartiallydeleted.
+ The editing function only works ona DVD-RW (VR
Mode). Youshould format the DVD-RW to VR
Mode before recording. -page 43
1. Set the [Mode( switch to [DISC(.
2 Set the [Power( switch to [[_(Player)].
3 Pressthe [QUICK MENU( button
4 Move the [Joystick( up or down to select _}
<Partial Delete>, then press the [Joystick(OK)].
5 Move the [Joystick( to select atitle scene you
want to delete partially from the thumbnail index
screen, then press the [Joystick[OK)[.
• The selected title scene will be paused+then
<Start> willbe highlighted.
6 Search the start point of deletion by pressing the
[ 14_/_'_'1] or [_ || ] button.
7 Press the [P,"!1] button atthe start point to pause
the screen, then press the [Joystick(OK)]. L_J
• <End> will be highlighted.
8 Press the [ I_ /_,t ] or [_ tl ] button to search
the end point of deletion.
9 Press the [1_!1] button at the end point to pause
the screen, then press [Joystick(OK)].
• <Execute> will be highlighted.
10. Press the [Joystick(OK)].
• The <Delete selected part ? Please
confirm.> message will appear
11. Move the [Joystick] left or right to select <Yes>, _}
then press the [Joystick(OK)].
• The selected part of the title scene will be
deleted.
• Use the [Joystick] to select <Back>, then
press the [Joystick(OK}] to return to the
thumbnail index
Videoc mara con DVD
_ - _D.RWmt+doYR
+t+ Partial Delete sdloesta operstivaen el Player
Mode '-+pagina28
i: Puedeeliminarseparcialmente]a escenadeltitulo
La funcidn de edicidn soloesta operatJvaen un
DVD-RW modoVR) Debe formatearel DVD-RW
en modoVR an es de grabar _pag na43
1 Coloqueel interrupter(Mode] en(DISC]
Coloqueel interruptor[Power] en [(_)(Player}]
: Pulse el bot6n[QUICKMENU]
4 Muevael Joystick hacia arriba o hada abajo
paraselecdonar <Partial Delete>y pulseelbotdn
(Joystick(OK)]
5 Muevael(Joystick] para seleccionarla escena
deltitulo quedesea borrarparcialmentede la
pantalladel indice de miniaturasy presioneel
(Joystick(OK)].
, Sehara una pausaen el titulo seleccionado y
se resaltara <Start>.
6 Busqueel punto inicJaldeelJminacidnpulsandoel
bot(m[1+_ /_€+1]o [_-II]
7 Pulseel boton [_ HI en el+puntoinitial para
haceruna pausaanlapamalla y pulse el boton
Joystick(OK)]
, <End> se resatar&
8 Pulseelbotdn[l++_i_¢+l o )11 parabuscarel
puntofinal de eliminacidn.
9 Pulseel botdn [1_H] en elpunto final para
haceruna pausaenla pantalla y pulse el boton
[Joystick(OK)]
. <Execute> seresaltara
10. Pulseel boton[Joystick(OK)]. '_
. Aparecera el mensaje <Delete seiected part ,
Please confirm.>.
11 Muevael [Joystick] a la Jzquierdao a la
derechapara seleccionar<Yes> ypulse elboron
[Joystick(OK)]
. Se eliminara la parte seleccionadadel titulo
• Utiliceel Joystick]para seleccionar<Back>y
presioneJoystick(OK)]paravolvera lalistade
tituos
[ ESPANOL ]
A deleted part of the title scene can not be recovered
Unaparteborradadel titulonopodrarecuperarse
Page 70

/
[ ENGLISH ] / [ ESPAI_IOL ]
DVD Camcorder: Playlist [ Videoc&maracon DVD:Listadereproducci6n
-.., - " , - ", I)YD-I_WYRmode I -_- - _ ,_ - ", _YI_,RiUm0_oY_
*:* This function works only in Player Mode. _} *:. Esta funei6n s61oesta operativa en eJPlayer
_page 28
+ The editing function only works on aDVD-RW
(VR Mode),
You should format the DVD-RW to VR Mode before
recording. -page 43
1, Set the [Mode] switch to [DISC].
2. Set the [Power] switch to [_(Player)].
. The thumbnail index screen appears. _}
3, Move the [Joystick] upto highlight the thumbnail
index screen icon (t_), then move the [Joystick[
right to highlight the playlist icon (_).
• The Piaylist scenes will be displayed in the form
of athumbnail index.
• No thumbnail index is provided before creating
a Playlist,
4, Press the [QUICK MENU] button. _}
5. Move the [Joystick] upor down to select
<New Playlist>, then press the [Joystick(OK)].
• The thumbnail index screen appears.
6, Use the [Joystick] to select a scene to create,
then press the [Joystick(OK)].
• Keep selecting in the order of your preference.
. The selected scene will be marked with <,/>,
7, Move the [Joystick] upto <Add>, then press the
[Joystick(OK)].
• A new Playlist will be created.
• Up to 199 playlists can be created.
• Up to 999 title scenes (chapters) can be registered
on a Playlist.
I
I
Mode, _pagina 28
*:, La funci6n de edici6n s61oestaoperativa en un
DVD-RW (modo VR). Debe formatear el DVD-
RW en modo VR antes de grabar. '-pagina 43
1. Coloque el interruptor [Mode] en [DISC].
2. Coloque et interruptor [Power] en [[_;_(Player)].
. Aparece la pantalla del [ndice de miniaturas,
3. Mueva el[Joystick] ardba para resaltar el
icono de la pantalla del indice de miniaturas
(_) ymueva el [Joystick] a la derecha para
resaltar el icono de la lista de reproduccion (_).
. Apareceran lasescenas de lalista de
reproducci6n enforma de indice de
miniaturas.
. NOse proporciona ningun indice de
miniaturas antes decroat una lista de
reproducci6n.
4. Presione el bot6n [QUICK MENU].
5. Mueva el[Joystick] hacia ardba o hacia abajo
para seleccionar <New Playlist> y pulse el
bot6n [Joystick(OK)].
. Aparece lapantaHadel indice de miniaturas.
6. Utilice el [Joystick] para seleccionar la
escena que va a croat y presione el bot6n
[Joystick(OK)].
. Mantenga la selecci6n en elorden de
preferencia.
. La escena seleccionada se marcara con
<,/>
7. Mueva el[Joystick] hasta <Add> y pulse el
bot6n [Joystick(OK]].
. Se creara una nueva lieta de reproducci6n.
. Pueden crearse hasta 199listasdereproducci6n.
. En una lista de reproducci6n paeden registrarse
hasta 999 escenas de titulos (capitulos).
Page 71

[ ENGLISH ]
[ ESPAI_OL ]
DVD Camcorder: Piayiist
=, _ - " . DYD-RW¥Rmode
*:. This function works only in Player Mode. -page 28
*:. The PJay]istscenes are displayed in the form of a thumbnail index
on the LCD Screen.
if theLCD Screen is closed, youcan view the recording through
the viewfinder,
Use the Playback related buttons on the DVD Camcorder or on the
remote control, '-page 65 r_ ":*
+ The editing function only works on aDVD-RW L£J
(MR Mode), You should format the DVD-RW to
VR Mode before recording. _page 43
1, insert the disc you want toview,
2, Set the [Mode] switch to [DISC].
3, Set the [Power] switch to [[_(Player)].
• The thumbnail index screen appears.
4, Move the [Joystick] up to highlight the
thumbnail index screen icon (_"}j),then move the
[Joystick] right to highlight the playlist icon (_),
• The Playlist scenes will be displayed in the
form of a thumbnail index.
5, Use the [Joystick] to select a Playlist to be
played, then press the [_|l] button.
6, Press the [VOL -,+] buttons to adjust volume.
• The sound will be heard through the built-in
speaker.
/
_Pays
%
Videoc&maracon DVD:Listade reproducci6n
" - Q oa o _- _ - _, ea o DYD-RW(modoYR)
*:o Esta funci6n s6]o esta operativa en el Player Mode. _pagina 28
+ Las escenas de la lista de reproducci6n aparecen en forma de
indice de miniaturas en la pantalla LCD.
Si se cierra la pantalla LCD, puede ver la grabaci6n a traves del
visor. Utiflce los botones refacionados con la reproducci6n en la
Videocamara con DVD o en el mando a distancia. _pagina 65
La funci6n de edicion s61o esta operativa en
un DVD-RW (modo VR). Debe formatear el
DVD-RW en mode VR antes de grabar,
-pagina 43
1. Insede el disco que desea ver.
2. Celoque el interruptor [Mode] en [DISC].
3. Co]oque el interrupter [Power] en
[[_(Player)].
• Aparece la pantalla de] indice de m[niaturas.
4. Mueva el [Joystick] arriba para resaltar el
icono de la pantalla del indice de miniaturas
(_) y mueva el [Joystick] a }a derecha para
resa]tar el icono de la lista de reproducci6n (_),
• Apareceran las escenas de lalistade
reproducci6n enformato de indice de
miniaturas.
5. Utilice el [Joystick] para seleccionar la
lista de reproducci6n que va a repreducir y
presione el bot6n [_ II].
6. Pulse losbotones [VOL -,+] para ajustar el
volumen.
• El sonido se oira a traves del altavoz
incorporado.
Page 72

[ ENGLISH ]
[ ESPANOL ]
DVD Camcorder: Playlist
| - - = . " . IJ- - - DYD-_ YRmode
*t* Delete function works only in Player Mode _page 28
÷:o You can delete undesired playlists.
_* TheeditingfunctienonlyworksenaOVD-RW(VRMode).Youshouid
formatthe DVD-RW to VRModebefore recording _page 43
1 Set the [Mode] ewitch to [DISC[. 2
2 Set the [Power] switch to [[_(Player)] L_jr_H_'ay}Jst
• The thumbnail index screen appears.
3 Move the [Joystick] up to highlight the thumbnail
index screen icon (_), then move the [Joystick]
right to highlight the p]aylist icon (_).
• The Playlist scenes will be displayed in the
form of a thumbnail index.
4 Pressthe [QUICK MENU] button.
5 Move the [Joystick] up or down to select
<Delete>, then press the [Joystick[OK)].
6 Move the [Joystick] up or down to select
<Select> or <Select All>, then press the
[Joystick(OK)].
• Select: Deletes an individualplaylist.
To delete a playlist, use the [Joystick] to
setect a playlist to delete, then pressthe
[Joystick(OK)].
The selected playlist will bemarked with <_>.
•Select All: Deletes aHptaylists
Todeleteall p_aylists,simplypressthe [_
[Joystick(OK)] after <Select All> isselected
All the selectedplaylistswill bemarkedwith <_>
7 Move the [Joystick] up to select <Execute>,
then press the [Joystick(OK)].
• <Delete?> message wit] appear.
8 Move the [Joystick] left or right to select <Yes>,
then press the [Joystick(OK)].
• All selected play]ists will be deleted.
Videoc maraconDVD:ListadereproducciSn
*t* Delete sblo estaoperative en el Player Mode._pagine 28
¢ Puede borrar]aslistas de reproduccion quanodesee.
¢ Lafuncion de edicbn s61oesta operativeenunDVD-RW(modoVR).
Debeformeteer el DVD-RWenmodoVR antesdegreber _pagine 43
_ _ J - - " DvD.rIwmodeYR
t
Co]oqueel interrupter[Mode] en[DISC]
Co]oqueel interruptor[Power] en[[_;_(Player)]
, Aparece lapantalla de] indice de miniataras
Mueva e] ]Joystick] arbba para resaltar e]
icono de lapantalla del indice de miniaturas
(_) y mueva el [Joystick] a la derecba para
resa]tar el icono de la lista de reproduccidn (_)
, Apereceranlosescenasde leIrstade
reproduccbnenformetode indicede miniaturas.
4 Pulseelboton [QUICKMENU[
5 Muevael[Joystick] hacia erbbeo hada abejo
hasta <Delete> y pulseel boton [Joystick(OK)[
6 Muevael[Joystick] hacia embao hacia abejo
peraseleccioner <Select> o <Select Ali>y
presbne ]Joystick(OK)].
= Select: eiimineunaliste de reproduccibn
individual.
Pareeliminer unelistedereproduccibn,utilice
el [Joystick] pare seleccionerlalistade
reproduccionque vea eliminary presioneel
[Joystick(OK)].
La listade reproduccbn seleccionade se
marcaracon <_>
, Select AIh eliminatodas]aslistasde
reproduccibn
Pareeliminer todes ]as listasde reproduccbn,
presionesimpiementee][Joystick(OK)] tras
eelecdonar <Select AII>.
Todas loslistes de reproduccibnseleccionedas
se marcaran con<'_>.
7 Muevael[Joystick] hecie erbbapara selecc[oner
<Execute> ypulseelbet0n[Joystick(OK)]
, Aparecera e] menseje <Delete?>
8 Muevael[Joystick] ale izquierda e e la
dereche pareseleccioner<Yes>y pulse elboton
[Joystick{OK)]
, Sesuprimirantedeslaslistasdereproduccbn
seieccionadas.
Page 73

[ ENGLISH ]
[ ESPAI_OL ]
DVD Camcorder: Playlist
+ This function works only in Player Mode. '-page 28
*,1oYou can add more scenes inan existing Playlist.
*;, The editing function only works on a DVD-RW (VR Mode).
You should format the DVD-RW to VR Mode before
recording. "-,page 43
1. Set the [Mode] switch to [DISC]. (_
2. Set the [Power] switch to [l_(Player)].
• The thumbnail index screen appears.
3. Move the [Joystick] up to highlight the
thumbnail index screen icon (_), then
move the [Joystick] right to highlight the
playlist icon ([_]).
• The Playlist scenes will be displayed in
the form of a thumbnail index.
4. Press the [QUICK MENU] button.
5. Move the [Joystick] up or down to
select <Edit Playlist>, then press the
[Joystick(OK)].
• The screen wilt be switched to the Edit
Playlist mode.
6. Use the [Joystick] to select the Playlist
to which you wish to add scenes, then press the
[Joystick(OK)].
• The scenes inside the Playlist will appear.
7. Press the [QUICK MENU] button.
Videoc maraconDVD:ListadereproducciSn
*,_,Esta funci6n s6to esta operativa en el Player Mode.
'=pagina 28
+ Puede a_adir mas escenas en una lista de reproducci6n
existente.
+ La funci6n de edici0n s61oesta operativa en un DVD-
RW (modo VR). Debe formatear el DVD-RW en modo VR
antes de grabar. ",pagina 43
1. Coloque el interruptor [Mode] en [DISC].
2. Coloque et interruptor [Power] en
[8E](Player)].
. Aparece la pantalta del indice de
miniaturas.
3. Mueva eI[Joystick] arriba para resaltar
el icono de lapantalla del indice de
miniaturas (_) y mueva el [Joystick] a
la derecha para resaltar et icono de la
lista de reproducci6n (_).
. Apareceran las escenas de la tista de
reproducci6n en formato de indice de
miniaturas.
4. Pulse el bot6n [QUICK MENU].
5. Mueva el [Joystick] hacia arriba o hacia
abajo para seleccionar <Edit Playlist>
y pulse elbot6n [Joystick(OK)]
. La pantalla cambiar& al modo Edit
Playlist.
6. Utilice et[Joystick] para seleccionar
la lista de reproducci6n en la que se
van a aSadirescenas y pulse el bot6n
[Joystick(OK)]
. Apareceran las escenas dentro de la
lista de reproducci0n.
7. Pulse el bot0n [QUICK MENU].._
A
Page 74

[ ENGLISH ]
[ ESPAI_OL ]
DVD Camcorder: Playlist
8. Move the [Joystick) up or down to setect _!
<Add>, then press the [Joystick(OK)].
= The title scenes to be added to the
Ptaylist will appear.
9. Use the [Joystick] to select the title
scenes to be addedto the Playiist, then
press the [Joystick(OK)].
, The setectedscenes will be marked with
<_>.
10.Move the ]Joystick] up to select
<Execute>, then press the
[Joystick(OK)].
• <Want to add?> message wilt appear.
11.Move the [Joystick] leftor right to select
<Yes>. then press the [Joystick(OK)]
, The <Now adding...> message will
appear.
, The selected scenes wilI be added
to the Playiist. The new scene will be
added as the last scene.
Videoc&maraconDVD:Listadereproduccibn
8. Mueva el[Joystick] hacia arriba o hacia
abajo para seleccionar <Add> y pulse el
bot6n [Joystick(OK)].
• Apareceran las escenas de lalista de
titulos que se van a aSadir a la lista de
reproducci6n.
9. Utilice ei[Joystick] para seleccionar
las escenas de la listade titulos que se
van a aSadir a lalista de reproducci6n y
pulse el bot6n [Joystick(OK)]
• Las escenas seleccionadas se
marcaran con <¢>.
10.Mueva el [Joystick] hacia arriba para
seleccionar <Execute> y pulse el bot6n
[Joystick(OK)]
• Aparecerael mensaje <Want to add?>
11.Mueva el [Joystick] a la izquierda o a la
derecha para seieccionar <Yes> y pulse
et bot6n [Joystick(OK)]
• Aparecerael mensaje <Now adding...>
• Las escenas seleccionadas se
aSadiran a la lista de reproducci6n.
La nueva escena se aSadira como la
0itima escena.
Page 75

[ ENGLISH ]
[ ESPAI_OL ]
DVD Camcorder: Playlist
+ This function works only in Player Mode. '-page 28
•:. You can change the order of scene playing within a
Playiist.
+ The editing function only works on a DVD-RW (VR Mode).
You shouid format the DVD-RW to VR Mode before
recording. ",page 43
1. Set the [Mode] switch to [DISC].
2. Set the [Power] switch to [ []E](Player)].
• The thumbnail index screen appears.
3. Move the [Joystick] up to highlight the
thumbnail index screen icon (C_),then
move the [Joystick] right to highlight the
playlist icon ([_3).
• The Playlist scenes will be displayed in
the form of a thumbnail index, r$q
4. Press the [QUICK MENU] button.
5. Move the [Joystick] up or down to select
<Edit Playlist>, then press the
[Joystick(OK)].
• The screen will be switched to the Edit
Playlist mode.
6. Use the [Joystick] to select the Playlist
which contains the scenes whose order you want to
change, then press the [Joystick(OK)]
• The scenes inside the Playiist will appear.
7. Press the [QUICK MENU] button.
L_
Videoc maraconDVD:ListadereproducciSn
+ Esta funci6n s6to esta operativa en el Player Mode.
'-pagina 28
+ Puede cambiar etorden de reproducci6n de escena
dentro de un a listade reproducci6n.
+ La funcidn de edici0n s61oesta operativa en un DVD-
RW (modo VR). Debe formatear el DVD-RW en modo VR
antes de grabar. _',pagina43
1. Coloqueel interruptor[Mode] en [DISC].
2. Coloque et interruptor [Power] en
[l_Ei(Player)].
• Aparece la pantalta del indice de
miniaturas.
3. Mueva eI[Joystick] arriba para resaltar
el icono de lapantalla del indice de
miniaturas (_) y mueva el [Joystick] a
la derecha para resaltar et icono de la
lista de reproducci6n (_).
• Apareceran las escenas de lalista de
reproducci6n en formato de indice de
miniaturas.
4. Pulse el bot6n [QUICK MENU].
5. Muevael [Joystick] hacia arriba o hacia
abajo para seleccionar <Edit Playlist>
y pulse elbot6n [Joystick(OK)]
• La pantalla cambiara al modo Edit
Playlist.
6. Utilice et[Joystick] para seleccionar
al lista de reproducci6n que contiene
las escenas para cambiar el orden
de reproducci6n ypulse et bot6n
[Joystick(OK)]
• Apareceran las escenas dentro de la
lista de reproducci0n.
7. Pulse el bot0n [QUICK MENU].
Page 76

[ ENGLISH ]
[ ESPAI_OL ]
DVD Camcorder: Playlist
8. Move the [Joystick] up or down to select [_
<Move>, then press the[Joystick(OK)]
9. Use the [Joystick] to select the scene to
be moved, then press the [Joystick[OK)].
= The selected scene wilt be marked with
<,/>.
Atso a bar nextto the scene wilt appear.
10.Use the [Joystick] to move the bar to the [1_
position of your choice, then press the
[Joystick(OK]].
= The selected scene wilt be moved to the
new position.
11.Move the [Joystick] up to select
<Execute>, then press the [Joystick(OK]]
= The <Want to move?> messagewilt
appear.
12.Move the [Joystick] leftor right to select
<Yes>, then press the [Joystick(OK}]
= The <Now moving...> message wilt
appear.
= Youcanmove the scenes as manytimes
as you wish.
Videoc&rnaraconDVD:Listadereproduccibn
8. Mueva eie [Joystick] hacia arriba o
hacia abajo para seleccionar <Move> y
pulse el bot6n [Joystick(OK)]
9. Utilice el[Joystick] para seleccionar la
escena que va a mover y pulse el botdn
[Joystick(OK}]
• Laescena seleccionada se marcara
con <,/>.
Tambienapareceraunabarraal lado de
lasescenes.
10.Utilice el [Joystick] para mover la barra
a la posicidn que elija y pulse et botdn
[Joystick(OK)]
• Laescena seleccionada se movera a
la nueva posici6n.
11.Muevael[Joystick} hastaseieccionar
<Execute> y pulse et bot6n [Joystick(OK)].
• Aparecerael mensaje<Wantto move?>.
12.Mueva el [Joystick] a la izquierda o a la
derecha para seleccionar <Yes> y pulse
el botdn [Joystick(OK}]
• Aparecerael mensaje<Now moving...>.
• Puedemover las escenastantasveces
comodesee.
Page 77

[ ENGLISH ] [ ESPANOL]
DVD Camcorder: Playlist Videoc; maraconDVD:Listadereproducci6n
4. This function works only in Player Mode .to Estefundbn s61oestaoperativa anel Piayer Mode.
_page 28 _ '-.pagina 28
4. You can delete the titlescenes inside the P]aylist.
4, The editing function only works on a DVD-RW
(VR Mode). You should format the DVD-RWto VR
Mode before recording. "_page43
1. Set the [Mode] switch to [DISC]
2. Set the [Power] switch to [_(Player)]
• The thumbnail index screen appears
3. Move the [Joystick] up to highlightthe thumbnail [_
index screen icon(_), thenmovethe [Joystick]
right to highlightthe playlist icon(_)
• The Play]ist scenes will be displayed in the
form of a thumbnail index
4. Press the ]QUICK MENU] button.
5. Move the [Joystick] up or down to select
<Edit Playlist> then press the [Joystick(OK)]
• The screen will be switched to the Edit Playlist
mode.
6. Use the [Joystick] toselect the Playlistwhich [_
contains the scenes to be deleted,then pressthe
[Joystick(OK)]
• The scenes inside the Play]istwill appear.
7. Press the ]QUICK MENU] button.
8. Move the [Joystick] up or down to select
<Delete>, then press the [Joystick(OK)]
9. Use the [Joystick] toselect thescenes to be
deleted, then press the [Joystick(OK)].
• The selected scenes wifl be marked with <./> _
10 Movethe [Joystick] up to select <Execute>, then
press the [Joystick(OK)].
• The <Delete?> message will appear
11. Move the [Joystick] ]eftor rightto select <Yes>.
then press the [Joystick(OK)]
• The <Now deleting...> message will appear
• The selected scenes will be deleted
+ Puedesuprimir lasesceeasdel titulodentro de la
lista de reproduccibn
*t* Lafuncion de edJddnsbio esta operativa en un
DVD-RW (modeVR).Debeformatearel DVD-RW
ea modoVR antes de grabar '=pagina 43
1 Coloqueel interruptor[Mode] en[DISC]
2 Coloqueel interrupter[Power]en[[:_](Player)].
, Aparece lapantalladel inducedemmiaturas
3 Muevael Joystick] arriba pararesa]tarel icono
de apan a a de ndce dem nauras _ y
muevael Joystick a laderechapara resa]tarel
icono de la ][stadereproducc[on([_h)
, Las esceease la lista de repro_r_ccibn
apareceranen formato de indicedeminiaturas
4 Pulseel boton [QUICK MENU]
5 Muevael Joystick] hacia ardbao haciaaba o
parase eccbear <Edt Pay st> y pusee bo on
Joystick(OK)]
, La panta a cambara a modo Ed Pay s
6 Utiflceel[Joystick] paraseleccionarla]istade
reproduccionque contienelasescenasque sevan
a eliminar y pulseel boton [Joystick(OK)]
, Apareceran las esceeasdela]istade
reproducddn.
7 Pu]see]boton QUICKMENU]
8 Muevae Joystck hacaarrbaohacaabao
parase]eccionar<Delete> ypulse el boron
]Joystick OK
9 Ut _cee Joystck paraseecconar as
esceeasqua sevan a eliminarypulse elboron
[Joystick(OK)]
, ha escenaseleccionadasemarcaracon<'/>
10 Muevael ]Joystick] hacia ardba paraseleccionar
<Execute> ypulseelbotdn [Joystick(OK)].
, Aparecera el mensaje <Delete?>
11 Muevael ]Joystick] a la izquierda o a la
derechapara se]eccioear<Yes> y pulse el boron
[Joystick(OK)]
, Aparecera el mensaje <Now deleting...>
Sesupdmiran las escenas se]eccioaadas._
Page 78

[ ENGLISH ]
[ ESPANOL ]
DVD Camcorder: Playlist
+ This fanction works only in Player Mode. -page 28
+ A Playlist scene can be partiaNydeleted.
+ The editing function only works on aDVD-RW (VR Mode).
You should format the DVD-RW to VR Mode before recording.
_page 43
1 Set the [Mode] switch to [DISC]. [_
2 Set the [Power] switch to [[_}(Player)].
• The thumbnail index screen appears.
3 Move the [Joystick] up to highlight the thumbnail
index screen icon (_), then move the [Joystick]
right to highlight the playlist icon([_'_).
• The Playlist scenes will be displayed in the
form of a thumbnail index.
4 Pressthe [QUICK MENU] button.
5 Move the [Joystick] up or down to select [_
<Edit Playlist>, then press the [Joystick(OK)].
• The screen will be switched to the Edit Playlist
mode.
6 Use the [Joystick] to select the Playlist which
contains the scenes to be partially deleted, then
press the [Joystick(OK)].
• The scenes inside the Playlist will appear.
7 Pressthe [QUICK MENU] button.
8 Move the [Joystick] up or down to select [_
<Partial Delete>, then press the [Joystick(OK)].
9 Use the [Joystick] to select the scene to be
partially deleted, then press the [Joystick(OK)].
• The Partial Delete screen will appear The
scene will be paused and <Start> will be
highlighted.
Videoc_maraconDVD:Listadereproduccibn
+ Esta fancion solo est& operativa en el Player Mode. _pagina 28
+ Puede eliminarse parcialmentelaescena de una listadereproduccion.
+ La funci6n de edici6n s61oesta operativa en an DVD-RW (modo
VR). Debe formatear el DVD-RW en modo VR antes de grabar.
_pagina 43
1. Coloque el interrupter [Mode] en [DISC].
2. Coloque el interrupter [Power] en [[]_E](Player)]
• Aparecera lapantalla de la lista de titulos.
3. Mueva el[Joystick] arriba para resaltar el
icono de la pantalla del indice de miniaturas
(_) y mueva el [Joystick] a la derecha para
resaRarel icono de la {istade reproduccidn ([_h).
• Las escenas e la lista de
reproduccidnapareceran en formato de
indice de miniaturas.
4. Pulse elboton [QUICK MENU].
5. Mueva el[Joystick] hacia ardba o hacia abajo
para seteccionar <Edit Playlist> y pulse el
boton [Joystick(OK)].
• La pantalla cambiara al modo Edit Playlist.
6. Utilice el [Joystick] para seleccionar la lista
de reproduccion que contiene las escenas que
se van a borrar parcialmente y pulse elboton
[Joystick(OK)].
• Apareceran las escenas de la lista de
reproducci6n
7. Pulse etboton [QUICK MENU].
8. Mueva el[Joystick] hacia arriba o hacia abajo
para seteccionar <Partial Delete> y pulse el
boton [Joystick(OK)].
9. Utilice el [Joystick] para seleccionar laescena
que se va a borrar parcialmente y pulse el
bot6n [Joystick(OK)].
• Aparecera la pantalla Partial Delete. Se
interrumpira laescena y se resaltara<Start>.
Page 79

[ ENGLISH ]
[ ESPAI_OL ]
DVD Camcorder: Playlist
10. Press the [14_/_,1 ] or [_"I| ] to search the
starting point of deletion.
11. Press the [_,"H] button to pause the screen
atthe starting point of deletion, then press the
[Joystick(OK)].
• <End> will be highlighted.
12. Press the [t,=4/_._1] or [_,"II] to search the end
point of deletion.
13. Press the [1_|J] button to pause the screen
atthe end point of deletion, then press the
[Joystick(OK)].
• <Execute> will be highlighted
14. Press the [Joystiek(OK)].
• The <Delete selected part ? Please
confirm.> message will appear.
15. Move the [Joystick] left or right to select <Yes>, then press the
[Joystick(OK)].
• The <Now deleting...> message will appear.
Videoc maraconDVD:Listadereproduccibn
10. Pulse elboton [14_/_vl] o [_,-II] para buscar
el punte inicial de eliminacidn.
11. Pulse elboton [_ II] en el punto inicial para
hacer una pausa en la pantalla y pulse el botdn
[Joystick(OK)].
• Se resaltara <End>.
12. Pulse elboton [t44 / _,_,1]o [!_-H] para buscar
el punto final de eliminaci6n.
13. Pulse elboton [1_H] en el punto final para
hacer una pausa en la pantalla y pulse el bot6n
[Joystick(OK)].
• Se resaltara <Execute>
14. Pulse elboton [Joystick(OK)[.
• Aparecera el mensaje <Delete selected
part ? Please confirm.>.
15. Mueva el [Joystick] a la izquierda o ala derecha para seleccionar
<Yes> y pulse el boton [Joystick(OK)]
• Aparecera el mensaje <Now deleting...>.
Page 80

[ ENGLISH ]
[ ESPANOL ]
DVD Camcorder: Disc Manager
D • . Q D • DYD-RW+RW-R +R D_
•-*o This function works in both Camera Mode and Player Mode.
_page 28
1 Set the [Mode] switch to [DISC].
2 Set the [Power] switch to [1_ (Camera)] or
[[_(Player)].
3 Pressthe [MENU] button.
• The menu list will appear.
4 Move the [Joystick] up or down to
select <Disc Manager>, then press the
[Joystick(OK)].
5 Move the [Joystick] up or down to select
<Disc Info>, then press the [Joystick(OK)].
• <Disc Name>, <Disc Type>, <Disc Format>,
<Used Space> and <Free Space> will be
displayed.
6 Toexit, press the [MENU] button or
[Joystick(OK)].
[_ /" \
@ Disc Format
_ D_sc _l_fo
_ /Disc Info
Videoc_rnaraconDVD:Administradordediscos
• _ - = • | , DVD-RW+RI_ .R+RDL
+ Esta funci6n s61oesta operativa en los Camera Modey Player
Mode. -pagina 28
Camera Mode
Disc Finaiize
_Move _Select _Extj
...........................I ............................
1.
Coloque e! interruptor[Mode] en [DISC]
2.
Coloque e! interruptor [Power] en
[l_l(Camera]] o [[_(Player)].
3.
Presione el boton [MENU].
• Aparece la fista de{men&
4.
Mueva el [Joystick] hacia arriba o hacia
abajo para seteccionar <Disc Manager> y
pulse el boton [Joystick(OK]].
5. Mueva el [Joystick] hacia arriba o hacia
abajo para seteccionar <Disc Info> y pulse
el boton [Joystick(OK)]
• Aparecera <Disc Name>, <Disc Type>,
<Disc Format>, <Used Space> y <Free
Space>.
Para satir,presione el boton [MENU] o
[Joystick(OK)]
Page 81

[ ENGUSH ] [ ESPANOL]
DVD Camcorder: Disc Manager Videoc_maraconDVD:Administradordediscos
o _ _ . - DYD-RW+RW.R+RDL o . o- _ o - o- e _ D o _ _ DYD._W+RW.R+RDL
Player Mode. _page 28 Camerar.£,_ Mode y Player Mode. ",pagina 28
+ Youcan specify a disc name. +
1 Set the [Mode] switch to [DISC].
2 Set the [Power] switch to [1_,1(Camera)] or
[[_(Player)].
3 Pressthe [MENU] button.
• The menu list will appear.
4 Move the [Joystick] up or down to select
<Disc Manager>, then press the [Joystick(OK}].
5 Move the [Joystick] up or down to select
<Disc Info>, then press the [Joystick(OK)].
6 Move the [Joystick] left or right to select
<Rename>, then press the [Joyetiok(OK)].
• Disc Name screen will appear (6}
7 Use the [Joystick] to move the cursor to the first
character of the current disc name.
8 Use the [Joystick] to move the cursor to
<Delete>, then press the [Joystick(OK)] to delete
the existing disc name.
9 Use the [Joystick] to select the desired characters
and items, then press the [Joystick(OK)].
10. Use the [Joystick] to select <Done>, then press
the [Joystick(OK)].
• The Disc Name will be changed.
• Use the [Joystick] to select <Back>, then
press the [Joystick(OK)] to return to Disc
Manager menu.
Disc Finalize
@ D_s__e'mat 2.
_.. _Move _Seecl _Exit
Puede especificar un nombre de disco.
Coloque el interrupter [Mode] en [DISC].
Coloque el interrupter [Power] en
[1_ (Camera)] o [[)_(Player)].
3.
Presione el boron [MENU]
• Aparece la lista del men&
4. Mueva el [Joystick] hacia arriba o hacia
abajo para seleccionar <Disc Manager> y
pulse el boron [Joystick(OK)].
5. Mueva el [Joystick] hacia arriba o hacia
abajo para seleccionar <Disc Info> y pulse el
boton [Joystick(OK)].
6. Mueva el [Joystick] a ta izquierda o a la
derecha para seleccionar <Rename> y pulse
el boton [Joystick(OK)].
• Aparece la pantalla Disc Name.
7. Utilice el [Joystick] para mover el cursor al
primer caracter de! titulo actual del disco.
8. Utilice el [Joystick] para mover el cursor a
<Delete> y pulse el boron [Joystick(OK)]
para eliminar el titulo de disco existente
9. Utilice el [Joystick] para selecdonar los
caracteres y opciones que desea y pulse el
boron [Joystick(OK)]
10. Utilice el [Joystick] para seleccionar <Done>
y pulse elboron [Joystick(OK)].
• Se cambiara el nombre del disco.
• UtiEiceet [Joystick] para seleccionar
<Back> y presione [Joystick(OK)] para
volver al men8 del administrador dediscos.
Page 82

[ ENGLISH ]
[ ESPAkiOL ]
DVD Camcorder: Disc Manager
= . _ _ J • . DVD-RW +RW
•:÷ This function works anly in Camera Mode _page 28
o:* You can format a recorded diac to be used again By formatting, all
existing data vdl[ be deleted
1 Set the [Mode] switch to [DISC] 1
2 Set the [Power) switch to [[_[Camera)[. _"...................................................................................."\ 2
3 Press the [MENU[ button 3
• The menu fistwi[I appear
4 Movethe [Joystick] up or down taselect
<Disc Manager>, then pressthe [Joystick[OK[]
5 Movethe [Joystick] up or down toselect
<Disc Format>, then pressthe [Joystick[OK)]
6 Movethe [Joystick] up or down toselect
<Video Mode>or <VR Mode>,thenpressthe
Joystick(OK)].(DVD-RW only) Setthe mode
dependngonthe app catch.
• Ifyou insert DVD-RW disc,,the <DiSCed!>format?
[Video orVR) All files will be delet .
messagewill appear
Video Ifthedischasbeenfinalized, it enables
)Video the disc tobeplayed backon other
Mode) DVDPlayers Recorders
VR (VR Yaucan edit the discona DVD
Mode) Cemcarder,batplaybackisonly
_ossib[eon a DVDRecorder that
supportsVR mode.
• Refer to page 14 for Finalized disc compatibility. F _,
If you insert DVD+RW disc <Disc format? All I 30r,Ti_[] I compatib[Iided de un disco finalizado.
files will be deleted!> message will appear. I I S[ [nsertaun disca DVD+RW=aparecera el mensaje
7 Move the [Joystick] left or right to select <Yes>. .& Discfolmat'_(Vdeo) <Disc format? All files will be deleted!>
then press the [Joystick(OK)] 1 A[]fileswillbadeleted! 7 Mueva el [Joystick] a la izguierda o a la
= When formatting is complete, the<Complete.>messagew[]]appear [Joystick{OK)]derechapara selecc[onar <Yes> y pulse el botch
_te_ mensaje <Complete!>
• The Finalize/Format functions are not
available at battery level _ and _. _te_
• Formatting w[]l delete all the recorded contents on La funcidn FormatlFinalize (Formato/Finafizar) no
a disc Be careful not ta delete data by mistake, esta disponib{e en el nivel de bateria _ o _.
• Do not turn the power off in the middle of the formatting The data
,,_._ecorded in disc may be damaged cuidado de no eliminar datos pot error.
_#,love []Select _Ext
@ _ STBY [] 0000oo ¢_,; i . Consulte la pagina 14 para conocer [a
(aca notediti cameode . una vez finalizado el formata, aparecera e]
Videoc_rnaraconDVD:Administradordediscos
• . • =- = • D • . DV_RW +RW
+ Esta funcidn sdlo esta operativa en el Camera Mode¸ _pagina 28
Puede formatear un disco grabado para usaflo de nuevo.
Ai forrnatear, se eliminaran todos los datos existentes
. El formateo e]iminara todo e] contenido grabado en el disco. Tenga
No apague el aparato durante elproceso de formeto Es posible que se
daffen los datos grabedos en el disco
Co]oque el [nterruptor [Mode] en [DISC]¸
Co]oque el interruptor [Power] en [ _ [Camera)[
Presione elbotch [MENU]
• Aparece la fista del menO
4.
Mueva el [Joystick] hacia arfiba o hacia abajo
para seleccionar <Disc Manager> y pulse el bot6n
[Joystick[OK}]
5.
Muevael [Joystick] hacaarribaohaciaabajopara
seieccionar<Disc Format>y pulseelbotch[Joystick (OK}]
6.
Mueva el [Joystick] arfiba o abajo para seleccionar
<Video Mode> o <VR Mode> y presione e]
[Joystick(OK}] (solo DVD-RW) Ajuste el modo
dependiendo de ]a apficacibn
• Si inser[a un disco DVD-RW. aparecer& e]
mensaje <Disc format? ]Video o VR) All files
will be deleted!>
¢ideo Si se ha finelizadoeldisco,es
[Modo posible reprodacire[ disco en otras
Video) ReprodactoresGrabadoras de DVD.
VR Puedeeditare]discoanunaVideocamara
[Mode con DVD,paro]areproduccidns01oas
CR) posib]een an Grabadorde DVDqua
admitae]modoVR
Page 83

[ ENGLISH ]
[ ESPANOL ]
DVD Camcorder: Disc Manager
• + • II m . - D¥_R_.R +RDL
+:÷ This function works only in Camera Mode _.page 28
+:÷ To play the contents of a DVD-RW,-R +R DL on other DVD players,
recorders, you must finalize the disc if the AC Power adapter Jsto be
used, make sure that the jack is properly connected A power cat dudag
finalizing may disrupt the disc from replaying
1 Set the )Mode] switcl_ to [DISC]
2 Set the Power] swRch to [ _(Camera)].
3 Press he MENU bu on
• The menu list will appear
4 Move the )Joystick] up or down to select
<Disc Manager>, then press the )Joystick(OK)]
5 Move the )Joystick] up or down to select
<Disc Finalize>, then press the )Joystick(OK)]
6 Move the )Joystick] left or right to select <Finalize>,
then press the )Joystick(OK)]
• The <Finalizing, please wait...> message
will appear When finalizing is complete the
<Complete!> message will appear
Dadag finalizing, do not cause impact or vibration to your
DVD camcorder This could cause a malfunction.
= The Finalize/Format functions are not available
at battery level (_J and _.
• Oncefinalized,thetitle scenesor Playlists inthe
disc cannotbedeletedor edited
• Timerequiredforfinalizingmaydifferbydisctype
= Referto page14forfinal+zealdisc compatiMity
= Playbackisnotguaranteedinall gvg Players/
Recorders.For compatibility details,refertoyour DVD
Players/Recordersowner'smanual.
• OncetheDVD-R/+R DLdisc is finalized,youcannot
re-recordit in the DVDCamcorder
= Youmay play back DVD+RWdiscsonotherdevices
withoutfinalizingthem.
• Youcannotmakeanadditionalrecordingon a
DVD-RWdiscwithoutunfinalizingitafterit isfinalized
• Thefinalizeddisc will not be supported in a Macintosh
[_ / ........................................................................................_', 2 Coloque el interruptor [Power] en [1_ [Camera[[
\
[_) /_ ........................ [Joystick(OK}]
Videoc_maracon DVD:Administradordediscos
• . + + - + + | . - DYD.F_W .1_+RDL
•_* Esta funci6n s6M esta operativa en el Camera Mode¸ '-+pagina 28
•_* Para reproducir el contenido de un disco DVD-RW/-R/+R DL en otros
reproductores/grabadores de DVD debe finalizar el disco¸ Si se va a utilizar
un adaptador de CA aseg_rese de que el terminal este correctamente
conectado Un code de corriente al finalizar podria impedir que el disco se
reprodujera
I Camera _ i 3 Presione el boron MENU
| j • Aparece la lista del menQ
DiscFin I+ze i 4 Mueva el ]Joystick] hacia ardba o hacia abajo
, , para seleccionar <Disc Manager> y pulse el bot6n
'Eiat j [doystick(OK}]
_Select _Ext / paraseleccionar<Finalize>ypulseelbot6n
, No puede reatizar una grabaeJ6n adicional en un
disco DVD-RW sin ar_ular la finalizacJ6n tras flnalizado
, El disco finalizado no se admJtiraen Macintosh
1 Coloque el interruptor [Mode] en [DISC]¸
j para seleccionar <Disc Finalize> y pulse elbot6n
j [Joystick(OK}]
j 5 Mueva el Joystick hacia ardba o hacia aba o
i 6 Muevael[Joystick]alaizquierdaoaladerecha
• Aparecera <Finalizing, please wait...> Una vez
\ termJnada lafinalizaci6n, aparecer& eJ mensaje
J <Complete!>
j Durante la finalizaci6n, no someta ta Videocamara con DVD
j a impactos nia vibraciones Esto podria causeravedas
j • La funcidn FormatlFinalize Formato/Finalizar) no
esta disponible en el nivel de bater a _ o _.
Una vez finaJizado no se pueden eliminar ni editar las
Hstasde tituJos o tas Jistas de reproducci6n del disco
• El tMmpo necesado para fJnaHzarpodria difedr pot
tipo de disco.
• ConsuJte lapagina t4 pare conocer Mcornpatibilidad
de un disco finalizado.
• La reproducci6n no est_ garantizada en todos los
Reproductores/Grabadoras de DVD, Para obtener
informaci6n sobre compatibilidad, consulte
el manual de instrucciones del Reproductor/
Grabadora de DVD,
• Una vez finalizado el disco DVD-R/+R DL, no puede
votver a grabar en laVideocamara con DVD
• Puede reproducir discos DVD+RW en otros
dispositivos sin finalizados
Page 84

[ ENGLISH ]
[ ESPANOL ]
DVD Camcorder: Disc Manager
+ The DVD disc can be played on a PC with a
DVD running media (DVD drive)
f Turn on your PC
2 Insert afinalized disc into the DVDdrive of the PC
• Starts DVD playback ap¢cetion software
and the disc will play
• If DVD playback application does not
start automatically, run the application by
navigating through the Start menu
• Use a DVD drive compatible to 31 2inch (Scm)
discs _.page 12
• A DVD playback application software should have been installed before
_/laying back e disc
ideo and audio may be paused or skipped when you play back from a DVD
disc directly. Inthis case, copy the data into your hard disk drive
The finalized disc will not be supported in a Macintosh
• A DVD-RW disc recorded in VR mode can not play back on your PC
You canplayback finalized DVD-R/-RW (Video mode) +R DL discs on DVD
Players/Recorders.
Playback is not guaranteed in all DVD Players/Recorders. For compatibility
details, refer to your DVD Player/Recorder owner's manual
Most DVD Players'Recorders can play back a f-
DVD+RWdiscthat has notbeen finalized
• Referto the page 14for finalizeddisc
compatibility
f Turn onthe DVD Player/Recorder
2 Insertthefinalized DVDdiscintothetray of a
DVD PlayerRecorder
• It maystartplayingautomaticallyorpressthe
PLAYbuttontostart
. Forfurtherdetailson playingbackDVDdiscs.
refertothe DVDPlayer/Recorderuser'smanual
DVD
ooooo@
Videoc_rnaraconDVD:Administradordediscos
D Qo • - _ Q a.o 6- | |
÷t÷ E] disco DVD puede reproducirse en un PC con
un medio que utJ]iceun DVD (unidad de DVD)
1 Encienda el PC
2 Inserte un disco finalizado en la unidad DVD del PC
• Inicia el software de la aplJcaci6nde reproducc[6n
de DVD y se reproducira]a pelicula
• SJno se inicia automatJcamente ]aaplicacidn
de reproduccion de DVD, ejecute la ap]icaci6n
desde Inicio
• Utilice una unidad de DVD compatible con discos
, Debe haberse instalado un software de apficaci6n de reproducci6n de DVD
antes de la reproduccion.
, Ei video y el audio pueden interrump[rse o sa[tarse al reproduc]r dftectamente
desde un disco DVD En este caso, copie los datos en la unidad del disco duro
= E] disco finafizado no se admitira en Macintosh
• No es posib]e reproducir en e] PCun disco DVD-RW grabado en modo VR
Puede reproducir discos DVD-R/-RW (modo Video)/+R DL en Reproductores/
Grabadoras de DVD
La reproducci6n no esta garantizada en todos los Reproductores/
Grabadoras de DVD. Para obtener informaci6n sobre compatibilidad,
consulte el manual de instrucciones deI Reproductor/Grabadora de DVD.
de 3 t/2pulg (8cm). _pagina 12
La mayofia de Reproductores/Grabadoras de DVD
pueden reproducir un disco DVD+RW que no haya
sido fina]izado
= Consulte ]apagina 14 para conocer la
compatibi]idad de un disco fina]izado
1 Enc[enda el reproductodgrabador de DVD
2 ]nserteel disco DVD finalizado en ]a bandeja del
reproductor/grabador de DVD
= Puedecomenzar la reproducci6nautorn&t[camente
o pulsar el bot6n PLAYpara comenzar
• Para obtener informaci6n adicional sobre la
reproduccion dediscos DVD, consulte elmanual
,,&
Un DVD-RW ftnalizado en modo VR se puede reproducir @]izando una Grabadora
de DVD que sea capaz de reproducir discos DVD-RW en rnodo VR
Page 85

[ ENGLISH ]
[ ESPANOL ]
DVD Camcorder: Disc Manager
• _ . D_ m . - DVD.RW
*:o This function works only in Camera Mode. -page 28
*:o If a DVD-RW disc had been finalized inthe VR mode or V+deo
mode, you can unfinalize the discfor further recording.
1 Set the [Mode] switch to [DISC].
2 Set the [Power] switch to [1_ {Camera)].
3 Pressthe [MENU] button.
• The menu list will appear.
4 Move the [Joystick[ upor down to select
<Disc Manager>, then press the [Joystick{OK[].
5 Movethe [Joystick] up or downto select ....................................I...................................................
<Disc Unftnalize>, then press the [Joystick(OK)]. [_ ,/ 5
6 Move the [Joystick] left or right to select
<Unfinalize>, then press the [Joystick(OK)].
• The <Unfinalizing, please wait...>
message will appear When unfinatizing is
complete, the <Complete!> message will
appear.
• The Finalize/Format functions are not
available at battery level _ and _.
• During unfinalizing+ do not cause impact or
vibration to your DVD camcorden This could
cause a malfunction.
_Move _Select _Ex,t /I
_,love _Select _Exit
%
Videoc_rnaraconDVD:Administradordediscos
, _ _ + ,- . + II • - DYD=nW
+ Esta funcion s61o esta operativa en el Camera Mode '_pagina 28
+ S+un disco DVD-RW se hafinalizado en modo VR o en modo
Video, puede anu+arla finalizaci6n de+disco para poder seguir
grabando.
1 Coloque el interruptor [Mode] en [DISC].
2 Coloque el interruptor[Power] en
[ I_ (Camera}].
3 Presione e! boton [MENU]
= Aparece lalista de! men&
4 Mueva el [Joystick] hacia arriba o hacia
abajo para seleccionar <Disc Manager> y
pulse e! boron [Joystick(OK)].
Mueva el [Joystick] hacia arriba o hacia
abajo para seleccionar <Disc Unfinalize> y
pulse el boron [Joystick(OK)].
Mueva el [Joystick] a la izquierda o a la
derecha para seleccionar <UnfinaHze> y
pulse el boron [Joystick(OK)].
= Aparezca elmensaje <Unfinalizing,
• La funci6n FormattFinalize(Formato/
Finalizar) no est_ disponible en el nivel de
bateria _ o _[_.
• Durante la anulacion de finalizacion, no
someta la videocamara con DVD aimpactos
ni a vibraciones. Esto podria causar averias.
please wait,,,> Una vez car_celada
la finalizaci6n, aparecera el mensaje
<Complete!>.
+
Page 86

[ ENGLISH ]
[ ESPAI_OL ]
DVD Camcorder: Connection
*:- AV In/Out function works only in Player Mode. -page 28
*:- AV In/Out setting enables you to record signals from external
sources.
Also, you can send your videos to external devices to record or
play back.
1 Set the [Mode] switch to [DISC].
2 Set the [Power] switch to IDa(Player)].
3 Pressthe [MENU] button.
• The menu list will appear.
4 Move the [Joystick] up or down to select
<Record>, then press the [Joystick(OK)].
5 Move the [Joystick] up or down to select
<AV In/Out>, then press the [Joystick[OK)].
6 Move the [Joystick] up or down to select
<Out>, <AV In> or, <S-Video In>, then press the
[Joystick(OK)].
• If you want to see the DVD Camcorder videos
on a TV, set <AV In/Out> menu to <Out>.
• To exit, press the [MENU] button
f .....................................................................................
%
Videoc mara con OVO: Cone×i6n
- *- _ O • * B •
+ AV In/Out s6to esta operativa en e! Player Mode _pagina 28
+ El ajuste AV In/Out permite grabar seBales desde fuentes
extemas.
Asimismo, puede enviar sus videos a dispositivos extemos para
grabarlos o reproducidos.
_ i 1. Coloque el interruptor [Mode] en [DISC]
Rv_ToO_ltei: Spt 2.3.Coloque el Jnterruptor[Power]en.pulse[[_(Player)].ApareceelbotOnlalista[MENU]delmen&
4.
Mueva el [Joystick] hacia arriba o hacia
abajo para seleccionar <Record> y pulse el
boton [Joystick(OK)]
5.
Mueva el [Joystick] hacia arriba o hacia
abajo para seleccionar <AV In/Out> y pulse el
boton [Joystick(OK)]
6.
Mueva el [Joystick] hacia arriba o hacia abajo
para seleccionar <AV In>, <S-Video In> o
<Out>, ypulse el boron [Joystick (OK)]
_Move _Select _Exit
I
[]
AV In
• Si desea ver los videos de la Videocamara
con DVD en un televisor, ajuste el men=3
<AV In/Out> en <Out>.
Para salir,pulse el boton [MENU].
J
Page 87

[ ENGLISH ]
[ ESPANOL ]
DVD Camcorder: Connection
_ + D_ Q o o
+ The Playback function works only in Player Mode _page 28
Playing back on a TV Monitor
4+ Toplay back a disc, the television must be NTSC compatible.
_page 119
4+ We recommend that you use the AC Power adapter as the power
source for the DVD Camcorder.
Connecting to a TV which has Audio/Video Input Jacks
1 Connect the DVD Camcorder to your TV with the Multi-AV cable.
• The yellow jack: Video
• The white jack: TV
Audio(L)-mono
• The red jack:Audio(R)
• If you connect to a
monaural TW,connect
the yellow jack (Video)
to thevideo input of
the TV and the white
jack (Audio L) to the
audio input of the TV.
2 Set the [Mode] switch to
[DISC]
3 Setthe [Power] switch to [[_(Player)].
4 Turn on the TV and set the TV/VIDEO selector on theTV to Video.
= Refer to the TV user's manual.
5. Play the disc. _page 64
= Youmay use an S-Videoconnector on the cable to obtain better
quality pictures ifyou have a S-Video connector on your TV.
= Even if you use an S-Video connector, you need to connect an
audio cable
= if you connect the cable to theAVISjack, you will hear sound from
the DVD Camcorder+s speakers.
= tf only amono audio input is available on the TV set, usethe audio
cable with the white jack (Audio L)
Multi-AV Cable
Videoc rnara con DVD: Conexibn
• • + +- + +++ • - - -
*.** Lafuncionde reproducci6n s61oestaoperativaen el Player Mode
-pagina 28
R_roducci6n en un monitor de TV
*.** Para reproducir un disco, el televisor debe set compatible con
NTSC. _pagina 119
+ Recomendamos usar como fuente de alimentaci6n para la
Videocamara con DVD el adaptador de CA
Conexi6n a un TV clue dispone de conectores de audio/video
1 Conecte ]aVideocamara con DVDalTV mediante el cable Muiti-AV
DVDCamcorder = Elterminal blanco:
3. Coloque el interruptor [Power[ en [{]EJ{Player)].
4 Encienda el televisor y celoque el selector TV/ViDEO del mismo en
Video.
• Consulteel manualdelusuario.
5 Reproduzca el disco -pagina 64
. Puede utilizar un conectorS-Video en el cable para obtener imagenes
de mejorcalldadsi tiene un conector de S-Video en el TV
. Incluso aunqueutilice un conectorde S-Video,tiene que conectarun
cable de audio
. Si conectael cableal terminalde AV/S+oira el sonido porelaltavozde
la Videocamara con DVD.
. Si s61oesta disponible unaentradadeaudiomonoaural en el equipo
de TV, utiliceel cablede audio con el terminal blanco (Audio L).
• Elterminal amarillo: Video
Audio(L)-mono
= El terminal rojo: Audio(R)
• Si se trata de un televisor
monoaural, conecte la
clavija amarilla (video) a
la entrada de video del
televisor y laclavija blanca
(Audio L) ala entrada de
audio del televisor.
2. Coloque el interruptor
- [Mode] en [DISC].
Page 88

[ ENGLISH ]
[ ESPANOL ]
DVD Camcorder: Connection
Connecting to a TV which has no Audio/Video Input Jacks
*:- You can connect your DVD Carncorder to a TVthrough a VCR.
1 Connectthe DVDCamcorder
toyour VCR with the Multi-
AVcable.
• The yellow jack: Video
• The white jack: Audio(L) -
Mono
• The red jack:Audio(R)
2 Connect a TV to the VCR.
3 Setthe [Mode] switch to
[DISC]
4 Setthe [Power] switch to
[[_(Player)].
5 Turn on both the TV and
VCR.
• Set the input selector on the VCR to Line.
• Select the channel reserved for your VCR on the TV set.
6 Play the disc. _page 64
tf the VCR has an S-Video input terminal, you may use the S-Video
connector for better quality.
Even if you use an S-Video connector, you need to connect an
audio cable
If only a mono audio input is available on the VCR set, use the
audio cable with the white jack (Audio L).
VCR
TV
Multi-AV Cable
Videoc mara con DVD: Cone×ibn
Conexi6n a un TV que no dispone de conectores de audio/video
•:. Es posible conectar la Videocamara con DVD a un televisor a
traves de un VCR.
1. Conecte la Videocamara con
DVD al VCR mediante el
cable Multi-AV.
DVD Camcorder
• Seleccione el canal reservado para elaparato devideo en el
televisor.
6. Reproduzca el disco _pagina 64
• Si el VCR tiene unterminal de entrada S-Video, puede utilizar el
conector de S-Video para obtener una mejor calidad.
• Incluso aunque utilice un conector de S-Video, tiene que conectar
un cable de audio.
• Si solo esta disponible una entrada de audio monoaural en el
equipo de video, utilice el cable de audio conel terminal blanco
(Audio L).
, EIterminal amarillo: Video
, EIterminal blanco:
Audio(L)-mono
El terminal rojo: Audio(R)
2. Conecte el televisor al
aparato de video.
3. Co!oque el interruptor [Mode]
en [DISC].
4. Coloque el interruptor
[Power] en [_(Player)]
5. Encienda el televisor y e!
aparato de video.
, Coloque elselector de
entrada de! aparato de
video en Line
Page 89

[ ENGLBH ]
[ ESPAi_OL ]
DVD Camcorder: Connection
oo o . II Q • . 0-o .o-
°:÷ The copying function works only in Player Mode "='page 28
o:÷ Connect your DVD Camcorder to a VCR using the AV/S jack to dub
the recording from a disc onto a VCR tape.
1. Set the [Mode] switch to
[DISC].
2. Set the [Power] switch to
[[_(Player)].
3. Insert the disc you want to
copy inyour DVD Camcorder
4. Insert a new tape in your
VCR
5. Connectthe DVD Camcorder
to your VCR with Multi-AV
cable
• Connect the Multi-AV cable to the input jack on your VCR.
• The yellow jack: Video
The white jack: Audio(L)-mono
The red jack: Audio(R)
6. Press the Record button on your VCR to start recording
7. Play the disc on your DVD Camcorder Please refer to page64 for
Playing.
• Press the [DISPLAY] button so as not to display OSD.
Stop recording onyour VCR, then press the [g(Stop)] button onyour
DVD Camcorder.
You can also copy moving images onto another disc or HDD by
connecting to a DVD Recorder.
MuEfl-AVCable
Videoc mara con OVO: Conexibn
o0 . _- o • - . .
•1- La funci6n de copia s61oesta operativa en el Player Mode.
=pagina 28
•t* Conecte la Videocamara con DVD al VCR utilizando el terminal
AVIS para mezclar la grabaci6n de un disco en una cinta de video.
1. Coloque elinterruptor [Mode]
en [DISC].
2. Coloque elinterruptor
[Power] en [C_(Player)l
3. Inserteel disco quedesea
copiar en la Videocamaracon
DVD
4. Inserte una nueva cinta en el
VCR.
5. Conecte la Videocamara con
_' DVD al VCR mediante el
• Conecte el cable Molti-AV al terminal de entrada del aparato de
video.
• Elterminal amarillo: Video
• Elterminal blanco:Audio(L)-mono
• Elterminal rojo:Audio(R)
6. Pulse elboton Grabar deI video para iniciar la grabaci6n.
7. Reproduzca el disco en soVideocamara con DVD. Consulte la
pagina 64 para la reproduccion.
• Pulse el boron [DISPLAY] para qoe no aparezca la OSD
Detenga lagrabacion en el VCR y presione el bot,Sn[l(Stop)] de la
Videocamara con DVD.
Tambicn puede copiar secuencias de imagenes en otto disco o disco
doro conectando a una grabadora de DVD.
cable Multi-AV.
Page 90

[ ENGUSH ]
[ ESPANOL ]
DVD Camcorder: Connection
+ The Recording(Copying)function works onlyin Player Mode
_page 28
¢ Connectyour DVD Camcorderto a VCR or aTV usingtheAViSjack to
recorda TV programorcopya videotapeto a disc. Setthe AVIn/Out
beforeRecording(Copying) -page 86
Recordin Co in onto a Disc
1 GetyourTV orVCR ready
2 Connectthe DVDCamcorder
toyourVCRor TV with Multi- TV
AVcable.
• ConnecttheMulti-AVcabb
to theoutput jack on your
VCR or TV
• The yellowjack:Video
• The white jack:Audio(L) -
Mono
• The red jack:Audio (R) VOR
3 Insertanempty discin your
DVD Camcorder.
• Please referto page 13for
selecting endformatting \
discs.
4 Insertthetape to beplayedinyourVCR
• Pauseat thestartingpoint of playing
5 Startcopyingby pressingthe[Start/Stop] buttononyourDVDCamcorder
6 Pressthe PLAYbutton on your VCR to playthetape
4 Selecta TV channelto be recorded
5 Start recordingbypressing the [Start/Stop] button on your DVD
Camcorder
Pressthe [l(Stop)] button on your DVD Camcorderto stop
recording(copying).
Multi-AV Cable
Videoc mara con OVO: Conexibn
+ Lafuncion de grabacion(Copia)soloesta operativeen elPlayer Mode.
_pagJna28
¢ Conecte la VideocamaraconDVDaunVCRo aun TV utilizando el
terminalAViS paragrabarunprogramade TV ocopierunednta de
video en un disco. DefinaAV In/Out antesdegrabar(copier).
_pagina 86
GrabaciOn coco_ en un disco
1 Prepareel TV o el aparatode
video
DVDCamcorder DVD al VCR o alTVmediante
4 Inserte la cinta quese va a reproducirenelaparatode video
, Interrumpa en el puntoinicialde la reproducdOn.
5 Comiencea copiarpresionandoel bot6n[Start/Stop]enlaVideocamara
con DVD
6 Pulseel botch PLAY.del video pare iniciar la dnta
4 Sebccione el caner de TV que sevaa grabar
5 ComienceagrabarpresionandoeJbeten[Start/Stop]enlaVideocamaraconDVD
Presioneel botch [l(Stop)] de la videocamara paradetenerlagrabacion
(copia)
2 ConectelaVideocamaracon
el cable MultPAV.
, Conecteelcable Multi-AV
alterminal desalidadel
aparatode video o TV
, EIterminal amabllo:Video
, EIterminalb_anco:
Audio (L) - Mono
, Elterminal rojo:Audio(R)
3 Inserteun disco vacioen la
Videocamaracon DVD.
"_ , Consultelapagina13para
sebccionary formateardiscos
Page 91

[ ENGLISH ]
[ ESPAI_OL ]
Digital Still Camera Mode
o . - o . = .= - - = . 0 _ 0e -_
+ TheMemory Card storesend
managesPhoto/Moving images
recordedby the DVDCamcorder.
+ Beforeinsertingorejectingthe
MemoryCard,setthe[Power]s,_vitch
to[Off]andopentheLCDScreen.
Card Functions
+ Recording/ViewingPhoto/Moving<MMC/SD>
Images
,:÷ ProtectingImagesfrom
accidentalerasure(except
MemoryStick DuoiMMC).
+ TheMemory Stick Duo/MMC
doesnot havee ProtectionTab.
When usingthe MemoryStick
Duo/MMC,be careful notto edit
ordelete databy mistake
+ DeletingPhoto/MovingImages <ReMMC/MiniSD>
stored in Memory Card
+ MarkingPhoto Imageswith
Print Information
,:÷ FormattingMemoryCards
Insertin a Mernor Card
1 Openthe LCD Screen.
2 Openthe Memory Card Cover
3 Insertthe Memory Card
• Please inserttheMemoryCardwith its terminals
facingupward
4 InserttheMemoryCardintotheslotuntilit softlyclicks.
5 CIosethe Memory Card Cover
_=jecting a Memory Card
1 Openthe LCD Screen.
2 Openthe Memory Card Cover
3 Slightlypush the Memory Card inwards to popitout
4 Pullthe Memory Cardout ofthe slot and closethe
MemoryCard Cover.
MemoryStick Duo,RSMMCor MiniSDshould MemoryStickDuo, RSMMCo MiniSD deben
be insertedby using an Adapter (not supplied), insertarse utiliz_ndo etadaptador (r_ose
Modo de c;_mara fotogr_fica digital
or* La tarjeta de memoria guarda
y gestiona fotografias y videos
grabados con la Videocamara
con DVD
or* Antes de insertar o expulsar la
tarjeta de memoria, coloque el
interruptor [Power] en [Off] y
abra la pantal}a LCD
<Memory Stick/Memory Stick PRO>
<Memory Stick Duo>
suministra).
+ Indusi6n de marcas en las fotografias con
informaci6n de impresi6n
¢ Formato de tarjetas de memoria
Inserci6n de una tar[eta de rnernoria
1 Abra la pantalla LCD
2 Abra la tapa de la tarjeta de memorta.
1
3 Insertela tarjeta de memoria
• Inserte la tarjeta de memoda con sus terminales
hacia arriba
4 Inserte la tarjeta dememoria en la ranura hasta que
emita un chasquido suave
5 Cierre la tapa de latarjeta de memorta.
Ex_ulsi6n de una taffeta de rnernoria
f Abra la pantalla LCD
2 Abra la tapa de la tarjeta de memorta.
3 Presione ligeramente la tarjeta de memoria hacia
4 Saque la tarjeta de memofia de la ranura y cierre la tapa
dentro para clue sarte.
Funciones de la tarjeta
de rnemoria
*:, Grabaci6nVisualizaci6n de
fotosivideos
+ Protecci6n deimagenes frente
a borrado accidental (excepto
Memory Stick DuoiMMC)
+ El Memory Stick Duo/MMC no
tiene la leng_eta de protecci6n
AI utilizar el Memory Stick Duo/
MMC, tenga cuidado de no editar
o borrar los datos por error
+ Supresidn de fotografiasi
secuencias almacenadas ea la
tarjeta de memorta
Page 92

[ ENGLISH ]
[ ESPAI_OL ]
Digital Still Camera Mode
Do not apply excessive force when you insert/eject the Memory Card
Do not turn the power off while recording, loading, erasing photo images
or formatting the Memory Card
Do not place the Memory Card near a strong electro-magnetic device
Do not allow metal substances to come in contact with the terminals on
the Memory Card
= Do not bend, drop or apply strong shock to Memory Card
After removing the Memory Card from the DVD Camcorder, keep it in a
soft case to prevent static shock
The data stored on the Memory Card may be changed or lost as a result
of misuse, static electricity, electric noise or repair Save important images
separately Samsung is not responsible for data loss due to misuse
16:9 Wide mode is not avaliable in M.Cam Mode and M.Player Mode
Because wide LCD supports only 4:3 mode (SC-D0564 DC565 only)
- • i a- _ m - • - - • . o
+ The photo images thatyou recorded
are saved in JPEG file format on the Memory Card
@ The moving images thatyou
recorded are saved in MPEG4 file
format on the Memory Card
,';÷ Each file has a file number and all DCIM
files are assigned to a folder 100SSDVC
- Afile numberfrom DCAM000f DCAM000t
is sequentially assigned to each DCAM0002
recorded image.
- Each folder is numbered from !
1OOSSDVC and recorded on 101SSDVC
the Memory Card
+ Afile name is stipulated by <Photo Image>
DCF Design rule for Camera File system)
DCF s an n egra ed mage f e format for d g a cameras: mage f es can
be used on all digital devices conforming to DCF
image Format
Photo Image
Images are compressed in JPEG
(Joint Photographic Experts Group) format
The picture size is 80Ox60O or 1152x864 ',-'page 94
Moving image
• Images are compressed in MPEG4 (Moving Picture
Experts Group) format
• The picture size is 720x480
<M.P/ayer Mode>
Mode de c; mara fotogr fica digital
• No apliqu6 excesiva fuerza al insertar o expulsar lafarjeta de memoria
No apague ]a videocamara mienfras este grabando cargando, borrando
fotografias o dando formate a la tarjeta de memoria
= Nocoloque]atarjetademernonacercadeun dispos_voelectro-magnetitepotente
= Imgida que los termina]esde la tarjeta entrenencontactocon objetosmetal}cos
= No doble deje caer ni golpee lafarjeta de mernoria
= Desgues de sacar la tarjeta de memofia de la Videocamara con DVD,guardela
en unafunda blanda para evitar descargas electricas
= Los dates almacenados en la tarjeta de mernofia se pueden estropear o perder
a causa de un use incorrecto de la electricidad estatica o del ruido electfico.
Guarde las imageries importantes aparte Samsung no se hace responsable de
los dates perdidos a causa del use incorrecto
= La Videocamara con DVD admite SD/MMC de 2 GB y de inferior tamale
Es posible que Instarjetas SD/MMC que contengan mas de2 GB no graben o
reproduzcan correctamente
= En el M.CAM Mode MPlayer Mode, no esfa disponib]e 16:9 Wide
Y el mode panoramlco aparece s61ocon una relaci6n altura/anchura de 4:3
(s61oSC-DC564/DC565)
@ Las im&genesfijas grabadas se guardan
en la tarjetade memoria enformate JPEG.
MSAMSUNG tarjeta de memoda an formate MPEG4
SSMOV @ Cadaarchive tiene un n_rneroy todos los
IOOSSMOV
<Moving Image>
mediante DCF (Norma de diseSo para sistema de archives de camara) DCF as
un formate de archJvode imagen integradopara c&maras digitales Los archives
de imageries pueden utilizarse entodos los dispositivos digita]es qua esten en
conformidad con DCF
Formate de ima en
Imagenes fijas
Estas imageries se comprimen an formate JPEG (Joint
Photographic Experts Group).
, El tamale de imagen as 800x600 o 1152x864 '-.page 94
Imagen en movimiento
Los videos se comprimen an formate MPEG4 (Moving
Picture Experts Group)
El tamaSo de ]a imagen as de 720x480
•t, El video grabado se guarda en la
archives est&n asignados auna carpets
- Acada imagen grabada sele
asigna un numaro de archive a
partir de DCAMO00f.
- Todas Ins carpetas se numeran a
partir de 100SSDVC y se graban en
la tarjeta
¢ Un nombre de archive se estipula
Page 93

[ ENGLISH ]
[ ESPAI_IOL ]
Digital Still Camera Mode
_:" Photo Quality function works in both Player Mode and r_ f
M.Cam Mode _"page 28 L_J ,,,_-_..,...,
*:, Yo_ can select the quality of aphotoimage to be recorded
Select the Photo Quality .s_,_Je,Fif,e
1 Set the ]Mode] switch to ]DISC] or [CARD] _,Series
2 If the [Mode] switch is set to [DISC], set the ]Power]
switch to [[]E](Player)].
if the [Mode] switch is set to [CARD], set the [Power]
switchto[_(Camera)] _4ove _Select _Exit
3 Press the [MENU] button
" The menu list will appear
4 Move the [Joystick] up or down to select <Memory>, L_
then press the [Joystick]OK)]
5 Move the [Joystick] up or down to select
<Photo Quality>, then press the [Joystick]OK)]
6 Move the [Joystick] up or down to select the desired
photo quality ]Super Fine, Fine or Normal), then press
the [Joystick]OK)]
7 To exit, press the [MENU] button.
, The icon of the selected option is displayed.
Number of Images that can be stored on a
Card
Memory
- ...........................I..........................................
/-
ou l,ty,2 MBlOB2GB
<SuperFme> Approx Approx Approx Approx Applox
<Normal> Approx Approx Agprox Al)prox Apl]rox
The number of imagesabove are based oil 800Xd00 Photo Size
= The n_lmber of images shown above are based on normal recording
= Up to 20,000 Photo images (JPEG) can be stored in a memory card
600 1200 2400 4960 9740
<Fine> Approx Approx Approx Approx Apl]rox
790 1580 3150 6520 12800
1270 2540 5070 10490 20000
You can directly access the Photo Quality function by using the [QUICK
MENU] bulton _page 29
The above approximate figures are based on number of images under normal
recording conditions
conditions
Modo de c mara fotogr fica digital
_1152x864
Move _ Sebct _ Exit " Aparece el icono de la opcidn seMccionada
790 _'_ en una tarieta de mernoria
• Puede acceder directamenM a la funcbn Photo Quality utilizando el botdn
QUICK MENU _pagina 29
Las cfras antedores aproximadas se basan en e n_mero de imagenes en
condiciones de grabacbn norrnales.
• El nSmero de imageries mostradas antedormente esta basado en
condiciones de grabaciOn norrnales
• En una tarjeta de mernoda pueden almacenarse hasta 20000
imagenes fotogr_ficas (JPEG)
+ La funcbn Photo QuMity est_ operativa en los Player
Mode y M.Cam Mode _p_gina 28
':" Sepuedeselecconarb calJdaddelafob queseva agrabar
Selecci6n de la calidad fetogr_fica
1 Coloque el interruptor [Mode] en [DISC[ o ]CARD]
2 Si elinterruptor ]Mode] est_ en [DISC[, coloque el
interruptor [Power] en[[_(Player)]
Si el interruptor [Mode]esta en [CARD], eoloque el
interruptor ]Power] en[_(Camera)]
3 Pres one etbotdn ]MENU]
• Apareee la Ista del men0
4 Mueva el [Joystick] hada arfiba o haca abajo para
seleccionar <Memory> y presione el botdn ]Joystick
(OK)]
5 Mueva el [Joystick] hacia amba o hacia abajo para
seleccJonar<Photo Quality> y presone elbotdn
[Joystick[OK)]
6 Mueva el ]Joystick] hacia amba o hacia abajo para
selecdonar la calidad de imagen que desea ]Super
Fine, Fine o Normal] y presione el botdn
[Joystick(OK}]
7 Para salih presione el botdn [MENU[
N_mero de images (Lue pueden almacenarse
8mirr | Calidad 128MB 256MB 512MB IGB 2GB<SuperFine> Aprox Aprox Aprox Aprox Al)rox
Z¢A| 600 /200 2400 4960 9740
<Fine> Aprox Aprox Aprox Aprox Aplox
<Normal> Aprox Aprox Aprox Aprox Ap/ox
• El nQrnero de im_genes antedores est_n basadas en
un tarnaSo de fob de 800X600
790 /580 3150 6520 12800
/270 2540 5070 10490 20000
Page 94

[ ENGLISH ]
[ ESPAI_IOL ]
Digital Still Camera Mode
•:* Photo Size function works only in M.Cam Mode. "*page 28
+ Youcan select the size of a photo image to be recorded.
f
1, Set the [Mode] switch to [CARD].
2, Set the [Power] switch to [l_(Camera)].
3, Press the [MENU] button.
• The menu list will appear.
4. Move the [Joystick] upor down to sebct
<Memory>, then press the[Joystick(OK]I,
5, Move the [Joystick] upor down to sebct
<Photo Size>, then press the [Joystick(OK][,
6, Move the [Joystick] upor down to select the
desired photo size (1152x864 or 800x600), then
press the [Joystick(OK)].
7, Toexit, press the [MENU] button,
= The icon of the selected option is displayed,
• You can directly access the Photo Size function
by using the [QUICK MENU] button. _page 29 {3_ (
• The number of images that can bestored on a
Memory Card depends onvarious conditions.
• Photo images that are recorded at 1152X864 on
your DVD camcorder, may not playback properly ,A.
on other digital devices that do not support this
photo size, _1s2
%
@
/
.,A
Modo de c mara fotogr fica digital
- = = _- _ e e = o = e = ¢ e _ -
+ Lafunci6n Photo Size s61o esta operativa en M.Cam Mode.
_pagina 28
+ Se puede seleccionar el tamaSo de lafoto que se va a grabar.
_,,-/ 152x86,_
_,,Series
_,,Super Fine
_,love _Select _Exit
I
_r,_ove _Select _Exit
8rain
600 E) 1
1. Coloque el interruptor [Mode] en [CARD],
2. Coloque el interruptor [Power] en [(Camera]].
3. Presione el bot6n [MENU],
• Aparece la lista del menu.
4. Mueva el [Joystick] hacia arriba o hacia abajo
para seleccionar <Memory> ypresione el
[Joystick(OK)],
5. Mueva el [Joystick] hacia arriba o hacia abajo
hasta sebccionar <Photo Size> y presione el
[Joystick(OK)I,
6. Mueva el [Joystick] hacia ardba o hacia abajo
hasta seleccionar el tamaSo de foto (1152x864
o 800x600) y presione el [Joystick(OK)I,
7. Para salir, presione el bot6n [MENU],
• Aparece el icono de la opci6n sebccionada.
Puede acceder directamente a la funci6n
Photo Sizeutilizando el boron [QUICK MEND].
_-'pagina 29
El nOmero de imagenes que se pueden
almacenar en una tarjeta de memoda depende
de diversas condiciones,
Las imageries fotograficas que se graban
en 1152X864 en la Videocamara con DVD
es posible que no puedan reproducirse
correctamente en otros dispositivos digitales
que no admitan este tamaBo de fotografia.
Page 95

[ ENGLBH ]
[ ESPANOL ]
Digital Still Camera Mode
- _ - - o- - +
+ File Number setting works only in M.Cam Mode. _page 28
¢ File Numbers are given to images inthe order they were recorded
when they are stored on the Memory Card.
¢ File numbers may be set as follows:
- <Series>: When there are existing files, the new image will be
named as the next number in the sequence.
- <Reset>: When there are no files stored on the Memory Card,
the file numbering starts from 0001
1. Set the [Mode] switch to [CARD].
2. Set the [Power] switch to [l_t(Camera)] [_ '
3. Press the [MENU] button _SuperFir;e
• The menu list will appear.
4. Move the [Joystick] up or down to select
<Memory>, then press the [Joystick(OK)].
5. Move the [Joystick] up or down to select
<File No.>, then press the [Joystick(OK)].
6. Move the [Joystick] up or down to select the
desired option (Series or Reset), then press
the [Joystick(OK)].
= The selected option is applied.
7. To exit, press the [MENU] button.
/
_Move _Select _Exit
,\
_love _Select _Exit /_
Modo de c; mara fotogr fica digital
+ _ - +- - _ +_ • - Q
+ El ajuste del numero de archive solo esta operativa enel M,Cam
Mode -pagina 28
+ Los numeros de archivo se asignan alas imagenes en el orden
en elque se grabaron cuando se almacenaron en latarjeta de
memoria
¢ Los numeros de archivo se pueden definir de la siguiente forma:
<Series>: Cuando hay archivos a la siguiente imagen se le
asignara el numero siguiente de la secuencia.
<Reset>: Cuando no hay archivos almacenados en la tarjeta de
memoria,
[ .....................................................
Photo Size
numeracion de archives empieza a partir de 0001.
1. Coloque e! interruptor [Mode] en [CARD].
2. Coloque el interruptor [Power] en
[ _ (Camera]].
3. Presione el boton [MENU].
• Aparece la lista del men&
4. Mueva el [Joystick] hacia arriba o hacia
abajo para seteccionar <Memory> y
presione el boton [Joystick(OK)]
X
5. Mueva el [Joystick] hacia arriba o hacia
abajo para seteccionar <File No.> y presione
el boton [Joystick(OK)]
6. Mueva el [Joystick] hacia arriba o hacia
abajo para seteccionar la opcidn que
desea (SerGeso Reset) y presione el boton
[Joystick(OK)]
• Se aplica la opcidn seleccionada.
7. Para salir, presione el boton [MENU].
A
Page 96

[ ENGUSH ]
[ ESPAI_IOL ]
Digital Still Camera Mode
•:* The Flash function works only in M.Cam Mode. _page 28
•:* You can take natural looking flash pictures with appropriate
illumination using the built-in flash, whether they are night scenes,
indoors or in other dark places.
- _ (Auto): The flash comes on depending on the brightness of
the subject. When there is sufficient light, the Auto flash icon will
blink and the flash does not fire.
- @ (Red-eye reduction auto): The flash
prefires automatically before the main firing to
reduce red-eye. When there is sufficient light,
the Red-eye reduction auto icon will blink and
the flash does not fire.
- _ (Flash on):The flash comes on regardless of
the brightness ofthe subject.
- @ (Off):The flash does not fire.
Flash Select
1, Set the [Mode] switch to [CARD].
2. Set the [Power] switch to [l_b(Camera)].
3. Press the [C.NITE/'_'] button,
4. Each time you press the [C.NITE/'_] button,
Flash mode is changed to;
, <_A(Auto)>, <d:b (Red-eye reduction auto)>
<_ (Flash on)> and <@ (Off)>.
• Do not fire the flash withthe flash bulb covered
with your hand.
• Do not fire the flash close to people's eyes.
• The Auto and Red-eye reduction auto functions are not available
while Exposure is in use.
• When Red-eye reduction auto is set. the flash fires 3times to
perform red-eye reduction during 1,5 seconds,
• The Effective flash range is 7-10 feet,
• The battery power will be consumed faster with repeated use of the flash,
• Public places such as museums may prohibit flash use,
iiil oi I
Modo de c mara fotogr fica digital
•++. La funci6n Flash select s61o esta operativa en M.Cam Mode
_pagina 28
•:. Puede sacar fotos con flash de aspecto natural con la iluminaci6n
adecuada utilizando el flash integrado, ya se trate de escenas
nocturnas, fl_tedores o en otros lugares oscuros
_ §A (Automatico): El flash se acciona dependiendo det brillo del
objeto. El flash se dispara en funci6n de la lurninosidad de la zona
I
6oo_ / 4 Cadavezquepulseelbot6n[C.NITE/_],cambia
= Las funciones automaticas y de reducd6n de ojos rojos no est_n
disponibles mientras se utiliza Exposure (Exposici6n).
, Cuando se configura (reducd6n autom&tica de ojos rojos), el flash se
dispara dos veces: una para realizar la reducci6n de ojos rojos y otra
para sacar la imagen pdncipah Existe un desfase de aproximadamente
1,5 segundos entre los flashes.
, El aMance efecfivo del Flash es de 4,5 a 6 metros.
= La carga de labateria se consumira mas r@idamente con eluserepetido del flash
, Lugares pOb[icos como los museos prohiben el uso del flash
donde se encuentra el objeto
- @ (Reducci6n autornatica de{ efecto ojos rojos):
El flash se acciona con antemano antes de que e[
fogonazo principal reduzca el efecto de ojos rojos El flash
se dispara previamente de manera autom_%a antes del
disparo principal para reducir el efecto ojos rojos
- _ (Flashactivado):EI flash sedisparaindependentemente
de la luminosidad de la zona donde se encuentra el obleto
- @ (Desactivado): El flash no se dispara
Seteccion de flash
1 Coloque elinterruptor [Mode] en [CARD[
2 Coloque el interruptor [Power] en [1_ (Carnera)].
3 Pulse el bot6n [C.NITEt_ ]
8min _ el modo Rash;
'_*_1 del efecto ojos rojos)>, <'_ (Flash acfivado)> y
= <'_ (Automatico)>, <(_ (Reducci6n autom_tica
<_) (Desactivado)>.
/ • Si tapa la bornbilla del flash con la mane. no Io
j dispare,
• No dispare el flash cerca de los ojos.
Page 97

[ ENGLISH ]
[ ESPANOL ]
Digital Still Camera Mode
+ Youmay take photo images while in M,Cam Mode and store the
images on the Memory Card. _page 28
+ Youcan take photo images using the remote control,
(SC-DC564/DC565 only)
+ Audio will not be recorded with a photo image onto the Memory
Card.
÷,.t,Pleasecheck the protection tab setting on your memory card before
recording. Youmay not be able to record when it is set to lock.
1. }nsertthe Memory Card.
2, Set the [Mode] switch to [CARD].
3. Set the [Power] switch to [1_ (Camera)].
4. After framing your subject, fu{ly press the
[PHOTO] button to take the picture.
• The picture is taken and saved into the
Memory Card within a few seconds.
• Taking another picture within this interval is
not possible.
• The <Photo capture> indicator appears
daring the time ittakes to save the
image.
• Savedphoto imageswill appear slightly larger
than what is shown on the LCD screen when
the photos are taken.
• Photo images are saved in the Memory s ........................................................................................
Card in an 800x600 or 1152x864 format.
• The number of photo images that can be stored depends on the
quality of the image.
f .................................................................
i'
Modo de c mara fotogr&fica digital
+ Puede hacer fotografias mientras se encuentra en el M.Cam
Mode y guarde las imageries en la tarjeta de memoria.
_pagina 28
+ Puede tomar fotografias utilizando el mandoa distancia
(s61oSC-DC564/DC565).
+ Compruebe lacolocaci6n de la lengSetade protecci6n en la
tarjeta de memoria antes de lagrabaci6n. No podra grabar con la
lengL)etacobcada en bioqueo.
1. Inser[e la tarjeta de memoda.
2. Cobque el interruptor [Mode] en [CARD].
3. Coleque el interruptor [Power] en
[ _ (Camera)],
4. Tras encuadrar el objeto que se va a grabar,
presione totalmente el boron [PHOTO] para
tomar la fmagen.
• La imagen se captura y se guarda en la
tarieta de memoria en pocos segundos.
• En este intervalo no es posiNe capturar otra
imagen.
= Aparece el indicador <Photo capture>
durante el tfempo que se tarda en guardar la
imagen.
• AI tomar las fotos, las imagenes fotograficas
guardadas apareceran algo mas grandes que
como se muestran en la pantalla LCD.
• Las imagenes fotograficas se guardan en la
tarjeta de memoria con un formato 800x6OOo
1152x864.
• El numero de imageries fijas que se paeden
guardar depende de lacalidad de la imagen.
Page 98

[ ENGLISH ]
[ ESPANOL ]
Digital Still Camera Mode
•:. Thisfunction works only inM.Player Mode _',page 28
•:* YoucanplaybackandviewphotoimagesrecordedontheMemoryCard
1 Set the [Mode] switch to [CARD]
2 Set the [Power] switch to [(_(Player)],
• The thumbnai] index of photo images
appears If there are no recorded images
on the Memory Card, <No file!> is
displayed
3 Use the [Joystick] to select a desired photo
image, then press the [Joystick(OK)].
• To display the previous six images, press
the [ 144] button
= To display the next six images, press the [ _._1]
button.
1 Use the [Joystick] to select adesired photo image,
then press the [Joystick[OK)]
2 Use the [144 / _i] buttons to search for the desired
photo image.
• To view the next image: press the [ _i] button
• To view the previous image: press the [ 14,q]
button
• Keep pressing [144 ] or [ _i,-I] to search for an image quickly.
Holding the [144 ] or [ _-I ] buttons will not change the displayed
image, but the file number will change until the button is released
When the button is released, the selected file will be displayed
3. To return to thumbnail index, press the [I_;_(MULTI DISP.)] button
Loading time may vary depending on the image size.
- Any large sized image taken with another device will be displayed as a
thumbnail image
Modo de c_mara fotogr_fica digital
+ Esta funci6n s61o esta operativa en el M.Player Mode.
-pagina 28
• Para vet la imagen anterior: presione el boton [14-_].
• Mantenga pulsado [14_ ] o [ !_,1] para buscar una imagen
rapidarnente.
Si se rnantienen los botones [1._] o [ _-_1]no carnbiara la
irnagen visualizada, pero el n_mero de archivo ira cambiando
hasta que se libere elbot6n. Cuando se libera el bot6n,
aparecera el archivo seleccionado.
3. Para volveral indicede miniaturas,presioneelboton[_;;;;_(MULTIDISR)].
• El tiempo de cargo puede variar dependiendo del tarnaSo de la
imogen.
• Cualquier irnagen grande tomada con otro dispositivo aparecera
como una imogen en rniniatura.
*;* Es posible reproduck yverbs imagenes
grabadas en el la tarjeta de memoria.
Cobque el interruptor [Mode] en [CARD].
Coloque el interruptor [Power] en Ilia(Player)].
• Aparece el indice de fotografias en miniatura.
Sf no hay imagenes grabadas en latarjeta
de memona, aparece <No file!>,
Utilice el [Joystick] para seleccionar la
imogen fotografica que desea y presione el
[Joystick[OK)].
• Para vet las seis imageries anteriores,
mantenga puBado el bot6n [ 14_],
• Para vet los seis imageries siguientes,
mantenga pulsado el boron [ _,_.1],
Utilice el [Joystick] para sefecdonar la
imogen fotografica que desea y presione el
[Joystick(OK)].
Utilizando los botones [ t4_/_-_1], busque la
fotografia que desea.
• Para vet la imagen siguiente: presione el
boton [ _-_-I].
Page 99

[ ENGLISH ]
[ ESPAI_IOL ]
Digital Stilt Camera Mode
1, Use the [Joystick] to sebct a desired photo
image, then press the [Joystick(OK)].
2, Press the [_ t| (S.SHOW)] button in the singb
image display mode.
• All images will be played back consecutively
for 2-3 seconds each.
• The <Slide> is displayed. The Slide Show
will start from the current picture,
To stopthe slide show, press the
[!_-|l (S.SHOW)] button again.
Slide
Modo de c mara fotogr&fica digital
1. Utilice el [Joystick] para sebccionar la
imagen fotograflca que desea y presione el
[Joystick(OK)].
2. Presione el bot6n [_|l (S.SHOW)] en el estado
de pantaIFa_nica.
•Las imagenes pasaran consecutivamente
y apareceran en la pantalla durante 2 6 3
segundos cada una.
• Aparece <Slide>, La presentacbn
comenzara desde la imagen actual
1152x864
100 0005
Para detener la presentacion, presione de
nuevo el bot6n [_ |l (S.SHOW)].
Page 100

[ ENGLISH ]
[ ESPANOL ]
Digital Still Camera Mode
= Q - • Q . +- . + - _ = -
*:o The Protect function works only +nM.Player Mode. =page 28
*:o You can protect importantimages from accidental erasure
+fyou execute format, all images includingprotected imageswill be
erased
1 Set the [Mode] switch to [CARD].
2 Set the [Power] switch to [[_(Player)].
• The thumbnail index of photo images
appears. If there are no recorded images on
the Memory Card, <No file!> isdisplayed
3 Use the [Joystick] to select images to be
protected.
4 Pressthe [MENU] button.
• The menu list will appear.
5 Move the [Joystick] up or down to select
<Memory>, then press the [Joystick(OK)]
6 Move the [Joystick] up or down to select
<Protect>+ then press the [Joystick(OK)].
7 Move the [Joystick] up or down to select <On>+
then press the [Joystick(OK)].
= To exit, press the [MENU] button
• The protection icon ([_]) is displayed.
_tes:
= Youcan directly access the Protect function by
using the [QUICK MENU]. _page 29
= Protected images will show the ([_) mark when
they are displayed.
= if the write protection tab on the Memory Card is
set to LOCK, you cannot set image protection.
ph/p/p/p/p/p/p/p/_oto__:_
_Move _Select _Ext
Modo de c; mara fotogr fica digital
• - + - - + +Q _o+ + +- . _ • --
÷ La funci6n Protect solo esta operativa en el M,Player Mode.
_pagina 28
+ Puede proteger imagenes importantes contra el borrado
accidental. Si ejecuta la funci6n de formato, se borraran todas las
imagenes inciuidas lasimagenes protegidas.
1. Coloque el interruptor [Mode] en [CARD]
2. Coloque el interruptor[Power] en
[[_(Player)].
= Aparece el indice defotografias en
miniatura. Si no hay imagenes grabadas
en la tarjeta de memoria, aparece
<No file!>
3. Utilice el [Joystick] para seleccionar las
imagenes que se van a proteger.
4. Presione el boton [MENU]
= Aparece lalista de! men&
5. Mueva el [Joystick] hacia arriba o hada
abajo para seleccionar <Memory> y presione
el boton [Joystick(OK)].
6. Mueva el [Joystick] hacia arriba o hacia
abajo para seleccionar <Protect> y presione
el boton [Joystick(OK)]
7. Mueva el [Joystick] hacia arriba o hacia
abajo para seleccionar <On>, y presione el
bot6n [Joystick(OK)]
• Para salir, presione el bot6n [MENU].
Aparece el icono de proteccion ([_)
• Puede acceder directamente a la funcion
Proteger utilizando el boron [QUICK MENU].
_pagina 29
. Las imageries protegidas mostraran la mama
([_)) cuando aparecen.
. Si la pesta_a de protecci6n contra escrJtura en
la tarjeta dememoria esfa colocada en LOCK,
no puede definir la protecci6n de imagen
 Loading...