

Samsung SC-D103-XAP User Manual
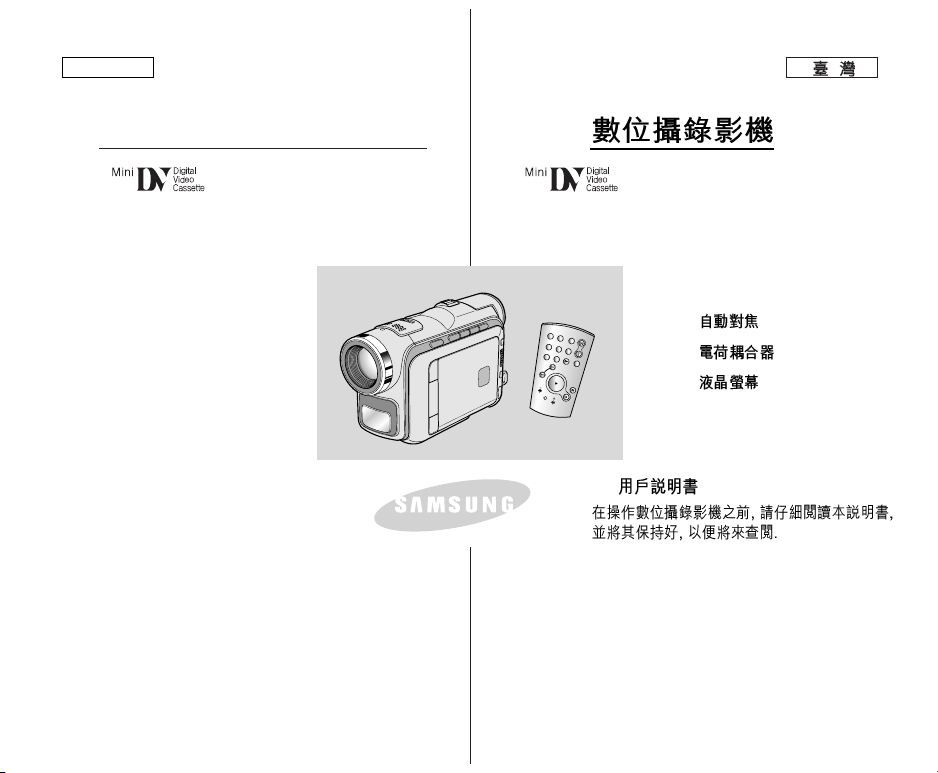
Digital Video Camcorder
Owner’s Instruction Book
Before operating the unit, please read this
instruction book thoroughly, and retain it for
future reference.
AF Auto Focus
CCD Charge Coupled Device
LCD Liquid Crystal Display
SCD101/D103/D105
ENGLISH
AD68-00743D
SCD101/D103/D105
AF
CCD
LCD
S
TA
STO
SELF
TIM
E
R
P
H
O
T
O
S
E
A
R
C
H
F
.AD
V
ELECTRONICS
RT/
P
P
HO
TO DISPLAY
ZER
O
M
E
D
M
A
OR
Y
T
I
A.DU
B
SLO
W
T
E
/
M
E
X
2
.....................................................................................................................
................................................................................
...................................................................................................
..................................................................................................................
...................................................................................................
.......................................................................................................
..........................................................................................
..................................................................
...................................................
.............................................................................
...........................................................................
............................................................................................
.............................................................................
.......................................................................................................
..............................................................................................................
...............................................................................................................
...............................................................................................................
...................................................................................................
..............................................................................................................
..............................................................
........................................................................................
...............................................................................................
........................................................................................
................................................
........................................................................................
...............................................................................................
..............................................................................................................
...........................................................................................
.....................................................................
...............................................................................................
........................................................................................
............................................................................................
.......................................................................................................
..........................................................................................................
.......................................................................................................
ENGLISH
Contents
22
Features ............................................................................................................... 11
Accessories Supplied with camcorder ................................................................ 12
Front & Left View ................................................................................................ 13
Left side View ...................................................................................................... 14
Right & Top View ................................................................................................. 15
Rear & Bottom View ............................................................................................ 16
Remote control (SCD105 only) ......................................................................... 17
OSD (On Screen Display in CAMERA and PLAYER modes) ............................ 18
OSD (On Screen Display in M.REC and M.PLAY modes) ................................. 19
Turning the OSD on/off (On Screen Display) .............................................. 19
How to use the Remote Control (SCD105 only) ................................................. 20
Battery Installation for the Remote Control ................................................. 20
Self Record using the Remote Control ........................................................ 20
Lithium Battery Installation ....................................................................................21
Adjusting the Hand Strap ................................................................................... 22
Hand strap ..................................................................................................... 22
Shoulder Strap............................................................................................... 22
Attaching the Lens Cover .............................................................................. 22
Connecting a Power Source ............................................................................... 23
To use the AC Power adapter and DC Cable ............................................ 23
To select the CAMCORDER mode................................................................23
Using the Lithium Ion Battery Pack ................................................................... 24
Charging the Lithium Ion Battery Pack ........................................................ 24
Table of continuous recording time based on model and
battery type .................................................................................................. 25
Battery level display ..................................................................................... 26
Inserting and Ejecting a Cassette ...................................................................... 27
Making your First Recording ............................................................................... 28
Selecting OSD LANGUAGE ............................................................................... 29
Record Search (REC SEARCH) ................................................................. 30
Hints for Stable Image Recording ...................................................................... 31
Recording with the LCD monitor .................................................................. 31
Recording with the Viewfinder .................................................................... 31
Adjusting the LCD .............................................................................................. 32
Using the VIEWFINDER .................................................................................... 33
Adjusting the Focus ...................................................................................... 33
BASIC Recording ..................................................... 28
Preparation .............................................................. 20
Notes and Safety Instructions .................................... 6
Getting to Know Your Camcorder ........................... 11
.......................................................... 28
........................................................................ 20

Contents
Playing back a tape you have recorded on the LCD ......................................... 34
Adjusting the LCD during PLAY ................................................................... 35
Controlling Sound from the Speaker ................................................................. 35
Use of various Functions .................................................................................... 36
Setting menu items ...................................................................................... 36
Set the camcorder to CAMERA or PLAYER mode and
M.REC or M.PLAY mode (SCD103/D105 only) ........................................... 37
Availability of functions in each mode .......................................................... 38
CLOCK SET ................................................................................................ 39
WL. REMOTE (SCD105 only) .................................................................... 40
DEMONSTRATION ..................................................................................... 41
PROGRAM AE ............................................................................................ 42
Setting the PROGRAM AE .......................................................................... 43
WHT. BALANCE (WHITE BALANCE) ......................................................... 44
Zooming In and Out ..................................................................................... 45
Tele MACRO ................................................................................................ 45
Digital Zoom ................................................................................................ 46
DIS (Digital Image Stabilizer) ....................................................................... 47
DSE (Digital Special Effects) SELECT ........................................................ 48
Selecting an effect ........................................................................................ 49
REC MODE ................................................................................................. 50
AUDIO MODE ............................................................................................. 51
WIND CUT .................................................................................................. 52
DATE/TIME .................................................................................................. 53
TV DISPLAY ................................................................................................ 54
Using Quick Menu ............................................................................................. 55
Setting the Quick menu ................................................................................ 56
SHUTTER SPEED & EXPOSURE ............................................................. 57
SLOW SHUTTER(Low Shutter Speed) ............................................................ 58
EASY Mode (for Beginners) ............................................................................... 59
AF/MF (Auto Focus/Manual Focus) ................................................................... 60
Auto Focusing .............................................................................................. 60
Manual Focusing .......................................................................................... 60
BLC (Back Light Compensation) ........................................................................ 61
Fade In and Out .................................................................................................. 62
To Start Recording ........................................................................................ 62
To Stop Recording (use FADE IN / FADE OUT) ......................................... 62
Audio dubbing (SCD105 only) ............................................................................ 63
Dubbing sound. ............................................................................................. 63
Dubbed Audio Playback ............................................................................... 64
PHOTO Image Recording ................................................................................... 65
Searching for a PHOTO picture ................................................................... 65
.........................................................................
.................................................................
...............................................................................................
.......................................................................................................
................................................................................................
..................
.............................................................................
................................................................................
.............................................................
....................................................................
....................................................................
........................................................................................
..............................................................................
...............................................................
...............................................................................
................................................................................
.....................................................
...........................................
........................................................................................
.................................................................................
.............................................................................
..................................................................................
................................................................................
...............................................................................
.....................................................................................
................................................................................................
.......................................
..............................................................................
.........................................................................
.........................................
.......................................................................................................
.......................................................................................................
....................................................................................................
.............................................................................
.......................................................................................................
..............................................................................
..........................................................
...............................................................................................................
................................................................................................
..............................................................................................................
.......................................................................................................
Advanced Recording ............................................... 36
ENGLISH
33
.......................................................... 36

ENGLISH
44
NITE PIX (0 lux recording)....................................................................................66
POWER NITE PIX.................................................................................................67
Using the VIDEO LIGHT (SCD103/D105 only)................................................... 68
Various Recording Techniques ........................................................................... 69
Tape Playback ..................................................................................................... 70
Playback on the LCD ................................................................................... 70
Playback on a TV monitor ............................................................................ 70
Connecting to a TV which has Audio/Video input jacks .............................. 70
Connecting to a TV which has no Audio and Video input jacks ................. 71
Playback ....................................................................................................... 71
Various Functions while in PLAYER mode ......................................................... 72
Playback pause ............................................................................................ 72
Picture search (Forward/Reverse) ................................................................ 72
Slow playback (Forward/Reverse) (SCD105 only) ...................................... 72
Frame advance (To play back frame by frame) (SCD105 only) ................ 73
X2 Playback (Forward/Reverse ) (SCD105 only) ........................................ 73
Reverse playback (SCD105 only) ................................................................ 73
ZERO MEMORY (SCD105 only) ....................................................................... 74
PB DSE (Playback Digital Special Effects) ....................................................... 75
PB ZOOM ........................................................................................................... 76
Transferring IEEE1394 (i.LINK)-DV standard data connections ....................... 77
Connecting to a DV device .......................................................................... 77
Connecting to a PC ...................................................................................... 77
System requirements ................................................................................... 78
Recording with a DV connection cable ........................................................ 78
Transferring a Digital Image through a USB Connection .................................. 79
System Requirements ......................................................................................... 79
Installing DVC Media 5.1 Program ...................................................................... 80
Using the “PC camera” function.................................................................... 80
Using the “removable Disk” function (SCD103/D105 only) .......................... 81
Using the “USB streaming” function ............................................................. 81
Connecting to a PC ............................................................................................. 81
MEMORY STICK (Optional Accessory) .............................................................. 82
Memory Stick Functions ................................................................................ 82
Inserting and ejecting the Memory Card ..................................................... 83
Structure of folders and files on the Memory Card ..................................... 84
Image Format ............................................................................................... 84
.........................................................................
......................................................................
........................................................................
.......................................................................................................
..........................................................................................................
........................................................................................
...................................................................................................
........................................................
....................................................................
...............................................................................................................
.......................................................................
.......................................................................................................
...................................................................................
...................................................................
...............................................................................
...............................................................
...............................................................................
...................................................
..............................................................................
..........................................................................................
............................................................
..............................................................................................
............................................................................................
.......................................................................................................
................................................................................
...............................................................................................
..............................................................................................................
.....................................................................................
..................................................................................
...............................................
......................................................................................
..........................................................................................................
........................................................................................................
................................................................................................
........................................................................................
..................................................................
.......................................................................................................
Contents
Playback .................................................................. 70
IEEE 1394 Data Transfer .......................................... 77
USB interface .......................................................... 79
Digital Still Camera mode (SCD103/D105 only)
.................. 82
........................................................................ 70
................................................. 77
................................................................. 79
............................. 82
Selecting the CAMCORDER mode .................................................................... 84
MEMORY FILE NUMBER .................................................................................. 85
Selecting the image quality ................................................................................. 86
Select the image quality .............................................................................. 86
Number of images on the Memory Card ..................................................... 86
Recording Still images to a Memory Card in M.REC Mode .............................. 87
Recording images to a Memory Card ...........................................................87
Recording an image from a cassette as a still image ................................ 88
Viewing Still images ............................................................................................ 89
To view a Single image ................................................................................. 89
To view a slide show ..................................................................................... 89
To view the Multi Display............................................................................... 90
Copying still images from a cassette to Memory Card ....................................... 91
Marking images for printing ................................................................................ 92
Protection from accidental erasure ...................................................................... 93
Deleting Still images ........................................................................................... 94
Formatting the Memory Card .............................................................................. 95
Attention ........................................................................................................ 95
MPEG RECORDING .......................................................................................... 96
Selecting the moving picture sizes ..................................................................... 97
MPEG Playback .................................................................................................. 98
After finishing a recording ................................................................................... 99
Cleaning and Maintaining the Camcorder......................................................... 100
Cleaning the Video Heads ......................................................................... 100
Using Your Camcorder Abroad ......................................................................... 101
Power sources ............................................................................................ 101
Color system .............................................................................................. 101
Troubleshooting ................................................................................................. 102
Self Diagnosis Display ............................................................................... 102
Moisture Condensation .............................................................................. 102
Self Diagnosis Display in M.REC, M.PLAY mode (SCD103/D105 only) ... 103
.......................................................................................................
...............................................................................................
.......................................................................................................
................................................................................................
..................................................................
..........................................
.....................................................................................
..........................................................................
.......................................................................................................
........................................................................................
........................................................................................
........................................................................................
.....................................................................
...........................................................................................
.......................................................................................................
.......................................................................................................
.......................................................................................................
...............................................................................................................
..........................................................................................................
...............................................................................................
..........................................................................................................
..........................................................................................................
..................................................................................
.....................................................................................................
.........................................................................................
.............................................................................................................
.....................................................................................................
............................................................................................................
..............................................................................................
.............................................................................................................
..................................................................................
Contents
Maintenance ............................................................. 99
Troubleshooting...................................................... 102
Specifications...........................................................105
INDEX..................................................................... 106
ENGLISH
55
......................................................................... 99
............................................................... 102
............................................................... 105
INDEX ................................................................... 106

ENGLISH
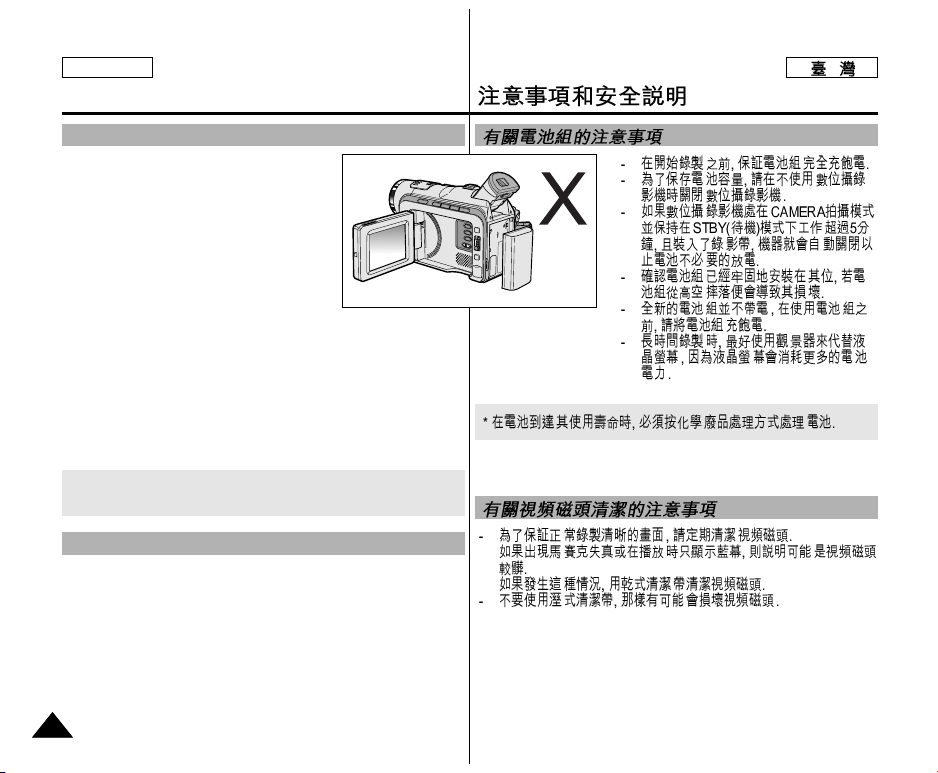
Notes and Safety Instructions
66
Notes regarding the rotation of the LCD screen
Please rotate the LCD screen carefully as illustrated.
Over rotation may cause damage to the inside of the hinge that
connects the LCD screen to the Camcorder.
1. LCD screen closed.
2. Standard recording using the LCD
screen.
■
Open the LCD screen with
your finger.
3. Recording when looking at the
LCD screen from the top.
4. Recording when looking at the
LCD screen from the front.
5. Recording with the LCD screen
closed.
■
1
2
3
4
5
LCD open knob

Television programs, video tapes, DVD titles, films, and other program
materials may be copyrighted.
Unauthorized copying of copyrighted material may be against the law.
1. A sudden rise in atmospheric temperature may cause
condensation to form inside the camcorder.
for example:
- When you move the camcorder from a cold location to a warm
location (e.g. from outside to inside during winter.)
- When you move the camcorder from a cool location to a hot
location (e.g. from inside to outside during the summer.)
2. If the (DEW) protection feature is activated, leave the
camcorder for at least two hours in a dry, warm room with the
cassette compartment opened and the battery pack removed.
1. Do not leave the camcorder exposed to high temperature
(above 60°C or 140°F).
For example, in a parked car in the sun or exposed to direct
sunlight.
2. Do not let the camcorder get wet.
Keep the camcorder away from rain, sea water, and any other form
of moisture. If the camcorder gets wet, it may get damaged.
Sometimes a malfunction due to exposure to liquids cannot be
repaired.
Notes and Safety Instructions
Notes regarding CAMCORDER
Notices regarding COPYRIGHT
Notes regarding moisture condensation
ENGLISH
77
ENGLISH
Notes and Safety Instructions
88
Notes regarding the battery pack
- Make sure that the battery pack is fully
charged before starting to record.
- To preserve battery power, keep your
camcorder turned off when you are not
operating it.
- If your camcorder is in CAMERA mode, and
it is left in STBY mode without being
operated for more than 5 minutes with a tape
inserted, it will automatically turn itself off to
protect against unnecessary battery discharge.
- Make sure that the battery pack is fitted firmly into place.
Dropping the battery pack may damage it.
- A brand new battery pack is not charged.
Before using the battery pack, you need to charge it completely.
- It is a good idea to use the viewfinder rather than the LCD when
making a long recording, because the LCD uses up more battery
power.
* When the battery reaches the end of its life, please contact your
local dealer. The batteries have to be dealt with as chemical waste.
- To ensure normal recording and a clear picture, clean the video
heads regularly. If a square block-shape distorts playback,
or only a blue screen is displayed, the video heads may be dirty.
If this happens, clean the video heads with a dry type cleaning
cassette.
- Do not use a wet-type cleaning cassette. It may damage the video
heads.
Notes regarding the Video Head Cleaning
ENGLISH
Notes and Safety Instructions
99
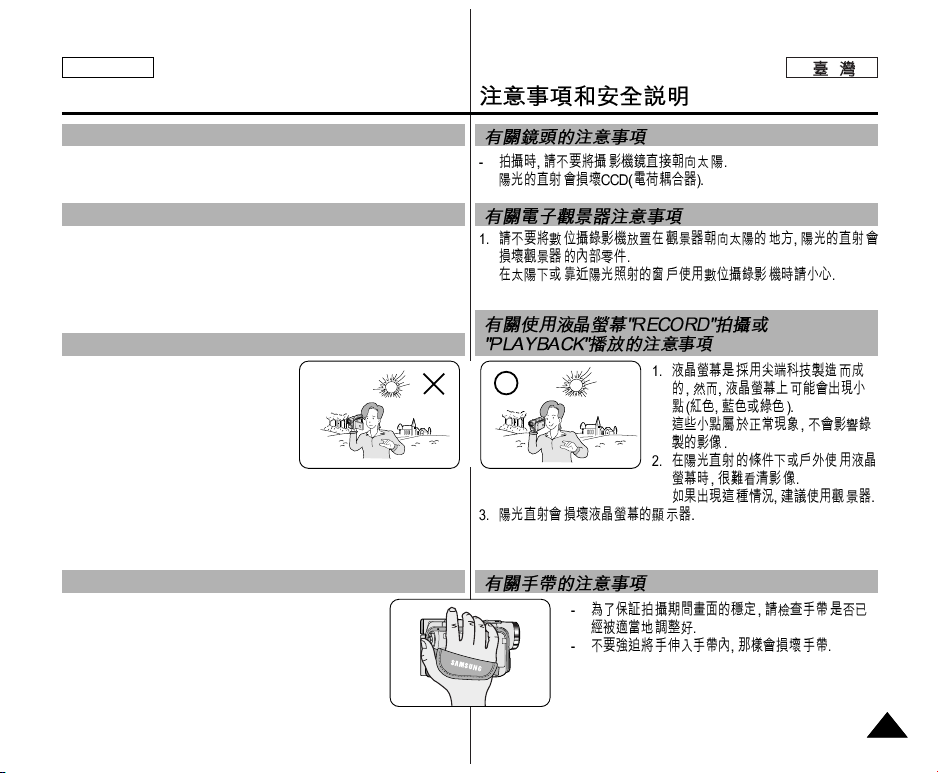
- Do not film with the camera lens pointing directly at the sun.
Direct sunlight can damage the CCD(Charge Coupled Device).
1. Do not position the camcorder such that the viewfinder is pointing
towards the sun.
Direct sunlight can damage the inside of the viewfinder. Be careful
when placing the camcorder under sunlight or near a window
exposed to sunlight.
1. The LCD display has been
manufactured using high precision
technology. However, there may be
tiny dots (red, blue or green in color)
that appear on the LCD display.
These dots are normal and do not
affect the recorded picture in any way.
2. When you use the LCD display under direct sunlight or outdoors,
it maybe difficult to see the picture clearly.
If this occurs, we recommend using the viewfinder.
3. Direct sunlight can damage the LCD monitor.
- To ensure a steady picture while filming, check that
the hand strap is properly adjusted.
- Do not force your hand into the hand strap as you
could damage it.
Note regarding the LENS
Notes regarding electronic viewfinder
Notes regarding ‘Record’ or ‘Playback’ using the LCD
Notes regarding the hand strap

ENGLISH
Notes and Safety Instructions
1010
Precautions regarding the Lithium battery
1. The lithium battery maintains the clock function and user settings;
even if the battery pack or AC adapter is removed.
2. The lithium battery for the camcorder lasts about 6 months under
normal operation from time of installation.
3. When the lithium battery becomes weak or dead, the date/time
indicator will display “---” when you set the DATE/TIME to ON.
When this occurs, replace the lithium battery with a new one
(type CR2025).
4. There is a danger of explosion if battery is incorrectly replaced.
Replace only with the same or equivalent type.
Warning: Keep the LITHIUM BATTERY out of reach of children.
Should a battery be swallowed, consult a doctor
immediately.
Do not attempt to service this CAMCORDER yourself.
Opening or removing covers may expose you to dangerous voltage or
other hazards.
Refer all servicing to qualified service personnel.
When replacement parts are required, be sure the service technician
has used replacement parts specified by the manufacturer
and having the same characteristics as the original part.
Unauthorized substitutions may result in fire, electric shock or other
hazards.
SERVICING
REPLACEMENT PARTS

Getting to Know Your Camcorder
Features
• MULTI OSD LANGUAGE
You can select the desired OSD Language among English, French, Spanish,
Portuguese, German and Italian.
• Digital data transfer function with IEEE1394
By incorporating the IEEE 1394 (i.LINK™ : i.LINK is a serial data transfer
protocol and interconnectivity system, used to transmit DV data) high speed
data transport port, both moving and still images can be transferred to a PC,
making it possible to produce or edit various images.
• USB interface for digital image data transfer
You can transfer images to a PC using the USB interface without an add-on
card.
• PHOTO
The PHOTO function lets you capture an object as a still along with sound,
while in Camera mode.
• 900x Digital zoom
Allows you to magnify an image up to 900 times its original size.
• Color TFT LCD
A high-resolution color TFT LCD gives you clean, sharp images as well as
the ability to review your recordings immediately.
• Digital Image Stabilizer (DIS)
The DIS compensates for any handshake, reducing unstable images
particularly at high magnification.
• Various digital effects
The DSE (Digital Special Effects) allows you to give your films a special look
by adding various special effects.
• Back Light Compensation (BLC)
The BLC function compensates for the bright background behind a subject
you're recording.
• Program AE
The Program AE enables you to alter the shutter speed and aperture to suit
the type of scene/action to be filmed.
• NITE PIX
The NITE PIX function enables you to record a subject in a dark place.
• Digital Still Camera function
■
Using Memory Card, you can easily record and playback standard still
images.
■
You can transfer standard still images on the Memory Card to your PC
using the USB interface.
• MPEG Recording (SCD103/D105 only)
MPEG recording makes it possible to record video onto a Memory Card.
• MULTI MEMORY CARD SLOT (SCD105 only)
Multi Memory Card Slot is able to use the Memory Stick, the MMC and,
the SD.
ENGLISH
1111
•
•
™
•
•
•
•
•
•
•
•
•
•
■
■
•
•

ENGLISH
Make sure that the following basic accessories are supplied with your
digital video camera.
Basic Accessories
1. Lithium Ion Battery pack
2. AC Power Adapter
(AA-E8 TYPE)
3. AC Cord
4. AUDIO/VIDEO Cable
5. Instruction Book
6. Lithium battery for
Remote Control or Clock.
(TYPE: CR2025)
7. Remote Control
(SCD105 only)
8. USB cable
9. Software CD
10. Lens Cover
11. Shoulder strap
Optional Accessories
12. S-VIDEO Cable
13. Memory Stick
(SCD103/D105 only)
Getting to Know Your Camcorder
1212
Accessories Supplied with camcorder
1. Lithium Ion Battery pack
4.
AUDIO/VIDEO Cable
7. Remote Control
(SCD105 only)
10. Lens Cover
3. AC cord
6. Lithium battery
(CR2025)
11. Shoulder strap
9. Software CD
2. AC Power Adapter
(AA-E8 TYPE)
8. USB cable
5. Instruction Book
12. S-VIDEO Cable
13. Memory Stick

ENGLISH
Getting to Know Your Camcorder
1313
Front & Left View
1. Internal MIC
2. Lens
3. Remote sensor
(SCD105 only)
4. Video Light
(SCD103/D105 only)
5. Viewfinder
(see page 33)
6. EASY Q button
(see page 59)
7. TFT LCD monitor
8. IR(Infrared) Light
2. Lens
4. Video Light
(SCD103/D105 only)
3. Remote sensor
(SCD105 only)
1. Internal MIC
5. Viewfinder
7. TFT LCD monitor
8. IR(Infrared) Light
6. EASY Q button

ENGLISH
Getting to Know Your Camcorder
1414
Left Side View
1. Function buttons
2. PB ZOOM/MACRO
3. DISPLAY
4. V. LIGHT
(SCD103/D105 only)
5. Mode switch
(MEMORY CARD/TAPE)
(SCD103/D105 only)
6. Speaker
7. MENU button
8. MENU dial (VOL/MF)
9. ENTER button
10. DC jack
PLAYER CAMERA M.PLAY
- EASY -
: (REW) REC SEARCH – REV
: (FF) REC SEARCH + FWD
: (PLAY/STILL) FADE SLIDE SHOW
: (STOP) BLC MULTI DISP.
1. Function buttons
2. PB ZOOM/MACRO
3. DISPLAY
4. V. LIGHT
(SCD103/D105 only)
5. Mode switch
(SCD103/D105 only)
7. MENU button
8. MENU dial (VOL/MF)
9. ENTER button
10. DC jack
6. Speaker
(SCD103/D105 only)
EASY
REC SEARCH FADE BLC
REV FWD S.SHOW
MULTI DISP.
ENGLISH
Getting to Know Your Camcorder
1515
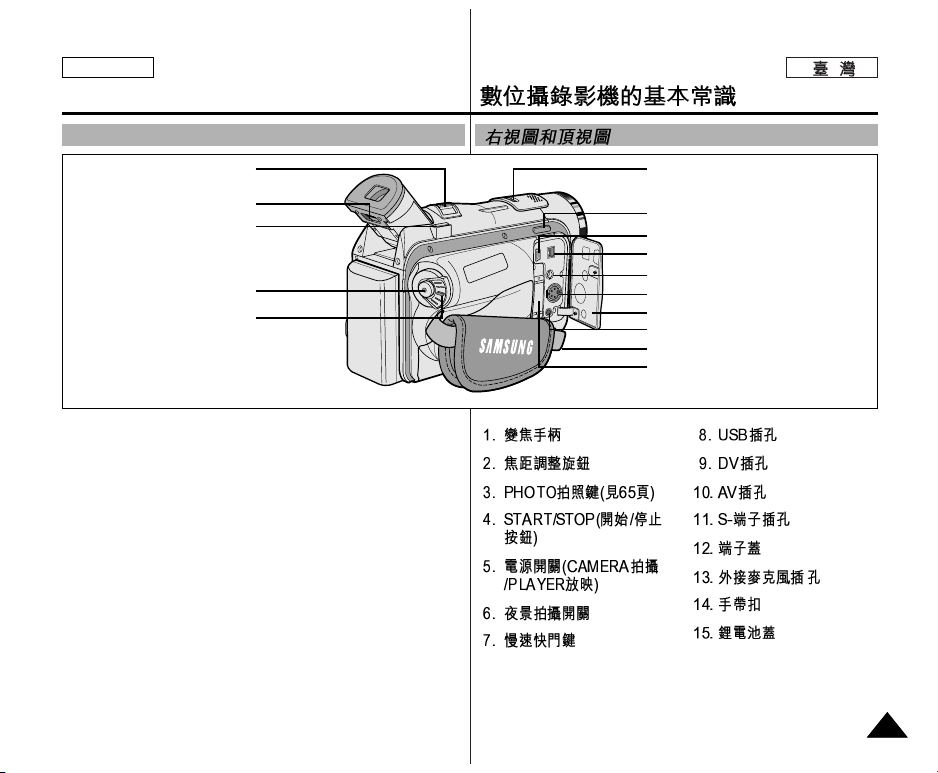
Right & Top View
1. Zoom lever
2. Focus adjustment
knob
3. PHOTO button
(see page 65)
4. START/STOP button
5. Power switch
(CAMERA or PLAYER)
6. NITE PIX switch
7. Slow shutter
8. USB jack
9. DV jack
10. Audio/Video jack
11. S-VIDEO jack
12. Jack Cover
13. External MIC in
14. Hook for handstrap
15. LITHIUM Battery
Holder
8. USB jack
9. DV jack
10. Audio/Video jack
11. S-VIDEO jack
12. Jack Cover
13. External MIC in
14. Hook for handstrap
15. LITHIUM Battery Holder
6. NITE PIX switch
7. Slow shutter
1. Zoom lever
3. PHOTO button
4. START/STOP button
5. Power switch
2. Focus adjustment knob

ENGLISH
Getting to Know Your Camcorder
1616
Rear & Bottom View
1. Charging indicator
2. Hook for shoulder strap
3. Memory Card slot (SCD103/D105 only)
4. Battery Release
5. Tripod receptacle
6. TAPE EJECT
6. TAPE EJECT
5. Tripod receptacle
3. Memory Card slot
(SCD103/D105 only)
1. Charging indicator
4. Battery Release
2. Hook for shoulder strap
Memory Card slot
SCD103
Memory Stick
SCD105
Memory Stick
Memory Stick PRO
SD/MMC
(Usable MEMORY CARD)

ENGLISH
Getting to Know Your Camcorder
1717
1. PHOTO
2. START/STOP
3. SELF TIMER (see page 20)
4. ZERO MEMORY
(see page 74)
5. PHOTO Search
6. A.DUB (see page 63)
7. (FF)
8. (REW)
9. (PLAY)
10. Direction ( , )
(see page 72)
11. F. ADV (see page 73)
12. (STOP)
13. (STILL)
14. (SLOW)
15. DATE/TIME
16. X2 (see page 73)
17. Zoom
18. Display
Remote control (SCD105 only)
1. PHOTO
2. START/STOP
3. SELF TIMER
4. ZERO MEMORY
5. PHOTO SEARCH
6. A.DUB
7. (FF)
8. (REW)
9. (PLAY)
10. Direction
18. DISPLAY
17. Zoom
16. X2
15. DATE/TIME
14. (SLOW)
13. (STILL)
11. F. ADV
12. (STOP)

ENGLISH
Getting to Know Your Camcorder
1818
OSD (On Screen Display in CAMERA and PLAYER modes)
1. Battery level (see page 26)
2. Easy mode (see pages 59)
3. DSE (Digital Special Effects) mode
(see page 48)
4. Program AE (see page 42)
5. White Balance mode (see page 44)
6. BLC (Back Light Compensation)
(see page 61)
7. Manual focus (see page 60)
8. Shutter speed and EXPOSURE
(see page 57)
9. Zoom position (see page 45)
10. NITE PIX (see page 66)
11. DATE/TIME (see page 53)
12. USB
13. WL. REMOTE (SCD105 only)
(see page 40)
14. WIND CUT (see page 52)
15. Audio recording mode (see page 51)
16. Zero memory indicator (SCD105 only)
(see page 74)
17. Remaining Tape (measured in minutes)
18. Tape Counter
19. Operating mode
20. Record speed mode
21. PHOTO mode
22. Self recording and waiting timer
(SCD105 only) (see page 20)
23. DIS (see page 47)
24. Volume control (see page 35)
25. Audio playback channel
26. DV IN(DV data transfer mode)
(see page 78)
27. DEW (see page 7)
28. Message Line
29. PB DSE (see page 75)
30. PB ZOOM/ENTER (see page 76)
31. POWER NITE PIX (see page 67)
32. Tele MACRO (see page 45)
OSD in CAMERA mode
1
2
3
6
4
5
7
31
9
8
23 2232 21 20 19
16
15
14
13
12
11
10
28
OSD in PLAYER mode
25
30
29
30
28
27
21
20 19
26
24
11
18
17
EASY
MIRROR
BLC
TAPE !
NITE PIXMF
SHUTTER
P
EXPOSURE
ZOOM
SHUTTER
EXPOSURE
SOUND [ 2 ]
PB ZOOM
1.2x
MIRROR
. . . C
ENTER :
VOL. [ 1 1 ]
REC
M - 0 : 0 0 : 0 0
5 5 min
1 6 bit
1 2 : 0 0 A M
JAN . 10 , 2 0 0 4
M - 0 : 0 0 : 0 0
5 5 min
1 6 bit
1 2 : 0 0 A M
J A N . 1 0 , 2 0 0 4
DV
ENGLISH
Getting to Know Your Camcorder
1919
A. Folder number-file number (see page 84)
B. Image counter
- Current still image/Total number of
recordable still images.
C. CARD (MEMORY CARD) indicator
D. Image recording and loading indicator
E. Quality
F. ERASE PROTECTION indicator
(see page 93)
G. Print Mark (see page 92)
H. SLIDE SHOW
I. MPEG4 SCREEN SIZE
Turning the OSD on/off (On Screen Display)
●
Turning OSD on/off
Press the DISPLAY button on the left side panel.
- Each press of the button toggles the OSD
function on and off.
- When you turn the OSD off,
In CAMERA mode: The STBY, REC, EASY.Q
modes are always displayed on the OSD,
even when the OSD is turned OFF and
the key input is displayed for 3 seconds
then turned off.
In PLAYER mode: When you press any
Function button, the function is displayed
on the OSD for 3 seconds before it turns off.
●
Turning the DATE/TIME on/off
- The DATE/TIME is not affected when the OSD function is switched
ON or OFF.
- To turn the DATE/TIME on or off, access the menu and change the
DATE/TIME mode. (see page 53)
- You may also use the Quick Menu to turn the DATE/TIME ON or
OFF. (see page 55) (only in CAMERA/M.REC mode)
OSD (On Screen Display in M.REC/M.PLAY modes)
(SCD103/D105 only)
●
●
OSD in M.REC mode
OSD in M.PLAY mode
F
H
A
G
2 2 / 2 4 0
3 5 2 2 min
SF
1 2 : 0 0 A M
J A N . 1 0 , 2 0 0 4
EBD C
I
1 0 0 - 0 0 0 1
SLIDE
MEMORY CARD !
0 0 1
2 2 / 2 4 0
1 2 : 0 0 A M
J A N . 1 0 , 2 0 0 4
ENGLISH
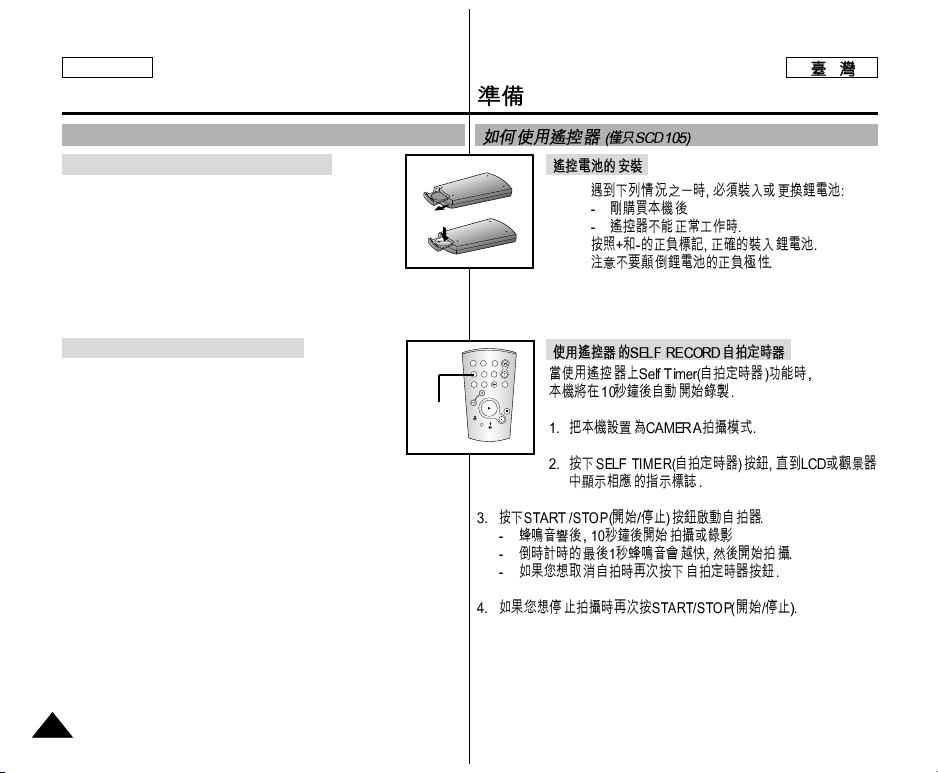
Battery Installation for the Remote Control
✤ You need to insert or replace the lithium battery
when :
- You purchase the camcorder.
- The remote control doesn’t work.
✤ Ensure that you insert the lithium battery correctly,
following the + and - markings.
✤ Be careful not to reverse the polarity of the battery.
Self Record using the Remote Control
When you use the Self Timer function on the remote
control, the recording begins automatically in 10 seconds.
1. Set the camcorder to CAMERA mode.
2. Press the SELF TIMER button until the appropriate indicator is
displayed in the LCD.
3. Press the START/STOP button to start the timer.
- Self Timer starts counting down from 10 with a beep sound.
- In the last one second of the countdown, the beep sound gets
faster, then recording starts automatically.
- If you want to cancel the Self Timer function before recording,
press the SELF TIMER button.
4. Press START/STOP again when you wish to stop recording.
Preparation
2020
How to use the Remote Control (SCD105 only)
✤
✤
✤
Self
Timer
START/
PHOTO DISPLAY
STOP
SELF
ZERO
DATE/
TIMER
MEMORY
TIME
PHOTO
SLOW
X2
A.DUB
SEARCH
F.ADV

Preparation
✤ The lithium battery maintains the clock function and preset
contents of the memory; even if the battery pack or AC power
adapter is removed.
✤ The lithium battery for the camcorder lasts about 6 months under
normal operation from the time of installation.
✤ When the lithium battery becomes weak or dead, the date/time
indicator will display “
---
” when you set the DATE/TIME to ON.
When this occurs, replace the lithium battery with CR2025 type.
1. Open the Jack Cover.
2. Take out the lithium battery holder from the lithium
battery compartment.
3. Position the Lithium battery in the Lithium battery
holder, with the positive ( ) terminal face down.
4. Re-insert the Lithium battery holder into the lithium
battery compartment until you can hear a "CLICK".
Note The lithium battery must be inserted
in the correct direction.
Warning: Keep the LITHIUM BATTERY out of the reach of the
children.
Should any battery be swallowed, consult a doctor
immediately.
Lithium Battery Installation
ENGLISH
2121
✤
✤
✤
2
3
4

ENGLISH
Preparation
2222
Adjusting the Hand Strap
It is very important to ensure that the Hand strap has been correctly
adjusted before you begin your recording.
The hand strap enables you to :
- Hold the camcorder in a stable, comfortable position.
- Press the Zoom and START/STOP button without having to change the
position of your hand.
Hand strap
a. Pull open the
Hand Strap cover
and release the
Hand Strap.
b. Adjust its length
and stick it back
onto the Hand
Strap cover.
c. Close the Hand Strap cover again.
Shoulder Strap
The Shoulder Strap enables you to carry your
camcorder around in complete safety.
1. Insert the end of strap into the Shoulder
Strap hook on the camcorder.
Insert the other end of strap into ring inside
hand strap.
2. Thread each end into the buckle, adjust the
length of the strap and then pull it tight in the buckle.
Attaching the
Lens Cover
1 2 3 4
a b c
1 2

ENGLISH
Preparation
2323
Connecting a Power Source
There are two types of power source that can be connected to your
camcorder.
- The AC Power Adapter and AC cord : used for indoor recording.
- The Battery Pack : used for outdoor recording.
To use the AC Power adapter and DC Cable
1. Connect the AC Power adapter to
the AC cord.
2. Connect the AC cord to a wall socket.
Notes
■
You must use the AC Power adapter
of AA-E8 TYPE.
■
The plug and wall socket type may
differ according to your resident
country.
3. Connect the DC cable to the
DC jack socket of the camcorder.
(When the battery is attached on
the set, you should keep outside
the projection of the DC cable.)
4. Set the camcorder to each mode by holding down the tab on the
power switch and turning it to the CAMERA or PLAYER mode.
To select the CAMCORDER mode
(SCD103/D105 only)
✤ If you want to use this unit as a camcorder,
set the mode switch to TAPE position.
✤ If you want to use this unit as a DSC
(Digital Still Camera), set the mode switch to
MEMORY CARD position.
■
■
✤
✤
Power Switch
MEMORY
CARD
TAPE

ENGLISH
Preparation
2424
Using the Lithium Ion Battery Pack
✤
The amount of continuous recording time available depends on
- The type and capacity of the battery pack you are using.
- How often the Zoom function is used.
It is recommended that you have several batteries available.
Charging the Lithium Ion Battery Pack
1.
Attach the battery pack to the camcorder.
2. Connect the AC Power adapter to an AC
cord and connect the AC cord to a wall
socket.
3. Connect the DC cable to the DC jack
socket on the camcorder.
4. Turn the power switch to off, and the
charging indicator will start to flash,
showing that the battery is charging.
5. When the battery is fully charged, disconnect the
battery pack and the AC Power adapter from the
camcorder.
■
Even with the power switched off, the battery pack
will still discharge if it is left connected to the
camcorder.
Notes
■
The battery pack may be charged a little at the time of purchase.
■
To prevent reduction in the life and capacity of the battery pack,
always remove it from the camcorder after it is fully charged.
✤
■
■
■
Blinking time Charging rate
Once per second Less than 50%
Twice per second 50% ~ 75%
Three times per second 75% ~ 90%
Blinking stops and stays on 90% ~ 100%
On for a second and Error - Reset the battery pack and
off for a second the DC cable
Power Switch
5

Preparation
Using the Lithium Ion Battery Pack
Table of continuous recording time based on model and
battery type.
✤ If you close the LCD screen, it switches off and the viewfinder
switches on automatically.
✤ The continuous recording time given in the table below are
approximations.
Actual recording time depends on usage.
Notes
■
The battery pack should be recharged in an environment of
between 32°F (0°C) and 104°F (40°C).
■
The battery pack should never be charged in a room temperature
that is below 32°F (0°C).
■
The life and capacity of the battery pack will be reduced if it is used
in temperatures below 32°F (0°C) or left in temperatures above
104°F (40°C) for a long period, even when it is fully recharged.
■
Do not put the battery pack near any heat sources (fire or flames,
for example).
■
Do not disassemble, process, press, or heat the Battery Pack.
■
Do not allow the + and - terminals of the battery pack to be shortcircuited. It may cause leakage, heat generation, induce fire and
overheating.
Battery
SB-LS110
SB-LS220
Charging
time
Approx.
2hr
Approx.
3hr 30min
LCD ON
VIEWFINDER ON
Continuous recording time
Time
Approx.
1hr 30min
Approx.
3hr 10min
Approx.
2hr
Approx.
4hr 10min
ENGLISH
2525
✤
✤
■
■
■
■
■
■

ENGLISH
Preparation
2626
Battery level display
•
The battery level display indicates the amount of power
remaining in the battery pack.
a. Fully charged
b. 20~40% used
c. 40~80% used
d. 80~95% used
e. Completely used (flickers)
(The camcorder will turn off soon,
change the battery as soon as possible)
✤ Please refer to the table on page 25 for
approximate continuous recording time.
✤ The recording time is affected by environmental temperature and
conditions.
The recording time becomes very short in a cold environment.
The continuous recording time in the operating instructions are
measured using a fully charged battery pack at 77°F(25°C).
As the environmental temperature and conditions may differ when
you actually use the camcorder, the remaining battery time may
not be the same as the approximate continuous recording time
given in these instructions.
Tips for Battery Identification
A charge mark is provided on the battery pack to help
you remember whether it has been charged or not.
Two colors are provided (red and grey)-you may
choose which one indicates charged and which
indicates discharged.
Note
The charge mark setting does not affect the battery's
charge status.
•
✤
✤
a
b
c
d
e

ENGLISH
Preparation
2727
Inserting and Ejecting a Cassette
✤ When inserting a tape or closing a cassette holder, do not apply
excessive force.
This may cause a malfunction.
✤ Do not use any tape other than Mini DV cassettes.
1. Connect a power source and slide the
TAPE EJECT switch and open the
cassette door.
- The cassette holding mechanism rises
automatically.
2. Insert a tape into the cassette holder with
the tape window facing outward and
the protection tab bottom.
3. Press the area marked PUSH on the
cassette holding mechanism until
it clicks into place.
- The cassette is loaded automatically.
4. Close the cassette door.
- Close the door completely until you hear a “click”.
Note
When you have recorded something that you wish to keep,
you can protect it so that it will not be accidentally erased.
a. Protecting a tape :
Push the safety tab on the cassette so that the hole is
uncovered.
b. Removing the tape protection :
If you no longer wish to keep the recording on the
cassette, push the safety tab back so that it covers the
hole.
•
How to store a tape
a. Avoid places with magnets or magnetic interference.
b. Avoid humidity and dust prone places.
c. Keep the tape in an upright position and avoid storing it
in direct sunlight.
d. Avoid dropping or knocking your tapes.
✤
✤
•
1
3
2
4
push
a. SAVE
b. REC

Basic Recording
2828
ENGLISH
Making your First Recording
1. Connect a Power source to the
camcorder. (see page 23)
(A battery pack or a AC power
adapter)
■
Insert a cassette.
(see page 27)
2. Remove the LENS COVER.
3. Set the power switch to the
CAMERA position.
■
Open the LCD monitor.
■
Set the mode switch to the
TAPE position.
Make sure that STBY is displayed.
■
If the protection tab of the cassette is open, STOP and
PROTECTION! will be displayed.
■
Make sure the image you want to record appears on the LCD
monitor or viewfinder.
■
Make sure the battery level indicates that there is enough
remaining power for your expected recording time.
4. To start recording, press the START/STOP button.
■
REC is displayed on the LCD.
To stop recording, press the START/STOP button again.
■
STBY is displayed on the LCD.
■
■
■
■
■
■
■
■
4
1
3
2

2929
ENGLISH
Basic Recording
Selecting OSD LANGUAGE
✤ Select the appropriate OSD Language among English, French,
Spanish, Portuguese, German and Italian.
✤ The Language Function works in CAMERA, PLAYER, M.REC,
M.PLAY modes.
1. Press the MENU button.
■
The menu list will appear.
2. Turn the MENU DIAL to highlight INITIAL and
press the ENTER button.
3. Select LANGUAGE from the sub-menu and ENTER
button.
4. Using the MENU DIAL, select the LANGUAGE and
press the ENTER button.
■
Press the ENTER button to confirm the OSD
LANGUAGE.
5. To exit, press the MENU button.
■
The OSD changes to the selected language.
Note
■
“LANGUAGE” is always indicated in ENGLISH.
✤
✤
■
■
■
■
CAM MODE
INITIAL CLOCK SET
WL. REMOTE
LANGUAGE
DEMO
CAMERA
A/V
MEMORY
VIEWER
CAM MODE
LANGUAGE
INITIAL SET
ENGLISH
CAM MODE
INITIAL SET
CLOCK SET
WL.REMOTE
LANGUAGE
DEMONSTRATION
ENGLISH
3030
ENGLISH
Basic Recording
When a cassette is loaded and the camcorder is left in the STBY
mode for more than 5 minutes without being used, it will switch off
automatically.
To use it again, push the START/STOP button or set the Power
switch to OFF and then back to CAMERA.
This Auto Power off feature is designed to save battery power.
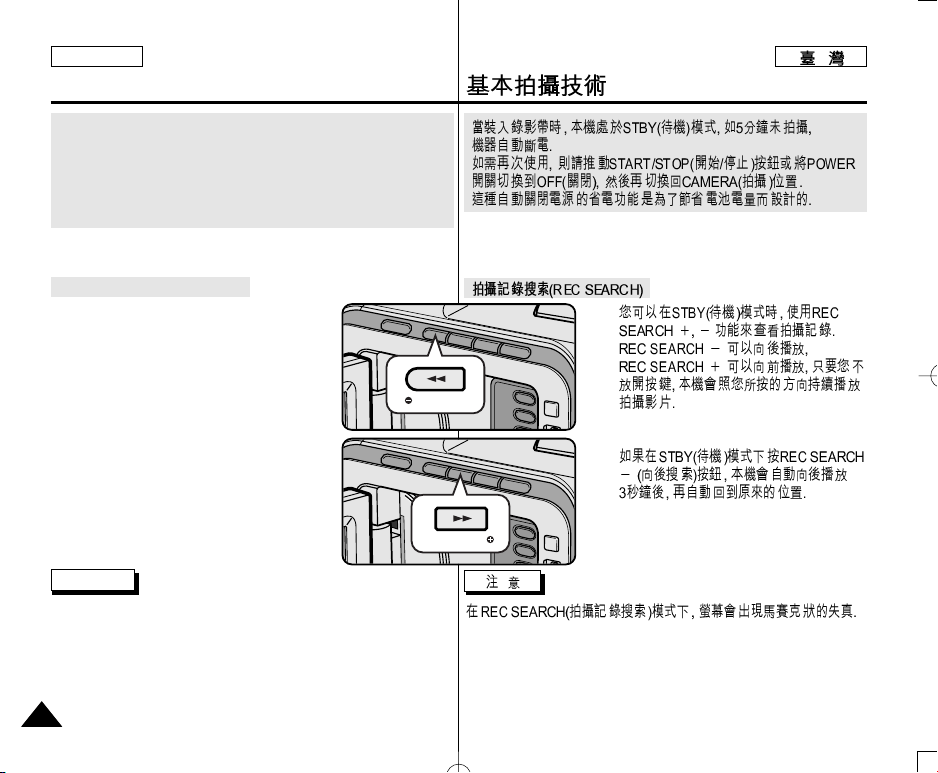
Record Search (REC SEARCH)
✤ You can view a recording using the REC
SEARCH +, -- function in STBY mode.
REC SEARCH -- enables you to play the
recording backwards and
REC SEARCH + enables you to play it
forwards, for as long as you keep each
button pressed down.
✤ If you press the REC SEARCH -- button in
STBY mode, your camcorder will play
in reverse for 3 seconds and return to the
original position automatically.
Note
Mosaic shaped distortion may appear on the screen while in Record
Search mode.
✤
✤
REC SEARCH
REC SEARCH
 Loading...