

Page 1
English
Refrigerator
user manual
imagine the possibilities
Thank you for purchasing a Samsung product.
To receive more complete service or accessory parts,
please register your product at or contact
www.samsung.com/register
1-800-SAMSUNG (726-7864)
Free Standing Appliance
This manual is made with 100 % recycled paper.
RF4289HB
DA68-02520B(0.2).indb 1DA68-02520B(0.2).indb 1 2013.2.28 10:16:29 AM2013.2.28 10:16:29 AM
Page 2
02_ safety information
SAFETY INFORMATION
Before operating the appliance, please read •
this manual thoroughly and retain it for your
reference.
Use this appliance only for its intended purpose •
as described in this instruction manual.
This appliance is not intended for use by
persons (including children) with reduced
physical, sensory or mental capabilities, or
lack of experience and knowledge, unless they
have been given supervision or instruction
concerning use of the appliance by a person
responsible for their safety.
Warnings and Important Safety Instructions in •
this manual do not cover all possible conditions
and situations that may occur.
It is your responsibility to use common sense,
caution, and care when installing, maintaining,
and operating your appliance.
Because these following operating instructions •
cover various models, the characteristics of
your refrigerator may differ slightly from those
described in this manual.
R600a or R134a is used as a refrigerant.
Check the compressor label on the rear of
the appliance or the rating label inside the
fridge to see which refrigerant is used for
your refrigerator. When this product contains
fl ammable gas (Refrigerant R600a), contact
your local authority in regard to safe disposal of
this product.
Important safety symbols and
precautions:
WARNING
Hazards or unsafe practices that may result in
severe personal injury or death.
CAUTION
Hazards or unsafe practices that may result in
minor personal injury or property damage.
Do NOT attempt.
Do NOT disassemble.
Do NOT touch.
Follow directions carefully.
Unplug the power plug from the wall socket.
Make sure the refrigerator is grounded to
prevent electric shock.
Call the contact center for help.
Note.
These warning signs are here to prevent injury
to you and others.
Please follow them carefully.
After reading this section, keep it in a safe
place for future reference.
CE Notice
This product has been determined to be in
compliance with the Low Voltage Directive
(2006/95/EC), the Electromagnetic Compatibility
Directive (2004/108/EC), Commission Delegated
Regulation (EU) No 1060/2010 and the Eco-Design
Directive(2009/125/EC) implemented by Regulation
(EC) No 643/2009 of the European Union. (For
products sold in European Countries only)
SEVERE WARNING SIGNS FOR
TRANSPORTATION AND SITE
• When transporting and installing the
appliance,care should be taken to ensure
that no parts of the refrigerating circuit
are damaged.
R600a or R134a is used as a refrigerant. •
Check the compressor label on the rear of
the appliance or the rating label inside the
refrigerator to see which refrigerant is used for
your refrigerator.
When this product contains fl ammable gas •
(Refrigerant R600a),
Refrigerant leaking from the pipe work could ignite or cause an eye injury. If a leak is
detected, avoid any naked fl ames or potential
sources of ignition and air the room in which the
appliance is standing for several minutes.
In order to avoid the creation of a fl ammable gas-air mixture if a leak in the refrigerating
circuit occurs, the size of the room in which the
appliance may be sited depends on the amount
of refrigerant used.
WARNING
safety information
DA68-02520B(0.2).indb 02DA68-02520B(0.2).indb 02 2013.2.28 10:16:30 AM2013.2.28 10:16:30 AM
Page 3
safety information _03
Never start up an appliance showing any signs of damage. If in doubt, consult your dealer.
The room where the refrigerator will be sited
must be 1 m³ in size for every 8 g of R600a
refrigerant inside the appliance. The amount of
refrigerant in your particular appliance is shown
on the identifi cation plate inside the appliance.
If the appliance contains isobutane refrigerant (R600a), a natural gas with high environmental
compatibility that is, however, also combustible.
When transporting and installing the appliance,
care should be taken to ensure that no parts of
the refrigerating circuit are damaged.
SEVERE WARNING SIGNS FOR
INSTALLATION
• Do not install the refrigerator in a damp
place or place where it may come in
contact with water.
Deteriorated insulation of electrical parts may cause an electric shock or fi re.
Do not place this refrigerator in direct sunlight or •
expose to the heat from stoves, room heaters
or other appliances.
Do not plug several appliances into the same •
multiple power board.
The refrigerator should always be plugged into
its own individual electrical outlet which has a
voltage rating that matched the rating plate.
This provides the best performance and also prevents overloading house wiring
circuits, which could cause a fi re hazard from
overheated wires. If the wall socket is loose, do
not insert the power plug.
There is a risk of electric shock or fi re. Do not use a cord that shows cracks or •
abrasion damage along its length or at either
end.
Do not bend the power cord excessively or •
place heavy articles on it.
Do not use aerosols near the refrigerator.•
Aerosols used near the refrigerator may cause -
an explosion or fi re.
Do not install this appliance in a location where •
gas may leak.
This may result in an electric shock or fi re. Plug the power plug into the wall socket fi rmly. •
Do not use a damaged power plug, damaged
power cord or loose wall socket.
This may result in an electric shock or fi re. This appliance must be properly grounded.•
Do not ground the appliance to a gas pipe,
WARNING
plastic water pipe, or telephone line.
You must ground the refrigerator to prevent any -
power leakages or electric shocks caused by
current leakage from the refrigerator.
This may result in an electric shock, fi re, explosion, or problems with the product.
Never plug the power cord into a socket that is not grounded correctly and make sure that it is
in accordance with local and national codes.
Do not pull or excessively bend the power cord.•
Do not twist or tie the power cord.•
Do not hook the power cord over a metal •
object, place a heavy object on the power
cord, insert the power cord between objects, or
push the power cord into the space behind the
appliance.
When moving the refrigerator, be careful not to roll over or damage the power cord.
This may result in an electric shock or fi re. This appliance should be positioned in such a •
way that it is accessible to the power plug.
Failing to do so may result in an electric shock -
or fi re due to electric leakage.
Do not install this appliance near a heater, •
infl ammable material.
Do not install this appliance in a humid, oily or •
dusty location, in a location exposed to direct
sunlight and water (rain drops).
When disposing of this or other refrigerator/s, •
remove the door/door seals, door latch so that
children or animals cannot become trapped
inside.
Children should be supervised to ensure that
they do not enter and play with the appliance.
If trapped inside, the child may become injury and suffocate to death.
Never put fi ngers or other objects into the
dispenser hole, ice chute and ice maker bucket.
It may cause a personal injury or material damage.
• The installation or any service of this
appliance is recommended by a qualifi ed
technician or service company.
Failing to do so may result in an electric shock, fi re, explosion, problems with the product, or
injury.
Do not stand on top of the appliance or place •
objects (such as laundry, lighted candles, lighted
cigarettes, dishes, chemicals, metal objects,
etc.) on the appliance.
This may result in an electric shock, fi re, problems with the product, or injury.
DA68-02520B(0.2).indb 03DA68-02520B(0.2).indb 03 2013.2.28 10:16:30 AM2013.2.28 10:16:30 AM
Page 4
04_ safety information
The installation or any service of this appliance is recommended by a qualifi ed technician or
service company.
Failing to do so may result in an electric shock, fi re, explosion, problems with the product, or
injury.
Do not touch the power plug with wet hands. This may result in an electric shock. This refrigerator must be properly installed and •
located in accordance with the manual before it
is used.
Connect the power plug in proper position with •
the cord hanging down.
If you connect the power plug upside down, wire can get cut off and a cause fi re or an
electric shock.
Make sure that the power plug is not squashed •
or damaged by the back of the refrigerator.
When moving the refrigerator, be careful not to •
roll over or damage the power cord.
This constitutes a fi re hazard. The appliance must be positioned so that the •
plug is accessible after installation.
• The refrigerator must be grounded.
You must ground the refrigerator to prevent any power leakages or electric
shocks caused by current leakage from
the refrigerator.
Never use gas pipes, telephone lines or other •
potential lightening rods as ground.
Improper use of the ground plug can result in an electric shock.
• If the power cord is damaged,
have it replaced immediately by the
manufacturer or its service agent.
The fuse on the refrigerator must be changed •
by a qualifi ed technician or service company.
Failing to do so may result in an electric shock or personal injury.
CAUTION SIGNS FOR
INSTALLATION
• Keep ventilation opening in the appliance
enclosure or mounting structure clear of
obstruction.
Allow the appliance to stand for 2 hours after •
installation.
CAUTION
SEVERE WARNING SIGNS FOR
USING
• Do not insert the power plug with wet
hands.
Do not store articles on the top of the appliance.•
When you open or close the door, the articles -
may fall and cause a personal injury and/or
material damage.
Do not put items fi lled with water on the •
refrigerator.
If spilled, there is a risk of fi re or electric shock. Do not let children hang on the door.•
Failure to do so may cause serious personal -
injury.
Do not leave the doors of the refrigerator open •
while the refrigerator is unattended and do not
let children enter inside the refrigerator.
Do not allow babies or children go inside the •
drawer.
It can cause death from suffocation by entrapment or personal injury.
Do not sit on the Freezer door.•
The door may be broken and cause a personal -
injury.
Do not put a container fi lled with water on the •
refrigerator.
If spilled, there is a risk of fi re or electric shock. Do not use or place any substances sensitive -
to temperature such as infl ammable sprays,
infl ammable objects, dry ice, medicine, or
chemicals near or inside of the refrigerator.
Do not keep volatile or infl ammable objects or substances (benzene, thinner, propane gas,
alcohol, ether, LP gas and other such products
etc.) in the refrigerator.
This refrigerator is for storing food only. This may result in fi re or explosion. Do not store pharmaceuticals products, scientifi •
c materials or temperature-sensitive products in
the refrigerator.
Products that require strict temperature controls must not be stored in the refrigerator.
If you smell pharmaceutical or smoke, pull •
out power plug immediately and contact your
Samsung Electronics service center.
If any dust or water is in Refrigerator, pull •
out power plug and contact your Samsung
Electronics service center.
Otherwise there is a risk of fi re. If gas leak is detected, avoid any naked fl ames •
or potential sources of ignition and air the room
in which the appliance is standing for several
WARNING
DA68-02520B(0.2).indb 04DA68-02520B(0.2).indb 04 2013.2.28 10:16:30 AM2013.2.28 10:16:30 AM
Page 5
safety information _05
minutes.
Do not attempt to repair, disassemble, or •
modify the appliance yourself.
Do not use any fuse (such as cooper, steel wire, -
etc.) other than the standard fuse.
When repairing or reinstalling the appliance is -
required, contact your nearest service center.
Failing to do so may result in an electric shock, -
fi re, problems with the product, or injury.
To prevent children entrapment, you must •
reinstall the divider using provided screws after
cleaning or other actions if you removed the
divider from the drawer.
Never put fi ngers or other objects into the •
dispenser hole.
Failure to do so may cause personal injury or material damage.
Do not store volatile or fl ammable substances •
such as benzene, thinner, alcohol, ether or LP
gas in the refrigerator.
The storage of any of such products may cause an explosion.
Do not store low temperature-sensitive •
pharmaceutical products, scientifi c materials or
other low temperature-sensitive products in the
refrigerator.
Products that require strict temperature controls must not be stored in the refrigerator.
Do not place or use electrical appliance inside •
the refrigerator, unless they are of a type
recommended by the manufacturer.
Do not use a hair dryer to dry the inside of the •
refrigerator.
Do not place a lighted candle in the refrigerator
for removing bad odors.
This may result in an electric shock or fi re. Do not touch the inside walls of the freezer or •
products stored in the freezer with wet hands.
This may cause frostbite. Do not use mechanical devices or any other •
means to accelerate the defrosting process,
other than those recommended by the
manufacturer.
Do not damage the refrigerant circuit.•
Never put fi ngers or other objects into the •
dispenser hole, ice chute and ice maker bucket.
It may cause a personal injury or material -
damage.
• This product is intended only for
the storage of food in a domestic
environment.
Bottles should be stored tightly together so that •
they do not fall out.
In the event of a gas leak (such as propane •
gas, LP gas, etc.), ventilate immediately without
touching the power plug.
Do not touch the appliance or power cord.
Do not use a ventilating fan. A spark may result in an explosion or fi re. Use only the LED Lamps provided by •
manufacturer or service agent.
If the products is equipped with the LED Lamp, •
do not disassemble Lamp Cover and LED
Lamp by yourself.
Please contact your service agent. Use only the LED Lamps provided by •
manufacturer or service agent.
Never stare directly at the UV LED lamp for long •
periods of time.
This may result in eye strain due to the -
ultraviolet rays.
Children should be supervised to ensure that •
they do not play with the appliance.
Keep fi ngers out of “pinch point” areas :
clearances between the doors and cabinet are
necessarily small. Be careful when you open the
doors when children are in the area.
Do not let children hang on the door.•
If not, a serious injury may occur.
There is a Risk of children entrapment.•
Do not let children enter inside the refrigerator.
• Do not disassemble or repair the
refrigerator by yourself.
You run a risk of causing a fi re, malfunction and / or personal injury.
In case of malfunction, please contact your
service agent.
• If the appliance generates a strange
noise, a burning or smell or smoke,
unplug the power plug immediately and
contact your nearest service center.
Failing to do so may result in an electric or fi re hazards.
If you experience diffi culty when changing the •
light, contact service agent.
If the products is equipped with the LED Lamp, •
do not disassemble the Lamp Cover and LED
Lamp by yourself.
Please contact your service agent. If any dust or water is in the refrigerator, pull •
out power plug and contact your Samsung
DA68-02520B(0.2).indb 05DA68-02520B(0.2).indb 05 2013.2.28 10:16:31 AM2013.2.28 10:16:31 AM
Page 6
06_ safety information
Electronics service center.
There is a risk of fi re. If any foreign substance such as water has •
entered the appliance, unplug the power plug
and contact your nearest service center.
Failing to do so may result in an electric shock or fi re.
CAUTION SIGNS FOR USING
• To get best performance from the
product,
Do not place foods too closely in front of the vents at the rear of the appliance as it can
obstruct free air circulation in the refrigerator
compartment.
Wrap the food up properly or place it in airtight containers before putting it into the refrigerator.
Do not put any newly introduced food for freezing near to already existing food.
Do not place carbonated or fi zzy drinks in the •
freezer compartment.
Do not put bottles or glass containers in the
freezer.
When the contents freeze, the glass may break and cause personal injury and property
damage.
Do not change or modify the functionality of the •
refrigerator.
Changes or modifi cations may result in a personal injury and/or property damage.
Any changes or modifi cations performed by
a 3rd party on this completed appliance are
neither covered under Samsung warranty
service, nor is Samsung responsible for safety
issues and damages that result from 3rd party
modifi cations.
Do not block air holes.•
If the air holes are blocked, especially with a -
plastic bag, the refrigerator can be over cooled.
If this cooling period lasts too long, the water
fi lter may break and cause water leakage.
Please observe maximum storage times and •
expiry dates of frozen goods.
Fill the water tank, ice tray, water cubes only •
with potable water.
Use only the ice-maker provided with the •
refrigerator.
The water supply to this refrigerator must only •
be installed/connected by a suitably qualifi ed
person and connected to a potable water
supply only.
In order to operate the ice-maker properly, •
water pressure of 138 ~ 862 kPa is required.
CAUTION
Do not spray volatile material such as •
insecticide onto the surface of the appliance.
As well as being harmful to humans, it may also result in an electric shock, fi re or problems with
the product.
Do not use a hair dryer to dry the inside of the •
refrigerator. Do not place a lighted candle in the
refrigerator for removing bad others.
This may result in an electric shock or fi re. DANGER : Risk of child entrapment, Before you •
throw away your old refrigerator or freezer.
Take off the doors. Leave the shelves in place so that children may -
not easily climb inside.
WARNING : Improper use of the grounding plug •
can result in a risk of an electric shock.
If it is necessary to use an extension cord, use -
only a 3-wire extension cord that has a 3-blade
grounding plug and a 3-slot receptacle that will
accept the plug on the appliance. The marked
rating of the extension cord should be AC 115120 V, 10 A, or more. If a grounding adapter
is used, make sure the receptacle box is fully
grounded.
CAUTION SIGNS
FOR CLEANING AND
MAINTENANCE
• Do not directly spray water inside or
outside the refrigerator.
There is a risk of fi re or electric shock. Do not use or place any substances sensitive •
to temperature such as infl ammable sprays,
infl ammable objects, dry ice, medicine, or
chemicals near the refrigerator.
Do not keep volatile or infl ammable objects or
substances (benzene, thinner, propane gas,
etc.) in the refrigerator.
This refrigerator is for storing food only. This may result in a fi re or an explosion. Do not spray cleaning products directly on the •
display.
Printed letters on the display may come off. Remove any foreign matter or dust from the •
power plug pins.
But do not use a wet or damp cloth when
cleaning the plug, remove any foreign material
or dust from the power plug pins.
Otherwise there is a risk of fi re or electric shock. -
CAUTION
DA68-02520B(0.2).indb 06DA68-02520B(0.2).indb 06 2013.2.28 10:16:31 AM2013.2.28 10:16:31 AM
Page 7

safety information _07
• Unplug the refrigerator before cleaning
and performing maintenance.
SEVERE WARNING SIGNS FOR
DISPOSAL
• Ensure that none of the pipes on the
back of the appliance are damaged prior
to disposal.
R600a or R134a is used as a refrigerant.•
Check the compressor label on the rear of the
appliance or the rating label inside the refrigerator
to see which refrigerant is used for your
refrigerator.
When this product contains fl ammable gas
(Refrigerant R600a), contact your local authority
in regard to safe disposal of this product.
Cyclopentane is used as an insulation blowing
gas.
The gases in insulation material require special
disposal procedure.
Please contact your local authorities in regard to
the environmentally safe disposal of this product.
Ensure that none of the pipes on the back of the
appliances are damaged prior to disposal.
The pipes shall be broken in the open space.
When disposing of this product or other •
refrigerators, remove the door/door seals, door
latch so that small children or animals cannot
become trapped inside.
Leave the shelves in place so that children may •
not easily climb inside.
Ensure that none of the pipes on the back of
the appliance are damaged prior to disposal.
R600a or R134a is used as a refrigerant.
Check the compressor label on the rear of
the appliance or the rating label inside the
fridge to see which refrigerant is used for your
refrigerator.
When this product contains fl ammable gas
(Refrigerant R600a) contact your local authority
in regard to safe disposal of this product.
Cyclopentane used as an insulation blowing •
gas. The gases in insulation material require
special disposal procedure.
Please contact your local authorities in regard
to the environmentally safe disposal of this
product.
Ensure that none of the pipes on the back of
the appliances are damaged prior to disposal.
The pipes shall be broken in the open space.
Please dispose of the packaging material for •
this product in an environmentally friendly
manner.
Allow the appliance to stand for 2 hours after •
installation.
WARNING
To get Best performance from the product,•
Do not place foods too closely in front of -
the vents at the rear of the appliance as it
can obstruct free air circulation in the freezer
compartment.
Wrap the food up properly or place it in airtight containers before putting it into the fridge or
freezer.
Do not put any newly introduced food for freezing near to already existing food.
Do not place glass or bottles or carbonated •
beverages into the freezer.
The container may freeze and break, and this may result in injury.
Please observe maximum storage times and •
expiry dates of frozen goods.
There is no need to disconnect the refrigerator •
from the power supply if you will be away for
less than three weeks.
But, Remove all the food if you are going away
for the three weeks or more.
Unplug the refrigerator and clean it, rinse and •
dry.
Remove all foreign substances such as dust •
or water from the power plug terminals and
contact points using a dry cloth on a regular
basis.
Unplug the power plug and clean it with a dry cloth.
Failing to do so may result in an electric shock or fi re.
Before cleaning or performing maintenance, •
unplug the appliance from the wall socket.
Failing to do so may result in an electric shock or fi re.
Do not clean the appliance by spraying water •
directly onto it.
Do not use benzene, thinner or alcohol to clean •
the appliance.
This may result in discoloration, deformation, damage, electric shock or fi re.
Do not spray infl ammable gas near the •
refrigerator.
There is a risk of explosion or fi re. Contains fl uorinated greenhouse gases covered •
by the Kyoto Protocol.
Hermetically sealed system. Do not vent gases into the atmosphere. Refrigerant type : R-134a Quantity : 0.16 kg Global Warming Potential (GWP) = 1300 To get more space, you can remove top freezer •
DA68-02520B(0.2).indb 07DA68-02520B(0.2).indb 07 2013.2.28 10:16:31 AM2013.2.28 10:16:31 AM
Page 8
08_ safety information
drawers since it does not affect thermal and
mechanical characteristics. A declared storage
volume of frozen food storage compartment is
calculated with these drawers removed. To get
the best energy effi ciency of this product, please
leave all selves, drawers and baskets on their
original position like as above illustration. When
you use this function the energy consumption
of the refrigerator will increase. Remember to
turn it off when you don’t need it and return the
freezer to your original temperature setting.
Power freezing •
If you need to freeze large amount of food stuff, -
activate Power Freeze function at least 24 hours
before.
ADDITIONAL TIPS FOR PROPER
USAGE
In the event of a power failure, call the local •
offi ce of your Electricity Company and ask how
long it is going to last.
Most power failures that are corrected within an hour or two will not affect your refrigerator
temperatures.
However, you should minimize the number of
door openings while the power is off.
Should the power failure last more than 24 hours, remove all frozen food.
If keys are provided with the refrigerator, the •
keys should be kept out of the reach of children
and not be in the vicinity of the appliance.
The appliance might not operate consistently •
(possibility of temperature becoming too warm
in the refrigerator) when sited for an extended
period of time below the cold end of the range
of temperature for which the refrigerating
appliance is designed.
Do not store food which spoils easily at low •
temperature, such as bananas, melons.
Your appliance is frost free, which means there •
is no need to manually defrost your appliance,
as this will be carried out automatically.
Temperature rise during defrosting can comply •
with ISO requirements.
But if you want to prevent an undue rise in the
temperature of the frozen food while defrosting
the appliance, please wrap the frozen food up
in several layers of newspaper.
Any increase in temperature of frozen food •
during defrosting can shorten its storage life.
Saving Energy Tips
Install the appliance in a cool, dry room with adequate ventilation.
Ensure that it is not exposed to direct sunlight
and never put it near a direct source of heat
(radiator, for example).
Never block any vents or grilles on the appliance.
Allow warm food to cool down before placing it in the appliance.
Put frozen food in the refrigerator to thaw. You can then use the low temperatures of the
frozen products to cool food in the refrigerator.
Do not keep the door of the appliance open for too long when putting food in or taking food
out. The shorter time for which the door is
open, the less ice will form in the freezer.
Clean the rear of the refrigerator regularly. Dust increases energy consumption.
Do not set temperature colder than necessary. Ensure suffi cient air exhaust at the refrigerator -
base and at the back wall of the refrigerator.
Do not cover air vent openings.
Allow clearance to the right, left, back and top when installing.
This will help reduce power consumption and
keep your energy bills lower.
To get the best energy effi ciency of this product, please leave all selves, drawers and baskets on
their original position like as above illustration.
DA68-02520B(0.2).indb 08DA68-02520B(0.2).indb 08 2013.2.28 10:16:31 AM2013.2.28 10:16:31 AM
Page 9
safety information _09
1. Regulatory Notice
1.1 FCC Notice
FCC CAUTION:
Any changes or modifi cations not expressly approved by the party responsible for compliance could void
the user’s authority to operate the equipment.
Contains Transmitter Module FCC ID: A3LDNURS11
This device complies with Part 15 of FCC Rules. Operation is Subject to following two conditions:
(1) This device may not cause harmful interference, and
(2) This device must accept any interference received including interference that cause undesired
operation.
For product available in the USA/Canada market, only channel 1~11 can be operated.
Selection of other channels is not possible.
FCC STATEMENT:
This equipment has been tested and found to comply within the limits for a Class B digital device,
pursuant to part 15 of the FCC Rules. These limits are designed to provide reasonable protection against
harmful interference in a residential installation.
This equipment generates, uses, and can radiate radio frequency energy and, if not installed and used
in accordance with the instructions, may cause harmful interference to radio communications. However,
there is no guarantee that interference will not occur in a particular installation. If this equipment does
cause harmful interference to radio or television reception, which can be determined by turning the
equipment off and on, the user is encouraged to try to correct the interference by one or more of the
following measures:
Reorient or relocate the receiving antenna•
Increase the separation between the equipment and receiver•
Connect the equipment into an outlet on a different circuit from that to which the receiver is connected•
Consult the dealer or an experienced radio/TV technician for help.•
FCC RADIATION EXPOSURE STATEMENT:
This equipment complies with FCC radiation exposure limits set forth for an uncontrolled environment.
This equipment should be installed and operated with a minimum distance of 20 cm between the radiator
and your body. This device and its antenna(s) must not be co-located or operation in conjunction with any
other antenna or transmitter.
SAVE THESE INSTRUCTIONS
CAUTION
DA68-02520B(0.2).indb 09DA68-02520B(0.2).indb 09 2013.2.28 10:16:31 AM2013.2.28 10:16:31 AM
Page 10
10_ safety information
1. Regulatory Notice
1.2 IC Notice
Contains Transmitter Module IC: 649E-DNURS11
The term “IC” before the radio certifi cation number only signifi es that Industry Canada technical
specifi cations were met. Operation is subject to the following two conditions : (1) this device may not
cause interference, and (2) this device must accept any interference, including interference that may
cause undesired operation of the device.
This Class B digital apparatus complies with Canadian ICES-003.
Cet appareil numérique de la classe B est conforme á la norme NMB-003 du Canada.
For product available in the USA/Canada market, only channel 1~11 can be operated.
Selection of other channels is not possible.
IC RADIATION EXPOSURE STATEMENT:
This equipment complies with IC RSS-102 radiation exposure limits set forth for an uncontrolled
environment. This equipment should be installed and operated with minimum distance 20cm between the
radiator & your body. This device and its antenna(s) must not be co-located or operation in conjunction
with any other antenna or transmitter.
SAVE THESE INSTRUCTIONS
DA68-02520B(0.2).indb 10DA68-02520B(0.2).indb 10 2013.2.28 10:16:31 AM2013.2.28 10:16:31 AM
Page 11
setting up _11
01 SETTING UP
GETTING READY TO INSTALL THE
REFRIGERATOR
Congratulations on your purchase of this Samsung
French Door Refrigerator.
We hope you enjoy the state-of-art features and
effi ciencies that this new appliance offers.
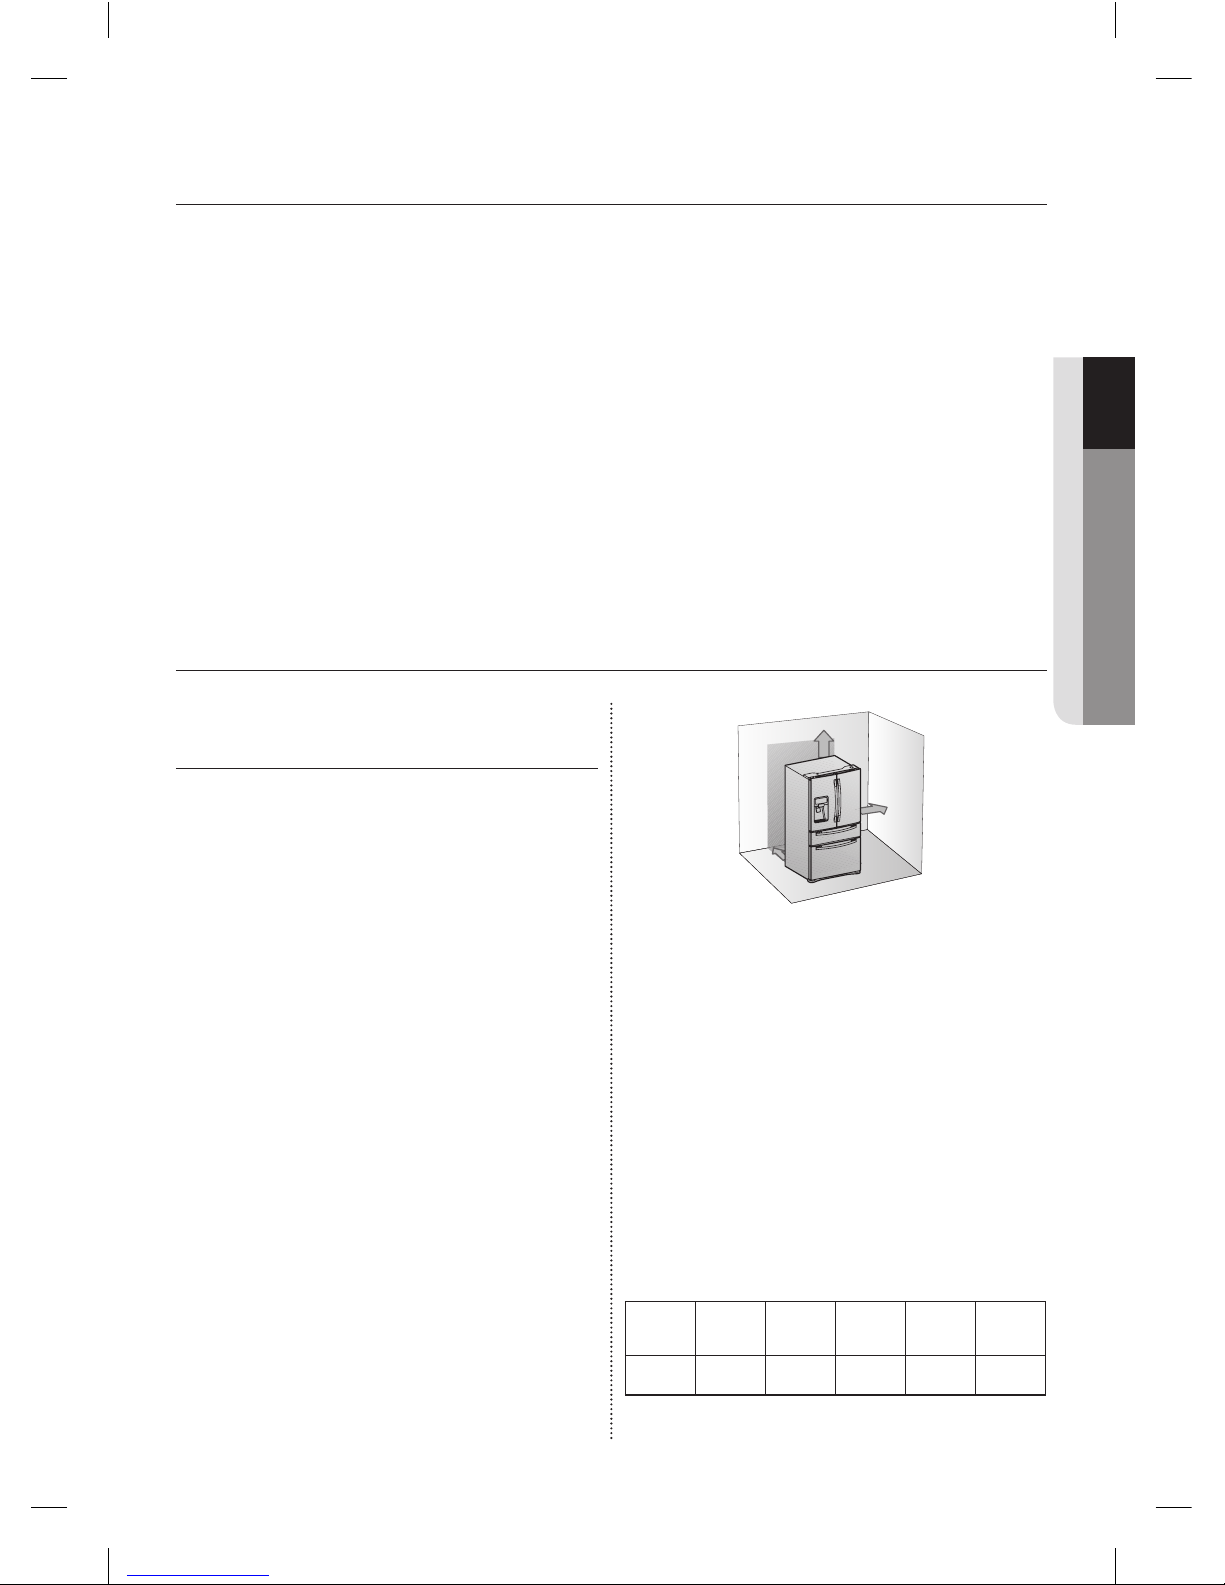
Selecting the best location for the
refrigerator
A location with easy access to a water supply.•
A location without direct exposure to sunlight.•
A location with a leveled fl oor.•
A location with enough space for the refrigerator •
doors to open easily.
A location that allows suffi cient space to the •
right, left, back and top for air circulation.
A location that allows you to move the •
refrigerator easily if it needs maintenance or
service.
If the refrigerator does not have enough space, the
internal cooling system may not work properly.
If your refrigerator has an ice maker, allow extra
space at the back for the water line connections.
When you install the refrigerator next to a fi xed wall,
you need a minimum clearance of 95 mm between
the refrigerator and wall to allow the door to swing
open.
First thing! Make sure that you can easily move
your refrigerator to its fi nal location by measuring
doorways (both width and height), thresholds,
ceilings, stairways, etc.
The following chart details the exact height and
depth of this Samsung French Door Refrigerator.
Model
Depth
“A”
Width
“B”
Height
“C”
Overall
Height
“D”
Depth
“E”
RF4289HB
33 6/8 ”
(858 mm)
35 6/8 ”
(908 mm)
68 1/2 ”
(1740 mm)
69 6/8 ”
(1774 mm)
36 2/8 ”
(920 mm)
Setting up your French Door
Refrigerator
Contents
SETTING UP YOUR FRENCH DOOR REFRIGERATOR ………………………… 11
OPERATING YOUR FRENCH DOOR REFRIGERATOR ………………………… 18
TROUBLESHOOTING ………………………………………………………………… 85
WARRANTY …………………………………………………………………………… 88
5 cm
10 cm
5 cm
DA68-02520B(0.2).indb 11DA68-02520B(0.2).indb 11 2013.2.28 10:16:31 AM2013.2.28 10:16:31 AM
Page 12
12_ setting up
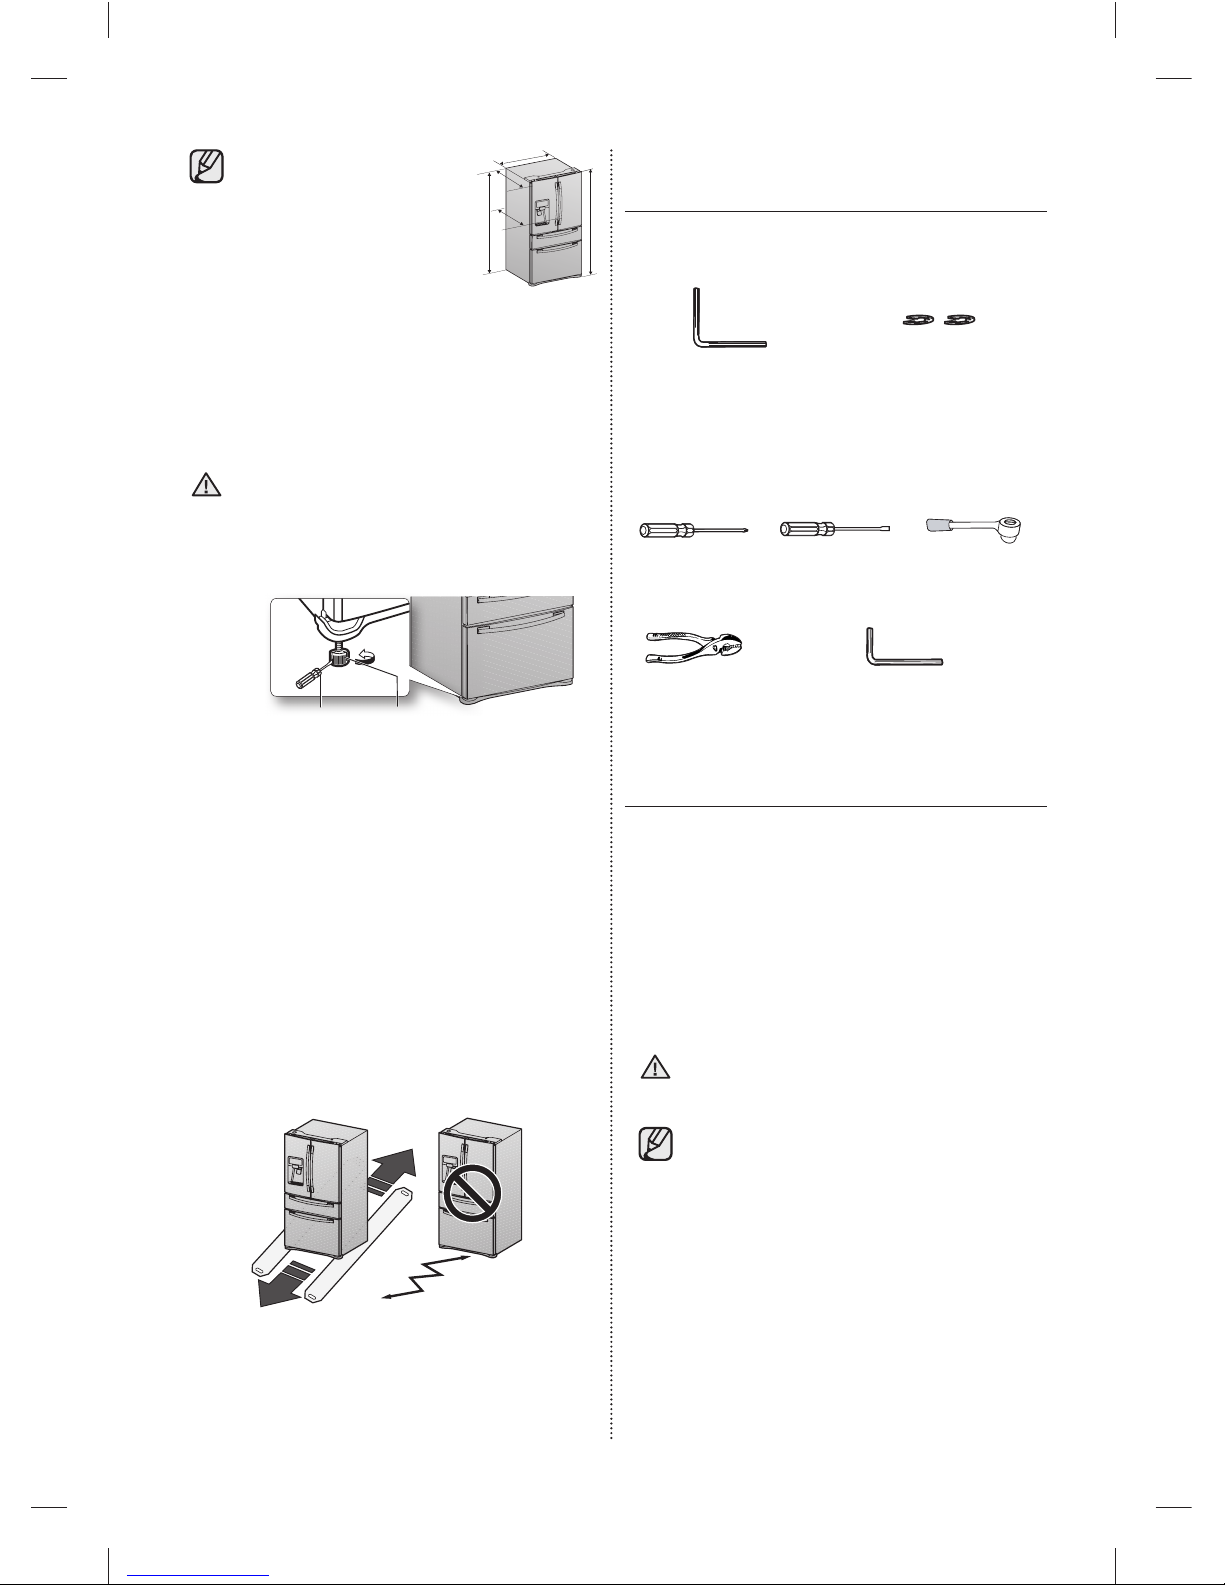
• Allow clearance to the
right, left, back and top
when installing.
This will help reduce
power consumption and
keep your energy bills
lower.
Do not install the refrigerator where the •
temperature will go below 10 ºC.
Do not locate the refrigerator where it may •
become wet.
When moving your refrigerator
To prevent fl oor damage, be sure the front
adjusting legs are in the up position (above
the fl oor).
Refer to ‘Adjusting the doors’ in the
manual (on page 14).
FLOORING
For proper installation, you must place this
refrigerator on a level, hard surface that is the
same height as the rest of the fl oor. This surface
should be strong enough to support a fully loaded
refrigerator, or approximately165 kg.
To protect the fi nish of the fl ooring, cut a large
section of the cardboard carton and place it under
the refrigerator where you are working. When
moving the refrigerator, you need to pull and push
it straight forwards or back. Do not wiggle it from
side to side.
CAUTION
ACCESSORIES AND REQUIRED
TOOLS
The following accessories are included with your
refrigerator:
Hex wrench Fastener
Required Tools (Not provided)
You need the following tools to complete the
installation of your refrigerator:
Philips
screwdriver (+)
Flat-blade
screwdriver (-)
Socket wrench
(10 mm)
Pliers Allen wrench (5 mm)
REMOVING THE REFRIGERATOR
DOORS
For some installations you need to remove the
fridge and fl ex doors and the freezer drawer so
you can move the refrigerator to its fi nal location.
Do not remove the doors/drawer if you don’t need
to. If you do not need to remove the refrigerator
doors, go to Adjusting the Level on page 9. If you
need to remove the doors. continue below. Before
removing the door/drawer, make sure you read the
following items:
Disconnect power to the refrigerator before
removing the doors or drawer.
• Be careful not to drop, damage, or
scratch the doors/drawer while removing
them.
Be careful not to injure yourself while removing •
the doors/drawer.
Reattach the doors/drawer properly to avoid: •
Moisture from air leakage. Uneven door alignment. Wasting energy due to improper door seal. -
WARNING
E
E
C
C
A
A
B
B
D
D
Flat-blade screw
Flat-blade screw
driver(-)
driver(-)
Control Lever
Control Lever
DA68-02520B(0.2).indb 12DA68-02520B(0.2).indb 12 2013.2.28 10:16:32 AM2013.2.28 10:16:32 AM
Page 13
setting up _13
01 SETTING UP
Disassemble the refrigerator doors
Be careful not to drop and scratch the
doors while removing the doors.
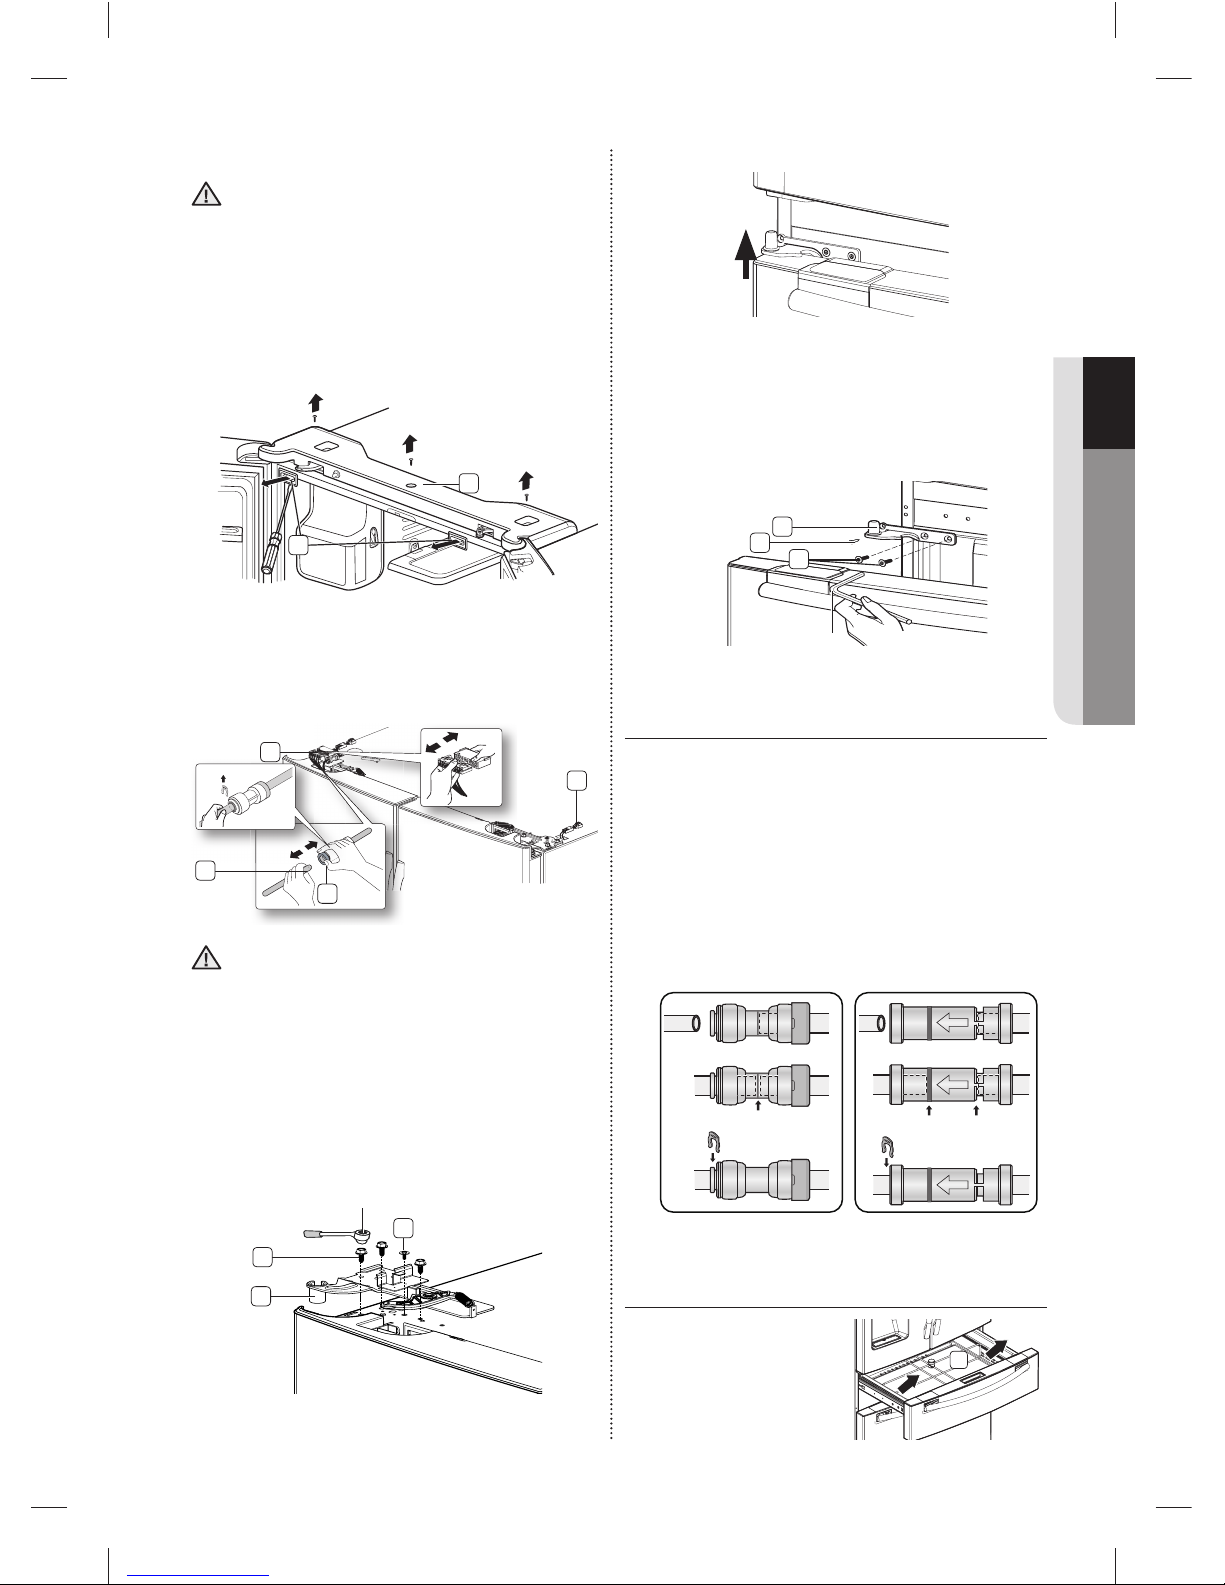
With the door opened, remove the cap top 1.
table ( 1 ) with a fl at-blade screwdriver (-), and
then close the door.
Remove the 3 screws holding down the
top table ( 2 ) and turn it with several wires
connected.
Disconnect one connector ( 2. 3 ) on the right side
door and one connector ( 4 ) on the left side
door. Remove the water line ( 5 ) while pressing
the dark gray part ( 6 ) of the water line coupler.
If a red clip is on the coupler, it must be
removed before removing the tube.
Remove the 3 hex head bolts ( 3. 7 ) attached
to the upper left and right door hinges with a
socket wrench (10 mm).
Remove the ground screw ( 8 ) attached to the
upper left and right door hinges with a philips
screwdriver (+). Remove the upper left and right
door hinges ( 9 ).
WARNING
CAUTION
Lift the door straight up to remove.4.
Remove the screw ( 5. 10 ) attached to the
lower left and right door hinges with a philips
screwdriver (+). Remove the 2 hex head bolts
( 11 ) attached to the lower left and right door
hinges with an allen wrench (5 mm). Remove
the lower left and right door hinges ( 12 ).
REATTACHING THE
REFRIGERATOR DOORS
To reattach the fridge doors after you have moved
the fridge to its fi nal location, assemble parts in
reverse order.
The Water Line must be fully inserted to the 1.
center of transparent coupler (Type A) or the
Guide Lines (Type B) to prevent water leakage
from the dispenser.
Insert the clip in the install pack and check that 2.
it holds the line fi rmly.
DISASSEMBLE THE FLEX DOOR
Take out the Flex Zone 1.
( 1 ) by lifting it up.
Allen wrench
Allen wrench
12
10
11
1
1
2
4
5
6
3
Red Clip
Red Clip
(1/4 ")
(1/4 ")
Socket wrench
Socket wrench
7
8
9
Center of Transparent coupler
Center of Transparent coupler
The Guide Lines
The Guide Lines
Dispenser
Dispenser
clip A (1/4 ”)
clip A (1/4 ”)
(6.35 mm)
(6.35 mm)
clip A (1/4 ”)
clip A (1/4 ”)
(6.35 mm)
(6.35 mm)
Type A
Type A
Type B
Type B
DA68-02520B(0.2).indb 13DA68-02520B(0.2).indb 13 2013.2.28 10:16:34 AM2013.2.28 10:16:34 AM
Page 14
14_ setting up
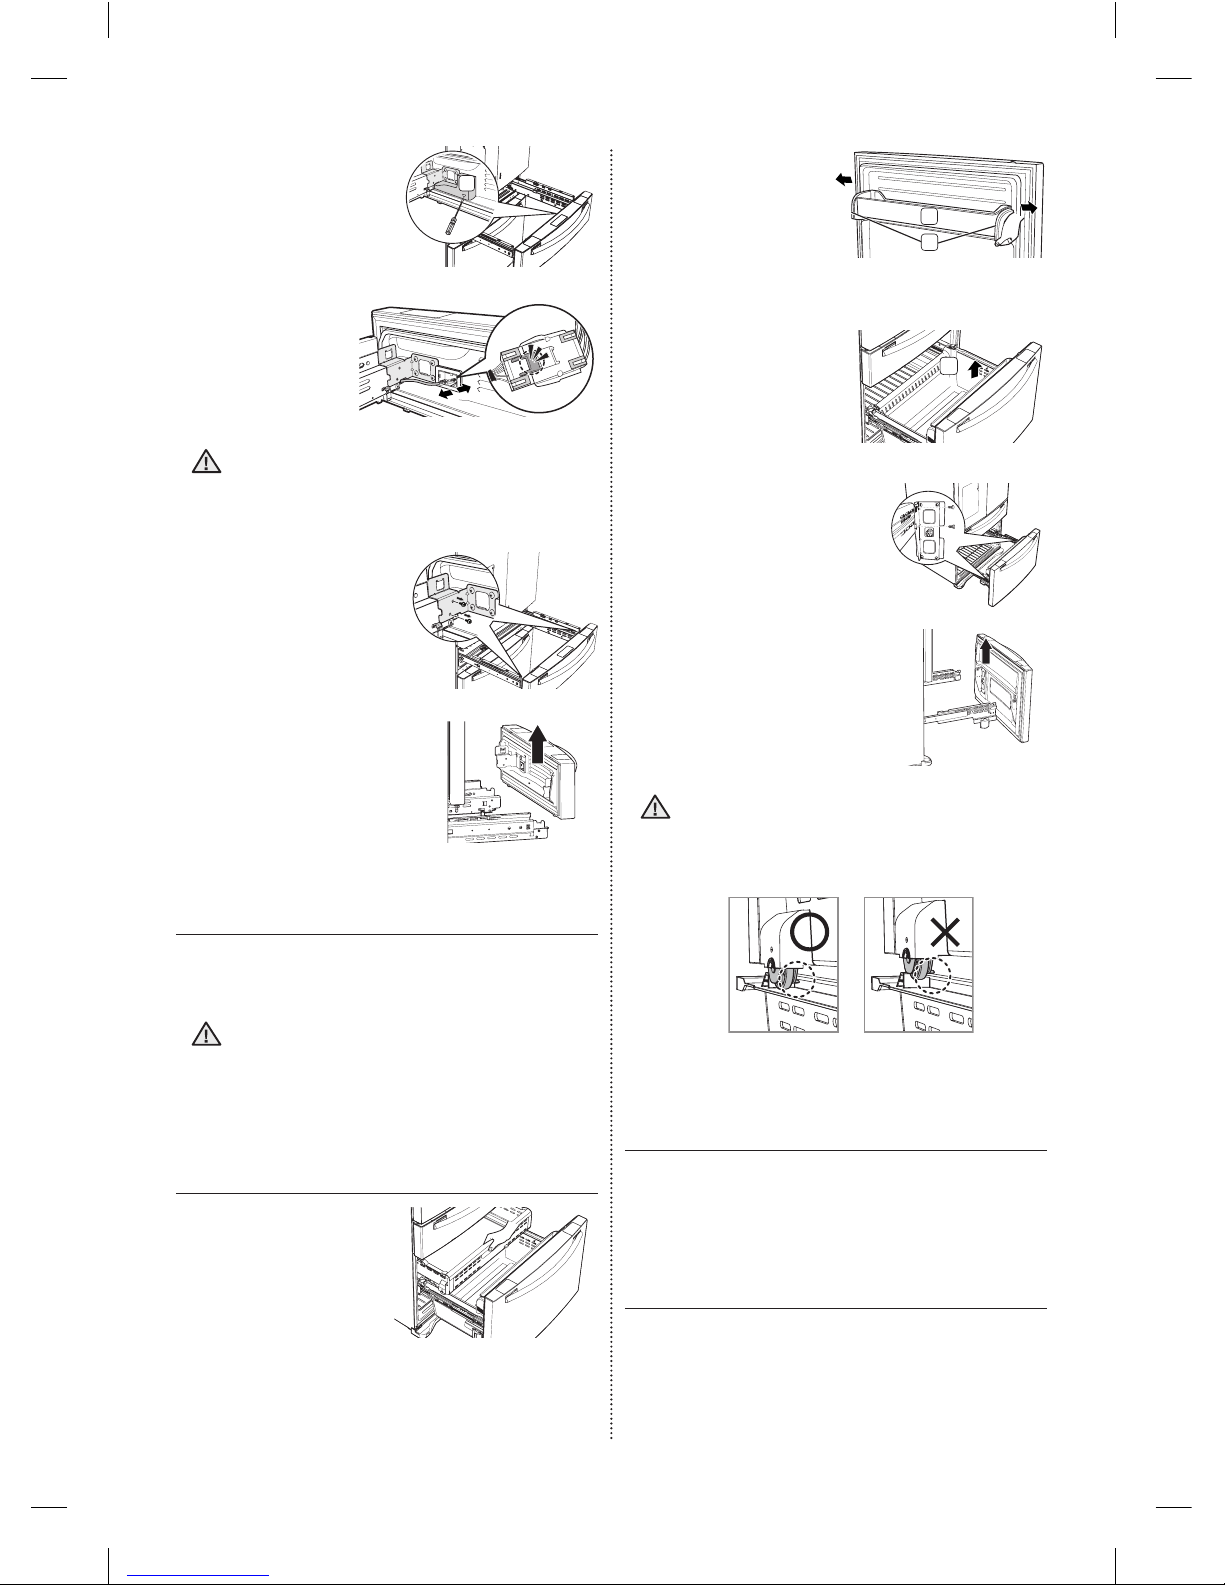
Take off the cover ( 2. 2 )
w/harness with a fl atblade screwdriver (-).
Press the 3.
locking tab and
separate the Wire
Connector.
When reassembling it, be sure to connect
the wire harness. If it is not connected, the
Flex Room does not work.
Remove 2 hex head 4.
bolts from the sides
with a socket wrench
(10 mm).
Lift up the Flex door from 5.
the rails.
ASSEMBLE THE FLEX DOOR
To reattach the fl ex door after you have moved the
fridge to its fi nal location, assemble parts in reverse
order.
Be sure to connect the Flex Door Wire
Connector. If it is not connected, the Flex
Room does not work.
DISASSEMBLE THE FREEZER
DRAWER
Take out the upper 1.
drawer by lifting it up.
CAUTION
CAUTION
Remove the tilting 2.
pocket ( 1 ) by
pulling both support
guards ( 2 ) aside.
And take out both
support guards by
pulling them aside.
Take out the lower 3.
basket ( 3 ) by lifting the
basket up from the rail
system.
Remove 4 hex head bolts 4.
from both sides with a
socket wrench (10 mm).
Lift up the freezer door 5.
from the rails.
Putting too much food into the freezer
drawers can prevent the freezer from
closing completely and can cause frost
build-up.
ASSEMBLE THE FREEZER
DRAWER
To reattach the drawer after you have moved the
fridge to its fi nal location, assemble parts in reverse
order.
LEVELING THE REFRIGERATOR
Make sure the refrigerator is level so that you can
make fi nal adjustments.
Use a level to test if the refrigerator is level both
side to side and back to front.
CAUTION
2
1
2
3
DA68-02520B(0.2).indb 14DA68-02520B(0.2).indb 14 2013.2.28 10:16:42 AM2013.2.28 10:16:42 AM
Page 15
setting up _15
01 SETTING UP
If the refrigerator is not level, it will not be possible
to get the doors perfectly even, which may cause
moisture condensation and increased energy bills.
Below is an example of how to level the refrigerator
if the left side of the refrigerator is lower than the
right side.
How to adjust the level
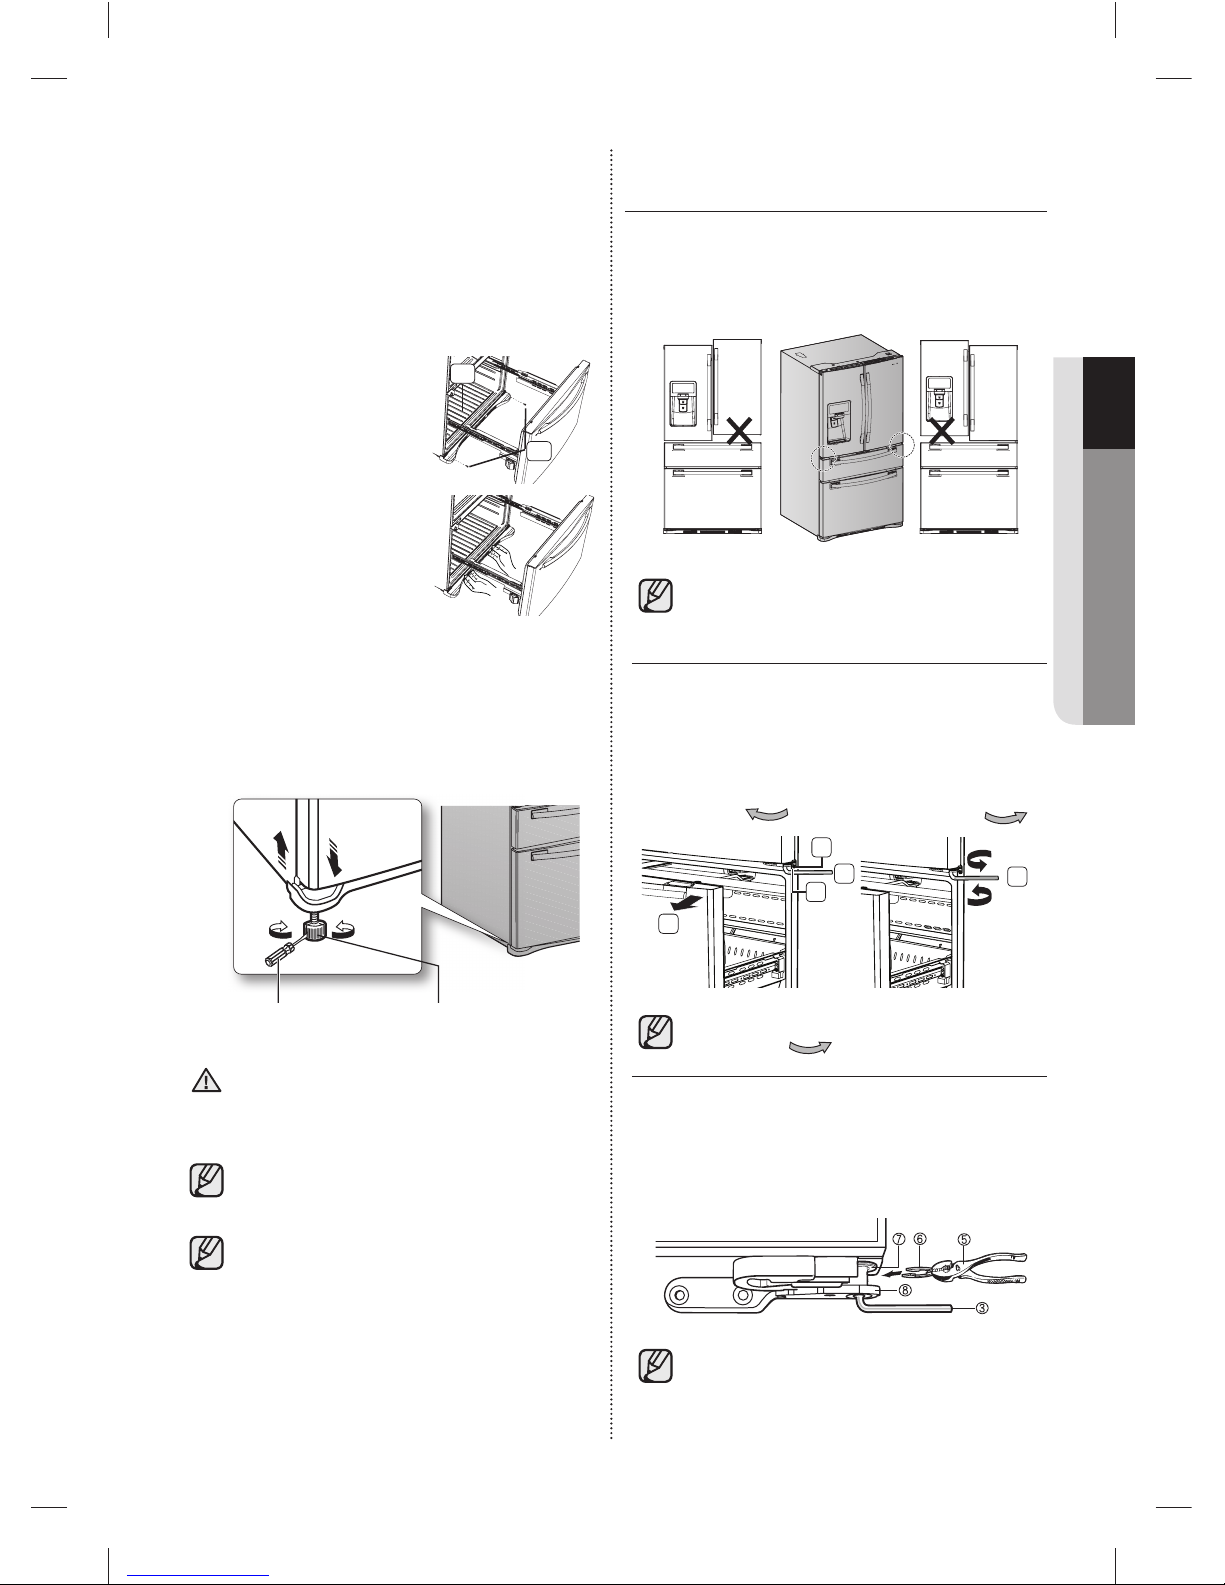
Open the freezer drawer 1.
and remove the lower
basket. (See to page 16.)
Remove the two screws 2.
( 1 ) attached to the front
leg cover ( 2 ) with a Philips
screwdriver (+).
Remove the front leg cover 3.
( 2 ) by lifting the bottom
part of the front leg cover
up and pulling it out.
Insert a fl at-blade screwdriver (-) into a notch on 4.
the left control lever, and turn it count clockwise
to level the refrigerator.
(You turn the lever clockwise to lower the
refrigerator and counterclockwise to raise it.)
Both control levers must be touching the
fl oor to avoid possible personal injury or
property damage because of tipping.
If the right side is lower, perform the same
procedure, but with the right control lever.
It is diffi cult to remove the front leg
cover from the refrigerator, so we do not
recommend making small adjustments
wIth the control lever.
Instead, refer to the next page for the best
way to make minor adjustments to the
doors.
CAUTION
MAKING MINOR ADJUSTMENTS
BETWEEN DOORS
Remember, a leveled refrigerator is necessary for
getting the doors perfectly even.
If you need help, review the previous section on
leveling the refrigerator.
The left door is fi xed. To make minor
adjustments between doors, adjust only
the right door.
Pull out the Flex Zone door ( 1. 1 ) to expose the
lower hinge ( 2 ).
Insert the supplied allen wrench (3/16 ”) ( 2. 3 )
into the shaft ( 4 ) of the lower hinge.
Adjust the height by turning the hex wrench ( 3. 3 )
clockwise (
DOWN
DOWN
) or counter-clockwise (
UP
UP
).
When you turn the hex wrench counterclockwise (
), the door will move up.
After adjusting the doors, insert the supplied 1.
fastener ( 6 ) using a pliers ( 5 ) in the gap
between the hinge-grommet ( 7 ) and the lower
hinge ( 8 ). The number of fasteners you’ll need
to insert depends on the gap.
2 fastener are enclosed with the
refrigerator.
The thickness of each fastener is 0.04 ”.
3
1
2
3
4
Adjustment
Adjustment
part
part
Fixed part
Fixed part
2
1
Flat-Blade Screwdriver(-)
Flat-Blade Screwdriver(-)
Control Lever
Control Lever
DA68-02520B(0.2).indb 15DA68-02520B(0.2).indb 15 2013.2.28 10:16:43 AM2013.2.28 10:16:43 AM
Page 16

16_ setting up
ADJUSTING THE FREEZER
DRAWER LEVEL
Locate the height-adjuster ( 1. 1 ) in the freezer
drawer. Unscrew the 8 Phillips screws ( 2 )
slightly to loosen the door.
Loosen the controller screw 2.
( 3 ) with a Phillips screwdriver
(+).
Find the best level to align the door slope.3.
After adjustment, tighten the controller screw •
( 3 ) and then the philips screws.
INSTALLING THE WATER
DISPENSER LINE
A water dispenser with a fi lter is one of the helpful
features on your new refrigerator. To help promote
better health, the water fi lter removes unwanted
particles from your water. However, it does not
sterilize or destroy microorganisms. You may need
to purchase a water purifying system to do that.
In order for the ice maker to operate properly, a
water pressure of 20 ~ 125 psi is required.
Under normal conditions, a 0.17 L cup can be fi lled
in about 10 seconds.
If the refrigerator is installed in an area with low
water pressure (below 20 psi), you can install a
booster pump to compensate for the low pressure.
After you have connected the water line, make
sure the water storage tank inside the refrigerator is
properly fi lled. To do this, press the water dispenser
lever until the water runs from the water outlet.
Water line installation kits are available at
extra cost from your dealer.
We recommend using a water line
installation kit that contains copper tubing
and 6 mm compression nut.
Connecting to the water supply line
First, shut off the main water 1.
supply.
Locate the nearest cold water drinking line and 2.
install the pipe clamp and shut off valve.
Connect the water line installation kit to the shut 3.
off valve.
Freezer Drawer
Adjustment part
Freezer Dra
jpj
p
1
2
Example) The slope is about 2 mm as shown below.
Example) The slope is about 2 mm as shown below.
- Rotate the height adjuster to -2.0 to reduce the door slope.
- Rotate the height adjuster to -2.0 to reduce the door slope.
Slope
Slope
Reference plane
Reference plane
3
Pipe clamp
Pipe clamp
Cold water line
Cold water line
Shut off valve
Shut off valve
Shut off valve
Shut off valve
Pipe clamp
Pipe clamp
Cold water line
Cold water line
Water line installation kit
Water line installation kit
DA68-02520B(0.2).indb 16DA68-02520B(0.2).indb 16 2013.2.28 10:16:45 AM2013.2.28 10:16:45 AM
Page 17
setting up _17
01 SETTING UP
Connecting the water supply line to the
refrigerator.
There are several items that you need to purchase
to complete this connection.
You may fi nd these items sold as a kit at your local
hardware store.
Use Copper Tubing Use Plastic Tubing
6 mm copper tubing•
6 mm compression •
nut (1 pc)
Ferrule (2 pc)•
6 mm plastic tubing •
→
Molded end (Bulb)
6 mm compression •
nut (1 pc)
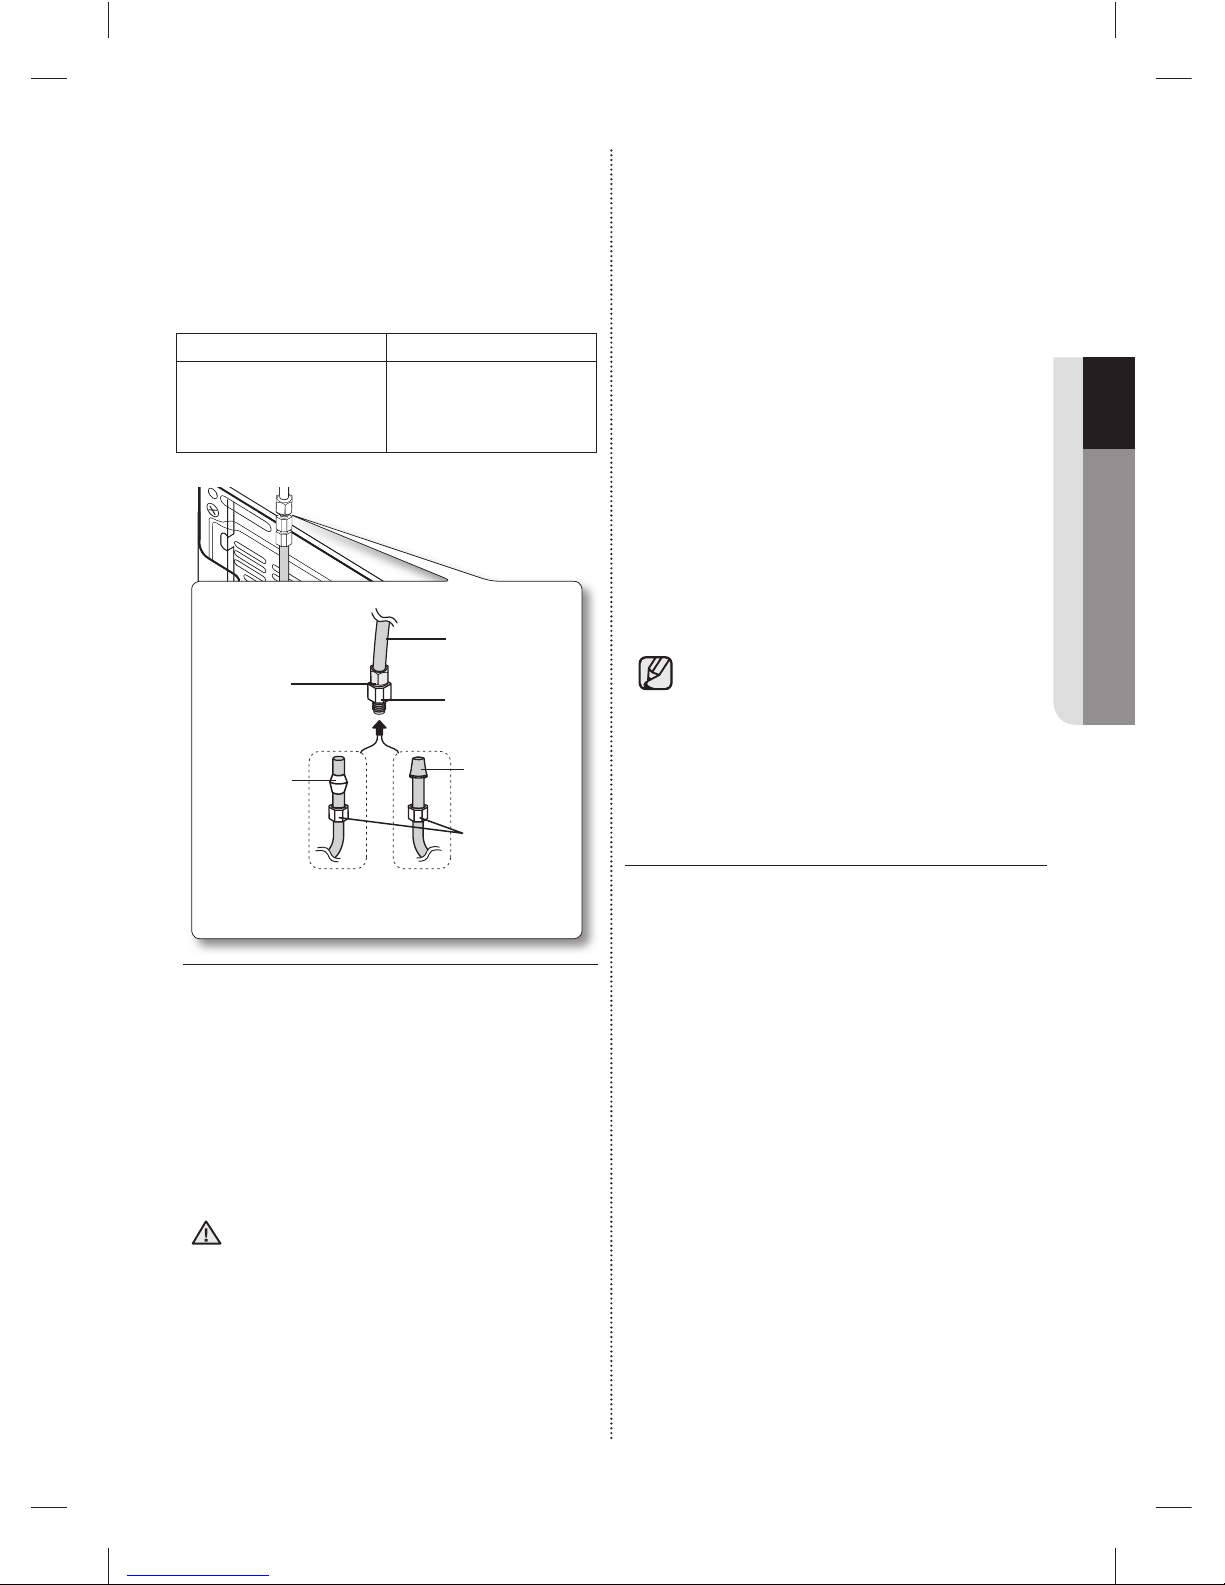
Connect the household water line to the 1.
assembled compression fi tting fi tting.
If you are using copper tubing, slip the compression nut ( B ) (not supplied) and
ferrule (not supplied) on the copper tubing (not
supplied) as shown.
If you are using plastic tubing ( - B ) , insert the
molded end (Bulb) of the plastic tubing ( B ) into
the compression fi tting.
Do not use without the molded end (Bulb)
of the plastic tubing ( B ).
Tighten the compression nut ( 2. B ) onto the
compression fi tting.
Do not over-tighten the compression nut ( B ) .
CAUTION
Turn water on and check for any leakage.3.
If you fi nd water drops or leakage in the
connection areas, turn off the main water
supply.
Check the connections and, if necessary,
tighten.
Flush 4 L of water through the fi lter before 4.
drinking or using the water from the refrigerator.
(Flush approximately 6 minutes.)
To fl ush, press a large glass or cup against the
water dispenser lever.
Fill the glass, empty it into the kitchen sink after
it is fi lled, and then repeat.
After you turn on the refrigerator, let the ice 5.
maker make ice for 1 to 2 days.
Over that period of time, throw out the fi rst 1 or
2 buckets of ice the freezer makes to ensure all
impurities have been removed from the water
line.
Only connect the water line to a drinkable
water source.
If you have to repair or disassemble the
water line, cut off 6 mm of the plastic
tubing to make sure you get a snug, leakfree connection.
COMPLETING THE SET UP
Now that you have your new refrigerator installed
in place, you are ready to set up and enjoy the
features and functions of the appliance.
By completing the following steps, your refrigerator
should be fully operational.
Make sure your refrigerator is in an appropriate 1.
location with reasonable clearance between it
and the wall.
Refer to installation instructions in this manual.
Once the refrigerator is plugged in, make sure 2.
the interior light comes on when you open the
doors.
Set the Temperature control to the coldest 3.
temperature and wait for an hour.
The freezer will get slightly chilled and the motor
will run smoothly. Reset the refrigerator and
freezer to the temperatures you want.
After you plug the refrigerator in, it will take a 4.
few hours to reach the appropriate temperature.
You can store food and drinks in the refrigerator
after the temperature is suffi ciently cool.
Compression
Compression
Nut (6 mm)
Nut (6 mm)
(Assembled)
(Assembled)
Ferrule
Ferrule
(Not supplied)
(Not supplied)
Plastic Tubing
Plastic Tubing
(Assembled)
(Assembled)
Compression Fitting
Compression Fitting
(Assembled)
(Assembled)
Molded end (Bulb)
Molded end (Bulb)
Compression nut (
Compression nut ( BB ) )
(6 mm) (Not supplied)
(6 mm) (Not supplied)
Copper tubing
Copper tubing
or
or
Plastic tubing ( B )
Plastic tubing ( B )
(Not supplied)
(Not supplied)
Household water supply line
Household water supply line
Refrigerator
Refrigerator
(Not supplied)
(Not supplied)
DA68-02520B(0.2).indb 17DA68-02520B(0.2).indb 17 2013.2.28 10:16:53 AM2013.2.28 10:16:53 AM
Page 18
18_ operating
Operating your French Door
Refrigerator
DISPLAY PANEL RESTRICTIONS AND ALERTS
English is a default language for the Display. Languages not supported are not displayed on the 1.
screen.
Periodic updates of Weather or News will cause network traffi c even when you are not using the 2.
Display.
When software updates become available, Samsung automatically updates the refrigerator software 3.
and then issues an alert which appears on your Display.
Please note that the relevant licensor (contents provider) retains sole discretion as to what content is 4.
made available through the various refrigerator applications.
Furthermore, each licensor retains the sole right to remove any such content that the licensor may
cease to offer through the refrigerator application. In such case, the licensor may send a written notice
to the user with regards to the removal of content.
DIGITAL PANEL
CPU NEXELL CPU OS Linux 2.6.28
RAM 256 MB LCD 20 cm TFT-LCD (800 * 480)
ROM 512 MB NETWORKS IEEE802.11 b / g / n
USING FOR THE FIRST TIME
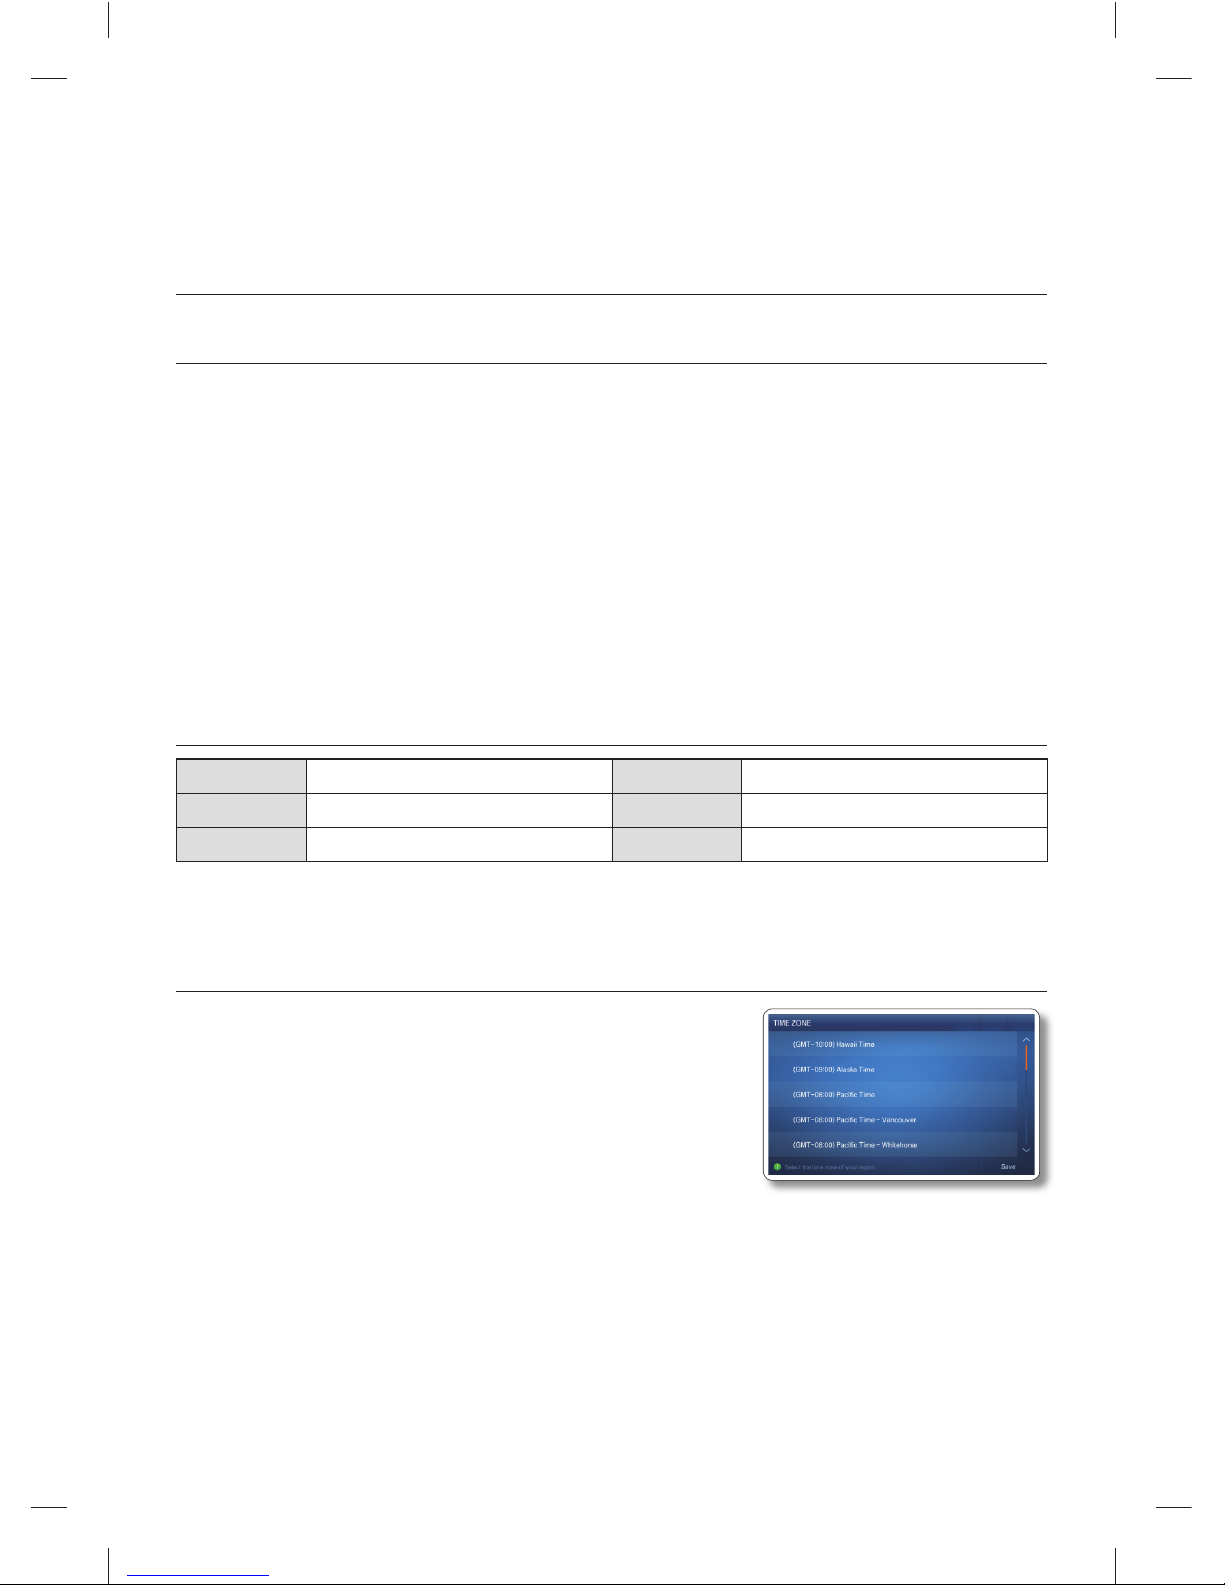
When you use the product for the fi rst time after installation, the •
Time Zone Setting screen appears on the Display Panel.
You need to select your time zone to use Google Calendar and
the Twitter service correctly.
After you select the time zone and press the [Save] button, the •
Home Screen appears on the Display Panel.
The Time Zone Setting screen may appear again after a software
update.
DA68-02520B(0.2).indb 18DA68-02520B(0.2).indb 18 2013.2.28 10:16:54 AM2013.2.28 10:16:54 AM
Page 19
operating _19
02 OPERATING
HOME SCREEN
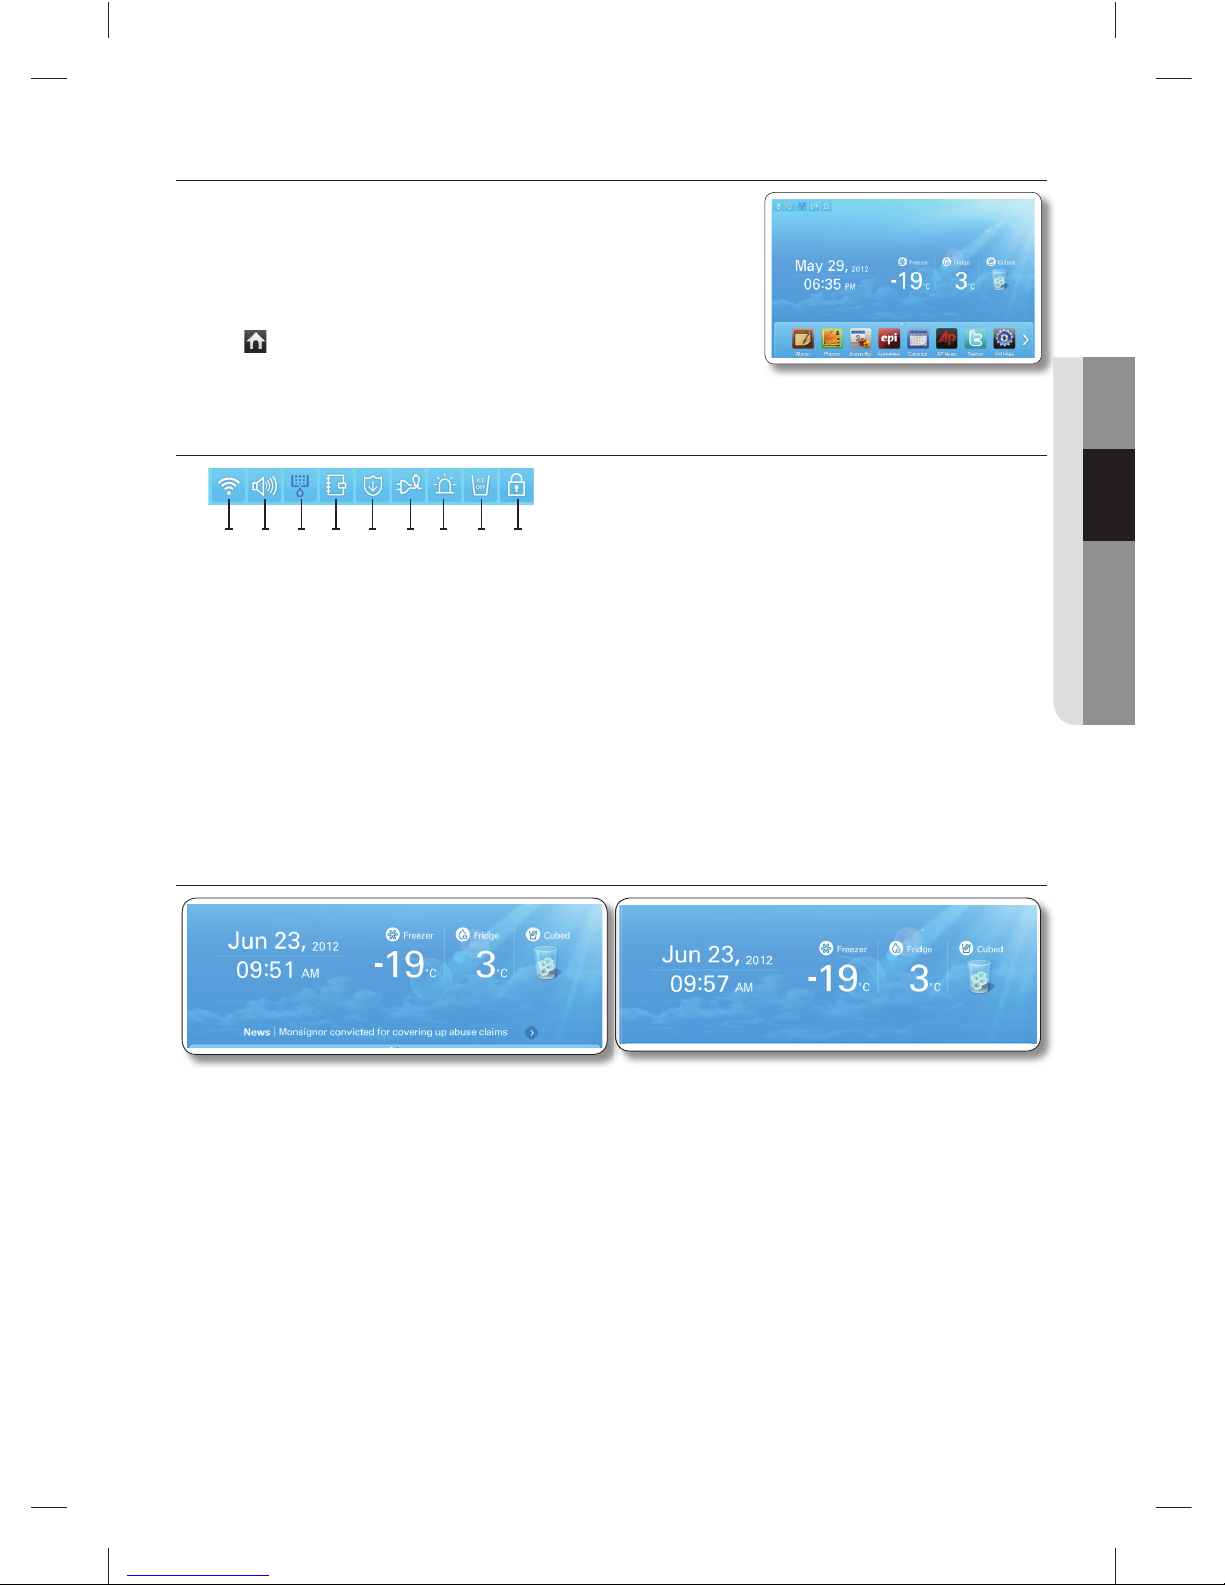
The Home screen is the starting point for all functions. In the center •
of the Home screen, basic refrigerator information such as Time,
Date, Weather, Temperature, and Dispenser Selection appears.
The indicator icons at the top left of the screen display information
about the refrigerator’s status. The Menu icons on the bottom of
the screen start various applications or functions. When you select
the (
) on any menu, the screen returns to the Home screen
immediately.
Indicator Icons (At the left-top of the Screen)
Network Signal Strength : 5 Level (off - 1 - 2 - 3 - 4)1.
Volume Level : 5 Level (off - 1 - 2 - 3 - 4)2.
Filter Status : 3 Level (blue - pink - red)3.
Schedule Alarm4.
S/W Update Notice5.
Energy Saver6.
Door Alarm7.
Ice Off8.
Dispenser Lock9.
Date/Time, Freezer/Fridge temperature, Dispenser selection, Current weather
(At the center of the Screen), News (At the bottom of the Screen)
Date/Time : Indicates the current date and time.1.
Freezer/Fridge temperature : Displays the current freezer/fridge temperature. When you select the 2.
freezer/fridge temperature, the temperature setting screen appears.
Dispenser : Displays the current status of the dispenser. When you select the current status of the 3.
dispenser, the ice type selection screen appears.
Weather: Displays the current local weather, if the refrigerator is connected to a WIFI.4.
The Home Screen displays the current weather (and time of day), using one of eight images (Clear,
Cloudy, Snow, Rain) X (Day or Night).
News: Displays via the Internet, as long as the unit is connected to WIFI.5.
News titles change at certain intervals. When you select a title, the article will appear on the screen.
11223344556677889
9
<Wireless network disconnected>
①
①
②
②
③
③
<Wireless network connected>
①
①
②
②
③
③
④
④
⑤
⑤
DA68-02520B(0.2).indb 19DA68-02520B(0.2).indb 19 2013.2.28 10:16:55 AM2013.2.28 10:16:55 AM
Page 20
20_ operating
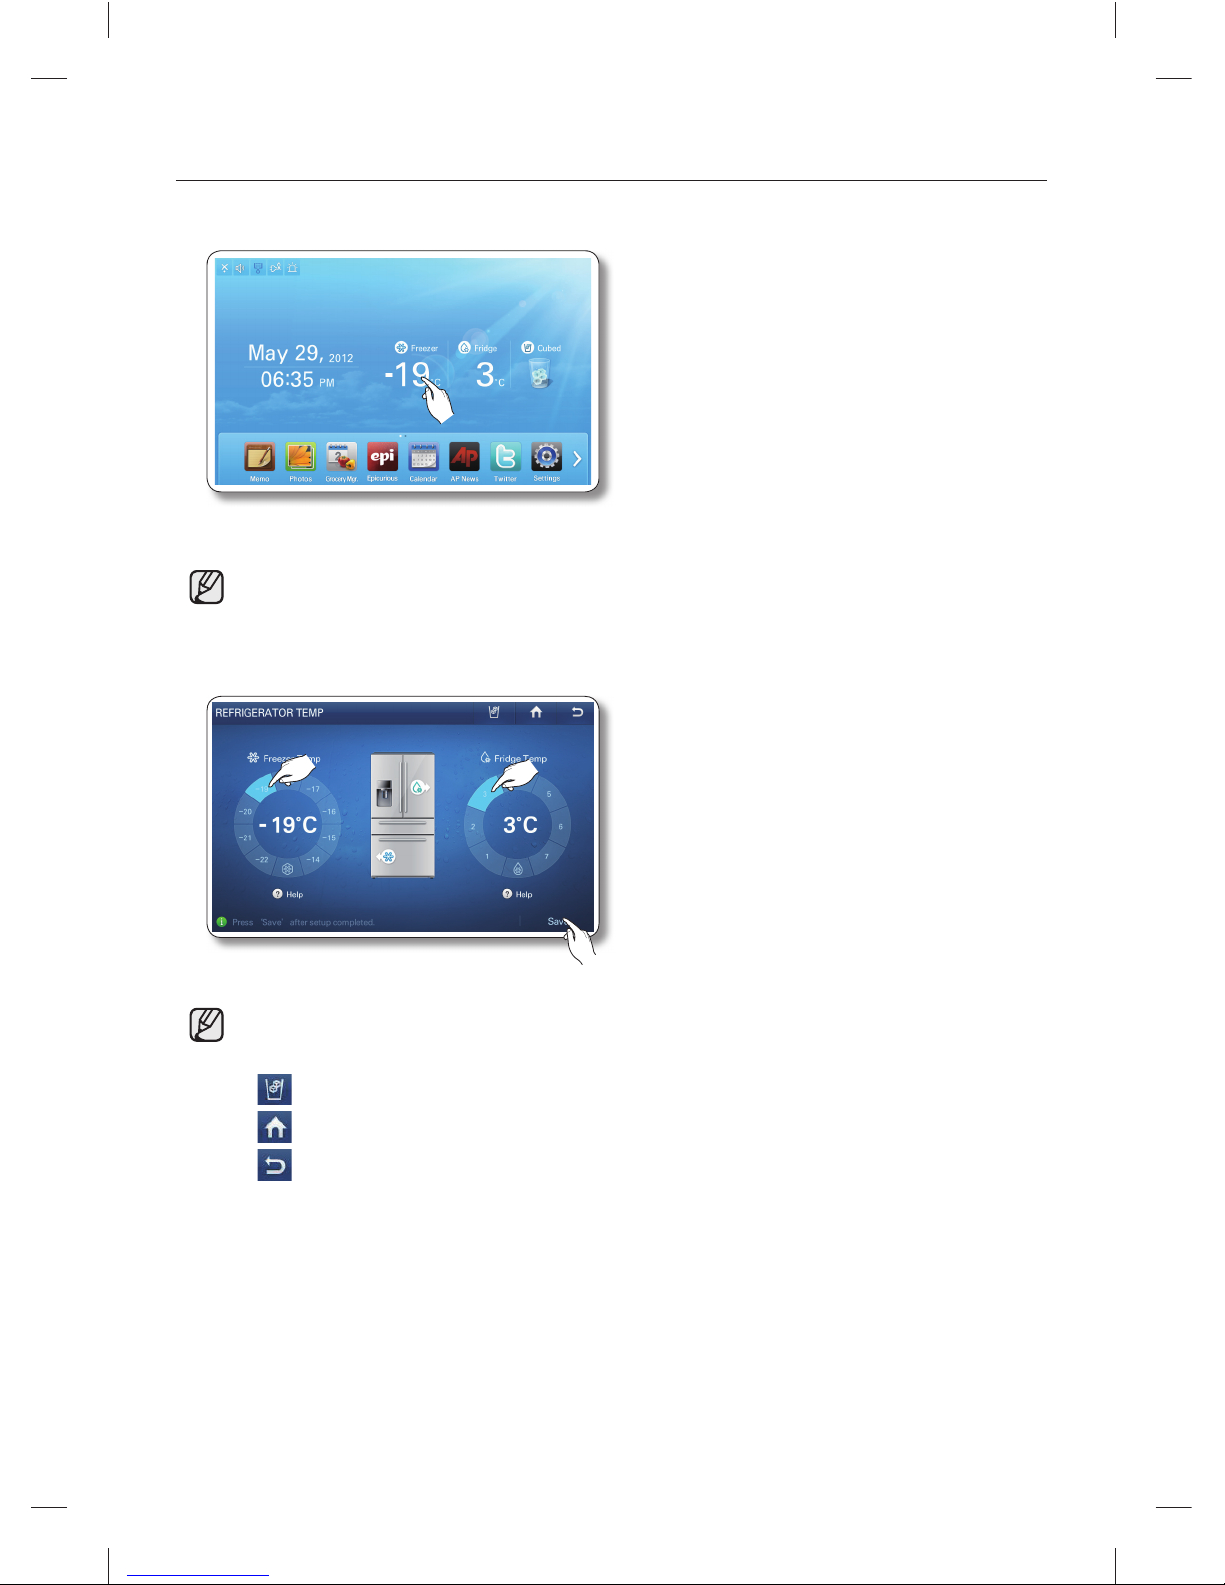
SETTING THE FREEZER/FRIDGE TEMPERATURE
The temperature control allows you to set the freezer and the fridge temperatures.
Use the following instructions to change and set these temperatures.
Select the Freezer/Fridge temperature on the Home screen.1.
• When you store ice cream at a temperature above 4 °F (-16 °C) in the freezer,
it may melt.
Choose a freezer and/or fridge temperature using the temperature buttons, and then select the [Save] 2.
button.
• Freezer : Fahrenheit : -8 °F ~ 8 °F (Default : -2 °F), Celsius : -22 °C ~ -14 °C (Default : -19 °C)
Fridge : Fahrenheit : 34 °F ~ 46 °F (Default : 38 °F), Celsius : 1 °C ~ 7 °C (Default : 3 °C)•
Function Icons on the upper right of the Display function screen:•
: Press to set the dispenser type. (Cubed/Crushed)
: Press to go to the Home screen.
: Press to display the preview screen.
DA68-02520B(0.2).indb 20DA68-02520B(0.2).indb 20 2013.2.28 10:16:56 AM2013.2.28 10:16:56 AM
Page 21
operating _21
02 OPERATING
• The freezer or fridge temperature may change
depending on how often you open and close the
door, the food quantity, the ambient temperature,
etc.
Temperatures vary in each food storage section in •
the freezer and fridge compartments.
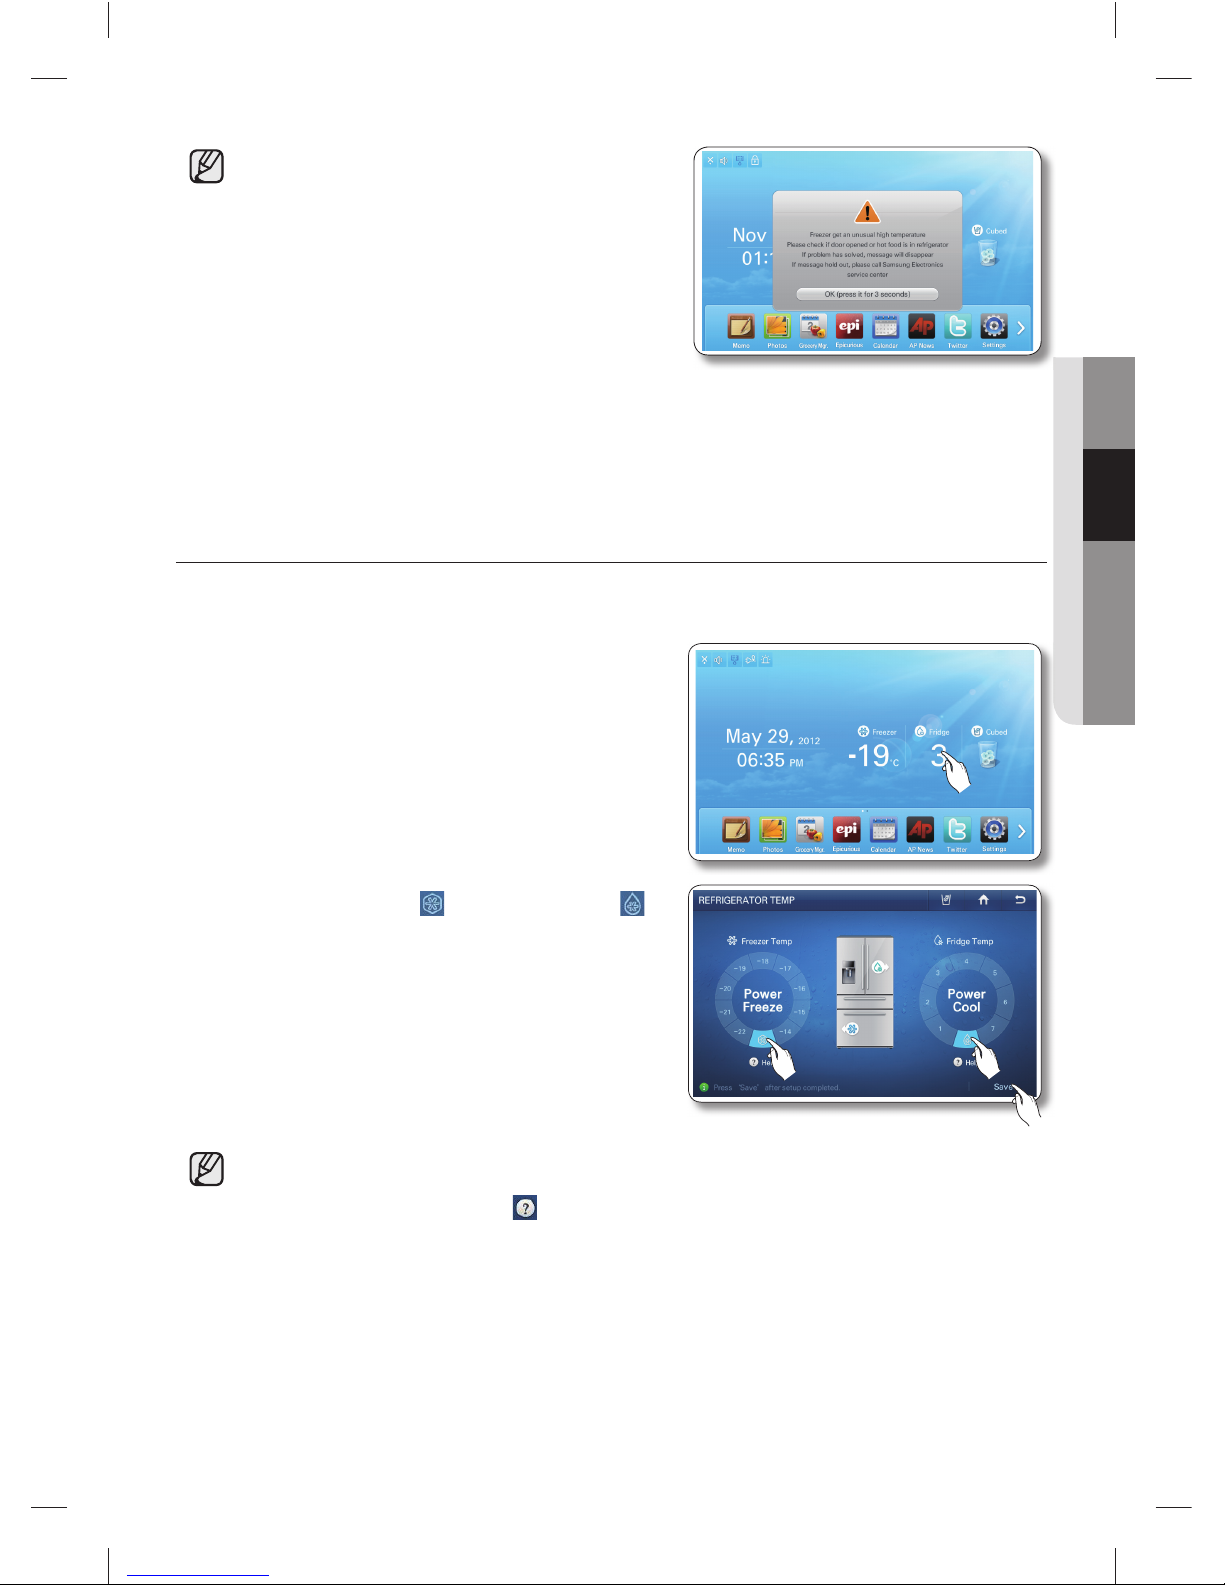
If the room temperature becomes unusually warm, •
it can cause temperatures in the Fridge and Freezer
to rise abnormally. If this occurs, the screen will
display the “Abnormally High Temperature” popup. When the temperatures return to normal, the pop-up will close automatically. If the room
temperature returns to normal and the pop-up does not close automatically within a few hours,
please contact your nearest repair center.
SETTING THE POWER FREEZE/POWER COOL
You can use the Power Freeze and Power Cool functions to lower the temperature of the freezer and
fridge compartments quickly. To use the Power Freeze or Power Cool function, follow these steps:
Touch the Freezer/Fridge temperature on the Home 1.
screen.
Select the Power Freezer (2.
) and/or Power Cool ( )
button(s), and then Press the [Save] button.
• To cancel the Power Freeze and the Power Cool, select a Temperature Setting button.
Energy consumption increases during Power Freeze and/or Power Cool usage.•
If you select the question icon (•
), the function description screen pops up.
Press the [OK] button on the popup screen to re-display the Temperature Display Screen.
When you turn on Power Freeze/Power Cool, the refrigerator’s compressor speeds up and is •
louder than during normal operation.
DA68-02520B(0.2).indb 21DA68-02520B(0.2).indb 21 2013.2.28 10:16:57 AM2013.2.28 10:16:57 AM
Page 22
22_ operating
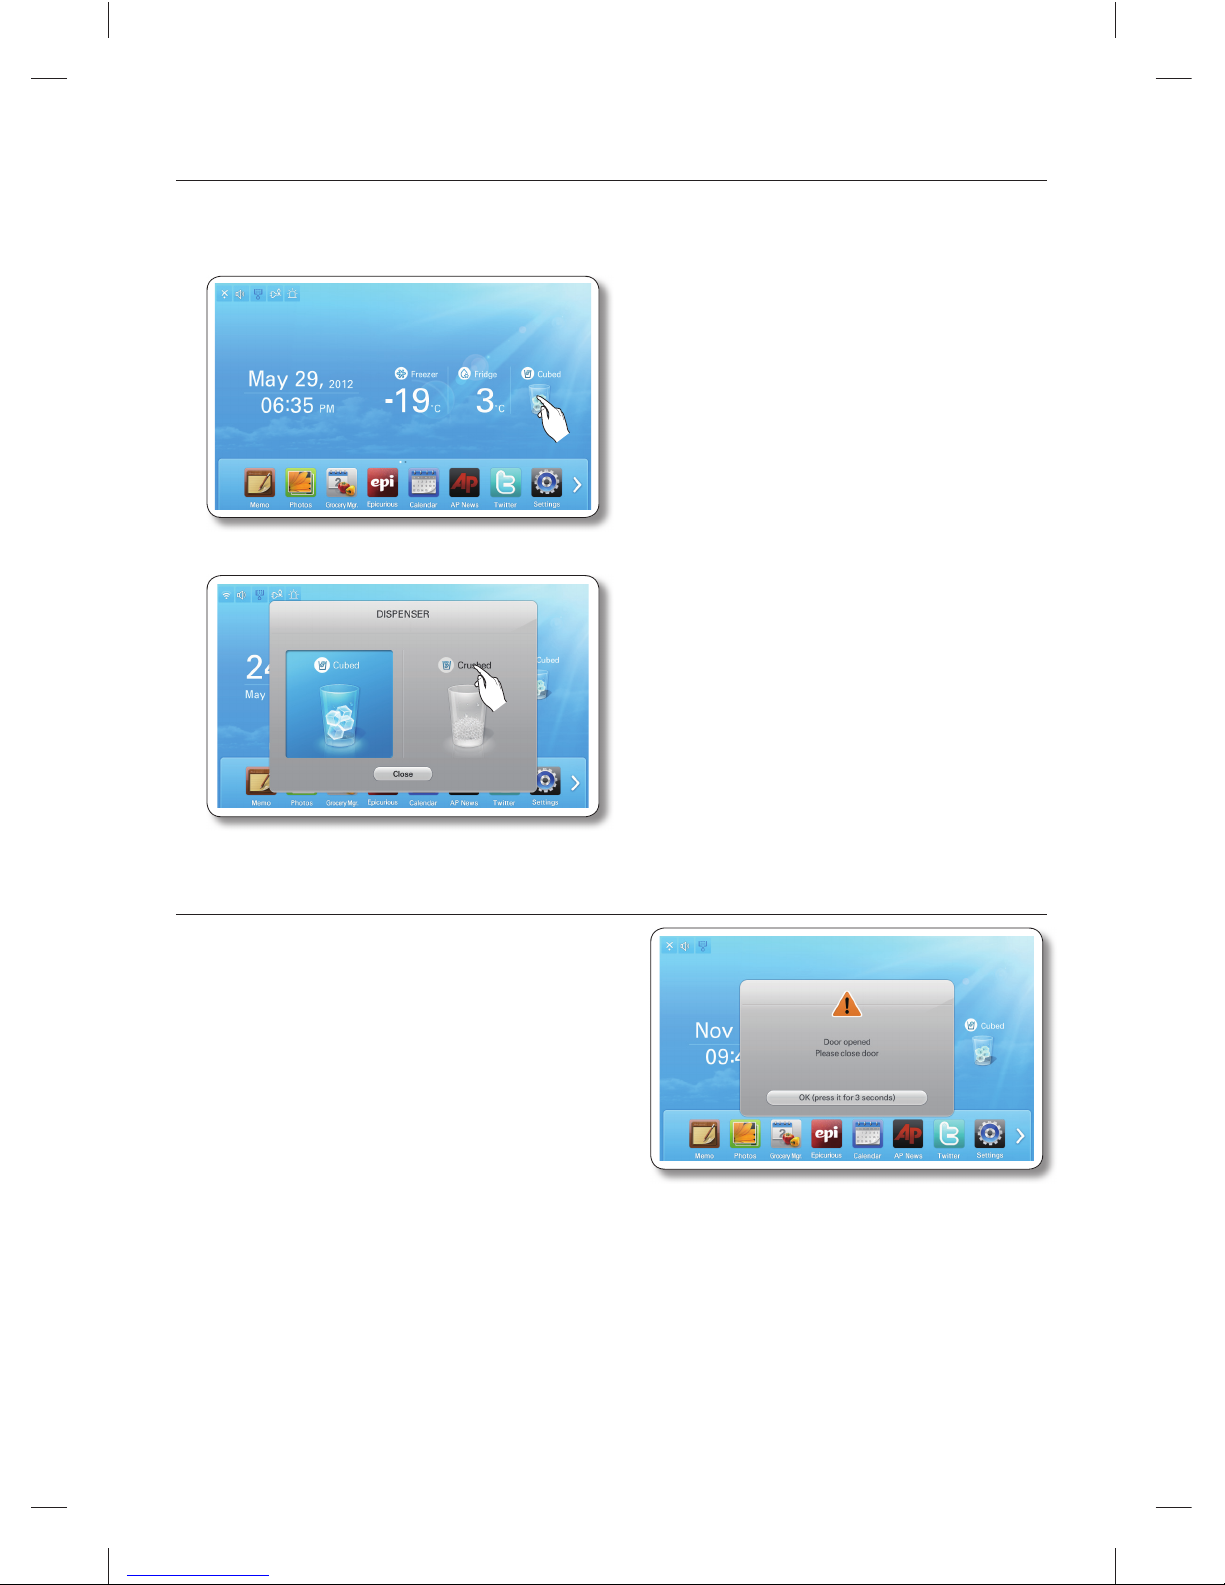
SETTING THE DISPENSER
To select the ice type, follow these steps:
Touch Dispenser Status on the Home screen. The Dispenser pop-up appears.1.
Touch the desired dispenser type, and then press the [Close] button.2.
DOOR OPEN ALARM
If the fridge / freezer door remains open more than 3
minutes, a warning window pops up accompanied by
alarm sounds. The alarm repeats every minute and
only stops when you close both doors. If you set Door
Alarm to OFF in the Settings menu, the alarm does not
operate.
DA68-02520B(0.2).indb 22DA68-02520B(0.2).indb 22 2013.2.28 10:16:58 AM2013.2.28 10:16:58 AM
Page 23
operating _23
02 OPERATING
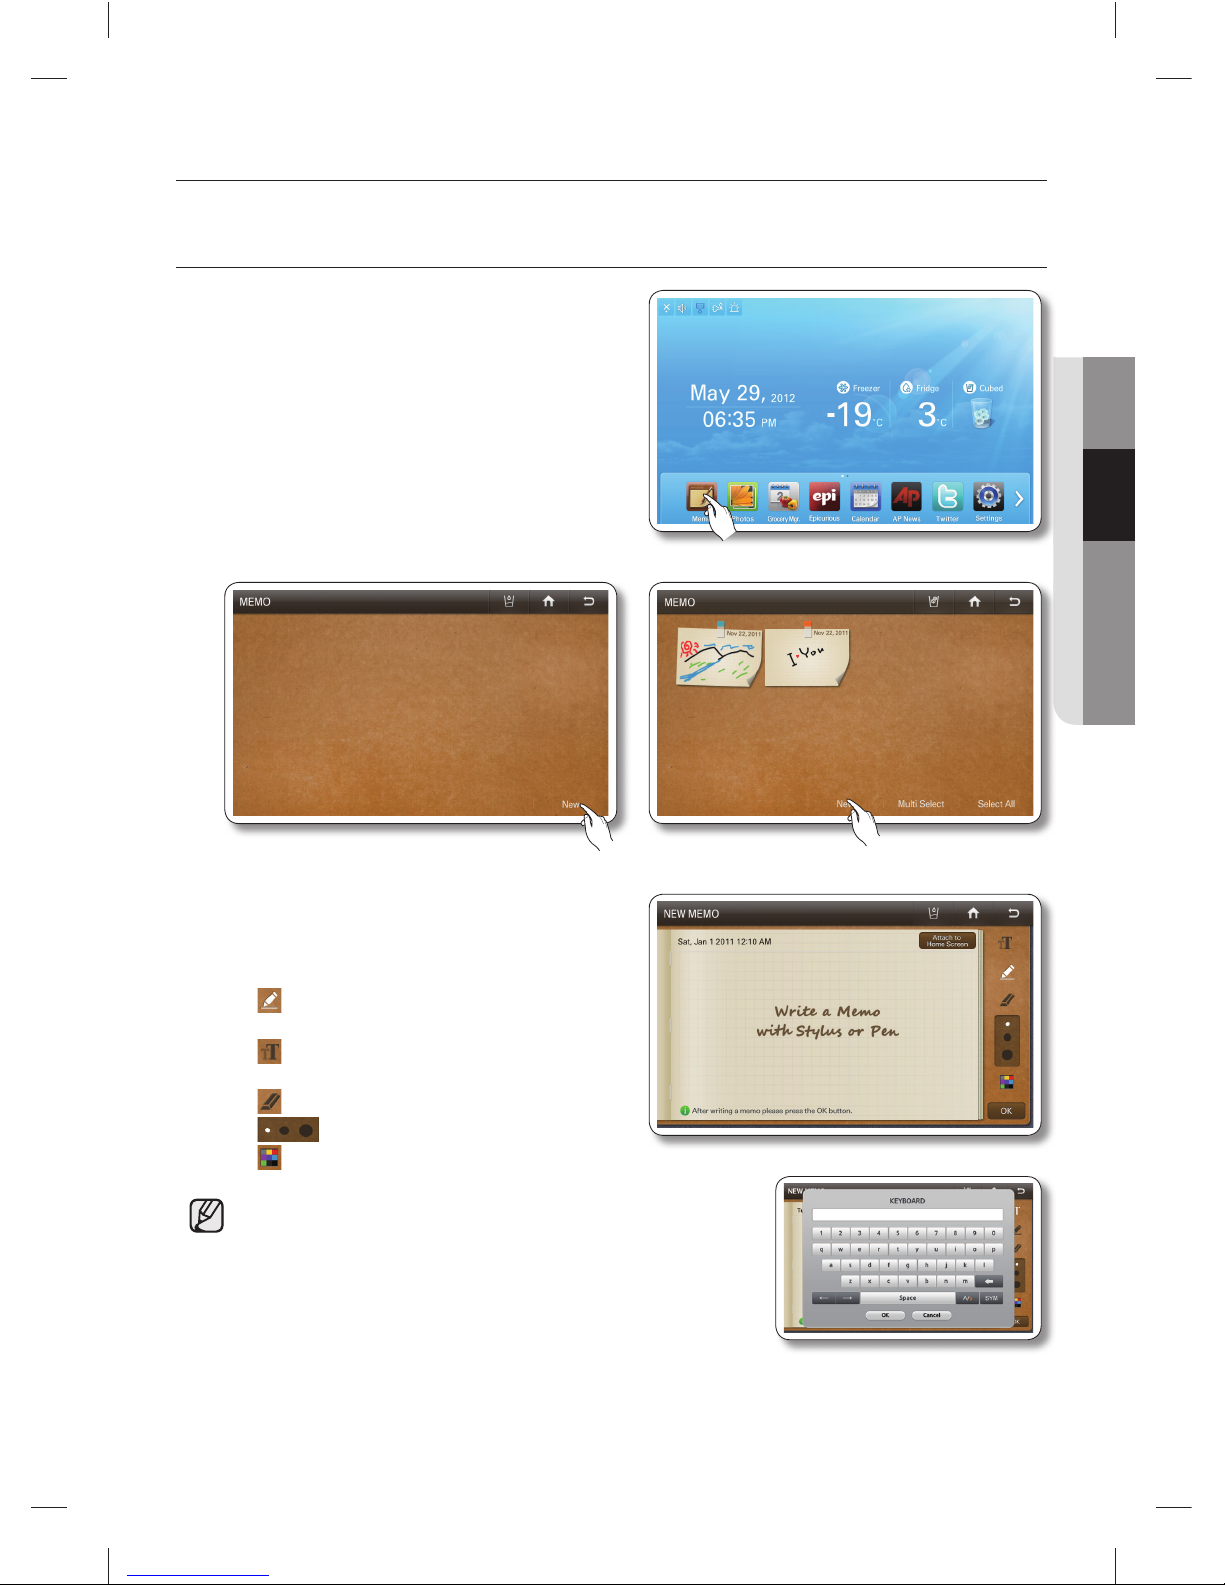
MEMO
You can use the Memo function to leave a memo for yourself or someone else.
How to leave a new memo.
Select the [Memo] button on the Home screen.1.
Select the [New] button.2.
Select the memo tools you want by touching the tool 3.
buttons above the memo entry area.
The tools are described below.
• : Select to input a memo in pen mode.
Use your fi nger or a smooth-tipped stylus.
• : Select to input a memo in keyboard
mode.
• : Select to erase a memo.
• : Select pen or erase thickness.
• : Select pen color.
• You can save up to 80 memos.
To use the Keyboard, press the Keyboard icon, and then •
touch where you want the memo to begin. The keyboard
pops up on the Display. The number of characters you can
input with the Keyboard is limited to the number of characters
that will fi t in the memo entry area.
DA68-02520B(0.2).indb 23DA68-02520B(0.2).indb 23 2013.2.28 10:16:59 AM2013.2.28 10:16:59 AM
Page 24
24_ operating
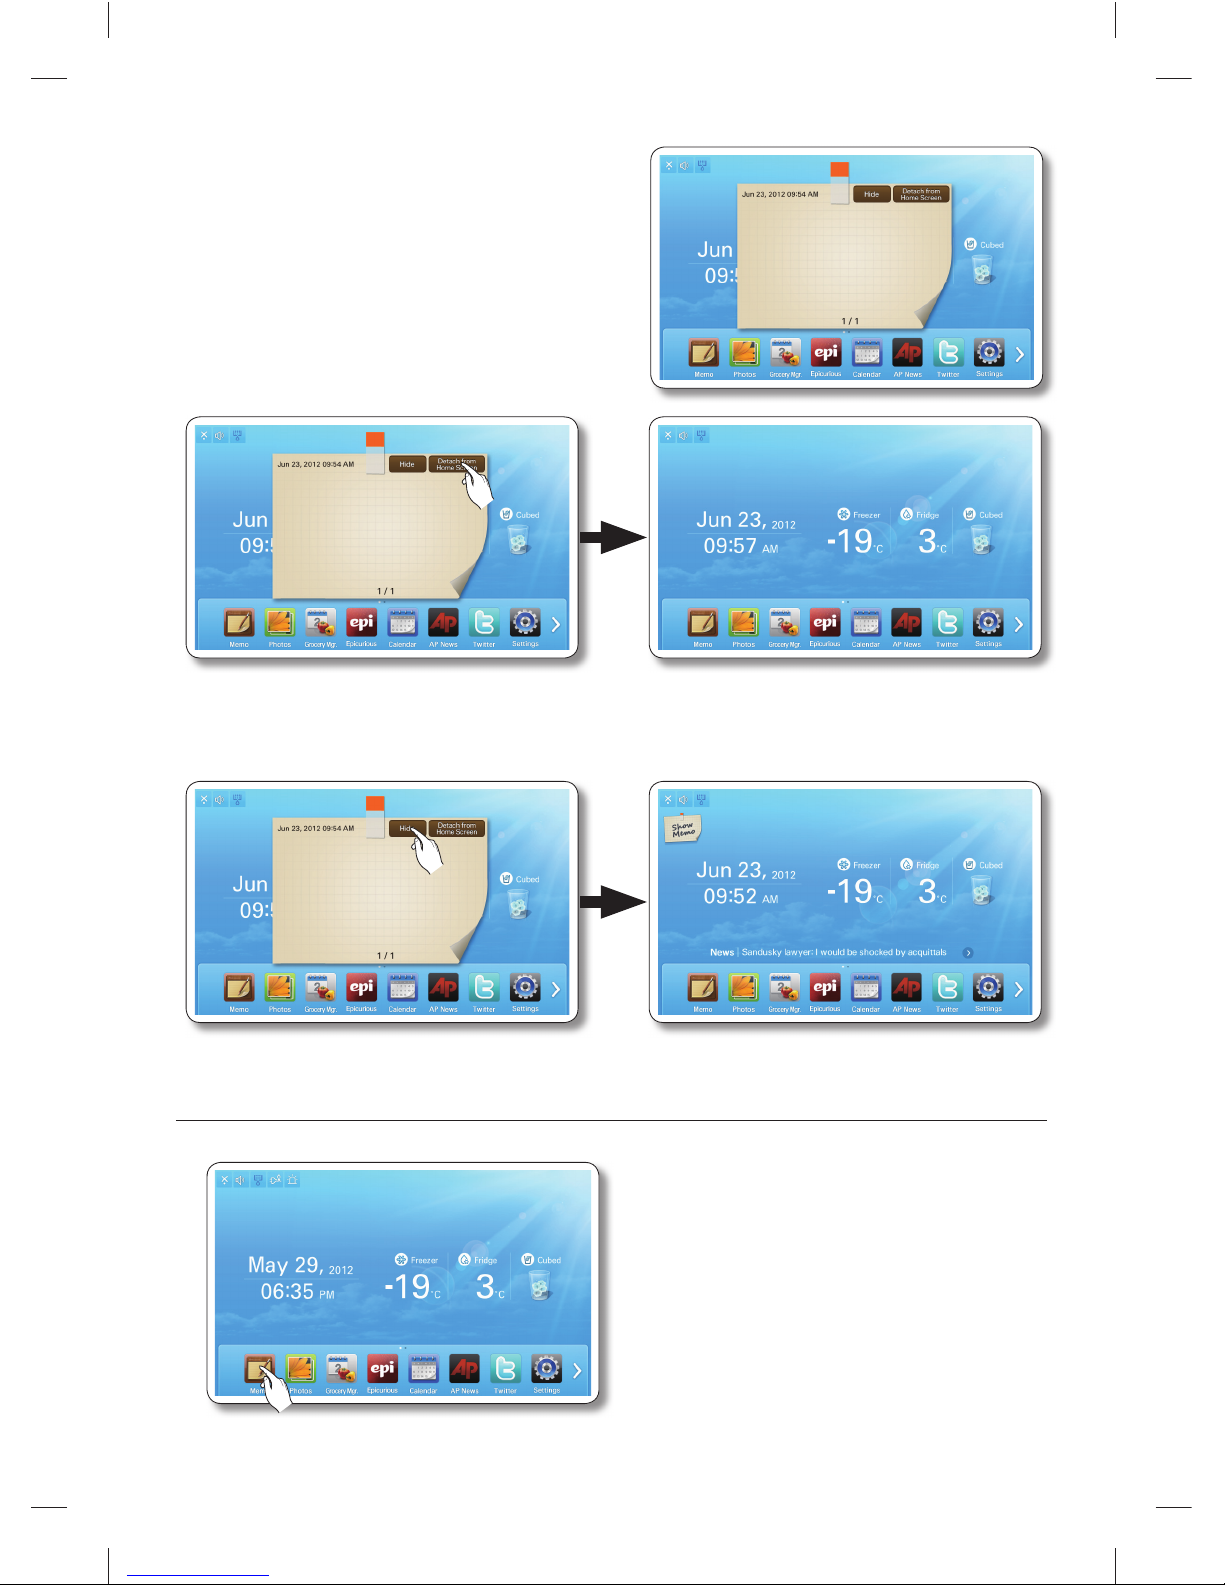
Press the [Save] button after you have completed 4.
your memo.
If you want to display the memo on the Home •
screen, select the [Attach to Home Screen]
button, and then select the [Save] button.
See below.
You can “put away” the memo being displayed on the Home screen by pressing the [Detach •
from Home Screen] button or hide it temporarily by pressing the [Hide] button.
How to display memos.
1. Select the [Memo] button on the Home screen.
To view multiple memos, continue
here.
DA68-02520B(0.2).indb 24DA68-02520B(0.2).indb 24 2013.2.28 10:17:1 AM2013.2.28 10:17:1 AM
Page 25
operating _25
02 OPERATING
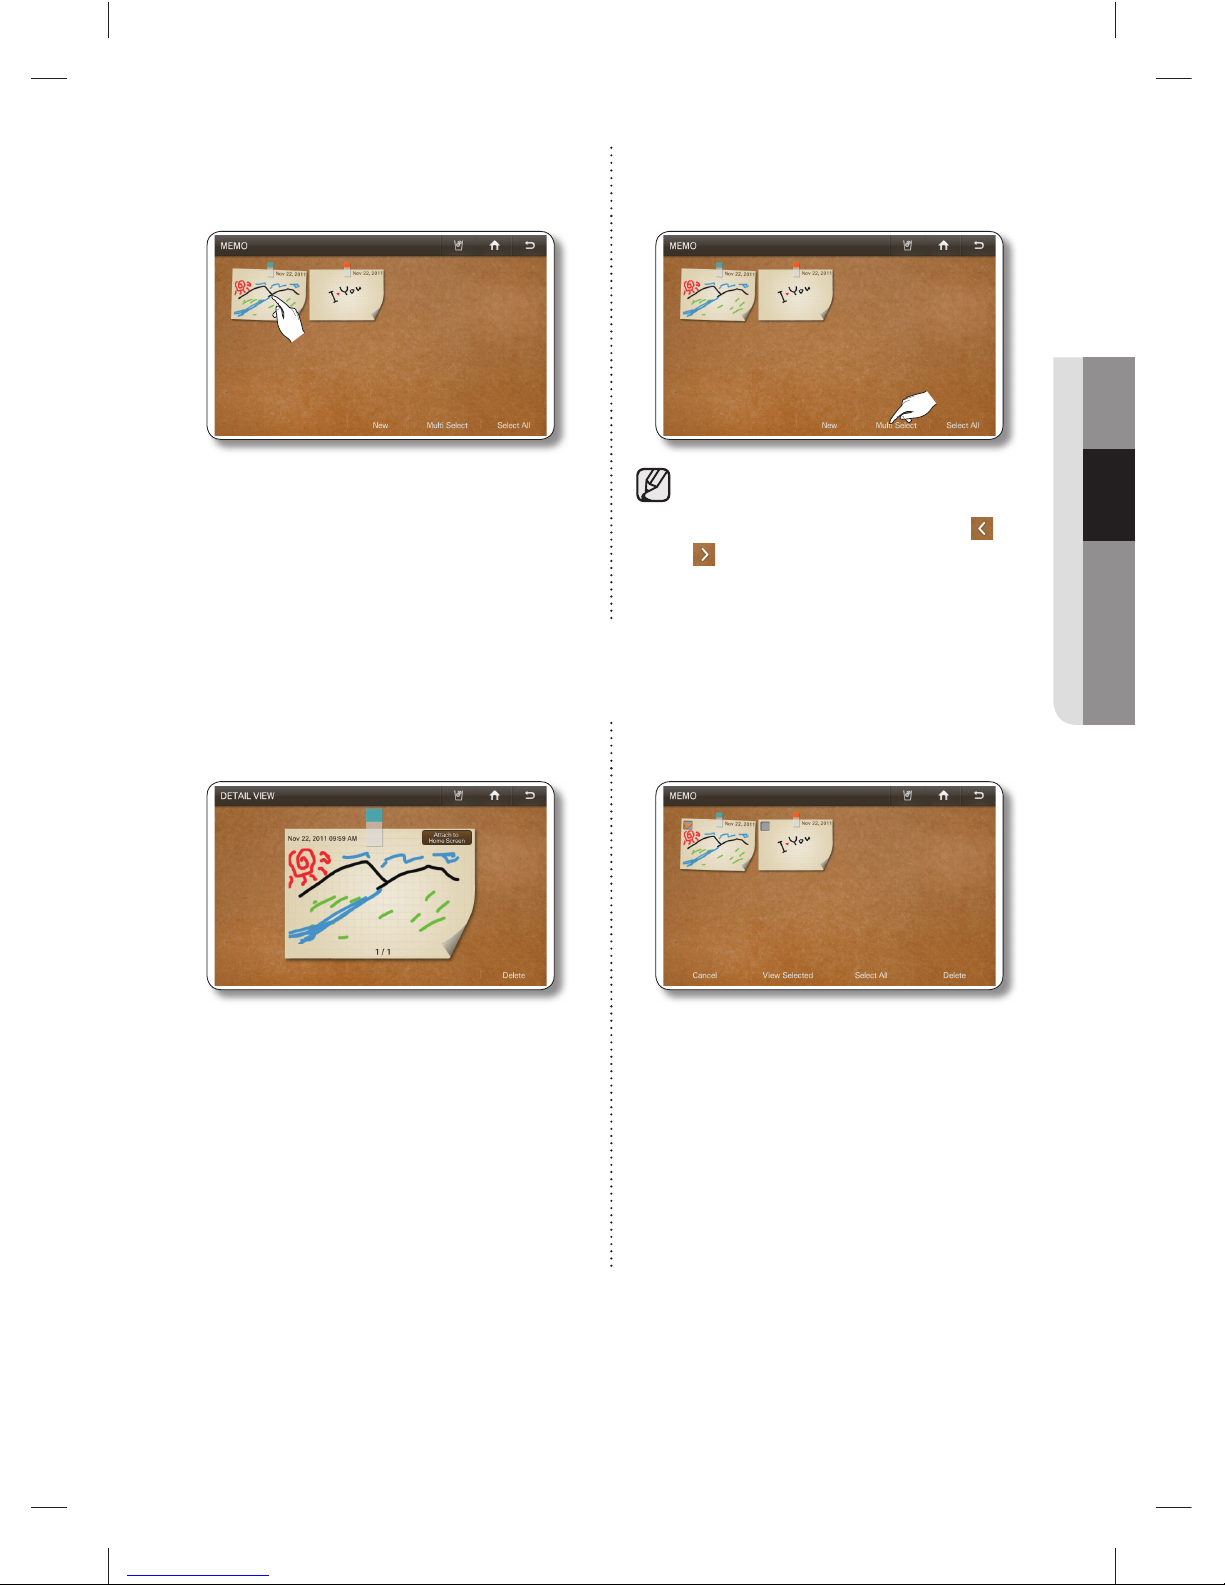
2. Select the memo you want to display. 2. To view multiple memos, press the [Multi
Select] button.
When you select the [Select All] button, the •
Multi Selection screen shows.
When there are multiple pages with many •
memos, there will be page number on the
bottom of the screen. If you select a page
number, the screen shifts to that page.
Multi-Select mode lets you select a
number of memos and then view them
one after another by pressing the
or
buttons.
The memo(s) being displayed on the Home screen is indicated with the red tack.•
The written memos appear as thumbnails.•
You can change the order of the written memos by dragging and dropping.
3. View the saved memo. 3. Select the memos you want to view.
In the Detail View screen, you can delete the •
memo or attach it to or detach it from the
Home screen.
When you select the [Select All] button, all the •
memos on the current page will be selected
and the [Select All] button will shift to the
[Unselect All] button.
To exit the Multi Select screen, press the •
[Cancel] button.
When there are multiple pages with many •
memos, there will be page numbers on the
bottom of the screen. If you press a page
number, the screen shifts to that page.
DA68-02520B(0.2).indb 25DA68-02520B(0.2).indb 25 2013.2.28 10:17:6 AM2013.2.28 10:17:6 AM
Page 26
26_ operating
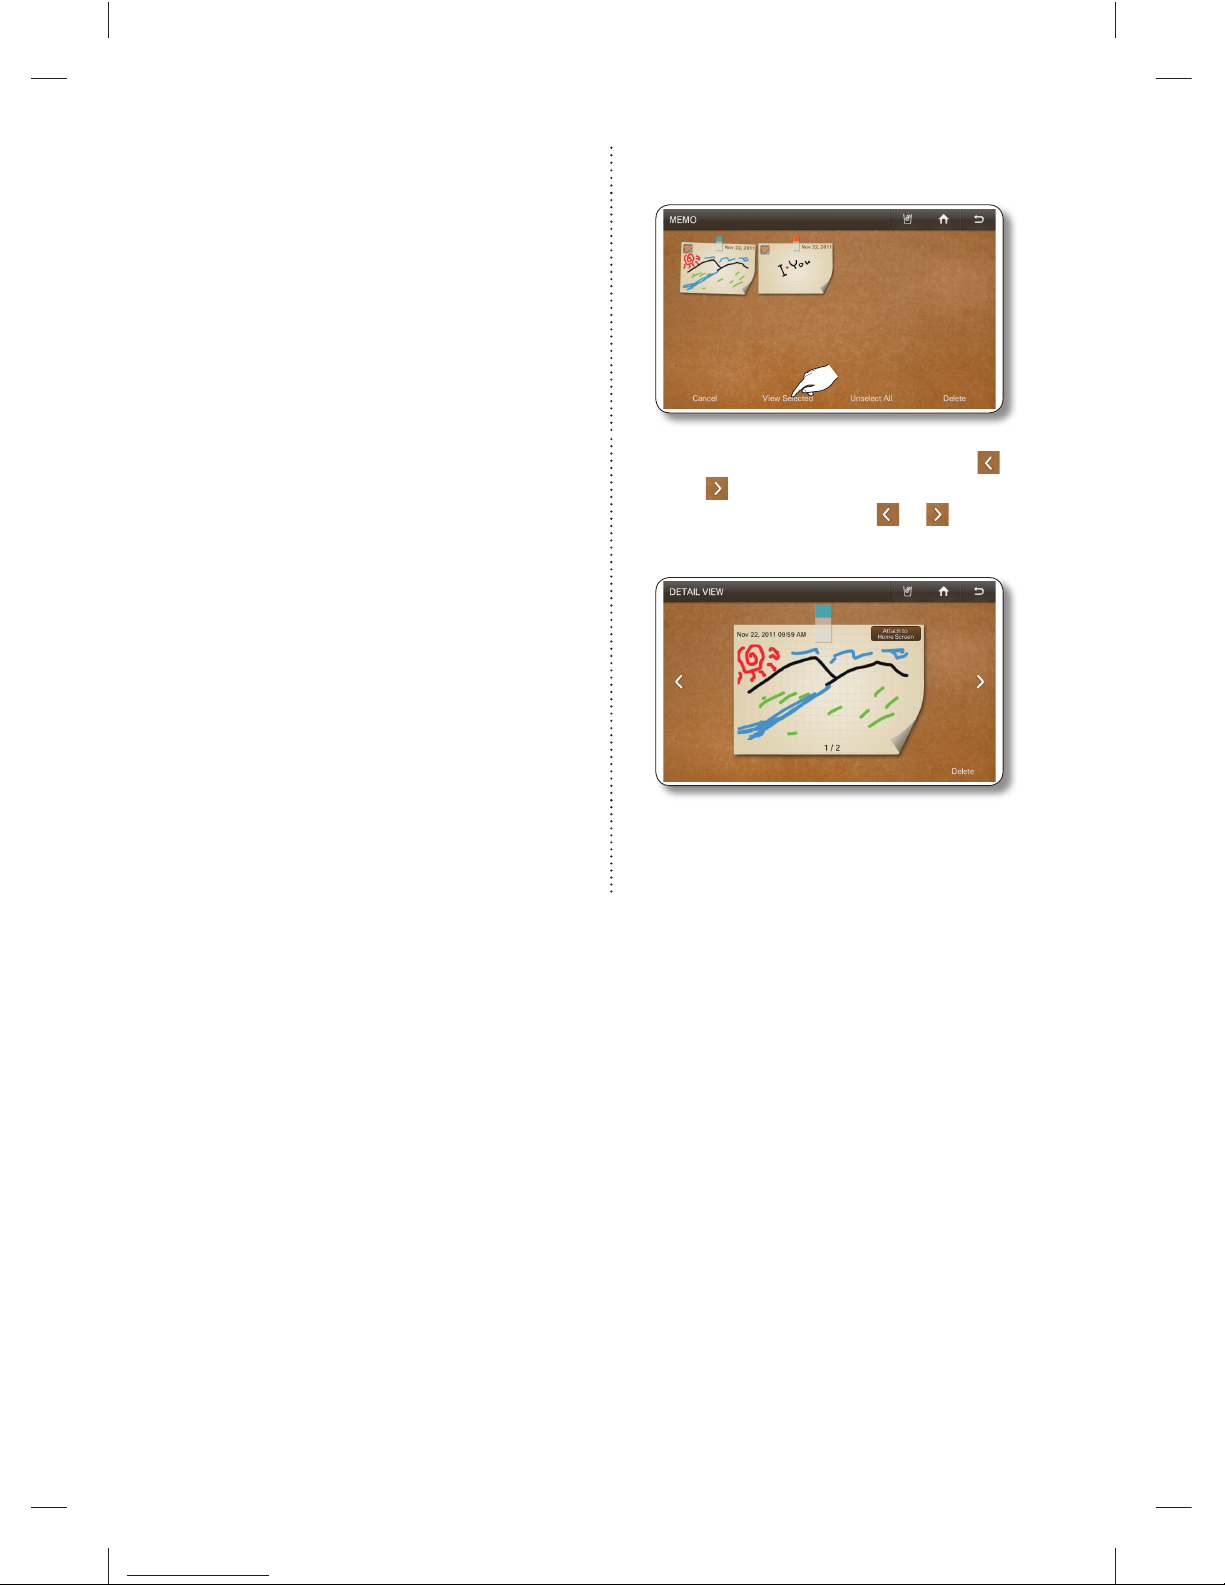
4. Select the [View Selected] button.
5. Check the saved memo by using the
and buttons.
Each time you select the
or button,
the next menu in sequence appears.
In the Detail View screen, you can delete a •
memo or attach it to or detach it from the
Home screen.
DA68-02520B(0.2).indb 26DA68-02520B(0.2).indb 26 2013.2.28 10:17:8 AM2013.2.28 10:17:8 AM
Page 27
operating _27
02 OPERATING
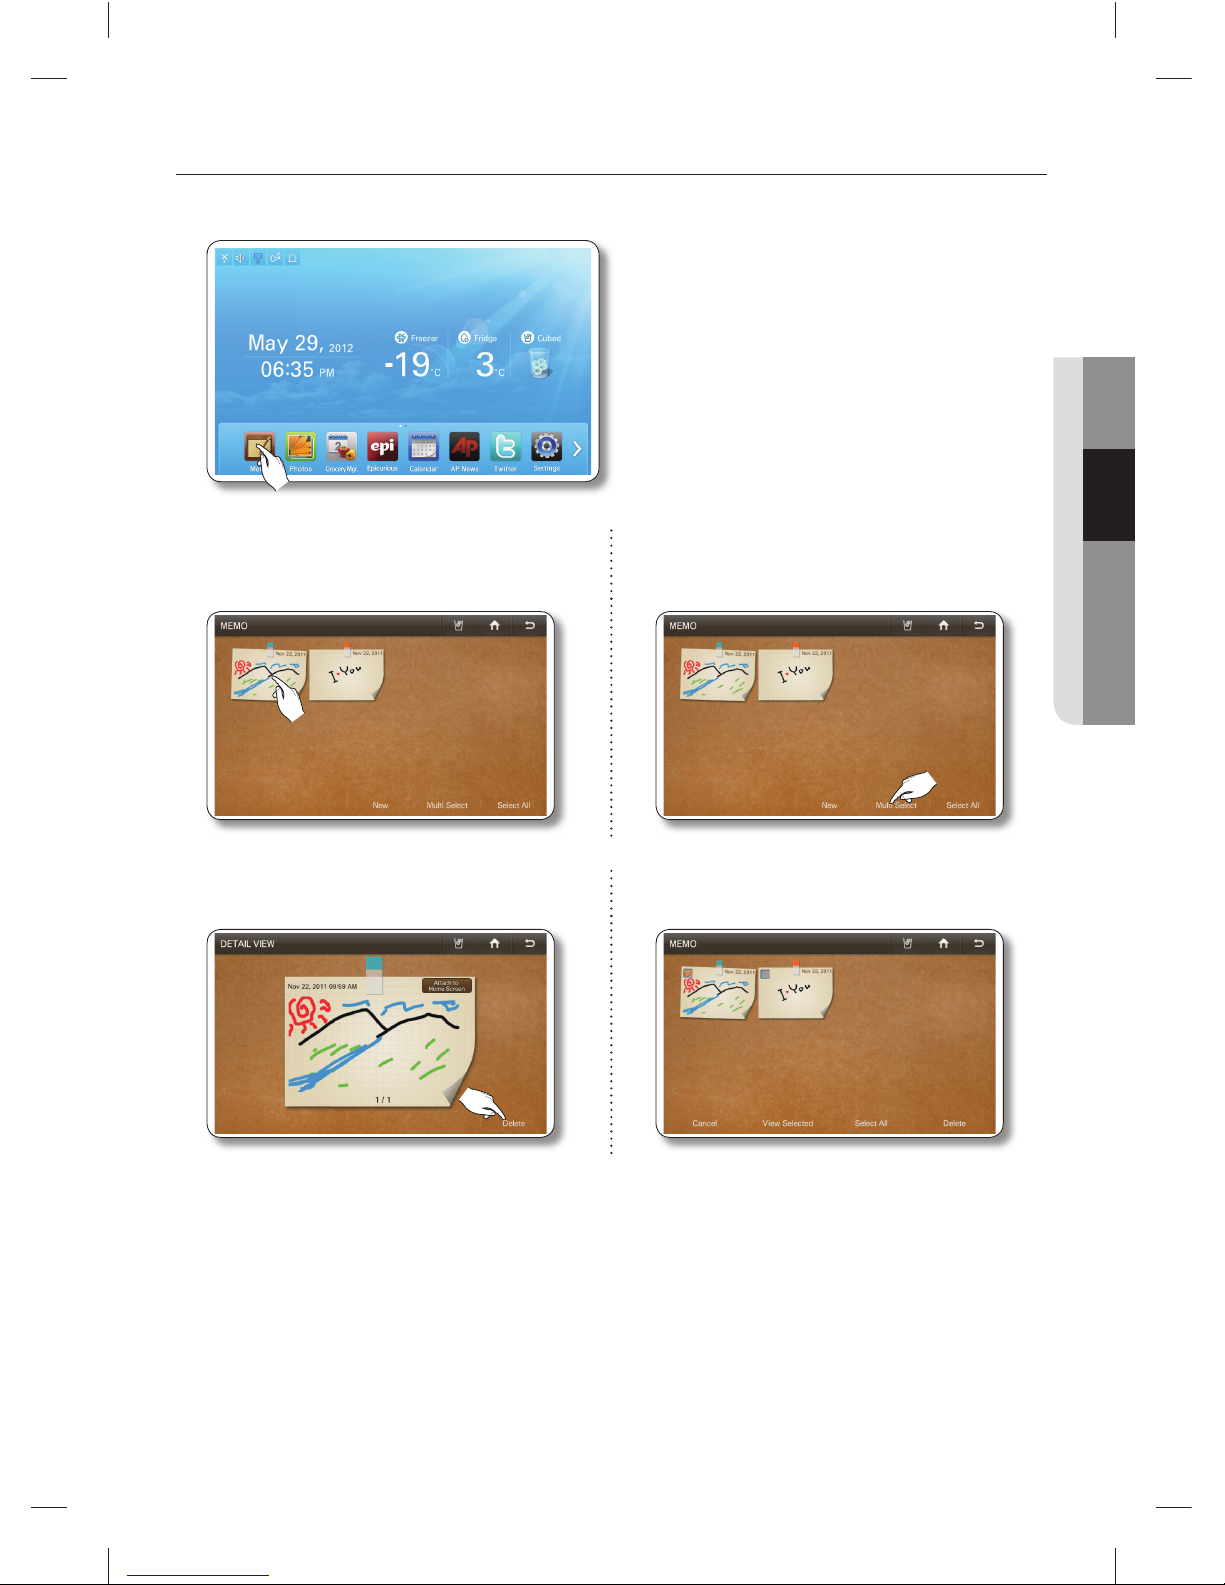
How to delete memos.
1. Select the [Memo] button on the Home screen.
2. Select the memo you want to delete. 2. To delete multiple memos, select the [Multi
Select] button.
3. Press the [Delete] button. 3. Select the memos you want to delete.
To delete multiple memos, continue
here.
DA68-02520B(0.2).indb 27DA68-02520B(0.2).indb 27 2013.2.28 10:17:9 AM2013.2.28 10:17:9 AM
Page 28
28_ operating
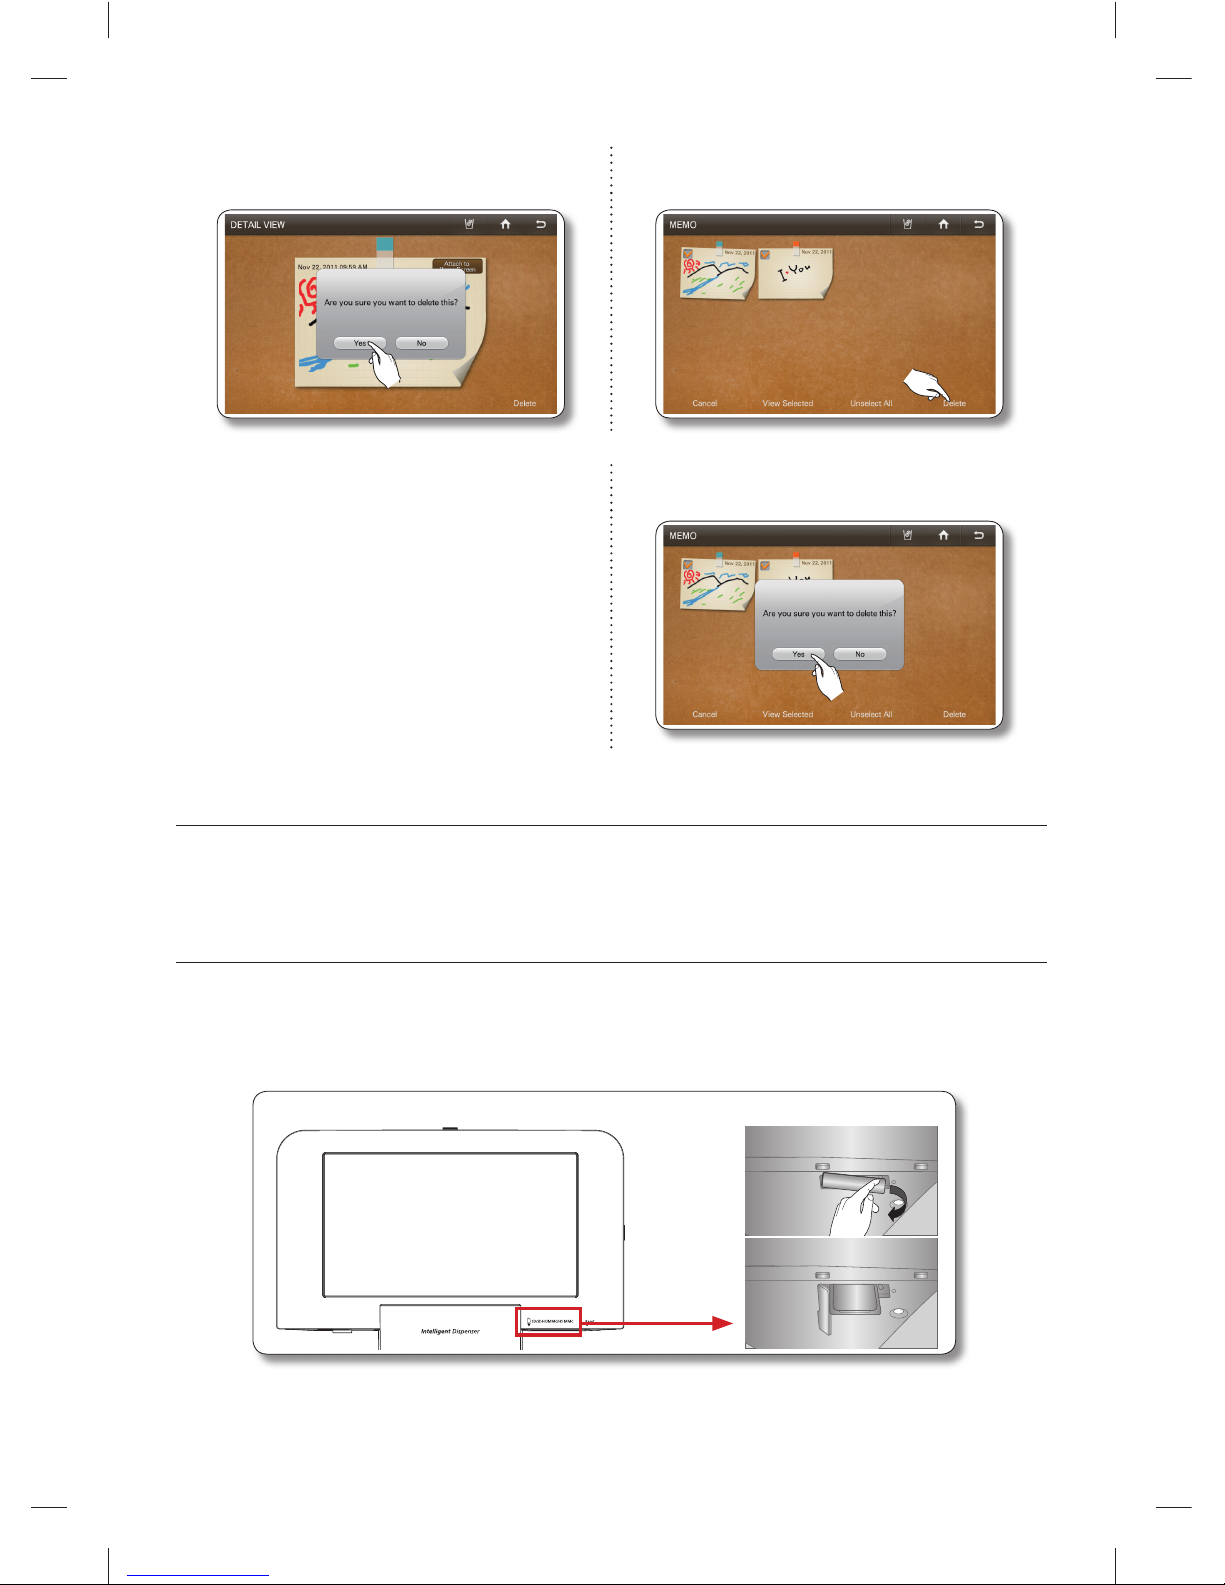
4. Press the [Yes] button. 4. Press the [Delete] button.
5. Press the [Yes] button.
PHOTOS
You can upload photos from a Memory card / AllShare (DLNA device) / Picasa Web Album into My Album
on your refrigerator.
How to copy photos from a Memory Card to My Album
1. Pull out the cover over the card slot and move it to the side.
2. Insert the memory card (SD/SDHC/MMC/HS MMC) with saved images into the card slot in the right
direction. The “A SD/MMC card is connected” message appears on the screen.
256
MB
DA68-02520B(0.2).indb 28DA68-02520B(0.2).indb 28 2013.2.28 10:17:11 AM2013.2.28 10:17:11 AM
Page 29
operating _29
02 OPERATING
• The Memory slot is only for SD/SDHC/MMC/HS MMC type memory cards.
The slot can read only JPEG(JPG) images.•
The Panel has a capacity of about 300 photos.•
When saving photos from a memory card to the panel, the refrigerator automatically changes •
the photo size to 800 x 480 pixels, regardless of the original size.
If there are many photos saved on the Memory card, it will take awhile for the preview function •
to load.
If the Memory Card is removed while transferring images, My Album only shows the images that •
have transferred completely. If no images have completely transferred, the Display returns to the
Photos screen.
The saved images are fi t to the screen size. Depending on the size of an image, there may be •
black bars on the top or sides.
A Memory Card is not supplied with the refrigerator.•
The refrigerator may not be able to read your SD/SDHC/MMC/HS MMC memory card, •
depending on the type of card it is.
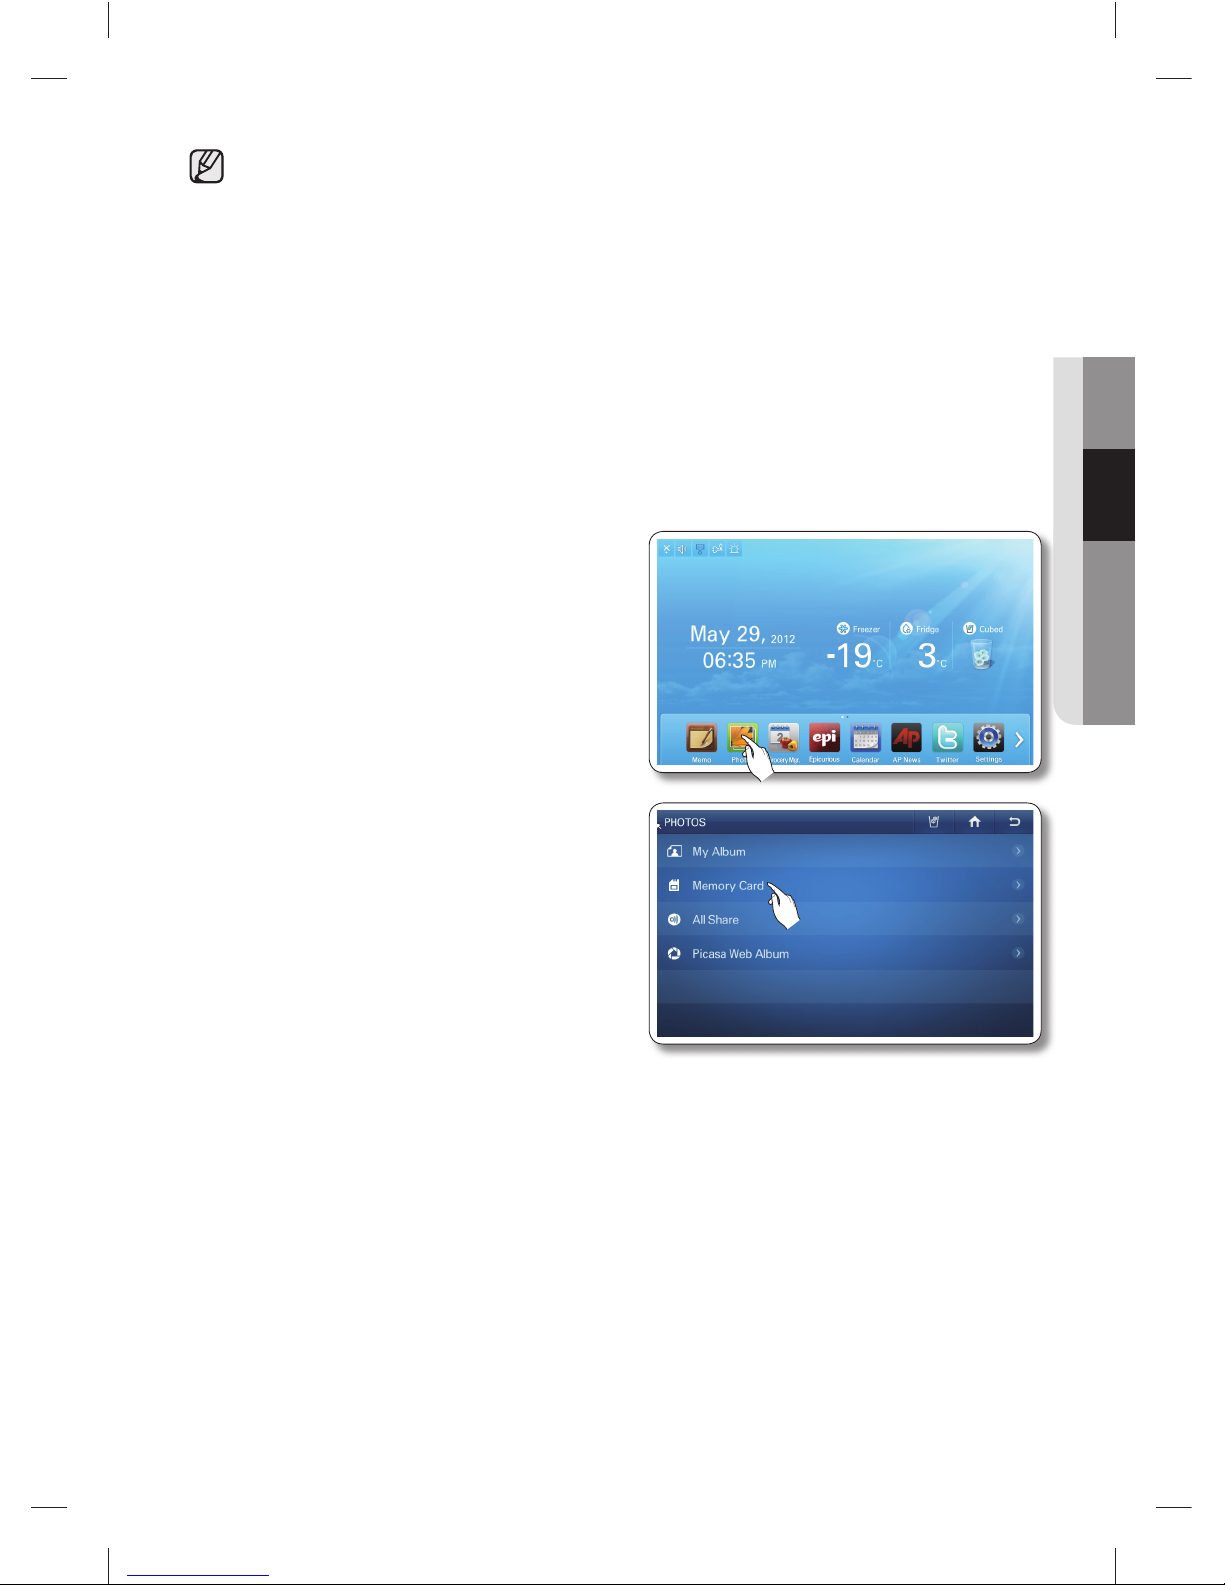
3. Select the [Photos] button on the Home screen.
4. Select [Memory Card] on the Photos list.
DA68-02520B(0.2).indb 29DA68-02520B(0.2).indb 29 2013.2.28 10:17:12 AM2013.2.28 10:17:12 AM
Page 30
30_ operating
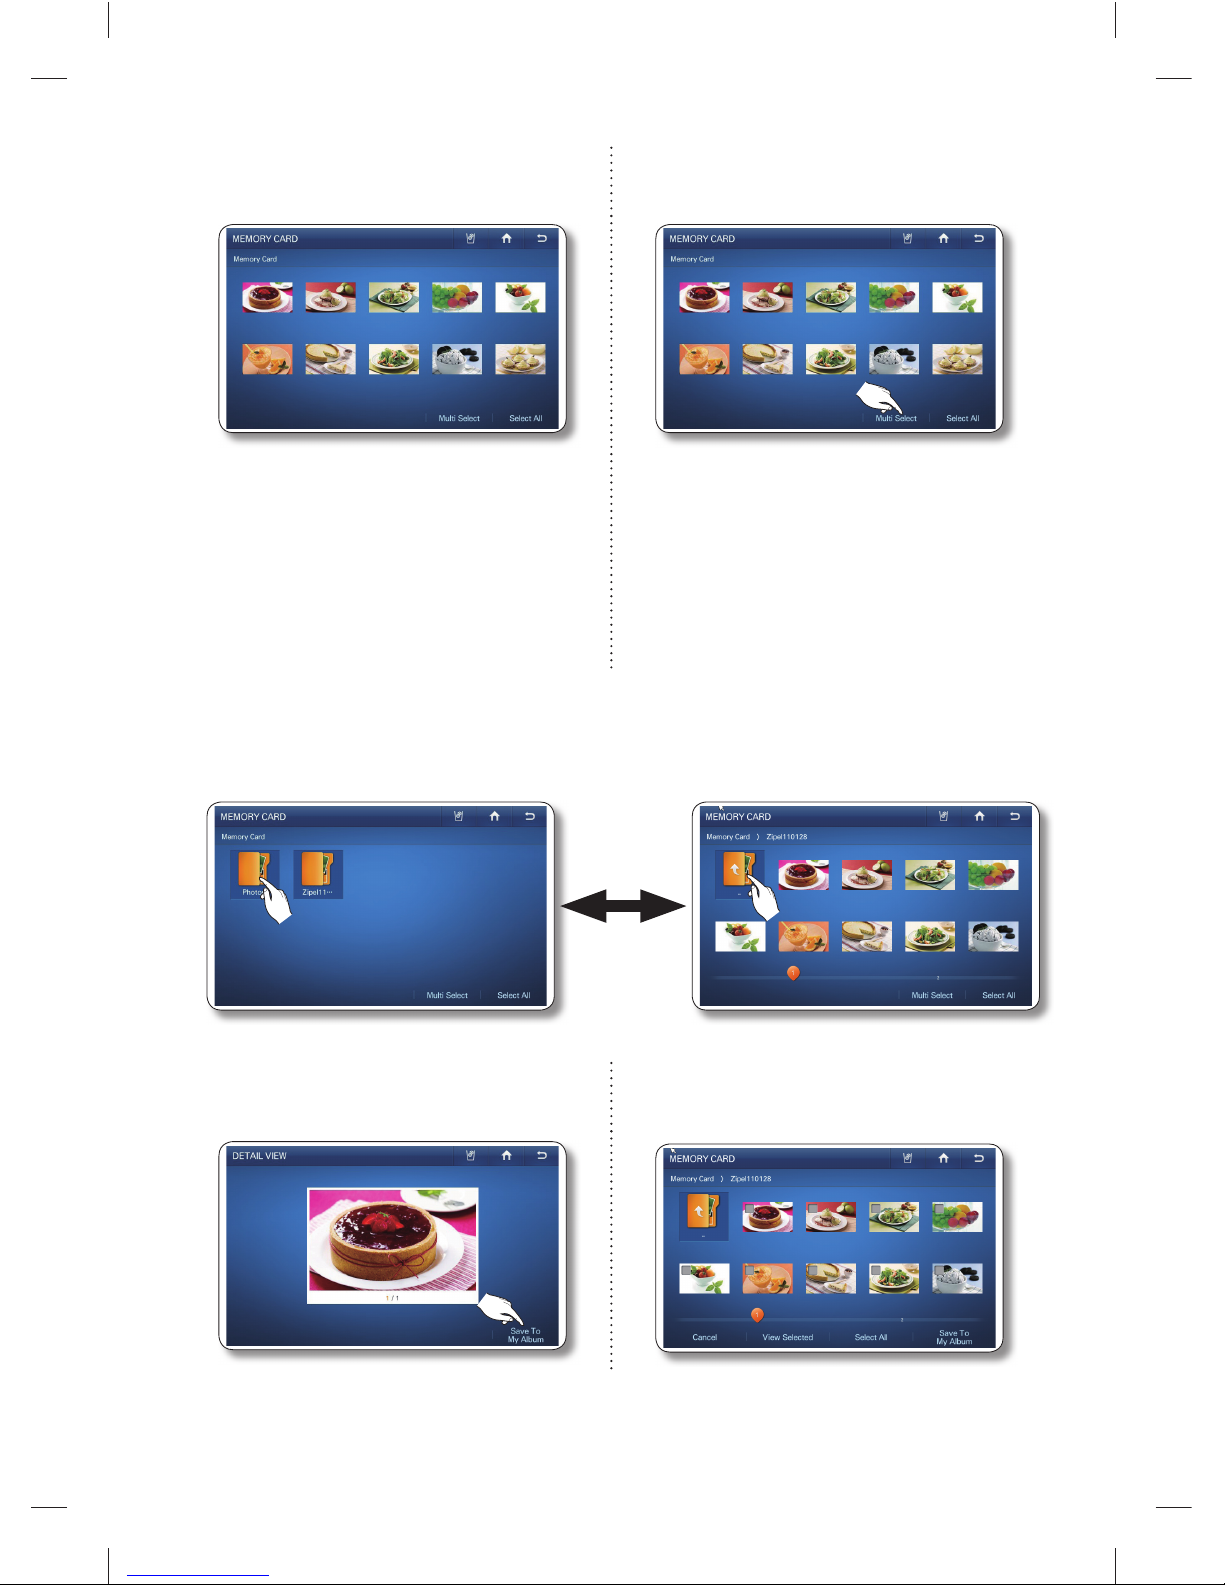
5. Select the photo you want to save to My
Album.
5. To store multiple photos, press the [Multi
Select] button.
When you select the [Select All] button, the •
Multi Selection screen appears.
When there are multiple pages with many •
photos, there will be page numbers on the
bottom of the screen. If you select the page
number, the screen shifts to that page.
This function also applies to the <All Share> •
and <Picasa Web Album> functions.
When there are folders in the Memory Card, the folder icons will appear on the screen.•
When you select a folder, you will see the photos stored in it.•
When you are in a sub-folder, you can move up to the folder that contains sub-folder by selecting •
the “..” icon on the sub-folder.
6. Press the [Save To My Album] button. 6. Select all the photos you want to save to
My Album.
DA68-02520B(0.2).indb 30DA68-02520B(0.2).indb 30 2013.2.28 10:17:13 AM2013.2.28 10:17:13 AM
Page 31
operating _31
02 OPERATING
When you select a photo, its detail information •
will appear.
When you select the [Select All] button, all the •
photos on the current page are selected and the
[Select All] button shifts to the [Unselect All] button.
When you press the [View Selected] button, •
you will see its larger version.
To exit the Multi Select screen, press the •
[Cancel] button.
To delete the check mark on a selected photo, •
touch the photo again.
When there are multiple pages with many photos, •
there will be page numbers on the bottom of the
screen.
If you have photos selected and move to another •
folder, the selected photos will be automatically
unselected.
When you touch the folder name above the thumb-•
nails (Preview Photos), the screen displays that
folder.
This function also applies to the <All Share> and •
<Picasa Web Album> functions.
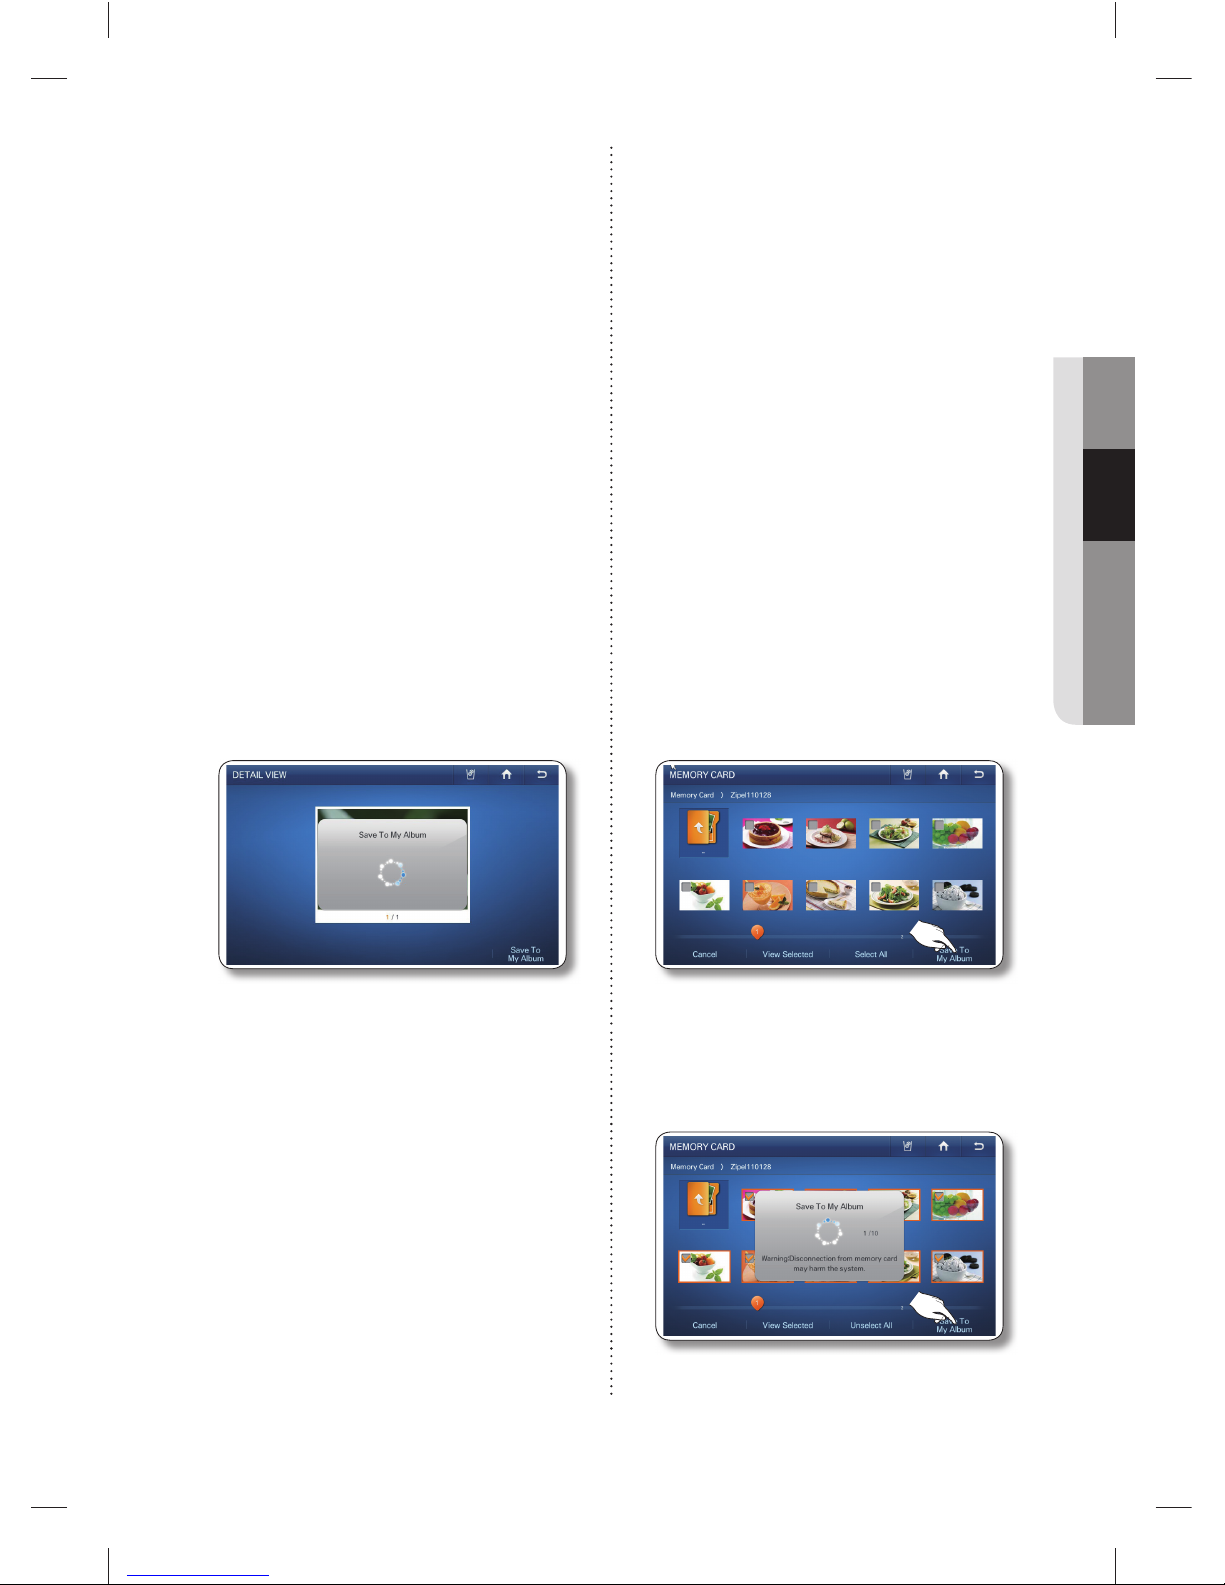
7. While the photo uploads from the Memory
Card, the “Save To My Album” popup
appears on the screen.
7. Press the [Save To My Album] button.
Larger photo sizes will take longer to upload.•
8. While the photos upload from the Memory
Card, the “Save To My Album” popup
appears on the screen.
Larger photo sizes will take longer to upload.•
9. When the upload is complete, take the Memory Card out of the slot.
DA68-02520B(0.2).indb 31DA68-02520B(0.2).indb 31 2013.2.28 10:17:15 AM2013.2.28 10:17:15 AM
Page 32
32_ operating
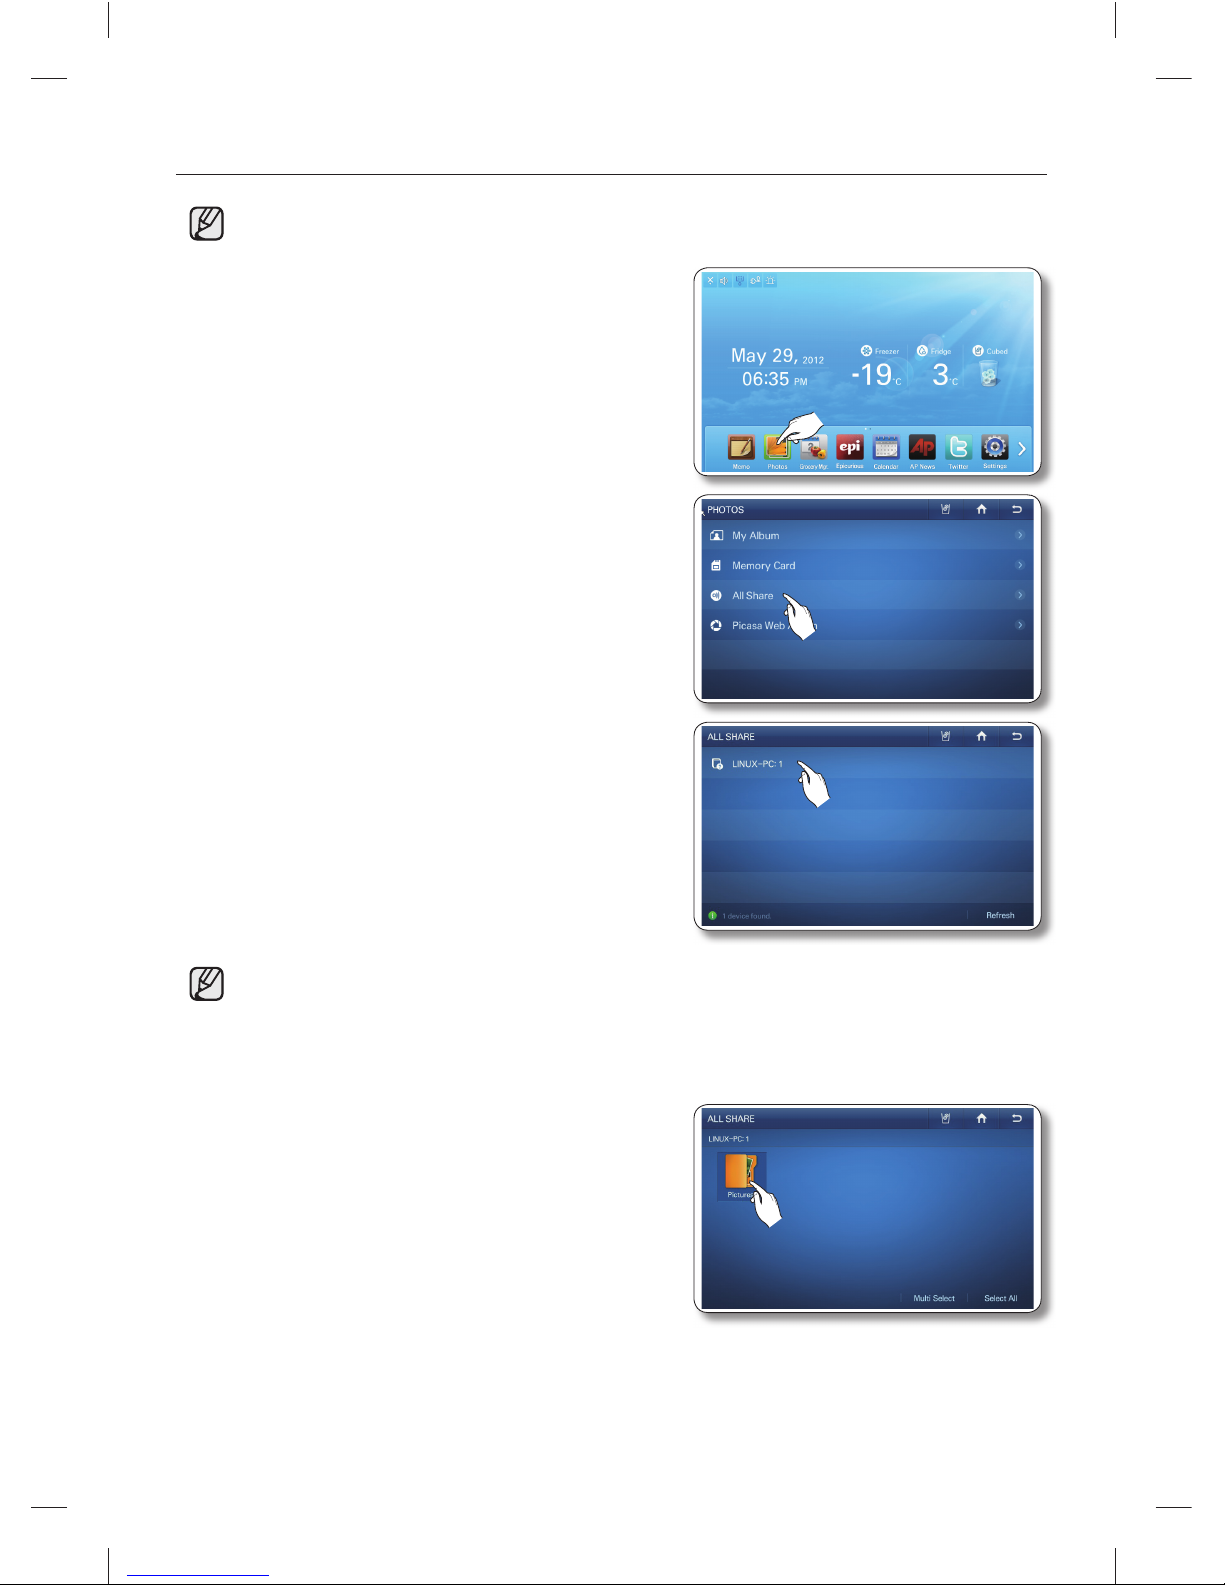
How to upload DLNA device photos to My Album (All Share)
• This function is only available when the refrigerator is connected to your wireless
network (Wi-Fi).
1. Select the [Photos] button on the Home screen.
2. Select [All Share] on the Photos list, and then connect
the DLNA device to the same wireless AP as the
refrigerator.
3. In the All Share list, select the DLNA device you want to
connect.
If the DLNA device you want to connect does not •
appear, press the [Refresh] button several times to
detect it.
• The device you want to connect must have the related function installed with the DLNA (Digital
Living Network Alliance) certifi cate.
The display supports up to 4096 x 4096 (16 mega) resolutions. When the number of pixels at •
either vertical or horizontal axis of a photo is more than 4,096 or its resolution is changed, the
display may not support it.
4. Select the desired folder.
DA68-02520B(0.2).indb 32DA68-02520B(0.2).indb 32 2013.2.28 10:17:17 AM2013.2.28 10:17:17 AM
Page 33
operating _33
02 OPERATING
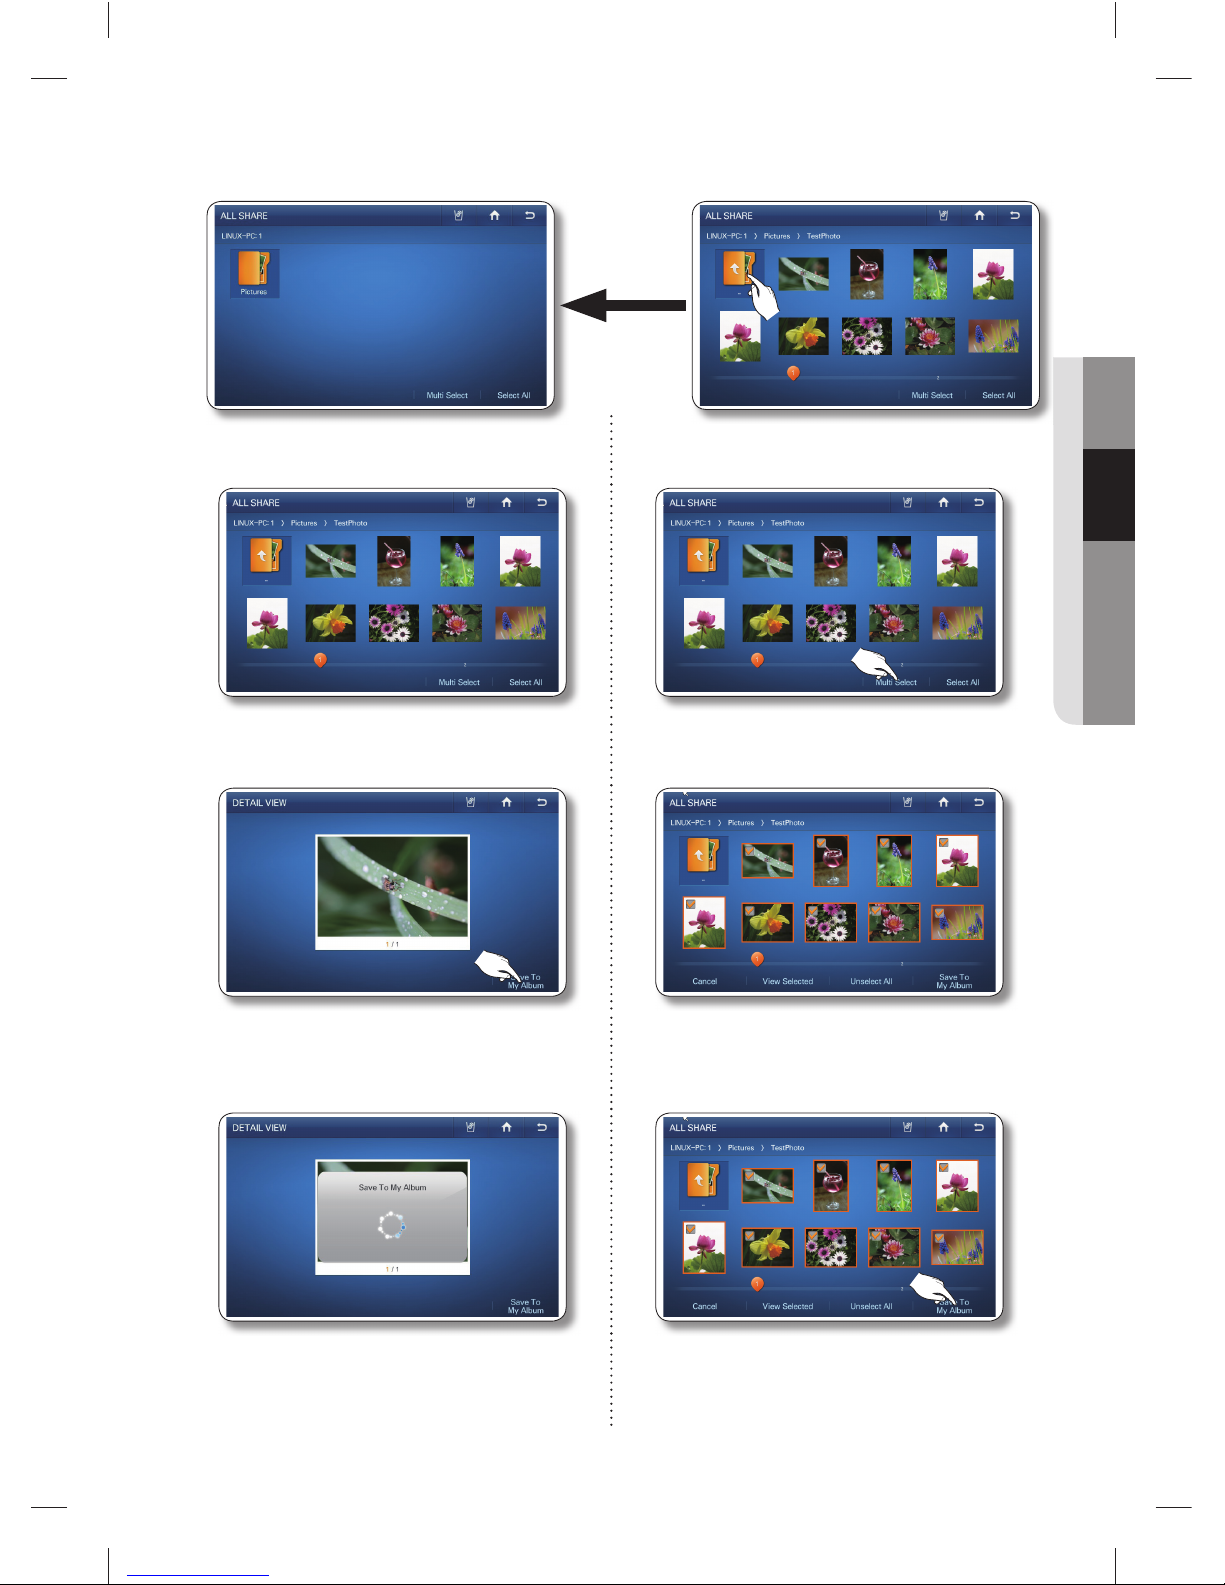
When you are in a sub-folder, you can move up to the folder that contains sub-folder by selecting the “..” •
icon on the sub-folder.
5. Select the photo you want to save to My
Album.
5. To store multiple photos, select the [Multi
Select] button.
6. Press the [Save To My Album] button. 6. Select the photos you want to save to My
Album.
7. While the photo uploads from the DLNA
device, the “Save To My Album” popup
appears on the screen.
7. Press the [Save To My Album] button.
8. While the photos upload from the DLNA
device, the “Save To My Album” popup
appears on the screen.
DA68-02520B(0.2).indb 33DA68-02520B(0.2).indb 33 2013.2.28 10:17:18 AM2013.2.28 10:17:18 AM
Page 34
34_ operating
• Larger photo sizes will take longer to upload.
The wireless network is used to transmit photos from the DLNA device. The transmission may •
not always work properly depending on the network conditions.
When you select a photo, its detail information will appear.•
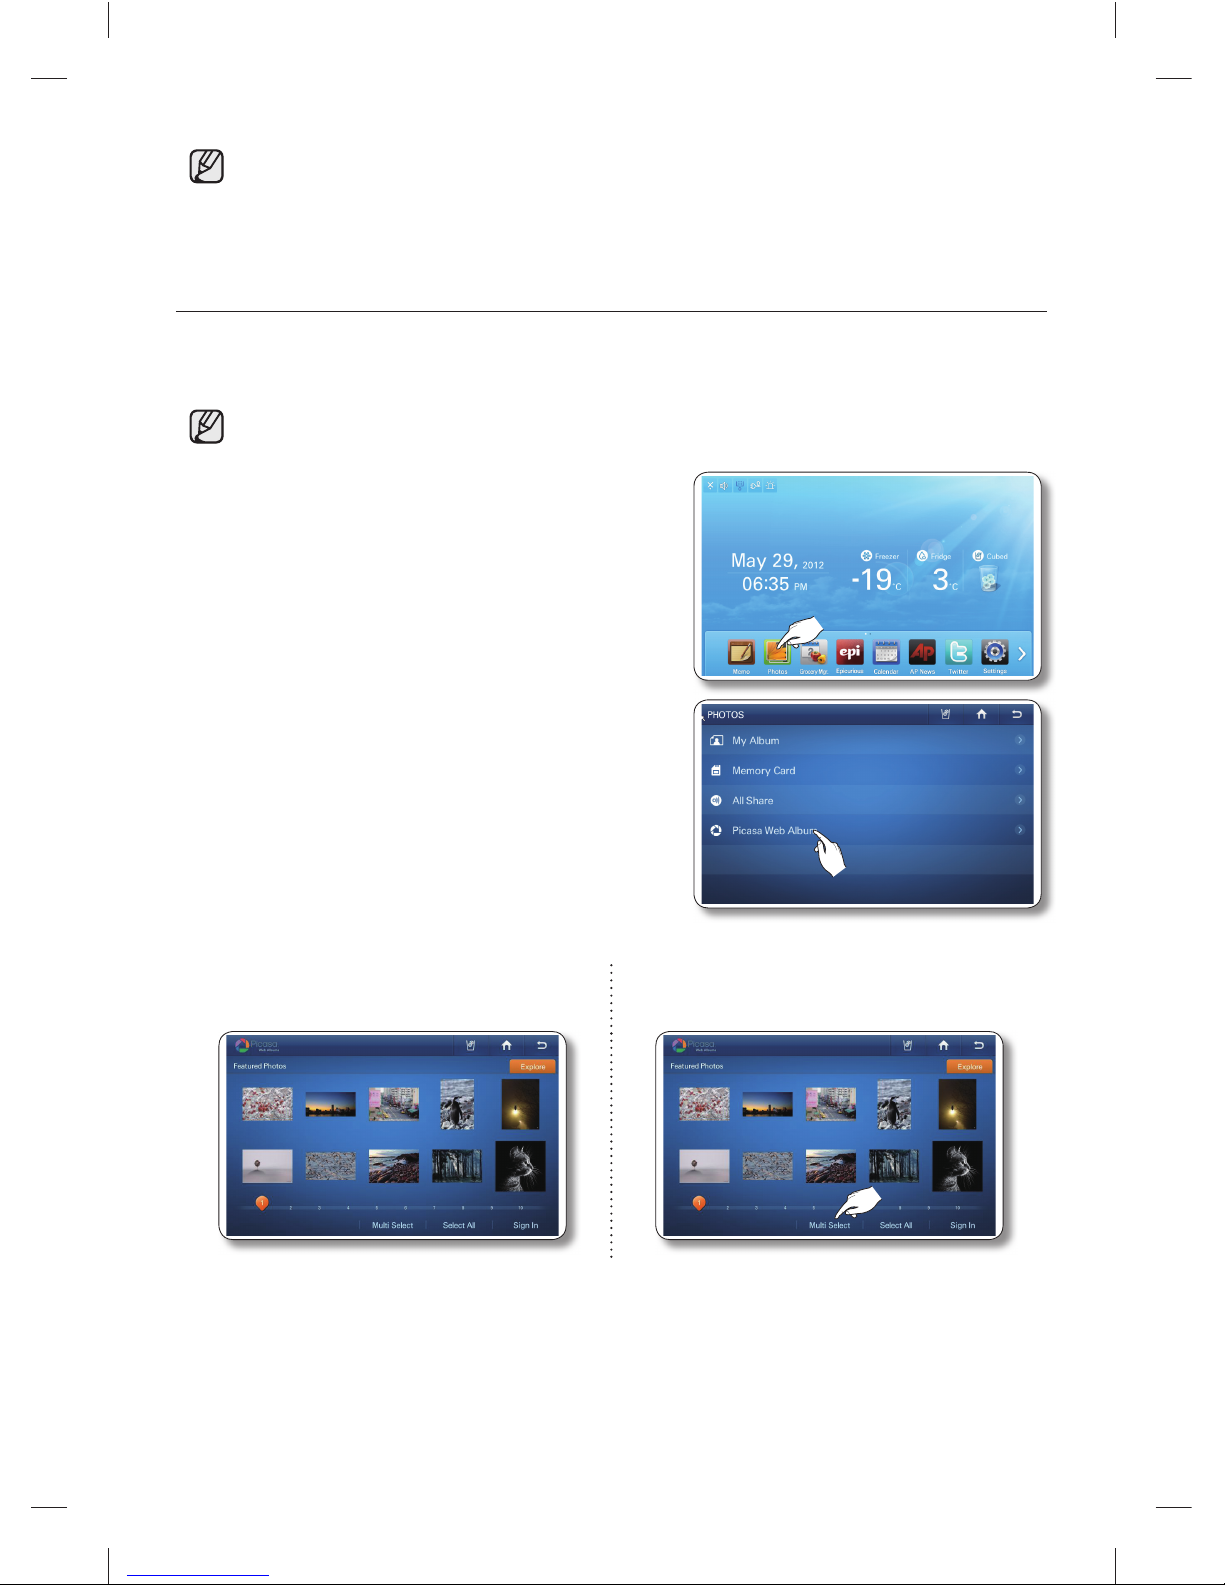
How to copy photos from Picasa Web Album to My Album.
[Public Photos]
You can download and store public photos from Google Picasa Web Album.
• This function is only available when the refrigerator is connected to your wireless
network (Wi-Fi).
1. Select the [Photos] button on the Home screen.
2. Select [Picasa Web Album] in the Photos list.
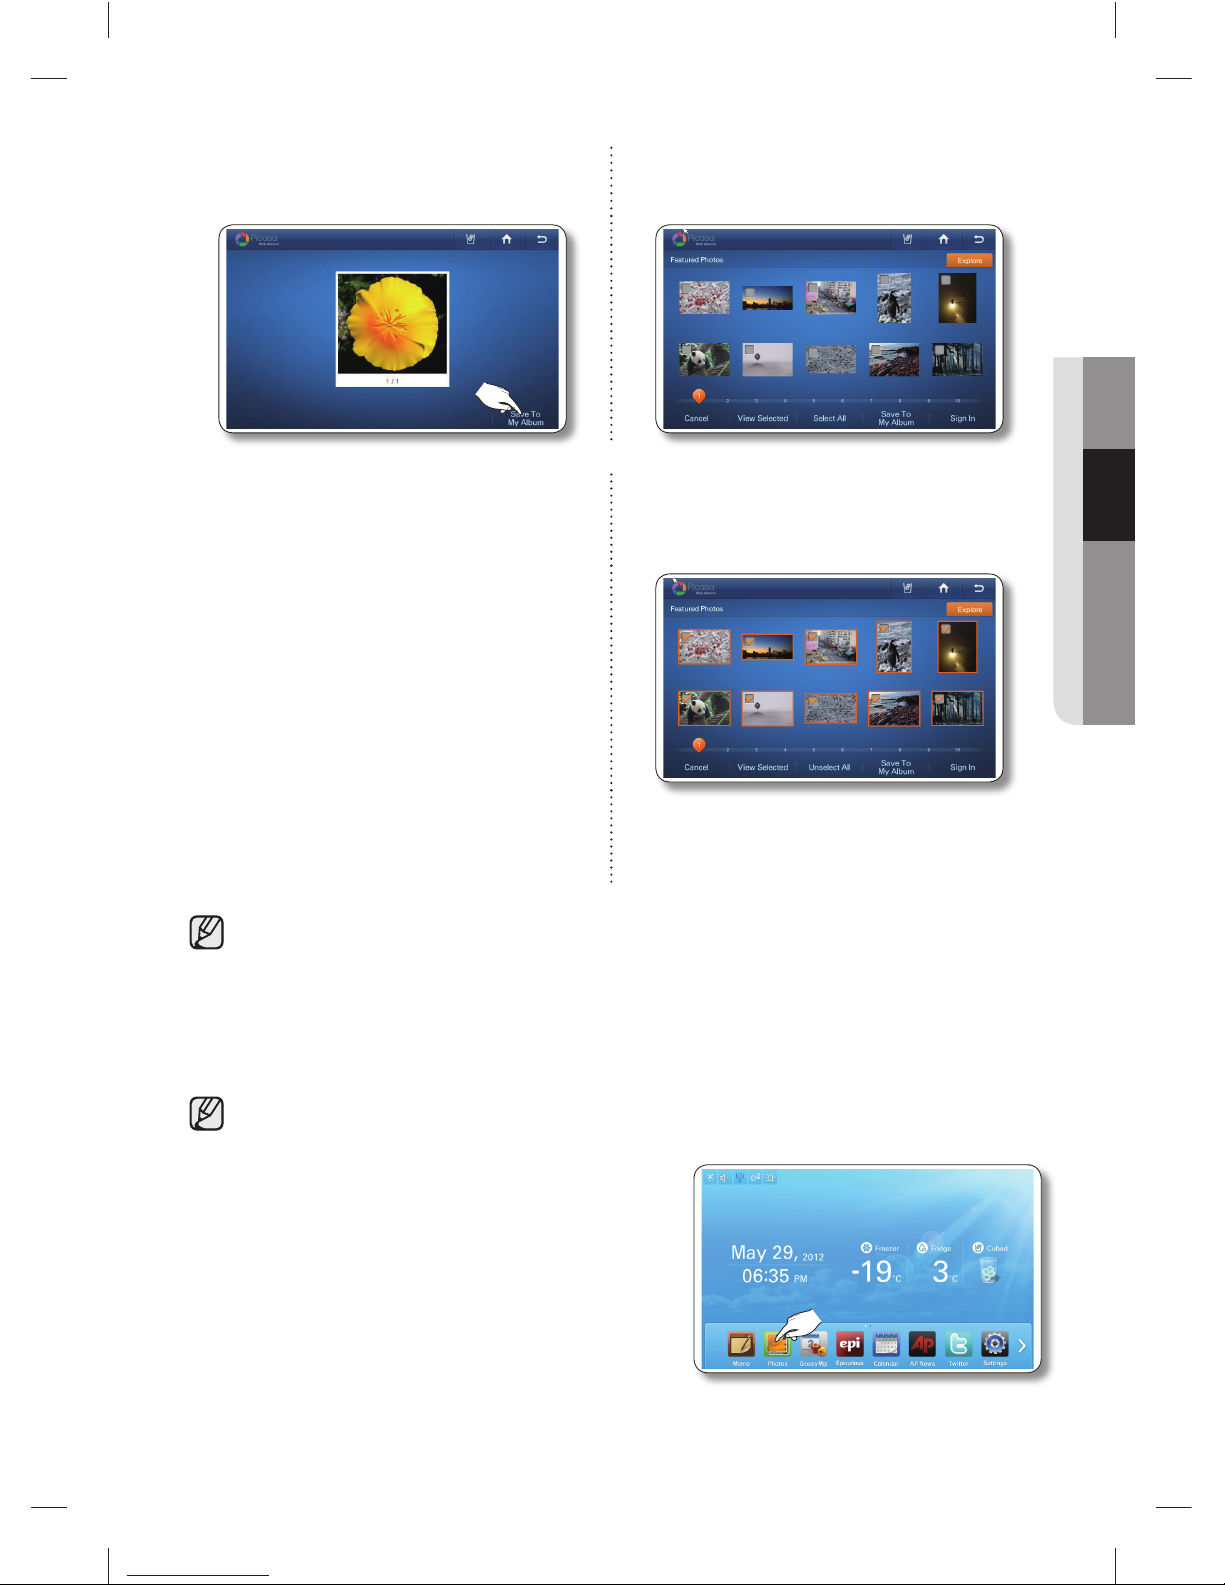
3. Select the photo you want to save to My
Album.
3. To store multiple photos, select the [Multi
Select] button.
DA68-02520B(0.2).indb 34DA68-02520B(0.2).indb 34 2013.2.28 10:17:20 AM2013.2.28 10:17:20 AM
Page 35
operating _35
02 OPERATING
4. Press the [Save To My Album] button. 4. Select the photos you want to save to My
Album.
5. While the photo downloads from Picasa
Web Album, the “Save To My Album” popup
appears on the screen.
5. Press the [Save To My Album] button.
6. While the photos download from Picasa
Web Album, the “Save To My Album” popup
appears on the screen.
• When you select a photo, its detail information will appear.
Larger photo sizes will take longer to upload.•
Depending on the status of the wireless network, the download may not always work.•
[Personal Photos]
You can download and store personal photos from Google Picasa Web Album.
• This function is available only when the refrigerator is connected to your wireless network (Wi-Fi).
To use this function, you must have a Google account.•
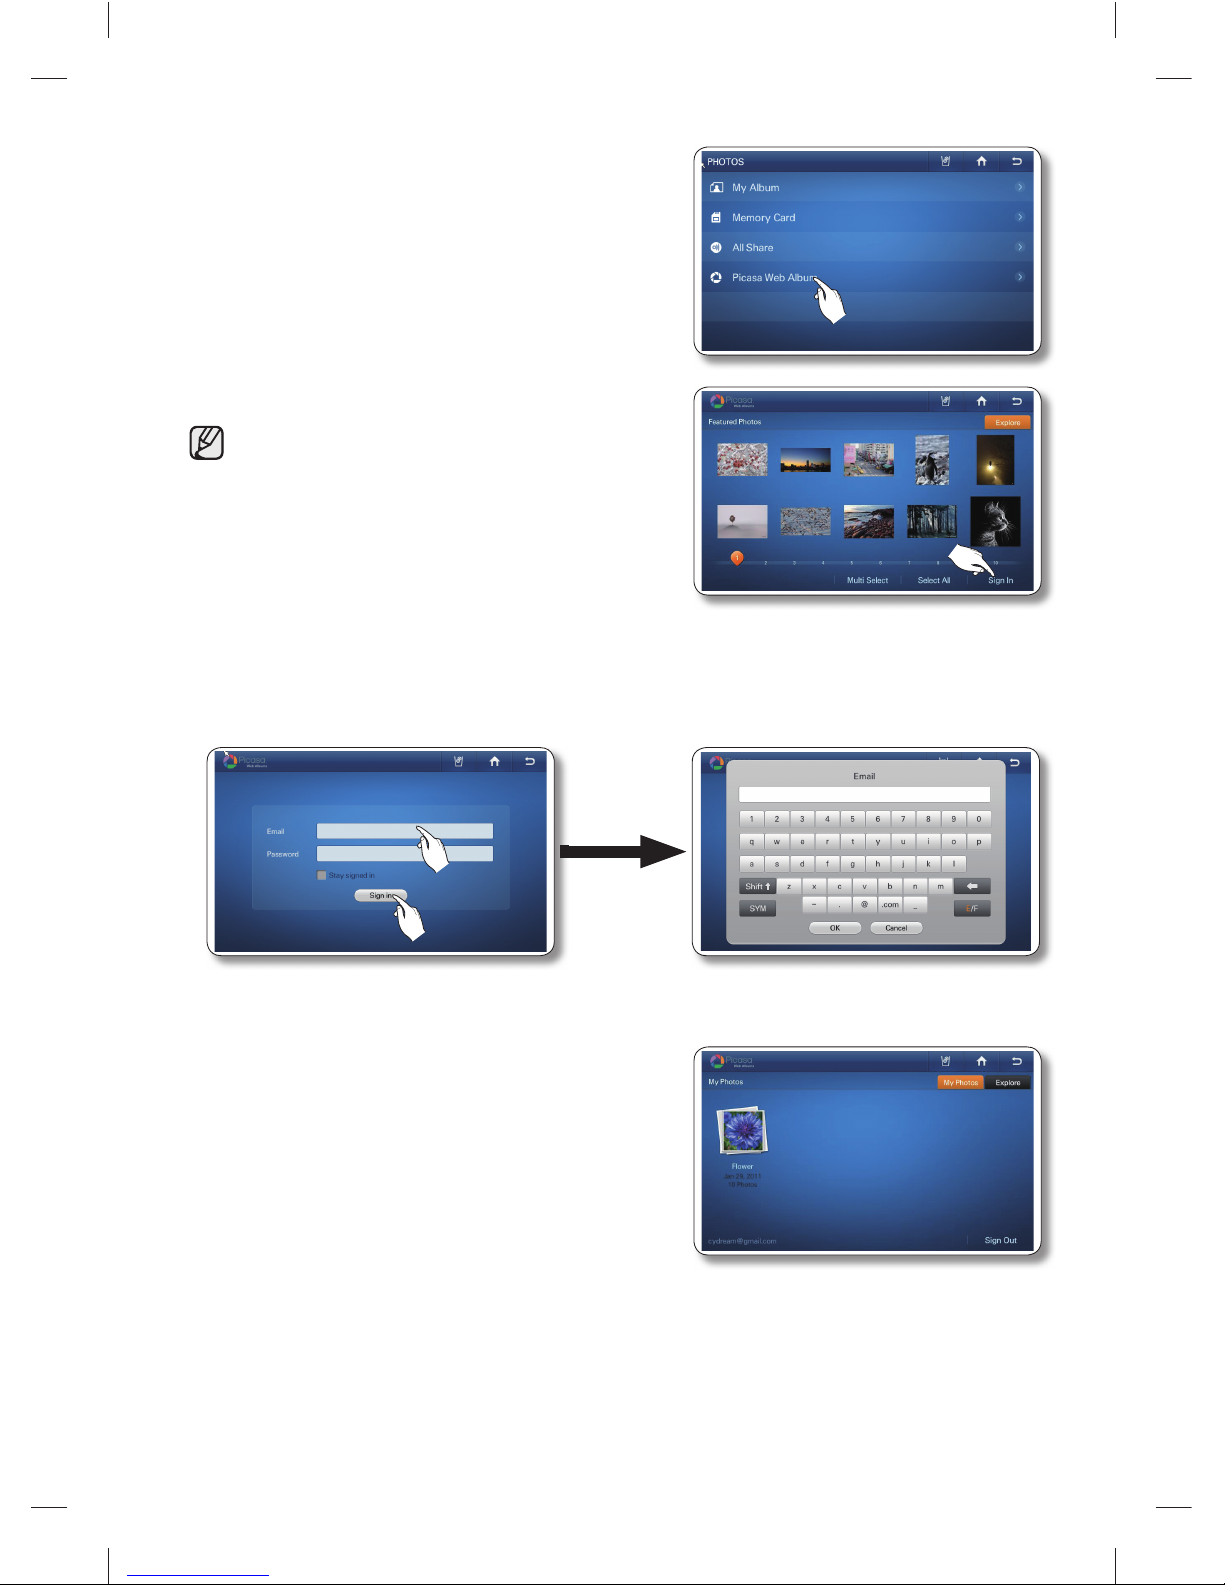
1. Select the [Photos] button on the Home screen.
DA68-02520B(0.2).indb 35DA68-02520B(0.2).indb 35 2013.2.28 10:17:22 AM2013.2.28 10:17:22 AM
Page 36
36_ operating
2. Select [Picasa Web Album] in the Photos list.
3. Press the [Sign In] button.
• When you have an account with Google Picasa
(http://picasaweb.google.com), you can see the
photos you uploaded to Picasa by logging into your
account.
4. Select the Email input box, and then enter your Google account ID using the on-screen keyboard.
Select Password input box, and then enter your Google password using the on screen keyboard.
5. Press the [Sign In] button.
If you check the ‘Stay signed in’ box, the refrigerator will store the account for faster future log-ins.•
6. Select a web album which has photos you want to store
in My Album.
If you press the [Sign Out] button, the Display •
returns to the Picasa public photos screen.
If you choose the Explore tab in the right upper •
corner, the screen displays the public photos
screen.
DA68-02520B(0.2).indb 36DA68-02520B(0.2).indb 36 2013.2.28 10:17:23 AM2013.2.28 10:17:23 AM
Page 37
operating _37
02 OPERATING
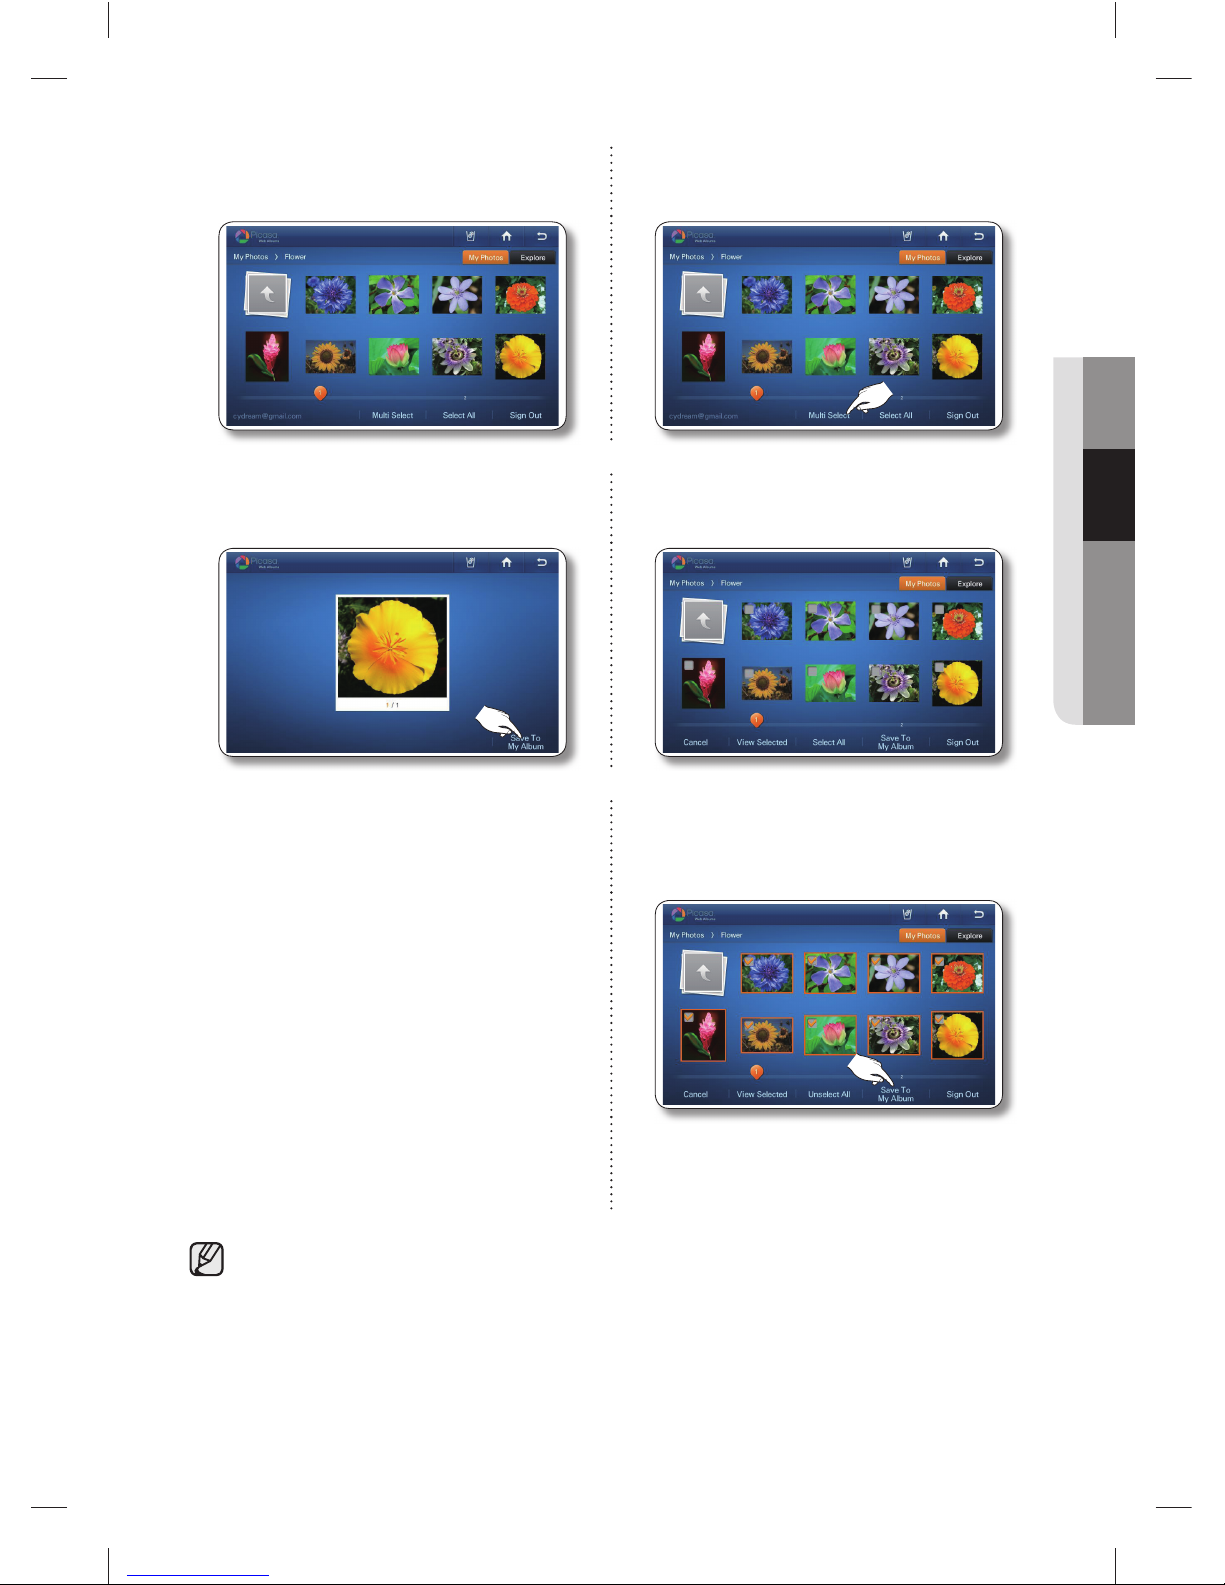
7. Select the photo you want to save to My
Album.
7. To store multiple photos, select the [Multi
Select] button.
8. Press the [Save To My Album] button. 8. Select the photos you want to save to My
Album.
9. While the photo downloads from Picasa
Web Album, the “Save To My Album” popup
appears on the screen.
9. Press the [Save To My Album] button.
10. While the photo downloads from Picasa
Web Album, the “Save To My Album” popup
appears on the screen.
• When you select a photo, its detail information will appear.
Larger photo sizes will take longer to upload.•
DA68-02520B(0.2).indb 37DA68-02520B(0.2).indb 37 2013.2.28 10:17:24 AM2013.2.28 10:17:24 AM
Page 38
38_ operating
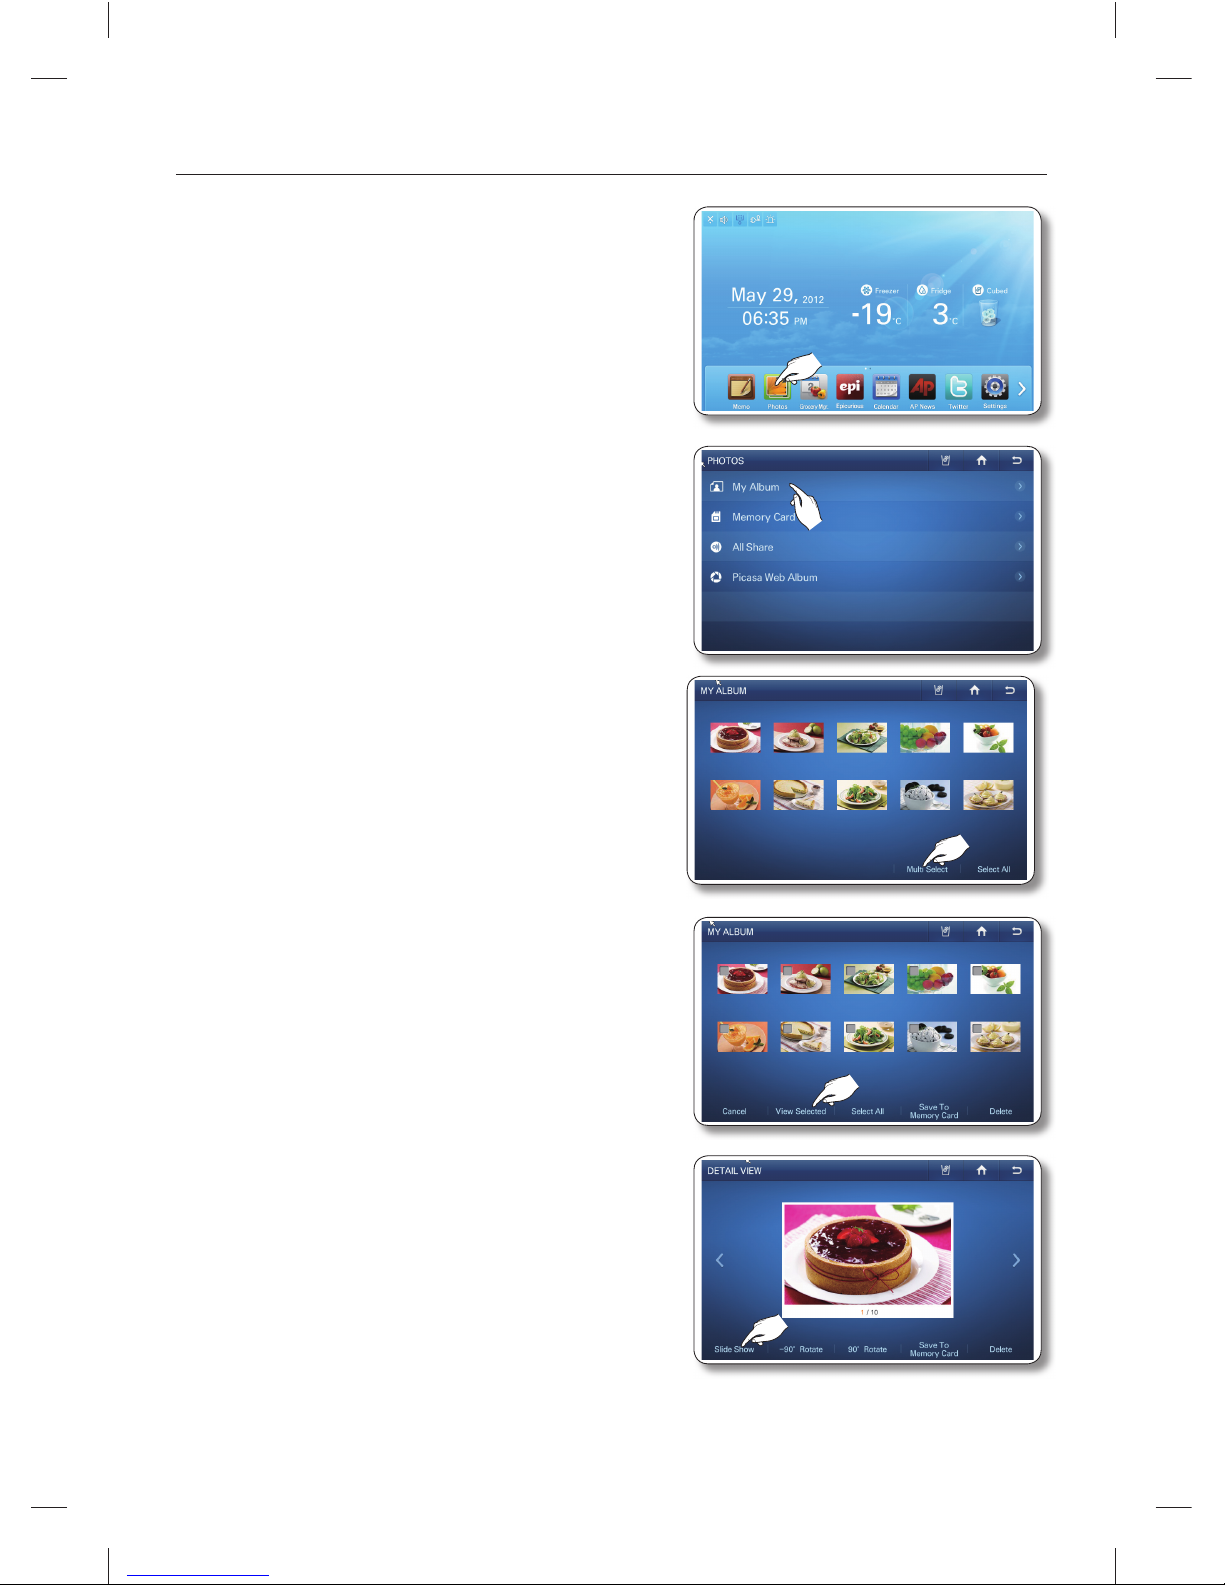
How to run a the slide show.
1. Select the [Photos] button on the Home screen.
2. Select [My Album] in the Photos list.
3. Select the [Multi Select] button.
4. Select the photos you want for the slide show, and then
press the [View Selected] button.
(Select more than two photos.)
When you select a photo, its detail information will •
appear.
5. Select the [Slide Show] button.
Depending on a photo’s size (Width x Height), the •
screen may display blank bars on the top or sides
of the image.
DA68-02520B(0.2).indb 38DA68-02520B(0.2).indb 38 2013.2.28 10:17:26 AM2013.2.28 10:17:26 AM
Page 39
operating _39
02 OPERATING
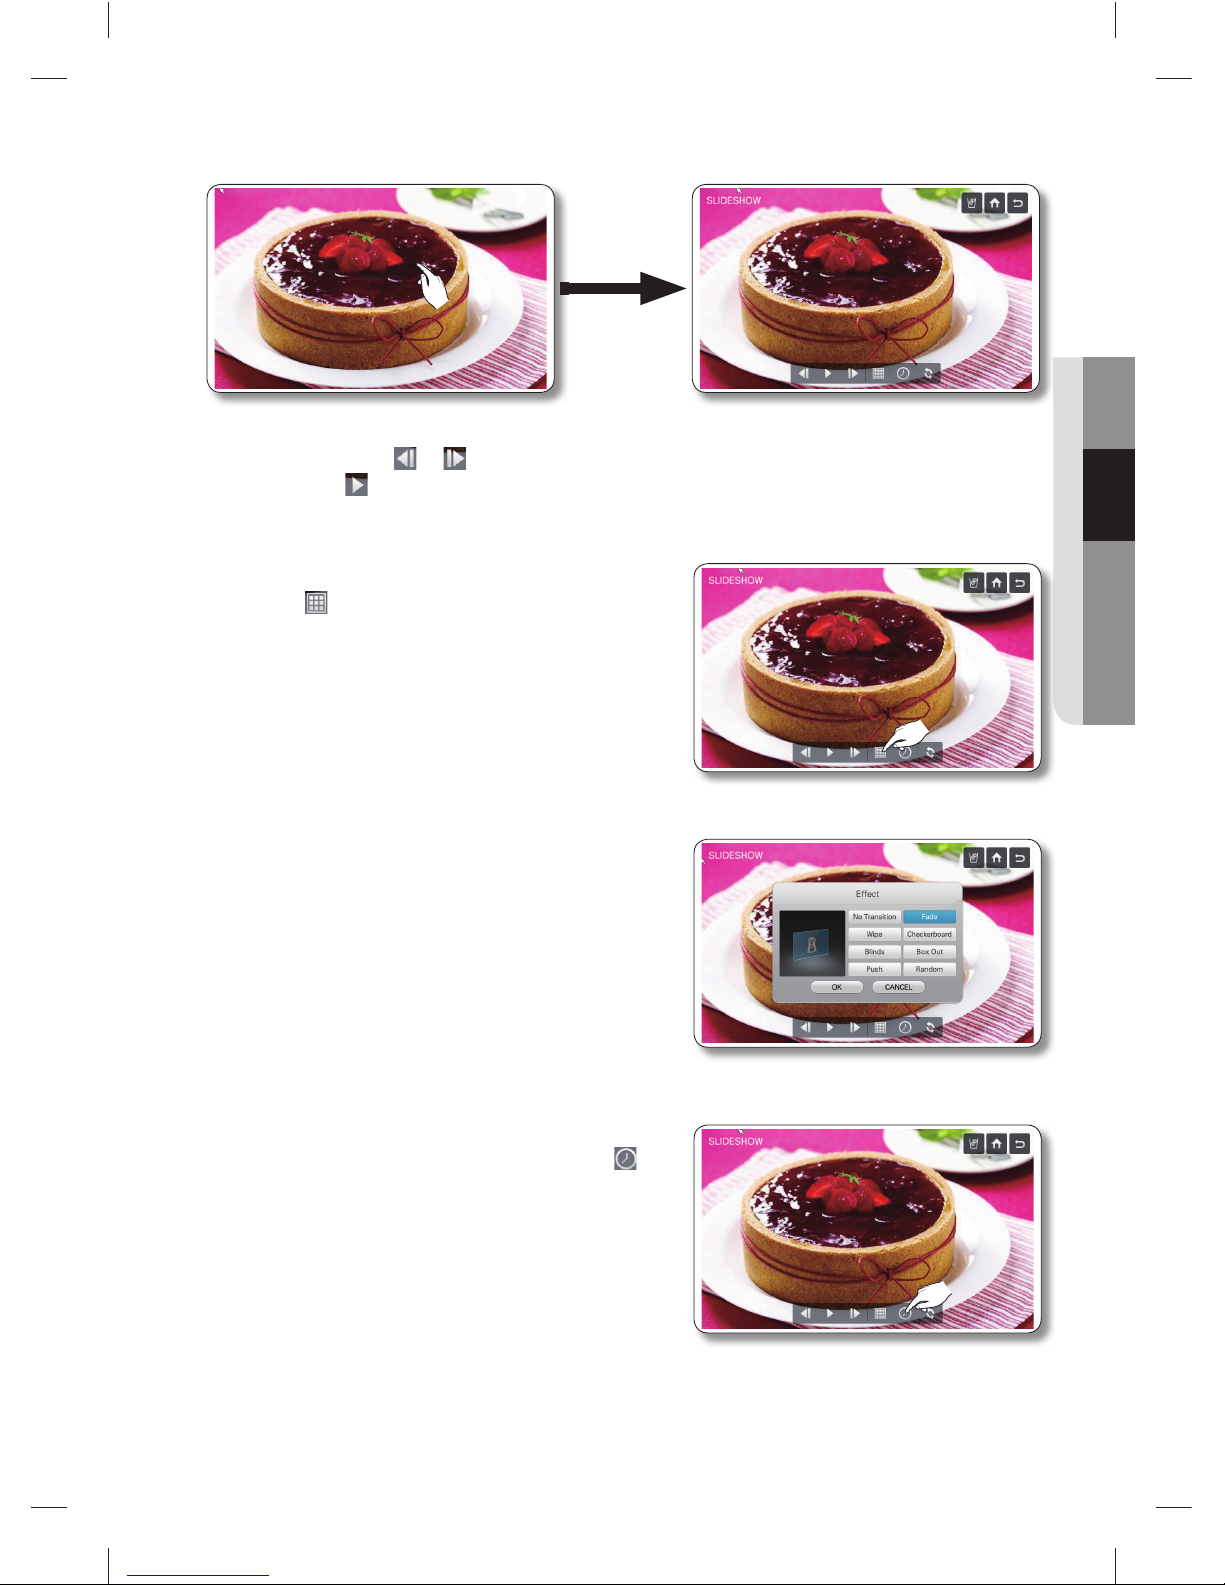
6. The slide show starts. Select the screen to change the view option.
The slide show runs once. When it fi nishes, the view options appear on the screen.•
By selecting the •
or button, you can move to the previous or next photo.
Select the • button to run the slide show again.
7. To change the screen transition effect of the slide show,
select the
button.
8. Select the desired slide show transition effects, and then
press the [OK] button.
You can preview the selected effect on the left side •
of the screen.
The Random effect runs the photos in a random •
order.
9. To change the screen transition time, select the
button.
DA68-02520B(0.2).indb 39DA68-02520B(0.2).indb 39 2013.2.28 10:17:28 AM2013.2.28 10:17:28 AM
Page 40
40_ operating
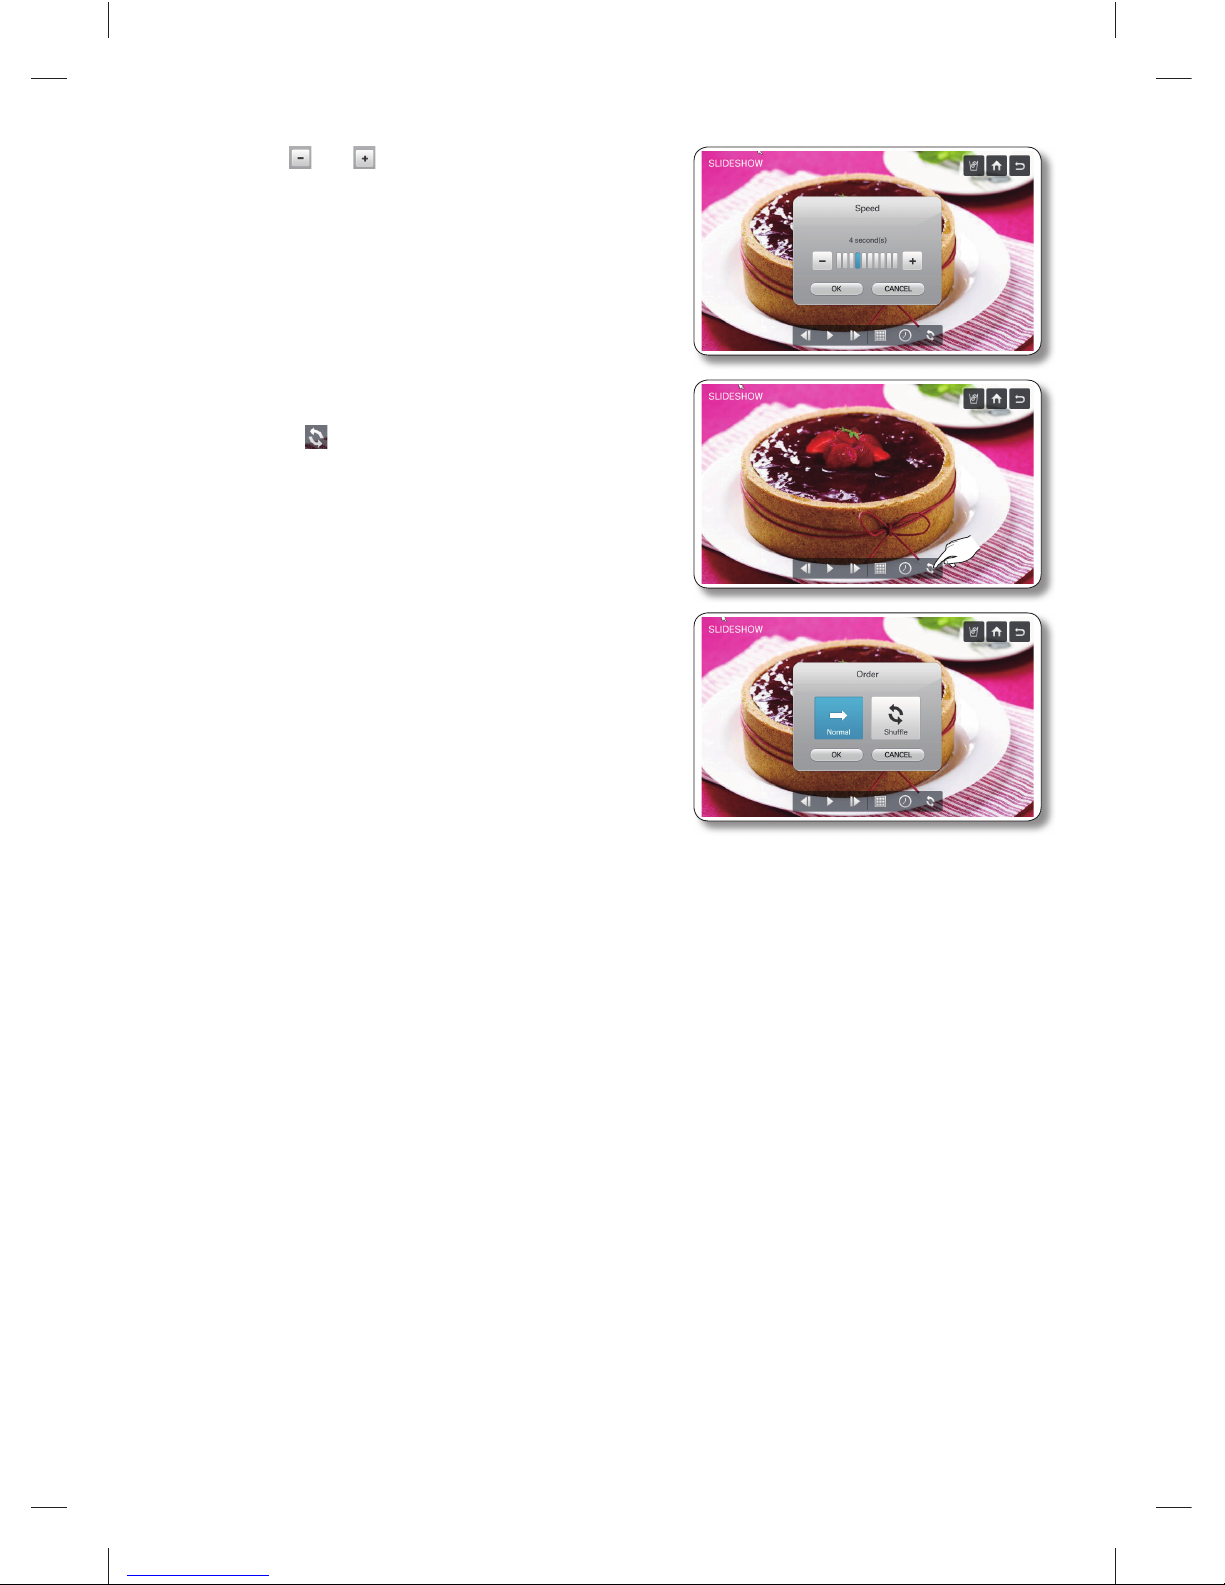
10. Use the and buttons to change the slide show
transition time, and then press the [OK] button.
11. To change the order of the photos in the slide show,
select the
button.
12. Select [Normal] or [Shuffl e], and then press the [OK]
button.
DA68-02520B(0.2).indb 40DA68-02520B(0.2).indb 40 2013.2.28 10:17:30 AM2013.2.28 10:17:30 AM
Page 41
operating _41
02 OPERATING
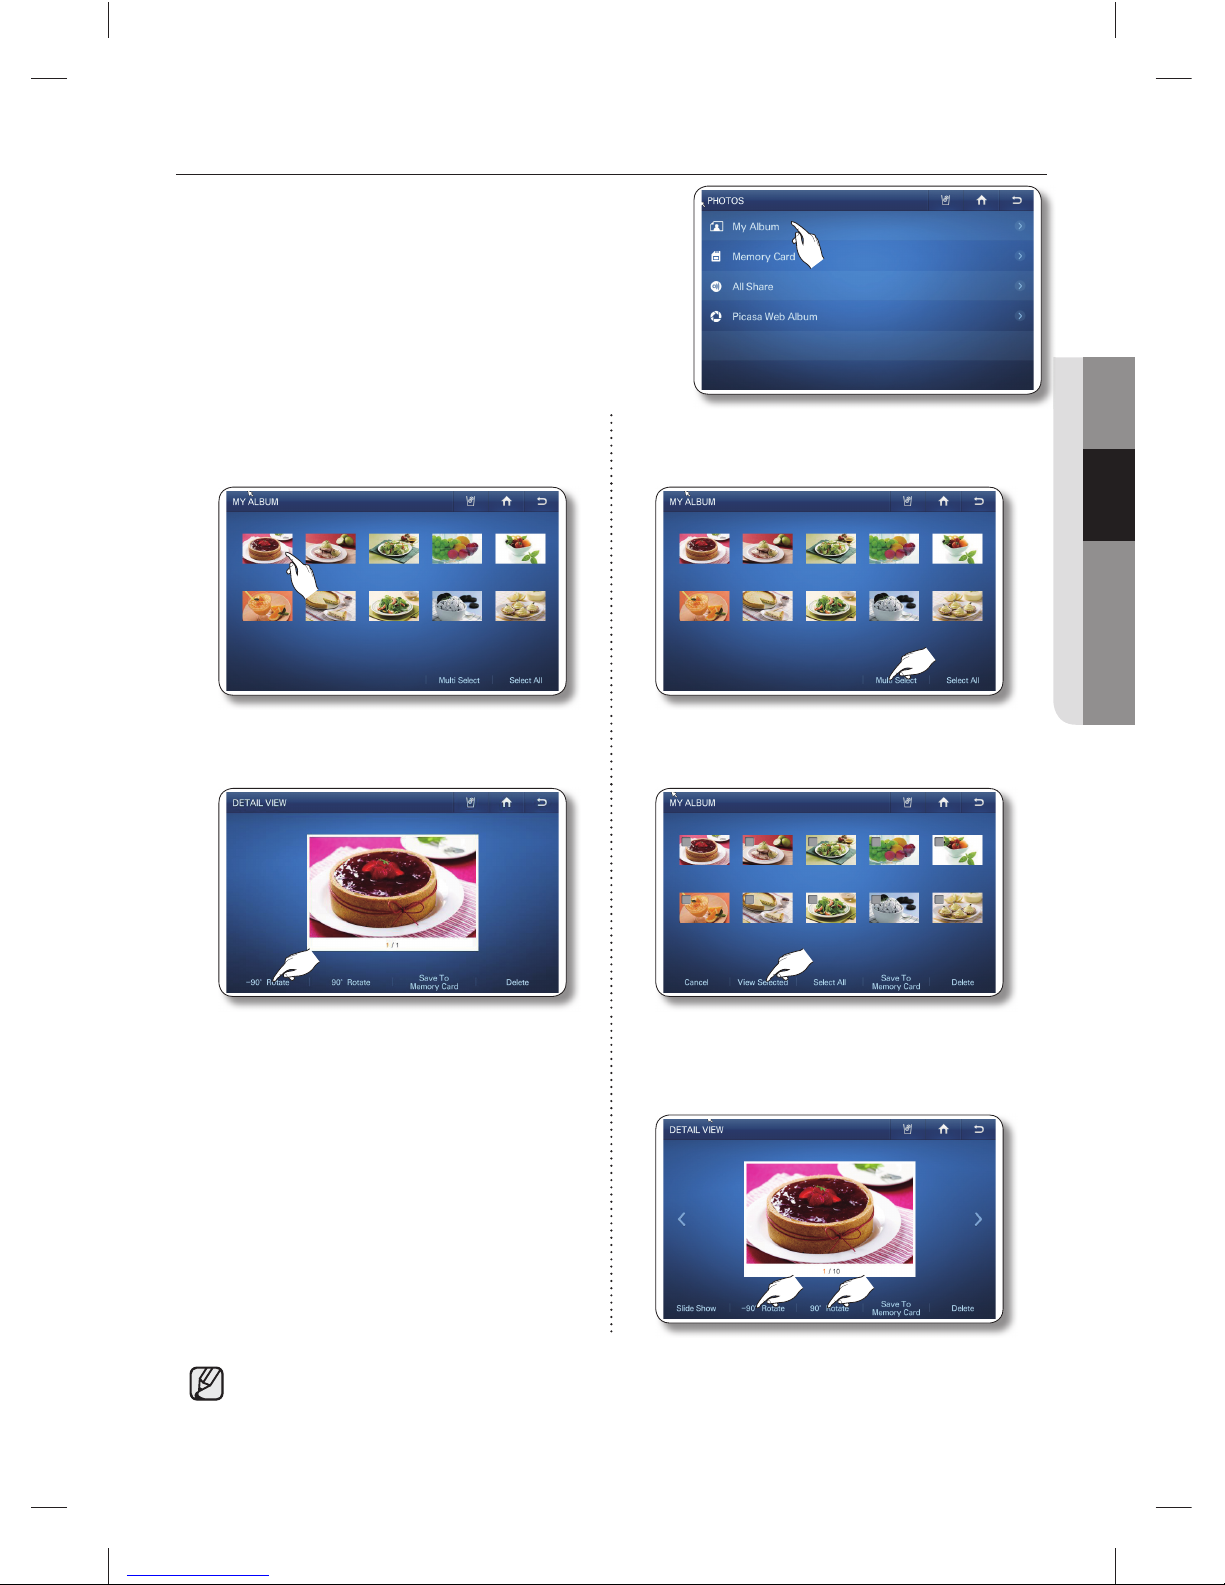
How to rotate photos.
1. Select [My Album] in the Photos list.
2. Select the photo you want to rotate. 2. Select the [Multi Select] button to rotate
multiple photos.
3. Select the [-90° Rotate] or [90° Rotate]
button.
3. Select the photos you want to rotate, and
then press the [View Selected] button.
4. After selecting the photos you want to
rotate, select the [-90° Rotate] or [90°
Rotate] button.
• The system automatically stores the rotated photos, replacing the original photos.
DA68-02520B(0.2).indb 41DA68-02520B(0.2).indb 41 2013.2.28 10:17:32 AM2013.2.28 10:17:32 AM
Page 42
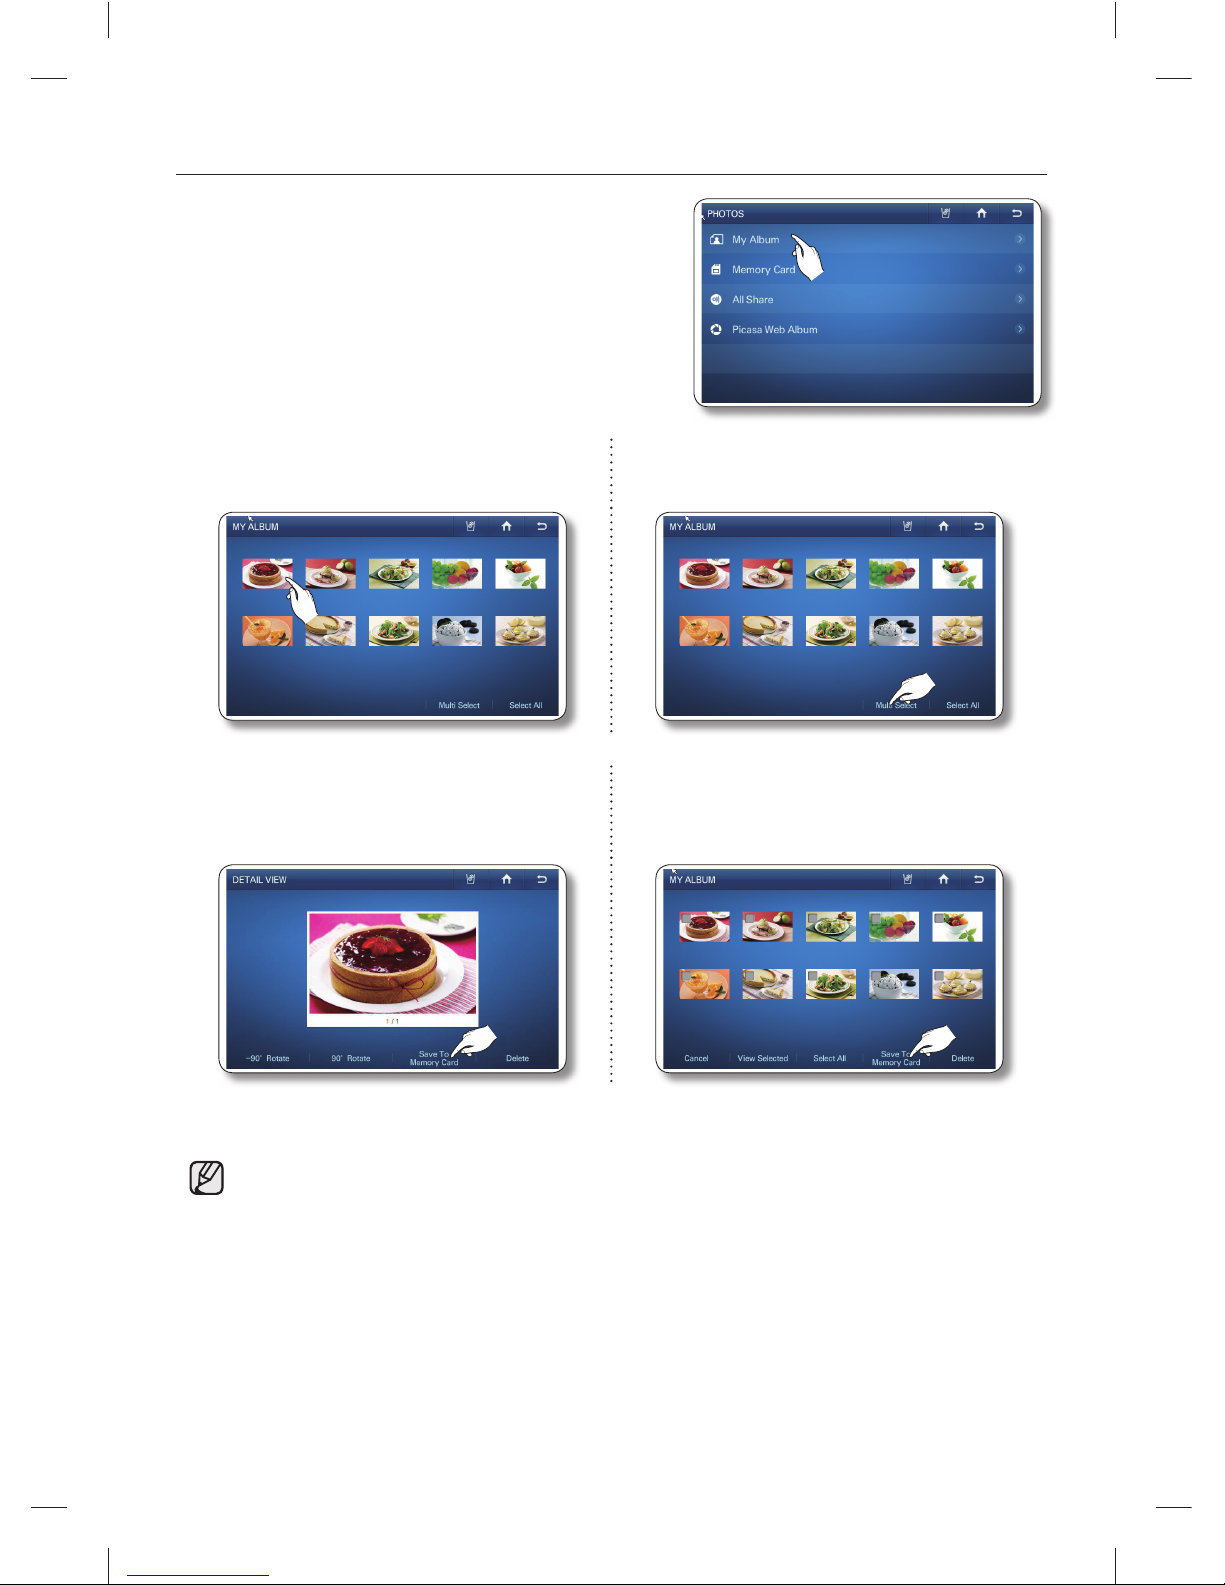
42_ operating
Saving photos to a memory card.
1. Insert a memory card into the refrigerator’s memory card
slot.
2. Select [My Album] in the Photos list.
3. Select the photo you want to save. 3. To save multiple photos, select the [Multi
Select] button.
4. Press the [Save To Memory Card] button. 4. Select the photos you want to save, and
then press the [Save To Memory Card]
button.
5. While the photos are being save, “Save To Memory Card” appears on the screen.
• You must insert a memory card into the memory card slot to use this function.
DA68-02520B(0.2).indb 42DA68-02520B(0.2).indb 42 2013.2.28 10:17:33 AM2013.2.28 10:17:33 AM
Page 43
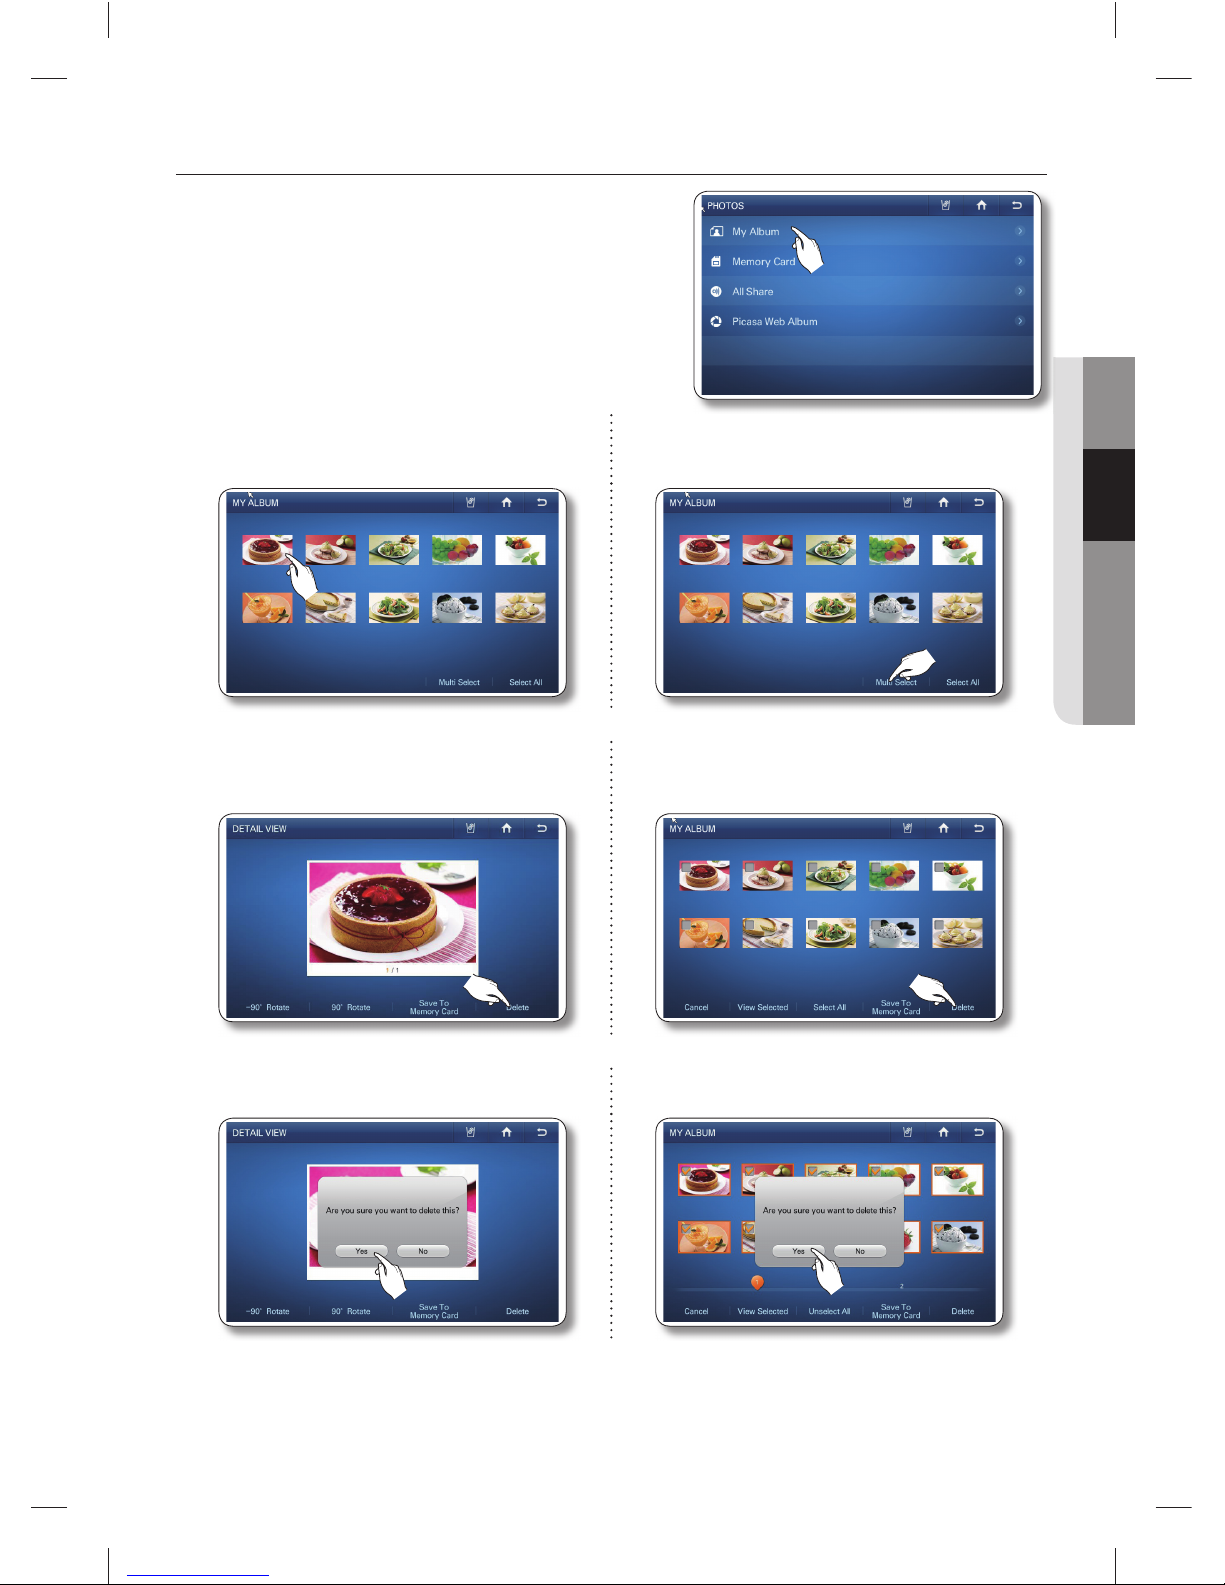
operating _43
02 OPERATING
How to delete photos.
1. Select [My Album] in the Photos list.
2. Select the photo you want to delete. 2. To delete multiple photos, press the [Multi
Select] button.
3. Press the [Delete] button. 3. Select the photos you want to delete, and
then press the [Delete] button.
4. Press the [Yes] button. 4. Press the [Yes] button.
There are 10 photos that have been pre-loaded by Samsung.•
These photos explain product features and cannot be deleted.
DA68-02520B(0.2).indb 43DA68-02520B(0.2).indb 43 2013.2.28 10:17:35 AM2013.2.28 10:17:35 AM
Page 44
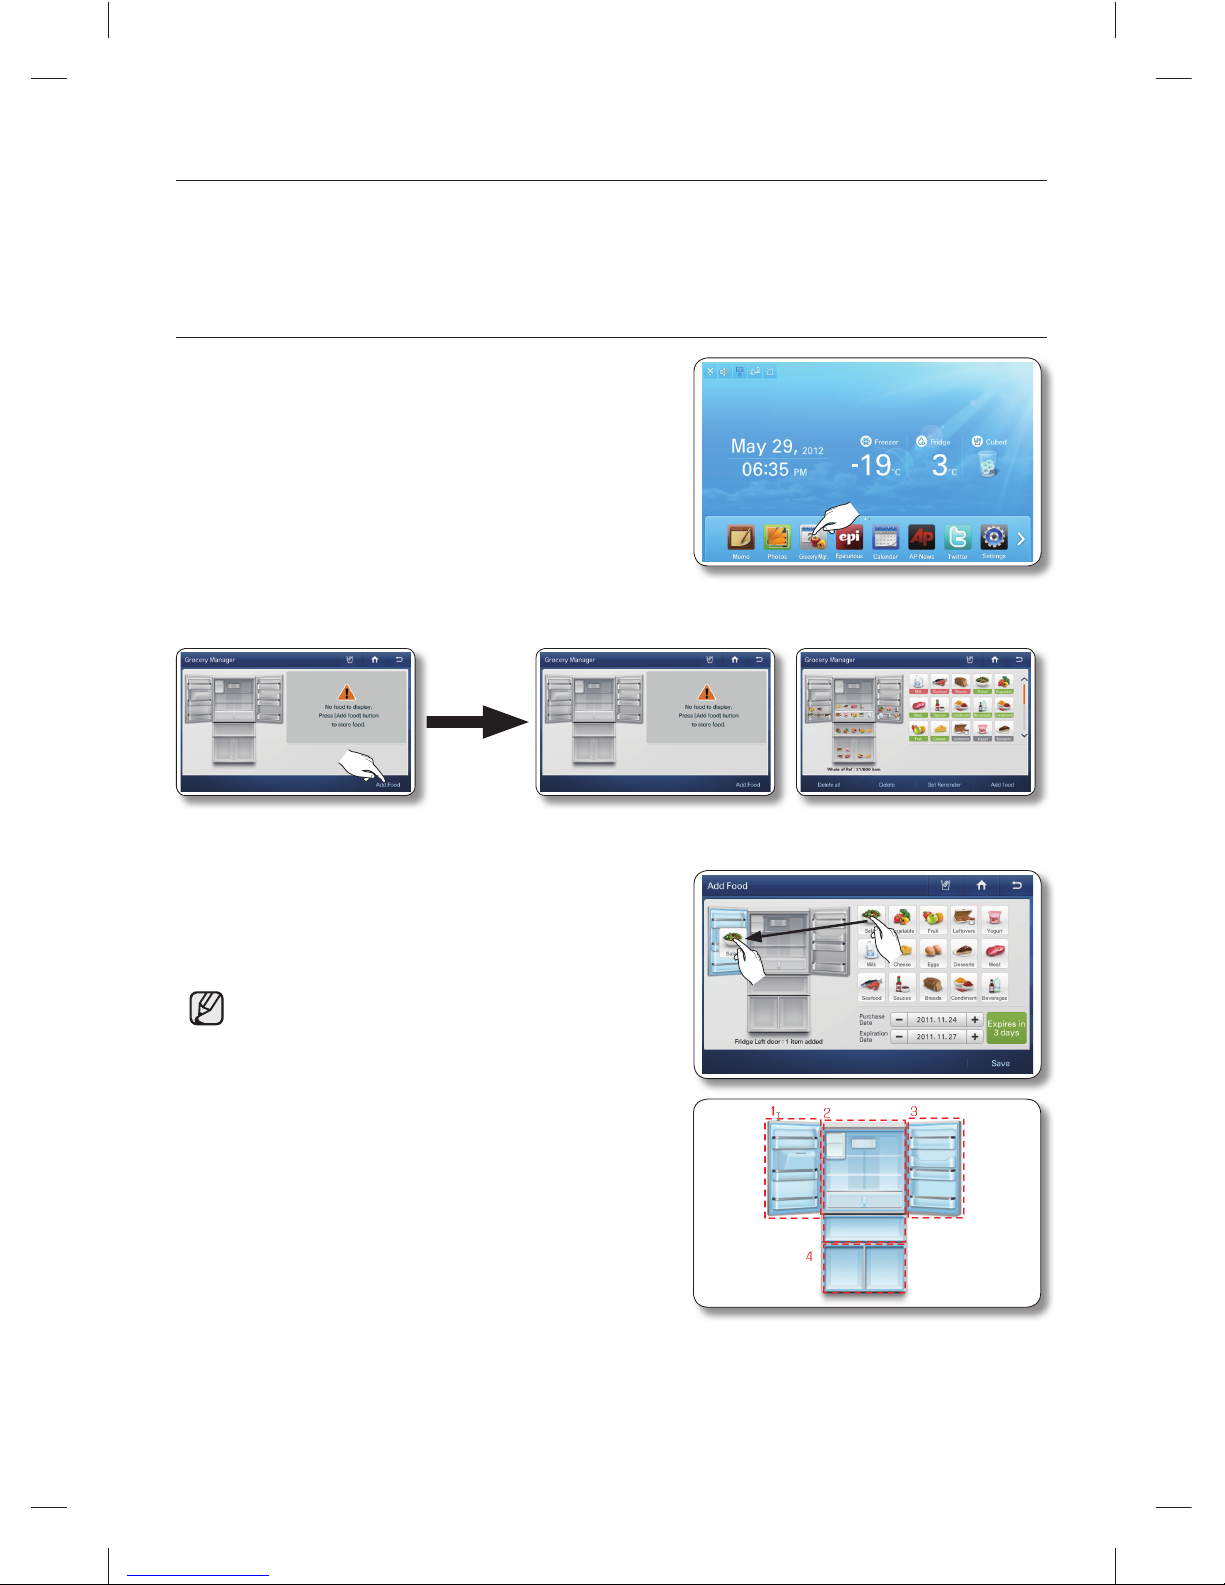
44_ operating
GROCERY MANAGER
You can save the purchase date and expiration date of your food before storing it in the fridge and then
easily check how long food has been stored at a later time.
Additionally, you can easily see what food items are stored and where they are located in the refrigerator.
How to add food
1. Select the [Grocery Manager] button on the Home
screen.
2. Select the [Add Food] button at the bottom right.
3. Select and hold one of the food images displayed on
the right. Then, drag & drop it into the location on the
refrigerator image where it will be stored. Be sure to
keep your fi nger on the food image until it is in place.
• The storage area for the refrigerator is divided into 4
sections. The added food is displayed as an icon in
the refrigerator image.
To change the location of a stored item, press and •
hold the food image, and then drag & drop it to
another location within the refrigerator image.
If you select a food icon added to the refrigerator •
and drag & drop it outside of the refrigerator, the
food item is deleted.
The refrigerator section and the quantity of added •
food items are displayed at the bottom of the
refrigerator image.
You can store up to 15 kinds of food and ‘freshness’ •
durations. See examples below: All food : 3 days.
[No food is stored]
[No food is stored]
[Food is stored]
[Food is stored]
DA68-02520B(0.2).indb 44DA68-02520B(0.2).indb 44 2013.2.28 10:17:37 AM2013.2.28 10:17:37 AM
Page 45
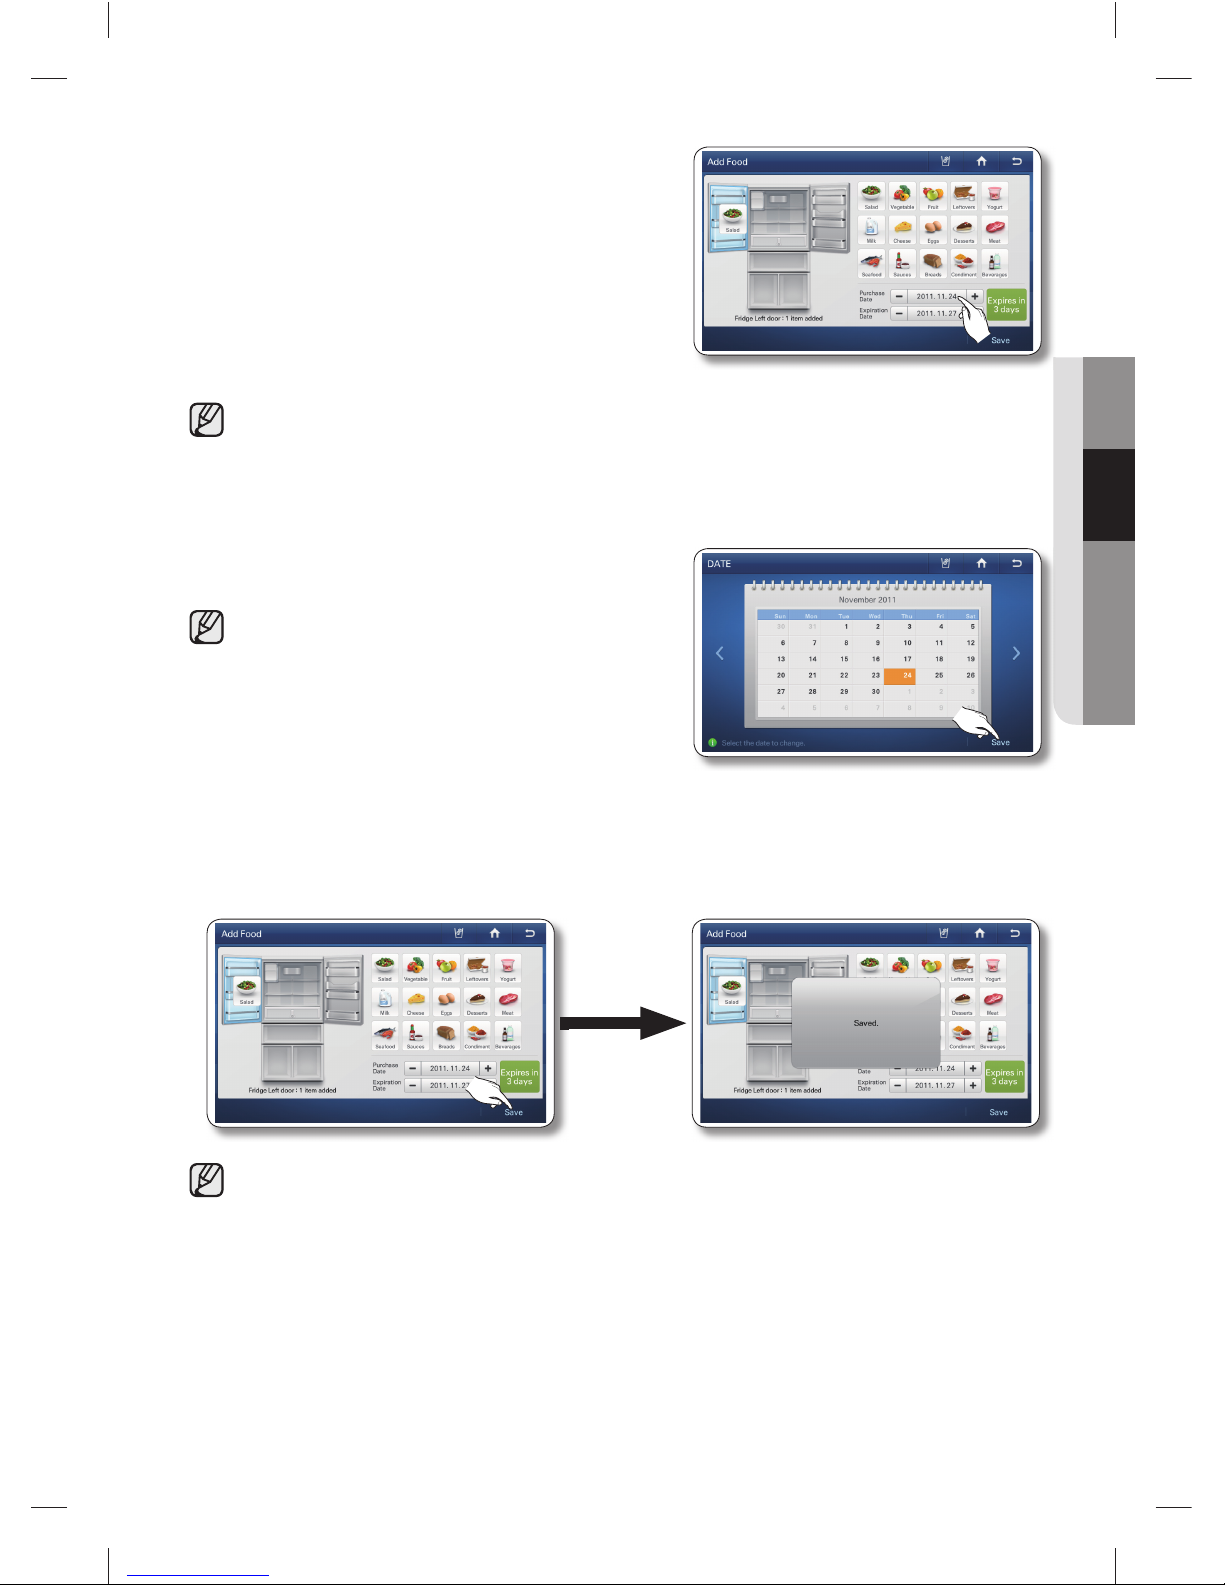
operating _45
02 OPERATING
4. The ‘Purchase Date’ and ‘Expiration Date’ are displayed
at the bottom of the screen.
The Purchase Date is automatically set to today, the
Expiration Date is automatically set to the last day of the
freshness duration.
To change the Purchase Date, touch the appropriate
section on the screen, and then enter the new date.
• You can also select a date by using the [+] and [-] buttons.
However, the Purchase Date must always be earlier than the Expiration Date.
5. Select the date, and then press [Save] button.
• To select additional food items, repeat steps 2 to 5.
6. Press the [OK] button after you have completed the date settings.
Press the [Save] button to save your settings.
• You can save up to 50 grocery items.
DA68-02520B(0.2).indb 45DA68-02520B(0.2).indb 45 2013.2.28 10:17:39 AM2013.2.28 10:17:39 AM
Page 46
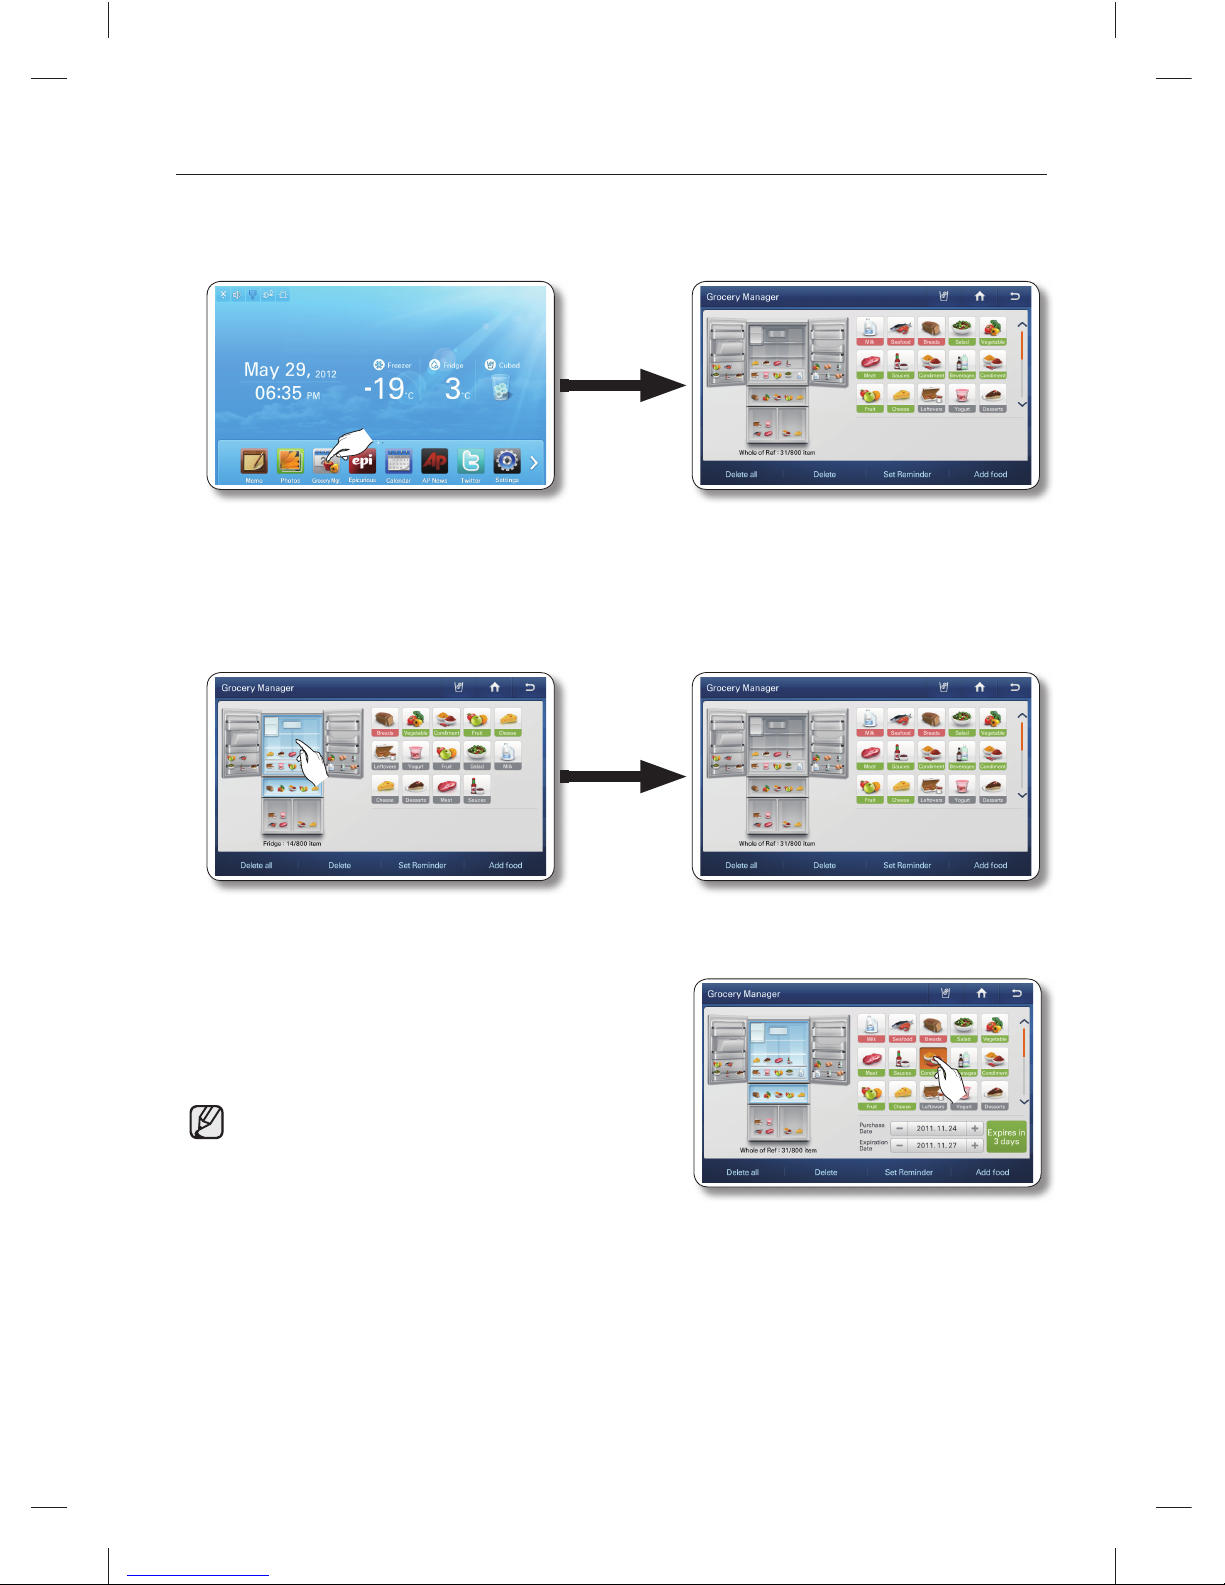
46_ operating
How to use the Grocery Manager
1. Select the [Grocery Manager] button on the Home screen.
All food items are displayed as icons in their stored locations within the refrigerator image on the left.
They are also listed on the right side of the screen.
2. Select a storage section in the refrigerator image to display the food stored in that section on the
right side of screen. Select the storage section again (deselect it) to list all the food items stored in
the refrigerator on the right side of the screen.
3. Select one of the stored food icons on the right side
of the screen to identify where it is located in the
refrigerator. The purchase and expiration dates of the
item will also be displayed.
• An expiration date can be set up to 999 days.
You cannot modify the purchase date and expiration •
date of the food in the Grocery Manager screen.
DA68-02520B(0.2).indb 46DA68-02520B(0.2).indb 46 2013.2.28 10:17:41 AM2013.2.28 10:17:41 AM
Page 47
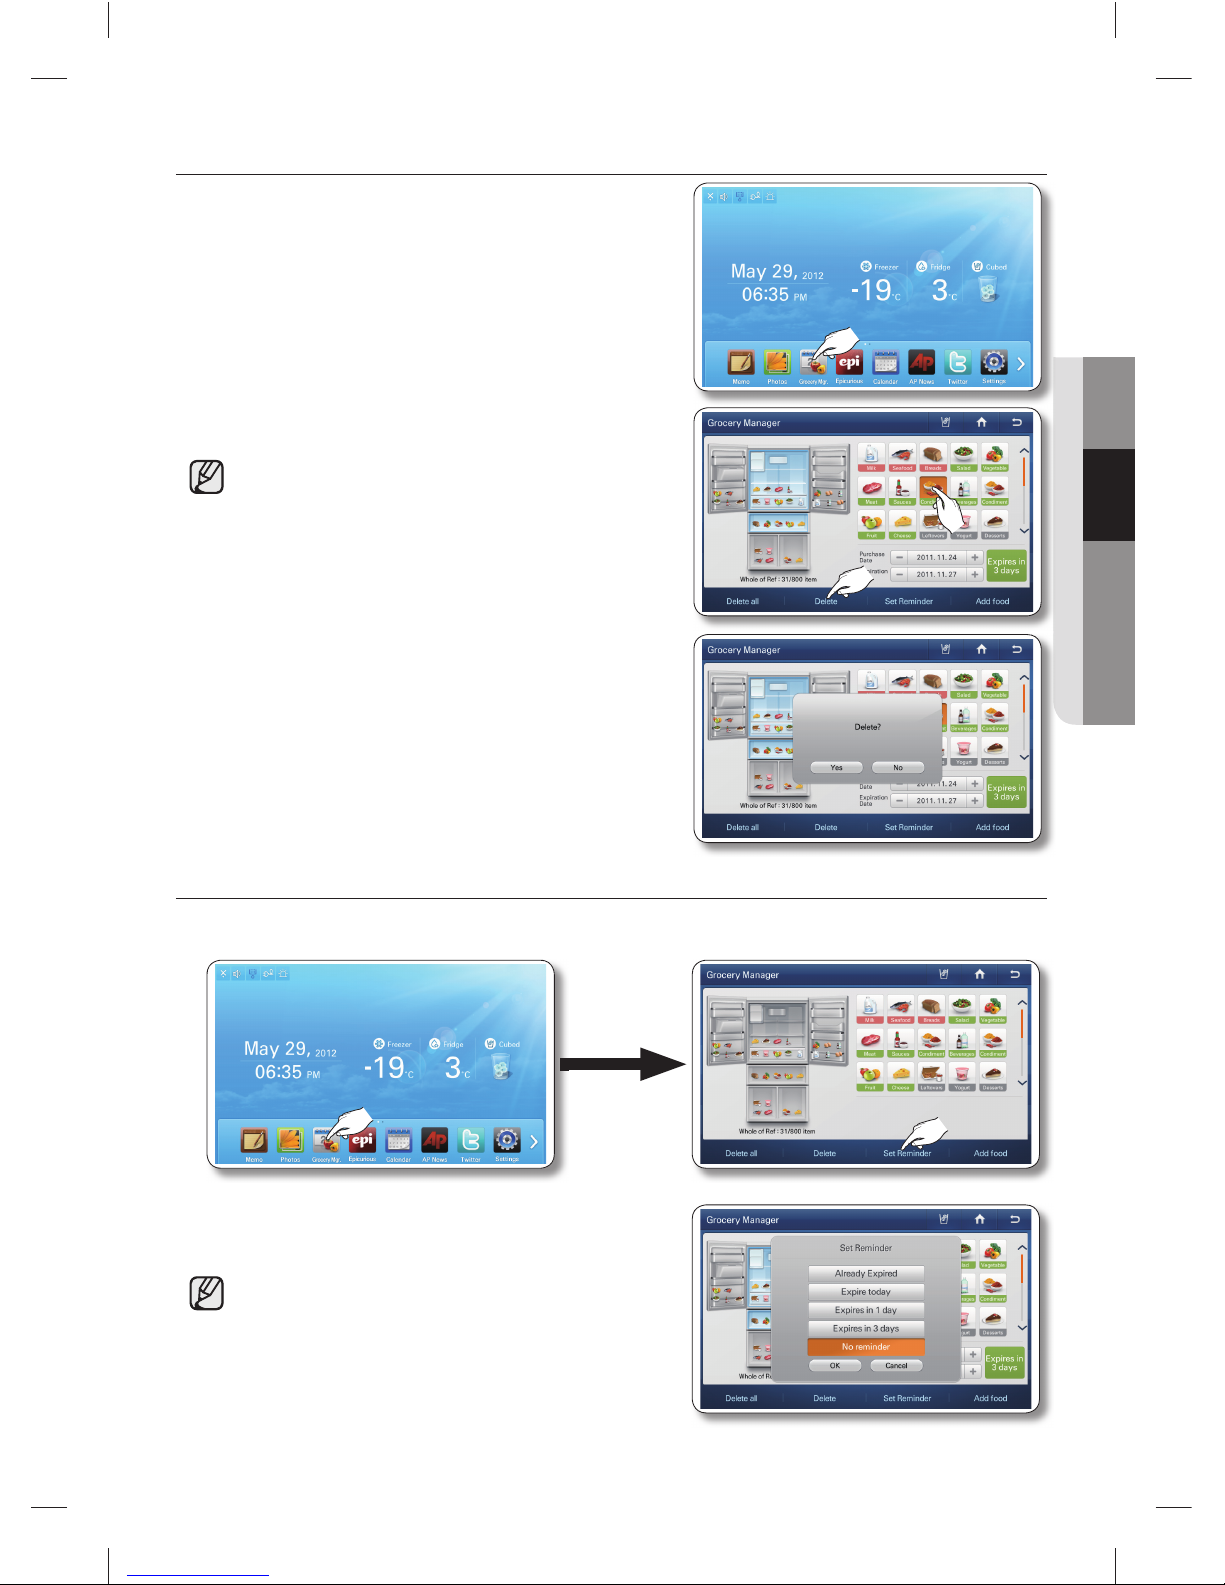
operating _47
02 OPERATING
How to delete food
1. Select the [Grocery Manager] button on the Home
screen.
2. Select the food, and then select the [Delete] button.
• To select all the stored food items, select the [Delete
all] button.
3. Select the [Yes] button to complete.
How to set a Reminder
1. Select the [Grocery Manager] button on the Home screen, and then select the [Set Reminder]
button.
2. Select the Reminder options you want, and then select
the [OK] button.
• A reminder is set based on the Expiration Date of
the stored food. A reminder window appears when
the scheduled duration has passed.
If more than one item is set to the same Reminder •
value (except [None]), the reminder window appears
at 6:00 AM, 11:00 AM and 5:00 PM.
DA68-02520B(0.2).indb 47DA68-02520B(0.2).indb 47 2013.2.28 10:17:42 AM2013.2.28 10:17:42 AM
Page 48
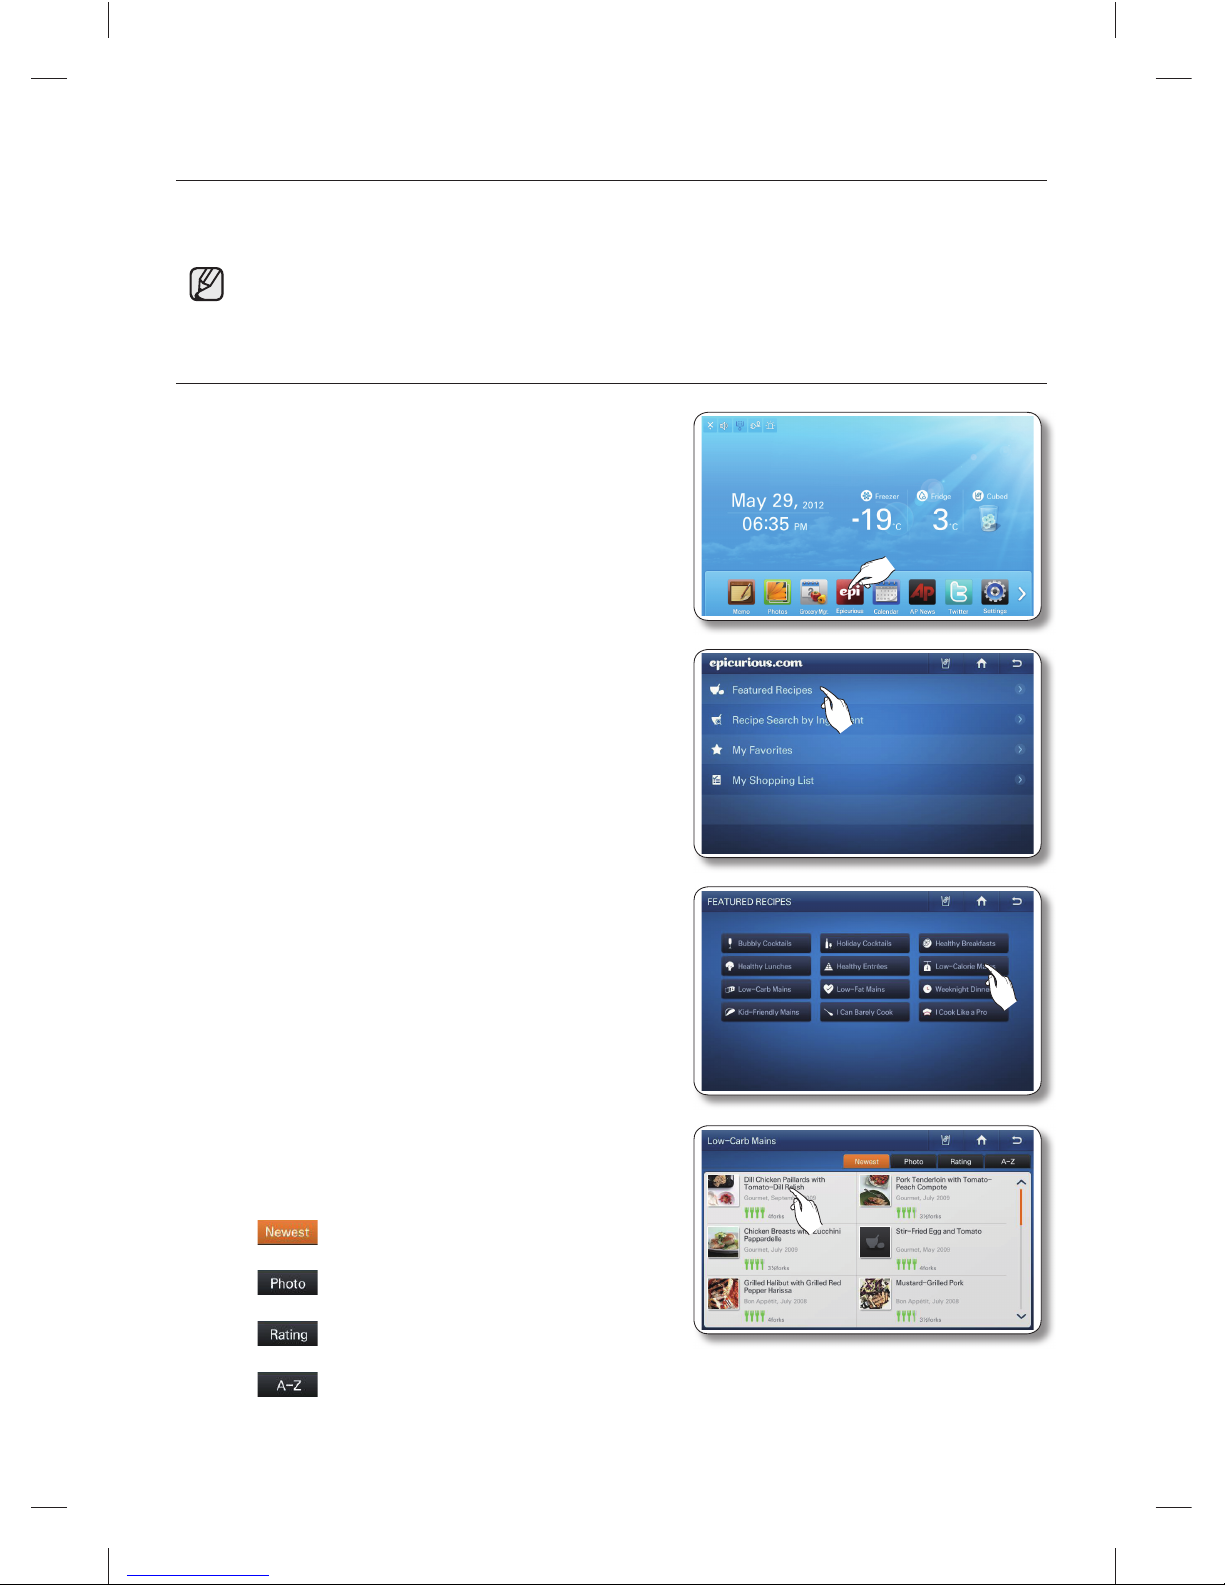
48_ operating
EPICURIOUS
With the Epicurious service, you can easily to fi nd various recipes by ingredient, season, occasion, or
category.
• This function is only available when the refrigerator is connected to your wireless
network (Wi-Fi).
How to use the Featured Recipes function
1. Select the [Epicurious] button on the Home screen.
There will be a 4-second commercial ad when you •
start Epicurious.
2. Select [Featured Recipes] on the epicurious list.
3. Select a Featured Recipes category.
The screen displays a list of recipes.
4. Select a recipe. The screen displays the recipe
ingredients and other details.
The popularity of a recipe is indicated by the •
number of forks. Four forks is the highest.
• : Select to show recipes in the last used
order.•
• : Select to show in order of photo
information.•
• : Select to show recipes in order of
popularity.•
• : Select to show recipes in alphabetical order.
DA68-02520B(0.2).indb 48DA68-02520B(0.2).indb 48 2013.2.28 10:17:44 AM2013.2.28 10:17:44 AM
Page 49
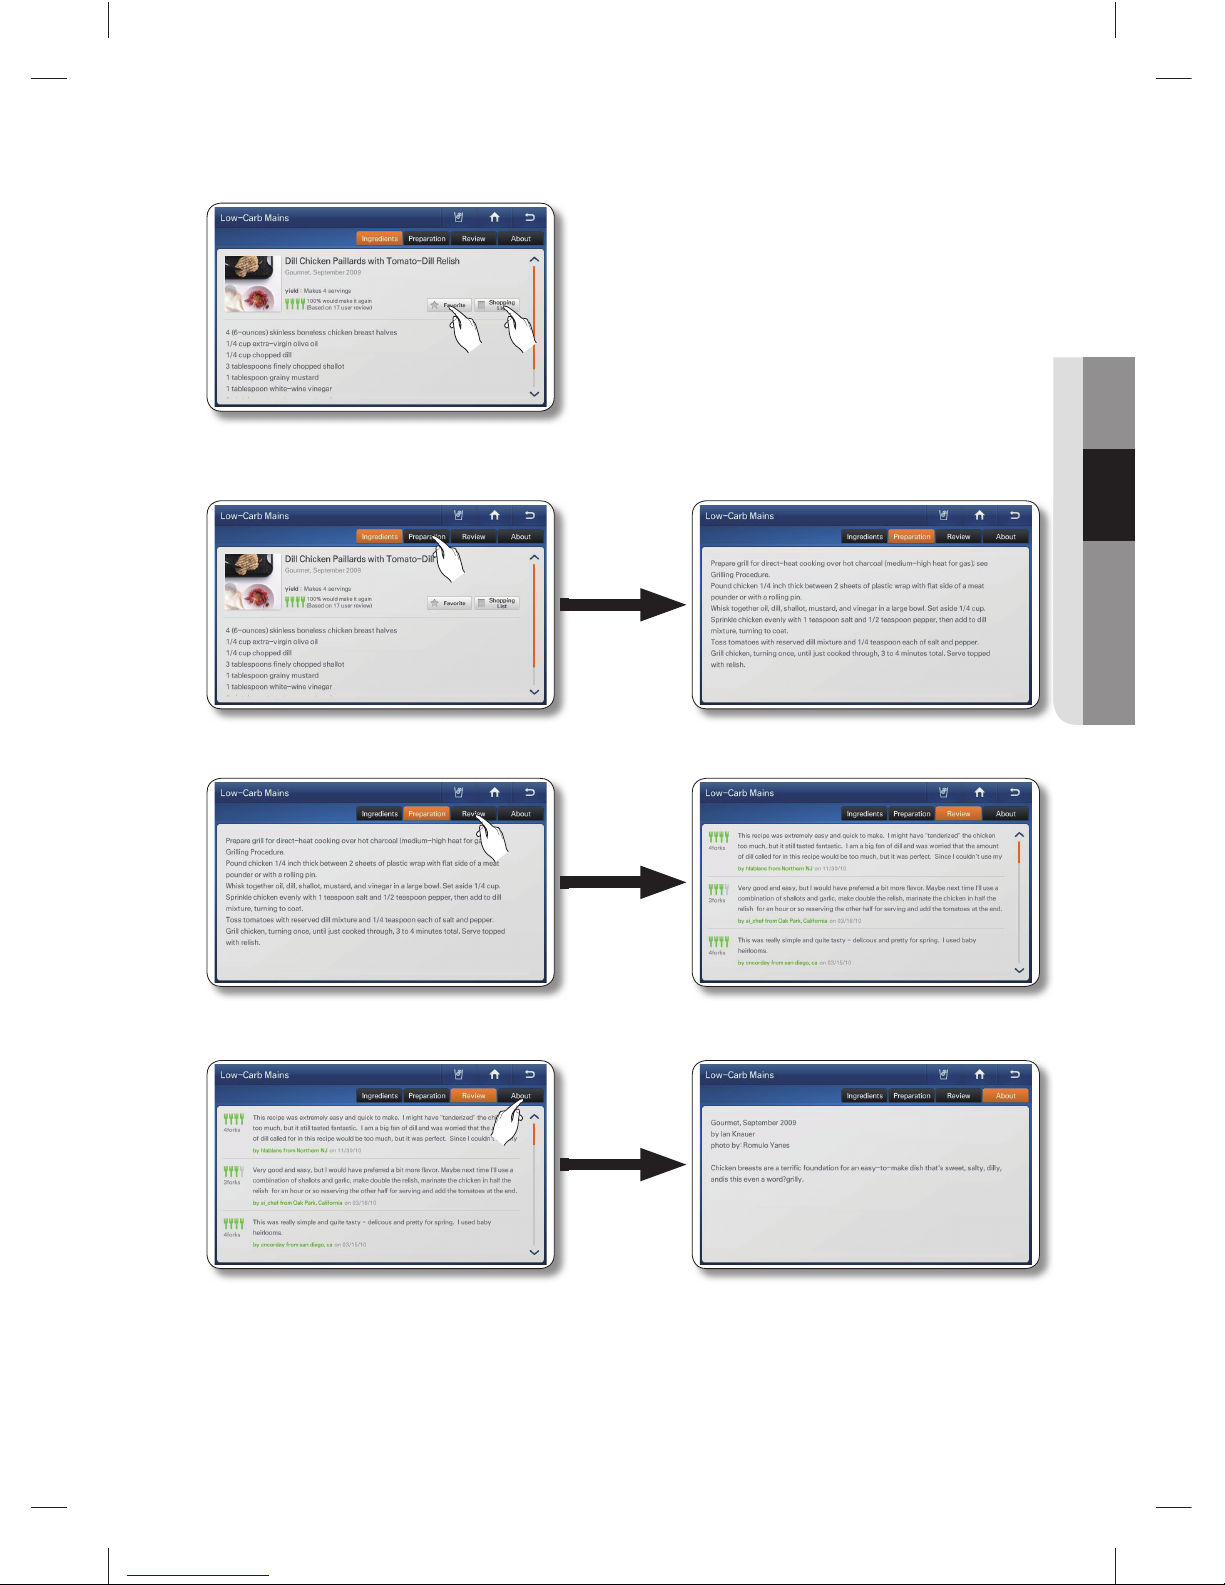
operating _49
02 OPERATING
5. Press the [Favorite] button to add a recipe to your favorite list.
Press the [Shopping List] button to make a shopping list for a recipe.
6. Select the [Preparation] tab on the top of the page to view the recipe’s step by step preparation
instructions.
7. Select the [Review] tab on the top of the page to see reviews of the recipe by other users.
8. Select the [About] tab on the top of the page to view information about the author of the recipe.
DA68-02520B(0.2).indb 49DA68-02520B(0.2).indb 49 2013.2.28 10:17:46 AM2013.2.28 10:17:46 AM
Page 50
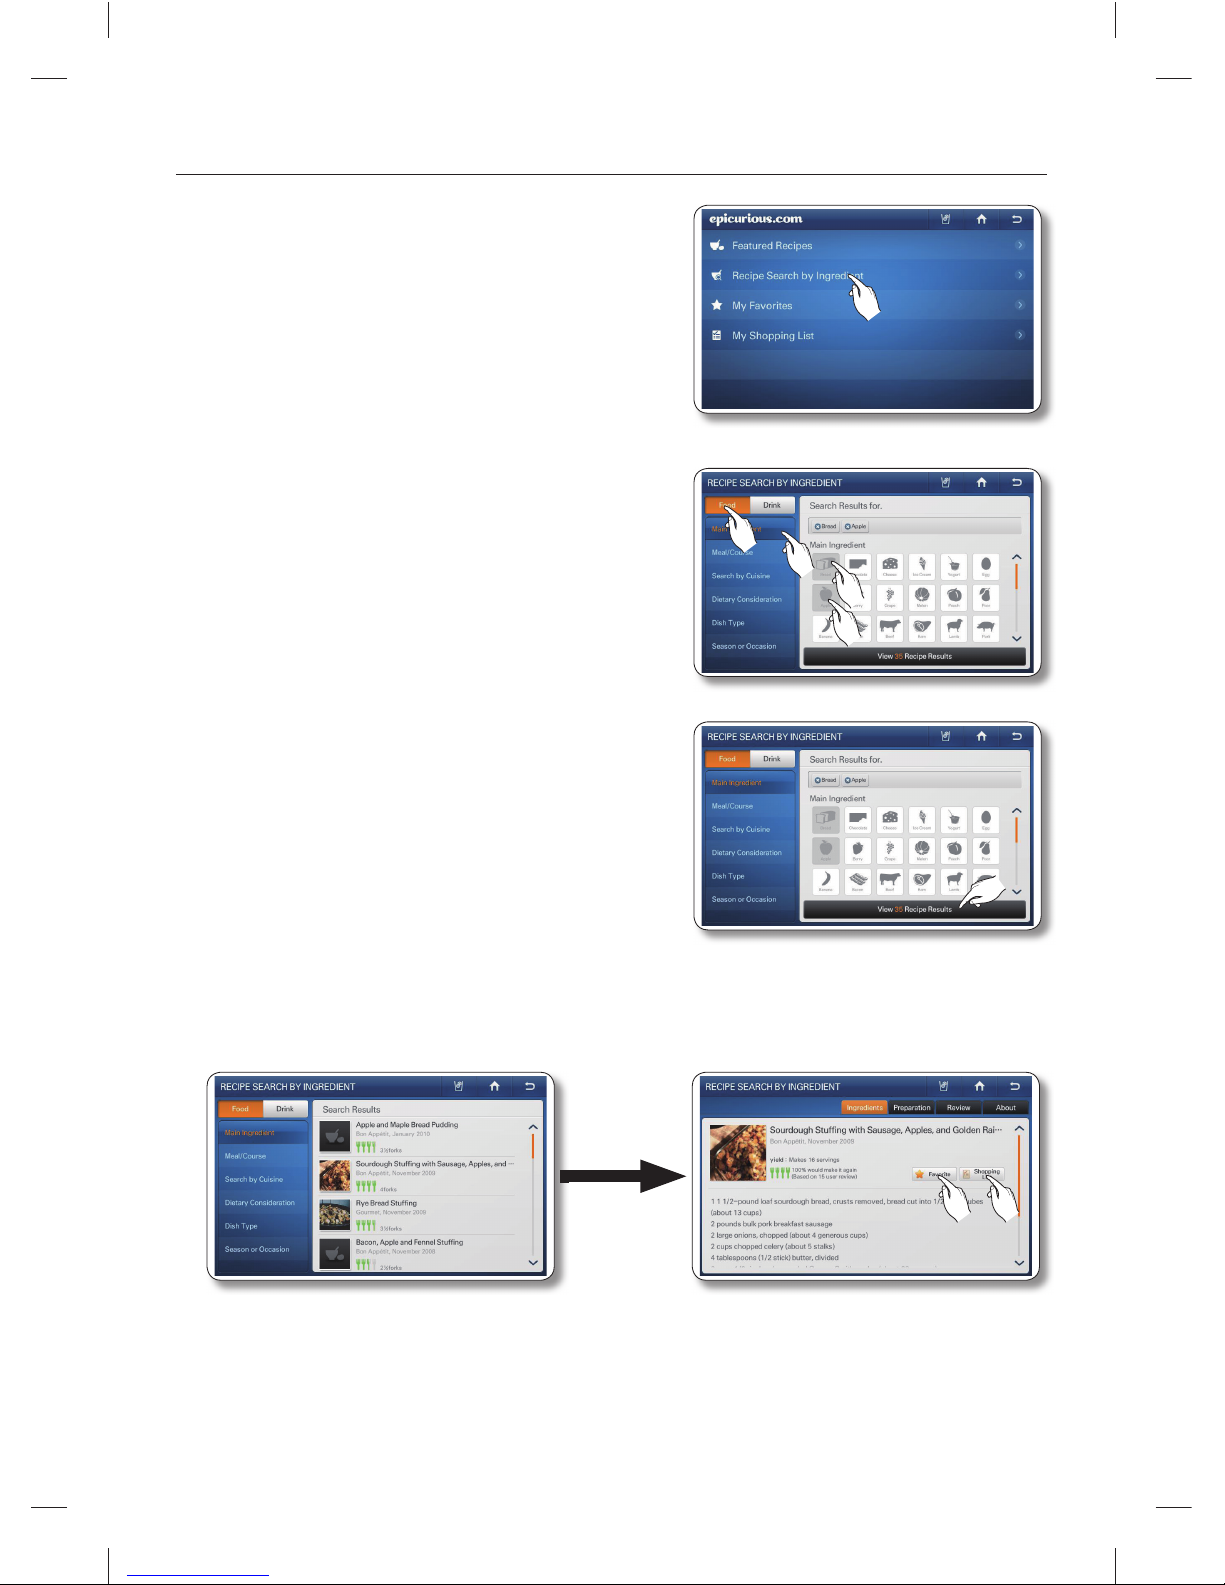
50_ operating
How to use Recipe Search by Ingredient.
1. Select [Recipe Search by Ingredient] on the Epicurious
list.
2. Select the [Food] or [Drink] button, and then select the
[Food]/[Drink] type on the left of screen.
Next, select an ingredient icon on the right.
When you select an ingredient icon, the number of •
recipes using that ingredient appears on the bottom
of the page.
You can select multiple ingredient icons.•
3. Select the [View Recipe Results] button.
4. Select the recipe you want. The screen displays the ingredients and other detail information.
5. Select the [Favorite] button to add the recipe to your Favorites list.
Select the [Shopping] List button to view a shopping list for the recipe.
DA68-02520B(0.2).indb 50DA68-02520B(0.2).indb 50 2013.2.28 10:17:48 AM2013.2.28 10:17:48 AM
Page 51
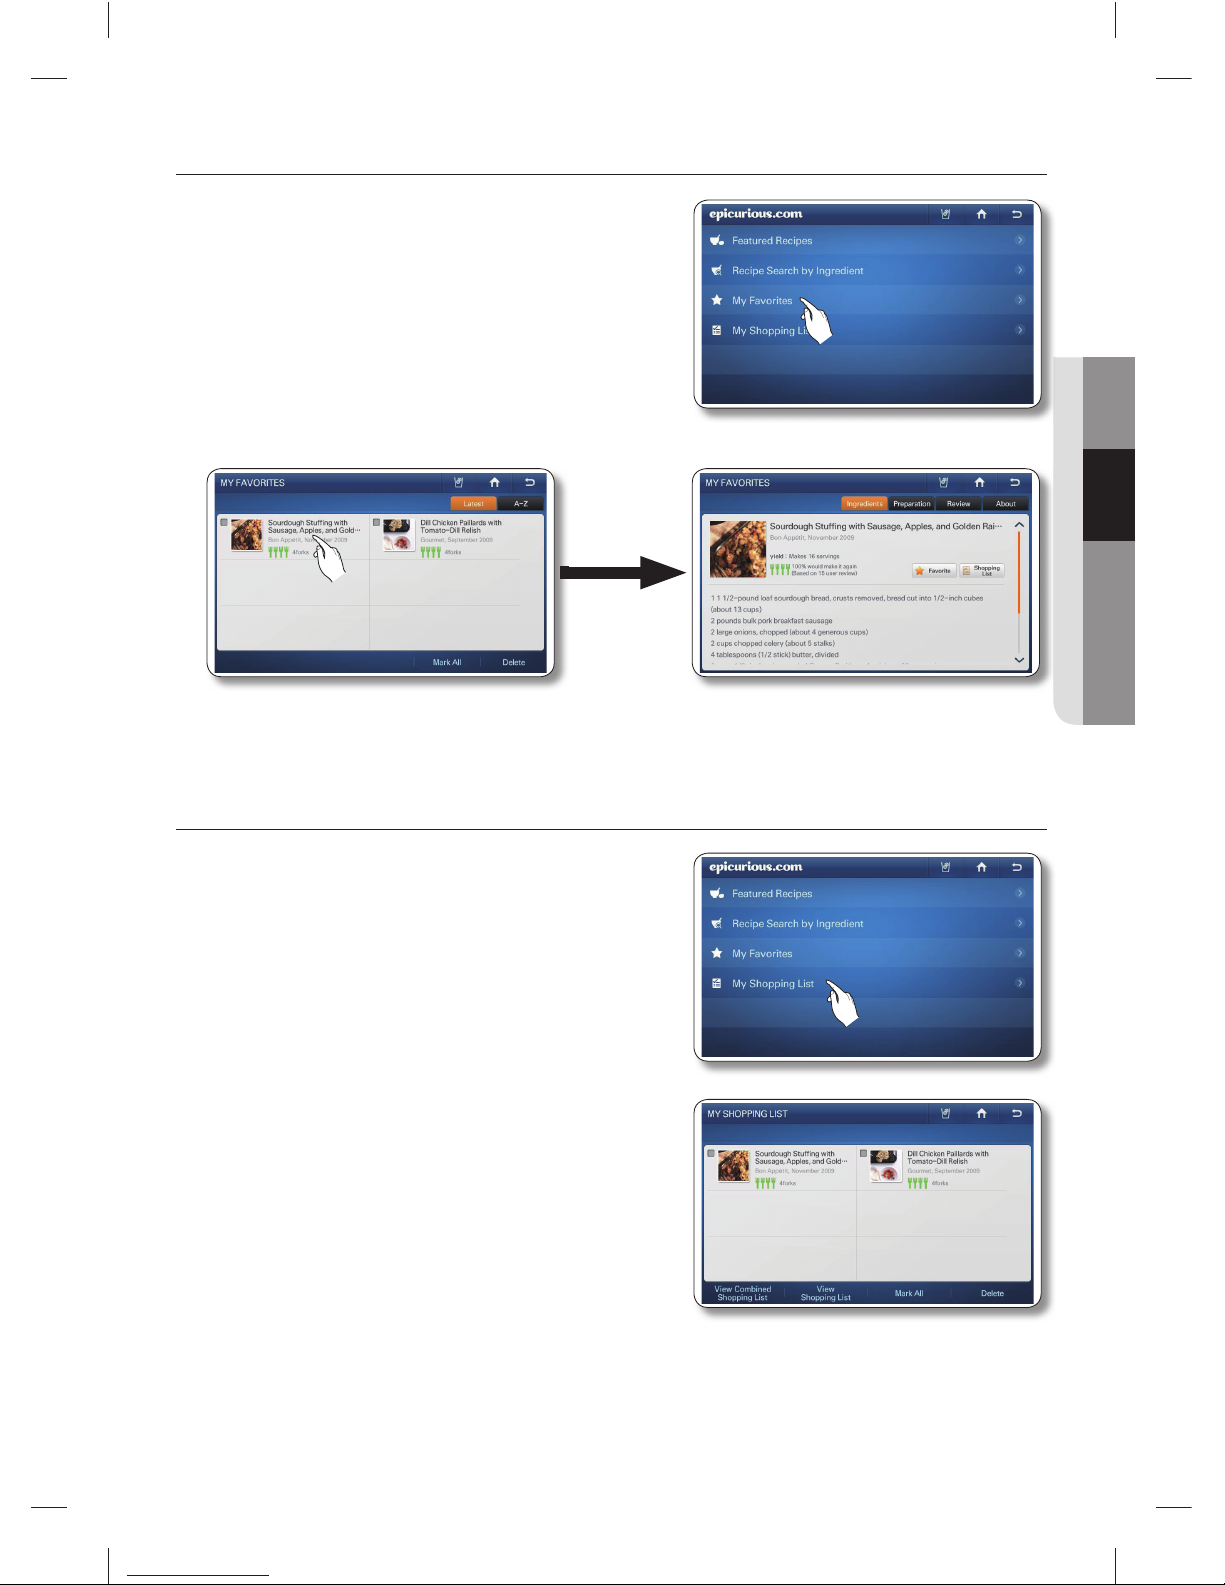
operating _51
02 OPERATING
How to use My Favorites.
1. Select [My Favorites] on the Epicurious list.
You can store up to 100 favorite recipes.•
2. Select the recipe you want.
Select the A-Z button on the right to arrange the favorites in the alphabetical order.•
Select a recipe, and then select the [Delete] button to delete the recipe from your Favorites List.•
How to use My Shopping List.
1. Select [My Shopping List] on the Epicurious list.
Displays the ingredients for recipes you select so •
you can create shopping lists.
You can store up to 100 shopping lists.•
2. Select the recipe or recipes you want.
DA68-02520B(0.2).indb 51DA68-02520B(0.2).indb 51 2013.2.28 10:17:50 AM2013.2.28 10:17:50 AM
Page 52
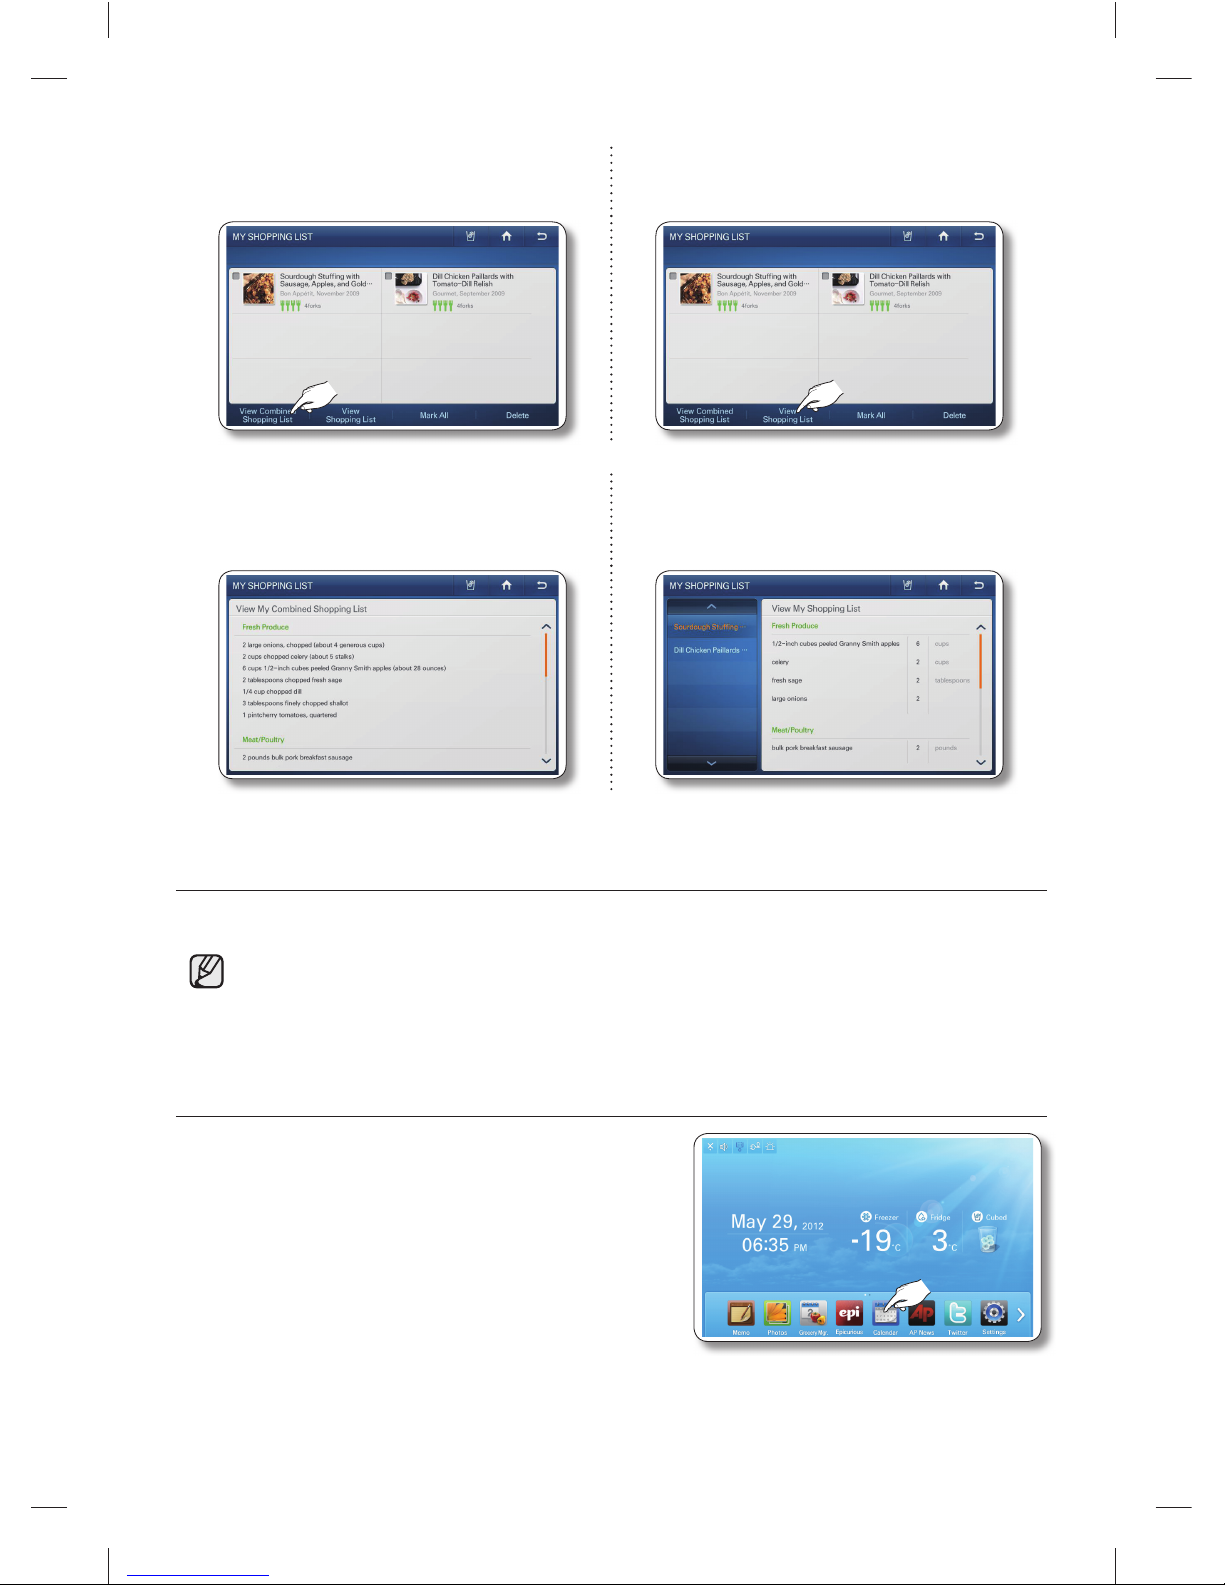
52_ operating
3. Select the [View Combined Shopping List]
button.
3. Select the [View Shopping List] button.
4. The screen displays the combined ingredient
list for all the recipes you selected.
4. Select a recipe on the left of screen.
The screen displays the ingredient list for
the recipe you selected.
CALENDAR
Displays the calendar from Google Calendar.
• This function is only available when the refrigerator is connected to your wireless network (Wi-Fi).
To use the Calendar function, you need a Google account.•
The Calendar schedule supports dates from Jan 1970 to Dec 2037.•
How to view the Google Calendar.
1. Select the [Calendar] button on the Home screen.
DA68-02520B(0.2).indb 52DA68-02520B(0.2).indb 52 2013.2.28 10:17:51 AM2013.2.28 10:17:51 AM
Page 53
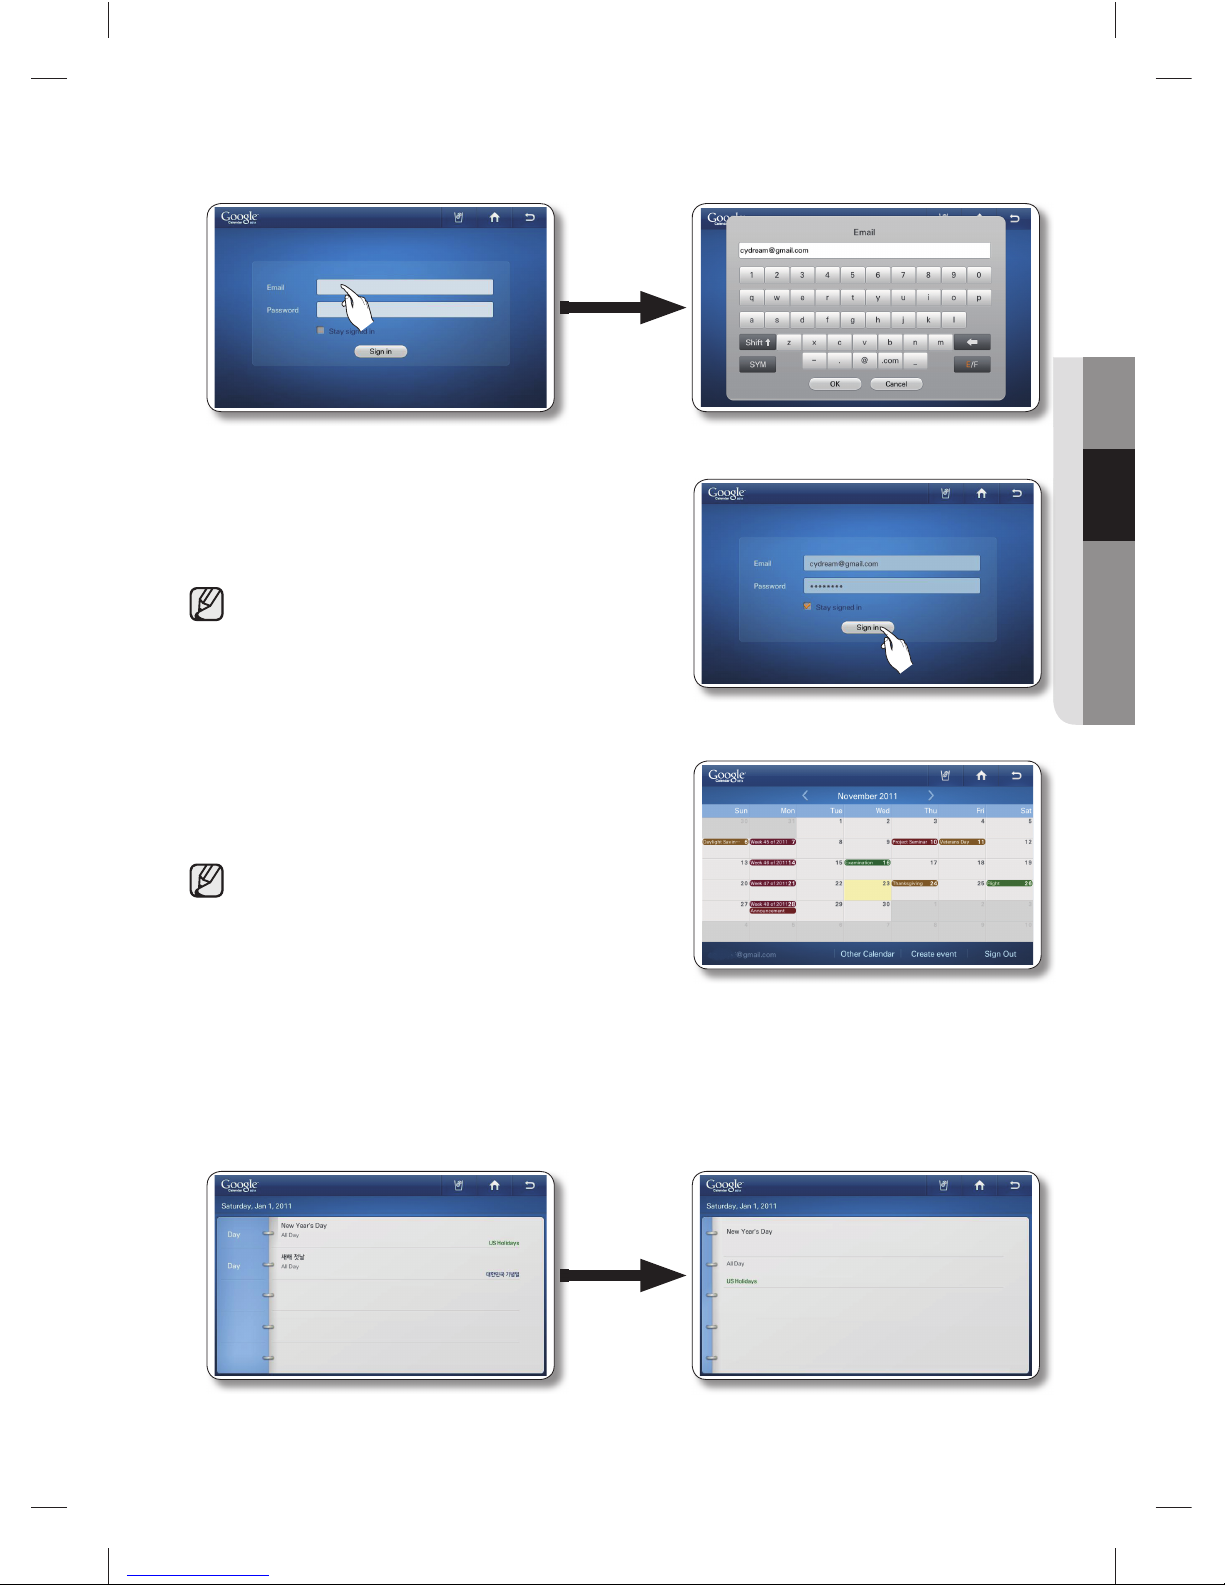
operating _53
02 OPERATING
2. Select the Email input box, and then enter your Google account ID using the on-screen keyboard.
Select the Password input box, and then enter your password using the on-screen keyboard.
3. Press the [Sign in] button.
If you check the ‘Stay signed in’ box, the refrigerator •
will store the account for faster future log-ins.
• If you do not have a Google account, you can get
one at http://calendar.google.com.
In the Email section, enter your Google account ID •
in this format: [email protected].
4. To view your schedule, select a date. The screen
displays the daily schedule for the date you selected.
• You cannot modify or erase the Google Calendar
schedule through the refrigerator Display screen.
The display color of each scheduled event is the •
same as that in the Google Calendar application.
Press the left / right direction arrows to check the •
Monthly Schedule.
When there are more than 4 events within a day, the calendar indicates the excess with “+1 •
more”.
The schedule updates every 30 minutes.•
5. Press the event you want to view. The event you selected appears on the screen.
DA68-02520B(0.2).indb 53DA68-02520B(0.2).indb 53 2013.2.28 10:17:53 AM2013.2.28 10:17:53 AM
Page 54
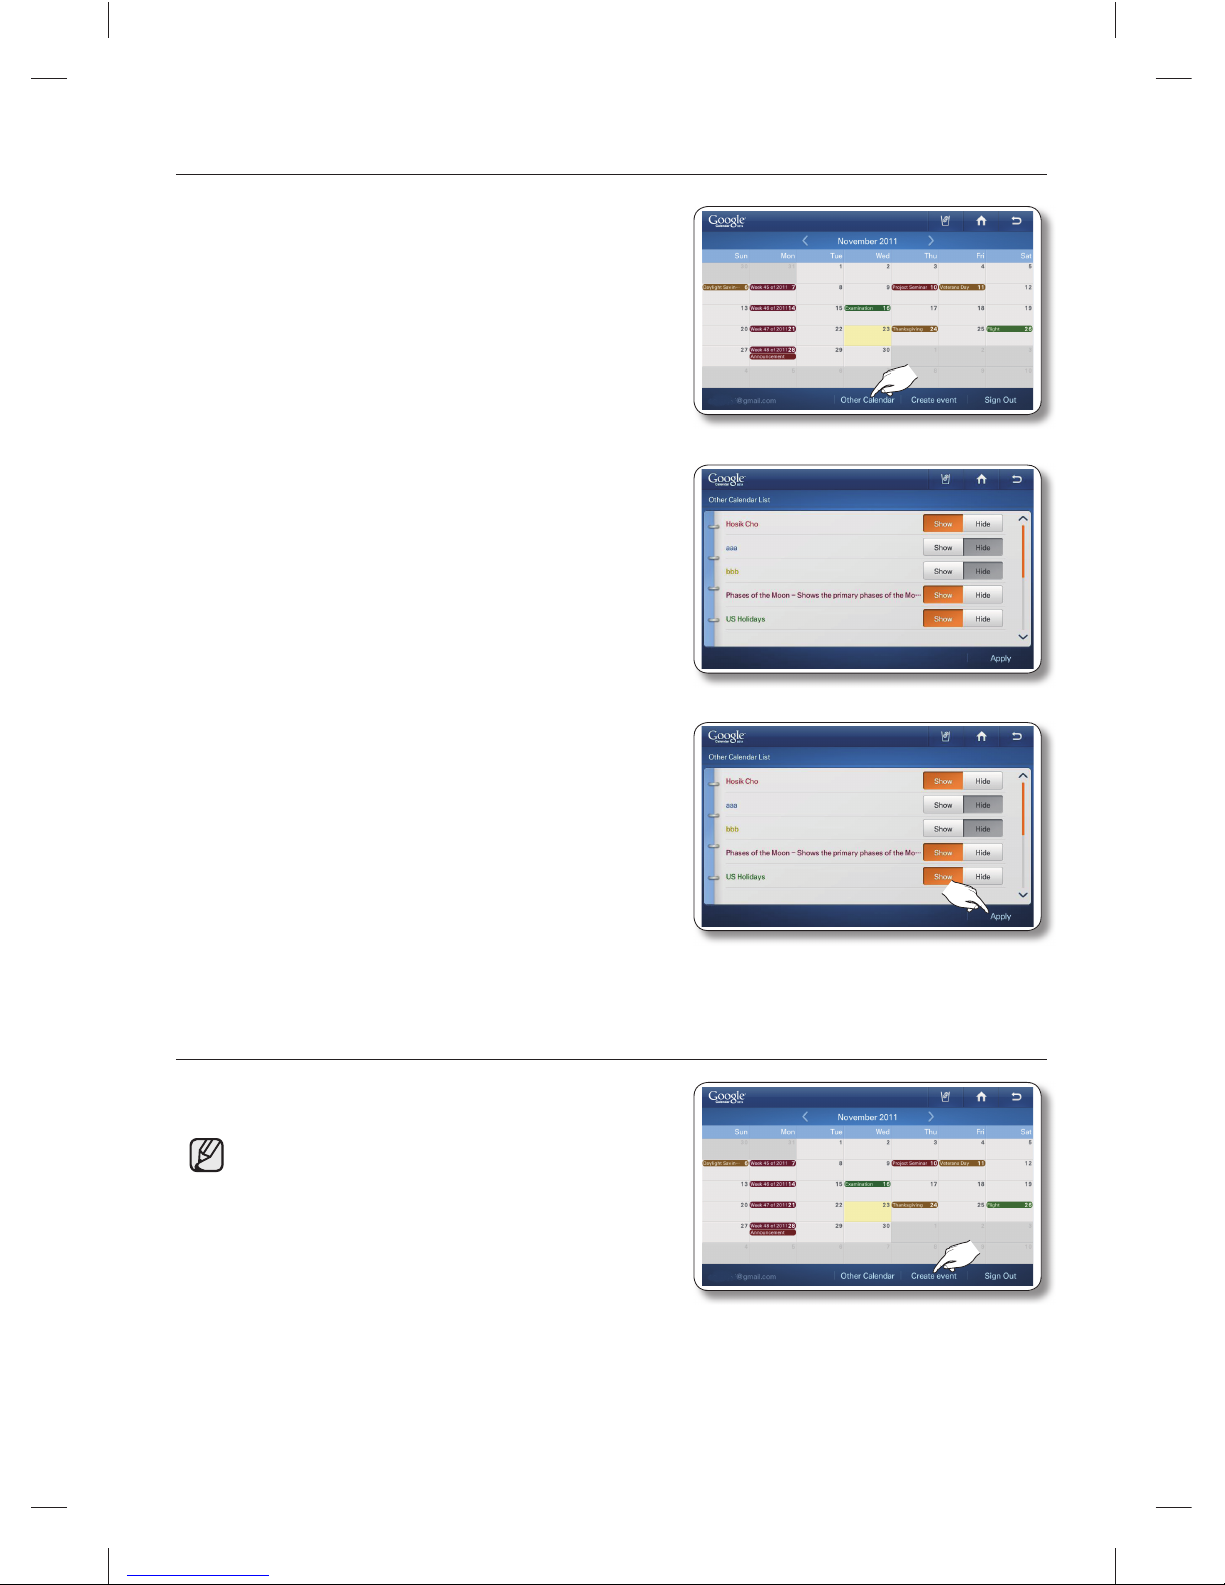
54_ operating
How to manage Shared Calendar
1. Select [Other Calendar].
2. Select a [Show] or [Hide] button.
You can show or hide schedules from your Google •
Web Calendar subscription list using the Other
Calendar List screen.
If you change the Show / Hide setting here, it does •
not change in the subscription list and the Show /
Hide setting on the Google Web Calendar.
3. Select the [Apply] button.
The Google Calendar re-appears with the displayed
schedule changed according to your selections.
How to create an event
1. Select the [Create event] button on the Calendar screen.
• You must be logged in on your primary Gmail email
address (***@gmail.com) to use the Create an event
feature.
To view the primary email address:•
Log in to www.google.com. 1.
Access Gmail.2.
Click the e-mail address on the upper right side 3.
of the screen ( ***@gmail.com).
A drop down window appears.
Click Account.4.
Look under [Email addresses and usernames] for the email address identifi ed as the Primary 5.
email.
DA68-02520B(0.2).indb 54DA68-02520B(0.2).indb 54 2013.2.28 10:17:55 AM2013.2.28 10:17:55 AM
Page 55
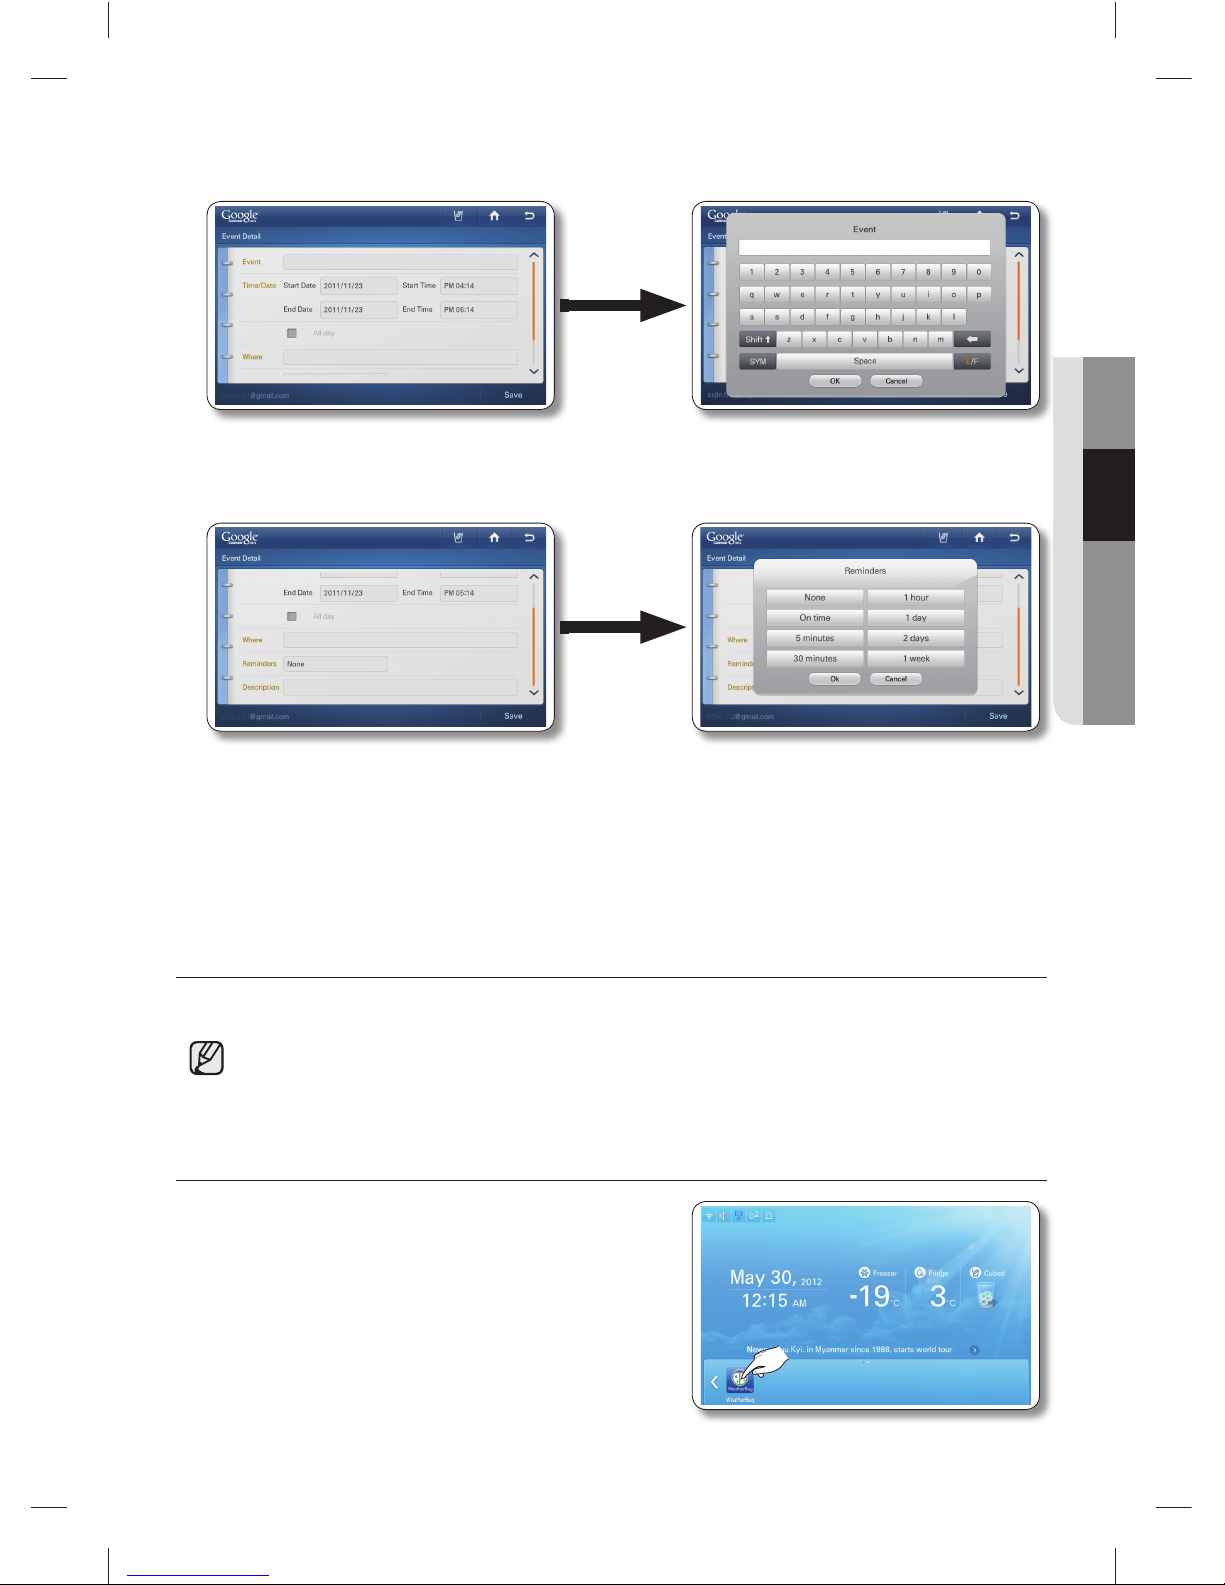
operating _55
02 OPERATING
2. Enter the Event Title, Date and Time, Location (Where), and Description in the corresponding entry
fi elds using the screen keyboard.
3. To set a reminder for a scheduled event, select the Reminders input box, and then select one of the
Reminder options.
4. When all settings are complete, select [Save].
WEATHERBUG
The internet weather service provides current and weekly weather information by region.
• This function is only available when the refrigerator is connected to your wireless
network (Wi-Fi).
How to add your Region to Weatherbug
1. Select the [WeatherBug] button on the Home screen.
There will be a 4-second commercial ad when you •
start the WeatherBug.
DA68-02520B(0.2).indb 55DA68-02520B(0.2).indb 55 2013.2.28 10:17:56 AM2013.2.28 10:17:56 AM
Page 56
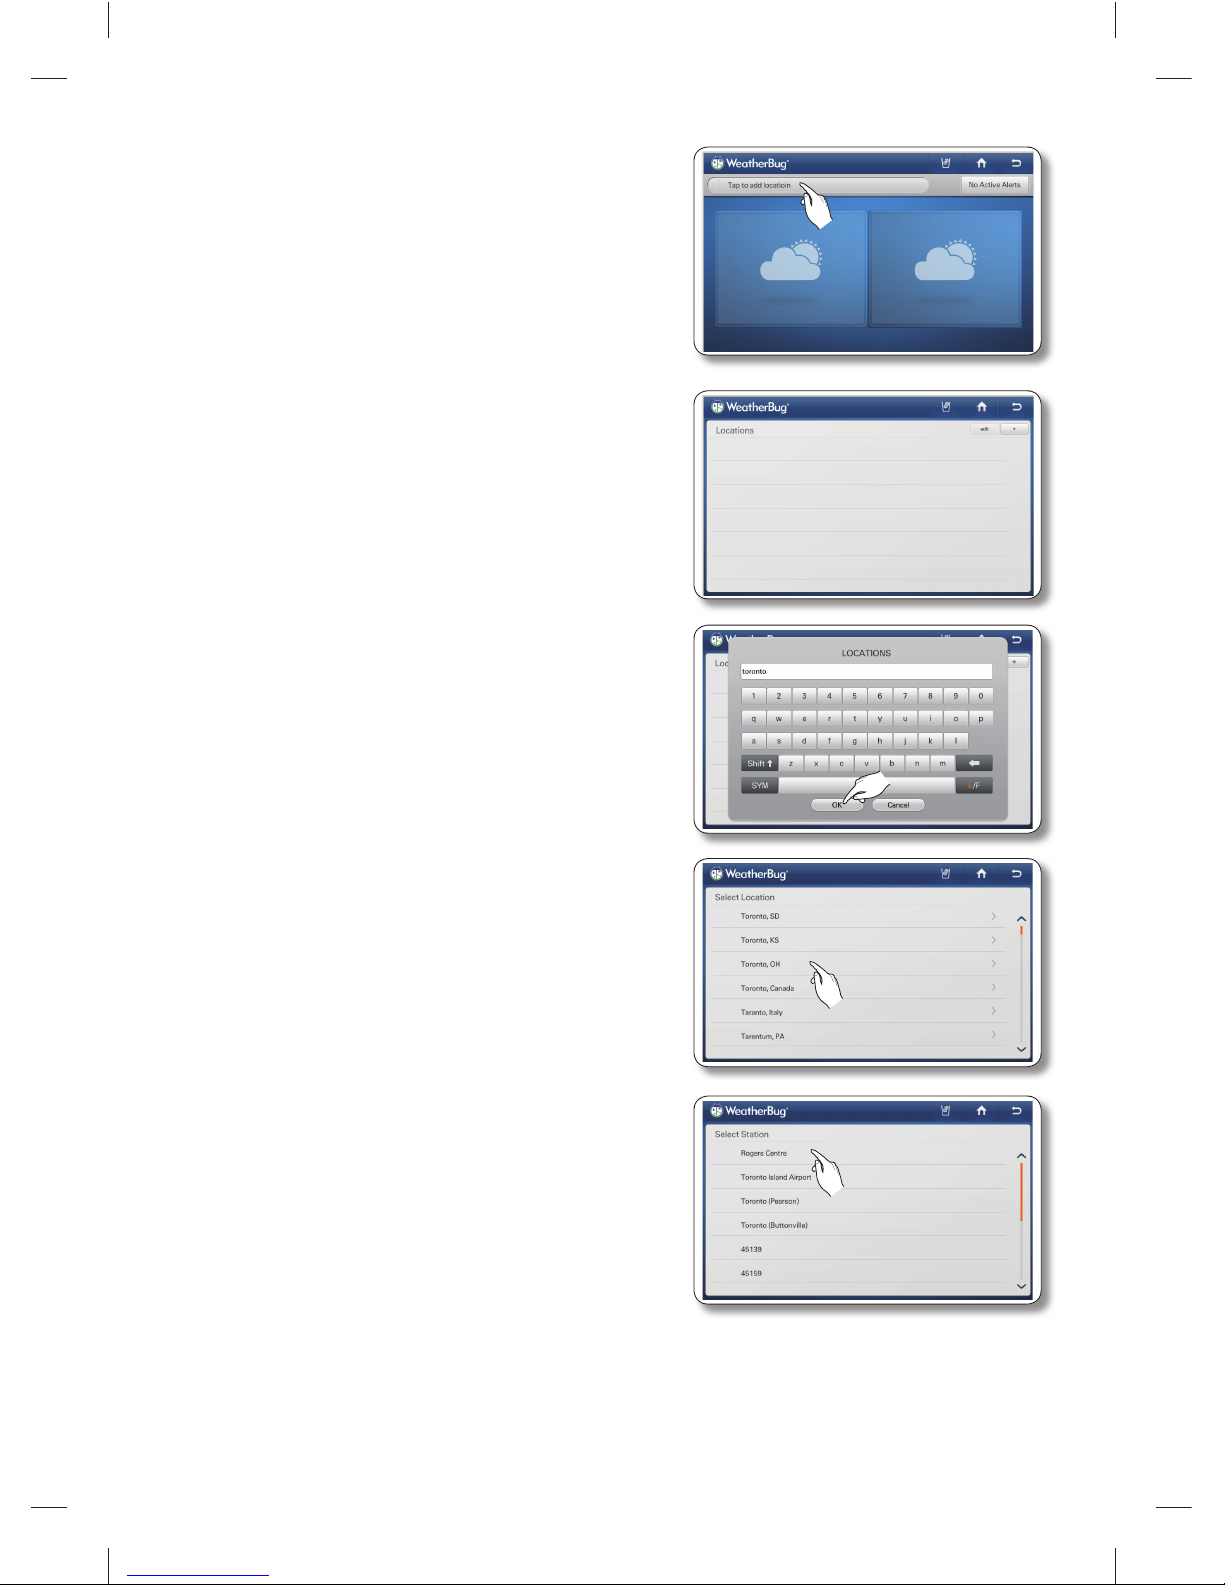
56_ operating
2. Select the region search bar on the top left of the screen.
3. Select the [+] button in the upper right corner of screen.
4. Enter your location or zipcode (US Only) using the
onscreen keyboard, and then press the [OK] button.
5. Select your location.
6. Select a local weather station.
DA68-02520B(0.2).indb 56DA68-02520B(0.2).indb 56 2013.2.28 10:17:58 AM2013.2.28 10:17:58 AM
Page 57
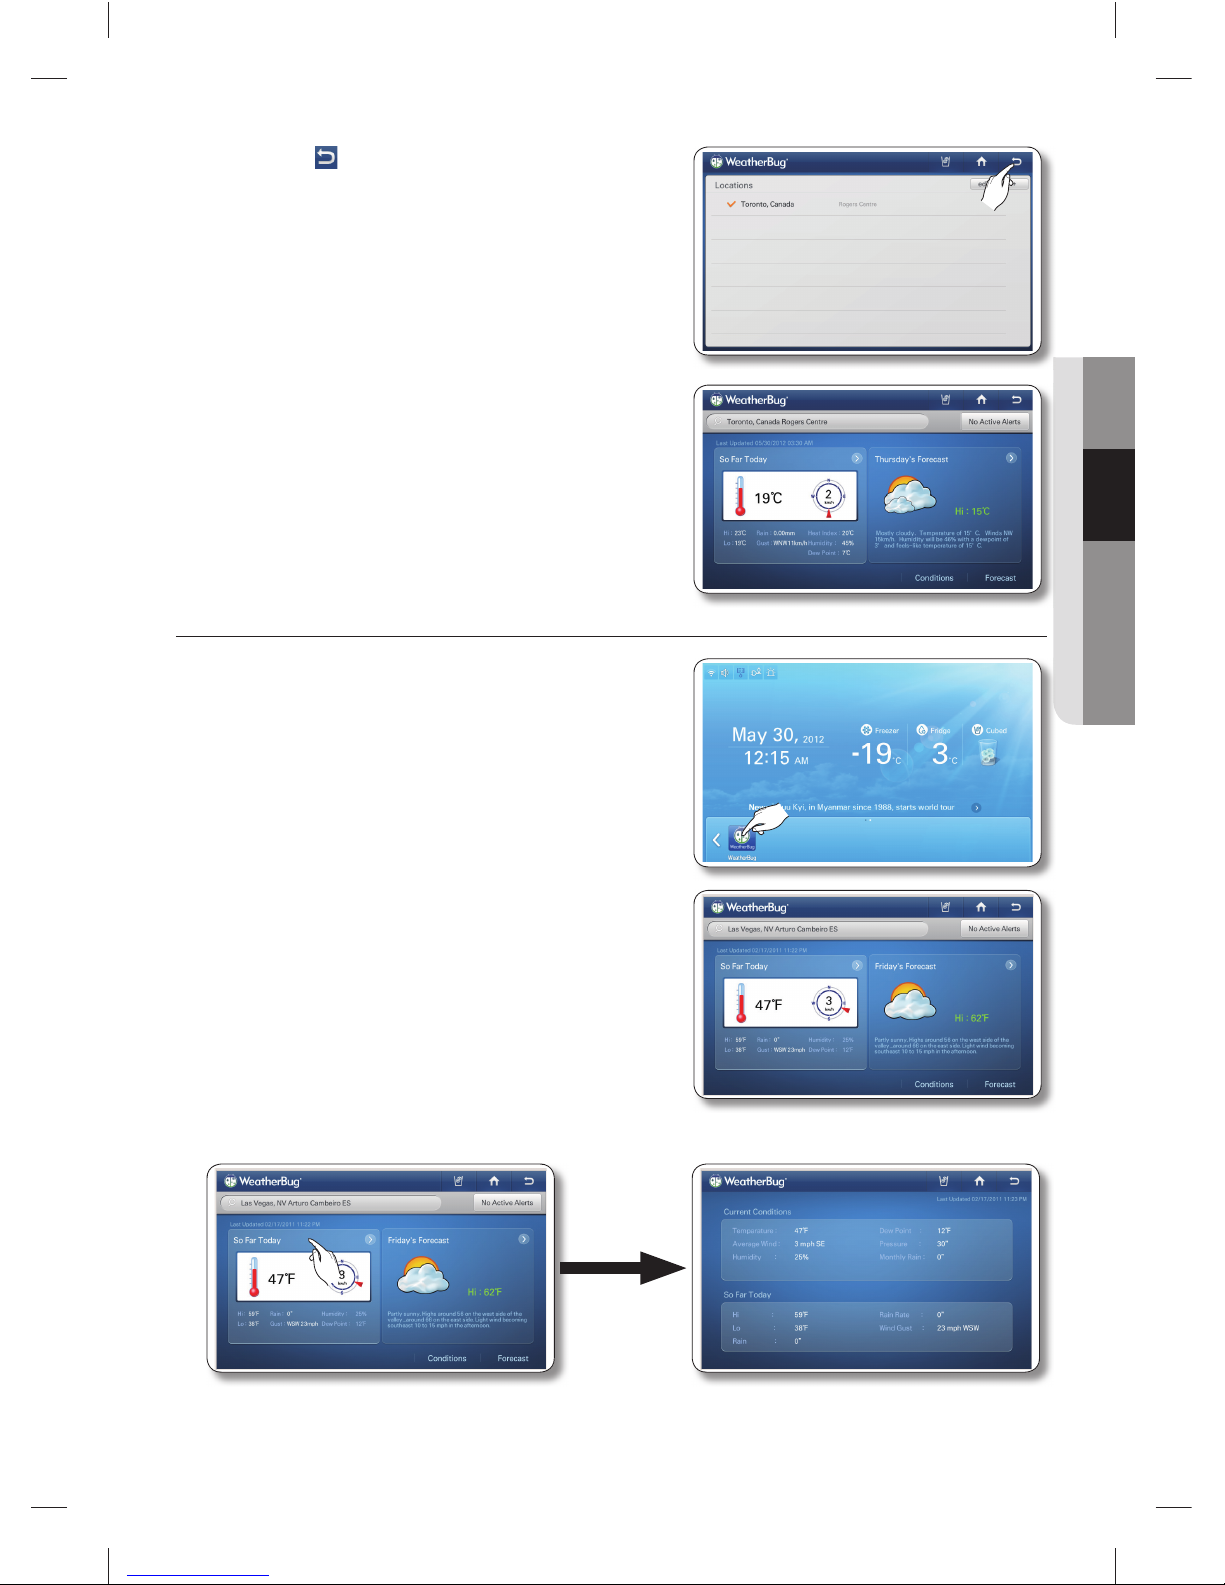
operating _57
02 OPERATING
7. Select the “ ” button on the top right of the screen.
8. The display screen shows your local weather.
How to view today’s weather.
1. Select the [WeatherBug] button on the Home screen.
There will be a 4-second commercial ad when you •
start the WeatherBug.
2. The Weatherbug screen at right appears displaying your
local weather.
If you select Active Alerts, the screen displays •
weather alerts.
3. Select [So Far Today]. The screen displays the current
weather detail information.
DA68-02520B(0.2).indb 57DA68-02520B(0.2).indb 57 2013.2.28 10:18:0 AM2013.2.28 10:18:0 AM
Page 58
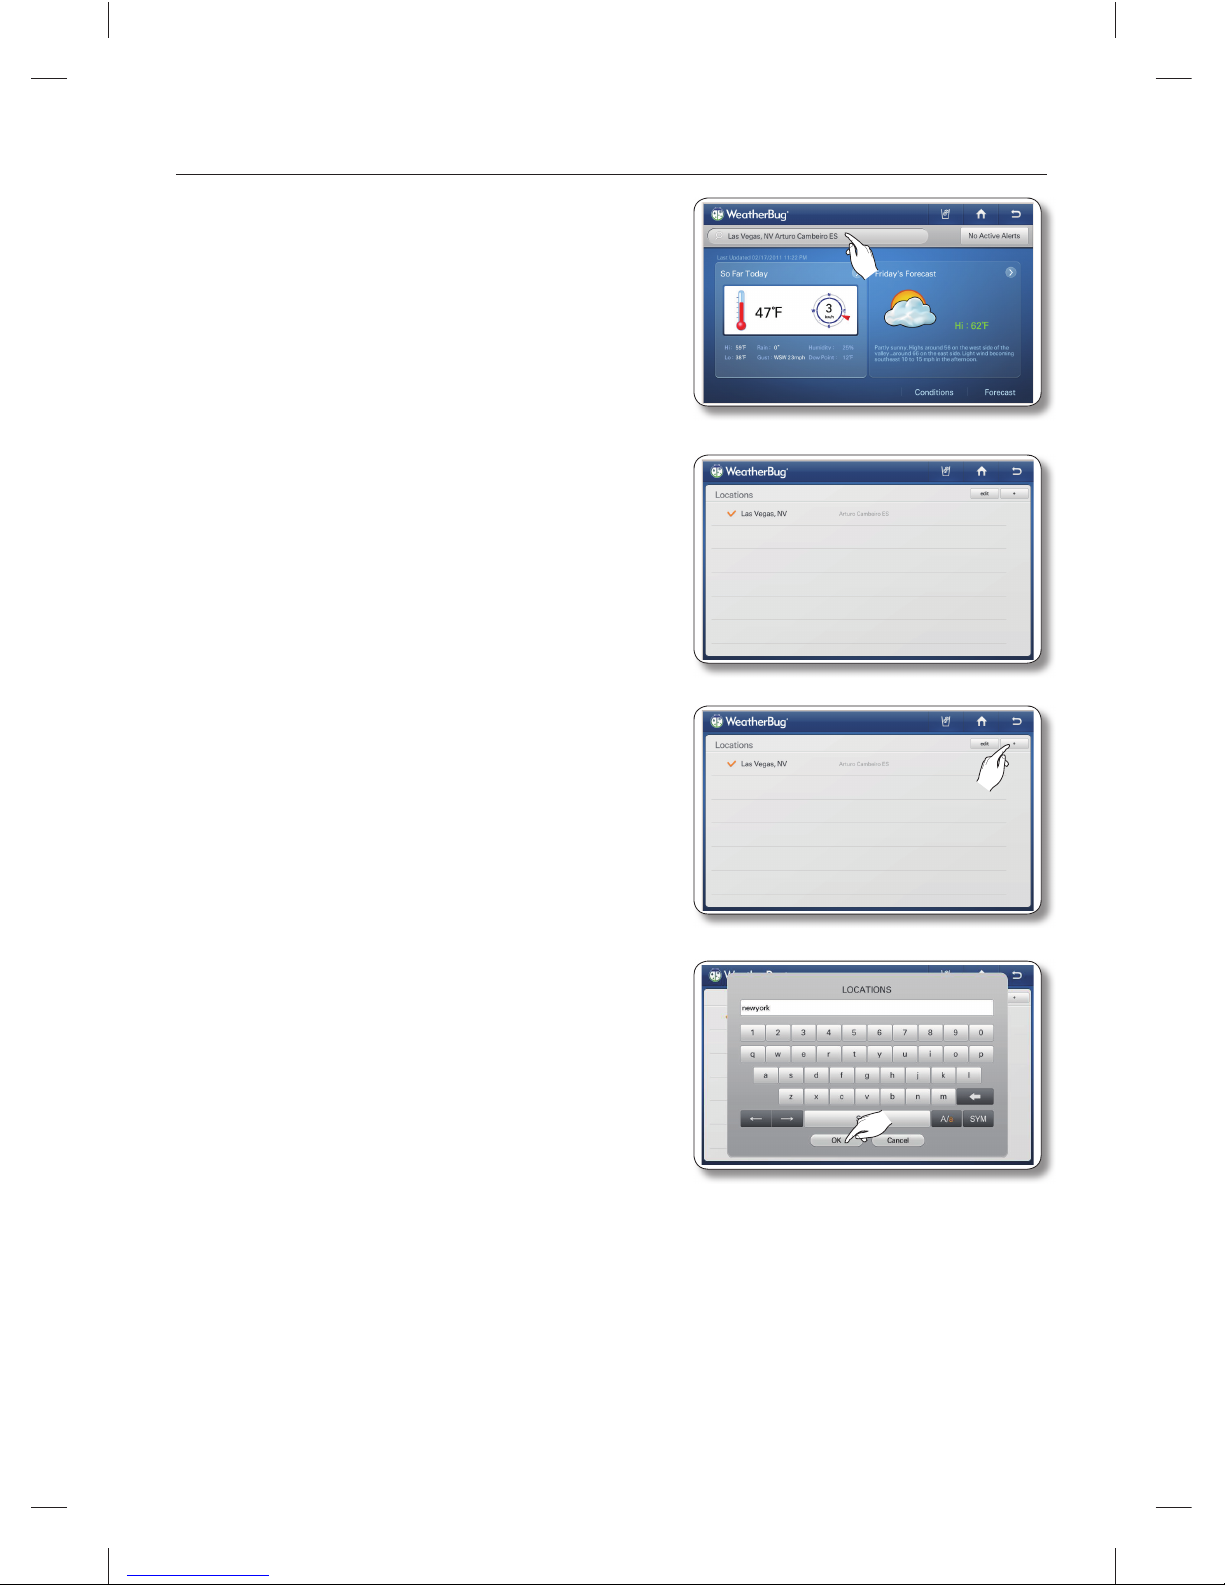
58_ operating
How to add other Regions to Weatherbug
1. Select the region search bar on the top left of the screen.
2. The current region information appears on the screen.
3. Select the [+] button in the upper right corner of the
screen.
4. Enter the location name or zipcode (US Only) using the
on-screen keyboard, and then press the [OK] button.
DA68-02520B(0.2).indb 58DA68-02520B(0.2).indb 58 2013.2.28 10:18:2 AM2013.2.28 10:18:2 AM
Page 59
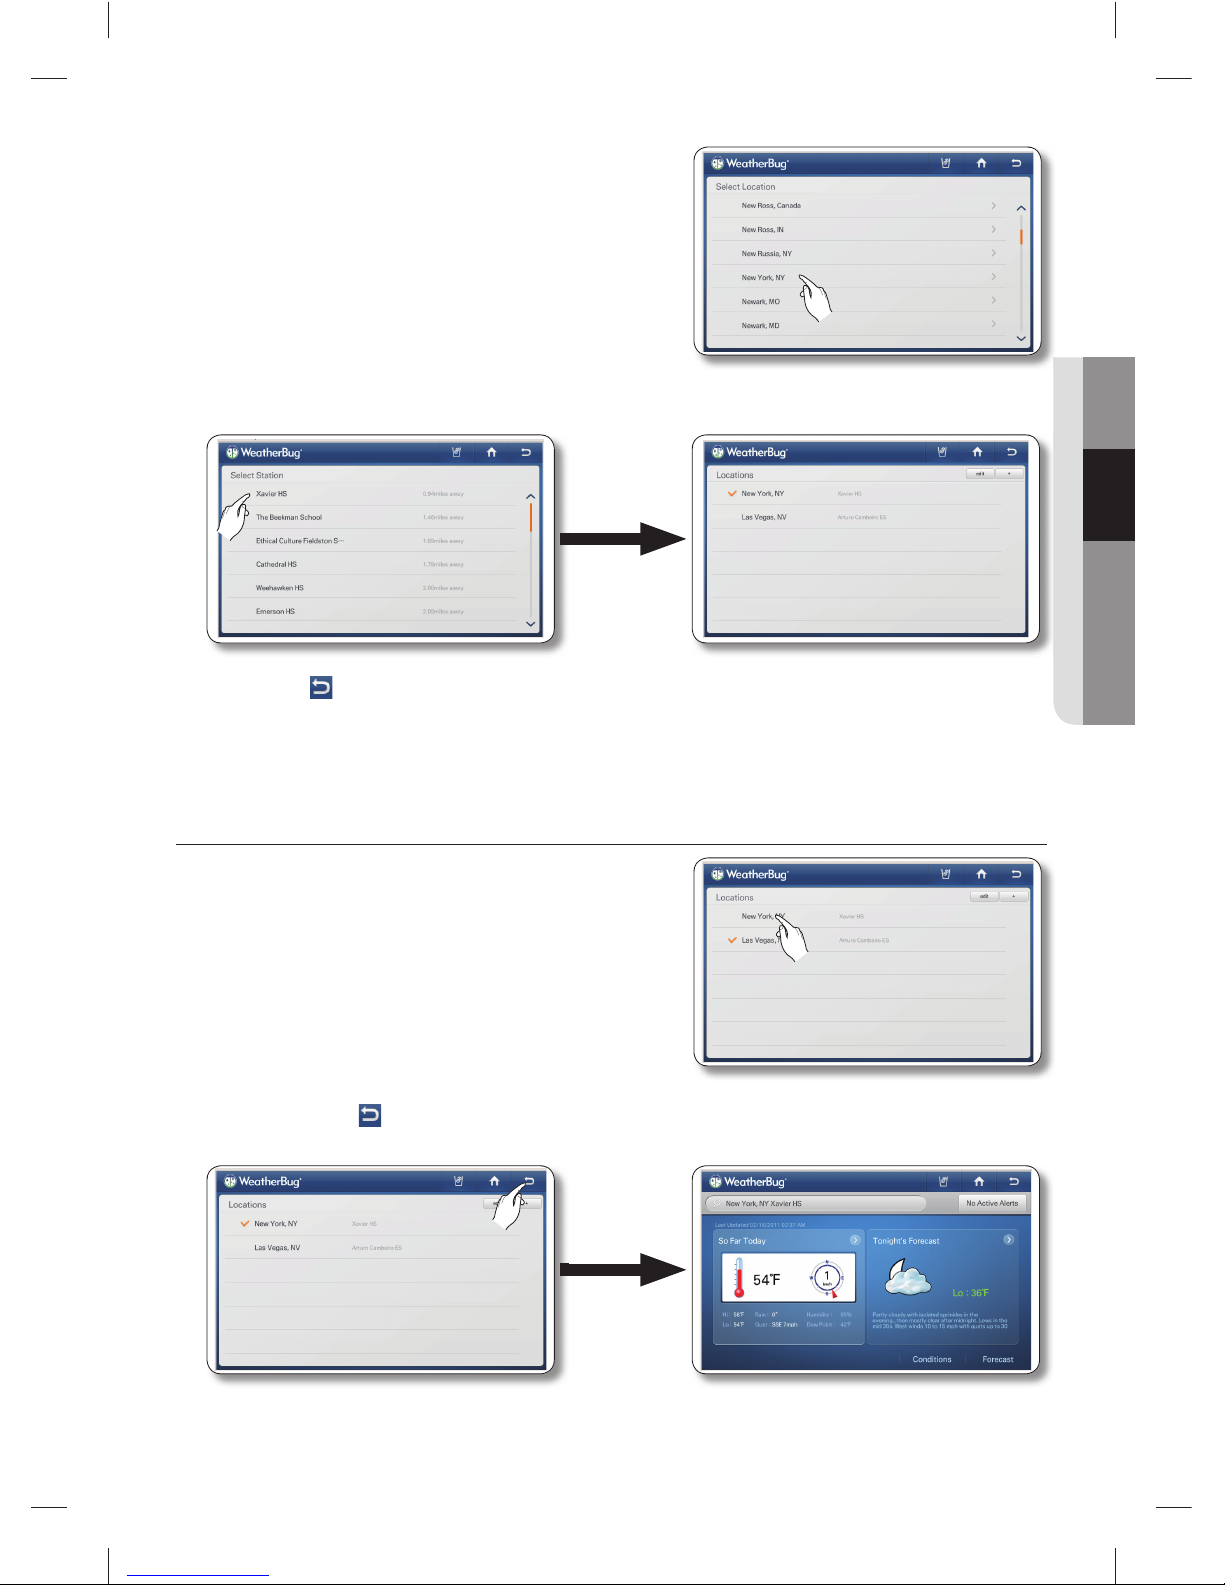
operating _59
02 OPERATING
5. Select the desired location.
6. Select the desired local weather station.
7. Press the “
” button on the top right of the screen.
8. The screen displays the weather for the location you selected.
How to view Weather Information for a Region
1. Select the desired location on the location list.
2. Press the back (
) button in the upper right corner.
The screen displays the weather for the location you selected.
DA68-02520B(0.2).indb 59DA68-02520B(0.2).indb 59 2013.2.28 10:18:4 AM2013.2.28 10:18:4 AM
Page 60
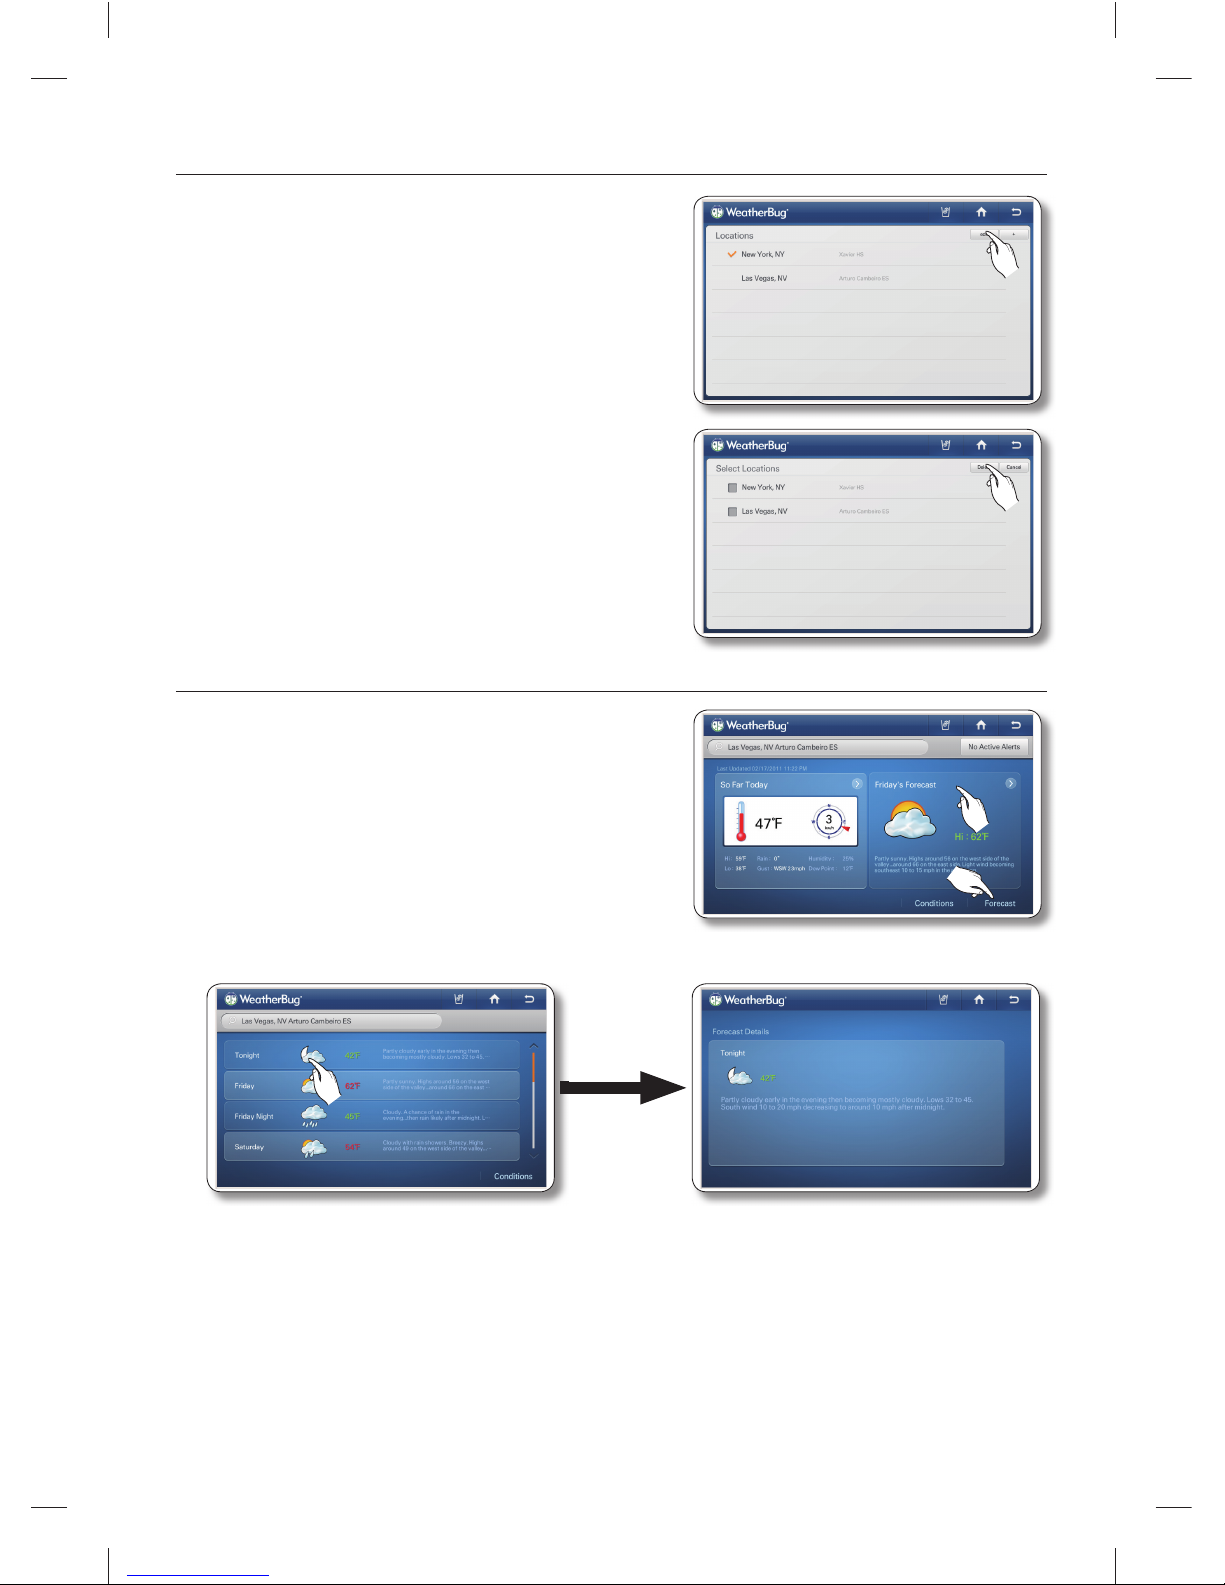
60_ operating
How to delete Regions from Weatherbug
1. Select the [edit] button in the upper right corner of
screen.
2. Select the check box on the left of the location you want
to delete, and then then select the Delete button.
How to view weather forecasts.
1. Select the [Forecast] button or Tonight’s Forecast.
2. Select the desired forecast on the forecast list. The screen displays detailed forecast information.
The forecast screen lists weather forecasts for 7 days.•
It shows the day, the Day / Night (US weather only), the weather condition icon, the temperature •
and the weather description.
If you select the [Conditions] button on the lower right, the screen displays the current weather •
information.
DA68-02520B(0.2).indb 60DA68-02520B(0.2).indb 60 2013.2.28 10:18:7 AM2013.2.28 10:18:7 AM
Page 61
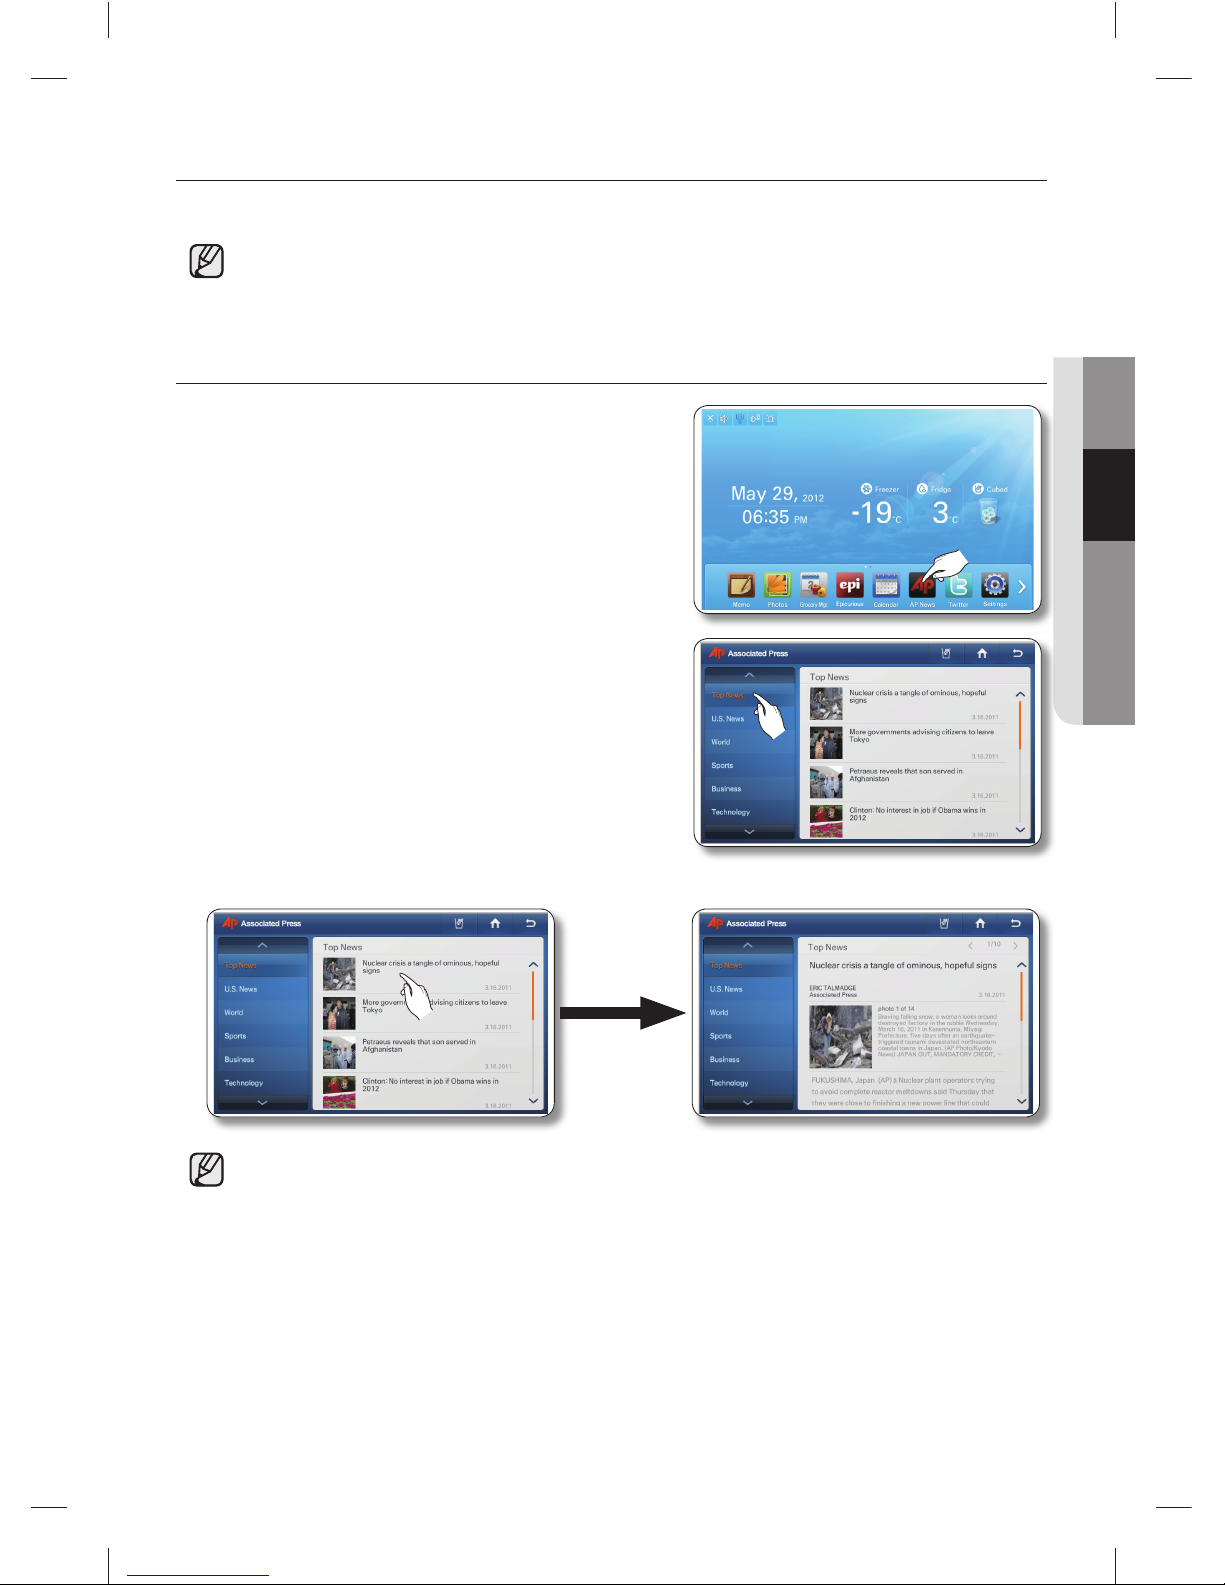
operating _61
02 OPERATING
AP NEWS
The internet news service provides current news in up to 11 categories.
• This function is only available when the refrigerator is connected to your wireless
network (Wi-Fi).
How to view news from AP News.
1. Select the [Ap News] button on the Home screen.
2. Select a news category.
When you select a category on the left, the screen •
displays the major news for that category.
3. Select the desired article.
• The news article on the preview page shows the fi rst 2 lines of the entire article.
To view the article in detail, visit http://www.ap.org on your mobile phone or PC.•
DA68-02520B(0.2).indb 61DA68-02520B(0.2).indb 61 2013.2.28 10:18:8 AM2013.2.28 10:18:8 AM
Page 62
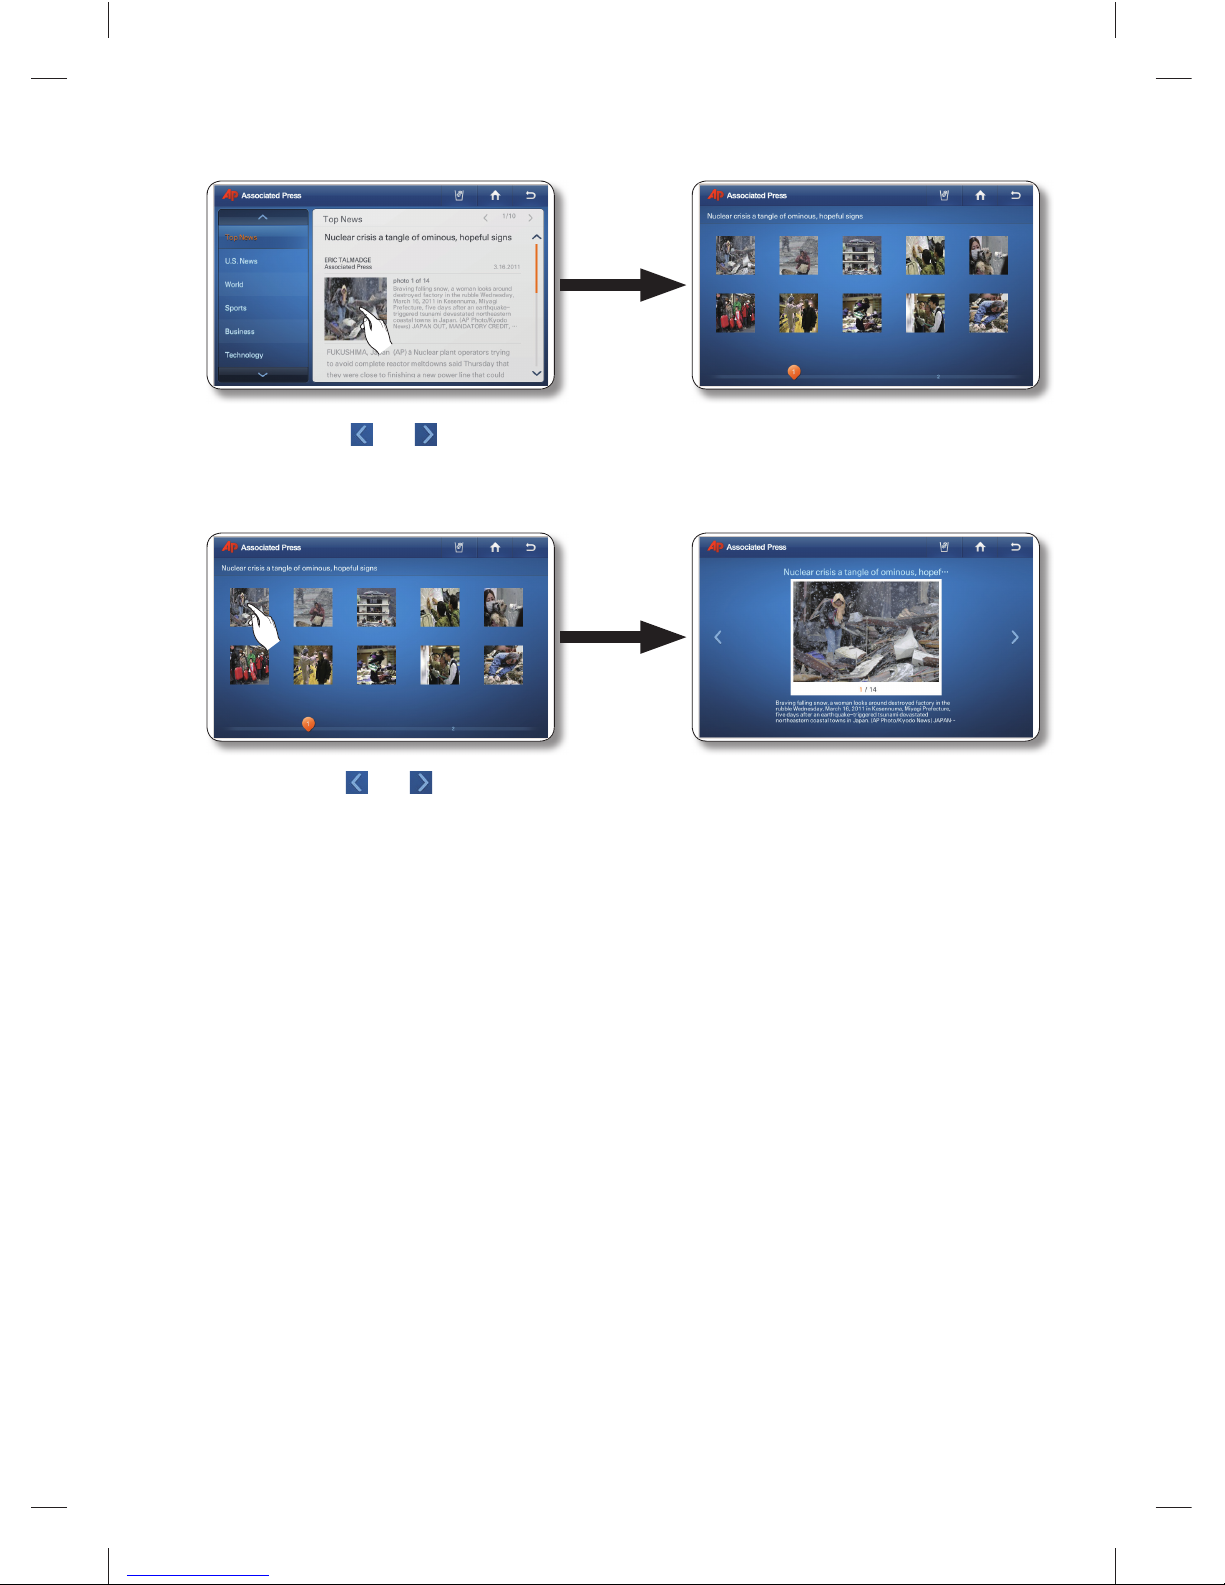
62_ operating
4. To see all the photos related to the article, select the main photo in the detail news article.
Select the •
and buttons on the top right of the article to view other articles.
5. Select a photo to enlarge it.
Press the •
and buttons to see other photos in enlarged view.
DA68-02520B(0.2).indb 62DA68-02520B(0.2).indb 62 2013.2.28 10:18:10 AM2013.2.28 10:18:10 AM
Page 63
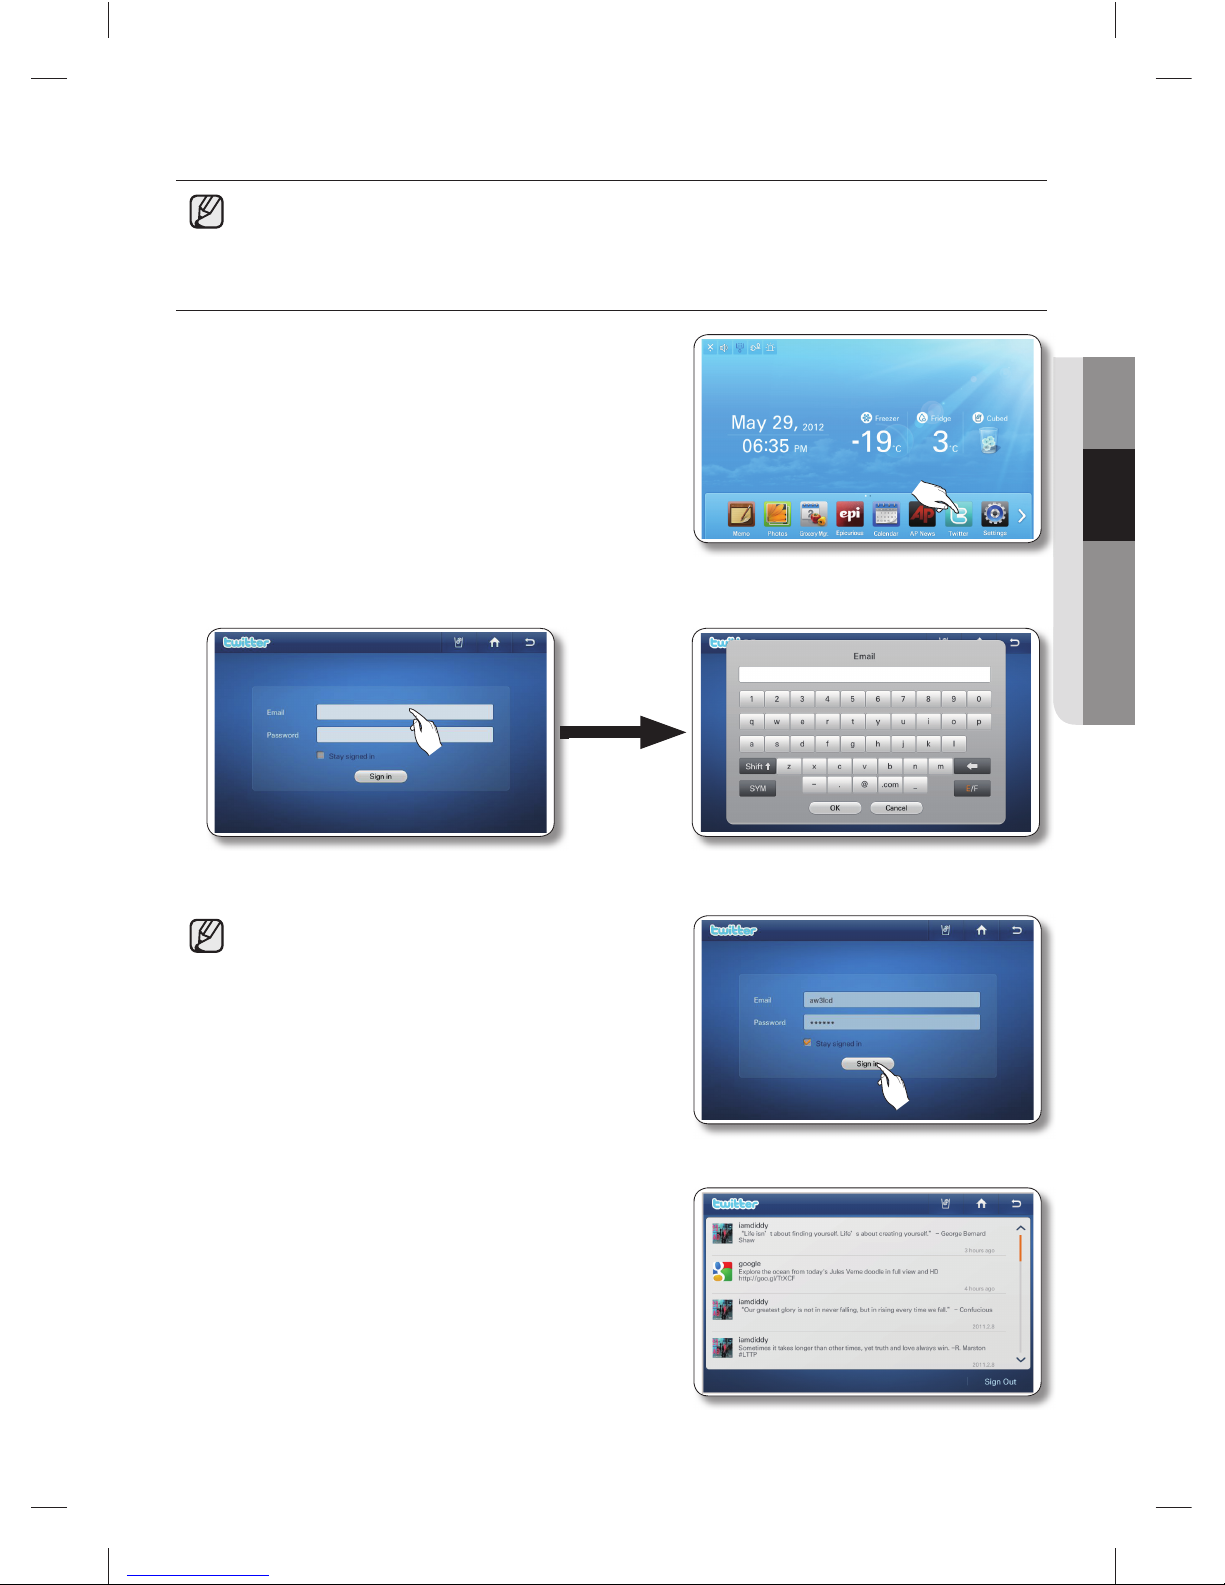
operating _63
02 OPERATING
TWITTER
• This function is only available when the refrigerator is connected to your wireless network (Wi-Fi).
You can’t write a tweet while using this function.•
How to show the twitter.
1. Select the [Twitter] button on the Home screen.
2. Select the Email input box. Enter your twitter account ID using the on-screen keyboard.
Select the Password input box. Enter your twitter password using the on-screen keyboard.
3. Press the [Sign in] button.
• If you do not have a twitter account, you can create
one at http://twitter.com.
In the Email section, enter your Twitter account ID, •
for example, [email protected].
If you select the ‘Stay signed in’ check box, you •
do not need to log in each time to enter the Twitter
menu.
If the system time is not set exactly, login may fail.•
If login fails, set the current time correctly at Settings
→
Time/Date, and then retry.
4. The Tweet list screen appears. This page displays your
following twitters up-to-date information including their
photos, comment previews and listed dates.
DA68-02520B(0.2).indb 63DA68-02520B(0.2).indb 63 2013.2.28 10:18:12 AM2013.2.28 10:18:12 AM
Page 64
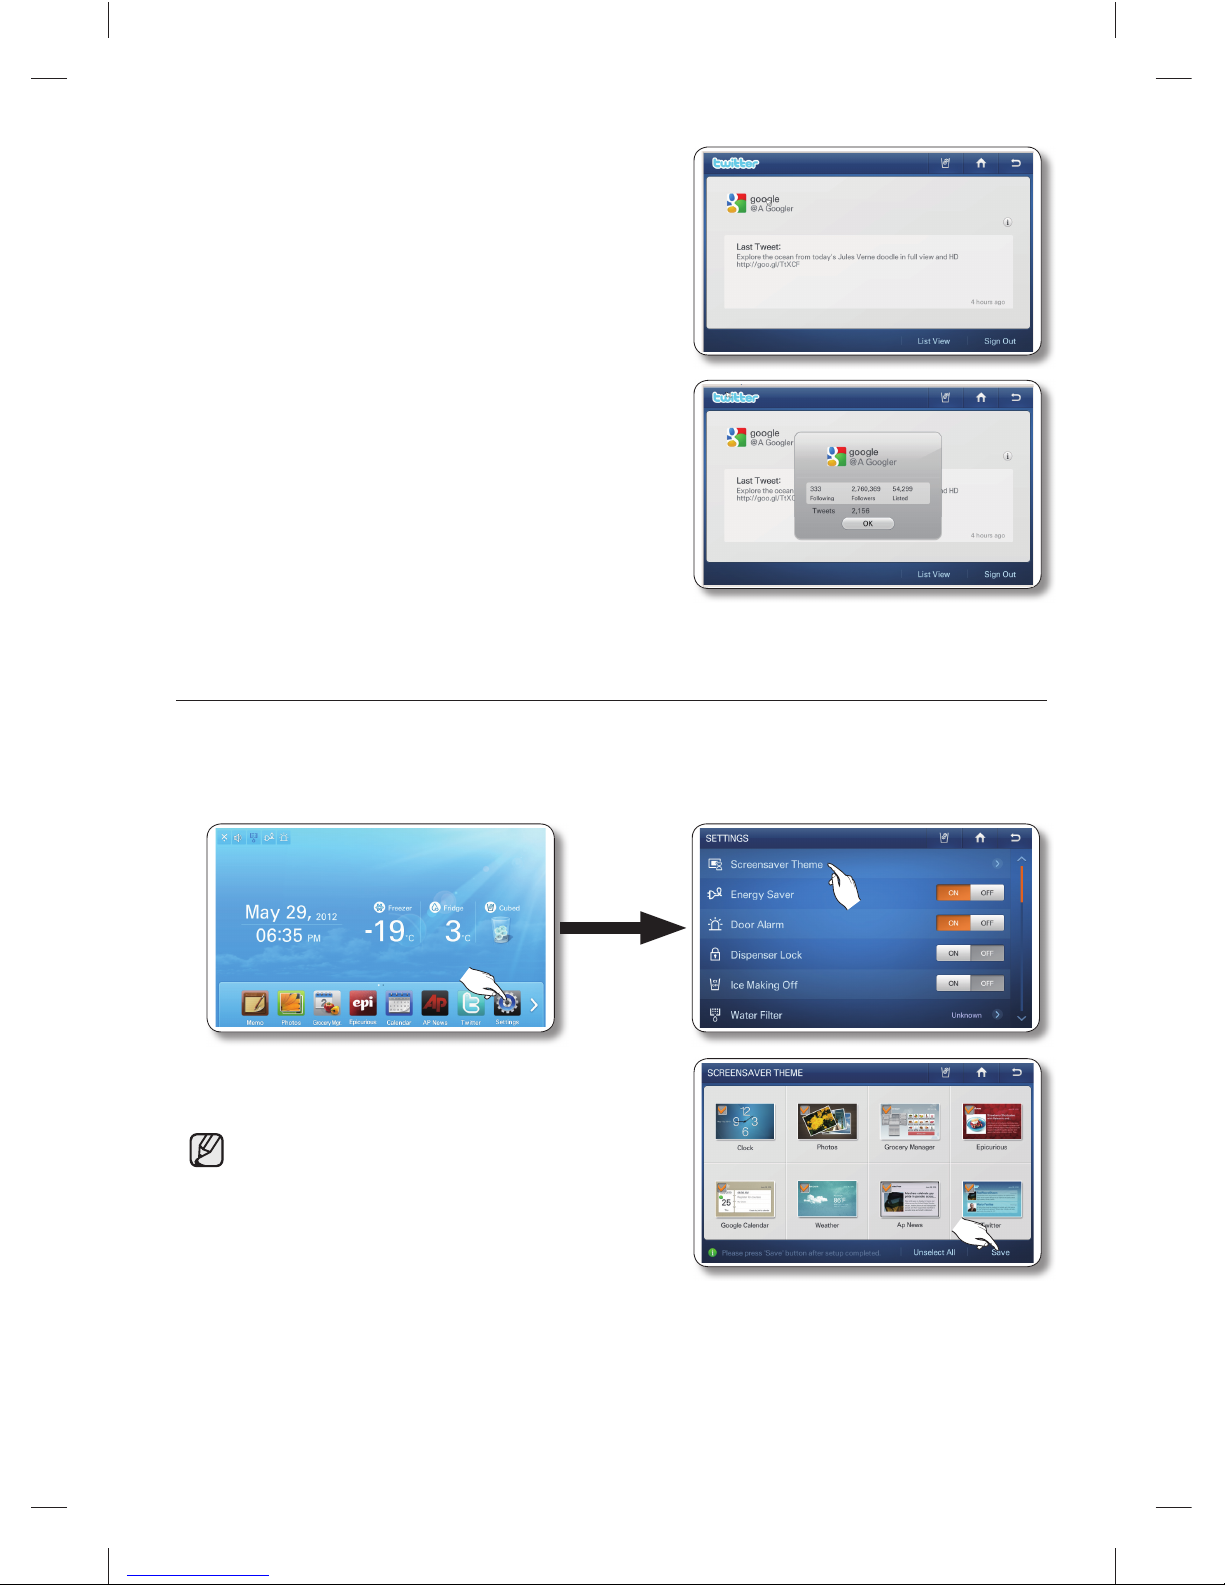
64_ operating
5. Press a tweet on the tweet list and you can see the
detail information.
When selecting the List View on the Detail View •
screen, the screen changes to the Twit List.
6. Select the i button on the right of the screen to see detail
information about the follower/followee.
SCREENSAVER THEME
Select the themes for the Display screen screensaver.
1. Select the [Settings] button.
2. Select the [Screensaver Theme] on the Settings list.
3. Select the theme(s) you want to use in the screensaver,
and then press the [Save] button.
• The themes you select may not display if the data
underlying them is not ready or unavailable
DA68-02520B(0.2).indb 64DA68-02520B(0.2).indb 64 2013.2.28 10:18:13 AM2013.2.28 10:18:13 AM
Page 65
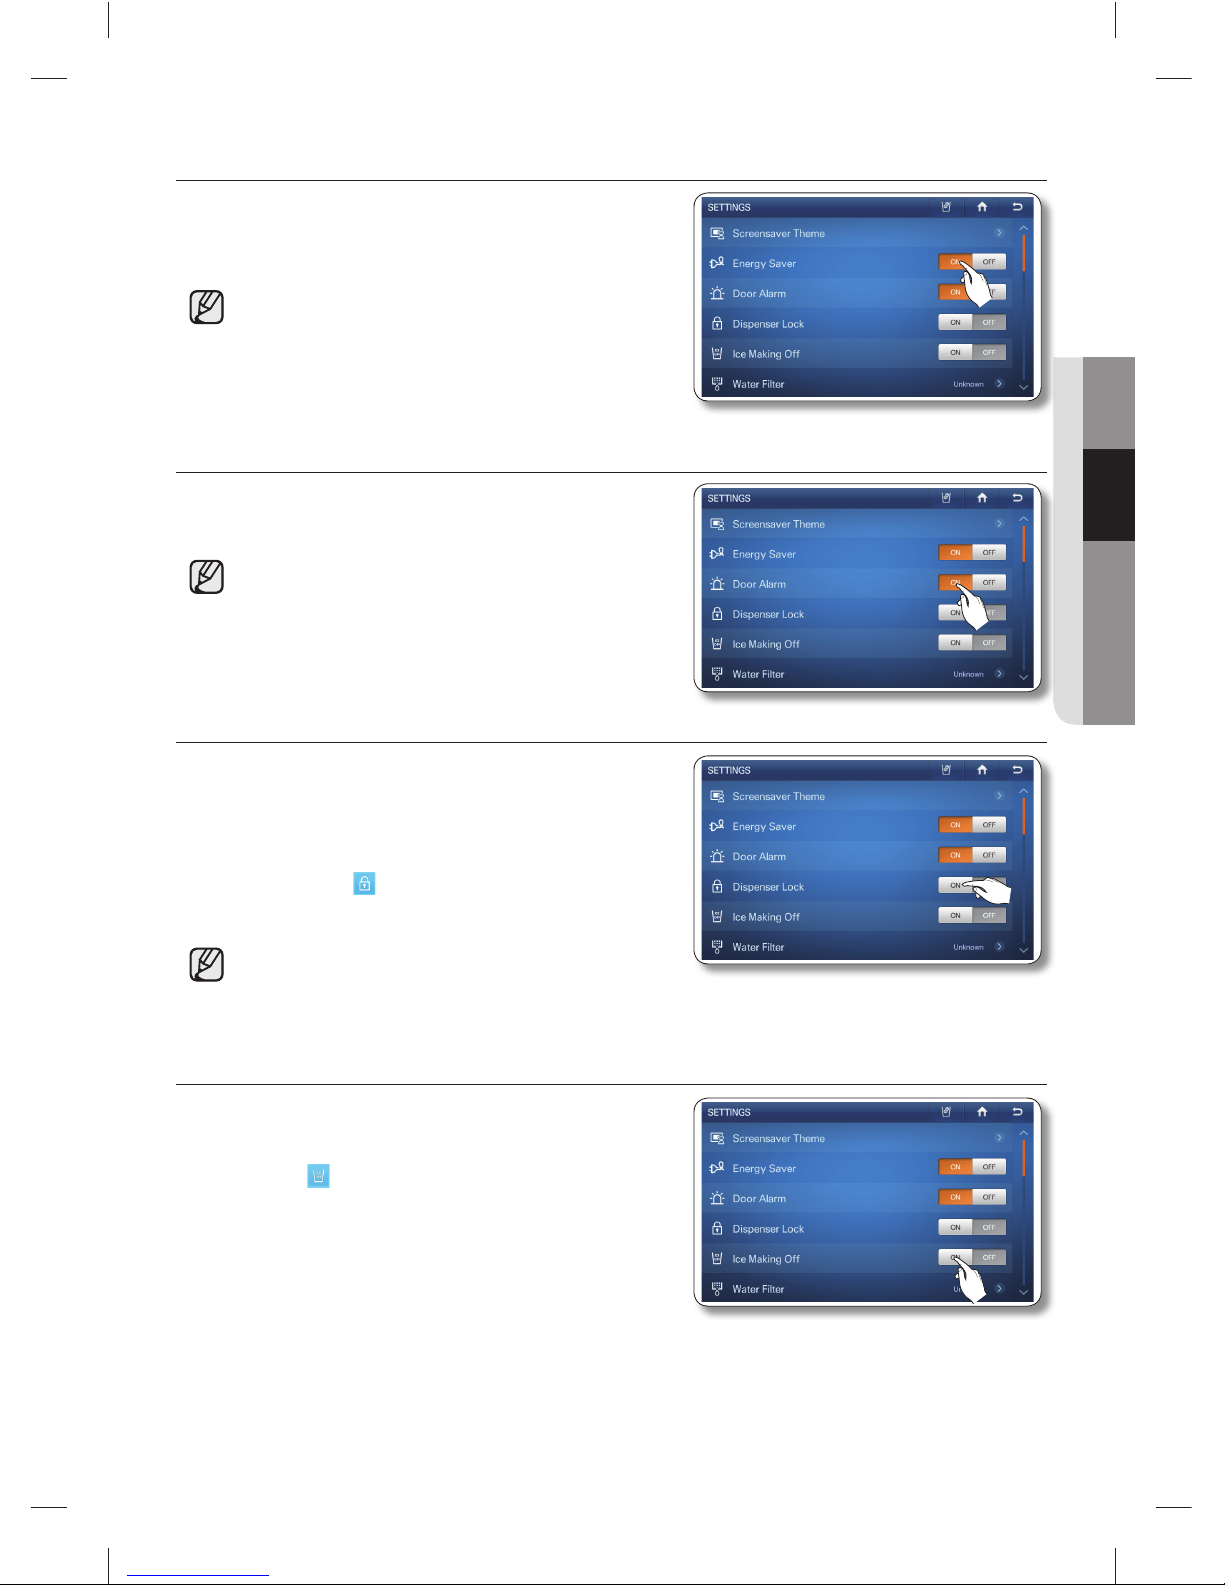
operating _65
02 OPERATING
ENERGY SAVER
Turns the Energy Saver function on and off. When the Energy
Saver is on, the power consumption decreases.
1. Select the Energy Saver ON or OFF buttons on the
Settings list.
• The Energy Saver function is pre-set to ON in the
factory.
If condensation or water drops appear on the doors, •
turn the Energy Saver mode off.
DOOR ALARM
Turns the Door Alarm on and off.
1. Select the Door Alarm ON or OFF buttons on the
Settings list.
• If the door alarm is set to ON, an alarm beeps if any
door is left open for more than three minutes.
The beeping stops when you close the door. The •
door alarm function is pre-set to ON in the factory.
DISPENSER LOCK
When you activate the Dispenser Lock function, the dispenser
and the fl ex zone selection button will not work.
1. Select the Dispenser Lock ON or OFF buttons on the
Settings list.
If you select the Dispenser Lock ON button, the •
Lock icon (
) appears in the upper left corner of
the Home screen.
• If you suddenly can not use the dispenser, check
whether the Dispenser Lock function is on.
ICE MAKING OFF
1. Select the Ice Making Off ON or OFF button on the
Settings list.
When the Ice Making Off is set, the Ice Off indicator •
icon (
) appears on the top left of the Home
screen.
Pressing the [ON] button turns Ice Making Off.•
DA68-02520B(0.2).indb 65DA68-02520B(0.2).indb 65 2013.2.28 10:18:15 AM2013.2.28 10:18:15 AM
Page 66
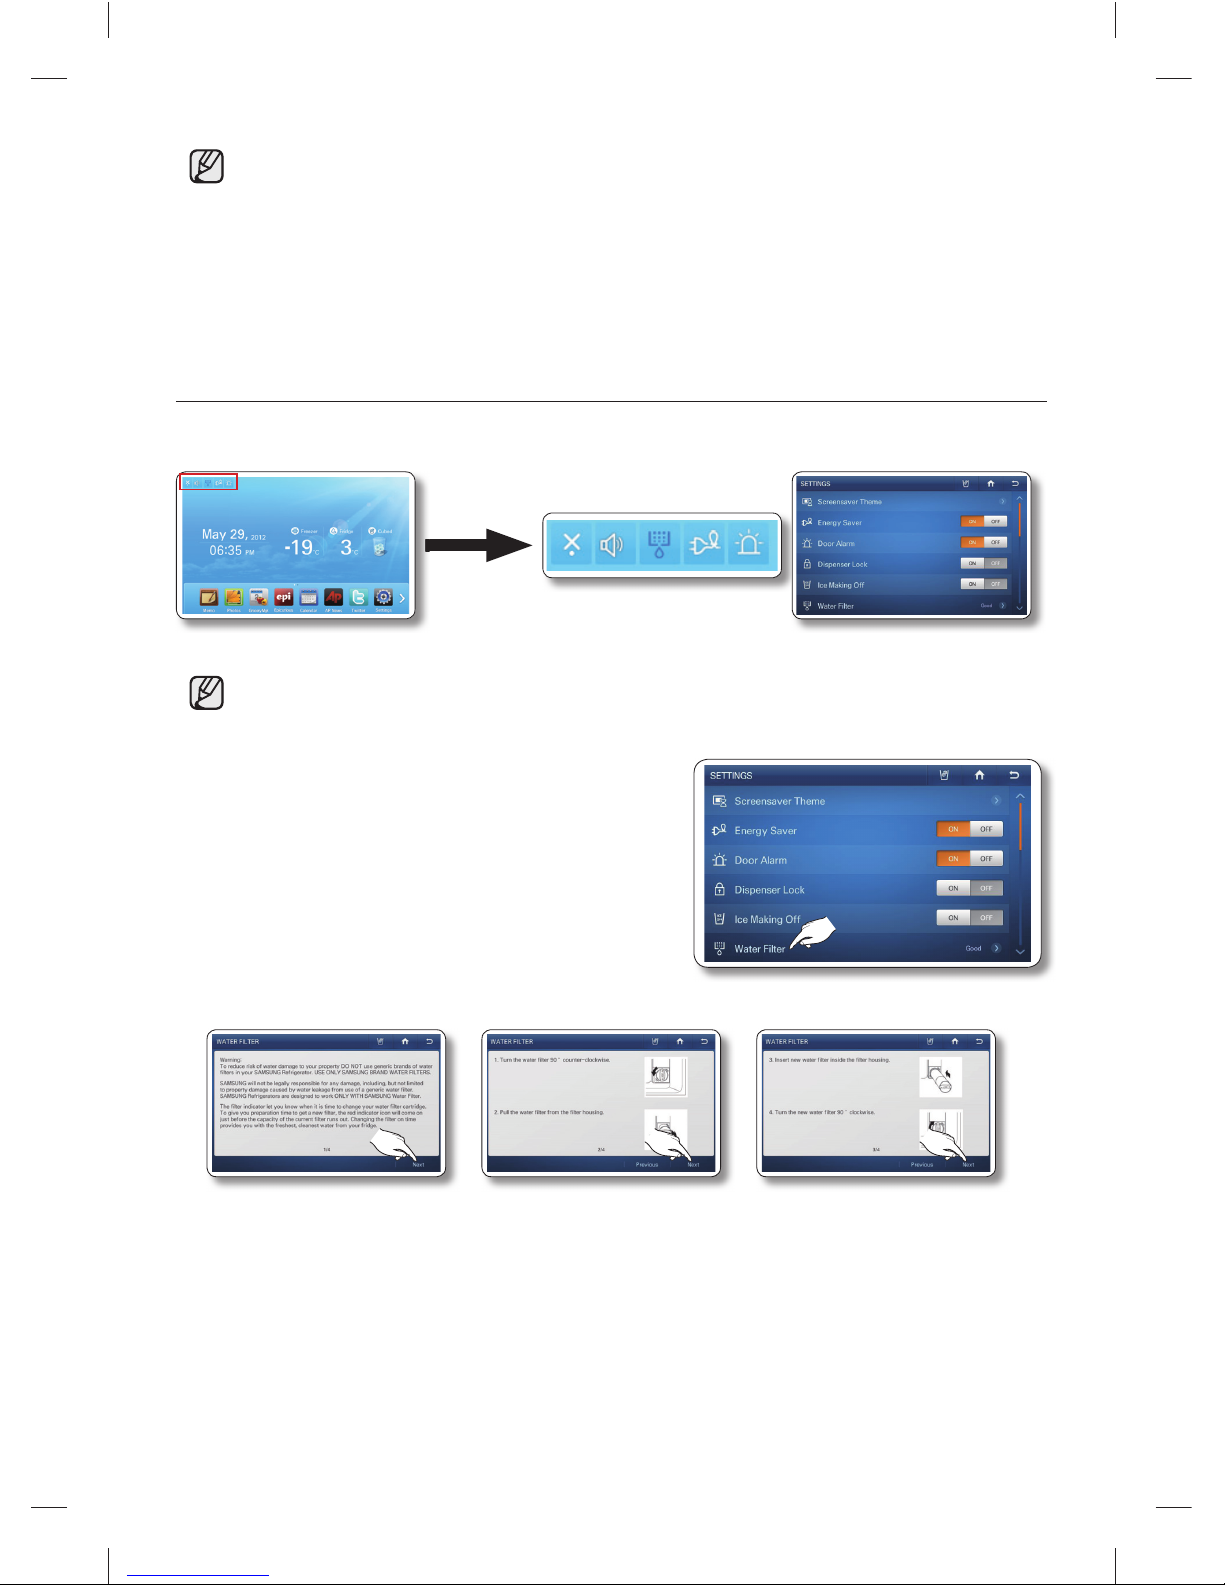
66_ operating
• We recommend you stop ice making if the following occur:
There is enough ice in the ice bucket. You want to save water and energy. Water is not being supplied to the Ice maker. If the ice maker function is ON, and the water line is not connected, there will be a water valve •
noise from back of the unit. Touch the Ice making Off ON button in the settings list to turn the
ice maker off.
WATER FILTER
The Water Filter status icon on the Home screen enables you to check the current status of the water
fi lter. Follow the instructions below to check and/or replace the water fi lter.
1. Check the water fi lter status in the Settings list or indicator icons on the upper left of Home screen.
• Good (Blue) : The fi lter does not need replacement. It is normal.
Order (Pink) : The fi lter needs replacement. Order a new fi lter.•
Replace (Red) : The fi lter needs replacement immediately.•
2. If the status reads “Order” or “Replace,” select the Water
Filter on the Settings list to access the replacement
instructions.
3. Follow instructions in the Water Filter replacement guide to replace the Water Filter.
Press the [Next] button to move to the next page of the instructions.•
4. When the replacement is done, press and hold ‘Reset the water fi lter’ at the center of the screen for
3 or more seconds to reset the water fi lter indicator.
DA68-02520B(0.2).indb 66DA68-02520B(0.2).indb 66 2013.2.28 10:18:17 AM2013.2.28 10:18:17 AM
Page 67
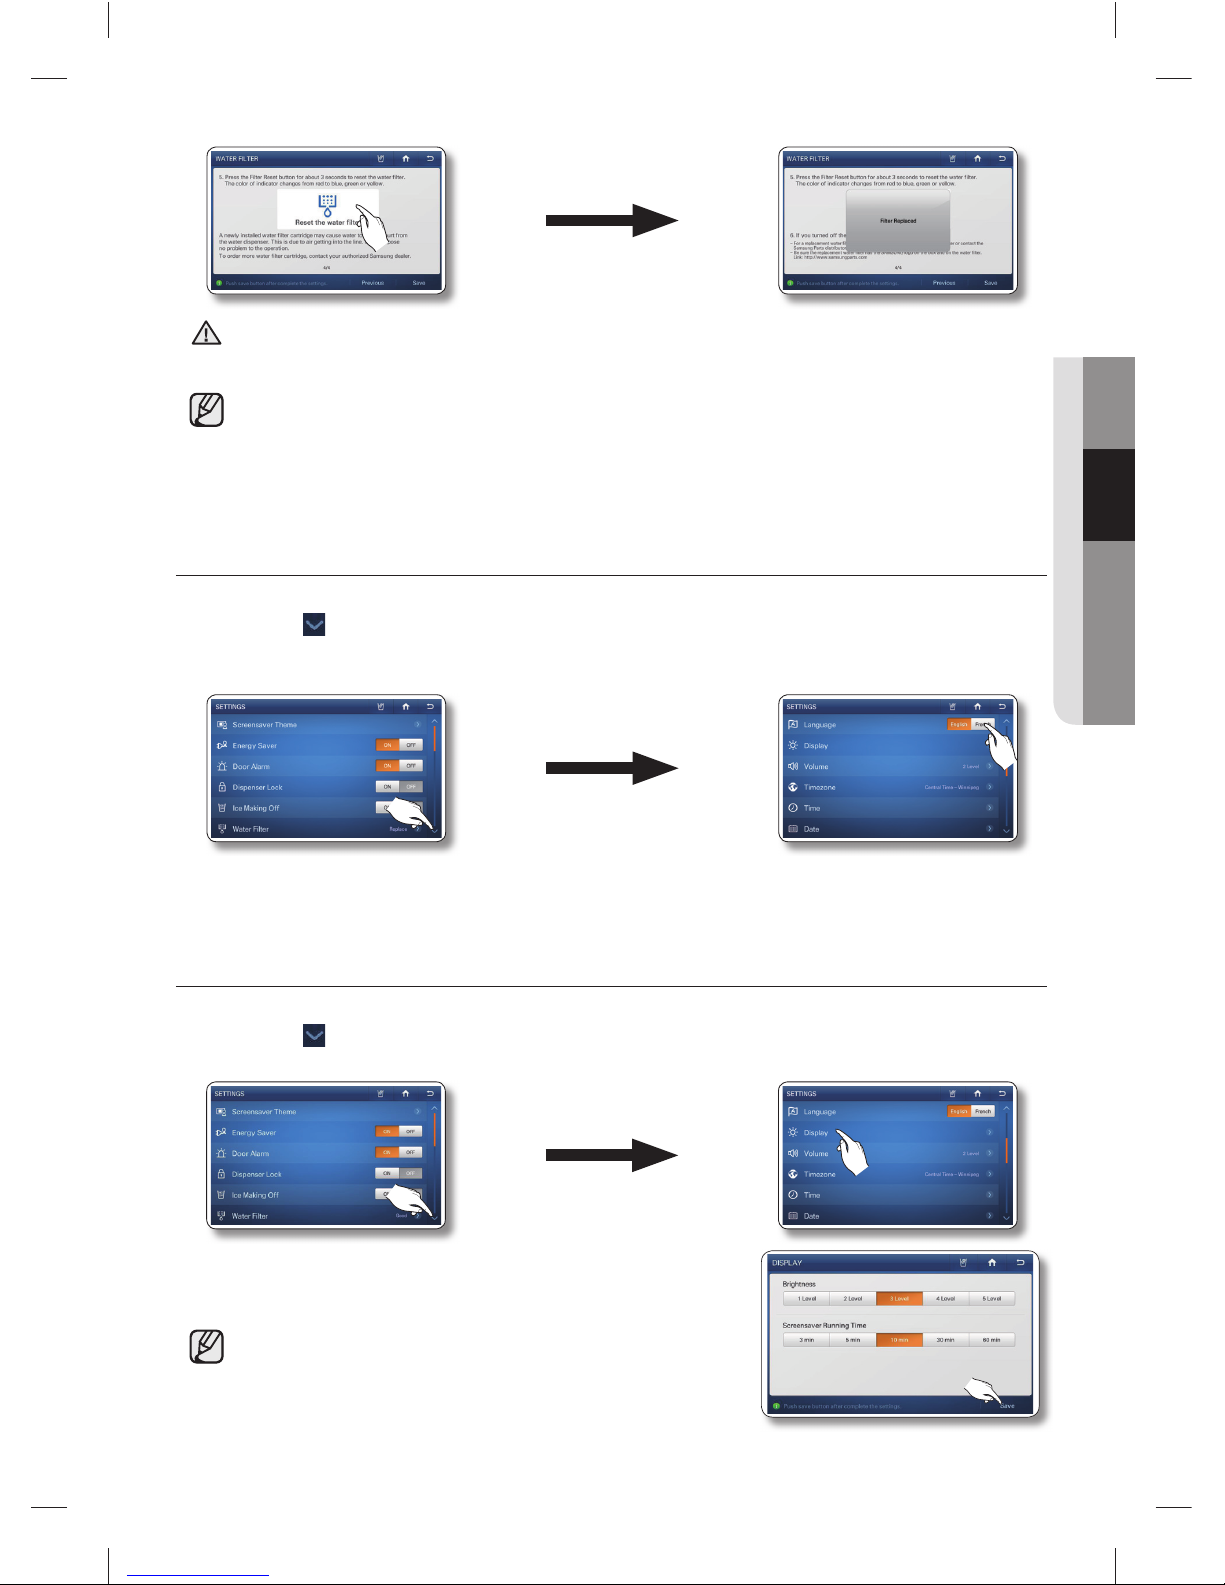
operating _67
02 OPERATING
DO NOT use the water or ice dispenser without a water fi lter cartridge. You can block the water
line or damage the dispenser.
• Be sure to fl ush the dispenser thoroughly to prevent the dispenser from dripping.
If water drips from the dispenser, it means that there is still air in the line.
For a replacement water fi lter, visit your local home improvement center or Samsung’s offi cial •
on-line parts distributor at http://www.samsungparts.com.
Be sure the replacement water fi lter has the SAMSUNG logo on the box and on the water fi lter.
LANGUAGE
You can select the default language.
1. Press the
button in the right bottom corner of the Settings list.
2. Select the preferred language on the Settings list.
After selection, the default language will be changed automatically.
Please be aware that if the contents providers do not support the different language, the •
language of contents itself would not be changed after language selection.
DISPLAY
Lets you set the brightness of the LCD and the running time of the Screensaver.
1. Press the
button in the right bottom corner of the Settings list.
2. Select [Display] in the Settings list.
3. Select the Brightness level and/or Screensaver Running Time
you want, and then press the [Save] button.
• After 60 seconds, the Screen Saver runs for the time you
set, then the LCD panel turns off.
CAUTION
DA68-02520B(0.2).indb 67DA68-02520B(0.2).indb 67 2013.2.28 10:18:18 AM2013.2.28 10:18:18 AM
Page 68
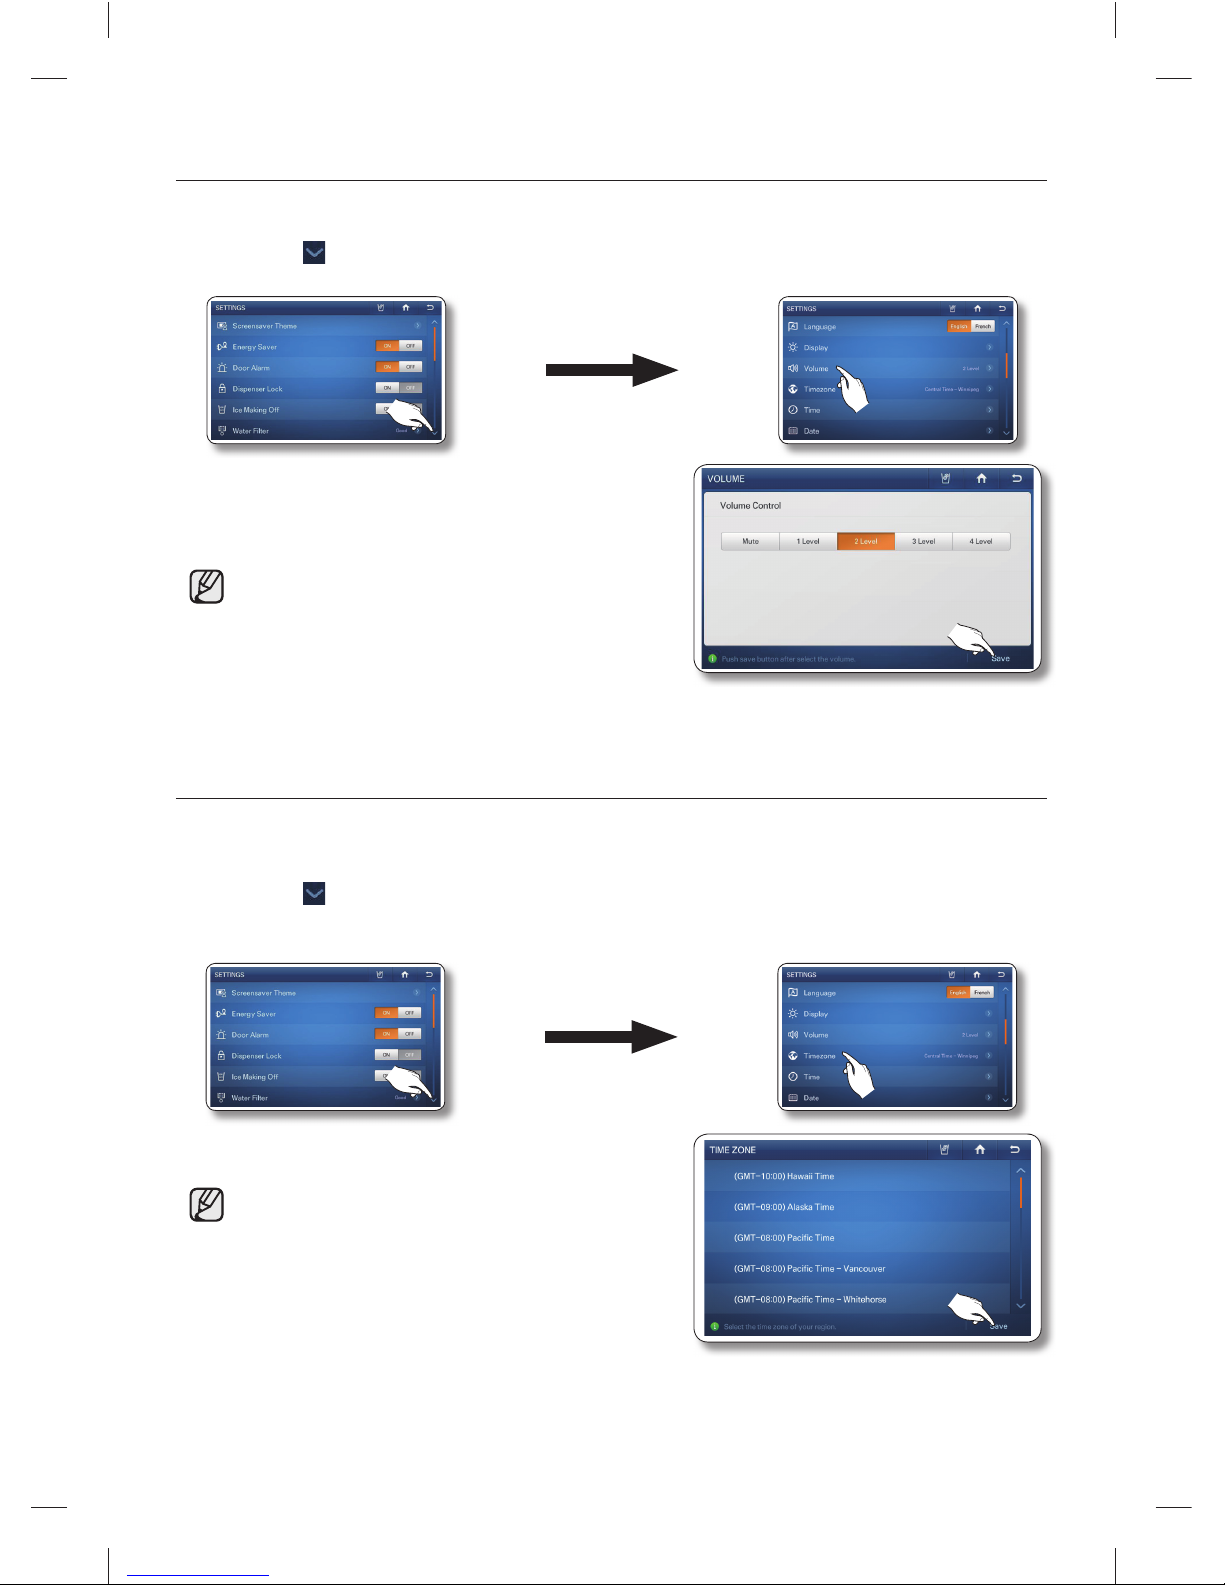
68_ operating
VOLUME
Lets you control the volume of the alert sounds.
1. Press the
button in the right bottom corner of the Settings list.
2. Select [Volume] in the Settings list.
3. Select a volume level button to change the alert sound
level.
4. Press the [Save] button to set the new volume level.
• An alert sounds whenever a button is touched or a
message window or menu list appears.
TIMEZONE
You must select your time zone to use Google Calendar and the Twitter service correctly.
To select your time zone, follow these steps:
1. Press the button in the right bottom corner of the Settings list.
The Time Zone Setting screen appears.
2. Select [Timezone] in the Settings list.
3. To save the new time zone, press the [Save] button.
• The Time Zone Setting screen may appear again
automatically after a software update.
DA68-02520B(0.2).indb 68DA68-02520B(0.2).indb 68 2013.2.28 10:18:20 AM2013.2.28 10:18:20 AM
Page 69
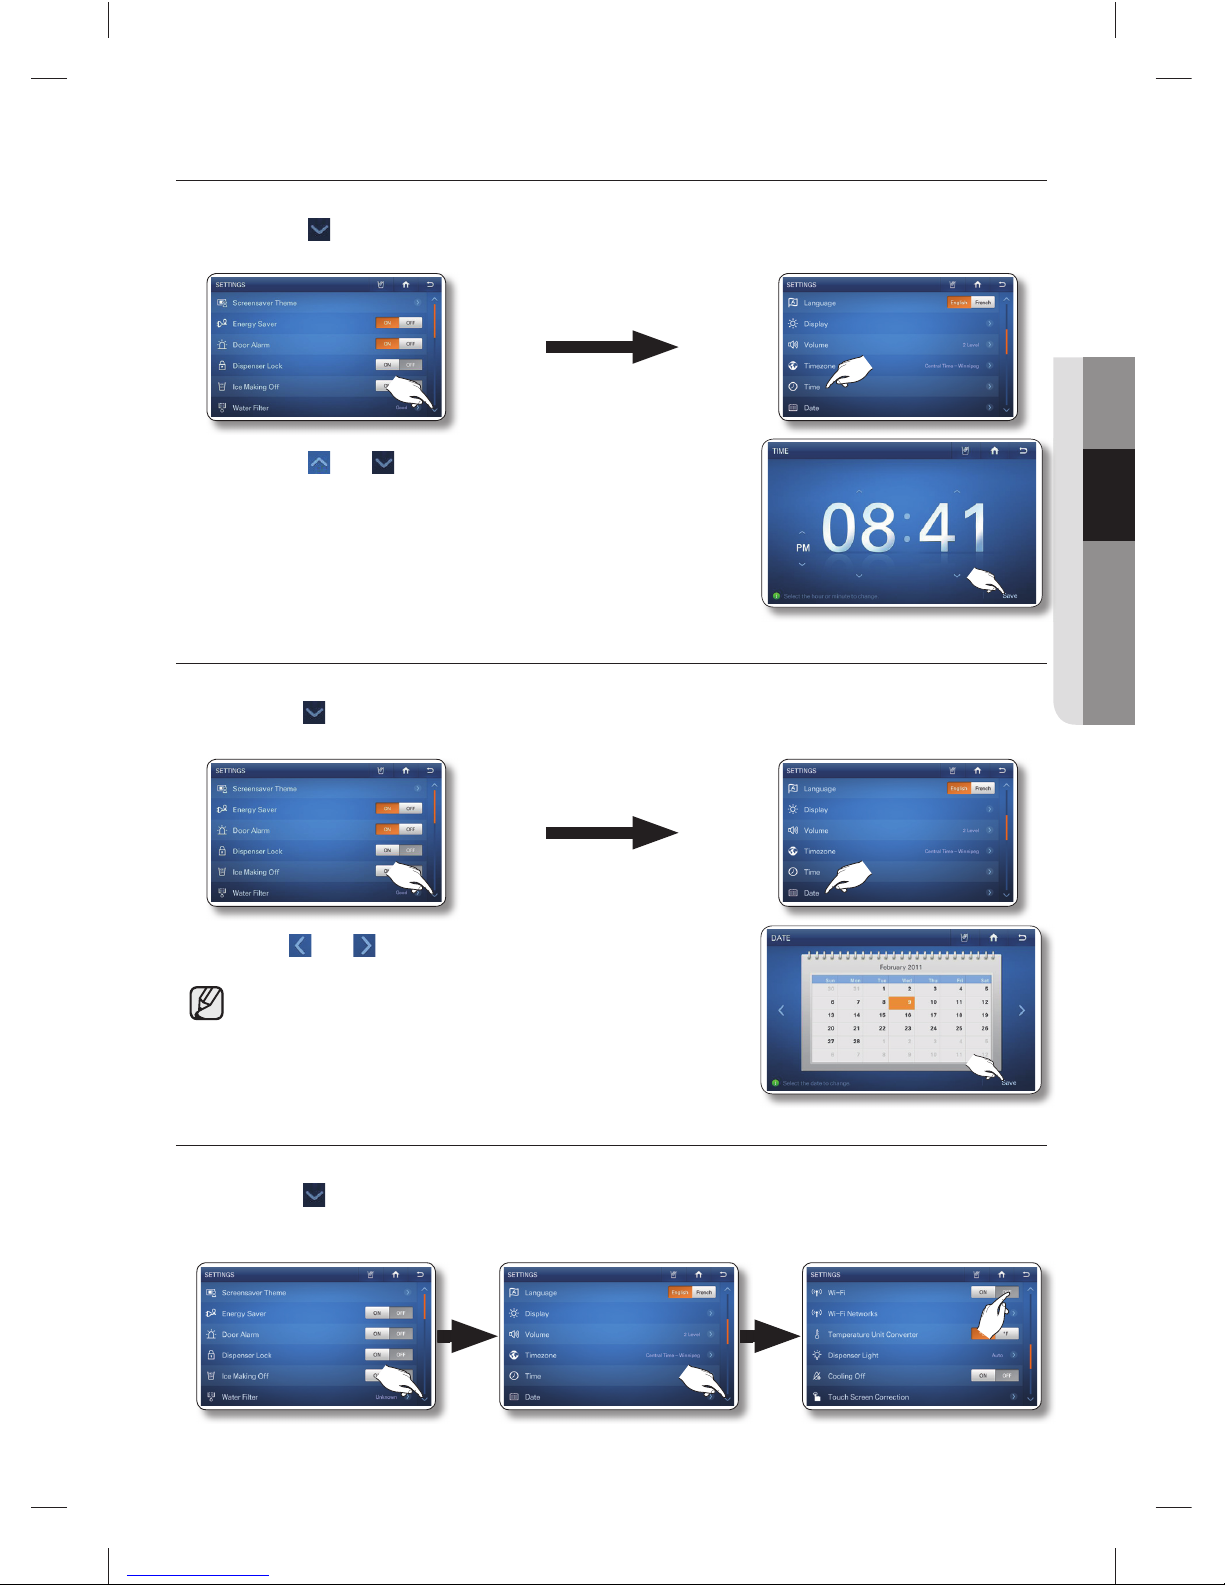
operating _69
02 OPERATING
TIME SETTING
Lets you set the current time.
1. Select the
button in the bottom right corner of the Settings list.
2. Select [Time] in the Settings list.
3. Select the and buttons to revise the time settings, and
then press the [Save] button.
If the current time is incorrect, you may not be able to use •
twitter.
DATE SETTING
Lets you can set the current date.
1. Press the
button in the right bottom corner of the Settings list.
2. Select [Date] in the Settings list.
3. Use the
and buttons to revise the month.
4. Select the desired day, and then press the [Save] button.
• If the current date is incorrect, you may not be able to use
twitter.
WI-FI
Lets you turn the refrigerator’s connection to your wireless network on and off.
1. Press the
button in the right bottom corner of the Settings list.
2. Select [Wi-Fi] the Settings list.
3. Select ON or OFF.
DA68-02520B(0.2).indb 69DA68-02520B(0.2).indb 69 2013.2.28 10:18:22 AM2013.2.28 10:18:22 AM
Page 70
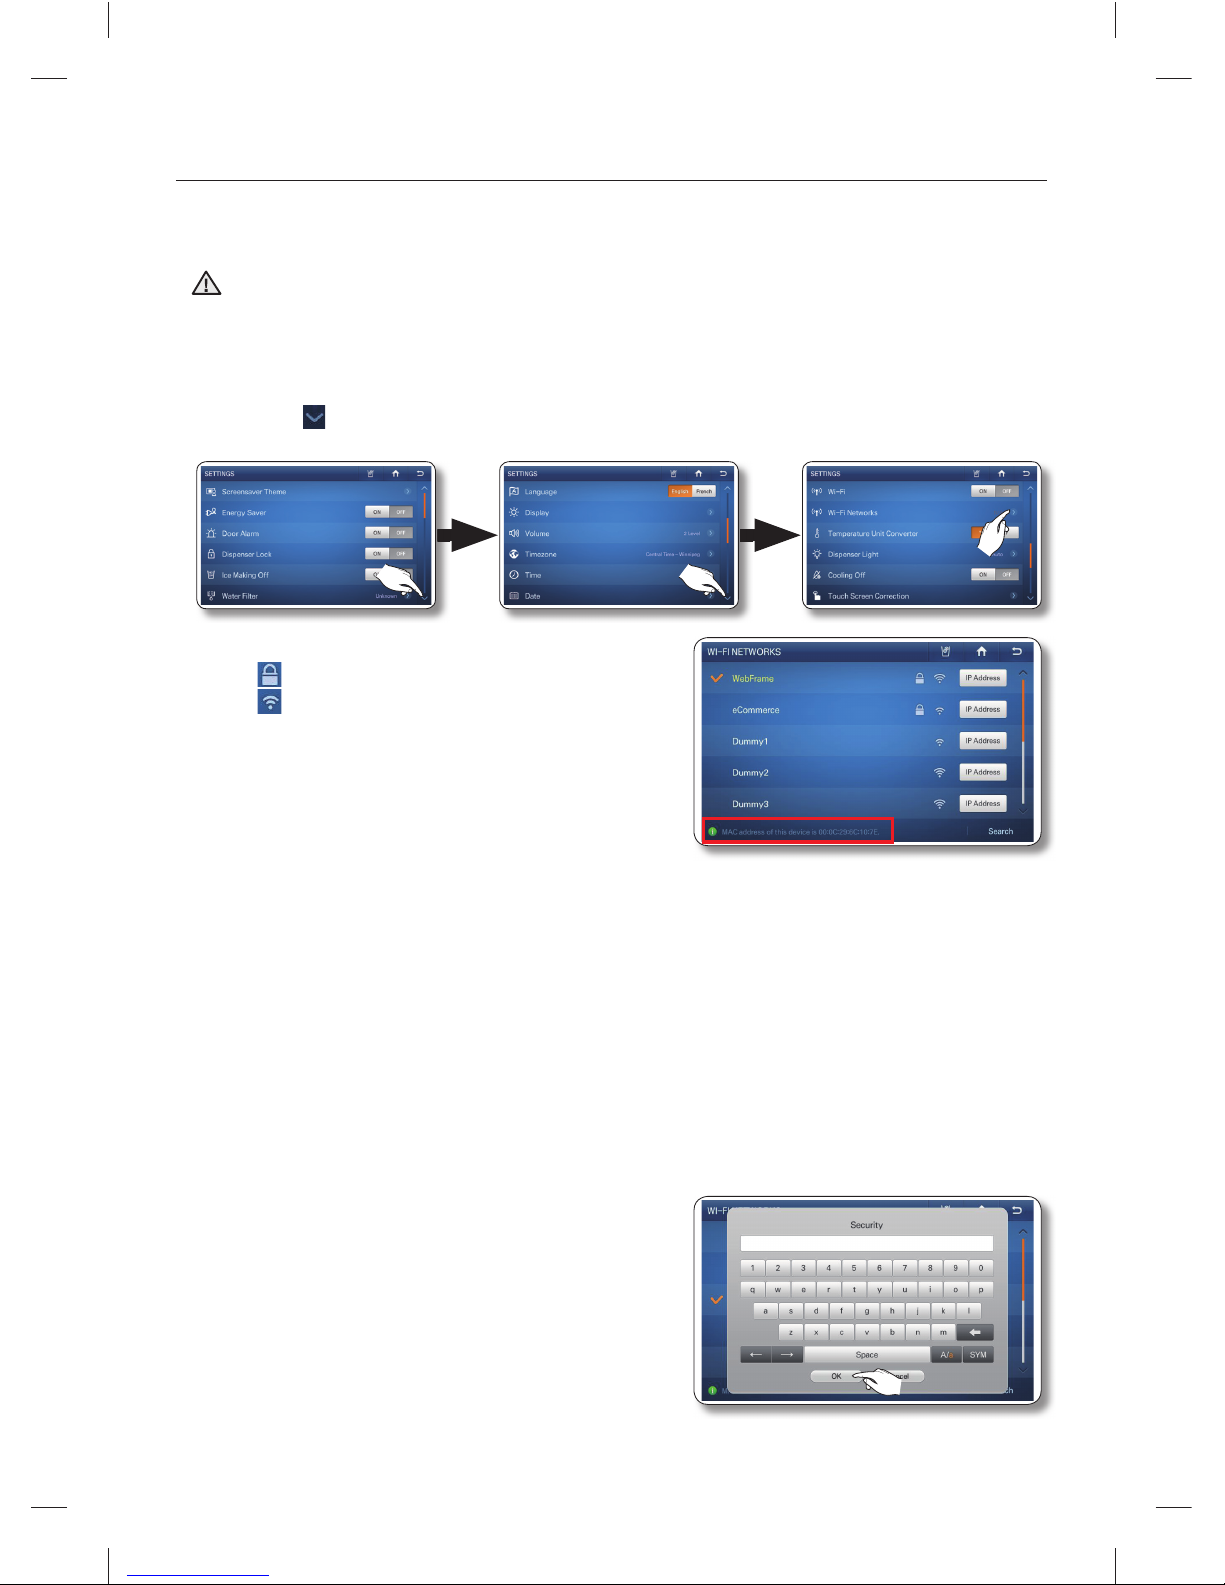
70_ operating
WI-FI NETWORKS
When you set Wi-Fi ON, (see above) the refrigerator’s wireless network function searches for a wireless
AP to connect to.
• In addition to the router installed in your home, your refrigerator can detect other wireless routers
installed in nearby houses or offi ces while connecting to your wireless network. It is illegal to use
another’s router without permission and can be subject to severe penalties. Consequently, you
should connect the refrigerator only to your own wireless router or to routers for which you have
permission.
1. Press the
button in the right bottom corner of the Settings list.
2. Select [Wi-Fi Networks] in the Settings list.
3. Select the wireless AP you want to connect to.
• : Locked with Security Code
• : Signal Strength
You can check the MAC address of the Fridge on •
the bottom of the Screen.
If there are no APs showing on the screen, press the [Search] menu at the bottom.•
Depending on the wireless AP type, the refrigerator may not make a connection.•
We recommended you use a wireless AP that supports IEEE802.11b/g/n.
If you don’t have a wireless router, please contact your internet provider or purchase and install •
one yourself.
If you can’t remember the name of your wireless network system (SSID) or its security code, •
please see the user manual of your router.
Radio frequency signals can interfere with any the wireless network system and they may affect •
the network performance of your refrigerator.
Obstacles such as concrete walls and metallic doors and radio and microwave interference from •
devices such as microwave ovens can affect the operation of your wireless network system.
Depending on the type and location of your wireless network system and the surrounding •
environment, the range and quality of your wireless network may vary.
4. If your wireless network has a security code enter the
security code, and then press the [OK] button.
In most cases, after you have entered the security
code, the refrigerator acquires the Network addresses
it needs (IP Address, Subnet Mask, Gateway, and DNS)
to connect to the network. If it does not or you need to
enter these values manually, go to Step 6.
CAUTION
DA68-02520B(0.2).indb 70DA68-02520B(0.2).indb 70 2013.2.28 10:18:24 AM2013.2.28 10:18:24 AM
Page 71
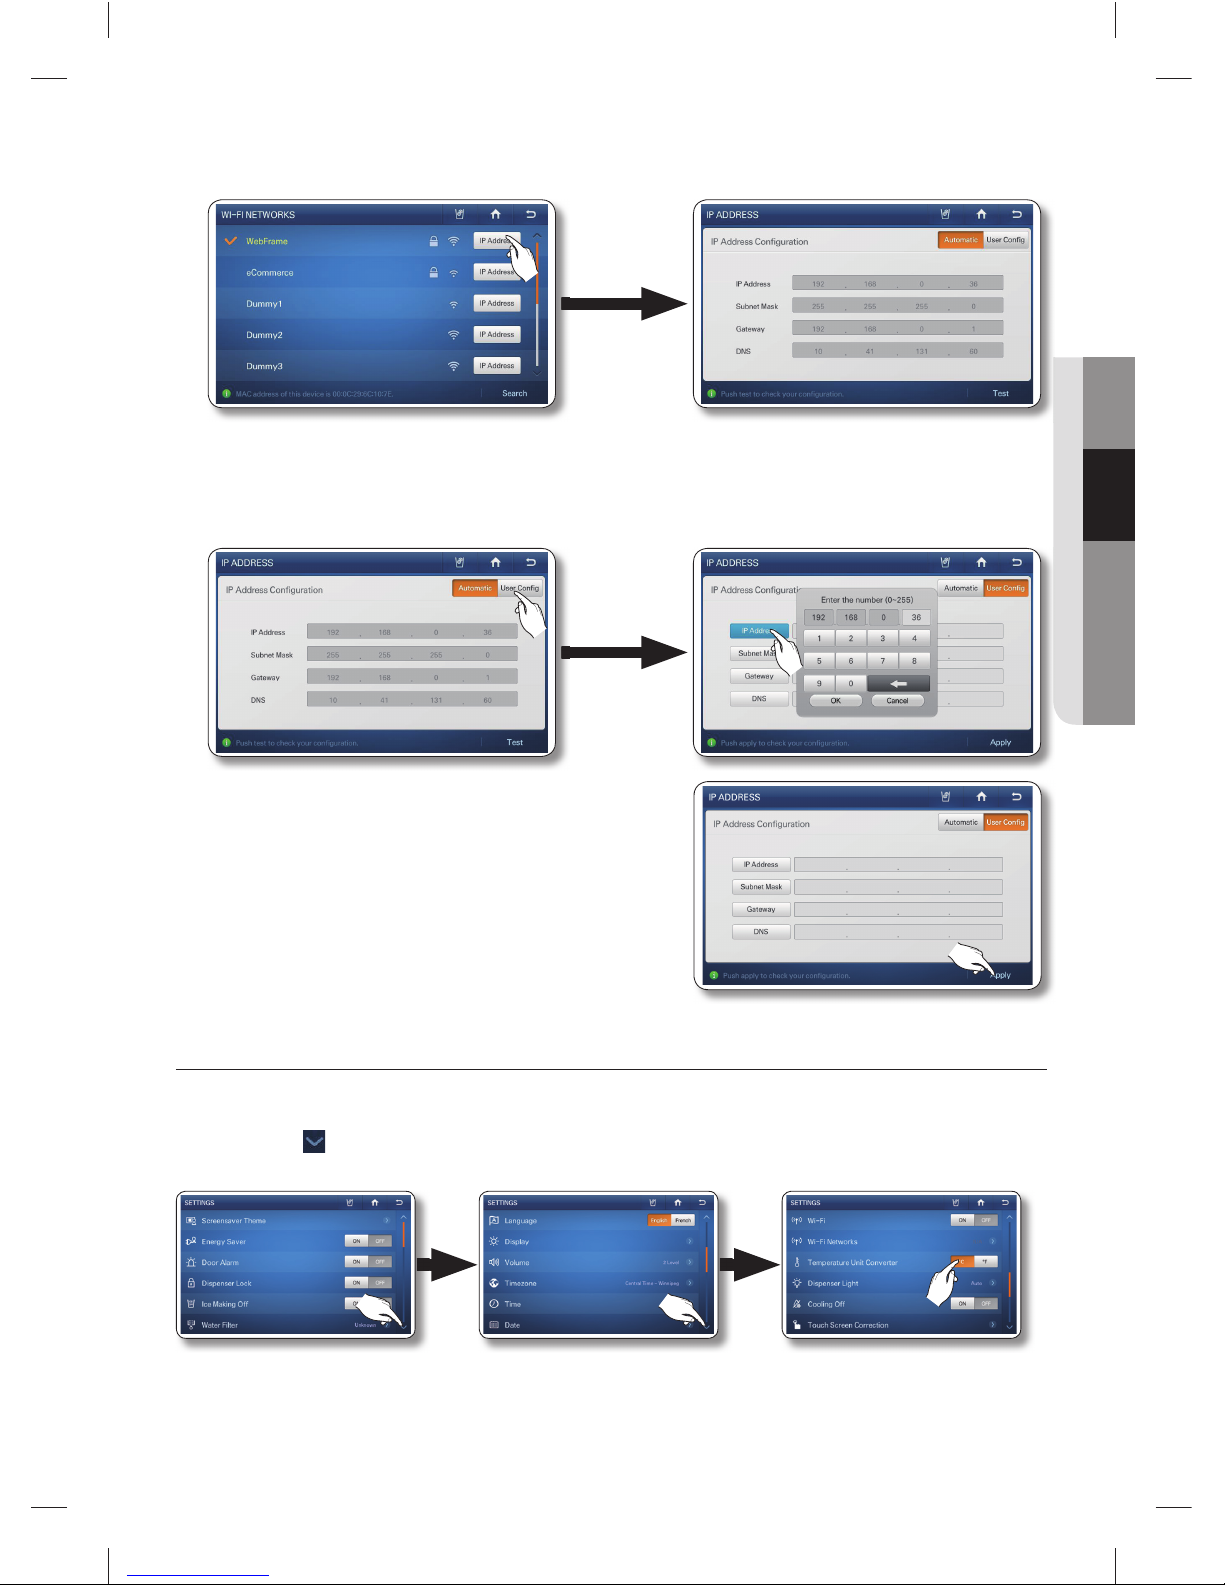
operating _71
02 OPERATING
5. After the refrigerator has connected to your network, you can select the [IP Address] button on the
Wi-Fi Networks screen to view the current IP address and Gateway values.
6. If you need to enter the IP Address, Subnet Mask, Gateway, and DNS manually, press the [User
Confi g] button on the IP Address screen. Then, select the [IP Address], [Subnet Mask], [Gateway],
and [DNS] buttons in turn and, using the keypad, enter the appropriate values. When you are done
with each entry, select the [OK] button on the keypad.
7. After entering the values for all four parameters, press
the [Apply] button.
TEMPERATURE UNIT CONVERTER
Lets you set the temperature display to Fahrenheit or Centigrade. The unit you select applies to the
Freezer / Fridge set temperature and the temperature displayed by the Weather function.
1. Press the button in the right bottom corner of the Settings list.
2. Select the Temperature Unit Converter °C or °F button in the Settings list.
DA68-02520B(0.2).indb 71DA68-02520B(0.2).indb 71 2013.2.28 10:18:26 AM2013.2.28 10:18:26 AM
Page 72
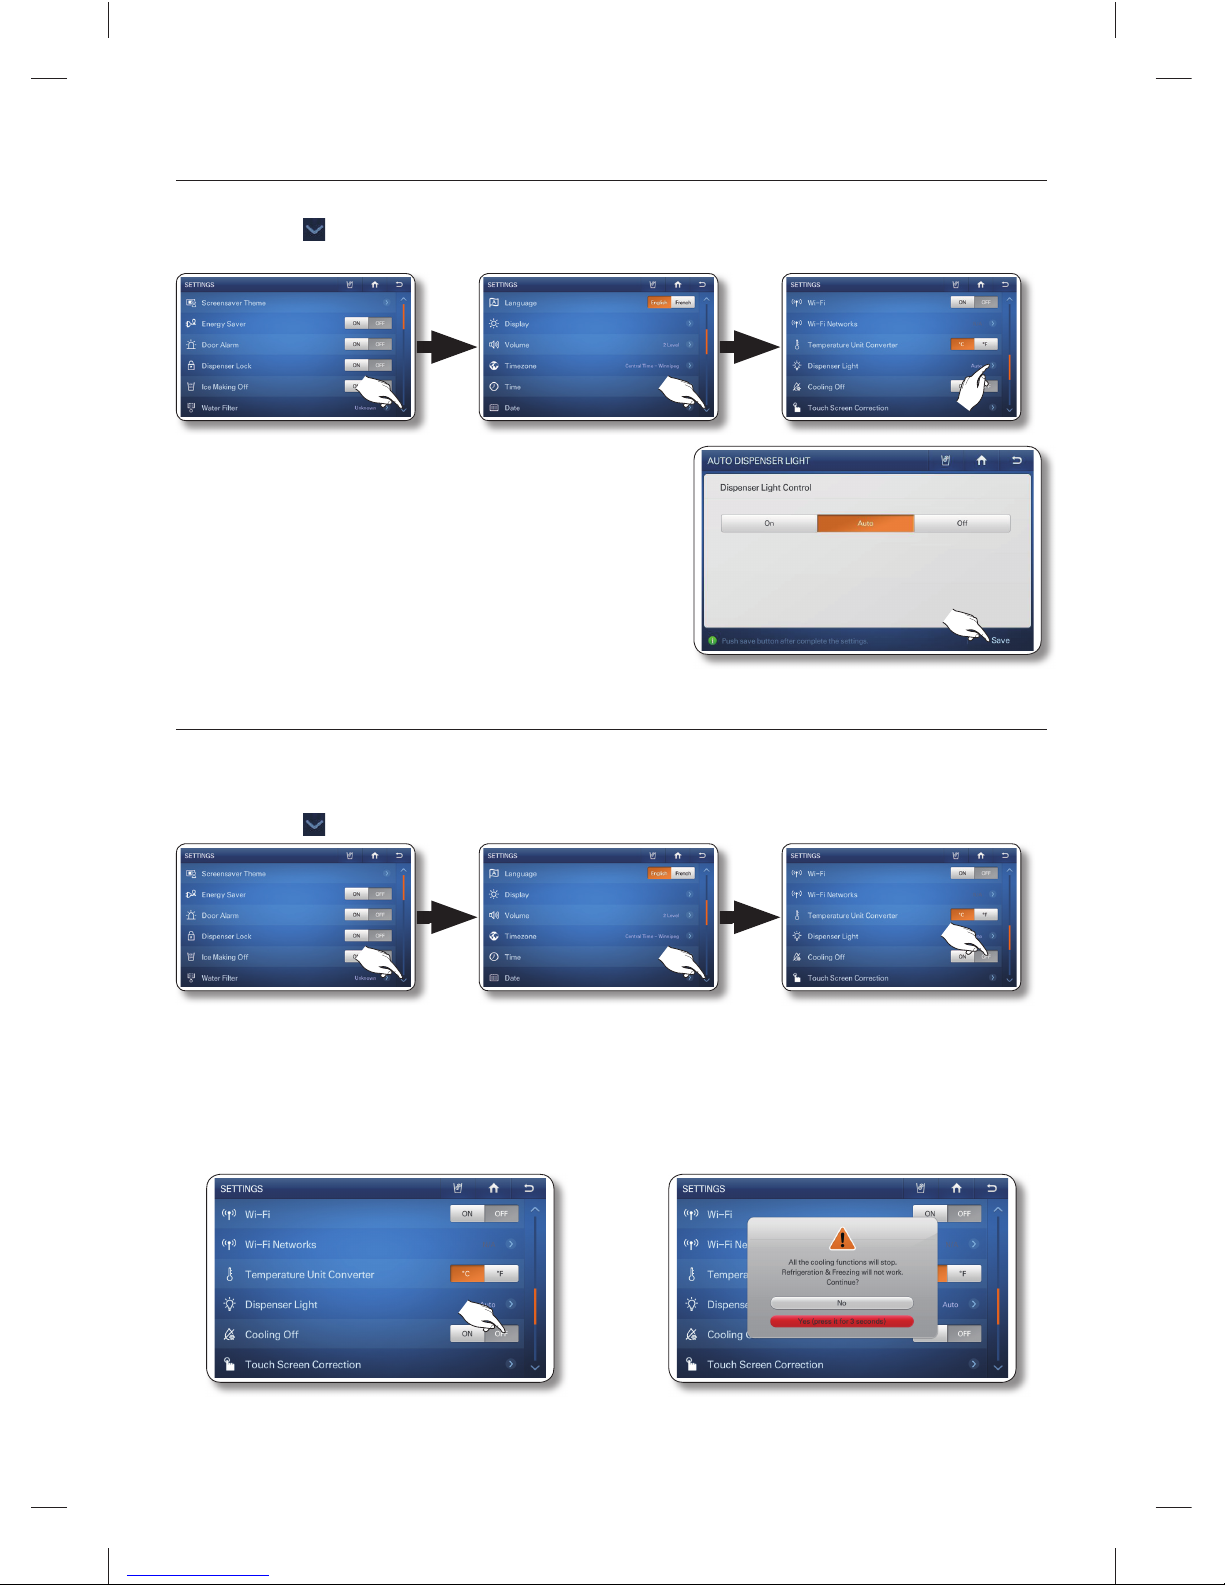
72_ operating
DISPENSER LIGHT
Lets you set the operation of the dispenser lamp light.
1. Press the
button in the right bottom corner of the Settings list.
2. Select [Dispenser Light] in the Settings list.
3. Select the desired dispenser light status, and then press
the [Save] button.
On : The Dispenser lamp is always on.•
Auto : The Dispenser lamp lights up when you use •
the Dispenser. When you release the Dispenser
lever, the light goes off in 5 seconds.
Off : The Dispenser lamp does not light up when •
you use the Dispenser.
COOLING OFF
The cooling off function shuts off the cooling mechanism in freezer and fridge compartments, but does
not shut off the electrical power to the refrigerator. This function is only used to demo refrigerator models
on showroom fl oors.
1. Press the button in the right bottom corner of the Settings list.
2. Select the Cooling Off ON or OFF button in the settings list.
If you select the Cooling Off ON button, the Home screen will displays “OFF” on the freezer/•
fridge temperatures and the refrigerator comselector functions will be deactivated.
(The refrigerator and freezer do not get cold.)
3. If you select the [ON] button, the message window below appears.
4. Press the [Yes] button for more than 3 seconds to confi rm.
DA68-02520B(0.2).indb 72DA68-02520B(0.2).indb 72 2013.2.28 10:18:28 AM2013.2.28 10:18:28 AM
Page 73
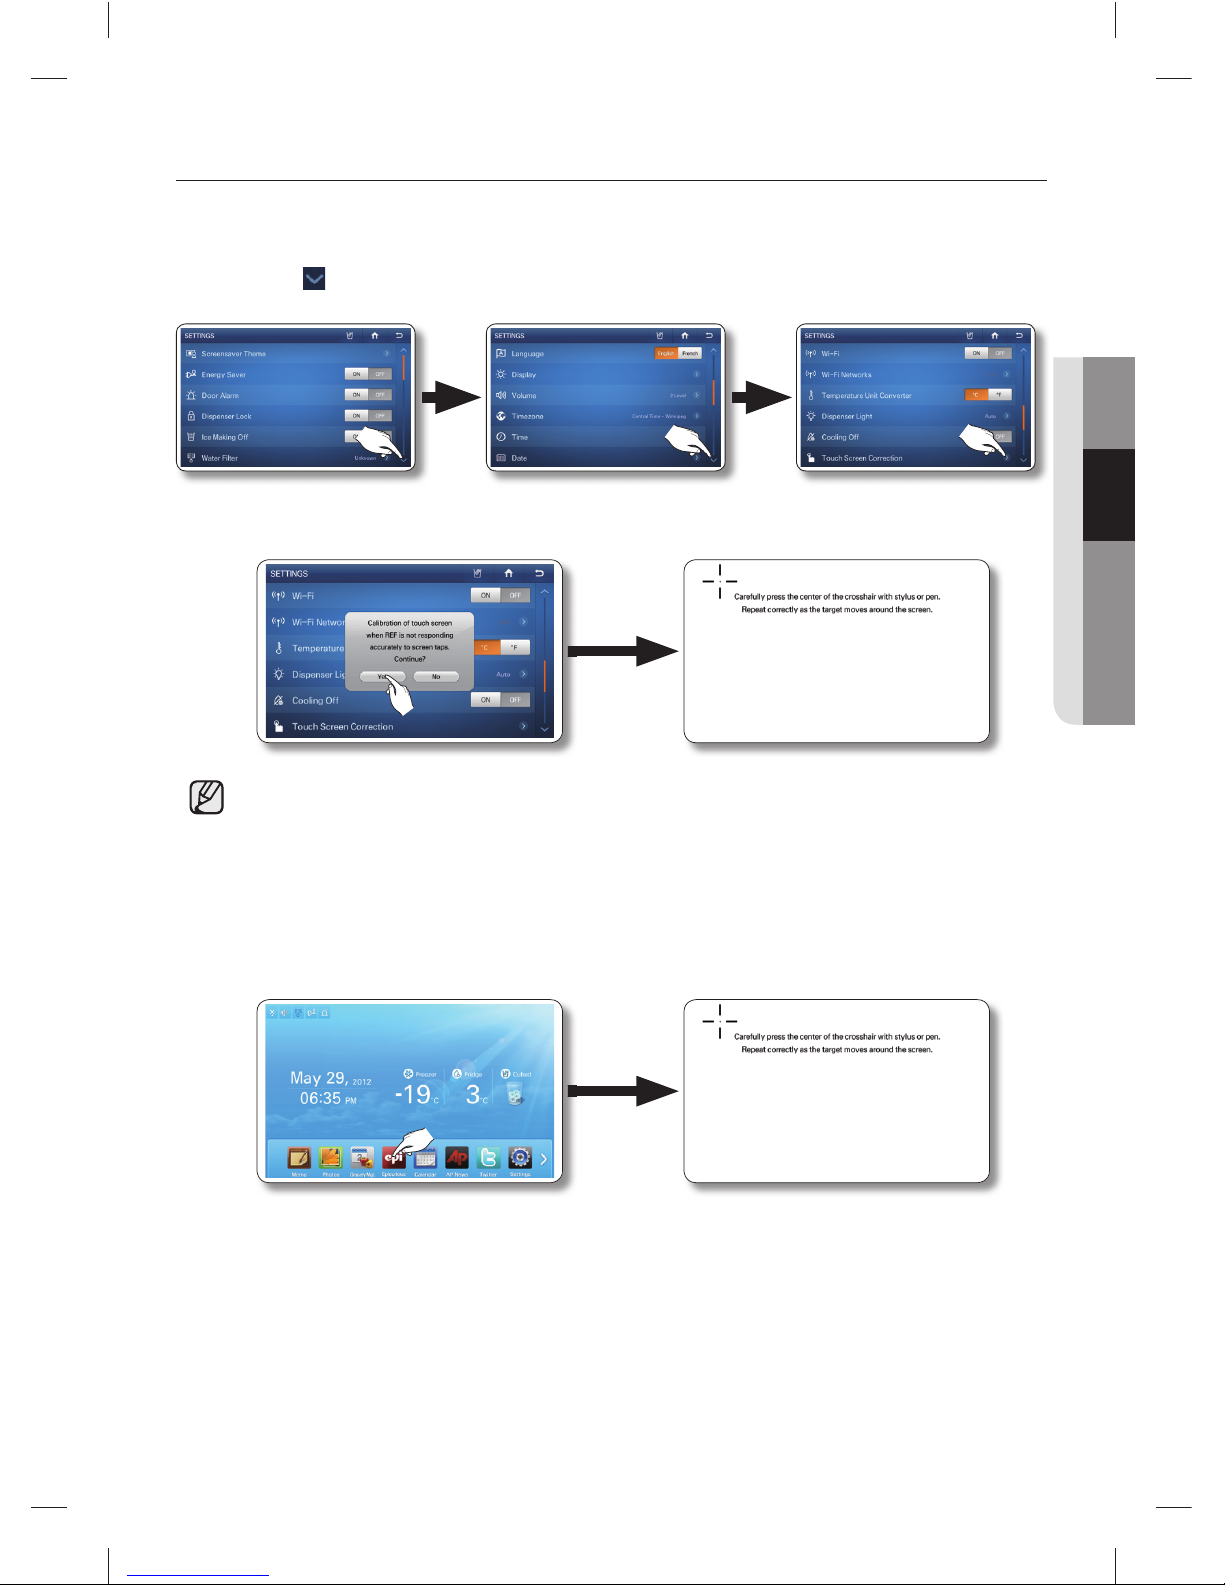
operating _73
02 OPERATING
TOUCH SCREEN CORRECTION
You can calibrate the stylus touch point to best meet your needs.
To adjust the stylus touch point on the touch screen:
1. Press the
button in the right bottom corner of the Settings list.
2. Select [Touch Screen Correction] in the Settings list.
3. Press the [Yes] button. A screen appears with pointer instructions on the top.
4. Press down lightly on the center of the “+” mark. Repeat as the “+” mark moves across the screen.
• If you do not press the center of the [+] properly, the cross mark appears repeatedly.
If you cannot run the Touch Screen Correction function in Settings because the touch screen input point
is incorrect:
1. Press and hold the Epicurious icon on the home screen for 5 seconds.
This will launch the select screen calibration function.
2. The screen will display a series of cross icons.
Press the exact center of each cross icon as it appears on the screen.
DA68-02520B(0.2).indb 73DA68-02520B(0.2).indb 73 2013.2.28 10:18:30 AM2013.2.28 10:18:30 AM
Page 74
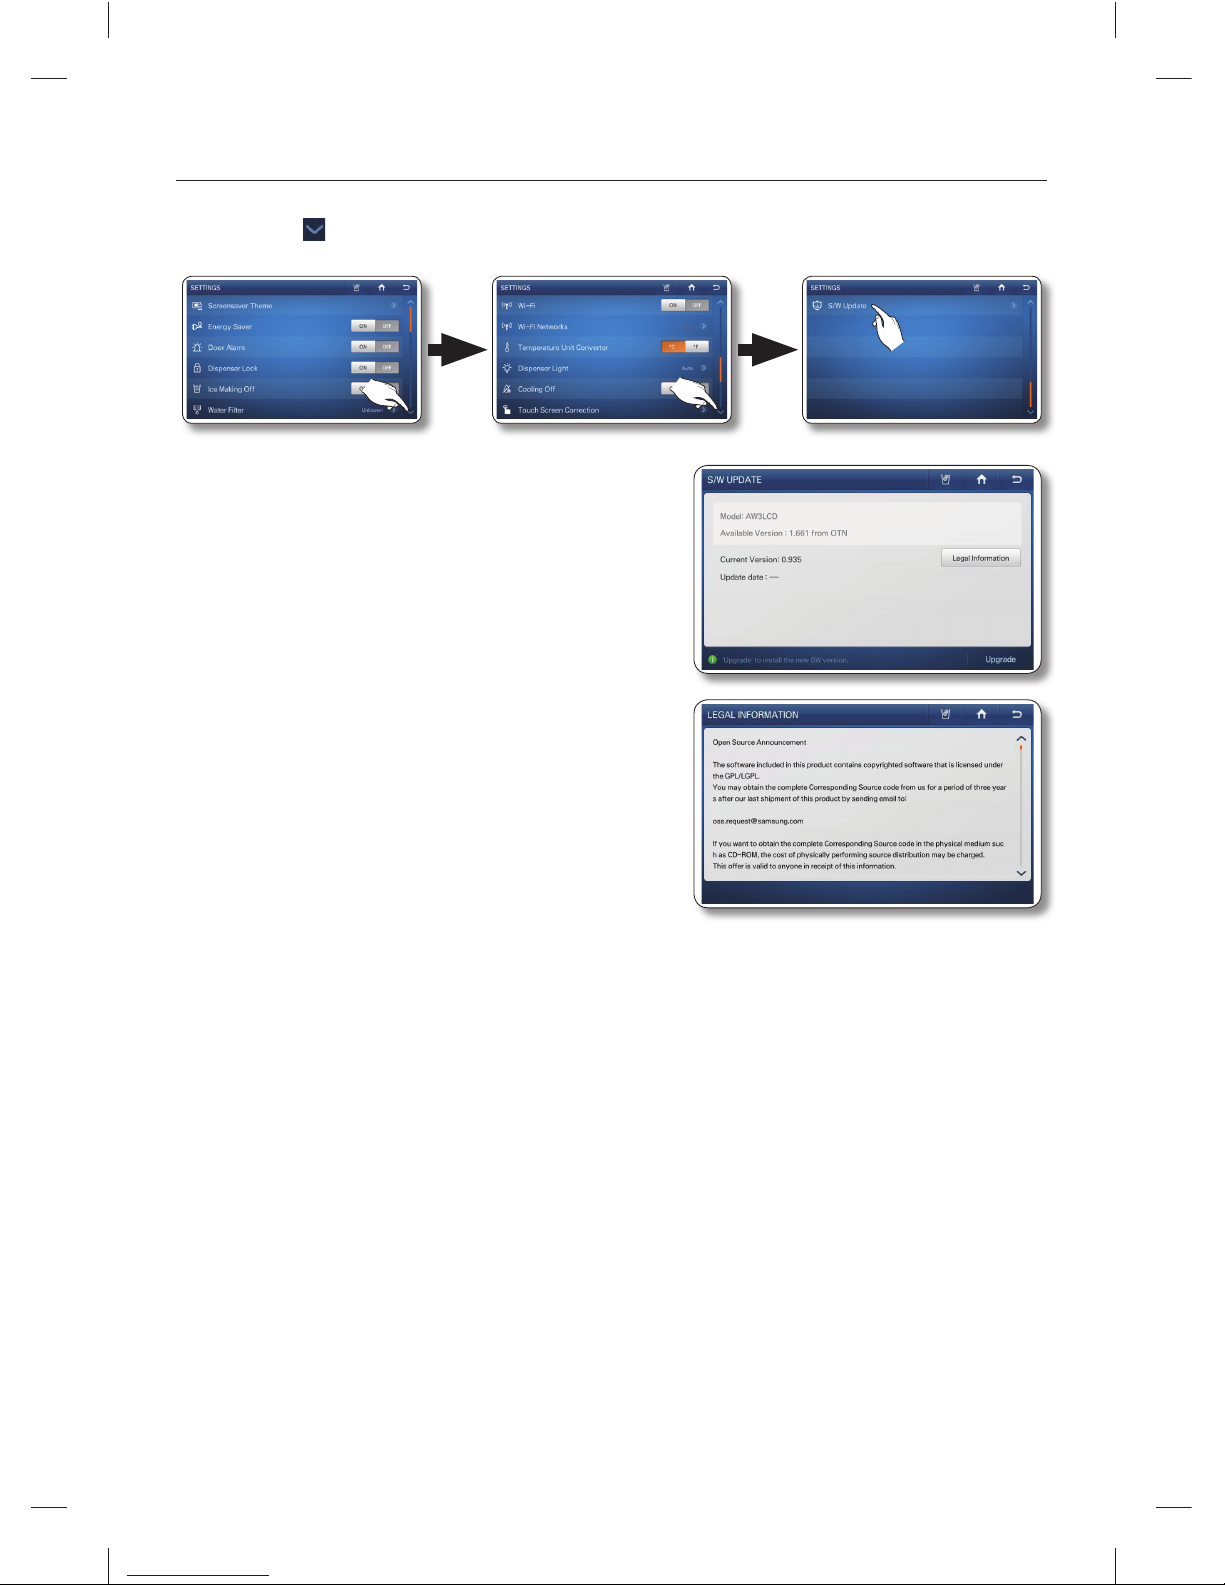
74_ operating
S/W UPDATE
Lets you check the current software version and update it to new software when available.
1. Press the
button in the right bottom corner of the Settings list.
2. Select [S/W Update] in the Settings list.
The software update is provided through the •
wireless network. When updated software is
available, the [Upgrade] button on the bottom right
corner of the screen is activated.
When you press the [Upgrade] button, the
upgraded starts almost immediately (in about 10
seconds). When the update is complete, “Upgrade
completed.” message appear on the screen and
then press the [Reboot] button in the “Upgrade
completed.” message.
Open Source License Notice - This product uses •
open source software. The Open Source Licenses
are available on the product menu. Press [Legal
Information] button to see the detail information.
DA68-02520B(0.2).indb 74DA68-02520B(0.2).indb 74 2013.2.28 10:18:32 AM2013.2.28 10:18:32 AM
Page 75
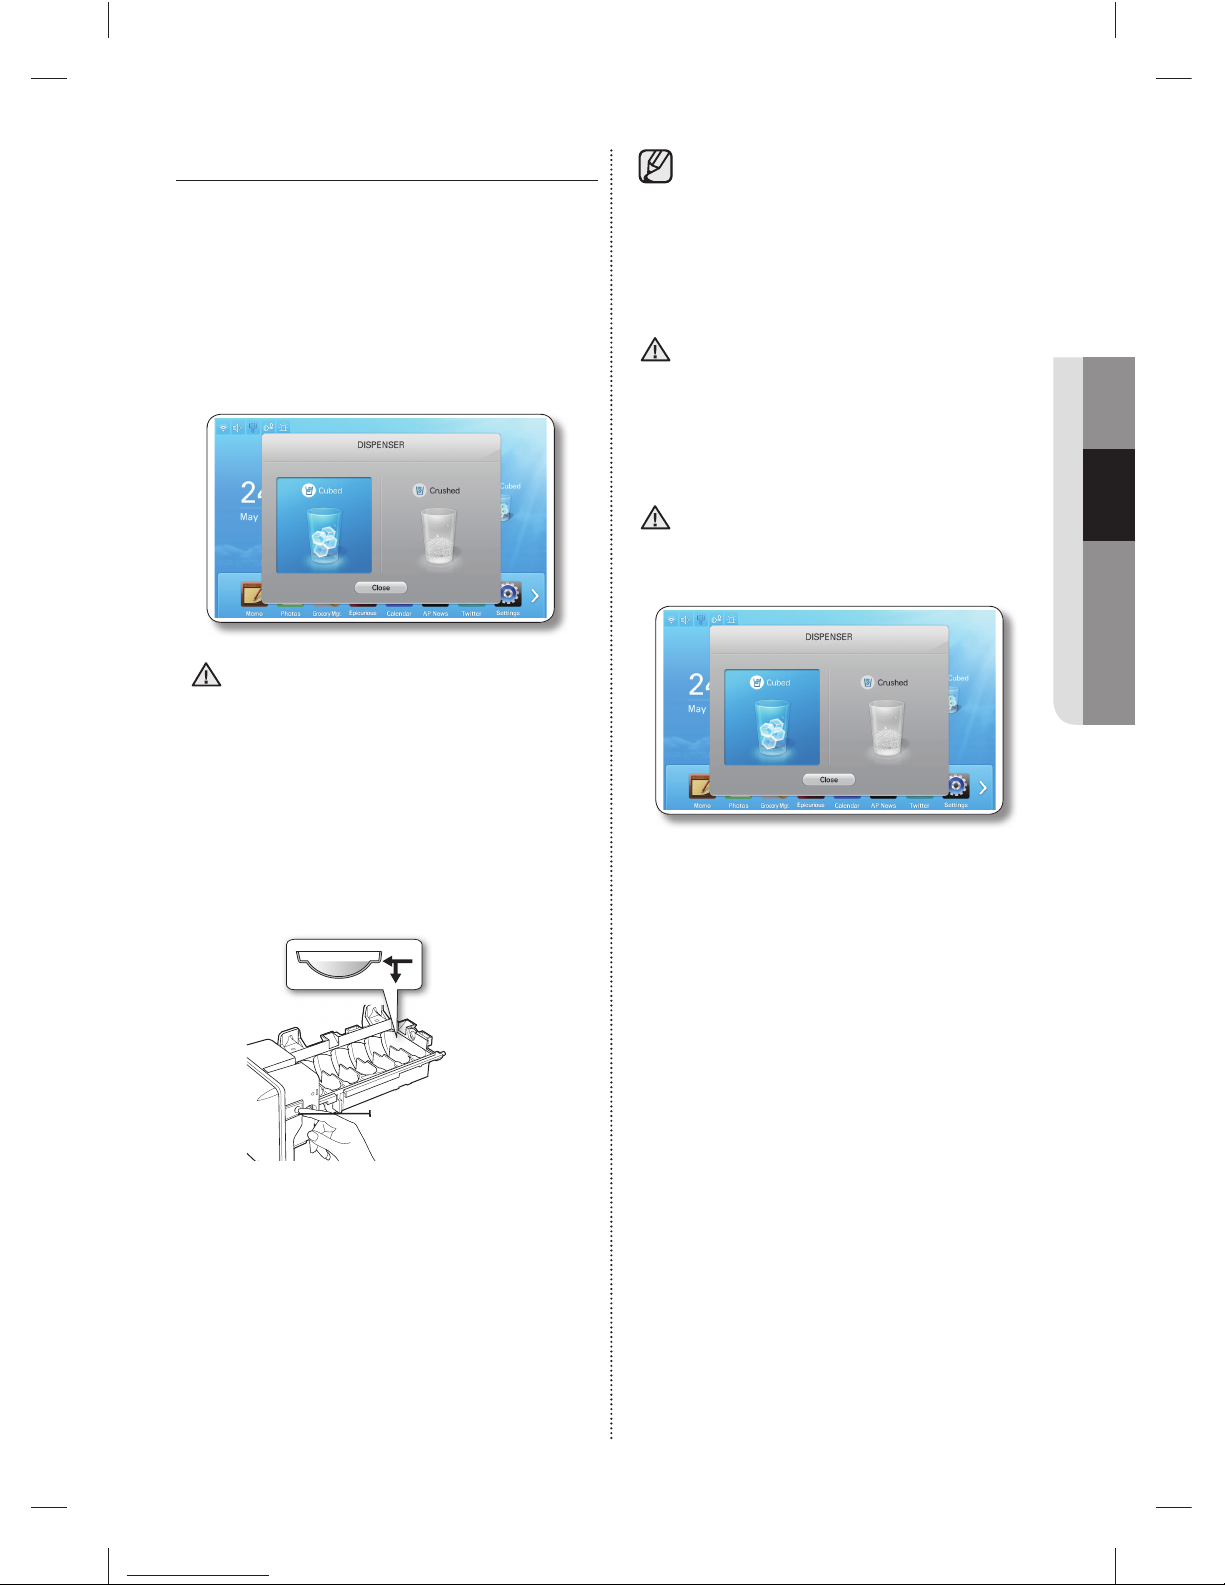
operating _75
02 OPERATING
HOW TO USE THE DISPENSER
Touch the dispenser status on the Home screen to
select the type of dispenser you want.
Place your cup under the ice outlet and push
gently against the dispenser lever.
Make sure the glass is in line with the dispenser to
prevent the ice from bouncing out.
When Cubed Ice is selected after using the
Crushed Ice feature, a small amount of residual
crushed ice might be produced.
Please wait 2 seconds before removing the
glass under the dispenser to prevent spills.
If the Fridge door opens, the Dispenser does not
work.
Do not pull the lever out.•
You could damage or break the lever’s spring.
To clean the ice bin/bucket, wash with a mild •
detergent, rinse well, and dry thoroughly it.
Do not use harsh or abrasive cleaners or
solvents.
In case ice doesn’t come out, pull out the ice •
bucket and press the test button located on the
right side of ice maker.
Do not press the test button continuously when •
the tray is fi lled with ice or water.
Water may overfl ow or ice may jam the bucket.
CAUTION
• When you select the Test button, you will
hear the refrigerator chime (ding-dong).
When the chime sounds, release the
[Test] button.
The chime sounds automatically again •
to let you know the ice maker is working
well.
If a power failure occurs, ice cubes may
melt then freeze together when the power
comes back on, causing the dispenser to
be out of order. To prevent this problem,
after a power failure, pull out the ice bucket
and discard the residual ice or water.
After you dump the ice from the ice bucket,
you should press the dispenser lever once
with the ‘CUBED’ or ‘CRUSHED’ function
ON.
The ice maker will make new ice faster after you
return the ice bucket in the refrigerator.
Normal Use•
To fi ll the ice bucket to maximum capacity after
installation, follow these steps:
Allow your refrigerator to operate and cool 1.
down for 24 hours (or 1 full day).
Waiting 24 hours will allow your ice maker to cool properly.
Dispense 4 to 6 ice cubes into the glass.2.
After 8, and then 16 hours, dispense a full glass 3.
of ice.
CAUTION
CAUTION
check the water
check the water
level
level
Test button
Test button
DA68-02520B(0.2).indb 75DA68-02520B(0.2).indb 75 2013.2.28 10:18:34 AM2013.2.28 10:18:34 AM
Page 76
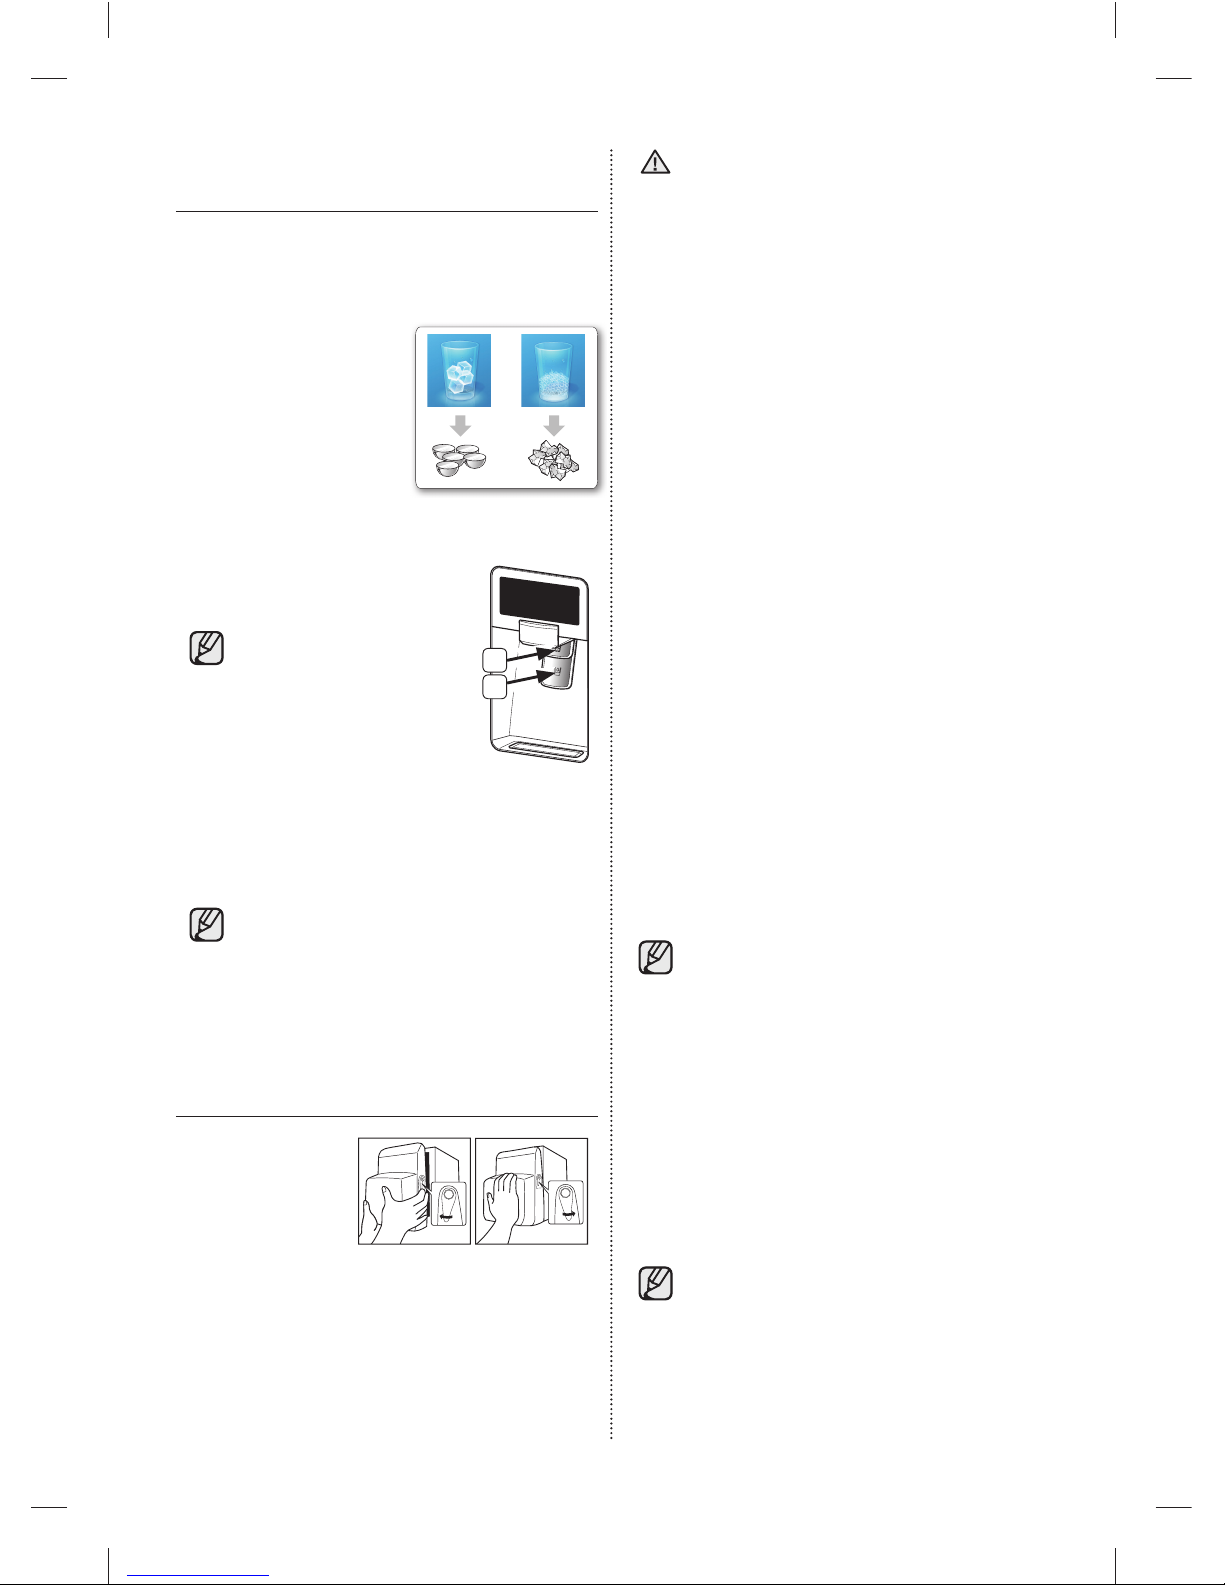
76_ operating
USING THE TWO LEVER
DISPENSER
Push the appropriate ice type button to
select what you want dispensed.
Using the ice lever ( 1 )
Push the Ice lever dispenser
( 1 ) gently with your glass.
Ice will be released from the
dispenser.
You can choose the ice
type. (Refer to SETTING
THE DISPENSER.)
Using the Water lever ( 2 )
Push the Water lever dispenser ( 2 )
gently with your glass. Water will be
released from the dispenser.
Even if you push the
water and Ice lever
simultaneously, the
dispenser operates only
the option you selected or
pushed fi rst.
Using the Ice & Water Dispenser together
To get Ice and water, push the Ice lever ( 1 ) fi rst
for ice, then move your glass down and press the
water dispenser lever ( 2 ) for water.
If you use all the ice at once, you must
repeat Steps 2 and 3 on the previous
page. However, only wait 8 hours before
dispensing the fi rst 4 to 6 ice cubes.
This will replenish the ice cubes and ensure
maximum ice production.
USING THE ICE OFF FUNCTION
When you select
the Ice Off mode,
remove all ice cubes
from the bucket. If
you are not using
the ice dispenser,
the ice cubes may clump together.
Pull the lock lever forward to remove the bucket.
Throw away the ice cubes or clumped ice.
Push the bucket back until you hear a click.
Use only the ice maker provided with
the refrigerator. The water supply to
this refrigerator must only be installed/
connected by a suitably qualifi ed person.
Connect to a potable water supply only.
To operate the ice maker properly, water pressure
of 138 ~ 862 kPa is required. If you have a long
vacation or business trip and won’t use the water
or ice dispensers for a long time:
Close the water valve. Otherwise, water leakage may occur.
Remove all food. Unplug the refrigerator. Wipe excess moisture from inside and leave the -
doors open.
Otherwise, odor and mold may develop.
Do not put your fi ngers, hands or any other
unsuitable objects in the chute or ice-maker bucket.
It may result in personal injury or material damage.
Never put your fi nger or any other objects in the
dispenser opening.
It may cause injury. -
Do not try to disassemble the ice maker.
Do not wash or spray the ice bucket with water
while it is in the refrigerator. Remove it to clean it.
Water clouding phenomenon
All water provided to the refrigerator fl ows
through the core fi lter which is an alkaline
water fi lter. In the fi ltering process, the
pressure of the water that has fl owed out
of the fi lter is increased, and the water
becomes saturated with oxygen and
nitrogen. When this water fl ows out into
the air, the pressure plummets and the
oxygen and nitrogen get supersaturated,
which results in gas bubbles. The water
may temporarily look misty or cloudy due
to these oxygen bubbles. After a few
seconds, the water will look clear.
Please wait 1 second before removing
the cup after dispensing water to prevent
spills. Do not pull out the lever dispenser
after dispensing ice or water. It comes
back automatically. Ice is made in cubes.
When you select “Crushed”, the ice maker
grinds the ice cubes into crushed ice.
CAUTION
1
2
PULL
PULL
PUSH
PUSH
DA68-02520B(0.2).indb 76DA68-02520B(0.2).indb 76 2013.2.28 10:18:36 AM2013.2.28 10:18:36 AM
Page 77
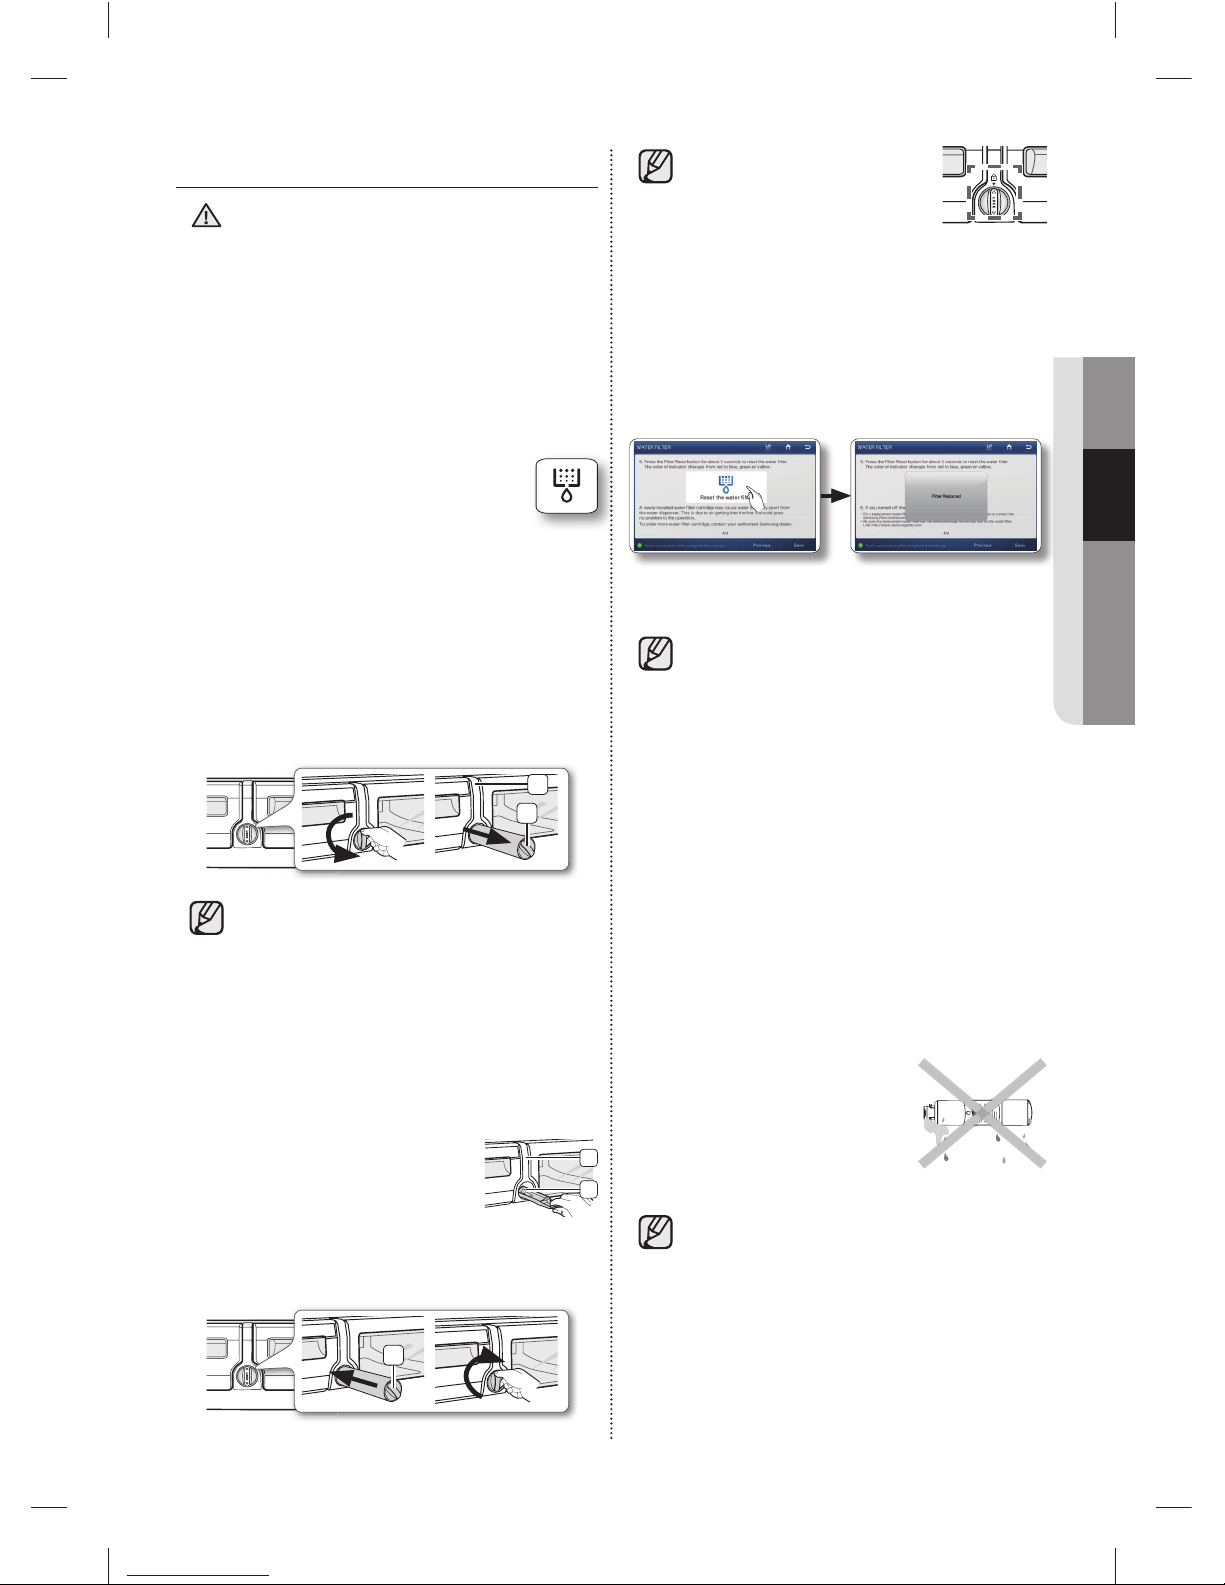
operating _77
02 OPERATING
CHANGING THE WATER FILTER
To reduce risk of water damage to your
property DO NOT use generic brands of
water fi lters in your SAMSUNG Refrigerator.
USE ONLY SAMSUNG BRAND WATER
FILTER. SAMSUNG will not be legally
responsible for any damage, including, but
not limited to property damage caused
by water leakage from use of a generic
water fi lter. SAMSUNG Refrigerators are
designed to work ONLY WITH SAMSUNG
Water Filter.
The Water Filter status icon on the Home
screen enables you to check the fi lter current
status of the water fi lter.
The Filter icon turns red to let you know when
it is time to change your water fi lter cartridge.
To give you time to get a new fi lter, the red icon comes
on just before the capacity of the current fi lter runs
out. Changing the fi lter on time provides you with the
freshest, cleanest water from your refrigerator.
Shut off the water supply. Then, turn the water 1.
fi lter ( 1 ) about 1/4 turn, counter-clockwise.
Pull the water fi lter ( 2. 1 ) from the case fi lter ( 2 ).
• To change the water fi lter more easily,
shut off the water supply valve.
Sometimes, it is hard to disassemble the water •
fi lter because impurities in the water cause it to
stick. If you are having diffi culties, grip the water
fi lter fi rmly and pull it hard.
When you pull the water fi lter, a little water can •
leak from the opening. This is normal.
To minimize the water leaks, keep the fi lter
cartridge horizontal when you pull it.
To prevent overfl ow, empty the •
water tray fi lter ( 3 ) and dry
around of case fi lter ( 2 ).
Insert the new fi lter into the fi lter case ( 3. 4 ).
Push the fi lter, and then turn it clockwise until it 4.
locks.
WARNING
• If you are in trouble of
inserting the water fi lter as
high pressure of water, shut
off the water supply valve.
The locked symbol should be lined up with the •
indicator line.
When the replacement is done, press and hold 5.
the ‘Reset the water fi lter’ simultaneously for 3
or more seconds at the center of the screen.
(Refer to the “WATER FILTER” part on this
manual.)
If you turned off the water supply, turn it back 6.
on.
For a replacement water fi lter, you can visit
your local home Improvement center or
contact the Samsung Parts distributor.
Be sure the replacement water fi lter has
the SAMSUNG logo on the box and on the
water fi lter.
Link : http://www.samsungparts.com
Removing any residual matter inside the
water supply line after installing the water
fi lter.
Turn ON the main water supply and supply 1.
water from water supply line.
Run water through the dispenser until the water 2.
runs clear (approx. 6 to 7 minutes).
This will clean the water supply system and
remove air from the lines.
Additional fl ushing may be 3.
required in some households.
Open the Refrigerator door and 4.
make sure there are no water
leaks coming from the water
fi lter.
Be sure to fl ush the dispenser thoroughly,
otherwise water may drip from the
dispenser. This means that there is still air
in the line.
(Red)
(Red)
2
1
3
2
4
DA68-02520B(0.2).indb 77DA68-02520B(0.2).indb 77 2013.2.28 10:18:38 AM2013.2.28 10:18:38 AM
Page 78
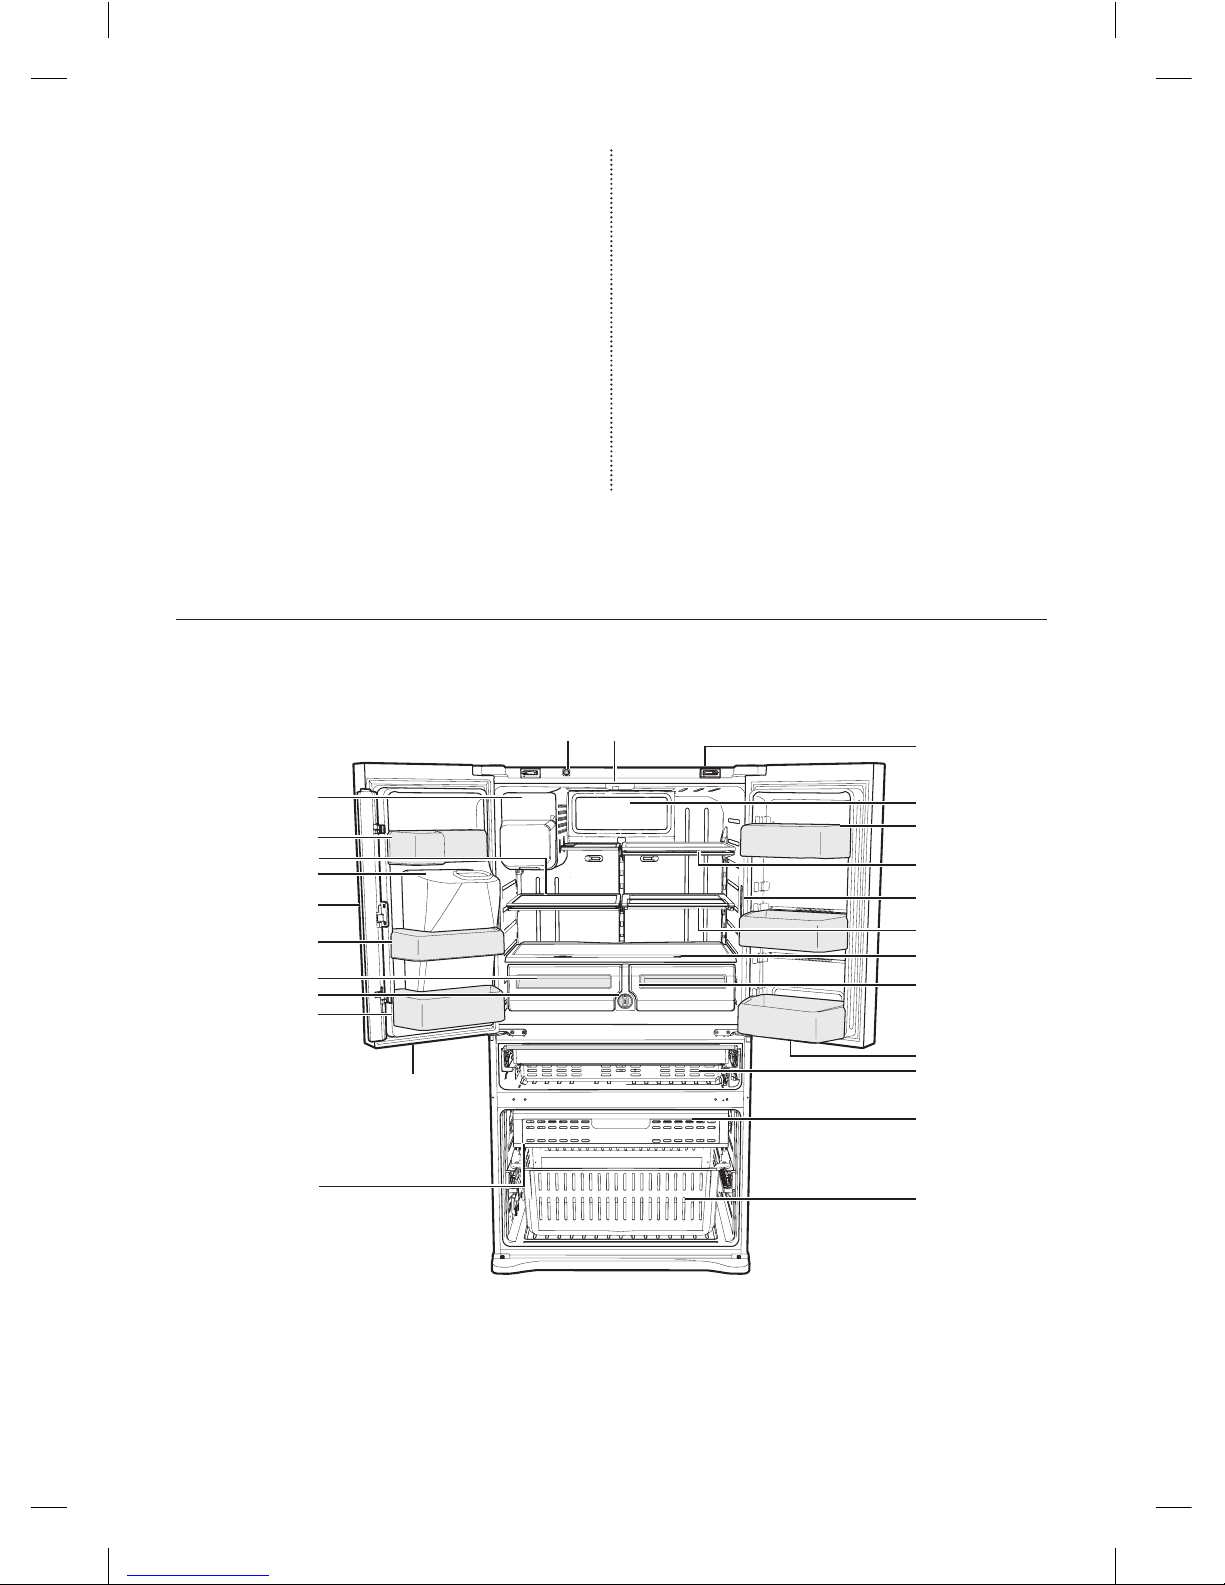
78_ operating
Reverse Osmosis Water Supply
IMPORTANT : The pressure of the water supply
coming out of a reverse osmosis system going to
the water inlet valve of the refrigerator needs to be
between 241 and 827 kPa.
If a reverse osmosis water fi ltration system is
connected to your cold water supply, the water
pressure to the reverse osmosis system needs to
be a minimum of 276 to 414 kPa.
If the water pressure to the reverse osmosis system
is less than 276 to 414 kPa:
Check to see whether the sediment fi lter in the •
reverse osmosis system is blocked.
Replace the fi lter if necessary.
Allow the storage tank on the reverse osmosis •
system to refi ll after heavy usage.
If your refrigerator has a water fi lter, it may •
further reduce the water pressure when used
in conjunction with a reverse osmosis system.
Remove the water fi lter.
If you have questions about your water pressure,
call a licensed, qualifi ed plumber.
PARTS AND FEATURES
Use this page to become more familiar with the parts and features of the refrigerator.
FF Ice-Maker
FF Ice-Maker
Light
Light
Interlocking switch
Interlocking switch
Door Closer
Door Closer
Cover Eva (Light)
Cover Eva (Light)
Right Door Bins
Right Door Bins
Tempered glass
Tempered glass
shelves
shelves
Light
Light
Quick-Space
Quick-Space
Glass Shelf
Glass Shelf
Cover Veg
Cover Veg
Light
Light
Light
Light
Convertible Room
Convertible Room
Auto Pull Out
Auto Pull Out
Drawer
Drawer
Freezer Drawer
Freezer Drawer
Bin
Bin
Dis Door Bins
Dis Door Bins
Slide-Shelf
Slide-Shelf
Cap Chute
Cap Chute
Vertical Hinged
Vertical Hinged
Section
Section
Mid Door Bins
Mid Door Bins
Vegetable & Fruit
Vegetable & Fruit
Drawers
Drawers
Water Filter
Water Filter
Left Door Bins
Left Door Bins
Tilting Pocket
Tilting Pocket
Light
Light
DA68-02520B(0.2).indb 78DA68-02520B(0.2).indb 78 2013.2.28 10:19:3 AM2013.2.28 10:19:3 AM
Page 79
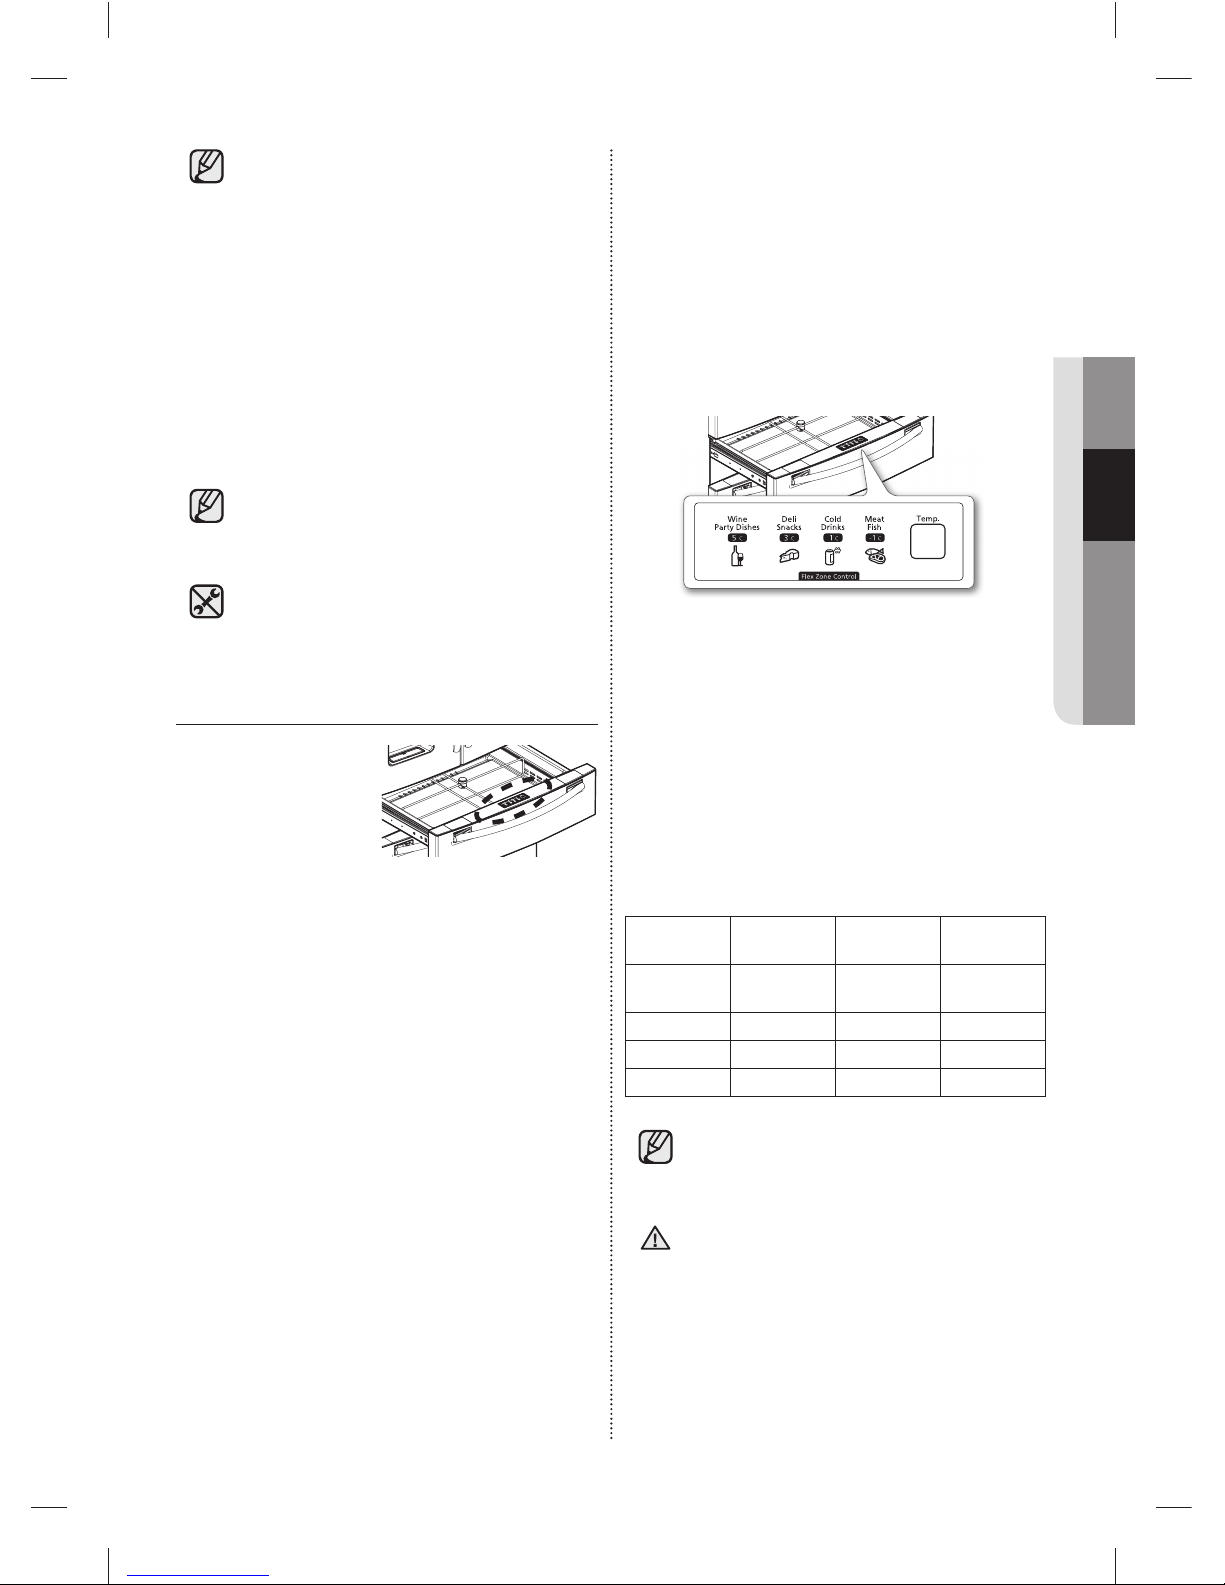
operating _79
02 OPERATING
When closing the door, make sure the
Vertical Hinged Section is in the correct
position to avoid scratching the other door.
If the Vertical Hinged Section is reversed,
put it back to the right position and close
the door.
Moisture may appear at times on the
Vertical Hinged Section.
The door handle may become loose over
time. If this happens, tighten the bolts
found on the inside of the door.
If you close one door with a lot of force,
the other door may open.
When the door opens, the interlock switch
automatically turns off the auger motor in
the ice maker for safety reasons.
When the interior or exterior LED lamp
has gone out, please contact your service
agents.
USING FLEX ZONE
The Flex Zone is a fullwidth drawer with an
adjustable temperature
control. You can use the
Flex Zone for large party
trays, deli items, wines,
pizzas, beverages, or miscellaneous items.
There is a temperature sensor which lets you adjust
the amount of cold air allowed into the Zone.
The control buttons are located on the cap door
center.
Press the Temp button repeatedly until your •
desired mode is lit.
Each time you press the Temp button, you •
change the mode in this order: Meat/Fish mode
(-1 °C), Cold Drinks mode, Deli/Snack (3 °C),
Wine/Party Dishes mode.
Initially, the Cold Drinks mode is selected.
The refrigerator will adjust the temperature in
the Flex Zone automatically to the temperature
you selected.
The Flex Zone Temp. Display may change •
depending on the number of items inside, where
they are located, the ambient temperature, and
how often the door is opened.
Temperature
You can select your Flex Zone temperature from
Meat/Fish mode, Cold Drinks mode, Deli/Snack, or
Wine/Party Dishes mode.
Selection Button
When “1. Wine/Party Dishes” is selected, the
temperature of Flex Zone will be kept around
5 °C. This feature helps keep food fresh for a
long time.
When “2. Deli/Snack” is selected, the
temperature of Flex Zone will be kept around
3 °C. This feature helps keep food fresh for a
longer time.
When “3. Cold Drink” is selected, the
temperature of Flex Zone will be kept around
1 °C. This feature also helps keep drinks cold
and refreshing.
When “Meat/Fish” is selected, the temperature 4.
of Flex Zone will be kept around-1 °C.
This feature also helps keep meat or fi sh fresh
for a longer time.
Wine Party
Dishes
Deli
Snacks
Cold
Drinks
Meat Fish
wine pineapples
bottled
water
steaks
cocktails lemons juice cold cuts
cakes biscuits soft drinks bacon
cheeses potatoes beer chili dogs
When the door opens, the interlock switch
automatically turns off the auger motor in
the ice maker for safety reasons.
When the door opens, the interlock switch
automatically turns off the auger motor in
the ice maker for safety reasons.
CAUTION
DA68-02520B(0.2).indb 79DA68-02520B(0.2).indb 79 2013.2.28 10:19:4 AM2013.2.28 10:19:4 AM
Page 80
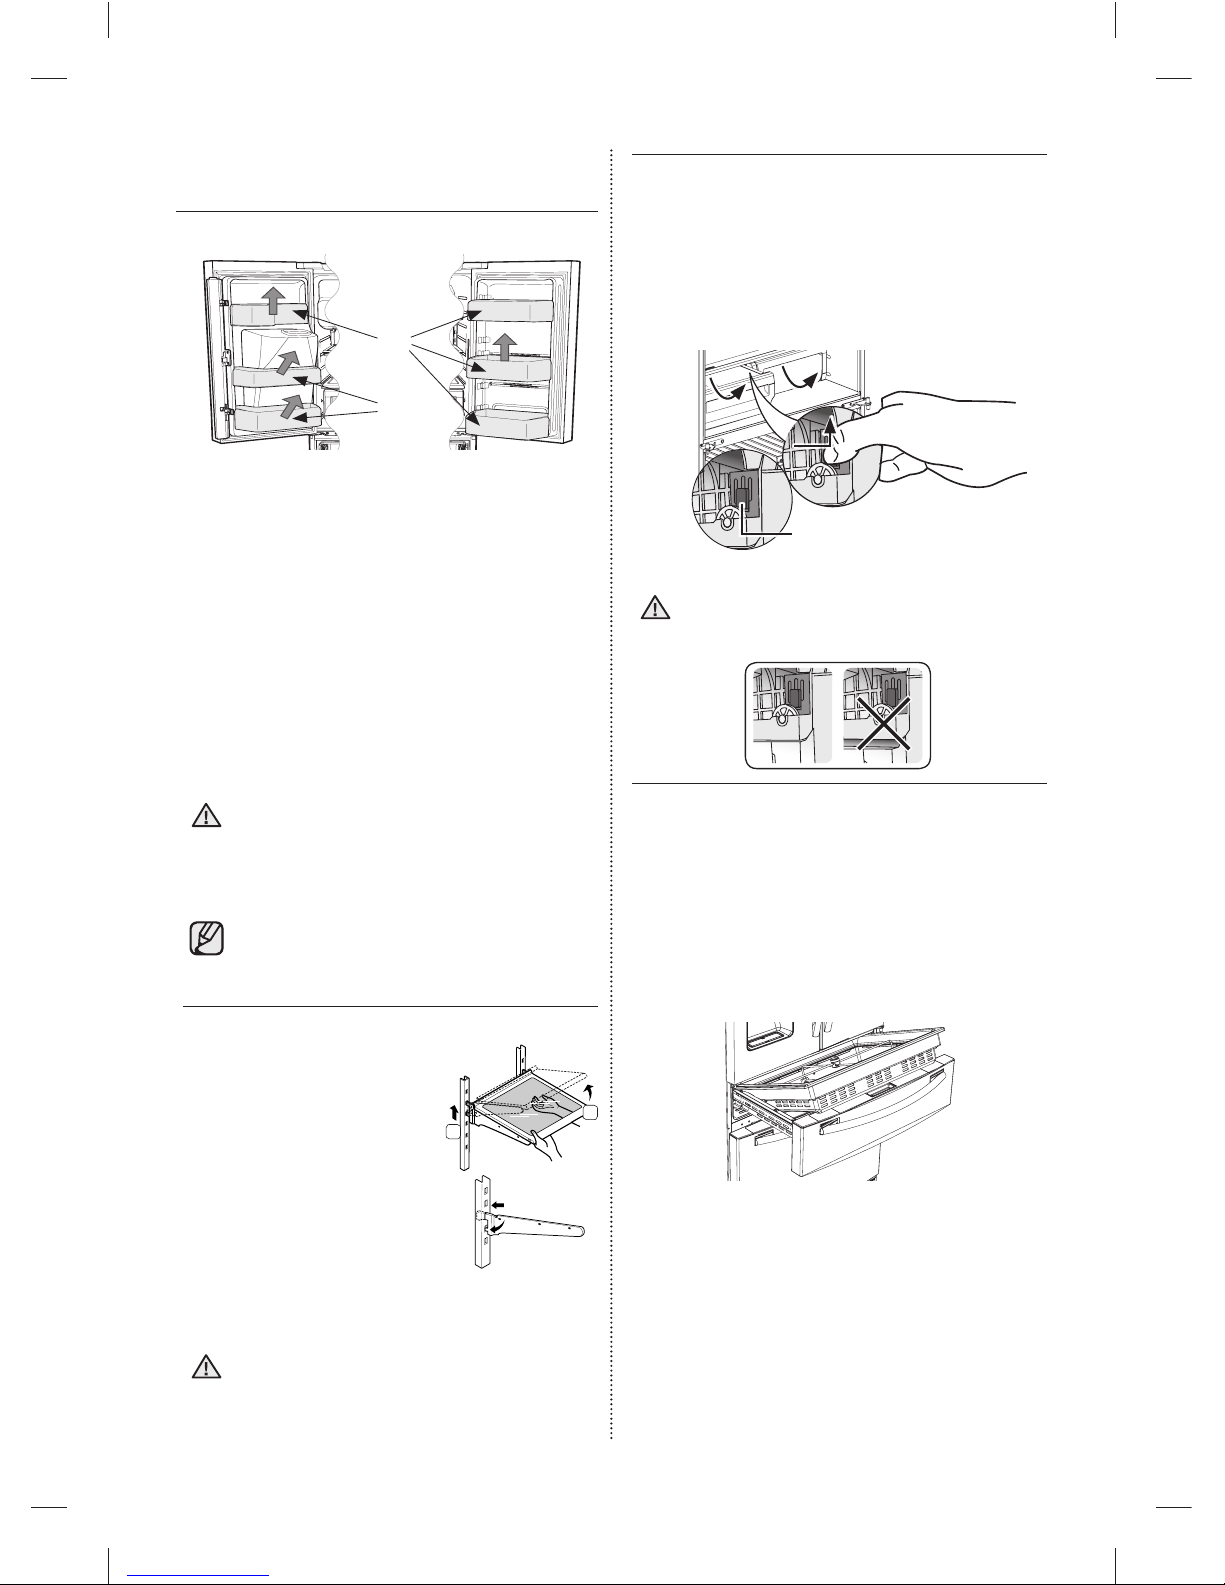
80_ operating
REMOVING THE REFRIGERATOR
ACCESSORIES
Door Bins & Dairy Compartment1.
Door Bins (1)
To remove - Simply lift the bin up and pull •
straight out.
To put back - Slide it in above the desired •
location and push down until it stops.
Door Bins (2)
To remove - Take the right side of the bin out by •
lifting it obliquely along the guide and then, take
the left side out by pulling it from the door.
To put back - Slide it into the original location •
and push down until it is sticks.
Injury may occur if the door bins are not
fi rmly positioned. Do not allow children to
play with bins. Sharp corners of the bins
may cause injury.
Do not adjust a bin full of food. Remove
the food fi rst. To remove dust, remove the
guard and wash in water.
Tempered Glass shelves2.
To remove - Tilt up the front •
of the shelf in the direction
shown ( 1 ) and lift it up
vertically ( 2 ). Pull the shelf
out.
To put back - Tilt the front of •
the shelf up and guide the
shelf hooks into the slots
at a desired height. Then,
lower the front of the shelf
so that the hooks can drop
into the slots.
The Tempered Glass shelves are heavy.
Use special care when removing them.
CAUTION
CAUTION
Vegetable & Fruit Drawers3.
After pulling out completely the vegetable pan, •
take it out by lifting up the front and pull it
forward.
To remove the shelf of the vegetable pan, press •
the button on the left side of the shelf while you
are lifting it. Pull it out slowly.
The drawers need to be removed before
the glass shelf above them can be lifted
out.
Flex Zone4.
To remove the Flex Zone - Pull the Flex door out •
to full extension. Lift the Flex Zone up, pulling it
to your body with both hands.
To put the Flex Zone back - Open the Flex door •
to full extension. Tilt the front of the Flex Zone
up, place the back of the Flex Zone onto the
rails, and then lower the front until the whole
Zone rests on the rails.
When the Flex Zone or LED lighting are
not working, check the connectors [( 1 ),
( 2 ) shown below] for cracks or leaks.
CAUTION
(1)
(2)
1
2
Button
Button
Rounded up while pressing
Rounded up while pressing
the button
the button
DA68-02520B(0.2).indb 80DA68-02520B(0.2).indb 80 2013.2.28 10:19:19 AM2013.2.28 10:19:19 AM
Page 81
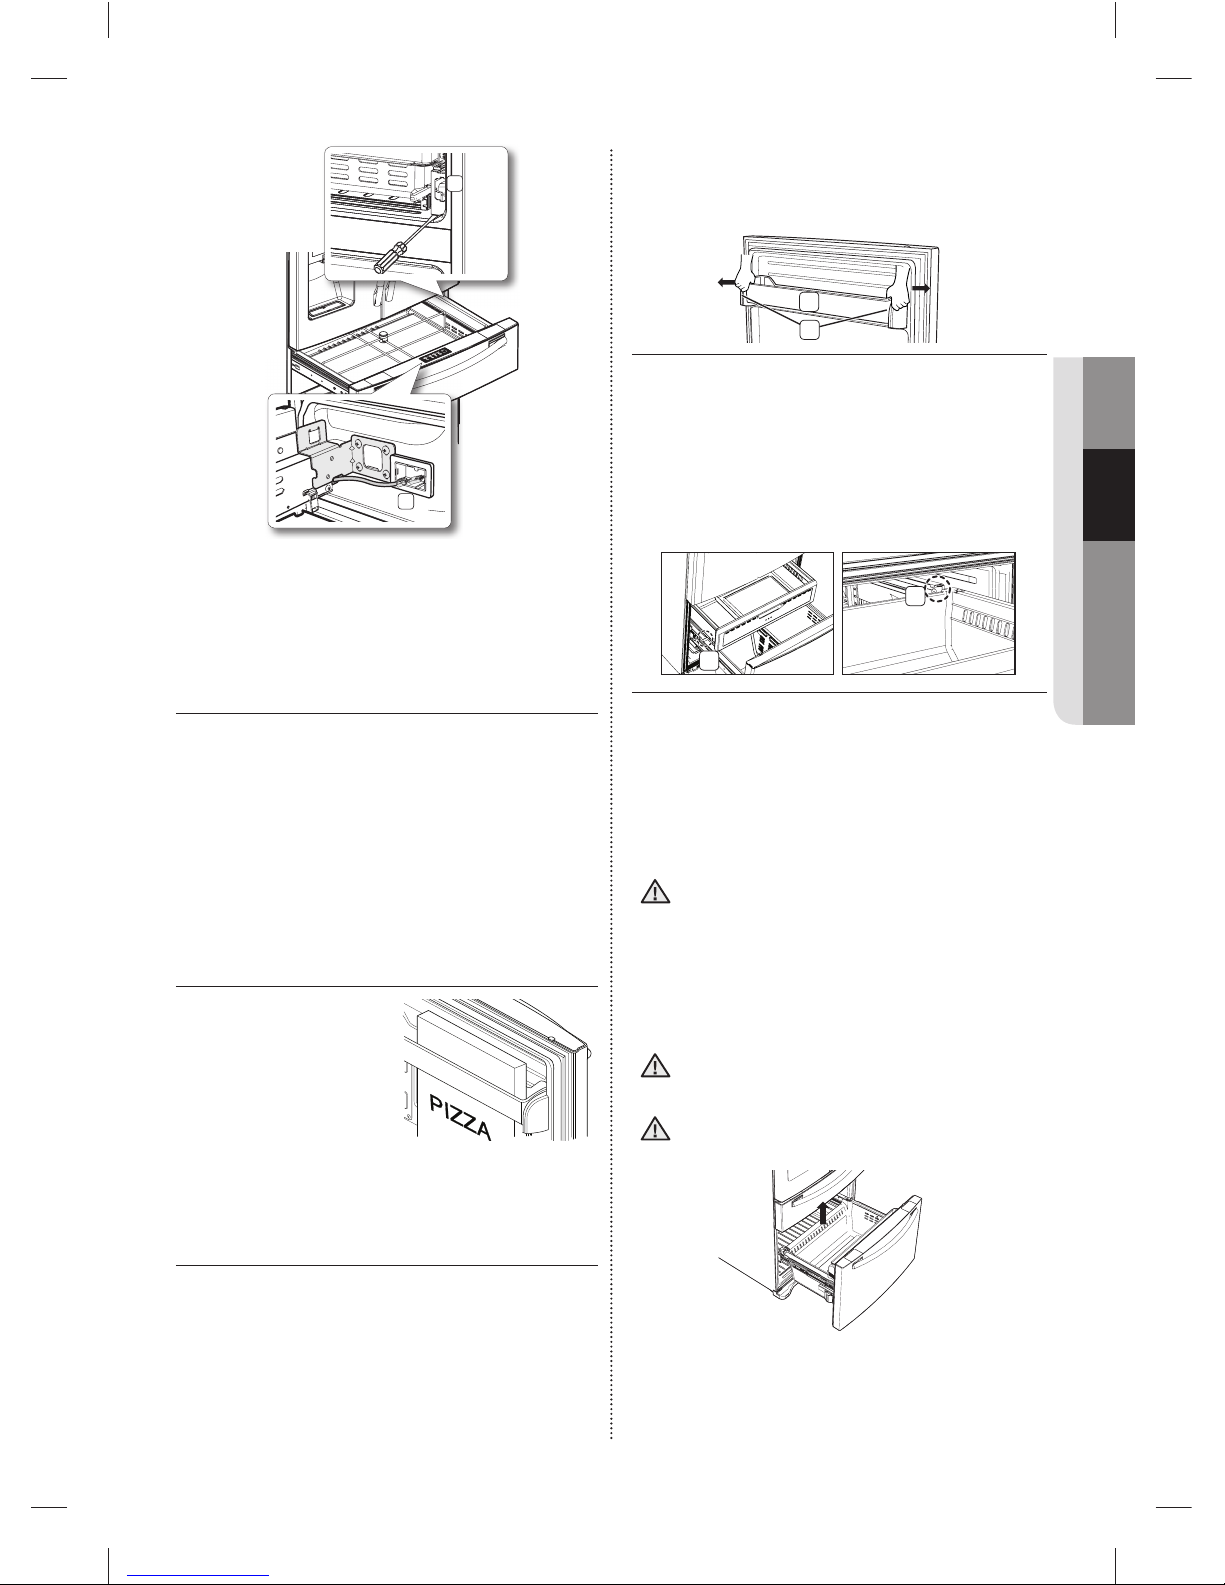
operating _81
02 OPERATING
Refer to page 7 for disassembly instructions.1.
Open the cover housing with a fl at-blade 2.
screwdriver.
USING THE DOORS
Ensure that the doors close all the way and are
securely sealed.
When the refrigerator door is only partially open, it
will automatically close.
But, the door will stay open if opened more
than the auto close range and you must close it
manually.
USING THE TILTING POCKET
You can use the Tilting
Pocket to store a pizza up
to 16 inches wide if you
place it as shown in the
illustration.
REMOVING THE FREEZER
ACCESSORIES
Tilting Pocket1.
To remove - Remove the tilting pocket ( • 1 ) by
pulling both support guards ( 2 ) aside.
Take out both support guards by pulling them
aside.
To put back - Hook the ends of the tilting •
pocket ( 1 ) onto the support guards ( 2 ) and
push down until they lock into place.
Super Extended Drawer2.
To remove - Pull the drawer out to full extension. •
Tilt up the rear of the drawer and lift straight
out.
To put back - Place the drawer onto the rails ( • 4 )
by tilting it up. Lower the drawer into place until
it is horizontal and slide the drawer ( 3 ) in.
Freezer Drawer3.
To remove the freezer drawer - Pull the freezer •
drawer out fully. Tilt up the rear of the bin and
lift it out to remove.
To put the freezer drawer back - Place the bin •
into the rail assembly.
Do not allow babies or children to go
inside the freezer drawer.
They could damage the refrigerator and
seriously injure themselves.
Do not sit on the freezer door.
The door may break. Do not allow children
to climb into the freezer drawer.
Do not remove the divider.
If trapped inside, children may get injured
or suffocate to death.
CAUTION
CAUTION
WARNING
1
2
2
1
3
4
DA68-02520B(0.2).indb 81DA68-02520B(0.2).indb 81 2013.2.28 10:19:23 AM2013.2.28 10:19:23 AM
Page 82
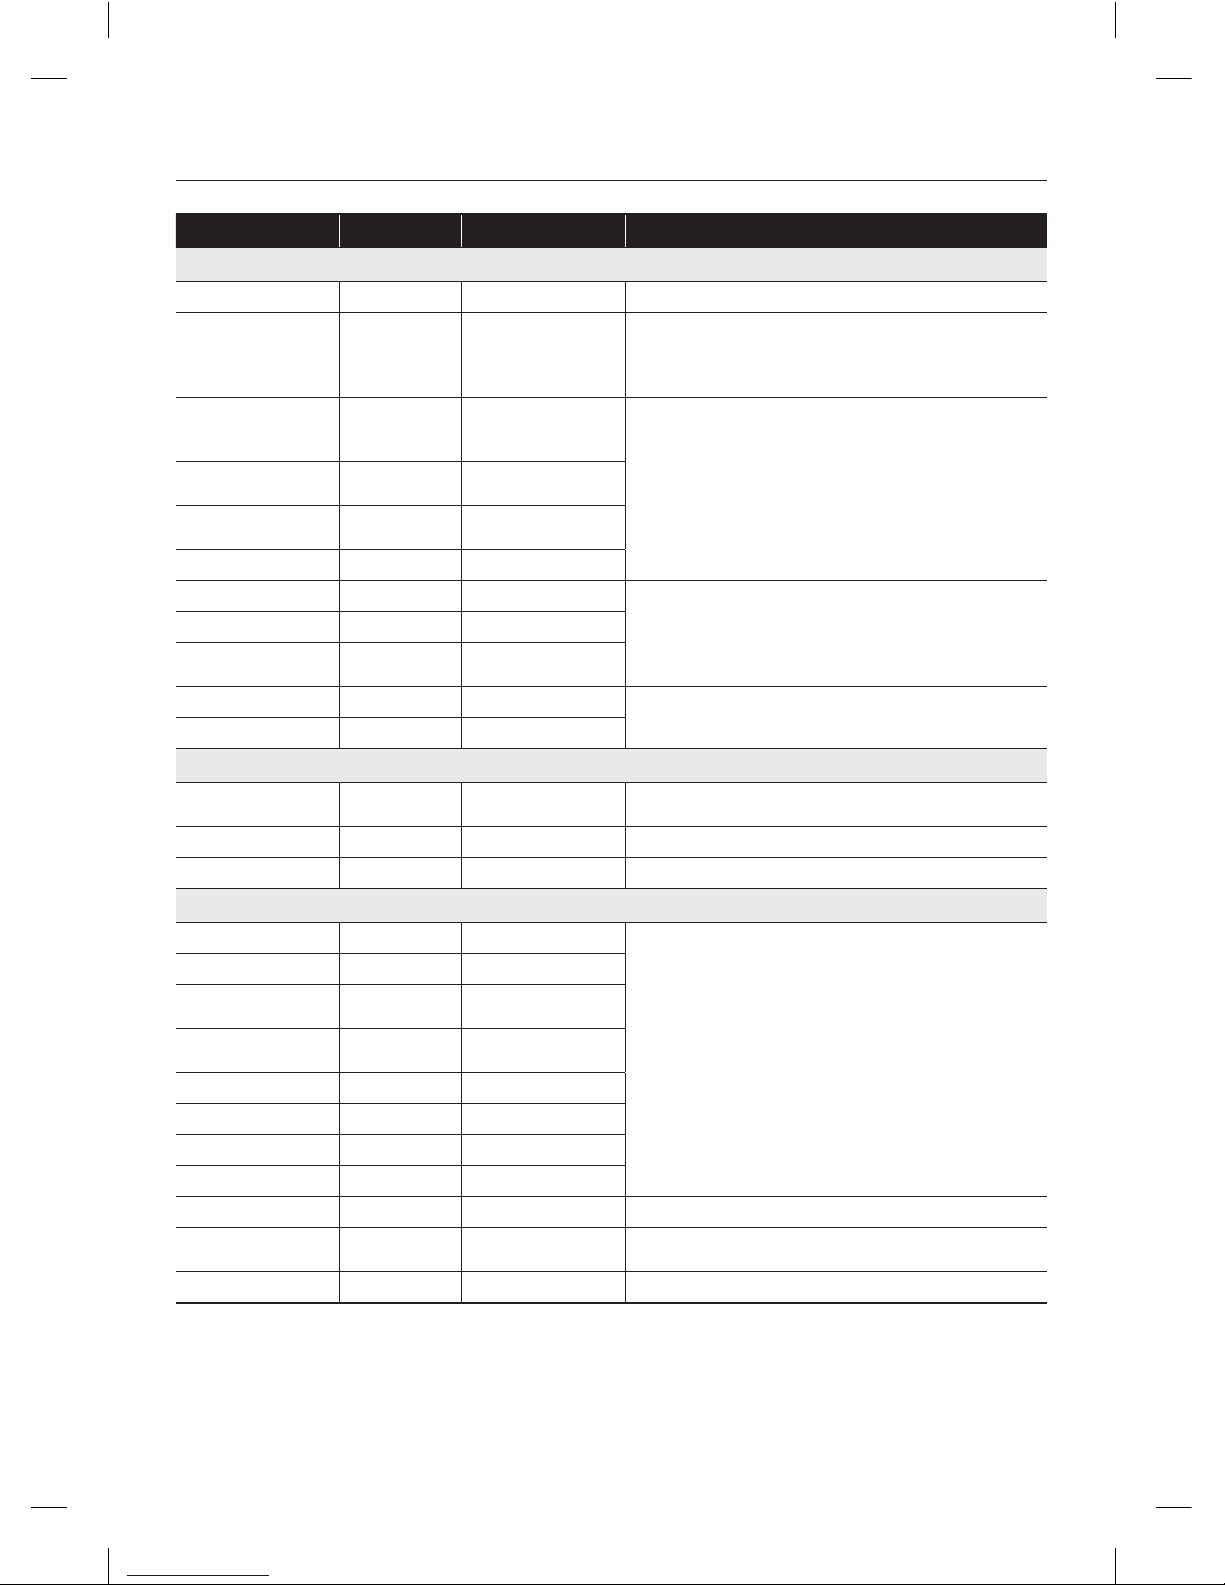
82_ operating
FOOD STORAGE TIPS
Foods Refrigerator Freezer Storage Tips
DAIRY PRODUCTS
Butter 2-3 Weeks 6-9 Months Wrap or cover tightly.
Milk 1-2 Weeks Not recommended
Check date code. Most milk and similar products are
sold in date-coded cartons that indicate a products’s
peak freshness. Re-seal with cap or wrap tightly. Do
not return unused portions to original container.
Cream Cheese,
cheese food, and
cheese spread
2-4 Weeks Not recommended
Check date code. Keep all cheese tightly packed in
moisture proof wrap
Hard Cheese
(unopened)
3-4 Months 6 Months
Hard Cheese
(opened)
2 Months Not recommended
Cottage Cheese 10-15 Days Not recommended
Cream 7-10 Days 2 Months
Check date code. Most yogurt, creams, and similar
products are sold in date-coded cartons that indicate a
product’s peak freshness. Re-seal or cover tightly.
Do not return unused portions to original container.
Sour Cream 2 Weeks Not recommended
Cream Dips
(opened)
1 Week Not recommended
Yogurt 10-14 Days Not recommended
Check date code. Keep covered.
Frozen Yogurt na 2 Months
EGGS
Eggs (uncooked) 3-4 Weeks Not recommended
Check date code. Store eggs in coldest part of
refrigerator and in their original container.
Eggs (cooked) 1 Week Not recommended Store in covered container
Leftover egg dishes 3-4 Days Not recommended Store in covered container
FRESH FRUITS
Apples 1 Month Not recommended
If storing in refrigerator, do not wash fruit before storing.
Store in moisture resistant bags or containers. Wrap cut
fruits. Some fruits darken when refrigerated.
Bananas 2-4 Days Not recommended
Peaches, Melons,
Pears, Avocados
3-5 Days Not recommended
Berries and
Cherries
2-3 Days 12 Months
Apricots 3-5 Days Not recommended
Grapes 2-5 Days na
Pineapple (un-cut) 2-3 Days Not recommended
Pineapple (cut) 5-7 Days 6-12 Months
Citrus 1-2 Weeks Not recommended Store uncovered.
Juice 6 Days Not recommended
Check date code and re-seal in original container. Do
not return unused portions to original container.
Frozen Juice Thawing only 12 Months Check date code. Do not re-freeze.
DA68-02520B(0.2).indb 82DA68-02520B(0.2).indb 82 2013.2.28 10:19:31 AM2013.2.28 10:19:31 AM
Page 83
operating _83
02 OPERATING
Foods Refrigerator Freezer Storage Tips
FISH AND SHELLFISH
Fish
Fatty Fish
(mackerel, trout,
salmon)
1-2 Days 2-3 Months
Keep in original wrapper and store in coldest part of
refrigerator. Package in vapor-proof and moisture proof
wrap for freezer. Freeze at -17 °C. Thaw in refrigerator
or check date code. Freeze in original packaging.
Lean Fish (cod,
fl ounder, etc)
1-2 Days 6 Months
Frozen or Breaded na 3 Months
Shellfi sh
Shrimp (uncooked) 1-2 Days 12 Months
To freeze, package in vapor-proof and moisture-proof
container.
Crab 3-5 Days 10 Months
Cooked Fish or
Shellfi sh
2-3 Days 3 Months
MEAT
Fresh, Uncooked
Chops 2-4 Days 6-12 Months
Check date code for use. Store in coldest part
of refrigerator in original packaging. Package in
moisture-proof and vapor-proof container for freezing.
Recommended refrigerator temperature 33ºF to 36ºF
and freezer temperature 0ºF to 2ºF
Ground 1 Day 3-4 Months
Roast 2-4 Days 6-12 Months
Bacon 1-2 Weeks 1-2 Months
Sausage 1-2 Days 1-2 Months
Steak 2-4 Days 6-9 Months
Poultry 1 Day 12 Months
Lunch meat 3-5 Days 1 Month
Cooked
Meat 2-3 Days 2-3 Months
Check date code for use. Store in coldest part of
refrigerator in original packaging. Package in moistureproof and vapor-proof container for freezing.
Poultry 2-3 Days 4-5 Months
Ham 1-2 weeks 1-2 Months
Sources:
American Meat Institute Foundation. 1994. Yellow pages: answers to predictable questions consumers
ask about meat and poultry. American Meat Institute Food Marketing Institute. 1999. The food keeper.
Food Marketing Institute, Washington, D.C. Freeland-Graves, J.H. and G.C. Peckham. 1996.
Foundations of food preparation, 6th ed. Prentice-Hall, Inc. Englewood Cliffs, NJ. Hillers, V.N. 1993.
Storing foods at home. Washington State University Cooperative Extension, Pullman, WA. Publ. EB 1205.
National Restaurant Association. 2001. Be cool-chill out! Refrigerate promptly. National Restaurant
Association Education Foundation¼s International Food Safety Council, Washington, D.C. USDA. 1997.
Basics for handling food safely. U.S. Department of Agriculture, Food Safety and Inspection Service,
Washington, D.C.
DA68-02520B(0.2).indb 83DA68-02520B(0.2).indb 83 2013.2.28 10:19:31 AM2013.2.28 10:19:31 AM
Page 84
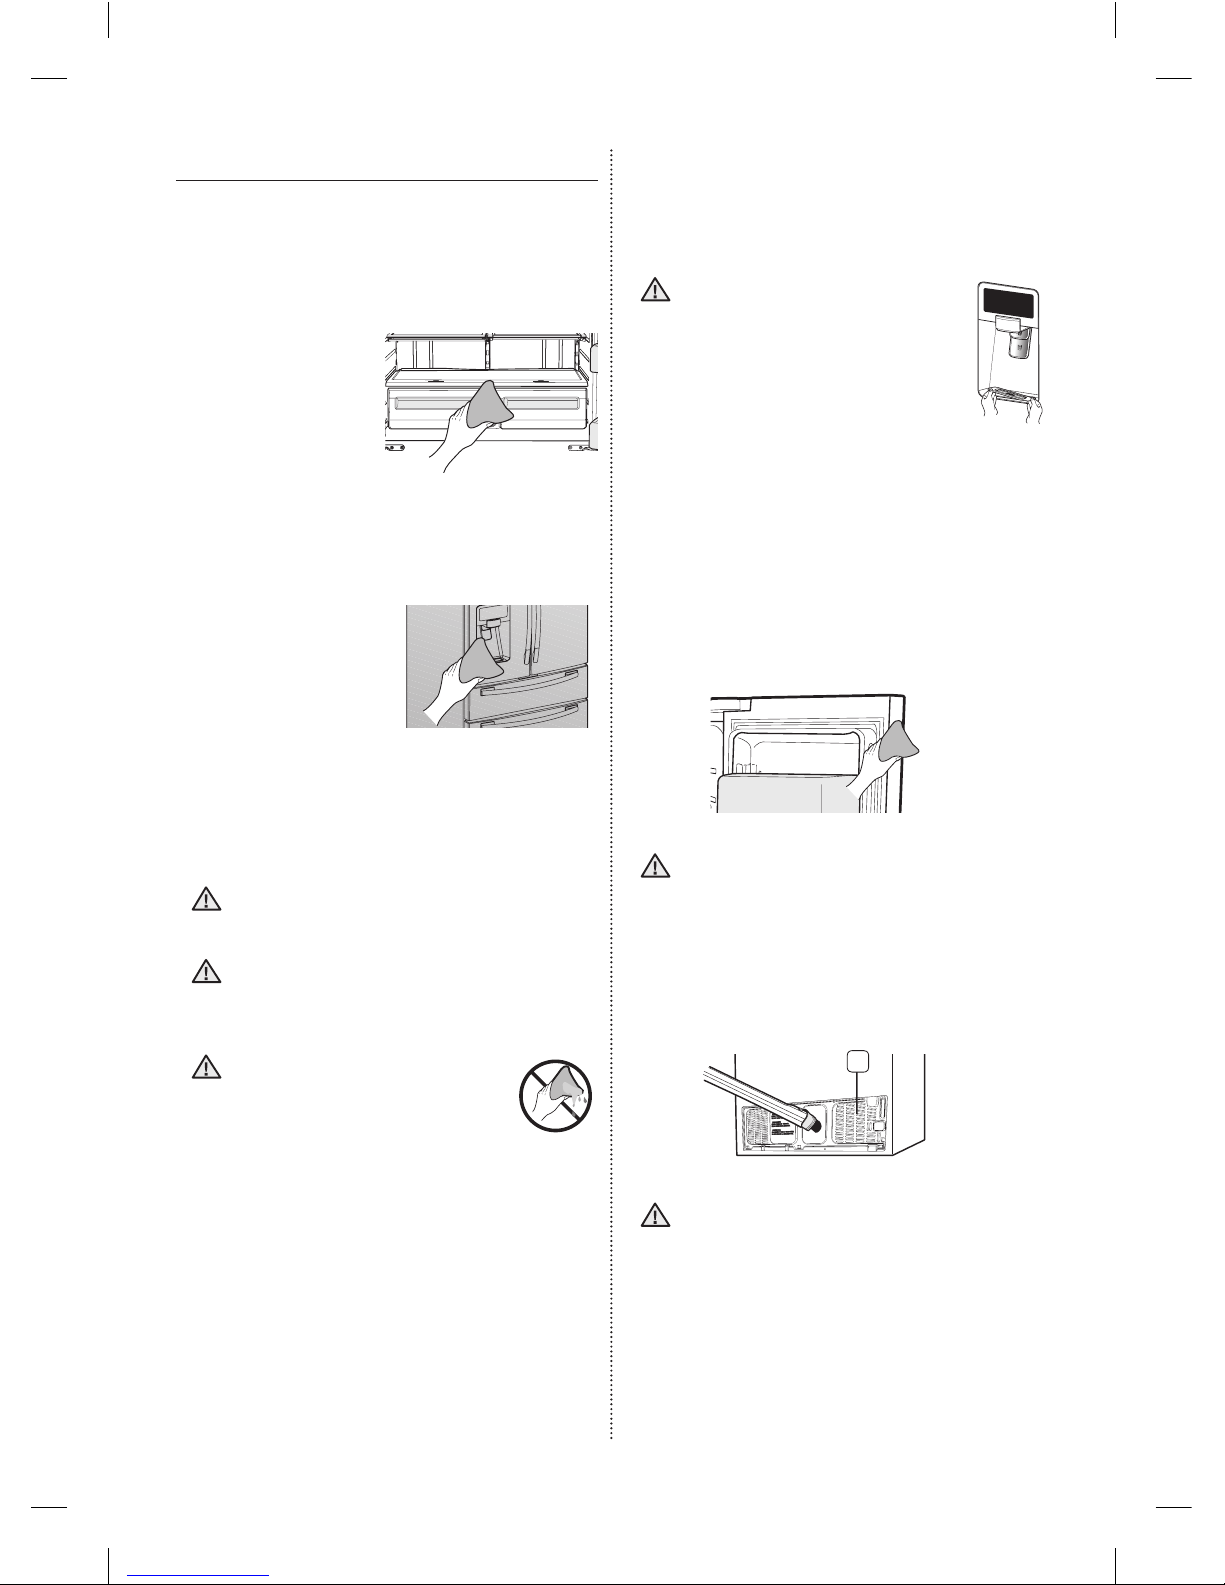
84_ operating
CLEANING THE REFRIGERATOR
Caring for your Samsung French Door Refrigerator
prolongs the life of your appliance and helps keep
the refrigerator free of odor and germs.
Cleaning the Interior
Clean the inside walls
and accessories with
a mild detergent and
then wipe dry with a soft
cloth. You can remove
the drawers and shelves
for a more thorough
cleaning. Just make sure to dry drawers and
shelves before putting them back into place.
Cleaning the Exterior
Wipe the control panel
and digital display with a
damp, clean, soft cloth.
Do not spray water
directly on the surface of
the refrigerator.
The doors, handles and cabinet surfaces should
be cleaned with a mild detergent and then wiped
dry with a soft cloth.
To keep your appliance looking its best, polish the
exterior once or twice a year.
Do not spray water directly on the
refrigerator.
Do not use benzene, thinner, or Clorox for
cleaning. They may damage the surface of
the appliance and may cause a fi re.
Printed letters on the display
may be erased if a stainless
cleaner is applied directly to
the area where the letters are
printed.
CAUTION
CAUTION
CAUTION
Cleaning the Ice / Water Dispenser
Push down one end of the tray dispenser and
remove it. Wipe the Ice / Water Dispenser with a
clean, soft cloth.
When you use the crushed ice
selection from the dispenser,
some residual ice chips may
start to collect in the ice chute.
To prevent that residual ice from
melting and running out of the
chute, you should clean out the
residual ice when you see it start to collect
in the ice chute.
Cleaning the Rubber door seals
If the rubber door seals are dirty, the doors may
not close properly, and the refrigerator will not
operate effi ciently. Keep the door seals free of
dust or stains by cleaning the doors with a mild
detergent and damp cloth.
Wipe dry with a clean, soft cloth.
Do not clean the refrigerator with benzene,
thinner, or car detergent due to risk of fi re.
Cleaning the rear side of the refrigerator
To keep cords and exposed parts free of dust and
dirt accumulation. Vacuum the rear side of the
appliance once or twice a year.
Do not remove the back cover ( 1 ).
You could suffer an electric shock.
CAUTION
CAUTION
CAUTION
1
DA68-02520B(0.2).indb 84DA68-02520B(0.2).indb 84 2013.2.28 10:19:32 AM2013.2.28 10:19:32 AM
Page 85
troubleshooting _85
03 TROUBLESHOOTING
troubleshooting
PROBLEM SOLUTION
The refrigerator
does not work at
all or it does not
chill suffi ciently.
Check that the power plug is properly connected.•
Is the temperature control on the display panel set to the correct temperature?•
Try setting it to a lower temperature.
Is the refrigerator in direct sunlight or located too near a heat source?•
Is the back of the refrigerator too close to the wall and therefore keeping air from •
circulating?
Food in the fridge
is frozen.
Is the temperature control on the display panel set to the correct temperature?•
Try setting it to a warmer temperature.
Is the temperature in the room very low?•
Did you store food with a high water content in the coldest part of the fridge?•
You hear unusual
noises or sounds.
Check that the refrigerator is level and stable.•
Is the back of the refrigerator too close to the wall and therefore keeping air from •
circulating?
Was anything dropped behind or under the refrigerator?•
If you hear a “ticking” sound from inside the refrigerator, this is normal.•
It occurs because various parts contract or expand in response to temperature
changes in the refrigerator interior.
The front corners
of the appliance
are hot and
condensation is
occurring.
Some heat is normal as anti-condensators are installed in the front corners of the •
refrigerator to prevent condensation.
Is the refrigerator door ajar? Condensation can occur when you leave the door open •
for a long time.
Ice is not
dispensing.
Did you wait for 12 hours after installation of the water supply line before making ice?•
Is the water line connected and the shut-off valve open?•
Did you manually stop the ice making function?•
Make sure Ice Type is set to Cubed or Crushed.
Are there ice cubes frozen together in the ice maker bucket?•
Is the freezer temperature too warm? Try setting the freezer temperature lower.•
You can hear water
bubbling in the
refrigerator.
This is normal. The bubbling comes from the refrigerant liquid circulating through the •
refrigerator.
There is a bad
smell in the
refrigerator.
Has a food item spoiled?•
Make sure that strong smelling food (for example, fi sh) is wrapped so that it is airtight.•
Clean out your freezer periodically and throw away any spoiled or suspect food.•
Frost forms on the
walls of the freezer.
Is the air vent blocked? Remove any obstructions so air can circulate freely.•
Allow suffi cient space between the foods stored for effi cient air circulation.•
Is the freezer door closed properly?•
Water dispenser is
not functioning.
Is the water line connected and the shut-off valve open?•
Has the water supply line tubing been crushed or kinked?•
Make sure the tubing is free and clear of any obstruction.
Is the water tank frozen because the refrigerator temperature is too low?•
Try selecting a warmer setting on the main display panel.
DA68-02520B(0.2).indb 85DA68-02520B(0.2).indb 85 2013.2.28 10:19:34 AM2013.2.28 10:19:34 AM
Page 86
86_ troubleshooting
PROBLEM SOLUTION
Display does not
work!
Press the Reset button over one second to reset the memory. With this, the user •
information is not to be reset.
Photos not
showing with a
memory card
connected
If the “A SD/MMC card is connected” messages do not appear on the screen, check •
if the memory type is SD / SDHC / MMC / HS MMC.
Check if there are photos or images stored in the memory card.•
Check if the images in the memory card are JPEG (JPG) types.•
The LCD
screen turns off
frequently.
This is a power-saving function and it is normal.•
At the Settings-Display, the Screensaver Running Time can be set.•
There is an after
image or an edge
line left on the
screen.
Still images can cause permanent damage to the LCD screen. When you select •
Screensavers, select a number of themes so the image changes frequently.
NOTE : Defects caused by this are not be covered by the factory warranty.
The input point of
the touch screen is
not correct.
Run the Touch Screen Calibration function at the Settings.•
There is no
wireless AP
detected.
Check if the power for the wireless AP is on.•
Check if the wireless AP supports IEEE802.11b/g/n.•
If the wireless AP is located away from the Fridge, move the wireless AP closer to the •
Fridge and check if it is detected.
Turn the power of both the Wireless AP and the Fridge off and on.•
It is not able to
connect to the
wireless AP.
Check if the wireless AP supports IEEE802.11b/g/n.•
Check the status of the internet connection of the wireless AP.•
Check if the current cost rate plan for the internet covers the wireless network •
connection.
If it does, check how many connections are allowed.
Your Refrigerator may not be able to connect to the Internet because your ISP has •
permanently registered the MAC address (a unique identifying number) of your PC
or modem, which it then authenticates each time you connect to the Internet as a
way of preventing unauthorized access. As your Refrigerator has a different MAC
address, your ISP can not authenticate its MAC address, and your Refrigerator can
not connect. To resolve this problem, ask your ISP about the procedures required to
connect devices other than a PC (such as your Refrigerator) to the Internet. (To fi nd
the MAC address of your Fridge, touch Settings --->WiFi Networks, and then look on
the bottom of the screen that lists the available network connections.)
Turn the power of both the Wireless AP and the Fridge off and on.•
Can’t remember
the password for
the wireless AP
connection.
Refer to the wireless AP manual and reset the password.•
DA68-02520B(0.2).indb 86DA68-02520B(0.2).indb 86 2013.2.28 10:19:39 AM2013.2.28 10:19:39 AM
Page 87
troubleshooting _87
03 TROUBLESHOOTING
PROBLEM SOLUTION
Functions using
the wireless
network (Wi-FI) do
not work.
Functions using the wireless network (Wi-Fi) such as Epicurious, Calendar, •
WeatherBug, AP News, Twitter can be used only if the refrigerator is connected to
your wireless network (Wi-Fi).
If there are any other devices connected to the wireless network, please check the •
connection status of the devices.
Because these services depend on data downloaded from the internet, the •
information updates can be delayed or cut depending on the status of the internet
connection.
Turn the power of both the Wireless AP and the Fridge off and on.•
Can’t connect
to the external
devices being
detected.
If the network connection of an external device the Fridge detects was shut down •
abnormally (by a power failure or by moving out of range, etc), the device’s network
information will remain on the network list (as stipulated by DLNA specifi cations), but
its connection will not be available.
Select the Photos function - All Share, and then search for the external devices again.•
After turn on the
power, is possible
to operate only the
dispenser selection
button.
Click the “Dispenser OK” button which is at the bottom of display .•
If the “”Dispenser OK” button is changed to “Complete”, turn the power off and on
again. It is correct to show the “Time Zone Setting screen”.
DA68-02520B(0.2).indb 87DA68-02520B(0.2).indb 87 2013.2.28 10:19:39 AM2013.2.28 10:19:39 AM
Page 88
88_ warranty
In case the need for servicing
arises
Do not hesitate to call any Samsung Authorized Service Center nearby giving them your name,
address and telephone number when your product is not functioning properly.
Warranty Information (CANADA)
Limited Warranty for Original Purchaser
This Samsung product is warranted by Samsung Electronics Canada, Inc. (hereafter referred to as SECA)
against manufacturing defects in material or workmanship for the following periods:
Labor : 1 year (in-home)
Parts : 1 year
Inverter Compressor : 10 years
SECA further warrants that if this product fails to operate properly within the specifi ed warranty period and
the failure is due to improper workmanship or defective material, SECA will repair or replace the product
at its option.
All warranty repairs or part replacements must be performed by a SECA Authorized Service Center.
(To fi nd the nearest SECA Service Center, call 1-800-SAMSUNG (7267864) or visit our web site at
www.samsung.com/ca)
Obligation to the Original Owner
The original dated sales receipt must be retained by the customer and is the only acceptable proof of
purchase. It must be presented to a SECA Authorized Service Center at the time service is requested
before warranty services are rendered. On all carry-in models, transportation to and from the Authorized
Service Center is the responsibility of the customer.
Exclusions of the Warranty
This warranty does not cover damage due to accident, fi re, fl ood, and/or other Acts of God, misuse,
incorrect line voltage, improper installation, improper or unauthorized repairs, commercial use, or damage
that occurs during shipping. Customer adjustments which are explained in this owners manual are not
covered under the terms of this warranty. This warranty will automatically be voided for any unit found
with a missing or altered serial number. This warranty is valid only on products purchased and used in the
Canada.
DA68-02520B(0.2).indb 88DA68-02520B(0.2).indb 88 2013.2.28 10:19:39 AM2013.2.28 10:19:39 AM
Page 89
warranty _89
04 WARRANTY
Samsung Electronics Canada Inc., Customer Service
55 Standish Court Mississauga, Ontario L5R 4B2
Canada
If you have any questions or comments relating to Samsung products,
please contact the SAMSUNG customer care center.
SAMSUNG ELECTRONICS CANADA, INC.
55 STANDISH COURT MISSISSAUGA, ONTARIO L5R 4B2 CANADA
TEL : 905-542-3535 FAX : 905-542-3835
1-800-SAMSUNG (726-7864)
www.samsung.com/ca
Customer Care Center 1-800-SAMSUNG(7267864)
Customer Care Center fax. 1-866-436-4617
DA68-02520B(0.2).indb 89DA68-02520B(0.2).indb 89 2013.2.28 10:19:39 AM2013.2.28 10:19:39 AM
Page 90
Scan the QR code* or visit
www.samsung.com/spsn
to view our helpful
How-to Videos and Live Shows
Requires reader to be installed on your smartphone
QUESTIONS OR COMMENTS?
COUNTRY CALL OR VISIT US ONLINE AT WRITE
U.S
800-SAMSUNG
(800-726-7864)
www.samsung.com
Samsung Electronics America, Inc. 85
Challenger Road Ridgefi eld Park, NJ 07660
CANADA
800-SAMSUNG
(800-726-7864)
www.samsung.com/ca
Samsung Electronics Canada Inc. Customer
Service, 55 Standish Court Mississauga, Ontario
L5R 4B2 Canada
DA68-02520B(0.2).indb 90DA68-02520B(0.2).indb 90 2013.2.28 10:19:39 AM2013.2.28 10:19:39 AM
Page 91
Français
Réfrigérateur
Guide d'utilisation
un monde de possibilités
Merci d'avoir choisi un produit Samsung.
Pour bénéfi cier du service clientèle et technique,
veuillez enregistrer votre produit à
www.samsung.com/register ou composez le
r
1-800-SAMSUNG (726-7864)
Appareil amovible
Ce guide est réalisé à partir de papier 100 % recyclé.
RF4289HB
DA68-02520B(0.2).indb 1DA68-02520B(0.2).indb 1 2013.2.28 10:19:40 AM2013.2.28 10:19:40 AM
Page 92
02_ Consignes de sécurité
CONSIGNES DE SÉCURITÉ
Avant d'utiliser cet appareil, veuillez lire •
attentivement ce guide et le conserver pour
toute référence ultérieure.
N'utilisez cet appareil que conformément à l'usage •
auquel il est destiné, en suivant les instructions
du guide. Cet appareil n’est pas destiné à être
utilisé par des personnes (y compris des enfants)
ayant des capacités physiques, sensorielles ou
mentales réduites, ou un manque d'expérience
et de connaissances, à moins qu'elles ne soient
surveillées ou qu'elles aient reçu les instructions
nécessaires concernant l'utilisation de cet appareil
de la part d'une personne responsable, et ce,
pour leur propre sécurité.
Les avertissements et les consignes importantes •
de sécurité contenus dans ce guide ne prétendent
pas couvrir toutes les situations susceptibles de se
produire. Il est de votre responsabilité de faire preuve
de bon sens et de prudence lors de l'installation, de
l'entretien et du fonctionnement de l'appareil.
Les instructions d’utilisation suivantes concernent •
plusieurs modèles; il est donc possible que les
caractéristiques de votre réfrigérateur soient
légèrement différentes de celles spécifi ées dans
ce guide. Le gaz réfrigérant utilisé est le R600a
ou R134a. Vérifi ez celui de votre réfrigérateur sur
l’étiquette du compresseur située à l’arrière de
l’appareil ou sur l’étiquette signalétique située à
l’intérieur du réfrigérateur. Si ce produit contient du
gaz infl ammable (gaz réfrigérant R600a), veuillez
communiquer avec les autorités locales pour
obtenir des renseignements sur les normes en
matière de traitement des déchets.
Consignes de sécurité importantes et symboles :
AVERTISSEMENT
Risques ou manipulations dangereuses
susceptibles d’entraîner des blessures
graves, voire mortelles.
ATTENTION
Utilisations inadaptées ou dangereuses
susceptibles de causer des blessures légères
ou des dommages matériels.
NE PAS essayer.
NE PAS démonter.
NE PAS toucher.
Suivre scrupuleusement les consignes.
Débrancher la fi che de la prise murale.
S'assurer que le réfrigérateur est relié à la terre
afi n d'éviter toute électrocution.
Contacter le service d'assistance technique
pour obtenir de l'aide.
Remarque.
Ces symboles d'avertissement ont pour but
d'éviter tout risque de blessure.
Respectez-les en toutes circonstances.
Lisez attentivement la section Consignes de sécurité
de ce guide et conservez ce dernier en lieu sûr afi n
de pouvoir vous y reporter ultérieurement.
Avis CE
Ce produit est conforme aux directives relatives à
la basse tension (2006/95/CE), à la compatibilité
électromagnétique (2004/108/CE), au Règlement
délégué de la Commission et à l'éco-conception (UE)
N° 1060/2010 et à l'éco-conception (2009/125/CE)
mises en place par le règlement (CE) N° 643/2009
de l'Union européenne. (Uniquement pour les
produits commercialisés dans les pays européens)
SYMBOLES D'AVERTISSEMENT
IMPORTANTS CONCERNANT
LE TRANSPORT ET LE LIEU
D'INSTALLATION DE L'APPAREIL
• Veillez à ce qu'aucune pièce du circuit
frigorifi que ne soit endommagée pendant
le transport ou l'installation de l'appareil.
R600a ou R134a est utilisé comme gaz réfrigérant. •
Pour savoir quel gaz réfrigérant est utilisé dans votre
appareil, reportez-vous à l'étiquette du compresseur
situé à l'arrière du réfrigérateur ou à l'étiquette
signalétique située à l'intérieur de l'appareil.
Lorsque l'appareil contient un gaz infl ammable : le •
réfrigérant R600a, veuillez communiquer avec les
autorités locales pour obtenir des renseignements
sur les normes en matière de traitement des déchets.
Risque d'incendie ou de blessures oculaires en cas de fuite de réfrigérant. En cas de fuite, n'approchez pas
de fl amme nue ou de source d’infl ammation potentielle
et aérez la pièce pendant plusieurs minutes.
Afi n d’éviter la création d’un mélange gaz-air infl ammable lorsqu’une fuite se produit dans le circuit
frigorifi que, la quantité de gaz réfrigérant présente
dans l’appareil dictera les dimensions de la pièce où
l’appareil pourra être installé.
AVERTISSEMENT
Consignes de sécurité
DA68-02520B(0.2).indb 02DA68-02520B(0.2).indb 02 2013.2.28 10:19:40 AM2013.2.28 10:19:40 AM
Page 93
Consignes de sécurité _03
Ne démarrez jamais un appareil qui présente des signes d'endommagement. En cas de doutes, communiquez
avec votre revendeur. La pièce où sera installé le
réfrigérateur doit compter au moins 1 m³ pour 8 g de
gaz réfrigérant R600a. La quantité de gaz réfrigérant
que votre appareil peut contenir est indiquée sur la
plaque signalétique située à l'intérieur de l'appareil.
Le réfrigérant isobutane R600a est un gaz naturel présentant une compatibilité écologique élevée, mais
qui est aussi un combustible. Veillez à ce qu'aucune
pièce du circuit frigorifi que ne soit endommagée
pendant le transport ou l'installation de l'appareil.
SYMBOLES D'AVERTISSEMENT
IMPORTANTS CONCERNANT
L'INSTALLATION DE L'APPAREIL
• N'installez pas le réfrigérateur dans un lieu
humide ou dans un lieu où il est susceptible
d’entrer en contact avec de l'eau.
Une détérioration de l'isolation des composants électriques est susceptible de provoquer une
électrocution ou un incendie.
N'installez pas le réfrigérateur dans un endroit •
exposé à la lumière directe du soleil ou à
proximité d’une cuisinière, d’un appareil de
chauffage ou d’autres appareils.
Ne branchez pas plusieurs appareils sur la même •
multiprise. Le réfrigérateur doit toujours être
branché dans une prise de courant indépendante
dotée d'une tension nominale correspondant à
celle fi gurant sur la plaque signalétique de l’appareil.
Vous obtiendrez de meilleurs résultats et éviterez également une surcharge des circuits
électriques (risque d'incendie suite à une
surchauffe des fi ls). Ne branchez pas la fi che
d'alimentation dans une prise murale mal fi xée.
Risque d’électrocution ou d'incendie. N’utilisez pas de cordon dont la gaine est •
craquelée ou endommagée à quelque endroit ou
à l’une de ses extrémités.
Ne pliez pas le cordon d'alimentation à l'excès •
et ne posez pas d'objets lourds dessus.
N'utilisez pas d'aérosols à proximité du réfrigérateur.•
Risque d'explosion ou d'incendie. N'installez pas cet appareil dans un endroit où des •
fuites de gaz sont susceptibles de se produire.
Risque d'électrocution ou d'incendie. Débranchez fermement la fi che de la prise murale. •
N'utilisez pas de de fi che ou de cordon d’alimentation
endommagés ou de prise murale mal fi xée.
Risque d'électrocution ou d'incendie. Cet appareil doit être mis à la terre. Pour la •
mise à la terre, ne raccordez pas l'appareil à
AVERTISSEMENT
une conduite de gaz, à une conduite d'eau en
plastique ou à une ligne téléphonique.
Le réfrigérateur doit être mis à la terre afi n d'éviter les dissipations d’énergie ou les électrocutions
provoquées par les fuites de courant de l'appareil.
À défaut de suivre cette consigne, il pourrait y avoir risque de secousse électrique, d’incendie, d’explosion,
de blessure ou de problèmes avec l’appareil.
Ne branchez jamais le cordon d'alimentation dans une prise qui n'a pas été correctement mise
à la terre et assurez-vous qu'elle est conforme
aux règlementations locales et nationales.
Ne tirez pas sur le cordon d’alimentation et le le •
pliez pas excessivement.
Ne tordez pas ou ne nouez pas le cordon d'alimentation.•
N'accrochez pas le cordon d'alimentation à un objet •
métallique, ne placez pas un objet lourd sur le cordon
d'alimentation, n'insérez pas le cordon d'alimentation
entre des objets ou n’enfoncez pas le cordon
d'alimentation dans l'espace situé derrière l'appareil.
Lorsque vous déplacez un réfrigérateur, prenez garde qu’il ne roule pas sur le cordon
d’alimentation ou ne l’endommage.
Risque d'électrocution ou d'incendie. Cet appareil doit être positionné de sorte que la •
prise de courant soit facilement accessible.
Le non-respect de cette consigne risquerait de -
provoquer une électrocution ou un incendie par
suite de fuites électriques.
N'installez pas cet appareil près d'une source •
de chaleur ni d'un matériel infl ammable.
N'installez pas cet appareil dans un lieu humide, •
huileux ou poussiéreux, ni dans un endroit exposé
directement au soleil ou à l'eau (gouttes de pluie).
Lors de la mise au rebut de ce réfrigérateur ou •
de tout autre, retirez la porte/les joints de porte
ainsi que le loquet de la porte afi n que des jeunes
enfants ou des animaux ne puissent pas se
retrouver piégés à l'intérieur. Les enfants doivent
être surveillés pour veiller à ce qu’ils n’entrent pas
dans l’appareil, ni ne jouent avec l’appareil.
Un enfant coincé à l’intérieur risque d’être blessé ou de suffoquer. Ne mettez jamais les doigts ni d'autres
objets dans l'orifi ce du distributeur d'eau, le conduit
d'écoulement et le bac à glace.
Risque de dommages corporels ou matériels. -
• Il est conseillé de faire appel à un technicien
qualifi é ou à une entreprise de dépannage
pour installer ou faire réparer l'appareil.
À défaut de suivre cette consigne, il pourrait y avoir •
risque de secousse électrique, d’incendie, d’explosion,
de blessure ou de malfonctionnement de l’appareil.
DA68-02520B(0.2).indb 03DA68-02520B(0.2).indb 03 2013.2.28 10:19:40 AM2013.2.28 10:19:40 AM
Page 94
04_ Consignes de sécurité
Ne montez pas sur l'appareil ni ne placez •
d'objets (tels que du linge, des bougies
allumées, des cigarettes allumées, des plats,
des produits chimiques, des objets métalliques,
etc.) sur l'appareil.
Le non-respect de cette consigne risque d'entraîner une électrocution, un incendie, des problèmes avec
l'appareil ou des blessures corporelles.
Il est conseillé de faire appel à un technicien qualifi é ou à une entreprise de dépannage pour
installer ou faire réparer l'appareil.
À défaut de suivre cette consigne, il pourrait y avoir risque de secousse électrique, d’incendie, d’explosion,
de blessure ou de malfonctionnement de l’appareil.
Ne touchez pas la fi che d'alimentation si vous avez les mains mouillées.
Cela pourrait entraîner une électrocution. Ce réfrigérateur doit être installé conformément •
au guide d'utilisation avant d'être utilisé.
Branchez la la fi che d'alimentation de telle façon •
que le cordon pende vers le bas.
Si vous branchez la fi che d'alimentation à -
l'envers, le câble risque de se rompre et de
provoquer un incendie ou une électrocution.
Assurez-vous que la fi che d’alimentation ne •
risque pas d’être écrasée ou endommagée par
le dos du réfrigérateur.
Lorsque vous déplacez un réfrigérateur, •
prenez garde qu’il ne roule pas sur le cordon
d’alimentation ou ne l’endommage.
Risque d'incendie. L’appareil doit être positionné de telle façon que •
la prise reste facilement accessible.
• Le réfrigérateur doit être mis à la terre.
Le réfrigérateur doit être mis à la terre afi n d'éviter les dissipations d’énergie ou
les secousses électriques provoquées
par les fuites de courant de l'appareil.
N'utilisez jamais de conduites de gaz, de •
fi ls téléphoniques ou d'autres éléments
susceptibles d'agir comme un paratonnerre
pour relier l'appareil à la terre.
Toute utilisation non conforme de la fi che de mise à la terre peut entraîner une électrocution.
• Si le cordon d'alimentation est endommagé,
demandez son remplacement immédiat par
le fabricant ou le réparateur certifi é.
Le fusible du réfrigérateur doit être changé par un •
technicien qualifi é ou une entreprise de dépannage.
Le non-respect de cette consigne risquerait de provoquer une électrocution ou des blessures corporelles.
SYMBOLES DE PRUDENCE
CONCERNANT L'INSTALLATION
• N’obstruez pas l’espace de ventilation à
l’intérieur du réfrigérateur ou de son caisson.
Laissez l'appareil reposer pendant 2 heures •
après l'installation.
SYMBOLES D'AVERTISSEMENT
IMPORTANTS CONCERNANT
L'UTILISATION DE L'APPAREIL
• Ne branchez pas la fi che d'alimentation
avec les mains mouillées.
N'entreposez pas d'objets sur de l'appareil.•
Ceux-ci risqueraient de tomber au moment de -
l'ouverture ou de la fermeture de la porte et de
provoquer des dommages matériels ou physiques.
Ne placez pas d’articles remplis d'eau sur le •
réfrigérateur.
En cas de renversement, cela pourrait entraîner un incendie ou une électrocution.
Ne laissez pas les enfants se suspendre à la •
porte de l'appareil.
Le non-respect de cette consigne risquerait d'entraîner de graves blessures.
Ne laissez pas les portes du réfrigérateur ouvertes •
lorsque l'appareil n'est pas sous surveillance afi n
d'éviter qu'un enfant ne se glisse à l'intérieur.
Ne laissez pas les bébés et les enfants entrer •
dans le tiroir.
Ils risqueraient de se blesser, voire rester piégés et suffoquer
Ne vous asseyez pas sur la porte du congélateur.•
Risque de dommage physique ou matériel. Ne placez pas de récipient rempli d'eau sur le •
réfrigérateur.
En cas de renversement, cela pourrait entraîner -
un incendie ou une électrocution.
N'utilisez pas et n'entreposez pas de -
substances thermosensibles (ex. :
pulvérisateurs, objets infl ammables, glace
sèche, médicaments ou produits chimiques) à
proximité ou à l'intérieur du réfrigérateur.
Ne stockez pas d'objets ou de substances volatiles ou infl ammables (benzène, diluant,
propane, alcool, éther, gaz liquéfi é ou toute autre
substance similaire, etc.) dans le réfrigérateur.
Le réfrigérateur a été conçu exclusivement pour l’entreposage de produits alimentaires.
Risque d’incendie ou d’explosion. Ne stockez pas de produits pharmaceutiques, •
scientifi ques, chimiques ou thermosensibles
dans le réfrigérateur.
ATTENTION
AVERTISSEMENT
DA68-02520B(0.2).indb 04DA68-02520B(0.2).indb 04 2013.2.28 10:19:40 AM2013.2.28 10:19:40 AM
Page 95
Consignes de sécurité _05
Les produits nécessitant un contrôle strict de la température ne doivent pas être entreposés
dans le réfrigérateur.
Si l'appareil dégage une odeur chimique ou •
de la fumée, débranchez-le immédiatement et
contactez votre centre de service technique
Samsung.
En cas de traces de poussière ou d'eau dans le •
réfrigérateur, débranchez la fi che et contactez le
centre de service technique Samsung Electronics.
À défaut, il existe un risque d'incendie. En cas de fuite de gaz, n'approchez pas de fl amme •
nue ou de matière potentiellement infl ammable et
aérez la pièce pendant plusieurs minutes.
Ne tentez pas de réparer, démonter ou modifi er •
l'appareil vous-même.
N'utilisez aucun fusible (tel que du cuivre, un fi l d'acier, etc.) autre que le fusible standard.
Si une réparation ou une réinstallation de l'appareil est requise, contactez le centre
d'assistance le plus proche.
À défaut de suivre cette consigne, il pourrait y avoir risque de secousse électrique, d’incendie, d’explosion,
de blessure ou de malfonctionnement de l’appareil.
Afi n d'éviter qu'un enfant ne reste piégé •
à l'intérieur de l'appareil, n'oubliez pas de
remettre en place la grille de séparation à l'aide
des vis fournies si vous l’avez retirée.
Ne mettez jamais les doigts ni d'autres objets •
dans l'orifi ce du distributeur.
Risque de dommage physique ou matériel. N'entreposez pas de matériaux volatiles ou •
infl ammables (ex. : benzène, diluant, alcool,
éther ou gaz liquéfi é) dans le réfrigérateur.
Risque d'explosion. N'entreposez pas de produits pharmaceutiques, •
chimiques ou sensibles aux basses
températures dans le réfrigérateur.
Les produits nécessitant un contrôle strict de la température ne doivent pas être entreposés
dans le réfrigérateur.
Ne placez pas et n'utilisez pas d'appareil •
électrique à l'intérieur du réfrigérateur, sauf cela est
recommandé par le fabricant de l'appareil concerné.
N'utilisez pas de séchoir à cheveux pour sécher •
l'intérieur du réfrigérateur. Ne placez pas de
bougie allumée à l'intérieur du réfrigérateur dans
le but d’éliminer les mauvaises odeurs.
Risque d'électrocution ou d'incendie. Ne touchez pas les parois intérieures •
du congélateur ni les produits qui y sont
entreposés si vous avez les mains mouillées.
Risque de gelures. -
N'utilisez pas d'appareil mécanique ni •
de dispositif susceptible d'accélérer le
processus de décongélation, autres que ceux
recommandés par le fabricant.
N'endommagez pas le circuit frigorifi que.•
Ne mettez jamais les doigts ni d'autres •
objets dans l'orifi ce du distributeur, le conduit
d'écoulement et le bac à glaçons.
Risque de dommages corporels ou matériels. -
• Cet appareil est destiné à l’entreposage
des aliments dans un environnement
domestique uniquement.
Serrez les bouteilles les unes contre les autres •
pour éviter qu'elles ne tombent.
En cas de fuite de gaz (gaz propane, gaz •
liquéfi é, etc.), aérez immédiatement la pièce
sans toucher la fi che d'alimentation.
Ne touchez pas l'appareil ou le cordon.
N'utilisez pas de ventilateur. Une étincelle risquerait de provoquer une -
explosion ou un incendie.
Utilisez uniquement les ampoules DEL fournies •
par le fabricant ou son réparateur agréé.
Si l'appareil est équipé d'une ampoules DEL, ne •
tentez pas de démonter vous-même le cache et
l'ampoule.
Contactez un réparateur agréé. Utilisez uniquement les ampoules DEL fournies •
par le fabricant ou son réparateur agréé.
Ne fi xez jamais directement une ampoule DEL •
UV pendant une période prolongée.
Cela risquerait d’entraîner une fatigue oculaire -
due aux rayons ultraviolets.
Les enfants ne doivent pas utiliser l’appareil sans •
la surveillance d’un adulte. Maintenez les doigts
éloignés des zones de pincement; l’espace
entre les portes et la caisse doit nécessairement
être restreint. Soyez attentif lorsque vous ouvrez
les portes en présence d’enfants.
Ne laissez pas les enfants se suspendre à la porte •
du réfrigérateur. Ils risqueraient de se blesser.
Ne laissez pas les enfants entrer dans le •
réfrigérateur au risque qu’ils y demeurent
enfermés.
• Ne démontez pas et ne réparez pas le
réfrigérateur vous-même.
Vous risqueriez de provoquer un incendie, un malfonctionnement et/ou de vous blesser.
En cas de dysfonctionnement, contactez un
réparateur agréé.
DA68-02520B(0.2).indb 05DA68-02520B(0.2).indb 05 2013.2.28 10:19:41 AM2013.2.28 10:19:41 AM
Page 96
06_ Consignes de sécurité
• Si l'appareil génère un bruit étrange,
une odeur de brûlé ou de la fumée,
débranchez-le immédiatement et contactez
votre centre d'assistance le plus proche.
Le non-respect de cette consigne risquerait de provoquer un incendie ou une électrocution.
Contactez un réparateur si vous rencontrez des •
diffi cultés pour remplacer l'ampoule.
Si l'appareil est équipé d'une ampoule DEL, ne tentez •
pas de démonter vous-même le cache et l'ampoule.
Contactez un réparateur agréé. Si vous constatez des traces de poussière ou •
d'eau dans le réfrigérateur, débranchez la fi che
et contactez le centre de réparation Samsung
Electronics.
Le non-respect de cette consigne peut provoquer un incendie.
Lorsqu'un corps étranger tel que de l'eau a •
pénétré dans l'appareil, débranchez ce dernier et
contactez le centre d'assistance le plus proche.
Le non-respect de cette consigne risquerait de provoquer un incendie ou une électrocution.
SYMBOLES DE PRUDENCE
CONCERNANT L'UTILISATION
• Pour un fonctionnement optimal de
l'appareil,
Ne placez pas d'aliments trop près des évents situés à l'arrière de l'appareil afi n de ne pas gêner
la libre circulation de l'air dans le réfrigérateur.
Emballez les aliments ou mettez-les dans des récipients hermétiques avant de les placer dans
le réfrigérateur.
Ne placez pas des aliments non surgelés près des aliments déjà congelés à l'intérieur du congélateur.
Ne placez pas de boissons gazeuses dans la •
partie congélateur. Ne mettez pas de bouteilles
ou de récipients en verre dans le congélateur.
Risque de blessures corporelles dues à l'éclatement du verre. sous la pression exercée
par l’expansion du contenu en gelant.
Ne tentez pas de modifi er la fonctionnalité du •
réfrigérateur.
Les changements ou modifi cations peuvent entraîner des blessures corporelles et/ou
des dommages matériels. Les changements
et modifi cations apportés à cet appareil par
un tiers ne sont pas couverts par le service
de garantie Samsung ; Samsung ne saurait
être tenu responsable en cas de problème
de sécurité ou de dommages résultant de
modifi cations apportées par un tiers.
ATTENTION
Ne bloquez pas les évents.•
Si les évents sont obstrués, notamment par un -
sac en plastique, le réfrigérateur risque de trop
refroidir. Une période de refroidissement trop
longue risque d'endommager le fi ltre à eau et de
provoquer des fuites.
Respectez les durées de congélation et les dates •
de péremption associées aux aliments surgelés.
Remplissez le réservoir et le bac à glaçons avec •
de l'eau potable uniquement.
Utilisez uniquement la machine à glaçons •
fournie avec le réfrigérateur.
L'arrivée d'eau de ce réfrigérateur doit être •
installée/branchée par une personne qualifi ée
et raccordée à une source d'eau potable
uniquement.
Pour que la machine à glaçons puisse •
fonctionner correctement, la pression de l'eau
doit être comprise entre 138 et 862 kPa.
Ne vaporisez pas de substance volatile sur la •
surface de l'appareil.
Ces produits peuvent se révéler dangereux pour la santé et risquent en outre de provoquer
une électrocution, un incendie ou un
dysfonctionnement.
N'utilisez pas de sèche-cheveux pour sécher •
l'intérieur du réfrigérateur. Ne placez pas de
bougie allumée à l'intérieur du réfrigérateur dans
le but d’éliminer une mauvaise odeur.
Risque d'électrocution ou d'incendie. -
SYMBOLES DE PRUDENCE
CONCERNANT LE NETTOYAGE
ET L'ENTRETIEN
• Ne vaporisez pas directement de l'eau à
l'intérieur ou à l'extérieur du réfrigérateur.
Risque d'incendie ou d'électrocution. N'utilisez pas et n'entreposez pas de •
substances thermosensibles (ex. :
pulvérisateurs, objets infl ammables, glace
sèche, médicaments ou produits chimiques) à
proximité du réfrigérateur.
Ne stockez pas d'objets ou de substances
volatiles ou infl ammables (benzène, diluant,
propane, etc.) dans le réfrigérateur.
Le réfrigérateur a été conçu exclusivement pour l’entreposage des produits alimentaires.
Le non-respect des consignes peut entraîner un risque d'incendie ou d'explosion.
Ne vaporisez pas de produit de nettoyage •
directement sur l'écran.
Les caractères imprimés risqueraient de s'effacer.
ATTENTION
DA68-02520B(0.2).indb 06DA68-02520B(0.2).indb 06 2013.2.28 10:19:41 AM2013.2.28 10:19:41 AM
Page 97
Consignes de sécurité _07
Éliminez les corps étrangers et la poussière des •
broches de la fi che d'alimentation.
Lors du nettoyage de la fi che, n'utilisez pas un
chiffon mouillé ou humide et éliminez les corps
étrangers ou la poussière des broches.
Le non-respect des consignes peut entraîner un risque d'incendie ou d'électrocution.
• Débranchez le réfrigérateur avant de le
nettoyer et d'en faire l'entretien.
SYMBOLES D'AVERTISSEMENT
IMPORTANTS CONCERNANT
LA MISE AU REBUT
• Assurez-vous qu'aucun des tuyaux situés
à l'arrière de l'appareil n'est endommagé
avant la mise au rebut.
R600a ou R134a est utilisé comme gaz Le gaz •
réfrigérant utilisé est le R600a ou R134a. Vérifi ez
celui de votre réfrigérateur sur l’étiquette du
compresseur située à l’arrière de l’appareil ou
sur l’étiquette signalétique située à l’intérieur
du réfrigérateur. Si ce produit contient du gaz
infl ammable (gaz réfrigérant R600a), veuillez
communiquer avec les autorités locales pour
obtenir des renseignements sur les normes
en matière de traitement des déchets. Du
cyclopentane est utilisé comme gaz isolant.
Les gaz utilisés pour l'isolation nécessitent
une procédure d'élimination spéciale. Veuillez
contacter les autorités locales pour obtenir des
renseignements sur les normes en matière de
traitement des déchets. Assurez-vous qu'aucun
des tuyaux situés à l'arrière de l’appareil n'est
endommagé avant la mise au rebut. Les tuyaux
pourraient se casser en espace ouvert.
Avant la mise au rebut de l'appareil, retirez la •
porte/les joints de porte ainsi que le loquet afi n
que des jeunes enfants ou des animaux ne
puissent pas se retrouver piégés à l'intérieur.
Ne retirez pas les clayettes afi n que les enfants •
ne puissent pas monter facilement dans le
réfrigérateur. Assurez-vous qu'aucun des tuyaux
situés à l'arrière de l'appareil n'est endommagé
avant la mise au rebut. Le gaz réfrigérant utilisé
est le R600a ou R134a. Vérifi ez celui de votre
réfrigérateur sur l’étiquette du compresseur
située à l’arrière de l’appareil ou sur l’étiquette
signalétique située à l’intérieur du réfrigérateur.
Si ce produit contient du gaz infl ammable
(gaz réfrigérant R600a), veuillez communiquer
avec les autorités locales pour obtenir des
renseignements sur les normes en matière de
traitement des déchets.
AVERTISSEMENT
Du cyclopentane est utilisé comme gaz isolant. •
Les gaz du matériau d'isolation nécessitent une
procédure particulière de mise au rebut. Veuillez
contactez les autorités locales pour obtenir des
renseignements sur les normes en matière de
traitement des déchets. Assurez-vous qu'aucun
des tuyaux situés à l'arrière de l'appareil ne soit
endommagé avant la mise au rebut. Les tuyaux
pourraient se casser en espace ouvert.
Jetez le matériel d'emballage de cet appareil •
dans le respect de l'environnement.
Laissez l'appareil reposer pendant 2 heures •
après l'installation.
Pour un fonctionnement optimal de l'appareil :•
Ne placez pas d'aliments trop près devant les -
évents situés à l'arrière de l'appareil car ils sont
susceptibles d'empêcher la libre circulation de
l'air dans la partie congélateur.
Emballez correctement les aliments ou mettez- les dans des récipients hermétiques avant de
les placer dans le congélateur ou le réfrigérateur.
Ne placez pas des aliments non surgelés près des aliments déjà congelés à l'intérieur du congélateur.
Ne placez pas de verre ou de bouteilles ni de •
boissons gazeuses dans le congélateur.
Le récipient peut geler et se briser, sous la pression exercée par l’expansion du contenu en
gelant, ce qui peut entraîner une blessure.
Respectez les durées de congélation et les dates •
de péremption associées aux aliments surgelés.
Il n'est pas nécessaire de débrancher le •
réfrigérateur si vous vous éloignez pour moins
de trois semaines. Cependant, retirez tous les
aliments si vous devez vous absenter pendant
trois semaines ou plus.
Débranchez le réfrigérateur, nettoyez-le, rincez-•
le et séchez-le.
Retirez régulièrement toutes les substances •
étrangères telles que la poussière ou l'eau des
broches et des points de contact des fi ches
d’alimentation à l'aide d'un chiffon sec.
Débranchez la fi che d'alimentation et nettoyez- la à l'aide d'un chiffon sec.
Le non-respect de cette consigne risquerait de provoquer un incendie ou une électrocution.
Débranchez l'appareil de la prise murale avant •
de le nettoyer et d'en faire l'entretien.
Le non-respect de cette consigne risquerait de provoquer un incendie ou une électrocution.
Ne nettoyez pas l'appareil en vaporisant de •
l'eau directement dessus.
N’utilisez pas de benzène, de diluant ni d'alcool •
pour nettoyer cet appareil.
DA68-02520B(0.2).indb 07DA68-02520B(0.2).indb 07 2013.2.28 10:19:41 AM2013.2.28 10:19:41 AM
Page 98
08_ Consignes de sécurité
Cela pourrait entraîner une décoloration, une déformation, endommager l'appareil ou
provoquer une électrocution ou un incendie.
Ne vaporisez pas de gaz infl ammable à •
proximité du réfrigérateur.
Il existe un risque d'explosion ou d'incendie. Contient des gaz à effet de serre fl uorés visés •
par le protocole de Kyoto.
Système de fermeture hermétique. Ces gaz ne doivent pas être libérés dans -
l'atmosphère.
Type de réfrigérant : R-134a Quantité : 0,16 kg Potentiel de réchauffement global (PRG) = 1300 Pour gagner de la place, retirez les tiroirs •
supérieurs du congélateur car ceci n'affecte pas
les caractéristiques thermiques et mécaniques
de l’appareil. Le volume de stockage nominal
du compartiment d'aliments surgelés est
calculé sans ces tiroirs. Pour optimiser la
consommation d’énergie du réfrigérateur, laissez
toujours les étagères, tiroirs et paniers dans
leur position d’origine. Lorsque vous utilisez
cette fonction, la consommation énergétique
du réfrigérateur augmente. N'oubliez pas de
l’arrêter lorsque vous n'en avez plus besoin et
de régler à nouveau la température d'origine.
Congélation rapide •
Si vous devez congeler de grandes quantités -
d'aliments, actionnez la fonction Power Freeze
(congélation rapide) 24 heures à l'avance.
CONSEILS SUPPLÉMENTAIRES
CONCERNANT L'UTILISATION
En cas de coupure de courant, contactez le •
service clientèle de votre fournisseur d'électricité
afi n de connaître la durée du problème.
La plupart des coupures de courant corrigées dans l'heure ou dans les deux heures qui
suivent n'affectent pas les températures du
réfrigérateur. Cependant, il est recommandé
de limiter le nombre d'ouvertures de la porte
pendant l'absence de courant.
S'il est prévu que la coupure de courant dure plus de 24 heures, retirez tous les aliments surgelés.
Si le réfrigérateur est fourni avec des clés, •
conservez-les hors de portée des enfants dans
un lieu éloigné de l'appareil.
L'appareil pourrait ne pas fonctionner de •
manière régulière (hausse trop importante de la
température à l'intérieur du réfrigérateur) si sa
température intérieure reste sous la limite inférieure
prescrite pendant une période prolongée.
Ne stockez pas d'aliments qui pourraient •
se gâter à basse température, comme des
bananes ou des melons.
Votre appareil est équipé de la fonction de •
dégivrage automatique, ce qui veut dire que vous
n'avez pas besoin de le dégivrer manuellement.
L'augmentation de la température pendant •
le dégivrage peut être conforme aux normes
ISO. Cependant, si vous souhaitez éviter toute
augmentation excessive de la température
des aliments surgelés pendant le dégivrage de
l'appareil, emballez-les dans plusieurs couches
de papier journal.
Toute augmentation de la température des •
aliments surgelés pendant le dégivrage peut
raccourcir la durée d’entreposage.
Conseils en matière d'économie d'énergie
Installez l'appareil dans une pièce sèche et fraîche, correctement ventilée. Vérifi ez qu'il n'est
pas exposé à la lumière directe du soleil et ne
le placez jamais à proximité d'une source de
chaleur (un radiateur par exemple).
Ne bloquez jamais les évents ou les grilles de l'appareil.
Laissez refroidir les aliments chauds avant de les placer à l'intérieur de l'appareil.
Placez les aliments surgelés dans le réfrigérateur pour les décongeler. Ainsi, vous pouvez utiliser
les basses températures des aliments surgelés
pour refroidir les aliments du réfrigérateur.
Veillez à refermer la porte rapidement lorsque vous mettez des aliments dans le réfrigérateur ou
lorsque vous les en sortez. Ceci afi n de réduire la
formation de glace à l'intérieur du congélateur.
Nettoyez régulièrement l'arrière de votre réfrigérateur. La poussière augmente sa consommation d’énergie.
Ne baissez pas inutilement la température intérieure. Vérifi ez que le système d'évacuation de l'air à -
la base et à l'arrière du réfrigérateur n'est pas
obstrué. Ne recouvrez pas les évents.
Laissez un espace suffi sant tout autour de l'appareil au moment de son installation.
Ceci vous permettra de réduire sa
consommation d'énergie et par le fait même,
vos factures.
Pour optimiser la consommation d’énergie du réfrigérateur, laissez toujours les étagères, tiroirs
et paniers dans leur position d’origine.
DA68-02520B(0.2).indb 08DA68-02520B(0.2).indb 08 2013.2.28 10:19:41 AM2013.2.28 10:19:41 AM
Page 99
Consignes de sécurité _09
1. Avis d'application de la réglementation
1.1 Avis FCC
AVERTISSEMENT CONCERNANT LA FCC :
Tout changement ou modifi cation, non expressément approuvé par la partie responsable de la conformité,
peut annuler l'autorisation de l'utilisateur à utiliser cet équipement.
Contient un Module de transmetteur FCC ID : A3LDNURS11
Cet appareil est conforme à la section 15 des Règles de la FCC. Les deux conditions de fonctionnement
suivantes sont requises :
(1) Cet appareil ne doit pas provoquer d'interférence nocives et
(2) Cet appareil doit accepter toute interférence reçue, même celles pouvant provoquer un fonctionnement
indésirable.
Pour un produit vendu aux États-Unis/au Canada, seul le canal 1~11 peut être actionné.
La sélection d'autres canaux est impossible.
DÉCLARATION DE LA FEDERAL COMMUNICATIONS COMMISSION (FCC)
Cet équipement a été testé et est conforme aux limites d’un instrument numérique de classe B de la
Section 15 des règlements de la FCC. Ces limites ont été établies pour assurer une protection raisonnable
contre les brouillages préjudiciables dans une installation résidentielle. Cet équipement produit, utilise
et peut rayonner des fréquences radioélectriques et, s’il n’est pas monté et utilisé conformément aux
instructions, peut créer un brouillage préjudiciable aux radiocommunications. Cependant, ces limites ne
garantissent pas qu’il n’y aura pas d’interférence dans une installation particulière. Si ce jouet produit
un brouillage préjudiciable aux transmissions télévisuelles ou radiophoniques, ce qui peut se déceler à
la mise en marche et à l’arrêt de l’équipement, l’usager devrait corriger la situation en suivant l’une ou
plusieurs des mesures suivantes:
réorienter ou replacer l’antenne de réception•
augmenter la distance entre l’équipement et le récepteur•
brancher l’équipement dans une prise de courant reliée à un circuit différent de celui de la prise dans •
laquelle est branché le récepteur
demander l’aide d’un marchand ou d’un technicien en radio et télévision•
DÉCLARATION DE LA FCC SUR L'EXPOSITION AUX IRRADIATIONS :
Cet équipement répond aux limites de la FCC sur l'exposition aux rayonnements établies pour un
environnement non-contrôlé. Cet équipement doit être installé et utilisé avec une distance minimale
de 20 cm entre le radiateur et votre corps. Cet appareil et sa ou ses antennes ne doivent pas être colocalisées ou opérant en conjonction avec tout autre antenne ou transmetteur.
CONSERVEZ CE GUIDE D'UTILISATION
ATTENTION
DA68-02520B(0.2).indb 09DA68-02520B(0.2).indb 09 2013.2.28 10:19:42 AM2013.2.28 10:19:42 AM
Page 100
10_ Consignes de sécurité
1. Avis d'application de la réglementation
1.2 Avis d’ IC
Contient un IC de module émetteur : 649E-DNURS11
Le terme « IC » avant le numéro de certifi cation/d'enregistrement signifi e seulement que les spécifi cations
techniques d'Industrie Canada ont été respectées. Les deux conditions de fonctionnement suivantes
sont requises : (1) cet appareil ne doit pas provoquer d'interférence et (2) cet appareil doit accepter toute
interférence reçue, même celles pouvant provoquer un fonctionnement indésirable.
This Class B digital apparatus complies with Canadian ICES-003.
Cet appareil numérique de la classe B est conforme à la norme NMB-003 du Canada.
Pour le produit disponible sur le marché des États-Unis/du Canada, seul le canal 1~11 peut être
sélectionné.
La sélection d'autres canaux est impossible.
DÉCLARATION D’IC SUR L’EXPOSITION AUX RAYONNEMENTS
Cet équipement est conforme aux limites d’exposition aux rayonnements RSS-102 d’IC établies pour un
environnement non contrôlé. Cet équipement doit être installé et utilisé avec une distance minimale de 20
cm entre le radiateur et votre corps. Cet appareil et sa ou ses antennes ne doivent pas être colocalisées
ou fonctionner conjointement avec une autre antenne ou transmetteur.
CONSERVEZ CE GUIDE D'UTILISATION
DA68-02520B(0.2).indb 10DA68-02520B(0.2).indb 10 2013.2.28 10:19:42 AM2013.2.28 10:19:42 AM
 Loading...